

Page 1
—
L
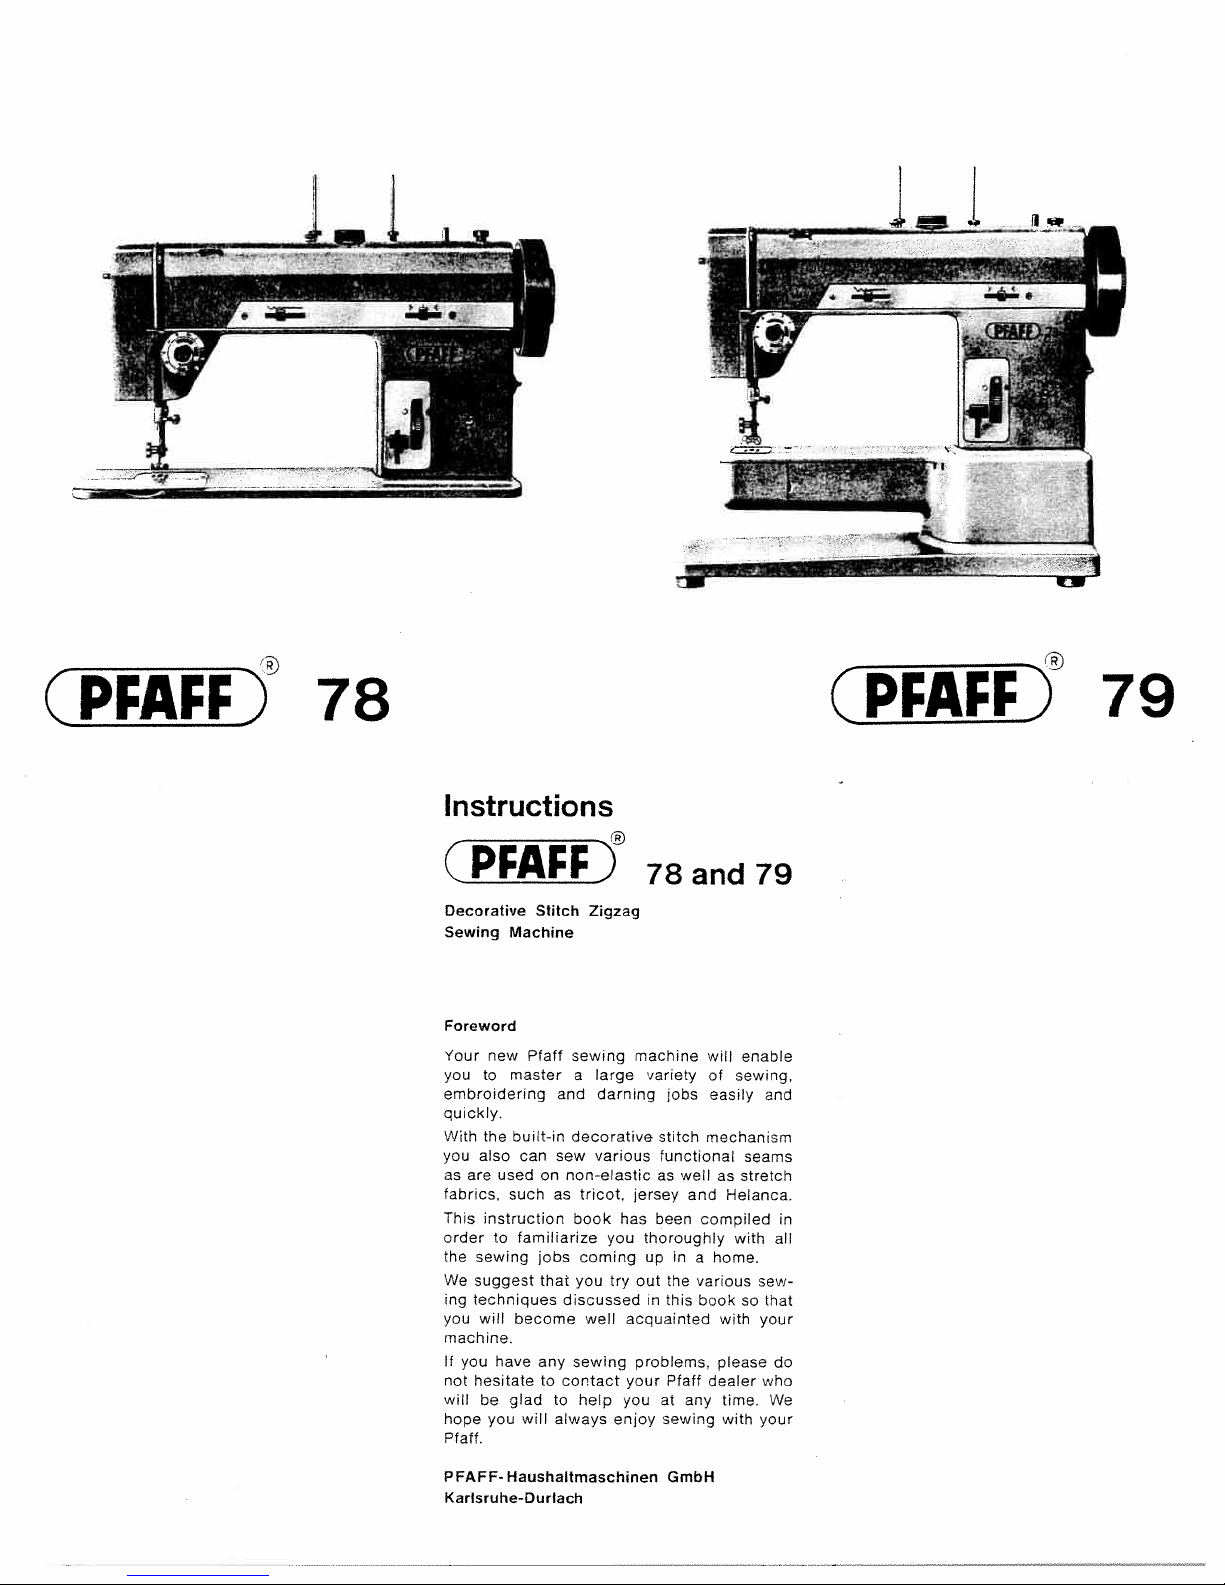
CPFAFFI
78
Instructions
CPFAFFi
Decorative
Sewing
Stitch
Machine
Zigzag
78
and
L
79
ji
CPFAFFi
79
Foreword
‘‘our
new
you
embroidering
quickly.
With
you
as
are
fabrics,
This
order
the
We
ing
you
machine.
If
you
not
will
hope
Pfaff.
PFAFFKarisruhe-Durlach
Pfaff
to
master
the
built-in
also
can
used
such
instruction
familiarize
o
sewing
suggest
techniques
will
become
have
hesitate
glad
be
will
you
Haushaltmaschinen
and
sew
on
as
jobs
that
any
to
to
always
sewing
large
a
darning
decorative
various
non-elastic
tricot.
book
you
coming
you
discussed
well
sewing
contact
help
machine
jersey
has
out
try
acquainted
problems,
your
you
enjoy
variety
jobs
stitch
functional
as
well
and
been
thoroughly
up
in
the
in
this
Pfaff
at
any
sewing
GmbH
will
enable
of
sewing,
easily
mechanism
seams
as
stretch
Helanca.
compiled
with
home.
a
various
sew
booksothat
with
please
dealer
time.
with
your
who
your
and
in
all
do
We
Page 2
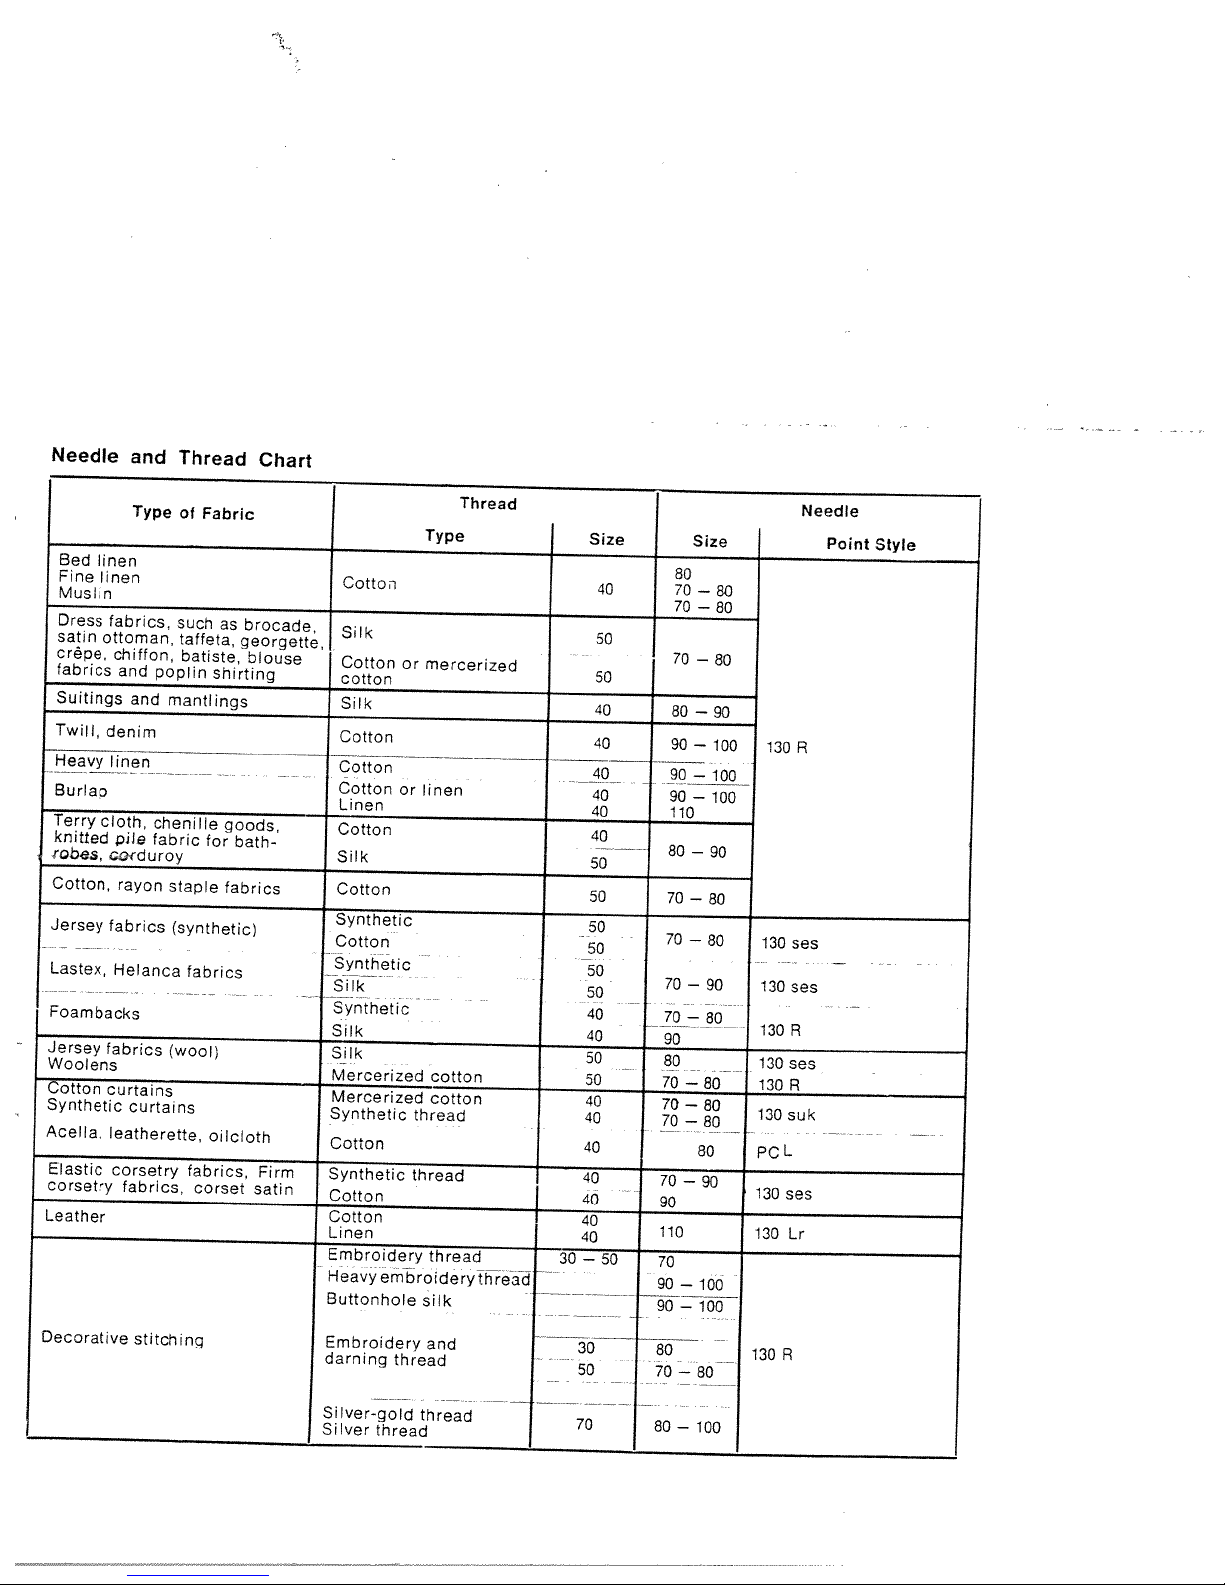
Needle
and
Thread
Chart
Bed
Fine
Muslin
Dress
satin
crêpe,
fabrics
Suitings
Twill,
Heavy
Burlap
Terry
knitted
robes,
Cotton,
Jersey
Lastex,
Foambacks
Jersey
Woolens
Cotton
Synthetic
Acella,
Elastic
corsetry
Leather
linen
linen
fabrics,
ottoman,
chiffon,
and
and
denim
linen
cloth,
pile
Corduroy
rayon
fabrics
Helanca
fabrics
curtains
curtains
leatherette
corsetry
fabrics,
Type
of
such
taffeta,
batiste,
poplin
mantlings
chenille
fabric
staple
(synthetic)
(wool)
Fabric
shirting
for
fabrics
oilcloth
fabrics,
corset
as
georgette,
goods,
bath-
fabrics
brocade
blouse
Firm
satin
Cotton
Cotton
Cotton
Linen
—
Cotton
Silk
Cotton
Synthetic
Cotton
Synthetic
Silk
Synthetic
Silk
Silk
Mercerized
—
Mercerized
Synthetic
Cotton
Synthetic
Cotton
Cotton
Linen
Embroidery
Heavy
Buttonhole
Cotton
Silk
Cotton
cotton
Silk
embroiderythread
or
or
linen
thread
thread
silk
Thread
Type
mercerized
cotton
cotton
thread
1
30
40
40
40
—
Size
50
50
50
50
50
50
40
40
50
50
40
40
40
40
Needle
Size
70
70
70
70
90
80
70
70
70
70
90
110
70
90
80
90
90
90
110
80
80
70
70
70
—
—
—
—
—
—
—
—
—
—
—
—
—
—100
—
—
—
80
80
90
80
80
80
80
80
90
100
80
80
80
90
100
lao
90
130
130
130
130
130
130
PCL
130
130
40
50
50
40
40
40
40
40
40
50
130
ses
ses
ses
R
ses
R
suk
Lr
Point
Style
R
—
Decorative
stitching
Embroidery
darning
Silver-gold
I
Silver
thread
thread
and
thread
70
30
50
80
8
70
—
—
100
130
R
Page 3
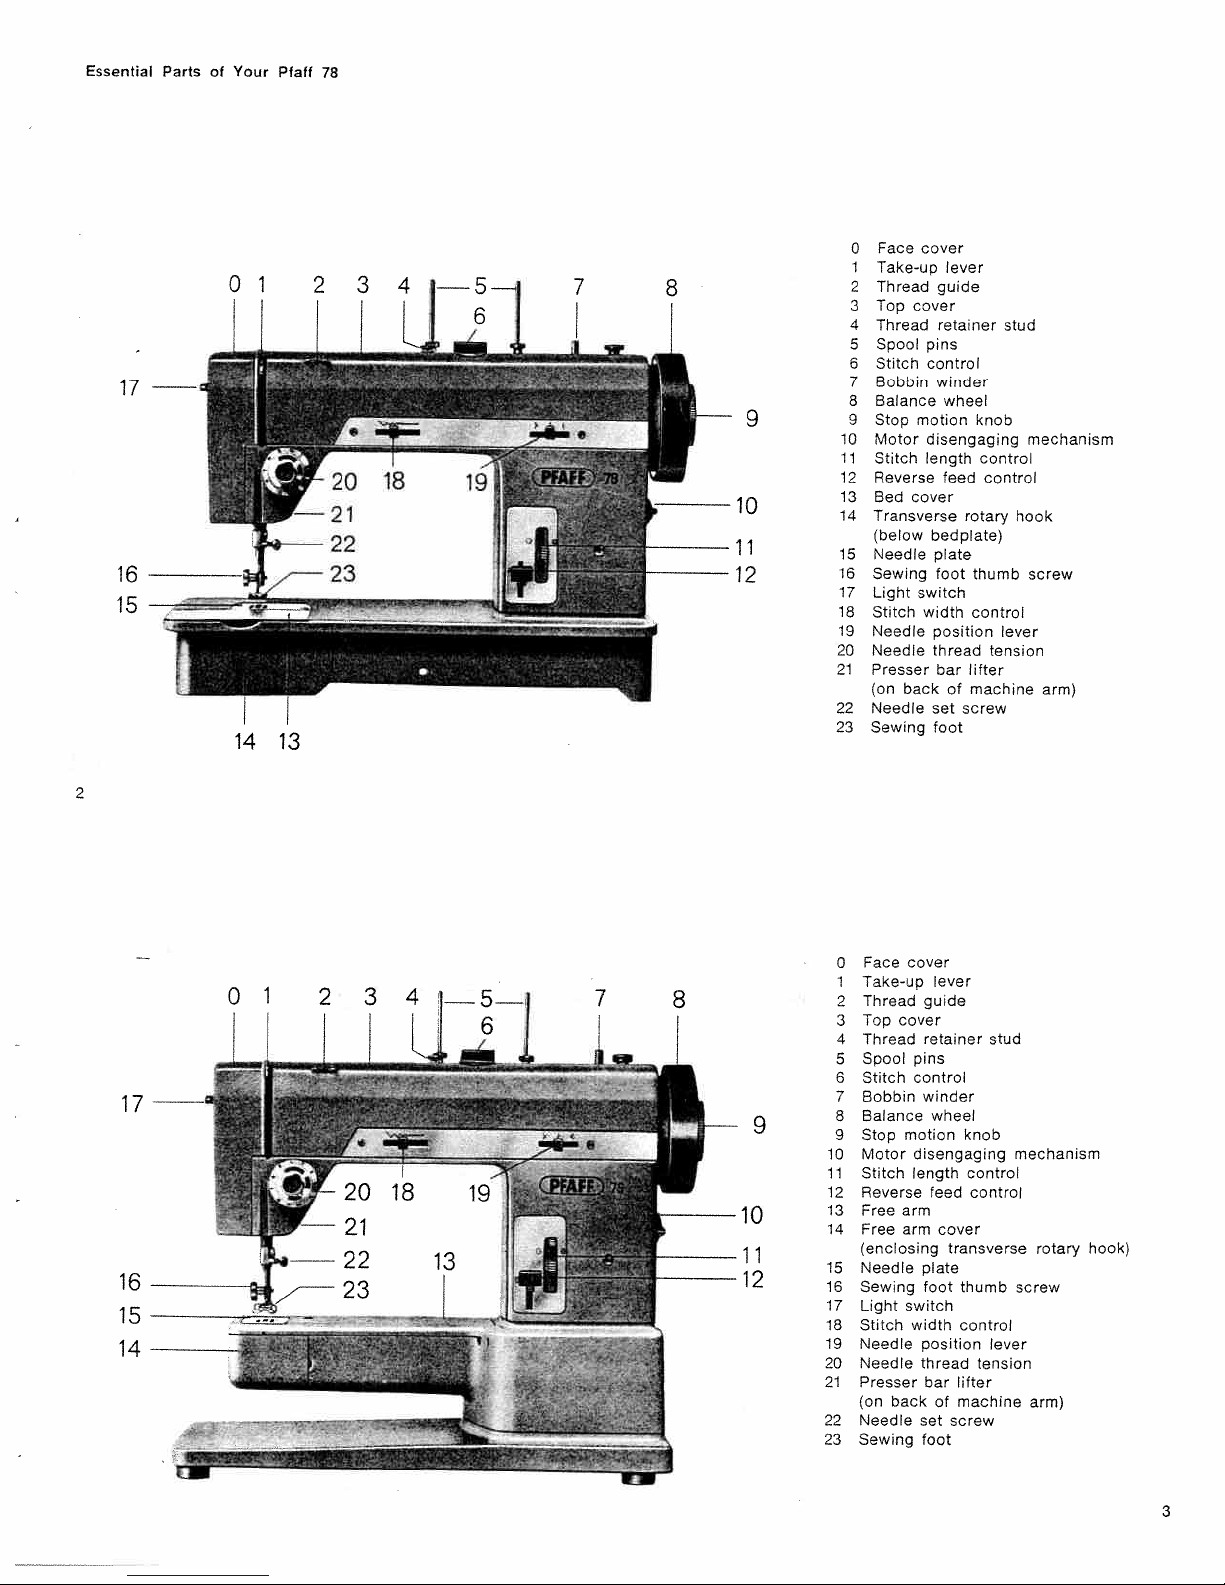
Essential
17
16
15
Parts
Your
of
14
Pfaff
13
78
Face
Take-up
Thread
cover
Top
Thread
Spool
Stitch
Bobbin
Balance
motion
Stop
Motor
Stitch
Reverse
cover
Bed
Transverse
(below
Needle
Sewing
Light
switch
Stitch
Needle
Needle
Presser
(on
back
Needle
Sewing
cover
lever
guide
retainer
pins
control
winder
wheel
disengaging
length
feed
rotary
bedplate)
plate
foot
width
position
thread
bar
lifter
of
machine
screw
set
foot
knob
control
control
thumb
control
tension
stud
mechanism
hook
screw
lever
arm)
o
1
2
3
4
5
6
7
8
9
9
10
11
12
13
14
15
16
17
18
19
20
21
22
23
2
Face
Take-up
Thread
cover
Top
Thread
Spool
Stitch
Bobbin
Balance
Stop
Motor
Stitch
Reverse
Free
Free
(enclosing
Needle
Sewing
Light
Stitch
Needle
Needle
Presser
(on
back
Needle
Sewing
cover
lever
guide
retainer
pins
control
winder
wheel
motion
disengaging
length
feed
arm
arm
cover
transverse
plate
foot
switch
width
position
thread
bar
of
set
foot
knob
control
control
thumb
control
tension
lifter
machine
screw
stud
lever
mechanism
rotary
screw
arm)
hook)
17
14
0
1
2
3
4
5
6
7
8
9
10
11
12
13
14
15
16
17
18
19
20
21
22
23
3
Page 4
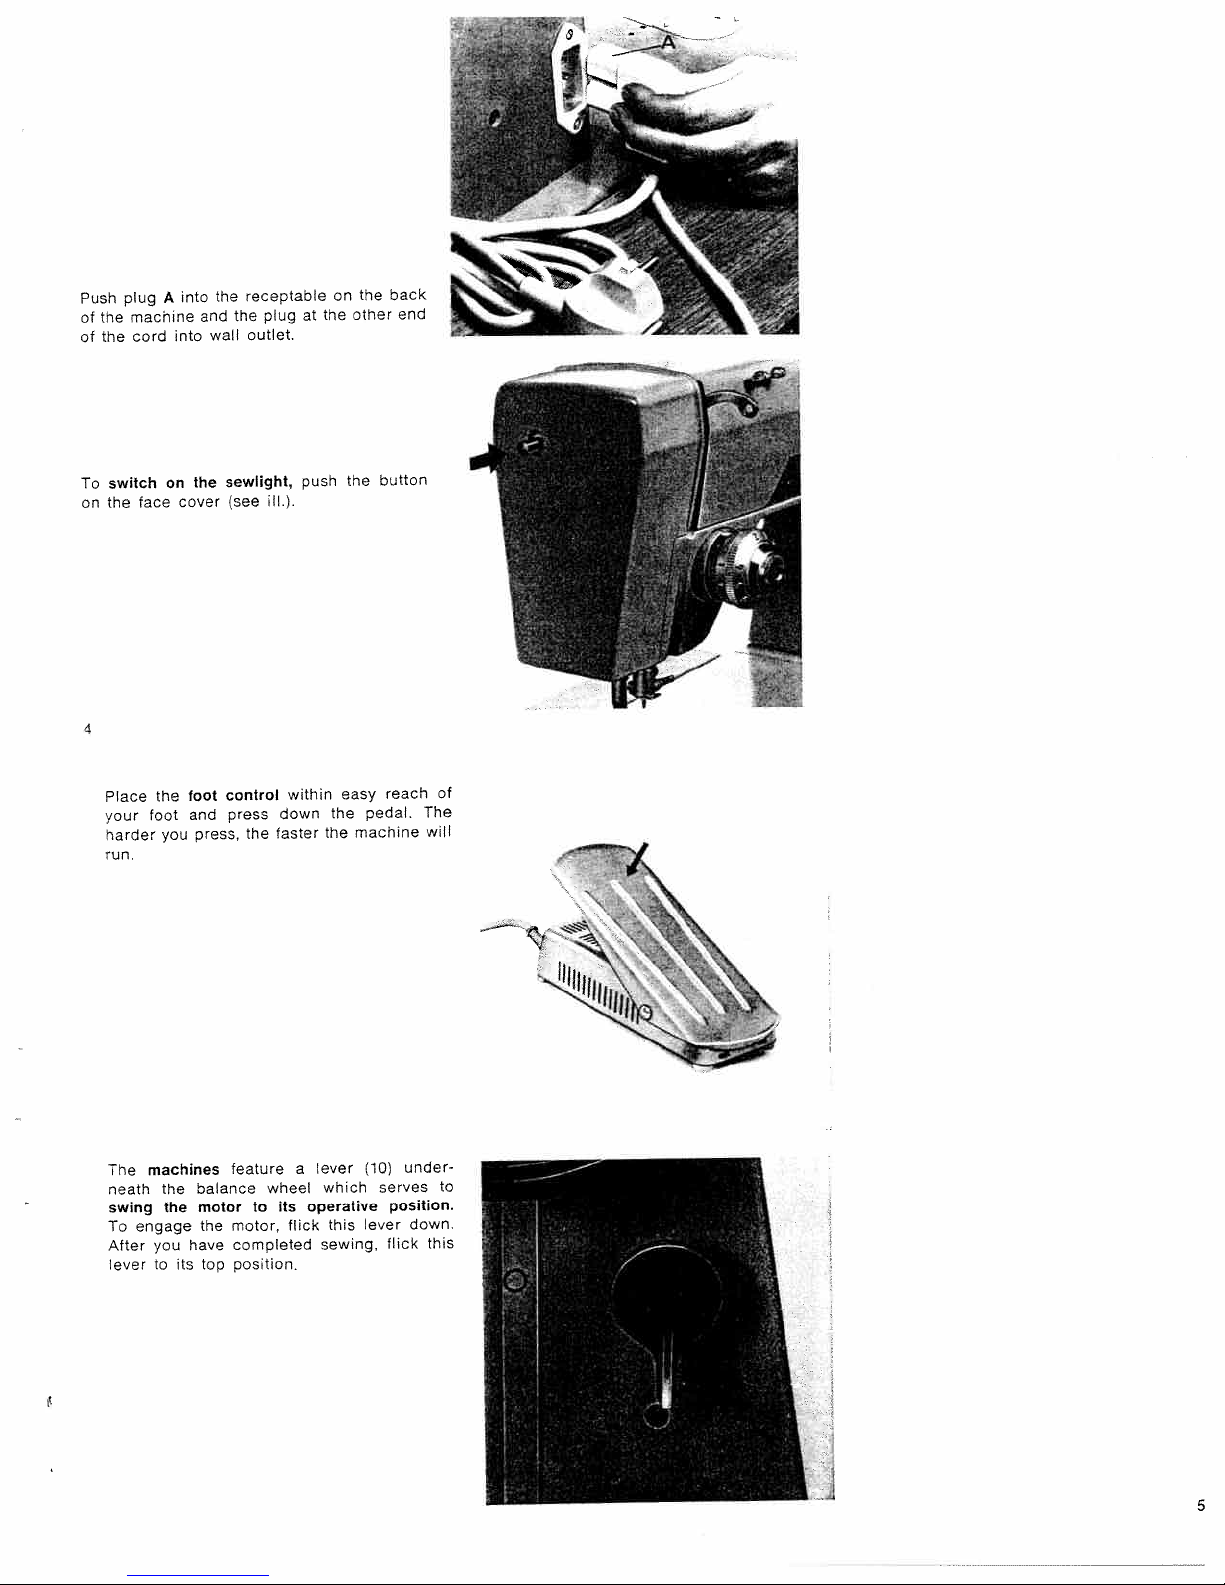
Push
of
of
To
on
4
the
the
switch
the
Place
your
harder
run.
plug
machine
cord
face
foot
the
A
on
you
into
into
cover
foot
and
and
wall
the
press,
the
the
sewlight,
(see
control
press
receptable
plug
outlet.
ill.).
within
down
faster
the
at
push
the
the
on
the
the
other
the
easy
machine
button
pedal.
back
end
reach
of
The
will
The
neath
swing
To
After
lever
machines
the
the
engage
you
to
its
balance
motor
the
have
top
feature
wheel
to
motor,
completed
position.
its
a
flick
ever
which
operative
this
sewing,
(10)
lever
under
serves
position.
down.
flick
this
to
J
S
Page 5
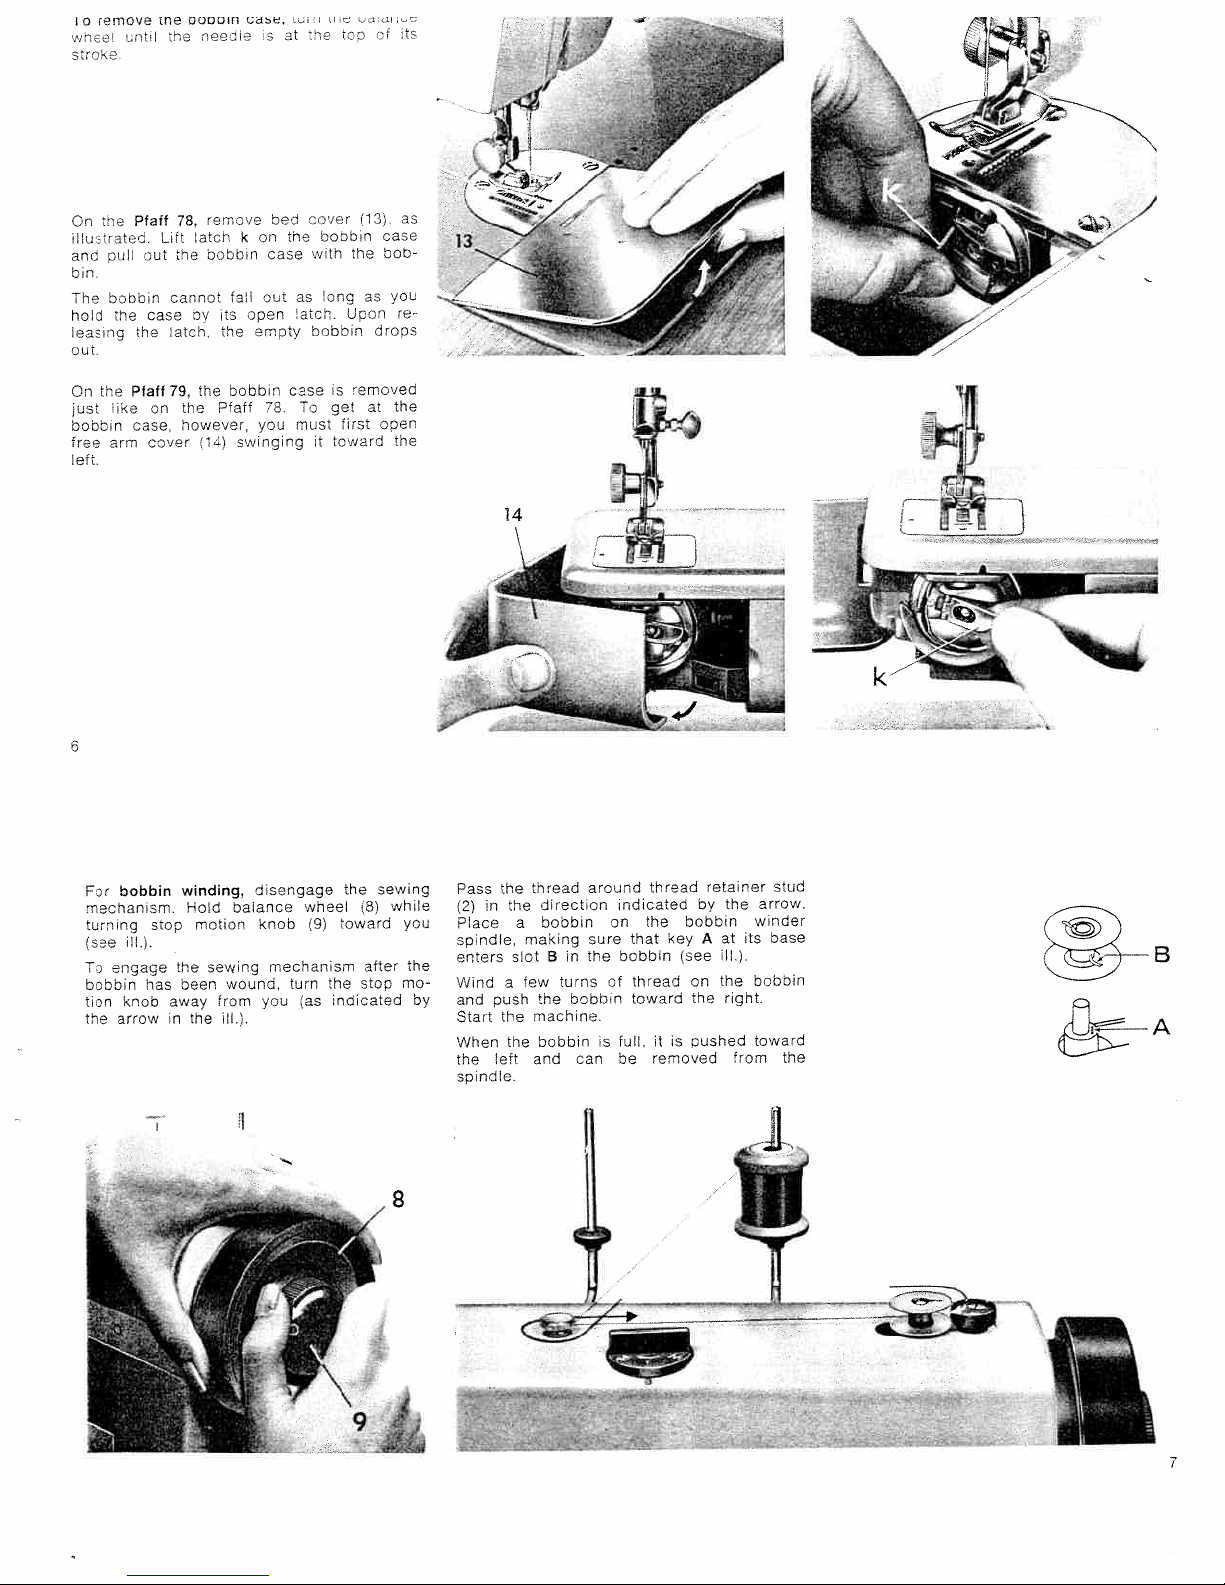
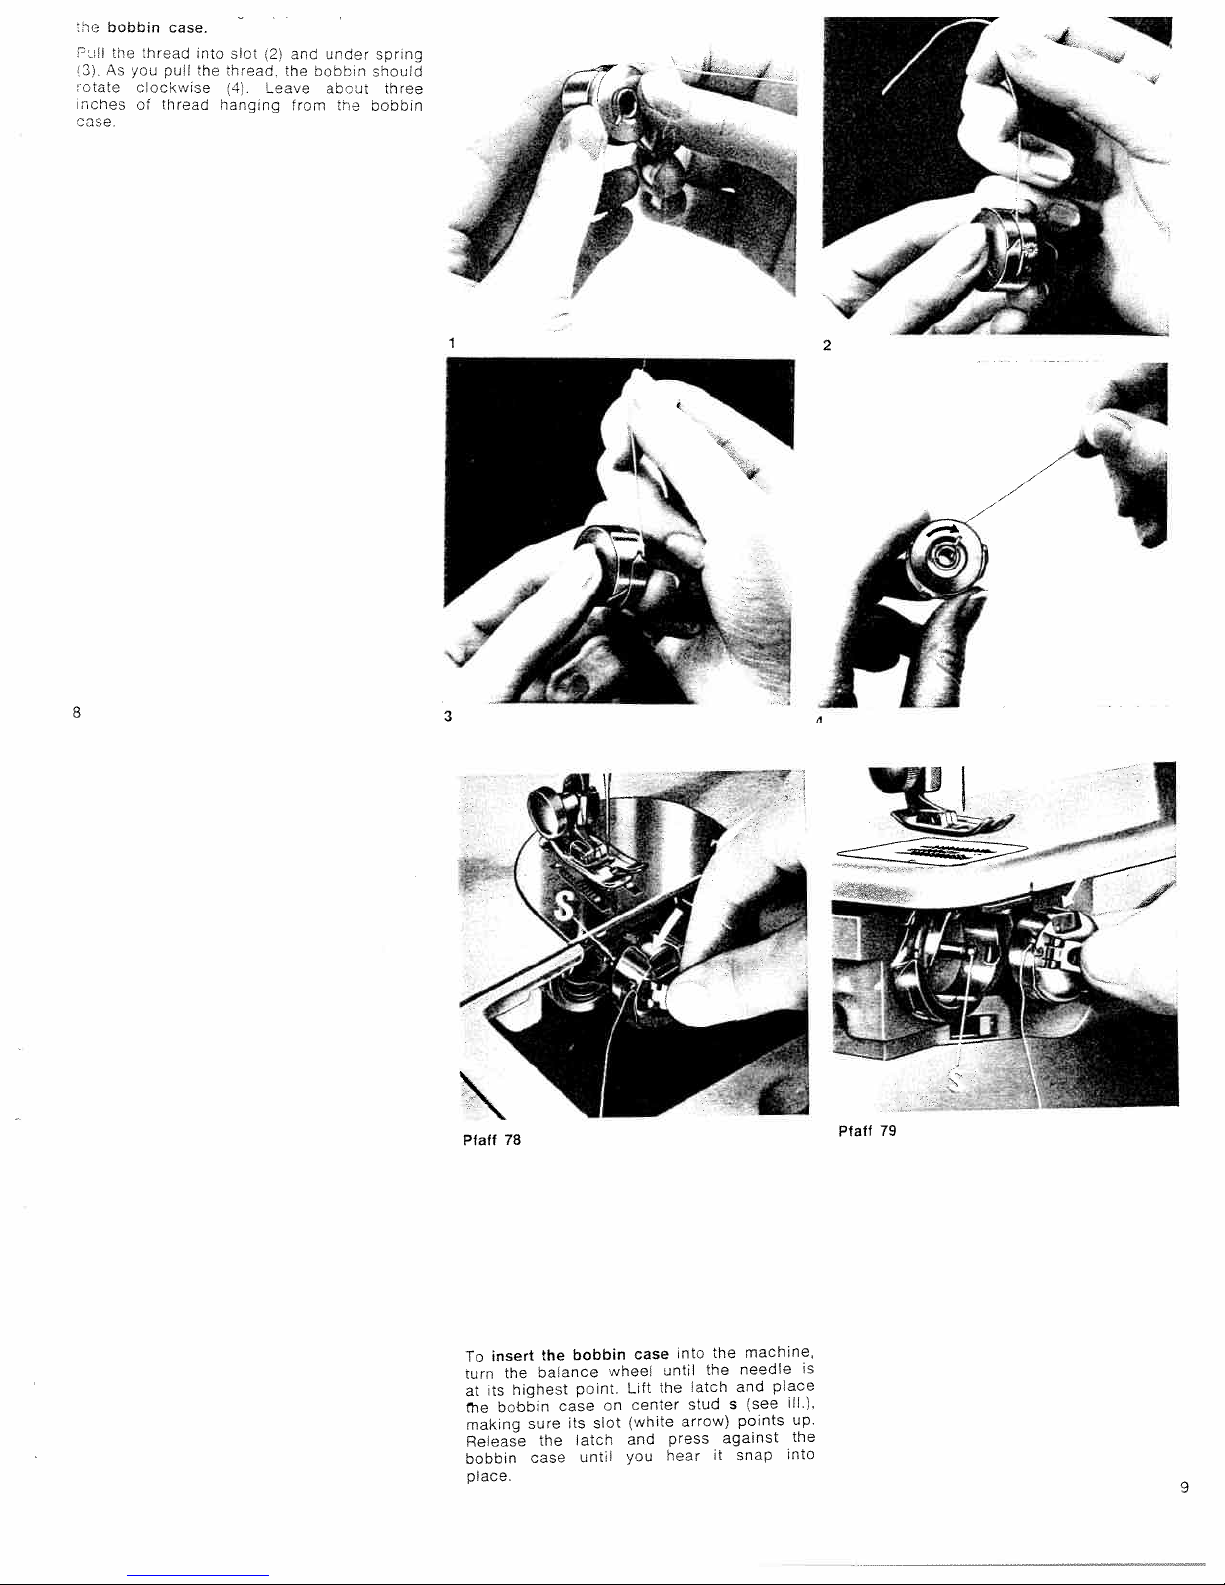
remove
o
0000111
iflC
Oe
ne
•.
n
o
at
‘ts
too
--
,
.
.-
On
iatec.
and
bin.
The
hoc
‘eas
cur
On
just
bocoin
tree
left.
toe
puli
ooobin
tne
ng
the
ike
arm
Pfaft
out
the
Pfaff
case.
itt
case
on
cover
78.
the
cannot
Dv
atch
79.
the
however,
re’ro,e
arch
000Dm
the
It,
k
tab
its
the
bobbin
Pfaff
swinging
ci
ocen
ernoty
•,ou
bec
case
out
8.
:ne
as
.aton.
case
must
.ooer
w
000Dm
To
3
oo•nbc
th
long
get
toward
Unci
s
brat
13
case
the
as
aroos
emoved
at
open
as
boo-
Jcu
re
the
the
1
k
For
bobbin
mechanism.
turning
ill,).
t
see
To
engage
bobbin
knob
tion
arrow
the
nas
stop
winding,
Hold
:he
oeen
away
tne
n
motion
sewing
from
balance
wound,
lii.
.1
d’sengage
knob
mechanism
turn
you
wheel
t9)
as
the
toward
the
ndicated
8)
ader
s:on
sewing
wnile
you
mo
8
the
by
the
Pass
the
in
2)
Place
spindle,
enters
W’nd
a
and
ush
the
Start
the
When
left
the
spindle.
E1Ezz.
a
making
slot
few
toread
direction
bobbin
in
B
turns
the
machine.
bobbin
and
around
sure
the
boboin
can
4
indicated
on
bobbin
cf
full,itis
is
be
thread
the
that
thread
toward
bobbin
key
isee
removed
retaner
oy
A
on
the
pushed
the
at
ill.).
the
right.
its
from
stud
arrow.
winder
base
B
boobin
toward
the
Page 6
ms
3.
tate
uches
onse
bobbin
tne
As
h’ead
/)U
Pu
clockwse
of
thread
case.
nto
the
st
:hread.
4
hang:na
2i
the
Leave
and
from
under
ocbb-t
abDut
spring
should
three
te
boobin
8
3
insert
To
turn
ts
at
me
making
Release
boobin
p1
ace.
the
highest
bobbn
the
balance
sure
the
case
case
its
bobbin
point.
slot
atcn
until
wnee!
on
case
Lift
center
(white
and
you
until
the
hear
into
press
the
latch
stud
arrow)
the
s
against
it
machine
needle
and
tsee
points
snap
is
place
ill.),
up.
the
into
Page 7
1
enlarge
To
ordinary
for
workplate
(1).
go
the
ever
until
the
the
free
against
place
remove
To
port
and
ing
up
arrow
(see
Then
(3).
the
locking
arm.
the
unlock
the
onto
ock
on
machine
the
lever
in
sewing
sewing
the
it
the
back
stud
Press
workplate,
it
by
on
Fig.2).
operations,
tree
in
place
snaps
the
base
pulling
the
area
arm
of
workplate
back
as
by
the
into
until
swing
of
out
of
the
far
turning
machine
the
it
snaps
up
and
the
Pfaff
push
as
hole
support
its
swing
machine
it
down
into
sup
79
the
will
(2)
in
machines
On
the
workplate
baseplate
10
no
machine.
is
carrying
pressed
case
against
base.
the
3
illustrated:
that
two
toward
do
cannot
needle
this,
as
of
the
the
around
the
hold
unwind.
from
thread
tension
right
front
jerk
spool
be
(20),
stud
(see
so
placed
is
discs
tension
the
a
with
the
on
to
back.
to
threading
Upper
drawn
As
thread
note
any
clockwise
you
the
Please
tween
2
pulled
and
ill).
that
Thread
having
support
of
the
‘%
---—
Page 8
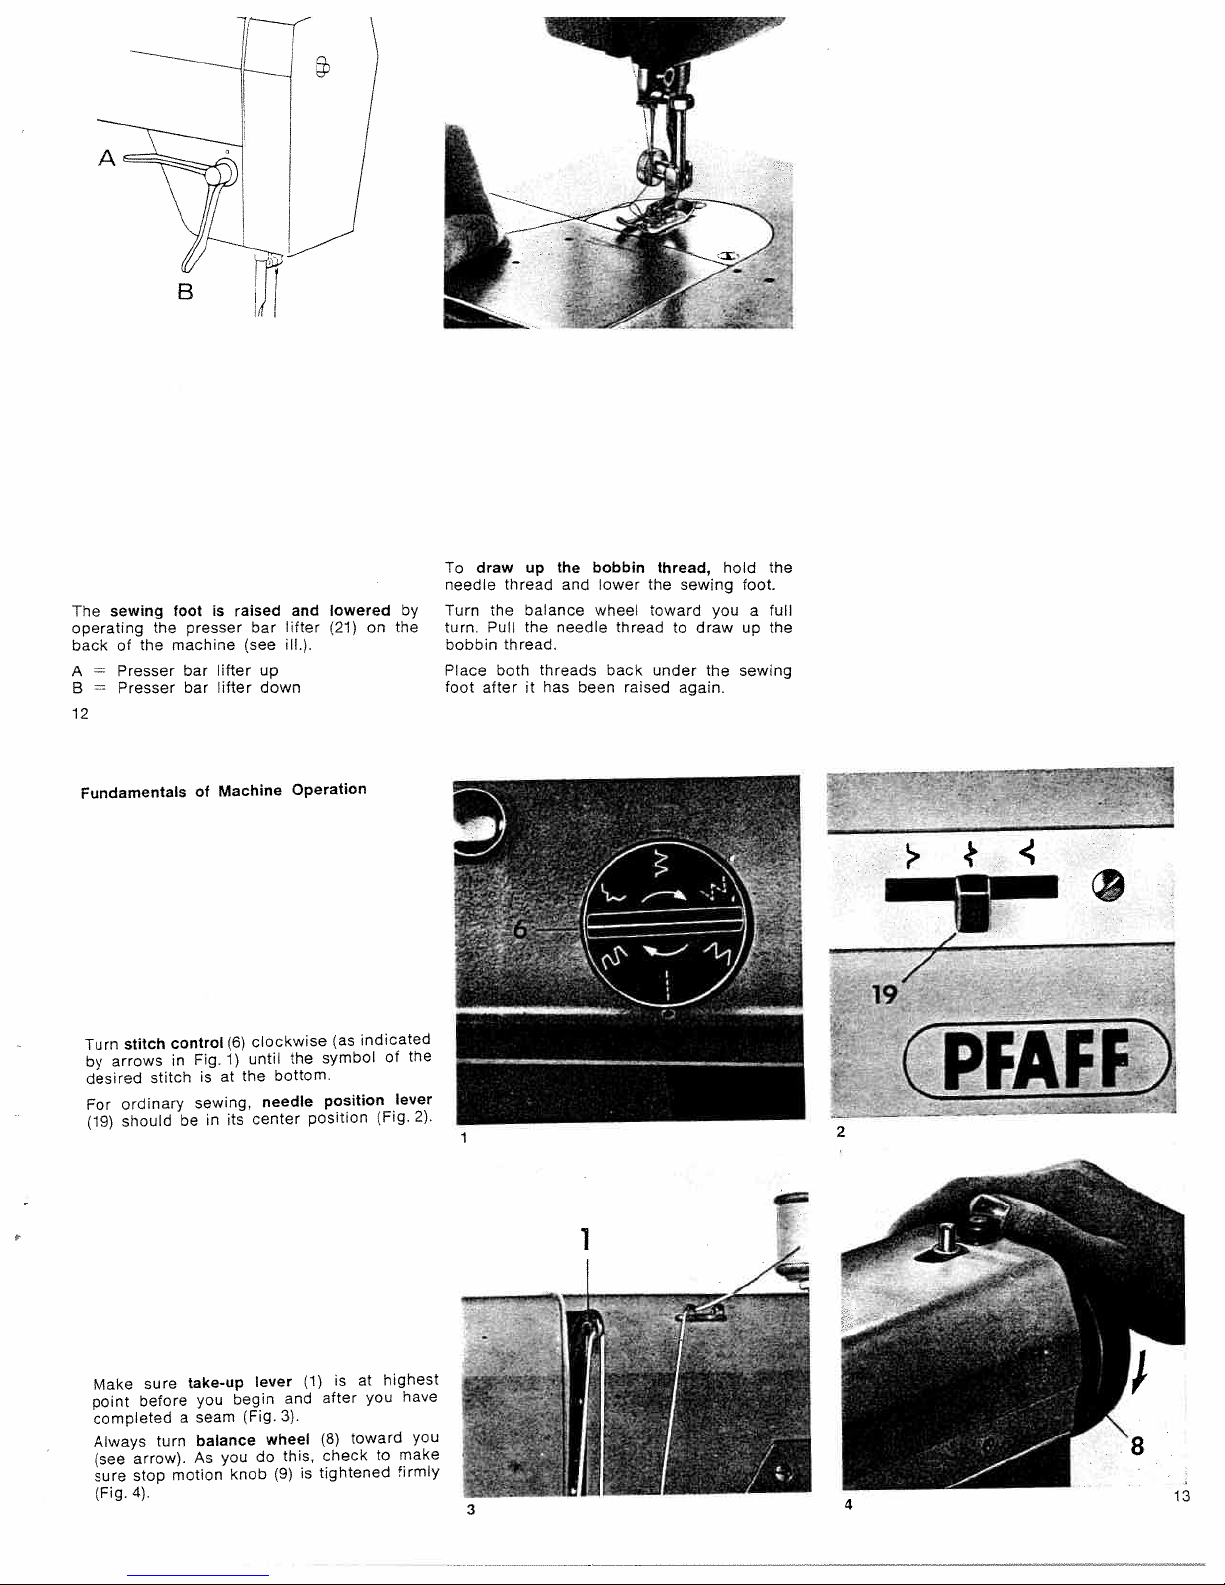
The
sewing
operating
back
A
B
=
12
of
the
Presser
Presser
the
foot
presser
machine
bar
bar
is
lifter
lifter
raised
bar
(see
up
down
and
lifter
ill.).
lowered
(21)
the
To
by
Turn
the
on
turn.
Place
needle
bobbin
foot
thread
the
balance
Pull
the
thread.
both
afterithas
and
needle
threads
been
bobbin
lower
wheel
thread
back
thread,
the
toward
under
raised
up
draw
sewing
to
again.
draw
the
you
hold
foot.
a
up
sewing
the
full
the
Fundamentals
Stitch
Turn
arrows
by
desired
ordinary
For
should
(19>
stitch
of
control
Fig.
in
sewing,
be
Machine
is
in
(6)
1)
at
its
clockwise
until
bottom.
the
needle
center
Operation
symbol
the
position
position
(as
indicated
of
lever
(Fig.
the
2).
---/-z-
19
CPFAFFZ
2
highest
is
at
(1)
Make
point
completed
Always
arrow).
(see
stop
sure
4).
(Fig.
sure
before
turn
take-up
a
As
motion
you
seam
balance
you
begin
(Fig.
knob
lever
wheel
do
(9)
and
3).
this,
(8)
check
tightened
is
after
you
toward
to
have
make
irrnly
you
Page 9

nosneo
rght
:o
be
as
ar
as
t
WI
I
go
11
I
To
stitch
symbol
-‘4
sew
onger
control
is
at
straight-stitch
(6)
the
bottom
until
the
see
seams,
straight-stitcn
ill.).
turn
::
‘!I!!;
18
Tne
stitcn
cating
Qoposite
the
For
enath
P1ace
and
/our
narder
run.
stitch
ength
the
slot.
ordinary
control
the
lower
:ne
foot
you
I
length
st:tch
the
sewing
materiai
the
cor
and
press,
control
dot
on
presser
oontrci
press
s
enght
on
operations,
‘2”.
under
the
regulated
1(.
the
bar
vthin
down
faster
The
chosen
left-hand
the
Liter
the
the
number
set
sewing
easy
pedai.
machine
cy
should
the
macn
:urning
side
stitcn
Indi
be
of
foot
of
The
will
To
seam,
(12).
For
hl
the
Then
stitcn
desired.
Jarious
cussed
Seti
des
wnle
uons
sew
simply
zigzag
zigzag-stitch
regu’ate
width
on
ng
the
go
the
3r
reverse
in
sewing,
zigzag
page
patterns
following
‘Jarious
press
me
control
sewing
26
macnine
or
bacictack the
down
turn
symbol
stitcn
(18)
and
for
‘s
explained
cages
sev:ng
finger
stitch
is
Nldth
toward
operations
following
foe
sewing
contain
operations.
control
at the
by
the
the
on
tip
end
bottom.
pusnirg
are
various
page
:nstruc
of
control
(6)
left,
dis
cages.
on
as
3.
a
-,
-
18
15
Page 10

needle
center
The
bobbin
turning
bin
case.
Turn
this
tighter
for
a
sion.
If
the
needle
to
adjust
tension
This
sistance
the thread.
and
of
the
same
and
the
screw
the
has
bobbin
material.
thread
smaii
tension,
size
on
bobbin
is
to
tne
set
knurled
right
threads
bobbin,
be
threads
tension
(with
or
left
thread
correctly
overcome
screw
your
for
are
there
interlock
is
regulated
on
thumo
looser
a
used
is
tension.
ifaslight
when
the
no
in
bob
nail)
ten
in
need
pulling
the
the
re
by
bottom
Uoper
loose.
tension
too
tight
or
lower
top
tension
too
Numbers
of
tension
higher
ordinary
For
tension
Please
for
sewing
16
The
accessory
machine
special
To
change
to
its
screw
moved,
The
new
order.
For
sewing
sewing
clear-’iiew
0
the
should
note:
sewing
highest
(16)
tilting
foot
to
on
number,
sewing
Ease
synthetic
contairs
the
until
foot
elastic
No,
sewing
10
indicate
the
upper
be
set
both
box
Dperations.
sewing
point
the
it
sideways
is
attached
93-838
foot
the
operations.
at
fabrics.
which
several
foot,
and
sewing
fabrics,
No.
different
tension
tighter
about
tensions
belongs
sewing
bring
raise
(see
954-00
93-100
the
foot
in
attach
dial.
the
the
5.
somewhat
the
foot. Turn
can
Figs.
the
rather
179-00.
degrees
tension.
upper
to
feet
needle
ce
1
&
reverse
ordinary
than
The
your
for
re
2).
bottom
.Jpper
tight.
Both
tension
tensions
too
loose
correctly
or
lower
balanced.
top
tension
top
too
1
2
3
To
change
to
its
foot,
the
Insert
it
will
side
Tighten
Use
highest
Loosen
old
new
go
of
System
needle
(Fig.
its
screw
the
needle
needle
shank
130
needle,
point
out
3),
(22)
R
and
set
of
and
making
faces
securely.
needles
bring
the
push
lower
screw
needle
sure
:oward
only.
the
it
(22)
up
that
needle
the
clamp.
as
the
sewing
and
the
far
back.
bar
pull
as
flat
Page 11

.J
i-
ceed
Replace
ing
rear
the
set
screw
as
foot
screw
so
116).
o
the
No.
iois:
93-102
that
(22).
Lower
ordinary
spnng
Tighten
I
‘--‘.
826-91,
the
.-
sewing
clip
sewing
presser
.‘.‘
.-.-“,
toot
attaching
rests
c
bar
foot
on
,,,,
by
lifter.
darn
it
from
needle
thumb
fr’
On
feed
the white
feed,
to
feed.
lever
its
bed
arrow.
cover
down
press
original
tne
siantwise,
th
Pfatf
13i
lever
s
position
and
78,
On
the
simply
by
underside
chine
posite
Pfaff
feed
direction.
79,
turning
of
the
again,
the
the
free
turn
machine
thumb
arm.
this
teed
To
screw
screw
raise
is
in
dropped
on
the
the
the
ma
op
Now
this
pressing
as
indicated
To
raise
down
drop the
done
is
the
and
machine
removing
ny
drop
by
the
machine
letitreturn
18
Darning
facilitated
Draw
threads
first
threads
across
the
sure
around
area
Turn
the
and
forth
sheer
up
lightly
stitches
and
the
threads
by
the
fabric
over
placing
start
hole
the
and
bobbin
with
are
are
hole.
at
the
soft
them
your
being
stitching
sewing
in
anchored
right
preceding
materials
in
thread
left
made.
angles
darning
and
hand
back
direction.
the
in
and
work
is
hoops.
hold both
wnile
Trim
forth
and
Make
unworn
back
sew
short
with
the
the
greatly
stitches.
matching
size
in
Select
the
If
the
tension
the
darning
needle
darning
too tight.
is
hoops
tobeperformed.
job
should
thread
a
breaK,
the
upper
Page 12

847
Attach
quilting
Stit...n
zipper
gauge.
length:
foot
1.5
without
to
2
it.
Stitch
for
about
the
toot
needle
the
and
foot
Continue
of
the
and
up
The
Fig.
4.
c
close
zipper.
to
finished
ose
inch,
1
along
in
stitching
the
to
the
the
Then
other
:ipper
p
the
the
left
guiding
zipper
material,
zipper
until
stitch
side.
closure
edge
12).
you
across
the
teeth
raise
of
right
reacn
is
the
(1).
the
this
edge
the
end
shown
zipper
of
Leave
zipper
end
(3)
in
I
/
/7-
2
20
3
4
Felled
Flat
felled
Flat
pieces
two
straight-stitched.
Seam:
First
sides
right
truding
enters
tom
piece
not
Open
Second
pressing
of
telling
fabric
folded.
the
about
the
(see
the
Seam;
it
foot.
foot
Seams
Attach
No.
Stitch
seams
of
Lay
facing
s
felling
is
folded
ill,
two
against
Insert the
and
felling
93-847561-00.
length;
used
are
fabric
pieces
and
the
inch.
Make
evenly
foot
over
left),
Lightly
stitch
the
but
flatten
needle
seam
down
at
pieces.
foot
1.5
and
together
bottom
the
the
to
(see
to
sure
edge
ridge
2
durably
are
and
top
the
plate
ill,
with
piece
the
of
fabric
at
usually
the
the
piece
in
into
join
the
pro
fabric
bot
top
is
by
front
the
right).
Quilting
84
Use
quilting
over the
zipper
gauge
entire
toot
for
surface
No.
sewing
93-847
the fabric.
of
600-00
parallel
with
seams
21
Page 13

dHd
unur
iFv
to
secure
shown
hemmer
making
fabric
slip
soft
riemmer
by
pulling
in
sideways
fabrics.
width,
scroll
sure
at
the
the
all
as
No.
h
Stitch
93-487551-00
length:
1.5
to
2
and lower
Make
folded
Draw
both
threads
drawing.
Feed
the
w’th
your
that
the
times
and the
under
To
produce
use
zigzag
instructed
3
the
the
edge
scroll
to
fabric
fabric
right
on
same.
4
straight
in
right
an
stitches.
page
place.
into
backwards,
edge
band
is
well
fabric
half
of
elastic
Set
25.
stitches
the
into
(see
filled
does
the
hem
hemmer
as
the
ill.),
with
not
foot.
the
on
stitch
Ii
22
Cording
ordinary
Use
and
insertatwin
tained
from
Stitch length:
Cording
When
threading
lead
each
tension
of
To
render
sertafiller
gauge
and
the
type
fabric
the
Lace
the
needle
plate,
Hold
both
the
balance
thread.
The
smallest
seams
made
is
approx.
use
one
of
To
make
ing
twin
supplied
Twin
needles
(3
64”),
1.6
3.0
and
4.0
Cording
grooves
cording
grooves
cording
grooves
is
for
for
sewing
your
1.5to2.
is
made
thread
discs
your
cord.
the
of
material
wider
filler
cord
as
needle
wheel
with
inch. For
the
different
needles
at
extra
for
(1
“),
(5.’32)
foot
used
foot
medium-heavy
foot
lightweight
foot
needle
Pfaff
with
the
needles,
between
ill.).
(see
cording
Select
sizeofthe
used.
the
needle
through
illustrated.
threads
to
draw
distance
ordinary
the
cording
size
and
cording
cost:
needle
1.8.
2.0
mm.
No.
93-847
for
heavy
No.
93-847
No.
93-847 680-00
No.
93-838
(which
dealer).
two
needle threads.
make
a
separate
more
prominent,
the
filler
The
gauge.
the
lightly
up
between
narrower
feet
listed
cording,
distances
(5/44),
671-00,
materials,
675-00
fabrics,
materials.
954-00,
canbeob
sure
twin
needle
cordtosuit
thicker
holeinthe
and
the bobbin
cording
sewing
cording,
below.
follow
the
feet
can
of
(3/33),
2.5
with
with
and
with
pair
the
turn
foot
1.2
to
in
Pfaff
79
Plaff
78
be
3
5
7
23
Page 14

Use
transaarent
cot
Shtcn
24
93-100179-CO
No.
length:
2
sewing
‘o
25
Use
matches
preferably
Incert
Maso
are
the
a
the
crease
The
hemstitching
ieft
wing
tne
fabr:c
seam,
needle
n
the
Ycu
can
along
by
ill.i
needle
hem
thread
a
a
cure
same
same
the
guiding
enters
fabric
the
guiding
stitches
the
a
twin
the
as
needle
needle
nalf
by
previous’y.
produce
nemmed
which
materiai
No.
50
hemstitch
neeale
size.
cording
‘or
effect
penetrating
a
the
material
needle
the
a
the
into
s
embroidery
The
thread
turn
.ce
edge
materiat
the
not
too
being
needle.
and
cobonthreads
threading
pork.
tension.
is
roduceo
the
and
sew
that
so
holes
nemstitcbing
of
the
so
fabric
cose
heavy
hemstitched
thread).
orocedure
Slightly
ny
‘acric.
the
second
the
it
nas
faoric
that
the
to
and
urn
sing
made
effect
tsee
left
the
the
‘‘4,’
I
,:b.;•
•‘_•••‘4_.
in
...
....
.
....
......
.
-.
ø1
‘“,‘
•
‘
0
‘
.
-.
.-
.......‘
,.
Zigzag-Stitching
Turn
stitch
ziq2ag-stitcn
The
stitch
stitch
width
far
as
is
desired.
Never
change
:ne
needle
control
symbol
wdth
control
s
outside
the
a
stitch
iS)
s
at
regulated
(18)
the
clockwise
the
toward
width
fanric.
Dottom
by
the
setting
jntil
pushing
left,
unless
the
as
The
stitch
stitch
F:g
3
length
ength
control
s
ill),
regulated
as
by
illustrated
turning
in
Zà
2
I___________
18
Page 15

To
weight
mum
Soft
with
Make
the
will
overcast
fabrics,
stitch
and
a
zigzag
sure
fabric
cover
the
width.
flimsy
the
and
the
Turn
stitch
zigzag-stitch
Stitch
Stitch
edges
set
the
fabrics
stitch
of
needle
the
other
fabric
edge
length:
width
of
machine
medium
takes
over
control
(see
light
are
securely.
symbol.
2
and
for
best
width.
one
its
below)
medium-
its
overcast
stitch
edge.
(6)
to
maxi
into
This
26
Inserting
l838
IJ
Larger
away
cutting
954
holes
the
exactly
Patches
ragged
Attach
Stich width:
can
be
edges
along
ordinary
patched
around the
the fabric
sewing
medium.
quickly.
yarns.
foot.
Trim
hole,
Cutapatch
hole
and
its
grain
Set
the
stitch
and
Set
the
of
At
needle
its
corners
away
Elastic
manner.
stitch
width
stitch
the
stitch
its
slot and sew
the
corners,
downinthe
throw.
the
materials
i
about
placeitunder
to
that
of
length
control
along
the
length
stitch
are
width
Then
excess
control
stop
turn
stitched
material
are
1,2
inch
the
the
fabric.
control
in
the
edgeofthe
control
at
first
over
the
material
the fabric
twice
on
patched
larger
hole,
on
middle
on
the
seam.
machine
on
(see
the
I
matching
“1’
of
patch.
extreme
the
so
ill.).
wrong
in
the
than the
and
the
its
slot
and
0.5”
left
with
the
right
the
that
Trim
side.
same
of
27
Page 16

L
L
.‘
.
‘L.Lc
&
‘
—:——
c
..
.:.
L
.,
44-
‘i
.
:.
—
.--
1111)1*
ê
l
I
*
L.
4
.
C_
9)
_
I
)
(\i
0
0
D
()
.
.
-
.
-
CD
CD
CD
CD
QW
CD
a
(
CD
—.
.
—
CD
°
CDCfl
—
(OCD
O
D
--
CD
-.
—
.
—
4.
C)
CD
CD
ODD
,m
CD
—
CD
CD
CD
a
_CD
CD
aa
C)
CD
a
C)
CD
CD.
CD
CD
CD
0
CD
-.
a
.
CD.
CD2CD
)0CD
CC
0
CD
CD
CDCD
a
CD
CD
-
a
CDç
CD
a
-
CD
a
aCD
0
CD
CD
DOD
CDCDCD
p3
a
CD
Page 17

IvIunoyldIll
Regulate
monogram.
the
Remove
chine
Trace
place
Let
the
beginning
bin
thread
thread
Slowly
tion,
chine
give
To
embroider
the
feed.
the
the
needle
ends
move
without
is
running
your
iIIuruIuery
the
sewing
monogram
material
of
up
and
monogram
the
stitch
Lower
stitch
the
through
the
turning
outlines
in
design
start
hoops
at
width
foot
the
darning
into
the
your
them,
high
Suit
to
and
presser
on
the
the
and
fabric.
machine.
in
“writing”
while
speed.
dimensional
twice.
drop
hoop.
draw
the
fabric
fabric
bar
the
Hold
the
size
the
at
direc
quality,
/
of
ma
lifter.
and
the
bob
both
ma
Sewing
38
Stitch
Stitch
Use
Chart).
Ease
Hold
sewing.
30
Changing
Some
the
needle
the
needle
lever
The
needle
for
sewing
holes,
Curtains
954
length:
width:
a
thin
the
synthetic
special
(19)
for
medium
needle
needle
the
Needle
switched
plate
to
the
position
on
instance.
-
2.5
to
thread
materials
sewing
slot.
right
buttons
OO9
7
3
(see
Needle
tension
a
Position
jobs
to
the
Thisisdone
and
left,
is
lever
and
and
somewhat.
little
taut
are
made
right
or
by
respectively.
indispensable
sewing
Thread
while
with
left
moving
button
I
t
—
Button
Sewing
transparent
the
the
the
width
stitch
needle
button
needle
needle,
position.
through
make
Attach
No.
93-100179-00.
to
feed.
under
will
Turn
symbol
until
both
width
two
its
enter
but
the
control
or
right
retain
the
holes.
three
of
Flick
the
machine
Place
that
so
Raise
lowered
zigzag-stitch
the
19
stitch
stitches
button.
Move
right
and
position
the
the
stitch
and
needle
(18)
foot
right
the
regulate
Sew
tying
sewing
and
and
hole.
foot
control
alternately
on
toward
stitches.
drop
align
in
foot
its
to
the
the
the
Lever
4-
left
at
center
“V
right
—
31
Page 18

(00H
?
CS
C
H
:;
07-
—-1
CD
0
CDCDa
0
0
D)
0
<a
QiD
CD
CD
o
a
CD
C)
Co
:3
:s
CD
T
a
:5
C-
CD
C
C
CD
QD)
-g
C)
D
a
0<
(1)
CCC
0
°
CD
CS
CD
0
a
C9
(0C-
(3-CD
C)
D’
CC)
CD
(DCD
g(
CD
a
C0
-‘
-
—
<
a
ç
a
(D,CD
a
0
C
aD
C-2-CD
-
o
—--
QCD
-—
0
CD
33
D3E
0
-ID)
:3-
L
CQCID)
CDCDCDD
-p
C
CD
(0(0
C0C-
°
C0
CO
CSD)
—
C)
(DO
QCD
_CD
—
CS
a
0
CD
CD
CD
a
CD
CD
a
(DO
C).
3
i.
)
>
H;
:
1:
I
N)
9jC0
32E
OC-
:5
5
a
DC
0
0
CC)
0
C)
(O<
CO
-
CD
C-
CD
a
--aCD
acD.
(DCD
:)
CDa2
Co
.0
C))
)
C)CD
-—CD
—
-o
00
-
a
—
‘o
a
2g
—)D(D
0
OCD
D03
3-
-
0
oE_
3DC+f
a
DC
33-
(04
3_:3
D)0°
CD
3<
3-
CD
;CD3-
:3)C)—
(03-
3
00)0
0
CpC-
—
-
C)o0
00)
C-
C-
0
CD
a
C)
),4?a
Q)C
CD0
0
-Qi
a-Co
CD—
0
:3C)-
CD
CD)))
-aE
CD
3-o
0
3-
Ep
c’a
g
0
C
5
a
a
0
CD
v
:s
0
-o
C
o
0
ao
3-
—
(C
0
0
a-c
C-
flC)
D•°3-3--
(CC
3-9-
CD
-
C-
DC)
a
0)
:3-
CD
3-
a
a
D3-
a”
-
O
CD
a
3-
3-c
--CD3
(
),
a
)))
0a
3
C)
C-
CD,,C-o
CC—0
=
-‘
CD
0
S6
a
a3-
3-3-oCD
C)3-33-
3-D
CD
oao—
CDoCC0
a
0)
0’<
-CD--
(fl:30C)
0
-
-
Cn05
00
a
33-0
:1
y3(DCD
C-
a
o))0D
0
C-
(0(0
OC-3-Q
(0)))Q
(
a
.
D0,-.-0
3-r-
a
(C)
30
5
C-0)
C
q
cji
C)
(C
Page 19

o
set
sewing,
dicated
desired
bottom
The
stitch
trol
(18)
sired.
various
indicated
inc
turn
by
stitch
(see
width
to
The
utility-stitch
in
arrows)
the
stitch
macnine
control
is
ill.).
is
right
width
the
(6
until
opposite
regulated
or
recommended
sewing
respective
for
decorative-stitch
clockwise
the
the
by
left,
as
instructions.
symbol
dot
moving
may
operations
(as
be
for
in
of
the
at
the
con
de
Zigzag
seam
/\1\/\/\A/\/\/VV\/V\/\
Ordinary
zigzag
scams.
the
is
Elastic
seam
\/
/
V
i
V V
\/
V
V
V
)
V
V
‘,
Sewing
ted
worn
fabrics.
tabrics.
areas,
on
elastic,
automatic
finishing
inserting
darning
edges
patches
in
in
of
rips
lightweight
knit
and
34
Blindstitching
33’00I?9
Apply
91-100179-00.
No.
Turn
stitch
blindstitch
page
(see
Stitch
transparent
control
symbol
34)
length:
2—3
sewing
(6)
Blindstitch
“Pinnacle”
“Lamp-shade”
seam
seam
seam
Blindstitch
ted
fabrics,
Sewing
stockings
edging,
Elastic
slacks,
seam,
terry
with
couching.
edge
sewing
borders.
cloth,
elastic
finishing,
on
shell
nserting
braiding
edging,
thread,
inseams
patches,
attaching
and
joining
Helanca
of
borders.
knit
sewing
lace
foot
to
Basting
seam
Fold
Baste
edge,
Reduce
the
as
hem
illustrated
needle
the
about
io
(1).
thread
inch
from
tension
the
by
fabric
one
grade.
Fold
sewing
the
line
in
Regulate
needle
folaed
the
with
takes
edge,
hem
the
foot
the
(2)
so
left
stitch
the
catching
and
width
left
place
that
groove
stitch
the
at
merely
the
folded
of
top
exactly
fabric
the
so
one
foot
edge
that
in
fabric
(see
the
the
under
yarn.
note:
Please
the
and
hem
finish
before
of
the
it
heavy
is
woolens
raw
edge
hemmed.
with
only
once
zigzag
Fold
(3)
stitches
is
Page 20

Attach
No.
No.
Turn
Push
as
Stitch
93-100
93-838
it
transparent
stitch
stitch
will
length:
179-00
954-00.
control
width
go
or
ever
(maximum
0.5
to
sewing
ordinary
(6)
2
to
(18)
stitch
foot
sewing
blindstitch
to
the
width).
left
foot
symbol.
as
far
one
gerie
fabrics
Fcid
enhanced
folded
ing
one
over
its
outside
nwardly
effect.
caging
or
the
edge
garments
or
fabric
stitch
edge.
the
thus
tricot.
by
with
fabric,
makea
along
snell
into
As
producng
the
the
a
made
edging.
the
threads
the
nice
the
needle
fabric
fabric
trmming
of
ne
which
Sew
alternately
and
are
edge
a
deNcate.
along
the
interlocked
shell
is
on
to
s
other
drawn
edging
soft
this
tak
lin
be
Set
stitch
medum
blindstitch
the
on
so
the
of
width
Knit
the
two
op
that
fabric
of
The
sewing
edges
Place
one
edge
into
i
ng
to
maximum
underwear
fabric.
pieces
of
the
the
and
oot
Turn
.ol:ndstitch
Maximum
lever
seam
of
other
needie
over
stitch
(18)
w
s
materal
its
control
symbol.
sttcn
for
a
dtb.
ideally
and
and
sew
alternately
edge
length
zigzag
suited
finishing
to
be
along
(see
6)
stitch
lolned
stitches
draw
to
0.5
for
the
the
36
Inserting
‘838
954
Patches
Apply
foot.
Turn
the
symbol
nacle”
Maximum
Stitch
the
stitch
seam
width:
ordinary
control
of
lsee
stitch
maximum
the
page
length:
sewing
(6)
“pin
34).
to
0.5
AyAvAvArNr]
Cut
the
WWWW
area
its
Sew
edges.
to
The
is
grain
the
seam
highly
patch
and
the
Turn
seams.
place
matches
patch
the
which
elastic.
a
little
it
over
the
down
material
oins
largerthan
the
rest
by
stitching
over
the
patch
of
thin
the
and
the
spot
to
damaged
fabric.
along
trim
the
so
fabric
that
its
close
A4AMAWJjJdiW’MMJMiiWMM/.AJi
Page 21

j1
)3:
C
U)C):Q
C)
0
CD
C)
•:
ci
C)CDCD
CD
3o
CC
5C
CC)
CD
CD
3:
CD
3:
QU-
C)
1
U)
(D
)
CC
C)
—
CD
o3
CDcjo
Co
V
ci
0
C)
0
CD
o
CD
—
3
C)
CD
<
CD
0
(C)
C)
C1
C)
C
C)
ci:
0
CD
O
:0CD
C):
_00
CDCD
0
C)
CD
0x
C)C):(C)(()
CDCDCC)
0
CD*
<30
<-CD
gcz
0
oo
CD
CS)
3
EjCDciCD
CDCDo
0.
0C)
C
-
)
OCDcic
0
wCCCDCJ)
CD<C
CCC.)
C)
C)
CD
3:
ciCD
CD
CDCD°
—
CD
o
Ci
I
on
-
CDCD
0
0
C):
CD
C)
cCC)DC
(1)
CD
C)
3:>
-‘
C)
Cl)
CD
V
:U<
CD
C/)
CD
C)
3:
ci
3:
C)
CD
C):
CD
CDCD<
-‘
0ciCD3
•
CD0CDCD
—
U)CDC):OO
•
CD
C1)rj
0oCDC)C)
ci
3:
D)
%D)CD
OCDciC)
CD
3—
—
:_C)
3:
ci
3
(C)
XCD
C)
ç)
CD
CD
C)
CD
0
CD3:CDC)
CD
O
CD
0
0
0)
03:
3
C)
CD
CC
CD
CD
C)CDCDO
)(
Co
C,)
Page 22

both
with
material
hr
ded
ion
pieces
dec
se/aged
under
edges
Them
edges
ratve
and
srcng
n
the
are
as
and
press.
therfo
together
excess
nas
not
00th
the
needle
Lay
a
betoded
cieces
abutted
and
pin
ng
0.5
side
the
above.
sew
so
).
faorc
need
place
tnat
the
with
Trim
needle
and
see
to
If
edges
Simply
foot
under
ed
rary
control
of
length:
maximum
the
scsi
6
)
use
the
9
1
fnot.
‘Thrn
the
nacle”
Maximum
Stitcn
oTh
stitch
symbol
seam.
stitch
width
nde
acutting
s
edge
Dressed.
sewing
centemd
nstjct
the
tones
side.
The
Mending
F33
-‘0
Sewing
‘9Ds
Hems
the
951
Aoply
Turn
ordinary
stitcil
the symboi
oontrol
of
the
sewing
6f
elastic
to
seam.
Maximum
Stitch
on
Elastic
954
Attach
Thot,
‘urn
the
seam
Stitch
Stitch
the
stitch
symbol
see
ength
width:
Ndth:
stitcn
maximum
ordinary
control
of
page
1
maximum
the
34)
ength:
sew:ng
elast:o
0.5
6l
to
with
Lay
it
the
The
the
Rip
oosite
suitable
the
double
fl
the
Sew
aoping
the
with
stretched
more
fabric
Doen
the
t
elastic
both
the
material
nem
down
the
the
damaged
and
foided
hands,
you
Nut
secton
so
with
seams.
or
elastic
stretch
be
n
press.
that
edge
the
gathered.
of
area.
the
Then
its
‘oded
of
decoratve
fabric
as
illustrated.
down.
the
inc
hgnt
the
e
Take
edge.
asfic
nen
size,
nser:
ecge
hem.
stltcres,
seam
oiece
a
foldton
tha
s
stretchr-g
Then
the
more
oece
n
over
sew
oo
me
of
“1:
“S.
i/
‘AS’
..•
.,/,.
9.
ti
C
I
ww
‘;‘t
.iSott.
)
‘/
\I
41
Page 23

r1
88
U
Use
foot.
Turn
the
shade
Stitch
Stitch
the
stitch
symbol
length:
width:
ordinary
seam.
control
the
of
0.5
minimum
sewing
(6)
“lamp
838
954
to
N
procedure
same
The
for
(see
insertirg
page
patches
37).
foot.
Turn
symbol
the
seam.
Maximum
Stitch
is
with
LI
stitch
width:
applied
stitch
‘pinnacle
a
control
the
of
length:
maximum
as
..“.‘
(6)
elastic
is
to
0.5
used
seam
LJI.III.”Y
Sew
the
press
larly
sewing
the
sion
The
ing
Reinforcing
1333
Turn
hem
chine
edge
of
the
machine
well
instructions
on
same
inseamS
954
allowance
indicated
as
the
two
the
synthetic
page
Hems
hem
pieces
seam
suited
16.
machine
of
Attach
foot,
Turn
the
shade’
Maximum
Stitch
(see
set
open.
stretch
given
trousers.
in
and
above
of
as
for
setting
Knit
the
stitch
symbol
width:
ill.).
material
indicated
This
stretch
fabrics,
for
Underwear
ordinary
seam
stitch
baste.
and
seam
fabrics.
regulating
used
is
control
of
the
(see
length:
maximum
Set
stitch
together
above
is
please
sewing
(6)
‘lamp-
page
the
the
particu
the
for
34).
0.5
ma
raw
When
clos
to
with
then
note
ten
Ornamental
All
to
threads
Some
illustrated
Set
desired
the
make
stitch
33000
of
different
exciting
in
different
the
on
length
pattern.
Seams
fashion-stitch
designs
the
Apply
foot
stitches
sizes
right.
and
/.
that
stitch
/:
transparent
No.
will
and
can
93-100
also
designs.
colors.
width
be
7
sewing
179-00.
be
made
to
suit
used
using
are
the
‘7
‘‘I
‘-
.—
—
-I’-
L*3
43
Page 24

To
cover
by
44
change
the
by
arrow
the
pulflng
light
it
Push
the
light
bulb
nto
its
bulb,
the
remove
direction
in
the
indicated
face
and
pins
Puib
pull
slide
in
and
out,
nto
Insert
turn
I,
the
the
socket
right.
socket.
new
slots.
bulb
so
Press
turn
that
left
the
its
As
ot
you
c,
snaps
reolace
Then
into
push
the
place.
face
against
cover.
the
face
sIlo
tip
cover
d
nb
until
Machine
Longevity
dependent
are
proper
chine
terials.
The
raceway
important
put
a
ii.
at
To
get
machine
the
Piaff
has
drop
ed
at
78
Care
and
oiling.
there
oiling
and
the
been
of
smooth
Since
are
in
oil
centerl.
sewing
back.
made
the
on
only
point.
into
machine
regular
your
from
sewing
the
hook
a
From
nook
Pfarf
high-grade
few
hook
of
the
performance
ceaning
sewing
oiling
the
is
time
to
raceway
Pfaff
points
most
time.
(see
78,
and
ma
ma
ti
The
.lustrated
nstructed
other
oiling
above.
on
page
points
lpemoVe
44)
macnine
in
the
face
the
cover
are
as
45
Page 25

Contents
Appliqué
Blindstitching
Button
Butt
Seaming
Changing
Changing
Changing
Changing
Cleaning
Cording
Darning
Darning
Darning
Drawing
Dropping
Electrical
Engaging
Sewing
Essential
Essential
Flat
Felled
Foot
Control
Foreword
Fundamentals
Hemming
Hemstitching
Inseams
Inserting
Inserting
Inserting
Inserting
Stitches
Inserting
48
Work
Sewing
the
the
the
Needle
the
Foot
Rips
Up
the
the
Machine
Equipment
and
Mechanism
Parts
Parts
Seams
of
a
Full
Lace
Patches
Patches
the
Bobbin
..,
Light
Bulb
Needle
Sewing
Bobbin
Disengaging
of
the
of
the
Machine
Bobbin
with
with
.
Case
.
Position
Foot
.
Thread
Feed
Pfaff
78
Pfaff
79
Qoeration
.
Zigzag
Decorative
.
.
the
.
. .
.
.
.
.
.
Stitches
.
.
.
.
Page
29
Machine
35
Mending
31
Monogram
40
44
17
31
17
46
23
18
18
39
12
18
4
Motor
Oiling
Ornamental
Overcasting
Pressed-open
Quilting
Raising
Regulating
Regulating
Reinforcing
Removing
Removing
Removing
.
.
.
.
.
Reverse
7
21
13
22
24
42
28
27
2
3
5
1
8
Sewing
Sewing
Sewing
Sewing
Shell
Stitching
Straight
Trouble
Upper
Decorative
Winding
Workplate
Workplate
.
.
Zigzag
37,
42
Zipper
9
Care
Hems
Embroidery
Disengaging
and
the
the
the
the
the
Sewing
Buttonholes
Curtains
Knit
on
Elastic
Edging
Terry
Stitching
Shooting
Threading
Stitch
the
of
of
Stitching
Insertion
Seams
Edges
Seams
Lowering
Stitch
Thread
Hens
Bobbin
Face
Top
Underwear
Cloth
Seams
Bobbin
the
Pfaff
the
Pfaff
Mechanism
.
.
.
.
the
Length
Tensions
in
Knit
Case
Cover
Cover
.
78
79
.
.
Sewing
Underwear
.
.
.
.
.
.
.
.
.
.
.
.
.
.
.
Foot
Page
45
40
30
a
45
43
26
42
21
12
14
16
43
44
46
15
32
30
36
41
36
38
14
47
11
34
7
10
10
25
20
CPFAFD®
 Loading...