

Page 1
z
I
C
A
0
Page 2
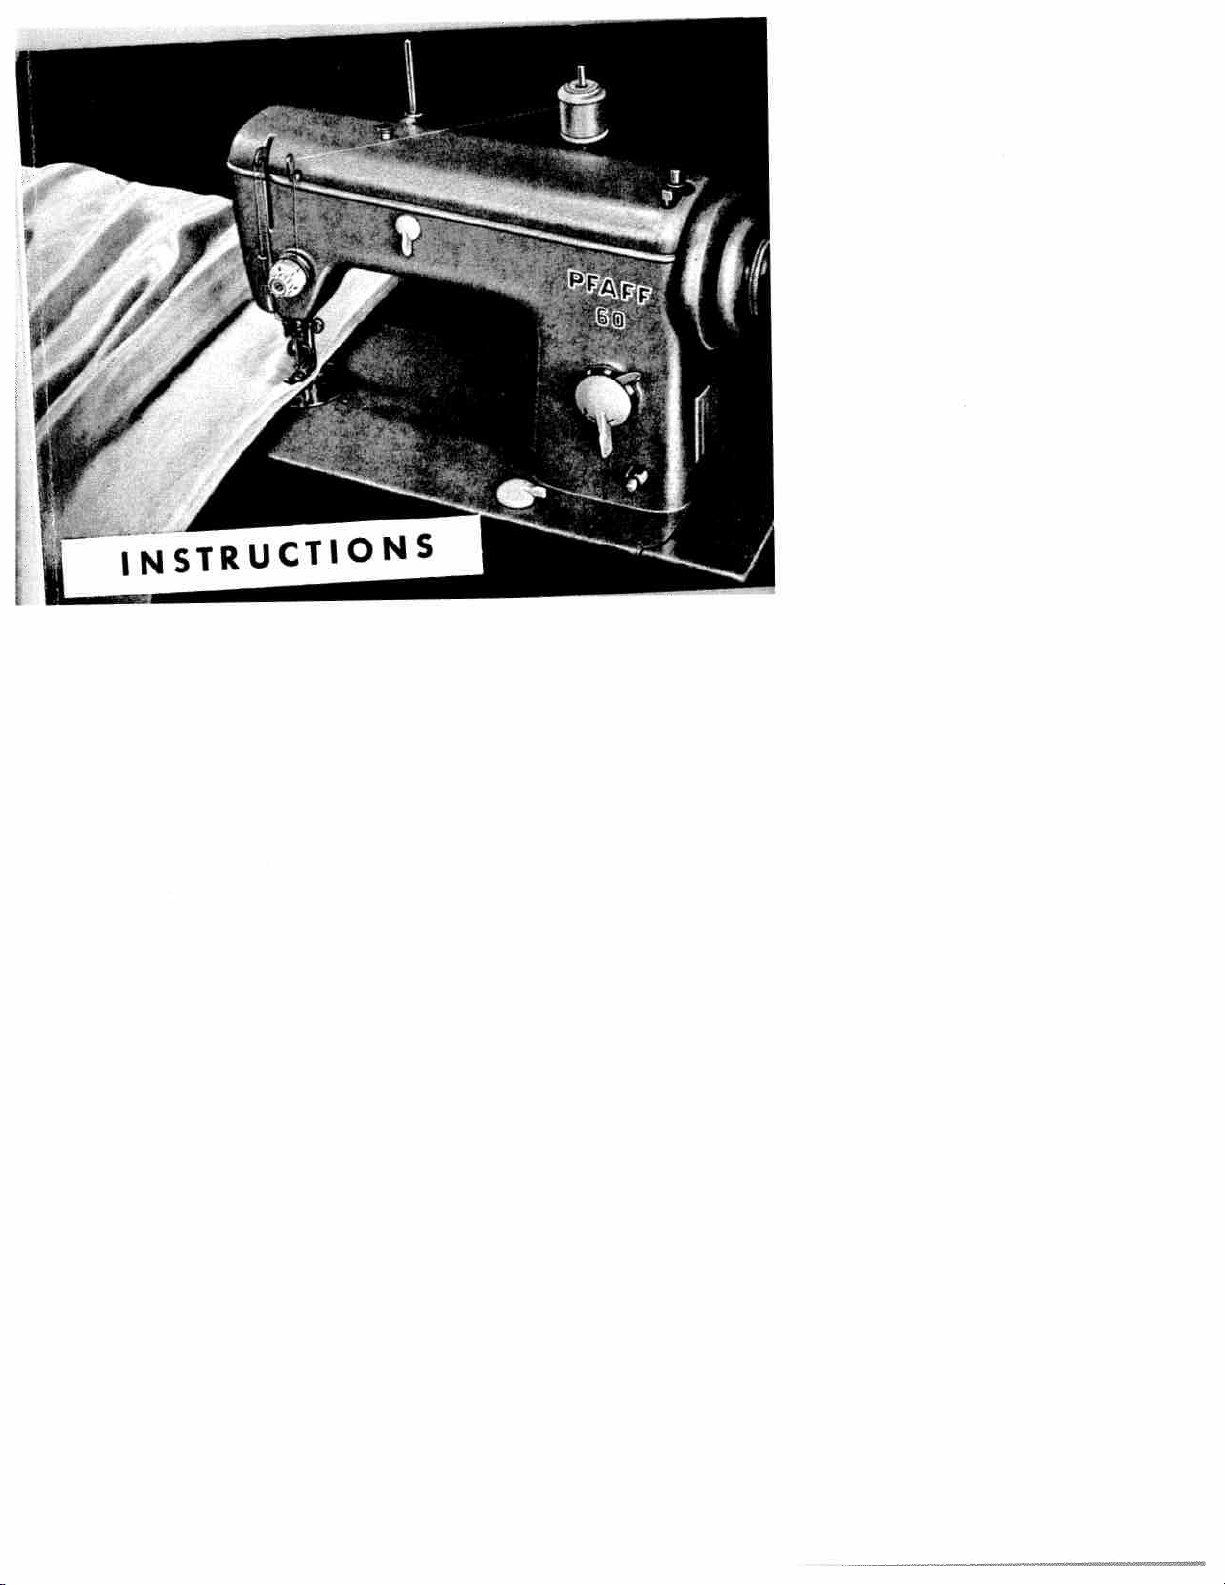
INSTRUCTIONS
FOREWORD
You
are
now
the
proud
owner
and
workmanship
modern
Your
PFAFF
these
simple
high
which
speed
sewing
is
60
easy
instructions
it
to
and
of
embodies
machines
operate,
sewing
FOR
FA
a
P
are
for
requiring
will
USING
F
F
60
straight
of
the
same
industrial
but
become
little
a
THE
stitching
high
standards
purposes.
attention
lasting
machine.
and
pleasure.
PFAFF
The
as
used
service.
Just
materia
in
today’s
follow
6C
G.M
PFAFF
AG
Page 3
Chapter
1.
Foreword
What
2.
Do
3.
4.
To
Relative
5.
To
6.
To
7.
To
8.
Toinsertthe
9.
To
10.
To
11.
needle
To
12.
To
13.
To
14.
Correct
15.
To
16.
To
17.
belongs
you
engage
change
wind
take
thread
operate
draw
regulate
regulate
adjust
remove
know
the
sizes
the
under
the
the
off
bobbin
the
the
threader
the
up
the
the
tension
the
the
your
to
your
sewing
needles
of
needle
bobbin
needle
built-in
under
upper
lower
regulation
stitch
top
machine?
machine?
mechanism
and
thread
case
the
in
thread
tension
tension
length
cover
thread
bobbin
case
Index
ge
1
2
3
5
6
7
10
15
16
19
20
21
22
23
24
Chapter
Correct
18.
of
To
19.
To
20.
Servicing
21.
To
22.
The
23.
8
24.
9
25.
26.
27.
28.
29.
30.
31.
32.
33.
regulation
sewing
the
off
take
off
take
and
remove
light
sew
the
for
Hints
sewing
of
Edgestitching
Quilting
Hemming
folder
The
ruffler
The
ruffling
Elastic
PFAFF
The
Darning
and
Embroidering
foot
face
the
balance
the
maintenance
shuttle
the
detection
trouble
No.25594
25547
No.
5-stitch-ruffler
mending
of
the
plate
pressure
wheel
and
elimination
50100
No.
Page 4

needles
29070
short
long
43729
No.
guide
25576
25579
25997
treadle
in
lieu of
machine?
262
No.25553
stands
No.
53003
What
2.
package
1
tape
1
bobbins
5
shuttle
1
screw
1
1
screw
hinged
1
guide
1
1
guide
edge
1
hemmer,
1
hemmer,
1
folder
1
reel
1
1
feed
1
oil
bottle
1
accessory
1
instruction
1
spanner No30278lwithmachinesmOuflte
1
spanner
1
Photo
beongstoyour
assorted
of
measure
No.
screw
driver
driver
presser
25820
No.
fastening
stitcher
2.5
4.0
25594
No.
No.
holder
plate
cover
No.29018
can
oil
of
box
booklet
No.
Darning
Note:
is
1
2030
driver
29002
No.
29007
No.
foot
screw
quilting
with
No.
mm,
No.
mm,
25869
No.
29180
No.
No.
290171
Attachment
furnished
No.
No.
29032
on
2
Page 5
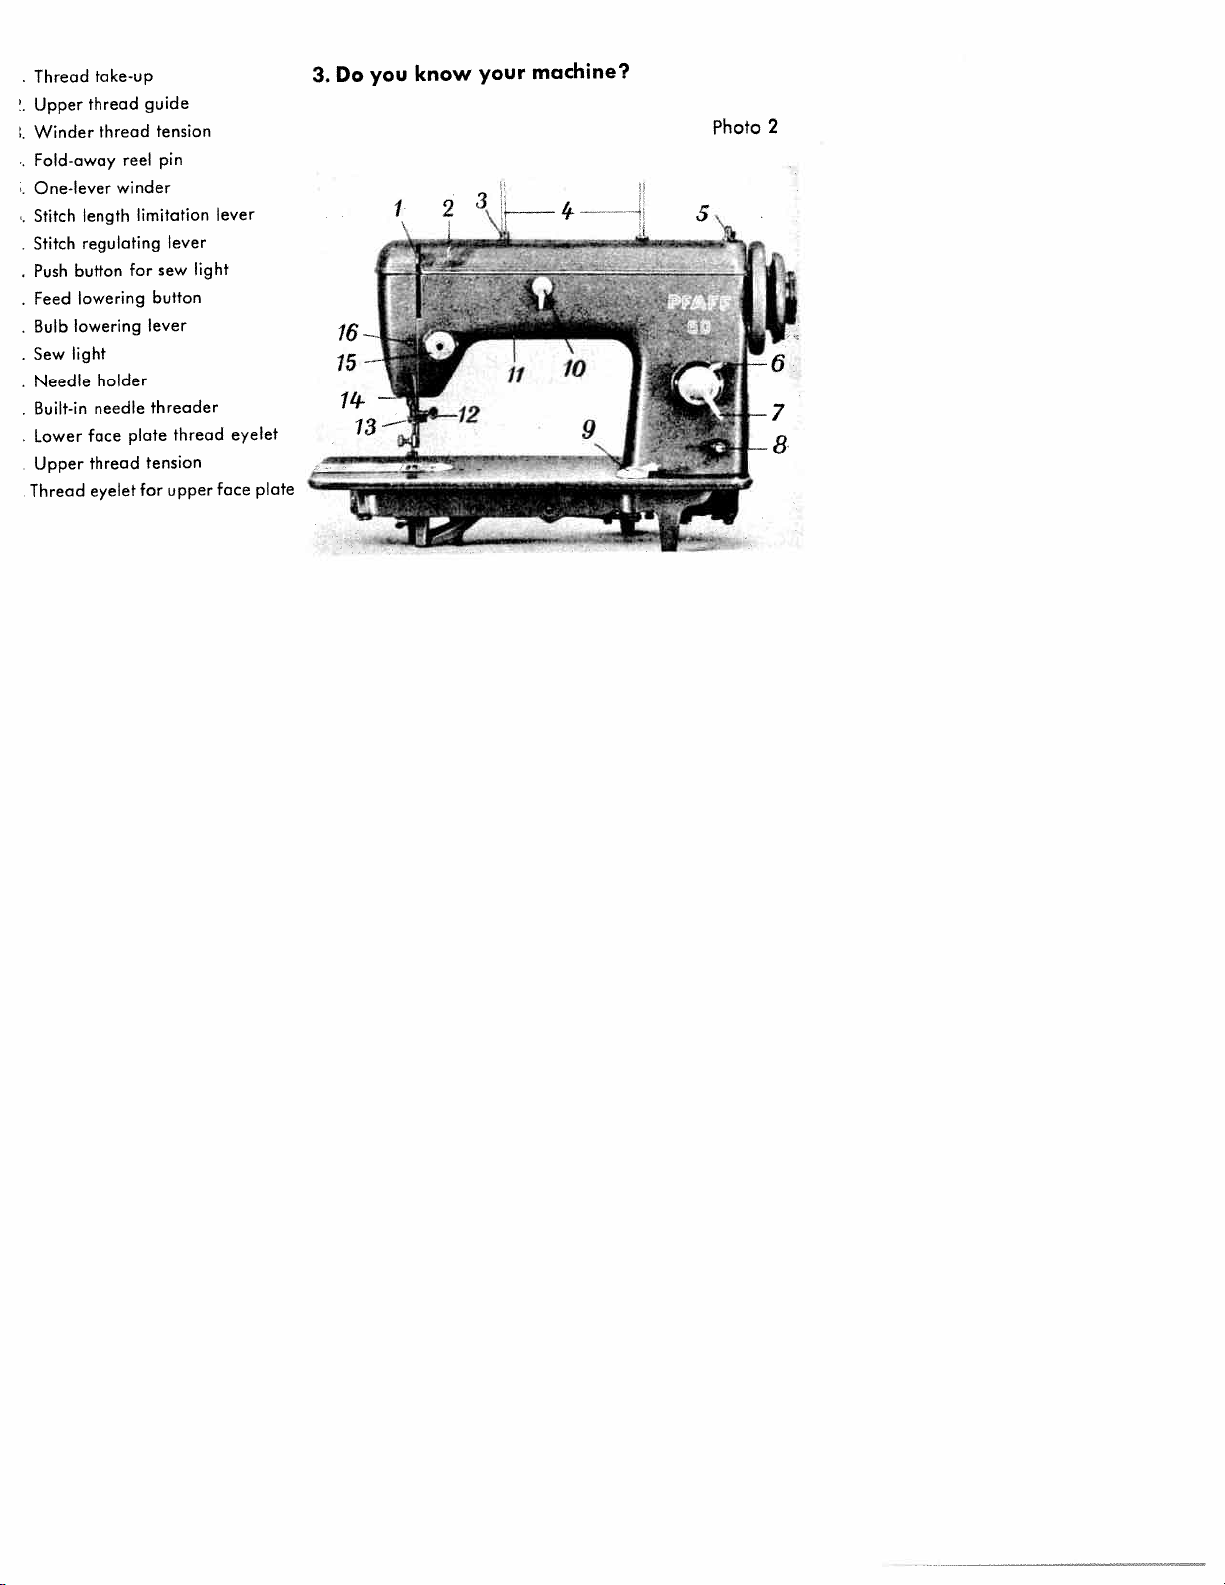
Thread
Upper
Winder
Fold-away
One-lever
Stitch
Stitch
•
Push
•
Feed
•
Bulb
•
Sew
•
Needle
Built-in
Lower
Upper
Thread
take-up
thread
thread
winder
length
regulating
button
lowering
lowering
light
holder
needle
face
thread
eyelet
guide
tension
pin
reel
limitation
sew
for
button
lever
threader
plate
tension
for
lever
thread
upper
light
lever
eyelet
face
plate
3.
Do
you
know
your
machine?
Photo
2
Page 6
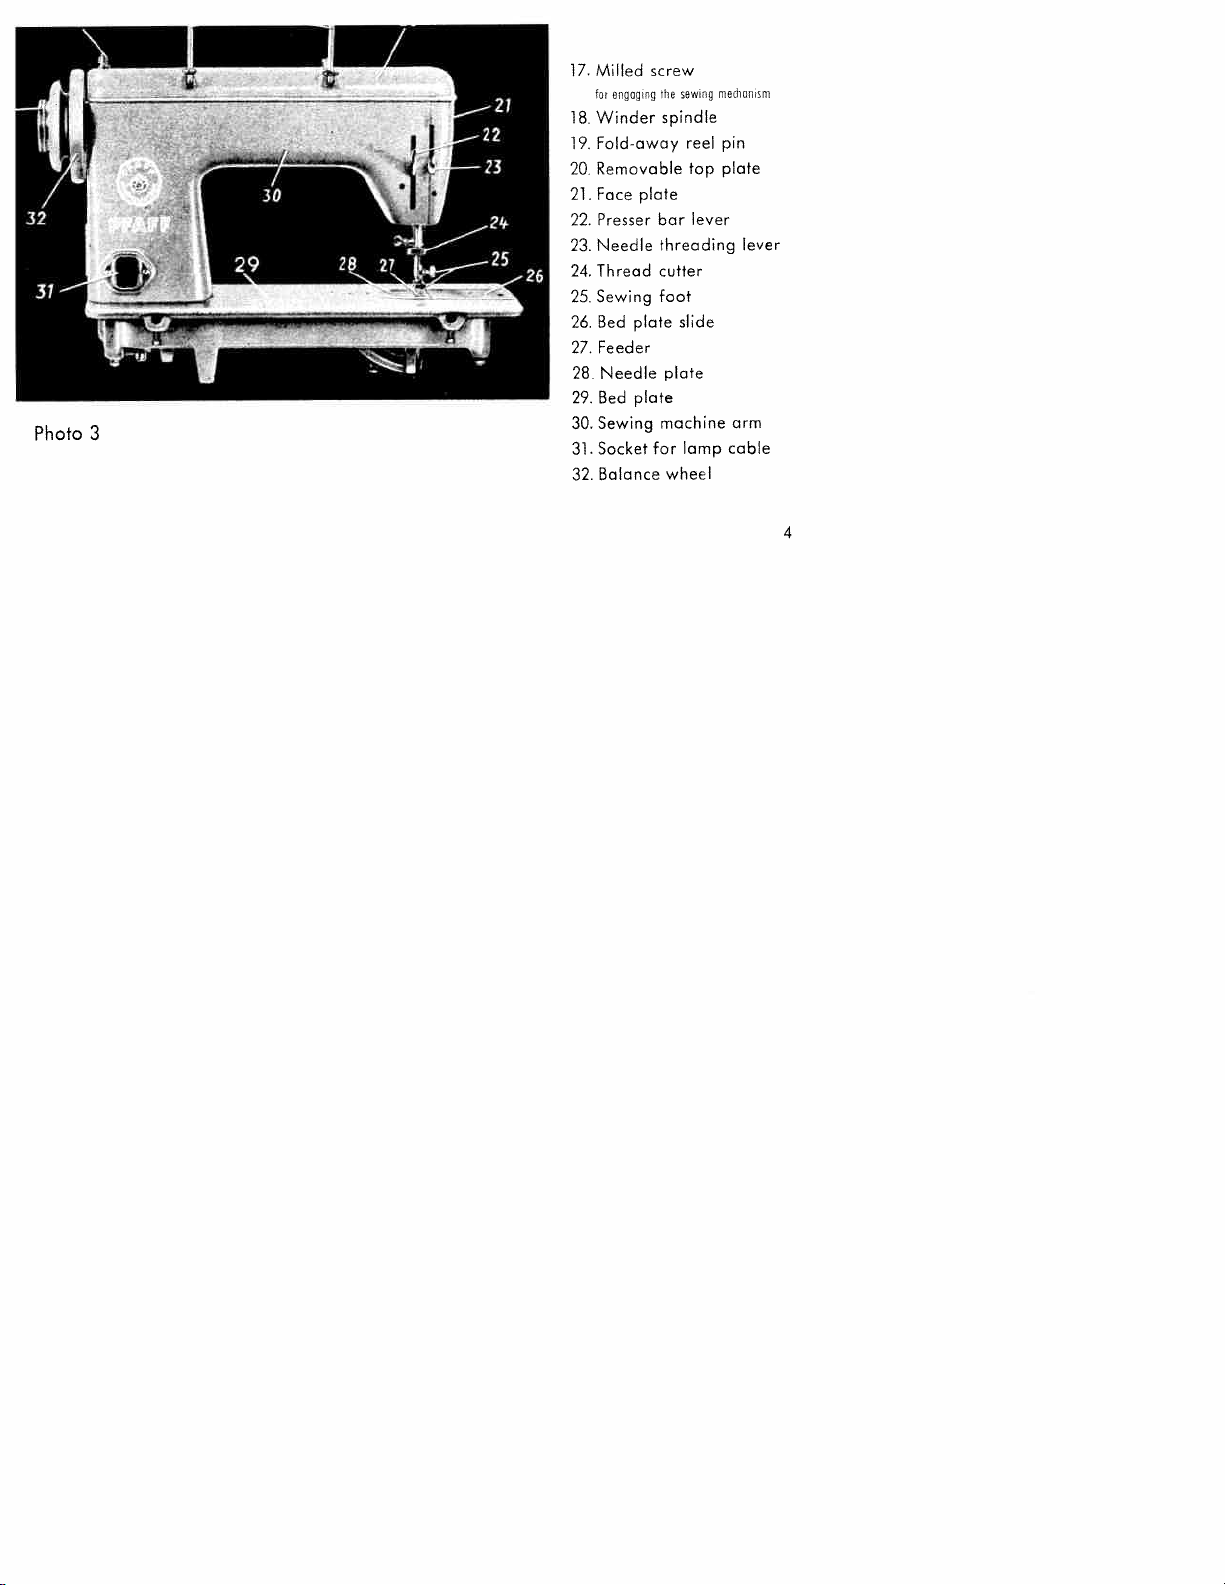
Photo
17.
18.
19,
20
21
22.
23.
24.
25.
26.
27.
28
29.
3
30.
31
32.
screw
Milled
for
Winder
eogog
rg
he
spindle
Foldawoy
Removable
plate
Face
Presser
bar
Needle
Thread
Sewing
Bed
threading
cutter
foot
plate
Feeder
Needle
plate
Bed
Sewing
Socket
machine
for
Balance
sewi
reel
top
slide
plate
lamp
wheel
09
lever
mechorr
pin
plate
arm
cable
sin
lever
4
Page 7
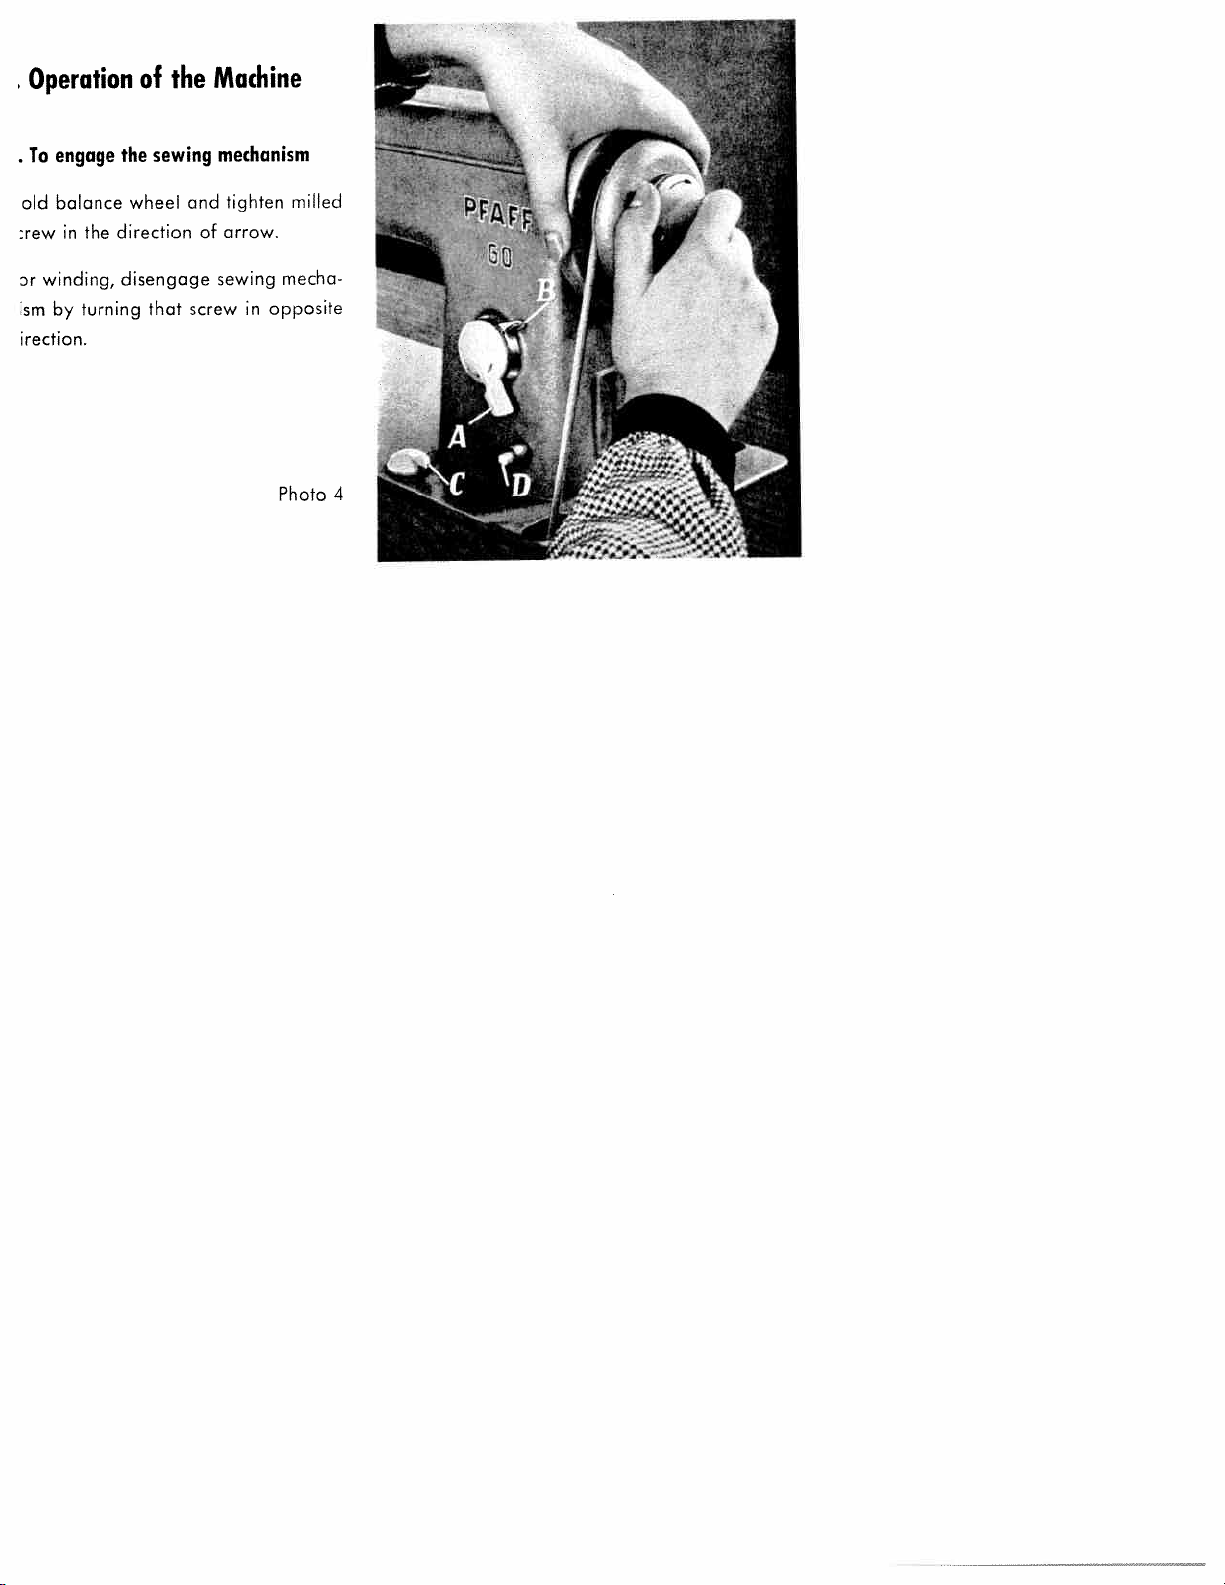
•
Operation
of
Machine
the
engage
To
•
balance
old
in
:rew
winding,
r
by
sm
irection.
the
direction
the
disengage
turning
sewing
wheel
that
mechanism
tighten
and
arrow.
of
sewing
screw
opposite
in
milled
mecha
Photo
4
Page 8
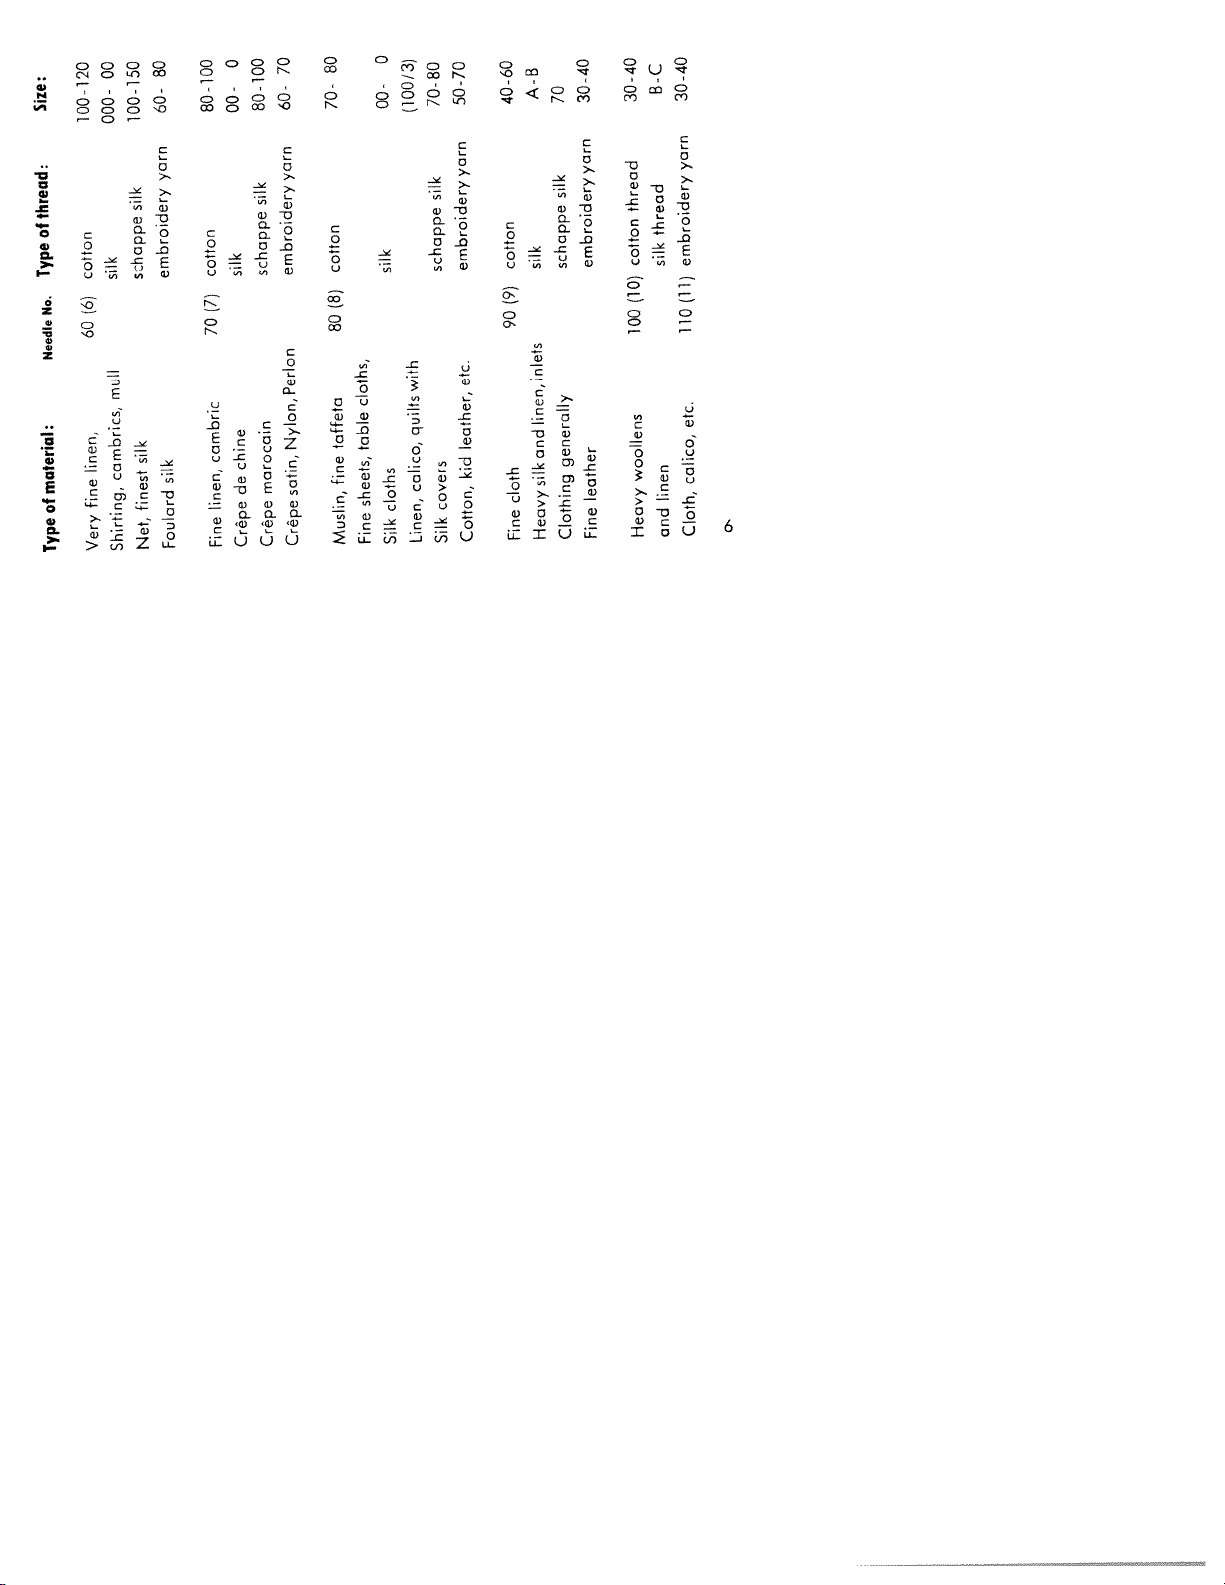
Size:
00
100-120
000-
150
100-
80
60-
0
80-100
00-
70
60
80-100
80
70-
0
00-
/3)
(100
50-70
70-80
A-B
40-60
70
30-40
B-C
30-40
30-40
thread:
of
Type
No.
Needle
material:
of
Type
Cotton
silk
(6)
60
mull
linen,
cambrics,
fine
Shirting,
Very
yarn
silk
embroidery
schappe
silk
silk
finest
Foulard
Net,
cotton
silk
(7)
70
cambric
chine
de
linen,
Fine
Crepe
yarn
silk
embroidery
schappe
Perlon
Nylon,
marocain
satin,
Crêpe
Crêpe
cotton
(8)
80
cloths,
taffeta
table
fine
sheets,
Fine
Muslin,
silk
cloths
Silk
silk
schappe
with
quilts
calico,
covers
Linen,
Silk
yarn
cotton
embroidery
(9)
90
etc.
leather,
kid
cloth
Fine
Cotton,
silk
silk
inlets
linen,
and
silk
Heavy
yarn
embroidery
schappe
generally
leather
Fine
Clothing
thread
thread
cotton
silk
(10)
100
woollens
linen
Heavy
and
yarn
embroidery
110(11>
etc.
calico,
Cloth,
Page 9
•
To
osen
sert
edIe
at
the
ghten
change
needle
needle
bar
flattened
the
right.
as
needle
the
clamp
into
far
clamp
needle:
the
will
as
side
screw.
opening
go,
of
the
screw.
taking
shank
the
of
care
faces
Photo
5
Page 10
:‘
Photo
6
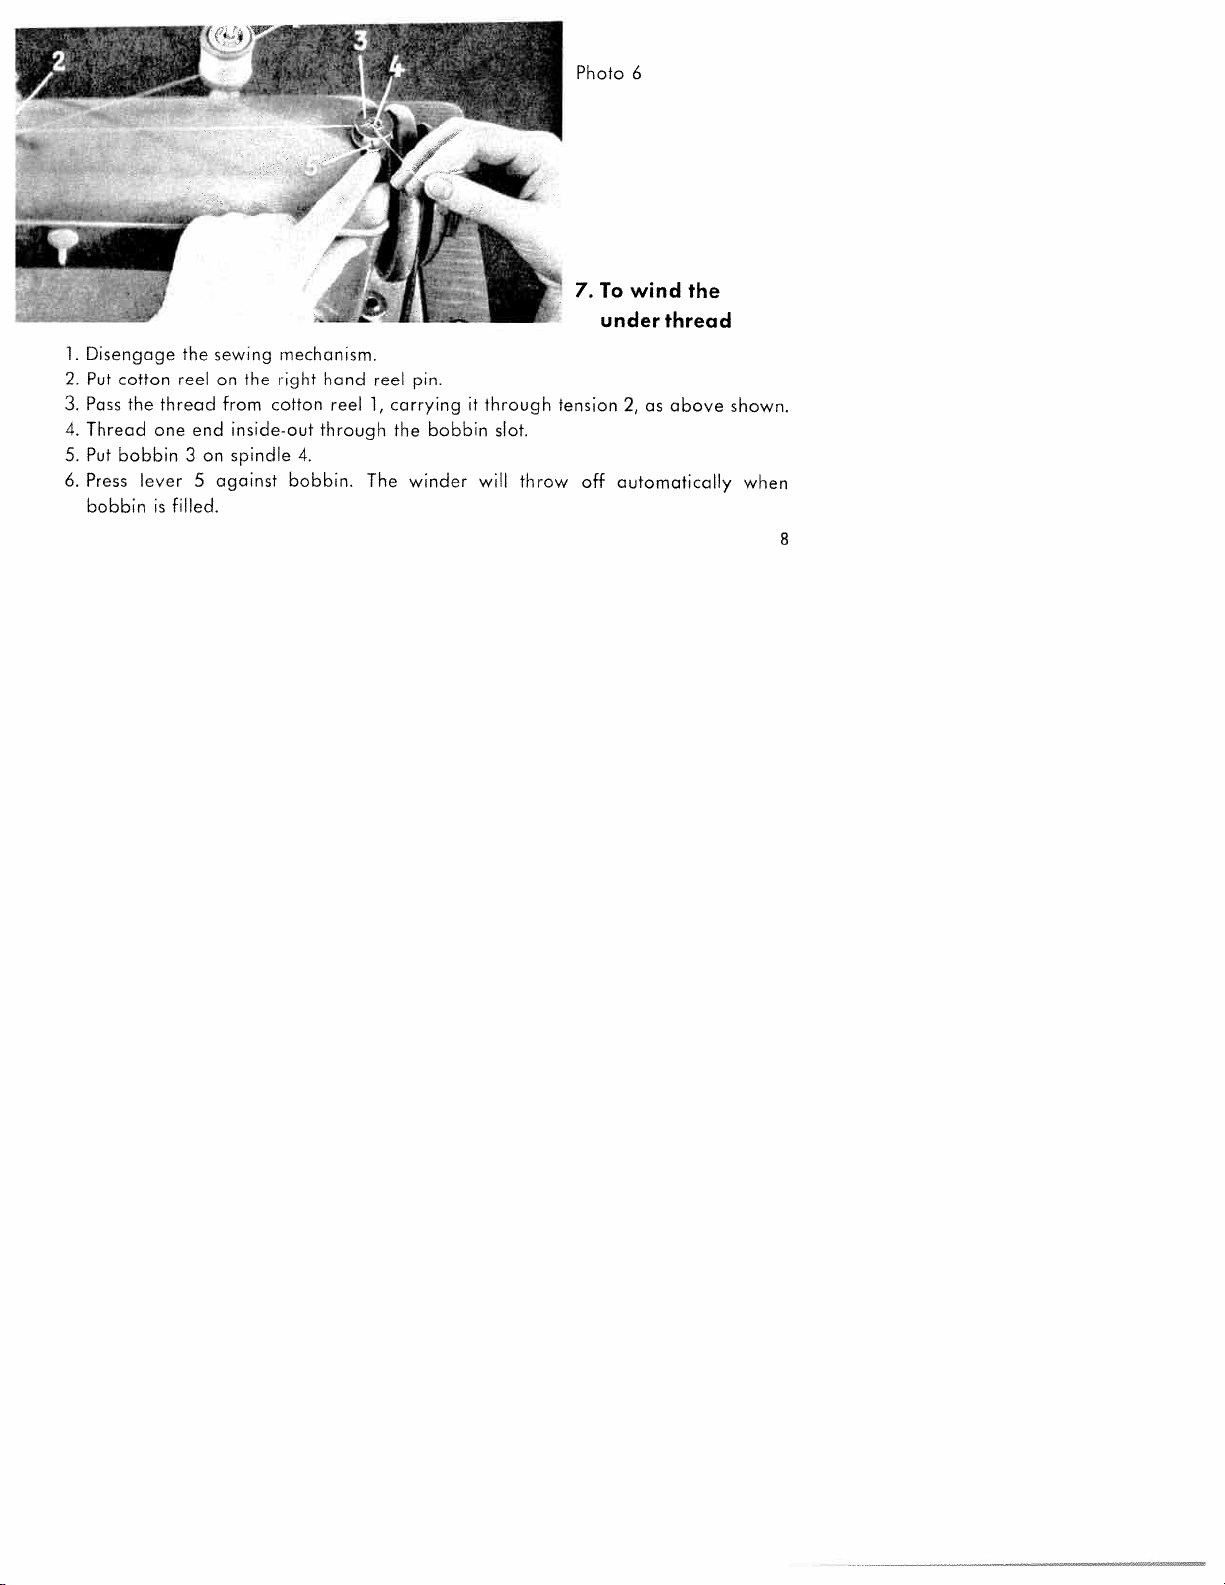
1.
Disengage
2.
Put
cotton
Pass
3.
4.
5.
6.
the
Thread
Put
Press
bobbinisfilled.
one
bobbin
lever
the
sewing mechanism.
reelonthe
thread
3
end
on
5
from
inside-out
spindle
against
right
cotton
4,
bobbin.
hand
reel
through
reel
pin.
carryingitthrough
1,
bobbin
the
The
winder
will
slot.
throw
7.Towind
under
tension
2,asabove
off
automatically
the
thread
shown.
when
8
Page 11
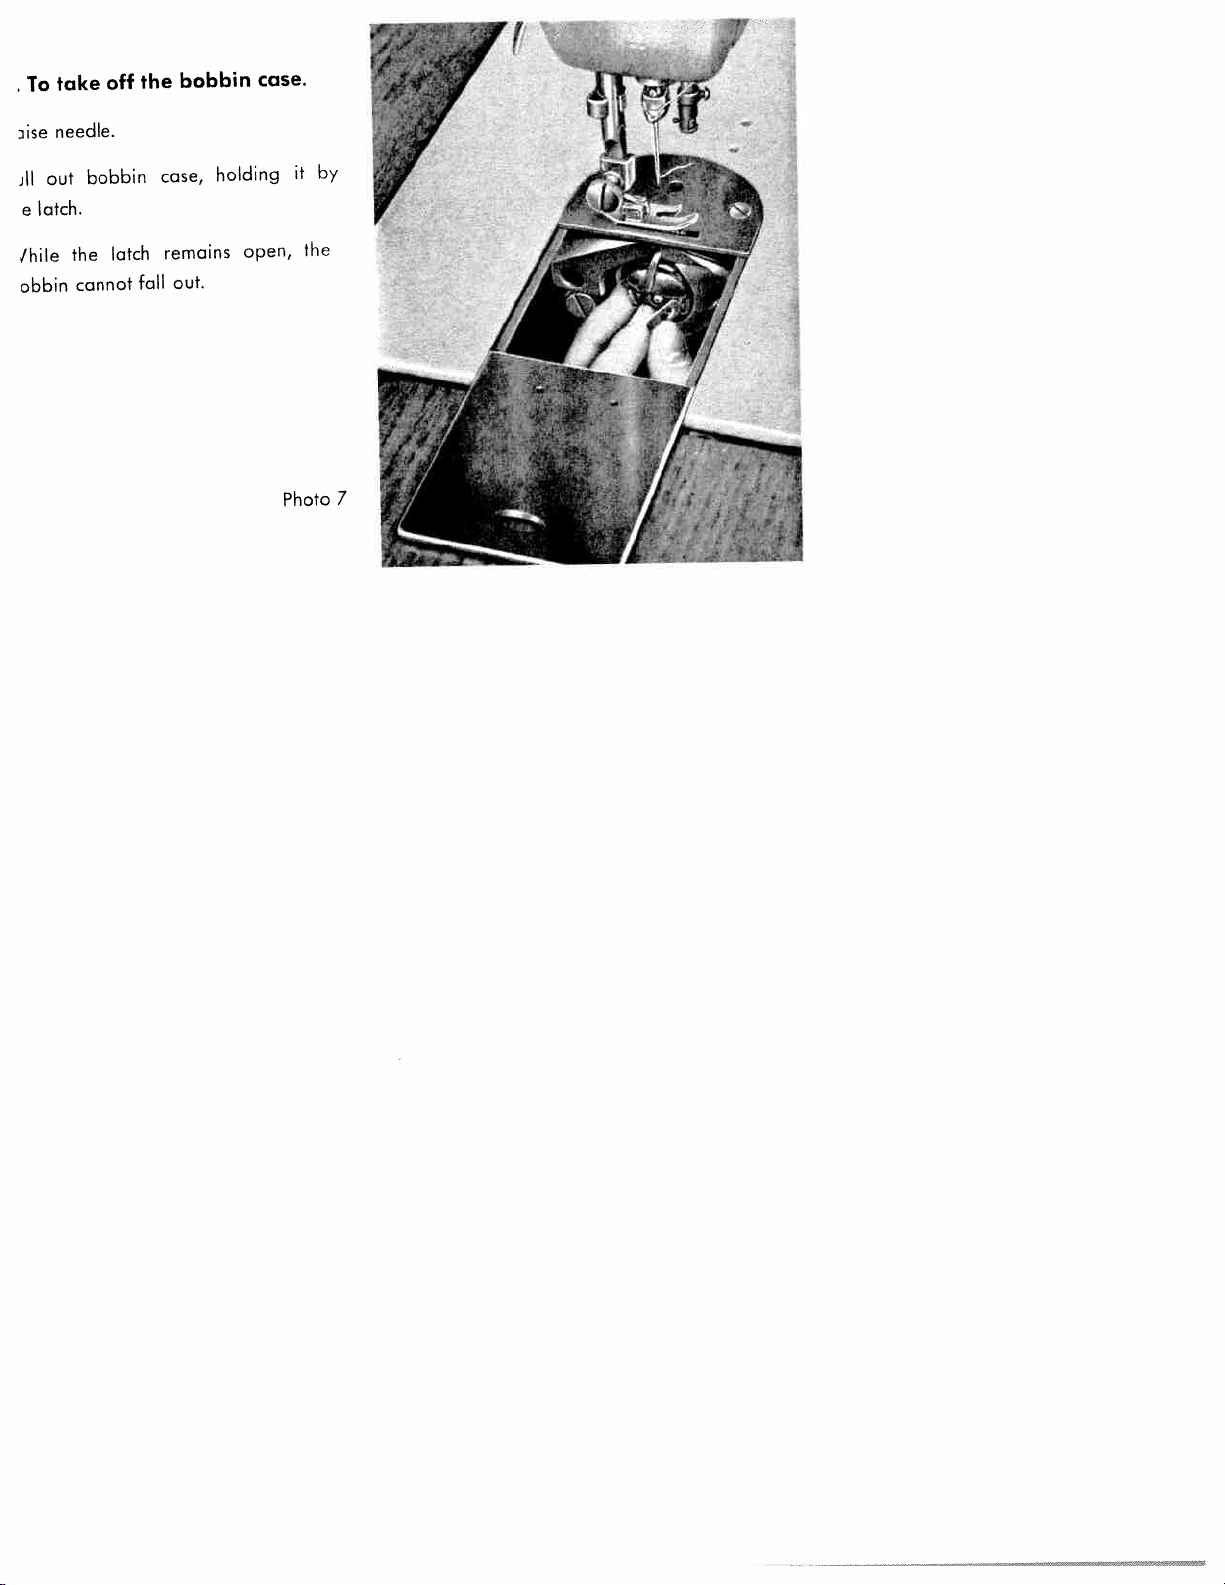
To
iise
ill
e
take
needle.
out
latch.
off
bobbin
the
bobbin
case,
case.
holding
by
it
/hile
obbin
the
cannot
latch
fall
remains
out.
open,
the
Photo
7
Page 12
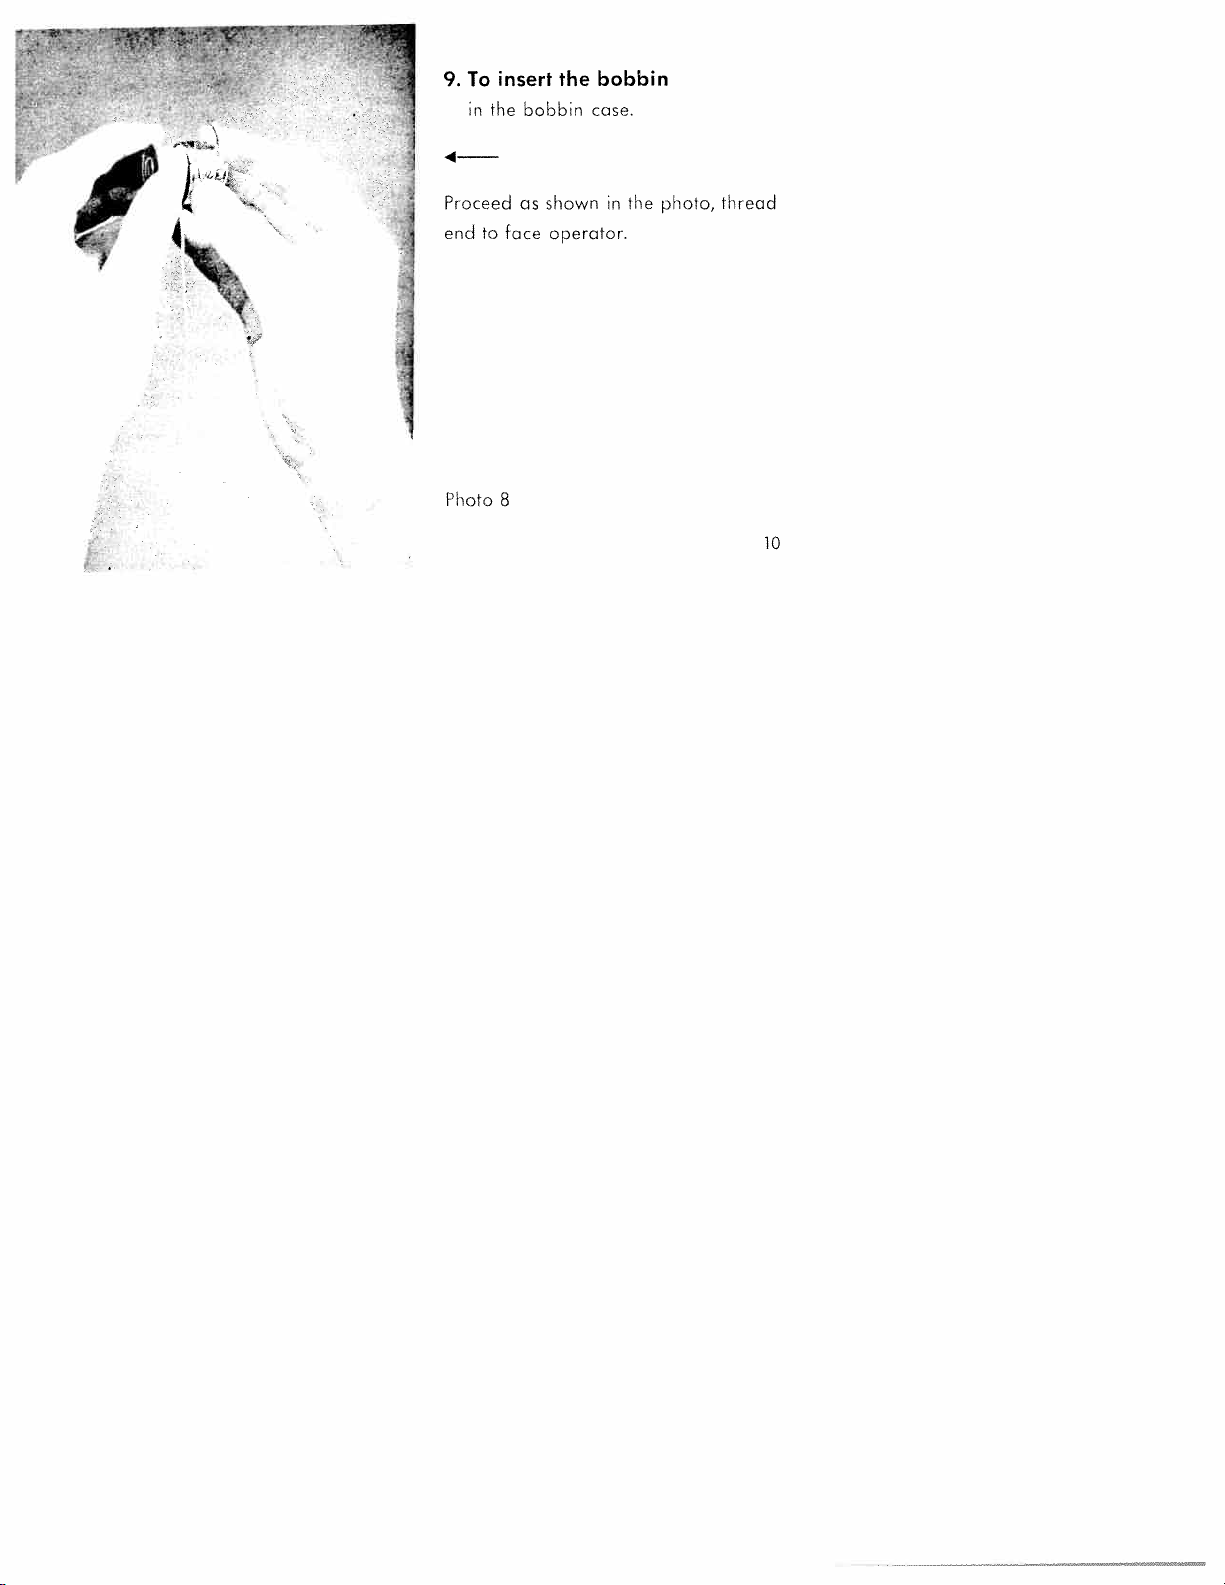
9.
.4—
To
in
insert
the
the
bobbin
bobbin
case.
r
Proceed as
endtoface
Photo
8
showninthe
operator.
photo,
thread
10
Page 13
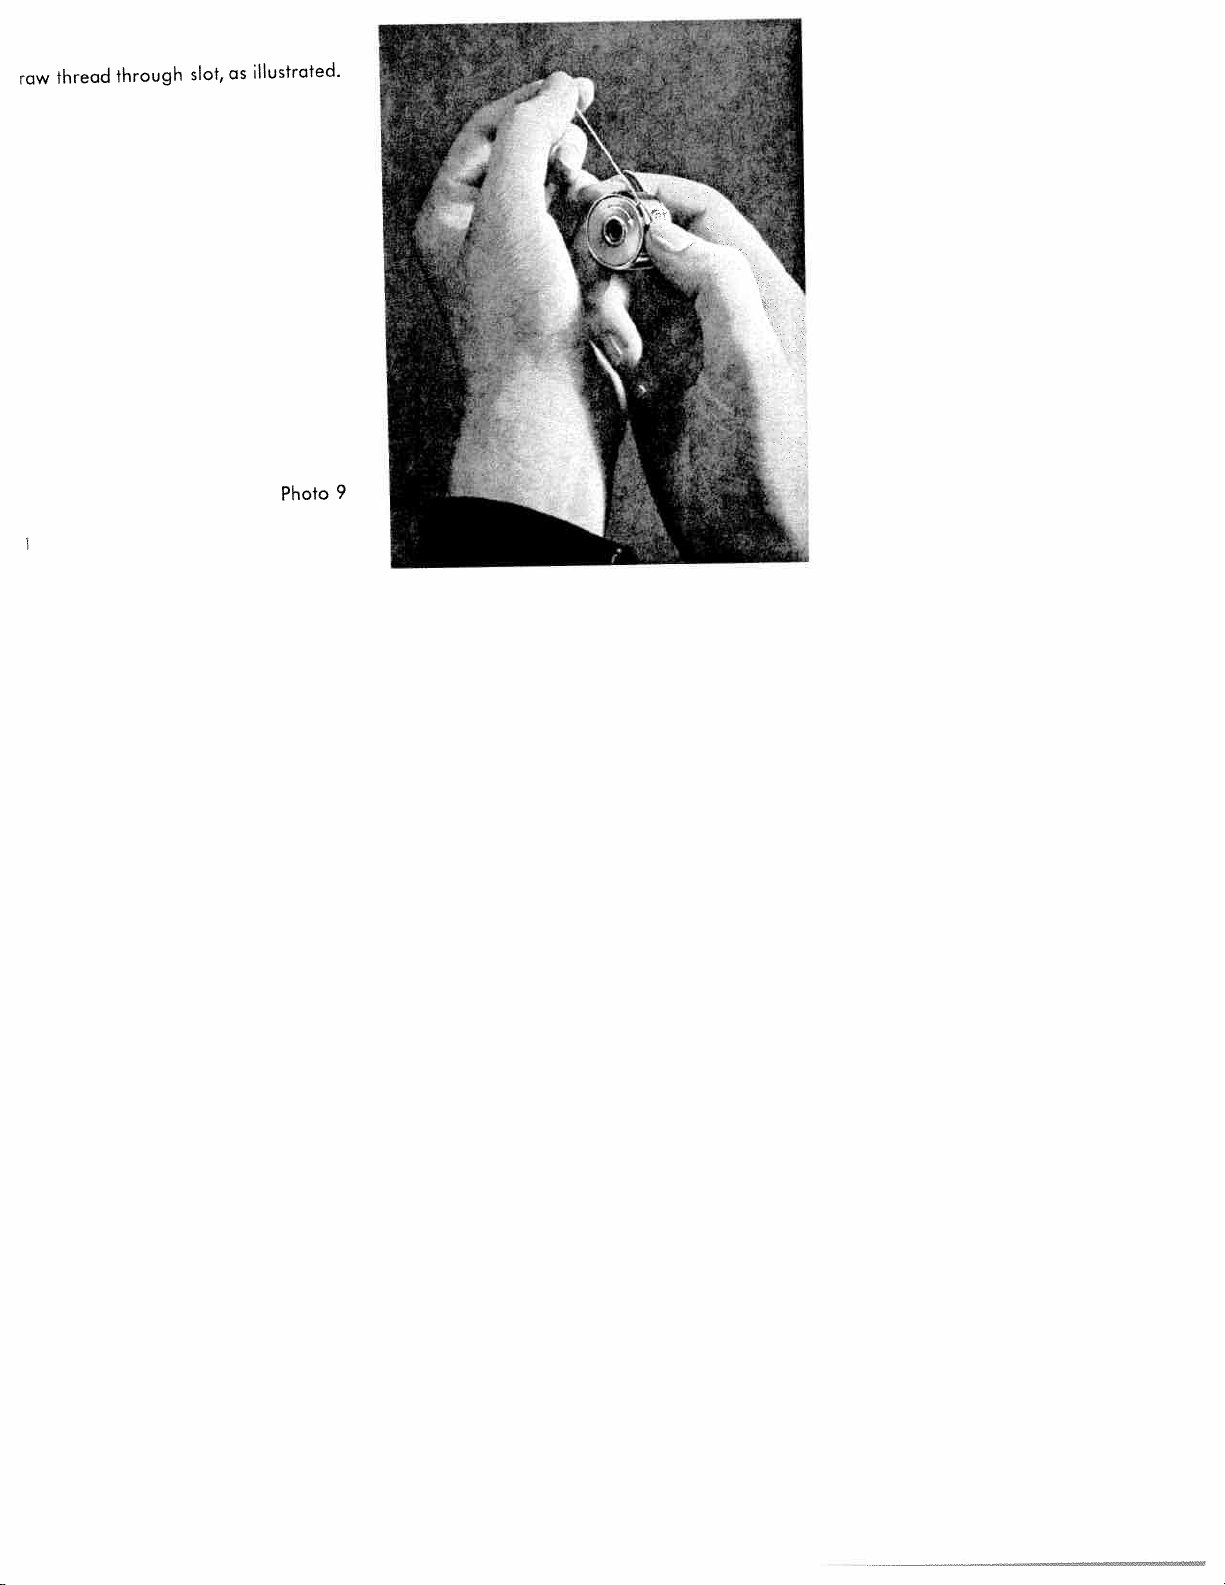
MDJ
pOøJ4
oIs
ij6noi1i
so
pOOJ4SflhIi
6
O4Od
Page 14
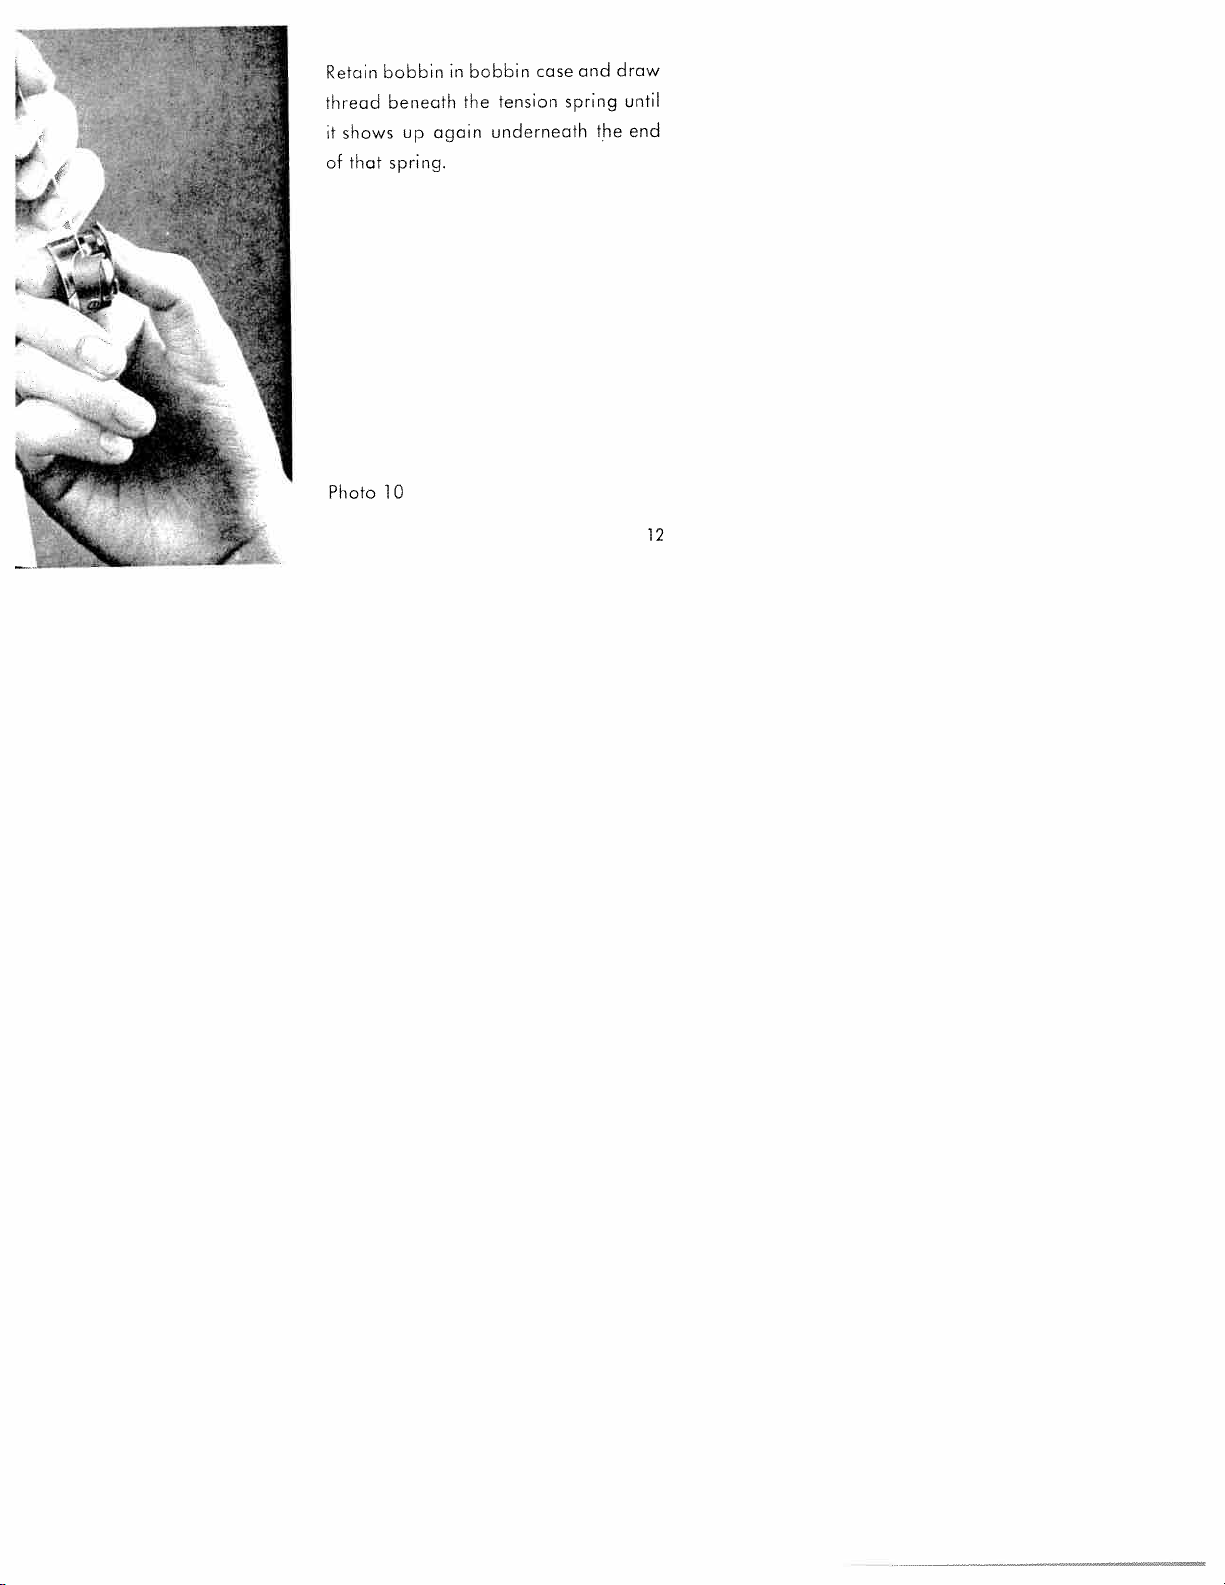
Retain
thread
it
shows
of
that
Photo
bobbin
beneath
up
spring.
10
in
again
bobbin
tension
the
underneath
case and
spring
the
draw
until
end
12
Page 15
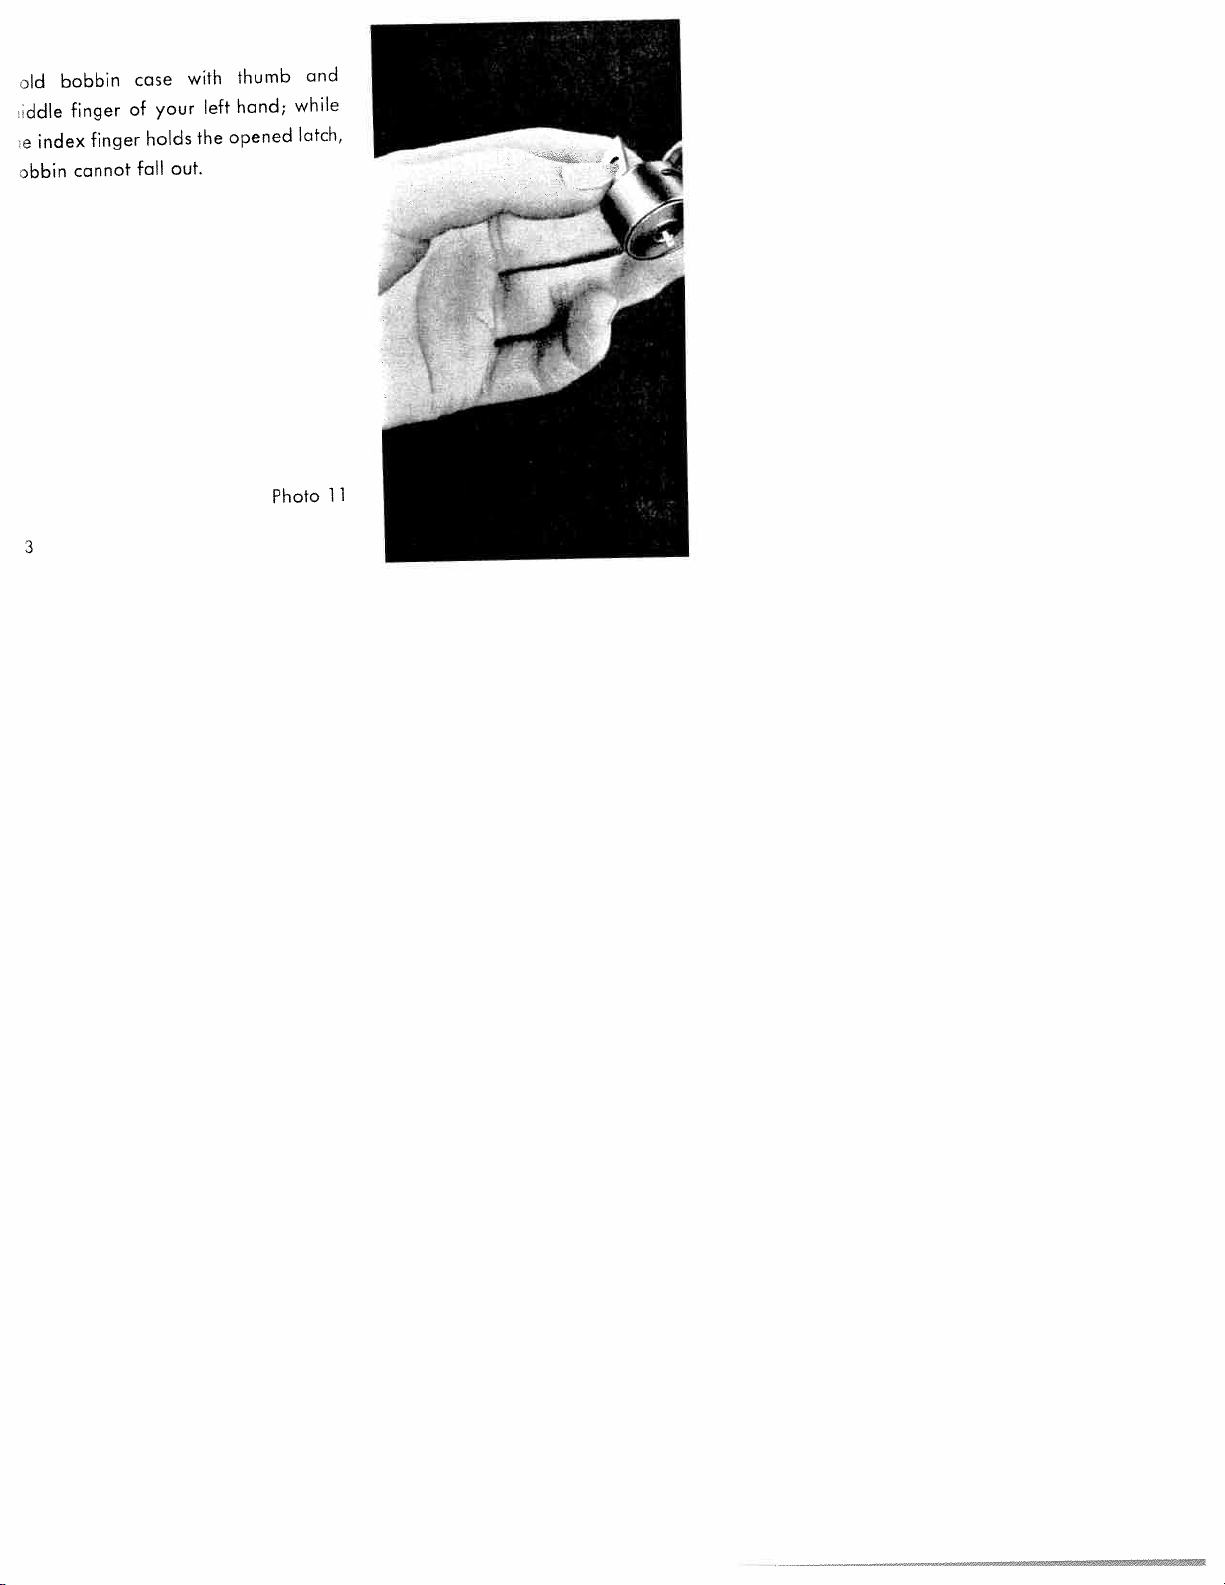
1d
ddle
index
e
bbin
bobbin
finger
finger
cannot
case
of
fall
your
holds
out.
with
left
the
thumb
hand;
opened
while
latch,
Photo
and
11
Page 16
J
4
and
shuttle
index
in
with
the
an
14
central
latch.
with
horn
on
case
the
thumb
engages
H
clicks
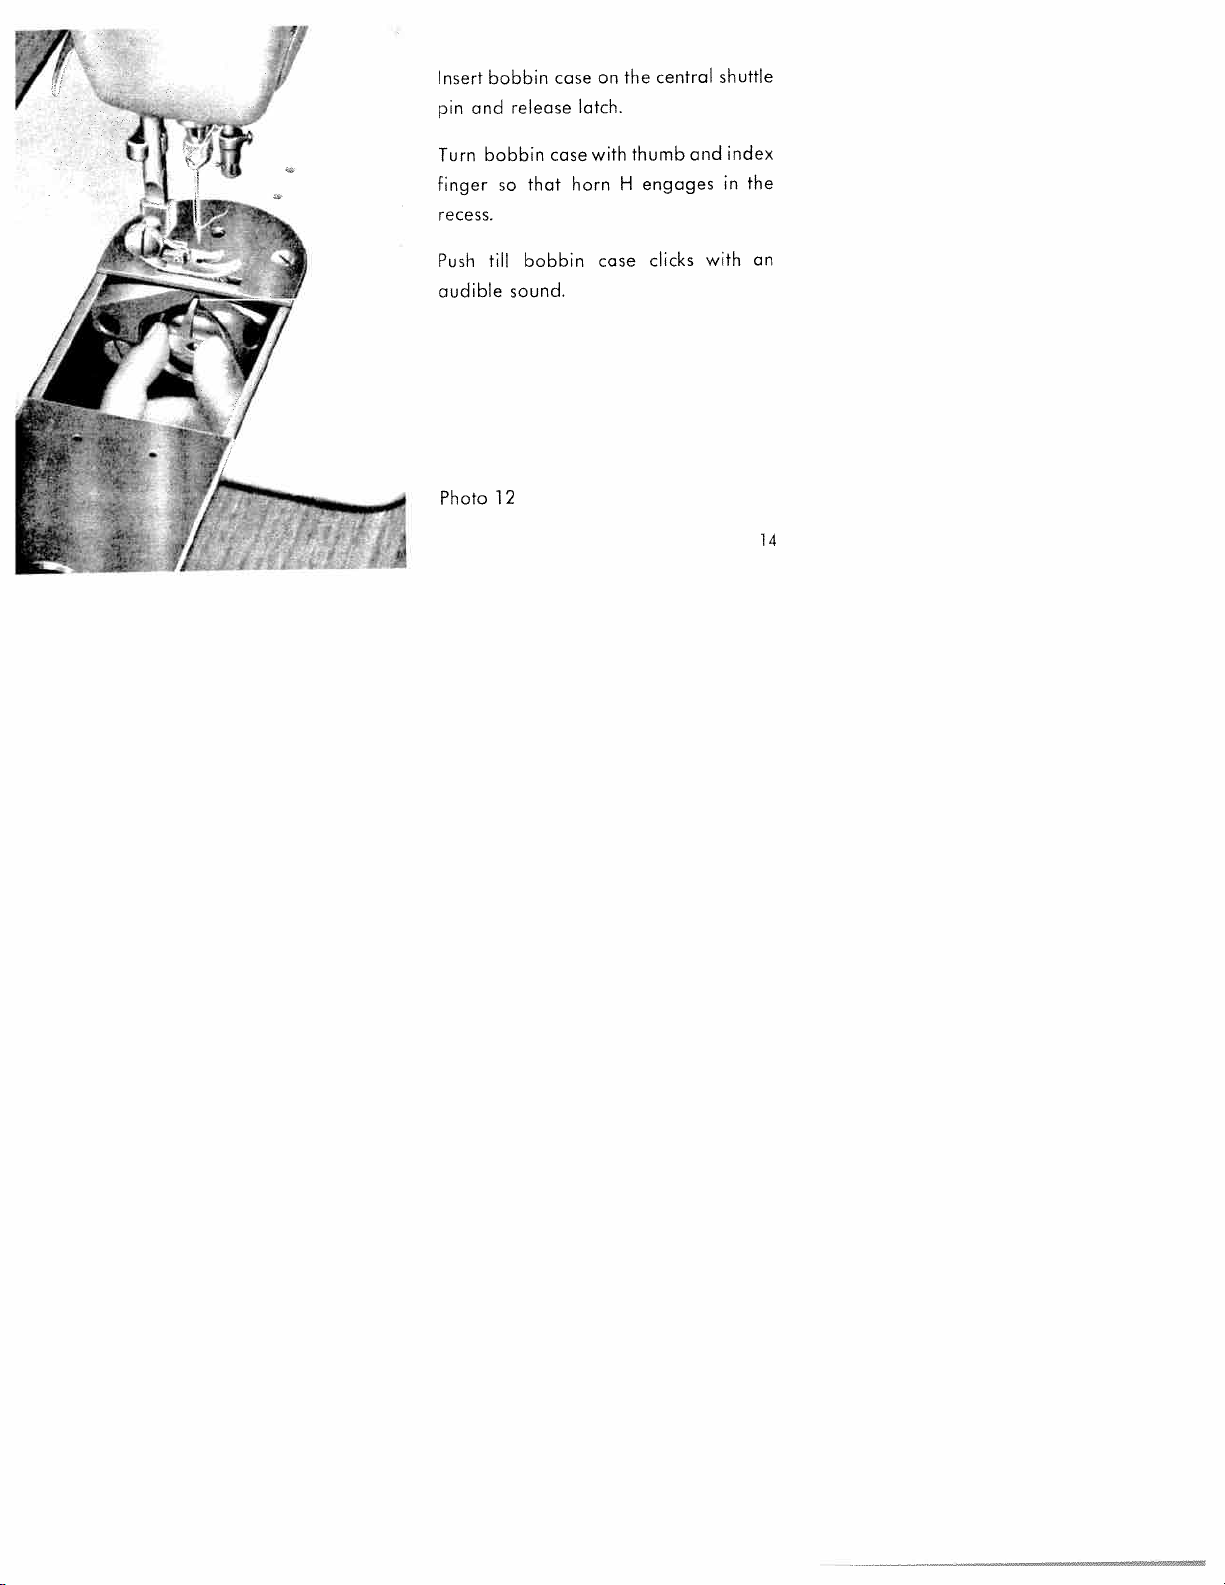
Insert
bobbin
pin
I
and
Turn
finger
recess.
Push
audible
Photo
bobbin
till
12
release
so
bobbin
sound.
case
case
that
Page 17
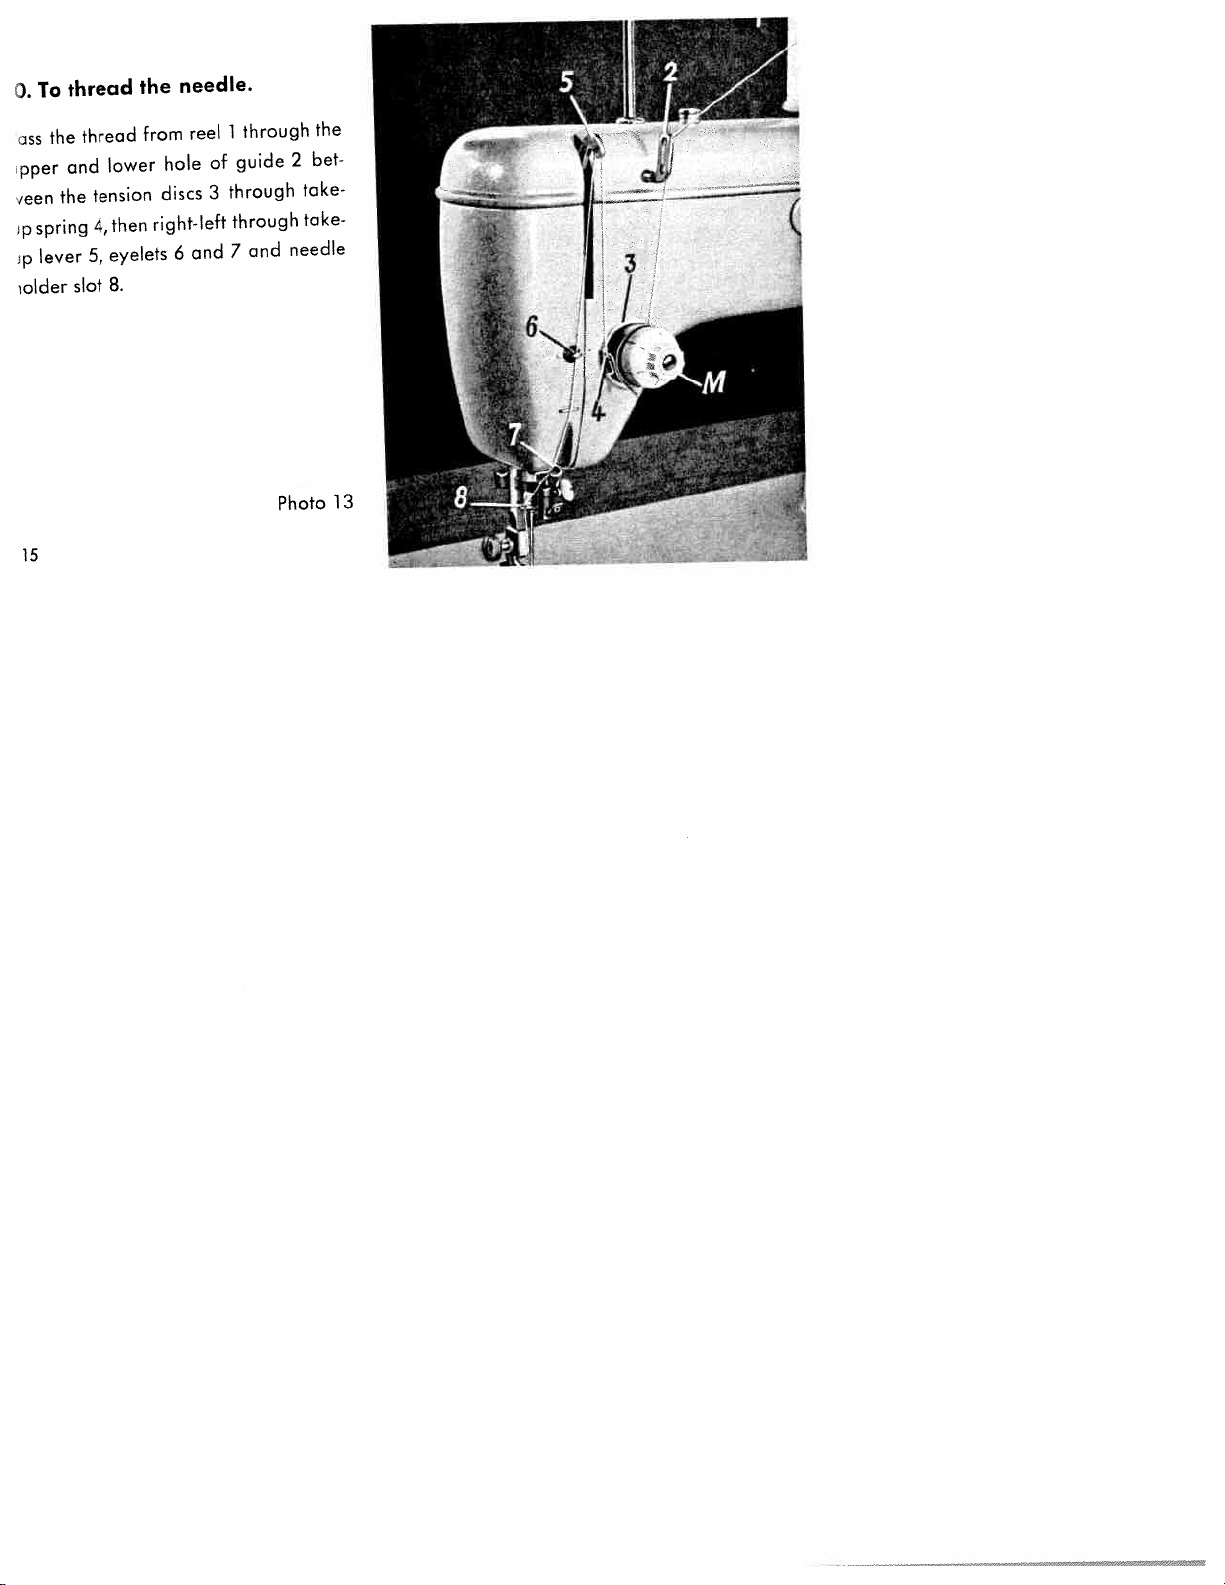
0.
To
thread
the
needle.
ss
pper
‘een
spring
p
lever
p
older
the
and
the
thread
tension
4,
5,
slot
from
lower
then
eyelets
8.
reel
of
hole
3
discs
right-left
and
6
through
1
guide
through
through
and
7
2
take
take
needle
Photo
the
bet
13
Page 18
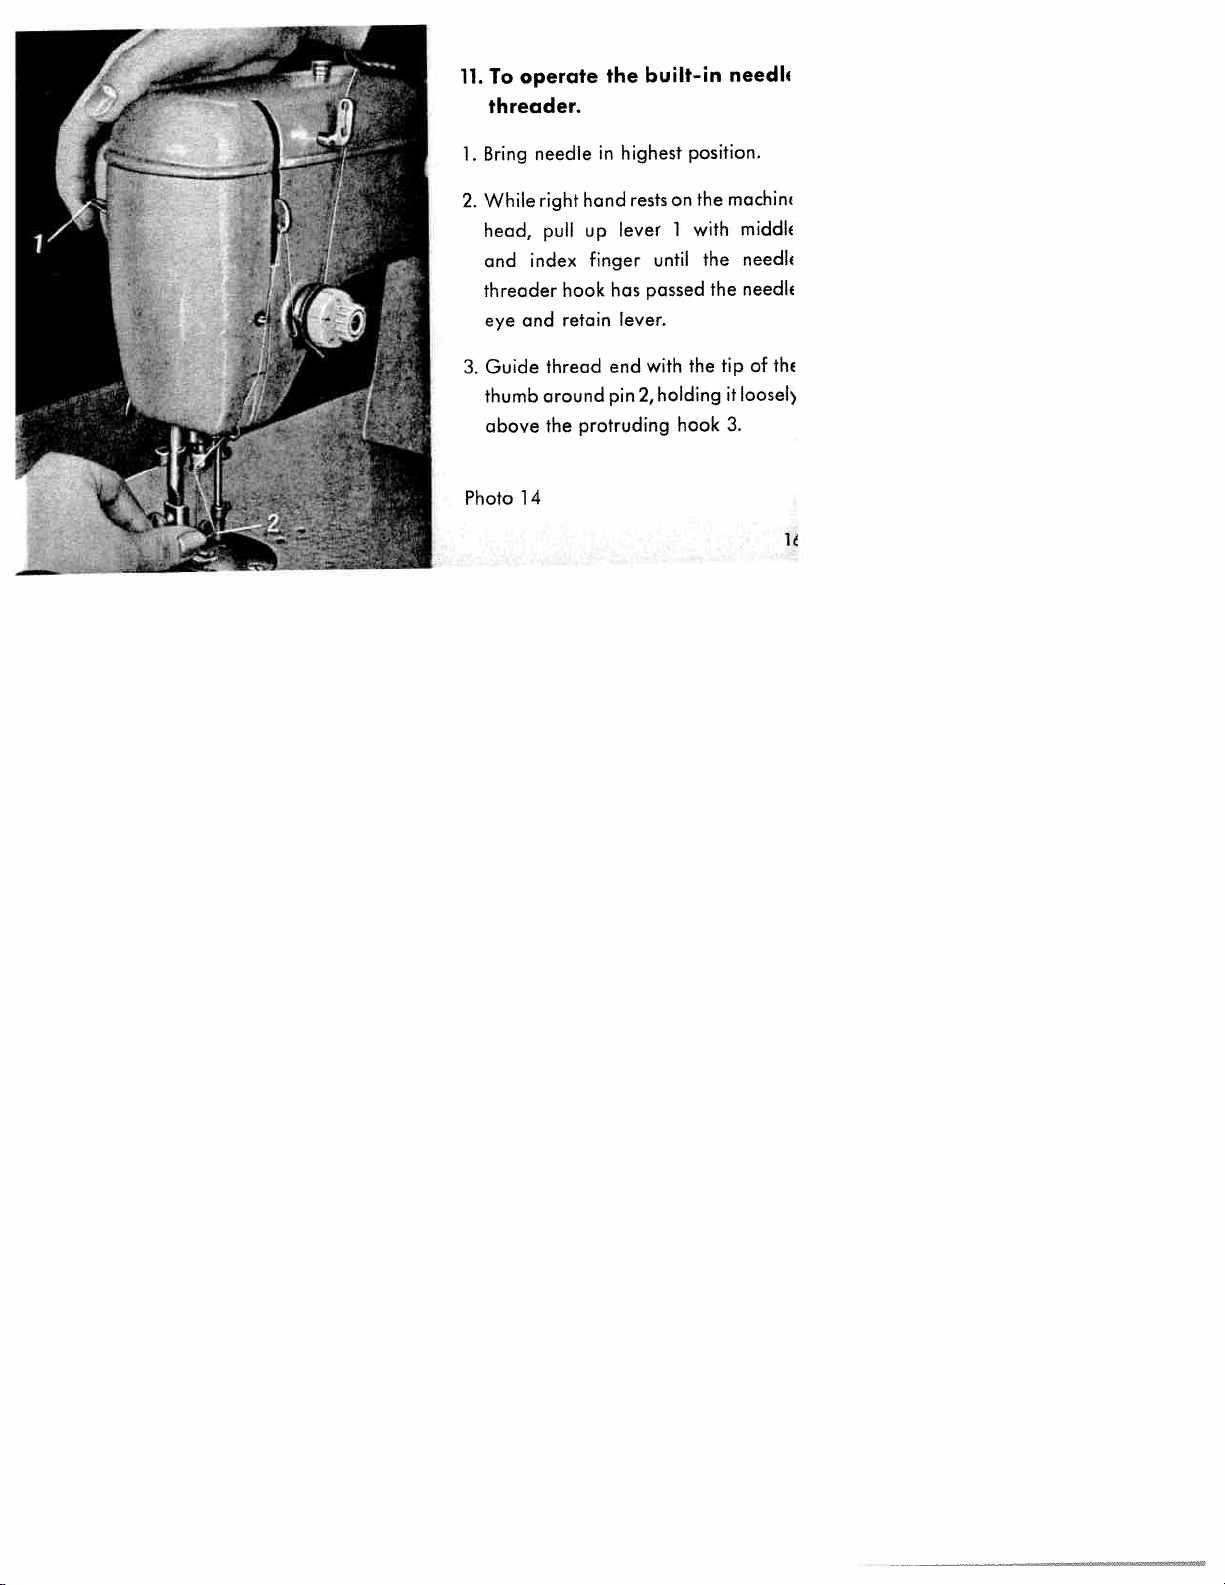
11.
To
threader.
operate
the
built-in
needh
Bring
1.
While
2.
head,
and
threader
eye
Guide
3.
thumb
above
Photo
needle
right
pull
index
and
thread
around
the
14
in
hand
up
finger
has
hook
retain
end
pin
protruding
highest
rests
lever
until
passed
lever.
with
holding
2,
position.
on
the
with
1
the
the
hook
machim
middle
needlf
needk
the
tip
it
loosel)
3.
of
thE
Page 19
ake
eedle
own.
sure
eye
to
and
place
hook
thread
point
between
as
3
below
Page 20
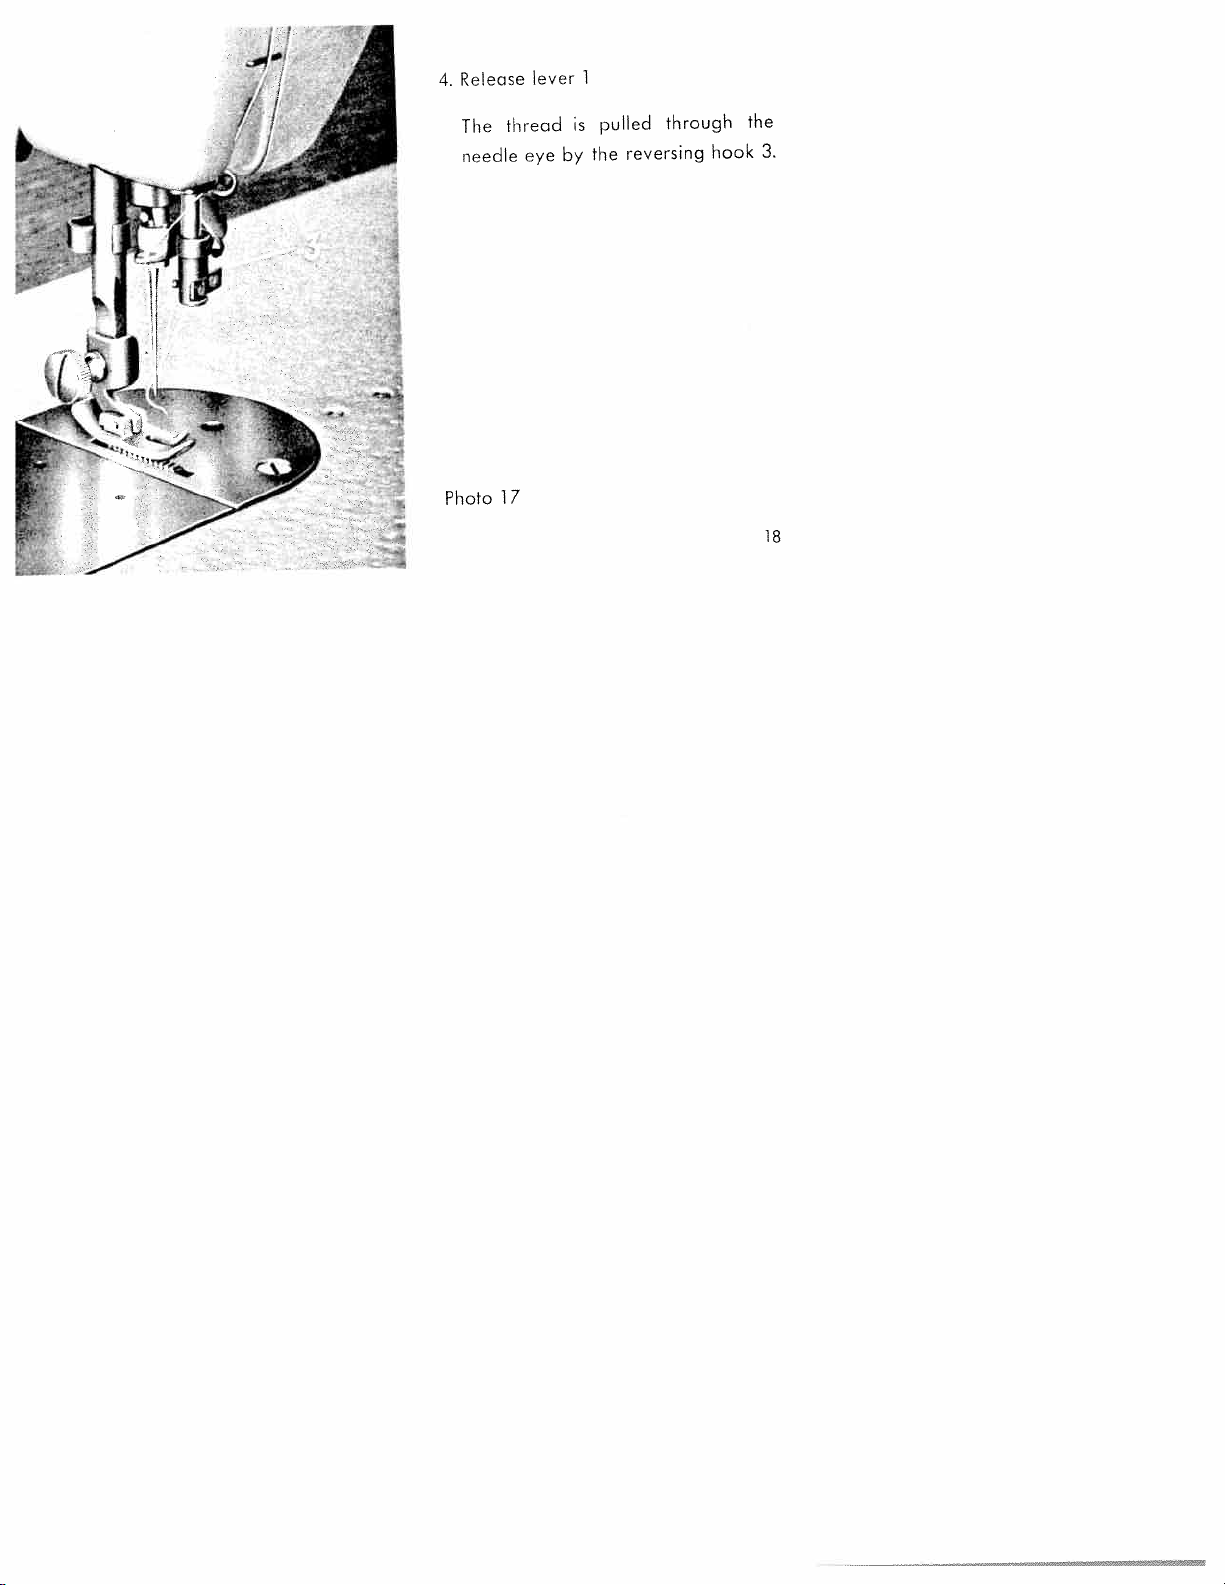
Release
4.
lever
1
I
The
needle
Photo
thread
eye
17
by
is
pulled
the
through
reversing
hook
the
3.
18
Page 21

2.
1.
To
Hold
draw
the
end
up
of
the
the
underthread.
upperthread.
2.
3.
4.
Turn
once
slightly
By
thread,
the
in
hole
Lay
presser
balance
gone
the
shape
the
in
both
foot.
of
and
a
until
loop
plate.
bock
wheel
down
drawing
underthread
needle
threads
up
up
will
through
needle
again.
the
come
under
Photo
has
upper
up
the
the
18
Page 22

Important:
this
In
jamrnng
thread.
threads
both
Make
take-up
highest
beginning
seam.
manner
and
In
this
when
sure
is
you
slip-offs
you
case
starting
thatthe
always
position
or
eliminate
of
heed
to
thread
in
when
ending
thread
upper
the
not
sew.
its
a
hold
To
13.
turn
to
A
tension
materials.
A
turn
tension
19
Photo
regulate
the
right
stitching
for
the
to
stitching
for
left
the
thicker
)c
4
upper
will
will
thinner
tension.
increase
heavier
and
decrease
fabrics.
the
the
20
Page 23

To
4.
lighter
irns
of
Id
irns
nsion.
regulate
tension
the
*m
of
of
the
smatl
that
lower
the
obtained
is
tension
screw
screw
screw
driver.
will
tension.
by
with
increase
Photo
left
the
Right
the
20
Page 24

///
Upper
Upper
lower
tension
Photo
Perfect
Photo
tension
tension
Photo
tension
too
21
stitch
too
too
22
too
23
weak
tight.
tight
weak
or
or
lower
Correct
l5.
perfect
with
lower
material
threads
results
tension
interlocking
the
in
neat
in
regulation
upper
of
centre
elastic
and
and
of
seams.
the
22
Page 25

To
16.
Set
1.
for
accordance
Push
2.
right
the
To
3.
A
23
adjust
stitch
the
stitch
stop
set
shift
the
to
the
length
desired
regulation
obtain
to
length.
reverse
to
left
with
stop.
stitch
limitation
stitch
scale.
the
lever
forward
a
stitching,
length.
lever
length
A
turn
Photo
to
stitch
lever
B
in
the
of
24
Page 26

.4
17.
With
no
The
taken
Photo
remove
To
oil
aU
soiling
one-piece
with
off
25
points
the
of
both
the
covered
top
stop
material!
cover
hands
cover.
up,
con
there
be
easil’
7
is
2
Page 27

lB.
Correct
pressure
regutation
the
on
of
material
the
assures
prevents
feeder.
left
A
pressure
the
right
a
increase
heavy
25
uniformity
injury
c—€(
turn
for
turn
)m
the
materials.
of
the
of
of
thin
of
pressure
stitch
material
screw
and
that
for
length
V
flimsy
screw
thick
by
will
fabrics;
Photo
and
the
ease
will
and
26
Page 28

.
r
19.
is
the
of
El
(
‘-4
1
take
To
necessary
only
presser
attachments.
1.
Remove
downwards
left,
the
When
2.
engages
L
in
the
inserting
When
pin
guide
27
Photo
replacing
slot
off
bar
screw
take
catches
F
in
K.
for
and
it
the
the
the
when
the
k,
oFf.
let
while
make
notch
face
face
proper
in
having
face
pushing
sure
N
plate,
hole
plate
fastening
plate
that
and
H.
to
see
turn
slide
it
part
pin
that
to
S
26
Page 29

O.
To
take
off
the
balance
wheel
the
or
)alance
Loosen
•
Loosen
the
•
Lift
balance
removal
wheel
screw
milled
left.
carrier
wheel
of
and
•
ring
odd
a.
screw
1
and
thread
arm
(photo
remove
shaft
b,
between
bushing.
turning
take
29),
thread.
to
it
28
Photo
off
Page 30

When
sure
replacing
that
its
bentup
the
carrier
parts
face
ring,
make
outside.
the
If
tighten
Photo
milled
large
firmly, turn
29
screw
carrier
should
ring
for
not
180°.
28
Page 31

Servicing
Zi.
egular
pply
not
)o
Photo
and
oil
forget
only
30
and
proper
at
to
maintenance.
oiling
points
the
rear
the
oil
serves
marked
arm
increase
to
by
shaft
arrows.
bushing,
the
life
half
your
of
covered
machine.
the
by
winder
wheel.
Page 32

The
Brush
oiling
off
pornis
regularly
underneath
lint
and
fluff
the
machine
between
needle
plate,
feeder
and
Photo
shuttlel
31
30
Page 33

Apply
the
n
dry
A
a
race
race
drop
of
will
of
the
wear
oil
from
shuttle.
off
time
rapidly.
time
to
Photo
32
4
Page 34

22,
To
remove
Cc
)mes
necescu
nta
ed
iito
)L)Cn
wing
A
/
Pu
J
)fO
wnwards.
33
the
y
the
ace
screwaand
shuttle
when
thread
push
has
bow
Page 35

.
Turn
is
Take
3.
central
33
balance
the
at
extreme
off
pin.
wheel
shuttle,
that
so
right.
holding
the
shuttle
it
Photo
the
at
34
Page 36

23.
The
sew
light
1,1
I
1
switched
is
button
(photo
and
exchange
To
the
bulb
the
to
Photo
is
left
D,
4).
held
into
left
35
on
located
The
by
and
the
and
and
bulb
spring.
a
the
retain
socket,
release
off
at
has
bulb
by
the
a
press
there.
it
turning
it.
pressing
vertical
bayonet
lever
Press
it
push
arm
cap
S
the
slightly
to
34
Page 37

nsert
)ins
ocket.
kess
f
he
fresh
a
easily
will
slightly,
bulb
is
bulb
then
now
slide
firmly
so
into
turn
the
that
the
shortly
it
secured.
slots
Photo
guiding
the
of
the
to
36
Page 38

Hints
24.
Skipping
for
stitches:
of
the
detection
and
elimination
of
sewing
trouble
Cause:
Needle
Wrong
Needle
Machine
Needle
thread
the
improperly
bent.
not
either
used.
is
properly
too
needle
is
inserted.
being
thin
used.
threadened.
thick
too
or
for
Remedy:
Needle
the
with
correct
The
the
on
a
Insert
Check
dance
Select
on
chart
must
long
bed
new
and
with
needle
page
be
groove
needle
plate
needle.
correct
chapter
in
6.
pushed
facing
system
slide.
threadening
10.
accordance
up
to
is
the
left.
stop,
stamped
accor
in
the
with
36
Page 39

hread
breaking
ause:
•hread
he
breaking
aforementioned
may
reasons.
occur
for
any
of
Remedy:
opposite
See
page.
Thread
of
Jse
ace
ammed
rhread
tension
inferior
being
the
having
dry
race.
tight.
too
knotty
or
odd
or
slipped
thread.
threads
the
off
having
reel.
Adjust
upper
accordance
best
Only
quality
good
and
Clean
chapters
put
not
Do
horizontal
the
with
sewing
oil
21
and
the
and
of
race
reel
reel
lower
chapters
machine
should
silk
in
22.
on
holder.
tensions
and
13
thread
used.
be
accordance
vertical
the
14.
or
with
n
a
but
Page 40

Tightness
Cause:
belt
Drive
short,
too
or
bearings.
the
on
Shuttle
odd
race
thread.
Mechanism
feeder
The
winder
The
ration.
ape
Thread
wheel
has
and
performance
of
too
being
causing
being
clogged
is
the
jams
engaged,
is
wound
bushing.
long
excessive
or
dry
up
needle
between
up
slips
and
pressure
obstructed
inferior
by
plate.
braking
off
by
oil.
the
balance
Remedy:
Shorten
belt
lengthening.
bias.
the
on
and
Clean
only
Use
salad
never
Unscrew
and
both
readjust
Disengage
Remove
of
and
needle.
thin
a
and/or
Cut
shuttle
oil
PFAFF
oil
feeder
properly.
winder.
unwind
the
sewing
glycerin.
or
insert
belt
race.
and
thread
piece
a
straight,
machine
needle
the
with
for
not
oil,
plate
aid
38
Page 41

4eedle
:ause:
eedle
shuttle.
he
breakage
bent
is
and
Remedy:
of
point
the
by
hit
is
Replace
damage.
needle
at
prevent
to
once
more
‘.leedle
hick.
Jpper
)ending
needle
he
to
ue
ushed.
lobbin
being
thread
needle.
the
case
too
tension
bent
is
material
not
thin
hits
and
being
properly
or
being
inserted.
thread
too
needle
pulled
too
tight,
plate
or
Study
Either
needle.
not
Do
crease
assure
so
When
until
needle
ease
force
pressure
inserting
clicks
it
and
tension
the
better
with
thread
or
feeding
thicker
on
feeding.
bobbin
the
audible
an
chart
on
a
use
movement,
material
case
sound.
page6,
thicker
in
and
press
Page 42

Ugly
Cause:
Tension
Thread
seams
not
to
properly
heavy,
regulated.
knotty
or
hard.
Remedy:
Adjust
chapters
with
only
Use
tension
first-class
a
accordance
in
and
13
14.
type
of
thread.
Under
Race
Odd
the
thread
to
thread
upper
dry.
unevenly
having
thread
infested
tension
wound.
discs.
between
winding
For
finger
your
tension.
Apply
Loosen
one
tension
but
or
do
over
two
and
not
run
the
drops
remove
thread
the
winder
of
over
thread
oil.
thread.
40
Page 43

4oisy
ause:
or
mt
way
ace
‘leed
nserted.
:eeder
vachine
erosene
performance
thread
odd
shuttle.
the
of
(after
plate
needle
jams
run
has
been
have
having
removal)
plate
or
dry
used.
infested
properly
not
cut-outs.
inferior
in
oil
the
or
Remedy:
and
Clean
chapters
Unscrew
feeder,
also
Clean
chapters
with
21
and
oil
and
needle
then
oil
way
race
22.
plate
readjust.
machine
and
21
according
if
and
line
in
22.
to
necessary,
Page 44

Inaccurate
feeding
Cause:
Feeder
level
enough
and
Lint
dented
the
Pressure
material.
the
NB:
zero
in
being
that
so
from
fluff
on
machine
If
position.
arranged
the
needle
having
rows.
sewing
teeth
does
at
will
plate.
infested
being
not
not
too
feed
too
come
between
in
weak
at
low
all,
a
up
for
see
Remedy:
Have
fully
Take
using
Increase
(chapter
whether
feeder
project
off
graver.
a
feeder
raised
from
needle
pressure
18).
lowered
is
so
the
plate
by
its
that
needle
remove
and
tightening
stitch
or
teeth
plate.
screw
regulator
will
lint,
V
42
Page 45

How
•
Edge
5.
several
‘ith
with
one
connection
43729.
o.
edgestitcher
the
se
be
to
re
use
to
stitching
parallel
special
the
taken
attachments
the
seams
guide
standard
the
with
No.25553
closely
to
the
No.
is
25820
if
edge.
Photo
easily
foot
seams
37
Page 46

QuiItng
26.
quilting
The
cularly
seams
of
directions
other.
each
guide
The
preceding
Photo
suited
over
and
38
guide
is
row.
taking
for
entire
the
at
passed
No.25553
accurate
surface
distance
any
always
is
in
along
parti
rows
both
from
the
44
Page 47

ea-cOSieS,
few
ist
a
stitch.
uilting
slippers,
many
of
cushions,
objects
etc.,
using
Photo
are
the
39
Page 48

27.
Hemming
hems
Neat
etc.
wear,
hemmers
facilitate
To
hemmer,
the
material.
Photo
40
on
can
Nos.
insertion
25576
clip
handkerchiefs,
produced
be
25579.
and
the
of
corner
the
off
under
with
material
of
the
in
the
46
Page 49

nsertonly
hemmer
the
Df
folded
he
left
he
47
as
edge
much
edge
of
as
the
material
required
is
the
of
hemmer.
the
in
for
material
mouth
guiding
along
Photo
41
Page 50

avoid
To
seam,
for
seam
little.
a
Photo
an
to
ugly
slightly
inch
slow
42
or
corners
press
before
so
down
at
down
the
end
the
the
end
the
feeding
the
of
material
the
of
motion
48
Page 51

The
!8.
erves
operations.
2
seam:
irst
•ach
nwards
width
a
n
that
ure
olded
folder
durably
to
other
so
once
Place
with
that
of
the
abt.
and
No.25594
2
join
both
right
the
lower
the
of
/o
projecting
stitched.
then
plies
layers
edge
an
edge
of
on
side
inch.
material
top
facing
projects
Make
only
is
Photo
of
43
Page 52

Second
seam:
upstanding
down
stitch
44
Photo
edge
to
Unfold
through
left.
the
both
plies,
the
run
folder
the
and
50
Page 53

9.
s
The
No.
(at
used
ruffling
25547
extra
an
for
3
attachment
charge)
purposes:
For
I.
whereby
passed
more
The
lower
movement.
the
ply
ruffling
the
through
lessofthe
or
depends
of
unruffled
the
slot
the
upper
ruffling
on
lower
of
the
ply
foot.
the
of
feeding
Photo
ply
is
the
45
Page 54

Instead
2.
used
of
both
for
with
Photo
of
and
foot.
the
edges
subsequent
eyelets
46
upper
an
through
fed
Stitching
result
will
application
hooks.
or
ply,
this
durable
in
ribbon
a
the
ribbon
of
is
guiding
along
ruffles
ribbons
52
Page 55

Attractive
3.
ply
with
tains,
53
will
the
be
etc.)
ruffling
obtained
ruffling
effects
foot
on
overseaming
by
used
(as
single
a
on
Photo
cur
47
Page 56

30.
Elastic
ruffling
on
etc.,
elastic
The
around
After
bobbin
ing
Photo
blouses,
easy
is
thread
elastic
the
an
case
2
of
48
childrens
accomplish
to
the
in
thread
bobbin.
appropriate
tension,
threads
or
3
dresses,
bobbin.
be
must
regulation
simultaneous
possible.
is
using
by
wound
aprons,
thin
firmly
the
of
stitch
54
Page 57

The
fl.
No.
(at
will
rhis
;titching
:or
making
every
at
r
55
PFAFF
50100
extra
an
permit
at
5-stitch-ruffler
charge)
ruffling
Moreover,
will.
at
ruffle
a
stitch.
th
5
each
and
it
single
straight
con
Photo
be
stitch
set
49
Page 58

ruffles
Broad
pleats.
to
Generally,
making
the
to
right-folded
surfaces,
large
supplied
used.
50
Photo
the
with
be
may
attachment
left
of
ruffles
the
the
strechted
folded
for
or
special
ruffling
attachment
ironed
or
lends
ruffles.
ruffling
is
itself
For
plate
to
of
be
56
Page 59

Darning
32.
reparing
Take
I.
feeder.
(photo
Insert
.
shown
according
plate
Screw
3.
Nr.
Suspend
4.
No.46
for
presser
off
To
4)
feed
in
slide.
on
53003.
128
and
mending:
do
the
to
cover
photo
photo
to
darning
presser
on
mending
foot
this,
front.
plate
51
attachment
bar
face
and
turn
No.
and
with
52
plate.
lower
lever
25997
secure
the
with
Photo
the
c
as
it
bed
hook
51
Page 60

Release
5.
Insert
6.
in
and
hoop.
presser
stretch
lever.
bar
defective
material
feed
The
guiding
material.
the
Photo
52
and
cover
increases
plate
facilitates
tension
the
the
of
58
Page 61

presser
he
resser
therwise
be
,oud
timely
he
stitches
hort
bar
must
bar
the
disengaged.
mending
will
lever
point
upper
prevent
the
of
downwards
thread
thin
of
holesl
suspended
tension
with
spots
Photo
as
53
‘43
Page 62

F
Fill
token
Photo
angulor
closely
54
cuts
in
with
both
darning
directions.
stitches
60
Page 63

If
the
piece,
place
machine
the
then
taken
are
holes
following
threads
the
follow
the
in
small,
the
operating
smallest
with
other
cutout
texture
one
in
high
at
darning
direction.
defective
the
threads.
direction
speed
Photo
First
with
and
stitches
55
Page 64

N
[
the
If
insert
The
along
In
ches
Photo
the
holes
a
patch
the
case
are
piece
cut
stitched
56
are
is
of
big,
the
of
cut
edges.
very
to
as
it
same
size
large
shown
advisable
is
material.
and
holes,
on
fastened
pat
the
photo
to
56.
62
Page 65

embroidering,
For
material
The
the
with
preliminary
a
As
necessary
filled
are
Attend
design.
practice
in
one
stretched
is
exercise,
properly.
the
of
the
acquired,
is
free
machine
the
in
slow
embroidery
Embroidering
33.
adjusted
is
and
hoop
treadling
select
courses
only
then
of
in
a
the
guided
the
plain
your
of
some
under
machine
linear
PFAFF
manner
the
recommended.
is
design
dealer
for
as
needle
and
mending.
in
see
to
get
accordance
Until
the
that
acquainted
the
lines
with
63
the
various
embroidery
styles.
 Loading...