

Page 1
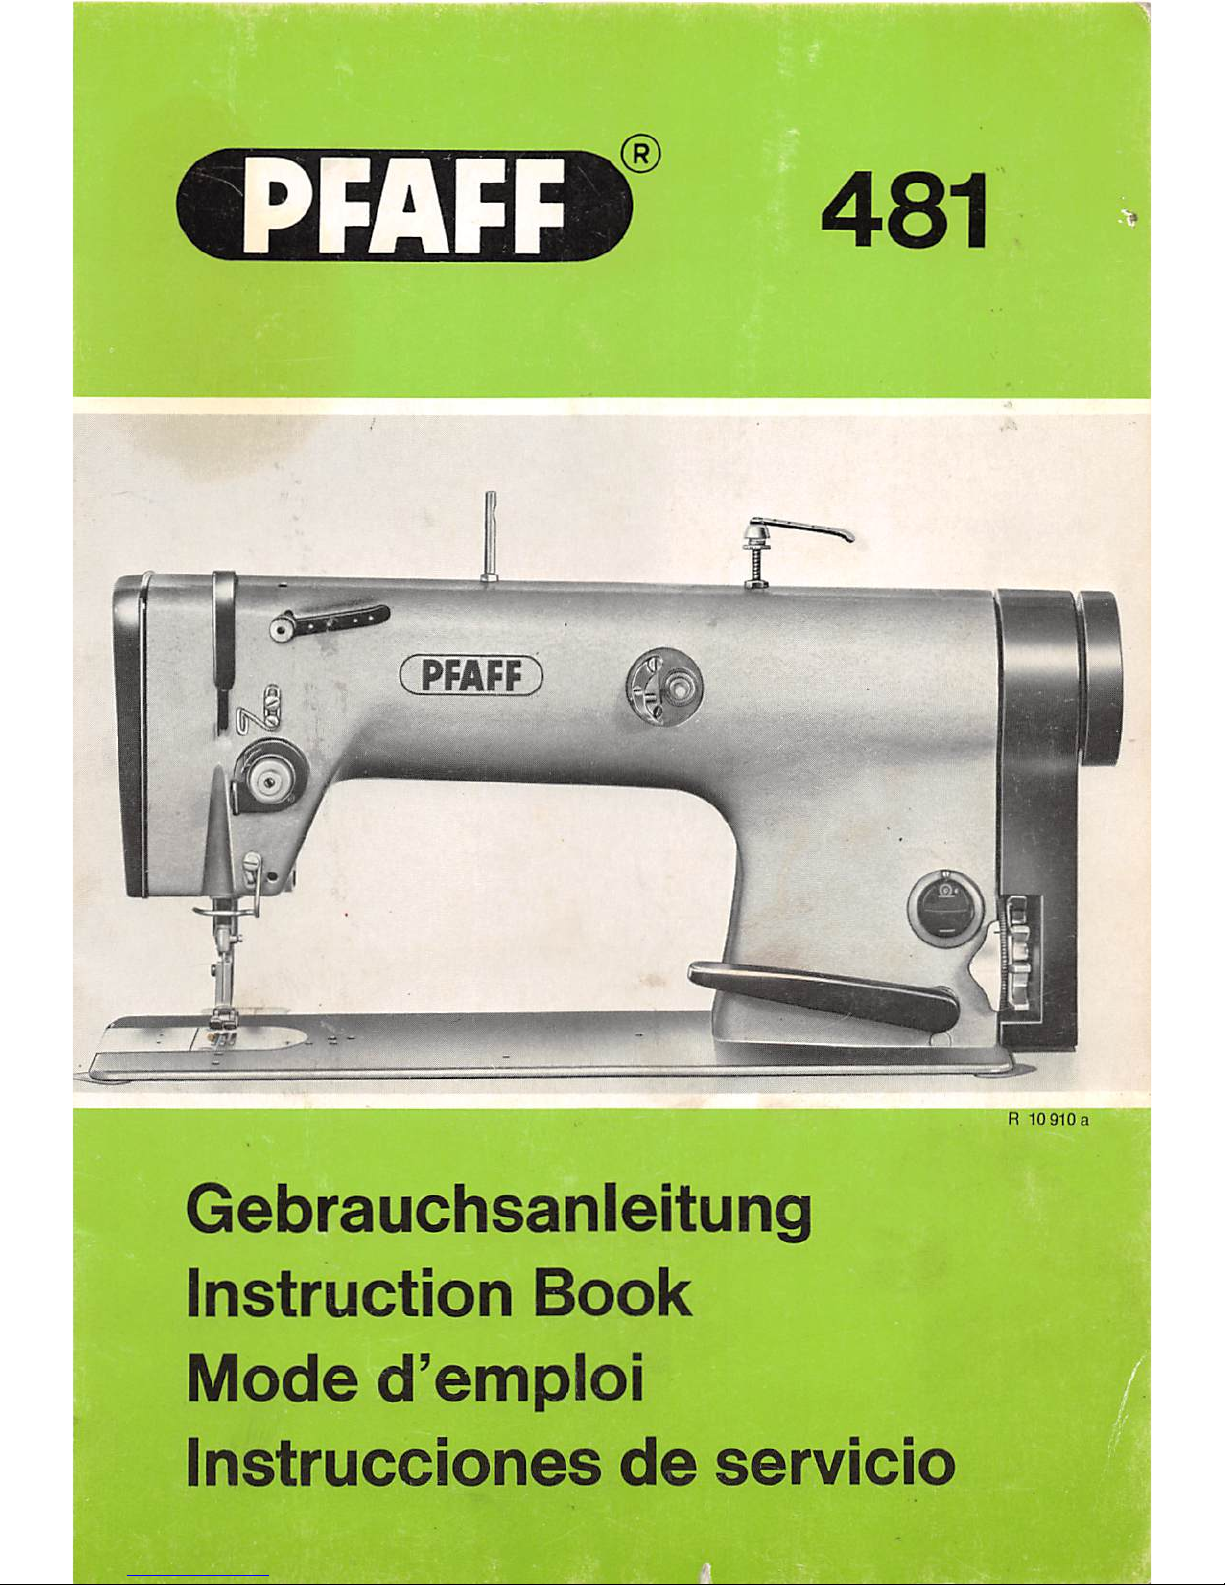
PFAFF
j®
481
CPFAFF)
Gebrauchsanleitung
Instruction
Book
Mode
d'emploi
Instrucciones
de
servicio
Page 2
Nadel
und
Garn
Die Wahl
der
richtigen Nadel isl nichl
nur
von
der
Ausfuhrungsart
der
Maschine,
sondern
auch
von
dem
zu
verarbeitenden
Material
und
Garn
ab-
hangig.
Die Zuordnung
der
Nadel- und Garndicke zu
der
entsprechenden
Ausfuhrungsart
kann
derTabelle
entnommen
werden.
Needle
and
thread
Selection of the
proper
needle
depends
not only
on
the
machine
model,
but
also
on
the
material
and
thread
used.
For
selectionofthe
proper
needle
and
thread
sizes
to
be
used
on
the
various
machine
models
please
refertothe
table
below.
Aiguillesetfils
Le choix correct de I'aiguille
depend
non
seule-
ment du
type
de machine,
mais
aussi
du tissu ^
travailleretdu
fil.
Pour la
grosseur
de I'aiguille et du fil,
correspon-
danlautypedemachine,
veuillez
vous
reporter
au
tableau
ci-apres.
Agujasehilos
La eleccion de la
aguja
correctsnosolo
depende
del tipodemaquina,
sino
tambien
del
genero
de
costura
y del hilo
queseemplee.
El
cuadro
siguiente
ofrece
algunos
puntos
de
referenda
paralacorrecta
elecciondela
aguja
y
del hilo
respecto
al tipodemaquina.
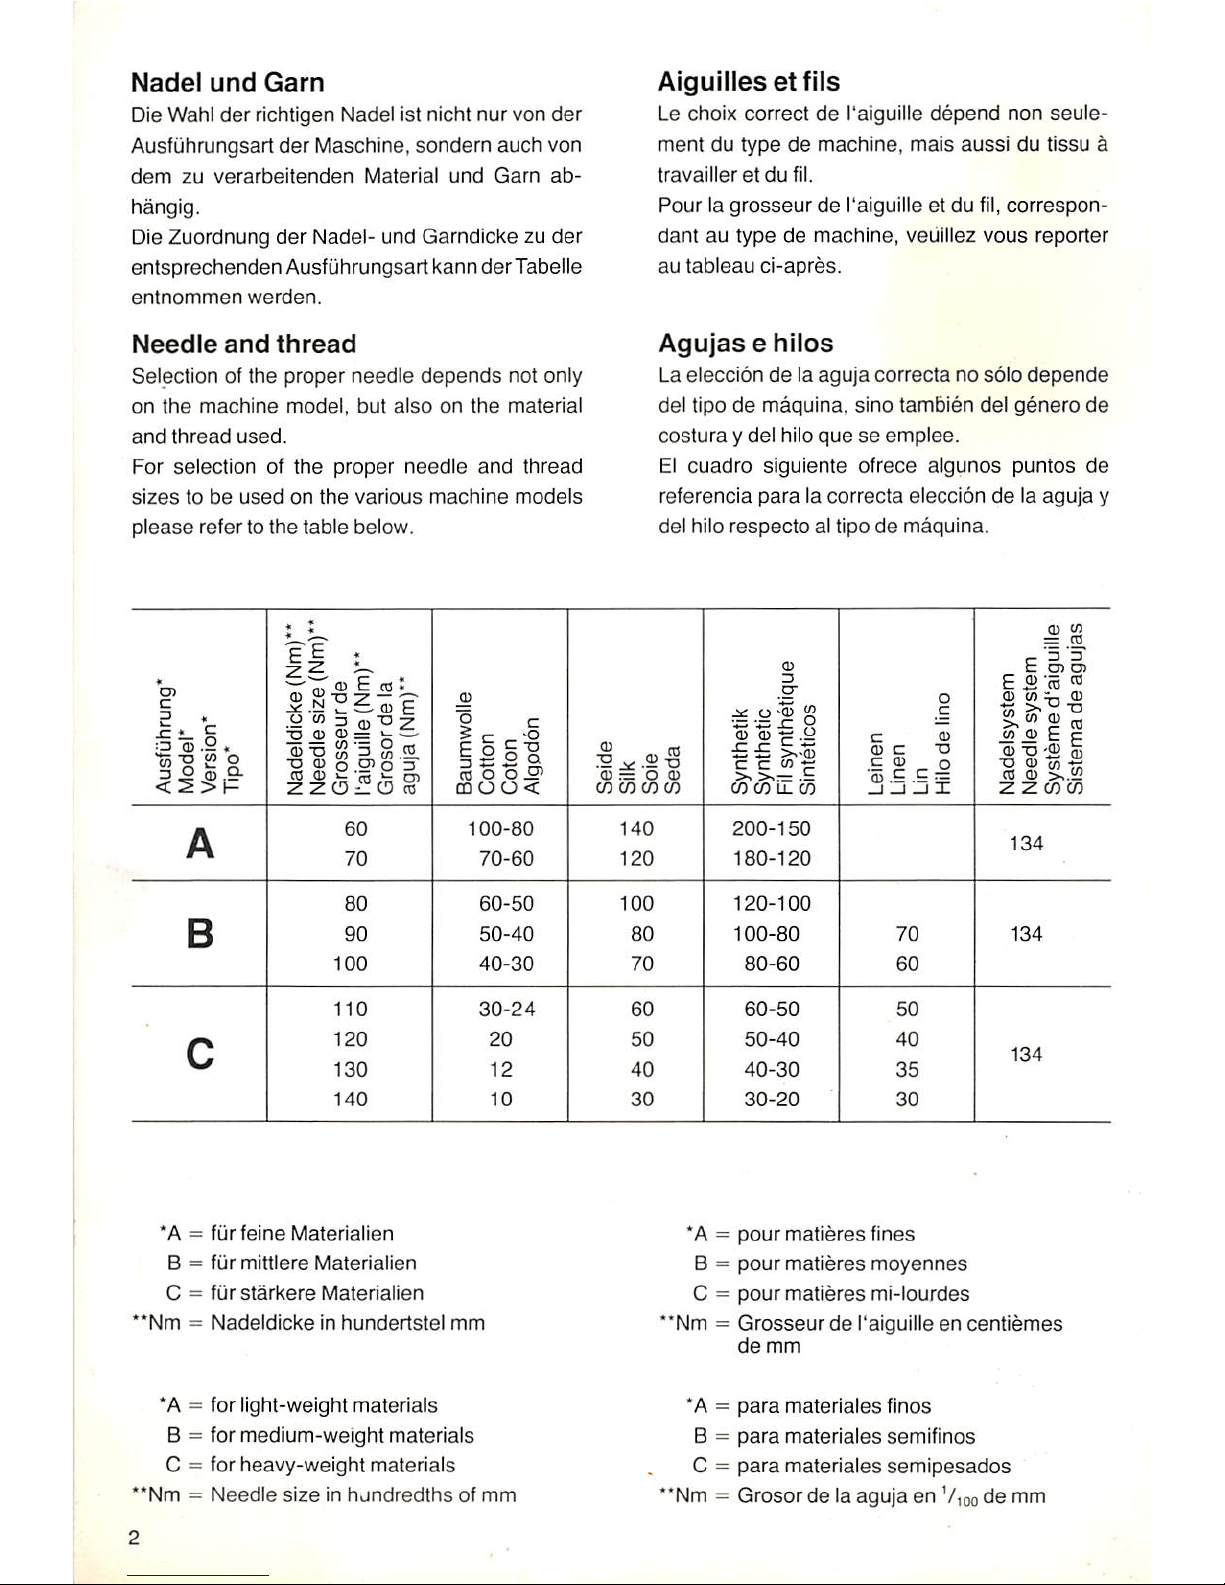
Ausfiihrung*
Model*
Version*
Tipo*
Nadeldicke
(Nm)**
Needle
size(Nm)**
Grosseurde
raiguille
(Nm)'*
Grosor
de
la
aguja
(Nm)**
Baumwolle
Cotton
Coton
Algodbn
Seide
Silk
Sole
Seda
Synthetik
Synthetic
Fil
synthetique
Sinteticos
Leinen
Linen
Lin
Hilo
de
lino
Nadelsystem
Needle
system
Systemed'aiguille
Sistema
de
agujas
A
60
70
100-80
70-60
140
120
200-150
180-120
134
B
80
90
100
60-50
50-40
40-30
100
80
70
120-100
100-80
80-60
70
60
134
C
110
120
130
140
30-24
20
12
10
60
50
40
30
60-50
50-40
40-30
30-20
50
40
35
30
134
*A =
fur
feine
Materialien
B =
fur
mittlere
Materialien
C =
furstarkere
Materialien
*Nm=Nadeldicke
in
hundertstel
mm
*A = for light-weight
materials
B = for medium-weight materials
C = for
heavy-weight
materials
'Nm=Needle
sizeinhundredths
of
mm
*A =
pour
matieres
fines
B =
pour
matieres
moyennes
C =
pour
matieres
mi-lourdes
*Nm =
Grosseur
de I'aiguille en
centiemes
de
mm
"A =
para
materialesfinos
B =
para
materiales
semifinos
C =
para
materiales
semipesados
'Nm = Grosor de la aguja en
V,oo
de mm
Page 3
Maschine
nur
In
Betrieb
setzen,
wenn
FIngerschutz.
Fadenhebelschutz
sowie
Riemenschutz
ober-
und
unterhalb
der
Tischplatte
ordnungsgemaB
angebrachl
sind
(slehe
auch
Selle
16
und
17).
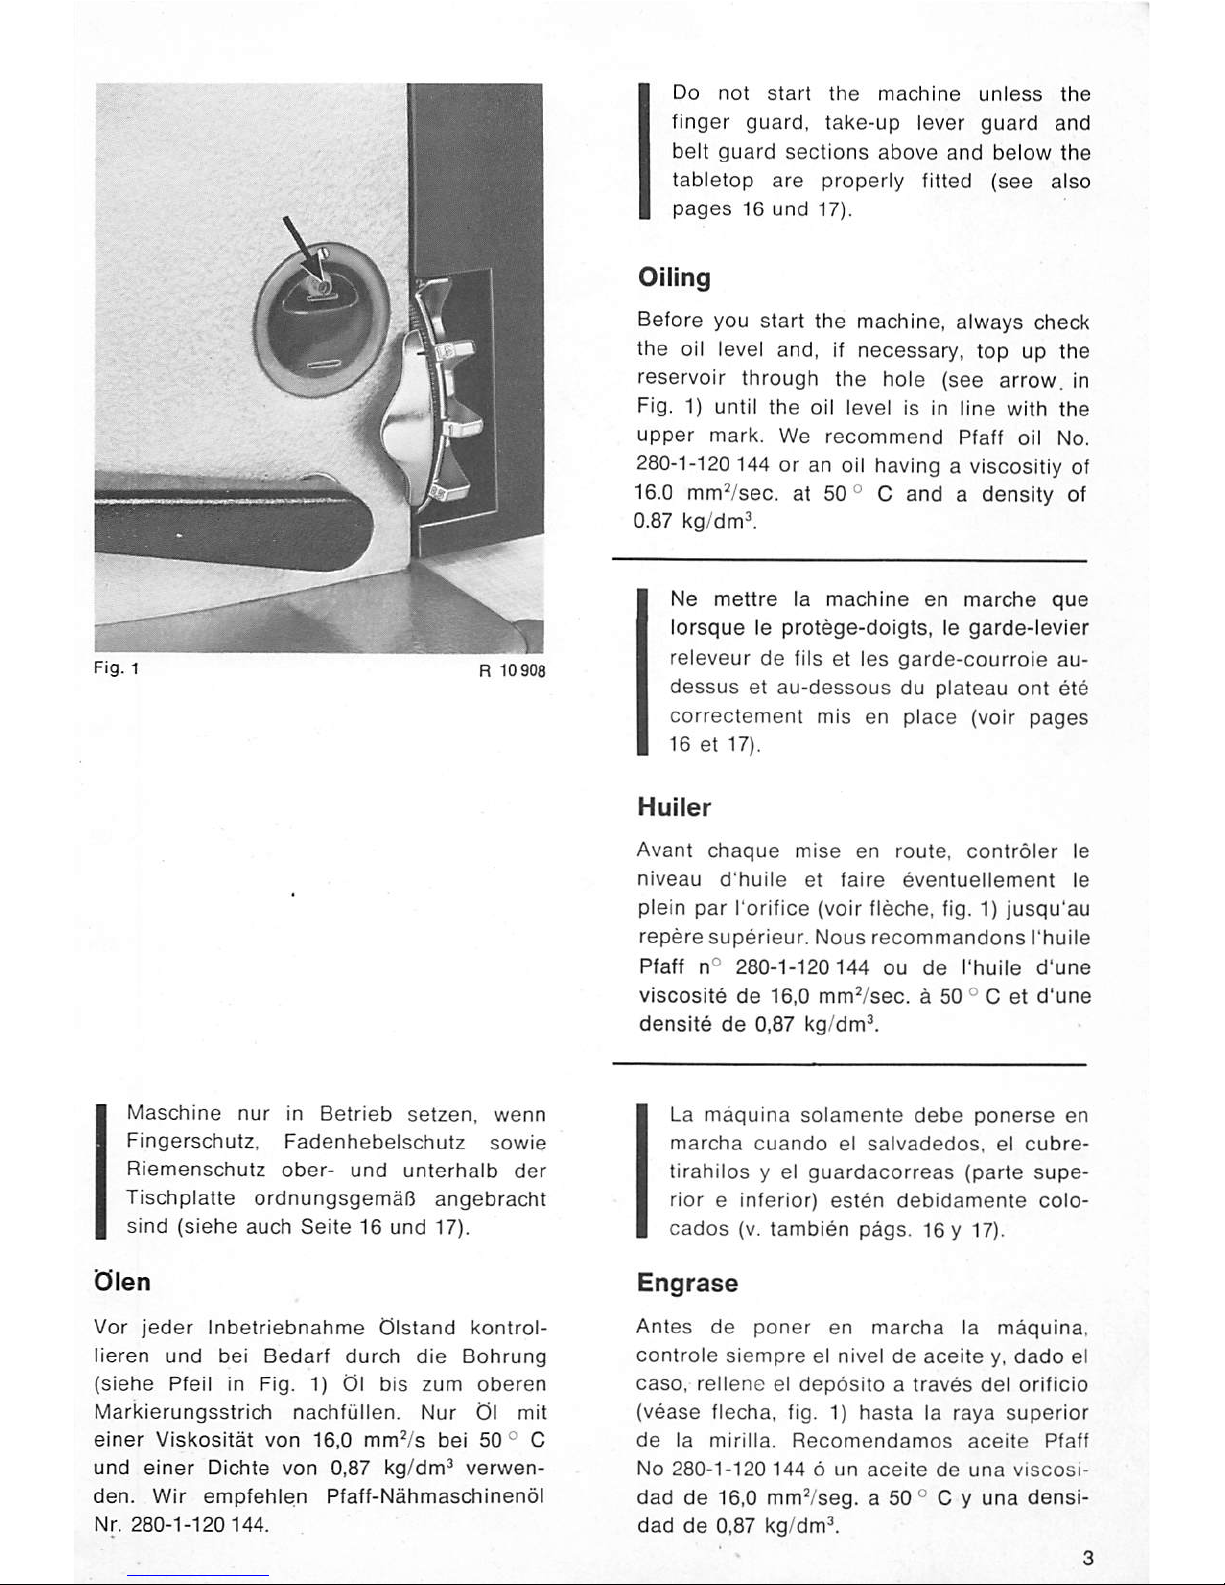
Vor
jeder
Inbetrlebnahme
Olstand
kontrol-
lleren
und
bei
Bedarf
durch
die
Bohrung
(siehe
Pfell In Fig. 1) Ol bis
zum
oberen
Marklerungsstrlch
nachfullen.
Nur
Ol mit
einer
Viskositat
von
16,0
mm'/s
bei
50 ® C
und
einer
Dichte von 0,87 kg/dm^
verwen-
den.
Wir
empfehlen
Pfaff-Nahmaschinenol
Nr.
280-1-120144.
Do
not
start
the
machine
unless
the
finger
guard,
take-up
lever
guard
and
belt
guard
sections
above
and
below
the
tabletop
are
properly
fitted
(see
also
pages
16
und
17).
Oiling
Before you start the machine, always check
the oil level and, If necessary, top up the
reservoir
through
the
hole
(see
arrow,
in
Fig, 1)
until
the
oil
level
Is in
line
with
the
upper
mark.
We
recommend
Pfaff
oil No,
280-1-120
144 or an oil having a viscositly of
16.0 mmVsec. at
50*^
C and a density of
0.87
kg/dml
Ne
mettre
la
machine
en
marche
que
lorsque
le
protege-dolgts,
le
garde-levler
releveur
de
flls et
les
garde-courroie
au-
dessus
et
au-dessous
du
plateau
ont
ete
correctement
mis
en
place
(voir
pages
16et17).
Huiler
Avant
chaque
mise
en route,
controler
le
niveau
d'hulle
et
faire
eventuellement
le
plein
par
I'oriflce (voir fleche, fig. 1)
jusqu'au
repere
superieur.
Nous
recommandons
I'huile
Pfaff
n®
280-1-120144
ou
de
I'huile
d'une
viscosite
de
16,0
mm^/sec.
50 ° Cetd'une
density
de
0,87
kg/dm^
La
maqulna
solamente
debe
ponerse
en
marcha
cuando
el
salvadedos,
el
cubre-
tlrahilos
y el
guardacorreas
(parte
supe
rior
e Inferior)
esten
debldamente
colo-
cados
(v.
tamblen
pdgs.
16 y 17).
Engrase
Antes
de
poner
en
marcha
la
maqulna,
controls
siempre
el nive!
de
aceitey.dado
el
caso,
rellene
el
depdslto
a
traves
del
oriflcio
(vease
flecha,
fig. 1)
hasta
la
raya
superior
de
la
mirilla.
Recomendamos
aceite
Pfaff
No
280-1-120
1446un
aceite
de
una
vlscosi-
dad
de
16,0
mmVseg.a50°
C y
una
densi-
dad
de
0,87 kg/dm^.
Page 4
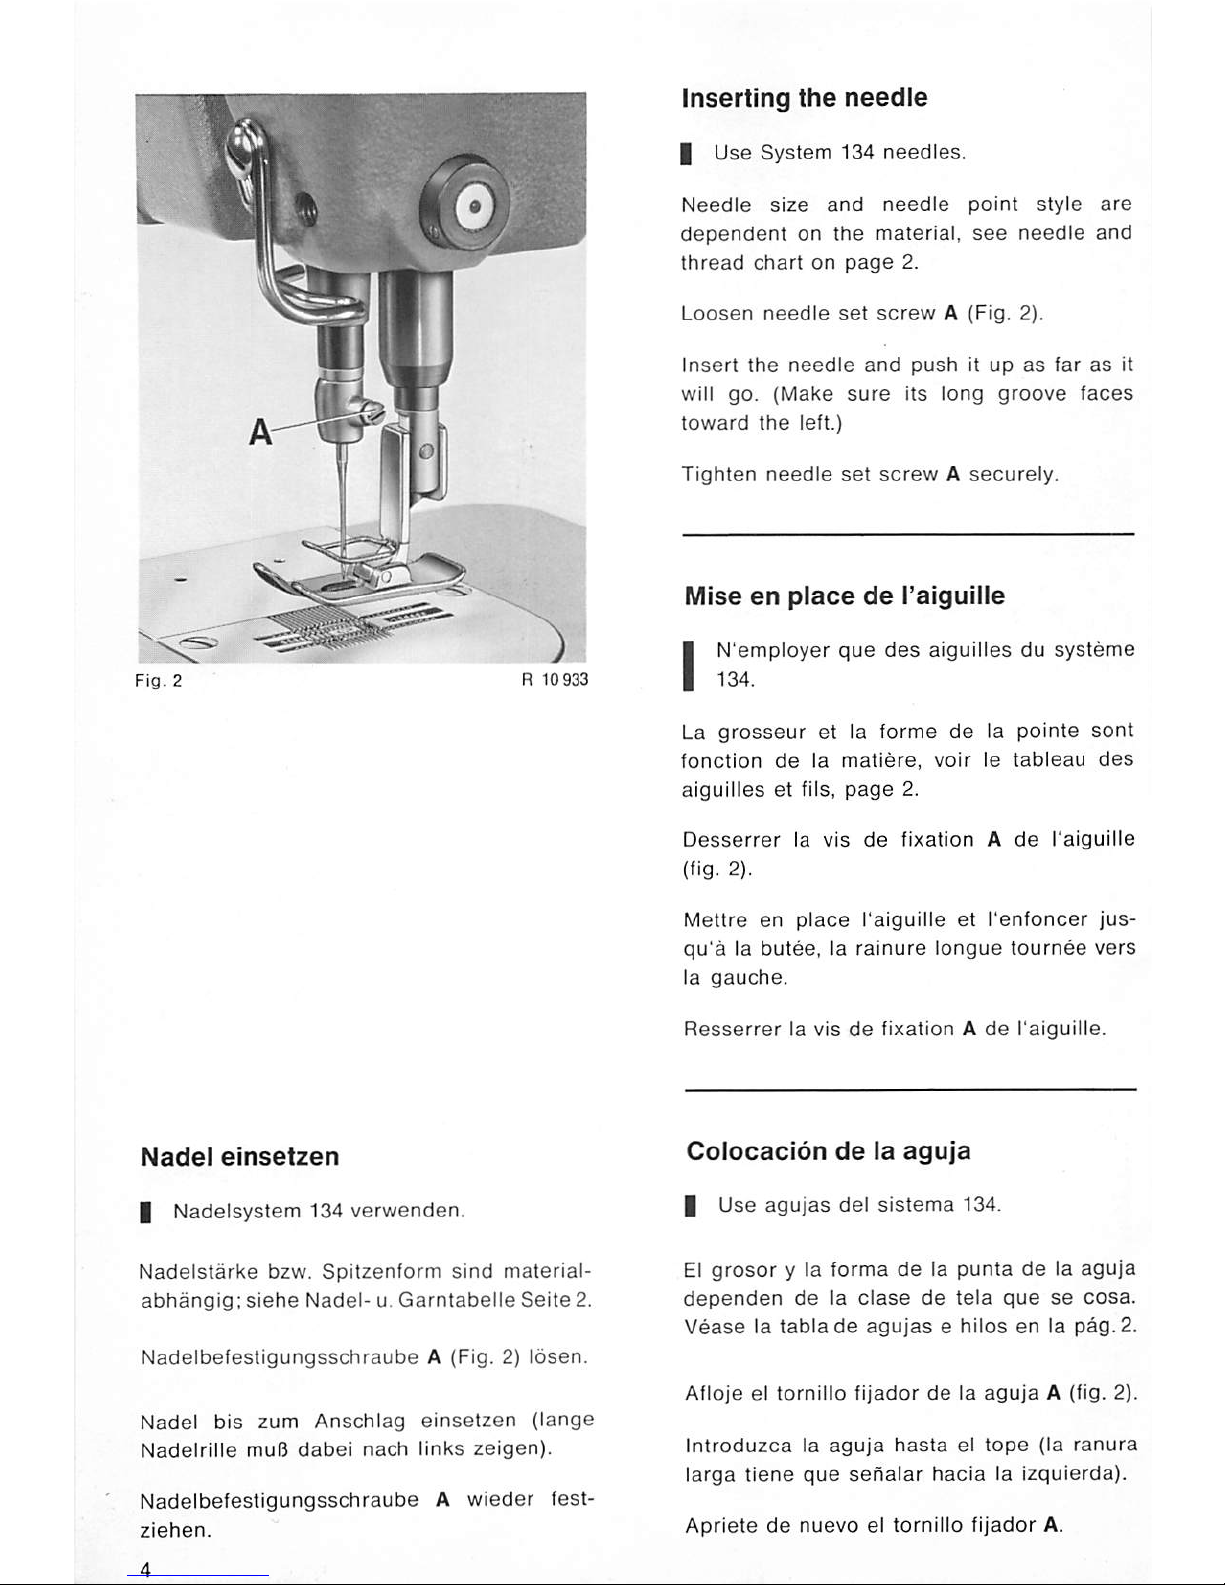
Nadel
einsetzen
I
Nadelsystem
134
verwenden.
Nadelstarke
bzw.
Spitzenform
sind
material-
abhangig:
siehe
Nadel-u.Garntabelle
Seite
2.
Nadelbefestigungsschraube
A
(Fig.2)losen.
Nadel
bis
zum
Anschlag
einsetzen
(lange
Nadeirille
muB
dabei
nach
links
zeigen).
Nadelbefestigungsschraube
A
wieder
fest-
ziehen.
Inserting
the
needle
I Use System 134 needles.
Needle
size
and
needle
point
style
are
dependent
on
the
material,
see
needle
and
thread
chart
on
page
2.
Loosen
needle
set
screw
A (Fig. 2).
Insert
the
needle
and
pushitup
as
far
as
it
will
go.
(Make
sure
its
long
groove
faces
toward
the
left.)
Tighten
needle
set
screw
A
securely.
MIse
en
place
de
raigullle
IN'employer
que
des
aiguilles
du
systeme
134.
La
grosseur
et la
forme
de
la
pointe
sont
fonction
de
la
matiere,
voir
le
tableau
des
aiguilles
et
fils,
page
2.
Desserrer
la vis
de
fixation A
de
raigullle
(fig. 2),
Mettre
en
place
I'aiguille
et
I'enfoncer
jus-
qu'a
la
butee,
la
rainure
longue
tournee
vers
la
gauche.
Resserrer
la vis
de
fixationAde
I'aiguille.
Colocaclon
de
la
aguja
I Use
agujas
del
sistema
134.
El
grosor
y la forma
delapunta
de la
aguja
dependen
de
la
clase
de
tela
que
se
cosa.
Veaselatablade
agujasehilos
en la
pag.2.
Aflojeeltornillo
fijador
delaaguja
A (fig. 2).
Introduzca
la
aguja
hasta
el
tope
(la
ranura
larga
tiene
que
sehalar
hacia
la
izquierda).
Apriete
de
nuevo
el tornillo
fijador
A.
Page 5
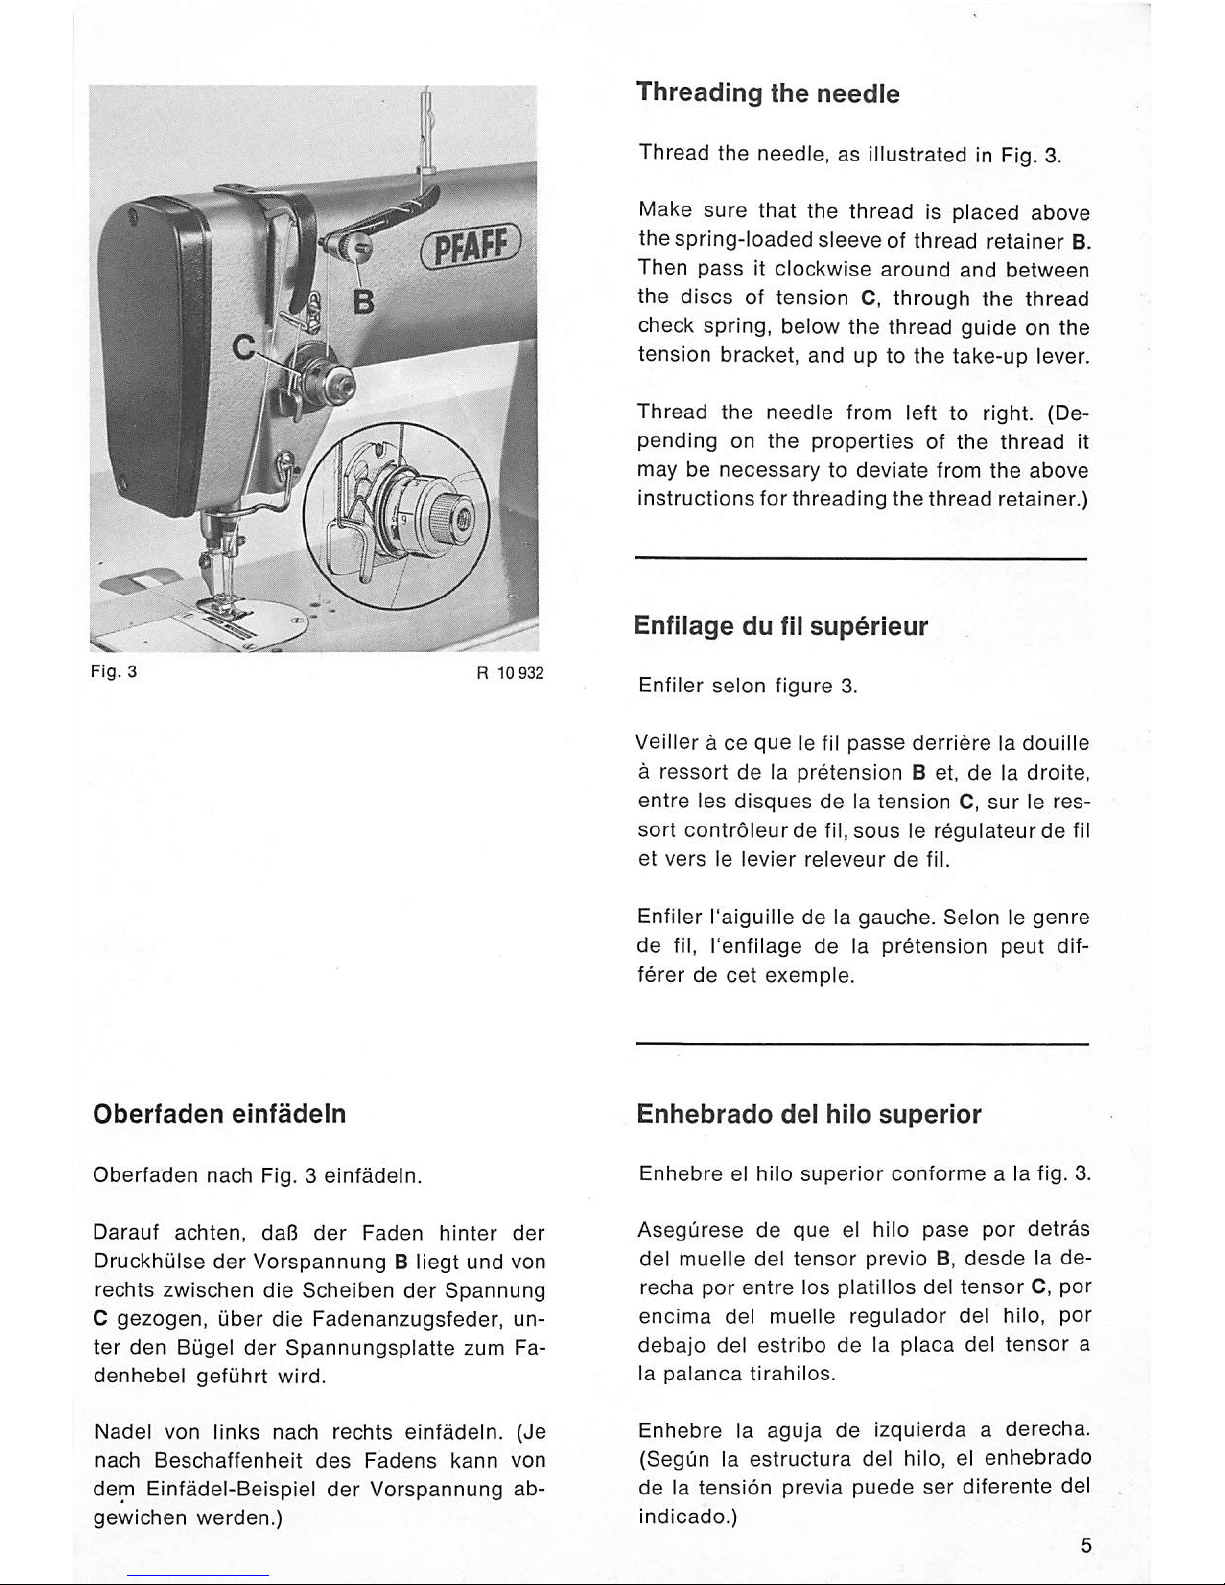
Oberfaden
einfadein
Oberfaden
nach
Fig. 3
einfadein.
Darauf
achten,
dal3
der
Faden
hinter
der
Druckhiilse
der
Vorspannung
B
llegt
und
von
rechts
zwischen
die
Schelben
der
Spannung
C
gezogen,
iiber
die
Fadenanzugsfeder,
un-
ter
den
Bugel
der
Spannungsplatte
zum
Fa-
denhebel
gefuhrt
wird.
Nadel
von
links
nach
rechts
einfadein.
(Je
nach
Beschaffenheit
des
Fadens
kann
von
dem
Einfadel-Beispiel
der
Vorspannung
ab-
gewlchen
werden.)
Threading
the
needle
Thread the needle, as illustrated in Fig. 3.
Make
sure
that
the
thread
is
placed
above
thespring-loaded
sleeveofthread
retainer
B.
Then
passitclockwise
around
and
between
the
discs
of
tension
C,
through
the
thread
check
spring,
below
the
thread
guide
on
the
tension
bracket,
and
up to
the
take-up
lever.
Thread
the
needle
from left to right. {De
pending
on
the
properties
of
the
thread
It
may
be
necessary
to
deviate
from
the
above
instructions
for
threading
the
thread
retainer.)
Enfllage
du
fll
superieur
Enfller
selon
figure
3.
Velllerace
que
le fll
passe
derrlereladoullle
a
ressort
delapretension
B
et,
deladrolte,
entre
les
disques
delatension
C,
surleres-
sort
controleurde
fll,
sousleregulateurde
fll
et
vers
le
levler
releveur
de
fll.
Enfller Talguille
delagauche.
Selonlegenre
de
fil,
I'enfllage
de
la
pretension
peut
dif-
ferer
de
cet
exemple.
Enhebrado
del
hilo
superior
Enhebre
el
hllo
superior
conforme
a la fig. 3.
Asegurese
de
que
el hllo
pase
por
detras
del
muelle
del
tensor
previoB,desde
la
de-
recha
por
entre
los
platillos
del
tensor
C,
por
enclma
del
muelle
regulador
del
hllo,
por
debajo
del
estrlbo
de
la
placa
del
tensor
a
la
palanca
tirahllos.
Enhebre
la
aguja
de
Izqulerda
a
derecha,
(Begun la
estructura
del hilo, el
enhebrado
de la
tensldn
previa
puede
ser
diferente
del
Indicado.)
Page 6
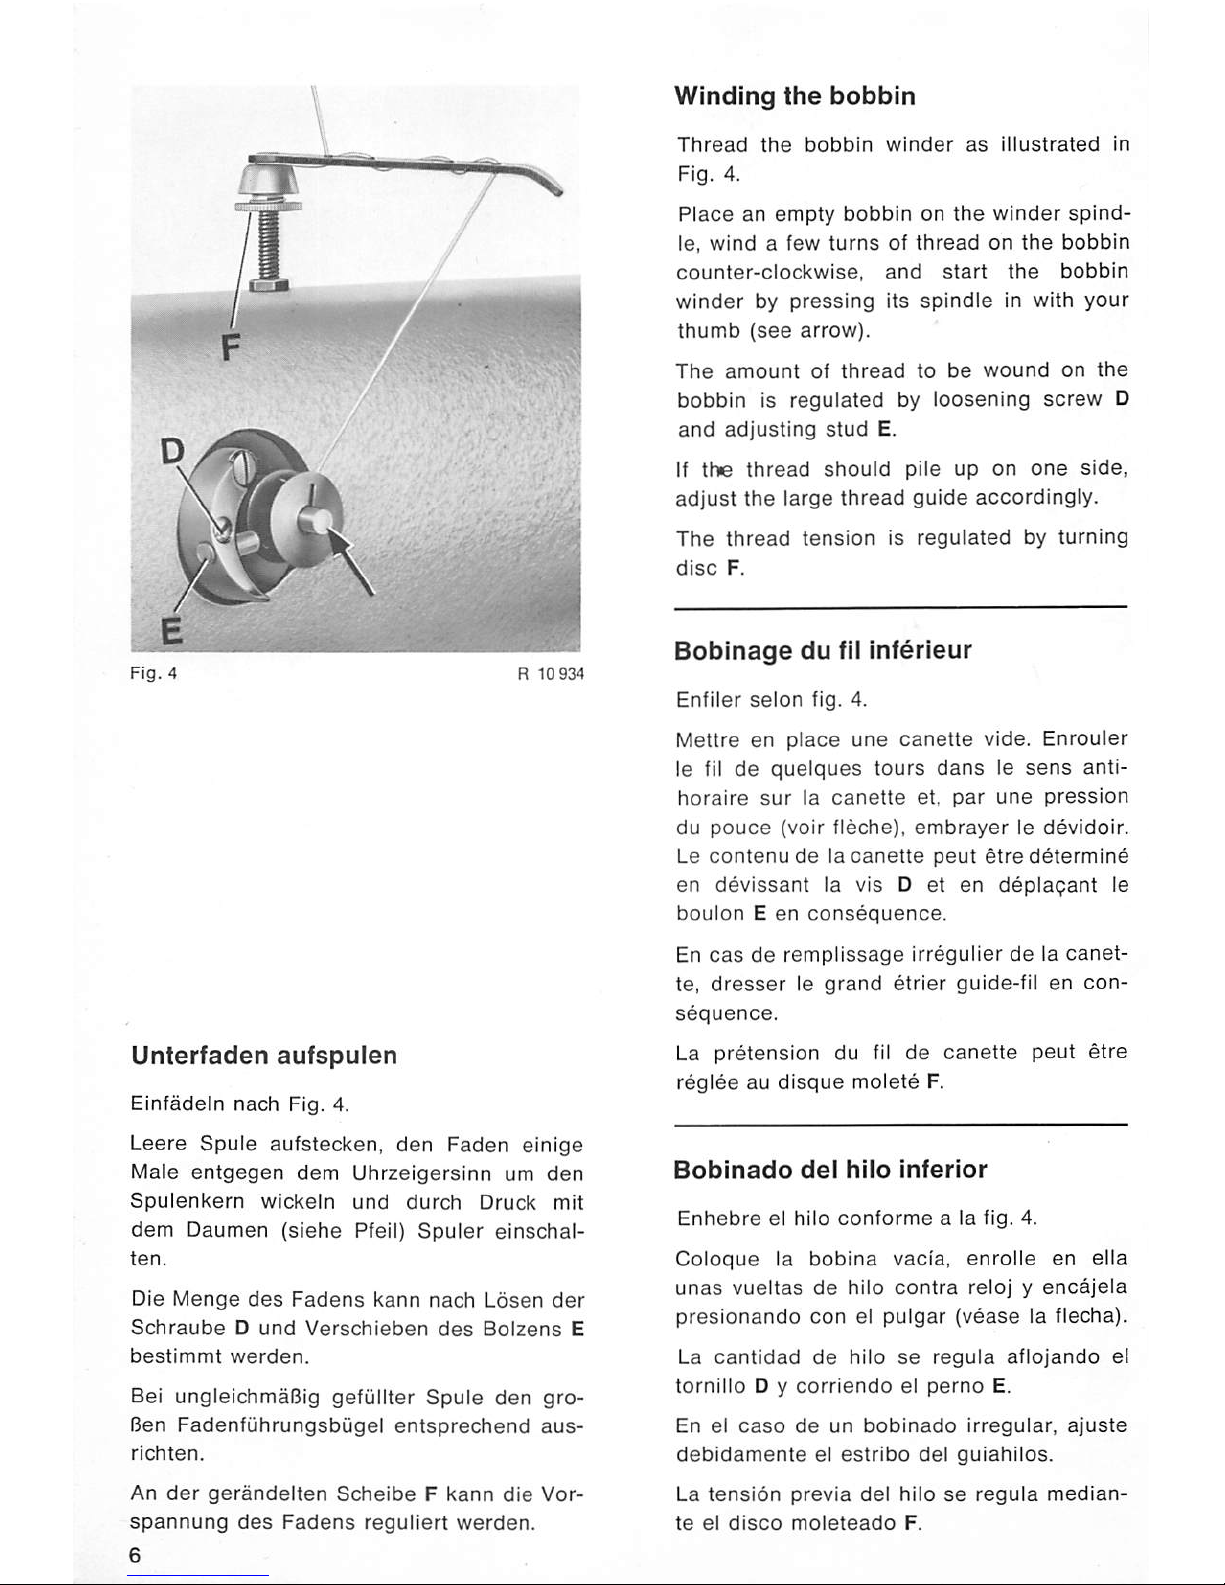
Unterfaden
aufspulen
Einfadein
nach
Fig. 4.
Leere
Spule
aufstecken,
den
Faden
einige
Male
entgegen
dem Uhrzeigersinn um
den
Spulenkern
wickein
und
durch
Druck
mit
dem
Daumen
(siehe
Pfeil)
Spuler
einschal-
ten.
Die
Menge
des
Fadens
kann
nach
Ldsen
der
Schraube
D
und
Verschieben
des
Bolzens
E
bestimmt
werden.
Bel ungleichma6ig gefullter
Spule
den
gro-
Ren
Fadenfuhrungsbiigel
entsprechend
aus-
richten.
An
der
gerandelten
Scheibe
F
kann
die
Vor-
spannung
des
Fadens
reguliert
werden.
6
Winding
the
bobbin
Thread
the
bobbin
winder
as
illustrated
in
Fig. 4.
Place
an
empty
bobbin
on
the
winder
spind
le,
windafew
turns
of
thread
on
the
bobbin
counter-clockwise,
and
start
the
bobbin
winder
by
pressing
its
spindle
in with
your
thumb
(see
arrow).
The
amount
of
thread
to
be
wound
on
the
bobbin
is
regulated
by
loosening
screw
D
and
adjusting
stud
E.
If
the
thread
should
pile up on
one
side,
adjust
the
large
thread
guide
accordingly.
The
thread
tension
is
regulated
by
turning
disc
F.
Boblnage
du
fll
Inferleur
Enfiler
selon
fig. 4.
Mettre
en
place
une
canette
vide.
Enrouler
le fil de
quelques
tours
dans
le
sens
anti-
horaire
sur
la
canette
et,
par
une
pression
du
pouce
(voir
fleche),
embrayer
le
devidoir.
Le
contenude
la
canette
peut
etre
determine
en
devissant
la vis D
et
en
deplaqant
le
boulon
E
en
consequence.
En
cas
de
remplissage
irregulier
delacanet
te,
dresser
le
grand
etrier
guide-fil en
con
sequence.
La
pretension
du fil
de
canette
peut
etre
reglee
au
disque
molete
F.
Boblnado
del
hllo
Inferior
Enhebre
el
hilo
conforms
a la fig. 4.
Coloque
la
bobina
vacia,
enrolls
en
ella
Unas
vueltas
de
hilo
contra
relojyencajela
presionando
conelpulgar
(vease
la flecha).
La
cantidad
de
hilo
se
regula
aflojando
el
tornillo
D y
corriendo
el
perno
E.
En el
caso
de
un
boblnado
irregular,
ajuste
debidamente
el
estribo
del
guiahilos.
La
tensidn
previa
del
hilo
se
regula
median
ts
el
disco
moleteado
F.
Page 7

Spulenkapsel
einfadein
und
einsetzen
Gefullte
Spule
in die
Oberkapsel
legen -
beim
Fadenabzug
muB sich die
Spule
in
Pfeilrichtung
(siehe
Fig.5)drehen.
Bei
leichtem
Festhalten
der
Spule
den
Fa-
den
in
den
Schlitz
G
einhangen
und
unter
der
Spannungsfeder
hindurch
ziehen,
bis
er
hinter
der
Federzunge
H
wieder
hervor-
kommt.
Durch
Drehen
am
Handrad
Fadenhebel
in
hochste
Stellung
bringen.
Spulenkapsel
mit
Spule
so
in
den
Greifer
einsetzen,
daB
die
Kapsel
beim
Nachdriicken
horbar
einrastet.
Inserting
the
bobbin
case
insert
the
full
bobbin
case
so
that
when
you
pull
the
thread
the
bobbin
turns
in
the
direction
indicated
by an
arrow
in Fig. 5.
Hold
the
bobbin fast
and
pull
the
thread
into slot G
and
under
the
tension
spring
until it
emerges
at its
tip
H.
Turn
the
balance
wheel
to
bring
the
take-up
lever
to its
highest
point.
Place
the
bobbin
case
into
the
sewing
hook.
Press
against
the
bobbin
case
until you
hear
it
snap
into
place.
Enfliage
et
mise
en
place
de
la
boite
a
canette
Introduire
la
canette
garnie
dans
la
capsule
- le fil
doit
se
derouler
de
maniere
que
la
canette
tourne
dans
le
sens
de
la
fleche
(fig. 5).
Tout
en
freinant
la
canette,
passer
le fil
depuis
la
fenteGsous
le
ressort
de
tension
jusqu'a
I'extremite
delalanguette
flexible
H.
Par
rotation
du
volant
de
tete,
placer
le
levier
releveur
de
fil
en
position
haute.
Placer
I'ensemble,
capsule
et
canette,
dans
le
crochet.
La
capsule
doit
s'emboTter
de
fapon
perceptible.
Enhebrado
y
colocacion
de
la
capsula
de
la
bobina
Coioque
la
bobina
llena
en
la
capsula.
Al
tirar
del
hilo, la
bobina
tiene
que
girar
en
el
sentido
delaflecha
(ver fig. 5).
Sujetando
ligeramente
la
bobina,
enganche
el hilo en la
ranura
G y
paselo
por
debajo
del
muelle
tensor
hasta
que
vuelvaaapa-
recer
por
detras
delalengiieta
del
muelle
H.
Girando
el
volante,
ponga
la
palanca
tira-
hilos
en
su
posicion
superior.
Introduzca
la
capsula
con
la
bobina
en
el
garfio
de
forma
que
selaoiga
encajar.
Page 8

Unterfaden
heraufholen
Oberfaden
festhalten
und
so
iange am
Handrad
in
Drehrichtung
drehen,
bis
der
Unterfaden
als
Schlinge
aus
dem
Stichloch
kommt.
Unterfaden
herausziehen
und
das
Faden-
ende
nach
hinten
unter
den
SteppfuB
legen.
Oieser
Arbeitsvorgang
ent/aiit
bei
Maschinen
mit
Fadenabschneideinrichtung
-900/.
.
Drawing
up
the
bobbin
thread
Hold
the
end
of
the
needle
thread
and
turn
the
balance
wheel
in
sewing
direction
until
the
bobbin
thread
comes
up
through
the
needle
hole
in a
loop.
Draw
the
bobbin
thread
out
of
the
needle
hole
and
lay it
back
under
the
presser
foot.
Disregard
these
InstructionsIfyour
machine
is
equipped
with
subci.
-900/. .
thread
trimmer.
Remonter
le
fil
inferleur
Maintenir
le fil
superieur
et
tourner
le
volant
dans
le
sens
de
rotation
normal
jusqu'^
ce
que
le fil de
canette
sorte
sous
forme
de
boucle
du
trou
d'aiguille.
Tirer
le fil
completement
du
trou
d'aiguille
et
le
coucher
vers
I'arriere
sous
le
pied
presseur.
Sur les machines comportant ie coupe-fli -900/. .
cette
operation
est
superfiue.
Extracclon
del
hllo
Inferior
Sujete
el
hilo
superior
y
gire
el
volante
en
sentido
normal
hasta
que
aparezca
el
hilo
inferior
en
forma
de
lazada
por
el
agujero
defaplaca
de
aguja.
Saque
ahora
la
punta
del
hilo
Inferior
y
coldquela
hacia
atras
por
debajo
del
pie
prensatelas.
Esta
operaciPn
noesnecesaria
en
mdquinas
equipadas
coneicortahilos
automatico
-900/.
.
Page 9

I
••
11
11
Fadenspannung
Ober-
und
Unterfadenspannung
so
aufein-
ander
abstimmen,
daB
die
belden
Faden
gut
eingezogen
sind und die Verschlingung
In
der
MItte
des
Nahgutes
erfolgt
(Fig. 7).
Oberfadenspannung
zu
schwach
oder
Unterfadenspannung
zu
stark
(Fig.
8).
Oberfadenspannung
zu
stark
oder
Unterfadenspannung
zu
schwach
(Fig. 9).
Tension
Regulate
both
tensions
so
that
the
needle
and
bobbin
threads
interlock
in
the
center
of
the
material
and
the
stitches
are
tightly
set
(Fig.
7).
Upper
tension
too
loose
or
lower
tension
too
tight
(Fig.
8).
Upper
tension
too
tight
or
lower
tension
too
loose
(Fig.
9).
Tension
des
flls
Adapter
les
tensions
de
maniere
que
les
deux
fils
ne
torment
pas
de
boucles
et
se
nouent
au
milieu
de
I'ouvrage
(fig. 7).
Tension
du fil
superieur
trop
faible
ou
ten
sion
du fil
inferieur
trop
forte
(fig. 8).
Tension
du fil
sup6rieur
trop
forte ou
tension
du fil
inferieur
trop
falble
(fig. 9).
Tension
de
los
hilos
La
tension
del hllo
superioreinferior
debe
coordinarse
de
forma
que
ambos
hilos
que-
den
bien
asentados
y
que
el
entrelazado
tenga
lugar
dentro
del
material
(Fig. 7).
Tension
del hilo
superior
demasiado
floja o
tension
del
hilo
inferior
demasiado
fuerte
(Fig.
8).
Tension
del hilo
superior
demasiado
fuerte
o
tension
del
hilo
inferior
demasiado
floja
(Fig.
9).
Page 10

Oberfadenspannung
regulieren
Nach
rechts
drehen:
starker
Nach
links
drehen:
schwacher
Regulating
the
needle
thread
tension
Turn
right
for a
tighter
tension.
Turn
left
foraweaker
tension.
R^glage
de
la
tension
du
fll
superieur
Rotation
vers
ia droite:
tension
plus forte
Rotation
verslagauche:
tension
plus faibie.
Regulaclon
de
la
tension
del
hllo
superior
GIrando
a ia
derecha:
la
tension
aumenta
Girando a ia izquierda: disminuye
Unterfadenspannung
regulieren
Nach
rechts
drehen:
starker
Nach
links
drehen:
schwacher
Regulating
the
bobbin
thread
tension
Turn
right
for a
lighter
tension.
Turn
left
foraweaker
tension.
Reglage
de
la
tension
du
fll
inferleur
Rotation
versladroite:
tension
plus
forte
Rotation
verslagauche:
tension
plus
faibie.
Regulaclon
de
la
tension
del
hilo
inferior
GIrando
aladerecha:
ia
tension
aumenta
Girando
a ia
izquierda:
disminuye
Page 11

Stichlange
einstellen
Sperrblech
I
drucken
und
am
Einstellrad
J
gewunschte
Stichlange
einstellen.
Ruckwartsnahen
Zum
Ruckwartsnahen
Umschalttaste
K
be-
tatigen.
Pflege
Taglich,
bei
Dauerbetrleb
otters,
Grelfer
und
Grelferraum
reinigen.
Dazu
Stichplatte
abschrauben
und
mit
Pinsel
Nahstaub
entfernen.
AuBerdem
wdchentlich
die
Maschine
grund-
lidi
reinigen.
Stitch
length
regulation
Press
in locking
leverIand
turn
control
J to
desired
stitch
length.
Reverse
sewing
To
sew
In
reverse,
operate
finger-tip
control
K.
Reglage
de
la
longueur
de
point
Choisir la longueur du point en appuyant
sur
la
tdle
de
blocageIet
en
tournant
le
disque
de
reglage
J.
Couture
arri^re
Pour
la
couture
en
arriere,
abaisser
la
ma-
nette
K.
Ajuste
del
largo
de
puntada
Preslone
la
chapa
de
bloqueo
I y
ajuste
el
largo
de
puntada
deseado
en
la
rueda
reguladora
J.
Costura
inversa
Para
coser
hacia
atras,
se
acciona
la
pa-
lanca
inversora
K.
Machine
care
Clean
hook
and
hook
raceway
once
every
day:
when
the
machine
is In
operation
con
tinuously,
even
more
frequently.
For
this
purpose,
unscrew
the
needle
plate
and
remove
the
lint
withasoft
brush.
In
addition,
clean
the
machine
thoroughly
once
a
week.
Page 12

NahfuDdruck
regulleren
Durch
Rechtsdrehen
wird
der
Druck
auf
den
NahfuB
verstarkt;
durch
Linksdrehen
ent-
sprechend
verringert.
Entretien
Nettoyer
le
crochet
et
son
compartiment
une
fois
par
jour
et
plus
frequemment
encore
si
la
machine
est
employee
en
service
continu.
Pour
ce
faire,
retirer
la
plaque
a
aiguille
et
enlever
les
bourresaI'aide
du
pinceau.
De
plus,
nettoyer
la
machine
a
fond
une
fois
par
semaine.
Regulating
the
pressure
on
the
material
When
the
screw
is
turned
to
the
right,
the
pressure
of the
presser
foot on the material
is
increased.
When
the
screw
is
turned
to
the
left, it is
decreased.
R^glage
de
la
pression
du
pled
presseur
Augmenterlapression
du pied
presseur
en
tournant
la vis
de
r6glage
vers
la
droite;
diminuer
cette
pression
en
tournant
la vis
vers
la
gauche.
Regulaclon
de
la
presion
del pie
prensateias
Girando
a la
derecha,
la
presion
del
pie
prensateias y del transportador superior
aumenta;
girando
a la izquierda, disminuye.
Limpieza
de
la
mdqulna
Limpie el
garfio
y la
zona
del
mismo
diaria-
mente.
En
caso
de
uso
continue,
varias
veces
al
dia.
Para
ello,
quite
la
placa
de
aguja
y limpie
el
polvo
con
un
pincel.
Aparte
de
esto,
limpie la
mSquina
prolija-
mente
una
vez
por
semana.
Page 13

Fig.
14
Bedienungsmoglichkeiten
der
Tretplatte(n)
Nahen
bis
zur
HSchstgeschwIndigkeit:
Betatigen
der
rechtenTretplatte
bisStellung
3.
Langsamnahen*:
Betatigen
der
rechtenTretplatte
bisStellung
2.
Ruhestellung:
Zurucknehmen
der
rechten
Tretplatte
von
Stellung 3 In 1 bzw. 2 In 1 (Nadel posltlo-
nlert Im Material*) Oder von Stellung 4 bzw.
5 In 1
(Nadel
posltlonlert
hoch*).
*
Nur
bel
Maschlnen
mit
Stopmotor
Nahfaden
abschnelden
(-900/..):
Ruckwartsbetatlgen
der
rechten Tretplatte
bis
Stellung
5.
NahfuB
anheben
(-910/..):
Ruckwartsbetatlgen
der
rechten
Tretplatte
bis
Stellung
4
oder
5,
auOerdem
bel
ent-
sprechender
Stellung
des
KIppschalters
am
Steuerkasten,
auch
bel
jeder
Nahunterbre-
chung
(Stellung
1).
Ruckwartsnahen
(-911/01):
Betatigen
der
llnken
Tretplatte
bis
Stellung
7
und
der
rechten
Tretplatte
bis
Stellung
2
Oder
3.
Nadel
hochstellen
(-913/02
ohne
-900/..):
Betatigen
der
rechtenTretplatte
bisStellung
5.
Pedal
operation
Sewing
uptotop
speed:
Press
the
right
pedal
forwardstoposition
3.
inching*:
Press
the
right
pedal
forwards to position 2.
Neutral
position:
Return
the
right
pedal
from position 3 or 2
to position 1
(needle
is positioned in
the
material*) or from positions 4 or 5 to 1
(needle
in
"up"
position*).
*
Onlyonmachines
with
Stop
motor
Trimming
the
threads
(-900/..):
Press
right
pedal
backwardstoposition
5.
Lifting the
presser
foot (-910/..):
Press
right
pedal
backwardstoposition
4 or
5. Depending on
the
position of
the
toggle
switch
on
the
control
box,
the
presser
foot
can
also
be
raised
at
every
Interruption
In
sewing
(position
1).
Backtacking
(-911/01):
Press
the left pedal to position 7 and the
right
pedal
forward to position 2 or 3.
Raisingthe needle
(-913/02
without-900/..):
Press
the
right
pedal
back
to position 5.
13
Page 14

Fig.
14
Fonctions
des
p§dales
Couture
klaVitesse
maximale
Abaisser
la
p^daie
droite
a la
position
3.
Couture
au
ralenti*
Abaisser
la
pedale
droite
a la
position
2.
Position
de
repos
Laisser
revenirlapedale
droite
a la
position
1.
L'aiguille
s'arrete
dans
I'ouvrage*
si la
pedale
est
partie
de
la
position3ou2.Elle
s'arrete
en
haut*
si la
p§dale
est
partie
de
la
position4ou
5.
Coupe
des
tils
(•900/..)
Abaisser
la
pedale
droite
vers
I'arriere
jus-
qu'a
la
position
5.
Relevage
du
pied
presseur
(-910/..)
A la fin
de
la
couture
etachaque
interrup
tion
(position
1)
lorsque
le
commutateur
k
*
Uniquement
sur
machines
avec
moteur
Stop.
14
bascule
se
trouve
a la
position
adequate,
abaisser
la
pedale
droite
vers
I'arriere
jus-
qu'a
la
position4ou
5.
Couture
en
arrlere
(-911/01)
Abaisser
simultanement
la
pedale
gauche
a
la
position6etlapedale
droite
a la
position
2
ou
3.
Relevage
de
l'aiguille (-913/02
sans
-900/..)
Abaisser
la
pedale
droite
a la
position
5.
Accionamiento
de
los
pedales
Costura
hasta
la
velocldad
maxima
Accione
el
pedal
derecho
hastalaposicion
3.
Costura
lenta'''
Accione
el
pedal
derecho
hastalaposicion
2.
Poslcl6n
neutra
Volviendoelpedal
derecho
delaposicidn
3
a la 1 6
de
la 2 a la 1, la
aguja
queda
posi-
cionada
dentro
del
material*.
Volviendo
el
pedal
de
las
posiciones
4 6 5 a la 1, la
aguja
pasa
a la
posicion
superior*.
*
Sdioenmaquinas
con
motor
Stop
Corte
de
los hllos
(-900/..)
Accioneelpedal
derecho
hastalaposicidn
5.
Elevacidn
del
pie
prensatelas
(-900/..)
Accionando
el
pedal
derecho
hacia
atras
hasta
la
posicion
4 6 5 y
tambldn
despuds
de
cada
interrupcion
delacostura
(posicidn
1),
segun
la
posicidn
del
interrupter
bascu-
lante.
Costura
en
retroceso
(-911/01)
Accionando
el
pedal
izquierdo
hasta
la
po
sicidn
6 y el
pedal
derecho
hastalaposicidn
2 d
3.
Posicidn
superior
de
la
aguja
(-913/..
sin
-900/..)
Presionando
el
pedal
derecho
hasta
la
po
sicidn
5.
Page 15

Sonstige
Schaltmoglichkeiten
Ruckwartsnahen
-911/.
Bei
-911/03
bzw.
-911/04,
Drucken
der
Hand-
taste
am
Maschinenkopf.
Ausschalten
der
automatischen Verriegelung
(-911/50
und
-911/54):
Umlegen
des
Kippschalters
am
Steuerkasten.
Nadel
hochstellen
-913/..:
Bei -913 03 mit -900
.jedoch
ohne
Nahfaden
abzuschneiden:
Betatigen
des
Kniehebels
bis
zum
Anschlag.
Bei
-913
04.mit -900 51;
jedoch
ohne
Nahfaden
abzuschneiden:
Betatigen
des
Knieschalters.
Operating
the
knuckle
and
knee
switches
Backtacking
-911/..:
On
-911/03
or -911/04,
operate
the
knuckle
switch
on
the
machine
head.
Switching
off
automatic
backtacking
(-911/50
and
-911/54):
Operate
the
toggle
switch
on
the
control
box.
Raising
the
needle
-913/..:
On
-913
03
with
-900
..;
without
thread
trimming:
Operate
the
knee
lever
as
far
as
it will
go.
On
-913
04
with
-900
51
but
without
thread
trimming:
Operate
the
knee
switch.
Autres
fonctions
Couture
en
arriere
(-911/..)
Sur
les
-911/03 et -911/04,
appuyer
sur
la
touche
sur
la
tete
de
machine.
D^brayagedeI'arretdecouture
automatique
(-911/50et-911/54)
Basculer
le
commutateur
sur
la
boite
de
commande.
Relevage
de
raigullle
(-913/..)
Sur la-913 03
avec-900'..,
mais
sans
coupe
des
fils:
actionner
la
genouillereafond.
Sur
la -913/04
avec
-900/51 mais
sans
coupe
des
fils:
agir
sur
I'interrupteur
de
genouil
lere.
Otras
funciones
Costura
en
retroceso
(-911/..)
Con
las
subclases
-911/03 y -911/04:
accio-
nando
el
pulsador
en
la
cabeza
de
la
ma-
quina.
Desconexion
del
presillado
automdtico
(-911/50 y -911/54)
Conmutando
el
interrupter
basculante
de
la
caja
de
mandos.
Posicidn
superior
deiaaguja
(-913/..)
Con
la -913/03
(con
-900/..
sin
que
se
pro-
duzca
el
corte
de
los
hilos):
accionando
el
interrupter
de
rodilla
hasta
el
tope.
15
Page 16

Riemenschutz
(oberhalb
der
Tischplatfe)
Riemenschutz
wie
folgt
anschrauben:
Linke
und
rechte Schutzhalfte
mit
ihren
Schlitzen
hinter
die
Kopfe
der
Befestigungs-
schrauben
a1
und
a2
schieben
(siehe
Fig.
15).
Distanzhulse
c
auf
die
Befestigungsschraube
d
stecken
und
die
Schraube
d
in
die
Ge-
windebohrung
d1
eindrehen.
Unter
Beachtung.
daB
die
Lasche
c1
hinter
den
Schlitz
b3
und
vor
die
Distanzhulse
c
kommt,
den
Riemenschutz
ausrichten
und
die
Schrauben
d,
a1
und
a2
fest
anziehen.
Belt guard (above the bedplate)
To
screw
the belt guard to the sewing head,
proceed
as follows:
Attach the right and left belt guard sections
so
that
screws
a1
and
a2
enter
the
appro
priate
slots
(Fig. 15).
Push spacing sleeve c onto screw d and
turn
the
latter
into
hole
d1 a
few
turns.
fvlake
sure
that lug c1 is positioned behind
slot
b3
and
in
front
of
spacing
sleeve
c,
align the belt guard and tighten screws d,
a1
and
a2.
Garde-courroie
sup^rieur
Visser le garde-courroie
au-dessus
du pla
teau
de
table
comme
suit;
Glisser les moities gauche et droite de
maniere que les fentes s'engagent derriere
les
tetes
des
vis de fixation a1 et a2 (fig. 15).
Placer
la douille
d'ecartementcsur
la vis d
et
visser
la vis d
dans
I'alesage
d1.
En veillant a
ce
quelalanguette
c1
prenne
appui derriere la fente b3 et devant la douil
le c, ajuster le garde-courroie et bloquer les
visd,a1
et
a2.
Guardacorreas
El guardacorreas de encima de la placa
base
se
atornilla
de
la
forma
siguiente:
Introduzca
ambas
mitades,
izquierda
y
derecha,
del
guardacorreas
con
sus
ranuras
por detras de las cabezas de los tornillos
de fijacion a1 y a2 (fig. 15).
Introduzcaelmanguito
distanclador
c en el
tornillo de fijacion d y atornille
este
en el
agujero
roscado
d1.
Cuidando
de
que
la
oreja
c1
quede
detras
de
la
ranura
b3 y
delante
del
manguito
distanciadorc,
asiente
bienel
guardacorreas
y
apriete
fuertemente
los tornillos d. a1 y a2.
Page 17

Fig.
16
Riemenschutz
(unterhalb
der
Tischplatte)
R10865
Riemenschutz
unterhalb
der
Tischplatte
-
nach
Losen
der
Flugelmutter
1 -
so
aus-
richten,
da3
sowohl
Motorschelbe
als
auch
Keilriemen
frei
lauft.
In
dieser
Stellung
Riemenschutz
mit Flugel
mutter
1 (Fig. 16)
festschrauben.
Belt
guard
(below
bedplate)
Loosen
wing
nut1and
align
the
belt
guard
section
below
the
bedplate
so
that
the
motor
pulley
and
the
V-belt
move
freely.
In
this
position,
tighten
wing
nut1(Fig.
16).
Garde-courroie
Inferleur
Apres
desserrage
de
I'ecrou
a
ailettes
1,
ajuster
le
garde-courrole
sous
le
plateau
de
table
de
manlere
que
la
poulle
motrice,
aussi
bien
quelacourrole
enV,se
meuvent
librement.
Dans
cette
position,
bloquer
de
nouveau
l'6crouaailettes
1 (fig.
16).
Guardacorreas
Despu^s
de
aflojarlatuerca
de
mariposa
1,
coloque
el
guardacorreas
de
debajo
de
la
placa
base
de
tal
forma,
que
tanto
la
polea
del
motor
como
la
correa
en
"V"
marchen
llbremente.
En
esa
poslcon
aprlete
fuertemente
la
tuer
ca
de
mariposa
1 (fig.
16).
Page 18

Fig. 19
Kantenbeschneideinrichtung
-731/01
Taste1nach
unten
driicken:
Schneideinrichlung
eingeschaltet.
Taste
1
nach
oben
drucken:
Schneideinrichtung
ausgeschaitet.
Messer
auswechsein
R
11197
Motor
und
Schneideinrichtung
ausschalten.
Schrauben
2
losen
und
Messer
herauszie-
hen.
Neues
Messer
bis
zum
Anschlag
ein-
setzen.
Schrauben2wieder
gut
anziehen.
18
Edge
trimmer
-731/01
Push
control
1
down:
The
trimmer
is
engaged.
Push
control1up:
The
trimmer
is
disengaged.
Changing
the
knife
Switch
off
the
motor
and
the
edge
trimmer.
Loosen
screws
2
and
puli
out
the
knife.
Insertanew
knife
and
push
it up
as
far
as
it wiii
go.
Tighten
screws2securely
again.
Dispositifaraser
ies
bords
-731/01
Abaisser
ia
touche
1:
couteau
embraye.
Pousser
la
touche
1
vers
!e
haut:
couteau
debraye.
Echange
du
couteau
Arreter
le
moteur
et
debrayer
ie
couteau.
Desserrer
ia
vis2et
sortir
le
couteau,
Mettre
ie
couteau
neuf
en
place
jusqu'a
ia
butee.
Rebloquer
la vis 2.
Dispositivo
recortador
-731/01
Presionando
hacia
abajo
la
palanca
1, el
dispositivo
recortador
se
conecta.
Presionando
ia
paianca
1
hacia
arriba,
el
dispositivo
recortador
se
desconecta.
Cambio
de
ia
cuchiiia
Desconecte
ei
motor
y ei
dispositivo
recor
tador.
Destornille
los
torniiios
2 y
quite
la
cuchiiia.
introduzca
ia
cuchiiia
nueva
hasta
ei
tope.
Apriete
de
nuevo,
fuertemente.
los
torniiios
2.
Page 19

(PMFF)
Pfaff,D6750
Kaiserslautern
Postfach
3020/3040,
Telex
045
753
Nr.
296-12-13133
/•
i
Wormser
Verlagsdruckerei,
D-6520
Worms
PrintedinWest
Germany
Imprime
en R.F.A.
Impreso
enlaR.F.A.
deutsch/engl./franz./span.
1/79
 Loading...