

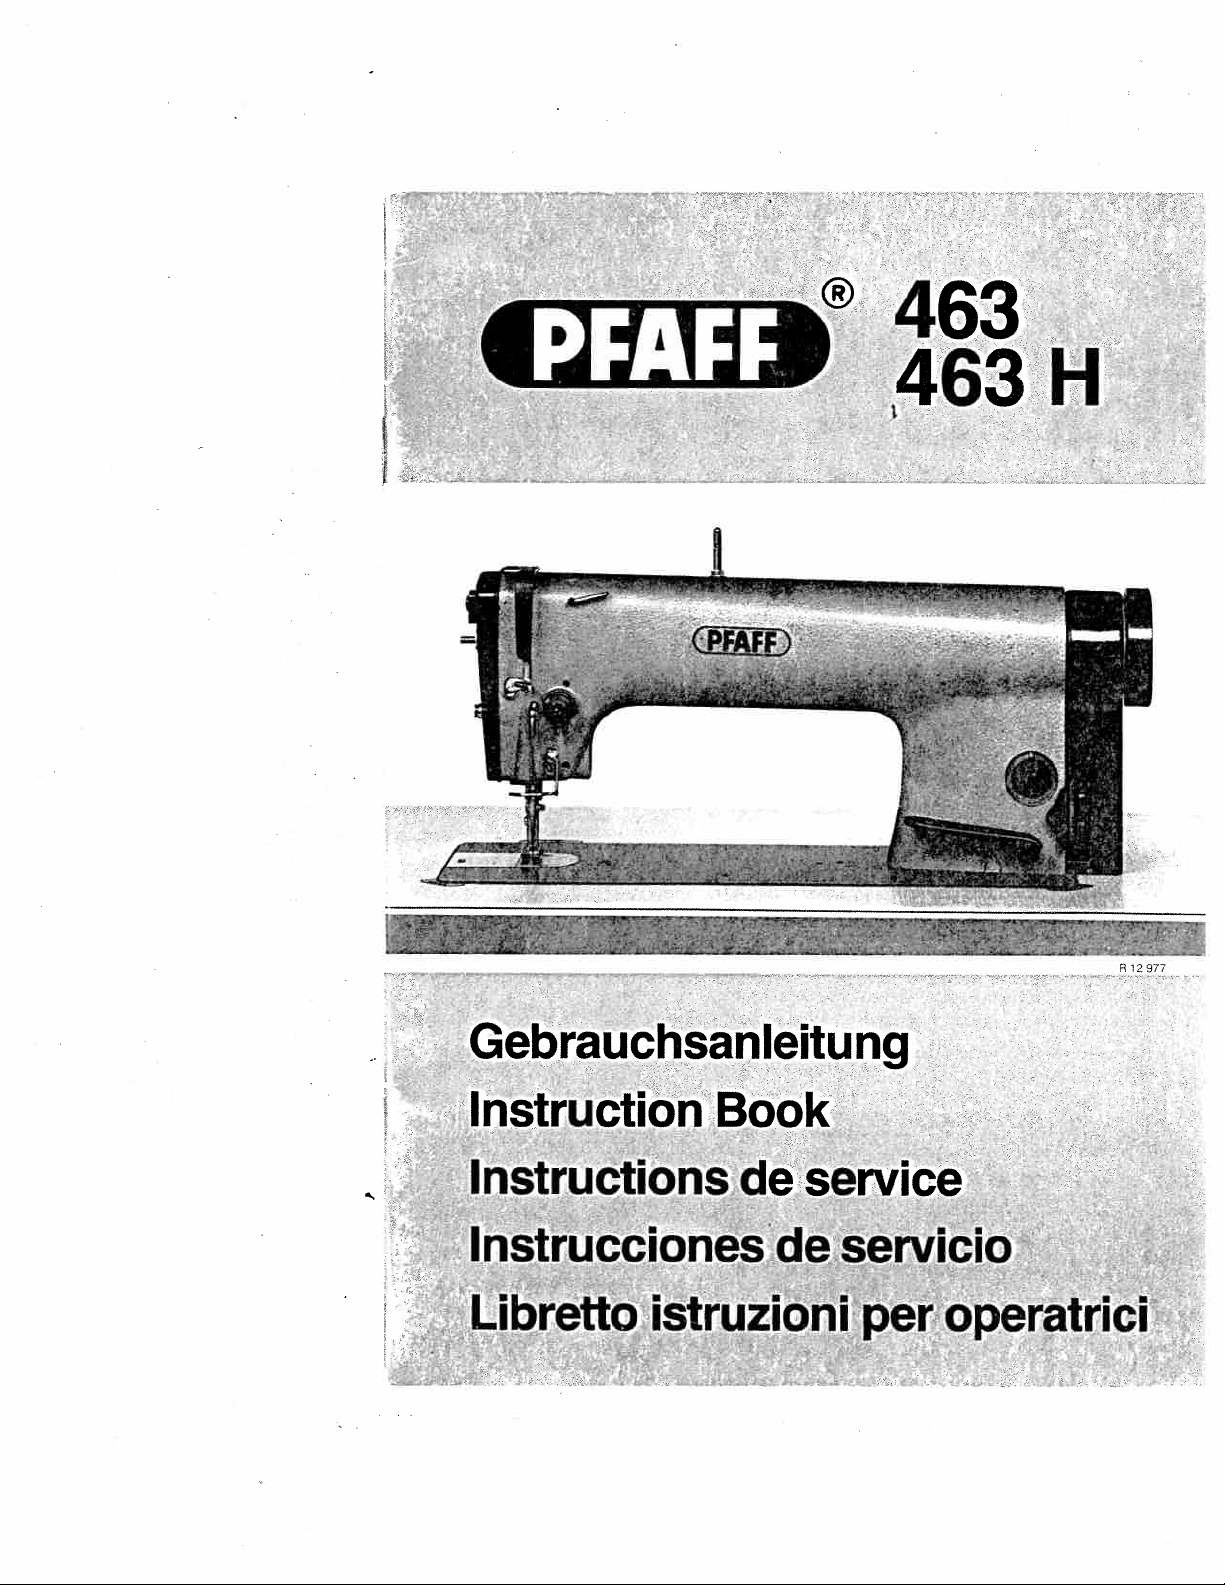
Page 1
Page 2
Wochen
zu
Beachtung
vermeiden,
besorideren
Zur
2
ersten
Die
•
Nahgutentnahme
Zur
•
Fadenhebelhochposition
folgt
Starungen
Urn
•
achten.
Sicherheits-Hinweise
darf
Die
Maschine
•
gen
•
•
son
•
Einfädeln,
schalten,
Bei
•
schen
Ausnahmen
Fachkrafte
•
sene
Arbeitenanunter
chungen
alle
sind
Betrieb
Em
Einschalten
Das
erfolgen.
Wechseln
Beirn
bei
d.h.
mechanisch
Wartungs-
Bei
Versorgungsnetz
zulassig.
Arbeitenander
Personen
gemaf3
gultigen
Maschine
der
von
Verlassen
durch
betatigten
und
nur
sind
elektrischen
durchgefuhrt
Spannung
DIN
nur
Schutzbestimmungen
und
Betatigen
Reparaturarbeiten
bei
57
Maschine
Fadenhebel
ihrer
Betreiben
Nahwerkzeugen,
des
zu
Justierarbeiten
105,
nur
automatisch).
Maschine
Bestimmung
die
ohne
der
Arbeitsplatzes
des
Hauptschalters
Kupplungsrnotoren
trennen.
Ausrustung
werden,
stehenden
nicht
erlaubt.
314
mit
immer
vom
Maschine
wie
an
und
Teilen
Hochstgeschwindigkeit
ihrer
höchste
die
in
regelmal3ig
gerna(3
berucksichtigen.
zu
angebrachten
Werk
darf
Nadel,
z.
B.
bei
und
ist
pneumatischen
Funktionsuberprufungen
nur
dürfen
und
Steflung
reinigen
verwendet
nur
durch
Nähful3,
Wartungsarbeiten,
oder
durch
Stilistand
der
Efektrofachkräfte
durch
Einrichtungen
bringen
(Seite
23)
werden.
Einrichtungen
Beirn
Schutzvorrichtungen
die
entsprechend
Stichplatte,
des
sind,
ist
Motors
durch
abgesehen
Herausziehen
lassen.
laufen
Maschine
(bei
und Olvorschriften
andere
in
Umbau
nicht
ist
unterwiesene
Stoffschieber
Maschine
die
Netzsteckers.
des
abzuwarten.
Maschine
st
die
entsprechend
entsprechend
oder
zulassigen
von
-900/.
mit
(Seite
Ausführun
erlaubt.
Bedienper
Spule,
und
elektrisch
pneumati
vom
unterwiesene
unterwie
.
er
7)
be
beirn
abzu
Abwei
2
Page 3
Important
•
During
Always
•
machines
To
avoid
•
the
make
the
trouble,
notes
first
sure
take-up
two
weeks
the
clean
take-up
lever
the
the
run
lever
is
positioned
machine
machine
is
at
its
regularly
3/4
at
highest
automatically).
up
(p.
of
point
23)
its
and
top
before
note
speed
you
only.
remove
lubricating
the
the
material
instructions
(on
subcl.
(p.
-900/.
7).
Safety
•
version
•
•
•
machine
tuating
In
“
•
from
The
•
who
Apart
milled.
instructions
The
machine
all
valid
Do
not
operate
The
machine
When
exchanging
or
leaving
the
the
only
have
from
master
carrying
pneumatic
exceptions
on
the
been
the
caseofmechanically-actuated
When
Work
only
must
safety
the
machine
must
onlybeswitched
gauge
it,
and
switch
out
maintenance-
supply
permitted
electrical
instructed
permissible
be
instructions
parts
when
or
by
source.
equipment
accordingly.
deviations
used
without
(e.g.
making
removing
clutch
are
for
the
purpose
have
to
be
the
safety
on
and
needle,
maintenance
the
motors
or
repair
adjustments
of
the
machine
according
considered.
operated
presser
mains
wait
work
on
and
to
it
was
devices
by
foot,
work,
plug.
for
the
pneumatic
performance
must
only
DIN
57105,
designed
it
is
equipped
persons
needle
machine
the
motor
devices
carried
be
workonlive
for.
In
caseofconversion
with.
who
have
been
plate,
feed
mustbedisconnected
to
stand
still.
machine
the
checks
madebycompetent
out
electricians
by
parts
dog,
and
instructed
bobbin),
must
be
or
equipment
into
another
accordingly.
threading
either
by
disconnected
personnel.
other
persons
is
not
the
ac
per
3
Page 4
Conseils
Pendant
•
A
•
machines
es
tiquement).
Pour
•
relatives
importants
les
l’enlèvement
éviter
au
en
les
graissage
premieres
2
de
-900/..,
derangements,
Recommandations
machine
version,
pas
Ia
Pour
Les
travaux
Ia
utiliser
l’opératrice
changement
le
canette,
circuit
hors
mecaniques,
travaux
es
exceptions
travaux
aux
respecter
avant
aux
pièces
N’utiliser
•
autre
Ne
•
Seule
•
Avant
•
feet
mettre
metteurs
•
pneumatique.
Seules
•
Les
57105.
l’ouvrage,
le
(page
que
Ia
machine
instruite
lenfilage.
linterrupteur
a
attendre
d’entretien
admises
équipements
et
semaines,
levier
le
positionnement
nettoyer
7).
sécurité
de
les
pour
es
toutes
sans
consequence
en
d’organes
avant
general
l’arrêt
et
reglages
électriques
dispositifs
faire
ne
releveur
du
regulierement
travaux
prescriptions
dispositifs
les
couture
de
quitter
de
ou
moteur.
du
reparation
de
contrOles
et
tension
sous
tourner
fil
de
levier
auxquels
de
de
devra
que
tels
machine
Ia
enlèvement
par
au
sont
ne
Ia
doit
releveur
Ia
elle
sécurité
sécurité.
mettre
l’aiguille,
système
du
par
confier
a
sont
machine
toujours
de
machine
est
valables.
Ia
et
personnel
a
pas
qu’aux
trouver
se
point
f
au
il
(page
destinée.
machine
presseur,
pied
le
travaux
Ies
avant
fiche
a
de
pneumatique,
competent.
électricien
un
sauf
admis,
3/4
au
haut
23)
cas
En
circuit
en
secteur.
ou
les
vitesse
sa
de
haut
point
course
sa
de
observer
et
transformation
de
et
plaque
Ia
dentretien,
Pour
couper
du
a
exceptions
de
es
coudre.
a
Ia
les
machine
Ia
personnel
selon
maximale,
course
sa
automa
lieu
a
prescriptions
en
Ia
aiguille,
machine
moteurs-trans
réseau
du
competent.
Ia
norme
(sur
une
grif
est
a
DIN
4
Page 5
1.
:
Observaciones
Durante
•
maxima.
Al
•
nas
•
Con
clones
Normas
•
No
ténganse
No
•
•
La
•
Al
que
rá
desconectarse
En
•
Al
mentaciOn
SOlo
•
Los
instruido
No
nes
retirar
con
-900/.
elfin
para
utilice
en
está
máquina
cambiar
al
enhebrar,
motores
efectuar
admiten
se
trabajosenel
al
está
permitido
Ia
norma
de
las
material
el
de
el
de
máquina
Ia
cuenta
permitido
Organos
de
trabajos
neumática.
caso.
importantes
primeras
2
de
.,
Ia
posiciOn
evitar
posibles
engrase
seguridad
más
todas
usar
solo
deberá
de
al
abandonar
eléctricamente
embrague
de
excepciones
equipo
realizar
DIN
57105.
semanas
costura,
superior
(pagina
que
las
Ia
máquina
ser
costura
accionados
reparaciOn
eléctrico
trabajos
coloque
averias,
7).
para
normas
conectada
(aguja,
el
puesto
con
en
el
en
rodaje
de
siempreIapalanca
de
Ia
palanca
engrase
los
trabajos
de
seguridad
sin
los
manejada
y
prensatelas,
costura
de
el
interruptor
mecánicamente
mantenimiento,
y
caso
de
ajustes
deberán
piezas
no
deberá
tirahilos
Ia
máquina
para
vigentes.
dispositivos
al
y
general
o
ser
realizados
dispositivos
y
marchar
con
los
que
de
por
Ia
placa
hacer
hay
que
habrá
controles
que
a
máquina
tirahilos
tiene
esté
protección
persona
de
trabajos
retirando
o
que
por
en
ugar
automáticamente).
regularidad
destinada.
montados
instruida
aguja,transportador,
de
esperar
desconectar
efectuados
electricistas
estén
bajo
mantenimiento.
el
su
(pagina
enchufe
que
a
por
tension,
más
de
posiciOn
23)
Al
transformarla
en
al
respecto.
canilla,
de
Ia
pare
se
Ia
mOquina
personal
competentes
salvo
3/4
de
superior
observe
y
fábrica.
etc.)
Ia
máquina
red.
motor.
el
deIared
especializado.
por
o
en
las
velocidad
su
(en
las
en
excepcio
máqui
instru
otro
tipo,
In
mismo
debe
de
personal
all
5
Page 6
Importante
Durante
•
Prima
•
-900/.
•
ficazione
Per
di
.
Ia
evitare
(pag.
le
estarre
leva
prime
tirafilo
guasti,
7).
due
ii
tessuto
viene
bisogna
settimane
assicurarsi
portata
pulire
fare
funzionare
che
Ia
automaticamente
Ia
macchina
Ia
macchina
eva
tirafilo
nella
regolarmente
nella
sia
posizione
(pag.
solo
3/4
a
posizione
pià
23)
osservare
e
della
alta).
velocitã
piu
alta
le
massima.
(nelle
istruzioni
macchine
per
Ia
con
lubri
Norme
•E’vietato
dovranno
•
E’
vietato
La
macchina
•
Prima
•
l’ago,
eseguire
mente
con
Nelle
macchine
Per
•
effettuare
macchina
eseguiti
da
I
avon
•
sone
istruiti
E’vietato
57105.
6
di
sicurezza
utilizzare
rispettare
adoperare
di
cambiare
lavori
l’interruttore
dalla
lavoratori
suIl’equipaggiamento
a
questo
lavorare
Ia
tutte
soltanto
organi
di
manutenzione
con
motore
lavori
di
rete
d’alimentazione
specializzati.
scopo.
su
pezzi
macchina
le
Ia
dovrà
principale
manutenzione
norme
macchina
essere
di
cucitura
frizione
a
elettrico
dispositivi
o
altro
che
di
sicurezza
senza
manovrata
(ago,
o
oppure
di
e
pneumatica.
dovranno
che
peril
i
dispositivi
piedino,
lasciare
togliendo
comando
riparazione
si
trovano
suo
scopo.
valide,
dalla
ii
posto
Ia
meccanico
Si
essere
In
di
sicurezza
persona
placca
di
lavoro,
spina
dispositivi
su
eccettuano
eseguiti
sotto
tensione,
caso
d’ago,
dalla
bisogna
di
trasformazione
montati
istruita
griffa,
bisogna
rete.
aspettare
pneumatici
soltanto
soltanto
salvo
da
a
questo
Spolina,
disinserire
I
lavori
da
elettricisti
nel
casi
fabbrica.
Scopo.
ecc.),
I’arresto
bisogna
di
regolazione
previsti
in
unaltra
prima
e
a
macchina
del
disinserire
specializzati
nella
versione,
d’infilare
elettrica
motore.
prima
e
controllo
norma
Si
Ia
per
o
DIN
Page 7
tSlen
Oiling
Huller
Engrase
Lubrificazione
x-J
Fig.
1
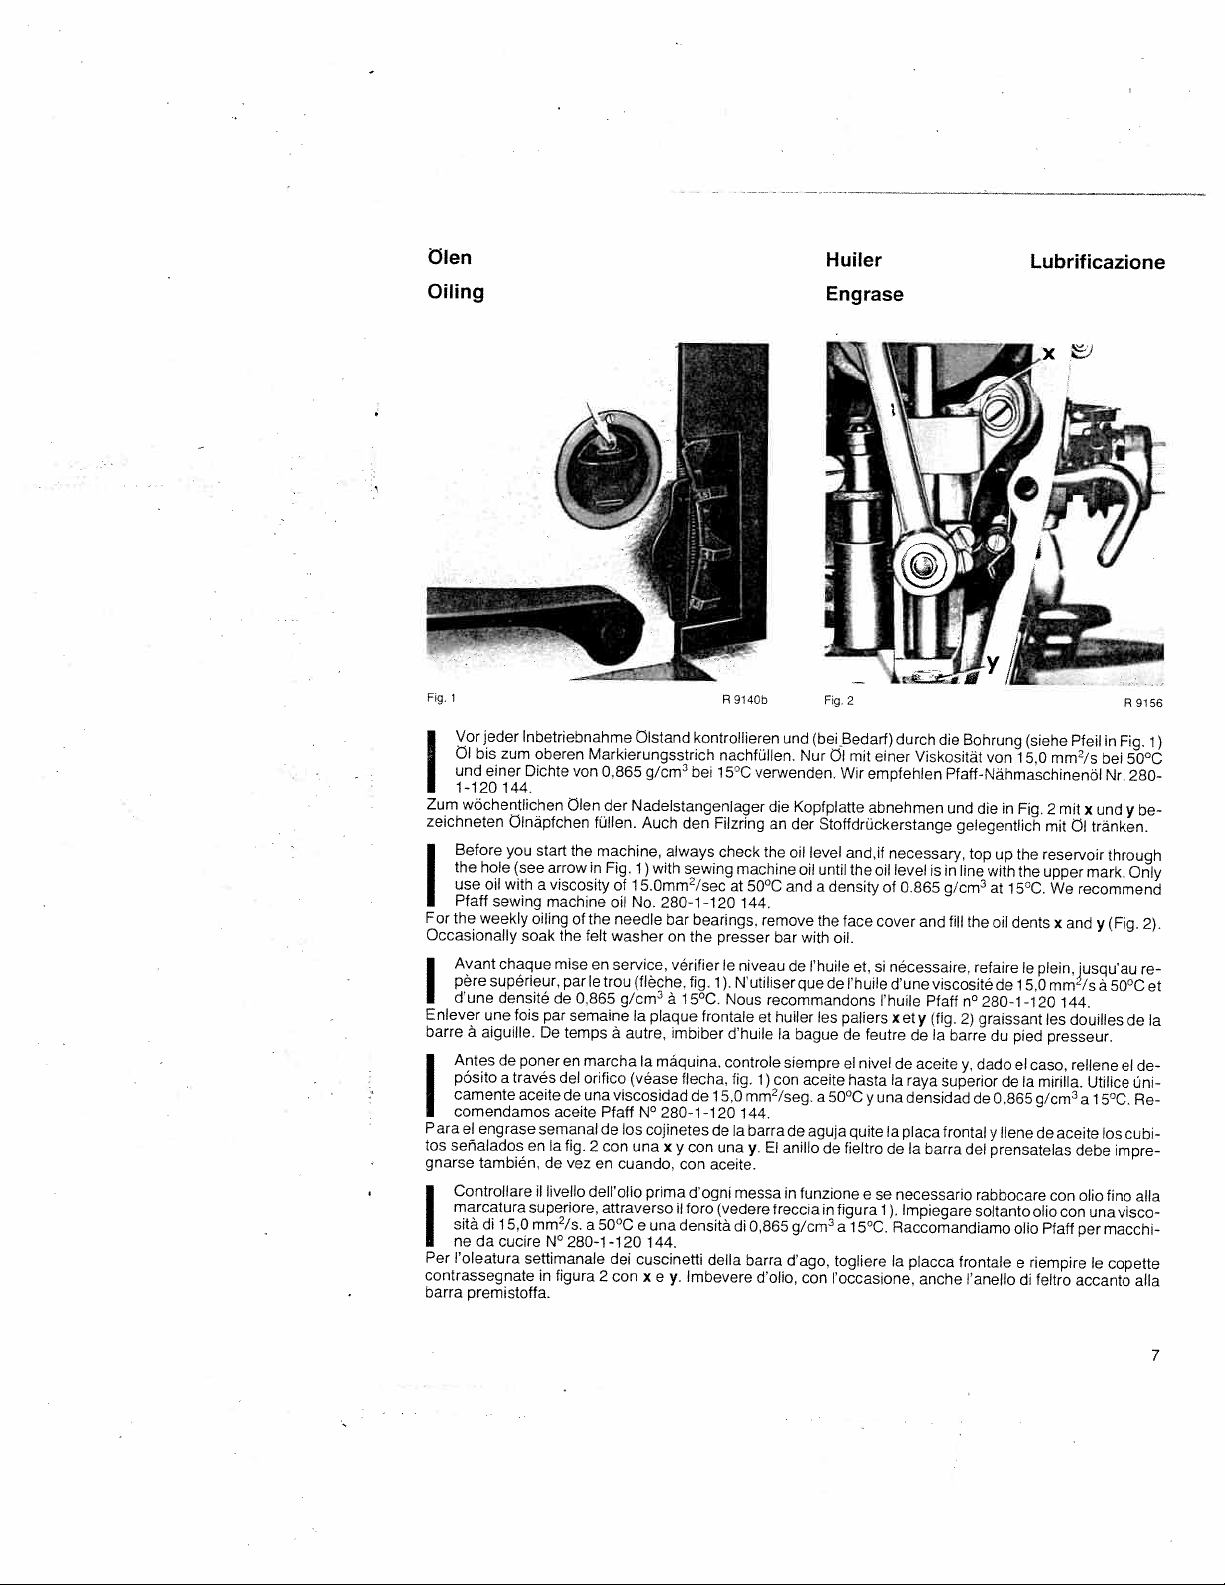
Vorjeder
Cl
bis
und
einer
1-120
I
wbchentlichen
Zum
zeichneten
Before
the
hole
oil
use
Pfaff
I
For
Occasionally
I
Enlever
barre
I
Para
tos
gnarse
I
Per
contrassegnate
barra
sewing
the
weekly
Avant
père
superieur.
dune
une
aiguille.
a
Antes
pósito
camente
comendamos
el
engrase
senalados
también,
Controllare
marcatura
sità
dii
ne
da
l’oieatura
premistoffa.
lnbetriebnahme
zum
oberen
Dichte
144.
Olnäpfchen
start
you
(see
arrowinFig.
with
viscosity
a
machine
oiling
soak
mise
chaque
densité
de
fois
par
De
poner
de
travès
a
aceite
aceite
semanal
en
Ia
de
1
livello
superiore,
mm2/s.
5.0
cucire
N°
settimanale
in
figura
Markierungsstrich
von
0.865
Olen
der
fOllen.
machine,
the
of
oil
of
the
needle
the
felt
washer
en
service.
par
le
trou
0,865
g/cm
3
semaine
temps
a
autre.
marcha
en
del
orifico
una
viscosidad
de
Pfaff
los
de
fig.
2
con
vez
en
cuando,
dell’olio
attraverso
50°C
a
280-1-120
del
2
con
R
Clstand
kontrollieren
den
always
sewing
280-1
bar
on
verifier
a
15°C.
imbiber
flecha.
280-1
xycon
con
il
foro
densità
Imbevere
y.
nachfüllen.
bei
15°C
Fiizring
check
-120
bearings,
the
presser
le
fig.
1).
frontale
de
15.0
-120
de
una
aceife.
d’ogni
(vedere
della
at
Nous
d’huile
controle
glcm
3
Nadelstangenlager
Auch
with
1)
1
5.Omm
2
/sec
No.
(flèche,
Ia
plaque
máquina.
a
(vèase
N°
cojinetes
una
prima
una
e
144.
cuscinetti
x
e
914O
verwenden.
die
an
the
machine
50°C
144.
remove
niveau
Nutiliser
recommandons
et
fig.
1)
mm2/seg.
144.
Ia
barra
El
y.
messa
di
0,865
barra
d’olio,
Fg
und
(bei
Nur
Cl
Kopfplatte
der
Stotfdruckerstange
oil
level
oil
until
and
a
density
the
with
bar
de
Ihuile
que
de
huiler
les
Ia
bague
siempre
con
aceite
a
50°C
de
aguja
anillo
de
in
funzione
freccia
in
g/cm
3
d’ago,
con
2
Bedarf)
mit
einer
Wir
empfehlen
abnehmen
and.if
oil
the
face
cover
oil.
et.
si
l’huile
l’huile
paliers
feutre
de
el
nivel
hasta
una
y
quite
fieltro
e
se
figura
1).
a
15°C.
togliere
loccasione,
durch
die
ViskositSt
Pfaff-Náhmaschinenäl
und
gelegentlich
necessary,
level
is
of
in
0.865
g/cm
3
fill
and
nécessaire.
dune
viscosité
Pfaff
xety
lfig.
Ia
barre
de
aceite
de
Ia
raya
superior
densidad
Ia
placa
frontal
barra
de
Ia
necessario
lmpiegare
Raccomandiamo
Ia
placca
anche
Bohrung
von
die
top
line
with
at
the
oil
reaire
280-1-120
n°
graissant
2)
du
dado
y.
de
0,865
y
del
prensatelas
rabbocare
soltanto
frontale
lanello
up
del
in
15°C.
dents
pied
el
de
Ilene
olio
e
15,0
Fig.
the
the
le
5.0
Ia
di
;ç
Pfeil
(siehe
mm2/s
2
mit
x
mit
Cl
reservoir
upper
mark.
We
recommend
x
and
plein,jusqu’au
mm°/s
144.
les
douilles
presseur.
caso.
rellene
mirilla.
g/cm
3
a
de
aceite
debe
con
ollo
ollo
con
Pfaff
per
riempire
feltro
accanto
el
in
Fig.
bei
Nr.
und
tränken.
through
(Fig.
y
a
50°C
Utilice
15°C.
los
impre
fino
una
visco
macchi
le
copette
R9156
50°C
280-
y
Only
de
el
Oni
cubi
1)
be
2).
re
et
Ia
de
Re
alla
alla
7
Page 8
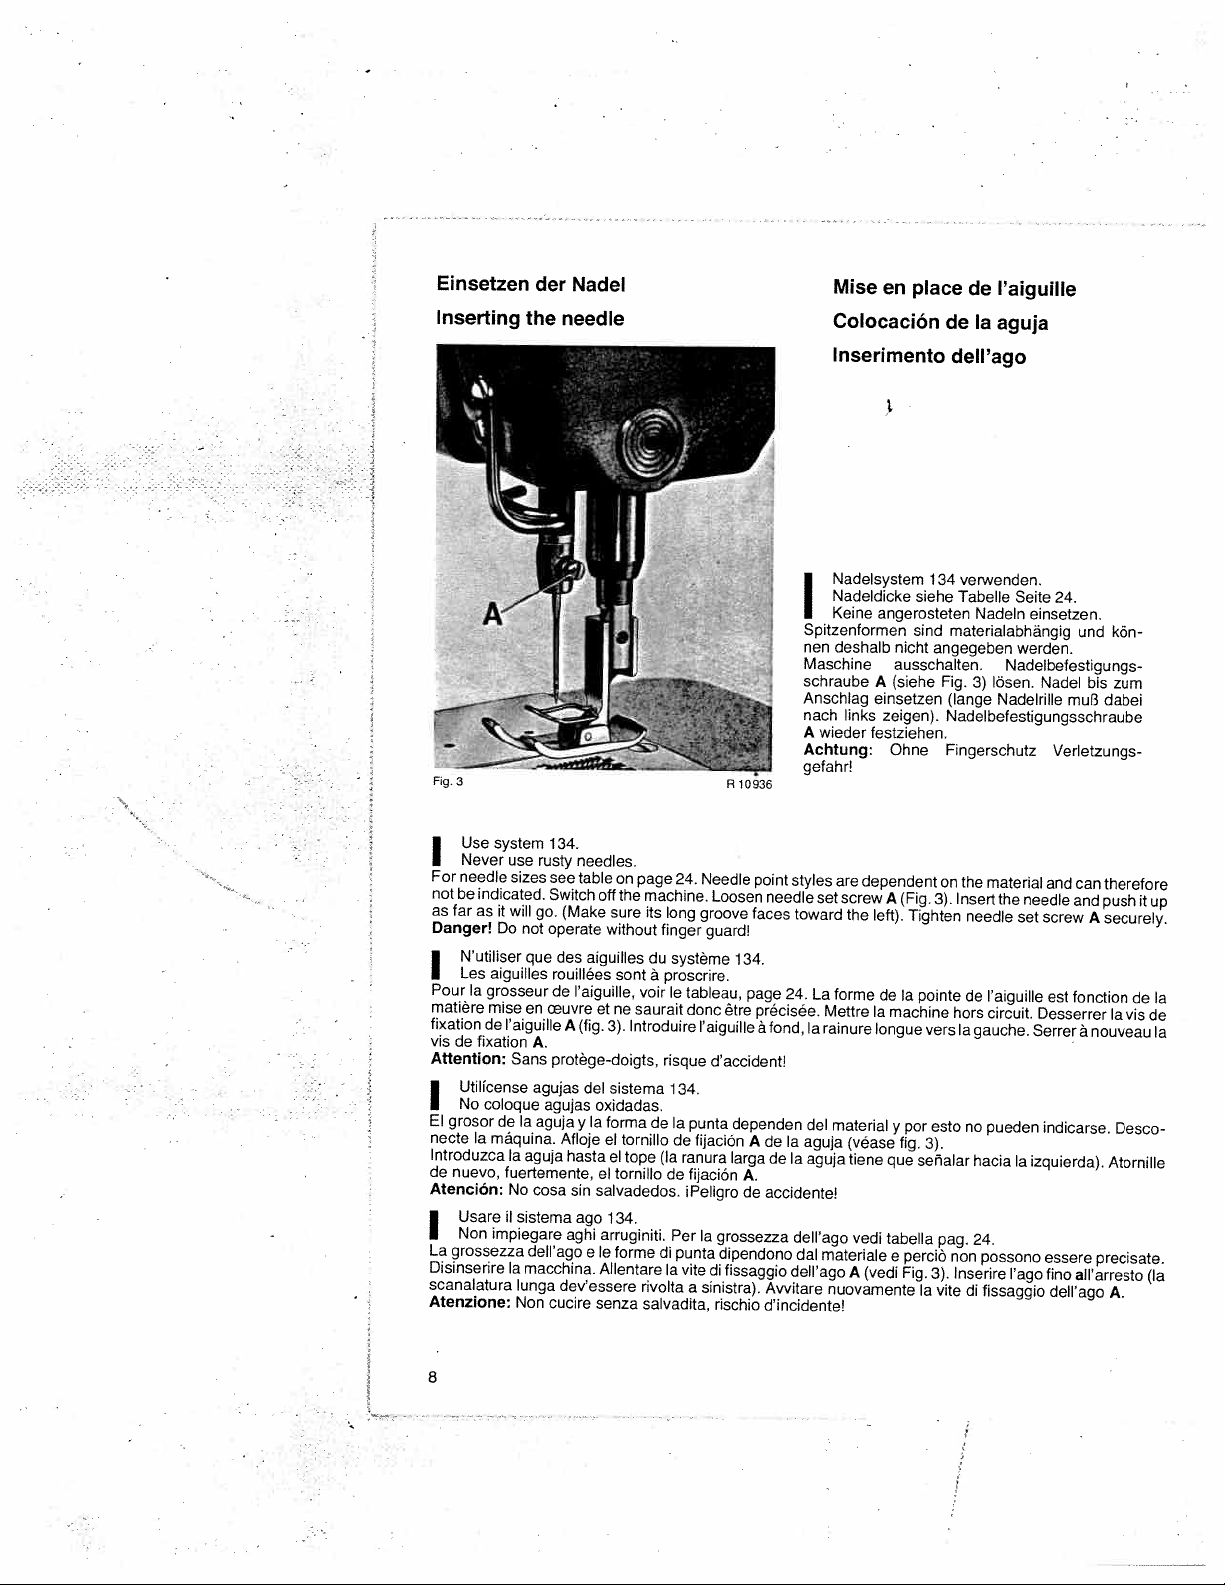
Einsetzen
Inserting
der
the
Nadel
needle
Mise
en
place
Colocación
Inserimento
de
de
Ia
dell’ago
l’aiguille
aguja
Fig.
3
system
Use
Never
needle
far
as
N’utiliser
Les
aiguilles
Ia
grosseur
mise
de
de
fixation
Utilicense
No
coloque
grosor
Ia
máquina.
nuevo,
Usare
Non
impiegare
grossezza
use
sizes
it
will
Do
I’aiguille
Sans
de
Ia
fuertemente,
No
ii
Ia
I
For
notbeindicated.
as
Danger!
I
Pour
matière
fixation
vis
Attention:
I
El
necte
Introduzca
de
Atención:
I
La
Disinserire
scanalatura
Atenzione:
134.
rusty
see
Switch
go.
operate
not
que
des
rouillées
de
en
uvre
A.
protège-doigts,
agujas
agujas
Ia
aguja
Afloje
aguja
cosa
sistema
deIlago
macchina.
lunga
dev’essere
Non
cucire
needles.
table
(Make
aiguilles
l’aiguille.
(fig.
A
del
oxidadas.
Ia
y
hasta
sin
ago
aghi
e
senza
page
on
off
the
machine.
sure
its
without
du
sont
a
voir
et
ne
saurait
Introduire
3).
sistema
forma
de
el
tornillo
el
tope
el
tornillo
salvadedos.
134.
arruginiti.
Ie
forme
Allentare
rivolta
salvadita,
24.
long
finger
système
proscrire.
le
tableau,
donc
risque
134.
Ia
punta
de
fijaciôn
(Ia
ranura
de
fijaciOn
iPeligro
Per
di
punta
vite
Ia
a
R
10936
Needle
Loosen
groove
guard!
134.
ètre
laiguille
d’accident!
dependen
larga
A.
Ia
grossezza
dipendono
di
fissaggio
sinistra).
rischio
point
needle
faces
page
précisée.
fond,
a
de
A
de
de
accidente!
Avvitare
d’incidente!
Nadelsystem
Nadeldicke
Keine
I
Spitzenformen
nen
deshalb
Maschine
schraube
Anschlag
nach
links
A
wieder
Achtung:
gefahr!
styles
are
screw
set
toward
24.
forme
La
Mettre
Ia
rainure
del
material
Ia
aguja
Ia
aguja
dell’ago
dal
materiale
deIl’ago
nuovamente
angerosteten
A
einsetzen
festziehen.
dependent
the
left).
Ia
longue
(vèase
tiene
vedi
(vedi
A
siehe
sind
nicht
ausschalten.
(siehe
zeigen).
Ohne
(Fig.
A
Tighten
de
Ia
pointe
machine
por
y
fig.
que
senalar
tabella
perciô
e
Fig.
Ia
verwenden.
134
Tabelle
Seite
Nadeln
materialabhangig
angegeben
Fig.
lösen.
3)
(lange
Nadelbefestigungsschraube
Fingerschutz
on
the
material
Insert
3).
needle
l’aiguille
de
hors
esto
pag.
3).
vite
Ia
gauche.
no
hacia
24.
non
Inserire
di
circuit.
pueden
possono
fissaggio
vers
3).
24.
einsetzen.
werden.
Nadelbefestigungs
Nadel
Nadelrille
Verletzungs
and
needle
the
screw
set
est
Desserrer
Serrer
indicarse.
Ia
izquierda).
essere
l’ago
fino
deIl’ago
und
bis
muf3
can
and
A
fonction
a
nouveau
precisate.
aIlarresto
kön
zum
dabei
therefore
push
it
securely.
de
Ia
vis
Desco
Atornille
A.
up
Ia
de
Ia
(Ia
8
Page 9
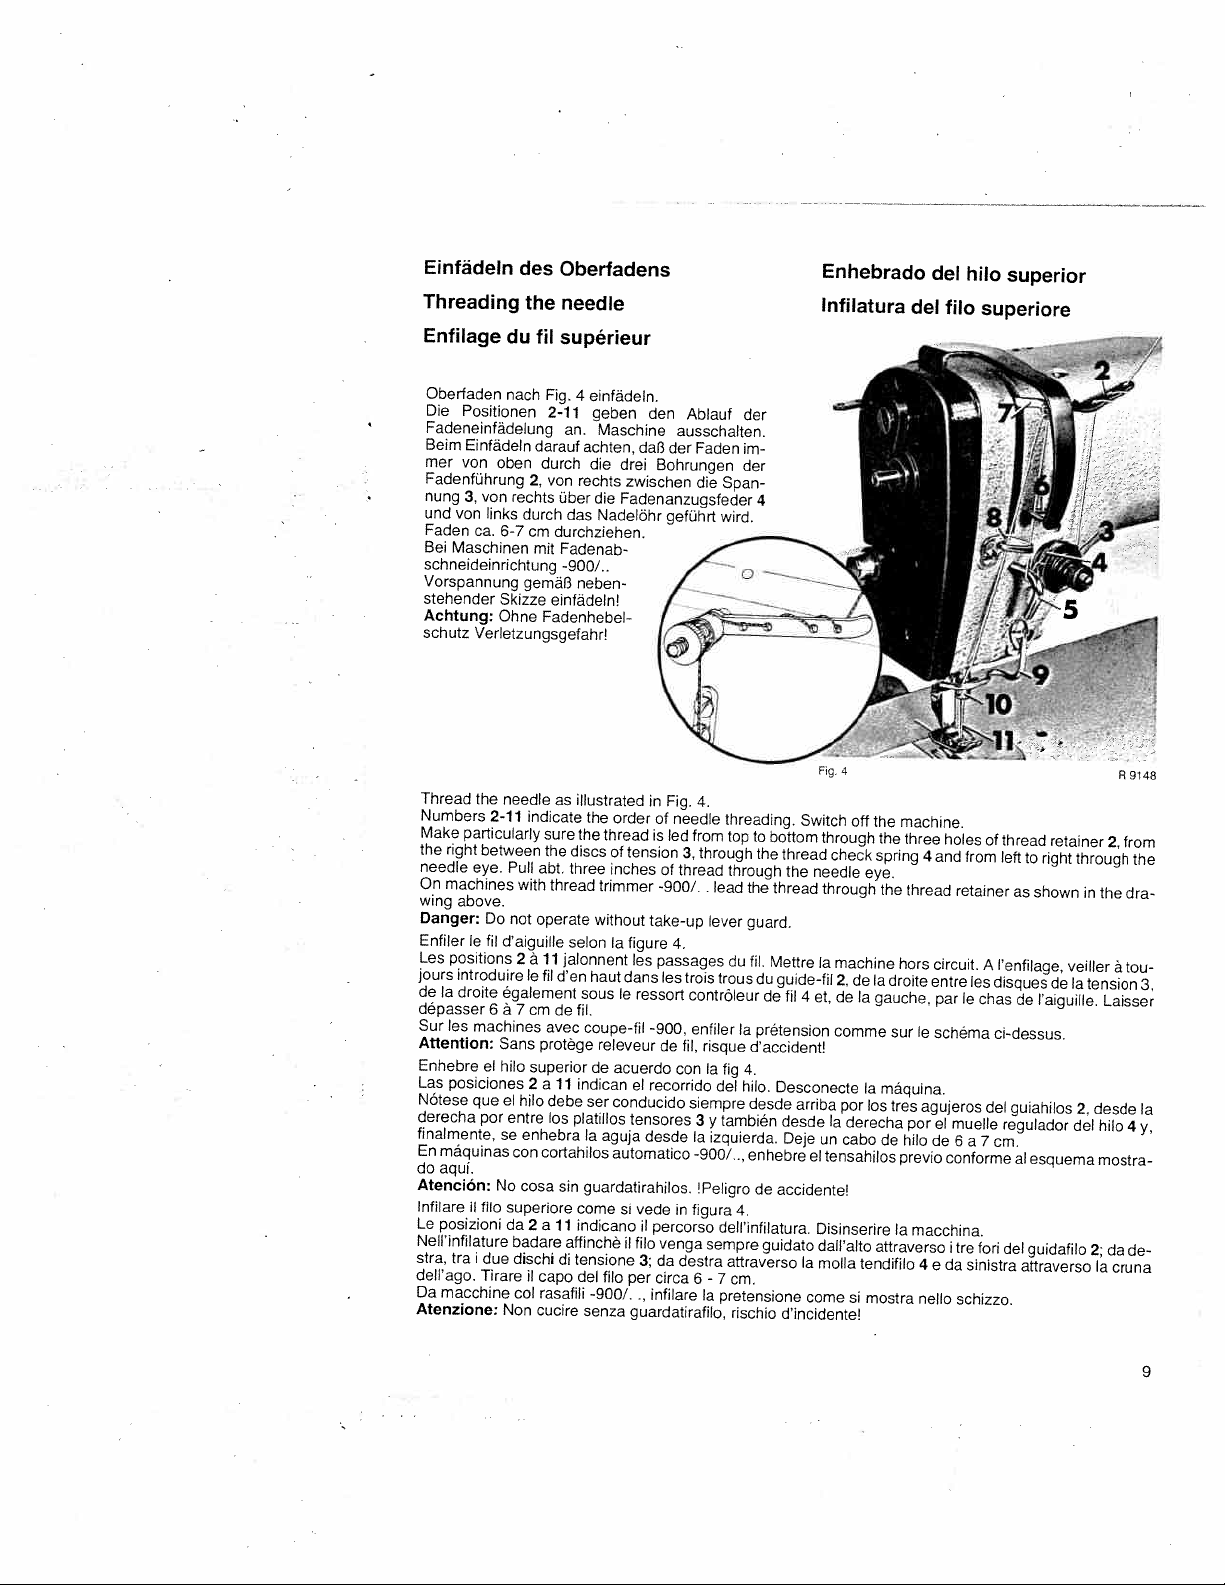
Einfädeln
Threading
Enfilage
des
the
du
Oberfadens
needle
fib
supérieur
Erthebrado
Infilatura
del
del
hilo
fib
superior
superiore
Oberfaden
Die
Fadeneinfadelung
Beim
mer
Fadenfuhrung
nung
und
Faden
Gel
schneideinrichtung
Vorspannung
stehender
Achtung:
schutz
Thread
Numbers
Make
the
needle
machines
On
wing
Danger:
Enfiler
Les
jours
deIadroite
dépasser
Sur
Attention:
Enhebre
Las
Nótese
derecha
finalmente,
maquinas
En
do
aqui.
Atención:
Infilare
Le
posizioni
NeIl’infilature
stra,
dell’ago.
Da
macchine
Atenzione:
nach
Positionen
Einfädeln
von
oben
von
3,
rechts
von
links
Ca.
6-7
Maschinen
Skizze
Ohne
Verletzungsgefahr’
the
needle
2-11
particularly
right
between
eye.
Pull
above.
Do
not
le
d’aiguille
fil
positions
introduire
egalement
6
a
les
machines
Sans
hilo
el
posiciones
que
el
por
entre
Se
con
No
il
fib
superiore
da
badare
i
due
tra
dischi
Tirare
Non
darauf
durch
2,
durch
cm
mit
gemafl
Fadenhebel
indicate
abt.
with
operate
2
a
11
le
fil
7
cm
protege
superior
2
all
hilo
enhebra
cortahilos
cosa
2a11
ib
capo
cob
rasafili
cucire
Fig.
4
einfädeln.
2-11
geben
an.
Maschine
achten,
die
von
rechts
über
die
das
Nadelöhr
durchziehen.
Fadenab
-900/..
neben
einfädeln!
illustrated
as
the
sure
the
the
discs
three
thread
without
selon
jalonnent
den
haut
sous
de
fil.
avec
coupe-fil
de
indican
debe
ser
los
platillos
Ia
sin
guardatirahilos.
come
indicano
aftinchè
di
tensione
del
-900/.
senza
den
ausscnalten.
daB
der
drei
Bohrungen
zwischen
Fadenanzugsfeder
gefuhrt
Fig.
in
order
of
is
led
tension
of
-900/.
take-up
figure
les
passages
dans
les
le
ressort
-900.
de
acuerdo
recorrido
el
tensores
desde
si
vede
il
percorso
1
fib
venga
3;dadestra
per
circa
..
infilare
guardatirafilo,
needle
thread
4.
con
in
thread
of
inches
trimmer
Ia
releveur
conducido
aguja
automatico
fib
Ablauf
Facten
die
Span
wird.
4.
threading.
from
top
through
3,
through
.
lead
lever
trois
trous
contrOleur
enfiler
risque
fil,
Ia
fig
del
siempre
3ytambién
Ia
izquierda.
-900/..,
Peligro
figura
dell’infilatura.
sempre
attraverso
-
7
6
Ia
pretensione
der
rn
der
4
to
the
the
guard.
fil.
du
du
de
Ia
pretension
d’accident!
4.
hilo.
desde
enhebre
de
4.
guidato
cm.
rischio
Fig.4
Switch
bottom
thread
the
needle
thread
Mettre
guide-fil
fil
4
et,
Desconecte
arriba
desde
Deje
un
el
accidente!
Disinserire
daII’abto
Ia
molla
come
d’incidente!
off
through
check
through
a
machine
2.
de
de
Ia
comme
por
Ia
derecha
cabo
tensahilos
tendifilo
si
the
machine.
the
spring
eye.
the
hors
Ia
droite
gauche,
sur
Ia
máquina.
los
tres
de
hilo
previo
Ia
attraverso
mostra
three
holes
4
and
thread
circuit.
entre
par
le
schema
agujeros
el
por
de
conforme
macchina.
4
edasinistra
nello
from
retainer
les
le
muelle
6a7
tre
i
schizzo.
—
of
thread
left
A
renfilage.
disques
chas
ci-dessus.
del
regulador
cm.
fori
del
‘—7
retainer
to
right
as
shown
de
l’aiguille.
de
guiahilos
al
esquema
guidafibo
attraverso
through
in
veiller
Ia
tension
2.
del
2;
2,
the
a
Laisser
desde
hilo
mostra
da
Ia
cruna
R9148
from
the
dra
tou
4
de
3,
Ia
y,
9
Page 10

Aufspulen
Winding
•
I
the
des
bobbin
Unterfadens
9141
A
Den
von
der
•
•
gersinn
gen
Windungen,
der
Maschine
Die
Fullmenge
lung
des
spannung
Lead
tension
bin
winder
wound
required.
clockwise
10
urn
Schaitnockens
fester
the
thread
15.
Place
is
on
the
The
for
Garnrolle
die
durch
der
engaged
bobbin
thread
a
tighter
kommenden
Spulenfadenspannung
ebenfalls
bzw.
from
bobbin
irn
Niederdrücken
Spule
kann
a
korrigiert
durch
the
spool
16
on
while
the
can
be
tension
tension
Uhrzeigersinn,
nach
Fechtsdrehen
down
spindle
machine
regulated
is
regulated
(Fig.
Faden
(15)
des
Lösen
werden.
and
17
by
5).
zuerst
durch
führen.
Spule
aufwickeln.
Schaltnockens
der
Befestigungsschraube
An
der
Rändelscheibe
loser
(siehe
through
thread
and
wind
few
running
turning
a
by
screw
thumb
is
loosening
by
die
Fadenfuhrungen
16
auf
Das
Einschalten
a.
Fig.
5.)
guides
turns
on
depressing
b
and
nut
18
Spindel
(18)
12,
13
it,
again
stop
setting
clock(ise
b
and
17
durch
wird
in
latch
cam
stecken
des
durch
14
and
a
clockwise
a.
a
for
(12,13,14)
und
Spulers
Verändern
Linksdrehen
clockwise
The
amount
higher
a
looser
sowie
den
Faden
geschieht
der
around
direction.
of
or
lower,
tension
rn
Uhrzei
mit
bei
laufen
Häheneinstel
die
Faden
thread
The
bob
thread
to
as
may
or
counter
eini
be
be
Page 11

Bobinage
Bobinado
Avvolgimento
Enfiler
lefil,
montre,
Placer
:-
tours
sur
Le
remplissage
ment
vertical
Pour
augmenter
duire
a
autour
a
canette
a
tension
du
del
venant
de
canette.
de
de
du
fil
hilo
del
de
Ia
tension
16
sur
Embrayer
Ia
canette
a
came
Ia
pretension,
fil
(fig.
inférieur
inferior
fib
a
bobine,
15.
Ia
broche
peut
a.
5).
inferiore
d’abord
17
a
canette,
être
tourner
par
et
enrouler
modifié,
le
disque
es
pendant
guide-fil
le
fil,
Ia
après
moleté
12,13
dans
marche
le
desserrage
18
vers
et
14,
puis,
dans
le
sens
des
aiguilles
le
sens
des
de
a
Ia
gauche;
aiguilles
machine,
de
Ia
vis
le
en
abaissant
de
fixation
tourner
de
montre,
vers
Ia
b,
par
Ia
droite
de
came
le
dune
quelques
a.
deplace
pour
ré
En
primer
lugar,
el
hilo
agujas
del
enrollan
en
marcha,
cantidad
ajuste
al
quantita
del
fib
reloj,
unas
vertical
girandolo
il
fib,
gruppo
in
senso
di
in
il
disco
(vedi
de
hilo
proveniente
fib
abtezza
se
na
La
.
el
aumenta;
Guidare
attorno
sempre
commutazione
La
posizione
Girando
ne
•
.
por
el
vueltas
se
efecta
que
de
Ia
a
tensione
orario.
a.
da
avvobgere
della
zigrinato
fig.
5).
procedente
tensahilos
de
presionando
debe
leva
a
derecha,
dalla
della
Linserimento
leva
(18)
hilo
en
bobinarse
de
mando
spobina
nebba
di
verso
spola
del
carrete
de
Ia
bobina
Ia
bobina
Ia
leva
puede
a.
Girando
dicha
tension
filato,
(15).
avviene
spoblina
sinistra
puO
o
commutazione
se
(15)
en
el
de
regularse,
disminuye
prima
lnfilare
con
essere
a.
verso
pasa
A
continuaciôn
sentido
mando
el
disco
attraverso
a
spolina
macchina
destra,
por
los
guiahilos
de
las
agujas
(a).
después
moleteado
(véase
i
guidafili
16
in
variata
svitando
rispettivamente
se
de
fig.
sullasse
moto
coloca
del
aflojar
(18)
5).
(12,
per
Ia
2,1
(1
Ia
reloj.
el
tornillo
a
Ia
13,
ed
avvolgere
mezzo
vite
di
aumenta
3,14)
y,enel
bobina
conexión,
La
de
izquierda,
14)
e
di
pressione
fissagio
o
sentido
16
en
el
con
fijaciOn
Ia
tensiOn
poi,
in
senso
alcune
b
per
diminuisce
husillo
Ia
mãqui
b,
variando
del
orario,
spire
sulla
eva
cambiare
Ia
tensbo
de
las
17y
hilo
di
fib
di
Ia
11
Page 12

Einsetzen
Inserting
der
Spulenkapsel
the
bobbin
case
Mise
en
place
deIaboite
canette
a
Die
Fig.
I
leichtem
Bei
hindurchziehen,
feder
lassen.
Maschine
Oberkapsel
nsert
direction
I
Hold
the
tip.
rear
its
the
Turn
the
Place
Introduire
aiguilles
I
en
Tout
jusqu’à
machine
Ia
course.
12
gefüllte
6).
in
the
bobbin
Pull
balance
bobbin
retenant
qu’iI
ce
hors
Placer
Spule
Festhalten
ausschalten.
Greifer
bobbin
full
arrow
(see
fast
abt.
out
wheeltobring
case
Ia
canette
montre
dune
legerement
réapparaisse
circuit.
Ia
bolteacanette
in
so
der
er
bis
einsetzen
into
in
pull
and
2
into
garnie
Tourner
die
Spule
hinter
the
Fig.
the
inches
the
(flèche,
Ia
derriere
Oberkapsel
Fadeninden
den
der
Fderzunge
Durch
Drehen
(Fig.
7).
bobbin
case
6)
into
thread
thread.
of
take-up
the
hook
sewing
dansIabolte
fig.
6).
canette,
languette
Ia
volant
le
garnie
einsetzen,
Schlitz
H
Handrad
am
when
that
so
(Fig.6)and
G
slot
Switch
off
to
lever
(Fig.
7).
canette,
a
faire
passer
du
jusquà
danslecrochet
quelelevier
Ce
daB
wieder
the
its
fil
le
ressort
der
Faden
(Fig.6)einhängen
G
hervorkommt.
Fadenhebel
the
pull
you
under
machine.
point.
highest
manière
de
H.
7).
fente
Ia
Laisser
releveur
depuis
(fig.
rn
Uhrzeigersinn
Fadenende
in
thread
the
tension
le
que
(fig.
G
dépasser
de
und
hdchste
the
bobbin
spring
Ill
déroule
se
sous
6)
ehviron
filsetrouve
ablauft
unter
Ca.
Stellung
turns
until
H
dans
ressort
le
5cm
au
der
5cm
bringen.
in
point
(siehe
Spannungs
überstehen
a
clockwise
it
emerges
sens
le
tension,
de
.
Mettre
fil
de
hautdesa
Pfeil
at
des
Page 13

Colocación
Inserimento
Coloque
(véase
I
Sujetando
sor
Desconecte
lntroduzca
Tenendo
tensione
Disinserire
piena
hasta
La
fig.
ligeramente
que
spolina
6)
leggermente
fino
nella
bobina
Ia
flecha,
aparezca
máquina.
Ia
bobina
a
che
a
macchina.
Ia
capsula
de
della
fig.
piena
cápsula
Ia
Ilena
6).
Ia
lena
va
Ia
non
ed
capsula
en
bobina,
nuevo
de
Gire
en
inserita
spolina,
fuoriesce
Girando
inserire
el
Ia
Ia
volante
cápsula
nel
enganche
por
il
bobina
Ia
de
detrás
hasta
y
capsula
volantino,
chrochet
de
colOquela
cápsula
nella
agganciare
nuovamente
el
de
portare
(fig.
forma
hilo
Ia
que
in
fib
il
dietro
que
Ia
en
lengueta
palanca
Ia
en
modo
nella
ii
7).
el
ranura
elástica
garfio
el
che
fessura
linguetta
a
tendifibo
hilo
corra
(fig.
G
tirahilos
(f.
il
fib
(fig.
G
della
nella
en
y
6)
dejando
H,
de
7).
scorra
6)
molla
posizione
sentido
el
páselo
halle
tirarlo
e
in
H.
por
que
en
senso
Tirare
pià
las
de
debajo
sobresalga
posición
su
orario
aldisotto
Ca.
Mettere
alta.
agujas
del
della
5cm
muelle
unos
superior.
(vedi
di
Ia
del
5cm.
freccia
molla
fib
spolina
reloj
ten
di
fuori.
RoilfuB
Rollfua
ausschwenken
hochstellen,
Disengaging
roller
the
Raise
Escamotage
barre
Ia
Lever
Desconexión
pie
Levante
el
Svincolazione
piedino
il
Elevare
the
presser,
du
pied
du
del
rodante,
a
nach
roller
pied
a
del
rotella,
unten
pull
a
roulette,
pie
un
tire
piedino
tirarlo
(bei
ziehen
presser
it
downwards,
roulette
tirer
rodante
poco
in
tinterklasse
und
pied
le
(en
hacia
él
de
rotella
a
girarbo
giü
e
nach
(on
then
(en
quelque
-944/01)
links
subcl.
swing
sous-classe
subclase
Ia
abajo
(nella
sinistra.
a
schwenken.
-944/01)
ittothe
-944/01)
vers
peu
-944/01)
desviebo
y
sottoclasse
left.
le
bas
hacia
l’escamoter
et
izquierda.
Ia
-944/01)
vers
Ia
gauche.
13
Page 14

Herautholen
Drawing
up
des
the
bobbin
Unterfadens
thread
Remonter
Extracción
Estrazi
9
ne
le
del
del
f
ii
inférieur
hilo
fib
inferior
inferiore.
off
Switch
Hold
comes
Pull
under
(Disregard
the
the
the
the
endofthe
through
up
needle
presser
above
the
machine.
MettreIamachine
le
fil
Tenir
de
Tendrelefil
sous
(Sur
Desconecte
Sujete
zada
Tire
coloque
(Eata
supérieur
boucle
par
le
d’aiguille
Ia
semelle
lea
machines
itquipees
a
hilo
superior
el
por
el
agujero
del
superior
hilo
puntas
las
operaciitnSeelimina
needle
the
needle
threadtodraw
foot.
if
your
steps
hors
circuit.
tournerlevolant
et
trou
a
de
et
tirer
du
presseur.
pied
du
coupe-fil
máquina.
gire
y
de
Ia
placa
hasta
ambos
de
en
mitquinas
thread
hole
the
machine
plaque
ainsilefil
el
volante
que
hilos
equipadas
is
-900/..,
de
haya
and
in
a
bobbin
equipped
aiguille.
a
inférieur
cette
en
aguja.
salido
hacia
turn
loop.
den
operation
sentido
con
the
thread
with
haut
el
atrás
el
cortahilos
balance
a
subclass
hors
hilo
por
through
up
vers
de
superflue).
est
normal
inferior
debajo
automittico
soi
Ia
Maschine
Obertaden
richturtg
als
den
Schlinge
Durch
Anziehen
aus
dem
beide
Fadenenden
ten
legen.
Dieser
Arbeitsvorgang
schneidvorrichtung
wheelinsewing
the
needle
-900/thread
plaque.
jusquà
hasta
por
del
Coucher
que
el
pie
-900/..).
trimmer)
ce
agujero
ausschalten.
festhalten
der
Maschine
dem
aus
des
Stichloch
Oberfadens
herausziehen.
unter
entfitllt
-900/..
direction
hole.
Finally
le
fil
inférieur
que
ensuite
aparezcaelhilo
placa
de
Ia
prensatelas.
und
drehen,
dem
bei
les
Handrad
das
Stichloch
Steppful3
Maschinen
until
the
lay
both
paraisse
deux
inferior
aguja.
de
der
bis
Unterfa
kommt.
den
Unterfaden
Anschliel3end
nach
mit
bobbin
threads
sous
fils
vers
l’arrière,
en
forma
Finalmente
in
Dreh
Fadenab
thread
forme
de
hin
back
Ia
Disinserire
Tenere
fermo
fuori
dab
Tirando
verso
retro.
(Quests
operazione
14
foro
ii
fib
Ia
macchina.
ii
fib
cucitura
di
superiore,
manca
superiore
in
estrarre
nelle
girare
ii
e
formadicappio.
ii
fib
inferiore
macchine
con
dispositivo
volantino
dal
rasafili
in
direzione
foro
-900/..).
di
cucitura.
normale
Quindi
fino
quando
a
disporre
i
capi
lb
fib
del
inferiore
non
fili
sottolbpiedino
viene
Page 15

I
Regulieren
Regulating
der
Fadenspannung
the
thread
tensions
Réglage
Regulación
Regolazione
de
Ia
tension
de
della
Ia
tensiOn
des
tensione
del
fils
del
hilo
R
fib
9787
Nach
Turn
right
Rotation
Girando
Girando
Oberdie
Verschlingung
Regulate
stitches
Regler
La
tensiOn
Ia
lazada
Regolare
centro
rechts
drehen:
for
tighter
a
droite:
a
a
a
und
both
are
ces
se
reciprocamente
del
tension
Ia
derecha:
destra:
piü
Unterfadenspannung
in
tensions
tightly
set.
tensions
de
ambos
forme
materiale
fester.
der
de
hilos
dentro
da
tension.
Ia
tension
forte,
Mitte
so
that
manière
tiene
del
le
cucire.
Nach
plus
Girando
des
the
tejido.
tensioni
links
Turn
forte.
aumenta.
so
aufeinander
NOhgutes
needle
que
que
drehen:
left
for
Rotation
a
sinistra:
les
fils
estar
regulada
superiore
a
Girando
and
soient
loser
weaker
a
gauche;
piü
leggera.
abstimmen,
erfolgt.
bobbin
bien
de
e
inieriore
tension.
a
a
threads
rentrés
tal
tension
izquierda:
daB
forma,
in
modo
plus
die
beiden
interlock
et
se
que
las
che
faible.
a
tensiOn
in
the
nouent
puntadas
entrambi
disminuye.
Fäden
center
dans
i
fili
gut
eingezogen
of
l’ouvrage.
queden
siano
the
material
bien
ben
asentadas
tirati
sind
and
proprio
und
the
y
in
15
Page 16

Einstellen
Stitch
length
der
Stichlänge
regulation
Réglage
de
Regulación
Regolazione
1.
Ia
Iongueur
del
largo
della
du
de
puntada
lunghezza
point
punto
Sperrblech
Zum
Rückwärtsnähen
Press
in
sew
a
couture
coser
locking
in
reverse,
sur
Ia
il
lamierino
To
Appuyer
désirée.
Pour
Presione
Para
Premere
desiderata.
Peracucitura
16
Sp
le
chapa
en
drücken
lever
operate
verrou
en
arrière,
de
retroceso
in
retromarcia
und
am
Umschalttaste
and
Sp
finger-tip
Spettourner
abaisser
bloqueo
presione
di
sbarramento
azionare
Einstellrad
turn
control
le
le
Spygire
simplemente
gewunschte
St
T
betatigen
St
to
control
T
(see
disque
de
levier
T
(fig.
el
disco
Speinserire
ii
tasto
di
(siehe
Fig.
desired
stitch
Fig.
11).
réglage
regulador
Ia
commutazione
11).
palanca
sul
volantino
St
jusqu’à
Stichlange
11).
length.
St
hasta
para
inversion
di
T
einstellen.
que
ce
obtener
regolazione
(vede
fig.
soit
de
obtenue
el
largo
costura
11).
St
Ia
puntada
de
(fig.
T
Ia
lunghezza
longueur
11).
de
point
deseado.
di
punto
Page 17

Anheben
Lifting
the
StoffdrUckerfuBes
des
presser
foot
Relevage
du pied
Elevación
Sollevamento
premistoffa
del
presseur
pie
prensatelas
del
piedino
Zum
Anheben
ne
ausschalten,
achten,
daB
Raise
the
chine,
ters
:
‘1
Du
chine,
genouillere
Para
hacia
de
Per
Peril
ne
presser
pull
groove
the
genou,
meifre
elevar
atrás,
que
el
perno
sollevamento
II
ribaltamento
v
si
inserisca
Stoffdrückerful3es
des
den
der
Bolzen
foot
the
knee
in
coupling
pousser
Ia
machine
en
place,
el
pie
prensatelas
desconéctela,
encaje
v
della
nelba
Kniehebel
vindie
by
lever
Ia
genouillère
hors
veiller
del
piedino
testa
scanalatura
pressing
sharply
sleeve
circuit,
ace
quite
y
en
Ia
tirare
Kniehebel
mit
einem
Nut
der
the
knee
towards
(see
q
vers
enlever
que
le
presione
Ia
palanca
muesca
premistoffa,
un
po’ in
del
nach
klelnen
Kupplungsmuffe
lever
to
the
front.
Fig.
12).
Ia
droite
pour
Ia
genouillere
boulon
v
Ia
palanca
rodilla
de
del
manguito
premere
avanti
manicotto
rechts
Ruck
the
right.
When
lever
s’engage
de
rodilla
tirando
de
verso
Ia
predetta
d’innesto
drücken.
nach
vorn
eingreift
q
To
tilt
back
mounting
le
pied
presseur.
d’un
leger
dans
Ia
hacia
Ia
de
ella
acoplamiento
destra
Ia
ginocchiella.
(vedi
fig.
q
Umlegen
Zum
abziehen.
(siehe
the
sewing
knee
the
Avant
coup
sec
rainure
derecha.
hacia
adelante.
(véase
q
ginocchiella.
Nella
12).
Fig.
lever
vers
du
Antes
des
Beim
12).
head,
make
coucher
de
l’avant.
manchon
de
Al
fig.
Disinserire
spinta,
Oberteils
Einschieben
switch
sure
Ia
En
(fig.
q
inclinar
introducirla,
12).
badare
Maschi
off
pin
that
tête
remettant
12).
Ia
máquina
cuidese
Ia
macchina.
che
darauf
the
v
de
II
bulb
ma
en
ma
Ia
17
Page 18

Regulieren
Regulating
des
SteppfuBdruckes
the
presser
foot
pressure
Reglage
presseur
de
Ia
pression
du
pied
Regulacion
prenstelas
Regolazione
piedino
de
Ia
della
presión
pressione
del
pie
del
Durch
•
Rechtsdrehen
Durch
Linksdrehen
screw
When
When
the
screw
Tourner
Par
Girando
girandolo
•
Girando
GirandoIavite
18
a
rotation
el
hacia
verso
vis
a
tomillo
is
19
de
gauche,
a
destra
predetta
turned
is
turned
reglage
regulador
izquierda,
der Stellschraube
entsprechend
right,
to
the
to
the
19
vers
pression
cette
hacia
19
dicha
a
vite
di
posizionamento
verso
sinistra,
verringert,
the
left,
it
is
a
droite
diminue.
a
presiOn
wird
19
pressure
decreased.
pour
derecha,
disminuye.
si
ottiene
der
Druck
on
the
augmenter
Ia
presión
19,
viene
linverso.
auf
den
material
pression
a
pie
del
aumentata
Steppful3
is
increased.
sur
prensatelas
Ia
pressione
verstärkt;
pied
le
presseur.
aumenta;
sul
piedino.
Page 19

Kantenbeschneideinrichtung
Edge
trimmer
•
.
•
-
-
‘
Taste
1
richtung
Messer
Motor
und
rn
unteren
Push
control
Danger!
Changing
Switch
off
lowest
point,
Abaisser
Attention:
Echange
Arréter
le
position
Pulsando
ta.
Atención:
Cambio
Desconecte
deberá
quedar,
Per
inserire
alto.
Atenzione:
Cambio
Disinserire
coltello
51
nach
ausgeschaltet.
auswechseln
Schneideinrichtung
Keep
the
the
a
du
moteur
basse,
Ia
deIacuchilla
del
ii
trovi
-731
unten
drücken:
Umkehrpunkt
1
down:
fingers
knife
motor
and
it
should
touche
1:
Ne
pas
mettre
couteau
et
débrayer
trouver
se
palanca
1
acerque
No
el
motor
y
en
el
ii
dispositivo
Non
coltello
motore
ed
nel
punto
/01
Achtung:
Ca.
The
trimmer
away
the
positioned
be
couteau
Ia
a
environ
hacia
abajo,
Ia
el
dispositivo
punto
muerto
tagliarnargini,
toccare
ii
dispositivo
morto
from
main
Schneideinrichtung
1mmunter
edge
le
mano
ii
-731/01
Nicht
ausschalten.
is
engaged.
moving
trimmer.
abt.
embrayé.
dans
couteau.
1
mm
el
dispositivo
Ia
a
recortador.
inferior,
premere
coltello
funzionante,
tagliamargini.
inferiore,
in
das
Schrauben
der
knife!
Loosen
mm
1
Pousser
le
couteau
Desserrer
plus
cuchilla
a
dovrà
eingeschaltet.
laufende
Gegenschneide
Push
below
bas
en
Afloje
1
mm
ii
restare
control
screw
the
Ia
touche
en
action.
a
vis
que
recortador
marcha.
los
aprox.
tasto
rischio
Allentare
ca.1mm
Messer
2
le
1
Dispositif
Dispositivo
Dispositivo
Taste
greifen,
Iösen
und
Messer
stehen
up:
1
The
and
2
change
stationary
1
vers
le
Risque
et
sortir
2
contre-couteau
tornillos
verso
se
conecta:
iPeligro
2
por
debajo
ii
basso;
d’incidente!
le
viti
2
sotto
le
y
e
raser
a
recortador
tagliamargini
nach
1
Verletzungsgefahr!
auswechseln;
(siehe
Kreis).
trimmer
the
knife.
cutting
edge
haut:
couteau
d’accident!
couteau,
(voir
pulsándola
accidente!
de
cambie
Ia
contracuchilla
de
Ia
per
disinserirlo,
cambiare
ii
controcoltello
les
oben
is
disengaged.
When
(see
débrayé.
Le
couteau
cercie).
hacia
cuchilla.
II
coltello,
bords
-731
drücken:
the
encircled
arriba,
La
premerlo
Cuando
(vedi
-731
Schneidein
das
Messer
knife
neuf
nueva
(v.
cIrculo).
circolo).
-731
/01
view).
devra,
se
/01
/01
soil
is
at
conec
cuchilla
verso
ii
nuevo
its
en
ii
19
F
Page 20

Funktionen
Functions
Nähen
Ruhestellung:
Nähfäden
NähfuB
chender
Rückwärtsnähen
(-911/01).
(-911/03;/05).
lung
1
Automatisches
der
Tretplatte
Zwischenverriegeln
Stellung
bis
zur
abschneiden
anheben
Stellung
DrUcken
und
1
der
of
max.
Zurücknehmen
nach
Drücken
Tretplatte(n)
pedal(s)
Stichzahl:
(-9101..):
Kippschalters
des
bzw.
Verriegeln
der
Handtaste
Verriegeln
vorn
in
innerhalb
der
und
Betatigen
Tretplatte
der
(-900/..):
Ruckwartsbetatigen
Ruckwartsbetatigen
am
(-911
am
am
Nahtanfang
Stellung
Handtaste
der
1
bzw.
Naht
am
Schalter
der
Tretplatte
von
Stellung
der
Steuerkasten
I..):
Maschinenkopf
Maschinenkopf.
Tretplatte
Betätigen
bzw.
Nahtende
nach
hinten
(-911/35;137;/95):
bei
bis
Steflung
1
bzw.
Tretplatte
der
bis
Stellung
Nahunterbrechung
jeder
beider
Tretplatten
und
Betätigen
(-911/15;117;/35;/37
in
Stellung
1.
2
oder
bis
3.
Betatigen
3
in
Stellung
oder
2
nach
der
rechten
der
0.
3,
vorn
Tretplatte
3
3.
auBerdem
(Stellung
in
Stellung
Tretplatte
und
/95):
bei
0).
nach
1
entspre
1
und
Stel
bis
Betatigen
vorn
4
in
Sewing
Rest
Cutting
Lifting
corresponding
Reverse
switch
Automatic
position
Intermediate
knuckle
20
up
position:
the
the
sewing
on
machine
or
1,
switch
to
max.
speed:
Depress
sewing
presser
position
or
backtacking
head
backtacking
backwards
backtacking
on
machine
the
threads
foot
of
and
at
to
Press
pedal
(-900/..):
(-910/..):
the
toggle
press
beginning
position
within
head.
pedal
the
from
Press
switch
(-911/..):
right
and
3.
seam
position
to
position
1,
2,
Press
pedal
(-911/35/37/95):
the
on
Press
end
the
pedal
the
to
of
pedal
control
both
position
seam
1.
or
3,
to
0.
backwards
backwards
box
pedalstopositions
1
(-911/15/17/35/37/95):
to
to
position
at
each
(-911/03/05).
Press
pedal
position
sewing
1
and
forwards
3.
2
or
3;
interruption
4
(-91
Press
to
it
is
1/01).
position
also
(position
Press
pedal
1
liftedatthe
0),
knuckle
forwards
actuate
and
to
Page 21

Fonctions
Funciones
Funzioni
del
des
de
pédales
los
pedali
pedales
del
e
et
des
interruptores
e
interruttore
interrupteurs
Couture
Position
Coupe
Relevage
teur
Couture
(-911/01).
(-911
Bridage
en
Arrêts
tête
Costura
Posición
Corte
Elevación
siempre
vez
Costura
Con
dOn
Rematado
hasta
•
Rematado
cabeza
jusqu’a
repos:
de
des
fils
(-900/.
du
a
position
de
queseinterrumpa
-911/036
1.
pied
bascule
de
marche
en
Appuyer
/03;/05).
automatique
1
ouIatalonner
intermédiaires
Ia
machine.
hasta
neutra:
de
los
hilos
del
prensatelas
que
el
en
retroceso
/05:
automático
Ia
posiciOn
intermedio
de
Ia
máquina.
Ia
interruptor
Ia
vitesse
faire
(-910/.
Ia
bolte
arrière
sur
au
(-911
velocidad
Haga
(-900/..):
Ia
o
pulse
1
0
3.
maximale:
revenir
.):
talonner
talonner
.):
du
moteur,
et
manocontact
debut
en
position
/35;/37;/95):
maxima:
volver
el
Pise
(-910/..):
basculante
costura
rematado
microrruptor
el
comienzo
points
eta
le
al
(-911/35,/37
pédale
a
Ia
pOdale
Ia
chaque
a
sur
Ia
fin
3.
Pise
pedal
de
el
pedal
Pise
de
(posician
(-911
al
y
/95):
y
abaisser
des
pédale
d’arrêt
Ta
de
abaisser
el
a
posición
hasta
el
pedal
a
caja
0),
I..):
Con
en
Ia
final
Pise
Ia
positions
en
position
en
position
interruption
(-911/.
têtedeIa
Ia
couture
Ia
pedal
a
posicion
hasta
de
mandos
-911/01:
cabeza
de
Ia
el
pedal
pédale
machine
pedale
hasta
1,
2
de
costura
en
position
1,
2
ou
n
3
3.
2
ou
De
3.
de
couture
.):
abaisser
et
(-911/1
5;/1
position
en
Ia
posición
ô
3
a
Ta
posiciOn
3.
Ia
posicion
halle
se
pise
los
Ia
dos
máquina
(-911/15,/17,/35,/37
hasta
Ia
posiciOn
1
position
plus,
(position
es
deux
abaisser
7;/35;/37
1
1.
2
O
3.
en
Ia
pedales
pise
y
0.
suivant
pédales
Ia
et
agir
0.
El
prensatelas
posición
el
pedal
1
y
Ia
positiondel’interrup
0).
position
en
pédale
droite
et
/95):
abaisser
sure
manocontact
eleva
se
correspondiente,
hasta
las
posiciones
derecho
y
/95):
pulse
el
microrruptor
en
hasta
Pise
1
position
Ia
pOdale
sur
además,
cada
1
Ia
posi
el
pedal
en
et
4
I
Ia
y
4.
Ia
“
Cucitura
Posizione
Taglio
Sollevamento
zato
nella
Cucitura
posizione
pedale
Fermatura
fino
Fermature
premere
anche
cassa
alla
fina
del
indietro
destro
posizione
il
alla
di
riposo:
(-900/..):
fill
del
ogni
ad
di
comando.
1
4.
Con
e
fino
automatica
intermedie
manuale
tasto
velocità
Mettere
Abbassare
piedino
interruzione
o
fermatura
(-911/03,
alla
posizione
al
1
oppure
della
nella
massima:
indietro
(-910/..):
inizio
fino
cucitura
della
dell
/05)
ed
alla
testa
TI
a
1.
al
Abbassare
el
pedale
Abbassare
cucitura
cucitura
premere
fine
posizione
della
II
pedale
pedale
dalle
posizioni
fino
alla
posizione
il
pedale
(posizione
(-9111..):
II
tasto
manuale
della
cucitura
3.
(-911/35,/37,/95):
macchina.
fino
alla
posizione
1,
2
oppure
3.
fino
alla
posizione
0)
secondo
Con
(-911/15;/17;/35;/37
Abbassare
(-911/01)
nella
testa
Ia
posizione
abbassare
II
alla
3
2
oppure
della
pedale
1.
posizione
3.
dell’interruttore
entrambi
macchina
/95):
Abbassare
e
fino
II
alla
0.
piedino
le
ed
abbassare
posizione
viene
situato
pedali
II
pedale
al
alla
1
ii
e
21
Page 22

Riemenschutz
Belt
guard
Garde-courroie
Guardacorreas
Copricinghia
•
•
Fig
15
Switch
off
Attach
the
wall
of
the
turns.
Make
tighten
screws
Danger!
Mettre
Ia
Mettre
en
et
(fig.
a2
En
veillant
courroie
Attention:
Desconecte
La
mitad
tornillos
ciOn
dySe
Teniendo
alinea
el
Atención:
Disinserire
Spingere
(vedi
a2
di.
Facendo
zionare
Attenzione:
machine.
the
right
and
belt
guard
sure
d,
not
Do
run
machine
place
les
Placer
15).
ace
que
et
serrer
Ne
pas
Ia
máquina.
izquierda
de
fijación
atornilla
cuidado
guardacorreas
No
ponga
Ia
macchina.
le
metà
fig.
il
sinistra
15).
Infilare
attenzione
copricinghia
Non
lug
al
hors
deux
les
faire
y
al
de
far
left
ci
machine
Ia
derecha
éste
che
To
screw
belt
guard
(Fig.
15).
is
positioned
and
a2
circuit.
parties
Ia
douille
languette
vis
d,
al
marcher
El
guardacorreas
(véase
a2
y
en
oreja
que
Ia
se
y
Ia
máquina
Avvitare
e
destra
Ia
boccola
Ia
fascetta
e
stringere
funzionare
on
sections
Push
securely.
without
Monter
du
garde-courroie.
d’écartement
ci
prenne
et
a2.
sans
del
guardacorreas
fig.
el
agujero
ci
aprietan
en
il
della
distanziatrice
le
Ia
macchina
F
the
belt
so
spacing
behind
slot
guard!
belt
le
garde-courroie
appui
garde-courroie.
se
15).
Se
roscado
queda
detrás
los
tornillos
marcha
copricinghia
protezione
ci
arrivi
dietro
viti
d,
ai
9145
guard,
that
screws
sleeve
c
and
b3
en
sur
Ia
c
derriere
coloca
se
introducen
introduce
di.
de
d,
sin
guardacorreas.
come
con
sulla
c
a
e
a2.
senza
guardacinghia,
Maschine
anschrauben:
Linke
hinter
und
auf
Schraube
hen.
den
den
d,
Achtung:
Unfallgefahr!
proceed
onto
in
front
superieur
en
engageant
vis
d
Ia
Risque
atornilla
y
el
Ia
ranura
la
y
segue:
le
loro
vite
fessura
ausschalten.
und
rechte
die
Köpfe
a2
schieben
die
Befestigungsschraube
d
Unter
Schlitz
Riemenschutz
und
al
a2
Nicht
as
follows:
al
and
a2
screw
and
d
of
spacing
comme
visser
et
fente
mangiuto
a2.
di
b3
d’accident!
de
con
b3
y
iPeligro
fessure
fissaggio
b3
e
celle-ci
et
Ia
sus
distanciador
delante
dietro
davanti
rischio
Schutzhälfte
der
(siehe
in
die
Beachtung,
und
vor
b3
test
anziehen.
ohne
enter
the
screw
sleeve
suit:
les
fentes
dans
devant
forma
siguiente:
ranuras
del
de
accidente!
le
teste
d
ed
avvitare
Ia
boccola
d’incidente!
Riemenschutz
mit
Befestigungsschrauben
Fig.
Gewindebohrung
daB
die
ausrichten
Riemenschutz
appropriate
this
screw
c,
derriere
le
Ia
douille
detrás
c
manguito
delle
ihren
15).
Oistanzhülse
d
stecken
die
Lasche
Distanzhulse
und
die
slots
into
align
sobre
questa
belt
the
les
tétes
trou
taraudé
ajuster
c,
las
de
cabezas
el
tornillo
distanciador
viti
di
fissaggio
nel
distanziatrice
hole
wie
Schlitzen
und
eindre
dl
ci
c
kommt,
Schrauben
betreiben,
in
the
dl
guard
des
di.
le
garde
de
foro
filettato
C,
folgt
hinter
back
a
vis
de
fija
c,
al
posi
al
c
die
few
and
al
los
se
e
22
Page 23

Riemenschutz unterhaib der Tischplatte
Maschine
Riemenschutzsoausrichten,
Stellung
Belt
Switch
Align
Garde-courroie
MettreIamachine
Aligner
touchent.Levisser
Guardacorreas
DesconecteIamáquina.
Coloqueelguardacorreasdeforma
mente
Copricinghia
DisinserireIamacchina.
Posizionareilcopricinghia
trapezoidale
ausschalten.
festschrauben.
below
guard
off
the
belt
the
garde-courroie
le
asegérelo
y
the
machine.
guard
section so
inférleur
hors
dans
(mitad Inferior)
en
scorrano
daB
tabletop
that
circuit.
inférieur
position.
cette
posición.
esa
al
di
sotto
liberamente.
sowohi
motor
de
que
della
manière
Motorscheibe
pulley
and
que
tantoIapolea
piastra
baseinmodo
als
auch
Kellriemen
V-belt
move
freely,
then
niIapoulie motriceniIa
del
motor
comoIacorrea
che, siaIapuleggia
frei
screw
courroie
trapezoidal
del
und
laufen
downinthis
it
trapézoidale ne
marchen
motore,
in
dieser
position.
libre
siaIacinghia
le
Pflege
Machine
care
Entretien
Limpiezaymantenimiento
de
Ia
máquina
Manutenzione
Mindestens
Maschine
Greifer und
Bei
Maschine
Clean
Switch
Clean
When
machine.
Nettoyer,aumoms une
MettreIamachine
A
.
l’aide
Au
graissage
La
máquina
DesconecteIamáquina.
garfio
El
Al
realizarelengrase
costuraenIa
Almeno
DisinserireIamacchina.
Pulire
Nel
di
cucitura
einmalinder
ausschalten.
Greiferraum
der
wöchentlichen
entfernen.
the machine
off
the
the
hook
oil
you
d’un
debe
Ia
y
una
voltaIasettimana
giornalmente
rifornimento
nella
Woche
grundlich
täglich
mit
lversorgung
thoroughlyatleast once a
machine.
and
hook
the
needle-bar
pinceau,
hebdomadairededouillesdeIa
zona
cabezadeIa
d’olio
testa
raceway
fois
hors
circuit.
nettoyer
limpiarseafondo,
del
mismo
semanal
conunpenelloilcrochet
settimanale
della
einem
Nadelstangenlagers
des
every
once
bearings,
par
máquina.
macchina.
remove
semaine,
chaque
jourlecrochet
porIcmenos,
limpiarse
debe
del
cojinetedeIa
pulireafondoIamacchina.
del
cuscinetto
reinigen.
Pinsel reinigen.
week.
day
withasoft
the
dust
which
Ia
machineafond.
et
barreaaiguille,
una
diariamente
barra
de
eIasua
barra
sede.
d’ago,
unbedingt
brush.
has
accumulatedatthe
alentours.
ses
ne
vez
aIasemana.
conunpincel.
aguja,
es
asportare
auch den
manquer
pas
necesario
immancabilmente
Nähstaub
needle-bar
d’enlever
limpiar
im
Kopf
end
les
bourres.
tambiénelpolvo
anche
Ia
polvere
der
of
the
de
23
Page 24

NadelNeedle
Tableau
und
and
des
Garntabelle
thread
chart
aiguilles
Tabla
de
agujas
Tabella
et
fits
d’aghi
e
hilos
e
fill
.EC5)N
>w
A*
B*
C
**Nm
C
?
)5)5)
oEC
<CUr
0
0c50
B
C
=
=
=
=
0
C
<‘
0
für
feine
für
mittlere
für
stârkere
Nadeldicke
Z
5)
c5O)—
z-ei3
jcs
.2øDDN
oa)
2E2
ZZ(!)CD(D
60
70
80
90
100
110
120
130
140
Materialien
Materialien
Materi
in
hundertstel
alien
Garndicke
0
c5000
cooOo
100—80
70—60
60—50
50—40
40—30
30—24
20
12
10
mm
00
/
Thread
size
/
Grosseur
du
fil
/
Grosor
de
hilo
/
Grossezza
del
filato
1
0
0
C
‘A
**Nm
B
C
(f)
c,Duitc5
200—150
180—120
120—100
100—80
80—60
60—50
50—40
40—30
30—20
=
pour
=
pour
=
pour
=
Grosseur
centièmes
_C5)
matières
matières
matières
de
l’aiguille
de
5)
05)5)
coco
140
140
100
80
70
60
50
40
30
OC
C0
0
CCC
jz
70
60
50
40
35
30
fines
moyennes
mi-lourdes
mm
,
C
=
t
00
en
Eo
>D0
o
coE
0——
c0>,
zzo5ã5
134
134
134
DD
**Nm
**Nm
24
=
for
B
for
C=for
=
Needle
*A
=
Tessuti
B
=
Tessuti
C
Tessuti
=
Grossezzad’agoin
light-weight
medium-weight
heavy-weight
size
in
hundredths
leggeri
medi
medio-pesanti
materials
materials
materials,
1/100
of
mm
mm
*A
*8
**Nm
=
para
materiales
=
para
=
=
para
Grosor
materiales
materiales
de
C
a
aguja
finos
semifinos
semipesados
en
de
mm
Page 25

Verschlei(3teile
-731/01;
-944/01
91—069
571—92
C
11-330
085-15
Wearing
/
91-054
91-048
H
U
91—000
-731/01
338-03I
778-93
91-048
o
7’=-
739—25
/
parts
I
233
715-05
—91-048703-04
91-048
779-03
(3x)
Pièces
d’usure
-6/01
r
Piezas
I
91—069
194—91
--
91-069795-01
91—063
111—92
de
desgaste
Pezzi
/
-6/01
91-051136-03
91-860048-04
d’usura
-944/01
91-001
155-93
91-048973-04
91-047260-04
•
=
Austuhrung
Indicate
=
Prdciser
=
Iridiquese
Indicare
]
1!]
angeben
model
La
version
el
Opo
esecuzione
de
91-047
91-089
91-100
máquina
macchina
V
484-04
595-84
91-089
91—000
250—15-
91—BOO
390-15
375-55
[060]
9111193091
91—009
026-05
076—61
91-080200-83
—:
91-101
376—00
=
Schneidabstand
=
State
trimming
Indiquer
Indiquese
Indicare
1L1_B_
7
:1_2
r———’
13—052988—55
L
91—175
91-002
bei
margin
Ia
distance
el
rnargen
distanza
tagllo
91-000
91009374—41
800
134-05
1
Bestellung
on
order
de
coupe
éLacommande
de
corte
en
nelle
ordinazioni
91-171
875-12
r———
I
91-171
91—009
los
069—05
91-168
pedidos
670—15
1-06H71-061271-05
angeben
todos
853-15
91—118
144-05
91-047547-04
884—91
01—000
790—15
91—900
55
678—15
25
Page 26

Inhaitsverzeichnis
Zur
besonderen
Sicherheits-Hinweise
DIen
Einsetzen
Einfädeln
Aufspulen
Einsetzen
Rollful3
ausschwenken
Heraufholen
Regulierung
Einstellen
Aufheben
Regulieren
Kantenbeschneideinrichtung
Funktionen
Riemenschutz
Pflege
Nadel-
und
Verschleil3teile
Beachtung
der
Nadel
des
Oberfadens
des
Unterfadens
Spulenkapsel
der
des
Unterfadens
der
Fadenspannung
der
Stichlänge
des
Stoffdrückerful3es
Steppful3druckes
des
der
Tretplatte(n)
Garntabelle
-731/01
22
Seite
20
+
23
23
24
25
12
13
14
15
16
17
18
19
10
Table
des
2
2
7
8
9
Conseils
Recommandationsdesécurité
Huiler
Mise
Enfilage
Bobinage
Mise
EscamOtage
Remonter
Reglage
Reglage
Relevage
Reglage
Dispositif
Fonctions
interrupteu
Garde-courroie
Entretien
Tableau
Pièces
importants
en
place
du
fil
du
en
placedeIa
le
fil
Ia
de
de
Ia
du pied
deIapression
a
raser
des
rs
aiguilles
des
d’usure
l’aiguille
de
supérleur
fil
inférieur
boite
du
piedaroulette
inférieur
tension
longueur
presseur
les
bords
pédales
et
des
et
du
du
fils
canette
a
fils
point
pied
-731/01
des
presseur
matières
pages
4
4
7
8
9
11
12
13
14
15
16
17
18
19
21
22+23
23
24
25
Contents
Important
instructions
Safety
Oiling
Inserting
Threading
Winding
Inserting
Disengaging
Drawing
Regulating
Stitch
Lifting
Regulating
Edge
Functions
Belt
Machine
Needle
Wearing
26
the
the
up
length
the
trimmer
guard
care
and
parts
notes
the
bobbin
the
the
the
presser
the
of
thread
needle
needle
bobbin
the
roller
bobbin
thread
regulation
foot
presser
-731/01
pedal(s)
chart
case
presser
thread
tensions
foot
pressure
page
22+23
14
15
16
17
18
19
20
23
24
25
10
12
13
Indice
3
3
7
8
9
Observaciones
Normas
Engrase
ColocaciOn
Enhebrado
Bobinado
Colocación
bobina
Desconexión
Extracción
Regulación
Regulacion
Elevación
RegulaciOndeIa
pie
prensatelas
Dispositivo
Funciones
interruptores
Guardacorreas
Limpieza
máquina
Ia
Tabla
de
Piezas
de
seguridad
de
del
del
hilo
de
Ia
del
hilo
del
deIatensiãn
del
del pie
recortador
de
los
y
mantenimiento
agujas
de
desgaste
importantes
a
aguja
hilo
superior
inferior
cápsula
pie
rodante
inferior
largo
de
prensatelas
presiOn
-731/01
pedales
hilos
e
Ia
de
del
hilo
puntada
del
e
de
página
5
5
7
8
9
11
13
13
14
15
16
17
18
19
21
22+23
23
24
25
Page 27

piedino
pagina
6
6
7
8
9
11
13
13
14
15
16
17
18
19
21
22+23
23
24
25
Indice
Importante
sicurezza
di
Norme
Lubrificazione
del
dei
daghi
dusura
dell’ago
superiore
fib
del
fib
capsula
della
piedino
del
inferiore
fib
del
tensione
della
lunghezza
della
piedino
del
pressione
della
tagliamargini
e
pedali
flu
e
inferiore
a
premistoffa
-731
interruttore
del
rotella
del
punto
del
/01
fib
Inserimento
Infilatura
Awolgimento
Inserimento
Svincolazione
I
•
Estrazione
Regolazione
Regolazione
Sollevamento
Regolazione
Dispositivo
Funzioni
Copricinghia
Manutenzione
Tabella
Pezzi
•
•
27
Page 28

CPFAFFD®
Plaff,
D
6750
45
753,
Kaiserslautern
3020/3040
Telefax
(06
31)1
72
02
Postfach
Telex
Nr.
296-12-13842
Wonnser
Verlagscjrijckerei
Gedruckt
in
der
In
West
en
in
Bundesrepubhk
Germany
RFA.
R.F.A
RF.G.
Printed
Imprimé
Impresoena
Stan,pato
deutsch/engI/tranzjspan/jtal
D-6520
2/86
Worms
Deutschland
 Loading...