

Peugeot Expert Dag 2006 Owner's Manual
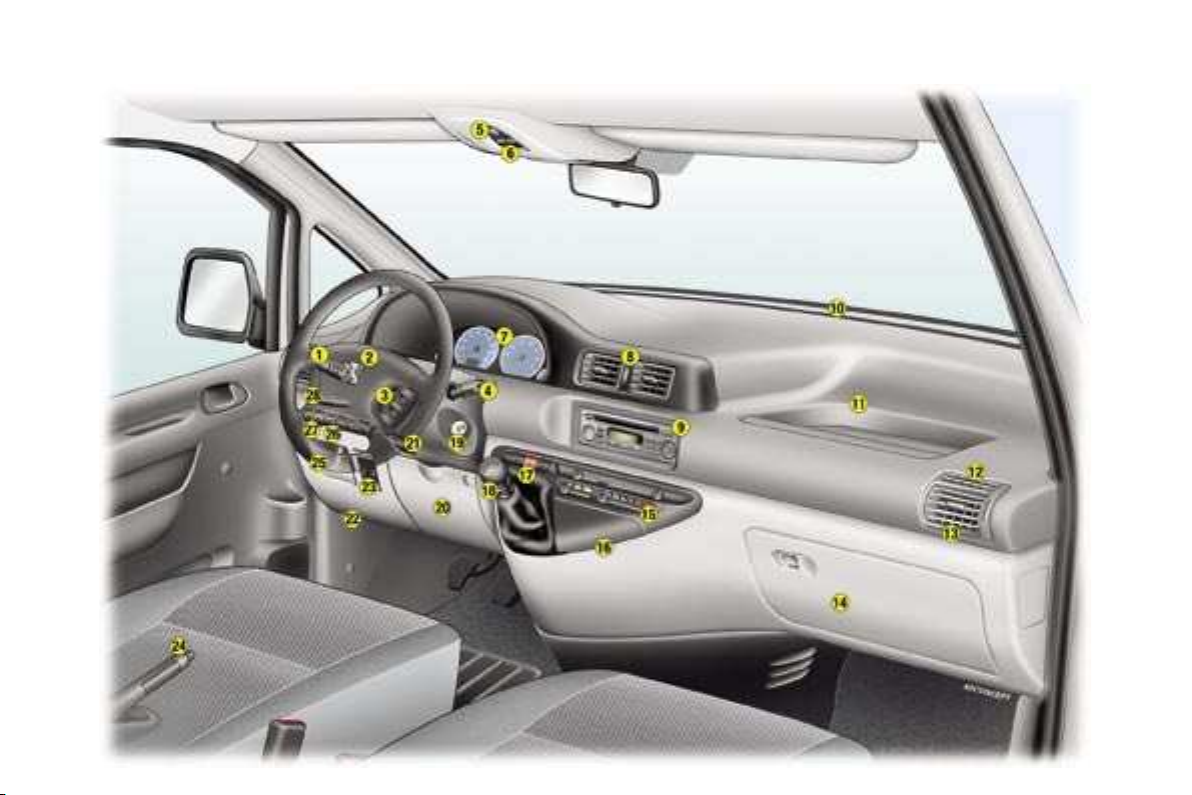
Familiarisation
4 -

INSTRUMENTS AND CONTROLS
Familiarisation
5
-
1 - Lights, direction indicators
and horn controls.
2 - Driver's air bag*.
3 - Audio equipment
steering wheel controls**.
4 - Windscreen wiper/wash-wipe
controls.
5 - Electric mirrors control.
6 - Electric window controls.
7 - Instrument panel.
8 - Adjustable central
vents.
9 - Audio RD1 or storage
compartment.
10 - Windscreen demisting
vents.
11 - Storage compartment.
12 - Side window demisting
vents.
13 - Adjustable side vents.
14 - Glove box.
15 - Heating/air conditioning
controls.
16 - Ashtray and lighter.
17 - Controls:
- Rear door screen
and/or mirrors demisting**.
- Heated mirrors**
and heated rear screen**.
- Hazard lights.
- Air conditioning.
18 - Gear lever.
19 - Steering lock
and ignition.
20 - Fuse box.
21 - Steering wheel height
adjustment control.
22 - Bonnet release.
23 - Headlamp height adjustment.
24 - Handbrake.
25 - Storage.
26 - Heated seat controls.
27 - Cruise control switch.
28 - Cruise control control.
* According to country.
** According to model.
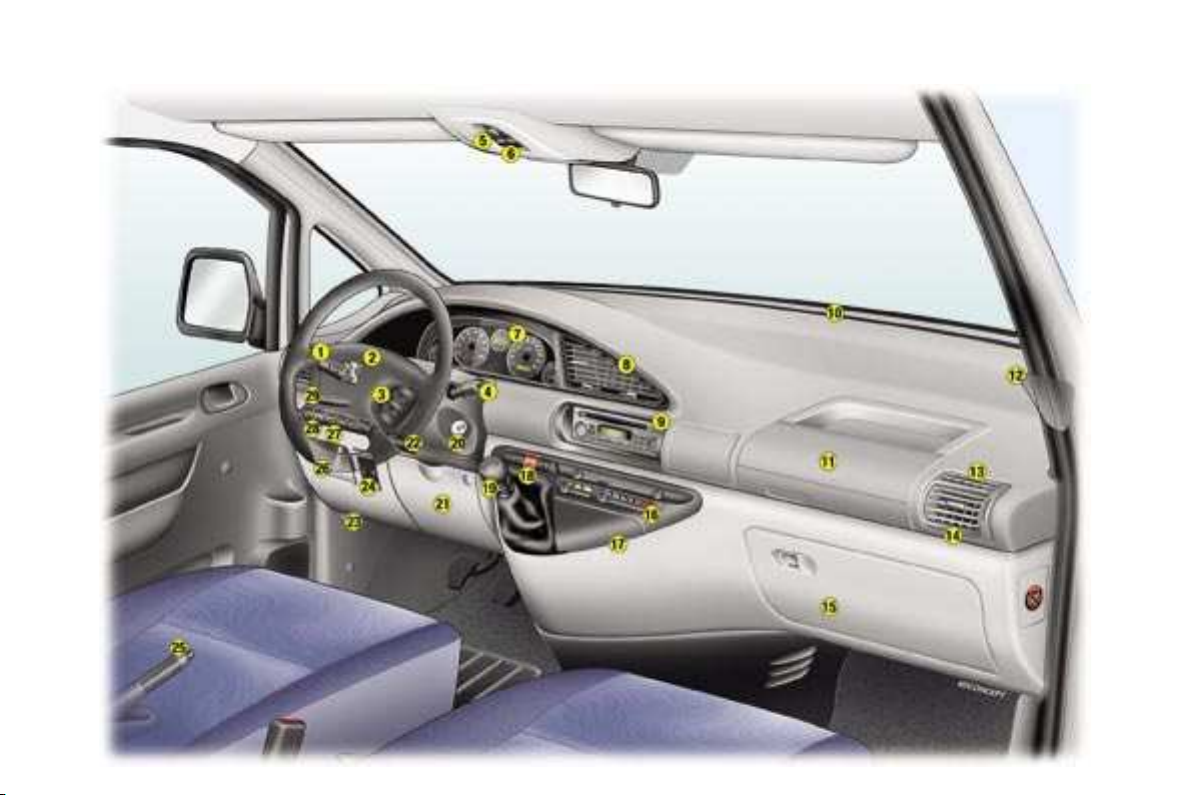
Familiarisation
6 -

INSTRUMENTS AND CONTROLS
Familiarisation
7
-
1 - Lights, direction indicators
and horn controls.
2 - Driver's air bag*.
3 - Audio equipment
steering wheel controls.
4 - Windscreen wiper/wash-wipe
controls.
5 - Electric mirrors control.
6 - Electric window controls.
7 - Instrument panel.
8 - Adjustable central vents.
9 - Audio RD1 or storage
compartment.
10 - Windscreen demisting
vents.
11 - Passenger air bag*
or glove box.
12 - Speaker location (tweeter)**.
13 - Side window demisting
vents.
14 - Adjustable side vents.
15 - Glove box.
16 - Heating/air conditioning
controls.
17 - Ashtray and lighter.
18 - Controls:
- Rear door screen and/or
mirrors demisting.
- Heated mirrors**
and heated rear screen**.
- Hazard lights.
- Air conditioning.
19 - Gear lever.
20 - Steering lock
and ignition.
21 - Fuse box.
22 - Steering wheel height
adjustment control.
23 - Bonnet release.
24 - Controls:
- Headlamp height
adjustment.
- Lighting rheostat.
25 - Handbrake.
26 - Storage.
27 - Heated seat controls.
28 - Cruise control switch.
29 - Cruise control control.
* According to country.
** According to model.
Familiarisation
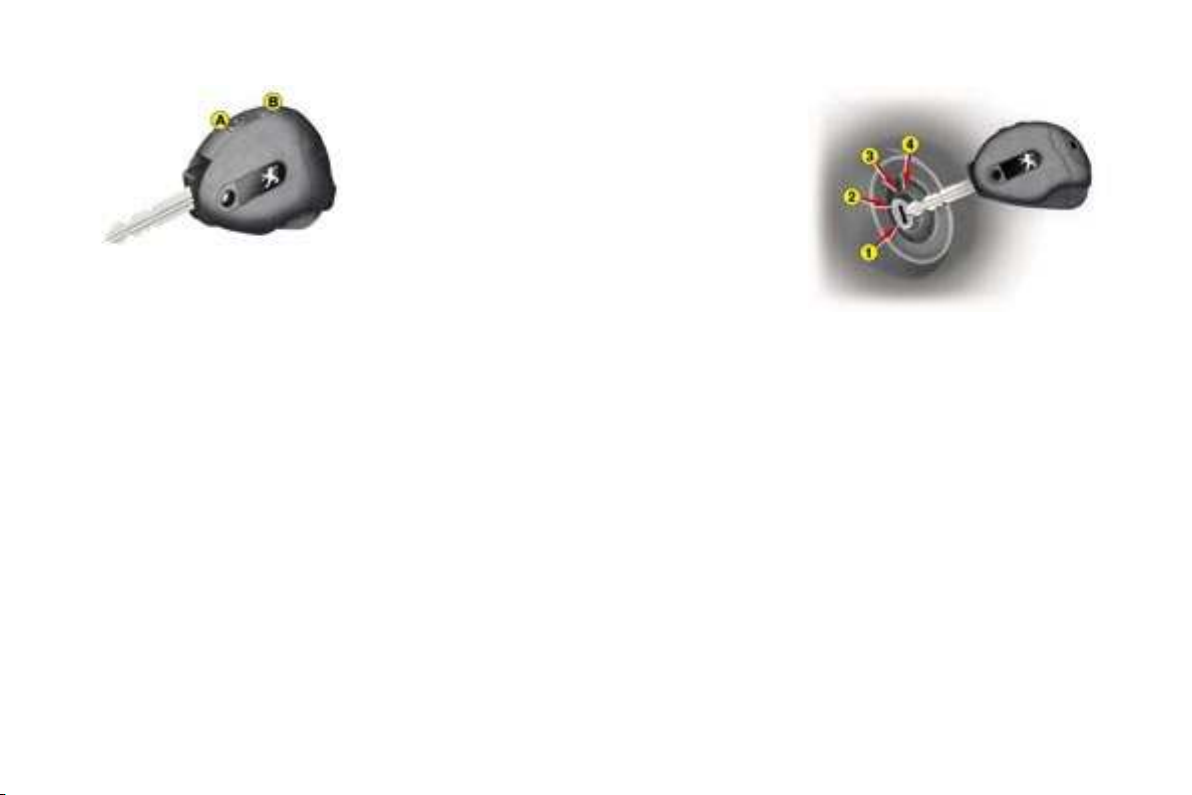
8 -
KEYS
The keys permit independent operation of the locks on the doors and on
the fuel tank cap and switching on of
the ignition.
Central locking
From the front doors, the keys lock
and unlock the front, side and rear
doors.
If one of the doors is open, the central locking will not work.
The remote control carries out the
same functions at a distance.
Remote control
Locking
Press button A to lock the vehicle.
This is confirmed by fixed lighting of
the direction indicators for approximately two seconds.
Unlocking
Press button B to unlock the vehicle.
This is confirmed by rapid flashing of
the direction indicators.
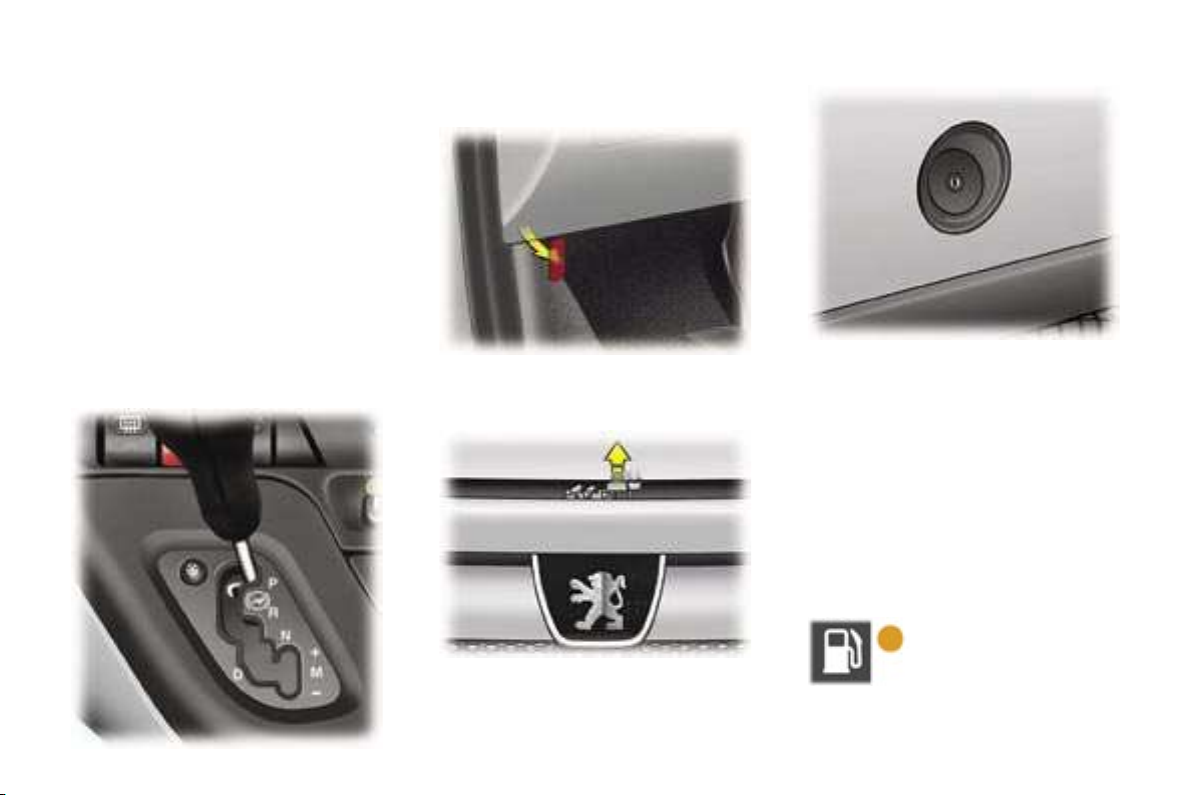
STARTING
1 - STOP position:
the ignition is off.
2 - Accessories position:
the ignition is off, but the accessories
can be used.
3 - Running position:
the ignition is on.
4 - Starting position:
operates the starter.
56
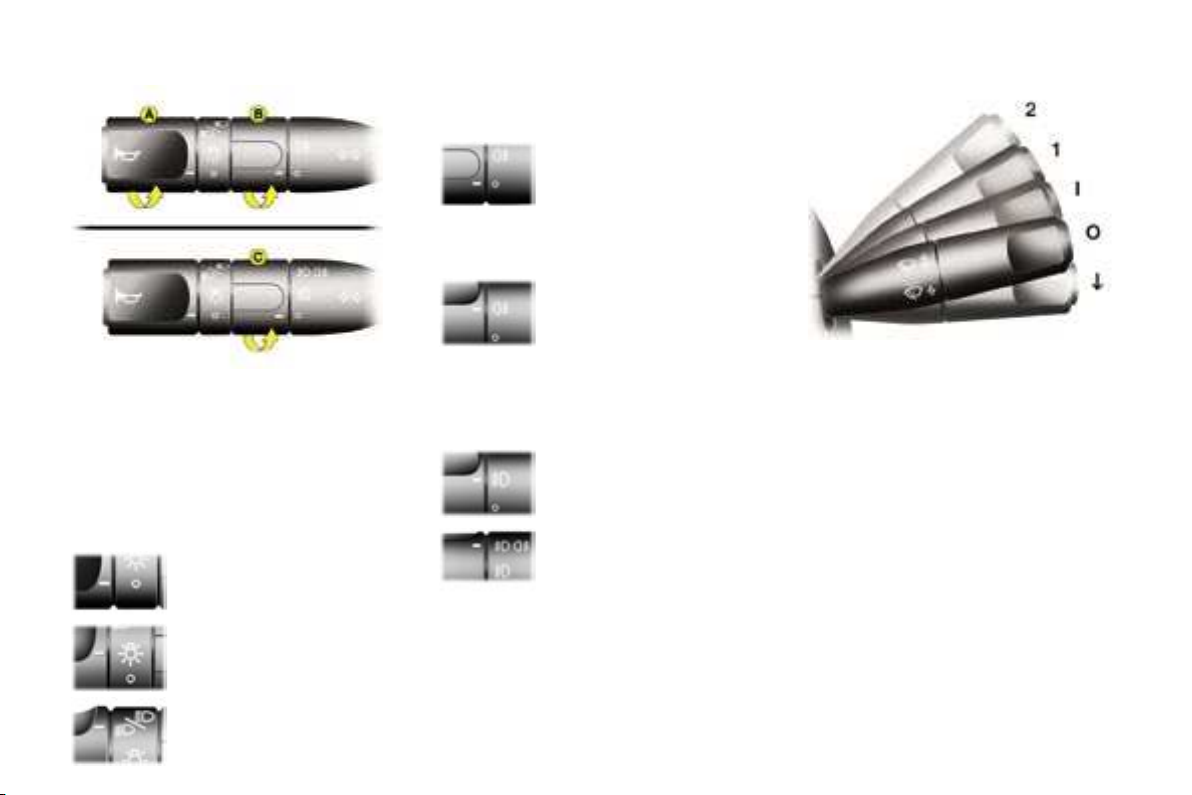
STEERING WHEEL
CONTROLS
LIGHTS
Selection is by rotation of the ring forwards to switch on and backwards to
switch off. The status is confirmed by the
indicator light on the instrument panel.
Front and rear lights (ring A)
Lights off.
Front fog lamps and rear fog lamp
Fog lamps off.
Vehicles fitted with a rear fog
lamp (ring B)
Rear fog lamp.
Vehicles fitted with front fog
lamps and a rear fog lamp (ring C)
Front fog lamps.
Front fog lamps and
rear fog lamp.
Familiarisation
FRONT WINDSCREEN WIPERS
2 Fast wipe (heavy rain).
1 Normal wipe (moderate rain).
I Intermittent wipe.
0 Park.
Single wipe.
Wash-wipe: pull the control towards
you.
15
-
Side lights.
Dipped headlamps/
Main beam headlamps.
62 63
Familiarisation
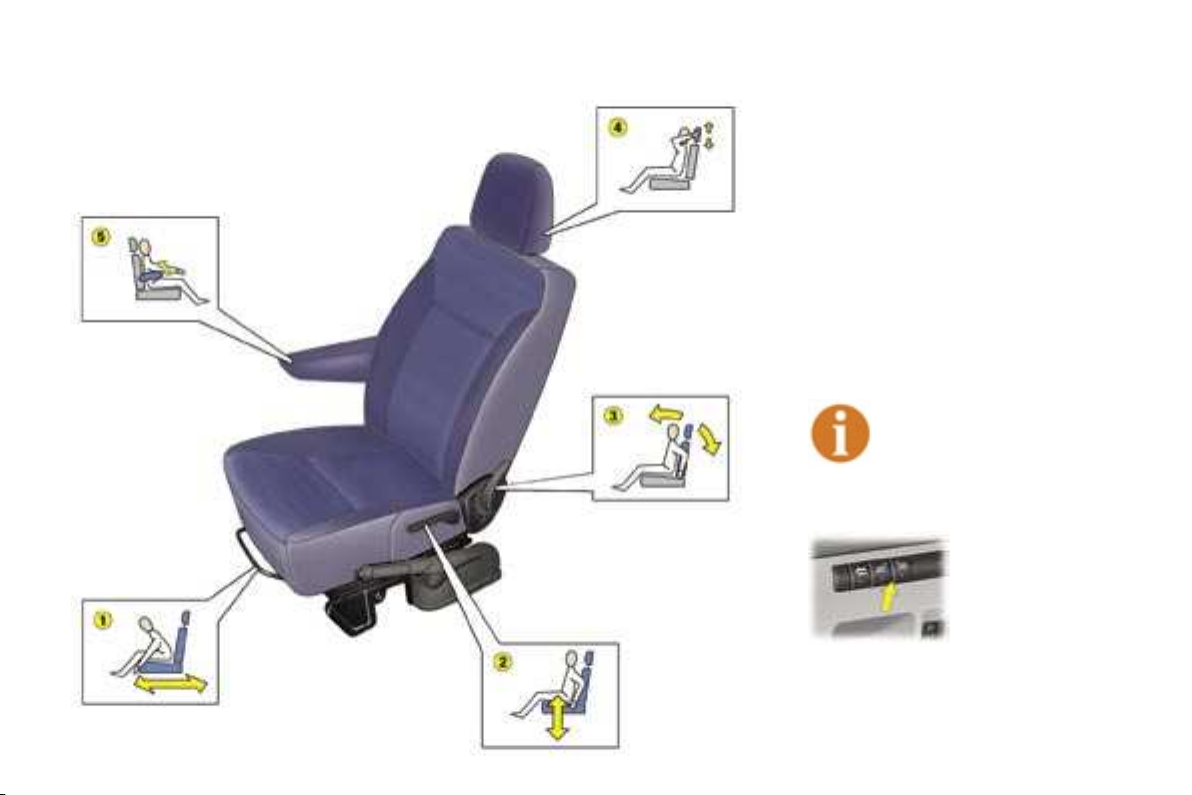
FRONT SEATS
Driver and passenger
(one seat) seats
1 - Forwards-backwards
adjustment.
2 - Driver's seat height
adjustment.
3 - Seat back angle
adjustment.
4 - Head restraint height
adjustment.
Never drive with the head
restraints removed.
5 - Adjustable armrest.
Heated seat controls (located with
the instruments and
controls).
11
-
42
Familiarisation
12 -
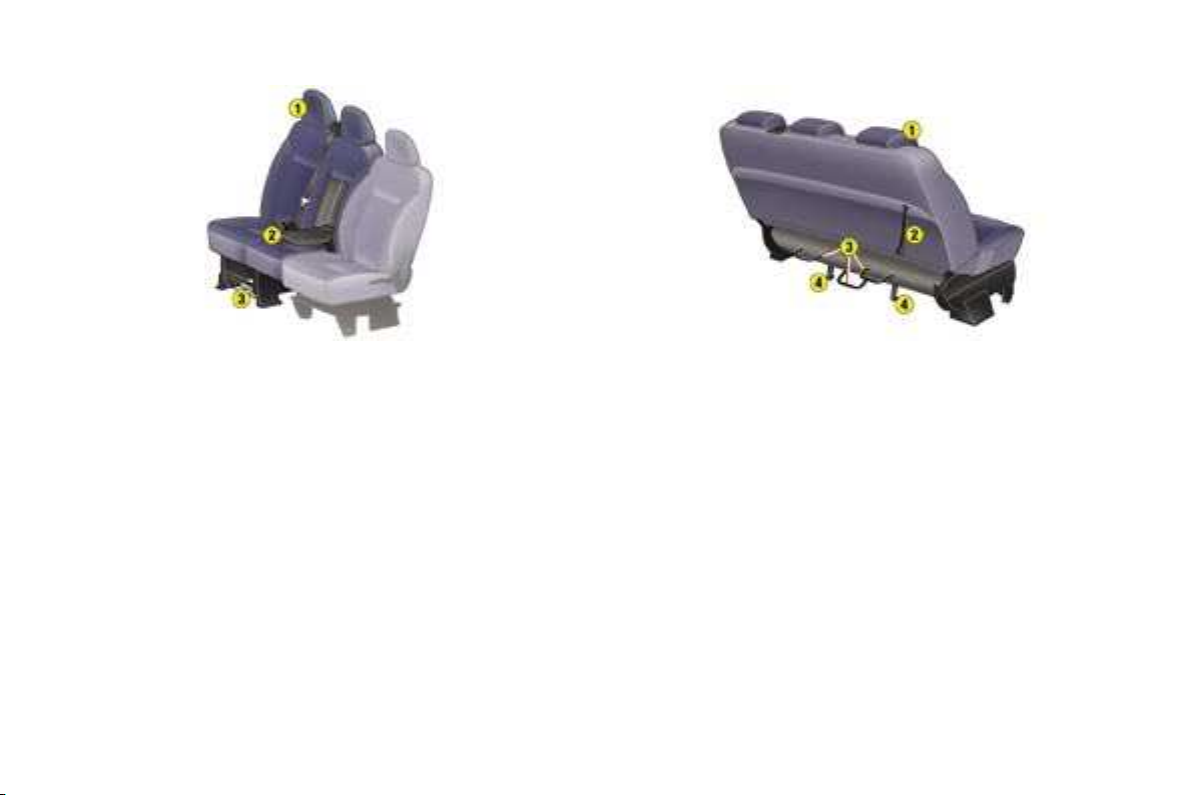
FRONT BENCH SEAT
Two-seat front passenger bench seat:
- height adjustable head restraint (1),
- folding writing table (2),
- storage basket (3).
Presentation 44 To remove or install the bench seat 45
REAR SEATS
2nd row three-seat bench seat:
- height adjustable head restraint (1),
- placing in table position (2),
- removal/installation (3),
- central stiffeners (4).

Familiarisation
12 -
FRONT BENCH SEAT
Two-seat front passenger bench seat:
- height adjustable head restraint (1),
- folding writing table (2),
- storage basket (3).
Presentation 44 To remove or install the bench seat 45
REAR SEATS
2nd row three-seat bench seat:
- height adjustable head restraint (1),
- placing in table position (2),
- removal/installation (3),
- central stiffeners (4).
Familiarisation
13
-
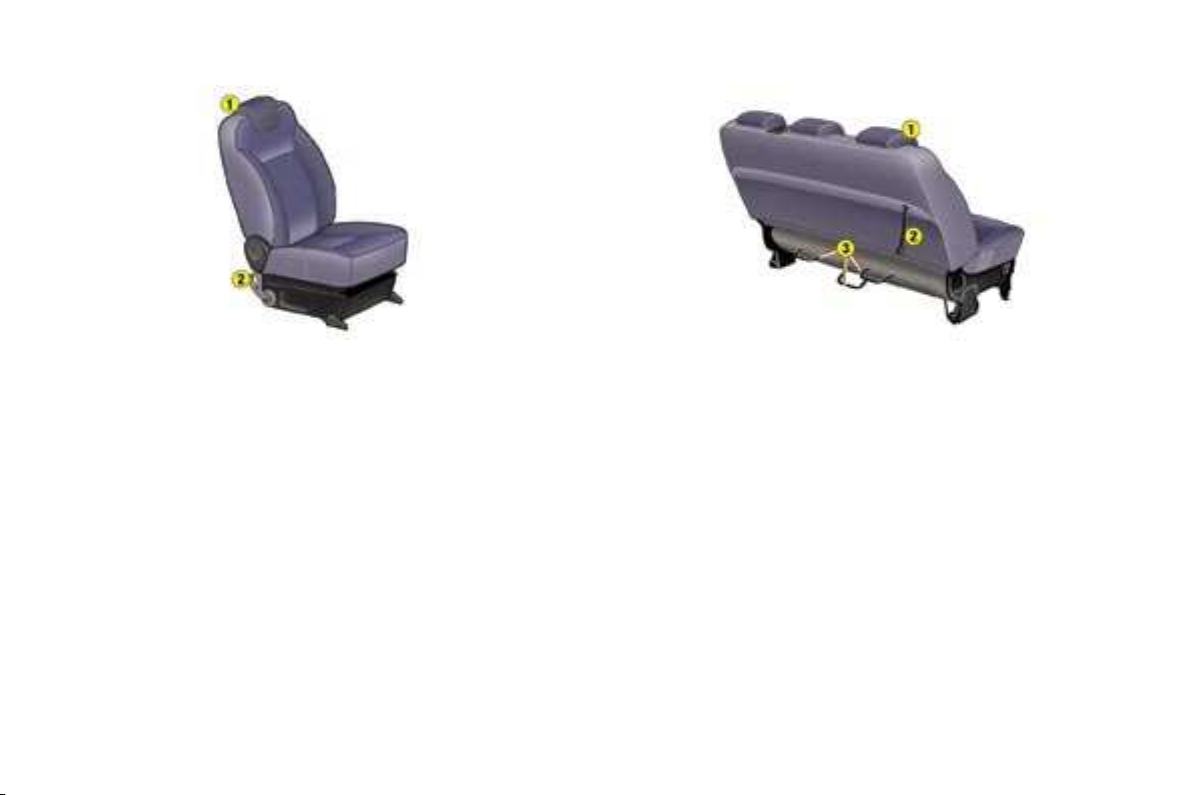
2nd row tilting seat:
- height adjustable head restraint (1),
- access to the 3rd row or exit from the 3rd row (2).
To tilt the seat 46 To remove or install the bench seat 46
3rd row three-seat bench seat:
- height adjustable head restraint (1),
- placing in table position (2),
- removal/installation (3).
Familiarisation
9
-
ELECTRIC WINDOWS
1 - Driver's electric window.
2 - Passenger electric window.
Manual mode:
Press or pull the switch gently. The
window stops when the switch is
released.
Automatic mode (driver):
Press or pull the switch firmly. One
touch opens the window fully.
64 65 66
ELECTRIC MIRRORS
Turn control 3 to the right or to the
left to select the mirror to be adjusted.
Move control 3 in all four direc-
tions to adjust.
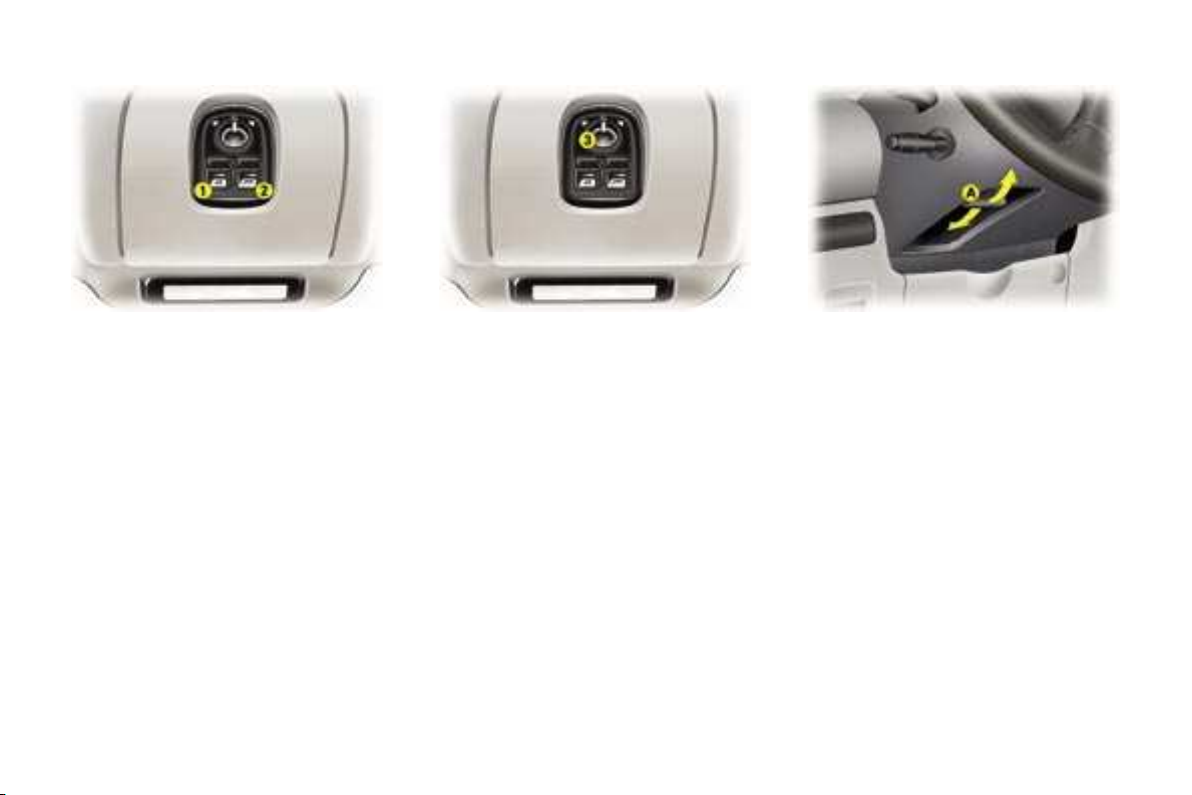
STEERING WHEEL HEIGHT
ADJUSTMENT
When stationary, push control A
forwards to unlock the steering
wheel.
Adjust the height of the steering
wheel.
Lock by pulling control A fully to-
wards you.
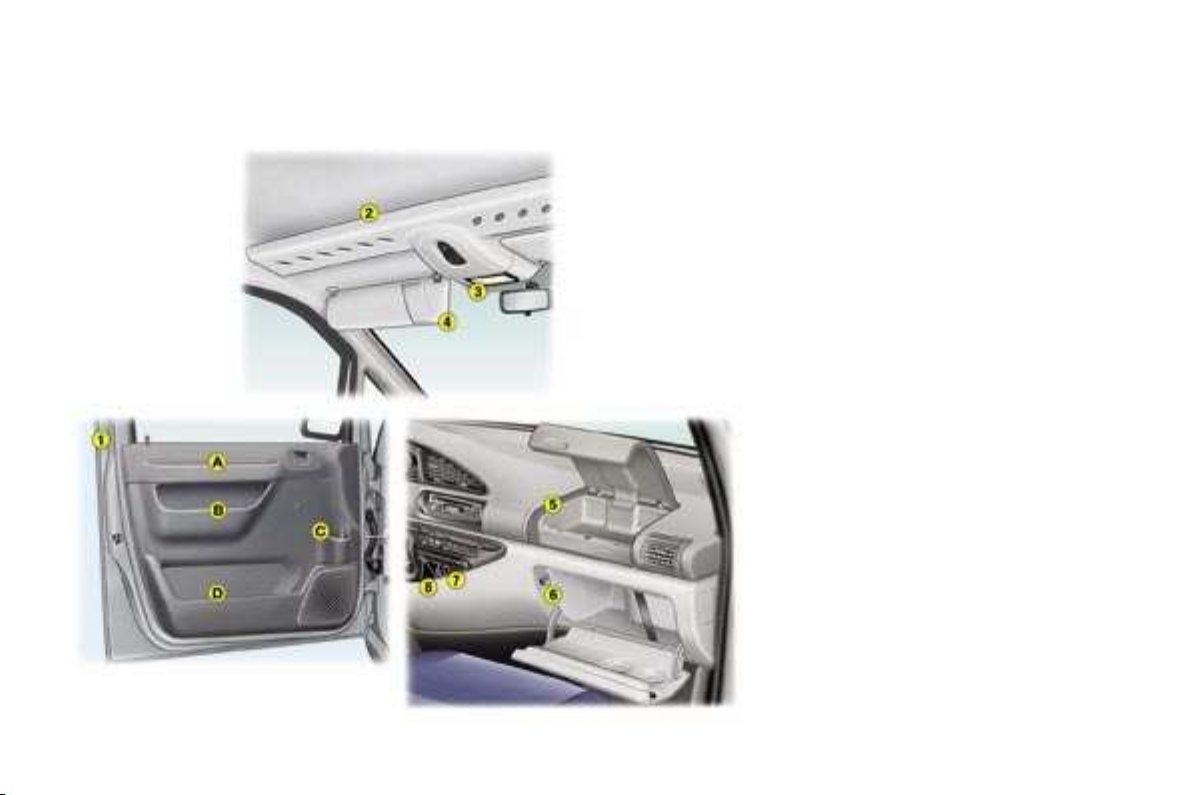
10 -
Familiarisation
FRONT FITTINGS
1. Fittings in the doors
A. Armrest.
B. Storage compartment.
C. Bottle holder/Can holder.
D. Storage compartment.
2. Overhead storage
3. Courtesy light
4. Sun visor
5. Glove box or
passenger air bag*
6. Glove box
7. Lighter
8. Removable ashtray
* According to country.
68
Familiarisation
16 -
"PORSCHE TIPTRONIC
SYSTEM"AUTOMATIC
GEARBOX
The four-speed automatic gearbox
offers the choice between the comfort of fully automatic operation,
enhanced by a snow program, or the
pleasure of manual gear changing.
Gear selection gate
Move the lever in the gate to se-
lect one of the positions.
Once a position has been selected,
the corresponding indicator light
comes on on the instrument panel
indicator.
OPENING THE BONNET
From inside: pull the control located
on the left, under the fascia.
From outside: lift the catch, raise
the bonnet and secure the strut to
hold the bonnet open.
FILLING THE FUEL TANK
The tank must be filled with the engine off.
Insert the key, then turn it to the
left.
Remove the cap.
A label indicates the type of fuel to
be used.
The capacity of the tank is
approximately 80 litres.
Low fuel level warning light
When the warning light
comes on you have
enough fuel left to
drive approximately
30 miles (50 km).
23, 72 60
61
Familiarisation
14 -
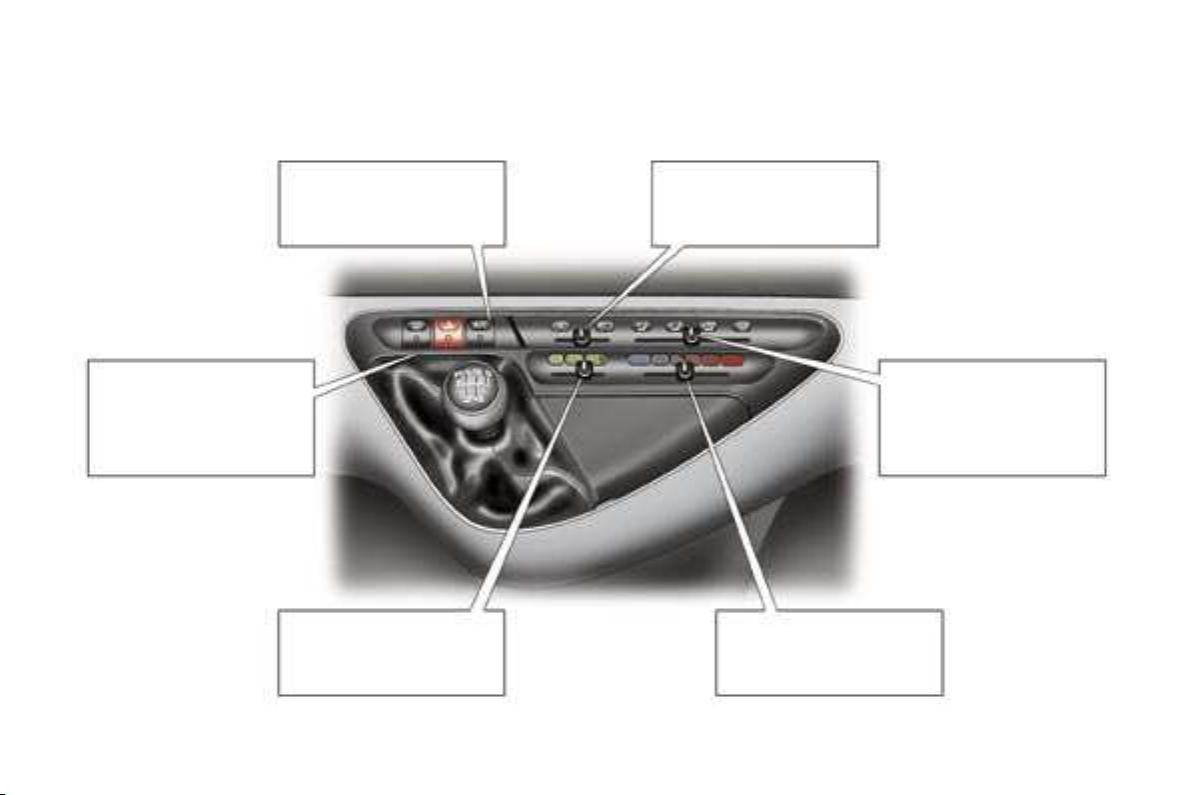
HEATING/AIR CONDITIONING
Rear screen and/or
mirrors demisting
Air conditioning on/off
Air flow
Air recirculation
Air distribution
Temperature
40
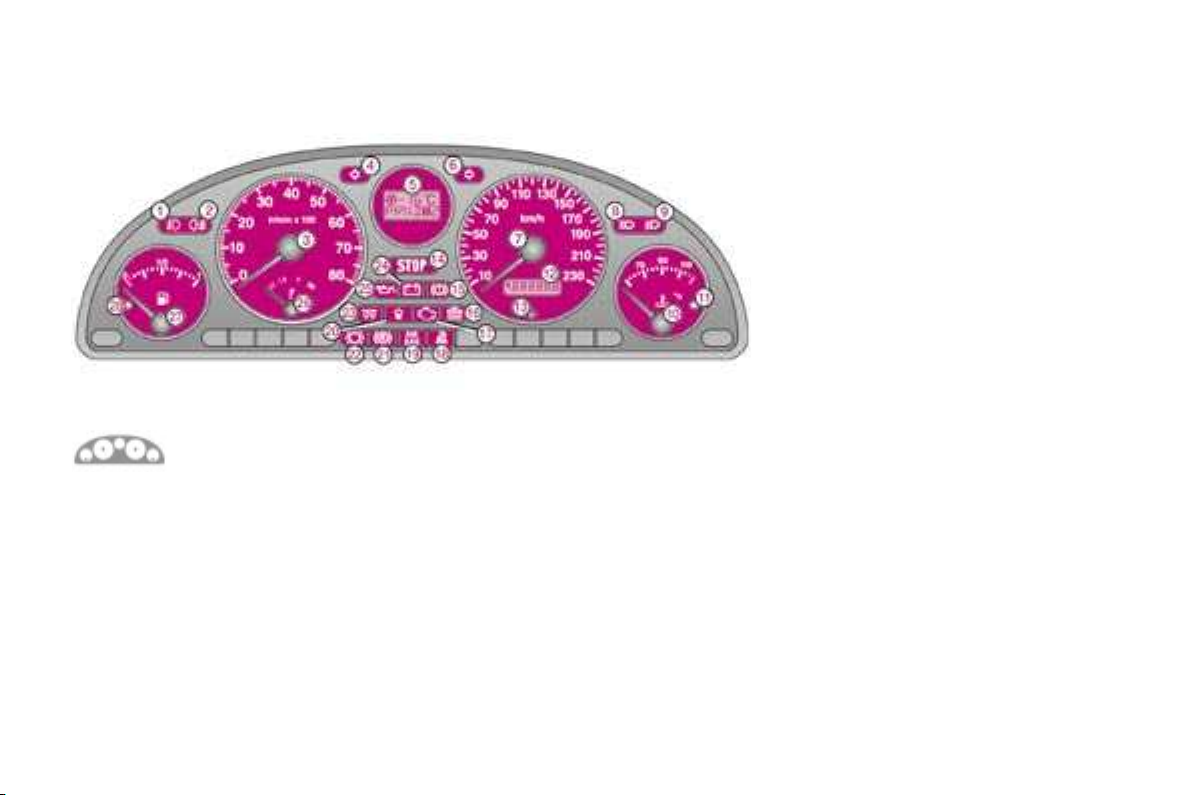
Instruments and controls
18 -
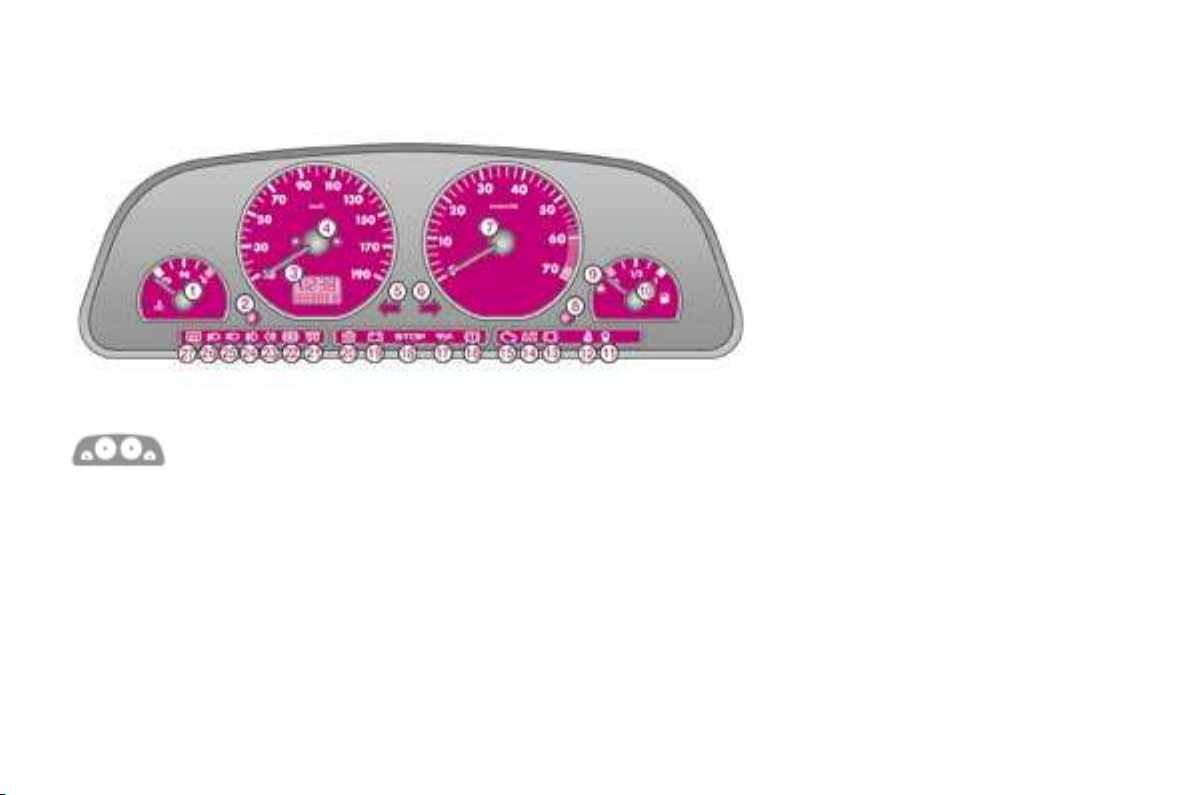
PETROL-DIESEL MANUAL GEARBOX INSTRUMENT
PANELS
1 - Coolant temperature indicator.
2 - Trip recorder zero reset and
total/trip distance recorder
display button.
3 - Clock, service indicator, engine
oil level indicator, total/trip
distance recorder.
4 - Speedometer.
5 - Left direction indicator.
6 - Right direction indicator.
7 - Rev counter.
8 - Lighting rheostat.
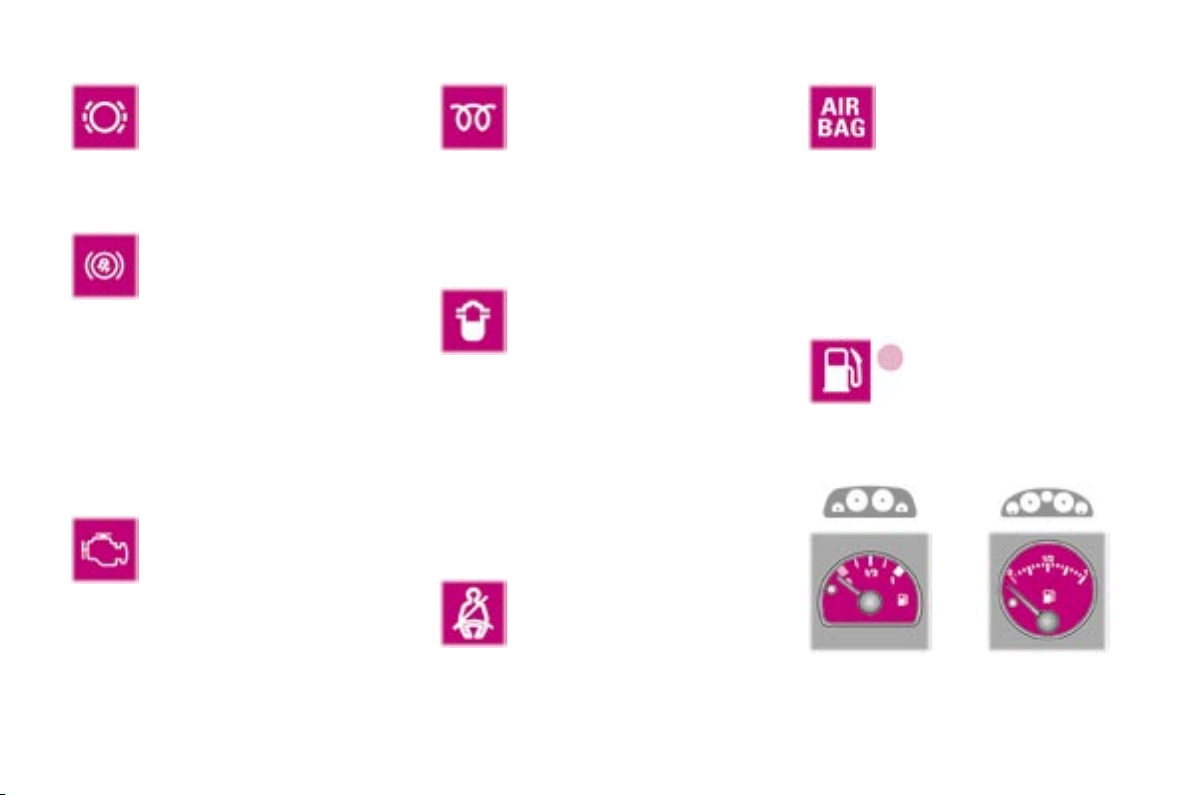
9 - Low fuel level warning light.
10 - Fuel level indicator.
11 - Water in diesel filter warning
light*.
12 - Seat belt not fastened warning
light*.
13 - Front brake pad wear warning
light.
14 - Front and side air bags warning
light.
15 - Engine autodiagnostics warning
light.
16 - Handbrake, low brake fluid level
and electronic brake force
distribution warning light.
17 - Engine oil pressure and
temperature warning light.
18 - Central STOP warning light.
19 - Battery charge warning light.
20 - Low coolant level warning light.
21 - Diesel engine pre-heat warning
light.
22 - Anti-lock brake system (ABS)
warning light.
23 - Rear fog lamp indicator light.
24 - Front fog lamps indicator light.
25 - Main beam headlamps indicator
light.
26 - Dipped beam headlamps
indicator light.
27 - Rear door window demisting
indicator light.
* According to country.
PETROL-DIESEL MANUAL AND AUTOMATIC GEARBOX
INSTRUMENT PANELS
1 - Front fog lamps indicator light.
2 - Rear fog lamp indicator light.
3 - Rev counter.
4 - Left direction indicator.
5 - Exterior temperature indicator
and automatic gearbox
indicator*.
6 - Right direction indicator.
7 - Speedometer.
8 - Main beam headlamps indicator
light.
9 - Dipped beam headlamps
indicator light.
10 - Coolant temperature indicator.
11 - Coolant maximum temperature
warning light.
12 - Service indicator and total/trip
distance recorder.
13 - Trip recorder zero reset and
total/trip distance recorder
display button.
14 - Central STOP warning light.
Instruments and controls
15 - Handbrake, low brake fluid level
and electronic brake force
distribution warning light.
16 - Low coolant level warning light.
17 - Engine autodiagnostics warning
light.
18 - Seat belt not fastened warning
light**.
19 - Front and side air bags warning
light.
20 - Water in diesel filter warning
light**.
21 - Anti-lock brake system (ABS)
warning light.
22- Front brake pad wear warning
light.
23 - Diesel engine pre-heat warning
light.
24 - Battery charge warning light.
25 - Engine oil pressure and
temperature warning light.
26 - Engine oil level indicator.
27 - Fuel level indicator.
28 - Low fuel level warning light.
* According to version.
** According to country.
-
19

Instruments and controls
20 -
INSTRUMENTS AND
CONTROLS
A permanently lit warning light
or one flashing, with the engine
running, indicates an operating
fault of the unit concerned. The
illumination of certain warning
lights may be accompanied by
an audible signal. Do not ignore
this warning: consult a PEUGEOT
dealer as soon as possible.
If the central STOP warning light
comes on when you are driving,
stop your vehicle immediately,
where it is safe to do so.
Central STOP warning
light
Linked to the "engine oil
pressure", "coolant tem-
perature and low level",
"handbrake", "low brake fluid level"
and "electronic braking system fault"
warning lights.
You must stop if the light flashes
with the engine running.
Consult a PEUGEOT dealer.
Engine oil pressure and
temperature warning
light
Linked to the central STOP
warning light.
You must stop.
This warning light indicates one of
the following:
- insufficient oil pressure,
- a lack of oil in the lubrication circuit.
Top up the level.
- an oil temperature which is too
high. The warning light is accompanied by an audible signal. To lower
the oil temperature, reduce your
speed.
Consult a PEUGEOT dealer.
Low coolant level
warning light
Linked to the central STOP
warning light.
You must stop.
Wait for the engine to cool before
topping up the level.
The cooling circuit is pressurised.
In the event of breakdown and to
prevent any risk of burns, unscrew
the cap to the first notch to allow the
pressure to drop.
When the pressure has dropped, remove the cap and top up the level.
Consult a PEUGEOT dealer.
Handbrake, low brake
fluid level and Electronic
Brake Force Distribution
fault warning light
Linked to the central STOP
warning light.
This indicates one of the following:
- that the handbrake is applied or not
fully released,
- an excessive drop in brake fluid
level (if the warning light remains
on even when the handbrake is released),
- a fault in the Electronic Brake Force
Distribution, if lit at the same time
as the ABS warning light.
You must stop.
Consult a PEUGEOT dealer.
Battery charge warning
light
This indicates one of the
following:
- faulty operation of the charging circuit,
- slack battery or starter terminals,
- a cut or slack alternator belt,
- an alternator failure.
Consult a PEUGEOT dealer.
Instruments and controls
-
21
Front brake pad wear
warning light
For your safety, have the
four front brake pads replaced as soon as the
warning light comes on.
Anti-lock braking system
(ABS) warning light
This comes on for 3 seconds each time the ignition
is switched on.
If the warning light remains on or
comes on above 8 mph (12 km/h),
this indicates an ABS malfunction.
However, the vehicle retains conventional servo-assisted braking.
Lighting of this warning light is
accompanied by an audible signal.
Consult a PEUGEOT dealer.
Engine diagnostics
warning light
This comes on each time
the ignition is switched on.
If it comes on with the engine running,
this indicates incorrect operation of the
injection, ignition or emission control
system. There is a risk of damage to
the catalytic converter (petrol engine
only).
Consult a PEUGEOT dealer.
Diesel engine pre-heat
warning light
Wait until the warning light
goes out before starting the
engine.
If the temperature is high enough,
the warning light comes on for less
than one second. You can start the
engine without waiting.
Water in diesel filter
indicator*
Lighting of this warning light
indicates the presence of
water in the diesel filter.
For the indirect injection Diesel engine, bleed the circuit at the filter.
For the direct injection Diesel engines, consult a PEUGEOT dealer
as soon as possible.
There is a risk of damage to the injection system.
Seat belt not fastened
warning light*
When the ignition is
switched on, this indicator
light comes on if the driver
has not fastened his seat belt.
* According to country.
Front and side* air bags
warning light
The light will come on for a
few seconds when the ignition is switched on.
With the engine running, illumination
of this warning light indicates a fault
in the air bags.
Consult a PEUGEOT dealer.
Low fuel level
warning light
When this light first
comes on, you have
enough fuel left to drive
approximately 30 miles (50 km)
(The tank capacity is approximately
80 litres).
Fuel gauge
Each time the engine is started, the
warning light comes on for a few seconds and the needle moves to test
the operation of the gauge.

Instruments and controls
22 -
Coolant temperature indicator Engine oil level indicator
When the ignition is switched on, the
needle indicates the engine oil level
then returns to zero.
If the needle is in the min zone, check
the level using the dipstick and top
up the oil.
The reading is only valid if the vehicle
is on level ground and the engine has
been off for 15 minutes.
- needle in zone (A), the temperature
is correct,
- needle in zone (B), the temperature is too high. The central STOP
warning light flashes.
You must stop.
Consult a PEUGEOT dealer.
Never exceed the maximum level as a surplus of
oil may damage the engine.
Consult a PEUGEOT dealer as soon as possible.
Exterior temperature indicator
The exterior temperature is displayed
from the time the ignition is switched
on.
If the symbol "°C" flashes, this is a
warning that there is a risk of ice.
Instruments and controls
-
23
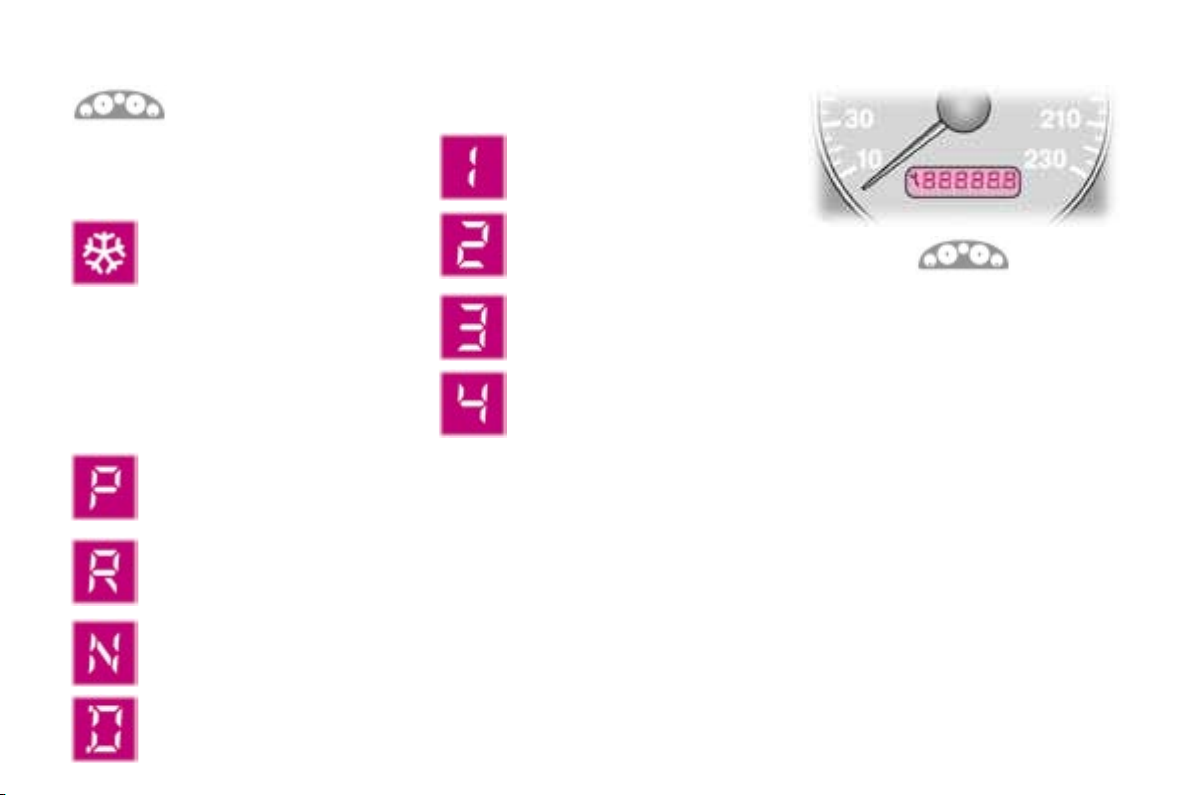
Automatic gearbox
indicator
Automatic gearbox indicator
light:
"SNOW" indicator light
This comes on when the automatic gearbox "SNOW"
operating program is selected.
Automatic gearbox lever
positions:
"Park"
"Reverse"
"Neutral"
"Manual" mode:
1st gear engaged
2nd gear engaged
3rd gear engaged
4th gear engaged
Instrument panel display
After switching on the ignition, two
functions are shown in succession:
- service indicator (see corresponding section),
- total distance recorder (see corresponding section).
Note: it displays the total and trip
distances for 30 seconds when the
ignition is switched off, on opening
the driver's door, as well as on
locking and unlocking the vehicle.
"Drive"

Instruments and controls
-
23
Automatic gearbox
indicator
Automatic gearbox indicator
light:
"SNOW" indicator light
This comes on when the automatic gearbox "SNOW"
operating program is selected.
Automatic gearbox lever
positions:
"Park"
"Reverse"
"Neutral"
"Manual" mode:
1st gear engaged
2nd gear engaged
3rd gear engaged
4th gear engaged
Instrument panel display
After switching on the ignition, two
functions are shown in succession:
- service indicator (see corresponding section),
- total distance recorder (see corresponding section).
Note: it displays the total and trip
distances for 30 seconds when the
ignition is switched off, on opening
the driver's door, as well as on
locking and unlocking the vehicle.
"Drive"

Instruments and controls
24 -
Instrument panel display
After switching on the ignition, three
functions are shown in succession:
- service indicator (see corresponding
section),
- engine oil level indicator,
- total distance recorder (see corresponding section).
Note: it displays the total and trip
distances for 30 seconds when the
ignition is switched off, on opening
the driver's door, as well as on locking
and unlocking the vehicle.
Engine oil level
indicator
When the ignition is switched on,
the engine oil level is indicated for
approximately 10 seconds, after the
service information.
Maximum
Minimum
Check the level using the dipstick and
top it up.
The reading is only valid if the vehicle
is on level ground and the engine has
been off for 15 minutes.
Lack of oil
Flashing of the segments indicates an
insufficient level of
oil.
It is essential that the oil level
is topped up. There is a risk of
damage to the engine.
Oil level gauge
fault
"Min" and "max"
flashing indicates a
malfunction.
Check the level using
the dipstick.
Consult a PEUGEOT dealer.
Never exceed the maximum
level as a surplus of oil may
damage the engine.
Consult a PEUGEOT dealer
as soon as possible.
Instruments and controls
-
25
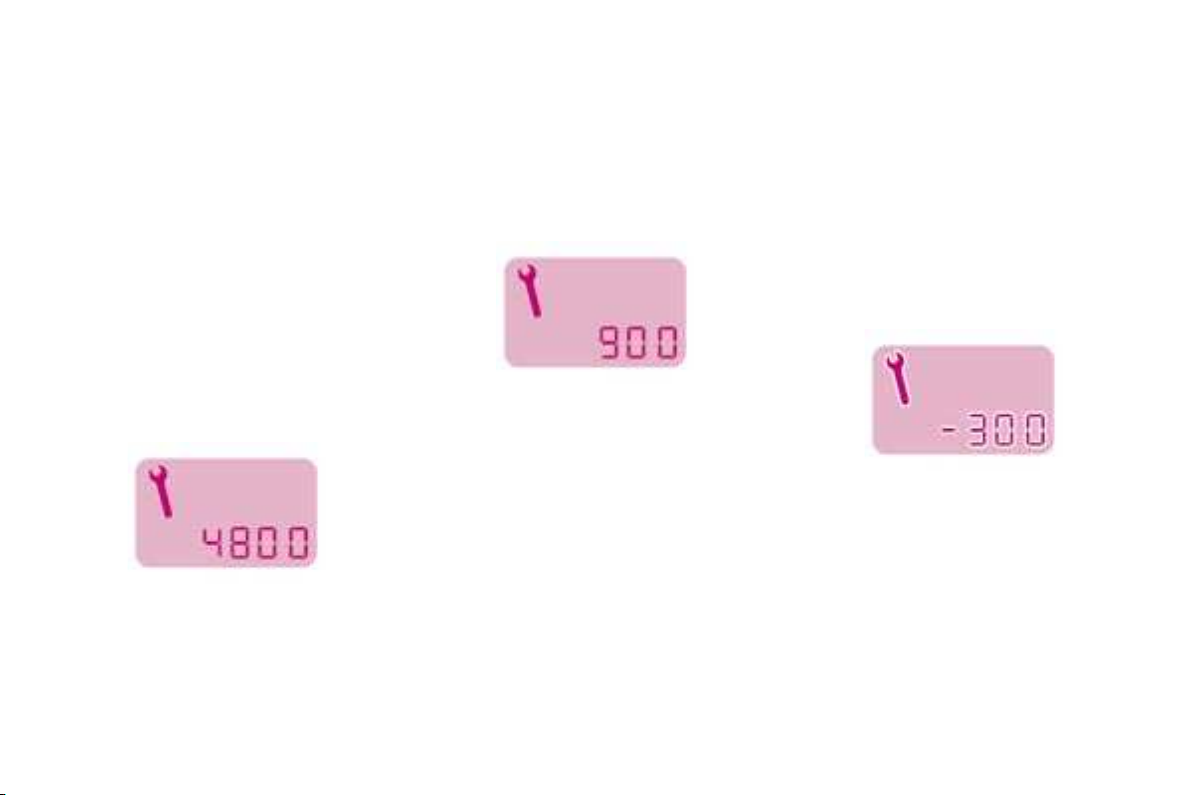
Service indicator
This is a visual reminder of when the
next service is due. This service is to
be carried out according to the manufacturer's servicing schedule.
Operation
As soon as the ignition is switched
on and for 5 seconds, the spanner
symbolising ''service operation'' is lit.
The trip recorder display shows the
distance remaining (in round figures)
before the next service.
Example: 4,800 miles/km remain before the next service is due. When the
ignition comes on and for 5 seconds
the display indicates:
5 seconds after the ignition is
switched on, the total distance recorder resumes normal operation
and the display shows the total or trip
distances.
The distance remaining before the
next service is less than 500 miles
(1,000 km).
Example: 400 miles (900 km) remain
before the next service is due.
When switching on the ignition and
for 5 seconds, the display shows:
5 seconds after the ignition is
switched on, the total distance recorder resumes normal operation
and the symbol remains lit.
This indicates that a service should
be carried out shortly. The display
shows the total or trip distances.
The service is overdue*.
Each time the ignition is switched on
and for 5 seconds, the symbol and
the excess distance flash.
Example: the service is overdue by
300 miles/km. The service should be
carried out very shortly.
When the ignition is switched on and
for 5 seconds, the display shows:
5 seconds after the ignition is
switched on, the total distance recorder resumes normal operation and
the symbol remains lit. The display
shows the total or trip distances.
* Whichever comes first: the service
spanner lights if the two-year interval has been exceeded.
Instruments and controls
26 -
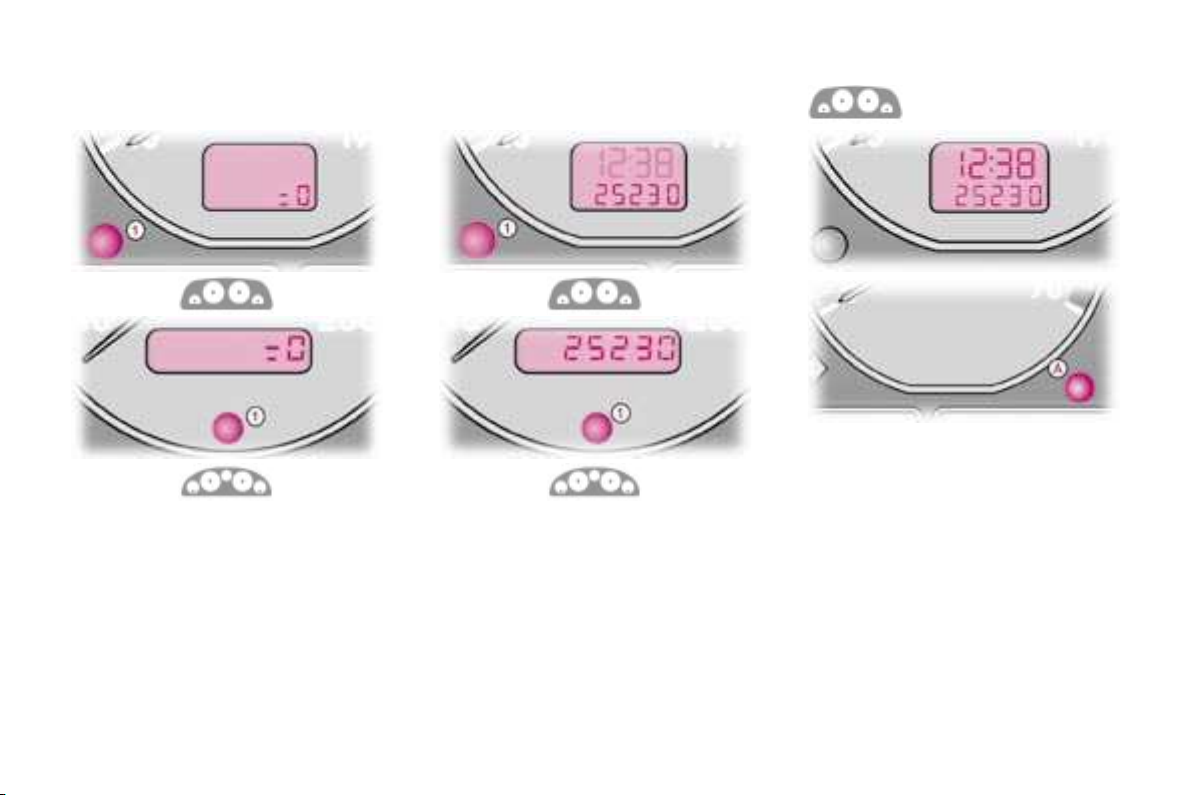
Resetting the service
indicator
Your PEUGEOT dealer carries out
this operation after each service.
The reset procedure is as follows:
- Switch off the ignition.
- Press and hold button 1.
- Switch on the ignition.
The display begins a 10 second
countdown.
- Keep button 1 pressed for 10 seconds.
The display shows [= 0] and the
service symbol disappears.
Total distance recorder
Briefly pressing button 1 alternates
between the total and trip distance
displays.
To reset the trip recorder to zero,
when it is displayed press button 1
until zeros appear.
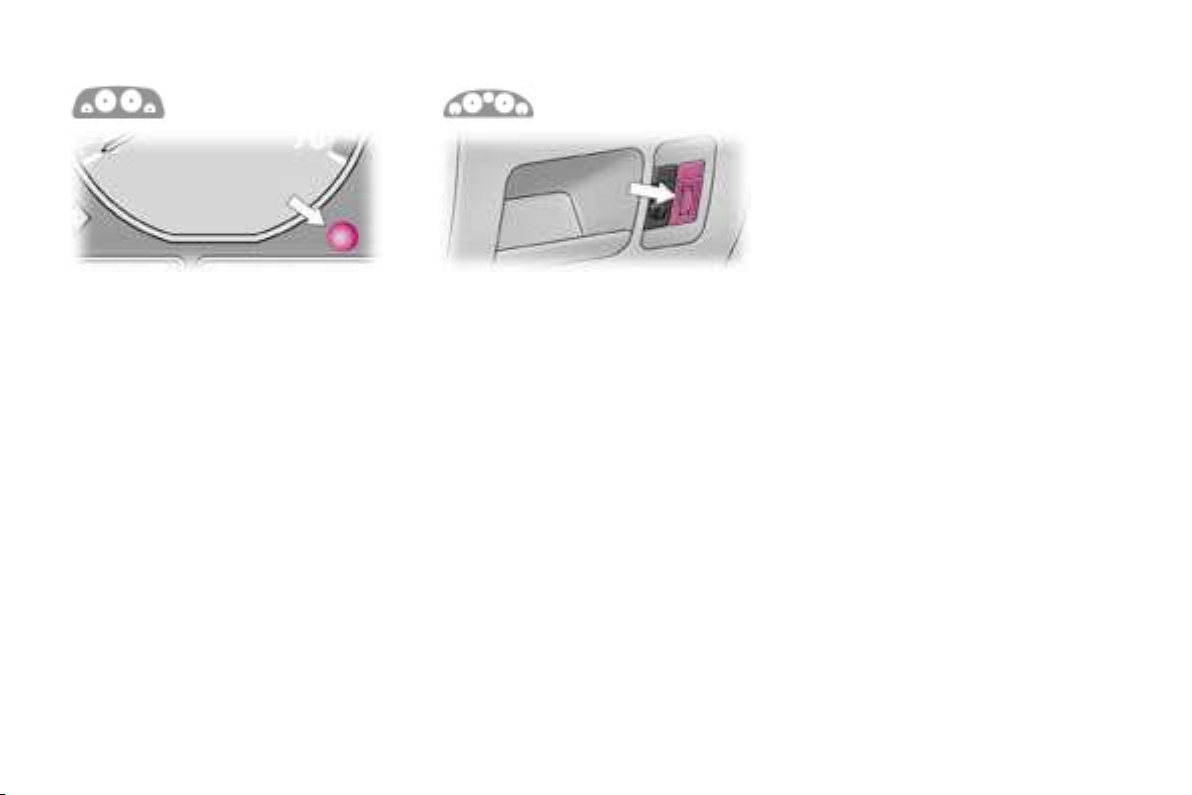
DIGITAL CLOCK
The clock is set with the ignition on,
engine off.
Press button A for more than three
seconds, the hours begin to flash.
You can now set the hours by pressing button A. Five seconds after
the button is released, the hours
are stored and the minutes begin to
flash.
You can now set the minutes. Five
seconds after the button is released,
the minutes are stored.
Note: press button A briefly for slow
advance or press and hold for rapid
advance.
Instruments and controls
-
27
LIGHTING
RHEOSTAT
With the lights on, press the button
to vary the intensity of the lighting of
the instruments and controls. When
the lighting reaches the minimum (or
maximum) setting, release the button
then press it again to increase (or reduce) the brightness.
As soon as the lighting is of the
required brightness, release the
button.
LIGHTING
RHEOSTAT
With the lights on, turn the knob to
vary the intensity of the lighting of the
instruments and controls.
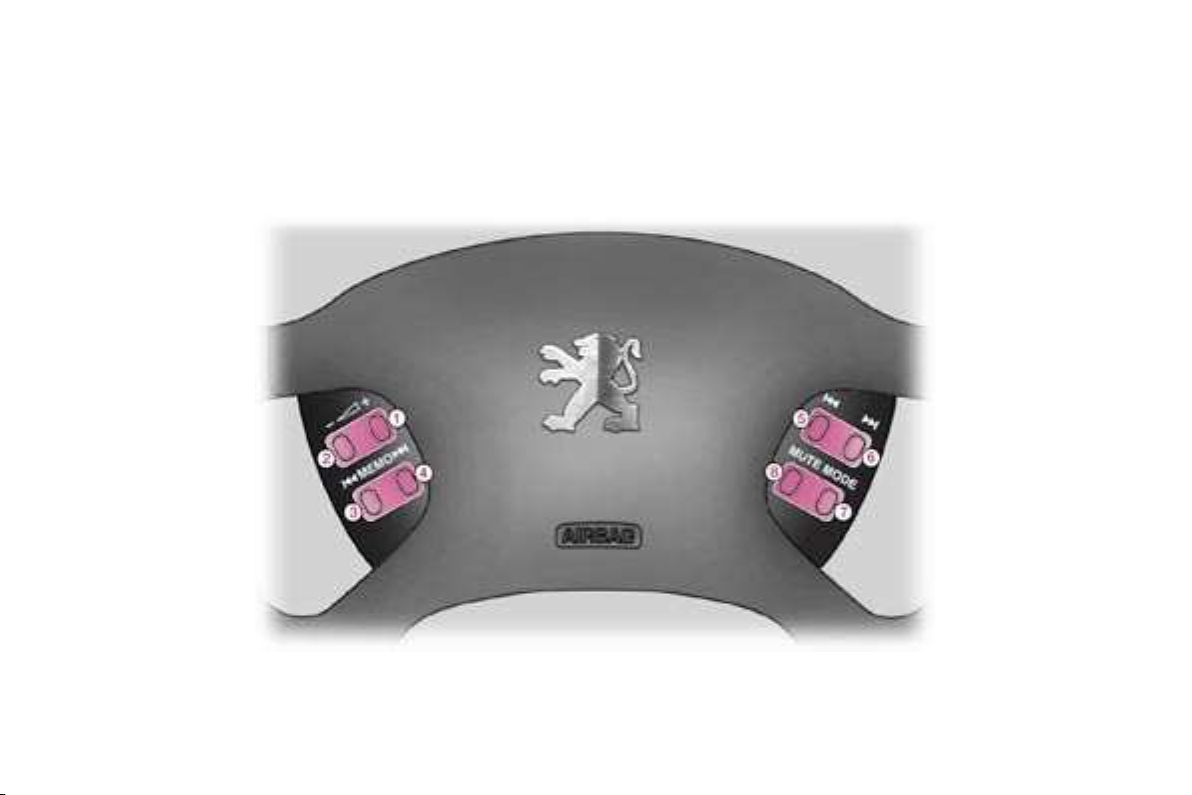
Audio equipment
28 -
RD1 STEERING WHEEL CONTROLS

Press Function carried out
Audio equipment
-
29
1
2 Decrease volume.
3 Selection of previous stored station (radio) - Selection of previous CD (CD changer).
4 Selection of next stored station (radio) - Selection of next CD (CD changer).
5 Automatic search of lower frequencies (radio) - Selection of previous track (CD/CD changer).
6 Automatic search of higher frequencies (radio) - Selection of next track (CD/CD changer).
7 Change of audio source (radio/CD/CD changer).
8 Mute; sound restored by pressing any button.
Increase volume.
Audio equipment
30 -
AUDIO RD1
Button Function
A ON/VOL Press: set on/off. Rotation: volume adjustment.
B
C RDS
D TA
E AUDIO Selection of the bass, treble, loudness and sound distribution setting.
F
Ejection of the CD.
RDS function on/off.
Press for more than 2 seconds: regional following mode on/off.
Traffic information priority on/off.
Press for more than 2 seconds: PTY function on/off.
Increase of the setting of the functions associated with button E.

Button Function
Audio equipment
-
31
G
H
I MAN Manual/automatic operation of buttons H and J.
J
K
L
M
1 to 6 1 2 3 4 5 6
Decrease of the setting of the functions associated with button E.
Automatic search of higher frequency.
Selection of next CD track.
Automatic search of lower frequency.
Selection of previous CD track.
Source selection: radio. Selection of FM1, FM2, FM3 and AM wavebands.
Press for more than 2 seconds: automatic storing of stations (autostore).
Source selection: CD changer.
Press for more than 2 seconds: shuffle.
Source selection: CD.
Press for more than 2 seconds: shuffle.
Selection of the stored station.
Press for more than 2 seconds: storing a station.
Selection of a CD.
 Loading...