

Peugeot Boxer Benne 2012 Owner's Manual
You can find your user guide on the PEUGEOT website, under the
heading "P
f
address
n
S
If the heading "Personal space" is not available on the public website
or your country, you can find your user guide at the following
http://public.servicebox.peugeot.com
ersonal space".
:
Referring to the user guide on-line also gives you access to the
latest information available, easily identified by the bookmarks,
associated with this pictogram:
elect:
The Vehicle documentation link in the home page (no registration is
eeded),
the language,
the model,
the edition date appropriate for the date of registration of your vehicle.
You will find your user guide, presented in the same way as the paper version.
WELCOM
E
Please note the following point: the fitting of electrical equipment
or accessories which are not recommended by PEUGEOT
may result in a failure of your vehicle's electronic system.
Please note this specific warning. It is advisable to contact a
PEUGEOT dealer to be shown the recommended equipment and
accessories.
Your vehicle is fitted with only some of the equipment described
in this document, depending on its trim level, version and the
specification for the country in which it was sold.
For any work on your vehicle, use a qualified workshop that has
the technical information, competence and equipment required,
which a PEUGEOT dealer is able to provide.
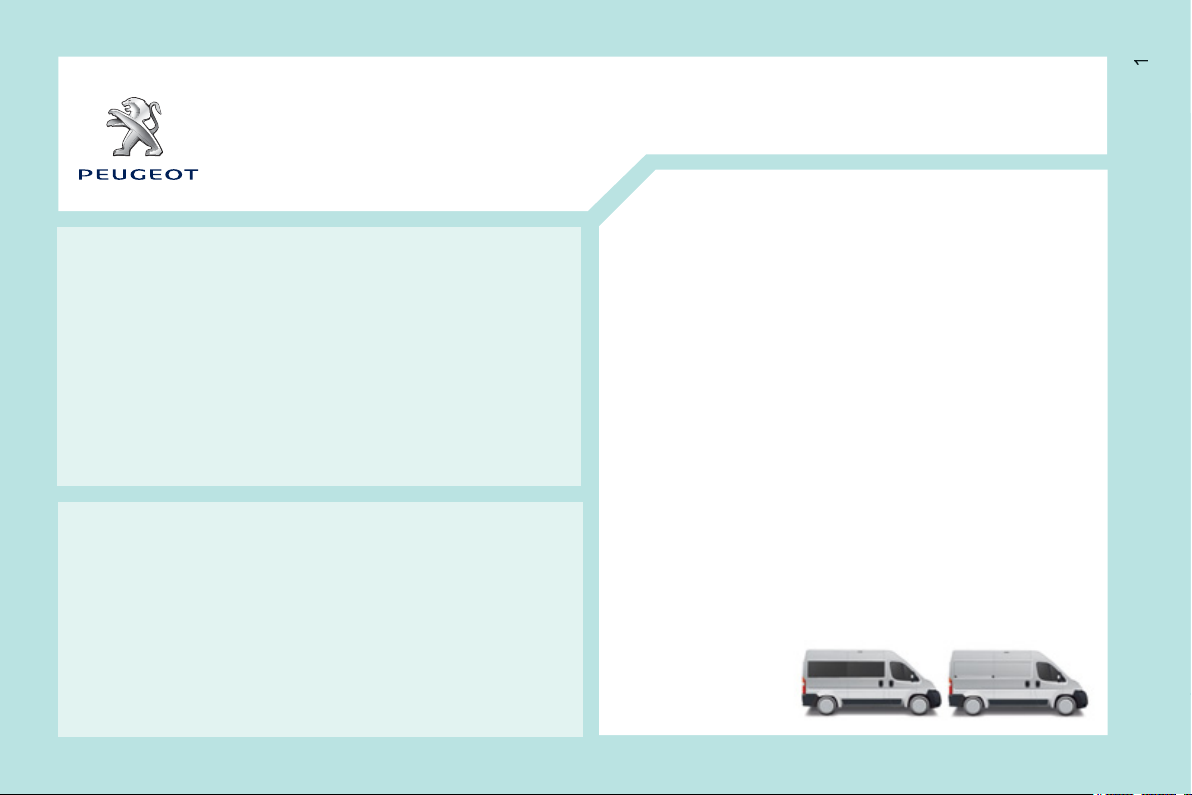
The Boxer has been designed to satisfy all your requirements
in terms of practicality, comfort, safety and aesthetics.
In order to get the most out of your vehicle, we suggest that
you take a tour, with the "Handbook" in front of you. The
handbook presents the operation of the equipment available
on board in detail.
PEUGEOT thanks you for your confidence and wishes you
very happy motoring.
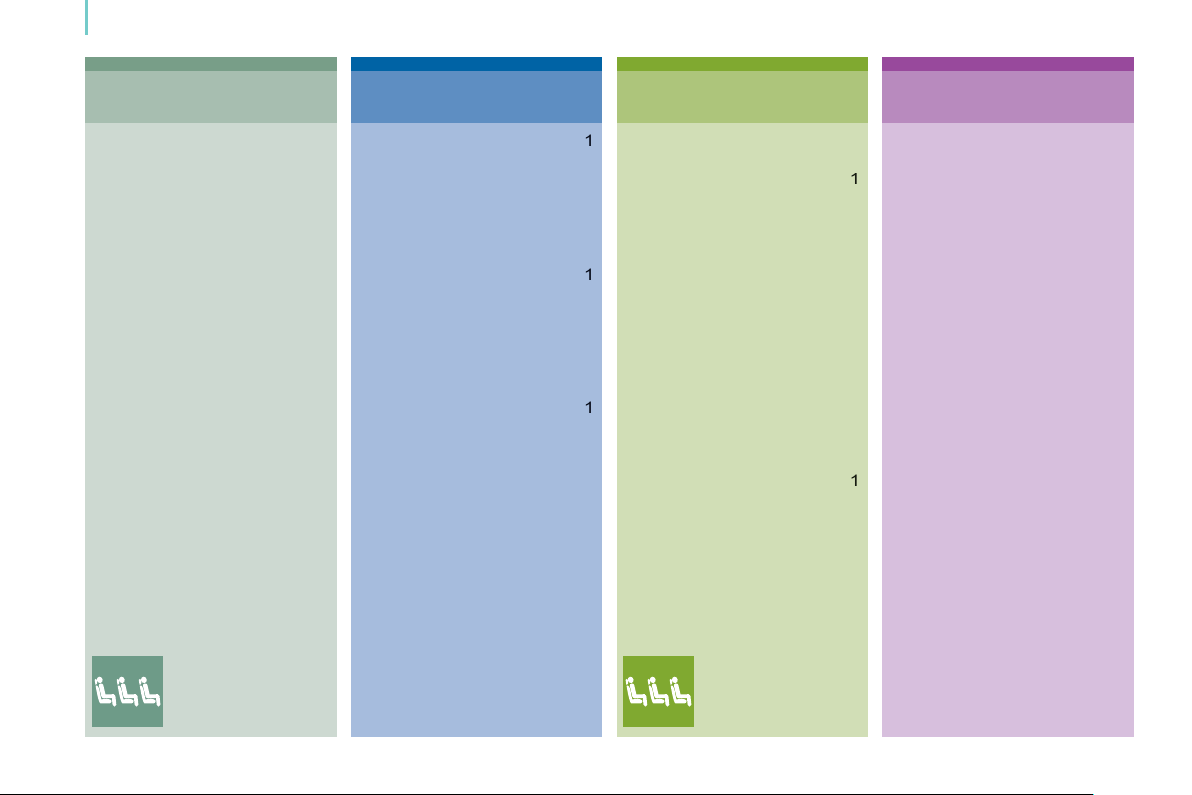
Contents
3
8
5
0
C
5
5
a
5
6
5
6
6
6
7
7
7
7
7
esentatio
Access
6
1
1
1
1
1
6
1
1
4
4
3
7
8
6
2
5
2
2
2
Ala
2
6
doors
2
2
3
g
assis
1. FAMILIARISATION
Pr
xterior
nterior
itting comfortably
eeing clearly
Ventilation
onitoring
Passenger safety
Driving safely
co-driving
n
-20
. READY TO SET OFF
mote control
Key
onfi dential card
rm
ront - rear
Load space
Instrument panels 3
Warning lamps 3
uel gauge 3
Temperature indicator 3
ervice indicator
Lighting rheostat 3
earbox and steerin
wheel 4
tarting and stopping 4
ill start
top & Start 4
21-4
t 4
. EASE OF USE and
COMFORT 46-7
Lighting control stalk 4
Wipers
ruise control
Demisting and
defrosting
anual heating /
ir conditioning
Digital air conditioning
Additional heating
systems 6
ear Heating /
Air Conditioning 6
Programmable additional
eating 6
Front seats
Front bench seat
ear seats
rew cab
Front fi ttings
ear fi ttings
irrors
Electric windows
. TECHNOLOGY on
BOARD 79-11
Trip computer
ode
arking sensors 8
eversing camera 8
neumatic suspension 8
Tachograph 8
Audio system 8
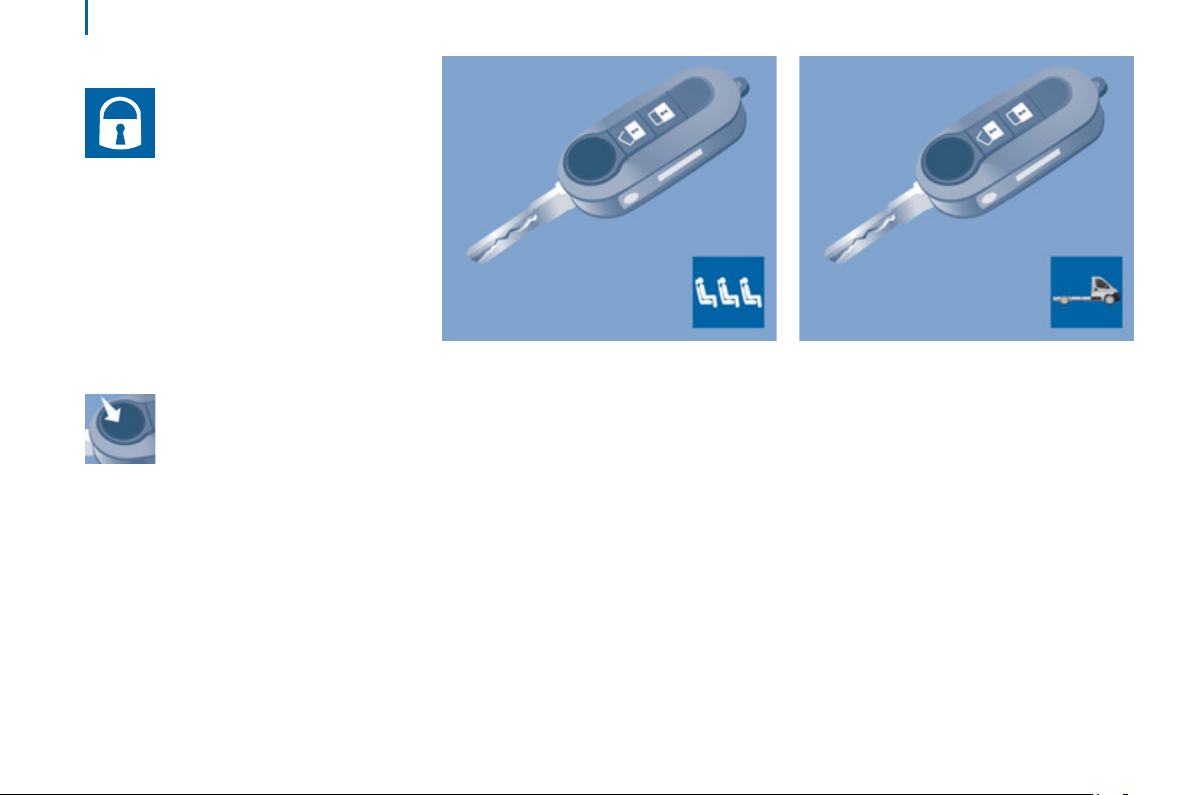
This symbol informs you of
equipment which is specific
to the combi model.
Sliding side windows. Rear
heating / air conditioning.
Rear seats / bench seats.
S
Contents
6
4
2
9
A
1
1
1
1
g
assistance
1
y
1
6
1
1
2
2
2
2
3
3
7
3
3
5
5
5
e
6
6
6
7
7
7
0
7
s
and co
7
7
7
5. SAFETY 114-132
arking brake 1
azard warning lamps 1
rn 1
ABS 1
mergency brakin
1
Anti-slip regulation (ASR)
and electronic stabilit
programme (ESP) 1
Fixed speed limiter 1
eat belts 1
Airbags 1
eactivating the passenger
airbag 1
hild seats 1
ISOFIX seats 1
6. ACCESSORIES
Towing a trailer 13
oof bars 1
ther accessories 1
7. CHECKS
pening the bonnet 13
nder the bonnet 1
Levels 1
hecks 14
l 14
33-13
37-14
. QUICK HELP
145-16
Battery 14
Changing a wheel 14
Puncture repair kit 1
Changing a bulb 1
Changing a fuse 1
Changing a wiper blad
Being towed 16
1
. TECHNICAL DAT
163-173
Environment 1
Dimensions 1
Engines 1
Weights 1
Identifi cation markings 1
0. VISUAL SEARCH
174-18
Exterior 1
Instrument
ntrols 1
Interior 1
Technical data -
intenance 1
Child seats in the rear.
CONTENT

PRESENTATION
This handbook is designed to familiarise you with the new vehicle
from the moment you get behind the wheel and to describe the
operating features.
Reading the handbook is made easy by a content divided into
10 colour-coded chapters. Its sections cover, by theme, all of the
functions of the vehicle in its most complete specification.
Chapter 9 gives all of the technical data relating to your vehicle.
At the end of the document, diagrams of the outside and inside of
the vehicle will assist you in locating equipment or functions and
page numbers refer you to the relevant section of the handbook.
Within the chapters symbols draw your attention to specific
information:
directs you to the chapter and section which contains detailed
information concerning a function,
indicates important information relating to use of the equipment,
alerts you to the safety of individuals and equipment on board.
4
2
5
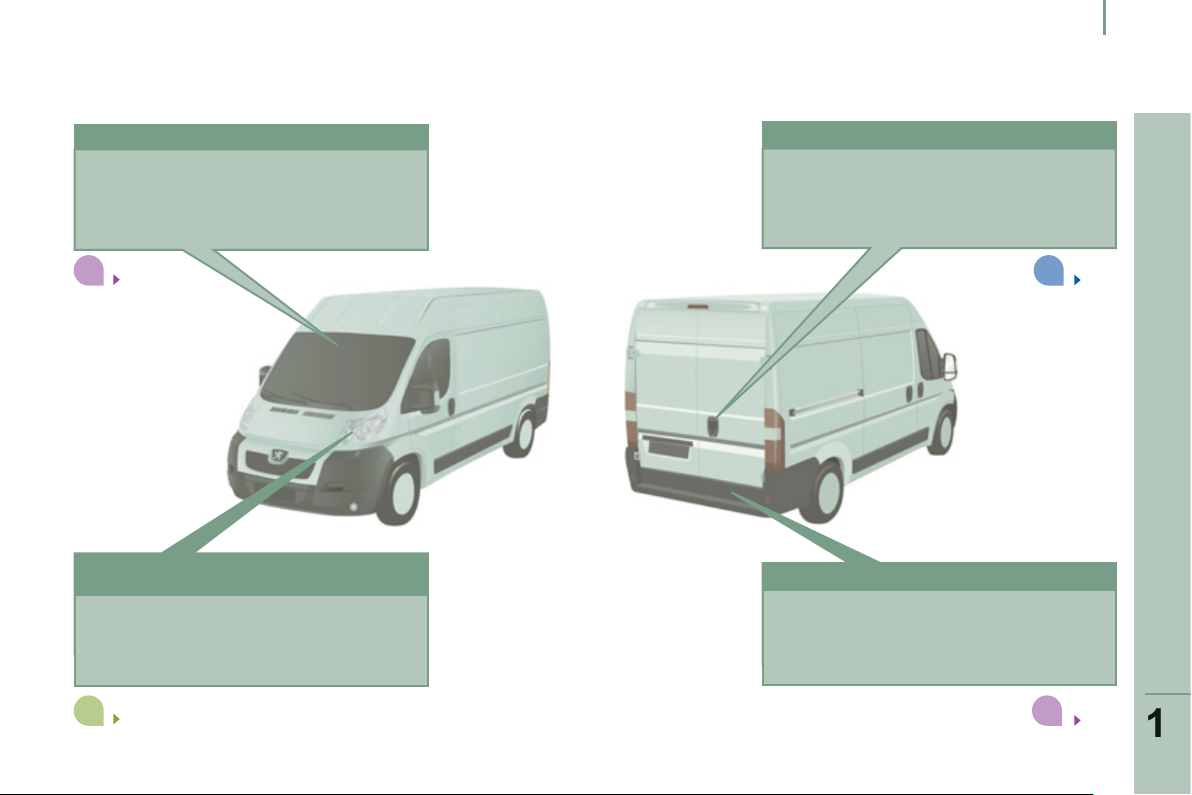
EXTERIOR
Familiarisation
Reversing camera
This system is activated automatically
when reverse gear is engaged, with a
visual return on a screen that takes the
place of the interior rear view mirror.
4
84
"Guide-me-home"
welcome lighting
After switching off the ignition, when you
leave the vehicle, the front lamps remain
on for a short period.
Opening the rear doors to 180°
Once the vehicle has been unlocked, the
rear doors can be opened to 180° to make
unloading/loading operations easier.
28
Rear parking sensors
This system warns you if an obstacle is
detected behind the vehicle when reverse
gear is engaged.
FAMILIARISATION
48
83
222
6
Familiarisation
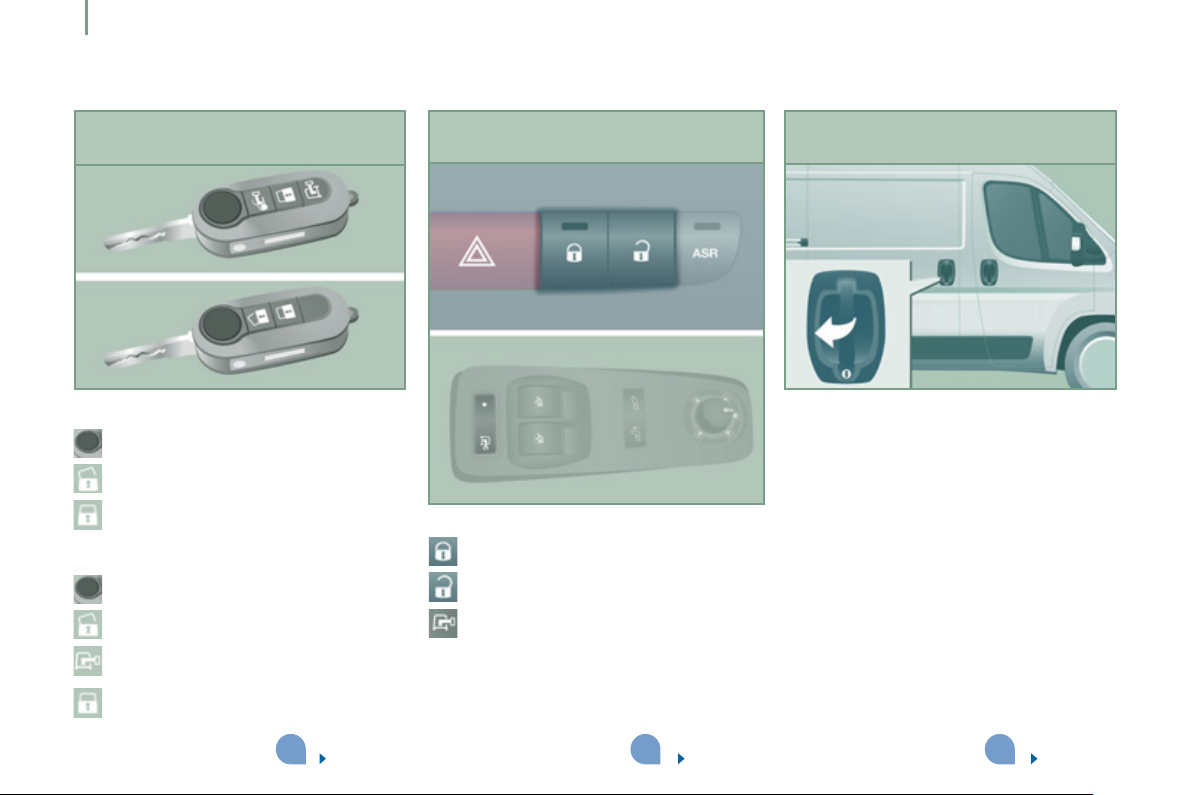
ACCESS
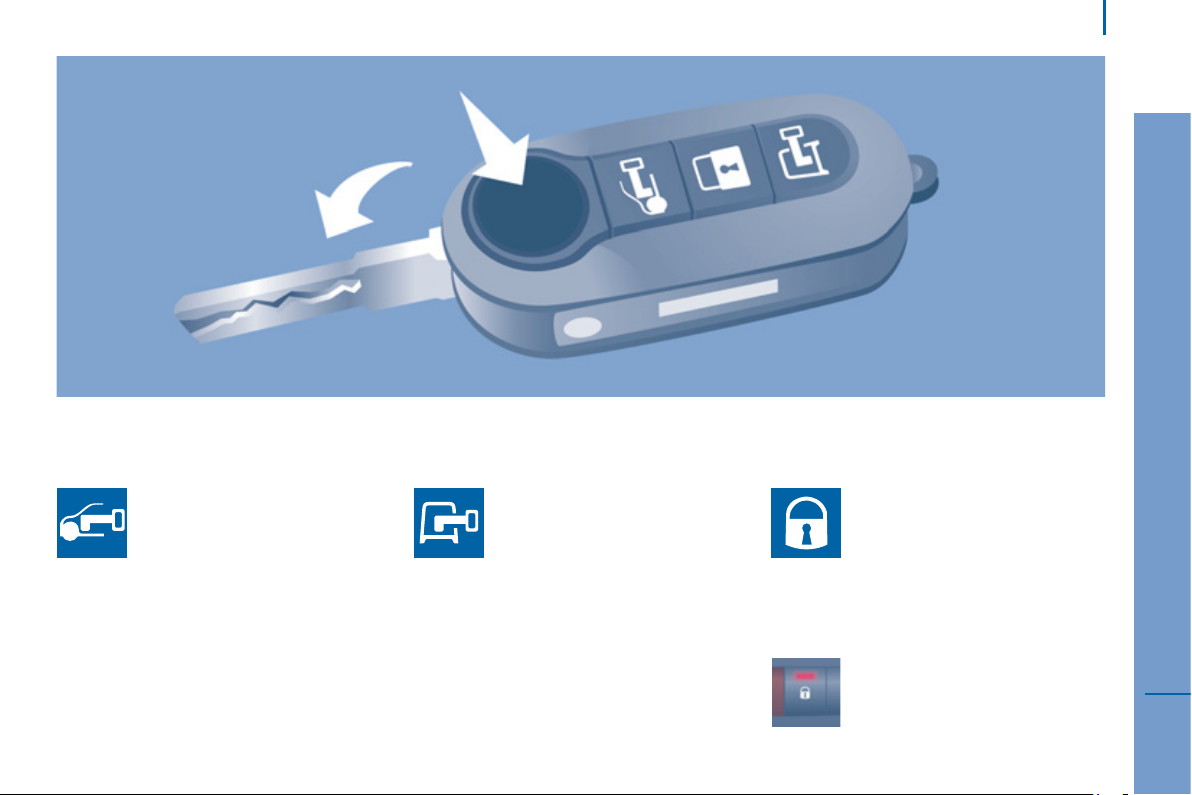
Remote control key
2 buttons
Unfolding / Folding the key.
Unlocking.
Locking.
3 buttons
Unfolding / Folding the key.
Unlocking the cab.
Unlocking the load space.
Locking the vehicle.
Manual central locking controls
Locking the vehicle.
Unlocking the vehicle.
Locking / Unlocking the load space.
Sliding side door
Opening
Pull the handle towards you then towards
the rear.
Take care not to obstruct the guide space
on the floor so as to allow the door to slide
correctly.
Take care to open the door fully so as to
engage the latch at the bottom of the door.
Do not drive with the sliding side door open.
21
29
27
2
2
7
ACCESS
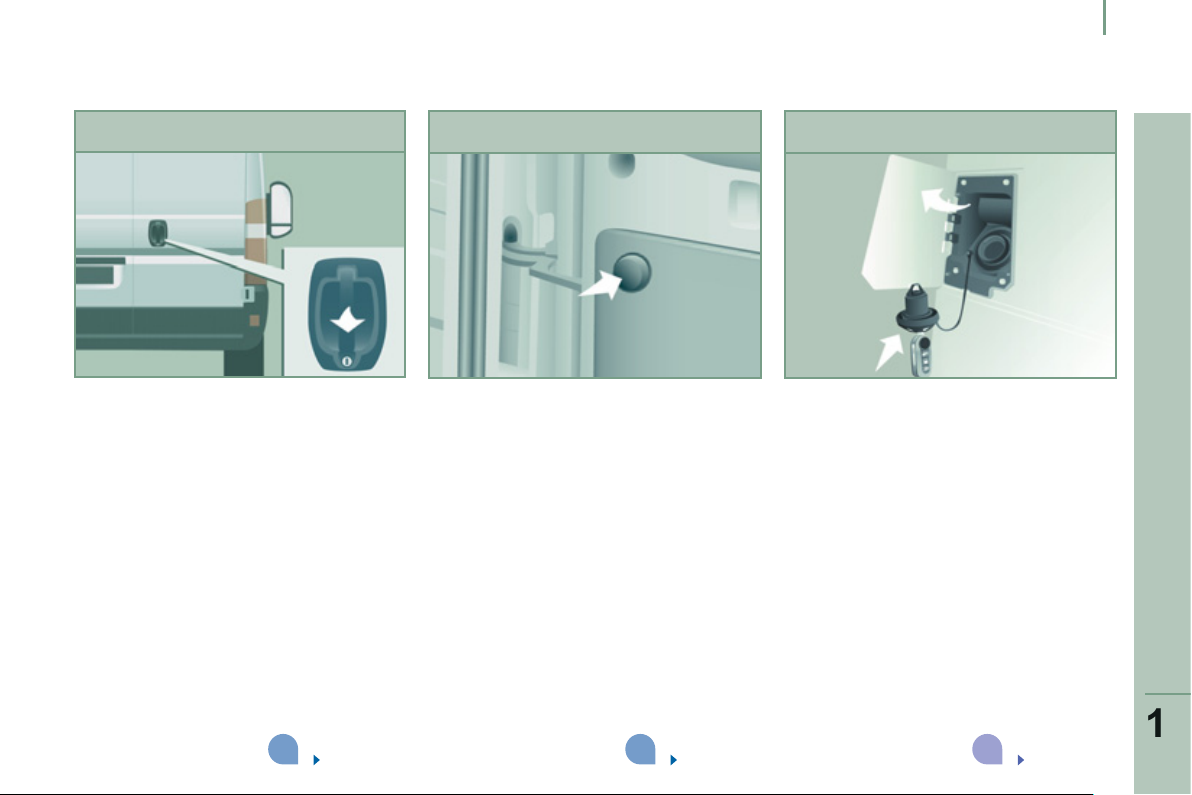
Familiarisation
Rear doors Opening to 180°
Opening
Pull the handle towards you.
Closing
To close, start with the left-hand door then
close the right-hand door.
Press the button, located on the door trim
panel, to widen the angle of opening of the
door.
Fuel tank
Opening the fuel filler flap.
Hooking the fuel filler cap.
Capacity of the fuel tank: approximately 90 litres.
FAMILIARISATION
28
28 144

8
Familiarisation
INTERIOR
Instruments and controls
1. Fusebox.
2. Programmable heating.
3. Cruise control switch.
4. MODE, configuration and
personalisation / lighting dimmer /
headlamp beam height adjustment.
5. Lighting and direction indicator control
stalk.
6. Instrument panel with screen.
7. Wiper / screenwash / trip computer
control stalk.
8. Ignition switch.
9. Driver's airbag / horn.
9
Familiarisation
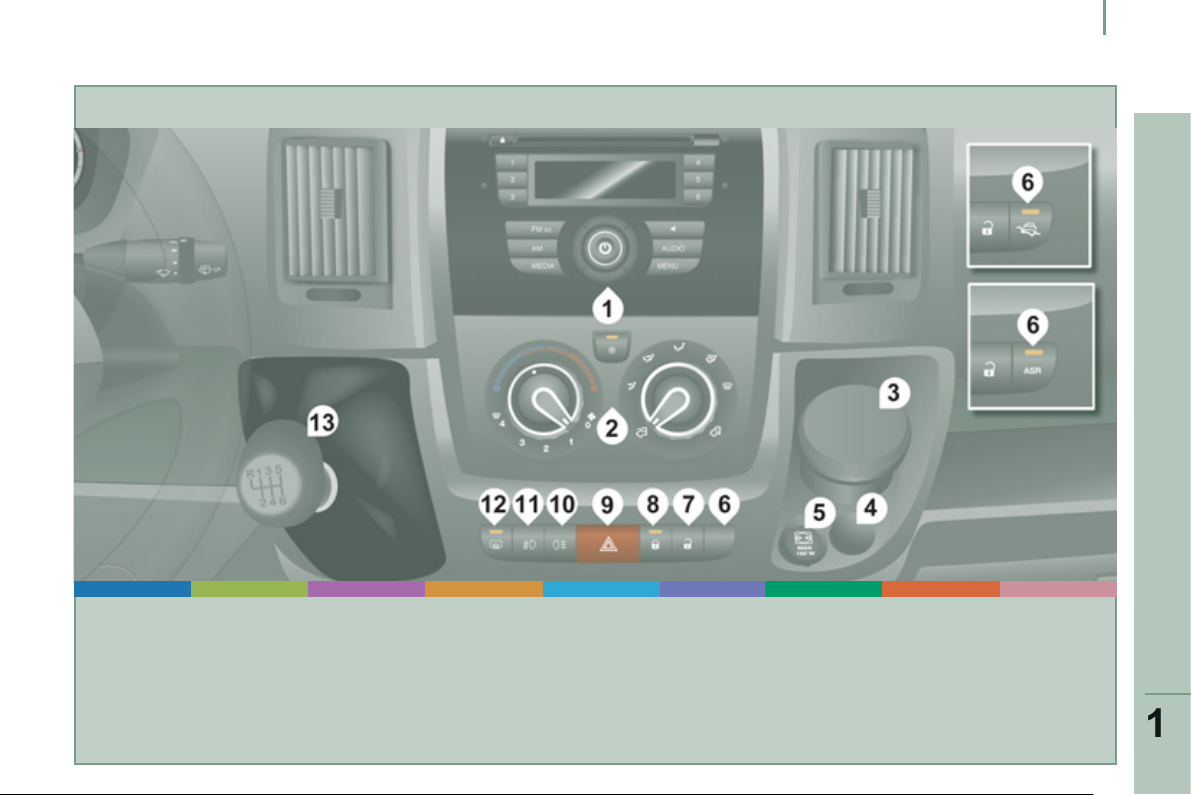
Centre console
1. Audio equipment.
2. Manual air conditioning.
3. Portable ashtray.
4. Cigarette lighter.
5. 12 volt accessory socket (180 W max).
6. Dynamic stability control (ASR) /
Intelligent Traction Control.
7. Central unlocking of the doors and load
space.
8. Central locking / alarm indicator lamp.
9. Hazard warning lamps.
10. Rear foglamps.
11. Front foglamps.
12. Demisting / defrosting.
13. Gear lever.
FAMILIARISATION
0
Familiarisation
1
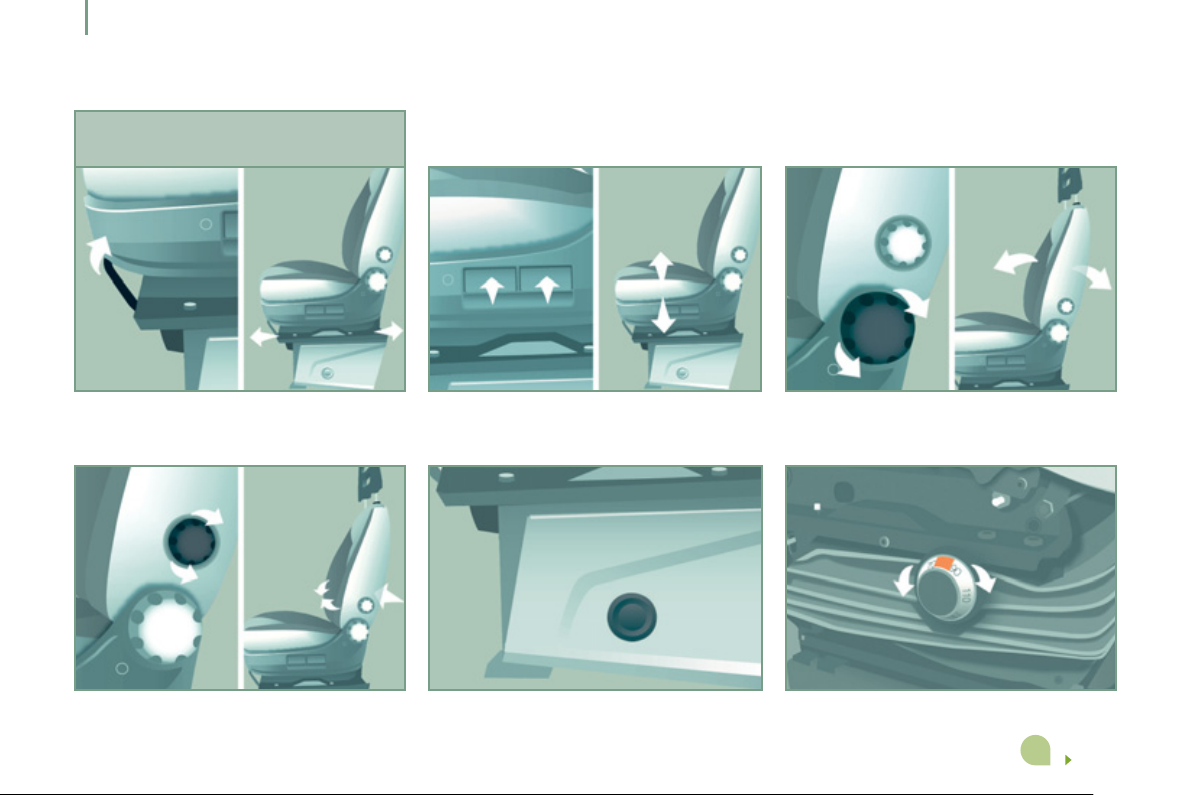
SITTING COMFORTABLY
Driver's seat adjustments
Forwards-backwards Seat height Seat back angle
Lumbar support Seat heating Variable damping seat
65
2
1
Familiarisation
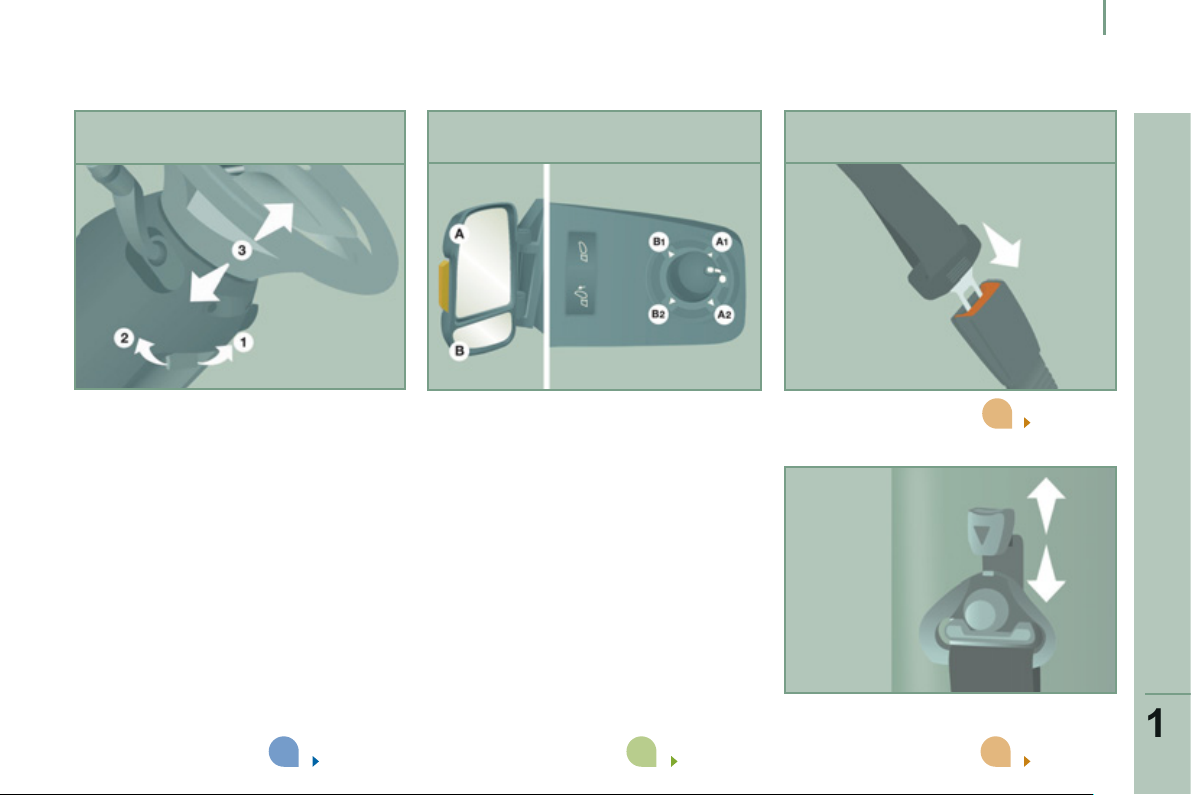
SITTING COMFORTABLY
Manual adjustment of the reach of the
steering wheel
1. Unlocking the adjustment mechanism.
2. Locking the adjustment mechanism.
3.
Adjustment of the reach of the steering wheel.
Door mirror adjustment
The mirrors are divided into two zones: A
and B.
1. Driver's mirror:
A1- Adjustment of the upper mirror.
B1- Adjustment of the lower mirror.
2. Passenger's mirror:
A2- Adjustment of the upper mirror.
B2- Adjustment of the lower mirror.
Front seat belt
Fastening.
1
119
FAMILIARISATION
Height adjustment.
40 77
119
12
Familiarisation
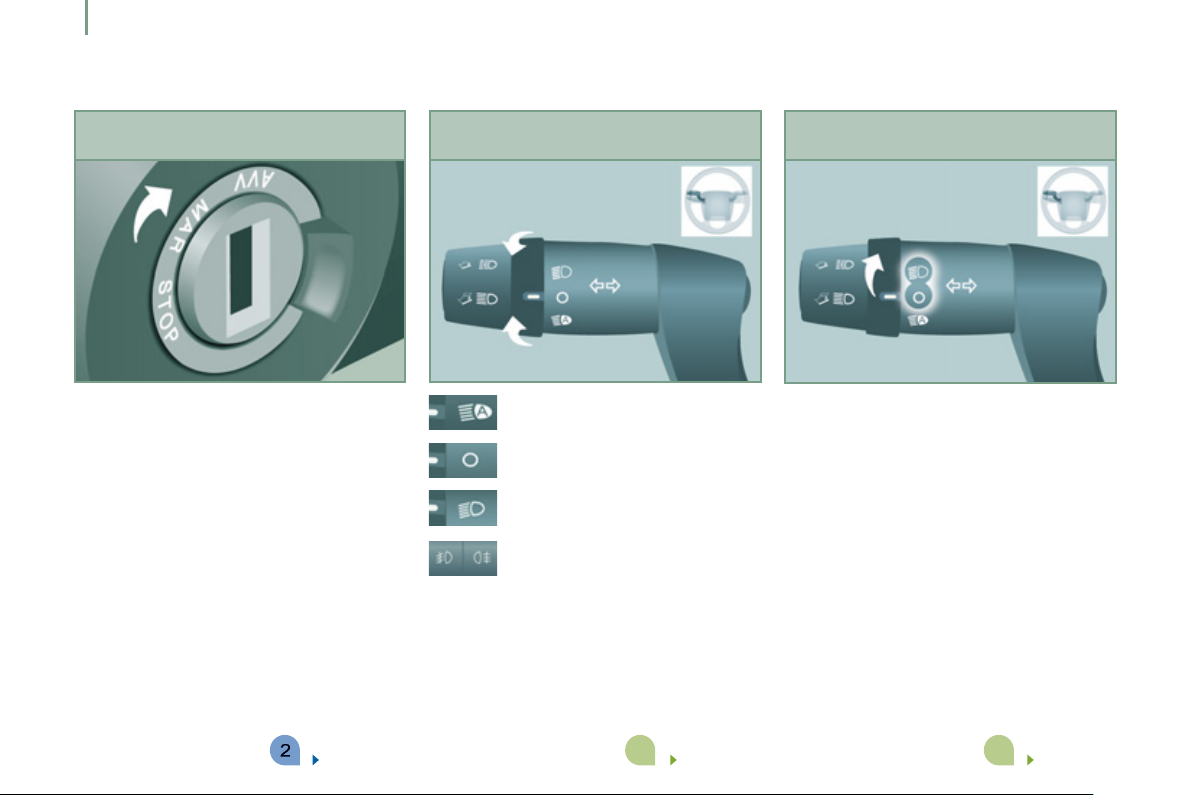
SITTING COMFORTABLY
Ignition switch
- STOP position.
- RUNNING position.
- START position.
SEEING CLEARLY
Lighting Parking lamps
Automatic illumination of
headlamps.
Lamps off.
Dipped or main beam headlamps.
Front and rear foglamps.
With the ignition off and the key in the STOP
position or removed:
Move the ring on the lighting stalk to
position O, then to dipped or main beam
headlamps.
The lamps will remain on while you are
parked.
41
47
49

3
Familiarisation
SEEING CLEARLY
Electric window controls
A. Driver's electric window control.
B. Passenger's electric window control.
The electric window functions are
deactivated one minute after the ignition is
switched off.
Windscreen wipers
A. Park.
B. Intermittent (4 speeds).
C. Slow continuous.
D. Fast continuous.
E. Single wipe.
1
Windscreen wash
Pull the control stalk towards you, the
windscreen wash is accompanied by a timed
operation of the wipers.
FAMILIARISATION
78
50
50
14
Familiarisation
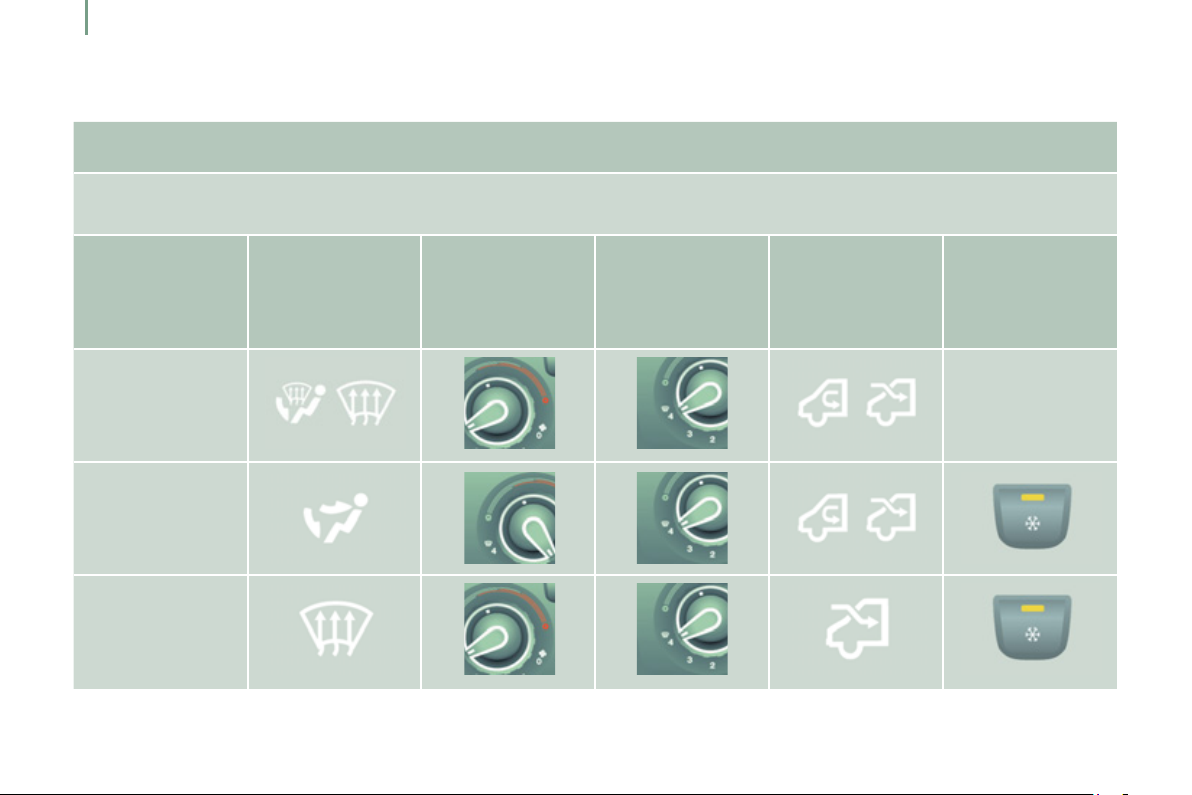
VENTILATION
Recommended interior settings
Manual Air Conditioning
If I require... Air distribution Temperature Air flow Air recirculation AC
Heating
Cooling
Demisting
Defrosting
Digital air conditioning : use of the fully automatic operation by pressing the "AUTO" button is recommended.
-
2
2
5
Familiarisation
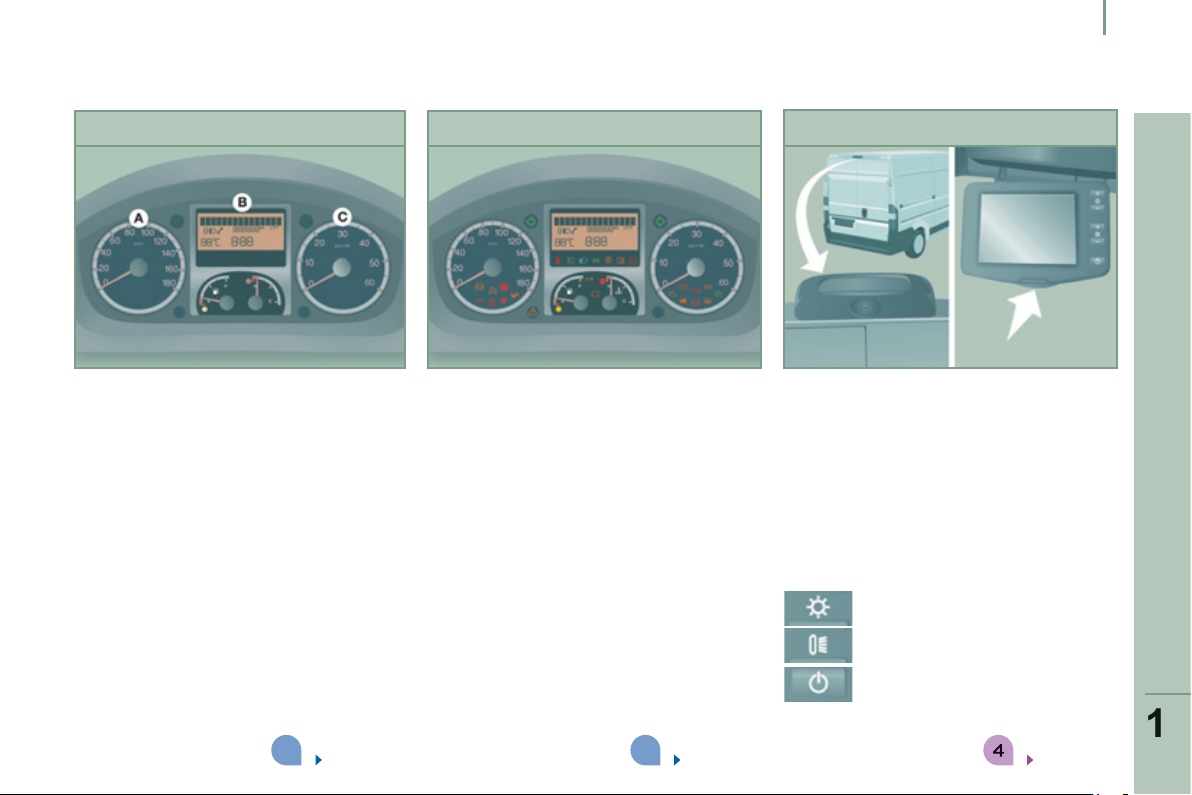
MONITORING
Instrument panel
A. Speedometer.
B. Instrument panel screen.
C. Rev counter.
Warning lamps
With the ignition on, the orange and red
warning lamps come on.
With the engine running, these warning
lamps should switch off.
If warning lamps remain on, refer to the
chapter concerned.
1
Reversing camera
The camera comes on when you engage
reverse gear and remains active up to
approximately 9 mph (15 km/h). It is
deactivated above 11 mph (18 km/h).
Screen
Press the button and place the screen in the
required position.
Buttons
Brightness adjustment.
Back-lighting adjustment.
ON/OFF provides views of the
rear without engaging reverse
gear.
30
31
84
FAMILIARISATION

2
6
Familiarisation
1
PASSENGER SAFETY
To deactivate the front passenger airbag,
refer to the "MODE" section of chapter 4, then
on the "Passenger airbag” menu, select OFF.
The airbag warning lamp on the instrument
panel stays on while the airbag is
deactivated.
Child lock
This prevents opening of the sliding side
door from the inside.
ISOFIX mountings
Two front rings, located between the seat
back and the seat cushion are used to
secure an ISOFIX child seat.
4
80
27
129
2
7
Familiarisation
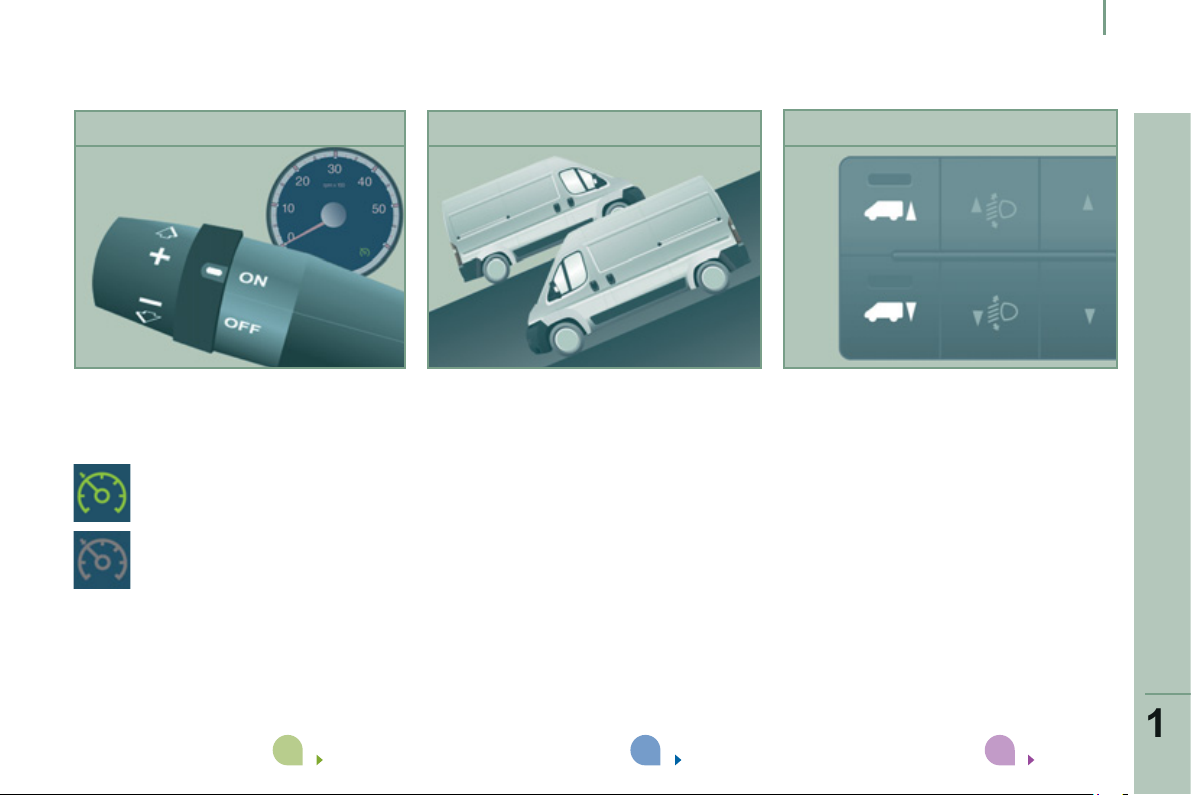
DRIVING SAFELY
Cruise control
The state of the cruise control system is given on the
instrument panel by a warning lamp located in the rev counter.
Function selected.
Function deactivated.
Hill start assist
This system, linked with the ESP, makes hill
starts easier and is activated in the following
conditions:
- the vehicle must be stationary, with the
engine running,
- the gradient of the road must be steeper
than 5%.
1
Pneumatic suspension
This equipment allows you to alter the rear
height of the load floor to make loading or
unloading easier.
Press the up control switch; release to stop
the movement. Each press increases by one
level: +1 to +3.
Press the down control switch; release to
stop the movement. Each press decreases
by one level: -1 to -3.
Driving with the load floor too high or too
low may damage components under the
body.
FAMILIARISATION
4
51
42
86
222
8
Familiarisation
1
DRIVING SAFELY
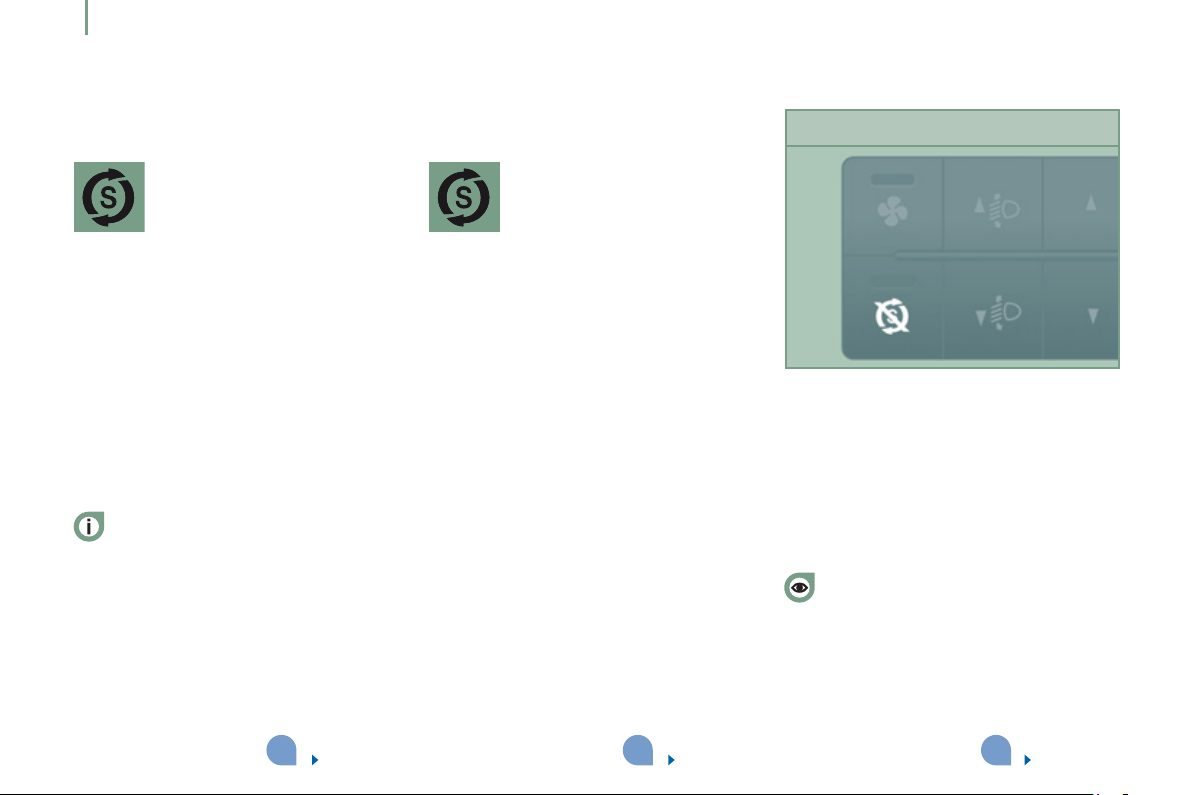
Stop & Start
Going into engine STOP mode
The "S" warning lamp comes on
in the instrument panel and the
engine goes into standby:
Going into engine START mode
The "S" warning lamp goes off
and the engine restarts:
Deactivation / Reactivation
- with a manual gearbox ; vehicle
stationary, put the gear lever into
neutral, then release the clutch pedal.
In some special cases, STOP mode may not
be available; the "S" warning lamp flashes
for a few seconds, then goes off.
Automatic stopping of the engine is
only possible once the vehicle has
exceeded 6 mph (10 km/h), so as to avoid
repeated stops of the engine when driving
slowly.
43
- with a manual gearbox ; depress the
clutch pedal.
In some special cases, START mode may
be invoked automatically; a message
appears in the instrument panel screen,
accompanied by the "S" warning lamp that
flashes for a few seconds, then goes off.
44
You can deactivate the system at any time
by pressing the "S - OFF" control; the lamp
in the button comes on, accompanied by a
message in the instrument panel screen.
The system is reactivated automatically at
every new start with the key.
Before refuelling, before doing
anything under the bonnet or before
leaving the vehicle, you must switch off the
ignition with the key.
45

9
ECO-DRIVING
y
equi
Eco-driving is a range of everyday practices that allow the motorist to optimise their fuel consumption and CO
emissions.
2
1
Optimise the use of your gearbox
With a manual gearbox, move off gently,
change up without waiting and drive by
changing up quite soon. If your vehicle has
the system, the gear shift indicator invites
you to change up; it is displayed in the
instrument panel, follow its instructions.
Drive smoothl
Maintain a safe distance between vehicles,
use engine braking rather than the
brake pedal, and press the accelerator
progressively. These practices contribute
towards a reduction in fuel consumption
and CO2 emissions and also helps reduce
the background traffic noise.
If your vehicle has cruise control, make
use of the system at speeds above 25 mph
(40 km/h) when the traffic is flowing well.
Control the use of your electrical
pment
Before moving off, if the passenger
compartment is too warm, ventilate it by
opening the windows and air vents before
using the air conditioning.
Above 30 mph (50 km/h), close the windows
and leave the air vents open.
Remember to make use of equipment
that can help keep the temperature in the
passenger compartment down (sunroof and
window blinds...).
Switch off the air conditioning, unless it has
automatic digital regulation, as soon as the
desired temperature is attained.
Switch off the demisting and defrosting
controls, if not automatic.
Switch off the heated seat as soon as
possible.
Switch off the headlamps and front foglamps
when the level of light does not require their
use.
Avoid running the engine before moving
off, particularly in winter; your vehicle will
warm up much faster while driving.
As a passenger, if you avoid connecting
your multimedia devices (film, music,
video game...), you will contribute towards
limiting the consumption of electrical
energy, and so of fuel.
Disconnect your portable devices before
leaving the vehicle.

2
0
Limit the causes of excess
onsumption
Spread loads throughout the vehicle;
place the heaviest items in the bottom of
the boot, as close as possible to the rear
seats.
Limit the loads carried in the vehicle and
reduce wind resistance (roof bars, roof
rack, bicycle carrier, trailer...). Use a roof
box in preference.
Remove roof bars and roof racks after use.
At the end of winter, remove snow tyres
and refit your summer tyres.
Observe the recommendations on
aintenance
Check the tyre pressures regularly, when
cold, referring to the label in the door
aperture, driver's side.
Carry out this check in particular:
- before a long journey,
- at each change of season,
- after a long period out of use.
Don't forget the spare wheel and the tyres
on any trailer or caravan.
Have your vehicle serviced regularly (engine
oil, oil filter, air filter...) and observe the
schedule of operations recommended by the
manufacturer.
When refuelling, do not continue after
rd
the 3
cut-off of the nozzle to avoid any
overflow.
At the wheel of your new vehicle,
it is only after the first 1 800 miles
(3 000 kilometres) that you will see the fuel
consumption settle down to a consistent
average.
1
A
A
CCESS
g
g
REMOTE CONTROL
Unlockin
the cab
Press this button to unlock your
vehicle's cab. The interior courtesy
lamp comes on briefl y and the
direction indicators fl ash twice.
Unlocking the rear doors
Press this button to unlock the
side door and the rear doors of
the load space.
ccess
2
Central lockin
Press this button briefly to lock all
of your vehicle's doors, cab and
load space. If one of the doors is
open or is not closed correctly,
the central locking will not work.
The direction indicators flash once.
The indicator lamp on the control
on the centre console comes on
then flashes.
READY TO SET OFF
Access
g
Deadlockin
Press this button twice in
succession to deadlock the
vehicle. It is then impossible to
open the doors from the inside or
the outside.
The direction indicators flash three times.
Never leave anyone inside the vehicle when
it is deadlocked.
Folding/unfolding the key
Press this button to release the
key from its housing.
To fold the key, press the button
then fold the key into the housing.
If you do not press the button, the
mechanism may be damaged.
A
ccess
This locks and unlocks the doors on the
vehicle, opens and closes the fuel filler cap,
as well as starting and stopping the engine.
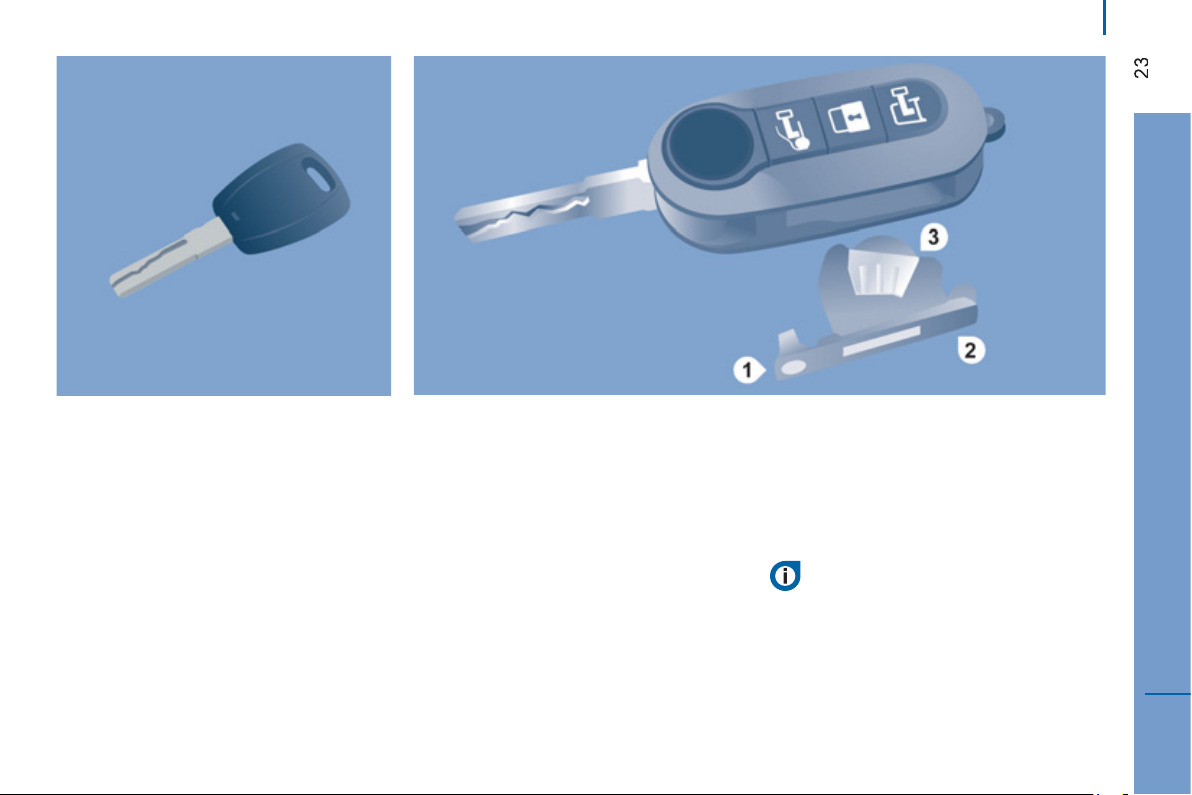
REMOTE CONTROL BATTERY
Reference: CR 2032/3 volts.
Changing the remote control
attery
- press the button to eject the key,
- turn the screw 1 from the closed padlock
to the open padlock using a screwdriver
with a thin lip,
- use the screwdriver as a lever to extract
the battery holder housing 2 ,
- remove the housing and change the
battery 3 observing the polarities,
- put the battery holder housing 2 back
inside the key and secure it by turning
the screw 1 .
There is a risk of damage if the
replacement battery is not of the
correct type.
Only use batteries which are identical or of
an equivalent type to those recommended
by a PEUGEOT dealer. Take used batteries
to an authorised collection point.
READY TO SET OFF

Access
MAIN FUNCTIONS OF THE KEY
Type of key
Key
Remote control - -
Signalling
Direction indicators 2 flashes. 1 flash. 2 flashes. 3 flashes.
Lamp on the control Off.
Unlocking
the cabin
Turn anti-clockwise
(driver's side).
Locking the doors
Turn clockwise
(driver's side).
On for about 3 seconds,
then flashing.
Unlocking the rear
doors
- -
Flashing. Flashing
Deadlocking
5
A
ELECTRONIC IMMOBILISER
All of the keys contain an electronic
immobiliser device.
This device locks the engine supply system.
It is activated automatically when the key is
removed from the ignition.
After the ignition is switched on, a dialogue
is established between the key and the
electronic immobiliser system.
This warning lamp is switched off
after the ignition is switched on
and the key has been recognised,
the engine can be started.
If the key is not recognised, the engine
cannot be started. Use another key and
have the faulty key checked by a PEUGEOT
dealer.
Make a careful note of the number of the
keys. If they are lost, your PEUGEOT dealer
will be able to carry out his work more
quickly and effectively if you give him this
number and the confidential card.
Do not make any modifications to the
electronic immobiliser system.
Operating the remote control, even when it
is in your pocket, may result in involuntary
unlocking of the doors.
However, if none of the doors is opened
within approximately thirty seconds following
unlocking, the doors relock automatically.
The simultaneous use of other high
frequency equipment (mobile telephones,
domestic alarms…), may interfere with the
operation of the remote control temporarily.
The remote control does not operate while
the key is in the ignition, even if the ignition
is off, except for reinitialisation.
When purchasing a second-hand vehicle:
- ensure that you are given the
confidential card,
- have the keys memorised by a
PEUGEOT dealer to ensure that the
keys in your possession are the only
ones which can start the vehicle.
Driving with the doors locked may make
access to the passenger compartment
by the emergency services more diffi cult in an
emergency.
As a safety precaution (with children on
board), remove the key from the ignition when
leaving the vehicle, even for a short time.
ccess
2
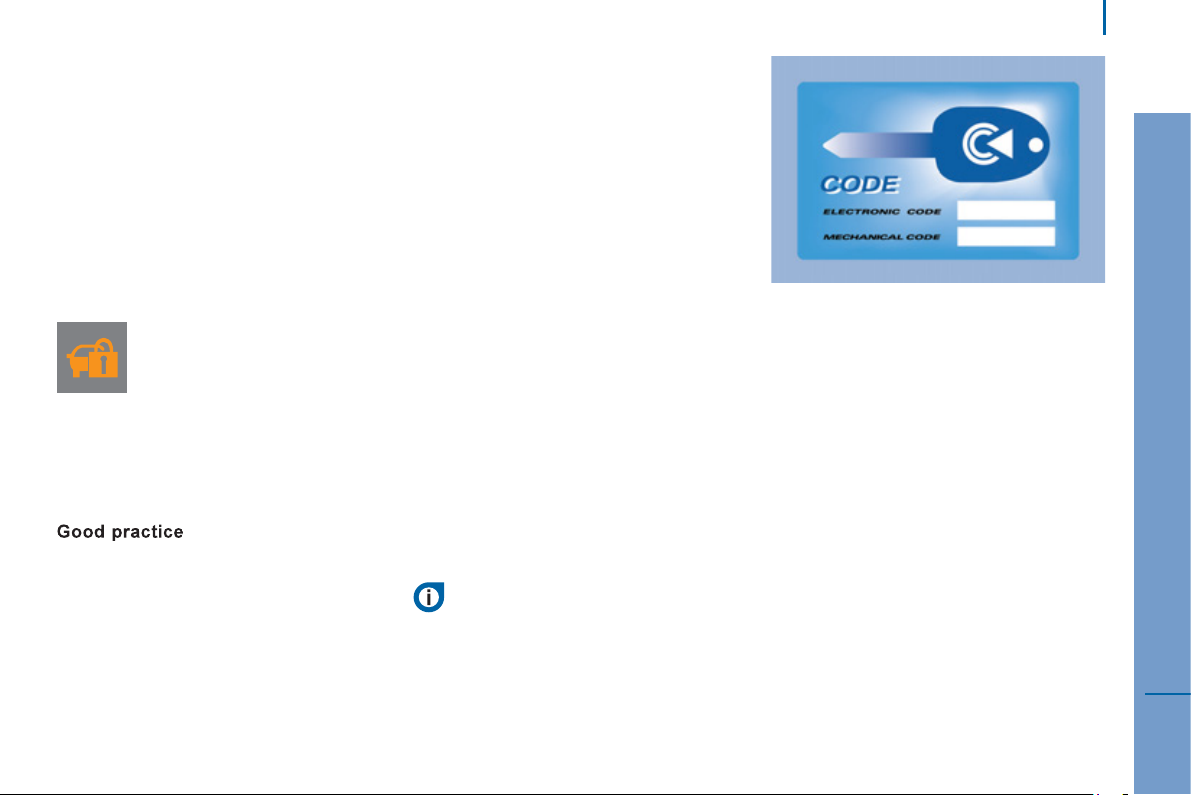
CONFIDENTIAL CARD
This is given to you on delivery of your
vehicle with the duplicate keys.
It contains the identification code necessary
for any work carried out by a PEUGEOT
dealer on the electronic immobiliser system.
This code is hidden by a film, which should
be removed only if necessary.
Keep your card in a safe place, never inside
the vehicle.
When undertaking a long trip or journey,
however, it is advisable to take it with you
along with your personal papers.
READY TO SET OFF
6
Access
A
ARM
AL
2
If your vehicle is fitted with an ANTI-THEFT
ALARM.
This provides:
- exterior perimeter protection by
- anti-tilt protection.
The system also includes a siren and an
LED which can be seen from outside,
indicating the three possible states of the
alarm:
- alarm activated (monitoring), slow
- alarm not activated (not monitoring),
- alarm triggered (intrusion signal), rapid
detectors on the openings (doors,
bonnet) and on the electrical power
supply,
flashing of the red LED,
LED off,
flashing of the red LED when the vehicle
is unlocked.
Activation of the alarm
First ensure that all of the doors are closed
correctly.
The alarm is activated by
pressing this padlock, the
protection is active after a few
seconds.
While the alarm is monitoring, any intrusion
triggers the siren for approximately
30 seconds, accompanied by lighting of the
direction indicators.
The alarm then returns to monitoring mode
but the triggering event is stored and is
indicated by rapid flashing of the LED, if the
alarm is deactivated.
The alarm is also triggered following an
electrical supply cut-off, when the supply is
restored.
utomatic activation
Depending on the country in which the
vehicle is sold: this function activates
monitoring automatically approximately
2 minutes after the last door is closed. To
avoid triggering the alarm when opening a
door, the unlocking button on the remote
control must be pressed again.
Deactivation using the key
Unlock the doors using the key and enter the
vehicle. Switch on the ignition, identification
of the key code will switch off the alarm.
Deactivation using the remote control
When this button is pressed, the
alarm is deactivated when the
vehicle is unlocked.
Deactivation of the anti-tilt
rotection *
Press this control to deactivate
the protection (when towing the
vehicle with the alarm on, for
example).
The protection remains active until the doors
are unlocked with the central locking.
Good practice
To deactivate the siren quickly following
unwanted triggering:
- switch on the ignition, identification of
the key code will switch off the alarm,
- press the unlocking button (cab and key)
on the remote control.
To avoid setting the alarm, when washing
the vehicle for example, lock the vehicle
using the key.
Unlocking the vehicle using the remote
control deactivates the siren automatically.
* Depending on engine.

7
A
ccess
FRONT DOORS
Driver's door
Use the remote control to unlock/lock.
SLIDING SIDE DOOR
Take care not to obstruct the guide space
on the floor in order for the door to slide
correctly.
From outside
Pull the handle towards you then towards
the rear.
From inside
To unlock and open, push the handle
towards the rear.
Ensure that the door opens fully in order
for the latch at the bottom of the door to
engage.
To release and close, pull the handle while
sliding the door.
Do not drive with the sliding side door
open.
2
Child lock
This prevents opening of the sliding side
door from the inside.
Press the control located on the edge of the
side door.
READY TO SET OFF
8
Access
2
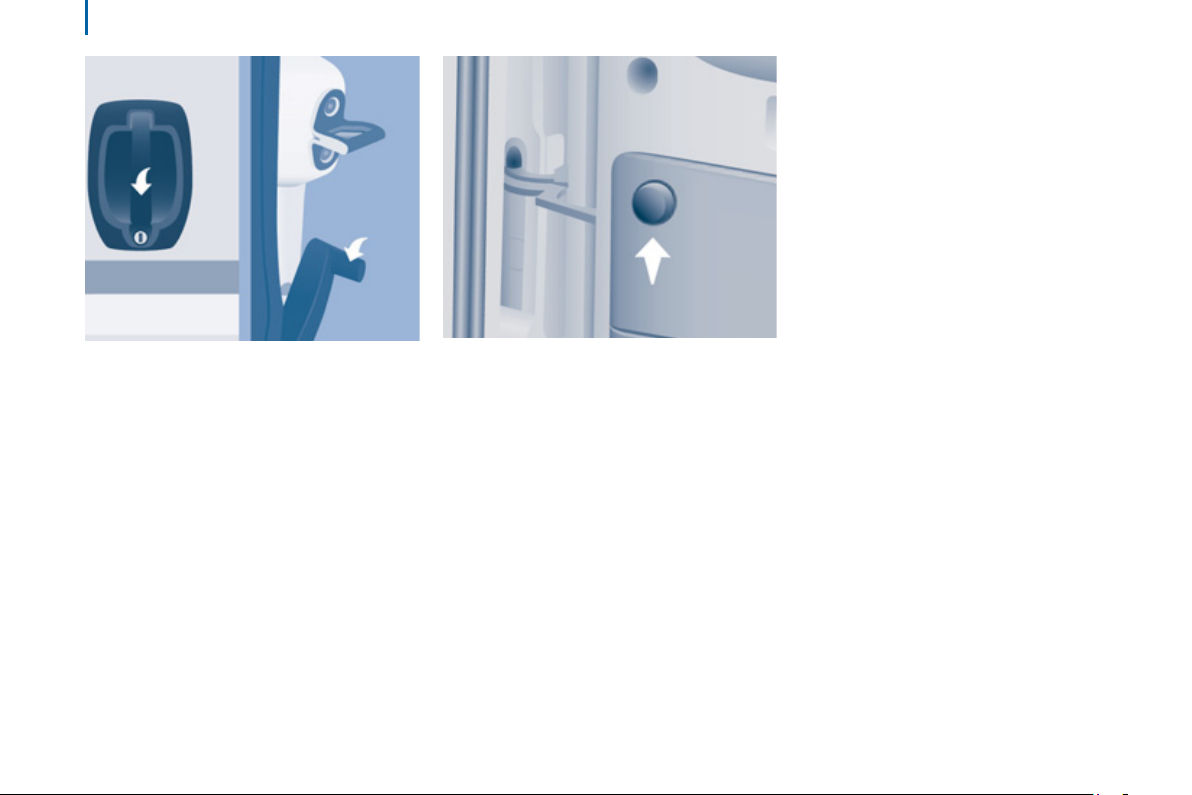
REAR DOORS
From outside
Pull the handle towards you. The two hinged
doors open to 96°.
Opening/Closing the doors
To open, pull the handle towards you then
pull the lever to open the left-hand door.
To close, start with the left-hand door then
close the right-hand door.
Opening to 180°
If your vehicle is fitted with this equipment,
a retractable check strap system permits
extending of the opening from 96° to 180°.
Press the button, located on the door trim
pad, to widen the angle of the door.
The check strap will take up its normal
position again automatically on closing.
 Loading...