


Page 1
FAMILIARISATION
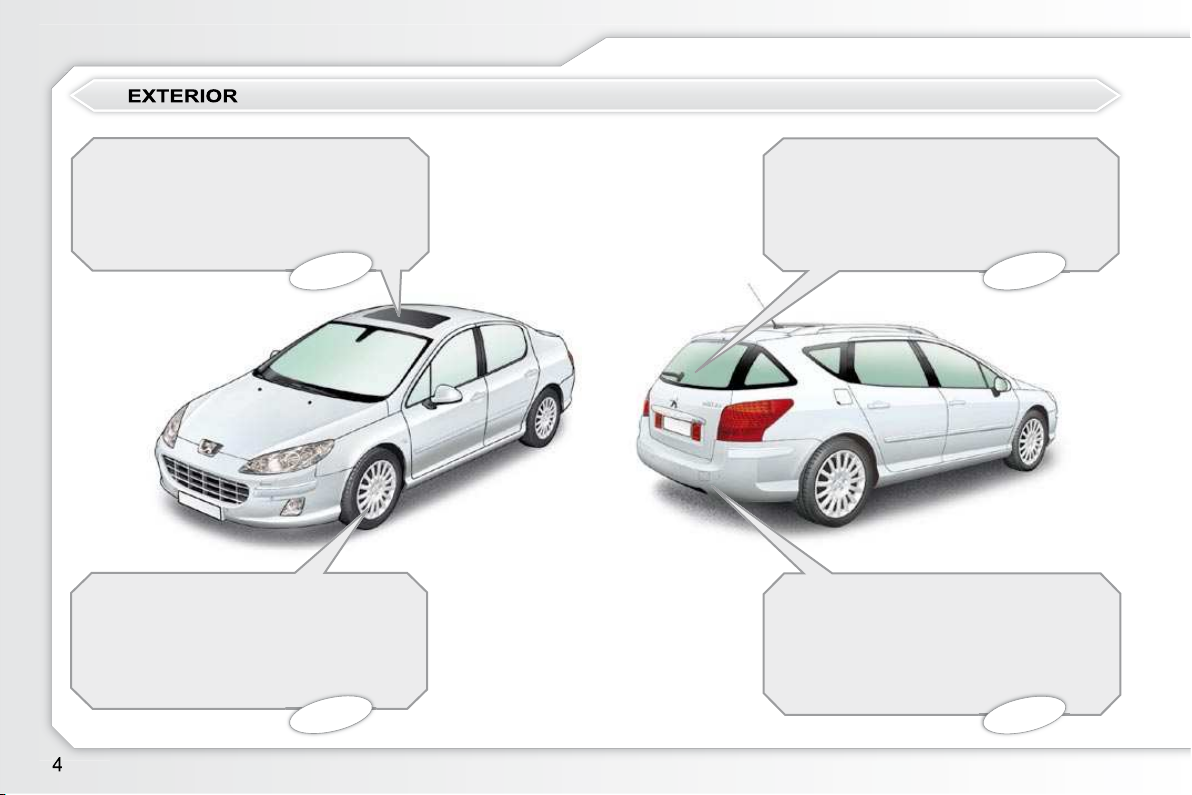
Sunroof (Saloon)
This roof improves the ventilation and
light in the passenger compartment.
70 68
Tyre under-inflation detection
This system checks the pressure of the
tyres while driving and warns you if a
malfunction occurs.
102
Rear screen (SW)
This rear screen provides remarkable
accessibility and makes the loading
of objects easier without opening the
boot.
Visual and audible front and
rear parking sensors
This system warns you if an obstacle
is detected in front of or behind the
vehicle in forward or reverse gear.
103
Page 2
FAMILIARISATION
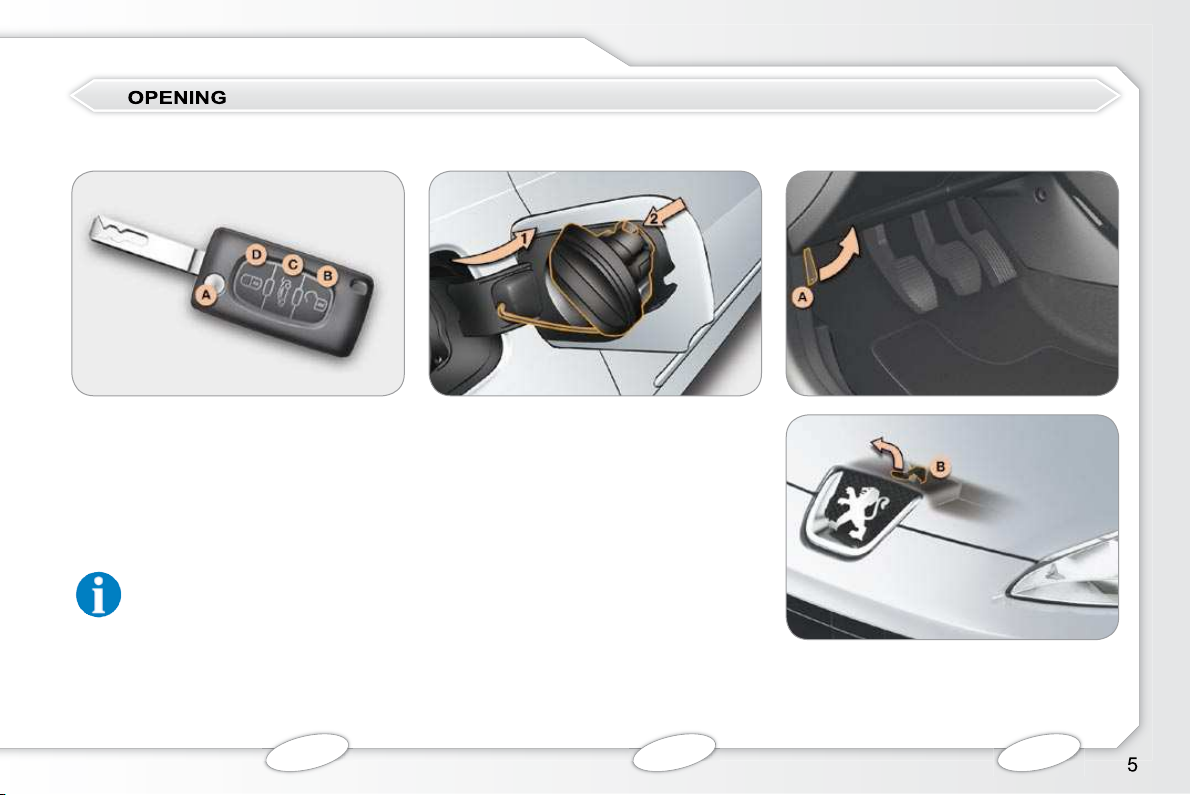
Remote control key
A. Unfolding/folding the key.
B. Unlocking the vehicle
(brief press).
C. Unlocking and partial opening of the
boot (saloon) or of the rear screen
(SW)
(long press).
Also...
D. Normal locking
(a single press)
or
deadlocking of the vehicle
(two presses in succession).
Fuel tank
1. Opening the fuel fi ller fl ap.
2. Opening and hooking the fuel fi ller
cap.
Tank capacity: approximately 67 litres.
Bonnet
A. Interior release lever
B. Exterior safety catch.
61
72 106
Page 3
FAMILIARISATION
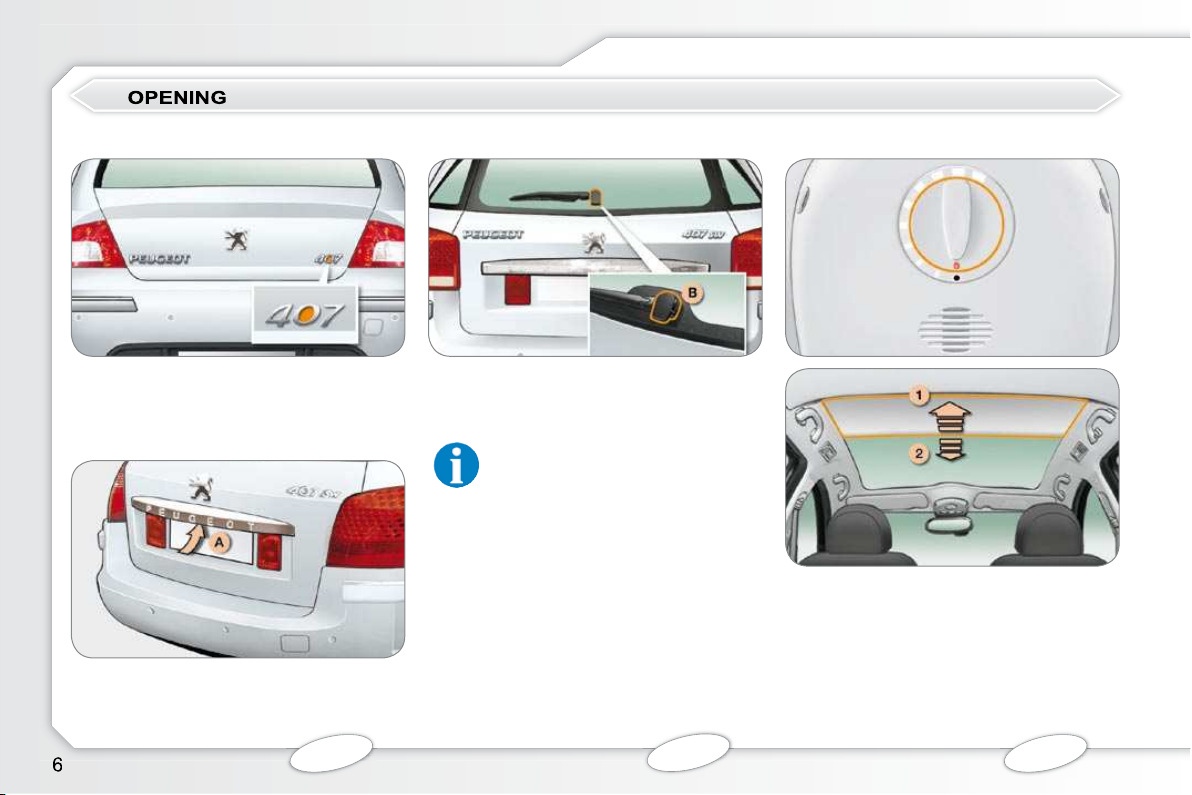
Boot (Saloon)
Press the button and raise the boot
lid.
Boot (SW)
With the rear screen closed, to open the
boot , pull the handle A then raise the
tailgate.
Rear screen (SW) Panoramic sunroof (SW)
With the tailgate closed, to open the
rear screen , pull the handle B then
raise the rear screen.
The tailgate and the rear
screen cannot both be open
at the same time.
1. Opening the blind.
2. Closing the blind.
68
68
71
Page 4
FAMILIARISATION
Digital air conditioning
This automatic air conditioning system
ensures comfort and adequate circulation
of air in the passenger compartment.
Cruise control/Speed limiter
The cruise control system automatically
maintains the speed of the vehicle at the
value programmed by the driver, without
any action on the accelerator pedal.
The speed limiter system prevents the
vehicle from exceeding the programmed
speed.
Audio and communication
systems
These systems benefi t from the lat-
est technology: MP3 compatible audio
equipment, Bluetooth hands-free tele-
phone, colour screen, audio system,
auxiliary sockets.
4 or 6-speed automatic gearbox
This system provides driving in auto-
adaptive mode together with a choice
of modes to suit the dynamic driving
conditions.
36
98
137
95
INTERIOR
Page 5
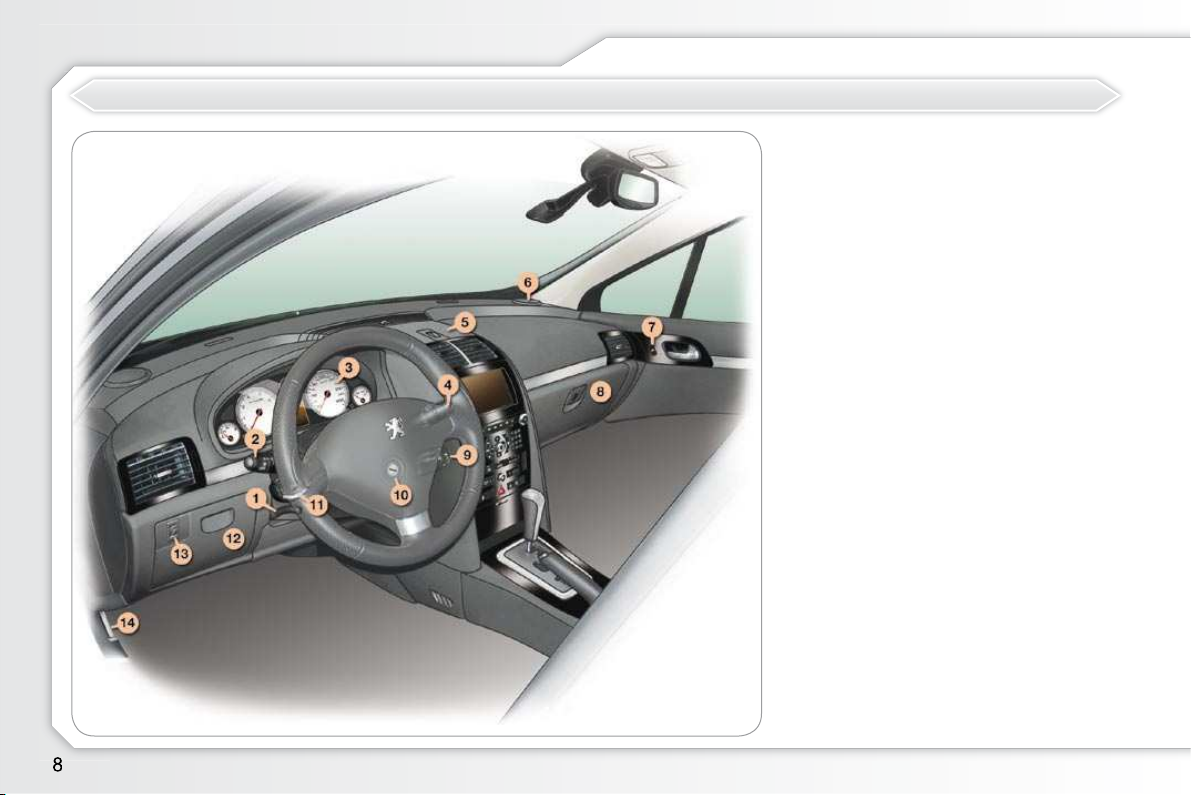
FAMILIARISATION
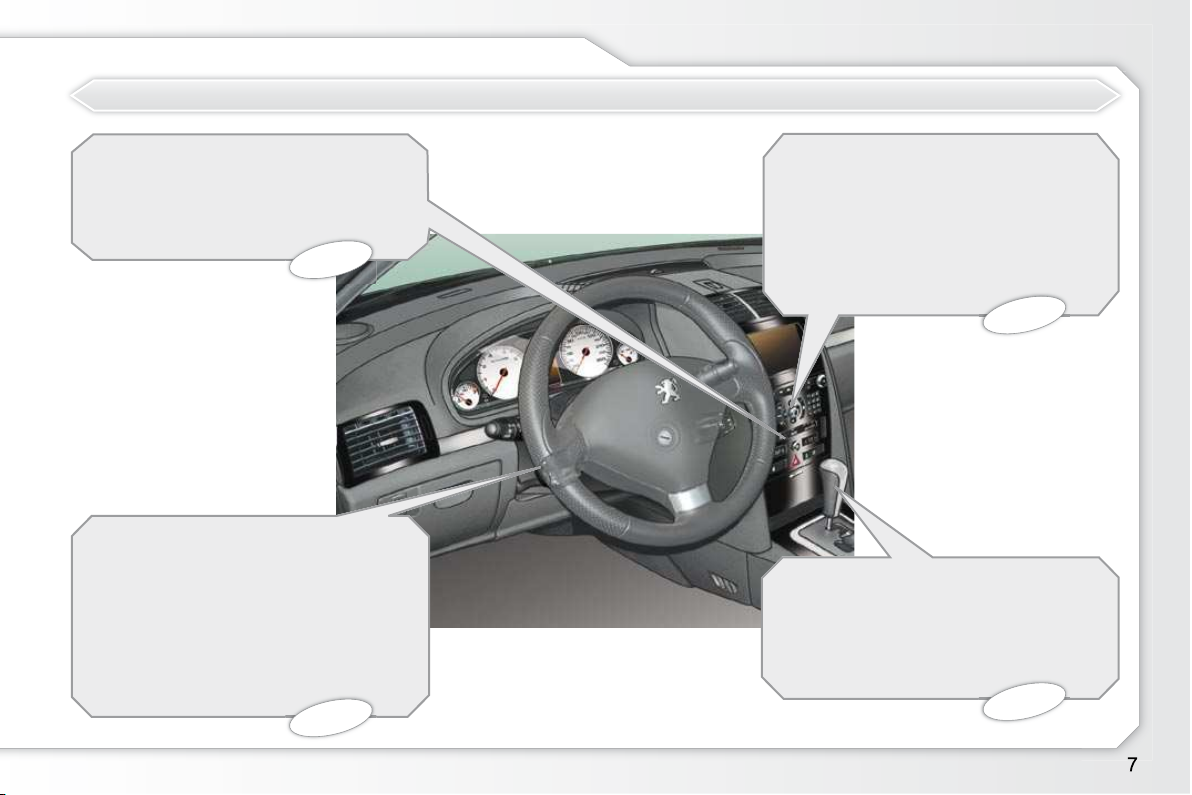
INSTRUMENTS AND CONTROLS
1. Steering wheel height and reach
adjustment.
2. Lighting/Direction indicator control
stalk.
3. Instrument panel.
4. Wiper/Wash-wipe/Trip computer
control stalk.
5. Air diffuser vent grille.
6. Speakers (tweeters).
7. Passenger-operated electric
window control.
8. Cooled glove box.
9. Audio equipment steering mounted
controls.
10. Steering lock and ignition.
11. Cruise control/speed limiter
controls.
12. Storage compartment
(driver's side).
Fusebox.
13. Headlamp height adjustment.
14. Bonnet release.
Page 6
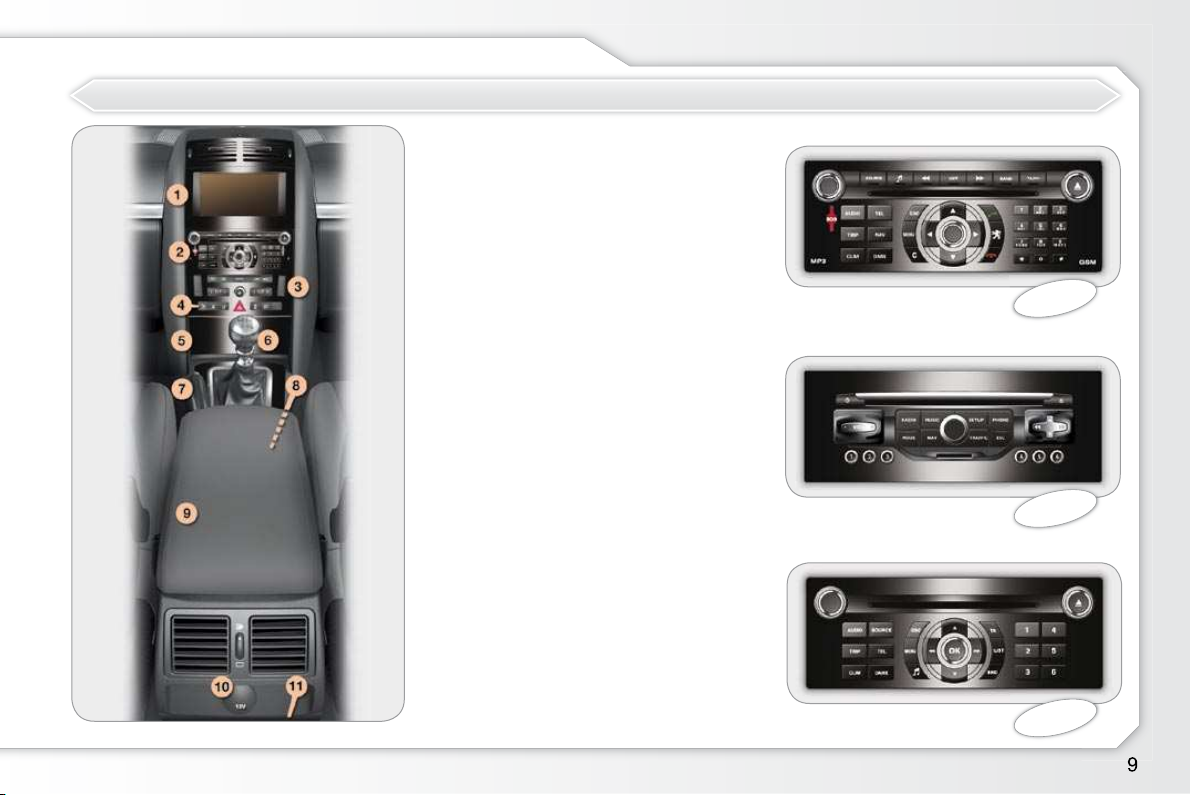
FAMILIARISATION
INSTRUMENTS AND CONTROLS
1. Multifunction screen.
2. Audio and telematics system.
3. Automatic air conditioning controls.
4. Deactivation of the audible parking
sensors.
Central locking from the inside.
Alarm control.
Hazard warning lamps.
SPORT suspension control.
Deactivation of the ESP system.
Child lock.
5. Ashtray/Front cigar lighter
(100 W max).
6. Gear lever.
7. Parking brake.
8. Retractable cup holder.
9. Armrest with storage compartment
and USB port.
10. 12 volt accessories socket
(100 W max).
11. Rear ashtray.
139
213
Peugeot Connect Media
Peugeot Connect Navigation
184
Peugeot Connect Sound
Page 7
FAMILIARISATION
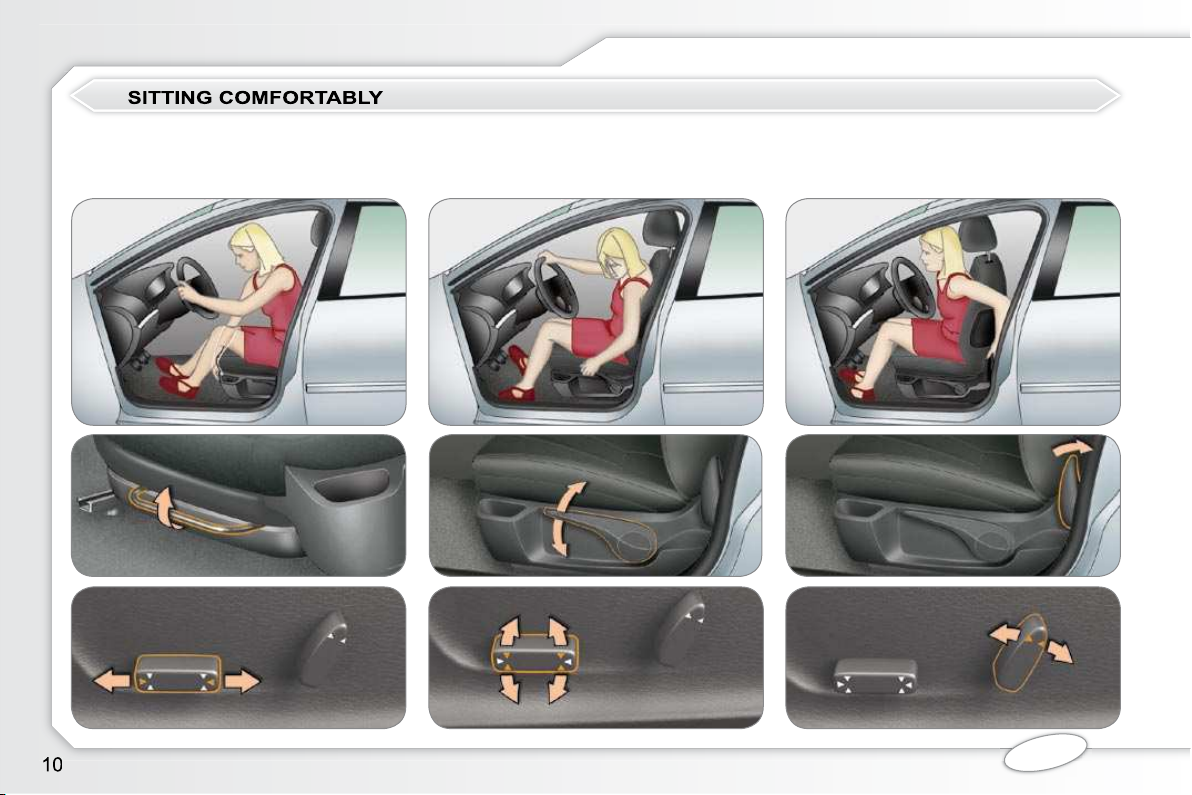
Front seat adjustments
Forwards-backwards Height and angle of the driver's seat
cushion
Seat back angle
50
Page 8
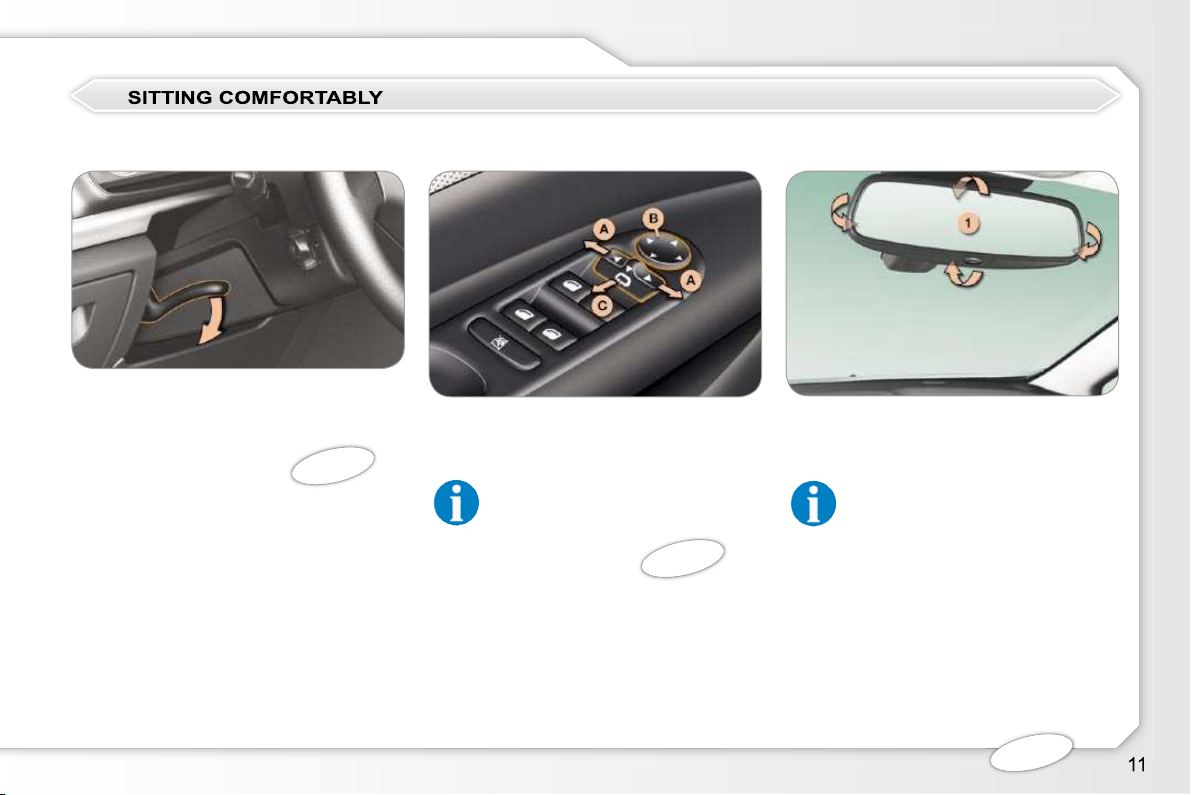
FAMILIARISATION
1. Mirror adjustment.
Steering wheel adjustment Automatic day/night rear view
Door mirror adjustment
mirror adjustment
When stationary, unlock the steering
wheel adjustment by pushing the control
forwards then lock by pulling the control
fully.
49
A. Selection of the mirror.
Adjustment of the position of the mirror.
B.
Also...
C. Folding/Unfolding.
48
Also...
To ensure optimum visibility
when manoeuvring, the mirror
lightens automatically when re-
verse gear is engaged.
48
Page 9
FAMILIARISATION
Front seat belt
1. Fastening.
2. Height adjustment.
Ignition switch
1. Stop position.
2. Ignition position.
3. Starting position.
A heavy object (key fob...), at-
tached to the key and weighing
down on its shaft in the ignition
switch, could cause a malfunction.
Electric window controls
1. Driver's electric window switch.
2. Passenger electric window switch.
3. Rear right electric window switch.
4. Rear left electric window switch.
Also...
5. Deactivation of the electric
window switches located in
the rear (child safety).
88
67
Page 10
FAMILIARISATION
Lighting
Ring A
Lighting off
Automatic illumination of head-
lamps
Sidelamps
Dipped/main beam headlamps
Ring B
Front foglamps (turn once).
Rear foglamps (turn twice).
74
Wipers
Windscreen wipers with intermittent
wipe
2 Fast wipe.
1 Normal wipe.
I Intermittent wipe.
0 Park.
Single wipe.
Automatic rain sensitive windscreen
wipers
2 Fast wipe.
1 Normal wipe.
AUTO Automatic wipe.
0 Park.
Single wipe.
77 78
Windscreen wipers with intermittent
and automatic wipe
2 Fast wipe.
1 Normal wipe.
I Intermittent wipe.
0 Park.
Automatic wipe then single wipe.
77
Rear wiper (SW)
Park.
Intermittent wipe.
Wash-wipe.
Page 11
FAMILIARISATION
Digital air conditioning (mono-zone)
1. Automatic programme (comfort).
2. Temperature adjustment.
3. Air fl ow adjustment.
Ventilation off.
4. Air distribution adjustment.
5. Front visibility control.
6. Rear screen demisting.
7. Intake of exterior air.
Recirculation of interior air.
Digital air conditioning (dual-zone)
1. Driver and passenger automatic programme (comfort).
2. Driver's side temperature adjustment.
Passenger's side temperature adjustment.
3. Air fl ow adjustment.
Ventilation off.
4. Driver's air distribution adjustment.
5. Passenger's air distribution adjustment.
6. Front visibility control.
7. Rear screen demisting.
8. Intake of exterior air.
Recirculation of interior air.
36
40
Page 12
FAMILIARISATION
Instrument panel
A. When the ignition is on, the fuel
gauge needle should rise.
B. When the engine is running, its as-
sociated low level warning lamp
should switch off.
C. When the ignition is on, the oil level
indicator should display "OIL OK"
for a few seconds.
If the levels are not correct, top up the
level which is low.
Warning lamps Switch panel
When the ignition is on, the orange and
red warning lamps come on.
When the engine is running, these
warning lamps should switch off.
If any warning lamp remains on, refer to
the page concerned.
Lighting of the indicator lamp indicates
the status of the corresponding function.
A. Audible front/rear parking
sensors off.
B. Central locking.
C. Alarm interior volumetric
protection off.
D. Hazard warning lamps.
Selection of the electroni-
E.
cally controlled suspension.
F. Electronic stability pro-
gramme ESP off.
104
62
65
86
97
86
18
20
Page 13
FAMILIARISATION
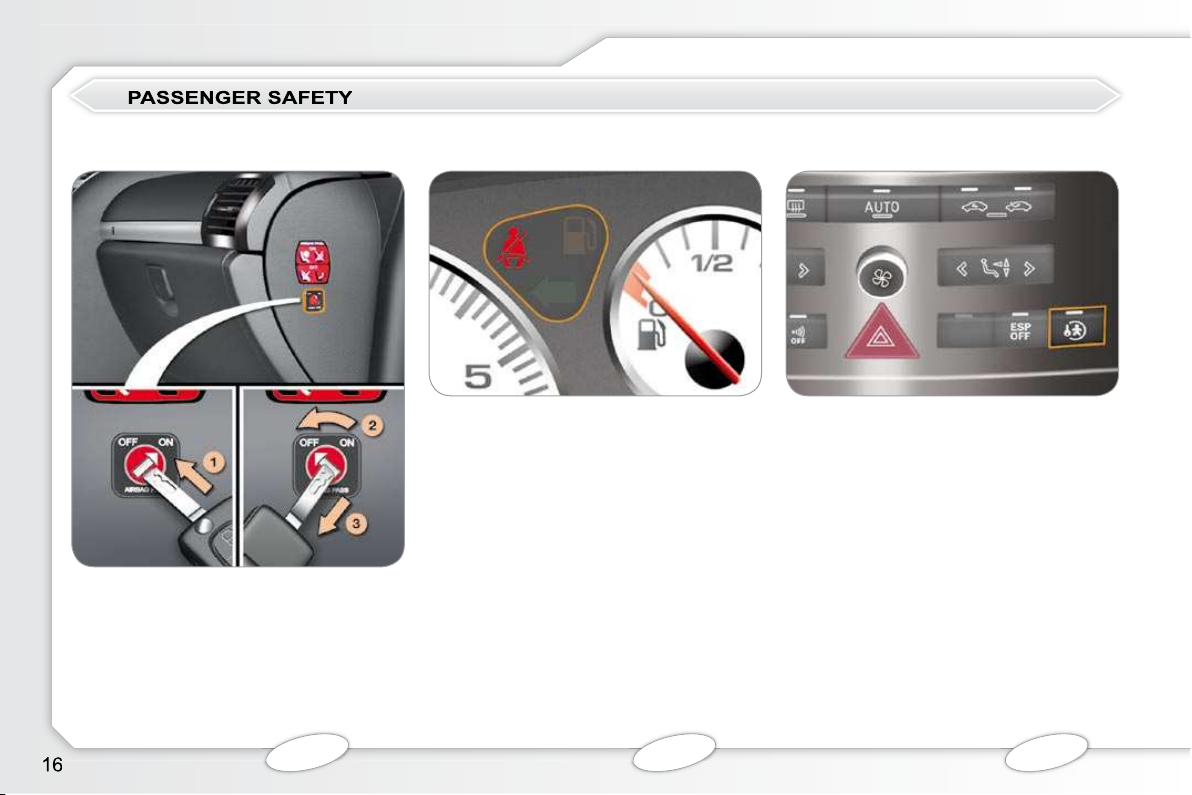
Front passenger's airbag Electric child lock
Detection of front seat belt
fastening
This prevents opening of the two rear
doors from the inside.
With the ignition on, press the button.
A message appears on the multifunc-
tion screen.
You are advised to check that the child
lock is activated each time you switch
on the ignition.
1. Insertion the key.
2. Select the "OFF" position
3. Removal the key keeping the switch
in the new position.
When the ignition is switched on , if
a front occupant has not fastened their
seat belt and if the vehicle speed is be-
low 12 mph (20 km/h) , you are warned
by the seat belt warning lamp which
comes on.
The warning lamp switches off when the
seat belt(s) concerned is(are) fastened.
If the vehicle speed is above 12 mph
(20 km/h) , you are warned by the seat
belt warning lamp which fl ashes, an
audible signal and a message on the
multifunction screen identifying the seat
belt(s) left unfastened.
91
88 64
Page 14
FAMILIARISATION
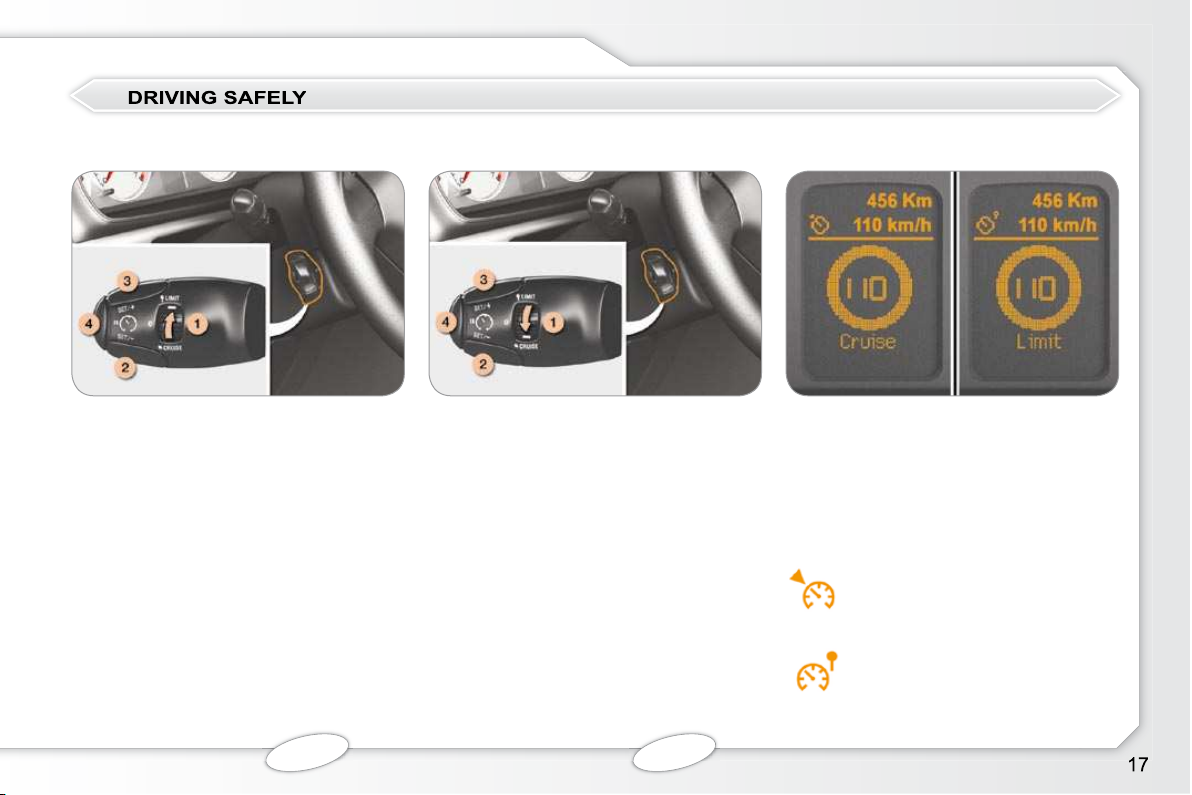
Cruise control Instrument panel screen
This enables the vehicle to maintain
a constant speed programmed by the
driver.
1. Cruise control mode Selection/Off.
2. Decrease the programmed value.
3. Increase the programmed value.
4. Cruise control On/Off.
In order to be programmed or activated,
the vehicle speed must be above 25 mph
(40 km/h), with at least fourth gear en-
gaged on the manual gearbox.
Speed limiter
This prevents the vehicle from exceeding
the speed programmed by the driver (mini-
mum speed 20 mph (30 km/h)).
1. Speed limiter mode Selection/Off.
2. Decrease the programmed value.
3. Increase the programmed value.
4. Speed limiter On/Off.
The settings must be adjusted with the
engine running.
The cruise control or speed limiter mode
appears on the instrument panel when
it is selected.
Cruise control
Speed limiter
98
100
Page 15
Page 16
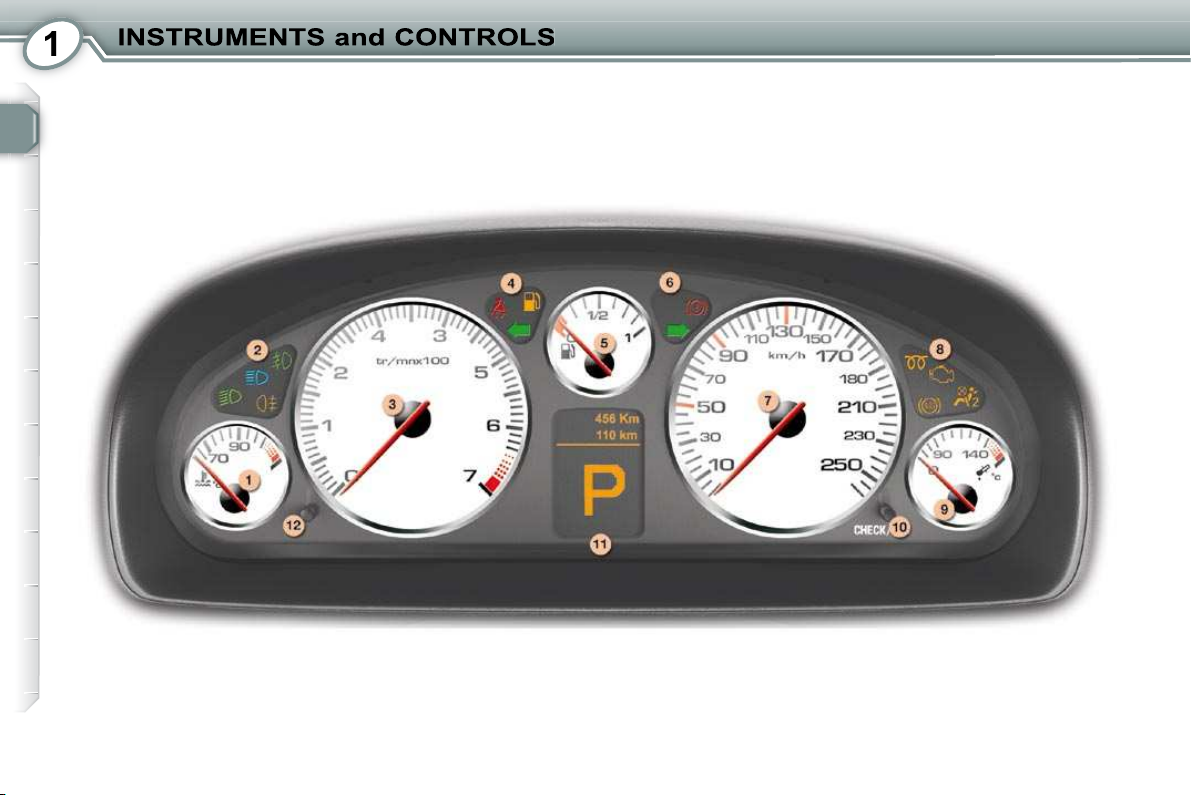
1. Coolant temperature gauge.
2. Lighting on indicators:
dipped beam headlamps.
main beam headlamps.
front foglamps.
rear foglamps.
3. Rev counter dial.
4. Warning lamps:
seat belts not fastened in
the front.
fuel level.
left direction indicator.
5. Fuel level gauge.
PETROL-DIESEL MANUAL AND AUTOMATIC
GEARBOX INSTRUMENT PANELS
6. Warning lamps:
parking brake applied or brake
fl uid level or electronic brake force
distribution fault.
right direction indicator.
7. Speedometer.
8. Warning lamps:
emission control system.
anti-lock braking system (ABS).
passenger's airbag deactivated.
pre-heat (Diesel engine starting).
9. Engine oil temperature gauge.
10. CHECK and trip recorder zero
reset and service display button.
11. Instrument panel screen:
Total distance recorder.
Trip recorder.
Automatic gearbox lever position
indicator.
Cruise control/speed limiter
reference value.
Service indicator.
Navigation instructions
CHECK (vehicle autotest).
Trip computer information
displays.
Warning and status displays.
12. Instrument panel lighting rheostat.
Page 17

20
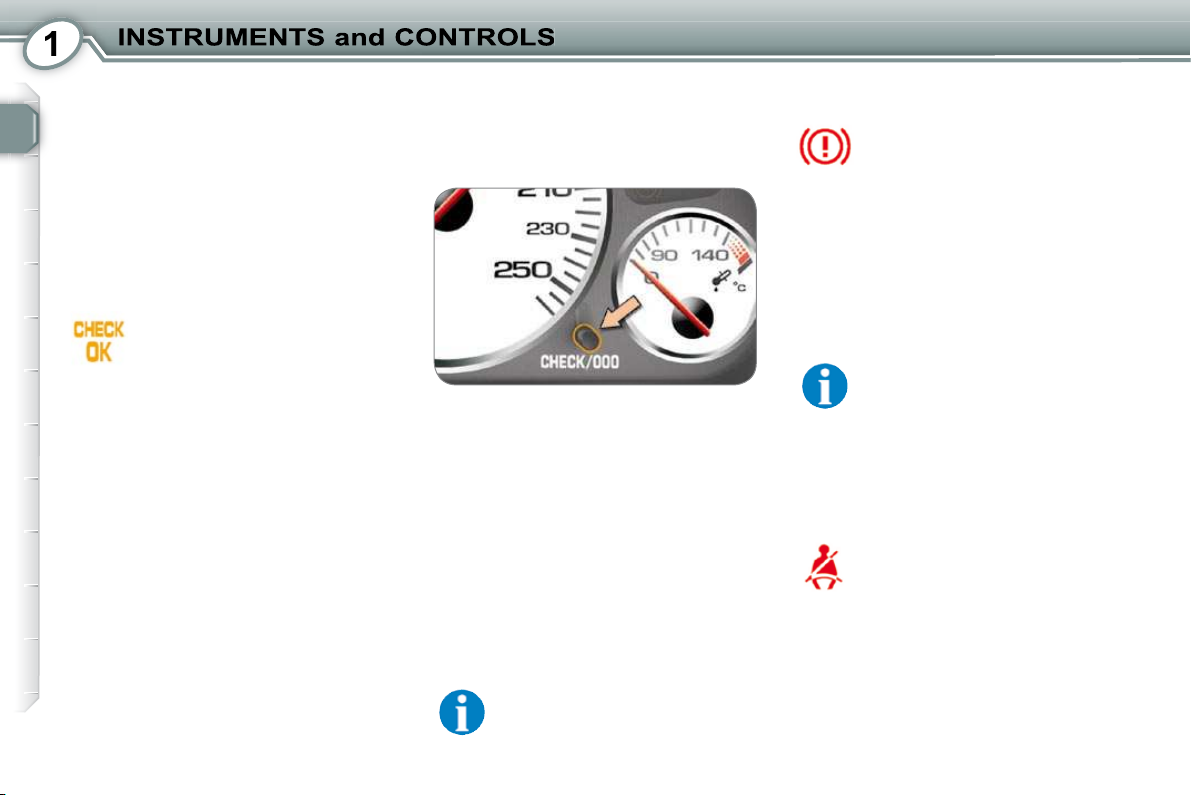
CHECK (VEHICLE AUTOTEST)
In the presence of a fault
Automatic CHECK
WARNING LAMPS ON
THE INSTRUMENT PANEL
With the key in the ignition on position,
all of the warning lamps of the functions tested are displayed. They are
switched off after a few seconds.
At the same time, an automatic CHECK
(vehicle autotest) is carried out.
No "major" fault has been detected: the CHECK OK indicator lamp is displayed after
You can start your vehicle.
A "minor" fault has been detected:
when the CHECK OK indicator lamp
has been displayed, the warning
lamp(s) is(are) displayed.
You can start your vehicle; however,
contact a PEUGEOT dealer as soon
as possible.
A "major" fault has been detected:
the CHECK OK indicator lamp does
not appear and the warning lamp(s)
is(are) displayed.
Do not start your vehicle.
Call a PEUGEOT dealer without delay.
two seconds.
Manual CHECK
Pressing the "CHECK/000" button on
the instrument panel starts the manual
CHECK (vehicle autotest).
This function enables you to fi nd out, at
any time (with the key in the ignition on
position or with the engine running):
- the warnings present,
- the status of the functions activated
or deactivated (wipers, automatic
illumination of headlamps).
With the engine running and the ve-
hicle moving, the instrument panel
screen displays the warning lamps
(in the event of a fault).
The passenger airbag deactivated indicator lamp * remains on
while the airbag is deactivated.
* Suivant destination.
Braking system warning
lamp
This indicates:
- parking brake applied or not fully
released,
- an excessive drop in the brake fl u-
id level, in this case linked with the
STOP warning lamp,
- an electronic brake force distribution malfunction, linked with the
STOP warning lamp.
The warning lamp is repeated on the instrument panel
screen in the case of the last
2 faults.
Stop immediately in the two latter
cases. Consult a PEUGEOT dealer.
Seat belt warning lamp
When the ignition is switched on, the
warning lamp comes on if a front occupant has not fastened or has unfastened their seat belt.
Page 18
20
CHECK (VEHICLE AUTOTEST)
In the presence of a fault
Automatic CHECK
WARNING LAMPS ON
THE INSTRUMENT PANEL
With the key in the ignition on position,
all of the warning lamps of the functions tested are displayed. They are
switched off after a few seconds.
At the same time, an automatic CHECK
(vehicle autotest) is carried out.
No "major" fault has been detected: the CHECK OK indicator lamp is displayed after
You can start your vehicle.
A "minor" fault has been detected:
when the CHECK OK indicator lamp
has been displayed, the warning
lamp(s) is(are) displayed.
You can start your vehicle; however,
contact a PEUGEOT dealer as soon
as possible.
A "major" fault has been detected:
the CHECK OK indicator lamp does
not appear and the warning lamp(s)
is(are) displayed.
Do not start your vehicle.
Call a PEUGEOT dealer without delay.
two seconds.
Manual CHECK
Pressing the "CHECK/000" button on
the instrument panel starts the manual
CHECK (vehicle autotest).
This function enables you to fi nd out, at
any time (with the key in the ignition on
position or with the engine running):
- the warnings present,
- the status of the functions activated
or deactivated (wipers, automatic
illumination of headlamps).
With the engine running and the ve-
hicle moving, the instrument panel
screen displays the warning lamps
(in the event of a fault).
The passenger airbag deactivated indicator lamp * remains on
while the airbag is deactivated.
* Suivant destination.
Braking system warning
lamp
This indicates:
- parking brake applied or not fully
released,
- an excessive drop in the brake fl u-
id level, in this case linked with the
STOP warning lamp,
- an electronic brake force distribution malfunction, linked with the
STOP warning lamp.
The warning lamp is repeated on the instrument panel
screen in the case of the last
2 faults.
Stop immediately in the two latter
cases. Consult a PEUGEOT dealer.
Seat belt warning lamp
When the ignition is switched on, the
warning lamp comes on if a front occupant has not fastened or has unfastened their seat belt.
Page 19

21
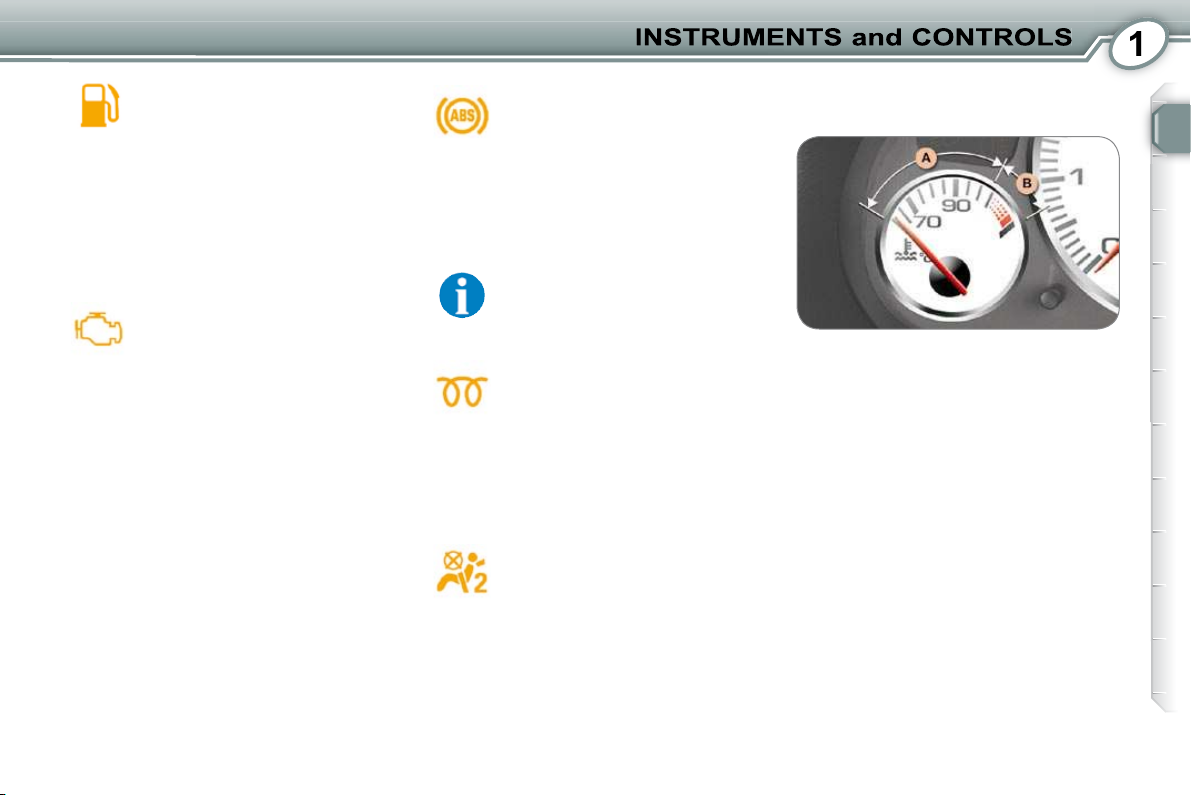
Fuel warning lamp
Coolant temperature gauge
Anti-lock braking system
(ABS) warning lamp
In certain driving conditions and depending on the engine, the distance
which you will be able to travel with
the remaining fuel may be less than
30 miles (50 kilometres) (the capacity
of the tank is approximately 67 litres).
Emission control system
warning lamp
This should switch off a few seconds
after the engine is switched on.
When the engine is running, if the
warning lamp fl ashes or comes on
continuously, this indicates an emission control system malfunction.
Contact a PEUGEOT dealer as soon
as possible.
If it comes on continuously above 6 mph
(10 km/h), it indicates an ABS fault.
However, the vehicle retains conventional servo-assisted braking.
Consult a PEUGEOT dealer.
The warning lamp is repeated on the instrument panel
screen.
Diesel engine pre-heat
warning lamp
Wait for the warning lamp to switch off
before starting. The illumination period
is determined by the ambient conditions.
Passenger's airbag
deactivated warning lamp *
If the warning lamp remains on, this
indicates that the passenger's airbag
has been deactivated intentionally.
When the needle is in zone A , the
temperature is correct.
When the needle is in zone B , the
temperature is too high.
If the coolant temperature warning
lamp comes on (linked with the STOP
warning lamp), stop as soon as it is
safe to do so.
Wait for the engine to cool down before topping up the level, if necessary.
As the cooling circuit is pressurised, in
order to prevent any risk of scalding,
unscrew the cap by two turns to allow
the pressure to drop.
When the pressure has dropped, remove the cap and top up the level, if
necessary.
Consult a PEUGEOT dealer.
* According to country.
Page 20
21
Fuel warning lamp
Coolant temperature gauge
Anti-lock braking system
(ABS) warning lamp
In certain driving conditions and depending on the engine, the distance
which you will be able to travel with
the remaining fuel may be less than
30 miles (50 kilometres) (the capacity
of the tank is approximately 67 litres).
Emission control system
warning lamp
This should switch off a few seconds
after the engine is switched on.
When the engine is running, if the
warning lamp fl ashes or comes on
continuously, this indicates an emission control system malfunction.
Contact a PEUGEOT dealer as soon
as possible.
If it comes on continuously above 6 mph
(10 km/h), it indicates an ABS fault.
However, the vehicle retains conventional servo-assisted braking.
Consult a PEUGEOT dealer.
The warning lamp is repeated on the instrument panel
screen.
Diesel engine pre-heat
warning lamp
Wait for the warning lamp to switch off
before starting. The illumination period
is determined by the ambient conditions.
Passenger's airbag
deactivated warning lamp *
If the warning lamp remains on, this
indicates that the passenger's airbag
has been deactivated intentionally.
When the needle is in zone A , the
temperature is correct.
When the needle is in zone B , the
temperature is too high.
If the coolant temperature warning
lamp comes on (linked with the STOP
warning lamp), stop as soon as it is
safe to do so.
Wait for the engine to cool down before topping up the level, if necessary.
As the cooling circuit is pressurised, in
order to prevent any risk of scalding,
unscrew the cap by two turns to allow
the pressure to drop.
When the pressure has dropped, remove the cap and top up the level, if
necessary.
Consult a PEUGEOT dealer.
* According to country.
Page 21

22
Battery charge warning
lamp
When the engine is running, this indicates a charging circuit malfunction
(battery terminals, alternator belt).
Consult a PEUGEOT dealer.
Tyre under-infl ation warning
lamp
This indicates that the tyre pressure is
too low.
A message on the multifunction screen
indicates the wheel(s) concerned.
Refer to the information label affi xed
to the central pillar of the driver's door.
For your safety, check the tyre pressures as soon as possible.
Electronic stability control system
(ESP) warning lamps
Activation warning lamp
Operation warning lamp
Deactivation warning lamp
Malfunction warning lamp
Power steering warning
lamp
This indicates a power steering fault.
It is linked with the STOP warning
lamp.
Consult a PEUGEOT dealer.
Parking brake warning lamp
This indicates that the parking brake is
still applied or has not been released
correctly.
It is linked with the braking system
warning lamp.
Low screenwash and
headlamp wash fl uid level
warning lamp
When the wipers are switched on, this
indicates that the fl uid level is too low.
Fill the screenwash and headlamp
wash fl uid reservoir.
Engine oil level warning
lamp
This indicates that the engine oil level
is too low.
WARNING LAMPS IN THE
These warning lamps are displayed
on the instrument panel screen.
STOP warning lamp
When this is displayed alone, it indicates a power steering fault.
It comes on linked with the engine oil
pressure, coolant temperature, braking system or punctured tyre warning
lamps.
Stop as soon as it is safe to do so.
Consult a PEUGEOT dealer.
Stop as soon as it is safe to do so.
Consult a PEUGEOT dealer.
Punctured tyre warning lamp
This indicates that one or more punctured tyres have been detected.
A message on the multifunction screen
identifi es the wheel(s) concerned.
It is linked with the STOP warning
lamp.
Stop as soon as it is safe to do so.
Change the damaged wheel and have
it repaired by a PEUGEOT dealer.
Page 22
Tyre under-infl ation detection
system warning lamp
This indicates the absence or malfunction of one or more tyre pressure sensors or a system fault.
Consult a PEUGEOT dealer.
Electronic engine
immobiliser warning lamp
This indicates an electronic engine immobiliser system malfunction.
Consult a PEUGEOT dealer.
Front brake pad wear
warning lamp
This indicates that the brake pads are
worn.
For your safety, have them replaced
by a PEUGEOT dealer.
Fuel fi ller cap warning lamp
(according to version)
With the engine running, this indicates
that the fuel fi ller cap is incorrectly fi t-
ted or absent.
It comes on in orange if the vehicle
speed is below 6 mph (10 km/h) and
in red if the vehicle speed is above
6 mph (10 km/h).
Water in diesel fi lter
warning lamp
This indicates the presence of water in
the diesel fi lter. There is a risk of da-
mage to the injection system.
Contact a PEUGEOT dealer as soon
as possible.
Door/boot open warning
lamp
With the engine running, this indicates
that an opening has not been closed
correctly.
An illustration on the multifunction
screen identifi es the opening(s) con-
cerned.
It comes on in orange if the vehicle
speed is below 6 mph (10 km/h) and
in red if the vehicle speed is above
6 mph (10 km/h).
Airbag warning lamp
This indicates an airbag fault.
Consult a PEUGEOT dealer.
Automatic headlamp beam
adjustment system warning
lamp
This indicates that the automatic headlamp height adjuster is faulty.
Consult a PEUGEOT dealer.
Engine oil pressure warning
lamp
This indicates that the engine oil pressure is too low.
It is linked with the STOP warning
lamp.
Stop as soon as it is safe to do so if it
comes on while the engine is running.
If the engine oil level is low, top up the
oil and contact a PEUGEOT dealer as
soon as possible.
Page 23
Particle emission fi lter
saturation warning lamp
(Diesel engine)
With the engine running, this indi-
cates that the particle emission fi lter
is star-ting to become saturated (exceptionally prolonged urban driving
type conditions: low speed, long traffi c
jams...) or a low diesel additive reservoir level.
In order to regenerate the fi lter, you are
advised to drive, as soon as possible
when the traffi c conditions permit, at a
speed of 40 mph (60 km/h) or above
for at least fi ve minutes (until the war-
ning lamp is switched off).
If the warning lamp remains on, con-
tact a PEUGEOT dealer.
Following prolonged use of the vehi-
cle at very low speeds or at idle, you
may, exceptionally, notice an emission
of water vapour at the exhaust during
acceleration. This does not affect the
performance of the vehicle or the environment.
Service warning lamp
This is displayed to indicate an engine
management system fault.
Contact a PEUGEOT dealer as soon
as possible.
Automatic gearbox fault
warning lamp
This indicates an automatic gearbox
fault.
The gearbox will operate in downgraded mode, locked in 3rd gear.
Never force the selector lever.
Consult a PEUGEOT dealer.
Electronically controlled
suspension fault warning
lamp
This indicates an electronically controlled suspension malfunction.
Select automatic operation and contact a PEUGEOT dealer as soon as
possible.
Parking sensor system
warning lamp
In reverse gear, this indicates a parking sensor system fault.
Consult a PEUGEOT dealer.
Electronically controlled
suspension indicator lamps
This comes on when the SPORT function is activated.
This comes on when the SPORT
function is deactivated.
Automatic illumination of
headlamps indicator lamp
Automatic illumination of
headlamps deactivation
indicator lamp
Automatic rain sensitive
wipers indicator lamp
Automatic rain sensitive
wipers deactivation
indicator lamp
This comes on when the AUTO function is activated.
This comes on when the AUTO function is deactivated.
This comes on when the AUTO function is activated.
This comes on when the AUTO function is deactivated.
Page 24
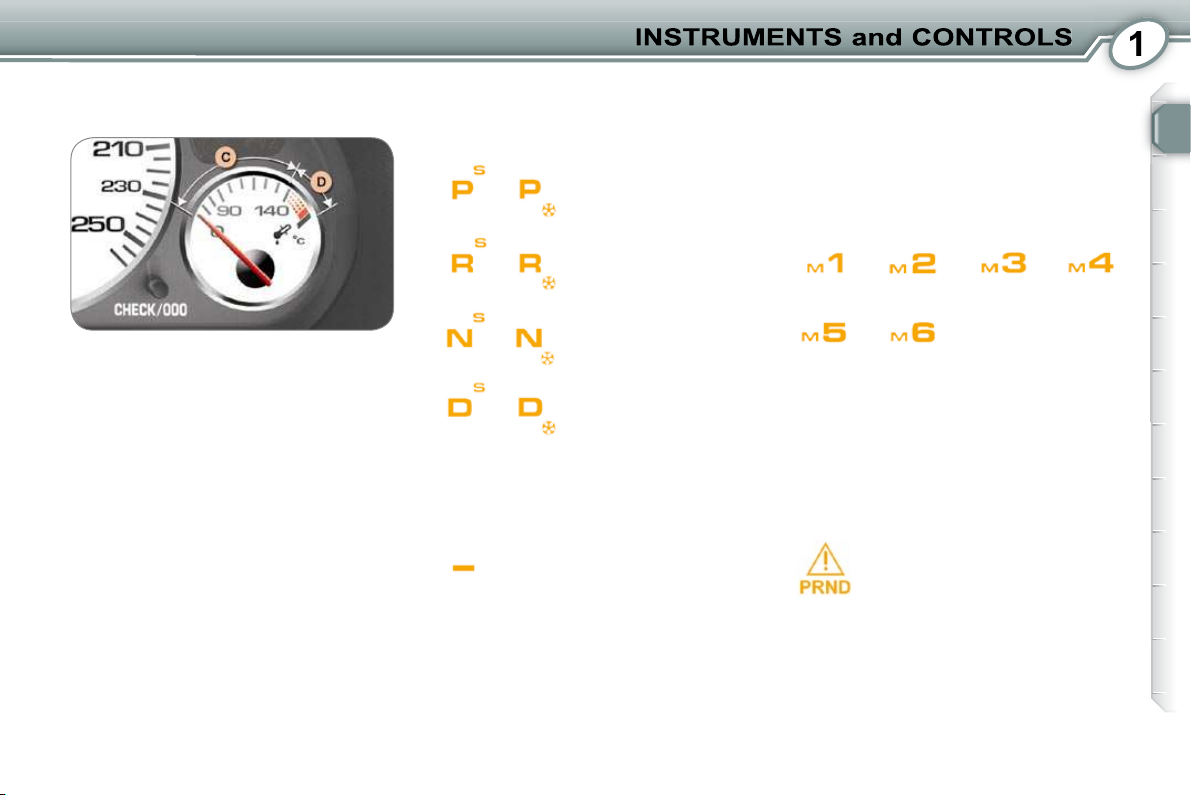
Automatic gearbox lever
"Park" indicator
Engine oil temperature gauge
"Reverse" indicator
4 or 6 speed automatic gearbox
Manual indicator
These correspond to the manual control of the gearbox, four or six speed.
When the ignition is switched on or
while the vehicle is moving, this indicates the engine oil temperature.
When the needle is in zone C , the
temperature is correct.
When the needle is in zone D , the
temperature is too high.
Reduce your speed to lower the temperature.
"Neutral" indicator
"Drive" indicator
The letter S or the symbol associat-
ed with the gate lever position indicator
comes on, corresponds to the Sport or
Snow programme selected intentionally.
This indicates an automatic
gearbox programme fault.
When the engine speed is too low or
too high in relation for gear engaged,
the gear selected fl ashes for a few
seconds, then the actual gear is displayed, the auto-adaptive programme
having taken control temporarily.
This indicates an automatic
gearbox malfunction.
Page 25
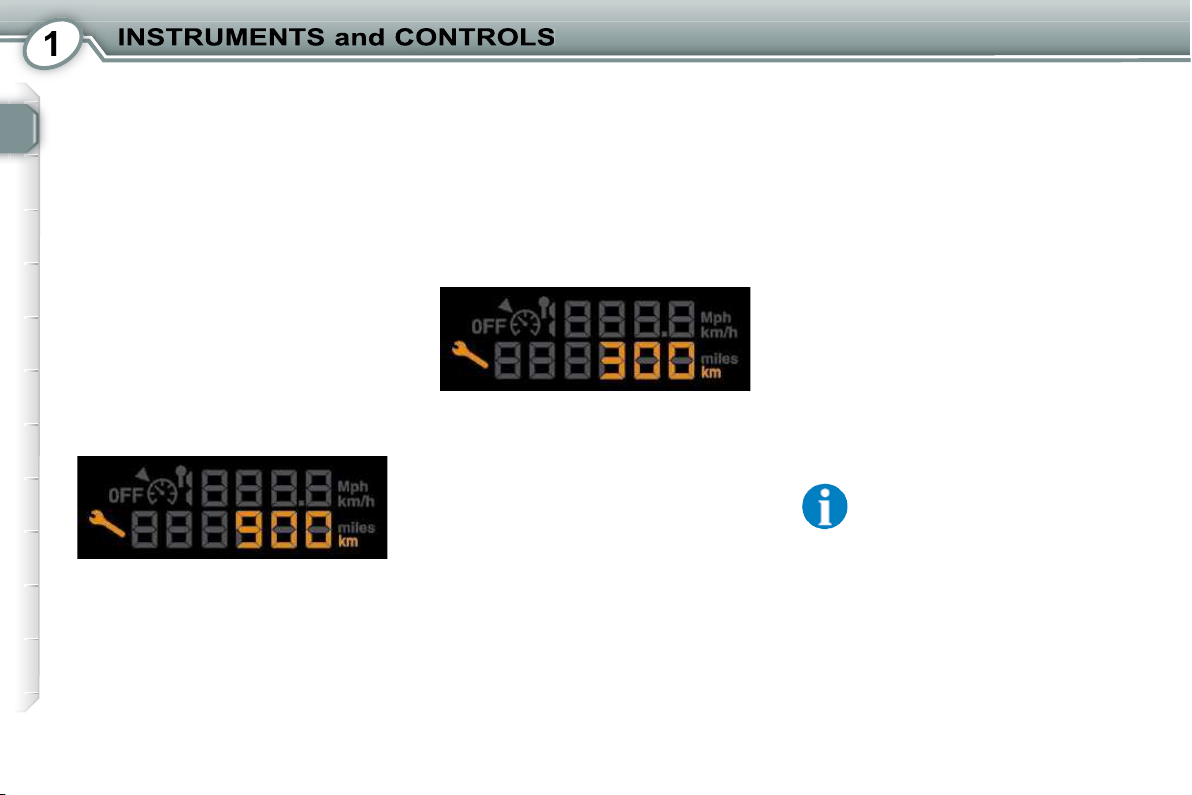
SERVICE INDICATOR
This is a visual reminder of when the
next service is due. This service is to
be carried out according to the manufacturer's servicing schedule.
Service indicator zero re-set
Operation
As soon as the ignition is switched on
and for 5 seconds, the spanner symbolising the service operations is lit.
The trip recorder display shows the
distance remaining (in round fi gures)
before the next service.
Example : when switching on the ig-
nition and for 5 seconds, the display
shows that 900 miles/km remain before the next service is due.
Once an engine oil level indication has
been displayed, the display indicates
the total and trip distances.
If the service is overdue , each time
the ignition is switched on and for
5 seconds, the distance and the span-
ner fl ash.
Example : when the ignition is switched
on and for 5 seconds, the display indicates that the service is overdue by
300 miles/km. The service should be
carried out very shortly.
Once the servicing and oil level information has been displayed, the total
distance recorder resumes normal operation and the spanner remains lit.
The point at which a service is due is
calculated using two parameters:
- the total distance travelled,
- the time elapsed since the last service.
The distance remaining may be
weighted by the time factor, depending on the user's driving conditions.
Your PEUGEOT dealer carries out this
operation after each service.
However, if you carry out the service
yourself, the re-set procedure is as
follows:
Switch off the ignition,
Press and hold the trip recorder
reset button,
Switch on the ignition.
The display begins a countdown.
When the display shows "=0" , release
the button; the spanner disappears .
After this operation, if you
wish to disconnect the battery,
lock the vehicle and wait for at
least fi ve minutes, otherwise
the zero re-set will not be
registered.
Page 26
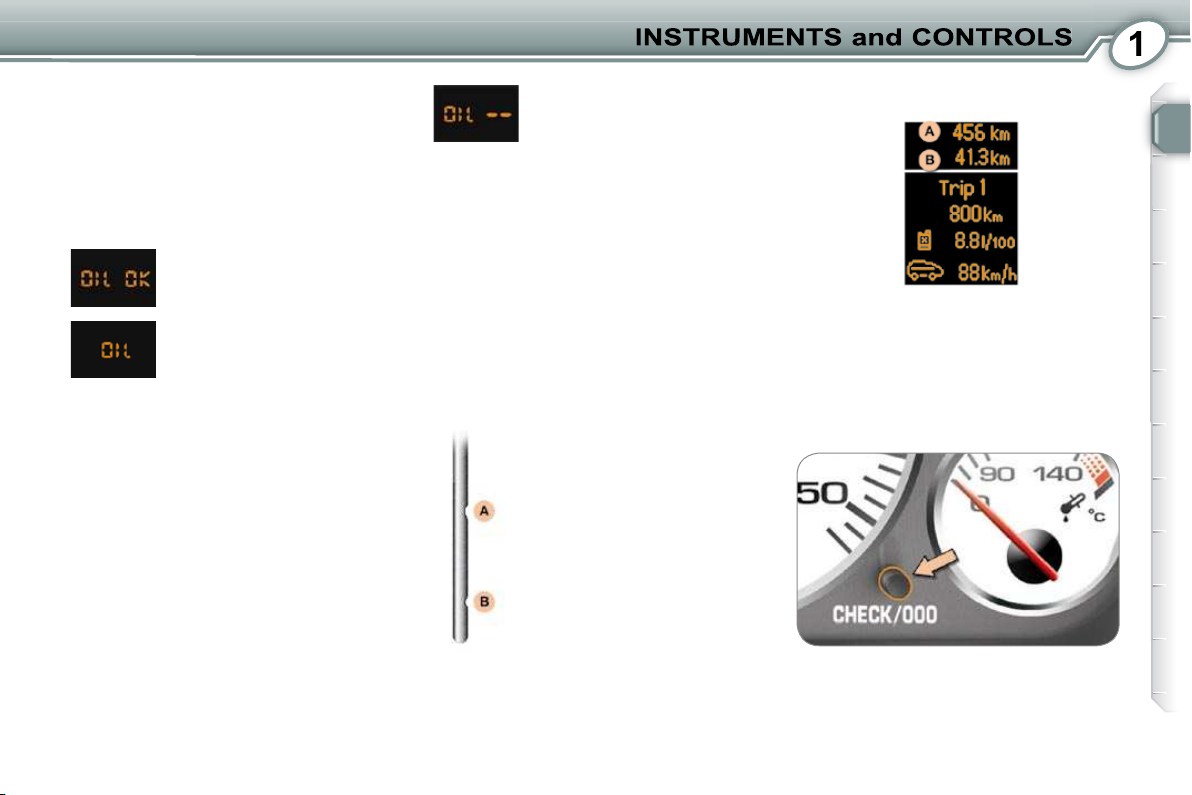
Engine oil level indicator
When the ignition is switched on, the
Trip recorder zero reset
Distance recorder
engine oil level is indicated for approximately 5 seconds, after the service
information.
Oil level correct
Lack of oil
Flashing indicates a lack of oil which
may damage the engine.
If the lack of oil is confi rmed by check-
ing with the dipstick, the level must be
topped up.
Oil level indicator fault
(fl ashing segments)
Check the oil level using the dipstick.
If the level is correct, the fl ashing indi-
cates an engine oil level gauge malfunction.
Consult a PEUGEOT dealer.
The level observed on the dipstick is
only valid if the vehicle is parked on
level ground and the engine has been
off for more than 15 minutes.
The total distance is displayed in
zone A of the display and the trip dis-
tance in zone B .
Dipstick
There are 2 level marks on
the dipstick: never exceed
level A .
In position B , top up the
level via the oil fi ller cap,
using the type of oil suited
to your engine.
A = max.
B = min.
With the trip distance displayed, press
the button for a few seconds.
Page 27
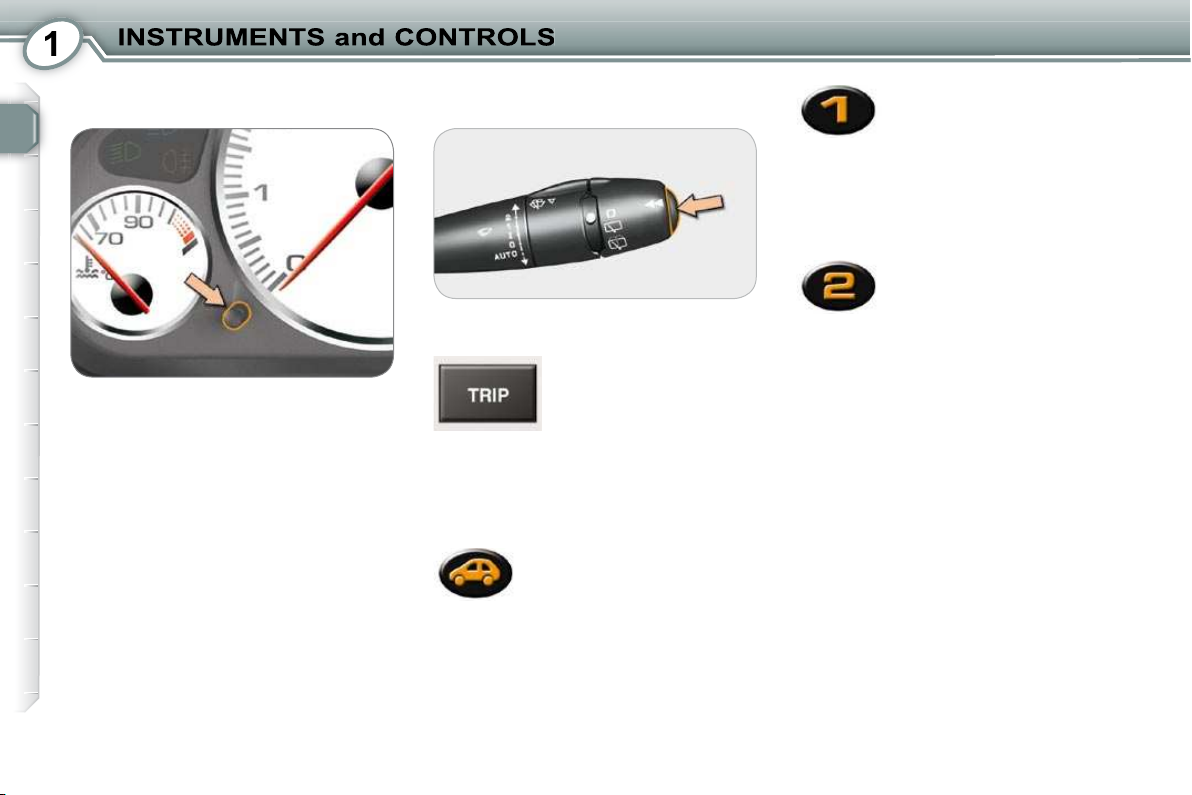
TRIP COMPUTER
With the exterior lighting on, press the
Trips
button to vary the intensity of the lighting of the instruments and controls.
When the lighting reaches the minimum (or maximum) setting, release
the button then press it again to increase (or reduce) the brightness.
As soon as the lighting is of the required brightness, release the button.
or
TRIP: access to the trip
computer displays.
Each successive press on the button
located at the end of the wiper stalk
displays different information.
- the "vehicle" tab with:
the range,
the current fuel
consumption
the distance
remaining.
- the trip "1" tab with:
the distance travelled,
the average fuel
consumption,
the average speed,
for the fi rst trip.
- the trip "2" tab with:
the distance travelled,
the average fuel
consumption,
the average speed,
for the second trip.
Trips "1" and ''2' ' are independent but
have identical application.
Trip "1" for example allows you to
make daily calculations and trip "2"
monthly calculations.
Zero reset
When the required trip is displayed,
press the control for more than
two seconds.
Page 28

TRIP COMPUTER
With the exterior lighting on, press the
Trips
button to vary the intensity of the lighting of the instruments and controls.
When the lighting reaches the minimum (or maximum) setting, release
the button then press it again to increase (or reduce) the brightness.
As soon as the lighting is of the required brightness, release the button.
or
TRIP: access to the trip
computer displays.
Each successive press on the button
located at the end of the wiper stalk
displays different information.
- the "vehicle" tab with:
the range,
the current fuel
consumption
the distance
remaining.
- the trip "1" tab with:
the distance travelled,
the average fuel
consumption,
the average speed,
for the fi rst trip.
- the trip "2" tab with:
the distance travelled,
the average fuel
consumption,
the average speed,
for the second trip.
Trips "1" and ''2' ' are independent but
have identical application.
Trip "1" for example allows you to
make daily calculations and trip "2"
monthly calculations.
Zero reset
When the required trip is displayed,
press the control for more than
two seconds.
Page 29
Range (miles or km)
Current fuel
This is the average quantity of fuel consumed during the last few seconds.
This shows the distance that can still
be covered with the fuel remaining in
the tank in accordance with the average consumption over the last few
miles (kilometres).
Distance remaining to be
Average speed (mph
Average fuel
Distance travelled
Access via the main menu
This fi gure may increase if
there is a change in the style
of driving or the road surface,
producing a signifi cant drop in
current fuel consumption.
When the range is less than 20 miles
(30 km), four bars are displayed. After
fi lling with fuel, the range is displayed
when it exceeds 62 miles (100 km).
If horizontal bars are displayed
for long periods instead of digits, contact a dealer.
This is the distance remaining to the
destination, either calculated at any
time by the navigation system if guidance is activated or entered by the
user, minus the distance covered since
the distance was entered.
If digits are missing, dashes are displayed in their place.
This is the average speed calculated
since the computer was last set to
zero (with the ignition on).
TRIP menu
Press the "MENU" button for access
to the main menu.
Select the "Trip computer" or "Ve-
hicle diagnostics" application using
the navigator, then confi rm or press
the "MODE" button until you gain ac-
cess to the trip computer screen, then
confi rm "OK" .
The "Trip computer" or "Vehicle diagnostics" menu offers various options:
- Alerts log,
- Status of the functions,
- Inputting the distance to be travelled.
Alerts log
This summarises the active warning
messages, displaying them on the
multifunction screen in succession.
This function is displayed only
when the vehicle is travelling at a speed greater than
20 mph (30 km/h).
This is the average fuel consumption
since the computer was last set to
zero.
This indicates the distance travelled
since the computer was last set to
zero.
Status of the functions
This summarises the active or inactive
status of the functions present on the
vehicle.
Distance remaining (miles or km)
When guidance is not activated, this
enables you to enter an approximate
distance to be travelled.
Page 30
MULTIFUNCTION SCREENS
MONOCHROME SCREEN C/
This displays the following information:
- time,
- date,
- ambient temperature (the value dis-
played fl ashes if there is a risk of
ice),
- check of openings,
- vehicle function status messages,
displayed temporarily,
- warning messages,
- audio functions,
- trip computer information,
- vehicle parameters,
- air conditioning settings,
- choice of language.
Management of the displays
The "AUDIO" , "TRIP" and "CLIM"
buttons on the audio equipment key-
pad permit displaying in the main window (on the right).
Example: TRIP
Main menu Defi ne the vehicle parameters
Permits the activation or deactivation
of certain driving and comfort elements.
Example: Automatic illumination of
headlamps.
Press the "MENU" button for access
to the main menu and select one of
the following functions: Audio Functions, Trip Computer, Personalisation/
Confi guration and Air Conditioning.
Example: display selected on "Audio
Functions".
Choice of language
The "Personalisation-Confi guration"
menu provides access to successive
confi rmation windows.
German, Spanish, French, English,
Italian, Dutch, Turkish, Portuguese
and Brazilian Portuguese.
Page 31

MULTIFUNCTION SCREENS
Display confi guration Changing the date and time Set the parameters one by one, using
- Brightness, to be adjusted in accordance with a scale between Moon
(-) and Sun (+).
- Selection of the units of measurement.
- Setting the date and time. Your operational zone is displayed on the
screen. Use the navigator to move
from one selection to another.
Your new parameters are confi rmed
one by one, by pressing the navigator button. All of the parameters are
recorded if you click on OK, displayed
on the screen.
The ESCape button on the control pad
enables you to choose not to confi rm
your changes.
- Selection of the colours (on colour
screen C only).
From the menu, displayed on the
screen, select the icon "Personalisa-
tion-Confi guration" using the navi-
gator, then confi rm.
From the list displayed, select "Display
confi guration" , then confi rm.
From the list displayed, select "Setting
the date and time" , then confi rm.
the navigator, then confi rm by clicking
on "OK" .
For safety reasons, confi gu-
ration of the multifunction
screen by the driver must only
be done when stationary.
Page 32

MULTIFUNCTION SCREENS
COLOUR SCREEN (WITH PEUGEOT
This displays the following information:
- time,
- date,
- ambient temperature (the value dis-
played fl ashes if there is a risk of ice),
- check of openings,
- vehicle function status messages,
displayed temporarily,
- warning messages,
- audio functions,
- trip computer information,
- air conditioning settings,
- satellite navigation system information.
"SETUP" menu
Press the SETUP button to gain access
to the "SETUP" menu. This provides
access to the following functions:
- System language,
- Date & Time,
- Display,
- Vehicle,
- Units,
- System.
System language
This menu allows you to select
the language used by the display:
German, English, Spanish, French,
Italian, Dutch, Polish, Portuguese.
Date & Time
This menu allows you to set the date
and time, the format of the date and
the format of the time (refer to the
"Audio and Telematics" section).
Display
This menu allows you to set the brightness of the display, the display colour
scheme and the colour of the map
(day/night and auto mode).
Vehicle
This menu permits the activation or
deactivation of certain driving and
comfort systems:
- air conditioning (A/C),
- vehicle information,
- access to the vehicle,
- driving assistance,
- lighting confi guration,
- comfort lighting.
Units
This menu permits selection of the
units: temperature (°C or °F) and fuel
consumption (km/l, l/100, miles and
mpg).
System
This menu permits restoring of the fac-
tory confi guration, display of the soft-
ware version and activation of scrolling
text.
For safety reasons, confi gu-
ration of the multifunction
screen by the driver must only
be done when stationary.
Page 33

HIGH DEFINITION COLOUR
This displays the following information:
VIDEO MENU (WITH PEUGEOT
- time,
- date,
- ambient temperature (the value dis-
played fl ashes if there is a risk of
ice),
- check of openings,
- vehicle function status messages,
displayed temporarily,
- warning messages,
- audio functions,
- trip computer information,
- air conditioning settings,
- satellite navigation system information.
Main menu
MULTIFUNCTION SCREENS
The "Confi guration" menu provides
access to the following functions:
- Display confi guration,
- Sound,
- Choice of language,
- Defi ne the vehicle parameters.
Defi ne the vehicle parameters
Permits the activation or deactivation
of certain driving and comfort elements:
- permanent locking of the boot on
the 407 Saloon,
- automatic illumination of headlamps,
- automatic "guide-me-home" lighting,
- automatic rear wiping on engaging
reverse gear on the 407SW.
Display confi guration
You can connect video equipment
(camcorder, digital camera, ...) to the
three video sockets, located in the
glove box.
Video display is only possible when
stationary.
Select the Video menu from the gen-
eral menu:
- "Activate video mode" to activate/
deactivate the video,
- "Video parameters" to set the display format, the brightness, the contrast and the colours.
Press the "ESC" or "DARK" button to
exit from video mode.
Press the "SOURCE" button several
times in succession to select an audio
source other than that of the video.
Press the "MENU" button to gain ac-
cess to the main menu and select one
of the following functions: Navigation-
Guidance, Map, Traffi c Information,
Audio Functions, Telematics, Confi gu-
ration, Video, Vehicle Diagnostics and
Air Conditioning.
- Choose colour,
- Adjust brightness,
- Adjust date and time,
- Choose units.
Page 34

COMFORT
Page 35

COMFORT
For even air distribution, take care
not to obstruct the exterior air intake
grille located at the bottom of the windscreen, the vents, the air outlets under
the front seats and the air extractor lo-
cated behind the fl aps in the boot.
In certain cases of particularly arduous
use (towing the maximum load on a
steep gradient in hot weather), cutting
off the air conditioning permits recovery of the engine power and therefore
improvement of the towing capacity.
Close the windows to benefi t from the
full effectiveness of the air conditioning.
Ensure that the passenger compartment fi lter is in good condition. Have
the fi lter elements replaced periodically. If you drive in a dusty environment,
replace it twice as often.
The air conditioning system does not
contain chlorine and is not harmful to
the ozone layer.
Operate the air conditioning system
for 5 to 10 minutes, once or twice a
month, to keep it in perfect working
order.
The water formed by the air conditioning
condensation is discharged via an opening provided for this purpose. Therefore,
a puddle of water may form underneath
the vehicle when stationary.
If the system does not produce cold air,
do not use it and contact a PEUGEOT
dealer.
1. Centre panel vents.
2. Adjustment of the glove box air
fl ow (see section"Interior layout").
3. Air outlet to passenger footwells.
4. Two ventilation vents at the rear at
the base of the centre console be-
tween the passengers.
5. Side vents.
6. Front windows demisting/defrosting
vents.
7.
Windscreen demisting/defrosting vents.
8. Sunshine sensor.
9. Air diffuser grille.
AUTOMATIC AIR
Use of the automatic regulation of the
air conditioning is recommended. It
permits automatic and optimised con-
trol of all of the following functions: air
fl ow, passenger compartment temperature and air distribution, by means
of various sensors, so preventing the
need for you to change your refer-
ence settings other than the value dis-
played.
Do not cover the sunshine sensor 8 .
It is required for regulation of the air
conditioning.
Advice on operation
To obtain even ventilation,
avoid closing the air diffuser
In hot weather, in order to obtain in-
tense ventilation, you can close the
air diffuser grille and use vents 1 and
5 only.
If, when the vehicle has been parked
in the sun for a long time, the interior
temperature remains very high, do not
hesitate to ventilate the passenger
compartment for a few minutes.
grille 9 .
Air diffuser
The air diffuser grille, located at the top
of the centre console, signifi cantly improves distribution and fl ows and pre-
vents air currents, while maintaining an
optimum temperature inside the passenger compartment.
Page 36

COMFORT
DIGITAL AIR CONDITIONING
Mono-zone: this is the overall regula-
tion of the temperature, distribution and
fl ow in the passenger compartment.
The symbols and messages associated
with the digital air conditioning controls
appear on the multifunction screen.
Control by the Auto programme
Automatic
programme comfort (1)
Press the "AUTO" button. The indicator
lamp comes on. The "AUTO" symbol is
displayed on the multifunction screen.
Depending on the level of comfort selected,
the system controls the air distribution, fl ow,
temperature and intake of air in order to pro-
vide comfort and an adequate circulation of
air in the passenger compartment. You do
not have to make any adjustments.
To prevent too great a distri-
bution of cold air when the engine is cold, the ventilation will
only reach its optimum level
progressively.
Adjustment of the temperature (2)
Press the right or
left arrow to change
it.
The value indicated on the display corresponds to a level of comfort and not
to a temperature in degrees Celsius or
Fahrenheit, depending on the screen
confi guration.
A setting around the value 21 makes
it possible to obtain optimum comfort.
However, depending on your require-
ments, a setting between 18 and 24
is usual.
Page 37

COMFORT
Manual control
It is possible to adjust one or more
functions manually, while leaving the
other functions in automatic mode.
Switching to manual mode may result
in discomfort (temperature, humidity,
odour, condensation) and is not advantageous (comfort).
To return to automatic mode, press the
"AUTO" button.
Blower (3)
Air fl ow
Turn the dial 3 to the
right to increase the
air fl ow or to the left
to reduce it.
Switching off the ventilation
Turn the dial 3 to the
left until the fl ow of
air stops.
Adjustment of air
distribution (4)
Successive or continuous pressure on
button 4 enables you to direct the fl ow
of air.
The "AUTO" button indicator lamp is
switched off.
The symbol (arrows) corresponding to
the chosen direction is displayed on
the multifunction screen.
Windscreen and front side windows.
Front and rear ventilation.
Front and rear footwells.
AUTO Automatic distribution.
Front visibility
control (5)
In certain cases, the comfort programme may not be suffi cient to demist or defrost the windows (humidity,
several passengers, ice).
In this case, select the front vis-
ibility programme in order to clear
the windows quickly. The indicator
lamp comes on.
It controls the air conditioning, air fl ow
and intake and distributes the ventilation to the windscreen and front side
windows.
The front visibility control symbol is
displayed on the multifunction screen.
Once the screen is clear, press button
1 to return the system to the comfort
setting.
To reactivate the air conditioning:
Press button 1 .
On entering the vehicle, the
interior temperature may be
much colder (or warmer) than
is comfortable. There is no
need to change the temperature displayed in order to obtain rapidly the
level of comfort required.
The automatic regulation of the air
conditioning settings is used to correct
the temperature difference as quickly
as possible.
The "AUTO" button indicator lamp is
switched off.
The air fl ow symbol (fan) is displayed
on the multifunction screen and is fi lled
according the value selected.
To prevent condensation and deterioration of the quality of the air in the
passenger compartment, ensure that
an adequate fl ow of air is maintained.
The "OFF" symbol is displayed on the
multifunction screen.
This action switches off the display
and the indicator lamps.
It deactivates all of the system's functions, with the exception of the rear
screen demisting.
The temperature-related comfort is no
longer controlled (temperature, humidity, odour, condensation).
Avoid driving for too long with the air
conditioning off.
Page 38

COMFORT
Intake of exterior
air/Recirculation of
interior air (6)
This function enables you to isolate
the passenger compartment from exterior fumes and odours.
Press button 6 several times to
set the air intake mode, the indica-
tor lamp which corresponds to the
mode set comes on at your prefe-
rence:
- intake of exterior air. Forced exterior air intake mode.
- recirculation of the air inside the
passenger compartment.
The indicator lamp for the mode
set comes on. Prolonged opera-
tion in interior air recirculation
mode may result in the formation
of condensation and deteriora-
tion of the quality of the interior
air.
Do not drive in air recirculation
mode for prolonged periods, except in truly exceptional atmospheric conditions.
The message associated with
the setting is displayed on the
multifunction screen.
Press button 6 to return to auto-
matic control of the air intake. The
two indicator lamps are switched
off.
For your comfort, when the ignition is switched off, the settings are
stored until it is switched on again.
Rear screen
demisting (7)
The heated rear screen operates independently of the air conditioning system.
Press button 7 , with the engine
running, to demist the rear screen
and the door mirrors. The indicator
lamp comes on.
Demisting is switched off automatical-
ly to prevent an excessive consumption of current and depending on the
ambient temperature.
It may be stopped by pressing button 7
again or when the engine is switched
off.
However, demisting resumes if the en-
gine is switched on again within one
minute.
Switch off the rear screen and door
mirror demisting when not needed as
lowering current consumption reduces
fuel consumption.
Page 39

COMFORT
"AIR CON" menu
Press the "MENU" but-
ton for access to the main
menu, then confi rm.
The "Main menu" appears on the
multifunction screen.
Select the Air Conditioning icon using
the navigator buttons.
The "Air Conditioning" menu ap-
pears on the multifunction screen as
the main display.
Deactivation of the air conditioning
(AC-OFF)
Deactivation may result in discomfort
(temperature, humidity, odour, condensation).
The symbol "AC OFF" is displayed on
the multifunction screen.
There is a risk that the temperature
setting value may not be reached and
you risk having condensation on the
windows.
You can cancel the deactivation by
pressing the "AUTO" button on the air
conditioning control panel.
Additional heating *
Vehicles which are fi tted with an HDI
engine may be equipped with automatic additional heating to improve
your comfort.
When the engine is idling or when the
vehicle is stationary, a high-pitched
whistling noise and the emission of a
small amount of smoke and odour is
normal.
* According to country.
Page 40

COMFORT
DIGITAL AIR CONDITIONING
Dual-zone: this is the differentiated
regulation of the temperature and air
distribution on the driver's side and the
front passenger's side.
The driver and front passenger can
each adjust the temperature and the
distribution of the air to suit their re-
quirements.
The symbols and messages associ-
ated with the digital air conditioning
controls appear on the multifunction
screen.
Control by the Auto programme
Automatic
programme - driver
and passenger
comfort (1)
Press the "AUTO" button. The indicator
lamp comes on. The "AUTO" symbol is
displayed on the multifunction screen.
Depending on the level of comfort selected,
the system controls the air distribution, fl ow,
temperature and intake of air in order to pro-
vide comfort and an adequate circulation of
air in the passenger compartment. You do
not have to make any adjustments.
To prevent too great a distri-
bution of cold air when the engine is cold, the ventilation will
only reach its optimum level
progressively.
Adjustment of the
temperature on the driver's
side (2)
Adjustment of the temperature
on the passenger's side (3)
Press the up or down arrow to change
the temperature on the driver's side 2
or passenger's side 3 .
The value indicated on the display corresponds to a level of comfort and not
to a temperature in degrees Celsius or
Fahrenheit, depending on the screen
confi guration.
A setting around the value 21 makes
it possible to obtain optimum comfort.
However, depending on your require-
ments, a setting between 18 and 24
is usual.
Page 41

COMFORT
Blower (4)
Air fl ow
Turn dial 4 to the
right to increase the
air fl ow or to the left
to reduce it.
Turn the dial 4 to the
left until the fl ow of
air stops.
Switching off the ventilation
Adjustment of
the driver's air
distribution (5)
Successive or continuous pressure on
button 5 or 6 enables you to direct the
fl ow of air on the driver's side or on the
passenger side independently.
The "AUTO" button indicator lamp is
switched off.
The symbol (arrows) corresponding to
the chosen direction 5 or 6 is displayed
on the multifunction screen.
Windscreen and front side windows.
Front and rear ventilation.
Front and rear footwells.
AUTO Automatic distribution.
Adjustment of the
passenger's air
distribution (6)
Manual control
It is possible to adjust one or more
functions manually while leaving the
other functions in automatic mode.
Switching to manual mode may result
in discomfort (temperature, humidity,
odour, condensation) and is not advantageous (comfort).
To return to automatic mode, press the
"AUTO" button.
On entering the vehicle, the
interior temperature may be
much colder (or warmer) than
is comfortable. There is no
need to change the temperature displayed in order to obtain rapidly the
level of comfort required.
The automatic regulation of the air
conditioning settings is used to correct
the temperature difference as quickly
as possible.
To reactivate the air conditioning:
Press button 1 .
The "AUTO" button indicator lamp is
switched off.
The air fl ow symbol (fan) is displayed
on the multifunction screen and is fi lled
according to the setting.
To prevent condensation and deterioration of the quality of the air in the
passenger compartment, ensure that
an adequate fl ow of air is maintained.
The "OFF" symbol is displayed on the
multifunction screen.
This action switches off the display
and the indicator lamps.
It deactivates all of the system's functions, with the exception of the rear
screen demisting.
The temperature-related comfort is no
longer controlled (temperature, humidity, odour, condensation).
Avoid driving for too long with the air
conditioning off.
Page 42

COMFORT
Front visibility
control (7)
In certain cases, the comfort programme may not be suffi cient to demist or defrost the windows (humidity,
several passengers, ice).
In this case, select the front visibi-
lity programme in order to clear the
windows quickly. The indicator lamp
comes on.
It controls the air conditioning, air fl ow
and intake and distributes the ventilation to the windscreen and front side
windows.
The front visibility control symbol is
displayed on the multifunction screen.
Once the screen is clear, press but-
ton 1 to return the system to the comfort
setting.
Intake of exterior
air/Recirculation of
interior air (8)
This function enables you to isolate
the passenger compartment from exterior fumes and odours.
Press button 8 several times to
set the air intake mode, the indica-
tor lamp which corresponds to the
mode set comes on at your prefe-
rence:
- intake of exterior air. Forced exterior air intake mode.
- recirculation of the air inside the
passenger compartment.
The indicator lamp which corre-
sponds to the mode set comes
on. Prolonged operation in interior air recirculation mode may
result in the formation of condensation and deterioration of
the quality of the interior air.
Do not drive in air recirculation
mode for prolonged periods, except in truly exceptional atmospheric conditions.
The message associated with
the control is displayed on the
multifunction screen.
Press button 8 to return to auto-
matic control of the air intake. The
indicator lamps are switched off.
For your comfort, when the ignition is switched off, the settings are
stored until it is switched on again.
Rear screen
demisting (9)
The heated rear screen operates independently of the air conditioning system.
Press button 9 , with the engine
running, to demist the rear screen
and the door mirrors. The indicator
lamp comes on.
Demisting is switched off automatically
to avoid an excessive consumption of
current and according to the ambient
temperature.
It may be stopped by pressing button 9
again or when the engine is switched
off.
However, the demisting resumes if the
engine is switched on again within one
minute.
Switch off the rear screen and exterior mirrors demisting when no longer
needed as lowering current consumption reduces fuel consumption.
Page 43

COMFORT
"AIR CON" menu
Press the "MENU" but-
ton for access to the
main menu, then confi rm.
The "Main menu" appears on the
multifunction screen.
Select the Air Conditioning icon using
the navigator buttons.
The "Air Conditioning" menu ap-
pears on the multifunction screen as
the main display.
Deactivation of the air conditioning
(A/C-OFF)
Deactivation may result in discomfort
(temperature, humidity, odour, condensation).
You can cancel the deactivation by
pressing the "AUTO" button on the air
conditioning control panel.
Deactivation or activation of the
simultaneous Left-Right control
Activation of this function transfers the
driver's settings to the passenger.
Deactivation of this function allows a
return to the independent driver/passenger settings.
Any manual action on button 4 or 6
cancels the simultaneous confi guration setting.
Additional heating *
Vehicles which are fi tted with an HDI
engine may be equipped with automatic additional heating to improve
your comfort.
When the engine is idling or when the
vehicle is stationary, a high-pitched
whistling noise and the emission of a
small amount of smoke and odour is
normal.
* According to country.
Page 44

COMFORT
PROGRAMMABLE HEATING
The programmable heating operates
independently of the engine.
When the engine is off, it pre-heats
the coolant circuit in order to benefi t
from an optimum engine operating
temperature from the time the engine
is switched on.
The programmable heating system
is switched on using the long range
remote control. Activation can be immediate or deferred by means of a
programming function.
If a malfunction of the programmable heating system occurs, contact
a PEUGEOT dealer.
Programming remote control
The heating system programming re-
mote control consists of the following
buttons and displays:
1. Scrolling functions menu buttons.
2. Function indicator lights: clock,
temperature, operating time, programmed time, heater operation,
heating management symbols.
3. Digital displays: time, temperature,
duration of operation, programmed
time or level of heating.
4. Off button.
5. On button.
Displays on the remote control
screen
Displaying the functions
Press the buttons 1 in succession to
display the functions.
The fi rst press of the left-hand or right-
hand button displays the time.
Next, the left-hand button permits ac-
cess to the programming time then to
the level of heating (C1 to C5).
The right-hand button permits access
to the passenger compartment temperature then to the duration of opera-
tion of the heater if it is to be switched
on immediately.
The passenger compartment
temperature information is
only available when the engine is off.
Page 45

COMFORT
Setting the time
Once the time has been displayed, by
means of the buttons 1 , press buttons 4
and 5 simultaneously within 10 seconds.
This symbol fl ashes.
Set the time using the buttons 1 .
Press buttons 4 and 5 simultaneously
to save it.
This symbol is displayed (fi xed).
Immediate activation
Press button 5 (ON) until the message
"OK" appears.
When the signal has been received,
the message "OK" is displayed along
with the duration of operation.
The heater starts and this symbol is displayed.
To deactivate the function, press button 4 (OFF) until the message "OK"
appears.
This symbol is switched off.
When carrying out these oper-
ations, if the message "FAIL"
appears, the signal has not
been received. Repeat the
procedure after changing your
location.
Setting the duration of
operation
Press the buttons 1 to display the du-
ration of operation.
This symbol is displayed.
Once the duration of operation has
been displayed, press buttons 4 and 5
simultaneously within 10 seconds.
This symbol fl ashes.
Set the duration by pressing the buttons 1 (adjustment in steps of 10 mins
and max value 30 mins).
Press buttons 4 and 5 simultaneously
to save the duration of operation.
This symbol is displayed (fi xed).
The factory setting value is
30 minutes.
Page 46

COMFORT
Programming the heating
You must programme your departure
time in order for the system to calculate the optimum heater start time automatically.
Programming the departure time
Press the buttons 1 to display the pro-
gramming time.
This symbol is displayed.
Once the programming time has been
displayed, press buttons 4 and 5 si-
multaneously within 10 seconds.
This symbol fl ashes.
Set the time by pressing the buttons 1
and press buttons 4 and 5 simultane-
ously to save it.
This symbol is displayed (fi xed).
Activation - deactivation
Once the programming time has been
displayed by means of the buttons 1 ,
press button 5 (ON) until the message
"OK" appears.
When the signal has been received,
the message "OK" is displayed
along with the symbol "HTM" .
This symbol is displayed when
the heater starts.
HTM: Heat Thermo Management.
To deactivate the programming, press
button 4 (OFF) until the message
"OK" appears.
The symbol "HTM" is switched
off.
When carrying out these operations, if the message "FAIL" ap-
pears, the signal has not been
received. Repeat the procedure
after changing your location.
Switching off the heating
Press button 5 (ON).
The symbol "HTM" remains on.
Changing the level of heating
The system offers 5 levels of heating
(from the lowest level C1 to the high-
est level C5 ).
Once the level of heating has been
displayed by means of the buttons 1 ,
press buttons 4 and 5 simultaneously.
The letter "C" fl ashes.
Set the level of heating by pressing
the buttons 1 .
Press buttons 4 and 5 simultaneously
to save the level selected. The letter
"C" is displayed (fi xed).
The factory pre-sets are replaced by the new settings entered. The programmed times
are stored until the next time
When the departure time is acti-
vated, the level of heating cannot be
changed. The departure time must be
deactivated fi rst.
they are changed.
Page 47

COMFORT
Changing the battery
The remote control is supplied by a
6V-28L battery, which is supplied.
Information on the display indicates
when it is time to replace this battery.
Unclip the casing then replace the battery.
The remote control must then be reini-
tialised, see below.
Do not discard the used bat-
teries, take them to an approved collection point.
Reinitialising the remote control
If the vehicle's battery is disconnected or the remote control's battery is
replaced, the remote control must be
reinitialised.
After switching on the power, press
button 4 (OFF) for 1 second within the
next 5 seconds. If the operation has
taken place correctly the message
"OK" is displayed on the remote con-
trol screen.
If a problem occurs, the message
"FAIL" appears. Repeat the operation.
Always switch off the programmable
heating while fi lling with fuel to avoid
any risk of fi re or explosion.
To avoid any risk of poisoning and asphyxiation, the programmable heat-
ing must not be used, even for short
periods, in an enclosed space such
as a garage or workshop which is not
equipped with an exhaust gas extraction system.
Do not park the vehicle on an infl ammable surface (dry grass, dead leaves,
paper…), there is a risk of fi re.
The programmable heating system
is supplied by the vehicle's fuel tank.
Before use, ensure that the quantity of
fuel remaining is suffi cient. If the fuel
tank is at the reserve, we strongly advise that you do not programme the
heating.
As an accessory, your pro-
grammable heating can be
adapted to pre-heat your vehicle's passenger compartment.
Page 48

COMFORT
REAR VIEW MIRROR
DOOR MIRRORS
Adjustment
Move control A to the right or to
the left to select the corresponding
mirror.
Direct control B in all four direc-
tions to adjust.
Folding back the mirrors
electrically
- from inside:
With the ignition on, move the
control A to the central position
then pull it rearwards.
- from outside:
Lock the vehicle using the re-
mote control * or the key.
This function can be deactivated.
Consult a PEUGEOT dealer.
When the vehicle is parked, the door
mirrors can be folded back manually.
* According to version.
Automatic day/night rear view
mirror
This automatically and gradually
changes between the day and night
positions. To prevent dazzling, the
glass of the mirror darkens automati-
cally depending on the intensity of the
light from behind. It clears as the light
(headlamps of following vehicles, sunlight) decreases, ensuring maximum
visibility.
Objects observed in the driver
and passenger mirrors are, in
reality, closer than they appear.
This must be taken into account in order to judge the distance of vehicles
approaching from behind correctly.
Page 49

COMFORT
REAR VIEW MIRROR
DOOR MIRRORS
Adjustment
Move control A to the right or to
the left to select the corresponding
mirror.
Direct control B in all four direc-
tions to adjust.
Folding back the mirrors
electrically
- from inside:
With the ignition on, move the
control A to the central position
then pull it rearwards.
- from outside:
Lock the vehicle using the re-
mote control * or the key.
This function can be deactivated.
Consult a PEUGEOT dealer.
When the vehicle is parked, the door
mirrors can be folded back manually.
* According to version.
Automatic day/night rear view
mirror
This automatically and gradually
changes between the day and night
positions. To prevent dazzling, the
glass of the mirror darkens automati-
cally depending on the intensity of the
light from behind. It clears as the light
(headlamps of following vehicles, sunlight) decreases, ensuring maximum
visibility.
Objects observed in the driver
and passenger mirrors are, in
reality, closer than they appear.
This must be taken into account in order to judge the distance of vehicles
approaching from behind correctly.
Page 50

Special feature
MANUAL ADJUSTMENT OF
AND REACH
To ensure maximum visibility
during manoeuvres, the mirror
lightens automatically when reverse
gear is engaged.
Manual interior mirror
The interior mirror has two positions:
- day (normal),
- night (anti-dazzle).
To change from one to the other, push
or pull the lever on the lower edge of
the mirror.
COMFORT
When the vehicle is stationary, unlock
the steering wheel adjustmment by
pushing the lever forwards.
Adjust the height and reach of the
steering wheel then lock the adjust-
ment by pulling the lever fully back.
Page 51

Special feature
MANUAL ADJUSTMENT OF
AND REACH
To ensure maximum visibility
during manoeuvres, the mirror
lightens automatically when reverse
gear is engaged.
Manual interior mirror
The interior mirror has two positions:
- day (normal),
- night (anti-dazzle).
To change from one to the other, push
or pull the lever on the lower edge of
the mirror.
COMFORT
When the vehicle is stationary, unlock
the steering wheel adjustmment by
pushing the lever forwards.
Adjust the height and reach of the
steering wheel then lock the adjust-
ment by pulling the lever fully back.
Page 52

COMFORT
FRONT SEATS
Manual mode
Longitudinal adjustment
Lift the control bar and slide the seat
forwards or backwards.
Driver's seat cushion height and
angle adjustment
Pump up or down to the required
position.
Seat back angle adjustment
Operate the lever for your comfort.
Page 53

COMFORT
Electric mode
Longitudinal adjustment
Push the control forwards or back-
wards to slide the seat.
Driver's seat cushion height and
angle adjustment
Height: tilt the rear of the control up
or down.
Tilt: tilt the front of the control up or
down.
Seat back angle adjustment
Tilt the control forwards or backwards
for your comfort.
The electrical functions of the driver's seat are deactivated one minute after the ignition is switched off.
To reactivate them, open the door or switch on the ignition.
Page 54

COMFORT
Driver's seat lumbar adjustment
Operate the lever to obtain the correct
position.
Heated seats adjustment
With the engine running, turn the dial.
The temperature of the seat is regulated automatically.
0 : Off.
1 : Low.
2 : Medium.
3 : High.
Head restraint height and angle
adjustment
To raise or lower the head restraint,
pull it forwards then slide it.
To tilt the head restraint, tilt the lower
part forwards or backwards.
To remove the head restraint, move it
almost to the highest position, lift the
tab using a coin and pull it forwards
and upwards at the same time.
To refi t the head restraint, engage the
stalks in the holes keeping in line with
the seat back.
Never drive with the head restraints removed and stored in
the vehicle. This is dangerous
and they may be thrown in the
event of sharp braking. They must be
in place and adjusted correctly.
The adjustment is correct when
the top of the head restraint is
aligned with the top of the head
of the occupant of the seat.
Front seat active head restraint
This system prevents "whiplash".
In the event of a rear impact, the action
of the body on the seat back moves
the head restraint forwards and upwards preventing the head from being
thrown back.
Front armrest
To change the position of the armrest:
Lift the handle 1 .
The armrest folds forwards and upwards.
To return to the initial position, push
the armrest backwards and press it to
engage.
Page 55

COMFORT
REAR SEATS (SALOON)
To fold down the rear left seat or the
rear right seat, always start with the
seat cushion, never with the seat back
(risk of damage):
move the front seat(s) forward if
necessary,
place the head restraints in the low
position or remove them if necessary,
Check that the seat belt strap is positioned correctly at the side of the seat
back,
Ensure that the outer seat belt tongues
are engaged in their claps (the centre
seat belt must not be fastened),
lift the front of the seat cushion 1 ,
tilt the seat cushion 1 against the
front seat(s),
pull control 3 forwards to unlock
the seat back 2 ,
fold down the seat back 2 .
Note: the seat cushion 1 can be re-
moved with care to increase the vol-
ume of the load space.
Squeeze the seat cushion fi xings to
detach them from their fastenings.
When repositioning:
fold up the seat back 2 and lock it
(the red marker of control 3 should
no longer be visible),
fold up the seat 1 ,
refi t the head restraints if they were
removed.
Take care not to trap the seat
belt and to position the tongue
of each strap correctly in its
down the seat back. This will enable
you to reposition the seat backs with
their seat belts and clasps ready to accommodate your rear passengers.
respective clasp before folding
Locking/unlocking the access
to the boot via the rear seats
Your vehicle's boot can be isolated
from the passenger compartment.
The red indicator on the control 3
should no longer be visible. If it is,
push the seat fully.
Insert the ignition key in the lock 4 .
Page 56

COMFORT
REAR SEATS (407SW)
To fold down the rear left seat or the
rear right seat, always start with the
seat cushion, never with the seat back
(risk of damage):
move the front seat(s) forward if
necessary,
place the head restraints in the low
position or remove them if necessary,
Check that the seat belt strap is positioned correctly at the side of the seat
back,
Ensure that the outer seat belt tongues
are fastened in their clasp (the centre
seat belt must not be fastened),
lift the front of the seat cushion 1 ,
tilt the seat cushion 1 against the
front seat(s),
pull control 3 forwards to unlock
the seat back 2 ,
fold down the seat back 2 .
Note: the seat cushion 1 can be re-
moved with care to increase the vol-
ume of the load space.
Squeeze the seat cushion fi xings to
detach them from their fastenings.
When repositioning:
fold up the seat back 2 and lock it
(the red marker of control 3 should
no longer be visible),
fold up the seat 1 ,
refi t the head restraints if they were
removed.
Take care not to trap the seat
belt and to position the tongue
of each strap correctly in its
respective clasp before folding
down the seat back. This will enable
you to reposition the seat backs with
their seat belts and clasps ready to accommodate your rear passengers.
Page 57

COMFORT
CHILD SEAT IN THE FRONT
GENERAL POINTS RELATING
Although one of PEUGEOT's main criteria when designing your vehicle, the
safety of your children also depends
on you.
For maximum safety, please
observe the following recommendations:
- in accordance with European reg-
ulations, all children under the
age of 12 or less than one and
a half metres tall must travel in
approved child seats suited to
their weight , on seats fi tted with a
seat belt or ISOFIX mountings * ,
- statistically, the safest seats in
your vehicle for carrying children are the rear seats,
- a child weighing less than 9 kg
must travel in the "rearwardsfacing" position both in the front
and in the rear.
PEUGEOT recommends that chil-
dren should travel in the rear seats of
your vehicle:
- "rearwards-facing" up to the age
of 2,
- "forwards-facing" over the age
of 2.
"Rearwards-facing"
When a "rearwards-facing"
child seat is installed on the
front passenger seat , it is
essential that the passenger
airbag is deactivated. Otherwise, the
child would risk being seriously injured or killed if the airbag were to
infl ate .
* The rules for carrying children are
specifi c to each country. Refer to the
current legislation in your country.
"Forwards-facing"
When a "forwards-facing" child seat
is installed on the front passenger
seat , adjust the vehicle's seat to the
intermediate longitudinal position with
the seat back upright and leave the
passenger airbag activated.
Intermediate longitudinal
position
Page 58

COMFORT
CHILD SEATS RECOMMENDED BY PEUGEOT
PEUGEOT offers a complete range of recommended child seats which are
secured using a three point seat belt :
Group 0: from birth to 10 kg
Group 0+: from birth to 13 kg
L1
"RÖMER Baby-
Safe Plus"
Installed in the
rearwards-facing
position.
Groups 2 and 3: from 15 to 36 kg
L3
"RECARO Start''
Can be fi tted to the vehicle's ISOFIX mountings.
The child is restrained by the seat belt.
Groups 1, 2 and 3: from 9 to 36 kg
"RÖMER KIDFIX"
L5
L2
"KIDDY Life"
The use of the
restraining cushion is
compulsory for carrying
young children
(from 9 to 18 kg).
Passenger air bag OFF
L4
"KLIPPAN Optima"
From the age of
6 years
(approximately 22 kg),
the booster is used on
its own.
Page 59

COMFORT
LOCATIONS FOR CHILD SEATS SECURED USING THE SEAT BELT
In accordance with European regulations, this table indicates the options for the installation of child seats secured using the
seat belt and universally approved (a) depending on the weight of the child and the seat in the vehicle:
Weight of the child/ indicative age
Below 13 kg
Seat
Front passenger
seat (c)
- fi xed U U U U
- height adjustable U(R) U(R) U(R) U(R)
Outer rear seats U U U U
Centre rear seat X X X X
a : Universal child seat: child seat which can be installed in all vehicles using the seat belt.
b : Group 0: from birth to 10 kg.
c : Consult the current legislation in your country before installing your child on this seat.
U : seat suitable for the installation of a child seat secured using the seat belt and universally approved, "rear facing" and/or
"forwards facing".
U (R) : identical to U , but the vehicle seat must be adjusted to the highest position.
X : seat which is not suitable for the installation of a child seat.
(groups 0 (b) and
0+)
Up to approx 1 year
9 to 18 kg
(group 1)
De 1 to 3 years
approx
15 to 25 kg
(group 2)
De 3 to 6 years
22 to 36 kg
(group 3)
De 6 to 10 years
approx
Page 60

COMFORT
"ISOFIX" MOUNTINGS
407 SALOON
407SW
These seats are fi tted with ISOFIX
mountings.
These are two rings located between
the seat back and the seat cushion.
This ISOFIX mounting system guarantees reliable, safe and fast fi tting of the
child seat in your vehicle.
The ISOFIX child seats are fi tted with
two locks which are secured easily on
these lower rings A .
The incorrect installation of a
child seat in a vehicle compromises the child's protection in
the event of a collision.
Page 61

COMFORT
ISOFIX CHILD SEAT RECOMMENDED BY PEUGEOT AND APPROVED FOR YOUR VEHICLE
ISOFIX RÖMER Duo Plus (size category B1 )
Group 1: from 9 to 18 kg
Installed in the forwards facing position, on the rear seats only.
Three child seat body angles: sitting, reclining and lying positions.
Adjust the vehicle's front seat so that the child's feet do not touch the seat back.
This child seat can also be used on seats which are not fi tted with ISOFIX mountings. In this case, it is essential that
it is secured to the vehicle's seat by means of the three point seat belt.
Follow the instructions for fi tting the child seat indicated in the seat manufacturer's installation guide.
Secured without the top strap.
Page 62

COMFORT
ADVICE ON CHILD
The incorrect installation of a child seat
in a vehicle compromises the child's
protection in the event of an accident.
Remember to fasten the seat belts or
the child seat harnesses keeping the
slack relative to the child's body to a
minimum, even for short journeys.
When installing a child seat using the
seat belt, ensure that the seat belt is
tightened correctly on the child seat
and that it secures the child seat fi rmly
on the seat of your vehicle.
For optimum installation of the "forwards-facing" child seat, ensure that
the back of the child seat is in contact
with the back of the vehicle's seat and
that the head restraint does not cause
any discomfort.
If the head restraint has to be removed,
ensure that it is stored or attached se-
curely to prevent it from being thrown
around the vehicle in the event of
sharp braking.
Children under the age of 10 must not
travel in the "forwards-facing" position
on the front passenger seat, unless
the rear seats are already occupied by
other children, cannot be used or are
absent.
Deactivate the passenger airbag when
a "rearwards-facing" child seat is installed on the front seat.
Otherwise, the child would risk being
seriously injured or killed if the airbag
were to infl ate.
Installing a booster seat
The chest part of the seat belt must
be positioned on the child's shoulder
without touching the neck.
Ensure that the lap part of the seat
belt passes correctly over the child's
thighs.
PEUGEOT recommends the use of
a booster seat which has a back, fi t-
ted with a seat belt guide at shoulder
level.
As a safety precaution, do not leave:
- a child or children alone and unsu-
pervised in a vehicle,
- a child or an animal in a vehicle
which is exposed to the sun, with
the windows closed,
- the keys within reach of children
inside the vehicle.
To prevent accidental opening of the
doors and rear windows, use the
"Child lock".
Take care not to open the rear win-
dows by more than one third.
To protect young children from the
rays of the sun, fi t side blinds on the
rear windows.
Page 63

ACCESS
REMOTE CONTROL KEY
The key allows you, from the driver's
side, to lock or unlock the doors, the
boot and the fuel fi ller fl ap and fold and
unfold the door mirrors and independently it allows you to open or close
the glove box, lock or unlock the access to the boot via the rear seats (407
Saloon) and switch on the ignition.
The remote control has the same
functions as the key as well as partial
opening of the boot (Saloon) or the
rear screen (407SW).
It is part of the key and is used for remote locking and unlocking.
If one of the doors or the boot is open,
the central locking does not work.
Unfolding/folding the key
To unfold or fold the key, press button A .
Locking
Press button B .
The direction indicators come on for
approximately two seconds and the
door mirrors fold.
Press and hold button B to close the
windows and sunroof automatically in
addition to locking.
Unlocking
Press button C .
The direction indicators fl ash rapidly
and the door mirrors unfold.
The "Folding of the door mirrors" func-
tion can be deactivated by a PEUGEOT
dealer.
Note: if the vehicle is locked
and unlocking is activated
inadvertently without a door
being opened within the next
30 seconds, the vehicle will lock automatically.
Unlocking and partial opening of
the boot (saloon) or rear screen
(407SW)
Press and hold button D .
This action also unlocks the doors.
Permanent locking of the boot
(saloon)
This function can be activated or deactivated via the
"personalisation - confi guration" menu and "Defi ne
the vehicle parameters" on
the multifunction screen.
Press button D on the remote
control key.
This will unlock the boot only.
Deadlocking
This renders the external and internal
door controls inoperative.
Do not operate the deadlocking
function if there is anyone inside
the vehicle.
Using the key
Lock the vehicle (the direction indi-
cators come on for approximately
two seconds).
Turning the key again within fi ve
seconds deadlocks the vehicle
(the direction indicators come on
for approximately two seconds).
Page 64

ACCESS
LOCKING/UNLOCKING FROM
MANUAL LOCKING
LOCATING YOUR VEHICLE
Using the remote control
Pressing button B locks the vehicle
(the direction indicators come on
for approximately two seconds).
A second press within fi ve seconds
deadlocks the vehicle (the direction indicators come on for approximately two seconds).
Press the button.
This allows the doors and the boot to
be locked or unlocked.
If the vehicle is deadlocked,
the button is not active. In this
case, use the key or the remote control to unlock.
Automatic central locking of
the doors
The doors can lock automatically
while driving (speed above 6 mph
[10 km/h]).
Press and hold the button to activate
or deactivate this function.
Note: driving with the doors
locked may make access to
the passenger compartment by
the emergency services more
diffi cult in an emergency.
Driver's door
Insert the key in the lock to lock or unlock
the door.
Passenger doors
To lock, insert the key in the control
located on the edge of the door then
turn to the right.
Key in ignition
A buzzer sounds on opening the driver's door, if the key has been left in
the ignition.
To locate your vehicle, if you have
locked or deadlocked it, in a car park:
press button B on the remote con-
trol, the courtesy lamps come on
and the direction indicators fl ash
for a few seconds.
Page 65

ACCESS
CHANGING THE REMOTE
Battery ref.: CR1620/3 volts.
REINITIALISATION
ELECTRONIC ENGINE
To change the battery, unclip the casing using a coin at the notch.
If the remote control does not work
after the battery has been changed,
reinitialise the remote control.
Switch off the ignition.
Switch the ignition on again.
Press the remote control locking but-
ton immediately for a few seconds.
Switch off the ignition and remove
the remote control key from the ignition lock. The remote control is
now working again.
This locks the engine control system as soon as the ignition has been
switched off and therefore prevents
starting of the vehicle by anyone who
does not have the key.
The ignition key has an electronic chip
which has a special code. When the ignition is switched on, the code must be
recognised for starting to be possible.
If the system does not function correct-
ly, the following indicator lamp comes on:
Electronic engine immobiliser
indicator lamp
It is accompanied by a message on
the multi-function screen.
Your vehicle will not start.
Consult a PEUGEOT dealer.
Lost keys
Visit a PEUGEOT dealer with
document and your personal identifi -
cation documents.
The PEUGEOT dealer will be able to
retrieve the key code and the transponder code required to order a replacement key.
Remote control
The high frequency remote control is
a sensitive system; do not operate it
while it is in your pocket as there is a
possibility that it may unlock the vehicle, without you being aware of it.
Do not repeatedly press the buttons of
your remote control out of range and
out of sight of your vehicle. You run the
risk of stopping it from working and the
remote control would have to be reinitialised.
The remote control does not operate
when the key is in the ignition, even
when the ignition is switched off, except for reinitialisation.
Locking the vehicle
Driving with the doors locked may
make access to the passenger compartment by the emergency services
more diffi cult in an emergency.
As a safety precaution (with children
on board), remove the key from the
ignition when you leave the vehicle,
even for a short time.
the vehicle's V5 registration
Page 66

ACCESS
CHILD LOCK
Anti-theft protection
Do not make any modifi ca-
tions to the electronic engine
immobiliser system; this could
cause malfunctions.
When purchasing a secondhand vehicle
Have the key codes memorised by a
PEUGEOT dealer, to ensure that the
keys in your possession are the only
ones which can start the vehicle.
Do not throw the remote control batteries away, they contain metals which are harmful
to the environment.
Take them to an approved collection point.
Manual mode
This prevents each of the rear doors
from being opened from inside.
Turn the switch on the edge of the
door a quarter of a turn using the
ignition key.
Electric mode
This prevents opening of both of the
rear doors from the inside.
With the ignition on, press the button.
A message appears on the multifunc-
tion screen.
This system is independent and does
not take the place of the central locking control in any circumstances.
Always remove the ignition
key when leaving the vehicle,
even for a short time.
tivation of the child lock each time the
ignition is switched on.
In the event of a serious impact, the
electric child lock is deactivated automatically to permit the exit of the rear
passengers.
It is advisable to check the ac-
Page 67

ACCESS
LOCKING/UNLOCKING FROM
MANUAL LOCKING
LOCATING YOUR VEHICLE
Using the remote control
Pressing button B locks the vehicle
(the direction indicators come on
for approximately two seconds).
A second press within fi ve seconds
deadlocks the vehicle (the direction indicators come on for approximately two seconds).
Press the button.
This allows the doors and the boot to
be locked or unlocked.
If the vehicle is deadlocked,
the button is not active. In this
case, use the key or the remote control to unlock.
Automatic central locking of
the doors
The doors can lock automatically
while driving (speed above 6 mph
[10 km/h]).
Press and hold the button to activate
or deactivate this function.
Note: driving with the doors
locked may make access to
the passenger compartment by
the emergency services more
diffi cult in an emergency.
Driver's door
Insert the key in the lock to lock or unlock
the door.
Passenger doors
To lock, insert the key in the control
located on the edge of the door then
turn to the right.
Key in ignition
A buzzer sounds on opening the driver's door, if the key has been left in
the ignition.
To locate your vehicle, if you have
locked or deadlocked it, in a car park:
press button B on the remote con-
trol, the courtesy lamps come on
and the direction indicators fl ash
for a few seconds.
Page 68

ACCESS
CHANGING THE REMOTE
Battery ref.: CR1620/3 volts.
REINITIALISATION
ELECTRONIC ENGINE
To change the battery, unclip the casing using a coin at the notch.
If the remote control does not work
after the battery has been changed,
reinitialise the remote control.
Switch off the ignition.
Switch the ignition on again.
Press the remote control locking but-
ton immediately for a few seconds.
Switch off the ignition and remove
the remote control key from the ignition lock. The remote control is
now working again.
This locks the engine control system as soon as the ignition has been
switched off and therefore prevents
starting of the vehicle by anyone who
does not have the key.
The ignition key has an electronic chip
which has a special code. When the ignition is switched on, the code must be
recognised for starting to be possible.
If the system does not function correct-
ly, the following indicator lamp comes on:
Electronic engine immobiliser
indicator lamp
It is accompanied by a message on
the multi-function screen.
Your vehicle will not start.
Consult a PEUGEOT dealer.
Lost keys
Visit a PEUGEOT dealer with
document and your personal identifi -
cation documents.
The PEUGEOT dealer will be able to
retrieve the key code and the transponder code required to order a replacement key.
Remote control
The high frequency remote control is
a sensitive system; do not operate it
while it is in your pocket as there is a
possibility that it may unlock the vehicle, without you being aware of it.
Do not repeatedly press the buttons of
your remote control out of range and
out of sight of your vehicle. You run the
risk of stopping it from working and the
remote control would have to be reinitialised.
The remote control does not operate
when the key is in the ignition, even
when the ignition is switched off, except for reinitialisation.
Locking the vehicle
Driving with the doors locked may
make access to the passenger compartment by the emergency services
more diffi cult in an emergency.
As a safety precaution (with children
on board), remove the key from the
ignition when you leave the vehicle,
even for a short time.
the vehicle's V5 registration
Page 69

ACCESS
CHANGING THE REMOTE
Battery ref.: CR1620/3 volts.
REINITIALISATION
ELECTRONIC ENGINE
To change the battery, unclip the casing using a coin at the notch.
If the remote control does not work
after the battery has been changed,
reinitialise the remote control.
Switch off the ignition.
Switch the ignition on again.
Press the remote control locking but-
ton immediately for a few seconds.
Switch off the ignition and remove
the remote control key from the ignition lock. The remote control is
now working again.
This locks the engine control system as soon as the ignition has been
switched off and therefore prevents
starting of the vehicle by anyone who
does not have the key.
The ignition key has an electronic chip
which has a special code. When the ignition is switched on, the code must be
recognised for starting to be possible.
If the system does not function correct-
ly, the following indicator lamp comes on:
Electronic engine immobiliser
indicator lamp
It is accompanied by a message on
the multi-function screen.
Your vehicle will not start.
Consult a PEUGEOT dealer.
Lost keys
Visit a PEUGEOT dealer with
document and your personal identifi -
cation documents.
The PEUGEOT dealer will be able to
retrieve the key code and the transponder code required to order a replacement key.
Remote control
The high frequency remote control is
a sensitive system; do not operate it
while it is in your pocket as there is a
possibility that it may unlock the vehicle, without you being aware of it.
Do not repeatedly press the buttons of
your remote control out of range and
out of sight of your vehicle. You run the
risk of stopping it from working and the
remote control would have to be reinitialised.
The remote control does not operate
when the key is in the ignition, even
when the ignition is switched off, except for reinitialisation.
Locking the vehicle
Driving with the doors locked may
make access to the passenger compartment by the emergency services
more diffi cult in an emergency.
As a safety precaution (with children
on board), remove the key from the
ignition when you leave the vehicle,
even for a short time.
the vehicle's V5 registration
Page 70

ACCESS
CHILD LOCK
Anti-theft protection
Do not make any modifi ca-
tions to the electronic engine
immobiliser system; this could
cause malfunctions.
When purchasing a secondhand vehicle
Have the key codes memorised by a
PEUGEOT dealer, to ensure that the
keys in your possession are the only
ones which can start the vehicle.
Do not throw the remote control batteries away, they contain metals which are harmful
to the environment.
Take them to an approved collection point.
Manual mode
This prevents each of the rear doors
from being opened from inside.
Turn the switch on the edge of the
door a quarter of a turn using the
ignition key.
Electric mode
This prevents opening of both of the
rear doors from the inside.
With the ignition on, press the button.
A message appears on the multifunc-
tion screen.
This system is independent and does
not take the place of the central locking control in any circumstances.
Always remove the ignition
key when leaving the vehicle,
even for a short time.
tivation of the child lock each time the
ignition is switched on.
In the event of a serious impact, the
electric child lock is deactivated automatically to permit the exit of the rear
passengers.
It is advisable to check the ac-
Page 71

ACCESS
CHILD LOCK
Anti-theft protection
Do not make any modifi ca-
tions to the electronic engine
immobiliser system; this could
cause malfunctions.
When purchasing a secondhand vehicle
Have the key codes memorised by a
PEUGEOT dealer, to ensure that the
keys in your possession are the only
ones which can start the vehicle.
Do not throw the remote control batteries away, they contain metals which are harmful
to the environment.
Take them to an approved collection point.
Manual mode
This prevents each of the rear doors
from being opened from inside.
Turn the switch on the edge of the
door a quarter of a turn using the
ignition key.
Electric mode
This prevents opening of both of the
rear doors from the inside.
With the ignition on, press the button.
A message appears on the multifunc-
tion screen.
This system is independent and does
not take the place of the central locking control in any circumstances.
Always remove the ignition
key when leaving the vehicle,
even for a short time.
tivation of the child lock each time the
ignition is switched on.
In the event of a serious impact, the
electric child lock is deactivated automatically to permit the exit of the rear
passengers.
It is advisable to check the ac-
Page 72

ACCESS
ALARM
System which protects and provides a
deterrent against theft and break-ins.
It provides the following types of monitoring.
- Exterior perimeter
The system checks for opening of the
vehicle.
The alarm is triggered if anyone tries
to open a door, the boot, the bonnet...
- Interior volumetric
The system checks for any variation in
the volume in the passenger compartment.
The alarm is triggered if anyone breaks
a window, enters the passenger compartment or moves inside the vehicle.
Self-protection function
The system checks for the
putting out of service of its
components.
The alarm is triggered if the battery, the
central control or the wires of the siren
are put out of service or damaged.
For all work on the alarm system, contact a PEUGEOT dealer.
Locking the vehicle with full
alarm system
Activation
Switch off the ignition and get out
of the vehicle.
Press the locking button on the re-
mote control.
The monitoring system is active: the
indicator lamp on the button fl ashes
once per second.
After the locking button on the remote
control is pressed, the exterior perimeter monitoring is activated after a delay
of 5 seconds and the interior volumetric after a delay of 45 seconds.
If an opening (door, boot...) is not
closed fully, the vehicle is not locked
but the exterior perimeter monitoring will be activated after a delay of
45 seconds at the same time as the
interior volumetric monitoring.
Deactivation
Press the unlocking button on the
remote control.
The alarm system is deactivated: the indicator lamp on the button switches off.
Locking the vehicle with
exterior perimeter monitoring
only
Deactivate the interior volumetric protection to avoid unwanted triggering of
the alarm in certain cases such as:
- leaving a pet in the vehicle,
- leaving a window partially open,
- washing your vehicle,
- changing a wheel,
- having your vehicle towed,
- transport by sea.
Deactivation of the interior
volumetric monitoring
Switch off the ignition.
Within ten seconds, press the but-
ton until the indicator lamp is lit
continuously.
Get out of the vehicle.
Press the locking button on the re-
mote control immediately.
The exterior perimeter monitoring alone
is activated: the indicator lamp on the
button fl ashes once per second.
To be effective, this deactivation must
be carried out each time the ignition is
switched off.
Page 73

ACCESS
Reactivation of the interior
volumetric monitoring
Press the unlocking button on the
remote control to deactivate the
exterior perimeter monitoring.
Press the locking button on the
remote control to activate all the
monitoring functions.
The indicator lamp on the button again
fl ashes once per second.
Triggering of the alarm
This is indicated by sounding of the
siren and fl ashing of the direction indi-
cators for thirty seconds.
The monitoring functions remain ac-
tive until the alarm has been triggered
eleven times in succession.
When the vehicle is unlocked using
the remote control, rapid fl ashing of
the indicator lamp on the button informs you that the alarm was triggered
during your absence. When the igni-
tion is switched on, this fl ashing stops
immediately.
Failure of the remote control
To deactivate the monitoring functions:
Unlock the vehicle using the key in
the driver's door lock.
Open the door; the alarm is trig-
gered.
Switch on the ignition; the alarm
stops. The indicator lamp on the
button switches off.
Locking the vehicle without
activating the alarm
Lock or deadlock the vehicle using
the key in the driver's door lock.
Malfunction
When the ignition is switched on, fi xed
lighting of the indicator lamp on the
button indicates a malfunction of the
system.
Have it checked by a PEUGEOT dealer.
Automatic activation *
2 minutes after the last door or the
boot is closed, the system is activated
automatically.
To avoid triggering the alarm on
entering the vehicle, fi rst press the
unlocking button on the remote
control.
* According to country.
Page 74

ACCESS
ELECTRIC WINDOWS
REINITIALISATION OF
1. Driver's electric window switch.
2. Passenger's electric window
switch.
3. Rear right electric window
switch.
4. Rear left electric window
switch.
5. Deactivating the rear electric
window switches (child safety).
Manual operation:
To open or close the window, press
or pull the switch gently. The window stops as soon as the switch is
released.
Automatic operation:
To open or close the window, press or
pull switch fully: the window opens or
closes completely when the switch is
released. Pressing the switch again
stops the movement of the window.
The electric window switches remain
operational for approximately one minute after the key has been removed
from the ignition.
Once this time has elapsed, the electric windows will not operate. To reactivate them, switch the ignition on
again.
Safety anti-pinch
When the window rises and meets an
obstacle, it stops and immediately partially lowers again.
In the event of unwanted opening
of the window on closing, press the
switch until the window opens completely, then pull the switch immediately until the window closes. Continue to
hold the switch for approximately one
second after the window has closed.
The safety anti-pinch function is not
active during this operation.
Deactivating the rear window
controls
For the safety of your children, press
switch 5 to prevent operation of the rear
windows irrespective of their position.
When the button is pressed down, the
switches are deactivated. When the button is raised, the switches are active.
Following reconnection of the battery,
the safety anti-pinch function must be
reinitialised: the safety anti-pinch function is not active during these operations.
- lower the window completely, then
raise it, it will rise in steps of a few
centimetres each time the switch is
pressed. Repeat the operation until the window closes completely,
- continue to press the switch for at
least one second after reaching
this position, window closed.
Always remove the key from
the ignition when leaving the
vehicle, even for a short time.
In the event of contact during
operation of the windows, you must reverse the movement of the window. To
do this, press the switch concerned.
When the driver operates the passenger electric window switches, he must
ensure that no one is preventing correct closing of the windows.
The driver must ensure that the passengers use the electric windows correctly.
Be aware of children when operating
the windows.
Page 75

ACCESS
BOOT (SALOON)
TAILGATE AND REAR SCREEN
Partial opening of the rear screen
To open the boot, press the push button
and raise the tailgate.
If the permanent locking of the
boot is activated, opening is
only possible by pressing the
remote control button.
The locking or unlocking of the tailgate
and rear screen is simultaneous with
that of the doors.
Opening the tailgate and rear
screen
The tailgate and rear screen cannot
be opened at the same time.
With the rear screen closed, to open
the tailgate , operate the handle A ,
then lift the tailgate.
With the tailgate closed, to open the
rear screen , operate the handle B ,
then lift the rear screen.
The boot lighting is controlled by opening the tailgate or the rear screen.
With the tailgate closed, to partially
open the rear screen , press and hold
the unlocking button C on the remote
control.
Notes: the tailgate and rear
screen lock automatically when
driving at 6 mph (10 km/h) and
unlock when one of the doors
is opened.
When the rear wiper is in a wiping
position, the rear screen cannot be
opened until the end of the cycle.
Close the rear screen using the wiper
arm or by pressing the centre of the
glass.
Page 76

ACCESS
BOOT (SALOON)
TAILGATE AND REAR SCREEN
Partial opening of the rear screen
To open the boot, press the push button
and raise the tailgate.
If the permanent locking of the
boot is activated, opening is
only possible by pressing the
remote control button.
The locking or unlocking of the tailgate
and rear screen is simultaneous with
that of the doors.
Opening the tailgate and rear
screen
The tailgate and rear screen cannot
be opened at the same time.
With the rear screen closed, to open
the tailgate , operate the handle A ,
then lift the tailgate.
With the tailgate closed, to open the
rear screen , operate the handle B ,
then lift the rear screen.
The boot lighting is controlled by opening the tailgate or the rear screen.
With the tailgate closed, to partially
open the rear screen , press and hold
the unlocking button C on the remote
control.
Notes: the tailgate and rear
screen lock automatically when
driving at 6 mph (10 km/h) and
unlock when one of the doors
is opened.
When the rear wiper is in a wiping
position, the rear screen cannot be
opened until the end of the cycle.
Close the rear screen using the wiper
arm or by pressing the centre of the
glass.
Page 77

ACCESS
"Rear screen open" warning
When the engine is running , if the
rear screen is not fully closed, you are
warned by a message on the multifunction screen.
When the vehicle is moving (speed
greater than 6 mph (10 km/h)), if the
rear screen is not fully closed, you are
warned by an audible signal, a message on the multifunction screen and
lighting of the service warning lamp.
Tailgate release
This enables the tailgate to be unlocked in the event of a central locking
fault.
- Fold back the rear seats to gain
access to the lock from inside the
boot.
- Insert a small screwdriver into hole A
of the lock to unlock the tailgate.
Page 78

ACCESS
SUNROOF (SALOON)
- To partially open the roof: Turn the
switch to the right (three possible
settings).
- To open the roof completely: Turn
the switch to the left (six possible
settings).
- To close it completely: Turn the
switch back to position "O".
- Safety anti-pinch: When the sunroof is closing and meets an obstacle, it stops then partially opens
again.
The sunroof blind is manual.
Notes:
After reconnecting the battery, you
must reinitialise the safety anti-pinch:
- place the control in the maximum
partial opening position (3rd notch
to the right),
- wait until the roof is in the maximum partially open position,
- press the control for at least one
second.
In the event of unwanted opening of
the roof on closing (for example, in the
presence of ice), and immediately after the roof stops:
- move the control to the "O" position and press the control immediately,
- continue to press the control until
the roof is fully closed.
Always remove the key from
the ignition when leaving the
vehicle, even for a short time.
In the event of contact during
operation of the roof, you must reverse
the movement of the roof. To do this,
press the switch concerned.
When the driver operates the roof
switch, they must ensure that no one
is preventing correct closing of the
roof.
The driver must ensure that passengers use the sunroof correctly.
Be aware of children when operating
the roof.
Page 79

ACCESS
PANORAMIC SUNROOF (407SW)
Your vehicle is fi tted with a tinted glass
panoramic sunroof which increases
the light and visibility in the passenger compartment. Its electric blind improves temperature conditions.
The blind is controlled electrically by
a dial with nine opening positions.
To close: turn the dial to the left (nine
possible settings).
To open: return the dial to the initial
position "0" .
Safety anti-pinch
If the blind encounters an obstacle
during closing, it stops and partially
opens again.
You must reinitialise the safety anti-
pinch within a maximum of fi ve sec-
onds after the blind has stopped:
- press part A of the control until the
blind is completely closed (closing
in stages of a few centimetres).
Notes :
Following reconnection of the battery,
in the event of a blind malfunction
while it is moving or immediately after
it has stopped, you must reinitialise
the safety anti-pinch:
- place the control in the fully open
position (position "0"),
- wait until the blind is in the fully
open position,
- press section A of the control for at
least three seconds.
In the event of unwanted opening of
the blind on closing, and immediately
after the blind has stopped:
- move the control to the fully closed
position (9th setting to the left) then
press part A of the control straight
away,
- continue to press the control until
the blind is fully closed.
The safety anti-pinch function is not
active during these operations.
In the event of contact during operation of the blind, you
must reverse its movement.
To do this, press the control
concerned.
When the driver operates the blindcontrol, they must ensure that no one
is preventing the blind from closing
correctly.
The driver must ensure that the passengers use the blind correctly.
Pay attention to children during operation of the blind.
Page 80

ACCESS
FUEL TANK
The capacity of the tank is approximately 67 litres.
Low fuel warning
When the low fuel level is
reached, this warning lamp
comes on in the instrument
panel, accompanied by an au-
dible signal and a message on the mul-
tifunction screen. When it fi rst comes
on, about 6 litres of fuel remains in
the tank.
If you run completely out of fuel
(Diesel), refer also to the "Checks"
section.
Refuelling
A label fi tted to the inside of the fuel
fi ller fl ap indicates which type of fuel
to use.
Additions of fuel must be of at least
5 litres to be taken into account by the
fuel gauge.
Opening the fuel fi ller may produce the
noise of an inrush of air. This vacuum
is entirely normal and results from the
sealing of the fuel system.
To refuel in complete safety:
you must switch off the engine,
open the fuel fi ller fl ap.
turn the cap to the left.
remove the cap and hang the end
on the hook located on the inside
of the fl ap.
fi ll the tank, but do not continue
after the third cut-off of the nozzle ; this may cause malfunctions.
After fi lling the tank:
refi t the cap,
close the fl ap.
Operating fault
A fuel gauge fault is indicated by the
fuel guage needle returning to zero.
Have it checked by a PEUGEOT dealer.
Page 81

ACCESS
Special features of BioFlex
engines
A BioFlex vehicle has been designed
to run on unleaded petrol (RON 95 or
RON 98) or ethanol (this is a mixture
containing 85% ethanol and 15% unleaded petrol, called E85).
So, regardless of the quantity of fuel
remaining in your tank and irrespective of its type (RON 95/RON 98, E85
or a mixture of the two), you can fi ll
your tank at any time with unleaded
petrol (RON 95 or RON 98) or ethanol
(E85).
There is no problem driving on unleaded petrol only with this vehicle.
In winter conditions, starting the engine from cold may
sometimes prove diffi cult.
During these very cold periods
you are advised to use unleaded petrol rather than E85 to ensure optimum
starting conditions.
Quality of the fuel used for
petrol engines
The petrol engines are perfectly compatible with E10 type petrol biofuels
(containing 10% ethanol), conforming
to European standards EN 228 and
EN 15376.
E85 type fuels (containing up to 85%
ethanol) are reserved exclusively for
vehicles marketed for the use of this
type of fuel (BioFlex vehicles). The
quality of the ethanol must comply with
European standard EN 15293.
For Brazil only, special vehicles are
marketed to run on fuels containing up
to 100% ethanol (E100 type).
Quality of the fuel used for
Diesel engines
The Diesel engines are perfectly compatible with biofuels which conform
to current and future European standards (Diesel fuel which complies with
standard EN 590 mixed with a biofuel which complies with standard EN
14214) available at the pumps (containing up to 7 % Fatty Acid Methyl
Ester).
The B30 biofuel can be used in certain Diesel engines; however, this use
is subject to strict application of the
special servicing conditions. Consult a
PEUGEOT dealer.
The use of any other type of (bio)fuel
(vegetable or animal oils, pure or diluted, domestic fuel...) is strictly prohibited (risk of damage to the engine
and fuel system).
Page 82

ACCESS
Special features of BioFlex
engines
A BioFlex vehicle has been designed
to run on unleaded petrol (RON 95 or
RON 98) or ethanol (this is a mixture
containing 85% ethanol and 15% unleaded petrol, called E85).
So, regardless of the quantity of fuel
remaining in your tank and irrespective of its type (RON 95/RON 98, E85
or a mixture of the two), you can fi ll
your tank at any time with unleaded
petrol (RON 95 or RON 98) or ethanol
(E85).
There is no problem driving on unleaded petrol only with this vehicle.
In winter conditions, star-
ting the engine from cold may
sometimes prove diffi cult.
During these very cold periods
you are advised to use unleaded petrol rather than E85 to ensure optimum
starting conditions.
Quality of the fuel used for
petrol engines
The petrol engines are perfectly compatible with E10 type petrol biofuels
(containing 10% ethanol), conforming
to European standards EN 228 and
EN 15376.
E85 type fuels (containing up to 85%
ethanol) are reserved exclusively for
vehicles marketed for the use of this
type of fuel (BioFlex vehicles). The
quality of the ethanol must comply with
European standard EN 15293.
For Brazil only, special vehicles are
marketed to run on fuels containing up
to 100% ethanol (E100 type).
Quality of the fuel used for
Diesel engines
The Diesel engines are perfectly compatible with biofuels which conform
to current and future European standards (Diesel fuel which complies with
standard EN 590 mixed with a biofuel which complies with standard EN
14214) available at the pumps (containing up to 7 % Fatty Acid Methyl
Ester).
The B30 biofuel can be used in certain Diesel engines; however, this use
is subject to strict application of the
special servicing conditions. Consult a
PEUGEOT dealer.
The use of any other type of (bio)fuel
(vegetable or animal oils, pure or diluted, domestic fuel...) is strictly prohibited (risk of damage to the engine
and fuel system).
Page 83

LIGHTING CONTROL STALK
Front and rear lamps (ring A)
Turn ring A to the position re-
quired.
Lighting off,
Front and rear foglamps (ring B)
Turn ring B forwards to switch on
and rearwards to switch off. The
status is confi rmed by the lamp on
the instrument panel.
Model without AUTO lighting
Model with AUTO lighting
Automatic illumination of
headlamps,
Sidelamps,
Dipped/main beam headlamps.
Dipped/main beam change
Pull the stalk fully towards you.
Lighting on
With the ignition off, on opening the
driver's door an audible signal indicates that you have left the lighting on
when leaving the vehicle.
Switch the lighting off.
Front foglamps (turn once)
These operate with the sidelamps and
the dipped or main beam headlamps.
Rear foglamps (turn twice)
These operate when the front fo-
glamps are already on.
Direction indicators
Left: downwards. The
direction arrow indica-
tor lamp fl ashes on the
instrument panel.
Right: upwards. The
direction arrow indica-
tor lamp fl ashes on the
instrument panel.
If you forget to return the di-
rection indicator to its normal
position, the volume of the
audible signal will increase, if
you are driving at a speed greater than
40 mph (60 km/h) or if the control stalk
is held on for more than 20 seconds.
Page 84

Automatic illumination of
headlamps
The dipped beam headlamps switch
on automatically if the light is poor and
when the windscreen wipers operate
continuously. They switch off when
the light is bright enough or the windscreen wipers stop.
Warning: in foggy weather or in snow,
the sunshine sensor can detect suffi cient light. The lighting will not come
on automatically. If necessary, you
must switch the dipped beam headlamps on manually.
Activation Manual "Guide-me-home" lighting
When you leave your vehicle, the side-
lamps and dipped beam headlamps
can be left on for a few seconds.
When the function is activated, the
indicator lamp comes on on the
5-dial instrument panel screen.
To deactivate or activate the
function, use the "Persona-
lisation - confi guration"
menu on your multifunction
screen.
For safety reasons, activation/
deactivation of the "Automatic
illumination of headlampss"
function via the menu must be
carried out when stationary.
To deactivate or activate the
"Automatic guide-me-home
lighting" function, use the
"Personalisation - configuration" menu on your
multifunction screen.
The duration of the lighting
can be set via the "Person-
alisation - confi guration"
menu of your multifunction
screen.
Automatic "Guide-me-home"
lighting
When you leave your vehicle with
the automatic illumination of headlamps activated, the sidelamps and
dipped beam headlamps remain on
for the duration selected after the ignition is switched off.
Deactivation
When the function is deactivated,
the indicator lamp comes on on the
5-dial instrument panel screen.
Do not cover the sunshine/
brightness sensor, located in
the centre of the windscreen.
It is used to regulate the air
conditioning and for the automatic illumination of headlamps.
If the sunshine/brightness sensor
does not function correctly, the
sidelamps and dipped beam headlamps come on.
Consult a PEUGEOT dealer.
Activation:
switch off the engine,
"fl ash" the headlamps,
get out of the vehicle and lock it.
Page 85

Automatic illumination of
headlamps
The dipped beam headlamps switch
on automatically if the light is poor and
when the windscreen wipers operate
continuously. They switch off when
the light is bright enough or the windscreen wipers stop.
Warning: in foggy weather or in snow,
the sunshine sensor can detect suffi cient light. The lighting will not come
on automatically. If necessary, you
must switch the dipped beam headlamps on manually.
Activation Manual "Guide-me-home" lighting
When you leave your vehicle, the side-
lamps and dipped beam headlamps
can be left on for a few seconds.
When the function is activated, the
indicator lamp comes on on the
5-dial instrument panel screen.
To deactivate or activate the
function, use the "Persona-
lisation - confi guration"
menu on your multifunction
screen.
For safety reasons, activation/
deactivation of the "Automatic
illumination of headlampss"
function via the menu must be
carried out when stationary.
To deactivate or activate the
"Automatic guide-me-home
lighting" function, use the
"Personalisation - configuration" menu on your
multifunction screen.
The duration of the lighting
can be set via the "Person-
alisation - confi guration"
menu of your multifunction
screen.
Automatic "Guide-me-home"
lighting
When you leave your vehicle with
the automatic illumination of headlamps activated, the sidelamps and
dipped beam headlamps remain on
for the duration selected after the ignition is switched off.
Deactivation
When the function is deactivated,
the indicator lamp comes on on the
5-dial instrument panel screen.
Do not cover the sunshine/
brightness sensor, located in
the centre of the windscreen.
It is used to regulate the air
conditioning and for the automatic illumination of headlamps.
If the sunshine/brightness sensor
does not function correctly, the
sidelamps and dipped beam headlamps come on.
Consult a PEUGEOT dealer.
Activation:
switch off the engine,
"fl ash" the headlamps,
get out of the vehicle and lock it.
Page 86

MANUAL HEADLAMP
ADJUSTMENT
AUTOMATIC HEADLAMP
ADJUSTMENT
Daytime running lamps *
On vehicles which are equipped with day-
time running lamps, the dipped beam headlamps come on when the vehicle is started.
This indicator lamp comes on on
the instrument panel screen.
The instruments and controls
(multifunction screen, air conditioning control panel...) are
only lit on switching to the
automatic illumination of headlamps
mode or when the lighting is switched
on manually.
For vehicles fi tted with halogen bulbs,
depending on the load in your vehicle,
adjusting the beam of your headlamps
is recommended.
0. 1 or 2 people in the front seats.
-. 3 people.
1. 5 people.
-. Intermediate adjustment
2. 5 people + maximum authorised
loads.
-. Intermediate adjustment
3. Driver + maximum authorised
loads.
Initial setting is position 0.
When stationary with the ignition
on , the system automatically corrects
the height of the beam, whatever the
load of the vehicle. The driver is then
assured of having optimum lighting
and not causing a nuisance to other
road users.
In cases of malfunction , the
warning lamp comes on on
the instrument panel screen,
accompanied by an audible
signal and a message on the multifunction screen. The system places
your headlamps to the low position.
Do not touch the xenon bulbs. Consult
a PEUGEOT dealer.
* According to country.
Page 87

WINDSCREEN WIPER
Windscreen wiper with intermittent
wipe
Windscreen wiper with automatic
wipe
Windscreen wiper with Intermittent
and automatic wipe
2 Fast wipe (heavy rain).
1 Normal wipe (moderate rain).
l Intermittent wipe.
0 Off.
Single wipe (press downwards).
In the Intermittent position, the wiping
speed is in proportion to the vehicle
speed.
2 Fast wipe (heavy rain).
1 Normal wipe (moderate rain).
AUTO Automatic wipe.
0 Off.
Single wipe (press downwards).
In the AUTO position, no action on
your part is necessary.
The windscreen wiping
must be reactivated if the
ignition has been switched off
for more than one minute.
2 Fast wipe (heavy rain).
1 Normal wipe (moderate rain).
I Intermittent wipe.
0 Off.
Automatic, then single wipe
(see following page).
In the AUTO position, no action on
your part is necessary.
In the Intermittent position, the wiping
speed is in proportion to the vehicle
speed.
The windscreen wiping
must be reactivated if the
ignition has been switched off
for more than one minute.
Page 88

Automatic rain sensitive
REAR WIPER CONTROL
windscreen wipers
Activation
Move the control to position 0 then re-
turn it to the AUTO position.
An indicator lamp comes on on the instrument panel screen, accompanied
by a message on the multifunction
screen.
In the AUTO position, the windscreen
wipers operate automatically and
adapt their speed to the intensity of
the rainfall.
Deactivation
Control with automatic wiping only
Manual operation of the wiper stalk interrupts the AUTO position, the deacti-
vation indicator lamp comes on on the
instrument panel screen, accompanied by a message on the multifunc-
tion screen.
In the event of malfunction , the
windscreen wipers will operate in in-
termittent mode.
Contact a PEUGEOT dealer to have
the system checked.
Control with Intermittent and
automatic wiping
Manual operation of the wiper stalk by
moving the stalk A up and returning
it to position "0" interrupts the AUTO
position, the deactivation indicator
lamp comes on on the instrument panel screen, accompanied by a message
on the multifunction screen.
Do not cover the rain sensor
located on the windscreen be-
hind the rear view mirror.
wash to wash your vehicle, switch off
the ignition or check that the wiper
stalk is not in the automatic position.
In winter, it is advisable to wait for the
windscreen to completely clear of ice
before operating the automatic wipers.
When using an automatic car
Turn the ring to the fi rst notch for intermittent wiping.
The control must be reactivated if
the ignition has been switched off.
To do this, move the control to any
position then return it to the required
position.
Automatic rear wiper
If the windscreen wipers control is activated and you engage reverse gear,
the rear wiper operates in intermittent
mode.
Note: if a bicycle carrier is
used, deactivate this function
by going to the "personalisa-
tion - confi guration" menu on
the multifunction screen or install a
special bicycle carrier approved by
PEUGEOT.
Page 89

Automatic rain sensitive
REAR WIPER CONTROL
windscreen wipers
Activation
Move the control to position 0 then re-
turn it to the AUTO position.
An indicator lamp comes on on the instrument panel screen, accompanied
by a message on the multifunction
screen.
In the AUTO position, the windscreen
wipers operate automatically and
adapt their speed to the intensity of
the rainfall.
Deactivation
Control with automatic wiping only
Manual operation of the wiper stalk interrupts the AUTO position, the deacti-
vation indicator lamp comes on on the
instrument panel screen, accompanied by a message on the multifunc-
tion screen.
In the event of malfunction , the
windscreen wipers will operate in in-
termittent mode.
Contact a PEUGEOT dealer to have
the system checked.
Control with Intermittent and
automatic wiping
Manual operation of the wiper stalk by
moving the stalk A up and returning
it to position "0" interrupts the AUTO
position, the deactivation indicator
lamp comes on on the instrument panel screen, accompanied by a message
on the multifunction screen.
Do not cover the rain sensor
located on the windscreen be-
hind the rear view mirror.
wash to wash your vehicle, switch off
the ignition or check that the wiper
stalk is not in the automatic position.
In winter, it is advisable to wait for the
windscreen to completely clear of ice
before operating the automatic wipers.
When using an automatic car
Turn the ring to the fi rst notch for intermittent wiping.
The control must be reactivated if
the ignition has been switched off.
To do this, move the control to any
position then return it to the required
position.
Automatic rear wiper
If the windscreen wipers control is activated and you engage reverse gear,
the rear wiper operates in intermittent
mode.
Note: if a bicycle carrier is
used, deactivate this function
by going to the "personalisa-
tion - confi guration" menu on
the multifunction screen or install a
special bicycle carrier approved by
PEUGEOT.
Page 90

FRONT COURTESY LAMP
Screenwash/
Rear wash-wipe
Turn the ring beyond the fi rst notch,
the wash-wipe then the wiper operate
for a set period of time.
Note: the rear wiper and rear
wash-wipe functions are de-
activated automatically when
the rear screen is opened.
Windscreen and headlamp wash
Pull the windscreen wiper stalk towards
you. The windscreen wash then the
windscreen wipers operate for a fi xed
period.
The headlamp wash is also activated,
if the headlamps are on .
When the minimum level of
the reservoir is reached, this
warning light comes on, accompanied by an audible
signal and a message on the
multi-function display.
Next time you stop, fi ll the screenwash/
headlamp wash reservoir.
The warning light comes on each time
the stalk is operated, until the reservoir
is fi lled.
1. Courtesy lamp
2. Map reading lamps
With the key in the ignition on or starting
position, operate the relevant switch.
The front courtesy lamp comes on
when the ignition key is removed, on
unlocking the vehicle or on opening
one of the doors.
It gradually goes off after the ignition
has been switched on or when the vehicle is locked.
Pressing switch 1 turns on the front
courtesy lamp.
The courtesy lamp can be deactivated
by pressing switch 1 with the door open.
The map reading lamps are not affected
by this and may be switched on.
To re-activate the lamps, press the
switch, with the door open.
Page 91

FRONT COURTESY LAMP
Screenwash/
Rear wash-wipe
Turn the ring beyond the fi rst notch,
the wash-wipe then the wiper operate
for a set period of time.
Note: the rear wiper and rear
wash-wipe functions are de-
activated automatically when
the rear screen is opened.
Windscreen and headlamp wash
Pull the windscreen wiper stalk towards
you. The windscreen wash then the
windscreen wipers operate for a fi xed
period.
The headlamp wash is also activated,
if the headlamps are on .
When the minimum level of
the reservoir is reached, this
warning light comes on, accompanied by an audible
signal and a message on the
multi-function display.
Next time you stop, fi ll the screenwash/
headlamp wash reservoir.
The warning light comes on each time
the stalk is operated, until the reservoir
is fi lled.
1. Courtesy lamp
2. Map reading lamps
With the key in the ignition on or starting
position, operate the relevant switch.
The front courtesy lamp comes on
when the ignition key is removed, on
unlocking the vehicle or on opening
one of the doors.
It gradually goes off after the ignition
has been switched on or when the vehicle is locked.
Pressing switch 1 turns on the front
courtesy lamp.
The courtesy lamp can be deactivated
by pressing switch 1 with the door open.
The map reading lamps are not affected
by this and may be switched on.
To re-activate the lamps, press the
switch, with the door open.
Page 92

REAR COURTESY LAMP
REAR READING LAMPS
Sill illumination
Boot light
1. Courtesy lamp
2. Map reading lamps
With the key in the ignition on or start-
ing position, operate the relevant
switch.
The rear courtesy lamp comes on
when the ignition key is removed, on
unlocking the vehicle or on opening
one of the doors.
It gradually goes off after the ignition
has been switched on or the vehicle
is locked.
Pressing switch 1 turns on the rear
courtesy lamp.
The courtesy lamp can be deactivat-
ed by pressing switch 1 with the door
open. The map reading lamps are not
affected by this and may be switched
on.
To re-activate the lamps, press the
switch, with the door open.
With the key in the ignition on or starting position, press the corresponding
switch.
The rear reading lamps come on when
the key is removed from the ignition
and when the vehicle is unlocked.
They switch off gradually when the ig-
nition is switched on or when the vehicle is locked.
Pressing switch 1 switches on the
rear reading lamp concerned for
ten minutes.
The sill lighting is at the bottom of each
door panel.
The lamps come on automatically
when a door is opened and switch off
automatically when all of the doors are
closed.
The boot light is located in the right-
hand boot trim.
It comes on automatically when the
boot is opened and switches off auto-
matically when the boot is closed.
Page 93

INTERIOR FITTINGS
Covered storage compartment,
driver's side
FITTINGS
Cooled glove box Front armrest
This can be used for storing small objects such as keys, a parking badge or
a mobile telephone.
Front door trays
These can be used for storing maps,
tourist guides or a bottle of water.
Front ashtray (100 W max)
This is fi tted with a cigar lighter socket
or a 12 volt socket.
Press the cover to open the ashtray.
To empty the ashtray, after opening,
grip the receptacle and remove it.
This is fi tted with a lock.
To open the glove box, lift the handle.
The glove box lights when the lid is
opened.
It is fi tted with three sockets for con-
necting video equipment (vehicle fi tted
with a 16/9 colour screen) and a ventilation nozzle (which can be closed
by means of a dial), distributing conditioned air at the same temperature as
the vents of the passenger compartment.
In cold weather, it is advisable to close
this nozzle to conserve the ambient air
inside the passenger compartment.
It has ocations for storing a pen, a pair
of spectacles, tokens, etc.
Retractable cup holder
This is located in front of the front armrest.
Press the cover to open the cup holder.
To open the compartment, raise the
cover or operate the left fi nger-plate
(according to version).
The storage compartment gives access to the USB port and can be used
for storing CDs and coins.
Rear storage container
This is located at the rear of the front
armrest.
To empty it, open it fully, press the upper lug then pull to remove it.
12 volt accessories socket
(100 W max)
This is a cigar lighter type socket, fi tted with a cap. It is supplied with current from the ignition on position.
Page 94

FITTINGS
Rear armrest Fitting/Removing the mat
The rear armrest consists of two compartments with a hinged cover.
Storage compartment 1 :
Lift the cover.
Cup holder 2 :
Fold the second cover forwards.
Access to the ski flap
Pull the handle down then towards you
to open the fl ap.
Storage compartments
There are two storage compartments
located in the boot side trim.
To gain access to a compartment:
turn the two screws to the right and
remove the panel.
When removing the mat on the driver's
side, push the seat as far back as possible and remove the fi xings.
When refi tting, position the mat correctly on the pin and clip the fi xings.
Check that the mat is secured correctly.
To prevent the mat from becoming caught under the pedals:
- only use mats suited to
the fi xings already present
in the vehicle. It is essential that these fi xings are
used.
- never fi t one mat on top of another.
Page 95

BOOT FITTINGS (407 SW)
1. 12V accessories socket (100 W
max) and boot lamp
This is a cigar lighter type 12 volt socket. It is installed on the rear left trim
and is supplied from the ignition on
position.
The boot lamp is controlled by opening the tailgate or rear screen.
FITTINGS
2. Storage boxes
There are two side storage boxes
which can contain:
- on the left: a can of oil, a fi rst aid
kit, a puncture repair aerosol,
- on the right (except when a JBL Hi-
Fi system is fi tted): a box of bulbs,
a warning triangle (support provided for this purpose), the luggage
retaining net.
3. Load space cover
To remove:
Unclip the front ends and remove
the load space cover.
To install:
Position the front ends of the load
space cover on its support and
press lightly to put it in place.
4. Stowing rings
There are four stowing rings on the
boot fl oor to which the luggage retaining net can be attached.
Page 96

FITTINGS
High load retaining net
The high load retaining net can be
used behind the front seats (row 1) or
behind the rear bench seat (row 2).
Note : if it is used behind the
front seats, the rear seat backs
and cushions must be folded
(see section on rear seats).
To install it:
fold the rear seat backs,
position the high load retaining net
roller above the two rails 5 located
behind the rear seats (2/3 bench
seat). The two notches 6 must be
placed above the two rails,
slide the two rails 5 in the notches 6 ,
push the roller (in the direction of
the length) from right to left to secure it,
put the rear seat backs back in
place.
To use it in row 1 :
fold the rear seat backs,
open the covers 7 of the corre-
sponding upper fi xings,
unroll the high load retaining net
and position one end of the metal
bar in the corresponding fi xing cover. Ensure that the hook is seated
correctly in the rail located inside
the cover 7 ,
pull the metal bar on the high load
retaining net to position the other
hook in the second fi xing cover.
Page 97

To use it in row 2 :
LOAD SPACE COVER (407 SW)
open the covers 8 of the corre-
sponding upper fi xings,
from the rear bench seat, unroll the
high load retaining net pushing it to
detach it from the retaining hooks,
position one of the ends of the
metal bar of the net in the corresponding fi xing cover. Ensure that
the hook is seated correctly in the
rail located inside the cover 8 ,
position the other hook in the sec-
ond fi xing cover and pull the metal
bar towards you.
FITTINGS
To unfold To fold
Page 98

To use it in row 2 :
LOAD SPACE COVER (407 SW)
open the covers 8 of the corre-
sponding upper fi xings,
from the rear bench seat, unroll the
high load retaining net pushing it to
detach it from the retaining hooks,
position one of the ends of the
metal bar of the net in the corresponding fi xing cover. Ensure that
the hook is seated correctly in the
rail located inside the cover 8 ,
position the other hook in the sec-
ond fi xing cover and pull the metal
bar towards you.
FITTINGS
To unfold To fold
Page 99

SAFETY
HORN
HAZARD WARNING LAMPS
ELECTRONIC STABILITY
Press one of the spokes of the steering wheel.
Press the button, the direction indica-
tors fl ash.
They can operate with the ignition off.
Automatic operation of hazard
warning lamps
When braking in an emergency, depending on the deceleration, the
hazard warning lamps come on automatically. They switch off automati-
cally the fi rst time you accelerate.
It is also possible to switch them off by
pressing the button.
This system is linked and complementary to the ABS system.
In the event of a signifi cant variation
between the trajectory of the vehicle
and the path required by the driver,
the ESP monitors wheel by wheel and
acts automatically on the engine and
on the brake of one or more wheels, to
put the vehicle back on course, within
the limit of the laws of physics.
ESP operation
The indicator lamp comes on.
Disarming the ESP
In exceptional conditions (starting the
vehicle when it is stuck in the mud,
immobilised in snow, on unstable
ground...), it may be advisable to disarm the ESP.
Press the "ESP OFF" switch, lo-
cated on the centre console.
The switch lights up and the warning
light comes on: the ESP no longer acts
on the operation of the engine.
Instrument panel indicator
light.
The system is triggered again:
automatically if the ignition is
switched off,
automatically above 30 mph (50 km/h),
manually by pressing the switch
again.
Page 100

SAFETY
HORN
HAZARD WARNING LAMPS
ELECTRONIC STABILITY
Press one of the spokes of the steering wheel.
Press the button, the direction indica-
tors fl ash.
They can operate with the ignition off.
Automatic operation of hazard
warning lamps
When braking in an emergency, depending on the deceleration, the
hazard warning lamps come on automatically. They switch off automati-
cally the fi rst time you accelerate.
It is also possible to switch them off by
pressing the button.
This system is linked and complementary to the ABS system.
In the event of a signifi cant variation
between the trajectory of the vehicle
and the path required by the driver,
the ESP monitors wheel by wheel and
acts automatically on the engine and
on the brake of one or more wheels, to
put the vehicle back on course, within
the limit of the laws of physics.
ESP operation
The indicator lamp comes on.
Disarming the ESP
In exceptional conditions (starting the
vehicle when it is stuck in the mud,
immobilised in snow, on unstable
ground...), it may be advisable to disarm the ESP.
Press the "ESP OFF" switch, lo-
cated on the centre console.
The switch lights up and the warning
light comes on: the ESP no longer acts
on the operation of the engine.
Instrument panel indicator
light.
The system is triggered again:
automatically if the ignition is
switched off,
automatically above 30 mph (50 km/h),
manually by pressing the switch
again.