

Peugeot 208 2014 Owner's Manual
HANDBOOK
This personal space offers advice and other useful information for
the care and maintenance of your vehicle.
On-line handbook
You can find your handbook on the
PEUGEOT
website, under
"Personal space".
Referring to the handbook on-line also gives you access to the
latest information available, easily identified by the bookmark,
associated with this symbol:
If the "Personal space" function is not available on the
PEUGEOT
public website for your country, you can find your handbook at the
following address:
http://public.servicebox.peugeot.com
The Vehicle documentation link in the home page (no registration is
needed),
the language,
the vehicle, its body style,
the print edition of your handbook appropriate for the date of registration of
your vehicle.
Please note the following point:
The fitting of electrical equipment or accessories which are
not recommended by PEUGEOT may result in a failure of your
vehicle's electronic system. Please note this specific warning.
Select:
You have access to your handbook on line, together with the latest

WELCOME
Key
Warning:
this symbol marks warnings which it
Information:
this symbol draws your attention to
Protection of
this symbol accompanies
Page reference:
this symbol invites you to refer to
Thank you for choosing a 208.
This handbook has been designed to enable you
Therefore, on the first few pages, you will find a
familiar with your vehicle.
All of the details specific to your vehicle, comfort,
Your vehicle is fitted with only some of the

Contents
Alarm 51
Ventilation 66
Automatic gearbox 93
Automatic illumination of headlamps 117
Automatic rain sensitive wipers 122
Familiarisation
Eco-driving
Monitoring
.
Access
Driving
.
Comfort
Visibility

Contents
Airbags 134
Advice on care and maintenance 186
Accessories 187
Audio system / Bluetooth 279
Audio system 305
Safety
Practical information
Checks
Technical data
Audio equipment and telematics
Visual search
Alphabetical index
.
.
Familiarisation
Stop & Start
This system puts the engine temporarily into standby
Park Assist
This is an active parking system that detects
Cornering lighting
At low speed this system provides additional
Exterior
96
119
4
105
.
Temporary puncture repair kit
This kit is a complete system consisting of a
Panoramic sunroof
Equipped with configurable light guides, this
Rear parking sensors
This system provides a warning when
Exterior
149
56
Familiarisation
109
5
Familiarisation
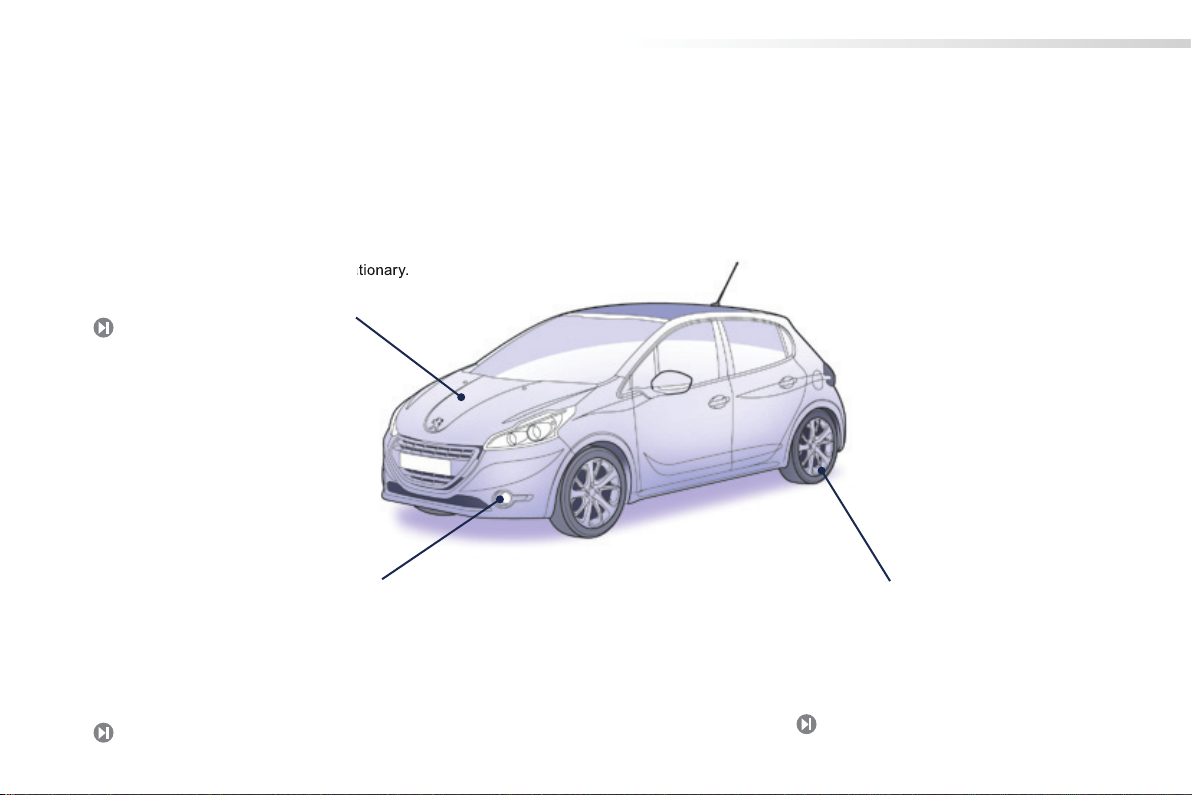
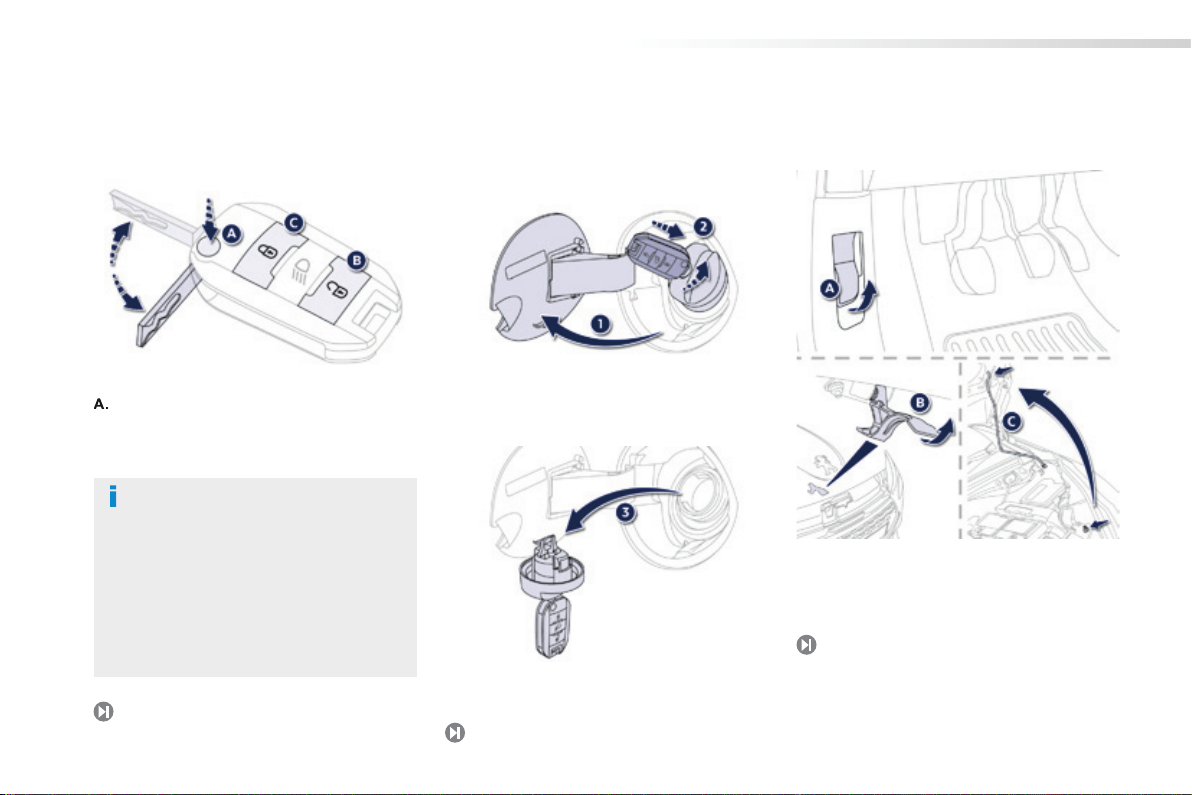
A.
Unfolding / Folding the key.
Unlocking the vehicle.
Deactivating the alarm.
Remote control key
Bonnet
Opening the fuel filler flap.
Removing the fuel filler cap.
Hooking the fuel filler cap.
Tank capacity: approximately 50 litres.
Interior release lever.
Exterior safety catch .
Bonnet stay.
Locking the vehicle.
Locating the vehicle.
Activating the alarm.
Fuel tank
Locking and unlocking of the vehicle
Access
44
6
190
193
.
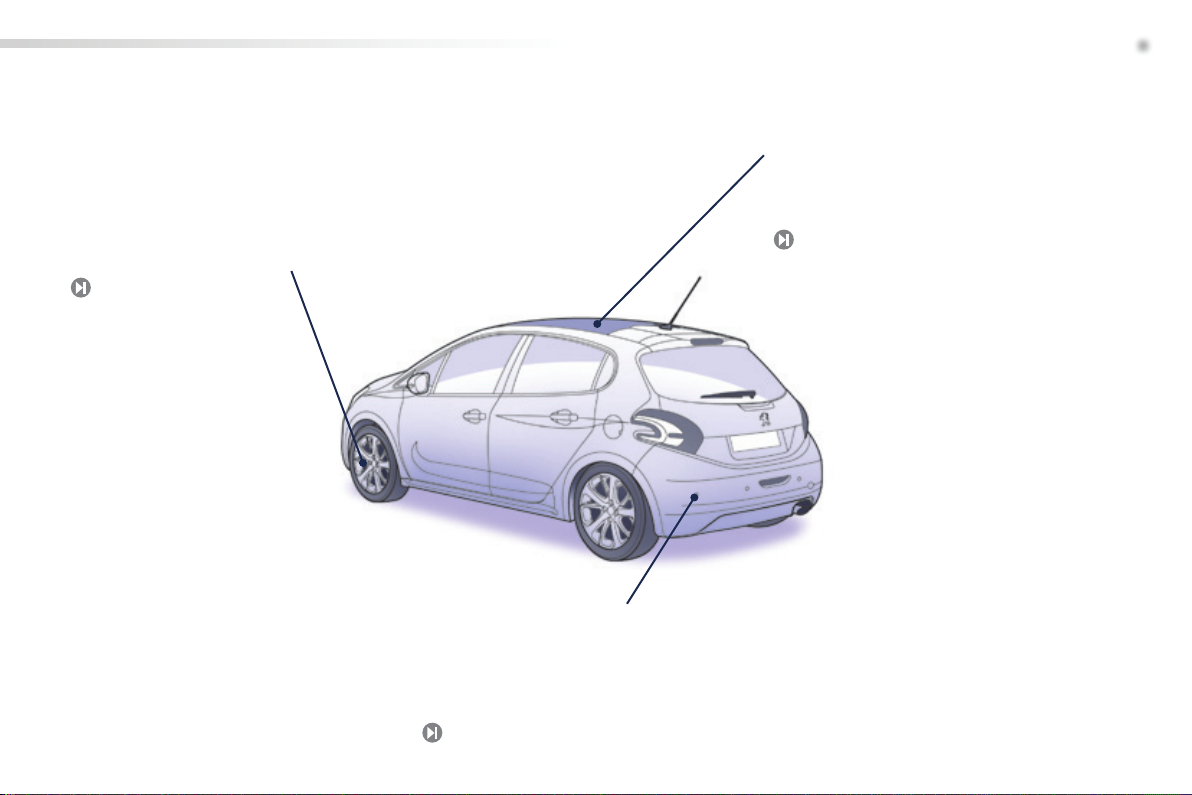
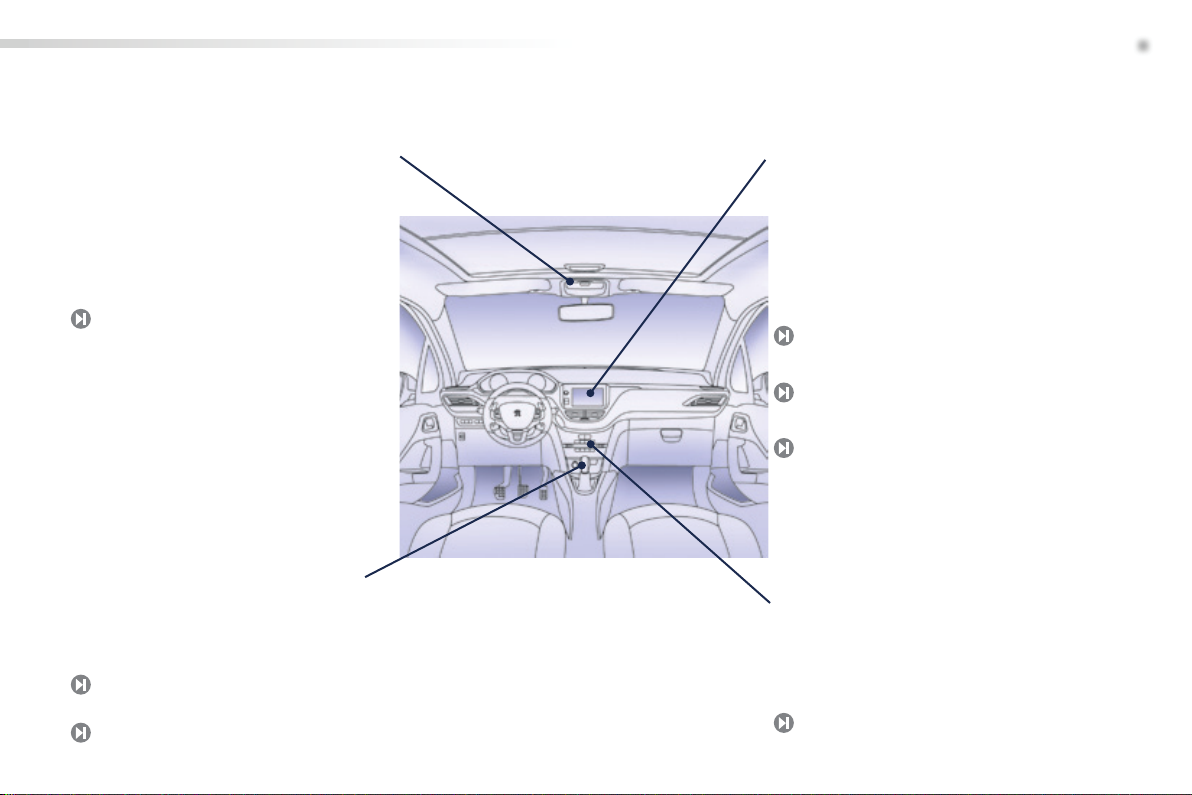
Interior
Electronic gearbox
This gearbox provides driving that combines
Interior mood lighting
This subdued passenger compartment lighting
footwells, in the courtesy lamp and on each
Dual-zone digital air conditioning
After setting the desired level of comfort, the
Audio and communication
These systems benefit from the latest
Audio system
Familiarisation
125
85
89
217
279
305
70
7

Familiarisation
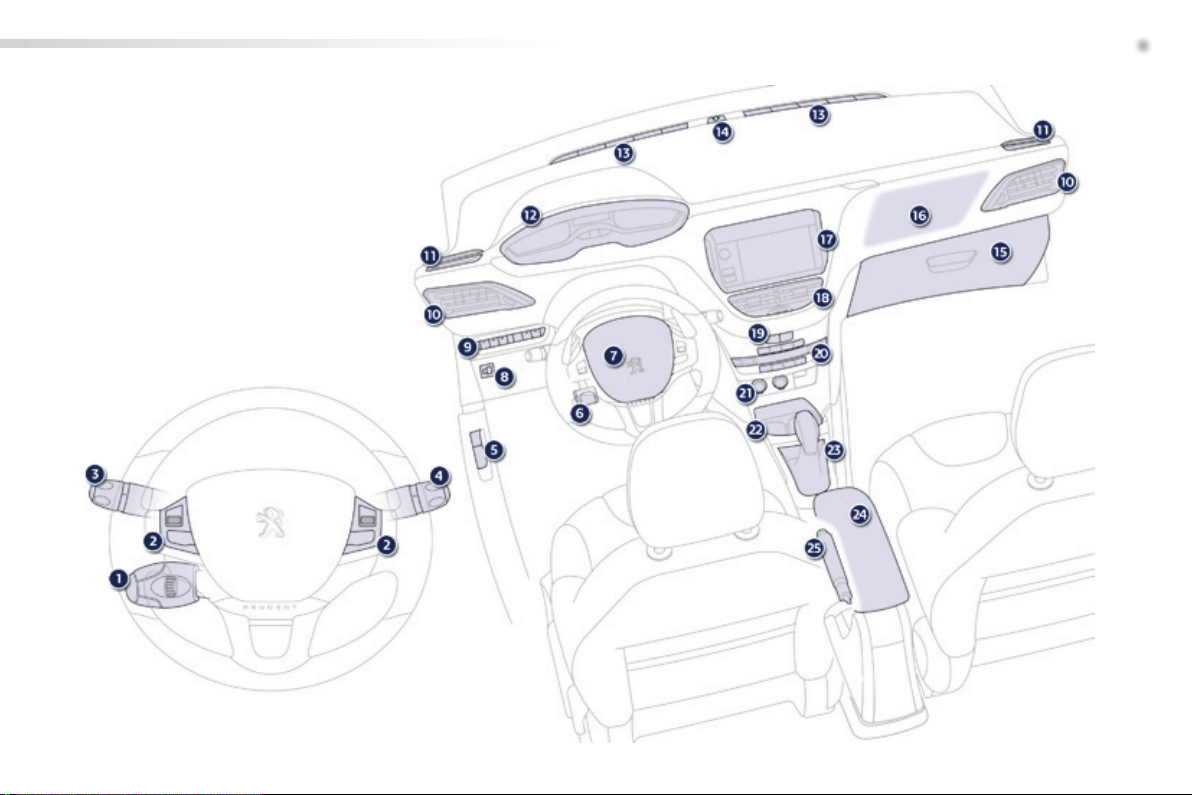
Side adjustable air vents.
Front side window demisting/defrosting
Instrument panel.
Windscreen demisting/defrosting vent.
Sunshine sensor.
Glove box / Passenger's front airbag
Passenger's front airbag.
Multifunction screen / Audio system.
Central adjustable air vents.
Cruise control / speed limiter controls.
Steering mounted controls for the touch
Lighting and direction indicator stalk
Wiper / screenwash / trip computer stalk.
Bonnet release lever.
Steering wheel adjustment control.
Driver's front airbag.
Horn.
Headlamp height adjustment.
Switch panel.
Central locking and hazard warning
Heating / air conditioning controls.
12 V accessory socket.
USB port / auxiliary socket.
Open storage.
Cup holder.
Gear lever.
Central armrest with storage.
Parking brake.
Instruments and controls
8
.
Familiarisation
9
Familiarisation
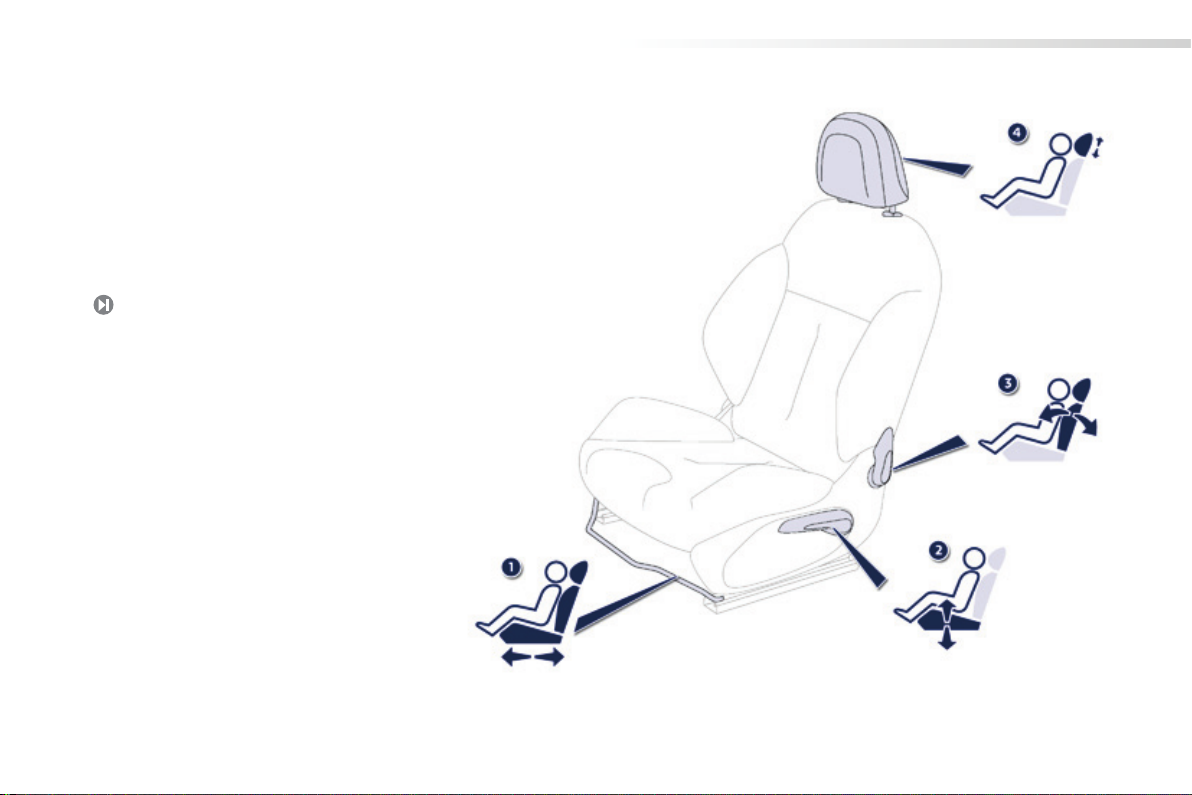
Front seats
Manual adjustments
Seat forwards-backwards adjustment.
Seat cushion height adjustment.
Backrest angle adjustment.
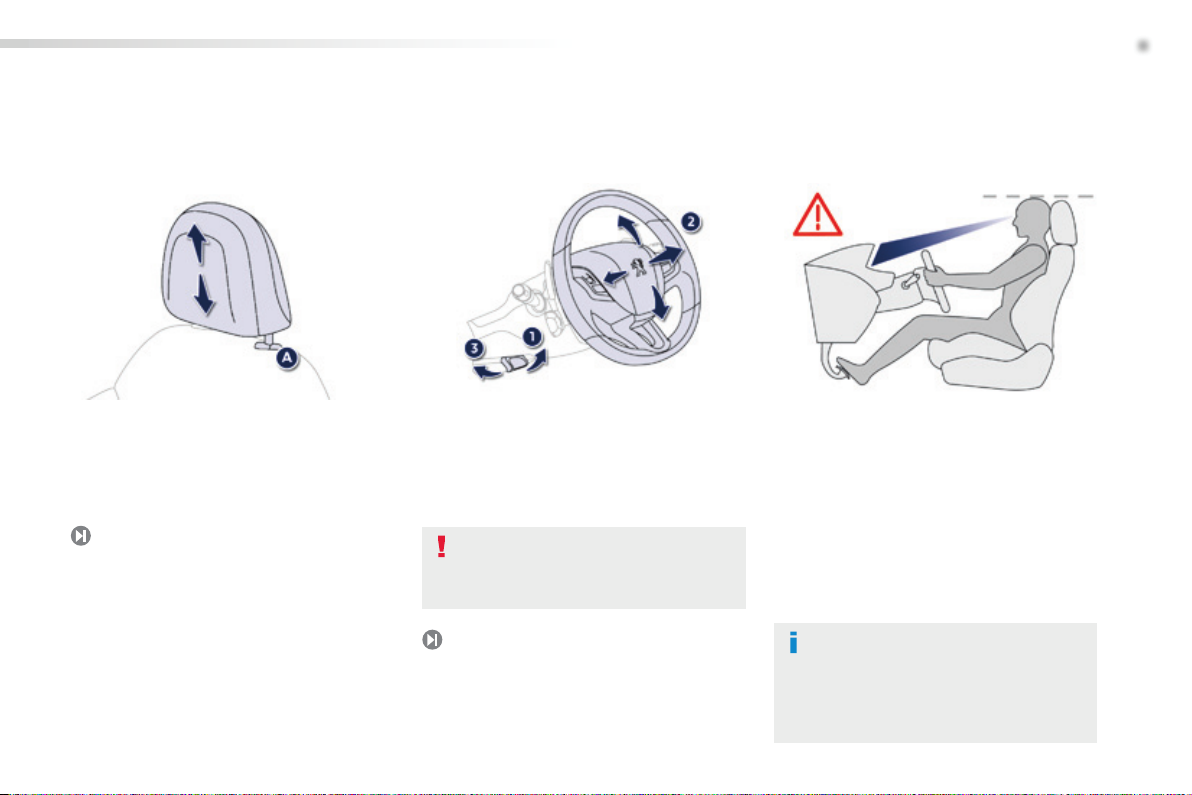
Head restraint height adjustment.
Sitting comfortably
57
10
.
Familiarisation
Head restraint adjustment
Release the adjustment mechanism.
Adjust for height and reach.
Lock the adjustment mechanism.
Steering wheel adjustment
For reasons of safety, these operations
To raise the head restraint, pull it upwards.
To lower it, press the lug
A
and down on the
Before taking to the road and to make the
following order:
- height of the head restraint,
- backrest angle,
- cushion height,
- longitudinal position of the seat,
- reach and then height of the steering wheel,
- the interior and door mirrors.
Once these adjustments have been
Sitting comfortably
58
Correct driving
position
63
11
Familiarisation
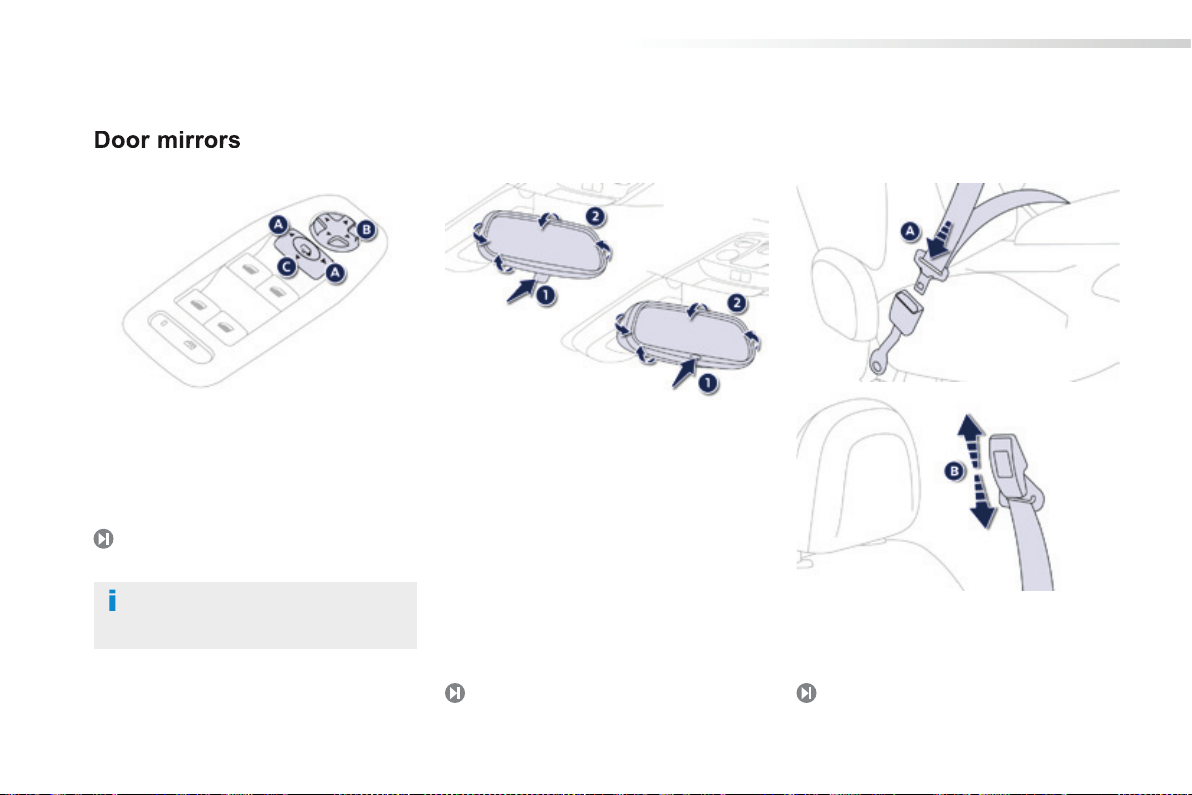
Door mirrors
Adjustment
A.
Selection of the mirror.
Adjusting the position of the mirror glass.
De-selection of the mirror.
Folding / Unfolding.
Rear view mirror
Manual day/night type
Selecting the "day" position of the rear view
Rear view mirror adjustment.
Automatic day/night type
Automatic detection of day/night mode.
Rear view mirror adjustment.
A.
Fastening.
Height adjustment (5-door).
Front seat belts
Sitting comfortably
64
12
65 131
.
Seeing clearly
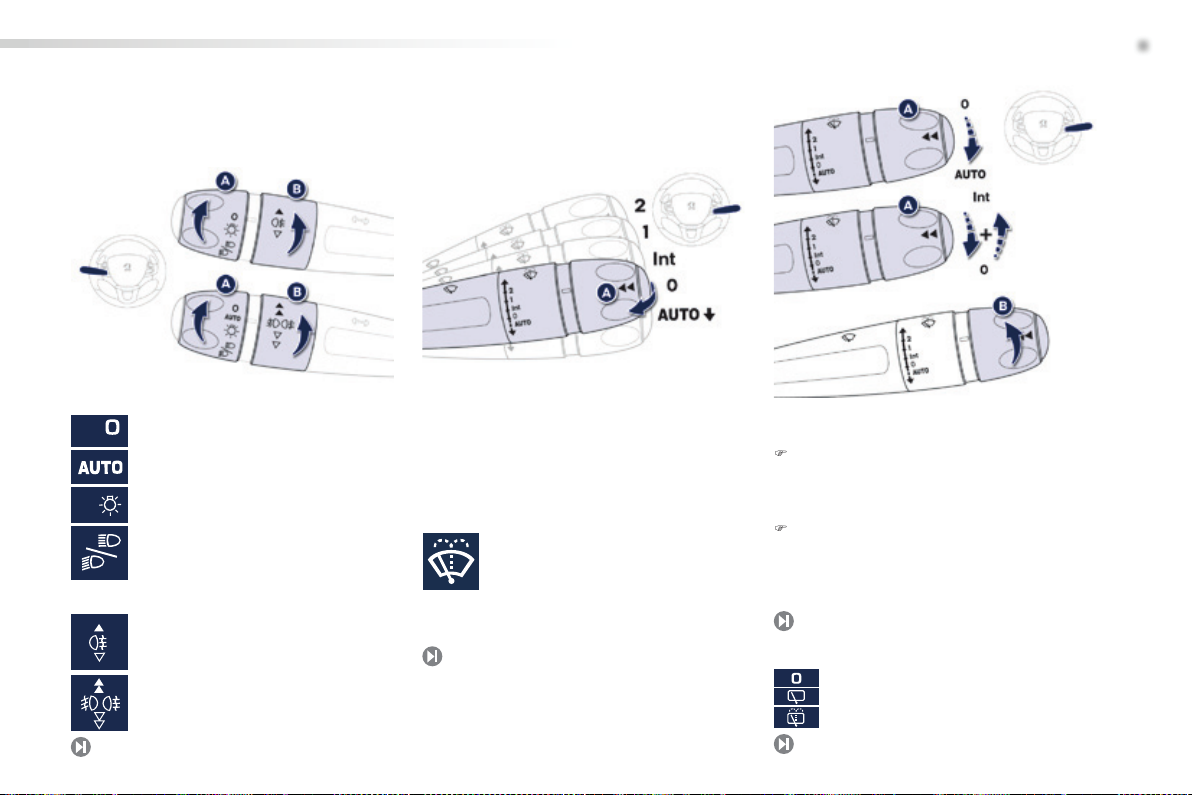
Lighting
Ring A
Ring B
Wipers
Control stalk A: windscreen wipers
Fast wipe.
Normal wipe.
Intermittent wipe.
Park.
AUTO
Automatic wiping.
Switching on "AUTO" mode
Briefly push the stalk downwards.
Switching off "AUTO" mode
Briefly push the stalk downwards or
Ring B: rear wiper
Lighting off.
Automatic illumination of headlamps.
Sidelamps.
Dipped / main beam headlamps.
Rear foglamp.
Park.
Intermittent wipe.
Screenwash.
or
Front and rear foglamps.
Single wipe: Brief pull on the stalk
Screenwash: Long pull on stalk
122
Familiarisation
112, 113
120
121
13
Familiarisation
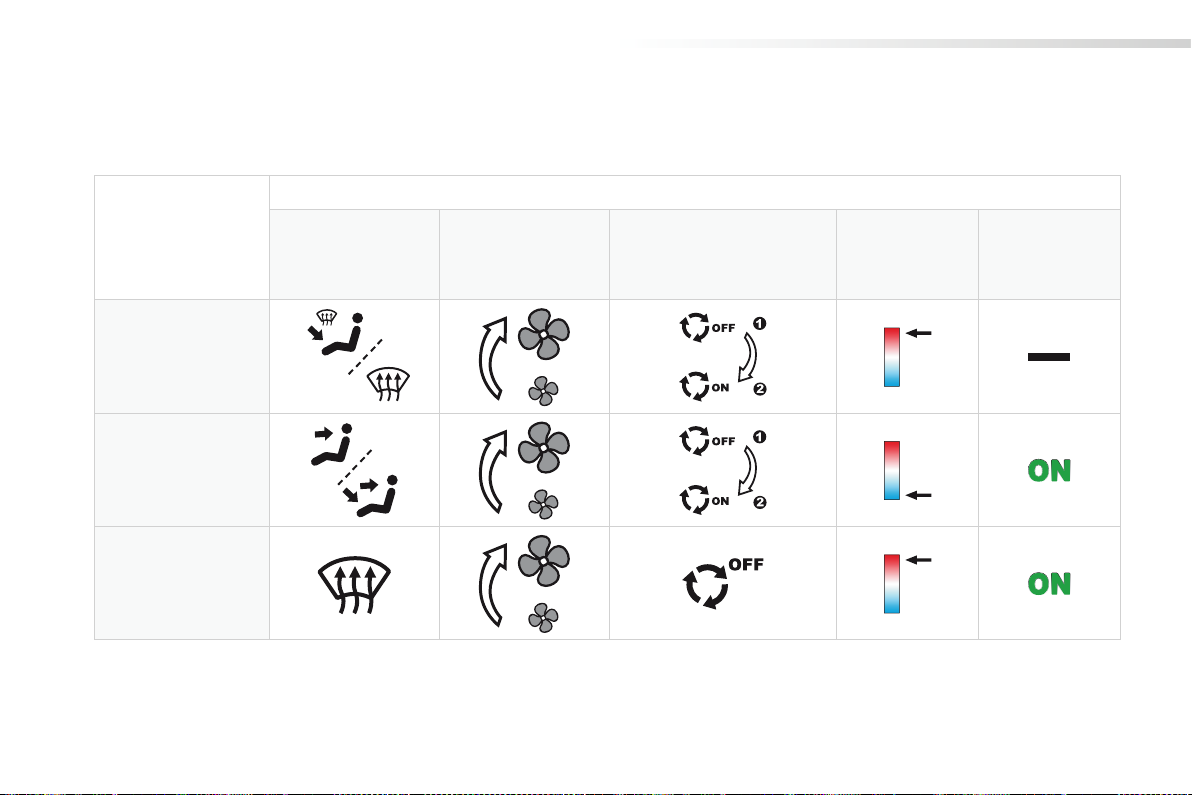
Air distribution
Air flow
Air recirculation/
Recommended interior settings
use the automatic mode in preference by pressing the
button.
Ventilation
14
.
Monitoring
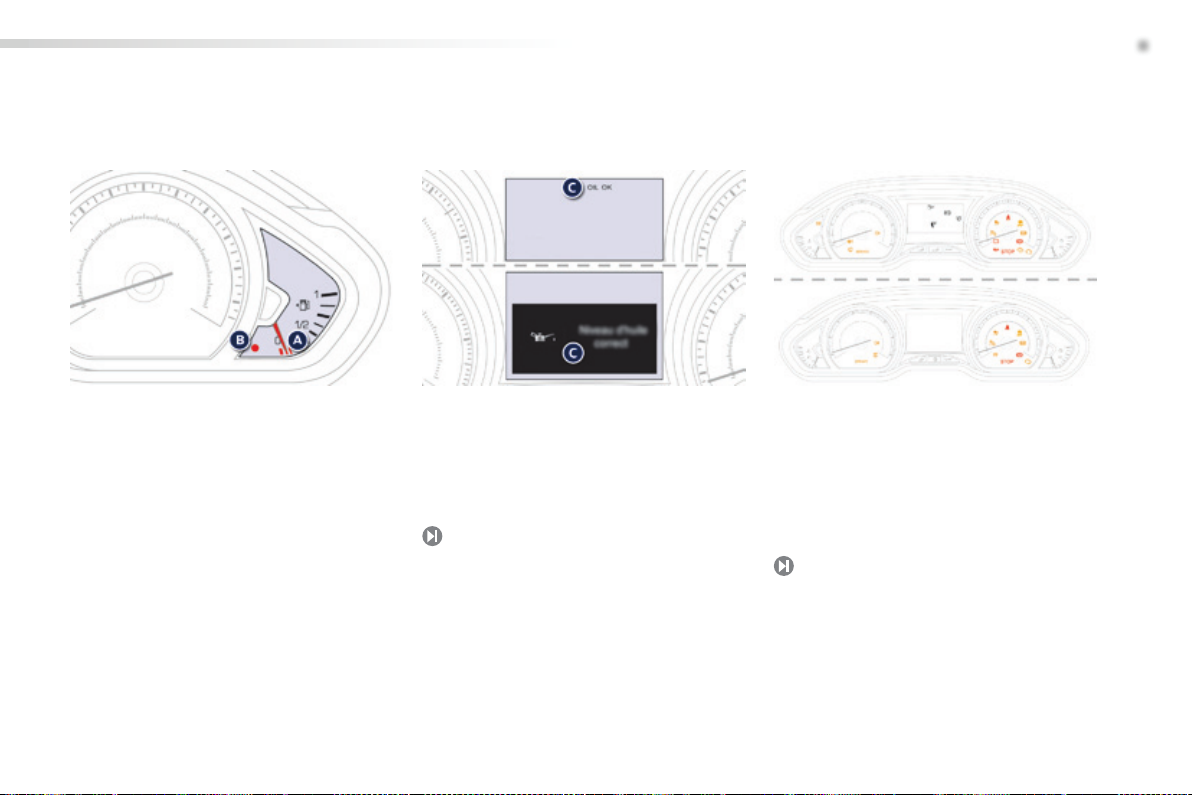
On switching on, the dial needles go to the
A.
With the ignition on, the needle should
With the engine running, the associated
Instrument panels
With the ignition on, the orange and red
warning lamps come on.
With the engine running, these warning
If a warning lamp remains on, refer to the page
Warning lamps
With the ignition on, the instrument panel
If the levels are not correct, top up the level
which is low.
21
23
Familiarisation
15
Familiarisation
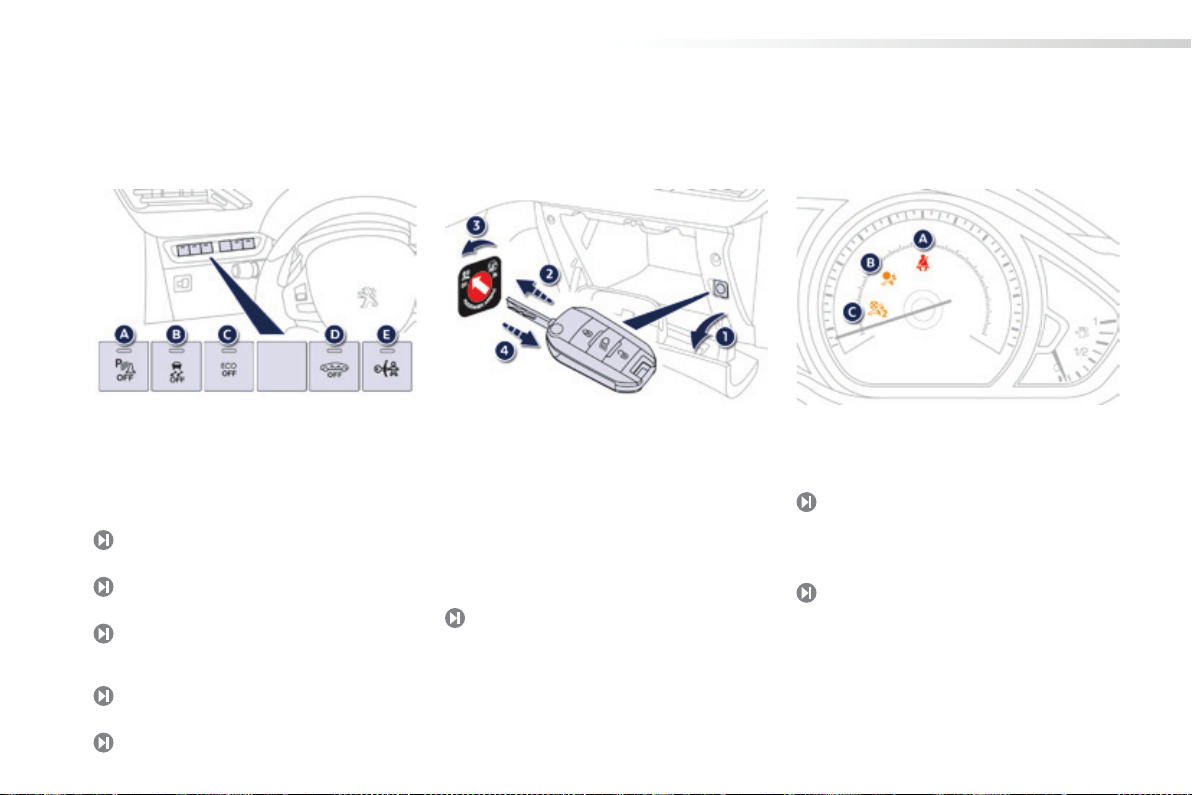
Illumination of the lamp indicates the status of
A.
Activation of the Park Assist system.
or
Deactivation of rear parking sensors.
Switch panel
Open the glove box.
Insert the key.
Select position:
(activation), with front passenger or
(deactivation), with "rear facing"
Remove the key keeping the switch in the
Front passenger's airbag
Deactivation of the DSC/ASR system.
Deactivation of the Stop & Start system.
Volumetric alarm monitoring off.
Electric child lock on.
A.
Front seat belts not fastened or unfastened
warning lamp.
Airbag fault warning lamp.
Front seat belts and
Front passenger's airbag deactivation
warning lamp.
Monitoring
106/107, 110
130
97
Passenger safety
32
27
135
52
148
16
.
Driving safely
Stop & Start
Going into engine STOP mode
The
warning lamp comes
Going into engine START mode
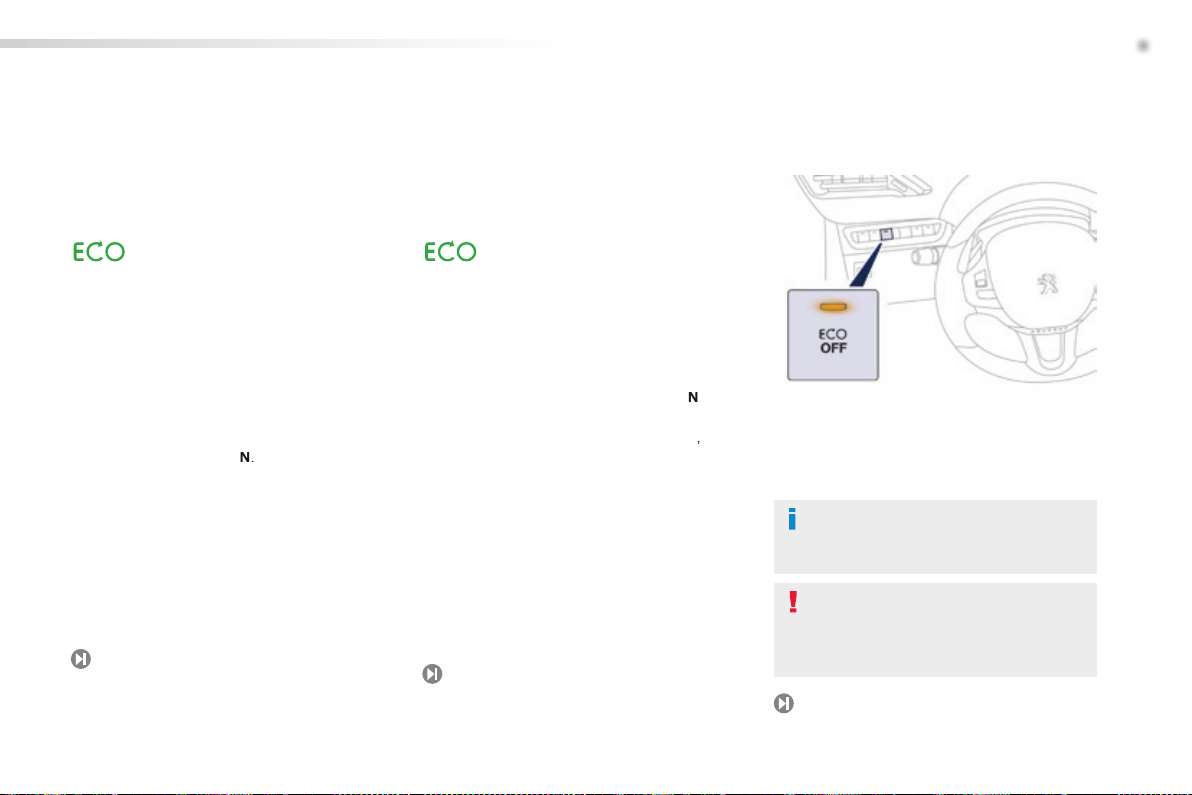
Deactivation / Reactivation
You can deactivate the system at any time by
button; the button's
warning lamp comes on.
The system is automatically reactivated
Before refuelling or doing anything
The
warning lamp goes off
with a manual gearbox
, when you press
with an electronic gearbox
● with the gear lever in position
or
when you release the brake pedal,
● or with the gear lever in position
and A or
,
● or when you engage reverse.
- for
with a manual gearbox
, at speeds
●
with an electronic gearbox
, at speeds
.
- for
, vehicle stationary.
In certain circumstances, START mode may be
warning lamp
flashes for a few seconds, then goes off.
In certain circumstances, STOP mode may not
warning lamp flashes
for a few seconds, then goes off.
Familiarisation
96
97
97
17
Familiarisation
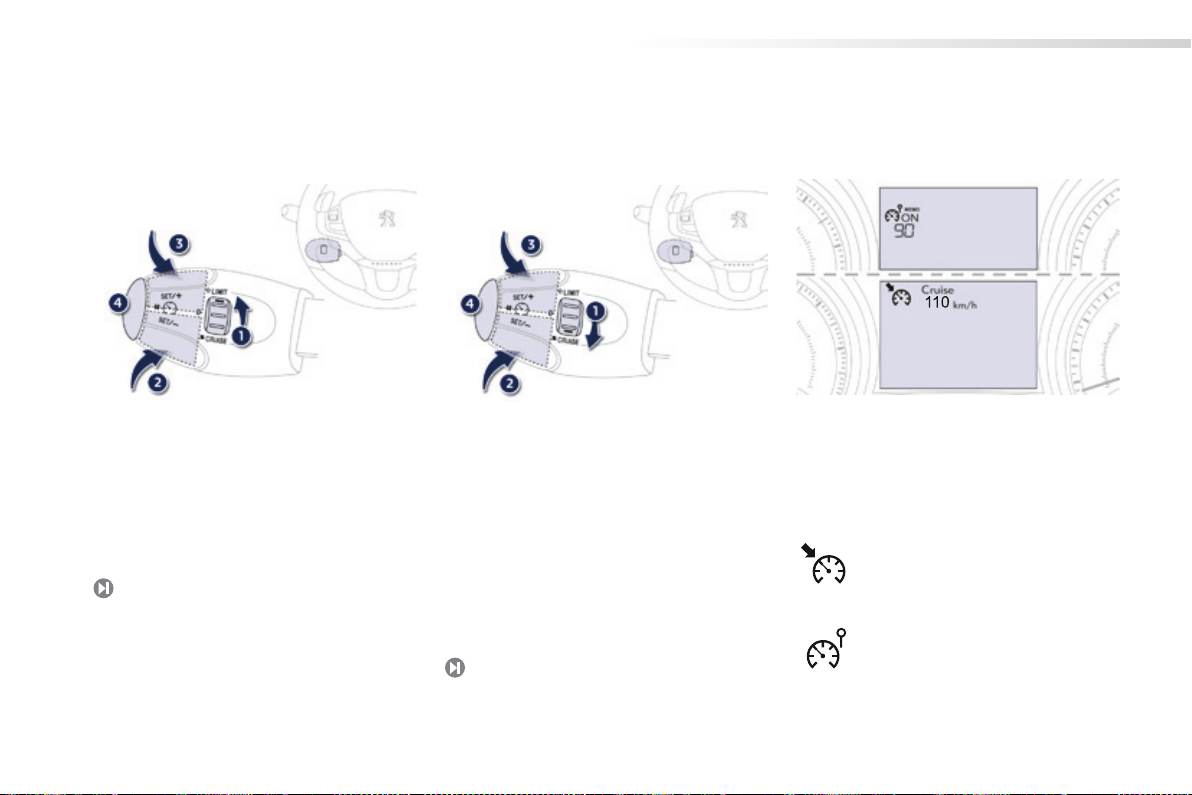
Selecting speed limiter mode.
Decrease the programmed value.
Increase the programmed value.
Speed limiter On / Off.
Speed limiter "LIMIT"
Selecting cruise control mode.
Decrease the programmed value.
Increase the programmed value.
Cruise control Off / Resume.
Cruise control "CRUISE"
The values must be set with the engine running.
In order to be programmed or activated, the
Display in the instrument panel
The cruise control or speed limiter mode
Driving safely
100
18
102

Eco-driving
Eco-driving is a range of everyday practices that allow the motorist to optimise their fuel consumption and CO
emissions.
Optimise the use of your gearbox
With a manual gearbox, move off gently and change up without waiting.
With an automatic or electronic gearbox, give preference to automatic
The gear shift indicator invites you engage the most suitable gear: as
For vehicles fitted with an electronic or automatic gearbox, this
Drive smoothly
Maintain a safe distance between vehicles, use engine braking rather
If your vehicle has cruise control, make use of the system at speeds
Control the use of your electrical
Before moving off, if the passenger compartment is too warm, ventilate it
Above 30 mph (50 km/h), close the windows and leave the air vents
Remember to make use of equipment that can help keep the
Switch off the air conditioning, unless it has automatic regulation, as
Switch off the demisting and defrosting controls, if not automatic.
Switch off the heated seat as soon as possible.
Switch off the headlamps and front foglamps when the level of light
Avoid running the engine before moving off, particularly in winter; your
As a passenger, if you avoid connecting your multimedia devices
Disconnect your portable devices before leaving the vehicle.
19

20
Limit the causes of excess consumption
Spread loads throughout the vehicle; place the heaviest items in the
Limit the loads carried in the vehicle and reduce wind resistance (roof
Remove roof bars and roof racks after use.
At the end of winter, remove snow tyres and refit your summer tyres.
Observe the recommendations on
Check the tyre pressures regularly, when cold, referring to the label in
Carry out this check in particular:
- before a long journey,
- at each change of season,
- after a long period out of use.
Don't forget the spare wheel and the tyres on any trailer or caravan.
Have your vehicle ser viced regularly (engine oil, oil filter, air filter,
When refuelling, do not continue after the third cut-off of the nozzle to
At the wheel of your new vehicle, it is only after the first 1 800 miles
Monitoring
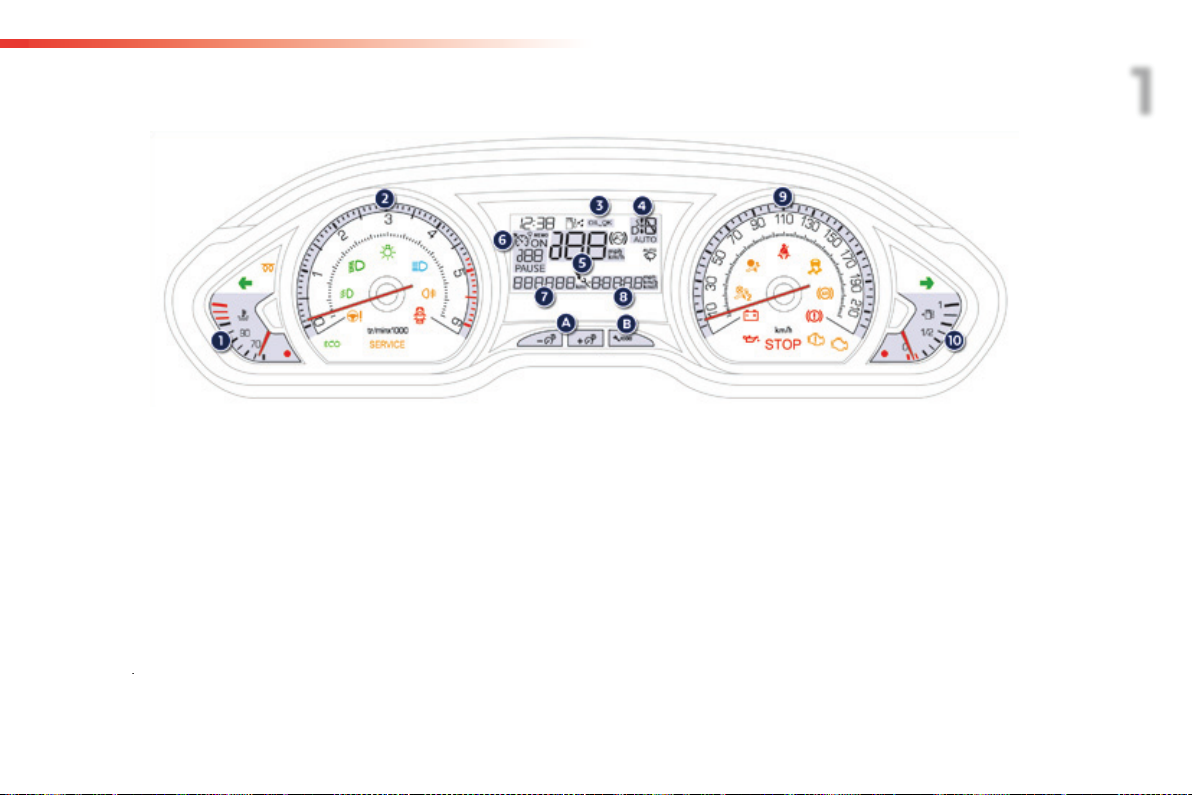
Engine coolant temperature gauge.
Rev counter (x 1 000 rpm or tr/min),
Engine oil level indicator * .
Gear shift indicator for a manual gearbox
Digital speedometer (mph or km/h)
This can be switched off with a long press
A.
General lighting dimmer.
Recalling the service information.
Resetting the function selected (service
Setting the time.
Switching the digital speedometer on
Cruise control or speed limiter settings.
Ser vice indicator, then total distance
These functions are displayed successively
Trip distance recorder (miles or km).
Analogue speedometer (mph or km/h).
Fuel gauge.
Dials and screens
Control buttons
* Depending on version.
LCD instrument panel
1
21
Monitoring
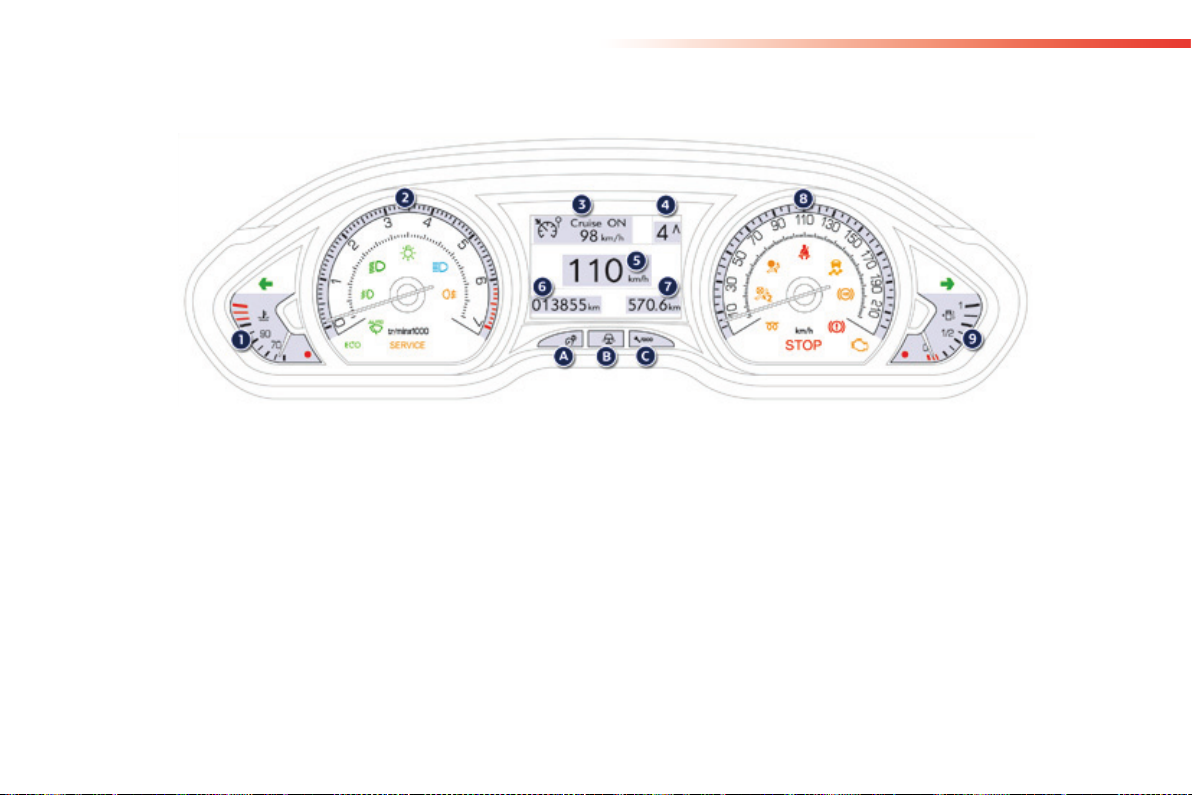
Dials and screens
Control buttons
Engine coolant temperature gauge.
Rev counter (x 1 000 rpm or tr/min),
Cruise control or speed limiter settings.
Gear shift indicator for a manual gearbox
Speedometer (mph or km/h).
Main lighting dimmer.
Instrument panel mood lighting.
Recall of the service information.
Reset the selected function (ser vice
Service indicator, then total distance
These functions are displayed successively
Trip distance recorder (miles or km).
Analogue speedometer (mph or km/h).
Fuel gauge.
Active matrix instrument panel
22
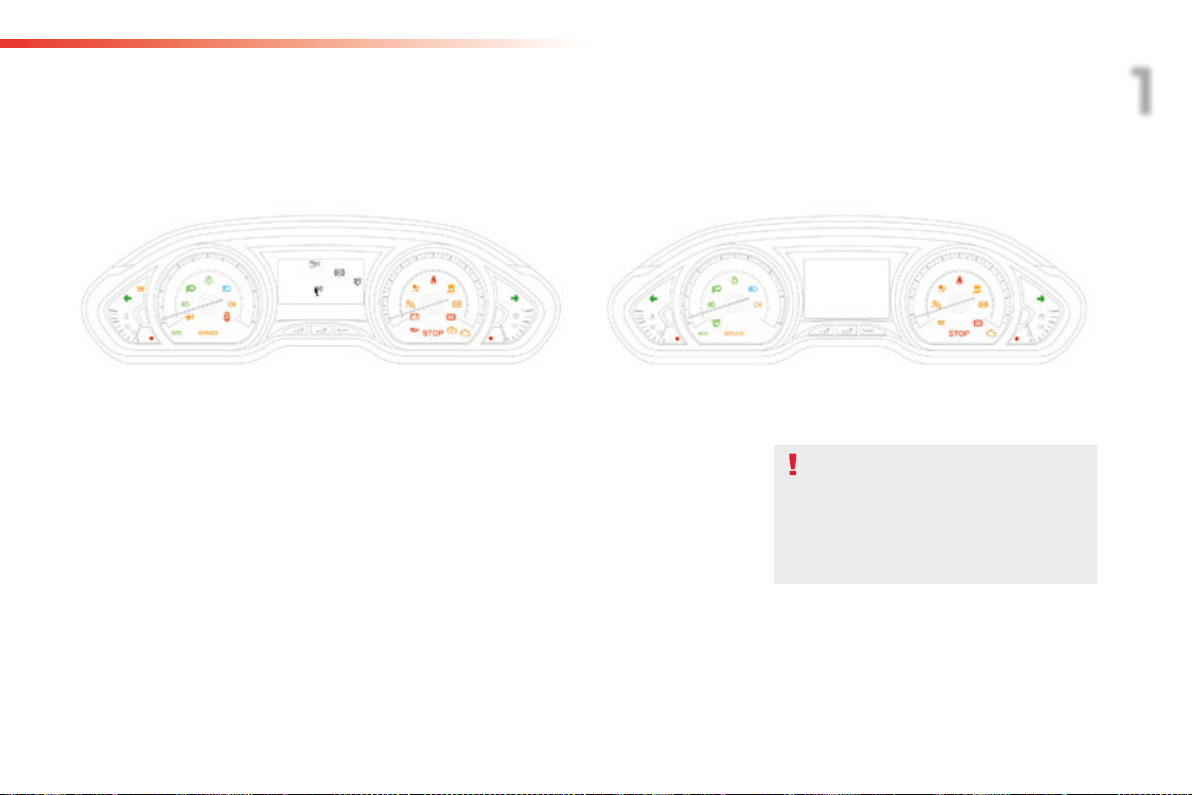
Monitoring
Certain warning lamps may come on in
whether the situation is normal or
whether a fault has occurred.
When the ignition is switched on
Certain warning lamps come on for a
few seconds in the instrument panel and/or
When the engine is started, these same
warning lamps should go off.
If they remain on, before moving off, refer to the
Associated warnings
The switching on of certain warning lamps
The warning lamps may come on continuously
Visual indicators informing the driver that a system is switched on (indicator or deactivation lamp) or has a fault
Indicator and warning lamps
1
23
Monitoring
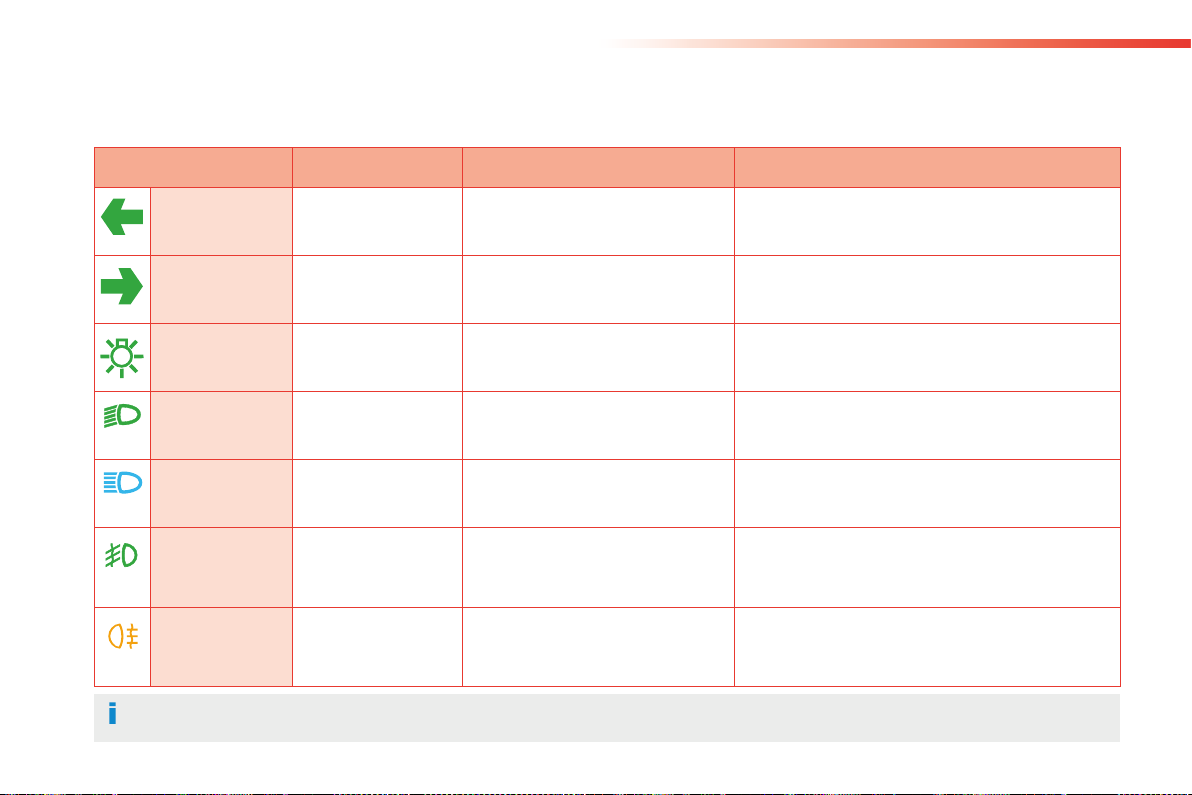
Operation indicator lamps
If one of the following indicator lamps comes on in the instrument panel and/or instrument panel screen, this confirms that the corresponding system has come into operation.
Warning / indicator lamp
Action / Observations
flashing with buzzer.
The lighting stalk is pushed down.
flashing with buzzer.
The lighting stalk is pushed up.
fixed.
The lighting stalk is in the
fixed.
The lighting stalk is in the "Dipped
fixed.
The lighting stalk is pulled towards
Pull the stalk to return to dipped beam headlamps.
fixed.
The front foglamps are switched on.
Turn the ring on the stalk rearwards twice to switch off
fixed.
The rear foglamp is switched on.
Turn the ring on the stalk rearwards to switch off the
For more information on the lighting controls, refer to the corresponding section.
24

Monitoring
Warning / indicator lamp
Action / Observations
fixed.
The ignition switch is
Wait until the warning lamp goes off before starting.
The period of illumination of the warning lamp is
If the engine does not start, switch the ignition off and
fixed.
The parking brake is applied or not
Release the parking brake to switch off the warning
Observe the safety recommendations.
For further information on the parking brake, refer to
fixed.
The brake pedal must be pressed.
With an electronic gearbox, press the brake pedal to
).
flashing.
With an electronic gearbox, if you
Use the brake pedal and/or the parking brake.
1
25

Monitoring
Warning / indicator lamp
Action / Observations
fixed.
In the STOP mode of Stop & Start,
You must declutch fully to allow the change to engine
fixed.
When the vehicle stops (red lights,
The warning lamp goes off and the engine restarts
flashes for a
few seconds,
STOP mode is temporarily
or
START mode is invoked
For more information on special cases with STOP
Automatic
wiping
fixed.
The wiper control is pushed
Automatic front wiping is activated.
To deactivate automatic wiping, operate the control
* Except for the active matrix instrument panel.
26
Monitoring
If one of the following indicator lamps comes on, this confirms that the corresponding system has been switched off intentionally.
Warning / indicator lamp
Action / Observations
fixed.
The control, located in the glove box,
position.
The passenger's front airbag is
facing" child seat.
Set the control to the
position to activate the
1
27

Monitoring
Warning lamps
When the engine is running or the vehicle is being driven, illumination of one of the following warning lamps indicates a fault which requires action on
Any fault resulting in the illumination of a warning lamp must be investigated further by reading the associated message in the screen.
If you encounter any problems, contact a PEUGEOT dealer or a qualified workshop.
Warning / indicator lamp
Action / Observations
fixed, associated with
It is associated with the engine
Stop as soon as it is safe to do so.
Park, switch off the ignition and call a PEUGEOT
fixed, associated with
Major faults have occurred.
Refer to the section on this warning lamp and you
workshop.
fixed associated with a
Faults have occurred for which there
Identify the fault by reading the message shown in the
- engine oil level alert,
- risk of blockage of the particle emissions filter
- Diesel fuel additive level (Diesel with particle
You must contact a PEUGEOT dealer or a qualified
workshop.
28
 Loading...