

Peugeot 208 2012 Owner's Manual
You can find your user guide on thePEUGEOTwebsite, under the
heading "P
f
address
P
n
r
Selec
ersonal space".
This personal space offers advice and other useful information for
the care and maintenance of your vehicle.
Referring to the user guide on-line also gives you access to the
latest information available, easily identified by the bookmarks,
associated with this pictogram:
lease note the following point:
The fitting of electrical equipment or accessories which are
ot recommended by PEUGEOT may result in a failure of your
vehicle's electronic system. Please note this specific warning.
It is advisable to contact a PEUGEOT dealer to be shown the
ecommended equipment and accessories.
If the heading "Personal space" is not available on the public website
or your country, you can find your user guide at the following
:
http://public.servicebox.peugeot.com
t:
the link in "Private customer access",
the language,
the model,
the edition date appropriate for the date of registration of your vehicle.
You will find your user guide, presented in the same way as the paper version.

WELCOME
s
a
add
use of
y
p
functio
y
g
y
g
y
y
f
A
comf
p
f
e most o
equi
d
d
as sold
ou for choosing a 208.
Thank
This handbook has been desi
to make the most of
Therefore, on the first few pa
a summar
intended to make it easier for
amiliar with your vehicle.
ll of the details specific to your vehicle,
resented in this handbook, to increase your
appreciation o
th
followed by a quick reference guide
ort, safety, practical information, are then
f it.
our vehicle in all situations.
the vehicle and to help you make
ned to enable you
es, you will find
ou to become
Your vehicle is fitted with only some of the
pment described in this document,
epending on its trim level, version an
the specification for the country in which it
w
.
Warning:
this symbol marks warnings which it
is essential to observe for your own
afety, for the safety of others or to
void any risk of damaging your vehicle.
Information:
this symbol draws your attention to
itional information for better
our vehicle.
Protection of
the environment:
this symbol accompanies advice
relating to protection of the environment.
Page reference:
this symbol invites you to refer to the
ages which provide details of the
n.

Contents
2
2
3
3
5
5
oof
5
seats
5
seats
6
6
6
6
digital ai
7
defros
7
7
g
7
8
8
8
8
A
9
9
0
0
1
1
A
1
11
1
p
1
A
1
1
2
Familiarisation
Eco-driving
Instruments and controls
Instrument panels
Indicator and warning lamps
Gauges and indicators
Tri p comp u ter
Trip computer with touch screen 4
etting the date and time 4
.
emote control key 4
Alarm
Electric windows 5
.
Boot
noramic sunr
ront
r
ear seats
irrors
teering wheel adjustment 6
Ventilation
eating 6
anual air conditioning 6
ual-zone
r screen demist Interior fi ttings
Boot fi ttin
r conditioning
s
t
Access
Comfort
Driving
tarting-stopping the engine
anual parking brake
anual gearbox
ear shift indicator
-speed electronic gearbox 8
-speed electronic gear control gearbox 8
utomatic gearbox 9
top & Start
ill start assist
peed limiter 9
ruise control 1
Parking sensors 104
4
Visibility
Lighting controls 1
LED lamps 1
Daytime running lamps 1
utomatic illumination of headlamps 1
eadlamp adjustment
ornering lighting 1
Wi
er controls 1
utomatic rain sensitive wipers 1
ourtesy lamp 1
Interior mood lighting 1
4
4

Contents
2
12
12
2
2
seat belts
2
A
2
3
3
4
5
16
17
7
7
7
7
Advice on care and ma
7
A
18
8
18
4
18
8
8
9
9
9
9
9
0
20
0
0
ouch scree
21
A
7
A
Safety
Direction indicators 1
azard warning lamps
mergency or assistance call
rn 1
P system 1
Front
irbags 1
hild seats 1
ISOFIX child seats 1
hild lock 14
1
Bonnet 1
etrol engines
iesel engines
uel tank 1
isfuel prevention (Diesel) 1
Running out of fuel (Diesel) 1
hecking levels 1
hecks 1
Practical information
Tem pora ry puncture repair kit 1
hanging a wheel 14
hanging a bulb 1
hanging a fuse 16
Battery
lectrical energy economy mode
hanging a wiper blade 1
Tow ing the vehicle 1
Tow ing a trailer 1
Fitting roof bars 1
intenance 1
ccessories
etrol engines 1
etrol weights 1
iesel engines 2
iesel weights 20
imensions
Identifi cation markings 2
Checks
Technical data
Audio equipment and telematics
Emergency or assistance 2
T
udio system / Bluetooth 2
udio system 29
n
Visual search
Alphabetical index
.
.
Familiarisation
j
S
h
y
y
3
g
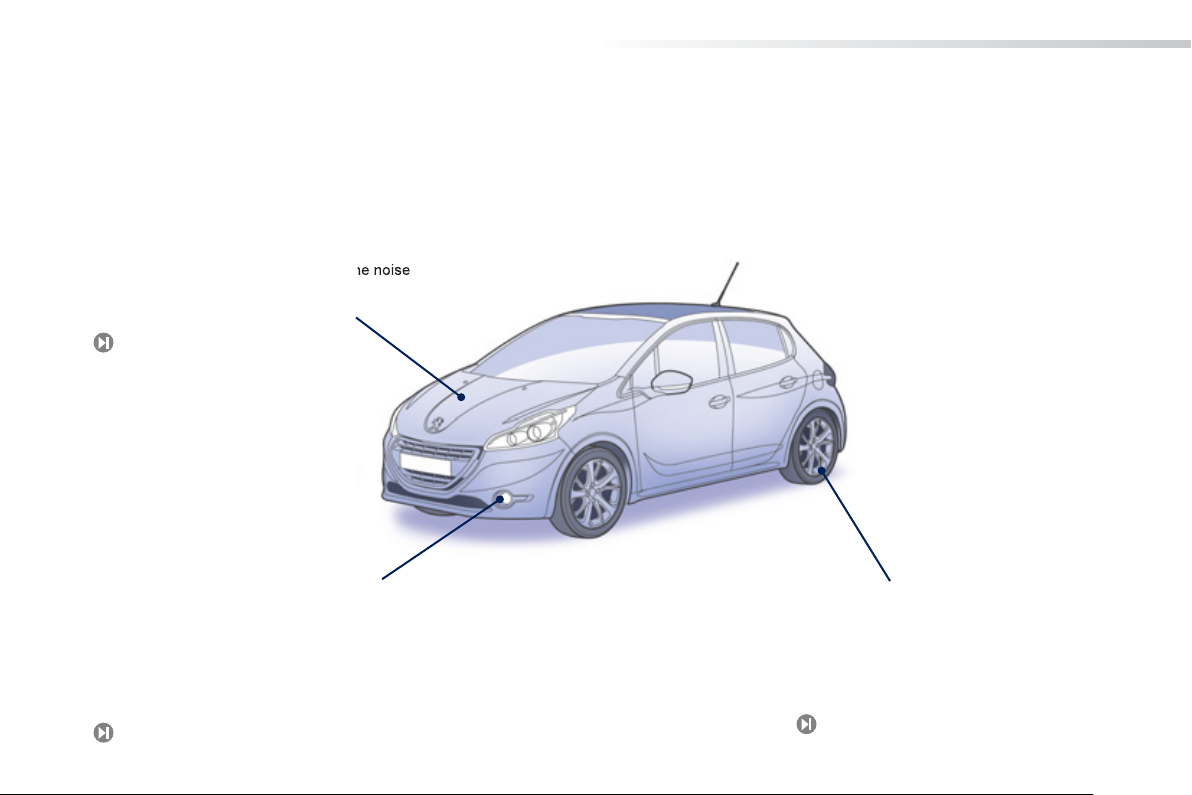
Exterior
Stop & Start
This system puts the engine temporarily into
tandby during stops in the traffic (red lights, traffic
ams, etc...). The engine restarts automatically as
oon as you want to move off. Perfectly suited to
urban use, the
onsumption, exhaust emissions and t
evel when stationary.
top & Start system reduces fuel
Cornering lighting
At low speed this system provides additional
li
hting in corners, at junctions, when parking...,
aking use of the corresponding front foglamp.
114
4
Electronic stability programme
This system allows you to maintain the
directional stabilit
laws of ph
12
of the vehicle, within the
sics.
idg
y
g
y
lighting i
6
Thi
4
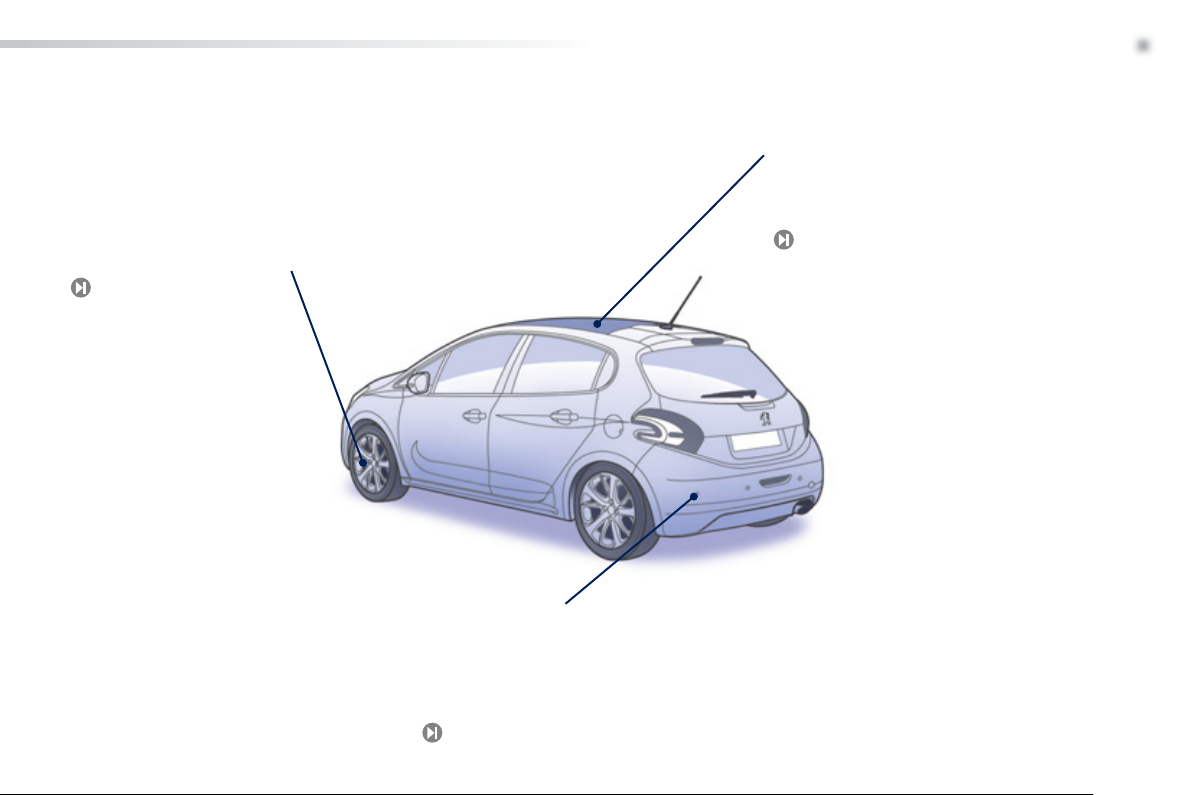
Exterior
Familiarisation
.
Tempor ary puncture repair kit
This kit is a complete system consisting of a
ompressor and a sealant cartr
the temporar
143
repair of a tyre.
e, to allow
Rear parking sensors
s system provides a warning when
anoeuvring backwards by detecting obstacles
ted behind the vehicle.
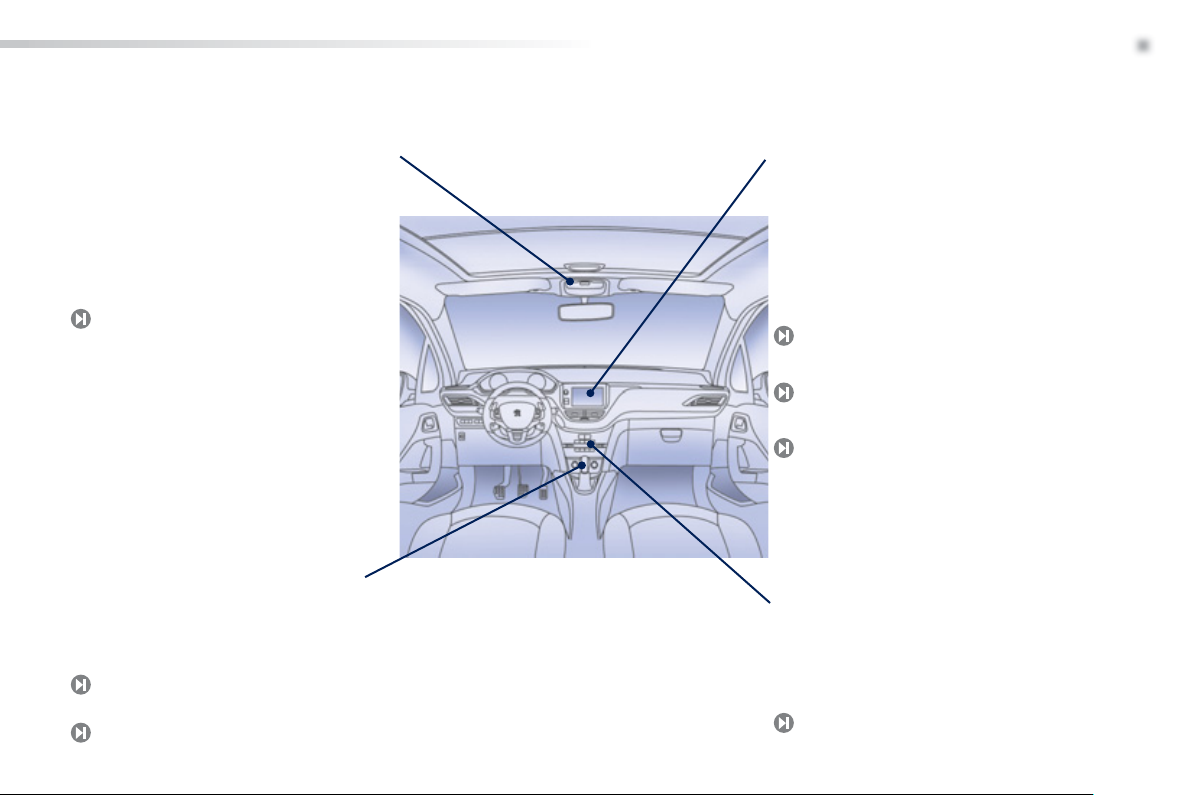
Panoramic sunroof
Equipped with configurable light guides, this
lar
e sunroof provides incomparable visibilit
and
5
n the passenger compartment.
0
5
Familiarisation
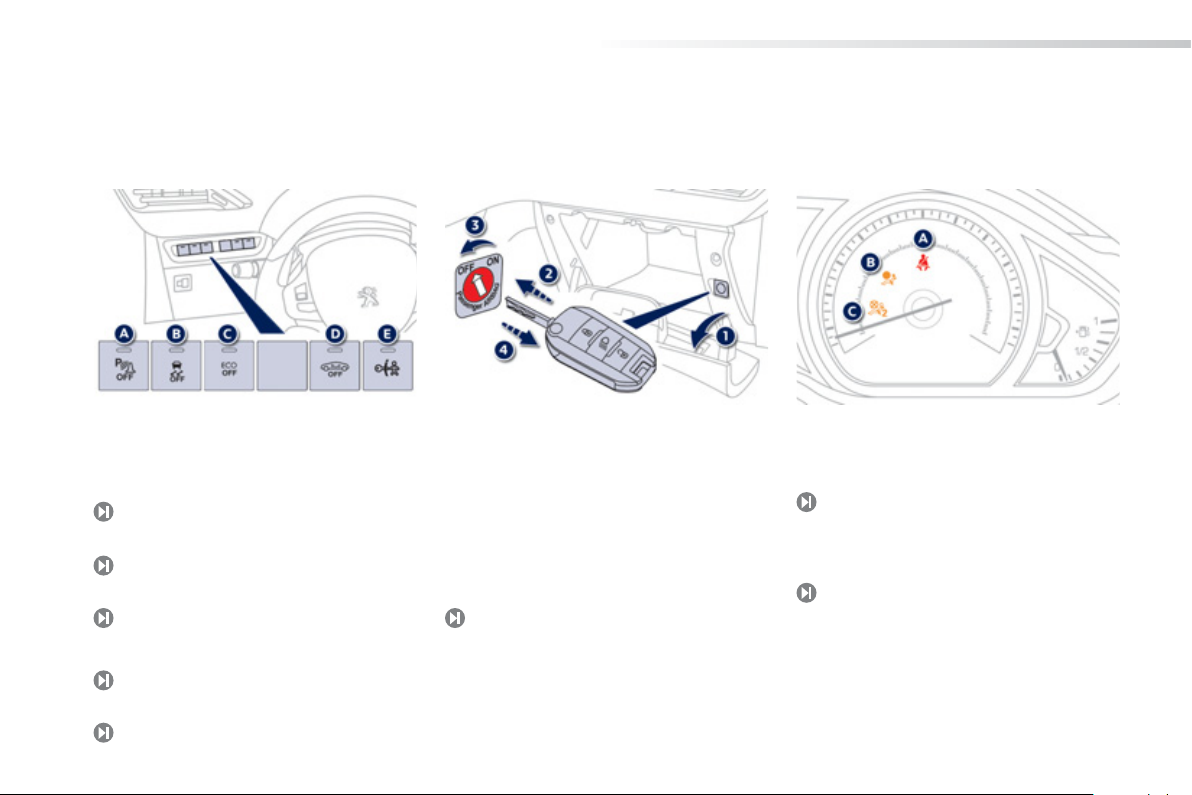
A.
6
.
O
.
y
ease leve
B
.
ocatio
3
Open
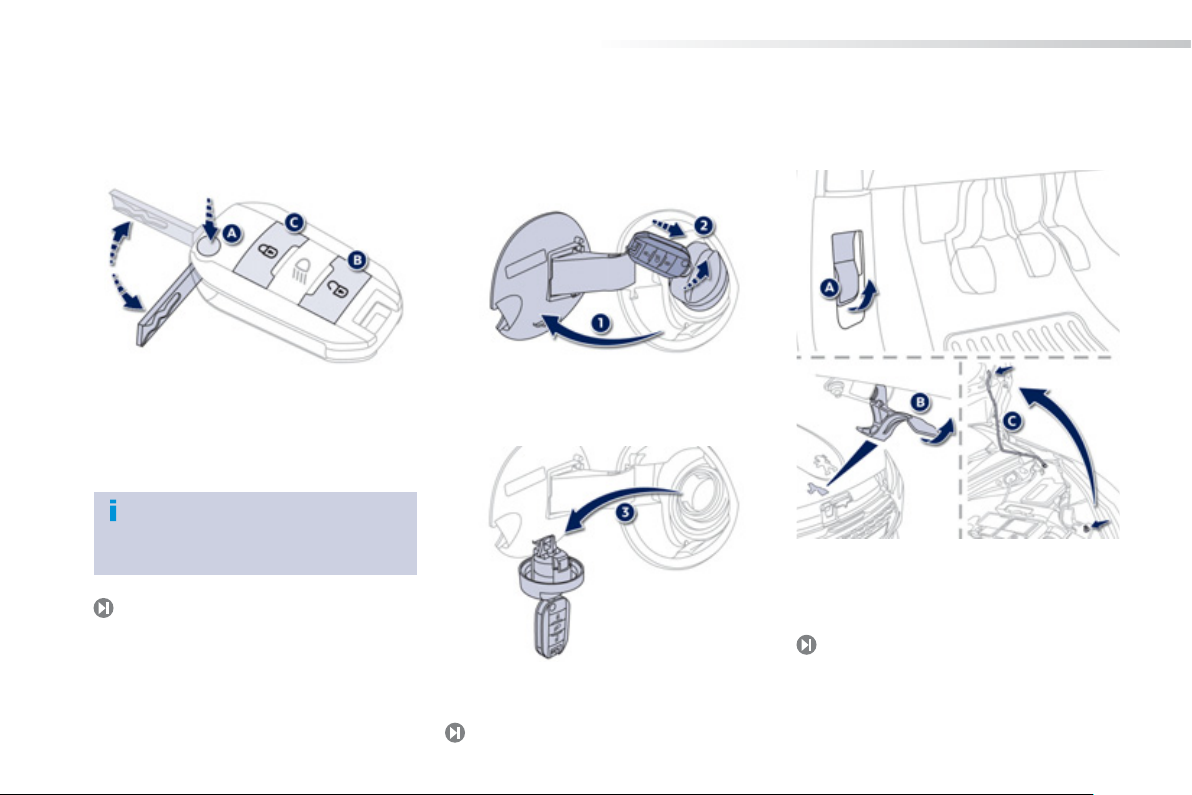
Remote control key Bonnet
Unfolding / Folding the key.
Unlocking the vehicle.
Other functions..
C.Normal locking of the vehicle
Vehicle l
n.
Fuel tank
1
pening the fuel filler flap.
2
Opening the fuel filler cap.
Hooking the fuel filler cap.
Tank capac it
: approximately 50 litres.
Interior rel
Exterior safety catch
onnet stay.
8
r.
8
6
Interior
This g
d
ode
p
g
y
f
g
gy
lli
5
1
y
Familiarisation
.
Interior mood lightin
This subdued passenger compar tment lighting
improves visibilit
ting conditions. It comprises several lamps,
ocated below the instrument panel, in the
ootwells, in the courtesy lamp and on each
ide of the panoramic sunroof.
120
inside the vehicle in low
Electronic gearbox
earbox provides driving that
ombines a completely automatic mode an
manual m
5-s
eed
8
6-speed
.
Audio and communication
systems
These systems benefit from the latest
technolo
ate
auxiliary inputs, Hi-Fi audio system, ...
Tou ch sc r een
Bluetooth audio system
Audio s
: MP3 compatible audio systems,
B player, Bluetooth hands-free system,
te navigation system with colour screen,
21
stem
297
Dual zone digital air conditioning
After setting the desired level of comfort, the
stem then automatically controls this level
accordin
to the ambient conditions.
70
7

Familiarisation
.
ent
.
.
g
.
.
.
elease leve
.
S
.
o
S
S
Cup
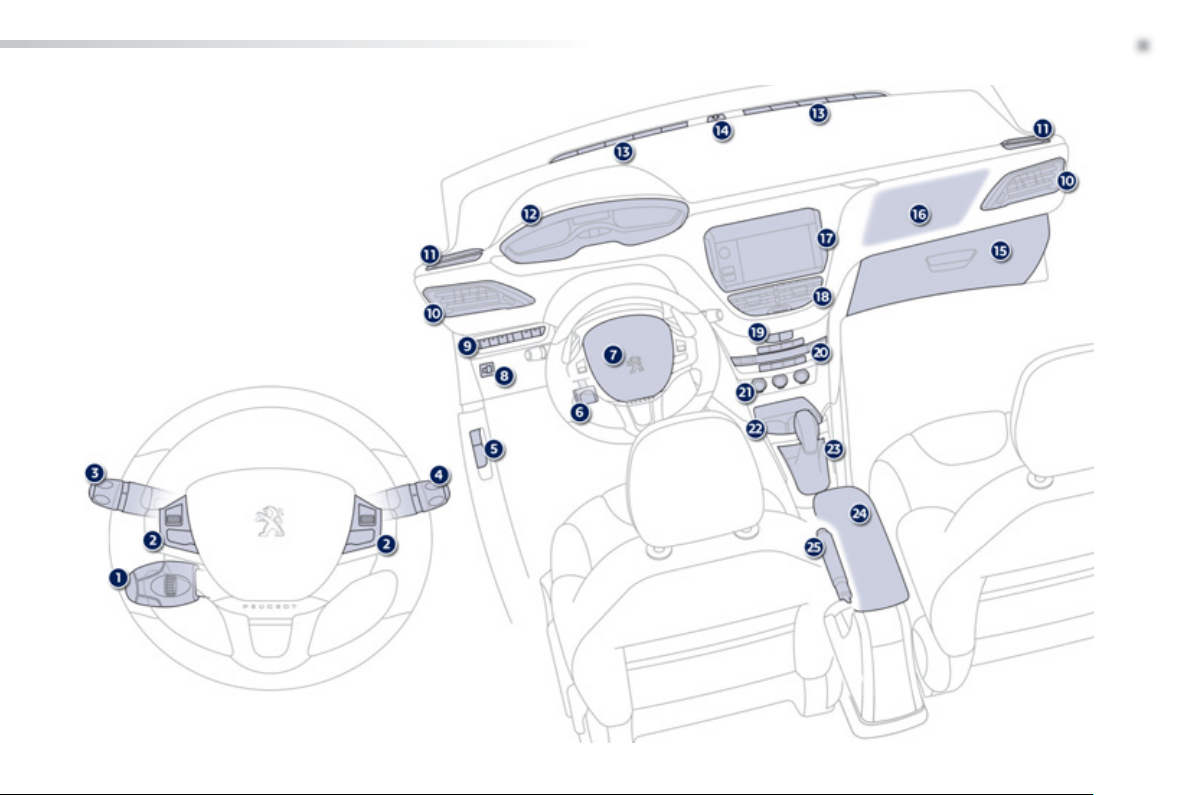
Instruments and controls
Cruise control / speed limiter controls.
Steering mounted controls for the touch
reen.
Lighting and direction indicator stalk.
Wiper / screenwash / trip computer stalk.
Bonnet r
6
teering wheel adjustment control.
7
Driver's airbag.
H
rn.
Headlamp height adjustment.
Switch panel.
r.
10. Side adjustable air vents.
11
Front side window demisting/defrosting
v
.
Instrument panel.
13
Windscreen demisting/defrosting vent.
Sunshine sensor.
15
Glove box / Passenger's airba
16
17
18
tivation.
Passenger's airbag.
Multifunction screen / Audio system.
Central adjustable air vents.
9. Central locking and hazard warning
ttons.
0. Heating / air conditioning controls.
12 V accessory socket.
U
B port / auxiliary socket.
Additional U
Open storage.
holder.
3. Gear lever.
4. Central armrest with storage.
5.Parking brake.
B port.
8
Familiarisation
.
9
Familiarisation
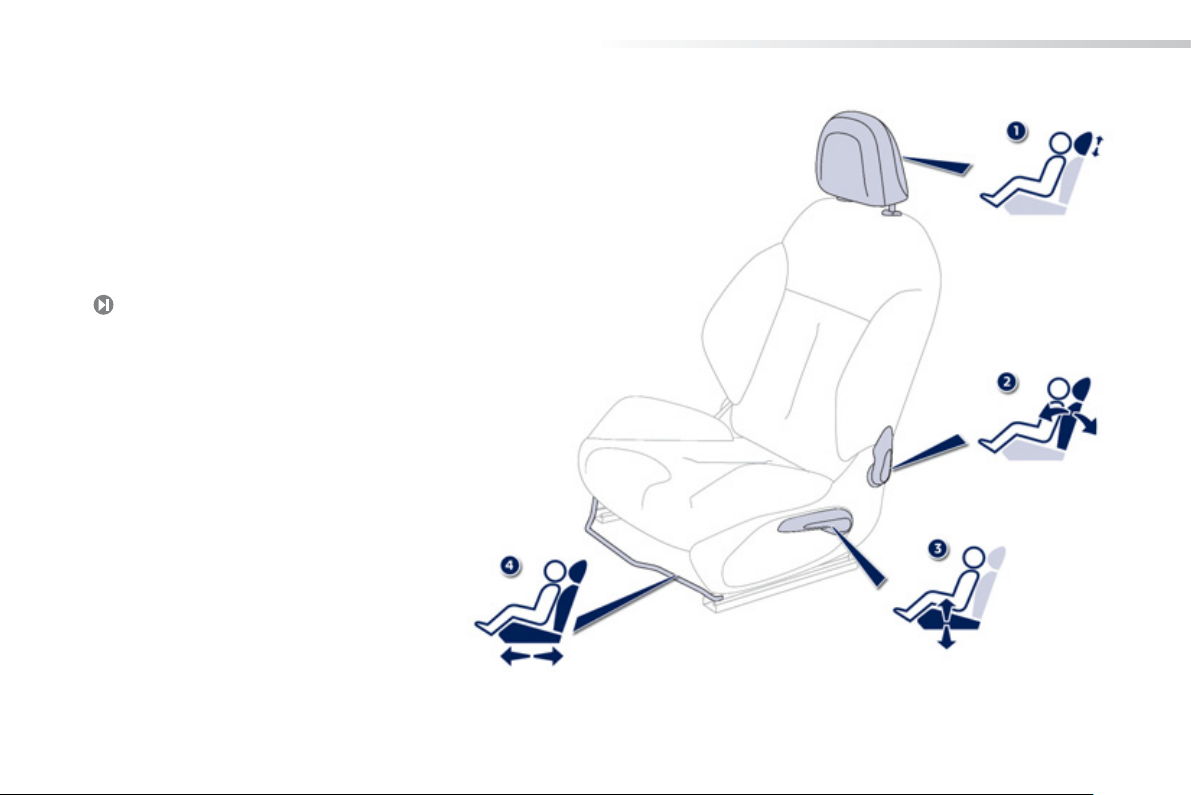
Sitting comfortably
Front seats
Manual adjustments
Head restraint height adjustment.
Backrest angle adjustment.
Seat cushion height adjustment.
Seat forwards-backwards adjustment.
57
10

Sitting comfortably
8
.
g
e
9
Familiarisation
.
Head restraint adjustment
To raise the head restraint, pull it upwards.
To lower it, press the lu
restraint at the same time.
5
A and down on th
Steering wheel adjustment
1.Release the adjustment mechanism.
2
Adjust for height and reach.
Lock the adjustment mechanism.
For reasons of safety, these operations
ust only be carried out with the
vehicle stationary.
65
Heated seats control
0 : off.
: low.
: medium.
: high.
5
11
Familiarisation
Adj
A.
.
.
S
o
.
4
.
.
6
Sitting comfortably
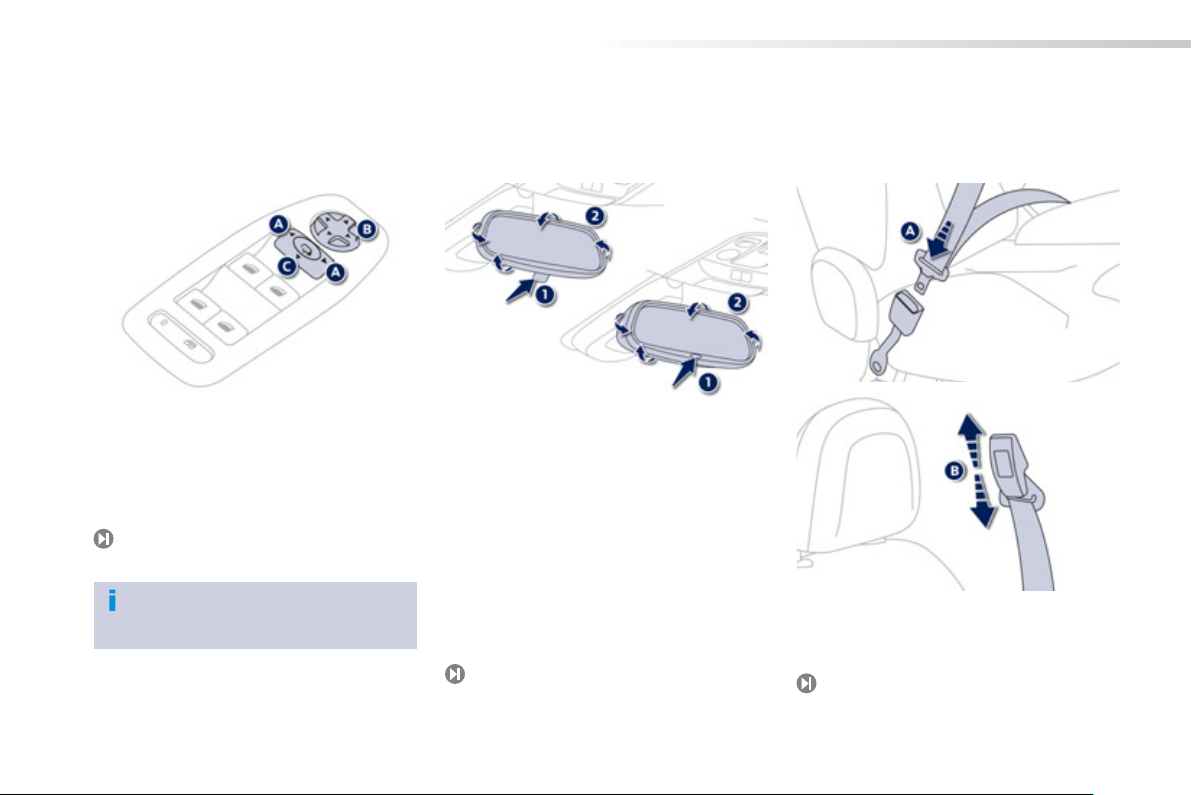
Door mirrors
ustment
Selection of the mirror.
Adjusting the position of the mirror glass.
De-selection of the mirror.
63
Other functions..
Folding / Unfolding.
Rear view mirror
Manual day/night type
1
electing the "day" position of the rear view
mirr
2
Automatic day/night type
1.Automatic detection of day/night mode.
2
r.
Rear view mirror adjustment.
Rear view mirror adjustment.
6
Front seat belts
A.Fastening.
B
Height adjustment (5-door).
12
12
Seeing clearly
g
A
B
7
.
.
A
g
5
6
Park
S
or
Familiarisation
.
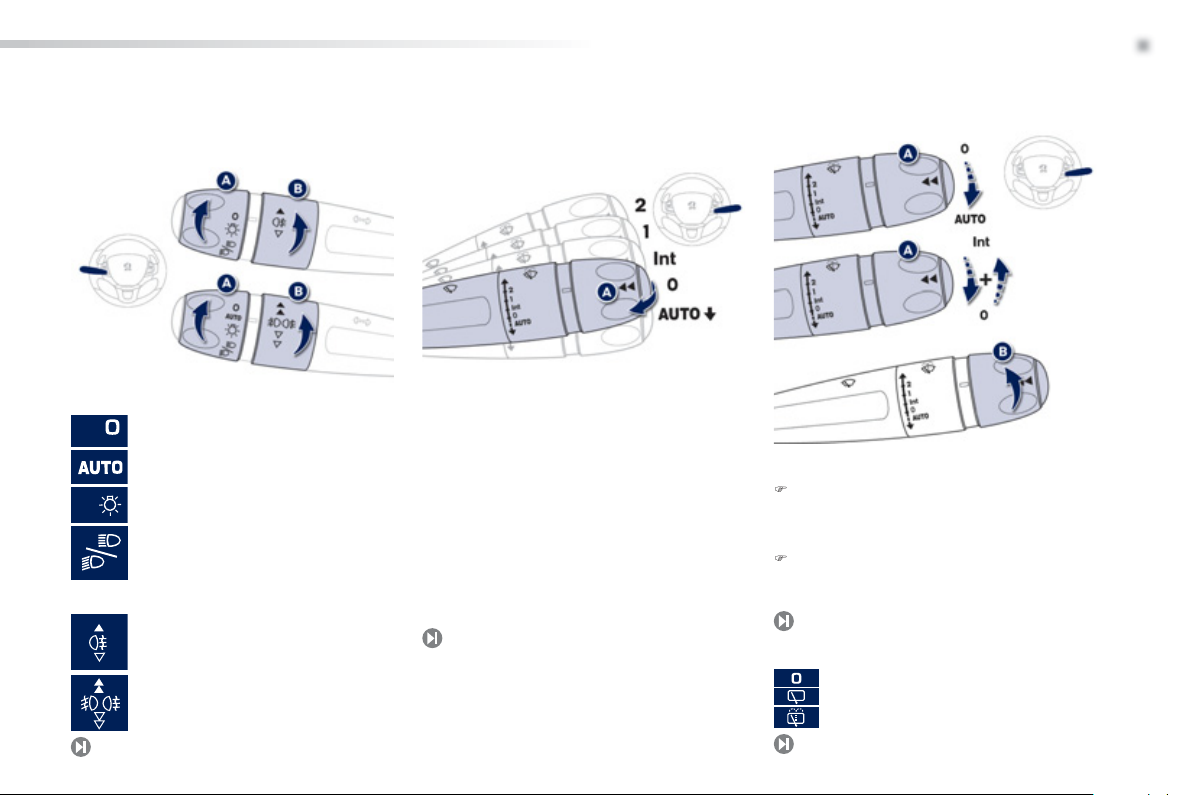
Lightin
Ring
Ring
Lighting off.
Automatic illumination of headlamps.
Sidelamps.
Dipped / main beam headlamps.
Rear foglamp.
Front and rear foglamps.
10
Wipers
Control stalk A: windscreen
wipers
Fast wipe.
1
Normal wipe.
Int
Intermittent wipe.
Park.
UTO Automatic wiping.
Single wipe: Brief pull on the stalk towards.
Screenwash: Lon
1
pull on stalk towards you.
Switching on "AUTO" mode
Briefly push the stalk downwards.
Switching off "AUTO" mode
Briefly push the stalk downwards or place
the stalk in another position: Int, 1 or 2.
Ring B: rear wiper
.
Intermittent wipe.
creenwash.
11
13
Familiarisation
.
g
A
w
e
T
G
R
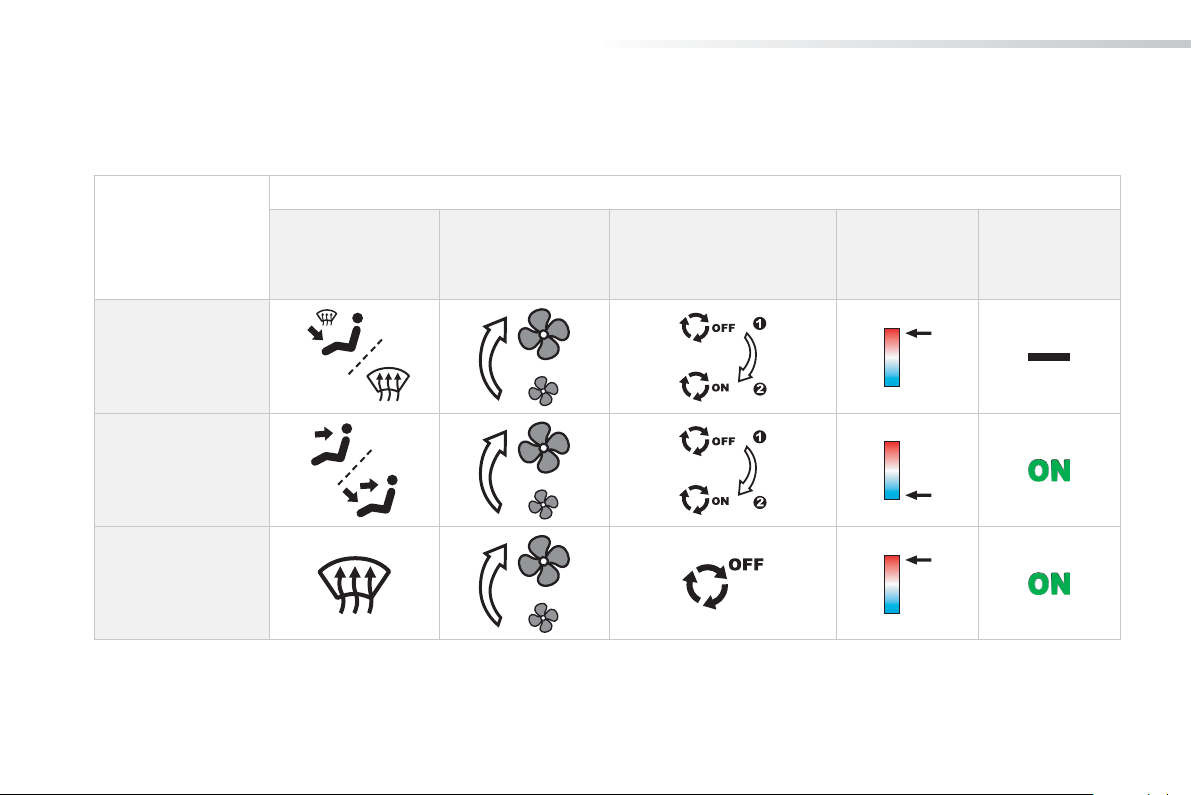
Ventilation
ecommended interior settings
eating or Manual air conditionin
I require..
O
COLD
EMISTING
EFROSTIN
igital air conditioning: use the automatic mode in preference by pressing the
14
Air distribution
ir flo
Air recirculation/
ntake of exterior air
AUTO"button.
emperatur
Manual AC
Monitoring
.
g
With th
d
g
g
f
8
whic
Familiarisation
.
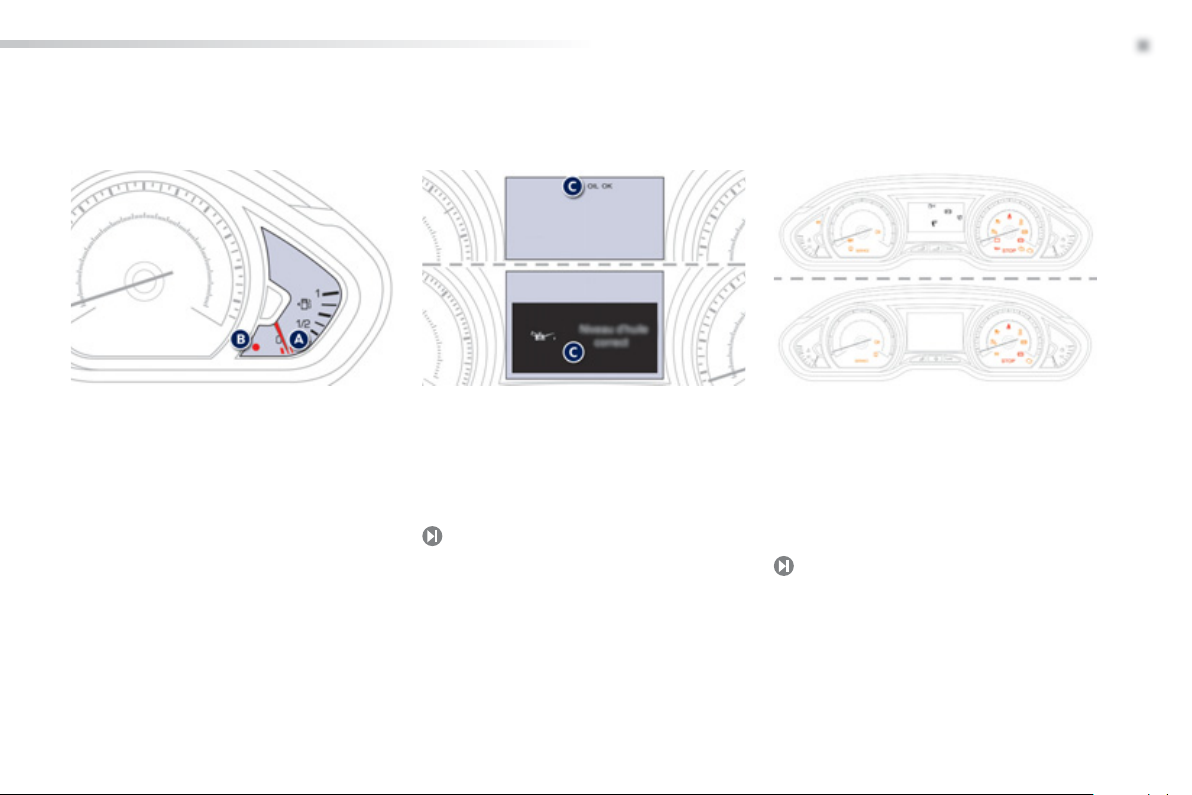
Instrument panels
On switching on, the dial needles go to the
xtent of their travel then return to 0.
A
With the ignition on, the needle should
indicate the fuel remainin
e engine running, the associate
low level warning lamp should go off.
.
C. With the ignition on, the instrument panel
reen should indicate the level of oil.
If the levels are not correct, top up the level
h is low.
Warning lamps
1. With the ignition on, the orange and red
warnin
lamps come on.
With the engine running, these warnin
lamps should go off.
I
a warning lamp remains on, refer to the page
ncerned.
23, 2
15
Familiarisation
g
A.
.
O
.
sea
4.
p
g
SC/AS
6
seat belts no
g
.
g
g
2
16
Monitoring
Switch panel
Illumination of the lamp indicates the status of
the correspondin
Deactivation of rear parking sensors.
05
Deactivation of the D
25
C.Deactivation of the Stop & Start system.
9
Volumetric alarm monitoring off.
52
Electric child lock on.
42
function.
R system.
Passenger safety
Front passenger's airba
pen the glove box.
1
2
Insert the key.
Select position:
ON" (activation), with front passenger or
orwards facing" child seat,
OFF"(deactivation), with "rear facing"
t.
Remove the key keeping the switch in the
new
osition.
30
Front seat belts and
assenger's front airba
A.Front
warnin
B
lamp.
Airbag fault warning lamp.
3
Front passenger's airbag deactivation
warnin
lamp.
t fastened or unfastened

Driving safely
g
/
y
g
lly
h
g
w
h
with
x
y
g
d
,
(
-
(
y
g
STO
g
Stop & Start
Familiarisation
.
Going into engine STOP mode
The
ECO" warning lamp comes
on in the instrument panel and the
en
ine goes into standby:
with a manual gearbox , at speeds below
12 mph
20 km/h), when you put the gear
ever into neutral, and you release the
utch pedal,
with an electronic gearbox , at speeds
below 5 mph
brake pedal or
osition N .
In certain circumstances,
be available; the
for a few seconds, then
8 km/h), when you press the
ou put the gear lever into
P mode may not
ECO" warning lamp flashes
oes off.
Going into engine START mode
The "ECO" warning lamp goes off
and the en
ith a manual gearbox, when you press
t
e clutch pedal,
an electronic gearbo
● with the gear lever in position
ou release the brake pedal,
● or with the
rake pedal released, when you move the
ear lever to position A or
● or when you engage reverse.
In certain circumstances, START mode may be
nvoked automatically; the
flashes for a few seconds, then
ine restarts:
ear lever in position
ECO" warning lamp
oes off.
or
when
an
Deactivation
You can deactivate the system at any time b
pressing the "ECO OFF" button; the button's
warnin
lamp comes on.
The system is automatica
very time the engine is started wit
the key.
Before refuelling or doing anything
nder the bonnet, you must switch off
the ignition with the key.
Reactivation
reactivated
17
Familiarisation
.
C
1
pp
r
Th
g
(
g
Driving safely
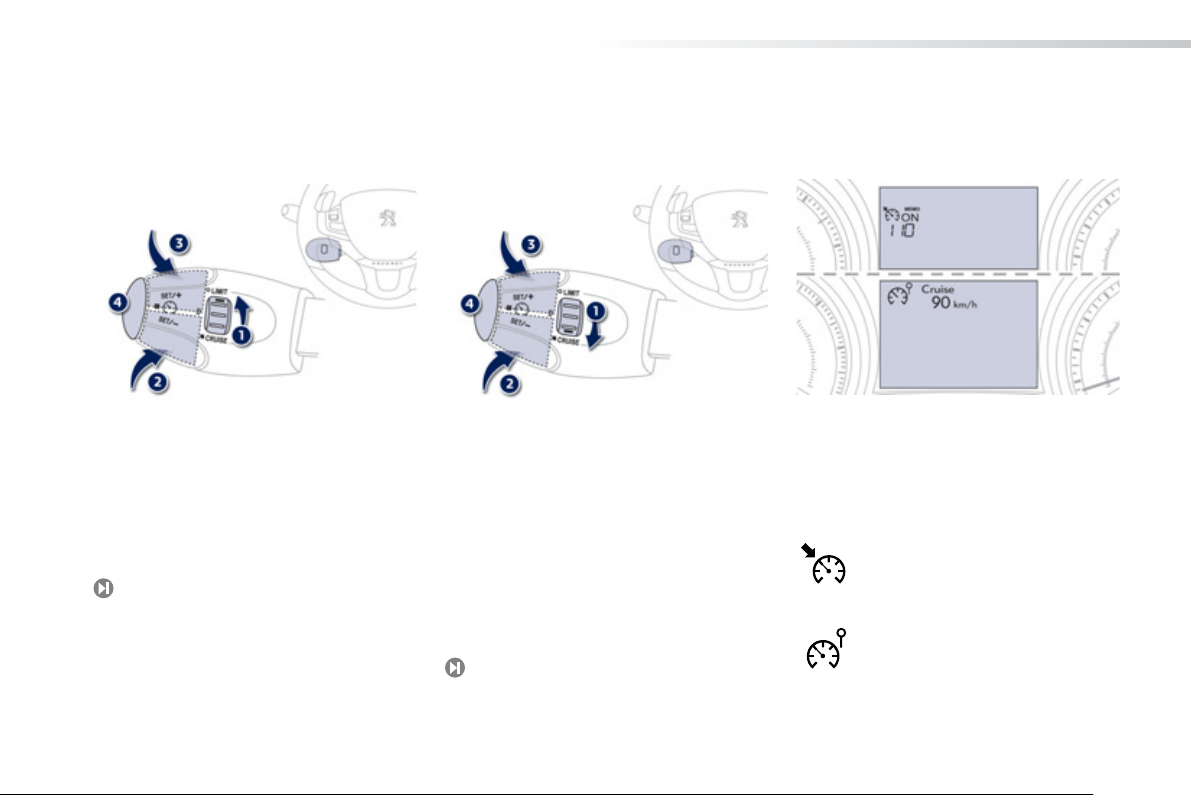
Speed limiter "LIMIT"
Selecting speed limiter mode.
Decrease the programmed value.
Increase the programmed value.
Speed limiter On / Off.
e values must be set with the engine running. In order to be programmed or activated, the
Cruise control "CRUISE"
1.Selecting cruise control mode.
2
Decrease the programmed value.
Increase the programmed value.
ruise control Off / Resume.
vehicle speed must be hi
40 km/h), with at least 4th gear engaged on a
manual gearbox
automatic
earbox).
0
her than 25 mph
2nd gear on an electronic or
Display in the instrument panel
The cruise control or speed limiter mode
a
ears in the instrument panel when it is
lected.
ruise control
Speed limite
18

Eco-driving
CO
2
issions
With
O
2
d
S
ill
y
Eco-driving is a range of everyday practices that allow the motorist to optimise their fuel consumption and
em
Familiarisation
.
.
Optimise the use of your
earbox
With a manual gearbox, move off gently,
ange up without waiting and drive by
hanging up quite soon. If your vehicle has
the system, the gear shift indicator invites you
to change up; it is displayed in the instrument
anel, follow its instructions.
an automatic or electronic gearbox,
tay in Drive or Auto
the type of gearbox, without pressing the
accelerator pedal heavily or suddenly.
, according to
Drive smoothly
Maintain a safe distance between vehicles,
use engine braking rather than the brake
edal, and press the accelerator progressively.
These practices contribute towards a reduction
in fuel consumption and C
also helps reduce the background traffic noise.
If your vehicle has cruise control, make use of
the system at speeds above 25 mph (40 km/h)
when the traffic is flowing well.
emissions an
Control the use of your
lectrical equipment
Before moving off, if the passenger
ompartment is too warm, ventilate it by
opening the windows and air vents before using
the air conditioning.
Above 30 mph (50 km/h), close the windows
nd leave the air vents open.
Remember to make use of equipment that can
elp keep the temperature in the passenger
ompartment down (sunroof and window
blinds...).
witch off the air conditioning, unless it has
utomatic digital regulation, as soon as the
desired temperature is attained.
Switch off the demisting and defrosting
ontrols, if not automatic.
Switch off the heated seat as soon as possible.
Switch off the headlamps and front foglamps
when the level of light does not require their
.
Avoid running the engine before moving off,
particularly in winter; your vehicle w
up much faster while driving.
As a passenger, if you avoid connecting
our multimedia devices (film, music, video
ame...), you will contribute towards limiting
the consumption of electrical energy, and so
f fuel.
Disconnect your portable devices before
leaving the vehicle.
warm
19

Familiarisation
S
oads ca
d
oof bars and roof racks after use
ufacture
d
y
Limit the causes of excess
onsumption
pread loads throughout the vehicle; place
the heaviest items in the bottom of the boot,
s close as possible to the rear seats.
Limit the l
educe wind resistance (roof bars, roof rack,
bicycle carrier, trailer...). Use a roof box in
reference.
Remove r
At the end of winter, remove snow tyres and
efit your summer tyres.
rried in the vehicle an
.
Observe the recommendations
on maintenance
Check the tyre pressures regularly, when cold,
eferring to the label in the door aperture,
river's side.
Carry out this check in particular:
- before a long journey,
- at each change of season,
- after a long period out of use.
Don't forget the spare wheel and the tyres on
any trailer or caravan.
Have your vehicle serviced regularly (engine
oil, oil filter, air filter...) and observe the
schedule of operations recommended by the
man
r.
When refuelling, do not continue after the
r
cut-off of the nozzle to avoid any overflow.
At the wheel of your new vehicle, it is onl
after the first 1 800 miles (3 000 kilometres)
that you will see the fuel consumption settle
down to a consistent average.
20
Instruments and controls
(
)
g
.
)
G
eca
f
)
g
g
f
g
.
.
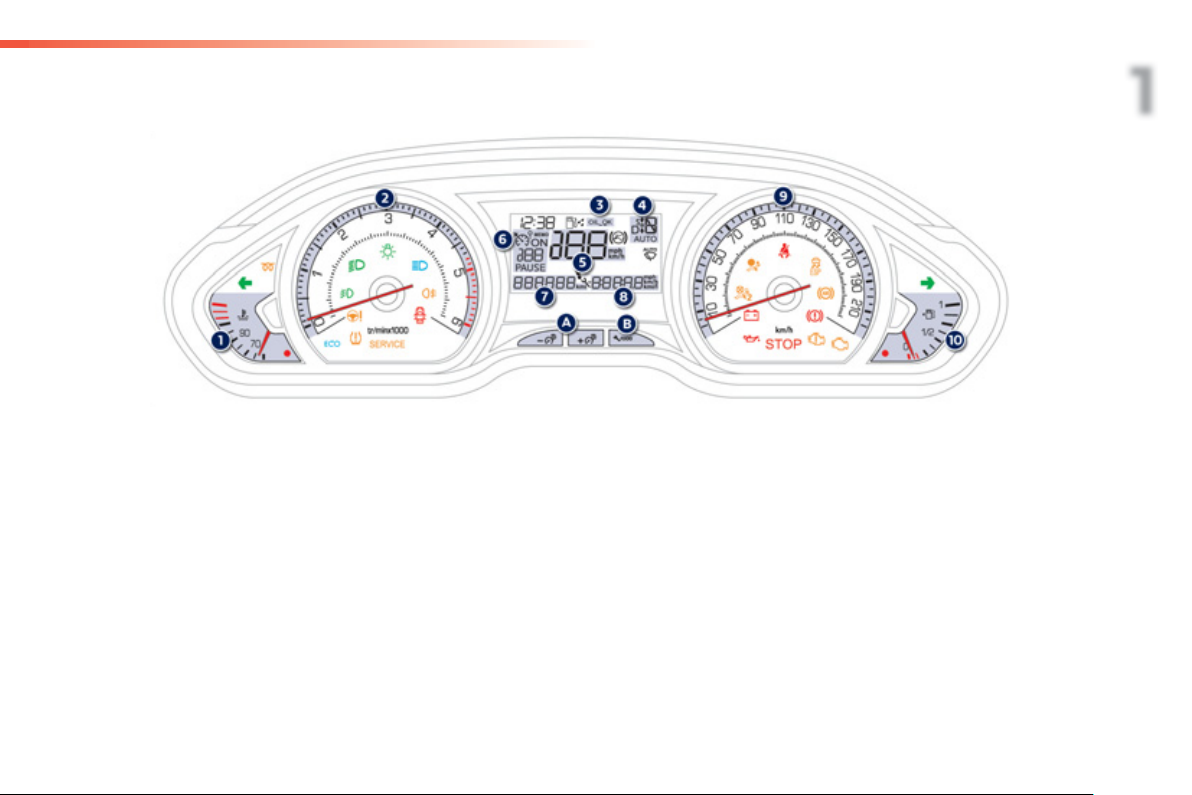
LCD instrument panel
Dials and screens Control buttons
Engine coolant temperature gauge.
Rev counter (x 1 000 rpm or tr/min),
graduation according to engine
Diesel
.
Engine oil level indicator.
Gear shift indicator for a manual gearbox
or
ear lever position and gear for an
lectronic or automatic gearbox.
5
Digital speedometer (mph or km/h
This can be switched off with a long
on
petrol or
Cruise control or speed limiter settings.
Service indicator, then total distance
ecorder (miles or km).
These
unctions are displayed successively
on switchin
Trip distance recorder (miles or km).
9
Analogue speedometer (mph or km/h).
10
Fuel gauge.
on the ignition.
eneral lighting dimmer.
R
Reset the
Settin
Switchin
ll the service information.
unction selected (service
indicator or trip distance recorder
the time.
the digital speedometer on
nd off.
1
.
21
Instruments and controls
(
g
g
Main lighting di
I
lighting
.
eca
f
)
.
(
f
.
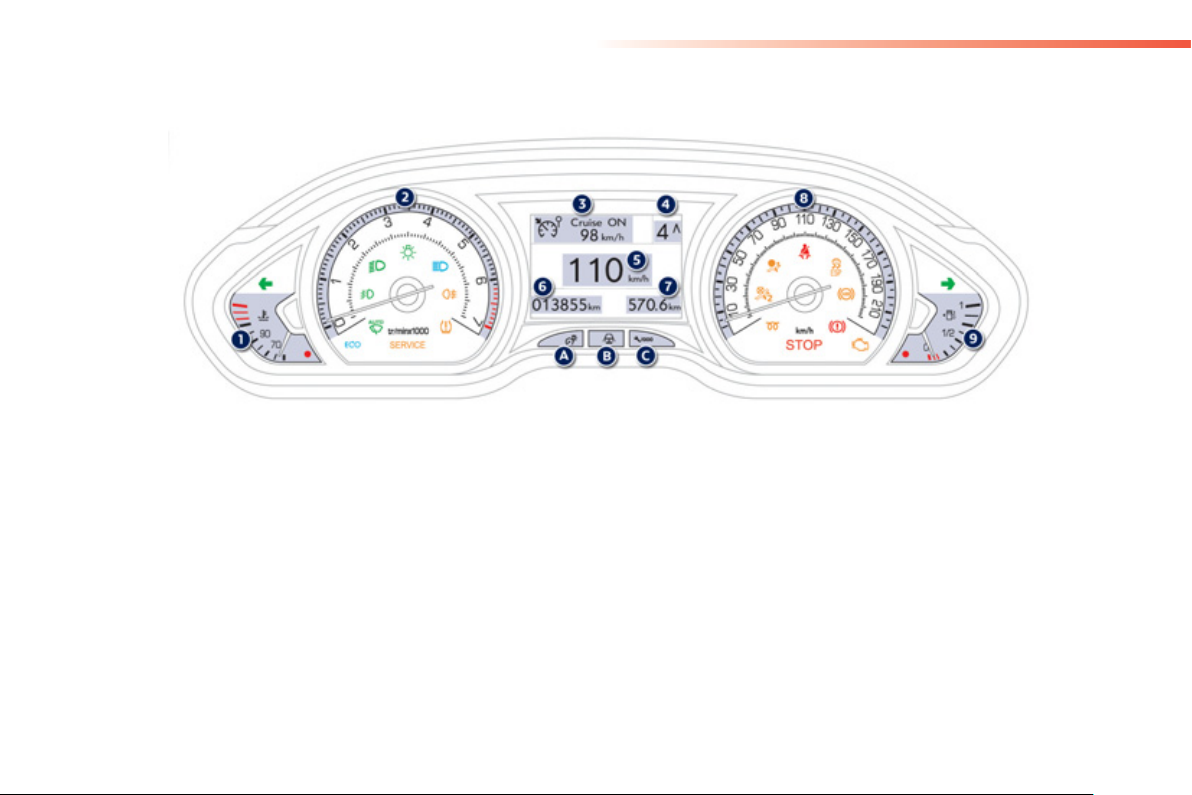
Active matrix instrument panel
Dials and screens Control buttons
Engine coolant temperature gauge.
Rev counter (x 1 000 rpm or tr/min),
graduation according to engine
iesel).
Cruise control or speed limiter settings.
Gear shift indicator for a manual gearbox
or
ear lever position and gear for an
electronic or automatic
Speedometer (mph or km/h).
petrol or
earbox.
Service indicator, then total distance
6
recorder
These
7
Trip distance recorder (miles or km).
Analogue speedometer (mph or km/h).
Fuel gauge.
miles or km).
unctions are displayed successively
n switching on the ignition.
nstrument panel mood
C
R
Reset the selected
ll of the service information.
indicator or trip distance recorder
mmer.
unction (service
.
.
22

Instruments and controls
ascertained
occurred
p
g
g
g
y
f
A
u
g
Indicator and warning lamps
Visual indicators informing the driver that a system is in operation, switched off or has a fault.
When the ignition is switched on
Certain warning lamps come on for a few
econds in the instrument panel and/or
instrument
i
nition is switched on.
When the en
warnin
If the
in
ormation on the warning lamp concerned.
anel screen when the vehicle's
ine is started, these same
lamps should go off.
remain on, before moving off, refer to the
ssociated warnings
The switching on of certain warning lamps
may be accompanied by an audible signal
nd a message in the instrument panel or
m
ltifunction screen.
The warnin
fixed) or flash.
lamps may come on continuously
Certain warning lamps may come on in
one of two modes. Only by relating the
type of lighting to the operating status
f the vehicle can it be
whether the situation is normal or
whether a fault has
.
1
23

Instruments and controls
e
e
A
f
The lighting
r
s
fixed
The lighting
S
ed
g
fixed
The lighting
o
Pull th
dipped b
s
fixed
f
g
g
fog
Operation indicator lamps
If one of the following indicator lamps comes on in the instrument panel and/or instrument panel screen, this confirms that the corresponding system has come into operation.
Warning / indicator lampStat
eft-hand
rection
ndicato
ight-hand
direction
ndicato
Sidelamp
ipped beam
headlamps
ain beam
headlamps
Front foglamp
ear foglamp fixed.The rear fo
For more information on the lighting controls, refer to the "Visibility" section.
lashing with buzzer.
flashing with buzzer. The lighting stalk is pushed up.
.
.The li
fix
.
.The
Caus
stalk is pushed down.
"
idelamps" position.
beam headlamps" position.
y
u.
stalk is in the
hting stalk is in the "Dipped
stalk is pulled towards
ront foglamps are switched on. Turn the ring on the stalk rearwards twice to switch off
lamp is switched on. Turn the ring on the stalk rearwards to switch off the
ction / Observations
e stalk to return to
the front fo
rear
lamps.
lamp.
eam headlamps.
24

Instruments and controls
e
e
g
(ig
g
g
y
y
f
g
h
e
g
g
O
g
g
l
The brak
.
ema
g
g
heats
Warning / indicator lamp Stat
iesel engine
re-heatin
arking brak
oot on the
rake peda
fixed. The ignition switch is at
fixed. The parking brake is applied or not
fixed.
flashin
Caus
the 2nd position
roperly released.
e pedal must be pressed. With an electronic gearbox, press the brake pedal to
. With an electronic gearbox, if you
old the vehicle on an incline using
the accelerator for too lon
ver
.
nition on).
, the clutch
Action / Observations
Wait until the warnin
The period of illumination of the warnin
determined b
seconds in extreme climatic conditions).
thirt
I
the engine does not start, switch the ignition off and
then on, wait until the warnin
t
en start the engine.
Release the parkin
lamp, keeping your foot on the brake pedal.
bserve the safety recommendations.
For further information on the parkin
the "Drivin
tart the engine (lever in position ).
With an automatic gearbox, with the engine running,
ress the brake pedal before releasing the parking
brake, to unlock the lever and come out of position
If you wish to release the parking brake without
ressing the brake pedal, this warning lamp will
r
Use the brake pedal and/or the parking brake.
" section.
in on.
lamp goes off before starting.
lamp is
the climatic conditions (up to about
lamp goes off again,
brake to switch off the warnin
brake, refer to
1
25

Instruments and controls
e
e
A
ed
O
y
y
t
ff
y
off
flashes for a fe
STO
or
S
f
STO
A
g
A
g
Warning / indicator lampStat
Foot on the
lutch *
utomatic
wipin
Stop & Star
fix
fixed. The wiper control is pushed
fixed. When the vehicle stops (red lights,
econds, then goes
ff.
Caus
.In the ST
hanging to START mode is refused
because the clutch pedal is not full
tra
w
navailable.
TAR T mo de is invoked
utomatically.
P mode of Stop & Start,
wn.
wnwards.
ic jams,...) the Stop & Start
stem has put the engine into STOP
.
P mode is temporarily
ction / Observations
You must declutch full
TAR T mo de.
utomatic front wiping is activated.
To deactivate automatic wipin
talk downwards or put the stalk into another position.
The warning lamp goes off and the engine restarts
automaticall
ve
er to "Driving - § Stop & Start" for special cases
Re
with
in START mode, as soon as you want to
.
P mode and STAR T mo de.
to allow the change to engine
, operate the control
26
* Except for the active matrix instrument panel.
Instruments and controls
dibl
e
e
fixed
Th
g
y
g
S
f
bility
l
)
f
e DSC/AS
deac
SC
AS
SC/AS
g
SC/AS
he vehicle is started
f
f
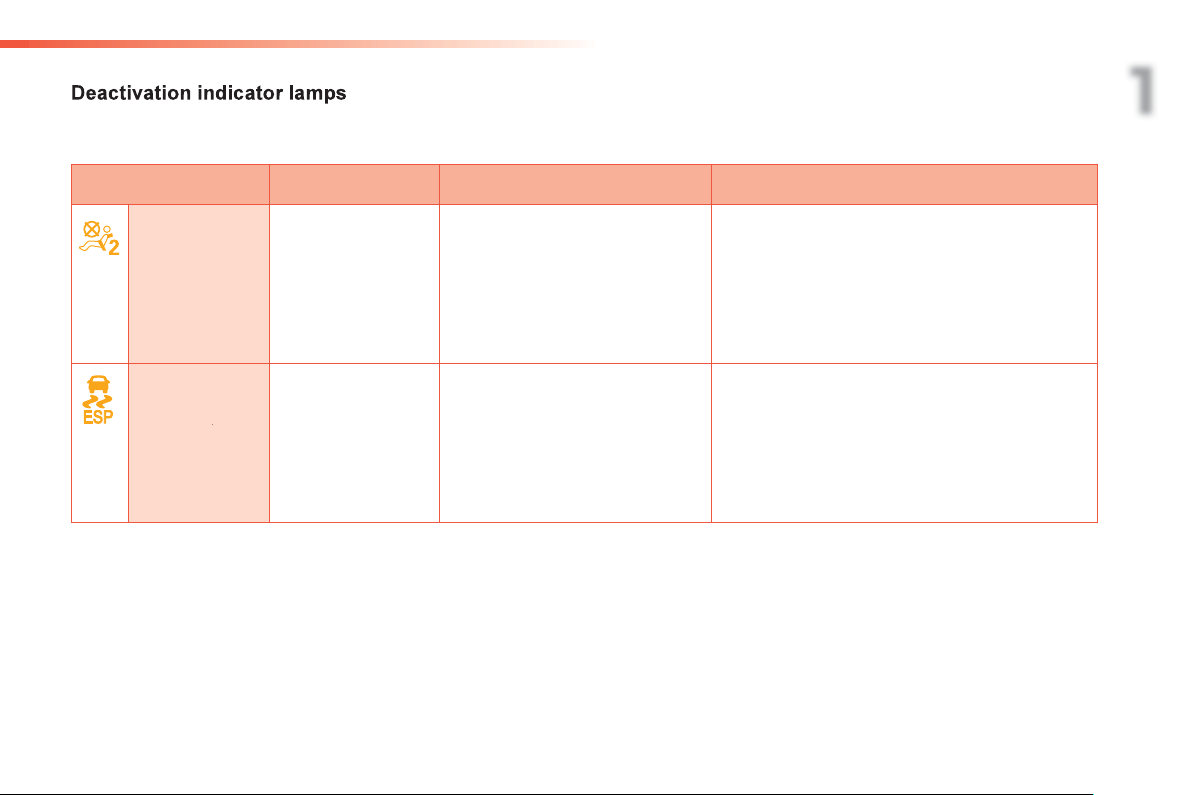
If one of the following indicator lamps comes on, this confirms that the corresponding system has been switched off intentionally.
s is may be accompanied by an au
Warning / indicator lamp
assenger's
rbag system
sta
namic
contro
fixed. The button, located at the bottom
tat
e signal and a message in the screen.
Caus
.
e control, located in the glove box,
set to the OFF position.
The passen
tivated.
In this case
facin
" child seat.
le
t of the dashboard, is pressed. Its
ndicator lamp is on.
Th
D
: dynamic stability control.
R: anti-slip regulation.
er's front airbag is
ou can install a "rear
R is
tivated.
Action / Observations
et the control to the
assenger's front airbag.
In this case, do not
osition.
Press the button to activate the D
lamp
oes off.
The D
t
I
deactivated, the system is reactivated automatically
rom around 30 mph (50 km/h).
R system is activated automatically when
position to activate the
it a child seat in the rear-facing
.
1
R. Its indicator
27

Instruments and controls
W
p
Any f
y
e
e
A
P
g
g
t
g
e
faults have occurred fo
f
f
g
(
g
a
fixed
j
f
fy
e screen and
dealer o
arning lamps
When the engine is running or the vehicle is being driven, illumination of one of the following warning lamps indicates a fault which requires action on
the
art of the driver.
ault resulting in the illumination of a warning lamp must be investigated further by reading the associated message in the screen.
If
ou encounter any problems, contact a PEUGEOT dealer or a qualified workshop.
28
Warning / indicator lampStat
STO
ervic
fixed, associated with
nother warning lamp.
on temporarily. Minor
Caus
It is associated with the en
oil pressure or the en
emperature.
there is no speci
.Ma
or faults have occurred for which
there is no speci
ic warning lamp.
ic warning lamp.
ine
ine coolant
r which
ction / Observations
Stop as soon as it is safe to do so.
Park, switch off the i
dealer or qualified workshop.
y the fault by reading the message shown in the
Identi
creen, such as, for example:
- the en
- saturation of the particle emissions filter
- the power steerin
-
For any other faults, contact a PEUGEOT dealer or a
ualified workshop.
Identi
th
ualified workshop.
ine oil level,
minor electrical fault.
the fault by reading the message shown in
nition and call a PEUGEOT
,
then contact a PEUGEOT
Diesel).
r
 Loading...