

Peugeot 207 CC 2012 Owner's Manual
Handbook
Access the latest information available.
PEUGEOT's SERVICE BOX Internet site permits easy
and free consultation of your vehicle documentation
on line.
Simple and user friendly, SERVICE BOX allows you access:
● to your Handbook,
● to previous Vehicle documentation.
Please note the following point:
!
The fi tting of electrical equipment or accessories which are not recommended by PEUGEOT may result in a failure of
your vehicle's electronic system. Please note this specifi c warning. It is advisable to contact a PEUGEOT dealer to be
shown the recommended equipment and accessories.
Connect to http://public.servicebox.peugeot.com:
select your language,
click on the link in the "Private customer access"
zone to consult the Vehicle documentation,
A window opens giving access to all of the handbooks...
select your vehicle,
choose its body type then the date of publication
of the handbook,
fi nally, click on the item which is of interest to you.
Thank you for choosing a 207 CC, a
symbol of confi dence, passion and in-
spiration.
This handbook has been designed to
enable you to make the most of your
207 CC.
On the fi rst few pages, you will fi nd a
detailed summary, followed by a quick
reference guide intended to make it
easier for you to become familiar with
your coupé-cabriolet.
All of the details specifi c to your 207 CC,
comfort, safety, driving, are then presented in this handbook, to increase
your appreciation of the vehicle help
you get the most from it.
Each model may only be fi tted with
some of the equipment mentioned in
this handbook, depending on its version
and the specifi cation for the country in
which it is sold.
Key
Warning:
!
this symbol marks warnings which
it is essential to observe for your
own safety, for the safety of others
or to avoid any risk of damaging
your vehicle.
Information:
i
this symbol draws your attention
to additional information for better
use of your vehicle.
Protection of the environment:
this symbol accompanies advice
relating to protection of the environment.
Page reference:
this symbol invites you to refer to
the pages which provide details
of the function.

CONTENTS
FAMILIARISATION 4 Î 17
ECO-DRIVING 18 Î 19
INSTRUMENTS
and CONTROLS 20 Î 44
Instrument panels 20
■
Indicator and warning lamps 21
■
Indicators 28
■
Adjustment buttons 32
■
Screens without audio
■
equipment 33
Screens with audio equipment 35
■
16/9 colour screen (Peugeot
■
Connect Navigation) 40
Trip computer 42
■
COMFORT 45 Î 64
Ventilation 45
■
Heating 47
■
Manual air conditioning 47
■
Rear screen demist - defrost 49
■
Digital air conditioning 50
■
Seats 52
■
Steering wheel adjustment 54
■
Mirrors 55
■
Interior fi ttings 57
■
Windstop 62
■
ACCESS 65 Î 79
Remote control key 65
■
Alarm 69
■
Window controls 71
■
Doors 73
■
Boot 76
■
Fuel tank 77
■
Misfuel prevention (Diesel) 79
■
VISIBILITY 80 Î 85
Lighting control stalk 80
■
Static directional lighting 83
■
Headlamp adjustment 83
■
Wiper control stalk 84
■
Courtesy lamp 85
■
CHILD
5
SAFETY 86 Î 92
Conventional child seats 86
■
ISOFIX child seats 90
■

CONTENTS
SAFETY 93 Î 104
Direction indicators 93
■
Emergency or assistance call 93
■
Hazard warning lamps 94
■
Horn 94
■
Tyre under-infl ation detection 95
■
Braking assistance systems 96
■
Trajectory control systems 97
■
Seat belts 98
■
Airbags 101
■
DRIVING 105 Î 115
Parking brake 105
■
Manual gearbox 105
■
Gear effi ciency indicator 106
■
Automatic gearbox 107
■
Speed limiter 110
■
Cruise control 112
■
Parking sensors 114
■
CHECKS 116 Î 122
Bonnet 117
■
Running out of fuel (Diesel) 117
■
Petrol engines 118
■
Diesel engine 119
■
Checking levels 120
■
Checks 121
■
PRACTICAL
INFORMATION 123 Î 147
Temporary puncture repair kit 123
■
Changing a wheel 128
■
Changing a bulb 132
■
Changing a fuse 136
■
Battery 141
■
Energy economy mode 143
■
Changing a wiper blade 143
■
Towing the vehicle 144
■
Towing a trailer 145
■
Accessories 147
■
TECHNICAL
0
DATA
Petrol engines 148
■
Weights (petrol) 149
■
Diesel engine 150
■
Weights (Diesel) 151
■
Dimensions 152
■
Identifi cation markings 153
■
148 Î 154
AUDIO EQUIPMENT
and TELEMATICS 155 Î 210
Emergency or assistance 155
■
Peugeot Connect Navigation (RNEG)
■
Peugeot Connect Sound (RD5) 189
■
157
VISUAL
SEARCH 211 Î 214
ALPHABETICAL
INDEX 215 Î 218
FAMILIARISATION
XTERIOR
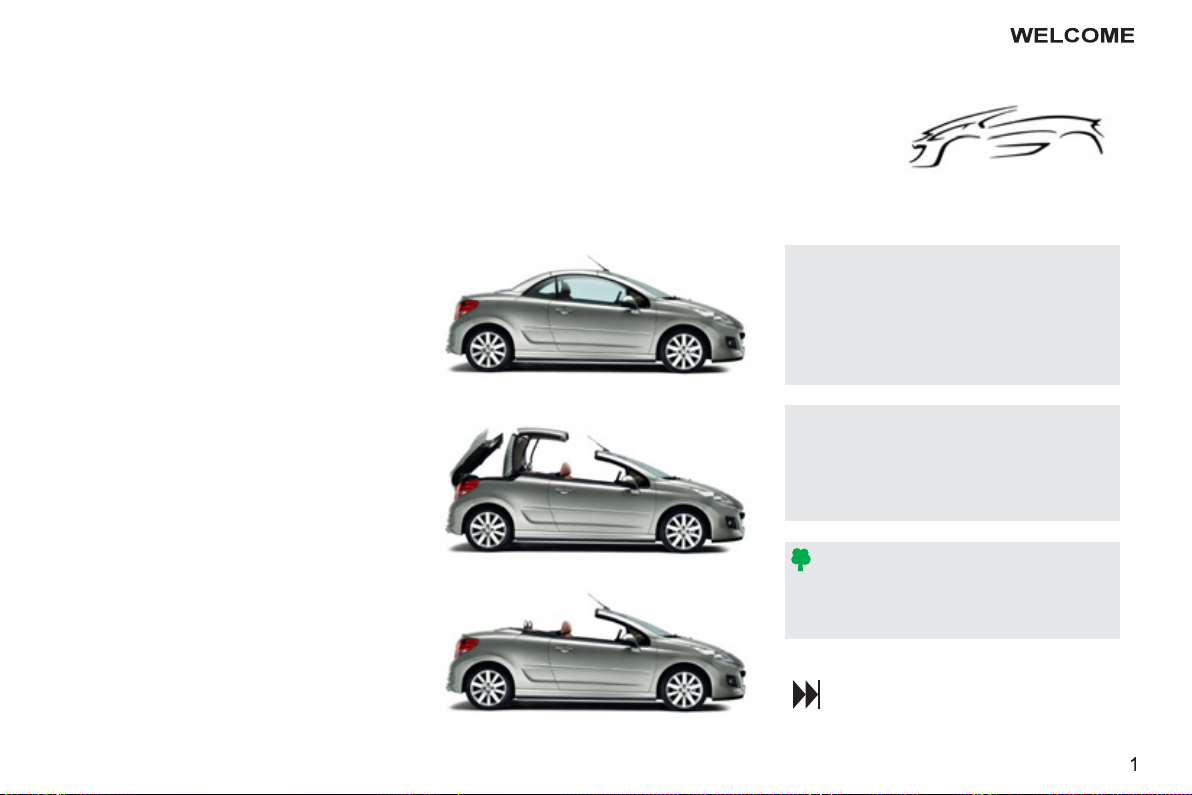
Retractable roof
This system enables you to change the
vehicle from "coupé" to "cabriolet" confi guration and vice versa with a single
action.
6
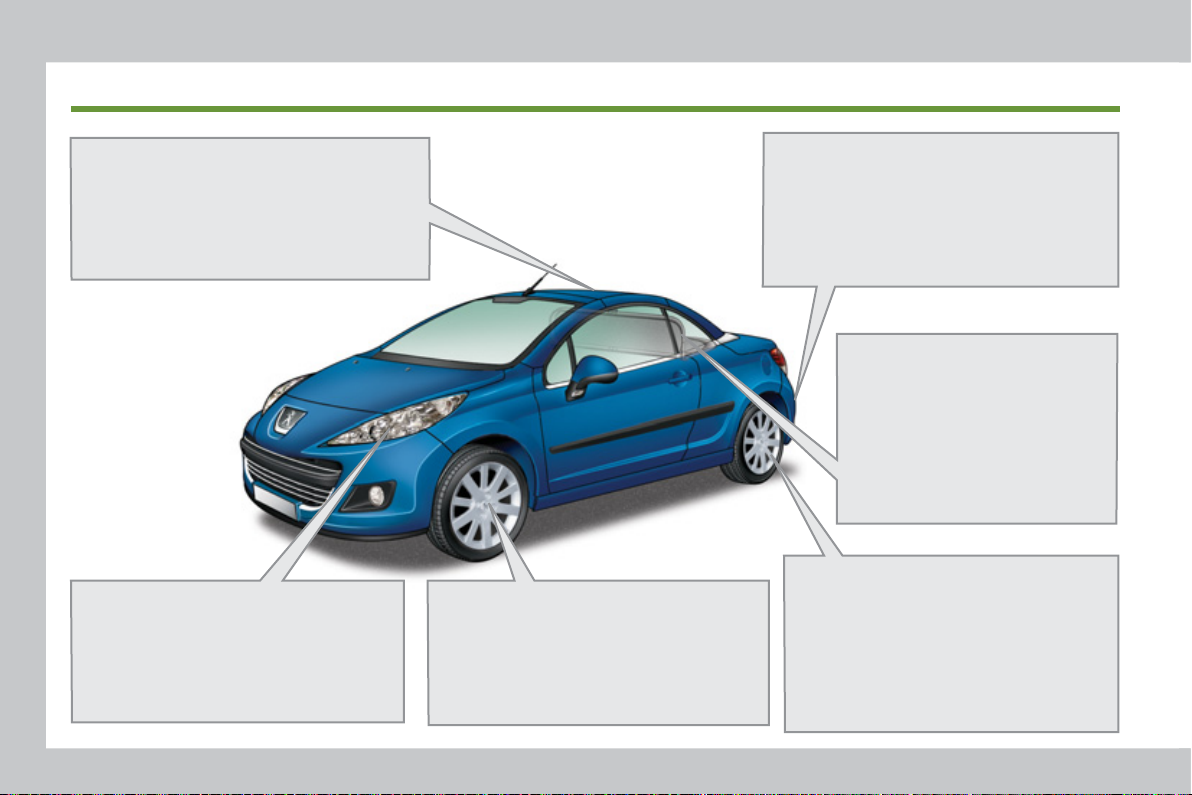
Static directional lighting
This additional lighting automatically
provides extended visibility when
turning.
83
Under-inflation detection
This system monitors the pressure in
each tyre and warns you of a puncture or drop in pressure.
95
Visual and audible rear parking
sensors
This system provides a warning when
reversing by detecting obstacles located behind the vehicle.
114
Turbulence prevention
net (Windstop)
In "cabriolet" confi guration, this
system reduces the wind turbulence in the front seats.
61
Temporary tyre repair kit
This kit is a complete system, consisting of a compressor and an integral sealant, for the temporary repair
of a tyre.
123
OPENING
FAMILIARISATION
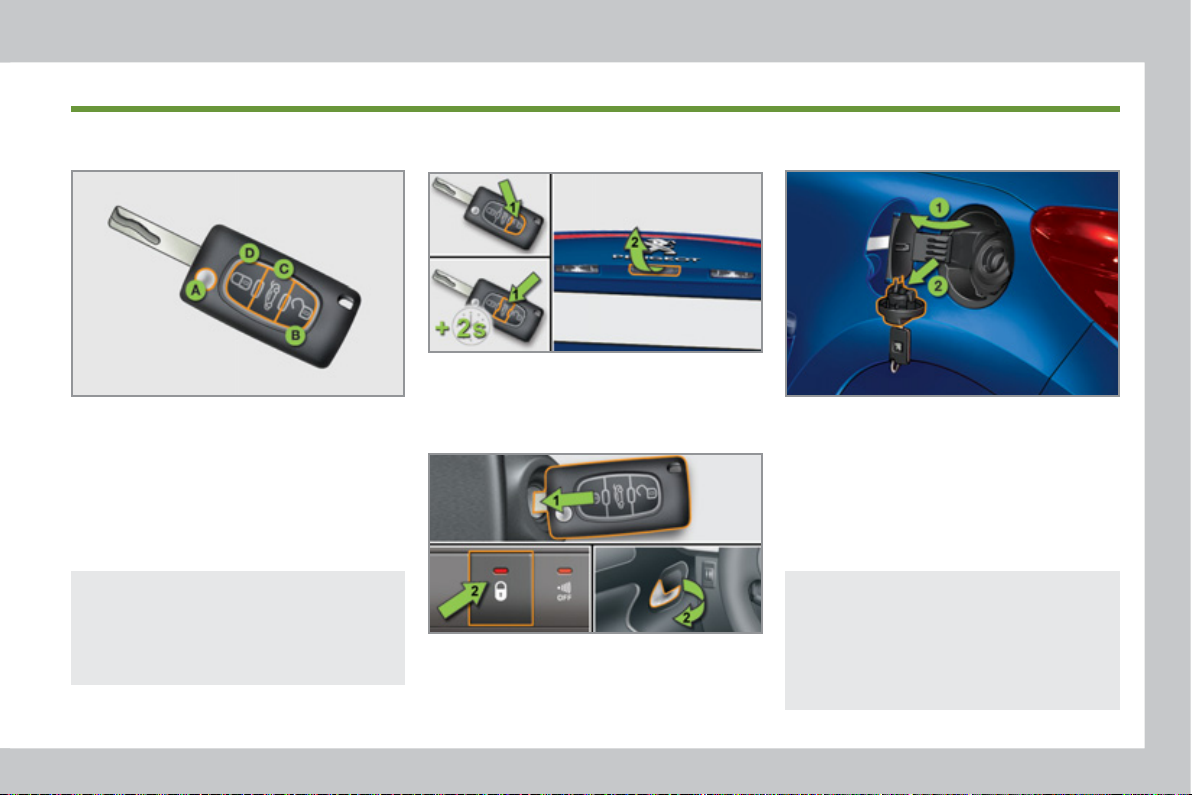
Remote control key
A. Unfolding/Folding the key.
B. Unlocking the vehicle.
C. Unlocking and partially opening the
boot.
65
Also...
i i
D. Normal locking
or
Deadlocking of the vehicle.
Boot
From outside
1. Unlocking the complete vehicle or
unlocking the boot and the vehicle.
2. Opening the boot lid.
From inside
1. Key in the ignition switch.
2. Unlocking using the manual cen-
tralised control or the door opening
control.
76
Fuel tank
1. Opening the fuel fi ller fl ap.
2. Opening and hooking the fuel fi ller
cap.
Capacity of the tank: approximately
50 litres (petrol) or 48 litres (Diesel).
77
On Diesel vehicles, the fuel fi ller
neck incorporates a misfuel prevention device which prevents fi lling
with petrol.
79
FAMILIARISATION
OPENING
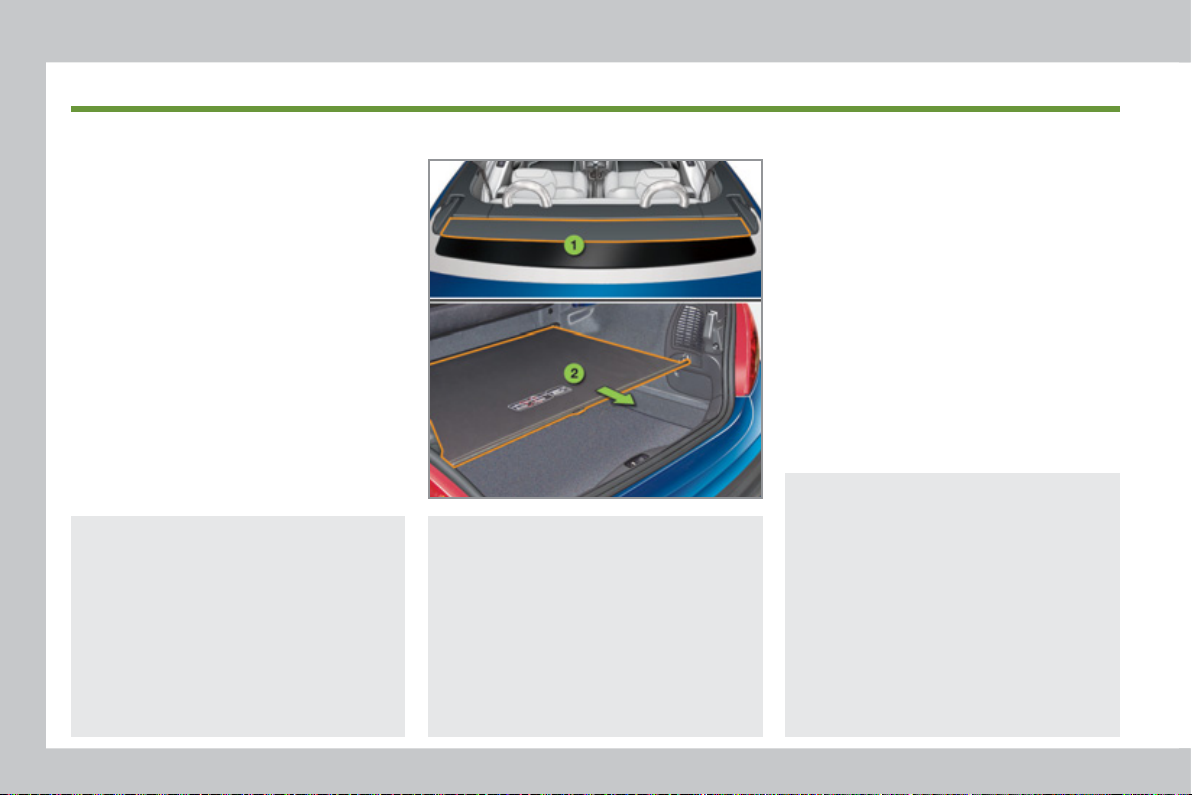
Retractable roof
Precautions to be taken before
operating the roof
) Park the vehicle on level ground.
) Check that no object could hinder
the operation of the roof:
- nothing should be placed on the
moving rear shelf 1 or on the net 2 .
- if luggage is being carried in the
boot, it must not raise the net,
) Ensure that the net 2 is secure.
) Close the boot correctly.
!
The roof is operated under the
sole responsibility of the driver.
During operation of the roof, to
avoid the risk of injury, ensure that
no one is in the vicinity of the moving parts.
You are strongly advised not to operate the roof in strong winds.
When washing your vehicle:
!
- lock the vehicle,
- avoid spraying the upper part
of the windows,
- keep the end of the high-pressure nozzle at least 1 metre
from the windows and door
seals.
After washing the vehicle or following rain, wait until the roof has
dried before opening it.
Preliminary conditions
) Switch on the ignition.
) Ensure that:
- the vehicle is not in energy economy
mode (refer to the corresponding
section),
- the battery voltage is suffi cient
(switching on of the indicator lamp
on the roof control),
- the roof fuse is in good condition (refer to the corresponding section),
- the electric windows are initialised
(refer to the corresponding section),
- the ambient temperature is above
-15 °C.
i
It is preferable to operate the roof
with the engine running.
The roof can be operated at
speeds below 6 mph (10 km/h).
It is only possible to carry out the
operation twice with the engine off,
to avoid discharging the battery.
Maintenance
Carry out a complete opening
and closing operation of the roof
at least once a month to keep it in
good working order.
OPENING
FAMILIARISATION
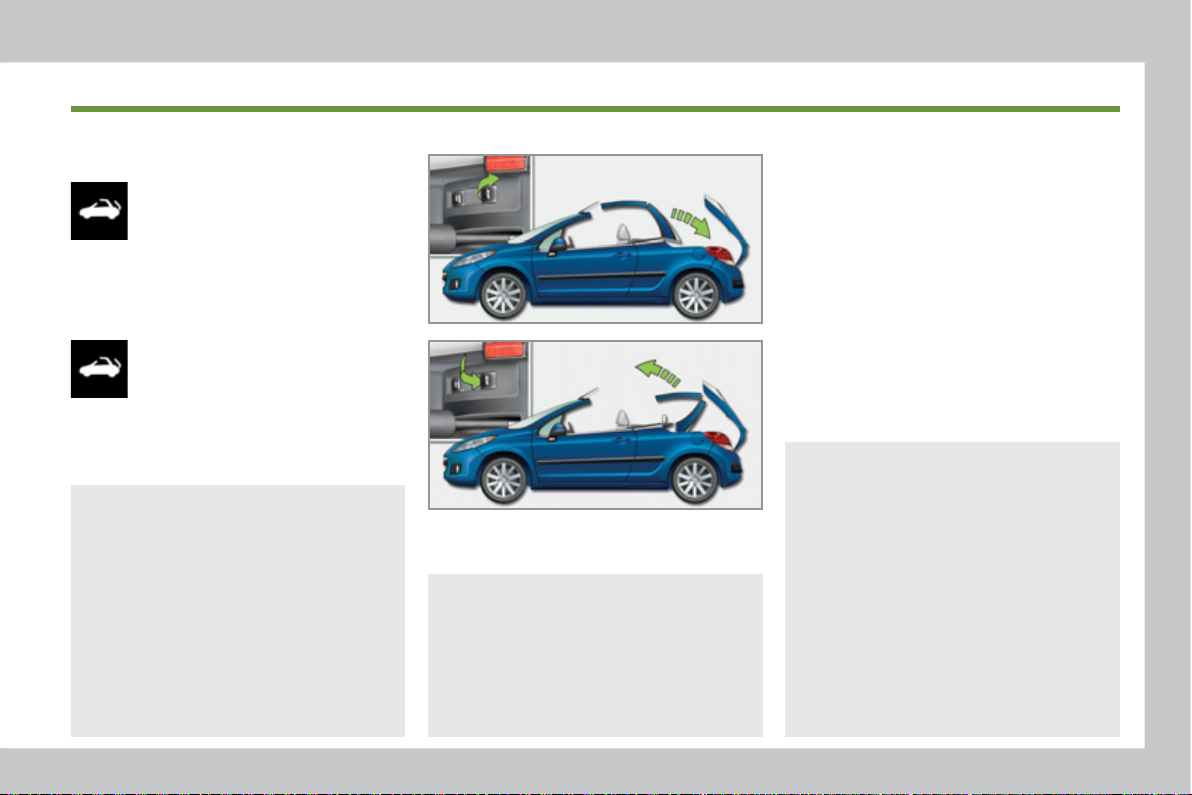
Retractable roof operation
Opening the roof
) Pull this control until the roof
is fully open.
The end of the operation is confi rmed
by an audible signal and a message on
the multifunction screen.
Closing the roof
) Press this control until the
roof is fully closed.
The end of the operation is confi rmed
by an audible signal and a message on
the multifunction screen.
Do not release the roof control
!
during operation of the roof.
However, in the event of danger,
release the control, the roof stops;
then, when the danger is no longer present, complete the required
operation.
If the operation has not completely
fi nished, you will be warned by an
audible signal and a message on
the multifunction screen. These will
be repeated as the vehicle passes
a number of speed thresholds.
Operating fault
!
If a malfunction of the roof occurs,
apply the parking brake, switch
off the ignition, restart the engine,
then start the required operation
again.
If the problem persists, contact a
PEUGEOT dealer.
Changing to "cabriolet"
confi guration:
- the four windows lower,
- the boot opens,
- the roof folds into the boot,
- the boot closes.
Changing to "coupé" confi guration:
- the four windows lower,
- the boot opens,
- the roof opens out and locks automatically,
- the boot closes.
i
If you continue to pull or press this
control after the end of the operation, the four windows rise.
The electric window controls and
the control for the four windows
are deactivated during operation
of the roof.
The roof electronic control unit may
interrupt the operation in progress
as a precaution (for example: door
movement and roof operation in
quick succession). In this case,
release the control then operate
it again to complete the required
operation.
FAMILIARISATION
INTERIOR
Electric windows
On the driver's side, control of
the electric window is automatic
when opening and when closing.
71
Audio and communication
systems
These systems benefi t from the latest
technology: MP3 compatible Peugeot
Connect Sound (RD5), Peugeot Connect USB, Bluetooth hands-free system,
Peugeot Connect Navigation (RNEG)
with 16/9 colour screen, JBL audio system, auxiliary sockets.
Peugeot Connect Navigation (RNEG)
157
Peugeot Connect Sound (RD5)
189
Peugeot Connect USB
196
Automatic gearbox
This system provides perfect driving
pleasure by combining a fully automatic
mode, associated with two special programmes, and a manual mode.
107
Dual-zone digital air
conditioning
This system allows different levels of
comfort to be set for the driver and the
front passenger. It then automatically
controls these levels according to the
ambient conditions.
50
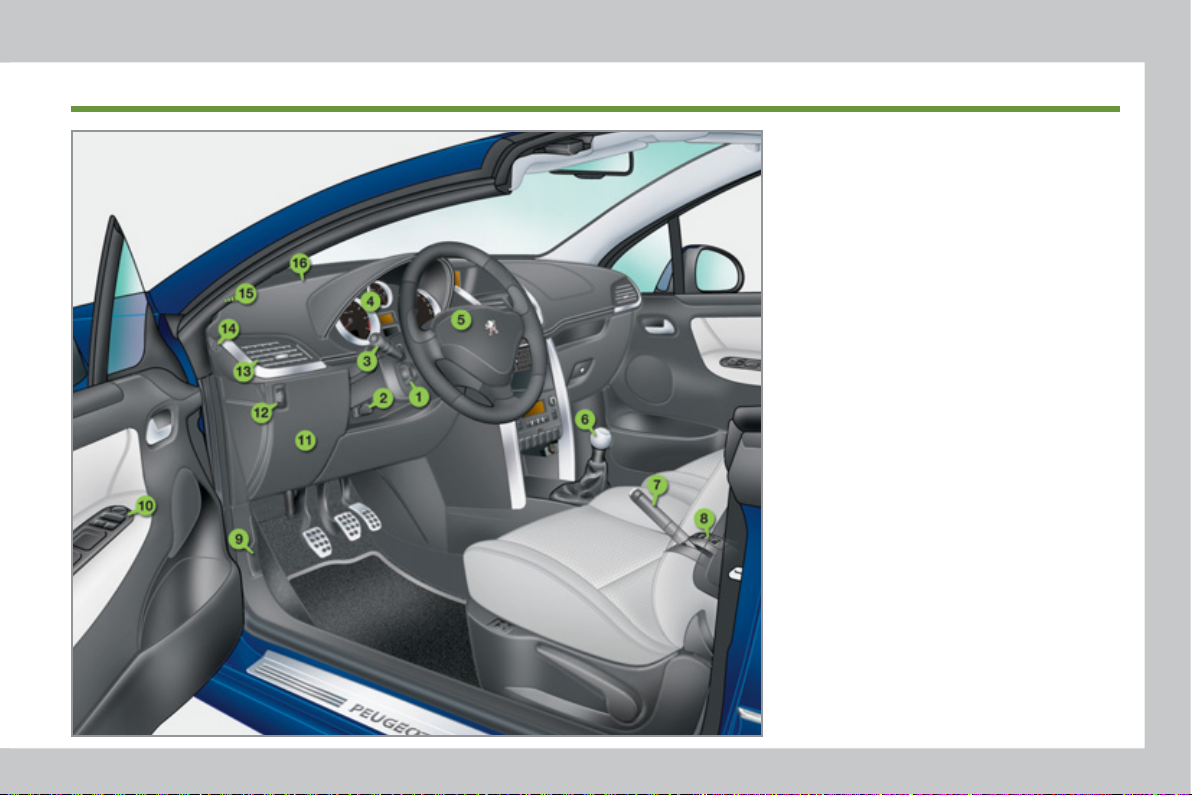
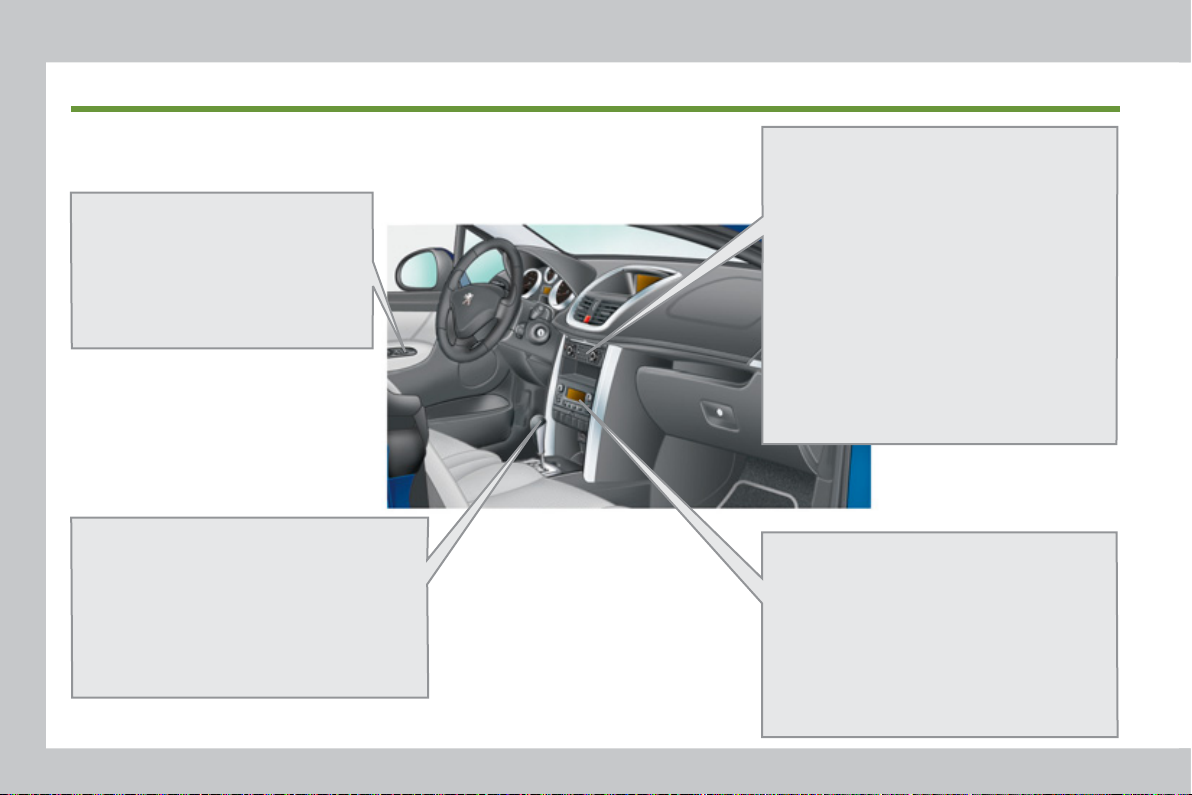
INSTRUMENTS AND CONTROLS
FAMILIARISATION
1. Cruise control/speed limiter
switches.
2. Steering wheel adjustment control.
3. Lighting and direction indicator
control stalk.
4. Instrument panel.
5. Driver's airbag.
Horn.
6. Gear lever.
7. Parking brake.
8. Retractable roof control.
Control for the four windows.
9. Bonnet release lever.
10. Door mirror controls.
Electric window controls.
11. Fusebox.
12. Headlamp height adjustment.
13. Side adjustable air vent.
14. Door window demisting vent.
15. Speaker (medium tweeter).
16. Windscreen demisting vent.
0
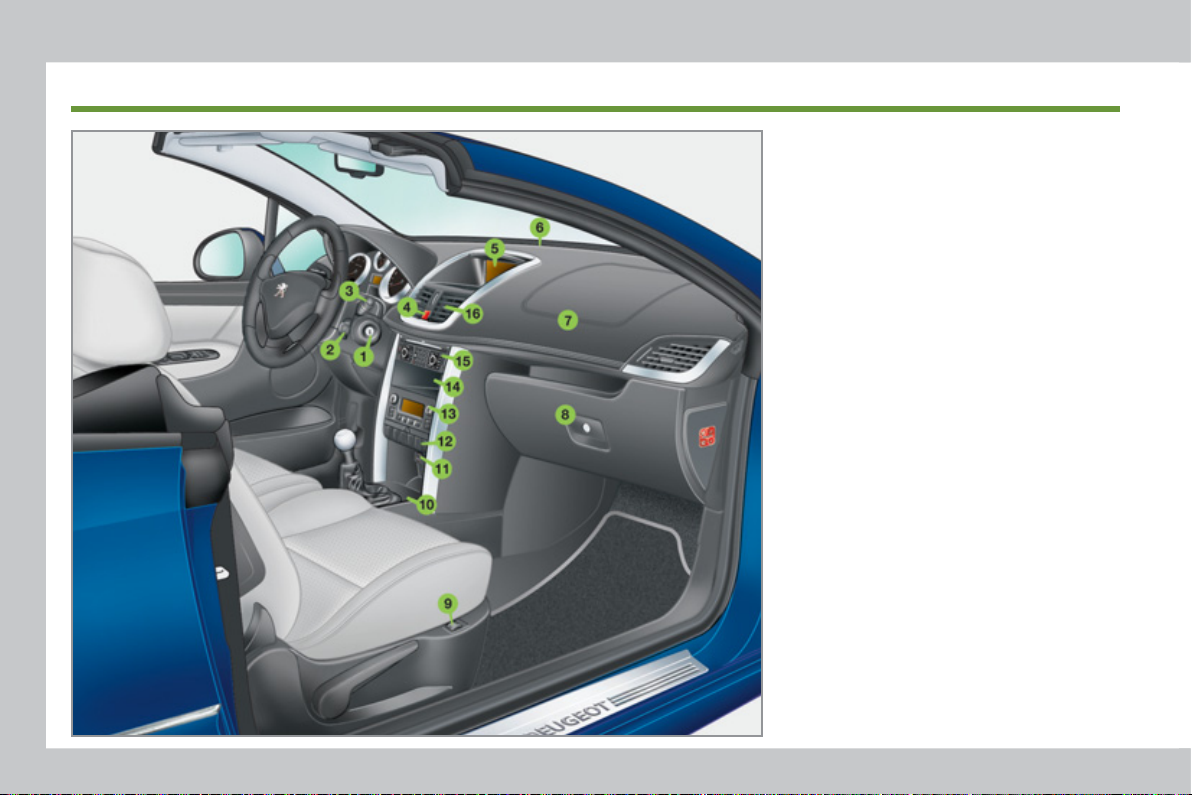
FAMILIARISATION
INSTRUMENTS AND CONTROLS
1. Steering lock and ignition.
2. Audio equipment steering mounted
controls.
3. Wiper/wash-wipe/trip computer
control stalk.
4. Hazard warning lamps switch.
5. Multifunction screen.
Seat belt fastening status warning
lamps.
6. Sunshine sensor.
7. Passenger's airbag.
8. Glove box/Passenger's airbag
deactivation/Audio/video sockets.
9. Heated seat control.
10. 12 V accessories socket.
11. USB port.
12. Dynamic stability control
(ESP/ASR) button.
Central locking button.
Alarm button.
13. Heating/air conditioning controls.
14. Storage compartment.
15. Audio and telematics system.
16. Central adjustable air vents.
1
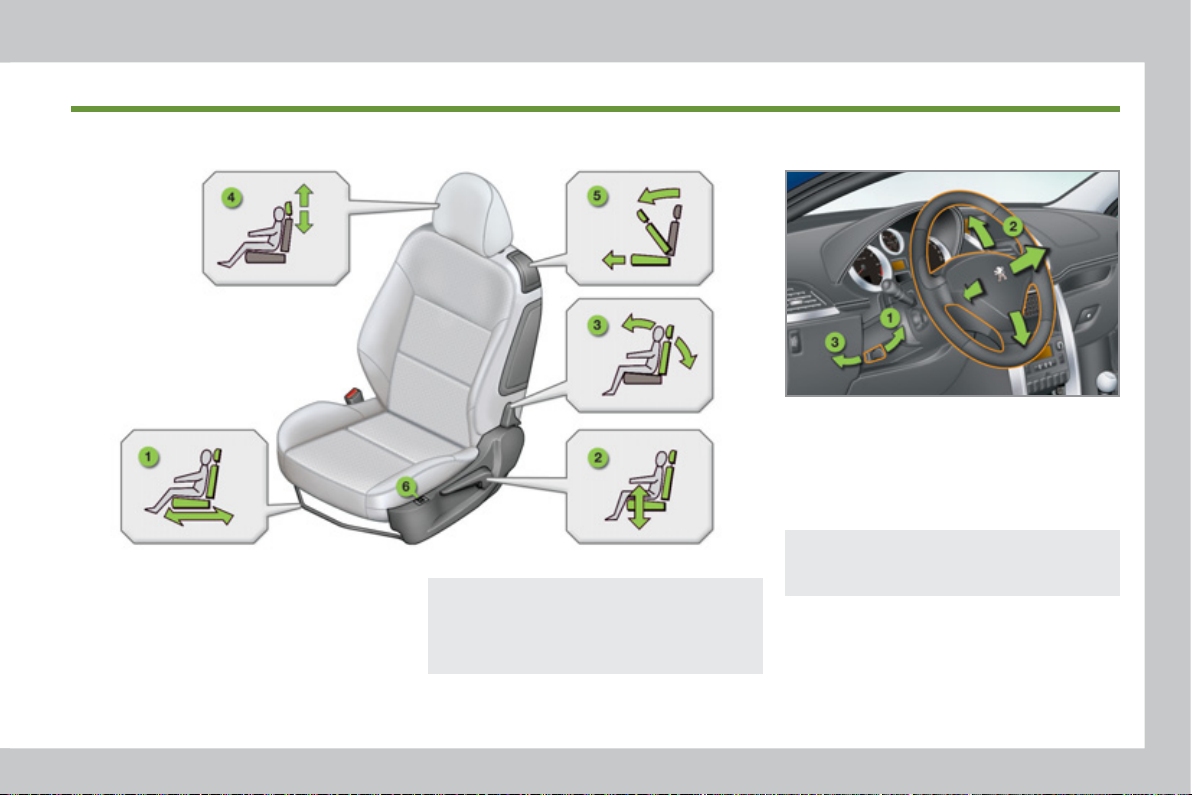
FAMILIARISATION
SITTING COMFORTABLY
Front seat adjustment Steering wheel adjustment
1. Unlocking the control.
2. Adjustment for height and reach.
3. Locking the control.
As a safety precaution, these opera-
!
tions must only be carried out while
1. Forwards-backwards adjustment.
2. Height adjustment.
3. Seat back angle adjustment.
4. Head restraint height adjustment.
52
Also...
i
5. Access to the rear seats.
6. Heated seat.
stationary.
54

FAMILIARISATION
SITTING COMFORTABLY
Door mirror adjustment
A. Selecting the mirror.
B. Adjusting the position of the mirror.
C. De-selecting the mirror.
55
Also...
i
D. Folding/Unfolding.
Rear view mirror adjustment
1. Selecting the "day" position of the
mirror.
2. Adjusting the mirror.
56
Front seat belts
A. Installing the strap.
B. Fastening the buckle.
C. Checking the fastening by pulling
the strap.
98
3
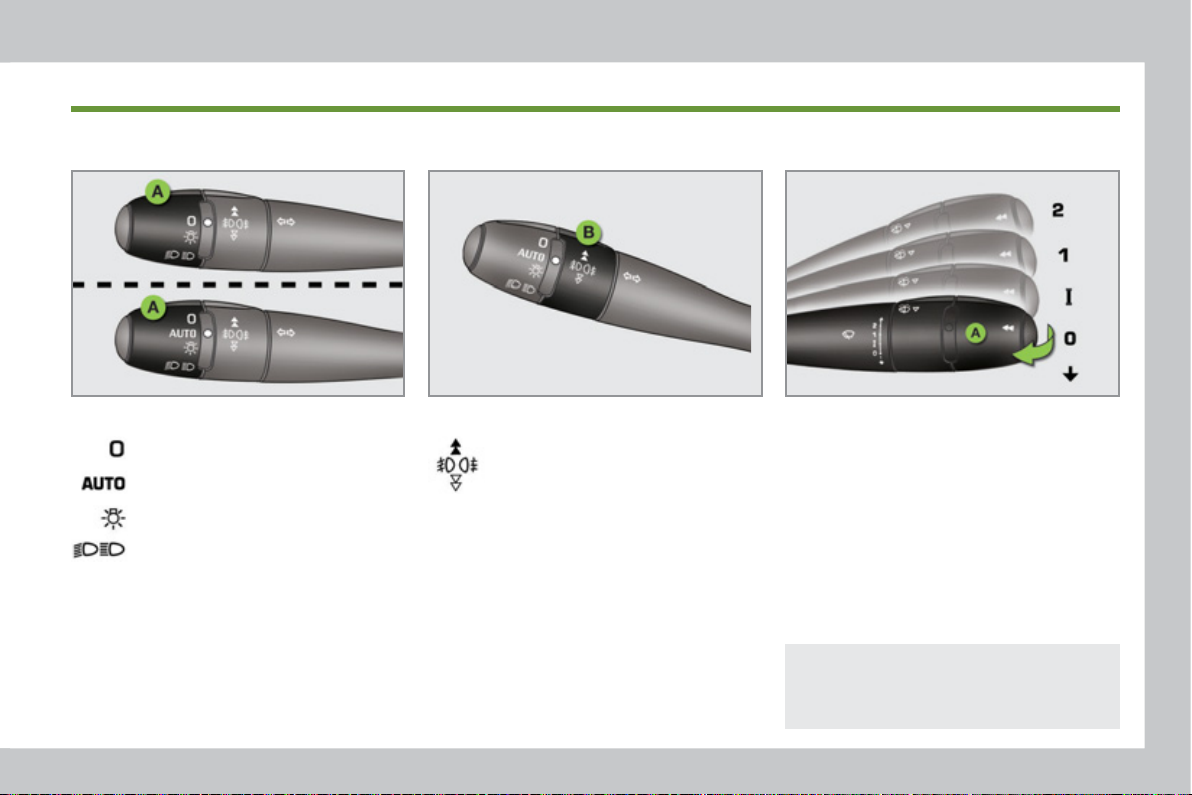
SEEING CLEARLY
Lighting Wipers
FAMILIARISATION
Ring A Stalk A: windscreen wipers
Lighting off.
Automatic illumination of head-
lamps.
Sidelamps.
Dipped/main beam headlamps.
80
Ring B
81
Front and rear foglamps.
2. Fast wipe.
1. Normal wipe.
I. Intermittent wipe.
0. Park.
È Single wipe.
Screenwash: pull the stalk towards
you.
84
i
Automatic wiping is not currently
available on the 207CC.
1
FAMILIARISATION
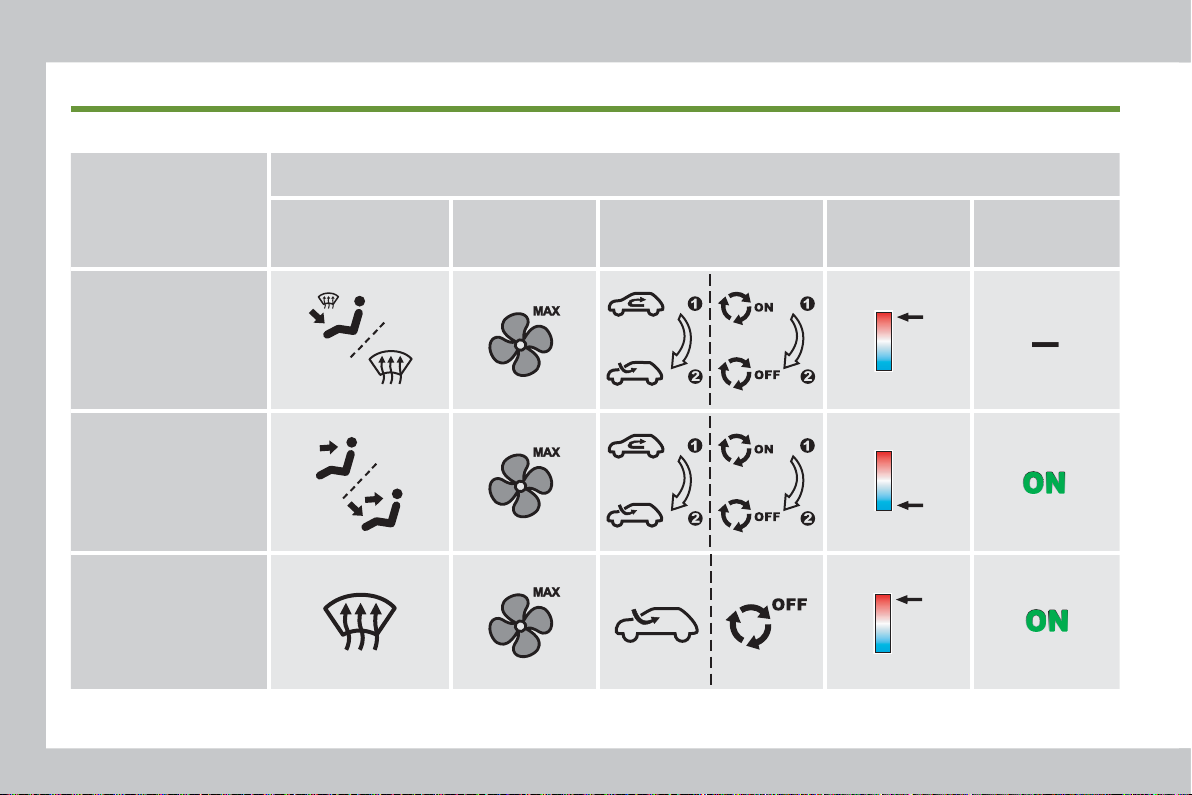
VENTILATION
Advice on interior settings
Heating or Manual air conditioning
I require...
Air distribution Air fl ow
HEAT
COOL
DEMISTING
DEFROSTING
Digital air conditioning : use of the fully automatic mode by pressing the "AUTO" button is recommended.
Air recirculation/
Exterior air intake
Temperature Manual A/C
5
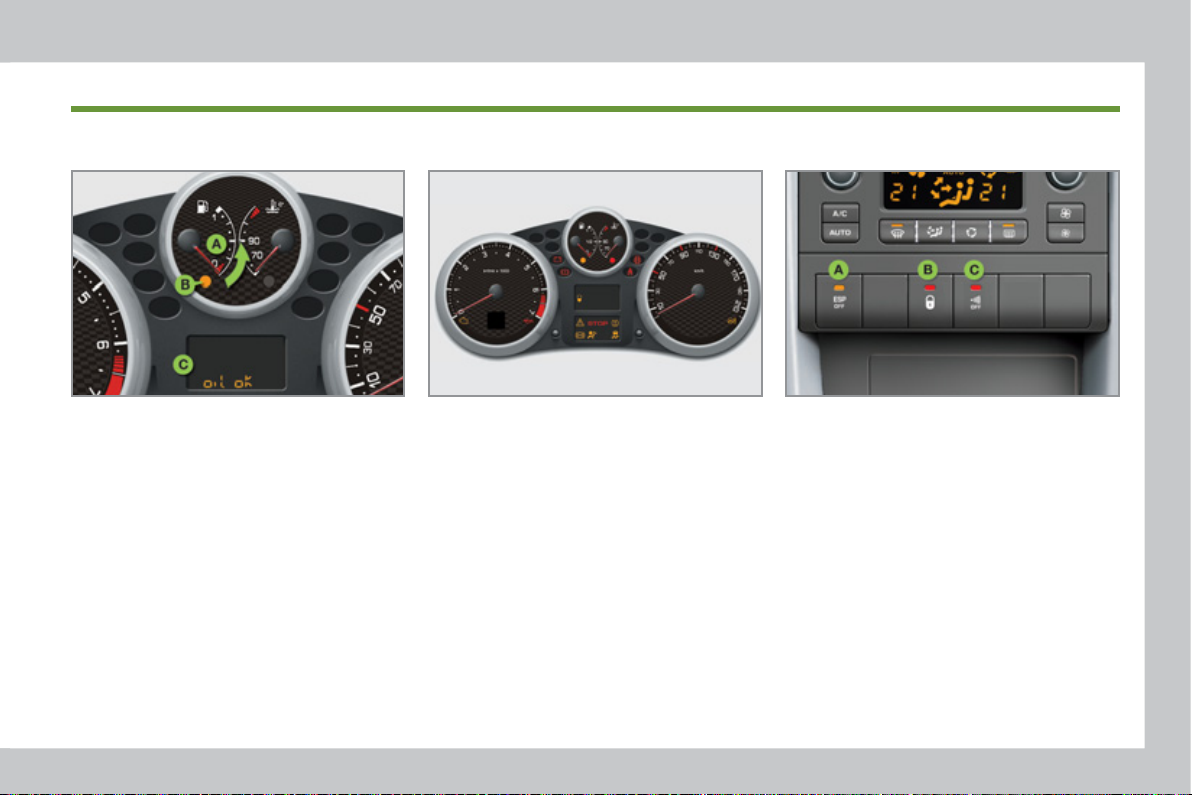
MONITORING
FAMILIARISATION
Instrument panel Switch panel
A. With the ignition on, the fuel gauge
needle should rise.
B. With the engine running, the associ-
ated low level warning lamp should
switch off.
C. With the ignition on, the oil level in-
dicator should display "OIL OK" for
a few seconds.
If the levels are not correct, top up the
level which is low.
20
Warning lamps
1. With the ignition on, the orange and
red warning lamps come on.
2. With the engine running, these
warning lamps should switch off.
If a warning lamp remains on, refer to
the page concerned.
21
Lighting of the indicator lamp indicates
the status of the corresponding function.
A. Deactivation of the ESP/ASR system.
97
B. Central locking.
74
C. Deactivation of the interior volumetric
protection alarm.
69
1
6
FAMILIARISATION
S
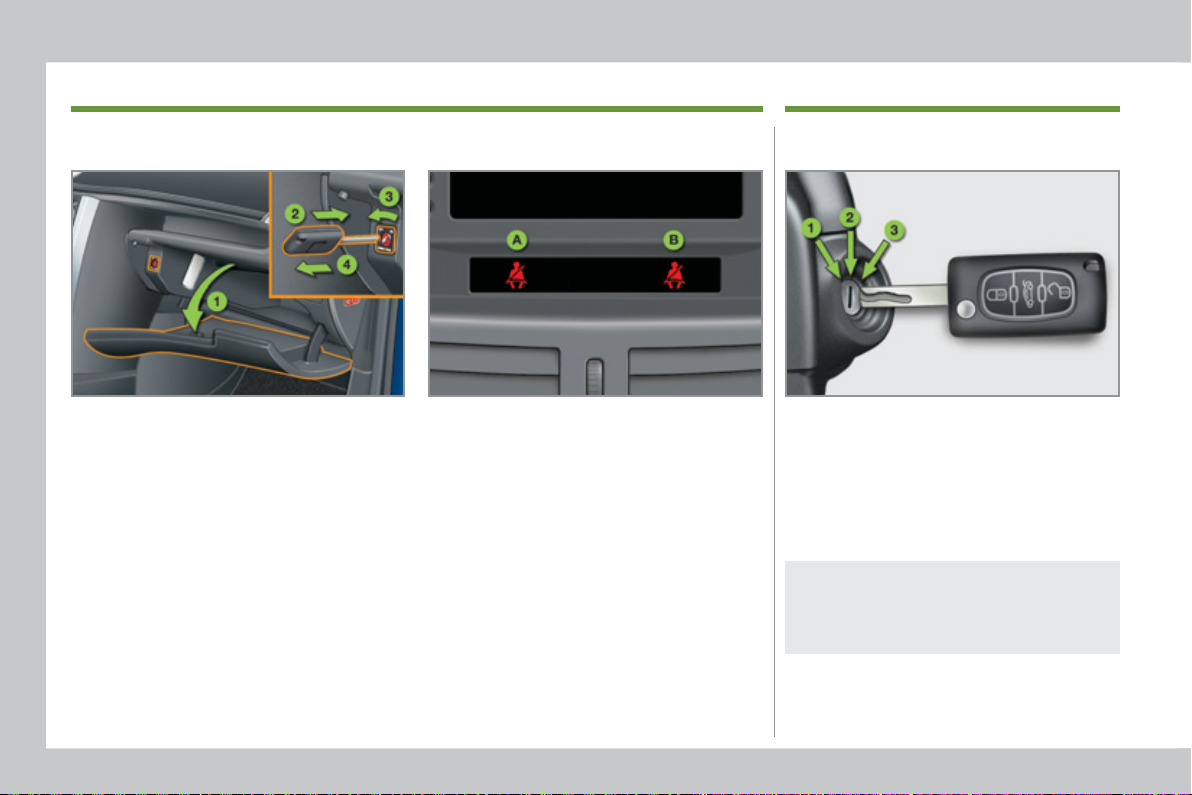
PASSENGER SAFETY
Front passenger's airbag Ignition switch
1. Open the glove box.
2. Insert the key.
3. Select position:
"ON" (activation), with front passen-
ger or "forwards facing" child seat,
"OFF" (deactivation), with "rear facing"
child seat.
4. Remove the key keeping the switch
in the new position.
102
Front seat belts
A. Front left seat belt not fastened or
unfastened warning lamp lit in red.
B. Front right seat belt not fastened or
unfastened warning lamp lit in red.
98
TART
1. Stop position.
2. Ignition position.
3. Starting position.
67
A heavy object (key fob...), attached
!
to the key and weighing down on
its shaft in the ignition switch, could
cause a malfunction.
1
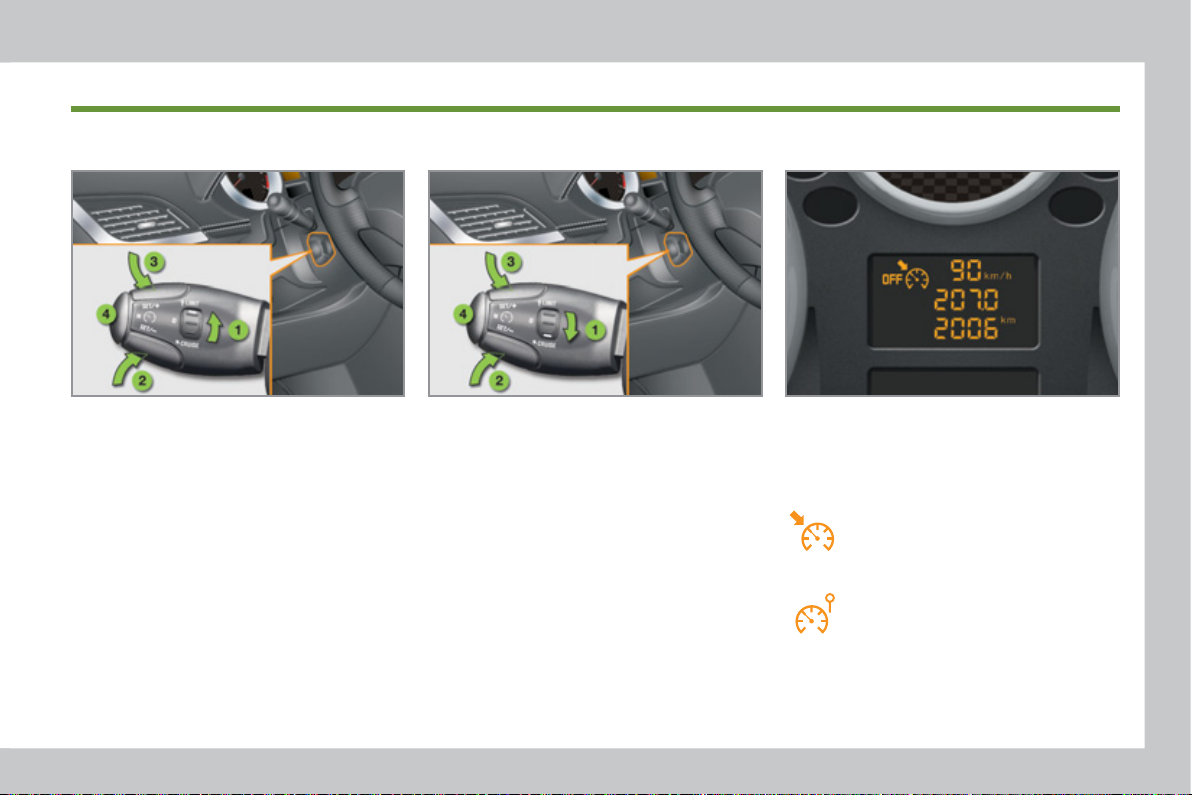
DRIVING SAFELY
FAMILIARISATION
Speed limiter "LIMIT" Instrument panel display
1. Selecting/Switching off speed limiter
mode.
2. Decrease the programmed value.
3. Increase the programmed value.
4. Speed limiter on/off.
The values must be set with the engine
running.
110
Cruise control "CRUISE"
1. Selecting/Switching off cruise con-
trol mode.
2. Decrease the programmed value.
3. Increase the programmed value.
4. Off/return to cruise control.
In order to be programmed or activated,
the vehicle speed must be higher than
25 mph (40 km/h), with at least fourth
gear engaged on the manual gearbox
(second gear on the automatic gearbox).
112
The cruise control or speed limiter mode
appears on the instrument panel when
it is selected.
Cruise control
Speed limiter

8
CO-DRIVING
Eco-driving is a range of everyday practices that allow the motorist to optimise their fuel consumption and CO
sions.
Optimise the use of your
gearbox
With a manual gearbox, move off gently, change up without waiting and
drive by changing up quite soon. If
your vehicle has the system, the gear
shift indicator invites you to change up;
it is displayed in the instrument panel,
follow its instructions.
With an automatic or electronic gearbox, stay in Drive "D" or Auto "A" , ac-
cording to the type of gearbox, without
pressing the accelerator pedal heavily
or suddenly.
Drive smoothly
Maintain a safe distance between vehicles, use engine braking rather than
the brake pedal, and press the accelerator progressively. These practices
contribute towards a reduction in fuel
consumption and CO2 emissions and
also helps reduce the background traffi c noise.
If your vehicle has cruise control, make
use of the system at speeds above
25 mph (40 km/h) when the traffi c is
fl owing well.
Control the use of your
electrical equipment
Before moving off, if the passenger
compartment is too warm, ventilate it by
opening the windows and air vents before using the air conditioning.
Above 30 mph (50 km/h), close the windows and leave the air vents open.
Remember to make use of equipment
that can help keep the temperature in
the passenger compartment down (sunroof and window blinds...).
Switch off the air conditioning, unless
it has automatic digital regulation, as
soon as the desired temperature is attained.
Switch off the demisting and defrosting
controls, if not automatic.
Switch off the heated seat as soon as
possible.
Switch off the headlamps and front foglamps when the level of light does not
require their use.
Avoid running the engine before moving off, particularly in winter; your vehicle will warm up much faster while
driving.
As a passenger, if you avoid connecting your multimedia devices (fi lm, mu-
sic, video game...), you will contribute
towards limiting the consumption of
electrical energy, and so of fuel.
Disconnect your portable devices before leaving the vehicle.
emis-
2
1

9
Limit the causes of excess
consumption
Observe the recommendations
on maintenance
Spread loads throughout the vehicle;
place the heaviest items in the bottom
of the boot, as close as possible to the
rear seats.
Limit the loads carried in the vehicle
and reduce wind resistance (roof bars,
roof rack, bicycle carrier, trailer...). Use
a roof box in preference.
Remove roof bars and roof racks after
use.
At the end of winter, remove snow
tyres and refi t your summer tyres.
Check the tyre pressures regularly,
when cold, referring to the label in the
door aperture, driver's side.
Carry out this check in particular:
- before a long journey,
- at each change of season,
- after a long period out of use.
Don't forget the spare wheel and the
tyres on any trailer or caravan.
Have your vehicle serviced regularly
(engine oil, oil fi lter, air fi lter...) and ob-
serve the schedule of operations recommended by the manufacturer.
When refuelling, do not continue after
the 3 rd cut-off of the nozzle to avoid
any overfl ow.
At the wheel of your new vehicle,
it is only after the fi rst 1 800 miles
(3 000 kilometres) that you will see
the fuel consumption settle down to a
consistent average.
1
INSTRUMENTS and CONTROLS
0
,
ETROL - DIESEL, MANUAL OR AUTOMATIC GEARBOX
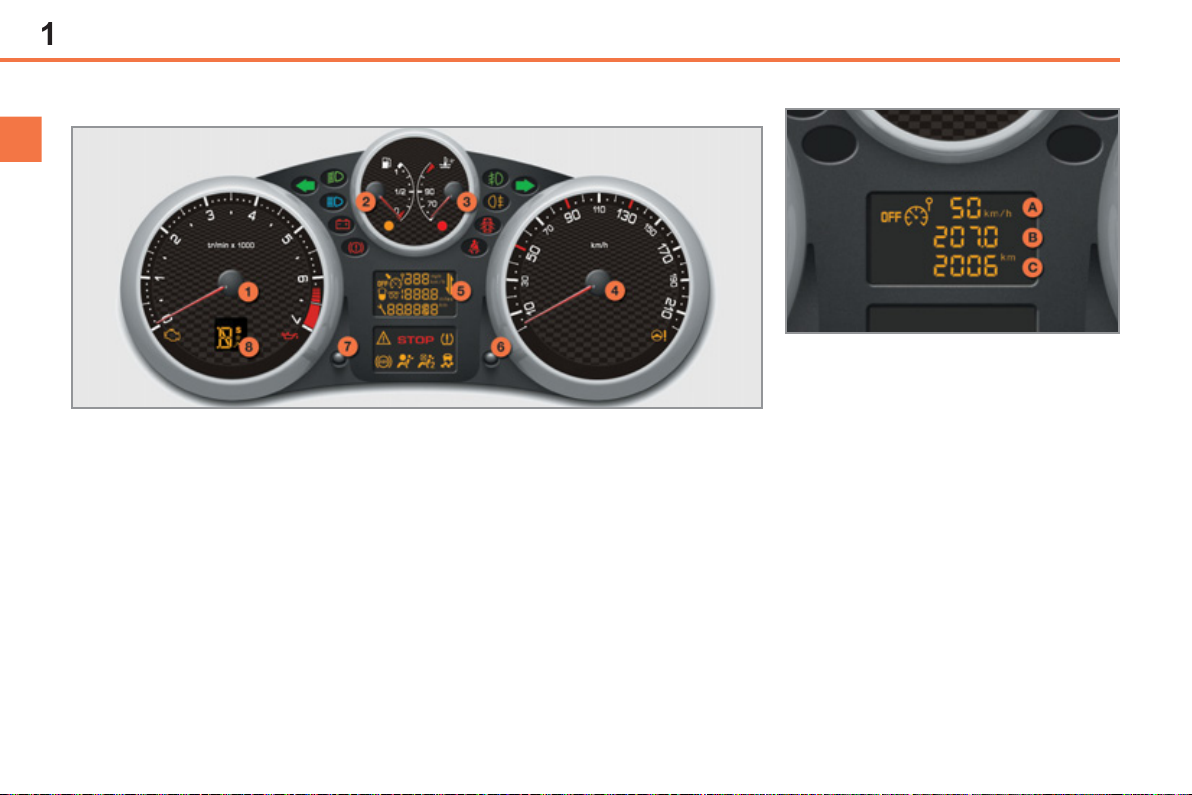
INSTRUMENT PANELS
Panel which groups together the vehicle operation dials and indicator lamps.
Dials
1. Rev counter.
Indicates the speed of rotation of
the engine (x 1 000 rpm).
2. Fuel gauge.
Indicates the quantity of fuel
remaining in the tank.
3. Coolant temperature.
Indicates the temperature of the
engine coolant (°Celsius).
4. Speedometer.
Indicates the current speed of the
moving vehicle (mph or km/h).
5. Screen.
6. Display zero reset button.
Resets the selected function to
zero (trip distance recorder or
service indicator).
7. Instrument panel lighting button.
Adjusts the brightness of the
lighting of the instruments and
controls.
8. Automatic gearbox.
Indicates the programme selected
and the gear engaged.
Screen
A. Speed limiter
or
Cruise control.
(mph or km/h)
B. Trip distance recorder.
(miles or km/h)
C. Service indicator.
(miles or km/h) then,
Engine oil level indicator.
then
Distance recorder.
(km or miles)
These three functions are displayed
in succession when the ignition is
switched on.
For more information, refer to the section
which corresponds to the function and to
the display associated with it.
2
INSTRUMENTS and CONTROLS
Indicator and warning lamps
Visual indicators informing the driver that a system is in operation (operation or
deactivation indicator lamps) or of the occurrence of a fault (warning lamp).
When the ignition is switched on
Certain warning lamps come on for a few seconds when the vehicle's ignition is
switched on.
When the engine is started, these same warning lamps should go off.
If they remain on, before moving off, refer to the information on the warning lamp concerned.
Associated warnings
The illumination of certain warning lamps may be accompanied by an audible signal and a message in the multifunction screen.
Operation indicator lamps
If one of the following indicator lamps comes on, this confi rms that the correspond-
ing system has come into operation.
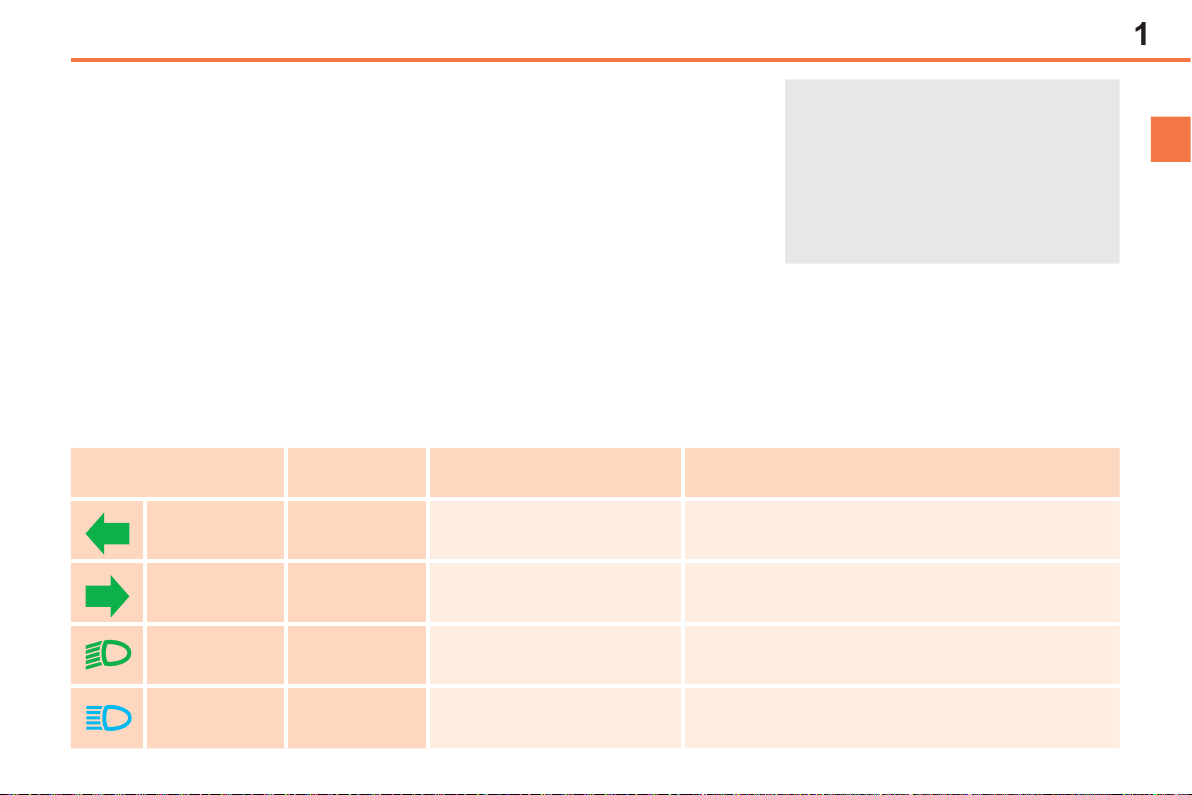
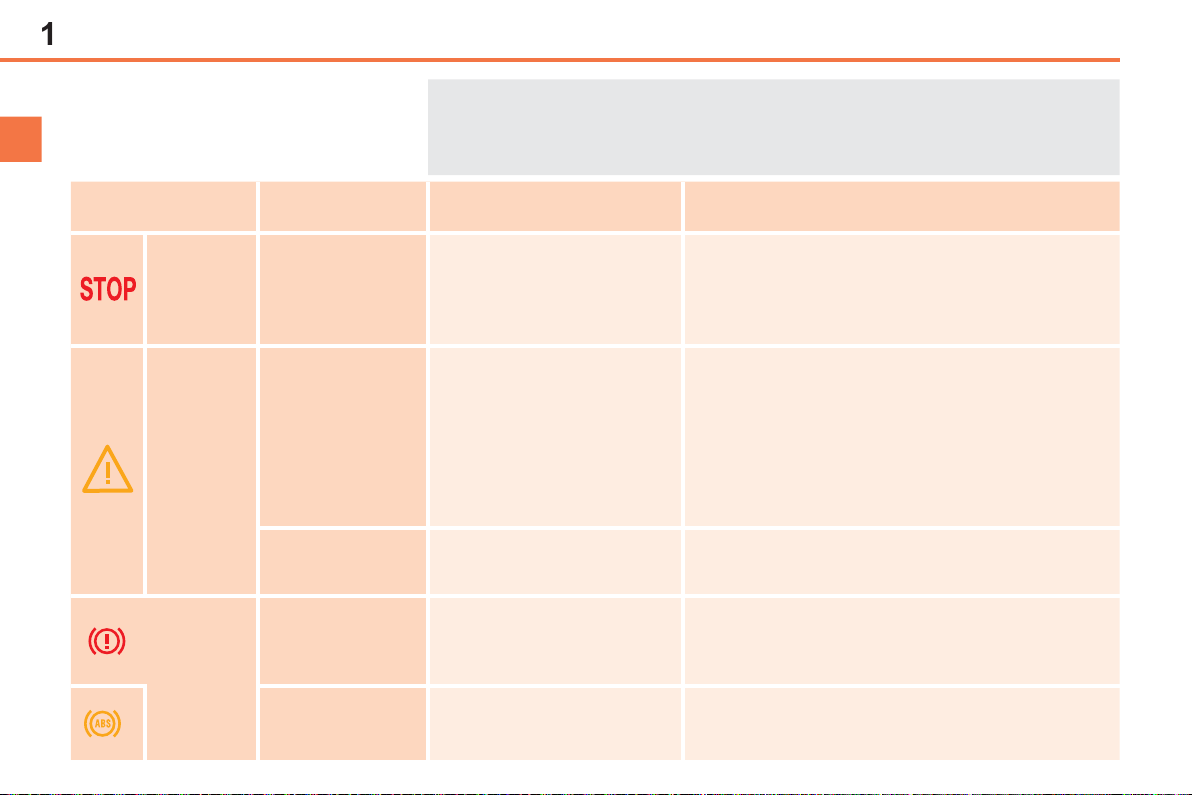
Warning lamp is on Cause Action/Observations
Left-hand
direction
indicato r
Right-hand
direction
indicator
Dipped beam
headlamps
fl ashing with
buzzer.
fl ashing with
buzzer.
fi xed.
The lighting stalk is pushed
down.
The lighting stalk is pushed
up.
The lighting stalk is in the
"Dipped beam headlamps"
position.
The warning lamps may come on
!
continuously (fi xed) or fl ash.
Certain warning lamps may come
on in two different modes. Only by
relating the type of illumination to
the operating status of the vehicle
can it be ascertained whether the
situation is normal or whether a
fault has occurred.
Main beam
headlamps
fi xed.
The lighting stalk is pulled
towards you.
Pull the stalk to return to dipped beam
headlamps.
INSTRUMENTS and CONTROLS
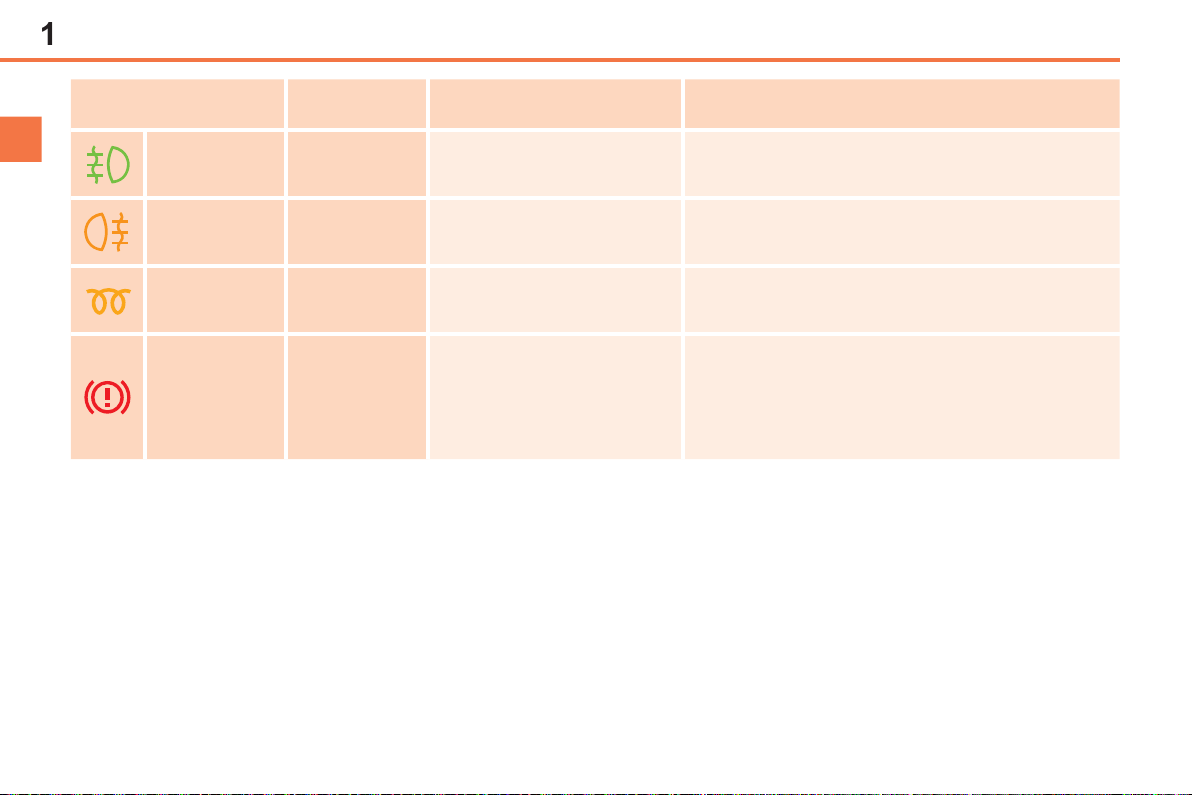
Warning lamp is on Cause Action/Observations
Front
foglamps
Rear
foglamps
Diesel engine
pre-heating
Parking brake fi xed.
fi xed.
fi xed.
fi xed.
The front foglamps are
switched on.
The rear foglamps are
switched on.
The ignition switch is at the
2nd position (ignition on).
The parking brake is
applied or not properly
released.
Turn the ring on the stalk rearwards twice to
switch off the front foglamps.
Turn the ring on the stalk rearwards to switch off
the rear foglamps.
Wait until the warning lamp has switched off before starting.
The duration for which the warning lamp is on is
determined by the climatic conditions.
Release the parking brake to switch off the
warning lamp, keeping your foot on the brake
pedal.
Observe the safety recommendations.
For further information on the parking brake, refer
to the "Driving" section.
INSTRUMENTS and CONTROLS
3
Deactivation indicator lamps
If one of the following indicator lamps comes on, this confi rms that the corresponding system has been switched off intentionally.
This is may be accompanied by an audible signal and a message on the multifunction screen.
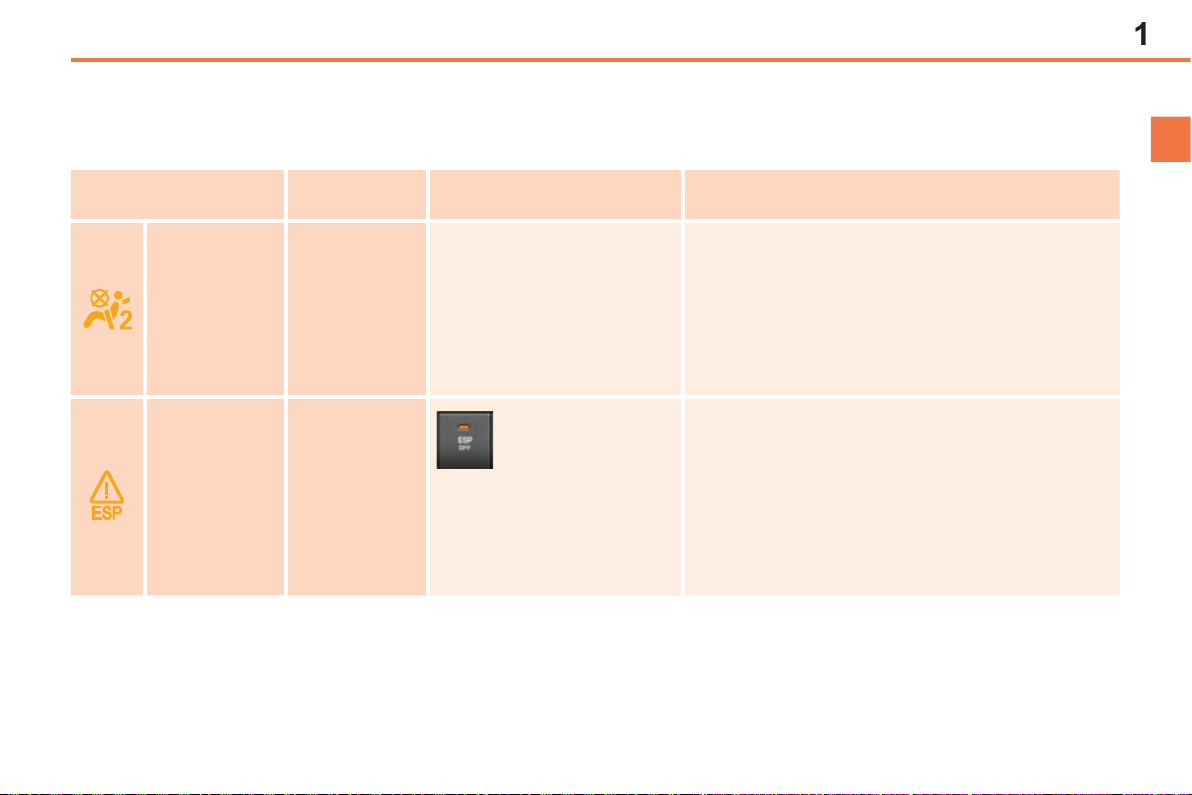
Warning lamp is on Cause Action/Observations
The control, located in the
Passenger's
airbag
system
ESP/ASR fi xed.
fi xed.
glove box, is set to the OFF
position.
The passenger's front
airbag is deactivated.
In this case you can install
a "rear facing" child seat.
The button, located
in the centre of
the dashboard,
is pressed. Its
indicator lamp is on.
The ESP/ASR is
deactivated.
ESP: electronic stability
programme.
ASR: anti-slip regulation.
Set the control to the ON position to activate the
passenger's front airbag.
In this case, do not fi t a child seat in the rear-facing
position.
Press the button again to reactivate
the ESP/ASR manually. Its indicator lamp
goes off.
From approximately 30 mph (50 km/h),
the system is reactivated automatically.
The ESP/ASR system is reactivated
automatically when the vehicle is started.
2
INSTRUMENTS and CONTROLS
Warning lamps
When the engine is running or the vehicle is
being driven, the illumination of one of the following warning lamps indicates a fault which
requires action on the part of the driver.
Warning lamp is on Cause Action/Observations
fi xed, alone or
associated with
STOP
Service
Braking
+
another warning lamp,
accompanied by an
audible signal and a
message on the screen.
temporarily.
fi xed.
fi xed, associated
with the STOP
warning lamp.
fi xed, associated
with the STOP and
ABS warning lamp.
Any fault resulting in the illumination of a warning lamp must be investigated
!
further by reading the associated message in the multifunction screen.
If you encounter any problems, do not hesitate to contact a PEUGEOT dealer
or a qualifi ed workshop.
Illumination of the warning
lamp is associated with a
serious braking system or
engine coolant temperature
problem.
Minor problems have
occurred for which there is
no specifi c warning lamp.
Major problems have
occurred for which there is
no specifi c warning lamp.
The braking system fl uid
level is too low.
The electronic brake force
distribution (EBFD) system
has a fault.
Stop as soon as it is safe to do so as the engine
may cut out when driving.
Park, switch off the ignition and call a PEUGEOT
dealer or a qualifi ed workshop.
Identify the problem by reading the message
shown in the screen, such as, for example:
- the engine oil level,
- the screenwash level,
- the remote control battery,
saturation of the particle emission fi lter on Diesel
-
vehicles (see "Checks - § particle emissions fi lter").
For any other faults, contact a PEUGEOT dealer
or a qualifi ed workshop.
Identify the problem by reading the message
shown in the screen and contact a PEUGEOT
dealer or a qualifi ed workshop.
You must stop as soon as it is safe to do so. Top
up with brake fl uid recommended by PEUGEOT.
If the problem persists, have the system checked
by a PEUGEOT dealer or a qualifi ed workshop.
You must stop as soon as it is safe to do so.
Have it checked by a PEUGEOT or a qualifi ed
workshop.
INSTRUMENTS and CONTROLS
5
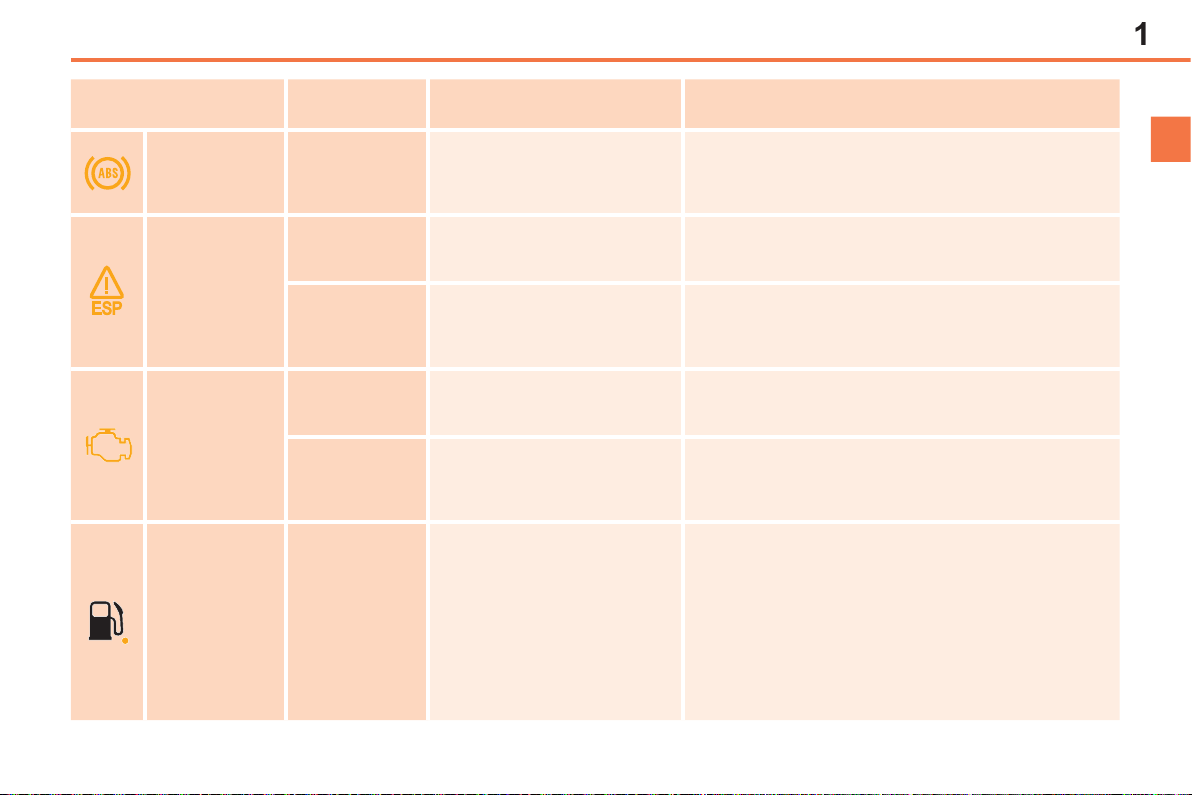
Warning lamp is on Cause Action/Observations
Anti-lock
Braking
System
(ABS)
Dynamic
stability
control
(ESP/ASR)
Engine
autodiagnosis
system
Low fuel level fi xed.
fi xed.
fl ashing.
fi xed.
fl ashing.
fi xed.
The anti-lock braking
system has a fault.
The ESP/ASR regulation is
active.
Unless it has been
deactivated (button pressed
and its indicator lamp on) the
ESP/ASR system has a fault.
The engine management
system has a fault.
The emission control
system has a fault.
When it fi
remains approximately
5 litres of fuel in the tank.
rst comes on there
The vehicle retains conventional braking.
Drive carefully at reduced speed and contact
a PEUGEOT dealer or a qualifi ed workshop
without delay.
The system optimises traction and improves the
directional stability of the vehicle.
Have it checked by a PEUGEOT or a qualifi ed
workshop.
Risk of destruction of the catalytic converter.
Have it checked by a PEUGEOT dealer or a
qualifi ed workshop.
The warning lamp should go off when the engine
is started.
If it does not go off, contact a PEUGEOT dealer
or qualifi ed workshop without delay.
You must refuel as soon as possible to avoid
running out of fuel.
This warning lamp will come on every time the
ignition is switched on, until a suffi cient addition
of fuel is made.
Fuel tank capacity: approximately 50 litres
(petrol) or 48 litres (Diesel).
Never continue to drive until you run out of fuel
as this could damage the emission control and
injection systems.
2
INSTRUMENTS and CONTROLS
6
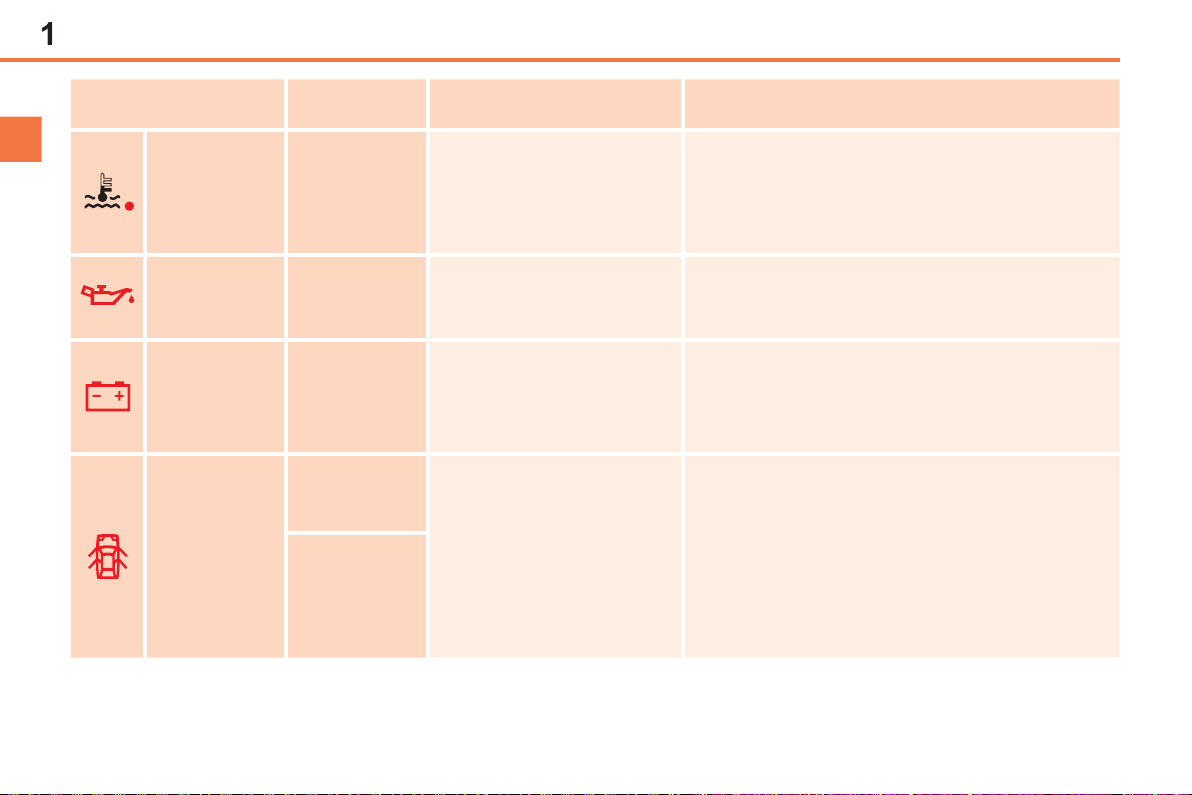
Warning lamp is on Cause Action/Observations
Stop as soon as it is safe to do so.
Maximum
coolant
temperature
fi xed red.
The temperature of the
cooling system is too high.
Wait until the engine has cooled down before
topping up the level, if necessary.
If the problem persists, contact a PEUGEOT
dealer or qualifi ed workshop.
Engine oil
pressure
Battery
charge *
Door(s)
open
fi xed.
fi xed.
fi xed if the
speed is
below 6 mph
(10 km/h).
fi xed and
accompanied
by an audible
signal if the
speed is
above 6 mph
(10 km/h).
There is a fault with the
engine lubrication system.
The battery charging circuit
has a fault (dirty or loose
terminals, slack or cut
alternator belt, ...).
A door, the boot or the rear
screen is still open.
2
You must stop as soon it is safe to do so.
Park, switch off the ignition and contact a
PEUGEOT dealer or a qualifi ed workshop.
The warning lamp should go off when the engine
is started.
If it does not go off, contact a PEUGEOT dealer
or a qualifi ed workshop.
Close the door or boot.
* According to destination country.
INSTRUMENTS and CONTROLS
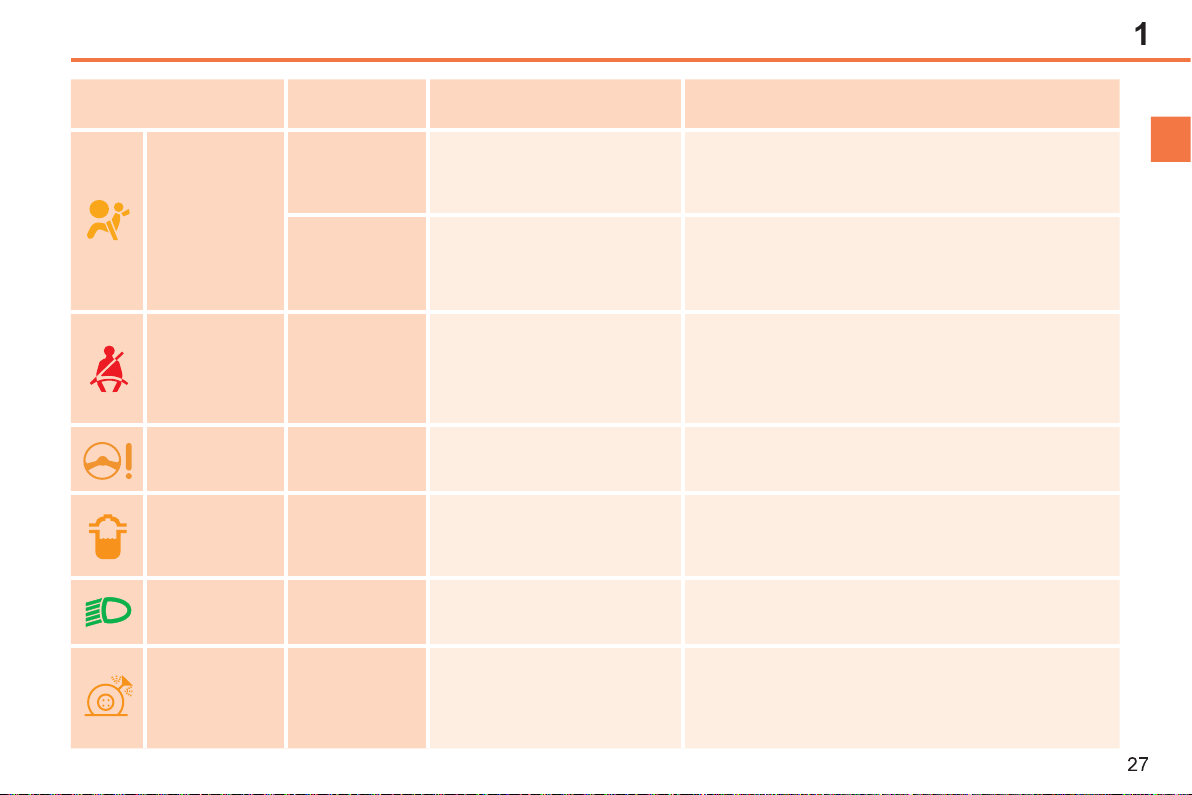
Warning lamp is on Cause Action/Observations
Airbags
Seat belt not
fastened/
unfastened
Power
steering
Water in
Diesel
Directional
headlamps
Punctured
wheel
temporarily.
fi xed.
fi xed then
fl ashing
accompanied
by an
increasing
audible signal.
fi xed.
fi xed.
fl ashing.
fi xed.
This lamp comes on for a
few seconds when you turn
on the ignition, then goes
off.
One of the airbag or seat
belt pretensioner systems
has a fault.
The driver and/or the front
passenger has not fastened
or has unfastened their seat
belt.
The power steering has a
fault.
The Diesel fuel fi lter
contains water.
The directional headlamps
system has a fault.
One or more wheels are
punctured or seriously
defl ated.
This lamp should go off when the engine is
started.
If it does not go off, contact a PEUGEOT dealer
or a qualifi ed workshop.
Have it checked by a PEUGEOT dealer or a
qualifi ed workshop.
Pull the strap then insert the tongue in the
buckle.
Drive carefully at reduced speed.
Have it checked by a PEUGEOT dealer or a
qualifi ed workshop.
Risk of damage to the injection system on Diesel
engines.
Contact a PEUGEOT dealer or a qualifi ed
workshop without delay.
Have it checked by a PEUGEOT dealer or a
qualifi ed workshop.
Stop immediately avoiding any sharp action on
the steering wheel or the brakes.
Repair or change the damaged wheel and have
the pressure of the tyres checked as soon as
possible.
INSTRUMENTS and CONTROLS
8
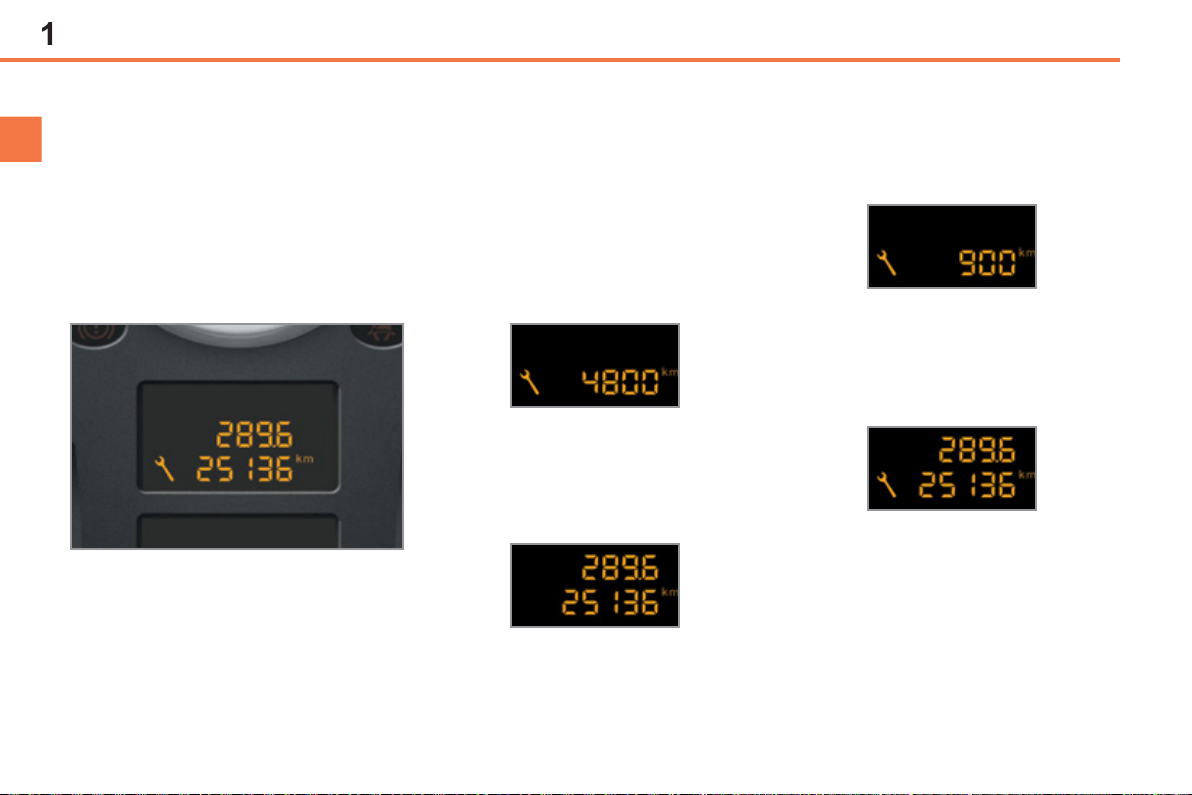
Service indicator
System which informs the driver when
the next service is due, in accordance with the manufacturer's servicing
schedule.
The point at which the service is due is
calculated from the last indicator zero
reset. It is determined by two parameters:
- the distance travelled,
- the time elapsed since the last service.
More than 1 000 km remain before
the next service is due
For 5 seconds after the ignition is
switched on, the spanner symbolising
the service operations comes on. The
distance recorder display line indicates
the distance remaining before the next
service is due.
Example: 4 800 km remain before the
next service is due.
For 5 seconds after the ignition is
switched on, the display indicates:
5 seconds after the ignition is switched
on, the spanner goes off ; the distance
recorder resumes its normal operation.
The display then indicates the total and
trip distances.
Less than 1 000 km remain before
the next service is due
Example : 900 km remain before the
next service is due.
For 5 seconds after the ignition is
switched on, the display indicates:
5 seconds after the ignition is switched
on, the distance recorder resumes its
normal operation. The spanner re-
mains on to indicate that a service
must be carried out soon.
2
 Loading...