

Peugeot 207 2007 Owner's Manual

INSTRUMENTS AND CONTROLS
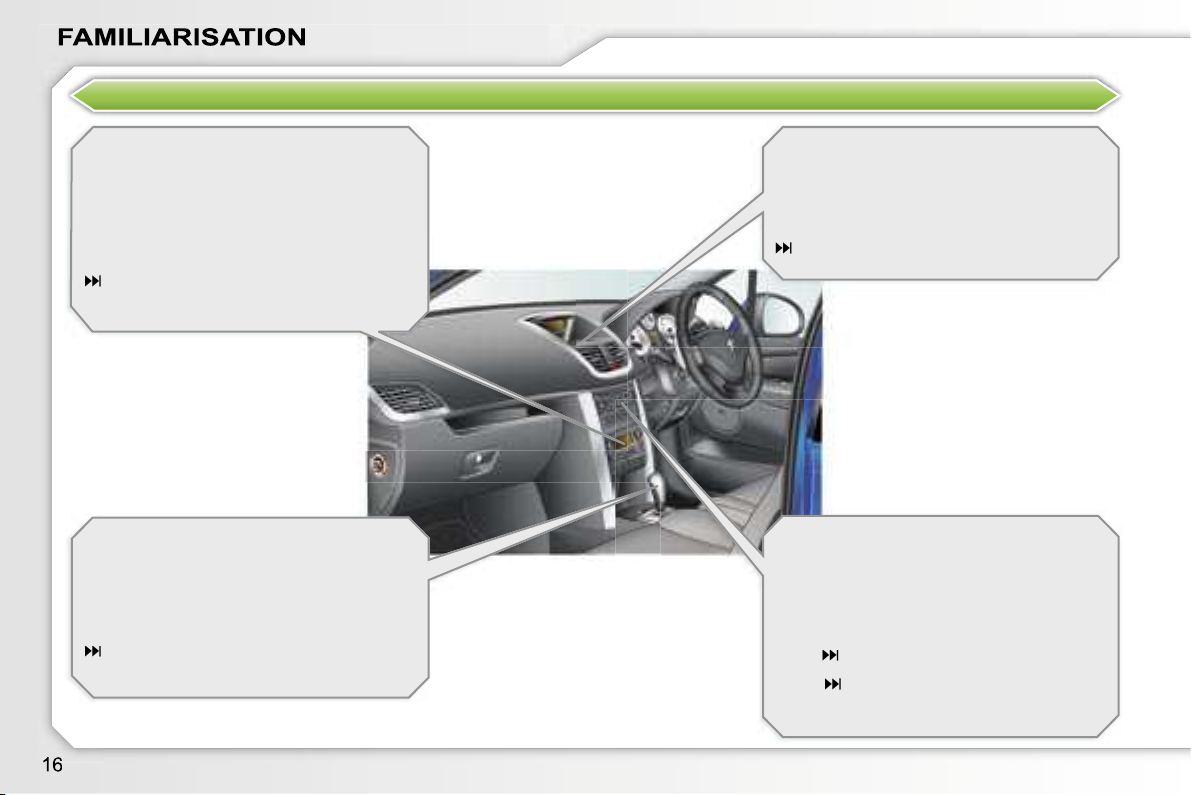
Audio equipment steering wheel
Steering lock and ignition.
Wipers/wash-wipe/trip computer
Instrument panel.
Driver’s air bag.
Horn.
Dynamic stability control
Rear parking assistance button.
Alarm button.
Gear lever.
Handbrake.
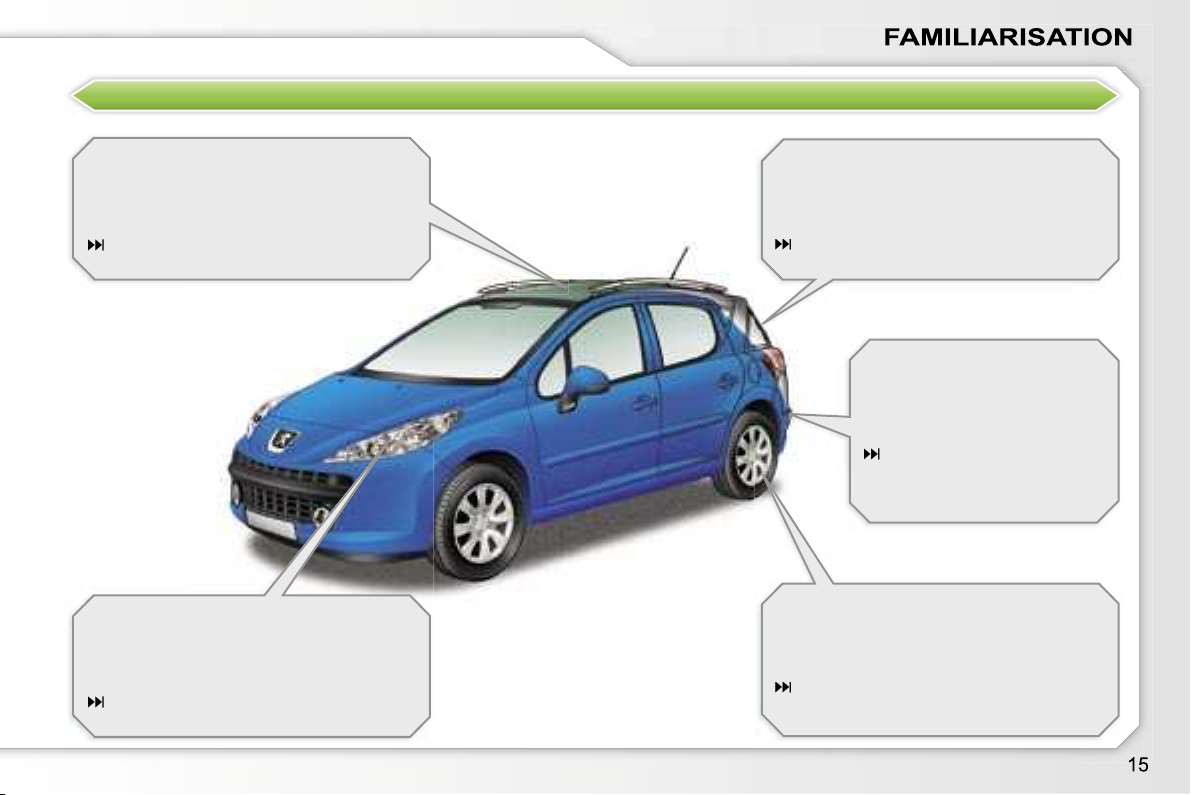
Panoramic roof shutter control
Exterior mirror controls.
Electric window controls.
Rear electric windows deactivation
Headlamp height adjustment.
Front door window de-icing vent.
Side adjustable and closing vent.
Windscreen de-icing vent.

INSTRUMENTS AND CONTROLS
Cruise control/speed limiter switch.
Lights and direction indicators
Hazard warning lights switch.
Fragrance diffuser.
Multifunction display.
Seat belt fastening status warning
Sunshine sensor.
Passenger air bag.
Speaker (tweeter).
Glove box/Passenger air bag
Bonnet release control.
Front ashtray/Lighter.
Heating/air conditioning controls.
CD changer.
Audio RD4 or RT3 GPS audio/
Central adjustable and closing
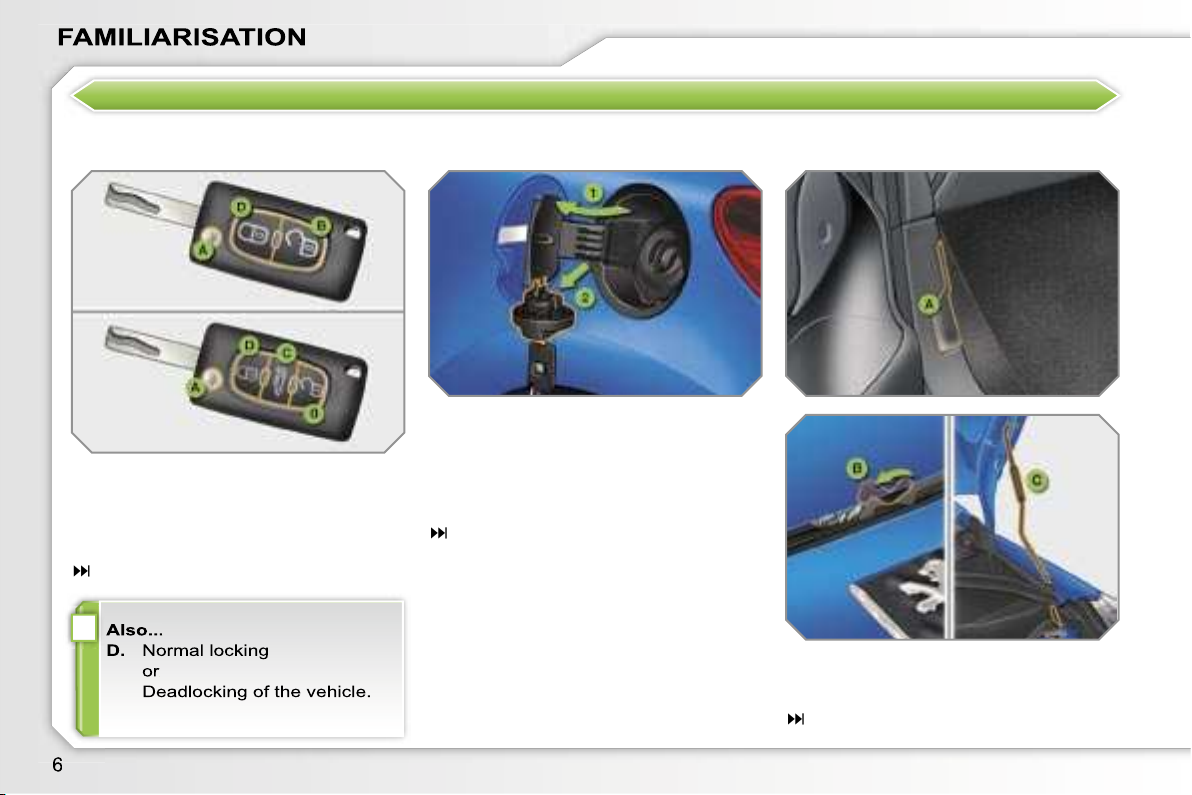
OPENING
A.
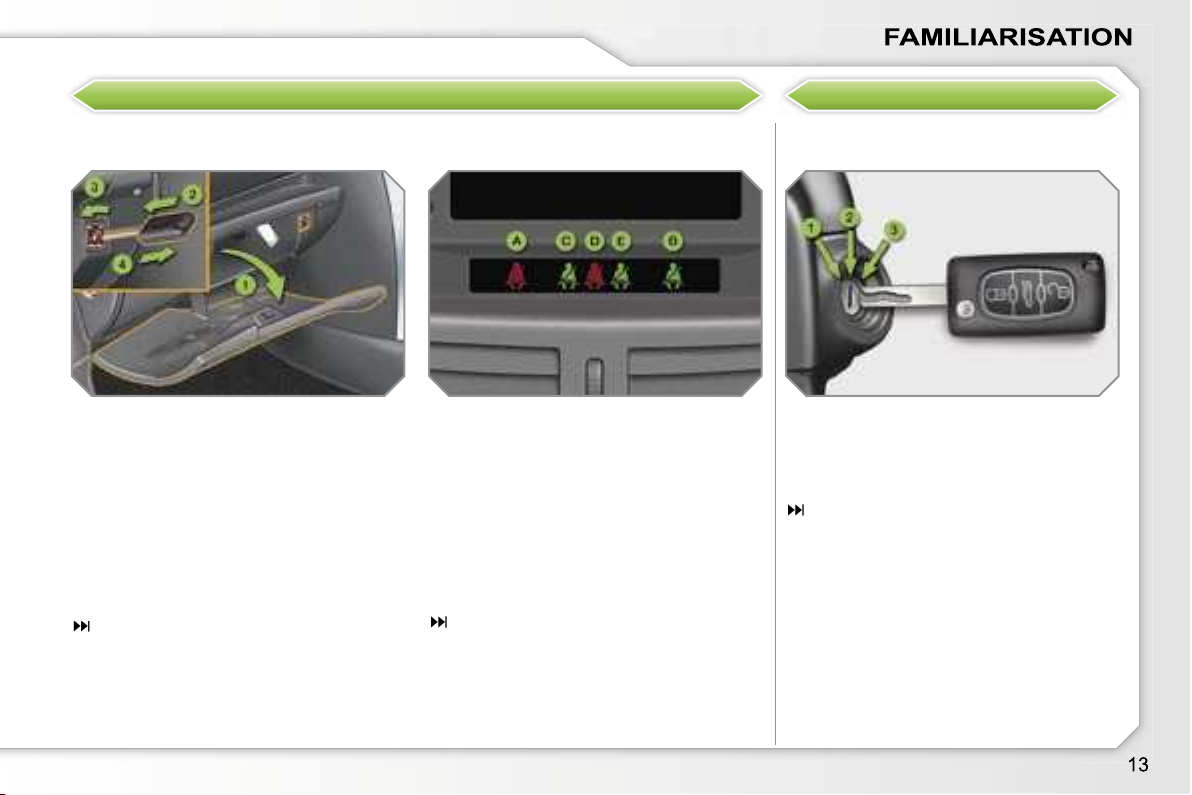
Unfolding/Folding the key.
Unlocking the vehicle.
Unlocking and partially opening
70
Opening the fuel filler flap.
Opening and hooking the fuel filler
A.
Interior control.
Exterior control.
Bonnet strut.
Remote control key
i
Fuel tank
Bonnet

OPENING
Unlocking the vehicle.
Opening the boot.
Vehicle locked
Unlocking and partially opening
Opening the rear screen.
Opening the shutter.
Closing the shutter.
81
Partially opening the rear screen.
Opening the rear screen.
Vehicle unlocked
Boot (SW)
i
Rear screen (SW)
Panoramic roof (SW)
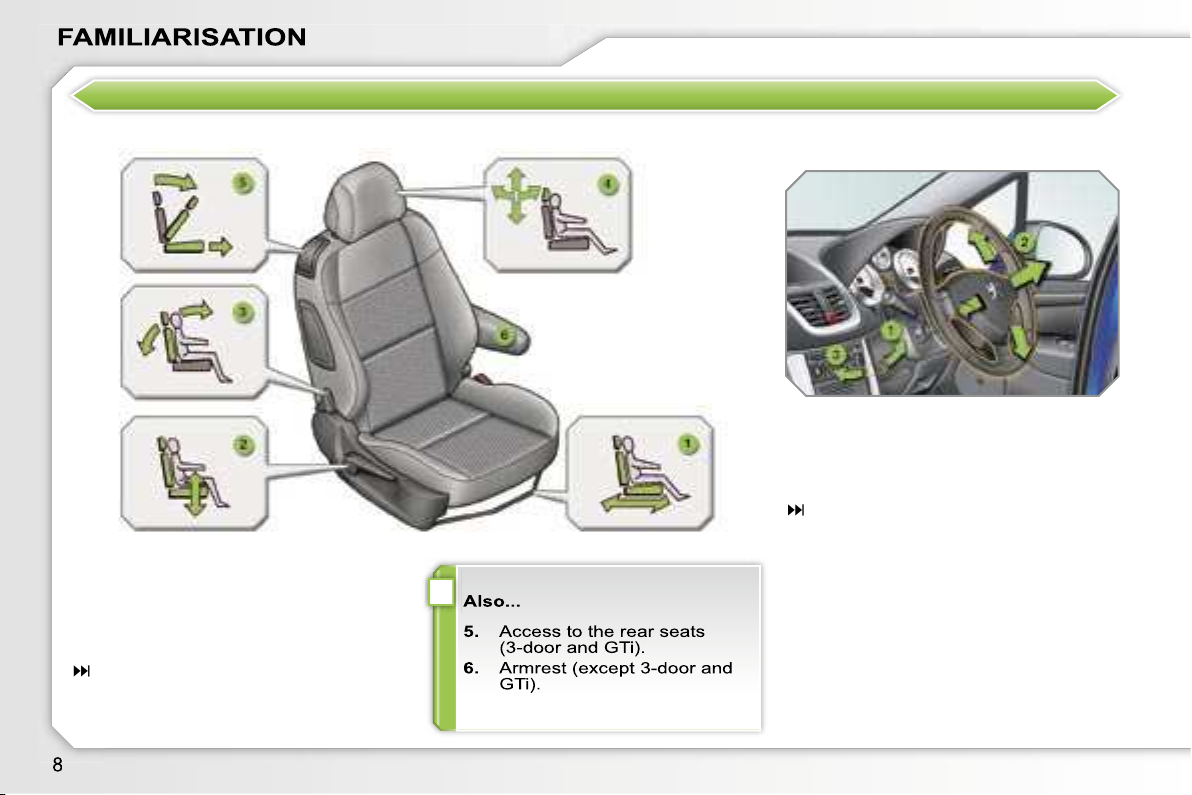
SITTING COMFORTABLY
Forwards-backwards adjustment.
Height adjustment.
Seat back angle adjustment.
Head restraint height and angle
Unlocking the control.
Height and depth adjustment.
Locking the control.
Front seat adjustment Steering wheel adjustment
i

SITTING COMFORTABLY
A.
Selecting the mirror.
Adjusting the position of the mirror.
De-selecting the mirror.
Selecting the "day" position of the
Directing the mirror.
60
Fastening.
Height adjustment.
Exterior mirrors adjustment
i
Interior mirror adjustment
Front seat belt
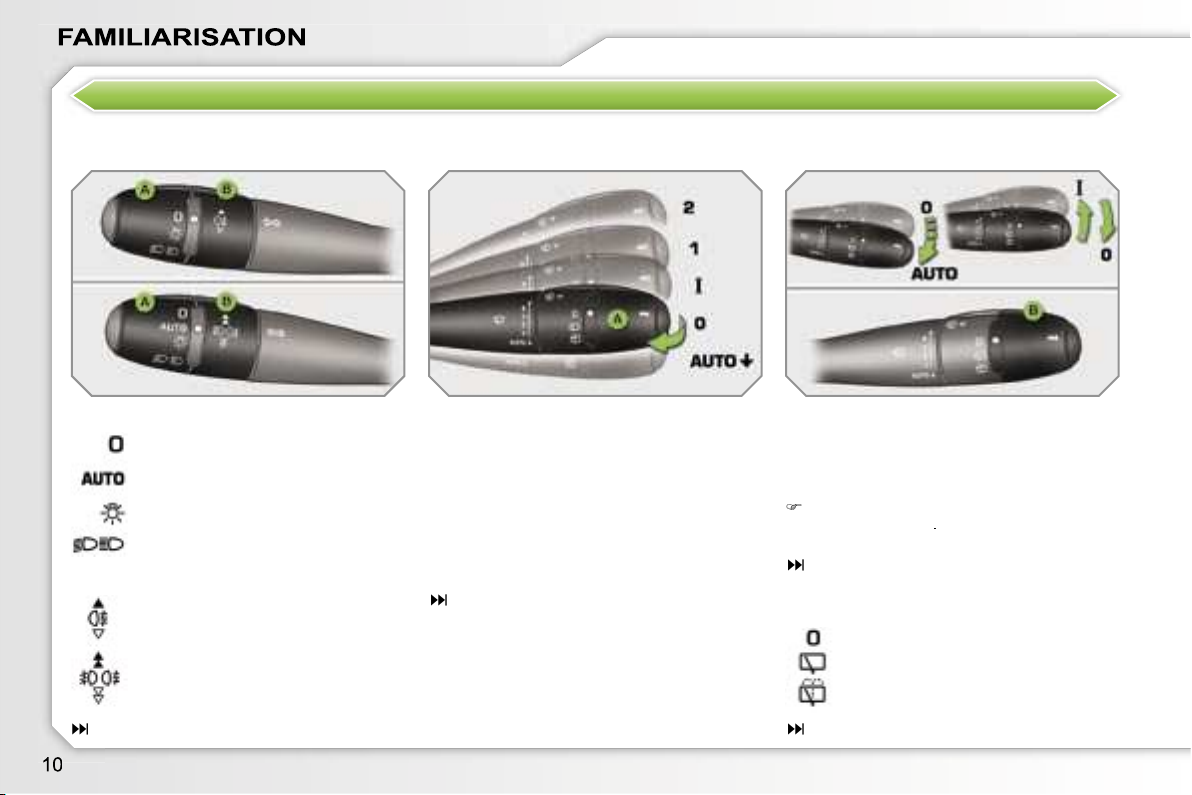
SEEING CLEARLY
Fast wipe.
Normal wipe.
Intermittent wipe.
Park.
AUTO
Automatic wiping or single
wipe.
Push the lever upwards and return it
Lights off.
Side lights.
Automatic lighting.
Lights
Wipers
Push the lever downwards and re-
lease it.

VENTILATION
Advice on interior settings
Air distribution
Air flow
Air recirculation/
Automatic air conditioning:
use of the fully automatic mode by pressing the
button is preferable.
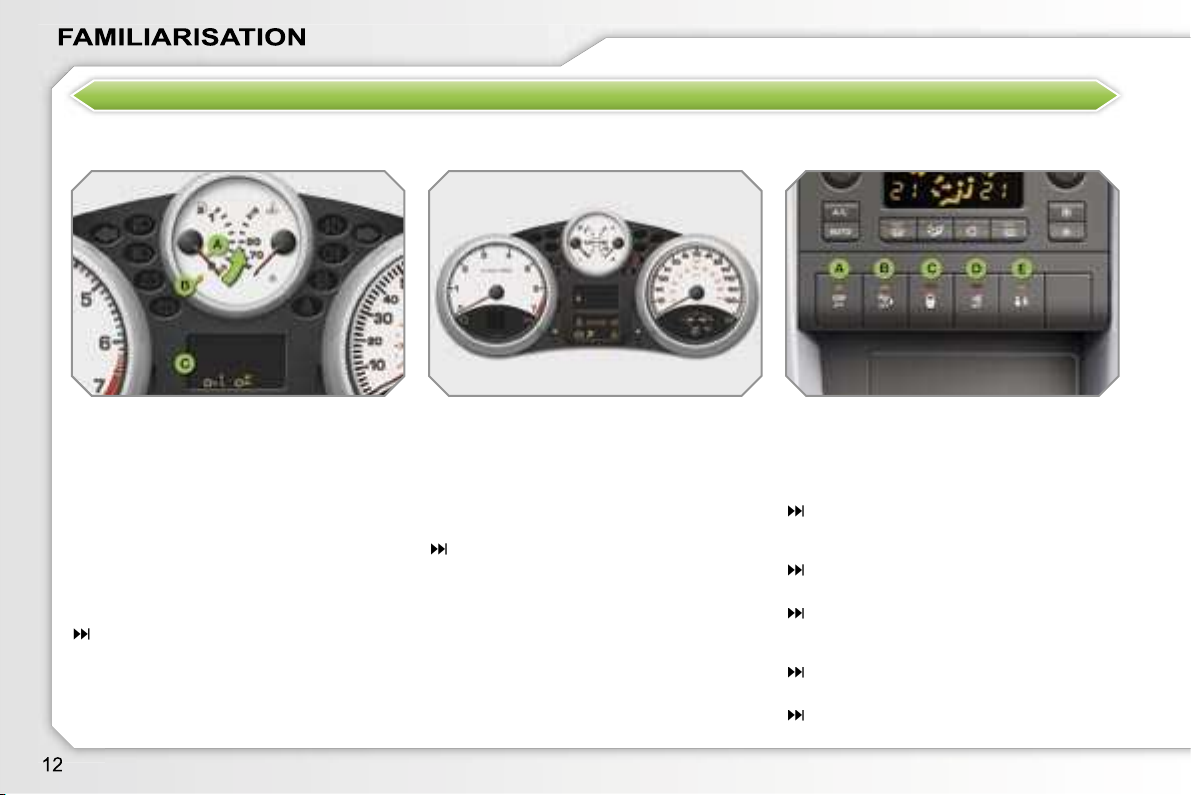
MONITORING
A.
With the ignition on, the fuel gauge
With the engine running, the
With the ignition on, the oil level
Deactivation of the ESP/ASR
Deactivation of the rear parking
Central locking.
Deactivation of the interior
Activation of the electric child lock*.
103
With the ignition on, the orange
With the engine running, these
warning lights should switch off.
Instrument panel Controls bar
Warning lights
KEEPING YOUR PASSENGERS SAFE
Open the glove box.
Insert the key.
Select position:
(activation), with front
(deactivation), with "rear
Remove the key keeping the
position.
position.
position.
A.
Front left seat belt not fastened or
Front right seat belt fastened
warning light lit in green.
Rear left seat belt fastened
warning light lit in green.
Rear centre seat belt unfastened
warning light lit in red*.
Rear right seat belt fastened
warning light lit in green.
STARTING
Front passenger air bag Ignition switch
Front and rear seat belts

DRIVING SAFELY
Selecting/Switching off speed
Decrease the programmed value.
Increase the programmed value.
Speed limiter on/off.
Selecting/Switching off cruise
Decrease the programmed value.
Increase the programmed value.
Cruise control on/off.
Speed limiter Instrument panel display
Cruise control
EXTERIOR FEATURES
88
81
warning when reversing by
INTERIOR FEATURES
53
Audio and communication systems
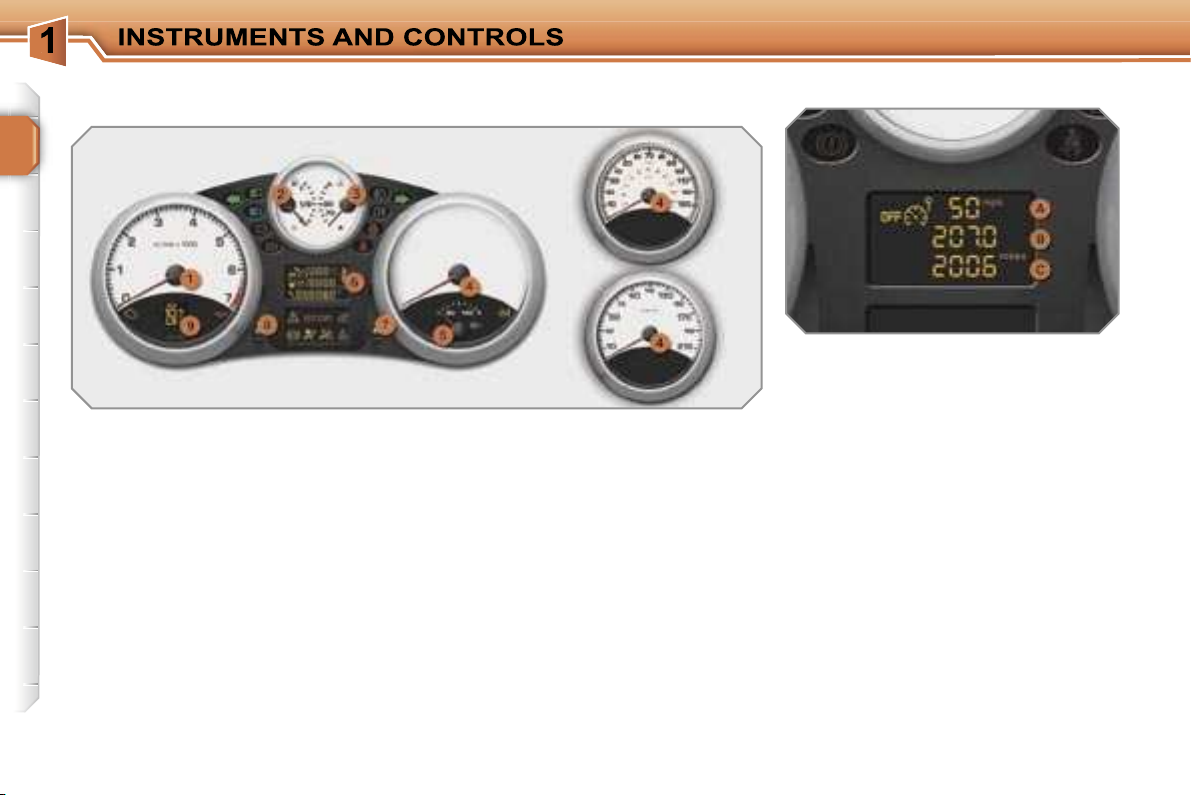
PETROL - DIESEL MANUAL GEARBOX, "2 TRONIC" GEARBOX OR
Indicates the temperature of the oil
Resets the selected function to
Adjusts the brightness of the
Indicates the programme selected
Indicates the speed of rotation of
Indicates the quantity of fuel
Indicates the temperature of the
Indicates the current speed of the
or
(km/h or mph)
(km or miles)
(km or miles) then,
Engine oil level indicator.
then
Distance recorder.
(km or miles)
These three functions are dis-
AUTOMATIC GEARBOX INSTRUMENT PANELS

!
Visual indicators which inform the driv-
Associated warnings
function display.
fore operating the starter.
When the ignition is switched on

A special switch, located in the
A special button, located in the centre

!
which does not have a specific
warning light.
After checking:
Anti-lock braking system
fault in the anti-lock braking
Warning lights

Air bags.
fault in the engine lubrication
fault in the battery charging cir-
A door, the boot or the bonnet
fault in the directional head-

A
warning light
function display.
You MUST stop as soon as it is safe
After driving for a few minutes, the tem-
wait for the engine to cool,
unscrew the cap by two turns to al-
when the pressure has dropped, re-
top up the level to the "MAX" mark.
warning light come on,
You MUST stop as soon as it is safe
i

4 800 miles/km remain before
400 miles (900 km) remain

i
After each service, the service indicator
switch off the ignition,
press and hold the trip distance re-
switch on the ignition; the distance
when the display indicates
to in-
the service is overdue by
i

i

CLOCK
With the ignition on, press the button
Activation
when the lighting reaches the mini-
when the lighting reaches the maxi-
when the lighting reaches the level
Press the corresponding button brief-
Continue to press the corresponding
button.
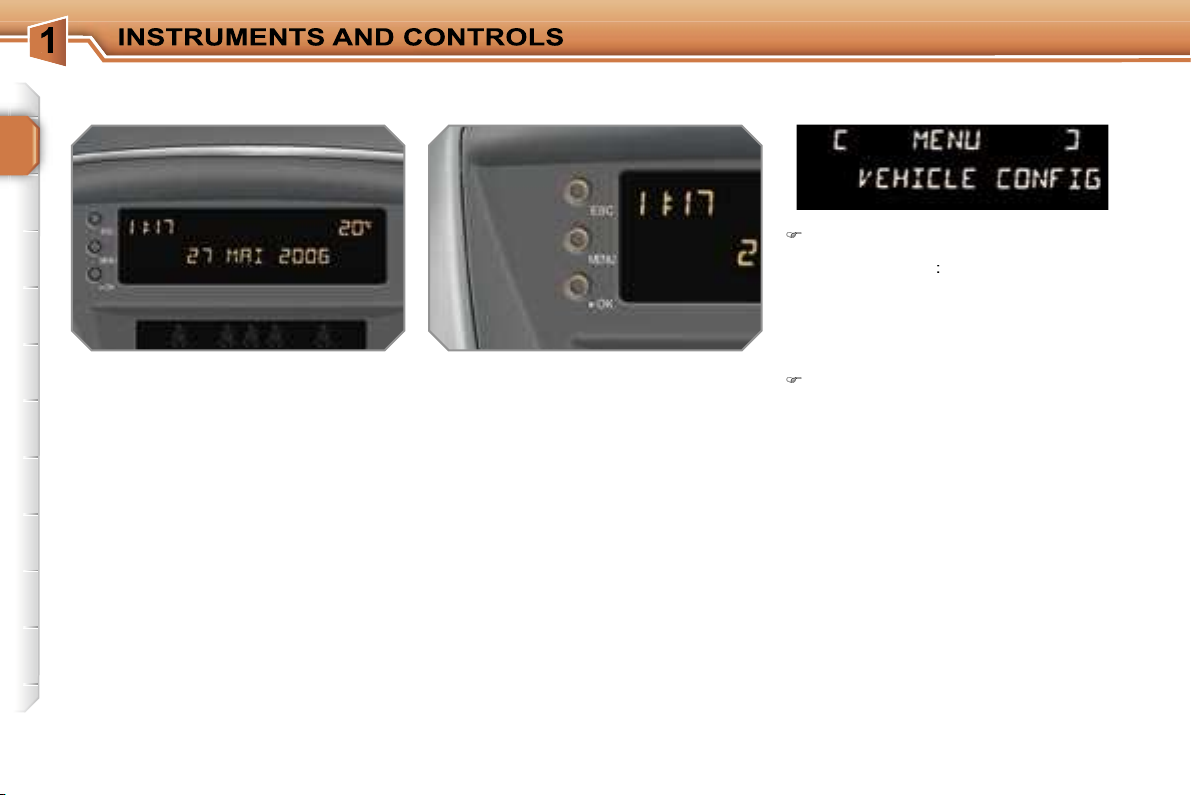
MONOCHROME SCREEN A
to abandon the operation in
to scroll through the menus
to select the menu or sub-menu
Press the
button to scroll
Press the
button to select the
(without RD4 audio equipment)
Controls General menu

Vehicle configuration
fuel consumption (l/100 km, mpg or km/l)
Once you have selected a setting,
button to change its
Wait for approximately ten sec-
button to cancel.
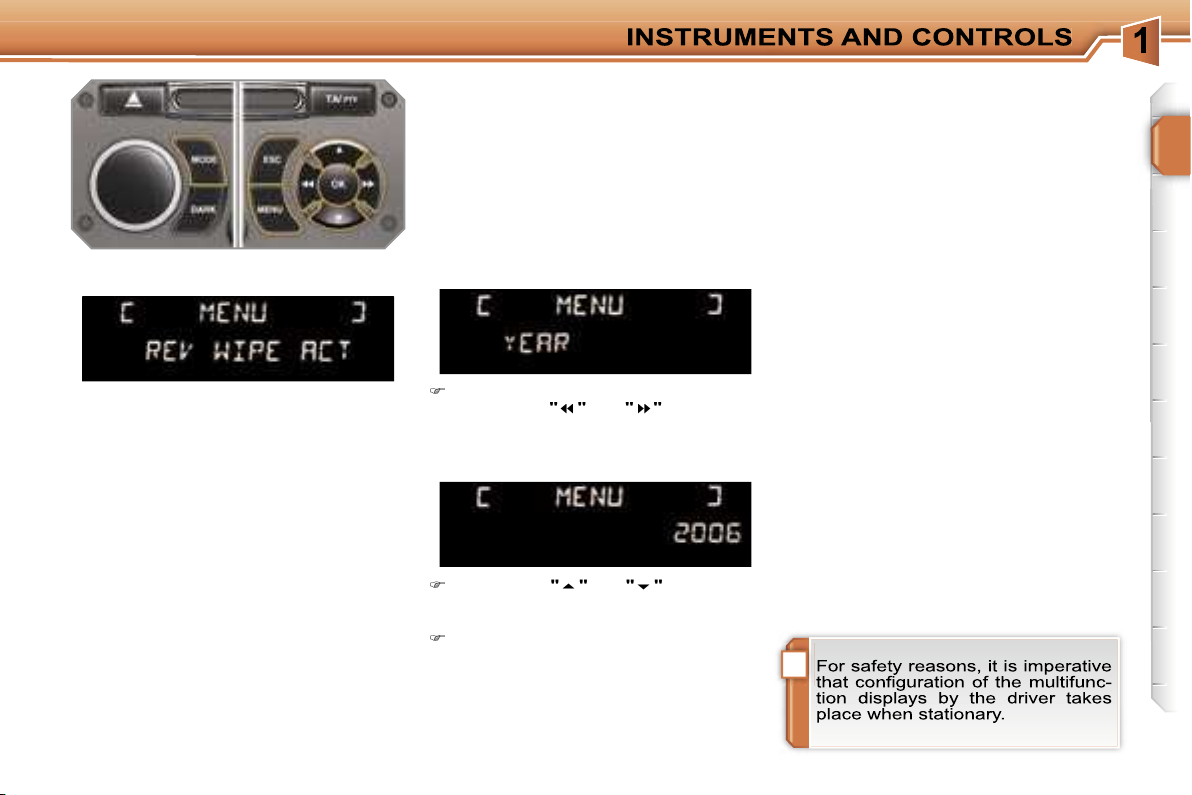
!
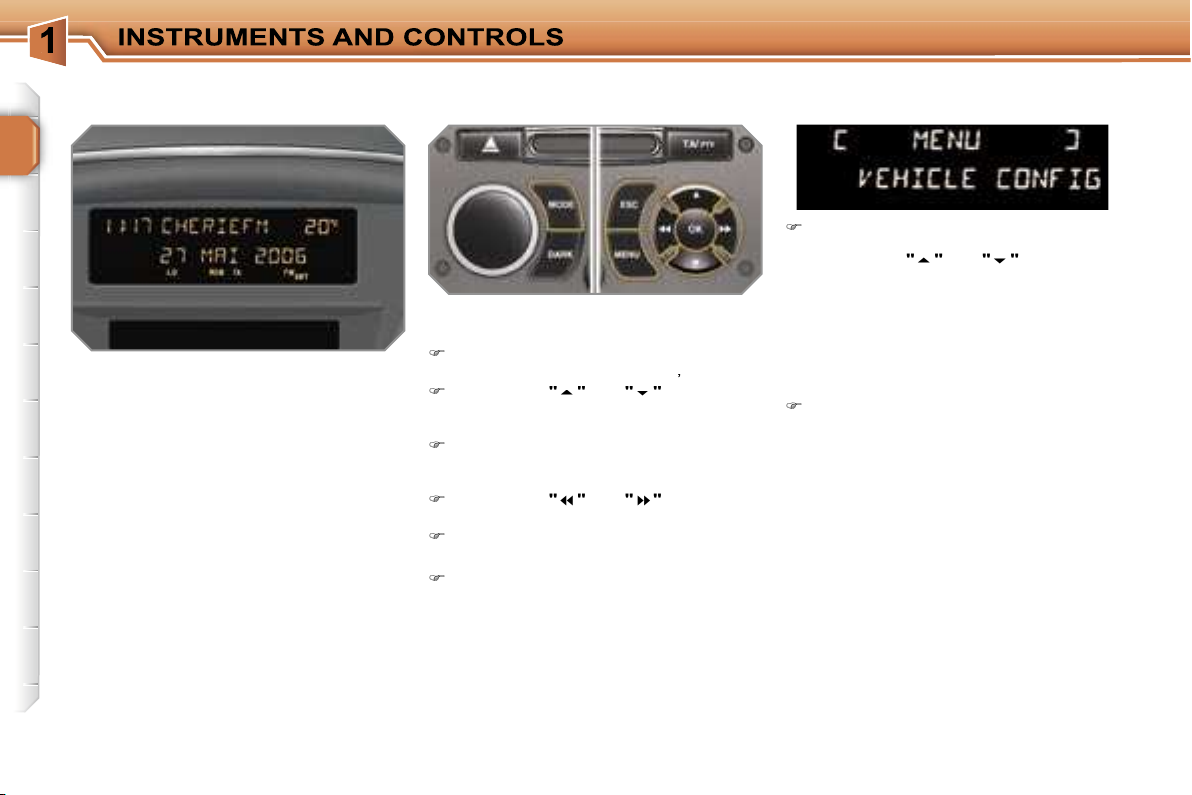
MONOCHROME SCREEN A Controls
button.
Press the
button to gain
or
buttons to
Press the
button to select the
press the
button to gain ac-
press the
or
buttons to
press the
button to change
press the
or
buttons to
press the
button to confirm,
press the
button to abandon
General menu
Once you have selected a setting,
or
buttons to
Press the
or
buttons to
Press the
button to record the
button to
Vehicle configuration
!

MONOCHROME SCREEN C General menu
button.
press the
button to gain ac-
press the
or
buttons to
press the
button to change
press the
or
buttons to
press the
button to confirm,
press the
button to abandon
Press the
button to gain ac-
Press the
or
buttons to se-
button.
Controls
"Audio functions" menu

"Personalisation-Configuration"
Press the
or
buttons, then
button to select the menu
Press the
or
buttons, then
button to select the "Fol-
Press the
or
buttons to set
button to
Press the
or
buttons, then
button to select the
menu
!

COLOUR SCREEN DT
button.
press the
button to gain ac-
turn the dial to move the selection,
press the dial to confirm the selec-
press the
button to abandon
Displays on the screen
General menu
Controls
 Loading...