

Peugeot 206 2005 Owner Manual
Familiarisation
10
-
01-10-2005
11
Familiarisation
-
01-10-2005
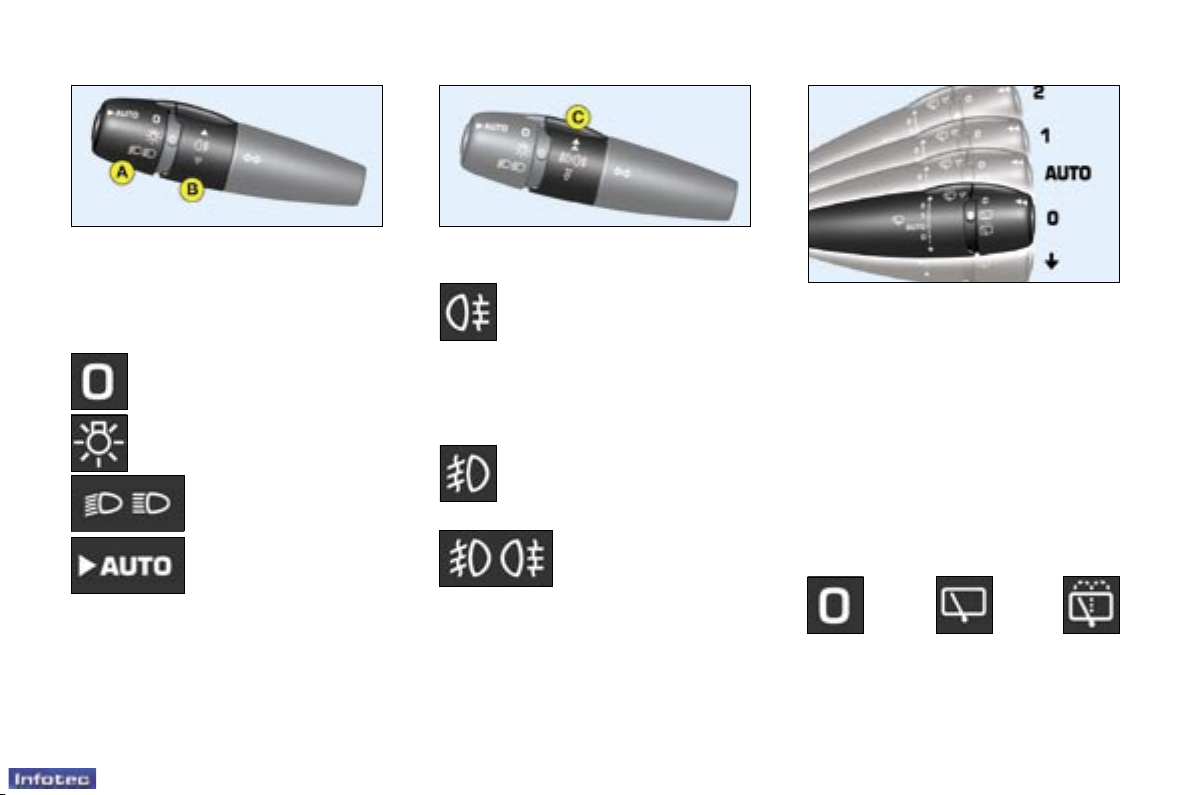
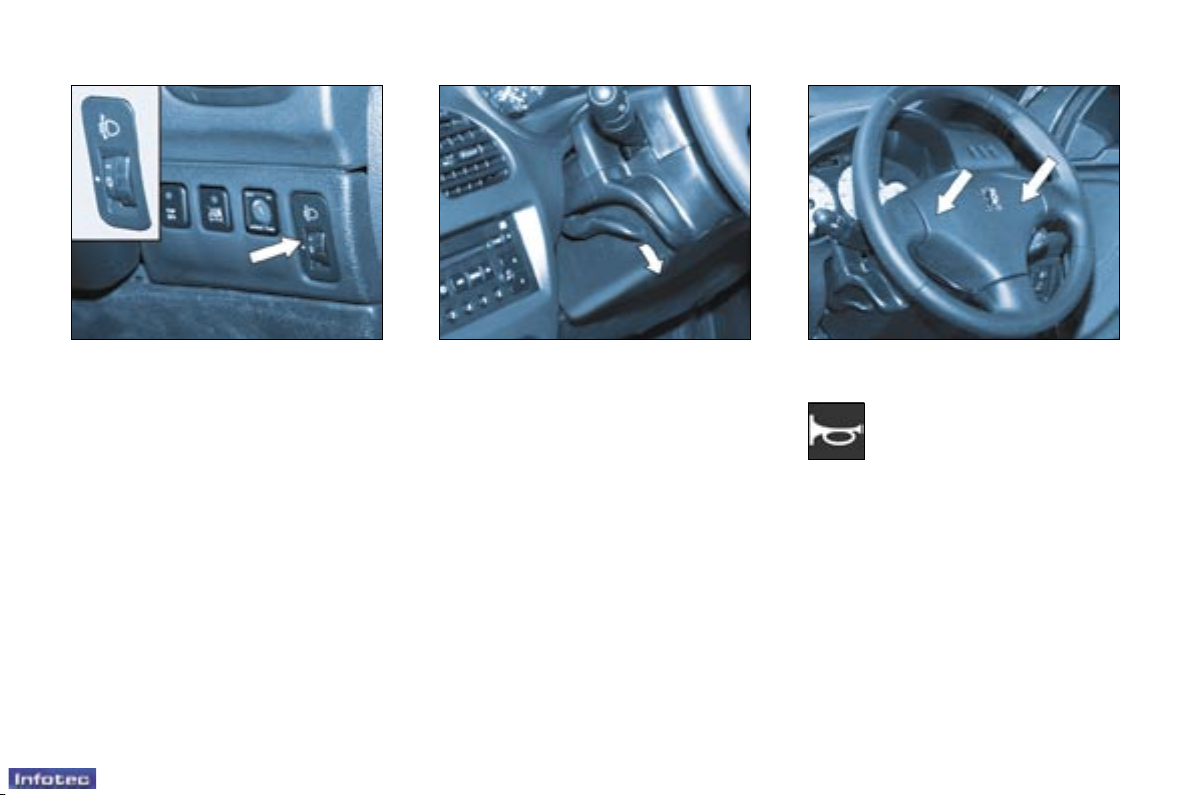
STEERING WHEEL
CONTROLS
Lights
Front lights (ring A)
Rear fog lamp (ring B)
Windscreen wipers
Front
2 Fast wipe
1 Normal wipe
I Intermittent wipe
or
AUTO Automatic wipe
0 Off
â Single wipe
Wash-wipe: pull the stalk towards
you.
Lights off
Side lights
Dipped / main beam
headlamps
Automatic switching
on of lights
Automatic switching on of lights
To activate or deactivate the function,
place the key in the accessories
position with the lights stalk in
position AUTO/0 and press the
end of the stalk for more than four
seconds.
Front fog lamps / Rear fog lamp
(ring C)
Rear fog lamp (rotation of
the ring forwards)
Front fog lamps (1st rotation
of the ring forwards)
†
Front fog lamps and
rear fog lamp (2nd
rotation of the ring
forwards)
†
Off
Intermittent
wipe
Wash-wipe
Automatic wipe
In the AUTO position, the windscreen
wipers operate automatically and
adjust their speed to the intensity
of the rainfall.
: 108 : 110
Rear
Accesses
102
-
01-10-2005
103
Accesses
-
01-10-2005
ELECTRONIC ENGINE
IMMOBILISER
This locks the engine control system
as soon as the ignition has been
switched off and therefore prevents
starting of the vehicle by anyone who
does not have the key.
The ignition key has an electronic
chip which has a special code.
When the ignition is switched on, the
code must be recognised for starting
to be possible.
CONFIDENTIAL CARD
This is given to you on delivery of
your vehicle with the duplicate keys.
It contains the identication code
necessary for any work carried out by
a PEUGEOT dealer on the electronic
immobiliser system. This code is
hidden by a lm, which should be
removed only if necessary.
Keep your card in a safe place,
never inside the vehicle.
When undertaking a long trip or
journey, however, it is advisable
to take it with you along with your
personal papers.
Make a careful note of the
number of each key. This
number is coded on the
label attached to the key.
If the keys are lost, your PEUGEOT
dealer can rapidly supply you with
new keys.
The high frequency remote control
is a sensitive system; do not
operate it while it is in your pocket
as there is a possibility that it may
unlock the vehicle, without you
being aware of it.
The remote control does not operate
when the key is in the ignition, even
when the ignition is switched off,
except for reprogramming.
Driving with the doors locked may
make access to the passenger
compartment by the emergency
services more difcult in an
emergency.
As a safety precaution (with children
on board), remove the key from the
ignition when you leave the vehicle,
even for a short time.
Do not repeatedly press the buttons
of your remote control out of range
of your vehicle.
You run the risk of stopping it from
working and the remote control
would have to be reprogrammed.
When purchasing a second-hand
vehicle:
- ensure that you are given the
condential card;
- have the key codes memorised
by a PEUGEOT dealer, to ensure
that the keys in your possession
are the only ones which can start
the vehicle.
Do not make any modications to
the electronic engine immobiliser
system.
If the system does not function
correctly, the central locking button
indicator light, situated in the centre
of the fascia, ashes rapidly when
the ignition is switched on (2nd
notch).
In this case your vehicle will not
start.
Contact a PEUGEOT dealer as soon
as possible.
103
Accesses
-
01-10-2005
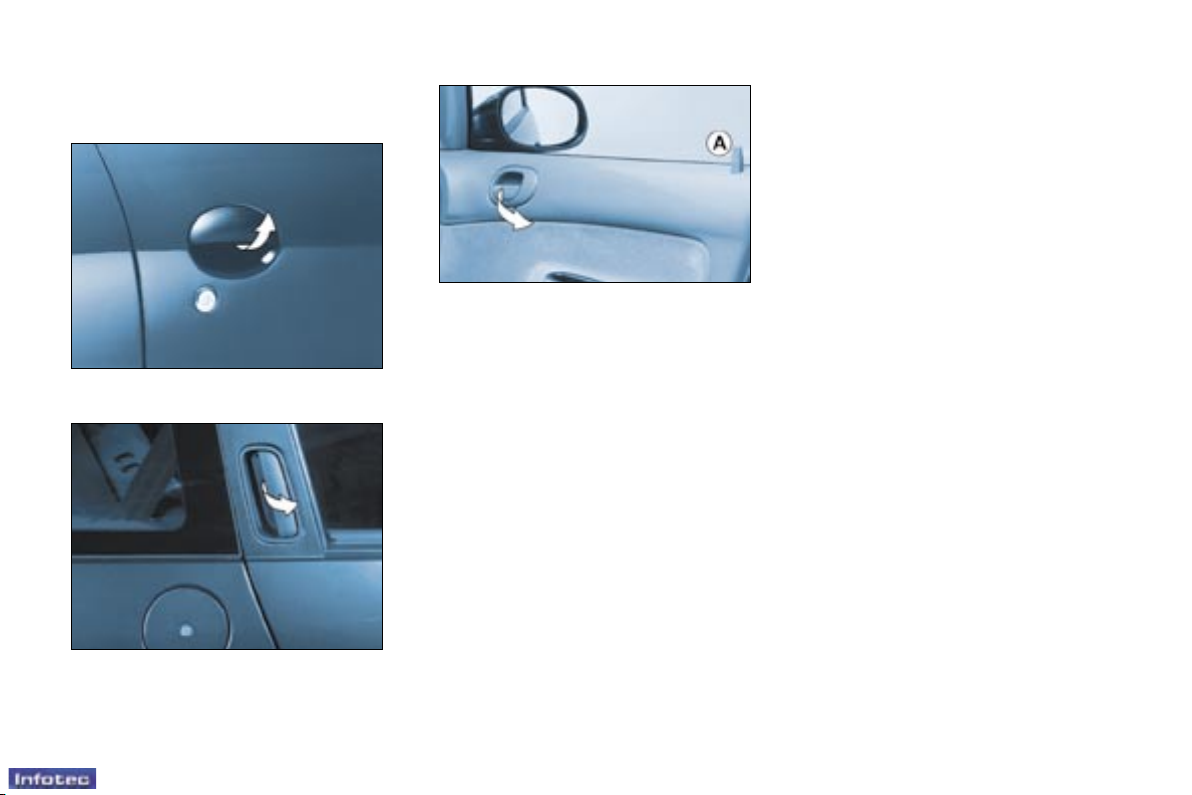
DOORS
Front doors
Rear doors (206 SW)
Opening the doors from outside
Opening the doors from inside*
Locking from inside
"Door open" warning
With the engine running, you are
warned if a door is not shut properly
by an audible signal and a message
or graphic on the multifunction
display, indicating the door in
question.
When the vehicle is moving, if the
courtesy light button is in the "lighting
on opening a door" position, the
courtesy light ashes.
Without central locking
To lock, press button A. The button
locks the door in question.
The button on the driver's door locks
the door, the tailgate and the rear
screen (206 SW).
With central locking
To lock, press button A.
Locking one of the front doors locks
the front and rear doors, the tailgate
and the rear screen (206 SW).
On the rear doors, the button only
locks the door in question.
Unlocking from inside
To unlock, pull button A or operate
the handle.
* According to version.
Accesses
104
-
01-10-2005
105
Accesses
-
01-10-2005
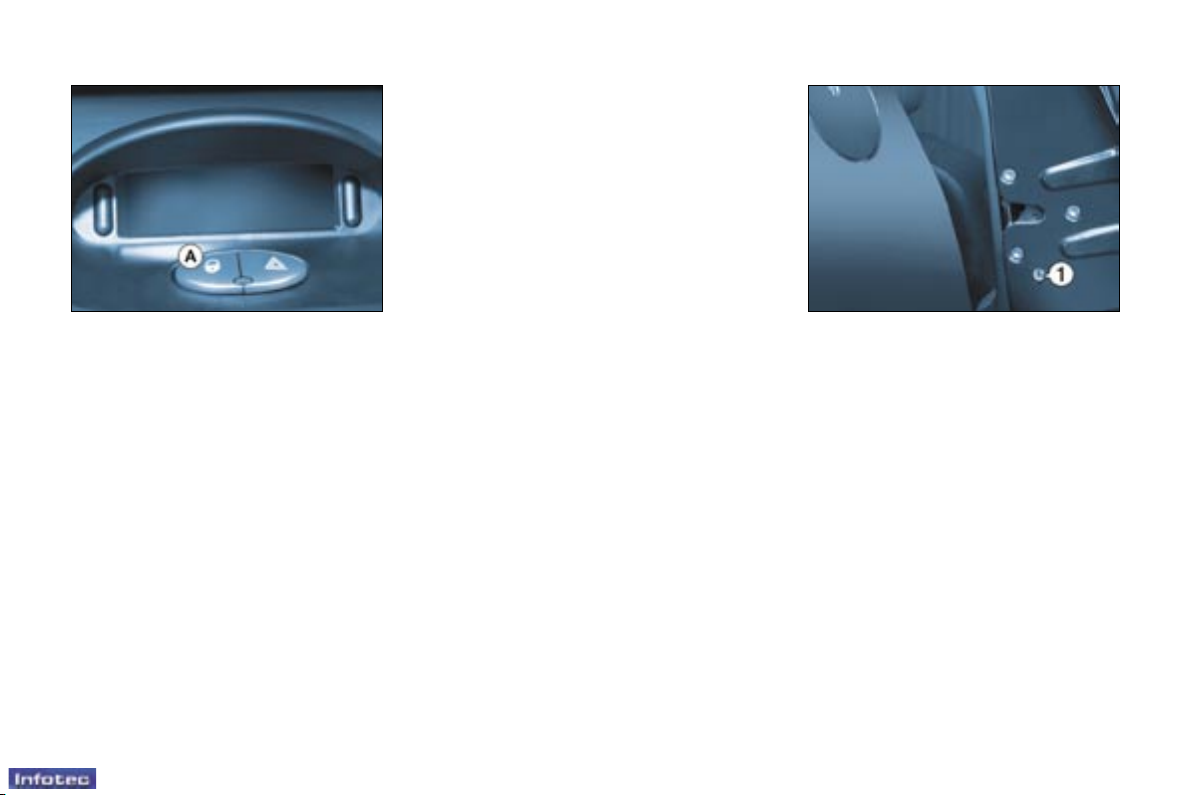
CHILD SAFETY LOCK
On each rear door this prevents
opening of the door from the inside.
Turn switch 1 a quarter turn using the
ignition key.
Locking/Unlocking from the
inside*
Pressing button A permits locking/
unlocking of the doors.
To switch on
Press and hold button A.
Activation of the function is
accompanied by an audible signal
and a message on the multifunction
display.
The message is displayed each time
the vehicle is started.
* According to specication.
To switch off
Press and hold button A.
Notes: if one of the doors is open,
locking from the inside and automatic
central locking are not possible.
If the boot is open, automatic central
locking of the doors is active.
Automatic central locking of the
doors
The doors can lock automatically
when you are driving (at a speed of
more than 6 mph (10 km/h)).
Above 6 mph (10 km/h), press
button A briey to unlock the doors
temporarily.
You can activate or deactivate this
function.
105
Accesses
-
01-10-2005
LOCKING/UNLOCKING OF
THE TAILGATE (saloon)
Without central locking:
To lock, turn the key from A to C.
To open, turn the key from A to B,
press the handle then lift the tailgate.
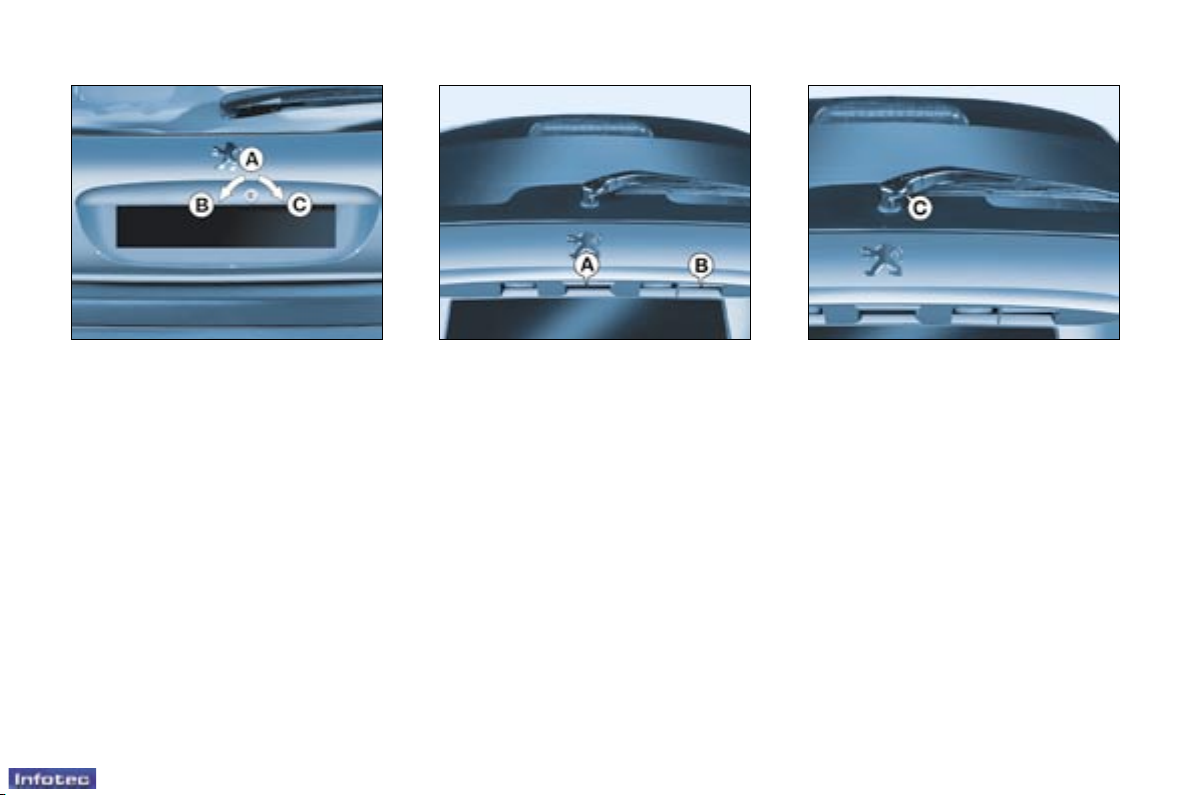
LOCKING/UNLOCKING OF
THE TAILGATE AND REAR
SCREEN (206 SW)
It is not possible to open the
tailgate and the rear screen
simultaneously.
With central locking
Locking or unlocking of the tailgate is
simultaneous with the doors.
With the rear screen closed, to open
the tailgate, operate the handle A
and lift the tailgate.
With the tailgate closed, to open
the rear screen, press and hold the
remote control unlocking button or
operate the handle B, then lift the
rear screen using the windscreen
wiper arm (location C).
Without central locking
The tailgate and rear screen are
locked or unlocked via the driver's
door lock.
With the rear screen closed, to open
the tailgate, operate the handle A
and lift the tailgate.
With the tailgate closed, to open the
rear screen, operate the handle B,
then lift the rear screen using the
windcsreen wiper arm (location C).
With central locking:
Locking and unlocking of the tailgate
is simultaneous with the doors.
The lighting is activated on opening
the tailgate.
Accesses
106
-
01-10-2005
107
Accesses
-
01-10-2005
The lighting is activated on
opening the tailgate or the rear
screen.
Notes: the tailgate and the rear
screen lock automatically while driving
(above 6 mph (10 km/h)) and unlock
when one of the doors is opened.
When the rear windscreen wiper is
in a wiping position, the rear screen
can only be opened at the end of the
cycle.
Close the rear screen using the
windscreen wiper arm or by pressing
the centre of the glass.
While driving, if the tailgate
or the rear screen is not
properly closed, the courtesy
light ashes if the button is in
this position.
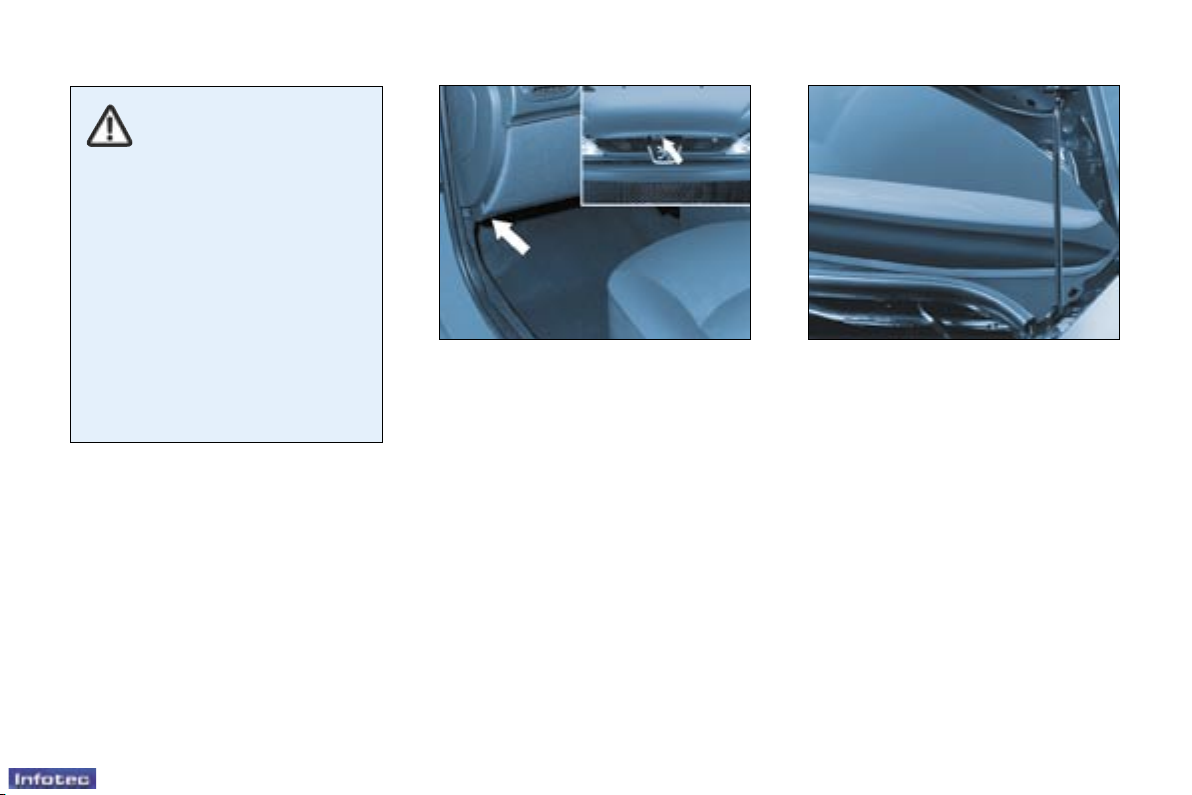
TAILGATE RELEASE (saloon)
This enables the tailgate to be
unlocked in the event of a central
locking fault:
- Fold back the rear seats to gain
access to the boot from inside the
vehicle,
- Pull the tailgate trim to release it,
- Pull the opening catch 1 upwards.
SUNROOF (saloon)
To open
Press part B of the switch. The roof
will open in the intermediate (comfort)
position.
To open the roof completely, press
part B again.
Panoramic sunroof screen
To move it to your chosen position,
press part A or B of the switch.
"Tailgate/rear screen open"
warning
With the engine running, if the
tailgate or the rear screen is not
properly closed, you are warned by
an audible signal and a message or a
diagram on the multifunction display.
To close
Press part A of the switch, the roof
will close in the intermediate (comfort)
position.
To close the roof completely, press
part A again.
107
Accesses
-
01-10-2005
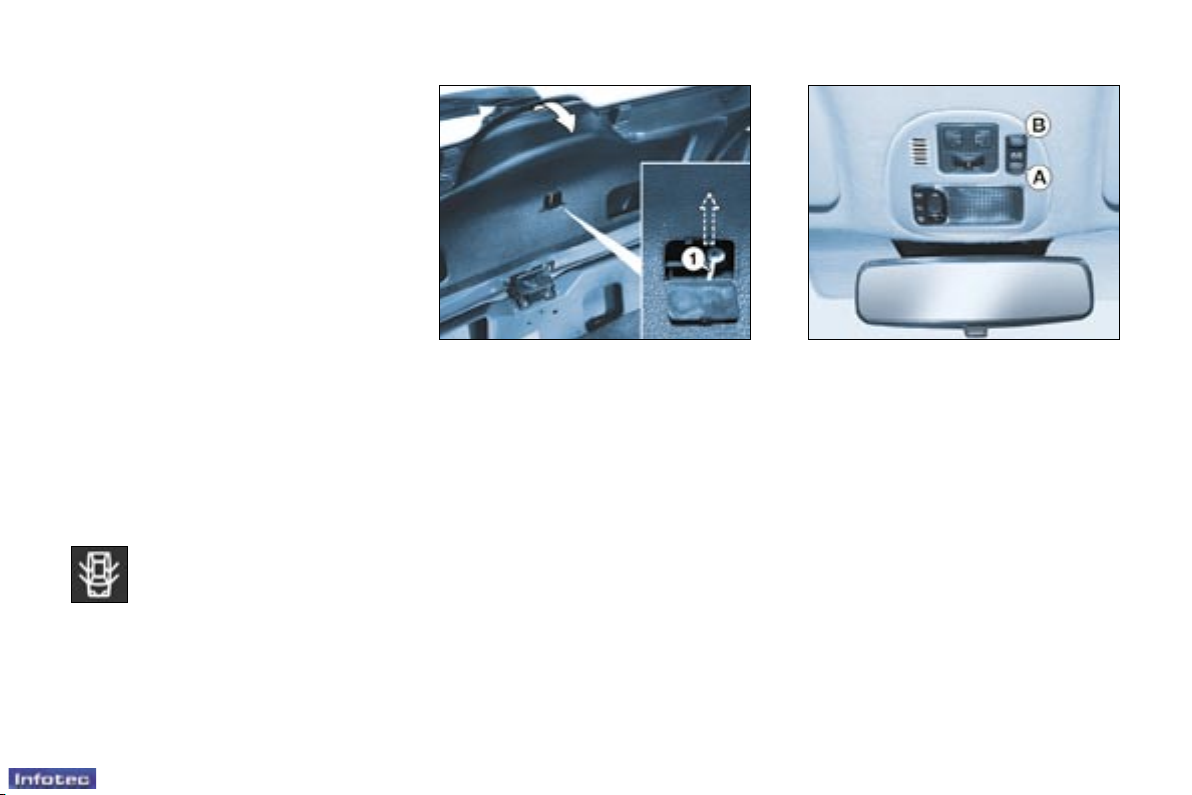
OPENING THE BONNET
Inside the vehicle: pull the handle on
the left-hand side, under the fascia.
Outside the vehicle: lift the catch
and raise the bonnet.
BONNET STRUT
Secure the strut to hold the bonnet
open.
Before closing the bonnet, replace
the strut in its housing.
Always remove the key
from the ignition when
leaving the vehicle, even
for a short time.
If an obstacle is detected when
operating the roof, you must
reverse the movement of the
roof. To do this, press the control
concerned.
When the driver operates the roof
control, he must ensure that no
one is preventing correct closing
of the roof.
The driver must ensure that
passengers use the sunroof
correctly.
Be aware of children when
operating the roof.
FILLING THE FUEL TANK
The tank must be lled with fuel with
the engine switched off.
Insert the key then turn it to the left.
Remove the cap.
A label indicates which type of fuel
to use.
If you ll your tank, do not continue
after the third cut-off of the pump
nozzle. This could result in vehicle
malfunctions.
The capacity of the tank is approximately 50 litres.
To close
Lower the bonnet and release it at
the end of its travel. Check that the
bonnet is locked.
Visibility
108
-
01-10-2005
109
Visibility
-
01-10-2005
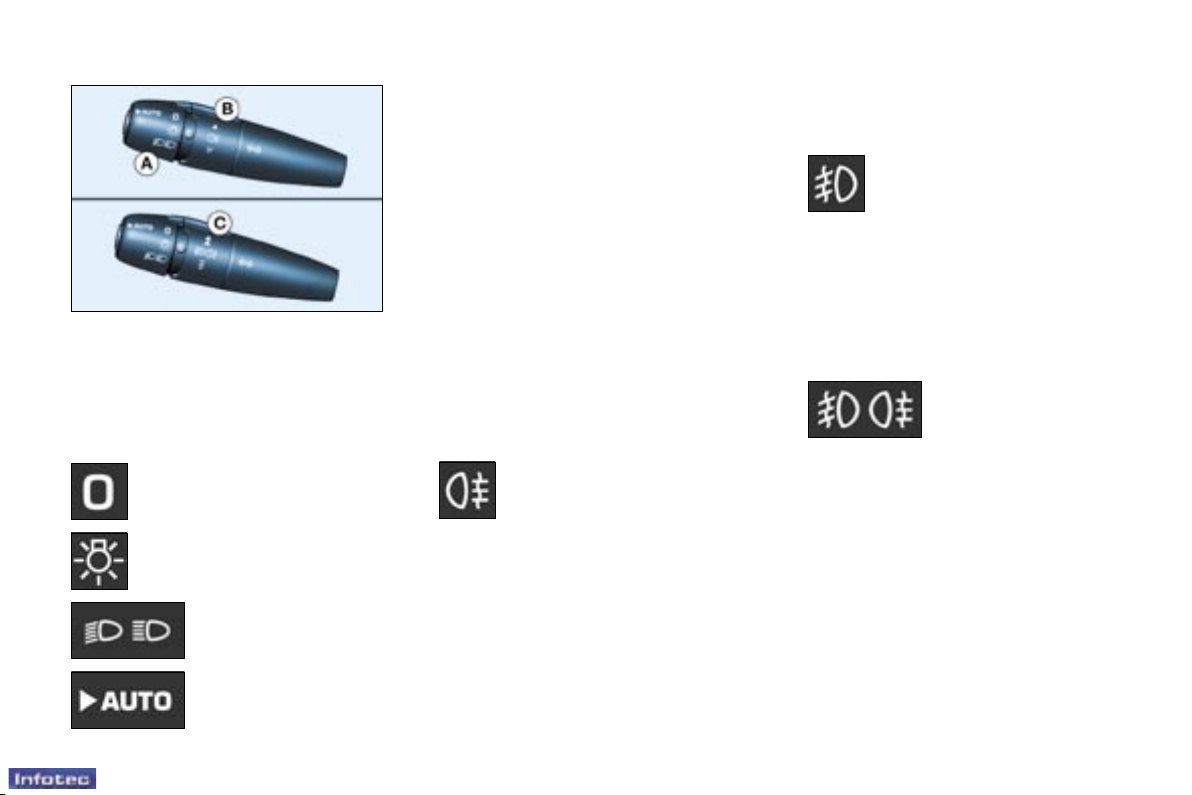
THE LIGHTS STALK
Front and rear lights
Selection is by turning ring A.
Dipped/Main beam change
Pull the stalk towards you.
Note: with the ignition off and the
automatic lighting function switched
off, when the driver's door is opened,
a buzzer sounds if you have left your
lights on.
Vehicles tted with front fog lamps
and a rear fog lamp (ring C)
Side lights
Dipped/Main beam
headlamps
Automatic switching
on of lights
Rear fog lamp
Front fog lamps (rst rotation
of the ring forwards)
Front and rear fog
lamps (2nd rotation of
the ring forwards).
Note: to switch off the rear fog lamp
and the front fog lamps, turn the ring
backwards twice in succession.
Note: when the lights are switched
off automatically or when the dipped
headlamps are switched off manually,
the front fog lamps, the rear fog lamp
and the side lights remain on (turn
the ring backwards to switch off the
front fog lamps. The side lights then
switch off).
Vehicles tted with a rear fog lamp
(ring B)
This only operates with the dipped/
main beam headlamps.
Note: when the lights are switched
off automatically, the rear fog lamp
and the dipped headlamps remain
on (turn the ring backwards to switch
off the rear fog lamp. The dipped
headlamps and side lights then
switch off).
The front fog lamps operate with
the side lights and the dipped
headlamps.
When the main beam headlamps
are switched on, the front fog lamps
are switched off. They are switched
on again when the main beam
headlamps are switched off.
Lights off
Front fog lamps and rear fog
lamp
Rotate the ring forwards to switch
on and backwards to switch off. The
status is conrmed by the indicator
light on the instrument panel.

109
Visibility
-
01-10-2005
"Follow me home" lighting
When you leave your vehicle, the
side lights and dipped headlamps
can be left on for approximately
30 seconds.
To do this:
- place the key in the STOP
position,
- place the lights stalk in the 0
position,
- ash the headlamps,
- get out of the vehicle and lock it.
AUTOMATIC SWITCHING ON
OF LIGHTS
The side lights and dipped beam
headlamps switch on automatically
if the light is poor and when
the windscreen wipers operate
continuously and switch off when the
light becomes bright enough or the
windscreen wipers are switched off.
In foggy weather or in snow, the
brightness sensor can detect
sufcient light, the lights will not
come on automatically.
This function is active when the
vehicle is supplied to the customer.
To disarm or activate the function:
- Place the key in the accessories
position (1st notch),
- Place the lights stalk in the AUTO/0
position,
- Press the end of the lights stalk for
more than four seconds.
Do not cover the brightness
sensor, coupled with the rain
sensor, located in the centre of the
windscreen, behind the interior
mirror. It is used for automatic
switching on of the lights.
Operating check
Activation
The activated function is accompanied by an audible signal and a message on the multifunction display.
In good or rainy weather,
both day and night, the
front fog lamps and the
rear fog lamp are dazzling
and are prohibited.
Do not forget to switch them off
when they are no longer needed.
Direction indicators (ashers)
Left: downwards.
Right: upwards.
Disarming
The disarmed function is accompanied by an audible signal.
When the driver uses the manual
lighting controls, the function is
temporarily disarmed.
If the brightness sensor does not
function correctly, the lights come
on accompanied by an audible signal
and a message on the multifunction
display.
Contact a PEUGEOT dealer.
11
Familiarisation
-
01-10-2005
Never drive with the head
restraints removed.
4 - Height adjustment.
5 - Seat back angle adjustment.
FRONT SEATS
(saloon and 206 SW)
1 - Forwards/backwards
adjustment.
2 - Head restraint height and angle
adjustment.
3 - Access to rear seats (3-door).
: 88
Visibility
110
-
01-10-2005
111
Visibility
-
01-10-2005
WINDSCREEN WIPER STALK
Front windscreen wiper with
intermittent wipe
2 Fast wipe (heavy rain).
1 Normal wipe
(moderate rain).
l Intermittent wipe.
0 Off.
â Single wipe
(press downwards).
In the Intermittent position, the
wiping speed is in proportion to the
vehicle speed.
Front windscreen wiper with
automatic wipe
2 Fast wipe (heavy rain).
1 Normal wipe
(moderate rain).
AUTO Automatic wipe.
0 Off.
â Single wipe
(press downwards).
In the AUTO position, the wiping
speed is in proportion to the intensity
of the rainfall.
The command must be reactivated
whenever the ignition has been
switched off for more than one
minute:
- move the stalk to any position,
- then move it back to the required
position.
Windscreen wash
Pull the wiper stalk towards you.
The windscreen wash, then the
windscreen wipers, operate for a
specied time.
111
Visibility
-
01-10-2005
Automatic windscreen wipers
In the AUTO position, the windscreen
wipers operate automatically and
adapt their speed to the intensity
of the rainfall.
Do not cover the rain
sensor located on the
windscreen behind the
interior mirror.
When using an automatic car
wash, switch off the ignition or
check that the wiper stalk is not in
the AUTO position.
In winter, it is advisable to wait
for the windscreen to completely
clear of ice before operating the
automatic wipe.
Rear screen wiper
Rear screen wash
Turn ring A to the rst notch
for intermittent wiping.
If the ignition is switched
off, it is necessary to
reactivate the control each time.
To do this, move the stalk to any
position, then move it back to the
required position.
Turn ring A past the rst
notch; the screen wash then
the wiper operate for a xed
period.
206 SW: the rear screen wiper and
rear screen wash functions are
disarmed automatically when the
rear screen is open.
Operating check
Activation
Activation of the function is accompanied by a message on the multifunction display.
In the event of malfunction, the
driver is informed by an audible
signal.
In the AUTO position, the windscreen
wiper will operate in intermittent
mode.
Contact a PEUGEOT dealer to have
the system checked.
Automatic rear screen wiper
When the windscreen wipers control
is activated and you engage reverse
gear, the rear screen wiper operates
intermittently.
Note: if you use a bicycle carrier,
consult a PEUGEOT dealer to have
this function deactivated or install a
specic bicycle carrier approved by
PEUGEOT.

Visibility
112
-
01-10-2005
113
Visibility
-
01-10-2005
TRIP COMPUTER
Pressing the button on the end of
the wash/wipe stalk enables the
following data to be displayed:
Display B
- the range
- the distance travelled
- the average consumption
- the current consumption
- the average speed
Monochrome screen CT
- the "vehicle" tab with:
• range, current consumption and
the distance still to be driven,
- tab "1" (route "1") with:
• the distance driven, the average
consumption and the average
speed calculated over route
"1"
- tab "2" (route "2") with the same
features.
It also permits access to the warning
log information.
Zero reset
Press the stalk for more than two
seconds.
Zero re-set
When the required route is displayed,
press the button for more than two
seconds.
113
Visibility
-
01-10-2005
Range
This shows the distance that can still
be covered with the fuel remaining in
the tank.
Note: this gure may increase
if there is a change in the style
of driving or the road surface,
producing a signicant drop in
current consumption.
When the range is less than 20 miles
(30 km), three segments are
displayed. After lling with fuel, the
range is displayed when it exceeds
62 miles (100 km).
If horizontal segments are displayed
for long periods instead of digits,
contact a PEUGEOT dealer.
Distance travelled
This indicates the distance travelled
since the computer was last set to
zero.
The routes
The routes "1" and ''2'' are independ-
ent but have identical application.
Route "1" for example allows you
to make daily calculations and route
"2" monthly calculations.
Current consumption
This is the average quantity of
fuel consumed during the last few
seconds.
This function is displayed only when
the vehicle is travelling at a speed
greater than 20 mph (30 km/h).
Average consumption
This is the average fuel consumption
since the computer was last set to
zero.
Distance remaining to be
travelled
This is the distance remaining to
the destination. It can either be
calculated by the navigation if
guidance is activated, or entered by
the user, minus the distance covered
since the distance was entered.
Note: if digits are missing, dashes
are displayed in their place.
Average speed
This is the average speed calculated
since the computer was last set to
zero (with the ignition on).
The warning log
This summarises the active warning
messages by displaying them on the
multifunction display.
Visibility
112
-
01-10-2005
113
Visibility
-
01-10-2005
TRIP COMPUTER
Pressing the button on the end of
the wash/wipe stalk enables the
following data to be displayed:
Display B
- the range
- the distance travelled
- the average consumption
- the current consumption
- the average speed
Monochrome screen CT
- the "vehicle" tab with:
• range, current consumption and
the distance still to be driven,
- tab "1" (route "1") with:
• the distance driven, the average
consumption and the average
speed calculated over route
"1"
- tab "2" (route "2") with the same
features.
It also permits access to the warning
log information.
Zero reset
Press the stalk for more than two
seconds.
Zero re-set
When the required route is displayed,
press the button for more than two
seconds.

113
Visibility
-
01-10-2005
Range
This shows the distance that can still
be covered with the fuel remaining in
the tank.
Note: this gure may increase
if there is a change in the style
of driving or the road surface,
producing a signicant drop in
current consumption.
When the range is less than 20 miles
(30 km), three segments are
displayed. After lling with fuel, the
range is displayed when it exceeds
62 miles (100 km).
If horizontal segments are displayed
for long periods instead of digits,
contact a PEUGEOT dealer.
Distance travelled
This indicates the distance travelled
since the computer was last set to
zero.
The routes
The routes "1" and ''2'' are independ-
ent but have identical application.
Route "1" for example allows you
to make daily calculations and route
"2" monthly calculations.
Current consumption
This is the average quantity of
fuel consumed during the last few
seconds.
This function is displayed only when
the vehicle is travelling at a speed
greater than 20 mph (30 km/h).
Average consumption
This is the average fuel consumption
since the computer was last set to
zero.
Distance remaining to be
travelled
This is the distance remaining to
the destination. It can either be
calculated by the navigation if
guidance is activated, or entered by
the user, minus the distance covered
since the distance was entered.
Note: if digits are missing, dashes
are displayed in their place.
Average speed
This is the average speed calculated
since the computer was last set to
zero (with the ignition on).
The warning log
This summarises the active warning
messages by displaying them on the
multifunction display.

Visibility
114
-
01-10-2005
115
Visibility
-
01-10-2005
Specic features of the
monochrome screen CT
General menu
Press the "MENU" button to access
the general menu.
Select the icon ''Trip computer''
using the dial, then validate to access
the ''Trip computer'' menu.
The ''Trip computer'' menu offers
various choices:
- Trip computer conguration,
- Warning log.
Trip computer conguration
This function allows the distance to
the destination to be input (when
guidance is not activated; otherwise
this information is given by the
navigation system) and also changing
of the units of measurement (°C or
°F, km/l or l/100 or mpg).
"Trip computer" context menu
The context menu associated with
the "Trip computer" application
appears as a superimposed display
when the trip computer is the
application currently being used in
the main screen window.
Briey press the continuous
application "Trip computer" button to
select one of the following functions:
- Warning log,
- Distance to destination.
Distance to destination
When guidance is not activated, this
enables an approximate value to be
entered to make all the trip computer
calculations possible.
115
Visibility
-
01-10-2005
ELECTRIC WINDOWS
1. Driver's electric window
switch
- Manual operation:
Press or pull switch 1 gently. The
window stops as soon as the switch
is released.
- Automatic operation:
Press or pull switch 1 rmly. One
touch completely opens or closes
the window.
Automatic closing only operates
when the engine is running and only
on the driver's electric window.
2. Passenger's electric window
switch.
3. Rear left electric window
switch.
4. Rear right electric window
switch.
REAR QUARTER LIGHTS
(3 DOOR)
To partially open the rear windows,
tilt lever then push the window.
Always remove the key
from the ignition when
leaving the vehicle, even
for a short time.
If an obstacle is detected when
operating the electric windows,
you must reverse the movement
of the window. To do this, press
the control concerned.
When the driver operates the passenger electric window controls,
he must ensure that no one is
preventing correct closing of the
windows.
The driver must ensure that passengers use the electric windows
correctly.
Be aware of children when operating the windows.
This switch enables the rear windows
to be locked whatever their position.
A 1st press activates the control (the
indicator light on the button comes
on) and a 2nd press deactivates it
(the indicator light on the button goes
out).
Temporary disarming of the
rear windows (child safety)
Visibility
116
-
01-10-2005
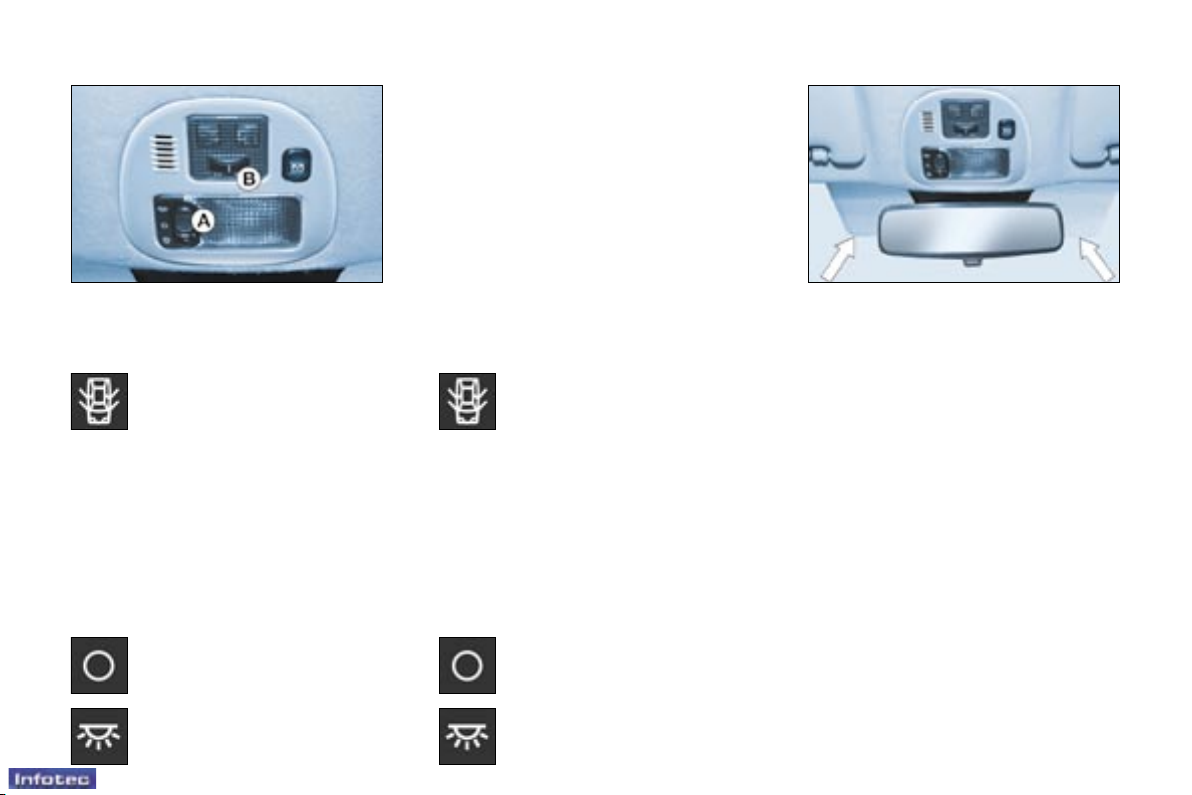
Manual interior mirror
The interior mirror has two positions:
- day (normal),
- night (anti-dazzle).
To change from one to the other,
push or pull the lever on the lower
edge of the mirror.
Manual exterior mirrors
Move the lever in all four directions
to adjust.
When the vehicle is parked, the
exterior mirrors can be folded back
manually.
ELECTRIC EXTERIOR
MIRRORS
Turn knob 1 to the right or to the left
to select the corresponding mirror.
Move knob 1 in all four directions to
adjust.
The exterior mirror on the
driver's side is convex in
order to eliminate the "blind
spot".
Furthermore, objects observed
in the driver's and passenger's
mirrors are in reality closer than
they appear.
This must be taken into account
to judge correctly the distance of
vehicles approaching from behind.
Fold-back electric mirrors
With the ignition on, turn knob 1 to
position A.
117
Layout
-
01-10-2005
HEADLAMP ADJUSTMENT
Depending on the load in your
vehicle, it is recommended that the
headlamp beam is adjusted.
0 - 1 or 2 people in the front seats.
- - 3 people.
1 - 5 people.
2 - 5 people + maximum authorised
load.
3 - Driver + maximum authorised
load.
Initial setting is position 0.
STEERING WHEEL HEIGHT
ADJUSTMENT
When stationary, lower the handle to
unlock the steering wheel.
Adjust to the desired height and
lift the handle to lock the steering
wheel.
HORN
Press one of the spokes of
the steering wheel.
Layout
118
-
01-10-2005
119
Layout
-
01-10-2005
COURTESY LIGHTS
Front courtesy light (button A)
Map-reading light (button B)
With the key in the accessories or
ignition on position, turn button B to
the left or to the right.
AREAS FOR TOLL CARDS/
CAR PARK TICKETS
The athermic windscreen has two
non-reective zones located either
side of the base of the interior
mirror.
They are intended for afxing toll
cards and/or car park tickets.
SUN VISOR
The sun visors are tted with a vanity
mirror, with a concealing ap on the
driver's side.
Rear courtesy light (206 SW)
In this position, it comes on
for about 30 seconds:
- on unlocking the vehicle,
- when opening a door,
- when opening the tailgate and the
rear screen (206 SW),
- on switching off the ignition.
It switches off on locking the vehicle.
The courtesy light ashes while
driving if a door or the boot is not
closed correctly.
Permanently off.
Permanently on when the key
is in the accessories position
or with the ignition on.
In this position, it comes on
for about 30 seconds:
- on unlocking the vehicle,
- when opening a door, the tailgate
and the rear screen,
- on switching off the ignition.
It switches off on locking the vehicle.
It ashes while driving if a door or the
boot is not closed correctly.
Permanently off.
Permanently on when the key
is in the accessories position
or with the ignition on.
119
Layout
-
01-10-2005
GLOVE BOX
To open the glove box, lift the handle.
The light comes on when the cover
is opened.
1. Handbook pack storage.
2. Can holder.
3. Pen holder.
4. Spectacles storage.
5. Map storage.
6. Coin storage.
FRONT ASHTRAY
To empty, close the cover.
Pull the lug and release the ashtray
upwards.
LIGHTER
Press and wait a few moments until it
springs out automatically.
It is supplied with power with the
ignition key in the accessories
position (1st notch).
Familiarisation
12
-
01-10-2005
13
Familiarisation
-
01-10-2005
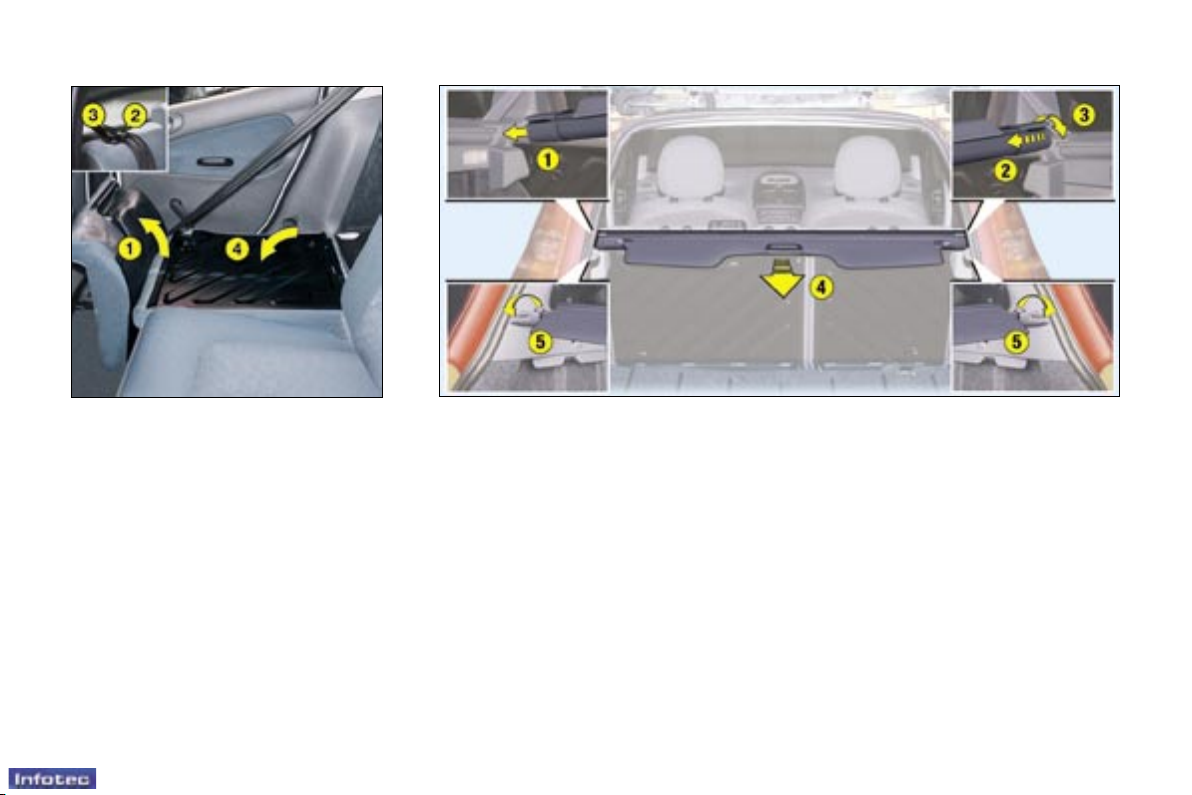
REAR SEATS
To fold the rear seats:
- Lift the front of the seat cushion 1,
- Tilt the seat cushion 1 against the
front seats,
- Position the seat belt under the belt
holder 2,
- Pull control 3 to unlock the seat
back 4,
- Remove or lower the head
restraint,
- Tilt the seat back 4.
When retting, take care not to trap
the seat belts.
Load space cover
To install:
- position 1 one end of the cover
roller in one of the two supports,
- compress 2 the opposite end of the
roller and position it,
- release it 3 so that it engages,
- unroll 4 the cover to the boot
pillars,
- insert the cover guides 5 in the rails
on the pillars.
: 91 : 122
To remove:
- remove the cover guides from the
rails on the pillars,
- return the cover to its roller,
compress it and remove it from its
support.
Layout
120
-
01-10-2005
121
Layout
-
01-10-2005
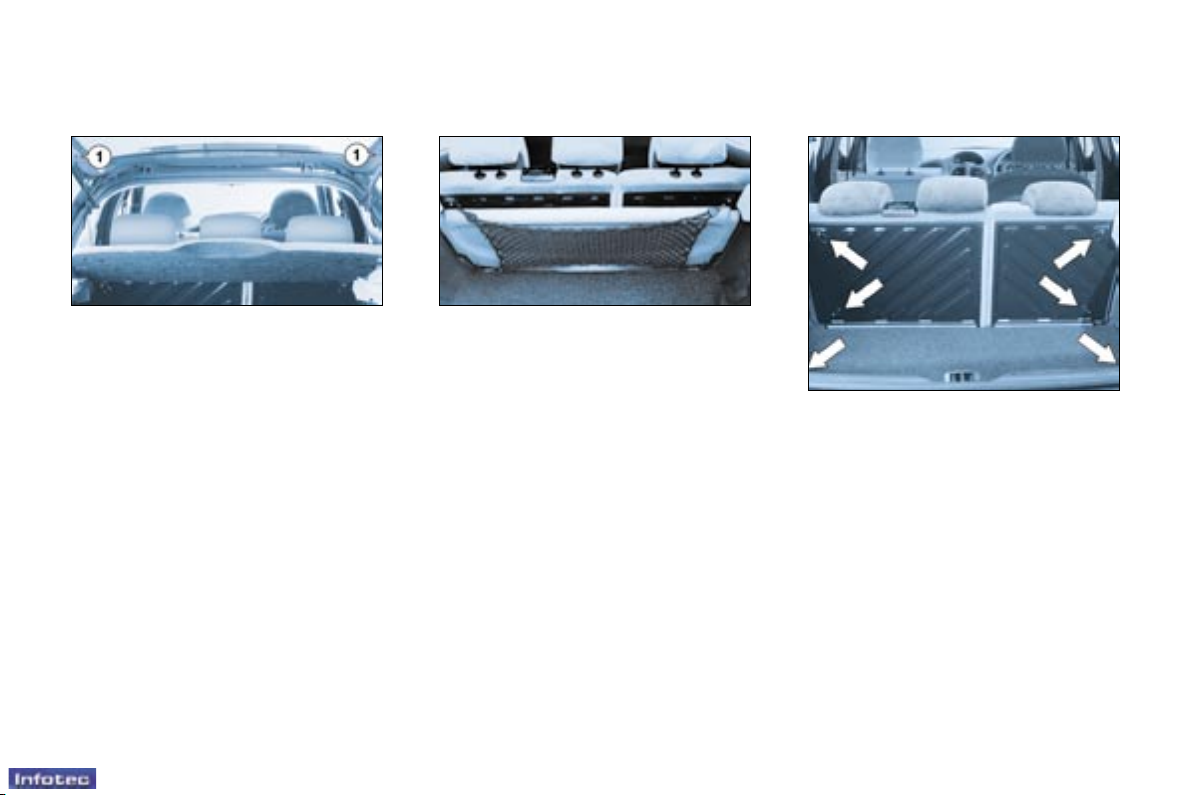
Luggage retaining net
Use the stowing rings on the boot
oor and on the back of the rear
seat* to hook on your luggage
retaining net.
There are several options for storing
the shelf:
- either behind the front seats,
- or behind the rear seat using the
luggage retaining net,
- or at in the boot.
Rear parcel shelf
To remove the shelf:
- unhook the two strings 1,
- slightly raise the shelf, then remove
it.
BOOT LAYOUT (saloon)
* According to version.

121
Layout
-
01-10-2005
Retaining strap
A strap secured to the side of the
boot enables you to secure various
objects (cans, rst aid kit, etc.).
Layout
122
-
01-10-2005
123
Layout
-
01-10-2005

123
Layout
-
01-10-2005
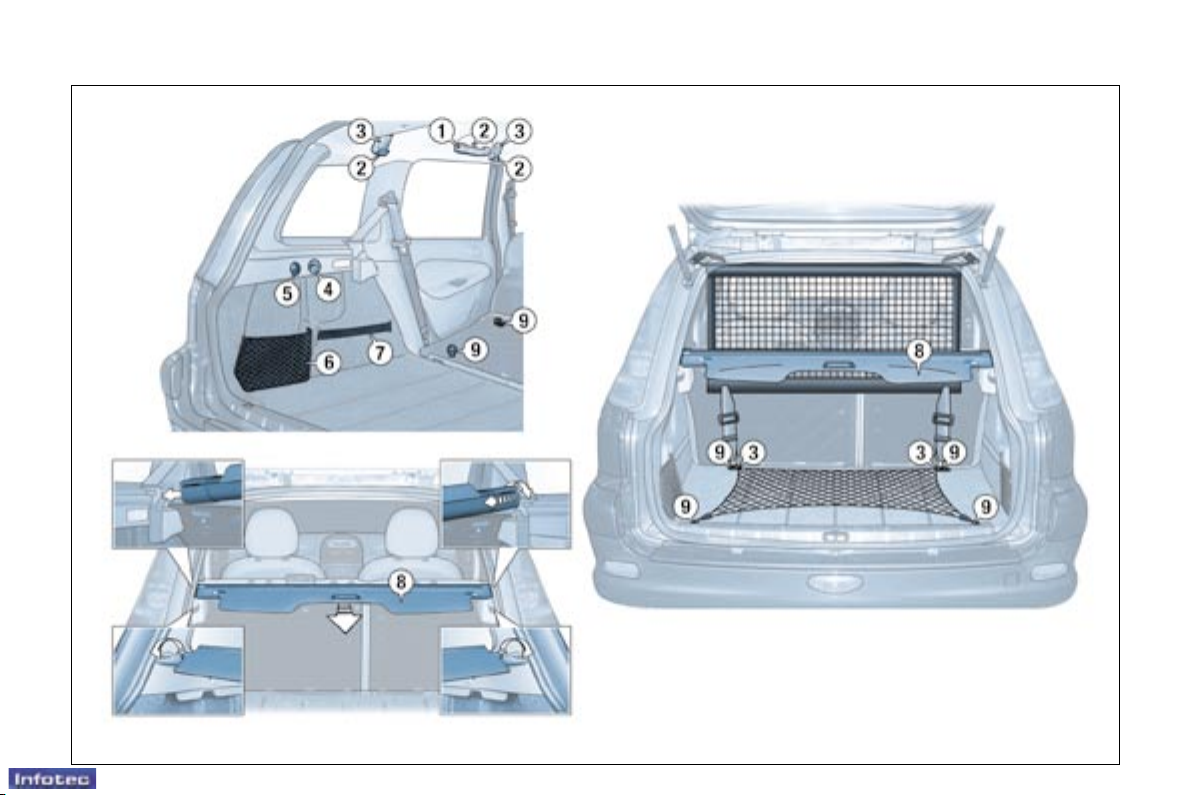
BOOT LAYOUT (206 SW)
1. Grab handles and coat hooks
2. Coat hooks
There are six hooks to accommodate
coats.
3. High load retaining net
fastenings
The high load retaining net can be
installed behind the front seats or
behind the rear seat.
Open the covers of the corresponding
upper fastenings.
Install one end of the metal bar in
one of the two fastenings, compress
the bar, then install the other end and
release.
Secure the two net strap hooks
behind the front seats, with the rear
seat folded down, or in the stowing
rings on the oor.
The rings are located directly below
the corresponding upper fastenings.
Pull the two straps taut.
4. Hooks
There are two side hooks on which to
hang light bags.
5. 12V Socket for accessories
This is a 12 volt socket (lighter type)
installed on the the rear left trim
and supplied from the accessories
position (1st notch).
6. Storage nets
There are two nets (which cannot
be removed), which can contain the
luggage retaining net, a rst aid kit,
etc.
7. Retaining straps
There are two straps for securing
various objects: cans, etc.
8. Load space cover
Note: release the rear seat back to
make installation and removal of the
load space cover easier.
To install it:
- position one end of the roller in one
of the two supports,
- compress the opposite end of the
roller and position it,
- release it to allow it to engage,
- unroll the cover as far as the boot
pillars,
- insert the cover guides in the rails
in the pillars.
To remove it:
- remove the cover guides from the
pillar rails,
- return the cover into its roller,
compress it and remove it from its
support.
9. Stowing rings
Stowing rings are provided for
securing the luggage retaining net:
they are located on the rear seat
back and on the boot oor (two of
which are under the carpet, at the far
end of the boot).
Warning triangle
The tailgate has a location intended
for a warning triangle.
Layout
124
-
01-10-2005
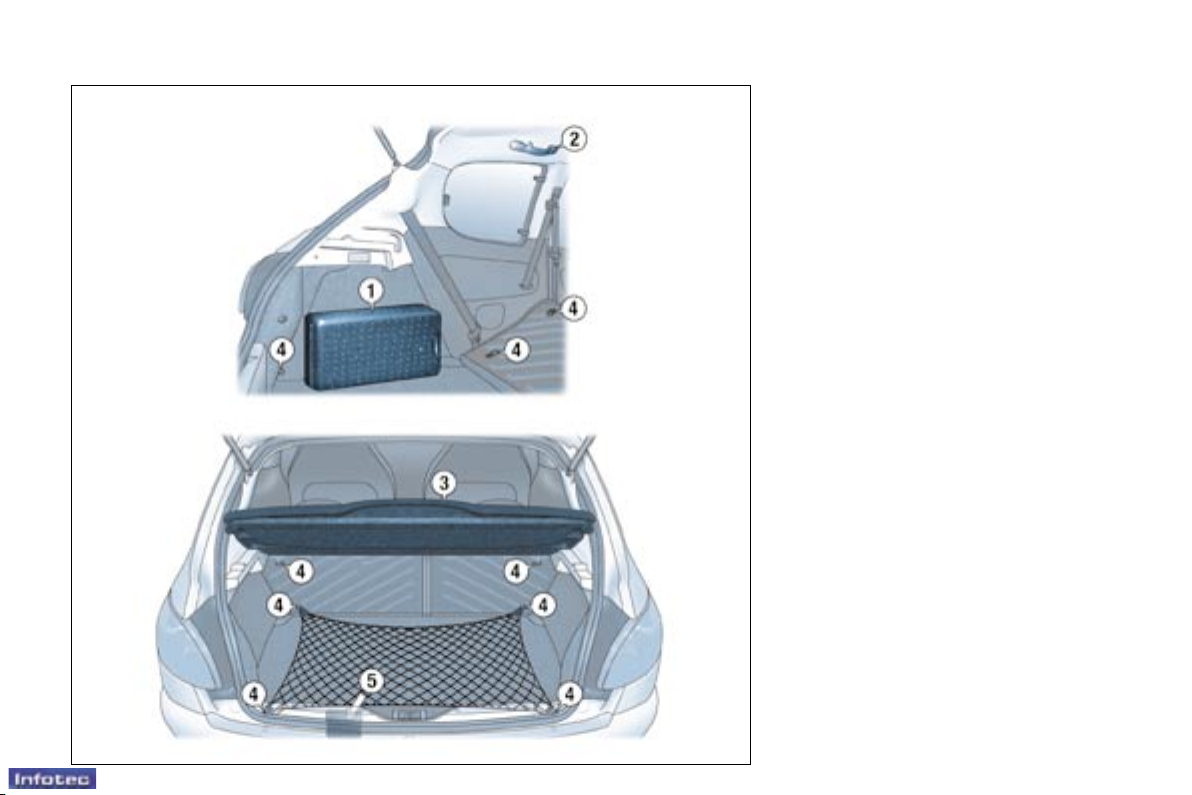
BOOT LAYOUT (206 GTi 180)
1. Insulated storage box
containing a puncture repair
kit, the jack and the folding
chock
2. Grab handles with coat hook
3. Removable rear shelf
4. Stowing rings
Stowing rings are provided onto
which the luggage retaining net may
be hooked: they are located on the
back of the rear seats and on the
boot rear inner panel (on the right
and on the left).
5. Luggage retaining net storage
(example of location)
125
Driving
-
01-10-2005
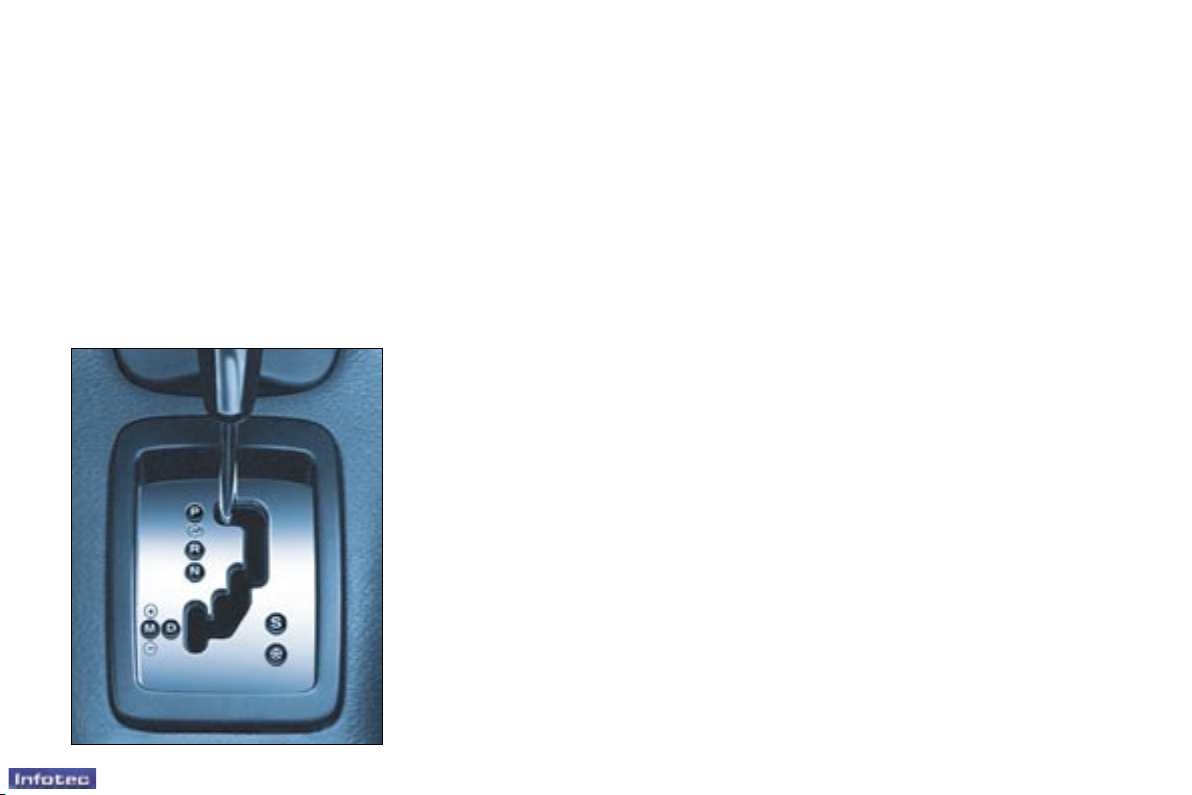
"PORSCHE TIPTRONIC
system" AUTOMATIC
GEARBOX
The four speed automatic gearbox
offers a choice between the comfort
of integral automatic operation,
enhanced by a sport and a
snow program, or manual gear
changing.
Gear selection gate
F Move the lever in the gate to
select a position.
The indicator light corresponding
to the position selected appears
on the instrument panel screen.
Park: to immobilise the vehicle
and to start the engine, with the
handbrake on or off.
Reverse: to reverse (select this
position with the vehicle stationary,
engine at idle).
Neutral: to start the engine and to
park, with the handbrake on.
If position N is inadvertently engaged
while driving, allow the engine
to return to idle before engaging
position D to accelerate.
Drive: for driving in automatic
mode.
Manual: for selection of gears.
S: sport program.
T
: snow program.
Moving Off
With the engine running, to move off
from position P:
F it is essential to press the brake
pedal to exit position P,
F select position R, D or M, then
gradually release the pressure
on the brake pedal; the vehicle
moves off immediately.
You can also move off from position N:
F release the handbrake, with your
foot on the brake,
F select position R, D or M, then
gradually release the pressure
on the brake pedal; the vehicle
moves off immediately.
Starting the engine
F with the handbrake on, select
position P or N in the gate,
F turn the ignition key to the Start
position.
WARNING
When the engine is at idle, brakes
not applied, if position R, D or M
is selected, the vehicle moves
even without the accelerator being
pressed.
For this reason, do not leave
children unsupervised inside the
vehicle, with the engine running.
When maintenance operations need
to be carried out with the engine
running, apply the handbrake and
select position P.
 Loading...