

Page 1
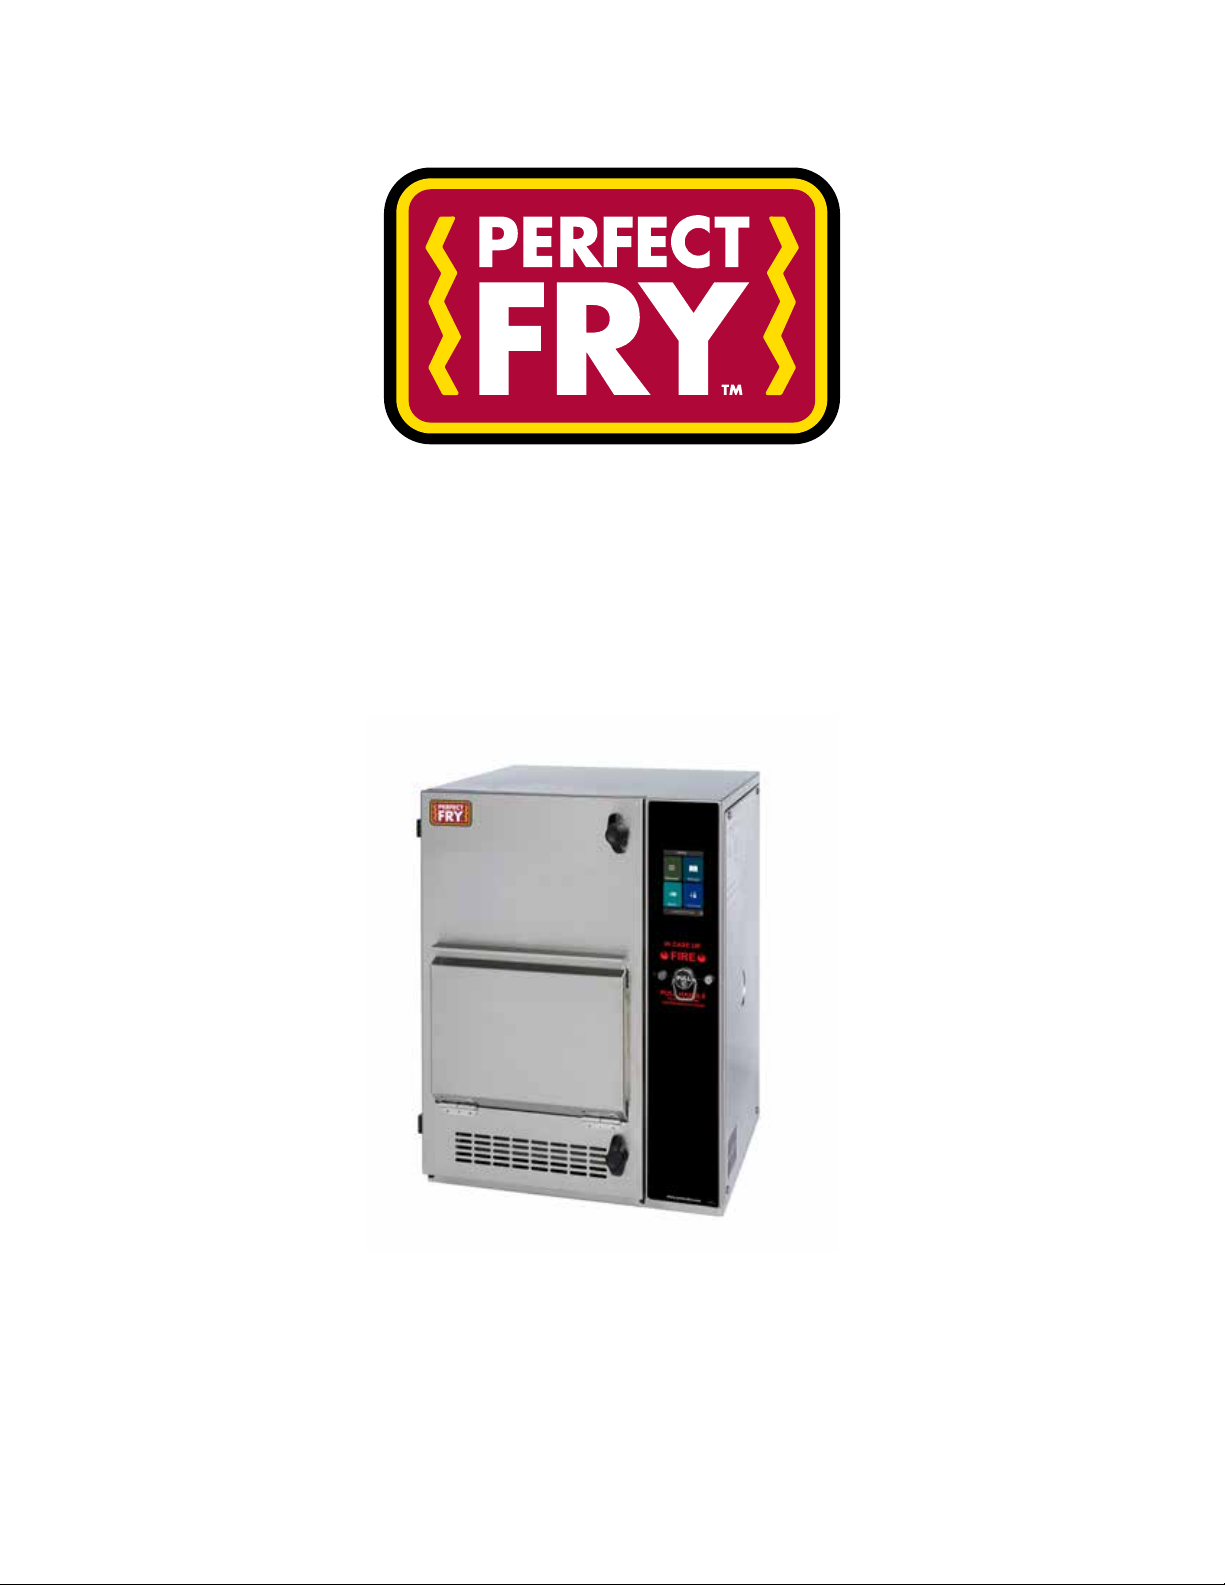
PFC SERIES
COUNTERTOP FRYERS
INSTALLATION - INSPECTION - MAINTENANCE
Be sure ALL operators read, understand and have access to this manual at all times.
PERFECT FRY
www.perfectfry.com
42 Allen Martin Drive, Essex Junction, Vermont 05452 USA Telephone: (802) 658-6600 Fax: (802) 864-0183
PN 84201 Rev F (2/24)
© 2024 - Perfect Fry Company
Page 2

TABLE OF CONTENTS
Thank you for Purchasing a PFC from Perfect Fry! ................................................................3
Owner’s Responsibilities ........................................................................................ 4
Regulations & Recycling ........................................................................................ 5
Safety First ....................................................................................................6
INSTALLATION
Electrical Power Supply (North American Models) .................................................................7
Prepare Countertop Area ....................................................................................... 8
Unpack .......................................................................................................8
Assembly ....................................................................................................10
CLEANING
Daily Maintenance ............................................................................................13
Weekly Maintenance ..........................................................................................13
Periodic Maintenance .........................................................................................15
OPERATING INSTRUCTIONS
Tips on Deep Frying ...........................................................................................16
Oil Facts .....................................................................................................17
Starting Up ...................................................................................................20
Manual Mode Frying ..........................................................................................21
Recipe Mode Frying ...........................................................................................23
Canceling a Recipe ...........................................................................................26
Standby Mode ................................................................................................27
Shut Down / Cool Down Operations ............................................................................27
Edit a Recipe .................................................................................................28
Edit Recipe Groups ...........................................................................................31
Settings ......................................................................................................33
Optional Perfect Filter .........................................................................................36
MAINTENANCE
Error Faults & Troubleshooting .................................................................................38
Troubleshooting Main Fan .....................................................................................39
Troubleshooting Control Fan ...................................................................................39
Troubleshooting Basket Motor ..................................................................................39
Troubleshooting Other .........................................................................................40
PFS AUTOMATIC EXTINGUISHER ....................................................................41
DECLARATION OF CONFORMITY ....................................................................43
ORIGINAL STANDARD EQUIPMENT LIMITED WARRANTY ......................................44
PFC SERIES INSTALLATION, OPERATION, MAINTENANCE 2
Page 3

THANK YOU FOR PURCHASING A PFC FROM
PERFECT FRY!
WARRANTY REGISTRATION
Be sure ALL operators read, understand and have access to this manual at all times.
1. Simply ll out the online warranty registration form anytime at www.perfectfry.com and automatically receive your war-
ranty activation code.
Now that you have registered and activated your fryer;
• Take comfort in knowing that the management and sta at Perfect Fry Company are dedicated to ensure that you, the
owner and operator of a Perfect Fry unit, receive a top quality product that is thoroughly inspected and tested prior to
shipment.
• Take comfort in knowing that our local Authorized Service and Parts Distribution (ASAPD) network is committed to
supplying your service and warranty needs. Each ASAPD has dedicated service sta that is able to answer any questions you may have regarding the operation of your Perfect Fry unit. We also have an online knowledgebase available 24/7/365 at perfectfry.com with many great tips and solutions.
OPEN KITCHEN REGISTRATION
1. Assemble unit fully (see “Installation”).
2. Scan code provided on removable label (shown below).
3. Follow steps provided by landing page & enter information as prompted to register unit online.
3 PFC SERIES INSTALLATION, OPERATION, MAINTENANCE
Page 4

OWNER’S RESPONSIBILITIES
IT IS THE OWNER’S RESPONSIBILITY TO:
• Ensure the Perfect Fry unit is properly maintained.
• Allow only properly trained personnel to operate, clean and maintain a Perfect Fry unit.
• Contact local authorities having jurisdiction to insure that the installation conforms to all local re, building and health
regulations.
• Schedule and maintain documentation that the appropriate inspection and maintenance of the PFS Automatic Extinguisher has been completed.
• Ensure that the model ready for installation matches the supply voltage.
• Ensure that the main power supply is disconnected before the Perfect Fry unit is serviced.
• Ensure that all safety devices are intact.
• Ensure that a proper surface is provided for the Perfect Fry unit to sit on.
• Ensure that proper clearances are kept.
• Operate and store the Perfect Fry unit above 32°F (0°C).
• Return the Perfect Fry unit for recycling when it reaches end of life.
PFC SERIES INSTALLATION, OPERATION, MAINTENANCE 4
Page 5
REGULATIONS & RECYCLING
Installation of your Perfect Fry unit must conform to all local re and health regulations and building codes. The installation use and maintenance is to be in accordance with the Standard for Ventilation Control and Fire Protection of Commercial Cooking Operations, NFPA 96 - 2004.
The table below describes the standards that your Perfect Fry unit has been tested to and the corresponding listing marks
depending on your region.
STANDARD DESCRIPTION LISTING MARK
UL 197
UL 710B
CSA 22.2 #109 Commercial Cooking Appliances forming part of Canadian
Commercial electric cooking appliances.
Commercial electric cooking appliances with recirculating systems.
UL 197 & UL 7410B reference the following standards which your
Perfect Fry unit meets applicable parts thereof:
• UL 1046: Grease Filters for Exhaust Ducts.
• UL 300: Fire Testing of Fire Extinguishing Systems for Protection
of Restaurant Cooking Areas.
• NFPA 17A: Wet Chemical Extinguishing Systems.
• NFPA 96: Standard for Ventilation Control and Fire Protection of
Commercial Cooking Operations.
• EPA 202: Determination of Condensable Particulate Emissions for
Stationary Sources.
Electrical Code, Part 2 Safety Standards for Electrical Equipment.
NSF 4 Commercial Cooking, Rethermalization, and Powered Hot Food Hold-
ing and Transport Equipment.
EN60335-1 Safety of Household and Similar Electrical Appliances Part 1. General
Requirements
EN60335-2-37 Safety of Household and Similar Electrical Appliances Part 2. Com-
mercial Electric Deep Fat Fryers
EN55014-1
EN55014-2
Electromagnetic Compatibility (EMC) – Emissions & Immunity for
Light Industrial Environments
5 PFC SERIES INSTALLATION, OPERATION, MAINTENANCE
Page 6

SAFETY FIRST
CAUTION
LIFTING & MOVING:
• Your fryer’s gross shipping weight is 130 lb. (59 kg). Net weight = 106 lb. (48 kg). DO NOT LIFT THE FRYER BY
YOURSELF. ALWAYS REMOVE OIL BEFORE MOVING FRYER.
DEEP FRYING:
• Cooking oil is very hot ~350ºF (177ºC). Hot oil can cause severe burns. DO NOT TOUCH THE COOKING OIL UNLESS YOU ARE SURE IT HAS COOLED.
HEATER MODULE:
• DO NOT DROP
• DO NOT IMMERSE IN WATER
CLEANING:
• Before cleaning fryer or removing oil, let fryer cool to 122ºF (50ºC). DO NOT TOUCH HEATER MODULE, VAT OR
OIL UNLESS YOU ARE SURE IT HAS COOLED.
COOKING OIL MAINTENANCE:
• For sanitation and safety, we recommend that the cooking oil is replaced once a week, more often for higher volume
usage. Use a commercial grade deep-fryer formulated cooking oil. See Oil Facts on page page 17.
SERVICING:
• DISCONNECT THE POWER SOURCE BEFORE SERVICING THE FRYER. There is no need to unplug your Perfect
Fry unit for normal cleaning or maintenance.
STORAGE:
• Do not store your fryer below 32°F (0°C)
• Intended for indoor use only
PFC SERIES INSTALLATION, OPERATION, MAINTENANCE 6
Page 7

INSTALLATION
ELECTRICAL POWER SUPPLY
• Your PERFECT FRY PFC must be connected to a dedicated electrical circuit that meets your fryer’s requirements
(see table below).
CAUTION
Improper installation may damage the fryer and void your warranty.
• All electrical connections to comply with local and national standards and codes.
• If your fryer’s plug does not t your wall outlet receptacle, have an electrician install the appropriate NEMA receptacle
within 4 feet of the fryer.
• See the manufacturer’s label on your fryer for the electrical specications.
MODEL VAC KW CYCLE PHASE AMP
PFC500
208
PFC730 7.3 60
PFC500
240
PFC730 8.0 50/60
PFC500
200
PFC730 6.8 1 34
PFC500
220
PFC730 6.7 1 31
PFC500
230
PFC730 7.3 1 32
PFC500
220/380
PFC730 6.7 3 11
5.0 60
5.5 50/60
4.7
50/60
4.6
50/60
5.0
50/60
4.6
50/60
1 24
3 14
1 35
3 21
1 23
3 14
1 34
3 20
1 24
1 21
1 22
3 7
PFC500
230/400
PFC730 7.3 3 11
PFC500
240/415
PFC730 8.0 3 12
7 PFC SERIES INSTALLATION, OPERATION, MAINTENANCE
5.0
5.5
50/60
3 8
3 8
50/60
Page 8
PREPARE COUNTERTOP AREA
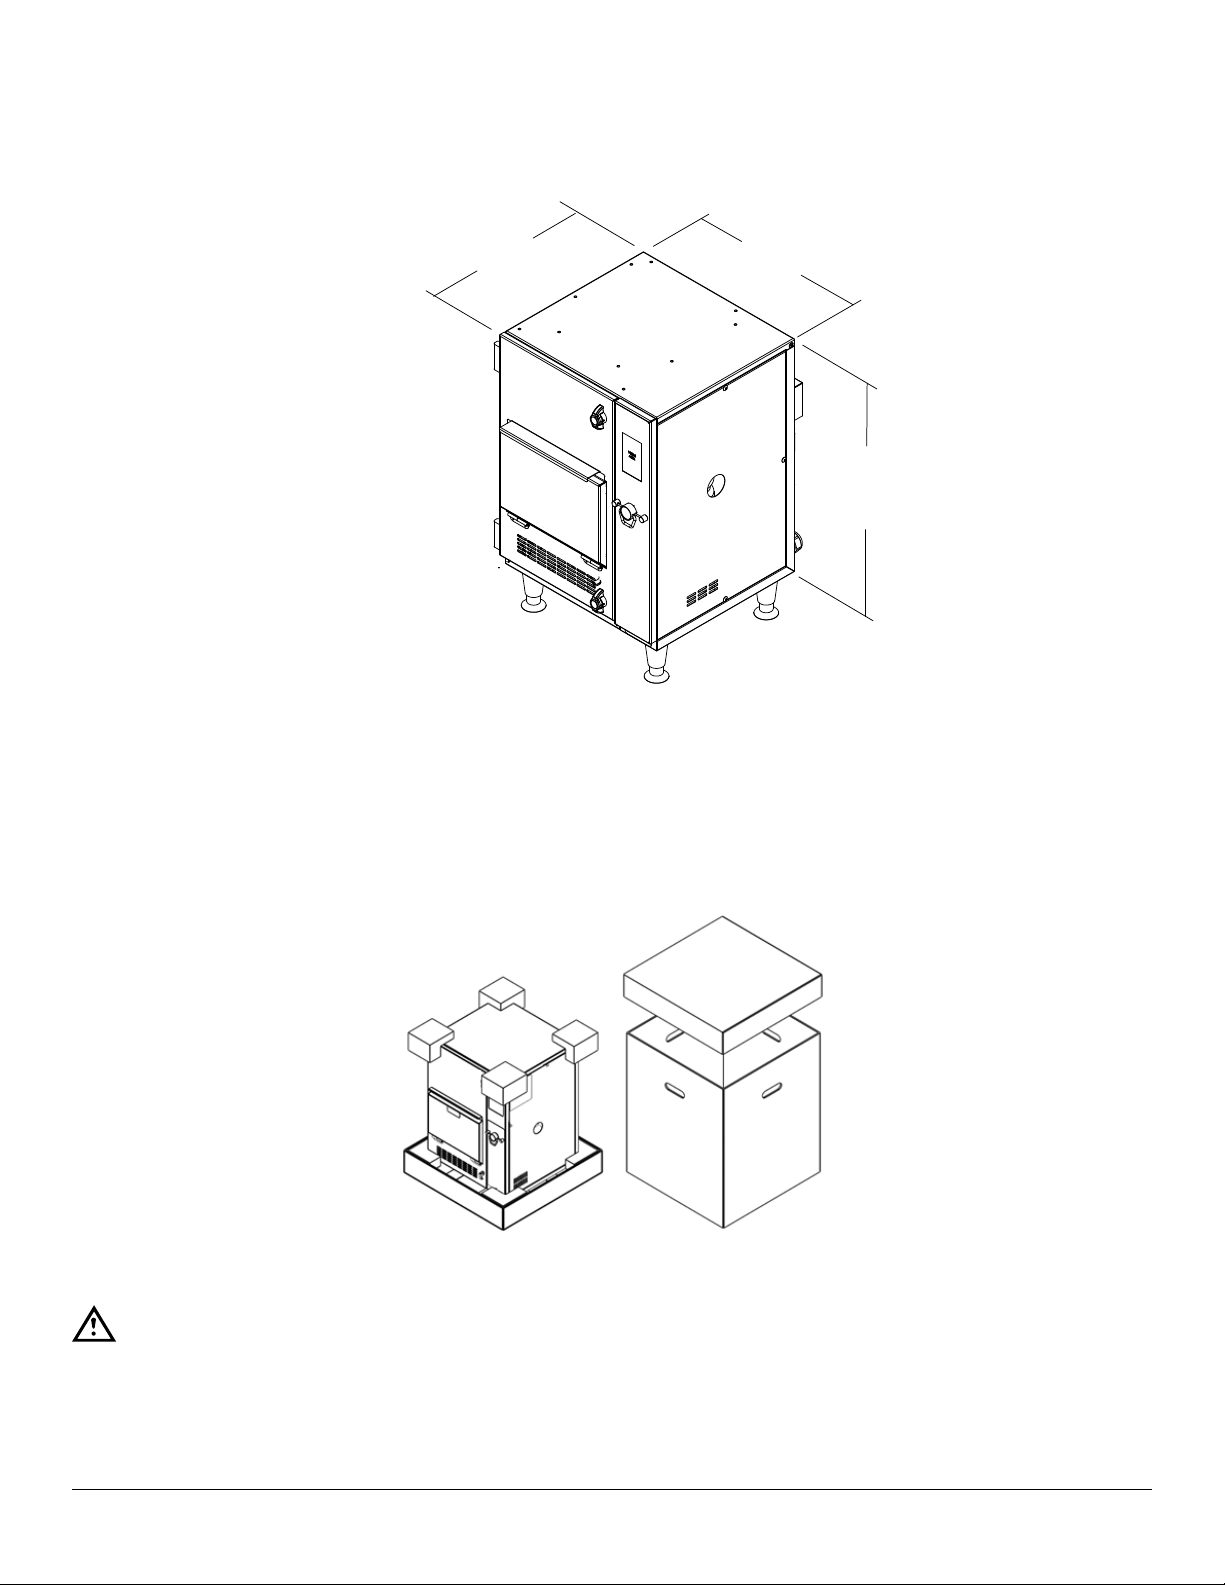
Clear space for your PFC fryer on the counter. Refer to the following gure for product and clearance requirement dimensions.
Clearances:
1” on sides
2” on back
0” on top
UNPACK
1. Cut straps on shipping box.
2. Remove box top and body
16”
(408 mm)
17”
(434 mm)
23”
(584 mm)
3. Remove outer plastic wrapping and keep box along with foam corners and sides
4. Remove all foam stung and parts
5. Put check mark in the box once the part is removed
CAUTION
Your PERFECT FRY weights 106 lbs (48 kg). Lift it carefully with your legs or with the help of another per-
son and place it in its nal location.
6. Ensure that blow-o caps on re extinguisher nozzles are kept in place
7. Proceed to ASSEMBLY section.
PFC SERIES INSTALLATION, OPERATION, MAINTENANCE 8
Page 9
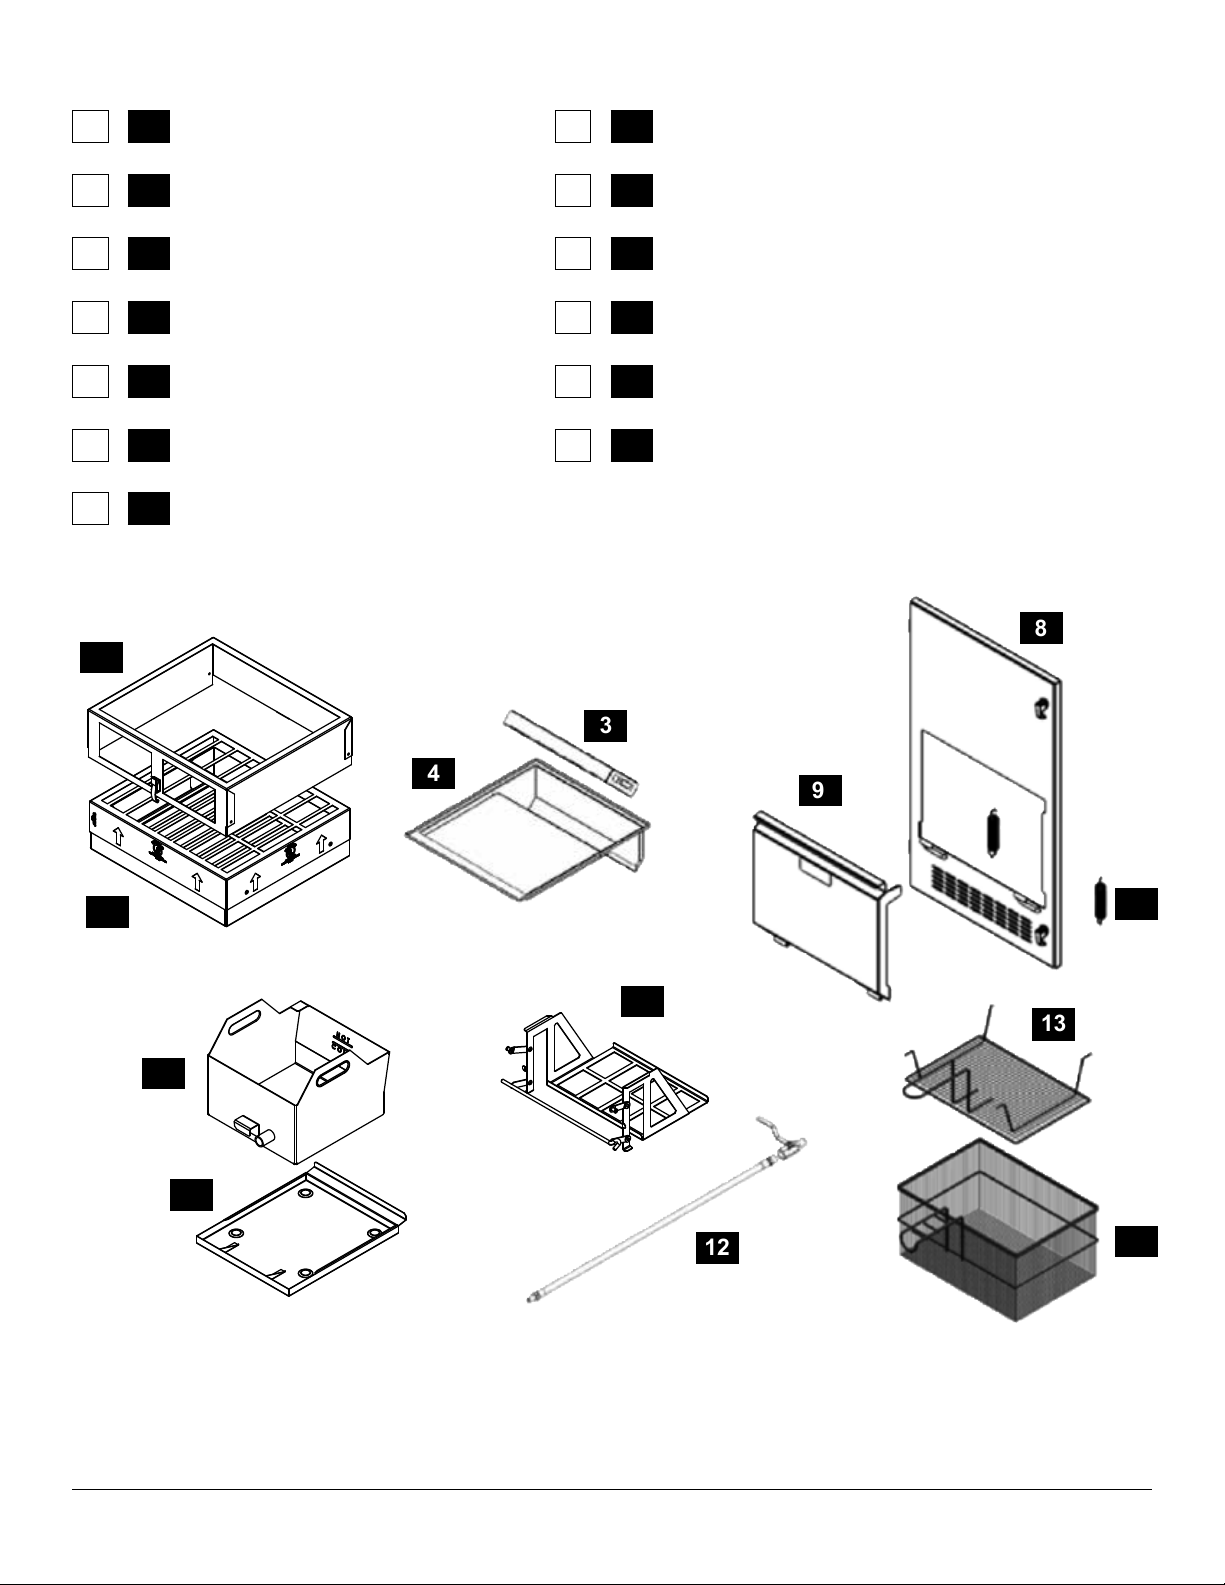
1
2
3
4
5
6
7
8
13
10
9
11
12
1 Air Filter Cage
8 Front Panel
2 Air Filter Cartridge
3 Grease Filter
4 Grease Filter Tray
5 Basket Lift
6 Oil Vat
7 Oil Spill Tray
9 Door
10 Door Spring (2)
11 Extra Large Basket
12 Oil Drainage Kit (Optional)
13 Extra Large Basket Cover (Optional)
9 PFC SERIES INSTALLATION, OPERATION, MAINTENANCE
Page 10
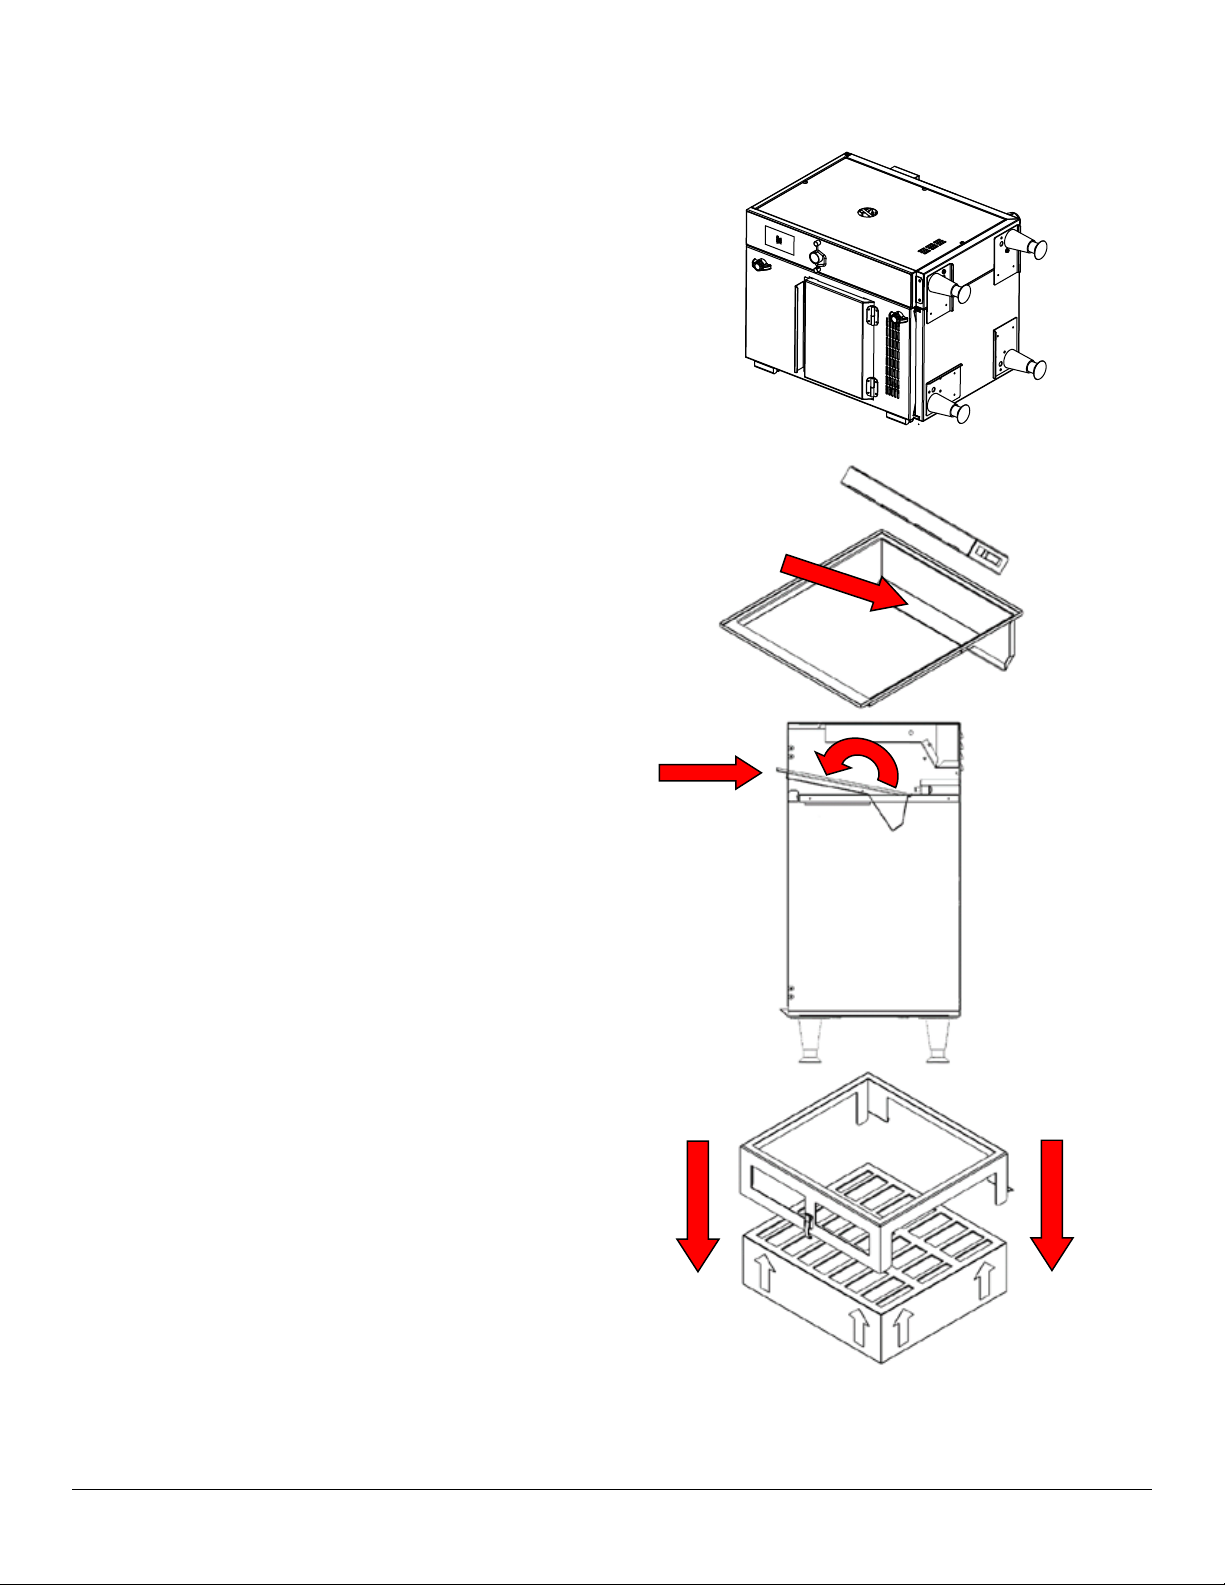
ASSEMBLY
1. Clean parts and inside of cabinet (all except air lter cartridge)
a. Wash in warm soapy water
b. Rinse with hot water
c. Rinse with vinegar solution (1 part vinegar to 2 parts water)
2. Place the unit on its side and attach the feet.
3. Open door
4. Install grease lter into grease lter tray
Note: magnet should be on right side
5. Install grease lter/grease lter tray into lter
compartment by sliding along rails and towards back.
6. Fit air lter cage over air lter cartridge.
Note: Make sure arrows are pointing up.
PFC SERIES INSTALLATION, OPERATION, MAINTENANCE 10
Page 11
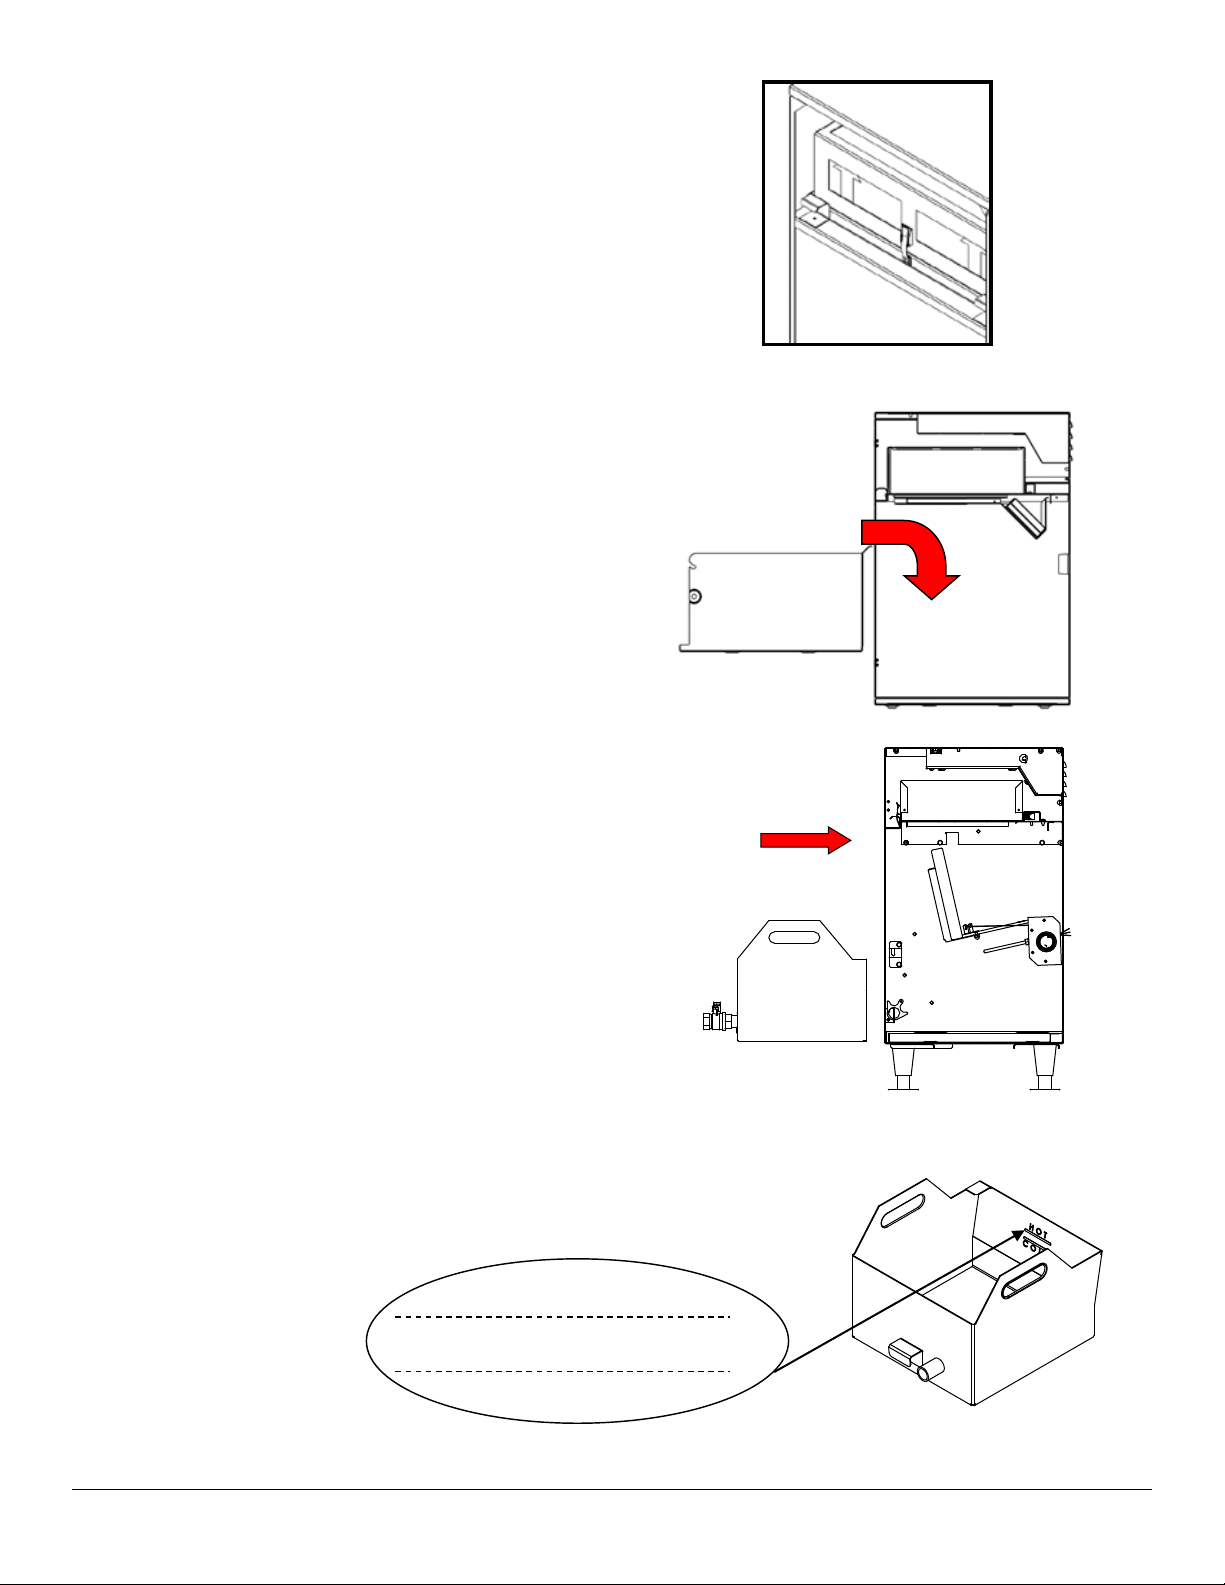
7. Slide air lter cartridge rmly back into lter com-
COLD
HOT
partment and fasten down with latch.
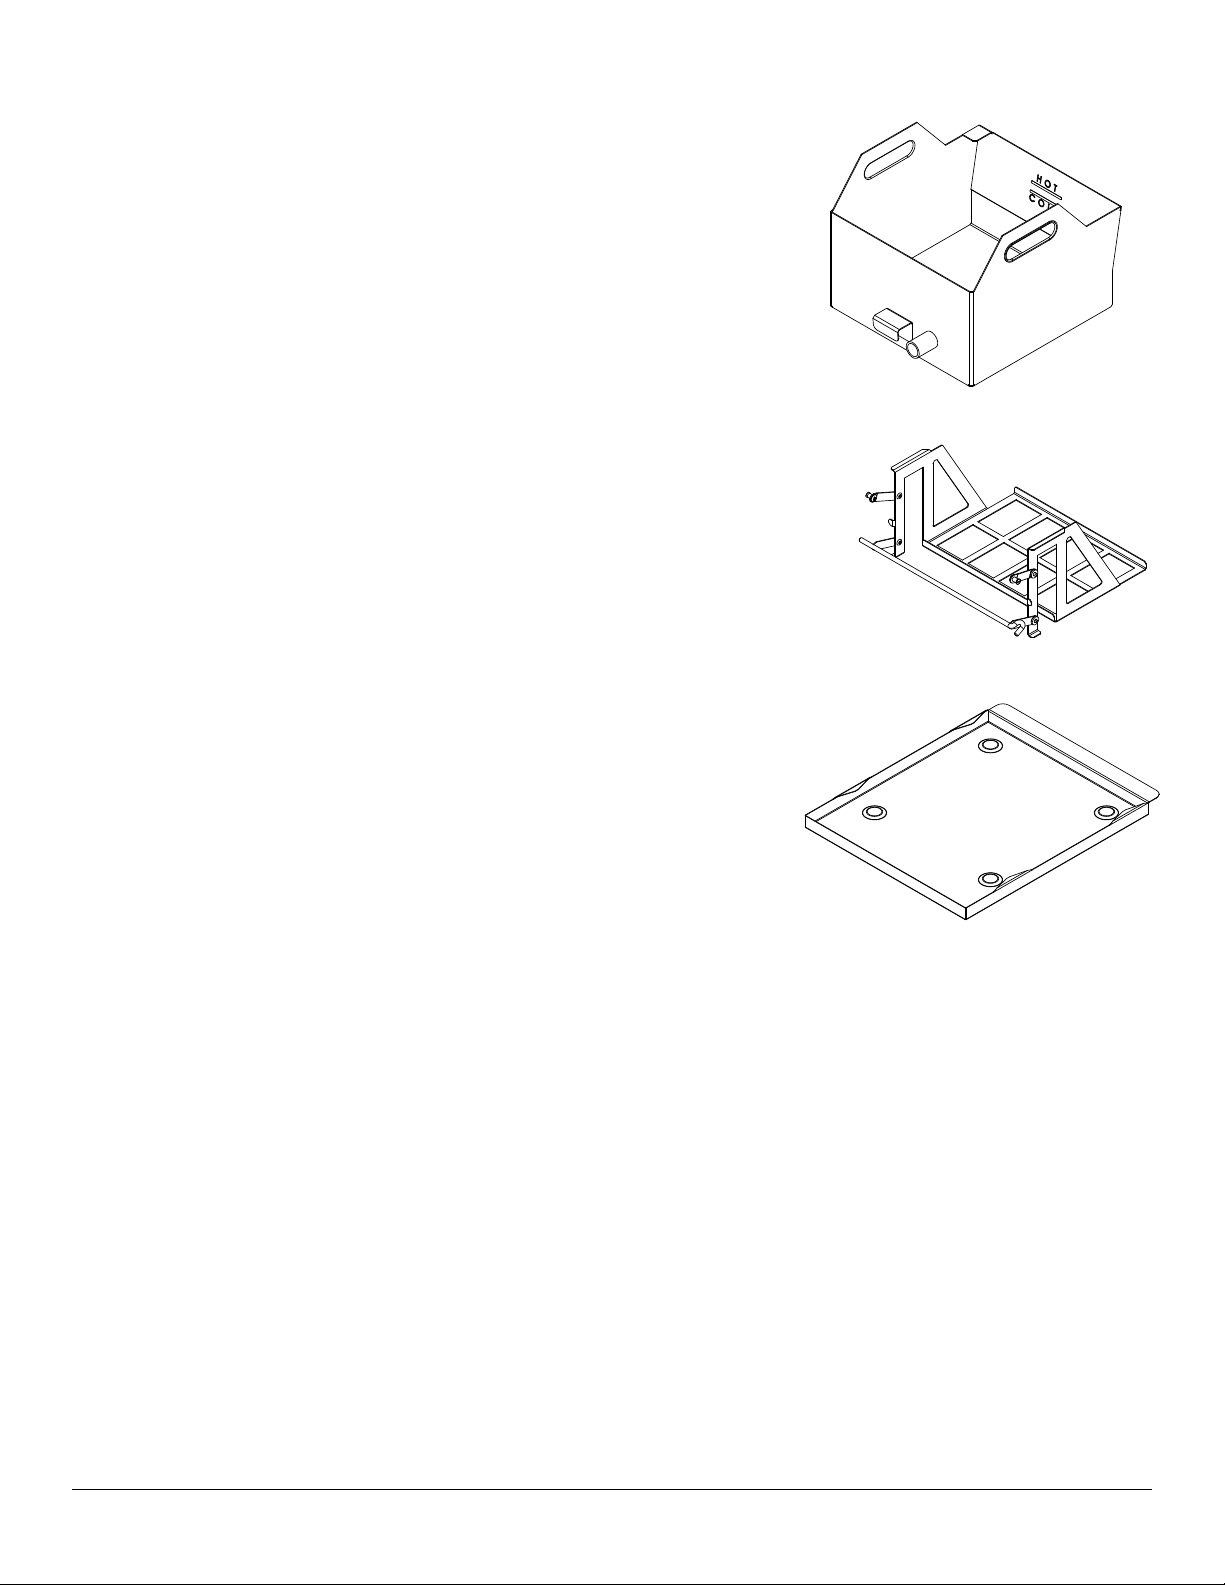
8. Install spill tray into bottom cooking compartment.
NOTE: Indents on bottom of spill tray should t into
indents on bottom of cabinet.
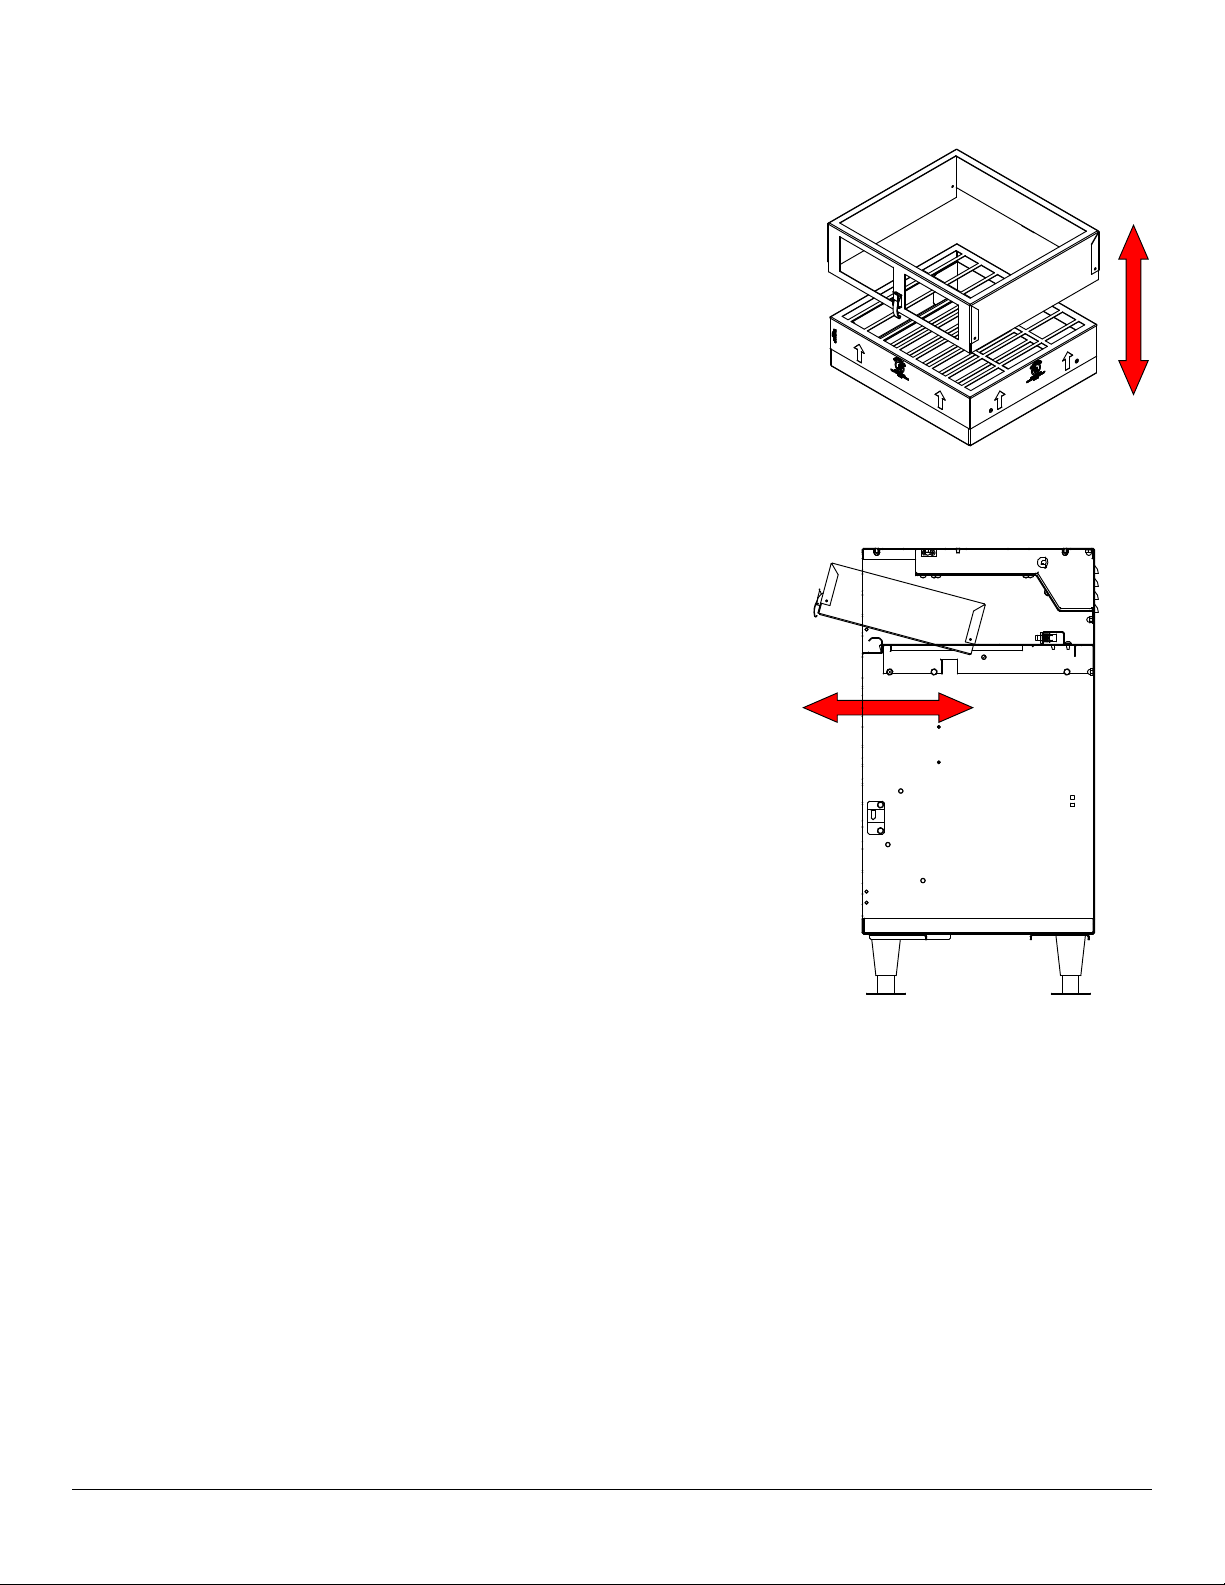
Your new Perfect Fry Fryer features a pivoting
element to allow the vat to be removed easily for
cleaning. To remove the vat, lift the element into its
raised position. To do this, open the door, nd the
pulley system mounted to the left side of the unit.
Pull the handle, and hook it around the pull catch
in the lower left corner of the front of the unit. The
vat may need to be shifted forward as the element
swings up. The spill tray may be removed or installed with the vat out of the unit and the element
raised.
To lower the element, ensure the vat is in place,
unhook from the catch and lower down slowly,
again the vat may need to be shifted forward or
back to allow the element to sit all the way down.
The fryer will not heat if the element is in the
raised position.
9. Pour frying oil into vat. Fill to COLD level mark.
Use commercial grade deep fryer cooking oil. DO
NOT OVERFILL
10. Pour frying oil into vat. Fill to COLD level mark.
Use commercial grade deep fryer cooking oil. DO
NOT OVERFILL
11 PFC SERIES INSTALLATION, OPERATION, MAINTENANCE
Page 12
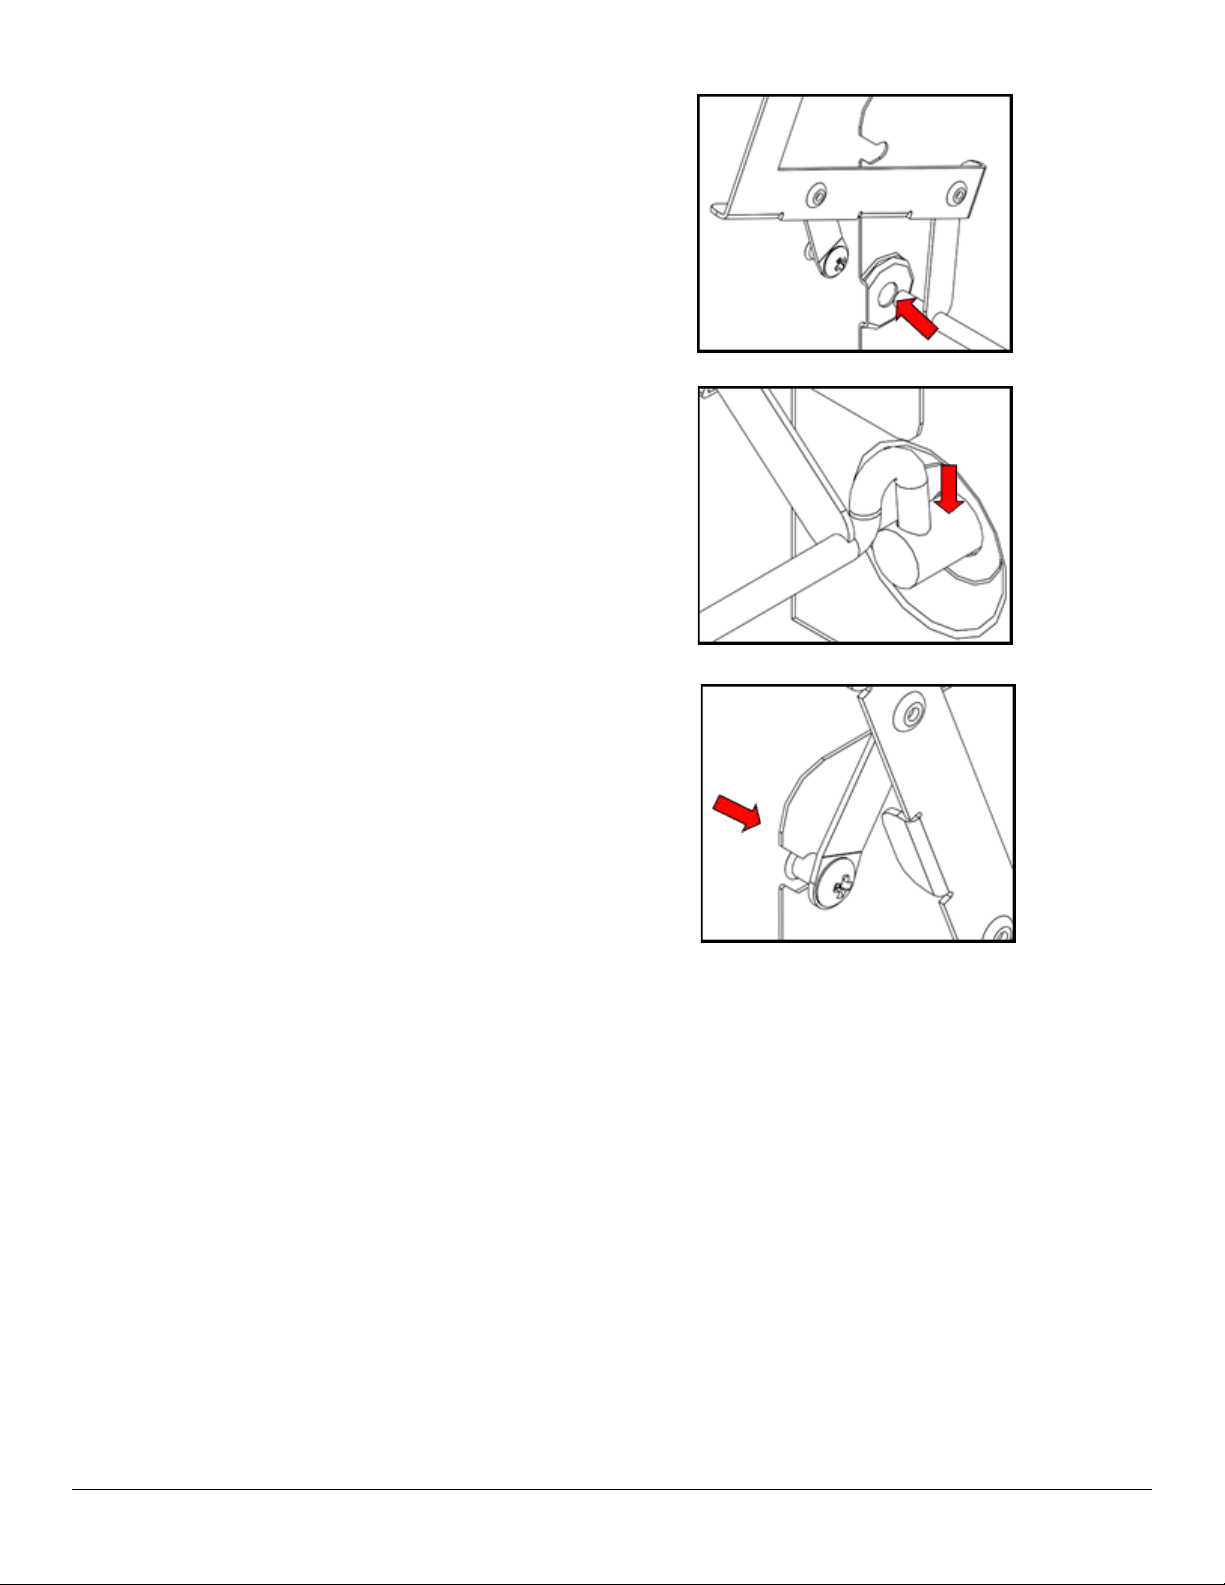
11. Install basket lift.
a. Hold basket tray vertical
b. Install rod into pivot hole – left side
c. Install rod into motor coupler – right side
d. Pivot basket tray forward from vertical
position and insert arms into spill tray
12. Install and close front panel. Turn latch ¼ turn
clockwise and press down.
13. The USB port for this unit is located next to
the circuit breaker on the back of the unit. This
is used to log diagnostic information, import
or export recipe and control information. Keep
the screw top in place when not in use to ensure the port stays clean.
14. There is a circuit breaker located in the upper
right corner on the back of the unit, this must
be turned on for the unit to operate.
PFC SERIES INSTALLATION, OPERATION, MAINTENANCE 12
Page 13
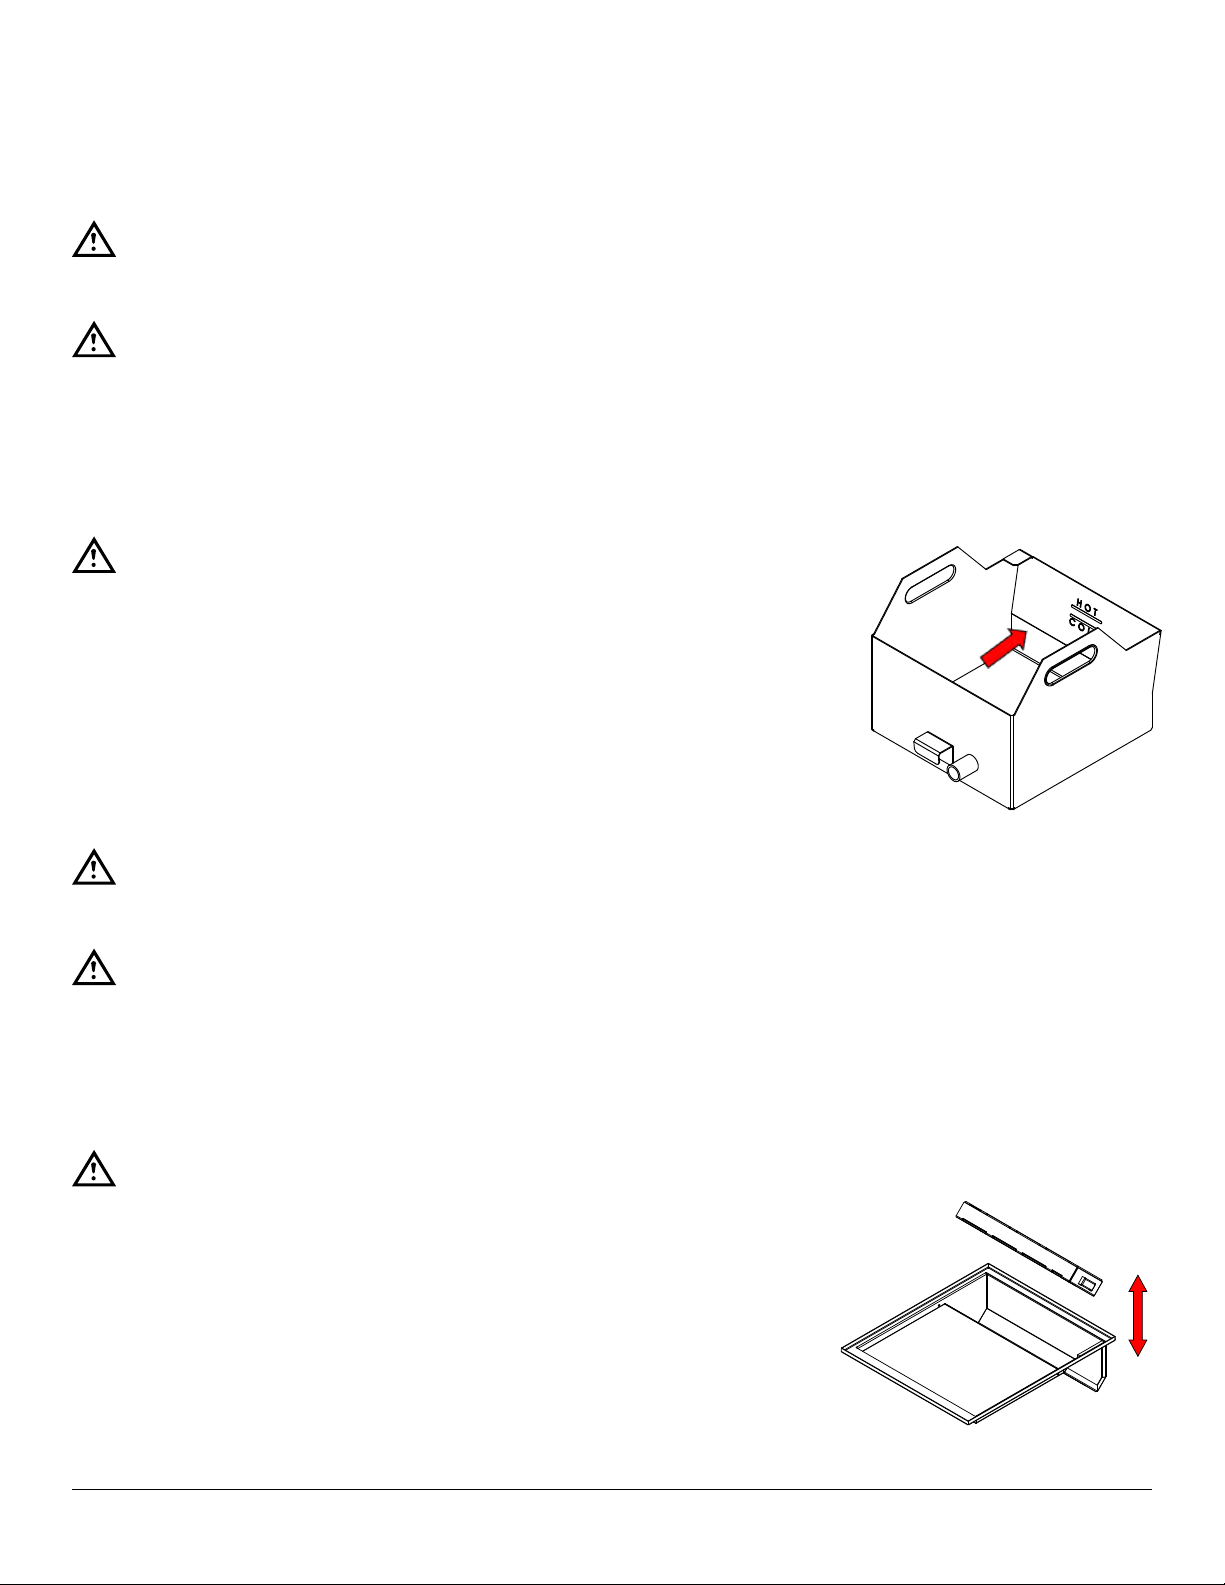
CLEANING
DAILY MAINTENANCE
CAUTION
Do not unplug the fryer and always make sure the fryer is turned o.
CAUTION
Do not touch heating element, oil vat or oil unless you are sure it has cooled.
1. Wipe basket with paper towel to remove crumbs and food particles.
2. Wipe crumbs, oil and any other food matter from inside of drawer using a paper towel.
3. Clean outside of fryer with a good stainless steel cleaner and wipe dry.
CAUTION
Do not clean the outside or any other stainless steel part using abrasive
cleaners.
4. Check oil level on the back of vat to make sure it is up to cold line (at room
temperature). If not, add oil as necessary. Replace the cooking oil once a week or
more often if necessary. Use a COMMERCIAL GRADE DEEP FRY COOKING OIL.
WEEKLY MAINTENANCE
CAUTION
Do not unplug the fryer and always make sure the fryer is turned o.
CAUTION
Do not touch heating element, oil vat or oil unless you are sure it has cooled.
1. Open front panel by turning the latches. Remove basket liftand wash in soap and hot water. Rinse well in hot water
and dry
2. Remove air lter cartridge and set aside (for replacement, refer to “Steps to replace air lter cartridge” on page 21).
CAUTION
Do not wash air lter cartridge.
3. Remove grease lter tray from cabinet. Remove grease lter from tray and drain
any oil that has accumulated. Wash both parts in soap and hot water. Rinse well
in hot water and dry.
13 PFC SERIES INSTALLATION, OPERATION, MAINTENANCE
Page 14
4. Attach oil hose and drain cooking oil from vat into containers for disposal.
Have empty containers handy for proper disposal of used cooking oil. A
rendering company can help with proper disposal.
5. Remove basket lift and oil vat (picture right). Spray parts with oven cleaner,
enclose with plastic bag for at least one hour or leave overnight if possible.
Wash in soap and hot water and rinse well in hot water. Rinse parts in a
solution of: 1 part white vinegar [5% acetic acid] and 2 parts water. The
vinegar rinse is very important. It neutralizes soap residue that causes
oil breakdown foaming. Soap residue turns oil dark and reduces its perfor-
mance signicantly. Clear water rinse parts.
6. Remove spill tray and drain any oil that has accumulated. Wash in soap
and hot water. Rinse well in hot water and dry.
7. With internal components removed, clean cooking and lter compartments
with grease cutting soap or oven cleaner if necessary. Rinse with damp
cloth and dry.
8. Clean countertop and external surfaces.
9. Ensure that blow-o caps on re extinguisher nozzles are kept in place.
10. Re-install all parts.
PFC SERIES INSTALLATION, OPERATION, MAINTENANCE 14
Page 15
PERIODIC MAINTENANCE
Air Filter Cartridge Replacement
• Replace the air lter cartridge at least once every 3 months, more often
for higher volume usage. Replacement is safer and easier when the fryer
is cool rather than hot.
• Only PERFECT FRY lters may be used in your Perfect Fry unit.
Steps to replace air lter cartridge
1. Open front panel by turning latches
2. Release latch on air lter cage, and remove air lter cage and air lter car-
tridge from lter compartment
3. Remove old used air lter cartridge from air lter cage.
4. Wipe air lter cage clean.
5. Fit air lter cage over new air lter cartridge and write date on cartridge.
(↑↑ Arrows up)
6. Install air lter cage and new air lter cartridge rmly back into lter compartment and latch in place.
7. Close front panel and latch shut.
PFS Automatic Extinguisher
• The PFS automatic extinguisher must be inspected monthly by the
owner/operator and semi-annually by authorized service personnel as
per NFPA 17A. It is important that a maintenance program is set up with
a local re service company to ensure that local jurisdictional codes are
being met. Please refer to PFS Automatic Extinguisher section for more
information.
15 PFC SERIES INSTALLATION, OPERATION, MAINTENANCE
Page 16

OPERATING INSTRUCTIONS
TIPS ON DEEP FRYING
GREAT FOOD IN LESS TIME
• Use premium quality commercial deep frying oil. Canola and Soybean oils are recommended. Do not use house-
hold cooking oils from your local supermarket. Poor quality oils may shorten the life of the air lter cartridge.
• Keep food frozen until ready to fry. Frozen product will absorb less oil during the cooking process.
• Remove ice from food. Ice results in excess bubbling and spillage of oil out of the vat.
• Minimize the moisture. Excess moisture extends the cooking time. Water, ice, sugar and breading all contribute to
shortening the life of the oil
MINIMIZE THE MOISTURE
REDUCE THE COOKING TIME
MAXIMIZE THE PROFIT
• Try to reduce the amount of breading that falls o of the food. Breading often has sugar and other ingredients
that will reduce the oil’s life and darken the appearance of food. Consider ltering the oil to remove the breading
particles.
• Do not overll the drawer. Excess food may not be cooked properly
COMMON QUESTIONS
• How Much Oil to Use?
The PERFECT FRY has a capacity of 2 gallons(8L) of oil. Fill the oil vat to the cold line only.
• How Much to Fry?
Fill the basket to the top only. The baskethas an approximate capacity of 2 lbs (1 kg) of product per cycle. Whatever
you can t in the basket is what you can fry.
• What is the Ideal Temperature Range for Cooking?
The ideal temperature range for cooking product is between 350°F and 360°F (177°C and 182°C). The factory default setting for cooking temperature is 350°F (177°C).
• Should Frozen Food Be Defrosted?
DO NOT THAW FROZEN FOOD! Frozen foods only should be put directly into the fryer in order to minimize moisture.
• Can I Refreeze Frozen Foods?
NO, do not refreeze frozen foods. Foods that are refrozen can absorb more oil, which will result in a dry, brittle and
tasteless product.
PFC SERIES INSTALLATION, OPERATION, MAINTENANCE 16
Page 17

OIL FACTS
Frying oil is especially formulated to withstand high temperatures. For this reason, you must ensure you are using the
right product. Liquid vegetable shortening is produced by several companies; the oil has an additive and/or has been
formulated to increase the performance during high temperature usage.
DO NOT USE OIL THAT IS RECOMMENDED BOTH FOR SALAD AND FRYING!
Fill the oil vat to the cold line only. The oil expands as it heats and if overlled, the bottom of the basket will remain in the
oil when in the up/serve position.
How Much to Fry?
• Fill the basket no higher than the top. Do not overll the basket.
• Keep basket clean and free of breading/batter build up.
• Remove ice crystals or excess water before frying.
• Do not salt or season before frying.
• Remove surplus and/or batter before frying.
• Do not allow frozen food to thaw before frying.
• Drain fried foods before serving.
How Hot is TOO Hot?
Ideal frying temperature range is between 350°F and 360°F (177°C and 182°C). Factory default setting is 350°F (177°C).
When frying at too low a temperature, food absorbs more oil which increases oil consumption.
Excessive Oil Usage?
The fried product is absorbing oil. Possible reasons for this include:
• Excess breading or batter, shake o excess before frying.
• Allow basket to drain longer, adjust the drain time.
• Food is being allowed to thaw before frying.
Cleaning Your Fryer?
• Refer to the Cleaning section of this owner’s manual. Remember to clean the basket daily.
Filtering Your Oil?
The most important procedure you can do is to maintain the oil, extending its life:
• Filter at least once a day, preferably rst thing in the morning when the oil is at room temperature.
• Filtering removes all the contaminants from the previous days cooking.
• Clean the oil vat.
Points to Remember:
• Clean the cooking chamber at least once a week and rinse thoroughly.
• Filter oil daily.
• Do not overheat oil.
• Use the standby mode when possible.
• Do not salt product prior to frying.
• Remove ice crystals and moisture before frying.
• Maintain oil level in vat, check to ensure it is at the hot line often.
• The oil is dead when foaming appears continuously on the oil surface
Your oil, product taste, and customers depend on you.
17 PFC SERIES INSTALLATION, OPERATION, MAINTENANCE
Page 18

If the oil temperature is set too high, the food will cook on the exterior and the interior will be undercooked. When the interior is cooked completely, the exterior will be overdone or burnt. The higher temperature will also cause the oil to break
down faster and smoke.
During slow periods, take advantage of the standby mode which allows the oil to cool down to 275°F (135°C), prolonging
the oil life and reducing energy costs while allowing quick recover time when required.
The oil temperature should not be adjusted when cooking dierent products. Adjust the cooking time instead.
Frozen Foods
Put frozen foods directly into the fryer. DO NOT THAW FROZEN FOODS! Blot excess water from food before frying.
Remove ice crystals that may be at the bottom of the product bag.
OIL AND WATER DO NOT MIX! Water reacts with oil and makes it break down rapidly resulting in darkening, smoking
and foaming (a process called hydrolysis). Excess water in the oil can cause the following problems:
• Unnecessary temperature drop meaning longer cooking times.
• More energy usage to maintain cooking temperature.
• Excessive splattering inside the fryer resulting in a mess to clean up.
• Decreased life of the air lter and the oil.
Refreezing Frozen Foods?
Frozen foods should be fried frozen. Foods that are refrozen can absorb more oil and make your fried foods taste greasy.
Refrozen food forms excessive ice and these ice crystals can bond food pieces together causing clumping. Remember:
• Always FRY FOOD FROZEN.
• NEVER REFREEZE thawed food
• REMOVE ice crystals from product before frying.
• DO NOT accept thawed or refrozen product from supplier.
Excessive Foaming?
The main reason for foaming is improper rinsing of oil vat after cleaning:
• To remove soap residue, rinse 3 times with water after cleaning or neutralize with a water and vinegar solution (1
part white vinegar to 2 parts water).
• Take care of your oil; use standby mode during slow periods. High temperature and oxygen contribute to oil
breakdown. Filter oil and clean vat at least once a day when using heavily breaded products.
Excessive Smoking/Oil Darkening?
• Oil is too hot, check temperature.
• Inadequate ltering, breading or batter build-up in vat causes oil breakdown, giving food a bitter taste.
• Moisture content is too high. Use precooked frozen products only. Remember to remove ice crystals.
Grease Soaked Food?
• Frozen food is being allowed to thaw before frying.
• Oil is in the advanced stages of breakdown, replace immediately.
• Oil temperature is too low, check temperature.
• Product has too much breading or batter, remove excess
PFC SERIES INSTALLATION, OPERATION, MAINTENANCE 18
Page 19

Food Not Browning Properly?
• New oil may not brown the product; check color again after a few basket loads.
• Too much product is in the basket; ll no higher than the ll line.
• Product is not frying long enough, follow manufacturers suggested cooking times.
• Oil temperature is too low, check oil temperature.
• Product is frying in excess foam.
• Oil level is too low, check the oil level.
Premature Oil Breakdown?
• Oil is at full temperature during slow periods, use standby mode.
• Oil is contaminated. Never use wire brushes, copper pads or steel wool for cleaning. Use a hard bristle brush
and lter oil regularly. Rinse with water vinegar solution.
• Also, see section; HOW HOT IS TOO HOT?
Statements used in OIL FACTS section are taken from:
• NAFEM Food Service Industry
• Canola Research Foundation
• Sysco Oil Publication
19 PFC SERIES INSTALLATION, OPERATION, MAINTENANCE
Page 20
STARTING UP
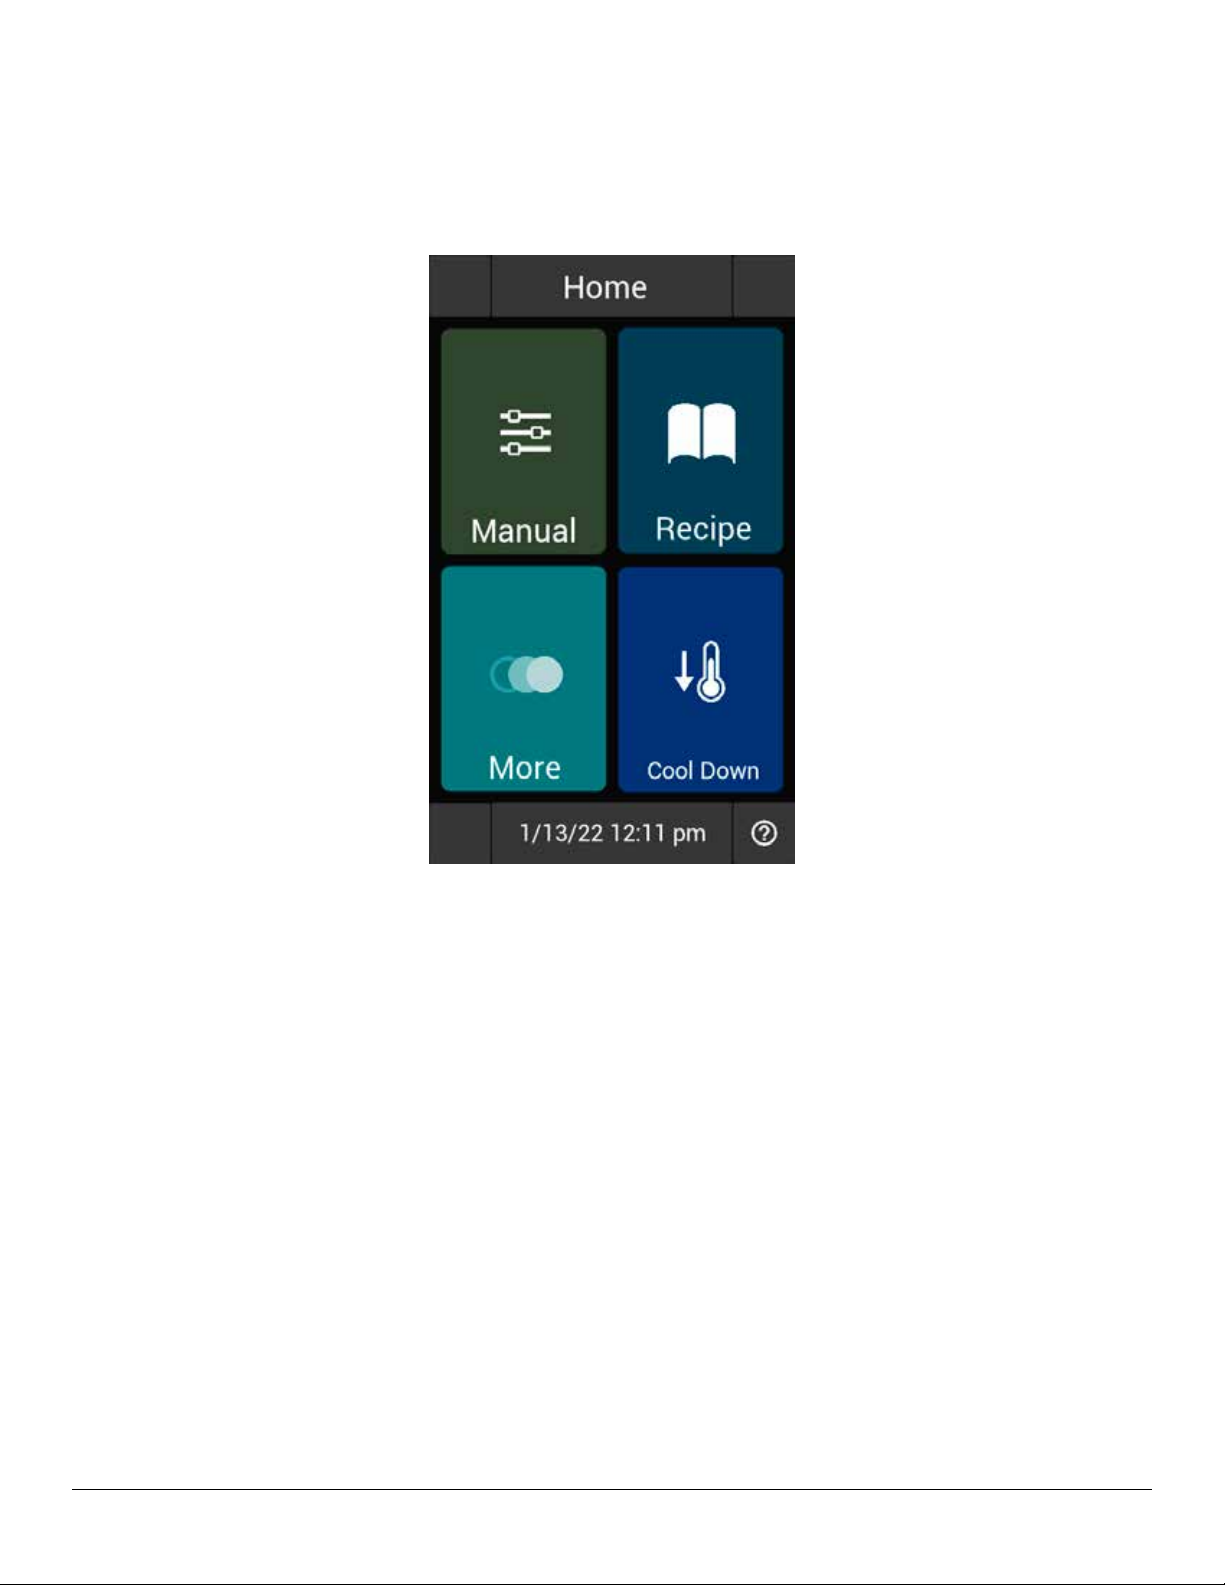
Upon powering the Perfect Fry, the control will boot to a screen displaying the Perfect Fry Logo, and a prompt to Tap
Screen To Continue. Tapping the screen will progress the unit to a brief system check, ensuring all functions are ready for
use.
Once the system check is complete, the control displays the HOME SCREEN.
From this screen you will be able to access your primary frying modes as well as the additional features of the Perfect
Fry® unit. To begin heating the unit, Manual or Recipe frying must be selected.
PFC SERIES INSTALLATION, OPERATION, MAINTENANCE 20
Page 21
MANUAL MODE FRYING
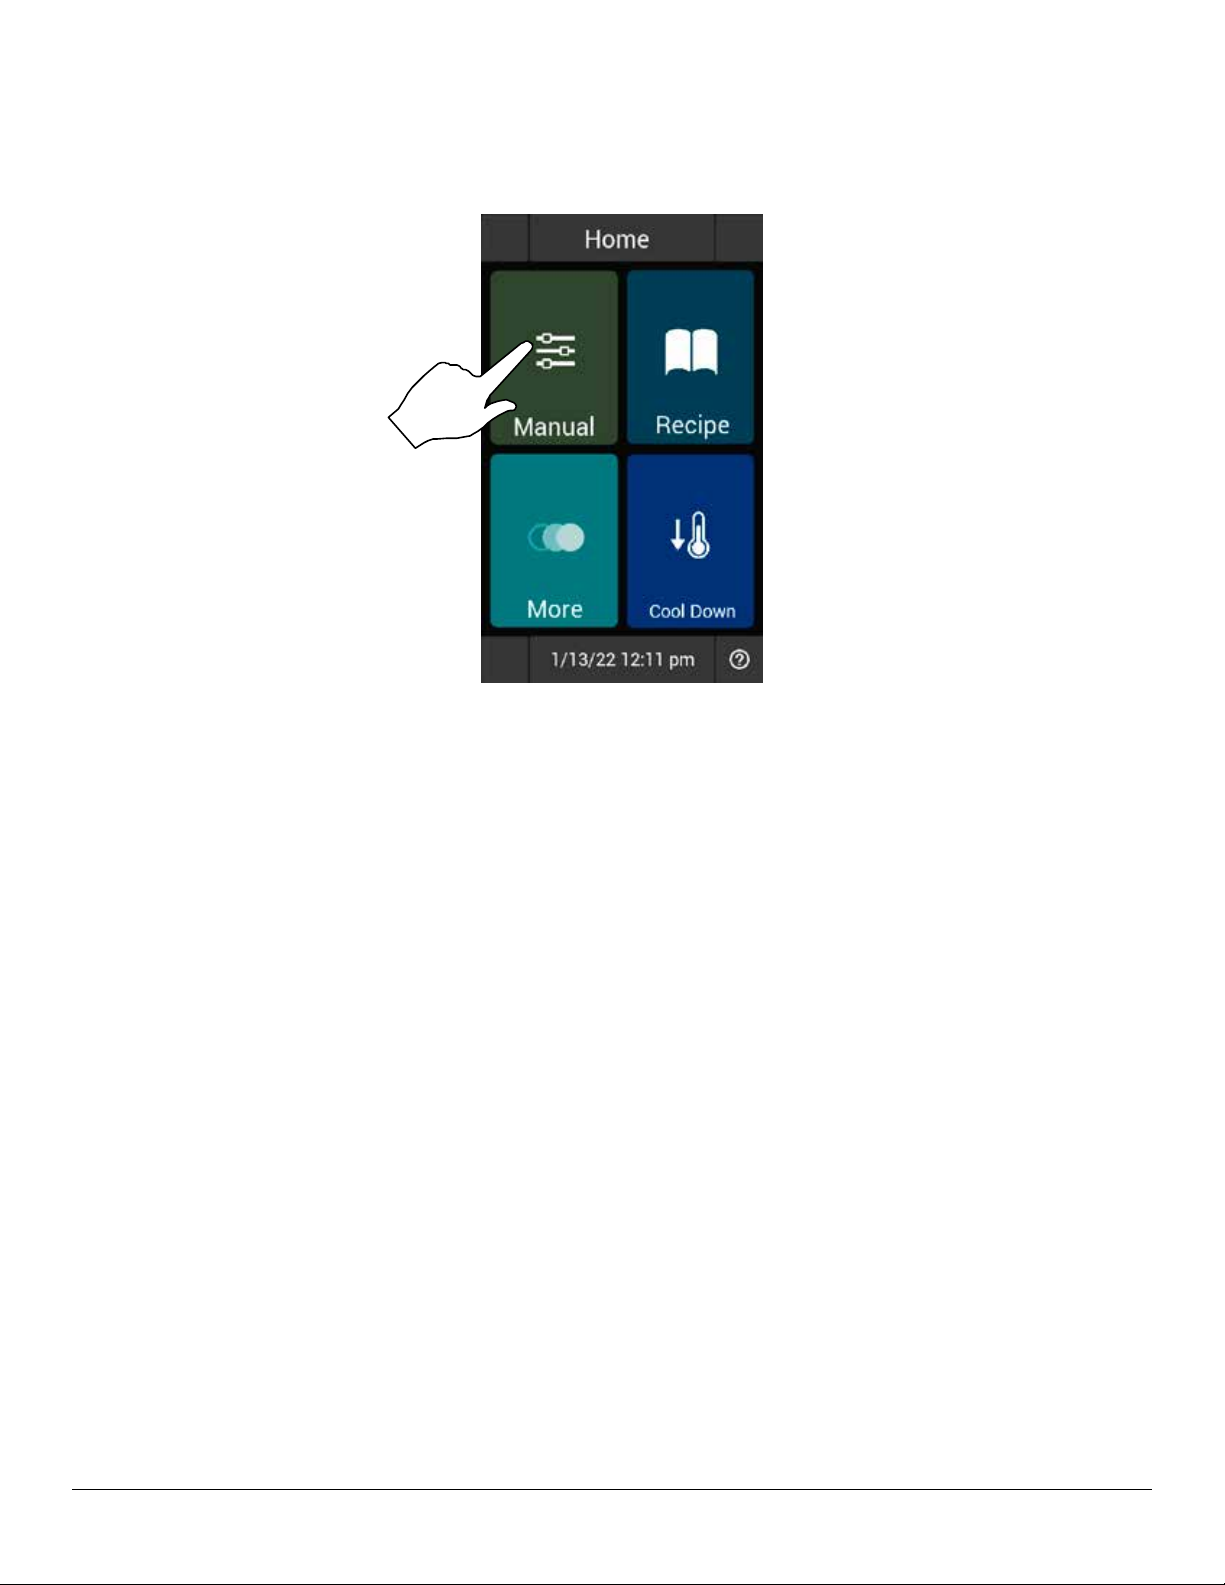
1. From the Home Screen select the Manual frying tile.
2. The preheat screen is displayed.
• Select TIME to set the desired frying time.
• Select TEMP to set the desired oil temperature setpoint.
• The bottom red bar displays the heating progress toward the temperature setpoint. To view the current oil temperature, press the red bar. The current oil temperature will be displayed in yellow.
21 PFC SERIES INSTALLATION, OPERATION, MAINTENANCE
Page 22
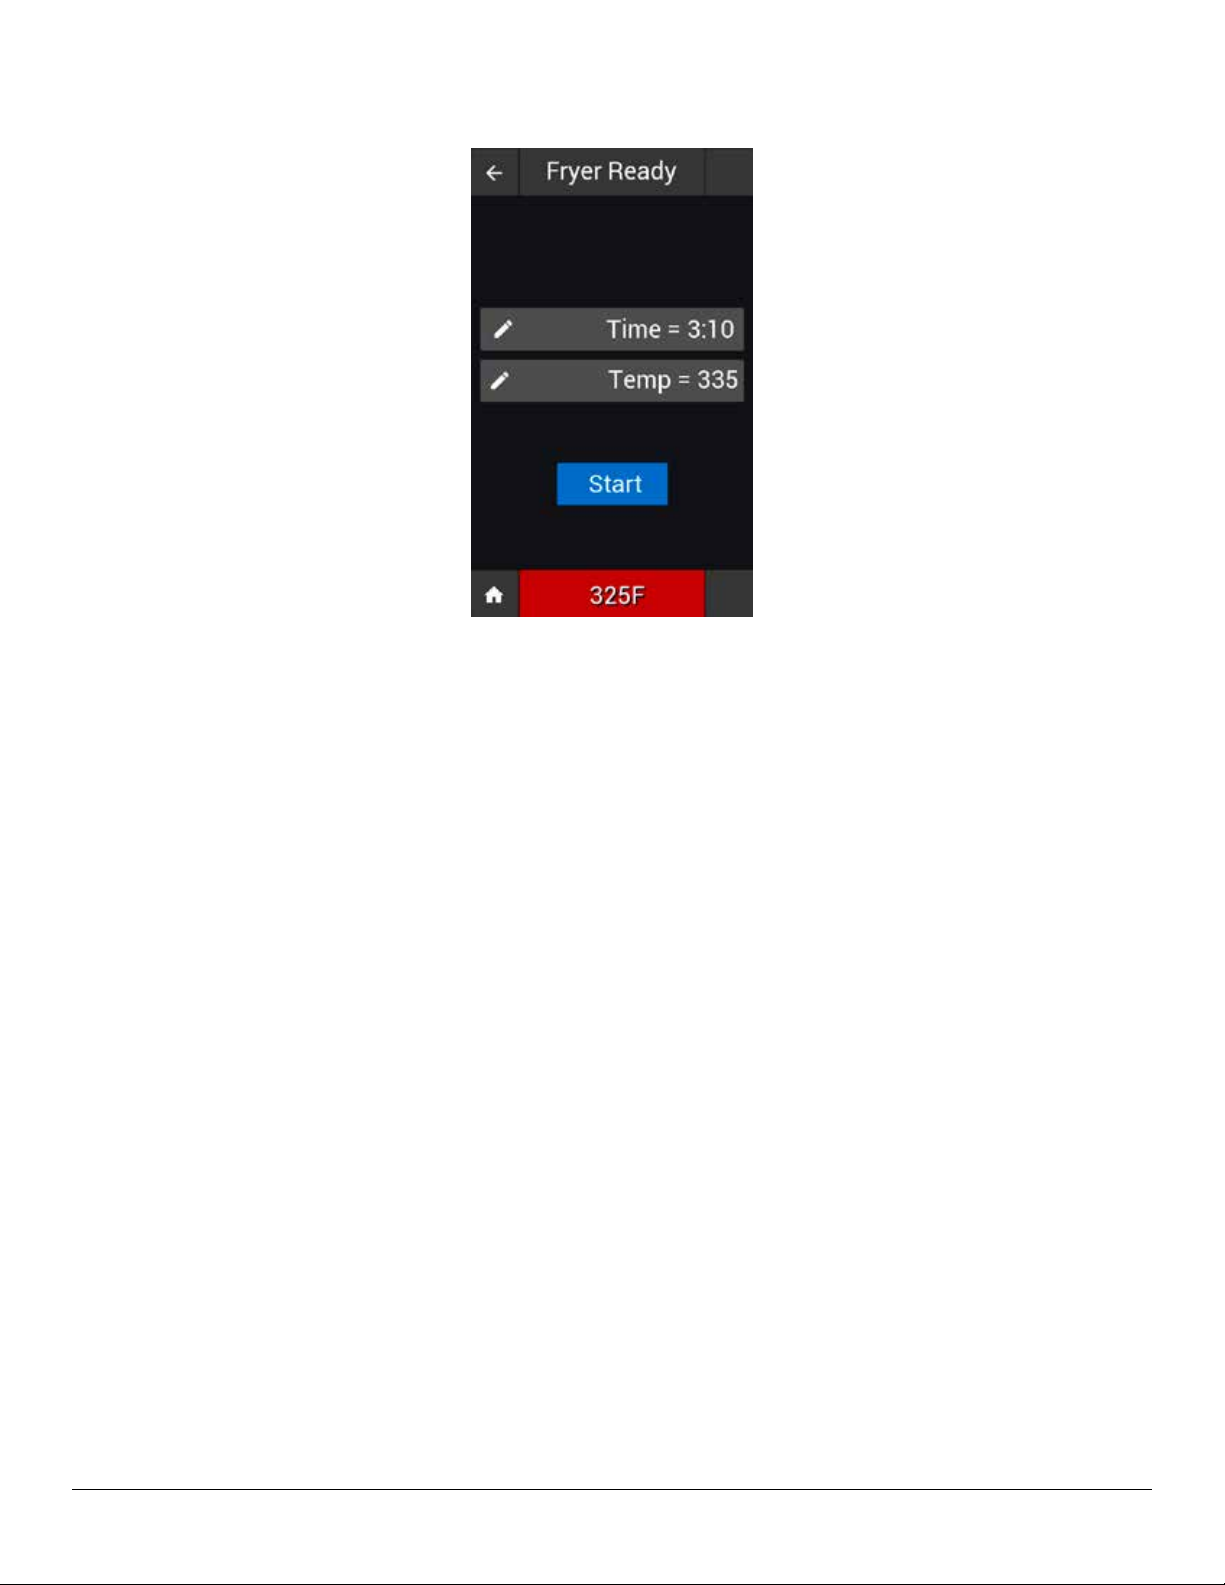
3. When the oil has reached the set temperature, the unit beeps and the FRYER READY screen is displayed.
4. Press the START key. The unit will prompt the operator to LOAD PRODUCT.
The PFC recognizes the opening and closing of the feeder door lid as indication a product has been loaded. Once a
product has been loaded, the timer begins counting down. Once frying is complete, the basket will be raised out of the
oil to drain. The user is promted to unload the basket.
5. Once complete, REPEAT may be selected to initiate another frying cycle under the same conditions, or select CANCEL
to return to the TIME & TEMP ENTRY screen.
PFC SERIES INSTALLATION, OPERATION, MAINTENANCE 22
Page 23
RECIPE MODE FRYING
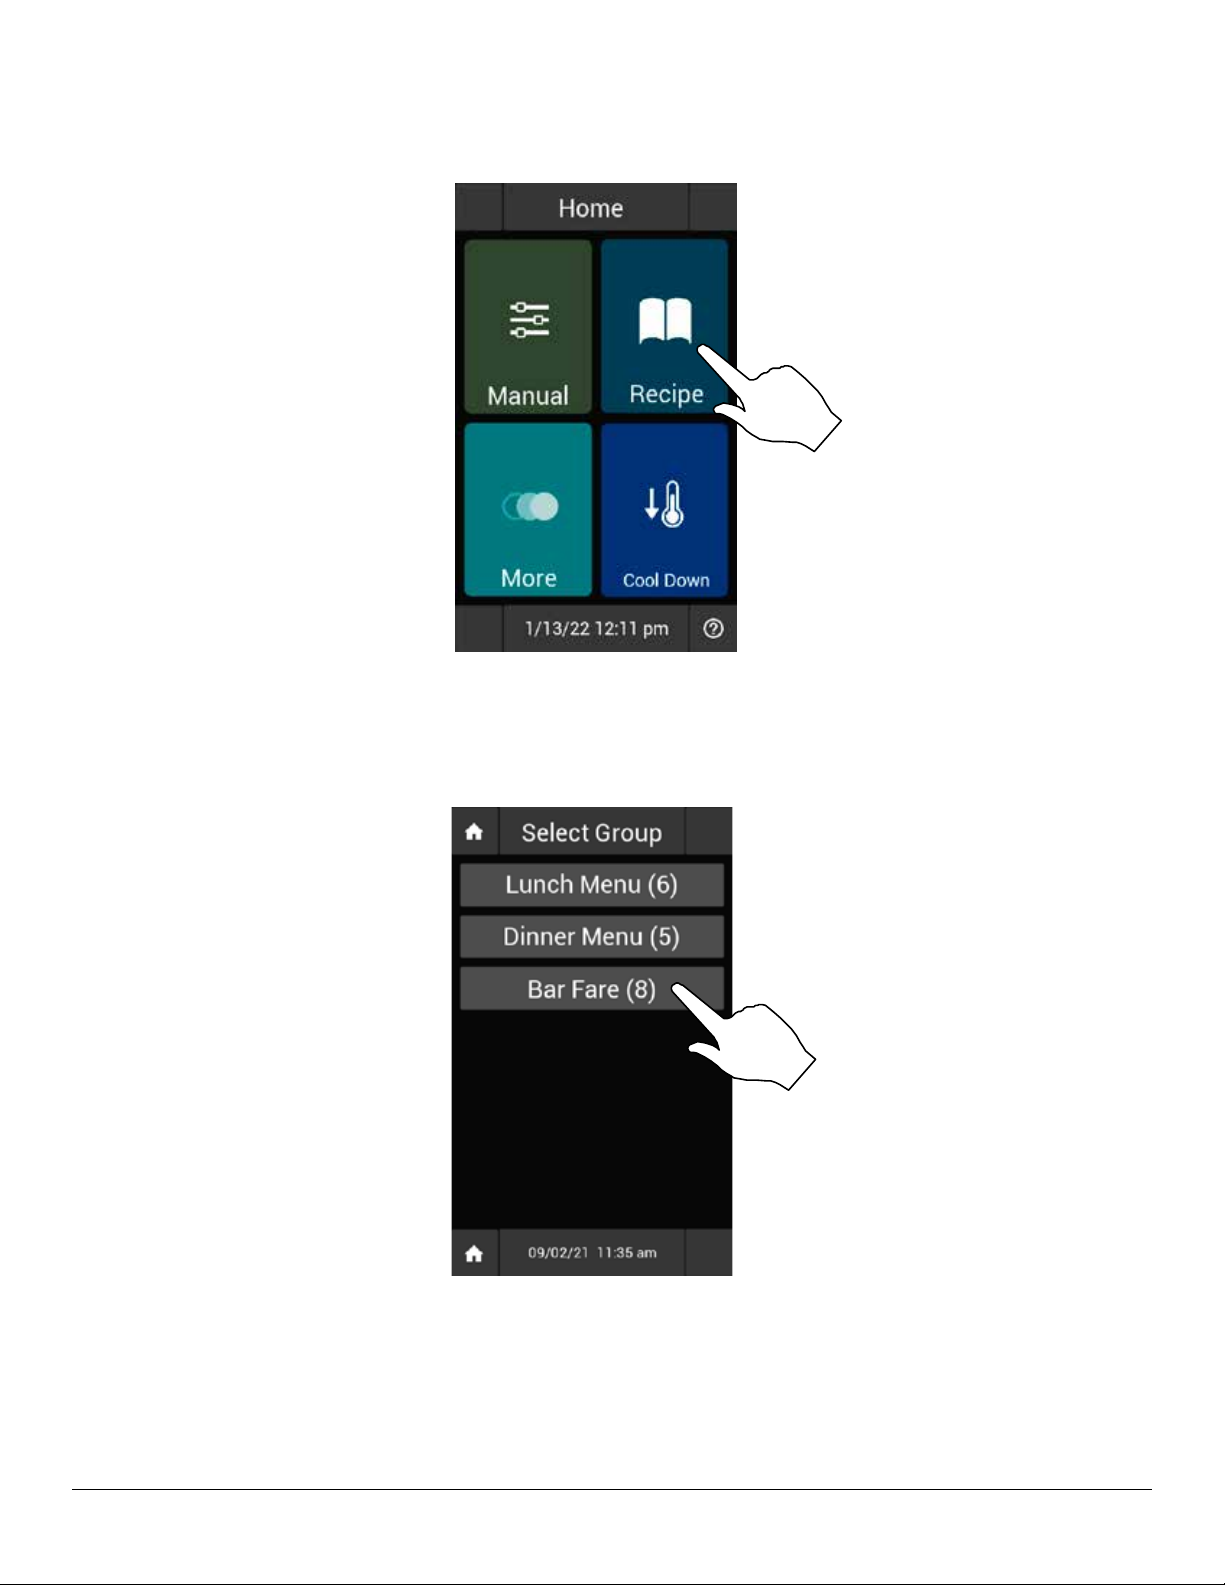
1. From the HOME SCREEN, press the RECIPE key.
2. The SELECT GROUP screen is displayed. This screen lists all available groups. Select desired group.
A Group is comprised of recipes with the same desired oil temperature. More information on editing of recipes &
groups, may be found in the respective sections of this manual.
23 PFC SERIES INSTALLATION, OPERATION, MAINTENANCE
Page 24
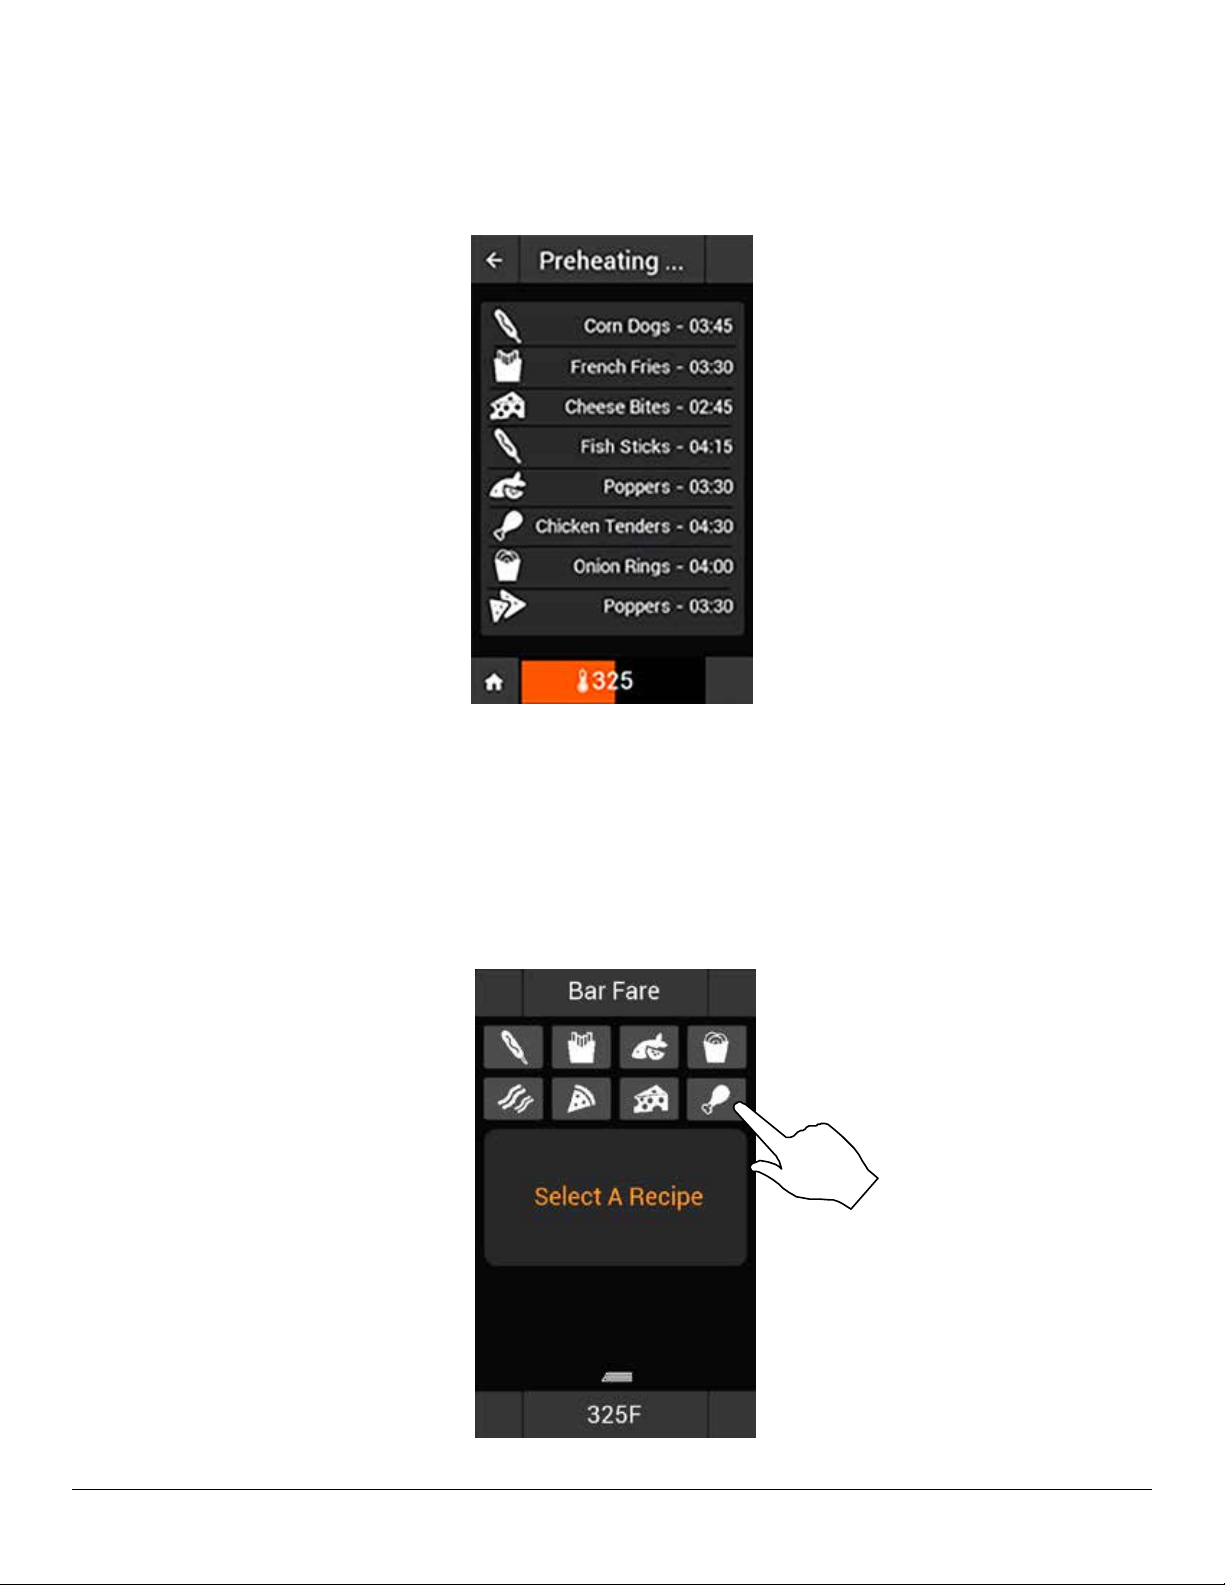
3. The control displays the PREHEATING screen. This screen lists all available recipes within the group.
The bottom red bar displays the heating progress toward the temperature setpoint. To view the current oil temperature, press the red bar. The current oil temperature will be displayed in yellow.
4. Once the oil has reached the preset temperature and is ready to fry, the control displays the SELECT A RECIPE screen.
Icons for each of the recipes in the group are displayed at the top of the screen. Select the desired product using one
of the following:
• Drag & Drop: Press, hold and drag the icon of the desired product to the Select A Recipe area of the screen.
Release the image in this area to assign the recipe.
• Select & Assign: Press the product icon to highlight the tile. With the tile highlighted, select the Select A Recipe
area to assign the recipe.
PFC SERIES INSTALLATION, OPERATION, MAINTENANCE 24
Page 25
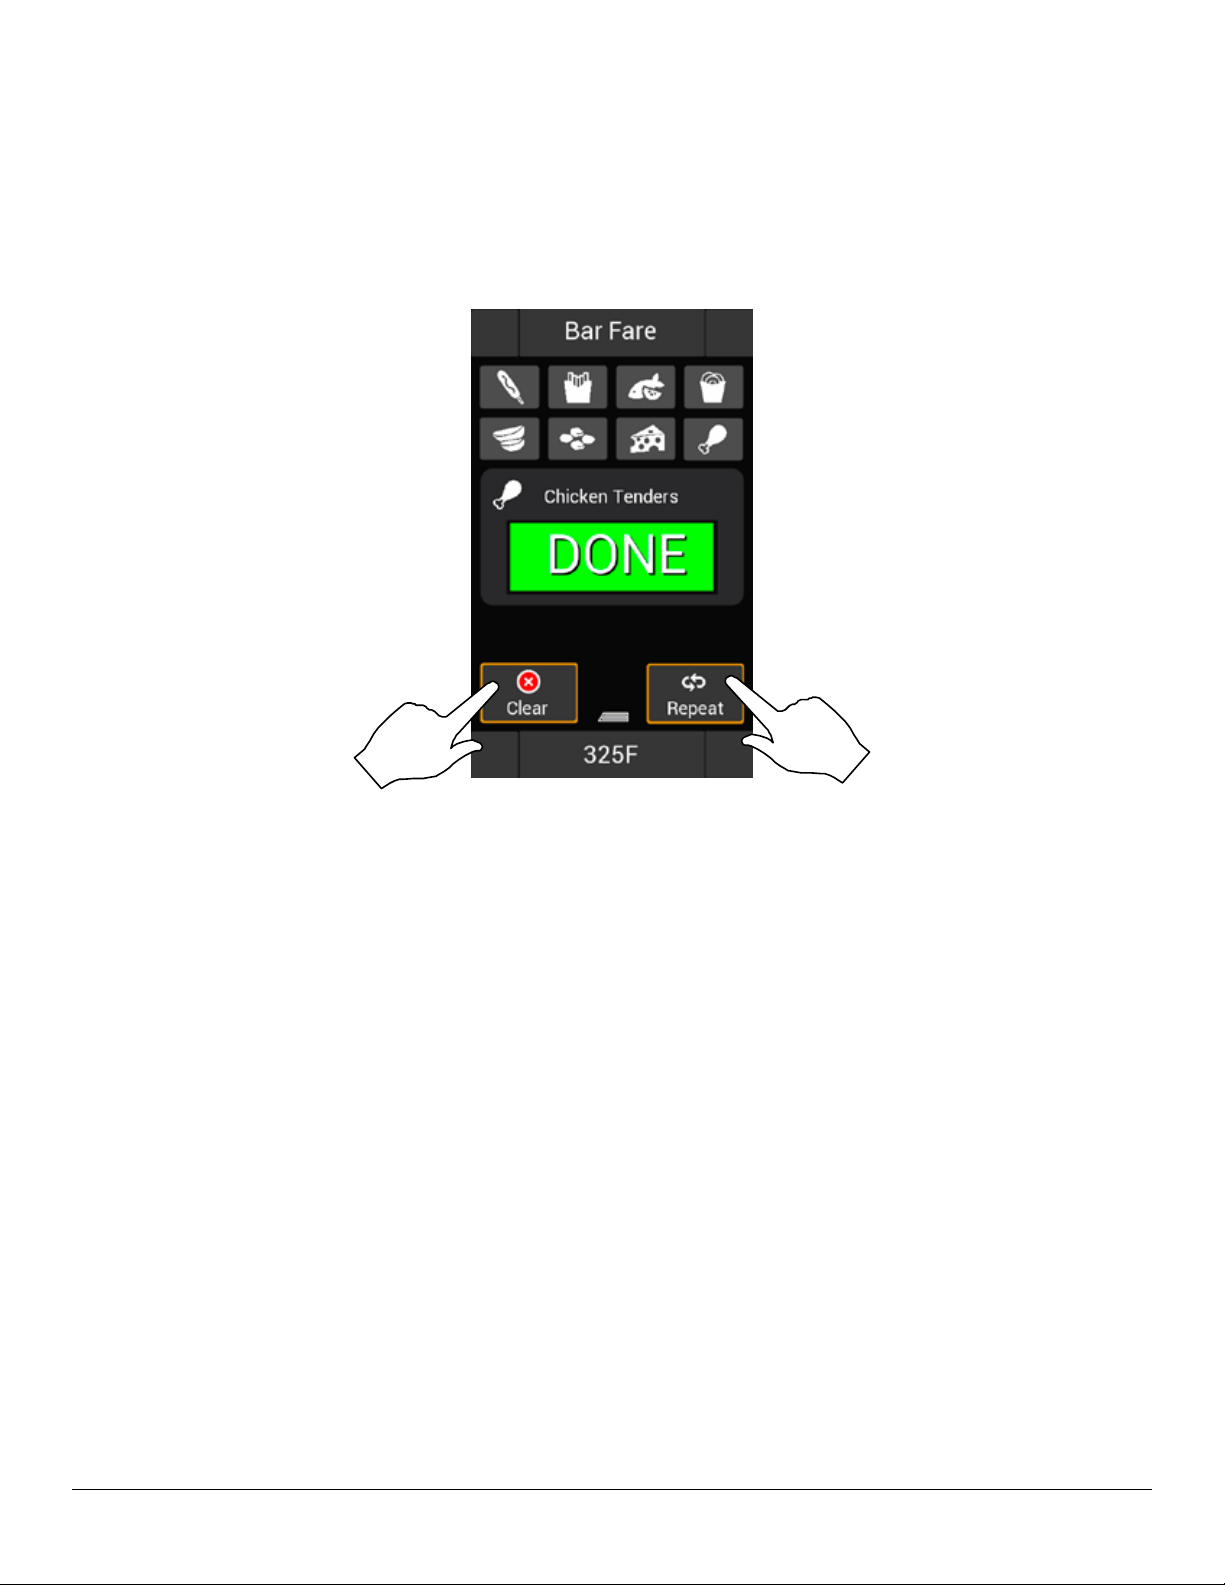
5. Once a product has been assigned the unit will prompt to LOAD PRODUCT.
The PFC recognizes the opening and closing of the feeder door as indication a product has been loaded.The timer
begins counting down. The product will automatically drain when the frying time has elapsed.
6. Once complete, REPEAT may be selected to initiate another frying cycle under the same conditions, or select CANCEL
to return to the SELECT A RECIPE screen.
25 PFC SERIES INSTALLATION, OPERATION, MAINTENANCE
Page 26
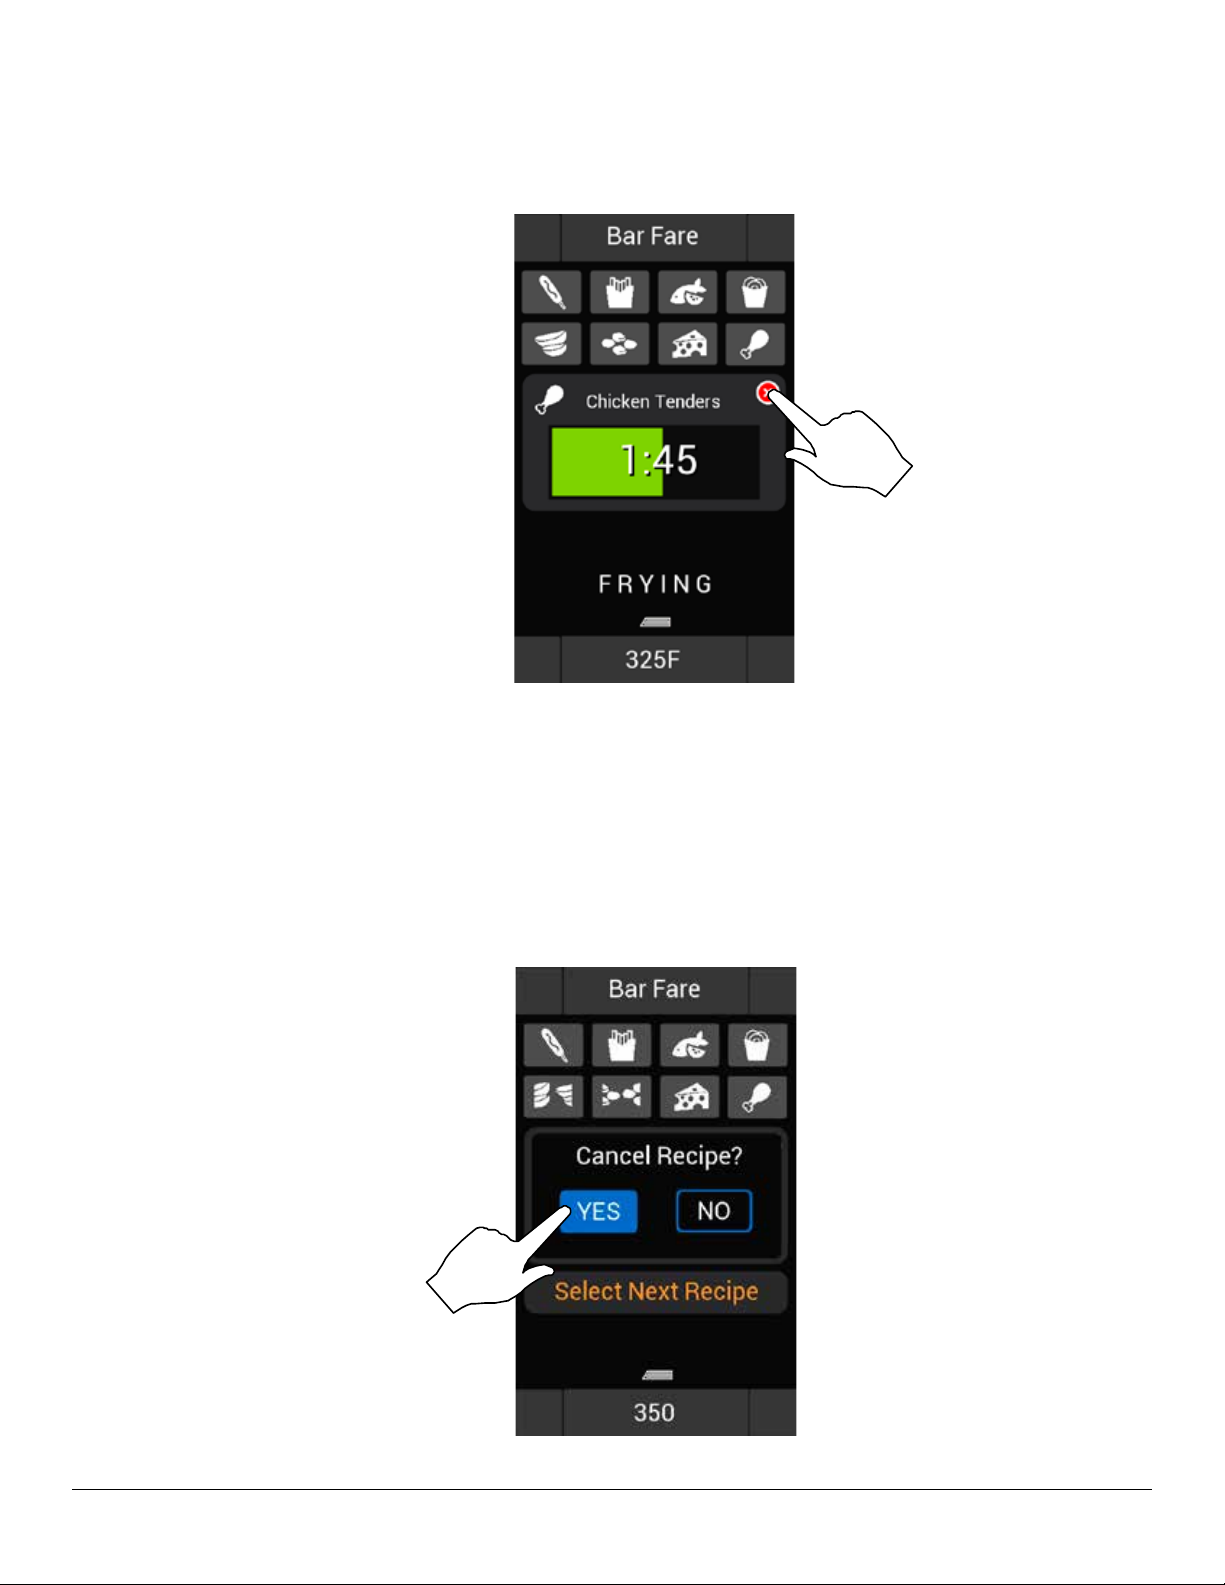
CANCELING A RECIPE
1. To cancel a recipe, press the Red X next to the product name.
2. The CANCEL YES/NO screen is displayed.
If the product has not yet been loaded, the space will be cleared for a new assignment.
If the product has already been loaded into the fryer, the unit will drain the product before allowing a new item to be
assigned.
You cannot cancel a recipe while the basket lift is in motion. Once the basket lift and/or motor have nished their current motions the cancel key will become available again.
PFC SERIES INSTALLATION, OPERATION, MAINTENANCE 26
Page 27
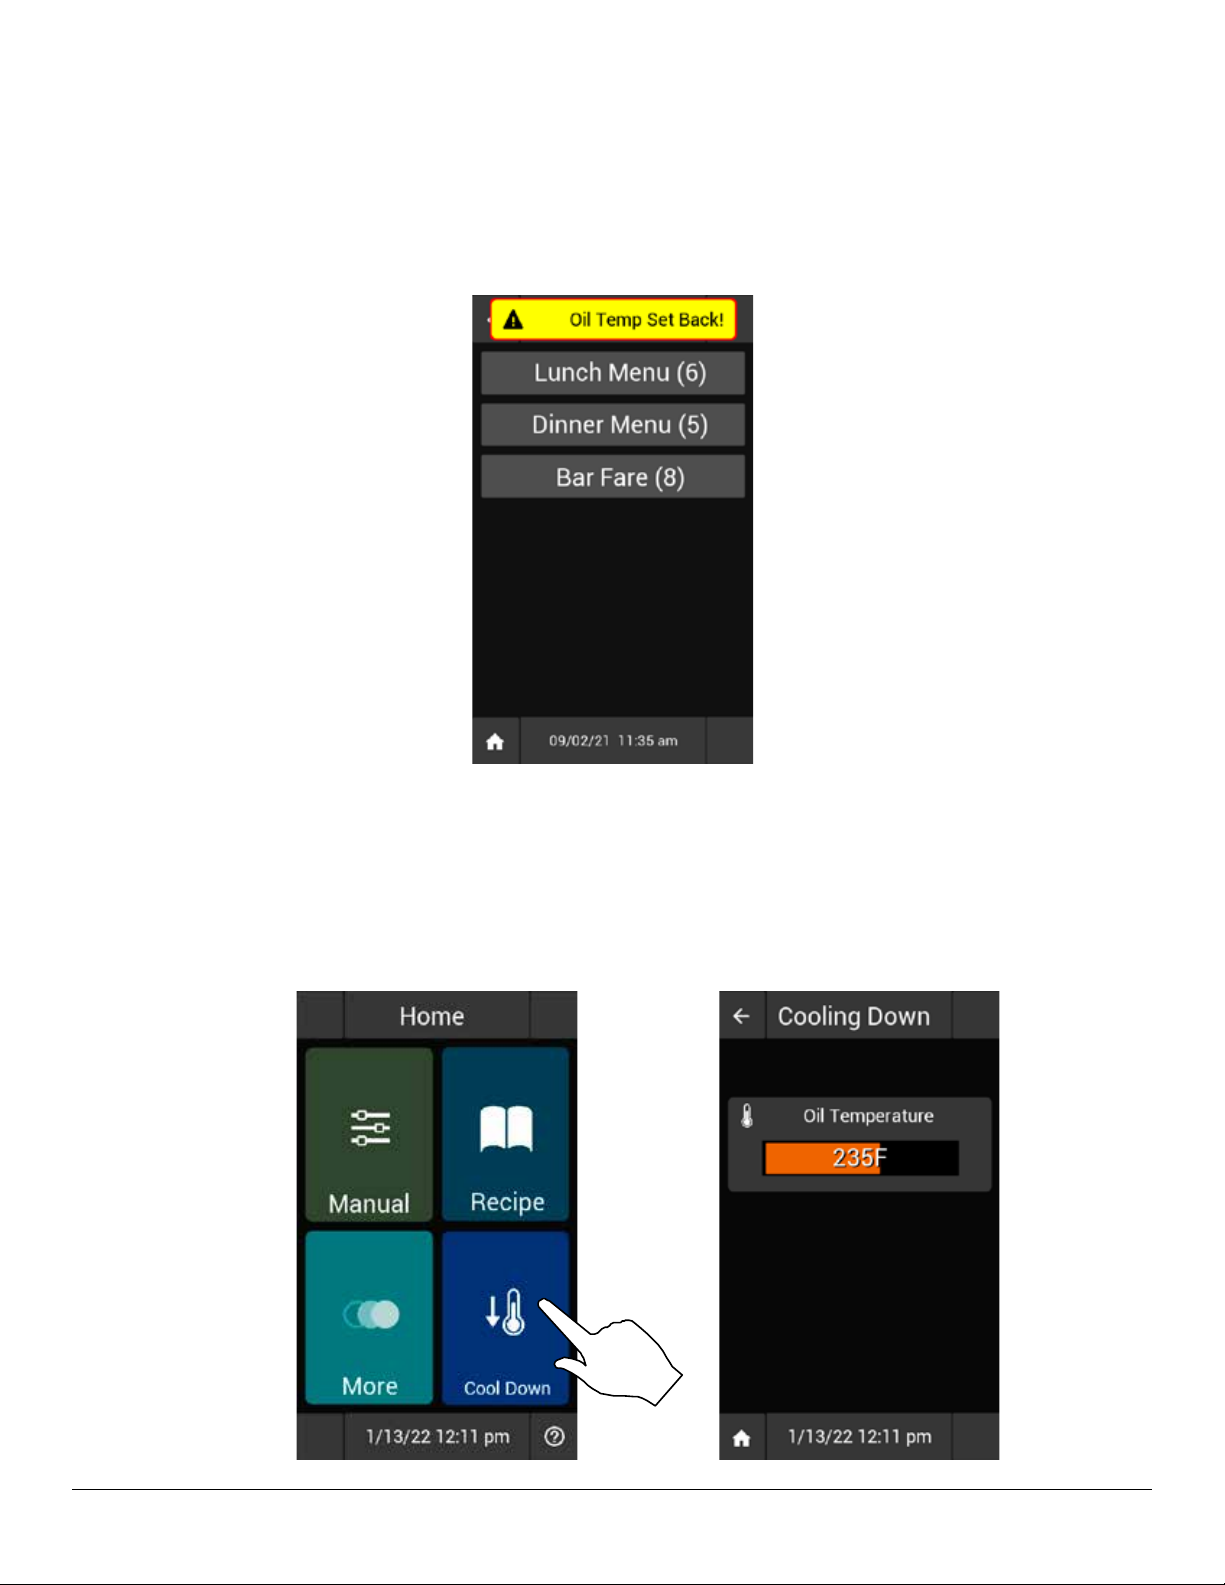
STANDBY MODE
Standby mode is an optional feature that may be enabled for energy savings during idle periods. If the unit features an
activated Standby Mode, it will exit the frying screen after a set duration has elapsed with no user interaction, and begin
regulating at a lower temperature. This lower temperature helps conserve energy during the idle period, while ensuring
relatively quick preheating should the unit be placed back into a fry mode. If the unit is allowed to remain in Standby mode
for the duration dened by the Standby Heat O parameter, all heating will cease until the user re-enters a cook mode.
SHUT DOWN / COOL DOWN OPERATIONS
When the unit is in the HOME, MORE, or COOL DOWN screens the unit will initiate cooling procedures. The unit will continue to run the system fans until the oil has achieved a temperature less than 122°F. At this point the unit will return to the
logo screen (OFF) automatically.
Press the screen to initiate the system checks and return the user to the HOME screen. To monitor the progress of the
cooling, select COOL DOWN from the Home screen. The control displays the actual oil temperature.
27 PFC SERIES INSTALLATION, OPERATION, MAINTENANCE
Page 28
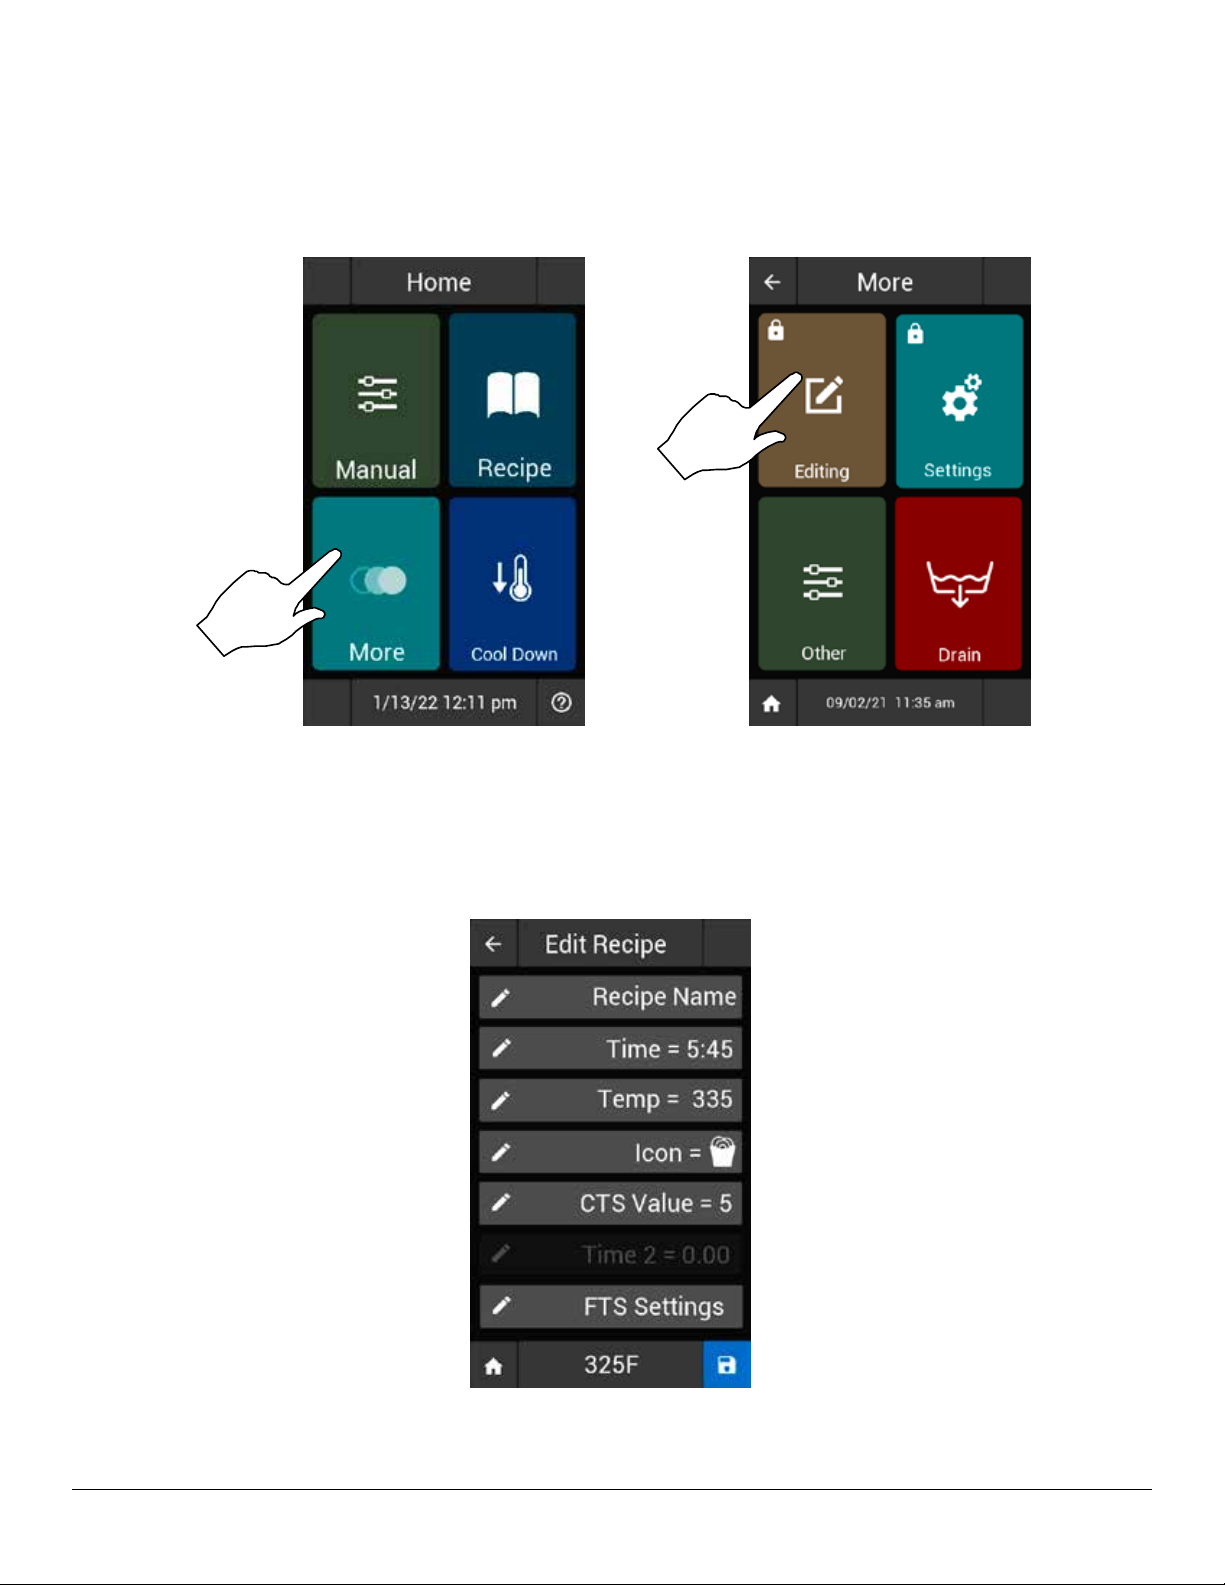
EDIT A RECIPE
1. Select MORE from the HOME screen. Additional options will be displayed.
2. Selecting EDITING. Then select the EDIT RECIPE key. The control displays the RECIPE LIBRARY screen.
3. Use the Up and Down arrow keys at right side of the display to scroll through the list of up to 16 recipes.
The unit has several recipes pre-programmed from factory. These can be overwritten or one of the spaces labeled
“Recipe #” can be used to create a new recipe.
4. Select the recipe you wish to edit. The control displays the RECIPE DETAILS menu.
PFC SERIES INSTALLATION, OPERATION, MAINTENANCE 28
Page 29

5. Press on the parameter you wish to edit. From this menu you can dene the following options:
• Recipe Name
• Cook Time
• Cook Temperature
• Recipe Icon
• Recipe CTS Value (see below for more information)
• FTS options (see below for more information)
CTS (Cook Time Sensitivity)
CTS adjusts frying time to compensate for the decrease in frying oil temperature when a basket of product is placed into
the fryer. CTS increases frying time to accommodate for dierences in product moisture content, basket-load size, and
initial temperature.
A proper CTS setting will ensure a high-quality product. For example; 2 lbs. of French fries will cook to the same quality as
only 6 ounces of French Fries.
In addition to having an optional “global” CTS setting for manually entered cook cycles, each preset can be programmed
with its own individual setting. This provides for exibility among dierent food products.
Some experimenting with the range of 1 (lowest compensation) to 9 (highest compensation) may be required to achieve
optimum quality.
• A value of 5 is a good place to start and is the default.
• A setting of 0 means no CTS at all.
• The cook time will always be as dened in the recipe settings.
FTS (Food Type Sensitivity)
FTS adjusts fry cycle loading and unloading sequences to compensate for dierences among food products. Each preset
can be programmed with its own individual setting. This provides exibility among dierent food products.
FTS OPTIONS:
• Start: In oil/ Drain - Denes if basket will be directly in oil or slightly above when product is loaded.
• Shake @ 15s, 30s, 45s, 60s - Denes if basket will lift at respective time, to prevent product from clumping during
frying process. “s” = seconds.
• Unloads: 1-4 - Denes how many times unit will shake basket in unload position to fully dispense product.
29 PFC SERIES INSTALLATION, OPERATION, MAINTENANCE
Page 30
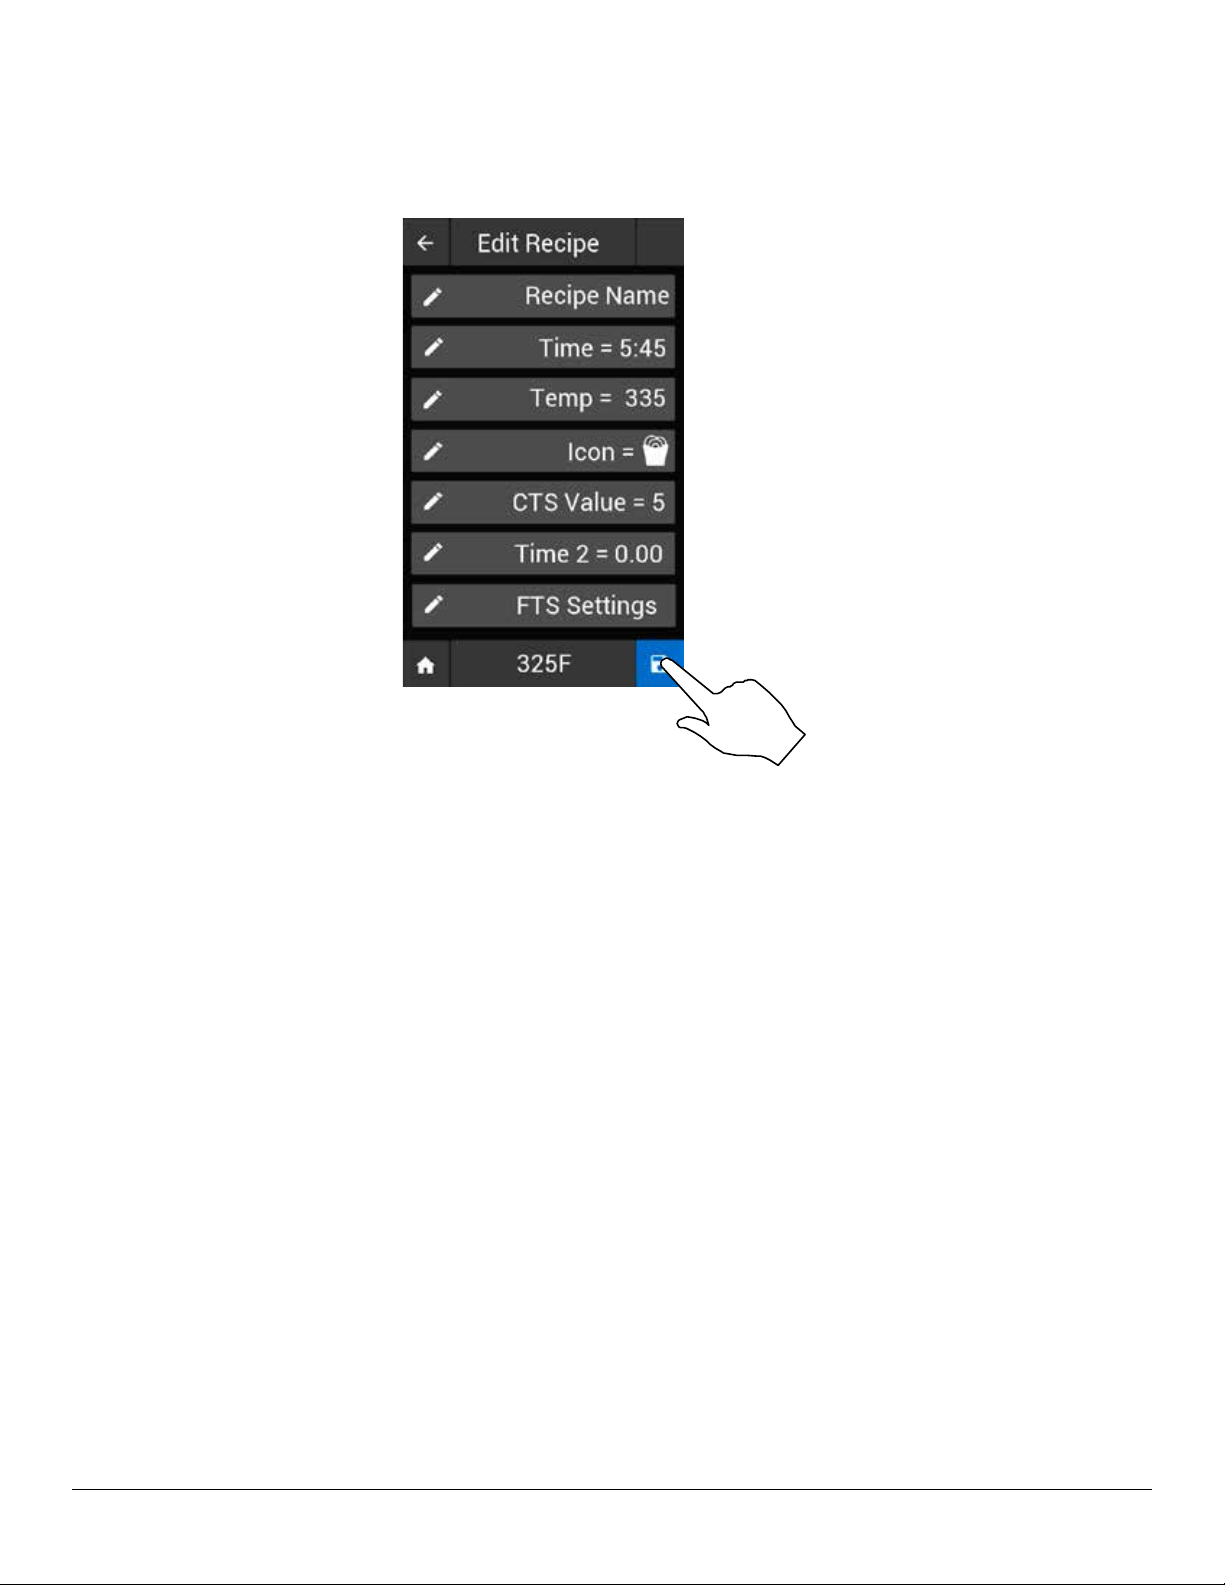
6. Select the blue SAVE key in the bottom right of the screen to save the changes.
7. Select the BACK-ARROW key in the top left to return to the recipe library list.
NOTE: If the BACK-ARROW is selected prior to saving, the changes will not be saved.
PFC SERIES INSTALLATION, OPERATION, MAINTENANCE 30
Page 31
EDIT RECIPE GROUPS
A group is comprised of recipes with the same desired oil temperature. In order to fry a recipe, it must be assigned to a
group. Up to 8 recipes may be assigned to a single group.
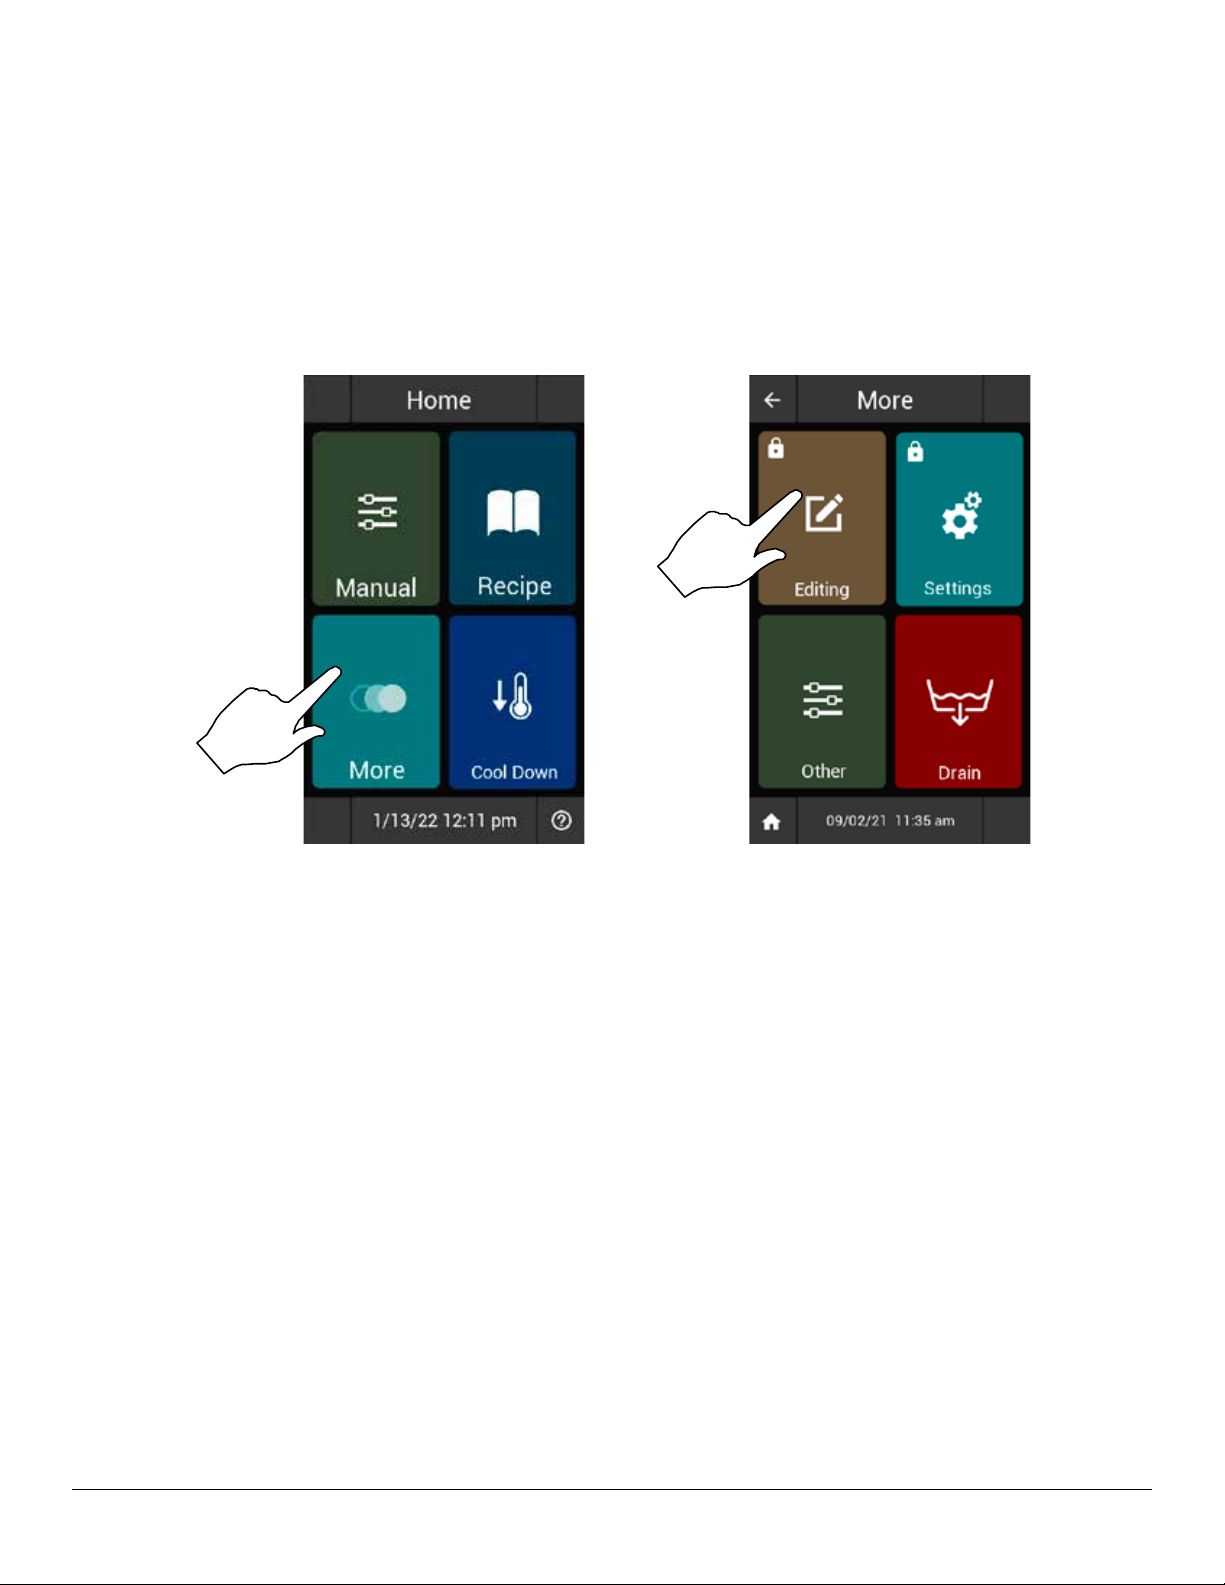
1. Select MORE from the HOME screen. Additional options will be displayed.
2. Selecting EDITING. Then select the EDIT GROUP key. The control displays the GROUP LIBRARY screen.
Groups that have yet to be dened are listed as “<name>”.
Dened groups will list their title and the number of recipes assigned to them.
31 PFC SERIES INSTALLATION, OPERATION, MAINTENANCE
Page 32
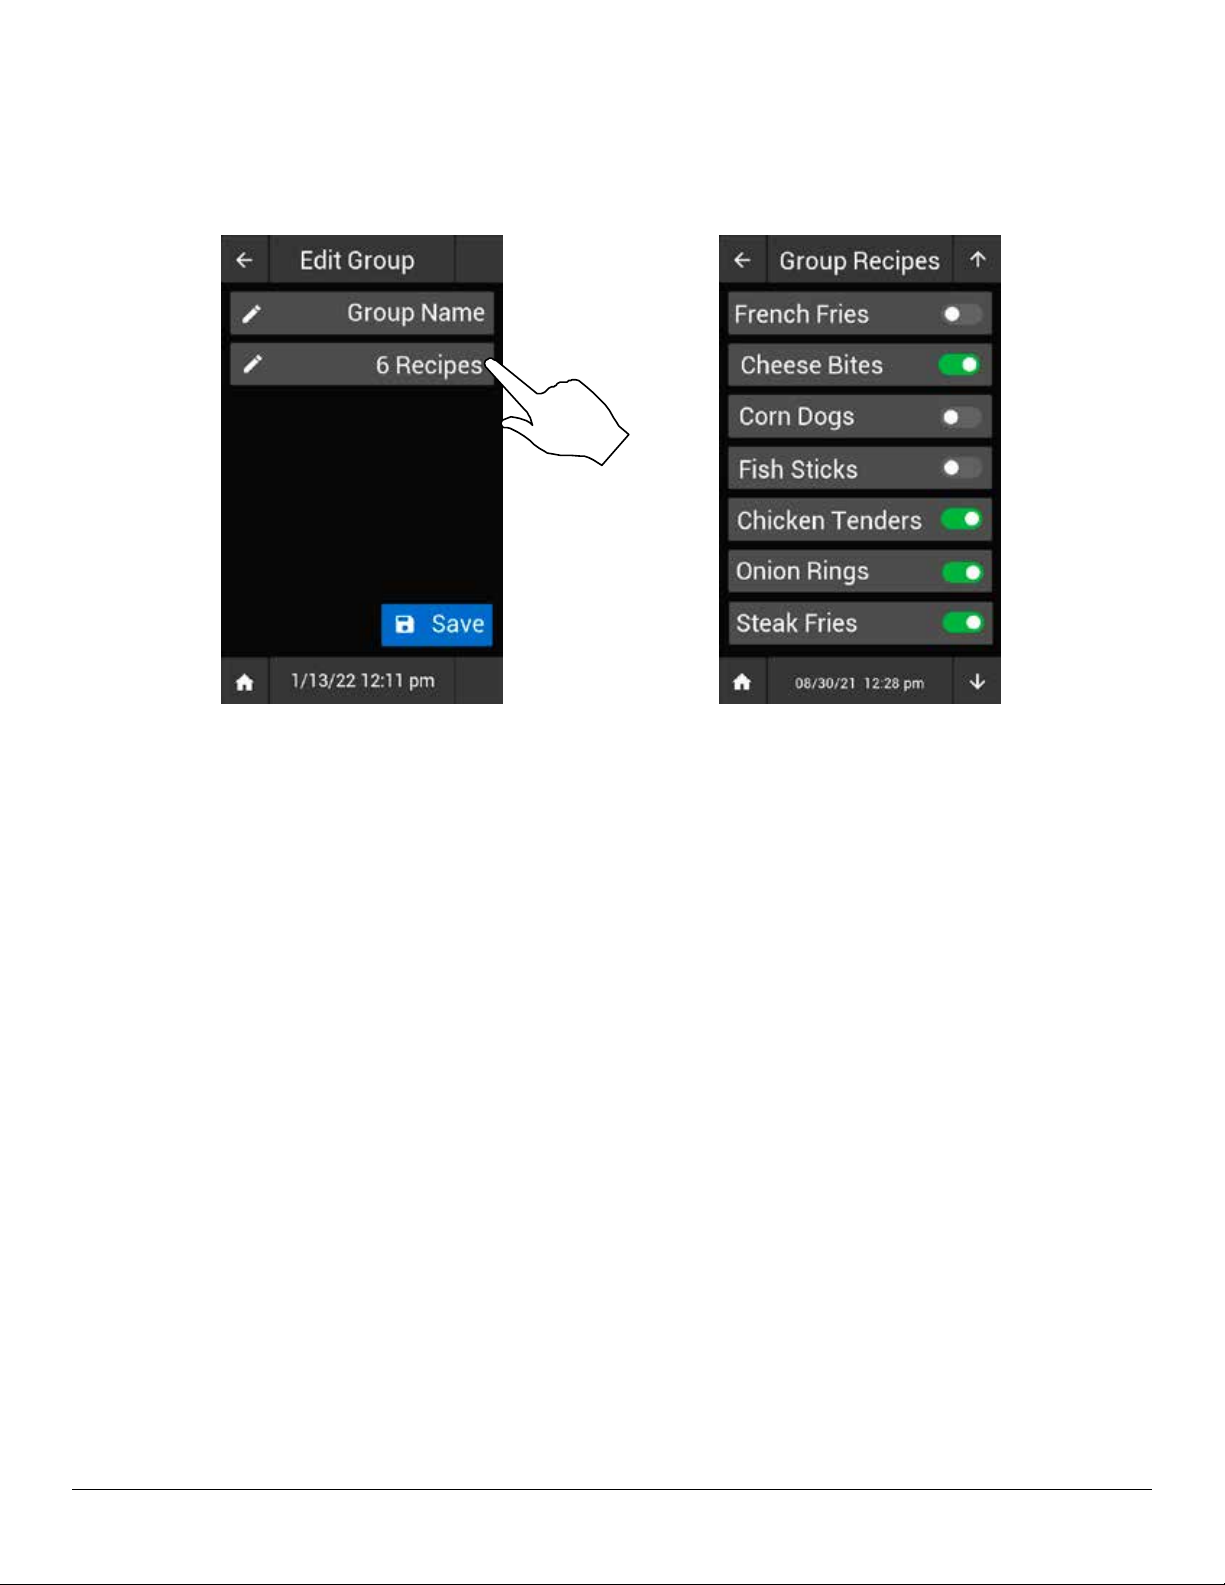
3. Selecting a Group will bring you into the GROUP EDITING menu for that specic group.
The top bar is the position for the group name. Selecting this region will allow you to enter a new name.
The lower bar shows the number of recipes assigned to the group. Selecting this bar will bring up the listing of the
current recipe library, in the GROUP RECIPES menu.
4. To add a recipe to the group, toggle the slider switch to the green ON position.
You may use the Up and Down arrow keys at the right of the screen to scroll through the recipe library.
The rst recipe selected will dene the frying temperature of the group. Any recipes that do not share that fry temperature will be greyed out, indicating they may not be added to the current group.
A group may hold up to 8 recipes.
5. When all desired recipes have been selected, press the back arrow in the top left to return to the Edit Group menu. The
lower bar will now reect the number of recipes that have been assigned to the group.
6. Select the blue SAVE key in the bottom right of the screen to save the changes.
7. Select the BACK-ARROW key in the top left to return to the group library list.
NOTE: If the BACK-ARROW is selected prior to saving, the changes will not be saved.
PFC SERIES INSTALLATION, OPERATION, MAINTENANCE 32
Page 33
SETTINGS
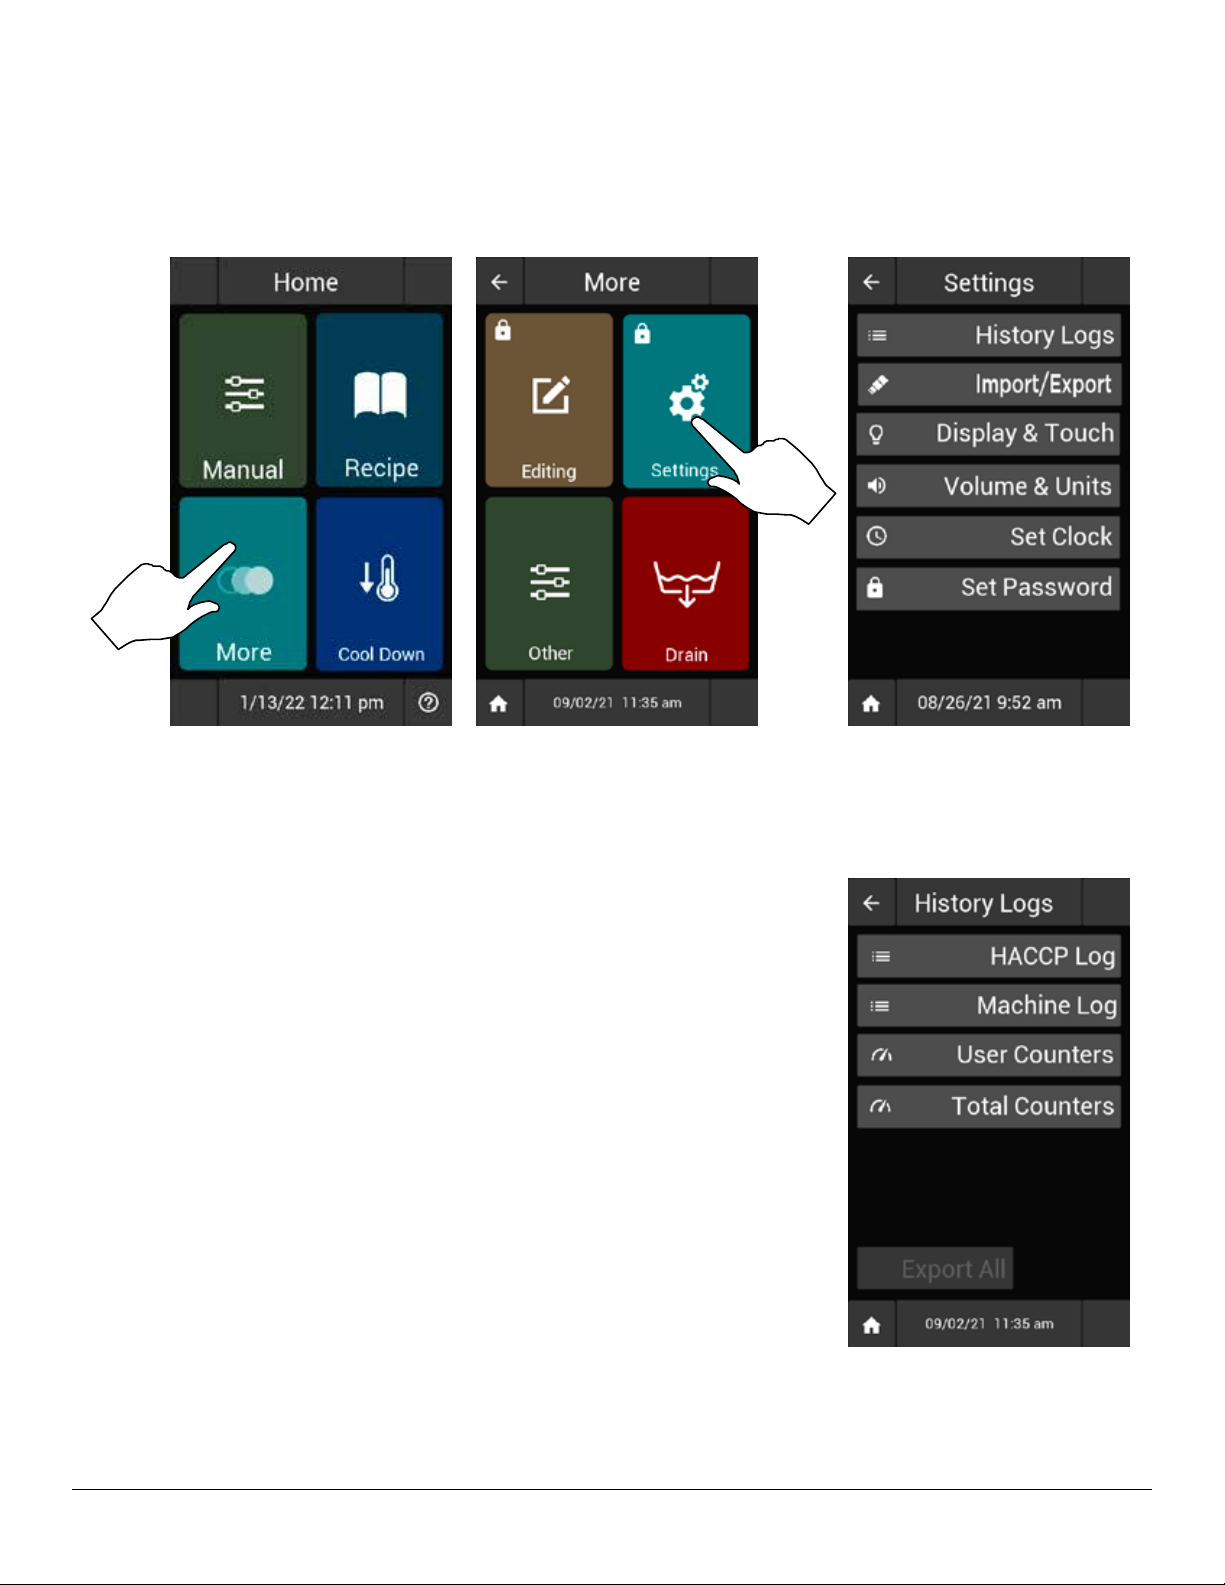
1. Select MORE from the HOME screen. Additional options will be displayed.
2. Select SETTINGS. The control displays the SETTINGS menu.
HISTORY LOGS
Note: All History log information may be exported to a USB drive in (.CSV) format to be read on a computer.
• HACCP - Average temperature and fry time of recent fry cycles (timestamped).
• Machine Log - Log of signicant activity events. Ex. Recipe/Group creation &
editing, Errors, USB operations.
• User Counters
• Frying Hours - Total Hours in Frying menus (Recipe & Manual)
• On Hours - Total hours unit has had power applied.
• Heater Cycles - Number of times heat has cycled on.
• Total Cooks - Number of complete recipe and manual timings.
• Recipe Counts - Tally of particular product fry cycles, including manual.
• Total Counters
• Frying Hours - Total Hours in Frying menus (Recipe & Manual)
• On Hours - Total hours unit has had power applied.
• Heater Cycles - Number of times heat has cycled on.
• Total Cooks - Number of complete recipe and manual timings.
• Recipe Counts - Tally of particular product fry cycles, including manual.
A user may clear the User Counters at any time in order to assist in data collection, such as hours run over a week, or
serving counts on a particular product. Total Counters cannot be cleared by the user. This keeps an overall tally of the
unit’s operational time and activities, similar to a car’s odometer.
33 PFC SERIES INSTALLATION, OPERATION, MAINTENANCE
Page 34
IMPORT/EXPORT
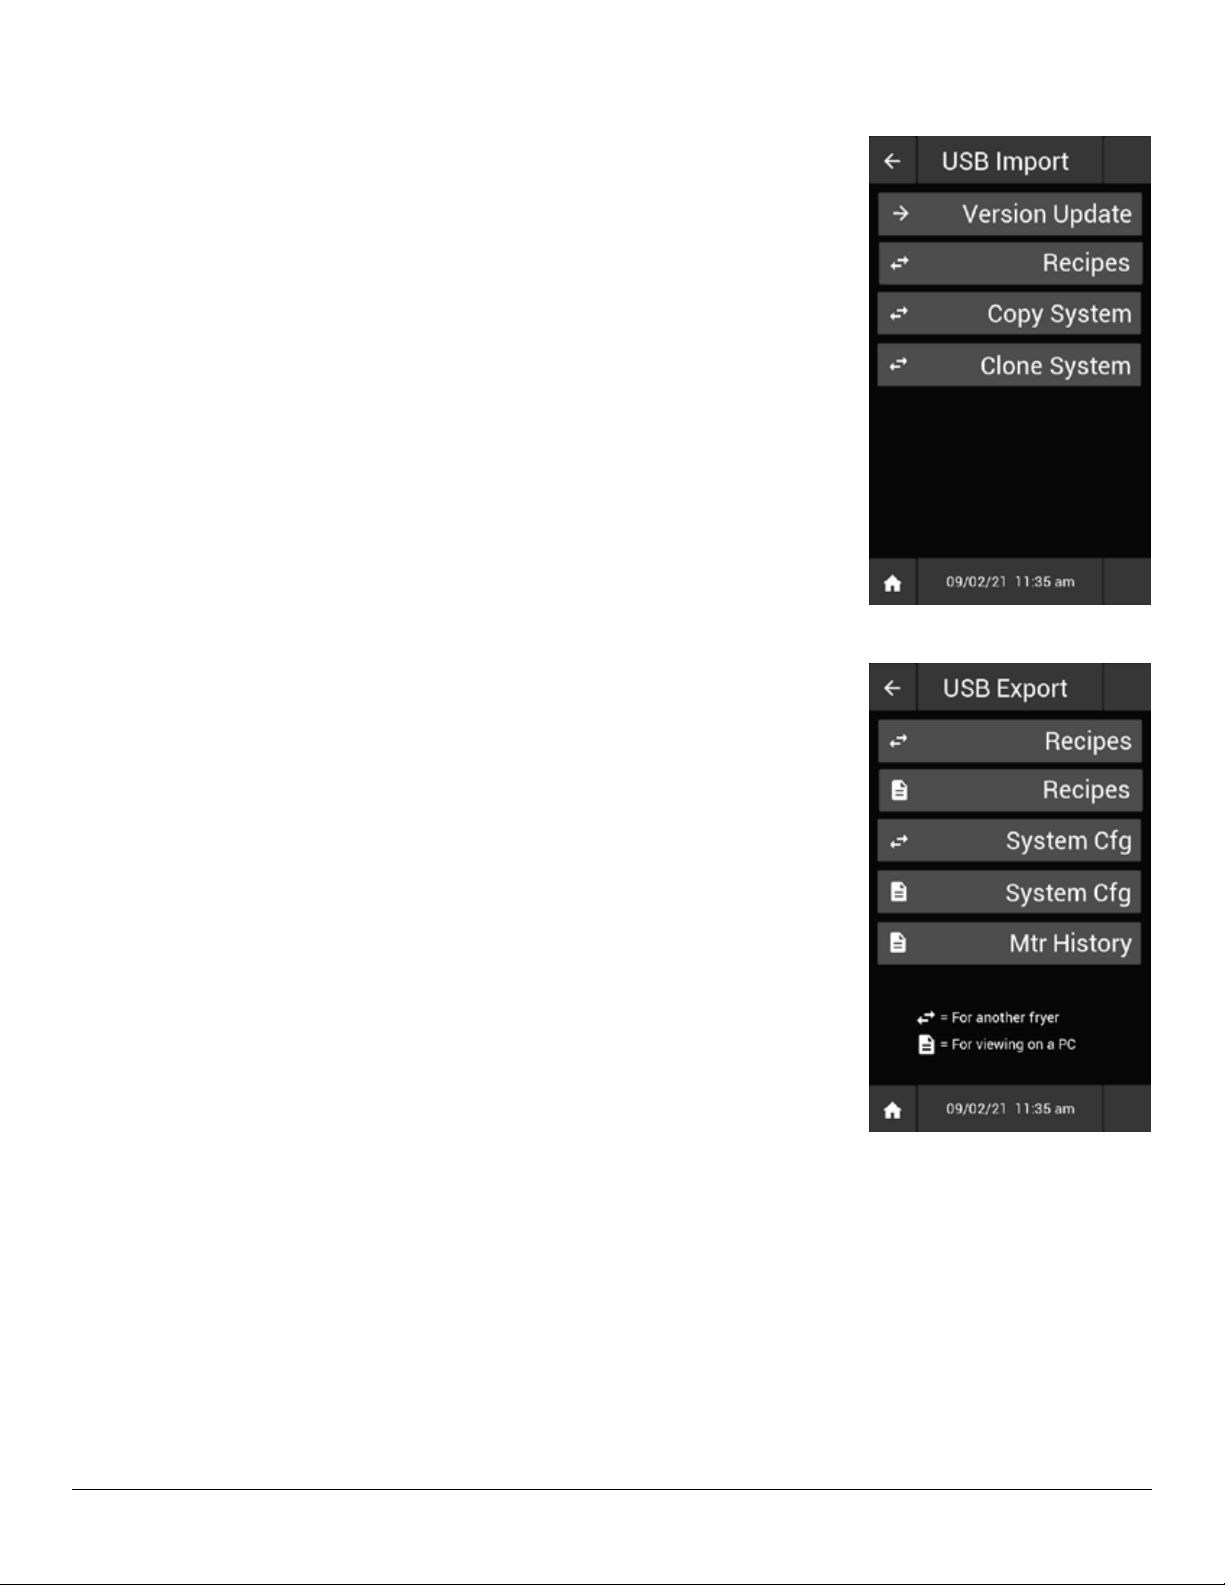
USB Import
• Version Update
• Checks USB for new version of software
• If valid update may be initiated
• Recipes - Imports saved Recipes & Groups structure and settings.
• Copy System - Imports direct copy of previously saved system conguration, in-
cluding unit particulars such as Serial number.
• Clone System - Imports previously saved system conguration to have unit mimic
originating unit’s performance.
USB Export
• Recipes (BIN) - Recipe and group settings for import to another PFC fryer
• Recipes (.CSV) - Recipe and group settings for reading on a computer
• System Cfg (.BIN) - System conguration for import to another PFC fryer
• System Cfg (.CSV) - System conguration for reading on a computer
• Motor History
PFC SERIES INSTALLATION, OPERATION, MAINTENANCE 34
Page 35
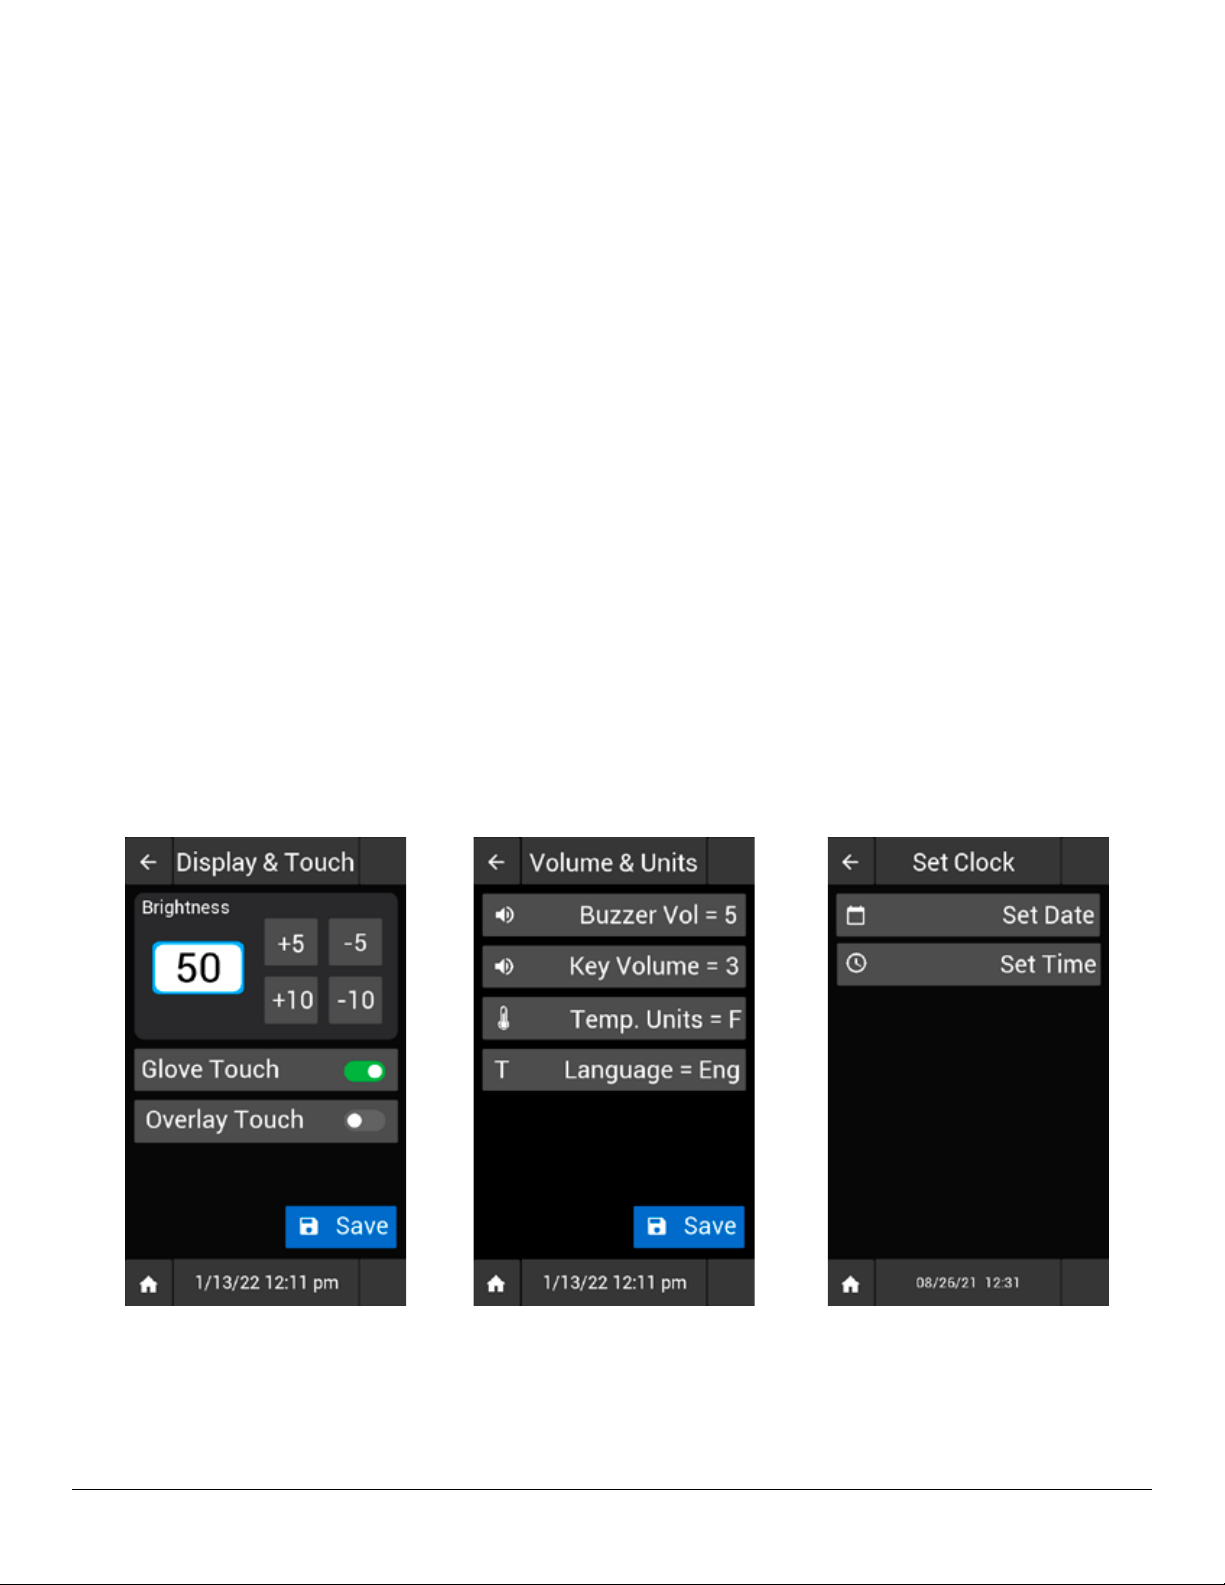
DISPLAY & TOUCH
• Change display Brightness
• Increase touch sensitivity with Glove Mode (On/O).
• Further Increase touch sensitivity with Overlay Mode (On/O).
VOLUME & UNITS
• Set Frying alert (Buzzer) volume.
• Set feedback (Key) volume.
• Dene temperature units as Celsius/Fahrenheit.
SET CLOCK
• Allows input of time and date for display and record logging purposes.
SET PASSWORD
• Allows for input of new “User” level password to be set by owner/operator for limited access to the Manual cooking
and Editing menus.
35 PFC SERIES INSTALLATION, OPERATION, MAINTENANCE
Page 36
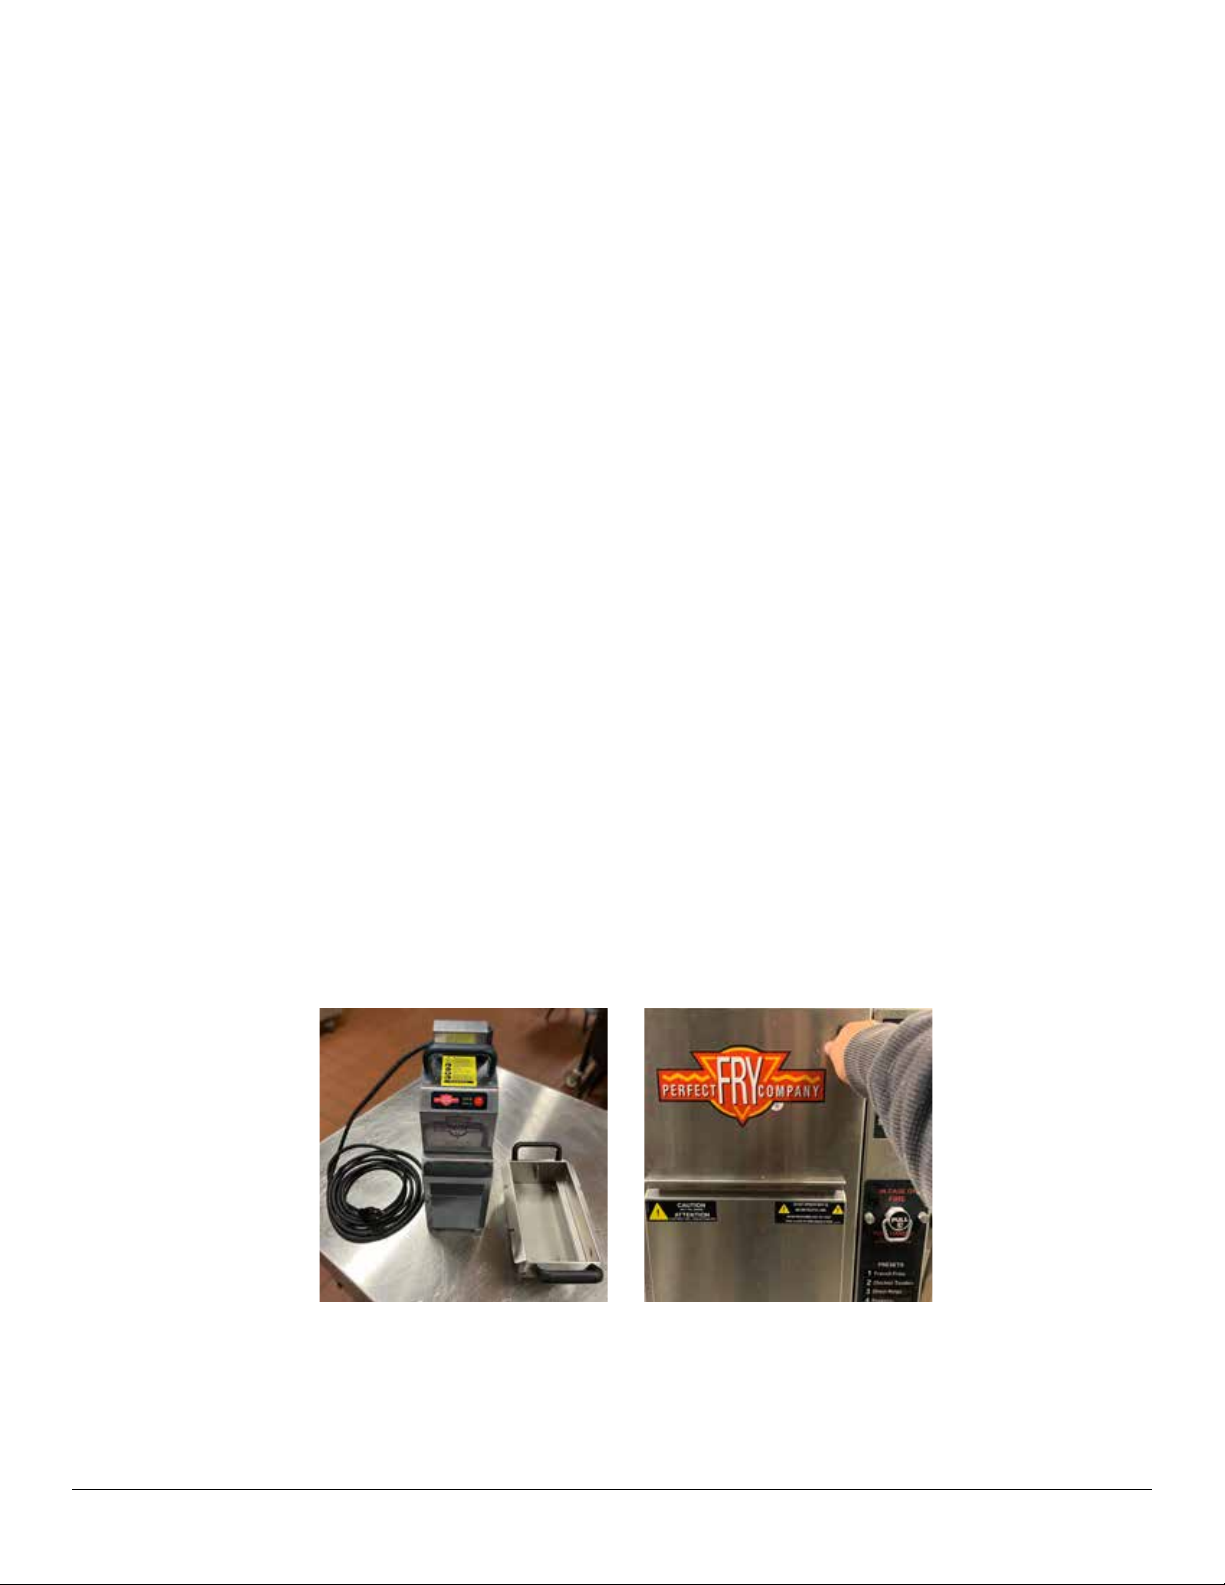
OPTIONAL PERFECT FILTER
The Perfect Filter allows restaurants to lter oil quickly and regularly, extending usability of the oil and increasing the
product quality. Using the Perfect Filter is a 10-minute operation. Ensure that a 120v receptacle is nearby for ltering, unit
is provided with a 13ft long power cord. The Perfect Filter uses replaceable paper lters that should be disposed of at the
end of each day of use.
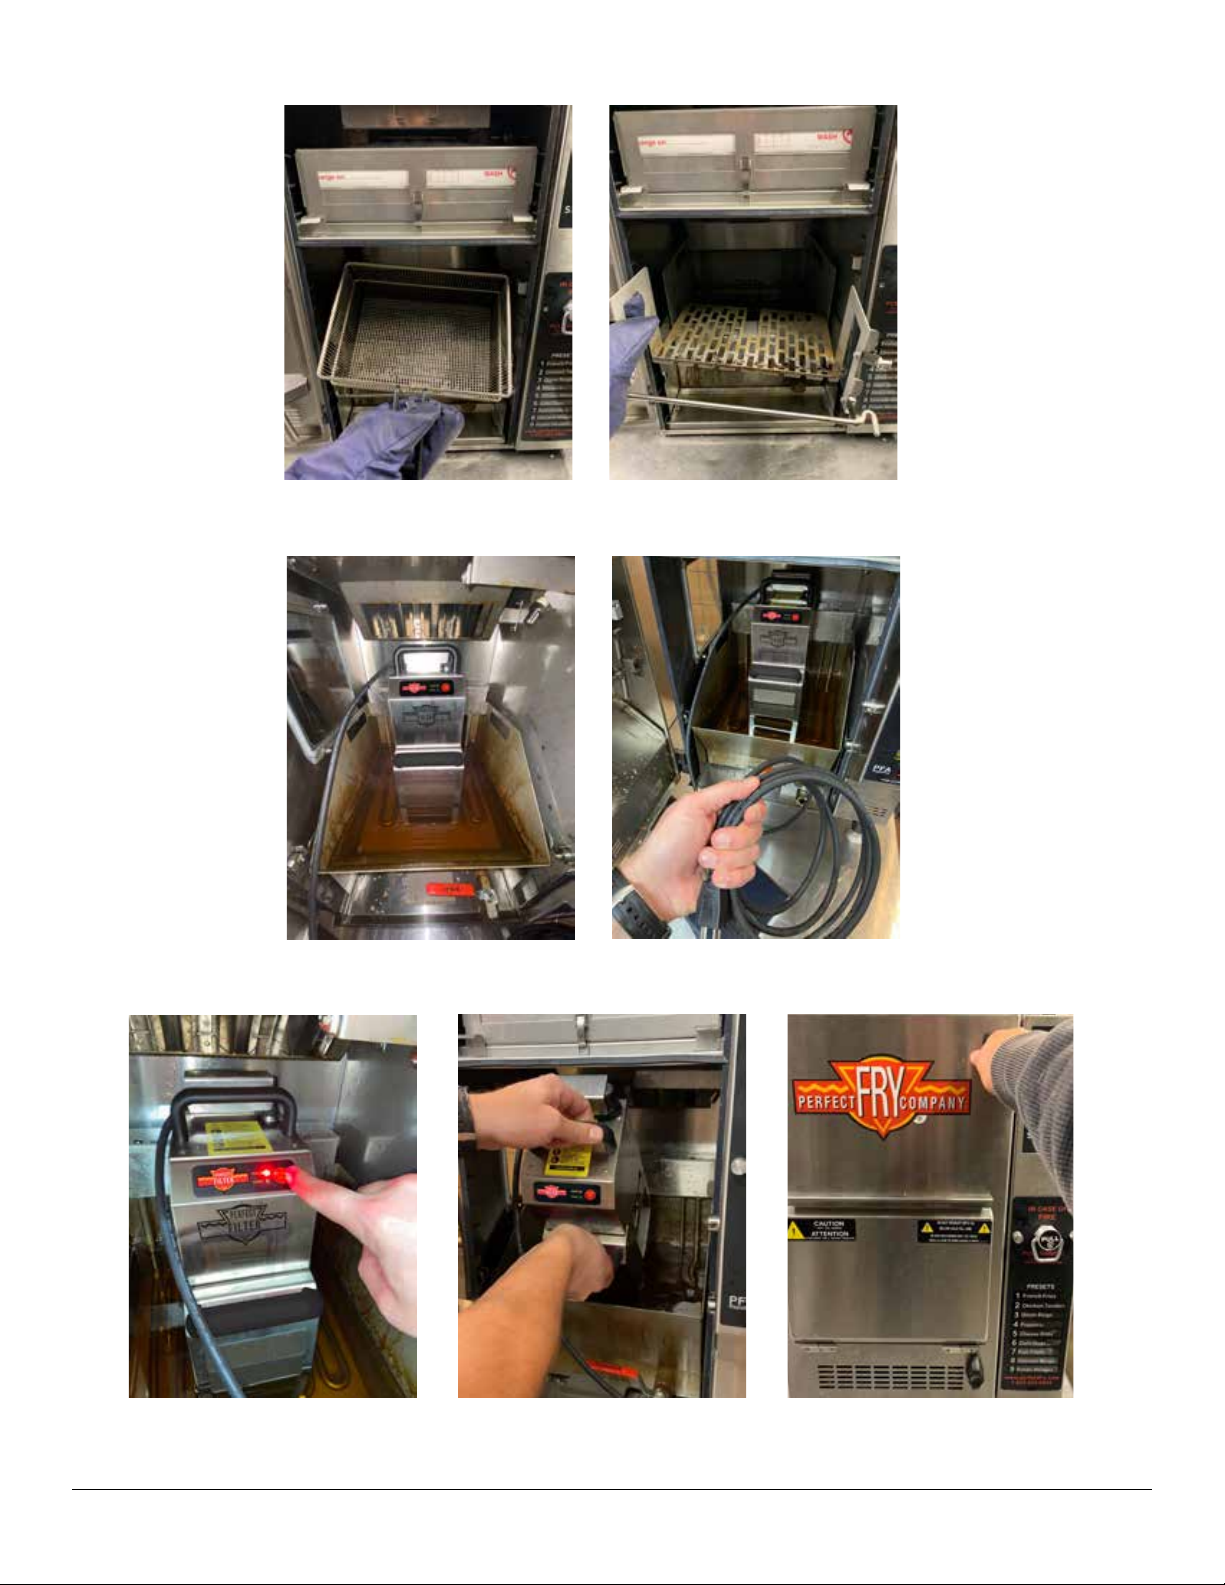
OPERATING INSTRUCTIONS
1. Assemble the Perfect Filter based on the Operation Manual provided with unit. Ensure all removable parts have been
washed, rinsed, sanitized, and allowed to air dry before use.
2. Stop frying and ensure fryer is free of product and turned o. Open fryer door to help heat escape the unit. Take care as
air leaving unit may be very hot, heat resistant gloves are recommended.
3. With heat resistant gloves, carefully remove fryer basket. Dispose of any crumbs or particulate in the basket and set
aside.
4. With heat resistant gloves, carefully remove fryer basket lift. Let excess oil drain into vat before setting aside.
5. Place Perfect Filter into oil vat. Unit may rest directly on the element. NOTE: ensure oil level lies between the (2) indicator arrows on unit.
6. Route power cable to the nearest 120V receptacle. Ensure that the cord is NOT in the oil, the cord MUST stay dry. Ensure that cable is not a trip hazard.
7. Begin ltering oil by pressing the “Start/Stop” button on the top of the Perfect Filter. The lter process will take approxi-
mately 4 ½ minutes. Once complete the unit will turn o automatically.
8. Once the unit has nished ltering and turned o, remove the Perfect Filter from the oil vat. Pause during removal to al-
low residual oil to drain back into the vat. After draining, place the Perfect Filter into the provided drip pan and set aside.
9. With heat resistant gloves, replace the fryer basket. Then close the fryer door and turn the unit back on. Once the home
screen reappears, the operator is ready to select the next recipe.
10. Store the Perfect Filter near fryer when not in use. Ensure all removable parts are washed, rinsed, sanitized, and allowed to air dry.
Step 1 Step 2
PFC SERIES INSTALLATION, OPERATION, MAINTENANCE 36
Page 37
Step 3 Step 4
Step 5
Step 7 Step 8 Step 9
37 PFC SERIES INSTALLATION, OPERATION, MAINTENANCE
Step 6
Page 38
MAINTENANCE
ERROR FAULTS & TROUBLESHOOTING
The PFC is equipped with multiple diagnostic sensors in order to maintain safe and consistent operation.
• Some critical conditions will block the user from operating the unit until resolved.
• Minor alerts are presented to the user to prompt general cleaning and maintenance, which if neglected may lead to
more substantial issues.
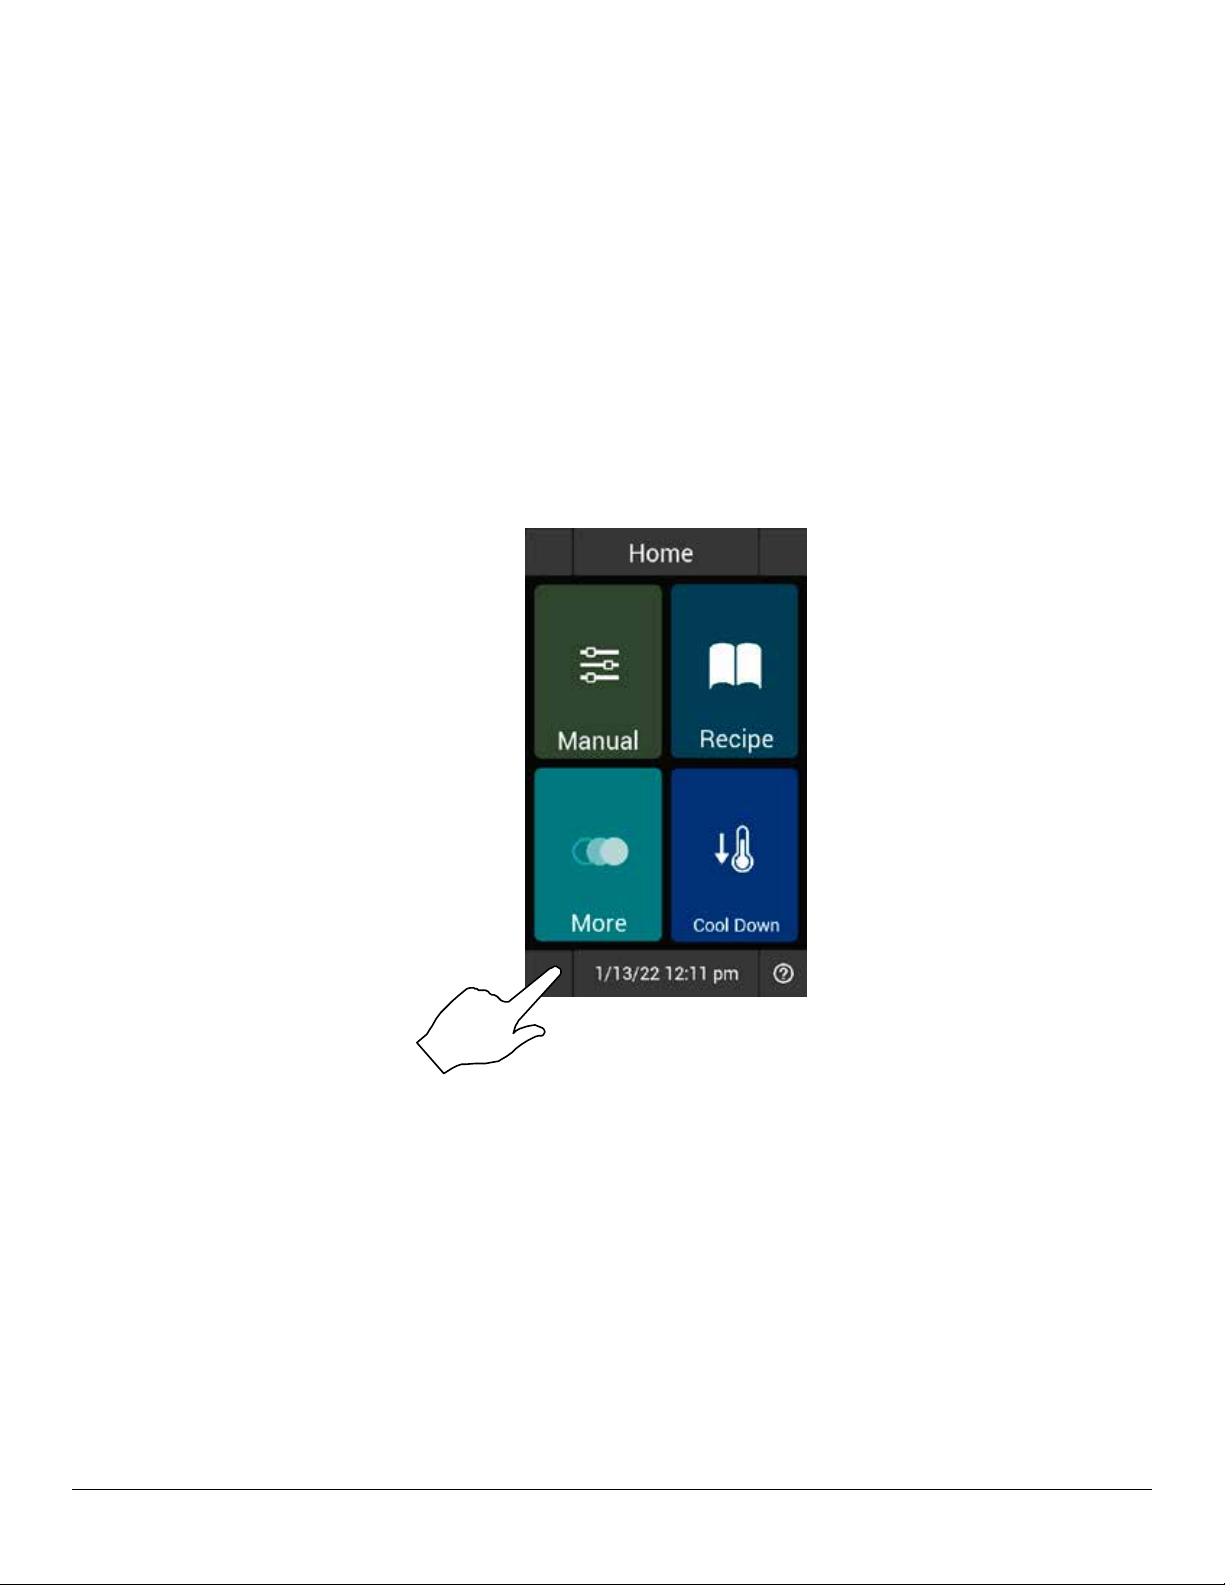
If an issue persists after clearing the error, attempt rebooting the control as follows.
1. Press and hold the area shown in the following image until the unit beeps (approximately 5 seconds).
2. If the issue is still not resolved, call Perfect Fry technical service at 1-802-864-0183, option 4 for additional assistance.
PFC SERIES INSTALLATION, OPERATION, MAINTENANCE 38
Page 39

TROUBLESHOOTING MAIN FAN
PROBLEM PROBABLE CAUSE PROBABLE SOLUTION
Main Fan Speed High The RPM feedback from the main
fan is higher than anticipated.
Main Fan Speed Low (Critical) The RPM feedback from the main
fan is higher than anticipated.
Main Fan Current High The current for the main fan is higher
than anticipated.
Main Fan Current Low The current for the main fan is low
than anticipated.
Main Fan Inrush High The starting current for the fan is
higher than anticipated.
TROUBLESHOOTING CONTROL FAN
PROBLEM PROBABLE CAUSE PROBABLE SOLUTION
Control Fan Speed High The RPM feedback from the fan is
higher than anticipated
Control Fan Speed Low The RPM feedback from the fan is
higher than anticipated.
Control Fan Current High The current for the fan is higher than
anticipated.
Check that the fan is rotating as
expected.
Check that the fan is rotating as
expected.
Check that the fan is spinning freely,
not impeded or restricted.
Check that the fan is operating
Check that the main Fan is spinning
freely, not impeded or restricted.
Check that the fan is rotating as
expected.
Check that the fan is rotating as
expected.
Check that the fan is spinning freely,
not impeded or restricted.
Control Fan Current Low The current for the fan is lower than
anticipated.
Control Fan Inrush High The starting current for the fan is
higher than anticipated.
Check that the fan is operating.
Check that the fan is spinning freely,
not impeded or restricted. Clean fan
guard at rear of unit.
TROUBLESHOOTING BASKET MOTOR
PROBLEM PROBABLE CAUSE PROBABLE SOLUTION
Basket Motor Overrun Motor has run without too long, with-
out intended position feedback.
Basket Motor Current Low Check that basket is installed. Verify basket is moving as intended.
Basket Motor Current High Check that basket is installed cor-
rectly.
Basket Motor Inrush High Check that basket is installed cor-
rectly.
Check basket is properly installed.
If occurring with product, ensure
product in not in excess of recommend load weight.
If occurring with product, ensure
product in not in excess of recommend load weight.
39 PFC SERIES INSTALLATION, OPERATION, MAINTENANCE
Page 40

TROUBLESHOOTING OTHER
PROBLEM PROBABLE CAUSE PROBABLE SOLUTION
Close Front Panel (Critical) Front panel is registered as open. Ensure panel is closer and locked in
position
Fire Ext Sw. Open (Critical) The pressure reading for the re
extinguisher is low
Grease Filter Switch Open (Critical) Grease lter is not registered as be-
ing installed
Air Filter Switch Open (Critical) Air lter is not registered as being
installed
Air Flow Switch Closed (Critical) Ensure front and rear vents are not
obstructed
Over Temp Alarm (Critical) High limit device has been tripped,
check oil level is not too low.
PCB High Temp (Critical) Control is registering high tempera-
tures. Clean fan guard at rear of unit.
Board Temp Error (Critical) Control is registering erroneous tem-
peratures (<32°F).
Temp Probe Failure (Critical) Probe is register open circuit
(>482°F).
Probe Wiring Error (Critical) Temperature probe feedback is er-
roneous
Check if extinguisher has
discharged, or has become
depressurized (gauge).
Check lter is installed correctly
Check lter is installed correctly
Clean grease lter
If issue persists, replace air lter.
Allow time for unit to cool, then reset
high limit in back of unit
Allow time for unit to cool, then reattempt operation
Call for service
Call for service
Call for service
Oil Too Hot (Critical) Probe is registering oil temperature
over 437°F
Allow unit to cool prior to attempting
operation.
PFC SERIES INSTALLATION, OPERATION, MAINTENANCE 40
Page 41
PFS AUTOMATIC EXTINGUISHER
NOTE: Please refer to the PFS Automatic Extinguisher Installation, Inspection, Maintenance & Recharge Manual
(L20-361) for more detailed information.
CAUTION The PFS must be stored above 32°F (0°C)
1. GENERAL DESCRIPTION
The PFS consists of a cylinder assembly (with pressure
switch and gauge), actuating lever, fusible link assembly,
manual pull station, and two nozzles. It is designed and
acceptable for use in areas that have ambient conditions
between 32°F (0°C) and 50°C (120°F).
2. OPERATION
Automatic Operation
Upon the detection of a re, the PFS will automatically
operate. The fusible link rated at 280ºF (138ºC) will operate when exposed to the re and operate the PFS automatic extinguisher unit. When operated, the PFS unit
will discharge wet chemical agent through the provided
discharge piping and distribution nozzles.
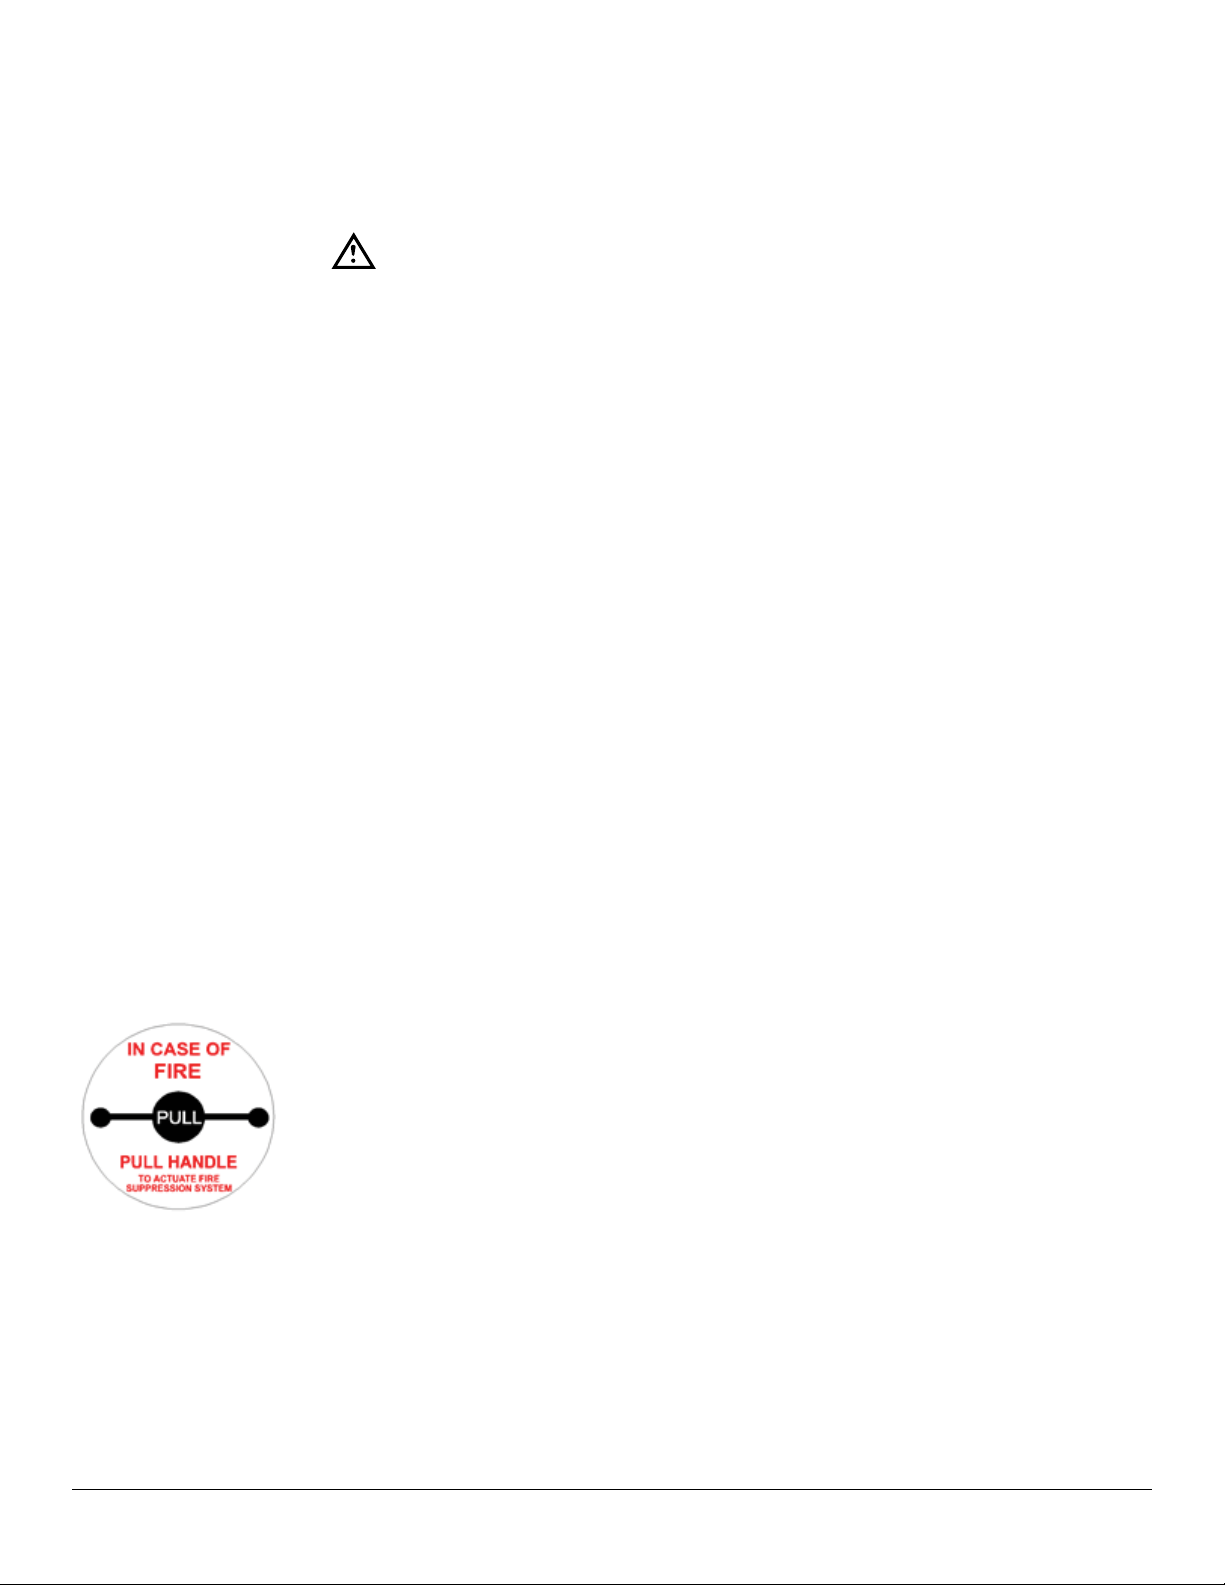
Manual Operation
The PFS unit can also be operated manually by pulling the remote lever (to be mounted on the front of the
cooking appliance) that is clearly marked “In Case Of
Fire - PULL”.
IMPORTANT:
The manual pull handle is to be pulled ONLY IN CASE
OF FIRE in the Perfect Fry unit (use when the automatic
system has failed).
3. INSPECTION & MAINTENANCE
The PFS Automatic Extinguisher must be serviced on a
regular basis. Three types of servicing are required by
NFPA 17A:
Monthly
An inspection or “quick check” must be conducted by the
owner/operator and include verication of the following:
1. The PFS is in its proper location.
2. The PFS shows no physical damage or condition that
might prevent operation.
3. The pressure gauge is in the green operating range.
4. The maintenance tag is in place and is up to date.
5. The manual pull is unobstructed.
6. The nozzle blow-o caps are intact and undamaged.
7. At least monthly, the date the inspection is performed
and the initials of the person performing the inspection shall be recorded.
Semi-Annually
Maintenance must be conducted by a service technician
that is trained and shall have passed a written or online
test that is acceptable to the authority having jurisdiction.
Maintenance shall be performed at intervals no more
than 6 months apart as outlined in NFPA 17A and shall
include the following::
1. A check to see that the hazard has not changed.
2. Examination of the fusible link, cylinder, tubing, nozzles and all auxiliary equipment.
3. Fusible links must be replaced at least Semi-annually
from the date of installation. They must be destroyed
when removed. Only use Perfect Fry part number:
83089, in the detection line. A fusible link loaded with
NOTE: Power shut-o is also achieved by system opera-
tion. If the pressure in the cylinder(s) drops below
92 psi (6.3 bar), the pressure switch opens, deactivating the power relay causing the appliance to
de-energize.
41 PFC SERIES INSTALLATION, OPERATION, MAINTENANCE
grease or other material can result in an excessive
delay in actuation.
4. Verication that the agent distribution piping is not ob-
structed. Remove the blow-o caps (83108) from the
nozzles to ensure that they are free of grease buildup and inspect them for deterioration. Replace them
as necessary.
Page 42

5. Where semi-annual maintenance of any wet chemical containers or PFS components reveals conditions
such as, but not limited to, corrosion or pitting in ex-
cess of manufactured limits, structural damage or re
damage, repairs by soldering, welding, or brazing,
the aected part(s) shall be replaced or hydrostatically tested. The hydrostatic testing of wet chemical
containers shall follow the applicable procedures outlined in NFPA 17A.
6. All wet chemical systems must be tested for proper
operation, which shall include operation of the detection system signals and releasing devices, including
the manual pull station and other associated equipment. A discharge of the wet chemical is not a required part of the test.
a. Simply disconnect one lead from the pressure
switch to initiate appliance shut-down.
7. Where the maintenance of the PFS reveals defective parts that could cause an impairment or failure of
proper operation of the PFS, the aected parts must
be replaced or repaired.
SEMI-ANNUAL INSPECTION & MAINTENANCE (I & M) LOG: PERFECT FRY Serial No. _______________
8. The maintenance report, with recommendations if
any, shall be led with the owner or with the designated party responsible for the PFS.
9. The PFS must have a tag or label indicating the
month and year the maintenance is performed and
identifying the person performing the service. Only
the current tag or label must remain in place.
Twelve Years
Maintenance must be done by authorized service personnel, as per NFPA 17A and include the following:
1. The wet chemical extinguishing agent must be removed and discarded.
2. The cylinder needs to be hydrostatically tested to 300
psi (21 bar).
3. If the cylinder shows no signs of rupture or distortion,
recharge the PFS as directed in the recharging instructions.
Date __________ I & M by _____________________ Date ____________ I & M by ____________________
Date __________ I & M by _____________________ Date ____________ I & M by ____________________
Date __________ I & M by _____________________ Date ____________ I & M by ____________________
Date __________ I & M by _____________________ Date ____________ I & M by ____________________
Date __________ I & M by _____________________ Date ____________ I & M by ____________________
Date __________ I & M by _____________________ Date ____________ I & M by ____________________
Date __________ I & M by _____________________ Date ____________ I & M by ____________________
Date __________ I & M by _____________________ Date ____________ I & M by ____________________
Date __________ I & M by _____________________ Date ____________ I & M by ____________________
Date __________ I & M by _____________________ Date ____________ I & M by ____________________
Date __________ I & M by _____________________ Date ____________ I & M by ____________________
Date __________ I & M by _____________________ Date ____________ I & M by ____________________
PFC SERIES INSTALLATION, OPERATION, MAINTENANCE 42
Page 43

DECLARATION OF CONFORMITY
(FOR CE PERFECT FRY ONLY)
Application of Council Directive(s): Low Voltage Directive
EMC Directive
RoHS Directive
Standard(s) to which Conformity is
Declared:
Manufacturer’s Name Perfect Fry Company LLC
Manufacturer’s Address: 42 Allen Martin Drive
Importer’s Name _____________________________________________________
Importer’s Address _____________________________________________________
Type of Equipment Commercial Electric Deep Fat Fryer
Model Number: _____________________________________________________
Serial Number: _____________________________________________________
Year of Manufacture: _____________________________________________________
I, the undersigned, hereby declare that the equipment specied above conforms
EN 60335-1, EN 60335-2-37
EN 55014-1
EN 55014-2
Essex Junction, VT USA
05452
_____________________________________________________
_____________________________________________________
to the above Directive(s) and Standard(s)
Place: Perfect Fry Company
Essex Junction, VT, USA
Date: ___/___/___
43 PFC SERIES INSTALLATION, OPERATION, MAINTENANCE
_____________________________________ (Signature)
_____________________________________ (Full Name)
_____________________________________ (Position)
Page 44

ORIGINAL STANDARD EQUIPMENT LIMITED WARRANTY
US & CANADA
Eective January 1, 2018, Serial Number E18AA000000
GENERAL WARRANTY
Perfect Fry warrants to the original purchaser of its commercial cooking appliances and related equipment that said appliances and related equipment will be free from defects in material and workmanship under normal use for a period of one
(1) year from the date of installation, with appropriate documentation, to a maximum of fteen (15) months from the date
of manufacture, subject to the following additions, exceptions, exclusions and limitations.
WHAT IS COVERED
This warranty is limited to the repair or replacement at the Company’s option, without charge, of any part found to be
defective within the warranty period and reasonable expenses incurred for freight and material for the installation of such
part; in addition, the Company’s obligation shall be limited to reimbursement for normal labor on such parts.
Perfect Fry, Inc. agrees to pay the Authorized Service and Parts Distributor, for any labor and material required to repair
or replace, at the Company’s option, any part which may fail due to defects in material or workmanship during the above
general warranty period.
ADDITIONAL PART ONLY WARRANTY
After the end of the above general warranty, the computer is warranted to be free of defects for an additional one (1) year.
This additional warranty only covers the cost of the part. Customer is responsible for all labor and shipping costs during
this warranty period.
HOW TO KEEP YOUR WARRANTY IN FORCE
• Make sure any shipping damages are reported immediately. Damages of this nature are the responsibility of the carrier and must be reported by the receiver.
• Install the appliance properly. This is the responsibility of the installer and the procedures are outlined in the manual.
• Register your equipment at www.perfectfry.com. This is necessary to start your warranty and to obtain the unlock code
for the computer. The unlock code will be sent via email.
• Do not install the appliance in a home or residence.
• Maintain the appliance properly. This is the responsibility of the purchaser of the appliance and the procedures are
outlined in the manual.
• Replace the air lter at regular intervals to prevent lter saturation. Record when the air lter is replaced in the Installation & Operations Manual. Also regularly inspect the door gasket for gaps, cracks and tears. Failure to do so could
result in a non-warranty main fan failure due to grease build up.
• Adjustments, such as calibration, leveling, tightening of fasteners or plumbing or electrical connections normally associated with initial installation are outlined in the manual and are not covered under warranty.
• Damages as a result of re, ood or other acts of God are not covered under this warranty.
• Use the appliance for what it is intended. If the appliance is used for a purpose other than for which it was intended or
designed, resulting damages are not covered under the warranty.
• Make sure that the appliance has the correct voltage. If a failure is due to incorrect or erratic voltage, these damages
are not covered under the warranty.
• Do not materially alter or modify the appliance.
• Do not obliterate, remove or alter the serial number rating plate.
PFC SERIES INSTALLATION, OPERATION, MAINTENANCE 44
Page 45

• Use only Genuine OEM parts from Perfect Fry or its Authorized Parts and Service Distributors. Repairs are not covered by the warranty if non-OEM parts or non-Authorized Parts and Service Distributors are used.
• Failures that are not attributable to a defect in materials or workmanship are not covered.
This warranty specically excludes parts which wear or would be replaced under normal usage, including, but not limited
to, electric lamps, fuses, interior or exterior nishes, lters and gaskets.
LIMITS TO THE WARRANTY
Charges for mileage over one hundred (100) miles and travel time over two (2) hours from the Authorized Service and
Parts Distributor are not covered under this warranty. Extended mileage charges are the responsibility of the individual or
rm requesting these services.
If any oral statements have been made regarding the appliance, these statements do not constitute warranties and are
not part of the contract of sale. This limited warranty constitutes the complete, nal and exclusive statement with regard to
warranties.
THIS LIMITED WARRANTY IS EXCLUSIVE AND IS IN LIEU OF ALL OTHER WARRANTIES WHETHER WRITTEN,
ORAL OR IMPLIED, INCLUDING, BUT NOT LIMITED TO ANY WARRANTY OF MERCHANTABILITY OR FITNESS FOR
A PARTICULAR PURPOSE OR WARRANTY AGAINST LATENT DEFECTS.
LIMITATIONS OF LIABILITY
In the event of a warranty or other claim, the sole obligation of Perfect Fry will be limited to the repair or replacement, at
the Company’s discretion, of the appliance or the component part. This repair or replacement will be at the expense of
Perfect Fry except as limited by this warranty statement. Any repair or replacement under this warranty does not constitute
an extension in time to the original warranty. Parts covered under this warranty will be repaired or replaced, at the Company’s discretion, with new or functionally operative parts. The liability of Perfect Fry on any claim of any kind, including
claims based on warranty, express or implied contract, negligence, strict liability or any other legal theories will be limited
to the repair or replacement of the appliance. This liability will not include, and the purchaser specically renounces any
right to recover special, incidental, consequential or other damages of any kind, including, but not limited to, injuries to
persons, damage to property, loss of prots or anticipated loss of the use of this appliance.
If any provision of this warranty is unenforceable under the law of any jurisdiction, that provision only will be inapplicable
there, and the remainder of the warranty will remain unaected.
The maximum exclusion or limitation allowed by law will be substituted for the unenforceable provision.
HOW TO OBTAIN WARRANTY SERVICE
Direct your claim to the Perfect Fry Authorized Service and Parts Distributor, found at http://perfectfry.com/servicemap.
aspx , closest to you giving complete model and serial number, voltage and description of the problem. Proof of the date
of installation and/or the sales slip may also be required. If there are questions about this procedure, write the National
Service Manager, Perfect Fry, 42 Allen Martin Drive, Essex Junction, VT 05452. USA
This warranty gives you certain specic legal rights; you may have other rights which vary from state to state.
45 PFC SERIES INSTALLATION, OPERATION, MAINTENANCE
Page 46

ORIGINAL STANDARD EQUIPMENT LIMITED WARRANTY
INTERNATIONAL UNITS
Eective January 1, 2018, Serial Number E18AA000000
WARRANTY
1 Year Parts
During the rst year after purchase, all parts of the fryer which prove to be defective in materials or workmanship will be
replaced free of charge (parts only).
2 Years Electronics:
During the rst 2 years after purchase, if the electronics module proves to be defective in materials or workmanship, it will
be replaced free of charge (parts only).
TERMS OF WARRANTY
1. Perfect Fry Company LLC warrants this fryer to be free from defects in materials and workmanship and will repair or
replace it at Perfect Fry Company LLC’s option for a period of one year after purchase providing the purchaser follows
the manufacturer’s recommended procedures for operation and maintenance contained in this manual. Perfect Fry
Company LLC shall not be liable for injury or damage to property other than this fryer.
2. The warranty applies to materials at the factory for one year (2 years electronics) from date of purchase. The warranty
does not include materials and labor employed in cleaning the fryer. Any and all transportation and shipping charges
and expenses are the responsibility of the Purchaser. The warranty card must be completed and registered with Perfect
Fry Company LLC. within 30 days of purchase to validate the warranty. The warranty will cease to exist if maintenance
has not been performed according to the manufacturer’s instructions. This warranty does not cover damage arising
from or caused by improper maintenance, directly or indirectly, transportation, accident, misuse, improper installation,
re, ood, or acts of God. Parts repaired or replaced under this warranty are warranted throughout the remainder of the
original warranty period only. The warranty does not apply to parts and service supplied or obtained from other than
Perfect Fry or its authorized distributors.
3. Other than the warranty expressed in clause 1) hereof, Perfect Fry Company LLC expressly disclaims all conditions
and warranties, express or implied, including, without limitation, the implied warranties of merchantability and tness for
a particular purpose. Perfect Fry shall not be responsible for, nor does this warranty extend to, any consequential or
incidental damages or expenses of any kind or nature, regardless of the cause thereof or any knowledge which Perfect
Fry may have regarding the probability of the occurrence of such damages or expenses including, without limitation,
injury to persons or property, loss of life, loss of use of the products, lost goodwill, loss of income, lost resale prots,
work stoppage, impairment of other goods, breach of contract, negligence or such other actions as may be deemed or
alleged to be the cause of a loss or damage.
PFC SERIES INSTALLATION, OPERATION, MAINTENANCE 46
 Loading...