

Page 1
TL8100
User Guide
Programmable Thermostat
n
This thermostat can be used to control the following heating systems:
• gas, oil or electric systems
• hot water heating
• hot air system with no fan control
• millivolt system (e.g., gas fireplace)
• electric heating up to 1200 W @ 240 V max.
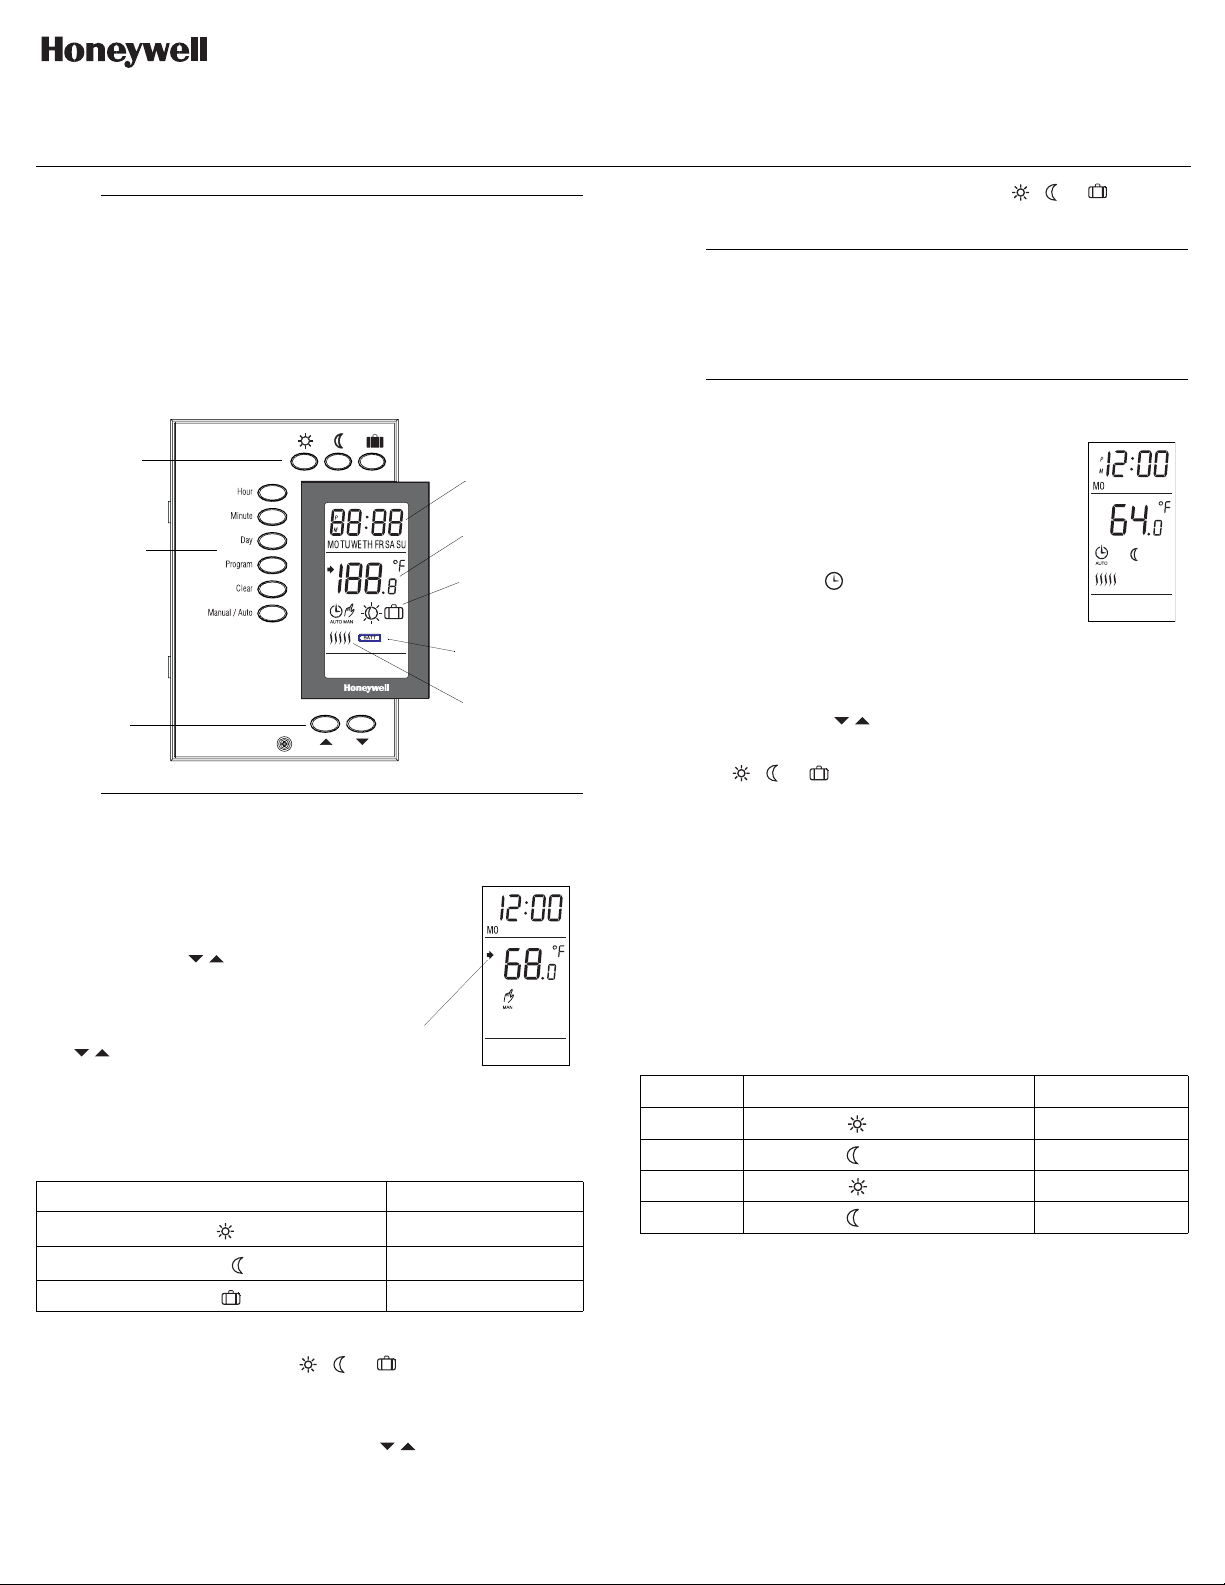
Temperature
preset buttons
o
Description
Programming
buttons
Temperature
adjustment
buttons
Temperature Display and Setting
Time and day
Temperature
Mode and preset
temperature
indicators
Low-battery
indicator
Heating
indicator
2.1 Setpoint Temperature
The thermostat normally displays the
measured ambient temperature. To
view the setpoint temperature, briefly
press either of the buttons. The
setpoint temperature will appear for 5
seconds.
To adjust the setpoint, press one of
the buttons until the desired
temperature is displayed.
Appears during the
setpoint display
2.2 Preset Temperatures
The thermostat has 3 preset temperatures:
Preset temperature Default value
Comfort temperature
Economy temperature
Vacation temperature
To use a preset temperature:
Press the corresponding button ( , or ). The temperature and
the corresponding icon will be displayed.
To change a preset temperature:
68°F (20°C)
64°F (18°C)
50°F (10°C)
n Set the desired temperature using the buttons.
1.
o Press and hold the corresponding button ( , or ) until the
icon is displayed on the screen (approximately 3 seconds).
p
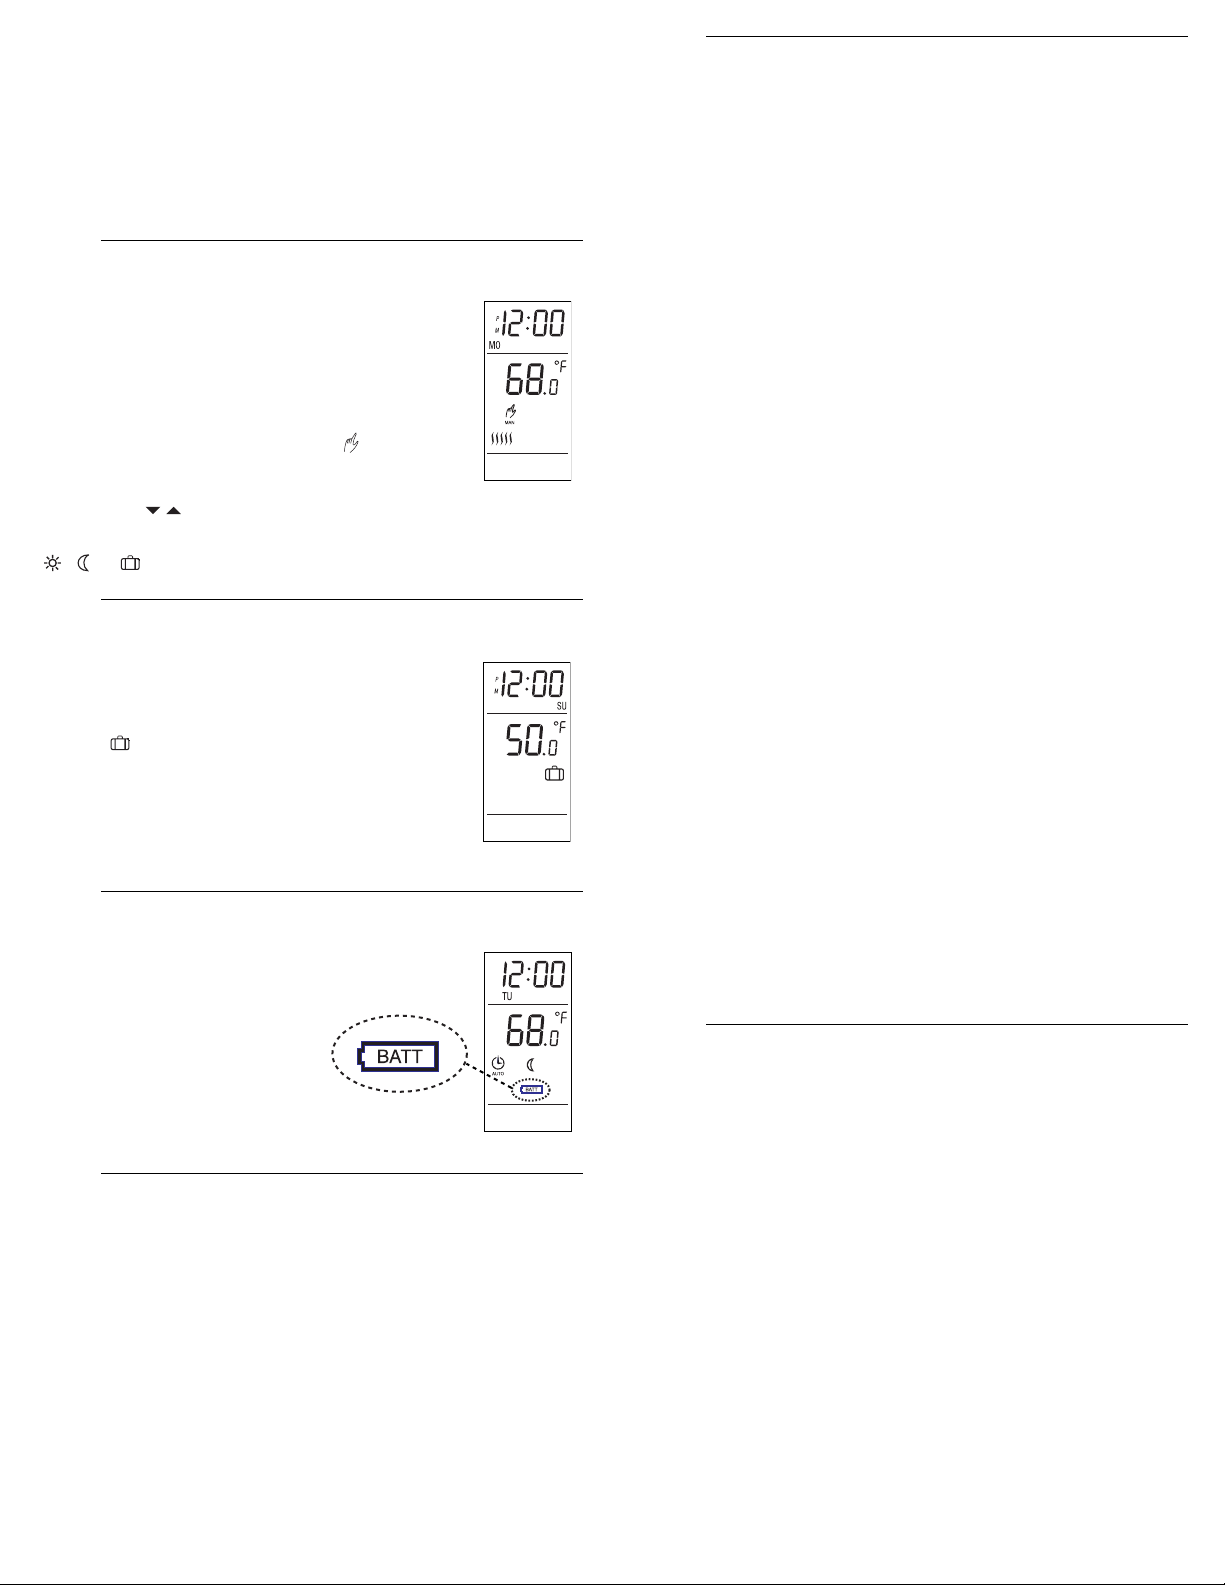
Set the Time and Day
3.
n Set the time, using the HOUR and MINUTE buttons.
o Set the day, using the DAY button.
4.
q
Use automatic mode if you want the thermostat to
follow the programmed schedule. The thermostat will
switch from the Comfort temperature to the Economy
temperature, or vice versa according to the schedule.
To use the automatic mode, press the Manual/Auto
button repeatedly until appears on the screen.
Automatic Mode
4.1 Temporary Bypass
You can bypass the temperature setpoint of the current period when
the thermostat is in Automatic mode.
To do so, press one of button until the desired temperature is
displayed or select a preset temperature by pressing the correspond-
2.
ing button ( , or ).
You can cancel the bypass, by pressing the Manual/Auto button
twice, before it cancels automatically at the start of the next period.
4.2 Schedule Programming
You can program up to 4 periods in a day. The Comfort temperaure is
used in periods 1 and 3 and the Economy temperature is used in
periods 2 and 4. The start time of each period can be different for
each day of the week.
For each day, enter the time you wake up (period 1), the time you
leave for work (period 2), the time you return home (period 3) and the
time you go to sleep (period 4):
Period Associated Temperature Time
1
2
3
4
Note: For periods 1 and 3, set the start time earlier by at least
15 minutes for every 2°F (1°C) that the temperature needs to
rise. For example, if you lower the temperature by 6°F (3°C) at
night and you wake up at 7:00 a.m., set period 1 to 6:15 a.m.
• Press Program to enter the programming mode. The thermostat
will display MO (Monday) and PROG 1 (period 1).
• To select another day, press Day.
• NOTE: To select all 7 days, hold Day for 3 seconds. When all 7
days are selected, the start time of the period being displayed
will be the same every day.
Comfort
Economy
Comfort
Economy
Wake up
Leave home
Return home
Sleep
TL8100 69-2018ES 11/28/06 1/2
Page 2
• To select another period, press Program.
• Press Hour and Min to set the start time for the displayed
period. If you want the thermostat to skip a period, press Clear,
the time display of the displayed period becomes --:--.
• Press Manual/Auto to exit.
NOTE: If you do not press any button for 60 seconds, the thermostat will automatically exit the programming mode and save
any changes made.
r
In manual mode, the programmed schedule is not
followed. Use this mode if you wish to set the
temperature manually or maintain the same
temperature all the time.
To use the manual mode, press the Manual/Auto
button repeatedly until the hand icon appears on
the screen.
Press one of buttons until the desired temperature is displayed
or select a preset temperature by pressing the corresponding button
(, or ).
s
In Vacation mode, the thermostat is set to the Vacation temperature. There are 2 ways to place the thermostat in Vacation mode.
• Press on the thermostat.
• From the remote control system or home automa-
Note: The Vacation mode can only be deactivated
t
An icon appears when the batteries must be replaced. The icon
remains on the display for 60
days. Afterwards, the thermostat
will cut power to the heating system.
The time and programming are
saved for the first 15 seconds
when the batteries are removed.
Manual Mode
Vacation Mode
tion system.
remotely if it has been activated remotely.
Battery Replacement
9.
;
Honeywell warrants this product, excluding battery, to be free from
defects in the workmanship or materials, under normal use and service, for a period of five (5) years from the date of purchase by the
consumer. If at any time during the warranty period the product is
determined to be defective or malfunctions, Honeywell shall repair or
replace it (at Honeywell's option).
5.
6.
7.
If the product is defective,
(i) return it, with a bill of sale or other dated proof of purchase, to
(ii) call Honeywell Customer Care at 1-800-468-1502. Customer
This warranty does not cover removal or reinstallation costs. This
warranty shall not apply if it is shown by Honeywell that the defect or
malfunction was caused by damage which occurred while the product was in the possession of a consumer.
Honeywell's sole responsibility shall be to repair or replace the product within the terms stated above. HONEYWELL SHALL NOT BE
LIABLE FOR ANY LOSS OR DAMAGE OF ANY KIND, INCLUDING
ANY INCIDENTAL OR CONSEQUENTIAL DAMAGES RESULTING,
DIRECTLY OR INDIRECTLY, FROM ANY BREACH OF ANY WARRANTY, EXPRESS OR IMPLIED, OR ANY OTHER FAILURE OF
THIS PRODUCT. Some states do not allow the exclusion or limitation
of incidental or consequential damages, so this limitation may not
apply to you.
THIS WARRANTY IS THE ONLY EXPRESS WARRANTY HONEYWELL MAKES ON THIS PRODUCT. THE DURATION OF ANY
IMPLIED WARRANTIES, INCLUDING THE WARRANTIES OF
MERCHANTABILITY AND FITNESS FOR A PARTICULAR PURPOSE, IS HEREBY LIMITED TO THE FIVE-YEAR DURATION OF
THIS WARRANTY. Some states do not allow limitations on how long
an implied warranty lasts, so the above limitation may not apply to
you.
This warranty gives you specific legal rights, and you may have other
rights which vary from state to state.
If you have any questions concerning this warranty, please write Honeywell Customer Relations, 1985 Douglas Dr, Golden Valley, MN
55422 or call 1-800-468-1502. In Canada, write Retail Products
ON15-02H, Honeywell Limited/Honeywell Limitée, 35 Dynamic Drive,
Scarborough, Ontario M1V4Z9.
If you have any questions about the operation of your thermostat,
please go to http://yourhome.honeywell.com, or call Honeywell
Customer Care toll-free at 1-800-468-1502.
Warranty
the place from which you purchased it, or
Care will make the determination whether the product should be
returned to the following address: Honeywell Return Goods,
Dock 4 MN10-3860, 1885 Douglas Dr N, Golden Valley, MN
55422, or whether a replacement product can be sent to you.
10.
Customer assistance
8.
u
Power supply: 2 AA or LR6 alkaline batteries 1.5 V
Max. resistive load: 5 A @ 24 VDC / 120 VAC / 240 VAC
Max. inductive load: 2 A @ 24 VDC / 120 VAC / 240 VAC (P.F.= 0.4)
Compatible with millivolt system
Remote input: 12 VDC, ± 10 %, 2.5 mA
Temperature setpoint range: 40 °F to 85 °F (5 °C to 30 °C)
Temperature display resolution: 0.1 degree
Operating temperature: 32 °F to 122 °F (0 °C to 50 °C), 95 % R.H.
Storage temperature: -4 °F to 122 °F (-20 °C to 50 °C)
Certifications: CE, c UL us
Protection index: IP 40
TL8100 69-2018ES 11/28/06 2/2
Specifications
Page 3

TL8100
Guía del usuario
Termostato programable
n
El termostato puede usarse para controlar los sistemas siguientes:
• Sistemas a gas, aceite y eléctricos
• Calefacción a agua caliente
• Sistema a aire caliente sin control de ventilador
• Sistema de milivoltios (por ej., hogar a gas)
• Calefacción eléctrica hasta 1200 W a 240 V max.
Botones de
predefinición de
la temperatura
o
Descripción
Botones de
programación
Botones de
ajuste de la
temperatura
Visualización y ajuste de la temperatura
Hora y día
Temperatura
Indicadores de
modo y de
temperatura
predefinida
Indicador de
pilas bajas
indicador de
calefacción
2.1 Punto de ajuste
El termostato indica normalmente la
temperatura ambiente medida. Para
ver el punto de ajuste, presionar brevemente uno de los botones . El
punto de ajuste aparecerá durante 5
segundos.
Para fijar el punto de ajuste, presionar
uno de los botones hasta que
aparezca la temperatura deseada.
Aparece durante la
visualización del
punto de ajuste
2.2 Temperaturas predefinidas
El termostato tiene 3 temperaturas predefinidas:
Temperatura predefinida Valor por defecto
Temperatura de Confort
Temperatura de Economía
Temperatura de Vacaciones
Para usar una temperatura predefinida:
Presionar el botón correspondiente ( , o ). Aparecerán la
temperatura y el ícono correspondiente.
Para modificar una temperatura predefinida:
20°C (68°F)
18°C(64°F)
10°C (50°F)
n Ajustar la temperatura deseada con los botones .
o Presionar y mantener presionado el botón correspondiente ( ,
o ) hasta que el ícono aparezca en pantalla (aproximada-
mente 3 segundos).
1.
p
Ajuste de la hora y el día
3.
n Ajustar la hora con los botones de HOUR y MINUTE .
o Ajustar el día con el botón DAY.
4.
q
Usar el modo automático si se desea que el
termostato utilice el horario preprogramado. El
termostato pasará de la temperatura de Confort a la
de Economía, o viceversa, según el horario.
Para usar el modo Automático, presionar el botón
Manual/Auto repetidas veces hasta que
aparezca en la pantalla.
Modo automático
4.1 Cancelación temporaria
Se puede cancelar el punto de ajuste de la temperatura del período
en curso cuando el termostato está en modo Automático.
Para ello hay que presionar uno de los botones hasta que la
temperatura deseada aparezca o seleccionar una temperatura pre-
definida presionando el botón correspondiente ( , o ).
Se puede anular la cancelación temporaria presionando el botón
2.
Manual/Auto dos veces, antes de que se produzca la cancelación
automática al comenzar el nuevo período.
4.2 Programación del horario
Se pueden programar hasta 4 períodos en un día. La temperatura de
Confort se usa en los períodos 1 y 3 y la temperatura Economía se
usa en los períodos 2 y 4. El tiempo de inicio de cada período puede
ser diferente para cada día de la semana.
Para cada día, hay que ingresar la hora del despertar (período 1), la
hora de salida para el trabajo (período 2), la hora del regreso
(período 3) y la hora de irse a dormir (período 4):
Período Temperatura asociada Hora
1
2
3
4
Nota: para los períodos 1 y 3, fijar la hora por lo menos 15 minutos
más temprano por cada 1 ºC (2 ºF) que la temperatura debe
subir. Por ejemplo, si se baja la temperatura 3 ºC (6 °F) a la
noche y uno se despierta a las 7 de la mañana, fije el período
1 a las 6.15.
• Presionar Program para ingresar en el modo Programación. El
temostato indicará MO (lunes) y PROG 1 (período 1).
• Para seleccionar otro día, presionar Day.
• NOTA: para seleccionar los 7 días, mantener Day presionado
durante 3 segundos. Cuando los 7 días hayan sido seleccionados, la hora de inicio del período que se presenta será la misma
cada día.
• Para escoger otro período, presionar Program.
Confort
Economía
Confort
Economía
Despertar
Salir de la casa
Regreso a la casa
Dormir
TL8100 69-2018ES 11/28/06 1/2
Page 4

• Presionar Hour y Min para fijar la hora de inicio del período vi-
sualizado. Si se desea que el termostato saltee un período, presionar Clear y la hora indicada para el período visualizado será
--:--.
• Presionar Manual/Auto para salir.
NOTA: si no se presiona ningún botón durante 60 segundos, el
termostato saldrá automáticamente del modo de programación y
salvaguardará todos los cambios que se hayan hecho.
r
En modo manual, no se sigue el horario programado.
Este modo se utiliza si se desea fijar la temperatura
manualmente o mantener la misma temperatura todo
el tiempo.
Para usar el modo manual, presionar el botón
Manual/Auto repetidas veces hasta que el ícono de
la mano aparezca en la pantalla.
Presionar uno de los botones hasta que la temperatura
deseada aparezca, o elegir una temperatura predefinida presio-
nando el botón correspondiente ( , o ).
s
En el modo Vacaciones, el termostato se fija en la
temperatura de Vacaciones. Hay dos maneras de
colocar el termostato en modo Vacaciones.
• Presionar en el termostato.
• Desde el sistema de control remoto o desde el
Nota: cuando el modo Vacaciones se activa con el
t
Aparece un ícono cuando deben
reemplazarse las pilas. El ícono
se visualiza durante 60 días,
luego de lo cual el termostato cortará la alimentación del sistema
de calefacción.
La hora y la programación se salvaguardan durante los primeros
15 segundos cuando se retiran
las baterías.
u
Alimentación: 2 pilas alcalinas AA o LR6 de 1,5 V
Máxima carga resistiva: 5 A a 24 VDC / 120 VDC / 240 VAC
Máx. carga inductiva: 2 A a 24 VDC / 120 VAC / 240 VAC (P.F. = 0,4)
Compatible con el sistema del milivoltio
Entrada remota: 12 VDC, ± 10%, 2,5 mA
Temperatura del punto de ajuste: 40 °F a 85 °F (5 °C a 30 °C)
Resolución de la visualización de la temperatura: 0,1 grado
Temperatura de funcionamiento: 32 °F a 122 °F (0 °C a 50 °C), 95%
humedad relativa
Temperatura de almacenamiento: -4 °F a 122 °F (-20 °C a 50 °C)
Certificaciones: CE, c UL us
Índice de protección: IP 40
Modo manual
Modo vacaciones
sistema domótico.
control remoto, sólo puede desactivarse con el
control remoto.
Reemplazo de las pilas
Especificaciones técnicas
9.
;
Honeywell garantiza por un período de cinco (5) años, a partir de la
fecha de compra por el consumidor, que este producto, sin incluir las
baterías, no presentará defectos en los materiales ni en lo referente
a la mano de obra, en condiciones normales de uso y de servicio. Si
en cualquier momento, durante el período de vigencia de la garantía,
se determina que el producto es defectuoso o que funciona mal,
5.
6.
7.
Honeywell lo reparará o lo reemplazará (a elección de Honeywell).
Si el producto es defectuoso:
I. Devuélvalo al lugar donde lo compró, acompañado por la factura
II. Llame al servicio de atención al cliente de Honeywell, al 1-800-
Esta garantía no cubre los costos de desinstalación y reinstalación.
Esta garantía no será válida si se demuestra que el defecto o el mal
funcionamiento se deben a un daño que ocurrió cuando el producto
estaba en posesión del consumidor.
La única responsabilidad de Honeywell será la de reparar o reemplazar el producto de acuerdo con los términos aquí establecidos.
HONEYWELL NO SERA RESPONSABLE DE NINGUNA PERDIDA
NI DE NINGUN DAÑO DE NINGUN TIPO, INCLUIDOS LOS DAÑOS
IMPREVISTOS O DERIVADOS QUE RESULTEN, DIRECTA O INDIRECTAMENTE, DEL INCUMPLIMIENTO DE CUALQUIER GARANTIA, EXPRESA O IMPLICITA, O DE CUALQUIER OTRA FALLA DE
ESTE PRODUCTO. Algunos estados no permiten la exclusión o la
limitación de los daños imprevistos o derivados, por lo tanto, es
posible que la limitación no se aplique.
ESTA ES LA UNICA GARANTIA EXPRESA QUE HONEYWELL
HACE SOBRE ESTE PRODUCTO. LA DURACION DE CUALQUIER
GARANTIA IMPLICITA, INCLUIDAS LAS GARANTIAS DE APTITUD
E IDONEIDAD PARA UN FIN DETERMINADO, QUEDA, POR EL
PRESENTE, LIMITADA A LA DURACION DE CINCO AÑOS DE
ESTA GARANTIA. Algunos estados no permiten limitaciones en
cuanto a la duración de las garantías implícitas. Por lo tanto, es
posible que la limitación anterior no se aplique en su caso.
Esta garantía le brinda derechos legales específicos, y usted puede
tener otros derechos que varían para cada estado.
Si tiene preguntas acerca de esta garantía, escriba a Honeywell Customer Relations, 1985 Douglas Dr, Golden Valley, MN 55422, o llame
al 1-800-468-1502. En Canadá, escriba a Retail Products ON1502H, Honeywell Limited/Honeywell Limitée, 35 Dynamic Drive, Scarborough, Ontario M1V4Z9.
.
Si tiene preguntas acerca del funcionamiento del termostato, visite
http://yourhome.honeywell.com o llame sin cargo al servicio de
8.
atención al cliente de Honeywell, al 1-800-468-1502.
Garantía
de compra o de otra prueba de compra que incluya la fecha.
468-1502. El servicio de atención al cliente determinará si el
producto debe devolverse a la siguiente dirección: Honeywell
Return Goods, Dock 4 MN10-3860, 1885 Douglas Dr N, Golden
Valley, MN 55422; o si se le enviará un producto de reemplazo.
10.
Asistencia técnica
TL8100 69-2018ES 11/28/06 2/2
 Loading...