

Page 1
Orphanc
ametas.com
Poste
d
-23-'04
7
This is
you
If
High
Most
This
ff
This next
the full text
find
other
will allow
you
manual
this
Bridge,
places
Pay
use
page
This manual is for reference and
Creation
page
This
may not
and
useful,
08829
NJ
would
me
to continpe
Pal
or wish
be sold or distributed
On-line camera manual library
images from
-T701
charge
It'll make
a.k.a www.butkus.org/chinon
contains
i
s copyright@
I have no connection
how
about
and
send
you
$7"50
read
Xerox
to
buy
you
to use
your
imi'*n*,i
information
purposes,
historical
by
without the expressed
with any camera company
the manual.
a donation of
new
feel
M.__B_ ._u_t_kuE-NJ-
your
e-mail
for
a electronic
copy.
manuals
better,
credit
won't
cardo
on this camera.
all rights reserved.
permission
Color
to:
$3
address so
copy or
pay
and
it?
go
of the
ima!
M. B
thr
back I
producer
Page 2
www.orphancameras.com
Page 3
you
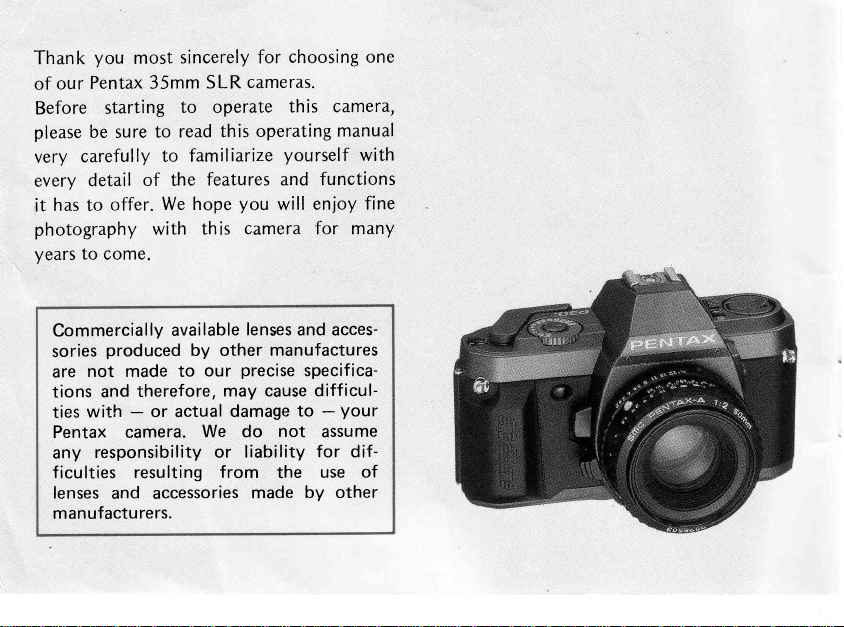
Thank
of our
Before
please
very
every
has
it
most
Pentax
starting
be sure
carefully
detail
offer.
to
photography
years
to come.
Commercially
produced
sories
not
are
tions
ties
Pentax
any
f
icu lties
lenses
m
made
therefore,
and
-
with
camera.
responsibility
resulting f rom
and accessories
an ufactu
re
sincerely for
35mm
to
read
to
familiarize
to
the
of
hope
We
th
with
available
by other
our
to
or actual
We do
rs.
choosing
cameras.
SLR
operate
this
this operating
yourself
features and
you
will
camera for
is
lenses
and acces-
manufactures
precise
may
damage
or liability
specifica-
cause difficul-
to
not
the
by other
made
one
camera,
manual
with
functions
enjoy fine
many
-
your
assume
for
dif-
of
use
Page 4
TABLE
www.orphancameras.com
OF
CONTENTS
Features
Nomenclature
PREPARATIONS
Inserting
Attaching
Film
wind
switch,
Main
shutter
Film
Loading film
Unf
oading f ilm
Strap
and soft
BASIC OPERATION
Viewfinder
Focusing
Hof
ding
Shooting
Shooting
Shooting in Metered
of
working
batteries
and
detaching lens
lever
shutter
dial
........
case
displays
camera
in Programmed
in Aperture-priority
........
release
Manual
parts
button,
AE
..........
mode
AE
mode
mode
2
ADVANCED
,4
O Self-timer
8 Using 100
10 Depth-of-f
11
12
1
S
16
17
18
19
20
22
24
pentax
Using
Programmed
Using
Exposure-memory
Depth
of
Infrared
Warning
Programmed
shutter/aperture
Diopter
correction,
P
eyecup
precautions
Specif ications
Taking
care of
Warranty
OpERATION
dedicated
setting
field
preview
ield
index mark
displays
AE
diag ram,
coupling
on
batteries
your
policy
auto flash
Auto
lock
mount
camera
Flash
mode
metering
range
adapter
...
un
K,
.
28
ra
i
1o
i
Page 5

camera
this
When
Pentax-F lens, it offers
or
SMC
Programmed AE, Aperture-priority AE;
modes:
Metered
When the
the
the
the
Metered
o
the
or Metered
Manual and Programmed
lens
Programmed AE mode
lens
aperture
"A"
setting,
Manual
When the conventional
camera operates in the Aperture-priority
Manual
used
is
with any
four
"A"
aperture
is
set to
can
is
set to
the Aperture-priority
modes can
mode.
be used.
f-stop
any
be used.
K-moL!nt lens
SMC
Auto
Pentax-A
exposure
Flash.
position,
When
other
than
or
AE
used,
is
AE
Programmed
The
camera automatically
combination of
correct
combination according to
subject.
want to
Aperture-priority
When
speed
brightness of the subject
the
exposure.
This
control
the
portraits,
as
AE Mode
shutter speed and
exposure, simultaneously
This mode
be bothered
you
set
is automatically
mode is suitable
is
suitable
by setting
AE Mode
the
aperture
adjusted according to
of the depth
etc.
for taking
selects the
the brightness
manually, the shutter
of field
most suitable
aperture
changing
for
exposure controls.
provide
to
pictures
who do
those
correct
is
desirable,
of the
for
to obtain
the
not
which
such
Metered Manual Mode
The
combination
completely
indication in
controls
deliberate over-
to
of
you.
up to
viewfinder,
the
proper
obtain
or underexposure
speed and aperture
shr.ltter
Guided by
you
exposure.
meter
the
adjust both
can
lf necessary,
obtained.
can be
is
Page 6

Programmed
www.orphancameras.com
when
camera
automatically
speed
pictu
.
The camera
properly
are
inserted
ffleter switch is
t
Most f
camera,
convenient functions.
Even if
provision,
f lash
operation
o
When
Tubes, lVlicnoscope
between the camena
operates
Manual
useC.
be
you
use a Pentax
in
its
to
control tlash
res.
inserted.
before
lashes
Pentax
but
you
use a f lash
this
you
in
the
merde"
l\uto Flash
Frogramrned
selects
does
operating it.
set
to ON
made
camera
"
use
the
Adapter,
Aperture-priority
Fn"ogrannrned
The
Mode
dedicated
proper
the
output
not
operate
Be
sure
or 0FF.
by others
dedicated f lashes
with
does
accessories
body and lens,
auto f lash
AE rnode,
apert[Jre
pro,per
fcr
unless
to check how
Also
check if
can
TTL
auto f lash
provide
not
such
etc.
that
this
AF
AE
be
rnocJe
the
camera
f
the
used
will
TTL
Extension
as
are
nnounted
carnena
M{etered
or
on this
and shutter
lash
batteries
they
are
the rnain
on
this
more
offer
auto
cani?CIt
Page 7
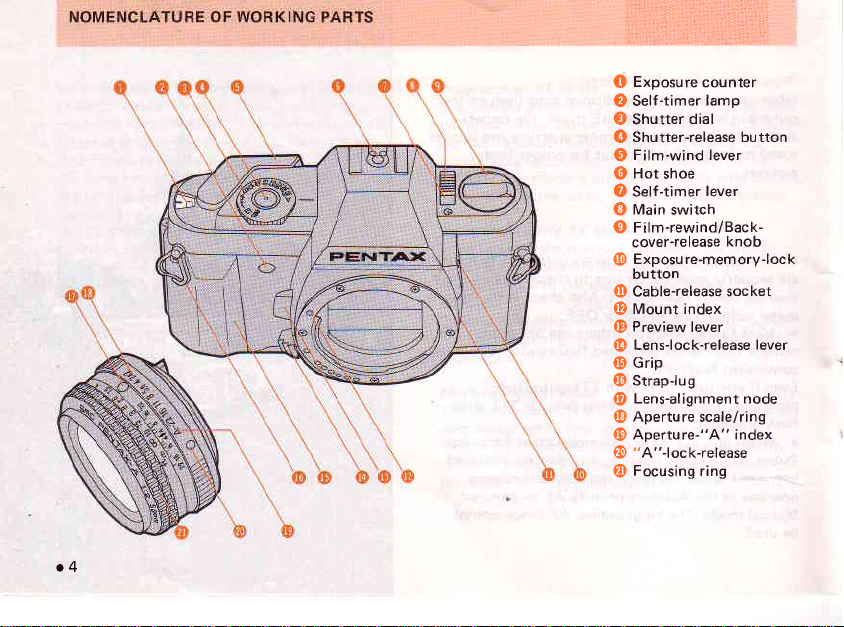
o4
Exposure
O
Self-timer
O
Shutter
O
Shutter-release bu tton
O
Film-wind lever
O
Hot
O
lD
Self-timer
Main
O
Film-rewind/Back-
O
cover-release
Exposu re-memory-lock
@
button
Cable-release
O
(D
Mount index
Preview
@
Lenslock-release
@
(D
Grip
(D
Strap{ug
Lens-alignment node
@
(D
Aperture scale/ring
(9
Aperture-"A" index
"A"-lock-release
@
(D
Focusing ring
counter
lamp
dial
shoe
lever
switch
knob
socket
lever
lever
Page 8

www.orphancameras.com
@ Film-rewind
@
Viewfinder
(D
Filmsprocket
(D
Film-take-up
Back
@
@ Film-information
window
Film-leader*nd
@
(D
Film-rewind
@ Shutter
@ Tripod
@
Batterychamber
@ Film
crank
eyepiece
spool
spool
cover
button
curtain
socket
chamber
mark
cap
Page 9

This
oxide
camera is
batteries.
powered
(Lithium
by two 1.5-volt
batteries are
or
alkaline
not usable.)
silver-
o
Open
direction
r
lnsert
(+)
o
As
switch
battery
the
the arrow.
of
the two batteries
facing upward,
sides
illustrated,
turn
in the direction
chamber cover by
into the chamber with
close
and
power
the arrow.
of
on by
the
sliding
the
sliding
cover.
it in the
their
main
the
Page 10

.
www.orphancameras.com
Press
the shutter
a shutter
Timer switch
The
built-in
seconds
ten
Battery
lf no
pressure
improperly
be
When
When
in
the
second.
completely exhausted,
shutter.
speed
timer switch
after
check
shutter
speed is
on the
inserted.
batteries
the
batteries are
viewfinder
lf
replace
so,
appears
you
shutter
weaken
starts
release
button half-way
on the
automatically
your
release
displayed in
button,
the
becoming weak,
to
blink
the
the shutter
slowly at the
batteries
left
finger
the viewfinder
batteries have
immediately.
button
and
side
of the viewfinder.
turns
the
off the
the shutter
speed of
not
does
make
power
shutter
even
power
no
speed
lf the
release
sure that
off in
button.
with
a slight
or may
displayed
per
once
batteries
the
about
are
7o
Page 11

lrig 4ra:
iai
o8
mount or interchange
To
the steps below.
follow
o
Remove
cap
o
Align
lens
clockwise until
lens in
allows
Align
touch.
o
To remove the
o
To
pressing
o
After removing
and
Note: Don't
mount
the body
is still on the eyepiece,
red
the
6,@).
light,
dot
the
method
(See
dim
lens mounting by touch.
raised node on
the
Then turn and
remove the
lens release lever.
the
lens caps to
rear
damage
face. When they become
dry cloth.
Pentak
mount cap and
remove
on the
lens
lens in
locks
Seat the
(O)
lens
lock
as
cap,
turn the
lens
press
from
lens
lens,
a
protect
stain the
or
KA
K,
and
the rear
Kaf
mount
lens cap. lf the
it.
the
body
click.
with the red dot
mount and turn
When mounting
camera body
with a
is recommended. This method
barrel with
the
release
lens
above.
in
notches at both sides.
the
on
lens counter-clockwise while
put
camera body,
the
lens from
the
electrical contact
wipe
stained,
dust
the
stains.
and
points
them with a clean,
lenses,
finder
on the
it
the
by
front
on the
Page 12

:;:iir;r; r:rrrri:r*:;"*'1i"'i,iiillrii:tiiiiii;iiiiiiliiriililliliiliiiiliiii,liiliiiriiirilriliiritiiriliiiiiii+il
www.orphancameras.com
ifl*Siryl$ldrt$,VH
,iii,tiii;li1-,;ii,littll'lillilil:iiiiiiiii;ii,'-,t:l:,i:iii,i,i.::,,:i:';i;;tiiiitfil:llilti,',,,,",,,.i;,,:iiiii];itr;
Stand-off
Setting
The film
position
remove
the
stand-off
After
completing
should
the
for
your
be
lever
wind
wind lever
faster film
thumb from
angle, ready for
a series
pushed
angle
for rapid
can
be set at the
advance. Even
of
in
to the
shooting
the lever,
the next
pictures,
original
stand-off
you
if
it
remains
quick
lever
the
position.
at
shot.
Film
advance
The film
goes.
Note:
The
a stroke
force
the
lever
as it
Exposure
The scale
o2o
Sro0
24o...o36.
Interlocked
mechanism,
number
stroke
wind lever
wind lever
when
lever
is.
the
and
film
counter
is indexed
4.....
with the
this counter
of exposed frames.
should
may
comes
rewind
follows:
as
.o2O.....
film
indicates
be thrown
stop in
the middle
its
to
the film leaving
end. Do not
wind
as
far
the
as
the
it
of
9o
Page 13

o
Main switch
To release the shutter,
When
the meter remains
the
main
switch
off.
be sure to turn
is
off, the shutter
the main switch to ON.
cannot
released and
be
o
o
o
10
release
Shutter
you
As
turn the
half-way, the meter will turn on, and
button
the shutter button
speed
Shutter
shooting in the Aperture-priority AE or Metered Manual
When
mode, turn
with
A = Aperture-priority
1000
B = Bulb
100
the shutter
index
the
-
1 = 1/1000 - 1
(long-time
=
1|IQQ sec.
button
main switch on and
release
will
dial
dial until the
(red
line).
AE
(Metered
sec.
exposure)
(flash-sync
shutter.
the
speed)
press
the shutter
a
shutter speed aligns
desired
Manual)
further
release
pressure
on
Page 14

FILM:'
www.orphancameras.com
;::i:
DX
r::1r:::
FILM
This
camera
DX-coded
of
chamber.
only
loaded
is
speed
other
camera is
automatically
film
when
Therefore,
DXcoded
to 100, whatever
words,
film
the camera
the only non-DX
one with ISO
Color
Fil,n
36.*o
sets the ISO
is loaded
it
you
are recommended
in this
camera.
will automatically
film
speed
f ilm
100.)
cdilfy
film
speed
into
film
the
to use
(lf
non-DX film
set
the
it may have;
usable for
this
film
in
The
film
use
speeds
the
this camera
to
this range.
0o0oo00ooooo-Ol
information
which
can
range from
DX-coded
be automatically
ISO
25
film
having
to 1600,
a
film
panel
so
be
speed
set
sure
within
'11
by
.
Page 15

Always load or unload
with
body.
shield
spot, or
a shady
your
As illustrated, unfold
pushing
Pull
the
cover snaps
the
Slide
with the
pushing
by
slightly making
your
it with
knob
rewind
open.
film cartridge
f
lat side
rewind
the
up. Lock the
sure that
o12
film in
the
from
it
direct
rewind crank by
the
finger-nail.
upwards
into the
knob
down,
grips
it
in
camera
sunlight
until the back
f ilm
chamber
cartridge
in
rotating
the spool.
place
it
(D
Pitm
chamber
rails
Guide
€)
Sprocket teeth
€)
Keep
the DX-information
scratches,
dirt, dust,
Spool teeth
O
f ltm leader end mark
O
()
DX-information
pins
etc.
free from
pins
B
(t)
r54
p
t
B
F
o
o
o
Page 16

:::
www.orphancameras.com
D000000000D.000t
o
o
illustrated,
As
its
end
aligns with
(red
bar); in
end
within
o
Make
side
teeth.
r
between the
o
film
the
o
loaded,
for
sure that
of the film
Also make
Take
up any
is f lat
cartridge.
When a film
do not leave
long
a
pull
the @ film
other words,
length
the
have
sure
two
O
slack left in
shown,
as
with
time.
film
the
bring
of the
bar.
perforations
the
engaged
that the film
a higher
the
the O sprocket
guide
rails.
the film
by rewinding it
ISO number
camera
leader
out so that
leader
end
f ilm
the
on the
properly
is
so that
slightly into
out of the
mark
leader
bottom
placed
the
is
case
13.
Page 17

Close
place.
r
Cock
knob turns
the back
film wind
the
in the direction
cover,
lever while
making
of the
sure that
checking
arrow.
it has
see
to
snapped
if the
in
firmly
film rewind
o14
o
The
the
making blank
Repeat
counter.
f ilm-inflormation
is loaded or
f
ilm
The
next
exposures
frame
window
not.
is ready
the back
on
until
for the
"0"
appears
first shot.
cover
will
in the
you
tell
exposure
if
Page 18
you
www.orphancameras.com
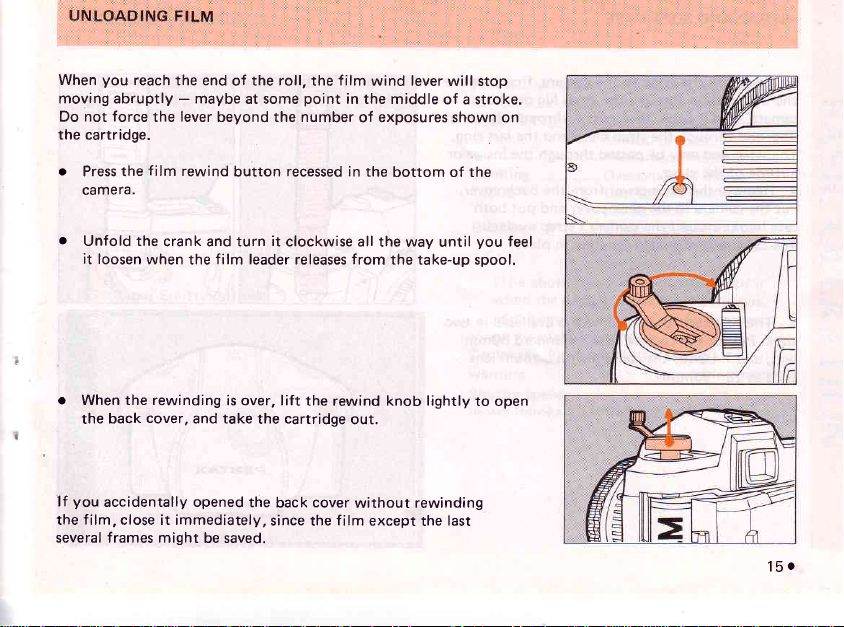
When
moving abruptly - maybe
Do not force
the cartridge.
reach the end
lever
the
beyond the number
of the
at some
roll,
f ilm
the
point
wind lever
in the middle
of exposures shown on
will stop
a stroke.
of
o
Press the
camera.
o
Unfold the
it loosen
o
When the rewinding
the
you
lf
the f ilm, close it immediately,
several frames
film
crank and turn
when
cover,
back
accidentally opened
might be saved.
rewind
film leader
the
and take
recessed in
button
it
clockwise all
is over, lift
the cartridge
the
back
since the
the
bottom of the
the way until
from
releases
the rewind knob lightly
cover
the take-up spool.
out.
without
film
except
rewinding
the
last
you
feel
to open
15.
Page 19

o
To
attach
the strap
end of
fold
camera,
ring, and
through
The strap end
outside of
o
Put
case
The camera
the clasp.
Remove the
the camera
hooks
around
is now held
the strap to
the camera,
through the strap
then
pass
it
back,
the strap clasp and the
passed
may
be
front
in
the back cover and
cover
through the
from
the camera's
securely
first
lug
on the
it
through
last ring.
the back
put
strap eyelets.
place.
in
pass
the
the strap
inside or
cover.
both
e
The
sizes:
lens,
such
o
16
case
soft
P-S for the camera with a
P-L2 f or the
and
-
80mm.
28
as
for
camera
this
camera
is
available
standard 50mm
zoom lens
with a
in two
PENTA)(
Page 20

Various
www.orphancameras.com
exposure data
displayed
LED = Light-Emitting
by
LED
described
on
the left
Diode
side
at right
of
are
viewf
the
Microprism
Split-imige
*",,"
screen
inder.
P
M .,............
1000 - 1
.............................
t
Blinking
"1000"
Bf inking
(The
when
of
the shutter/aperturecoupling
or the metering range.)
Camera-shake
warning ..................30
Shutter
in
use
{blinks}........Memory
.......
Programmed
...............Shutter
...............
"
1" .........Underexposure
above two indications
the exposure
speed
Metered
1/1000
F
lash-ready
Overexposure i
tion
per
second)
tion
per
second)
combination
(slow-shutter-speed
-
Manual
speeds
to
1 sec.
indication
(blinks
four
(blinks
four
also
1 appears
lock
AE mode
mode
from
ndica-
times
indica-
times
appear
is
out
range
)
in orange
17.
Page 21

You
image,
using
until
the center
aligned.
focus
collar.
image
crisp.
Note:
lens
the case
on
microprism collar
for
focus in three ways,
can
microprism, and/or
split-image,
the
the two
is
the
satisfactory
images
the
of
When using
glitter
the
until
With the
on
lf the
smaller
matte
matte
matte
the
maximum aperture
than
long
of a
f ield
focusi ng.
the
with
field.
matte
focuslng ring
the
turn
in
split-image circle
the
focusing screen are
microprism
the
disappears
field,
field
f/5.6
telephoto),
since
become
areas
focus
appears
(for
example,
it
split-image
the
from inside the
until
sharp
of the attached
is
easier to
much too
split-
To
perfectly
collar,
the
and
f
lB
and
focus
at
in
as
focus
dark
r
18
adjustment
Diopter
People
hypermetropia
diff
this
f
enses
who
icult
case,
M
wear
focus
to
use the
(See
page
for viewf
eyeglasses due
presbyopia,
or
wearing their
while
accessory
421 .
inder eyepiece
myopia,
to
sometimes
glasses.
correction
diopter
find
it
In
Page 22

Proper
www.orphancameras.com
holding
of
minimize
pictures.
camera
before
Generalfy
camera.
your
face
camera
wirf
camera.
your
Release
breath.
Practice
f n
camera
inserting
there
are
any
case,
your
with
hef p you
the
Strong
the
shake
holding
camera
which
and
your
three
basic
hold
the
hands.
keep
a steady
shutter
pressure
is
essentiaf
causes
operating
first
firm
ways
camera
The grips
hord
gently
while
on
the
shutter
to
brurred
your
cartridge.
to
hofd
tightly
oi
this
on
holding
the
to
your
release
button
Take
a
secure,
straining
if
a
using
exposures
recommended
camera
f
ustration
good
idea
a
tree,
shake
yourserf.
should
to
building
or
while
may
wef
l-balanced
The
be
stabilize
using
to
use
to
a
minimum.
cause
portion
drawn
your
wall,
a
tripod
blurred
posture
marked
your
to
body
table,
etc.
telephoto
in
order
photographs.
witfrout
o
in
the
body.
lt
the
For
to
is
camera
long
it
is
reduce
19.
and
lenses,
 Loading...