

Page 1
This
Quick Start Guide
is only for quick reference. For more details
on advanced functions, you can refer to your Operating Manual.
GETTING TO KNOW YOUR CAMERA
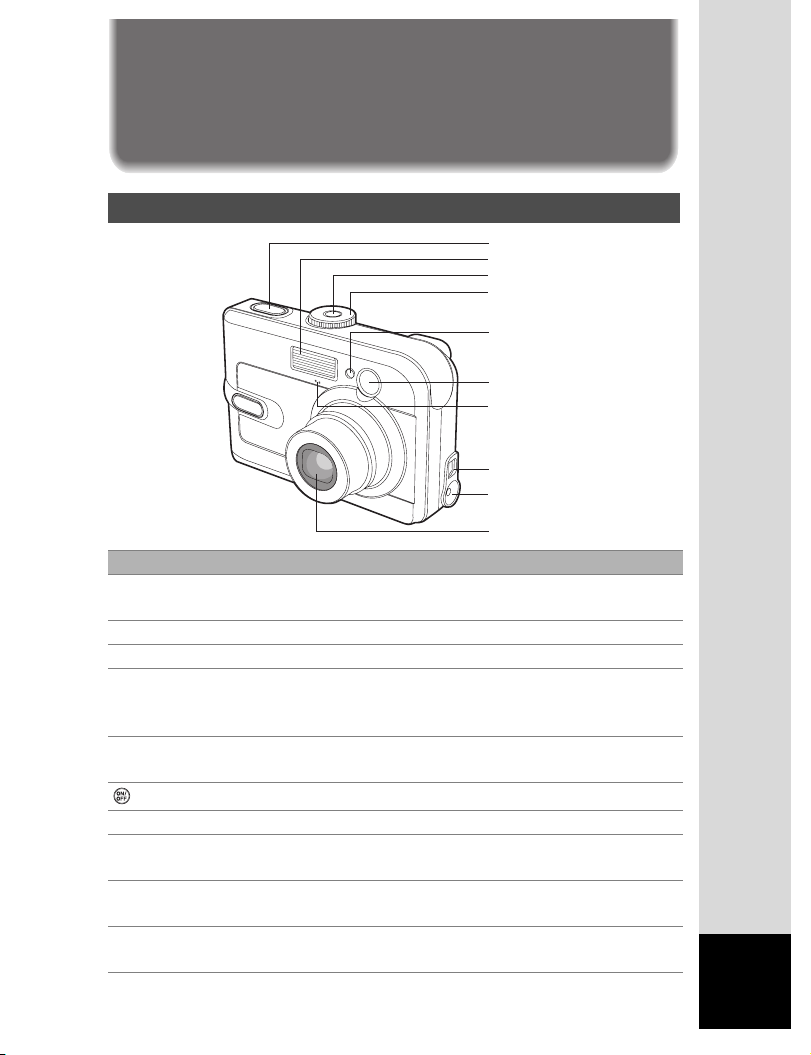
Front View
Shutter release button
Flash
Power button
Mode dial
Self-timer LED
Viewfinder
Microphone
PC/AV terminal
DC input terminal
Lens
Name Description
Self-timer LED Blinks blue during Self-timer mode until picture is
taken.
Viewfinder Allows you to frame the subject of the picture.
Flash Provides flash illumination.
Shutter release
button
Lens 3x optical zoom lens allows you to take telephoto
Power button
Mode dial Sets the camera mode.
DC input terminal Allows you to connect AC power adapter to the
PC/AV terminal Allows you to connect a USB cable or an AV cable to
Microphone Allows you to record sound with the recorded movie
Focuses and locks the exposure of the camera
when pressed halfway down, and takes the picture
when pressed all the way down.
and wide-angle pictures.
Turns the camera power on and off.
camera to operate the camera without battery.
the camera.
clips.
1
Page 2
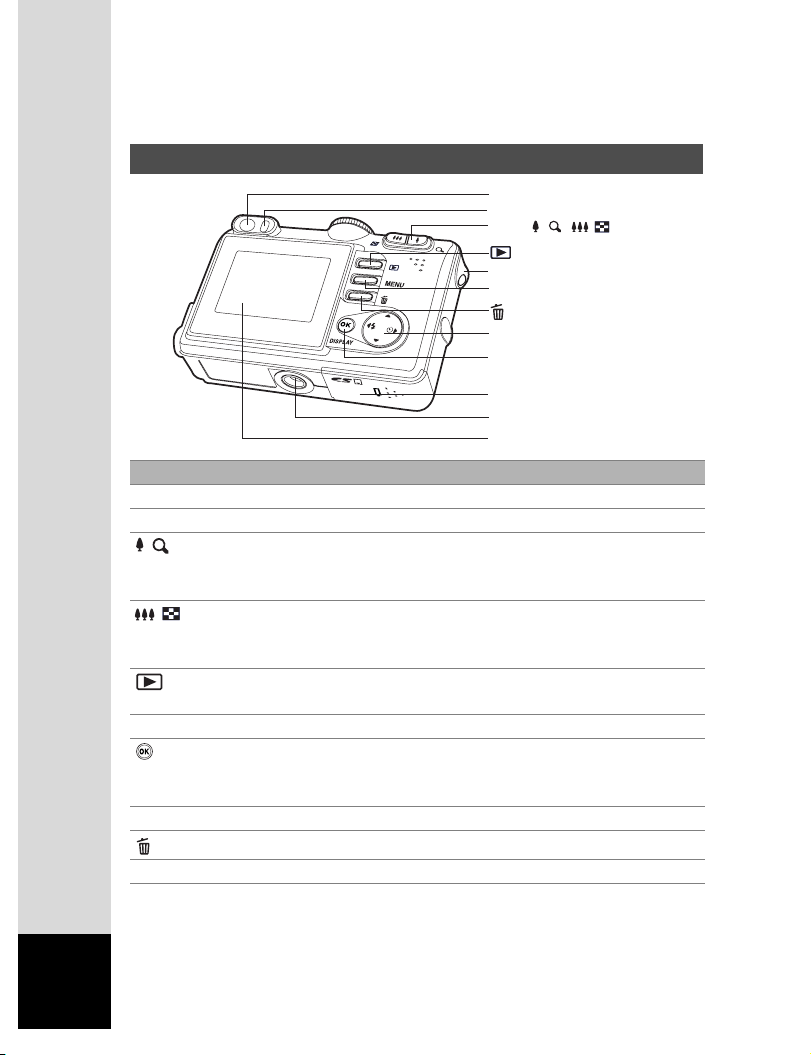
Rear View
Viewfinder
Viewfinder LED
Zoom/ / / / button
button
Strap holder
MENU button
button
Four - way controller
OK/DISPLAY button
Battery/Card cover
Tripod socket
LCD monitor
Name Description
Viewfinder Allows you to frame the subject of the picture.
Viewfinder LED Displays the camera current state.
/ button
/ button
button
MENU button Toggles OSD menu on and off.
/DISPLAY
button
Strap holder Camera strap attachment.
button
Tripod socket Allows tripod mounting.
Zooms the lens to telephoto position.
During zoom playback, it changes the size of the
Zoom Display image displayed on the LCD monitor.
Zooms the lens to wide-angle position.
Changes the display into nine images (thumbnail) in
the playback mode.
Switches to Playback mode. The latest image and
information appear on the LCD monitor.
Confirms the menu item selection.
Turns the LCD monitor display and live view on and
off.
Allows you to erase the picture.
2
Page 3
Battery/Card cover Allows you to access to the battery and insert or
remove the memory card.
LCD monitor Provides menu information to operate the camera,
and previews the picture before taking it and review
it afterwards.
Four-way
controller
Allows you to scroll through menus and pictures,
and then select choices.
(W)- Selects the flash mode in Capture mode.
(X)- Selects the self-timer mode in Capture mode.
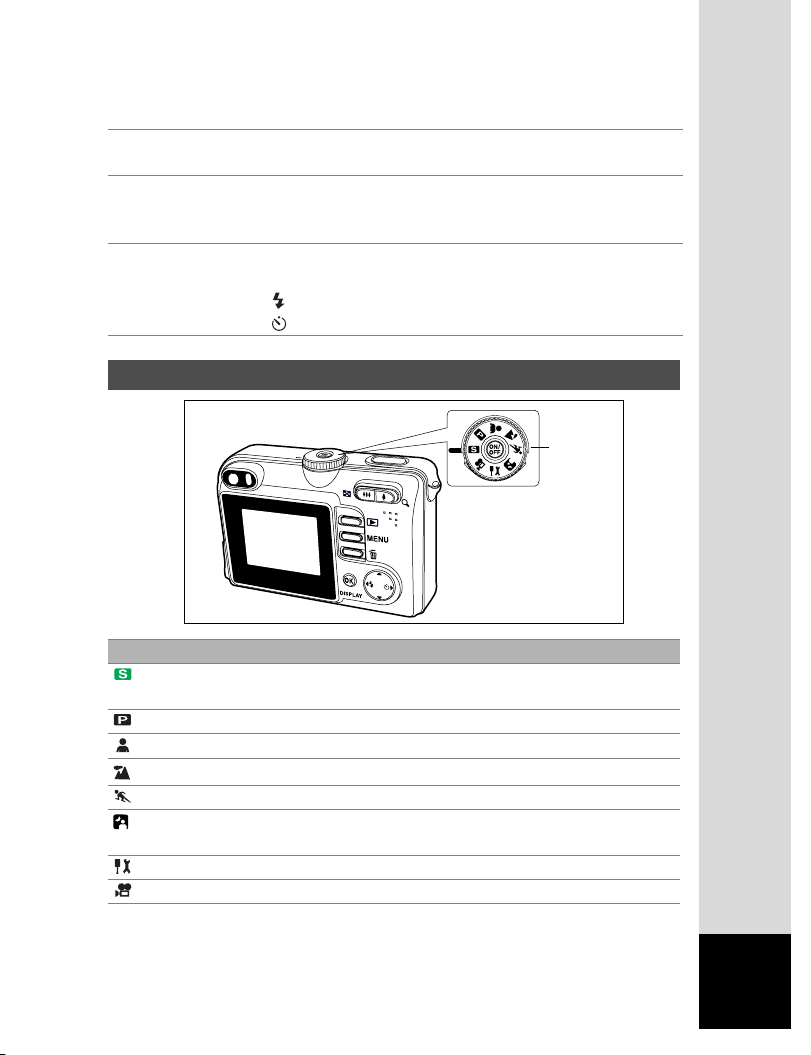
Mode Dial
Mode Dial
Mode dial
Name Description
Simple Lets the camera set the functions
automatically.
Program The basic picture-taking mode.
Portrait Lets you take portrait-type pictures.
Landscape Lets you take landscape views.
Sport Lets you take sport pictures.
Night-scene Lets you take dark scenes such as night
views.
Setup Lets you select the camera preferences.
Moving Picture(Movie) Lets you take moving pictures.
3
Page 4
GETTING STARTED
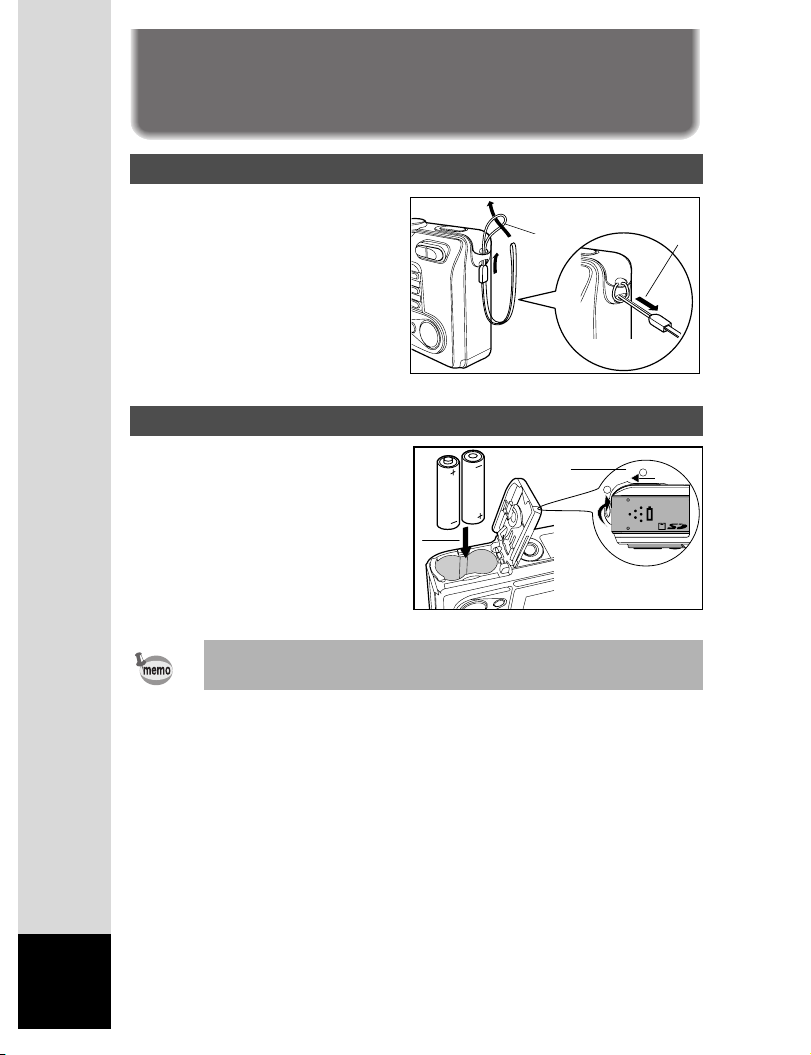
Attaching the Camera Strap
Attaching the Camera Strap
Attach the camera strap as shown
in the illustration.
Inserting the Battery
1. Open the battery/card cover.
2. Insert the battery in the
correct orientation as shown
on the right.
3. Close the battery/card cover.
• You can use 2 AA size batteries (alkaline or Ni-MH rechargeable)
to power the camera.
2
1
1
2
2
1
4
Page 5
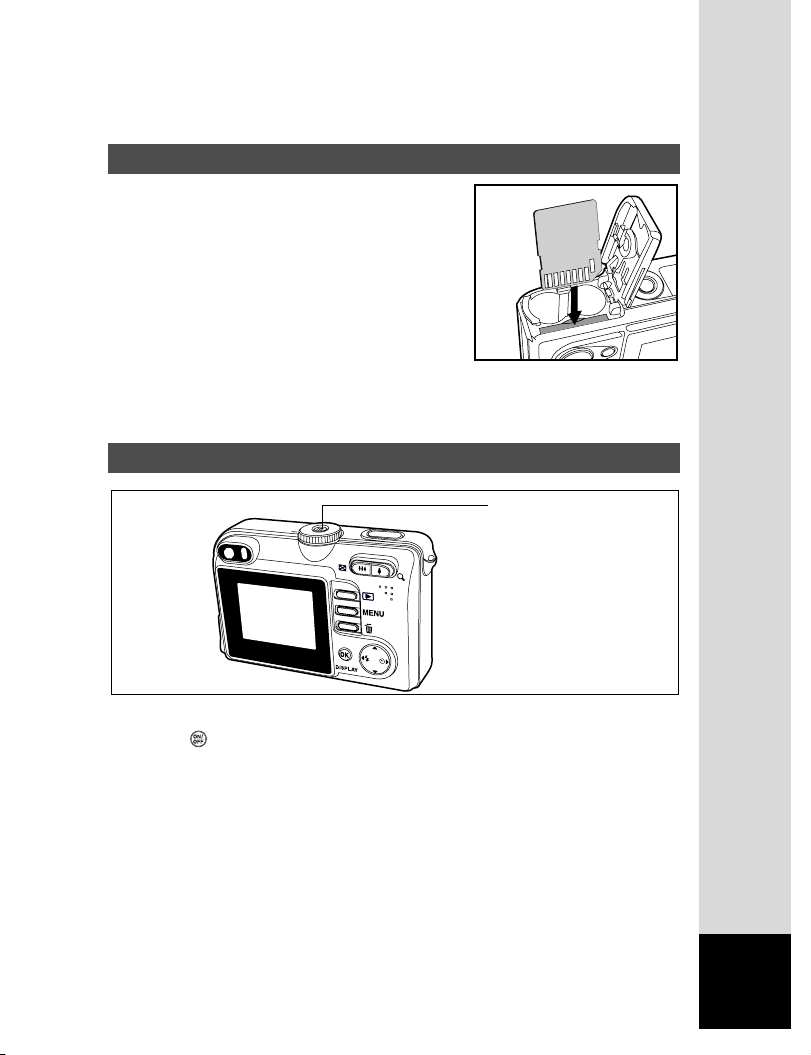
Inserting the SD Memory Card (Optional Accessory)
1. Open the battery/card cover.
2. Insert the SD memory card in the
correct orientation as shown on the
right.
Hold the SD memory card with its
metal contact end surface facing the
rear side of the camera, and then
insert the card as far as it can go.
3. Close the battery/card cover.
Turning the Power On
Power button
Press the button to turn the power on.
The viewfinder LED lights green and the camera is ready to take
pictures.
5
Page 6

Choosing the OSD (On-Screen Display) Language
Choosing the OSD (On-Screen Display) Language
1. Set the mode dial to .
2. Use the four-way controller (X) to
select [Set-up2] menu.
[Set-up2] of the set-up menu is
displayed.
3. Use the four-way controller (T) to
select [Language] and press the
button.
4. Use the four-way controller (ST)
to select the language.
5. Press the button to confirm the
language selection.
6
Set-up 1 Set-up 2
Date Adjust
Video Out
Language
Brightness
OK :
Language
OK :
y/m/d
PAL
English
3 / 5
1 / 8
Page 7

Setting the Date and Time
1. Set the mode dial to and use
the four-way controller (X) to select
[Set-up2] menu.
[Set-up2] of the set-up menu is
displayed.
2. Select [Date Adjust] with the four-
way controller (T).
3. Use the four-way controller (WX)
to select the date type.
4. Press the button.
The Date Adjust screen appears.
5. Use the four-way controller (WX)
to select itemís field and adjust the
value for the date and time with the
four-way controller (ST).
6. After confirming all settings are
correct, press the button.
Set-up1 Set-up2
Date Adjust
Video Out
Language
Brightness
OK :
Date Adjust
0 2 / 0 1 / 2 0 1 0
0 4 : 0 0
OK :
d/m/y
PAL
English
1 / 5
Select :
7
Page 8

Taking Still Pictures
Shutter release button
Power button
Viewfinder
Zoom / / / button
LCD monitor
OK/DISPLAY button
Mode dial
1. Press the button to turn on the camera.
2. Set the mode dial to .
3. Compose your image in the LCD monitor or through the viewfinder.
4. Press the shutter release button halfway down to automatically focus
the image. Proper exposure is determined and locked at the same
time.
5. Press the shutter release button down fully to take the pictures.
Playing Back Still Pictures
Power button
Playback button
LCD monitor
Four - way controller
1. Press the button.
The last image appears on the screen.
2. Use the four-way controller (WX) to view the pictures.
Four-way controller (W): go back to the previous image.
8
Four-way controller (X): advance to the next image.
Page 9

Recording Movie Clips
This mode allows you to record movie clips with sound via built-in
microphone.
1. Rotate the mode dial to and turn
1
your camera on by pressing the
button.
2. Press the shutter button to start
recording.
3. To stop recording, press the shutter
button again.
Playing Back Movie Clips
You can play back the recorded movie clips on the LCD monitor.
However, the sound recorded with movie clips can only be played back
on TV or computers.
1. Press the button.
2. Use the four-way controller (WX)
to go through the images until the
movie clip you want to play back
is displayed.
To view the previous image,
press the four-way controller
(W).
100-0001
Size 320X240
EV 0.0
01.04. ’04 05:22
1
To view the next image, press
the four-way controller (X).
3. Press the button to start
playing back the movie clips.
To pause or resume movie
playback, press the button
again.
<
<Erasing Images
9
Page 10

Erasing Images
1. Press the
button.
The last image will be displayed on the screen.
2. Select the image you want to erase with the four-way controller
(WX).
3. Press the button.
3
4. Use the four-way controller (ST) to
select [OK].
5. Press the button to confirm the
deletion.
Delete
OK
Cancel
OK :
10
Page 11

TRANSFERRING RECORDED IMAGES AND
MOVIES TO YOUR COMPUTER
Camera
Setting Up Your Digital Camera
After installing the necessary software on your computer, you must now
set up your digital camera to transfer images from the camera to your
computer.
The USB driver included in the CD-ROM (S-SW33) is exclusively for
Windows 98/98SE. For more details on driver installation process, you
can refer to your Operating Manual.
Setting the USB Connection Mode to [PC]
1. Set the mode dial to .
2. Press the four-way controller (X) to
display the [Set-up2] menu.
3. Use the four-way controller (T) to
select [USB Con.].
4. Press the button.
OK :
Set-up1
USB Con.
Set-up2
PC
5 / 5
5. Use the four-way controller (ST)
to select [PC].
6. Press the button.
OK :
• Do not connect the camera to your computer while [PictBridge] is
selected for the USB Connection mode.
• Do not connect the camera to your printer while [PC] or [PC
Camera] is selected for the USB Connection mode.
• On Windows 98/98SE/ME/2000, if the camera is connected to your
computer and you unintentionally set the camera's USB connection
to PictBridge, the "Install Driver" message will appear. Ignore this
message and click "Cancel".
USB Con.
PC
PictBridge
PC Camera
Connecting the Camera to Your Computer
1 / 3
11
Page 12

Connecting the Camera to Your Computer
PC/AV terminal
1. Connect the camera to the PC with the USB cable.
If there is no SD Memory Card in the camera, the images stored
in the internal memory will be transmitted to the computer.
2. Turn the camera on.
3. Look for a new “Removable Disk” icon appearing in the “My
Computer” window.
Your recorded images/movie clips will be in a folder on this
“removable disk”. (For Mac users, double-click the “untitled” disk
on the desktop.)
12
Page 13

Downloading Images/Movie Clips
When the camera is turned on and connected to your computer, it is
considered to be a disk drive, just like a floppy disk or CD. You can
download (transfer) images by copying them from the “removable disk”
(“untitled” disk on a Macintosh) to your computer hard drive.
For Computers Running Windows
Open the “removable disk” by double clicking on it. Double click on the
folder containing your recorded images/movie clips. Select the images/
movie clips that you prefer and then choose “Copy” from the “Edit” menu.
After that, open the destination location and choose “Paste” from the
“Edit” menu.
For Computers Running Mac OS
Open the “untitled” disk window and the hard disk or the destination
location. Drag and drop from the camera disk to the desired destination.
13
Page 14

USING THE DIGITAL CAMERA AS A PC CAMERA
Your digital camera can act as a PC camera, which allows you to
videoconference, or have a real-time conversation with friends or
family.
1. Install the PC camera driver.
The PC-camera driver included in the CD-ROM (S-SW33) is
exclusively for Windows. The PC camera function is not supported
for Mac platforms.
2. Rotate the mode dial to and turn your camera on by pressing
the button.
3. Press the four-way controller (X)
to select the [Set-up2] menu, then
use the four-way controller (T) to
select [USB Con.].
4. Press the button.
5. Use the four-way controller (ST)
to select [PC Camera], then press
the button.
6. Connect one end of the USB cable
to an available USB port on your
computer.
7. Position the digital camera steadily
on top of your computer monitor or
use a tripod.
OK :
USB Con.
PC
PictBridge
PC Camera
3 / 3
14
• If the Certified Warning message appears during PC camera driver
installation on Windows XP, please click "Continue" and wait until
the driver installation is completed.
Page 15

To use Windows NetMeeting for videoconferencing
1. Go to Start => Programs => Accessories => Communications =>
NetMeeting to launch the NetMeeting program.
2. Click the Start Video button to view live video.
3. Click the Place Call button.
4. Type the e-mail address or the network address of the computer
that you are calling.
5. Click Call.
The person that you are calling must also have Windows
NetMeeting running and be willing to accept your call to start the
videoconference.
• The video resolution for videoconferencing applications is
generally 320 x 240.
15
 Loading...