

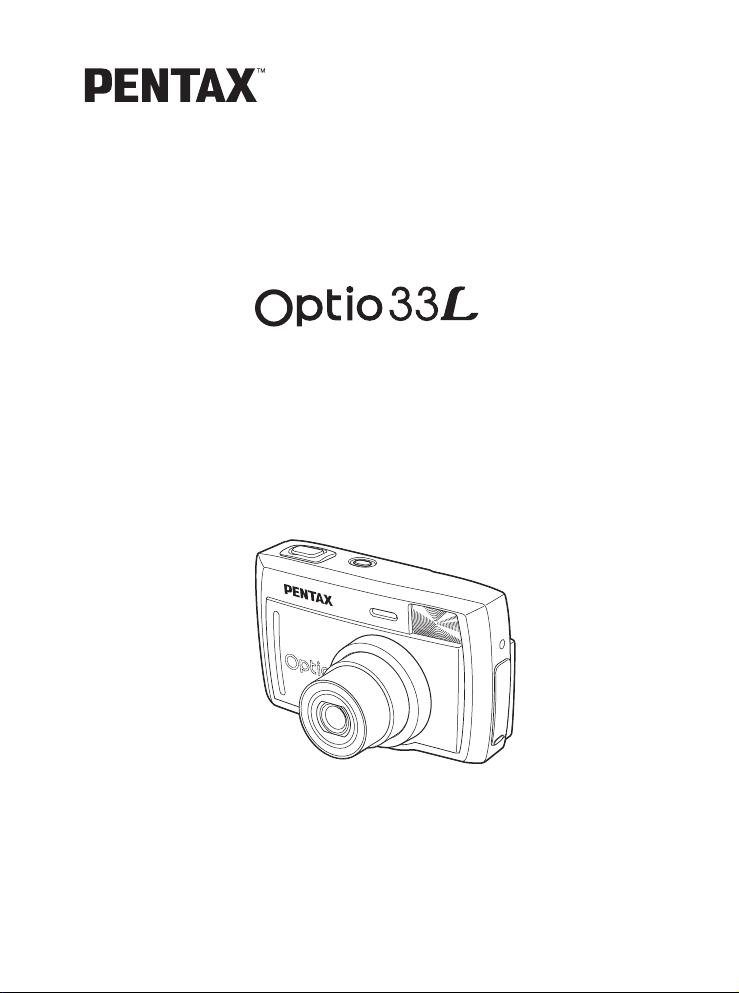
Page 1
Digital Camera
Operating Manual
For optimum camera performance,
please read the Operating Manual
before using the camera.
Page 2

Thank you for buying the PENTAX Optio 33L Digital Camera. Please
read this manual before using the camera in order to get the most out of
all the features and functions. Keep this manual safe, as it can be a
valuable tool in helping you to understand all the camera's capabilities.
Regarding copyrights
Images taken using the Optio 33L that are for anything other than personal
enjoyment cannot be used without permission according to the rights as
specified in the Copyright Act. Please take care, as there are even cases where
limitations are placed on taking pictures even for personal enjoyment during
demonstrations, industrial enterprise or as items for display. Images taken with
the purpose of obtaining copyrights also cannot be used outside the scope of
use of the copyright as laid out in the Copyright Act, and care should be taken
here also.
Regarding trademarks
• CompactFlash and CF are trademarks of SanDisk Corporation.
• PENTAX is a trademark of PENTAX Corporation.
• Optio is a trademark of PENTAX Corporation.
• All other brands or product names are trademarks of registered trademarks of
their respective companies.
• The USB driver uses software developed by inSilicon Corporation.
Copyright © 2002 inSilicon Corporation. All rights reserved.
• This product supports PRINT Image Matching II.
When used in combination, PRINT Image Matching II enabled digital still
cameras, printers and software help photographers to produce images more
faithful to their intentions.
Copyright 2001 Seiko Epson Corporation. All Rights Reserved.
PRINT Image Matching is a trademark of Seiko Epson Corporation.
To users of this camera
• There is a possibility that recorded data may be erased of that the camera may
not function correctly when used in surroundings such as installations
generating strong electromagnetic radiation or magnetic fields.
• The liquid crystal panel used in the LCD display is manufactured using
extremely high precision technology. Although the level of functioning pixels is
99.99% or better, you should be aware that 0.01% or fewer of the pixels may
not illuminate or may illuminate when they should not. However, this has no
effect on the recorded image.
• There is a possibility that the illustrations and the display screen of the LCD
monitor in this manual are different form the actual product.
2
Page 3

FOR YOUR SAFETY
We have paid close attention to the safety of this product. When using
this product, we request your special attention regarding items marked
with the following symbols.
Warning
Caution
This symbol indicates that violating this item could
cause serious personal injury.
This symbol indicates that violating this item could
cause minor or medium personal injury, or material
loss.
Warning
• Do not disassemble or modify the camera. High voltage areas are present
inside the camera, with the risk of electric shock.
• If the camera interior is exposed due to dropping or otherwise damaging the
camera, never touch the exposed portion. There is the risk of electric shock.
• Wrapping the strap around your neck is dangerous. Take care that small
children do not hang the strap over their necks.
• Always use the AC adapter specified exclusively for this product, with the
specified power and voltage. Using an AC adapter not exclusive to this
product, or using the exclusive AC adapter with an unspecified power or
voltage can cause a fire, electric shock, or camera breakdown.
• If any irregularities occur during use, such as smoke or a strange odor, stop
use immediately, remove the batteries or the AC adapter , and contact your
nearest PENTAX service center. Continued use could cause a fire or electric
shock.
• During thunderstorms, unplug and discontinue use of the AC adapter.
Continued use could cause equipment failure, a fire, or electric shock.
Caution
• Do not short the battery or dispose of the battery in fire. Do not disassemble
the battery. The battery could explode or catch fire.
• Do not charge any batteries other than rechargeable Ni-MH batteries. The
battery could explode or catch fire. Of the batteries that can be used in this
camera, only the Ni-MH battery can be recharged.
• Remove the battery from the camera immediately if it becomes hot or begins
to smoke. Be careful not to burn yourself during removal.
• Some portions of the camera heat up during use. There is the risk of low
temperature burns when holding such portions for long periods.
3
Page 4

Handling the Camera
• Always confirm that the camera is working properly when the camera has not
been used for a long time, or before important occasions (weddings, trips,
etc.). PENTAX is not responsible for consequential damages (costs incurred
for photography, lost profits, etc.) arising from failure of this product.
• The lens on this camera is not exchangeable. The lens is not removable.
• Do not clean the product with organic solvents such as thinner, alcohol, or
benzene.
• Do not subject to high temperatures or high humidity. Do not leave the camera
in a vehicle, as the temperature can get very high.
• Do not store the camera with preservatives and chemicals. Storage in high
temperatures and high humidity can cause molding. Remove from case and
store in a dry and well-ventilated location.
• This camera is not waterproof, and cannot be used in the rain or where the
camera could get wet.
• Do not subject the camera to strong vibrations, shocks, or pressure. Use a
cushion to protect the camera from vibrations of motorcycles, automobiles, or
ships.
• The temperature range for camera use is 0°C to 40°C.
• The LCD display may appear black under high temperatures, but will return to
normal as temperatures normalize.
• The LCD display may respond more slowly at low temperatures. This is due to
liquid crystal properties, and is not a fault.
• Periodic inspections are recommended every one to two years to maintain
high performance.
• Sudden temperature changes will cause condensation on the inside and
outside of the camera. Place the camera in your bag or a plastic bag, retrieving
the camera after decreasing the temperature difference.
• Avoid contact with garbage, mud, sand, dust, water, toxic gases, or salts.
These could cause a camera breakdown. Wipe dry any rain or water drops on
the camera.
• See “Precautions When Using a CF Card” (p.16) for details on the compact flash
memory card (CF Card).
• Please do not press forcefully on the LCD monitor. This could cause breakage or
malfunction.
• When you rotate the LCD monitor, please rotate it carefully in the correct direction,
and do not apply excessive force. This could damage your camera.
4
Page 5

Contents
FOR YOUR SAFETY ..................................................... ............................... ... 3
Handling the Camera .......................................... ................................ ............. 4
Contents.......... ............................... ................................ ............................... ... 5
Contents of This Manual .................................................................................. 7
Checking Package Contents............................................................................ 8
Names of Parts ................................................................................................ 9
Getting Started 11
Quick Start 22
Common Operations 29
Taking Pictures 36
Names of Operating Parts ............................................................................. 10
Attaching the Strap ........................................ ............................... ...................... 11
Powering the Camera..... ................................ ............................... ...................... 12
Installing the Batteries.................... ................................ ............................... . 12
Using the AC Adapter .................................................................................... 14
Installing/Removing the CF Card....................................................................... 15
Rotating the LCD Monitor (Rotate LCD)........................................................... . 17
Initial Settings ...................................................................................................... 18
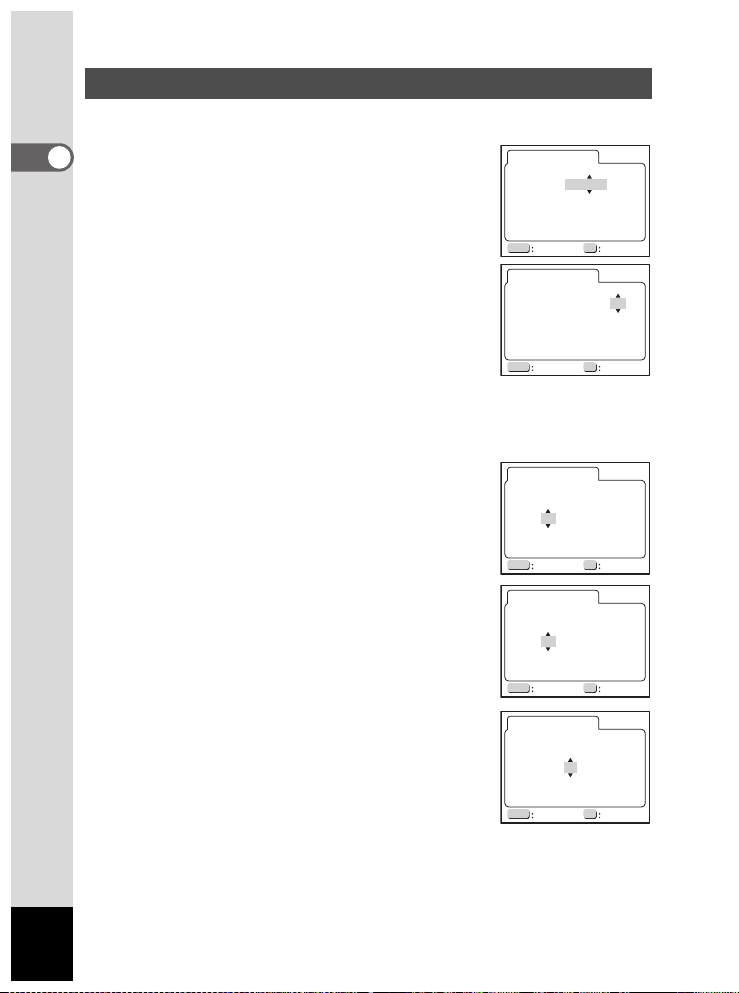
Setting the Display Lang uage ............................................................. ........... 18
Setting the Home Town ...................................................................... ........... 18
Setting the D.S.T. Mode................................................................................. 19
Setting the Video Output Format ........................ ................................ ........... 19
Setting the Date and Time ............................................................................. 20
Taking Still Pictures............................................................................ 22
Playing Back Still Pictures .................................................................24
Playing Back Images ........... ............................... ........................................... 24
Playing Back Previous or Next Images ............... ........................................... 24
Using Your CF Card ............................................................................ 26
Turning the Camera On and Off......................................................................... 29
Playback Only Mode ........................................... ................................ ........... 29
Using Button Functions. ................................ ............................... ...................... 30
Capture Mode ..................................................................................... ........... 30
Playback Mode .............................................................................................. 31
Setting the Menus ..................... ............................... ................................ ........... 32
How to Set the Menus .................................................................................... 32
Menu List ....................................................................................................... 34
Setting the Capture Functions ........... ................................ ................................ 36
Changing Focus Settings..... ............................... ................................ ........... 36
Selecting the Flash Mode .............................................................................. 38
Selecting the Recorded Pixels ....................................................................... 39
Selecting the Quality Level ................................. ................................ ........... 40
Adjusting the White Balance ............................................................... ........... 41
Setting the Focusing Area.............................................. ............................... . 43
Setting the Light Metering Range ....................... ................................ ........... 44
Setting Sensitivity........................................................... ............................... . 45
Setting the Instant Review Time .................................................................... 46
Setting Image Sharpness.............................................................................. . 46
Setting Color Saturation ........................................................... ...................... 47
Setting the Image Contrast ............................................................................ 47
Switching Between Modes ................................................................................. 48
5
Page 6

Switching Between Cap ture Mode and Playback Mode ................................ 48
Selecting the Capture Mode .......................................................................... 48
Taking Pictures.................................................................................................... 49
Program Mode ............................................................................................... 49
Picture Mode .................................................................................................. 50
Taking Self-Portraits ................................. ..................................................... 52
Taking Dark Scenes (Night-Scene Mode) .......... ................................ ........... 53
Taking Movie Pictures (Movie Picture Mode ) ................................................ 54
Taking Panorama Pictures (Panorama Assist Mode) .................................... 56
Taking 3D Pictures (3D Ima ge Mode)............................................................ 58
Taking Pictures with Digital Filters (Digital Filter Mode) ................................. 63
Automatically Change Capture Conditions (Auto Bracket Mode) .................. 64
Continuous Shooting (Continuous Shooting/High-Speed Shooting)... ........... 66
Using the Self-Timer ...................................................................................... 67
Using the Zoom.................... ............................... ................................ ........... 68
EV Compensation ............................................... ................................ ........... 70
Saving the Settings ............................................................................................. 72
Playback/Deleting 74
Settings 84
Appendix 92
Saving the Menu Items (Memory) .................................................................. 72
Playing Back Images........................................................................................... 74
Playing Back Still Pictures .................................. ................................ ........... 74
Zoom Playback .............................................................................................. 74
Playing Back Movie Pictures.......................................................................... 75
Nine Image Display ........................................................................................ 76
Slideshow........ ............................... ................................ ............................... . 77
Deleting Images ......................... ............................... ........................................... 78
Deleting a Single Image....... .......................................................................... 78
Deleting All Images ............................................. ................................ ........... 78
Protecting Images from Deletion (Protect) ..................................................... 79
Viewing Images on a TV ..................................................................................... 80
Printing Service Settings (DPOF) ...................................................................... 81
Single Image Settings .................... ................................ ................................ 81
Settings for All Images ................... ................................ ................................ 83
Camera Settings .................................................................................................. 84
Formatting a CF card .......................................................................... ........... 84
Changing the Display Language .................................................................... 85
Changing the Date Style and Date/Time ............ ................................ ........... 85
Selecting the Video Output Format ..................... ........................................... 86
Turning the Operation Sound On and Off ................................ ...................... 86
Setting World Time .............. .......................................................................... 87
Setting the Display Mode ............................................... ............................... . 88
Screen Effect ................................................................................................. 90
Setting the Background Color ............................................................. ........... 90
Setting Auto Power Off .................................................................................. 91
Setting LCD Monitor Brightness..................................................................... 91
Resetting to Default Set tings [Reset] ............................................................. 91
List of City Names ............................................................................................... 92
Messages ............................................................................................................. 93
Troubleshooting .................................................................................................. 94
Optional Accessories.......................................................................................... 96
Main Specifications............................................................................................. 97
WARRANTY POLICY ........................................................................................... 99
6
Page 7
Contents of This Manual
This operating manual contains the following chapters.
1 Getting Started
Explains your first steps, from purchasing the camera to taking pictures. Be
sure to read it and follow the instructions.
2 Quick Start
Explains the simplest way to take pictures and play back images. Use it if
you want to get started right away. It also explains how to use the CF card.
3 Common Operations
Explains common operations such as button functions and using the
menus. See “Taking Pictures”, “Playback/Deleting”, and “Settings” chapters
for more details.
4 Taking Pictures
Explains various ways to capture images, and how to set the relevant
functions, such as setting the virtual mode dial to change capture modes,
and selecting the right picture mode for the current scene.
5 Playback/Deleting
Explains how to play back images on the camera or a TV, and how to
delete.
6 Settings
Explains setting camera functions.
7 Appendix
Explains troubleshooting, and introduces accessories sold separately.
1
2
3
4
5
6
7
The symbols used in this operating manual are explained below.
Shows reference page number explaining a related operation.
Shows information useful to know.
Shows precautions to take when oper ating the camera.
A
, Picture
Mode,
B, C,
G
, D, F, l
Icons for functions available in a capture mode are shown at the
beginning of a section.
7
Page 8
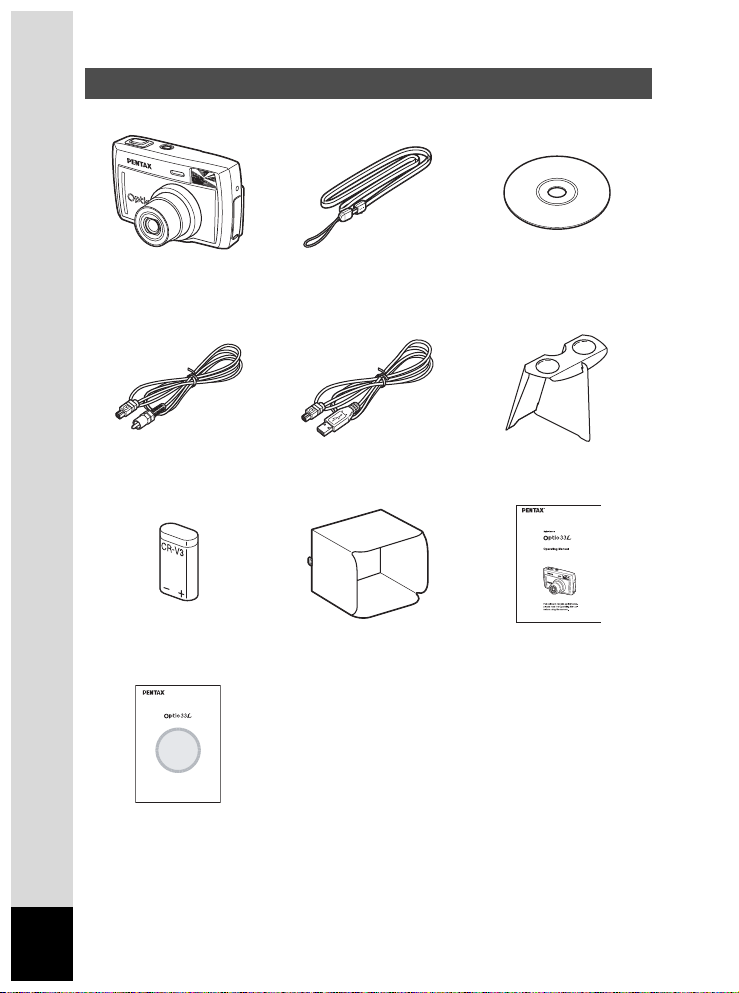
Checking Package Contents
Camera
Optio 33L
Video cable
I-VC2(∗)
Lithium battery
CR-V3
(PC Connection Manual)
Viewing Your Digital
Camera Images
On Your PC
Operating Manual
(PC Connecting Manual)
Strap
O-ST5(∗)
USB cable
I-USB2(∗)
LCD monitor hood
Software
(CD-ROM)
S-SW8
3D image viewer
O-3DV1
Operating Manual
(this manual)
∗ Items marked with an asterisk are also available as optional accessories.
For other optional accessories, see “Optional Accessories” (p.96).
8
Page 9
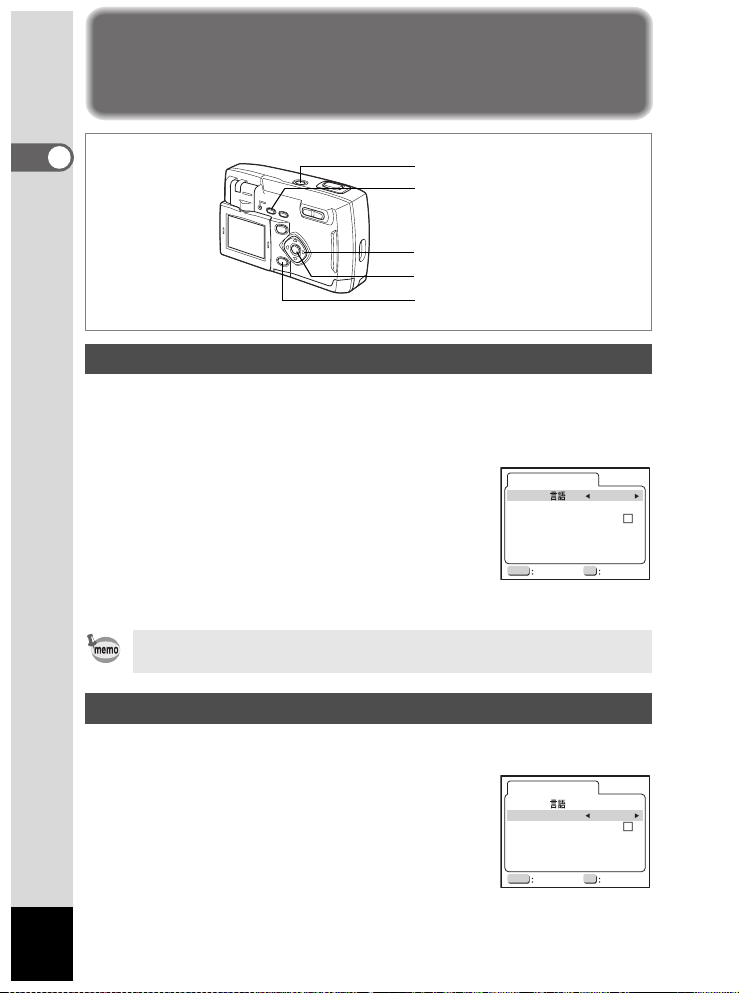
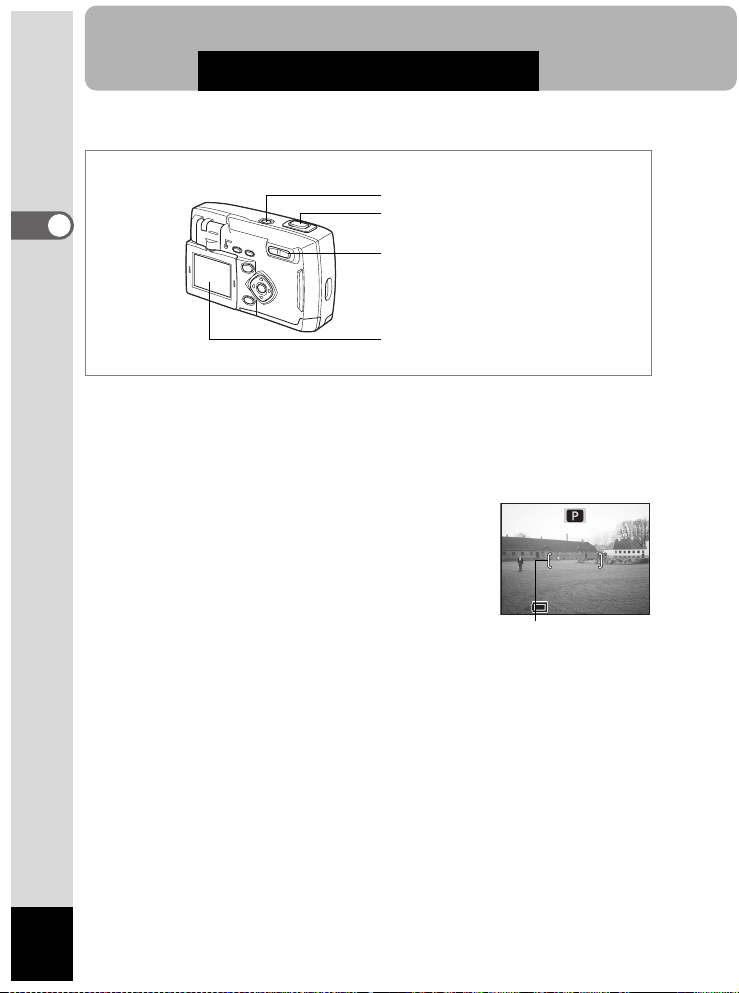
Names of Parts
Front
Back
Shutter release button
Power switch
Self-timer la mp
Flash
Terminal cover
USB/Video terminal
DC input terminal
Lens
LCD monitor
Strap lug
CF card cover
Battery cover
Tripod socket
LCD monitor hood installation
holes
9
Page 10
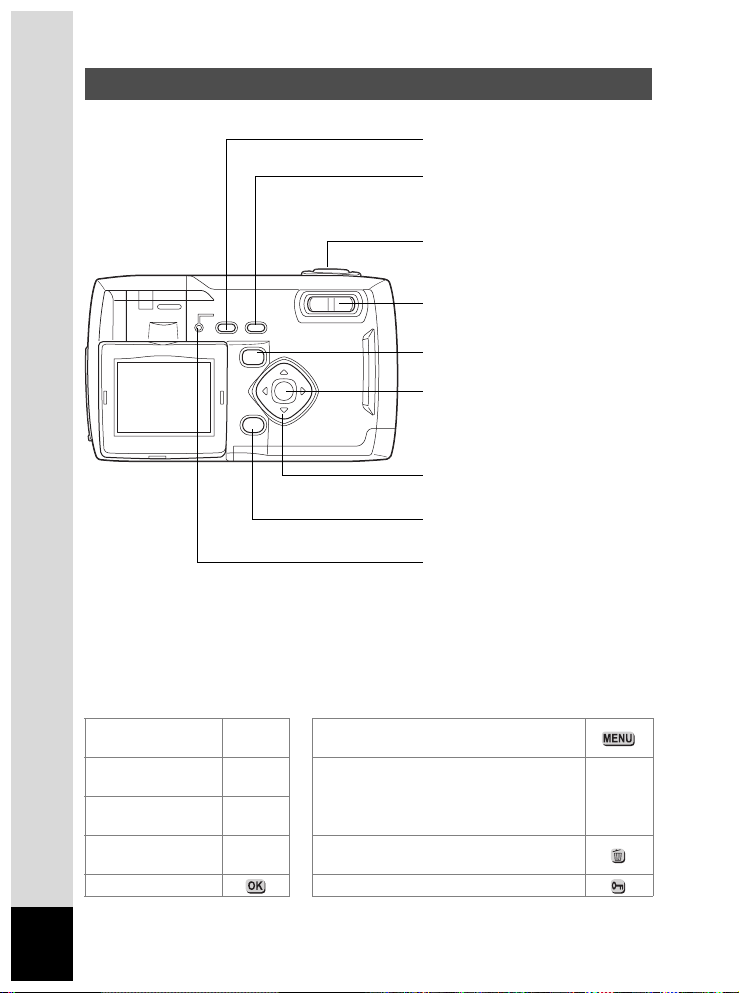
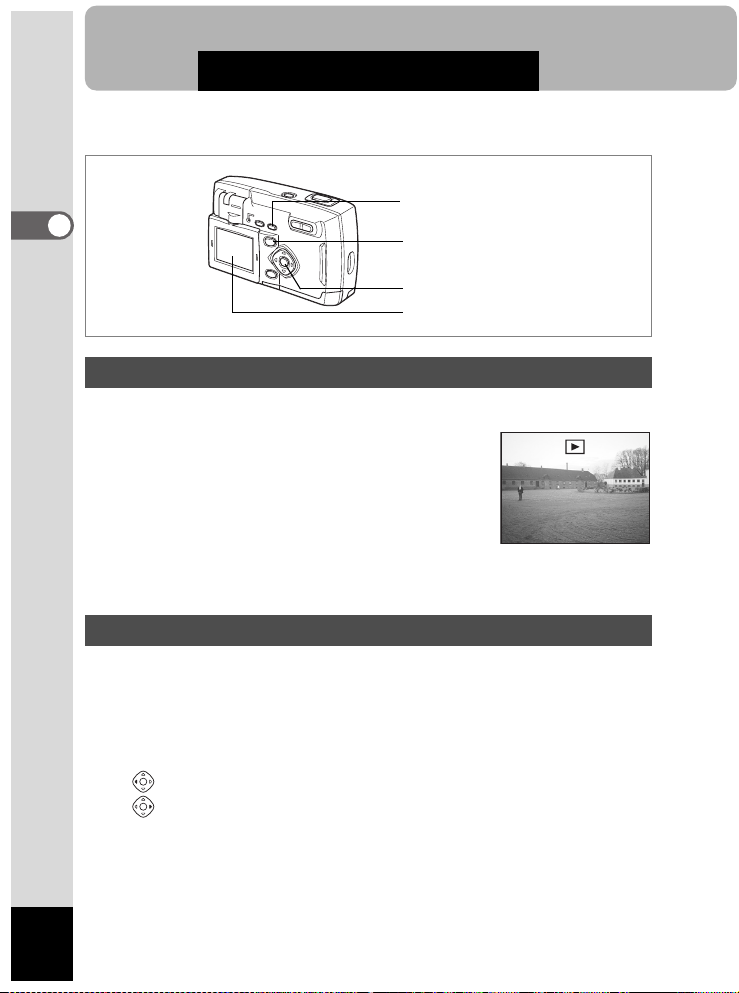
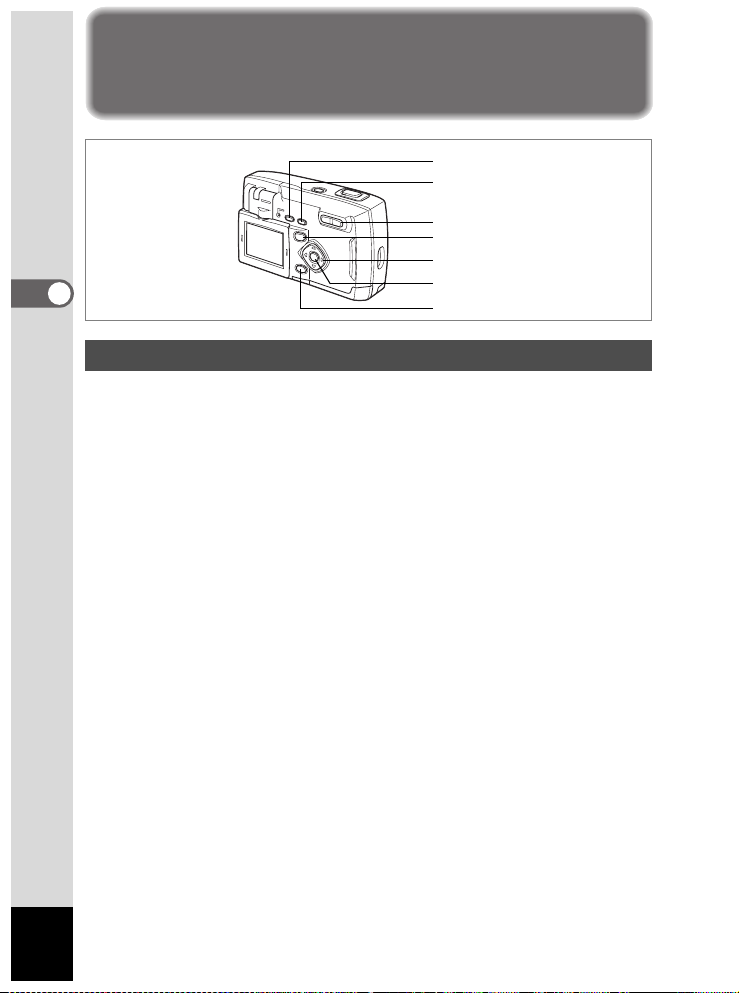
Names of Operating Parts
b/Z button
) button
Shutter release button
Zoom
f/y button
Q button
Playback
OK button
Four-way controller (
MENU button
Flash status lamp (red)
Guide display
A button operation guide is displayed on the LCD monitor during
operation.
The buttons are indicated as shown below.
Four-way
controller (2)
Four-way
controller (3)
Four-way
controller (4)
Four-way
controller (5)
OK button Z button
10
2 MENU button
3
4
5i button
Zoom f/y button
(Digital zoom and magnified playback
only)
2345)
y
Page 11
Getting Started
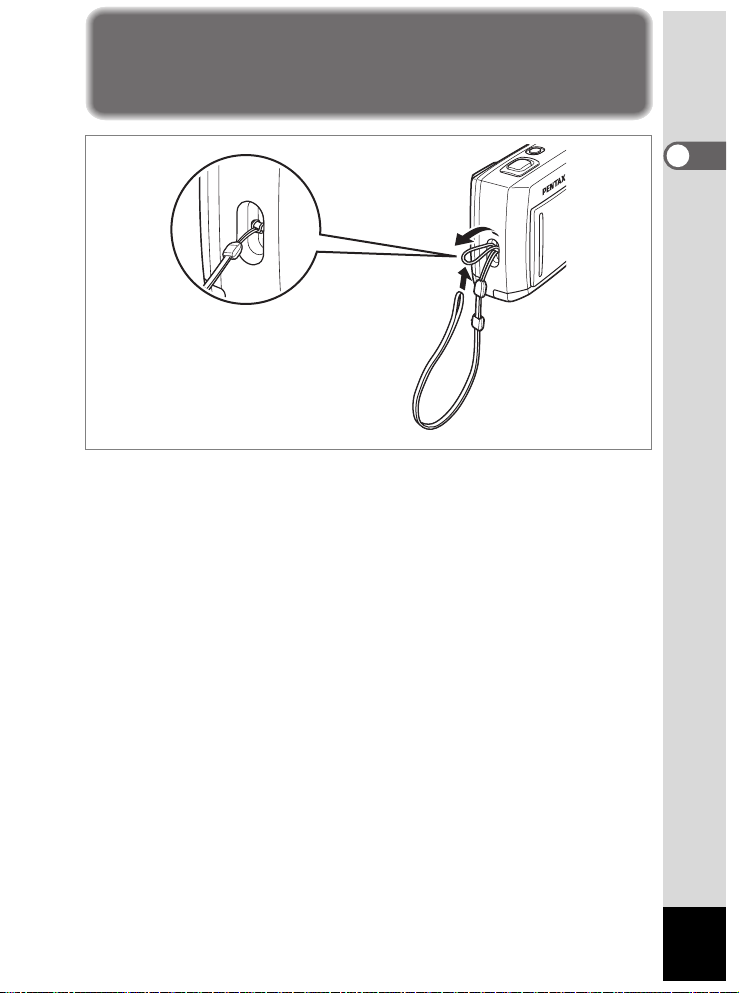
Attaching the Strap
Pass the narrow end of the strap through the strap lug, and attach as
shown.
1
Getting Started
11
Page 12
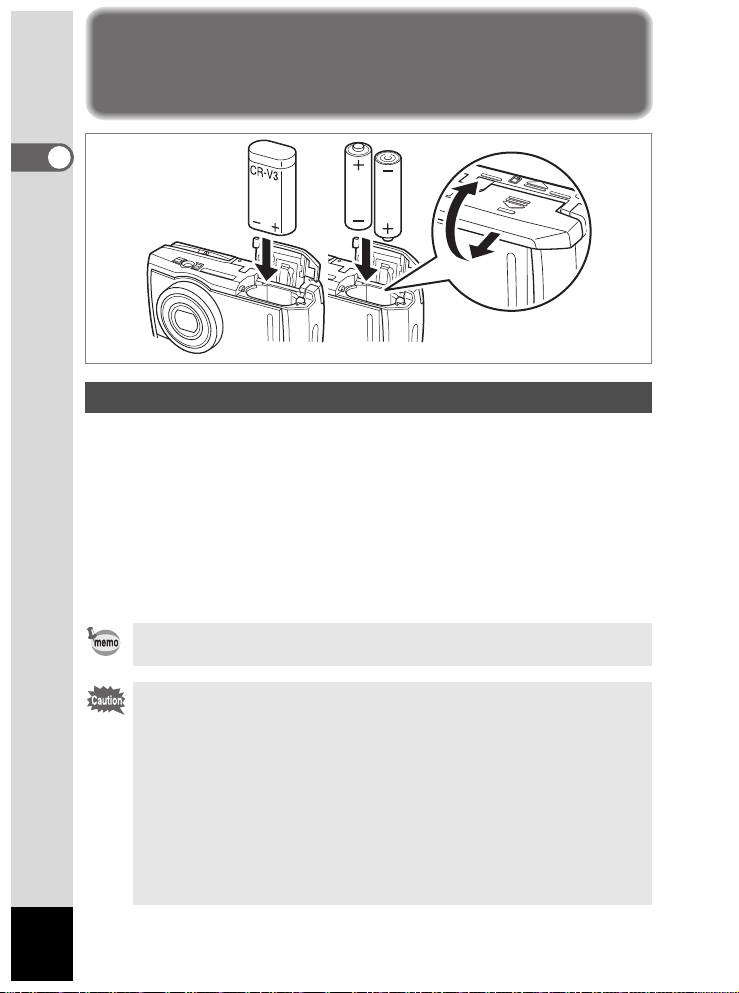
Powering the Camera
1
Getting Started
(Using CR-V3) (Using AA batteries)
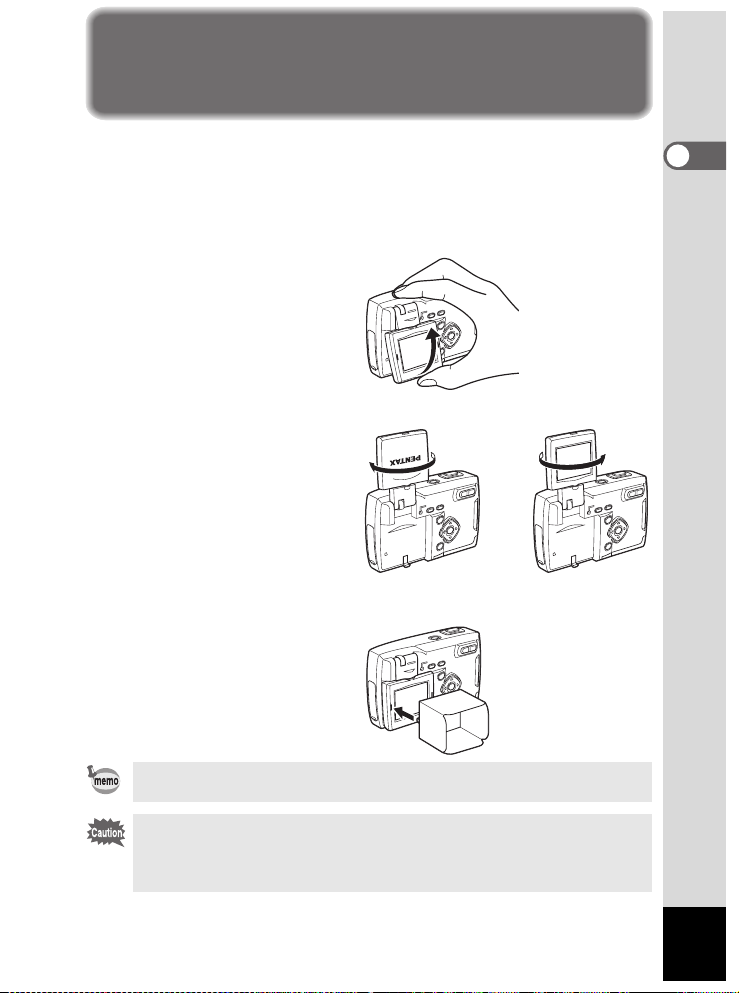
Installing the Batteries
Install batteries in the camera. Use one CR-V3, or use two AA lithium
batteries, AA Ni-MH batteries, or AA alkaline batteries.
1 Slide the battery cover in the direction indicated, and
flip open.
2 Insert the batteries according to the +/- indicator in the
battery chamber.
3 Close the battery cover and push horizontally to lock.
When using for a prolonged period, please use the AC adapter kit
D-AC5. (
1p.14).
12
• CR-V3 (battery included), AA lithium batteries, and AA alkaline
batteries are not rechargeable.
• Do not open the battery cover or remove the batteries when the
power switch is on.
• When you will not use the camera for a long while, remove the
batteries. Otherwise, the battery may leak.
• If the date and time settings have been reset when you insert new
batteries after a long while, follow the procedure for “Setting the Date
and Time” (p.20).
• Insert batteries correctly. Batteries inserted backwards can cause a
camera breakdown.
Page 13
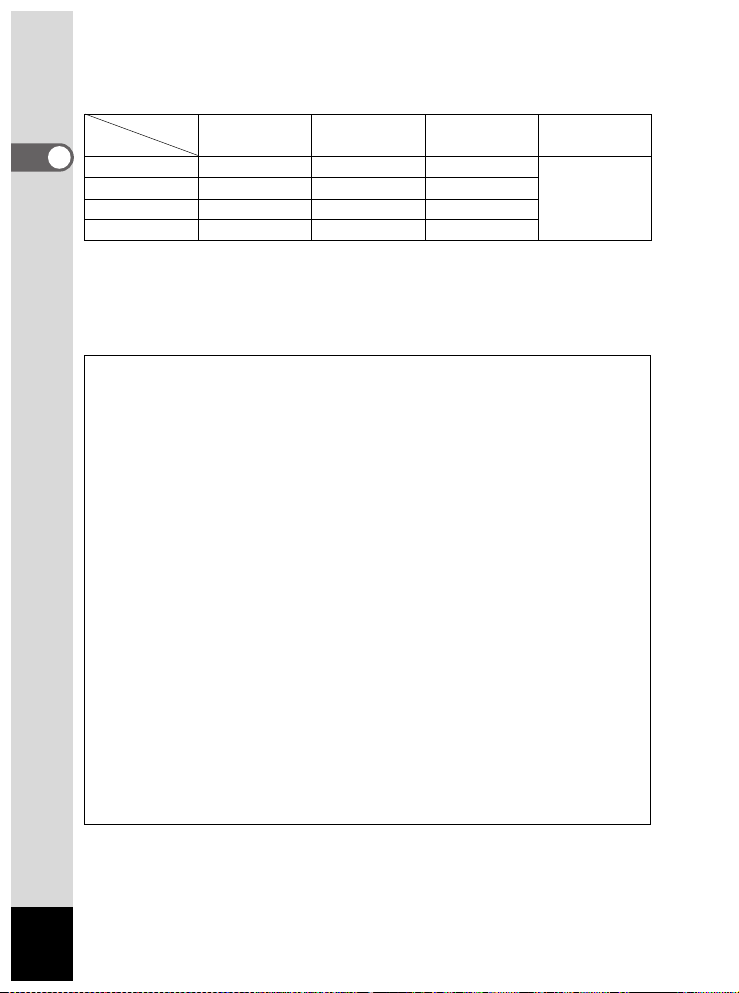
Number of Captures and Playback Time (room temperature, new
batteries)
Number of recordable images Playback time
With the flash
fired for 50% of
the shots
CR-V3
AA lithium Approx. 400 Approx. 300
AA Ni-MH Approx. 270 Approx. 200
AA alkaline Approx. 70 Approx. 70
Approx. 650 Approx. 450
• These figures are based on PENTAX measuring conditions. May vary by
capture mode or shooting conditions.
• Battery performance temporarily decreases as the temperature
decreases. When using the camera in cold climates, have extra
batteries on hand, keeping them warm in your pocket. Batt ery
performance will return to normal when returned to room
temperature.
• AA alkaline batteries may not adequately handle all the camera
functions. We do not recommend their use except in emergencies.
• When traveling overseas, taking pictures in cold climates, or when
you will be taking a lot of pictures, please have extra batteries ready.
Battery Level Indicator
You can check the battery level on the LCD monitor.
# (lit green) : Plenty of battery power
↓
(lit yellow) : Battery running low
$
↓
(lit red) : Battery almost gone
%
↓
[Battery Depleted] : After displaying this message, the camera turn s off.
1
Getting Started
13
Page 14

1
Getting Started
Using the AC Adapter
When using the LCD monitor for a long time or when connecting to your
PC, we recommend using the AC adapter kit D-AC5 (sold separately).
1 Make sure the camera is turned off before opening the
terminal cover.
2 Connect the DC terminal on the AC adapter to the DC
input terminal on the camera.
3 Connect the AC plug cord to the AC adapter.
4 Plug into the power outlet.
• Make sure the camera is turned off before connecting or
disconnecting the AC adapter.
• Make sure connections are secure between the camera, AC adapter,
AC plug cord terminal, and the power outlet. Disconnections while the
camera is recording or reading data on the CF card will corrupt your
data.
• When using the AC adapter, be sure to read the AC adapter D-AC5
operating manual.
• Connecting the AC adapter will not charge the rechargeable batteries
in your camera.
14
Page 15

Installing/Removing the CF Card
CF card eject button
Captured images are recorded on the compact flash (CF) card. Make
sure the camera is turned off before installing or removing a CF card
(market product).
Installing
1 Slide the CF card cover in the direction, and flip
open.
2 Insert the card all the way with the CF card label (or 2
symbol) toward the lens.
3 Close the CF card cover.
Removing
1 Slide the CF card cover in the direction, and flip
open.
2 Press the CF card eject button and remove the card.
3 Close the CF card cover.
1
Getting Started
• If the CF card cover is opened with the power on, a w arning will
sound and the camera will automatically be turned off.
• If the CF card cover is opened while saving an image, the save is
interrupted (the image is not saved).
15
Page 16
• Approximate Number of Shots, Recorded Pixels, and Quality
Levels
Quality Level
Recorded Pixels
1
2048 × 1536 8 16 33
Getting Started
1600 × 1200 13 27 60
1024 × 768 24 50 89
640 × 480 50 89 128
• These figures show the number of shots when using a 16MB CF card.
• These figures are based on PENTAX standard shooting conditions, and may
vary depending on the subject, shooting conditions, capture mode, and CF
card used.
Best Better Good Movie images
CD E(320 × 240)
30 sec × 2 sets
Precautions When Using a CF Card
• Make sure the camera is turned off before opening the CF card cover.
• The CF card may be hot when r emoved immediately after camera use. Please be
careful.
• Never open the CF card cover or turn off the camera while recording data on the
CF card, during image playback, or while connected to a PC with a USB cable.
This could cause data loss or card damag e.
• Do not bend the CF card or subject it to violent impact. Do not get it wet or leave it
in a high temperature location.
• New cards or cards used in another camera must be formatted before use. See
“Formatting a CF card” (p.84) for formatting.
• Never open the CF card cover while formatting a CF card. The card may be
damaged beyond use.
• Data saved on a CF card may be erased under the following conditions.
PENTAX does not accept any liability regarding erased data.
• When the user mishandles the CF card
• When the CF card is placed in a location with static electricity or electrical
interference
• When the card is not used for a long time
• When the card, the AC adapter, or battery is removed wh ile recording or reading
data on the CF card
• The CF card has a limited life. The stored data may become unreadable after long
periods of disuse. Please periodically backup important data onto your PC.
• Please avoid using or storing your card where static electricity or electrical
interferen ce can occur.
• Do not use or store your card where it may be exposed to sudden temperature
changes, condensation , or direct sunlight.
16
Page 17
Rotating the LCD Monitor (Rotate LCD)
You can rotate the LCD monitor 180° vertically or horizontally.
The screen display will change with the rotation of the LCD monitor.
When taking your self-portrait, you can check the screen while you take
the picture.The screen display changes with the rotation of the LCD
monitor (mirror image).
• Pull the LCD monitor upward.
• You can rotate the monitor 180° horizontally.
• When the LCD monitor is hard to see, such as in bright sunlight, install the
supplied LCD monitor hood.
1
Getting Started
When your digital camera is not in use, protect your LCD monitor by
rotating it to the back (PENTAX logo is on the front) for storage.
• When attaching or removing the LCD monitor hood, please return the
LCD monitor to its stowed position, to prevent undue force on the
LCD monitor rotation hinge.
• When rotating the LCD monitor, do not apply excessive force.
17
Page 18
Initial Settings
1
Getting Started
Power switch
Flash lamp (red)
Four-way controller
OK button
MENU button
Setting the Display Language
You can choose the language in which the menus, error messages, etc.
are displayed from the following: English, French, German, Spanish,
Italian and Japanese.
1 Turn the camera on.
2 Use the four-way controller (45) to
select the display language.
Initial Setting
Language/
City
DST
Video Out
The default setting is English.
MENU OK
3 Press the four-way controller (3).
Exit Ok
The screen for setting the next item will be displayed.
• You can change the setting after it has been made. Refer to
“Changing the Display Language” (p.85).
Setting the Home Town
English
NYC
NTSC
You can choose the city (Home Town) in which you will use the camera.
1 Press the four-way controller (45) to
select the desired city (Home Town).
18
Initial Setting
Language/
City
DST
Video Out
MENU OK
Exit Ok
English
NYC
NTSC
Page 19
2 Press the four-way controller (3).
The screen for setting the next item will be displayed.
• See p.92 for the list of cities and corresponding code names.
• You can change the setting after it has been made. Refer to
“Setting World Time” (p.87).
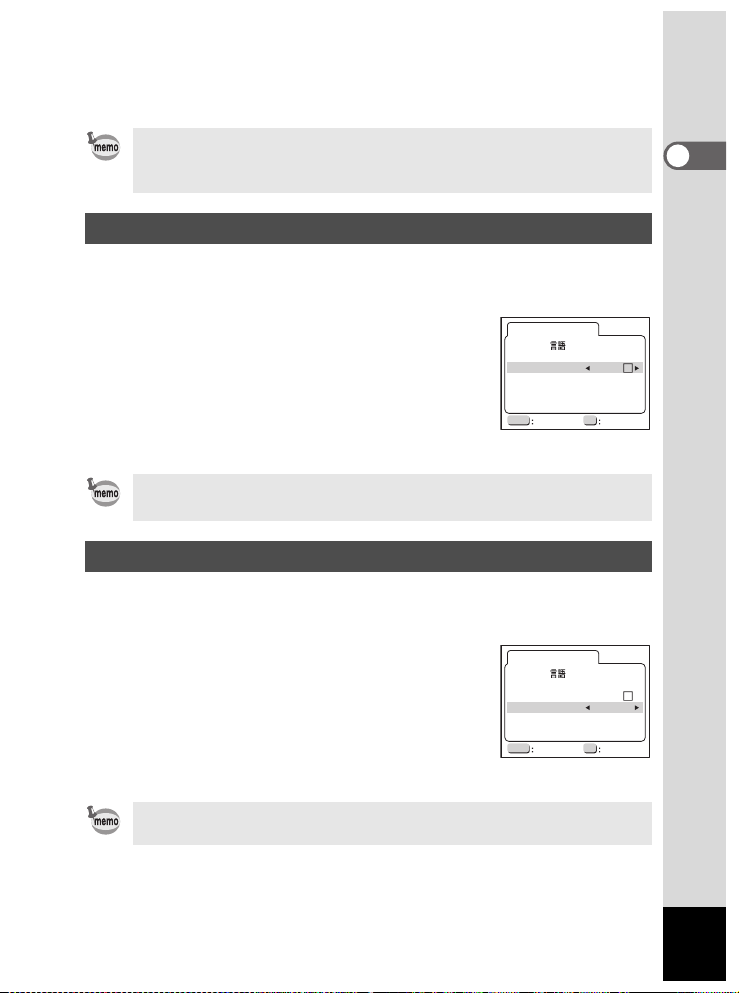
Setting the D.S.T. Mode
You can choose whether or not to display the D.S.T (Daylight Saving
Time) mode.
1 Use the four-way controller (45) to
select
The default setting is P (Off).
O (On) or P (Off).
Initial Setting
Language/
City
DST
Video Out
English
NYC
NTSC
2 Press the four-way controller (3).
MENU OK
The screen for setting the next item will be
Exit Ok
displayed.
• You can change the setting after it has been made. Refer to
“Setting World Time” (p.87).
Setting the Video Output Format
You can choose the output format (NTSC or PAL) for taking or
playing back pictures using a TV monitor.
1 Use the four-way controller (45) to
select the video output format.
The default setting is NTSC.
Initial Setting
Language/
City
DST
Video Out
English
NYC
NTSC
2 Press the Playback/OK button.
MENU OK
The screen for setting the date and time will be
displayed.
Exit Ok
1
Getting Started
• You can change the setting after it has been made. Refer to
“Selecting the Video Output Format” (p.86).
19
Page 20
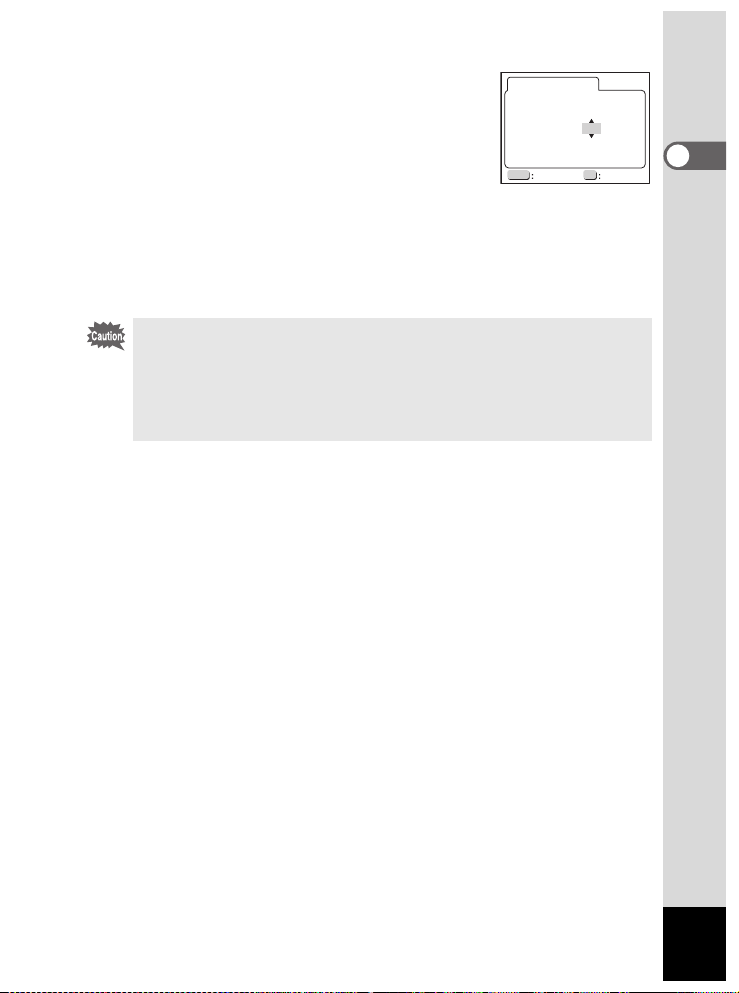
Setting the Date and Time
Set the current date and time, and the display style.
1 Press the four-way controller (23) to
1
Getting Started
select the date and time display style.
2 Press the four-way controller (5).
23 are displayed above and below "24h".
3 Press the four-way controller (23) to
select 24h (24-hour display) or 12h
(12-hour display).
Date Adjust
Date Style: mm/dd/yy 24h
01 / 01 /2003
00:00
MENU OK
Exit Ok
Date Adjust
Date Style: mm/dd/yy 24h
01 / 01 /2003
00:00
MENU OK
Exit Ok
4 Press the four-way controller (5).
23 is displayed above and below the month.
5 Press the four-way controller (23) to
change the month.
6 Press the four-way controller (5).
23 are displayed above and below the date.
20
Date Adjust
Date Style: mm/dd/yy 24h
01 / 01 /2003
00:00
MENU OK
Exit Ok
Date Adjust
Date Style: mm/dd/yy 24h
03 / 01 /2003
00:00
MENU OK
Exit Ok
Date Adjust
Date Style: mm/dd/yy 24h
03 / 01 /2003
00:00
MENU OK
Exit Ok
Page 21
7 Press the four-way controller (23) to
set the date and press the four-way
controller (
23 are displayed above and below the year.
5) again.
8 Repeat step 7 to set the year, hour,
Date Adjust
Date Style: mm/dd/yy 24h
MENU OK
and minutes.
9 Press the OK button.
The camera is ready to take a picture. When you set the date and
time using the MENU button, you will return to the Menu screen.
Press the Playback/OK button again.
• If you press the MENU button before initial settings are complete,
your settings will be cancelled, but you can take pictures. If this
happens, the Initial Settings screen is displayed the next time the
camera is turned on.
• Your settings can be changed later from the Menu screen. To access
the menu, see “Changing the Date Style and Date/Time” (p.85)
03 / 20 /2003
00:00
Exit Ok
1
Getting Started
21
Page 22
Quick Start
Taking Still Pictures
Power switch
2
Quick Start
This is the simplest way to take still pictures. The flash discharges
automatically based on light conditions by the default setting.
Shutter release button
Zoom f/y button
LCD monitor
1 Press the power switch.
The camera will turn on.
2 Confirm the subject and shooting
information on the LCD monitor.
The focus frame at the center of the LCD
screen indicates the zone of automatic
focusing. Press the Zoom button to change the
size of the subject.
x Subject becomes bigger.
w Subject becomes smaller.
Focus frame
3 Press the shutter release button.
The captured image is displayed on the LCD monitor for 0.5 seconds
(instant review). The image is saved on the CF card (The red lamp
blinks while saving).
22
22
Page 23
Pressing the Shutter Release Button
The shutter release button works in two steps.
• Press halfway
Lightly press (halfway) the shutter release button to lock the focus
position, exposure, and white balance.
• The shutter speed and aperture settings are only displayed when
pressing the shutter release button halfway.
• The following information is shown on the LCD monitor and flash
status lamp.
1. Focus frame
The frame lights green when focused. It is not displayed when out of
focus.
2. Flash lamp status
Flash status lamp (red)
Lit Flash is ready
Blink Charging
You cannot take a picture while the flash is charging.
• Press down fully
Press the shutter release button all the way down (fully) to take a
picture.
Instant Review
The Instant Review default setting is 0.5 sec.
• Pressing the
i button during Instant Review displays the Delete
menu.
• Select [Delete] and press the OK button to delete the image.
Setting the Instant Review Time 1 p.46
2
Quick Start
23
Page 24
Quick Start
100-0030
11:20
03/20/2003
1/100
F2.6
Playing Back Still Pictures
i button
2
Quick Start
Playback button
OK button
LCD monitor
Playing Back Images
To play back still pictures:
1 Press the playback button after
taking a picture.
The captured image is displayed on the LCD
monitor.
Pressing the four-way controller(3) will rotate
the image 90°, 180°, and 270°.
You can display images taken vertically for
easy viewing.
Playing Back Previous or Next Images
1/100
1/100
F2.6
F2.6
100-0030
100-0030
03/20/2003
03/20/2003
11:20
11:20
You can play back still pictures, cycling through one at a time.
1 Press the playback button after taking a picture.
The captured image is displayed on the LCD monitor.
2 Press the four-way controller (45).
Displays the previous image.
Displays the next image.
24
Page 25

Playback button
Four-way controller
OK button
LCD monitor
Deleting a Displayed Image
While the image is displayed, press the i
button to display the Delete screen. Press the
Delete(One)
four-way controller (2) to select Delete, and
press OK. The image is deleted.
Press the Playback button again, or press the
100-0107
shutter release button halfway to return to
capture mode.
• When you switch to the playback screen, the image with the highest
file number is shown first.
• You can enlarge the image displayed on the LCD monitor by pressing
the zoom/
f/y button.
• For movie pictures, the first frame is displayed.
• If no images are stored, the “No Image” message is displayed.
2
Quick Start
Delete
Cancel
OK
Ok All
Zoom Playback
1 p.74
25
Page 26
Quick Start
Using Your CF Card
Pictures taken with this camera are recorded on the
compact flash (CF) card. You can view the pictures
recorded on the CF card on the camera itself,
2
transfer them to your PC, or print them.
Quick Start
Viewing Images on the Camera
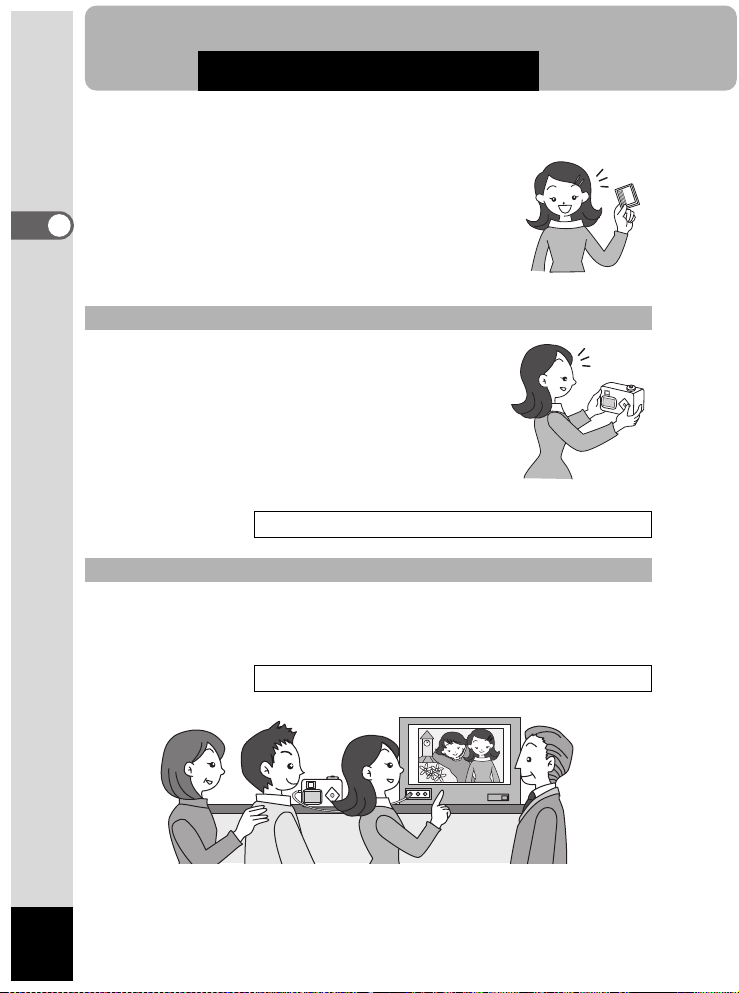
One advantage of a digital camera is that you can
check the picture as soon as you take it. You can
check the composition and brightness, and take a
picture again if you are not satisfied.
Playing Back Still Pictures 1 p.74
Viewing Images on a TV
Displaying your pictures on a TV is handy for those group occasions.
To view the images, connect your camera to the TV with the video
cable.
Viewing Images on a TV 1 p.80
26
Page 27
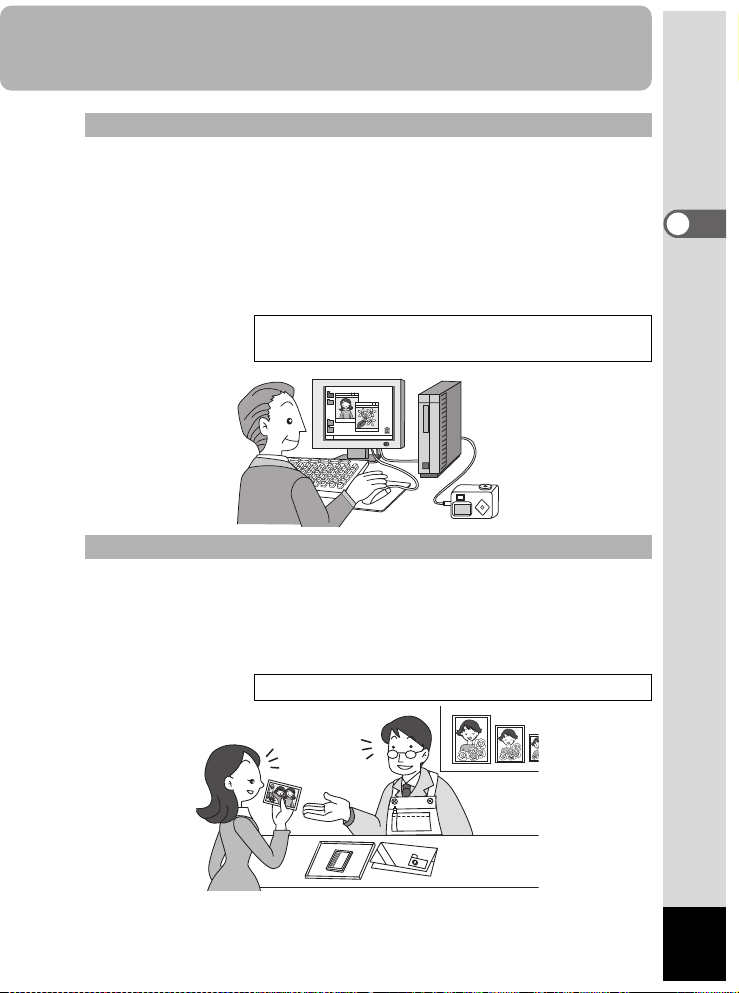
Viewing Images on a PC
You only install the USB driver the very first time. After that, you simply
connect the camera with the USB cable and read the images into your
PC. You can view your pictures on you PC, or transfer the data and edit
it. Or you can remove the CF card from the camera and transfer the
data with a card reader. On a laptop, you can put a CF card in a card
adapter and insert it into your card slot to transfer the image data.
(When using other equipment to transfer your images from your CF
card, please read the operating manual for your equipment.)
1 Booklet: Viewing Your Digital Camera Images On
Your PC
Printing Images at a Printing Service
You can order conventional photograph prints by taking the CF card
with recorded images to a store with a printing service.
DPOF (Digital Print Order Format) settings allow you to specify the
number of copies or to include the date. Set these before taking your
card to a store providing DPOF printing.
Printing Service Settings (DPOF) 1 p.81
2
Quick Start
27
Page 28

2
Quick Start
28
Page 29
Common Operations
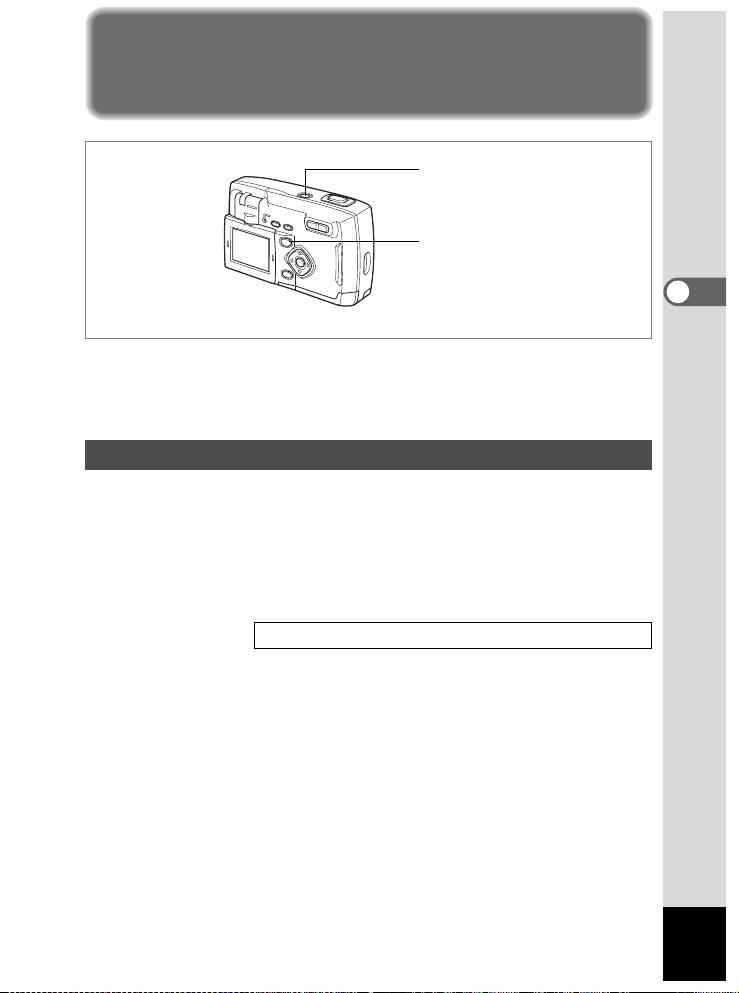
Turning the Camera On and Off
Power switch
Playback button
Press the power switch.
1
The camera will turn on. The lens cover opens and the lens extends.
Press the power switch again to turn the camera off.
Playback Only Mode
Turning the camera on while pressing the Playback button activates the
Playback Only mode.
• When the camera is started in Playback Only mode, the lens cover
remains closed and the lens does not extend.
• To switch from Playback Only mode to Capture mode, turn the
camera off and then turn it on again.
Playing Back Still Pictures 1 p.24
3
Common Operations
29
Page 30
Using Button Functions
3
Common Operations
Capture Mode
1
b button
Changes the flash mode. (1 p.38)
2 ) button
Changes the capture mode as follows. (1 p.36)
Macro mode (
Infinity-landscape mode (
Manual focus mode (
1 p.36)
1 p.36)
3 Zoom button
Changes the size of the subject. (1 p.68)
4 Playback button
Switches to Playback mode. (1 p.48)
5 Four-way controller (45)
Changes the EV compensation. (1 p.70)
6 Four-way controller (2)
Selects continuous shooting mode or self-timer mode. (1 p.66, 67)
7 Four-way controller (3)
Displays the virtual mode dial and changes the capture mode. (1 p.48)
8 OK button
Selects a menu item.
9 MENU button
Displays [Rec. Mode] and [Set-up] menus. (1 p.32)
1
2
3
4
5, 6, 7
8
9
1 p.36)
30
Page 31

1
2
3
4
5, 6, 7
8
9
Playback Mode
1 Z button
Protects the image from deletion. (1 p.79)
2 i button
Deletes the image. (1 p.78)
3 Zoom/f/y button
Displays nine images at once when pressed in standard Playback
mode.
Changes the image size on the LCD monitor in Zoom Display mode.
(
1 p.74)
4 Playback/Q button
Switches to Capture mode.
5 Four-way controller (45)
Plays back previous or next image. (1 p.24)
6 Four-way controller (2)
Sets DPOF settings. (1 p.81)
7 Four-way controller (3)
Rotates the displayed image clockwise 90°, 180°, and 270°. (1 p.24)
8 OK button
Selects a menu item.
9 MENU button
Displays Playback and Set-up menus. (1 p.32)
3
Common Operations
31
Page 32

Setting the Menus
Press the MENU button to display the menus on the LCD screen. With
these you can set functions, save the settings, and change the camera
settings.
How to Set the Menus
A button operation guide is displayed on the LCD monitor during menu
operation.
3
Common Operations
1 Press the MENU button.
The menu screen is displayed. The current selection is displayed in a
frame.
2 Press the four-way controller (45).
Use the four-way controller (45) to select the menu screen.
3 Press the four-way controller (23) to select an item.
This 23moves the selection frame up and down.
4 Press the four-way controller (45) to change the
setting. Press the four-way controller (
Select screen if available.
When finished, press the OK button to return to the menu.
5) to move to a
5 Press the OK button.
This saves the settings and returns to Capture or Playback mode.
32
Even after you press the OK button and close the menu screen, if the
camera is turned off improperly (such as removing the batteries while
the camera is on), your settings will not be saved.
Page 33

Example of menu operation (Pressing the MENU button in
Capture mode)
MENU button
1
[A Rec. Mode] Menu
Rec.Mode
Recorded Pixels
Quality
White Balance
Forcusing Area
AE Metering
Sensitivity
MENU OK
Exit Ok
2048
1536
AUTO
Wide
AUTO
B Setup] Menu
[
Set-Up
Format
Beep
Date Adjust
World Time
Language/
Display Mode
MENU OK
Exit Ok
mm/dd/yy
English
Normal
2
Rec.Mode
Recorded Pixels
Quality
White Balance
Forcusing Area
AE Metering
Sensitivity
MENU OK
Exit Ok
2048
1536
AUTO
Wide
AUTO
Set-Up
Format
Beep
Date Adjust
World Time
Language/
Display Mode
MENU OK
Exit Ok
mm/dd/yy
English
Normal
3
Common Operations
3
Rec.Mode
Recorded Pixels
Quality
White Balance
Forcusing Area
AE Metering
Sensitivity
MENU OK
Exit Ok
2048
1536
AUTO
Wide
AUTO
4
Selection Screen
White Balance
AUTO
MENU OK
Exit Ok
3
Rec.Mode
Recorded Pixels
Quality
White Balance
Forcusing Area
AE Metering
Sensitivity
MENU OK
Exit Ok
2048
1536
AUTO
Wide
AUTO
Rec.Mode
Recorded Pixels
Quality
White Balance
Forcusing Area
AE Metering
Sensitivity
MENU OK
Exit Ok
2048
1536
AUTO
Wide
100
3
Next menu screen
If you press the shutter release button halfway or press the Zoom button to
leave a menu screen, your settings will be saved and the camera returns to
Capture mode (or the playback screen in Playback Only mode).
33
Page 34

Menu List
[
A Rec. Mode] Menu
{···All changes are valid.
×···Setting changes are invalid.
A
Item Description
Recorded
Pixels
3
Common Operations
Quality Level
White Balance
Focusing Area
AE Metering
Sensitivity Sets sensitivity. AUTO { × p.45
Digital Zoom
Instant Review
Soft Setting
EX. Bracket
Step
WB Bracket
Step
3D Mode
Memory
Sharpness Sets the sharpness.
Saturation S ets the saturation.
Contrast Sets the contrast.
Selects the number of
recorded pixels.
Selects the image
compression rate.
Adjusts color balance
according to lighti ng.
Changes the area for
autofocus.
Sets the metering m ethod
to determine exposure.
For taking digital zoom
pictures.
Sets the Instant Review
display time.
Adjusts the softness for soft
mode in Picture mode.
Adjusts the bracket amount
for Exposure Auto Bracket.
Adjusts the bracket amount
for the White Balance Auto
Bracket.
Sets 3D picture viewing
method.
Saves the Rec. Mode
settings when the camera is
turned off.
Default
Setting
2048×1536 {
D
AUTO {{p.41
Wide { × p.43
L {{p.44
O (on) {{p.69
0.5s
(0.5 sec)
x
(norm al)
± 0.3 (EV) { × p. 65
± 1 { × p.65
Parallel
(Mode)
x
(norm al)
x
(norm al)
x
(norm al)
Items marked with × can be changed on the menu screen, but are not
reflected in actual operation.
Picture
Mode
B
F G
Dl
{ × p.40
{{p.46
{ × p.51
{ × p.58
{ × p.72
{ × p.46
{ × p.47
{ × p.47
C
Set to
320×240
Reference
p.39
34
Page 35

[
Q Playback] Menu
Item Description Default Setting
Slide Show Plays recorded images successively. 3s (3 sec. interval) p.77
B Set-up] Menu
[
Item Description Default Setting
Format Formats a CF card Cancel p.84
Beep Sets the button operation sound.
Date Adjust Sets the date and time. mm/dd/yy p.85
World Time Sets world time. P (off) p.87
Language/
Display Mode
Screen Effect
Video Out Sets the video output format. NTSC p.86
Background Color
Auto Power Off Sets power conservation mode. 3m (3 minute) p.91
Brightness Level Sets brightness of LCD monitor. No rmal p.91
Reset Returns settings to defaults. Cancel p.91
Switches the langu age for displaying
menus and messages.
Switches the display mode in Capture
Mode and Playback Mode.
Displays on the LCD screen will
transition smoothly.
Sets the background color of the LCD
screen.
O (on) p.86
English p.85
Normal p.88
O (on) p.90
Blue p.90
Reference
Reference
3
Common Operations
35
Page 36

Taking Pictures
Setting the Capture Functions
) button
4
Changing Focus Settings
Taking Pictures
Focus Mode
Focuses on object in the focusing area when the
(No icon) Autofocus mode
q Macro mode
Infinity-lands cape
s
mode
z Manual focus mode Adjust focus manually.
shutter release button is pressed halfway. Use
when the distance to the subject is more than
40cm.
Use when the distance to the subject is 10cm to
50cm. Focuses on object in the focusing area
when the shutter release button is pressed
halfway.
Use for taking pictures of distant obje cts.
1 Pressing ) in Capture mode will switch focus
modes, and the current setting is displayed on the LCD
monitor.
The camera is ready to take a picture in the set focus mode.
• The focus mode default setting is the Autofocus mode.
36
• In Movie Picture mode (
• In Picture mode (
image mode (
1 p.58), Manual Focus mode cannot be set.
1 p.54), only Autofocus mode is available.
1 p.50), Panorama Assist mode (1 p.56), and 3D
Page 37

Manual Focus
On the
z setting, press the four-way controller (45) to enlarge the
central portion of the screen to full screen on the LCD monitor.
Adjust the focus with the four-way controller while watching the image
on the monitor.
For distant focus
For closer focus
Once the focus is set, press any button other than the four-way
controller (
45), or take your finger off of the four-way controller for
about 2 seconds. The camera will switch to the standard Capture
screen.
• When focusing, hold down the four-way controller (45) to focus
quickly.
• Enlarged display is not available near maximum magnification in
digital zoom.
4
Taking Pictures
Saving the Focus Mode
1 p.72
37
Page 38

Selecting the Flash Mode
bbutton
(No icon) Automatic flash
4
Taking Pictures
a Flash Off
b Flash On
Auto flash + red-
c
eye reduction
Flash On + red-eye
d
reduction
• The flash is always off when the Capture mode is set on C,
Continuous shooting, or Infinity-Landscape.
• When using the flash, it always
picture, to assist with metering.
• In Auto + red-eye reduction or Flash On + r ed-eye reduction, the flash
discharges once before taking the picture to make the iris of the
subject's eyes contract, shortly before firing again to take the picture.
The flash discharges automatically based on light conditions.
The fl ash never discharges regardless of light conditions.
The flash always discharges regardl ess of light conditions.
Reduces red-eye in the picture, caused by the flash
reflecting from the subject’s eyes. The flash
discharges automatically.
Reduces red-eye in the picture, caused by the flash
reflecting from the subject’s eyes.
The flash discharges regardless of lighting conditions.
discharges once before taking the
1 Press the b button in Capture mode.
This will switch focus modes, and the current icon is displayed on the
LCD monitor.
The camera is ready to take a picture in the selected flash mode.
Flash Lamp
Saving the Flash Mode
38
1 p.23
1 p.72
Page 39

Four-way controller
OK button
MENU button
A Picture Mode B F GDl
Selecting the Recorded Pixels
Rec.Mode
Recorded Pixels
Quality
White Balance
Forcusing Area
AE Metering
Sensitivity
MENU OK
Exit Ok
2048
1536
AUTO
Wide
AUTO
Select the number of recorded pixels from 2048×1536, 1600×1200,
1024×768, 640×480.
The more pixels there are, the larger the image size and file size.
The image file size will also differ according to quality level settings.
2048×1536 Suited for printing on A4 paper.
1600×1200 Suited for printing on A5 paper.
1024×768 Suited for printing on postcards.
640×480 Suited for attaching to e-mail, or for creatin g website s.
1 Select [Recorded Pixels] on the [A Rec. Mode] menu.
2 Press the four-way controller (45) to
change the recorded pixels.
3 Press the OK button.
The camera is ready to take a picture.
• The recorded pixels is fixed at 320×240 in Movie Picture mode.
• Selecting a large number of recorded pixels will result in a clearer
image when printed.
Rec.Mode
Recorded Pixels
Quality
White Balance
Forcusing Area
AE Metering
Sensitivity
MENU OK
Exit Ok
2048
1536
AUTO
Wide
AUTO
4
Taking Pictures
39
Page 40

Rec.Mode
Recorded Pixels
Quality
White Balance
Four-way controller
OK button
MENU button
Forcusing Area
AE Metering
Sensitivity
MENU OK
Exit Ok
A Picture Mode B C F GDl
Selecting the Quality Level
Select the image compression rate.
4
The more
Taking Pictures
E there are, the better the quality and the larger the file.
The image file size will also differ according to Recorded Pixels
settings.
C Best
D Better
E Good
This has the lowest compression rate, and is suited for
printing large pictures on A4 paper.
This has a standard compression rate, and is suited for
viewing as standard photographs or on your computer
screen.
Highest compression rate. Suited for attaching to e-mail,
or for creating websites.
1 Select [Quality Level] on the [A Rec. Mode] menu.
2 Press the four-way controller (45) to
change the quality level.
3 Press the OK button.
The camera is ready to take a picture.
Rec.Mode
Recorded Pixels
Quality
White Balance
Forcusing Area
AE Metering
Sensitivity
MENU OK
Exit Ok
2048
1536
AUTO
Wide
AUTO
2048
1536
AUTO
Wide
AUTO
40
Page 41

Four-way controller
OK button
MENU button
A Picture Mode B F GDl
Adjusting the White Balance
Rec.Mode
Recorded Pixels
Quality
White Balance
Forcusing Area
AE Metering
Sensitivity
MENU OK
Exit Ok
2048
1536
AUTO
Wide
AUTO
Adjusts for natural coloring in your picture, according to the lighting.
AUTO Auto The camera makes the adjustment automatically.
G Dayligh t For taking pictures outside in sunlight.
H Shade For taking pictures outside in the shade.
I Tungsten Light
Fluorescent
J
Light
K Manual
For taking pictures under standard light bulbs or other
tungsten light.
For taking pictures und er fluorescent light.
For taking pictures by manually adjusting the white
balance.
1 Select [White Balance] on the [A Rec. Mode] menu.
2 Press the four-way controller (5).
The White Balance selection screen is
displayed.
White Balance
AUTO
3 Press the four-way controller (23) to
MENU OK
change the setting.
Exit Ok
4 Press the OK button twice.
The camera is ready to take a picture.
Saving the White Balance 1 p.72
4
Taking Pictures
41
Page 42

Setting Manually
1 Select [K] (Manual) on the White
Balance selection screen.
2 Point your camera at white paper to
fill the screen.
3 Press the OK button.
The LCD monitor will display "Adjusting", and return to the menu
screen when the white balance is adjusted.
4 Press the OK button.
The camera is ready to take a picture.
4
Taking Pictures
White Balance
AUTO
MENU OK
Exit Ok
42
Page 43

Four-way controller
OK button
MENU button
Setting the Focusing Area
Rec.Mode
Recorded Pixels
Quality
White Balance
Forcusing Area
AE Metering
Sensitivity
MENU OK
Exit Ok
2048
1536
AUTO
Wide
AUTO
A Picture Mode B F GDl
You can changes the area for autofocus (Focusing Area).
Wide Normal range
Spot The a utofocus range becomes smaller
1 Select [Focusing Area] on the [A Rec. Mode] menu.
2 Press the four-way controller (45) to
change the focusing area.
3 Press the OK button.
The camera is ready to take a picture.
Saving the Focusing Area Setting 1 p.72
Rec.Mode
Recorded Pixels
Quality
White Balance
Forcusing Area
AE Metering
Sensitivity
MENU OK
Exit Ok
2048
1536
AUTO
Wide
AUTO
4
Taking Pictures
43
Page 44

Rec.Mode
Four-way controller
OK button
Recorded Pixels
Quality
White Balance
Forcusing Area
AE Metering
Sensitivity
MENU OK
Exit Ok
2048
MENU button
A Picture Mode B F GDl
Setting the Light Metering Range
You can choose the part of the screen to use for measuring brightness
4
and determining exposure.
Taking Pictures
L Multi-segment
M Ce nter-weighted
N Spot
Detailed measurement of entire screen to determine
exposure.
Measures mainly the center of the screen to determine
exposure.
Measures only the very center of the screen to
determine exposure.
1 Select [AE Metering] on the [A Rec. Mode] menu.
2 Press the four-way controller (45) to
change the metering mode.
3 Press the OK button.
The camera is ready to take a picture.
Saving the AE Metering Method 1 p.72
Rec.Mode
Recorded Pixels
Quality
White Balance
Forcusing Area
AE Metering
Sensitivity
MENU OK
Exit Ok
1536
AUTO
Wide
AUTO
2048
1536
AUTO
Wide
AUTO
44
Page 45

Setting Sensitivity
Four-way controller
OK button
MENU button
A Picture Mode B F GDl
Rec.Mode
Recorded Pixels
Quality
White Balance
Forcusing Area
AE Metering
Sensitivity
MENU OK
Exit Ok
2048
1536
AUTO
Wide
AUTO
You can set the Sensitivity to match the brightness of the surroundings.
AUTO
The camera makes the adjustment automatically.
100 • The lower the Sensitivity (smaller number), the sharper the image with
200
400
less noise.The shutter speed will be slower in low light conditions.
• The higher the Sensitivity (larger number), the faster the shutter speed
in low light conditions. The image will have more noise.
1 Select [Sensitivity] on the [A Rec. Mode] menu.
2 Press the four-way controller (45) to
change the sensitivity.
3 Press the OK button.
The camera is ready to take a picture.
The only available AUTO settings are 100 and 200.
Saving the Sensitivity
1 p.72
Rec.Mode
Recorded Pixels
Quality
White Balance
Forcusing Area
AE Metering
Sensitivity
MENU OK
Exit Ok
2048
1536
AUTO
Wide
AUTO
4
Taking Pictures
45
Page 46

Rec.Mode
Recorded Pixels
Quality
White Balance
Four-way controller
OK button
MENU button
Forcusing Area
AE Metering
Sensitivity
MENU OK
Exit Ok
A Picture Mode B F GDl
Setting the Instant Review Time
You can select the Instant Review display time from 0.5 sec, 1 sec, 2
4
sec, 3 sec, 5 sec, or OFF (no display).
Taking Pictures
1 Select [Instant Review] on the [A Rec. Mode] menu.
2 Press the four-way controller (45) to
change the display time.
3 Press the OK button.
The camera is ready to take a picture.
The Instant Review setting stays the same even after the camera is
turned off.
A Picture Mode B F GDl
Setting Image Sharpness
You can make the image outlines sharp or soft.
Rec.Mode
Digital Zoom
Instant Review
Soft Setting
Ex. Bracket Step
WB Bracket Step
3D Mode
MENU OK
Exit Ok
1 Select [Sharpness] on the [A Rec. Mode] menu.
2 Press the four-way controller (45) to
select
y (Soft).
x (Normal), z (Hard), or
Rec.Mode
Memory
Sharpness
Saturation
Contrast
3 Press the OK button.
MENU OK
The camera is ready to take a picture.
Exit Ok
2048
1536
AUTO
Wide
AUTO
Parallel
0.5s
0.3
1
46
Page 47

Four-way controller
OK button
MENU button
Setting Color Saturation
Rec.Mode
Recorded Pixels
Quality
White Balance
Forcusing Area
AE Metering
Sensitivity
MENU OK
Exit Ok
2048
1536
AUTO
Wide
AUTO
A Picture Mode B F GDl
This sets the color saturation.
1 Select [Saturation] on the [A Rec. Mode] menu.
2 Press the four-way controller (45) to
select
(Low).
z (High), x (Normal), or y
Rec.Mode
Memory
Sharpness
Saturation
Contrast
3 Press the OK button.
MENU OK
The camera is ready to take a picture.
Exit Ok
A Picture Mode B F GDl
Setting the Image Contrast
You can set the image contrast level.
1 Select [Contrast] on the [A Rec. Mode] menu.
2 Press the four-way controller (45) to
select
(Low).
z (High), x (Normal), or y
Rec.Mode
Memory
Sharpness
Saturation
Contrast
3 Press the OK button.
MENU OK
The camera is ready to take a picture.
Exit Ok
4
Taking Pictures
47
Page 48

Switching Between Modes
Capture mode is for taking pictures, and Playback mode is for playing
back or erasing images.
Switching Between Capture Mode and Playback Mode
• Press the Playback button to switch from Capture mode to Playback mode.
• Press the Playback button or press the shutter release button halfway
to switch from Playback mode to Capture mode.
Selecting the Capture Mode
Display the virtual mode dial to select the Capture mode. There are
eight Capture modes available.
4
Taking Pictures
A Program Mode Lets you set all the functions. p.49
H
(Default
Setting)
B Night-Scene Mode Lets you take dark scenes. p.53
C Movie Picture Mode Lets you take movie pictures. p.54
F Panorama Assist Mode Lets you take panorama pictures. p.56
G 3D Image Mode Lets you take 3D pictures. p.58
l
(Default
Setting)
Picture Mode
D Digital Filter Mode
Auto Bracket Mode
You can match the settings to the
shooting situation. There are eight
picture modes available. (The
default setting is H.)
Lets you set a color filter. (The
default setting is B&W .)
Lets you use auto brackets. (The
default setting is l.)
p.50
p.63
p.64
1 Press the four-way controller (3) in
Capture Mode.
The virtual mode dial is displayed.
2 Press the four-way controller (23) to
select the desired mode.
The icon will be magnified.
In Digital Filter Mode or Auto Bracket Mode, press the four-way
controller (
5) again for detailed settings.
3 Press the OK button.
The icon for the selected Capture mode is displayed. The camera is
ready to take the picture.
48
Program
OK
Ok
Page 49

Taking Pictures
Shutter release button
Four-way controller
OK button
Program Mode
In Program Mode (A), you can set all the functions and take pictures.
1 Press the four-way controller (3) in Capture Mode.
The virtual mode dial is displayed.
2 Press the four-way controller (23) to
select the [Program
3 Press the OK button.
The camera is ready to take a picture.
4 Set the functions you want to use.
See “Setting the Capture Functions” (p.36~p.47) for instructions.
A].
Program
OK
Ok
5 Press the shutter release button.
The picture will be taken.
Taking Still Pictures 1 p.22
4
Taking Pictures
49
Page 50

Shutter release button
Four-way controller
OK button
Picture Mode
You can match your settings to the situation.
4
Picture Mode
Taking Pictures
There are eight modes available.
Landscape
H
(Default Setting)
I Flower Enhances your flower photos.
J Portrait Enhances your portrait photos.
M Self-Portrait Enhances self-portraits or pictures including yourself.
V Soft
L Surf and Snow
K Sunset Beautiful results on pictures of
U Illustration Makes the photograph look like a
Enhances your landscape photos.
Provides a softened effect for your pictures.
Softness can be set at seven levels.
Enhances pictures taken against dazzling backgrounds
such as beaches or snow.
sunsets or sunrises.
sketch.
1 Press the four-way controller (3) in Capture Mode.
The virtual mode dial is displayed.
2 Press the four-way controller (23) to
select the [Picture Mode (
and press the four-way controller (
The picture mode dial is displayed.
H)] dial,
5).
Picture Mode
OK
Ok
50
Page 51

3 Press the four-way controller (23) to
Picture Mode
select the icon for the desired picture
mode.
4 Press the OK button.
The Picture mode is selected.
Portrait
OK
Ok
5 Press the shutter release button.
The picture will be taken.
• In Picture mode, your selection is confirmed by pressing the shutter
release button half-way or by pressing the four-way controller, or by
doing nothing for more than five seconds.
• In Picture mode, the EV compensation, saturation, contrast,
sharpness, and white balance are automatically set to the optimum
values for each mode. (You can change the settings.)
Setting the Softness
You can set the softness for soft mode in Picture mode.
1 Select [Soft setting] on the [A Rec. Mode] menu.
2 Press the four-way controller (45) to
set the degree of softness.
Moving the (x) to the right will increase the
softening effect. Move it to the left to decrease
softness.
Rec.Mode
Digital Zoom
Instant Review
Soft Setting
Ex. Bracket Step
WB Bracket Step
3D Mode
MENU OK
Exit Ok
3 Press the OK button.
The camera is ready to take a picture.
0.5s
0.3
Parallel
4
Taking Pictures
1
51
Page 52

Shutter release button
Four-way controller
LCD monitor
Taking Self-Portraits
You can reverse the LCD monitor while you take a self-portrait or a
couple-shot, checking yourself in the LCD monitor while you take the
4
picture.
Taking Pictures
1 Press the four-way controller (3) to select [Picture
Mode] on the virtual mode dial, and set it to [Selfportrait (
M)].
2 Rotate the LCD Monitor.
You can see yourself in the LCD monitor.When you rotate the LCD
monitor, the image on the monitor rotates (mirror image).
3 Press the shutter release button.
The picture will be taken.
When pressing the shutter release button causes the camera to shake,
particularly for taking pictures in low light conditions, secure the camera
to a tripod or on another surface and use the self-timer.
52
Rotating the LCD Monitor
Matching the Picture to the Scene (Picture Mode)
1 p.50
1 p.17
Page 53

Shutter release button
Four-way controller
OK button
Taking Dark Scenes (Night-Scene Mode)
The settings in this mode are appropriate for taking dark scenes.
1 Press the four-way controller (3) in Capture Mode.
The virtual mode dial is displayed.
2 Press the four-way controller (23) to
select the [Night Scene Mode(
3 Press the OK button.
The camera is ready to take a picture.
4 Press the shutter release button.
The picture will be taken.
Pressing the Shutter Release Button 1 p.23
Playing Back Still Pictures
When taking night-scenes and other pictures with a slow shutter speed,
the capture time is nearly doubled, because of a function that removes
noise from the image after capture.
B)].
1 p.24
Night Scene Mode
OK
Ok
4
Taking Pictures
Because the shutter speed is slow when taking dark scenes, please
stabilize the camera on a tripod or other surface to prevent shaking the
camera.
53
Page 54

Shutter release button
22sec
Four-way controller
OK button
Taking Movie Pictures (Movie Picture Mode)
You can take movie pictures. The maximum length of one recording (1
set) is about 30 seconds. Sound cannot be recorded.
4
Taking Pictures
1 Press the four-way controller (3) in Capture Mode.
The virtual mode dial is displayed.
2 Press the four-way controller (23) to
select the [Movie (
3 Press the OK button.
1 Flash OFF icon 2 Movie Picture icon
3 Recording time remaining for next set
4 Sets remaining
C)].
Movie
OK
Ok
1
2
4 Press the shutter release button.
Recording will begin. You can switch the
image size using the Zoom button.
x Subject becomes bigger.
w Subject becomes smaller.
5 Press the shutter release button.
Playback will end. The remaining available recording time is
displayed.
22sec
22sec
3
4
11
54
Page 55

Recording by holding down the shutter release button
If you hold down the shutter release button for one second or more, the
camera will record while you hold down the button. Recording stops
when you release the shutter release button.
Playing Back Movie Pictures 1 p.75
• The flash will not fire in Movie Picture mode.
• Continuous shooting is not available in Movie Picture mode.
• The only focus mode available in Movie Picture mode is Autofocus.
4
Taking Pictures
55
Page 56

Shutter release button
Set shift direction
Four-way controller
OK button
Taking Panorama Pictures (Panorama Assist
Mode)
ACD photostitcher is only for the English version and the Japanese
4
Taking Pictures
version.
You can join several images together to form one panorama picture.
Use a Windows PC and the provided software to join the images.
1 Press the four-way controller (3) in Capture Mode.
The virtual mode dial is displayed.
2 Press the four-way controller (23) to select [Panorama
Assist (
F)].
3 Press the OK button.
4 Press the four-way controller to
choose the joining direction.
4 Joins the images at the left.
5 Joins the images at the right.
2 Joins the images at the top.
3 Joins the images at the bottom.
The explanation below will assume that
5 is selected.
Set shift direction
Set shift direction
5 Take the first picture.
Press the shutter release button to take the first
image. The right edge of the image is displayed
in transparent form at the left of the LCD
monitor.
56
Page 57

6 Move the camera to the right, and
take the second picture.
Repeat this procedure for the third and
following pictures.
7 Press the OK button.
The screen returns to step 4.
To cancel Panorama Assist mode, switch to any other mode.
• The camera cannot join the images. Use the software provided. For
details on joining panorama images, see the separate booklet
“Viewing Your Digital Camera Images On Your PC”.
• Continuous shooting is not available in Panorama Assist mode.
• You need a Windows PC for joining panorama pictures. (The
provided software is not Macintosh-compatible.)
4
Taking Pictures
57
Page 58

Shutter release button
Four-way controller
OK button
MENU button
Taking 3D Pictures (3D Image Mode)
Using the LCD monitor, you can take 3D pictures to be viewed by the
parallel method or cross method (
4
it through the 3D image viewer provided. It will appear in three dimensions.
Taking Pictures
p.60
). Print out the 3D picture and look at
Selecting the viewing method
The default setting is Parallel to view with the 3D Image Viewer. If you
do not need to switch to Cross, proceed to step 5.
1 Press the MENU button.
The [A Rec. Mode] menu will be displayed.
2 Press the four-way controller (23) to
select [3D Mode].
3 Press the four-way controller (45) to
select Cross.
You can also view it without the image viewer.
Rec.Mode
Digital Zoom
Instant Review
Soft Setting
Ex. Bracket Step
WB Bracket Step
3D Mode
MENU OK
Exit Ok
4 Press the OK button.
The screen returns to the 3D image mode.
Taking Pictures
0.5s
0.3
Parallel
1
5 Press the four-way controller (3) in Capture Mode.
The virtual mode dial is displayed.
6 Press the four-way controller (23) to select the 3D
Image mode (
58
G).
Page 59

7 Press the OK button.
The screen for taking the first image appears on the left side of the
LCD monitor.
8 Take the first image.
Position the subject at the center of the left side
of the screen, and press the shutter release
button. The image is displayed on the left side
of the LCD monitor. The right side of the screen
is for taking the second image.
9 Move the camera to the right without changing your
stance.
10 Overlap the images.
The first image appears opaque on the right of
the screen, overlapping the second. Match the
opaque image with the actual image to make
the layout match.
11 Press the shutter release button.
The second image is taken, and the display returns to step 7. To take
more 3D pictures, repeat the operations from step 8.
• Check the images in Playback mode.
• To cancel 3D Image mode, press the four-way controller (
to a different mode.
• Taking pictures of a moving subject will not provide a threedimensional effect, because two images are required for each
subject. If taking a picture of a person, ask your model to stay still,
and take the second picture quickly. Shifting the camera horizontally
is much easier when using a tripod or other support.
• The camera should be moved about 1/40 of the distance to the
subject. For example, if the distance is 3m, the movement amount
would be 3m÷40=7.5cm.Each individual sees 3D images differently,
so do not be too concerned. Use the chart below as a guide, and
experiment with different movement distances.
3) to switch
55
4
Taking Pictures
Distance to subject 0.1m 0.3m 0.5m 1m 3m 5m
Camera movement 0.5cm 1cm 1.5cm 2.5cm 7.5cm 13cm
59
Page 60

Viewing 3D Pictures with the Parallel method and Cross method
Because our eyes are positioned about 6 to 7cm apart, each eye sees
at a slightly different angle. The brain processes this difference to
produce a three-dimensional image. This principle is applied to taking
and viewing 3D pictures.
3D pictures can be viewed by the Parallel method, where the left and
right lines of sight are parallel (like looking far away), or by the Cross
method, crossing the lines of sight. Viewing a 3D picture without the
viewer may take some practice.
Assembling the 3D Image Viewer
Assemble the supplied 3D Image Viewer as shown below.
4
Taking Pictures
60
Page 61

How to view 3D pictures with the 3D Image Viewer
Print out the pictures so they are 11cm to 12cm wide. Place the 3D
Image Viewer divider between the two images.
The distance between the eyes differ from person to person. Some may
not see a three-dimensional effect even with the same size print.
Pictures too large or too small make seeing the three-dimensional effect
very difficult. Try different size prints until the right effect is achieved.
• Never look at the sun through the 3D Image Viewer.
• Do not leave the 3D Image Viewer in direct sunlight, as this may
cause a fire.
4
Taking Pictures
61
Page 62

Example of a 3D Picture
4
Taking Pictures
62
Page 63

Shutter release button
Four-way controller
OK button
Taking Pictures with Digital Filters (Digital Filter
Mode)
You can take pictures with digital filters with a variety of colors, such as
red, blue, and green.
Filters
Eight color filters are provided: black-and-white, sepia, red, green, blue,
black-and-white+red, black-and-white+green, and black-andwhite+blue. When you select a filter in Digital Filter Mode, the display
on the LCD monitor is filtered with the selected color, and the pictures
are taken in that color.
1 Press the four-way controller (3) in Capture Mode.
The virtual mode dial is displayed.
2 Press the four-way controller (23) to
select the [Digital Filter (
3 Press the four-way controller (5).
The filter selection screen is displayed.
4 Press the four-way controller (23) to
select the filter.
D)].
Digital Filter
OK
Ok
Digital Filter
5 Press the OK button.
The camera is ready to take a picture.
6 Press the shutter release button.
The picture is taken.
B&W
OK
Ok
4
Taking Pictures
63
Page 64

Shutter release button
Four-way controller
OK button
Automatically Change Capture Conditions (Auto
Bracket Mode)
You can automatically take three pictures in a row with different settings
4
Taking Pictures
for exposure, saturation, sharpness, and contrast. For exposure and
white balance, the bracket step must be set in advance.
1 Press the four-way controller (3) in Capture Mode.
The virtual mode dial is displayed.
2 Press the four-way controller (23) to select [Auto
Bracket (
l)].
3 Press the four-way controller (5).
The bracket type selection screen is displayed.
4 Press the four-way controller (23) to
Auto Bracket
select the bracket type.
5 Press the OK button.
The camera is in Bracket Capture Mode.
6 Press the shutter release button.
The pictures are taken in Auto Bracket mode.
Saturation
OK
Ok
64
• Check the images in Playback mode.
• Setting the Auto Bracket Mode will cancel the Continuous Shooting mode.
• To exit auto bracket capture mode, switch to another mode.
Playing Back Still Pictures
1 p.24
Page 65

Setting the Exposure Bracket
You can set the bracket step to use when selecting Ex. Bracketing in
Auto Bracket Mode. Select from ±03, ±0.7, ±1.0, ±1.3, ±1.7, or ±2.0
1 Select [Ex. Bracket Step] on the
[
A Rec. Mode] menu.
2 Press the four-way controller (45) to
set the step.
3 Press the OK button.
Rec.Mode
Digital Zoom
Instant Review
Soft Setting
Ex. Bracket Step
WB Bracket Step
3D Mode
MENU OK
Exit Ok
0.5s
Parallel
The camera is ready to take a picture.
Three images will be taken; one with standard exposure, one with a
positive (+) step, and one with a negative (-) step.
Setting the White Balance Bracket
You can set the bracket step to use when selecting White Balance in
Auto Bracket Mode. Select from ±1, ±2, ±3, ±4, or ±5.
1 Select [WB Bracket Step] on the
[
A Rec. Mode] menu.
2 Press the four-way controller (45) to
set the step.
3 Press the OK button.
Rec.Mode
Digital Zoom
Instant Review
Soft Setting
Ex. Bracket Step
WB Bracket Step
3D Mode
MENU OK
Exit Ok
0.5s
Parallel
The camera is ready to take a picture.
Three images will be taken; one with standard white balance, one
with a positive (+) step, and one with a negative (-) step.
0.3
1
4
Taking Pictures
0.3
1
65
Page 66

Shutter release button
Four-way controller
A Picture Mode BDl
Continuous Shooting (Continuous Shooting/
High-Speed Shooting)
4
Taking Pictures
Pictures are taken continually while the shutter release button is pressed.
There is Continuous Shooting and High-Speed Shooting available.
j
q
Continuous
Shooting
High-Speed
Shooting
Images are captured, processed, and saved one by one.
Three frames are taken in a row, followed by image
processing and saving.
1 Press the four-way controller (2) to
display
j or q on the LCD monitor.
2 Press the shutter release button.
Pictures are taken continually while the shutter
release button is pressed.
Recording stops when you release the shutter
release button.
Playing Back Still Pictures 1 p.24
33
66
• You can continue shooting until the CF card is full.
• The interval between continuous shots differs according to recorded
pixels and quality level settings.
• The flash will not fire in Continuous Shooting mode.
• Continuous shooting and High-speed shooting are not available in 3D
Image mode, Movie Picture mode, Panorama Assist mode, or Auto
Bracket mode.
• High-speed shooting is not available in night-scene mode, or when
using black-and-white+red, black-and-white+green, or black-andwhite+blue digital filters.
Page 67

Using the Self-Timer
Shutter release button
Four-way controller
A Picture Mode B C F GDl
The picture will be taken either 10 seconds or 2 seconds after the
shutter release button is pressed.
1 Press the four-way controller (2) to
display
g or r on the LCD monitor.
2 Press the shutter release button.
gThe self-timer is engaged, and the self-timer
lamp lights for about 7 seconds. The picture
is taken about 3 seconds after the self-timer
lamp begins to blink.
r The self-timer is engaged, and the picture is taken about 2 seconds
after the self-timer lamp begins to blink.
Pressing the four-way controller or the MENU button during count-down
display will cancel the self-timer.
Playing Back Still Pictures
Taking a Self-Portraits
1 p.24
1 p.52
4
Taking Pictures
33
67
Page 68

Zoom button
Four-way controller
OK button
MENU button
A Picture Mode B F GDl
Using the Zoom
You can use the Zoom to take pictures in Tele or Wide mode.
4
Taking Pictures
1 Press the Zoom button in Capture
mode.
x Tele: Subject becomes larger.
w Wide: Subject becomes smaller.
33
68
When the digital zoom function is disabled,
there is an optical zoom available up to 3 times.
When the digital zoom function is enabled, you
can further enlarge the subject up to 8 times.
Saving the Zoom Position 1 p.72
Zoom bar
33
Digital zoom range
Page 69

Enabling the Digital Zoom Function
1 Press the MENU button in Capture mode.
The [A Rec. Mode] menu will be displayed.
2 Press the four-way controller (3) to
select [Digital Zoom].
3 Press the four-way controller (5) to
select
O (on).
4 Press the OK button.
The camera is ready to take a picture.
Rec.Mode
Digital Zoom
Instant Review
Soft Setting
Ex. Bracket Step
WB Bracket Step
3D Mode
MENU OK
Exit Ok
0.5s
0.3
Parallel
1
Saving the Digital Zoom Function Setting 1 p.72
4
Taking Pictures
69
Page 70

Four-way controller
<+0.7>
A Picture Mode B C F GDl
EV Compensation
Use EV Compensation when you want to intentionally over expose
4
(brighten) or under expose (darken) your picture.
Taking Pictures
1 Press the four-way controller (45) in
Capture Mode.
5 Adjusts the exposure to over-expose (+
side).
4 Adjusts the exposure to under-expose (-
side).
The EV Compensation setting is displayed on the LCD monitor.
When you press the four-way controller (45) once, or when you set
this to ±0, the display will disappear in two seconds.
<+0.7>
<+0.7>
33
70
Saving the EV Compensation Setting
1 p.72
Page 71

Taking Pictures
71
4
Page 72

Saving the Settings
Saving the Menu Items (Memory)
You can choose whether to save the set values when the camera is
turned off. If you select On, the camera saves the settings in effect just
before the camera is turned off. If you select Off, the settings return to
default settings when the camera is turned off.
Item Description
Flash
EV compensation Saves the EV compensation settings. P
4
Taking Pictures
White Balance
Focusing Area
AE Metering
Sensitivity
Digital Zoom
Focus Mode Saves the Focus Mode settings. P
Zoom Position Saves the Zoom Position settings. P
Display Mode Saves the LCD monitor display mode. P
File No.
Saves the Flash mode setting selected with the
button.
Saves the White Balance settings on the Rec. Mode
menu.
Saves the Focusing Area settings on the Rec. Mode
menu.
Saves the AE Metering settings on the Rec. Mode
menu.
Saves the Sensitivity settings on the Rec. Mode
menu.
Saves the Digital Zoom settings on the Rec. Mode
menu.
Saves the file numbers. File numbers will continue
to have sequential numbers even after chan ging the
CF card.
Default
Setting
O
P
P
P
P
O
O
72
• Menu items not included in Memory will also be saved with the
settings selected on the menus for each function.
• Zoom positions set within the digital zoom range will not be saved
even when Zoom Position is set to On in Memory.
Page 73

1 Press the MENU button in Capture mode.
2 Press the four-way controller (23) to
select [Memory].
3 Press the four-way controller (5).
The Memory menu is displayed.
4 Press the four-way controller (23) to
select the item.
5 Press the four-way controller (45) to
select
O (on) or P (off).
6 Press the OK button twice.
The camera is ready to take a picture.
Rec.Mode
Memory
Sharpness
Saturation
Contrast
MENU OK
Exit Ok
Memory
Flash
EV Compensation
White Balance
Forcusing Area
AE Metering
Sensitivity
MENU OK
Exit Ok
4
Taking Pictures
73
Page 74

Playback/Deleting
x1.0
Playing Back Images
f/y button
Zoom/
Four-way controller
Playing Back Still Pictures
See “Playing Back Images” (p.24), or “Playing Back Previous or Next
Images” (p.24).
5
Zoom Playback
Playback/Deleting
You can play back images magnified up to 12 times. A button operation
guide is displayed on the LCD monitor during magnification.
1 In Playback mode, use the four-way controller (45) to
select the image to magnify.
2 Press x/y on the Zoom/f/y button.
The image is magnified. (1×-12×) Keep pressing
to continuously change the magnification.
• Operations available during Zoom Playback:
Four-way controller (
Zoom/
f/ybutton (x) Makes image larger
Zoom/
f/ybutton (x) Makes image smaller
2345) Moves zoom
position
3 Press the shutter release button halfway.
The camera is ready to take a picture.
x1.0
x1.0
74
Zoom Display is not available for movie pictures.
Page 75

Playback button
100-0049
11:20
03/20/2003
Four-way controller
Playing Back Movie Pictures
To play back movie pictures: A button operation guide is displayed on
the LCD monitor during playback.
1 In Playback mode, use the four-way controller (45) to
select the image to play back.
2 Press the four-way controller (2).
Playback will start.
• Operations available during Playback:
Four-way controller (
Four-way controller (
Four-way controller (
• Operations available while paused:
Four-way controller (
Four-way controller (
Four-way controller (
4) Reverse playback
5) Forward playback
2)Pause
4) Frame reverse
5) Frame forward
2) Cancels pause (Playback resumes)
100-0049
100-0049
03/20/2003
03/20/2003
11:20
11:20
3 Press the four-way controller (3).
Playback will stop.
4 Press the Playback button.
The camera returns to Capture mode.
5
Playback/Deleting
75
Page 76

f/y button
Zoom/
Four-way controller
Nine Image Display
You can display nine images at the same time.
1 In Playback mode, use the four-way controller (45) to
select the image.
2 Press w/f on the Zoom f/y button.
5
Playback/Deleting
Up to nine small images will be displayed at
once.
Press the four-way controller (
select the image. If there are 10 or more
images recorded, a scroll bar appears at the
right of the screen. With an image selected in
the bottom row, pressing the four-way controller
(
3) displays the next nine images.
With the very last image selected, press the four-way controller (3) to
display the first nine images.
2345) to
Selected ima ge
3 Press w/f on the Zoom f/y button.
The selected image is displayed by itself.
* For movie pictures, the first frame is displayed.
100-0030
76
Page 77

Four-way controller
OK button
MENU button
Slideshow
You can play back all recorded images on your CF card successively.
1 In Playback mode, use the four-way controller (45) to
select the images for the slideshow.
2 Press the MENU button.
The Playback Mode menu is displayed.
Play Back
Slideshow
3s
3 Press the four-way controller (3) to
select [Slideshow].
4 Press the four-way controller (45) to
change the playback interval.
Select from 3s (3 sec), 5s (5 sec), 10s (10sec), 15s (15 sec), 20s (20
sec), and 30s (30 sec).
MENU OK
Exit Ok
5 Press the OK button.
Playback will start at the specified interval.
• Pressing the four-way controller or the MENU button during
continuous playback will stop the slideshow.
• The slideshow will repeat until you press a button to stop it.
• Movie pictures will be played through to the end and move to the next
image, regardless of the playback interval.
5
Playback/Deleting
77
Page 78

Deleting Images
i button
Four-way controller
OK button
Deleting a Single Image
In Playback mode, use the four-way controller (45) to
1
select the image to delete.
2 Press the i button.
5
Playback/Deleting
The Delete screen will be displayed.
3 Press the four-way controller (2) to
select [Delete].
4 Press the OK button.
• You can also delete displayed images in Instant Review (p.23).
• You cannot delete protected (
Deleting All Images
Z) images.
Delete(One)
100-0107
Delete
Cancel
OK
Ok All
You can erase all saved images at once.
• Once deleted, images cannot be restored.
• Protected images cannot be deleted.
1 In Playback mode, press the i button
twice.
The Delete All screen is displayed.
2 Select [Delete] with the four-way
controller (
2).
3 Press the OK button.
78
Delete(All)
Delete all images on memory card?
Delete
Cancel
OK
Ok
Page 79

Z button
Four-way controller
OK button
Protecting Images from Deletion (Protect)
You can protect images from being accidentally erased.
1 In Playback mode, select the image to protect with the
four-way controller (
2 Press the Z button.
The Protect screen is displayed.
3 Select [Protect] with the four-way
controller (
2).
4 Press the OK button.
• Select Unprotect in step 3 to cancel the Protect setting.
•The
Z symbol is displayed when playing back protected images.
Protecting All Images
You can protect all of the images.
45).
Protect(One)
100-0107
OK
Ok All
Protect
Unprotect
1 Enter the Playback mode.
2 Press the Z button twice.
The Protect All screen is displayed.
3 Select [Protect] with the four-way controller (2).
4 Press the OK button.
5
Playback/Deleting
Select Unprotect in step 3 to cancel the Protect setting on all of the
images.
Even protected images are deleted by formatting the CF card.
79
Page 80

Viewing Images on a TV
By using the video cable, you can capture and play back images
using a TV or other equipment with a video IN jack as your
5
monitor. Make sure that both the TV and the camera are turned off
Playback/Deleting
before connecting the cable.
1 Open the terminal cover and connect the video cable.
2 Connect the other end of the video cable to the video
IN jack on the TV.
3 Turn on the TV and the camera.
80
Selecting the Video Output Format 1 p.86
The LCD monitor is always off when the camera is connected to a
TV.When using the camera for a long time, use of the AC adapter
(optional) is recommended.Please refer to the operating manual of the
TV or other connected equipment.
Page 81

Printing Service Settings (DPOF)
You can print the images on the CF card using a DPOF (Digital Print
Order Format) compatible printer, or at a printing service.
Four-way controller
OK button
Single Image Settings
Set the following items for each image.
• Copies: Set the number of prints up to 99.
• Date: Specify whether or not to imprint the date on the image.
1 In Playback mode, use the four-way controller (45) to
select the image for DPOF settings.
2 Press the four-way controller (2).
The DPOF screen is displayed.
3 Use the four-way controller (45) to
select [ONE], and press the four-way
controller (
The frame will move to Number of Prints.
3).
4 Press the four-way controller (45) to
select the number of prints, and
press the four-way controller (
The frame will move to Date.
3).
5 Press the four-way controller (45) to
select
O The date will be printed.
P The date will not be printed.
O or P.
DPOF
100-0107
Exit
DPOF
100-0107
Exit Ok
ONE
Copies
Date
ONE
Copies
Date
00
OKMENU
Ok
01
OKMENU
5
Playback/Deleting
81
Page 82

6 Press the OK button.
Prints can be made according to the settings.
• If DPOF settings already exist for an image, the number of prints and
the on/off date setting will be displayed.
• To cancel DPOF settings, set the number of prints to 0 and press the
OK button.
• DPOF settings are not available for movie pictures.
• Some printers or printing equipment at the photo processing lab may
not imprint the date even when the DPOF setting is set.
5
Playback/Deleting
82
Page 83

Four-way controller
OK button
Settings for All Images
1 Press the four-way controller (2) in Playback Mode.
The DPOF screen is displayed.
2 Press the four-way controller (45) to select [All] and
press the four-way controller (
The frame will move to Number of Copies.
3 Press the four-way controller (45) to
set the number of prints.
The maximum setting is 99.
4 Press the four-way controller (3).
5 Press the four-way controller (45) to
select
O The date will be printed.
P The date will not be printed.
O or P for the date.
3).
DPOF
ALL
DPOF setting for all images.
Copies
Date
Exit Ok
01
OKMENU
6 Press the OK button.
Prints can be made according to the settings.
• Settings for all images will cancel settings for single images.
• When you specify the number of prints for all images, the number of
prints applies to all images.Before printing, always check that the
number is correct.
• DPOF settings are not available for movie pictures.
• To cancel DPOF settings, with "All Images" selected, set the number
of prints to 00.
5
Playback/Deleting
83
Page 84

Settings
Camera Settings
How to recall the [B Set-up] menu
Four-way controller
OK button
MENU button
Rec.Mode
Recorded Pixels
Quality
White Balance
Forcusing Area
AE Metering
Sensitivity
MENU OK
Exit Ok
Formatting a CF card
6
Settings
Formatting will delete all the data on the CF card.
2048
1536
AUTO
Wide
AUTO
Format
Beep
Date Adjust
World Time
Language/
Display Mode
MENU OK
• Do not open the CF card cover while formatting a CF card. The card
may be damaged beyond use.
• Please note that formatting will delete protected images as well.
1 Select [Format] on the [B Set-up] menu.
2 Press the four-way controller (5).
The format screen is displayed.
3 Select [Format] with the four-way controller (2).
4 Press the OK button.
Formatting begins. When formatting is complete, the camera is ready
to take a picture.
84
Set-Up
mm/dd/yy
Exit Ok
English
Normal
Page 85

Changing the Date Style and Date/Time
You can change the initial date and time settings. You can also set the
date display style. Choose from y/m/d, m/d/y, and d/m/y.
1 Select [Date Adjust] on the [B Set-up] menu.
2 Press the four-way controller (5).
The Date Adjust screen is displayed.
See “Initial Settings” (p.18) for instructions on setting the date and
time.
Changing the Display Language
You can change the language of the menus and error messages.
1 Select [Language] on the [B Set-up] menu.
2 Press the four-way controller (5).
The Language setting screen is displayed.
3 Select your language with the four-way controller
(
23).
4 Press the OK button.
Menus are displayed in the language of your choice.
5 Press the OK button.
The camera is ready for capture or playback.
6
Settings
85
Page 86

How to recall the [B Set-up] menu
Four-way controller
OK button
MENU button
Rec.Mode
Recorded Pixels
Quality
White Balance
Forcusing Area
AE Metering
Sensitivity
MENU OK
Exit Ok
2048
1536
AUTO
Wide
AUTO
Set-Up
Format
Beep
Date Adjust
World Time
Language/
Display Mode
MENU OK
Exit Ok
Selecting the Video Output Format
You can select the output format (NTSC or PAL) for capturing or playing
back images on a TV monitor.
6
Settings
1 Select [Video Out] on the [B Set-up] menu.
2 Press the four-way controller (45) to select NTSC or
PAL, to match your TV output format.
3 Press the OK button.
The camera is ready for capture or playback.
Turning the Operation Sound On and Off
You can turn the operation sounds on and off.
1 Select [Beep] on the [B Set-up] menu.
2 Press the four-way controller (45) to select O (on) or
P (off).
3 Press the OK button.
The camera is ready for capture or playback.
mm/dd/yy
English
Normal
86
Page 87

Setting World Time
The date and time set in “Initial Settings” (p.18) are the Home Time
(your usual time zone) setting.
Setting World Time enables you to display the local date and time on
the monitor when traveling overseas.
1 Select [World Time] on the [B Set-up] menu.
2 Press the four-way controller (5).
The World time setting screen is displayed.
3 Press the four-way controller (45) to
switch between
ODisplays the time in the country selected in
World time.
PDisplays the time in the country selected as Home Time.
O and P.
World Time
NYC
City
DST
20:13
NYC
City
DST
20:13
MENU OK
Exit Ok
4 Press the four-way controller (3).
This sets world time city.
If New York is selected as the world time city, New York’s position
blinks on the world map, and the
(NYC) and the local time.
X will display the code for New York
5 Press the four-way controller (45) to select the World
Time city, and press the four-way controller (
3).
6 Press the four-way controller (45) to select DST O (on)
or
P (off), and press the four-way controller (3).
This sets home time city.
If New York is selected for home time city, press the four-way
controller (
45) to select your Home time city, or turn DST on and off.
7 Press the OK button 2 times.
The camera is ready to capture or play back images with the correct
date and time.
6
Settings
See the list on p.92 for available cities and their codes.
87
Page 88

How to recall the [B Set-up] menu
100-0030
11:20
03/20/2003
1/100
F2.6
Four-way controller
OK button
MENU button
Rec.Mode
Recorded Pixels
Quality
White Balance
Forcusing Area
AE Metering
Sensitivity
MENU OK
Exit Ok
2048
1536
AUTO
Wide
AUTO
Set-Up
Format
Beep
Date Adjust
World Time
Language/
Display Mode
MENU OK
Exit Ok
Setting the Display Mode
This determines the content displayed on the LCD monitor. You can
choose Normal, Histogram, Grid, or No Information. Capture mode and
6
Playback mode display different information on the screen.
Settings
Normal
Capture information is
displayed.
1 Flash 2 Focus Mode
3 Capture method
4 Capture mode
5 Autofocus frame
6 Capacity remaining
7 Battery symbol
8 Date and Time
9 Shutter speed · Aperture
value
10 Folder name · File name
Capture Mode Playback Mode
123 6 104
33
1/100
1/100
F2.6
F2.6
75 9 8
mm/dd/yy
English
Normal
100-0030
100-0030
03/20/2003
03/20/2003
11:20
11:20
88
Page 89

Histogram
100-0030
1/100
F2.6
11:20
03/20/2003
Brightness distribution is
displayed. The horizontal
axis shows brightness (dark
to bright left to right), and
the vertical axis shows the
pixels.
Grid
The grid is not displayed in
Playback mode.
No Information
Capture information is not
displayed.
• During Autofocus, the
Autofocus frame and battery
icon are displayed.
• Settings are displayed for
several seconds when
changed.
Capture Mode Playback Mode
100-0030
100-0030
03/20/2003
03/20/2003
11:20
Capture Mode
Capt ure Mode
33
1/100
1/100
F2.6 11:20
F2.6
6
Settings
1 Select [Display Mode] on the [B Set-up] menu.
2 Press the four-way controller (45) to select your
desired display mode.
3 Press the OK button.
The camera is ready for capture or playback.
89
Page 90

How to recall the [B Set-up] menu
Four-way controller
OK button
MENU button
Rec.Mode
Recorded Pixels
Quality
White Balance
Forcusing Area
AE Metering
Sensitivity
MENU OK
Exit Ok
2048
1536
AUTO
Wide
AUTO
Set-Up
Format
Beep
Date Adjust
World Time
Language/
Display Mode
MENU OK
Exit Ok
Screen Effect
You can use various animated effects when switching display screens
on the LCD monitor.
6
1 Select [Screen Effect] on the [B Set-up] menu.
Settings
2 Press the four-way controller (45) to select O (on) or
P (off).
3 Press the OK button.
The camera is ready for capture or playback.
Setting the Background Color
This sets the background design and color displayed on the LCD monitor.
1 Select [Background Color] on the [B Set-up] menu.
2 Press the four-way controller (5).
The Background color screen is displayed.
3 Press the four-way controller (4253 ) to select the
background color.
4 Press the OK button twice.
The camera is ready for capture or playback.
90
mm/dd/yy
English
Normal
Page 91

Setting Auto Power Off
You can set the camera to turn off automatically after a certain length of
inactivity.
1 Select [Auto Power Off] on the [B Set-up] menu.
2 Press the four-way controller (45) to select 3 min, 5
min, or OFF.
3 Press the OK button.
The camera is ready for capture or playback.
Auto Power Off will not work during slideshow playback or a USB
connection.
Setting LCD Monitor Brightness
You can set the brightness for your LCD monitor.
1 Select [Brightness Level] on the [B Set-up] menu.
2 Press the four-way controller (45) to adjust the
brightness while you watch the LCD monitor.
Press the four-way controller (4) to darken the display, and the fourway controller (
5) to brighten it.
3 Press the OK button twice.
The camera is ready for capture or playback.
Resetting to Default Settings [Reset]
6
Settings
This resets all settings other than Date/Time, Language, Video Out,
Date Style, and World Time.
1 Select [Reset] on the [B Set-up] menu.
2 Press the four-way controller (5).
The Reset screen is displayed.
3 Press the four-way controller (2) to select [Reset].
4 Press the OK button.
The camera is ready for capture or playback.
91
Page 92

Appendix
List of City Names
There are the cities and code numbers available for setting the world
time.
PPG Pagopago THR Tehran
HNL Honolulu DXB Dubai
ANC Anchorage KHI Karachi
YVR Vancouver KBL Kabul
SFO San Francisco MLE Male
LAX Los Angeles DEL Delhi
YYC Calgary CMB Colombo
DEN Denver KTM Kathmandu
MEX Mexico City DAC Dacca
CHI Chicago RGN Rangoon
MIA Miami BKK Bangkok
YTO Toronto KUL Kuala Lumpur
NYC New York VTE Vientiane
SCL Santiago SIN Singapore
CCS Caracas PNH Phnom Penh
YHZ Halifax SGN Ho chi Minh
BUE Buenos Aires JKT Jakarta
SAO Sao Paulo HKG Hong Kong
7
RIO Rio de Janeiro PER Perth
Appendix
MAD Madrid BJS Beijing
LON London SHA Shanghai
PAR Paris MNL Manila
MIL Milano TPE Taipei
ROM Rome SEL Seoul
BER Berlin ADL Adelaide
JNB Johannesburg TYO Tokyo
IST Instanbul GUM Guam
CAI Cairo SYD Sydney
JRS Jerusale m NOU Noumea
MOW Moscow WLG Wellington
JED Jeddah AKL Auckland
92
Page 93

Messages
The following messages may be displayed on the LCD monitor during
camera operation.
Memory full The CF card memory is full, and no more images can be
No image There are no images for playback on the CF card.
Camera cann ot display
this image
No card in camera The CF card is not inserted in the camera. (p.15)
Battery dep leted The battery is exhausted. Charge the battery if it is an
Memory card error The CF card has a problem, and image capture and
Card not formatted The CF card inserted is not formatted, or has been
Data being recorded The image is being recorded onto the CF card.
Changing the settings The image protect settings or DPOF settings are being
Formatting The CF card is being forma tted.
Deleting The image is being deleted.
Image folder could not
be created
Settings not stored The CF card memory is full, and no more DPOF settings
Could not save image The image could no t be saved because of a CF card error.
saved. Insert a new CF card or delete unwanted images.
(p.15, p.78)
You may be able to save the image by changing the quality
level or recorded pixels. (p.39, p.40)
You are trying to play back an image not sup ported by this
camera. You may be able to display this on a PC or
another brand of camera.
rechargeable battery. Otherwise, replace with new
batteries. (p.12)
playback are impossible. Try displaying it on a PC.
formatted on a PC or other de vice. (p.84)
changed.
The maximum file number has been used, and no more
images can be saved. Insert a new CF card or format the
CF card. (p.84)
can be made.
7
Appendix
93
Page 94

Troubleshooting
Problem Cause Remedy
The camera will
not turn on.
No image on
the LCD
monitor
Shutter release
button will not
work
7
Appendix
No batteries are
installed
CF card cover is open Close the CF card cover.
Battery is installed
incorrectly
Battery is exhausted Install new batteries in the camera. Or,
Connected to a TV The LCD monitor is always off when the
Image is displayed but
hard to see
Flash is charging While the flash status lamp is flashing
The CF card is full Insert a CF card with some space, or
Recording Please wait until recording is finished.
Check whether battery is installed. If not,
install battery.
Check orientation of battery. Reinsert
battery according to the (-) and (+)
symbols in the battery compartment.
(p.12)
use the AC Adapter.
camera is connected to a TV. (The LCD
monitor is also off when the video cable IVC2 is connected to the camera.)
Images on the LCD monitor may be hard
to see when taking pictures outside in
sunlight. Change the brightness settings
on your LCD monitor. (p.91) Or, use the
LCD monitor hood.(p.17)
red, the flash is being charged and a
picture cannot be taken. The lamp lights
red when charging is comp lete.
delete unwanted images. (p.15, p.78)
94
Page 95

Problem Cause Remedy
Out of focus Subject is difficult for
Picture is dark Subject is too far away
Flash does not
fire
Autofocus to handle
Subject is not in
Focusing Area
Subject is too close Set the focus mode on q. (p.36)
The focus mode is on q When the focusing mode is on q, normal
in a dark environment
(night-scenes, etc.)
Background is dark When taking a picture of a person against
The Flash Mode is set to
Off
The Capture mode is
set on C, Continuous
Capture, or s.
Subjects difficult for Autofocus include
those with low contrast (blue skies, white
walls), dark objects, fine-patterned
objects, fast-moving objects, and
landscapes seen through a windo w or
net. Focus on something at the same
distance as your subject, secure the
focus (by pressing shutter release button
halfway), aim at your subject, and pre ss
shutter release button fully.
Position focusing target within the frame
(Focusing Area) at the center of the LCD
screen. If your subject is not within the
Focusing area, first focus on your subject
within the AF area, secure the focus (by
pressing shutter release button halfway),
then reframe your picture as desired, and
press shutter release bu tton fully.
pictures will be out of focus.
If the subject is too far away, the image
will be dark. Take the picture within the
flash rang e.
a dark background, the person may
appear clearly while the background
appears dark, because the flash does not
reach it. If you select the B mode on the
virtual dial screen, both the person and
the night-scene will be clear. (p.53)
Set to Auto or b. (p.38)
The flash will not fire in these modes.
7
Appendix
95
Page 96

Optional Accessories
The following optional accessories are available for this camera.
AC Adapter D-AC5
USB Cable I-USB2 (included)
Video cable I-VC2 (included)
Camera Case O-CC5
Strap O-ST5 (included)
3D Imag e Viewer O-3DV1
7
Appendix
96
Page 97

Main Specifications
Model Fully automatic compact-type digital still camera with built-in zoom
Effective Pixels 3.2 megapixels
Sensor 3.34 megapixels (total pixels), 1/2.7 inch interline transfer CCD with a
Recorded Pixels Still 2048×1536 pixels, 1600×1200 pixels,
Sensitivity Auto, Manual (Equivalent to ISO100, ISO200, and ISO400)
File Format Still JPEG (Exif2.2), DCF, DPOF, PRINT Image Matching II
Quality Level “Best”, “Better”, “Good”
Storage Medium Compact Flash (CF) Type I
Image Storage Capacity
Recorded Pixels
White Balance Auto, Daylight, Shade, Tungsten Light, Fluorescent light, Manual
Lens Focal Length 5.8mm - 17.4mm (Equivalent to 38 - 114mm in
Digital Zoom Capture Mode Max 2.7× (Combines with 3× optical zoom to
LCD monitor 1.5 TFT color LCD monitor (with backlight and brightness control)
Playback Functions Single-frame, 9-frame index, enlargement (max. 12×), scroll, slideshow,
Autofocus system T ype TTL contrast detection by sensor
primary color filter
1024×768 pixels, 640×480 pixels
Movie picture 320×240 pixels
Movie picture AVI (Open DML Motion JPEG), about 15fps
Quality Level
2048×1536 8 16 33
1600×1200 13 27 60
1024×768 24 50 89
640×480 50 89 128
• These figures show the number of shots when using a 16MB CF card.
Aperture f/2.6 - f/5.0
Lens Composition 6 elements in 5 groups (one lens aspherical on both
Zoom type Electrically driven
Capture Range 38.4mm×28.5mm (full screen) (Using macro mode
Lens Barrier Electrically driven
180-degree rotation mechanism included
movie playback
Capture Range
(From lens front)
Focus Lock By pressing the shutter release button halfway
Best Better Good
35mm format)
sides)
or manual focus at max. WIDE position)
provide zoom equivalent to 8× max.)
Normal: 0.4m ~ ∞ (full zoom range)
Macro: 0.1m ~ 0.5m (full zoom range)
Infinity-landscape: ∞ (full zoom range)
Movie picture
(320×240)
30 sec × 2 sets
7
Appendix
97
Page 98

Manual Focus 0.1m ~ ∞
Exposure Mechanism AE Metering TTL metering by sensor (multi-segment, center-
Exposure modes Standard, PICT, Night-scene, Movie, 3D
EV compensation ±2EV (Can be set in 1/3EV steps)
Movie Picture Recording time approx. 1 s ec - 30 sec.
Shutter Model Electronic/Mechanical shutter
Flash Model Automatic flash with red-eye reduction function
Drive Modes Single-frame, Continuous, Self-timer
Self-timer Electronic control, operation time: approx. 10 sec.
Time function World Time settings for 62 cities (28 time zones)
Power Supply Lithium battery CR-V3, two AA batteries (Alkaline, nickel, Ni-MH, Lithium),
Battery Life Approx. 650
I/O Port USB/AV terminal (PC communication USB1.1), external power supply
Video Output format NTSC/PAL
Size 105 (W) × 63 (H) × 41.5 (D) mm (excludes operating members)
Mass 180g (excludes battery and CF card)
Mass when shooting 230g (Includes battery and CF card)
7
Appendix
Accessories Lithium battery CR-V3, 3D image viewer, USB cable, software (CD-ROM),
Auto Bracket available
Speed Approx. 1/1500 sec - 4 sec.
Flash Modes Auto, Flash Off, Flash On, Auto+Red-eye
Capture Range Wide Approx. 0.2m-5.0m w/Sensitivity AUTO
AC Adapter Kit (optional)
images
terminal
video cable, strap, LCD monitor hood, operating manual
weighted, spot)
reduction, Flash On+Red-eye reduction
Tele Approx. 0.1m-2.7m w/Sensitivity AUTO
(with 50% of shooting using flash, and using lithium
battery CR-V3)
* Based on PENTAX measuring conditions.
98
Page 99

WARRANTY POLICY
All PENTAX cameras purchased through authorized bona fide photographic
distribution channels are guaranteed against defects of material or workmanship
for a period of twelve months from date of purchase. Service will be rendered,
and defective parts will be replaced w ithout cost to you within that period,
provided the equipment does not show evidence of impact, sand or liquid
damage, mishandling, tampering, battery or chemical corrosion, operation
contrary to operating instructions, or modification by an unauthorized repair
shop. The manufacturer or its authorized representatives shall not be liable for
any repair or alterations except those made with its written consent and shall not
be liable for damages from delay or loss of use or from other indirect or
consequential damages of any kind, whether caused by defective material or
workmanship or otherwise; and it is expressly agreed that the liability of the
manufacturer or its representatives under all guarantees or warranties, whether
expressed or implied, is strictly limited to the replacement of par ts as
hereinbefore provided. No refunds will be made on repairs by nonauthorized
PENTAX service facilities.
Procedure During 12-month Warranty Period
Any PENTAX which proves defective during the 12-month warranty period
should be returned to the dealer f rom whom you purchased the equipment or to
the manufacturer. If there are no representatives
of the manufacturer in your country, send the equipment to the manufacturer,
with postage prepaid. In this case, it will take a considerable length of time
before the equipment can be returned to you owing to the complicated customs
procedures required. If the equipment is covered by warranty, repairs will be
made and parts replaced free of charge, and the equipment will be returned to
you upon completion of servicing. If the equipment is not covered by warranty,
regular charges of the manufacturer or of its representatives will apply. Shipping
charges are to be borne by the owner. If your PENTAX was purchased outside
of the country where you wish to have it serviced during the warranty period,
regular handling and servicing fees may be charged by the manufacturer’s
representatives in that country. Notwithstanding this, your PENTAX returned to
the manufacturer will be serviced free of charge according to this procedure and
warranty policy. In any case, however, shipping charges and customs clearance
fees to be borne by the sender. To prove the date of your purchase when
required, please keep the receipt or bills covering the purchase of your
equipment for at least a year. Before sending your equipment for servicing,
please make sure that you are sending it to the manufacturer’s authorized
representatives or their approved repair shops, unless you are sending it directly
to the manufacturer. Always obtain a quotation for the service charge, and only
after you accept the quoted service charge, instruct the service station to
proceed with the servicing.
7
Appendix
99
Page 100

• This warranty policy does not affect the customer’s statutory rights.
• The local warranty policies available from PENTAX distributors in some
countries can supersede this warranty policy. Therefore, we recommend
that you review the warranty card supplied with your product at the time
of purchase, or contact the PENTAX distributor in your country for more
information and to receive a copy of the warranty policy.
7
Appendix
100
The CE Mark is a Directive conformity mark of the European
Community.
 Loading...