


A
3
5
8
1
1
16
22
3.5
5.6
80
35
-
A
X
E
P
NN
T
OPERATING MANUAL
BASIC OPERATION
(PREPARATION)
BASIC OPERATION
(SHOOTING)
ADVANCED OPERATIONS
OTHERS

Congratulations on your purchase of this camera and welcome
to the exciting world of Pentax autofocus photography! This
compact and lightweight camera is an autofocus SLR camera
that offers higher levels of sophistication and performance.
Incorporating a broad range of advanced technologies and
highly accurate automation, this camera will perform superbly for
the most exacting photographer.
• Read this instruction manual carefully to get a full explanation
of operations before use.
The camera does not operate when a lens with the following
conditions attached.
1.When a lens, which does not have autofocus function is
attached.
2.When an F or FA lens is attached with the aper ture ring set
other than the A position.
3.When any accessory mentioned on page 101 is used
between the camera and an F or FA lens.
Lenses and accessories produced by other manufacturers are
not made to meet our precise specifications and therefore may
cause difficulties with, or actual damage to your Pentax camera.
We do not assume any responsibility or liability for difficulties
resulting from the use of lenses and accessories made by other
manufacturers.
This mark indicates precautions that, if not
followed, could result in serious injury to the
person.
This mark indicates precautions that, if not
followed, could result in minor or medium
injury to the person or damage to the
equipment.
1
FOR SAFE USE OF YOUR CAMERA
Although we have carefully designed this camera for safe operation,
please be sure to follow precautions given on this page.
• The electronic circuits inside the camera contain high voltage
working parts. Never attempt to disassemble the camera yourself.
• Never touch internal parts of the camera if they become exposed
from dropping the camera or for some other reason, as there is
danger of an electric shock.
• Wrapping the strap around your neck is dangerous.Make sure that
small children do not get the strap caught around their neck.
• Do not look directly at the sun through the camera, as viewing the
sun may damage your eyes, and/or parts of the camera (e.g.: shutter
curtains, etc.)
• Be sure to store batteries out of the reach of children. Seek medical
assistance immediately if accidentally swallowed.
• Do not use the flash near anyone's eyes, as it may hurt them. Be
particularly careful with the flash around infants.
• Never try to disassemble, short or recharge the battery. Also, do not
dispose of the battery in fire, as it may explode.
• Remove the batteries from the camera immediately if they become
hot or begin to smoke.Be careful not to burn yourself during removal.
WARNING
WARNING:
CAUTION:
CAUTION

2
PRECAUTIONS FOR YOUR CAMERA
Your Pentax camera is a high-precision mechanism.
Handle it with great care.
Precautions when taking pictures
• Do not use the camera where it may come in contact with rain, water,
or any other liquid, because the camera is not weather, water, or liquid
resistant. Should the camera get wet from rain, splashing water, or any
other liquid wipe it off immediately with a dry soft cloth.
• Do not drop the camera or allow it to hit solid objects.If the camera suffers
a shock or impact, take it to a Pentax service center for inspection.
• Be careful not to subject the camera to strong vibrations, shock or
pressure. Use a cushion to protect the camera when carrying it in a
motorcycle, car, boat, etc.
• Condensation on the interior or exterior of the camera may be
extremely harmful to the camera mechanism as it may cause rust.
Furthermore, if the camera is taken from warm temperature to a
subfreezing one or vice versa, the formation of icelets may cause
damage. In such a case, put the camera into a case or plastic bag so
that any changes in temperature difference is minimized.Do not
remove it from the bag until temperature has stabilized.
• Regular size color prints may cut off what appears on the extreme
edges of the film frame. Compose your picture with a margin of safety
at the edges.
Precautions for storage
• Avoid leaving the camera for extended periods in places where the
humidity and temperature are very high, such as in a car.
• Do not store the camera in a closet with moth balls or in an area where
chemicals are handled. Store it in a place with good dry air circulation
to prevent the growth of fungus.
Precautions for proper care
• Never touch the shutter curtain or mirror with your finger or any other object.
• Use a blower and lens brush to remove dust accumulated on the lens
or viewfinder.
• Never use solvents such as paint thinner, alcohol or benzene to clean
the camera.
• Electrical problems may often be caused by water, dirt or dust at points
of electrical contact. Also check for battery leakage, traces of dirt or
grease, or corrosion due to salinity or gas.If you cannot correct the

3
problems, have your camera inspected at a Pentax service center.
Repairs of this nature are not covered under the terms of the warranty
and charges may be assessed.
Other precautions
• The temperature range at which this camera functions properly is 50°C
to -10°C (122˚F to 14˚F).
• A camera which has been submerged in water usually cannot be
repaired. If such an accident should occur, it is advisable to contact a
Pentax Service Center immediately.
• To maintain optimum performance, it is recommended that the camera
be inspected every one or two years.If the camera has not been used
for an extended period, or is being prepared for an important
photographic session, it is recommended that you have the camera
inspected or test shoot with it.
• Repairs deemed necessary due to usage of this product in an industrial
or commercial application may not be covered under the terms of the
Pentax warranty.
• The PENTAX warranty provides only for the repair of defects in
materials or workmanship. Damage of any kind cannot be repaired at
any charge under the terms of the warranty. If the difficulty is caused as
a direct result of the product being used in conditions as outlined in the
"Precautions for Your Camera" section or any other operation contrary
to the instructions outlined in this manual, charges will be assessed
and a repair quotation will be provided.
PRECAUTIONS FOR BATTERY USAGE
• Use two 3V lithium batteries (CR2 type).
• Misuse of the battery can cause hazards such as leakage, overheating,
explosion, etc.The battery should be inserted correctly with regard to
polarity (+ and -) marked on the battery and the camera.
• Battery performance may be temporarily hindered in low temperatures,
but will recover in normal temperatures.
• Keep a spare battery on hand for replacement convenience when
shooting outdoors or while traveling.
• If the built-in flash is used continuously, the battery may become warm,
but it does not mean that the battery is faulty; it is one of the battery's
characteristics.
• Replace the batteries at the same time. Do not mix battery brands, type
or an old battery with a new one. It may cause explosion or overheating.

4
TABLE OF CONTENTS
FOR SAFE USE OF YOUR CAMERA . . . . . . . . . . . . . .1
PRECAUTIONS FOR YOUR CAMERA . . . . . . . . . . . . .2
PRECAUTIONS FOR BATTERY USAGE . . . . . . . . .3
TABLE OF CONTENTS . . . . . . . . . . . . . . . . . . . . . . . .4
NAMES OF WORKING PARTS . . . . . . . . . . . . . . . . . . .8
LCD PANEL INDICATIONS . . . . . . . . . . . . . . . . . . . . .10
VIEWFINDER INDICATIONS . . . . . . . . . . . . . . . . . . .11
QUICK AND EASY SHOOTING . . . . . . . . . . . . . . . . .12
CAMERA FUNCTIONS AVAILABLE WITH VARIOUS LENSES
. .14
HOW TO USE THIS OPERATING MANUAL . . . . . . . .16
BASIC OPERATION (PREPARATION) 17
Step 1. ATTACHING THE CAMERA STRAP . . . . . . . .18
Step 2. LOADING THE BATTERIES . . . . . . . . . . . . . .19
• BATTERY LIFE . . . . . . . . . . . . . . . . . . . . . . . . . .21
• LOW BATTERY WARNING . . . . . . . . . . . . . . . . .22
Step 3.TURNING ON THE POWER . . . . . . . . . . . . . .23
Step 4. ADJUSTING THE DATE AND TIME . . . . . . . .24
Step 5. IMPRINTING THE DATE . . . . . . . . . . . . . . . . .26
Step 6. ATTACHING THE LENS . . . . . . . . . . . . . . . . .28
Step 7. FILM LOADING . . . . . . . . . . . . . . . . . . . . . . .30
Step 8.
OPERATING THE SHUTTER RELEASE BUTTON
.32

5
BASIC OPERATION (SHOOTING) 33
Step 1. SET THE STANDARD PROGRAM MODE . . . .34
Step 2. SET THE AUTO POP UP FLASH . . . . . . . . . .35
Step 3. SET THE SINGLE FRAME DRIVE MODE . . . .36
Step 4. SET THE AUTO FOCUS MODE TO AF . . . . .37
Step 5. USING THE ZOOM LENS . . . . . . . . . . . . . . . .38
Step 6. HOLDING THE CAMERA . . . . . . . . . . . . . . . .39
Step 7.TAKING A PICTURE . . . . . . . . . . . . . . . . . . . .40
Step 8. UNLOADING A FILM . . . . . . . . . . . . . . . . . . .42
Step 9. REWINDING A FILM IN MID-ROLL . . . . . . . .43
ADVANCED OPERATIONS 45
SELECTING A DRIVE MODE . . . . . . . . . . . . . . . . . . .46
CONSECUTIVE-FRAME DRIVE MODE . . . . . . . .47
SELF-TIMER MODE . . . . . . . . . . . . . . . . . . . . . . .48
AUTO BRACKET EXPOSURE MODE . . . . . . . . . .50
SELECTING 6 PICTURE MODES . . . . . . . . . . . . . . . .52
SETTING THE ONE OF 6 PICTURE MODES . . . .53
1. STANDARD PROGRAM MODE . . . . . . . . .54
2. PORTRAIT PROGRAM MODE . . . . . . . . . .55
3. LANDSCAPE PROGRAM MODE . . . . . . . .56
4. CLOSE-UP PROGRAM MODE . . . . . . . . . .57
5. ACTION PROGRAM MODE . . . . . . . . . . . .58
6. NIGHT-SCENE PROGRAM MODE . . . . . . .59
SELECTING ANOTHER EXPOSURE MODES . . . . . .60
EFFECT OF APERTURE AND SHUTTER SPEED . . 60

6
TABLE OF CONTENTS
USING ANOTHER EXPOSURE MODES . . . . . . . . . .62
1. APERTURE-PRIORITY AE MODE . . . . . . . . . . .62
2. SHUTTER-PRIORITY AE MODE . . . . . . . . . . . .64
3. METERED MANUAL MODE . . . . . . . . . . . . . . .66
4. SLOW-SPEED-SYNC MODE . . . . . . . . . . . . . . .69
5. BULB TIMER EXPOSURE MODE . . . . . . . . . . .70
AE LOCK FUNCTION . . . . . . . . . . . . . . . . . . . . . . . . .71
MANUAL FOCUSING . . . . . . . . . . . . . . . . . . . . . . . . .72
HARD-TO-AUTOFOCUS SUBJECTS . . . . . . . . . .74
SETTING THE FILM SPEED (ISO) MANUALLY . . . . .75
USING THE BUILT-IN FLASH . . . . . . . . . . . . . . . . . . .76
AUTO POP UP FLASH FUNCTION . . . . . . . . . . .76
SELECTING THE VARIOUS BUILT-IN FLASH MODES . .77
RED-EYE REDUCTION FLASH FUNCTION . . . . .78
ABOUT RED-EYE PHENOMENON . . . . . . . . . . . .78
FLASH EFFECTIVE RANGE FOR THE PICTURE
MODE . . . . . . . . . . . . . . . . . . . . . . . . . . . . . . . . . .79
MANUAL POP UP THE BUILT-IN FLASH . . . . . . . . . .80
DAYLIGHT-SYNC SHOOTING . . . . . . . . . . . . . . . .82
FLASH-OFF MODE . . . . . . . . . . . . . . . . . . . . . . . .83
FLASH RECOMMENDED INDICATOR . . . . . . . . .83
INAPPROPRIATE LENS WARING WHEN THE BUILT-IN
FLASH IS USED . . . . . . . . . . . . . . . . . . . . . . . . . . . . .84
ADVANCED OPERATION FOR THE BUILT-IN FLASH . . .85
COMPATIBILITY OF F AND FA LENSES WITH THE
BUILT-IN FLASH . . . . . . . . . . . . . . . . . . . . . . . . . .88
OVERVIEW OF FLASH FUNCTION . . . . . . . . . . . . . .90

7
USING PENTAX DEDICATED AUTO FLASH UNITS . .92
USING BOTH THE BUILT-IN FLASH AND THE
EXTERNAL FLASH . . . . . . . . . . . . . . . . . . . . . . . . . . .93
RED-EYE REDUCTION FLASH FUNCTION . . . . .94
TRAILING-SHUTTER-CURTAIN SYNC FLASH . . .94
MULTI-BURST FLASH WITH THE PENTAX
DEDICATED FLASH . . . . . . . . . . . . . . . . . . . . . . .94
CONTRAST-CONTROL-SYNC FLASH . . . . . . . . .95
OTHERS 97
ACCESSORIES (OPTIONAL) . . . . . . . . . . . . . . . . . . .98
TROUBLESHOOTING . . . . . . . . . . . . . . . . . . . . . . .102
PROGRAM LINES . . . . . . . . . . . . . . . . . . . . . . . . . .104
STANDARD PROGRAM MODE / NIGHT-SCENE
PROGRAM MODE WITHOUT FLASH
PORTRAIT PROGRAM MODE
LANDSCAPE PROGRAM MODE
ACTION PROGRAM MODE
CLOSE-UP PROGRAM MODE
SPECIFICATIONS . . . . . . . . . . . . . . . . . . . . . . . . . . .106
WARRANTY POLICY . . . . . . . . . . . . . . . . . . . . . . . .108
8
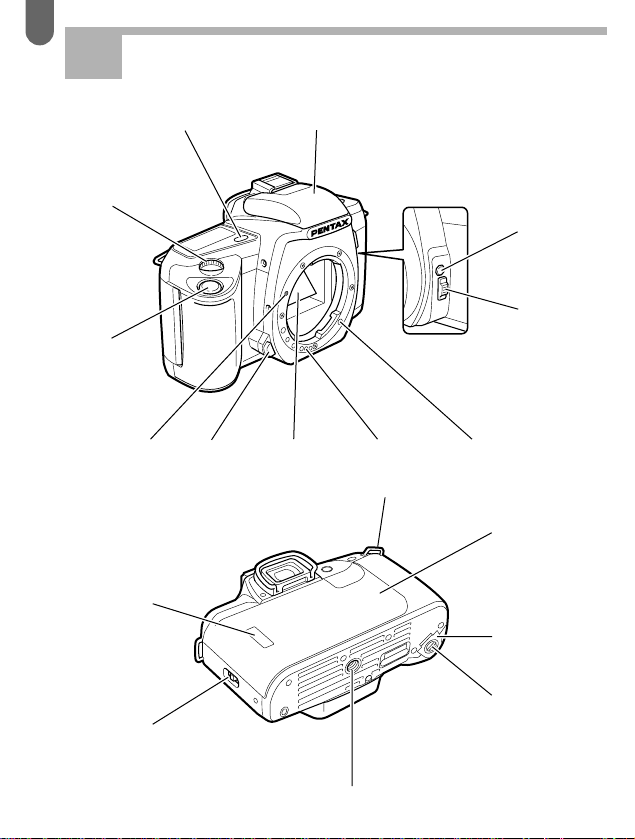
NAMES OF WORKING PARTS
Select dial
Main switch
AV button
Shutter
release
button
Built-in flash
Focus mode
switch
Lens information
contacts
AF coupler
Strap lug
Back cover
Battery
chamber
cover
Battery cover
screw
Tripod socket
Back cover
release lever
Film information
window
Lens mount
index
Lens unlock
button
Mirror
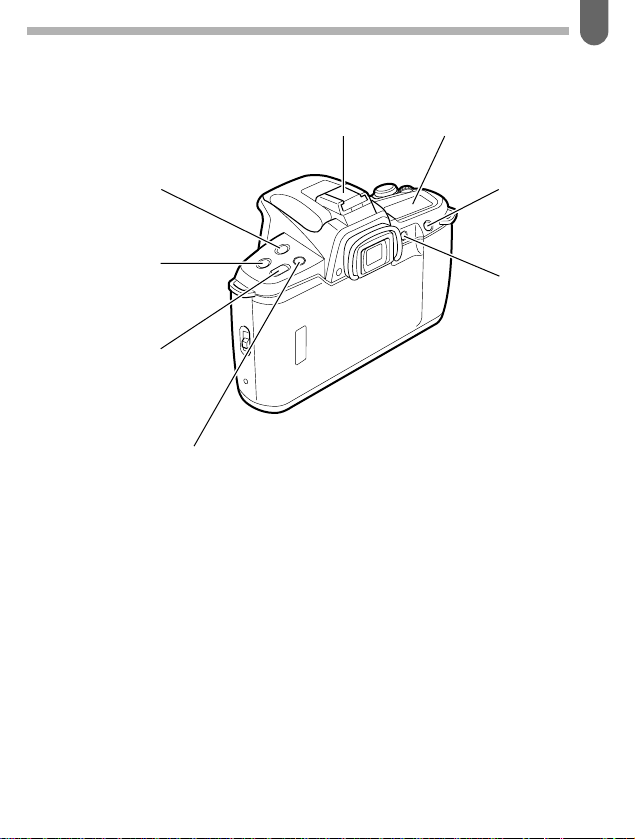
9
Drive mode button
Flash mode
button
Exposure mode button
Date mode button
Hot shoe LCD panel
AE lock
button
Flash
pop up
button
10
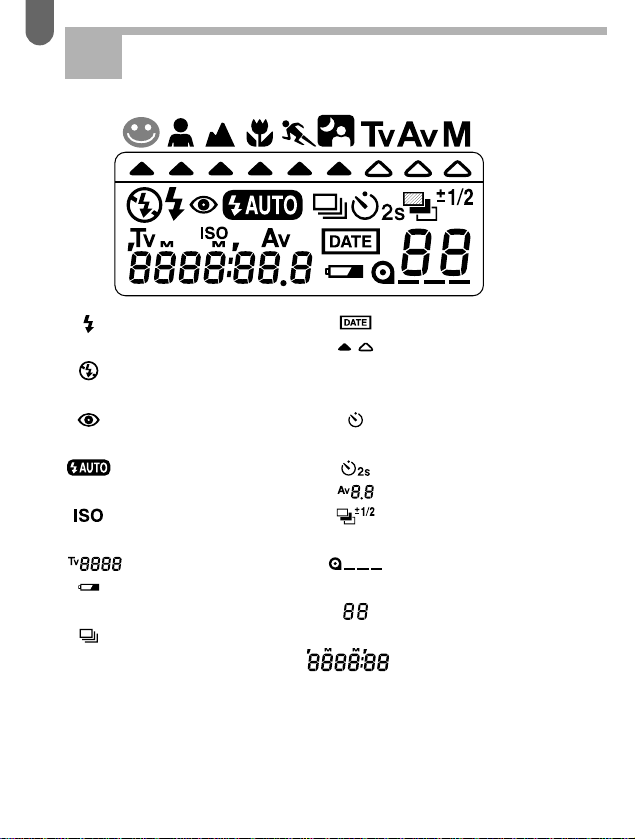
LCD PANEL INDICATIONS
: Flash status information
(p. 80, 83, 84)
: Flash-off information
(p. 83)
: Red-eye reduction flash
indication (p. 77)
: Automatic flash
information (p. 35, 77)
: Manual-set film speed
(p. 75)
: Shutter speed
: Battery exhaustion
warning (p.22)
: Consecutive shooting
(p. 47)
: Date mode (p. 26)
: Exposure mode/
AV,TV select pointer
(p. 53, 62, 64)
: Self-timer
(p. 48)
: 2 seconds self-timer
: Aperture value
: Auto bracket exposure
(p. 50)
: Film status information
(p. 31, 42)
: Exposure counter
(p. 31, 42)
: Date/time
All indications will not actually appear simultaneously as shown.
LCD (Liquid-Crystal Display)
When the LCD is exposed to high temperatures over
approximately 60°C, it may blacken, but when the temperature
normalizes, it should return to normal.
11
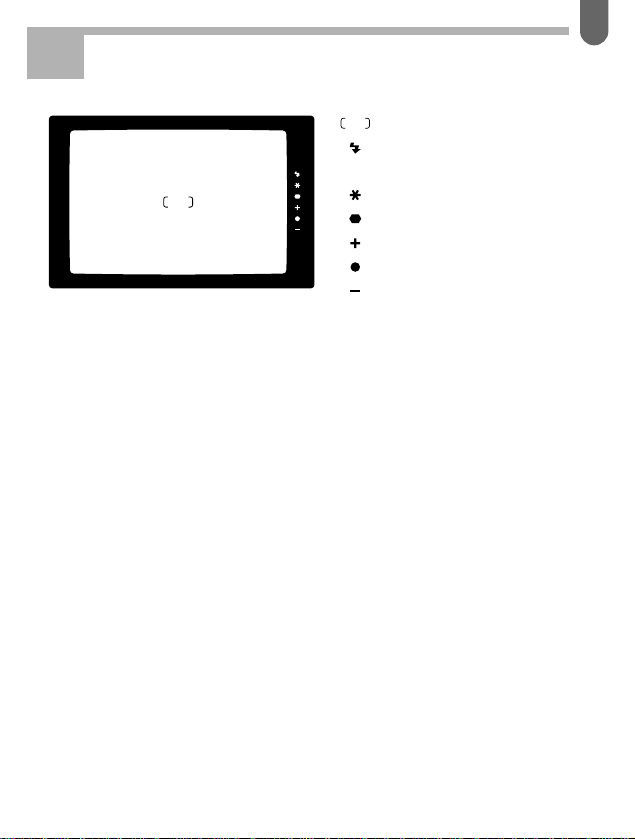
: AF frame (p. 40)
: Flash status information
(p. 53, 76, 80)
: AE lock (p. 71)
: Focus indicator (p. 41)
: Over exposure (p. 67)
: Correct exposure (p. 67)
: Under exposure(p. 67)
VIEWFINDER INDICATIONS
12
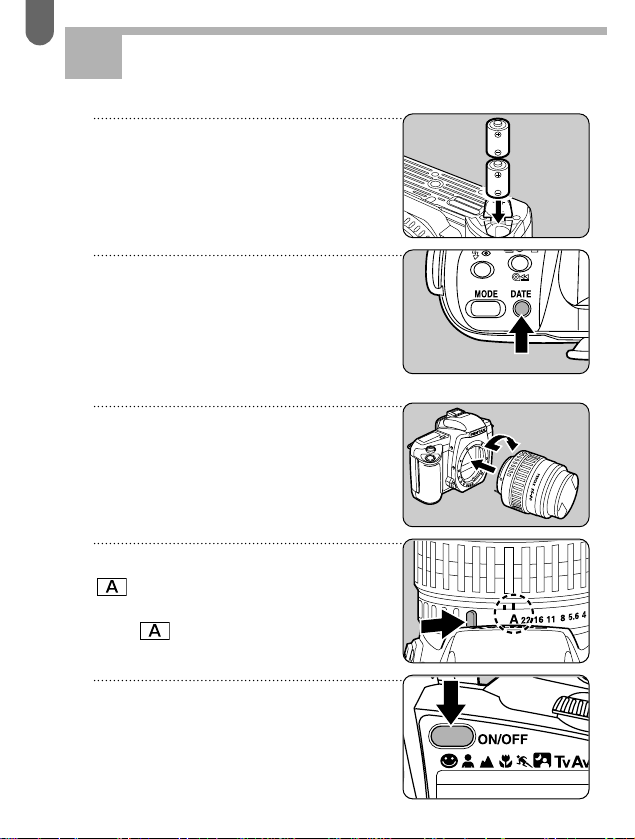
1 Loading the batteries
Open the battery cover and load
two CR2 Lithium batteries.
See page 19.
2 Set the date and time
You can skip this step if you do
not imprint the data at this time,
but the date and time should be
adjusted after loading the
batteries. See page 24.
3 Attaching the lens
Align the red dots on the camera
and lens mounts.Turn the lens to
clockwise until it clicks in place.
See page 28.
4 Set the lens aperture ring to
position
This camera does not work other
than position. See page 34.
5 Turn the power switch ON.
Depress the main switch button.
See page 23.
QUICK AND EASY SHOOTING
13
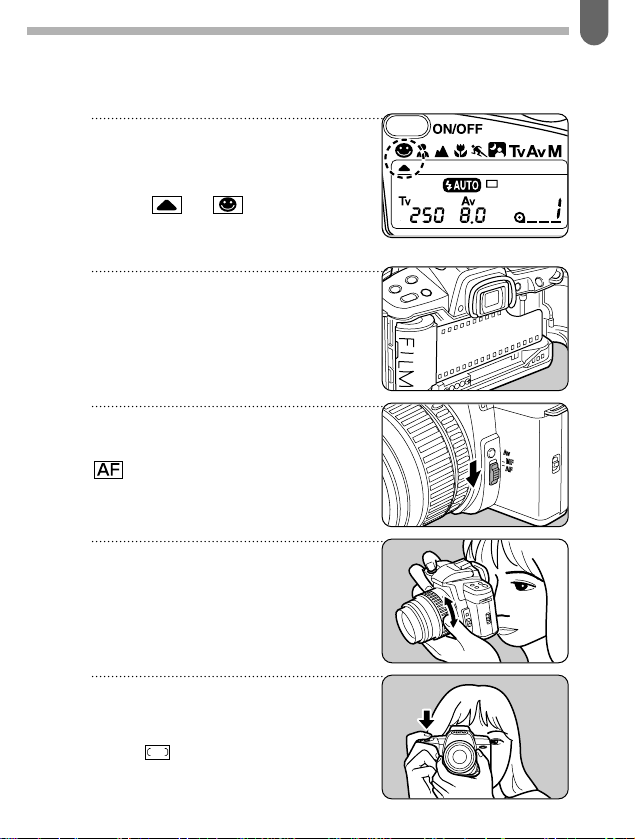
6 Set the exposure mode to
Standard program mode.
Move the select lever to set the
pointer to while
depressing the exposure mode
button.
See page 34.
7 Loading the film.
See page 30.
8 Set to the Autofocus
Set the focus mode switch to
in down position.
See page 37.
9 Compose the subject by
turning the zoom ring.
See page 38.
10 Adjust the focus and take
a picture.
Frame the subject in the focus
frame and depress the
shutter release button. Auto
flash pops up automatically if it
necessary.See page 40.
14
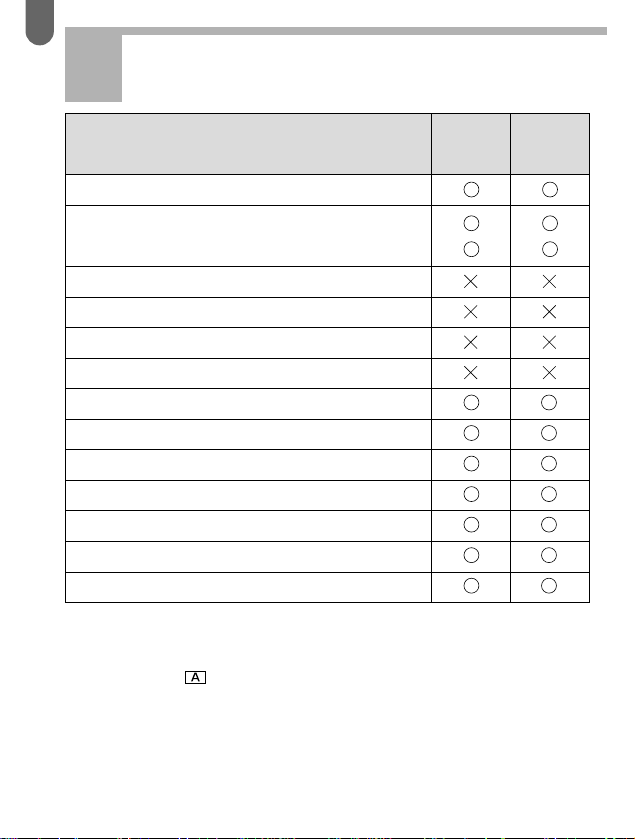
Notes:
*1. As an F/FA 85mm f/2.8 Soft lenses and FA 28mm f/2.8 soft lens do
not have the position on the aperture ring, the shutter cannot be
released.
*2. Manual focus with aid of the in-focus indicator (FI) in the viewfinder.
*3. Lenses with a maximum aperture of f/5.6 or larger.
*4. Only works when the picture mode is selected.
Power zoom
Image size tracking
Zoom clip
Auto zoom effect
Picture Mode
Aperture-Priority AE
Shutter-Priority AE
Metered Manual
Auto-popup built-in flash mode *4
Programmed TTL Auto Flash
TTL Auto Flash
Function Lens FA lens F lens
[Mount type] [KAF2] *1 [KAF] *1
Autofocus (Lens only)
Manual focus (with FI) *2
(with Matte field)
*3 *3
CAMERA FUNCTIONS AVAILABLE
WITH V ARIOUS LENSES

15
✍
MEMO
• KAF2 and KAF mount lenses are designed to work with the Autofocus
SLR camera.
The camera will not operate when a lens with following condition.
1.When a lens, which does not have autofocus function is
attached.
2.When an F or FA lens is attached with aper ture ring set
other than the position.
3.The accessory for close-up photography is attached.

This manual is organized into the following sections.
Basic Operation (Preparation)
—>Page 17
Basic Operation ( Shooting )
—>Page 33
Advanced Operations
—>Page 45
Other information
—>Page 97
16
HO W TO USE THIS OPERA TING
MANU AL
If you like to begin taking
pictures with this new camera as
soon as possible, read section
1and 2, "BASIC
OPERATION(PREPARATION)"
and " BASIC OPERATION
(SHOOTING)".
These sections introduce only
the basic functions of this
camera.
More information that is
detailed can be found in the
section 3 and the section 4.

BASIC OPERATION
(PREPARATION)
BASIC OPERATION
(SHOOTING)
ADVANCED OPERATIONS
OTHERS
BASIC OPERATION (PREPARATION)
Step 1. ATTACHING THE CAMERA STRAP . . . . . . .18
Step 2. LOADING THE BATTERIES . . . . . . . . . . . . .19
Step 3. TURNING ON THE POWER . . . . . . . . . . . .23
Step 4. ADJUSTING THE DATE AND TIME . . . . . . .24
Step 5. IMPRINTING THE DATE . . . . . . . . . . . . . . .26
Step 6. ATTACHING THE LENS . . . . . . . . . . . . . . . .28
Step 7. FILM LOADING . . . . . . . . . . . . . . . . . . . . . .30
Step 8. OPERATING THE SHUTTER RELEASE
BUTTON . . . . . . . . . . . . . . . . . . . . . . . . . . .32
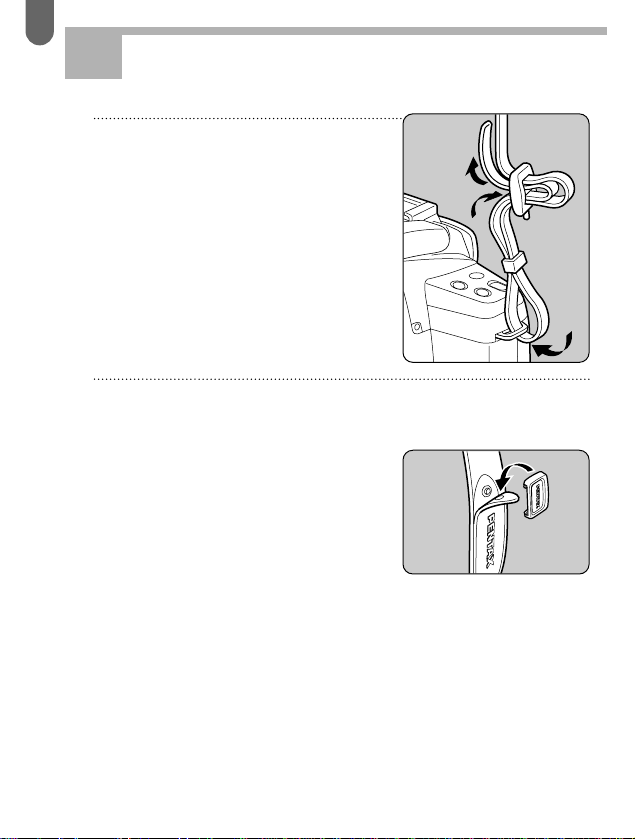
1 Pass the end of the strap
through the strap lug from
underneath, and then pass
the strap through the clasp
from underneath as
illustrated.
18
ATTACHING THE CAMERA STRAP
✍
MEMO
• The strap has pockets that can store the
viewfinder cap, hot shoe cover or any
other small accessory as illustrated.
Step 1
2 Follow the same procedure to attach the other end
of the strap to the other strap lug.

19
BASIC OPERATION
(PREPARATION)
BASIC OPERATION
(SHOOTING)
ADVANCED OPERATIONS
OTHERS
1 Open the battery chamber
cover by turning it to
counterclockwise with a
coin, etc. as shown in the
illustration.
2 Load two 3V lithium
batteries (CR2) or equivalent
into the battery chamber
with positive (+) contacts of
the batteries pointing up as
shown in the illustration.
3 Push in the battery chamber
cover firmly and use a coin
to turn the cover clockwise
to lock securely.
4 If the batteries are removed,
date indicates [-----] that no
data will be imprinted.
See page 24 for adjusting
the date and time.
LO ADING THE BA TTERIES
Step 2
✍
MEMO
• The camera memorizes only the exposure number and date when the
batteries were removed.

20
✍
MEMO
• Be sure to use two Lithium batteries CR2 or equivalents.
• Both the camera function and the data imprinting function to keep
constant track of time use the batteries.
• The optional "AA-Batter y Pack FG" is also available for this camera
instead of using the lithium batteries.
• Replace the batter ies at the same time. Do not mix batter y brands, type
or an old battery with a new one.
• Keep a spare battery on hand for replacement convenience when
shooting outdoors or while traveling.
• When the batter ies were replaced, date mode will be re-set and the
following camera settings will take effect.
All other settings will remain unchanged
Self-timer Drive mode
Single frame
Red-Eye-Reduction
flash
Off
Auto pop up flash
On
LOADING THE BA TTERIES

21
BASIC OPERATION
(PREPARATION)
BASIC OPERATION
(SHOOTING)
ADVANCED OPERATIONS
OTHERS
✍
MEMO
• CR2 batter ies were used under Pentax testing conditions.
• Actual batter y life and performance may vary drastically depending on
usage of autofocus, built-in flash and external conditions such as
temperature and freshness of the battery.
• Batter y performance may be temporarily hindered in low temperatures,
but it will recover in normal temperature.
Battery Life(using 24-exposure film rolls at 20°C/68°F)
General existing light photography Approx. 120 rolls
Flash photography (using flash 50% of the times) Approx. 20 rolls
Flash photography (using flash 100% of the times) Approx. 12 rolls
Battery Life(using 24-exposure film rolls at -10°C/14°F)
General existing light photography Approx. 30 rolls
Flash photography (using flash 50% of the times) Approx. 15 rolls
Flash photography (using flash 100% of the times) Approx. 5 rolls
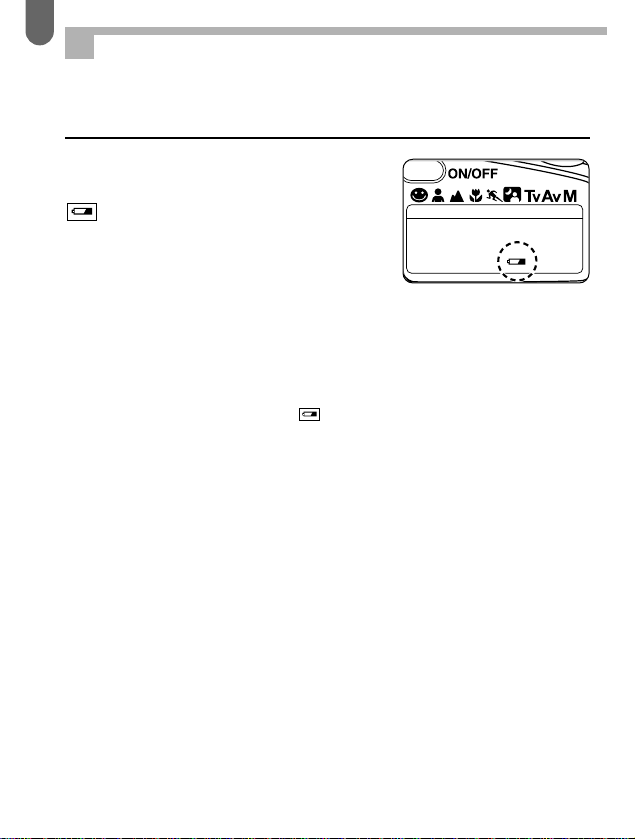
Low Battery Warning
When the batteries are nearly
exhausted, the batter y symbol
appears on the LCD panel
to warn you. Replace the
batteries as soon as possible.
22
LOADING THE BA TTERIES
✍
MEMO
• See page 19 for loading the batteries.
• Even if the low-battery symbol appears, exposure will be correct as
long as the shutter can be released. It is recommended to replace the
batteries as soon as possible.
• When the low batter y warning starts blinking, the shutter cannot be
released and no indication in the viewfinder.
23
BASIC OPERATION
(PREPARATION)
BASIC OPERATION
(SHOOTING)
ADVANCED OPERATIONS
OTHERS
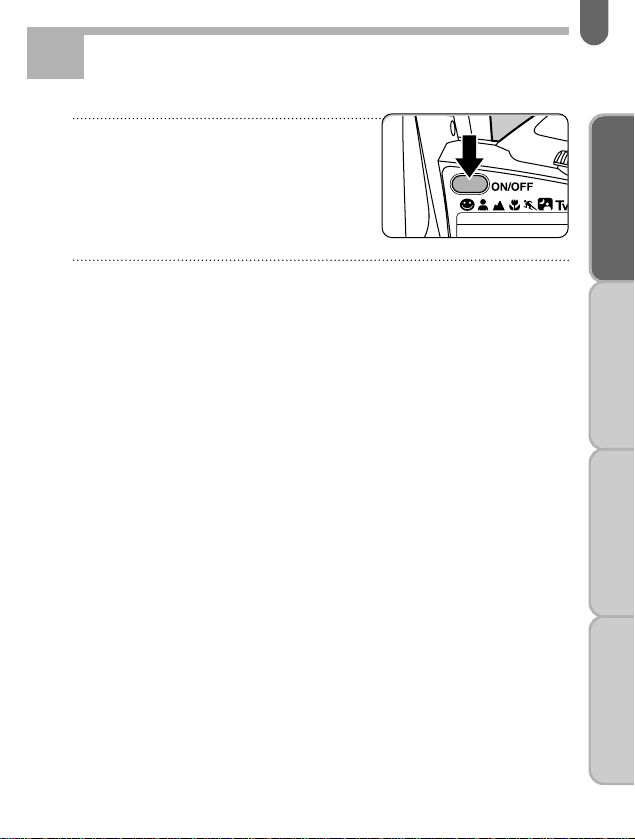
TURNING ON THE POWER
1 Turn the power ON.
Push the main switch button
to turn ON.
2 Turn the power OFF.
Push the main switch button again to turn OFF.
✍
MEMO
• Be sure to tur n the main switch OFF to prevent accidental battery drain
when not in used.
• If the camera is ON and left unused for over 3 minutes, the power is
tuned OFF automatically.
Step 3
24
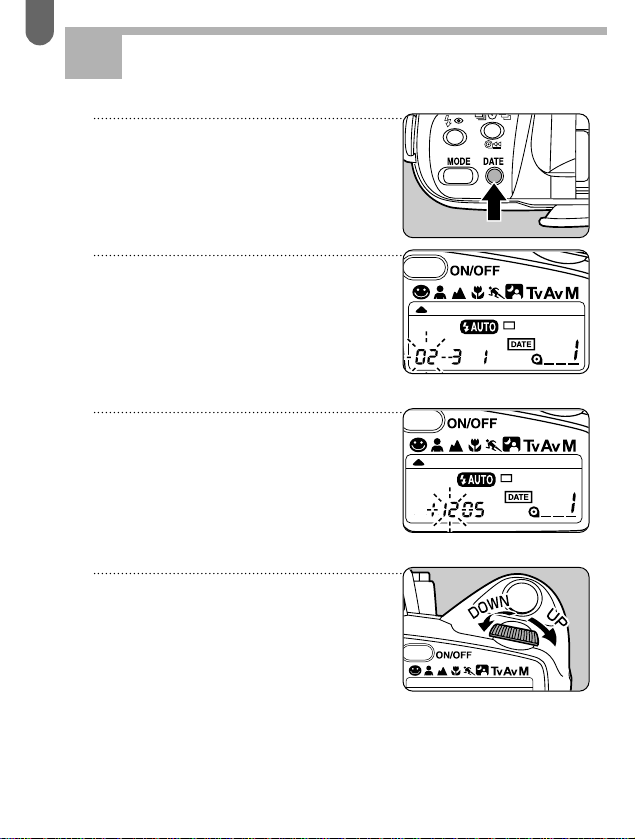
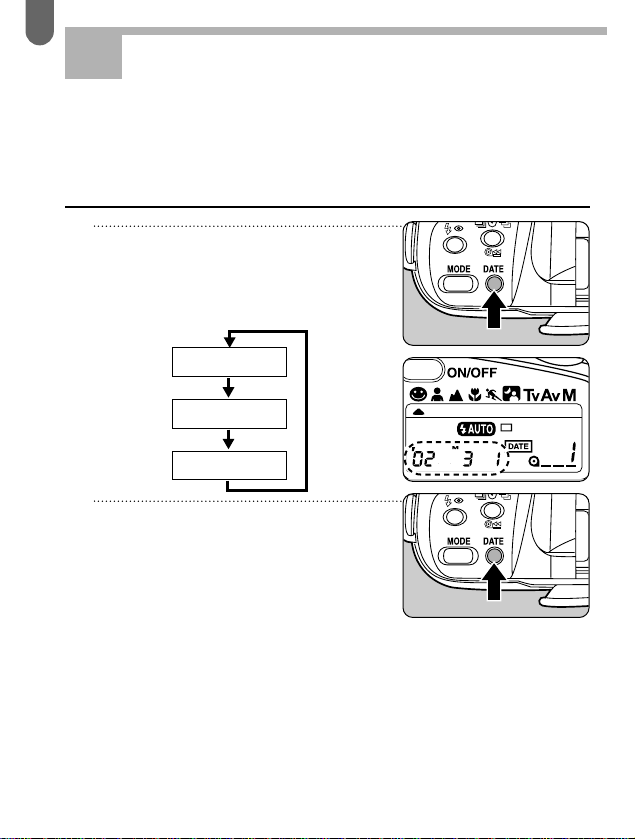
1 Turn the power ON and
depress the [DATE] button
to display date mode on the
LCD panel.
2 Keep depressing the [DATE]
button for 3 seconds on the
date mode display, the
"year" digits will start to
blink.
3 Each time the [DATE] button
is depressed, the blinking
digits change in the
following order: Year-MonthDay-Hour-Minute-: . Select
the desired digits.
4 Move the Select dial to right
or left to change the digits
that you wish to change the
blinking digits.
ADJUSTING THE DA TE AND TIME
Step 4

25
BASIC OPERATION
(PREPARATION)
BASIC OPERATION
(SHOOTING)
ADVANCED OPERATIONS
OTHERS
The digits increase by one each time the select dial
is moved to right and the digits decreased by it’s
moved to left.
Holding the select dial for about one second will
change the digits rapidly.
5 After the data has been changed, depress the
[DATE] button each time until blinking stops.
6 Depress the [DATE] button to select your date
mode that you wish to imprint on your pictures.
✍
MEMO
Depress the [DATE] button in synchronize with a time signal to set the
second to zero while ( : ) is blinking.
Operational precautions
• The working temperature for data printing is -10°C – 50°C (14°F –
122°F).
• Use DX-coded films with ISO rating from 25 – 5000.
• If high-speed film with an ISO rating of1000 or faster is used, the
imprinted characters may blur.
• If film with ISO rating of 50 or slower is used, the printed characters
may be dark or dim.
• If you release the shutter while the blinking data is being corrected, the
data cannot be imprinted.
26
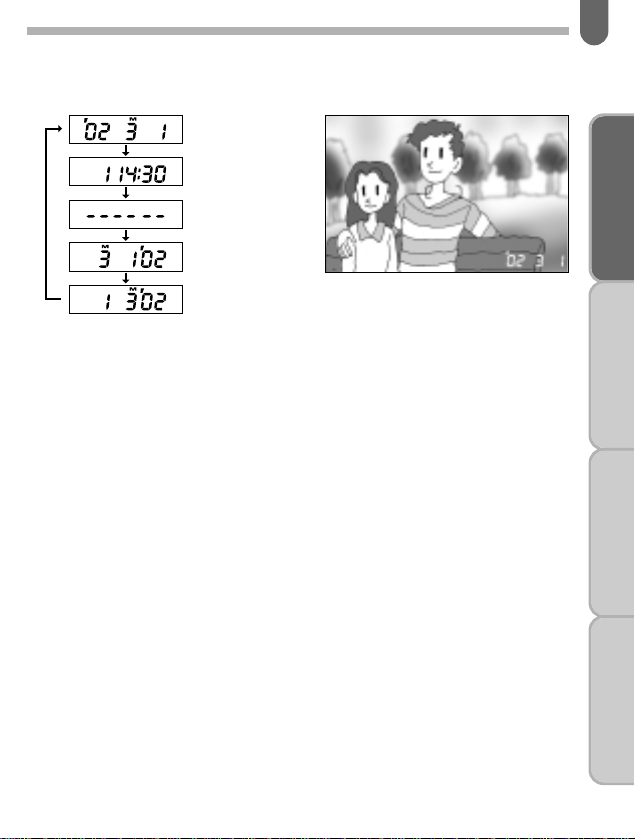
1 At each depress of the
[DATE] button, the display on
the LCD panel changes as
follows.
2 While the date mode is
displayed, at each depress of
the [DATE] button as shown
in the illustration, the date
mode on the LCD panel of
the data changes as
indicated in the chart.
IMPRINTING THE DA TE
Step 5
The DATE model records date information on your pictures
clearly on each frame that you expose.
Selecting the date mode
Tv/Av
Date mode
Tv/Av
27
BASIC OPERATION
(PREPARATION)
BASIC OPERATION
(SHOOTING)
ADVANCED OPERATIONS
OTHERS
✍
MEMO
• [ M ] on the LCD indicates "Month".
• Year 2000 will imprint " 00 " on pictures.
• [ -- -- -- ] indicates that no data will be impr inted.
• If there is a white or yellow object in the left bottom corner of the
picture where the data is imprinting, the data may be difficult to read.
When composing your picture, try to avoid brightly colored subject in
that corner.
• The data operates on power for the 6V lithium battery camera. If the
camera batteries were removed or replaced, data setting will be
initialized to "[ -- -- -- ] no data imprinted ", need to adjust the date and
time.
(Year Month Day)
(Day Hour Minute)
(No data imprinted)
(Month Day Year)
(Day Month Year)
28
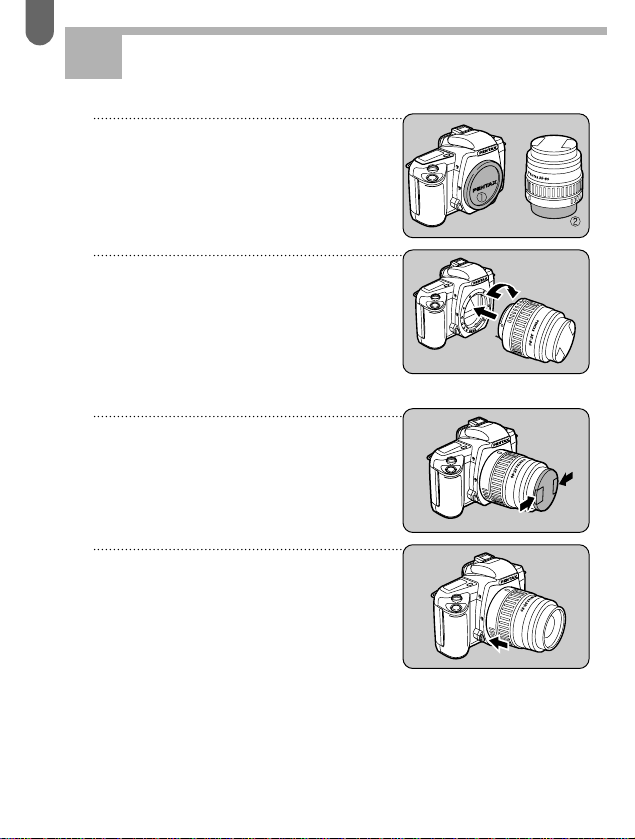
1 Remove the body mount cap
and rear lens cap .
2 Align the red dots on the
lens and camera while
mounting the lens to the
camera body, then turn the
lens clockwise until it clicks
in place.
3 To remove the front lens
cap, squeeze the tabs on
both sides in the direction
of the arrow.
4 To remove the lens, holds
down the lens unlock button
and turn the lens
counterclockwise.
A TT A CHING THE LENS
Step 6

29
BASIC OPERATION
(PREPARATION)
BASIC OPERATION
(SHOOTING)
ADVANCED OPERATIONS
OTHERS
✍
MEMO
• The body mount cap is designed to protect the camera against
scratches and dust at the factory. For storage, the optional accessory
"Body Mount Cap K" is available.
• After mounting the lens, tr y to tur n the lens counterclockwise to make
sure it is locked in place.
• The camera body and lens mount incor porate lens information contacts
and an AF coupler.Dir t, dust, or corrosion may cause damage to the
electrical system. Clean the contacts with a soft, dry cloth.
• We assume no responsibility nor liability for damages resulting from the
use of lenses made by other manufacturers.
• To protect the lens information contacts and AF coupler of the lens
against damage after removal, be sure to place the lens down with the
mount side upward.

30
1 To open the back cover,
slide the back cover release
lever down in the direction
of the arrow.
2 Place the film cartridg e in
the film chamber as shown
in the illustration.
3 Pull the film leader out far
enough to reach the take-up
spool.
✍
MEMO Remove the protective card
• Before loading film for the first time after purchase, open the back cover
and remove the protective card.
• Be careful not to touch the shutter curtains with protective card.
• Always load and unload the film in the shade or avoid direct sunshine.
• The shutter curtains are made from fine precision material. Do not
touch them with your fingers or any other object while loading the film.
We suggest that you first operate the camera with no film loaded
to become familiar with its operations.
FILM LOADING
Step 7

31
BASIC OPERATION
(PREPARATION)
BASIC OPERATION
(SHOOTING)
ADVANCED OPERATIONS
OTHERS
4 Align the film leader with
film leader end mark as
shown as illustrated.
1
5 Close the back cover and
turn the main switch ON.
The film will be advanced to first
frame automatically and the
exposure counter 1 and film
status information appear on the
LCD panel when film is loaded
properly.
Note
• Automatic film speed setting
When DX-coded film is used, the correct film speed is automatically set
for the camera.If you use a non-DX coded film, you can set the film
speed manually. See page 75.
✍
MEMO Incorrect film loading
If the film is not loaded properly, will blink on the LCD panel.Open
the back cover and load the film again.

32
OPERA TING THE SHUTTER
RELEASE BUTTON
The shutter release button has two positions.Depressing it down
halfway (first position) turns on the exposure meter and
autofocus system.
Depressing it fully (second position) releases the shutter.When
taking a picture, depress the shutter release button gently to
prevent camera shake.
✍
MEMO
• To prevent camera shake, depress the shutter release button gently.
• Before loading a roll of film, slowly depress the shutter release button
to learn where the first position is.
• The LCD indication stays on for about 10 seconds after the button is
released from the halfway position.Depressing the shutter release
button halfway down keeps the LCD indicator on.
Not
pressed
Pressed halfway
down
(first position)
Step 8
Pressed fully
down
(
second position
)

BASIC OPERATION
(PREPARATION)
BASIC OPERATION
(SHOOTING)
ADVANCED OPERATIONS
OTHERS
BASIC OPERATION (SHOOTING)
Step 1. SET THE STANDARD PROGRAM MODE . .34
Step 2. SET THE AUTO POP UP FLASH . . . . . . . . .35
Step 3. SET THE SINGLE FRAME DRIVE MODE . .36
Step 4. SET THE AUTO FOCUS MODE TO AF . . . .37
Step 5. USING THE ZOOM LENS . . . . . . . . . . . . . .38
Step 6. HOLDING THE CAMERA . . . . . . . . . . . . . . .39
Step 7. TAKING A PICTURE . . . . . . . . . . . . . . . . . .40
Step 8. UNLOADING A FILM . . . . . . . . . . . . . . . . . .42
Step 9. REWINDING A FILM IN MID-ROLL . . . . . . .43

34
For quick and easy shooting, set your camera for Standard
program mode, autofocus, auto flash and single frame drive mode.
This standard program mode allows you to take pictures by simply
depressing the shutter release button.The camera selects the best
combination of aperture and shutter speed setting.
SET THE STANDARD PROGRAM MODE
1 Set the lens aperture ring to
the position.
To set the lens aperture ring to
the position, turn the
aperture ring while holding down
the aperture-A lock button on the
lens.
2 Set the pointer mark to
by moving the select
dial while depressing the
exposure mode button.
When the shutter release button
is depressed halfway down, the
shutter speed (TV) and aperture
value (AV) are displayed on the
LCD panel.
✍
MEMO
• The shutter cannot be released when an F or FA lens is attached with
the aperture ring set to other than position.
Step 1

35
BASIC OPERATION
(PREPARATION)
BASIC OPERATION
(SHOOTING)
ADVANCED OPERATIONS
OTHERS
SET THE AUTO POP UP FLASH
1 Depress the flash mode
button until appears
on the LCD panel.
2 In this mode, the built-in
flash automatically pops up
when depressing the shutter
button halfway down in the
low light or backlight
conditions.
✍
MEMO
• The Built-in flash does not retract automatically, push the built-in flash
down into the camera body after use.
• The built-in flash does not discharge when not required even though it
has been in the up position. See page 76 for more details.
• Do not use a lens hood when the built-in flash is used, as it may
obstruct the path of the light coming from the flash, causing vignetting
in the picture corners.
Step 2

36
SET THE SINGLE FRAME DRIVE
MODE
Depress the drive mode button
until single frame appears
on the LCD panel.
✍
MEMO
The drive mode can also set to consecutive-frame mode , self-timer
, 2 seconds self- timer or auto bracket shooting mode .
Step 3
One picture is taken each time the shutter release
button is depressed.

37
BASIC OPERATION
(PREPARATION)
BASIC OPERATION
(SHOOTING)
ADVANCED OPERATIONS
OTHERS
✍
MEMO
• The picture cannot be taken unless focus is achieved.The focus will
remain locked as long as shutter release button is held in halfway
down.
• See page 72 for manual focusing.
SET THE AUTO FOCUS MODE TO AF
Set the focus mode switch to
in the down position.
When the shutter release button is depressed halfway down, the
lens adjusts focus automatically.
Step 4

38
✍
MEMO
• The smaller the number shown on the zoom scale ring , the wider the
angle. Conversely, the larger the number, the more magnified the
image appears.
• The Image Size Tracking Mode, Zoom Clip Mode, Auto Zoom Effect
Mode and Power Zoom function do not operate with this camera even if
an FA lens is attached.
Telephoto
Wide angle
USING THE ZOOM LENS
Turning the zoom ring to the
right makes the subject appear
larger (telephoto) and turning it
to the left makes the subject
appear smaller (wide angle).
Step 5

39
BASIC OPERATION
(PREPARATION)
BASIC OPERATION
(SHOOTING)
ADVANCED OPERATIONS
OTHERS
HOLDING THE CAMERA
✍
MEMO
• To reduce camera shake, suppor t your body or the camera on a solid
object - a table, tree, or a wall for instance.
• When using an telephoto lens, a tripod that is heavier than the total
weight of the camera and lens is recommended to avoid camera shake.
• Although there are individual differences among photographers, in
general the shutter speed for a hand held camera is the inverse of the
focal length. For example, 1/50 of second for focal length is 50mm, and
1/100 of second for it is 100mm. A tripod should be used for shutter
speeds slower than this.
• Hold the camera firmly, with your left hand suppor ting the
camera and lens as shown in the illustrations.
• While taking a picture, gently depress the shutter release
button. Sudden force on the shutter release button will cause
camera shake, making the picture blurred.
Camera held horizontally
Camera held vertically
Step 6

40
1 Confirm that the focus mode
switch has been set to
and the lens aperture ring
has been set to , and
select the data mode to
imprint or not.
2 Look through the viewfinder
and frame the subject with
the autofocus frame .
When the shutter release button
is depressed halfway down, the
lens adjust focus automatically.
3 Confirm that the shutter
speed, aperture value and
picture mode on the LCD
panel.
TAKING A PICTURE
Step 7

41
BASIC OPERATION
(PREPARATION)
BASIC OPERATION
(SHOOTING)
ADVANCED OPERATIONS
OTHERS
✍
MEMO
• The shutter cannot be released if the subject is out of focus.
• Depress the shutter release button halfway down.While lights on,
the camera-to-subject distance is fixed (Focus lock). To refocus on
another subject, lift your finger off the shutter release button.
• When the camera senses subject movement during the autofocus
operation, the camera will automatically switch the focus mode to the
predictive autofocus mode to measure the speed of a moving subject,
and predict where it will be at the moment of shutter release to
maintain sharp focus on the subject.
The focus indicator blinks when the camera is not able to
obtain proper focus for one of the following reasons.
1.The subject is too close. Adjust the camera-to-subject distance.
2.The subject is difficult to autofocus.See "HARD-TO-
AUTOFOCUS" subject on page 74.
4 When the subject is in focus,
the focus indicator in the
viewfinder lights up.
5 Take a picture.
Gently depress the shutter
release button completely.
The built-in flash pops up
automatically when the subject is
not lighted adequately.

42
UNLOADING A FILM
1 The film automatically
rewinds at the end of the
roll.
During rewinding, blinks
on the LCD panel, indicating that
the film is being rewound, the
exposure counter counts frame
numbers in reverse.
2 When the film is fully
rewound, blinks on the
LCD panel.
3 Open the back cover and
remove the film.
✍
MEMO
• When removing the film from the camera, avoid direct sun light.
• A roll of 24-exposure film takes about 20 seconds to rewind.
• Before opening the back cover, check that is blinking.
• The shutter may be released a frame or more after the specified
number of frames have been used as indicated on the film cartridge.
However, those extra frames may be lost in processing.When you take
important pictures, rewind the film when the film reaches the number of
frames indicated on the film cartridge. See page 43.
Step 8

43
BASIC OPERATION
(PREPARATION)
BASIC OPERATION
(SHOOTING)
ADVANCED OPERATIONS
OTHERS
1 Set the main switch to the
ON position, Depressing the
Drive mode button for over
2seconds, Film status
information will
appear on the LCD.
2 Holding the drive mode
button and depress the
shutter release button to
start rewinding.When the
film is fully rewound,
blinks on the LCD panel.
• The film will be rewound, Film
status information on the LCD
panel blinks and counts the
frame numbers in reverse.
• Before opening the back cover,
check that is blinking.
REWINDING A FILM IN MID-ROLL
If you wish to unload the film before exposing all the frames, use
this function.
Step 9

44

BASIC OPERATION
(PREPARATION)
BASIC OPERATION
(SHOOTING)
ADVANCED OPERATIONS
OTHERS
ADVANCED OPERATIONS
SELECTING A DRIVE MODE . . . . . . . . . . . . . . . . . . . . . . . . . . . . . .46
CONSECUTIVE-FRAME DRIVE MODE . . . . . . . . . . . . . . . . . . . .47
SELF-TIMER MODE . . . . . . . . . . . . . . . . . . . . . . . . . . . . . . . . . .48
AUTO BRACKET EXPOSURE MODE . . . . . . . . . . . . . . . . . . . . .50
SELECTING 6 PICTURE MODES . . . . . . . . . . . . . . . . . . . . . . . . . .52
SETTING THE ONE OF 6 PICTURE MODES . . . . . . . . . . . . . . . .53
1. STANDARD PROGRAM MODE . . . . . . . . . . . . . . . . . . . . . . . .54
2. PORTRAIT PROGRAM MODE . . . . . . . . . . . . . . . . . . . . . . . .55
3. LANDSCAPE PROGRAM MODE . . . . . . . . . . . . . . . . . . . . . .56
4. CLOSE-UP PROGRAM MODE . . . . . . . . . . . . . . . . . . . . . . . .57
5. ACTION PROGRAM MODE . . . . . . . . . . . . . . . . . . . . . . . . . . .58
6. NIGHT-SCENE PROGRAM MODE . . . . . . . . . . . . . . . . . . . . .59
SELECTING ANOTHER EXPOSURE MODES . . . . . . . . . . . . . . . . .60
EFFECT OF APERTURE AND SHUTTER SPEED . . . . . . . . . . . .60
USING ANOTHER EXPOSURE MODES . . . . . . . . . . . . . . . . . . . . .62
1. APERTURE-PRIORITY AE MODE . . . . . . . . . . . . . . . . . . . . . .62
2. SHUTTER-PRIORITY AE MODE . . . . . . . . . . . . . . . . . . . . . . .64
3. METERED MANUAL MODE . . . . . . . . . . . . . . . . . . . . . . . . . . .66
4. SLOW-SPEED-SYNC MODE . . . . . . . . . . . . . . . . . . . . . . . . . .69
5. BULB TIMER EXPOSURE MODE . . . . . . . . . . . . . . . . . . . . . . .70
AE LOCK FUNCTION . . . . . . . . . . . . . . . . . . . . . . . . . . . . . . . . . . . .71
MANUAL FOCUSING . . . . . . . . . . . . . . . . . . . . . . . . . . . . . . . . . . . .72
HARD-TO-AUTOFOCUS SUBJECTS . . . . . . . . . . . . . . . . . . . . . .74
SETTING THE FILM SPEED (ISO) MANUALLY . . . . . . . . . . . . . . . . 75
USING THE BUILT-IN FLASH . . . . . . . . . . . . . . . . . . . . . . . . . . . . . .76
AUTO POP UP FLASH FUNCTION . . . . . . . . . . . . . . . . . . . . . . .76
SELECTING THE VARIOUS BUILT-IN FLASH MODES . . . . . . . . .77
RED-EYE REDUCTION FLASH FUNCTION . . . . . . . . . . . . . . . . .78
ABOUT RED-EYE PHENOMENON . . . . . . . . . . . . . . . . . . . . . . .78
FLASH EFFECTIVE RANGE FOR THE PICTURE MODE . . . . . . .79
MANUAL POP UP THE BUILT-IN FLASH . . . . . . . . . . . . . . . . . . . . .80
DAYLIGHT-SYNC SHOOTING . . . . . . . . . . . . . . . . . . . . . . . . . . .82
FLASH-OFF MODE . . . . . . . . . . . . . . . . . . . . . . . . . . . . . . . . . . .83
FLASH RECOMMENDED INDICATOR . . . . . . . . . . . . . . . . . . . . .83
INAPPROPRIATE LENS WARING WHEN THE BUILT-IN FLASH IS USED . .84
ADVANCED OPERATION FOR THE BUILT-IN FLASH . . . . . . . . . . .85
COMPATIBILITY OF F AND FA LENSES WITH THE BUILT-IN FLASH
. . .88
OVERVIEW OF FLASH FUNCTION . . . . . . . . . . . . . . . . . . . . . . . . .90
USING PENTAX DEDICATED AUTO FLASH UNITS . . . . . . . . . . .92
USING BOTH THE BUILT-IN FLASH AND THE EXTERNAL FLASH
. .93
RED-EYE REDUCTION FLASH FUNCTION . . . . . . . . . . . . . . . . .94
TRAILING-SHUTTER-CURTAIN SYNC FLASH . . . . . . . . . . . . . . .94
MULTI-BURST FLASH WITH THE PENTAX DEDICATED FLASH
. .94
CONTRAST-CONTROL-SYNC FLASH . . . . . . . . . . . . . . . . . . . . .95

46
SELECTING A DRIVE MODE
This camera has a total of six drive modes as shown.
Single-Frame
Drive Mode
Consecutive-Frame
Drive Mode
Self-timer Mode
2 Seconds
self-timer Mode
Auto Bracket
Exposure Mode
Auto Bracket
Exposure Mode
One picture is taken each time the shutter release button
is depressed.
Pictures can be taken consecutively while holding down
the shutter release button. See page 47.
A picture will be taken with a 12-second-delay.
See page 48.
The reflex mirror locks up to prevent camera shake and
the shutter is released about 2 seconds later.
Use with the Bulb timer exposure.
See page 48.
3 pictures will be taken with exposure compensation
±0, -1/2, +1/2EV.
See page 50 for more details.
3 pictures will be taken with exposure compensation
±0, -1, +1EV.
See page 50 for more details.

47
BASIC OPERATION
(PREPARATION)
BASIC OPERATION
(SHOOTING)
ADVANCED OPERATIONS
OTHERS
Consecutive-Frame Drive Mode
Pictures can be taken consecutively while holding down the
shutter release button.
Setting the consecutive frame
drive mode.
Depress the drive mode button
until appears on the LCD
panel.
1.Depress the shutter release
button halfway down to focus
on the subject.
2.Depress and hold down the
shutter release button
completely.
3.Take you finger off from the
shutter release button to stop
taking pictures.
✍
MEMO
• The shutter cannot be released while the built-in flash is being charged.
• Depress the dr ive mode button to another setting to cancel the
consecutive-frame drive mode.

48
SELECTING A DRIVE MODE
Self-timer Mode
The self-timer mode delays the shutter release, and is useful for
taking group shots that include the photographer or when you
wish to prevent camera shake for slow speed exposure as closeup or night- scene pictures.The shutter will be released about 2
seconds or 12 seconds after the shutter release button is
depressed fully.
1 Mount the camera on the
tripod.
2 Depress the drive mode
button until or
appears on the LCD panel.
3 Focus on the subject first using the autofocus
frame and by depressing the shutter release button
halfway down.

✍
MEMO Preventing stray light entering the eyepiece
• Underexposure may occur if light enters
the viewfinder during self-timer
operation. If you intend to move away
from the viewfinder, attach the supplied
finder cap as shown in the illustration.
• When using accessories such as the
finder cap, remove the Eyecup FK as
illustrated.The Eyecup FK comes from
the factory fitted to the camera's
viewfinder accessory grooves.
✍
MEMO
• Use of tr ipod is recommended.
• To cancel the self-timer operation after it has been activated, depress
the drive mode button to disappear from the LCD panel.
49
BASIC OPERATION
(PREPARATION)
BASIC OPERATION
(SHOOTING)
ADVANCED OPERATIONS
OTHERS
4 Depress the shutter release
button fully to start the selftimer.
When the self-timer is in
operation, the self-timer lamp
blinks and the rate increases for
the last two seconds.
✍
MEMO
• When the 2 seconds self-timer is used, depress the shutter release
button to start, lock-up the reflex mirror to prevent camera shake and
shutter will be released about 2 seconds later.

50
Auto Bracket Exposure Mode
When you depressed shutter release button, three consecutive
frames will be taken at the different exposure times. The first
frame is exposed with no compensation.The second frame is
under exposed and the third frame is over exposed.
The bracketing amount can be set to ±1/2 EV or ±1 EV.
1 Depress the drive mode
button until or
appears on the LCD panel.
Exposure with no
compensation
Under exposure Over exposure
✍
MEMO
• If the exposure compensation amount is small, the effect will not be
noticeable with print film.
SELECTING A DRIVE MODE

51
BASIC OPERATION
(PREPARATION)
BASIC OPERATION
(SHOOTING)
ADVANCED OPERATIONS
OTHERS
2 Focus on the subject by depressing the shutter
button halfway down.
The focus is locked at the first picture and remains
locked until three pictures are taken.
3 Take three consecutive pictures, depress and hold
down the shutter release button.
✍
MEMO
• If you take a finger off from the shutter release button during auto
bracketing, the auto bracketing mode will remain effective for about 20
seconds. After that, the auto bracketing exposure for the first bracketed
frame will take effect.
• Auto bracket does not work in the Bulb timer Mode.
• Only the amount of light of the flash can be changed continuously by
using the auto bracketing mode following completion of charging of the
built-in flash or external flash unit (TTL and P-TTL Auto only).However,
in case of an external flash unit, if three consecutive frames are taken
while depressing the shutter button, the second and third frame may be
taken prior to completion of charging. Always make sure to check
completion of charging for each time.
How to cancel
Auto bracket can be canceled if the power is turned OFF or any
other drive mode is set.

52
SELECTING 6 PICTURE MODES
You can select your desired Picture mode by moving the select
dial while depressing the exposure mode button.The picture
mode has a total 6 modes as follows.See details for each mode
on page 54 to 59.
Standard program Mode 54
Portrait Program Mode 55
Landscape Program Mode 56
Close-up Program Mode 57
Action Program Mode 58
Night-scene Program Mode 59

53
BASIC OPERATION
(PREPARATION)
BASIC OPERATION
(SHOOTING)
ADVANCED OPERATIONS
OTHERS
Exposure Warning
• If the subject is too bright or
too dark, the plus or
minus
indicator in the viewfinder and
the shutter speed and aperture
on the LCD panel would blink
rapidly as a warning.
• If the subject is in low light and backlight condition, the flash
recommended indicator blinks slowly. See page 85.
1 Set the lens aperture ring to
.
2 Set the pointer mark to
the desired exposure mode
symbols by moving the
select dial to left or right
while depressing the
exposure mode button.
Setting the one of 6 picture modes

54
• When the shutter release button is depressed halfway, the
shutter speed and aperture setting are displayed on the LCD
panel.
1. Standard program Mode
For easy picture taking, use this
Standard program Mode.You simply
depress the shutter release button.
The camera selects the best
combination of aperture and shutter
speed setting.
SELECTING 6 PICTURE MODES
Set the pointer mark to
by moving the select dial while
depressing the exposure mode
button.

55
BASIC OPERATION
(PREPARATION)
BASIC OPERATION
(SHOOTING)
ADVANCED OPERATIONS
OTHERS
2. Portrait Program Mode
This mode is suitable for taking
portrait photography.
Set the pointer mark to
by moving the select dial while
depressing the exposure mode
button.
• When the shutter release button is depressed halfway
down,the shutter speed and aperture setting are displayed
on the LCD panel.
✍
MEMO
In this mode, the telephoto lens produces a portrait in crisp focus against
the out-of-focus background, while the wide-angle lens enables you to
shoot group photography or snapshots in sharp and clear focus with the
extended depth-of-field.

56
3. Landscape Program Mode
This mode is ideal for landscape
photography and scenic snapshots.
SELECTING 6 PICTURE MODES
• When the shutter release button is depressed halfway down,
the shutter speed and aperture setting are displayed on the
LCD panel.
✍
MEMO
When a landscape photograph is taken in this mode, the resulting
photograph will be in focus for entire landscape, including objects closeup and these in the distance.
Set the pointer mark to
by moving the select dial while
depressing the exposure mode
button.

57
BASIC OPERATION
(PREPARATION)
BASIC OPERATION
(SHOOTING)
ADVANCED OPERATIONS
OTHERS
4. Close-up Program Mode
This mode is convenient when taking
close-up photos of flower and so forth.
This mode favors smaller aper tures to
maximize the depth of field, ensuring
sharp focus of a close-up subject.
Set the pointer mark to
by moving the select dial while
depressing the exposure mode
button.
• When the shutter release button is depressed halfway down,
the shutter speed and aperture setting are displayed on the
LCD panel.

58
5. Action Program Mode
This mode selects a faster shutter
speed to capture a moving subject
and prevents blurred images. This
mode is especially convenient for
active photography. It is also suitable
for portraits with blurred background.
SELECTING 6 PICTURE MODES
• When the shutter release button is depressed halfway down,
the shutter speed and aperture setting are displayed on the
LCD panel.
✍
MEMO
• In this mode, the camera focuses on the subject continuously when the
shutter release button is depressed half way down, and the shutter can
be released whenever the subject is in focus or out of focus.
• If the subject is moving too fast, the shutter may not be released.
Predictive Autofocus Mode
When the camera senses subject movement during the
autofocus operation, the camera will automatically switch the
focus mode to the predictive autofocus mode to measure the
speed of a moving subject, and predict where it will be at the
moment of shutter release to maintain sharp focus on the
subject.
Set the pointer mark to
by moving the select dial while
depressing the exposure mode
button.

59
BASIC OPERATION
(PREPARATION)
BASIC OPERATION
(SHOOTING)
ADVANCED OPERATIONS
OTHERS
6. Night-scene Program Mode
This mode is useful when taking a
portrait photograph with a night scene
in the background.
Press the flash pop up button to activate the flash if
auto pop up flash is not selected.
• When the shutter release button is depressed halfway down,
the shutter speed and aperture setting are displayed on the
LCD panel.
✍
MEMO
It is possible to photograph subjects and background in a balanced way
by using the flash to properly expose the foreground subject and a slowspeed to expose the low light background.The shutter speed
automatically changes in the range of 1/100 to 1 second.
• Use of a tr ipod is recommended.
• The Standard program mode is automatically set when the built-in flash
is not in use.
• This camera does not have a socket for cable release and cable switch,
use 2 seconds self-timer to prevent camera shake.
Set the pointer mark to
by moving the select dial while
depressing the exposure mode
button.

60
A correct exposure is established by a combination of shutter
speed and aperture setting according to the subject brightness.
There are many correct combinations of shutter speed and
aperture for a particular subject brightness. Different shutter
speed and aperture settings produce different effects.
SELECTING ANOTHER EXPOSURE
MODES
Effect of aperture and shutter speed
Effect of shutter speed
The shutter speed determines the film exposure times, or the
length of time that the light is allowed to strike the film.
If the subject is moving, the
image will be blurred when a
slow shutter speed is used.
It is possible to enhance the
effect of motion, (The
movement of a water,
waterfall) by intentionally
using a slower shutter speed.
Choosing a faster shutter
speed will allow the image of
a moving subject to be frozen.
A faster shutter speed also
helps prevent camera shake.
slower shutter speed
faster shutter speed

Effect of aperture
The aperture increases or reduces the amount of reflected light
from an object which passes through the lens,
controlling how much light strikes the film.
If the aperture is opened up to
increase the amount of light,
subjects in front of and behind
an in-focus subject will not be
focused.That is the range of
focus (depth of field) becomes
small. If the aper ture is
stopped down to reduce the
amount of light, the depth of
field increases. For instance, if
you shoot a person against a
landscape with the aperture
open, the landscape in front of
and behind the person will be
blurred, making the person
appears to rise out of the
landscape. By contrast,
stopping down the aperture
increases the in-focus range.
61
BASIC OPERATION
(PREPARATION)
BASIC OPERATION
(SHOOTING)
ADVANCED OPERATIONS
OTHERS
open aperture
stopped down aperture

62
1. Aperture-Priority AE Mode
When the desired aperture is selected, the appropriate shutter
speed is automatically set by the camera for a proper exposure
according to the brightness of the subject.This mode is ideal for
shooting landscapes with increased depth of field, or a portrait
against a blurred background.
USING ANOTHER EXPOSURE MODES
1 Set the lens aperture ring to
.
2 Set the pointer mark to
by moving the select
dial while depressing the
exposure mode button.
3 Select the desired aperture
by moving the select dial.

63
BASIC OPERATION
(PREPARATION)
BASIC OPERATION
(SHOOTING)
ADVANCED OPERATIONS
OTHERS
• When the power is on, the shutter speed and aperture value
will be displayed on the LCD panel.
Exposure Warning
If the subject is too bright or
too dark, the plus or
minus indicator in the
viewfinder and the selected
shutter speed on the LCD
panel would blink slowly as a
warning as shown.When the
subject is too bright, choose a smaller aperture, if available;
when it is too dark, choose a larger aperture, if available.When
the shutter speed indication stops blinking, you can take the
picture. If both shutter speed and aperture blink rapidly, it means
that the exposure is out of metering range, unable to obtain a
correct exposure even if the aper ture is adjusted. Select a darker
subject if it is too bright, or use a flash if it is too dark.
4 Confirm the shutter speed
and aperture value on the
LCD panel.

64
2. Shutter-Priority AE Mode
When the desired shutter speed is selected, the appropriate
aperture is automatically set by the camera for a proper
exposure according to the brightness of the subject.This mode is
suitable for freezing the action with a fast shutter speed or
capturing a flowing dynamic image with a slow shutter speed.
1 Set the lens aperture ring to
.
2 Set the pointer mark to
by moving the select
dial while depressing the
exposure mode button.
3 Select the desired shutter
speed by moving the select
dial.
USING ANOTHER EXPOSURE MODES

65
BASIC OPERATION
(PREPARATION)
BASIC OPERATION
(SHOOTING)
ADVANCED OPERATIONS
OTHERS
• When the power is on, the shutter speed and aperture value
will be displayed on the LCD panel.
* Exposure Warning
If the subject is too bright or
too dark, the plus or
minus indicator in the
viewfinder and the selected
aperture value on the LCD
panel would blink slowly as a
warning as shown.When the
subject is too bright, choose a faster shutter speed. If it is too
dark, choose a slower shutter speed.When the selected aperture
value stops blinking rapidly, you can take the picture. If both
selected shutter speed and aperture blink, it means that the
exposure is out of metering range, unable to obtain a correct
exposure even if the shutter speed is adjusted. Select a darker
subject if the subject is too bright. Use a flash if it is too dark.
4 Confirm the shutter speed
and aperture value on the
LCD panel.

66
USING ANOTHER EXPOSURE MODES
3. Metered Manual Mode
The manual exposure mode is a convenient exposure mode for
taking pictures using the same shutter speed and aperture
setting combination, or taking creatively under or over exposed
photographs.
1 Set the lens aperture ring to
.
2 Set the pointer mark to
by moving the
select dial while depressing
the exposure mode button.
3 Move the select dial to
change the shutter speed.

67
BASIC OPERATION
(PREPARATION)
BASIC OPERATION
(SHOOTING)
ADVANCED OPERATIONS
OTHERS
4 Move the select dial to
change the aperture value
while holding the AV button.
5 Confirm the shutter speed
and aperture value on the
LCD panel.
6 in the center indicates
the correct exposure.
indicates over
exposure.
indicates under
exposure.
When under or over exposure is set beyond + 1 or - 1 step
(1EV), or indicator will light.
When under or over exposure is set less than + 1 or - 1 step
(1EV), or indicator will light.

68
USING ANOTHER EXPOSURE MODES
✍
MEMO
The AE lock does not operate in the Metered Manual Mode.
Exposure Warning
If both blink in the
viewfinder and both shutter
speed and aperture value
blink on the LCD panel,
it means that the exposure is
out of metering range.

69
BASIC OPERATION
(PREPARATION)
BASIC OPERATION
(SHOOTING)
ADVANCED OPERATIONS
OTHERS
4. Slow-Speed-Sync Mode
It is possible to balance the exposure of a foreground subject
against a dimly light background by using the flash to properly
expose the foreground subject and a slow-shutter-speed to
expose the low light background.
With the Night-scene Program Mode
1. Set the lens aperture ring to .
2. Set the pointer mark to by moving the select dial
while depressing the exposure mode button.
3.The built-in flash pops up automatically.
4. Before shooting, confirm that the flash is fully charged.
With the Metered Manual Mode
1. Depress the flash pop-up button to activate the built-in flash.
2. Set the Exposure mode to the Metered Manual Mode.
3. Select an appropriate shutter speed (slower than 1/100 of
second) and aperture combination for a correct exposure
on the LCD panel.
4. Before shooting, confirm that the flash is fully charged.
✍
MEMO
• The slow-speed-sync can also be used with the Shutter-Prior ity AE
Mode set. Confirm that the exposure warning is not appearing in the
viewfinder.
• In the slow-speed-sync shooting, use of a tripod is recommended to
prevent camera shake.

70
1 In the Metered Manual
Mode, move the select dial
to change the shutter speed
to desired slower shutter
speed appears on the LCD
panel.
2 When using this mode, use
a steady tripod to prevent
camera shake and gently
depress the shutter release
button.
✍
MEMO
• The shutter remains open for selected shutter speed.
• indicators will not light in this Bulb timer mode.
• This camera does not have a socket for cable release and cable switch,
use this mode with 2 seconds self-timer to release the shutter to
prevent camera shake.
5. Bulb Timer Exposure Mode
This mode is useful for the long exposures required for shooting
night scenes and fireworks.The shutter speed can be set from
45seconds to 32minutes as follows.
45sec, 1min., 1.4min., 2min., 2.8min., 4min.,5.6min., 8min.,
11min., 16min., 22min., 32min.
USING ANOTHER EXPOSURE MODES

71
BASIC OPERATION
(PREPARATION)
BASIC OPERATION
(SHOOTING)
ADVANCED OPERATIONS
OTHERS
1 Position the area to be
measured in the viewfinder
metering area and press the
AE lock button .
To cancel the AE lock, press
the AE lock button again.
2 is displayed in the
viewfinder. The measured
exposure level is locked for
20 seconds.
AE LOCK FUNCTION
✍
MEMO
•
If the shutter release button is depressed halfway down while the AE lock timer
is operating, the memorized meter reading will remain even if the AE lock
button is released.
•
The auto-popup built-in flash function does not work while the AE lock is in use.
•
AE lock does not work in the Metered Manual Mode and Bulb timer Mode.
The AE Lock function enables an exposure level lock before
picture is taken.
If the subject is too small for a proper exposure setting to be
obtained, you can zoom in on the subject to obtain the proper
exposure setting.Then lock the exposure setting and recompose
shot before taking a picture.
To use the AE Lock:
3
Recompose the image in the viewfinder and
take the picture.

72
1 Set the focus mode switch
to .
2 Frame the subject, then turn
the focusing ring to right or
left until the subject is in
focus.
3 When the subject comes
into focus, the focus
indicator lights up in
the viewfinder.
MANUAL FOCUSING
When you adjust focus manually, you can either look at the focus
indicator in the viewfinder or the viewfinder matte field to
check if the subject is in focus.
How to focus with aid of the in-focus indicator
4
Depress the shutter release button fully to take
a picture.

73
BASIC OPERATION
(PREPARATION)
BASIC OPERATION
(SHOOTING)
ADVANCED OPERATIONS
OTHERS
3
Depress the shutter release button fully to take
a picture.
✍
MEMO
When the special effect filter or Magic Image Attachment or Stereo
Adapter is used, the auto focusing and manual focusing with the in-focus
indicator in the viewfinder will not work. Use the manual focus mode to
focus on the subject with aid of the matte field.
1 Set the focus mode switch
to .
2
Frame the subject, then turn
the focusing ring to the right
or left until the subject looks
sharp in the viewfinder.
How to focus with aid of the matte field
When the autofocus mode or the focus indicator in the
viewfinder cannot be used for focus confirmation for the following
reasons, focus on the subject in the manual focus mode with the
aid of the matte field in the viewfinder.
The focus indicator blinks because the subject is difficult to
autofocus.See page 74.

74
HARD-TO-AUTOFOCUS SUBJECTS
The autofocus system is highly precise, but not perfect.
Depending on the brightness, contrast, shape, and size of your
subject, the autofocus system may not operate. In such a case,
set the focus mode switch to and use the manual focus
mode to focus the lens on the subject with the aid of the matte
field in the viewfinder (see page 73).
Subjects, which may fool the autofocus system, include:
a)Extremely low-contrast subjects such as a white wall in the
autofocus frame .
b)Subjects which don't reflect much light in the autofocus
frame .
c)Subjects that are moving too fast.
d)Multiple subjects in the foreground and background of the
autofocus frame .
e)Subjects positioned against reflected light or strong backlight
or with extremely bright backgrounds.
MANUAL FOCUSING

This camera automatically reads the film speed from the film's
DX code. However, the film speed setting can be changed. If you
use a non-DX coded film, set the film speed manually.
How to set
1 Load the Non-DX coded
film.
Move the select dial until
blinking appears on the
LCD panel while depressing
the exposure mode button.
will stop blinking and stays
on when you take a finger off
from the exposure mode button.
2 Move the select dial to set
ISO film speed displayed on
the LCD panel.
3 After ISO film speed is set, move the select dial to
set your desired exposure mode while depressing
the exposure mode button.
✍
MEMO
• To change the ISO film speed, move the select dial to left for a smaller
number (Slower film speed), or right for a larger number (Faster film speed).
• The shutter cannot be released when ISO film speed is displayed on
LCD panel.
• will display when DX coded film speed is set other than DX coded
film speed in used.
75
BASIC OPERATION
(PREPARATION)
BASIC OPERATION
(SHOOTING)
ADVANCED OPERATIONS
OTHERS
SETTING THE FILM SPEED (ISO)
MANU ALLY

76
USING THE BUILT-IN FLASH
1 Depress the flash mode
button until
appears on the LCD
panel.
2 Depress the shutter release
button halfway down, and
the built-in flash
automatically pops up when
the flash is required.
✍
MEMO
• The built-in flash does not retract automatically, push the built-in flash down
into the camera body after use.
• The built-in flash does not discharge when not required even though it has
been in the up position.
• Do not use the lens hood when the built-in flash is used, as it may obstruct
the path of the light coming from the flash, causing vignetting in the picture
corners.
• When using an inappropriate F or FA lens, will blink rapidly in the
viewfinder and on the LCD panel when the shutter release button is
depressed halfway down.For more details on COMPATIBILITY OF F AND
FA LENSES WITH THE BUILT-IN FLASH, see page 88.
• If the built-in flash is used continuously, the battery may become warm, but
it does not mean that the battery is faulty; it’s one of the battery’s
characteristics.
• The shutter cannot be released until the flash is fully charged.
Auto-popup flash function
In this mode, the built-in flash pops up and discharges
automatically in low light and backlight condition.

77
BASIC OPERATION
(PREPARATION)
BASIC OPERATION
(SHOOTING)
ADVANCED OPERATIONS
OTHERS
Selecting the various built-in flash modes
✍
MEMO
• The auto-popup flash mode can only be set when one of 6 picture
modes is selected.
• The built-in flash pops up automatically when is displayed on the
LCD panel. However, it discharges only when required. (Automatic flash
function)
• or can only be set when one of 6 picture modes is selected.
• The auto-popup function of the built-in flash does not work when the
AE lock function is in use.
• The automatic flash function can also be used with the external flash.
• Even if is displayed on the LCD panel, the built-in flash does not
pop up automatically when the external flash has been mounted either
with the power off or the external flash is not yet fully charged.
• If the red-eye reduction is used while the AF360 FGZ, etc. is set as a
slave unit, the pre-flash will trigger the slave unit to discharge. Do not
use red-eye reduction with slave unit.
Auto-popup Auto-popup
+
Red-eye reduction
Manual-popup
+
Red eye reduction
(See page 78, 80)
Manual-popup
(See page 80)
Flash off
(See page 83)
At each depress of the flash
mode button, the flash mode
on the LCD panel changes as
shown in the chart.

78
USING BUILT-IN FLASH
RED-EYE REDUCTION FLASH FUNCTION
This camera includes a red-eye reduction flash function, which
reduces the red-eye phenomenon utilizing pre-flash.In this
mode, the pre-flash is discharged just before the shutter is
released which reduces the diameter of the pupil of the eye.
Then the main flash is discharged while the pupils are smaller,
which in turn reduces the red-eye effect.
ABOUT RED-EYE PHENOMENON
Shooting portraits with flash in a dark environment often causes
a subject eyes to turn out reddish in the print.This phenomenon,
commonly known as "Red-Eye", is caused by the reflection of the
electronic flash in the retina of your subject eye.It can be
reduced by taking a picture in a brighter light condition or by
shooting with a wider-angle lens at a closer distance, or by
employing the red-eye reduction flash feature. When using a
Pentax dedicated flash unit off the camera, it may also help to
position the flash as far away from the camera as possible.

79
BASIC OPERATION
(PREPARATION)
BASIC OPERATION
(SHOOTING)
ADVANCED OPERATIONS
OTHERS
FLASH EFFECTIVE RANGE FOR THE PICTURE
MODE
As a rule of thumb the distance for using the built-in flash (which
varies with the lens used) is within about four meters (using ISO
400 film).
✍
MEMO
• The flash effective range does not come closer than 0.7m (2.6ft), even
if the lens aperture is so small. When a subject is shot at a distance
less than 0.7m (2.6ft), the correct exposure cannot be obtained, and
you will see vignetting in the picture corners.
• Note the built-in flash pops up even when the subject is far away or
beyond the maximum flash effective range. See page 86 for the flash
effective range.

80
1 Push the flash pop-up
button to activate the flash.
will disappear on the LCD
panel.
2 appears in the
viewfinder and on the
LCD panel when the
flash is fully charged.
3 Depress the shutter release
button fully, and the flash
unit discharges.
4 After using the Built-in
flash, push down the flash
head to lock it in the closed
position.
MANUAL POP UP THE BUILT-IN FLASH

81
BASIC OPERATION
(PREPARATION)
BASIC OPERATION
(SHOOTING)
ADVANCED OPERATIONS
OTHERS
✍
MEMO
• The built-in flash does not pop up even if the flash pop-up button is
depressed with the flash mode is set to .
• This mode can be used with the red-eye reduction together.
• When the flash pop up button is depressed, is disappeared from
the LCD pane if auto flash mode was set, and the flash is always
discharged even if the subject is not required flash light.
• The shutter cannot be released until the flash is fully charged.
• Do not use a lens hood with the built-in flash as it may obstruct the
path of the light coming from the flash, causing vignetting in the picture
corners.
• With the built-in flash popped up, an external flash cannot be attached
to the hot shoe. If you would like to use an external flash together with
the built-in flash, see the flash connections on page 93.

82
DAYLIGHT-SYNC SHOOTING
In daylight conditions, when a portrait picture is taken with a
person's face cast in shadow, discharging the flash will eliminate
the shadow.
1.Depress the flash pop up button. ( )
2.Confirm either the built-in or the external flash is fully
charged.
If the background is too bright, it may be over exposed.
3.Take a picture.
✍
MEMO
When taking a daylight-sync photograph with displayed on the LCD
panel, the flash may not discharge.
Using other type of a flash
Use of non-Pentax flash units may damage the camera. For the
best results, use a Pentax dedicated flash unit.
Without Daylight-Sync With Daylight-Sync
MANUAL POP UP THE BUILT-IN FLASH

FLASH-OFF MODE
Use this mode if you don’t want the
built-in flash to pop-up automatically.
The flash will not pop-up
automatically even when it is dark or
when the flash is required.
Depress the Flash mode button
until appears on the LCD panel.
✍
MEMO
• The flash does not discharge even if the built-in flash is in the pop-up
position.
• The Built-in flash does not pop up automatically or by pushing the
Flash pop up button manually.
• In the flash off mode, the external flash will not discharge either.
FLASH RECOMMENDED INDICATOR
The flash recommended
indicator in the
viewfinder and on the
LCD panel blink slowly to
warn and recommend
you to use flash when
you attempt to take a picture in low light and backlight
condition.
✍
MEMO
In the Shutter-Priority AE Mode and Metered-Manual Mode, the flash
recommended indicator blinks only when attempting to photograph a
subject in a backlight condition.
83
BASIC OPERATION
(PREPARATION)
BASIC OPERATION
(SHOOTING)
ADVANCED OPERATIONS
OTHERS

84
INAPPROPRIATE LENS WARING
WHEN THE BUILT-IN FLASH IS USED
When using an
inappropriate F or FA
lens, will blink
rapidly in the viewfinder
and on the LCD panel
when the shutter release
button is depressed halfway down.
✍
MEMO
• See page 88 for more details on compatibility of F and FA lenses with
the built-in flash.
• Taking a picture while this warning is appeared may cause vignetting in
the picture corners or semi-circular vignetting at the bottom of the
picture.

85
BASIC OPERATION
(PREPARATION)
BASIC OPERATION
(SHOOTING)
ADVANCED OPERATIONS
OTHERS
1.When using one of 6 Picture Modes
• The camera automatically chooses an optimum combination
of shutter speed and aperture according to the subject
brightness, allowing you to take a flash photograph with
ease.
• The shutter speed automatically changes to approximately
1/100 sec. or to a slower speed, which does not cause
camera shake.The slowest shutter speed depends on the
focal length of the lens fitted to the camera.The slowest
shutter speed in the Night-scene Program Mode is 1
seconds.When the Action program mode is used, the shutter
speed is fixed to 1/100 of second.
2.Shutter-Priority AE Mode
• When taking a fast moving subject, you can increase a
subject blur effect.The shutter speed can be set slower than
1/100 of second.
• In this mode, the aperture automatically changes according
to the ambient brightness, making a flash photograph easily.
3.Aperture-Priority AE mode
• In this mode, the shutter speed automatically changes with
the ambient brightness.The shutter speed changes in range
of 1/100 sec. to a slower shutter speed that does not cause
camera shake.The slowest shutter speed depends on the
focal length of the lens in use.The shutter speed of 1/100
sec. is set automatically with a Pentax A lens.
ADVANCED OPERATION FOR THE
BUILT-IN FLASH

86
ADVANCED OPERATION FOR THE BUILT-IN FLASH
4.Metered Manual Mode
• When using the built-in flash in the Metered Manual Mode,
any combination of aperture and shutter speed slower than
1/100 can be set. In this mode, the exposure of the
background can be controlled by the manual exposure while
the flash properly exposes the foreground subject.
1. Calculating the flash effective range according to the camerato-subject distance.
Maximum flash distance = Guide Number ÷ Selected aper ture
Minimum flash distance = Maximum flash distance ÷ 5*
✍
MEMO
• When the distance to the subject is less than 0.7m (2.3ft), the flash
cannot be used. If the flash is used less than 0.7m, it causes vignetting
in the picture corners, light is distributed unevenly and the picture may
be over exposed.
• *The value 5 used in the formula above is fixed value applied to the
built-in flash in this camera.
The guide number (GN) depends upon the film speed used as
shown below.
ISO25 GN5.5 ISO200 GN15.6
ISO50 GN7.8 ISO400 GN22
ISO100 GN11

87
BASIC OPERATION
(PREPARATION)
BASIC OPERATION
(SHOOTING)
ADVANCED OPERATIONS
OTHERS
Exp.If an ISO100 film is used at an aperture of f/3.5, the flash
effective distance is obtained as follows:
For maximum distance Guide Number (11) ÷ f/3.5 = 3.14m
For minimum distance 3.14 ÷ 5 = 0.63m →0.7m *
* Minimum distance of the built-in flash in this camera
Thus, the flash effective distance is from approx. 0.7m to 3.14m.
2.Calculating the aperture according to the camera-to-subject
distance
Aperture = Guide Number ÷ Camera-to-subject distance
Exp.
If the camera-to-subject distance is 2.5m and ISO 100 film is
used, the effective aperture is obtained as follows:
Guide Number (11) ÷ Distance (2.5m) = f/4.4
If the calculated aperture value is different from an indicated f
stop, for instance f/4.4, select the next smaller aperture value.
(Set to f/4 in this case)

88
COMPATIBILITY OF F AND FA LENSES WITH THE
BUILT-IN FLASH
If an F or FA lens incompatible with the built-in flash is used,
depressing the shutter release button halfway down when the
flash is ready, blink in the viewfinder and on the LCD panel
as a warning.
If the flash picture is taken with an incompatible lens, the corner
of the picture may look dark or there may be dark, semi-circular
area on the lower part of the picture.
= compatible = Vignetting will occur under the usage
conditions
= incompatible because of vignetting ]
Lens Name Compatibility
F, Fish-Eye Zoom 17-28mm f/3.5-4.5
FA Zoom20-35mm f/4 Vignetting will occur at focal length
is less than 28mm.
FA Zoom 24-90mm f/3.5-4.5AL(IF) Vignetting will occur at focal length
between 24-28mm.
FA* Zoom 28-70mm f/2.8AL
FA Zoom 28-70mm f/4 AL
FA Zoom28-80mmf/3.5-5.6 Vignetting will occur at focal length
between 28-35mm or the camera
to subject distance is less than 1m
with the focal length of 35mm.
FA Zoom 28-90mm f/3.5-5.6
FA Zoom 28-105mm f/3.2-5.6
FA Zoom 28-105mm f/4-5.6 (IF) Vignetting will occur at focal length
is less than40mm.
FA Zoom 28-200mm f/3.8-5.6 Vignetting will occur at focal length
is less than 70mm.
F or FA35-80mm f/4-5.6
ADVANCED OPERATION FOR THE BUILT-IN FLASH

89
BASIC OPERATION
(PREPARATION)
BASIC OPERATION
(SHOOTING)
ADVANCED OPERATIONS
OTHERS
Lens Name Compatibility
FA Zoom 70-200mm f/4-5.6
FA* Zoom 80-200mm f/2.8 Vignetting will occur at focal length
is less than 90mm.
F or FA Zoom 80-200mm f/4.7-5.6
FA Zoom 80-320mm f/4.5-5.6
F or FA Zoom 100-300mm f/4.5-5.6
FA Zoom 100-300mm f/4.7-5.6
FA*Zoom 250-600mmf/5.6ED(IF)
FA20mmf/2.8
FA24mmf/2AL(IF)
FA28mmf/2.8
FA31mmf/1.8AL Limited
FA35mmf/2AL
FA43mmf/1.9 Limited
FA50mmf/1.4,f/1.7
FA77mmf/1.8
FA*85mmf/1.4
FA*135mm
FA*200mm
FA*300mmf/2.8
FA*300mmf/4.5
FA*400mmf/5.6
FA* 600mmf/4ED (IF)
FA MACRO 50mm f/2.8
FA MACRO 100mm f/2.8, f/3.5
FA MACRO 200mm f/4.0 ED (IF)
FA Soft 28mm f/2.8
FA Soft 85mm f/2.8

90
OVERVIEW OF FLASH FUNCTION
CAMERA FUNCTION A B C D E
Red-eye reduction flash function
Smart flash function operates
After the flash is charged, the camera
automatically switches to the flash-sync
speed.
Automatic aperture setting in the Picture
Mode or Shutter-Priority AE Mode
Flash confirmation in the viewfinder
TTL auto flash
Slow-shutter sync flash
AF illuminator
Trailing-shutter-curtain sync flash *4
Contrast-control-sync flash mode *4
Multiple burst flash, slave flash
*
3
*
4
*
5
*
6
*
1
*
2
*
2
A:Built-in flash
B:AF360FGZ, AF500FTZ, AF330FT
C:AF400FTZ, AF240FTZ
D:AF400T, AF280T, AF220T, AF200T, AF080C, AF140C,
AF201SA, AF200SA
E:AF200S, AF160, AF140,

91
BASIC OPERATION
(PREPARATION)
BASIC OPERATION
(SHOOTING)
ADVANCED OPERATIONS
OTHERS
✍
MEMO
*1.When using the AF280T or AF400T with the flash confirmation OFF
and TTL mode, the red-eye reduction function operates.
*2.When using a type D flash (except AF200SA and AF201SA) in the
MS (Manual Sync) or M (Manual) Mode or when using a Type E
flash, set the camera exposure mode to the Aperture-Priority AE
Mode, Metered Manual or Bulb timer Mode.Picture mode and
Shutter –priority AE cannot be used because the actual required
aperture value may change.
*3.With the AF201SA and AF200SA, TTL auto cannot be used.
*4.The shutter speed is 1/60 of second or slower.
*5.With TYPE B or C and D flash units, trailing-shutter-curtain sync
flash is possible.
*6.Except AF360FGZ and AF330FTZ.

92
Using Pentax dedicated auto flash units
If the built-in flash is not powerful enough, a Pentax dedicated
auto flash should be used.
A Pentax dedicated TTL Auto Flash like the PENTAX AF FTZ or
AF FT series flash unit (i.e.: AF500FTZ, AF330, AF280T or
AF220T) incorporate the TTL Flash Mode.
Using the TTL Auto Flash Mode
1.Remove the hot shoe cover FK.
Store the removed hot shoe cover in the strap pocket.
2.Attach a Pentax dedicated flash unit to the camera.
3.Turn the flash ON.
4.Set the flash mode to the TTL Auto Mode.
5.Confirm that the flash is fully charged.
6.Focus on the subject and depress the shutter release
button to take a picture.
✍
MEMO
• When the flash is fully charged, the ready lamp on the flash unit lights
up.When the shutter release button is depressed halfway down,
appears in the viewfinder indicating the flash is ready.
• An external flash can also be made to automatically fire. Note that the
flash will not fire against a lighter subject especially during daytime
synchro shooting.
• Read the operating manual of the flash unit for more details.
OVERVIEW OF FLASH FUNCTION

93
BASIC OPERATION
(PREPARATION)
BASIC OPERATION
(SHOOTING)
ADVANCED OPERATIONS
OTHERS
Using both the built-in flash and the external flash
An external flash cannot be used when the built-in flash is in its
popped up position.When the built-in flash and the external flash
are used simultaneously, use the following optional accessories.
Extension Cord F5P
Off-Camera Shoe
Adapter F
Hot Shoe
Adapter F
G
R
A
3
5
8
1
1
1
6
2
2
3
.5
5
.
6
80
35
-
A
X
E
P
NN
T
1. Remove the hot shoe cover FK from the camera.
Store the removed hot shoe cover in the strap pocket.
2. Attach the hot shoe adapter FG to the camera.
3. Connect the extension cord F5P to the hot shoe adapter F
G
Turn the flash ON.
4. Attach the Off-Camera shoe adapter F to a tripod Set the
flash mode to the TTL Auto Mode.
5. Attach the flash unit to the Off-camera shoe adapter F
Connect the extension cord F5P to the Off-camera shoe
adapter F.
6. Depress the flash pop up button to activate the built-in flash.
7. Confirm that the all flash units are fully charged.
8. Focus on the subject and depress the shutter release
button to take a picture.

94
• The AF500FTZ can be connected directly to the Extension
cord F5P without Off-camera shoe adapter.
• The AF400T flash cannot be used with the built-in flash
simultaneously because the 4P sync cord B from the
AF400T will interrupt the function of the built-in flash.
Red-eye reduction flash function
The red-eye reduction flash function with an external flash
attached can also be used depending on what type of an
external flash is attached, and it may have any restrictions for
usage. See page 77 for more details.The red-eye reduction flash
function can be used only when the external flash is set to the
TTL Auto Mode.
Trailing-Shutter-Curtain Sync Flash
When using the built-in flash and the external flash
simultaneously, the trailing-shutter-curtain-flash function for the
built-in flash also operates when the external flash is set to the
trailing-shutter-curtain flash function. Before shooting, confirm
that both flash units are fully charged.
Multi-burst flash with the Pentax dedicated flash
When discharging more than 2 Pentax dedicated flashes, make
sure that they are of the same type, combine the type B with
Type C or Type D with Type E. Refer to the overview of Flash
Function on page 90.The built-in flash can be operated with any
type of Pentax TTL dedicated flash unit. 2.
OVERVIEW OF FLASH FUNCTION

95
BASIC OPERATION
(PREPARATION)
BASIC OPERATION
(SHOOTING)
ADVANCED OPERATIONS
OTHERS
Contrast-Control-Sync Flash
Using the dedicated external flash in combination with the built-in
flash allows twin flash photography (contrast-control-synch flash
photography).This is based on the difference between the
amounts of light discharged from two units.
Contrast control synch flash is possible with the combination of
following flash units:
AF360FGZ, AF330FTZ, AF500FTZ and the built-in flash
1. Place the flash unit a part from the camera.
2. Depress the flash pop up button to activate the built-in flash.
3. Set the flash synch mode to the Contrast-Control-Synch mode.
4. Ensure that both flash units are fully charged and then depress
the shutter button to take a picture.
✍
MEMO
• The ratio of the amount of flashlight is 1 (built-in flash): 2 (dedicated
flash unit).
• Do not combine an accessor y with a different number of contacts such
as a "Hot Shoe Grip" as a malfunction may occur.
• In the Contrast-Control-Sync Flash Mode, the faster flash sync speed is
1/60 of second.

96

BASIC OPERATION
(PREPARATION)
BASIC OPERATION
(SHOOTING)
ADVANCED OPERATIONS
OTHERS
OTHERS
ACCESSORIES (OPTIONAL) . . . . . . . . . . . . . . . . .98
TROUBLESHOOTING . . . . . . . . . . . . . . . . . . . . . .102
PROGRAM LINES . . . . . . . . . . . . . . . . . . . . . . . . .104
STANDARD PROGRAM MODE /
NIGHT-SCENE
PROGRAM MODE WITHOUT FLASH
PORTRAIT PROGRAM MODE
LANDSCAPE PROGRAM MODE
ACTION PROGRAM MODE
CLOSE-UP PROGRAM MODE
SPECIFICATIONS . . . . . . . . . . . . . . . . . . . . . . . . .106
WARRANTY POLICY . . . . . . . . . . . . . . . . . . . . . . .108

98
A number of dedicated accessories are available for this camera.
AA-BATTERY PACK FG
Four size-AA batteries are used and dedicated to MZ-60/ZX-60.
ACCESSORIES (OPTIONAL)
✍
MEMO
Battery life ( Using 24-Exposure film rolls)
Size AA Alkaline batteries were used under Pentax testing conditions.
Number of film rolls
at 20°C( 68°F)
General existing light photography approximately 180 rolls
Flash photography using flash 50% of
the times
approximately 35 rolls
Flash photography using flash
100
% of
the times
approximately 20 rolls
 Loading...