


USE & CARE |
Model AE (8") |
Model AF (10") |

Dear Customer
Congratulations on the purchase of your new Delta-Q Autoclave. The technical documentation provided is designed as a part of this product. Always keep this documentation handy. The Use & Care Manual describes the 8” and 10” models. Please read the instructions and get to know the autoclave. Please carryout maintenance according to relevent instructions.
Pelton & Crane
TABLE OF CONTENTS |
|
Important Safety Instructions ..................................................................................................................................................... |
3 |
Familiarization ............................................................................................................................................................................. |
6 |
Operating Features ............................................................................................................................................................. |
6 |
Safety Features .................................................................................................................................................................. |
6 |
Visual Displays ................................................................................................................................................................... |
4 |
Switch Functions ................................................................................................................................................................ |
6 |
Audible Signals ................................................................................................................................................................... |
8 |
Program Parameters ........................................................................................................................................................... |
8 |
Installation .................................................................................................................................................................................... |
9 |
Programming ............................................................................................................................................................................. |
10 |
Operation ................................................................................................................................................................................... |
11 |
Important Sterilization Practices ........................................................................................................................................ |
11 |
Preparation and Loading ................................................................................................................................................... |
12 |
Operating Steps ................................................................................................................................................................ |
13 |
Maintenance ............................................................................................................................................................................... |
14 |
Maintenance and Performance Schedule .......................................................................................................................... |
14 |
Cleaning Procedure .................................................................................................................................................... |
15 -16 |
Trouble Shooting Guide ..................................................................................................................................................... |
17 |
Self-Diagnostic Check ...................................................................................................................................................... |
19 |
Operating Alarms .............................................................................................................................................................. |
20 |
Options ....................................................................................................................................................................................... |
21 |
Installation and Servicing Checklist ......................................................................................................................................... |
22 |
-2-

! IMPORTANT SAFETY INSTRUCTIONS !
Caution! Personal Safety
¥To avoid electrical shock, never insert plug into outlet with wet hands.
¥Do not attempt to open door unless pressure gauge reads Ò0Ó or injury may result.
¥Do not operate Autoclave in area containing combustible gases.
¥Do not place Autoclave within 6 feet of patient.
¥Routinely inspect power cord for cuts and abrasions. Discontinue use and have authorized service representative replace cord if damaged.
¥Protect your hands from contact with soiled instruments to prevent serious infections.Wear heavy rubber gloves when handling instruments.
Warning! To Avoid Serious Burns:
Do not open door during sterilization cycle. Stand to one side when opening door after sterilization cycle and do not place hands or face over door.
-Use a tool or hot pad to remove trays and avoid touching chamber walls.
-Stand away from door after the sterilization cycle is completed. Liquids may still be in the chamber and can cause serious burns.
-Ensure unit is properly leveled. Follow the Installation Instructions on page 9.
-When performing safety valve maintenance (pg. 14) stand clear of discharge area (lower right corner at rear of unit).
Do not remove cover: Electrical shock hazard. Refer servicing to authorized service representative . Disconnect power before servicing.
DANGER: Do Not attempt to open door with pressure in the chamber. Avoid direct contact with hot chamber walls or sterilized load. Use metal handle (8” model only) and gloves.
Warning! ÑTo avoid serious burns Ñ
If used for liquid sterilization, the liquid must be allowed to cool or the liquid may boil when exposed to atmospheric pres-
sure. Pelton & Crane does not recommend use of this device for liquid sterilization.
Caution! Check weekly for proper door switch operation (see pg. 14).
Product Safety
¥This unit requires a dedicated circuit (separate branch circuit only).
¥Always use distilled quality water. Tap water will cause corrosion of chamber and clog valves and filters with mineral deposits.
¥Never operate unit outside the specified voltage range (see data plate on back of unit).
¥Do not use steel wool or steel brushes on stainless steel. Metal pads will damage chamber.
¥Use only manufacturerÕs replacement parts/accessories. Failure to do so may cause poor performance.
¥Refer servicing to authorized service representative.
¥Do not position the unit so that it is difficult to reach the circuit breaker on the power plug.
WARNING: If unit is operating in high altitude, adjustments to time, temperature or pressure may be required. Also, leaking of safety valve may indicate need for adjustment.
Product Disposal
Caution!
Contact your local authorized dealer for proper disposal of the device or the components of the device to ensure compliance with your local environmental regulations.
CAUTION: ANY LIQUIDS THAT ARE STERILIZED IN THIS UNIT ARE FOR LABORATORY USE ONLY AND NOT FOR USE IN DIRECT PATIENT CONTACT.
Interference with electromedical devices:
To guarantee the operational safety of electromedical devices, it is recommended that the operation of mobile radio telephones in the medical practice or hospital be prohibited.
Strong EMI sources such as electro surgery units or x-ray units may effect performance. If performance problems occur, move the unit to another electrical circuit or physical location.
-3-

PRODUCT INFORMATION
Table of Symbols
Power
Ground
Mode
Printer Connection
Printer On/Off
Arrows
Attention: Printer Connection Only
Clear/Start
Program
Hot Surface
Low Water
Dry
Ready
Sterilize
CAUTION. Failure to carefully follow the described procedure may result in damage to the equipment.
WARNING. Failure to carefully follow the described procedure may result in damage to the equipment and the operator.
Risk of electrical shock present. Make sure power is disconnected before attempting this procedure.
The conformity of the quality management system is certified with Certificate No. 369CE, dated April 8, 1999 by:
AMTAC Certification Services, LTD
Norman Road, Broadheath, Altrincham
Cheshire WA 14 4EP, United Kingdom
-4-

PRODUCT INFORMATION
8” Model
12 1/4” (31.1cm)
17½ ” (44.5cm)
10” Model
14” |
(35.6cm) |
19 1/4” (48.9cm)
20 1/4” (44.5cm)
24 5/8” (62.5cm)
Specifications
Exterior Dimensions
8Ó Model-
12 1/4Ó high x 20 1/4Ó deep x 17 1/2Ó wide (31.1 cm high x 51.4 cm deep x 44.5 cm wide) 10Ó Model-
14Ó high x 24 5/8Ó deep x 19 1/4Ó wide
(35.6 cm high x 62.5 cm deep x 48.9 cm wide)
Chamber Dimensions
8Ó Model-
8 7/32Ó inside diameter x 14Ó useable depth
(21 cm inside diameter x 35.6 cm deep) 10Ó Model-
9 7/8Ó inside diameter x 17 7/16Ó useable depth
(25.1 cm inside diameter x 44.3 cm deep)
Weight Without Water in Reservoir
8Ó Model-
61 lbs. (28 kg) 10Ó Model-
84 lbs. (38 kg)
Measurement Accuracy
Pressure: +/- 8 kPa (1.16 PSI or .08 bars) Temperature: +/- 3.6¡ F (2¡ C)
Time: +/- 1 second
Power Supply
Both Models-
110 - 120 Volts, 50/60 Hz or
220 - 240 Volts, 50/60 Hz
Nominal Current Consumption
8Ó Model-
12 Amperes @115 Volts
6 Amperes @230 Volts 10Ó Model-
10 Amperes @115 Volts
8 Amperes @230 Volts
Environmental and Storage Limitations
Both Models-
Optimum Operating Temperature Range: 50¡F to 104¡F
(10¡C to 40¡C)
Relative Humidity Range: 30% to 75%
Unit is designed for normal dental/medical office environment.
NOTE: If printer is used, its operating temperature is 41¡F to 95¡F (5¡C to 35¡C).
Mode of Operation:
Both ModelsContinuous
NOTICE: Manufacturer will make available all information which will assist the authorized service representative to repair equipment. Calibration of the power board is to be done only at the factory.
-5-

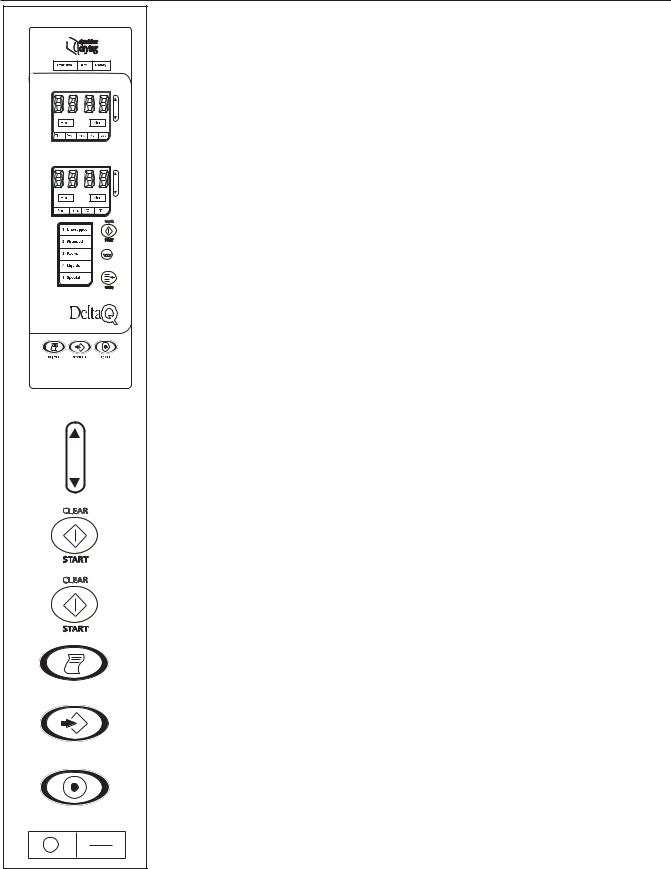
FAMILIARIZATION
19
18
17
15
OPERATING FEATURES
1.Power Switch/Circuit Breaker (rear of unit)
2.Reservoir Fill
3.Operation Indicator Light
4.Display Window (Pressure) kPa
5.Arrow Switches
6.Display Window (Temp/Time) C/F / Minutes
7.Clear/Start Switch
8.Low Water Light
9.Mode Selection Switch
10.Mode/Program Display
11.Power On Switch
12.Programming Switch
13.Printer On/Off Switch
14.Quick Drain Connection (inside door)
15.Leveling Feet
16.Door Lock
17.Safety Valve (rear corner of unit)
18.Operating Instructions Label
19.Caution Label
20.Serial Number Plate (inside door)
.
20  2
2
3
4


 5
5
6


 5
5


 7
7 
 8
8


 9
9
10
11
12
13
 15 14
15 14
SAFETY FEATURES
The design of the autoclave has these safety features for your protection:
Door Lock
Door can be opened only when internal pressure is at atmospheric pressure.
VentValve
The vent valve will open and the P-2 alarm will display should the chamber pressure exceed 240 kPa.
Safety Valve
The safety valve opens as backup protection should the chamber pressure exceed 262 kPa.
Overheat Protection
Chamber temperature is protected with a surface sensor so the temperature will not exceed 159¡C. It has additional overheat protection should the temperature of the heating elements reach 180¡C.
Electrical Power Interruption
In case of a power failure during the sterilization cycle, pressure in the chamber is automatically vented to the atmosphere and display is blank
-6-
FAMILIARIZATION
VISUAL DISPLAYS
Indicator Lights
ÒSterilize” light illuminates to indicate sterilization cycle in progress. ÒDryÓ light indicates the heater and pump are on for the drying cycle.
ÒReadyÓ light illuminates when instruments may be removed from chamber.
Upper Window
Displays Time, Pressure, Clock and Year.
Lower Window
Displays Temperature, Date, Operational Timer, Failure Codes, Power colon Ò:Ó ( power button is not activated when main power is ON) and End.
Mode/Program
See Program Parameters, pg. 10.
Low Water
When the water level in the reservoir is too low, the ÒLow WaterÓ light illuminates.
SWITCH FUNCTIONS
Arrows
Increases or decreases values of digits flashing when programming the system parameter.
Clear/Start
Controls the start of a sterilizing cycle when unit is in stand-by. Also, used to clear a cycle and returns unit to stand-by. If depressed with ÒPowerÓ switch, self-diag- nostic check is performed.
Mode Selection
Press to select one of the five sterilization mode programs. (See page 14 for special mode)
Printer On/Off
Use to switch the printer on or off.
Program
Sets the minutes, hour, day, month and year. Chooses units of temperature and pressure. Changes the drying time. Also, chooses the Special mode to the parameter desired. It initiates selected display mode during sterilization.
Power
Powers on operating controls. LCD will be visible. If depressed with ÒClear/StartÓ switch, self-diagnostic check is performed.
Main Power (back of unit)
Depress ÒIÓ side of switch to turn unit on. A colon Ò:Ó illuminates in the lower display indicating power is on. Leave switch in the On position.
-7-

FAMILIARIZATION
AUDIBLE SIGNALS
Switches
One beep occurs when depressing switches, except when depressing Power Switch and Arrow switches. When pressing Arrow or Power Switch, no beep occurs.
Sterilization/Dry Cycle
Five beeps indicate the Sterilization or Drying cycles are complete.
Operational Alarm
Sixty beeps indicates an operational error or alarm. Depress Clear/Start to put unit in standby mode.
Door Open
Continuous beeping indicates the door has been opened during or prior to start of cycle.
|
PROGRAM PARAMETERS* |
|
|
|
|
Program/Temp**, Pres, |
Items to be Sterilized |
|
Time** |
||
|
|
|
1 Unwrapped/ |
Instruments loose on a tray. Open glass or metal canisters. Heat-resistant rubber tubing |
|
134¡C, 216 kPa for 3 |
||
which will not be used in surgical procedure. Any items where 134¡C-137¡C for 3 minutes |
||
minutes |
||
is appropriate. |
||
|
||
|
Loosely wrapped individual instruments. |
|
2 Wrapped/ |
Wrapped dental handpieces***. Multiple layers of instruments separated by fabric. Instru- |
|
134¡C, 216 kPa for 12 |
||
ments in pouches. Wrapped tray of loose instruments. Heat-resistant rubber tubing. Any |
||
minutes |
||
items where 134¡C-137¡C for 12 minutes is appropriate. |
||
|
||
3 Packs/ |
Common groups of surgical instruments in commercially prepared packs. Surgical instru- |
|
121¡C, 115 kPa for 30 |
||
ments subject to prolonged storage. Any items, other than liquids, where 121¡C for 30 |
||
minutes |
||
minutes is appropriate. |
||
|
||
4 Liquids/ |
Liquids or gels that could boil or spill out of container. At end of sterilizing cycle, venting is |
|
121¡C, 115 kPa for 30 |
slowed to allow heat in liquid to dissipate |
|
minutes |
slowly and eliminate boilovers.Venting occurs at 20 kPa to complete the cycle.There is |
|
|
NO drying cycle in the ÒLiquidsÓ mode. |
|
|
|
|
|
!CAUTION: ANY LIQUIDS THAT ARE STERILIZED IN THIS UNIT ARE FOR |
|
|
LABORATORY USE ONLY AND NOT FOR USE IN DIRECT PATIENT CONTACT. |
|
|
Warning! —To avoid serious burns — |
|
|
If used for liquid sterilization, the liquid must be allowed to cool or the liquid |
|
|
may boil when exposed to atmospheric pressure. Pelton & Crane does not |
|
|
recommend use of this device for liquid sterilization. |
|
5 Special/ |
|
|
Dependent upon parameters user has programmed. Operator is responsible for correct |
||
Programmable to |
||
time and temperature settings for load. |
||
101¡C to 135¡C, for 1 |
||
|
||
to 90 minutes. |
|
|
|
|
*For mixed loads, use the longer or lower temperature program (i.e., for loose instruments and surgical dressings in packs, use Ò3 PacksÓ).
**Time and temperatures are minimums.
***When sterilizing handpieces, check handpiece manufacturerÕs recommendations for appropriate sterilization conditions. Use Ò2 WrappedÓ program only if handpieces are able to withstand 134¡C-137¡C temperature.
The names of the various modes of operation are general categories.
When selecting the mode of operation, take into consideration the density of the individual load and the ability of the steam to circulate and penetrate wraps. Then determine the correct programmed values to assure sterilization.
-8-
 Loading...