

Page 1

®
TLR3040
Time-Lapse VCR
Installation/
Operation Manual
C671M (1/01)
Pelco • 3500 Pelco Way • Clovis, CA 93612-5699 USA • www.pelco.com
In North America and Canada: Tel (800) 289-9100 or FAX (800) 289-9150
International Customers: Tel +1 (559) 292-1981 or FAX +1 (559) 348-1120
Page 2

CONTENTS
Section Page
GENERAL ..........................................................................................................................6
SAFEGUARDS, WARNINGS, CAUTIONS, AND CARE ............................................ 7
UNPACKING INSTRUCTIONS ..................................................................................9
INTRODUCTION TO TIME-LAPSE RECORDERS ...................................................9
TLR3040 FEATURES AND FUNCTIONS .................................................................10
QUICK START .................................................................................................................. 11
BASIC START ...........................................................................................................11
ADDITIONAL ITEMS .................................................................................................11
INSTALLATION .................................................................................................................12
PRE-INSTALLATION CAUTIONS ............................................................................. 12
SECURING THE VCR CONTROLS ................................................................. 12
MONITOR TIPS ................................................................................................ 12
INSTALLATION .........................................................................................................13
CONNECTING THE VCR TO A MULTIPLEXER............................................... 14
ALARM RECORDING CONNECTION ............................................................. 15
CONNECTING FOR SERIES RECORDING ....................................................15
CONNECTING FOR REMOTE RECORDING ..................................................15
CONNECTING FOR EXTERNAL TIME CLOCK ADJUSTMENT ..................... 16
CONTROLS ...................................................................................................................... 16
FRONT PANEL ......................................................................................................... 16
FLUORESCENT DISPLAY ....................................................................................... 18
REAR PANEL............................................................................................................20
ADJUSTING THE CLOCK AND USING THE JOG AND SHUTTLE CONTROLS ............22
JOG AND SHUTTLE CONTROLS ............................................................................22
USING THE JOG DIAL .....................................................................................22
USING THE SHUTTLE RING ...........................................................................22
ADJUSTING THE CLOCK ........................................................................................22
ADJUSTING TO THE EXACT SECOND ..........................................................22
PROGRAMMING .............................................................................................................. 23
GENERAL PROGRAMMING INSTRUCTIONS ........................................................ 23
LANGUAGE SELECTION MENU ............................................................................. 23
QUICK GUIDE TO THE MENU STRUCTURE..........................................................24
MAIN MENU ..............................................................................................................25
DISPLAY MENU ........................................................................................................ 25
DISPLAY MODE ...............................................................................................25
TIME/DATE SIZE ..............................................................................................25
BLUE BACK ......................................................................................................25
TIMER PROGRAM ...................................................................................................26
RECORDING SET UP MENU ...................................................................................27
REAR TERMINAL MENU..........................................................................................28
MAINTENANCE MENU ............................................................................................29
FIRST TIME SET UP MENU..................................................................................... 30
ADDITIONAL MATERIAL ..........................................................................................31
DAY AND TIME DISPLAY MODES ................................................................... 31
SET THE DAY AND TIME .................................................................................32
LOADING, UNLOADING, PROTECTING THE TAPE CASSETTE ...................................33
LOADING ..................................................................................................................33
UNLOADING .............................................................................................................33
PREVENTING ACCIDENTAL ERASURE .................................................................34
DAMAGED CASSETTE TAPE ..........................................................................34
WHEN TO REPLACE A TAPE .................................................................................. 34
RECORDING .................................................................................................................... 34
MANUAL RECORDING ............................................................................................34
RECORDING MODE ........................................................................................ 35
RECORDING CHECK FUNCTION ...................................................................35
AUDIO RECORDING ........................................................................................ 35
REPEAT RECORDING .....................................................................................36
SERIES RECORDING ......................................................................................36
REMOTE RECORDING .................................................................................... 37
TIMER RECORDING ................................................................................................38
PROGRAMMING PROCEDURE ......................................................................38
HOLIDAY SET UP ............................................................................................. 39
SPECIAL DW SETTINGS .................................................................................39
2 Pelco Manual C671M (1/01)
Page 3

OVERLAPPING PROGRAMS .......................................................................... 39
WHAT IF THE TIMER RECORDING INDICATOR STARTS FLASHING? ........39
ALARM RECORDING ............................................................................................... 40
ALARM RECORDING CONNECTION ............................................................. 40
PROGRAMMING FOR ALARM RECORDING .................................................41
RECORDING AFTER A POWER FAILURE ..............................................................42
MAINTENANCE ................................................................................................................42
POWER LOSS LIST ................................................................................................. 42
VIEWING THE POWER LOSS LIST.................................................................42
CLEARING THE POWER LOSS LIST .............................................................. 42
ALARM LIST ............................................................................................................. 43
VIEWING THE ALARM LIST.............................................................................43
CLEARING THE ALARM LIST .......................................................................... 43
ALL MENU INITIALIZE (RESET) .............................................................................. 43
ELAPSED TIME AND REPEAT RECORDING TIMES DISPLAY..............................44
PLAYBACK........................................................................................................................44
PLAYBACK PROCEDURE ....................................................................................... 44
PLAYBACK MODE............................................................................................ 45
AUDIO PLAYBACK ........................................................................................... 45
END OF TAPE ..................................................................................................45
SPECIAL EFFECTS PLAYBACK ..............................................................................46
STILL PICTURE ................................................................................................46
FRAME-BY-FRAME PLAYBACK ......................................................................46
SHUTTLE RING ................................................................................................ 46
DIRECT SHUTTLE RING .................................................................................47
ADJUSTING THE PICTURE DURING PLAYBACK ..................................................47
TRACKING ADJUSTMENT .............................................................................. 47
ADJUSTING PICTURE QUALITY .................................................................... 48
SEARCH TECHNIQUES ...................................................................................................48
ADDITIONAL FUNCTIONS AND FEATURES .................................................................. 51
TESTING ........................................................................................................................... 51
TROUBLESHOOTING ......................................................................................................52
SPECIFICATIONS............................................................................................................. 54
INDEX ............................................................................................................................... 56
REGULATORY NOTICES .................................................................................................58
INFORMATION .................................................................................................................58
WARRANTY AND RETURN INFORMATION....................................................................58
VERTICAL (VIBRATION) ADJUSTMENT ......................................................... 48
COUNTER MEMORY STOP.....................................................................................48
SKIP SEARCH ..........................................................................................................49
INDEX SEARCH ....................................................................................................... 49
HOW TO COUNT THE INDEX NUMBER ......................................................... 50
TIME AND DATE SEARCH ....................................................................................... 50
COUNTER ................................................................................................................51
TAPE COUNTER ..............................................................................................51
COUNTER RESET ........................................................................................... 51
COUNTER MEMORY .......................................................................................51
MEMORY BACKUP IN CASE OF POWER FAILURE .............................................. 51
INITIAL SYSTEM TESTING...................................................................................... 51
REGULAR SYSTEM TESTING ................................................................................ 51
SELF-DIAGNOSTIC FUNCTION AND WARNING DISPLAY ................................... 52
BEFORE CALLING FOR SERVICE .......................................................................... 52
Pelco Manual C671M (1/01) 3
Page 4

LIST OF ILLUSTRATIONS
Figure Page
1Typical System Setup ....................................................................................... 13
2 Connecting VCR to Multiplexer .........................................................................14
3 Alarm Recording Connection ............................................................................15
4 Connecting VCRs for Series Recording ............................................................ 15
5 Connecting for Remote Recording .................................................................... 15
6 Connecting for External Time Clock Adjustment ...............................................16
7 Front Panel ....................................................................................................... 16
8 Fluorescent Display .......................................................................................... 18
9 Rear Panel ........................................................................................................20
10 JOG Dial and and SHUTTLE Ring .................................................................... 22
11 Language Menu ................................................................................................23
12 Menu Tree .........................................................................................................24
13 Main Menu ........................................................................................................ 25
14 Display Menu .................................................................................................... 25
15 Timer Program Illustration ................................................................................. 26
16 Recording Set Up Menu .................................................................................... 27
17 Rear Terminal Menu ..........................................................................................28
18 First Time Set Up Menu ....................................................................................30
19 Switching from Normal to Alarm Mode and Back..............................................40
20 Maintenance Menu ...........................................................................................42
21 Playback Controls .............................................................................................44
22 Shuttle Ring Speed Settings .............................................................................46
23 Direct Shuttle Ring Speed Settings ................................................................... 47
24 Tracking Adjustment..........................................................................................47
25 Picture Quality Adjustment ................................................................................ 48
26 Vertical Picture (Vibration) Adjustment .............................................................. 48
27 Skip Search ....................................................................................................... 49
28 Index Searching ................................................................................................50
4 Pelco Manual C671M (1/01)
Page 5

LIST OF TABLES
Table Page
A Call Out/Tape End ............................................................................................. 28
BTape Replacement By Use ............................................................................... 34
C Recording/Playback Times ............................................................................... 35
D Action When Tape End Is Reached By Setting ................................................. 36
E Minimum Interval Between Recordings ............................................................ 40
F Audio Playback and Picture Quality ..................................................................45
G End of Tape Actions .......................................................................................... 45
HWarning Display and Actions ............................................................................ 52
ITape Speed and Recording Time (T-160 Cassette) ..........................................55
Pelco Manual C671M (1/01) 5
Page 6
GENERAL
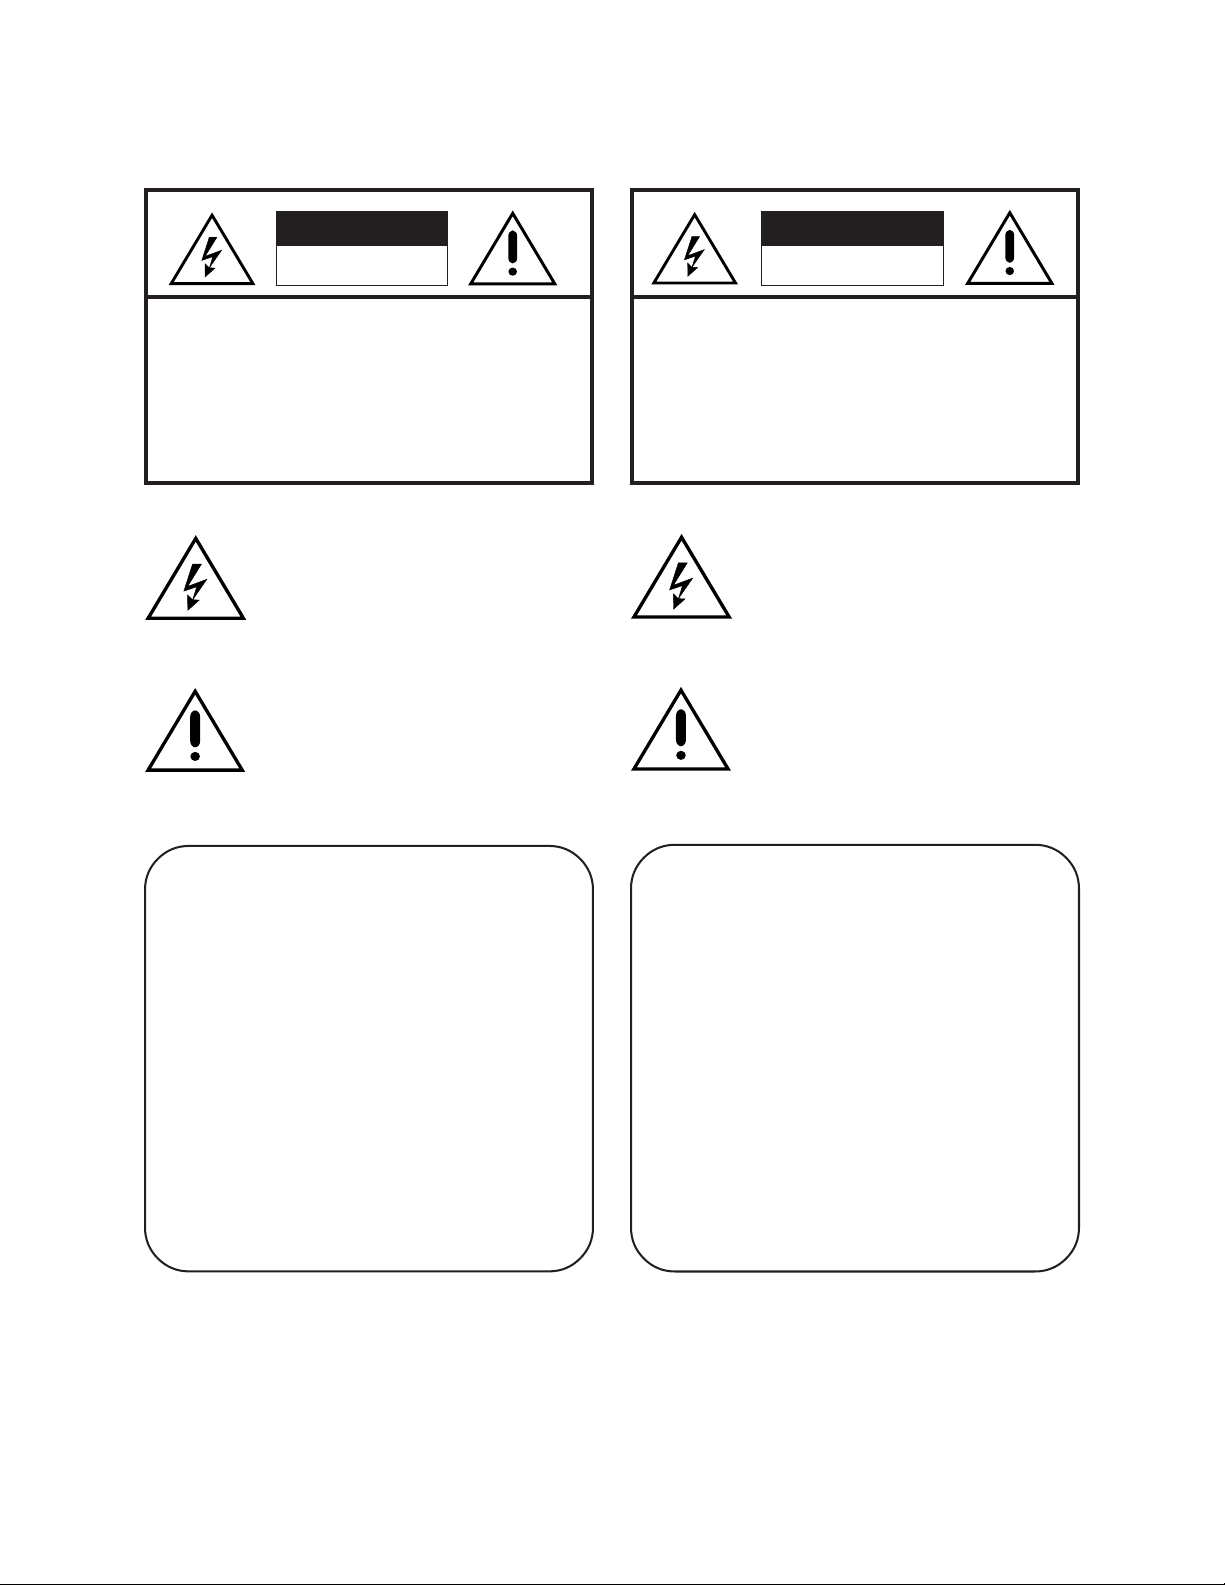
WARNING
RISK OF ELECTRIC SHOCK
DO NOT OPEN
WARNING:
REFER SERVICING TO QUALIFIED SERVICE PERSONNEL.
TO REDUCE THE RISK OF ELECTRIC SHOCK
DO NOT REMOVE COVER (OR BACK)
NO USER-SERVICEABLE PARTS INSIDE
The lightning flash with arrowhead symbol,
within an equilateral triangle, is intended to alert
the user to the presence of uninsulated
dangerous voltage within the product’s
enclosure that may be of sufficient magnitude
to constitute a risk of electric shock.
The exclamation point within an equilateral
triangle is intended to alert the user to the
presence of important operating and
maintenance (servicing) instructions in the
literature accompanying the equipment.
AVERTISSEMENT
DANGER D’ÉLECTROCUTION
NE PAS OUVRIR
AVERTISSEMENT: POUR ÉLIMINER TOUT RISQUE
D’ÉLECTROCUTION, NE PAS OUVRIR LE
COUVERCLE (OU LA PARTIE ARRIÈRE).
AUCUNE PIECE RÉPARABLE PAR
L’UTILISATEUR NE SE TROUVE À
L’INTÉRIEUR. POUR TOUTE
INTERVENTION D’ENTRETIEN OU DE
RÉPARATION SE CONFIER AUX
TECHNICIENS QUALIFIÉS.
La flèche symbolisant l’éclair dans un triangle
équilateral a pour objet de tirer l’attention de
l’utilisateur sur le fait, qu’il y a des tensions
dangereuses non-isolées à l’intérieur de
l’enceinte du produit qui peuvent être
suffisamment impor-tantes pour conduire au
risque d’électrocution.
Le point d’exclamation au sein d’un triangle
équilateral a pour objet de tirer l’attention de
l’utilisateur sur le fait qu’il y a des instructions
de mise en service et d’entretien (de
réparation) dans les fiches descriptives de
l’appareil qui doivent obligatoirement être
respectées.
WARNING:
TO PREVENT FIRE OR SHOCK HAZARD, DO
NOT EXPOSE THIS EQUIPMENT TO RAIN OR
MOISTURE.
CAUTION:
TO PREVENT ELECTRIC SHOCK DO NOT USE
THE POLARIZED PLUG WITH AN EXTENSION
CORD, RECEPTACLE OR OTHER OUTLET
UNLESS THE BLADES CAN BE FULLY
INSERTED TO PREVENT BLADE EXPOSURE.
AVERTISSEMENT:
AFIN D’ÉVITER TOUT RISQUE D’INCENDIE
OU D’ÉLECTROCUTION, NE PAS EXPOSER
CET APPAREIL À LA PLUIE NI À L’HUMIDITÉ.
ATTENTION:
POUR PRÉVENIR LES CHOCS
ÉLECTRIQUES NE PAS UTILISER CETTE
FICHE POLARISÉE AVEC UN
PROLONGATEUR, UNE PRISE DE COURANT
OU UNE AUTRE SORTIE DE COURANT,
SAUF SI LES LAMES PEUVENT ÊTRE
INSÉRÉES À FOND SANS EN LAISSER
AUCUNE PARTIE À DÉCOUVERT.
6 Pelco Manual C671M (1/01)
Page 7

WARNING:
The
included power
cord is used for
120 VAC, 60 Hz. Never connect any outlet or power
supply having a different
voltage or frequency. If you
are unsure of the type of
power supply, consult your
equipment dealer or local
power company.
SAFEGUARDS, WARNINGS, CAUTIONS, AND CARE
Observe the following WARNINGS before installing and using this product. Follow all
warnings and instructions marked on the VCR.
Instructions
Read all the safety and operating instructions before operating the VCR. Keep the
instructions for future reference. Follow all operating and use instructions. Heed all
warnings on the equipment and in the operating instructions.
Tapes
Only video cassette tapes with the VHS mark may be used with this model.
Power Source and Power Cord
Do not damage the power cord—it may cause fire or shock hazard. Route the cord so it will
not be walked on or pinched by items placed on or against it. Pay particular attention to the
cord at the wall plug or convenience receptacle and the point where it connects to the VCR.
When unplugging the power cord, grasp the plug and remove it carefully.
Installation/Servicing
Installation and servicing should be done by qualified service personnel only and conform
to all local codes. Do not try to service the VCR yourself. Opening or removing covers may
expose you to dangerous voltage or other hazards.
Damage Requiring Service
Unplug the VCR from the wall outlet and refer servicing to qualified service personnel under
the following conditions:
• When the power cord or plug is damaged.
• If liquid has been spilled or objects have fallen into the VCR.
• If the VCR does not operate normally when following the operating instructions.
Adjust only those controls covered by the operating instructions. Improper adjustment
of other controls may cause damage and will often require extensive work by a
qualified technician to restore the VCR to normal operation.
• If the VCR was dropped or the cabinet damaged.
• When the VCR shows a distinct change in performance. This indicates a need for service.
Replacement Parts
Be sure the service technician uses only replacement parts Pelco recommends, or which
have the same characteristics as the original part. Unauthorized substitutions may cause
fire, electric shock, or other hazards.
Safety Check
When service or repair to the VCR is completed, ask the service technician to perform
safety checks to ensure it is in safe operating condition.
Water/Moisture/Condensation
Do not use this VCR near water. It is designed for indoor use only and must not be installed
where exposed to rain and moisture.
Do not place objects containing water, such as drinks, on top of the VCR.
If the VCR is exposed to a rapid increase in temperature (such as warming a cold room or
after moving it from a cold location to a warm one), condensation may form on the tape
transport mechanism inside the VCR. To prevent damage to the VCR or tapes, plug the
VCR into the AC outlet and turn the power on for about two hours. Do not play back or
record on the VCR during this time.
Condensation is likely to occur:
• When the VCR is moved from a cold room to a warm room or from outdoors to indoors
• When a cold room is heated quickly
• When the humidity is very high
Avoid using the VCR where cold air (such as from an air conditioner) will blow directly on it.
Pelco Manual C671M (1/01) 7
Page 8

Cleaning
Unplug the VCR from the wall outlet before cleaning. Do not use liquid or aerosol cleaners.
Clean with a soft cloth slightly moistened with mild detergent and water. Wipe dry. NEVER
use petroleum-based solutions.
Attachments
Do not use attachments not recommended by Pelco as they may cause hazards.
Accessories
Use only with a cart, stand, tripod, bracket, or table recommended by Pelco or sold with the
VCR. Follow Pelco’s instructions when mounting equipment, and use a mounting accessory
recommended by Pelco.
Do Not Place Anything Heavy On The VCR
Heavy objects placed on the VCR will damage it.
Ventilation
Slots and openings in the cabinet provide ventilation and prevent it from overheating. Do
not block these openings. Never place the VCR near or over a radiator or heat register. Do
not place it in a built-in installation such as a rack unless proper ventilation is provided or
Pelco’s instructions have been followed. There are many ventilation holes on the bottom of
the VCR—for maximum ventilation, place it on a hard level surface only.
Grounding or Polarization
This VCR has a three-wire grounding-type plug—a plug with a third (grounding) pin. As a
safety feature, this plug fits only into a grounding-type outlet. If you cannot insert the plug
into the outlet, contact an electrician to replace the obsolete outlet.
Lightning/Power Surges
Unplug the VCR for additional protection during lightning storms or when it is unused for
long periods. Pelco recommends using conditioned-output uninterruptible power supplies
(UPS) and/or surge protected outputs to maximize protection of the VCR.
When Not In Use
When you finish operating the VCR, always unload the cassette and turn off the power.
Overloading
Do not overload wall outlets and extension cords as this increases the risk of fire and
electric shock.
Foreign Objects
Never push objects of any kind into the VCR through openings. They may touch dangerous
voltage points or short out parts that could cause a fire or electric shock, or damage the
mechanism.
Care of Video Cassette Tape
•Avoid violent vibration and shock.
• Do not place near a strong magnetic field (near a motor, transformer, or magnet).
• Never place or store in direct sunlight.
•Avoid dusty places.
• Place the cassette in the cassette case and store vertically.
• Never store tapes in humid locations.
8 Pelco Manual C671M (1/01)
Page 9

UNPACKING INSTRUCTIONS
Unpack and inspect all parts carefully. Save the shipping carton, boxes, and inserts. They
are the safest material in which to make future shipments.
If an item appears damaged in shipment, replace it properly in its box and contact the
factory at 1-800-289-9100 or 1-559-292-1981 for a replacement. (International customers
fax 1-559-348-1120 for authorization and instructions.)
If an item needs to be returned to the factory for repair, consult the WARRANTY AND
RETURN section of this manual for instructions.
INTRODUCTION TO TIME-LAPSE RECORDERS
Time-lapse recording permits longer than ordinary recording times. The primary reason for
using time-lapse recording in a CCTV security system is that a single VCR tape can be
used for an extended period beyond the standard recording time. The following explains
how time-lapse recording works.
The actual recording on VCRs is a series of still pictures or fields. Standard consumer VHS
recorders store 60 fields (30 frames) per second. A T-120 cassette lasts just two hours in
this mode (SP mode). You can get slightly longer recording times (six hours) using the
extended recording mode (EP mode). You can record even longer on a T-160 cassette in
these modes: two hours and 40 minutes in SP mode and eight hours in EP mode. (Refer to
Table C for actual recording times in different modes.)
Time-lapse recorders, however, use microprocessor-based techniques to record fewer
fields per second than a normal VHS machine and extend recording time. This negates the
need to change the tape every two hours—and also substantially reduces viewing time
when the recording is played back, another important consideration.
In normal VCR operation, all video head scans (60 per second) are recorded. But in timelapse mode the tape runs more slowly and records pictures periodically. In 12-hour mode, a
normal time-lapse machine records 10 fields per second, and in 24-hour mode, it stores
just five fields per second (for up to 12 and 24 hours on a tape, respectively). Longer times
are possible by slowing the recording rate further.
At normal speed a picture is recorded every 1/60 of a second so there is little change over
five frames. In longer time-lapse modes, however, a field is recorded intermittently over a
longer period so changes are apparent from field to field.
The time-lapse recording can be played back at normal two-hour tape speed, which makes
for rapid review—one of the time-lapse recorder’s most important advantages. Action on
the tape, however, appears faster than normal.
As an advanced feature, time-lapse recorders (like the TLR3040) can automatically switch
from time-lapse to real-time recording when an alarm condition occurs. This is important
since the primary purpose of recording an event is identification, and real-time recording
provides more detail.
Pelco Manual C671M (1/01) 9
Page 10

TLR3040 FEATURES AND FUNCTIONS
The TLR3040 Time-Lapse VCR is a powerful surveillance tool designed for industrial and
security recording. The unit supports both T-120 and T-160 tapes.
•T-120 Tapes
The unit can record for 6, 18, or 30 hours.
•T-160 Tapes
The unit can record for 8, 24, or 40 hours.
The TLR3040 features frame-by-frame and field-by-field playback and high-speed search.
Playback also allows still picture viewing.
Audio Recording—Audio recorded in 8H, L24H, and L40H modes is played back only in
its respective mode.
Resolution and Image Quality—This VCR has a high-quality circuit allowing more than
330 lines in black and white mode and more than 240 lines in color mode.
Automatic Head Cleaning—This VCR automatically removes foreign matter from the
heads when a cassette is inserted for continuous smooth operation.
Easy Setup Using a Monitor—The on-screen menus simplify setup programming. You
can select these menus even without inputting a video signal.
Easy Cueing with Alarm Recording—Index signals are automatically added at the
beginning of alarm recording for easy cueing. You can even use the monitor to confirm an
alarm recording’s starting time.
NOTE:
The battery backup
is for memory only—the
VCR does not continue
recording if the power goes
out. If you want to keep
recording during an outage,
make sure the VCR system
is on your UPS
(uninterruptible power
supply) system.
One-Button Recording Check—You can confirm correct recording by pressing the PLAY/
REC CHECK button during recording.
Complete or Partial Front Panel Lock—All or some of the front panel buttons are locked,
keeping the VCR in its current condition.
Protection Against Power Failures—Recording data (including date, time, and timer
setup) is stored in backup memory, so the system can resume recording after a power
failure. The monitor displays the time of the failure.
External Time Clock Adjustment—You can reset the on-screen clock to the nearest hour
by applying a signal to the RST (reset) IN terminal at the rear of the VCR.
Variety of Search Functions—You can do index and skip searches, or search by time and
date.
Special Playback Features—These include still images, speed search, reverse playback,
frame-by-frame and field-by-field viewing in both directions, slow-motion, and high-speed
viewing.
JOG Dial/SHUTTLE Ring—You can use these controls to search for the desired image.
You can adjust the playback speed with the SHUTTLE ring and search for an image frameby-frame with the JOG dial.
Recording Options—This system offers the following recording options: daily/weekly/
holiday timer recording, alarm recording, series recording, remote recording, and repeat
recording.
Digital Elapsed Time Display—The elapsed time of recording and playback is stored in
non-volatile memory. You can use the elapsed time display as a guide to when to do
periodic maintenance.
Tape Use Counter—This counter displays how many times you have recorded on a tape.
This helps you decide when you need to replace a tape.
Daylight Savings Time Setting—A daylight savings time setting is available. You can set
the clock forward an hour by programming the menu.
10 Pelco Manual C671M (1/01)
Page 11

QUICK START
BASIC START
NOTE:
This section is
intended for people experienced in working with
time-lapse recorders and
installing CCTV systems.
(However, you might want to
take a few minutes to review
the material in the
General
section.)
ADDITIONAL ITEMS
1. Decide where to locate the VCR. Do all system hookups first (camera, multiplexer,
etc.) if you are installing the VCR in a location where you cannot access its rear panel.
2. Connect the VCR to other equipment (refer to the
to a Multiplexer
3. Set the time and date with the power off by pressing the MENU button for more than
three seconds and then adjusting the time and date on the fluorescent display. (Refer
Adjusting the Clock
to the
4. Plug in the VCR and press the POWER button.
5. Insert a T-120 or T-160 tape. Refer to Table C for recording times.
6. Put the VCR in the recording mode you want by pressing the REC/PLAY MODE + and
– buttons. Watch the fluorescent display. Set the recording speed to 8H, L24H, or
L40H.
7. Press REC to begin recording. Press STOP to stop.
8. Turn the SHUTTLE ring right to fast forward and left to rewind. Press STOP to stop.
Press PLAY to play back the tape.
9. Refer to the
You can also incorporate the following programming steps for more than a basic quick
setup.
sections.)
section.) Skip if you do not want to set the time and date.
Initial System Testing
section for information on testing.
Installation
and
Connecting the VCR
• If desired, set the tape end and quasi v-sync options (refer to the
Menu
section).
• If desired, set the display mode and time and date size options (refer to the
Menu
section).
• If desired, program for timer recording (refer to the
• If desired, program for alarm recording mode and duration (refer to the
Up Menu
• If desired, refer to the
Series Recording
operation mode of the REC IN terminal.
section).
Rear Terminal Menu
section), clock out, operation of the mode out terminal, and
Timer Program Menu
section to program for call out (refer to the
First Time Set Up
section).
Recording Set
Display
Pelco Manual C671M (1/01) 11
Page 12

INSTALLATION
PRE-INSTALLATION CAUTIONS
• Provide secure power to system components. Prevent overloading or shorting by
dedicating power circuits to the surveillance equipment. Restrict access to the
surveillance system circuit breakers, switches, and equipment power cords.
• If you need to record multiple cameras, a multiplexer is required.
• Surveillance system components must be operationally compatible. Time-lapse
recording speeds and dwell times of any accessory switching equipment must be
compatible with each other.
• The TLR3040 Time-Lapse VCR provides multiple alarm recording speeds so it is
important that alarm triggering of components be operationally compatible. Refer to the
Introduction to Time-Lapse Recorders
• Complete all system hookups (cameras, multiplexer, etc.) before installing the VCR in
a location where you cannot access its rear panel.
SECURING THE VCR CONTROLS
Protect surveillance equipment to forestall tampering. We recommend putting the recorder
in a secure VCR cabinet. Pelco offers such units—the RM2000, which is a rack kit for a
single VCR, and the RM2004, which is a rack kit for four VCRs.
MONITOR TIPS
• Pelco recommends using a CCTV monitor.
section for information on time-lapse recording.
• Some monitors may cause picture vibration or picture distortion at the top or bottom of
the image during still or normal playback. (Refer to the
information.)
•A television may be unable to provide a stable picture without vibration or distortion.
Vertical Adjustment
section for
12 Pelco Manual C671M (1/01)
Page 13
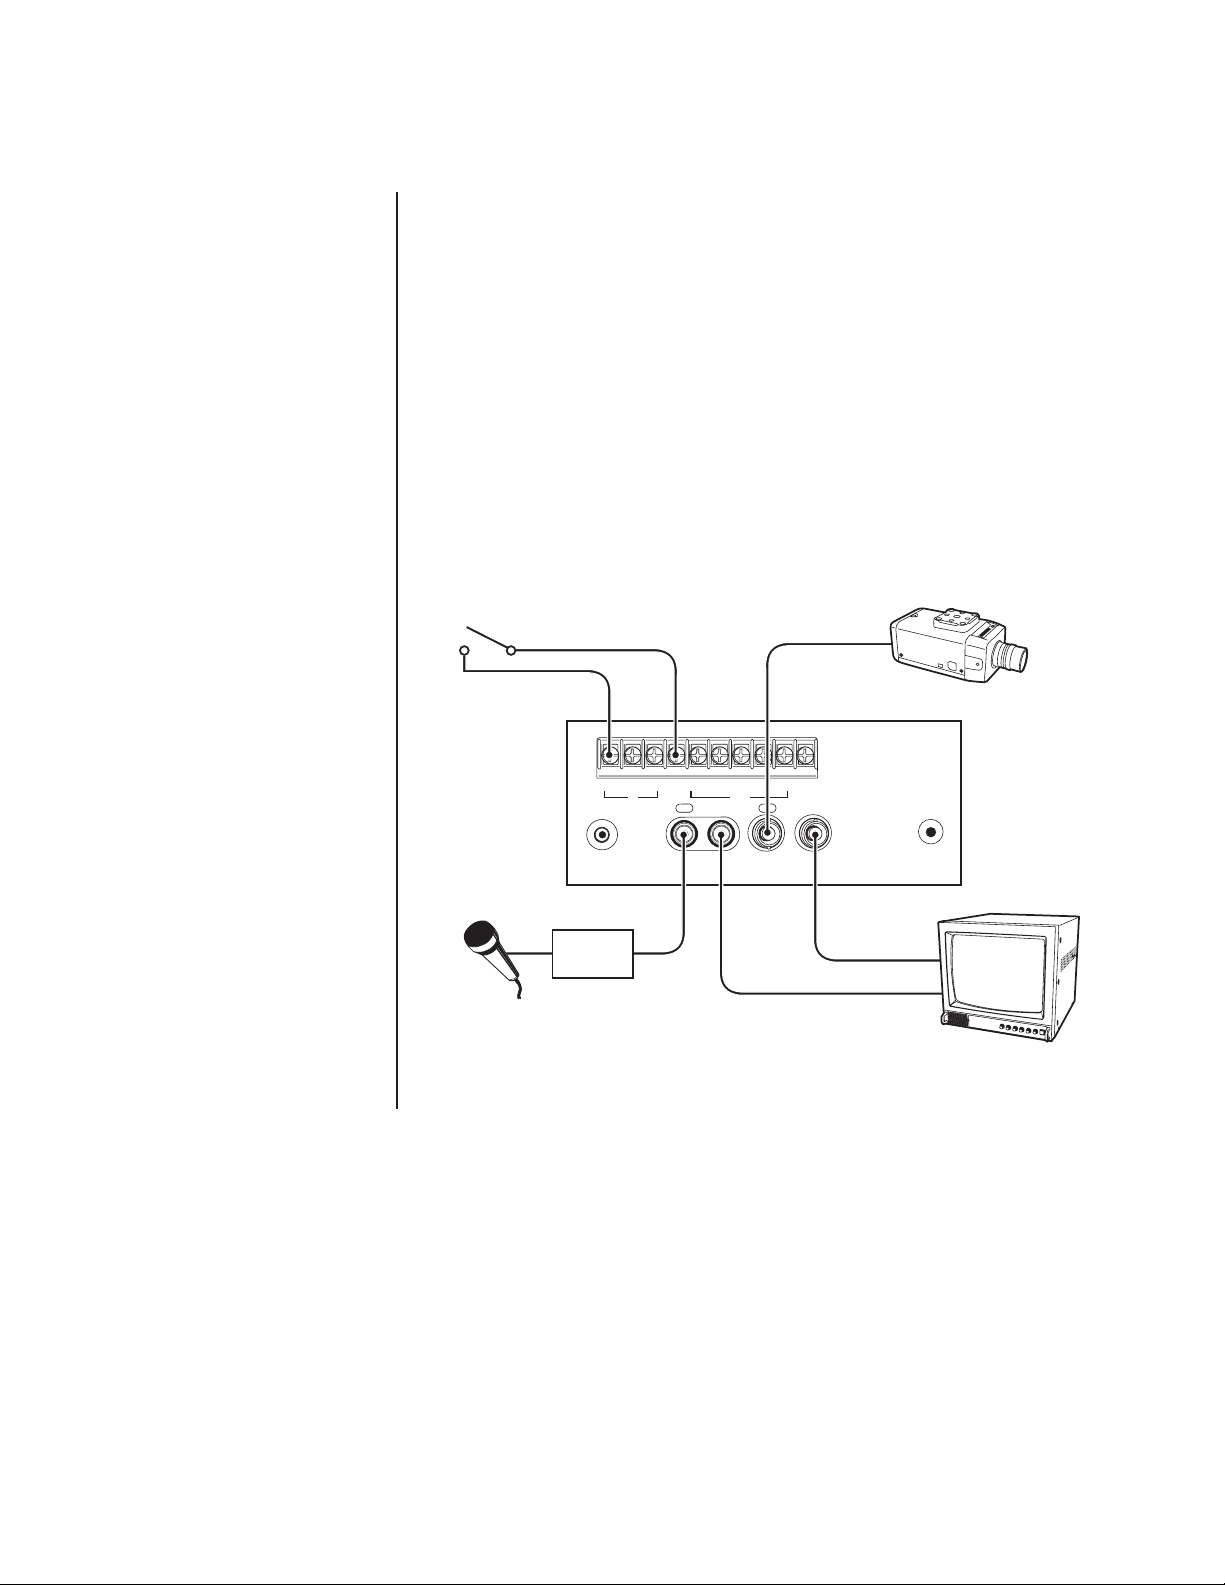
INSTALLATION
1. Remove the VCR and all cables from the box.
2. Place the VCR in a suitable location.
3. If installing in a rack, place the VCR in the rack before making cable and power
connections. Refer to the documentation included with the rack kit for installation
instructions.
4. If you are not using a multiplexer, refer to Figure 1.
• Connect the camera (video output) to the rear of the VCR (video input BNC).
Connect the VCR (video output BNC) to the monitor (video input).
• Connect the alarm input to the VCR (ALM IN and GND [ground] terminals).
• If you are using a 600-ohm microphone, connect it to the VCR (AUDIO IN jack).
Connect the VCR (AUDIO OUT connector) to the monitor (audio input).
5. If you are using a multiplexer, refer to the
ALARM OUTPUT
FROM DEVICE
ALM RST GNDREC ALM MODE CLK CALL
IN OUT
MICROPHONE
REMOTE
MICROPHONE
AMPLIFIER
AUDIO
IN OUT
AUDIO
IN
AUDIO
OUT
Figure 1. Typical System Setup
Connecting the VCR to a Multiplexer
VIDEO
IN
IN OUT
VIDEO
VIDEO
OUT
RESET
VIDEO IN
AUDIO IN
MONITOR
section.
00248
Pelco Manual C671M (1/01) 13
Page 14
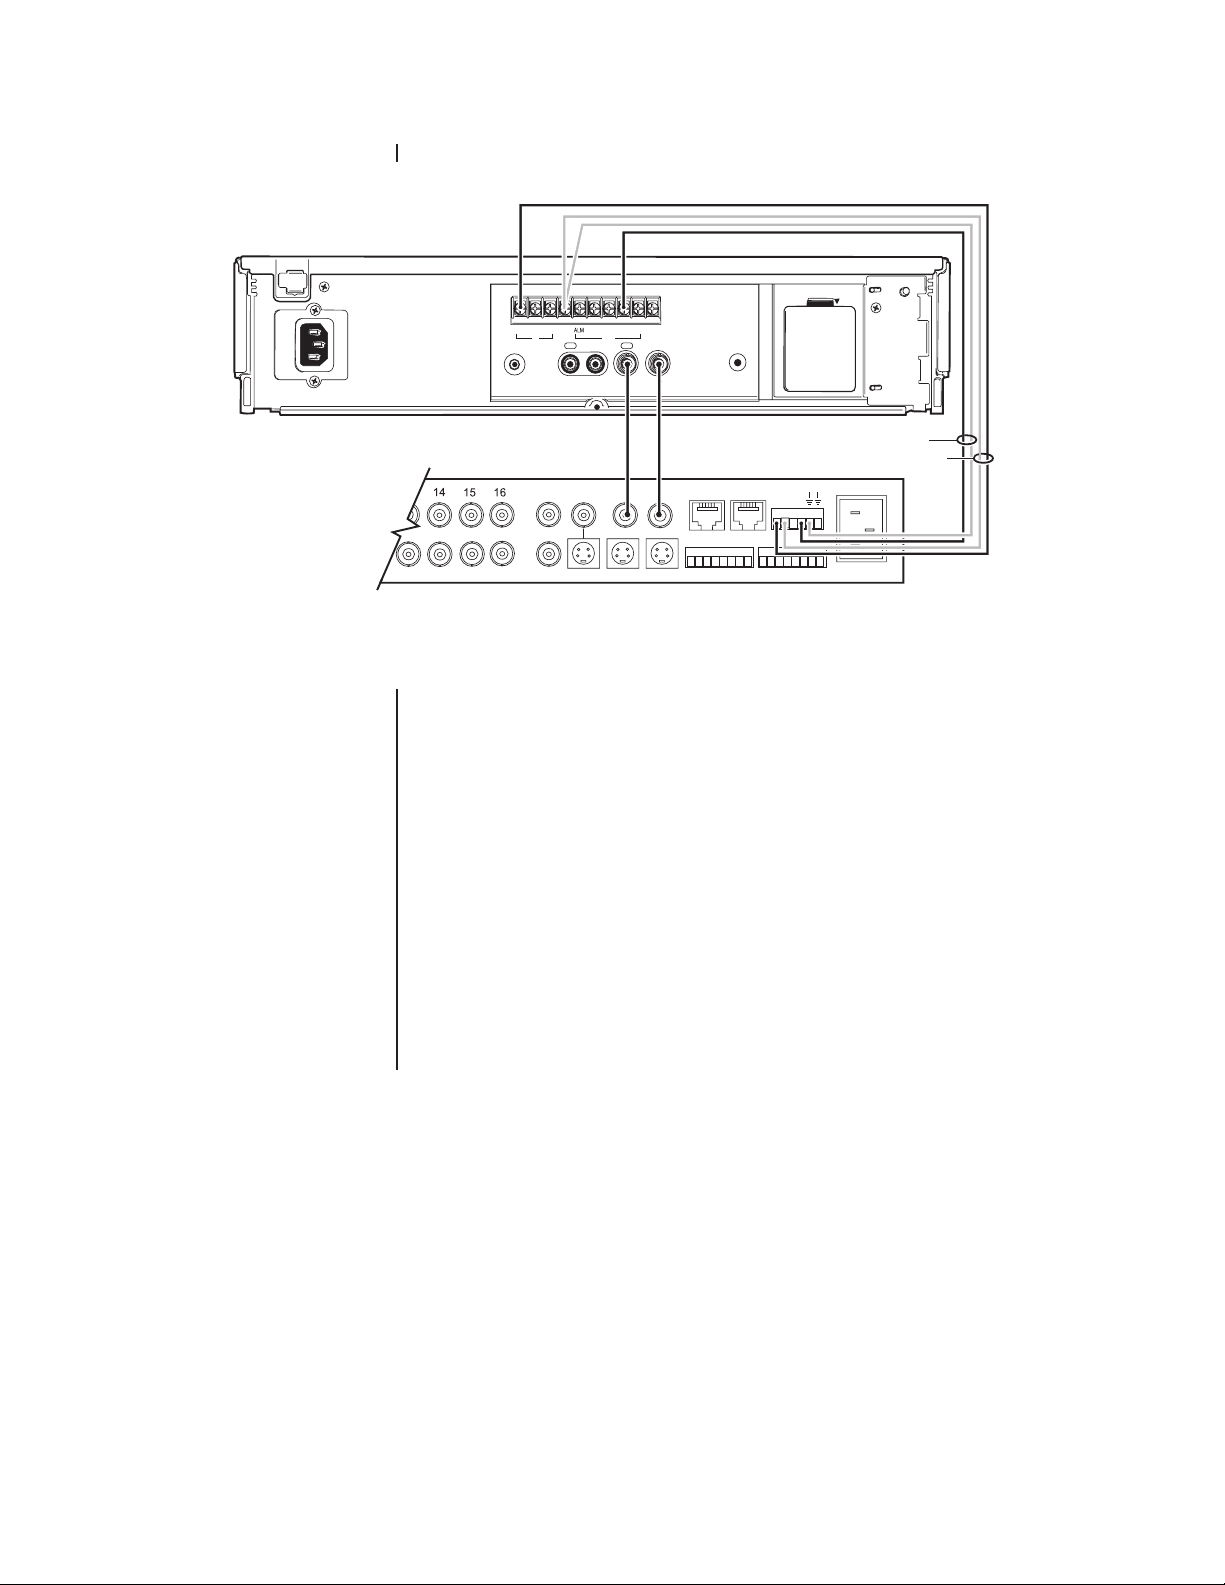
CONNECTING THE VCR TO A MULTIPLEXER
BATTERY OPEN
ALM RST GNDREC MODE CLK CALL
IN OUT
NOTE:
Cameras and monitors are connected to the
multiplexer. Figure 2 shows
the connection between the
VCR and an MX4000 Series
Genex Multiplexer. Refer to
the multiplexer manual for
additional component
connections.
REMOTE
SPOT
AUX
IN OUT
AUDIO
COAXIAL
CABLE
MAIN
OUT IN
SVHS
IN OUT
VIDEO
VCR
SVHS
COAXIAL
CABLE
RESET
IN COM OUT
ALARMS
12345678 91011 14151612 13
NNH
OC
C
S
110-240V 50/60 Hz
B
A
00249
MX4000 GENEX™ SERIES MULTIPLEXER
Figure 2. Connecting VCR to Multiplexer
Figure 2 shows how to connect the VCR to an MX4000 Series Genex® Multiplexer.
• For Automatic Speed Tracking (“B” lines in Figure 2)
This lets the VCR control the multiplexer’s recording speed. It is the most efficient
recording method.
1. Connect the CLK output to the multiplexer’s head switching (HS) input to
synchronize camera switching.
2. Connect the multiplexer’s ground terminal to the VCR’s GND terminal.
• For Alarm Recording (“A” lines in Figure 2)
This is to start and stop recording when there are alarms.
1. Connect the multiplexer’s normally open (N.O.) relay terminal to the VCR’s ALM
IN (alarm input) terminal.
2. Connect the common (C) terminal to the VCR’s GND terminal.
14 Pelco Manual C671M (1/01)
Page 15
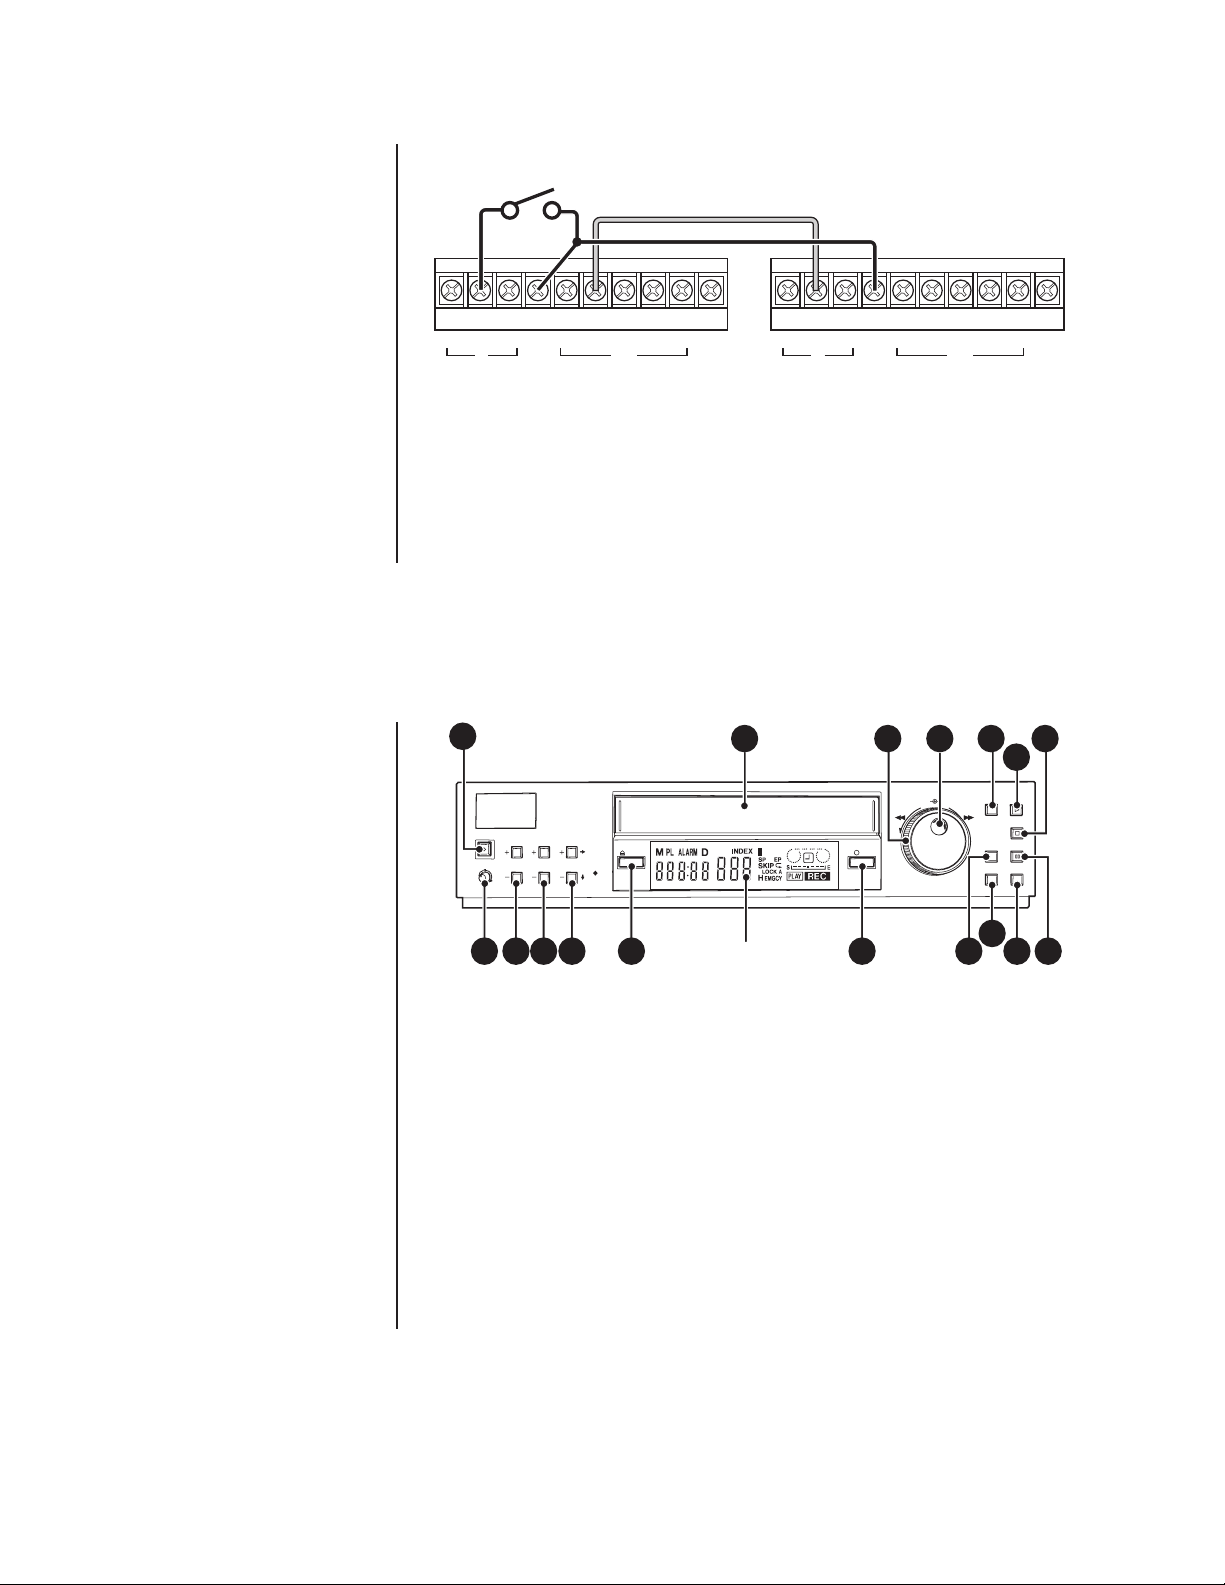
ALARM RECORDING CONNECTION
A
L
Y
*
LARM SET SWITCH
RSTINREC ALM
ALARM SET SWITCH
GNDALM
EXTERNAL ALARM LAMP
AND BUZZER
MODE
OUT
CLK
CALL
00250
Figure 3. Alarm Recording Connection
You can confirm an alarm from a distance by connecting the ALM OUT terminal with an
existing alarm system panel or other peripherals, such as a buzzer. Connect the VCR and
other peripherals as shown in Figure 3.
CONNECTING FOR SERIES RECORDING
GNDALM RSTINREC ALM
MODE
1ST VCR 2 ND VCR
CLK
CALL GNDALM RSTINREC ALM
OUT
MODE
*1: THIS CONNECTION IS NECESSAR
CASE OF SERIES RECORDING 2.
OUT
CLK
CAL
Figure 4. Connecting VCRs for Series Recording
Connect the VCRs as shown in Figure 4. Refer to the
information about series recording methods 1 and 2.
Series Recording
section for
CONNECTING FOR REMOTE RECORDING
RSTINREC ALM
REMOTE SWITCH
Figure 5. Connecting for Remote Recording
Connect the VCR with a remote switch as shown in Figure 5.
GNDALM
MODE
OUT
CLK
CALL
00252
Pelco Manual C671M (1/01) 15
Page 16
CONTROLS
FRONT PANEL
CONNECTING FOR EXTERNAL TIME CLOCK ADJUSTMENT
*1
GNDALM RSTINREC ALM
MODE
CLK
CALL GNDALM RSTINREC ALM
OUT
1ST VCR 2 ND VCR
*1: WHEN CONNECTING THE MODE OUT TERMINAL OF THE FIRST VCR WITH THE RST IN TERMINAL OF THE
SECOND VCR, THE ON-SCREEN CLOCK OF THE SECOND VCR CAN BE ADJUSTED TO THAT OF THE FIRST VCR.
Figure 6. Connecting for External Time Clock Adjustment
If ALARM REC DURATION in the Recording Set Up menu is set to other than MAN 1, the
on-screen clock can be reset to the nearest hour by applying a signal to the RST (reset) IN
terminal. For example, if the current time is 11:29:59, it will be reset to 11:00:00, and if the
current time is 11:30:00, it will be reset to 12:00:00.
MODE
OUT
CLK
CALL
00253
1
POWER
PICTURE
SOFT SHARP
REC/PLAY
POSITON/
TRACKING
VERTICAL
MODE
ADJUST
EJECT REC
2
FLUORESCENT
DISPLAY
3 4 5
JOG/ADJUST
SHUTTLE
CLEAR/
REW
ENTER/
FW
TIME DATE ADJUST
15
141312111098
MENU
COUNTER
RESET
SEARCH TIMER REC
Figure 7. Front Panel
1. POWER button
Press for on; press again for off. The POWER indicator lights when the VCR is turned on.
2. Cassette loading slot
Insert the cassette in this slot to load it.
3. SHUTTLE ring
Use to adjust the playback speed and to program the menus. Turn this ring to the right
to advance the tape or to forward search. Turn it to the left to rewind a tape or to reverse
search. You can also use it to clear the alarm list, power loss list, timer recording, and to
initialize the menu programming. It also lets you program or exit the menus after setup.
4. JOG dial
Use to advance or reverse the tape frame-by-frame and to program the menus.
6
/
PLAY/
REC CHECK
STOP
PAUSE/
SUTTLE HOLD
16 17
7
00254
16 Pelco Manual C671M (1/01)
Page 17

5. MENU/TIME DATE ADJUST button
• When the VCR is turned on, press to display the Main menu. Press again to exit
the menu.
• When the VCR is turned off, press for more than three seconds and you can
adjust the VCR’s time and date on the fluorescent display.
6. PLAY/REC CHECK button
• When the VCR is in stop mode, press to play back a previously recorded tape.
• During recording, press for more than 1.5 seconds to check recording function.
7. STOP button
Press to halt all tape-related functions.
8. PICTURE control
Use this control to adjust picture quality between soft and sharp.
9. REC/PLAY MODE buttons
Set to 8H, L24H, or L40H for recording, and to 2H, 8H, L24H, or L40H for playback.
10. TRACKING buttons (+/-)
Press to reduce or eliminate the noise during playback, slow playback, etc.
11. POSITION/VERTICAL ADJUST buttons (+/-)
• Pressing the (+) button moves the time and date display to the right. Pressing the
(-) button moves the display down the screen. The display cannot be adjusted
during an alarm recording or if a warning is displayed.
• Pressing either button minimizes vertical jitter in still mode or during fast
playback. Refer to the
12. EJECT button
Press to remove the cassette.
13. REC (record) button
Press to begin recording.
14. COUNTER RESET button
Press to reset the counter to 00000.
15. SEARCH button
Press to access the Search Function menu.
16. TIMER REC button
Press to make a timed recording (once the VCR is programmed to record).
17. PAUSE/SHUTTLE HOLD button
• Press during recording to temporarily stop tape movement. Press again to
resume recording.
• Press during playback for a still picture. Press again to resume normal playback.
• Press and hold after turning the SHUTTLE ring to fix the playback speed.
Vertical Adjustment
section for details.
Pelco Manual C671M (1/01) 17
Page 18
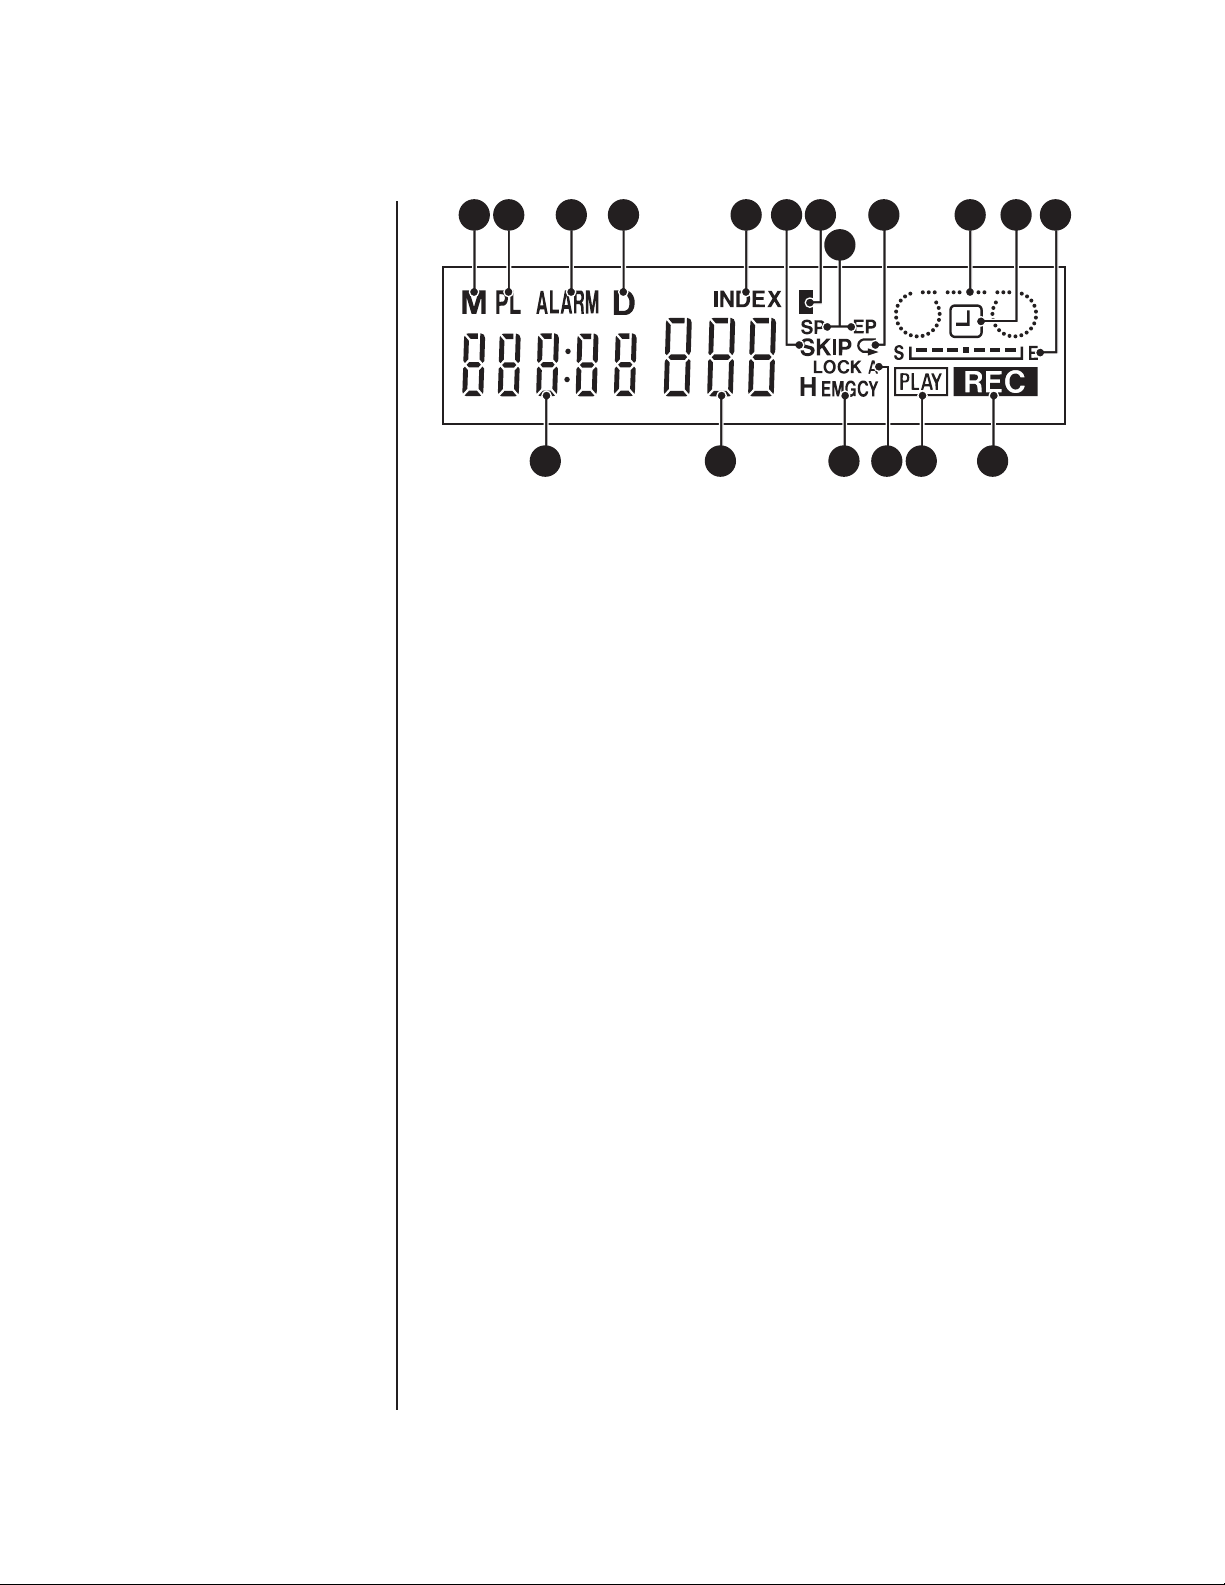
FLUORESCENT DISPLAY
1 2 3 4 5 7 9 10 11 12
6
8
13 14 15 16 17 18
Figure 8. Fluorescent Display
1. M (counter memory stop/month) indicator
• Lights during counter memory stop.
• Also, lights while the VCR is turned off and the month of the VCR’s clock has
been set on the fluorescent display.
2. PL (power loss) indicator
Lights when the VCR is turned on after a power failure during recording.
3. ALARM indicator
Flashes during alarm recording and stays on when the alarm recording is finished.
4. D (time date search/day) indicator
• Lights during the time date search.
• Also, lights while the VCR is turned off and the day of the VCR’s clock has been
set on the fluorescent display.
00255
5. INDEX (index search) indicator
Flashes when recording an index signal, and lights during the index number setup and
the index search. (Index number is shown on the Recording and Playback Mode display.)
6. SKIP (skip search) indicator
Lights during a skip search.
7. Daylight Saving Time indicator
Lights when DAYLIGHT SAVINGS is set to ON.
8. SP, EP (tape speed) indicator
Indicates the tape speed (SP = standard play, EP = extended play).
9. Repeat indicator
Lights when TAPE END in the First Time Set Up menu is set to REPEAT or
ALARM•PROT.
10. Cassette Status indicator
Lights when you insert a tape. The light advances, stops, or flashes according to tape
movement.
11. Timer Recording indicator
Lights when the VCR is in standby for timer recording or during timer recording.
12. Tape Remaining indicator
Indicates the absolute position on the tape (S = start of tape, E = end of tape).
18 Pelco Manual C671M (1/01)
Page 19

13. Counter/Clock display
• With the VCR on, indicates the relative position on the tape. (The counter stops
counting where no recording is made on the tape.)
•With the VCR off, shows the clock (24-hour format).
14. Recording and Playback Mode/Index Number display
Displays the number corresponding to a selected recording or playback mode. Also,
displays the index number during the index number setup and the index search.
15. EMGCY (emergency recording) indicator
Lights when EMERGENCY REC in the Recording Set Up menu is set to ON.
16. LOCK/LOCK A indicator
• Lock: Lights when all buttons except REC and EJECT are locked.
• Lock A: Lights when all buttons are locked.
17. PLAY indicator
Lights during playback.
18. REC (recording) indicator
Lights during recording.
Pelco Manual C671M (1/01) 19
Page 20

REAR PANEL
WARNING:
The
included power
cord is used for
120 VAC, 60 Hz. Never
connect the power cord to
any output or power supply
having a different voltage or
frequency.
Make sure the power cord is
unplugged before making
any rear panel terminal
connections.
1 2 3
ALM RST GNDREC MODE CLK CALL
IN OUT
REMOTE
IN OUT
AUDIO
IN OUT
VIDEO
75
4 6 8
Figure 9. Rear Panel
1. AC power socket
The power cord plugs into this socket. Insert the cord firmly.
2. Terminals
• Input Terminals
ALM (alarm) IN
Use for alarm recording. Connect the alarm sensor here.
RST (reset) IN
Connect alarm reset switch here to stop alarm recording when ALARM REC
DURATION in the Recording Set Up menu is set to MAN1. You can also use this
terminal to set the on-screen clock when set to any mode other than MAN1.
RESET
9
BATTERY OPEN
00246
REC (recording) IN
Use to start and stop recording or for series recording (refer to the
Recording
section).
Series
• GND (ground)
Connect the ground lead here when a lead connected to other terminals requires
a ground.
• Output Terminals
ALM (alarm) OUT
Use to indicate to an external device that an alarm is being recorded.
MODE OUT
Use to indicate the VCR’s mode of operation. When MODE OUT in the Rear
Terminal menu is set to CLOCK ADJ, the clocks of all connected VCRs can be
adjusted.
CLK (clock) OUT
Use to control an external camera switcher, such as the MX4000 Series Genex
Multiplexer.
CALL OUT
Use to indicate when the tape finishes recording or that there was a problem
during recording.
20 Pelco Manual C671M (1/01)
Page 21

3. Battery box
The battery is stored here. (NOTE:
This is a special battery. Consult your dealer to
replace it.)
4. REMOTE jack
Jack for connecting a remote control unit.
5. AUDIO IN connector
Audio input connector (RCA pin).
6. AUDIO OUT connector
Audio output connector (RCA pin).
7. VIDEO IN connector
Input connector for video signal (BNC connector). Connect cameras here.
8. VIDEO OUT connector
Output connector for video signal (BNC connector). Connect a monitor here.
9. RESET button
Press to erase the date, present time, alarm recording list, power loss list, counter
display, and recording and playback mode; and reset them to their default values. The
VCR turns off.
Pelco Manual C671M (1/01) 21
Page 22

ADJUSTING THE CLOCK AND USING THE JOG AND SHUTTLE
CONTROLS
JOG AND SHUTTLE CONTROLS
USING THE JOG DIAL
•Turn by using your finger on the indent.
•Turning the JOG dial right advances you
through the options while turning left
reverses direction.
• When the option is not flashing, turn
right to move the cursor downward, turn
left to move upward.
USING THE SHUTTLE RING
• The SHUTTLE ring automatically
centers itself if you turn it fully right/left
and release it.
• Some menus move down to the next
layer when you turn the SHUTTLE ring
right. Turning it left returns to the
previous layer.
ADJUSTING THE CLOCK
You can adjust the VCR’s clock on the front panel even when the VCR is turned off. (You
can also enter time and date information through the First Time Set Up menu.) This function
lets you enter the order of the time, month, day, and year. The hour time is entered twice
due to daylight saving time.
To adjust the clock:
1. When the VCR and peripheral devices are turned off, press the MENU button for more
than three seconds. The hour digits on the fluorescent display’s clock start flashing.
2. Turn the JOG dial to set the hour digits. (If the flashing item is the same as the current
time, turn the SHUTTLE ring without turning the JOG dial.)
3. Turn the SHUTTLE ring right to make the 10-minute digit flash, and then turn the JOG
dial to adjust.
4. Turn the SHUTTLE ring right to make the 1-minute digit flash, and then turn the JOG
dial to adjust. (If you want to finish the clock adjustment now, press the MENU button
for more than three seconds.)
5. Turn the SHUTTLE ring right to make the month digits flash, and then turn the JOG
dial to adjust. The month indicator (M) lights.
6. Turn the SHUTTLE ring right to make the day digits flash, and then turn the JOG dial
to adjust. The day indicator (D) lights.
7. Turn the SHUTTLE ring right to make the year digits flash, and then turn the JOG dial
to adjust.
8. Turn the SHUTTLE ring right. The VCR’s clock is now set.
9. Repeat steps 1 and 2, and then turn the SHUTTLE ring left to exit after the hour digits
are entered the second time (for daylight saving time).
JOG DIAL
JOG/ADJUST SHUTTLE
CLEAR/
REW
SHUTTLE RING
ENTER/
FW
TIME DATE ADJUST
MENU
/
COUNTER
RESET
SEARCH TIMER REC
Figure 10. JOG Dial and
SHUTTLE Ring
PLAY/
REC CHECK
STOP
PAUSE/
SUTTLE HOLD
00256
ADJUSTING TO THE EXACT SECOND
Set the clock as described previously, but set the minutes to one minute ahead of the time
you are using as a reference. After step 7, turn the SHUTTLE ring right when the desired
time reaches 00 seconds of the minute you have chosen.
22 Pelco Manual C671M (1/01)
Page 23

PROGRAMMING
GENERAL PROGRAMMING INSTRUCTIONS
The following is a universal procedure that shows how programming is done on the VCR.
Use the JOG dial to select items, turn the SHUTTLE ring to the right to enter, and
turn the SHUTTLE ring to the left to exit.
1. Press the MENU button. The Main menu appears.
2. Turn the JOG dial to select the desired item.
•Turn right to move the cursor downward.
•Turn left to move the cursor upward.
3. Turn the SHUTTLE ring right. The desired item is selected and the menu appears.
4. Turn the JOG dial left or right to select an item.
5. Turn the SHUTTLE ring right. The item flashes.
6. Turn the JOG dial left or right to change the setting.
7. Turn the SHUTTLE ring right to enter.
8. Press the MENU button. The day and present time display appears.
LANGUAGE SELECTION MENU
The Language menu appears on the screen:
ENGLISH
FRANÇAIS
ESPAÑOL
Use JOG to select,
and ENTER.
Figure 11. Language
Menu
00257
• When you press the MENU button when the VCR is turned on the first time after it is
purchased
• When you press the RESET button during use
Remember: After the first time, the only way to access the Language menu is to press
the RESET button on the rear panel with a pointed object. Doing so will erase your
custom programming and return the unit to factory default settings. Then follow steps
1-4 below.
The menu offers three languages: English (default), French (Français) and Spanish
(Español). To set the language:
1. Press the MENU button. The Language menu appears.
2. Turn the JOG dial to select the desired language.
3. Turn the SHUTTLE ring right. The Main menu appears in the selected language.
4. Press the MENU button to exit.
Pelco Manual C671M (1/01) 23
Page 24

QUICK GUIDE TO THE MENU STRUCTURE
0
0
0
A
0
0
0
0
0
0
0
0
T
h
n
T
h
w
A
T
h
The VCR’s operating parameters are set through various on-screen menus. Program your
choices on the menus according to the instructions on the following pages.
THE DAY AND PRESENT TIME DISPLAY
01-01-’00 16:26:48
<MAIN MENU>
DISPLAY
TIMER PROGRAM
RECORDING SET UP
REAR TERMINAL
MAINTENANCE
CLOCK/FIRST TIME SET UP
Use JOG to select,
and ENTER.
Press MENU to exit.
<DISPLAY>
DISPLAY MODE 2
TIME DATE SIZE SMALL
BLUE BACK OFF
e.g.<MODE 2>
01-01-’00 SAT
00:00:00 L24
<TIMER PROGRAM>
PROGRAM TO RECORD
HOLIDAY SET UP
SPECIAL DW MON-SAT
<RECORDING SET UP>
ALARM REC MODE 8H
ALARM REC DURATION 1M
EMERGENCY REC OFF
CLOG DETECT OFF
<REAR TERMINAL>
CALL OUT WRNG•TAPE END
CLOCK OUT REC- 1
MODE OUT REC
REC IN SERIES
<PROGRAM TO RECORD>
DW START END HR
1 DAY 12:00 15:00 L24
2 TUE 12:00 15:00 L24
3 WED 12:00 15:00 8
4 THU 12:00 15:00 8
5 FRI 12:00 15:00 L24
6 HLD 12:00 15:00 SKIP
7 SUN 12:00 15:00 L24
8 SPL 20:00 22:00 SKIP
<HOLIDAY SET UP>
01/01 01/15 02/11 03/22
04/29 05/03 05/04 05/05
07/20 09/15 09/23 10/10
11/03 11/23 1 2/23 - - / - -
- - / - - - - / - - - - / - - - - / - MONTH / DAY
<
<
0
0
0
0
0
0
0
0
t
i
t
<MAINTENANCE>
POWER LOSS LIST
ALARM LIST
ALL MENU INITIALIZE
POWER LOSS LIST CLEAR
ALARM LIST CLEAR
<REPEAT REC TIMES> 0
<ELAPSED TIME> 0H
<FIRST TIME SET UP>
TIME DATE ADJUST
TAPE END STOP
QUASI V-SYNC ON
VIDEO MODE COLOR
TAPE LENGTH T-120
BUZZER WRNG
Figure 12. Menu Tree
<TIME DATE ADJUST>
DAYLIGHT SAVINGS OFF
MONTH 0 1
DAY 01
YEAR 2000
TIME 00:00:00
24 Pelco Manual C671M (1/01)
t
c
Page 25

MAIN MENU
The contents of the Main menu are as follows. Access it by pressing the MENU button.
<MAIN MENU>
DISPLAY
TIMER PROGRAM
RECORDING SET UP
REAR TERMINAL
MAINTENANCE
CLOCK/FIRST TIME SET UP
Use JOG to select,
and ENTER.
Press MENU to exit.
Figure 13. Main Menu
<DISPLAY>
DISPLAY MODE
TIME DATE SIZE
BLUE BACK
e.g.<MODE 1>
07-09
• DISPLAY
• TIMER PROGRAM
• RECORDING SET UP
00259
• REAR TERMINAL
• MAINTENANCE
• CLOCK/FIRST TIME SET UP
DISPLAY MENU
DISPLAY MODE
This is where you set the display mode. (Set the current time and date in the Clock/First
Time Set Up menu. Refer to the
DISPLAY MODE 1 Displays date (month, day, year), time (hour, minute, second),
DISPLAY MODE 2 Displays date, day of the week (SUN, etc.), alarm recording
Sets the format to display the time and date on the monitor.
Sets the timed recordings.
Sets the alarm recording mode, alarm recording duration, emergency recording, etc.
Sets the number of frames or fields to record for CLK OUT, output signal of the CALL
OUT terminal, the MODE OUT terminal, etc.
Displays the power loss list, alarm list, etc. Also, initializes all menu settings. Clears
the power loss list and alarm list.
Sets the time and date, quasi v-sync, VCR operation when the end of the tape is
reached, etc.
Clock/First Time Set Up Menu
section.)
and alarm recording counter.
counter, time, and recording mode.
Figure 14. Display Menu
DISPLAY MODE 3 Displays nothing until alarm recording starts—then date, day of
the week, alarm recording counter, time, and recording mode are
displayed.
DISPLAY MODE 4 Displays nothing on the monitor, even during alarm recording.
TIME/DATE SIZE
This is where you set the size of the letters in the time and date display.
SMALL The letters become small.
LARGE The letters become large.
BLUE BACK
This is where you set the background color.
ON The blue-colored screen overlays the recorded picture when the menu
is displayed on the monitor.
When the setting is ON and the video signal is not input, the
background color is blue. The warning “NO SIGNAL” flashes on the
screen, and “noSIg” flashes on the fluorescent display.
OFF The recorded picture is overlaid with the menu display.
When the setting is OFF and the video signal is not input, the
background is blue when the menu is displayed on the monitor.
Pelco Manual C671M (1/01) 25
Page 26

TIMER PROGRAM
This is where you set the program number, day of the week, starting and ending times, and
the recording mode. (Refer to the
and procedures.)
PROGRAM NUMBER
DAY OF THE WEEK
RECORDING START TIME
NEXT DAY INDICATOR
RECORDING END TIME
Figure 15. Timer Program Illustration
<TIMER PROGRAM>
SPECIAL DW MON-FRI
RECORDING MODE DISPLAY
Timer Recording
section for more detailed information
00261
(program number) This number identifies the program (eight maximum). If the
recording times of two programs overlap, the higher program
number has priority.
DW Day of the week. DAY is used to record at the same time every
day. SPL (special) uses the start/end days selected with
SPECIAL DW at the bottom of the screen. HLD is used to control
recording on holidays (20 maximum).
START/END The VCR uses a 24-hour display for starting and ending recording
times. 00:00 indicates midnight; 12:00, noon; and 15:00, 3 p.m.
An indicator between the START and END columns shows that
recording continues to the following day.
HR This is the recording mode. SKIP indicates that timer recording is
not performed during the set period.
26 Pelco Manual C671M (1/01)
Page 27

RECORDING SET UP MENU
N
<RECORDING SET UP>
ALARM REC MODE
ALARM REC DURATIO
EMERGENCY REC
CLOG DETECT
Figure 16. Recording Set
Up Menu
Refer to the
Programming for Alarm Recording
section for programming instructions for the
following fields.
NOTE:
When using the MX4000 Series Genex Multiplexer, set ALARM REC DURATION
to MAN2, and make sure EMERGENCY REC is set ON if the VCR is to record alarms only.
ALARM REC MODE Sets the alarm recording mode. When you turn the JOG dial,
ALARM REC DURATION Sets the length of the alarm recording period. When you turn
EMERGENCY REC Sets the emergency recording mode, as follows:
CLOG DETECT Sets clog detection mode, as follows:
the display switches in the following order: 8H, L24H, L40H, 8H.
the JOG dial, the display switches in the following order: 1M
(minute), 2M, 5M, 10M, MAN1, MAN2, 15S (second), 30S,
45S, 1M.
• ON – Starts alarm recording when the alarm signal is
received (ALM IN terminal grounded), not only during
recording but also when the power is off, when the tape
is stopped, or when the VCR is in standby mode for
timer recording.
• OFF – Starts alarm recording when the alarm signal is
received (ALM IN terminal is grounded) during
recording.
• ON – The VCR automatically removes particles that
may accumulate on the heads during time-lapse
recording. If they cannot be entirely removed, the
warning CLOG flashes on the fluorescent display.
• OFF – The VCR does not detect a clogged head.
Pelco Manual C671M (1/01) 27
Page 28

N
TAPE END
setting
ALARM
•PROT
STOP
REWIND
REPEAT
When there
are alarm
recordings
during
recording
When there
are no alarm
recordings
during
recording
CALL OUT
setting
REAR TERMINAL MENU
Table A. Call Out/Tape End
WRNG•TAPE END WRNG•REMAIN WRNG
Outputs a call signal at the
end of the tape.
Outputs a call signal at the
end of the tape for 2
seconds.
(same as above)
(same as above)
Outputs a call signal at the
end of the tape.
<REAR TERMIN
CALL OUT WR
CLOCK OUT
MODE OUT
REC IN
Figure 17. Rear Terminal Menu
Outputs a low active signal
three minutes before the
tape ends.
(same as above)
(same as above)
(same as above)
(same as above)
When a malfunction occurs
in the VCR during recording,
a call signal is output.
(same as above)
(same as above)
(same as above)
(same as above)
CALL OUT Sets the call signal output at the end of the tape. Turns on or off the
signal coming from the CALL terminal when the end of the tape is
reached during recording. If a problem occurs during recording, a call
signal is output from the CALL terminal on the rear panel regardless of
the CALL OUT setting.
• WRNG•TAPE END – The VCR outputs a call signal at the end of
the tape or when a malfunction occurs. What the VCR does when
the tape ends depends on the setting for TAPE END in the First
Time Set Up menu.
• WRNG•REMAIN – The VCR outputs a call signal when the tape
has about nine minutes left (in 8H mode) or when a malfunction
occurs.
• WRNG – The VCR outputs a call signal only when a malfunction
occurs.
28 Pelco Manual C671M (1/01)
Page 29

CLOCK OUT Sets at the CLOCK OUT terminal the number of frames or fields being
recorded (depending on the recording mode).
1. First, set the recording mode for the CLOCK OUT pulse output in
the Rear Terminal menu.
• REC – When recording in any mode
• T/L REC – When recording in time-lapse mode (L24H, L40H)
2. Second, select the frequency interval by turning the JOG dial,
switching the display in the following order: 1, 2, 3, 4, 5, 10, 15,
20, 25, 30, 50, 60, F (field), 1. The numbers from 1 to 60 indicate
the number of frames in 8H recording mode and the number of
fields in time-lapse recording modes. One frame consists of two
fields. One field is selected when set to F (field).
MODE OUT Sets the state in which the signal output at the MODE OUT terminal is
REC IN Sets the REC IN terminal’s operating mode.
switched to active. When you turn the JOG dial, the display switches in
the following order, and under the following circumstances:
• REC – During recording.
• PLAY – During playback.
• POWER – While the VCR is turned on.
• TAPE IN – When you insert a tape in the VCR.
• TAPE REMAIN – When the tape has about nine minutes left (in
• CLOCK ADJ – When the clock indicates 00:00
• SERIES – Recording starts when the signal is input.
• REC-START/STOP – Recording continues while the signal is
MAINTENANCE MENU
Refer to the
Maintenance
8H mode).
(minutes:seconds), output the signal for one second only.
input. Recording may not start if the input period is short.
section for instructions and procedures.
Pelco Manual C671M (1/01) 29
Page 30

FIRST TIME SET UP MENU
U
T
<FIRST TIME SET
TIME DATE ADJUS
TAPE END
QUASI V-SYNC
VIDEO MODE
TAPE LENGTH
BUZZER
Figure 18. First Time Set
Up Menu
NOTE:
Quasi v-sync must
be set OFF for some multiplexers to work properly.
With the Pelco MX4000
Series Genex Multiplexer,
setting quasi v-sync on or
off has no apparent effect
on playback.
TIME DATE ADJUST Sets the time, date, and daylight saving time setting. Refer to the
TAPE END Sets the VCR’s state of operation when the tape runs out during
QUASI V-SYNC Sets quasi v-sync on or off.
VIDEO MODE Sets the playback and recording color mode.
Set the Day and Time
recording, as follows:
• STOP – The tape stops. “End” appears on the fluorescent
display and TAPE END on the monitor. When CALL OUT is
set to WRNG•TAPE END, a call signal is output from the
CALL OUT terminal.
• REWIND – Rewinds the tape to the beginning and stops
(except during timer recording). When CALL OUT is set to
WRNG•TAPE END and a tape reaches its end, a call signal
is output for two seconds from the CALL OUT terminal.
• REPEAT – Rewinds the tape to the beginning and resumes
recording. When CALL OUT is set to WRNG•TAPE END and
a tape reaches its end, a call signal is output for two seconds
from the CALL OUT terminal.
• ALARM•PROT – (Alarm Protection) If alarm recordings are
on the tape and the tape stops, “End” appears on the
fluorescent display and TAPE END on the monitor. When
CALL OUT is set to WRNG•TAPE END, a call signal is
output from the CALL OUT terminal. If there are no alarm
recordings, the tape rewinds and recording continues.
• ON – Quasi v-sync signal is inserted on the video output
signal when in the special playback modes (still, slow
motion, reverse, fast playback, and speed search) and
during playback in L24H and L40H modes.
• OFF – Quasi v-sync signal is not inserted.
section for the procedure.
• AUTO – The VCR automatically switches the circuits
according to the type of input/playback video signal; color, or
black and white.
• B/W – Select for recording or playback in black and white.
• COLOR – Select for recording or playback in color.
TAPE LENGTH Sets the tape length.
• T-120 – Select when using T-120 tape.
• T-160 – Select when using T-160 tape.
NOTE:
To stop the buzzer,
BUZZER Sets a buzzer to sound a warning.
press the MENU button
once. If the Main menu appears, press MENU again to
exit the menu. When the
VCR is locked, press the
LOCK button to unlock the
VCR; then the buzzer stops.
• WRNG – The buzzer sounds when the VCR malfunctions.
• WRNG•TAPE END – The buzzer sounds when the VCR
malfunctions or the tape reaches its end.
• WRNG•REMAIN – The buzzer sounds when the VCR
malfunctions or the tape has about nine minutes left (in 8H
mode).
• OFF – The buzzer does not sound.
30 Pelco Manual C671M (1/01)
Page 31

ADDITIONAL MATERIAL
DAY AND TIME DISPLAY MODES
YEAR
DAY
07-09-’00 SUN A0001
20:25:00 2
HOUR
MINUTE
SECOND
RECORDING MODE
DISPLAY MODE 2 & 3
DAY OF WEEK
MONTH
DAY
YEAR
ALARM
RECORDING
COUNTER
07-09-’00 20:25:00 A0001
HOUR
MINUTE
SECOND
DISPLAY MODE 1
MONTH
Display Mode 1
• Month-Day-Year
• Hour:Minute:Second
A 24-hour display is used: 00:00 indicates midnight; 12:00, noon; and 15:00, 3 p.m.
• Alarm recording counter
An alarm recording counter is displayed during alarm recording.
Display Mode 2
• Month-Day-Year
• Day of the week
The day of the week is set automatically.
• Alarm recording counter
ALARM
RECORDING
COUNTER
00265
• Hour:Minute:Second
• Recording mode
Pelco Manual C671M (1/01) 31
Page 32

SET THE DAY AND TIME
T
U
A
S
S
Keep the following in mind:
•You must set the day and time before performing timer programming.
• The year 2000 is shown as 00.
• The clock is in 24-hour format.
• The alarm recording counter appears only during alarm recording.
<MAIN MENU>
DISPLAY
TIMER PROGRAM
RECORDING SET UP
REAR TERMINAL
MAINTENANCE
CLOCK/FIRST TIME SET UP
Use JOG to select,
and ENTER.
Press MENU to exit.
<FIRST TIME SE
TIME DATE ADJ
TAPE END
QUASI V-SYNC
VIDEO MODE
TAPE LENGTH
BUZZER
<TIME DATE
DAYLIGHT
MONTH
DAY
YEAR
TIME
Do the following to set the day and time:
1. Press the MENU button to display the Main menu on the monitor.
2. Turn the JOG dial right to select CLOCK/FIRST TIME SET UP, and turn the SHUTTLE
ring right. The First Time Set Up menu appears.
00266
3. Turn the JOG dial right to select TIME DATE ADJUST, and then turn the SHUTTLE
ring right. The Time Date Adjust menu appears.
4. Turn the JOG dial right to set DAYLIGHT SAVINGS, and then turn the SHUTTLE ring
right. The daylight savings item flashes.
• When set to ON, the clock advances one hour.
• When set to AUTO, the clock advances one hour from the first Sunday in April (at
2 a.m.) to the last Sunday in October (at 3 a.m.). Remember: Programmed
recordings starting or ending in the daylight saving time changeover period may
not be recorded correctly.
• When set to ON or AUTO and the clock advances one hour, the daylight saving
time symbol ( ) is displayed next to the present time display. The daylight
saving time indicator (❚) is illuminated on the fluorescent display.
Daylight saving time may vary from the one above depending on your region or the
year. In this case, set DAYLIGHT SAVINGS to ON or OFF manually.
When DAYLIGHT SAVINGS is set to ON or OFF and there is no tape in the VCR, you
can toggle DAYLIGHT SAVINGS to ON and OFF on the VCR’s front panel by
simultaneously pressing the STOP and EJECT buttons.
NOTE:
If power goes out while daylight saving time is selected, the power failure
mark “X” replaces the daylight saving time symbol. When the power failure mark “X”
disappears, the daylight saving time symbol reappears.
5. Turn the JOG dial to set the month, and then turn the SHUTTLE ring right.
<TIME DATE
DAYLIGHT
MONTH
DAY
YEAR
TIME
6. Set DAY, YEAR, and TIME the same way. Year digits can be set from 97 (for year
1997) to 27 (for 2027).
Do the following if you want to set the time to the exact second. Set the minute digits
one minute ahead of the time you are using as a reference. The digit on the right will
flash and the seconds digits stay at 00. Turn the SHUTTLE ring right when the time
reaches 00 seconds of the time you set. The time will begin counting from 00. Turn the
JOG dial to set the day, and then turn the SHUTTLE ring right.
7. Turn the SHUTTLE ring right while the 1-minute digit of TIME is flashing. Programming
is now complete. The First Time Set Up menu appears.
NOTE:
The POWER but-
8. Press the MENU button. The day and time display appears on the screen.
ton will not operate if any
menu display is flashing.
32 Pelco Manual C671M (1/01)
Page 33

LOADING, UNLOADING, PROTECTING THE TAPE CASSETTE
You can load video cassette tapes into your VCR as long as it is plugged into a power
source. Loading a cassette automatically turns the VCR on even if its power switch is
turned off. Use only video cassette tapes marked VHS .
We recommend using high grade (HG) tape. (Standard grade tape can be used, but is not
recommended.) Use only T-120 or T-160 tapes, nothing longer.
LOADING
1. Prepare to insert the cassette into the cassette slot by holding it so the long narrow
edge with the contents label faces you. The hinged narrow edge should face the VCR.
The clear plastic window showing the tape should face up.
2. Line up the cassette squarely with the cassette slot and gently push the cassette in
until the VCR pulls it in. The cassette status indicator on the fluorescent display lights
when the cassette is inserted.
The VCR’s protection circuit will eject improperly loaded cassettes. If the VCR ejects
the cassette you are trying to load, remove it and check that the contents label is
facing you and the clear plastic window showing the tape faces up. Wait a few
seconds and try again.
Also, you cannot load a cassette while all the VCR’s buttons are locked and the lock
all indicator (LOCK A) is illuminated.
3. The VCR turns on automatically. If the erase prevention tab on the cassette has been
removed, the VCR automatically plays back the tape.
UNLOADING
1. Press the EJECT button on the front of the VCR.
Even in standby mode the VCR will eject a video cassette. When you press EJECT,
the VCR automatically turns on, ejects the tape, and turns off.
You cannot eject a tape while recording without first pressing the STOP button, or
while all the VCR’s buttons are locked.
2. Remove the cassette.
CORRECT
INCORRECT
00270
Pelco Manual C671M (1/01) 33
Page 34

PREVENTING ACCIDENTAL ERASURE
ERASURE
PREVENTION
TAB
00271
WHEN TO REPLACE A TAPE
RECORDING
Video cassettes come with an erasure prevention tab. Removing it stops the tape’s
contents from being erased or recorded over. The VCR automatically ejects a cassette if
you try to record over it with the erasure prevention tab removed.
DAMAGED CASSETTE TAPE
We recommend taking any torn or broken cassette tape requiring repair only to professionals who specialize in such procedures. The adhesives on many common types of tape
could damage the heads on the VCR.
We recommend you replace the tape cassette with a new one according to the mode in
which it is used. Refer to Table B.
Table B. Tape Replacement By Use
Number of Tape Uses
Recording Time Mode T-120 T-160
8H 100 50
L24H 60 30
L40H 30 10
MANUAL RECORDING
1
REMOTE
POSITON/
REC/PLAY
TRACKING
PICTURE
SOFT SHARP
VERTICAL
MODE
ADJUST
4
1. Turn on the VCR and peripheral devices.
2. Load a cassette with the erasure prevention tab intact.
3. To record the day and time, display them on the monitor.
(If you are not using a multiplexer and the date and time do not appear on the monitor
and you want them recorded on tape, you must turn them on using the VCR’s menu
system. If you already have them supplied by a multiplexer, you probably will not want
them turned on via the VCR’s menu.)
4. Press the REC/PLAY MODE button to select the desired recording mode.
2
EJECT REC
5
3
6
SHUTTLE
JOG/ADJUST
CLEAR/
REW
ENTER/
FW
MENU
/
TIME DATE ADJUST
COUNTER
RESET
SEARCH TIMER REC
PLAY/
REC CHECK
STOP
PAUSE/
SUTTLE HOLD
00272
• The recording mode shown on the fluorescent display assumes the use of T-160
tape.
• Refer to the
Recording Mode
section for the actual recording/playback time when
T-120 or T-160 tape is used.
34 Pelco Manual C671M (1/01)
Page 35

5. Press the REC button to begin recording.
6. Press the STOP button to stop recording.
Keep the following in mind:
• Press the PAUSE button to momentarily stop recording. Press again to resume
recording.
•To protect the tape, pause mode is released automatically after about five minutes.
• The REC button will not function unless the tape is in stop or pause mode.
• The VCR automatically ejects a cassette whose erasure prevention tab is removed if
you try to record on it.
•A tape recorded on this VCR may or may not be played back correctly by another VCR.
RECORDING MODE
Pressing the REC/PLAY MODE button switches the recording mode in the following order:
8H, L24H, L40H, 8H.
In recording mode, the VCR indicates the recording time with a T-160 cassette. Table C
shows recording times with T-120 and T-160 cassettes.
Table C. Recording/Playback Times
T-120 T-160
(2H) (2h) (2h 40m)
8H 6h 8h
L24H 18h 24h
L40H 30h 40h
( ) is for playback only.
RECORDING CHECK FUNCTION
When the VCR is recording, press the REC CHECK button for more than 1.5 seconds and
then release. The tape rewinds a little and then plays back the recording just made. When
the tape reaches the spot where you pressed REC CHECK, the VCR starts recording again.
AUDIO RECORDING
Apply the specified line input signal to the AUDIO IN connector. Audio will not be recorded if
a peripheral for audio is not connected.
The 8H, L24H and L40H modes allow audio recording and playback. The 2H mode allows
audio playback only.
The lengthier the recording mode, the poorer the sound quality. In L40H mode, sound
quality is such that speech can be heard.
Pelco Manual C671M (1/01) 35
Page 36

REPEAT RECORDING
With this function, when the tape reaches its end during recording, the VCR rewinds the
tape and starts recording again.
Table D shows what happens automatically when the tape ends during recording.
1. Press the MENU button. The Main menu appears.
2. Turn the JOG dial to select CLOCK/FIRST TIME SET UP, and then turn the SHUTTLE
ring right. The First Time Set Up menu appears.
3. Turn the JOG dial to select TAPE END and turn the SHUTTLE ring right.
4. Turn the JOG dial to select REPEAT or ALARM•PROT, and then turn the SHUTTLE
ring right. Refer to Table D. The repeat indicator on the fluorescent display lights.
5. Press the MENU button. The day and time display appears on the screen.
Table D. Action When Tape End Is Reached By Setting
STOP
When there are
alarm recordings
on the tape
When there are NO
alarm recordings
on the tape
*To repeat recording on the same tape in ALARM•PROT mode, eject the tape once and reinsert.
The tape stops.
(same as above)
REWIND
The tape automatically
rewinds to the beginning
(except in timer recordings) and then stops.
(same as above)
REPEAT
The tape automatically
rewinds to the beginning
and then recording
resumes (recording over
existing alarms).
(same as above)
Recommended Number of Tape Uses
Video tape wears during use. Use a new cassette according to Table B.
SERIES RECORDING
You can do series recording by connecting two or more TLR3040 VCRs together. Refer to
Figure 4 for the physical connection.
If a problem occurs (for example, the motor malfunctions during recording) in the first VCR,
the second VCR automatically begins recording.
Series recording will not work during timer or emergency recording.
When recording in series, set CALL OUT in the Rear Terminal menu to a mode other than
WRNG.
ALARM•PROT
The tape stops.*
The tape automatically
rewinds to the
beginning and
recording resumes.
There are two types of series recording. Choose either Series Recording 1 or Series
Recording 2.
36 Pelco Manual C671M (1/01)
Page 37

Series Recording 1
When the tape in the first VCR reaches the end during recording or an error occurs on the
VCR, the tape in the second VCR automatically begins recording.
1. Press the MENU button. The Main menu appears.
2. Turn the JOG dial to select REAR TERMINAL, and then turn the SHUTTLE ring right.
The Rear Terminal menu appears.
3. (Perform this step and step 4 on the first VCR only.) When the cursor is next to CALL
OUT, turn the SHUTTLE ring right.
4. Turn the JOG dial to select WRNG•TAPE END, and then turn the SHUTTLE ring right.
5. (Perform this step and step 6 on the second VCR only.) Turn the JOG dial to select
REC IN, and then turn the SHUTTLE ring right.
6. Turn the JOG dial to select SERIES and turn the SHUTTLE ring right.
7. Press the MENU button. The day and time display appears.
Series Recording 2
When the first VCR’s tape reaches its end, the second VCR automatically begins recording.
When the second VCR’s tape reaches its end, the first VCR starts recording again. The two
keep recording one after the other. Set up both VCRs as follows:
1. Perform steps 1 through 6 in the
2. Turn the SHUTTLE ring left. The Main menu appears.
3. Turn the JOG dial to select CLOCK/FIRST TIME SET UP, and then turn the SHUTTLE
ring right. The First Time Set Up menu appears.
4. Turn the JOG dial to select TAPE END, and then turn the SHUTTLE ring right.
5. Turn the JOG dial to select REWIND, and then turn the SHUTTLE ring right.
6. Press the MENU button. The day and time display appears.
Series Recording 1
section above.
REMOTE RECORDING
This function lets you control the start and end of recording from a remote location. The
VCR starts recording when the REC IN terminal is grounded. Refer to Figure 5 for the
remote recording connection.
An index signal is not recorded during remote recording.
Series and timer recording cannot be used simultaneously with remote recording.
1. Press the MENU button. The Main menu appears.
2. Turn the JOG dial to select REAR TERMINAL, and then turn the SHUTTLE ring right.
The Rear Terminal menu appears.
3. Set REC IN to REC-START/STOP.
4. Press the MENU button. The day and time display appears on screen.
Pelco Manual C671M (1/01) 37
Page 38

<MAIN MENU>
3
D
H
H
2
H
H
2
0
1
DISPLAY
TIMER PROGRAM
RECORDING SET UP
REAR TERMINAL
MAINTENANCE
CLOCK/FIRST TIME SET UP
Use JOG to select,
and ENTER.
Press MENU to exit.
TIMER RECORDING
Remember to set the date and time before timer programming.
PROGRAMMING PROCEDURE
(Refer to the
Record menu.)
1. Press the MENU button. The Main menu appears.
2. Turn the JOG dial to select TIMER PROGRAM, and then turn the SHUTTLE ring right.
3. When the cursor is next to PROGRAM TO RECORD, turn the SHUTTLE ring right.
0027
Timer Program
The Timer Program menu appears.
The Program To Record menu appears.
section for information on the columns on the Program To
<TIMER PROGRAM>
PROGRAM TO RECOR
HOLIDAY SET UP
SPECIAL DW
<PROGRAM TO RECORD>
DW START END
DAY 08 : 00 17 : 00 L
- - - - - : - - - - : - - -
- - - - - : - - - - : - - -
3
<PROGRAM TO RECORD>
DW START END
DAY 08 : 00 17 : 00 L
TUE - - : - - - - : - - -
- - - - - : - - - - : - - -
3
<PROGRAM TO RECORD>
DW START END
DAY 08 : 00 17 : 00 L
TUE 12 : 00 - - : - - -
- - - - - : - - - - : - - -
3
<PROGRAM TO RECORD>
DW START END
DAY 08 : 00 17 : 00 L
TUE 12 : 00 15 : 00 -
- - - - - : - - - - : - - -
3
4. Turn the JOG dial to select the program number.
5. To set the day of the week (DW), turn the JOG dial to select the day, and then turn the
SHUTTLE ring right.
• Select DAY to record at the programmed time every day.
• Select HLD to apply HOLIDAY SET UP settings (refer to the
Holiday Set Up
section).
• Select SPL to apply SPECIAL DW settings (refer to the
Special DW Settings
section).
6. To set the START recording time, turn the JOG dial to select the hour digits (24-hour
format). Turn the SHUTTLE ring right when done.
Set the 10-minute and 1-minute digit positions in the same way.
7. To set the END recording time, turn the JOG dial to select the hour digits. Turn the
SHUTTLE ring right when done.
Set the 10-minute and 1-minute digit positions in the same way.
8. To set the recording mode (HR), turn the JOG dial to select the recording mode.
(Timer recording will not be performed if you set it to SKIP.)
9. Turn the SHUTTLE ring right when finished. The cursor should stop flashing. If the
program has not been set completely, the DW column will keep flashing.
• If the END time is the same or earlier than the START time, the next day indicator
(•) is automatically displayed. This indicates the recording will run continuously
from the START time on the first day to the END time on the next day.
<PROGRAM TO RECORD>
DW START END HR
DAY 08 : 00 17 : 00 L24
TUE 12 : 00 15 : 00 L40
- - - - - : - - - - : - - - - -
3
0028
• Repeat steps 4-9 to set two or more programs at once (you can set up to eight
programs).
• To erase the program setting, select the program number to be erased. Turn the
SHUTTLE ring right to flash the day of the week, then turn the SHUTTLE ring
left.
<PROGRAM TO RECORD>
DW START END HR
DAY 08 : 00 17 : 00 L24
TUE 12 : 00 15 : 00 L40
- - - - - : - - - - : - - - - -
3
0028
38 Pelco Manual C671M (1/01)
10. Press the MENU button. The day and time display appears.
11. Press the TIMER REC button. The VCR turns off and the timer recording indicator
lights on the fluorescent display. (When you press the TIMER REC button during the
programmed period, the VCR starts recording immediately.)
Page 39

HOLIDAY SET UP
Up to 20 days a year can be set as days to perform timer recording. Or you can specify up
to 20 days when timer recording will not be performed during the programmed period by
setting HR in the Program To Record menu to SKIP.
1. Press the MENU button. The Main menu appears.
2. Turn the JOG dial to select TIMER PROGRAM, and then turn the SHUTTLE ring right.
The Timer Program menu appears.
3. Turn the JOG dial to select HOLIDAY SET UP, and then turn the SHUTTLE ring right.
The Holiday Set Up menu appears.
4. Turn the JOG dial to move the cursor right to select the month you want and turn the
SHUTTLE ring right.
To erase the preset month and day, turn the SHUTTLE ring left while the month item
is flashing.
5. Turn the JOG dial to select the day you want, and then turn the SHUTTLE ring right.
Repeat steps 4 and 5 to set two or more days at once.
6. Press the MENU button. The day and time display appears.
SPECIAL DW SETTINGS
You can set the recording period by specifying the start and end day of the week for timer
recording.
1. Press the MENU button. The Main menu appears.
2. Turn the JOG dial to select TIMER PROGRAM, and then turn the SHUTTLE ring right.
The Timer Program menu appears.
3. Turn the JOG dial to select SPECIAL DW, and then turn the SHUTTLE ring right.
4. Turn the JOG dial to set the start day, and then turn the SHUTTLE ring right.
5. Turn the JOG dial to set the end day, and then turn the SHUTTLE ring right. The start
and end days cannot be set to the same day.
6. Press the MENU button. The day and time display appears.
OVERLAPPING PROGRAMS
When the recording period of two or more programs overlap, the VCR always gives priority
to the higher-numbered program.
WHAT IF THE TIMER RECORDING INDICATOR STARTS
FLASHING?
Do the following if the timer recording indicator starts flashing:
1. Press the TIMER REC button to turn off the timer recording indicator.
2. The flashing indicator can mean:
•A tape is not inserted. Remedy: Insert a tape.
•A tape without an erasure prevention tab is inserted. Remedy: Insert a tape with
an erasure prevention tab.
• The day and time have not been set. Remedy: Set the day and time (refer to the
Adjusting the Clock
or
Set the Day and Time
sections.
•A menu item has been set (flashing). Remedy: Turn the SHUTTLE ring right to
stop the flashing.
3. Press the TIMER REC button to turn on the timer recording indicator.
Pelco Manual C671M (1/01) 39
Page 40

ALARM RECORDING
When an alarm occurs, the VCR switches to alarm recording.
• Set the alarm recording mode and alarm recording period in the Recording Set Up
menu. Refer to the
information and the
• The index signal is automatically recorded when an alarm recording begins (INDEX
indicator flashes on the fluorescent display).
• Even if an alarm recording is happening, a new recording starts when the second
alarm signal is input. (However, if the interval between two alarm recording start times
is too short, the second signal may not be detected during skip or index search. Refer
to Table E.)
Recording Set Up Menu
section for field definitions and additional
Programming for Alarm Recording
section for instructions.
Table E. Minimum Interval Between Recordings
Alarm Minimum Interval
Recording Between Two Alarm
Mode Recording Start Times
8H Approx. 15 seconds
L24H Approx. 2 minutes
L40H Approx. 2 minutes
• An alarm recording continues until its end during timer recording, even if the timer
recording end time is reached.
• An alarm recording is cancelled if the tape reaches its end.
ALARM SET INPUT
TAPE DIRECTION
8 - L40H
RECORDING
NORMAL mode
8 -L40H
8H
RECORDING
RECORDING
15sec
ALARM mode
8 - L40H
RECORDING
NORMAL mode
00247
Figure 19. Switching from Normal to Alarm Mode and Back
ALARM RECORDING CONNECTION
You can confirm an alarm from a distance by connecting the ALM (alarm) OUT terminal to
an existing alarm system panel or other external device, such as a buzzer. Refer to Figure 3.
40 Pelco Manual C671M (1/01)
Page 41

<MAIN MENU>
0
0
DISPLAY
TIMER PROGRAM
RECORDING SET UP
REAR TERMINAL
MAINTENANCE
CLOCK/FIRST TIME SET UP
Use JOG to select,
and ENTER.
Press MENU to exit.
00282
PROGRAMMING FOR ALARM RECORDING
Emergency recording activates alarm recording even if the VCR is off, stopped, or in timer
recording or standby modes. After an emergency recording, the VCR automatically returns
to its original state. The emergency recording indicator (EMGCY) on the fluorescent display
lights provided EMERGENCY REC is ON. After an emergency recording, the VCR
automatically returns to its original state.
You should set the alarm recording mode in the Recording Set Up menu before using alarm
recording.
1. Press the MENU button. The Main menu appears.
<RECORDING SET UP>
ALARM REC MODE 8H
ALARM REC DURATION 1M
EMERGENCY REC ON
0
<RECORDING SET UP>
ALARM REC MODE
ALARM REC DURATION
EMERGENCY REC
<RECORDING SET UP>
ALARM REC MODE 8H
ALARM REC DURATION 1M
EMERGENCY REC ON
0
NOTE:
If an alarm input is
received during alarm recording, a new alarm recording will start with the
new input signal.
Alarm recording will continue
for the period set in the
ALARM REC DURATION
field, even if a timer recording has reached its end time.
Alarm recording stops when
the end of the tape is
reached.
2. Turn the JOG dial to select RECORDING SET UP, and then turn the SHUTTLE ring
right. The Recording Set Up menu appears.
3. When the cursor is next to ALARM REC MODE, turn the SHUTTLE ring right.
4. Turn the JOG dial to set the alarm recording mode you want, and then turn the
SHUTTLE ring right.
5. Turn the JOG dial to select ALARM REC DURATION, and then turn the SHUTTLE ring
right.
6. Turn the JOG dial to set the alarm recording duration you want, and then turn the
SHUTTLE ring right.
• When set to MAN1, alarm recording continues until the RST (reset) IN terminal is
grounded.
• When set to MAN2, alarm recording continues while the ALM IN terminal is
grounded.
•You can adjust the internal time clock by applying a signal to the RST IN terminal
when ALARM REC DURATION is set to other than MAN1.
7. If you wish to activate emergency recording, turn the JOG dial to select EMERGENCY
REC, and then turn the SHUTTLE ring right. Turn the JOG dial to select ON for
emergency recording or OFF to disable it.
8. Press the MENU button. The day and time display appears.
During alarm recording, the alarm recording count is displayed automatically except
when Display Mode 4 (display nothing) is selected.
• The alarm recording count display counts up to 9999 alarm recordings and then
resets to 0000 and continues counting.
• When initializing the alarm recording list, the alarm recording count display is
reset.
• The alarm indicator (ALARM) flashes during alarm recording and stays lit when
the alarm recording finishes.
Pelco Manual C671M (1/01) 41
Page 42

01-01-97 WED
00:00:00 X L24
RECORDING AFTER A POWER FAILURE
After a power failure during manual, timer, or alarm recording, the VCR turns itself on when
the power resumes and begins recording in the same mode as before the failure.
When power resumes, an “X” appears next to the present time on the screen for about a
minute. The fluorescent display shows the power loss indicator (PL).
00286
MAINTENANCE
<MAINTENANCE>
POWER LOSS LIST
ALARM LIST
ALL MENU INITIALIZE
POWER LOSS LIST CLEAR
ALARM LIST CLEAR
<REPEAT REC TIMES> 0
<ELAPSED TIME> 0H
Figure 20. Maintenance
Menu
<POWER LOSS LIST>
01 01-31’00 00:00
02
03
If there is a power failure during playback, the VCR will be in stop mode when power resumes.
Refer to the
POWER LOSS LIST
The Power Loss List displays up to three power failure start times. If more occurred, the
first and last two start times will be displayed.
VIEWING THE POWER LOSS LIST
1. Press the MENU button. The Main menu appears.
2. Turn the JOG dial to select MAINTENANCE, and then turn the SHUTTLE ring right.
The Maintenance menu appears.
002
3. Turn the JOG dial to select POWER LOSS LIST, and then turn the SHUTTLE ring
right. The Power Loss List appears.
4. Press the MENU button. The day and time display appears.
CLEARING THE POWER LOSS LIST
1. Press the MENU button. The Main menu appears.
Power Loss List
section for more information on viewing and clearing the list.
00288
POWER LOSS LIST CLEAR
Turn the SHUTTLE RING
then POWER LOSS LIST
will be cleared.
00289
2. Turn the JOG dial to select MAINTENANCE, and then turn the SHUTTLE ring right.
The Maintenance menu appears.
3. Turn the JOG dial to select POWER LOSS LIST CLEAR, and then turn the SHUTTLE
ring right.
(If you change your mind at this point and want to exit the menu without clearing the
list, skip to step 5.)
4. Turn the SHUTTLE ring left to clear the list. The Maintenance menu appears.
5. Press the MENU button.
Once the list is cleared, the power loss indicator (PL) goes off.
42 Pelco Manual C671M (1/01)
Page 43

ALARM LIST
<ALARM LIST>
0001 01-31’-01 00:00
0002
0003
0004
0005
0006
0007
0008
ALARM LIST CLEAR
Turn the SHUTTLE RING
then ALARM LIST will be
cleared.
00290
00291
When alarm recordings begin, the start times are stored in memory so you can confirm
when they occurred. Up to eight alarm recording start times can be stored in memory. If
there are more, the first and last seven are displayed. A maximum of 9,999 alarm recording
start times will be counted.
VIEWING THE ALARM LIST
1. Press the MENU button. The Main menu appears.
2. Turn the JOG dial to select MAINTENANCE, and then turn the SHUTTLE ring right.
The Maintenance menu appears.
3. Turn the JOG dial to select ALARM LIST, and then turn the SHUTTLE ring right. The
Alarm List appears.
4. Press the MENU button. The day and time display appears.
CLEARING THE ALARM LIST
1. Press the MENU button. The Main menu appears.
2. Turn the JOG dial to select MAINTENANCE, and then turn the SHUTTLE ring right.
The Maintenance menu appears.
3. Turn the JOG dial to select ALARM LIST CLEAR, and then turn the SHUTTLE ring
right.
4. Turn the SHUTTLE ring left to clear the list. The Maintenance menu appears.
5. Press the MENU button.
ALL MENU INITIALIZE
Turn the SHUTTLE RING
then all MENU will be
initialized.
Once the list is cleared, the alarm recording indicator (ALARM) on the fluorescent display
goes off.
ALL MENU INITIALIZE (RESET)
This feature resets all menus (except timer programs) to their initial settings.
1. Press the MENU button. The Main menu appears.
2. Turn the JOG dial to select MAINTENANCE, and then turn the SHUTTLE ring right.
The Maintenance menu appears.
3. Turn the JOG dial to select ALL MENU INITIALIZE, and then turn the SHUTTLE ring
right. The All Menu Initialize menu appears.
00292
(If you change your mind at this point and want to exit the menu without resetting all
menus, skip to step 5.)
4. Turn the SHUTTLE ring left. All menus (except Timer Program) return to their original
settings.
5. Press the MENU button. The day and time display appears.
Pelco Manual C671M (1/01) 43
Page 44

ELAPSED TIME AND REPEAT RECORDING TIMES DISPLAY
<MAINTENANCE>
POWER LOSS LIST
ALARM LIST
ALL MENU INITIALIZE
POWER LOSS LIST CLEAR
ALARM LIST CLEAR
<REPEAT REC TIMES> 0
<ELAPSED TIME> 0H
The repeat recording times and elapsed time are shown on the bottom of the Maintenance
menu.
ELAPSED TIME
The elapsed time indicates the total time the VCR has been used for recording and playback
(up to 89,999 hours). Use the elapsed time as a guide for periodic parts replacement.
REPEAT REC TIMES
• The repeat recording times displays the number of times a tape has been recorded
002
on. The number of tape uses increments by one when the tape ends during recording
(except when TAPE END in the First Time Set Up menu is set to STOP).
• The number of tape uses is kept even if AC power is disconnected, provided the
backup battery is fully charged.
• The number of tape uses is reset when a new tape is inserted.
• The number of tape uses shown can be up to 200. OVER appears if 200 times is
exceeded.
To view:
1. Press the MENU button. The Main menu appears.
2. Turn the JOG dial to select MAINTENANCE, and then turn the SHUTTLE ring right.
The Maintenance menu appears. The repeat recording times and elapsed time are
shown at the bottom of the screen.
3. Press the MENU button. The day and time display appears.
PLAYBACK
PLAYBACK PROCEDURE
REMOTE
PICTURE
SOFT SHARP
REC/PLAY
1
JOG/ADJUST
SHUTTLE
CLEAR/
REW
POSITON/
TRACKING
VERTICAL
MODE
ADJUST
EJECT REC
ENTER/
FW
MENU
/
TIME DATE ADJUST
COUNTER
RESET
SEARCH TIMER REC
3
PLAY/
REC CHECK
STOP
PAUSE/
SUTTLE HOLD
00294
2
Figure 21. Playback Controls
1. Load a pre-recorded tape. (Turn on the VCR and peripherals if you have not already
done so. If the erasure prevention tab has been removed, the VCR automatically
begins playback mode.)
2. Press the REC/PLAY MODE buttons (+) or (-) to select the desired playback mode.
(Refer to the
Playback Mode
section for more information.)
4
44 Pelco Manual C671M (1/01)
Page 45

3. Press PLAY to start playback. (If noise occurs, adjust the tracking. Refer to the
Tracking Adjustment
When a pre-recorded tape is used for recording, colored noise may appear on the
beginning of the playback picture.
4. Press STOP to halt playback.
•Turn the SHUTTLE ring left to rewind the tape when the VCR is stopped. Press
STOP to stop.
•Turn the SHUTTLE ring right to fast forward the tape when the VCR is stopped.
Press STOP to stop.
• Fast forward/rewind time of a T-160 tape is about 160 seconds, but can vary
according to the type of tape.
section.)
PLAYBACK MODE
• When you press the REC/PLAY MODE button, playback mode is switched in the
following order: 8H, L24H, L40H, 8H (for a tape recorded in one of these modes).
• Picture jitter or noise may occur when the tape is played back in L24H or L40H mode
(even if the tape was recorded in that mode).
•A tape recorded in SP mode using another VCR can only be played back in 2H mode.
AUDIO PLAYBACK
There is normal sound playback only when a tape recorded in 8H, L24H, or L40H mode is
played back in its respective mode.
Table F. Audio Playback and Picture Quality
Playback Mode 2H/8H L24H L40H
Audio Playback Available Available Available
Picture Quality Good Vibrating Vibrating
END OF TAPE
When the end of the tape is reached, the following functions are performed automatically
during playback or fast forwarding.
Table G. End of Tape Actions
Tape End Selected REPEAT or ALARM•PROT STOP or REWIND
Playback The tape automatically rewinds to Stop
Fast Forward Stop Stop
the beginning and stops.
Pelco Manual C671M (1/01) 45
Page 46

SPECIAL EFFECTS PLAYBACK
The VCR features the following convenient functions. Audio output is muted during special
effects playback.
STILL PICTURE
Press PAUSE during playback. (A few noise bars or vertical movement may appear during
still playback.) Press again to resume playback.
FRAME-BY-FRAME PLAYBACK
You can use the JOG dial to advance the tape frame by frame.
1. Press PAUSE to freeze the picture while the VCR is playing the tape.
2. Turn the JOG dial clockwise to advance the tape or counterclockwise to reverse it. To
get a continuous frame-by-frame picture, keep rotating the JOG dial.
3. To freeze the picture again, release the JOG dial.
4. Press PLAY to resume normal playback.
A few noise bars or vertical movement may appear during frame-by-frame playback. Noise
bars may appear on the picture when switching between forward and reverse playback.
SHUTTLE RING
You can set the playback speed using the SHUTTLE ring.
1. Press PLAY to begin playback.
2. Press PAUSE/SHUTTLE HOLD to get a still picture.
3. Turn the SHUTTLE ring right or left to get the playback speed you want.
4. Cancel by pressing PAUSE/SHUTTLE HOLD to get a still picture and then pressing it
again to return to the playback.
Playback speed varies according to the angle of the SHUTTLE ring (as shown in Figure 22).
When the SHUTTLE ring is released, it comes back to the center position and the playback
picture stays still.
6
1/30
1/15
7
1/7
8
1
9
2
10
9
15
11
00295
5
4
3
3
2
9
15
1
1/30
1/15
1
1/7
1. Reverse high speed search 7. Slow playback
2. Reverse speed search 8. Normal playback
3. Reverse fast playback 9. Fast playback (x2)
4. Reverse playback 10. Forward speed search
5. Reverse slow 11. Forward high speed search
6. Still
Figure 22. Shuttle Ring Speed Settings
46 Pelco Manual C671M (1/01)
Page 47

DIRECT SHUTTLE RING
You can also change the playback speed without entering pause mode by turning the
SHUTTLE ring during playback, as shown below.
4
3
5
2
1
15
3
9
2
9
15
1. Reverse high speed search 5. Fast playback (x2)
2. Reverse speed search 6. Forward speed search
3. Reverse fast playback (x3) 7. Forward high speed search
4. Normal playback
Figure 23. Direct Shuttle Ring Speed Settings
ADJUSTING THE PICTURE DURING PLAYBACK
TRACKING ADJUSTMENT
If noise appears in the picture during playback, fast playback, reverse playback,
forward/reverse slow playback, frame playback, or field playback, you can reduce or
eliminate it by adjusting tracking.
IF NOISE APPEARS
6
7
00296
TRACKING
00297
Figure 24. Tracking Adjustment
Adjust tracking at each playback mode or the type of playback (fast, reverse, etc.) since the
method of adjusting tracking varies.
Noise bars will move continuously through the picture when holding down a TRACKING
button. Noise may also remain although tracking is adjusted during reverse playback or
reverse slow playback. Noise may also remain after adjustment when a picture recorded in
8H mode is played back in L24H or L40H mode.
•To adjust during playback:
Press the TRACKING buttons (+/-) for the best picture.
•To adjust during fast, reverse, forward/reverse slow, frame, or field playback:
1. During still picture mode, turn the SHUTTLE ring to get the desired playback
mode. (If noise appears in the frame or field, set to slow playback.)
2. While turning the SHUTTLE ring, press PAUSE. The playback picture is fixed at
the selected speed.
3. Release the SHUTTLE ring.
4. Press the TRACKING buttons (+/-).
•To reset the tracking:
Press both TRACKING buttons (+/-) together during playback to set tracking to its
initial setting.
Pelco Manual C671M (1/01) 47
Page 48

ADJUSTING PICTURE QUALITY
This control lets you adjust the playback picture so the outline is sharper or softer. It is only
effective during playback. During playback, turn the PICTURE control right for sharper or
left for softer.
SOFT SHARP
SOFT
PICTURE
SHARP
00298
Figure 25. Picture Quality Adjustment
VERTICAL (VIBRATION) ADJUSTMENT
The VERTICAL ADJUST (+/-) buttons will not correct horizontal vibration. Also, they will not
work when QUASI V-SYNC in the First Time Set Up menu is set OFF.
• If the picture vibrates when watching still, slow motion, fast playback, or normal
playback in L24H or L40H mode:
1. Press PAUSE during playback.
2. Press the VERTICAL ADJUST (+/-) buttons to reduce or eliminate picture vibration.
•To reset vertical adjustment:
Press both the VERTICAL ADJUST (+/-) buttons together during still picture, forward
or reverse slow playback, or playback in L24H or L40H mode.
WHEN THE PICTURE
IS VIBRATING
POSITION/
VERTICAL
ADJUST
Figure 26. Vertical Picture (Vibration) Adjustment
SEARCH TECHNIQUES
COUNTER MEMORY STOP
This feature rewinds a tape until the counter on the fluorescent display reaches 00000 and
stops. (
NOTE:
Search Function menu cannot be selected.
1. Press the SEARCH button once. The Search Function menu appears with COUNTER
MEMORY STOP highlighted. The COUNTER MEMORY STOP indicator (M) on the
fluorescent display lights.
To exit the Search Function menu without rewinding, press STOP.
2. Turn the SHUTTLE ring right. The VCR starts rewinding the tape.
3. Press STOP to quit rewinding.
When the counter indicates 00000, COUNTER MEMORY STOP on the
00299
)
48 Pelco Manual C671M (1/01)
Page 49

SKIP SEARCH
The VCR automatically inserts an index signal at the beginning of each alarm recording, so
the start of each alarm can be located. During fast forwarding or rewinding, the VCR plays
back a tape (in 2H or 8H mode) for about four seconds where an index signal is recorded. It
repeats this process until reaching the end or beginning of the tape.
1. Press the SEARCH button enough times to highlight SKIP SEARCH on the Search
Function menu. The skip search indicator (SKIP) on the fluorescent display lights.
To exit the Search Function menu without searching, press STOP.
2. Turn the SHUTTLE ring right (search forward) or left (search backward) to start
searching.
3. When you find a picture you want to view, press PLAY.
4. To quit searching, press STOP.
The index signal may be hard to find under some recording conditions. Skip search may
not function if the interval between two alarm recordings start times is too short. Refer to
Table E for minimum intervals.
Audio output is muted during skip search.
PRESENT POSITION
INDEX SEARCH
The VCR automatically inserts an index signal at the beginning of each alarm recording, so
the start of each alarm can be located. During fast forwarding or rewinding, the VCR can
search for an alarm index signal you have selected. When the VCR finds it, the VCR plays
back the tape in still mode.
1. Press the SEARCH button enough times to highlight INDEX SEARCH on the Search
Function menu. The index search indicator (INDEX) on the fluorescent display lights.
To exit the Search Function menu without searching, press STOP.
2. Turn the JOG dial to select an index number (between 1 and 255) you want to find.
3. Turn the SHUTTLE ring right (search forward) or left (search backward) to start
searching. The index number in the fluorescent display decreases by one as each
index signal goes by.
The index signal may be hard to find under some recording conditions. Index search may
not function if the interval between two alarm recordings start times is too short. Refer to
Table E for minimum intervals.
FAST
FORWARD
INDEX
ALARM
RECORDING
FAST
FORWARD
APPROX. 4 SEC.
PLAYBACK
Figure 27. Skip Search
INDEX
ALARM
RECORDING
FAST
FORWARD
APPROX. 4 SEC.
PLAYBACK
00300
Pelco Manual C671M (1/01) 49
Page 50

HOW TO COUNT THE INDEX NUMBER
The index number is the count from the present position. The index number of one alarm
recording before the present position is –1. The index number of one alarm recording after
is +1.
The maximum count of alarm recordings is ±255.
PRESENT POSITION
REWIND
DIRECTION
FAST FORWARD
DIRECTION
ALARM
RECORDING
-255
ALARM
RECORDING
-1
TIME AND DATE SEARCH
You can find a picture recorded at a specific date and time.
1. Press the SEARCH button enough times to highlight TIME DATE SEARCH on the
Search Function menu. The time date search indicator (D) on the fluorescent display
lights.
2. Turn the SHUTTLE ring right. The Time Date Search menu appears.
Turn the SHUTTLE ring left several times to exit the Time Date Search menu without
searching.
3. Turn the JOG dial to set the digits for the hour you want to find next to TIME. Turn the
SHUTTLE ring right.
4. Set the 10-minute and 1-minute digits in the same way.
5. Set the date using the JOG dial and SHUTTLE ring in the same manner.
6. Set the direction (forward or reverse) in which to search the tape using the JOG dial
and SHUTTLE ring.
ALARM
RECORDING
+1
ALARM
RECORDING
+2
Figure 28. Index Searching
ALARM
RECORDING
+255
00301
(When the desired part of the tape is not found in the selected direction, the VCR
automatically searches in the opposite direction.)
7. Turn the SHUTTLE ring right to begin searching. When the recorded picture is found,
it is shown in still mode.
8. To quit while searching, press STOP.
The VCR writes an index mark on the tape at each hour (1:00, 2:00, etc.) during recording.
The time and date search cannot be resumed if the hour’s index mark (set in step 3) is not
recorded on the tape. (For example, if the VCR recorded from 8:15 to 17:30 on the tape,
only pictures between 9:00 and 17:30 can be found.)
The time and date search may not function correctly if you used a tape with poor recording
quality or with alarm recordings in several recording modes. Also, it will not function with a
tape recorded with other VCRs or with a tape recorded without setting the date and time.
50 Pelco Manual C671M (1/01)
Page 51

ADDITIONAL FUNCTIONS AND FEATURES
COUNTER
TAPE COUNTER
A five-digit counter indicates the relative position on the recorded portion of the tape.
COUNTER RESET
Press the COUNTER RESET button to reset the counter to 00000.
COUNTER MEMORY
The counter display is stored in memory when the power is turned off, so the same
numbers are displayed when power is restored. (Refer to the
for information and procedures for rewinding to 00000.)
MEMORY BACKUP IN CASE OF POWER FAILURE
Counter Memory Stop
section
NOTE:
The backup is for
memory only—the VCR will
not continue recording during a power outage unless
connected to a UPS.
TESTING
The VCR includes a built-in memory backup so the settings for time and date, alarm list,
power loss list, number of tape uses, counter display, and recording/playback mode will
remain in memory if there is a power failure or the power cord is unplugged for a long
period (two-three months). The settings remain in memory for up to 31 days provided the
VCR has been connected to AC power for at least 40 hours per week. Connection charges
the battery backup.
However, if the power cord is unplugged for a long period (two-three months), the time may
be wrong. If so, set the clock again.
When ALARM REC DURATION in the Recording Set Up menu is set to MAN1 or MAN2
and the power fails during recording, the VCR may not return to the alarm recording mode
when power is restored.
INITIAL SYSTEM TESTING
Before using the newly installed surveillance system, do the following:
Make test recordings at the time-lapse speeds you will be using. Test how the system
performs with alarms.
Interrupt electrical power to check your installed power backup system (if applicable).
On playback, verify picture quality and that you can see the time and date display under
normal and alarm conditions.
REGULAR SYSTEM TESTING
Every day check that the system is operating. Is the recording indicator lit? Does the
counter display indicate movement? Does the monitor show proper camera sequencing
and time and date information?
Check for recorded alarms. Multiple alarms could make the tape run out early. Make sure
there is enough tape to record at least five minutes of alarm activity at the selected speed.
Regularly verify picture quality and operation under normal and alarm conditions. Play a
tape recorded recently under normal conditions, which also includes an alarm condition that
you triggered manually.
Regularly replace tapes (refer to Table B for a schedule). Check tapes for head scarring.
Replace damaged tapes. Always store tapes in their boxes, away from magnetic fields,
heat, direct sunlight, and dust.
Pelco Manual C671M (1/01) 51
Page 52

TROUBLESHOOTING
SELF-DIAGNOSTIC FUNCTION AND WARNING DISPLAY
The VCR uses self-diagnostics to detect internal malfunctions during recording. If one
occurs, the VCR indicates it on the monitor and on the VCR’s fluorescent display.
Table H shows the type of malfunction corresponding to the warning display and the action
to take.
Table H. Warning Display and Actions
Fluorescent Monitor Cause Remedy To Turn Off
Display Indicator
End TAPE END Tape ends during Rewind tape or press Rewind tape or press
NoSig NO SIGNAL No video signal input. Check for loose Restore video signal or
(display starts CHECK Tape or deck Check cassette. If nothing is wrong, try recording
flashing) trouble. again. If CHECK still appears, insert a new cassette
CLog — Clogged head. Eject cassette and Clear recording mode.
recording. EJECT. EJECT.
connections. clear recording mode.
and retry recording. If CHECK stays on, unplug the
power cord and contact your dealer.
reinsert. If CLog remains, clean tape. If it
still remains, contact
your dealer.
• When the tape ends:
SYMPTOM REMEDY
No power at the VCR.
The VCR power is on but the
unit does not operate.
When the tape reaches its end during recording, END appears on the fluorescent
display and TAPE END appears on the monitor. They will not appear if TAPE END in
the First Time Set Up menu is set to REPEAT, ALARM•PROT (when no alarm
recording is made), or REWIND.
• Lack of video signal:
“NO SIGNAL” appears on the monitor and “NoSIg” flashes on the fluorescent display
when the VCR cannot get any video input signal during recording. Check that the
cable from the camera is not broken and the camera has power.
• Fouling (clogged) head:
When CLOG DETECT in the Recording Set Up menu is set ON, the VCR automatically removes particles that have accumulated on the heads during time-lapse
recording mode. If they cannot be removed completely, CLog flashes on the fluorescent display. If this happens, follow the remedy in Table H.
BEFORE CALLING FOR SERVICE
INSTALLATION PROBLEMS
• Is the power cord disconnected at the AC output?
• Is the lock or lock all indicator lit? Press the LOCK button several times to unlock the VCR.
• Is the timer recording indicator lit? Press the TIMER REC button on the front panel to cancel
timer recording.
• Is the lock or lock all indicator lit? Press the LOCK button several times to unlock the VCR.
• Safety devices are operating. Press the RESET button on the rear panel using a ballpoint pen
or pencil. Turn power on again.
52 Pelco Manual C671M (1/01)
Page 53

SYMPTOM REMEDY
No picture on the monitor.
Picture on the monitor is not
clear.
No operation when any tape
operation button is pressed.
The time is wrong even though
the VCR is used every day.
The power cord was
disconnected for less than 31
days but the time has been
reset.
A tape cannot be loaded.
Recording does not work by
pressing REC.
Cannot stop recording by
pressing STOP.
Repeat recording does not
work.
Timer recording does not
work.
Alarm recording does not
work.
No operation when PLAY is
pressed.
Noise bars appear in the
picture during playback.
Playback speed is fast or slow.
The picture vibrates at the top
and bottom when in still
picture mode.
• Are the monitor and camera connected properly?
• Is the video cable connected properly? Is the cable defective? Check the connection and for a
snapped wire in the cable.
Is the camera focused? Refer to your camera’s user manual and focus the camera correctly.
FUNCTION/OPERATION PROBLEMS
• Is the lock or lock all indicator lit? Press the LOCK button several times to unlock the VCR.
• Is a cassette inserted?
Make sure the VCR has AC power supplied continuously for at least 40 hours per week.
• Make sure the VCR has AC power supplied continuously for at least 40 hours per week.
• Contents stored in memory may be erased before the 31 days depending on the charge time of
the power failure compensation circuit. Set the present time again.
Is the lock all indicator lit? Press the LOCK button once to unlock the VCR.
RECORDING PROBLEMS
• Is the lock all indicator lit? Press the LOCK button once to unlock the VCR.
• Is the cassette’s erasure prevention tab broken off? Load a cassette with an erasure prevention tab.
• Has the tape run out? Rewind or load a new cassette.
• Is the lock or lock all indicator lit? Press the LOCK button several times to unlock the VCR.
• Is the timer recording indicator lit? Press the TIMER REC button on the front panel to cancel
timer recording.
• Is the repeat indicator lit? Set TAPE END in the First Time Set Up menu to REPEAT or
ALARM•PROT.
• If TAPE END is set ALARM•PROT (alarm protection), repeat recording will not work if there is an
alarm recording on the tape.
• When a tape reaches its end during alarm recording, the VCR rewinds the tape and stops
(recording does not start again) even though TAPE END is set to REPEAT.
• Are the day and time set correctly? Set them again if not.
• Are the recording start and end times and the recording mode set correctly? Confirm the settings
in PROGRAM TO RECORD.
• Is the timer recording indicator lit? If not, press the TIMER REC button on the front panel.
• Is the external switch connected correctly? Check the connection.
• Is the emergency recording indicator lit? Set EMERGENCY REC in the Recording Set Up menu ON.
PLAYBACK PROBLEMS
• Is the lock or lock all indicator lit? Press the LOCK button several times to unlock the VCR.
• Is a cassette inserted?
• Has the tape run out?
Adjust tracking by pressing the TRACKING buttons on the front panel.
Adjust playback speed by pressing the REC/PLAY MODE buttons on the front panel.
Adjust the picture by pressing the VERTICAL ADJUST buttons on the front panel.
Camera pictures are clear
during recording but unclear
during playback.
The video heads may be clogged with oxide deposits. Clean them using a video head cleaning
cassette available in most local retail stores. Consult your dealer if this fails to solve the problem.
Pelco Manual C671M (1/01) 53
Page 54

SPECIFICATIONS
ELECTRICAL
Power Source: 100-230 VAC, 50/60 Hz (the included power cord is used for
Power Consumption: Approximately 18 watts
Rating
ALM/CALL/MODE: Active: “low” level, maximum current 50 mA (+5 VDC)/10 mA
ALM/RST/REC: Active: when terminals are short-circuited or “low” level
CLK: Recording: a pulse of the frequency division ratio selected in
VIDEO AND AUDIO
Tape Format: VHS, 1/2-inch width high-density video cassette tape
Television System: 525 lines, 60 field, NTSC-type color system
Video Recording System: 4 rotary heads
Luminance Signal: Frequency modulation recording
Color Signal: Low frequency conversion, sub-carrier phase shift recording
Audio Track: 1 track
120 VAC, 60 Hz)
(+24 VDC)
Non-active: open, maximum voltage +24 VDC
voltage is applied
Non-active: open
Rear Terminal menu
Tape Speed and
Recording Time: Refer to Table I
Fast Forward/Rewind Time: Approximately 160 seconds with T-160 tape
Horizontal Resolution: More than 330 lines (black and white)
Audio Frequency
Response: 70 Hz - 4 kHz (8H mode)
Signal-to-Noise Ratio: Video: better than 42 dB
Input: Video: 1.0 Vp-p, 75 ohms, BNC plug
Output: Video: 1.0 Vp-p, 75 ohms, BNC plug
Battery Backup: Lasts 31 days
More than 240 lines (color)
Audio: better than 43 dB
Audio: 308 mV (rms), 50 ohms, RCA plug
Audio: 388 mV (rms), 1 ohm, RCA plug
54 Pelco Manual C671M (1/01)
Page 55

MECHANICAL
Heads
Video: 4 rotary heads
Audio/Control: 1 stationary head
Erase: 1 full-track head
Motors: 3 direct drive (drum, capstan)
Connectors
ALM Input: Screw terminal for starting alarm recording
RST Input: Screw terminal for finishing alarm recording or for adjusting
REC Input: Screw terminal for starting/finishing recording or for series
GND: Screw terminal for ground
ALM Output: Screw terminal for output while alarm recording is underway
CLK Output: Screw terminal to command camera switching
MODE Output: Screw terminal for indicating the VCR’s selected mode
CALL Output: Screw terminal for external warning device or for series recording
GENERAL
Operating Temperature: 41° to 104°F (5° to 40°C)
Relative Humidity: Maximum 80%
Dimensions
(JOG dial Included): 16.7 (W) x 12.3 (D) x 3.7 (H) inches (42.5 x 31.3 x 9.5 cm)
Weight: 9 lb (4.2 kg)
on-screen clock
recording
Weight and dimensions shown are approximate.
(Design and product specifications subject to change without notice.)
Table I. Tape Speed and Recording Time (T-160 Cassette)
Mode Record Speed Recording Recording Video Audio Tape
8H (EP) 811.12 0.0167 60 Continuous Recordable Continuous
L24H (EP) 24 3.71 0.050 20 Time-lapse Recordable Continuous (slow)
L40H (EP) 40 2.22 0.083 12 Time-lapse Recordable Continuous (slow)
Time (mm/s) Interval Fields Signal Signal Drive
(hours) (s/field) (per second)
Pelco Manual C671M (1/01) 55
Page 56

INDEX
A
Adjusting the picture 48
Alarm list 43
Alarm receiver connection 40
Alarm recording 40
Alarm recording connection 15
Alarm recording duration 27
Alarm recording mode 27
Alarm recording search 49
Alarm start times 43
All menu initialize (reset) 43
Audio playback 45
Audio recording 35
B
Background color 25
Blue back 25
Buzzer 30
C
Call out setting 28
Check 52
Check recording 35
Clock adjustment 22
Clock out setting 29
CLog 52
Clog detection 27
Connecting for remote recording 15
Connecting for series recording 15
Connecting for typical setup 13
Connecting VCR to multiplexer 14
Counter memory 51
Counter memory stop 48
Counter reset 51
D
Date adjust setting 30
Date search 50
Date size display 25
Day (setting) 32
Day and time display modes 31
Daylight savings 32
Direct SHUTTLE ring operation 47
Display menu 25
Display mode 25
Display modes 1 and 2 31
DW (day of the week recording) 26
E
Elapsed time display 44
Emergency recording 41
Emergency recording mode 27
End 52
End recording times 26
Erasure prevention tab 33, 34
F
Features 10
First time set up menu 30
Flashing indicator 39
Fluorescent display 18
Frame-by-frame playback 46
Front panel controls 16
H
Holiday recording 26
Holiday recording set up 39
HR (recording mode) 26
I
Index search 49
Installation 13
Installation cautions 12
J
JOG dial operation 22
L
Language selection menu 23
Loading/unloading tape cassettes 33
Lock all buttons 33
M
Main menu 25
MAN1/MAN2 41
Memory backup 51
Menu tree 24
Mode out setting 29
Monitor tips 12
N
No signal 52
NoSIg 52
O
Overlapping programs 39
P
Phone numbers for factory 9
Picture adjustment 47
Playback procedure 44
Power loss list 42
Program number 26
Program overlap 39
Programming alarm recording 41
Q
Quasi v-sync 30
Quick guide to menu structure 24
56 Pelco Manual C671M (1/01)
Page 57

R
Rear panel connections 20
Rear terminal menu 28
Rec In setting 29
Recording
alarm programming 41
alarms 40
audio 35
by timer 38
check 35
emergency 41
for holidays 39
in series 36
input terminal setting 29
manually 34
mode (HR) 26
mode and times 35
remote 37
special day of week settings 39
Remote recording 37
Repeat recording 36
Repeat recording times display 44
Reset all menus 43
Reset the counter 51
S
Search techniques
counter memory 48
index 49
skip 49
time date 50
Self-diagnostic function 52
Series recording 36
Set day and time 32
SHUTTLE ring operation 22, 46
Skip search 49
Special DW (day of week) recording 39
Special effects playback 46
Start recording times 26
Still picture 46
T
Tape cassette loading/unloading/protecting 33
Tape counter 51
Tape end 52
Tape end setting 30
Tape length 30
Tape replacement 34, 36
Tape uses (number of) 44
Testing the system 51
Time (setting) 32
Time date adjust setting 30
Time display modes 31
Time program menu 26
Time search 50
Time/date size display 25
Timer recording 38
Tracking adjustment 47
Troubleshooting 52
V
VCR controls (securing) 12
Vertical adjustment 48
Vibration control 48
Video mode 30
W
Warning display 52
Pelco Manual C671M (1/01) 57
Page 58

REGULATORY NOTICES
This equipment has been tested and found to comply with the limits for a Class B digital
device, pursuant to Part 15 of the FCC Rules. These limits are designed to provide
reasonable protection against harmful interference in a residential installation. This
equipment generates, uses, and can radiate radio frequency energy and, if not installed
and used in accordance with the instructions, may cause harmful interference to radio
communications. However, there is no guarantee that interference will not occur in a
particular installation. If this equipment does cause harmful interference to radio or
television reception, which can be determined by turning the equipment off and on, the user
is encouraged to try to correct the interference by one or more of the following measures:
- Reorient or relocate the receiving antenna.
- Increase the separation between the equipment and receiver.
- Connect the equipment into an outlet on a circuit different from that to which the
receiver is connected.
- Consult the dealer or an experienced radio/TV technician for help.
Changes or modifications not expressly approved by the party responsible for compliance
could void the user’s authority to operate the equipment.
INFORMATION
This Class B digital apparatus meets all requirements of the Canadian InterferenceCausing Equipment Regulations.
INFORMATION
Cet appareil numérique de la classe B respecte toutes les exigences du Réglement sur le
matériel brouilleur du Canada.
REVISION HISTORY
Manual # Date Comments
C671M 1/01 Original version.
PRODUCT WARRANTY AND RETURN INFORMATION
WARRANTY
Pelco will repair or replace, without charge, any merchandise proved defective in material or
workmanship for a period of one year after the date of shipment.
Exceptions to this warranty are as noted below:
• Five years on FT/FR8000 Series fiber optic products.
• Three years on Genex
• Three years on Camclosure
CC3701H-2X, CC3751H-2, CC3651H-2X, MC3651H-2, and MC3651H-2X camera models,
which have a five-year warranty.
•Two years on standard motorized or fixed focal length lenses.
•Two years on Legacy
fixed dome products.
•Two years on Spectra
continuous motion applications.
•Two years on Esprit
• Eighteen months on DX Series digital video recorders, NVR300 Series network video
recorders, and Endura
• One year (except video heads) on video cassette recorders (VCRs). Video heads will be
covered for a period of six months.
• Six months on all pan and tilts, scanners or preset lenses used in continuous motion
applications (that is, preset scan, tour and auto scan modes).
Pelco will warrant all replacement parts and repairs for 90 days from the date of Pelco
shipment. All goods requiring warranty repair shall be sent freight prepaid to Pelco, Clovis,
California. Repairs made necessary by reason of misuse, alteration, normal wear, or accident
are not covered under this warranty.
Pelco assumes no risk and shall be subject to no liability for damages or loss resulting from
the specific use or application made of the Products. Pelco’s liability for any claim, whether
based on breach of contract, negligence, infringement of any rights of any party or product
liability, relating to the Products shall not exceed the price paid by the Dealer to Pelco for
such Products. In no event will Pelco be liable for any special, incidental or consequential
damages (including loss of use, loss of profit and claims of third parties) however caused,
whether by the negligence of Pelco or otherwise.
The above warranty provides the Dealer with specific legal rights. The Dealer may also have
additional rights, which are subject to variation from state to state.
®
Series products (multiplexers, server, and keyboard).
®
and fixed camera models, except the CC3701H-2,
®
, CM6700/CM6800/CM9700 Series matrix, and DF5/DF8 Series
®
, Esprit®, ExSite™, and PS20 scanners, including when used in
®
and WW5700 Series window wiper (excluding wiper blades).
™
Series distributed network-based video products.
If a warranty repair is required, the Dealer must contact Pelco at (800) 289-9100 or
(559) 292-1981 to obtain a Repair Authorization number (RA), and provide the following
information:
1. Model and serial number
2. Date of shipment, P.O. number, Sales Order number, or Pelco invoice number
3. Details of the defect or problem
If there is a dispute regarding the warranty of a product which does not fall under the
warranty conditions stated above, please include a written explanation with the product
when returned.
Method of return shipment shall be the same or equal to the method by which the item was
received by Pelco.
RETURNS
In order to expedite parts returned to the factory for repair or credit, please call the factory at
(800) 289-9100 or (559) 292-1981 to obtain an authorization number (CA number if returned
for credit, and RA number if returned for repair).
All merchandise returned for credit may be subject to a 20% restocking and refurbishing
charge.
Goods returned for repair or credit should be clearly identified with the assigned CA or RA
number and freight should be prepaid. Ship to the appropriate address below.
If you are located within the continental U.S., Alaska, Hawaii or Puerto Rico, send goods to:
Service Department
Pelco
3500 Pelco Way
Clovis, CA 93612-5699
If you are located outside the continental U.S., Alaska, Hawaii or Puerto Rico and are
instructed to return goods to the USA, you may do one of the following:
If the goods are to be sent by a COURIER SERVICE, send the goods to:
Pelco
3500 Pelco Way
Clovis, CA 93612-5699 USA
If the goods are to be sent by a FREIGHT FORWARDER, send the goods to:
Pelco c/o Expeditors
473 Eccles Avenue
South San Francisco, CA 94080 USA
Phone: 650-737-1700
Fax: 650-737-0933
® Pelco, the Pelco logo, Spectra, Genex, Legacy, and PelcoVision are registered trademarks of Pelco. © Copyright 2001, Pelco.
™ Esprit and Camclosure are trademarks of Pelco. All rights reserved.
58 Pelco Manual C671M (1/01)
 Loading...