

Page 1
QUICK START
DX4500/DX4600 Series Digital Video Recorder
Server Operation
C2699M-A (1/08)
Page 2

2 C2699M-A (1/08)
Page 3

Welcome
Thank you for purchasing Pelco’s DX4500/DX4600 Series digital video recorder (DVR). This guide is designed to assist you in getting immediate
results from the DX4500/DX4600.
About This Guide
This guide provides basic instructions on how to perform the following procedures:
• Turn on and log on to the DX4500/DX4600 DVR.
• Configure the date and time.
• View live video.
• Start instant recording and playback.
• Export video.
• Set up a daily recording schedule.
For more information about the DX4500/DX4600 Series DVR, refer to the following publications:
• DX4500/DX4600 Installation manual: Describes how to install the DVR.
• DX4500/DX4600 Operation and Programming: Describes how to use the front panel, remote control, or graphical user interface (GUI),
and how to operate and configure the DVR.
• DX4500/DX4600 Client Applications Operation and Programming: Describes how to install the Client applications (Client,
Emergency Agent, and Export Viewer) and how to use the Client GUI to operate and configure the DVR.
C2699M-A (1/08) 3
Page 4
Turning On and Logging On to the DVR
POWERING ON LOGGING ON
You must log on to the DX4500/DX4600 with a valid user name (ID) and password to operate the DVR. By default, the DX4500/DX4600 comes
with one login account: the user name is ADMINISTRATOR and the default password is 000000.
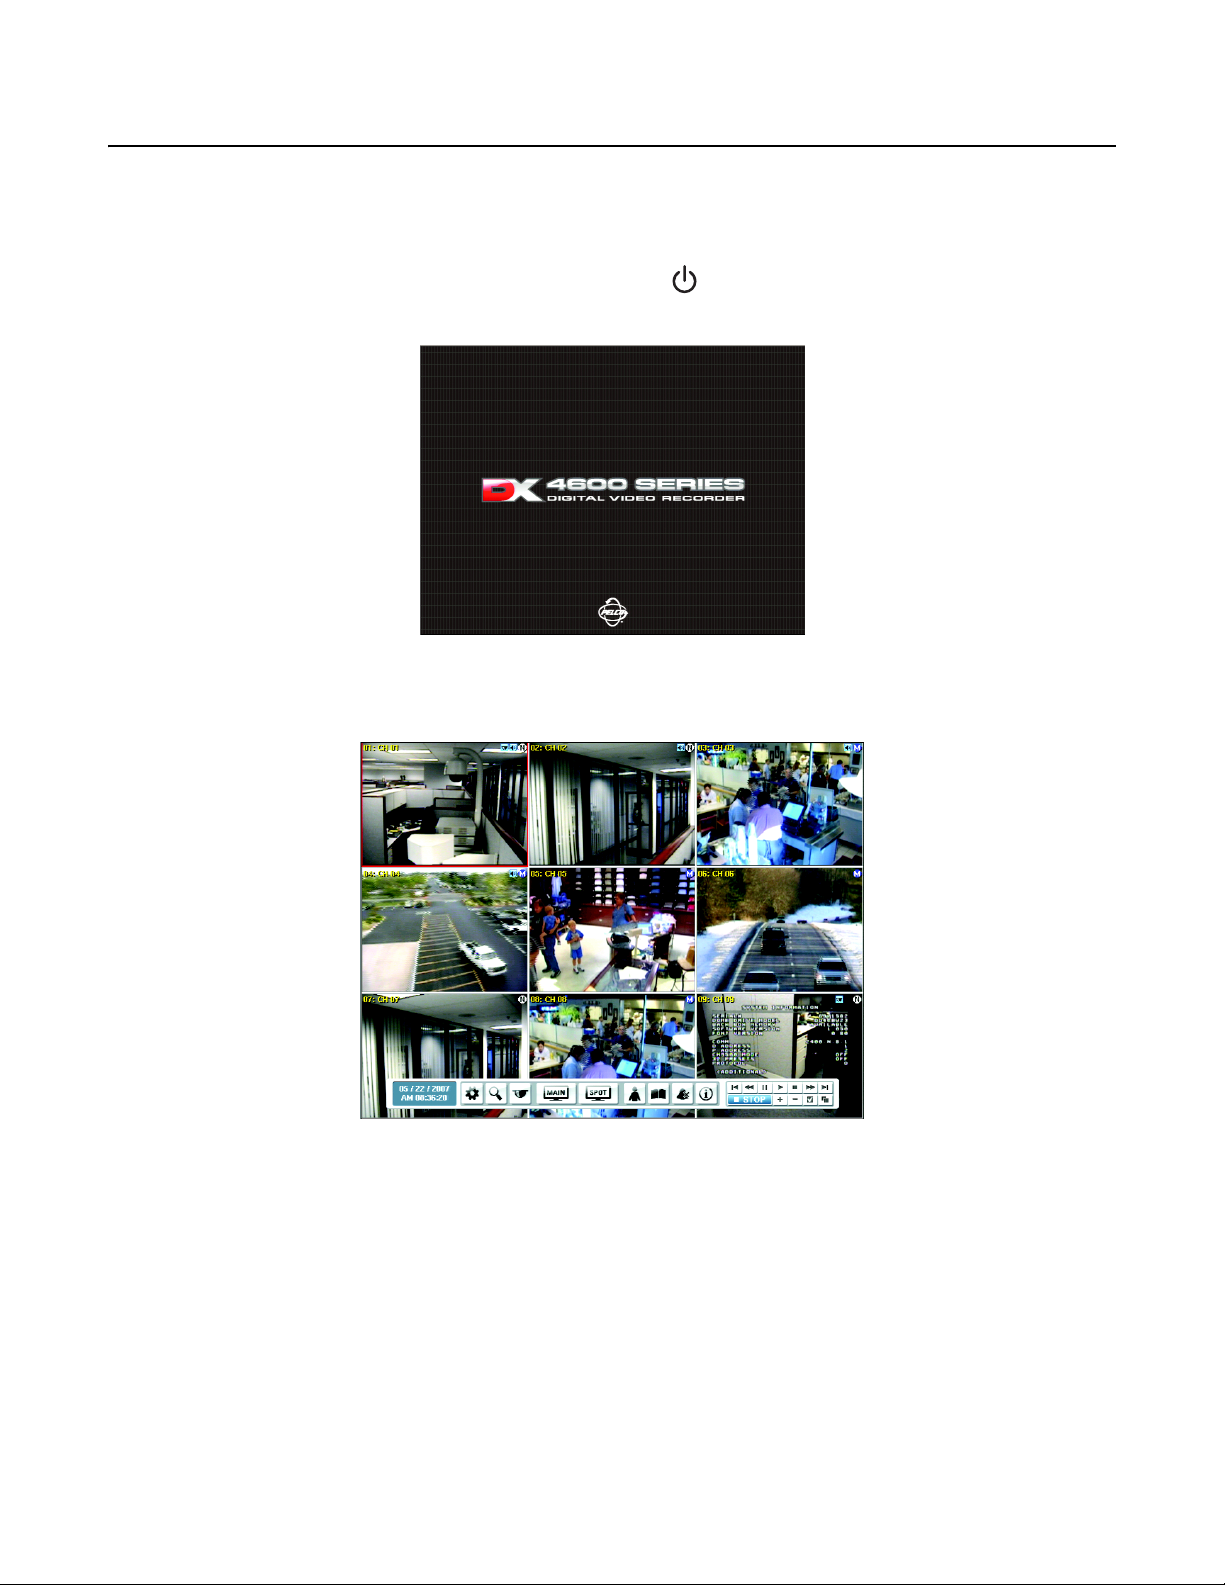
1. On the front panel or remote control, press and hold the power button until your hear a beep, and then release the button. After a few
seconds, the DX4500/DX4600 startup screen is displayed.
Figure 1. DX4500/DX4600 Startup Screen
2. Wait until the DVR displays the application window.
Figure 2. Application Window and GUI Toolbar
4 C2699M-A (1/08)
Page 5
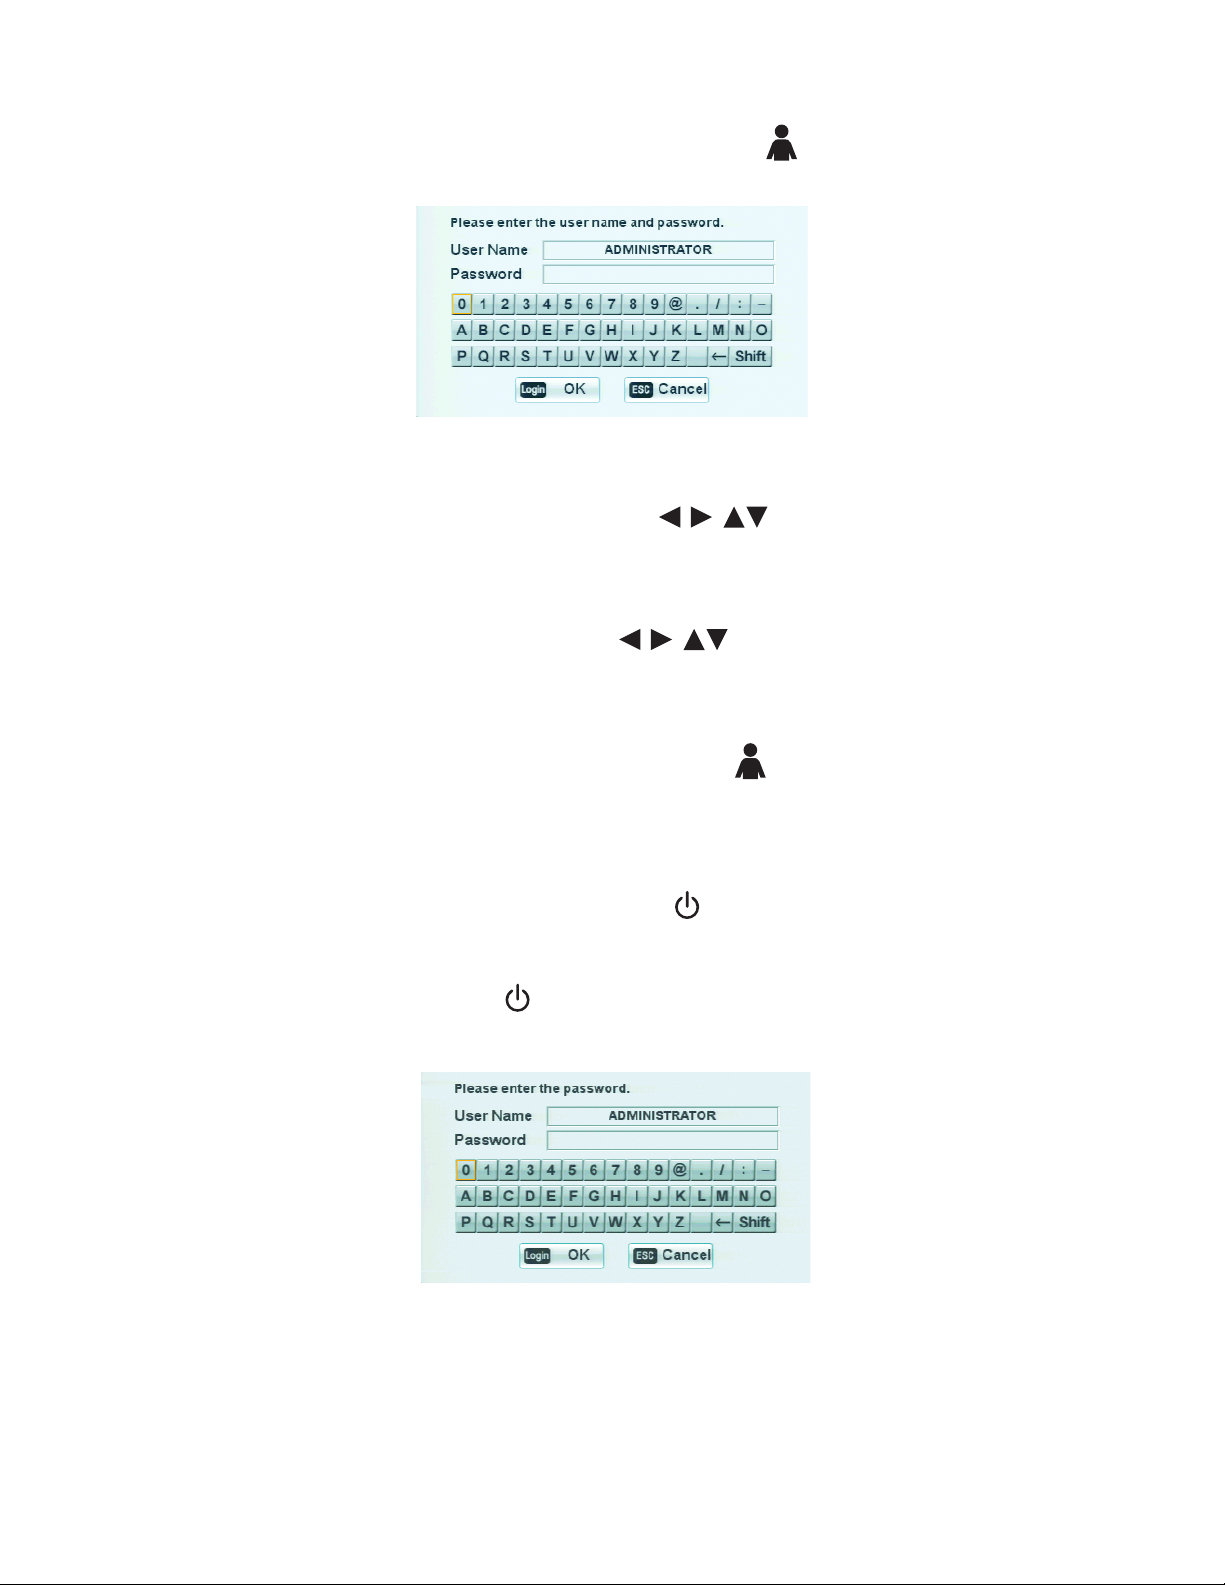
3. On the front panel or remote control, press Login. On the toolbar, click the login icon with the mouse. The Login dialog box opens.
Use the virtual keyboard to enter the password.
Figure 3. Virtual Keyboard Login
4. To enter the default password, do one of the following:
• On the front panel or remote control, press the arrow buttons to select 0 (zero) from the virtual keyboard, and then
press ENTER six times.
• With the mouse, click 0 (zero) six times.
Six asterisks are displayed in the Password entry box.
5. On the front panel or remote control, press the arrow buttons to select OK, and then press ENTER. On the toolbar, click
Login with the mouse. The Login icon turns blue, indicating you have successfully logged on to the DVR.
LOGGING OFF
On the front panel or remote control, press LOGIN. On the toolbar, click the Login icon with the mouse. The Login icon changes from blue to
black, indicating you are logged off.
TURNING OFF THE DVR
You must be logged on to the DVR with administrator level permission to turn off the DX4500/DX4600.
1. On the front panel or remote control, press and hold the power switch until you hear a beep.
• If you are not logged on with administrator level permission, do the following:
(1) Log on at the administrator level.
(2) Press and hold the power switch until you hear a beep.
The Login dialog box opens. You have approximately 20 seconds to enter the password before, the dialog box closes.
Figure 4. Login Dialog Box
C2699M-A (1/08) 5
Page 6

2. To enter the password, do one of the following:
• On the front panel or remote control, press the arrow buttons to select the password character on the virtual
keyboard, and then press ENTER. Repeat this process until you have entered every character of the password.
• Using the mouse, click each password character on the virtual keyboard.
Asterisks representing each password character are displayed in the Password field.
3. On the front panel or remote control, press the arrow buttons to select Login, and then press ENTER. On the toolbar, click
Login with the mouse. The system turns off.
6 C2699M-A (1/08)
Page 7
Configuring the Date and Time
1. On the front panel, press the MENU/ESC button or on the remote control, press the MENU/ESC button . Using the mouse, click the
Setup icon . By default, the Setup window opens and the Camera menu is selected.
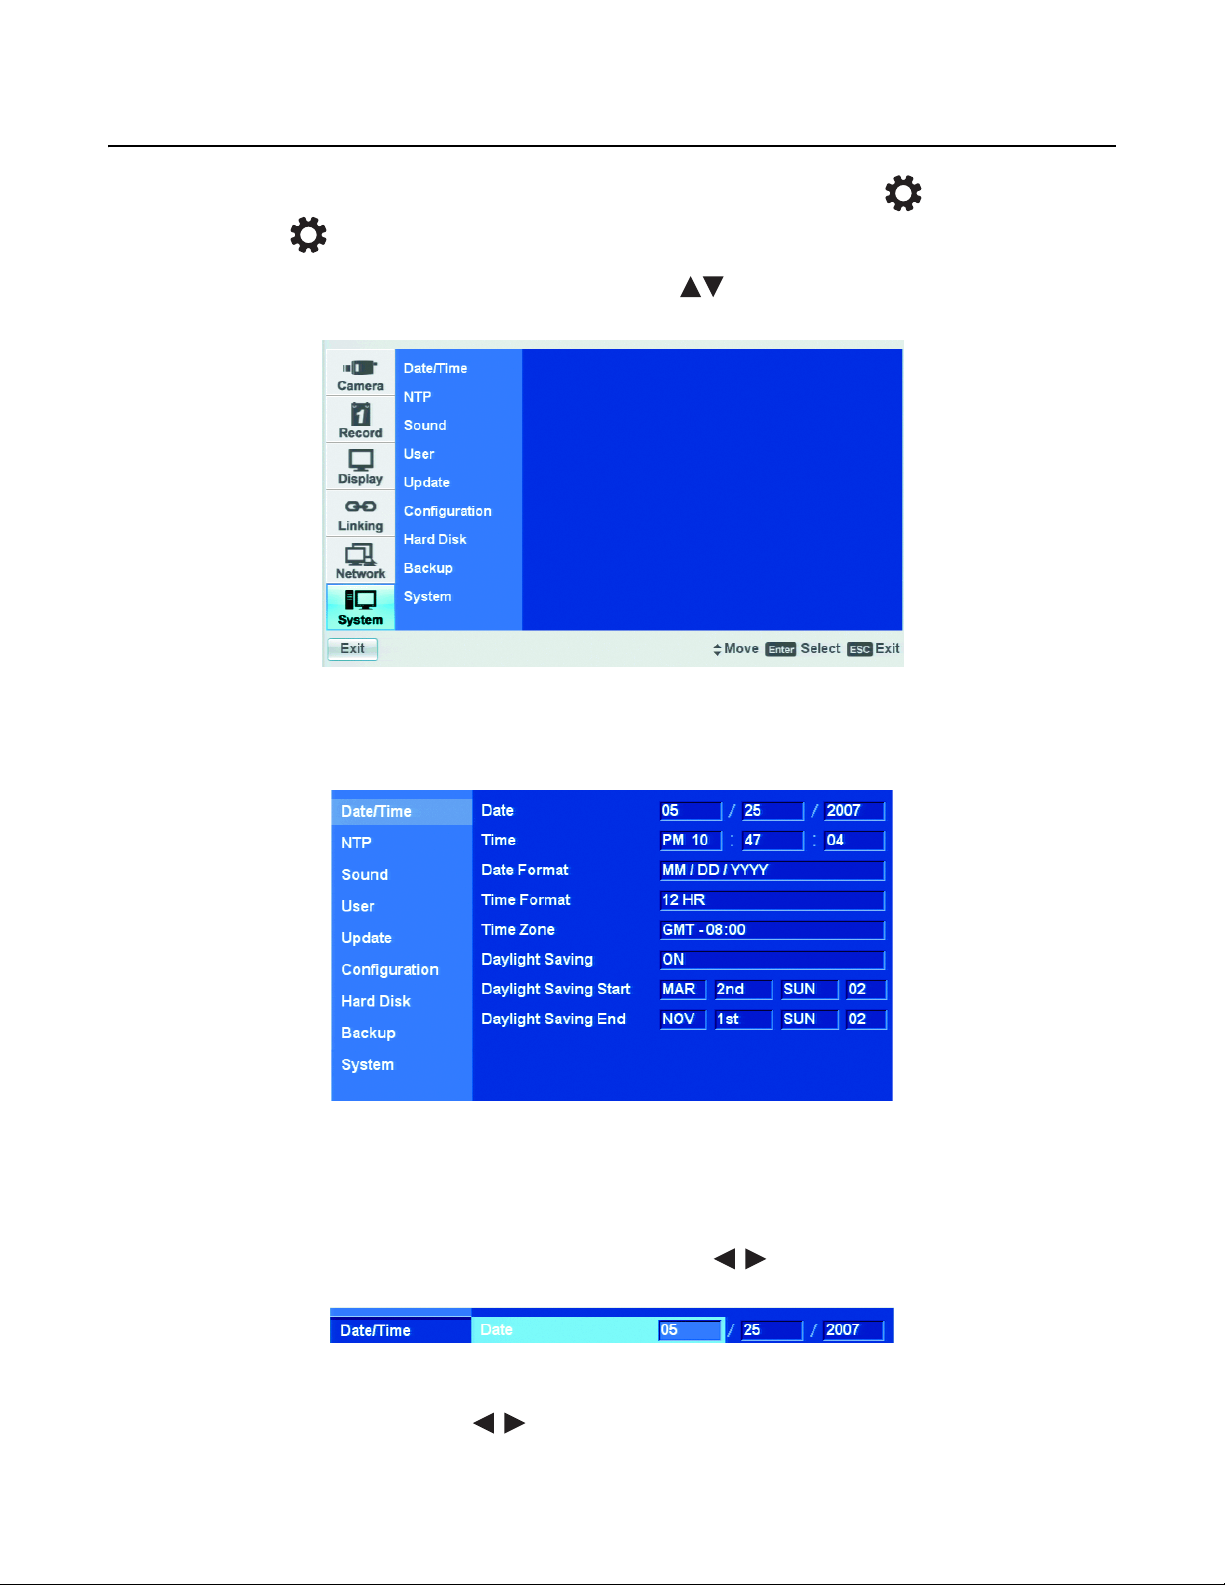
2. On the front panel or remote control, press the up/down arrow buttons to select the System menu. Using the mouse, click System.
The System page opens, listing the available options.
Figure 5. System Page
3. On the front panel or remote control, press ENTER. Using the mouse, click the Date/Time option. The date and time settings are displayed;
by default the date format is MM/DD/YYYY.
Figure 6. Date and Time Settings
4. Select the date.
a. On the front panel or remote control, press ENTER twice. Using the mouse, click the month settings box. The month settings box
changes color.
b. On the front panel or remote control, press the left/right arrow buttons to display the desired month, and then press ENTER.
Using the mouse, click the settings box.
Figure 7. Date Setting Entry Box
c. Press the left/right arrow buttons to highlight the day settings box and press ENTER. Using the mouse, click the day settings
box. The day settings box changes color.
C2699M-A (1/08) 7
Page 8

d. On the front panel or remote control, press the left/right arrow buttons to display the desired date, and then press ENTER.
Using the mouse, click the settings box.
e. Press the left/right arrow buttons to highlight the year settings box press ENTER. Using the mouse, click the year settings
box. The year settings box changes color.
f. On the front panel or remote control, press the left/right arrow buttons to display the year, and then press ENTER. Using the
mouse, click the settings box.
5. Select the time.
a. On the front panel or remote control, press the up/down arrow buttons to highlight the Time property, and then press ENTER.
Using the mouse, click the hour settings box. The settings box changes color.
b. On the front panel or remote control, press the left/right arrow buttons to display the desired hour, and then press ENTER.
Using the mouse, click the settings box.
c. Press the left/right arrow buttons to highlight the minutes settings box and press ENTER. Using the mouse, click the minutes
settings box. The minutes settings box changes color.
d. On the front panel or remote control, press the left/right arrow buttons to display the desired minute, and then press ENTER.
Using the mouse, click the settings box.
e. Press the left/right arrow buttons to highlight the seconds settings box and press ENTER. Using the mouse, click the seconds
settings box. The seconds settings box changes color.
f. On the front panel or remote control, press the left/right arrow buttons to display the desired second, and then press ENTER.
Using the mouse, click the settings box.
6. Set the date format.
a. On the front panel or remote control, press the up/down arrow buttons to highlight the Date Format property, and then press
ENTER. Using the mouse, click the Date Format settings box. The settings box changes color.
b. On the front panel or remote control, press the left/right arrow buttons to display the date format, and then press ENTER.
Using the mouse, click the settings box.
7. Set the time format.
a. On the front panel or remote control, press the up/down arrow buttons to highlight Time Format, and then press ENTER. Using
the mouse, click the Time Format settings box. The settings box changes color.
b. On the front panel or remote control, press the left/right arrow buttons to display the time format, and then press ENTER.
Using the mouse, click the settings box.
8. Set the time zone.
a. On the front panel or remote control, press the up/down arrow buttons to highlight Time Zone and then press ENTER. Using
the mouse, click the Time Zone settings box. The settings box changes color.
b. On the front panel or remote control, press the left/right arrow buttons to display the time zone, and then press ENTER.
Using the mouse, click the settings box.
9. If you want to configure daylight saving time (DST), proceed with the following steps. If you do not want to configure DST, go to step 5 of
Configuring Daylight Saving.
8 C2699M-A (1/08)
Page 9

CONFIGURING DAYLIGHT SAVING
The DVR has the following conditions when the DST feature is used:
• Daylight Saving OFF: By default, the Daylight Saving feature is set to OFF. In this case, there is no change in the system time stamp for
recorded data throughout the year. The effective date is set using the Date, Time, Date Format, and Time Zone options.
• Daylight Saving OFF, but later is set to ON: For example, the DVR is installed in a location where DST is already in observance and the DVR’s
time is set to the local time. Sometime in the future, the Daylight Savings option is set to ON. In this case, there is no change in the system
time stamp for recorded data. When the Daylight Saving End date and time occur, the unit’s adjusts backward one hour.
Example: Based on Pacific time zone (GMT-8)
November, 1st SundayMarch, 2nd Sunday
DST (Daylight Saving Time) ON
Fall Season = DST PFF
1:59 am 1:59 am
3:00 am
Figure 8. DST Time Shift
1. On the front panel or remote control, press the up/down arrow buttons to highlight Daylight Saving, and then press ENTER. Using
the mouse, click the Daylight Saving settings box. The settings changes color.
1:00 am
Figure 9. Daylight Saving Settings
2. On the front panel or remote control, press the left/right arrow buttons to change the setting to ON, and then press ENTER. Using
the mouse, click the settings box.
3. To select the Daylight Saving Start date.
a. Press the up/down arrow buttons to highlight Daylight Saving Start, and then press ENTER. Using the mouse, click the
Daylight Saving Start settings box. The day settings box changes color.
b. On the front panel or remote control press the left/right arrow buttons to display the desired month, and then press ENTER.
Using the mouse, click the settings box.
c. Press the left/right arrow buttons to highlight the week settings box, and then press ENTER. Using the mouse, click the
settings box. The settings box changes color.
d. On the front panel or remote control, press the left/right arrow buttons to display the desired week, and then press ENTER.
Using the mouse, click the settings box.
C2699M-A (1/08) 9
Page 10

e. Press the left/right arrow buttons to highlight the day settings box, and then press ENTER. Using the mouse, click the day
settings box. The settings box changes color.
f. On the front panel or remote control, press the left/right arrow buttons to display the desired name of the day, and then
press ENTER. Using the mouse, click the settings box.
g. Press the left/right arrow buttons to highlight the hour of the day settings box, and then press ENTER. Using the mouse, click
the day settings box. The settings box changes color.
h. On the front panel or remote control, press the left/right arrow buttons to display the desired hour of the day, and then press
ENTER. Using the mouse, click the settings box.
4. To select the Daylight Saving End date.
a. Press the up/down arrow buttons to highlight Daylight Saving End, and then press ENTER. Using the mouse, click the daylight
saving end settings box. The day settings box changes color.
b. On the front panel or remote control, press the left/right arrow buttons to display the desired month, and then press ENTER.
Using the mouse, click the settings box.
c. Press the left/right arrow buttons to highlight the week settings box, and then press ENTER. Using the mouse, click the
settings box. The settings box changes color.
d. On the front panel or remote control, press the left/right arrow buttons to display the desired week, and then press ENTER.
Using the mouse, click the settings box.
e. Press the left/right arrow buttons to highlight the day settings box, and then press ENTER. Using the mouse, click the day
settings box. The settings box changes color.
f. On the front panel or remote control, press the left/right arrow buttons to display the desired name of the day, and then
press ENTER. Using the mouse, click the settings box.
g. Press the left/right arrow buttons to highlight the hour of the day settings box, and then press ENTER. Using the mouse, click
the day settings box. The settings box changes color.
h. On the front panel or remote control, press the left/right arrow buttons to display the desired hour of the day, and then press
ENTER. Using the mouse, click the settings box.
i. Press ENTER on the front panel or remote control. If using the mouse, click Daylight Saving End. The settings box changes color.
5. To save the changes.
a. Do one of the following:
• On the front panel, press the MENU/ESC button or on the remote control press the MENU/ESC button until the
“Configuration data is changed. Save the new settings message?” dialog box is displayed.
• Using the mouse, click Exit. The “Configuration data is changed. Save the new settings?” dialog box is displayed.
b. On the front panel or remote control, press the left/right arrow buttons to highlight OK, and then press ENTER. Using the
mouse, click OK. The changes are saved and the live view mode is displayed.
10 C2699M-A (1/08)
Page 11

Viewing Live Video
As soon as the DX4500/DX4600 DVR is turned on, it begins displaying live video. By default, the recording mode for all channels is configured for
alarm and motion recording. Figure 10 shows an example of the DX4500/DX4600 displaying live video for channel 01 and channel 09, while
immediately recording motion video on the other channels.
Figure 10. Example of Initial Live Video Display
To navigate the application window:
1. To select a view pane: on the front panel or remote control, press the arrow buttons to select a camera pane. Using the
mouse, click a camera pane. A red border highlights the selected pane.
2. To select a toolbar button: on the front panel or remote control, press the button representing the action you want to perform. Using the
mouse, click a button.
WORKING WITH THE MONITORS
MAIN MONITOR
1. On the front panel and remote control, press the MAIN button or on the toolbar, click the MAIN icon on the toolbar. The Select
Starting Channel dialog box opens.
2. To select a display format, click a division button. The application window reorganizes the display format to the new setting.
3. On the front panel and remote control, press ENTER. Using the mouse, click OK. The setting is accepted.
C2699M-A (1/08) 11
Page 12

4. To display a channel in full-screen mode, double-click the desired channel.
Figure 11. Main Monitor Dialog Box
Main
ESC
1
OK
Cancel
Channel: Selects the main channel, which is displayed in the upper left pane.
The remaining channels are sequentially numbered starting from the main channel.
Division: Selects the number of channels that are displayed in the application
window. The DX4500/DX4600 displays video in the live view mode in full, 4, 9, 16,
1+5, and 1+7 division format on the main monitor.
Sequence: Displays each channel in sequence.
Accept: Accepts the change.
Cancel: Cancels the change.
12 C2699M-A (1/08)
Page 13

SPOT MONITOR
1. On the front panel and remote control, press the SPOT button , or on the toolbar, click the SPOT button on the toolbar. The spot
monitor Select Starting Channel dialog box opens.
2. To select a display format, click a division button. The application window reorganizes the display format to the new setting.
3. On the front panel and remote control, press ENTER. Using the mouse, click OK. The setting is accepted.
4. To display a channel in full-screen mode, double-click the desired channel.
Figure 12. Spot Monitor Dialog Box
Main
ESC
1
OK
Cancel
Channel: Selects the main channel, which is displayed in the upper left pane.
The remaining channels are sequentially numbered starting from the main channel.
Division: Selects the number of channels that are displayed in the application
window. The DX4500/DX4600 displays video in full or quad division format on the
spot monitor.
Sequence: Displays each channel in sequence.
Accept: Accepts the change.
Cancel: Cancels the change.
C2699M-A (1/08) 13
Page 14

WORKING WITH PTZ
ACTIVATING PRESETS
1. On the front panel or remote control, press the arrow buttons to select a camera pane. Using the mouse, click a camera
pane. A red border highlights the selected pane.
2. Press PTZ on the front panel or the remote control. Using the mouse, click the PTZ button . The PTZ control is displayed.
Figure 13. PTZ Operation
3. On the front panel or remote control, press the preset number, and then press SHIFT + PRESET. Using the mouse, click the number pad on
the PTZ control, and then click PRESET. The camera moves to the preset location.
ACTIVATING PATTERNS
1. On the front panel or remote control, press the arrow buttons to select a camera pane. Using the mouse, click a camera
pane.
2. Press PTZ on the front panel or the remote control. Using the mouse, click the PTZ button . The PTZ control is displayed.
3. On the front panel or remote control, press the pattern number, and then press SHIFT + PATTERN. If using the mouse, click the number pad
on the PTZ control, and then click PATTERN. The pattern executes.
4. To halt the pattern, on the front panel or remote control, press the arrow buttons . Using the mouse, click the Move
function on the PTZ control .
14 C2699M-A (1/08)
Page 15

SENDING AUXILIARY COMMANDS TO A DEVICE
To send an Aux 1 command to operate the wiper on an Esprit positioning system:
1. On the front panel or remote control, press the arrow buttons to select a PTZ camera. Using the mouse, click the camera.
2. Press PTZ on the front panel or remote control. Using the mouse, click the PTZ button . The PTZ control is displayed.
3. To enter the PTZ programming mode.
• On the front panel, press SHIFT + SET.
• On the remote control, press SET.
• Using the mouse, click SET.
4. To send an AUX 1 command.
• On the front panel, press SHIFT + AUX, and then press 1.
• On the remote control, press AUX, and then press 1.
• Using the mouse, click AUX, and then click 1.
The wiper operates one cycle.
C2699M-A (1/08) 15
Page 16

Instant Recording and Playback
STARTING AND STOPPING INSTANT RECORDING
1. Do one of the following:
• DX4508/DX4608: On the front panel or remote control, press REC and the channel number. Using the mouse, click the camera’s
recording indicator .
• DX4516/DX4616: On the front panel, press REC and the channel number. On the remote control, press REC, the channel number, and
ENTER. Using the mouse, click the camera’s recording indicator .
The recording indicator immediately changes to the Instant Record indicator .
2. To stop instant record, do one of the following:
• DX4508/DX4608: On the front panel or remote control, press REC and the channel number. Using the mouse, click the Instant Record
indicator
• DX4516/DX4616: On the front panel, press REC and the channel number. On the remote control, press REC, the channel number, and
ENTER. Using the mouse, click the Instant Record indicator
The recording indicator immediately changes to the scheduled recording mode.
I
WORKING WITH INSTANT PLAYBACK
1. On the front panel or remote control, press the arrow buttons to select a camera pane. Using the mouse, click a camera
pane. A red border highlights the selected pane.
N
I
N
I
2. To initiate instant playback, on the front panel or remote control, press the play button . Using the mouse, click the button play .
The DVR displays playback video.
Figure 14. Playback Video
3. To view playback video and live video simultaneously, on the front panel or remote control, press the arrow buttons
to move the pane. Using the mouse, left-click and drag the pane.
The PIP pane relocates, and you can view playback and live video simultaneously.
4. To return to the live view mode, on the front panel or remote control, press STOP. If using the mouse, click the stop button .
16 C2699M-A (1/08)
Page 17

Figure 15. Viewing Playback and Live Video Simultaneously
Figure 16. Playback Control
Start: Starts playback for the selected date beginning at time when data is first
recorded.
Reverse: Reverse playback in one of the two modes:
• Reverse playback: Plays back recorded video in the reverse direction at the
normal speed. Click to increase playback speed by 2x, 3x, and 4x the normal speed.
• Step backward: Activated when playback is paused. Repeatedly click to reverse
playback frame-by-frame.
Pause: Pauses playback.
Play: Starts playing back video data.
Stop: Stops playback.
Forward: Forwards in one of two modes:
• Forward playback: Plays back recorded video in the forward direction at the
normal speed. Click to increase playback speed by 2x, 3x, and 4x the normal speed.
• Step backward: Activated when playback is paused. Repeatedly click to reverse
playback frame-by-frame.
End: Jumps to within two minutes of the latest recorded data.
Copy/Export: Displays the Copy/Export dialog box.
Mark: Inserts a bookmark at the specified time during played back video.
Reduce: Reduces the playback window.
Enlarge: Enlarges the playback window.
STOP
C2699M-A (1/08) 17
Stop: Stops playback.
Page 18

Exporting Video
When exporting data, the starting time must be a minimum of two minutes earlier than the current time.
1. Do one of the following:
• On the front panel, press SHIFT + COPY.
• On the remote control, press the Copy button .
• Using the mouse, click the Copy button .
The copy/export dialog box is displayed. The target device settings box is highlighted.
2. To define the export criteria.
a. On the front panel or remote control, press ENTER. Using the mouse, click the settings box. The settings box changes color.
b. Do one of the following:
• Press the arrow buttons on the front panel or the remote control to display the target device you want, and then press
ENTER.
• Using the mouse, right-click or left-click the settings box, and then click the channel 1 button.
Figure 17. Copy/Export Dialog Box
The target device settings box changes color.
c. Do one of the following:
• On the front panel or remote control, press the arrow buttons to highlight the channel number from which you
want to export video, and then press ENTER.
• Using the mouse, click the channel button.
The channel button changes color.
d. Repeat step c to select additional channels.
3. To select the start date and time.
a. On the front panel or remote control, press the up/down arrow buttons to select the month settings box, and then press
ENTER. Using the mouse, click the settings box. The settings box changes color.
b. Press the left/right arrow buttons on the front panel or the remote control to display the month you want, and then press
ENTER. Using the mouse, right-click or left-click the settings box. The settings box changes color.
c. Press the left/right arrow buttons on the front panel or remote control to move to the day of the month, and repeat step 3b to
select the day.
d. Repeat step 3c to select the year.
4. Repeat step 3 to set the end date and time.
5. Do one of the following:
• On the front panel, press SHIFT + COPY.
• On the remote control, press the Copy button .
• Using the mouse, click EXPORT.
If the export settings are correct, the system exports the data to the target device and then displays a message stating that the export
process is complete. If the settings are not correct, the system displays a message.
6. On the front panel or remote control, press ENTER. Using the mouse, click OK.
18 C2699M-A (1/08)
Page 19

Setting Up a Daily Recording Schedule
In the example below, you will set up a daily recording schedule for camera 02 for normal recording between 0800 and 1600. The remaining
cameras are set for the default Alarm+Motion recording.
1. On the front panel, press the MENU/ESC button or on the remote control, press the MENU/ESC button . Using the mouse, click the
Setup icon . By default, the Setup window opens and the Camera menu is selected.
2. On the front panel or remote control, press the up/down arrow buttons to highlight Record, and then press ENTER. Using the mouse,
click Record. The Record option is highlighted and the property settings are displayed.
3. On the front panel or remote control press ENTER, and then press the up/down arrow buttons to highlight a day of the week, for
example Monday. Using the mouse, click Monday. The Monday option is highlighted and the schedule is displayed.
Figure 18. Creating a Daily Schedule for Monday
4. To schedule channel 2 for normal recording between 0800 (8 a.m.) and 1600 (4:00 p.m.) and leave the default Alarm+Motion mode effective
from 1600 to 2400, do the following:
a. On the front panel or remote control, press ENTER. Using the mouse, click in the schedule grid. The first cell of channel 1 is
highlighted.
NOTE: The first cell of channel 1 is the default starting location for all channels.
Figure 19. Selecting Channel 1
b. On the front panel or remote control, press the arrow buttons to highlight the cell at 08 for channel 2, and then
press ENTER. Using the mouse, click the cell at 08 for channel 2. The starting time for channel 2 is marked at 08.
NOTE: Each time you select a cell in the schedule, the scheduling tool cycles through the recording modes beginning with No record.
Figure 20. Marking the Starting Time for Channel 2
c. Press ENTER or click the cell again. The marked cell for channel 2 at 08 turns green as well as the remaining cells in the row.
C2699M-A (1/08) 19
Page 20

Figure 21. Selecting Continuous Recording Mode for Channel 2
d. On the front panel or remote control, press the arrow buttons to move the cursor to the cell at 1600, and then press
ENTER. Using the mouse, click the cell until the cell turns yellow. The ending time for channel 2 is marked at 1600.
Figure 22. Marking Channel 2 Continuous Recording Ending Time at 1600
5. To save the continuos recording schedule for channel 2, you must exit from the Record mode back to live view.
a. Do one of the following:
• On the front panel, press the MENU/ESC button or on the remote control, press the MENU/ESC button until the
“Configuration data is changed. Save the new settings?” dialog box is displayed.
• Click Exit. The “Configuration data is changed. Save the new settings?” dialog box is displayed.
Figure 23. Saving the Recording Schedule for Channel 2
b. On the front panel or remote control, press the left/right arrow buttons to highlight OK, and then press ENTER. Using the
mouse, click OK. The settings are saved and the live view mode is displayed.
20 C2699M-A (1/08)
Page 21

Appendix
TIME ZONE CONVERSION CHART
To determine your time, add the standard, daylight saving, or summer time to the Universal Time (UT).
Table A. Time Zone Conversion Chart
Time Zone Standard Time
International Date Line East (IDLE) +12 hours
New Zealand Standard Time (NZST) +12 hours
New Zealand Time (NZT) +10 hours
Guam Standard Time (GST) +10 hours
Australian Eastern Standard Time (AEST) (AEDT) +10 hours +11 hours
Australian Central Standard Time (ACST) (ACDT) +9.5 hours +10.5 hours
Japan Standard Time (JST) +9 hours
China Coast Time (CCT) +8 hours
Australian Western Standard Time (AWST) +8 hours
India Standard Time (IST) +5.5 hours
Russian Zone 3 +4 hours
Baghdad Time (BT) +3 hours
Russian Zone 2 +3 hours
Moscow Time (MSK) (MSD) +3 hours +4 hours
Eastern European Time (EET) (EEST) +2 hours +3 hours
Russian Zone 1 +2 hours
Central Europe Summer Time (CEST) +2 hours
Central European Time (CET) +1 hour
Middle European Time (MET) +1 hour
Swedish Winter Time (SWT) 0 hours
Greenwich Mean Time (GMT) 0 hours
Universal Time (UT) 0 hours
Western European Time (WET) (WEST) 0 hours +1 hour
British Summer Time (BST) +1 hour
Irish Summer Time (IST) +1 hour
West African Time (WAT) -1 hour
Newfoundland Standard Time (NST) (NDT) -3.5 hours -2.5 hours
Atlantic Standard Time (AST) (ADT) -4 hours - 3 hours
Eastern Standard Time (EST) (EDT) -5 hours -4 hours
Central Standard Time (CST) (CDT) -6 hours -5 hours
Mountain Standard Time (MST) (MDT) - 7 hours -6 hours
Pacific Standard Time (PST) (PDT) -8 hours - 7 hours
Alaskan Standard Time (AKST) (AKDT) -9 hours -8 hours
Hawaiian Standard Time (HST) -10 hours
International Date Line West (IDLW) - 12 hours
Daylight Saving and
Summer Time
C2699M-A (1/08) 21
Page 22

22 C2699M-A (1/08)
Page 23

PRODUCT WARRANTY AND RETURN INFORMATION
WARRANTY
Pelco will repair or replace, without charge, any merchandise proved defective in
material or workmanship for a period of one year after the date of shipment.
Exceptions to this warranty are as noted below:
• Five years on fiber optic products and TW3000 Series unshielded twisted pair
(UTP) transmission products.
• Three years on Spectra
• Three years on Genex
• Three years on DX Series digital video recorders, DVR5100 Series digital video
recorders, DigitalSENTRY
recorders, NVR300 Series network video recorders, and Endura
distributed network-based video products.
• Three years on Camclosure
the CC3701H-2, CC3701H-2X, CC3751H-2, CC3651H-2X, MC3651H-2, and
MC3651H-2X camera models, which have a five-year warranty.
• Three years on PMCL200/300/400 Series LCD monitors.
• Two years on standard motorized or fixed focal length lenses.
• Two years on Legacy
Series fixed dome products.
• Two years on Spectra III
including when used in continuous motion applications.
• Two years on Esprit and WW5700 Series window wiper (excluding wiper
blades).
• Two years (except lamp and color wheel) on Digital Light Processing (DLP
displays. The lamp and color wheel will be covered for a period of 90 days. The
air filter is not covered under warranty.
• Two years on Intelli-M
• One year (except video heads) on video cassette recorders (VCRs). Video heads
will be covered for a period of six months.
• Six months on all pan and tilts, scanners, or preset lenses used in continuous
motion applications (preset scan, tour, and auto scan modes).
Pelco will warrant all replacement parts and repairs for 90 days from the date of
Pelco shipment. All goods requiring warranty repair shall be sent freight prepaid
to a Pelco designated location. Repairs made necessary by reason of misuse,
alteration, normal wear, or accident are not covered under this warranty.
®
IV products.
®
Series products (multiplexers, server, and keyboard).
®
Series hardware products, DVX Series digital video
®
and Pelco-branded fixed camera models, except
®
, CM6700/CM6800/CM9700 Series matrix, and DF5/DF8
™
, Spectra Mini, Esprit®, ExSite®, and PS20 scanners,
®
eIDC controllers.
®
Series
Pelco assumes no risk and shall be subject to no liability for damages or loss
resulting from the specific use or application made of the Products. Pelco’s liability
for any claim, whether based on breach of contract, negligence, infringement of
any rights of any party or product liability, relating to the Products shall not exceed
the price paid by the Dealer to Pelco for such Products. In no event will Pelco be
liable for any special, incidental, or consequential damages (including loss of use,
loss of profit, and claims of third parties) however caused, whether by the
negligence of Pelco or otherwise.
The above warranty provides the Dealer with specific legal rights. The Dealer may
also have additional rights, which are subject to variation from state to state.
If a warranty repair is required, the Dealer must contact Pelco at (800) 289-9100 or
(559) 292-1981 to obtain a Repair Authorization number (RA), and provide the
following information:
1. Model and serial number
2. Date of shipment, P.O. number, sales order number, or Pelco invoice number
3. Details of the defect or problem
If there is a dispute regarding the warranty of a product that does not fall under
the warranty conditions stated above, please include a written explanation with
the product when returned.
Method of return shipment shall be the same or equal to the method by which the
item was received by Pelco.
®
)
RETURNS
To expedite parts returned for repair or credit, please call Pelco at (800) 289-9100
or (559) 292-1981 to obtain an authorization number (CA number if returned for
credit, and RA number if returned for repair) and designated return location.
All merchandise returned for credit may be subject to a 20 percent restocking and
refurbishing charge.
Goods returned for repair or credit should be clearly identified with the assigned
CA or RA number and freight should be prepaid.
1-8-08
The materials used in the manufacture of this document and its components are compliant to the requirements of Directive 2002/95/EC.
This equipment contains electrical or electronic components that must be recycled properly to comply with Directive 2002/96/EC of the European Union
regarding the disposal of waste electrical and electronic equipment (WEEE). Contact your local dealer for procedures for recycling this equipment.
REVISION HISTORY
Manual # Date Comments
C2699M 8/07 Original version.
C2699M-A 1/08 Updated DST feature and PTZ information. Added an appendix containing a time zone conversion chart.
Pelco, the Pelco logo, Camclosure, DigitalSENTRY, Endura, Esprit, ExSite, Genex, Intelli-M, Legacy, and Spectra are registered trademarks of Pelco, Inc. © Copyright 2008, Pelco, Inc. All rights reserved.
Spectra III is a trademark of Pelco, Inc.
DLP is a registered trademark of Texas Instruments Incorporated.
Page 24

Worldwide Headquarters
3500 Pelco Way
Clovis, California 93612 USA
USA & Canada
Tel: 800/289-9100
Fax: 800/289-9150
International
Tel: 1-559/292-1981
Fax: 1-559/348-1120
www.pelco.com
ISO9001
Australia|Canada|Finland|France|Germany|Italy|Macau|The Netherlands|Russia|Singapore
South Africa
Spain|Sweden|United Arab Emirates|United Kingdom|United States
|
 Loading...