

Page 1
EN Instructions for use
USA
FIUS1801I262
WARNING:
• Do not install or use this
booster seat until you
read and understand all
the instructions in this
manual and the labels.
To avoid serious injuries
to your child, follow the
instructions carefully. Keep
the instruction manual
in the dedicated pocket
for future reference.
Weight range:
40 – 120 lbs
(18 – 54 kg)
Height range:
39 - 63 inches
(99 – 160 cm)
Age:
at least 4 years old
(highback mode)
at least 5 years old
(backless mode)
Page 2
TABLE OF CONTENTS
Introduction ...................................................................................................3
Safe practices .................................................................................................4
Information & warnings ...................................................................6
Registration and recall ...............................................................................8
Your booster seat..........................................................................................9
When is a child ready to transition to a booster seat? ................10
When is a child ready to ride without this booster seat? ......13
Seat belts - which ones are safe to use with this booster seat? ....14
Vehicles and vehicle seats - which ones are safe to use with
this booster seat?........................................................................................15
Latch - what is it and where is it in the vehicle?..........................16
Rigid latch - why to use it?......................................................................18
Modes of use: highback and backless .............................................19
Highback mode:
- Adjusting the seat to t your child...................................................21
- Installing the booster seat in the vehicle ....................................24
- Securing this booster with rigid latch ...........................................25
- Buckling your child in the booster..................................................29
Converting from highback to backless mode............................33
Backless mode:
- Installing the backless booster seat in the vehicle .................35
- Securing this booster with rigid latch in the vehicle..............36
- Buckling your child in the booster .................................................40
When and how to use the shoulder belt positioning clip........44
Cup holder......................................................................................................46
Cleaning and maintenance...................................................................47
Replacement parts......................................................................................53
© 2018 Peg-Perego. All rights reserved.
2
Page 3
INTRODUCTION
Thank you for choosing the Peg-Perego Viaggio
Shuttle Plus 120 booster seat. As with all PegPerego products, your Viaggio Shuttle Plus 120 has
been designed and certied by a dedicated team
of engineers inside Peg-Perego's research and
development department. lt has been manufactured
and assembled in a Peg-Perego plant under certied
quality procedures using high quality materials from
certied suppliers. As with all booster seats, the
Viaggio Shuttle Plus 120 is designed to be used by a
child in a vehicle.
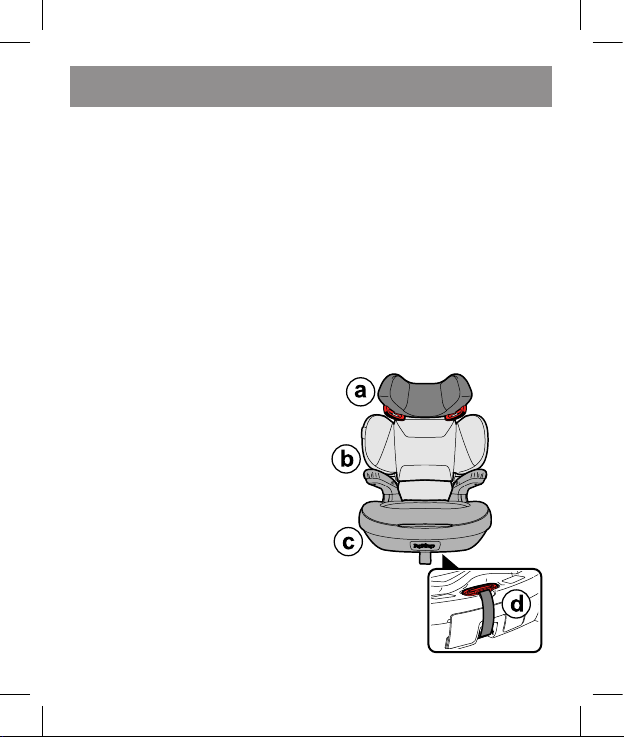
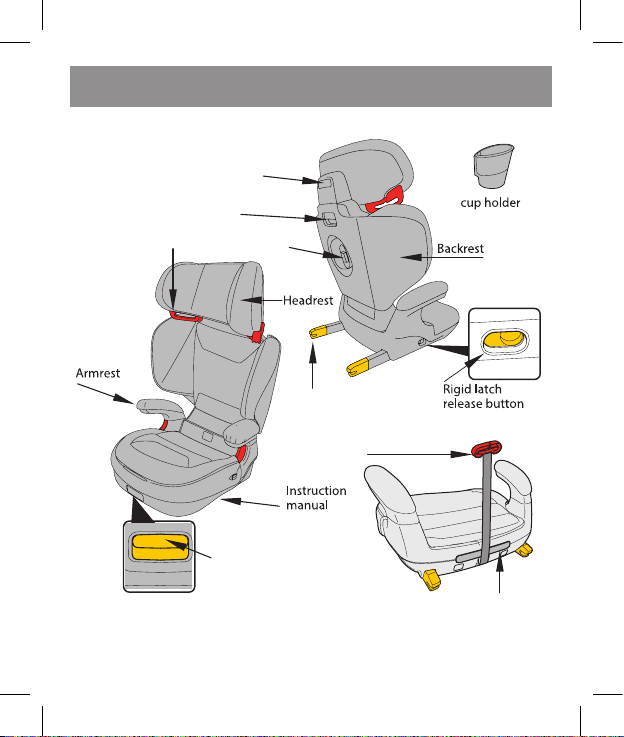
Always check the product
prior to use. The product is
composed of:
headrest (a), backrest (b),
seat with integrated rigid
latch (c) and shoulder belt
positioning clip(d).
In case of missing or
malfunctioning parts,
please contact our
Customer Service @ 1-800-
671-1701 for help.
3
Page 4

SAFE PRACTICES
• Everyone buckles up, including adults in the back
seat. Make no exceptions. If someone unbuckles,
stop the vehicle. Be rm and consistent from the start
so children know the rules. An unrestrained person
increases the risk of death for everyone else as they
can y into and injure other passengers.
• Never take a child out of a booster seat for any
reason while the vehicle is moving.
• Do not leave loose objects, bags or luggage in the
passenger area. In a crash they will be much heavier
than usual and can y around and hurt the people in
the car.
• Do not leave your child unattended in the vehicle,
even for a minute. Your child can get tangled in the
seat belt and strangle.
• This booster seat must be secured when the child
is not in it. This booster seat is a heavy object that
can severely hurt others in a crash if it were to y
around the car. There are two ways you can secure
this booster seat when the child is not in it to prevent
it from becoming a deadly projectile. You only need
to use one of these ways.
1. Use the rigid LATCH (see page 25-26)
2. Use the vehicle’s seat belt to buckle in the empty
booster
4
Page 5

SAFE PRACTICES
• DO NOT give children lollipops or ice cream on a
stick while in the car. These sticks can injure a child if
the car hits a bump or swerves.
• Do not leave the booster seat under direct sunlight
for a prolonged time. The seat may become very hot
and burn your child’s skin.
• Store the booster seat in a cool, dry area if not used
for long periods.
• Do not try to remove or add parts unless where
explained in this manual; do not try to repair this
product. In case of damaged or defective parts, call
customer service at 1-800-671-1701.
5
Page 6
INFORMATION & WARNINGS
• Certication: This booster seat meets or exceeds all
applicable Federal Motor Vehicle Safety Standard 213
requirements for use in motor vehicles. This restraint
is NOT certied for aircraft use.
• Expiration: Do not use this booster seat if it is more
than 12 years old. The date of manufacture can be
found on a sticker located on the underside of the
booster.
• In case of a crash: If this booster seat is involved in a
minor crash, you may continue to use it. Otherwise, it
must be replaced. If you have questions, call customer
service at 1-800-671-1701.
• A minor crash is one where you can say YES to ALL of
the following statements:
• The vehicle was able to be driven away from the
crash site.
• The vehicle door nearest the booster seat was not
damaged.
• None of the passengers in the vehicle sustained any
injuries in the crash.
• If the vehicle has air bags, the air bags did not deploy
during the crash.
• There is no visible damage to the booster seat.
• Do not use this booster seat until you have read
this manual and the labels on the product. To avoid
6
Page 7
INFORMATION & WARNINGS
serious injuries to your child, follow the instructions
and labels carefully.
• WARNING! Use only the vehicle's lap and
shoulder belt system when restraining the child in
this booster seat.
• Keep the instruction manual in its storage pocket in
the underside of the booster.
• All fabric covers and pads that come with this booster
seat are part of the booster and the certication
program. The use of non approved covers or other
accessories are not recommended and can put your
child at risk in a crash.
• The energy absorbing white foam located under the
fabric covers is a safety feature of this booster seat
and should never be removed or damaged.
This booster seat is not certied for aircraft use
because aircraft seats DO NOT have shoulder belts
7
Page 8

REGISTRATION AND RECALL
Important! Child restraints could be recalled for safety
reasons. You must register this restraint to be reached in a recall.
Send your name, address and the restraint's model number
and date of manufacture to: Peg-Perego U.S.A., Inc. 3625
Independence Drive FortWayne,IN 46808 or call1-800-6711701(tollfree) or register online at www.carseat-registration.
pegperego.com
For recall information, call the U.S. Government’s Vehicle Safety
Hotline at 1-888-327-4236
(TTY: 1-800-424-9153) or go to http://www.NHTSA.gov
Model number, model name, date
of manufacture, etc. are indelibly
printed on a label located under
the seat base (as shown here).
The registration card is attached
to the fabric cover. Detach the
card, ll it in and mail it to PegPerego. No stamp is needed. We
have already paid the postage. If
the registration card is missing,
please call Customer Service at
1-800-671-1701.
8
Page 9
Backrest
height adjuster
Red shoulder
belt guide
YOUR BOOSTER SEAT
Headrest
height adjuster
Backrest
width adjuster
Lower anchor connector
(Rigid latch)
Rigid latch
release
9
Red shoulder belt
positioning clip
Transport handle
Page 10

WHEN IS A CHILD READY
TO TRANSITION TO A BOOSTER SEAT?
Many parents confuse the words “car seat” and “booster seat”. It
is important to understand the dierence between a car seat
and a booster seat.
A car seat is a seat the child sits in and uses a 5-point harness as
their restraint.
A booster seat is a seat the child sits on and uses the vehicle's
seat belt as their restraint.
This Viaggio Shuttle Plus 120 is a booster seat.
Booster seats are for kids who are too big for their car seat and
too small to t properly in a seat belt. Booster seats help the
child’s body t properly on the vehicle seat. Booster seats make
the seat belt start and stay on the correct bony parts of the
child's body.
It isn't a coincidence that boosters make kids taller. By raising the
child up, boosters help the shoulder belt t properly between
the shoulder and the neck. By raising the child up and giving the
child a shorter seat pan, the child's knees can now bend at the
edge of the booster. This makes kids much less likely to slouch.
Slouching is dangerous as it puts the lap belt on the soft belly
10
Page 11

WHEN IS A CHILD READY
TO TRANSITION TO A BOOSTER SEAT?
which injures the abdominal organs and spinal cord. Boosters
also have design features that help the lap belt start and stay on
the lap during a crash. Many boosters use arm rests to do this.
Make sure if your booster has arm rests, that the lap belt always
goes under both arm rests.
A child must meet ALL of these requirements before they can
ride in this booster seat:
• at least 4 years old (highback mode) / at least 5 years old
(backless mode)
• at least 40 pounds
• at least 39 inches tall
• able to sit properly in this booster seat during the entire car ride
- no slouching, no playing with the seat belt, no putting the seat
belt under the arm or behind the back, no leaning over, etc.
Most children can not sit properly in a booster seat until at least
age 5. Sitting properly is what makes sure the seat belt ts snug
and rests on the proper bony parts of the body. If the child is
not mature enough for a booster, they need to ride in a car seat.
The car seat's 5-point-harness will keep them safe and won’t let
them slouch or lean over.
11
Page 12

WHEN IS A CHILD READY
TO TRANSITION TO A BOOSTER SEAT?
Does your child meet all of the requirements above to use this
booster, but also still ts in their old car seat? Many parents can
be unsure about which seat to use. If you use their forwardfacing car seat, make sure you always use the tether strap on
that forward-facing car seat. If you have a vehicle that does not
have a tether anchor, a booster seat may provide better head
and neck protection than a forward-facing car seat that isn’t
tethered.
12
Page 13

TO RIDE WITHOUT THIS BOOSTER SEAT?
WHEN IS A CHILD READY
Children need a booster seat until their body ts properly on
the vehicle seat AND the seat belt ts properly on their body
without the help of a booster.
Fitting properly means that you can say yes to all 5 questions
below:
1. The child can sit with their back against the back of the vehicle
seat.
2. The child’s knees can bend naturally at the edge of the vehicle
seat without slouching.
3. The lap belt is on the lap, not on the belly. The lap belt should
rest on the top of the thighs.
4. The shoulder belt is comfortable between the neck and the
shoulder.
5. The child can sit like this for the entire trip.
Studies show that half of all 10 year olds need a booster seat to
ride safely. By age 12 most kids can ride safely without a booster.
13
Page 14
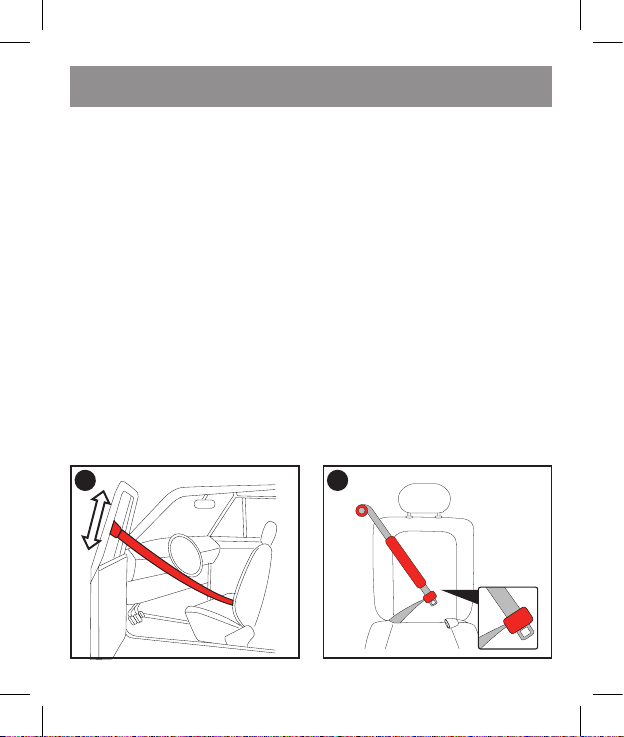
SEAT BELTS - WHICH ONES ARE SAFE TO USE WITH
2
1
THIS BOOSTER SEAT?
This booster seat must be used with a lap/shoulder belt.
This booster seat can not be used when there is only a lap belt.
Using just a lap belt puts your child at increased risk of injury
because lap belts don’t hold the child’s head and chest in a crash.
Most lap/shoulder belts are safe to use with this booster.
However:
1. If your vehicle is equipped with seat belts that are attached to
the door of the vehicle, do not use this booster.
2. If your vehicle is equipped with inatable seat belts, please
call Peg-Perego Customer Service at 1-800-671-1701 for
compatibility of this booster seat with your vehicle.
14
Page 15
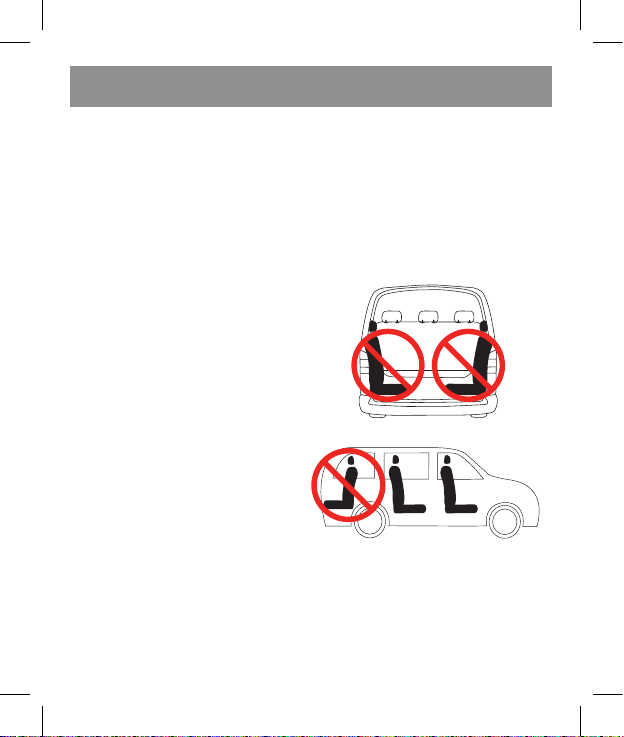
VEHICLES AND VEHICLE SEATS - WHICH ONES ARE
NO
SAFE TO USE WITH THIS BOOSTER SEAT?
This booster seat is designed to be used in passenger vehicles.
It is not designed to be used on three-wheel vehicles or motor
bikes.
According to crash statistics, children are safer when properly
restrained in the back seat than in the front seat. Therefore, Peg
Perego strongly recommends that children using this booster
seat ride in the back seat.
This booster seat can ONLY
be used on a vehicle seat that
faces the front of the vehicle.
Do NOT use this booster seat
on any of the following:
1. Side facing vehicle seats
2. Rear facing vehicle seats
3. Vehicle seats that rotate in
NO
dierent positions
If your vehicle is equipped with front passenger side air bags,
please refer to your vehicle owner’s manual for compatibility
and further information about booster seat installation.
15
Page 16

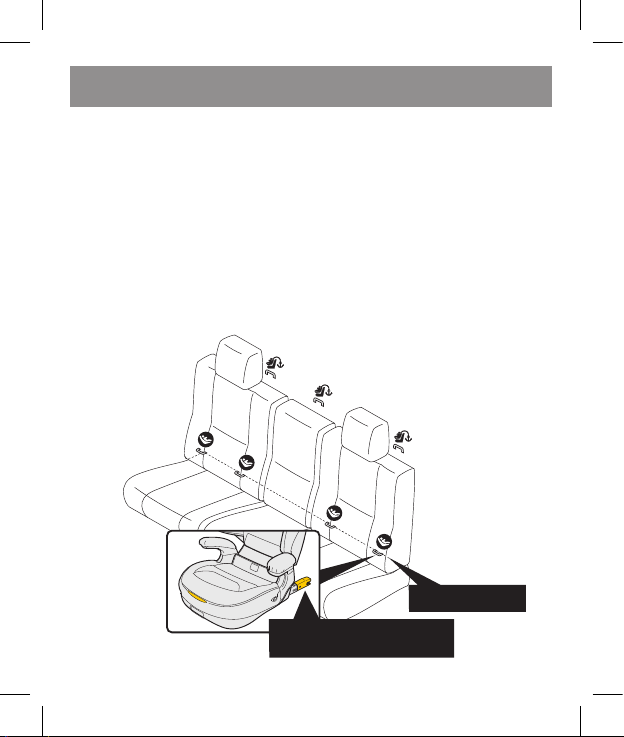
LATCH - WHAT IS IT AND WHERE
IS IT IN THE VEHICLE?
LATCH stands for Lower Anchors and Tethers for children.
LATCH works by connecting parts of your child’s car seat
or booster seat to special anchors in the vehicle.
Vehicle LATCH hardware:
Lower Anchors: These are a pair of metal bars hidden
in the vehicle's seat crease. Most vehicles since 2003
have the lower anchors for at least 2 seating positions
(almost always for the driver & passenger side seats.
The center seat almost never has lower anchors).
Tether Anchors: These are metal rings or bars that
are behind the vehicle seat. Most vehicles since 2000
have tether anchors for at least 3 seating positions.
Read your vehicle’s owners manual to see if and where
your vehicle has lower anchors and tether anchors.
Child Seat LATCH hardware:
Lower Anchor Connectors: These are hooks on your
child’s seat that will hook onto the lower anchors in
the vehicle’s seat crease.
Flexible LATCH: When the hooks are attached to a
exible strap that is part of your child's seat.
Rigid LATCH: When the hooks are rigidly attached to
the child's seat and there is no strap involved.
16
Page 17
LATCH - WHAT IS IT AND WHERE
IS IT IN THE VEHICLE?
This booster seat has rigid LATCH
Tether Strap: The tether is a strap found on every
forward-facing car seat. The tether strap secures the
top of the child's car seat to the vehicle’s tether anchor.
The tether strap keeps the brain and spine safer for a
child riding in a forward-facing car seat. Booster seats
usually do not have or use tether straps.
This booster seat does not have a tether strap.
Lower anchors
Lower anchors connector
(Rigid latch)
17
Page 18

RIGID LATCH - WHY TO USE IT?
This booster seat features rigid LATCH which secures the
booster to the vehicle:
• Using rigid LATCH is optional.
• With or without rigid LATCH, this booster seat meets
or exceeds all safety standards and can keep your
child safe.
• However, Peg Perego strongly recommends
using rigid LATCH with this booster seat whenever
possible. Rigid LATCH gives this booster seat added
stability in case of a sudden stop or sharp turn. Rigid
LATCH also prevents the booster from ying around
when the child is not in it, which can hurt others in the
car.
Your child will always use the seat belt across them as their
restraint. This is regardless of whether or not you have
used rigid LATCH to secure the booster to the vehicle.
18
Page 19
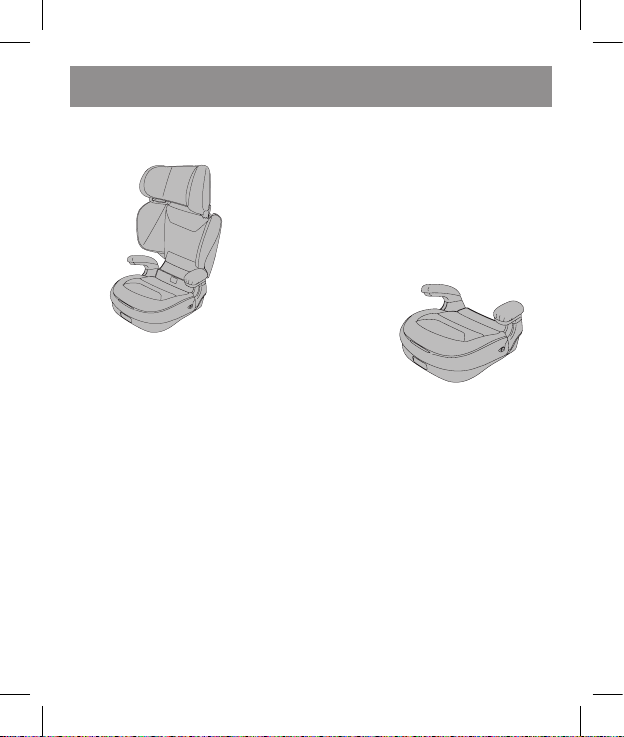
MODES OF USE: HIGHBACK AND BACKLESS
This booster seat can be either a highback or a backless
booster.
When you use the headrest &
backrest, you have a highback
booster.
Without the headrest &
backrest, it is a backless booster.
Highback mode gives your child the best protection
because the headrest & backrest:
• Provide additional protection to your child’s head, neck,
and chest in a side impact crash
• Provide a more enclosed seat which helps kids sit up
straight. Kids often lean over and squirm less when in a
highback than a backless booster.
• Help keep the child’s body in a better position during
swerving or other pre-crash maneuvers.
• Help keep a sleeping child’s body upright. When a
sleeping child slumps sideways, the seat belt gets loose
19
Page 20

MODES OF USE: HIGHBACK AND BACKLESS
and slides o the correct parts of their body.
• Provide head and neck support to prevent whiplash
injuries in vehicles that can't support to the top of the
child's ears.
We strongly recommend using this as a highback booster
whenever possible. However, we realize there are times
when it is easier to travel with it in backless mode.
In backless mode: Make sure some part of the vehicle either the seat back or the head restraint - comes to at
least the top of the child’s ears.
Why? The top of the ears is the same height as the base of
the child’s skull. When the seat back or the head restraint
comes to at least the top of the ears, the child can not
throw their head back in a crash. This support helps
prevent whiplash injuries.
If the vehicle can not support the top of the child’s
ears you may not use this booster in backless mode
and must use it in highback mode to give the child's
head the support it needs.
20
Page 21
ADJUSTING THE SEAT TO FIT YOUR CHILD
HIGHBACK MODE:
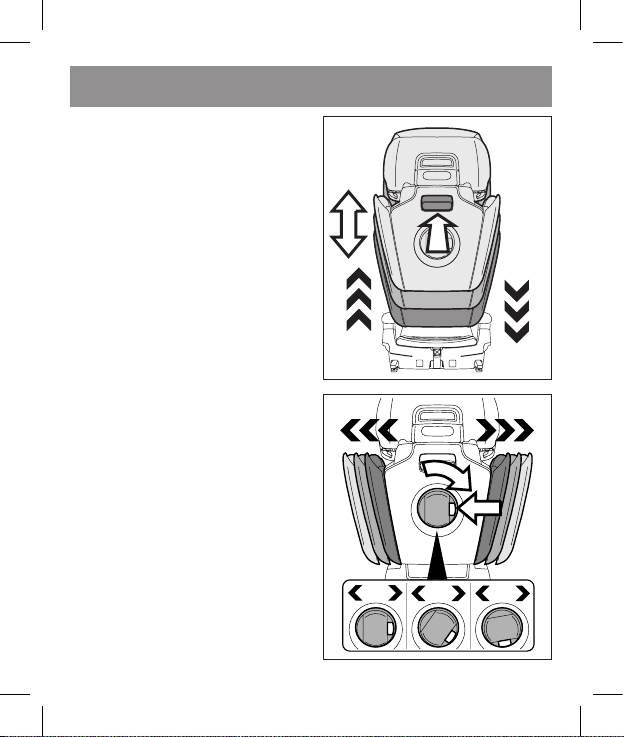
The headrest and backrest adjust in 3 dierent ways.
The three adjustments are independent of each other to
ensure the best t for kids of dierent sizes. Take a few
minutes and try out dierent adjustments until you nd
the one that ts your child best. Kids grow quickly. Make
sure to check the adjustments every 3 months. As your
child grows, you will need to make the headrest and
backrest taller, and widen the backrest.
Some kids prefer a narrower backrest, others like more
room for their arms. Let your child tell you what is most
comfortable for them.
IMPORTANT: When the headrest AND backrest are
both in their highest positions AND the red shoulder
belt guides are below the child's shoulders you must
STOP using this as a highback booster.
Refer to page 33 for backless mode conversion.
21
Page 22
1
2
3
4
5
1
2
3
4
5
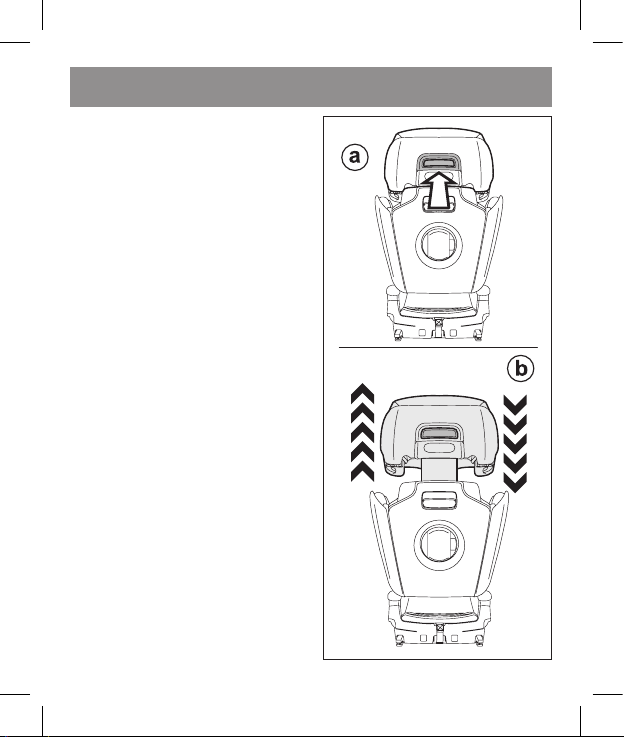
ADJUSTING THE SEAT TO FIT YOUR CHILD
HIGHBACK MODE:
1. Headrest height
The headrest has 5
positions. Squeeze the
handle (a) on the back of
the headrest and at the
same time raise or lower
the headrest (b). Make
sure the headrest clicks
into place by trying to
move it without touching
the handle. Make sure the
red shoulder belt guides
are always at, or up to 1
inch above, the child’s
shoulders (see page 32).
22
Page 23
ADJUSTING THE SEAT TO FIT YOUR CHILD
HIGHBACK MODE:
2. Backrest height
The height of the backrest
has 3 positions. Squeeze
the handle (1) on the back
of backrest and at the
same time raise or lower
2
the backrest (2). Make sure
the backrest clicks into
place by trying to move
it without touching the
handle.
3
2
1
1
3
2
1
3. Backrest width
The width of the backrest
has 3 settings. Push the
button on the side of the
knob (1) and at the same
time turn the knob (2)
clockwise to make the
backrest wider. To narrow
the backrest, turn the knob
counter-clockwise.
3
2
1
1
23
2 3
3
2
1
2
1
Page 24
INSTALLING THE BOOSTER SEAT IN THE VEHICLE
HIGHBACK MODE:
Please read “Rigid LATCH: Why to Use It” (see page 18).
If you choose not to use the rigid LATCH:
- Skip to “Highback Mode: Buckling your Child in the
Booster” (see page 29).
IMPORTANT: because your booster is not secured
to the vehicle it can become a projectile when the
child is not in it. Therefore, make sure you buckle
the booster when it is empty so it does not become
a projectile.
If you choose to use the rigid LATCH, follow the
instructions below.
24
Page 25

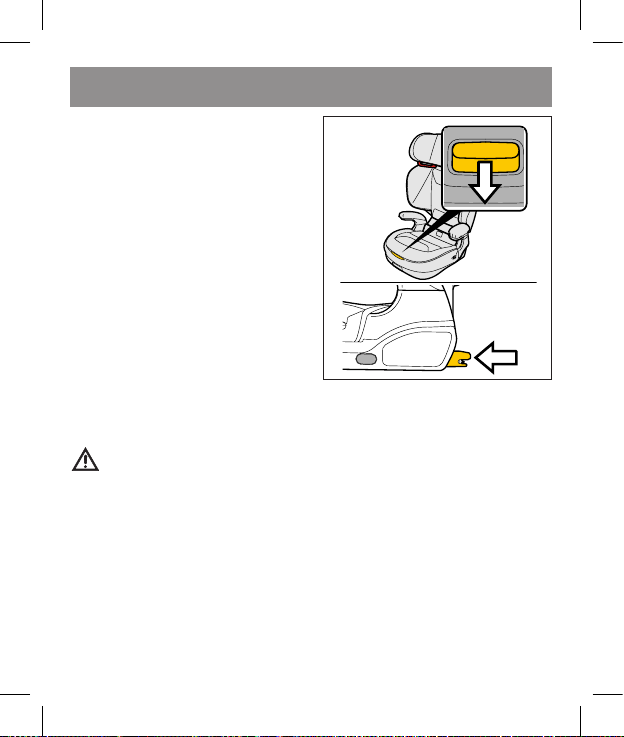
SECURING THIS BOOSTER WITH RIGID LATCH
HIGHBACK MODE:
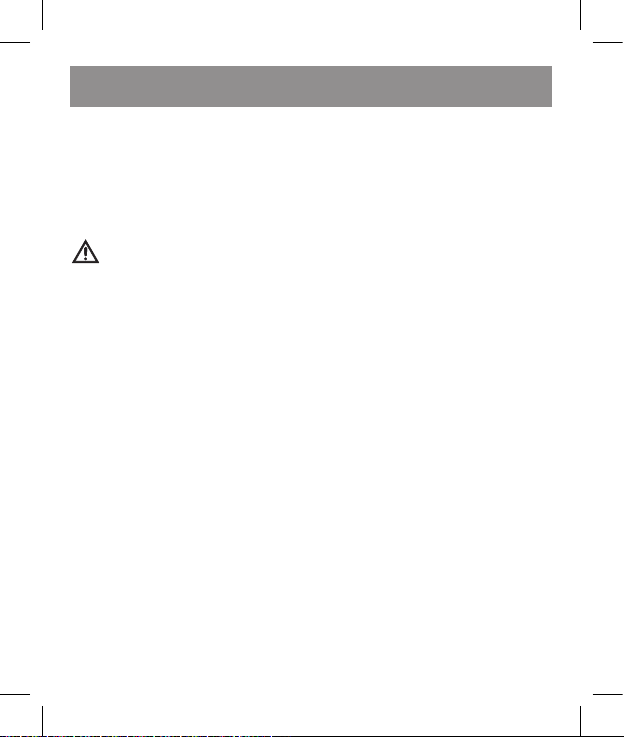
Find the lower anchors in
your vehicle (see "LATCH What is it and where is it in
the vehicle?" - see page 16)
1. Squeeze the yellow
handle (a) at the front of
the booster. Both yellow
rigid LATCH connectors
will pop out (b) at the same
time. Squeeze the yellow
handle once more to make
sure both connectors
popped out all the way .
2. Align the yellow rigid
LATCH connectors with
the lower anchors in
the vehicle’s seat crease.
Connect by pushing the
booster towards the back
of the vehicle seat.
click
25
Page 26
SECURING THIS BOOSTER WITH RIGID LATCH
HIGHBACK MODE:
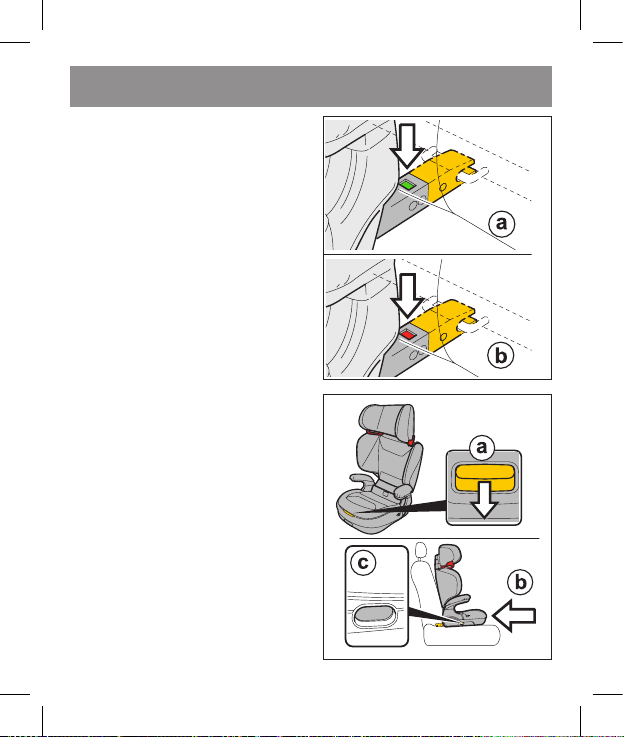
3. Check that there is green
in both indicator windows.
Green (a) means the rigid
LATCH connectors are
securely connected to the
vehicle’s lower anchors.
Red (b) means the booster
is not connected to the
vehicle’s lower anchors.
4. Pull the yellow handle
at the front of the booster
(a) again. At the same time,
push the booster against
the back of the vehicle seat
(b). This will hide the release
buttons (c) for the rigid
LATCH connectors. This
will prevent someone from
accidentally disconnecting
the rigid LATCH.
26
Page 27
SECURING THIS BOOSTER WITH RIGID LATCH
HIGHBACK MODE:
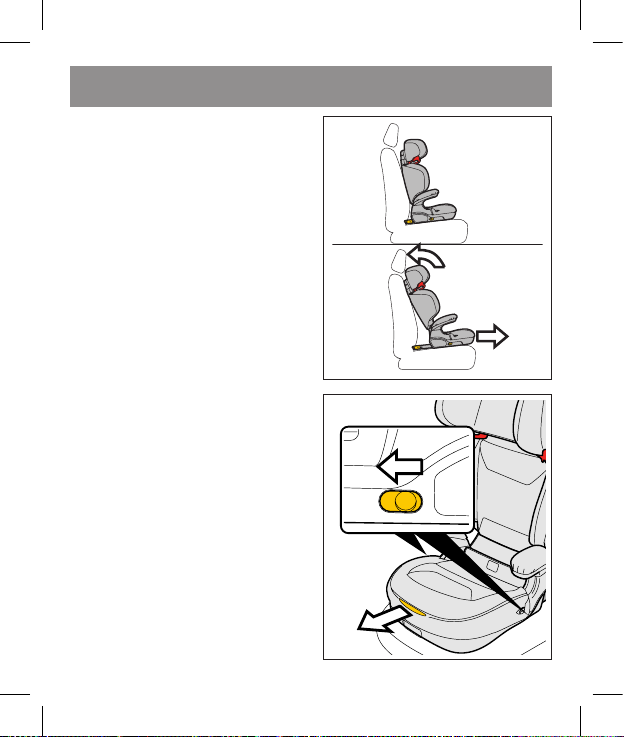
5.
You may recline this
highback booster seat.
Squeeze the yellow handle and
pull the booster seat towards
you to create the recline that is
best for your child.
You may need to adjust
or remove the vehicle’s
head restraint to allow this
booster seat to t best. If you
remove your vehicle’s head
restraint, be sure to store it
away from the vehicle.
6. To disconnect the
booster seat squeeze the
yellow handle at the front
2
of the booster (1) and pull
the booster seat towards
you until the yellow release
buttons on the side of the
base are fully revealed.
Pull both yellow release
buttons at the same time
(2) until you hear the rigid
LATCH connectors open.
1
27
Page 28
SECURING THIS BOOSTER WITH RIGID LATCH
HIGHBACK MODE:
7. To store the rigid LATCH
connectors inside the
booster seat, squeeze the
yellow handle and at the
1
same time push the yellow
rigid LATCH connectors
into the booster until they
disappear.
2
IMPORTANT: Make sure the booster does not sit
on top of the seat belt hardware or webbing for its
seat or a neighboring seat. If the booster sits on top of
the hardware or webbing, stop using the rigid LATCH
and reposition the booster seat. If it still sits on top
of the hardware or webbing, move the booster to a
dierent seating position. If you need further help,
check your vehicle owner’s manual and/or contact
Peg-Perego Customer Service at 1-800-671-1701.
28
Page 29
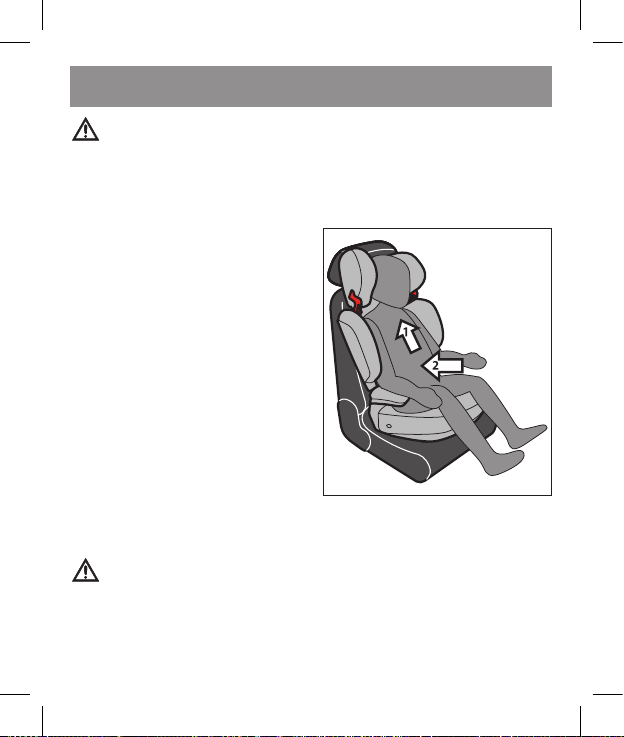
BUCKLING YOUR CHILD IN THE BOOSTER
HIGHBACK MODE:
IMPORTANT: Make sure to remove bulky or puy
jackets because they can make the seat belt too loose on
the child’s body during a crash. In winter, it is safe for the
child to wear thin, tight-tting sweaters and jackets.
Have the child sit in the
booster seat up straight (1)
and the child must sit all
the way back (2) so that his
back touches the backrest
of the booster. Make sure
the child is not slouching.
Slouching is dangerous as
it puts the lap belt on the
soft belly.
The red shoulder belt
guides must always be at
or up to 1 inch above the
child’s shoulders (see page
32).
IMPORTANT: Stop using this booster in high back
mode when the red shoulder belt guides can not be
positioned at or above the child’s shoulders with the
head rest and back rest in their highest positions.
29
Page 30
BUCKLING YOUR CHILD IN THE BOOSTER
HIGHBACK MODE:
1. Slide the shoulder belt
into the red shoulder belt
guide that is on the same
side as where the vehicle’s
shoulder belt comes from.
Make sure the shoulder
belt is completely inside
the red guide and can not
slip out. NEVER use both
red shoulder belt guides at
the same time.
Route the lap belt under
both armrests.
Why? When the lap belt
goes under both armrests,
the armrests keep the
lap belt on the strong hip
bones. When the lap belt
goes over an armrest the
lap belt puts the crash
forces on the child's soft
belly which causes serious
injuries.
30
Page 31

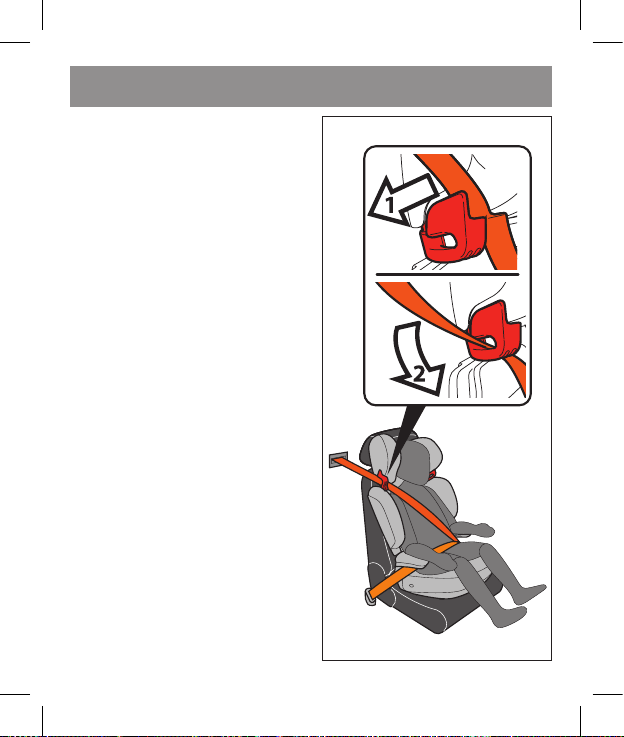
BUCKLING YOUR CHILD IN THE BOOSTER
HIGHBACK MODE:
2. Route the shoulder belt
under the armrest next to
the seat belt buckle.
Never place the shoulder
belt under both armrests.
Buckle the seat belt. Make
sure the seat belt clicks in.
3. Pull upwards on the
shoulder belt to remove
slack in the lap belt as
shown in the picture.
The lap belt must be snug
across the child’s thighs.
The shoulder belt should
lie at across the child’s
chest and rest between the
neck and the shoulder.
31
Page 32

BUCKLING YOUR CHILD IN THE BOOSTER
HIGHBACK MODE:
4. If the shoulder belt rubs
the child’s neck (a) or is
on the side of the arm (b),
make sure you have the
headrest and backrest
adjusted correctly for your
child's height (see page
23).
The red shoulder belt
guide must be at or
slightly above the shoulder
(maximum 1" - 2.5 cm).
32
Page 33

CONVERTING FROM HIGHBACK
TO BACKLESS MODE
Please refer to “Modes
of Use: Highback and
Backless” (see page 19) to
understand more about
the dierent modes and
why to choose one over
the other.
1. Unbutton the two
buttons in the fabric cover.
2. Push the two buttons (1)
and at the same time pull
the backrest up (2).
33
Page 34

CONVERTING FROM HIGHBACK
TO BACKLESS MODE
3. Rotate the fabric ap (1)
so that it is under the fabric
cover (2).
4. Insert the two hooks in
the fabric cover into the
holes in the booster seat
(3).
34
Page 35

BACKLESS MODE: INSTALLING THE BACKLESS
BOOSTER SEAT IN THE VEHICLE
Please read “Rigid LATCH: Why to Use It” (see page 18).
If you choose not to use the rigid LATCH:
- Skip to “Backless Mode: Buckling your Child in the
Booster”.
IMPORTANT: because your booster is not secured
to the vehicle it can become a projectile when the
child is not in it. Therefore, make sure you buckle
the booster when it is empty so it does not become
a projectile.
If you choose to use the rigid LATCH, follow the
instructions below.
35
Page 36

BACKLESS MODE: SECURING THIS BOOSTER
WITH RIGID LATCH IN THE VEHICLE
1. Squeeze (b) the yellow
handle at the front of the
booster (a). Both yellow
rigid LATCH connectors
will pop out (c) at the same
time. Squeeze the yellow
handle once more to make
sure both connectors
popped out all the way.
2. Align the yellow rigid
LATCH connectors with
the lower anchors in the
vehicle’s seat crease and
connect by pushing the
booster towards the back
of the vehicle seat.
click
36
Page 37

BACKLESS MODE: SECURING THIS BOOSTER
WITH RIGID LATCH IN THE VEHICLE
3. Check that there is green
in both indicator windows.
Green (a) means the rigid
LATCH connectors are
securely connected to the
vehicle’s lower anchors.
Red (b) means the booster
is not connected to the
vehicle’s lower anchors.
4. Pull the yellow handle
at the front of the booster
(a) again. At the same time,
push the booster against
the back of the vehicle seat
(b). Make sure the booster
touches the back of the
vehicle seat.
37
Page 38

BACKLESS MODE: SECURING THIS BOOSTER
WITH RIGID LATCH IN THE VEHICLE
5. To disconnect the
booster seat squeeze the
yellow handle at the front
2
of the booster (1) and pull
the booster seat towards
you until the yellow release
buttons on the side of the
base are fully revealed.
Pull both yellow release
buttons at the same time
(2) until you hear the rigid
1
LATCH connectors open.
Now, you can remove the
booster seat.
6. To store the rigid LATCH
connectors inside the
booster seat, squeeze the
yellow handle and at the
same time push the yellow
rigid LATCH connectors
into the booster until they
disappear.
38
1
2
Page 39

BACKLESS MODE: SECURING THIS BOOSTER
WITH RIGID LATCH IN THE VEHICLE
IMPORTANT: Make sure the booster is properly
positioned in the vehicle. The booster must touch the
back of the vehicle seat.
Make sure the booster does not sit on top of the seat
belt hardware or webbing for its seat or a neighboring
seat. If the booster sits on top of the hardware or
webbing, stop using the rigid LATCH and reposition
the booster seat. If it still sits on top of the hardware
or webbing, move the booster to a dierent seating
position. If you need further help, check your vehicle
owner’s manual and/or contact Peg-Perego Customer
Service at 1-800-671-1701.
39
Page 40

BUCKLING YOUR CHILD IN THE BOOSTER
BACKLESS MODE:
IMPORTANT: Make sure to remove bulky or puy
jackets because they can make the seat belt too loose on
the child’s body during a crash. In winter, it is safe for your
child to wear thin, tight-tting sweaters and jackets.
IMPORTANT: Make sure some part of the vehicle either the seat back or the head restraint - comes to at
least the top of the child’s ears. Many head restraints are
adjustable in height by pulling them upwards.
Why? The top of the ears is the same height as the base of
the child’s skull. When the seat back or the head restraint
comes to at least the top of the ears, the child can not
throw their head back in a crash. This support helps
prevent whiplash injuries.
If the vehicle can not support to the top of the child’s ears
you may not use this booster in backless mode. You must
use this as a highback booster to give the child's head the
support it needs.
40
Page 41

BUCKLING YOUR CHILD IN THE BOOSTER
BACKLESS MODE:
1. Have the child sit in the
booster seat up straight
(1) and the child must
sit all the way back (2) so
that his back touches the
backrest of the vehicle seat.
Make sure the child is not
slouching. Slouching is
dangerous as it puts the
lap belt on the soft belly.
2. Route the lap and
shoulder belt as shown in
the picture . Route the lap
belt under both armrests.
Why? When the lap belt
goes under both armrests,
the armrests keep the
lap belt on the strong hip
bones. When the lap belt
goes over an armrest the lap
belt puts the crash forces on
the child's soft belly which
causes serious injuries.
41
Page 42

BUCKLING YOUR CHILD IN THE BOOSTER
BACKLESS MODE:
3. Route the shoulder belt
under the armrest next to
the seat belt buckle, but
never under both armrests.
Buckle the seat belt. Make
sure the seat belt clicks in.
4. Pull upwards on the
shoulder belt to remove
slack in the lap belt. The lap
belt must be snug across
the child’s thighs.
The shoulder belt should
lie at across the child’s
chest and rest between the
neck and the shoulder.
42
Page 43

BUCKLING YOUR CHILD IN THE BOOSTER
BACKLESS MODE:
5.
If the shoulder belt is on
the side of the arm (a), the
shoulder belt can not protect
the child properly. See if
your vehicle has a height
adjustable shoulder belt. If it
does, raise the shoulder belt.
Otherwise, use this booster
in highback mode, or choose
a dierent seating position
in the vehicle.
If the shoulder belt rubs
the child’s neck (b), use the
shoulder belt positioning
clip provided with this
booster seat.
The clip can make shorter
kids more comfortable by
pulling the shoulder belt
o their neck (c).
43
Page 44

THE SHOULDER BELT POSITIONING CLIP
WHEN AND HOW TO USE
To properly use the
shoulder belt positioning
clip follow the instructions
below.
1. The shoulder belt
positioning clip is stored
under the fabric cover of
the seat. Lift the cover (1)
and pull the red clip out
(2). Next, pass the red clip
through the handle (3).
2. Pull the strap out from
under the booster seat.
Make the strap as long as
possible. Push the button
at the back of the booster
seat that is hidden by the
strap (1) and at the same
time pull the strap up as far
as it goes (2).
1
2
3
44
Page 45

THE SHOULDER BELT POSITIONING CLIP
WHEN AND HOW TO USE
3. Slide the shoulder belt
into the red shoulder belt
positioning clip (1) and pull
the strap at the front of the
booster (2) to lower the red
clip.
4. Stop pulling the strap
when the red clip is about
1 inch (2.5 cm) above
the child’s shoulder. The
shoulder belt should rest
comfortably between the
child’s neck and shoulder.
The shoulder belt should
never rest on the side of
the arm.
1
2
1” 2.5cm
45
Page 46

CUP HOLDER
This booster seat comes
with a cup holder. Place
the cup holder on the
mushroom button,
present on either side of
the seat (a), and secure it
in place (b). Never put hot
drinks in the cup holder.
46
Page 47

CLEANING AND MAINTENANCE
Cleaning the Plastic & Metal Parts:
It is important to keep all moving parts clean. Use a damp
cloth to clean the plastic parts. Use a dry cloth on the
yellow lower anchor connectors. Do not use water on the
yellow lower anchor connectors - as you don’t want them
to rust.
Never use chemicals or solvents on any part of this
booster seat.
Cleaning the Fabric:
The entire fabric cover - the parts on the seat, the backrest,
and head rest - can all be removed and machine washed
at 87° F (30° C). Hang the fabric covers to dry. Do not put
the fabric covers in the dryer. Do not iron, bleach, or dry
clean the fabric covers.
Follow the instructions below to remove the fabric and
put it back on properly. There are energy absorbing white
foam panels under the cover that are there to protect your
child in a crash. Be careful when removing the padding to
avoid breaking the energy absorbing panels.
47
Page 48

CLEANING AND MAINTENANCE
Removing the fabric cover
from the seat:
1. Unbutton the two
buttons on the side of the
seat
2. Unhook the two elastics.
48
Page 49

CLEANING AND MAINTENANCE
3. Unbutton the two
buttons.
Removing the fabric cover
from the backrest:
1. Widen the side wings
by turning the knob at the
back of the booster. Then,
remove the four eyelets
from the plastic buttons on
the sides of the backrest.
49
Page 50

CLEANING AND MAINTENANCE
2. Unhook the four elastics
(two on the top, two on the
bottom).
3. Raise the head rest to
its highest position by
squeezing the head rest
adjuster lever in the back
of the seat and pulling the
head rest up. Remove the
two aps from their slots
on the upper part of the
backrest. Pull the fabric
cover o the backrest.
50
Page 51

CLEANING AND MAINTENANCE
Removing the fabric from
the headrest:
1. Unhook the two side
hooks to remove the
plastic cover on the back of
the headrest.
2. Release the bottom (1)
and top (2) as shown.
2
1
51
1
Page 52

CLEANING AND MAINTENANCE
3. Release the two elastics
on one side (a) and then
on the other (b) to remove
the fabric cover on the
headrest.
To put the cover back on,
simply reverse the above
steps.
Accessories
Booster Seat Travel Bag:
This practical travel bag
keeps the booster seat
clean
52
Page 53

1) SPST7731NF
2) BRIVSP•
3) BSCVSP•
4) MUCI0161N
5) BSSVSP•
6) BSAVSP•
7) MMSP0089
8) SPST10036NF
9) BBRVSP•
Replacement Parts
1
2
3
4
5
9
9
6
8
7
NOTE: Spare parts available in different
colors* to be specified when ordering.
53
Page 54

Declaration of
conformity
Product name
Viaggio Shuttle Plus 120
Product reference number
IMVS01US35---
Reference Standards (origin)
FMVSS 571-213 (USA)
Declaration of conformity
PegPerego S.p.A. declares under
its sole responsibility that the
article to which this declaration
relates has undergone internal
testing and has been approved,
in accordance with regulations
in force, by external, independent testing laboratories.
Date and place of issue
Arcore, March 201
PegPerego S.p.A.
via De Gasperi, 50
20862 Arcore (MB), ITALY
declaración de
conformidad
Denominación del producto
Viaggio Shuttle Plus 120
Código de identicación del
producto
IMVS01US35---
Normativas de referencia
(origen)
FMVSS 571-213 (USA)
Declaración de conformidad
PegPerego S.p.A. declara bajo
su responsabilidad que el
artículo en objeto ha sido
sometido a pruebas de ensayo
internas y ha sido homologado
según las normativas vigentes
en laboratorios exteriores e
independientes.
Fecha y lugar de expedición
Arcore,
Marzo
2018
PegPerego S.p.A.
Via De Gasperi, 50
20862 Arcore (MB), ITALY
54
Page 55

Page 56

Page 57

2018
56
20862 Arcore (MB), ITALY
Via De Gasperi, 50
PegPerego S.p.A.
Arcore,
Marzo
Fecha y lugar de expedición
independientes.
en laboratorios exteriores e
según las normativas vigentes
internas y ha sido homologado
sometido a pruebas de ensayo
artículo en objeto ha sido
su responsabilidad que el
PegPerego S.p.A. declara bajo
Declaración de conformidad
FMVSS 571-213 (USA)
(origen)
Normativas de referencia
IMVS01US35---
producto
Código de identicación del
Viaggio Shuttle Plus 120
Denominación del producto
conformidad
declaración de
20862 Arcore (MB), ITALY
via De Gasperi, 50
PegPerego S.p.A.
Arcore, March 201
Date and place of issue
dent testing laboratories.
in force, by external, indepenin accordance with regulations
testing and has been approved,
relates has undergone internal
article to which this declaration
its sole responsibility that the
PegPerego S.p.A. declares under
Declaration of conformity
FMVSS 571-213 (USA)
Reference Standards (origin)
IMVS01US35---
Product reference number
Viaggio Shuttle Plus 120
Product name
conformity
Declaration of
Page 58

55
los colores* de las piezas de repuesto.
NOTA: cuando haga su pedido especifique
7
8
6
9
9
5
4
3
9) BBRVSP•
8) SPST10036NF
7) MMSP0089
2
1
6) BSAVSP•
5) BSSVSP•
4) MUCI0161N
3) BSCVSP•
2) BRIVSP•
1) SPST7731NF
PIEZAS DE REPUESTO
Page 59

54
limpio el asiento elevado
bolsa de viaje mantiene
elevado: Esta práctica
Bolsa de viaje del asiento
Accesorios
la inversa.
el mismo procedimiento a
revestimiento, lleve a cabo
Para volver a poner el
reposacabezas.
el revestimiento de tela del
del otro (g_b) para retirar
de un lado (g_a) y después
3. Libere los dos elásticos
LIMPIEZA Y MANTENIMIENTO
Page 60

53
1
2
1
muestra.
(1) y superior (2) como se
2. Libere la parte inferior
reposacabezas.
de la parte posterior del
retirar la cubierta de plástico
ganchos laterales para
1. Desenganche los dos
reposacabezas:
revestimiento de tela del
Desmontaje del
LIMPIEZA Y MANTENIMIENTO
Page 61

52
tela del respaldo.
Tire del revestimiento de
parte superior del respaldo.
aletas de sus ranuras de la
hacia arriba. Retire las dos
asiento y tire del asiento
de la parte posterior del
ajuste del reposacabezas
apretando la palanca de
hasta su posición más alta
3. Suba el reposacabezas
inferior).
superior, dos en la parte
elásticos (dos en la parte
2. Desenganche los cuatro
LIMPIEZA Y MANTENIMIENTO
Page 62

51
lados del respaldo.
botones de plástico de los
los cuatro ojales de los
A continuación, retire
del asiento elevado.
de la parte posterior
laterales girando el pomo
1. Ensanche las alas
respaldo:
revestimiento de tela del
Desmontaje del
botones.
3. Desabotone los dos
LIMPIEZA Y MANTENIMIENTO
Page 63

50
elásticos.
2. Desenganche los dos
asiento.
botones del lado del
1. Desabotone los dos
asiento:
revestimiento de tela del
Desmontaje del
LIMPIEZA Y MANTENIMIENTO
Page 64

49
energía.
el relleno para no romper los paneles que absorben
están debajo del revestimiento. Tenga cuidado al quitar
sirven para proteger al niño en caso de accidentes y
Los paneles de espuma blanca que absorben energía
revestimiento de tela y volverlo a colocar correctamente.
Siga las instrucciones siguientes para retirar el
revestimiento de tela.
tela en la secadora. No planche, use lejía ni lave en seco el
tela para que se seque. No ponga el revestimiento de
la lavadora a 87 °F (30 °C). Cuelgue el revestimiento de
respaldo y reposacabezas, pueden retirarse y lavarse en
Todo el revestimiento de tela, las partes del asiento,
Limpieza del revestimiento de tela:
ninguna parte de este asiento elevado.
No use nunca productos químicos o disolventes en
del anclaje inferior, puesto que podrían oxidarse.
anclaje inferior. No use agua en los conectores amarillos
plástico. Use un paño seco en los conectores amarillos del
limpios. Use un paño húmedo para limpiar las partes de
Es importante mantener todos los componentes móviles
Limpieza de los componentes de plástico y metal:
LIMPIEZA Y MANTENIMIENTO
Page 65

48
portavasos.
bebidas calientes en el
lugar (b). No ponga nunca
del asiento (a) y fíjelo en su
está en uno de los lados
el botón de hongo que
Coloque el portavasos en
provisto de un portavasos.
Este asiento elevado está
PORTAVASOS
Page 66

47
lado del brazo.
debe permanecer nunca al
El cinturón de hombro no
cuello y el hombro del niño.
cómodamente entre el
1” 2.5cm
correa debe apoyarse
niño. El cinturón de la
encima del hombro del
a 1 pulgada (2,5 cm) por
está aproximadamente
cuando el gancho rojo
4. Deje de tirar de la correa
2
gancho rojo.
elevado (2) para bajar el
parte delantera del asiento
1
(1) y tire de la correa de la
de la correa de hombro
rojo de posicionamiento
hombro en el gancho
3. Deslice el cinturón de
POSICIONAMIENTO DEL CINTURÓN DE HOMBRO
CUÁNDO Y CÓMO USAR EL GANCHO DE
Page 67

46
que se pueda (2).
correa hacia arriba lo más
el mismo tiempo tire de la
oculto por la correa (1) y
asiento elevado que está
de la parte posterior del
posible. Empuje el botón
Haga la correa lo más larga
debajo del asiento elevado.
2. Saque la correa de
a través de la manilla (3).
Después, pase el gancho rojo
3
gancho rojo hacia fuera (2).
revestimiento (1) y tire del
tela del asiento. Levante el
debajo del revestimiento de
de hombro está guardado
posicionamiento del cinturón
1. El gancho de
2
las instrucciones siguientes.
del cinturón de hombro, siga
1
gancho de posicionamiento
Para usar correctamente el
POSICIONAMIENTO DEL CINTURÓN DE HOMBRO
CUÁNDO Y CÓMO USAR EL GANCHO DE
Page 68

45
hombro del cuello (c).
les quita el cinturón de
más cómodos puesto que
niños más pequeños estén
El gancho sirve para que los
con este asiento elevado.
hombro que se suministra
colocación del cinturón de
(b), use el gancho de
roza el cuello del niño
Si el cinturón de hombro
el vehículo.
o elija un asiento distinto en
elevado con el respaldo alto
contrario, use este asiento
el cinturón de hombro. De lo
altura ajustable. Si es así, suba
un cinturón de hombro de
si el vehículo cuenta con
niño correctamente. Vea
de hombro no protege al
del brazo (a), el cinturón
hombro está a un lado
5.
Si el cinturón de
SEGURIDAD AL NIÑO EN EL ASIENTO ELEVADO
SIN RESPALDO: ABROCHAR EL CINTURÓN DE
Page 69

44
neck and the shoulder.
chest and rest between the
lie at across the child’s
The shoulder belt should
the child’s thighs.
belt must be snug across
slack in the lap belt. The lap
shoulder belt to remove
4. Pull upwards on the
del asiento emite un chasquido.
de que el cinturón de seguridad
seguridad del asiento. Asegúrese
Abroche el cinturón de
ambos reposabrazos.
del asiento, nunca debajo de
del cinturón de seguridad
reposabrazos cerca del broche
de hombro debajo del
3. Coloque el cinturón
niño y esto causa lesiones graves.
impacto en el vientre blando del
SEGURIDAD AL NIÑO EN EL ASIENTO ELEVADO
SIN RESPALDO: ABROCHAR EL CINTURÓN DE
Page 70

43
regazo pone las fuerzas del
reposabrazos el cinturón de
de regazo se coloca sobre un
la cadera. Cuando el cinturón
en los huesos más fuertes de
mantienen el cinturón de regazo
reposabrazos, los reposabrazos
regazo pasa por debajo de los dos
¿Por qué? Cuando el cinturón de
de los dos reposabrazos.
cinturón de regazo debajo
en la figura. Coloque el
de hombro como se muestra
2. Gire el cinturón de regazo y
parte blanda del vientre.
cinturón de regazo queda en la
es peligroso puesto que el
niño no se encorva. Encorvarse
vehículo. Asegúrese de que el
el respaldo del asiento del
de modo que la espalda toque
completamente hacia atrás (2)
el asiento elevado derecho (1) y
1. Haga que el niño se siente en
SEGURIDAD AL NIÑO EN EL ASIENTO ELEVADO
SIN RESPALDO: ABROCHAR EL CINTURÓN DE
Page 71

42
dar a la cabeza del niño la sujeción que necesita.
Debe usar este asiento elevado con el respaldo alto para
del niño no debe usar este asiento elevado sin respaldo.
Si el vehículo no sujeta la parte superior de las orejas
latigazo.
accidente. Este soporte ayuda a evitar las lesiones por
orejas, el niño no puede tirar la cabeza hacia atrás en un
sobresale por lo menos hasta la parte superior de las
del asiento o el dispositivo de contención de la cabeza
altura de la base del cráneo del niño. Cuando el respaldo
¿Por qué? La parte superior de las orejas está la misma
ajustable, tirándolos hacia arriba.
dispositivos de contención para la cabeza son de altura
la parte superior de las orejas del niño. Muchos de los
contención de la cabeza, sobresalga por lo menos hasta
vehículo, ya sea el respaldo del asiento o el dispositivo de
IMPORTANTE: Asegúrese de que una parte del
delgados y ceñidos.
es más seguro que el niño use chaquetas y suéteres
en el cuerpo del niño durante un accidente. En invierno,
cinturón de seguridad del asiento esté demasiado ojo
chaquetas abultadas o acolchadas porque hacen que el
IMPORTANTE: Cerciórese de haber quitado al niño
SEGURIDAD AL NIÑO EN EL ASIENTO ELEVADO
SIN RESPALDO: ABROCHAR EL CINTURÓN DE
Page 72

41
1701.
de asistencia el cliente de Peg-Perego al 1-800-671del vehículo y/o póngase en contacto con el servicio
necesita más asistencia, lea el manual de propietario
traslade el asiento elevado a un asiento diferente. Si
sigue estando colocado sobre el equipo o las correas,
LATCH rígido y vuelva a colocar el asiento elevado Si
colocado sobre el equipo o las correas, deje de usar el
su asiento o de un asiento cercano. Si el asiento está
sobre el equipo de correas del asiento o correas de
Asegúrese de que el asiento elevado no está colocado
asiento del vehículo.
El asiento elevado debe tocar la parte posterior del
elevado está colocado correctamente en el vehículo.
IMPORTANTE: Asegúrese de que el asiento
CON LATCH RÍGIDO EN EL VEHÍCULO
SIN RESPALDO: FIJACIÓN DEL ASIENTO ELEVADO
Page 73

40
2
desaparezcan.
asiento elevado hasta que
amarillos LATCH dentro del
los conectores rígidos
el mismo tiempo empuje
apriete la manilla amarilla y
dentro del asiento elevado,
conectores rígidos LATCH
6. Para guardar los
1
asiento elevado.
abran. Ahora puede retirar el
conectores rígidos LATCH se
(2) hasta que escuche que los
amarillos al mismo tiempo
1
ambos botones de apertura
vean por completo. Tire de
parte lateral de la base se
de apertura amarillos de la
sí hasta que los botones
del asiento elevado hacia
asiento elevado (1) y tire
la parte delantera del
2
la manilla amarilla de
asiento elevado, apriete
5. Para desconectar el
CON LATCH RÍGIDO EN EL VEHÍCULO
SIN RESPALDO: FIJACIÓN DEL ASIENTO ELEVADO
Page 74

39
asiento del vehículo.
toca la parte posterior del
de que el asiento elevado
vehículo (b). Asegúrese
posterior del asiento del
elevado contra la parte
tiempo, empuje el asiento
elevado (a). Al mismo
parte delantera del asiento
manilla amarilla de la
4. Vuelva a tirar de la
vehículo.
anclajes inferiores del
no está conectado a los
que el asiento elevado
vehículo. Rojo (b) signica
anclajes inferiores del
de forma segura a los
LATCH están conectados
que los conectores rígidos
verdes. Verde (a) signica
ventanas de indicación son
3. Compruebe que ambas
CON LATCH RÍGIDO EN EL VEHÍCULO
SIN RESPALDO: FIJACIÓN DEL ASIENTO ELEVADO
Page 75

click
38
vehículo.
posterior del asiento del
elevado hacia la parte
empujando el asiento
del vehículo y conéctelos
del pliegue del asiento
con los anclajes inferiores
LATCH rígidos amarillos
2. Alinee los conectores
hasta el fondo.
conectores se abrieron
asegurarse de que ambos
amarilla una vez más para
tiempo. Apriete la manilla
se abren (b) al mismo
rígidos amarillos LATCH
(a). Ambos conectores
del asiento elevado
(b) de la parte delantera
1. Apriete la manilla amarilla
CON LATCH RÍGIDO EN EL VEHÍCULO
SIN RESPALDO: FIJACIÓN DEL ASIENTO ELEVADO
Page 76

37
instrucciones siguientes.
Si decide usar el sistema LATCH rígido, siga las
convierta en un proyectil.
al asiento elevado cuando está vacío para que no se
tanto, asegúrese de poner el cinturón de seguridad
proyectil cuando el niño no está sentado sobre él. Por
no está jado al vehículo puede convertirse en un
IMPORTANTE: puesto que el asiento elevado
seguridad al niño en el asiento elevado".
- Salte al apartado "Sin respaldo: abrochar el cinturón de
Si decide no usar el LATCH rígido:
página 19).
Lea el apartado "LATCH rígido: Por qué usarlo" (vea la
SIN RESPALDO EN EL VEHÍCULO
SIN RESPALDO: MONTAJE DEL ASIENTO ELEVADO
Page 77

36
elevado (3).
en los oricios del asiento
del revestimiento de tela
4. Inserte los dos ganchos
(2).
del revestimiento de tela
de modo que esté debajo
3. Gire la solapa de tela (1)
SIN RESPALDO
CONVERSIÓN DE RESPALDO ALTO A
Page 78

35
(2).
del respaldo hacia arriba
(1) y al mismo tiempo tire
2. Empuje los dos botones
de tela.
botones del revestimiento
1. Desabotone los dos
elegir uno respecto al otro.
modos distintos y por qué
información sobre los
la página 18) para más
alto y sin respaldo" (véase
"Modos de uso: Respaldo
Consulte el apartado
SIN RESPALDO
CONVERSIÓN DE RESPALDO ALTO A
Page 79

34
cm).
hombro (máximo 1"-2,5
o ligeramente encima del
hombro debe estar sobre
La guía roja del cinturón de
del niño (véase la página 22).
correctamente para la altura
respaldo están ajustados
que el reposacabezas y el
del brazo (b), asegúrese de
o está en la parte lateral
roza el cuello del niño (a)
4. Si el cinturón de hombro
hombro.
apoyarse entre el cuello y el
SEGURIDAD AL NIÑO EN EL ASIENTO ELEVADO
RESPALDO ALTO: ABROCHAR EL CINTURÓN DE
Page 80

33
plano en el pecho del niño y
de hombro debe quedar
muslos del niño. El cinturón
estar ceñido a través de los
El cinturón de regazo debe
muestra en la figura.
cinturón de regazo como se
eliminar la holgura del
cinturón de hombro para
3. Tire hacia arriba el
asiento emite un chasquido.
el cinturón de seguridad del
asiento. Asegúrese de que
cinturón de seguridad del
reposabrazos. Abroche el
de hombro debajo de los
Nunca ponga el cinturón
seguridad del asiento.
broche del cinturón de
reposabrazos cerca del
de hombro debajo del
2. Coloque el cinturón
causa lesiones graves.
vientre blando del niño y esto
SEGURIDAD AL NIÑO EN EL ASIENTO ELEVADO
RESPALDO ALTO: ABROCHAR EL CINTURÓN DE
Page 81

32
las fuerzas del impacto en el
el cinturón de regazo pone
coloca sobre un reposabrazos
Cuando el cinturón de regazo se
huesos más fuertes de la cadera.
cinturón de regazo en los
reposabrazos mantienen el
de los dos reposabrazos, los
de regazo pasa por debajo
¿Por qué? Cuando el cinturón
reposabrazos.
regazo debajo de los dos
Coloque el cinturón de
de hombro al mismo tiempo.
ambas guías rojas del cinturón
deslizarse. NO use nunca
la guía roja y que no puede
completamente dentro de
el cinturón de hombro está
vehículo. Asegúrese de que
cinturón de hombro del
está en el mismo lado del
cinturón de hombro que
hombro en la guía roja del
1. Deslice el cinturón de
SEGURIDAD AL NIÑO EN EL ASIENTO ELEVADO
RESPALDO ALTO: ABROCHAR EL CINTURÓN DE
Page 82

31
más altas.
reposacabezas y el respaldo en sus posiciones
en o más arriba de los hombros del niño con el
rojas de la correa de hombro no puedan colocarse
elevado con el respaldo alto cuando las guías
IMPORTANTE: Deje de usar este asiento
SEGURIDAD AL NIÑO EN EL ASIENTO ELEVADO
RESPALDO ALTO: ABROCHAR EL CINTURÓN DE
Page 83

30
hombros del niño (ver la página 34).
estar siempre a 1 pulgada por encima o más de los
Las guías rojas de la correa de hombro deben
la parte blanda del vientre.
peligroso puesto que el cinturón de regazo queda en
encorva. Encorvarse es
de que el niño no se
elevado. Asegúrese
respaldo del asiento
la espalda toque el
atrás (2) de modo que
completamente hacia
asiento elevado (1) y
siente derecho en el
Haga que el niño se
delgados y ceñidos.
use chaquetas y suéteres
más seguro que el niño
accidente. En invierno, es
demasiado ojo en el cuerpo del niño durante un
hacen que el cinturón de seguridad del asiento quede
niño chaquetas abultadas o acolchadas porque
IMPORTANTE: Cerciórese de haber quitado al
SEGURIDAD AL NIÑO EN EL ASIENTO ELEVADO
RESPALDO ALTO: ABROCHAR EL CINTURÓN DE
Page 84

29
el cliente de Peg-Perego al 1-800-671-1701.
y/o póngase en contacto con el servicio de asistencia
asistencia, lea el manual de propietario del vehículo
elevado a un asiento diferente. Si necesita más
sobre el equipo o las correas, traslade el asiento
colocar el asiento elevado Si sigue estando colocado
o las correas, deje de usar el LATCH rígido y vuelva a
cercano. Si el asiento está colocado sobre el equipo
del asiento o correas de su asiento o de un asiento
elevado no está colocado sobre el equipo de correas
IMPORTANTE: Asegúrese de que el asiento
2
hasta que desaparezcan.
dentro del asiento elevado
rígidos amarillos LATCH
empuje los conectores
amarilla y el mismo tiempo
elevado, apriete la manilla
rígidos dentro del asiento
7. Para guardar los conectores
1
rígidos LATCH se abran.
escuche que los conectores
al mismo tiempo (2) hasta que
CON SISTEMA LATCH RÍGIDO
RESPALDO ALTO: FIJACIÓN DEL ASIENTO ELEVADO
Page 85

28
1
botones de apertura amarillos
completo. Tire de ambos
lateral de la base se vean por
apertura amarillos de la parte
sí hasta que los botones de
del asiento elevado hacia
del asiento elevado (1) y tire
amarilla de la parte delantera
elevado, apriete la manilla
2
6. Para desconectar el asiento
guardarlo lejos del vehículo.
del vehículo, cerciórese de
contención para la cabeza
Si retira el dispositivo de
elevado se encaje mejor.
vehículo para que el asiento
contención de la cabeza del
o eliminar el dispositivo de
Puede ser necesario ajustar
posición reclinada para el niño.
sí hasta encontrar la mejor
tire del asiento elevado hacia
Apriete la manilla amarilla y
respaldo alto puede reclinarse.
5.
Este asiento elevado de
CON SISTEMA LATCH RÍGIDO
RESPALDO ALTO: FIJACIÓN DEL ASIENTO ELEVADO
Page 86

27
rígido.
accidentalmente el LATCH
que alguien desconecte
LATCH. Esto impedirá
de los conectores rígidos
los botones de apertura (E)
del vehículo (b). Esto ocultará
parte posterior del asiento
asiento elevado contra la
mismo tiempo, empuje el
del asiento elevado (a). Al
amarilla de la parte delantera
4. Vuelva a tirar de la manilla
vehículo.
anclajes inferiores del
no está conectado a los
que el asiento elevado
vehículo. Rojo (b) signica
anclajes inferiores del
de forma segura a los
LATCH están conectados
que los conectores rígidos
verdes. Verde (A) signica
ventanas de indicación son
3. Compruebe que ambas
CON SISTEMA LATCH RÍGIDO
RESPALDO ALTO: FIJACIÓN DEL ASIENTO ELEVADO
Page 87

click
26
vehículo.
posterior del asiento del
elevado hacia la parte
empujando el asiento
del vehículo. Conéctelos
del pliegue del asiento
con los anclajes inferiores
LATCH rígidos amarillos
2. Alinee los conectores
abrieron hasta el fondo.
que ambos conectores se
más para asegurarse de
manilla amarilla una vez
mismo tiempo. Apriete la
amarillos se abren (b) al
conectores LATCH rígidos
asiento elevado. Ambos
() de la parte delantera del
1. Apriete la manilla amarilla
- véase la página 15)
está ubicado en el vehículo?"
"LATCH - ¿Qué es y dónde
del vehículo (vea el apartado
Busque los anclajes inferiores
CON SISTEMA LATCH RÍGIDO
RESPALDO ALTO: FIJACIÓN DEL ASIENTO ELEVADO
Page 88

25
instrucciones siguientes.
Si decide usar el sistema LATCH rígido, siga las
convierta en un proyectil.
al asiento elevado cuando está vacío para que no se
tanto, asegúrese de poner el cinturón de seguridad
proyectil cuando el niño no está sentado sobre él. Por
no está jado al vehículo puede convertirse en un
IMPORTANTE: puesto que el asiento elevado
(véase la página 30).
cinturón de seguridad al niño en el asiento elevado"
- Salte hasta el apartado "Respaldo alto: Abrochar el
Si decide no usar el LATCH rígido:
página 19).
Lea el apartado "LATCH rígido: Por qué usarlo" (vea la
MONTAJE DEL ASIENTO ELEVADO EN EL VEHÍCULO
RESPALDO ALTO:
Page 89

24
2 3
1
hacia la izquierda.
el respaldo, gire el pomo
más ancho. Para estrechar
para que el respaldo sea
1
2
pomo (2) hacia la derecha
al mismo tiempo gire el
del lado del pomo (1) y
tres ajustes. Ponga el botón
1
2
3
1
2
3
1
2
3
1
2
3
El ancho del respaldo tiene
3. Ancho del respaldo
sin tocar la manilla.
lugar intentando moverlo
encaja con un clic en su
de que el respaldo se
el respaldo (2). Asegúrese
1
2
mismo tiempo suba o baje
posterior del respaldo y al
la manilla (1) de la parte
tres posiciones. Apriete
La altura del respaldo tiene
2. Altura del respaldo
AJUSTE DEL ASIENTO PARA QUE SE ADAPTE AL NIÑO
RESPALDO ALTO:
Page 90

23
1
2
3
4
5
1
2
3
4
5
página 34).
hombros del niño (ver la
por encima o más de los
están siempre a 1 pulgada
de la correa de hombro
de que las guías rojas
tocar la manilla. Asegúrese
intentando moverlo sin
con un clic en su lugar
reposacabezas se encaja
(b). Asegúrese de que el
baje el reposacabezas
mismo tiempo suba o
del reposacabezas y al
de la parte posterior
Apriete la manilla (a)
tiene cinco posiciones.
El reposacabezas
reposacabezas
1. Altura del
AJUSTE DEL ASIENTO PARA QUE SE ADAPTE AL NIÑO
RESPALDO ALTO:
Page 91

22
Consulte la página 35 para quitar el respaldo.
elevado de respaldo alto.
hombros del niño debe DEJAR de usar este asiento
rojas del cinturón de hombro están debajo de los
respaldo están en sus posiciones más altas Y las guías
IMPORTANTE: Cuando el reposacabezas Y el
que el niño le diga lo que es más cómodo para él.
otros les gusta tener más espacio para los brazos. Deje
Algunos niños preeren un respaldo más estrecho, a
posición más alta y ensanchar el respaldo.
necesitará colocar el reposacabezas y el respaldo en una
los ajustes cada 3 meses. A medida que el niño crece,
al niño. Los niños crecen rápidamente. Compruebe
ajustes hasta que encuentre el que se adapta mejor
tamaños. Dedique unos cuantos minutos e intente varios
para garantizar el mejor ajuste para niños de distintos
distintas. Los tres ajustes son independientes entre ellos
El reposacabezas y el respaldo se ajustan de 3 maneras
AJUSTE DEL ASIENTO PARA QUE SE ADAPTE AL NIÑO
RESPALDO ALTO:
Page 92

21
niño la sujeción que necesita.
debe usarlo con respaldo alto para dar a la cabeza del
del niño no use este asiento elevado sin respaldo,
Si el vehículo no sujeta a la parte superior de las orejas
Este soporte ayuda a evitar las lesiones por latigazo.
el niño no puede tirar la cabeza hacia atrás en un accidente.
sobresale por lo menos hasta la parte superior de las orejas,
del asiento o el dispositivo de contención de la cabeza
altura de la base del cráneo del niño. Cuando el respaldo
¿Por qué? La parte superior de las orejas está la misma
sobresalga por lo menos hasta la parte superior de las orejas del niño.
respaldo del asiento o el dispositivo de contención de la cabeza,
Sin respaldo: Asegúrese de que una parte del vehículo, ya sea el
fácil viajar con el niño en un asiento elevado sin respaldo.
factible. Sin embargo, sabemos que hay veces en que es más
como asiento elevado con respaldo alto siempre que sea
Recomendamos encarecidamente utilizar este asiento
sujetan la parte superior de las orejas de los niños.
impedir lesiones por latigazo en los vehículos que no
• Proporciona soporte para la cabeza y el cuello para
fuera de las partes correctas del cuerpo.
MODOS DE USO: RESPALDO ALTO Y SIN RESPALDO
Page 93

20
el cinturón de seguridad del asiento se aoja y se desliza
duerme. Cuando un niño que duerme cae lateralmente,
• Ayuda a mantener el cuerpo del niño derecho mientras
durante los giros bruscos u otras maniobras antes del accidente.
• Ayuda a mantener el cuerpo del niño en una posición mejor
con respaldo alto en vez de sin respaldo.
apoyan y retuercen menos cuando están en un asiento
los niños a sentarse derechos. Los niños a menudo se
• Proporciona un asiento más cerrado que ayuda a
pecho del niño en caso de accidente con impacto lateral
• Proporciona protección adicional a la cabeza, cuello y
reposacabezas y reposabrazos:
El respaldo alto da al niño la mejor protección porque el
asiento elevado sin respaldo.
el reposabrazos, es un
Sin el reposacabezas o
es de respaldo alto.
reposabrazos, su asiento elevado
Si está usando un reposacabezas y
respaldo.
El asiento elevado puede ser con el respaldo alto o sin
MODOS DE USO: RESPALDO ALTO Y SIN RESPALDO
Page 94

19
jar el asiento elevado al vehículo.
consideración si usa o no un sistema LATCH rígido para
asiento como dispositivo de contención. Esto sin tener en
El niño usará siempre el cinturón de seguridad del
personas que están en el automóvil.
está sentado sobre él, porque puede herir a las demás
el asiento elevado salga volando cuando el niño no
giro brusco. Además, el sistema LATCH impide que
este asiento elevado en caso de parada repentina o
El sistema LATCH rígido aumenta la estabilidad de
con este asiento elevado siempre que sea factible.
encarecidamente usar un sistema LATCH rígido
• Sin embargo, Peg Perego recomienda
al niño seguro.
supera todas las normas de seguridad para mantener
• Con o sin LATCH rígido, este asiento elevado cumple o
• El uso de un LATCH rígido es opcional.
ja al vehículo.
Este asiento elevado cuenta con un LATCH rígido que lo
SISTEMA LATCH RÍGIDO ¿POR QUÉ USARLO?
Page 95

18
inferiores (LATCH rígido)
Conector de los anclajes
Anclajes inferiores
Este asiento elevado no tiene una correa de sujeción.
normalmente no tienen ni usan correas de sujeción.
orientado hacia adelante. Los asientos elevados
dorsal de un niño que viaja en un asiento de vehículo
de sujeción mantiene seguros el cerebro y la espina
del niño al anclaje de sujeción del vehículo. La correa
sujeción ja la parte superior del asiento de vehículo
vehículo orientados hacia adelante. La correa de
correa que se encuentra en todos los asientos de
Correa de sujeción: La correa de sujeción es una
ESTÁ UBICADO EN EL VEHÍCULO?
SISTEMA LATCH - ¿QUÉ ES Y DÓNDE
Page 96

17
Este asiento elevado cuenta con un LATCH rígido
forma rígida al asiento del niño y no hay correas.
LATCH rígido: Cuando los ganchos están unidos de
correa flexible que forma parte del asiento del niño.
LATCH flexible: Cuando los ganchos están unidos a una
inferiores del pliegue del asiento del vehículo.
asiento del niño que se enganchan a los anclajes
Conectores del anclaje inferior: Son ganchos del
provisto de anclajes inferiores y de sujeción y dónde están ubicados.
Lea el manual del propietario del vehículo para ver si el vehículo está
sujeción por al menos tres posiciones de asientos.
de los vehículos a partir de 2000 tienen los anclajes de
que están detrás del asiento del vehículo. La mayoría
Anclajes de sujeción: Son anillos o barras de metal
asiento central casi nunca cuenta con anclajes inferiores).
siempre para los asientos del pasajero y del conductor. El
inferiores para al menos dos posiciones de asientos (casi
de los vehículos a partir de 2003 tienen los anclajes
ocultas en el pliegue del asiento del vehículo. La mayoría
Anclajes inferiores: Son un par de barras de metal
Equipo LATCH del vehículo:
del niño o asiento elevado a anclajes especiales del vehículo.
LATCH funciona conectando las piezas del asiento de vehículo
de correas de sujeción y anclajes inferiores para niños. El sistema
LATCH (Lower Anchors and Tethers for Children) significa sistema
ESTÁ UBICADO EN EL VEHÍCULO?
SISTEMA LATCH - ¿QUÉ ES Y DÓNDE
Page 97

NO
NO
16
montaje del asiento elevado.
del vehículo para más información sobre la compatibilidad y el
pasajeros de la parte delantera, consulte el manual del propietario
Si su vehículo está equipado con bolsas de aire laterales para los
3• Asientos de vehículos que giran en posiciones diferentes
2• Asientos de vehículos orientados hacia la parte trasera
hacia la parte lateral
1• Asientos de vehículos orientados
los siguientes casos:
NO utilice este asiento elevado en
la parte delantera del vehículo.
asiento de vehículo orientado hacia
utilizarse SOLAMENTE en un
Este asiento elevado puede
asiento posterior.
utilicen este asiento elevado en el
encarecidamente que los niños
en vez del asiento delantero. Por tanto, Peg Perego recomienda
cuando están sujetados correctamente en el asiento posterior
Según las estadísticas de accidentes, los niños están más seguros
motocicletas.
No está diseñado para usarse en vehículos de tres ruedas o
pasajeros.
Este asiento elevado está diseñado para usarse en vehículos de
USARSE DE FORMA SEGURA CON ESTE ASIENTO ELEVADO?
VEHÍCULOS Y ASIENTOS DE VEHÍCULOS - ¿CUÁLES PUEDEN
Page 98

15
2
1
este asiento elevado con su vehículo.
al 1-800-671-1701 para más información sobre la compatibilidad de
asientos inflables, llame al servicio de atención al cliente de Peg-Perego
2• Si su vehículo está equipado con cinturones de seguridad de
están fijados a la puerta del vehículo, no use este asiento elevado.
1• Si el vehículo está equipado con cinturones de seguridad de asiento que
Sin embargo:
manera segura con este asiento elevado.
La mayoría de cinturones de regazo/hombro pueden usarse de
regazo no sujetan la cabeza ni el pecho del niño en caso de accidentes.
que aumente el riesgo de lesiones para el niño porque los cinturones de
de un cinturón de regazo. Usar solamente el cinturón de regazo hace
Este asiento elevado no puede utilizarse cuando se dispone solamente
hombro.
Este asiento elevado debe utilizarse con un cinturón de regazo/
DE FORMA SEGURA CON ESTE ASIENTO ELEVADO?
CINTURONES DE SEGURIDAD - ¿CUÁLES PUEDEN USARSE
Page 99

14
viajar de forma segura en un asiento elevado.
segura. Cuando tienen 12 años, la mayoría de los niños puede
10 años necesitan un asiento elevado para viajar de forma
Los estudios demuestran que la mitad de los niños que tienen
el viaje.
5• El niño puede permanecer sentado de esta manera por todo
4• El cinturón de hombro es cómodo entre el cuello y el hombro.
piernas.
cinturón de regazo debe apoyarse en la parte superior de las
3• El cinturón de regazo está en el regazo, no en el vientre. El
asiento del vehículo sin encorvarse.
2• Las rodillas del niño se doblan naturalmente en el borde del
asiento del vehículo.
1• El niño puede sentarse con la espalda contra el respaldo del
siguientes 5 preguntas:
Adaptación correcta signica que puede decir que sí a las
sin la ayuda de un asiento elevado.
de seguridad del asiento se adapte correctamente a su cuerpo
quepa adecuadamente en el asiento del vehículo Y el cinturón
Los niños necesitan un asiento elevado hasta que su cuerpo
VIAJAR SIN ESTE ASIENTO ELEVADO?
¿CUÁNDO ESTÁ PREPARADO EL NIÑO PARA
Page 100

13
adelante que no está jada.
la cabeza y cuello que una silla para vehículo orientada hacia
asiento elevado puede proporcionar una protección mejor para
un vehículo que no cuenta con una correa de sujeción, un
cerciórese de usarla siempre con la correa de sujeción. Si tiene
usar. Si usa la silla para vehículo orientada hacia adelante,
Muchos padres no están seguros sobre cuál asiento hay que
asiento elevado, pero aún cabe en su silla vieja para vehículo?
¿El niño cumple todos los requisitos anteriores para usar este
seguro y no dejará que se encorve o se apoye.
El arnés de cinco puntos de la silla para vehículos hará que esté
un asiento elevado, tiene que viajar en una silla para vehículos.
del cuerpo. Si el niño no es lo sucientemente maduro para usar
del asiento se ciña y permanezca en las partes óseas apropiadas
correctamente es lo que garantiza que el cinturón de seguridad
un asiento elevado hasta tener por lo menos 5 años. Sentarse
La mayoría de los niños no puede sentarse correctamente en
etc.
asiento debajo del brazo o detrás de la espalda, sin apoyarse,
de seguridad del asiento, sin poner el cinturón de seguridad del
durante todo el viaje - sin encorvarse, sin jugar con el cinturón
PARA PASAR A UN ASIENTO ELEVADO?
¿CUÁNDO ESTÁ PREPARADO EL NIÑO
 Loading...