

Page 1
IT Istruzioni d’uso
EN Instructions for use
FR Notice d’emploi
DE Gebrauchsanleitung
ES Instrucciones de uso
Page 2
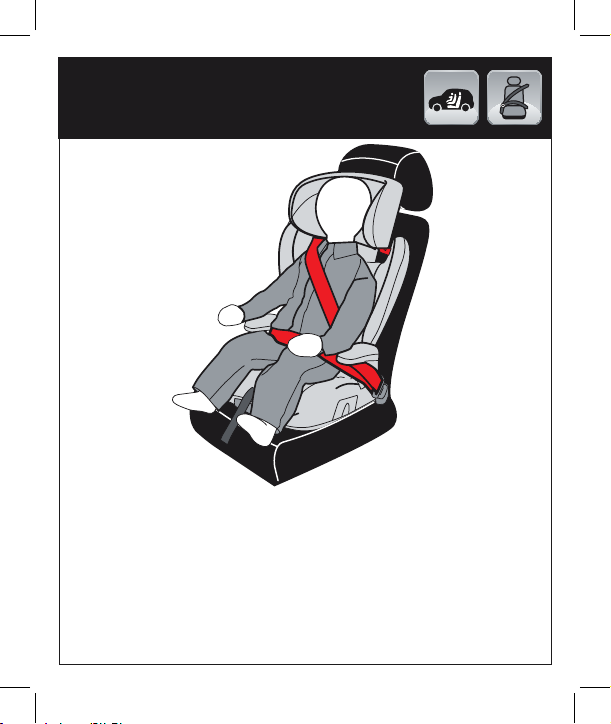
UNIVERSAL CATEGORY 15-36 Kg
BELTED
IT• Il bambino è assicurato con la cintura del veicolo. Il seggiolino è solo
appoggiato al sedile.
EN• The child is secured by means of the safety belt of the car. The child
seat simply leans against the car seat.
FR• L'enfant est attaché avec la ceinture du véhicule. Le siège-auto est
uniquement adossé à la banquette.
DE• Das Kind wird mit dem Fahrzeuggurt gesichert. Der Kindersitz liegt
nur auf dem Sitz auf.
ES• El niño se asegura con el cinturón del vehículo. La silla de auto sólo se
apoya sobre el asiento.
2
Page 3
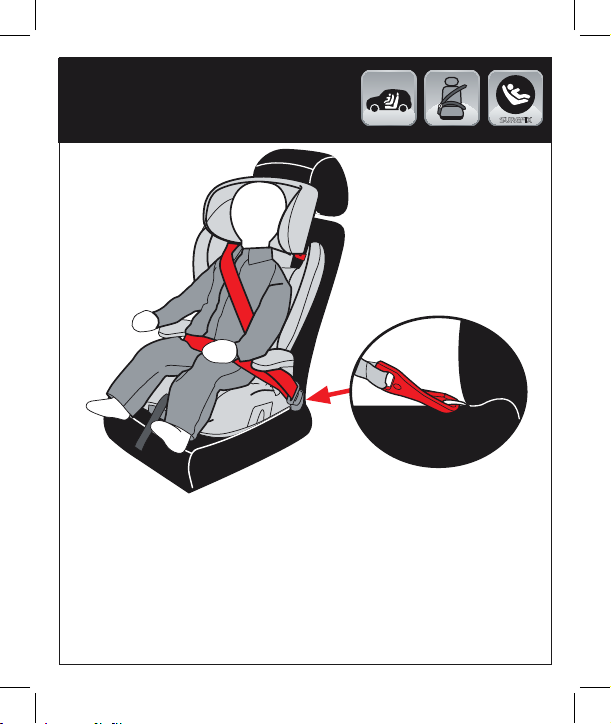
SEMI-UNIVERSAL CATEGORY
15-36 Kg
BELTED + SUREFIX
IT• Il bambino è assicurato con la cintura del veicolo. Il seggiolino auto viene fissato
con i connettori ISOFIX del veicolo.
EN• The child is secured by means of the safety belt of the car. The child seat is fixed
in place with the ISOFIX connectors of the car.
FR• L'enfant est attaché avec la ceinture du véhicule. Le siège-auto est fixé avec les
connecteurs ISOFIX du véhicule.
DE• Das Kind wird mit dem Fahrzeuggurt gesichert. Der Autokindersitz wird mit den
ISOFIX-Befestigungen des Fahrzeugs befestigt.
ES• El niño se asegura con el cinturón del vehículo. La silla de auto se fija con los
conectores ISOFIX del vehículo.
3
SUREFIX
Page 4
OK
NO
NO
1
NO
NO
NO
Page 5
6
5
4
3
2
1
1
2
3
4
5
6
3
2
4
Page 6
5
A
B
C
6
7
8
Page 7
9
10
11
12
Page 8
2 cm
13
14
1615
Page 9

17
18
A
B
19
20
Page 10
21
22
23
24
Page 11
25
26
Page 12
Viaggio 2-3 Surefix
1
3
4
2
IT• Ricambi disponibili in piú colori da
specificare nella richiesta.
EN• Spare parts available in different colours to
be specified when ordering.
FR• Pièces de rechange disponibles en
plusieurs couleurs à spécifier dans la
demande.
DE• Ersatzteile in mehr Farben vorhanden, die
in der Anfrage spezifiziert werden müssen.
ES• Repuestos disponibles en otros colores que
se especificarán en el pedido.
5
1) ASPI0148NF
2) SPST7164NF
3) BRIVIA•
4) BSCVIA•
5) BSAVIA•
12
Page 13

IT_Italiano
Grazie per aver scelto un
prodotto Peg-Pérego.
Seggiolino-auto, Viaggio 2/3
categoria “Universale”con
cinture
• Omologato secondo la normativa
Europea UN/ECE R44/04 per bambini di
peso da 15 a 36 kg (da 3 a 12 anni circa).
• Adatto alla maggior parte dei sedili
delle autovetture, ma non a tutti.
• Il seggiolino-auto può essere
correttamente installato se nel
manuale d’uso e manutenzione del
veicolo è indicata la compatibilità con
sistemi di ritenuta “Universali”.
• Questo seggiolino-auto è
classificato “Universale” secondo
criteri di omologazione più severi
rispetto ai modelli precedenti che
non dispongono dell’ etichetta di
omologazione.
• Il seggiolino-auto puó essere
utilizzato solo su veicoli approvati,
dotati di cintura a tre punti statica o
con avvolgitore, omologati secondo
il regolamento UN/ECE R°16 o
normative equivalenti.
• Non é consentito usare la cintura a
due punti o addominale.
Seggiolino auto, Viaggio 2/3
categoria “Semi Universale”,
con Cinture + Surefix
• Omologato secondo la normativa
Europea UN/ECE R44/04 per bambini
di peso da 15 a 36 kg (da 3 a 12 anni
circa).
• Questo seggiolino è omologato
per uso semiuniversale ed è adatto
al fissaggio sui sedili delle vetture
elencate nella lista allegata al
presente foglio istruzioni.
• Il seggiolino-auto puó essere
utilizzato solo su veicoli approvati,
dotati di cintura a tre punti statica o
con avvolgitore, omologati secondo
il regolamento UN/ECE R°16 o
normative equivalenti.
• Non é consentito usare la cintura a
due punti o addominale.
AVVERTENZA
• Leggere attentamente le
istruzioni prima dell’uso e
conservarle nell’apposita sede
per riutilizzarle in futuro. La
mancata scrupolosa osservanza
delle istruzioni di installazione del
seggiolino-auto, comporterebbe
dei rischi al vostro bambino.
• Le operazioni di montaggio e
di installazione di Viaggio 2/3
devono essere effettuate da adulti.
L'operazione di montaggio e
installazione, si effettua senza il
bambino nel seggiolino auto.
• Durante i viaggi in auto non
tenere mai in braccio il bambino
e non sistemarlo mai al di fuori
13
Page 14
del seggiolino. In caso di frenata
improvvisa, anche a bassa andatura,
il bambino verrebbe facilmente
catapultato in avanti.
• Evitare di introdurre le dita nei
meccanismi.
• In auto prestare particolare
attenzione a bagagli o altri oggetti
che possono causare lesioni al
bambino nel seggiolino-auto in caso
di incidente.
• Non utilizzare metodologie di
installazione diverse da quelle
indicate, pericolo di distacco dal
sedile.
• Assicurarsi che la cintura a tre
punti del veicolo per fissare il
seggiolino-auto sia sempre tesa e
non attorcigliata.
• Non lasciare mai incustodito il
vostro bambino nel seggiolino-auto:
sorvegliarlo anche mentre dorme.
• Se la vettura é in movimento,
non togliere mai il bambino dal
seggiolino-auto.
• Prestare attenzione che il
seggiolino-auto non rimanga
bloccato da una parte mobile del
sedile o da una portiera.
• Regolare l’altezza e la tensione
delle cinture verificando che siano
aderenti al corpo del bambino
senza stringere troppo; verificare
che la cintura di sicurezza non sia
attorcigliata e che il bambino non la
sganci da solo.
• Non lasciare il seggiolino-auto
nella vettura sotto l’esposizione del
sole, alcune parti potrebbero essersi
surriscaldate e nuocere alla pelle
delicata del bambino, controllare
prima di collocare il bambino.
• Non utilizzare il seggiolinoauto senza il rivestimento di
tessuto, tale rivestimento non
puó essere sostituito da uno non
approvato dal costruttore in
quanto costituisce parte integrante
del seggiolino e della sicurezza.
• Non rimuovere o cambiare le parti
in polistirolo in quanto costituiscono
parte integrante della sicurezza.
• In caso di dubbi, rivolgersi al
costruttore o al rivenditore di questo
seggiolino-auto.
• Questo articolo è numerato
progressivamente.
• Non staccare le etichette adesive
e cucite; potrebbero rendere il
prodotto non conforme ai sensi di
norma.
• Non utilizzare il seggiolino-auto se
presenta rotture o pezzi mancanti,
se è di seconda mano, o se è stato
sottoposto a sollecitazioni violente
in un incidente perchè potrebbe
avere subito dei danni strutturali
estremamente pericolosi.
• Non effettuare modifiche al
prodotto.
• Per eventuali riparazioni, sostituzioni
di pezzi e informazioni sul prodotto,
contattare il servizio assistenza postvendita. Le varie informazioni sono
all’ultima pagina di questo manuale.
Se il seggiolino è agganciato agli
14
Page 15

attacchi isofix dell'auto, lasciarlo
sempre agganciato.
Se il seggiolino è agganciato in
auto solo con le cinture, qualora
non fosse in uso, posizionarlo
nel bagagliaio o rimuoverlo.
• Non utilizzare accessori che non
siano approvati dal costruttore o
dalle competenti autorità.
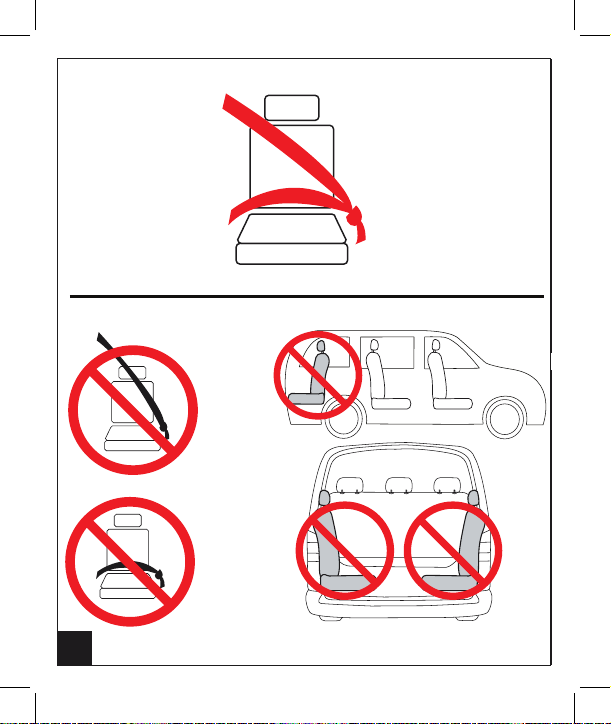
1_ IMPORTANTE
• "Viaggio 2/3": seggiolino auto
gruppo 2/3, deve essere installato
in senso di marcia.
• Non installare “Viaggio 2/3”
su sedili rivolti in direzione
opposta al senso di marcia o
trasversalmente al senso comune
di marcia del veicolo.
• Si consiglia sempre l'uso del
sedile posteriore sul lato opposto
al guidatore.
• In caso di installazione su
sedile anteriore, si raccomanda
di posizionare il seggiolino il più
lontano possibile dal cruscotto.
• In caso di difficoltà nel montare
Viaggio 2/3 in auto, sollevare ma
non togliere il poggiatesta del
veicolo.
2_
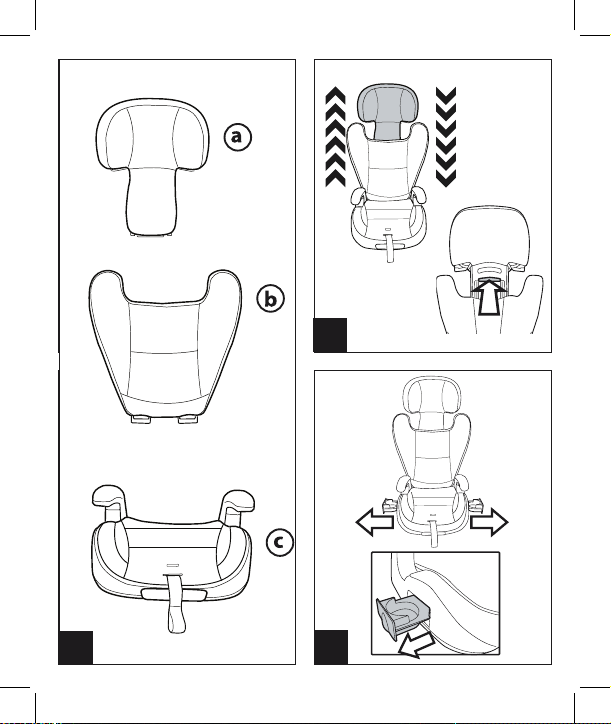
Componenti dell' articolo
Verificare il contenuto presente
nell'imballo e in caso di reclamo
prego contattare il Servizio
Assistenza.
_ Il seggiolino auto è composto da:
1 poggiatesta (a), 1 schienale (b), 1
seduta (c).
Il prodotto nel suo imballo originale
è pronto all'uso. Non sono richieste
operazioni di montaggio.
Caratteristiche di prodotto
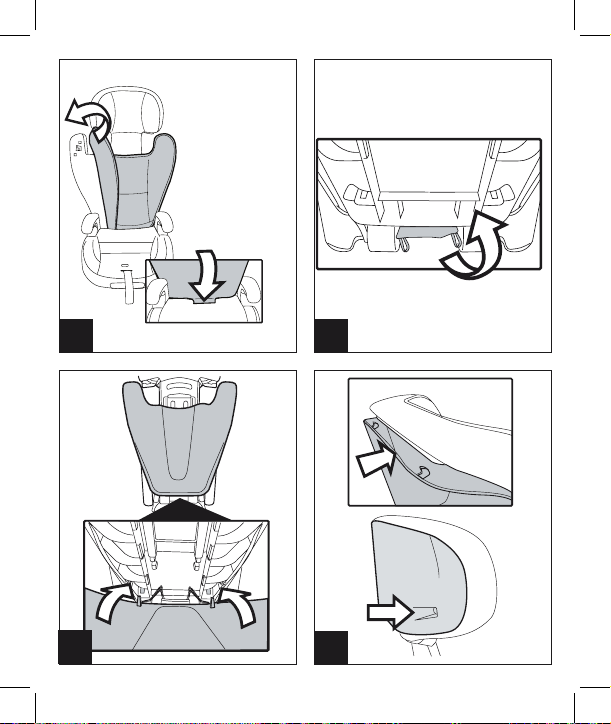
3• Il poggiatesta è regolabile in 6
posizioni. Sollevare la maniglia
posta sul retro dello schienale e
posizionarlo all'altezza desiderata.
IMPORTANTE: Per seguire la
crescita del bambino è necessario
regolare l'altezza del poggiatesta
in rapporto alla sua altezza.
IMPORTANTE Ad operazione
eseguita provare a muovere il
poggiatesta per verificare che sia
correttamente agganciato.
4• Viaggio2/3 è dotato di due
portabibite estraibili laterali.
5• Viaggio2/3 è dotato di un
sistema di reclinazione per garantire
maggiore comfort. Per reclinarlo
tirare la maniglia posta davanti e
contemporaneamente sollevare il
prodotto.
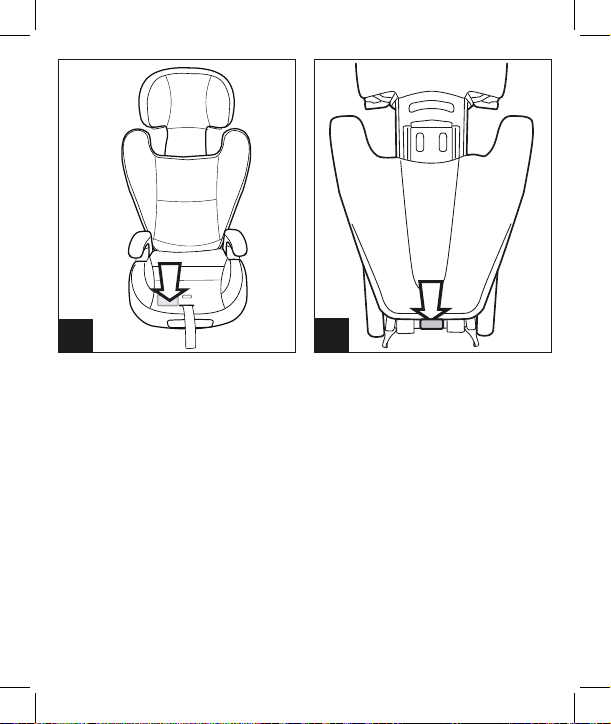
Aggancio in auto
con cinture di sicurezza +
Surefix
Per chi possiede una
vettura con attacchi Isofix
E' possibile utilizzare questo tipo di
aggancio solo se la vostra vettuta è
dotata di ganci isofix.
15
Page 16

Per maggiori informazioni sulla
presenza e posizione dei ganci,
consultare il manuale d'uso della vettura.
L'aggancio surefix garantisce una
maggior sicurezza in auto, ma
non sostituisce la funzione delle
cinture del veicolo.
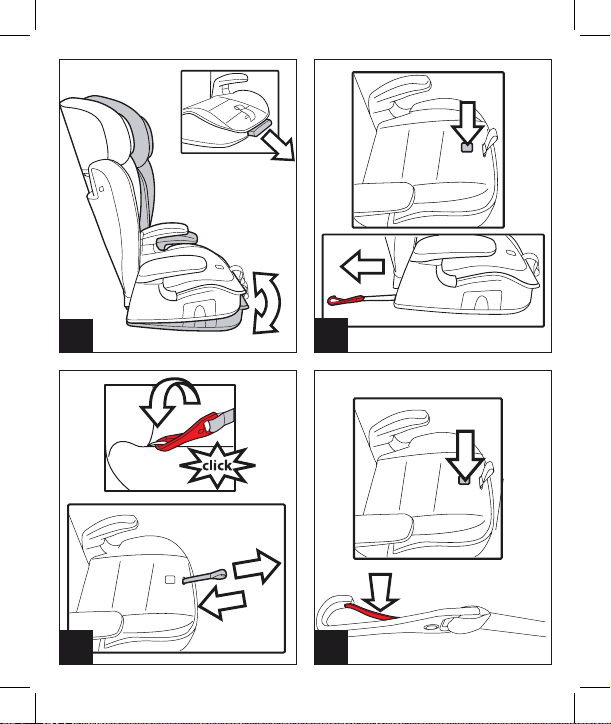
6• Per allungare i connettori surefix,
premere il pulsante posto davanti
all'interno della sacca, come in figura,
ed allungarli manualmente.
7• Agganciare i connettori surefix del
seggiolino ai ganci Isofix del sedile
dell'auto, fino al "click" (freccia A).
Tendere la cinghia e
contemporaneamente (freccia
B), spingere il seggiolino contro lo
schienale del sedile (freccia C).
IMPORTANTE: ad operazione
completata muovere il seggiolino
per verificare l'effettivo aggancio agli
attacchi Isofix .
8• Per sganciare i connettori surefix del
seggiolino dai ganci isofix del sedile,
premere sul seggiolino il pulsante
posto davanti all'interno della sacca
per allentare le cinghie dei connettori
e poi sganciarli manualmente
premendo sulla levetta di sicurezza
posta sui ganci, come in figura.
Aggancio in auto
con cinture di sicurezza
Per chi NON possiede una
vettura con attacchi Isofix
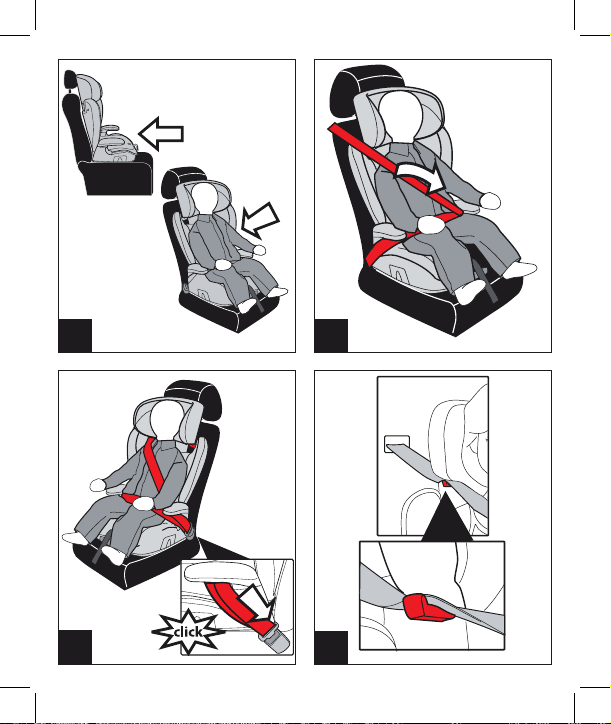
9• Posizionare il seggiolino Viaggio
2/3 sul sedile dell'auto nel senso di
marcia del veicolo, come in figura e
accomodare il bambino.
Come assicurare il bambino
su Viaggio 2/3
10• Far passare la cintura di sicurezza
dell'auto, come in figura.
11• Agganciare la cintura di sicurezza
dell'auto al sedile, fino al click.
Posizionare i due rami della cintura
come in figura.
12• Per completare l'aggancio in
auto, far passare la cintura diagonale
nel passaggio superiore posto sopra
la spalla del bambino.
IMPORTANTE: se la cintura
rimane lenta tenderla.Fare
attenzione che rimanga sempre
tesa e non attorcigliata.
13• La giusta posizione delle cinture
è quella in cui le spalle del bambino
sono sotto al punto di passaggio
delle cinture, come in figura.
IMPORTANTE: le cinture non
devono essere né troppo alte, ne
troppo basse rispetto alle spalle
del bambino.
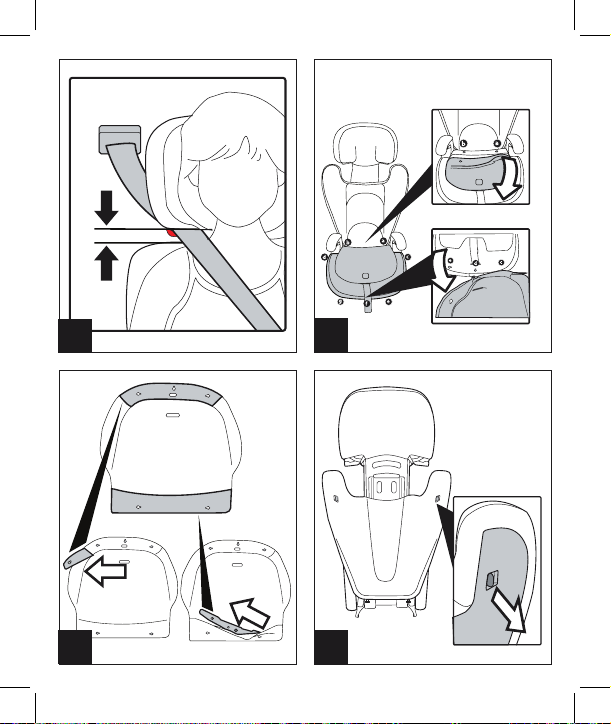
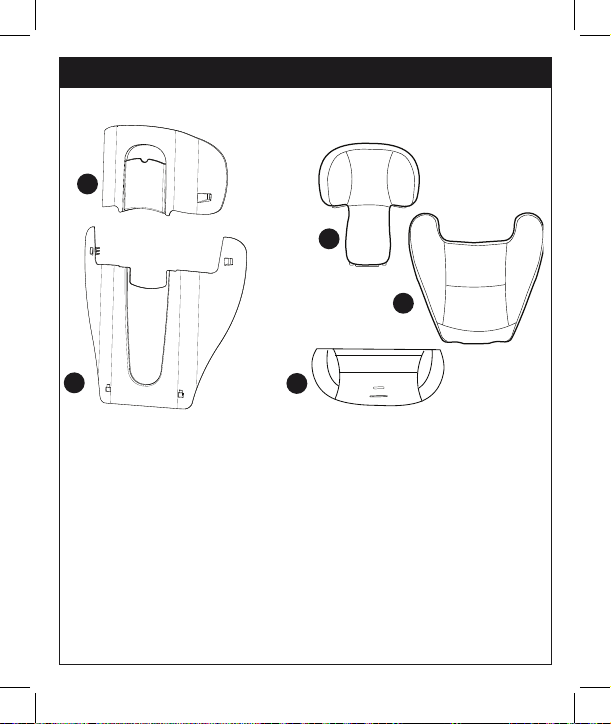
Come sfoderare la sacca
Per rimuovere il rivestimento del
seggiolino auto Viaggio 2/3 i tre
elementi: poggiatesta, schienale,
seduta NON vanno sganciati tra di
loro ma rimangono uniti.
SFODERARE SEDUTA:
14• sganciare i gancini della sacca dalla
16
Page 17

seduta, nei punti e nella sequenza
indicata. Sfilare la cinghia centrale.
15• sfilare dalla sacca i listelli rigidi,
come in figura.
SFODERARE SCHIENALE:
16• Rimuovere il coperchio posteriore
tirando verso l'esterno, come in
figura;
17• sganciare tutti gli elastici presenti;
18• sfilare la sacca.
SFODERARE POGGIATESTA:
19• Sul retro del poggiatesta
rimuovere il coperchio tirando verso
l'esterno e sganciare i due elastici,
come in figura;
20• sfilare la sacca.
Manutenzione
dell'imbottitura
Spazzolare le parti in tessuto per
allontanare la polvere;
• lavare in lavatrice ad una
temperatura massima di 30°C azione
meccanica e centrifugazione ridotta;
• non candeggiare al cloro;
• non stirare;
• non lavare a secco;
• non smacchiare con solventi;
• non asciugare a mezzo di
asciugabiancheria a tamburo rotativo.
°
30
Come rivestire la sacca
RIFODERARE SEDUTA:
• Inserire i listelli rigidi nel tessuto della
seduta facendo emergere i ganci;
• agganciare i gancini alla seduta,
prima i tre più esterni, infilare poi la
cinghia centrale nell'asola e infine
agganciare i due ganci più interni.
• Agganciare i bottoni automatici
laterali.
RIFODERARE SCHIENALE:
21• calzare la sacca, facendo passare
la parte inferiore del tessuto dietro lo
schienale, come in figura;
22• agganciare tutti gli elastici;
23• agganciare il coperchio prima
nella parte inferiore e poi nella
parte superiore.
RIFODERARE POGGIATESTA:
• calzare la sacca facendo attenzione
alla parte bianca in polistirolo.;
• agganciare tutti gli elastici;
24• agganciare il coperchio prima
nella parte superiore e poi nella parte
inferiore.
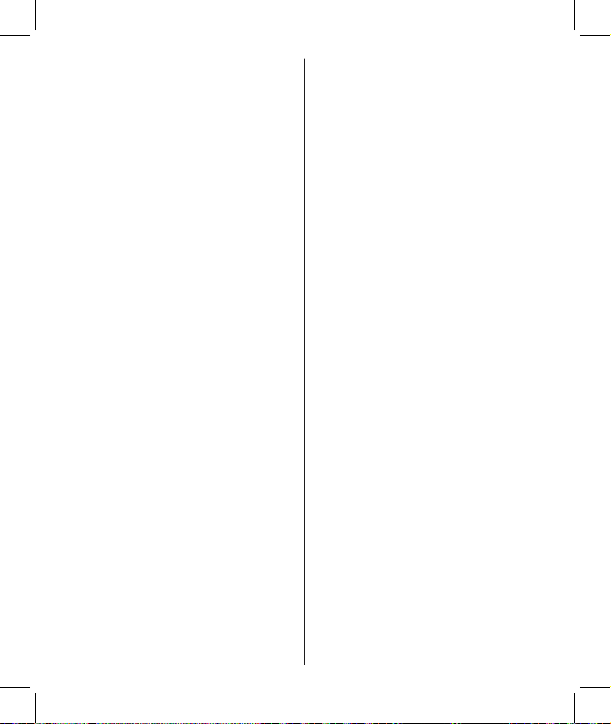
Numeri di serie
25• Viaggio 2/3 riporta sotto la sacca
della seduta informazioni relative
a: nome del prodotto, data di
produzione e numerazione seriale
dello stesso.
26• Viaggio 2/3 riporta dietro lo
schienale in basso l' etichetta di
omologazione.
Pulizia del prodotto
• Il vostro prodotto necessita un
17
Page 18

minimo di manutenzione. Le
operazioni di pulizia e manutenzione
devono essere effettuate solo da
adulti.
• Si raccomanda di tenere pulite
tutte le parti in movimento.
• Periodicamente pulire le parti in
plastica con un panno umido, non
usare solventi o altri prodotti simili.
• Non pulire il dispositivo di
assorbimento d’urto in polistirolo
con solventi o altri prodotti simili.
•
Proteggere il prodotto da agenti
atmosferici, acqua, pioggia o neve;
l’esposizione continua e prolungata al
sole potrebbe causare cambiamenti
di colore in molti materiali.
• Conservare il prodotto in un posto
asciutto.
Come leggere l'etichetta
di omologazione
• In questo paragrafo vi spieghiamo
come leggere l’etichetta di
omologazione (etichetta arancione).
• L’etichetta è doppia perchè questo
seggiolino-auto è omologato per
essere fissato in auto in due modi:
• Sistema di aggancio SUREFIX
(la scritta SEMI-UNIVERSAL indica la
compatibilità del seggiolino-auto
con veicoli equipaggiati con sistema
ISOFIX).
• Sistema di aggancio con cintura a
tre punti statica o con avvolgitore
(la scritta UNIVERSAL indica la
compatibilità del seggiolino-auto
su veicoli dotati di questo tipo di
cintura).
• In alto all’etichetta c’è il marchio
dell’azienda produttrice e il nome del
prodotto.
• La lettera E in un cerchio: indica il
marchio di omologazione Europea
e il numero definisce il paese che
ha rilasciato l’omologazione (1:
Germania, 2: Francia, 3: Italia, 4: Paesi
Bassi, 11: Gran Bretagna e 24: Irlanda).
• Numero di omologazione: se inizia
con 04 vuol dire che è il quarto
emendamento (quello attualmente
in vigore) del regolamento R44.
• Normativa di riferimento: UN/ECE
R44/04.
• Numero progressivo di produzione:
personalizza ogni seggiolino, dal
rilascio dell’omologazione ognuno è
contraddistinto dal proprio numero.
PEG-PÉREGO S.p.A.
Peg-Pérego S.p.A. è
certificata ISO 9001. La
certificazione offre ai
clienti e ai consumatori
la garanzia di una
trasparenza e fiducia nel modo di
lavorare dell'impresa. Peg Pérego
potrà apportare in qualunque
momento modifiche ai modelli
descritti in questa pubblicazione, per
ragioni di natura tecnica o
commerciale.Peg Pérego è a
disposizione dei suoi Consumatori
per soddisfare al meglio ogni loro
18
Page 19

esigenza. Per questo, conoscere il
parere dei ns. Clienti, è per noi
estremamente importante e
prezioso. Le saremo quindi molto
grati se, dopo aver utilizzato un ns.
prodotto, vorrà compilare il
QUESTIONARIO SODDISFAZIONE
CONSUMATORE , segna lando
eventuali osservazioni o
suggerimenti, che troverà nel nostro
sito internet: www.pegperego.com
Servizio assistenza
Peg-Pérego
Se fortuitamente parti del modello
vengono perse o danneggiate, usare
solo pezzi di ricambio originali Peg
Pérego. Per eventuali riparazioni,
sostituzioni, informazioni sui
prodotti, vendita di ricambi originali
e accessori, contatta il Servizio
Assistenza Peg Pérego indicando,
qualora fosse presente, il numero
seriale del prodotto.
tel. 0039/039/60.88.213
numero verde: 800/147.414
(contattabile da rete fissa)
fax 0039/039/33.09.992
e-mail assistenza@pegperego.it
sito internet www.pegperego.com
Tutti i diritti di proprietà intellettuale
relativi ai contenuti di questo
manuale d’istruzione appartengono
a PEG PEREGO S.p.A. e sono tutelati
dalle leggi vigenti.
EN_English
Thank you for choosing a
Peg-Pérego product.
Car seat, Viaggio 2/3,
“Universal” model with belts
• Homologated in accordance with
European standard UN/ECE R44/04
for children weighing from 15 to 36
kg (app. 3 – 12 years).
• Compatible with most car seats,
though not all.
• The child car seat can be correctly
installed if the operation and
maintenance manual of the vehicle
specifies that it is compatible with
“universal” fixing systems.
• This child car seat is classified as
“universal” and meets more severe
homologation criteria as compared
to previous models, which did not
have an homologation label.
• The child car seat can only be
used in approved cars, fitted with
safety belts with three static fixing
points and winder, homologated in
accordance with regulation UN/ECE
R°16 or equivalent regulations.
• The use of safety belts with two
fixing points or an abdominal fixing
point is forbidden.
Car seat, Viaggio 2/3,
“Semi-universal” model,
19
Page 20

with belts and Surefix
• Homologated in accordance with
European standard UN/ECE R44/04
for children weighing from 15 to 36
kg (app. 3-12 years).
• This child car seat is classified
as “semi-universal” and can be
fitted on the seats of car models
specified in the list attached to these
instructions.
• The child car seat can also be
used in approved cars, fitted with
safety belts with three static fixing
points and winder, homologated in
accordance with standard UN/ECE
R°16 or equivalent regulations.
• The use of safety belts with two
fixing points or an abdominal fixing
point is forbidden.
WARNING
• Carefully read the instructions
before use and keep them in a safe
place for future reference. Failure
to thoroughly follow installation
instructions could expose children
to serious hazards.
• Viaggio 2/3 must be assembled
and installed by adults. The car seat
must be assembled and installed
when the child is not seated.
• When travelling, do not hold your
child in your arms or allow him to sit
on the car seats. In case of sudden
braking, even at low speed, the child
could you be easily thrown forward.
• Do not insert your fingers in the
mechanism.
• Pay particular attention to luggage
or other objects that could injure the
child seated in child seat in case of
accident.
• Do not use installation methods
other than those recommended
because they could cause the
detachment of the car seat.
• Verify that the belt with three fixing
points, used to fix the child car seat
to the car, is appropriately tensioned
and untwisted.
• Do not leave the car unattended
when the child is seated in the child
car seat: watch your child even when
he is asleep.
• Never remove the child from the
seat when the car is moving.
• Verify that the child car seat is not
obstructed by a moving part of the
seat or a door.
• Adjust the height and tension of
the belts, verifying that they adhere
to the body of the child without
exerting excessive pressure. Verify
that the safety belt is not twisted and
the child cannot unfasten it.
• Do not leave the car seat in the car
if exposed to direct sunlight, because
some parts could overheat and
cause injuries to the delicate skin of
your child. Verify that the seat is not
too hot before seating your child.
• Do not use the child car seat
without the lining. This lining cannot
be replaced by another lining that
has not been specifically approved
20
Page 21

by the manufacturer because it is
an integral part of the seat and is
essential for safety purposes.
• Do not remove or replace parts
in polystyrene because they are
essential for safety purposes.
• In case of doubts, contact the
manufacturer or retailer of this child
car seat.
• This item has a progressive serial
number.
• Do not remove the adhesive or
sawn labels. The removal of these
labels could result in the product not
being compliant with standards.
• Do not use the child car seat if
it is broken or if there are missing
parts, if it is second-hand or if it has
been subjected to heavy impacts as
a result of accidents, because it may
be structurally damaged.
• Do not alter the product.
• Contact the post-sales service for
reparations, the replacement of
components and information on the
product.
Refer to the last page of this manual
for further information.
If the child car seat has been fixed
in place with Isofix fittings, do not
detach it from the fittings.
If the car seat has been fixed in place
with safety belts only, it is possible to
remove it and store it in the luggage
compartment if unused.
• Do not use accessories that have not
been approved by the manufacturer
or competent authorities.
1_ IMPORTANT
• "Viaggio 2/3": this car seat, group
2/3, must be installed in the direction
of travel.
• Do not install “Viaggio 2/3” in an
opposite or transversal location as
compared to the direction of travel.
• It is always advisable to fit the child
seat on the rear seats and on the
passenger’s side.
• If the child seat is installed on the
front seat, it is advisable to place it as
far as possible from the dashboard.
If you experience problems during
the installation of Viaggio 2/3,
try lifting the headrest without
removing it.
2_ Components of the
product
Inspect the content of the package
and contact the Customer Care if
some items are missing.
_ The child car seat includes: 1
headrest (a), 1 backrest (b), 1 seat (c).
The product supplied in its original
packaging is ready for use and
does not require specific assembly
operations.
Features of the product
3• The headrest can be adjusted in 6
positions. Lift the handle on the rear
of the backrest and position it at the
desired height.
IMPORTANT: as the child
grows, it is necessary to adjust
21
Page 22

the height according to the
stature of the child.
IMPORTANT: after completing
the operation, try moving the
headrest to verify that it is
correctly fitted in place.
4• Viaggio2/3 is fitted with two lateral
and removable drink holders.
5• Viaggio2/3 is fitted with a
reclination system that guarantees
maximum comfort. To recline the
seat, pull the handle on the front and
simultaneously lift the seat.
Fitting the child car seat
with the safety belts and
Surefix fittings
For cars fitted with Isofix
hooks
This method can be used only if the
car is fitted with Isofix hooks.
For further information on the
availability of these hooks and their
location, refer to the instruction
manual of the car. Surefix fittings
guarantee a greater safety, but
cannot replace the function of
safety belts.
6• To stretch the Surefix hooks, press
the button on the front inside the
bag, as shown in the figure, and
stretch them manually.
7• Fix the Surefix connectors to the
Isofix hooks of the car seat, verifying
that they “click” in place (Arrow A).
Tension the belt and simultaneously
push the child car seat (Arrow B)
towards the backrest of the car seat
(Arrow C).
IMPORTANT: after completing
the operation, try moving the seat
to verify that the Isofix fittings have
been correctly hooked to the Isofix
fittings .
8• To detach the Surefix connectors
of the child car seat from the Isofix
hooks, press the button on the
front inside the bag and release
the connectors belts in order to be
able to manually detach them by
pressing the safety lever situated on
the hooks, as shown in the figure.
Fitting the child car seat
with the safety belts
For cars that are NOT
fitted with Isofix fittings
9• Place Viaggio 2/3 on the car seat
in the direction of travel, as shown
in the figure, and place the child on
the seat.
How to secure your child
on Viaggio 2/3
10• Secure your child with the car
safety belt as shown in the figure.
11• Fix the car safety belt to the
car, ensuring that it clicks in place.
Position the two sections of the belt
as shown in the figure.
12• To complete the fixing, insert the
safety belt diagonally in the upper
22
Page 23

slot above the child’s shoulder.
IMPORTANT: if the belt is slack,
tension it. Verify that the belt is
always tensioned and untwisted.
13• The safety belts are correctly
positioned if the child’s shoulders are
below the intersection point of the
safety belts, as shown in the figure.
IMPORTANT: the safety belts
should not be too above or below
the child’s shoulders.
How to remove the lining
from the bag
When removing the lining of Viaggio
2/3, do NOT detach the three
elements - headrest, backrest, seat but keep them together.
REMOVE THE LINING FROM THE
SEAT:
14• Detach the small hooks of
the seat bag from the points and
following the sequence shown in the
figure. Remove the central belt.
15• Remove the rigid ties as shown
in the Figure.
REMOVE THE LINING FROM THE
BACKREST:
16• Remove the rear cover by pulling
it outwards as shown in the figure.
17• Remove all the elastic straps.
18• Remove the bag.
REMOVE THE LINING FROM THE
HEADREST:
19• Remove the cover from the rear
of the headrest by pulling it outwards
and releasing the two elastic bands
as shown in the figure.
20• Remove the bag.
Maintenance of the
padding
Brush the fabric parts to remove
dust.
• Machine wash at a maximum of
30°C with a delicate wash setting
and short spin cycle.
• Do not use chlorine bleach.
• Do not iron.
• Do not dry clean.
Do not remove stains with solvents.
• Do not tumble dry.
°
30
How to reline the bag
RELINING THE SEAT:
• Insert the rigid ties in the fabric of
the seat, verifying that that the hooks
project.
• Fix the small hooks to the seat,
starting from the three more
external, insert the central belt into
the slot, then fasten the two most
internal hooks.
• Fasten the side automatic buttons.
RELINING THE BACKREST:
21• Fit the bag in place, by inserting
the lower section of the fabric behind
the headrest, as shown in the figure.
22• Fasten all the elastic straps in
23
Page 24

place.
23• Fit the cover in place, starting with
the lower section and proceeding
with the upper section.
RELINING THE HEADREST:
• Fix the bag in place paying attention
to the white polystyrene section.
• Fasten all the elastic straps in place.
24• Fit the cover in place, starting with
the lower section and proceeding
with the upper section.
Serial numbers
25• The following information on
Viaggio 2/3 is provided below the
seat: product name, production date
and serial number.
26• The homologation label of
Viaggio 2/3 can be found in the
lower section on the rear of the
back rest.
Product cleaning
• This product requires a small
amount of maintenance. Cleaning
and maintenance must only be
carried out by adults.
• It is advisable to keep all the moving
parts clean.
• Clean the plastic parts periodically
with a damp cloth. Do not use
solvents or similar substances.
• Do not clean the polystyrene shock
absorbing device with solvents or
other similar products.
• Protect the product from
atmospheric agents: humidity, rain
or snow. Extended exposure to
sunshine can cause colour changes
in many materials.
• Store the product in a dry
environment.
How to read the approval
label
• This paragraph explains how to
interpret the approval label (orange
label).
• The label is double because this car
seat is approved for two types of
installation in cars:
• SUREFIX fixing system (the
indication SEMI-UNIVERSAL indicates
that the child car seat is compatible
with the
ISOFIX).
• Attachment systems using static
or inertia-reel three-point safety
belts (the term UNIVERSAL indicates
compatibility of the car seat with
vehicles fitted with this type of belt).
• The top of the label displays the
trademark of the manufacturing
company and the name of the
product.
• The letter E in a circle indicates the
European approval mark and the
number indicates the country that
issued the approval (1: Germany, 2:
France, 3: Italy, 4: Netherlands, 11:
Great Britain, 24: Republic of Ireland).
• Approval number: if it starts with 04,
this indicates the fourth amendment
(the one currently in force) of
24
Page 25

Regulation R44.
• Reference standard: UN/ECE R44/04.
• Production serial number: on
issue of approval, each car seat is
personalized with its own number.
PEG-PÉREGO S.p.A.
Peg-Pérego S.p.A. is an
ISO 9001 certified
com pany. Th is
cer tification is a
guarantee for customers
and consumers of the transparency
and trustworthiness of the
company's procedures and working
methods. Peg Pérego can make
changes at any time to the models
described in this publication for
technical or commercial reasons. Peg
Pérego is at the disposal of its
customers and consumers to ensure
that all their demands and queries
are fully satisfied. It is a key part of our
policy to ensure we are always aware
of our customers' views and
requirements. We would therefore
be very grateful if, after using a Peg
Pérego product, you take the time to
fill in our CUSTOMER SATISFACTION
QUESTIONNAIRE, making a note of
any comments or suggestions you
might have. You can find the
questionnaire on the Peg Pérego
website: www.pegperego.com
Peg-Pérego after-sales
service
If any parts of the item get lost
or damaged, only use genuine Peg
Pérego spare parts. For any repairs,
replacements, information on the
products and sales of genuine
spare parts and accessories, contact
the Peg Pérego Assistance Service
and state the serial number of the
product, if present.
tel. 0039/039/60.88.213
fax 0039/039/33.09.992
e-mail assistenza@pegperego.it
website www.pegperego.com
All intellectual property rights on
the contents of this manual are
property of PEG PEREGO S.p.A. and
are protected by the laws in force.
25
Page 26

FR_Français
Merci d’avoir choisi un
produit Peg-Pérego.
Siège-auto, Viaggio 2/3
catégorie “Universelle” avec
ceintures
• Homologué conformément à la
norme européenne UNI/ ECE R44/04
pour les enfants pesant de 15 à 36 kg
(de 3 à 12 ans environ).
• Adapté à la plupart des sièges de
voitures, mais pas à tous.
• Le siège-auto peut être
correctement installé si dans le
manuel d’instruction et d’entretien
du véhicule, la compatibilité avec
des systèmes de retenue “Universels”
est indiquée.
• Ce siège-auto est classé comme
"universel" selon des critères
d'homologation plus rigoureux par
rapport aux modèles précédents
qui ne portent pas l'étiquette
d'homologation.
• Le siège-auto peut être utilisé
uniquement sur les véhicules
homologués, dotés de ceinture à
trois points d'ancrage statique
ou avec enrouleur, homologués
conformément au règlement UN/
ECE R°16 ou normes équivalentes.
• L'utilisation de la ceinture à deux
points ou abdominale n'est pas
autorisée.
Siège-auto, Viaggio
2/3 catégorie “Semi
Universelle”, avec Ceintures
+ Surefix
• Homologué conformément à la
norme européenne UNI/ ECE R44/04
pour les enfants pesant de 15 à 36 kg
(de 3 à 12 ans environ).
• Ce siège-auto est homologué
pour utilisation semi-universelle et
convient pour le montage sur les
sièges des voitures figurant dans
la liste jointe à la présente notice
d'instruction.
• Le siège-auto peut uniquement
être utilisé sur les véhicules
homologués, dotés de ceinture à
trois points d'ancrage statique
ou avec enrouleur, homologués
conformément au règlement UN/
ECE R°16 ou normes équivalentes.
• L'utilisation de la ceinture à deux
points ou abdominale n'est pas
autorisée.
AVERTISSEMENT
• Lire attentivement les
instructions avant l'utilisation
et bien les conserver pour les
consulter ultérieurement. Le
non-respect des instructions
pour l'installation du siège-auto,
entraînerait des risques pour
votre bébé.
• Les opérations de montage et
d'installation de Viaggio 2/3 doivent
26
Page 27

être effectuées par des adultes.
L'opération de montage et
d'installation doit être effectuée
sans l'enfant dans le siège-auto.
• Pendant les voyages en voiture, ne
jamais tenir le bébé dans ses bras,
et ne jamais l'installer en dehors du
siège. En cas de freinage brusque,
même à faible allure, l'enfant pourrait
facilement être catapulté vers l'avant.
• Éviter d'introduire les doigts dans
les mécanismes.
• En voiture faire très attention
aux bagages ou autres objets qui
pourraient causer des lésions à
l'enfant dans le siège-auto en cas
d'accident.
• Ne pas utiliser de méthodes
d' Installation autres que celles
indiquées, danger de détachement
du siège.
• Veiller à ce que la ceinture à trois
points du véhicule pour fixer le
siège-auto soit toujours bien tendue
et pas tordue.
• Ne jamais laisser votre enfance
sans surveillance dans le siège-auto :
le surveiller, même lorsqu'il dort.
• Si le véhicule est en mouvement,
ne jamais retirer l'enfant du siègeauto.
• Veiller à ce que le siège-auto ne
reste pas bloqué à cause d'une
partie mobile du siège ou à cause
d'une portière.
• Ajuster la hauteur et la tension des
ceintures de sécurité en vérifiant
qu'elles adhèrent bien au corps de
l'enfant, sans trop serrer , vérifier
aussi que la ceinture de sécurité
n'est pas tordue et que l' enfant ne
la détache pas tout seul.
• Ne pas laisser le siège-auto dans la
voiture exposée au soleil, certaines
parties pourraient surchauffer et
endommager la peau délicate de
l'enfant, vérifier avant d'installer
l'enfant.
• Ne pas utiliser le siège-auto sans le
revêtement en tissu, ce revêtement
ne peut pas être remplacé par
un autre non homologué par le
fabricant dans la mesure où il fait
partie intégrante du siège et de la
sécurité.
• Ne pas supprimer ou changer
les pièces en polystyrène dans
la mesure où elles font partie
intégrante de la sécurité.
• En cas de doute, contacter le
fabricant ou le revendeur du siègeauto.
• Cet article est numéroté
progressivement.
• Ne pas enlever les autocollants
cousus, ceci pourrait rendre le
produit non conforme à la norme.
• Ne pas utiliser le siège-auto s' il
présente des morceaux cassés ou
des pièces manquantes, s'il est
de deuxième main, ou s'il a été
soumis à des chocs violents lors
d'un accident, car il pourrait avoir
subi des dommages structuraux
extrêmement dangereux.
27
Page 28

• Ne pas apporter de modifications
au produit.
• Pour toute réparation, remplacement
de pièces et informations sur le produit,
contacter le service après-vente.
Les informations diverses se trouvent
à la dernière page de ce manuel.
Si le siège est fixé aux attaches isofix,
de la voiture, le laisser toujours installé.
Si le siège est fixé dans la voiture
uniquement avec les ceintures,
lorsqu'il n'est pas utilisé, le ranger
dans le coffre ou l'enlever.
• Ne pas utiliser d'accessoires non
homologués par le fabricant ou par
les autorités compétentes.
1_ IMPORTANT
• «Viaggio 2 / 3» : siège-auto
groupe 2/3 doit être installé dans
le sens du déplacement.
• Ne pas installer "Viaggio 2/3" sur
des sièges orientés dans le sens
opposé à celui du déplacement
ou transversalement par rapport
à celui-ci.
• Il est toujours conseillé d'utiliser
le siège arrière sur le côté opposé
au conducteur.
• En cas d'installation sur le siège
avant, il est recommandé de
placer le siège-auto le plus loin
possible du tableau de bord.
• En cas de problèmes pour
monter Viaggio 2/3, dans la
voiture, soulever mais ne pas
enlever l'appuie-tête du véhicule.
2_Composants de l'article
Vérifier le contenu de l'emballage
et en cas de réclamation, merci de
contacter le service d'assistance.
_ Le siège-auto est composé de :
1 appuie-tête (a), 1 dossier (b) 1
assise (c).
Le produit dans son emballage
d'origine est prêt à l'emploi. Aucune
opération de montage n'est requise.
Caractéristiques du produit
3 • L'appuie-tête est réglable en 6
positions. Soulever la poignée à
l'arrière du dossier et le placer à la
hauteur désirée.
IMPORTANT : Pour suivre la
croissance de l'enfant, il faut
régler la hauteur de l’appuie-tête
par rapport à sa taille.
IMPORTANT Lorsque
l'opération est terminée, essayer
de déplacer l'appuie-tête pour
vérifier qu'il est bien verrouillé.
4• Viaggio2/3 est équipé de deux
porte-boissons latéraux amovibles.
5• Viaggio2/3 est équipé d'un
système d'inclinaison pour un
meilleur confort. Pour l'incliner, tirer
sur la poignée placée à l'avant et
simultanément soulever le produit.
Ancrage dans la voiture
avec ceintures de sécurité +
Surefix
Pour ceux qui possèdent
28
Page 29

une voiture avec fixations
Isofix
Il est possible d'utiliser ce type de
fixations, uniquement si votre voiture
est équipée de crochets Isofix.
Pour plus d'informations sur la
présence et la position des crochets,
voir le manuel d'utilisation de la
voiture. Le dispositif Surefix assure
une plus grande sécurité en
voiture, mais ne remplace pas la
fonction de la ceinture de sécurité.
6 • Pour allonger les connecteurs
Surefix, appuyer sur le bouton placé
devant à l'intérieur du sac, comme
le montre la figure, et les allonger
manuellement.
7 • Fixer les connecteurs surefix du
siège-auto aux crochets Isofix de la
banquette, jusqu'au déclic (flèche A).
Serrer la sangle, et en même temps
(flèche B), pousser le siège-auto
contre le dossier de la banquette
(flèche C).
IMPORTANT : une fois l'opération
terminée, faire bouger le siège-auto
pour vérifier qu'il est bien accroché
aux fixations Isofix.
8• Pour décrocher les connecteurs
surefix du siège-auto des crochets
isofix de la banquette, appuyer sur le
bouton du siège-auto placé devant
à l'intérieur du sac pour desserrer
les sangles des connecteurs, puis les
décrocher à la main en appuyant sur
le petit levier de sécurité placé sur les
crochets, comme le montre la figure.
Ancrage dans la voiture
avec ceintures de sécurité
Pour ceux qui NE
possèdent PAS une voiture
avec fixations Isofix
9 • Placer le siège-auto Viaggio 2/3
sur la banquette de la voiture dans
le sens de déplacement du véhicule,
comme le montre la figure et installer
l'enfant.
Comment installer
l'enfant sur Viaggio 2/3
10 • Faire passer la ceinture de
sécurité du véhicule, comme le
montre la figure.
11 • Accrocher la ceinture de sécurité
du véhicule à la banquette, jusqu'au
déclic. Placer les deux branches de la
ceinture comme sur la figure.
12 • Pour compléter l'installation dans
la voiture, faire passer la ceinture
diagonale dans le passage supérieur
placé au-dessus des épaules de
l'enfant.
IMPORTANT : si la ceinture
n'est pas assez serrée, la serrer
davantage. Veiller à ce qu'elle
soit toujours bien tendue et pas
tordue.
13 • La juste position de la ceinture
est celle où les épaules de l'enfant
sont en dessous du point de passage
des ceintures, comme sur la figure.
IMPORTANT : les ceintures ne
doivent pas être ni trop hautes,
29
Page 30

ni trop basses par rapport aux
épaules de l'enfant.
Comment déhousser le sac
Pour retirer le revêtement du siègeauto Viaggio 2/3 les trois éléments :
appuie-tête, dossier, assise
NE doivent pas être décrochés entre
eux mais restent ensemble.
DÉHOUSSER L'ASSISE :
14 • décrocher les crochets du sac de
l'assise, dans les points et dans l'ordre
indiqué. Retirer la sangle centrale.
15 • retirer les bandes rigides du sac,
comme sur la figure.
DÉHOUSSER LE DOSSIER :
16• Enlever le couvercle arrière en
tirant vers l'extérieur, comme le
montre la figure ;
17 • détacher tous les élastiques
présents ;
18 • enlever le sac.
DÉHOUSSER L'APPUIE-TÊTE :
19• À l'arrière de l'appuie-tête, enlever
le couvercle en tirant vers l'extérieur et
détacher les deux élastiques comme le
montre la figure ;
20 • enlever le sac.
Entretien des parties en
tissu brosser les éléments
en tissu pour éliminer la
poussière.
• laver en machine à la température
maximale de 30° C avec action
mécanique et essorage réduit ;
• ne pas blanchir au chlore ;
• ne pas repasser ;
• ne pas laver à sec ;
ne pas utiliser de solvants pour
enlever les taches ;
• ne pas sécher dans un sèche-linge
à tambour rotatif.
°
30
Comment réhousser le sac
RÉHOUSSER L'ASSISE :
• Introduire les bandes rigides
dans l'assise en faisant ressortir les
crochets ;
• Fixer les crochets à l'assise, d'abord
les trois les plus à l'extérieur, puis
mettre la sangle centrale dans la
fente, et enfin fixer les deux crochets
intérieurs.
• Fixer les boutons pressions latéraux.
RÉHOUSSER LE DOSSIER :
21 • enfiler le sac, en faisant passer la
partie inférieure du tissu derrière le
dossier, comme sur la figure ;
22• attacher tous les élastiques ;
23 • accrocher le couvercle, avant en
bas et puis en haut.
RÉHOUSSER L'APPUIE-TÊTE :
• enfiler le sac tout en faisant attention
à la partie blanche en polystyrène ;
• attacher tous les élastiques ;
24 • accrocher le couvercle, avant en
30
Page 31

haut et puis en bas.
Numéros de série
25• Viaggio 2/3 reporte sous le sac de
l'assise des informations concernant:
le nom du produit, la date de
fabrication, et le numéro de série
de celui-ci.
26• Viaggio 2/3 reporte derrière
le dossier en bas l'étiquette
d'homologation.
Nettoyage du produit
• Ce produit requiert un entretien
minimum. Les opérations de
nettoyage et d’entretien doivent
être effectuées uniquement par des
adultes.
• Il est recommandé de garder
bien propres toutes les parties en
mouvement.
• Nettoyer périodiquement les
parties en plastique avec un linge
humide ; ne pas utiliser de solvants
ou tout produit similaire.
• Ne pas nettoyer le dispositif
d’absorption des chocs en
polystyrène avec des solvants ou
autres produits similaires.
• Protéger le produit des agents
atmosphériques (eau, pluie ou
neige) ; une exposition continue et
prolongée au soleil peut provoquer
la décoloration de nombreux
matériaux.
• Conserver le produit dans un
endroit sec.
Comment lire l’étiquette
d’homologation
• Cette section explique comment
lire l’étiquette d’homologation
(étiquette orange).
• L’étiquette est fournie en double,
ce siège-auto ayant été homologué
pour être fixé de deux façons
différentes dans le véhicule :
•
Système de fixation SUREFIX (Le
mot SEMI-UNIVERSAL indique la
compatibilité du siège-auto avec des
véhicules équipés du système ISOFIX).
• Système de fixation avec ceinture
à trois points statique ou avec
enrouleur (la mention « UNIVERSAL
» indique que le siège-auto est
compatible avec des véhicules
équipés de ce type de ceinture).
• Dans la partie supérieure de
l’étiquette figurent la marque du
fabricant et la dénomination du
produit.
• La lettre E entourée d’un cercle
indique la marque d’homologation
européenne et le numéro représente
le pays qui a délivré l’homologation
(1 : Allemagne ; 2 : France; 3 : Italie, 4:
Pays-Bas ; 11 : Grande-Bretagne ; 24 :
Irlande).
• Numéro d’homologation : s’il
commence par 04, cela signifie
qu’il est fait référence au quatrième
amendement (celui actuellement en
vigueur) du règlement R44.
• Norme de référence : UN/ECE
R44/04.
31
Page 32

• Numéro progressif de production:
il est propre à chaque siège-auto ;
lorsque l’homologation est délivrée,
chaque produit est caractérisé par un
numéro différent.
PEG-PÉREGO S.p.A.
Peg-Pérego S.p.A. est
certifiée ISO 9001. La
certification offre à la
clientèle une garantie
de transparence et
confiance dans la façon de travailler
de l’entreprise. Peg-Pérego se réserve
le droit de procéder à tout moment à
des modifications sur les modèles
décrits dans cet ouvrage, pour des
raisons de nature technique ou
commerciale. Peg-Pérego est à la
disposition de sa clientèle pour
satisfaire au mieux chacune de ses
exigences. En cela, il est très
important et précieux pour nous de
connaître l’opinion de notre clientèle.
Nous vous saurions donc gré, après
avoir utilisé un de nos produits, de
remplir le QUESTIONNAIRE DE
SATISFACTION CLIENT, en nous
faisant part de toute observation ou
suggestion éventuelle. Vous
trouverez ce questionnaire sur notre
site Internet, à l'adresse www.
pegperego.com
représente un gage de
Service d’assistance
Peg-Pérego
En cas de perte de pièces ou de
rupture de l'une d'elles, utiliser
exclusivement des pièces
de rechange originales PegPérego. Pour toute réparation,
remplacement, informations sur les
produits, vente de pièces détachées
d’origine et accessoires, contactez le
service après-vente Peg Pérego en
indiquant, si présent, le numéro de
série du produit.
tél. 0039/039/60.88.213
fax 0039/039/33.09.992
e-mail assistenza@pegperego.it
site Internet www.pegperego.com
Tous les droits de propriété
intellectuelle relatifs au contenu de ce
manuel appartiennent à PEG PEREGO
SpA et sont protégés par la loi.
32
Page 33

DE_Deutsch
Vielen Dank, dass Sie sich
für ein Produkt Peg-Pérego
entschieden haben.
Autokindersitz Viaggio 2/3
Kategorie “Universal” mit
Gurten
• Zugelassen gemäß der Bestimmung
UN/ECE R44/04 für Kinder mit einem
Gewicht von 15 bis 36 kg (ca. von 3
bis 12 Jahren).
• Für den Großteil der Fahrzeugsitze
geeignet, jedoch nicht für alle.
• Der Autositz kann korrekt installiert
werden, wenn in der Bedienungsund Wartungsanleitung des
Fahrzeugs die Kompatibilität mit
Rückhaltesystemen “Universal”
angegeben ist.
• Dieser Autokindersitz ist im Vergleich
zu den Vorgängermodellen, die
nicht über das Zulassungsetikette
ver fügen, gemäß strengerer
Zulassungskriterien als „Universal“
klassifiziert.
• Der Autokindersitz darf nur auf
genehmigten Fahrzeugen, die mit
statischem 3-Punkte-Gurt oder mit
Einziehvorrichtung ausgestattet
sind, verwendet werden, die gemäß
der Bestimmung UN/ECE R 16 oder
entsprechenden Bestimmungen
zugelassen sind.
• Es ist nicht gestattet, den Zwei-
Punkt- oder Bauchgurt zu
verwenden.
Autokindersitz Viaggio 2/3
Kategorie “Halb-universal”
mit Gurten + Surefix
• Zugelassen gemäß der Bestimmung
UN/ECE R44/04 für Kinder mit einem
Gewicht von 15 bis 36 kg (ca. von 3
bis 12 Jahren).
• Dieser Kindersitz ist für den
ha lbu niv ers ale n Ge bra uch
zugelassen und zur Befestigung
auf den Sitzen der in der Anlage
zu dieser Anleitung genannten
Fahrzeuge geeignet.
• Der Autokindersitz darf nur auf
genehmigten Fahrzeugen, die mit
statischem 3-Punkte-Gurt oder mit
Einziehvorrichtung ausgestattet
sind, verwendet werden, die gemäß
der Bestimmung UN/ECE R 16 oder
entsprechenden Bestimmungen
zugelassen sind.
• Es ist nicht gestattet, den ZweiPunkt- oder Bauchgurt zu
verwenden.
WARNUNG
• Vor dem Gebrauch aufmerksam
die Anweisungen lesen und
zum späteren Nachschlagen
an dem dafür vorgesehenen
Platz aufbewahren. Werden die
Installationsanweisungen des
Autokindersitzes nicht streng
befolgt, könnte dies zu Risiken für
33
Page 34

Ihr Kind führen.
•
Die Montage - und
Installationsvorgänge des Viaggio 2/3
müssen durch Erwachsene erfolgen.
Der Montage- und Installationsvorgang
erfolgt ohne Kind im Autokindersitz.
• Während der Fahrten im Auto,
das Kind nie im Arm halten und
dieses nie außerhalb des Sitzes
unterbringen. Im Fall plötzlicher
Bremsungen könnte das Kinde
auch bei langsamer Fahrt leicht
nach vorn katapultiert werden.
• Vermeiden, die Finger in die
Mechanismen zu bringen.
• Im Auto besonders auf Gepäck oder
andere Gegenstände achten, die das
Kind im Autokindersitz im Fall eines
Unfalls verletzen könnten.
• Keine anderen als die beschriebenen
Installationsmethoden verwenden,
da die Gefahr des Lösens vom Sitz
besteht.
• Vergewissern Sie sich, dass der
3-Punkt-Gurt des Fahrzeugs zum
Befestigen des Autokindersitzes stets
gespannt und nicht verdreht ist.
• Ihr Kind nie unbeaufsichtigt im
Autokindersitz lassen: überwachen
Sie es auch, wenn es schläft.
• Das Kind nie bei fahrendem
Fahrzeug aus dem Autokindersitz
heben.
• Darauf achten, dass der
Autokindersitz nicht durch einen
beweglichen Teil des Sitzes oder eine
Fahrzeugtür blockiert wird.
• Die Höhe und die Spannung
der Gurte einstellen und dabei
überprüfen, ob diese am Körper
des Kindes anliegen, ohne zu stark
einzuschnüren. Überprüfen, ob der
Sicherheitsgurt nicht verdreht ist und
das Kind diesen nicht selbst aushakt.
• Den Autokindersitz nicht unter
Sonneneinstrahlung im Fahrzeug
lassen. Einige Teile könnten
stark erwärmt werden und der
empfindlichen Haut des Kindes
Schaden zufügen. Überprüfen, bevor
Sie das Kind in den Sitz setzen.
• Den Autokindersitz nicht ohne
den Stoffbezug verwenden. Dieser
Bezug darf nicht durch einen
nicht vom Hersteller genehmigten
Bezug ersetzt werden, da er
integrierender Teil des Sitzes und der
Sicherheitsgarantie ist.
• Die Styroporteile nicht
entfernen oder austauschen,
da diese integrierender Teil der
Sicherheitsgarantie sind.
• Wenden Sie sich im Zweifelsfall an
den Hersteller oder den Händler des
Autokindersitzes.
• Dieser Artikel ist mit einer
fortlaufenden Nummer versehen.
• Die Aufkleber oder Aufnäher nicht
ablösen, da dadurch das Produkt
nicht mehr normgerecht sein könnte.
• Den Autokindersitz nicht
verwenden, wenn Brüche vorliegen
oder Teile fehlen, sollte dieser aus
zweiter Hand erworben werden oder
sollte dieser bei einem Unfall heftigen
Beanspruchungen ausgesetzt
34
Page 35

gewesen sein, da er extrem
gefährliche strukturelle Schäden
davongetragen haben könnte.
• Keine Änderungen an dem Produkt
anbringen.
• Wegen eventueller Reparaturen,
zum Ersetzen von Teilen und wegen
Informationen zum Produkt wenden
Sie sich bitte an den Kundendienst.
Die verschiedenen Informationen
befinden sich auf der letzten Seite
dieser Anleitung.
Ist der Kindersitz an den IsofixBefestigungen angebracht, diesen
immer eingehakt lassen.
Ist der Kindersitz im Auto nur mit
den Gurten befestigt, diesen bei
Nichtgebrauch in den Kofferraum
legen oder entfernen.
• Kein Zubehör verwenden, das nicht
vom Hersteller oder den zuständigen
Behörden genehmigt ist.
1_ WICHTIG
• "Viaggio 2/3": Autokindersitz
der Baugruppe 2/3, muss in
Fahrtrichtung installiert werden.
• “Viaggio 2/3” nicht auf Sitzen
installieren, die gegen die
Fahrtrichtung gerichtet sind
oder quer zur allgemeinen
Fahrtrichtung liegen.
• Es wird stets die Verwendung des
Rücksitzes auf der Gegenseite des
Fahrers empfohlen.
• Bei der Installation auf dem
Vordersitz wird empfohlen,
den Kindersitz so weit wie
möglich vom Armaturenbrett zu
positionieren.
• Bei Schwierigkeiten bei der
Montage des Viaggio 2/3 im Auto,
die Kopfstütze des Fahrzeugs
anheben, jedoch nicht entfernen.
2_Bauteile des Artikels
Den Inhalt der Verpackung
überprüfen und bei Reklamationen
bitte den Kundendienst verständigen.
_ Der Autokindersitz besteht aus: 1
Kopfstütze (a), 1 Rückenlehne (b), 1
Sitzfläche (c).
Das Produkt in seiner Originalverpackung
ist einsatzbereit. Es sind keine
Montagevorgänge erforderlich.
Produktcharakteristiken
3• Die Kopfstütze kann in sechs
Positionen verstellt werden.
Den Hebel auf der Rückseite der
Rückenlehne anheben und auf die
gewünschte Höhe stellen.
WICHTIG: Um sich dem
Wac hstum des K indes
anzupassen, muss die Höhe der
Kopfstütze im Verhältnis zu seiner
Größe angepasst werden.
WICHTIG Nachdem der Vorgang
ausgeführt wurde, versuchen,
die Kopfstütze zu bewegen, um
zu kontrollieren, ob sie korrekt
eingerastet ist.
4• Viaggio2/3 ist mit zwei
ausziehb ar e n se it l i chen
35
Page 36

Getränkehaltern ausgestattet.
5• Viaggio2/3 ist mit einem
Neigungssystem ausgestattet, um
größeren Komfort zu garantieren.
Um den Kindersitz zu neigen, den
Hebel vorn ziehen und gleichzeitig
das Produkt anheben.
Befestigung im Auto mit
Sicherheitsgurten + Surefix
Für diejenigen, die ein
Fahrzeug mit IsofixBefestigungen besitzen
Diese Art der Befestigung kann
nur verwendet werden, wenn
Ihr Fahrzeug mit Isofix-Haken
ausgestattet ist.
Wegen weiterer Informationen
hinsichtlich des Vorhandenseins
und der Position der Haken
siehe Bedienungsanleitung des
Fahrzeugs. Die Surefix-Befestigung
garantiert höhere Sicherheit im
Auto, ersetzt jedoch die Funktion
der Sicherheitsgurte nicht.
6• Um die Surefix-Befestigungen zu
verlängern, die Taste vorn im Inneren
des Sacks betätigen wie in der
Abbildung dargestellt und manuell
verlängern.
7• Die Surefix-Befestigungen des
Sitzes an den Isofix-Haken des
Autositzes anbringen, bis ein
"Klicken" zu hören ist (Pfeil A). Den
Gurt spannen und gleichzeitig
(Pfeil B) den Kindersitz gegen die
Rückenlehne des Sitzes drücken
(Pfeil C).
WICHTIG: nach diesem
Vorgang den Sitz bewegen, um die
tatsächliche Befestigung an den
Isofix-Befestigungen zu überprüfen.
8• Um die Surefix-Befestigungen
des Kindersitzes von den IsofixHaken des Sitzes zu lösen, auf dem
Kindersitz die Taste vorn im Inneren
des Sacks betätigen, um die Gurte
der Befestigungen zu lösen und diese
dann manuell auszuhaken, indem auf
den Sicherheitshebel auf den Haken
gedrückt wird wie in der Abbildung.
Befestigung im Auto mit
Sicherheitsgurten
Für diejenigen, die KEIN
Fahrzeug mit IsofixBefestigungen besitzen
9• Den Kindersitz Viaggio 2/3 in
Fahrtrichtung auf dem Fahrzeug
positionieren wie in der Abbildung
dargestellt und das Kind hineinsetzen.
Sicherung des Kindes auf 2/3
10• Den Sicherheitsgurt des Autos wie
in der Abbildung hindurchführen.
11• Den Sicherheitsgurt des Autos
mit einem Klicken am Sitz befestigen.
Die beiden Teile des Gurts wie in der
Abbildung positionieren.
12• Um die Befestigung im Auto
abzuschließen, den diagonalen Gurt
in den oberen Durchgang über der
36
Page 37

Schulter des Kindes einführen.
WICHTIG: bleibt der Gurt
locker, diesen spannen. Darauf
achten, dass dieser stets gespannt
und nicht verdreht ist.
13•Die korrekte Position der Gurte ist
die, in der die Schultern des Kindes
sich unter dem Durchgang der Gurte
befinden wie in der Abbildung.
WICHTIG: die Gurte dürfen im
Verhältnis zu den Schultern des
Kindes weder zu hoch noch zu
niedrig verlaufen.
Abziehen des Sackes
Um den Bezug des Autokindersitzes
Viaggio 2/3 abzuziehen, dürfen
die drei Elemente: Kopfstütze,
Rückenlehne, Sitzfläche NICHT
voneinander getrennt werden,
sondern bleiben ein Ganzes.
ABZIEHEN DER SITZFLÄCHE:
14• Die Haken des Sacks an den
angegebenen Stellen und in der
angegebenen Reihenfolge von der
Sitzfläche lösen. Den mittleren Gurt
herausziehen.
15• Von dem Sack die steifen Teile
herausziehen wie in der Abbildung.
ABZIEHEN DER RÜCKENLEHNE:
16• Die hintere Abdeckung entfernen,
indem diese wie in der Abbildung
nach außen gezogen wird;
17• alle vorhandenen Gummibänder
aushaken;
18• den Sack herausziehen.
ABZIEHEN DER KOPFSTÜTZE:
19• Auf der Rückseite der Kopfstütze
die Abdeckung entfernen, indem
diese nach außen gezogen wird und
die beiden Gummibänder wie in der
Abbildung gelöst werden;
20• den Sack herausziehen.
Pflege der Polsterung
Die Stoffteile abbürsten, um Staub
zu entfernen.
• Bei höchstens 30°C im
Schonwaschgang und mit
leichtem Schleudergang in der
Waschmaschine waschen.
• Nicht bleichen.
• Nicht bügeln.
• Nicht Trockenreinigen.
• Nicht mit Lösungsmitteln
behandeln.
• Nicht im Wäschetrockner mit
rotierender Trommel trocknen.
°
30
Aufziehen des Sacks
BEZIEHEN DER SITZFLÄCHE:
• Die steifen Teile in den Stoff der
Sitzfläche einführen, so dass die
Haken hervortreten;
• die Haken an der Sitzfläche
befestigen, zuerst die äußeren, dann
den mittleren Gurt in die Öse führen
und schließlich die beiden weiter
innen liegenden Haken anbringen.
• Die seitlichen Automatikknöpfe
37
Page 38

befestigen.
BEZIEHEN DER RÜCKENLEHNE:
21• den Sack aufziehen und dabei
den unteren Teil des Stoffs unter der
Rückenlehne durchziehen wie in der
Abbildung;
22• alle Gummibänder einhaken;
23• die Abdeckung zuerst am unteren
und dann am oberen Teil einhaken.
BEZIEHEN DER KOPFSTÜTZE:
• den Sack aufziehen und dabei auf den
n Styroporteil achten;
weiße
• alle Gummibänder einhaken;
24• die Abdeckung zuerst am oberen
und dann am unteren Teil einhaken.
Seriennummern
25• Auf Viaggio 2/3 sind unter dem
Sack der Sitzfläche Informationen
zu Folgendem angegeben:
Produktname, Herstellungsdatum
und serielle Nummer der Herstellung.
26• Auf Viaggio 2/3 ist unten
hinter der Rückenlehne das
Zulassungsschild angebracht.
Reinigung
• Ihr Produkt braucht nur geringe
Wartung. Reinigung und Wartung
dürfen nur von Erwachsenen
durchgeführt werden.
• Es wird empfohlen, alle beweglichen
Teile sauber zu halten.
• Regelmäßig die Kunststoffteile
mit einem feuchten Tuch reinigen,
keine Lösungsmittel oder ähnliche
Produkte verwenden.
• Den Stoßdämpfer aus Styropor nie
mit Lösungsmitteln oder anderen
ähnlichen Produkten reinigen.
• Das Produkt vor Witterung
schützen, vor Wasser, Regen oder
Schnee; wird das Produkt wiederholt
und über längere Zeit der Sonne
ausgesetzt, können die Farben vieler
Materialien verblassen.
• Das Produkt trocken aufbewahren.
Informationen auf dem
Prüfzertifikat
• In diesem Abschnitt erläutern
wir, welche Informationen Sie
dem orangefarbenen Prüfetikett
entnehmen können.
• Das Etikett ist doppelt angebracht,
weil der Autokindersitz für zwei
verschiedene Befestigungsarten im
Fahrzeug zugelassen ist:
• Befestigungssystem SUREFIX (die
Aufschrift SEMI-UNIVERSAL gibt die
Kompatibilität des Autokindersitzes
mit dem System ISOFIX
ausgestatteten Fahrzeugen an).
• Das Befestigungssystem ISOFIX
(die Benennung SEMI-UNIVERSAL
der Klasse A bedeutet, dass der
Autokindersitz in Fahrzeugen
verwendet werden darf, die mit
diesem System ausgestattet sind).
• Über dem Etikett befindet das
Firmenzeichen des Herstellers und
die Produktbezeichnung.
38
Page 39

• Der Kreis mit dem Buchstaben
E: Er bedeutet, dass die Produkte
europäischen Normen entsprechen.
Die Nummer zeigt das Land an, in
dem die Zulassung erfolgt ist (1:
Deutschland, 2: Frankreich, 3: Italien,
4: Niederlande, 11: Großbritannien,
24: Irland).
• Zulassungsnummer: Beginnt sie mit
den Ziffern 04, bedeutet dies, dass es
sich um die vierte, derzeit gültige
Zusatzbestimmung der Norm R44
handelt.
• Referenznorm: UN/ECE R44/04.
• Laufende Produktionsnummer:
Kennzeichnet jeden einzelnen
Kindersitz. Nach der Zulassung
ist jeder der Sitze an seiner
Produktionsnummer erkennbar.
PEG-PÉREGO S.p.A.
Peg-Pérego S.p.A. ist
gemäß ISO 9001
ze r tif izi ert. Die
Zertifizierung garantiert
den Kunden und
Verbrauchern Transparenz und
ermöglicht das Vertrauen in die
Arbeitsweise des Unternehmens. Peg
Pérego kann zu jedem beliebigen
Zeitpunkt Änderungen an den in dieser
Veröffentlichung beschriebenen
Modellen sowohl aus technischen, als
auch aus kommerziellen Gründen
vornehmen. Peg Pérego steht den
Verbrauchern zur Verfügung, um deren
Anforderungen auf das Bestmöglichste
gerecht zu werden. Demnach ist es
ausgesprochen wichtig und wertvoll
für uns, über die Meinung unserer
Kunden Bescheid zu wissen. Wir bitten
Sie daher, das FORMULAR ÜBER DIE
KONSUMENT E NZUF R IEDE N HEIT
auszufüllen, nachdem Sie unsere
Produkte ausprobiert haben. Das
Formular ist unter folgender
Int erne tad res se abruf bar:
www.pegperego.com.
Kundendienst Peg-Pérego
Sollten Teile des Modells verloren
gehen oder beschädigt werden,
ersetzen Sie diese bitte ausschließlich
durch originale Peg PeregoTeile. Für Reparaturen, Ersatzteile,
Produktinformationen und Anbieter
von originalen Ersatzteilen und
Zubehör wenden Sie sich bitte an
den Peg Perego Kundendienst.
Halten Sie hierfür, wenn möglich,
die Seriennummer des betreffenden
Produktes bereit.
Tel. 0039/039/60.88.213
Fax 0039/039/33.09.992
E-Mail assistenza@pegperego.it
Webseite www.pegperego.com
Alle Rechte geistigen Eigentums
bezüglich der Inhalte dieser
Bedienungsanleitung gehören PEG
PEREGO S.p.A. und werden von den
geltenden Bestimmungen geschützt.
39
Page 40

ES_Español
Le agradecemos haber
elegido un producto
Peg-Pérego.
Silla de auto Viaggio 2/3
categoría “Universal”con
cinturones
• Homologada según la norma europea
UN/ECE R44/04 para niños de 15 a 36
kg (de 3 a 12 años aproximadamente).
• Adecuada para la mayoría de los
asientos de automóvil, pero no para
todos.
• La silla de auto se puede instalar
correctamente si en el manual de uso
y mantenimiento del vehículo se indica
la compatibilidad con sistemas de retén
“Universales”.
• Esta silla de auto está clasificada
como “Universal” según criterios de
homologación más estrictos que los
modelos anteriores, que no tienen
etiqueta de homologación.
• La silla de auto se puede utilizar sólo
en vehículos aprobados, dotados de
cinturón de seguridad de tres puntos
estático o enrollable, homologados
según el reglamento UN/ECE N° 16 o
normas equivalentes.
• No está permitido utilizar el cinturón
de dos puntos o abdominal.
Silla de auto Viaggio 2/3
categoría “Semiuniversal”
con cinturones + Surefix
• Homologada según la norma europea
UN/ECE R44/04 para niños de 15 a 36
kg (de 3 a 12 años aproximadamente).
• Esta silla de auto está homologada
para uso semiuniversal y es adecuada
para la fijación en los asientos de
los automóviles enumerados en la
lista adjunta a la presente hoja de
instrucciones.
• La silla de auto se puede utilizar sólo
en vehículos aprobados, dotados de
cinturón de seguridad de tres puntos
estático o enrollable, homologados
según el reglamento UN/ECE N° 16 o
normas equivalentes.
• No está permitido utilizar el cinturón
de dos puntos o abdominal.
ADVERTENCIA
• Leer la s instrucc iones
detenidamente antes del uso
y conservarlas para consultas
futuras. El incumplimiento de las
instrucciones de instalación de la
silla de auto implica riesgos para
el niño.
• Las operaciones de montaje e
instalación de Viaggio 2/3 deben
ser efectuadas por adultos. Las
operacione s de montaje e
instalación se realizan sin el niño
en la silla.
• Durante los viajes en automóvil, no
tener al niño en brazos y no sentarlo
fuera de la silla. En caso de frenadas
repentinas, incluso a baja velocidad,
el niño podría ser proyectado hacia
delante.
• Evitar introducir los dedos en los
mecanismos.
40
Page 41

• En el automóvil, prestar atención
especialmente al equipaje y demás
objetos que puedan causar lesiones
al niño en la silla de auto en caso de
accidente.
• No aplicar métodos de instalación
diferentes de los indicados: la silla
podría desprenderse del asiento.
• Asegurarse de que el cinturón de tres
puntos del vehículo para fijar la silla
de auto siempre esté tensado y no
retorcido.
• No dejar al niño en la silla de auto
sin vigilancia. Vigilarlo incluso mientras
duerma.
• Si el automóvil está en movimiento,
no retirar al niño de la silla de auto.
• Prestar atención para que la silla de
auto no quede bloqueada por una
parte móvil del asiento o una puerta.
• Regular la altura y la tensión de
los cinturones comprobando que
adhieran al cuerpo del niño, sin apretar
demasiado; comprobar que el cinturón
de seguridad no esté retorcido y que el
niño no lo pueda desenganchar solo.
• No dejar la silla de auto en el
automóvil al sol: algunas partes podrían
recalentarse y perjudicar la delicada
piel del niño; comprobar que la silla
no esté recalentada antes de apoyar
al niño.
• No utilizar la silla de auto sin
el revestimiento de tejido; el
revestimiento no se puede reemplazar
con otro no aprobado por el fabricante,
ya que forma parte de la silla y hace a
la seguridad.
• No quitar ni cambiar las partes de
poliestireno, ya que hacen a la
seguridad.
• En caso de duda, consultar al
fabricante o al revendedor de esta silla
de auto.
• Este artículo lleva un número de serie
progresivo.
• No despegar las etiquetas adhesivas o
cosidas; el producto podría resultar no
conforme a la norma.
• No utilizar la silla de auto si presenta
roturas o le faltan componentes, si
es de segunda mano, o si ha estado
sometida a esfuerzos violentos en un
accidente: podrían haberse producido
daños estructurales extremadamente
peligrosos.
• No realizar modificaciones en el
producto.
• Para reparaciones, sustituciones de
componentes e información sobre el
producto, contactar con el servicio de
asistencia posventa.
Los datos necesarios para ponerse en
contacto figuran en la última página de
este manual.
Si la silla de auto se engancha a los
conectores Isofix del automóvil, dejarla
siempre enganchada.
Si la silla se engancha al automóvil sólo
con los cinturones, retirarla o guardarla
en el maletero cuando no se utilice.
• No utilizar accesorios no aprobados
por el fabricante o por las autoridades
competentes.
1_ IMPORTANTE
• "Viaggio 2/3": silla de auto grupo
2/3 se debe instalar orientada en el
sentido de marcha.
• No instalar “Viaggio 2/3” sobre
41
Page 42

asientos orientados en la dirección
opuesta o transversal al sentido de
marcha del vehículo.
• Se recomienda utilizar el asiento
trasero, del lado opuesto al
conductor.
• En caso de instalación en el asiento
delantero, se recomienda colocar
la silla lo más lejos posible del
salpicadero.
• En caso de dificultades para montar
Viaggio 2/3 en el automóvil, levantar
pero no quitar el reposacabezas del
vehículo.
2_Componentes del
artículo
Verificar el contenido del embalaje y,
por cualquier reclamación, contactar
con el servicio de asistencia.
_ La silla de auto está compuesta por:
1 reposacabezas (a), 1 respaldo (b), 1
asiento (c).
El producto en el embalaje original
viene listo para usar. No es necesaria
ninguna operación de ensamblaje.
Características del producto
3• El reposacabezas se puede regular
en 6 posiciones. Levantar el mango
situado sobre el lado posterior del
respaldo y ponerlo a la altura deseada.
IMPORTANTE: La altura del
reposacabezas se debe regular a
medida que el niño crece.
IMPORTANTE: Una vez regulado
el reposacabezas, hay que intentar
moverlo, para comprobar que esté
enganchado correctamente.
4• Viaggio 2/3 está dotada de dos
portabebidas laterales extraíbles.
5• Viaggio 2/3 está dotada de un sistema
de reclinación para garantizar mayor
confort. Para reclinarla, tirar del mango
situado delante y simultáneamente
levantar la silla.
Enganche en el automóvil
con cinturones de seguridad
+ Surefix
En caso de automóvil con
conectores Isofix
Es posible utilizar este tipo de enganche
sólo si el automóvil está dotado de
ganchos Isofix.
Para más información sobre la existencia
y la posición de los ganchos, consultar
el manual de uso del automóvil.
El enganche Surefix garantiza una
mayor seguridad en el automóvil,
pero no sustituye la función de los
cinturones del vehículo.
6• Para alargar los conectores Surefix,
pulsar la tecla delantera en el interior
del saco, como en la figura, y alargarlos
manualmente.
7• Enganchar los conectores Surefix
de la silla de auto a los ganchos Isofix
del asiento del automóvil hasta oír el
encastre (flecha A). Tensar la correa y
simultáneamente (flecha B) empujar
la silla de auto contra el respaldo del
asiento (flecha C).
IMPORTANTE: Concluida la
operación, mover la silla de auto para
comprobar el enganche efectivo a los
conectores Isofix .
8• Para desenganchar los conectores
42
Page 43

Surefix de los ganchos Isofix del asiento
del automóvil, pulsar la tecla delantera
en el interior del saco de la silla de
auto para aflojar las correas de los
conectores y luego desengancharlos
manualmente presionando la palanca
de seguridad de los ganchos, como
en la figura.
Enganche en el automóvil
con cinturones de seguridad
En caso de automóvil SIN
conectores Isofix
9• Poner la silla de auto Viaggio 2/3 sobre
el asiento del automóvil orientada en el
sentido de marcha del vehículo, como en
la figura, y sentar al niño.
Cómo asegurar al niño en
Viaggio 2/3
10• Hacer pasar el cinturón de seguridad
del automóvil como en la figura.
11• Enganchar el cinturón de seguridad
del automóvil al asiento, hasta oír el
encastre. Poner las dos secciones del
cinturón como indica la figura.
12• Para completar el enganche en
el automóvil, hacer pasar el cinturón
diagonal por el paso superior ubicado
por encima del hombro del niño.
IMPORTANTE: si el cinturón
queda flojo, tensarlo. El cinturón
siempre debe quedar tenso y no
retorcido.
13• Con los cinturones en la posición
correcta, los hombros del niño quedan
por debajo del punto de paso de los
cinturones, como en la figura.
IMPORTANTE: los cinturones no
deben quedar ni demasiado arriba
ni demasiado abajo de los hombros
del niño.
Cómo quitar el saco
Para quitar el revestimiento de la silla
de auto Viaggio 2/3, el reposacabezas,
el respaldo y el asiento NO se deben
desenganchar entre sí sino que se
deben mantener unidos.
DESENFUNDAR EL ASIENTO:
14• desenganchar del asiento los
ganchos del saco, en los puntos y en
la secuencia indicada. Extraer la correa
central;
15• extraer del saco los listones rígidos,
como indica la figura.
DESENFUNDAR EL RESPALDO:
16• Extraer la tapa trasera tirando de la
misma hacia afuera, como se muestra
en la figura;
17• desenganchar todos los elásticos;
18• quitar el saco.
DESENFUNDAR EL REPOSACABEZAS:
19• Extraer la tapa de la parte trasera
del reposacabeza tirando de la misma
hacia afuera y desenganchar los dos
elásticos, como se muestra en la figura;
20• quitar el saco.
Mantenimiento del
acolchado
Cepillar las partes de tejido para
protegerlas del polvo.
• Lavar en lavadora a una temperatura
43
Page 44

máxima de 30º C con acción mecánica
y centrifugado reducido.
• No utilizar lejía a base de cloro.
• No planchar.
• No lavar en seco.
No eliminar las manchas con
disolventes.
• No secar en secadoras con tambor
rotativo.
°
30
Cómo poner el saco
ENFUNDAR EL ASIENTO:
• introducir los listones rígidos en el
tejido del asiento haciendo emerger
los ganchos;
• enganchar al asiento los tres ganchos
más externos, introducir la correa
central en la ranura y enganchar los
dos ganchos más internos;
• enganchar los botones automáticos
laterales.
ENFUNDAR EL RESPALDO:
21• calzar el saco haciendo pasar la
parte inferior del tejido por detrás del
respaldo, como en la figura;
22• enganchar todos los elásticos;
23• enganchar la tapa primero en
la parte inferior y luego en la parte
superior.
ENFUNDAR EL REPOSACABEZAS:
• calzar el saco prestando atención a la
parte blanca de poliestireno;
• enganchar todos los elásticos;
24• enganchar la tapa primero en la
parte superior y luego en la parte inferior.
Números de serie
25• Viaggio 2/3 consta de la siguiente
información en la parte inferior del
saco del asiento: nombre del producto,
fecha de producción, número de serie.
26• Viaggio 2/3 tiene la etiqueta de
homologación en la parte trasera
inferior del respaldo.
Limpieza del producto
• Este producto requiere de un
mantenimiento mínimo. Las operaciones
de limpieza y mantenimiento sólo
deben realizarse por adultos.
• Se recomienda mantener limpias
todas las partes móviles.
• Limpiar asiduamente las partes de
plástico con un trapo húmedo sin
usar disolventes ni otros productos
similares.
• No limpiar el dispositivo de
absorción de impacto de poliestireno
con disolventes u otros productos
parecidos.
• Proteger el producto contra agentes
atmosféricos (agua, lluvia o nieve). Una
exposición continua y prolongada al
sol puede causar cambios de color de
muchos materiales.
•
Conservar el producto en un lugar seco.
Significado de la etiqueta
de homologación
• Este apartado explica el significado de
la etiqueta de homologación (etiqueta
naranja).
• La etiqueta es doble porque esta silla
de auto está homologada para acoplarse
en el automóvil de dos maneras:
44
Page 45

• Sistema de enganche SUREFIX (la
inscripción SEMIUNIVERSAL indica la
compatibilidad de la silla de auto con
los vehículos equipados con sistema
ISOFIX).
• Sistema de enganche con cinturón
de tres puntos estático o con arrollador
(la inscripción UNIVERSAL indica la
compatibilidad de la silla de auto con
vehículos equipados con este tipo de
cinturón).
• En la parte superior de la etiqueta
figura la marca de la empresa fabricante
y el nombre del producto.
• La letra E dentro de un círculo indica el
certificado de homologación europea
y el número identifica el país que
ha emitido dicha homologación (1:
Alemania; 2: Francia; 3: Italia; 4: Países
Bajos; 11: Gran Bretaña; 24: Irlanda).
• Número de homologación: Si empieza
por 04 hace referencia a la cuarta
enmienda (actualmente en vigor) del
reglamento R44.
• Norma de referencia: UN/ECE R44/04.
• Numeración en orden consecutivo
de producción: Personaliza cada silla,
pues al emitirse la homologación
se identifica cada modelo con su
correspondiente número.
PEG-PÉREGO S.p.A
confianza en cuanto a los
procedimientos de trabajo de la
Peg-Pérego S.p.A posee la
certificación de la Norma
ISO 9001. La certificación
ofrece a los clientes y a los
consumidores la garantía
de transparencia y de
empresa. Peg-Pérego podrá aportar en
cualquier momento modificaciones a
los modelos que se describen en el
presente manual por razones técnicas
o comerciales. Peg-Pérego está a
disposición de sus consumidores para
responder satisfactoriamente a sus
exigencias. De ahí que sea fundamental
y extremamente importante conocer la
opinión de nuestros Clientes. Les
agradeceríamos por tanto que tras
utilizar uno de nuestros productos
rellenase, indicando eventuales
observaciones o sugerencias, el
CUESTIONARIO DE SATISFACCIÓN DEL
CONSUMIDOR que se halla en nuestra
página Web www.pegperego.com
Servicio de asistencia
Peg-Pérego
Si se pierden o dañan algunas partes
del modelo, utilizar únicamente repuestos
originales Peg Pérego. Para cualquier
reparación, sustitución, información
acerca de los productos, venta de
repuestos originales y accesorios,
contactar con el Servicio de Asistencia Peg
Pérego indicando, en caso fuere presente,
el número de serie del producto.
tel. 0039/039/60.88.213
fax 0039/039/33.09.992
e-mail assistenza@pegperego.it
sito internet www.pegperego.com
Todos los derechos de propiedad
intelectual sobre los contenidos
de este manual de instrucciones
pertenecen a PEG PEREGO S.p.A. y
están protegidos por las leyes vigentes.
45
Page 46

46
Page 47

47
Page 48

PEG PEREGO S.p.A. VIA DE GASPERI 50 20862 ARCORE MB ITALIA
tel. 0039•039•60881 - fax 0039•039•615869-616454
Servizio Post Vendita/After Sale: tel. 0039•039•6088213 - fax: 0039•039•3309992
800-147414
www.pegperego.com
FI001102I145 - 20/10/2011
 Loading...