

Page 1
FI000602I06
Venezia
Istruzioni dʼuso IT
Instructions for use EN
Notice dʼemploi FR
Gebrauchsanleitung DE
Instrucciones de uso ES
Instruções para uso PT
Gebruiksaanwijzing NL
Használati útmutató HU
Navodila za uporab SL
Инструкции по пользованию RU
Kullanim klavuzu TR
ΟΔΗΓΙΕΣ ΧΡΗΣΕΩΣ EL
Page 2

A
B
A
B
1 2
6
5
4
3
OK
Page 3
AB C
A
B
A
B
7 8
9 10
11 12
Page 4
1°
2°
1413
15
17
16
18
Page 5
A
B
22
2019
21
23 24
Page 6
30
27 28
25 26
29
Page 7

2
35
36
33 34
32
31
1
Page 8
39
37
38
40
41 42
Page 9

B
47 Accessory
46 Accessory
45 Accessory
A
44 Venezia+Primo Viaggio "B"
43 Venezia+Primo Viaggio "A"
Page 10
Venezia
MT
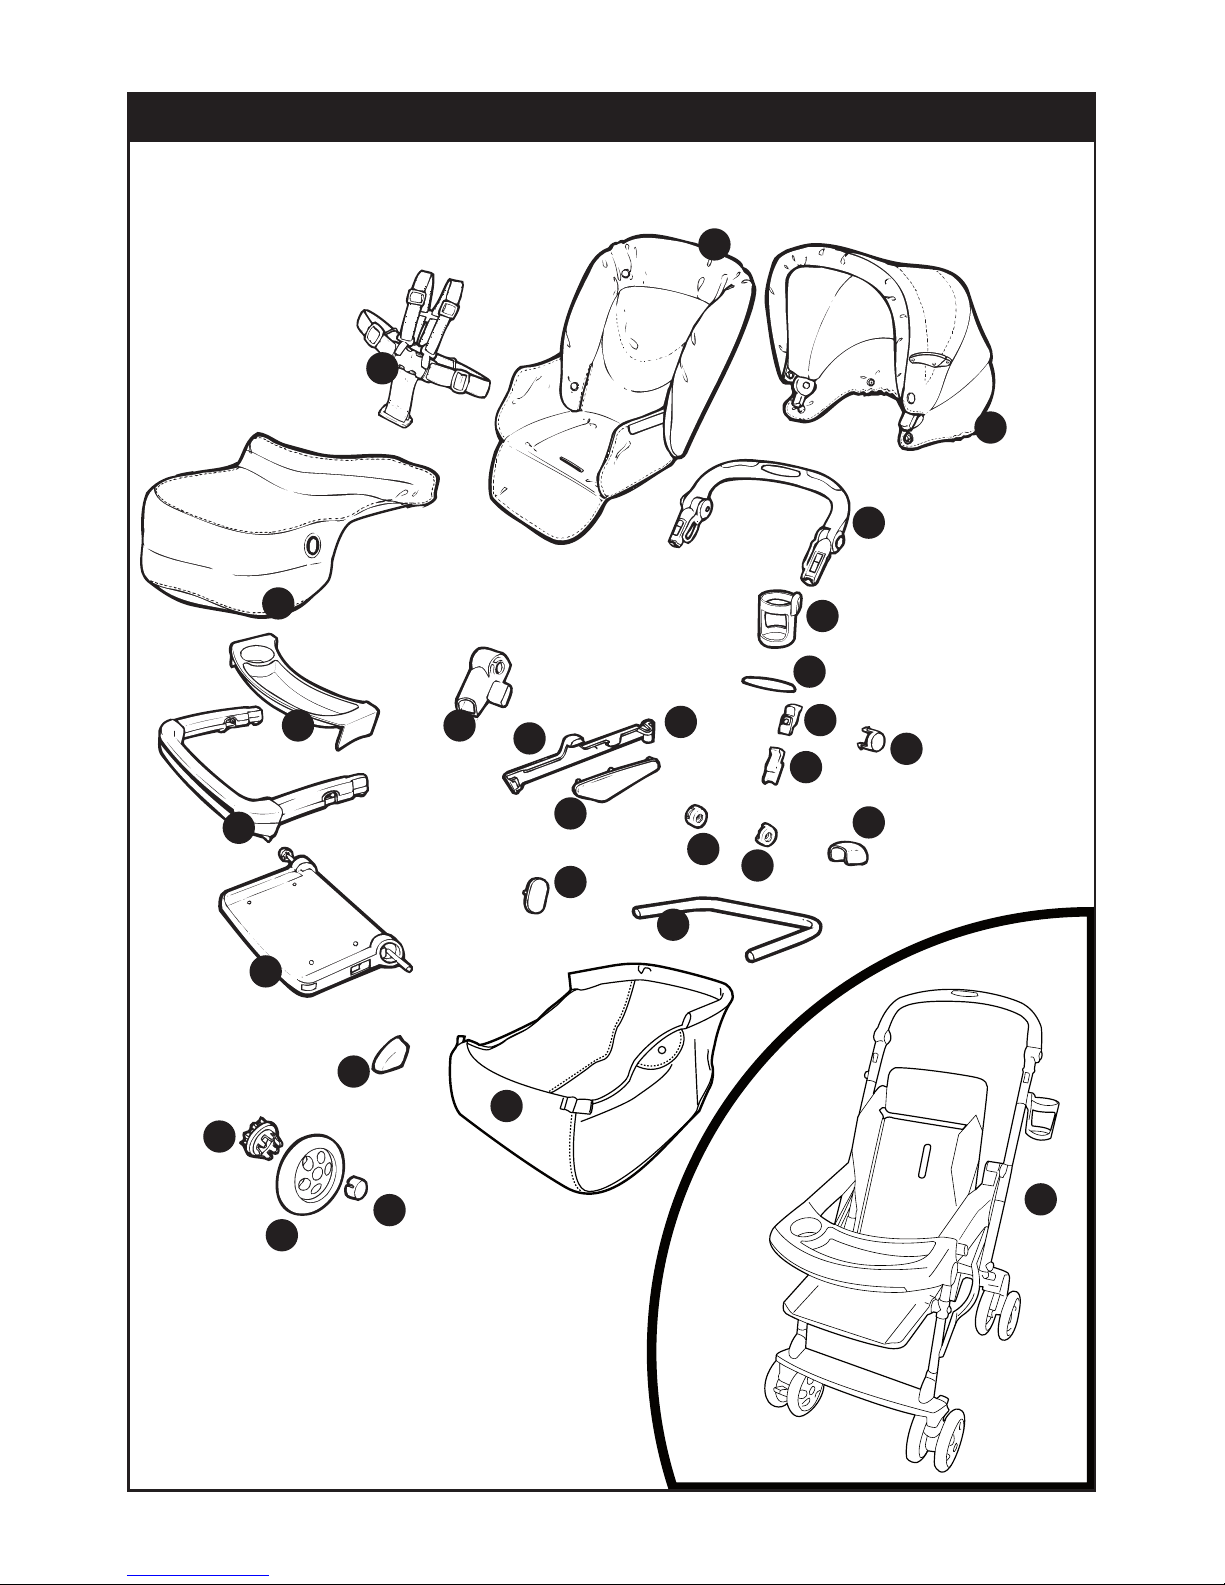
1
2
3
4
5
6
7
8
9
10
11
12
13
14
15
16
17
18
19
20
21
22
23
24
25
25
27
26
Page 11

Venezia
MT
1 ITPAVE•
2 CRSHVN00•
3 SPST5468•
4 SAPI5469JGRN
5 SPST4023•
6 ARPI0128•
7 SAPI4853•
8 IKTR0003•
9 BCOVNZ•
10 SPST4845D•
SPST4845S•
11 SPST4814D•
SPST4814S•
12 SPST4813WDGR•
SPST4813WSGR•
13 SPST4748•
14 SPST4778•
15 SPST4838•
16 SPST4833•
17 ASPI0079•
18 SPST4832•
19 MUCI5P14•
20 SPST4848GR
21 SPST4851AGR
22 SPST4851GR
23 MMMA4995•
24 IRTR0013GR
25 ARPI0142•
26 BCAVNZ•
27 BSAVNZ•
IT• Ricambi disponibili in piú colori da specificare nella richiesta.
EN• Spare parts available in different colours to be specified when ordering.
FR• Pièces de rechange disponibles en plusieurs couleurs à spécifier dans la demande.
DE• Ersatzteile in mehr Farben vorhanden, die in der Anfrage spezifiziert werden müssen.
ES• Repuestos disponibles en otros colores que se especificarán en el pedido.
PT• Peças de reposição disponíveis em cores alternativas a serem especificadas no pedido.
NL• Reserveonderdelen verkrijgbaar in meerdere kleuren, bij bestelling te specificeren.
HU• A tartalék alkatrészek különböző színekben elérhetők, melyeket rendeléskor kell kiválasztani.
SL• Rezervni deli so na voljo v več barvah, ki jih je treba navesti pri naročilu.
RU• Запчасти имеются различных цветов, необходимый указать в запросе.
TR• Siparişte belirtilen değişik renklerdeki yedek parçalari mevcuttur.
EL• Ανταλλακτικά διαθέσιμα σε διάψορα χρώματα. Προσδιορίστε όταν παραγγείλετε.
Page 12
• IMPORTANTE: leggere attentamente queste
istruzioni e conservarle per un futuro utilizzo.
La sicurezza del bambino potrebbe essere messa
a rischio se non si eseguono queste istruzioni.
• Peg Perego potrà apportare in qualunque
momento modifiche ai modelli descritti in questa
pubblicazione, per ragioni di natura tecnica o
commerciale.
Peg Perego S.p.A. è certificata ISO 9001.
La certificazione offre ai clienti e
ai consumatori la garanzia di una
trasparenza e fiducia nel modo di lavorare
dell'impresa.
SERVIZIO ASSISTENZA
Se fortuitamente parti del modello vengono perse o
danneggiate, usare solo pezzi di ricambio originali
Peg Perego. Per eventuali riparazioni, sostituzioni,
informazioni sui prodotti, la vendita di ricambi
originali e accessori, contatta il Servizio Assistenza
Peg-Perego:
tel.:0039-039-60.88.213,
fax: 0039-039-33.09.992,
e-mail: assistenza@pegperego.it,
www.pegperego.com
La Peg Perego è a disposizione dei suoi Consumatori
per soddisfare al meglio ogni loro esigenza. Per
questo, conoscere il parere dei ns. Clienti, è per noi
estremamente importante e prezioso. Le saremo
quindi molto grati se, dopo aver utilizzato un
ns. prodotto, vorrà compilare il QUESTIONARIO
SODDISFAZIONE CONSUMATORE che troverà in
internet al seguente indirizzo: www.pegperego.com/
SSCo.html.it,
segnalando eventuali osservazioni o suggerimenti.
ISTRUZIONI DʼUSO
APERTURA
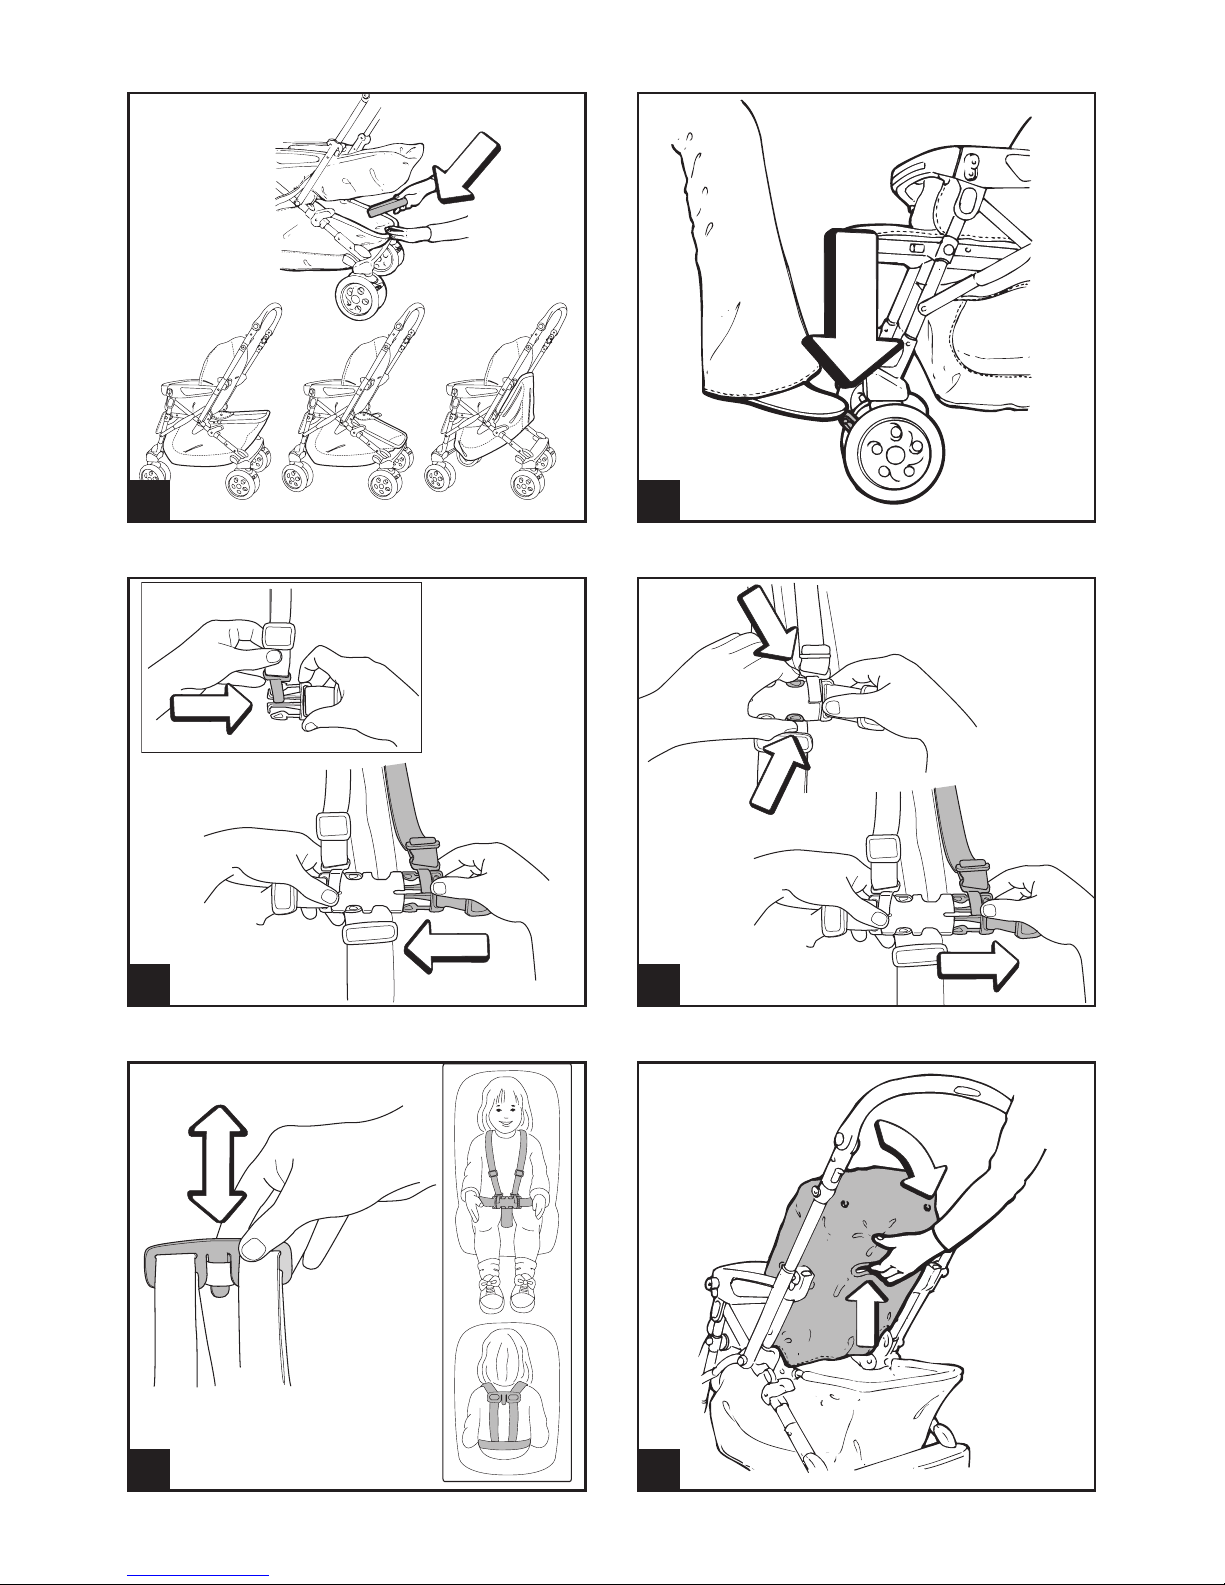
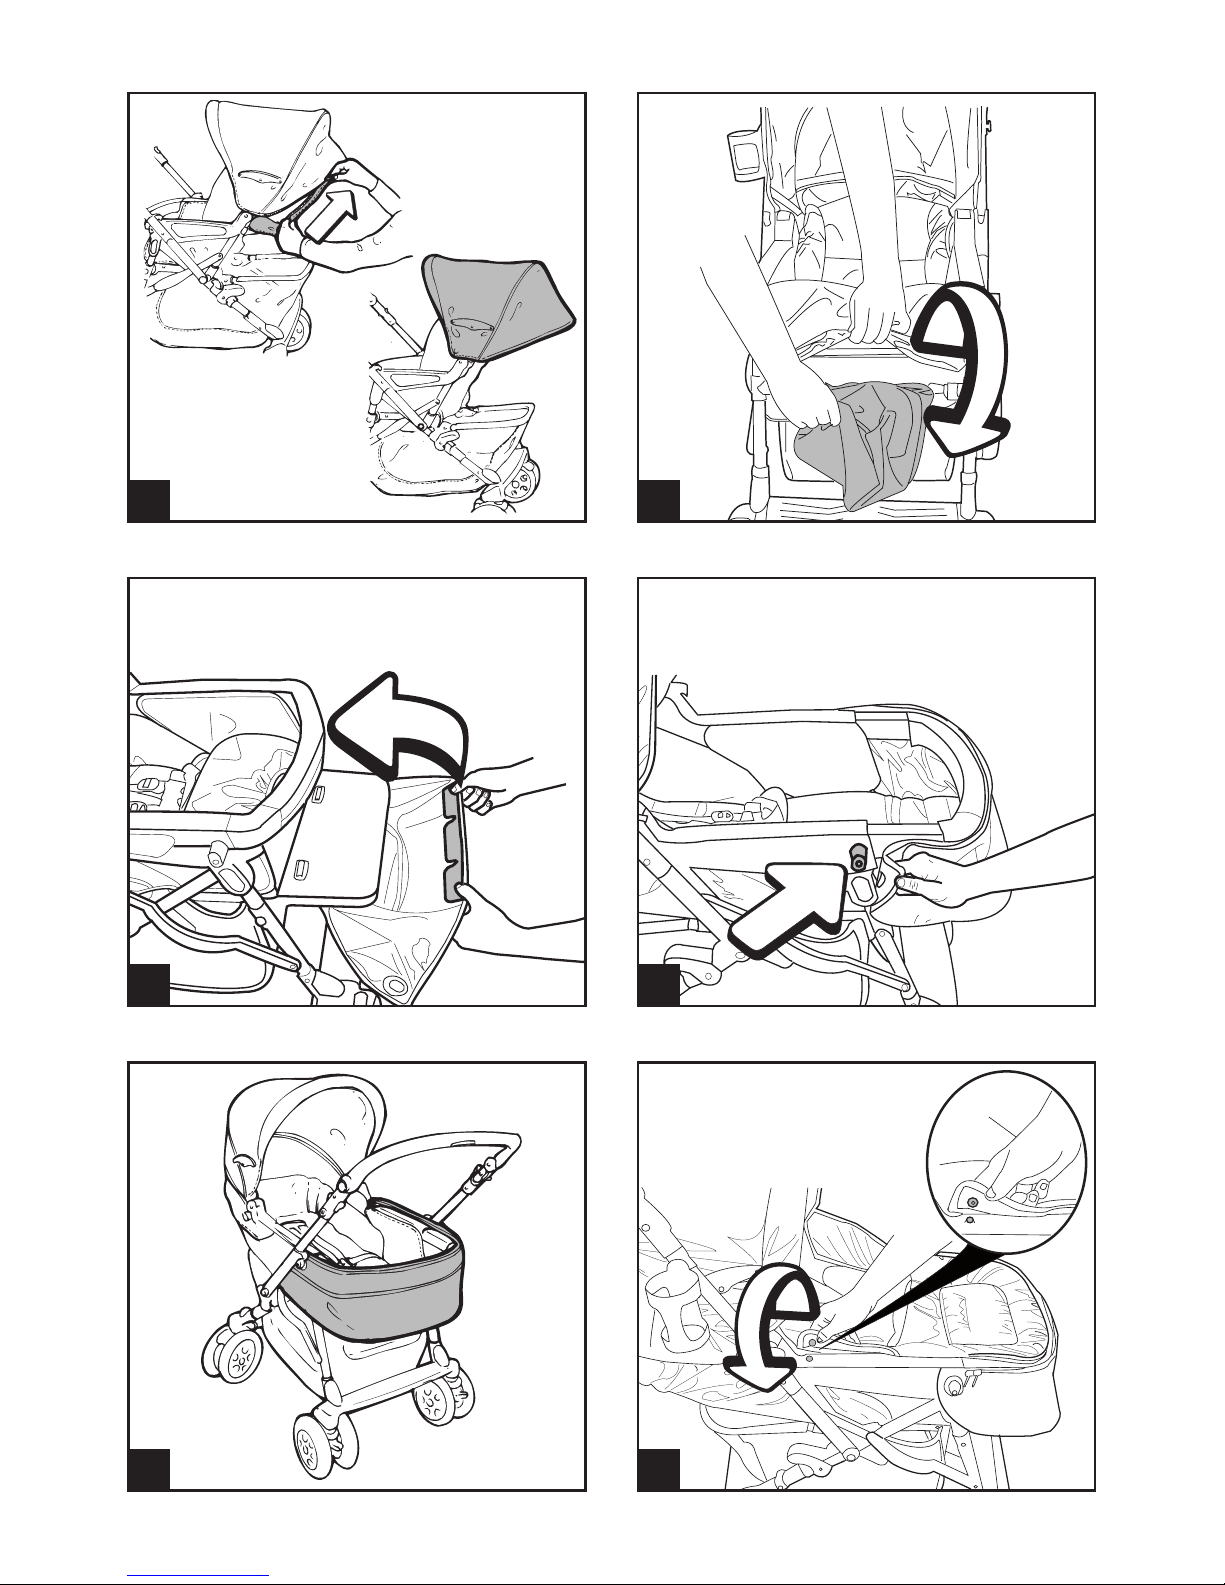
1• Per aprire il passeggino, premere
contemporaneamente i due pulsanti del
maniglione e bloccarlo nella posizione verticale.
Sganciare gli attacchi come in figura.
2• Alzare con decisione il manubrio verso lʼalto e
successivamente spingerlo verso il basso fino allo
scatto finale.
MONTAGGIO DEL CESTELLO
3• Per montare il cestello premere i pulsanti laterali e
tirare per estrarre lʼasta del cestello.
4• Verificare il corretto posizionamento dell'asta del
cestello facendo riferimento alla figura.
5• Infilare lʼasta nel tessuto del cestello. Inserire
lʼasta con il cestello nella sua sede fino al click.
6• Agganciare il cestello lateralmente ai bottoni e
anteriormente infilare le due asole al passeggino
come in figura.
7• Il cestello del passeggino ha tre regolazioni.
A: posizione normale.
B: Il cestello si abbassa per permettere lʼutilizzo
anche quando lo schienale è completamente
abbassato, premendo su di esso, è più facile
riempirlo senza disturbare il bebé.
C: cestello alzato per accedere alla pedana
posteriore.
FRENO
8• Il passeggino ha tutte e quattro le ruote frenabili,
poichè il manubrio è reversibile; occorre frenare
solo le ruote che si trovano dalla stessa parte del
manubrio. Per frenare il passeggino, abbassare col
piede la leva freno delle ruote come in figura. Da
fermi, azionare sempre i freni.
CINTURA DI SICUREZZA
9• A: Assicurarsi che la bretella sia correttamente
inserita spingendo come in figura. B: Agganciare
la cintura agendo come in figura.
10• Per sganciare la cintura, premere ai lati della fibbia
e contemporaneamente tirare verso lʼesterno, il
cinturino girovita.
11• La nuova cintura di sicurezza da oggi, é più facile
da indossare grazie al sistema “attacca e stacca”.
Infatti prima di agganciare la cintura, attacca la
fibbietta allo schienale inserendo la linguetta
nellʼapposito passante come in figura; poi quando
hai agganciato la cintura al tuo bambino staccala
dallo schienale per lasciare il tuo bambino più
libero di muoversi. La fibbietta deve rimanere
sotto le spalle del bambino.
REGOLAZIONE SCHIENALE
12• Lo schienale del passeggino è reclinabile fino a
tre posizioni. Per abbassarlo sollevare la maniglia,
e contemporaneamente bloccarlo nella posizione
desiderata; per alzarlo, spingerlo verso lʼalto.
REGOLAZIONE PEDANETTA
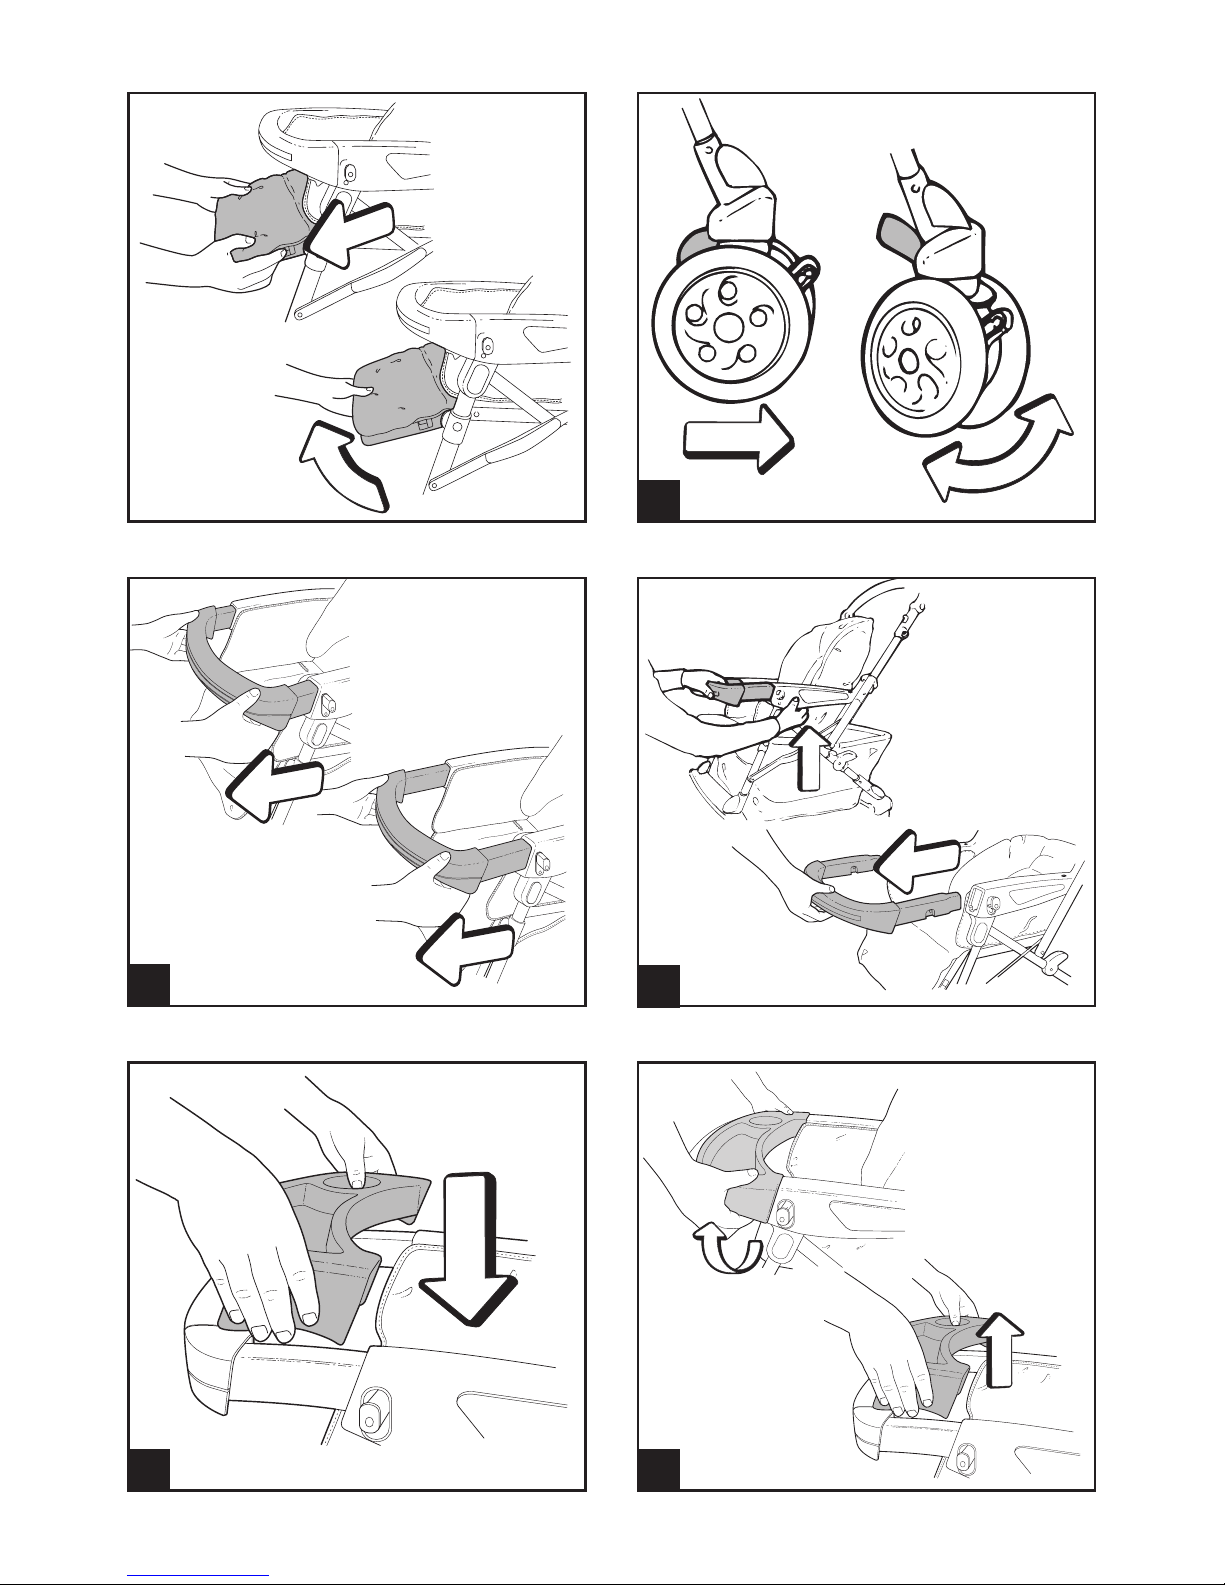
13• La pedanetta é regolabile in due posizioni. Per
abbassarla tirare le due levette verso il basso e
contemporaneamente abbassare la pedanetta
come in figura. Per alzarla sollevarla verso lʼalto
fino al click.
RUOTE PIROETTANTI
14• Il passeggino ha tutte e quattro le ruote
piroettanti; poichè il manubrio è reversibile;
occorre rendere piroettanti solo le ruote che si
trovano dalla parte opposta al manubrio. Per
rendere le ruote piroettanti, occorre alzare la leva,
come in figura. Per renderle fisse, abbassare la
leva.
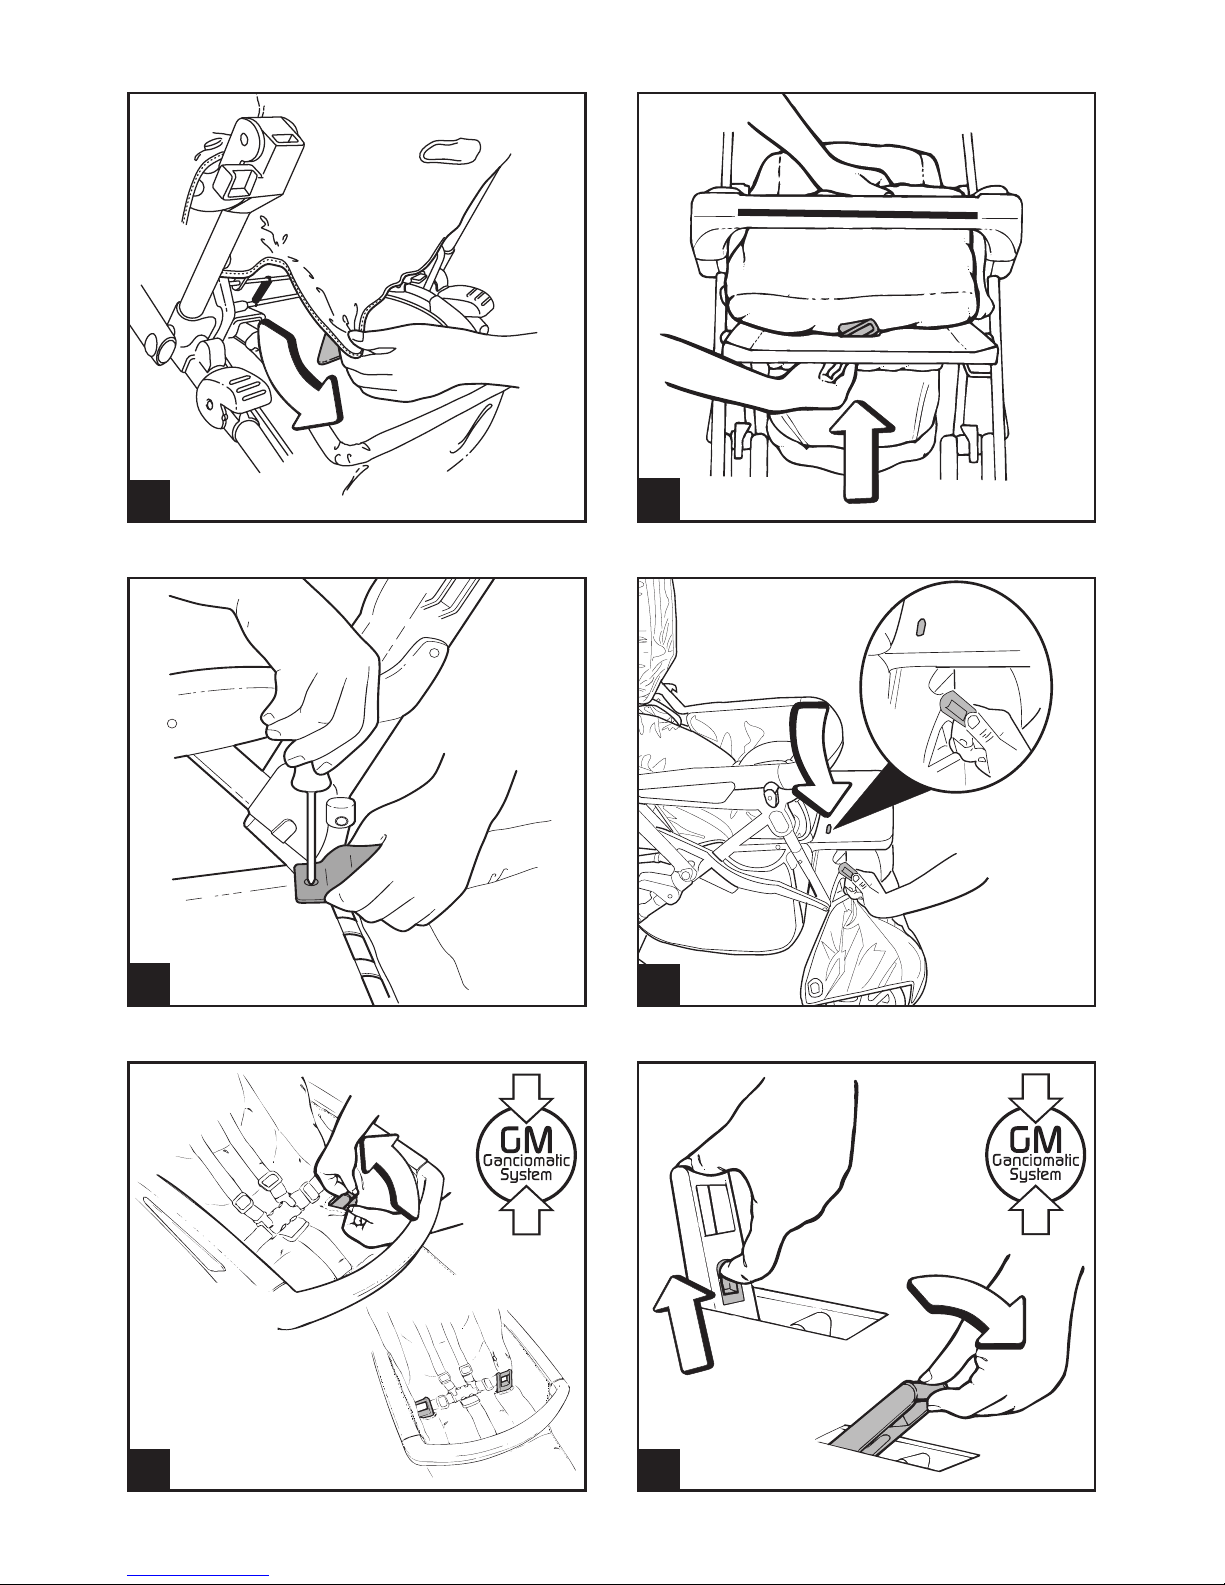
FRONTALINO
15• Il frontalino é allungabile in due posizioni. Per
allungarlo alla prima posizione, tirare verso di
sé le due levette poste sotto il frontalino e il
frontalino fino al primo scatto, per allungarlo alla
seconda posizione, tirare ulteriormente le due
levette e il frontalino verso di sé fino al secondo
scatto.
16• Quando i vostri bambini sono più grandi, é
possibile rimuovere il frontalino. Per estrarre il
frontalino, schiacciare i pulsanti posti sotto ai
braccioli e contemporaneamente tirare il frontalino
verso lʼesterno.
VASSOIO “CHILD TRAY”
17• Per agganciare il vassoio portabibite al
passeggino, occorre allungare il frontalino
fino alla seconda posizione e successivamente
agganciare il vassoio spingendolo verso il
basso,come in figura.
18• Per togliere il vassoio spingere in fuori le due
alette laterali del vassoio e contemporaneamente,
alzarlo verso lʼalto. É pericoloso appoggiare
bevande bollenti sul vassoio.
MANUBRIO
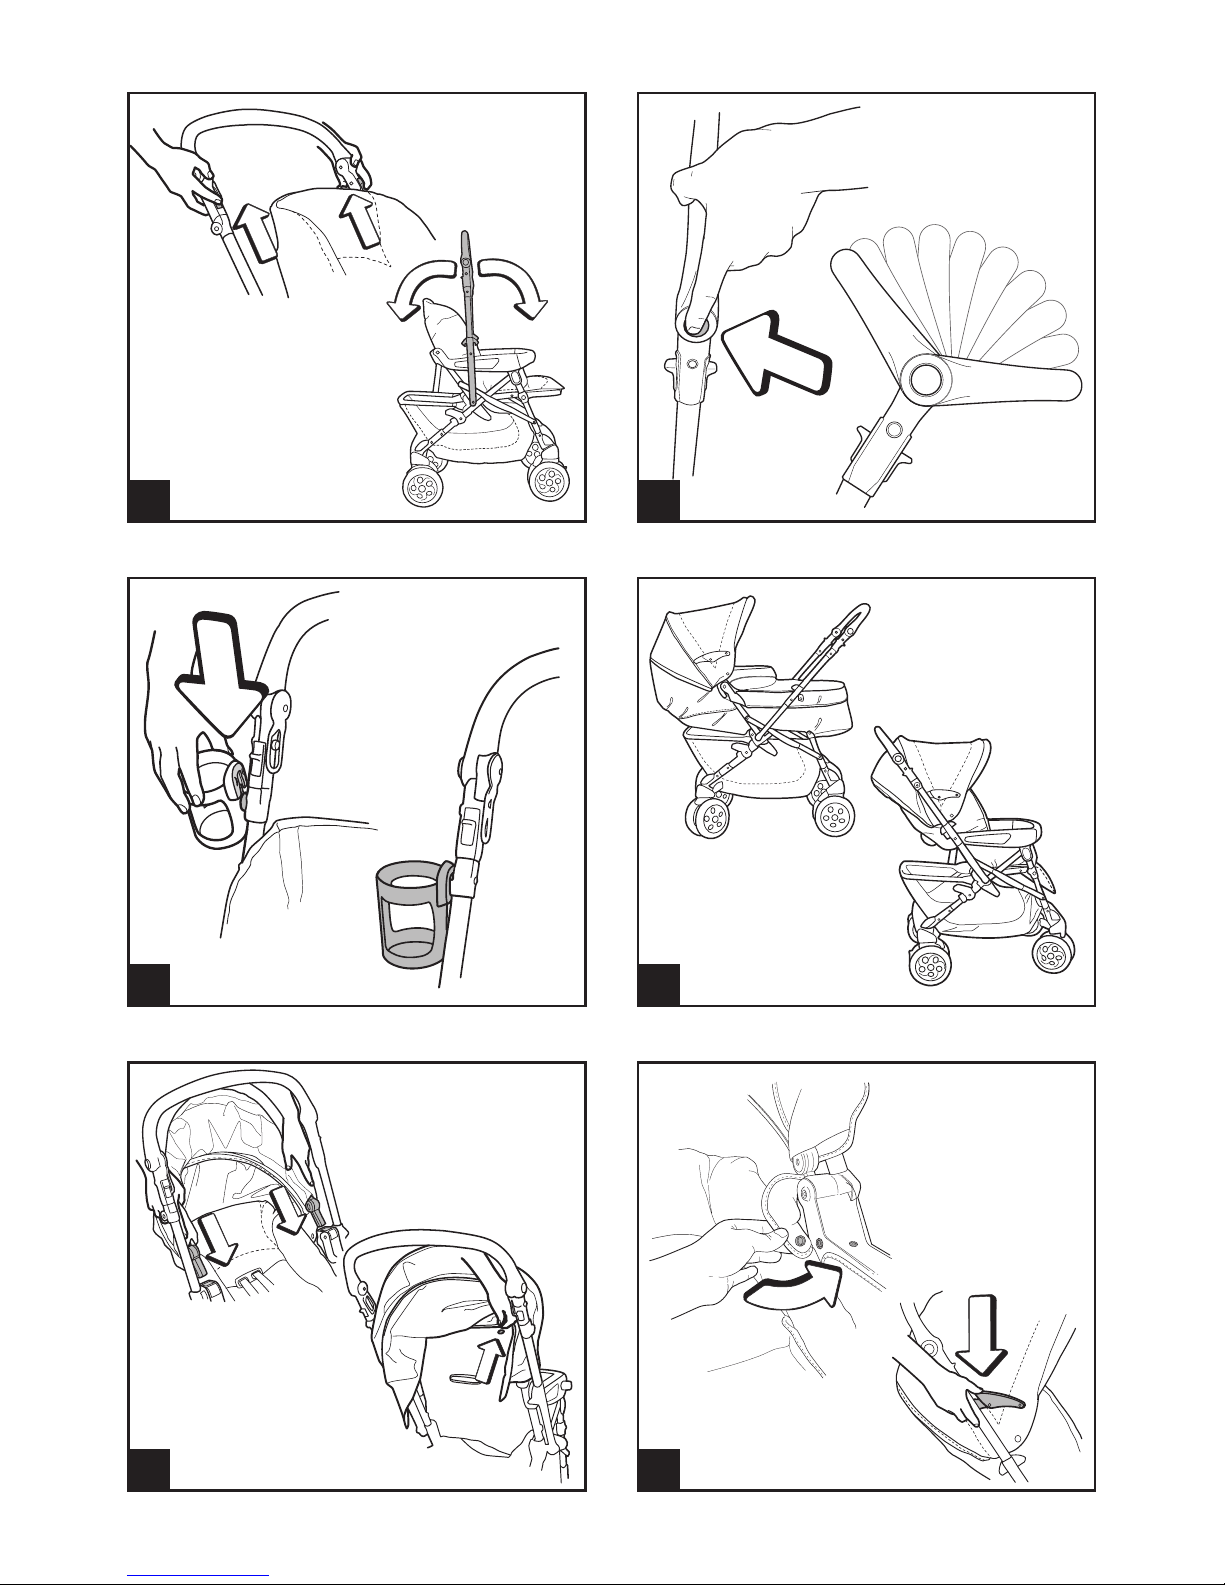
19• Per rendere reversibile il manubrio, tirare verso
lʼalto contemporaneamente entrambe le levette
poste sul manubrio e portare il manubrio dalla
parte opposta fino allo scatto finale. Nel compiere
questa operazione, assicurarsi di non urtare le
mani o le braccia del bimbo.
20• Per regolare lʼaltezza del maniglione, premere
IT•ITALIANO
Page 13
contemporaneamente i due pulsanti laterali come
in figura e bloccare il maniglione nella posizione
desiderata.
PORTABIBITE
21• Il portabibite è applicabile sia nel lato destro, sia
nel lato sinistro del manubrio. Per applicare il
portabibite, inserire la guida di questo nel piolo
del manubrio e spingerlo verso il basso fino al
click. Si consiglia di non inserire nel portabibite
bevande calde e con un peso superiore a 1 Kg (2,2
lbs).
CARROZZINA E/O PASSEGGINO
22• A: CARROZZINA: Venezia è carrozzina, quando ha
lo schienale abbassato fino allʼultima posizione, la
pedanetta alzata, il manubrio dalla parte opposta
dello schienale e le ruote piroettate dalla parte
dello schienale.
• B: PASSEGGINO: Venezia è passeggino, quando
ha lo schienale alzato, la pedanetta abbassata,
il manubrio dalla parte dello schienale e le ruote
piroettate dalla parte opposta dello schienale.
CAPOTTINA
23• Per applicare la capottina inserire gli attacchi nelle
apposite sedi dei braccioli del passeggino come in
figura e abbottonarla sul retro dello schienale.
24• Abbottonare la capottina ai lati interni dei braccioli
e tendere la capottina, abbassando i compassi
come in figura.
25• Per trasformare la capottina in tettuccio parasole,
aprire la cerniera come in figura e sbottonare il
resto della capottina.
COPERTINA
• Per trasformare Uno in versione carrozzina
occorre prima allungare il frontalino nella
seconda posizione e alzare la pedanetta.
26• Sfilare la parte inferiore della copertina da sotto
la sacca della pedanetta.
27• Inserire le linguette della parte inferiore della
copertina nelle fessure del frontalino. (Le fessure
del frontalino escono, quando si allunga il
frontalino. Nel caso le fessure rientrassero nella
propria sede, occorre spingere verso di sè le due
levette poste sotto il frontalino.)
28• Infilare le asole laterali ai braccioli.
29• Versione carrozzina senza copertina.
30• Allacciare con la zip la parte superiore della
copertina a quella inferiore e abbottonarla ai
braccioli come in figura.
31• Versione carrozzina con copertina.
CHIUSURA
Prima di chiudere il passeggino, assicurarsi che:
il manubrio sia posizionato dalla parte dello
schienale, se é applicata la capottina, allentare i
compassi e accertarsi che tutte le ruote, siano in
posizione fissa.
32• Per chiudere il passeggino, abbassare per prima la
leva di destra contrassegnata con il numero 1, fino
allo scatto finale.
33• Abbassare la leva di sinistra contrassegnata con il
numero 2 e alzare il manubrio verso lʼalto.
34• Successivamente, abbassare il manubrio verso il
basso e completare la chiusura, agganciando gli
attacchi come in figura.
TRASPORTO
35• Il passeggino ha due maniglie di trasporto sui
lati che consentontono di trasportare il prodotto
sia da chiuso che da aperto (es.: per scendere le
scale).
SFODERABILITÁ
36• Per sfoderare il passeggino, sfilare le alette della
sacca dai braccioli e sganciare i bottoni.
37• Togliere lʼaletta della sacca dallo schienale;
38• sfilare la cintura di sicurezza, da sotto il sedile;
39• Svitare il cinturino da entrambi i lati e sfilare la
sacca.
40• Per poter lavare la parte inferiore della copertina,
sfilare gli attacchi dalle sedi poste sul telaio della
pedanetta come in figura.
GANCIOMATIC SYSTEM
Il Ganciomatic System è il sistema pratico e veloce
che permette di agganciare al passeggino, grazie agli
attacchi Ganciomatic, il seggiolino auto Primo Viaggio,
anchʼesso dotato di Ganciomatic System, acquistabile
separatamente. Primo Viaggio si sgancia dalla sua
base (che rimane in auto) e si aggancia al passeggino
per trasportare, senza disturbare, il bambino.
Con il passeggino Venezia hai la possibilità di
agganciare il seggiolino auto in due modi differenti
("A" e "B").
ATTACCHI GANCIOMATIC DEL PASSEGGINO
41• Per alzare gli attacchi Ganciomatic del
passeggino, sollevare la sacca negli angoli della
seduta e ruotare verso lʼalto i due attacchi che
automaticamente si sposteranno verso l'esterno.
42• Per abbassare gli attacchi Ganciomatic del
passeggino, tirare verso lʼalto la levetta e
contemporaneamente abbassare il gancio come in
figura.
• Venezia puó essere chiuso anche con gli attacchi
Ganciomatic sollevati.
VENEZIA + PRIMO VIAGGIO
43• Per agganciare il seggiolino auto al passeggino
nel MODO "A", occorre:
- frenare il passeggino;
- togliere la capottina del passeggino;
- abbassare lo schienale del passeggino fino alla
penultima posizione;
- alzare gli attacchi Ganciomatic del passeggino;
- ruotare il manubrio dalla parte opposta dello
schienale;
- posizionare il seggiolino auto rivolto verso il
manubrio;
- agganciare il seggiolino auto, spingendolo verso il
basso fino al click.
44• Per agganciare il seggiolino auto al passeggino
nel MODO "B", occorre:
- frenare il passeggino;
- togliere la capottina del passeggino;
- abbassare lo schienale del passeggino fino alla
penultima posizione;
- alzare gli attacchi Ganciomatic del passeggino;
- assicurarsi che il manubrio sia posizionato dalla
parte dello schienale;
- estrarre il frontalino fino al primo scatto;
- posizionare il seggiolino auto rivolto verso lo
schienale;
- agganciare il seggiolino auto, spingendolo verso il
basso fino al click.
• Per sganciare il seggiolino auto dal passeggino
consultare il suo manuale istruzioni.
LINEA ACCESSORI
45• Parapioggia Cover All: Parapioggia copri-tutto in
PVC trasparente.
46• Questo parapioggia è stato studiato anche nel
caso che sul passeggino Venezia ci sia agganciato
il seggiolino auto Primo Viaggio, garantendo la
totale protezione.
47• Borsa Cambio: Borsa con materassino per il
cambio del bebè, agganciabile al passeggino.
Page 14
PULIZIA E MANUTENZIONE
Il vostro prodotto necessita un minimo di
manutenzione. Le operazioni di pulizia e
manutenzione devono essere effettuate solo da adulti.
• Si raccomanda di tenere pulite tutte le parti in
movimento e se occorre, lubrificarle con olio
leggero.
• Asciugare le parti in metallo del prodotto per
prevenire la ruggine.
• Periodicamente pulire le parti in plastica con un
panno umido, non usare solventi o altri prodotti
simili.
• Spazzolare le parti in tessuto per allontanare la
polvere.
• Tenere pulite le ruote da polvere e sabbia.
• Proteggere il prodotto da agenti atmosferici, acqua,
pioggia o neve; lʼesposizione continua e prolungata
al sole potrebbe causare cambiamenti di colore in
molti materiali.
• Conservare il prodotto in un posto asciutto.
• Per il lavaggio della sacca, seguire le suguenti
indicazioni.
ATTENZIONE
• UTILIZZATE SEMPRE LE CINTURE DI SICUREZZA A 5
PUNTI.
• NON LASCIATE MAI INCUSTODITO IL VOSTRO
BAMBINO.
• POTREBBE ESSERE PERICOLOSO UTILIZZARE
ACCESSORI CHE NON SIANO APPROVATI DAL
COSTRUTTORE.
• EVITARE DI INTRODURRE LE DITA NEI MECCANISMI.
• LE OPERAZIONI DI MONTAGGIO DEVONO ESSERE
EFFETTUATE DA ADULTI.
• NON UTILIZZATE IL PRODOTTO SE PRESENTA
ROTTURE O PEZZI MANCANTI.
• DA FERMI METTERE SEMPRE I FRENI.
• NON UTILIZZATE IL PRODOTTO IN VICINANZA DI
SCALE O GRADINI.
• SI RACCOMANDA DI NON ALZARE IL PASSEGGINO
IMPUGNANDOLO DAL FRONTALINO PERCHÈ QUESTO
NON É PROGETTATO PER SOPPORTARE CARICHI.
IN CASO DI NECESSITÀ SOLLEVARE IL PASSEGGINO
AFFERRANDOLO SOTTO I BRACCIOLI.
• VERIFICARE IL CORRETTO AGGANCIO DEL
SEGGIOLINO AUTO SUL PASSEGGINO.
NORME DI SICUREZZA
Per agganciare la cintura di sicurezza infilare le
bretelline e inserire le due estremità del cinturino
girovita nella fibbia. Assicurarsi sempre di aver
effetuato lo scatto di chiusura.
Per sganciare la cintura di sicurezza premere ai lati
della fibbia e contemporaneamente tirare verso
lʼesterno il cinturino girovita.
Pacchi e/o accessori possono rendere instabile il
prodotto. Raccomandiamo di non caricare il cestello
con più di 5 kg.
Fate attenzione al rischio rappresentato dal fuoco
e da altre significative fonti di calore quali radiatori
elettrici, stufe a gas ecc. nelle immediate vicinanze del
prodotto.
Assicurarsi sempre che il seggiolino auto, sia ben
agganciato ai ganci del passeggino.
• IMPORTANT: read these instructions carefully
and keep them for future reference.
Failure to follow these instructions could put the
childʼs safety at risk.
• PEG PEREGO reserves the right to make any
necessary changes or improvements to the products
shown at any time without notice.
Peg Perego S.p.A. is an ISO 9001 certified
company.
The fact that we are certified provides
a guarantee of our honesty for our
customers, and fosters trust in the
companyʼs way of working.
CUSTOMER SERVICE
If parts of the model are accidentally lost or damaged,
use only original Peg Perego spare parts. Contact
the Peg Perego Customer Service for all repair work,
replacements, information about products, and sale of
original spare parts and accessories, at the following:
tel.: 0039-039-60.88.213
fax: 0039-039-33.09.992
e-mail: assistenza@pegperego.it,
www.pegperego.com
Peg Perego is at the consumer's service, meeting
every need in the best way possible. This is why our
customers' opinions are so important and valuable
to us. We would be very grateful if you would kindly
fill in the CUSTOMER SATISFACTION QUESTIONNAIRE
after using one of our products. You will find the
questionnaire on the Internet at "www.pegperego.
com/SSCo.html.en-UK".
Please note any observations or suggestions you may
have on the questionnaire.
INSTRUCTIONS FOR USE
OPENING THE STROLLER
1• To open the stroller, simultaneously press the two
buttons on the handlebar, and fix the handlebar
in the upright position. Unhook the catches, as
shown in the figure.
2• Firmly lift the handlebar upwards, then push
downwards until it clicks into place.
MOUNTING THE BASKET
3• To mount the basket, press the side buttons and
pull to extract the basket rod.
4• Check that the basket bar is properly aligned as
indicated in the figure.
5• Slip the rod through the basket fabric. Insert the
rod with the basket into its housing, and press
until it clicks into place.
6• Fasten the basket sideways to the buttons and
before insert the two eyelets in the stroller as
indicated in the figure.
7• The stroller basket has three different positions.
A: The normal position.
B: A lowered position, obtained by pressing the
basket down, to allow you to use it even when the
backrest is completely lowered.
C: Basket raised to allow access to the rear
footrest.
BRAKE
8• The stroller has brakes on all four wheels, since
the handlebar is reversible. It is necessary to brake
only the wheels that are on the same side of the
stroller as the handlebar. To brake the stroller,
EN•ENGLISH
Page 15
push the brake levers on the wheels downwards
with your foot, as shown in the figure. Always set
the brake when the stroller is not moving.
SAFETY BELT
9• A: Make sure that the brace is properly inserted by
pushing as shown in the figure. B: Fasten the belt
as shown in the figure.
10• To unfasten the belt, press on the buckle sides
and pull out the waist strap.
11• The new safety belt is now easier to fasten thanks
to the "snap-open-and-shut" device. Before
fastening the safety belt, attach the buckle to the
backrest by inserting the tab through the special
holder, as shown in the figure. After fastening
the safety belt on your child, detach it from the
backrest to allow the child more freedom of
movement. The buckle must remain below the
child's shoulders.
ADJUSTING THE BACKREST
12• The backrest reclines to three different positions.
To lower the backrest, lift the handlebar and fix
the backrest in the desired position. To raise the
backrest, pull it upwards.
ADJUSTING THE FOOTREST
13• The footrest can be adjusted to two positions.
To lower it, pull the two levers downwards while
lowering the footrest, as shown in the figure. To
raise the footrest, lift it upwards until it clicks into
place.
SWIVELING WHEELS
14• Since the stroller handlebar is reversible, all four
of the stroller wheels can be set to swivel. It is
necessary to swivel only the wheels that are on the
opposite side of the stroller from the handlebar.
Lift the lever as shown in the figure to allow the
wheels to swivel. Lower the lever for fixed wheels.
FRONT BAR
15• The front bar can be extended to two positions.
To extend it to the first position, pull the two
little levers under the front bar and the front bar
towards you, until you hear the first click. To
extend the front bar to the second position, pull
the two levers and the front bar towards you again
until you hear the second click.
16• When your children are bigger, you can remove
the front bar. To detach the bar, press the buttons
under the armrests, while pulling the front bar
out.
“CHILD TRAY”
17• To hook the child tray to the stroller, extend the
front bar to the second position and then hook the
tray onto it by pushing it down as shown in the
figure.
18• To remove the tray, push out the two side tabs of
the tray as you lift the tray upward. It is dangerous
to put hot drinks on the tray.
HANDLEBAR
19• To reverse the handlebar, simultaneously pull the
little levers on the handlebar upwards and move
the handlebar to the opposite position, pressing
until you hear the final click. While carrying out
this operation, be very careful not to catch your
child's hands or arms.
20• To adjust the handlebar height, press the side
buttons simultaneously, as shown in the figure,
and lock the handlebar into the desired position.
DRINK-HOLDER
21• The drink-holder attaches to both the right and
the left-hand sides of the handlebar. To attach
the drink-holder, slip the attachment onto the
handlebar, and push downwards until it clicks into
place. Do not place hot drinks in the drink-holder.
Do not place anything heavier than 1 Kg. (2.2 lbs.)
in the drink-holder.
BABY CARRIAGE AND/OR STROLLER
22• A) BABY CARRIAGE: Venezia becomes a baby
carriage when the backrest is lowered to the last
position, with the footrest raised, the handlebar
positioned opposite the backrest, and the wheels
on the same side as the backrest set to swivel.
• B) STROLLER: Venezia becomes a stroller when
the backrest is raised, with the footrest lowered,
the handlebar positioned on the same side as the
backrest, and the wheels opposite the backrest set
to swivel.
HOOD
23• To attach the hood, insert the tabs into the special
notches on the stroller armrests as shown in the
figure, and fasten the hood to the back of the
backrest.
24• Fasten the hood to the inner sides of the armrests,
stretch out the hood, and press down on the side
braces as shown in the figure.
25• To turn the hood into a canopy to shield the child
from the sun, open the zipper as shown in the
figure and undo the rest of the hood.
COVER
• To transform Uno into the carriage version, first
extend the front bar to the second position and
lift the footrest
26•
Slip off the lower part of the hood from under the
footrest sack.
27• Insert the tabs on the lower part of the cover into
the slots in the front bar. (The slots on the front
bar flip out when the front bar is extended. If the
slots slide back into their housing, pull the two
little levers under the front bar towards you.)
28• Insert the side eyelets into the armrests.
29• Baby carriage without cover.
30• Zip the upper part of the cover to the lower part
and button to the armrests as indicated in the
figure.
31• Carriage version with cover.
CLOSING THE STROLLER
Before closing the stroller, check to make sure
that the handlebar is positioned on the same side
as backrest. If the hood is attached, pull the side
braces upwards. Make sure the four wheels are
fixed.
32• To close the stroller, lower the right-hand lever
(marked "1") until it clicks into place.
33• Lower the left-hand lever (marked "2"), and lift the
handlebar upwards.
34• Lower the handlebar to finish closing the stroller,
and close the catches as shown in the figure.
TRANSPORT
35• The stroller has a handle on each side, which
together allow you to transport it when open (as
when going down stairs) or closed.
REMOVABLE LINING
36• To remove the lining from the stroller, remove the
flaps on the sack from the armrests and unfasten
the buttons.
37• Remove the sack flap from the backrest.
38• Pull the safety belt out from under the seat.
39• Loosen the safety belt from both sides, and slip
the sack off the stroller.
40• To wash the part below the cover, undo
attachments from fittings found on the footrest
chassis as indicated in the figure.
Page 16

• Protect the product against smog, water, rain and
snow. Continued and extended exposure to sunlight
can change the colours of many materials.
• Store the product in a dry area.
• To wash the lining, carry out the following
instructions.
WARNING
• AVOID SERIOUS INJURY FROM FALLING OR SLIDING
OUT. ALWAYS USE COMPLETE 5 POINT SEAT BELT.
• NEVER LEAVE YOUR CHILD UNATTENDED.
• THE USE OF PARTS OR ACCESSORIES NOT APPROVED
BY THE MANUFACTURER COULD BE DANGEROUS.
• DO NOT INTRODUCE FINGERS IN THE MECHANISMS.
• ALL OPERATING AND ASSEMBLY PROCEDURES
SHOULD BE PERFORMED BY AN ADULT.
• DO NOT USE THE PRODUCT IF IT HAS BROKEN OR
MISSING PARTS.
• ALWAYS USE BRAKES WHEN STOPPED.
• DO NOT USE THIS PRODUCT AROUND STAIRS OR
STEPS.
• DO NOT LIFT THE STROLLER BY GRIPPING THE
FRONT BAR. THE FRONT BAR IS NOT DESIGNED TO
WITHSTAND LOADS. TO PICK UP THE STROLLER,
GRIP IT UNDER THE ARMRESTS.
• CHECK THE CORRECT FIXING OF THE PRIMO VIAGGIO
CAR SEAT TO THE STROLLER.
SAFETY RULES
Use special care when performing operating
procedures to avoid injurying the child or yourself.
To secure safety harness insert the two tongues into
the crotch strap until they click into place. Always
make sure that the safety harness is completely locked
into position. To release the safety belt, press both
sides of the buckle and pull at the same time the belt
outwards.
Parcels and accessory items, or both, placed on the
unit may cause the unit to become unstable. Maximum
weight for objects placed in basket is 11 lbs. Excessive
weight may cause a hazardous condition to exist.
Stay attentive to the risks provided by fire and other
significant sources of heat such as electric radiators,
gas heaters, ect. That are in the immediate vicinity of
the product.
Always make sure that the Primo Viaggio car seat is
properly fixed to the stroller hooks.
GANCIOMATIC SYSTEM
The Ganciomatic system is a fast, practical way to
fasten the Primo Viaggio car seat to the stroller, using
the Ganciomatic fasteners. The Primo Viaggio car seat
is also equipped with a Ganciomatic System, and can
be purchased separately. The Primo Viaggio car seat
fastens to its own base (which is left in the car) and to
the stroller, so the child can be moved without being
disturbed. The Venezia stroller allows you to fasten
the car seat two different ways (“A” and “B”).
GANCIOMATIC FASTENERS ON THE STROLLER
41• To raise the Ganciomatic fasteners on the stroller,
lift the sack at the corners of the seat and turn
the two fasteners upward. The fasteners will
automatically move outwards.
42• To lower the Ganciomatic fasteners on the
stroller, pull the lever upwards while lowering the
hook, as shown in the figure.
• The Venezia stroller can be folded up with the
Ganciomatic fasteners raised or lowered.
VENEZIA + PRIMO VIAGGIO
43• To fasten the car seat to the stroller in the “A”
VERSION:
- set the brake on the stroller;
- remove the hood from the stroller;
- lower the backrest on the stroller to the lowest
position;
- raise the Ganciomatic fasteners on the stroller;
- turn the handlebar to the opposite side from the
backrest;
- place the car seat facing the handlebar;
- fasten the car seat by pressing down on it until it
clicks into place.
44• To fasten the car seat to the stroller in the “B”
VERSION:
- set the brake on the stroller;
- remove the hood from the stroller;
- lower the backrest on the stroller to the lowest
position;
- raise the Ganciomatic fasteners on the stroller;
- make sure the handlebar is on the same side as
the backrest;
- pull the front bar out until it clicks into its first
position;
- place the care seat facing the backrest;
- fasten the car seat by pressing down on it until it
clicks into place.
• To detach the car seat from the stroller, consult
the instruction manual for the car seat.
LINE OF ACCESSORIES
45• Cover All Rain Canopy: Rain canopy in clear PVC
covers the entire stroller.
46• This rain canopy has been designed for use with
the Primo Viaggio car seat as well attached to the
Venezia stroller, to guarantee total protection.
47• Diaper-Changing Bag: Satchel with pad for
changing babyʼs diaper. Attaches to the stroller.
CLEANING & MAINTENANCE
Your product requires only minimal maintenance.
Cleaning and maintenance operations must be
performed only by adults.
• Be sure to keep all moving parts clean, lubricating
them with light oil if necessary.
• Dry off metal parts to prevent rusting.
• Regularly clean the plastic parts with a damp cloth.
Do not use solvents or similar products.
• Brush the fabric parts to remove dust.
• Remove any dust and sand from the wheels.
Page 17

• IMPORTANT : lire ces instructions avec attention
et les conserver pour toute référence future.
ILa sécurité de votre enfant pourrait être menacée
si ces instructions ne sont pas respectées.
• Pour des raisons techniques et commerciales,
PEG PEREGO pourra apporter à tout moment des
modifications aux modèles décrits dans ce manuel.
Peg Perego S.p.A. bénéficie de la
certification ISO 9001.
La certification assure aux clients et
aux consommateurs une garantie de
transparence et de confiance dans la
façon dont travaille lʼentreprise.
SERVICE DʼASSISTANCE
En cas de perte ou dommage fortuit de pièces
du modèle, utilisez exclusivement les pièces de
rechange originales Peg Perego. Pour les éventuelles
réparations, substitutions, informations sur les
produits, la vente de pièces de rechange originales et
dʼaccessoires, contactez le Service dʼassistance PegPerego:
tél.: 0039-039-60.88.213
fax: 0039-039-33.09.992
e-mail: assistenza@pegperego.it
www.pegperego.com
Peg Perego est à la disposition de ses consommateurs
pour satisfaire au mieux toutes leurs exigences.
À cette fin, connaître lʼavis de nos clients est pour
nous extrêmement important et précieux. Nous vous
saurions donc gré, après avoir utilisé lʼun de nos
produits, de bien vouloir remplir le QUESTIONNAIRE
SATISFACTION DU CONSOMMATEUR que vous
trouverez sur Internet à lʼadresse suivante:
“www.pegperego.com/SSCo.html.en-UK”,
et de nous faire vos éventuelles observations ou
suggestions.
NOTICE DʼEMPLOI
OUVERTURE
1• Pour ouvrir la poussette, appuyer simultanément
sur les deux boutons du guidon, bloquer ce
dernier à la verticale. Décrocher les fixations
comme indiqué sur la figure.
2• Tirer énergiquement le guidon vers le haut, puis
le pousser vers le bas jusquʼà entendre le déclic
dʼenclenchement.
MONTAGE DU PANIER
3• Pour monter le panier, appuyer sur les boutons
latéraux et tirer pour faire sortir la tige du panier.
4• Vérifier le bon positionnement de la barre du
panier en se référant à la figure.
5• Introduire la tige dans le tissu du panier. Insérer
la tige assemblée au panier dans son logement,
jusqu'à entendre un déclic.
6• Accrocher les côtés du panier aux boutons et, à
lʼavant, accrocher les deux œillets à la poussette,
comme sur la figure.
7• Le panier de la poussette est réglable en trois
positions.
A: position normale.
B: le panier sʼabaisse pour pouvoir lʼutiliser même
lorsque le dossier est complètement abaissé ;
en appuyant sur celui-ci, il est plus facile de le
remplir sans déranger le bébé.
C: panier relevé pour accéder au repose-pied
arrière.
FR•FRANÇAIS
FREIN
8• Le guidon étant réversible, le frein des quatre
roues de la poussette peut être enclenché.
Enclencher uniquement le frein des roues qui
se trouvent du même côté que le guidon. Pour
enclencher le frein de la poussette, abaisser
du pied le levier de freinage des roues, comme
indiqué sur la figure. A lʼarrêt, le frein doit
toujours être enclenché.
CEINTURES DE SECURITE
9• A: Assurez-vous que la bretelle soit correctement
insérée en vérifiant comme indiqué sur le schéma
correspondant. B: Accrochez la ceinture comme
indiqué sur le schéma.
10• Pour détacher la ceinture, appuyez de chaque côté
de la boucle et tirez pour que les deux parties se
désolidarisent.
11• Grâce à son système de fixation particulier, la
nouvelle ceinture de sécurité est désormais plus
pratique à attacher. En effet, avant dʼattacher la
ceinture, fixer la boucle au dossier en insérant
la languette dans le passant prévu à cet effet,
comme indiqué sur la figure. Après avoir attaché
la ceinture, la détacher du dossier pour permettre
au bébé de bouger en toute liberté. La boucle doit
rester sous les épaules du bébé.
REGLAGE DU DOSSIER
12• Le dossier de la poussette est inclinable en trois
positions. Pour lʼabaisser, soulever la poignée tout
en bloquant le dossier dans la position souhaitée.
Pour le relever, le pousser vers le haut.
REGLAGE DU REPOSE-PIED
13• Le repose-pied est réglable en deux positions.
Pour l'abaisser, tirer les deux doigts vers le bas
tout en abaissant le repose-pied, comme indiqué
sur la figure. Pour le relever, le soulever jusqu'à
entendre le déclic dʼenclenchement.
ROUES PIVOTANTES
14• Le guidon étant réversible, les quatre roues de la
poussette sont pivotantes. Seules les roues qui
se trouvent du côté opposé au guidon doivent
être mises en position pivotante. Pour mettre les
roues avant en position pivotante, relever le levier
comme indiqué sur la figure. Pour les mettre en
position fixe, abaisser le levier.
BARRE FRONTALE
15• La barre frontale peut être rallongée en deux
positions. Pour la rallonger en première position,
tirer vers soi les deux doigts situés sous la barre
frontale et cette dernière jusquʼau premier déclic.
Pour rallonger la barre frontale en seconde
position, continuer de tirer vers soi les deux
doigts et la barre frontale jusquʼau second déclic.
16• Lorsque les enfants sont plus grands, il est
possible de retirer la barre frontale. Pour cela,
appuyer sur les boutons situés sous les accoudoirs
tout en tirant la barre frontale vers lʼextérieur.
PLATEAU "CHILD TRAY"
17• Pour accrocher le plateau porte-objets à la
poussette, rallonger la barre frontale jusquʼà la
seconde position puis accrocher le plateau en le
poussant vers le bas, comme indiqué sur la figure.
18• Pour enlever le plateau, pousser vers lʼextérieur
les deux ailettes latérales du plateau tout en
soulevant ce dernier. Il est dangereux de poser
des boissons bouillantes sur le plateau.
GUIDON
19• Pour inverser le guidon, tirer simultanément
vers le haut les deux doigts situés sur le guidon
et amener le guidon du côté opposé jusquʼà
Page 18

POUR RETIRER LA HOUSSE
36• Pour retirer la housse de la poussette, détacher
les ailettes de la housse des accoudoirs et la
déboutonner.
37• Retirer lʼailette de la housse du dossier;
38• enlever la ceinture de sécurité en la faisant glisser
par le dessous du siège;
39• Dévisser la ceinture des deux côtés et retirer la
housse.
40• Pour nettoyer la partie inférieure du tablier,
détacher les fixations sur le cadre du repose-
pieds, comme indiqué sur la figure.
SYSTÈME GANCIOMATIC
Grâce aux fixations Ganciomatic, le Système
Ganciomatic permet dʼaccrocher rapidement et
facilement le siège auto Primo Viaggio (également
équipé du Système Ganciomatic) à la poussette. Il est
possible de démonter Primo Viaggio de sa base (qui
reste dans la voiture) et de le monter sur la poussette
pour transporter lʼenfant sans le déranger. Avec la
poussette Venezia, il est possible de monter le
siège auto de deux manières différentes («A» et
«B»).
FIXATIONS GANCIOMATIC DE LA POUSSETTE
41• Pour relever les fixations Ganciomatic de
la poussette, soulever la housse au niveau
des angles de lʼassise et faire pivoter vers le
haut les deux fixations; elles se déplaceront
automatiquement vers lʼextérieur.
42• Pour abaisser les fixations Ganciomatic de la
poussette, tirer vers lʼextérieur le petit levier et,
dans le même temps, abaisser le crochet, comme
sur la figure.
• Venezia peut être refermée également avec les
fixations Ganciomatic relevées.
VENEZIA + PRIMO VIAGGIO
43• Pour monter le siège auto sur la poussette
selon la VERSION «A», il convient de:
- bloquer la poussette;
- enlever la capote de la poussette;
- abaisser le dossier jusquʼà lʼavant-dernière
position;
- relever les fixations Ganciomatic de la poussette;
- positionner le guidon de lʼautre côté du dossier;
- positionner le siège auto vers le guidon;
- bloquer le siège auto en le poussant vers le bas
jusquʼau déclic;
44• Pour monter le siège auto sur la poussette
selon la VERSION «B», il convient de:
- bloquer la poussette;
- enlever la capote de la poussette;
- abaisser le dossier jusquʼà lʼavant-dernière
position;
-
relever les fixations Ganciomatic de la poussette;
- sʼassurer que le guidon est positionné du côté
opposé au dossier;
- tirer la barre frontale jusquʼau premier cran;
- positionner le siège auto vers le dossier;
- bloquer le siège auto en le poussant vers le bas
jusquʼau déclic;
• Pour décrocher le siège auto de la poussette,
consulter son mode dʼemploi.
LIGNE DʼACCESSOIRES
45• Bâche intégrale (Cover All): bâche intégrale en PVC
transparent.
46• Cette bâche a également été conçue en cas de
montage du siège auto Primo Viaggio sur la
poussette Venezia, garantissant sa protection
totale.
entendre le déclic dʼenclenchement. Au cours de
cette opération, sʼassurer de ne pas heurter les
mains ou les bras de lʼenfant.
20• Pour régler la hauteur du guidon, appuyer
simultanément sur les deux boutons latéraux,
comme indiqué sur la figure, et bloquer le guidon
dans la position souhaitée.
PORTE-BOUTEILLE
21• Le porte-bouteille peut être appliqué du côté
gauche ou du côté droit du guidon. Pour appliquer
le porte-bouteille, insérer son guide dans le
téton du guidon et le pousser vers le bas jusquʼà
entendre le déclic dʼenclenchement. Il est conseillé
de ne pas insérer des boissons chaudes et pesant
plus de 1 kg (2,2 lbs) dans le porte-bouteille.
POUSSETTE VENEZIA VERSION A ET B
22• A: Venezia est en version A lorsque le dossier est
abaissé jusquʼen dernière position, le repose-pied
relevé, le guidon du côté opposé au dossier et les
roues pivotantes du côté du dossier.
• B: Venezia est en version B lorsque le dossier est
relevé, le repose-pied abaissé, le guidon du côté
du dossier et les roues pivotantes du côté opposé
au dossier.
CAPOTE
23• Pour appliquer la capote, insérer les fixations
dans les logements appropriés des accoudoirs de
la poussette, comme indiqué sur la figure, et la
boutonner à lʼarrière du dossier.
24• Boutonner la capote aux flancs internes des
accoudoirs et tendre la capote en abaissant les
petits leviers, comme indiqué sur la figure.
25• Pour transformer la capote en pare-soleil, ouvrir
la fermeture Eclair comme indiqué sur la figure et
déboutonner le reste de la capote.
TABLIER
Pour transformer Uno en version landau, allonger
tout dʼabord la barre frontale jusquʼà atteindre la
deuxième position puis relever la pédale reposepieds.
26• Détacher la partie inférieure du tablier par le
dessous de la housse du repose-pieds.
27• Insérer les languettes de la partie inférieure du
tablier dans les fentes de la barre frontale. (Les
fentes de la barre frontale sortent lorsque cette
dernière est rallongée. Si les fentes rentraient
dans leur logement, pousser vers soi les deux
doigts situés sous la barre frontale.)
28• Insérer les œillets latéraux dans les accoudoirs.
29• Version sans tablier.
30• Unir à lʼaide de la fermeture Éclair la partie
supérieure du tablier à la partie inférieure et la
boutonner aux accoudoirs, comme sur la figure.
31• Version landau avec tablier.
FERMETURE
Avant de fermer la poussette, sʼassurer que le
guidon est du côté du dossier. Si la capote est
appliquée, desserrer les petits leviers et sʼassurer
que toutes les roues sont en position fixe.
32• Pour fermer la poussette, abaisser tout dʼabord
le levier de droite portant le chiffre 1, jusqu
ʼà
entendre le déclic dʼenclenchement.
33• Abaisser le levier de gauche portant le chiffre 2 et
tirer le guidon vers le haut.
34• Abaisser ensuite le guidon et fermer la poussette
en accrochant les fixations comme indiqué sur la
figure.
TRANSPORT
35• La poussette est dotée de deux poignées latérales
qui permettent de la transporter tant fermée
quʼouverte (ex.: pour descendre les escaliers).
Page 19

47• Sac à langer: Sac muni dʼun petit matelas
pour changer bébé, qui peut être monté sur la
poussette.
NETTOYAGE ET ENTRETIEN
Votre produit nécessite un minimum dʼentretien. Les
opérations de nettoyage et dʼentretien doivent être
effectuées uniquement par des adultes.
• Il est recommandé de maintenir toutes les parties
mobiles propres et, au besoin, de les lubrifier avec
une huile légère.
• Essuyer les parties métalliques du produit pour
prévenir la formation de rouille.
• Nettoyer régulièrement les parties en plastique avec
un chiffon humide, ne pas utiliser de solvants ou
dʼautres produits du même type.
• Brosser les parties en tissu pour les dépoussiérer.
• Éliminer les dépôts de poussière et de sable des
roues.
• Protéger le produit contre les agents
atmosphériques, lʼeau, la pluie ou la neige;
lʼexposition continue et prolongée au soleil pourrait
altérer les couleurs de nombreux matériaux.
• Conserver le produit dans un endroit sec.
• Pour le lavage du sac, suivre les instructions ci-
après.
AVERTISSEMENT
• TOUJOURS UTILISER LA CEINTURE DE SECURITE A 5
POINTS.
• NE JAMAIS LAISSER LʼENFANT SANS SURVEILLANCE.
• LʼUTILISATION DʼACCESSOIRES NON APPROUVES PAR
LE CONSTRUCTEUR POURRAIT ETRE DANGEREUSE.
• NE PAS METTRE LES DOIGTS DANS LES MECANISMES.
• LES OPERATIONS DE MONTAGE ET DE DEMONTAGE
DOIVENT ETRE EFFECTUEES PAR DES ADULTES.
• NE PAS UTILISER LE PRODUIT SʼIL EST ENDOMMAGE
OU SI DES PIECES SONT MANQUANTES.
• A LʼARRET, TOUJOURS ENCLENCHER LE FREIN.
• NE PAS UTILISER LE PRODUIT À PROXIMITÉ
DʼESCALIERS OU DE MARCHES.
• IL EST RECOMMANDE DE NE PAS SOULEVER LA
POUSSETTE PAR LA MAIN COURANTE, CELLE-CI
NʼETANT PAS CONÇUE POUR SUPPORTER DES
CHARGES. EN CAS DE BESOIN, SOULEVEZ LA
POUSSETTE EN LA PRENANT PAR LES ACCOUDOIRS.
• VERIFIER LA FIXATION PARFAITE DU SIEGE AUTO
PRIMO VIAGGIO SUR LA POUSSETTE.
NORMES DE SECURITE
Pour boucler la ceinture de sécurité, enfilez les deux
extrémités de la ceinture dans la boucle de la sangle
entre-jambes et accrochez les deux ceintures dorsales
dans les boucles prévues à cet effet. Pour ouvrir la
ceinture de sécurité, poussez les deux extrémités de
la ceinture vers lʼintérieur, appuyez sur le milieu de la
boucle et en même temps, tirez vers lʼextérieur.
Des paquets et/ou des accessoires peuvent rendre
instables le produit.
Nous recommandons de ne pas mettre dans le panier
une charge supérieure à 5 kg.
ATTENTION: veillez à ne pas mettre cette poussette
à proximité dʼune source de chaleur telle quʼun
convecteur électrique, chauffage, etc.
Vérifiez systématiquement que le siège auto Primo
Viaggio est correctement ancrés sur la poussette
NOTICE RÉSERVÉE AU MARCHÉ FRANÇAIS:
• “Conforme aux exigences de securite”.
• Norme NF S 54-001.
• Lʼutilisation de cette poussette est fortement
déconseillée aux enfants dʼun âge inférieur à 6 mois
à moins quʼelle ne comporte une position allongée.
Page 20

• WICHTIG: diese gebrauchsanleitung aufmerksam
durchlesen und für späteren gebrauch
aufbewahren.
Die missachtung dieser gebrauchsanleitung
könnte die sicherheit ihres kindes gefährden.
• Farbliche und technische Änderungen vorbehalten.
Peg Perego S.p.A. ist gemäß ISO 9001
zertifiziert.
Die Zertifizierung garantiert den
Kunden und Verbrauchern Transparenz
und ermöglicht das Vertrauen in die
Arbeitsweise unseres Unternehmens.
KUNDENDIENST
Bei Verlust oder Beschädigung ausschließlich
Originalersatzteile von Peg Perego verwenden. Für
eventuelle Reparaturen, Produktinformationen,
den Austausch diverser Teile bzw. den Kauf von
Originalersatzteilen oder Zubehörteilen wenden Sie
sich bitte an den Kundendienst Peg-Perego:
Tel.: 0039-039-60.88.213,
Fax: 0039-039-33.09.992,
E-Mail: assistenza@pegperego.it,
www.pegperego.com
Als Peg Perego stehen wir unseren Kunden für jeden
Bedarf immer gerne zur Seite. Deshalb ist es auch
extrem wichtig, über die Meinung unserer Kunden
Bescheid zu wissen. Wir bitten Sie, das FORMULAR
ÜBER DIE KONSUMENTENZUFRIEDENHEIT nachdem Sie
unsere Produkte ausprobiert haben, auszufüllen. Das
Formular ist unter folgender Internetadresse abrufbar:
“www.pegperego.com/SSCo.html.en-UK”
Wir würden uns über Anmerkungen und Ratschläge
freuen.
GEBRAUCHSANLEITUNG
ÖFFNEN
1• Zum Aufklappen des Sportwagens gleichzeitig
die beiden Druckknöpfe des Lenkers drücken
und diesen auf vertikaler Position feststellen. Die
Anschlüsse laut Abbildung aushaken.
2• Den Lenker entschieden hochheben und danach
bis zum Einschnappen nach unten drücken.
MONTAGE DES ABLAGEKORBS
3• Zum Montieren des Korbes die sich an der Seite
befindlichen Knöpfe betätigen und die Stange des
Korbes herausziehen.
4• Die richtige Positionierung der Stange des
Ablagekorbes gemäß Abbildung prüfen.
5• Die Stange in das Korbnetz einführen. Die Stange
mit dem Korb in die dafür vorgesehene Position
bis zum Klickgeräusch einführen.
6• Den Ablagekorb seitlich an den Knöpfen
einhängen und auf der Vorderseite die beiden
Ösen, wie in der Abbildung gezeigt, am
Sportwagen einführen.
7• Der Korb des Sitzwagens kann auf drei
verschiedene Stellungen gestellt werden.
A: normale Position.
B: Der Korb wird nach unten verstellt, damit er
auch bei flacher Rückenlehne und ohne das Baby
zu stören verwendet werden kann.
C: hoch gestellter Korb für den Zugang zum
hinteren Trittbrett.
BREMSE
8• Alle vier Räder des Sportwagens sind mit Bremsen
DE•DEUTSCH
ausgestattet, da der Lenker umkehrbar ist; nur die
Räder auf der Seite des Lenkers müssen gebremst
werden. Zum Bremsen des Sportwagens den Hebel
an den Rädern laut Abbildung mit dem Fuß nach
unten drücken. Den Wagen, wenn er steht, immer
bremsen.
SICHERHEITSGURT
9• A: Stellen Sie sicher, daß der Träger richtig
eingeführt worden ist und schieben Sie wie in der
Abbildung angezeigt. B:Schnallen Sie den Gurt an,
wie in der Abbildung angezeigt.
10• Zum Abschnallen drücken Sie auf beiden Seiten
der Schnalle und ziehen Sie gleichzeitig den
Leibgurt nach außen.
11• Der neue Sicherheitsgurt ist durch das
„Schnappsystem“ einfacher zu verwenden.
Vor dem Anschnallen des Gurts die Schnalle
laut Abbildung an der Rückenlehne fixieren;
danach das Kind festschnallen und für mehr
Bewegungsfreiheit den Gurt von der Rückenlehne
losschnallen. Die Schnalle muss unter den
Schultern des Kindes bleiben.
EINSTELLUNG DER RÜCKENLEHNE
12• Die Rückenlehne kann auf drei verschiedene
Stellungen eingestellt werden. Um die
Rückenlehne nach unten zu verstellen, den Griff
anheben und die Rückenlehne gleichzeitig auf die
gewünschte Position verstellen; zum Anheben die
Rücklehne einfach nach oben drücken.
TRITTBRETT-EINSTELLUNG
13• Das Trittbrett kann auf zwei verschiedene
Stellungen eingestellt werden. Um das Trittbrett
nach unten zu verstellen, die beiden Hebel nach
unten ziehen und das Trittbrett laut Abbildung
gleichzeitig nach unten verstellen. Zum Anheben
das Trittbrett bis zum Einrasten anheben.
SCHWENKBARE RÄDER
14• Alle vier Räder des Sportwagens sind schwenkbar,
da der Lenker umkehrbar ist; nur die Räder auf
der gegenüberliegenden Seite des Lenkers auf
Drehbewegung stellen. Für die Drehbewegung
den Hebel laut Abbildung anheben. Um die
Drehbewegung zu unterbinden, den Hebel nach
unten verstellen.
VORDERER SCHUTZBÜGEL
15• Der Schutzbügel kann auf zwei verschiedene
Stellungen eingestellt werden. Zum Verstellen
auf die erste Position die beiden Hebel unter dem
Schutzbügel zu sich und den Schutzbügel bis zum
ersten Einrasten ziehen; für die zweite Position die
beiden Hebel weiter ziehen und den Schutzbügel
bis zum zweiten Einrasten zu sich ziehen.
16• Für größere Kinder kann der Schutzbügel
abgenommen werden. Zur kompletten Abnahme
des Schutzbügels die beiden Knöpfe unter
den Armlehnen drücken und den Schutzbügel
gleichzeitig nach außen ziehen.
ABLAGESCHALE “CHILD TRAY”
17• Zum Einhängen des Getränkehalters an den
Sportwagen muss der Frontbügel bis in die zweite
Position ausgezogen werden; anschließend wird
die Schale eingehängt und wie abgebildet nach
unten gedrückt.
18• Zum Entfernen der Schale die beiden Seitenlaschen
der Schale nach außen drucken und die Schale
zugleich anheben. Es ist gefährlich, warme
Getränke ans Tablett zu stellen.
LENKER
19• Zum Umkehren des Lenkers beide daran
befindlichen Hebel gleichzeitig nach oben ziehen
und den Lenker bis zum Einschnappen auf die
Page 21

gegenüber liegende Stellung verstellen. Dabei auf
die Arme und Hände des Kindes achten.
20• Zur Höheneinstellung des Lenkers laut Abbildung
gleichzeitig die beiden seitlichen Druckknöpfe
drücken und den Lenker auf der gewünschten
Stellung fixieren.
FLASCHENHALTER
21• Der Flaschenhalter kann sowohl rechts als auch
links am Lenker befestigt werden. Zur Befestigung
des Flaschenhalters seine Führung in den Zapfen
des Lenkers einsetzen und bis zum Einrasten
nach unten drücken. Keine heißen Getränke bzw.
Gefäße über 1 kg (2,2 Ibs) im Flaschenhalter
abstellen.
KINDERWAGEN U/O SITZWAGEN
22• A: KINDERWAGEN: Venezia ist mit ganz flach
gestellter Rückenlehne, angehobenem Trittbrett,
Lenker auf der gegenüber liegenden Seite der
Rückenlehne und drehbaren Rädern auf der Seite
der Rückenlehne ein Kinderwagen.
• B: SITZWAGEN: Venezia ist mit hoch gestellter
Rückenlehne, nach unten verstelltem Trittbrett,
Lenker auf der gleichen Seite der Rückenlehne und
drehbaren Rädern auf der gegenüber liegenden
Seite der Rückenlehne ein Sitzwagen.
VERDECK
23• Zur Montage des Verdecks die Anschlüsse laut
Abbildung in die dementsprechenden Löcher der
Armlehnen des Sitzwagens stecken und hinter der
Rückenlehne anknöpfen.
24• Das Verdeck an den Innenseiten der Armlehnen
anknöpfen und durch Senken der Spreizhebel laut
Abbildung spannen.
25• Um das Verdeck in Sonnendach umzuwandeln,
den Reißverschluss laut Abbildung öffnen und
vom Rest des Verdecks abknöpfen.
DECKE
Um UNO in die Sportwagenausführung
umzubauen muss zuerst der Sicherheitsbügel in
die zweite Position verlängert und das Trittbrett
angehoben werden.
26• Den unteren Teil des Fußsacks unter dem Bezug
des Trittbretts hervorziehen.
27• Die Laschen der unteren Deckenseite in die
Schlitze des Schutzbügels stecken. (Die Schlitze
sind nur bei ausgezogenem Schutzbügel sichtbar.
Sollten die Schlitze in ihren Sitz zurücktreten,
die beiden Hebel unter dem Schutzbügel zu sich
ziehen.)
28• Die seitlichen Ösen in die Armlehnen einhängen.
29• Kinderwagenversion ohne Decke.
30• Mit dem Reißverschluss den oberen Teil des
Fußsacks am unteren befestigen und, wie in der
Abbildung gezeigt, an den Armlehnen anknöpfen.
31• Version des Sportwagens mit Fußsack.
SCHLIESSEN
Vor dem Schließen des Sitzwagens sicherstellen,
dass: der sich Lenker an der Seite der Rückenlehne
befindet, bei montiertem Verdeck die Spreizhebel
geschlossen werden und alle Räder auf fixer
Position stehen.
32• Zum Schließen des Sitzwagens zuerst den rechten,
mit der Nummer 1 gekennzeichneten Hebel bis
zum Einrasten senken.
33• Den linken, mit der Nummer 2 gekennzeichneten
Hebel senken und den Lenker hoch heben.
34• Danach den Lenker nach unten stellen und
den Wagen laut Abbildung durch Einhaken der
Anschlüsse komplett schließen.
TRANSPORT
35• Der Sitzwagen hat zwei seitliche Transportgriffe,
mit denen er sowohl im offenen (z.B. über
Treppen) als auch geschlossenen Zustand
transportiert werden kann.
ABZIEHEN DES BEZUGS
36• Um den Bezug vom Kinderwagen zu
lösen, Kopfteil und Armlehnen des Bezugs
herausnehmen und abknöpfen.
37• Kopfteil des Bezugs vom Rückenteil abnehmen;
38• Sicherheitsgurt von unten herausziehen;
39• Gurt an beiden Seiten abschrauben und den Bezug
abziehen.
40• Um den unteren Teil des Fußsacks waschen zu
können, die Verbindungsstücke am Rahmen
des Trittbretts, wie in der Abbildung gezeigt,
entfernen.
GANCIOMATIC SYSTEM
Das Ganciomatic- System ist das praktische und
schnelle System, welches dank der GanciomaticVerbindungsstücke das Anbringen des Kindersitzes
fürs Auto Primo Viaggio, ebenfalls mit dem
Ganciomatic- System versehen und separat erhältlich.
Primo Viaggio wird von der Basis (bleibt stets im Auto)
abgenommen und zum Transport an den Kinderwagen
angebracht ohne dabei das Baby zu stören. Der
Kinderwagen Venezia bietet die Möglichkeit den
Kindersitz in zweifacher Weise anzubringen. („A“
und „B“).
GANCIOMATIC- VERBINDUNGSSTÜCKE DES
KINDERWAGENS
41• Um die Ganciomatic- Verbindungsstücke zu
erhöhen, den Bezug an den Ecken der Sitzfläche
anheben und die beiden Verbindungsstücke nach
oben drehen, die sich automatisch nach außen
schieben.
42• Um eine niedrigere Höhe der Ganciomatic-
Verbindungsstücke des Kinderwagens
einzustellen, Hebel nach oben ziehen und
gleichzeitig Haken nach unten drücken (s.h.
Abbildung).
• Venezia kann auch mit angehobenen Ganciomatic-
Verbindungsstücken zusammengeklappt werden.
VENEZIA + PRIMO VIAGGIO
43• Um den Kindersitz fürs Auto am Kinderwagen
nach Möglichkeit „A“ anzubringen bedarf es:
- den Kinderwagen zum Stehen bringen;
- das Verdeck des Kinderwagens abnehmen;
- die Rückenlehne des Kinderwagens auf die
vorletzte Position einstellen;
- die Ganciomatic- Verbindungsstücke des
Kinderwagens anheben;
- den Lenker auf die entgegengesetzte Seite des
Rückenteils drehen;
- den Kindersitz in Richtung des Lenkers
positionieren;
- den Kindersitz anbringen, indem man ihn bis zum
Klicken nach unten schiebt.
44• Um den Kindersitz fürs Auto am Kinderwagen
nach Möglichkeit „B“ anzubringen bedarf es:
- den Kinderwagen zum Stehen bringen;
- das Verdeck des Kinderwagens abnehmen;
- die Rückenlehne des Kinderwagens auf die
vorletzte Position einstellen;
- die Ganciomatic- Verbindungsstücke des
Kinderwagens anheben;
- der Sicherheit, dass sich der Lenker auf der Seite
der Rückenlehne befindet;
- den Sitzbügel bis zum ersten Klicken
herausziehen;
- den Kindersitz zur Rückenlehne hin ausrichten;
- den Kindersitz anbringen, indem man ihn bis zum
Klicken nach unten schiebt.
• Zum Abnehmen des Kindersitzes vom
Kinderwagen den Anweisungen im Handbuch für
Page 22

den Kinderwagen folgen.
ZUBEHÖR
45• Regenschutz von Kopf bis Fuß: Regenschutz von
Kopf bis Fuß aus klarsichtigem PVC.
46• Dieser Regenschutz wurde auch für den Fall, dass
der Autositz Primo Viaggio im Sportwagen Venezia
befestigt wird, geplant und garantiert auch
dahingehend besten Schutz.
47• Wickeltasche: Tasche mit Wickelunterlage, lässt
sich am Sportwagen befestigen.
REINIGUNG UND PFLEGE
Ihr Produkt ist nur gering wartungsbedürftig. Die
Reinigung und Instandhaltung darf ausschließlich von
Erwachsenen durchgeführt werden.
• Alle beweglichen Teile unbedingt sauber halten und
wenn nötig, mit Leichtöl schmieren.
• Die Metallteile gut trocknen, um die Rostbildung zu
vermeiden.
• Die Kunststoffteile regelmäßig mit einem feuchten
Lappen reinigen - keine Lösungsmittel oder ähnliche
Produkte verwenden.
• Die Stoffteile abbürsten, um den Staub zu entfernen.
• Die Räder staub- und sandfrei halten.
• Den Produkt vor Witterungseinflüssen, wie Wasser,
Regen oder Schnee geschützt aufbewahren; eine
längere Bestrahlung durch die Sonne kann zu
Farbänderungen der verschiedenen Materialien
führen.
• Den Produkt an einem trockenen Ort aufbewahren.
• Für die Reinigung des Bezugs sind die folgenden
Hinweise zu beachten.
WARNUNG
• DIE SICHERHEITSGURT MIT 5 PUNKTEN IMMER
BENUTZEN.
• LASSEN SIE IHR KIND NIEMALS UNBEAUFSICHTIGT.
• ALS ZUBEHÖR UND ERSATZTEILE DÜRFEN NUR
ORIGINALTEILE VERWENDET WERDEN.
• FINGER IN DEN MECHANISMEN NICHT EINSTECKEN.
• DER EINBAU DARF NUR VON ERWACHSENEN
VORGENOMMEN WERDEN.
• DAS PRODUKT NICHT BENUTZEN, WENN ES BRÜCHE
ODER FEHLENDE TEILE AUFWEIST.
• WENN SIE NICHT FAHREN, LEGEN SIE IMMER DIE
BREMSE EIN.
• DIE SCHAUKEL NICHT IN DER NÄHE VON TREPPEN
ODER STUFEN VERWENDEN.
• DEN SPORTWAGEN NICHT AM VORDEREN
SCHUTZBÜGEL HOCHHEBEN ODER ZIEHEN, DA DIESER
FÜR DERARTIGE BELASTUNGEN NICHT AUSGELEGT
IST. FALLS NOTWENDIG, DEN SPORTWAGEN UNTER
DEN ARMSTÜTZEN ANFASSEN UND DANN ANHEBEN.
• ÜBERPRÜFEN SIE DIE KORREKTE BEFESTIGUNG DES
AUTOSITZES AM SPORTWAGEN.
SICHERHEITSNORM
Bitte beachten Sie zum Auf-und Zuklappen
des Sportwagens die Hinweise in der
Gebrauchsanweisung. Hände nicht in den
Klappmechanismus.
Um der Gurtverschluß zu schließen, die Arme des
Kindes durch die Sicherheitsgurt schlüpfen und die
zwei Gurtenden in den Verschluß stecken. Versichern
sich immer, den Verschluß klicken zu hören.
Um den Sicherheitsgurt zu öffnen, an den Seiten der
Gurtzunge drücken und gleichzeitig den Hüftgurt
nach außen ziehen.
Schwere Gegenstände machen den Produkt instabil.
Es wird empfohlen, den Korb nicht mit mehr als 5 Kg
- 11.0 lbs Gewicht zu beladen.
Denken Sie an das Risiko von offenem Feuer und
anderen starken Hitzequellen, wie electrische
Heizstrahler, gasbeheitzte Öfen usw. in der unmittel
baren Umgebung der Wickeleinrichtung.
Stellen Sie sicher, daß der Autositz an den
Sportwagenhaken immer richtig befestigt ist.
Page 23

• IMPORTANTE: leer atentamente estas instrucciones y conservarlas para una futura utilización.
Si no se siguen estas instrucciones, se podría
arriesgar la seguridad del niño.
• PEG PEREGO podrá modificar los modelos descritos
en este prospecto, por razones técnicas o
comerciales.
Peg Perego S.p.A. cuenta con la
certificación ISO 9001.
Dicha certificación ofrece tanto a los
clientes como a los consumidores la
garantía de una transparencia y confianza
por lo que concierne al modo de trabajar
de la empresa.
SERVICIO DE ASISTENCIA
Si por casualidad alguna parte del modelo se pierde o
se rompe, usar sólo piezas de repuesto originales Peg
Perego. Para todo lo que concierne las reparaciones,
cambios, informaciones sobre los productos y la venta
de repuestos originales y accesorios, contacte con el
Servicio de Asistencia Peg-Perego:
Tel.: 0039-039-60.88.213
Fax: 0039-039-33.09.992
e-mail: assistenza@pegperego.it
www.pegperego.com
Peg Perego está a disposición de sus Consumidores
para satisfacer lo mejor posible todas sus exigencias.
Por eso, conocer lo que piensan nuestros Clientes,
es para nosotros muy importante y fundamental. Le
agradeceremos mucho si, después de haber utilizado
uno de nuestros productos rellena el FORMULARIO DE
SATISFACCIÓN DEL CONSUMIDOR que encontrará en
internet en la siguiente dirección: “www.pegperego.
com/SSCo.html.en-UK”,
indicando las posibles observaciones o sugerencias.
INSTRUCCIONES DE USO
APERTURA
1• Para abrir la silla de paseo, presionar al mismo
tiempo los dos pulsadores del manillar y
bloquearlo en la posición vertical. Desenganchar
los acoples como indica la figura.
2• Levantar con decisión el manillar hacia arriba y
luego empujarlo hacia abajo hasta oír el clic.
MONTAJE DE LA CESTA
3• Para montar la cesta pulsar los botones laterales y
tirar para extraer la varilla de la cesta.
4• Comprobar la correcta colocación de la varilla de
la cesta observando la figura.
5• Meter la varilla en el tejido de la cesta. Juntar la
varilla con la cesta en su alojamiento hasta que
haga clic.
6• Enganchar la cesta lateralmente en los botones y
meter por delante los dos ojales a la silla de paseo
como indica la figura.
7• La cesta de la silla de paseo tiene tres posiciones.
A: posición normal.
B: la cesta se baja para que se pueda utilizar
también cuando el respaldo está completamente
bajado, presionando sobre ella misma, así es más
fácil llenarla sin molestar al bebé.
C: cesta levantada para acceder al peldaño
posterior.
FRENO
8• La silla de paseo tiene las cuatro ruedas que
ES•ESPAÑOL
pueden frenar pues el manillar es reversible; hay
que frenar sólo las ruedas que están en la misma
parte que el manillar. Para frenar la silla de paseo,
bajar con el pie la palanca del freno de las ruedas
como indica la figura. Cuando se está parados,
poner siempre los frenos.
CINTURÓN DE SEGURIDAD
9• A: Asegurarse que los tirantes estén
correctamente introducidos, empujando tal y
como muestra la figura. B: Enganchar el cinturón
actuando como muestra la figura.
10• Para desenganchar el cinturón, pulsar en los lados
de la hebilla y al mismo tiempo tirar hacia fuera, el
cinturón.
11• El nuevo cinturón de seguridad desde hoy es
más fácil de poner gracias al sistema “quita y
pon”. De hecho, antes de enganchar el cinturón,
fije la hebilla pequeña al respaldo introduciendo
la lengüeta en la presilla como indica la figura;
luego, cuando haya enganchado el cinturón al
niño tiene que soltarla del respaldo para dejar que
el niño tenga más movilidad. La hebilla pequeña
tiene que quedar debajo de los hombros del niño.
REGULACIÓN DEL RESPALDO
12• El respaldo de la silla de paseo se puede reclinar
en tres posiciones. Para bajarlo hay que subir el
asa y al mismo tiempo bloquearlo en la posición
deseada; para subirlo hay que empujarlo hacia
arriba.
REGULACIÓN DEL REPOSAPIÉS
13• El reposapiés se puede regular en dos posiciones.
Para bajarlo tirar hacia abajo las dos palanquitas y
al mismo tiempo bajar el reposapiés como indica
la figura. Para subirlo, levantarlo hacia arriba hasta
oír clic.
RUEDAS GIRATORIAS
14• La silla de paseo tiene las cuatro ruedas giratorias
pues el manillar es reversible; hay que hacer que
sean giratorias sólo las ruedas de la parte opuesta
al manillar. Para que las ruedas sean giratorias hay
que levantar la palanca como indica la figura. Para
que no giren hay que bajar la palanca.
FRONTAL
15• El frontal se puede ensanchar en dos posiciones.
Para ensancharlo en la primera posición, tirar
hacia sí mismos las dos palanquitas que hay
debajo del frontal y el frontal hasta el primer clic;
para ensancharlo en la segunda posición hay que
tirar otra vez las dos palanquitas y el frontal hacia
sí mismos hasta el segundo clic.
16• Cuando sus hijos crecen, se puede quitar
el frontal. Para quitar el frontal, apretar los
pulsadores que hay debajo de los brazos y al
mismo tiempo tirar hacia fuera el frontal.
BANDEJA “CHILD TRAY”
17• Para enganchar la bandeja portabebidas a la
silla de paseo hay que alargar el frontal hasta la
segunda posición y sucesivamente enganchar la
bandeja empujándola hacia abajo como indica la
figura.
18• Para quitar la bandeja tirar hacia fuera las dos
aletas laterales de la bandeja y, al mismo tiempo,
subirla hacia arriba. Es peligroso poner bebidas
calientes en la bandeja.
MANILLAR
19• Para hacer que el manillar sea reversible tirar
hacia arriba las dos palanquitas del manillar al
mismo tiempo y ponerlo en la parte opuesta hasta
oír clic. Durante esta operación asegurarse de no
golpear las manos o los brazos del niño.
20• Para regular la altura del asa, presionar al mismo
Page 24

37• Quitar la aleta de la funda por el respaldo;
38• extraer el cinturón de seguridad por debajo del
asiento;
39• Destornillar la correa por ambos lados y sacar el
saco.
40• Para poder lavar la parte inferior del cubrepies,
sacar los acoples de los alojamientos que hay en
el chasis de la plataforma como indica la figura.
GANCIOMATIC SYSTEM
El Ganciomatic System es el sistema práctico y rápido
que, gracias a los acoples Ganciomatic, permite
enganchar en la silla de paseo la silla de auto Primo
Viaggio, dotada también del Ganciomatic System, que
se puede comprar por separado. Primo Viaggio se
desengancha de su base (que se queda en el coche)
y se engancha en la silla de paseo para transportar al
niño, sin molestarlo. Con la silla de paseo Venezia
se puede enganchar la silla de auto de dos formas
diferentes (“A” y “B”).
ACOPLES GANCIOMATIC DE LA SILLA DE PASEO
41• Para subir los acoples Ganciomatic de la silla
de paseo, levantar la funda en las esquinas del
asiento y girar hacia arriba los dos acoples que se
desplazarán automáticamente hacia fuera.
42• Para bajar los acoples Ganciomatic de la silla de
paseo, tirar hacia arriba la palanquita y al mismo
tiempo bajar el gancho como indica la figura.
• Venezia puede cerrarse también con los acoples
Ganciomatic subidos.
VENEZIA + PRIMO VIAGGIO
43• Para enganchar la silla de auto en la silla de
paseo de la FORMA “A”, hay que:
- frenar la silla de paseo;
- quitar la capota de la silla de paseo;
- bajar el respaldo de la silla de paseo hasta la
penúltima posición;
- subir los acoples Ganciomatic de la silla de paseo;
- girar el asa por la parte opuesta del respaldo;
- poner la silla de auto hacia el asa;
- enganchar la silla de auto, empujándola hacia
abajo hasta oír clic.
44• Para enganchar la silla de auto en la silla de
paseo de la FORMA “B”, hay que:
- frenar la silla de paseo;
- quitar la capota de la silla de paseo;
- bajar el respaldo de la silla de paseo hasta la
penúltima posición;
- subir los acoples Ganciomatic de la silla de paseo;
- asegurarse de que el asa esté puesta por la parte
del respaldo;
- extraer la barra frontal hasta el primer clic;
- poner la silla de auto hacia el respaldo;
- enganchar la silla de auto, empujándola hacia
abajo hasta oír clic.
• Para desenganchar la silla de auto de la silla de
paseo consultar el manual de instrucciones.
LÍNEA DE ACCESORIOS
45• Plástico de lluvia Cover All: plástico de lluvia
integral de PVC transparente.
46• Este plástico de lluvia ha sido concebido también
para cuando se engancha la silla de automóvil
Primo Viaggio a la silla de paseo Venezia,
garantizando así una protección total.
47• Bolso con cambiador: bolso con colchoneta para
cambiar al bebé, que se puede enganchar a la silla
de paseo.
LIMPIEZA & MANTENIMIENTO
Su producto necesita un mínimo mantenimiento. Las
tiempo los dos pulsadores laterales como indica la
figura y bloquear el asa en la posición deseada.
PORTABEBIDAS
21• El portabebidas se puede poner tanto en el
lado derecho como en el izquierdo del manillar.
Para aplicar el portabebidas, insertar la guía del
mismo en la espiga del manillar y empujar hacia
abajo hasta oír clic. Se aconseja no poner en el
portabebidas bebidas calientes ni con un peso
superior a 1 Kg (2,2 lbs).
COCHECITO Y/O SILLA DE PASEO
22• A: COCHECITO: Venezia es un cochecito cuando
tiene el respaldo bajado hasta la última posición,
el reposapiés levantado, el manillar en la parte
opuesta del respaldo y las ruedas giratorias en la
parte del respaldo.
• B: SILLA DE PASEO: Venezia es una silla de paseo
cuando tiene el respaldo levantado, el reposapiés
bajado, el manillar en la parte del respaldo y las
ruedas giratorias en la parte opuesta del respaldo.
CAPOTA
23• Para aplicar la capota insertar los acoples en los
correspondientes alojamientos de los brazos de la
silla de paseo como indica la figura y abrocharla
en la parte de detrás del respaldo.
24• Abrochar la capota a los lados internos de los
brazos y tensar la capota bajando los compases
como indica la figura.
25• Para transformar la capota en toldo parasol, abrir
la cremallera como indica la figura y desabrochar
la parte de detrás de la capota.
CUBREPIES
Para transformar Uno en versión cochecito
primero hay que alargar la barra frontal hasta la
segunda posición y subir el reposapiés.
26• Sacar la parte inferior del cubrepies por debajo del
saco del reposapiés.
27• Insertar la lengüeta de la parte inferior del
cubrepies en las muescas del frontal. (Las
muescas del frontal salen cuando se ensancha
el frontal. Si las muescas se meten en su proprio
alojamiento hay que empujar hacia sí mismos las
dos palanquitas que hay debajo del frontal).
28• Meter los ojales laterales en los reposabrazos.
29• Versión cochecito sin cubrepies.
30• Unir con la cremallera la parte superior del
cubrepies con la de abajo y abrocharla a los
reposabrazos, como indica la figura.
31• Modelo cochecito con cubrepies.
CIERRE
Antes de cerrar la silla de paseo, asegurarse de
que: el manillar esté colocado en la parte del
respaldo, si está puesta la capota, aflojar los
compases y asegurarse de que todas las ruedas
estén en la posición fija.
32• Para cerrar la silla de paseo, bajar primero la
palanca de la derecha identificada con el número
1, hasta oír clic.
33• Bajar la palanca de la izquierda identificada con el
número 2 y subir el manillar hacia arriba.
34• Luego, bajar el manillar hacia abajo y terminar de
cerrar, enganchando los acoples como indica la
figura.
TRANSPORTE
35• La silla de paseo tiene dos asas de transporte a
los lados que permiten transportarla tanto cerrada
como abierta (por ej.: para bajar las escaleras).
CÓMO SE QUITA LA FUNDA
36• Para quitar la funda de la silla de paseo, extraer
las aletas de la funda de los reposabrazos y
desabrochar los botones.
Page 25

operaciones delimpieza y mantenimiento tiene que ser
efectuadas sólo por adultos.
• Se aconseja mantener limpias las partes en
movimiento y si hiciera falta, lubricarlas con aceite
ligero.
• Secar las partes de metal del producto para evitar
que se oxiden.
• Limpiar periódicamente las partes de plástico con
un paño húmedo, no usar disolventes ni otros
productos parecidos.
• Cepillar las partes de tejido para quitar el polvo.
• Mantener limpias las ruedas quitando polvo y arena.
• Proteger el producto contra los agentes
atmosféricos, agua, lluvia o nieve; la exposición
continua y prolongada al sol puede causar cambios
de color en muchos materiales.
• Conservar el producto en un sitio seco.
• Para lavar los revestimientos, seguir las indicaciones
siguientes.
CUIDADO
• UTILICE SIEMPRE CINTURONES DE SEGURIDAD DE 5
PUNTOS.
• NO DEJAR NUNCA VUESTRO NIÑO SIN CUSTODIA.
• PUEDE SER PERIGROSO UTILIZAR ACCESSORIOS QUE
NON HAYAN SIDO APROBADOS POR EL FABRICANTE.
• EVITAR INTRODUCIR LOS DEDOS EN LOS
MECANISMOS.
• LAS OPERACIONES DE MONTAJE DEBEN SER
REALIZADAS ÚNICAMENTE POR PÉRSONAL ADULTAS.
• NO UTILIZAR EL PRODUCTO SI PRESENTA
DESPERFECTOS Y/O PIEZAR FALTANTES.
• CUANDO SE ESTÁ PARADOS PONER SIEMPRE LOS
FRENOS.
• NO UTILIZAR EL PRODUCTO CERCA DE ESCALERAS O
ESCALONES.
• SE ACONSEJA NO LEVANTAR LA SILLA DE PASEO
COGIÉNDOLA POR LA PARTE FRONTAL PUES NO
ESTÁ CONCEBIDA PARA SOPORTAR CARGAS. EN
CASO DE NECESIDAD, LEVANTAR LA SILLA DE PASEO
COGIÉNDOLA POR DEBAJO DE LOS BRAZOS.
• COMPROBAR QUE ESTÉN CORRECTAMENTE
ENGANCHADOS LA SILLA A LA SILLA DE PASEO.
NORMAS DES SEGURIDAD
Abrir y cerrar con cuidado, evitando el introducir los
dedos dentro el mecanismo.
Para enganchar el cinturón de seguridad, introduzca
los tirantes e inserte ambos extremos del cinturón
en la hebilla. Asegúrese que éste insertado
correctamente. Para desenganchar el cinturón de
seguridad, apretar en los lados de la hebilla y al
mismo tiempo tirar hacia fuera el cinturón.
Los bultos y/o accessorios pueden desestabilizar el
producto. Recomendamos no cargarla con màs de 5
kg - 11.0 lbs de peso.
Presten atención al riesgo que representa el fuego
y otras importantes fuentes de calor como son
los radiadores eléctricos, estufas a gas ect., en las
proximidades del producto.
Asegurarse siempre que la silla auto esté bien
enganchado a los ganchos de la silla de paseo.
• IMPORTANTE: leia atentamente estas instruções,
conserve-as para sua futura utilização.
A segurança da criança pode ser colocada em
risco, caso tais instruções não sejam respeitadas.
• A Peg Perego poderá efectuar em qualquer
momento modificações aos modelos descritos nesta
publicação, por motivos de natureza técnica ou
comercial.
A Peg Perego S.p.A. é certificada ISO
9001.
A certificação oferece aos clientes e
aos consumidores a garantia de uma
trasparência e confiança no modo de
trabalhar da empresa.
SERVIÇO DE ASSISTÊNCIA
No caso de perda ou dano de partes do modelo, use
somente peças originais Peg Perego. Caso necessite
de reparar, substituir, informar-se sobre os produtos
Perego, ou também, adquirir peças originais e
acessórios, procure o Serviço de Assistência PegPerego:
tel.:0039-039-60.88.213,
fax: 0039-039-33.09.992,
e-mail: assistenza@pegperego.it,
www.pegperego.com
A Peg Perego é a disposição de seus Consumidores
para satisfazê-los no melhor modo possível. Por
isto, conhecer a opinião dos nossos Clientes,
para nos é muito importante e precioso. Portanto
agradecemos muito se logo após ter utilizado um
nosso produto V.Sa. queira preencher, enviando-nos
suas observações ou sujestões, o QUESTIONÁRIO
SATISFAÇÃO DO CONSUMIDOR que encontrarás em
internet ao seguinte endereço: “www.pegperego.com/
SSCo.html.it”.
INSTRUÇÕES DE USO
ABERTURA
1• Para abrir o carrinho de bebé, premir os dois
botões do puxador ao mesmo tempo e bloqueálo na posição vertical. Soltar as presilhas, como
representado na figura.
2• Levantar o guiador com força para cima e
depois empurrá-lo para baixo, até que fique
completamente preso.
MONTAGEM DO CESTINHO
3• Para montar o cestinho, carregar nos botões
laterais e puxar para retirar a haste do cestinho.
4• Para montar as rodas grandes coloque-as em
correspondência das sedes apropriadas, e
introduza até sentir o clique.
5• Enfiar a haste no tecido do cestinho. Inserir a
haste com o cestinho no seu lugar até fazer um
estalido.
6• Enganche a cesta lateralmente nos botões e na
parte da frente, introduza as duas aberturas na
cadeira de passeio, assim como na figura.
7• O cestinho do carrinho de bebé tem três
regulações.
A: posição normal.
B: O cestinho baixa-se para permitir a utilização
mesmo quando o encosto está completamente
baixado. Apertando por baixo deste, é mais fácil
enchê-lo sem perturbar o bebé.
C: cestinho levantado para aceder à trave de apoio
traseira.
PT•PORTUGUÊS
Page 26

TRAVÃO
8• Todas as rodas do carrinho têm travões; como
o guiador é reversível, só é necessário travar as
rodas que se encontram do mesmo lado que
o guiador. Para travar o carrinho, baixar com
o pé a alavanca de travagem das rodas, como
representado na figura. Quando estiver parado,
accionar sempre os travões.
CINTO DE SEGURANÇA
9• A: Assegure-se que os cintos estejam
correctamente introduzidos, empurrando-os
como ilustrado na figura. B: Aperte o cinto,
actuando como mostra a figura.
10• Para desapertar o cinto, pressione aos lados da
fivela e simultaneamente, puxe o cinto para fora.
11• O novo cinto de segurança é mais fácil de colocar
devido ao sistema “prende e desprende”. De
facto, antes de encaixar o cinto, prenda a fivela
ao encosto, inserindo a lingueta no orifício
adequado, como representado na figura; depois,
quando tiver prendido a cintura da criança, soltea do encosto para a deixar mais livre para moverse. A fivela deve permanecer por baixo das costas
da criança.
REGULAÇÃO DO ENCOSTO
12• O encosto do carrinho é reclinável para três
posições. Para baixar, erguer o puxador e, ao
mesmo tempo, bloqueá-lo na posição desejada;
para subir, empurrar para cima.
REGULAÇÃO DO APOIO PARA PÉS
13• O apoio para os pés é regulável para duas
posições. Para baixar, puxar as duas molas para
baixo e, ao mesmo tempo, baixar o apoio, como
representado na figura. Para subir, levantar o
apoio até que faça um estalido.
RODAS GIRATÓRIAS
14• Todas as rodas do carrinho são giratórias; como
o guiador é reversível, só é necessário tornar
giratórias as rodas que se encontram do lado
oposto ao do guiador. Para tornar as rodas
giratórias, é necessário levantar a alavanca, como
representado na figura. Para as fixar, baixar a
alavanca.
TRAVESSA DE PROTECÇÃO DIANTEIRA
15• A travessa de protecção dianteira é extensível
para duas posições. Para esticar para a primeira
posição, puxar para si as duas molas colocadas
debaixo da travessa de protecção e esta até à
primeira ranhura; para esticar para a segunda
posição, puxar depois as duas molas e a travessa
para si, até à segunda ranhura.
16• Quando as suas crianças já são maiores, é possível
remover a travessa. Para retirar a travessa de
protecção, carregar nos botões colocados debaixo
dos braços da cadeira e, ao mesmo tempo, puxar
a travessa de protecção para fora.
TABULEIRO “CHILD TRAY”
17• Para enganchar o tabuleiro portabebidas na
carrocinha, é necessário alongar a mascarinha até
alcançar a segunda posição e logo após enganchar
o tabuleiro empurrando-a para baixo como
demonstra a figura.
18• Para remover o tabuleiro empurrar para fora
as duas asas laterais do tabuleiro mesmo e
contemporaneamente, levantar-lo para o alto.
É perigoso apoiar bebidas quentes sobre o
tabuleiro.
GUIADOR
19• Para tornar o guiador reversível, ao mesmo tempo,
puxar as duas molas colocadas no guiador para
cima e passar o guiador para o lado oposto, até
que fique completamente preso. Ao executar esta
operação, ter o cuidado de não ferir as mãos ou
os braços da criança.
20• Para regular a altura do puxador, premir os dois
botões laterais ao mesmo tempo e bloquear
o puxador na posição desejada, tal como
representado na figura.
PORTA-BEBIDAS
21• O porta-bebidas é aplicável tanto no lado
direito como no lado esquerdo. Para aplicar o
porta-bebidas, inserir a guia deste na cavilha do
guiador e empurrá-lo para baixo, até fazer um
estalido. Aconselha-se a que não se coloquem no
porta-bebidas líquidos quentes ou com um peso
superior a 1 kg (2,2 lbs).
CARROCINHA E/OU CADEIRINHA
22• A: CARROCINHA: O Venezia está em posição de
carrocinha quando tem o encosto completamente
baixado, o guiador do lado oposto ao do encosto
e as rodas giratórias do lado do encosto.
• B: CADEIRINHA: O Venezia está em posição de
cadeirinha quando tem o encosto levantado, o
guiador do lado do encosto e as rodas giratórias
do lado oposto ao do encosto.
CAPOTA
23• Para aplicar a capota, inserir os ganchos nos
orifícios adequados nos braços do carrinho, como
representado na figura, e apertá-la atrás do
encosto.
24• Apertar a capota nos lados dos braços da cadeira
e esticar a capota baixando as molas, como
representado na figura.
25• Para transformar a capota numa protecção para
o sol, abrir a dobradiça, como representado na
figura, e desapertar o resto da capota.
COBERTURA
Para transformar Uno na versão carrinho, é preciso
alongar primeiramente o apoio de mãos na
segunda posição, e levantar o apoio de pés.
26• Retire a parte inferior da coberta por baixo da
bolsa do apoio de pés.
27• Inserir as linguetas da parte inferior da cobertura
nas ranhuras da travessa de protecção. (As
ranhuras saem quando se estica a travessa de
protecção. Se as duas ranhuras voltarem a entrar,
é necessário empurrar para si as duas molas
colocadas debaixo da travessa de protecção.)
28• Introduza as aberturas laterais nos braços.
29• Versão carrocinha sem cobertura.
30• Prenda com o zip a parte superior da coberta
àquela inferior e abotoe-a aos braços, como na
figura.
31• Versão carrinho com coberta.
FECHO
Antes de fechar o carrinho, assegure-se de que: o
guiador está posicionado do lado do encosto, se
a capota estiver colocada, desapertar as molas e
ter a certeza que todas as rodas estão em posição
fixa.
32• Para fechar o carrinho, baixar a alavanca da
direita assinalada com o número 1, até que fique
completamente presa.
33• Baixar a alavanca da esquerda assinalada com o
número 2 e virar o guiador para cima.
34• Em seguida, baixar o guiador até ao fundo e
terminar o fecho, apertando os ganchos como
representado na figura.
TRANSPORTE
35• O carrinho tem duas pegas de transporte nos
lados que permitem o transporte do produto
tanto fechado como aberto (ex.: para descer as
escadas).
Page 27

RETIRADA DA VESTIDURA EM TECIDO
36• Para retirar a vestidura da cadeira de passeio,
puxe as abas da vestidura dos braços e solte os
botões.
37• Retire a aba da vestidura do encosto;
38• retire o cinto de segurança, por baixo do assento;
39• Solte o cinto de ambos os lados e retire a
vestidura.
40• Para poder lavar a parte inferior da coberta, retire
os encaixes das sedes situadas na estrutura do
apoio de pés, como na figura.
GANCIOMATIC SYSTEM
O Ganciomatic System é um sistema prático e rápido
que permite enganchar a cadeira de passeio, graças
aos encaixes Ganciomatic, a cadeira para automóvel
Primo Viaggio, também dotada de Ganciomatic
System, pode ser comprada separadamente. Primo
Viaggio se desengancha de sua base (que fica no
automóvel) e se engancha à cadeira de passeio
para transportar a criança sem incomodá-la. Com a
cadeira de passeio Venezia, tem-se a possibilidade
de encaixar a cadeira para automóvel em dois
modos diferentes (“A” e “B”).
ENCAIXES GANCIOMATIC DA CADEIRA DE
PASSEIO
41• Para erguer os encaixes Ganciomatic da cadeira
de passeio, levante a vestidura pelos cantos do
assento, gire para cima os dois encaixes que
automaticamente se deslocarão para fora.
42• Para abaixar os encaixes Ganciomatic da cadeira
de passeio, puxe a alavanca para cima e ao
mesmo tempo, abaixe o gancho, assim como na
figura.
• Venezia pode ser fechada, mesmo se os encaixes
Ganciomatic estiverem levantados.
VENEZIA + PRIMO VIAGGIO
43• Para encaixar a cadeira para automóvel àquela
de passeio no MODO “A”, é preciso:
- travar a cadeira de passeio;
- retirar a capota da cadeira de passeio;
- abaixar o encosto da cadeira de passeio para a
penúltima posição;
- levantar os encaixes Ganciomatic da cadeira de
passeio,
- girar o guidão na parte contrária ao encosto;
- colocar a cadeira para automóvel em direcção ao
guidão;
- encaixar a cadeira para automóvel, a empurrar
para baixo até sentir o clique.
44• Para encaixar a cadeira para automóvel àquela
de passeio no MODO “B”, é preciso:
- travar a cadeira de passeio;
- retirar a capota da cadeira de passeio;
- abaixar o encosto da cadeira de passeio para a
penúltima posição;
- levantar os encaixes Ganciomatic da cadeira de
passeio,
- certificar-se que o guidão esteja colocado na
parte do encosto;
- extrair o pousa-mãos até sentir o primeiro clique;
- colocar a cadeira para automóvel em direcção ao
encosto;
- encaixar a cadeira para automóvel, a empurrar
para baixo até sentir o clique.
• Para desenganchar a cadeira para automóvel
daquela de passeio, consulte seu manual de
instruções.
LINHA DE ACESSÓRIOS
45• Protector de chuva Cover All: Protector de chuva
cobre-tudo em PVC transparente.
46• Este protector para a chuva também foi ideado
para o caso em que na cadeira Venezia esteja
acoplada a cadeira auto Primo Viaggio, garantindo
assim uma protecção total.
47• Bolsa de Troca: Bolsa com colchãozinho para a
troca do bebé, que pode ser enganchada à cadeira
de passeio.
LIMPEZA E MANUTENÇÃO
O seu produto necessita de um mínimo de
manutenção. As operações de limpeza e de
manutenção devem ser feitas somente por pessoas
adultas.
• Aconselha-se de manter limpas todas as partes em
movimento e se for necessário, lubrificá-las com
óleo leve.
• Enxugar as partes de metal do produto para prevenir
contra a ferrugem.
• Periodicamente limpar as partes de plástica com um
pano húmido, não usar solventes ou outros produtos
semelhantes.
• Passar uma escova nas partes de tecido para eliminar
a poeira.
• Manter as rodas limpas sem poeira e areia.
• Proteger o produto contra os agentes atmosféricos,
água, chuva ou neve; a exposição continua e
prolongada ao sol pode causar mudanças de cor em
muitos materiais.
• Conservar o produto em um lugar seco.
• Para a lavagem dos revestimentos, seguir as
indicações seguintes.
ATENÇÃO
• UTILIZE SEMPRE OS CINTOS DE SEGURANÇA A 5
PONTOS.
• JAMAIS DEIXE O SEU BEBÉ SEM VIGILÂNCIA.
• PODE TORNAR-SE PERIGOSO UTILIZAR ACESSÓRIOS
QUE NÃO SEJAM APROVADOS PELO FABRICANTE.
• EVITE INTRODUZIR OS DEDOS NOS MECANISMOS.
• AS OPERAÇÕES DE MONTAGEM DEVEM SER
REALIZADAS SOMENTE POR ADULTOS.
• NÃO UTILIZE O ARTIGO, SE O MESMO APRESENTAR
PEÇAS QUEBRADAS OU INEXISTENTES.
• QUANDO PARADA / O UTILIZE SEMPRE OS TRAVÕES.
• NÃO UTILIZAR O PRODUTO PERTO DE ESCADAS E DE
DEGRAUS.
• ACONSELHA-SE DE NÃO LEVANTAR O CARRINHO
DE BEBÉ PELA PARTE FRONTAL POIS ESTE NÃO
FOI PROJECTADO PARA SUPORTAR PESOS. EM
CASO DE NECESSIDADE LEVANTAR O CARRINHO
AGARRANDO-O POR BAIXO DOS BRAÇOS.
• VERIFICAR O CORRECTO ENGANCHE DA CADEIRA
PARA AUTOMÓVEIS SOBRE O CARRINHO PARA BEBÊS.
NORMAS DE SEGURANÇA
Para enganchar o cinto de segurança enfiar as
cinturinhas e inserir as duas extremidades do cinto ao
redor da cintura na fivela. Assegurar-se sempre de ter
sentido o impulso de fechamento.
Para desenganchar o cinto de segurança pressionar
aos lados da fivela e contemporaneamente puxar para
o externo o cinto ao redor da cintura.
Pacotes e/ou acessórios podem tornar instável o
produto. Recomendamos de não carregar o cesto com
mais de 5 kg.
Preste atenção ao risco representado pelo fogo e
de outras significativas fontes de calor, como por
Page 28

exemplo, radiadores eléctricos, estufas a gás, etc... na
imediatas proximidade do artigo.
Assegurar-se sempre que a cadeira para automóvel,
esteja bem enganchado aos ganchos da carrinho de
bebês.
• BELANGRIJK: lees aandachtig deze instructies en
bewaar ze ook voor later.
U brengt uw kind in gevaar als u deze instructies
niet naleeft.
• Peg Perego kan op ieder gewenst moment
wijzigingen aanbrengen op de modellen die in
deze publicatie beschreven worden, om reden van
technische of commerciële aard.
Peg Perego S.p.A. heeft een ISO 9001-
certificaat.
De certificiëring biedt klanten
en consumenten de garantie van
doorzichtigheid en vertrouwen in de
manier van werken van het bedrijf.
ASSISTENTIEDIENST
Indien delen van het model per ongeluk verloren
gaan of beschadigd raken dan dient u alleen originele
reserveonderdelen van Peg Perego te gebruiken. Voor
eventuele reparaties of vervanging van de producten,
alsmede voor informatie over de producten,
de verkoop van originele reserveonderdelen
en accessoires, neemt u contact op met de
Assistentiedienst van Peg-Perego:
tel.: 0039-039-60.88.213,
fax: 0039-039-33.09.992,
e-mail: assistenza@pegperego.it,
www.pegperego.com
Peg Perego staat ter beschikking van de Consument
om zo goed mogelijk aan diens wensen tegemoet te
komen. Daarom is het voor ons uiterst belangrijk om
de mening van onze klanten te kennen. Wij zullen u
daarom dankbaar zijn indien u, na het gebruik van
één van ozne producten, de VRAGENLIJST TEVREDEN
KLANTEN wilt invullen die u in het internet vindt, op
het volgende adres: “www.pegperego.com/SSCo.html.
it”, waarbij u opmerkingen kunt plaatsen of suggesties
kunt doen.
INSTRUCTIES VOOR HET GEBRUIK
OPENEN
1• Om de wandelwagen te openen, drukt u
tegelijkertijd op de twee knoppen van de
stuurstang en blokkeert u de wandelwagen in de
verticale stand. Koppel de aansluitingen los, zoals
de afbeelding toont.
2• Til de stuurstang met kracht op en duw hem
vervolgens omlaag tot hij vastklikt.
MONTAGE VAN DE MAND
3• Om de mand te monteren, drukt u op de twee
zijknoppen en trekt u de stang van de mand naar
buiten.
4• Controleer de correcte positionering van de stang
van de mand door de afbeelding te raadplegen.
5• Steekt de stang in het weefsel van de mand. Plaats
de stang met de mand in de betreffende zitting,
tot u de klik hoort.
6• Maak de zijkanten van de mand vast aan de
knopen en bevestig aan de voorkant de twee
sleuven aan de wandelwagen, zoals de afbeelding
toont.
7• De mand van de wandelwagen heeft drie
instellingen.
A: normale positie.
B: de mand kan omlaag geplaatst worden, om
hem ook te kunnen gebruiken wanneer de
rugleuning volledig omlaag geplaatst is, door erop
NL•NEDERLANDS
Page 29

te drukken. Zo kan de mand makkelijker gevuld
worden zonder de baby te storen.
C: omhoog geplaatst mand om bij de voetenplank
aan de achterkant te kunnen.
REM
8• De wandelwagen heeft vier rembare wielen,
aangezien de stuurstang omkeerbaar is. Alleen
de wielen die zich aan de zijde van de stuurstang
bevinden, moeten geremd worden. Om de
wandelwagen te remmen, duwt u met uw voet
de remhendel van de wielen omlaag, zoals de
afbeelding toont. Acitveer altijd de remmen
wanneer u stilstaat.
VEILIGHEIDSGORDEL
9• A: Controleer of de gordel correct naar binnen
gestoken is, door erop te duwen zoals afbeelding
B toont. Bevestig de gordel zoals de afbeelding
toont.
10• Om de gordel los te maken, drukt u op de
zijkanten van de gesp en trekt u de heupgordel op
hetzelfde moment in buitenwaartse richting los.
11• De nieuwe veiligheidsgordel van vandaag
kan makkelijker gedragen worden, dankzij
het “los-vast”-systeem. Voordat u de gordel
inderdaad bevestigt, bevestigt u het gespje aan
de rugleuning, door het lipje in de daarvoor
bestemde doorgang te steken, zoals de afbeelding
toont. Wanneer u de gordel eenmaal aan uw
kind bevestigd heeft, kunt u de gordel van
de rugleuning losmaken, zodat uw kind meer
bewegingsvrijheid heeft. Het gespje moet onder
de schouders van uw kind blijven.
INSTELLING RUGLEUNING
12• De rugleuning van de wandelwagen kan in drie
standen worden gezet. Om de rugleuning omlaag
te plaatsen, tilt u de handgreep op en blokkeert
u de rugleuning op hetzelfde moment in de
gewenste stand. Om de rugleuning omhoog te
plaatsen, duwt u hem omhoog.
INSTELLING VOETENPLANKJE
13• Het voetenplankje kan in twee standen worden
gezet. Om hem omlaag te plaatsen, trekt u de
twee hendeltjes omlaag en plaatst u op hetzelfde
moment het voetenplankje omlaag, zoals de
afbeelding toont. Om hem omhoog te plaatsen,
tilt u hem omhoog tot u de klik hoort.
ZWENKWIELEN
14• Alle vier de wielen van de wandelwagen zijn
zwenkwielen, omdat de stuurstang omkeerbaar
is. Alleen de wielen die zich aan de tegengestelde
zijde van de stuurstang bevinden, mogen als
zwenkwielen gebruikt worden. Om zwenkwielen
van de wielen te maken, moet u de hendel
optillen, zoals de afbeelding toont. Om er vaste
wielen van te maken, plaatst u de hendel omlaag.
VOORZETSTUK
15• Het voorzetstuk kan in twee standen verlengd
worden. Om het tot de eerste stand te verlengen,
trekt u de twee hendeltjes, die zich onder het
voorzetstuk bevinden, samen met het voorzetstuk
naar u toe tot de eertste klik. Om het tot de
tweede stand te verlengen, trekt u nogmaals aan
de hendeltjes en trekt u het voorzetstuk naar u
toe tot de tweede klik.
16• Wanneer uw kinderen groter zijn, kunt u het
voorzetstuk verwijderen. Om het voorzetstuk naar
buiten te trekken, drukt u op de knoppen onder
de armleuningen, en trekt u op het zelfde moment
het voorzetstuk in buitenwaartse richting.
BLAD “CHILD TRAY”
17• Om het flesjeshouderblad op de wandelwagen te
bevestigen, dient u het voorzetstuk te verlengen
tot de tweede postie, en haakt u het blad
eraan vast door dit omlaag te duwen, zoals de
afbeelding toont.
18• Om het blad te verwijderen, duwt u de twee
zijlipjes van het blad naar buiten en tilt u het blad
op hetzelfde moment omhoog. Het is gevaarlijk
om kokendhete dranken op het blad te plaatsen.
STUUR
19• Om het stuur omkeerbaar te maken, trekt u
beide hendeltjes, die zich op het stuur bevinden,
tegelijktertijd omhoog en brengt u het stuur over
naar de andere kant, tot u de eindklik hoort.
Terwijl u dit doet, dient u erop te letten dat u niet
tegen de handen of de armen van het kind stoot.
20• Om het stuur in hoogte in te stellen, drukt u
tegelijkertijd op de twee zijknoppen en zet u het
stuur vast in de gewenste stand.
FLESJESHOUDER
21• De flesjeshouder kan zowel rechts als links van
het stuur bevestigd worden. Om de flesjeshouder
aan te brengen, plaatst u de geleider ervan aan
het haakje van het stuur en duwt u het omlaag
tot de klik. Het wordt aangeraden om geen hete
dranken met een gewicht van meer dan1 Kg (2,2
lbs) in de flesjeshouder te plaatsen.
KINDERWAGEN EN/OF WANDELWAGEN
22• A: KINDERWAGEN: Venezia is een kinderwagen
wanneer de rugleuning tot de laatste stand omlaag
geplaatst is, het voetenplankje omhoog geplaatst
is, het stuur zich aan tegengestelde zijde van de
rugleuning bevindt en de zwenkwielen zich aan de
zijde van de rugleuning bevinden.
• B: WANDELWAGEN: Venezia is een wandelwagen
wanneer de rugleuning omhoog geplaatst is, het
voetenplankje omlaag geplaatst is, het stuur zich
aan de zijde van de rugleuning bevindt en de
zwenkwielen zich aan tegengestelde zijde van de
rugleuning bevinden.
KAP
23• Om de kap te bevestigen, steekt u de
aansluitingen in de daarvoor bestemde zittingen
van de armleuningen van de wandelwagen, zoals
de afbeelding toont, en knoopt u de kap vast aan
de achterkant van de rugleuning.
24• Knoop de kap vast aan de binnenzijde van de
armleuningen en span de kap, door de kompassen
omlaag te plaatsen, zoals de afbeelding toont.
25• Om de kap in zonnenscherm te veranderen, opent
u de rits zoals de afbeelding toont, en knoopt u
de rest van de kap los.
DEKEN
Om de UNO tot kinderwagen om te bouwen,
moet eerst het voorzetstuk tot de tweede stand
verlengd worden en moet het voetenplankje
omhoog gezet worden.
26• Trek het onderste deel van de deken van onder de
zak van het voetenplankje naar buiten.
27• Steek de lipjes van het onderste deel van de deken
in de gleuven van het voorzetstuk. (De gleuven
van het voorzetstuk komen naar buiten wanneer
het voorzetstuk verlengd wordt. Mochten de
gleuven naar binnen terugkeren, dan dient u de
twee hendeltjes, onder het voorzetstuk, naar u toe
te duwen).
28• Bevestig de sleuven aan de zijkanten aan de
armleuningen.
29• Versie kinderwagen zonder deken.
30• Verenig het bovenste deel van de deken met de
rits aan het onderste deel en knoop de deken vast
aan de armleuningen, zoals de afbeelding toont.
31• Versie kinderwagen met deken.
Page 30

SLUITEN
Voordat u de wangelwagen sluit, controleert u
of: het stuur zich aan de zijde van de rugleuning
bevindt. Indien de kap aangebracht is, zet u de
kompassen los en controleert u of alle wielen in
de vaste stand staan.
32• Om de wandelwagen te sluiten, plaatst u eerst de
rechterhendel met nummer 1 omlaag, tot u de
eindklik hoort.
33• Plaats nu de linkerhendel met nummer 2 omlaag
en til het stuur omhoog.
34• Plaats het stuur vervolgens omlaag en voltooi
de sluiting, door de aansluitingen vast te haken,
zoals de afbeelding toont.
VERVOER
35• De wandelwagen heeft aan de zijkanten twee
handgrepen voor het vervoer, die het mogelijk
maken het product zowel geopend als gesloten te
verplaatsen (bv. om de trap af te gaan).
VERWIJDEREN VAN DE BEKLEDING
36• Om de bekleding van de wandelwagen te
verwijderen, de lipjes van de zak uit de
armleuningen trekken en de knopen losmaken.
37• Maak het lipje van de zak los van de rugleuning;
38• Trek de veiligheidsgordel los van onder de zitting;
39• Schroef het riempje aan beide zijden los en
verwijder de zak.
40• Om het onderste deel van de deken te kunnen
wassen, moeten de bevestigingspunten uit de
zittingen op het frame van het voetenplankje
getrokken worden, zoals de afbeelding toont.
GANCIOMATIC SYSTEM
Het Ganciomatic System is het praktische en snelle
systeem dat u in staat stelt om dankzij de Ganciomatic
bevestigingspunten, het autozitje Primo Viaggio,
dat ook over een Ganciomatic System beschikt en
dat apart verkrijgbaar is, op de wandelwagen te
bevestigen. De Primo Viaggio wordt losgekoppeld
van de basis (die in de auto blijft) en vastgekoppeld
op de wandelwagen om het kind te vervoeren zonder
het te storen. Met de wandelwagen Venezia heb
je de mogelijkheid om het autozitje op twee
verschillende manieren (“A” en “B”) vast te maken.
GANCIOMATIC BEVESTIGINGSPUNTEN VAN DE
WANDELWAGEN
41• Om de Ganciomatic bevestigingspunten van de
wandelwagen omhoog te plaatsen, tilt u de zak op
aan de hoeken van de zitting en draait u de twee
bevestigingspunten omhoog die automatisch in
buitenwaartse richting verplaatst worden.
42• Om de Ganciomatic bevestigingspunten van
de wandelwagen omlaag te plaatsen, trekt u
het hendeltje omhoog en plaatst u de haak op
hetzelfde moment omlaag, zoals de afbeelding
toont.
• De Venezia kan ook gesloten worden terwijl
de Ganciomatic bevestigingspunten omhoog
geplaatst zijn.
VENEZIA + PRIMO VIAGGIO
43• Om het autozitje op WIJZE “A” op de
wandelwagen te bevestigen, gaat u als volgt te
werk:
- rem de wandelwagen;
- verwijder de kap van de wandelwagen;
- plaats de rugleuning van de wandelwagen omlaag
tot de op één na laatste stand;
- plaats de Ganciomatic bevestigingspunten van de
wandelwagen omhoog;
- draai het stuur naar de kant die tegengesteld aan
de rugleuning is;
- breng het autozitje in positie in de richting van
het stuur gedraaid;
- bevestig het autozitje door het omlaag te duwen
tot de klik gehoord wordt.
44• Om het autozitje op WIJZW “B” op de
wandelwagen te bevestigen, gaat u als volgt te
werk:
- rem de wandelwagen;
- verwijder de kap van de wandelwagen;
- plaats de rugleuning van de wandelwagen omlaag
tot de op één na laatste stand;
- plaats de Ganciomatic bevestigingspunten van de
wandelwagen omhoog;
- controleer of het stuur zich aan de zijde van de
rugleuning bevindt;
- trek het voorzetstuk naar buiten tot de eerste klik;
- breng het autozitje in positie in de richting van de
rugleuning gedraaid;
- bevestig het autozitje door het omlaag te duwen
tot de klik gehoord wordt.
• Om het autozitje van de wandelwagen los
te maken, raadpleegt u de handleiding met
instructies van het zitje.
ACCESSOIRES
45• Regenscherm Cover All: Alles afdekkend
regenscherm van transparant PVC.
46• Dit regenscherm is bestudeerd om ook gebruikt te
worden wanneer het autozitje Primo Viaggio op de
wandelwagen Venezia bevestigd is, en garandeert
een volledige bescherming.
47• Tas Verschoning: Tas met matrasje voor
de verschoning van de baby, kan aan de
wandelwagegn bevestigd worden.
REINIGING EN ONDERHOUD
Uw product behoeft een minimum aan onderhoud.
Reiniging en onderhoud mogen alleen uitgevoerd
worden door volwassenen.
• Het wordt geadviseerd alle bewegende delen schoon
te houden en zonodig te smeren met lichte olie.
• Droog de metalen delen van het product, om
roestvorming te voorkomen.
• Reinig regelmatig de plastic delen met een vochtige
doek, gebruik geen oplosmiddelen of gelijkaardige
producten.
• Reinig het doek met een borstel om vuil te
verwijderen.
• Houd de wielen schoon van stof en zand.
• Bescherm het product tegen de
weersomstandigheden, water, regen of sneeuw; de
continue en langdurige blootstelling aan zonlicht
kan een kleurverandering van vele materialen
veroorzaken.
• Bewaar het product op een droge plek.
• Om de zak te wassen, volgt u onderstaande
aanwijzingen op.
LET OP
• GEBRUIK ALTIJD DE VEILIGHEIDSHORDELS MET 5
BEVESTIGINGSPUNTEN.
• LAAT UW KIND NOOIT ZONDER TOEZICHT ACHTER.
• HET KAN GEVAARLIJK ZIJN ACCESSOIRES TE
GEBRUIKEN DIE NIET GOEDGEKEURD ZIJN DOOR DE
FABRIKANT.
• VERMIJD HET UW VINGERS IN DE MECHANISMEN TE
STEKEN.
Page 31

• DE MONTAGEWERKZAAMHEDEN MOETEN DOOR
VOLWASSENEN WORDEN UITGEVOERD.
• GEBRUIK HET PRODUCT NIET INDIEN ER GEBROKEN
ONDERDELEN ZIJN OF INDIEN ER ONDERDELEN
ONTBREKEN.
• BIJ STILSTAND ALTIJD DE REMMEN INSCHAKELEN.
• GEBRUIK HET PRODUCT NOOIT NABIJ EEN TRAP OF
AFSTAPJES.
• HET WORDT AANGERADEN DE WANDELWAGEN
NIET OP TE TILLEN DOOR HET AAN DE VOORRAND
BEET TE NEMEN, OMDAT DIT ONDERDEEL NIET
ONTWORPEN IS OM LASTEN TE VERDRAGEN. TIL DE
WANDELWAGEN IN GEVAL VAN NOOD OP AAN DE
ARMSTEUNEN.
• CONTROLEER DE CORRECTE VASTKOPPELING VAN
HET AUTOZITJE AAN DE WAGEN.
VEILIGHEIDSNORMEN
Om de veiligheidsgordel vast te maken steekt u de
riemen naar binnen en steekt u de twee uiteinden van
de tailleriem in de gesp. Controleer altijd of de klik
van de sluiting plaatsgevonden heeft.
Om de veiligheidsgordel los te maken drukt u op de
zijkanten van de gesp en trekt u op hetzelfde moment
de tailleriem in buitenwaartse richting los.
Pakken en/of accessoires maken het product instabiel.
Het wordt aangeraden de mand met niet meer dan 5
kg te laden.
Wees bedacht op het risico dat gevormd wordt door
vuur en andere belangrijke warmtebronnen, zoals
elektrische straalkachels, gaskachels enz, die zich in
de onmiddellijke nabijheid van het product bevinden.
Controleer altijd of het autozitje goed vastgekoppeld
is aan de haken van de wandelwagen.
• FONTOS: fi gyelmesen olvassák el ezeket
az utasításokat és őrizzék meg a jövőbeni
felhasználás céljából.
A gyermek biztonságát veszélyeztethetik azzal,
ha nem tartják be ezeket az utasításokat.
• A Peg Perego az ebben a kiadásban ismertetett
modelleknél műszaki vagy kereskedelmi jellegű
okokból kifolyólag bármikor végrehajthat
módosításokat.
Peg Perego R.t. ISO 9001 tanúsítvánnyal
rendelkezik.
A tanúsítvány a vállalati munkamódszer
rendszerezettségének és az abban való
bizalomnak a garanciáját kínálja az
ügyfeleknek és a fogyasztóknak.
VEVŐSZOLGÁLAT
Ha véletlenül a modell részei elvesznek vagy
károsodnak, akkor csak eredeti Peg Perego
alkatrészeket használjon! Az esetleges javítások,
cserék, a termékekkel kapcsolatos információk
valamint az eredeti alkatrészek és tartozékok
értékesítése ügyében vegye fel a kapcsolatot a Peg
Perego Vevőszolgálatával:
tel.:0039-039-60.88.213,
fax: 0039-039-33.09.992, a
e-mail: assistenza@pegperego.it,
www.pegperego.com
A Peg Perego a fogyasztóinak rendelkezésére áll
minden igényük legjobb kielégítése céljából. Ehhez
az ügyfeleink véleményének megismerése számunkra
rendkívül fontos és értékes. Ezért nagyon hálásak
lennénk, ha a termékünk használatbavétele után
kitöltené a FOGYASZTÓ ÉRTÉKELÉSE KÉRDŐÍVET,
amelyet az alábbi internet címen talál meg: www.
pegperego.com/SSCo.html.it.
Ott feltüntetheti az esetleges észrevételeit vagy
ötleteit.
HASZNÁLATI UTASÍTÁS
KINYITÁS
1• A sportkocsi kinyitásához egyidejűleg nyomják
be a fogantyú két nyomógombját és függőleges
pozícióban rögzítsék. Akasszák ki a kapcsokat az
ábra szerint.
2• Határozottan emeljék meg felfelé a kézikormányt
és ezt követően nyomják lefelé a végső kattanásig.
KOSÁR FELSZERELÉSE
3• A kosár felszereléséhez nyomják meg az oldalsó
nyomógombokat és húzzák meg a kosár rúdját és
vegyék ki.
4• Vizsgálják meg a kosár rúdjának helyes beállítását
az ábrán feltüntetett rajz alapján.
5• Vezessék be a rudat a kosár szövetébe. Vezessék
be a rudat a kosárral együtt a helyére egészen
kattanásig.
6• Oldalt a gombokkal erősítsék fel a kosarat és elől
fűzzék a két gomblyuknyílást a sportkocsira az
ábra szerint.
7• A sportkocsi kosara három beállítási szinttel
rendelkezik.
A: normál pozíció.
B: a kosár leengedhető a használatának lehetővé
tételéhez akkor is, amikor a háttámla teljesen
le van engedve, ha lenyomják a kosarat, akkor
könyebben megtölthetik anélkül, hogy a babát
zavarnák.
HU•MAGYAR
Page 32

C: megemelt kosár a hátsó kocsilépcsőre való
szabad fellépéshez.
FÉK
8• A sportkocsinak mind a négy kereke lefékezhető,
mivel a kézikormány átfordítható; csak azokat a
kerekeket kell lefékezni, amelyek a kézikormány
oldalán találhatók. A sportkocsi lefékezéséhez
lábbal engedjék le a kerekek fékkarját az ábra
szerint. Álló helyzetben mindig működtessék a
fékeket.
BIZTONSÁGI ÖV
9• A: Győződjenek meg arról, hogy a vállpánt
helyesen be van-e fűzve úgy, hogy nyomják be
az ábra szerint. B: Kapcsolják be az övet az ábrán
látható eljárással.
10• Az öv kikapcsolásához nyomják be a csat oldalait
és egyidejűleg húzzák a kültér felé a derékszíjat.
11• Az új biztonsági övet manapság könnyebb viselni
a “beakasztás és kiakasztás” rendszerének
köszönhetően. Nos valóban az öv bekapcsolása
előtt akasszák be a csatot a háttámlához oly
módon, hogy vezessék be a nyelvecskét a
megfelelő nyílásba az ábra szerint; majd amikor
már bekapcsolták az övet a gyermekükön, akkor
akasszák ki az övet a háttámlából azért, hogy a
gyermek szabadabban mozoghasson. A csatnak a
gyermek vállai alatt kell maradnia.
HÁTTÁMLA BEÁLLÍTÁSA
12• A sportkocsi háttámlája lehajtható három
pozícióba. A leengedéséhez emeljék fel a
fogantyút és ezzel egyidejűleg rögzítsék a
háttámlát a kívánt pozícióban; a felemeléséhez
nyomják felfelé.
LÁBTARTÓ BEÁLLÍTÁSA
13• A lábtartó beállítható két pozícióba. A
leengedéséhez húzzák lefelé a két kis kart és
ezzel egyidejűleg engedjék le a lábtartót az ábra
szerint. A felemeléséhez nyomják felfelé egészen
a kattanásig.
BOLYGÓKEREKEK
14• A sportkocsinak mind a négy kereke bolygókerék;
minekután a kézikormány átfordítható; csak
azokat a kerekeket kell bolygókerékké alakítani,
amelyek a kézikormánnyal ellentétes oldalon
találhatók. A kerekek bolygókerékké alakításához
fel kell emelni a kart az ábra szerint. Fix állapotba
történő beállításukhoz engedjék le a kart.
VÉDŐPÁNT
15• A védőpánt meghosszabbítható két pozícióba.
Az első pozícióba történő meghosszabbításához
húzzák maguk felé a védőpánt alatt elhelyezett
két kis kart és a védőpántot az első kattanásig, a
második pozícióba történő meghosszabbításához
húzzák tovább maguk felé a két kis kart és a
védőpántot a második kattanásig.
16• Amikor a gyermekek már nagyobbak, akkor
el lehet távolítani a védőpántot. A védőpánt
kihúzásához nyomják be a kartámlák alatt
elhelyezett nyomógombokat és egyidejűleg
húzzák a védőpántot a kültér irányába.
“CHILD TRAY” TÁLCA
17• Az italtartó tálcának a sportkocsira történő
erősítéséhez meg kell hosszabbítani a védőpántot
a második pozícióig és ezt követően ráerősíteni
a tálcát úgy, hogy azt nyomják lefelé az ábra
szerint.
18• A tálca levételéhez nyomják kifelé a tálca két kis
oldalsó fülét és ezzel egyidejűleg emeljék felfelé.
Veszélyes forró italokat a tálcára helyezni.
KÉZIKORMÁNY
19• A kézikormány átfordíthatóvá tételéhez
egyidejűleg húzzák felfelé a kézikormányra
helyezett mindkét kis kart és fordítsák a
kézikormányt az ellenkező oldalra a végső
kattanásig. E művelet végrehajtása folyamán
vigyázzanak arra, hogy ne üssék meg a gyermek
kezét vagy karját.
20• A fogantyú magasságának beállításához
egyidejűleg nyomják meg a két oldalsó
nyomógombot az ábra szerint és rögzítsék a
fogantyút a kívánt pozícióban.
ITALTARTÓ
21• Az italtartó felerősíthető a kézikormánynak
akár a jobb, akár a bal oldalára. Az italtartó
felerősítéséhez vezessék be annak vezetősínjét a
kézikormány tartópecekébe és nyomják rá lefelé
egészen kattanásig. Nem ajánlatos meleg és 1 Kg
–nál (2,2 Ibs) nagyobb súlyú italok behelyezése az
italtartóba.
BABAKOCSI ÉS/VAGY SPORTKOCSI
22• A: BABAKOCSI: Venezia babakocsi akkor, amikor
a háttámla le van engedve egészen a legalsó
pozícióig, a lábtartó felemelt, a kézikormány
a háttámlával ellentétes oldalon van és a
bolygókerekek a háttámla oldalán találhatók.
• B:SPORTKOCSI: Venezia sportkocsi akkor, amikor
a háttámla fel van emelve, a lábtartó leengedett,
a kézikormány a háttámla oldalán van és a
bolygókerekek a háttámlával ellentétes oldalon
találhatók.
KOCSITETŐ
23• A kocsitető felerősítéséhez illesszék be a
kapcsokat a sportkocsi kartámláinak megfelelő
mélyedéseibe az ábra szerint és gombolják be a
háttámla hátulján.
24• Gombolják be a kocsitetőt a kartámlák belső
oldalain és feszítsék ki a kocsitetőt úgy, hogy
engedjék le a tartóvázakat az ábra szerint.
25• A kocsitetőnek napellenző tetővé való
átalakításához nyissák szét a czipzárt az ábra
szerint és gombolják ki a kocsitető további részét.
TAKARÓ
Az Uno babakocsis változattá történő
átalakításához először ki kell húzni a kapaszkodót
a második pozícióba és megemelni a lábtartót.
26• Húzzák ki a takaró alsó részét a lábtartó
zsákrésze alól.
27• Illesszék be a takaró alsó részének nyelvecskéit
a védőpánt nyílásaiba. (A védőpánt nyílásai
előjönnek, amikor meghosszabbítják
a védőpántot. Amennyiben a nyílások
visszamennének a helyükre, akkor nyomják
maguk felé a védőpánt alatt elhelyezett két kis
kart.).
28• Fűzzék be az oldalsó gomblyuknyílásokat a
kartámlához.
29• Babakocsi változat takaró nélkül.
30• Húzzák össze a villámzárat a takaró felső és
alsó része között és gombolják be a takarót a
kartámlákhoz az ábra szerint.
31• Babakocsi változat takaróval együtt.
ÖSSZECSUKÁS
A sportkocsi összecsukása előtt győződjenek
meg arról, hogy: a kézikormány a háttámla
oldalára legyen állítva, amennyiben a kocsitető
rá van erősítve, engedjék ki a tartóvázat és
bizonyosodjanak meg arról, hogy minden kerék
fix pozícióban van.
32• A sportkocsi összecsukásához először engedjék
le az 1-es számmal megjelölt jobb kart egészen a
végső kattanásig.
33• Engedjék le a 2-es számmal megjelölt bal kart és
Page 33

emeljék felfelé a kézikormányt.
34• Ezt követően engedjék lefelé a kézikormányt
és a kapcsok beakasztásával fejezzék be az
összecsukást az ábra szerint.
SZÁLLÍTÁS
35• A sportkocsi az oldalain két szállítófogantyúval
rendelkezik, amelyek lehetővé teszik a termék
szállítását akár csukott, akár nyitott állapotban
(pl.: lépcsőn való lemenethez).
A HUZAT LEVÉTELE
36• A sportkocsi huzatának levételéhez húzzák ki
a zsák füleit a kartámlákból és gombolják ki a
gombokat.
37• Vegyék ki a zsák fülét a háttámlából;
38• húzzák ki a biztonsági övet az ülés alól;
39• Csavarozzák ki a szíjakat mindkét oldalon és húzzák
le a zsákot.
40• A takaró alsó részének kimosásához húzzák
ki a kapcsokat a lábtartó vázán kialakított
foglalatokból az ábra szerint.
GANCIOMATIC SYSTEM
A Ganciomatic System egy olyan praktikus és
gyors rendszer, amely a Ganciomatic kapcsoknak
köszönhetően lehetővé teszi a külön megvásárolható,
ugyancsak Ganciomatic System-mel felszerelt Primo
Viaggio autós gyerekülésnek a sportkocsira történő
rákapcsolását. A Primo Viaggio lekapcsolható a
talprészről (amely az autóban marad) és rákapcsolható
a sportkocsira a gyermek zavartalan szállításához.
A Venezia sportkocsinál lehetőséged nyílik az
autós gyerekülés két különböző módon történő
bekapcsolására (“A” és “B”).
GANCIOMATIC KAPCSOK A SPORTKOCSIN
41• A sportkocsi Ganciomatic kapcsainak
felemeléséhez húzzák fel a zsákot az ülés
sarkainál és forgassák felfelé a két kapcsot,
amelyek ekkor automatikusan kifelé el fognak
mozdulni.
42• A sportkocsi Ganciomatic kapcsainak
leengedéséhez húzzák felfelé a kis kart és
egyidejűleg engedjék le a kapcsot az ábra szerint.
• Venezia összecsukható felemelt Ganciomatic
kapcsokkal is.
VENEZIA + PRIMO VIAGGIO
43• Az autós gyerekülés “A” MÓD szerint történő
sportkocsira kapcsolásához szükséges:
- a sportkocsi lefékezése;
- a sportkocsi tetejének levétele;
- a sportkocsi háttámlájának lehajtása az utolsó
előtti pozícióba;
- a sportkocsi Ganciomatic kapcsainak felemelése;
- a tolókar átfordítása a háttámlával ellentétes
oldalra;
- a tolókar irányába fordított autós gyerekülés
elhelyezése;
-
az autós gyerekülés rákapcsolása lefelé nyomva
kattanásig.
44• Az autós gyerekülés “B” MÓD szerint történő
sportkocsira kapcsolásához szükséges:
- a sportkocsi lefékezése;
- a sportkocsi tetejének levétele;
- a sportkocsi háttámlájának lehajtása az utolsó
előtti pozícióba;
- a sportkocsi Ganciomatic kapcsainak felemelése;
- annak ellenőrzése, hogy a tolókar a háttámla felőli
oldalon van-e;
- a biztosítópánt kihúzása az első kattanásig;
- a háttámla irányába fordított autós gyerekülés
elhelyezése;
- az autós gyerekülés rákapcsolása lefelé nyomva
kattanásig.
• Az autós gyerekülés sportkocsiról történő
lekapcsolásához tanulmányozzák az ahhoz
tartozó használat utasítást.
KIEGÉSZÍTŐK TERMÉKSKÁLÁJA
45• Cover All Esővédő: Mindent betakaró esővédő
átlátszó PVC-ből.
46• Ezt az esővédőt arra az esetre is tervezték, amikor
a Venezia sportkocsira a Primo Viaggio autós
gyerekülést kapcsoljá rá, garantálva ezzel a teljes
védelmet.
47• Pelenkázó Táska: Táska védőhuzattal együtt
a baba pelenkázásához, amely a sportkocsira
akasztható.
TISZTÍTÁS ÉS KARBANTARTÁS
A termék minimális karbantartást igényel. A tisztító és
karbantartó műveleteket csak felnőttek végezhetik.
• Valamennyi mozgó rész tisztántartása javasolt, és
amennyiben az szükséges, olajjal vékonyan kenjék
be azokat.
• Szárítsák meg a termék fémből készült részeit a
rozsdásodás megelőzése céljából.
• Egy nedves törlőruhával rendszeresen tisztítsák meg
a műanyagból készült részeket, ne használjanak
oldószereket vagy egyéb hasonló termékeket.
• A szövetrészeket keféljék le a por eltávolításához.
• Portól és homoktól tartsák tisztán a kerekeket.
• Óvják a terméket a légköri hatóerőktől, víztől,
esőtől vagy hótól; a folytonos és hosszadalmas
napsütésnek való kitétel sok alapanyagban
színváltozást okozhat.
• Száraz helyen tárolják a terméket.
• A zsák mosásánál tartsák be az alábbi útmutatást.
VIGYÁZAT
• MINDIG 5 PONTOS BIZTONSÁGI ÖVET
HASZNÁLJANAK.
• NE HAGYJA SOHA GYEREKÉT FELÜGYELET NÉKLÜL.
• VESZÉLYES LEHET OLYAN ESZKÖZÖK ALKALMAZÁSA,
MELYET A GYÁRTÓ NEM HAGYOTT JÓVÁ.
• AZ UJJÁT SEMMILYEN KÖRÜLMÉNYEK KÖZT NE TEGYE
A GÉPEZETBE.
• A FELSZERELÉST NAGYKORÚNAK KELL VÉGEZNIE.
• AMENNYIBEN TÖRÉST ÉSZLEL VAGY ALKATRÉSZEK
HIÁNYOZNAK, NE HASZNÁLJA A TERMÉKET.
•
MEGÁLLÁSKOR MINDIG HÚZZA BE A FÉKEKET.
• NE HASZNÁLJÁK A TERMÉKET LÉPCSŐ VAGY
LÉPCSŐFOKOK KÖZELÉBEN.
• NEM AJÁNLATOS A HOMLOKVÉDŐNÉL
MEGMARKOLVA FELEMELNI A SPORTKOCSIT, MERT
AZT NEM TERHELÉSEK ELBÍRÁSÁRA TERVEZTÉK.
SZÜKSÉG ESETÉN A KARTÁMLÁK ALATT MEGFOGVA
EMELJÉK FEL A SPORTKOCSIT.
• ELLENŐRIZZÉK AZ AUTÓS GYEREKÜLÉS HELYES
KAPCSOLÓDÁSÁT A KOCSIVÁZHOZ.
BIZTONSÁGI ELŐÍRÁSOK
A biztonsági öv bekapcsolásához vezessék be a
vállpántot és illesszék be a deréköv két végződését
a csatba. Mindig győződjenek meg arról, hogy
megtörtént a záró kattanás.
A biztonsági öv kikapcsolásához nyomják be a csat
oldalait és egyidejűleg húzzák a kültér irányába a
Page 34

derékövet.
Csomagok és/vagy tartozékok instabillá tehetik a
terméket. Javasoljuk, hogy 5 kg-nál nagyobb súllyal
ne rakják meg a kosarat.
Fordítson figyelmet a tűz, vagy egyébb hőforrások
által képviselt veszélyre, mint radiátorok, gázkályhák,
stb., melyek a termék közvetlen közelében vannak.
Győződjenek meg mindig arról, hogy az autós
gyerekülés jól kapcsolódik-e a sportkocsi kapcsaihoz.
• POMEMBNO: pozorno preberite ta navodila in jih
shranite za nadaljnjo uporabo.
Če ne upoštevate teh navodil, lahko zmanjšate
stopnjo varnosti otroka.
• Peg Perego se lahko kadarkoli odloči, da bo
spremenil modele, objavljene v katalogu, najsi bo to
zaradi tehničnih ali tržnih razlogov.
Peg Perego S.p.A. ima certifikat ISO 9001.
Certifikat za stranke in porabnike pomeni
garancijo transparentnosti in zaupanja v
delo podjetja.
POMOČ UPORABNIKOM
Če izgubite ali poškodujete sestavni del izdelka,
uporabite izključno originalne rezervne dele Peg
Perego. Za morebitna popravila, zamenjave, podatke
o izdelkih, prodajo originalnih rezervnih delov
in dodatkov, stopite v stik s centrom za pomoč
uporabnikom Peg Perego:
tel.:0039 (039) 60-88-213,
faks: 0039 (039) 33-09-992,
e-pošta: assistenza@pegperego.it,
www.pegperego.com
Peg Perego je vedno na voljo svojim strankam, da
v kar največji meri izpolni njihove potrebe. Zato je
za nas zelo pomembno, da poznamo mnenje svojih
strank.
Hvaležni vam bomo, če si boste, ko boste uporabili
naš izdelek, vzeli čas in izpolnili VPRAŠALNIK O
ZADOVOLJSTVU STRANK, ki ga boste našli na naših
spletnih straneh, na naslovu “www.pegperego.com/
SSCo.html.en-UK”, in nam sporočite vaše pripombe in
predloge.
NAVODILA ZA UPORABO
ODPIRANJE
1• Da bi odprli voziček, sočasno pritisnite gumba
pod ročajem in ga blokirajte v vertikalnem
položaju. Odpnite priključke, kot je prikazano na
risbi.
2• Odločno dvignite ročaj navzgor in ga potisnite
navzdol, dokler ne zaslišite klika.
NAMEŠČANJE NAKUPOVALNE KOŠARICE
3• Da bi namestili nakupovalno košaro, pritisnite
gumba, da lahko izvlečete palico košarice.
4• Preverite pravilno postavite droga za nakupovalno
košaro, kot prikazuje risba.
5• Palico vstavite v tkanino košarice. Palico s košarico
potisnite na njeno ležišče, dokler ne klikne.
6• Pripnite košaro ob bokih na gumbe in od spredaj
vstavite v reže na vozičku, kot prikazuje risba.
7• Nakupovalno košaro vozička je mogoče nastaviti
na tri načine.
A: običajni položaj
B: Nakupovalna košara je spuščena, tako da jo
je mogoče uporabljati, tudi ko je hrbtni naslon
popolnoma spuščen. Če jo nekoliko pritisnete ob
strani, jo lahko napolnite, ne da bi motili otroka.
C: dvignjena košara, da je omogočen dostop do
zadnjega podnožnika
ZAVORA
8• Vsa štiri kolesa imajo zavore, saj je ročaj mogoče
obrniti v obe smeri; zavreti je treba le kolesa, ki so
na isti strani kot ročaj. Da bi voziček zavrli, z nogo
pritisnite navzdol vzvod zavore na kolesih, kot
je prikazano na risbi. Ko stojite na mestu, vedno
SL•SLOVENŠČINA
Page 35

zavrite.
VARNOSTNI PAS
9• A: Prepričajte se, da je naramnica pravilno
vstavljena, kot je prikazano na risbi. B: Zapnite
pas okoli pasu, kot je prikazano na risbi.
10• Da bi odpeli pas, pritisnite ob straneh sponke in
sočasno jermenček okoli pasu potegnite navzven.
11• Novi varnostni pas je zaradi sistema "pripni in
odpni" še laže uporabljati. Preden pas zapnete,
pripnite sponko na hrbtni naslon, tako da vstavite
jeziček v ustrezno režo, kot je prikazano na risbi;
ko zapnete pas otroku, ga odpnite z naslona, da
se otrok laže premika. Sponka mora ostati pod
otrokovimi rameni.
URAVNAVANJE HRBTNEGA NASLONA
12• Hrbtni naslon vozička je mogoče nastaviti v tri
položaje. Da bi ga spustili, dvignite ročico in
naslon zaustavite v želenem položaju; da bi ga
dvignili, ga potisnite navzgor.
URAVNAVANJE NASLONA ZA NOGE
13• Naslon za noge je mogoče nastaviti v dva
položaja. Da bi ga spustili, vzvoda povlecite
navzdol in sočasno spustite naslon, kot je
prikazano na risbi. Da bi ga dvignili, ga potegnite
navzgor, dokler ne klikne.
VRTLJIVA KOLESA
14• Vrtljiva so vsa štiri kolesa; ker je mogoče ročaj
obrniti v obe smeri; je treba sprostiti le kolesa, ki
so stran od ročaja. Da bi se sprednja kolesa vrtela,
je treba spustiti vzvod, kot je prikazano na risbi.
Da bi jih fiksirali, dvignite vzvod.
SPREDNJA ZAPORA
15• Sprednjo zaporo je mogoče podaljšati v dva
položaja. Da bi jo podaljšali v prvi položaj,
potegnite proti sebi dva vzvoda pod zaporo in
zaporo samo do prvega klika, da bi jo podaljšali v
drugi položaj, še nekoliko povlecite oba vzvoda in
zaporo proti sebi, da klikne še enkrat.
16• Ko so otroci večji, lahko sprednjo zaporo tudi
odstranite. Da bi odstranili zaporo, pritisnite
gumba pod nasloni za roke in jo hkrati potegnite
navzven.
PLADENJ »CHILD TRAY«
17• Da bi pripeli pladenj za pijačo na voziček, je treba
podaljšati sprednjo zaporo v drugi položaj in nato
pripeti pladenj, tako da ga potisnete navzdol, kot
je prikazano na risbi.
18• Da bi odstranili pladenj, sočasno potisnite ven
bočni krilci pladnja in ga dvignite navzgor.
Odlaganje vročih pijač na pladenj je nevarno.
ROČAJ
19• Da bi lahko ročaj obračali, sočasno povlecite
navzgor oba vzvoda na ročaju in ga potegnite na
drugo stran, dokler ne klikne. Pri tem pazite, da
ne bi zadeli otrokovih rok.
20• Da bi to storili, sočasno pritisnite oba bočna
gumba, kot je prikazano na risbi, in ročaj
postavite v želeni položaj.
DRŽALO ZA PIJAČO
21• Držalo za pijačo je mogoče pritrditi na desno ali
na levo stran ročaja. Da bi pripeli držalo, vstavite
vodilo v zatič na ročaju in ga potisnite navzdol,
dokler ne zaslišite klika. Svetujemo vam, da v
držalo ne postavljate toplih pijač ali pijač, težjih
od 1 kg (2,2 funta).
KOŠARA IN/ALI ŠPORTNI VOZIČEK
22• A: KOŠARA: Venezia je košara, ko ji do konca
spustimo naslon in dvignemo podstavek za noge,
ročaj na nasprotni strani hrbtnega naslona in
kolesa obrnjena proti hrbtnemu naslonu.
• B: ŠPORTNI VOZIČEK: Venezia je športni voziček,
ko ji dvignemo naslon in spustimo podstavek za
noge, ročaj na strani hrbtnega naslona in kolesa
obrnjena v nasprotno smer od hrbtnega naslona.
STREHICA
23• Da bi namestili strehico, vstavite priključke
v ustrezna ležišča na ročajih vozička, kot je
prikazano na risbi, in jo pripnite na zadnji strani
hrbtnega naslona.
24• Strehico pripnite na notranjih straneh ročajev in
napnite strehico, tako da spustite napenjala, kot je
prikazano na risbi.
25• Da bi strehico spremenili v senčnik, odpnite
zadrgo, kot je prikazano na risbi, in odpnite
preostanek strehice.
ODEJICA
Da bi Uno spremenili v različico s košaro, je treba
prestaviti sprednjo zaporo v drugi položaj in
dvigniti podnožnik.
26• Izvlecite spodnji del odejice izpod vreče
podnožnika.
27• Vstavite jezičke spodnje strani odejice v reže
sprednje zapore. (Reže na sprednji zapori se
pojavijo, ko jo podaljšate.) Če bi se reže skrile, je
treba proti sebi potisniti dva vzvoda pod sprednjo
zaporo.)
28• Povlecite bočna žepka na naslonjala za roke.
29• Različica športni voziček brez odejice.
30• Z zadrgo pripnite zgornji del odejice na spodnjega
in ga pripnite na naslonjala za roke, kot prikazuje
risba.
31• Različica košara z odejico.
ZAPIRANJE
Preden voziček zaprete, se prepričajte, da: je ročaj
ob hrbtnem naslonu, če je nameščena strehica,
zrahljajte napenjala in se prepričajte, da so vsa
kolesa fiksirana.
32• Da bi voziček zaprli, spustite najprej desni vzvod
z oznako 1, dokler ne klikne.
33• Spustite levi vzvod z oznako 2 in dvignite ročaj.
34• Nato spustite ročaj navzdol in voziček zaprite do
konca, nato pa pripnite sponke, kot je prikazano
na risbi.
PRENA·ANJE
35• Voziãek ima dva roãaja na bokih, da ga lahko
prena amo zaprtega ali odprtega (npr.: da bi li po
stopnicah).
SNEMANJE PREVLEKE
36• Da bi sneli prevleko z vozička, izvlecite krilca
vreče z naslonov za roke in odpnite gumbe.
37• Odstranite krilce vreče s hrbtnega naslona;
38• izvlecite varnostni pas izpod sedeža;
39• Odvijte jermenček z obeh strani in izvlecite vrečo.
40• Da bi lahko oprali spodnji del odejice, izvlecite
spenjalne elemente iz ležišč v okvirju podnožnika,
kot prikazuje risba.
SISTEM GANCIOMATIC
Sistem Ganciomatic je praktičen in hiter sistem, ki
omogoča pripenjanje s priključki Ganciomatic: na
voziček lahko pripnete avtosedež Primo Viaggio. Ta
je tudi opremljen s sistemom Ganciomatic in ga lahko
kupite posebej. Avtosedež Primo Viaggio odpnete s
podstavka (ta ostane v avtu) in ga pripnete na športni
voziček, da lahko popeljete otroka, ne da bi ga motili
med spanjem. Na voziček Venezia lahko pripnete
avtosedež na dva različna načina (“A” in “B”).
PRIKLJUČKI GANCIOMATIC ZA VOZIČEK
41• Da bi dvignili priključke Ganciomatic na vozičku,
Page 36

na vogalih sedeža dvignite vrečo in navzgor
zavrtite oba priključka, ki se bosta samodejno
premaknila navzven.
42• Da bi spustili priključke Ganciomatic z vozička,
navzgor povlecite vzvod in sočasno spustite
spenjalni člen, kot prikazuje risba.
• Venezia je mogoče zapreti tudi, če so priključki
Ganciomatic dvignjeni.
VENEZIA + PRIMO VIAGGIO
43• Da bi avtosedež pripeli na voziček na način “A”,
je treba:
- zavreti voziček;
- z vozička odstraniti strehico;
- spustiti naslon vozička do predzadnjega položaja;
- dvigniti priključke Ganciomatic na vozičku;
- zavrteti ročaj na nasprotno stran hrbtnega
naslona;
- postaviti avtosedež tako, da je obrnjen proti
ročaju;
- pripeti avtosedež, tako da ga potisnete navzdol,
dokler ne klikne.
44• Da bi avtosedež pripeli na voziček na način “B”,
je treba:
- zavreti voziček;
- z vozička odstraniti strehico;
- spustiti naslon vozička do predzadnjega položaja;
- dvigniti priključke Ganciomatic na vozičku;
- prepričati se, da je ro
čaj na strani hrbtnega
naslona;
- izvleči sprednjo zaporo, dokler enkrat ne klikne;
- postaviti avtosedež tako, da bo obrnjen proti
hrbtnemu naslonu;
- pripeti avtosedež, tako da ga potisnete navzdol,
dokler ne klikne.
• Da bi avtosedež sneli z vozička, preberite navodila
za uporabo avtosedeža.
DODATKI
45• Dežna prevleka Cover All: Dežna prevleka iz
prozorne plastike.
46• Izdelana je tako, da omogoãa popolno za ãito tudi
ãe je na voziãek Venezia pripet avtosedeÏ Primo
Viaggio.
47• Torba za previjanje: Torba s podlogo za previjanje
otroka, ki jo je mogoče pripeti na voziček.
ČIŠČENJE IN VZDRŽEVANJE
Izdelek ne potrebuje veliko vzdrževanja. Čistijo in
vzdržujejo ga lahko samo odrasli.
• Svetujemo vam, da redno čistite vse premikajoče se
dele in jih, če je to potrebno, podmažete z lahkim
oljem.
• Kovinske dele obrišite do suhega, da ne bi zarjaveli.
• Plastične dele redno brišite z vlažno krpo. Ne
uporabljajte topil ali drugih podobnih izdelkov.
• Blago skrtačite, da z njega odstranite prah.
• Na koleščkih ne sme biti prahu ali peska.
• Izdelek zaščitite pred atmosferskimi vplivi, vodo,
dežjem ali snegom; daljše izpostavljanje soncu
lahko povzroči spremembo barve veliko materialov.
• Izdelek hranite v suhem prostoru.
• Za čiščenje vreče upoštevajte naslednja navodila.
POZOR
• VEDNO UPORABLJAJTE PETTOČKOVNE VARNOSTNE
PASOVE.
• OTROKA NIKOLI NE PUŠČAJTE SAMEGA.
• UPORABLJANJE DODATNE OPREME, KI JE NI ODOBRIL
PROIZVAJALEC, BI LAHKO BILO NEVARNO.
• V MEHANIZME NE VTIKAJTE PRSTOV.
• IZDELEK MORAJO SESTAVITI ODRASLI.
•
IZDELKA NE UPORABLJAJTE, ČE JE KATERI OD DELOV
POČEN ALI ČE DELI MANJKAJO.
• KO STOJITE NA MESTU, VEDNO ZAVRITE VOZIČEK.
• IZDELKA NE UPORABLJAJTE V BLIŽINI STOPNIC.
• SVETUJEMO VAM, DA VOZIČKA NE DVIGATE ZA
SPREDNJI DEL, SAJ TA NI NAČRTOVAN TAKO, DA BI
PRENESEL TOVRSTNE OBREMENITVE. ČE MORATE
VOZIČEK DVIGNITI, GA PRIMITE POD NASLONI ZA
ROKE.
• PREVERITE, DA JE AVTOSEDEŽ PRAVILNO PRITRJEN NA
VOZIČEK.
VARNOSTNI PREDPISI
Da bi pripeli varnostni pas, vstavite naramnice in
konca pasu vtaknite v sponko. Vedno se prepričajte,
da ste zaslišali klik, s katerim se sponka zapne.
Da bi varnostni pas odpeli, pritisnite ob straneh
sponke in sočasno pas potegnite navzven.
Paketi ali dodatki lahko ogrozijo stabilnost vozička.
Svetujemo vam, da v nakupovalno košaro ne naložite
za več kot 5 kg stvari.
Ob odprtem ognju ali ogrevalnih telesih (električni
radiatorji, plinske pečice itd.) bodite še posebej
pozorni na nevarnost.
Vedno se prepričajte, da je avtosedež pravilno pripet
zanke vozička.
Page 37

• ВАЖНО: внимательно прочитайте эти
инструкции и сохраните их для использования
в будущем.
При невыполнении этих инструкций
безопасность ребенка может быть поставлена
под угрозу.
• Пег Перего имеет право внести в любой момент
изменения в модели, описанные в данном
руководстве, по техническим или коммерческим
причинам.
Peg Perego S.p.A. сертифицирована по
норме ISO 9001.
Сертификация гарантирует
заказчикам
и потребителям, что компания работает,
соблюдая принципы гласности и
доверия.
ОБСЛУЖИВАНИЕ
Если вы случайно потеряли или повредили какиенибудь детали изделия, заменяйте их только
фирменными запасными частями Пег Перего. Для
ремонта, замены, получения сведений о продукции,
приобретения фирменных запасных частей и
принадлежностей обращайтесь в Сервисную службу
Пег-Перего:
тел.: 0039-039-60.88.213,
факс
: 0039-039-33.09.992,
e-mail: assistenza@pegperego.it,
www.pegperego.com
Фирма Пег Перего находится в распоряжении
своих потребителей для того, чтобы наилучшим
образом удовлетворить все их требования. Поэтому,
для нас очень важно и ценно знать мнение наших
заказчиков. Мы будем вам очень признательны,
если, после использования нашего изделия, вы
пожелаете заполнить АНКЕТУ УДОВЛЕТВОРЕННОСТИ
ПОТРЕБИТЕЛЯ, которую вы найдете в интернете на
сайте:
“www.pegperego.com/SSCo.html.en-UK”,
выразив там свои пожелания или советы.
ИНСТРУКЦИИ ПО ПОЛЬЗОВАНИЮ
РАСКЛАДЫВАНИЕ
1• Для раскладывания коляски, нажмите
одновременно две кнопки ручки и заблокируйте
ее в вертикальном положении. Отсоедините
крепления, как показано на рисунке.
2• Резко потяните рукоятку вверх, после чего
опустите ее вниз до заключительного щелчка.
УСТАНОВКА КОРЗИНЫ
3• Для установки корзины нажмите
боковые
кнопки и выньте штангу корзины.
4• Проверьте правильное положение штанги
корзины, ссылаясь на рисунок.
5• Вденьте штангу в обивку корзины. Вставьте
штангу с корзиной в соответствующее гнездо до
щелчка.
6• Прикрепите корзину сбоку к кнопкам, а спереди
наденьте две петли на прогулочную коляску
так, как показано на рисунке.
7• Корзина прогулочной коляски
регулируется в
трех положениях.
A: Нормальное положение.
B: Корзина опускается, что позволяет
использовать ее даже тогда, когда спинка
полностью опущена. Нажимая на нее, можно
легче загрузить корзину, не беспокоя ребенка.
RU•PУССКИЙ
C: приподнятая корзинка, чтобы получить
доступ к задней подножке.
ТОРМОЗ
8• Так как ручка коляски двухсторонняя, все
четыре колеса коляски можно поставить на
тормоз; необходимо ставить на тормоз только
те колеса, которые расположены со стороны
ручки. Для торможения прогулочной коляски
нажмите ногой рычаг тормоза, как показано на
рисунке. Когда коляска стоит,
всегда ставьте ее
на тормоз.
РЕМЕНЬ БЕЗОПАСНОСТИ
9• А: Убедиться в том, что бретель вставлена
правильно, нажимая, как показано на рисунке.
В: Соединить ремень, действуя по рисунку.
10• Для отсоединения ремня нажать с боков пряжки
и одновременно потянуть наружу поясной
ремешок.
11• Благодаря пристегивающейся системе, теперь
ремень безопасности можно будет надевать
проще. Перед тем, как прикрепить ремень,
прикрепите пряжку к спинке, пропустив язычок
через специальную петлю, как показано на
рисунке. Затем, когда ремень был застегнут
на ребенке, открепите его от спинки, чтобы
ваш ребенок мог свободно двигаться. Пряжка
должна оставаться под плечами ребенка.
РЕГУЛИРОВКА СПИНКИ
12• Наклон спинки регулируется в трех
положениях
. Чтобы опустить спинку, поднимите
ручку и одновременно заблокируйте спинку
в необходимом положении. Чтобы поднять
спинку, сместите ее вверх.
РЕГУЛИРОВКА ПОДНОЖКИ
13• Подножка регулируется в двух положениях.
Чтобы перевести подножку в нижнее
положение, опустите два рычага и
одновременно с этим опустите подножку, как
показано на рисунке. Чтобы перевести ее в
верхнее
положение, поднимите ее вверх.
ПОВОРОТНЫЕ КОЛЕСА
14• Так как ручка коляски двухсторонняя, все
четыре колеса коляски поворотные; необходимо
делать поворотными только колеса,
расположенные с противоположной стороны
ручки. Чтобы колеса стали поворотными
необходимо поднять рычаг, как показано на
рисунке. Чтобы колеса не поворачивались,
опустите рычаг.
ПЕРЕДНИК
15• Передник может выдвигаться в два
положения.
Для выдвижения передника в первое положение
потяните на себя два рычажка под передником
и передник до первого щелчка. Для выдвижения
передника во второе положение потяните еще
на себя два рычажка и передник до второго
щелчка.
16• Когда ваши дети подрастут, передник можно
снять. Чтобы снять его, нажмите расположенные
под
подлокотниками кнопки и одновременно с
этим потяните передник наружу.
ЛОТОК “CHILD TRAY”
17• Для крепления лотка для напитков к
прогулочной коляске необходимо удлинить
передник до второго положения, после чего
закрепите лоток, смещая его вниз, как показано
на рисунке.
18• Для снятия лотка сместите наружу два боковых
крыла лотка, и одновременно с этим
поднимите
его вверх. Ставить горячие напитки на лоток опасно.
Page 38

РУЧКА
19• Для изменения положения ручки сместите вверх
одновременно оба рычага, расположенные на
ручке, и сместите ручку в противоположное
положение до щелчка. При выполнении данной
операции обращайте внимание на то, чтобы не
задеть пальцы или руки ребенка.
20• Для регулировки ручки по высоте нажмите
одновременно две боковые кнопки, как
показано на
рисунке, и заблокируйте ручку в
необходимом положении.
КОЛЬЦО-ПОДСТАВКА ДЛЯ НАПИТКОВ
21• Кольцо можно установить как с правой, так и
с левой стороны ручки. Для установки кольца
установите его направляющую на штырь ручки
и сместите его вниз до щелчка. Рекомендуется
не ставить в кольцо горячие напитки и напитки
весом более 1
кг.
ДЕТСКАЯ КОЛЯСКА И/ИЛИ ПРОГУЛОЧНАЯ
КОЛЯСКА
22• A: ДЕТСКАЯ КОЛЯСКА: Venezia - это детская
коляска, когда спинка опущена до последнего
положения, подножка поднята, ручка
установлена с противоположной стороны
спинки, поворотные колеса со стороны спинки.
• B: ПРОГУЛОЧНАЯ КОЛЯСКА: Venezia - это
прогулочная коляска, когда спинка поднята,
подножка опущена, ручка установлена
со стороны спинки, поворотные колеса
с
противоположной стороны спинки.
КАПОТ
23• Для установки капота вставьте крепления
в специальные гнезда подлокотников
прогулочной коляски, как показано на рисунке,
и пристегните его к задней стороне спинки.
24• Пристегните капот к внутренним сторонам
подлокотников, и натяните его, опуская каркас,
как показано на рисунке.
25• Чтобы превратить его в солнцезащитную крышу
,
откройте молнию, как показано на рисунке, и
опустите оставшуюся часть капота.
ПОКРЫВАЛО
Для превращения Uno в детскую коляску
необходимо опустить передник во второе
положение и поднять подножку.
26• Снимите нижнюю часть покрывала из-под
обивки подножки.
27• Вставьте язычки нижней части покрывала в
прорези передника. (Прорези передника
появляются при выдвижении передника
. Если
прорези вернулись с свое гнездо, необходимо
сместить к себе два рычажка, расположенных
под передником.)
28• Наденьте боковые петли на подлокотники.
29• Вариант детская коляска без покрывала.
30• Соедините молнией-застежкой верхнюю
часть покрывала с нижней и пристегните ее к
подлокотникам так, как показано на рисунке.
31• Детская коляска с
покрывалом.
СКЛАДЫВАНИЕ
Перед складыванием коляски убедитесь, что:
ручка установлена со стороны спинки; если
установлен капот, то ослабьте каркас; и,
наконец, проверьте, что все колеса находятся в
фиксированном положении.
32• Для складывания коляски необходимо опустить
сначала правый рычаг, помеченный цифрой 1,
до конечного щелчка.
33• Опустите левый рычаг, обозначенный цифрой 2,
и потяните
ручку вверх.
34• Затем сместите ручку вниз и завершите
складывание, застегнув крепления, как
показано на рисунке.
ПЕРЕНОС
35• Коляска оснащена двумя транспортными
ручками по бокам, которые позволяют
переносить ее как в сложенном, так и в
разложенном состоянии (например, чтобы
спускаться по лестницам).
СНЯТИЕ ОБИВКИ
36• Для снятия обивки с прогулочной коляски
отсоедините лепестки обивки от подлокотников
и отстегните кнопки.
37• Снимите лепесток обивки со спинки;
38•
Выньте ремень безопасности из-под сиденья;
39• Отвинтите ремешок с обеих сторон и снимите
обивку.
40• Для стирки нижней части покрывала удалите
крепления из гнезд, расположенных на раме
подножки, как показано на рисунке.
СИСТЕМА GANCIOMATIC SYSTEM
Gаnciomаtic System - это практичная и быстрая
система, позволяющая вам установить на
прогулочную коляску при помощи креплений
Gа
nciomаtic автомобильное кресло Primo Viaggio,
которое также оборудовано Ganciomatic System,
и которое можно приобрести отдельно. Кресло
Primo Viaggio отсоединяется от основания
(которое остается в автомобиле) и прикрепляется
к прогулочной коляске, чтобы перенести ребенка,
не беспокоя его. Прогулочная коляска Venezia
предоставляет вам возможность прикрепить
автомобильное кресло двумя разными способами
(“A” и “B”).
КРЕПЛЕНИЯ GANCIOMATIC ПРОГУЛОЧНОЙ
КОЛЯСКИ
41• Для поднятия
креплений Ganciomatic
прогулочной коляски поднимите обивку у углов
сиденья, и поверните вверх два крепления,
которые автоматически сместятся наружу.
42• Для опускания креплений Ganciomatic
прогулочной коляски сместите рычажок вверх
и одновременно опустите крепление так, как
показано на рисунке.
• Прогулочную коляску Venezia можно сложить,
даже если крепления Gаnciomаtic подняты.
VENEZIA + PRIMO VIAGGIO
43• Чтобы прикрепить автомобильное
кресло
к прогулочной коляске СПОСОБОМ “А”
необходимо:
- поставить прогулочную коляску на тормоз;
- снять капот с прогулочной коляски;
- опустить спинку прогулочной коляски в
предпоследнее положение;
- поднять крепления Ganciomatic прогулочной
коляски;
- повернуть ручку с противоположной стороны
спинки;
- установить автомобильное кресло, обращенное
в сторону ручки;
- прикрепить автомобильное кресло, сместив его
вниз
до щелчка.
44• Чтобы прикрепить автомобильное кресло
к прогулочной коляске СПОСОБОМ “В”
необходимо:
- поставить прогулочную коляску на тормоз;
- снять капот с прогулочной коляски;
- опустить спинку прогулочной коляски в
предпоследнее положение;
- поднять крепления Ganciomatic прогулочной
коляски;
- убедиться, что ручка установлена со стороны
спинки;
- вынуть передник до первого щелчка;
-
установить автомобильное кресло, обращенное
Page 39

в сторону спинки;
- прикрепить автомобильное кресло, сместив его
вниз до щелчка.
• Для отсоединения автомобильного кресла от
прогулочной коляски смотрите его руководство
по пользованию.
ЛИНИЯ ПРИНАДЛЕЖНОСТЕЙ
45• Дождевик Cover All: Универсальный дождевик
из прозрачного ПВХ.
46• Этот дождевик был разработан для применения
также в случае, если на прогулочной коляске
Venezia установлено автомобильное кресло
Primo Viaggio, и он обеспечивает полную защиту
от дождя.
47• Сумка для пеленания: сумка с матрасиком для
пеленания ребенка, которую можно прикрепить к
прогулочной коляске.
ЧИСТКА И УХОД
Ваше изделие нуждается в несложном уходе.
Операции по чистке и уходу должны выполнять
только взрослые.
• Рекомендуется содержать в чистоте все
движущиеся части, при необходимости смажьте
их легким маслом.
• Вытрите насухо металлические части, чтобы
предотвратить образование ржавчины.
• Периодически очищайте пластмассовые части
влажной тканью, не пользуйтесь растворителями
или сходными
с ними веществами.
• Чистите щеткой тканые части, чтобы удалить ею
пыль.
• Очищайте от пыли и песка колеса.
• Защитите изделие от атмосферных осадков
- воды, снега или дождя. Постоянная и
продолжительная подверженность солнечным
лучам может вызвать цветовые изменения многих
материалов.
• Храните изделие в сухом месте.
• Для стирки тканой обивки
выполните следующие
указания.
BHИMAHИE
• ВСЕГДА ИСПОЛЬЗУЙТЕ РЕМНИ БЕЗОПАСНОСТИ С 5
ТОЧКАМИ КРЕПЛЕНИЯ.
• НИКОГДА НЕ ОСТАВЛЯЙТЕ ВАШЕГО РЕБЕНКА БЕЗ
ПРИСМОТРА.
• ИСПОЛЬЗОВАНИЕ АКСЕССУАРОВ, НЕ ОДОБРЕННЫХ
ИЗГОТОВИТЕЛЕМ, МОЖЕТ БЫТЬ ОПАСНЫМ.
• ИЗБЕГАЙТЕ ПОПАДАНИЯ ПАЛЬЦЕВ В МЕХАНИЗМЫ.
• ОПЕРАЦИИ СБОРКИ ДОЛЖНЫ ВЫПОЛНЯТЬСЯ
ВЗРОСЛЫМИ.
• НЕ ИСПОЛЬЗУЙТЕ ИЗДЕЛИЕ, ЕСЛИ ОНО СЛОМАНО
ИЛИ НЕКОМПЛЕКТНО.
• ВО
ВРЕМЯ СТОЯНКИ ВСЕГДА ИСПОЛЬЗУЙТЕ
ТОРМОЗ.
• НЕ ПОЛЬЗУЙТЕСЬ ИЗДЕЛИЕМ ВБЛИЗИ ЛЕСТНИЦ
ИЛИ СТУПЕНЕК.
• РЕКОМЕНДУЕТСЯ НЕ ПОДНИМАТЬ ПРОГУЛОЧНУЮ
КОЛЯСКУ, ДЕРЖА ЕЕ ЗА ПЕРЕДНИК, ТАК КАК ОН
НЕ ПРЕДНАЗНАЧЕН ДЛЯ БОЛЬШИХ НАГРУЗОК. ПРИ
НЕОБХОДИМОСТИ ПОДНИМАЙТЕ КОЛЯСКУ ЗА
ПОДЛОКОТНИКИ.
• ПРОВЕРЬТЕ ПРАВИЛЬНОСТЬ КРЕПЛЕНИЯ
АВТОМОБИЛЬНОГО КРЕСЛА К КОЛЯСКЕ.
ПРАВИЛА БЕЗОПАСНОСТИ
Чтобы застегнуть ремни безопасности проденьте
лямки и вставьте два конца брюшного ремня
в пряжку. Всегда проверяйте, чтобы ремень
защелкнулся.
Чтобы отстегнуть ремни безопасности
необходимо нажать на боковые стороны пряжки и
одновременно с этим потянуть наружу брюшной
ремень.
Сумки или принадлежности могут сделать коляску
неустойчивой. Рекомендуем не класть в корзину
грузы весом более 5 кг.
Помните об опасности, которую представляет
собой огонь и другие сильные источники тепла,
такие как электрические отопители, газовые печи и
т.д., расположенные в непосредственной близости
к изделиям.
Всегда проверяйте, чтобы автомобильное кресло
было закреплено на коляске.
Page 40

• ÖNEMLI: bu talimatlari dikkatlice okuyunuz ve
ileride de istifade edebilmek amaciyla muhafaza
ediniz.
Bu talimatlara uyulmamasi halinde çocuğun
güvenliği tehlikeye girebilir.
• Pegperego ihbarsiz olarak herhangi bir zamanda
üründe değişiklik yapmak ve islah etmek haklarini
sakli tutar.
Peg Perego S.p.A. ISO 9001 sertifikalıdır.
Bu sertifika ile müşterilere ve tüketicilere
kurumun şeffaf işleyişinin ve tam bir
güven ortamının garantisi verilmektedir.
MÜŞTERİ SERVİSİ
Şayet kazara ürünün birtakım parçaları kaybolacak ya
da zarar görecek olursa, yedek parça olarak yalnızca
orijinal PegPerego parçalarını kullanın. Muhtemel
tamir, değiştirme, ürün hakkında bilgi alma, orijinal
yedek parça ve aksesuar satışı işlemleri için PegPerego
Satış Destek hattına başvurun:
tel.: 0039-039-60.88.213,
fax: 0039-039-33.09.992,
e-mail: assistenza@pegperego.it,
www.pegperego.com
Peg Perego olarak tüketicilerin her türlü gereksinimini
en iyi şekilde karşılamak üzere daima onlara hizmet
etmeye hazırız. Dolayıs
ıyla, müşterilerimizin görüş ve
önerileri bizim için son derece önemli ve değerlidir.
Bu nedenle, bir ürünümüzü satın alıp kullandıktan
sonra, görüş ve önerilerinizi bildirmek üzere Internet
üzerinde “www.pegperego.com/SSCo.html.en-UK”
adresinde yer alan MÜŞTERİ MEMNUNİYETİ FORMUNU
dolduracak olursanız size gerçekten minnettar
kalacağız.
KULLANIM KILAVUZU
AÇMA
1• Çocuk arabasını açmak için kolun üzerindeki iki
düğmeye eş zamanlı olarak basın, çocuk arabasını
dikey konumda sabitleyin. Bağlantı birimlerini
şekildeki gibi çözün.
2• Tutma kolunu tek hamlede yukarı doğru kaldırın
ve hemen ardından son atım noktasına gelene dek
tutma kolunu aşağı doğru itin.
SEPET MONTAJI
3• Sepet monte etmek için yanlarda bulunan
düğmelere basınız ve sepet milini çı
kartmak için
çekiniz.
4• Şekle bakmak suretiyle sepet milininin doğru
konumlandırılmış olmasını kontrol ediniz.
5• Mili sepetin kumaş kısmına yerleştiriniz. Mili
sepetle birlikte bir “klik” sesi duyana kadar
yuvasına yerleştiriniz.
6• Sepeti yan taraftan düğmelere takınız ve şekilde
görüldüğü gibi ön taraftan da ilikleri pusete
ilikleyiniz.
7• Sepet üç farklı konumda ayarlanabilir.
A: Sepet normal konumda.
B: Sepet alçaltılmış konumda; arkalığın tamamen
aşağı yatırılmış olduğu durumda da kolayca
kullanılabilmesi için, sepet, üzerine bastırılarak
alçaltılır. Böylece bebeği hiç huzursuz etmeden
sepete eşya koyabilirsiniz.
C: Arka ayaklığ
ı serbesti sağlamak üzere sepetin
yukarı kaldırılmış hali.
FREN
8• Çocuk arabasının dört tekerleğinin dördü de
frenleme düzeneğine sahiptir. Tutma kolu geriye
doğru çevrilebilecek biçimde tasarlandığından
yalnızca tutma koluyla aynı tarafta bulunan
tekerleklerdeki fren sistemini devreye sokmanız
gerekir. Çocuk arabasını sabit konumda
durdurmak için şekildeki gibi ayağınızla
tekerleklerin fren çubuğuna basın. Çocuk
arabasını durdurduğunuz zaman daima frenleri
sabit konuma getirin.
EMNİYET KEMERİ
9• A: resımdekı gıbı bastirarak ucun tam olarak
takildiğindan emın olun. B: kemerı resımde
gösterıldığı gıbı bastirin.ı
10• Kemerı açmak ıçın kenarlardakı dü
ğmelere basin
ve kollardakı askilari çekın.
11• Günümüzün yeni emniyet kemerlerinin takılıp
çıkarılması “tak ve çıkar” düzeneği sayesinde
çok daha kolaylaşmıştır. Emniyet kemerini
bağlamadan önce, kemer tokasını arkalığa takın;
işlemi yaparken dili şekildeki gibi uygun gelen
geçişe oturtun. Daha sonra, emniyet kemerini
çocuğunuza bağladığınızda kemeri arkalıktan
çıkarın; böylece çocuk daha serbestçe hareket
etme imkânı bulacaktır. Kemer tokasının çocuğun
omuzlarının altında kalması gerekir.
ARKALIĞIN AYARLANMASI
12• Çocuk arabasını
n arkalığı üç farklı konumda
yatırılabilecek biçimde tasarlanmıştır. Arkalığı
yatırmak için kolu yükseltin ve aynı anda arkalığı
arzu edilen konumda sabitleyin. Arkalığı kaldırmak
için yukarı doğru itin.
AYAKLIĞIN AYARLANMASI
13• Ayaklık iki farklı konuma gelecek biçimde
tasarlanmıştır. Ayaklığı alçaltmak için iki küçük
kolu aşağı doğru indirin ve aynı anda ayaklığı da
şekildeki gibi alçaltın. Ayaklığı yukarı kaldırmak
için tık sesini duyana kadar ayaklığı yükseltin.
FIRDÖNDÜ TEKERLEKLER
14•
Çocuk arabasının dört tekerliğinin dördü de
fırdöndü tekerlektir. Tutma kolu geriye doğru
çevrilebilecek biçimde tasarlandığından yalnızca
tutma kolunun karşı tarafında yer alan tekerlekleri
fırdöndü tekerlek konumuna getirmeniz gerekir.
Tekerlekleri fırdöndü konumuna getirmek için
şekildeki gibi kolu yukarı kaldırın. Tekerlekleri
tekrar sabit konuma getirmek istediğinizde kolu
aşağı indirin.
ALINLIK
15• Alınlık iki farklı konumda uzatılabilecek şekilde
tasarlanmıştır. Alınlığı birinci konuma uzatmak
için alınlığın alt kısmına yerleştirilmiş olan iki kolu
kendinize doğru ve alınlığı da ilk atım noktas
ına
doğru çekin. Alınlığı ikinci konuma uzatmak için
iki kolu ve alınlığı, alınlık ikinci atım noktasına
gelene dek kendinize doğru biraz daha çekin.
16• Çocuklarınız biraz daha büyüdüklerinde alınlığı
çıkarabilirsiniz. Alınlığı yerinden çıkarmak için
kolların altına yerleştirilmiş olan düğmelere basın
ve aynı anda alınlığı dışarı doğru çekin.
“CHILD TRAY” TEPSİ
17• Çocuk arabasına içecek taşıma tepsisini takmak
için alınlığı ikinci konuma kadar uzatmak ve
hemen ard
ından tepsiyi şekildeki gibi aşağı doğru
iterek takmak gerekir.
18• Tepsiyi çıkrmak için dış tarafta bulunan tepsinin
iki yan kanatçığını itin ve aynı anda tepsiyi yukarı
doğru kaldırın. Tepsiye kaynar içecekler koymak
tehlikelidir.
TR•TÜRKÇE
Page 41

TUTMA KOLU
19• Tutma kolunu geri çevrilebilir konuma getirmek
için tutma koluyla birlikte aynı anda tutma
kolunun üzerine yerleştirilmiş olan çubukların
her ikisini birden yukarı doğru çekin ve tutma
kolunu, tam karşı tarafından, son atım noktasına
kadar götürün. Bu işlemi yaptığınız sırada bebeğin
ellerine ya da kollarına çarpmamaya dikkat edin.
20• Tutma kolunun yüksekliğini ayarlamak için yan
kısımlardaki düğmelerin her ikisine birden aynı
anda şekildeki gibi bastırın ve arzu ettiğiniz
konuma getirdiğinizde tutma kolunu sabitleyin.
BARDAKLIK
21• Bardaklığı, tutma kolunun isterseniz sağ
tarafından isterseniz de sol tarafından
takabilirsiniz. Bardaklığı takmak için bardaklık
yuvasını tutma kolunun askı
sına geçirin ve yuvayı
tık sesini duyana dek aşağı doğru itin. Bardaklığın
üzerine sıcak içeceklerin ve 1 kilogramdan daha
ağır eşyaların konulmaması tavsiye edilir.
BEBEK ARABALARI VE/VEYA ÇOCUK ARABALARI
22• A: BEBEK ARABASI: Arkalığı en son konuma
getirilip yatırıldığında, ayaklığı yukarı
kaldırıldığında, tutma kolu arkalığın karşı tarafına
getirildiğinde ve fırdöndü tekerlekler arkalıkla aynı
tarafta bulunduğunda Venezia bir bebek arabasına
dönüşür.
• B: ÇOCUK ARABASI: Arkalığı yukarı kaldır
ıldığında,
ayaklığı aşağı indirildiğinde, tutma kolu arkalıkla
aynı tarafta bulunduğunda ve fırdöndü tekerlekler
arkalığın karşı tarafına getirildiğinde Venezia bir
çocuk arabasına dönüşür.
BAŞLIK
23• Başlığı takmak için bağlantı birimlerini çocuk
arabasının kollarında bulunan uygun yerlere
şekildeki gibi geçirin ve başlığı arkalığın sırt
kısmına düğmeleyin.
24• Başlığı kolların iç kı
sımlarına da düğmeleyin ve
pergel biçimli bağlantı birimlerini şekildeki gibi
aşağı doğru indirerek başlığı iyice gerin.
25• Başlığı güneşlik olarak kullanmak üzere çadır
haline getirmek istediğinizde fermuarı şekildeki
gibi açın ve başlığın geri kalan düğmelerini çözün.
KILIF
“Uno”yu bebek arabası versiyonuna
dönüştürebilmek için öncelikle ön kısmı uazatarak
ikinci konuma getirmek ve ayak dayama yerini
kaldırmak gerekmektedir.
26• Örtünün alt tarafını ayak dayama kılı fının altından
çekmek suretiyle çıkartınız.
27•
Kılıfın alt kısmında bulunan dilciklerini alınlıkta
bulunan oyuklara geçirin. (Alınlıktaki oyuklar
alınlık uzatıldığı zaman dışarı çıkar. Oyukların
tekrar eski yerlerine girmesi durumunda alınlığın
altına yerleştirilmiş olan iki kolu yeniden kendinize
doğru çekmeniz gerekir.)
28• Yanlarda yer alan ilikleri kol dayama yerlerine
geçiriniz.
29• Kılıf olmadan bebek arabası konumu.
30• Örtünün üst tarafı ile alt tarafını fermuarla
birleştiriniz ve şekilde gösterildiği gibi kol koyma
yerlerine düğmeleyiniz.
31• Örtülü bebek arabası versiyonu.
KAPATMA
Çocuk arabasını
kapatmadan önce, tutma
kolunun arkalığın bulunduğu tarafa konumlanmış
olduğundan emin olun, şayet başlık takılı
durumdaysa pergel biçimli bağlantı birimlerini
gevşetin ve bütün tekerleklerin sabit konuma
getirilip getirilmediğini kontrol edin.
32• Çocuk arabasını kapatmak için ilk önce üzerinde
“1” numara işareti olan sağ kolu, son atım
noktasına gelene dek, aşağı indirin.
33• Üzerinde “2” numara işareti olan sol kolu aşağı
indirin ve tutma kolunu yukarı doğru kaldırın.
34• Hemen ardından tutma kolunu aşağı doğru indirin
ve bağlantı birimlerini şekildeki gibi takarak
kapatma işlemini tamamlayın.
TAŞIMA
35• Çocuk arabasının her iki yanında taşıma amacıyla
tasarlanmış iki tutamağı vardır; bu sayede
arabayı hem kapalıyken hem de açıkken rahatça
taşıyabilirsiniz (örneğin; merdivenlerden inerken).
DÖŞEMENİN ÇIKARTILMASI
36• Bebek arabasının döşemesini çıkartmak için kılı
fın
yan taraflarını kol dayama yerlerinden çıkartınız ve
düğmeleri açınız.
37• Kılıfın sırt dayama kısmını çıkartınız;
38• emniyet kemerini oturma gurubunun altından
çekerek çıkartınız;
39• Kayışı iki tarafından çözünüz ve kılıfı çıkartınız.
40• Örtünün alt tarafını yıkayabilmek içinzemin
gövdesinde bulunan kancaları, şekilde gösterildiği
gibi, çıkartınız.
GANCIOMATIC SYSTEM
“Ganciomatic System”, “ganciomatic” kancaları
sayesinde yine “Ganciomatic Sistem”i haiz ve ayr
ıca
satın alınabilecek olan “Primo Viaggio” (İlk Yolculuk)
araba koltuğunun bebek arabasına pratik ve hızlı
şekilde takılabilmesini sağlayan bir sistemdir. “Primo
Viaggio” araba koltuğu dayanağından ayrılır (dayanak
arabada kalır) ve çocuğun rahatsız olmaksızın
taşınabilmesi için bebek arabasına monte edilir.
“Venezia” bebek arabası ile araba koltuğunu iki
farklı şekilde (“A” ve “B”) takma olanağı mevcuttur.
BEBEK ARABASININ “GANCIOMATIC”
KANCALARI
41• Bebek arabasının “Ganciomatic” kancalarını
kaldırmak için, oturma gurubu kılıfının köşelerini
yukarı doğru kaldırın
ız ve iki kancayı yukarı doğru
kaldırınız, kancalat otomatik olarak dışa doğru
kayacaklardır.
42• Bebek arabasının “Ganciomatic” kancalarını aşağı
indirmek için, kolu yukarı doğru çekin ve eş
zamanlı olarak da kancayı, şekilde gösterildiği
gibi, aşağı konuma getiriniz.
• “Venezia”, “Ganciomatic” kancaları yukarı
konumdayken de kapatılabilir.
VENEZIA + PRIMO VIAGGIO (İlk Yolculuk)
43• Araba koltuğunun bebek arabasına “A”
ŞEKLİNDE takılabilmesi için aşağıdaki
işlemlerin yapılması gerekmektedir:
-
bebek arabasını fren konumuna getiriniz;
- bebek arabasının tentesini çıkartınız;
- bebek arabasının sırt dayamasını en son
konumdan bir evvelkine kadar yatırınız;
- bebek arabasının “Ganciomatic” kancalarını
kaldırınız;
- tutma kolunu sırt dayama yerinin aksi istikametine
doğru itiniz;
- araba koltuğunu tutma koluna doğru dönük olarak
konumlandırınız;
- araba koltuğunu, aşağı doğru “klik” sesini duyana
kadar itmek suretiyle tespit ediniz.
44• Araba koltuğunun bebek arabasına “B”
ŞEKLİNDE takılabilmesi için aşa
ğıdaki
işlemlerin yapılması gerekmektedir:
- bebek arabasını fren konumuna getiriniz;
- bebek arabasının tentesini çıkartınız;
- bebek arabasının sırt dayamasını en son
konumdan bir evvelkine kadar yatırınız;
- bebek arabasının “Ganciomatic” kancalarını
kaldırınız;
- tutma kolunu sırt dayama yeri tarafında
Page 42

olduğundan emin olunuz;
- ön kısmı ilk kademeye kadar dışa doğru çekiniz;
- araba koltuğunu sırt dayama ferine dönük olarak
konumlandırınız;
- araba koltuğunu, aşağı doğru “klik” sesini duyana
kadar itmek suretiyle tespit ediniz.
• Araba koltuğunun bebek arabasından
çıkartılabilmesi için kendi kullanım kılavuzuna
bakınız.
AKSESUAR HATTI
45• “Cover All” yağmurluk: Şeffaf PVCʼden mamul tam
korumalı yağmurluk.
46• Bu yağmurluk, Venedik çocuk arabasına, İlk
Yolculuk araba koltuğunun takılması durumunda
da tam anlamıyla güvenli bir koruma sağlayacak
şekilde tasarlanıp üretilmiştir.
47• Değiştirme Çantası: Bebeğin altını değiştirmek için
pusete takılabilen yataklı çanta.
TEMİZLEME VE BAKIM
Pusetiniz çok az bir bakım gerektirir. Temizlik
ve bakım işlemleri sadece yetişkinler tarafından
yapılmalıdır.
• Bütün hareketli kısımların temiz tutulması ve
gerekirse ince yağla yağlanması önerilir.
• Demir kısımlarını, paslanmayı önlemek için iyicene
kurulayın.
• Düzenli olarak plastik kısımları nemli bir bezle silin,
çözücü veya benzeri maddeler kullanmayın.
• Tozdan arındırmak için kumaş kısımları
nı fırçalayın.
• Tekerlekleri tozdan ve kumdan temiz tutun.
• Ürünü su, yağmur ve kar gibi dış etkenlerden
koruyun, güneşte devamlı ve uzun kalış birçok
malzemede renk değişimine sebep olabilir.
• Ürünü kuru bir ortamda muhafaza edin.
• Torbanın yıkanması için, aşağıdaki talimatlara riayet
ediniz.
UYARI
• BEŞ KADEMELİ EMNİYET KEMERLERİNİ DAİMA
KULLANIN.
• ÇOCUĞUNUZU HİÇBİR ZAMAN TEK BAŞINA
BIRAKMAYIN.
• ÜRETİCİ TARAFINDAN ONAYLANMAMIŞ
AKSESUARLARI KULLANMAK TEHLİKELİ OLABİLİR.
• PARMAKLARINIZIN MEKANİK AKSAMA
SIKIŞMAMASINA ÖZEN GÖSTERİN.
• KURULMA İŞ
LEMİ YETİŞKİNLER TARAFINDAN
YAPILMALIDIR.
• KIRIK YA DA EKSİK PARÇALI ÜRÜNLERİ
KULLANMAYIN.
• ARABAYI HER DURDUĞUNUZDA FREN KİLİTLERİNİ
KULLANIN.
• ÜRÜNÜ, MERDİVEN YA DA BASAMAK GİBİ GEÇİŞ
YERLERİNİN YAKINLARINDA KULLANMAYIN.
• ÇOCUK ARABASININ ALINLIKTAN TUTULARAK
KALDIRILMAMASI TAVSİYE OLUNUR ÇÜNKÜ ALINLIK
YÜK TAŞIMAK ÜZERE ÜRETİLMEMİŞTİR. İHTİYAÇ
HALİNDE ÇOCUK ARABASINI KOL KISIMLARININ
ALTINDAN TUTARAK KALDIRIN.
• ARABA KOLTUĞUNUN ÇOCUK ARABASINA DOĞRU
ŞEKİLDE TAKILIP TAKILMADIĞINI KONTROL EDİN.
GÜVENLİK KURALLARI
Emniyet kemerini takmak için askıları uzatın ve
askıları bel kayışının dış uçlarından kemer tokasına
geçirin. Kemerin sıkıca kapandığından daima emin
olun.
Emniyet kemerini çözmek için tokanın kenarlarına
basın ve aynı anda bel kayışını dışarı doğru çekin.
Yükler ve/veya aksesuarlar ürünün dengesini
bozabilir. Sepete 5 kilogramdan daha fazla yük
konulmamasını öneririz.
Ürünün yakınlarında bulunması muhtemel elektrikli
ısıtıcılar, gaz sobaları v.s gibi ısı kaynaklarının ve
ateşin neden olabileceği tehlikelere karşı dikkatli olun.
Araba koltuğunun çocuk arabasının kancalarına sıkıca
bağlı olduğundan emin olun.
Page 43

• ΣΗΜΑΝΤΙΚΟ: διαβάστε με προσοχή τισ οδηγίεσ
αυτέσ και διατηρήστε τισ για μελλοντική χρήση.
Η ασφάλεια του παιδιού θα μπορούσε να τεθεί
σε κίνδυνο εάν δεν ακολουθήσετε τισ οδηγίεσ
αυτέσ.
• Η PEG PEREGO διατηρεί το δικαίωμα να κάνει ότι
αλλαγές είναι αναγκαίες ή βελτιώσεις σε αυτά τα
προιόντα οποτεδήποτε χωρίς ειδοποίηση.
Η Peg Perego S.p.Α. διαθέτει
πιστοποίηση ΙSΟ 9001.
Η πιστοποίηση παρέχει στους πελάτες
και στους καταναλωτές την εγγύηση
της διαφάνειας και της εμπιστοσύνης
στον τρόπο με τον οποίο εργάζεται η
εταιρία.
ΕΞΥΠΗΡΕΤΗΣΗ ΠΕΛΑΤΩΝ
Εάν τυχόν χαθούν μέρη του μοντέλου ή υποστούν
κάποια βλάβη, χρησιμοποιείτε μόνο γνήσια
ανταλλακτικά Peg Perego. Για τυχόν επισκευές,
αντικαταστάσεις, πληροφορίες σχετικά
με τα
προϊόντα, την πώληση γνήσιων ανταλλακτικών
και αξεσουάρ, επικοινωνήστε με την Υπηρεσία
Εξυπηρέτησης Peg Perego:
τηλ: 0039-039-60.88.213,
fax: 0039-039-33.09.992,
e-mail: assistenza@pegperegο.it,
www.pegperegο.cοm
Η Peg Perego είναι στη διάθεση των Καταναλωτών
της για την καλύτερη εξυπηρέτηση των αναγκών
τους. Για το λόγο αυτό είναι για μας εξαιρετικά
σημαντικό και πολύτιμο να γνωρίζουμε τη γνώμη
των Πελατών
μας. Θα σας είμαστε λοιπόν πολύ
ευγνώμονες εάν, αφού χρησιμοποιήσετε ένα
προΪφόν μας, συμπληρώσετε το ΕΡΩΤΗΜΑΤΟΛΟΓΙΟ
ΙΚΑΝΟΠΟΙΗΣΗΣ ΚΑΤΑΝΑΛΩΤΗ που θα βρείτε στο
ιξterξet στην ακόλουθη διεύθυνση: “www.pegperegο.
cοm/SSCο.html.en-UK”,
επισημαίνοντας ενδεχόμενες παρατηρήσεις ή
υποδείξεις.
ΟΔΗΓΙΕΣ ΧΡΗΣΕΩΣ
ΑΝΟΙΓΜΑ
1• Για να ανοίξετε το καροτσάκι περιπάτου,
πατήστε συγχρόνως τα δύο κουμπιά της
χειρολαβής, μπλοκάρετε στην κάθετη θέση.
Αποσυνδέσετε τις συνδέσεις όπως φαίνεται
στην εικόνα.
2• Σηκώστε με δύναμη τη χειρολαβή προς τα πάνω
και στη συνέχεια σπρώξτε την προς τα κάτω
μέχρι την τελική συγκράτηση.
ΣΥΝΑΡΜΟΛΟΓΗΣΗ ΤΟΥ ΚΑΛΑΘΙΟΥ
3• Για να συναρμολογήσετε το καλάθι πατήστε τα
πλαϊνά κουμπιά καιτραβήξτε για να βγάλετε τη
ράβδο
του καλαθιού.
4• Ελέγξτε τη σωστή τοποθέτηση της ράβδου του
καλαθιού βλέποντας σχετικά την εικόνα.
5• Περάστε τη ράβδο μέσα από το ύφασμα του
καλαθιού. Τοποθετήστε τη ράβδο με το καλάθι
στην έδρα του μέχρι το κλικ.
6• Συνδέστε το καλάθι πλευρικά στα κουμπιά και
μπροστά περάστε τις δύο σχισμές στο
καροτσάκι
περιπάτου όπως φαίνεται στην
εικόνα.
7• Το καλάθι του καροτσιού περιπάτου έχει τρεις
ρυθμίσεις.
A: κανονική θέση.
ΕL•EΛΛΗΝΙΚΑ
B: Το καλάθι χαμηλώνει για να επιτρέψει
τη χρήση του ακόμη και όταν η πλάτη είναι
εντελώς κατεβασμένη, πιέζοντας επάνω του,
είναι πιο εύκολο να το γεμίσετε χωρίς να
ενοχληθεί το μωρό.
C: σηκωμένο καλάθι για να έχετε πρόσβαση
στον πίσω βατήρα.
ΦΡΕΝΟ
8• Το καροτσάκι περιπάτου έχει και τους τέσσερις
τροχούς με δυνατότητα να φρενάρουν, καθώς
η χειρολαβή μπορεί να αναστραφεί. Χρειάζεται
να βάλετε φρένο μόνο στους τροχούς που
βρίσκονται στην ίδια πλευρά της χειρολαβής.
Για να φρενάρετε το καροτσάκι περιπάτου,
κατεβάστε με το πόδι το μοχλό φρένου των
τροχών όπως φαίνεται στην εικόνα. Όφταν
είστε σταματημένοι, ενεργοποιείτε πάντα τα
φρένα
.
ΖΩΝΗ ΑΣΦΑΛΕΙΑΣ
9• A: Βεβαιωθείτε ότι η τιράντα έχει τοποθετηθεί
σωστά ωθώντας όπως φαίνεται στην εικόνα. B:
Γαντζώστε τη ζώνη ενεργώντας όπως δείχνει η
εικόνα.
10• Για να απελευθερώσετε τη ζώνη, πιέστε στα
πλαϊνά της αγκράφας και συγχρόνως τραβήξτε
προς τα έξω, τη ζώνη που περιβάλλει τη μέση.
11• Η νέα ζώνη
ασφαλείας από σήμερα, είναι πιο
εύκολο να φορεθεί χάρη στο σύστημα “βάλε και
βγάλε”. Πράγματι πριν να γαντζώσετε τη ζώνη,
συνδέστε το λουράκι στην πλάτη βάζοντας τη
γλωσσίτσα στο ειδικό θηλυκάκι όπως φαίνεται
στην εικόνα. Στη συνέχεια αφού γαντζώσετε τη
ζώνη στο παιδί bγάλτε την από την πλάτη για
να μπορεί
το παιδί να κινείται πιο ελεύθερα. Το
λουράκι πρέπει να παραμείνει κάτω από τους
ώμους του παιδιού .
ΡΥΘΜΙΣΗ ΠΛΑΤΗΣ
12• Η πλάτη του καροτσιού μπορεί να πάρει κλίση
μέχρι τρεις θέσεις. Για να την κατεβάσετε
σηκώστε τη χειρολαβή, και συγχρόνως
μπλοκάρετέ την στη θέση που επιθυμείτε. Για
να τη σηκώσετε,
σπρώξτε την προς τα πάνω.
ΡΥΘΜΙΣΗ ΒΑΤΗΡΑ
13• Ο βατήρας μπορεί να ρυθμιστεί σε δύο
θέσεις. Για να τον κατεβάσετε τραβήξτε τους
δύο μοχλούς προς τα κάτω και συγχρόνως
κατεβάστε το βατήρα όπως φαίνεται στην
εικόνα. Για να τον σηκώσετε τραβήξτε τον προς
τα πάνω μέχρι να ακουστεί το κλικ.
ΠΕΡΙΣΤΡΕΦΟΜΕΝΟΙ ΤΡΟΧΟΙ
14• Το καροτσάκι έχει και τους τέσσερις τροχούς
περιστρεφόμενους, καθώς η χειρολαβή μπορεί
να αναστραφεί. Χρειάζεται να καταστήσετε
περιστρεφόμενους μόνον τους τροχούς
που βρίσκονται στην αντίθετη πλευρά από
τη χειρολαβή. Για να κάνετε τους τροχούς
περιστρεφόμενους, χρειάζεται να σηκώσετε το
μοχλό, όπως φαίνεται στην εικόνα. Για να τους
σταθεροποιήσετε
, κατεβάστε το μοχλό.
ΜΕΤΩΠΙΔΑ
15• Η μετωπίδα μπορεί να επεκταθεί σε δύο θέσεις.
Για να την επεκτείνετε στην πρώτη θέση,
τραβήξτε προς το μέρος σας τους δύο μοχλούς
που βρίσκονται κάτω από τη μετωπίδα και τη
μετωπίδα μέχρι το πρώτο σημείο συγκράτησης,
για να την επεκτείνετε στη δεύτερη θέση,
τραβήξτε
περαιτέρω τους δύο μοχλούς και τη
μετωπίδα προς το μέρος σας μέχρι το δεύτερο
σημείο συγκράτησης.
16• Όφταν τα παιδιά σας είναι πιο μεγάλα,
μπορείτε να βγάλετε τη μετωπίδα. Για να
βγάλετε τη μετωπίδα, πατήστε τα κουμπιά
Page 44

που βρίσκονται κάτω από τα μπράτσα και
συγχρόνως τραβήξτε τη μετωπίδα προς τα έξω.
ΔΙΣΚΟΣ “CHILD TRAY”
17• Για να τοποθετήσετε το δίσκο για την
τοποθέτηση των αναψυκτικών επάνω
στο καροτσάκι, χρειάζεται να επεκτείνετε
τη μετωπίδα έως τη δεύτερη θέση και
στη συνέχεια να τοποθετήσετε το δίσκο
σπρώχνοντας προς τα κάτω, όπως
φαίνεται
στην εικόνα.
18• Για να βγάλετε το δίσκο σπρώξτε προς τα
έξο τα δύο πλαϊνά πτερύγια του δίσκου και
συγχρόνως, σηκώστε τον προς τα πάνω. Είναι
επικίνδυνο να ακουμπάτε καυτά ροφήματα
επάνω στο δίσκο.
ΧΕΙΡΟΛΑΒΗ
19• Για να κάνετε αναστρέψιμη τη χειρολαβή,
τραβήξτε προς τα πάνω συγχρόνως και τους
δύο
μοχλούς που είναι τοποθετημένοι επάνω
στη χειρολαβή και φέρτε τη χειρολαβή από την
αντίθετη θέση μέχρι την τελική συγκράτηση.
Όφταν ενεργείτε αυτή τη διαδικασία, να
βεβαιώνεστε ότι δεν προσκρούετε στα χέρια ή
στους βραχίονες του παιδιού.
20• Για να ρυθμίσετε το ύψος της χειρολαβής,
πατήστε συγχρόνως τα δύο πλαϊνά κουμπιά
όπως φαίνεται στην εικόνα και μπλοκάρετε τη
χειρολαβή στη θέση που επιθυμείτε.
ΔΙΣΚΟΣ -ΧΕΙΡΟΛΑΒΗ
21• Ο δίσκος χειρολαβής μπορεί να τοποθετηθεί και
στη δεξιά πλευρά, και στην αριστερή πλευρά
της χειρολαβής. Για να τοποθετήσετε το δίσκο
για τα αναψυκτικά, τοποθετείστε τον οδηγό
του στο σκαλάκι της χειρολαβής και σπρώξτε
τον προς
τα κάτω μέχρι να ακουστεί το κλικ.
Συμβουλεύουμε να μην τοποθετείτε στο δίσκο
αναψυκτικών ζεστά ροφήματα και με βάρος
μεγαλύτερο του 1 Kg (2,2 lbs).
ΠΟΛΥΚΑΡΟΤΣΙ ΚΑΙ/Η ΚΑΡΟΤΣΑΚΙ ΠΕΡΙΠΑΤΟΥ
22• A: ΠΟΛΥΚΑΡΟΤΣΙ: Το Venezia είναι πολυκαρότσι,
όταν έχει την πλάτη κατεβασμένη μέχρι την
τελευταία θέση, το βατήρα ανεβασμένο, τη
χειρολαβή από την αντίθετη πλευρά της
πλάτης
και τους τροχούς περιστρεφόμενους από την
πλευρά της πλάτης.
• B: ΚΑΡΟΤΣΑΚΙ ΠΕΡΙΠΑΤΟΥ: Το Venezia είναι
καροτσάκι περιπάτου, όταν έχει την πλάτη
σηκωμένη, το βατήρα κατεβασμένο, τη
χειρολαβή από την πλευρά της πλάτης και τους
τροχούς περιστρεφόμενους από την αντίθετη
πλευρά της πλάτης.
ΚΟΥΚΟΥΛΑ
23• Για να τοποθετήσετε την κουκούλα περάστε
τις
συνδέσεις στις ειδικές θέσεις των μπράτσων
του καροτσιού περιπάτου όπως φαίνεται στην
εικόνα και κουμπώστε την στο πίσω μέρος της
πλάτης.
24• Κουμπώστε την κουκούλα στις εσωτερικές
πλευρές των μπράτσων και τεντώστε την
κουκούλα, κατεβάζοντας τους στροφείς όπως
φαίνεται στην εικόνα,
25• Για να μετατρέψετε την κουκούλα σε οροφή
για
την προστασία από τον ήλιο, ανοίξτε
το φερμουάρ όπως φαίνεται στην εικόνα
και ξεκουμπώστε το υπόλοιπο μέρος της
κουκούλας.
ΚΟΥΒΕΡΤΟΥΛΑ
Για να μετατρέψετε το Uno στον τύπο
πολυκαρότσι χρειάζεται να προεκτείνετε
πρώτα την προστατευτική μπάρα στη δεύτερη
θέση και να σηκώσετε την πλατφόρμα.
26• Βγάλτε το κάτω μέρος της κουβερτούλας κάτω
από το σάκο της πλατφόρμας.
27• Περάστε τις γλωσσίτσες του κάτω μέρους της
κουβερτούλας στις σχισμές της μετωπίδας.
(Οι σχισμές της μετωπίδας βγαίνουν, όταν
επεκτείνεται η μετωπίδα. Σε περίπτωση
που οι σχισμές μπαίνουν στην έδρα τους,
χρειάζεται να σπρώξετε προς το μέρος σας
τους δύο μοχλούς που βρίσκονται κάτω από
τη
μετωπίδα.)
28• Περάστε τις πλευρικές σχισμές στα μπράτσα.
29• Τύπος πολυκαροτσιού χωρίς κουβερτούλα.
30• Ενώστε με το φερμουάρ το επάνω μέρος της
κουβερτούλας με το κάτω και κουμπώστε
την στα μπράτσα όπως φαίνεται στην εικόνα.
31• Τύπος πολυκαρότσι με κουβερτούλα.
ΚΛΕΙΣΙΜΟ
Πριν κλείσετε το καροτσάκι, βεβαιωθείτε ότι: η
χειρολαβή
είναι τοποθετημένη από την πλευρά
της πλάτης, εάν είναι εφαρμοσμένη η κουκούλα,
χαλαρώστε τους στροφείς και βεβαιωθείτε ότι
όλοι οι τροχοί, βρίσκονται στη σταθερή θέση.
32• Για να κλείσετε το καροτσάκι, κατεβάστε πρώτα
το δεξιό μοχλό που διακρίνεται με τον αριθμό 1,
μέχρι την τελική συγκράτηση.
33• Κατεβάστε τον αριστερό μοχλό που
διακρίνεται
με τον αριθμό 2 και σηκώστε τη χειρολαβή προς
τα πάνω.
34• Στη συνέχεια, κατεβάστε το μοχλό προς τα
κάτω και ολοκληρώστε το κλείσιμο, συνδέοντας
τις συνδέσεις όπως φαίνεται στην εικόνα.
ΜΕΤΑΦΟΡΑ
35• Το καροτσάκι περιπάτου έχει δύο λαβές
στα πλαϊνά για τη μεταφορά του οι οποίες
επιτρέπουν τη μεταφορά
του προϊόντος και
κλειστό και ανοικτό (π.χ. για να κατεβείτε τις
σκάλες).
ΑΦΑΙΡΕΣΗ ΤΗΣ ΕΠΕΝΔΥΣΗΣ
36• Για να αφαιρέσετε την επένδυση από το
καροτσάκι περιπάτου, βγάλτε τα πτερύγια του
ποδόσακου από τα μπράτσα και ξεκουμπώστε
τα κουμπιά.
37• Βγάλτε το πτερύγιο του ποδόσακου από την
πλάτη;
38• βγάλτε τη ζώνη ασφαλείας,
κάτω από το
κάθισμα;
39• Ξεβιδώστε τη ζωνίτσα και από τις δύο πλευρές
και βγάλτε το σάκο.
40• Για να μπορέσετε να πλύνετε το κάτω μέρος της
κουβερτούλας, βγάλτε τους συνδέσμους από τις
έδρες που βρίσκονται επάνω στο σκελετό της
πλατφόρμας όπως φαίνεται στην εικόνα.
GANCIOMATIC SYSTEM
Το Ganciomatic System είναι το πρακτικό και
γρήγορο
σύστημα που σας επιτρέπει να συνδέσετε
στο καροτσάκι περιπάτου, χάρη στους συνδέσμους
Ganciomatic, το κάθισμα αυτοκινήτου Primo Viaggio,
το οποίο διαθέτει και αυτό Ganciomatic System,
και που μπορείτε να αγοράσετε ξεχωριστά. Το
Primo Viaggio αποσυνδέεται από τη βάση του
(που παραμένει στο αυτοκίνητο) και συνδέεται
στο καροτσάκι περιπάτου για να μεταφέρετε το
παιδί, χωρίς να το
ενοχλήσετε. Με το καροτσάκι
περιπάτου Venezia έχετε τη δυνατότητα να
συνδέσετε το κάθισμα αυτοκινήτου με δύο
διαφορετικούς τρόπους (“A” και “B”).
ΣΥΝΔΕΣΜΟΙ GANCIOMATIC ΤΟΥ ΚΑΡΟΤΣΙΟΥ
ΠΕΡΙΠΑΤΟΥ
41• Για να σηκώσετε τους συνδέσμους Ganciomatic
του καροτσιού περιπάτου, σηκώστε τον
ποδόσακο στις γωνίες του καθίσματος και
στρέψτε προς τα πάνω τους δύο συνδέσμους
Page 45

που αυτόματα θα μετακινηθούν προς τα έξω.
42• Για να κατεβάσετε τους συνδέσμους Ganciomatic
του καροτσιού περιπάτου, τραβήξτε προς τα
έξω το μοχλό και ταυτόχρονα κατεβάστε το
άγκιστρο όπως φαίνεται στην εικόνα.
• Το Venezia μπορεί να κλείσει και με τους
συνδέσμους Ganciomatic σηκωμένους.
VENEZIA + PRIMO VIAGGIO
43• Για να συνδέσετε το κάθισμα αυτοκινήτου
στο
καροτσάκι περιπάτου με τον ΤΡΟΠΟ “A”,
χρειάζεται να:
- φρενάρετε το καροτσάκι περιπάτου;
- αφαιρέσετε την κουκούλα από το καροτσάκι
περιπάτου;
- κατεβάσετε την πλάτη του καροτσιού
περιπάτου μέχρι την προτελευταία θέση;
- σηκώσετε τους συνδέσμους Ganciomatic του
καροτσιού περιπάτου;
- στρέψετε τη χειρολαβή από την αντίθετη
πλευρά της πλάτης;
- τοποθετήσετε το κάθισμα αυτοκινήτου
στραμμένο
προς τη χειρολαβή;
- συνδέσετε το κάθισμα αυτοκινήτου, ωθώντας
προς τα κάτω μέχρι να ακουστεί το κλικ.
44• Για να συνδέσετε το κάθισμα αυτοκινήτου
στο καροτσάκι περιπάτου με τον ΤΡΟΠΟ “Β”,
χρειάζεται να:
- φρενάρετε το καροτσάκι περιπάτου;
- αφαιρέσετε την κουκούλα από το καροτσάκι
περιπάτου;
- κατεβάσετε την πλάτη του
καροτσιού
περιπάτου μέχρι την προτελευταία θέση;
- σηκώσετε τους συνδέσμους Ganciomatic του
καροτσιού περιπάτου;
- βεβαιωθείτε ότι η χειρολαβή έχει τοποθετηθεί
από την πλευρά της πλάτης;
- να βγάλετε την προστατευτική μπάρα μέχρι το
πρώτο σημείο συγκράτησης;
- τοποθετήσετε το κάθισμα αυτοκινήτου
στραμμένο προς την πλάτη;
- συνδέσετε το κάθισμα αυτοκινήτου, ωθώντας το
προς
τα κάτω μέχρι να ακουστεί το κλικ.
• Για να αποσυνδέσετε το κάθισμα αυτοκινήτου
από το καροτσάκι περιπάτου συμβουλευτείτε
το εγχειρίδιο οδηγιών του.
ΣΕΙΡΑ ΑΞΕΣΟΥΑΡ
45• Προστατευτικό κάλυμμα για τη βροχή Cover All:
Προστατευτικό κάλυμμα για τη βροχή ολικής
κάλυψης από διαφανές PVC.
46• Αυτό το προστατευτικό κάλυμα για τη βροχή
έχει μελετηθεί και για
την περίπτωση που
επάνω στο καροτσάκι περιπάτου Venezia είναι
συνδεδεμένα το κάθισμα αυτοκινήτου Primo
Viaggio, εξασφαλίζοντας πλήρη προστασία.
47• Τσάντα Αλλαξιάς: Τσάντα με στρωματάκι
για την αλλαξιά του μωρού, συνδεόμενη στο
καροτσάκι περιπάτου.
ΚΑΘΑΡΙΣΜΑ ΚΑΙ ΣΥΝΤΗΡΗΣΗ
Το προϊόν σας χρειάζεται μία ελάχιστη συντήρηση.
Οι εργασίες καθαρισμού και συντήρησης πρέπει να
εκτελούνται μόνον από ενήλικες
.
• Συμβουλεύουμε να διατηρείτε καθαρά όλα τα μέρη
που κινούνται και εάν χρειάζεται, να τα λιπαίνετε
με ελαφρύ λάδι.
• Στεγνώνετε τα μεταλλικά μέρη του προϊόντος για
να αποφύγετε τη σκουριά.
• Περιοδικά καθαρίζετε τα πλαστικά μέρη με ένα
υγρό πανί, μη χρησιμοποιείτε διαλυτικά ή άλλα
παρόμοια προϊόντα.
• Βουρτσίζετε τα μέρη
από ύφασμα για να
απομακρυνθεί η σκόνη.
• Διατηρείτε καθαρούς τους τροχούς από σκόνη και
άμμο.
• Προστατεύετε το προϊόν από ατμοσφαιρικούς
παράγοντες, νερό, βροχή ή χιόνι, η συνεχής
έκθεση στον ήλιο για πολύ καιρό θα μπορούσε να
προκαλέσει αλλαγές στο χρώμα πολλών υλικών.
• Φυλάξτε το προϊόν σε ξηρό χώρο.
• Για το πλύσιμο των επενδύσεων, ακολουθήστε τις
παρακάτω
υποδείξεις.
ΠΡΟΣΟΧΗ
• ΧΡΗΣΙΜΟΠΟΙΕΙΤΕ ΠΑΝΤΑ ΤΙΣ ΖΩΝΕΣ ΑΣΦΑΛΕΙΑΣ 5
ΣΗΜΕΙΩΝ.
• ΜΗΝ ΑΦΗΝΕΤΕ ΠΟΤΕ ΤΟ ΠΑΙΔΙ ΣΑΣ ΧΩΡΙΣ ΕΠΙΒΛΕΨΗ.
• ΜΠΟΡΕΙ ΝΑ ΕΙΝΑΙ ΕΠΙΚΙΝΔΥΝΗ Η ΧΡΗΣΗ
ΕΞΑΡΤΗΜΑΤΩΝ ΠΟΥ ΔΕΝ ΕΧΟΥΝ ΤΗΝ ΕΓΚΡΙΣΗ ΤΟΥ
ΚΑΤΑΣΚΕΥΑΣΤΗ.
• ΑΠΟΦΕΥΓΕΤΕ ΤΗΝ ΕΙΣΑΓΩΓΗ ΤΩΝ ΔΑΚΤΥΛΩΝ ΣΤΟΥΣ
ΜΗΧΑΝΙΣΜΟΥΣ.
• ΟΙ ΕΡΓΑΣΙΕΣ ΣΥΝΑΡΜΟΛΟΓΗΣΗΣ ΠΡΕΠΕΙ ΝΑ
ΕΚΤΕΛΟΥΝΤΑΙ ΑΠΟ ΕΝΗΛΙΚΕΣ.
• ΜΗ ΧΡΗΣΙΜΟΠΟΙΕΙΤΕ ΤΟ
ΠΡΟΪΟΝ ΕΑΝ ΠΑΡΟΥΣΙΑΖΕΙ
ΡΩΓΜΕΣ Η ΤΜΗΜΑΤΑ ΠΟΥ ΛΕΙΠΟΥΝ.
• ΟΤΑΝ ΣΤΑΜΑΤΑΤΕ ΝΑ ΒΑΖΕΤΕ ΠΑΝΤΑ ΤΑ ΦΡΕΝΑ.
• ΜΗ ΧΡΗΣΙΜΟΠΟΙΕΙΤΕ ΤΟ ΠΡΟΪΟΝ ΚΟΝΤΑ ΣΕ ΣΚΑΛΕΣ
Η ΣΚΑΛΑΚΙΑ.
• ΣΥΝΙΣΤΑΤΑΙ ΝΑ ΜΗΝ ΣΗΚΩΝΕΤΕ ΤΟ ΚΑΡΟΤΣΑΚΙ
ΠΙΑΝΟΝΤΑΣ ΤΟ ΑΠΟ ΤΗ ΜΕΤΩΠΙΔΑ ΕΠΕΙΔΗ Η
ΜΕΤΩΠΙΔΑ ΔΕΝ ΕΧΕΙ ΣΧΕΔΙΑΣΘΕΙ ΓΙΑ ΝΑ ΣΗΚΩΝΕΙ
ΦΟΡΤΙΑ. ΣΕ ΠΕΡΙΠΤΩΣΗ ΑΝΑΓΚΗΣ ΣΗΚΩΣΤΕ
ΤΟ ΚΑΡΟΤΣΑΚΙ ΠΙΑΝΟΝΤΑΣ ΤΟ ΚΑΤΩ ΑΠΟ ΤΑ
ΜΠΡΑΤΣΑ.
• ΕΛΕΓΞΤΕ ΤΗ ΣΩΣΤΗ ΣΥΝΔΕΣΗ ΤΟΥ ΚΑΘΙΣΜΑΤΟΣ
ΑΥΤΟΚΙΝΗΤΟΥ ΣΤΟ ΚΑΡΟΤΣΑΚΙ.
ΚΑΝΟΝΙΕΣΜΟΙ ΑΣΦΑΛΕΙΑΣ
Για να συνδέσετε τη ζώνη ασφαλείας περάστε τις
τιραντούλες και μαζί τις δύο άκρες της ζωνούλας
που περιβάλλει τη μέση μέσα στην αγκράφα.
Να βεβαιώνεστε πάντα ότι πραγματοποιήθηκε η
συγκράτηση κλεισίματος.
Για να ελευθερώσετε τη ζώνη ασφαλείας πιέστε
στις πλαϊνά της αγκράφας και συγχρόνως τραβήξτε
προς τα έξω τη ζωνούλα που περιβάλλει τη μέση.
Δέματα και/ή εξαρτήματα μπορούν να προκαλέσουν
την αστάθεια του προϊόντος. Συστήνουμε να μη
φορτώνετε το καλάθι με περισσότερο από 5 kg.
Προσοχή στον κίνδυνο που προκαλείται από τη
φωτιά
και από άλλες σημαντικές πηγές θερμότητας
όπως ηλεκτρικά καλοριφές, σόμπες υγραερίου κλπ,
που βρίσκονται κοντά στο προϊόν.
Να βεβαιώνεστε πάντα ότι το κάθισμα αυτοκινήτου,
είναι καλά συνδεμένο στα άγκιστρα από το
καροτσάκι.
Page 46

PEG PEREGO SpA
Via De Gasperi, 50
20043 Arcore (MI) Italy
www.pegperego.com
ΠΑΙΔΙΚΑ ΕΙΔΗ ΒΡΕΦΑΝΑΠΤΥΞΗΣ ΚΑΙ ΠΑΙΧΝΙΔΙΑ ΕΓΓΥΗΣΗ
Η PEG – PEREGO εγγυάται για τυχόν εργοστασιακά ελαττώματα των προιόντων
της για διάστημα έξι μηνών από την ημερομηνία αγοράς. Η προσκόμιση
της ανάλογης ταμειακής απόδειξης αγοράς είναι απαραίτητη. Εξαιρούνται
της εγγύγησης οι επαναφορτιζόμενες μπαταρίες και οι μετασχη-ματιστές
παιχνιδιών. (βλ. αναλυτικές οδηγίες χρήσεως παιχνιδιών).
Η παρούσα
εγγύηση ισχύει μόνον εφʼ όσον το προιόν χρησιμοποιείται σωστά και
βάσει των οδηγιών χρήσεως. Ο κατασκευαστής και οι εντεταλμένοι συνεργάτες
του διατηρούν το δικαίωμα τεχνικού ελέγχου.
Ο κατασκευαστής δεν μπορεί να θεωρηθεί υπεύθυνος εφʼ όσον:
• Δεν τηρηθούν οι ανάλογες οδηγίες χρήσεως του κάθε προιόντος.
• Καταστραφεί τυχαία το προιόν ή προκληθούν
βλάβες από κακή χρήση αυτού.
• Υπάρξει τεχνική παρέμβαση ξένου προς την εταιρεία μας τεχνικού, πράγμα το
οποίο απαγορεύεται και αποτελεί κίνδυνο για την ασφάλεια του παιδιού.
• Φυσιολογική φθορά του προιόντος.
Διατηρείτε την εγγύηση και τις οδηγίες χρήσεως και για μελλοντική χρήση.
ΕΓΓΥΗΣΗ
ΟΝΟΜΑΤΕΠΩΝΥΜΟ ΑΓΟΡΑΣΤΟΥ : .................................................................................................
ΔΙΕΥΘΥΝΣΗ : .............................................................................................................................................
ΤΗΛΕΦΩΝΟ : .............................................................................................................................................
ΕΙΔΟΣ ΠΡΟΙΟΝΤΟΣ : ..............................................................................................................................
ΚΩΔΙΚΟΣ ΠΡΟΙΟΝΤΟΣ : .......................................................................................................................
ΗΜΕΡΟΜΗΝΙΑ ΑΓΟΡΑΣ
ΣΦΡΑΓΙΔΑ ΚΑΤΑΣΤΗΜΑΤΟ
Προσοχή: Η εγγύηση ισχύει μονο εφʼ όσον εχει συμπληρωθεί και σφραγισθεί
από τον πωλητή η ημερομηνία αγοράς. Ζητείστε το από το κατάστημα τη στιγμή
της αγοράς. Αν χαθεί ή καταστραφεί το απόκομμα της εγγύησης δεν μπορεί να
αντικατασταθεί.
&
Page 47

Page 48

PEG PEREGO S.p.A.
VIA DE GASPERI 50 20043 ARCORE MI ITALIA
tel. 0039•039•60881 fax 0039•039•615869-616454
Servizio Post Vendita - After Sale:
tel. 0039•039•6088213 fax: 0039•039•3309992
PEG PEREGO U.S.A. Inc.
3625 INDEPENDENCE DRIVE FORT WAYNE INDIANA 46808
phone 260•482•8191 fax 260•484•2940
Call us toll free 1•800•671•1701
PEG PEREGO CANADA Inc.
585 GRANITE COURT PICKERING ONTARIO CANADA L1W3K1
phone 905•839•3371 fax 905•839•9542
Call us toll free 1•800•661•5050
www.pegperego.com
MARTINELLI è prodotta da Peg Perego.
MARTINELLI is produced by Peg Perego.
MARTINELLI est un produit Peg Perego.
MARTINELLI wird von Peg Perego hergestellt.
MARTINELLI es un producto Peg Perego.
MARTINELLI é um produto Peg Perego
MARTINELLI is een productie van Peg Perego.
MARTINELLI egy Peg Perego termék.
MARTINELLI je izdelek Peg Perego.
МАRTINELLI произведена Peg Perego.
MARTİNELLİ PegPerego tarafindan Üretilmektedir.
Tα προιόντα MARTINELLI παράγονται από την Peg – Perego.
Venezia
6-09-2006
 Loading...