

Page 1
IT Istruzioni d’uso
EN Instructions for use
FR Notice d’emploi
DE Gebrauchsanleitung
ES Instrucciones de uso
PT Instruções para uso
NL Gebruiksaanwijzing
DK Brugsanvisning
FI Käyttöohjeet
CZ Návod na použití
SK Návod na použitie
HU Használati útmutató
SL Navodila za uporabo
RU Инструкции по пользованию
TR Kullanım kılavuzu
EL Οδηγίες χρήσεως
sí
Page 2
A
B
3
2
1
C
OK
B
A
A
B
A
B
C
Page 3

6
5
4
B
A
2
1
B
A
1
2
1
2
C
B
A
Page 4

8
7
9
A
1
2
B
1
2
A
B B
C
D D
B
A
Page 5

10
11
F
B
C
D
E
A
12
B
A
2
1
3
2
1
Page 6
15
14
13
2
1
B
4
A
3
B
A
Page 7
16
17
B
A
C
D
18
G
F
E
1
2
B
A
Page 8
21
20
19
D
C
3
1
2
4
A
B
Page 9

22
B
A
Page 10
- 10 -
1
2
3
4
6
7
12
9
8
11
10
5
Sí
IT• Ricambi disponibili in piú colori da specificare nella richiesta.
EN• Spare parts available in different colours to be specified when ordering.
FR• Pièces de rechange disponibles en plusieurs couleurs à spécifier dans la demande.
DE• Ersatzteile in mehr Farben vorhanden, die in der Anfrage spezifiziert werden müssen.
ES• Repuestos disponibles en otros colores que se especificarán en el pedido.
PT• Peças de reposição disponíveis em cores alternativas a serem especificadas no pedido.
NL• Reserveonderdelen verkrijgbaar in meerdere kleuren, bij bestelling te specificeren.
DK• Reservedele kan leveres i flere farver som bør specificeres ved bestillingen.
FI• Varaosia saatavana eri värisinä: ilmoita väri tilauksessa.
CZ• U náhradních dílů, které jsou k dispozici ve více barvách, je nutné na objednávce specifikovat příslušnou barvu.
SK• Pri náhradných dieloch, ktoré sú k dispozícii vo viacerých farbách, je potrebné pri objednávke špecifikovať želanú farbu.
HU• A tartalék alkatrészek különböző színekben elérhetők, melyeket rendeléskor kell kiválasztani.
SL• Rezervni deli so na voljo v več barvah, ki jih je treba navesti pri naročilu.
RU• Запчасти имеются различных цветов, необходимый указать в запросе.
TR• Siparişte belirtildiği takdirde farklı renklerde yedek parçaları tedarik edilebilir.
EL• Ανταλλακ τικά διαθέσιμα σε διάφορα χρώματα. Προσδιορίστε όταν παραγγείλετε.
1) BCAPSZ•
2) BSAPSZ•
3) IRBELV0007
4) BCOPSI
•
5) ERSHSI00-NY01RE01M
6) SAPI7087N
7) MUCI5P22N
8) BAKPSZ
•
9) MUCI0129N
10) SAPI6837NGR
11) SPST6692SN
12) ITPASZ00NL65
Page 11

- 11 -
IT_Italiano
Grazie per aver acquistato un prodotto Peg-Pérego.
ATTENZIONE
_ IMPORTANTE: leggere attentamente queste
istruzioni e conservarle per un futuro utilizzo. La
sicurezza del bambino potrebbe essere messa a
rischio se non si eseguono queste istruzioni.
_ Questo articolo è stato progettato per il trasporto di 1
bambino nella seduta.
_ Non utilizzare questo articolo per un numero di
occupanti superiori a quanto previsto dal costruttore.
_ Questo articolo è omologato per bambini dalla nascita,
fino a 15 kg di peso nella seduta.
_ Potrebbe essere pericoloso lasciare il vostro bambino
incustodito.
_ Utilizzare sempre la cintura di sicurezza a cinque punti,
agganciare sempre il cinturino girovita al cinturino
spartigambe.
_ Utilizzare il frontalino sempre istallato sul passeggino.
_ Prestare attenzione alla presenza del bambino quando
si effettuano operazioni di regolazione dei meccanismi
(maniglione, schienale).
_ Azionare sempre il freno quando si è fermi e durante le
operazioni di carico e scarico del bambino.
_ Le operazioni di assemblaggio, preparazione
dell’articolo, di pulizia e manutenzione devono essere
effettuate solo da adulti.
_ Non utilizzate questo articolo se presenta parti
mancanti o rotture.
_ Prima dell’ uso assicurarsi che tutti i meccanismi di
aggancio siano inseriti correttamente.
_ Evitare di introdurre le dita nei meccanismi.
_ Ogni carico appeso al maniglione o alle maniglie può
rendere instabile l'articolo; seguire le indicazioni del
costruttore riguardo ai massimi carichi utilizzabili.
_ Non introdurre nel cestello carichi per un peso
superiore a 5 kg. Non inserire nei portabibite pesi
superiori a quanto specificato nel portabibite stesso
e mai bevande calde. Non inserire nelle tasche delle
capotte (se presenti) pesi superiori a 0.2 Kg.
_ Non utilizzare l'articolo in vicinanza di scale o gradini;
non utilizzare vicino a fonti di calore, fiamme libere od
oggetti pericolosi a portata delle braccia del bambino.
_ Potrebbe essere pericoloso utilizzare accessori non
approvati dal costruttore.
_ Questo articolo non e' adatto per il jogging o la corsa
coi pattini.
_ Non utilizzare il parapioggia (se presente) in ambienti
chiusi e controllare sempre che il bambino non sia
accaldato; non collocare mai vicino a fonti di calore e fare
attenzione alle sigarette. Assicurarsi che il parapioggia
non interferisca con nessun meccanismo in movimento
del carrello o passeggino; togliere sempre il parapioggia
prima di chiudere il vostro carrello o passeggino.
_ ATTENZIONE: con passeggino aperto e durante
l'impiego usare il frontalino solo nella posizione 1
(sollevato), ed usare la posizione 2 (abbassato) solo col
passeggino chiuso.
_ AVVERTENZA: Non aggiungere materassini.
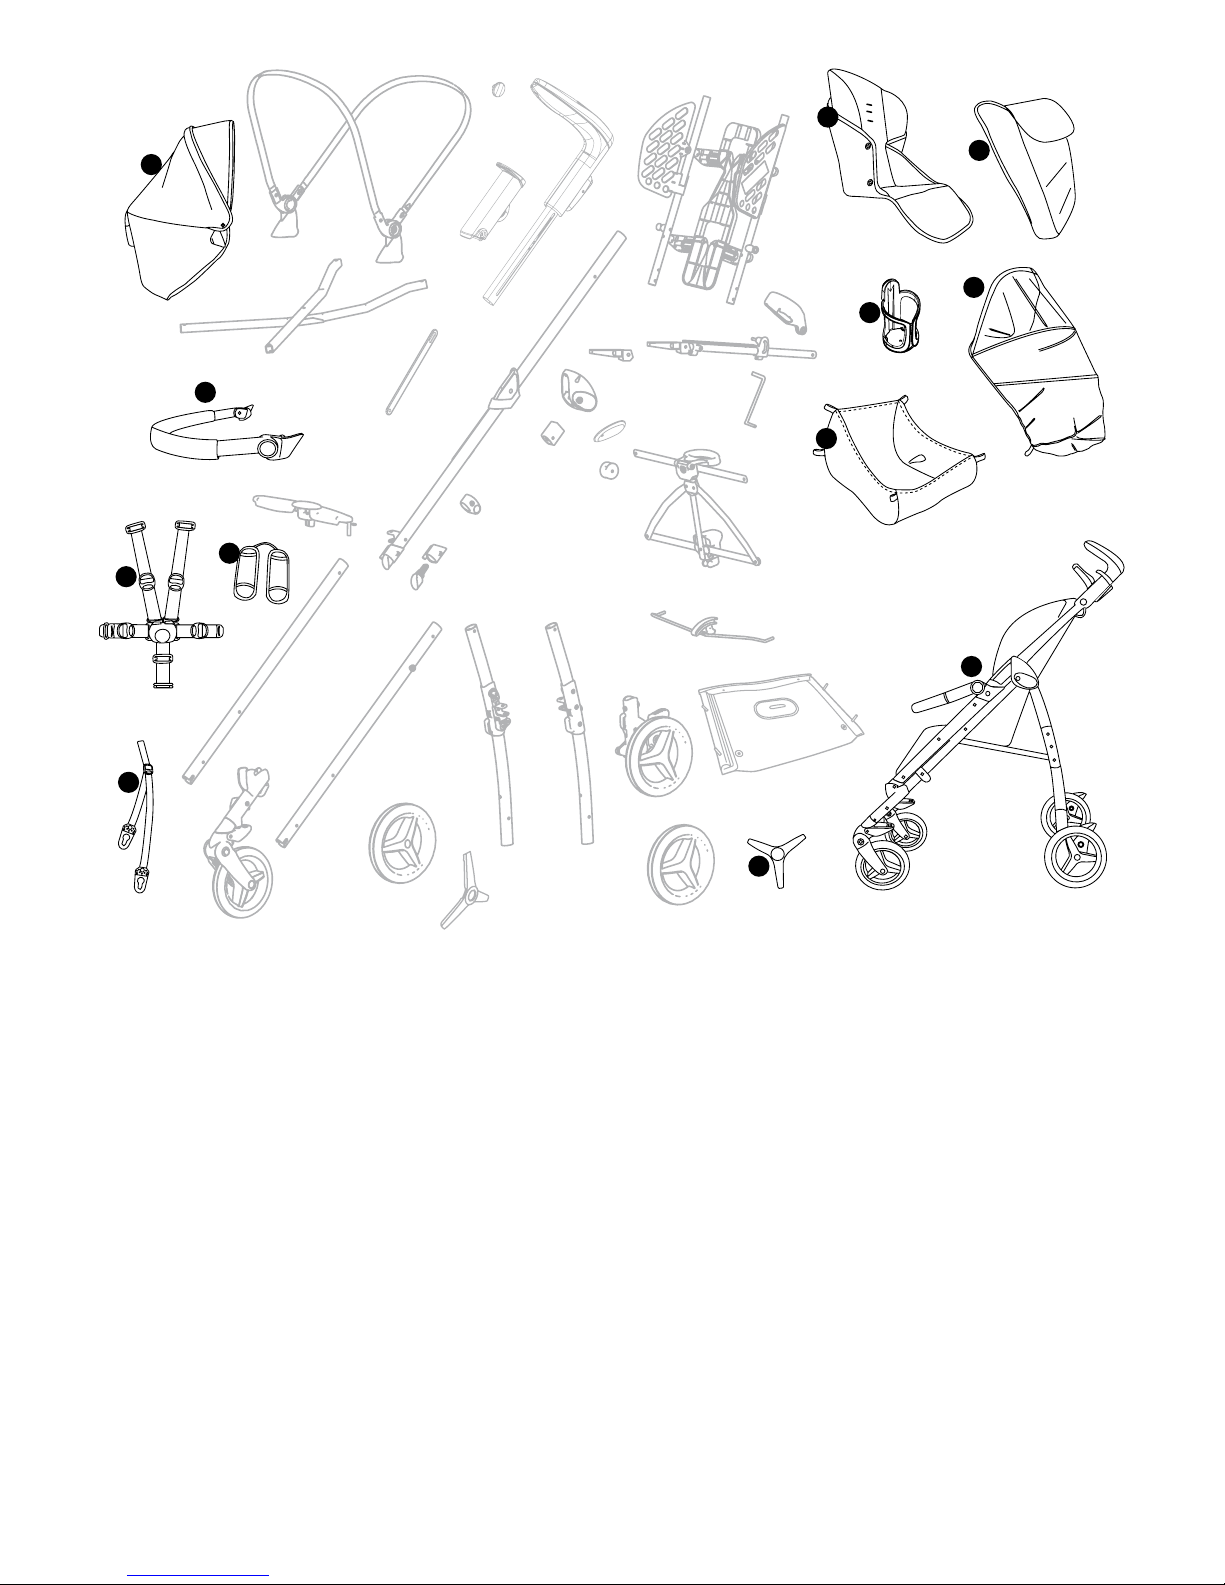
COMPONENTI DELL' ARTICOLO
Verificare il contenuto presente nell'imballo e in caso
di reclamo prego contattare il Servizio Assistenza.
_ Passeggino Sì COMPLETO è composto da: 2 ruote
anteriori piroettanti o bloccabili, 2 ruote posteriori,
cestello, portabibite, capottina, copertina, parapioggia,
2 spallacci per i cinturini e 1 spartigambe, 2 cinturini
adattatori per aggancio Car Seat.
_ Passeggino Sì CLASSICO è composto da: 2 ruote
anteriori piroettanti o bloccabili, 2 ruote posteriori,
cestello, portabibite, capottina, 2 spallacci per i
cinturini e 1 spartigambe, 2 cinturini adattatori per
aggancio Car Seat.
ISTRUZIONI D'USO
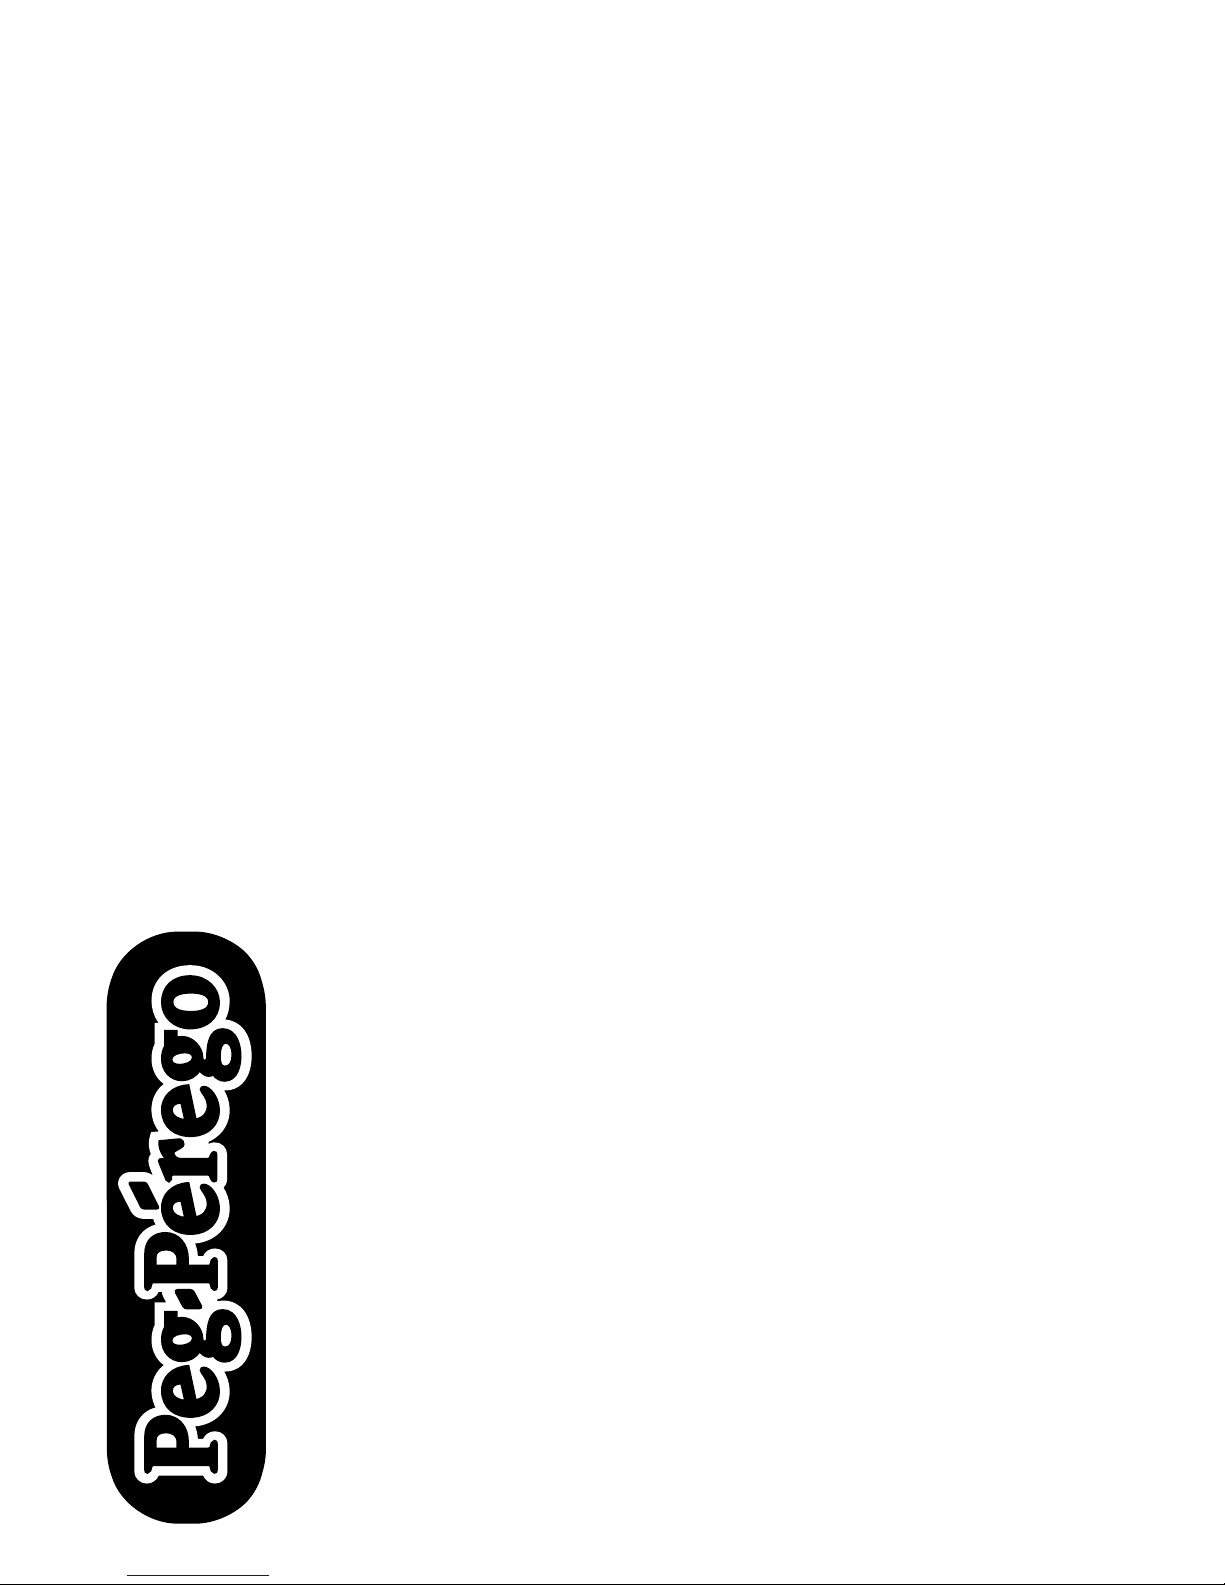
1• Per aprire il carrello, occorre tirare verso l’alto le due
leve sui manici (Fig.a); contemporaneamente sollevare
il carrello che si aprirà automaticamente (Fig.b).
Per verificare che il passeggino sia correttamente
aperto, controllare i due ganci laterali (Fig.c).
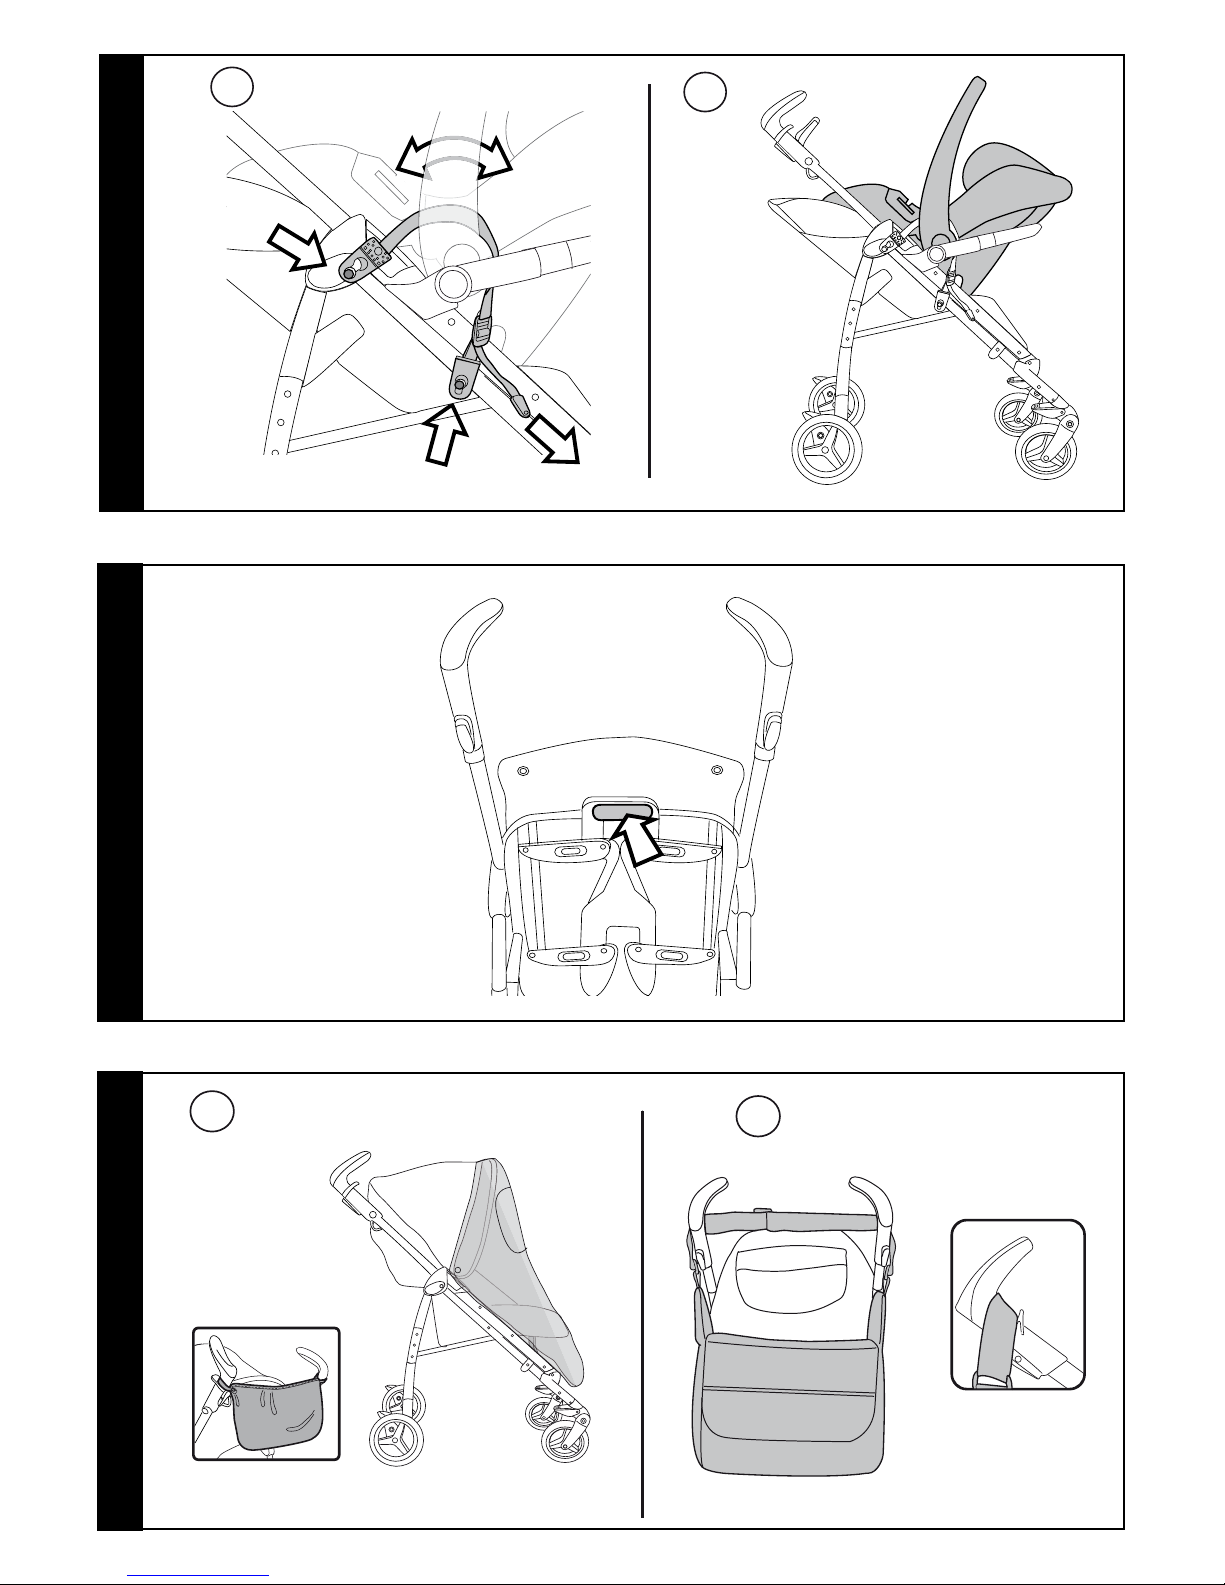
2• Se i ganci non si fossero agganciati correttamente, fare
pressione sulla seduta (fig_a) fino al click di aggancio.
Infine premere verso il basso col piede su PUSH (fig_b)
e alzare il frontalino di una posizione (paragrafo 5b).
3• CESTELLO: per montare il cestello, infilare le asole ai
ganci posteriori A e B e al gancio anteriore C, (fig_a).
PORTABIBITE: é applicabile solamente sul lato destro del
passeggino, grazie al gancio già presente sul telaio. Per
applicare il portabibite, agganciarlo fino al click (fig_b).
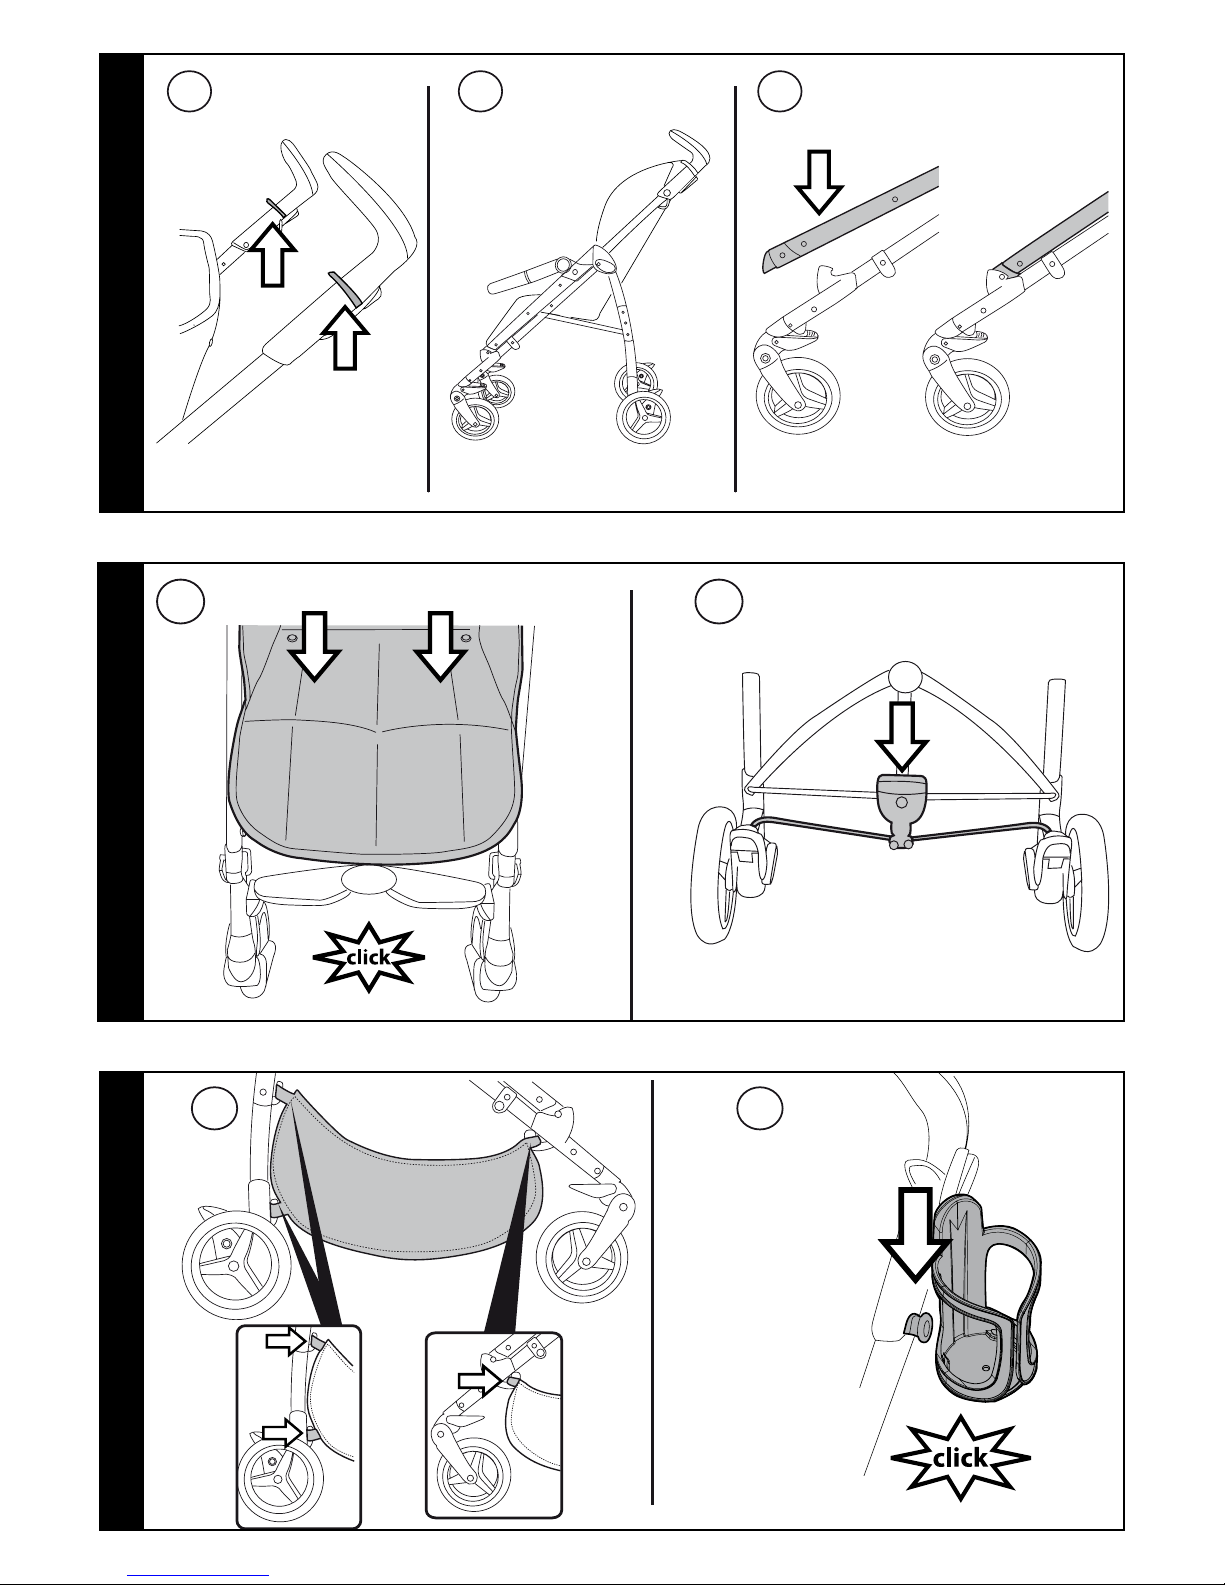
4• REGOLAZIONE MANICI: i manici sono regolabili
in 3 differenti altezze. Per regolarli nella
posizione desiderata, premere il pulsante e
contemporaneamente tirare il manico verso l’alto. Per
abbassarli agire in senso contrario (fig_a).
FRENO: per frenare il passeggino abbassare col piede
la leva freno posizionata sul gruppo ruote posteriori.
Per sbloccare il freno, agire in senso opposto (fig_b).
Da fermi, azionare sempre il freno.
5• RUOTE PIROETTANTI: le ruote sono già agganciate al
passeggino.
Per rendere le ruote anteriori piroettanti, occorre
abbassare la leva (freccia 1). Per renderle fisse, agire
sulla leva in senso contrario (freccia 2). Le ruote
posteriori sono fisse.
ATTENZIONE: utilizzare il frontalino sempre istallato
sul passeggino.
FRONTALINO: è già agganciato al passeggino.
E' regolabile in 2 posizioni:
POSIZIONE 1:d'uso
POSIZIONE 2: di chiusura.
Per regolarlo, premere il pulsante laterale su entrambi i
lati contemporaneamente (fig_b).
6• CAPOTTINA: per applicare la capottina, inserire gli
attacchi nelle apposite sedi fino al click e abbottonare la
capottina sul retro dello schienale del passeggino (fig_a).
La capottina è regolabile in 3 posizioni (fig_b)
semplicemente tirandola in avanti o in dietro.
E' possibile tirar fuori lo spicchio di rete dalla capotta
per proteggere il bambino dal sole (fig_c) e con un
semplice gesto riposizionarla all'interno della capottina
quando non serve più.
7• COPERTINA: per applicare correttamente la copertina
(fig_a) agganciare i bottoni nella parte interna
del passeggino (fig_1), calzarla sotto la seduta
comprendendo il poggiagambe e infine agganciare i
Page 12

- 12 -
bottoni (fig_2).
PARAPIOGGIA: per montare il parapioggia calzarlo sul
passeggino (fig_b), abbottonarlo ai lati della capottina
(fig_1) e abbottonare gli elastici comprendendo il
telaio nella parte bassa del passeggino (fig_2) .
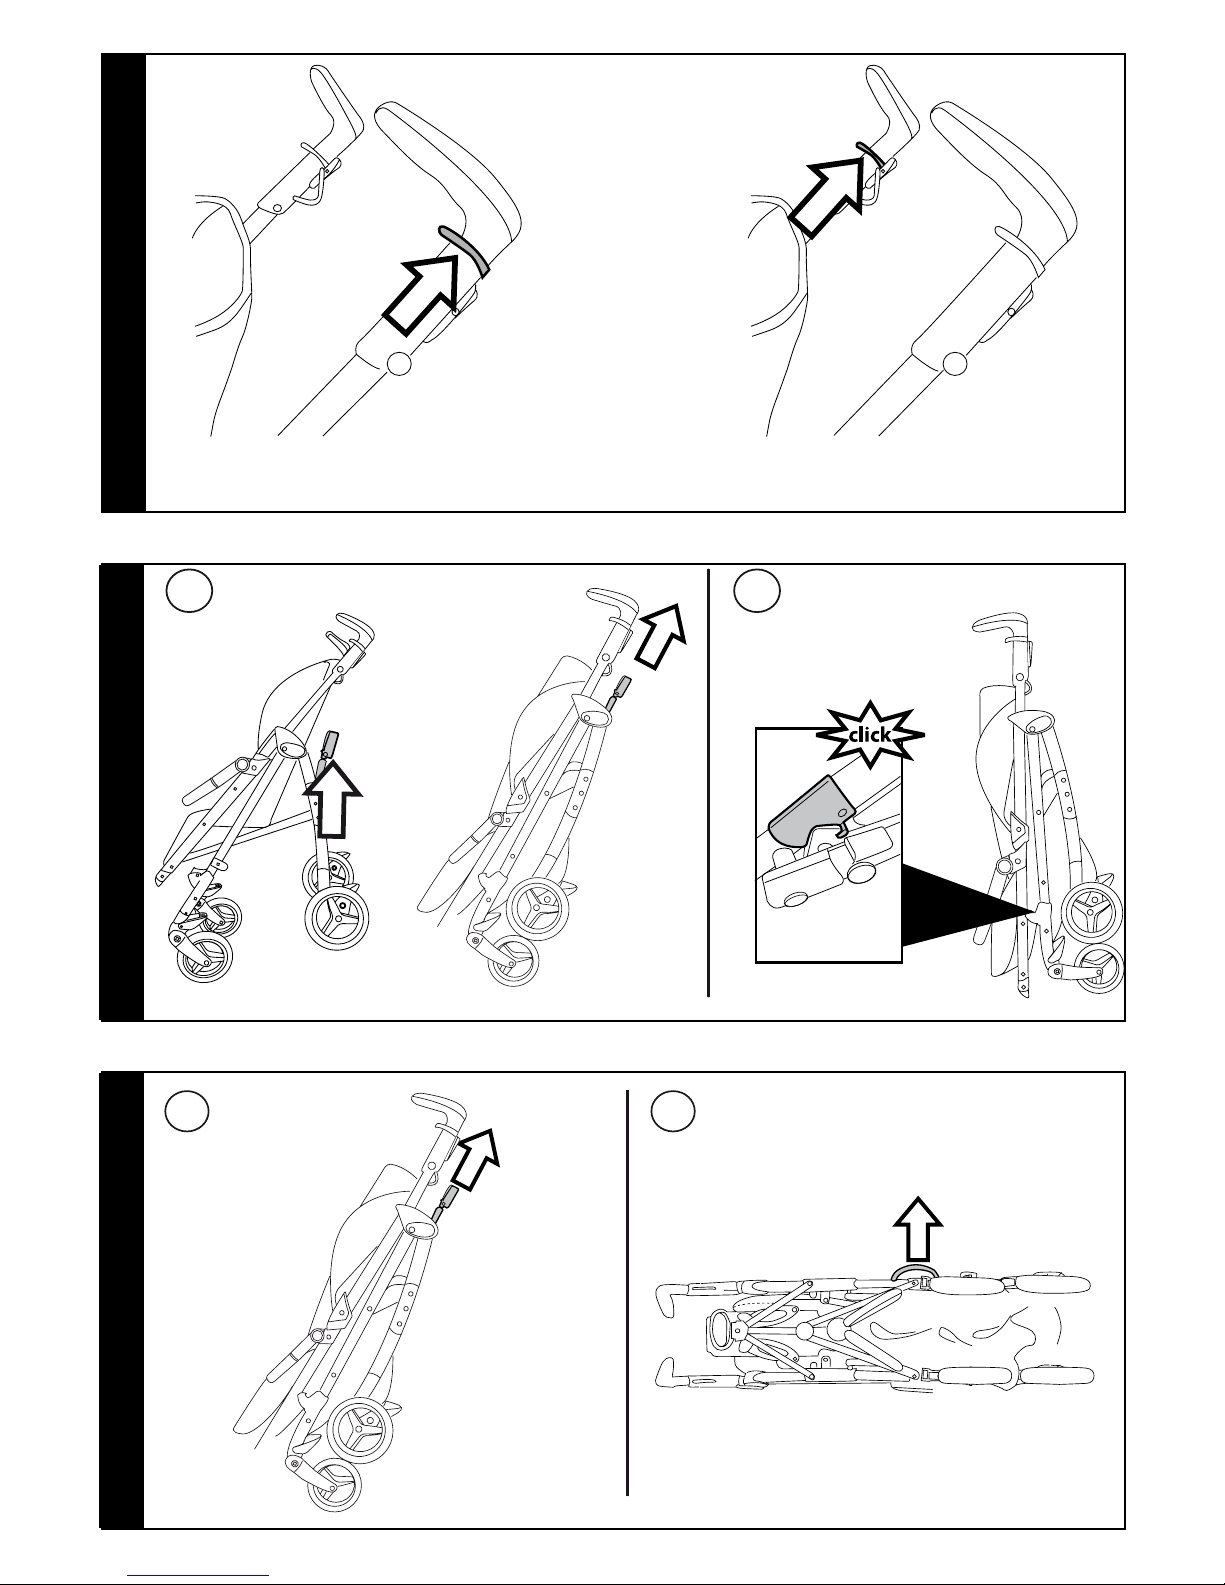
8• CINTURA DI SICUREZZA 5 PUNTI: per agganciarle,
inserire le due fibbie del cinturino girovita (con bretelle
agganciate freccia a) nel cinturino spartigambe fino
al click (freccia b). Per sganciarle premere il pulsante
posto centralmente alla fibbia (freccia c) e tirare verso
l’esterno il cinturino girovita (freccia d).
9• Per stringere il cinturino girovita tirare, da entrambi i
lati, nel senso della freccia (Fig.a), per allentarlo agire in
senso contrario. Il cinturino girovita può essere stretto
fino al fermo di sicurezza (Fig.b).
10• E' possibile regolare le cinture di sicurezza in 3 altezze in
base all'altezza del bambino. E' necessario passare alla
posizione più alta, quando il bambino è più grande.
11•
Per regolare l'altezza delle cinture di sicurezza è necessario
sganciare sul retro dello schienale le due fibbie. Tirare
verso di se le bretelle (freccia a) fino a sganciare la fibbie
e infilarle nelle asole dello schienale (freccia b). Sfilare
le bretelle dalla sacca (freccia c) e infilarle nell'asola più
idonea (freccia d), infine riagganciare le due fibbie dietro
lo schienale (freccia e). Il corretto aggancio delle fibbie è
determinato dal click (fig f).
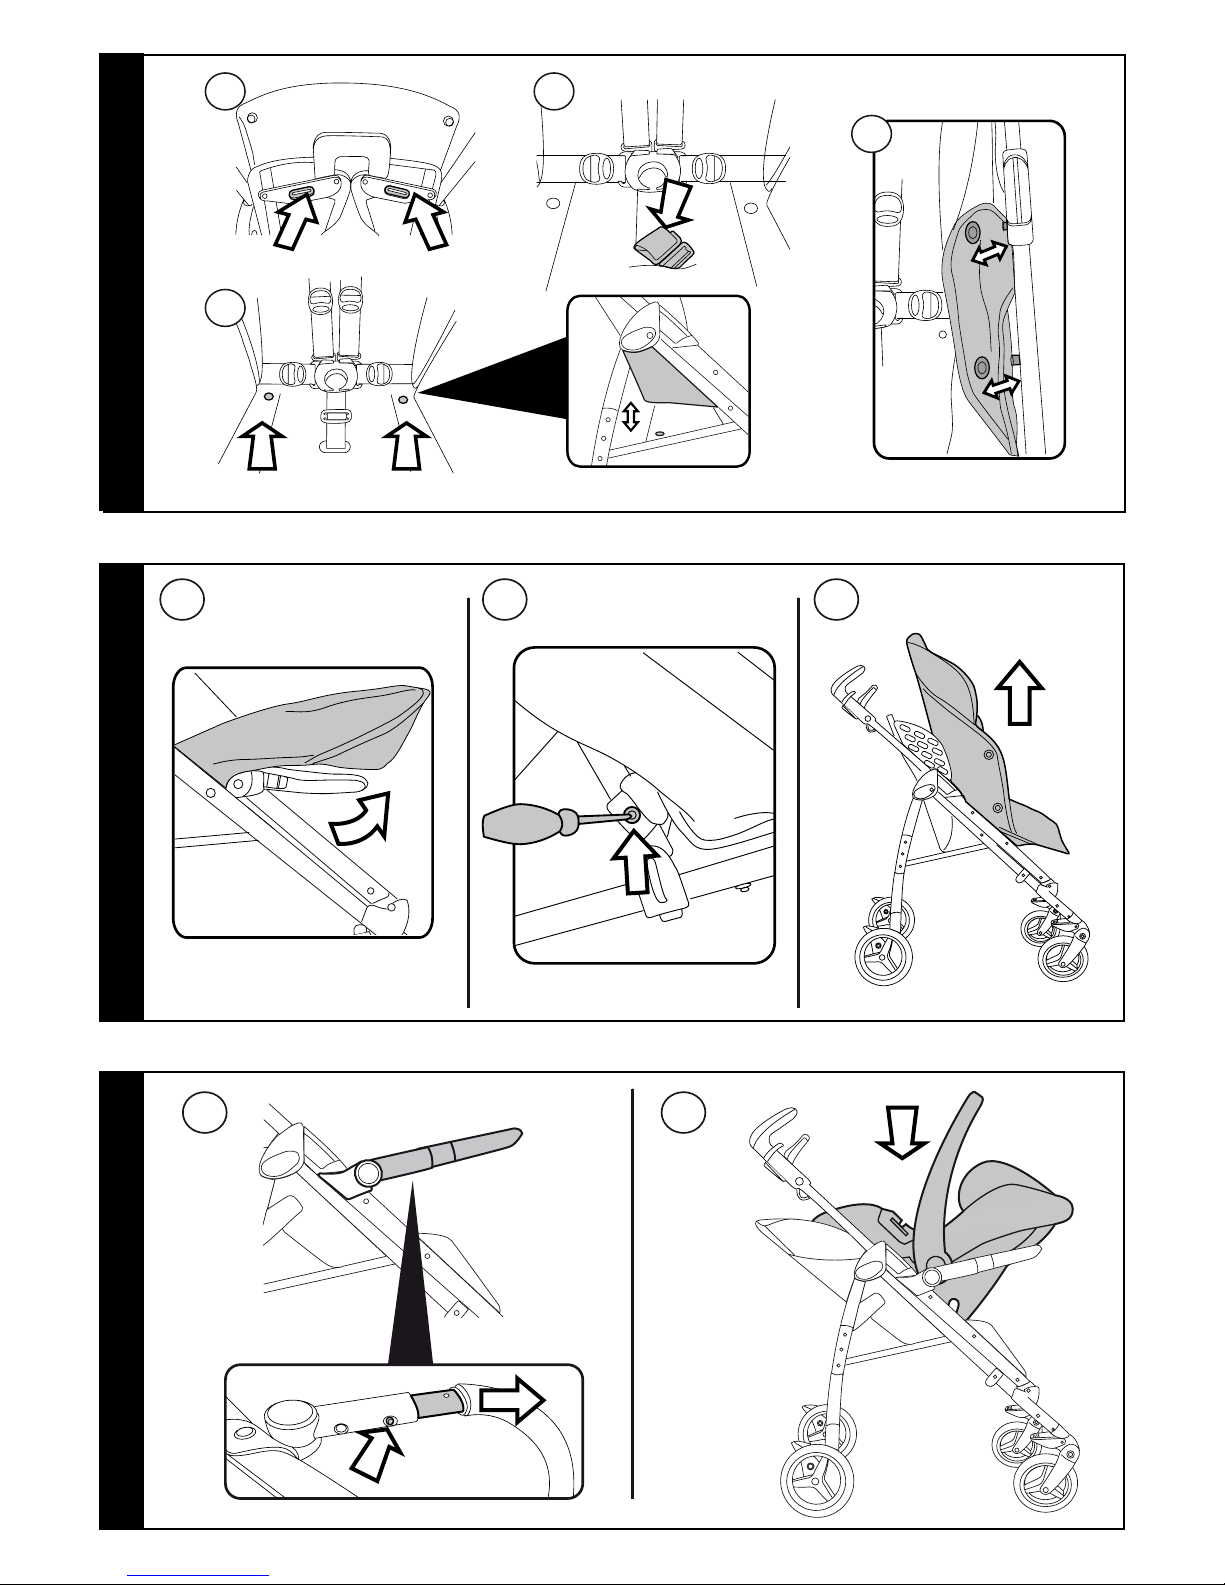
12• REGOLAZIONE POGGIAGAMBE: Il poggiagambe
é regolabile in 2 posizioni. Per abbassare il
poggiagambe, tirare le due levette laterali verso il
basso e contemporaneamente abbassarlo. Per alzare il
poggiagambe, spingerlo verso l’alto fino al click.
REGOLAZIONE SCHIENALE: Lo schienale é reclinabile
in 3 posizioni. Per abbassare lo schienale, sollevare la
levetta laterale contemporaneamente su entrambi i lati
e abbassare lo schienale, bloccandolo nella posizione
desiderata. Per alzarlo, spingere lo schienale verso l’alto.
13• CHIUSURA: per chiudere il passeggino, è preferibile
prima abbassare il frontalino, nella posizione 2, di
chiusura. É possibile chiudere il passeggino con una
sola mano: tirare verso l’alto prima una leva e poi l’altra
fino allo scatto.
14• Impugnare la maniglia centrale e tirarla verso l’alto
fino alla chiusura (fig_a). Verificare la corretta chiusura
del carrello dal gancio di sicurezza. Il carrello chiuso
rimane in piedi da solo (fig_b).
15• TRASPORTO: Il passeggino si può trasportare
comodamente (tenendo le ruote anteriori fisse)
impugnando la maniglia centrale (fig_a). E' possibile
trasportarlo anche grazie alla maniglia laterale (fig_b).
16• SFODERABILITA': per sfoderare il passeggino:
sganciare sul retro dello schienale le due fibbie (fig_a).
Sganciare i due bottoni nella seduta (fig_b).
Sfilare da sotto, la fibbia dello spartigambe (fig_c).
Sganciare i bottoni dalla sacca laterale (fig_d).
17• Sfilare la sacca dalla pedanetta (fig_e).
Per togliere il cinturino di sicurezza, svitare (da
entrambi i lati) le due viti utilizzando un cacciavire ed
una pinza per tenere fermo il dado (fig_f).
Tirare la sacca verso l'alto (fig_g).
AGGANCIO PRIMO VIAGGIO TRI-FIX
E' necessario frenare il passeggino.
Agganciare il seggiolino auto al passeggino senza il
bambino all'interno.
Agganciare il seggiolino auto sempre e solo verso la
mamma.
E' possibile per comodità, togliere la capottina del
passeggino perchè presente sul seggiolino auto.
Posizionare lo schienale del passeggino nella 2°
posizione centrale (paragrafo 12).
Posizionare il maniglione del Car Seat nella posizione
di trasporto, per facilitare l'aggancio dei cinturini.
18•Allungare il frontalino premendo il pulsante sotto il
bracciolo e contemporanemente tiralo verso l'esterno,
da entrambi i lati (fig. a).
ATTENZIONE: allungare il frontalino solo quando si
vuole agganciare il Car Seat.
Appoggiare e incastrare il seggiolino auto sulla seduta
del passeggino (fig. b).
19• Agganciare prima l'asola del cinturino al funghetto del
passeggino (freccia 1) e far passare il cinturino dietro al
maniglione del seggiolino auto (freccia 2) .
Agganciare poi asola del cinturino al funghetto nella
parte bassa del telaio del passeggino (freccia 3) e
infine tendere il cinturino fino a far aderire al massimo
il Car Seat al passeggino (freccia 4). Fare lo stesso
procedimento nell'altro lato del passeggino (fig.c).
Car seat agganciato correttamente sul passeggino (fig. d)
Per sganciare il seggiolino auto dal passeggino:
allentare le cinture;
sganciare l'asola del cinturino nella parte bassa del
telaio del passeggino;
sfilarlo da dietro il maniglione del seggiolino auto;
infine sganciare l'asola del cinturino al funghetto del
passeggino.
NUMERI DI SERIE
20• Passeggino Si, riporta dietro lo schienale, informazioni
relative: nome del prodotto, data di produzione e
numerazione seriale dello stesso.
Queste informazioni sono indispensabili in caso di
reclamo.
ACCESSORI
21• ZANZARIERA: applicabile alla capottina (fig_a).
BORSA: borsa con materassino per il cambio del bebè,
applicabile al passeggino (fig_b).
22• BORSA VIAGGIO: Pratica borsa per il trasporto aereo
del passeggino (fig_a).
OMBRELLINO: pratico ombrellino coordinato (fig_b).
PULIZIA E MANUTENZIONE
MANUTENZIONE DELL'ARTICOLO: proteggere da
agenti atmosferici: acqua, pioggia o neve; l’esposizione
continua e prolungata al sole potrebbe causare
cambiamenti di colore in molti materiali; conservare
questo articolo in un posto asciutto.
PULIZIA DEL TELAIO: periodicamente pulire le parti in
plastica con un panno umido senza utilizzare solventi
o altri prodotti simili; mantenere asciutte tutte le
parti in metallo per prevenire la ruggine; mantenere
pulite tutte le parti in movimento (meccanismi di
regolazione, meccanismi di aggancio, ruote...) da
polvere o sabbia e se occorre, lubrificarle con olio
leggero.
PULIZIA DEL PARAPIOGGIA: lavare con una spugna e
Page 13

- 13 -
dell'acqua saponata, senza utilizzare detersivi.
PULIZIA DELLE PARTI IN TESSUTO: spazzolare le parti
in tessuto per allontanare la polvere e lavare a mano
a una temperatura massima di 30° non torcere; non
candeggiare al cloro; non stirare; non lavare a secco;
non smacchiare con solventi e non asciugare a mezzo
di asciugabiancheria a tamburo rotativo.
PEG-PÉREGO S.p.A.
Peg-Pérego S.p.A. è certificata ISO
9001. La certificazione offre ai clienti e
ai consumatori la garanzia di una
trasparenza e fiducia nel modo di
lavorare dell'impresa. Peg Pérego potrà
apportare in qualunque momento modifiche ai
modelli descritti in questa pubblicazione, per ragioni di
natura tecnica o commerciale. Peg Pérego è a
disposizione dei suoi Consumatori per soddisfare al
meglio ogni loro esigenza. Per questo, conoscere il
parere dei ns. Clienti, è per noi estremamente
importante e prezioso. Le saremo quindi molto grati
se, dopo aver utilizzato un ns. prodotto, vorrà
compilare il QUESTIONARIO SODDISFAZIONE
CONSUMATORE, segnalando eventuali osservazioni o
suggerimenti, che troverà nel nostro sito internet:
www.pegperego.com
SERVIZIO ASSISTENZA PEG-PÉREGO
Se fortuitamente parti del modello vengono perse
o danneggiate, usare solo pezzi di ricambio originali
Peg Pérego. Per eventuali riparazioni, sostituzioni,
informazioni sui prodotti, vendita di ricambi originali
e accessori, contatta il Servizio Assistenza Peg Pérego
indicando, qualora fosse presente, il numero seriale del
prodotto.
tel. 0039/039/60.88.213
numero verde: 800/147.414 (contattabile da rete fissa)
fax 0039/039/33.09.992
e-mail assistenza@pegperego.it
sito internet www.pegperego.com
EN_English
Thank you for choosing a Peg-Pérego product.
WARNING
_ IMPORTANT: read the instructions carefully before
use and keep them for future reference. The child
may be hurt if you do not follow these instructions.
_ This item was designed for the transport of 1 child in
the seat.
_ Do not use this item for a number of occupants greater
than that intended by the manufacturer.
_ This item is approved for children from birth up to a
weight of 15 kg in the seat.
_ It may be dangerous to leave your child unattended.
_ Always use the 5-point harness and attach the waist
strap to the leg divider strap.
_ Always keep the front bar fitted to the stroller.
_ Be careful not to hurt the child when adjusting the
mechanisms (handlebar, backrest).
_ Always apply the brake when stopped and when
positioning the child in the seat or when removing the
child from the seat.
_ Assembly and preparation of the product, plus
cleaning and maintenance operations, must be carried
out exclusively by adults.
_ Do not use this item if there are parts missing or signs
of breakage.
_ Before use check that all the attachment mechanisms
are correctly insert.
_ Do not insert fingers into the mechanisms.
_ Any load hanging on the handlebar or the handles
can make the stroller/carriage unstable; follow the
manufacturer’s instructions for max load capacity.
_ Do not place loads over 5 kilos in the basket. Do not
place in the bottle holder weights heavier than stated
or hot drinks. Do not place in the hood pockets (if
applicable) weights over 0.2 Kg.
_
Do not use the item near to stairs or steps, heat sources,
naked flames or dangerous objects within reach of the child.
_ The use of accessories not approved by the
manufacturer could be dangerous.
_ This item is not suitable for jogging or roller skating.
_ Do not use the rain canopy (if present) indoors and
regularly check to ensure the child is not too warm;
do not park the stroller close to heat sources and keep
well away from lighted cigarettes. Ensure the rain
canopy is not interfering with any moving parts of the
carriage or stroller; always remove the rain canopy
before folding your carriage or stroller.
_ WARNING: The front bar must always be in position
1 (raised) when the stroller is open and during use.
It should only be in position 2 (lowered) when the
stroller is folded up.
_ WARNING: Do not add a mattress.
PRODUCT PARTS
Check the package contents and contact our Customer
Service for any claim.
Page 14

- 14 -
_ Stroller Sì COMPLETO version is made up of the following
parts: 2 swivel/lockable front wheels, 2 rear wheels,
basket, cup holder, hood, cover, rain canopy, 2 shoulder
straps and 1 leg divider, 2 car seat strap adaptors.
_ The Sì CLASSICO stroller comprises: 2 swivel or
locking front wheels, 2 rear wheels, a basket, a drink
holder, a hood, 2 shoulder padding sections for the
harness and 1 leg divider strap, 2 adaptor straps for
attaching the Car Seat.
INSTRUCTIONS
1• To open the chassis, pull the two levers on the
handlebars upwards (Fig.a); at the same time, lift the
chassis and it will open automatically (Fig.b). To make
sure that the stroller is correctly open, check the two
side hooks (Fig.c).
2• If the straps are not fasten correctly, press onto the
seat (fig_a) until it clicks into place.
Then push down into PUSH (fig. b) with your foot and
lift the front bar by one position (section 5b).
3• BASKET: To fit the basket, pull the loops over rear
hooks A and B and front hook C (fig_a).
CUP HOLDER: It can only be fitted to the right hand
side of the stroller, using the clip which is already
present on the chassis. To fit the cup holder, push until
it clicks into place (fig_b).
4• HANDLE ADJUSTMENT: The handles can be set at
3 different heights. To move them into the required
position, press the button and simultaneously pull the
handle upwards. To lower them, press the button and
push the handle down (fig_a).
BRAKE: To set the brake on the stroller, lower the lever
on the rear wheel unit with your foot. To release the
brake, lift the lever (fig_b). When stationary, always
apply the brake.
5• SWIVEL WHEELS: the wheels are already fixed into the
stroller.
In order to make the wheels swivel, the lever (arrow 1)
must be lowered. To secure the wheels, move the lever
to the opposite direction (arrow 2). The rear wheels
are fixed.
WARNING: Always keep the front bar fitted to the
stroller.
FRONT BAR: It is already attached to the stroller.
It can be put in 2 positions:
POSITION 1: Use.
POSITION 2: Folding.
To adjust it, press the two side buttons at the same
time (fig_b).
6• HOOD: To fit the hood, click the fasteners onto the
appropriate points and button down the hood on the
rear of the stroller’s backrest (fig_a).
The hood can be set in 3 different positions (fig_b) by
simply pulling it forwards or backwards.
The section of netting can be pulled out from the hood
to protect the child from the sun (fig_c) and easily
replaced back inside when it is no longer needed.
7• COVER: in order to use the cover correctly (fig. a),
fasten the buttons in the inner part of the stroller (fig.
1) and lay it beneath the seat covering the footrest,
then fasten the buttons (fig. 2).
RAIN CANOPY: To fit the rain canopy, slip it onto the
stroller (fig_b), button it down on the sides of the
hood (fig_1) and attach the elastic loops, taking in the
chassis in the lower part of the stroller (fig_2).
8• 5-POINT SAFETY HARNESS: to fasten, insert the two
buckles of the waist strap (with attached shoulder
straps, arrow a) into the leg divider strap until they
click into place (arrow b). To unfasten them, press the
button which is situated in the centre of the fastener
(arrow c) and pull the waist strap outwards (arrow d).
9• To tighten the waist strap, pull on both sides in the
direction of the arrow (Fig.a). To loosen it do the
opposite. The waist strap can be tightened as far as the
safety lock (Fig_b).
10• It is possible to set the safety harness at 3 different
heights, depending on how tall the child is. As the
child gets bigger, the harness must be moved to a
higher position.
11• To adjust the height of the safety harnesses, release
the two buckles on the rear of the backrest.
Pull the shoulder straps towards you (arrow a) until the
buckles are released and insert them in the backrest
loops (arrow b). Remove the shoulder straps from the
sack (arrow c) and insert them in the most appropriate
buckle (arrow d), then reattach the two buckles
behind the backrest (arrow e). The buckles are securely
attached when a click is heard (fig f).
12• LEG REST ADJUSTMENT: The leg rest can be set in 2
different positions. To lower the leg rest, pull the two
side levers downwards and at the same time lower the
leg rest. To raise the leg rest, push it upwards until it
clicks into position.
BACKREST ADJUSTMENT: The backrest can be set in 3
positions: To lower the backrest, lift the levers on both
sides at the same time and lower it, locking it in the
position required. To lift the backrest, push it upwards.
13• FOLDING UP: Before folding up the stroller, it is best to
lower the front bar to position 2.
The stroller can be folded up using one hand only: pull
first one lever upwards and then the other, until they
click.
14• Hold the central handlebar and pull it upwards until
the stroller folds up (fig_a). Check the correct closure
of the chassis from the safety hook. When folded, the
chassis will stand upright (fig_b).
15• TRANSPORT: The stroller can be moved with ease (with
the front wheels fixed) using the central handle (fig_a).
It can also be carried using the side handle (fig_b).
16• REMOVABLE COVERS: To remove the cover of the stroller:
Release the two buckles on the rear of the backrest
(fig_a).
Release the two buttons on the seat (fig_b).
Pull the buckle of the crotch strap out from
underneath (fig_c).
Release the buttons from the side of the sack (fig_d).
17• Pull the sack off the footrest (fig_e).
To remove the safety harness, release the screws on
both sides, using a screwdriver and pliers to hold the
nut still (fig_f ).
Pull the sack upwards (fig_g).
ATTACHING PRIMO VIAGGIO TRI-FIX
You must first set the brakes on the stroller.
Lock the car seat onto the stroller without the baby.
The car seat must be fastened facing the mother at
all times.
If necessary, take off the stroller hood since it is
Page 15
- 15 -
already fitted on the car seat.
Position the backrest of the stroller into the 2nd
central position (section 12).
Position the car seat handlebar into transport
position so that the straps can be easily fastened.
18
• Push the button beneath the armrest and extend
the front bar, then simultaneously pull it out from
both sides (fig. a).
WARNING: Only extend the front bar when
attaching the Car Seat.
Lean and fit-in the car seat into the seat of the
stroller (fig. b).
19
• First lock the strap buttonhole into the button of
the stroller (arrow 1), then pass through the strap
behind the handlebar of the car seat (arrow 2).
Lock the strap buttonhole into the button on the
lower part of the stroller frame (arrow 3) and then
tighten the strap until the car seat is completely
fastened into the stroller (arrow 4).
Follow the same procedures on the other side of
the stroller (fig. c).
Car seat locked correctly into the stroller (fig. d).
Releasing the car seat from the stroller:
loosen the belts;
unlock the strap buttonhole from the lower part
of the stroller frame; slip it off from behind the
handlebar of the car seat; then, unlock the strap
buttonhole from the stroller button.
SERIAL NUMBERS
20• The Stroller Si has all the following relevant
information behind the backrest: product name,
date of manufacture and serial number.
This information is required for any complaints.
ACCESSORIES
21• MOSQUITO NETTING: can be fastened to the hood (fig_a).
BAG: diaper-changing bag with pad for changing baby’s
diaper. Attaches to the stroller (fig_b).
22• TRAVEL BAG: practical duffle bag for transporting the
stroller by plane (fig_a).
UMBRELLA: practical umbrella to match (fig_b).
CLEANING AND MAINTENANCE
PRODUCT MAINTENANCE: protect from the weather:
water, rain, or snow; prolonged and continuous
exposure to bright sunlight may give rise to colour
changes of various different materials; store this
product in a dry place.
CLEANING THE CHASSIS: periodically clean all plastic
parts with a damp cloth. Do not use solvent or
similar cleaning products; keep all metal parts dry to
prevent rusting; keep moving parts clean (adjustment
mechanisms, locking mechanisms, wheels, ...) and free
of dust and sand and, if necessary, lubricate with light
machine oil.
CLEANING THE RAIN CANOPY: wash with a sponge and
soapy water; do not use detergents.
CLEANING FABRIC PARTS: brush fabric parts to remove
dust and wash by hand at a maximum temperature of
30°C; do not wring; do not use chlorine bleach, do not
iron; do not dry clean; do not apply solvent-based stain
removers and do not dry in a tumble dryer.
PEG-PÉREGO S.p.A.
Peg-Pérego S.p.A. is an ISO 9001
certified company. This certification is
a guarantee for customers and
consumers of the transparency and
trustworthiness of the company's
procedures and working methods. Peg
Pérego can make changes at any time to the models
described in this publication for technical or
commercial reasons. Peg Pérego is at the disposal of its
customers and consumers to ensure that all their
demands and queries are fully satisfied. It is a key part
of our policy to ensure we are always aware of our
customers' views and requirements. We would
therefore be very grateful if, after using a Peg Pérego
product, you take the time to fill in our CUSTOMER
SATISFACTION QUESTIONNAIRE, making a note of any
comments or suggestions you might have. You can
find the questionnaire on the Peg Pérego website:
www.pegperego.com
PEG-PÉREGO AFTER-SALES SERVICE
If any parts of the item get lost or damaged, only
use genuine Peg Pérego spare parts. For any repairs,
replacements, information on the products and sales
of genuine spare parts and accessories, contact the
Peg Pérego Assistance Service and state the serial
number of the product, if present.
tel. 0039/039/60.88.213
fax 0039/039/33.09.992
e-mail assistenza@pegperego.it
website www.pegperego.com
Page 16
- 16 -
FR_Français
Merci d’avoir choisi un produit Peg-Pérego.
AVERTISSEMENT
_ IMPORTANT : lire ces instructions avec attention
et les conserver pour toute référence future. La
sécurité de l’enfant pourrait être menacée si ces
instructions ne sont pas suivies.
_ Cet article a été conçu pour transporter 1 enfant dans
le siège.
_ Ne pas utiliser lorsque le nombre d’occupants est
supérieur aux prescriptions du fabricant.
_ Cet article est homologué pour des enfants dans le
siège de la naissance jusqu’à un poids de 15 kg.
_ Il peut être dangereux de laisser l’enfant sans surveillance.
_ Toujours utiliser la ceinture de sécurité à cinq points;
toujours accrocher la sangle ventrale à la sangle
d’entrejambes.
_ Toujours utiliser le garde corps installé sur la poussette.
_ Prêter attention à la position de l’enfant lors des opérations
de réglage des éléments mobiles (poignée, dossier).
_ Toujours actionner le frein lorsque l’article est à l’arrêt
et pendant l’installation ou la sortie de l’enfant.
_ Les opérations d’assemblage, de préparation de
l’article, de nettoyage et d’entretien doivent être
réalisées uniquement par des adultes.
_ Ne pas utiliser cet article si des pièces sont
manquantes ou cassées.
_ Avant l’utilisation, s’assurer que tous les mécanismes
de fixation sont correctement enclenchés.
_ Éviter de mettre les doigts dans les mécanismes.
_ Toute charge suspendue aux poignées peut
déstabiliser le produit, suivre les recommandations du
fabrication sur les charges maximales admises.
_ Ne pas utiliser le panier pour transporter des charges
dont le poids dépasse 5 kg. Ne pas introduire dans
le porte-boisson des charges supérieures à celles
indiquées sur le porte-boisson lui-même et ne jamais
introduire de boissons chaudes. Ne pas introduire dans
les poches de la capote (lorsqu'elles sont présentes)
des objets dont le poids dépasse 0.2 kg.
_ Ne pas utiliser l’article à proximité d’escaliers ou de
marches; ne pas l’utiliser à proximité de sources de
chaleur, de flammes directes ou d’objets dangereux se
trouvant à la portée de l’enfant.
_ L’utilisation d’accessoires n’ayant pas été approuvés
par le fabricant peut se révéler dangereuse.
_ Ne pas utiliser ce produit lors d’un jogging ou avec des
patins à roulettes.
_ Ne pas utiliser l’habillage pluie (lorsqu’il est présent
sur l’article) dans des milieux clos et toujours contrôler
que l’enfant n’ait pas trop chaud; ne jamais placer à
proximité de sources de chaleur et prendre garde aux
cigarettes. S’assurer que l’habillage pluie n’interfère
avec aucun mécanisme en mouvement du châssis ou
de la poussette; toujours retirer l’habillage pluie avant
de refermer le châssis ou la poussette.
_ AVERTISSEMENT : quand la poussette est ouverte
ou pendant l’utilisation avec l’enfant, utiliser la main
courante seulement dans la position 1 (relevée) et
utiliser la position 2 (abaissée) seulement pour plier la
poussette ou la ranger.
_ Ne jamais utiliser la poussette sans la main-courante
_
AVVERTISSEMENT: Ne pas ajouter de matelas.
_ Conforme aux exigences de sécurité.
COMPOSANTS DE L'ARTICLE
Vérifier le contenu du carton et en cas de
réclamation, contacter votre magasin revendeur
ou le service assistance.
_ La poussette Sì COMPLETO est composée de : 2
roues avant pivotantes ou avec blocage, 2 roues
arrière, panier, porte-boissons, capote, tablier,
habillage pluie, 2 bretelles pour les ceintures et 1
sangle d’entrejambes, 2 ceintures adaptables pour
fixation du siège auto.
_ La poussette Sì CLASSICO est composée de : 2
roues avant pivotantes ou avec blocage, 2 roues
arrière, panier, porte-boissons, capote, 2 bretelles
pour les ceintures et 1 sangle d’entrejambes, 2
ceintures adaptables pour fixation du siège auto.
INSTRUCTIONS D’UTILISATION
1• Pour ouvrir le châssis, il faut tirer vers le haut les deux
leviers sur les poignées (Fig.a); soulever, en même
temps, le châssis qui s’ouvrira automatiquement
(Fig.b). Pour vérifier que la poussette est correctement
ouverte, contrôler les deux crochets latéraux (Fig.c).
2• Si les crochets ne sont pas fixés correctement,
faire pression sur l’assise (fig_a) jusqu’au déclic
d’accrochage.
Enfin, appuyer vers le bas avec le pied sur PUSH
(fig_b) et soulever la main courante d’une position
(paragraphe 5b).
3• PANIER : pour monter le panier, accrocher ses boucles
aux crochets arrière A et B et au crochet avant C (fig_a).
PORTE-BOISSONS : il se fixe du côté droit de la
poussette grâce au crochet près de la poignée.
Pour fixer le porte-boissons, l’insérer jusqu’au déclic
(fig_b).
4• RÉGLAGE DES POIGNÉES : les poignées sont réglables
en 3 hauteurs différentes. Pour régler les poignées à la
position désirée, appuyer sur le bouton tout en tirant
la poignée vers le haut. Pour l’abaisser, procéder à
l’opération inverse (fig_a).
FREIN : pour immobiliser la poussette, abaisser à l’aide
du pied le levier de frein situé sur le bloc roues arrière.
Pour débloquer le frein, procéder à l’opération inverse
(fig_b). Toujours actionner le frein lorsque la poussette
est à l’arrêt.
5• ROUES PIVOTANTES : les roues sont déjà fixées à la
poussette.
Pour rendre les roues avant pivotantes, il faut baisser le
levier (flèche 1). Pour les rendre fixes, agir sur le levier
dans le sens opposé (flèche 2). Les roues arrière sont fixes.
IMPORTANT :toujours utiliser le garde corps installé
sur la poussette
MAIN COURANTE: elle est déjà fixée à la poussette.
Réglable en 2 positions: POSITION 1: avec l'enfant dans la
poussette. POSITION 2: position de pliage. Pour la régler,
appuyer simultanément sur les 2 boutons latéraux (Fig B)
6• CAPOTE : pour fixer la capote, enclencher ses fixations
dans les emplacements prévus à cet effet et la
boutonner à l’arrière du dossier (fig_a).
Page 17

- 17 -
La capote peut être réglée en 3 positions (fig_b)
simplement en la tirant en avant ou en arrière.
Il est possible d'étirer la visière en toile de la capote
pour protéger l’enfant du soleil (fig_c) puis, lorsqu’elle
n’est plus utile, de la remettre en place d’un simple
geste à l’intérieur de la capote.
7• TABLIER : pour appliquer correctement le tablier (fig_a),
fixer les boutons dans la partie interne de la poussette
(fig_1), le placer sous l'assise en comprenant le reposepieds et enfin, fixer les boutons (fig_2).
HABILLAGE PLUIE : pour fixer l’habillage pluie, le mettre
en place sur la poussette (fig_b), le boutonner aux
côtés de la capote (détail 1) et accrocher les élastiques
sur le bas de la poussette (détail 2).
8• CEINTURE DE SÉCURITÉ À 5 POINTS : pour l’accrocher,
insérer les deux clips de la sangle ventrale (avec
les bretelles accrochées, flèche_a) dans la sangle
d’entrejambes jusqu’au déclic (flèche_b). Pour le
détacher, appuyer sur le bouton situé au centre de la
bouche (flèche c) et tirer vers l’extérieur la ceinture
ventrale (flèche d).
9• Pour serrer la sangle ventrale, tirer, des deux côtés,
dans le sens de la flèche (Fig.a), pour la desserrer
procéder dans le sens inverse. La sangle ventrale peut
être serrée jusqu’à la butée de sécurité (Fig.b).
10• Les ceintures sont réglables en 3 hauteurs en fonction
de la taille de l'enfant. Lorsque l'enfant est grand, il est
nécessaire de passer à la position la plus haute.
11• Pour régler la hauteur des ceintures de sécurité, il faut
décrocher les deux clips à l’arrière du dossier.
Tirer vers soi les bretelles (flèche_a) jusqu’à décrocher
les clips et les enfiler dans les boutonnières du dossier
(flèche b). Enlever les bretelles de la housse (flèche
c) et les enfiler dans la boutonnière la plus adaptée
(flèche d), enfin accrocher de nouveau les deux clips
derrière le dossier (flèche e). L’accrochage correct des
clips est déterminé par le déclic (fig.f).
12• RÉGLAGE DU REPOSE-PIED : Le repose-pied peut être
réglé en 2 positions. Pour abaisser le repose-pied,
déplacer les deux manettes latérales vers le bas tout en
l’abaissant. Pour relever le repose-pied, le tirer vers le
haut jusqu’au déclic.
RÉGLAGE DU DOSSIER : Le dossier peut être incliné
en 3 positions. Pour abaisser le dossier, soulever
simultanément les leviers latéraux de chaque côté
et abaisser le dossier en le bloquant dans la position
souhaitée. Pour le relever, pousser le dossier vers le haut.
13• PLIAGE : pour plier la poussette, il est préférable de
rabaisser la main courante dans la position de pliage 2.
On peut fermer la poussette d’une seule main : Tirer
vers le haut d’abord un levier, puis l’autre jusqu’au
déclic.
14• Prendre la poignée centrale et la tirer vers le haut
jusqu’à la fermeture (fig_a). Vérifier la fermeture
correcte du châssis grâce au crochet de sécurité. Le
châssis reste debout tout seul (fig_b).
15• TRANSPORT : La poussette peut être facilement
transportée (avec les roues avant fixes) en la saisissant
par sa poignée centrale (fig_a). Elle peut également
être transportée à l’aide de sa poignée latérale (fig_b).
16• POUR ENLEVER LA HOUSSE : pour enlever la housse de
la poussette :
décrocher les deux boucles à l’arrière du dossier (fig_a).
défaire les deux boutons de l’assise (fig_b).
faire sortir la boucle d’entrejambe par en dessous (fig_c).
défaire les boutons sur les côtés de la housse (fig_d).
17• défaire la housse du repose-pied (fig_e).
Pour enlever la ceinture de sécurité, dévisser (des deux
côtés) les deux vis à l’aide d’un tournevis et d’une
pince pour bloquer l’écrou (fig_f).
Tirer la housse vers le haut (fig_g).
FIXATION PRIMO VIAGGIO TRI-FIX
Il faut freiner la poussette.
Fixer le siège auto à la poussette sans l’enfant à l’intérieur.
Fixer le siège auto toujours et uniquement tourné vers
maman.
Il est possible, par commodité, d’enlever la capote de la
poussette pourvu qu’elle soit présente sur le siège auto.
Positionner le dossier de la poussette dans la 2°
position centrale (paragraphe 12).
Positionner la poignée du siège auto dans la position
de transport, pour faciliter la fixation des ceintures.
18• Allonger la main courante en appuyant simultanément
sur les petits boutons situés sous les bras de la main
courante et tirer la main courante vers l'extérieur. (fig a)
ATTENTION: allonger la main courante seulement en
cas d'utilisation du siège auto sur la poussette.
Appuyer et encastrer le siège auto sur l’assise de la
poussette (fig. b).
19• Fixer d’abord la boutonnière de la ceinture au
champignon de la poussette (flèche 1) et faire passer la
ceinture derrière la poignée du siège auto (flèche 2) .
Fixer ensuite la boutonnière de la ceinture au
champignon dans la partie basse du châssis de la
poussette (flèche 3) et, enfin, tendre la ceinture jusqu’à
faire adhérer au maximum le siège auto à la poussette
(flèche 4).
Suivre la même procédure pour l’autre côté de la
poussette (fig.c).
Siège auto fixé correctement sur la poussette (fig. d).
Pour décrocher le siège auto de la poussette :
desserrer les ceintures ;
décrocher la boutonnière de la ceinture dans la partie
basse du châssis de la poussette ;
le retirer par l’arrière de la poignée du siège auto ;
Enfin, décrocher la boutonnière de la ceinture du
champignon de la poussette.
NUMÉROS DE SÉRIE
20• La poussette Si reporte, derrière le dossier, des
informations : nom du produit, date de production et
numéro de série. Ces informations sont indispensables
en cas de réclamation.
ACCESSOIRES EN OPTION
21• MOUSTIQUAIRE : applicable à la capote (fig_a).
SAC : Sac avec un petit matelas pour langer bébé,
applicable à la poussette (fig_b).
22• SAC DE VOYAGE : Sac pratique pour le transport en
avion de la poussette (fig_a).
OMBRELLE : Pratique ombrelle coordonnée (fig_b).
NETTOYAGE ET ENTRETIEN
ENTRETIEN DE L’ARTICLE: protéger l’article des agents
atmosphériques (eau, pluie ou neige); une exposition
Page 18

- 18 -
continue et prolongée au soleil pourrait entraîner
un changement de couleur de nombreux matériaux;
ranger cet article dans un lieu sec.
NETTOYAGE DU CHÂSSIS: nettoyer régulièrement les
pièces en plastique à l’aide d’un linge humide; ne
pas utiliser de solvants ou autres produits similaires.
Veiller à ce que toutes les pièces métalliques restent
sèches pour prévenir la formation de rouille. Maintenir
le bon état de propreté de toutes les pièces mobiles
(mécanismes de réglage, mécanismes de fixation,
roues, etc.) en enlevant poussière ou sable; graisser
avec une huile légère si nécessaire.
NETTOYAGE DE L’HABILLAGE PLUIE: utiliser une éponge
et de l’eau savonneuse; ne pas utiliser de détergents.
NETTOYAGE DES ÉLÉMENTS EN TISSU : brosser les
éléments en tissu pour enlever la poussière et laver à
la main à une température maximale de 30° ; ne pas
tordre ; ne pas utiliser d’eau de javel ; ne pas repasser ;
ne pas laver à sec ; ne pas détacher à l’aide de solvants;
ne pas sécher dans un sèche-linge à tambour rotatif.
PEG-PÉREGO S.p.A.
Peg-Pérego S.p.A. est certifiée ISO
9001. La certification offre à la clientèle
une garantie de transparence et
représente un gage de confiance dans
la façon de travailler de l’entreprise.
Peg-Pérego se réserve le droit de
procéder à tout moment à des modifications sur les
modèles décrits dans cet ouvrage, pour des raisons de
nature technique ou commerciale. Peg-Pérego est à la
disposition de sa clientèle pour satisfaire au mieux
chacune de ses exigences. En cela, il est très important
et précieux pour nous de connaître l’opinion de notre
clientèle. Nous vous saurions donc gré, après avoir
utilisé un de nos produits, de remplir le
QUESTIONNAIRE DE SATISFACTION CLIENT, en nous
faisant part de toute observation ou suggestion
éventuelle. Vous trouverez ce questionnaire sur notre
site Internet, à l'adresse www.pegperego.com
SERVICE D’ASSISTANCE PEG-PÉREGO
En cas de perte de pièces ou de rupture de l'une
d'elles, utiliser exclusivement des pièces de rechange
originales Peg-Pérego. Pour toute réparation,
remplacement, informations sur les produits, vente de
pièces détachées d’origine et accessoires, contactez
le service après-vente Peg Pérego en indiquant, si
présent, le numéro de série du produit.
tél. 0039/039/60.88.213
fax 0039/039/33.09.992
e-mail assistenza@pegperego.it
site Internet www.pegperego.com
DE_Deutsch
Vielen Dank, dass Sie sich für ein Peg-Pérego Produkt
entschieden haben.
WARNUNG
_ WICHTIG: Diese Anweisungen sorgfältig lesen und
danach aufbewahren. Die Sicherheit des Kindes
könnte bei Nichtbeachtung der Anweisungen
gefährdet werden.
_ Dieser Artikel ist für die Beförderung eines Kindes auf
dem Sitz vorgesehen.
_ Den Artikel nicht für mehr Insassen verwenden, als
vom Hersteller vorgesehen.
_ Dieser Artikel ist für Kinder ab der Geburt bis zu einem
Gewicht von 15 kg auf dem Sitz zugelassen.
_ Lassen Sie Ihr Kind nie unbeaufsichtigt.
_ Den 5-Punkt-Sicherheitsgurt immer benutzen und den
Beckengurt immer mit dem Schrittgurt befestigen.
_ Verwenden Sie den Sportwagen stets mit montiertem
Sicherheitsbügel.
_ Bei Einstellungen an den Mechanismen (Griff,
Rückenteil) auf das Kind acht geben.
_ Beim Halten und während des Hineinsetzens und
Herausnehmens des Kindes immer die Feststellbremse
betätigen.
_ Die Montage und, die Zusammensetzung des Artikels,
sowie die Reinigung und die Instandhaltung dürfen
ausschließlich von Erwachsenen durchgeführt werden.
_ Artikel nicht mit fehlenden oder kaputten Teilen verwenden.
_ Vor dem Gebrauch sicherstellen, dass alle
Verankerungsmechanismen korrekt befestigt sind.
_ Nicht die Finger in die Mechanismen halten.
_ Gewichte, die am Tragebügel oder am Schieber
angebracht sind, können die Stabilität des Artikels
beeinträchtigen; die Anweisungen des Herstellers in
Bezug auf das vorgesehene Höchstgewicht beachten.
_ Keine Gegenstände mit einem Gewicht von mehr als 5
kg in den Korb legen. Niemals warme Getränke sowie
keine Gegenstände mit einem höheren Gewicht, als
das auf dem Getränkehalter angegebene in diesen
stellen. Keine Gegenstände von mehr als 0,2 kg in die
Taschen des Verdecks (sofern vorhanden) füllen.
_ Den Artikel nicht in der Nähe von Treppen oder Stufen
abstellen und auch nicht in der Nähe von Wärmequellen,
offenem Feuer oder gefährlichen Gegenständen die sich
in Reichweite des Kindes befinden können.
_ Es könnte gefährlich sein, vom Hersteller nicht
genehmigtes Zubehör zu verwenden.
_ Dieser Artikel ist nicht zum Joggen oder
Rollschuhlaufen geeignet.
_ Den Regenschutz (sofern vorhanden) nicht in
geschlossenen Räumen benutzen und immer überprüfen,
dass das Kind nicht schwitzt; den Regenschutz nicht in
die Nähe von Wärmequellen bringen und beim Rauchen
besondere Vorsicht walten lassen. Überprüfen, dass sich
der Regenschutz nicht in den laufenden Mechanismen
des Gestells oder des Sportwagens verfangen kann; den
Regenschutz vor dem Zusammenklappen des Kinder-
oder Sportwagens abnehmen.
- ACHTUNG: Bei geöffnetem Sportwagen und während
des Gebrauchs den Sicherheitsbügel ausschließlich
Page 19

- 19 -
in Position 1 (hochgeklappt) verwenden; Position
2 (hinuntergeklappt) nur verwenden, wenn der
Sportwagen geschlossen werden soll.
-
HINWEIS: Keine Sitzpolster hinzufügen
ARTIKEL - LIEFERUMFANG
Den Inhalt der Verpackung überprüfen. Für Reklamationen
wenden Sie sich bitte an unseren Kundendienst.
_ Kinderwagen Sì COMPLETO, bestehend aus: 2
schwenk- oder feststellbaren Vorderrädern, 2
Hinterrädern, Korb, Flaschenhalter, Verdeck, Fußsack,
Regenschutz, 2 Gurtriemen und 1 Beingurt, 2 AdapterGurte zur Befestigung des Autositzes.
_ Der Sportwagen Sì CLASSICO besteht aus: 2 schwenk- oder
fixierbaren Vorderrädern, 2 Hinterrädern, Korb, Getränkehalter,
Verdeck, 2 Schutzpolster für die Brustgurte und 1 Beingurt, 2
Adaptergurte für die Montage des Autositzes.
GERAUCHSANWEISUNG
1• Zum Öffnen des Kinderwagens die beiden Hebel an
den Griffen nach oben ziehen (Abb. A); An beiden
Schiebergriffen den Sportwagen anheben. Dabei
öffnet sich dieser automatisch (Abb. B). Beidseitig
kontrollieren, ob die Schieberrohre unten richtig
eingerastet sind (Abb. C).
2• Wenn die Haken nicht richtig eingehakt sind, gegen
den Sitz drücken (Abb. A) bis sie hörber einrasten.
Dann mit dem Fuß auf PUSH (Abb. B) drücken und den
Vorderbügel eine Position höher stellen (Abschnitt 5B).
3• NETZKORB: Zur Befestigung des Korbes die
Netzschlaufen in die Einhängehaken an den
abgebildeten Stellen A und B hinten am Gestell und C
vorne beidseitig einhängen (Abb. A).
GETRÄNKEHALTER: Er kann nur auf der rechten Seite des
Sportwagens am dafür vorgesehenen Haken angebracht
werden. Zur Befestigung des Getränkehalters diesen bis
zum Einrasten nach unten drücken (Abb. B).
4• EINSTELLUNG DER SCHIEBERGRIFFE: Die Griffe können
auf drei verschiedene Höhen eingestellt werden. Um
sie höher zu stellen, die Taste drücken und gleichzeitig
den Griff nach oben ziehen. Um sie niedriger zu stellen,
umgekehrt vorgehen (Abb. A).
FESTSTELLBREMSE: Zum Feststellen des Wagens mit
dem Fuß die an den Hinterrädern befindlichen Hebel
hinunterdrücken. Um die Bremse zu lösen, den Hebel
wieder nach oben drücken (Abb. B). Bei Stillstand die
Bremse immer einlegen.
5• SCHWENKBARE RÄDER: Die Räder sind bereits am
Kinderwagen befestigt.Nach Senken des Hebels (Pfeil 1)
sind die Vorderräder schwenkbar. Zum Feststellen der Räder
muss der Hebel hingegen in die andere Richtung gedrückt
werden (Pfeil 2). Die Hinterräder sind nicht schwenkbar.
ACHTUNG: Verwenden Sie den Sportwagen stets
mit montiertem Sicherheitsbügel.
SICHERHEITSBÜGEL: bereits am Sportwagen montiert.
Er ist in 2 Positionen verstellbar:
POSITION 1: bei Gebrauch
POSITION 2: zum Schließen.
Zum Verstellen jeweils den Knopf auf beiden Seiten
gleichzeitig drücken (Abb. b).
6• VERDECK: Um das Verdeck zu befestigen, die
Verbindungsstücke in die entsprechenden Öffnungen
einrasten lassen und das Verdeck an der Rückseite der
Rückenlehne anknöpfen (Abb. A).
Durch einfaches Vor- oder Zurückziehen kann das
Verdeck auf drei verschiedene Positionen eingestellt
werden (Abb. B).
Als Sonnenschutz kann das am Verdeck angebrachte
Netz hervorgezogen werden (Abb. C) und problemlos
wieder an der Innenseite des Verdecks befestigt
werden, wenn es nicht mehr gebraucht wird.
7• FUSSSACK: Zur Befestigung des Fußsacks (Abb. A) die
Knöpfe an der Innenseite des Kinderwagens (Abb. 1)
anknöpfen, unter dem Sitz über die Beinstütze ziehen
und dann festknöpfen (Abb. 2).
REGENSCHUTZ: Den Regenschutz zur Befestigung über
den Sportwagen ziehen (Abb. B), an beiden Seiten des
Verdecks festknöpfen (Abb. 1) und die Gummibänder
einhaken, so dass er den unteren Teil des Sportwagens
bedeckt (Abb. 2).
8• 5-PUNKT-SICHERHEITSGURT: Zum Anlegen der
Sicherheitsgurte die beiden Gurtzungen des
Beckengurts mitden aufgesteckten Schultergurtösen
(Pfeil A) bis zum Einrasten in das Gurtschloss des
Schrittgurtes stecken (Pfeil B). Zum Lösen die Taste
in der Mitte der Schnalle (Pfeil C) betätigen und den
Bauchgurt nach außen ziehen (Pfeil D).
9• Den Becken beidseitig in Pfeilrichtung (Abb. A) festziehen.
Zum Lockern des Gurts in die entgegengesetzte Richtung
ziehen. Der Beckengurt kann bis zum Sicherheitsverschluss
festgezogen werden (Abb. B).
10• Die Sicherheitsgurte können je nach Größe des Kindes in
3 verschiedene Positionen höhenverstellt werden. Wenn
das Kind wächst, die jeweils höhere Position wählen.
11• Zur Höhenregulierung der Sicherheitsgurte die beiden
Gurtösen auf der Rückseite der Lehne herausziehen.
Ziehen Sie die Schultergurte zu sich heran (Pfeil A) bis die
Gurtösen ausrasten. Dann die Gurtösen in die Schlitze
der Rückenlehne stecken (Pfeil B). Die Schultergurte
von vorne herausziehen (Pfeil C) und in der richtigen
Höhe wieder in die Schlitze hineinstecken (Pfeil D);
dann die beiden Gurtösen wieder auf der Rückseite der
Rückenlehne einrasten (Pfeil E). Die Gurtösen müssen
hörbar einrasten, damit sie fest sitzen (Abb. F).
12• EINSTELLUNG DER FUSSSTÜTZE: Die Fußstütze
kann auf zwei verschiedene Positionen eingestellt
werden. Um die Fußstütze niedriger zu stellen, die
beiden Schieber nach vorne ziehen und gleichzeitig
die Fußstütze absenken. Um die Fußstütze höher zu
stellen, diese bis zum Einrasten nach oben drücken.
EINSTELLUNG DER RÜCKENLEHNE: Die Rückenlehne
kann auf drei verschiedene Positionen eingestellt
werden. Um die Rückenlehne niedriger zu stellen,
die Arretierungshebel gleichzeitig auf beiden Seiten
hochziehen, die Rückenlehne hinunterdrücken und in
der gewünschten Position feststellen. Zum Hochstellen
der Rückenlehne, diese einfach nach oben drücken.
13• ZUSAMMENKLAPPEN: Um den Sportwagen zu
schließen, sollte zuerst der Sicherheitsbügel in Position 2
heruntergeklappt werden.
Der Kinderwagen kann mit einer Hand
zusammengelegt werden: Zunächst an den Griffen den
einen und , dann den anderen Hebel bis zum Einrasten
nach oben ziehen.
14• Den mittleren Griff in die Hand nehmen und nach
oben ziehen, so dass der Wagen zusammenklappt
(Abb. A). Am Sicherheitshaken überprüfen, ob
der Sportwagen richtig zusammengelegt ist. Der
zusammengelegte Sportwagen ist von alleine
standfest (Abb. B).
15• TRANSPORT: Der Sportwagen kann zum Transport (mit
festgestellten Vorderrädern) am Mittelgriff komfortabel
gezogen werden (Abb. A). Der seitliche Tragegriff
Page 20

- 20 -
ermöglicht außerdem ein bequemes Tragen (Abb. B).
16• ABNEHMBARER BEZUG: Um den Bezug abzunehmen:
Die beiden Gurtösen an der Rückseite der Rückenlehne
öffnen (Abb. A).
Die beiden Druckknöpfe am Sitz lösen (Abb. B).
Die Öse des Schrittgurtes von unten herausziehen (Abb. C).
Die seitlichen Druckknöpfe des Bezugs öffnen (Abb. D).
17• Den Bezug vom der Fußstütze abziehen (Abb. E).
Um den Sicherheitsgurt abzunehmen, die zwei
Schrauben auf beiden Seiten mit Hilfe eines
Schraubendrehers und einer schmalen Zange zur
Fixierung der Schraubenmutter entfernen (Abb. F).
Den Bezug nach oben ziehen (Abb. G).
BEFESTIGUNG DES ZUBEHÖRS PRIMO
VIAGGIO TRI-FIX
Zunächst Feststellbremse bestätigen.
Den Autositz am Kinderwagen anbringen, ohne dass
das Kind darin sitzt.
Den Autositz immer nur mit Blickrichtung zur Mutter
befestigen.
Aus praktischen Gründen kann eventuell der Fußsack
vom Kinderwagen entfernt werden, da am Autositz
vorhanden.
Die Rückenlehne des Kinderwagens in die 2. mittlere
Position stellen (Abschnitt 12).
Den Griff des Autositzes in die Transportstellung
bringen, um das Einhaken der Gurte zu erleichtern.
18• Den Vorderbügel durch gleichzeitiges Drücken der
Taste unter der Armlehne und Nach-Außen-Ziehen des
Bügels auf beiden Seiten verlängern (Abb. a).
ACHTUNG: Den Sicherheitsbügel nur dann ausziehen,
wenn der Autokindersitz montiert werden soll.
Den Autositz auf den Sitz des Kinderwagens stellen
und einrasten (Abb. b).
19• Zuerst die Öse des Gurts am Knopf des Kinderwagens
befestigen (Pfeil 1) und den Gurt hinter dem Griff des
Autositzes nach unten ziehen (Pfeil 2).
Dann die Gurtöse am Knopf am unteren Teil des
Gestells befestigen (Pfeil 3) und zuletzt den Gurt
festziehen bis der Autositz so stramm wie möglich auf
dem Kinderwagen befestigt ist (Pfeil 4).
Denselben Vorgang auf der anderen Seite des
Kinderwagens (Abb. c) wiederholen.
Richtig auf dem Kinderwagen angebrachter Autositz
(Abb. d).
So wird der Autositz vom Kinderwagen entfernt:
Gurte lockern; Öse des Gurts am unteren Teil des
Gestells aushaken; den Gurt hinter dem Griff des
Autositzes hervorziehen; dann die Öse des Gurts vom
Knopf des Kinderwagens lösen.
SERIENNNUMMER
20• Hinter der Rückenlehne sind folgende Informationen
am Kinderwagen „Si“ anbegracht: Produktname,
Produktionsdatum und Seriennummer des
Kinderwagens.Diese Informationen sind unerlässlich
im Falle von Reklamationen.
ZUBEHÖR
21• MÜCKENSCHUTZ: zur Montage am Verdeck (Abb. A).
TASCHE: mit Wickelauflage zum Befestgen an den
Schiebergriffen (Abb. B).
22• TRANSPORTTASCHE: Praktisch zum Transport des
Kinderwagens im Flugzeug (Abb. A)
SONNENSCHIRM: Zum Kinderwagen passender
Sonnenschirm (Abb. B).
REINIGUNG UND PFLEGE
PFLEGE DES ARTIKELS: vor Witterungseinflüssen
schützen: Wasser, Regen oder Schnee; eine längere
Bestrahlung durch die Sonne kann zu Farbänderungen
der verschiedenen Materialien führen; diesen Artikel
an einem trockenen Ort aufbewahren.
REINIGUNG DES GESTELLS: die Kunststoffteile
regelmäßig mit einem feuchten Lappen reinigen – keine
Lösungsmittel oder ähnliche Produkte verwenden;
sämtliche Metallteile trocken halten, um einem
eventuellen Rosten vorzubeugen; alle beweglichen Teile
(Einstellungsmechanismen, Befestigungsmechanismen,
Räder,…) von Staub oder Sand unbedingt sauber halten
und, wenn nötig, mit Leichtöl schmieren.
REINIGUNG DES REGENSCHUTZES: mit einem
Schwamm und Seifenwasser waschen, ohne
Reinigungsmittel zu verwenden.
REINIGEN DER STOFFTEILE: die Stoffteile abbürsten,
um den Staub zu entfernen und per Hand bei einer
Höchsttemperatur von 30° waschen; nicht auswringen;
nicht mit Bleichmittel behandeln; nicht bügeln; nicht
chemisch Reinigen; die Flecken nicht mit Hilfe von
Lösungsmitteln entfernen und nicht in einem Trockner
mit Drehtrommel trocknen.
PEG-PÉREGO S.p.A.
Peg-Pérego S.p.A. ist gemäß ISO 9001
zertifiziert. Die Zertifizierung garantiert
den Kunden und Verbrauchern
Transparenz und ermöglicht das Vertrauen
in die Arbeitsweise des Unternehmens.
Peg Pérego kann zu jedem beliebigen
Zeitpunkt Änderungen an den in dieser Veröffentlichung
beschriebenen Modellen sowohl aus technischen, als
auch aus kommerziellen Gründen vornehmen. Peg
Pérego steht den Verbrauchern zur Verfügung, um deren
Anforderungen auf das Bestmöglichste gerecht zu
werden. Demnach ist es ausgesprochen wichtig und
wertvoll für uns, über die Meinung unserer Kunden
Bescheid zu wissen. Wir bitten Sie daher, das FORMULAR
ÜBER DIE KONSUMENTENZUFRIEDENHEIT auszufüllen,
nachdem Sie unsere Produkte ausprobiert haben. Das
Formular ist unter folgender Internetadresse abrufbar:
www.pegperego.com
KUNDENDIENST PEG-PÉREGO
Sollten Teile des Modells verloren gehen oder
beschädigt werden, ersetzen Sie diese bitte
ausschließlich durch originale Peg Perego-Teile.
Für Reparaturen, Ersatzteile, Produktinformationen
und Anbieter von originalen Ersatzteilen und
Zubehör wenden Sie sich bitte an den Peg Perego
Kundendienst. Halten Sie hierfür, wenn möglich, die
Seriennummer des betreffenden Produktes bereit.
Tel. 0039/039/60.88.213
Fax 0039/039/33.09.992
E-Mail assistenza@pegperego.it
Webseite www.pegperego.com
Page 21

- 21 -
ES_Español
Le agradecemos haber elegido un producto Peg-Pérego.
ADVERTENCIA
_ IMPORTANTE: léase atentamente estas
instrucciones y consérvelas para futuras consultas.
La seguridad del niño podría estar en peligro si no
se leen dichas instrucciones.
_ Este artículo se ha diseñado para el transporte de 1
niño en el asiento.
_ No utilice este artículo para un número de ocupantes
superior al previsto por el fabricante.
_
Este artículo está homologado para niños desde el
nacimiento hasta los 15 kg de peso en el asiento.
_ Podría ser peligroso dejar a su hijo sin vigilancia.
_ Utilizar siempre el cinturón de seguridad de cinco
puntos y enganchar siempre la correa ventral a la tira
entrepiernas.
_ Utilizar la barra frontal sólo cuando esté instalada en la
silla de paseo.
_ Preste atención a la presencia del niño cuando efectúe
operaciones de regulación de los dispositivos (asa,
respaldo).
_ Tener pulsado siempre el freno cuando el automóvil
esté parado y durante la carga y descarga del niño.
_ Las operaciones de montaje, preparación del producto,
limpieza y manutención deben realizarlas sólo los
adultos.
_ No utilice este artículo si le faltan partes o presenta
rupturas.
_ Antes de usarse, asegúrese de que todos los
mecanismos de enganche estén perfectamente
enganchados.
_ No introduzca los dedos en los dispositivos.
_ Las cargas colgadas del manillar o asas pueden
desestabilizar el artículo; siga las indicaciones del
fabricante relativas a las cargas máximas que pueden
utilizarse.
_ No introduzca en la cesta cargas con un peso superior
a 5 kg. No coloque en los portabebidas pesos
superiores a los que figuran en el propio portabebidas
ni bebidas calientes. No meta en los bolsillos de la
capota (si los hay) pesos superiores a 0.2 Kg.
_ No utilice el artículo cerca de escaleras o peldaños;
no utilizar cerca de fuentes de calor, llamas directas
u objetos peligrosos que se hallen al alcance de los
niños.
_ Podría ser peligroso usar accesorios no aprobados por
el fabbricante.
_ Este artículo no está adaptado para el footing o
carreras en patines.
_ No utilizar el protector de lluvia (si presenta) en lugares
cerrados y controlar siempre que el niño no esté
acalorado. Nunca colocarlo cerca de fuentes de calor y
prestar atención a los cigarillos. Asegurarse de que el
protector de lluvia no interfiera en ningún dispositivo
en movimiento del carrito o silla de paseo. Quitar
siempre el protector de lluvia antes de cerrar vuestro
carrito o silla de paseo.
_
ATENCIÓN: Utilizar siempre la barra frontal en la
posición 1 (levantada) cuando la silla de paseo esté
abierta y se esté usando y, en la posición 2 (bajada),
cuando la silla esté cerrada.
_ ADVERTENCIA: No añada colchonetas.
COMPONENTES DEL ARTÍCULO
Compruebe el contenido presente en el embalaje y,
en caso de reclamación, póngase en contacto con el
Servicio de Asistencia.
_ Silla de paseo Sì COMPLETO se compone de: 2 ruedas
anteriores piruetantes o bloqueables, 2 ruedas
posteriores, cesta, portabebidas, capota, cubierta,
paralluvia, 2 correas para los cinturones y 1 cinturón
de separación de las piernas, 2 cinturones adaptadores
para enganche de la sillita de coche.
_ Silla de paseo Sì CLASSICO dispone de: 2 ruedas
delanteras pivotantes o fijas, 2 ruedas traseras,
cesta, portabebidas, capota, 2 almohadillas para
los cinturones y 1 tira entrepiernas, y 2 correas
adaptadoras para el enganche de Car Seat.
INSTRUCCIONES DE USO
1• Para abrir el cochecito, es necesario tirar hacia
arriba las dos palancas en los mangos (Fig. a); Al
mismo tiempo suba el cochecito que se abrirá
automáticamente (Fig. b). Para comprobar que la silla
de paseo se ha abierto correctamente, controle los dos
ganchos laterales (Fig. c).
2• Si los ganchos no están correctamente enganchados,
haga presión en el asiento (fig_a) hasta oír un clic de
enganche. Finalmente apriete hacia abajo con el pie en
PUSH (fig_b) y suba el frontal una posición (párrafo 5b).
3• CESTA: Para montar la cesta, abrochar los ojales a los
enganches traseros A y B al enganche delantero C
(fig_a).
PORTABEBIDAS: Sólo puede colocarse en el lado
derecho de la silla de paseo gracias al enganche ya
existente en el chasis.
Para aplicar el portabebidas, engancharlo hasta oír el
clic (fig_b).
4• REGULACIÓN DE LAS ASAS: Las asas pueden regularse
en 3 alturas diferentes. Para regularlas en la posición
deseada, presionar el pulsante y simultáneamente
tirar el asa hacia arriba. Para bajarlas, realizar la misma
operación pero en sentido contrario (fig_a).
FRENO: Para frenar la silla de paseo, bajar con el pie
la palanca freno colocada sobre el grupo de ruedas
traseras. Para desbloquear el freno, realizar la misma
operación pero en sentido contrario (fig_b). Accionar
siempre el freno estando parados.
5• RUEDAS PIRUETANTES: las ruedas ya están
enganchadas a la silla de paseo.
Para hacer que las ruedas anteriores sean piruetantes,
es necesario bajar la palanca (flecha 2). Para hacer que
sean fijas, gire la palanca en sentido contrario (lecha 2).
Las ruedas posteriores son fijas.
ATENCIÓN: Utilizar sólo la barra frontal estando
instalada en la silla de paseo.
BARRA FRONTAL: Ya está enganchada a la silla de
paseo.
Se puede regular en 2 posiciones:
POSICIÓN 1: De uso.
POSICIÓN 2: De cierre.
Para regularla, presionar el botón lateral desde ambos
lados simultáneamente (fig_b).
Page 22

- 22 -
6• CAPOTA: Para aplicar la capota, introducir los
enganches en los correspondientes alojamientos hasta
oír el clic y abrochar la capota por detrás del respaldo
de la silla de paseo (fig_a).
La capota puede regularse en 3 posiciones (fig_b)
tirando simplemente de ella hacia adelante o hacia
atrás.
Puede extraerse la parte de red de la capota para
proteger al niño del sol (fig_c) y volver a colocarla con
un simple gesto dentro de la capota cuando no sirva
más.
7• CUBIERTA: para aplicar la cubierta (fig_a) enganche los
botones en la parte interior de la silla de pase (fig_1),
pásela debajo del asiento incluyendo el apoyapiernas y
finalmente enganchar los botones (fig_2).
PLÁSTICO PARA LA LUVIA: Para aplicar el plástico
para la lluvia, ajustarlo con la silla de paseo (fig_b),
abotonarlo a ambos lados de la capota (fig_1) y
abrochar los elásticos abarcando el chasis en la parta
baja de la silla de paseo (fig_2).
8• CINTURÓN DE SEGURIDAD DE 5 PUNTOS: para
engancharlo, introduzca las dos hebillas de la correa
de la cintura (con tirantes enganchados, (flecha a) en
la correa de separación de las piernas hasta oír un clic
(flecha b). Para desengancharla, pulsar la tecla central
de la hebilla (flecha c) y tirar de la correa de la cintura
hacia fuera (flecha d).
9• Para apretar la correa de la cintura tire, desde los dos
lados, en el sentido de la flecha (flecha a), para aflojarla
actúe en sentido contrario. La correa de la cintura
puede apretarse hasta el tope de seguridad (Fig b).
10• Se pueden reglar los cinturones de seguridad en 3
alturas según la altura del bebé. Se deberá usar la
posición más alta cuando el bebé sea más grande.
11• Para regular la altura de los cinturones de seguridad
es necesario desenganchar en la parte posterior del
respaldo de las dos hebillas.
Tire hacia sí los tirantes (flecha a) hasta desenganchar
las hebillas y pasarlas por las ranuras del respaldo
(flecha b). Saque los tirantes del saco (flecha c)
y páselos por la ranura más adecuada (flecha d),
finalmente vuelva a enganchar las dos hebillas detrás
del respaldo (flecha e). Un clic determina que se han
enganchado correctamente las hebillas (Fig. f).
12• REGULACIÓN DEL REPOSAPIÉS: El reposapiés puede
regularse en 2 posiciones. Para bajar el reposapiés,
empujar hacia abajo las dos palancas laterales y
simultáneamente bajarlo. Para levantar el reposapiés,
empujarlo hacia arriba hasta oír el clic.
REGULACIÓN DEL RESPALDO: El respaldo puede
reclinarse en 3 posiciones. Para bajar el respaldo,
levantar la palanca lateral simultáneamente de ambos
lados y bajar el respaldo, bloqueándolo en la posición
deseada. Para levantarlo, presionar sobre el respaldo
hacia arriba.
13• CIERRE: Para cerrar la silla de paseo, se aconseja bajar
primeramente la barra frontal en la posición 2 de
cierre. Se puede cerrar la silla de paseo con una sola
mano: tire hacia arriba primero una palanca y después
la otra hasta que salten.
14• Tome el asa central y tírela hacia arriba hasta que se
cierre (fig_a). Compruebe que el cochecito esté bien
cerrado con el gancho de seguridad. El cochecito
cerrado permanece en pie solo (fig_b).
15• TRANSPORTE: La silla de paseo puede transportarse
fácilmente (con las ruedas delanteras fijas) empuñando
la manija central (fig_a). Puede transportarse también
gracias a la manija central (fig_b).
16• DESENFUNDABLE: Para desenfundar la silla de paseo
hacer lo siguiente:
Desenganchar por detrás del respaldo las dos hebillas (fig_a).
Desabrochar los dos botones del asiento (fig_b).
Sacar desde abajo la hebilla de la tira entrepierna
(fig_c).
Desabrochar los botones de la funda lateral (fig_d).
17• Sacar la funda por el estribo (fig_e).
Para quitar el cinturón de seguridad, desatornillar
(de ambos lados) los dos tornillos utilizando un
destornillador y un alicate para mantener la tuerca fija
(fig_f).
Extraer la funda hacia arriba (fig_g).
ENGANCHE DE PRIMO VIAGGIO TRI-FIX
Es necesario frenar la silla de paseo.
Enganche la silla de coche a la silla de paseo sin el
niño dentro.
Enganche la silla de coche siempre y solo hacia la
madre.Para mayor comodidad, se puede quitar la
capota de la silla de paseo ya que está presente en
la silla de coche.
Coloque el respaldo de la silla de paseo en la 2ª
posición central (párrafo 12).
Coloque el asa de la sillita de coche en la posición
de transporte, para facilitar el enganche de los
cinturones.
18
• Alargue el frontal apretando el pulsador debajo
del brazo y al mismo tiempo tire hacia fuera, desde
los dos lados (fig. a).
ATENCIÓN: Extender la barra frontal sólo
cuando se desee enganchar Car Seat.
Apoye y encastre la silla de coche en el asiento de
la silla de paseo (fig. b).
19
• Enganche primero la ranura del cinturón a la seta de
la silla de paseo (flecha 1) y haga pasar el cinturón
detrás del asa de la silla de coche (flecha 2).
Enganche después la ranura del cinturón al tope
en la parte baja del chasis de la silla de paseo
(flecha 3) y finalmente tense el cinturón hasta
hacer que la sillita de coche se adhiera al máximo a
la silla de paseo (flecha 4).
Siga el mismo procedimiento en el otro lado de la
silla de paseo (fig.c).
Sillita de coche correctamente enganchada en la
silla de paseo (fig. d).
Para desenganchar la silla de coche de la silla de
paseo: afloje los cinturones; desenganche la ranura
del cinturón en la parte baja del chasis de la silla
de paseo; sáquelo de detrás del asa de la silla de
coche; finalmente, desenganche la ranura del
cinturón del tope de la silla de paseo.
NÚMEROS DE SERIE
20• Silla de paseo Si, indica detrás del respaldo,
informaciones relativas a: nombre del producto,
fecha de producción y numeración de serie del
mismo. Estas informaciones son indispensables en
caso de reclamación.
ACCESORIOS:
21• MOSQUITERA: aplicable a la capota (fig_a).
BOLSA: bolsa con colchoncito para el cambio del bebé
Page 23

- 23 -
aplicable a la silla de paseo (fig_b).
22• BOLSA DE VIAJE: Práctica bolsa para el transporte
aéreo de la silla de paseo (fig_a).
SOMBRILLA: práctica sombrilla coordinada (fig_b).
LIMPIEZA Y MANTENIMIENTO
MANTENIMIENTO DEL PRODUCTO: proteger contra
agentes atmosféricos (agua, lluvia o nieve). Una
exposición contínua y prolongada al sol podría causar
cambios de color de muchos materiales. Conservar
este producto en un lugar seco.
LIMPIEZA DEL CHASIS: Limpiar periódicamente las
partes de plástico con un paño húmedo sin usar
solventes u otros productos similares. Mantener secas
todas las partes de metal para prevenir la oxidación.
Mantener limpias todas las partes móviles (dispositivo
de regulación, de enganche, ruedas...) quitando el
polvo o la arena y, en caso necessario, engrasarlas con
aceites ligeros.
LIMPIEZA DEL PROTECTOR DE LLUVIA: lavar con una
esponja con agua y jabón, sin usar detergentes.
LIMPIEZA DE LAS PARTES DE TEJIDO: cepillar las partes
de tejido quitando el polvo y lavar a mano a una
temperatura máxima de 30º. No torcer, no usar lejía, no
planchar, no lavar en seco, no usar solventes y no secar
utilizando secadoras de tambor rotativo.
PEG-PÉREGO S.p.A
Peg-Pérego S.p.A posee la
certificación de la Norma ISO 9001. La
certificación ofrece a los clientes y a
los consumidores la garantía de
transparencia y de confianza en
cuanto a los procedimientos de trabajo de la empresa.
Peg-Pérego podrá aportar en cualquier momento
modificaciones a los modelos que se describen en el
presente manual por razones técnicas o comerciales.
Peg-Pérego está a disposición de sus consumidores
para responder satisfactoriamente a sus exigencias. De
ahí que sea fundamental y extremamente importante
conocer la opinión de nuestros Clientes. Les
agradeceríamos por tanto que tras utilizar uno de
nuestros productos rellenase, indicando eventuales
observaciones o sugerencias, el CUESTIONARIO DE
SATISFACCIÓN DEL CONSUMIDOR que se halla en
nuestra página Web www.pegperego.com
SERVICIO DE ASISTENCIA PEG-PÉREGO
Si se pierden o dañan algunas partes del modelo,
utilizar únicamente repuestos originales Peg Pérego.
Para cualquier reparación, sustitución, información
acerca de los productos, venta de repuestos originales
y accesorios, contactar con el Servicio de Asistencia
Peg Pérego indicando, en caso fuere presente, el
número de serie del producto.
tel. 0039/039/60.88.213
fax 0039/039/33.09.992
e-mail assistenza@pegperego.it
sito internet www.pegperego.com
PT_Português
Obrigado por ter escolhido um produto Peg-Pérego.
ADVERTÊNCIA
_ IMPORTANTE: leia atentamente estas instruções
e conserve-as para uma futura utilização. A
segurança da criança pode vir a ser colocada em
risco se estas instruções não forem efectuadas.
_ Este artigo foi projectado para o transporte de 1
criança no assento.
_ Não utilizar este artigo para um número de ocupantes
superior àquele previsto pelo fabricante.
_ Este artigo é homologado para crianças desde o
nascimento até aos 15 kg de peso no assento.
_ Deixar a vossa criança sem vigilância pode ser perigoso.
_ Utilize sempre o cinto de segurança de cinco pontos,
enganche sempre o cinto na cintura àquele divisor de pernas.
_ Utilizar sempre a barra frontal instalada no carrinho.
_ Prestar atenção à presença da criança quando forem
efectuadas operações de regulação dos mecanismos
(manípulo, encosto).
_ Accione sempre o travão quando parado e durante as
operações de carga e descarga da criança.
_ As operações de montagem, preparação do artigo, de
limpeza e manutenção devem ser efectuadas somente
por adultos.
_ Não utilizar este artigo caso apresente partes que
faltem ou rupturas.
_ Antes do uso assegurar-se que todos os mecanismos
de enganche estejam enganchados correctamente.
_ Evitar introduzir os dedos nos mecanismos.
_ Cada carga colocada sob a pega ou nas pegas poderá
tornar o artigo instável; siga as indicações do fabricante em
relação às recomendações máximas de cargas a utilizar.
_ Não coloque no cesto de carga um peso superior a 5
kg. Não coloque no suporte, pesos superiores ao que
foi especificado no próprio suporte e mais bebidas
quentes. Não com coloque nos bolsos da cobertura (se
existirem) pesos superiores a 0.2 kg.
_ Não utilizar o artigo perto de escadas ou degraus; não
utilizá-lo perto de fontes de calor, chamas livres ou
objectos perigosos ao alcance dos braços da criança.
_ Pode ser perigoso utilizar acessórios não aprovados
pelo fabricante.
_ Este artigo não é idóneo para o jogging ou para a
corrida em patins.
_ Não utilize o protector de chuvas (se presente) em
ambientes fechados, e controle sempre que a criança
não esteja quente demais, não coloque jamais perto de
fontes de calor e preste atenção a cigarros. Certifique-
se que o protector de chuva não interfira com os
mecanismos em movimento do carrinho ou cadeirinha
de passeio; retire sempre o protector de chuva antes de
fechar o carrinho ou cadeirinha de passeio.
_ ATENÇÃO: com o carrinho aberto e durante a utilização,
manter a barra frontal apenas na posição 1 (elevada), e
utilizar a posição 2 (baixa) apenas com o carrinho fechado.
_ ADVERTÊNCIA: Não acrescente colchonetes.
Page 24

- 24 -
COMPONENTES DO ARTIGO
Verifique se conteúdo da embalagem e, na
eventualidade de uma reclamação pedimos-lhe que
contacte o Serviço de Assistência.
_ Carrinho Sì COMPLETO é composto por: 2 rodas
dianteiras pivotantes ou bloqueáveis, 2 rodas traseiras,
cesta, porta-bebidas, capota e protector de chuva, 2
alças para os cintos e 1 separadores de pernas, 2 cintos
adaptadores para encaixe da cadeira para auto.
_ O carrinho Sì CLASSICO é composto por: 2 rodas
dianteiras livres ou bloqueáveis, 2 rodas traseiras,
cesto, porta-bebidas, capota, 2 protecções para os
cintos e 1 cinto entrepernas, 2 cintos adaptadores para
o encaixe Car Seat.
INSTRUÇÕES DE USO
1• Para abrir o carro é necessário puxar para cima as duas
alavancas que se encontram nos manípulos (Fig.a);
contemporaneamente levantar o carro que se irá abrir
automaticamente (Fig.b). Para verificar que o carrinho
de bebé está aberto correctamente, verificar os dois
ganchos lateriais (Fig.c).
2• Caso os ganchos não tivesse sido encaixados
correctamente, pressionar o assento (fig_a) atéa o
clique de encaixe.
Por fim, pressionar para baixo com o pé em PUSH
(fig_b) e levantar o frontal uma posição (parágrafo 5b).
3• CESTA PORTA-OBJECTOS: para montar a cesta, enfie as
alças nos ganchos traseiros A e B no gancho dianteiro
C (fig_a).
PORTA-BEBIDAS: só pode ser aplicado do lado direito
da cadeira de passeio, graças ao gancho presente no
chassis.
Para aplicar o porta-bebidas, encaixe-o até ouvir um
clique (fig_b).
4• REGULAÇÃO DOS MANÍPULOS: os manípulos
são reguláveis em 3 alturas diferentes. Para os
regular na posição desejada, prima o botão e
contemporaneamente puxe o manípulo para cima.
Para os baixar puxe no sentido oposto (fig_a).
TRAVÃO: para travar a cadeira de passeio baixe com o
pé a alavanca situada no grupo de rodas traseiras. Para
soltar o travão, faça a operação contrária (fig_b). Com a
cadeira de passeio parada, accione sempre o travão.
5• RODAS PIVOTANTES: as rodas já se encontram
encaixadas no carrinho.
Para tornar as rodas dianteiras pivotantes, tem que se
baixar a alavanca (seta 1). Para as fixar, usar a alavanca
no sentido contrário (seta 2). As rodas traseiras são
fixas.
ATENÇÃO: utilizar sempre a barra frontal instalada no
carrinho.
BARRA FRONTAL: está já encaixado no carrinho.
Dispõe de 2 posições de ajuste:
POSIÇÃO 1: de utilização
POSIÇÃO 2: de fecho.
Para regulá-la, pressionar o botão lateral de ambos os
lados em simultâneo (fig_b).
6• CAPOTA: para montar a capota, insira os encaixes nos
respectivos alojamentos até ouvir um clique e aperte
as molas da capota na parte traseira do encosto da
cadeira de passeio (fig_a).
A capota é regulável em 3 posições (fig_b) puxando-a
simplesmente para a frente ou para trás.
É possível puxar para fora a parte de rede da capota
para proteger a criança do sol (fig_c) e com um simples
gesto reposicioná-la no interior da capota quando já
não serve.
7• CAPOTA: para colocar correctamente a capota (fig_a)
encaixar os botões na parte interna do carrinho (fig_1),
colocá-la sob o assento envolvendo o apoio de pernas
e por fim encaixar os botões (fig_2).
PROTECTOR DE CHUVA: para montar o protector
de chuva prenda-o na cadeira de passeio (fig_b),
apertando as molas nos lados da capota (fig_1) e
prendendo os elásticos envolvendo o chassis na parte
inferior da cadeira de passeio (fig_2).
8• CINTO DE SEGURANÇA: para apertar, inserir as
duas fivelas do cinto da cintura (com suspensórios
engachados seta a) no cinto dos separadores de
pernas até fazer clique (seta b). Para a desprender,
pressione o botão que se encontra situado na parte
central do fixador (seta c) e puxe a correia para a
cintura para fora (seta d).
9• para apertar o cinto da cintura puxar, ambos os lados,
no sentido indicado pela seta (Fig.a), para soltar agir
no sentido contrário. O cinto da cintura pode ser
apertado até ao travão de segurança (Fig.b).
10• É possível regular os cintos de segurança em 3
posições com base na altura da criança. É necessário
passar à posição mais alta quando a criança crescer.
11• Para regular a altura dos sentidos de segurança é
necessário desapertar da parte de trás do encosto as
duas fivelas.
Puxar para si os suspensórios (seta a) até desapertar
as fivelas e enfiá-las nas ranhuras do encosto (seta
b). Deslizar as fitas da bolsa (seta c) e e enfiá-las nas
ranhuras mais idóneas (seta d), por fim, voltar a apertar
as fivelas atrás do encosto (seta e). O clique determina
um encaixe perfeito (fig f).
12• REGULAÇÃO DO REPOUSA-PÉS: o repousa-pés é
regulável em 2 posições. Para baixar o repousa-
pés, empurre as duas patilhas laterais para baixo
e contemporaneamente baixe-o. Para levantar o
repousa-pés, puxe-o para cima até ouvir um clique.
REGULAÇÃO DO ENCOSTO: o encosto é reclinável em 3
posições. Para baixar o encosto, eleve a patilha lateral
contemporaneamente de ambos os lados e baixe o
encosto, bloqueando-o na posição desejada. Para o
levantar, empurre o encosto para cima.
13• FECHO: para fechar o carrinho, é preferível baixar
primeiro a barra frontal, na posição 2 de fecho. É
possível fechar o carrinho de bebé com uma só mão:
puxar para cima, primeiro uma alavanca e depois a
outra até fazer fazer clique.
14• Segurar o manípulo central e puxá-lo para cima até ao
fecho (fig_a). Verificar através do gancho de segurança
que o carro está fechado correctamente. Uma vez
fechado permanece em pé sozinho (fig_b).
15• TRANSPORTE: a cadeira de passeio pode ser
transportada comodamente (mantendo as rodas
dianteiras fixas) agarrando-a pela pega central (fig_a).
Também é possível transportá-la graças à pega lateral
(fig_b).
16• RETIRAR A VESTIDURA: para retirar a vestidura da
cadeira de passeio:
solte as duas fivelas, atrás do encosto (fig_a).
Desaperte as duas molas no assento (fig_b).
Desenfie o cinto entre-pernas por baixo (fig_c).
Desaperte as molas da vestidura lateralmente (fig_d).
17• Desenfie a vestidura do repousa-pés (fig_e).
Page 25

- 25 -
Para remover o cinto de segurança, desaparafuse (de
ambos os lados) os dois parafusos utilizando uma
chave de fendas e um alicate para segurar a porca
(fig_f).
Puxe a vestidura para cima (fig_g).
ENCAIXE PRIMO VIAGGIO TRI-FIX
É preciso travar o carrinho.
Encaixar a cadeirinha auto ao carrinho sem a criança.
Encaixar a cadeirinha auto sempre e unicamente
virada para a mãe.
Por uma questão de comodidade, é possível retirar a
capota do carrinho presente na cadeirinha auto.
Colocar o encosto do carrinho na 2° posição central
(parágrafo 12).
Colocar o manípulo grande da cadeira para auto na
posição de transporte, para facilitar o encaixe dos
cintos.
18• Alongar o apoio de mãos pressionando o botão sob o
apoio do braço e contemporanemente puxá-lo para
fora, de ambos os lados (fig. a).
ATENÇÃO: esticar a barra frontal apenas quando
pretender encaixar o Car Seat.
Apoiar e encaixar a cadeirinha auto no assento do
carrinho (fig. b).
19• Antes prender a ranhura do cinto do carrinho (seta 1) e
passar o cinto por trás do manípulo da cadeirinha auto
(seta 2).
Prender a ranhura do cinto na parte de baixo da
estrutura do carrinho (seta 3) e por fim, esticar o
cinto até à máxima aderência da cadeira para auto ao
carrinho (seta 4).
Executar o mesmo procedimento do outro lado do
carrinho (fig.c).
Cadeira para auto correctamente encaixada ao
carrinho (fig. d).
Para soltar a cadeirinha auto do carrinho:
folgar os cintos;
soltar a ranhura do cinto na parte de baixo da
estrutura do carrinho;
deslizá-lo na parte de trás do manípulo grande da
cadeirinha auto;
por último soltar a ranhura do cinto do carrinho.
NÚMEROS DE SÉRIES
20• Carrinho Si, possui na parte de trás do encosto
informações relativas a: nome do produto, data de
produção e numeração de série do mesmo.
Estas informações são indispensáveis em caso de
reclamação.
ACESSÓRIOS
21• MOSQUITEIRO: aplicável à capota (fig_a).
BOLSA : bolsa com colchãozinho para mudar a criança
e que è aplicável ao carrinho de bebé (fig_b).
22• BOLSA DE VIAGEM: Prática bolsa para o transporte
aéreo do carrinho de bebé (fig_a).
SOMBRINHA: prática sombrinha coordenada (fig_b).
LIMPEZA E MANUTENÇÃO
MANUTENÇÃO DO ARTICO: Protesa dos agentes
atmosféricos: Água, chuva ou neve; a exposição
contínua e prolongada ao sol pode causar alterações
de cor em muitos materiais, conserve este artigo num
sítio seco.
LIMPEZA DO CHASSIS: Limpe periodicamente as partes
em plástico com um pano húmido sem usar solventes
ou outros produtos similares; mantenha todas as
partes em metal bem secas para prevenir ferrugem;
mantenha todas as parte em movimento (mecanismos
de regulação, mecanismos de encaixe, rodas ...) limpas
de poeiras ou areia e se necessário, lubrifique com um
óleo leve.
LIMPEZA DO PROTECTOR DE CHUVA: Lave com uma
esponja molhada com água e sabão, sem utilizar
detergentes.
LIMPEZA DAS PARTES EM TECIDO: escove as partes
em tecido para retirar poeiras e lave à mão a uma
temperatura máxima de 30°, não torça, não use
alvejante ou cloro, não passe a ferro, não lave a seco,
não use tira-manchas com solventes e não seque por
meio de máquinas de secar com tambor giratório.
PEG-PÉREGO S.p.A.
Peg-Pérego S.p.A é certificada ISO
9001. A certificação oferece aos
clientes e aos consumidores a garantia
de transparência e confiança no que se
refere ao modo com que a empresa
trabalha. Peg Pérego poderá realizar
em qualquer momento alterações nos modelos
descritos nesta publicação, por motivos técnicos ou
comerciais. Peg Perego está à disposição dos seus
Consumadores para satisfazer ao máximo suas
exigências. Portanto, conhecer a opinião de nossos
Clientes, é para nós extremamente importante e
precioso. Ficaremos muito agradecidos se depois de
ter utilizado um nosso produto, quiser preencher o
QUESTIONÁRIO DE SATISFAÇÃO DO CONSUMADOR, a
indicar eventuais observações ou sugestões, que
encontrará em nosso site Internet:
www.pegperego.com
SERVIÇO DE ASSISTÊNCIA PEG-PÉREGO
Se, inadvertidamente, uma peça do modelo se perder
ou danificar, utilizar apenas peças de substituição
Peg Pérego originais. Para eventuais reparações,
substituições, informações sobre os produtos, venda
de peças originais e acessórios, contactar o Serviço de
Assistência Peg Pérego, indicando o número de série
do produto, caso este esteja presente.
tel. 0039/039/60.88.213
fax 0039/039/33.09.992
e-mail assistenza@pegperego.it
sito internet www.pegperego.com
Page 26

- 26 -
NL_Nederlands
Wij danken u voor de keuze van een Peg-Pérego product.
WAARSCHUWING
_ BELANGRIJK: lees deze instructies aandachtig en
bewaar ze voor toekomstig gebruik. Het kind kan
gevaar lopen als u deze instructies niet opvolgt.
_ Dit artikel is ontworpen om 1 kind te vervoeren.
_ Gebruik dit artikel niet voor meer dan het het door de
fabrikant voorziene aantal kineren.
_ Dit artikel is goedgekeurd voor kinderen vanaf de
geboorte tot een gewicht van 15 kg.
_ Het kan gevaarlijk zijn uw kind zonder toezicht alleen te laten.
_ Zet het kind altijd vast in de vijfpuntsveiligheidsgordel
en maak altijd het buikgordeltje vast aan het beenstuk.
_ Gebruik altijd de frontstang die op de wandelwagen
geplaatst zit.
_ Pas op voor het kind als u mechanismen afstelt (stuur,
rugleuning).
_ Zet de rem altijd op als u stilstaat en als u het kind erin
zet of het eruit haalt.
_ Alleen volwassenen mogen dit artikel in elkaar zetten,
het klaarmaken, reinigen en onderhouden.
_ Gebruik dit artikel niet als er onderdelen ontbreken of
stuk zijn.
_ Controleer vóór het gebruik of alle bevestigingen goed
zijn gemonteerd.
_ Steek uw vingers niet in mechanismen.
_ Elke last die u aan de handgrepen of aan de duwstang
hangt, kan het artikel onstabiel maken; leef de
voorgeschreven gewichten van de fabrikant na.
_ Steek niets in het mandje dat meer dan 5 kg weegt.
Steek niets in de flessenhouder dat meer weegt dan
wat is voorgeschreven voor de flessenhouder en steek
er nooit warme dranken in. Steek niets in de kappen
(indien aanwezig) dat meer weegt dan 0,2 Kg.
_ Gebruik het artikel niet op trappen of treden; gebruik
het niet in de buurt van warmtebronnen, vlammen of
gevaarlijke voorwerpen binnen armbereik van het kind.
_ Niet door de fabrikant goedgekeurde accessoires
kunnen gevaarlijk zijn.
_ Dit artikel is niet geschikt om te joggen of te schaatsen.
_ Gebruik de regenkap (indien aanwezig) niet in gesloten
ruimten en controleer altijd of het kind het niet te warm
heeft; zet het niet in de buurt van warmtebronnen en pas
op voor sigaretten. Controleer of de regenkap nergens in
de weg zit van bewegende mechanismen van de kinder-
of wandelwagen; haal de regenkap er altijd af voordat u
de kinder- of wandelwagen dichtklapt.
_ ATTENTIE: met de wandelwagen opengeklapt en
tijdens gebruik dient u de frontstang alleen in positie 1
(omhoog) te gebruiken. Positie 2 (omlaag) gebruikt u
alleen wanneer de wandelwagen ingeklapt is.
_ WAARSCHUWING: Geen matrasjes toevoegen.
COMPONENTEN
Controleer de inhoud van de verpakking. Neem
contact op met de klantenservice in geval van
klachten.
_ De kinderwagen Sì COMPLETO bestaat uit: 2
blokkeerbare of draaiwielen voor, 2 achterwielen,
mand, flessenhouder, kap, deken, regenkap, 2
schouderstukken voor de gordels en 1 beenstuk, 2
pasgordeltjes voor bevestiging van de Car Seat.
_ Wandelwagen Sì CLASSICO bestaat uit: 2
zwenkwielen vooraan die kunnen worden vastgezet,
2 wielen achteraan, mandje, flessenhouder, kap, 2
schouderdelen voor de gordeltjes en 1 beenstuk, 2
pasgordeltjes voor bevestiging van de Car Seat.
GEBRUIKSAANWIJZINGEN
1• Om het frame te openen worden beide hendeltjes
op de handgrepen naar boven getrokken (Fig.a); Til
het frame tegelijk op; hij zal automatisch opengaan
(Fig.b). Om te controleren of de wandelwagen correct
geopend is, controleer beide zijgrendels (Fig.c).
2• Indien de haaksluitingen niet correct bevestigd zijn,
druk op het zitje (fig_a) tot de klik hoorbaar is.
Duw tot slot met de voet op PUSH (fig_b) en hef het
voorste deel een positie (paragraaf 5b).
3• MANDJE: monteer het mandje door de ogen aan
de achterste haken A en B en voorste haak C te
bevestigen (fig_a).
FLESSENHOUDER: deze kan alleen aan de rechterkant
van de wandelwagen worden bevestigd, aan de haak
op het frame.
Om de flessenhouder te bevestigen haakt u hem vast
tot een klik horen is (fig_b).
4• INSTELLING HANDGREPEN: de handgrepen zijn op
3 verschillende hoogten in te stellen. Om ze in de
gewenste positie te zetten drukt u op de knop en trekt
u tegelijkertijd de handgreep naar boven. Om ze naar
beneden te doen duwt u ze met ingedrukte knop
omlaag (fig_a).
REM: om te remmen met de wandelwagen drukt u
met de voet de remhendel op de achterste wielen naar
beneden. Om de rem eraf te halen duwt u hem weer
naar boven (fig_b). Zet in stilstand altijd de rem erop.
5• DRAAIWIELEN: de wielen zijn al vastgemaakt aan de
kinderwagen.
opdat de voorwielen zouden zwenken, moet de
hendel omlaag gebracht worden (pijl 1). Om ze te
blokkeren, bedien het hendeltje in de andere richting
(pijl 2). De achterste wielen zijn al vast.
ATTENTIE: gebruik altijd de frontstang die op de
wandelwagen geplaatst zit.
FRONTSTANG: zit reeds op de wandelwagen geplaatst.
Deze kan in 2 posities worden gezet:
POSITIE 1: tijdens gebruik
POSITIE 2: bij gesloten stand.
Om de stang in te stellen drukt u aan beide kanten
tegelijkertijd de knop in (fig_b).
6• KAP: om te kap te bevestigen steekt u de
bevestigingen in de uitsparingen tot ze klikken en
knoopt u de kap aan de achterkant van de rugsteun
van de wandelwagen vast (fig_a).
De kap kan in 3 posities gezet worden (fig_b) door
hem eenvoudigweg naar voren of achteren te trekken.
Het stukje gaas kan uit de kap worden gehaald om
het kind tegen de zon te beschermen (fig_c), en kan
eenvoudig weer terug in de kap geplaatst worden
wanneer het niet langer nodig is.
7• DEKENTJE: om het dekentje correct aan te brengen
(fig_a), maak de knopen aan de binnenkant van de
kinderwagen vast (fig_1), breng het dekentje onder
Page 27

- 27 -
het zitje en de benensteun, en maak de knopen vast
(fig_2).
REGENSCHERM: om het regenscherm te monteren
plaatst u hem op de wandelwagen (fig_b), knoopt
u hem aan beide kanten van de kap vast (fig_1) en
knoopt u de koordjes om het frame onderaan de
wandelwagen (fig_2).
8• 5-PUNTSVEILIGHEIDSGORDEL: om dicht te doen, steek
beide gespen van het buikgordeltje (met bevestigde
schouderriemen pijl a) in het beenstuk, tot u een
klik hoort (pijl b). Om los te maken, duw de ronde
knop in het midden van de gesp in (pijl c) en trek het
buikgordeltje naar buiten (pijl d).
9• Om het buikgordeltje aan te trekken, trek aan
weerszijden in de richting van de pijl (Fig.a), om losser
te maken, te werk gaan in de andere richting. Het
buikgordeltje kan strak gemaakt worden tot aan de
veiligheidsgrendel (Fig.b).
10• De veiligheidsgordels kunnen op 3 hoogten worden
ingesteld, afhankelijk van de lengte van het kind.
Wanneer het kind groter is moet de hoogste positie
worden ingesteld.
11• Om de hoogte van de veiligheidsgordels te regelen,
moeten beide gespen achter aan de rug losgehaakt
worden.
Trek de schouderriemen naar u toe (pijl_a) tot de
gespen loskomen en steek ze in de gaten van de
rugsteun (pijl b). Haal de schouderriemen uit de zal
(pijl c) en steek ze in het gepaste gat (pijl d); haak
beide gespen tot slot weer vast achter de rug (pijl e).
De gespen zijn correct vastgehaakt wanneer men een
klik hoort (fig.f).
12• INSTELLEN VOETENSTEUN: De voetensteun kan in 2
posities gezet worden. Om de voetensteun neer te
laten trekt u de twee zijhendeltjes naar beneden en
laat u tegelijkertijd de steun neer. Om de voetensteun
naar boven te doen duwt u hem omhoog tot hij klikt.
INSTELLEN RUGSTEUN: De rugsteun is in 3 posities
verstelbaar. Om de rugsteun naar beneden te doen
doet u tegelijkertijd de zijhendeltjes aan beide kanten
omhoog en laat u de steun neer. Als hij in de gewenste
stand staat blokkeert u hem. Om de steun weer naar
boven te doen duwt u hem omhoog.
13• INKLAPPEN: om de wandelwagen in te klappen doet u
eerst de frontstang omlaag, in positie 2.
De wandelwagen kan met een hand gesloten worden:
trek een hendel naar boven en daarna de andere, tot
de klik.
14• Neem de centrale handgreep vast en trek hem naar
boven tot de sluiting (fig_a). Controleer of het frame
correct gesloten is met de veiligheidsgrendel. Het frame
kan in gesloten positie alleen rechtop staan (fig_b).
15• VERVOER: De wandelwagen kan makkelijk vervoerd
worden (met de voorste wielen in vaste stand) door
hem bij de centrale handgreep vast te pakken (fig_a).
Hij kan ook bij de zijhandgreep vastgepakt worden
(fig_b).
16• VERWIJDERING BINNENBEKLEDING: om de
binnenbekleding los te maken:
maak aan de achterkant van de rugsteun de twee
gespen los (fig_a).
Maak de twee knopen van de zitting los (fig_b).
Haal van onder de gesp van het beenstuk eruit (fig_c).
Maak de knopen van de zijzak los (fig_d).
17• Haal de zak uit de voetensteun (fig_e).
Om het veiligheidsgordeltje te verwijderen schroeft
u (aan beide kanten) met een schroevendraaier de
twee schroeven los terwijl u met een tang de moer
vasthoudt (fig_f).
Trek de zak omhoog (fig_g).
BEVESTIGING PRIMO VIAGGIO TRI-FIX
De rem van de kinderwagen moet eerst opgezet
worden.
Bevestig de autostoel aan de kinderwagen zonder dat
het kind erin zit.
Maak de autostoel altijd vast in de richting van de
mama.
De kap kan van de kinderwagen genomen worden
omdat die aanwezig is op de autostoel.
Breng de rugleuning van de kinderwagen in de 2°
centrale positie (paragraaf 12).
Positioneer het handvat van de Car Seat in de
transportpositie, om de gordels makkelijker vast te
maken.
18• Verleng het voorste deel door te drukken op de knop
onder de armsteun en hem tegelijk naar buiten te
trekken, aan weerszijden (fig. a).
ATTENTIE: verleng de frontstang alleen wanneer de
Car Seat bevestigd wordt.
Plaats de autostoel op het zitje van de kinderwagen
(fig. b).
19• Breng eerst het gat in de gordel over de knop van
de kinderwagen (pijl 1) en laat de gordel achter het
handvat van de autostoel gaan (pijl 2).
Breng het gat in de gordel vervolgens over de knop
onderaan het frame van de kinderwagen (pijl 3) en
houd de gordel strak tot de car seat maximaal aan de
kinderwagen vastzit (pijl 4).
Doe hetzelfde aan de andere zijde van de kinderwagen
(fig. c).
Car seat correct bevestigd op de kinderwagen (fig. d).
Om de autostoel van de kinderwagen te halen:
maak de gordels los;
maak het gat in de gordel onderaan het frame van de
kinderwagen los;
haal hem van achter het handvat van de autostoel;
maak tot slot het gat in de gordel vrij van de knop van
de kinderwagen.
SERIENUMMERS
20• De kinderwagen Si heeft achter op de rugleuning
informatie zoals de naam van het product, de
productiedatum en het serienummer van het product.
Deze gegevens zijn noodzakelijk in geval van een
klacht.
ACCESSOIRES
21• MUGGENSCHERM: wordt vastgemaakt aan de kap (fig_a).
TAS: tas met matrasje om de luier te vervangen, kan
aan de wandelwagen gehangen worden (fig_b).
22• REISTAS: Handige tas voor het luchttransport van de
wandelwagen (fig_a).
PARASOL: handige bijpassende parasol (fig_b).
Page 28

- 28 -
ONDERHOUD EN REINIGEN
HET ARTIKEL ONDERHOUDEN: bescherm het tegen
weer en wind: water, regen of sneeuw; een langdurige
en continue blootstelling aan zonnestralen kan vele
materialen doen verkleuren; bewaar het op een droge
en beschutte plaats.
HET FRAME REINIGEN: reinig regelmatig de plastic
delen met een vochtige doek, zonder verdunners
of andere dergelijke producten; houd de metalen
delen droog zodat ze niet kunnen roesten; houd
alle bewegende delen schoon (stelmechanismen,
sluitmechanismen, wielen...), zorg dat er geen stof of
zand op blijft zitten en smeer ze indien nodig met een
lichte olie.
DE REGENKAP REINIGEN: was de kap met een spons en
sop zonder reinigingsproducten.
DE DELEN IN STOF REINIGEN: borstel de delen in stof
zodat er geen stof meer op zit en was ze met de hand
in water dat niet warmer is dan 30°. Wring ze niet
uit, bleek ze niet en strijk ze niet; laat ze niet stomen;
ontvlek ze niet met verdunners en laat ze niet drogen
in een droogtrommel.
PEG-PÉREGO S.p.A.
Peg-Pérego S.p.A. is houder van het
ISO-certificaat 9001. Dit certificaat
biedt aan onze klanten en gebruikers
van onze producten een waarborg
voor een transparante werkwijze en
dus vertrouwen. Peg Pérego kan op
elk ogenblik de in deze documenten beschreven
modellen wijzigen om technische of commerciële
redenen. Peg Pérego wenst zo veel en zo goed
mogelijk tegemoet te komen aan de wensen van onze
klanten. De mening van onze klanten kennen, is dus
heel belangrijk voor ons. Wij verzoeken u daarom
vriendelijk een ogenblikje tijd te nemen om onze
VRAGENLIJST TEVREDEN KLANTEN in te vullen als u
één van onze producten gebruikt en ons uw eventuele
opmerkingen of suggesties stuurt. U vindt de
vragenlijst op het adres: www.pegperego.com
TECHNISCHE SERVICE PEG-PÉREGO
Indien delen van het model per ongeluk kwijtraken
of beschadigd raken, dient u alleen originele
reserveonderdelen van Peg Pérego te gebruiken.
Voor eventuele reparaties aan, vervanging van of
informatie over de producten, verkoop van originele
reserveonderdelen en accessoires, kunt u contact
opnemen met de Assistentiedienst van Peg Pérego.
Vermeld hierbij, indien mogelijk, het serienummer van
het product.
tel. 0039/039/60.88.213
fax 0039/039/33.09.992
e-mail assistenza@pegperego.it
site internet www.pegperego.com
DK_Dansk
Tak for dit valg af et produkt fra Peg-Pérego.
PAS PÅ!
_ VIGTIGT: Læs denne brugsanvisning grundigt og
gem den til fremtidig brug. Barnets sikkerhed kan
blive udsat for risiko, hvis denne brugsanvisning
ikke følges.
_ Denne artikel er udformet til transport af 1 barn i
sædet.
_ Anvend ikke denne artikel til et større antal børn, end
det, der er fastsat af producenten.
_ Denne artikel er godkendt til børn lige fra fødslen og
op til 15 kg. i sædet.
_ Det kan være farligt at efterlade barnet uden opsyn.
_ Brug altid 5-punkts sikkerhedsselen og hægt altid den
lille rem om livet sammen med benremmen.
_ Anvend altid klapvognen med forstykket installeret.
_ Når barnet er til stede, skal der udvises stor
opmærksomhed ved justering af mekanismerne (styr,
ryglæn).
_ Slå altid bremsen til under ophold eller når barnet
sættes i eller tages op af vognen.
_ Montering og forberedelse af produktet samt
rengøring og vedligeholdelse må kun udføres af
voksne.
_ Brug ikke denne artikel i tilfælde af manglende eller
defekte dele.
_ Sørg for, at alle fasthægtningsmekanismerne er sat
rigtigt i, før vognen anvendes.
_ Undgå at sætte fingrene ind i mekanismerne.
_ Eventuelle genstande, der hænges på håndgrebet
eller andre greb, kan gøre produktet ustabilt; følg altid
producentens anvisninger vedrørende den maksimalt
tilladte last.
_ Læg ikke ting i kurven med en samlet vægt på over
5 kg. Sæt ikke tungere ting i flaskebeholderen end
angivet på flaskebeholderen og aldrig varme drikke.
Stik ikke ting i lommerne på kalecherne (hvis disse er
monterede), der vejer mere end 0,2 kg.
_ Brug ikke artiklen i nærheden af trapper eller
trappetrin. Brug den ikke i nærheden af varmekilder,
åben ild eller farlige genstande, som er inden for
barnets rækkevidde.
_ Det kan være farligt at benytte udstyr, der ikke er
godkendt af producenten.
_ Denne artikel er ikke beregnet til at løbe med eller til at
løbe på skøjter med.
_ Anvend ikke regnslaget i lukkede miljøer, og kontroller
regelmæssigt at barnet ikke har det for varmt; Anbring
ikke regnslaget i nærheden af varmekilder og pas på
med cigaretter. Sørg for at kontrollere at regnslaget
ikke kommer i vejen for nogen af stellets eller
klapvognens bevægelige dele; Tag altid regnslaget af
før stellet eller klapvognen lukkes sammen.
_ PAS PÅ!: Når klapvognen er åben og i brug, må
forstykket kun anvendes i indstilling 1 (løftet),
hvorimod indstilling 2 (sænket) kun bruges, når
klapvognen er lukket helt sammen.
_ OPLYSNINGER: Tilføj ikke flere madrasser.
Page 29

- 29 -
PRODUKTETS KOMPONENTER
Kontroller indholdet i emballagen og kontakt
Servicecenteret i tilfælde af reklamationer.
_ Sì COMPLETO klapvogn er udgjort af: 2 drejelige
eller fastlåselige forhjul, 2 baghjul, kurv, flaskeholder,
kaleche, overlæder, regnslag, 2 skulderremme til seler
og 1 skridtrem, 2 tilpasningsseler til fastspænding af
autostol.
_ Klapvognen Sì CLASSICO består af: 2 forhjul, der
kan dreje om sig selv eller være faste, 2 baghjul,
kurv, flaskeholder, kaleche, 2 skulderstykker til
sikkerhedsselerne og 1 skridtrem, 2 tilpasningsseler for
fastspænding af Car Seat.
BRUGSANVISNING
1• For at åbne stellet skal man trække de to tapper på
håndtagene opad (Fig.a); samtidig skal man løfte
stellet, som automatisk åbnes (Fig.b). Kontroller at
klapvognen er korrekt åbnet, kontroller de to kroge på
siderne (Fig.c).
2• Hvis krogene ikke er påsat korrekt, skal man trykke på
sædet (fig_a) indtil man hører et klik.
Til sidst skal man trykke nedad med foden på PUSH
(fig_b) og løfte forstykket til en position (afsnit 5b).
3• KURV: Kurven monteres ved at hægte løkkerne på de
bageste kroge A og på den forreste krog C (fig_a).
FLASKEHOLDER: Denne kan kun monteres på
klapvognens højre side ved hjælp af den lille krog på
stellet.
For at sætte flaskeholderen på, hægtes den på indtil
den klikker fast (fig_b).
4• REGULERING AF HÅNDTAG: Håndtagene kan reguleres
til 3 forskellige højder. For at indstille dem til den
ønskede position trykker du på trykknappen, samtidigt
med at håndtagene trækkes opad. For at sænke dem
skubbes de i modsat retning (fig_a).
BREMSE: Klapvognen bremses ved at skubbe
bremsepedalen på baghjulsgruppen ned med foden.
For at løsne bremserne, løftes pedalen i modsat
retning (fig_b). Når klapvognen holder stille, bør
bremserne altid slås til.
5• DREJELIGE HJUL: hjulene er allerede sat på
klapvognen.
For at gøre forhjulene drejelige, skal man sænke
grebet (pil 1). For at låse dem, skal man virke på grebet
i modsat retning (pil 2). Baghjulene er spændt fast.
PAS PÅ!: Anvend altid klapvognen med forstykket
installeret.
FORSTYKKE: er allerede påmonteret klapvognen.
Kan justeres til 2 indstillinger:
INDSTILLING 1: under brugen
INDSTILLING 2: sammenklappet.
For at kunne justere det trykker du på begge
sideknapperne samtidigt (fig_b).
6• KALECHE: Kalechen monteres ved at indsætte
beslagene i de tilhørende lejer, indtil de klikker
fast, og herefter knappe kalenchen på bagsiden af
klapvognens ryglæn (fig_a).
Kalechen kan reguleres til 3 indstillinger (fig_b) ved
blot at trække den fremad eller skubbe den tilbage.
Du kan trække det lille net ud fra kalechen for at
beskytte barnet mod solen (fig_c) og med en enkelt
bevægelse skubbe det tilbage i kalenchen, når der ikke
er brug for det mere.
7• OVERLÆDER: for at påsætte overlæderet korrekt (fig_a)
skal man knappe knapperne på klapvognens indre
del (fig_1), passe det ind under sædet ved at presse
benstøtten og til sidst knappe knapperne (fig_2).
REGNSLAG: Regnslaget monteres ved at trække det
over klapvognen (fig_b), knappe det fast på kalechens
sider (fig_1) og sætte elastikkerne fast på stellet
nederst på klapvognen (fig_2).
8• FEM-PUNKTS SIKKERHEDSSELE: for at spænde selen,
skal man sætte de to spænder på maveremmen (med
selerne fastgjort pil a) i benremmen, til der høres et
klik (pil b). Løsn dem ved at trykke på knappen midt på
spændet (pil c), og træk maveselen udad (pil d).
9• For at stramme maveremmen skal man trække fra
begge sider i pilens retning (Fig. a), for at løsne
remmen, skal man gøre det modsatte. Maveremmen
kan strammes indtil sikkerhedsstoppet (Fig.b).
10• Sikkerhedsselen kan justeres til 3 indstillinger i højden,
så de svarer til barnet højde. Når barnet er blevet
større, er det nødvendigt at indstille selen til den
højeste indstilling.
11• For at regulere sikkerhedsselerne i højden skal man
hægte de to spænder på bagsiden af ryglænet af.
Man skal trække selerne mod sig selv (pil a), indtil
spænderne hægtes af og herefter føre dem ind i
åbningerne på ryglænet (pil b). Træk selerne ud af
betrækket (pil c) og før dem ind i den ønskede åbning
(pil d), hægt til sidst spænderne fast igen bag på
ryglænet (pil e). Når spænderne er korrekt fastgjort
høres et klik (fig f).
12• REGULERING AF BENSTØTTEN: Benstøtten kan
reguleres til 2 forskellige indstillinger. For at sænke
benstøtten trækker du nedad i de to små sidegreb,
mens benstøtten samtidigt sænkes. For at løfte den
skubbes den opad, indtil du hører et klik.
REGULERING AF RYGLÆN: Ryglænet kan bøjes
bagud i 3 indstillinger. For at sænke ryglænet løftes
sidegrebene samtidigt, mens ryglænet sænkes til
det blokeres i den ønskede stilling. For at hæve det,
skubbes ryglænet opad.
13• LUKNING: Når klapvognen skal lukkes sammen er
det bedst først at sænke forstykket til indstilling 2,
sammenklapning.
Det er muligt at lukke klapvognen med én hånd: træk
først det ene og så det andet håndtag opad indtil
klikket.
14• Tag fat om håndtaget i midten og træk det opad, indtil
klapvognen er lukket (fig_a). Kontroller at stellet er
lukket korrekt via sikkerhedskrogen. Det lukkede stel
kan stå af sig selv (fig_b).
15• TRANSPORT: Klapvognen transporteres nemt (med de
drejelige forhjul i blokeret stilling) ved at holde i det
midterste håndtag (fig_a). Den kan også transporteres
ved at holde i sidegrebet (fig_b).
16• AFTAGELIG BEKLÆDNING: Du tager beklædningen af
således:
løsn de to spænder (fig_a) på bagsiden af ryglænet.
Løsn de to knapper på sædet (fig_b).
Træk skridtremmens spænde ud nedefra (fig_c).
Løsn knapperne på køreposens side (fig_d).
17• Træk køreposen væk fra fodstøtten (fig_e).
Sikkerhedsselen tages af ved at løsne de to skruer (på
begge sider) ved hjælp af en skruetrække og en tang
til at holde møtrikken fast med (fig_f).
Træk køreposen opad (fig_g).
Page 30

- 30 -
FASTSPÆNDING AF PRIMO VIAGGIO
TRI-FIX
Det er nødvendigt at bremse klapvognen.
Fastspænd autostolen på klapvognen uden barnet
derpå.
Fastspænd altid kun autostolen rettet mod moderen.
Det er for behagelighedens skyld muligt at fjerne
klapvognens kaleche fordi den findes på autostolen.
Placér klapvognens ryglæn i 2° midterste position
(afsnit 12).
Placér autostolens store håndtag i transportposition,
for at gøre fastspændingen af selerne lettere.
18• Forlæng forstykket ved at trykke knappen under
armlænet og samtidig trække det udad til, fra begge
sider (fig. a).
PAS PÅ!: Forlæng kun forstykket når du vil
påhægte et Car Seat.
Stil og fastspænd autostolen på klapvognens sæde
(fig. b).
19• Spænd først selens knaphul fast på klapvognens lille
svamp (pil 1) og få selen om bagved autostolens
håndtag (pil 2) .
Spænd derefter selens knaphul fast på den lille svamp
ved klapvognens stels lave del (pil 3) og til sidst
stramme selen indtil den får autostolen til at sidde
fuldstændigt tæt til klapvognen (pil 4).
Foretag samme procedure på den anden side af
klapvognen (fig.c).
Autostol der er korrekt fastspændt på klapvognen (fig. d).
For at løsne autostolen fra klapvognen:
skal man løsne selerne;
frakoble selens knaphul på klapvognens stels lave del;
trække den ud omme bagfra autostolens store
håndtag;
til sidst skal man frakoble selens knaphul klapvognens
lille svamp.
SERIENUMMER
20• På Si klapvognen vises på ryglænets bagside
relaterende informationer: produktnavn,
produktionsdato og serienummer på selve denne.
Disse informationer er nødvendige i tilfælde af
reklamation.
TILBEHØR
21• MYGGENET: kan sættes på kalechen (fig_a).
TASKE: taske med lille madras til bleskift, som kan
hænges på klapvognen (fig_b).
22• REJSETASKE: Praktisk taske til opbevaring af
klapvognen på flyrejsen (fig_a).
PARASOL: praktisk matchende parasol (fig_b).
RENGØRING OG VEDLIGEHOLDELSE
VEDLIGEHOLDELSE AF PRODUKTET: Beskyt produktet
mod vejrforholdene: vand, regn eller sne; mange
materialer vil skifte farve, såfremt de udsættes for
sollys i længere tid; opbevar produktet på et tørt sted.
RENGØRING AF STELLET: Rengør delene i plastik
regelmæssigt med en fugtig klud og brug ikke
opløsningsmidler eller lignende produkter; hold
alle metaldele tørre for at forhindre rustdannelser;
hold de bevægelige dele (justeringsmekanismer,
påhægtningsmekanismer, hjul...) rene og fri for støv
eller sand; smør med en let olie efter behov.
RENGØRING AF REGNSLAGET: Kan vaskes med
en svamp og sæbevand men uden brug af
rengøringsmidler.
RENGØRING AF DELE I STOF: børst stofdelene for
at fjerne støv og vask dem i hånden ved en højeste
temperatur på 30º; må ikke vrides; må ikke klorbleges;
må ikke stryges; må ikke kemisk renses; fjern ikke
pletter med opløsningsmidler og tør ikke stofdelene i
en tromletørremaskine.
PEG-PÉREGO S.p.A.
Peg Pérego S.p.A. er ISO 9001
certificeret. Certificeringen yder
kunder og forbrugere garanti for
gennemskuelighed og tillid til måden
firmaet arbejder på. Peg-Pérego
forbeholder sig retten til på ethvert tidspunkt at
foretage ændringer af de heri beskrevne modeller af
tekniske eller forretningsmæssige grunde. Peg-Pérego
er til forbrugernes disposition med henblik på at
opfylde deres behov på bedste måde. Det er derfor
yderst vigtigt og værdifuldt for os at høre, hvad vores
kunder mener. Vi vil derfor være dig taknemmelige,
hvis du efter anvendelsen af et af vores produkter
udfylder SPØRGESKEMAET VEDR. KUNDETILFREDSHED,
som du finder på vores internetside, hvor du kan
anføre bemærkninger eller forslag: www.pegperego.
com
SERVICEAFDELINGEN PEG-PÉREGO
Skulle det ske, at dele af modellen mistes eller
beskadiges, må der kun anvendes originale Peg-
Pérego reservedele. For eventuelle reparationer,
udskiftninger, produktoplysninger, salg af originale
reservedele og tilbehør bedes du kontakte
Serviceafdelingen hos Peg Pérego med oplysning om
produktets serienummer, hvis et sådant findes.
Tlf.: 0039/039/60.88.213
fax 0039/039/33.09.992
e-mail assistenza@pegperego.it
Internetside www.pegperego.com
Page 31

- 31 -
FI_Suomi
Kiitos, kun olet valinnut Peg-Pérego-tuotteen.
HUOMAA
_ TÄRKEÄÄ: lue ohjeet huolellisesti läpi ja säilytä ne
myöhempää tarvetta varten. Lapsen turvallisuus
saattaa vaarantua, jos näitä käyttöohjeita ei noudateta.
_ Tämä tuote on suunniteltu yhden lapsen
kuljettamiseen istuinosassa.
_ Älä käytä tuotetta lasten kuljettamiseen, jos niiden
lukumäärä ylittää valmistajan antamat ohjeet.
_ Tämä tuote on hyväksytty käytettäväksi vauvoille ja
lapsille enintään 15 kg painoon asti.
_ Lapsen jättäminen yksin ilman valvontaa saattaa olla
vaarallista.
_ Käytä aina viisipisteturvavyötä. Kiinnitä vyötärön
ympäri kulkeva vyö jalkojen välistä kulkevaan vyöhön.
_ Pidä suojakaari aina asennettuna rattaisiin.
_ Pidä lasta tarkasti silmällä kun säädät mekanismeja
(työntöaisa, selkänoja).
_ Käytä aina jarrua paikalla oltaessa ja nostaessasi lasta
vaunuihin tai niistä pois.
_ Tuotteen saa koota, valmistella käyttöä varten,
puhdistaa ja huoltaa vain aikuinen.
_ Älä käytä tuotetta, jos siitä puuttuu osia tai jokin osa on rikki.
_ Ennen käyttöönottoa varmista, että kaikki
kiinnitysmekanismit on kytketty oikein.
_ Varo sormien laittamista mekanismien väliin.
_ Tavaroiden ripustaminen työntöaisaan tai kahvoihin
voi tehdä tuotteesta epävakaan. Noudata valmistajan
enimmäiskuormituksesta antamia ohjeita.
_ Älä laita koriin kuormia, joiden paino ylittää 5 kg. Älä
laita juomanpidikkeeseen esineitä, joiden paino ylittää
pidikkeeseen merkityn painorajan, äläkä koskaan
kuumia juomia. Älä laita kuomujen taskuihin (jos
sellaisia on) esineitä, joiden paino ylittää 0,2 kg.
_ Älä käytä tuotetta portaiden tai askelmien
läheisyydessä. Älä käytä paikoissa, joissa lapsen käsien
ulottuvilla on lämmönlähteitä, avotulta tai vaarallisia
esineitä.
_ Muiden kuin valmistajan hyväksymien lisävarusteiden
käyttö saattaa olla vaarallista.
_ Tämä tuote ei sovellu käytettäväksi hölkätessä tai
rullaluistellessa.
_ Älä käytä sadesuojaa (jos sellainen kuuluu tuotteeseen)
sisätiloissa. Tarkasta aina, ettei lapsella ole liian kuuma.
Älä vie sadesuojaa lähelle lämmönlähteitä - varo myös
savukkeita. Varmista, ettei sadesuoja tartu mihinkään
vaunujen tai rattaiden liikkuvaan mekanismiin. Irrota
aina sadesuoja, ennen kuin suljet vaunut tai rattaat.
_ HUOMIO: Rattaiden ollessa auki ja käytön aikana
suojakaari täytyy pitää asennossa 1 (ylhäällä).
Asentoa 2 (alhaalla) saa käyttää vain rattaat
suljettuina.
_ VAROITUS: Älä lisää patjoja tai alustoja.
TUOTTEEN OSAT
Tarkasta pakkauksen sisältö. Jos sinulla on
huomautettavaa, ota yhteyttä asiakaspalveluumme.
_ Stroller Sì COMPLETO –versio on tehty seuraavista
osista: 2 kääntyvää/lukkiutuvaa etupyörää, 2
takapyörää, kori, juomanpidike, kuomu, peite,
sadesuoja, 2 olkahihnaa ja 1 jalkojen välistä kulkeva
vyö, 2 autoistuimen vyösovitinta.
_ Sì CLASSICO -rattaisiin kuuluu: 2 kaksi kääntyvää tai
lukittavaa etupyörää, 2 takapyörää, kori, juomanpidin,
kuomu, 2 turvavyön olkahihnaa ja 1 jalkojen välinen
hihna, 2 kaksi säädettävää vyötä Car Seat -kiinnitystä
varten.
KÄYTTÖOHJEET
1• Avaa rattaat vetämällä kahvojen kaksi vipua ylöspäin
(kuva a). Nosta samalla rattaita, jolloin ne aukeavat
automaattisesti (kuva b). Varmista, että rattaat ovat
täysin auki tarkistamalla kaksi sivukoukkua (kuva c).
2• Jos vyöt eivät kiinnity kunnolla, paina istuinta (kuva a),
kunnes se naksahtaa paikalleen.
Paina sitten JALALLA (kuva b) ja nosta suojakaarta
yhdellä pykälällä (osa 5b).
3• KORI: kokoa kori asettamalla lenkit takakoukkuihin A ja
B ja etukoukkuun C (kuva_a).
JUOMANPIDIKE: voidaan kiinnittää vain rattaiden
oikealle puolelle rungossa olevaan koukkuun.
Kiinnitä juomanpidike naksauttamalla se paikalleen
(kuva_b).
4• KÄDENSIJOJEN SÄÄTÄMINEN: kädensijat voidaan
säätää 3 eri korkeudelle. Ne säädetään haluttuun
asentoon painamalla painiketta ja vetämällä kädensijaa
samalla ylös. Ne lasketaan alas toimimalla päinvastoin
(kuva_a).
JARRU: rattaita jarrutetaan painamalla jalalla
takapyöräryhmään sijoitettua jarruvipua. Jarru
vapautetaan työntämällä sitä päinvastaiseen suuntaan
(kuva_b). Kytke jarru aina kun rattaat ovat paikoillaan.
5• KÄÄNTÖPYÖRÄT: pyörät on valmiiksi kiinnitetty
rattaisiin.
Jos haluat kääntää etupyöriä, laske vipua (nuoli 1).
Voit kiinnittää pyörät siirtämällä vipua vastakkaiseen
suuntaan (nuoli 2). Takapyörät eivät käänny.
HUOMIO: Pidä suojakaari aina asennettuna rattaisiin.
SUOJAKAARI: Valmiiksi asennettu rattaisiin.
Voidaan säätää kahteen eri asentoon:
ASENTO 1: käyttö
ASENTO 2: sulkeminen.
Asentoa vaihdetaan painamalla samanaikaisesti
molempia sivuilla olevia painikkeita (kuva_b)
6• KUOMU: kuomu kiinnitetään sijoittamalla kiinnikkeet
paikoilleen ja työntämällä kunnes ne naksahtavat
kiinni, takaa kuomu kiinnitetään rattaiden selkänojaan
napeilla (kuva_a).
Kuomu voidaan säätää 3 asentoon (kuva_b)
yksinkertaisesti vetämällä sitä eteen tai taakse.
Kuomusta voidaan ottaa esiin verkko lapsen
suojaamiseksi auringolta (kuva_c), ja kun sitä ei enää
tarvita, se voidaan yksinkertaisesti sijoittaa takaisin
kuomun sisään.
7• PEITE: jotta käytät peittoa oikein (kuva a), kiinnitä napit
rattaiden sisäpuolelle (kuva 1) ja laita peitto istuimen
alle peittäen reisituen ja kiinnitä lopuksi napit (kuva 2).
SADESUOJA: sadesuoja asetetaan rattaiden päälle
(kuva_b), kiinnitetään napeilla kuomun sivuille
(kuva_1) ja sitten kuminauhoilla rattaiden rungon
alaosaan saakka (kuva_2).
Page 32

- 32 -
8• VIISIPISTETURVAVYÖ: kiinnitä laittamalla vyötärön
ympäri kulkevan vyön (jonka olkahihnat on kiinnitetty,
nuoli a) soljet jalkojen välistä kulkevaan vyöhön niin,
että ne naksahtavat paikalleen (nuoli b). Irrota se
painamalla keskellä solkea olevaa painiketta (nuoli c) ja
vedä lantiovyötä ulkosuuntaan (nuoli d).
9• Kiristä vyötärön ympäri kulkeva vyö vetämällä
molemmilta puolilta nuolen (kuva a) suuntaan. Voit
löysentää vyötä toimimalla päinvastoin. Vyötärön
ympäri kulkeva vyö voidaan kiristää turvalukkoon
(kuva b) asti.
10• Turvavyöt voidaan asettaa kolmelle eri korkeudelle
lapsen pituuden mukaan. Lapsen kasvaessa siirrytään
korkeampaan asentoon.
11• Jos haluat säätää turvavyön korkeutta, vapauta
molemmat soljet selkänojan takana.
Vedä olkahihnoja itseäsi kohti (nuoli a), kunnes soljet
vapautuvat ja työnnä ne selkänojan silmukoihin
(nuoli b). Irrota olkahihnat verhoilusta (nuoli c) ja
liitä ne sopivimpaan solkeen (nuoli d). Kiinnitä sitten
molemmat soljet uudelleen selkänojan taakse (nuoli e).
Kun kuuluu naksahdus, soljet ovat lujasti kiinni (kuva f).
12• REISITUEN SÄÄTÄMINEN: Reisituki voidaan säätää 2
asentoon. Se lasketaan alas vetämällä kahta sivuilla
olevaa vipua alas laskien samalla tukea. Se nostetaan
ylös työntämällä ylöspäin naksahdukseen saakka.
SELKÄNOJAN SÄÄTÄMINEN: Selkänoja voidaan säätää
3 asentoon. Selkänoja lasketaan alas nostamalla
samanaikaisesti molemmilla puolilla olevia vipuja
ja laskemalla selkänojaa alaspäin. Lukitse selkänoja
haluamaasi asentoon. Selkänoja nostetaan ylös
työntämällä sitä ylöspäin.
13• SULKEMINEN: Rattaita suljettaessa on hyvä ensin laskea
suojakaari alas, sulkemisasentoon 2.
Rattaat voidaan sulkea yhdellä kädellä: vedä ensin
toista ja sitten toista vipua ylöspäin, kunnes ne
naksahtavat.
14• Tartu keskikahvaan ja vedä sitä ylöspäin, kunnes
rattaat sulkeutuvat (kuva a). Tarvista turvakoukusta,
että rattaat ovat sulkeutuneet oikein. Kun rattaat ovat
kiinni, ne pysyvät pystyasennossa (kuva b).
15• KULJETTAMINEN: Rattaita voi kuljettaa mukavasti
(etupyörien ollessa lukittu asentoon) tarttumalla kiinni
keskikahvaan (kuva_a). Niitä voidaan kuljettaa myös
sivukahvasta (kuva_b).
16• VERHOILUN IRROTTAMINEN: rattaiden verhoilun
irrottaminen:
irrota kaksi solkea selkänojan takaa (kuva_a).
Irrota kaksi nappia istuinosasta (kuva_b).
Irrota alta jalkojen välisen hihnan solki (kuva_c).
Irrota napit sivutaitteesta (kuva_d).
17• Irrota taite jalkatuesta (kuva_e).
Irrota vyö ruuvaamalla auki (molemmilta puolilta)
kaksi ruuvia. Käytä ruuvitalttaa sekä pihtiä mutterin
pitämiseksi paikallaan (kuva_f).
Vedä verhoilu ylös (kuva_g).
PRIMO VIAGGIO TRI-FIX
AUTOISTUINTEN KIINNITTÄMINEN
Kytke ensin rattaitten jarrut.
Lukitse autoistuin rattaisiin tyhjänä.
Autoistuin on aina kiinnitettävä kohti rattaiden
työntäjää.
Irrota tarvittaessa rattaiden kuomu, sillä se on jo
kiinnitetty autoistuimeen.
Aseta rattaiden selkätuki 2. keskiasentoon (osa 12).
Aseta autoistuimen kahva kuljetusasentoon niin, että
hihnat on helppo kiinnittää.
18• Työnnä nappi käsinojan alle, jatka suojakaarta ja vedä
se sitten samanaikaisesti ulos molemmilta puolilta
(kuva a).
HUOMIO: Pidennä suojakaarta vain Car Seatin
kiinnittämistä varten
Nojaa ja sovita autoistuin rattaiden istuimeen (kuva b).
19• Kiinnitä ensin vyön napinläpi rattaiden nappiin (nuoli
1) ja työnnä sitten vyö autoistuimen kahvan taakse
(nuoli 2).
Kiinnitä vyön napinläpi rattaiden rungon alaosan
nappiin (nuoli 3) ja kiristä sitten vyö, kunnes autoistuin
on lujasti kiinni rattaissa (nuoli 4).
Toimi samoin rattaiden toisella puolella (kuva c).
Autoistuin oikein lukittuna rattaisiin (kuva d).
Autoistuimen vapauttaminen rattaista:
Löysennä hihnat;
irrota vyön napinläpi rattaiden rungon alaosasta;
pujota se irti autoistuimen kahvan takaa;
irrota sitten vyön napinläpi rattaiden napista.
SARJANUMEROT
20• Stroller Si rattaissa on kaikki seuraavat tärkeät tiedot
selkänojan takana: tuotteen nimi, valmistuspäivä ja
sarjanumero.
Nämä tiedot vaaditaan kaikkiin valituksiin.
LISÄVARUSTEET
21• HYTTYSVERKKO: voidaan kiinnittää napeilla kuomuun
(kuva a).
KASSI: Makuualusta ja laukku vauvan vaipoille. Voidaan
kiinnittää rattaisiin (kuva b).
22• MATKALAUKKU: kätevä laukku rattaiden
kuljettamiseksi lentokoneessa (kuva a).
SATEENVARJO: käytännöllinen rattaisiin sopiva
sateenvarjo (kuva b).
PUHDISTUS JA HUOLTO
TUOTTEEN HUOLTO: Suojaa tuote sateelta, lumelta ja
vedeltä. Jatkuva altistuminen auringonvalolle saattaa
muuttaa monien materiaalien väriä. Säilytä tuote
kuivassa paikassa.
RUNGON PUHDISTUS: Puhdista muoviosat
säännöllisesti kostealla kankaalla. Älä käytä liuotteita
tai muita vastaavia tuotteita. Pidä tuotteen metalliosat
kuivina, jotta ne eivät ruostu. Pidä kaikki liikkuvat
osat (säätömekanismit, kiinnitysmekanismit, pyörät
jne.) puhtaina ja poista niistä sora ja hiekka. Voitele
tarvittaessa kevytöljyllä.
SADESUOJAN PUHDISTUS: Pese saippuavedellä ja
sienellä. Älä käytä pesuaineita.
KANGASOSIEN PUHDISTUS: pöly harjataan
kangasosista ja kangas pestään käsin enintään
30-asteisessa vedessä. Ei saa vääntää kuivaksi.
Ei kloorivalkaisua, ei silitystä, ei kuivapesua, ei
tahranpoistoa liuotteilla, ei rumpukuivausta.
Page 33

- 33 -
PEG-PÉREGO S.p.A.
Peg Pérego S.p.A. on ISO 9001 sertifioitu yhtiö. Sertifiointi on
asiakkaille ja kuluttajille tae siitä, että
yritys toimii läpinäkyvästi ja
luotettavasti. Peg Pérego voi koska
tahansa tehdä tässä julkaisussa kuvattuihin malleihin
teknisistä tai kaupallisista syistä muutoksia. Peg Pérego
haluaa palvella asiakkaitaan ja vastata parhaansa
mukaan kaikkiin heidän tarpeisiinsa. Siksi
asiakkaidemme mielipiteet ovat meille erittäin tärkeitä
ja arvokkaita. Olisimmekin hyvin kiitollisia, jos haluaisit
tuotettamme käytettyäsi täyttää KULUTTAJAN
TYYTYVÄISYYSKYSELYN ja kertoa siinä mahdollisista
huomautuksistasi ja parannusehdotuksistasi. Kyselyn
löydät Internet-sivuiltamme: www.pegperego.com
PEG-PÉREGO-ASIAKASPALVELU
Jos mallin osat sattuvat menemään hukkaan tai
ne vaurioituvat, käytä ainoastaan Peg Péregon
alkuperäisiä varaosia. Jos tuotteet vaativat korjausta,
osia tulee vaihtaa, haluat lisätietoa tuotteista tai tilata
alkuperäisiä varaosia ja lisävarusteita, ota yhteyttä Peg
Pérego -yhtiön asiakaspalveluun ja jos mahdollista,
ilmoita tuotteen sarjanumero.
puh. +39 039 60 88 213
fax +39 039 33 09 992
s-posti assistenza@pegperego.it
Internet-sivu www.pegperego.com
CZ_Čeština
Děkujeme, že jste si vybrali ýrobek Peg-Pérego.
UPOZORNĚNÍ
_ DŮLEŽITÉ: přečtěte si tento návod a uchovejte jej
pro pozdější použití. Pokud se jím nebudete řídit,
můžete ohrozit bezpečí dítěte.
_ Tento výrobek byl navržen pro přepravu 1 dítěte
v sedačce.
_ Nepoužívejte výrobek pro přepravu více lidí, než jak
bylo zamýšleno výrobcem.
_ Tento výrobek byl schválen pro přepravu dětí od
narození až do hmotnosti 15 kg.
_ Může být nebezpečné ponechat dítě bez dozoru.
_ Vždy používejte pětibodový bezpečnostní pás, břišní
pás a pás na nohy.
_ Při upravování mechanismu (řidítek, opěradla pro
záda) buďte opatrní, abyste nezranili dítě.
_ Kočárek vždy používejte s předním madlem.
_ Jestliže je kočárek v klidu, vždy ho zabrzděte. Kočárek
zabrzděte i při usazování a vysazování dítěte.
_ Veškeré operace spojené s montáží, přípravou,
čištěním a údržbou mohou provádět pouze dospělé
osoby.
_ Nepoužívejte výrobek, pokud z něj chybí nějaké
součásti nebo pokud vykazuje známky poškození.
_ Před použitím zkontrolujte, zda jsou všechny spojovací
prvky řádně upevněny.
_ Nestrkejte do mechanismu prsty.
_ Každý náklad zavěšený na madlech a rukojetích může
způsobit nestabilitu výrobku; sledujte pokyny výrobce
pokud jde o max. povolené zatížení těchto prvků.
_ Do košíka nevkládejte náklad těžší než 5 kg. Do držáku
na pití nevkládejte předměty s hmotností větší než
hodnota předepsaná na samotném držáku, a také do
něj nikdy nevkládejte horké nápoje. Nevkládejte do
kapes stříšky (pokud se na Vašem výrobku nacházejí)
předměty těžší než 0.2 kg.
_ Nepoužívejte výrobek v blízkosti schodů nebo
stupátek, zdrojů tepla, otevřeného ohně nebo
nebezpečných předmětů v dosahu dítěte.
_ Použití příslušenství, které není schváleno výrobcem,
může být nebezpečné.
_ Tento výrobek není vhodný pro jogging nebo jízdu na
bruslích.
_ Nepoužívejte pláštěnku (je-li součástí výbavy) v
zavřených prostorech a pravidelně kontrolujte, jestli
není vaše dítě přehřáté; nepokládejte pláštěnku do
blízkosti zdrojů tepla a dávejte pozor na to, abyste
ji nepropálili cigaretou. Ujistěte se, že pláštěnka
nezasahuje do žádných pohybujících se mechanismů
podvozku nebo kočárku; před složením podvozku
nebo kočárku pláštěnku vždy sejměte.
_
UPOZORNĚNÍ: jestliže je kočárek rozložený, a
během jeho použití musí být přední madlo pouze v
poloze 1 (zdvižené); polohu 2 (sklopené) používejte
pouze u kočárku složeného k zabalení.
_ UPOZORNĚNÍ: Nepoužívejte přídavné matračky.
Page 34

- 34 -
SLOŽKY VÝROBKU
Zkontrolujte obsah obalu a v případě reklamace
kontaktujte servisní středisko.
_ Kočárek verze Si COMPLETO se skládá z následujících
dílů: 2 natáčecí/uzamykatelná přední kola, 2 zadní kola,
košík, držák na láhev, stříška, kryt, pláštěnka, 2 ramenní
popruhy a 1 pás oddělující nohy, 2 pásové adaptéry
pro autosedačku.
_ Kočárek SI CLASSICO tvoří tyto díly: 2 přední otočná
nebo blokovatelná kolečka; 2 zadní kolečka, košík,
držák na lahvičku; stříška, 2 ramenní popruhy a 1 pás
pro nožičky, 2 adaptéry pro připevnění Car Seat.
NÁVOD NA POUŽITÍ
1• Kočárek rozložíte zatažením za dvě páčky na madlech
směrem nahoru (Obr. a); Zároveň kočárek nadzvedněte
– automaticky se otevře (Obr. b). Abyste se ujistili, že je
kočárek správně rozložený, zkontrolujte dvě postranní
úchytky (Obr. c).
2• Jestliže nejsou pásky správně utaženy, zatlačte na
sedačku (obr. a), dokud nezacvakne na místo.
Poté nohou sešlápněte část s nápisem PUSH (obr. b)
směrem dolů a nadzvedněte přední tyčku o jednu
pozici (část 5b).
3• KOŠÍK: při umístění košíku nasaďte poutka na zadní
háčky A a B a na přední háček C (obr_a).
Držák na lahvičku: můžete ho připevnit pouze na
pravou stranu kočárku na již připravenou úchytku na
rukojeti.
Držák lahvičky nasaďte tak, aby zaklapl (obr_b).
4• SEŘÍZENÍ RUKOJETÍ: rukojeti je možné nastavit do 3
různých výšek. při seřízení do požadované polohy
stiskněte tlačítko a současně zatáhněte za rukojeť
směrem nahoru. Chcete-li rukojeť snížit, postupujte
opačně (obr_a).
BRZDA: kočárek zabrzdíte tak, že nohou sešlápnete
brzdovou páku umístěnou na zadních kolečkách.
Uvolněním směrem nahoru ji zase odblokujete (obr_b).
Při zastavení kočárek vždy zabrzděte.
5• NATÁČECÍ KOLA: kola jsou již připevněna ke kočárku.
Abyste zajistili, že se budou kola natáčet, musí být
páčka (šipka 1) stlačena dolů. Jestliže chcete kola
zajistit, přesuňte páčku opačným směrem (šipka 2).
Zadní kola jsou zajištěna.
UPOZORNĚNÍ: kočárek vždy používejte s předním
madlem.
PŘEDNÍ MADLO: je již připevněno ke kočárku.
Můžete ho nastavit do 2 výšek:
POLOHA 1: použití kočárku
POLOHA 2: složení kočárku.
Seřízení se provádí současným stisknutím obou
bočních tlačítek (obr. b).
6• STŘÍŠKA: při nasazování stříšky zasuňte úchyty do
příslušných umístění, až zaklapnou a připněte stříšku
knoflíky na zadní straně zádové opěrky kočárku
(obr_a).
Stříška je nastavitelná do 3 poloh (obr_b)
jednoduchým zatažením dopředu nebo dozadu.
Můžete také roztáhnout síťku stříšky k ochraně dítěte
před sluncem (obr_c), a když už ji nepotřebujete,
jednoduše ji vrátit dovnitř stříšky.
7• KRYT: jestliže má být kryt správně upevněn (obr. a),
připněte knoflíky k vnitřní části kočárku (obr. 1) a
položte jej za sedadlo tak, aby překrýval opěrku pro
nohy. Poté zapněte knoflíky (obr. 2).
PLÁŠTĚNKA: pláštěnku natáhněte na kočárek (obr_b),
připněte ji knoflíky ke stříšce (obr_1) a připněte
gumičky ke kostře kočárku včetně dolní části kočárku
(obr_2) .
8• PĚTIBODOVÝ BEZPEČNOSTNÍ PÁS: Chcete-li připnout
bezpečnostní pás, zapojte dvě přezky břišního pásu (s
připojeným ramenním pásem, šipka a) do spony pásu
pro nohy, dokud neuslyšíte cvaknutí (šipka b). Pro
odpoutání stiskněte tlačítko umístěné ve středu pásu
(šipka c) a vytáhněte popruh kolem pasu ven (šipka d).
9• Chcete-li břišní pás utáhnout, zatáhněte po obou
stranách ve směru šipky (Obr. a). Pokud jej chcete
povolit, udělejte opak. Bezpečnostní pás lze utáhnout
až po bezpečnostní zámek (Obr. b).
10• Bezpečnostní pásy můžete seřídit do 3 výšek podle
výšky dítěte. Jakmile dítě povyroste, je nutné nastavit
vyšší polohu.
11• Výšku bezpečnostního pásu nastavíte uvolněním dvou
přezek na zadní straně zádové opěrky.
Vytahujte ramenní popruhy směrem k sobě (šipka a),
dokud se přezka neuvolní, a zasuňte je do oček na
zádové opěrce (šipka b). Vytáhněte ramenní pásy z
potahu (šipka c) a protáhněte je nejvhodnější přezkou
(šipka d). Poté opět upevněte dvě přezky za zádovou
opěrkou (šipka e). Přezky budou bezpečně zapnuty,
jakmile uslyšíte cvaknutí (Obr. f).
12• SEŘÍZENÍ OPĚRKY NOHOU: opěrku nohou můžete
nastavit do 2 poloh. Jestliže chcete opěrku nohou
snížit, přesuňte boční páčky směrem dolů a současně
snižte opěrku nohou. Jestliže chcete opěrku nohou
zvýšit, vytlačte ji směrem nahoru, až uslyšíte cvaknutí.
SEŘÍZENÍ OPĚRKY ZAD: Opěrku zad můžete sklopit do
3 poloh. Jestliže chcete opěrku zad snížit, nadzvedněte
boční páčku současně na obou stranách a sklopte
opěrku zad; v požadované poloze opěrku zablokujte.
Jestliže chcete opěrku zad naopak zvýšit, vytlačte ji
směrem nahoru.
13• SLOŽENÍ: chcete-li kočárek složit, doporučujeme
nejprve složit přední madlo do polohy složení 2.
Kočárek můžete složit i jednou rukou: nejprve přesuňte
jednu páčku směrem nahoru a poté druhou, dokud
neuslyšíte cvaknutí.
14• Uchopte centrální rukojeť a táhněte ji nahoru, dokud
se kočárek nesloží (Obr. a). Zajistěte správné složení
kočárku pomocí bezpečnostní úchytky. Pokud je
kočárek správně složen, bude stát bez opory (Obr. b).
15• PŘEPRAVA: Kočárek můžete velmi pohodlně přenášet
(se zablokovanými předními kolečky) tak, že uchopíte
středovou rukojeť (obr_a). Můžete ho také přenášet
pomocí bočního držadla (obr_b).
16• ODSTRANĚNÍ POTAHU: při sejmutí potahu postupujte
takto:
na zadní straně zádové opěrky rozepněte obě spony
(obr_a).
Odepněte dva knoflíky na sedačce (obr_b).
Zespodu vytáhněte sponu pásu na nožičky (obr_c).
Odepněte knoflíky bočního potahu (obr_d).
17• Stáhněte potah z opěrky nohou (obr_e).
Chcete-li odstranit břišní bezpečnostní pás (na obou
stranách), vyšroubujte (z obou stran) dva šrouby
pomocí šroubováku a kleští, kterými zablokujete matici
(obr_f).
Potah vytáhněte směrem vzhůru (obr_g).
Page 35

- 35 -
UPEVŇOVÁNÍ AUTOSEDAČEK PRIMO
VIAGGIO TRI-FIX
Nejprve musíte kočárek zabrzdit.
Autosedačku bez dítěte nasaďte na kočárek.
Autosedačka musí být vždy namontována tak, aby
směřovala k mamince.
V případě potřeby sundejte stříšku kočárku, která je již
k autosedačce připevněna.
Přesuňte zádovou opěrku kočárku do 2. střední polohy
(část 12).
Umístěte rukojeť autosedačky do přepravní polohy tak,
aby bylo možné snadno upevnit pásky.
18• Stiskněte tlačítko pod loketní opěrkou a roztáhněte
přední tyčku. Poté ji současně po obou stranách
vytáhněte (obr. a).
UPOZORNĚNÍ: přední madlo vytahujte pouze pro
připevnění Car Seat.
Nakloňte autosedačku a vsaďte ji do sedačky kočárku
(obr. b).
19• Nejprve připněte pásek ke knoflíku na kočárku (šipka 1)
a poté jej protáhněte za rukojetí autosedačky (šipka 2).
Připněte pásek ke knoflíku ve spodní části rámu
kočárku (šipka 3) a poté jej utáhněte, dokud nebude
autosedačka zcela připevněna ke kočárku (šipka 4).
Stejně postupujte i na druhé straně kočárku (obr. c).
Správně připevněná autosedačka je znázorněna na
(obr. d).
Odejmutí autosedačky z kočárku:
povolte pásy;
odepněte pás od knoflíku ve spodní části rámu
kočárku;
vytáhněte pás zpoza rukojeti autosedačky;
poté odepněte pás od knoflíku na kočárku.
SÉRIOVÁ ČÍSLA
20• Na kočárku Si jsou pod zádovou opěrkou uvedeny
následující informace: název výrobku, datum výroby a
sériové číslo.
Tyto informace jsou nezbytné při řešení jakýchkoliv
stížností.
PŘÍSLUŠENSTVÍ
21• SÍŤ PROTI HMYZU: Může být připnuta pomocí knoflíků
ke stříšce (Obr. a).
TAŠKA : Taška s podložkou pro přebalení dítěte. Je
možné ji připnout ke kočárku (Obr. b).
22• CESTOVNÍ TAŠKA: Praktická polstrovaná taška pro
leteckou přepravu kočárku (Obr. a).
DEŠTNÍK: Praktický deštník určený pro tento kočárek
(Obr. b).
ČIŠTĚNÍ A ÚDRŽBA
ÚDRŽBA: Chraňte výrobek před atmosférickými vlivy
(voda, déšť nebo sníh); nepřetržité a dlouhodobé
vystavení slunečnímu záření může způsobit změnu
barvy mnoha materiálů; uchovávejte výrobek na
suchém místě.
ČIŠTĚNÍ PODVOZKU: Pravidelně čistěte umělohmotné
části vlhkým hadrem bez použití rozpouštědel
nebo jiných podobných prostředků; kovové části
vždy dobře vysušte, aby nedošlo k jejich zrezivění;
udržujte veškeré pohyblivé části výrobku čisté
(regulační mechanismy, úchytné mechanismy, kola...) a
pravidelně z nich odstraňujte prach a písek; v případě
potřeby je promažte lehkým olejem.
ČIŠTĚNÍ PLÁŠTĚNKY: Umývejte houbou a mýdlovou
vodou bez použití čistících prostředků.
ČIŠTĚNÍ TEXTILNÍCH ČÁSTÍ: textilní části pravidelně
kartáčujte, aby se na nich neusazoval prach, a perte
je v ruce při max. teplotě 30°; neždímejte; nebělte
chlórem; nežehlete; nečistěte chemicky; neodstraňujte
skvrny pomocí rozpouštědel a nesušte v sušičce s
otočným bubnem.
PEG-PÉREGO S.p.A.
Společnost Peg-Pérego S.p.A. je
certifikovaná podle ISO 9001. Tato
certifikace zaručuje klientům a
spotřebitelům transparentnost a
spolehlivost ohledně pracovních
postupů společnosti. Společnost Peg Pérego si
vyhrazuje právo provést jakékoliv změny a úpravy na
modelech popsaných v této publikaci, jestliže si to
vyžádají technické nebo obchodní důvody. Společnost
Peg Pérego je k dispozici svým zákazníkům, aby co
nejlépe uspokojila veškeré jejich potřeby a požadavky.
Z tohoto důvodu je pro společnost velmi užitečné a
cenné se seznámit s názory svých zákazníků. Budeme
vám proto velmi vděční, když po použití našeho
výrobku vyplníte DOTAZNÍK O SPOKOJENOSTI
ZÁKAZNÍKŮ, který naleznete na našich internetových
stránkách www.pegperego.com, a seznámíte nás s
vašimi případnými připomínkami a podněty.
SERVISNÍ SLUŽBA PEG-PÉREGO
Jestliže náhodou dojde ke ztrátě nebo poškození
jednotlivých dílů výrobku, použijte pouze originální
náhradní díly Peg Pérego. V případě opravy, výměny,
dotazů na výrobky, prodeje originálních náhradních
dílů a příslušenství se obraťte na servisní středisko Peg
Pérego a pokud možno uveďte sériové číslo výrobku.
tel. 0039/039/60.88.213
fax 0039/039/33.09.992
e-mail assistenza@pegperego.it
internetové stránky www.pegperego.com
Page 36

- 36 -
SK_Slovenčina
Ďakujeme, že ste si vybrali výrobok Peg-Pérego.
OPOZORILO
_ DÔLEŽITÉ: prečítajte si dôkladne tieto inštrukcie
a uschovajte si je pre použitie v budúcnosti.
Bezpečnosť dieťaťa by mohla byť ohrozená
v prípade, že tieto inštrukcie nie sú dodržané.
_ Tento výrobok je určený pre prepravu 1 dieťaťa na
sedačke.
_ Nepoužívajte tento výrobok pre väčší počet užívateľov
ako je určené výrobcom.
_ Tento výrobok je schválený pre detí od narodenia do 15
kilogramov váhy na sedačke.
_ Nenechávajte dieťa bez dozoru. Môže to byť
nebezpečné.
_ Vždy použite päťbodový bezpečnostný pás, brušný pás
a pás na nohy.
_ Športový kočík používajte vždy s namontovanou
prednou opierkou.
_ Dávajte pozor, aby ste nezranili dieťa počas
nastavovania mechanizmov (držadlo, opierka).
_ Keď je kočík v kľude vždy ho zabrzdite. Kočík zabrzdite
aj pri nakladí a vykladaní dieťaťa.
_ Operácie spojené s montážou, prípravou výrobku,
čistením a údržbou musia vykonávať len dospelé osoby.
_ Výrobok nepoužívajte, ak niektoré súčasti chýbajú
alebo sú zrejmé známky poškodenia.
_ Pred použitím skontrolujte, či sú všetky spojovacie
mechanizmy správne upevnené.
_ Do mechanizmov nedávajte prsty.
_ Každý náklad zavesený na držadlá a rukoväte môže
spôsobiť nestabilitu výrobku; sledujte pokyny výrobcu
pokiaľ ide o max. povolené zaťaženie týchto prvkov.
_ Do košíka nedávajte náklad ťažší ako 5 kg. Do držiaka
nápojov nevkladajte predmety o hmotnosti väčšej než
je predpísaná na samotnom držiaku, a tiež doň nikdy
nevkladajte horúce nápoje. Nevkladajte do vrecák
striešky (ak sú na Vašom výrobku) predmety ťažšie ako
0.2 kg.
_ Nepoužívajte výrobok v blízkosti schodov alebo
stupníkov, tepelných zdrojov, otvoreného ohňa alebo
iných nebezpečných predmetov, ktoré sú v dosahu
dieťaťa.
_ Použitie doplnkov, ktoré nie sú schválené výrobcom,
môže byť nebezpečné.
_ Tento výrobok nie je vhodný pre behanie alebo pre
kolieskové korčuľovanie.
_ Nepoužívajte plášť (ak je súčasťou výbavy) v uzavretých
priestoroch a pravidelne kontrolujte, či nie je vaše dieťa
prehriate; plášť nikdy neumiestňujte v blízkosti zdrojov
tepla a dávajte pozor na to, aby ste ho neprepálili
cigaretou. Uistite sa, či plášť nebráni v pohybe žiadnemu
mechanizmu podvozku alebo kočíku; pred zložením
podvozku alebo kočíka plášť vždy odoberte.
_
POZOR: s otvoreným športovým kočíkom a
počas jeho používania majte prednú opierku iba
v polohe 1 (nadvihnutá) a polohu 2 (spustená)
používajte, iba keď je športový kočík zložený.
_ UPOZORNENIE: Nepridávajte k nej matrace.
ZLOŽKY VÝROBKU
Skontrolujte obsah obalu a v prípade reklamácie
kontaktujte servisné stredisko.
_ Prevedenie kočíka Sì COMPLETO sa skladá z týchto
častí: 2 otočné/aretovateľné predné kolieska, 2 zadné
kolieska, košík, držiak na fľašu, strieška, kryt, pršiplášť, 2
ramenné pásy a 1 medzinožný pás, 2 pásové adaptéry
na autosedačku.
_ Športový kočík Sì CLASSICO tvoria: 2 predné kolieska
otáčavé okolo vertikálnej osi alebo blokovateľné,
2 zadné kolieska, košík, držiak na fľaše, strieška, 2
adaptéry na pásy a 1 medzinožný pás, 2 adaptačné
pásky na pripevnenie Car Seat.
NÁVOD NA POUŽITIE
1• Rám otvorte potiahnutím dvoch páčok na rukovätiach
smerom nahor (obr. a). Zároveň zdvihnite rám a ten sa
automaticky otvorí (obr. b). Aby ste sa ubezpečili, že
ste kočík otvorili správne, skontrolujte dva bočné háky
(obr. c).
2• Ak pásy nie sú riadne upevnené, zatlačte sedačku tak,
aby zapadla na miesto. (obr. a) .
Potom nohou zatlačte PUSH (obr. b) a nadvihnite
prednú tyč (časť 5b) o jeden stupeň.
3• KOŠÍK: pri montáži košíka vsuňte očká na zadné háčky
A a B na predný háčik C (obr_a).
NOSIČ FLIAŠ: môžete namontovať iba na pravú stranu
kočíka, vďaka háčiku, ktoý je už na kostre.
Pri montáži držiaka na fľaše ho nasuňte na háčik, až
kým neklikne (obr_b).
4• REGULÁCIA RUKOVÄTÍ: výšku rukovätí možno nastaviť
v 3 rôznych polohách. Pri nastavení rukoväte do
želanej polohy stlačte tlačidlo a súčasne ťahajte
rukoväť smerom hore. Aby ste rukoväte znížili,
postupujte opačne (obr_a).
BRZDA: aby ste kočík zabrzdili, stlačte nohou páčku
brzdy nachádzajúcu sa na jednotke zadných koliesok.
Pri odblokovaní bŕzd postupujte opačne (obr_b). Keď
kočík stojí, vždy ho zabrzdite.
5• OTOČNÉ KOLIESKA: kolieska sú už namontované v
kočíku.
Ak chcete, aby sa otáčali, je potrebné, aby bola páka
(šípka 1) dolu. Na zaistenie koliesok páčku posuňte
opačným smerom (šípka 2). Zadné kolieska sú
zaaretované.
POZOR: športový kočík používajte vždy s
namontovanou prednou opierkou.
PREDNÁ OPIERKA: je už pripevnená ku športovému
kočíku.
Dá sa nastaviť do 2 polôh:
POLOHA 1: pri používaní kočíka
POLOHA 2: zatvorený kočík.
Aby ste ju nastavili, stlačte súčasne tlačidlá na oboch
stranách (obr_b).
6• STRIEŠKA: pri montáži striešky vsuňte úchytky do
príslušných miest, aby zapadli a zapnite gombíky
striešky na zadnej strane chrtového operadla kočíka
(obr_a).
Strieška sa dá nastaviť do 3 polôh (obr_b) jednoduchým
potiahnutím vpred alebo zatlačením dozadu.
Môžete vytiahnuť časť sieťky striešky, aby bolo dieťa
chránené pred slnkom (obr_c) a jednoduchým gestom
ju môžete znovu vsunúť do striešky, keď už ochrana
nebude potrebná.
7• KRYT: na správne použitie krytu (obr. a) upevnite
Page 37

- 37 -
tlačidlá vo vnútornej časti kočíka (obr. 1) a umiestnite
ho pod sedadlo tak, aby zakrýval priestor na nohy a
potom ho zapnite (obr. 2).
PRŠIPLÁŠŤ: aby ste na kočík namontovali pršiplášť
(obr_b), zapnite gombíka na bokoch nánožníka (obr_1)
a zapnite aj gumičky tak, aby bola zakrytá aj spodná
časť kostry kočíka (obr_2) .
8• 5-BODOVÝ BEZPEČNOSTNÝ PÁS: Pri jeho upevňovaní
vsuňte dve sponky pásového popruhu (s pripevnenými
ramennými popruhmi, šípka a) do popruhu medzi
nohami, kým kliknutím nezapadnú na správne miesto
(šípka b). Ak ich chcete odopnúť, stlačte tlačidlo, ktoré
sa nachádza v strede upínača (šípka c) a potiahnite
bedrový pás smerom von (šípka d).
9• Ak chcete pásový popruh pritiahnuť, zatiahnite na
oboch stranách v smere šípky (Obr. a). Ak ho chcete
uvoľniť postupujte opačne. Pásový popruh je možné
zatiahnuť len potiaľ, pokiaľ to umožní bezpečnostná
poistka (Obr. b).
10• Bezpečnostné pásy môžete nastaviť do 3 výšok, v
závislosti od výšky dieťaťa. Pásy prepnite do vyššej
polohy, keď je dieťa vyššie.
11• Če želite nastaviti višino varnostnega pasu, sprostite
sponki na zadnji strani opore.
Naramnici povlecite proti sebi (puščica a), dokler se
sponki ne sprostita in ju lahko vstavite v zanki okvirja
(puščica b). Naramnici odstranite iz naslonjala (puščica
c) in ju vstavite v najprimernejšo sponko (puščica
d), sponki pa nato znova pritrdite na zadnjo stran
hrbtnega naslonjala (puščica e). Sponki sta varno
pripeti, ko zaslišite klik (slika f).
12• REGULÁCIA PODNOŽKY: Podnožku možno nastaviť do
2 polôh. Pri znížení podnožky potiahnite dve bočné
páčky a súčasne podnožku zatlačte. Pri nadvihnutí
zatlačte smerom hore, aby klikla.
REGULÁCIA CHRBTOVÉHO OPERADLA: Chrbtové
operadlo sa dá nastaviť do 3 polôh. Pri spustení
operadla nadvihnite bočnú páčku súčasne na oboch
stranách a spusťte operadlo do želanej polohy,
zablokujte ho. Pri nadvihnutí operadla ho zatlačte
smerom hore.
13• ZLOŽENIE: aby ste športový kočík zložili, odporúča sa
najprv sklopiť prednú opierku, do polohy 2, teda do
zatvorenej polohy.
Kočík sa dá zložiť jednou rukou: Najprv potiahnite
smerom nahor jednu páčku, a potom druhú, až kým
nebudete počuť kliknutie.
14• Držte centrálnu rukoväť a potiahnite ju smerom nahor,
kým sa kočík nezloží (obr. a). Skontrolujte správne
zatvorenie rámu v mieste bezpečnostného háku. Keď je
kočík zložený, rám sám stojí (obr. b).
15• PREPRAVA: Kočík môžete pohodlne prepravovať (ak
sú predné kolieska zablokované) držaním za strednú
rukoväť (obr_a). Môžete ho prepravovať aj vďaka
bočnej rukoväti, (obr_b).
16• STIAHNUTIE POŤAHU: pri stiahnutí poťahu kočíka:
odopnite dve pracky na zadnej strane operadla (obr_a).
Odopnite dva gombíky na sedadle (obr_b).
Vytiahnite zospodu pracku medzinožného pásu (obr_c).
Odopnite gombíky bočného vaku (obr_d).
17• Stiahnite poťah zo stupienka (obr_e).
Aby ste vybrali bezpečnostný pás, odskrutkujte
(na oboch stranách) dve skrutky, pričom použite
skrutkovač a kliešťami pridržte maticu (obr_f).
Stiahnite poťah z hornej časti (obr_g).
PRIPEVNENIE AUTOSEDAČKY PRIMO
VIAGGIO TRI-FIX
Najprv nastavte brzdy kočíka.
Sedačku na kočík upevňujte vždy bez dieťaťa.
Autosedačka sa musí vždy upevňovať tak, že ste oproti
nej.
Ak je to potrebné, odstráňte striešku kočíka, pretože tá
sa už nachádza na autosedačke.
Opierku kočíka dajte do 2. strednej polohy (časť 12).
Držadlo autosedačky umiestnite do polohy na prenos
tak, aby bolo možné jednoducho upevniť pásy.
18• Stlačte tlačidlo pod opierkou ruky a natiahnite prednú
tyč a následne ju vytiahnite naraz z oboch strán (obr. a).
POZOR: prednú opierku predĺžte, iba ak chcete
pripevniť Car Seat.
Autosedačku nakloňte a vložte do kočíka (obr. b).
19• Najprv zapnite cvok na kočíku a páse (šípka 1), potom
prevlečte cez pás poza držadlo autosedačky (šípka 2).
Zapnite cvok na páse a spodnej časti rámu kočíka
(šípka 3) a utiahnite ho tak, aby bola autosedačka
pevne uchytená v kočíku (šípka 4).
To isté zopakujte na oboch stranách kočíka (obr. c).
Autosedačka je správne upevnená v kočíku (obr. d).
Uvoľnenie autosedačky z kočíka:
uvoľnite pásy;
Odopnite cvok pásu zo spodnej časti rámu kočíka;
uvoľnite ho spoza držadla autosedačky;
potom odopnite cvok pásu z kočíka.
SERIJSKE ŠTEVILKE
20• Kočík Si má všetky dôležité informácie uvedené na
zadnej časti operadla: názov výrobku, dátum výroby a
sériové číslo.
Tieto informácie uveďte v prípade reklamácie.
PRÍSLUŠENSTVO
21• SIEŤKA PROTI KOMÁROM: Môže byť pripevnený
gombíkmi k strieške (obr. a).
TORBA: Taška na prebaľovanie s podložkou na
prebaľovanie dieťaťa. Dá sa pripevniť ku kočíku (obr. b).
22• CESTOVNÁ TAŠKA: Praktická pevná taška na prenášanie
kočíka v lietadle (obr. a).
DÁŽDNIK: Praktický pripojiteľný dáždnik (obr. b).
ČISTENIE A ÚDRŽBA
ÚDRŽBA VÝROBKU: chráňte výrobok pred
atmosférickými vplyvmi: voda, dážď alebo sneh;
nepretržité a dlhodobé vystavenie slnečnému žiareniu
môže spôsobiť zmenu farby mnohých materiálov;
uchovávajte výrobok na suchom mieste.
ČISTENIE PODVOZKU: pravidelne čistite umelohmotné
časti vlhkou handričkou; nepoužívajte rozpúšťadlá
alebo podobné prostriedky; kovové časti výrobku
vysušte, aby nedošlo k ich zhrdzaveniu; udržiavajte v
čistom stave všetky mobilné časti výrobku (regulačné
mechanizmy, úchytné mechanizmy, kolesá...),
odstraňujte z nich prach a piesok a v prípade potreby
ich namažte ľahkým olejom.
ČISTENIE PLÁŠŤA: umývajte pomocou špongie a
Page 38

- 38 -
mydlovej vody, nepoužívajte pracie prostriedky.
ČISTENIE TEXTILNÝCH ČASTÍ: textilné časti výrobku
pravidelne vykefujte, čím odstránite prach a perte
v rukách pri maximálnej teplote 30°; nežmýkajte;
nepoužívajte prostriedky obsahujúce chlór;
nežehlite; nečistite chemicky; na odstraňovanie
škvŕn nepoužívajte rozpúšťadlá a nesušte v sušičke s
otáčajúcim sa bubnom.
PEG-PÉREGO S.p.A.
Spoločnosť Peg-Pérego S.p.A. je
certifikovaná podľa ISO 9001. Tento
certifikát zaručuje zákazníkom a
spotrebiteľom transparentnosť a
spoľahlivosť vzhľadom na pracovné
postupy spoločnosti. Spoločnosť Peg
Pérego môže kedykoľvek vykonať zmeny a úpravy na
modeloch, ktoré sú popísané v tejto publikácii, ak si to
budú vyžadovať technické alebo obchodné
podmienky. Spoločnosť Peg Pérego je vždy k dispozícii
svojim spotrebiteľom, aby čo najlepšie uspokojila
všetky ich potreby a požiadavky. Z tohto dôvodu je pre
spoločnosť veľmi dôležité a cenné oboznámiť sa s
názormi našich zákazníkov. Preto vám budeme veľmi
vďační, keď po použití nášho výrobku vyplníte
DOTAZNÍK PRE ZISTENIE SPOKOJNOSTI ZÁKAZNÍKOV,
ktorý nájdete na nasledujúcej internetovej adrese:
www.pegperego.com. Prosíme vás o uvedenie
prípadných postrehov a doporučení.
ASISTENČNÁ SLUŽBA SPOLOČNOSTI
PEG-PÉREGO
Ak by ste náhodou časti modelu stratili alebo by sa
poškodili, používajte výhradne originálne náhradné
diely Peg Pérego. V prípade prípadných opráv, výmen,
informácií o výrobkoch, predaji náhradných dielov a
príslušenstva sa obráťte na servisnú sieť Peg Pérego,
pričom uveďte, ak by ste ho mali k dispozícii, sériové
číslo výrobku.
tel. 0039/039/60.88.213
fax 0039/039/33.09.992
e-mail assistenza@pegperego.it
internetová stránka www.pegperego.com
HU_Magyar
Köszönjük, hogy a Peg-Pérego termékét választották.
FIGYELMEZTETÉS
_
FONTOS: figyelmesen olvassák el az alábbi utasításokat
és azokat őrizzék meg a későbbi alkalmazás céljából. A
gyermek biztonságát veszélyeztethetik azzal, ha nem
tartják be ezeket az utasításokat.
_ Ezt a terméket 1 gyermek ülésben történő szállítására
tervezték.
_ Ne használják többen a terméket a gyártó által
megadott személyek számánál.
_ Ezt a terméket újszülött és maximum 15 kg súlyú
gyermekek ülésben történő szállítására hitelesítették.
_ A gyermekük felügyelet nélkül hagyása veszélyes lehet.
_ Mindig használják az ötpontos biztonsági övet, mindig
csatolják be a csípőövet a lábelválasztó övbe.
_ Mindig használják a sportkocsira felszerelt kapaszkodót.
_ Figyeljenek oda a jelenlévő gyermekre akkor, amikor a
szerkezeteket beállító műveleteket (tolókar, háttámla)
végzik.
_ Álló helyzetben és a gyermek behelyezése és kivétele
folyamán mindig működtessék a fékeket.
_ A termék összeszerelési, előkészítési, tisztítási és
karbantartási műveleteit csak felnőttek végezhetik.
_ Ne használják a terméket, ha egyes részei hiányoznak
vagy azon törést észlelnek.
_ A használat előtt győződjenek meg arról, hogy minden
rögzítő szerkezet helyesen be van kapcsolva.
_ Ne tegyék az ujjukat a szerkezetekbe.
_ A tolókarra vagy a fogantyúkra felakasztott bármilyen
teher instabillá teheti a terméket; tartsák be a
gyártó utasításait a maximális terhek alkalmazására
vonatkozóan.
_ Ne rakjanak a kosárba 5 kg-nál nagyobb súlyú
terheket. Ne tegyenek az italtartókba az italtartón
feltüntetett súlynál nehezebb terhet és meleg italt
soha. A kocsitető zsebekbe (ha vannak) 0,2 kg-ot meg
nem haladó súlyokat helyezzenek.
_ Ne alkalmazzák a terméket lépcső vagy lépcsőfokok
mellett; ne használják hőforrások, nyílt láng vagy a
gyermek kezeügyébe eső, veszélyes tárgyak közelében.
_ A gyártó által jóvá nem hagyott tartozékok használata
veszélyes lehet.
_ Ez a termék nem alkalmas arra, hogy jogging vagy
görkorcsolyázás közben használják.
_ Ne használják az esővédőt (ha van) zárt környezetben
és mindig ellenőrizzék, hogy a gyermek nincs-e
kimelegedve; soha ne helyezzék hőforrásokhoz közel
és dohányzás közben vigyázzanak. Győződjenek meg
arról, hogy az esővédő nem ütközik a kocsiváz vagy a
sportkocsi semmilyen mozgásban lévő szerkezetébe;
mindig vegyék le az esővédőt, mielőtt összecsukják a
kocsivázat vagy a sportkocsit.
_
FIGYELEM: szétnyitott sportkocsin és a használat
folyamán a kapaszkodót csak az 1. (felemelt) pozícióban
használják, míg a 2. (leengedett) pozícióban csak az
összecsukott sportkocsin alkalmazzák.
_ FIGYELMEZTETÉS: Ne tegyenek be matracokat.
Page 39

- 39 -
A TERMÉK ALKOTÓELEMEI
Ellenőrizzék a csomag tartalmát és reklamáció esetén
kérjük, hogy vegyék fel a kapcsolatot a Vevőszolgálattal.
_ A Sì COMPLETO típusú sportkocsi készlete az
alábbiakból áll: 2 elülső bolygó-/zárókerék, 2 hátsó
kerék, kosár, pohártartó, kocsitető, takaró, esővédő,
2 vállpánt és 1 lábelválasztó, 2 db autós gyerekülést
rögzítő pánt.
_ A Sì CLASSICO sportkocsi összetevői: 2 első
bolygókerekes vagy rögzíthető kerék, 2 hátsó
kerék, kosár, cumisüvegtartó, tető, 2 vállszíj az
övekhez és 1 lábelválasztó, 2 adapter szíj a Car Seat
rákapcsolásához.
HASZNÁLATI UTASÍTÁS
1• A kocsiváz szétnyitásához felfelé kell húzni a
fogantyúkon lévő két kart (a. ábra); Egyidejűleg
emeljék fel a kocsivázat, amely ekkor automatikusan
szétnyílik (b. ábra). Annak vizsgálata céljából, hogy
a sportkocsi helyesen van-e kinyitva, ellenőrizzék az
oldalsó két horgot (c. ábra).
2• Ha a pántok nincsenek a megfelelő módon rögzítve,
nyomják le az ülést (a. ábra), hogy az bekattanjon.
Ezután a lábukkal nyomják le a PUSH fokozatba (b.
ábra) és a kapaszkodót emeljék egy pozícióval feljebb
(5b pont).
3• KOSÁR: a kosár felszereléséhez húzza a nyílásokat a
hátsó A és B, valamint az első C kampóra (a ábra).
ITALTARTÓ: csak a babakocsi jobb oldalára lehet
fölszerelni a vázon már fönt lévő kampó segítségével.
Az italtartó felszereléséhez kattanásig akassza azt be (b
ábra).
4• TOLÓKAROK BEÁLLÍTÁSA: a tolókarokat 3 különböző
magasságba lehet beállítani. A kívánt helyzetbe
állításhoz nyomja le a gombot, és evvel egy időben
húzza fölfelé a kart. A leeresztéshez a műveletet
ellenkező irányban végezze el (a ábra).
FÉK: a babakocsi befékezéséhez lábbal nyomja le a
hátsó kerekeknél található fékkart. A fék kioldásához
végezze el a műveletet ellenkező irányban (b ábra).
Álló helyzetben mindig fékezze be a babakocsit.
5• BOLYGÓKEREKEK: a kerekek már a sportkocsiba lettek
rögzítve.
A kerekek bolygókerekekként való használata céljából
a kart (1. nyíl) le kell ereszteni. A kerekek bebiztosítása
céljából mozdítsák el a kart az ellenkező irányba (2.
nyíl). A hátsó kerekek rögzítettek.
FIGYELEM: mindig használják a sportkocsira
felszerelt kapaszkodót.
KAPASZKODÓ: a sportkocsira már rá van erősítve.
2 pozícióba állítható:
1. POZÍCIÓ: használati
2. POZÍCIÓ: lehajtott.
A beállításához egyidejűleg mindkét oldalon nyomják
be az oldalsó gombot (b_ábra).
6• KUPOLA: a kupola fölhelyezéséhez illessze be a
csatlakozóelemeket a megfelelő helyre kattanásig,
és gombolja rá a kupolát a babakocsi háttámlájának
hátsó oldalára (a ábra).
A kupolát egyszerűen előre vagy hátra húzva 3
helyzetbe lehet állítani (b ábra).
A kupolából ki lehet húzni a napellenző hálót a
gyermek naptól való védelmére (c ábra), és egy
egyszerű mozdulattal vissza lehet helyezni a kupolába,
amikor már nincs rá szükség.
7• TAKARÓ: a takaró helyes használata céljából (a. ábra)
kapcsolják be a gombokat a sportkocsi belső részén (1.
ábra) és fektessék le az ülés alatt úgy, hogy az betakarja
a lábtartót, majd rögzítsék a gombokkal (2. ábra).
ESŐERNYŐ: az esőernyő felszereléséhez helyezze azt a
babakocsira (b ábra), gombolja föl a kupola oldalán (1
ábra), és gombolja föl a gumiköteleket is a babakocsi
alján a vázat is beburkolva (2 ábra).
8• 5-PONTOS BIZTONSÁGI ÖV: a becsatolásához
vezessék be a csípőöv szíjának két csatját (rácsatolt
vállpántokkal – a nyíl) a lábelválasztó szíjba
kattanásukig (b nyíl). A lekapcsoláshoz nyomja meg
a rögzítő közepén található gombot (c nyíl), és húzza
kifelé a derékszíjakat (d nyíl).
9• A csípőöv megfeszítéséhez azt húzzák mindkét oldalon
a nyíl irányába (a. ábra). A meglazításához az ellenkező
irányban járjanak el. A csípőöv a biztonsági pecekig
feszíthető (b. ábra).
10• A biztonsági övet a gyermek magassága alapján
3 szintbe lehet beállítani. A magasabb pozícióba
történő átállítás akkor szükséges, amikor a gyermek
már nagyobb.
11• A biztonsági öv magasságának a beállításához csatolják
ki a háttámla hátsó részén található két csatot.
Húzzák maguk felé a vállpántokat (a nyíl), egészen
addig, míg a csatok kioldódnak, majd vezessék
be őket a háttámlán található övbújtatókba (b
nyíl). Vegyék ki a vállpántokat a zsákból (c nyíl) és
vezessék be a legmegfelelőbb övbújtatóba (d nyíl),
majd ezt követően ismét csatolják be a két csatot a
háttámla hátsó részén (e nyíl).). A csatok akkor vannak
biztonságosan rögzítve, ha bekattannak (f. ábra).
12• A LÁBTARTÓ BEÁLLÍTÁSA: A lábtartót 2 helyzetbe lehet
állítani. A lábtartó leengedéséhez húzza lefelé a két
oldalsó kart, és evvel egyidejűleg engedje le a lábtartót.
Fölemeléshez emelje föl a lábtartót kattanásig.
HÁTTÁMLA BEÁLLITÁS: A háttámlát 3 döntési
helyzetbe lehet állítani. A háttámla ledöntéséhez húzza
föl egyidejűleg a két oldalon a karokat, és nyomja le a
háttámlát, rögzítse a kívánt helyzetben. Felemeléséhez
nyomja föl a háttámlát.
13• ÖSSZECSUKÁS: a sportkocsi összecsukásához
ajánlatos először leengedni a kapaszkodót a 2.
lehajtott pozícióba.
A sportkocsi összecsukható akár egy kézzel is: először az
egyik majd a másik kart húzzák fel kattanásig.
14• Fogják meg a középső fogantyút és húzzák felfelé az
összecsukásig (a. ábra). Ellenőrizzék a kocsiváz helyes
összecsukását a biztonsági kapocsnál. Az összecsukott
sportkocsi egymagában megáll (b. ábra).
15• SZÁLLÍTÁS: A babakocsit a középső fogantyúnál
fogva kényelmesen lehet szállítani (a két első kereket
rögzített állapotban tartva) (a ábra). Az oldalsó
fogantyú segítségével is lehet szállítani (b ábra).
16• LEHÚZHATÓ BÉLÉS: a babakocsi bélésének lehúzásához:
a háttámla hátulsó oldalán ki kell kötni a két csatot (a
ábra).
Ki kell akasztani az ülésen lévő két gombot (b ábra).
Alulról ki kell húzni a lábközép csatját (c ábra).
Ki kell akasztani az oldalzsák gombokat (d ábra).
17• Le kell húzni a zsákot a lábtartóról (e ábra).
A biztonsági öv levételéhez (mindkét oldalon) csavarja
ki egy csavarhúzóval a két csavart, miközben az
anyacsavart egy fogóval rögzíti (f ábra).
Húzza fölfelé a zsákot (g ábra).
Page 40

- 40 -
A PRIMO VIAGGIO TRI-FIX AUTÓS
GYEREKÜLÉSEK FELERŐSÍTÉSE
Először fékezzék be a sportkocsit.
Az autós gyerekülést a sportkocsira üresen, gyermek
nélkül rögzítse.
Az autós gyerekülést úgy szereljék fel, hogy az arccal
mindig a mama irányában legyen.
Ha szükséges, vegyék le a sportkocsi fedelét,
amennyiben azt korábban az autós gyerekülésre
szerelték fel.
A sportkocsi háttámláját állítsák a középső, 2.
fokozatba (12. pont).
Az autós gyerekülés fogantyúját állítsák a szállítási
pozícióba, hogy a pántokat könnyen be lehessen
csatolni.
18• Nyomják le a gombot a kartámla alá és húzzák ki a
kapaszkodót, majd egyidejűleg húzzák ki azt mindkét
oldalról (a. ábra).
FIGYELEM: csak akkor hosszabbítsák meg a
kapaszkodót, amikor rá kívánják kapcsolni a Car
Seat-t.
Támaszkodjon az autós gyerekülésre és illessze be azt
a sportkocsi ülésébe (b. ábra).
19• Először csatlakoztassák a pánt gomblyukát a sportkocsi
gombjához (1. nyíl), majd az autós gyerekülés
kapaszkodója mögött bújtassák át a pántot (2. nyíl).
Csatlakoztassák a pánt gomblyukát a sportkocsi
vázának az alsó részén lévő gombjához (3. nyíl) és
szorítsák meg a pántot, hogy az autós gyerekülés
teljesen a sportkocsiba legyen rögzítve (4. nyíl).
Végezzék el ugyanezeket a műveleteket a sportkocsi
másik oldalán is (c. ábra).
Az autós gyerekülés a sportkocsiba a megfelelő módon
lett rögzítve (d. ábra).
Az autós gyerekülés kivétele a sportkocsiból:
lazítsa meg a szíjakat;
csatolja le a pánt gomblyukát a sportkocsi vázának az
alsó részéről;
csúsztassa ki az autós gyerekülés kapaszkodója mögül;
ezt követően csatolja le a pánt gomblyukát a
sportkocsi gombjáról.
SOROZATSZÁMOK
20• A Si Sportkocsi háttámlája mögött az alábbi információ
található: a termék neve, gyártási idő és sorozatszám.
Az esetleges reklamáció esetén ezeket az adatokat
kérjük megadni.
TARTOZÉKOK
21• SZÚNYOGHÁLÓ: gombokkal a kocsitetőhöz illeszthető
(a. ábra).
ZSÁK: pelenkázó táska védőhuzattal együtt a baba
pelenkázásához. A sportkocsira akasztható (b. ábra).
22• UTAZÓTÁSKA: praktikus táska a sportkocsi légi
szállításához (a. ábra).
ESERNYŐ: praktikus, a sportkocsira szerelhető esernyő
(b. ábra).
TISZTÍTÁS ÉS KARBANTARTÁS
A TERMÉK KARBANTARTÁSA: védjék meg az időjárási
viszontagságoktól: víztől, esőtől vagy hótól; a
napsütésnek való folytonos és hosszadalmas kitétel
sok alapanyagban színváltozást okozhat; száraz helyen
tárolják a terméket.
A VÁZ TISZTÍTÁSA: egy nedves törlőruhával,
oldószerek vagy egyéb hasonló termékek alkalmazása
nélkül, rendszeresen tisztítsák meg a műanyagból
készült részeket; tartsanak szárazon minden fémből
készült részt a rozsdásodás megelőzése céljából;
tisztítsák le a port vagy a homokot minden mozgó
részről (szabályozó mechanizmusok, összekapcsoló
mechanizmusok, kerekek…) és szükség esetén könnyű
olajjal kenjék be.
AZ ESŐVÉDŐ TISZTÍTÁSA: egy szivaccsal és szappanos
vízzel, mosószerek használata nélkül mossák le.
A SZÖVETRÉSZEK TISZTÍTÁSA:A SZÖVETRÉSZEK
TISZTÍTÁSA: keféljék le a szövetrészeket a por
eltávolításához és legfeljebb 30°-os hőmérsékleten,
kézzel mossák ki; ne facsarják; ne fehérítsék klórral; ne
vasalják; ne végezzenek száraz tisztítást; ne távolítsák
el a foltokat oldószerekkel és ne szárítsák forgódobos
ruhaszárítógépben.
PEG-PÉREGO S.p.A.
A Peg-Pérego Rt. ISO 9001
tanúsítánnyal rendelkezik. A
tanúsítvány a vállalati munkamódszer
rendszerezettségének és az abban való
bizalomnak a garanciáját kínálja az
ügyfeleknek és a fogyasztóknak. A Peg Pérego az
ebben a kiadványban ismertetett modelleknél műszaki
vagy kereskedelmi jellegű okokból kifolyólag bármikor
végrehajthat módosításokat. A Peg Pérego a
Fogyasztói rendelkezésére áll minden igényük legjobb
kielégítése céljából. Ehhez az Ügyfeleink véleményének
megismerése számunkra rendkívül fontos és értékes.
Ezért nagyon hálásak lennénk, ha a termékünk
használatbavétele után kitöltenék a FOGYASZTÓI
ÉRTÉKELÉSI KÉRDŐÍVET és abban feltüntetnék az
esetleges észrevételeiket vagy ötleteiket; a kérdőívet
az alábbi internetes weboldalunkon találják meg:
www.pegperego.com
PEG-PÉREGO VEVŐSZOLGÁLAT
Ha a modell részei véletlenül elvesznek vagy
megsérülnek, akkor csak eredeti Peg Pérego
cserealkatrészeket használjanak! Az esetleges javítások,
cserék, a termékekkel kapcsolatos információk
valamint az eredeti alkatrészek és tartozékok
értékesítése ügyében vegyék fel a kapcsolatot a Peg
Pérego Vevőszolgálatával, meghatározva a termék
sorozatszámát, amennyiben a rendelkezésükre áll.
tel. 0039/039/60.88.213
fax 0039/039/33.09.992
e-mail assistenza@pegperego.it
internetes weboldal www.pegperego.com
Page 41

- 41 -
SL_Slovenščina
Hvala, ker ste izbrali izdelek Peg-Pérego.
OPOZORILO
_ POMEMBNO: natančno preberite ta navodila in jih
shranite za prihodnjo uporabo. Neupoštevanje teh
navodil lahko ogrozi varnost otroka.
_ Ta izdelek je namenjen prevažanju 1 otroka v sedežu.
_ Ne prevažajte večjega števila otrok, kot to navaja
proizvajalec.
_ Izdelek je primeren za otroke od rojstva do teže 15 kg v
sedežu.
_ Otroka nikoli ne puščajte samega.
_ Vedno uporabljajte pettočkovni varnostni pas. Jermen
za okoli pasu vedno pripnite na mednožni jermenček.
_ Sprednja zapora naj bo vedno nameščena na voziček.
_ Pazite, da ne poškodujete otroka, ko nastavljate
mehanizme (ročaj, hrbtni naslon).
_ Vedno uporabljajte zavore, ko ste zaustavljeni, ter
medtem ko otroka polagate v voziček ali ga jemljete iz
njega.
_ Sestavljanje in pripravo izdelka, čiščenje in vzdrževanje
morajo izvajati odrasle osebe.
_ Izdelka ne uporabljajte, če manjkajo deli ali so vidne
poškodbe.
_ Pred uporabo se prepričajte, ali so vsi mehanizmi
sistema za pripenjanje pravilno speti.
_ V mehanizme nikoli ne vstavljajte prstov.
_ Vsako breme na ročaju ali ročicah lahko izdelek naredi
nestabilen; upoštevajte priporočila proizvajalca za
maksimalno obremenitev izdelka.
_ V nakupovalno košaro ne dajajte tovorov, ki bi
presegali težo 5 kg. V držalo za pijačo ne vstavljajte
predmetov, ki so težji od navedbe na samem držalu za
pijačo. Vanj nikoli ne odlagajte toplih pijač. V žepe na
strehici (če so prisotni) ne odlagajte predmetov, težjih
od 0,2 kg.
_ Izdelka ne uporabljajte v bližini stopnic, virov toplote,
odprtega ognja ali nevarnih predmetov, ki so v dosegu
otrokovih rok.
_ Uporaba dodatkov, ki jih ne odobri proizvajalec, je
lahko nevarna.
_ Izdelek ni primeren za uporabo med tekanjem ali
rolanjem.
_ Dežne prevleke (če je v uporabi) ne smete uporabljati v
zaprtih prostorih. Vedno preverite, da otrok ni pregret;
Dežne prevleke nikoli ne puščajte ob virih toplote in
pazite na prižgane cigarete. Prepričajte se, da dežna
prevleka ne ovira premikajočih se mehanizmov
ogrodja ali vozička; preden ogrodje ali voziček zaprete,
jo vedno odstranite.
_ OPOZORILO: ko je voziček odprt in medtem ko ga
uporabljate, naj bo sprednja zapora vedno v položaju
1 (dvignjena), položaj 2 (spuščen) pa uporabljajte le, ko
je voziček zaprt.
_ OPOZORILO: ne dodajajte blazin za ležanje.
SESTAVNI DELI IZDELKA
Preverite, ali je v embalaži vse navedeno in v primeru
reklamacije pokličite center za pomoč uporabnikom.
_ Voziček Si COMPLETO različico sestavljajo naslednji
deli: 2 vrtljivi/zaskočni sprednji kolesi, 2 zadnji kolesi,
košara, držalo za pijačo, strehica, pokrov, dežna
prevleka, 2 ramenska trakova in 1 pas za mednožje, 2
adapterja pasov avtosedeža.
_ Voziček Sì CLASSICO je sestavljen iz: 2 sprednjih koles,
ki ju je mogoče sprostiti, da se vrtita, ali blokirati, 2
zadnjih koles, nakupovalne košare, držala za pijačo,
strehice, 2 ramenskih prevlek za varnostne jermene
in 1 mednožnega jermenčka, 2 prilagojevalnih
jermenčkov za pripenjanje avtomobilskega stolčka
Car Seat.
NAVODILA ZA UPORABO
1• Da bi odprli okvir, vzvoda na ročajih potegnite navzgor
(slika a). Obenem dvignite okvir, ki se bo nato
samodejno odprl (slika b). Preverite še bočni zanki in se
tako prepričajte, da je voziček pravilno odprt (slika c).
2• Če pasovi niso pravilno zapeti, pritisnite ob sedež
(slika_a), dokler se ne zaskočijo. Nato z nogo potisnite
navzdol do položaja PUSH (slika b) in sprednjo zaporo
dvignite za eno mesto (razdelek 5b).
3• NAKUPOVALNA KOŠARA: da bi namestili nakupovalno
košaro, vtaknite zatiče na zadnja obešala A in B in na
sprednje obešalo C (risba a).
DRŽALO ZA PIJAČO: namestiti ga je mogoče le na
desno stran vozička, saj je tam na ogrodju pripravljeno
obešalo.
Da bi namestili držalo za pijačo, ga pripnite, tako da
klikne (risba b).
4• NASTAVLJANJE ROČAJEV: ročaje je mogoče nastaviti
v 3 višine. Da bi jih nastavili v želeni položaj, pritisnite
gumb in sočasno povlecite ročaj navzgor. Da bi jih
spustili, naredite nasprotno (risba a).
ZAVORA: da bi zavrli voziček, z nogo pritisnite zavorni
vzvod, ki je nad zadnjima kolesoma. Da bi zavoro
odpustili, narediti nasprotno (risba b). Ko stojite na
mestu, vedno zavrite.
5• VRTLJIVA KOLESA: kolesa so že pritrjena na voziček.
Če želite, da se kolesa vrtijo, morate spustiti vzvod
(puščica 1). Da kolesa zavarujete na svoje mestu, vzvod
pomaknite v nasprotno smer (puščica 2). Kolesa so zdaj
pritrjena.
OPOZORILO: sprednja zapora naj bo vedno
nameščena na voziček.
SPREDNJA ZAPORA: je že pripeta na voziček.
Nastaviti jo je mogoče v 2 položaja:
POLOŽAJ 1: za uporabo
POLOŽAJ 2: za zapiranje.
Da bi jo naravnali, sočasno pritisnite bočna gumba na
obeh straneh vozička (slika b).
6• STREHICA: da bi namestili strehico, vstavite priključke v
ustrezna ležišča, dokler ne kliknejo, in pripnite strehico
na zadnji strani hrbtnega naslona (risba a).
Strehica je nastavljiva v 3 položaje (risba b), tako da jo
preprosto povlečete naprej ali potisnete nazaj.
Možno je izvleči mrežasto zaščito pred soncem (risba c)
in jo s preprostim gibom vrniti v notranjost strehice, ko
je ne potrebujete več.
7• POKROV: da bi pokrov uporabljali pravilno (slika a),
gumbe pripnite na notranji del vozička (slika 1), in ga
položite pod sedež, ki prekriva naslon za noge, nato pa
pripnite gumbe (slika 2).
DEŽNA PREVLEKA: da bi namestili dežno prevleko,
Page 42

- 42 -
jo navlecite na voziček (risba b) in jo pripnite ob
strani strehice (risba 1); nato pripnite elastike, tako da
zaobjamete ogrodje na spodnji strani vozička (risba 2).
8• 5-TOČKOVNI VARNOSTNI PAS: če želite pripeti
varnostni pas, vstavite sponki pasov okoli pasu (s
pripetima naramnicama – puščica a) v mednožni pas,
dokler sponki ne zaskočita na svoje mesto (puščica
b). Če jih želite odstraniti, pritisnite gumb na sredini
pritrdila (puščica c) ter povlecite pas za čez pas
navzven (puščica d).
9• Če želite zatisniti pas okoli pasu, povlecite pas v
smeri puščice (slika a). Če ga želite zrahljati, storite
nasprotno. Pas okoli pasu lahko zatisnete do varnostne
zaponke (slika b).
10• Varnostne pasove lahko nastavite na 3 višine glede na
velikost otroka. V drugi, višji položaj jih prestavite, ko je
otrok večji.
11• Ak chcete upraviť výšku bezpečnostného pásu,
uvoľnite dve spony na zadnej strane chrbtovej opierky.
Potiahnite ramenné popruhy smerom k sebe (šípka
a), až kým sa spony neuvoľnia, a vsuňte ich cez pútka
na chrbtovej opierke (šípka b). Odstráňte ramenné
popruhy z vaku (šípka c) a vsuňte ich do najlepšie
vyhovujúcej spony (šípka d), potom opätovne
pripevnite dve sponky za chrbtovou opierkou (šípka
e). Spony sú bezpečne pripevnené, keď počujete ich
kliknutie (obr. f).
12• NASTAVLJANJE NASLONA ZA NOGE: Naslon za noge
je mogoče nastaviti v 2 položaja. Da bi ga spustili,
povlecite bočna vzvoda navzdol in ga sočasno
potisnite navzdol. Da bi ga dvignili, ga potisnite
navzgor, dokler ne klikne.
URAVNAVANJE HRBTNEGA NASLONA: Hrbtni naslon
je mogoče nastaviti v 3 položaje. Da bi ga spustili,
dvignite stranska vzvoda sočasno na obeh straneh
in potisnite hrbtni naslon navzdol ter ga blokirajte
v želenem položaju. Da bi ga dvignili, ga potisnite
navzgor.
13• ZAPIRANJE: da bi zaprli voziček, je bolje najprej
spustiti sprednjo zaporo v položaj 2, za zapiranje.
Voziček lahko zaprete tudi z eno samo roko: najprej
navzgor potegnite en vzvod, nato še drugega, dokler
se ne zaskočita.
14• Primite sredinski ročaj in ga potegnite navzgor,
dokler se voziček ne zapre (slika a). Z varnostno zanko
preverite, ali je okvir pravilo zložen. Ko je zložen, bo
okvir stal v pokončnem položaju (slika b).
15• TRANSPORT: Voziček je mogoče udobno prenašati
(če so sprednja kolesa fiksirana), tako da ga nesete za
osrednji ročaj (risba a). Možno ga je prenašati tudi za
bočni ročaj (risba b).
16• SNEMLJIVOST PREVLEK: da bi sneli prevleke z vozička:
na zadnji strani hrbtnega naslona odpnite obe sponki
(risba a).
Odpnite gumba na sedišču (risba b).
S spodnje strani izvlecite sponko mednožnega
jermenčka (risba c).
Odpnite gumbe z bočne vreče (risba d).
17• Iz vreče izvlecite podnožnik (risba e).
Da bi odstranili varnostni pas, odvijte (na obeh
straneh) vijaka. Uporabite izvijač in klešče, s katerimi
boste prijeli matico (risba f).
Vrečo povlecite navzgor (risba g).
PRITRJEVANJE AVTOSEDEŽEV PRIMO
VIAGGIO TRI-FIX
Kolesa na vozičku morate najprej blokirati.
Avtosedež namestite na voziček brez otroka.
Avtosedež mora biti pritrjen tako, da je zmeraj obrnjen
proti staršu.
Po potrebi snemite strehico vozička, saj je že pritrjena
na avtosedež.
Hrbtni naslon vozička nastavite v 2. sredinski položaj
(razdelek 12).
Ročico avtosedeža nastavite v položaj za prenašanje,
tako da lahko pasove brez težav pripnete.
18• Pritisnite gumb pod naslonom za roke in raztegnite
sprednjo zaporo ter jo hkrati izvlecite z obeh strani
(slika a).
OPOZORILO: sprednjo zaporo podaljšajte le, ko
želite nanjo pripeti avtomobilski stolček Car Seat.
Avtosedež nagnite in ga namestite, da se bo prilegal
sedežu vozička (slika b).
19• Gumbnico pasu najprej vpnite v gumb na vozičku
(puščica 1), pas pa nato speljite za ročajem avtosedeža
(puščica 2).
Gumbnico pasu najprej vpnite v gumb na spodnji strani
okvirja vozička (puščica 3), pas pa nato zategnite, dokler
avtosedež ni v celoti pripet na voziček (puščica 4).
Enak postopek uporabite na drugi strani vozička (slika c).
Avtosedež, ki je pravilno pritrjen na voziček (slika d).
Sprostitev avtosedeža iz vozička:
zrahljajte pasove;
gumbnico pasu odpnite s spodnjega dela okvirja
vozička;
pas potegnite izza zadnje strani ročaja avtosedeža;
gumbnico pasu nato odpnite z gumba na vozičku.
SÉRIOVÉ ČÍSLA
20• Na hrbtnem naslonu vozička Si so izpisane naslednje
informacije: ime izdelka, datum izdelave in serijska
številka.
Ti podatki so potrebni za morebitne pritožbe.
DODATKI
21• MREŽICA PROTI KOMARJEM: lahko jo z gumbi pripnete
na strehico (slika a).
TORBA: torba s podlogo za previjanje otroka. Pritrdite
jo na voziček (slika b).
22• POTOVALKA: praktična podložena vreča za prenašanje
vozička (slika a).
DEŽNIK: praktičen dežnik, ki se lepo ujema z vozičkom
(slika b).
ČIŠČENJE IN VZDRŽEVANJE
VZDRŽEVANJE IZDELKA: zaščitite pred atmosferskimi
vplivi: vodo, dežjem ali snegom; daljše izpostavljanje
soncu lahko povzroči spremembo barve veliko
materialov; izdelek vedno spravljajte na suhem mestu.
ČIŠČENJE OGRODJA: plastične dele redno brišite z
vlažno krpo. Ne uporabljajte topil ali drugih podobnih
izdelkov; pazite, da bodo vsi kovinski deli suhi, da bi
preprečili rjo; pazite, da premični deli (mehanizmi
za uravnavanje, mehanizmi za pripenjanje, kolesa ...)
ne bodo prašni in, če je to potrebno, jih podmažite z
Page 43

- 43 -
lahkim oljem.
ČIŠČENJE DEŽNE PREVLEKE: Operite z gobo in milnico,
ne uporabljajte detergentov.
ČIŠČENJE DELOV IZ BLAGA: blago skrtačite, da z njega
odstranite prah in ga operite na roke pri največ 30°; ne
ožemajte; ne uporabljajte klorovega belila; ne likajte;
ne uporabljajte kemičnega čiščenja; ne čistite s topili in
ne uporabljajte sušilca za perilo z vrtljivim bobnom.
PEG-PÉREGO S.p.A.
Peg Pérego S.p.A. ima certifikat ISO
9001. Certifikat za stranke in
uporabnike pomeni garancijo
transparentnosti in zaupanja v delo
podjetja. Peg Perego se lahko
kadarkoli odloči, da bo spremenil
modele, objavljene v katalogu, najsi bo to zaradi
tehničnih ali podjetniških razlogov. Peg Pérego je
vedno na voljo svojim strankam, da v kar največji meri
izpolni njihove potrebe. Zato je za nas zelo
pomembno, da poznamo mnenje svojih strank.
Hvaležni vam bomo, če si boste, ko boste uporabili naš
izdelek, vzeli čas in izpolnili VPRAŠALNIK O
ZADOVOLJSTVU STRANK, ki ga boste našli na naših
spletnih straneh, na naslovu: www.pegperego.com
CENTER ZA POMOČ UPORABNIKOM
Če izgubite ali poškodujete sestavni del izdelka,
uporabite izključno originalne rezervne dele Peg
Pérego. V primeru popravil, zamenjav, podatkov
o izdelku in naročila originalnih nadomestnih
delov in dodatkov, se obrnite na službo za pomoč
uporabnikom Peg Perego, pri tem pa navedite serijsko
številko izdelka, če je le ta navedena.
tel. 0039/039/6088213
faks 0039/039/3309992
e-pošta assistenza@pegperego.it
spletna stran www.pegperego.com
RU_Pусский
Благодарим вас за то, что вы выбрали продукцию
компании Peg-Pеrego.
ПРЕДУПРЕЖДЕНИЕ
_ ВАЖНО: внимательно прочитайте данные
инструкции и храните, чтобы в дальнейшем их
можно было использовать для консультации.
Ребёнок может подвергаться опасности, если Вы
не будете следовать данным инструкциям.
_ Данное изделие было создано для перемещения
одного ребёнка в сидячем положении.
_ Запрещается использование данного изделия для
перемещения большего количества детей, чем то,
которое было предусмотрено производителем.
_ Данное изделие было рассчитано для детей
от рождения и до достижения веса в 15 кг,
находящихся в сидячем положении.
_ Не оставляйте Вашего ребёнка без присмотра,
поскольку это может представлять собой опасность.
_ Всегда используйте ремень безопасности с пятью
точками крепления, всегда соединяйте поясной
ремень с центральным ремешком.
_ Используемая защитная панель должна быть
установлена на коляску.
_ Когда идёт выполнение операций по регулировке
механизмов (ручка, спинка), будьте очень
внимательны, если в изделии сидит ребёнок.
_ Всегда ставьте коляску на тормоз, когда она стоит и
во время посадки и высадки ребенка.
_ Операции сборки, подготовки изделия, чистки и
ухода должны всегда выполнять только взрослые.
_ Запрещается использование данного изделия при
обнаружении в нём недостающих частей или поломок.
_ Перед использованием убедитесь, что все
механизмы крепления были правильно зацеплены.
_ Избегайте попадания пальцев в механизмы.
_ Любая нагрузка, подвешенная к ручке или к
ручкам, может нарушить устойчивость изделия;
соблюдайте указания изготовителя о максимальных
прилагаемых нагрузках.
_ Не кладите в корзину нагрузки, превышающие 5
кг. Не кладите в подставки для напитков предметы,
вес которых выше указанного на подставке. Ни в
коем случае не ставьте в них горячие напитки. Не
кладите в карманы капотов (при их наличии) грузы,
превышающие 0,2 кг.
_ Запрещается использование изделия вблизи
лестниц или ступенек; не используйте его рядом
с источниками тепла, открытым огнём или
когда опасные предметы находятся в пределах
досягаемости ребёнка.
_ Использование вспомогательных принадлежностей,
которые не получили одобрения производителя,
может представлять собой опасность.
_ Данное изделие не предназначено для использования
при занятии бегом или катания на коньках.
_ Не используйте дождевик (если имеется) в
закрытых помещениях, и всегда проверяйте, чтобы
ребенку не было жарко. Не держите дождевик
рядом с источниками тепла, будьте осторожными с
Page 44

- 44 -
сигаретами. Убедитесь, что дождевик не цепляется
за движущиеся части шасси или прогулочной
коляски. Всегда снимайте дождевик перед тем, как
сложить шасси или прогулочную коляску.
_ ВНИМАНИЕ: когда коляска открыта и во время
закрепления защитная панель должна находиться
исключительно в положении 1 (поднята), а
когда коляска закрыта, защитная панель должна
находиться в положении 2 (опущена).
_ ПРЕДУПРЕЖДЕНИЕ: Не стелите дополнительные
матрасики.
КОМПОНЕНТЫ ИЗДЕЛИЯ
Проверьте содержание упаковки и в случае
рекламации обратитесь в службу обслуживания.
_ COMPLETO комплект коляски «Sì» состоит из
следующих деталей: 2-х вертлюжных стопорящихся
передних колес, 2-х задних колес, корзинки,
держателя для бутылочки, складного верха,
покрывала, дождевика, 2-х плечевых лямок и 1-го
центрального ремня, идущего между ног, 2-х ремней
крепления детского автомобильного кресла.
_ Коляска Sì CLASSICO состоит из: 2 передних плавающих
колес с возможностью блокировки, 2 задних колес,
корзины, подставки для напитков, тента, 2 лямок для
ремней, 1 анатомической вставки для разделения ног
и 2 адаптерных ремней для крепления Car Seat.
ИНСТРУКЦИЯ ПО ЭКСПЛУАТАЦИИ
1• Чтобы разложить шасси, потяните вверх
рычажки на рукоятках (рис. a). одновременно с
этим поднимите шасси вверх и оно раскроется
автоматически (рис. b). Чтобы убедиться в том,
что коляска правильно разложилась, проверьте
боковые крючки (рис. c).
2• Если лямки не застегнулись, нажмите на сиденье
(рис. А), пока оно со щелчком не встанет на место.
Затем нажмите ногой на PUSH (рис. b) и поднимите
поручень на одно положение (раздел 5b).
3• КОРЗИНА: для установки корзины наденьте петли на
задние скобы A и B и на переднюю скобу C (рис_ a).
ПОДСТАВКА ДЛЯ НАПИТКОВ: её можно установить
только с правой стороны коляски, для этого на раме
расположено специальное крепление.
Чтобы установить подставку, закрепите её до
щелчка (рис_ b).
4• РЕГУЛИРОВКА РУКОЯТОК: по высоте рукоятки
устанавливаются в трех различных положениях. Чтобы
установить их в желаемую позицию, нажмите кнопку
и одновременно потяните рукоятку наверх. Чтобы
опустить рукоятки, действуйте наоборот (рис_ a).
ТОРМОЗ: для торможения коляски нажмите ногой
на педаль тормоза, расположенную на задней
колесной группе. Чтобы разблокировать тормоз,
поднимите его (рис_ b). Используйте тормоз во
время любой остановки.
5• ВЕРТЛЮЖНЫЕ КОЛЕСА Эти колеса постоянно
прикреплены к коляске.
Для того чтобы колеса могли вращаться вокруг
вертикальной оси, нужно опустить рычаг (стрелка
1). Чтобы зафиксировать колеса, передвиньте рычаг
в другом направлении (стрелка 2). Задние колеса не
могут вращаться вокруг вертикальной оси.
ВНИМАНИЕ: используемая защитная панель
должна быть установлена на коляску.
ЗАЩИТНАЯ ПАНЕЛЬ: уже установлена на коляску.
Регулируется в двух положениях:
ПОЛОЖЕНИЕ 1: для использования
ПОЛОЖЕНИЕ 2: складывание.
Для регулировки нажмите на боковую кнопку
одновременно с обеих сторон (рис_b).
6• ТЕНТ: чтобы установить тент, до щелчка вставьте
крепления в соответствующие отверстия и пристегните
тент к задней части спинки коляски (рис_ a).
Тент может бать раскрыт в трех позициях (рис_ b). –
для этого просто потяните его вперёд или назад.
Простым движением вы можете выдвинуть из тента
сетку для защиты ребенка от солнца (рис_ c), и, при
необходимости, убрать ее обратно внутрь тента.
7• ПОКРЫВАЛО Чтобы правильно установить покрывало
(рис. А), нужно пристегнуть его на кнопки с внутренней
стороны коляски (рис. 1), накрыть им сиденье, закрывая
подножку, и застегнуть кнопки (рис. 2).
НАКИДКА ОТ ДОЖДЯ: для установки накидки от дождя
наденьте ее на коляску (рис_ b), прикрепив её кнопками
к краям тента (рис_ 1) и прикрепите эластичные завязки
к раме в нижней части коляски (рис_ 2).
8• 5-ТОЧЕЧНЫЙ РЕМЕНЬ БЕЗОПАСНОСТИ Для того
чтобы застегнуть ремень безопасности, вставьте
половинки поясного ремешка (с надетыми
плечевыми лямками – стрелка а) в пряжку
центрального ремешка до щелчка (стрелка
b). Чтобы отстегнуть его, нажмите на кнопку,
находящуюся в центре застежки (стрелка «c»), и
потяните поясной ремень наружу (стрелка «d»).
9• Для затягивания поясного ремешка потяните его с
обеих сторон в направлении, указанном стрелкой
(рис. а). Если его надо ослабить – поступите
наоборот. Поясной ремешок можно затянуть
только до предохранительного стопора (рис. b).
10• В зависимости от роста ребенка ремень
безопасности можно регулировать по высоте,
фиксируя его в трех позициях. Когда ребенок
подрастет, необходимо поместить ремень в более
высокую позицию.
11• Для регулировки ремня безопасности по высоте,
отстегните обе пряжки на обратной стороне спинки.
Вытягивайте плечевые лямки на себя (стрелка a),
пока пряжки не освободятся, после чего вставьте
их в отверстия спинки (стрелка b) Выньте плечевые
лямки из обивки (стрелка c) и проденьте их в
подходящие по высоте пряжки (стрелка d), затем
заново закрепите пряжки на обратной стороне
спинки (стрелка e). Пряжки надежно застегиваются
со щелчком (рис f).
12• РЕГУЛИРОВКА ПОЛОЖЕНИЯ ПОДНОЖКИ: Подножка
может быть установлена в 2 позициях. Чтобы опустить
подножку, потяните два боковых рычага книзу и
одновременно опустите подножку. Чтобы поднять
подножку, потяните ее вверх, пока не услышите щелчок.
РЕГУЛИРОВКА ПОЛОЖЕНИЯ СПИНКИ: Спинка
может быть установлена в 3 положениях. Чтобы
опустить спинку, приподнимите боковой рычаг
одновременно с двух сторон и опустите спинку, а
затем заблокируйте в желаемом положении. Чтобы
поднять спинку, потяните ее по направлению вверх.
13• СКЛАДЫВАНИЕ: перед закрыванием коляски
желательно сначала опустить защитную панель в
вторую позицию (складывание).
Коляску можно сложить одной рукой. Для этого
достаточно потянуть вверх до щелчка за одну ручку,
потом за другую.
14• После этого возьмитесь за центральный рычаг и
потяните его вверх, чтобы коляска сложилась (рис.
а). Убедитесь в том, что шасси коляски правильно
сложилось и крючок защелкнулся. В сложенном
Page 45

- 45 -
состоянии коляска должна стоять (рис. b).
15• ТРАНСПОРТИРОВКА: коляску можно удобно
перевозить (зафиксировав передние колеса), держа
за центральную ручку (рис_ a). Кроме того, ее
можно носить и за боковую ручку (рис_ b).
16• СНЯТИЕ ЧЕХЛА: чтобы снять с коляски чехол:
Отстегните две застежки, расположенные на
обратной стороне спинки коляски (рис_ a).
Отстегните две застежки, расположенные на
сидении (рис_ b).
Продеть снизу застежку чехла для ножек (рис_ c).
Отстегнуть застежки бокового чехла (рис_ d).
17• Снять чехол с подставки (рис_ e).
Чтобы снять ремень безопасности, отвинтите (с
обеих сторон) оба винта при помощи отвертки и
плоскогубцев удерживающих гайку (рис_ f).
Потяните чехол вверх (рис_ g).
КРЕПЛЕНИЕ ДЕТСКИХ
АВТОМОБИЛЬНЫХ КРЕСЕЛ PRIMO
VIAGGIO TRI-FIX
Сначала необходимо поставить коляску на тормоз.
Нельзя устанавливать детское кресло на коляску
вместе с ребенком. Автомобильное кресло надо
устанавливать так, чтобы ребенок всегда был бы
лицом к матери. Если это необходимо, снимите
складной верх коляски. Ведь он уже установлен на
автомобильном детском кресле. Поставьте спинку
коляски во второе среднее положение (раздел 12).
Переставьте ручку автомобильного детского кресла
в положение для переноски, для того чтобы можно
было легко закрепить ремни.
18• Нажмите на кнопку под подлокотником и
освободите поручень, после чего одновременно
вытяните его с обеих сторон (рис. а).
ВНИМАНИЕ: удлиняйте защитную панель, только
если вы хотите присоединить Car Seat.
Наклонитесь и устройте поудобнее автомобильное
детское кресло на сиденье коляски (рис. b).
19• Наденьте ремень петлей на кнопку на коляске
(стрелка 1), и проведите ремень за ручкой
автомобильного креслица (стрелка 2).
Застегните свободную петлю ремня на кнопку в
нижней части коляски (стрелка 3), и туго затяните
ремень, чтобы кресло было надежно прикреплено
к коляске (стрелка 4). Повторите эти операции на
другой стороне коляски (рис. с).
Правильно установленное на коляске детское
кресло (рис. d).
Снятие детского автомобильного кресла с коляски:
ослабьте ремни;
отстегните петлю ремня с кнопки в нижней части
коляски; вытяните ремень из ручки кресла;
отстегните вторую петлю от кнопки на коляске.
СЕРИЙНЫЕ НОМЕРА
20• Все сведения о коляске «Si» находятся на обратной
стороне спинки: наименование изделия, дата
изготовления и серийный номер.
Эти данные необходимо указывать в любых претензиях.
АКСЕССУАРЫ (продаются отдельно)
21• СЕТКА ОТ КОМАРОВ: Пристегивается на кнопки к
складному верху (рис. a).
СУМКА: Cумка с матрасиком для пеленания ребенка
и смены подгузников. Крепится к коляске (рис. b).
22• ДОРОЖНАЯ СУМКА Практичная спортивная сумка,
в которой можно перевозить коляску в самолете
(рис. a).
ЗОНТИК Практичный зонтик для комплекта (рис. b).
ЧИСТКА И УХОД
УХОД ЗА ИЗДЕЛИЕМ: защитите изделие от
атмосферных осадков - снега или дождя. Постоянная
и продолжительная подверженность солнечным
лучам может вызвать цветовые изменения многих
материалов. Храните это изделие в сухом месте.
ЧИСТКА ШАССИ: периодически очищайте
пластмассовые детали влажной тряпкой, без
использования растворителей и сходных веществ.
Держите металлические части изделия сухими, чтобы
предотвратить образование ржавчины. Поддерживайте
чистоту всех движущихся деталей (регулировочные и
соединительные детали, колеса и т.д.), удаляя пыль и
песок. При необходимости, смажьте их легким маслом.
ЧИСТКА ДОЖДЕВИКА: Промывайте его губкой и
мыльной водой, не пользуйтесь моющими средствами.
ЧИСТКА ТКАНЫХ ЧАСТЕЙ: чистите щеткой тканые
части, чтобы удалить пыль. Стирайте вручную
при макс. температуре 30°, не выкручивать; не
отбеливать хлором; не гладить; не чистить в
химчистке; не обрабатывать растворителями и не
сушить при помощи барабанных сушильных машин.
PEG-PEREGO S.p.A.
Peg-Perego S.p.A. сертифицирована по
ISO 9001. Сертификация гарантирует
заказчикам и потребителям, что
компания работает, соблюдая
принципы гласности и доверия.
Компания Peg-Perego имеет право
вносить в любой момент изменения в модели,
описанные в настоящем издании, по причинам
технического или коммерческого характера. Peg-Perego
находится к услугам своих клиентов для полного
удовлетворения всех их требований. Поэтому, для нас
очень важно знать мнение наших клиентов. Поэтому, мы
будем вам признательны, если после использования
нашего изделия вы заполните АНКЕТУ ОБ
УДОВЛЕТВОРЕННОСТИ ПОТРЕБИТЕЛЯ, которую можно
найти на нашем сайте в Интернете, высказывая свои
замечания или рекомендации. www.pegperego.com
СЛУЖБА ОБСЛУЖИВАНИЯ PEG-PEREGO
В случае утери или порчи аксессуаров, применяйте
только фирменные запасные части производства
компании Peg Pérego. Для выполнения ремонта,
замены запасных частей и получения информации об
устройстве обращайтесь в службу послепродажного
обслуживания Peg Pérego, сообщив, при его наличии,
серийный номер продукта:
тел.: 0039/039/60.88.213
факс 0039/039/33.09.992
e-mail assistenza@pegperego.it
сайт в интернете: www.pegperego.com
Page 46

- 46 -
TR_Türkçe
Bir Peg-Pérego ürününü tercih ettiğiniz için teşekkür ederiz.
UYARILAR
_ Ürünün kurulum ve kullanımından önce tüm
kullanım kılavuzunu dikkatle okuyun. Bu
talimatlara uyulmaması halinde çocuğun
güvenliği tehlikeye girebilir. İleride referans
olması için kullanım kılavuzunu saklayın
_ Bu ürün doğumdan itibaren 15 kg’a kadar olan
çocukların kullanımı için tasarlanmıştır.
_ Ürünün montaj ve kurulum işlemlerinin yetişkin bir
kişi tarafından yapılmalıdır.
_ Ürünü kullanmadan evvel tüm bağlantı aksamlarının
tam olarak takıldığından emin olun.
_ Bu ürünün oturma koltuğunda aynı anda sadece bir
adet çocuk taşınmalıdır.
_ Çocuğunuzu bebek arabasında tek başına bırakmayın.
_
Çocuğunuzu arabaya oturtmadan önce, bebek arabasının
tamamen açılmış ve kilitlerinin yerlerine oturmuş
olduğundan emin olun, tekerlek frenlerini kilitleyin.
_ Arabayı asla ön barından tutup kaldırmayın.
_ Oturma ünitesinde ilave şilte kullanmayın.
_ Çocuğunuz arabada iken beş noktalı emniyet
kemerinin, bacak arası bandı ve bel kayışıyla birlikte
takılı olduğundan emin olun.
_ Ön emniyet barı çocuğunuz arabada iken daima
yerine takılmış olmalıdır.
_ Mekanizmaların ayar işlemleri (itme sapı ayarı,
sırt dayanağı ayarı, koltuk yönü değişimi v.s.) asla
çocuğunuz arabanın içinde iken yapılmamalıdır.
_ Düzenli aralıklarla mekanizmaları kontrol edip, kırık ya
da eksik parça olması halinde ürünü kullanmayın.
_ Parmaklarınızı mekanizmalar arasına sokmayın.
_ Arabanın itme sapına asılan veya tente üzerine konulan
alışveriş torbaları, bebek çantası ve/veya aksesuarlar
arabanın dengesinin bozulup devrilmesine neden olur.
Bu nedenle arabanın sapına bir şey asılmamalı ve tente
üzerine bir şey konmamalıdır.
_ Sepete 5 kg’dan fazla ağırlık koymayın. İçecek sepetine
(var ise) kesinlikle sepet üzerinde belirtilenden fazla
ağırlık ve sıcak içecek koymayın. Tente üzerinde yer
alan ceplere (var ise) 0,2 Kg’dan fazla ağırlık koymayın.
_ Ürünü basamak yakınlarında ve özellikle yürüyen
merdivenlerde asla kullanmayın.
_ Ürünü ısı kaynaklarına, ateşe ve çocuğun erişebileceği
tehlikeli cisimlere yakın yerlerde kullanmayın.
_ Üretici tarafından onaylanmamış aksesuarların
kullanılması tehlikeli olabilir.
_ Bu ürün koşu sırasında kullanım veya patenle koşmak
için uygun değildir.
_
Yağmurluğu (eğer var ise) kapalı mekânlarda kullanmayın
ve bebeğin aşırı ısıya maruz kalmamasını için sürekli olarak
kontrol edin. Yağmurluk takılı iken, ısı kaynaklarından
uzak tutun ve sigara konusunda dikkatli olun. Ürünü
kapatmadan evvel yağmurluğu çıkartmayı unutmayın.
ÜRÜNÜN PARÇALARI
SI COMPLETO modeli aşağıdaki parçalardan
oluşmaktadır:
_ Dönebilen ve kilitlenebilir iki adet ön tekerlek, 2 adet
arka tekerlek, sepet, biberon/bardak askısı, tente, ayak
örtüsü, yağmurluk, 5 noktalı emniyet kemeri.
_ SI CLASSICO modeli aşağıdaki parçalardan
oluşmaktadır: Dönebilen ve kilitlenebilir iki adet ön
tekerlek, 2 adet arka tekerlek, sepet, biberon/bardak
askısı, tente, 5 noktalı emniyet kemeri.
ÖNEMLİ ! Ürün kurulumunu yaparken ambalaj
muhteviyatını kontrol edin. Ürünün parçalarının tam
olduğundan emin olmadan ürün orijinal kolisini atmayın.
Eksik bir parça var ise kolinin üstünde bulunan kod
numaraları ile ürünü kullanmaya başlamadan önce
bakım servis merkezine müracaat edin.
KULLANIM KILAVUZU
1• Sepetin Takılması: Sepetin uçlarında bulunan ilikleri
tekerleklerin yanlarında bulunan kancalara geçirerek
takın (Şekil 3A). Bu işlemi oklar içinde A ve B harfleriyle
gösterildiği şekilde, önce iki tarafında iki delik bulunan
arka kancaları takarak, daha sonrada ok içinde C harfi
ile gösterildiği şekilde ön kancaları takarak yapın.
2• Kayýţlar düzgün bađlanamýyorsa, yerine oturana kadar
koltuđun üzerinde bastýrýn (ţek_a).
Bunu yaptýktan sonra ayađýnýzla PUSH (ţek. b) ve ön
tutunma yerini bir konumuna kaldýrýn (bölüm 5b).
3• SEPET: Sepeti monte etmek için, kılavuz delikleri arka A
ve B kancalarına ve ön C kancasına geçiriniz (şekil_a).
İÇECEK TAŞIYICI: Bebek arabası üzerinde hazır bulunan
kanca sayesinde sadece arabanın sağ yanına takılabilir.
İçecek taşıyıcısını takmak için klik yapacak şekilde
kancalayınız (şekil_b).
4• KOLLARIN AYARLANMASI: Kollar 3 farklı seviyede
ayarlanabilmektedir. İstenen pozisyonda ayarlamak için
düğmeye basınız ve aynı zamanda kolu yukarıya doğru
kaldırınız. Aşağı indirmek için bu işlemin tersini yapınız
(şekil_a).
Arka Tekerlek Frenleri: Arka tekerlekleri fren
konumuna getirmek için tekerleklerin fren
mandallarını Şekil 4B’de gösterilen yönde aşağıya
doğru indirin. Frenleri açmak için bu işlemin tersini
yapın. DİKKAT! Araba sabit durumdayken tekerlekler
mutlaka kilitli konumda olmalıdır.
5• 360° Döner Ön Tekerlekler: Ön tekerlekleri döner
hale getirmek için Şekil 5A’da gösterilen sabitleme
mandalını 1numaralı ok yönünde aşağı indirin. Ön
tekerlekleri sabitlemek için ise sabitleme mandalı
2 numaralı ok yönünde yukarıya doğru kaldırın ve
tekerlekleri “klik” sesi gelene kadar bir tur çevirin.
Ön Emniyet Barı: Ön emniyet barı her iki yan tarafında
bulunan yuvarlak düğmelere bastırılarak 2 farklı
konuma ayarlanabilir (Şekil 5B). Konum 1: Arabanın
kullanımı esnasında bar 1 numaralı konumda olmalıdır.
Konum 2: Bar 2 numaralı konuma sadece araba
katlanırken getirilmelidir. Ön emniyet barını çıkartmak
için barın iki yanında, alt kısımda bulunan dillere
bastırıp barı kendinize doğru çekerek ister tek taraftan
ister iki taraftan çıkartabilirsiniz. DİKKAT! Arabayı
kullanırken ön emniyet barı daima takılı olmalıdır.
6• Tente: Tenteyi takmak için bağlantı kancalarını “klik”
sesi duyacak şekilde yerlerine takın ve tentenin
arka uç kısmındaki çıtçıtları arabanın sırt dayanağı
arkasındaki yuvalarına takarak sabitleyin (Şekil 6A).
Tente, nazikçe öne veya arkaya çekilerek 3 farklı
pozisyona ayarlanabilir (Şekil 6B). Bebeğinizi güneşten
Page 47

- 47 -
korumak için tente ucundaki gölgeliği dışarıya doğru
çekerek açın (Şekil 6C).
7• Ayak Örtüsü: Ayak örtüsü üzerinde oklar ile gösterilen
sabitleme düğmelerini oturma ünitesinin üst ve alt
yanlarındaki çıtçıtlara takın (Şekil 7A).
Yağmurluk: Yağmurluğu arabanın üzerine geçirin ve
Şekil 7B – 1 ve 2 numaralı resimlerde görülen çıtçıtlar
ile araba üzerine sabitleyin.
8• 5-NOKTALI EMNİYET KEMERİ: takmak için, bel kayışının
her iki tokasını da (omuz kayışı takılı haldeyken, ok_a)
yerine oturana kadar bacakları ayıran kayışa takın
(ok_b). Çıkarmak için bağlantının ortasındaki düğmeye
basın (c oku) ve bel kemerini dışa doğru çekin (d oku).
9• Bel kayışını sıkmak için, ok yönünde her iki taraftan
çekin (Şek.a). Gevşetmek tam tersini yapın. Bel kayışı
emniyet kilidine kadar sıkılabilir (Şekil_b).
10• Güvenlik kemerlerini bebeğin boyuna göre 3 yükseklik
seviyesinde ayarlamak mümkündür. Bebek büyüdüğünde
daha yüksek pozisyona geçmek gerekmektedir.
11• Emniyet kemerinin yüksekliğini ayarlamak için, koltuk
arkalığının sırtındaki her iki tokayı da serbest bırakın.
Omuz kayışlarını tokalar serbest kalana kadar kendinize
doğru çekin (ok a) ve koltuk arkalığı halkalarına takın
(ok b). Omuz kayışlarını bezden çıkarın (ok c) ve en
uygun tokaya sabitleyin (ok d), ardından iki tokayı
tekrar arkalığa takın (ok e). Tık sesi duyulduğundan
tokalar güvenli bir şekilde takılmıştır (şek f).
12• Ayak Dayanağının Ayarlanması: Ayak dayanağı 2
pozisyona ayarlanabilir. Dayanağı aşağı indirmek
için, dayanağın iki yanındaki mandalları kendinize
doğru çekin ve dayanağı aşağı doğru itin (Şekil 12
A). Dayanağı kaldırmak için “klik” sesi duyana kadar
yukarıya doğru kaldırın.
Sırt Dayanağının Ayarlanması: Sırt dayanağı 3
pozisyona ayarlanabilir (Şekil 12B). Sırt dayanağını
yatırmak için her iki yanda arabanın arka tekerleklere
giden borusu üzerindeki mandalı Şekil 12 B küçük
resimde görülen mandalı ok ile gösterilen yönde
yukarı kaldırın. Bu işlem sırasında dayanağı “klik” sesi
duyana kadar bastırarak arkaya doğru itin. Dayanağı
bir kademe daha yatırmak için aynı işlemi tekrarlayın.
Sırt dayanağını kaldırmak için istediğiniz konuma
gelip “klik” sesi çıkartana kadar yukarıya doğru itin.
13/14• Arabanın Kapatılması: Önce emniyet barını aşağı
konuma (konum 2) getirin (Şekil 13A). Ön tekerlekleri
sabitleyin. Arabayı tek elinizle katlayabilirsiniz. İtme
sapının altındaki katlama mandalının önce birini
daha sonra diğerini yukarıya doğru çekin (Şekil 13B).
Şekil 14A’da 3 numara ile gösterilen merkezi katlama
kolunu tutun ve araba katlanana kadar kendinize
doğru çekin (Şekil 14A ok 4). Şekil 14B’de gösterilen
katlama kilidinin yerine tam oturduğundan emin olun.
Katlandığında araba desteksiz duracaktır (Şekil 14B).
15• Taşıma: Katlanmış bebek arabası merkezi katlama
kolundan tutularak, ön tekerlekler üzerinde çekilerek
(Şekil 15A) veya taşıma sapından tutularak yatay olarak
taşınabilir (Şekil 15B).
16/17• Kılıfın Çıkartılması: Sırt dayanağının arka kısmında
bulunan iki tokayı çıkartın (Şekil 16A). Oturma
yerindeki, kılıfı arabanın iskeletine sabitleyen çıtçıtları
açın (Şekil 16B). Bacak arası kemerinin tokasını
arabanın iskeletinden çıkartıp ayırın (Şekil 16C). Kılıfın
yan tarafındaki düğmeleri iliklerinden çıkartın (Şekil
16D). Kılıfın ayak dayanağı kısmını çıkartın (Şekil 17E).
Kılıf üretim sırasında iskelete vida ile sabitlenmiştir.
Tornavida ile her iki taraftaki vida ve sonumu sökerek
çıkartın (Şekil 17F). Kılıfı yukarıya doğru çekerek
iskeletten ayırın (Şekil 17G).
PRIMO VIAGGIO TRI-FIX BEBEK
ARABASI KOLTUKLARININ TAKILMASI
18/19• Taşıma Koltuğunun Arabaya Takılması: ÖNEMLİ!
Koltuğun arabaya takma işlemi sırasında bebeğiniz
asla arabada oturtturulmamalıdır. Önce tüm
tekerlekleri kilitleyerek sabitleyin. Koltuk her zaman
anneye bakacak şekilde yerleştirilmelidir. Taşıma
koltuğunun kendi tentesi olduğundan, isterseniz
arabanın tentesini çıkartabilirsiniz. Sırt dayanağını
2. orta konuma getirin. Ön barın alt kısmında
bulunan siyah düğmeye basın ve aynı anda ön barı
kendinize doğru çekerek uzatın (Şekil 18A). Koltuğu
Şekil 18B’de gösterildiği gibi anneye bakar yönde
yerleştirin. DİKKAT! Emniyet barı sadece taşıma
koltuğu araba üzerine takılı iken yukarıda belirtilen
uzatılmış konuma getirilmelidir. Taşıma koltuğunu
arabaya sabitlemek için kayışın iki ucunu Şekil
19C’de 1 numaralı ok ile gösterilen, kol dayanağının
altında bulunan aparata takın. Kayışı 2 numaralı ok
ile gösterildiği gibi koltuk sapı ile koltuk arasından
geçirin. Kayışın ucunu 3 numaralı ok ile gösterilen kol
dayanağı altındaki aparata takın ve 4 numaralı ok ile
gösterildiği gibi kayışı çekerek sıkın. Aynı işlemi diğer
tarafta da yapın. Şekil 19D araba üzerine doğru olarak
yerleştirilmiş taşıma koltuğunu göstermektedir.
Taşıma Koltuğunun Arabadan ayrılması: Kayışları gevşetin.
Kayışı iskeletin alt kısmına sabitlediğiniz aparatlardan
kurtarın ve koltuğu arabadan çıkartarak ayırın.
SERİ NUMARALARI
20• Satın aldığınız Peg Perego bebek arabasının ürün
adı, üretim tarihi ve seri numarası gibi bilgiler araba
koltuğunun arka tarafında Şekil 20’de ok ile gösterilen
bölümde bulabilirsiniz.
AKSESUARLAR
Aksesuarlar opsiyoneldir; istenirse ilave ücret
ödeyerek tedarik edilebilir.
21• Sineklik: Tenteye kolaylıkla takılır (Şekil 21A). Çanta:
Pratik çanta (Şekil 21B).
22• Seyahat çantası: Taşıma amaçlı kalın kumaştan
yapılmıştır (Şekil 22A).
Şemsiye: Pratik şemsiye (Şekil 22B).
BAKIM VE ONARIM
Bebek arabasının bakım ve onarımı için aşağıdaki
talimat ve önerileri uygulayın.
• Arabanızın bakımını düzenli olarak yapın.
• Kilit mekanizmaları, tekerlek kilitleri, emniyet kemeri,
bağlantı noktaları ve adaptörlerini muntazam
aralıklarla kontrol ediniz ve sağlam, çalışır durumda
olduklarından emin olun.
• Frenler, tekerlekler ve tekerlek jantları zamanla aşınıp
yıpranabilir. Böyle durumlarda zarar gören parçalar
yenilenmelidir.
• Toz ve pislik birikimleri özellikle arabanın hareketli
noktalarında sıkışmalara ve parçaların zor hareket
etmesine neden olabilir. Bu nedenle belli aralıklarla
biriken toz ve pislikler temizlenmeli ve daha sonra bu
noktalar silikonlu yağla yağlanmalıdır. Temizlenmeden
yapılan yağlama daha fazla toz ve pislik toplayarak
problemi daha çok büyütür. Temizlenmiş ve muntazam
olarak yağlanmış parçalar arabanın daha rahat açılıp
kapanmasını ve daha uzun ömürlü olmasını sağlar.
Page 48

- 48 -
• Arabanın plastik ve metal parçaları yumuşak bir
deterjan ve ılık su ile ıslatılmış bir süngerle silinmeli ve
kuru bir bezle iyice kurulanmalıdır.
• Arabanın kumaş kısımları yıkanmaz. Bu nedenle
belli aralıklarla renk açmayan bir deterjan ve ılık su
ile nemlendirilmiş bir bezle bastırmadan silinerek
temizliği korunmalıdır.
• Araba temizlendikten sonra kurulanmadan veya
yağmurda ıslanmış ise yine iyice kurulanmadan
katlanıp kaldırıldığında metal kısımlarda paslanma
oluşur. Bu nedenle herhangi bir sebepten ıslanmış
olan araba muhakkak iyice kurutularak katlanmalıdır.
• Arabanın temizliği için asla kimyasal bileşenli,
aşındırıcı temizleyiciler, amonyak ya da çamaşır suyu
kullanılmamalıdır.
• Güneş ışığı solmaya neden olacağından,
kullanılmadığı zamanlarda katlanarak kapanmış dahi
olsa araba balkon, pencere yakını gibi güneşe maruz
kalacağı yerlerde saklanmamalıdır.
• Arabayı ikinci çocuğunuz için kullanacaksanız veya
arabanın ilk kullanımından 18 ay sonra, arabanın
kontrol ve bakımının yapılması gerekir.
• Arabanın tamir ve bakımı sadece yetkili servisi
tarafından yapılmalıdır. Bu servis dışında yapılan tamir
ve parça değişimi arabanın garanti kapsamından
çıkmasına neden olur.
PEG-PÉREGO S.p.A.
Peg-Pérego S.p.A. ISO 9001
sertifikasına haizdir. Söz konusu
sertifikalandırma, kullanıcılara şirketin
şeffaf ve güvenilir çalışmaları
konusunda garanti sunmaktadır. Peg
Perego, bu belgede belirtilen ürün özellikleri üzerinde,
teknik ve ticari gereksinimlere istinaden, arzuladığı
zaman değişiklik yapabilme hakkını saklı tutar. Peg
Perego, gereksinimlere en iyi şekilde cevap verebilmek
için tüm müşterilerinin emrine amadedir. Bu nedenle
de müşterilerimizin fikir ve görüşlerini almak bizler için
gayet önemlidir. Ürünümüzü kullandıktan sonra, www.
pegperego.com internet sitemizde bulabileceğiniz
“Müşteri Memnuniyet Formunu” doldurmak suretiyle
muhtemel görüş ve önerilerinizi bizlere bildirebilirsiniz.
Sizlere müteşekkir oluruz.
TEKNİK / BAKIM SERVİS HİZMETİ
Modelin parçalarının kazara kaybedilmesi veya zarar
görmesi halinde, sadece orijinal Peg Pérego yedek
parçalarını kullanın. Olası tamir ve değiştirme işlemleri,
ürün hakkında bilgi, orijinal yedek parça ve aksesuar
satışı için yukarıda belirtilen servis istasyonu ile temasa
geçin ve mevcutsa ürünün seri numarasını belirtin.
Kullanım ömrü 5 yıldır.
İmalatçı Firma: PEG-PEREGO S.P.A.
VIA DE GASPERI, 50, 20043 - ARCORE, ITALY
TEL : 39-60881 FAX : 39-615869
E-mail : assistenza@pegperego.it
İthalatçı Firma: ATAK DIŞ TİCARET A.Ş.
BÜYÜKDERE CAD. MAYA BİNASI NO: 102 KAT: 20
ESENTEPE – İSTANBUL
TEL : 0 212 211 7400 - FAX : 0 212 288 0091
Servis İstasyonu: ATAK DIŞ TİCARET A.Ş.
DEREBOYU CAD. AYTAÇ MAH. NO: 44/1
HALKALI – İSTANBUL
TEL : 0 212 696 9542 - AX : 0 212 698 6465
ΕL_Eλληνικά
Σας ευχαριστούμε που επιλέξατε ένα προϊόν Peg-Pérego.
ΠΡΟΕΙΔΟΠΟΙΗΣΗ
_ ΣΗΜΑΝΤΙΚΟ: διαβάστε προσεκτικά τις οδηγίες
αυτές και διατηρήστε τις για μελλοντική χρήση.
Η ασφάλεια του παιδιού θα μπορούσε να τεθεί σε
κίνδυνο, εάν δεν ακολουθήσετε τις οδηγίες αυτές.
_ Το προϊόν αυτό έχει σχεδιαστεί για τη μεταφορά 1
παιδιού στο κάθισμα.
_ Μην χρησιμοποιείτε το προϊόν αυτό για έναν αριθμό
καθήμενων μεγαλύτερο από αυτόν που προβλέπεται
από τον κατασκευαστή.
_ Το προϊόν αυτό είναι εγκεκριμένο για παιδιά από τη
γέννηση, έως 15 kg βάρος στο κάθισμα.
_ Μπορεί να είναι επικίνδυνο, εάν αφήσετε το παιδί σας
χωρίς επίβλεψη.
_ Χρησιμοποιείτε πάντα τη ζώνη ασφαλείας πέντε
σημείων, συνδέετε πάντα τη ζωνίτσα που περιβάλλει
τη μέση στη ζωνίτσα του διαχωριστικού για τα πόδια.
_ Χρησιμοποιήστε την προστατευτική μπάρα πάντα
τοποθετημένη στο καροτσάκι περιπάτου.
_ Προσέχετε ιδιαίτερα όταν εκτελείτε εργασίες ρύθμισης των
μηχανισμών (χειρολαβή, πλάτη) παρουσία του παιδιού.
_ Ενεργοποιείτε πάντα το φρένο όταν είστε
σταματημένοι και κατά τους χειρισμούς τοποθέτησης
και εξόδου του παιδιού.
_ Οι εργασίες συναρμολόγησης, προετοιμασίας του
προϊόντος, καθαρισμού και συντήρησης πρέπει να
εκτελούνται μόνον από ενήλικες.
_ Μην χρησιμοποιείτε το προϊόν αυτό εάν παρουσιάζει
μέρη που λείπουν ή είναι σπασμένα.
_ Πριν από τη χρήση βεβαιωθείτε ότι όλοι οι μηχανισμοί
σύνδεσης είναι συνδεμένοι σωστά.
_ Μην εισάγετε τα δάχτυλα μέσα στους μηχανισμούς.
_ Κάθε φορτίο που κρεμάτε στη χειρολαβή ή στις λαβές
μπορεί να προκαλέσει την αστάθεια του προϊόντος·
ακολουθήστε τις υποδείξεις του κατασκευαστή όσον
αφορά το ανώτατο φορτίο που μπορεί να χρησιμοποιηθεί.
_ Μην εισάγετε στο καλάθι φορτία με βάρος μεγαλύτερο
από 5 kg. Μην εισάγετε στην υποδοχή αναψυκτικών
βάρη μεγαλύτερα από αυτά που προσδιορίζονται στην
υποδοχή αναψυκτικών και ποτέ ζεστά ροφήματα. Μην
εισάγετε στις τσέπες των κουκούλων (εάν υπάρχουν)
βάρη που είναι μεγαλύτερα από 0.2 kg.
_ Μην χρησιμοποιείτε το προϊόν κοντά σε σκάλες ή
σκαλάκια· μην το χρησιμοποιείτε κοντά σε πηγές
θερμότητας, ελεύθερες φλόγες ή επικίνδυνα
αντικείμενα που μπορεί να φτάσει το παιδί.
_ Μπορεί να είναι επικίνδυνη η χρήση εξαρτημάτων που
δεν έχουν την έγκριση του κατασκευαστή.
_ Το προϊόν αυτό δεν είναι κατάλληλο για το jogging ή
το πατινάζ.
_ Μην χρησιμοποιείτε το προστατευτικό κάλυμμα για τη
βροχή (εάν υπάρχει) σε κλειστούς χώρους και ελέγχετε
πάντα ότι το παιδί δεν ζεσταίνεται· μην το τοποθετείτε
ποτέ κοντά σε πηγές θερμότητας και προσέξτε τα τσιγάρα.
Βεβαιωθείτε ότι το προστατευτικό κάλυμμα για τη βροχή
δεν παρεμβάλλει με κανέναν κινούμενο μηχανισμό που
υπάρχει στο καρότσι ή στο καροτσάκι περιπάτου·βγάζετε
πάντα το προστατευτικό κάλυμμα για τη βροχή πριν να
κλείσετε το καρότσι ή το καροτσάκι περιπάτου σας.
_
ΠΡΟΣΟΧΗ: με το καροτσάκι περιπάτου ανοιχτό και κατά
Page 49

- 49 -
τη χρήση του χρησιμοποιείτε την προστατευτική μπάρα
μόνο στη θέση 1 (σηκωμένη), και χρησιμοποιήστε τη θέση
2 (χαμηλωμένη) μόνο με το καροτσάκι περιπάτου κλειστό.
_ ΠΡΟΕΙΔΟΠΟΙΗΣΗ: Μην προσθέτετε στρωματάκια.
ΕΞΑΡΤΉΜΑΤΑ ΤΟΥ ΠΡΟΪΌΝΤΟΣ
Ελέγξτε το περιεχόμενο της συσκευασίας και
σε περίπτωση διαμαρτυρίας παρακαλούμε να
επικοινωνήσετε με την Υπηρεσία Υποστήριξης.
_ Το καροτσάκι περιπάτου Sì COMPLETO αποτελείται
από τα εξής: 2 μπροστινοί τροχοί περιστρεφόμενοι
ή που μπλοκάρουν,·2 πίσω τροχοί, καλάθι, υποδοχή
αναψυκτικών, κουκούλα, ποδόσακο, προστατευτικό
κάλυμμα για τη βροχή, 2 λουρίδες πλάτης για τις
ζωνίτσες και 1 διαχωριστικό για τα πόδια, καθώς και 2
ζωνίτσες ρύθμισης για την προσάρτηση Car Seat.
_ Καροτσάκι Sì CLASSICO αποτελούμενο από: 2
μπροστινούς περιστρεφόμενους τροχούς ή που
μπλοκάρουν, 2 πίσω τροχούς, καλάθι, υποδοχή
αναψυκτικών, κουκούλα, 2 τιράντες για τις ζωνίτσες
και 1 διαχωριστικό για τα πόδια, 2 ζωνίτσες
προσαρμογείς για σύνδεση Car Seat.
ΟΔΗΓΙΕΣ ΧΡΗΣΗΣ
1• Για να ανοίξει το καρότσι, πρέπει να τραβήξετε προς τα
πάνω τους δύο μοχλούς στις λαβές (Εικ. a). Tαυτόχρονα
ανασηκώστε το καρότσι που θα ανοίξει αυτόματα
(Εικ.b). Για να επαληθεύσετε ότι το καροτσάκι
περιπάτου έχει ανοίξει σωστά, ελέγξτε τους δύο
πλάγιους γάντζους (Εικ.c).
2• Αν οι γάντζοι δεν είναι σωστά ασφαλισμένοι, πιέστε
στο κάθισμα (εικ._a) έως ότου ακουστεί το κλικ της
σύνδεσης.Τέλος, πιέστε προς τα κάτω με το πόδι στο
PUSH (εικ._b) και ανασηκώστε την προστατευτική
μπάρα κατά μία θέση (παράγραφος 5b).
3• ΚΑΛΑΘΙ: για να τοποθετήσετε το καλάθι, περάστε
τις οπές στα πίσω άγκιστρα Α και Β στο μπροστινό
άκγιστρο C (εικ_a).
ΥΠΟΔΟΧΗ ΑΝΑΨΥΚΤΙΚΩΝ: εφαρμόζεται μόνο στη
δεξιά πλευρά του καροτσιού περιπάτου, χάρη στο
άγκιστρο που υπάρχει ήδη επάνω στο σκελετό.
Για να εφαρμόσετε την υποδοχή αναψυκτικών,
συνδέστε την μέχρι να ακουστεί το κλικ (εικ_b).
4• ΡΥΘΜΙΣΗ ΧΕΙΡΟΛΑΒΩΝ: οι χειρολαβές μπορούν να
ρυθμιστούν σε 3 διαφορετικά ύψη. Για να τις ρυθμίσετε
στη θέση που επιθυμείτε, πατήστε το κουμπί και
ταυτόχρονα τραβήξτε τη χειρολαβή προς τα πάνω. Για
να τις κατεβάσετε ενεργήστε αντίθετα (εικ_a).
ΦΡΕΝΟ: για να φρενάρετε το καροτσάκι περιπάτου
κατεβάστε με το πόδι το μοχλό φρένο που βρίσκεται
επάνω στο γκρουπ των πίσω τροχών. Για να ελευθερώσετε
το φρένο, ενεργήστε αντίθετα (εικ_b). Όταν είστε
σταματημένοι, να ενεργοποιείτε πάντα το φρένο.
5• ΠΕΡΙΣΤΡΕΦΟΜΕΝΟΙ ΤΡΟΧΟΙ: Οι τροχοί είναι ήδη
προσαρτημένοι στο καροτσάκι περιπάτου.
Για να κάνετε τους πρόσθιους τροχούς περιστρεφόμενους,
πρέπει να κατεβάσετε το μοχλό (βέλος 1). Για να τους
κάνετε σταθερούς, δράστε στον μοχλό στην αντίθετη
κατεύθυνση (βέλος 2). Οι πίσω τροχοί είναι σταθεροί.
ΠΡΟΣΟΧΗ: χρησιμοποιήστε την προστατευτική μπάρα
πάντα τοποθετημένη στο καροτσάκι περιπάτου.
ΠΡΟΣΤΑΤΕΥΤΙΚΗ ΜΠΑΡΑ: είναι ήδη συνδεμένη στο
καροτσάκι περιπάτου.
Ρυθμίζεται σε 2 θέσεις:
ΘΕΣΗ 1:χρήσης
ΘΕΣΗ 2: κλεισίματος.
Για να την ρυθμίσετε, πατήστε το πλαϊνό κουμπί και
στις δύο πλευρές συγχρόνως (εικ_b).
6• ΚΟΥΚΟΥΛΑ: για να εφαρμόσετε την κουκούλα, περάστε
τους συνδέσμους στις ειδικές έδρες μέχρι να ακουστεί
το κλικ και κουμπώστε την κουκούλα στο πίσω μέρος
της πλάτης του καροτσιού περιπάτου (εικ_a).
Η κουκούλα μπορεί να ρυθμιστεί σε 3 θέσεις (εικ_b)
απλά τραβώντας την μπροστά ή πίσω.
Μπορείτε να τραβήξετε έξω το τμήμα του διχτιού από την
κουκούλα για να προστατεύσετε το παιδί από τον ήλιο
(εικ_c) και με μία απλή κίνηση επανατοποθετήστε την στο
εσωτερικό της κουκούλας όταν δεν χρειάζεται πλέον.
7• ΠΟΔΟΣΑΚΟΣ: Για τη σωστή εφαρμογή του ποδόσακου
(εικ._a) κουμπώστε τα κουμπιά στο εσωτερικό μέρος
στο καροτσάκι (εικ._1), περάστε το κάτω από το
κάθισμα συμπεριλαμβανομένου του στηρίγματος για
τα πόδια και τέλος κουμπώστε τα κουμπιά (εικ._2).
ΠΡΟΣΤΑΤΕΥΤΙΚΟ ΚΑΛΥΜΜΑ ΓΙΑ ΤΗ ΒΡΟΧΗ: για να
τοποθετήσετε το προστατευτικό κάλυμμα για τη βροχή
(εικ_b), κουμπώστε το στα πλαϊνά της κουκούλας (εικ_1)
και κουμπώστε τα λάστιχα περιλαμβάνοντας το σκελετό
στο κάτω μέρος του καροτσιού περιπάτου (εικ_2) .
8• ΖΩΝΗ ΑΣΦΑΛΕΙΑΣ 5 ΣΗΜΕΙΩΝ: για να τη συνδέσετε,
περάστε τις δύο αγκράφες της ζωνίτσας που
περιβάλλει τη μέση (με τιράντες συνδεμένες βέλος
a) στη ζωνίτσα του διαχωριστικού για τα πόδια
μέχρι να ακουστεί το κλικ (βέλος_b). για να την
απελευθερώσετε πιέστε το κουμπί που βρίσκεται στο
κέντρο της αγκράφας (βέλος c) και τραβήξτε προς τα
έξω τη ζώνη για την κοιλιά (βέλος d).
9• Για να σφίξετε τη ζωνίτσα που περιβάλλει τη μέση
τραβήξτε, και από τις δύο πλευρές, προς τη φορά του
τόξου (Εικ. a), για να τη χαλαρώσετε ενεργήστε προς
την αντίθετη κατεύθυνση. Η ζωνίτσα που περιβάλλει
τη μέση μπορεί να σφιχτεί μέχρι το στοπ ασφαλείας
(Εικ._b).
10• Μπορείτε να ρυθμίσετε τις ζώνες ασφαλείας σε 3 ύψη
ανάλογα με το ύψος του παιδιού. Είναι απαραίτητο να
περάσετε στην πιο ψηλή θέση, όταν το παιδί είναι πιο μεγάλο.
11• Για να ρυθμίσετε το ύψος των ζωνών ασφαλείας
είναι αναγκαίο να αποσυνδέσετε στο πίσω μέρος της
πλάτης τις δύο αγκράφες. Τραβήξτε προς το μέρος
σας τις τιράντες (βέλος_a) έως ότου αποσυνδεθούν οι
αγκράφες και περάστε τες στις κουμπότρυπες της πλάτης
(βέλος_b). Βγάλτε τις τιράντες του σάκου (βέλος_c) και
βάλτε τες στην πιο κατάλληλη κουμπότρυπα (βέλος_d),
τέλος ξανασυνδέστε τις δύο αγκράφες πίσω από την
πλάτη (βέλος_e). Το σωστό κούμπωμα των αγκραφών
προσδιορίζεται από ένα κλικ (εικ._f).
12• ΡΥΘΜΙΣΗ ΒΑΣΗΣ ΣΤΗΡΙΞΗΣ ΠΟΔΙΩΝ: H βάση στήριξης των
ποδιών είναι ρυθμιζόμενη σε 2 θέσεις. Για να χαμηλώσετε τη
βάση στήριξης των ποδιών, τραβήξτε τους δύο πλευρικούς
μοχλούς προς τα κάτω και ταυτόχρονα κατεβάστε την. Για
να σηκώσετε τη βάση στήριξης των ποδιών, ωθήστε την
προς τα πάνω μέχρι να ακουστεί το κλικ.
ΡΥΘΜΙΣΗ ΠΛΑΤΗΣ: Η πλάτη είναι ανακλινόμενη σε 3 θέσεις.
Για να χαμηλώσετε την πλάτη, σηκώστε τον πλευρικό
μοχλό ταυτόχρονα και στις δύο πλευρές, κατεβάστε την
πλάτη, μπλοκάροντάς την στην επιθυμητή θέση. Για να τη
σηκώσετε, ωθήστε την πλάτη προς τα πάνω.
13• ΚΛΕΙΣΙΜΟ: για να κλείσετε το καροτσάκι περιπάτου,
είναι προτιμότερο να κατεβάσετε πρώτα την
προστατευτική μπάρα, στη θέση 2, κλεισίματος.
Είναι δυνατόν να κλείσετε το καροτσάκι περιπάτου με
ένα μόνο χέρι: Τραβήξτε προς τα πάνω πρώτα έναν
μοχλό και μετά τον άλλο έως την αποδέσμευση.
14• Πιάστε την κεντρική χειρολαβή και τραβήξτε την προς τα
πάνω έως το κλείσιμο (εικ.a). Επαληθεύστε το σωστό κλείσιμο
του καροτσιού από τον γάντζο ασφαλείας. Το καροτσάκι
περιπάτου κλειστό παραμένει όρθιο μόνο του (εικ.b).
15• ΜΕΤΑΦΟΡΑ: Το καροτσάκι περιπάτου μπορεί να
Page 50

- 50 -
μεταφερθεί άνετα (έχοντας τους μπροστινούς τροχούς
σταθερούς) πιάνοντας την κεντρική χειρολαβή
(εικ_a). Μπορεί να μεταφερθεί και χάρη στην πλαϊνή
χειρολαβή, (εικ_b).
16• ΔΥΝΑΤΟΤΗΤΑ ΑΦΑΙΡΕΣΗΣ ΤΗΣ ΕΠΕΝΔΥΣΗΣ: για
να αφαιρέσετε την επένδυση από το καροτσάκι
περιπάτου:
αποσυνδέστε στο πίσω μέρος της πλάτης, τις δύο
αγκράφες (εικ_a).
Ξεκουμπώστε τα δύο κουμπιά στο κάθισμα (εικ_b).
Βγάλτε από κάτω, την αγκράφα του διαχωριστικού για
τα πόδια (εικ_c).
Ξεκουμπώστε τα κουμπιά από τον πλευρικό ποδόσακο
(εικ_d).
17• Βγάλτε τον ποδόσακο από την πλατφόρμα (εικ_e).
Για να αφαιρέσετε τη ζώνη ασφαλείας, ξεβιδώστε (και
από τις δύο πλευρές) τις δύο βίδες χρησιμοποιώντας
ένα κατσαβίδι και μία πένσα για να κρατήσετε σταθερό
το παξιμάδι (εικ_f).
Τραβήξτε τον ποδόσακο προς τα πάνω (εικ_g).
ΣΥΝΔΕΣΗ ΤΩΝ PRIMO VIAGGIO TRI-FIX
Πρέπει να φρενάρετε το καροτσάκι.
Συνδέστε το κάθισμα αυτοκινήτου στο καροτσάκι
περιπάτου χωρίς το παιδί στο εσωτερικό του.
Συνδέστε το κάθισμα αυτοκινήτου πάντα και μόνο
προς τη μαμά. Είναι δυνατόν για λόγους άνεσης, να
βγάλετε την κουκούλα από το καροτσάκι γιατί υπάρχει
στο κάθισμα αυτοκινήτου. Τοποθετήστε την πλάτη
από το καροτσάκι περιπάτου στην 2η κεντρική θέση
(παράγραφος 12).Τοποθετήστε τη χειρολαβή του Car
Seat στη θέση μεταφοράς για τη διευκόλυνση της
σύνδεσης των ζωνών.
18• Επιμηκύνετε την προστατευτική μπάρα πατώντας
το πλήκτρο κάτω από τον βραχίονα και ταυτόχρονα
τραβήξτε το προς τα έξω, από αμφότερες τις πλευρές
(εικ. a).ΠΡΟΣΟΧΗ: επιμηκύνετε την προστατευτική
μπάρα μόνον όταν θέλετε να συνδέσετε το Car
Seat. Στηρίξτε και ασφαλίστε το κάθισμα αυτοκινήτου
στο κάθισμα του καροτσιού περιπάτου (εικ. b).
19• Κουμπώστε πρώτα την κουμπότρυπα της ζωνίτσας
στην κατάλληλη υποδοχή του καροτσιού (βέλος 1)
και περάστε τη ζωνίτσα πίσω από τη χειρολαβή του
καθίσματος του αυτοκινήτου (βέλος 2) .
Συνδέστε κατόπιν την κουμπότρυπα της ζωνίτσας στην
κατάλληλη υποδοχή στο κάτω μέρος του πλαισίου του
καροτσιού περιπάτου (βέλος 3) και τέλος εκτείνετε τη
ζωνίτσα έως ότου εφαρμόσει πλήρως το car seat στο
καροτσάκι (βέλος 4). Κάντε το ίδιο στην άλλη πλευρά
του καροτσιού (εικ.c). Car seat σωστά συνδεδεμένο
στο καροτσάκι (εικ. d). Για την αποσύνδεση του
καθίσματος αυτοκινήτου από το καροτσάκι:
Χαλαρώστε τις ζώνες, αποσυνδέστε την κουμπότρυπα
της ζώνης στο κάτω μέρος του πλαισίου του καροτσιού
περιπάτου, βγάλτε την πίσω από τη χειρολαβή του
καθίσματος αυτοκινήτου και τέλος αποσυνδέστε την
κουμπότρυπα της ζώνης στην υποδοχή του καροτσιού
περιπάτου.
SERIAL NUMBER
20•
Το Passeggino Si, αναγράφει, πίσω από την πλάτη,
πληροφορίες σχετικά με τα εξής: όνομα προϊόντος,
ημερομηνία παραγωγής και αριθμό σειράς αυτού.Αυτές οι
πληροφορίες είναι απαραίτητες σε περίπτωση παραπόνων.
ΕΞΑΡΤΗΜΑΤΑ
21• ΚΟΥΝΟΥΠΙΕΡΑ: Εφαρμόζεται στην κουκούλα (εικ.a).
ΤΣΑΝΤΑ: Τσάντα με στρωματάκι για το άλλαγμα
της πάνας του μωρού, συνδεόμενη στο καροτσάκι
περιπάτου (εικ.b).
22• ΤΣΑΝΤΑ ΤΑΞΙΔΙΟΥ: Πρακτική τσάντα για τη μεταφορά
του καροτσιού περιπάτου με το αεροπλάνο (εικ.a).
ΟΜΠΡΕΛΙΤΣΑ: Πρακτική ταιριαστή ομπρελίτσα (εικ.b).
ΚΑΘΑΡΙΣΜΟΣ ΚΑΙ ΣΥΝΤΗΡΗΣΗ
ΣΥΝΤΗΡΗΣΗ ΤΟΥ ΠΡΟΪΟΝΤΟΣ: προστατέψτε το από
τους ατμοσφαιρικούς παράγοντες: νερό, βροχή ή χιόνι·
η συνεχής και παρατεταμένη έκθεση στον ήλιο θα
μπορούσε να προκαλέσει αλλαγές στο χρώμα πολλών
υλικών· φυλάξτε το προϊόν αυτό σε ξηρό χώρο.
ΚΑΘΑΡΙΣΜΟΣ ΤΟΥ ΣΚΕΛΕΤΟΥ: Περιοδικά καθαρίζετε
τα πλαστικά μέρη με ένα υγρό πανί χωρίς να
χρησιμοποιείτε διαλυτικά ή άλλα παρόμοια προϊόντα·
κρατήστε στεγνά όλα τα μεταλλικά μέρη για να μη
σκουριάσουν· κρατήστε καθαρά όλα τα κινούμενα
μέρη (μηχανισμοί ρύθμισης, μηχανισμοί σύνδεσης,
τροχοί…) από σκόνη ή άμμο και εάν χρειαστεί,
λιπάνετέ τα με ελαφρύ λάδι.
ΚΑΘΑΡΙΣΜΟΣ ΤΟΥ ΠΡΟΣΤΑΤΕΥΤΙΚΟΥ ΚΑΛΥΜΜΑΤΟΣ
ΓΙΑ ΤΗ ΒΡΟΧΗ: πλύνετε με ένα σφουγγάρι και
σαπουνισμένο νερό, χωρίς τη χρήση απορρυπαντικών.
ΚΑΘΑΡΙΣΜΟΣ ΤΩΝ ΥΦΑΣΜΑΤΙΝΩΝ ΜΕΡΩΝ: βουρτσίστε
τα μέρη από ύφασμα για να απομακρύνετε τη σκόνη
και πλύνετε στο χέρι σε θερμοκρασία 30° το ανώτερο·
μην τα στύβετε· μην λευκαίνετε με χλώριο· μην τα
σιδερώνετε· μην κάνετε στεγνό καθάρισμα· μην
αφαιρείτε τους λεκέδες με διαλυτικά και μην στεγνώνετε
σε στεγνωτήριο με περιστροφικό κύλινδρο.
PEG-PÉREGO S.p.A.
Η Peg-Pérego S.p.A. διαθέτει
πιστοποίηση ΙSO 9001. Η πιστοποίηση
παρέχει στους πελάτες και τους
καταναλωτές την εγγύηση διαφάνειας
και εµπιστοσύνης στον τρόπο µε τον
οποίο εργάζεται η εταιρία. Η PegPérego θα μπορεί να επιφέρει ανά πάσα στιγμή
τροποποιήσεις στα μοντέλα που περιγράφονται στην
παρούσα δημοσίευση, για λόγους τεχνικής ή
εμπορικής φύσης. Η Peg-Pérego είναι στη διάθεση των
Καταναλωτών της για να ικανοποιήσει όσο το δυνατόν
καλύτερα όλες τις απαιτήσεις τους. Για το λόγο αυτό,
για μας είναι εξαιρετικά σημαντικό και πολύτιμο να
γνωρίζουμε τη γνώμη των Πελατών μας. Θα σας
είμαστε λοιπόν ευγνώμονες εάν, αφού
χρησιμοποιήσετε ένα προϊόν μας, συμπληρώσετε το
ΕΡΩΤΗΜΑΤΟΛΟΓΙΟ ΙΚΑΝΟΠΟΙΗΣΗΣ ΚΑΤΑΝΑΛΩΤΗ,
επισημαίνοντας ενδεχόμενες παρατηρήσεις ή
υποδείξεις, που θα βρείτε στην ιστοσελίδα μας στο
διαδίκτυο. www.pegperego.com
ΥΠΗΡΕΣΙΑ ΥΠΟΣΤΗΡΙΞΗΣ PEG-PÉREGO
Εάν τυχόν χαθούν ή καταστραφούν μέρη
του μοντέλου, χρησιμοποιήστε μόνον γνήσια
ανταλλακτικά Peg-Pérego. Για ενδεχόμενες επισκευές,
αντικαταστάσεις, πληροφορίες σχετικά με τα προϊόντα,
πώληση γνήσιων ανταλλακτικών και αξεσουάρ,
επικοινωνήστε με την Υπηρεσία Υποστήριξης Peg
Pérego αναφέροντας, σε περίπτωση που υπάρχει, τον
σειριακό αριθμό του προϊόντος.
τηλ. 0039/039/60.88.213
fax 0039/039/33.09.992
e-mail assistenza@pegperego.it
ιστοσελίδα internet www.pegperego.com
Page 51

- 51 -
ΠΕΡΑΜΑΞ Α.Ε.
2η & 17η οδός (Οδυσ. Ελύτη)
ΒΙΟ.ΠΑ - Άνω Λιόσια 133 41 Αττικής
Τηλ. : 210 24 74 638 – 210 24 86 850
• Fax: 210 24 86 890
e-mail: info@peramax.gr • www.peramax.gr
PEG PEREGO
ΠΑΙΔΙΚΑ ΕΙΔΗ ΒΡΕΦΑΝΑΠΤΥΞΗΣ ΚΑΙ ΠΑΙΧΝΙΔΙΑ
Η Εγγύηση για τυχόν εργοστασιακά ελαττώματα των προϊόντων της Peg – Perego ορίζεται για
διάστημα έξι μηνών από την ημερομηνία αγοράς. Ο καταναλωτής πρέπει να απευθύνει πάντα
το αίτημα προς τον πωλητή, από τον οποίο έχει την απόδειξη αγοράς ή οποιοδήποτε άλλο
έγγραφο ισοδύναμο.
Η παρούσα εγγύηση ισχύει μόνο εφ΄ όσον το προϊόν χρησιμοποιείται σωστά και βάσει των
οδηγιών χρήσεως. Ο κατασκευαστής και οι εντεταλμένοι συνεργάτες του διατηρούν το δικαίωμα
του τεχνικού ελέγχου.
Ο κατασκευαστής δεν μπορεί να θεωρηθεί υπεύθυνος εφ΄ όσον:
• Δεν τηρηθούν οι ανάλογες οδηγίες χρήσεως του κάθε προϊόντος.
• Καταστραφεί τυχαία το προϊόν ή προκληθούν βλάβες από τη κακή χρήση αυτού.
• Υπάρξει τεχνική παρέμβαση ξένου προς την εταιρεία μας τεχνικού, πράγμα το οποίο
απαγορεύεται και αποτελεί κίνδυνο για την ασφάλεια του παιδιού.
• Φυσιολογική φθορά η οποία δεν επηρεάζει την λειτουργία του προϊόντος.
Διατηρείτε την εγγύηση και τις οδηγίες χρήσεως και για μελλοντική χρήση.
ΕΓΓΥΗΣΗ
ΟΝΟΜΑΤΕΠΩΝΥΜΟ ΑΓΟΡΑΣΤΟΥ: ........................................................................................
ΔΙΕΥΘΥΝΣΗ: ............................................................................................................................
ΤΗΛΕΦΩΝΟ: ............................................................................................................................
e-mail: ......................................................................................................................................
ΣΕΙΡΙΑΚΟΣ ΑΡΙΘΜΟΣ ΠΡΟΪΝΤΟΣ: ........................................................................................
ΚΩΔΙΚΟΣ ΠΡΟΪΝΤΟΣ: .............................................................................................................
ΗΜΕΡΟΜΗΝΙΑ ΑΓΟΡΑΣ
ΣΦΡΑΓΙΔΑ ΚΑΤΑΣΤΗΜΑΤΟΣ
Προσοχή: Η εγγύηση ισχύει μόνο εφ΄όσον έχει συμπληρωθεί και σφραγιστεί από τον πωλητή
με την ημερομηνία αγοράς. Ζητείστε το από το κατάστημα τη στιγμή της αγοράς. Αν χαθεί ή
καταστραφεί το απόκομμα της εγγύησης δεν μπορεί να αντικατασταθεί.
&
Page 52

PEG PEREGO S.p.A.
VIA DE GASPERI 50 20862 ARCORE MB ITALIA
tel. 0039 039 60881 fax 0039 039 615869/616454
Servizio Post Vendita - After Sale:
tel. 0039 039 6088213 fax: 0039 039 3309992
PEG PEREGO U.S.A. Inc.
3625 INDEPENDENCE DRIVE FORT WAYNE INDIANA 46808
phone 260 482 8191 fax 260 484 2940
Call us toll free: 1 800 671 1701
PEG PEREGO CANADA Inc.
585 GRANITE COURT PICKERING ONTARIO CANADA L1W3K1
phone 905 839 3371 fax 905 839 9542
Call us toll free: 1 800 661 5050
www.pegperego.com
Tutti i diritti di proprietà intellettuale relativi ai contenuti di questo manuale d’istruzione appartengono a PEG PEREGO S.p.A. e sono
tutelati dalle leggi vigenti.
All of the intellectual property rights for the contents of this instruction manual belong to PEG PEREGO S.p.A. and are protected by
the laws in force.
sí
sí
FI001201I132
19/12/2011
 Loading...