

Page 1

IT Istruzioni d’uso
EN Instructions for use
FR Notice d’emploi
DE Gebrauchsanleitung
ES Instrucciones de uso
PT Instruções para uso
NL Gebruiksaanwijzing
DK Brugsanvisning
FI Käyttöohjeet
CZ Návod na použití
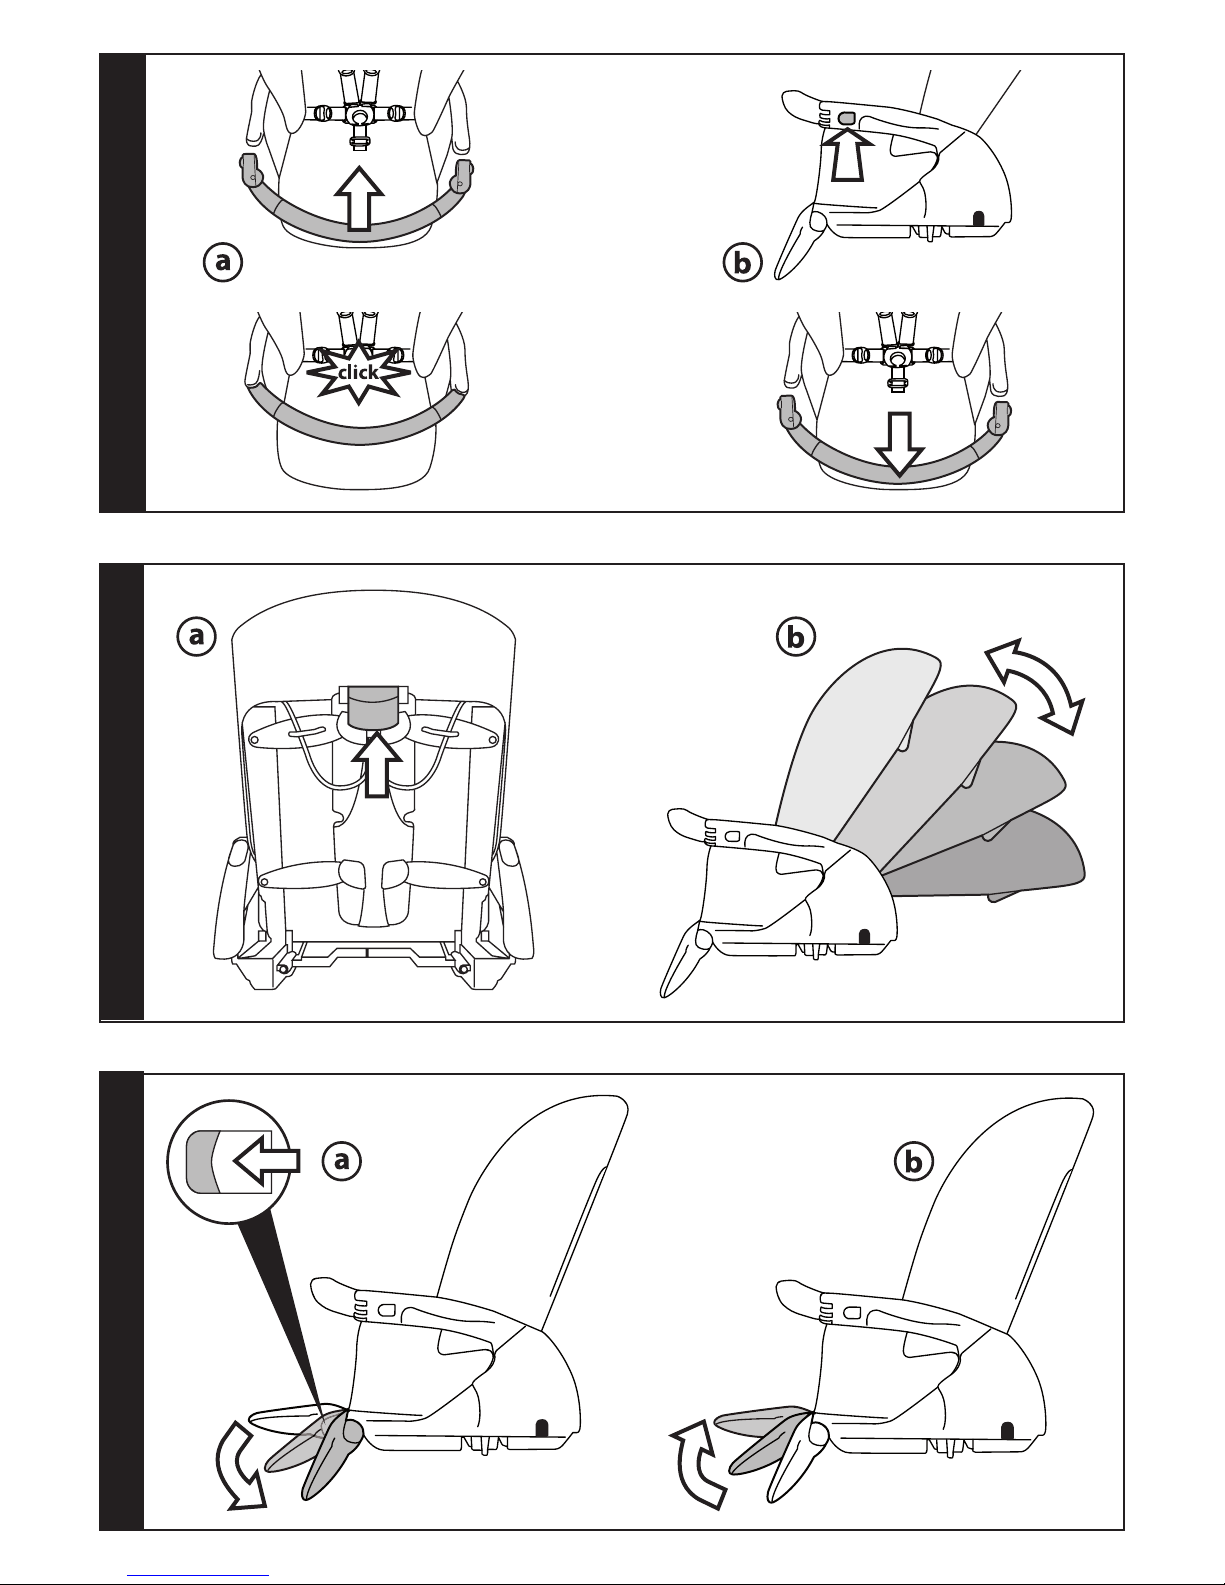
SK Návod na použitie
HU Használati útmutató
SL Navodila za uporab
RU Инструкции по пользованию
TR Kullanim klavuzu
EL Οδηγίες χρήσεως
pliko switch compact
Page 2

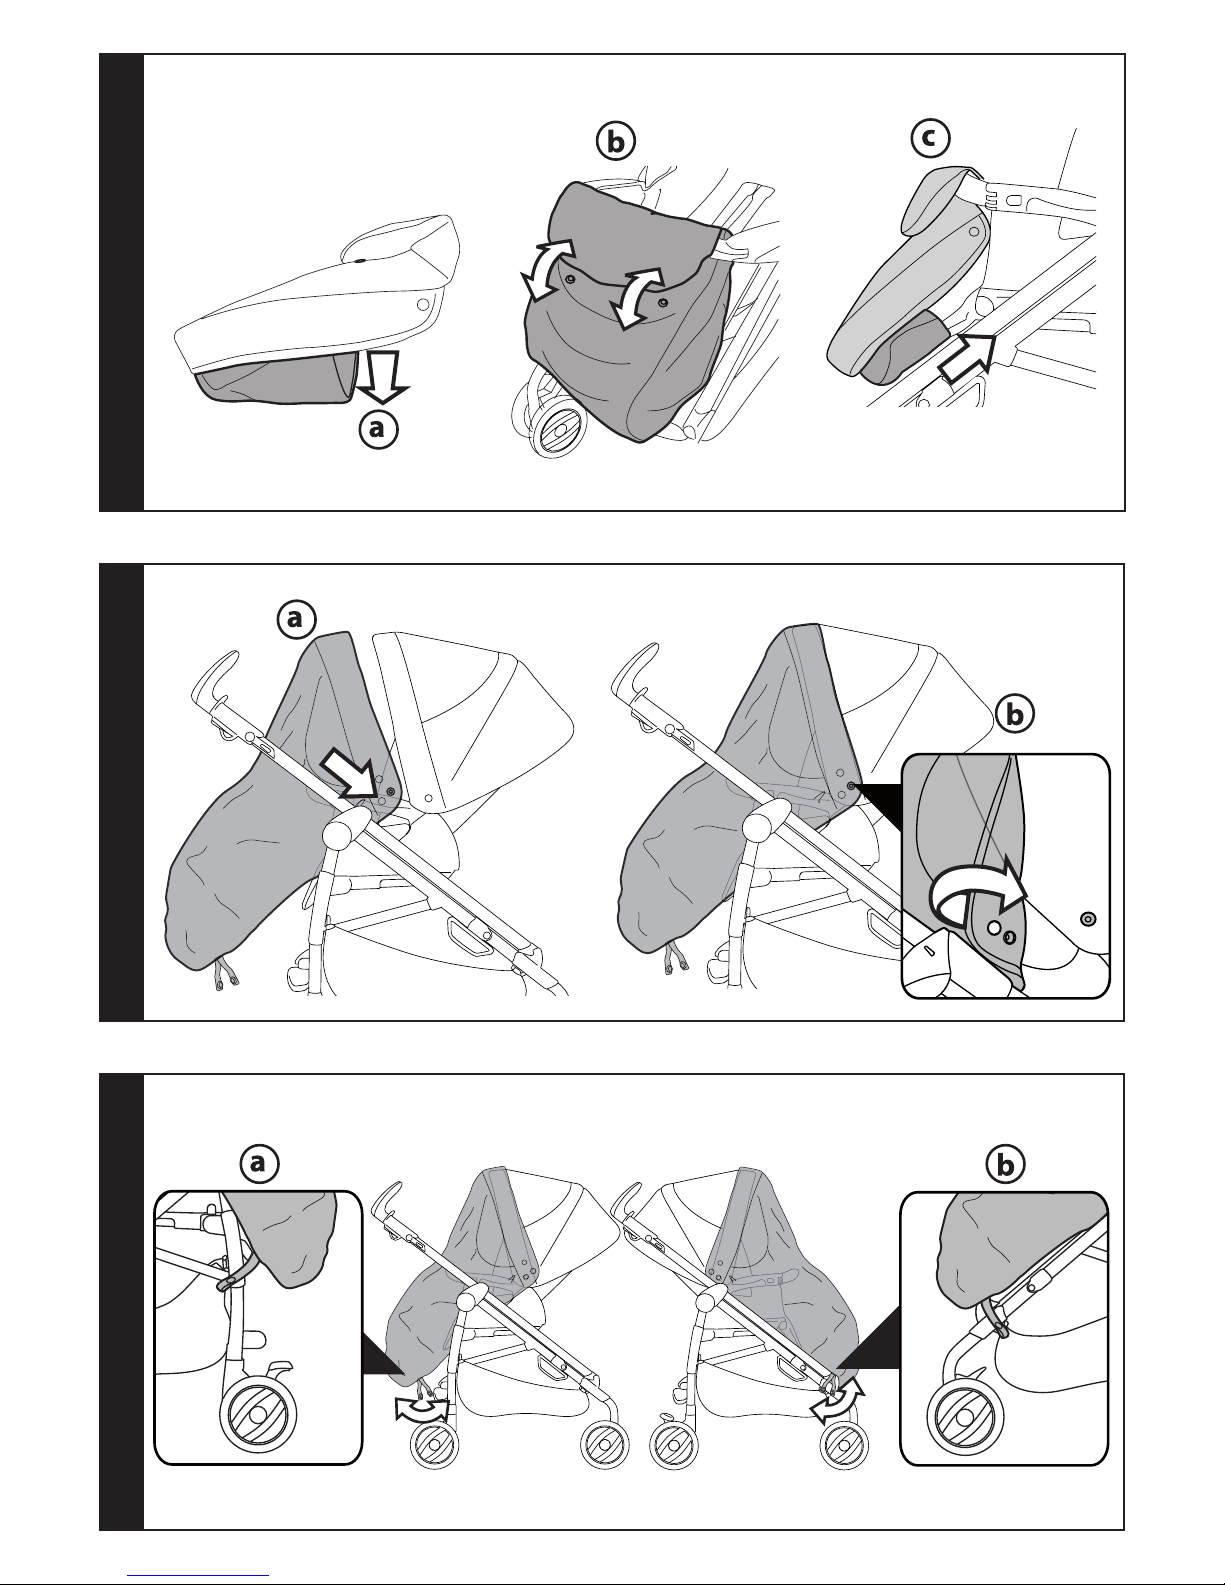
NO
OK
3
2
1
Page 3

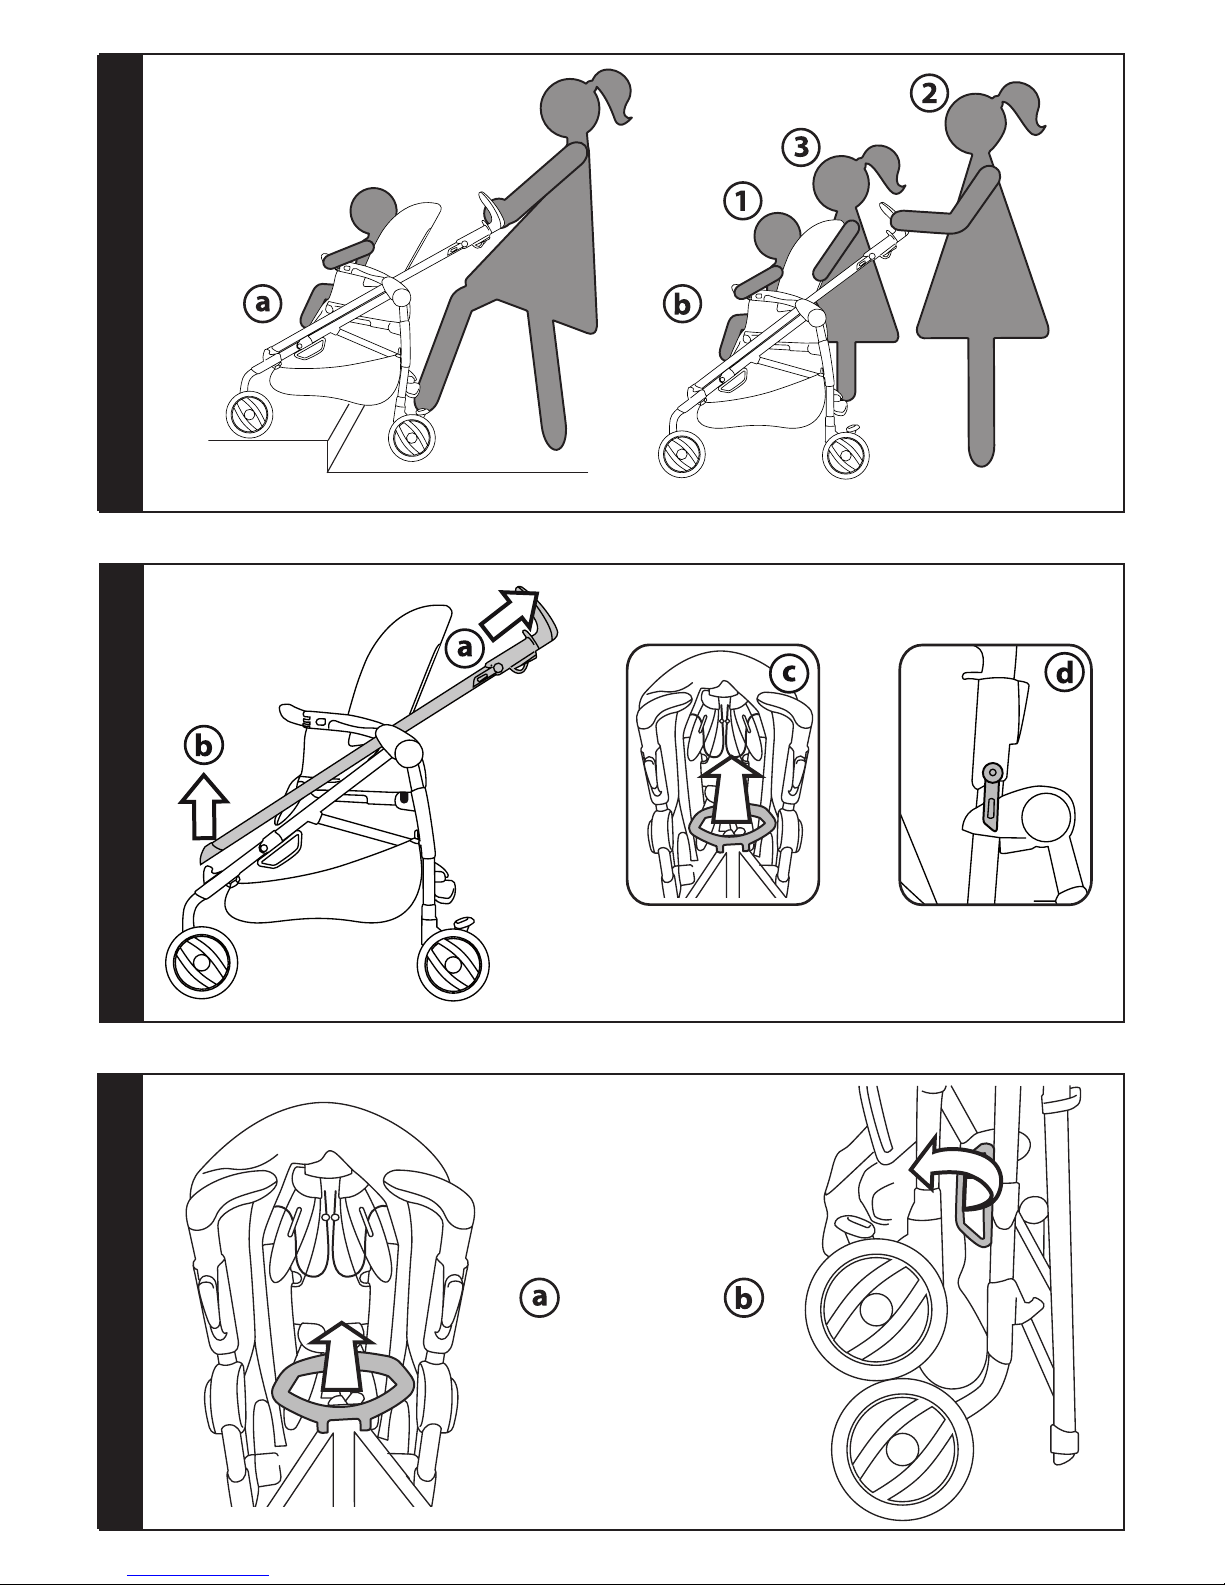
6
5
4
Page 4

8
7
9
Page 5

12
11
10
Page 6
14
15
13
Page 7

16
17
18
Page 8

20
21
19
Page 9
22
23
24
Only Pliko Switch On Track
Page 10
25
26
27
Page 11

28
29
30
Page 12

IT Ricambi disponibili in piú colori da specificare nella richiesta.
EN Spare parts available in different colours to be specified when ordering.
FR Pièces de rechange disponibles en plusieurs couleurs à spécifier dans la demande.
DE Ersatzteile in mehr Farben vorhanden, die in der Anfrage spezifiziert werden müssen.
ES Repuestos disponibles en otros colores que se especificarán en el pedido.
PT Peças de reposição disponíveis em cores alternativas a serem especificadas no pedido.
NL Reserveonderdelen verkrijgbaar in meerdere kleuren, bij bestelling te specificeren.
DK Reservedele kan leveres i flere farver som bør specificeres ved bestillingen.
FI Varaosia saatavana eri värisinä: ilmoita väri tilauksessa.
CZ U náhradních dílů, které jsou k dispozici ve více barvách, je nutné na objednávce specifikovat příslušnou barvu.
SK Pri náhradných dieloch, ktoré sú k dispozícii vo viacerých farbách, je potrebné pri objednávke špecifikovať želanú farbu.
HU A tartalék alkatrészek különböző színekben elérhetők, melyeket rendeléskor kell kiválasztani.
SL Rezervni deli so na voljo v več barvah, ki jih je treba navesti pri naročilu.
RU Запчасти имеются различных цветов, необходимый указать в запросе.
TR Siparişte belirtilen değişik renklerdeki yedek parçalari mevcuttur.
EL Ανταλλακτικά διαθέσιμα σε διάφορα χρώματα. Προσδιορίστε όταν παραγγείλετε.
31
Page 13
15
2
5
6
13
14
1
7
12
11
8
10
9
17
23
22
20
19
18
16
21
4
3
Only Pliko Switch
Compact
Pliko Switch
1 SAPI6430NGR
2dx SPST7060DN
2sx SPST7060SN
3 BSAPSS•
4 BCOPSS•
5 SOFF0186Z
6 SPST7031N
7 SAPI7020GRN
8 SAPI5368JJNGR
9 IRSHPG00-NY01RE53M
10 SAPI6099L31NGR
11 ARPI0594L31N
12dx SPST7002KDGRS
12sx SPST7002KSGRS
13 SAPI6994L31NGR
14 SPST6991GR
15 ITPWCO00NL65
16 SAPI6980NFGRPEG
17 IRBELV0007
18 BCAPSS•
19dx SPST6975DB
19sx SPST6975SB
20 SAPI6977NF
21 ITSWCO00NF
22 ASPI0136NFGL
23 MUCI5P22N
Page 14

- 14 -
IT_Italiano
Grazie per aver acquistato un prodotto Peg-Pérego.
AVVERTENZA
_ IMPORTANTE: leggere attentamente queste
istruzioni e conservarle per un futuro utilizzo. La
sicurezza del bambino potrebbe essere messa a
rischio se non si eseguono queste istruzioni.
_ Questo articolo è stato progettato per il trasporto di
1 bambino nella seduta ed 1 bambino in piedi sulla
pedanetta posteriore.
_ Non utilizzare questo articolo per un numero di
occupanti superiori a quanto previsto dal costruttore.
_ Telaio-Pliko Switch + seggiolino-Pliko Switch è
omologato per bambini dalla nascita, fino a 15 kg di
peso nella seduta. La pedanetta posteriore del Pliko
Switch Compact è omologata per il trasporto di un
secondo bambino fino a 20 kg di peso.
_ Il telaio-Pliko Switch e' stato progettato per essere
usato in combinazione con i prodotti Peg-Pérego
Ganciomatic: telaio-Pliko Switch + seggiolino auto
"Primo Viaggio" (gruppo 0+) è omologato per
bambini dalla nascita, fino a 13 kg di peso; telaioPliko Switch + navicella "Navetta" o "Primonido" è
omologato per bambini dalla nascita, fino a 10 kg
di peso. Nell'uso con "Navetta" e "Primonido", non
utilizzare la pedanetta posteriore.
_ Prima dell’ uso assicurarsi che i prodotti Peg-Pérego
Ganciomatic siano correttamente agganciati
all'articolo.
_ Potrebbe essere pericoloso lasciare il vostro bambino
incustodito.
_ Utilizzare sempre la cintura di sicurezza a cinque
punti, agganciare sempre il cinturino girovita al
cinturino spartigambe.
_ Prestare attenzione alla presenza del bambino
quando si effettuano operazioni di regolazione dei
meccanismi (maniglione, schienale).
_ Azionare sempre il freno quando si è fermi e durante
le operazioni di carico e scarico del bambino.
_ Le operazioni di assemblaggio, preparazione
dell’articolo, di pulizia e manutenzione devono essere
effettuate solo da adulti.
_ Non utilizzate questo articolo se presenta parti
mancanti o rotture.
_ Prima dell’ uso assicurarsi che tutti i meccanismi di
aggancio siano ingaggiati correttamente.
_ Evitare di introdurre le dita nei meccanismi.
_ Ogni carico appeso al maniglione o alle maniglie
può rendere instabile l'articolo; seguire le
indicazioni del costruttore riguardo ai massimi
carichi utilizzabili.
_ Non introdurre nel cestello carichi per un peso
superiore a 5 kg. Non inserire nei portabibite pesi
superiori a quanto specificato nel portabibite stesso
e mai bevande calde. Non inserire nelle tasche delle
capotte (se presenti) pesi superiori a 0.2 Kg.
_ Il frontalino non è progettato per reggere il peso del
bambino; il frontalino non è disegnato per mantenere
il bambino nella seduta e non sostituisce il cinturino
di sicurezza.
_ Non utilizzare l'articolo in vicinanza di scale o gradini;
non utilizzare vicino a fonti di calore, fiamme libere
od oggetti pericolosi a portata delle braccia del
bambino.
_ Potrebbe essere pericoloso utilizzare accessori non
approvati dal costruttore.
_ Questo articolo non e' adatto per il jogging o la corsa
coi pattini.
_ Non utilizzare il parapioggia (se presente) in ambienti
chiusi e controllare sempre che il bambino non sia
accaldato; non collocare mai vicino a fonti di calore
e fare attenzione alle sigarette. Assicurarsi che il
parapioggia non interferisca con nessun meccanismo
in movimento del carrello o passeggino; togliere
sempre il parapioggia prima di chiudere il vostro
carrello o passeggino.
_ quando si utilizza il passeggino con due bambini,
non lasciarli mai da soli e non permettere al secondo
bambino di salire sulla pedanetta posteriore con il
passeggino vuoto.
_ Non utilizzare le maniglie di sgancio per trasportare o
alzare il passeggino con dentro il bambino.
_ ATTENZIONE Non aggiungere alcun materassino.
Pliko Switch compact, il passeggino compatto con
seggiolino reversibile!
Versione completa di capottina, copertina e
paragioggia.
Versione sportiva con capottina e paragioggia (Pliko
Switch compact On Track Sportivo).
CARATTERISTICHE DELL'ARTICOLO
_ Questo articolo è numerato progressivamente.
_ Pliko Switch è un passeggino con seggiolino
reversibile: fronte mamma o fronte mondo.
_ Pliko Switch è composto da due elementi: TELAIO-
Pliko Switch e SEGGIOLINO-Pliko Switch.
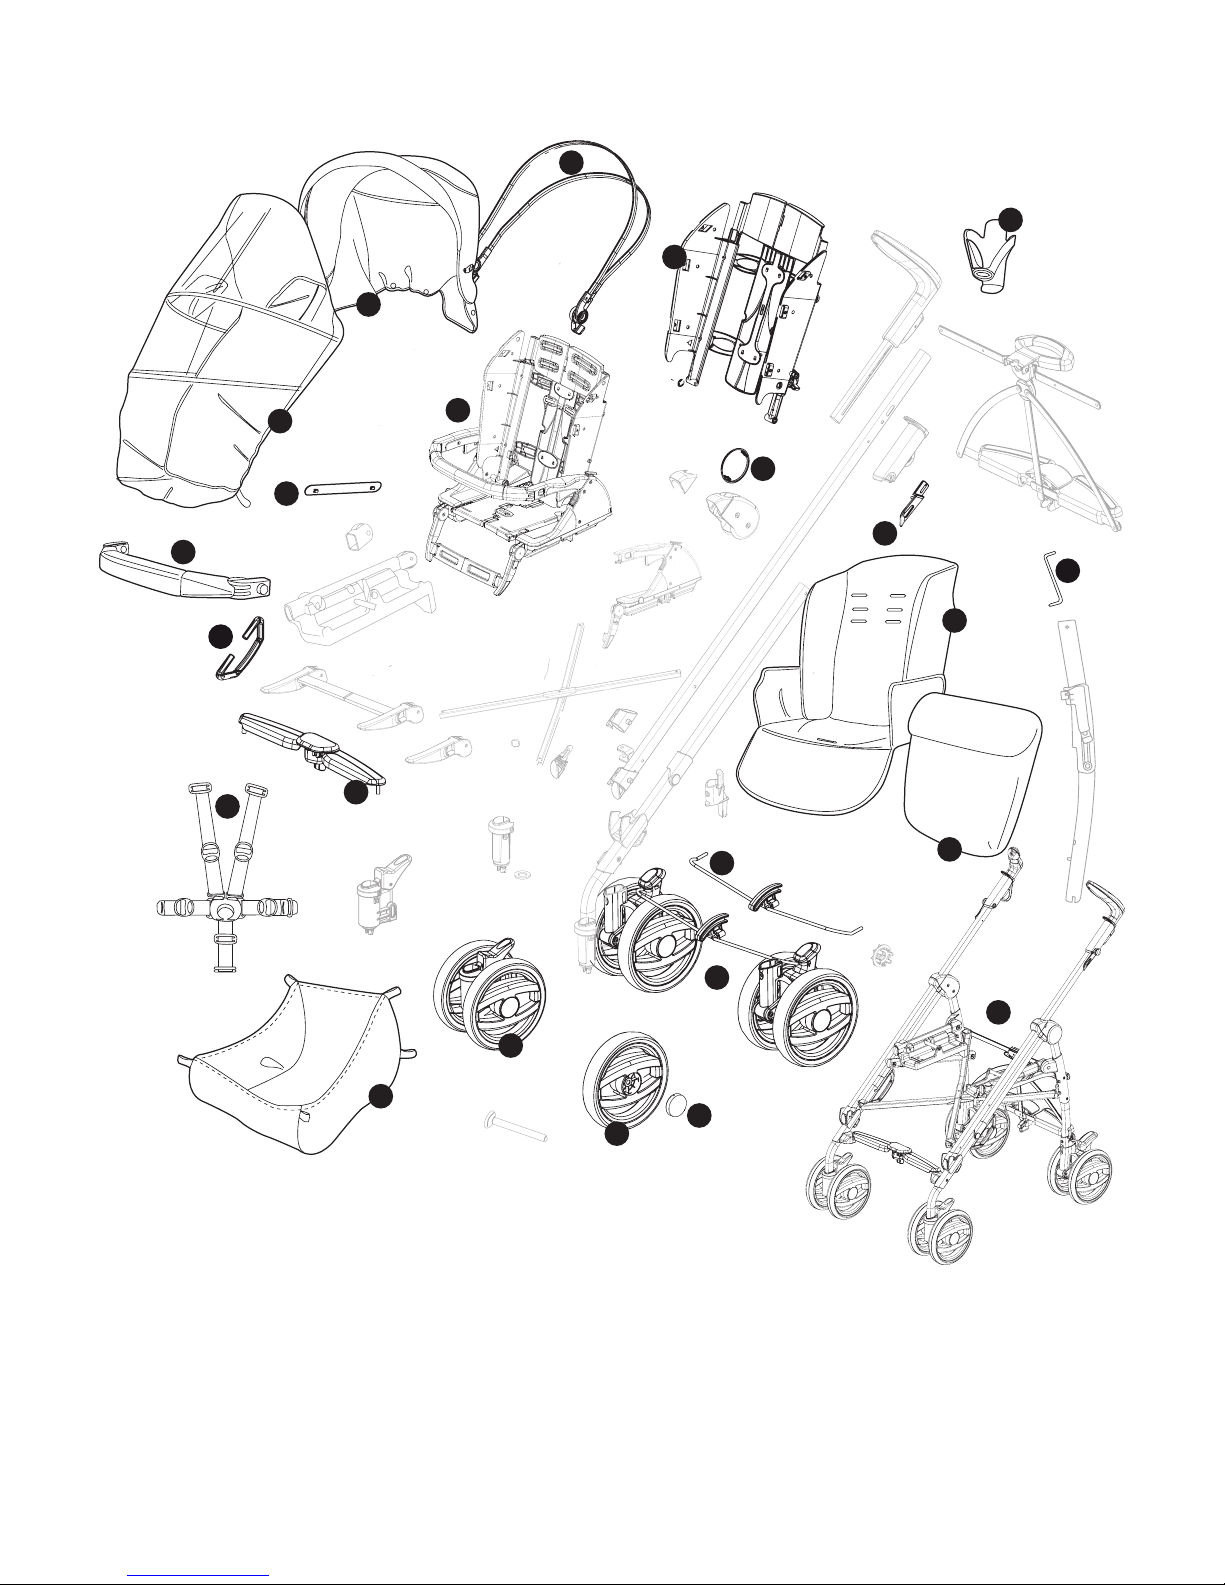
COMPONENTI DELL'ARTICOLO
Verificare il contenuto presente nell'imballo e in caso
di reclamo prego contattare il Servizio Assistenza.
_ Telaio Pliko Switch: cestello; 2 ruote anteriori
piroettanti o bloccabili; 2 ruote posteriori con freno a
barra centralizzato e portabibite.
_ Seggiolino Pliko Switch: frontalino; capottina;
copertina; parapioggia.
_ Seggiolino Pliko Switch On Track Sportivo: frontalino;
capottina; parapioggia.
ISTRUZIONI D'USO
1 PROTEZIONI IMBALLO: prima di aprire il telaio occorre
rimuovere le protezioni (fig_a), altrimenti il telaio non
si aprirà correttamente (fig_b).
2 APERTURA: alzare insieme le leve delle due maniglie
(fig_a) e tirare verso l'alto fino ad aprire il telaio
(fig_b). Verificare la corretta apertura: i tubi laterali
devono risultare agganciati tra di loro (fig_c).
3 MONTAGGIO RUOTE ANTERIORI: verificare che sia
presente la rondella, come in figura, abbassare la leva
delle due ruote anteriori (fig_a), infilare la ruota fino al
click (fig_b).
4 MONTAGGIO RUOTE POSTERIORI: infilare le ruote
fino al click (fig_a) e verificare il corretto aggancio
(fig_b).
5 Infine agganciare l'elemento centrale sulla barra
freno al telaio (fig_a), controllando che l'aggancio sia
avvenuto correttamente (fig_b).
6 MONTAGGIO CESTELLO: infilare le asole ai ganci
anteriori (fig_a) e ai ganci posteriori (fig_b).
7 MONTAGGIO PORTABIBITE: infilare sul perno fino al
click (fig_a). Il porta-bibite é applicabile su entrami i
lati del telaio.
8 MANIGLIE REGOLABILI.
Pliko Switch compact: per alzare o abbassare
le maniglie, premere il pulsante (fig_a) e
contemporaneamente regolare le maniglie (fig_b).
9 RUOTE ANTERIORI FISSE O PIROETTANTI: alzare le leve
per rendere le ruote fisse (fig_a), abbasssare le leve
per rendere le ruote piroettanti (fig_b). Su terreni
difficili si consiglia l'uso di ruote fisse.
10 FRENO: premere una leva freno per bloccare il telaio
Page 15

- 15 -
(fig_a), alzare per sbloccare (fig_b).
11 AGGANCIO DEL SEGGIOLINO AL TELAIO: il seggiolino
reversibile può essere agganciato al telaio rivolto
verso la mamma (fig_a) o verso la strada (fig_b),
posizionare sul telaio in corrispondenza dei simboli
e premere verso il basso con entrambe le mani fino
al doppio click di aggancio. Assicurarsi il corretto
aggancio del seggiolino, tirandolo verso l'alto
afferrandolo dal frontalino.
12 SGANCIO DEL SEGGIOLINO DAL TELAIO: premere
i due pulsanti tondi laterali al seggiolino (fig_a)
e contemporaneamente le due leve poste sotto i
braccioli (fig_b) tirando verso l'alto il seggiolino
(fig_c) fino a sganciarlo.
13 FRONTALINO: per agganciare il frontalino,
accompagnare gli attacchi nei braccioli, spingere
verso il seggiolino fino al click di aggancio (fig_a).
Per rimuovere il frontalino premere i due pulsanti ed
estrarre (fig_b). Aprire il frontalino solo da un lato per
agevolare l'entrata e l'uscita del bambino.
14 SCHIENALE: per regolare alzare la maniglia (fig_a) e
posizionare a piacere in una delle 4 posizioni (fig_b).
15 POGGIAGAMBE: per abbassare spingere verso il basso
le due levette e abbassare (fig_a); per alzare spingere
il poggiagambe verso l'alto (fig_b).
16 CINTURA DI SICUREZZA 5 PUNTI: per agganciare,
inserire le due fibbie del cinturino girovita (con
bretelle agganciate freccia_a) nel cinturino
spartigambe fino al click (freccia_b). Per sganciare,
premere il pulsante tondo posto centralmente alla
fibbia (freccia_c) e tirare verso l’esterno il cinturino
girovita (freccia_d).
17 Per stringere il cinturino girovita tirare, da entrambi
i lati, nel senso della freccia (freccia_a), per allentarlo
agire in senso contrario. Il cinturino girovita può
essere stretto fino al fermo di sicurezza (fig_b).
18 Per regolare l'altezza delle cinture di sicurezza è
necessario sganciare sul retro dello schienale le due
fibbie;
Tirare verso di se le bretelle (freccia_a) fino a
sganciare la fibbie e infilarle nelle asole dello
schienale (freccia_b). Sfilare le bretelle dalla sacca
(freccia_c) e infilarle nell'asola più idonea (freccia_d),
infine riagganciare le due fibbie dietro lo schienale
(freccia_e). Il corretto aggancio delle fibbie è
determinato dal click (fig_f).
19 CAPOTTINA: per agganciare infilare gli attacchi al
seggiolino lateralmente (fig_a) e abbottonarla al retro
dello schienale (fig_b). Per togliere la capottina: sfilare
gli attacchi e sbottonare. Per alzare la capottina:
tirarla verso di sè; per chiudere la capottina: spingerla
indietro. Per trasformare la capottina in parasole,
aprire la cerniera con doppio cursore (fig_c) e
sbottonarla dal retro dello schienale. La capotta è
dotata di un'asola alla quale appendere il suo gioco
preferito (fig_d).
20 COPERTINA: calzare la copertina e abbottonarla
sotto al poggiagambe (fig_a) e lateralmente al
poggiagambe. Per la versione a carrozzina alzare
il poggiagambe e posizionare la copertina sopra il
frontalino (fig_b) fissandola ai bottoni della capottina
(fig_c).
21 Per la versione a passeggino abbassare il
poggiagambe, infilare la copertina sotto il frontalino
(fig_a) e fissarla in base al modello acquistato A, B.
22 COPERTINA Pliko Switch On Track:
si utilizza e si aggancia sia sulla Navetta XL che sul
passeggino Pliko Switch On Track. Per montarla sulla
Navetta XL, consultare il suo manuale d'uso.
Per montarla sul passeggino, allargare la copertina
al suo interno per far comprendere le gambe del
bambino (Fig.a).
Calzarla comprendendo il frontalino e unire i bottoni
davanti (Fig.b) inserire sotto il poggiagambe nella
copertina (Fig.c).
23 PARAPIOGGIA: posizionare il parapioggia sul
passeggino (fig_a) e infilare le due asole laterali dello
stesso ai bottoni della capottina (fig_b).
24 fissare il parapioggia agganciando l'elastico ai
montanti posteriori (fig_a) o a quelli anteriori (fig_b) a
seconda della posizione del seggiolino.
25 PEDANETTA POSTERIORE: agevola la mamma nel
superare piccoli dislivelli (fig_a) e per trasportare il
secondo bambino (fig_b). Per utilizzare il passeggino
con due bambini, frenare il passeggino, posizionare
il bambino più piccolo nella seduta e agganciare la
cintura di sicurezza (1). Impugnare i manici (2) e fare
salire il secondo bambino sulla pedanetta (3).
26 CHIUSURA: può essere effettuata senza il seggiolino,
con seggiolino rivolto verso la mamma o verso la
strada. Se il seggiolino è rivolto verso la mamma:
prima di chiudere, abbassare completamente lo
schienale; se il seggiolino è rivolto verso la strada:
prima di chiudere alzare lo schienale e una volta
chiuso, abbassare. Per chiudere rendere le ruote
anteriori fisse, chiudere la capottina se applicata.
Alzare una alla volta le due leve delle maniglie o del
maniglione fino allo scatto e spingere verso il basso
per sbloccare i tubi laterali (fig_a-b), tirare in alto la
maniglia centralizzata (fig_c) fino a chiudere i ganci di
sicurezza (fig_d).
27 TRASPORTO: si può trasportare dala maniglia
centralizzata, tenendo le ruote anteriori fisse (fig_a) o
dalla maniglia laterale (fig_b).
28 SFODERABILITA': sfilare la sacca dalla pedanetta
(fig_a),
sganciare gli attacchi della sacca dai braccioli
(fig_b)
staccare dai lati dello schienale i due bottoni
(fig_c) e
sfilare dall'alto (spingendo da sotto il
seggiolino) il cinturino spartigambe (fig_d).
GANCIOMATIC SYSTEM
29 Ganciomatic System é il sistema pratico e veloce
che ti permette di agganciare la navicella Navetta
o PrimoNido, il seggiolino auto Primo Viaggio e il
seggiolino Pliko Switch alla Base Ganciomatic del
telaio con un solo gesto.
Appoggiarli alla Base Ganciomatic e premere sul
prodotto con entrambi le mani fino al click.
Azionare sempre il freno del telaio o passeggino
prima di agganciare e sganciare i prodotti (consultare
i rispettivi manuali istruzioni).
Verificare che l'elemento di trasporto del bambino sia
correttamente agganciato.
ACCESSORI
30 BORSA: borsa con materassino per il cambio del bebè,
agganciabile al passeggino.
NUMERI DI SERIE
31 Pliko Switch, riporta informazioni relative alla data di
produzione dello stesso.
_ Nome del prodotto, data di produzione e
numerazione seriale della seduta (fig_a) e del carrello
(fig_b).
Queste informazioni sono indispensabili in caso di
reclamo.
PULIZIA E MANUTENZIONE
MANUTENZIONE DELL'ARTICOLO: proteggere
da agenti atmosferici: acqua, pioggia o neve;
l’esposizione continua e prolungata al sole potrebbe
causare cambiamenti di colore in molti materiali;
conservare questo articolo in un posto asciutto.
PULIZIA DEL TELAIO: periodicamente pulire le parti in
plastica con un panno umido senza utilizzare solventi
Page 16

- 16 -
o altri prodotti simili; mantenere asciutte tutte le
parti in metallo per prevenire la ruggine; mantenere
pulite tutte le parti in movimento (meccanismi di
regolazione, meccanismi di aggancio, ruote...) da
polvere o sabbia e se occorre, lubrificarle con olio
leggero.
PULIZIA DEL PARAPIOGGIA: lavare con una spugna e
dell'acqua saponata, senza utilizzare detersivi.
PULIZIA DELLE PARTI IN TESSUTO: spazzolare le parti
in tessuto per allontanare la polvere e lavare a mano
a una temperatura massima di 30° non torcere; non
candeggiare al cloro; non stirare; non lavare a secco;
non smacchiare con solventi e non asciugare a mezzo
di asciugabiancheria a tamburo rotativo.
PEG-PÉREGO S.p.A.
Peg-Pérego S.p.A. è certificata ISO 9001.
La certificazione offre ai clienti e ai
consumatori la garanzia di una
trasparenza e fiducia nel modo di
lavorare dell'impresa.
Peg Pérego potrà apportare in qualunque momento
modifiche ai modelli descritti in questa pubblicazione,
per ragioni di natura tecnica o commerciale.
Peg Pérego è a disposizione dei suoi Consumatori
per soddisfare al meglio ogni loro esigenza. Per
questo, conoscere il parere dei ns. Clienti, è per noi
estremamente importante e prezioso. Le saremo
quindi molto grati se, dopo aver utilizzato un
ns. prodotto, vorrà compilare il QUESTIONARIO
SODDISFAZIONE CONSUMATORE, segnalando
eventuali osservazioni o suggerimenti, che troverà nel
nostro sito internet: www.pegperego.com
SERVIZIO ASSISTENZA PEG-PÉREGO
Se fortuitamente parti del modello vengono perse
o danneggiate, usare solo pezzi di ricambio originali
Peg Pérego. Per eventuali riparazioni, sostituzioni,
informazioni sui prodotti, vendita di ricambi originali
e accessori, contatta il Servizio Assistenza Peg Pérego
indicando, qualora fosse presente, il numero seriale
del prodotto.
tel. 0039/039/60.88.213 numero verde: 800/147.414
(contattabile da rete fissa)
fax 0039/039/33.09.992
e-mail assistenza@pegperego.it sito internet www.
pegperego.com
EN_English
Thank you for choosing a Peg-Pérego product.
WARNING
_ IMPORTANT: read the instructions carefully before
use and keep them for future reference. The child
may be hurt if you do not follow these instructions.
_ PLIKO SWITCH COMPACT: This item is designed to
carry 1 child in the seat and 1 child standing on the
rear ledge.
_ When using the stroller with two children, never leave
them unattended and do not allow the second child
to climb onto the rear ledge if the stroller is empty.
_ Do not use this item for a number of occupants
greater than that intended by the manufacturer.
_ The Pliko Switch Chassis + Pliko Switch car seat is
approved for infants from birth up to 15 kg in weight.
The rear ledge is approved for transporting a second
child of up to 20 kg in weight.
_ The Pliko Switch chassis is designed for use with Peg-
Pérego Ganciomatic products: the Pliko Switch chassis
+ Primo Viaggio car seat (0+ group) is approved for
children from birth up to 13 kg of weight. The Pliko
Switch chassis + “Navetta” or “Primonido” bassinet
unit is approved for children from birth up to 10 kg of
weight. If using with the “Navetta” or the “Primonido”,
refrain from using the rear ledge.
_ Before use check that the Peg-Pérego Ganciomatic
products are correctly fixed to the item.
_ It may be dangerous to leave your child unattended.
_ Always use the 5-point harness and attach the waist
strap to the leg divider strap.
_ Be careful not to hurt the child when adjusting the
mechanisms (handlebar, backrest).
_ Always apply the brake when stopped and when
positioning the child in the seat or when removing
the child from the seat.
_ Assembly and preparation of the product, plus
cleaning and maintenance operations, must be
carried out exclusively by adults.
_ Do not use this item if there are parts missing or signs
of breakage.
_ Before use check that all the attachment mechanisms
are correctly engaged.
_ Do not insert fingers into the mechanisms.
_ Any load hanging on the handlebar or the handles
can make the stroller/carriage unstable; follow the
manufacturer’s instructions for max load capacity.
_ Do not place loads over 5 kilos in the basket. Do not
place in the bottle holder weights heavier than stated
or hot drinks. Do not place in the hood pockets (if
applicable) weights over 0.2 Kg.
_ The front bar is not designed to support the child’s
weight. It is not designed to keep the child in the seat
and does not substitute for the waist belt.
_ Do not use the item near to stairs or steps, heat
sources, naked flames or dangerous objects within
reach of the child.
_ The use of accessories not approved by the
manufacturer could be dangerous.
_ This item is not suitable for jogging or roller skating.
_ Do not use the rain canopy (if present) indoors and
regularly check to ensure the child is not too warm;
do not park the stroller close to heat sources and keep
well away from lighted cigarettes. Ensure the rain
canopy is not interfering with any moving parts of the
carriage or stroller; always remove the rain canopy
before folding your carriage or stroller.
_ When using the stroller with two children, never leave
them unattended and do not allow the second child
to climb onto the rear ledge with the stroller empty.
Page 17

- 17 -
_ Do not use the release levers to move or lift the
stroller when the child is in it.
_ WARNING: Do not add a mattress pad.
Pliko Switch compact, the compact stroller with
reversible baby seat!
Full version with hood, cover and rain canopy.
Sports version with hood and rain canopy (Pliko
Switch compact On Track Sportivo).
FEATURES OF THE ITEM
_ The item is numbered progressively.
_ Pliko Switch is a stroller with a reversible seat: facing
the person pushing or facing forwards.
_ Pliko Switch is made up of two elements: Pliko Switch
CHASSIS and Pliko Switch SEAT.
COMPONENTS OF THE ITEM
Check the contents of the packaging and if you have
any complaints please contact the Assistance Service.
_ Pliko Switch Chassis: a basket, 2 swiveling or locking
front wheels, 2 rear wheels with a central brake bar
and a drink holder.
_ Pliko Switch baby seat: front bumper bar; hood; cover;
rain canopy.
_ Pliko Switch On Track Sportivo baby seat: front bar;
hood; rain canopy.
INSTRUCTIONS
1 PACKING PROTECTION: before opening the chassis
remove the protection (fig_a), otherwise it will not
open correctly (fig_b).
2 OPENING: Raise the levers on the two handles
together (fig_a) and pull upwards until the chassis
is completely open (fig_b). Check that the chassis
is correctly opened: the side tubes must be locked
together (fig_c).
3 FITTING THE FRONT WHEELS: First check that the
washer is in place, as shown in the figure, lower the
levers on the two front wheels (fig_a) and push them
until they click into place (fig_b).
4 FITTING THE REAR WHEELS: Push the wheels until
they click into place (fig_a) and check that they are
properly attached (fig_b).
5 Finally, attach the element in the centre of the brake
bar to the chassis (fig_a) and check that it has slotted
into place properly (fig_b).
6 FITTING THE BASKET: Slip the loops onto the hooks at
the front (fig_a) and the rear (fig_b).
7 FITTING THE CUP HOLDER: insert the cup holder on
the corresponding peg and press down until it clicks
into place (fig_a). The cup holder can be attached to
either side of the chassis.
8 ADJUSTABLE HANDLES: Pliko Switch compact: To raise
or lower the handles, hold the button down (fig_a)
and adjust them (fig_b).
9 FIXED OR SWIVELLING FRONT WHEELS: Lift the levers
to prevent the wheels from swiveling (fig_a) and
lower them to allow the wheels to swivel (fig_b). On
uneven surfaces, the wheels should be set to their
fixed position.
10 BRAKES: Press a brake lever to immobilize the chassis
(fig_a) and lift the lever to release it (fig_b).
11 MOUNTING THE SEAT TO THE CHASSIS: the reversible
seat can be attached to the chassis either facing
the person pushing the stroller (fig_a), or facing
forwards (fig_b), place the seat on the chassis so
that it is aligned with the relative symbols and press
downwards with both hands until you hear two clicks
confirming that it has locked into position. Ensure
the seat is correctly secured by attempting to pull it
upwards by gripping the front bar.
12 REMOVING THE SEAT FROM THE CHASSIS: Hold down
the two round buttons on the sides of the seat (fig_a),
press the two levers under the armrests (fig_b) and
pull up the seat (fig_c) until it is released.
13 FRONT BAR: To attach the front bar, slide the
connections into the ends of the armrests and push
them in until they click into place (fig_a). To remove
the front bar, press the two buttons and pull it
outwards (fig_b). To make it easier for the child to get
in and out, it is also possible to open the front bar on
one side only.
14 BACKREST: to recline the backrest lift the lever (fig_a)
and choose one of the 4 positions (fig_b).
15 FOOTREST: to lower the footrest push the two levers
downwards and then push the footrest downwards
(fig_a); to raise the footrest lift it upwards (fig_b).
16 FIVE POINT SAFETY HARNESS: To fasten it, push the
two waist strap buckles (with the shoulder straps
attached – arrow_a) into the leg divider until they
click into place (arrow_b). To unfasten it, press the
round button in the centre of the buckle (arrow_c)
and pull the waist straps out (arrow_d).
17 To tighten the waist strap, pull on both sides in the
direction of the arrow (arrow_a). To loosen it do the
opposite. The waist strap can be tightened as far as
the safety lock (fig_b).
18 To adjust the height of the safety harnesses, release
the two buckles on the rear of the backrest.
Pull the shoulder straps towards you (arrow_a) until
the buckles are released and insert them in the
backrest loops (arrow_b). Remove the shoulder straps
from the sack (arrow_c) and insert them in the most
appropriate loop (arrow_d), then re-attach the two
buckles on the rear of the backrest (arrow_e) The
buckles are securely attached when a click is heard
(fig_f).
19 HOOD: to attach the hood insert the connections
into the sides of the seat (fig_a) and then fasten the
buttons on the rear of the backrest (fig_b). To remove
the hood: disengage the connections and unbutton
from the backrest. To raise the hood: pull it towards
you; to close the hood: push it back. To convert the
hood into a sun canopy, open the double zipper
(fig_c) and unfasten the buttons on the rear of the
backrest. The child’s favorite toy can be hung from
the loop on the hood (fig_d).
20 COVER: Fit the cover on and fasten the buttons under
the leg rest (fig_a) and on the sides of it. For the baby
carriage version, raise the leg rest, put the cover over
the front bar (fig_b) and fasten it with the buttons on
the hood (fig_c).
21 For the stroller version, lower the footrest, insert the
cover underneath the front bar (fig_a) and secure it
according to the model purchased A, B.
22 Pliko Switch On Track COVER:: this can be used with
and attached to both the Navetta XL and the Pliko
Switch On Track stroller. To fit it on the Navetta XL,
consult its user manual. To fit it on the stroller, open
up the cover inside to make room for the child’s legs
(Fig. a). Put it into position. Cover the front bar, fasten
the buttons on the front (Fig. b) and insert it under
the leg rest (Fig. c).
23 RAIN CANOPY: position the rain canopy on the stroller
(fig_a) and insert the two lateral loops over the hood
buttons (fig_b).
24 Secure the rain canopy by attaching the elastic loop
to the rear uprights (fig_a) or to the front uprights
(fig_b), according to the seat position.
25 REAR LEDGE: the rear ledge makes it easier to
negotiate kerbs or level differences with the stroller
(fig_a) and can also be used to transport a second
child (fig_b). To use the stroller with two children,
apply the brakes, position the smaller child in the seat
and attach the safety harness (1). Grip the handles (2)
and help the second child to climb onto the ledge (3).
Page 18

- 18 -
26 FOLDING UP: The stroller can be folded without the
seat, with the seat facing the person pushing, or
with the seat facing forwards. If the seat is facing the
person pushing: before folding it, lower the backrest
completely. If the seat is facing forwards: before
folding the stroller raise the backrest, then lower it
once the stroller is folded. To fold the stroller, set
the front wheels to their fixed position and close the
hood (if fitted).
Lift the two levers on the handles one at a time until
they click, push downwards to release the side tubes
(fig_a-b) and pull the central handle upwards (fig_c)
until the safety catches engage (fig_d).
27 TRANSPORT: the stroller can be carried by the central
handle, keeping the front wheels fixed (fig_a) or by
the side handle (fig_b).
28 REMOVABLE COVERS: Pull the fabric covering off
the ledge (fig_a), release the attachments of the
fabric covering from the armrests (fig_b), unfasten
the buttons on the sides of the backrest (fig_c) and
remove the leg divider strap from above by pushing it
from under the seat (fig_d).
GANCIOMATIC SYSTEM
29 Ganciomatic is a fast and practical system that allows
you to attach the Navetta or PrimoNido bassinet unit,
the Primo Viaggio car seat or the Pliko Switch seat to
the Ganciomatic Base of the chassis in one quick step.
Place the item on the Ganciomatic Base and press
down with both hands until it clicks into place.
Always apply the chassis or stroller brake before
attaching and removing products (refer to the
respective instruction manuals).
Check that the child transport unit is properly
attached.
ACCESSORY
30 BORSA. Diaper-Changing Bag with pad for changing
the baby. Attaches to the stroller.
SERIAL NUMBERS
31 Pliko Switch reports information as at the date of
manufacture of the product.
_ Product name, date of manufacture and serial
number of the seat (fig_a) and of the carriage (fig_b).
This information is required for any complaints.
CLEANING AND MAINTENANCE
PRODUCT MAINTENANCE: protect from the weather:
water, rain, or snow; prolonged and continuous
exposure to bright sunlight may give rise to colour
changes of various different materials; store this
product in a dry place.
CLEANING THE CHASSIS: periodically clean all plastic
parts with a damp cloth. Do not use solvent or
similar cleaning products; keep all metal parts dry to
prevent rusting; keep moving parts clean (adjustment
mechanisms, locking mechanisms, wheels, ...) and free
of dust and sand and, if necessary, lubricate with light
machine oil.
CLEANING THE RAIN CANOPY: wash with a sponge
and soapy water; do not use detergents.
CLEANING FABRIC PARTS: brush fabric parts to remove
dust and wash by hand at a maximum temperature
of 30°C; do not wring; do not use chlorine bleach, do
not iron; do not dry clean; do not apply solvent-based
stain removers and do not dry in a tumble dryer.
PEG-PÉREGO S.p.A.
Peg-Pérego S.p.A. is an ISO 9001
certified company. This certification is a
guarantee for customers and
consumers of the transparency and
trustworthiness of the company's
procedures and working methods.
Peg Pérego can make changes at any time to the
models described in this publication for technical or
commercial reasons.
Peg Pérego is at the disposal of its customers and
consumers to ensure that all their demands and
queries are fully satisfied. It is a key part of our policy
to ensure we are always aware of our customers'
views and requirements. We would therefore be very
grateful if, after using a Peg Pérego product, you
take the time to fill in our CUSTOMER SATISFACTION
QUESTIONNAIRE, making a note of any comments
or suggestions you might have. You can find the
questionnaire on the Peg Pérego website: www.
pegperego.com
PEG-PÉREGO AFTER-SALES SERVICE
If any parts of your Peg Pérego product should be
accidentally mislaid or damaged, use exclusively
genuine original Peg Pérego replacements. For any
repairs, replacements, product information, and
orders for genuine original replacement parts and
accessories, please contact Peg Perego After Sales
Service indicating the product serial number, if any.
tel. 0039/039/60.88.213 fax 0039/039/33.09.992
e-mail assistenza@pegperego.it
website www.pegperego.com
Page 19

- 19 -
FR_Français
Merci d’avoir choisi un produit Peg-Pérego.
AVERTISSEMENT
_ IMPORTANT : lire ces instructions avec attention
et les conserver pour toute référence future. La
sécurité de l’enfant pourrait être menacée si ces
instructions ne sont pas suivies.
_ Cet article a été conçu pour transporter 1 enfant dans
le siège et 1 enfant debout sur le marchepied arrière.
_ Ne pas utiliser lorsque le nombre d’occupants est
supérieur aux prescriptions du fabricant.
_ Châssis-Pliko Switch + siège-Pliko Switch est
homologué pour des enfants de la naissance jusqu’à
un poids de 15 kg dans le siège. Le marchepied arrière
est homologué pour le transport d’un second enfant
d’un poids maximal de 20 kg.
_ Le châssis-Pliko Switch a été conçu pour être utilisé
en combinaison avec les produits Peg-Pérego
Ganciomatic : châssis-Pliko Switch + siège-auto «
Primo Viaggio » (groupe 0+) est homologué pour
les enfants de la naissance jusqu’à un poids de 13
kg ; châssis Pliko Switch + nacelle « Navetta » est
homologué pour les enfants de la naissance jusqu’à
un poids de 10 kg. Ne pas utiliser le marche-pied
arrière lorsque le produit est employé en combinaison
avec « Navetta ».
_ Avant chaque utilisation, s’assurer que les articles
Peg-Pérego Ganciomatic sont correctement
accrochés sur le châssis.
_ Il peut être dangereux de laisser l’enfant sans
surveillance.
_ Toujours utiliser la ceinture de sécurité à cinq points;
toujours accrocher la sangle ventrale à la sangle
d’entrejambes.
_ Prêter attention à la position de l’enfant lors des
opérations de réglage des éléments mobiles
(poignée, dossier).
_ Toujours actionner le frein lorsque l’article est à l’arrêt
et pendant l’installation ou la sortie de l’enfant.
_ Les opérations d’assemblage, de préparation de
l’article, de nettoyage et d’entretien doivent être
réalisées uniquement par des adultes.
_ Ne pas utiliser cet article si des pièces sont
manquantes ou cassées.
_ Avant l’utilisation, s’assurer que tous les mécanismes
de fixation sont correctement enclenchés.
_ Éviter de mettre les doigts dans les mécanismes.
_ Toute charge suspendue aux poignées peut
déstabiliser le produit, suivre les recommandations du
fabrication sur les charges maximales admises.
_ Ne pas utiliser le panier pour transporter des charges
dont le poids dépasse 5 kg. Ne pas introduire dans
le porte-boisson des charges supérieures à celles
indiquées sur le porte-boisson lui-même et ne jamais
introduire de boissons chaudes. Ne pas introduire
dans les poches de la capote (lorsqu'elles sont
présentes) des objets dont le poids dépasse 0.2 kg.
_ La main courante n’a pas été conçue pour supporter
le poids de l’enfant; elle n’a pas non plus été conçue
pour maintenir l’enfant en position assise et ne
remplace pas la sangle de sécurité.
_ Ne pas utiliser l’article à proximité d’escaliers ou de
marches; ne pas l’utiliser à proximité de sources de
chaleur, de flammes directes ou d’objets dangereux
se trouvant à la portée de l’enfant.
_ L’utilisation d’accessoires n’ayant pas été approuvés
par le fabricant peut se révéler dangereuse.
_ Ne pas utiliser ce produit lors d’un jogging ou avec
des patins à roulettes.
_ Ne pas utiliser l’habillage pluie (lorsqu’il est présent
sur l’article) dans des milieux clos et toujours contrôler
que l’enfant n’ait pas trop chaud; ne jamais placer à
proximité de sources de chaleur et prendre garde aux
cigarettes. S’assurer que l’habillage pluie n’interfère
avec aucun mécanisme en mouvement du châssis ou
de la poussette; toujours retirer l’habillage pluie avant
de refermer le châssis ou la poussette.
_ Lorsque la poussette est utilisée avec deux enfants,
ne jamais les laisser seuls et ne pas laisser le second
enfant monter sur le marchepied arrière tandis que la
poussette est vide.
_ Ne pas se servir des poignées de décrochage pour
transporter ou soulever la poussette alors que l’enfant
est installé à bord.
_ ATTENTION : ne pas rajouter de matelas.
_ Conforme aux exigences de sécurité.
Pliko Switch compact, la poussette compacte avec
siège reversible!
Version complète avec capotte, tablier et habillage
pluie.
Version sportive avec capotte et habillage pluie (Pliko
Switch compact On Track Sportivo).
CARACTÉRISTIQUES DE L’ARTICLE
_ Cet article fait l’objet d’une numérotation progressive.
_ Pliko Switch est une poussette dotée d’un siège
réversible, faisant face à maman ou au monde.
_ Pliko Switch se compose de deux éléments : CHÂSSIS
Pliko Switch et SIÈGE Pliko Switch.
COMPOSANTS DE L’ARTICLE
Vérifier le contenu de l’emballage. Pour toute
réclamation, veuillez contacter le Service d’assistance.
_ Châssis-Pliko Switch : panier ; 2 roues avant pivotantes
ou fixes ; 2 roues arrière avec frein à barre centralisé ;
porte-boissons.
_ Siège Pliko Switch: barre frontale, capotte, tablier et
habillage pluie.
_ Siège Pliko Switch On Track Sportivo: barre frontale,
capotte et habillage pluie.
INSTRUCTIONS D’UTILISATION
1 PROTECTIONS EMBALLAGE: avant d’ouvrir le châssis,
retirer les protections (fig. a). Dans le cas contraire le
châssis ne s’ouvrira pas correctement (fig. b).
2 OUVERTURE : relever simultanément les leviers des
deux poignées (fig_a) et tirer vers le haut jusqu’à
l’ouverture du châssis (fig_b). Contrôler la bonne
ouverture du châssis : les montants latéraux doivent
être accrochés les uns aux autres (fig_c).
3 MONTAGE ROUES AVANT : Vérifier tout d’abord que
la rondelle est bien présente, comme le montre la
figure, baisser le levier des roues avant (fig_a) et
insérer la roue jusqu’au déclic (fig_b).
4 MONTAGE ROUES ARRIÈRE : insérer les roues jusqu’au
déclic (fig_a) et vérifier qu’elles sont correctement
accrochées (fig_b).
5 Accrocher l’élément central sur la barre de frein au
châssis (fig_a) et contrôler qu’il est correctement
monté (fig_b).
6 MONTAGE PANIER : accrocher les œillets aux crochets
avant (fig_a) et arrière (fig_b).
7 MONTAGE DU PORTE-BOISSONS: enfiler le porte-
boissons sur son support jusqu’au déclic (fig. a).
Il peut se fixer indifféremment des deux côtés du
châssis.
8 POIGNÉES RÉGLABLES: Pliko Switch compact : pour
lever ou baisser les poignées, appuyer sur le bouton
(fig_a) tout en réglant les poignées (fig_b).
9 ROUES AVANT PIVOTANTES OU FIXES : relever le levier
pour bloquer les roues (fig_a), le baisser pour les
rendre pivotantes (fig_b). Sur terrains difficiles, il est
Page 20

- 20 -
conseillé d’utiliser les roues fixes.
10 FREIN : appuyer sur un levier de frein pour bloquer
le châssis (fig_a), le relever pour débloquer le châssis
(fig_b).
11 MONTAGE DU BLOC POUSSETTE SUR LE CHÂSSIS: il est
possible d’accrocher le bloc poussette réversible au
châssis en le tournant vers maman (fig. a) ou vers le
monde (fig. b). Le positionner sur le châssis en s’aidant
des symboles et appuyer vers le bas des deux mains
jusqu’à entendre un double clic d’enclenchement.
S’assurer du bon accrochage du siège en le tirant vers
le haut par la main courante. Si le bloc poussette se
décroche, répéter l’opération ci-dessus décrite..
12 DÉCROCHAGE DU SIÈGE DU CHÂSSIS : appuyer sur
les deux boutons ronds situés sur les côtés du siège
(fig_a) et, dans le même temps, sur les deux leviers
placés sous les accoudoirs (fig_b), puis tirer le siège
vers le haut (fig_c) jusqu’à ce qu’il se décroche.
13 BARRE FRONTALE : pour accrocher la barre frontale,
guider les fixations dans les accoudoirs et la pousser
vers le siège jusqu’au déclic (fig_a).
Pour enlever la barre frontale, appuyer sur les deux
boutons et l’extraire (fig_b). Ouvrir la barre frontale
d’un côté seulement pour faciliter l’entrée et la sortie
de l’enfant.
14 DOSSIER: pour régler l’inclinaison, relever la poignée
(fig. a) et placer le dossier dans l’une des 4 positions
au choix (fig. b).
15 REPOSE-PIEDS: pour abaisser le repose-pieds,
déplacer vers le bas les deux petits leviers et baisser
le repose-pieds. vers le bas (fig. a); pour le relever, le
pousser vers le haut (fig. b).
16 CEINTURE DE SÉCURITÉ À 5 POINTS : pour l’accrocher,
enclencher les deux boucles de la ceinture ventrale
(bretelles attachées, flèche_a) dans la sangle
d’entrejambes jusqu’au déclic (flèche_b). Pour la
décrocher, appuyer sur le bouton rond situé au centre
de la boucle (flèche_c) et tirer la ceinture ventrale vers
l’extérieur (flèche_d).
17 Pour serrer la sangle ventrale, tirer, des deux côtés,
dans le sens de la flèche (flèche_a), pour la desserrer
procéder dans le sens inverse. La sangle ventrale peut
être serrée jusqu’à la butée de sécurité (fig_b).
18 Pour régler la hauteur des ceintures de sécurité, il faut
décrocher les deux clips à l’arrière du dossier.
Tirer vers soi les bretelles (flèche_a) jusqu’à décrocher
les clips et les enfiler dans les boutonnières du dossier
(flèche_b). Enlever les bretelles de la housse (flèche_c)
et les enfiler dans la boutonnière la plus adaptée
(flèche_d), enfin accrocher de nouveau les deux clips
derrière le dossier (flèche_e). L’accrochage correct des
clips est déterminé par le déclic (fig_f).
19 CAPOTE: pour installer la capote, accrocher ses
fixations sur les côtés du siège (fig. a) et la boutonner
à l’arrière du dossier (fig. b). Pour enlever la capote,
défaire ses fixations et la déboutonner. Pour la
relever, la tirer vers l’avant. Pour la replier, la pousser
en arrière. Pour la transformer en pare-soleil, ouvrir
la fermeture éclair à double curseur (fig. c) et la
déboutonner de l’arrière du dossier. La capote est
équipée d’une boucle pour accrocher le jouet préféré
de l’enfant (fig_d).
20 TABLIER : mettre le tablier en place et le boutonner
sous le repose-pieds (fig_a) et sur les côtés. Pour la
version landau, relever le repose-pieds et mettre
le tablier en place sur la barre frontale (fig_b) en
l’accrochant aux boutons de la capote (fig_c).
21 Pour la version poussette, baisser le repose-pieds,
enfiler la capote sous la main courante (fig_a) et la
fixer selon le modèle acheté A, B.
22 TABLIER Pliko Switch On Track :
s’utilise et s’accroche tant sur la nacelle Navetta XL
que sur la poussette Pliko Switch On Track. Pour le
monter sur la nacelle Navetta XL, consulter la notice
d’emploi.
Pour le monter sur la poussette, l’élargir à l’intérieur
pour que les jambes de l’enfant puissent y entrer (Fig.
a).
L’enfiler en enveloppant la barre frontale et unir les
boutons devant (Fig. b) ; enfiler sous le repose-jambes
(Fig. c).
21 Le siège de Pliko Switch modèle Soft est réversible.
Avant de procéder, enlever les ceintures et les
remettre en place (voir paragraphe 17) à la fin de
l’opération. Pour retourner, déboutonner, dans la
partie du repose-pieds, la housse supérieure de la
housse inférieure (fig_a), ouvrir la fermeture éclair le
long du dossier (fig_b) et remettre la housse du côté
opposé.
23 HABILLAGE PLUIE : Placer l’habillage pluie sur la
poussette (fig_a) et enfiler ses deux boutonnières
latérales aux boutons de la capote (fig_b).
24 Fixer l’habillage pluie en fixant l’élastique aux
montants arrière (fig_a) ou aux montants avant
(fig_b) selon la position du siège.
25 MARCHEPIED ARRIÈRE: il permet d’aider à franchir de
petits obstacles (fig. a) et de transporter un second
enfant (fig. b). Pour transporter deux enfants sur la
poussette, actionner le frein de la poussette, placer le
plus petit enfant dans le siège et l’attacher à l’aide de
la ceinture de sécurité (1). Saisir la poussette par ses
poignées (2) et faire monter le second enfant sur le
marchepied (3).
26 FERMETURE : la poussette peut être fermée sans le
siège, avec le siège tourné vers maman ou vers la
route. Si le siège est tourné vers maman : avant de la
fermer, baisser complètement le dossier ; si le siège
est tourné vers la route : relever le dossier avant de la
fermer, et le baisser une fois la poussette fermée. Pour
replier la poussette, rendre les roues avant fixes et
fermer la capote si celle-ci est installée.
Relever un après l’autre les deux leviers des poignées
jusqu’au déclic et pousser vers le bas pour débloquer
les montants latéraux (fig_a-b), tirer vers le haut la
poignée centralisée (fig_c) jusqu’à ce que les crochets
de sécurité se ferment (fig_d).
27 TRANSPORT: Pliée, elle se transporte par sa poignée
centrale, en ayant pris soin de mettre les roues avant
en position fixe (fig. a), ou par sa poignée latérale (fig.
b).
28 POUR ENLEVER LA HOUSSE : enlever la housse
du repose-pieds (fig_a), décrocher la housse des
accoudoirs (fig_b), défaire des côtés du dossier
les deux boutons (fig_c) et défaire par le haut
(en poussant par le dessous du siège) la sangle
d’entrejambes (fig_d).
SYSTÈME GANCIOMATIC
29 Le Système Ganciomatic, pratique et rapide, permet
d’accrocher en un seul geste la nacelle Navetta, le
siège-auto Primo Viaggio et le siège Pliko Switch au
châssis: les positionner sur le châssis et appuyer des
deux mains jusqu’au déclic. Châssis non utilisable
avec la nacelle Primo Nido en France
Toujours actionner le frein du châssis ou de la
poussette avant d’accrocher ou de décrocher les
produits (consulter le manuel d’instructions de
chaque produit).
Vérifier que le produit est bien positionné sur le
châssis.
ACCESSOIRES EN OPTION
30 BORSA (Sac à langer). Ce sac muni d’un petit matelas
pour changer bébé peut se fixer sur la poussette.
NUMÉROS DE SÉRIE
31 Pliko Switch reporte les informations relatives à sa
Page 21

- 21 -
date de production.
_ Nom du produit, date de production et numéro de
série du siège (fig_a) et du châssis (fig_b).
Ces informations sont indispensables en cas de
réclamation.
NETTOYAGE ET ENTRETIEN
ENTRETIEN DE L’ARTICLE: protéger l’article des agents
atmosphériques (eau, pluie ou neige); une exposition
continue et prolongée au soleil pourrait entraîner
un changement de couleur de nombreux matériaux;
ranger cet article dans un lieu sec.
NETTOYAGE DU CHÂSSIS: nettoyer régulièrement
les pièces en plastique à l’aide d’un linge humide; ne
pas utiliser de solvants ou autres produits similaires.
Veiller à ce que toutes les pièces métalliques
restent sèches pour prévenir la formation de rouille.
Maintenir le bon état de propreté de toutes les pièces
mobiles (mécanismes de réglage, mécanismes de
fixation, roues, etc.) en enlevant poussière ou sable;
graisser avec une huile légère si nécessaire.
NETTOYAGE DE L’HABILLAGE PLUIE: utiliser une
éponge et de l’eau savonneuse; ne pas utiliser de
détergents.
NETTOYAGE DES ÉLÉMENTS EN TISSU: brosser les
éléments en tissu pour enlever la poussière et laver
à la main à une température maximale de 30° ; ne
pas tordre ; ne pas utiliser d’eau de javel ; ne pas
repasser ; ne pas laver à sec ; ne pas détacher à l’aide
de solvants ; ne pas sécher dans un sèche-linge à
tambour rotatif.
PEG-PÉREGO S.p.A.
Peg-Pérego S.p.A. est certifiée ISO 9001.
La certification offre à la clientèle une
garantie de transparence et représente
un gage de confiance dans la façon de
travailler de l’entreprise.
Peg-Pérego se réserve le droit de
procéder à tout moment à des modifications sur les
modèles décrits dans cet ouvrage, pour des raisons de
nature technique ou commerciale.
Peg-Pérego est à la disposition de sa clientèle pour
satisfaire au mieux chacune de ses exigences. En
cela, il est très important et précieux pour nous
de connaître l’opinion de notre clientèle. Nous
vous saurions donc gré, après avoir utilisé un de
nos produits, de remplir le QUESTIONNAIRE DE
SATISFACTION CLIENT, en nous faisant part de toute
observation ou suggestion éventuelle. Vous trouverez
ce questionnaire sur notre site Internet, à l'adresse
www.pegperego.com
SERVICE D’ASSISTANCE PEG-PÉREGO
En cas de perte de pièces ou de rupture de l'une
d'elles, utiliser exclusivement des pièces de rechange
originales Peg-Pérego. Pour d’éventuelles réparations,
substitutions, informations sur les produits, vente
de pièces de rechange d’origine et d’accessoires,
contactez le Service Assistance Peg Perego en
indiquant, s’il est présent, le numéro de série du
produit.
tél. 0039/039/60.88.213 fax 0039/039/33.09.992
e-mail assistenza@pegperego.it site Internet www.
pegperego.com
DE_Deutsch
Vielen Dank, dass Sie sich für ein Peg-Pérego Produkt
entschieden haben.
WARNUNG
_ WICHTIG: Diese Anweisungen sorgfältig lesen und
danach aufbewahren. Die Sicherheit des Kindes
könnte bei Nichtbeachtung der Anweisungen
gefährdet werden.
_ Dieser Artikel ist für die Beförderung eines Kindes im
Sitz und eines auf dem hinteren Trittbrett stehenden
Kindes vorgesehen.
_ Den Artikel nicht für mehr Insassen verwenden, als
vom Hersteller vorgesehen.
_ Die Kombination Gestell-Pliko Switch + Autositz-Pliko
Switch ist für Kinder mit einem Gewicht von 0-15 Kg
zugelassen. Das hintere Trittbrett eignet sich für den
Transport von einem zweiten Kind mit einem Gewicht
von 0-20 Kg.
_ Das Untergestell Pliko Switch ist für den Gebrauch
in Verbindung mit den Ganciomatic-Produkten von
Peg-Pérego vorgesehen: Das Untergestell Pliko Switch
+ der Autositz “Primo Viaggio” (Gruppe 0+) sind für
Kinder ab der Geburt bis zu einem Körpergewicht
von 13 kg zugelassen; das Untergestell Pliko Switch +
die Wiege “Navetta” oder “Primonido” sind für Kinder
ab der Geburt bis zu einem Körpergewicht von 10 kg
zugelassen. Bei der Verwendung mit “Navetta“ oder
“Primonido“ das hintere Trittbrett nicht verwenden.
_ Vor Gebrauch sicherstellen, dass die Peg-Pérego
Ganciomatic Produkte korrekt am Artikel angebracht
wurden.
_ Es könnte gefährlich sein, das Kind ohne Aufsicht zu
lassen.
_ Den Fünf-Punkt-Sicherheitsgurt immer benutzen.
_ Bei Verstellen von beweglichen Teilen (Griff,
Rückenteil) auf das Kind acht geben.
_ Beim Halten und während des Herein- und
Herausnehmens des Kindes immer die
Feststellbremse einlegen.
_ Die Montage, die Zusammensetzung des Artikels,
die Reinigung und die Instandhaltung dürfen
ausschließlich von Erwachsenen durchgeführt
werden.
_ Artikel nicht mit fehlenden oder defekten Bauteilen
verwenden.
_ Vor dem Gebrauch sicherstellen, dass alle
Verbindungsmechanismen korrekt befestigt sind.
_ Nicht die Finger in die Mechanismen halten.
_ Gewichte, die am Tragebügel oder am Schieber
angebracht sind, können die Stabilität des Artikels
beeinträchtigen; die Anweisungen des Herstellers in
Bezug auf das vorgesehene Höchstgewicht beachten.
_ Keine Gegenstände mit einem Gewicht von mehr als 5
kg in den Korb legen. Niemals warme Getränke sowie
keine Gegenstände mit einem höheren Gewicht, als
das auf dem Getränkehalter angegebene in diesen
stellen. Keine Gegenstände von mehr als 0,2 kg in die
Taschen des Verdecks (sofern vorhanden) füllen.
_ Der vordere Sicherheitsbügel ist nicht zum Tragen
des Kindes geeignet; der vordere Sicherheitsbügel ist
nicht dazu gedacht, das Kind im Sitzen zu halten oder
den Sicherheitsgurt zu ersetzen.
_ Den Artikel nicht in der Nähe von Treppen oder
Stufen abstellen und nicht in Reichweite des Kindes
von Wärmequellen, offenem Feuer oder gefährlichen
Gegenständen abstellen.
_ Es könnte gefährlich sein, vom Hersteller nicht
genehmigtes Zubehör zu verwenden.
_ Dieser Artikel ist nicht zum Joggen oder
Rollschuhlaufen geeignet.
Page 22

- 22 -
_ Den Regenschutz (sofern vorhanden) nicht in
geschlossenen Räumen benutzen und immer
überprüfen, dass das Kind nicht schwitzt; den
Regenschutz nicht in die Nähe von Wärmequellen
bringen und beim Rauchen besondere Vorsicht
walten lassen. Überprüfen, dass sich der Regenschutz
nicht in bewegten Teilen des Sportwagens verfangen
kann; den Regenschutz vor dem Zusammenklappen
des Wagens abnehmen.
_ Beim Benutzen des Sportwagens mit zwei Kindern,
dürfen diese nie unbeaufsichtigt sein und die
Schiebergriffe nie ausgelassen werden. Das zweite
Kind darf bei leerem Sportwagen das Trittbrett nicht
betreten.
_ Den Befestigungsbügel zum Transport oder zum
Hochstellen des Sportwagens nicht benutzen, wenn
ein Kind darin sitzt.
_ ACHTUNG: Keine zusätzliche Matratze verwenden.
Pliko Switch Compact, der kompakte
Kindersportwagen mit umkehrbarem Sitz!
Vollständig mit Verdeck, Fußdecke und Regenschutz.
Sportversion mit Verdeck und Regenschutz (Pliko
Switch Compact On Track Sportivo).
KENMERKEN VAN HET ARTIKEL
_ Dit artikel heeft een volgnummer.
_ Pikoswitch is een wandelwagen met een stoeltje dat
in twee richtingen kan worden gezet: in de rijrichting
en andersom.
_ Piko Switch bestaat uit twee elementen. Piko Switch
Frame en Piko Switch Stoeltje.
COMPONENTEN
Controleer de inhoud van de verpakking. Neem contact
op met de technische service in geval van klachten.
_ Pliko Switch Rahmen: Korb, 2 schwenk- und
blockierbare Vorderräder, 2 Hinterräder mit zentraler
Stangenbremse und Getränkehalter.
_ Kindersitz Pliko Switch: Sicherheitsbügel, Verdeck,
Fußdecke, Regenschutz.
_ Kindersitz Pliko Switch On Track Sportivo:
Sicherheitsbügel, Verdeck, Regenschutz.
GERAUCHSANWEISUNG
1 SCHUTZVORRICHTUNGEN: vor dem Öffnen des
Gestells müssen die Schutzvorrichtungen (Abb_a)
entfernt werden, da sich das Gestell ansonsten nicht
korrekt öffnen lässt (Abb_b).
2 ÖFFNEN: Heben Sie gleichzeitig die Hebel der Griffe
an (Abb_a) und ziehen Sie den Rahmen nach oben
hin auseinander (Abb_b). Prüfen Sie, ob das Gestell
korrekt geöffnet ist: Die seitlichen Streben müssen
fest ineinandergreifen (Abb_c).
3 MONTAGE DER VORDERRÄDER: Prüfen Sie zunächst,
ob die Unterlegscheibe wie in der Abbildung
dargestellt eingelegt ist. Senken Sie den Hebel an den
Vorderrädern ab (Abb_a) und stecken Sie die Räder
bis zum Einrasten auf die Anschlüsse (Abb_b).
4 MONTAGE DER HINTERRÄDER: Stecken Sie die Räder
bis zum Einrasten auf die Anschlüsse (Abb_a) und
prüfen Sie, ob sie fest sitzen (Abb_b).
5 Befestigen Sie schließlich das Bauteil in der Mitte
der beiden Streben an der Bremsstange am Rahmen
(Abb_a) und prüfen Sie anschließend den korrekten
und festen Sitz (Abb_b).
6 MONTAGE KORB: Hängen Sie die Haken in die
vorderen (Abb_a) und hinteren (Abb_b) Ösen.
7 MONTAGE GETRÄNKEHALTER: bis zum Einrasten auf
den Zapfen schieben (Abb_a). Der Getränkehalter
kann auf beiden Seiten des Gestells angebracht
werden.
8 SCHIEBEGRIFFE VERSTELLBAR: Pliko Switch Compact:
Halten Sie zum Höher- oder Tieferstellen der Griffe
den in Abb_a gezeigten Knopf gedrückt und stellen
Sie die Griffe ein (Abb_b).
9 SCHWENK- ODER FESTSTELLBARE VORDERRÄDER:
Heben Sie zum Feststellen der Räder die Hebel, wie
in Abb_a gezeigt, an. Wenn Sie die Hebel absenken,
sind die Räder schwenkbar (Abb_b). Auf schwierigem
Untergrund sollten die Räder fest gestellt werden.
10 BREMSE: Drücken Sie einen der Bremshebel, um den
Wagen zu bremsen (Abb_a), heben Sie ihn an, um ihn
wieder zu bewegen (Abb_b).
11 BEFESTIGUNG DES SITZES AM GESTELL: der
umsetzbare Sitz kann sowohl in Blickrichtung
zur Mama (Abb_a) als auch in Fahrtrichtung
(Abb_b) auf dem Gestell befestigt werden. Den
Sitz in Übereinstimmung mit den Markierungen
positionieren und mit beiden Händen bis zum
Einrasten nach unten drücken. Die korrekte
Befestigung des Sitzes durch Hochziehen am
vorderen Schutzbügels überprüfen.
12 DEN KINDERSITZ VOM RAHMEN ABNEHMEN: Drücken
Sie gleichzeitig die zwei runden Knöpfe am Kindersitz
(Abb_a) und die Hebel unterhalb der Armstützen
(Abb_b). Ziehen Sie dabei den Kindersitz nach oben
(Abb_c) und nehmen Sie ihn ab.
13 SICHERHEITSBÜGEL: Stecken Sie zum Befestigen des
Sicherheitsbügels die Anschlüsse bis zum Einrasten in
die Armstützen (Abb_a).
Drücken Sie zum Abnehmen des Sicherheitsbügels
die zwei Knöpfe, wie in Abb_b dargestellt, und
ziehen Sie ihn heraus. Um das Kind leichter in den
Sitz zu setzen oder herauszunehmen, können Sie den
Sicherheitsbügel nur an einer Seite öffnen.
14 RÜCKENLEHNE: um die Rückenlehne einzustellen,
den Griff hochziehen (Abb_a) und in eine der 4
vorgegebenen Positionen bringen (Abb_b).
15 FUSSSTÜTZE: zum Verstellen der Fußstütze beidseitig
die Einrastschieber nach vorne (in Pfeilrichtung
ziehen Abb_a)und die Fußstütze in die gewünschte
Position schwenken (Abb_b).
16 FÜNF-PUNKT-SICHERHEITSGURT: Stecken Sie zum
Schließen des Sicherheitsgurtes die zwei Schnallen
des Bauchgurtes (mit angeschlossenen Schultergurten
(Pfeil_a) bis zum Einrasten in den Beingurt (Pfeil_b).
Drücken Sie zum Öffnen des Sicherheitsgurtes den
runden Knopf in der Mitte der Schnalle (Pfeil_c) und
ziehen Sie den Bauchgurt nach außen (Pfeil_d).
17 Den Bauchgurt beidseitig in Pfeilrichtung (Pfeil
a) festziehen. Zum Lockern des Gurts in die
entgegengesetzte Richtung ziehen. Der Bauchgurt
kann bis zum Sicherheitsverschluss festgezogen
werden (Abb. b).
18 Zur Höhenregulierung der Sicherheitsgurte die
beiden Schnallen auf der Rückseite der Lehne
herausziehen.
Ziehen Sie die Schultergurte zu sich heran (Pfeil a )
bis die Schallen ausrasten. Dann die Schnallen in die
Ösen an der Lehne stecken (Pfeil b). Die Schultergurte
aus der Schutztasche ziehen (Pfeil c) und in die
geeignete Öse einführen (Pfeil d); dann die beiden
Schnallen wieder hinter der Rückenlehne einrasten
(Pfeil e). Die Schnallen müssen hörbar einrasten,
damit sie fest sitzen (Abb. f). Das Verdeck verfügt über
eine Öse, in die das Lieblingsspielzeug eingehängt
werden kann (Abb_d).
20 FUSSDECKE: Ziehen Sie die Fußdecke auf und befestigen
Sie sie unterhalb und seitlich der Fußstütze (Abb_a).
Bei der Verwendung als Kindersportwagen heben Sie
die Fußstütze an und ziehen die Fußdecke unter dem
Sicherheitsbügel hindurch (Abb_b). Befestigen Sie sie an
den Knöpfen des Verdecks (Abb_c).
21 Bei Verwendung als Sitzwagen die Beinauflage
senken, den Fußsack unter dem Vorderbügel
aufziehen (Abb. a ) und je nach Modell (A, B)
Page 23

- 23 -
befestigen.
22 BEINDECKE Pliko Switch On Track:
Die Beindecke kann sowohl mit der Babywanne
Navetta XL als auch mit dem Sportwagen Pliko Switch
On Track verwendet werden. Die Befestigung an
der Babywanne Navetta XL ist im entsprechenden
Handbuch beschrieben.
Zur Befestigung am Sportwagen ziehen Sie die
Beindecke innen auseinander, damit die Beine des
Kindes hineinpassen (Abb. A). Klappen Sie sie über
den Frontbügel, schließen Sie die Knöpfe an der
Vorderseite (Abb. B), und ziehen Sie die Beindecke
anschließend über die Fußstütze (Abb. C).
23 REGENSCHUTZ: Den Regenschutz über dem
Kinderwagen anbringen (Abb. a) und die beiden
seitlichen Schlitze an den Knöpfen des Verdecks
einhaken (Abb. b).
24 Dann den Regenschutz mit den Gummilaschen je
nach Sitzposition an den vorderen (Abb. a) oder
hinteren (Abb. b) Stangen befestigen.
25 HINTERES TRITTBRETT: hilft der Mama kleine
Höhenunterschiede zu überwinden (Abb_a) und
ermöglicht ihr, ein zweites Kind zu transportieren
(Abb_b). Um den Sportwagen mit zwei Kindern
zu benutzen, muss der Wagen in die feststehende
Stellung gebracht, das kleinere Kind in den
Sitz gesetzt und mit Hilfe der Sicherheitsgurte
angeschnallt werden (1). Die Griffe festhalten (2) und
das zweite Kind auf die Fußstütze steigen lassen (3).
26 SCHLIESSEN: Sie können das Gestell ohne Kindersitz,
aber auch mit Kindersitz zur Mutter oder in
Fahrtrichtung gerichtet zusammenklappen. Ist der
Kindersitz zur Mutter hin gerichtet: Senken Sie vor
dem Schließen die Rückenlehne vollständig ab. Ist
der Kindersitz in Fahrtrichtung ausgerichtet: Heben
Sie die Rückenlehne vor dem Schließen an. Absenken.
Stellen Sie zum Schließen die Räder fest und schließen
Sie, falls angebracht, das Verdeck.
Heben Sie nacheinander die zwei Hebel der Griffe bis
sie sich auslösen, und drücken Sie die Griffe nach unten,
um die Blockierung der seitlichen Stangen zu lösen
(Abb_a-b). Ziehen Sie den zentralen Griff nach oben
(Abb_c) bis sich die Sicherungshaken schließen (Abb_d).
27 TRANSPORT: er kann an dem zentralen Griff gezogen
werden, wobei die Vorderräder in die feststehende
Stellung gebracht werden müssen (Abb_a) oder an
dem seitlichen Griff getragen werden (Abb_b).
28 ABNEHMBARER BEZUG: Nehmen Sie den Fußsack von
der Fußstütze (Abb_a), lösen sie die Befestigungen
des Fußsacks von den Armlehnen (Abb_b), lösen Sie
die zwei Knöpfe an beiden Seiten der Rückenlehne
(Abb_c) und ziehen Sie den Beingurt nach oben
heraus (Abb_d), schieben Sie ihn dabei von der
Unterseite des Sitzes her nach.
GANCIOMATIC SYSTEM
29 Das Ganciomatic System ist das praktische und
schnelle System, das Ihnen die Befestigung der
Wiege Navetta oder PrimoNido, des Autositzes Primo
Viaggio und des Sitzes Pliko Switch am Untergestell
mit nur einem Arbeitsschritt ermöglicht: Auflegen
und auf das Produkt mit beiden Händen bis zum
hörbaren Klick-Laut drücken.
Die Bremse des Gestells oder des Sitzwagens vor
dem Befestigen und Abnehmen der Produkte stets
betätigen (die entsprechenden Anweisungen der
Gebrauchshandbücher befolgen).
Überprüfen Sie, ob das Transportelement für das Kind
richtig befestigt wurde.
ZUBEHÖR
30 BORSA (Wickeltasche). Tasche mit Unterlage, die zum
Wickeln des Babys verwendet wird und am Sitzwagen
angebracht werden kann.
SERIENNNUMMER
31 Am Piko Switch sind Informationen zum
Produktionsdatum des Kinderwagens angebracht.
Produktname, Produktionsdatum un Seriennummer
des Sitzes (Abb. a) und des Wagens (Abb. b).
Diese Informationen sind unerlässlich im Falle von
Reklamationen.
REINIGUNG UND PFLEGE
REINIGUNG DES ARTIKELS: vor Witterungseinflüssen
schützen: Wasser, Regen oder Schnee; eine
längere Bestrahlung durch die Sonne kann zu
Farbänderungen der verschiedenen Materialien
führen; diesen Artikel an einem trockenen Ort
aufbewahren.
REINIGUNG DES GESTELLS: die Kunststoffteile
regelmäßig mit einem feuchten Lappen reinigen
– keine Lösungsmittel oder ähnliche Produkte
verwenden; sämtliche Metallteile trocken halten,
um einem eventuellen Rosten vorzubeugen; alle
beweglichen Teile (Einstellungsmechanismen,
Befestigungsmechanismen, Räder,…) von Staub oder
Sand unbedingt sauber halten und, wenn nötig, mit
Leichtöl schmieren.
REINIGUNG DES REGENSCHUTZES: mit einem
Schwamm und Seifenwasser waschen, ohne
Reinigungsmittel zu verwenden.
REINIGUNG DER STOFFTEILE: die Stoffteile abbürsten,
um den Staub zu entfernen und per Hand bei
einer Höchsttemperatur von 30° waschen; nicht
auswringen; nicht mit Bleichmittel behandeln; nicht
bügeln; nicht chemisch Reinigen; die Flecken nicht
mit Hilfe von Lösungsmitteln entfernen und nicht in
einem Trockner mit Drehtrommel trocknen.
PEG-PÉREGO S.p.A.
Peg-Pérego S.p.A. ist gemäß ISO 9001
zertifiziert. Die Zertifizierung garantiert
den Kunden und Verbrauchern
Transparenz und ermöglicht das
Vertrauen in die Arbeitsweise des
Unternehmens.
Peg Pérego kann zu jedem beliebigen Zeitpunkt
Änderungen an den in dieser Veröffentlichung
beschriebenen Modellen sowohl aus technischen, als
auch aus kommerziellen Gründen vornehmen.
Peg Pérego steht den Verbrauchern zur
Verfügung, um deren Anforderungen auf das
Bestmöglichste gerecht zu werden. Demnach ist es
ausgesprochen wichtig und wertvoll für uns, über
die Meinung unserer Kunden Bescheid zu wissen.
Wir bitten Sie daher, das FORMULAR ÜBER DIE
KONSUMENTENZUFRIEDENHEIT auszufüllen, nachdem
Sie unsere Produkte ausprobiert haben. Das Formular
ist unter folgender Internetadresse abrufbar: www.
pegperego.com
KUNDENDIENST PEG-PÉREGO
Bei Verlust oder Beschädigung ausschließlich
Originalersatzteile von Peg Pérego verwenden.
Für eventuelle Reparaturen, Ersatzforderungen,
Informationen zum Produkt, den Verkauf von
Originalersatzteilen und Zubehör setzen Sie sich bitte
mit dem Peg Perego Kundendienst in Verbindung.
Halten Sie dazu, falls vorhanden, die Seriennummer
des Produkts bereit.
Tel. 0039/039/60.88.213 Fax 0039/039/33.09.992
E-Mail assistenza@pegperego.it Webseite www.
pegperego.com
Page 24

- 24 -
ES_Español
Le agradecemos haber elegido un producto Peg-
Pérego.
ADVERTENCIA
_ IMPORTANTE: léase atentamente estas
instrucciones y consérvelas para futuras consultas.
La seguridad del niño podría estar en peligro si no
se leen dichas instrucciones.
_ Este artículo se ha diseñado para el transporte de 1 niño
en el asiento y un niño de pie en el patinete posterior.
_ No utilice este artículo para un número de ocupantes
superior al previsto por el fabricante.
_ El chasis-Pliko Switch + la silla de auto-Pliko Switch
está homologado para bebés desde el nacimiento
hasta los 15 kg de peso en el asiento. El patín
posterior está homologado para transportar a un
segundo bebé hasta los 20 kg de peso.
_ El chasis Pliko Switch se ha diseñado para usarse junto
con los productos Peg-Pérego Ganciomatic: chasisPliko Switch + silla de auto “Primo Viaggio” (grupo
0+) está homologado para bebés desde el nacimiento
hasta los 13 kg de peso; chasis-Pliko Switch + capazo
“Navetta” o “Primonido” está homologado para bebés
desde el nacimiento hasta los 10 kg de peso. Cuando
se use con “Navetta” y “Primo Nido”, no utilizar el
patín posterior.
_ Antes de usar los productos Peg-Pérego Ganciomatic
asegúrese de que estén correctamente enganchados
al artículo.
_ Podría ser peligroso dejar a su hijo sin vigilancia.
_ Utilizar siempre el cinturón de seguridad de cinco
puntos y enganchar siempre la correa ventral a la tira
entrepiernas.
_ Preste atención a la presencia del niño cuando
efectúe operaciones de regulación de los dispositivos
(asa, respaldo).
_ Tener pulsado siempre el freno cuando el automóvil
esté parado y durante la carga y descarga del niño.
_ Las operaciones de montaje, preparación del
producto, limpieza y manutención deben realizarlas
sólo los adultos.
_ No utilice este artículo si le faltan partes o presenta
rupturas.
_ Antes de usarse, asegúrese de que todos los mecanismos
de enganche estén perfectamente enganchados.
_ No introduzca los dedos en los dispositivos.
_ Las cargas colgadas del manillar o asas pueden
desestabilizar el artículo; siga las indicaciones del
fabricante relativas a las cargas máximas que pueden
utilizarse.
_ No introduzca en la cesta cargas con un peso superior a
5 kg. No coloque en los portabebidas pesos superiores
a los que figuran en el propio portabebidas ni bebidas
calientes. No meta en los bolsillos de la capota (si los
hay) pesos superiores a 0.2 Kg.
_ La barra frontal no se ha diseñado para soportar
el peso del niño; la barra frontal no se ha diseñado
para mantener al niño en el asiento y no sustituye el
cinturón de seguridad.
_ No utilice el artículo cerca de escaleras o peldaños;
no utilizar cerca de fuentes de calor, llamas directas u
objetos peligrosos que se hallen al alcance de los niños.
_ Podría ser peligroso usar accesorios no aprobados por
el fabbricante.
_ Este artículo no está adaptado para el footing o
carreras en patines.
_ No utilizar el protector de lluvia (si presenta) en
lugares cerrados y controlar siempre que el niño no
esté acalorado. Nunca colocarlo cerca de fuentes de
calor y prestar atención a los cigarillos. Asegurarse
de que el protector de lluvia no interfiera en ningún
dispositivo en movimiento del carrito o silla de paseo.
Quitar siempre el protector de lluvia antes de cerrar
vuestro carrito o silla de paseo.
_ Cuando se usa la silla de paseo con dos niños, no
dejarlos nunca solos y evitar que el segundo niño se
suba sobre el patín posterior estando el carrito vacío.
_ No utilizar las asas de desenganche para transportar o
alzar la silla de paseo estando el bebé dentro.
_ ATENCIÓN: No añada ningún colchón.
Pliko Switch Compact, ¡la silla de paseo compacta
con sillita reversible!
Versión con capota, cubrepiés y protector de lluvia.
Versión deportiva con capota y protector de lluvia
(Pliko Switch Compact On Track Sportivo).
CARACTERÍSTICAS DEL ARTÍCULO
_ Este artículo se ha enumerado progresivamente.
_ Pliko Switch es una silla de paseo con sillita reversible:
hacia mamá o hacia el mundo.
_ Pliko Switch se compone de dos elementos: CHASIS-
Pliko Switch y SILLITA-Pliko Switch.
COMPONENTES DEL ARTÍCULO
Comprobar el contenido presente en el embalaje y
contactar al Servicio de Asistencia en caso de reclamación.
_ Chasis-Pliko Switch: Cesta, 2 ruedas delanteras
pivotantes o con bloqueo, 2 ruedas traseras con freno
de barra centralizado y portabebidas.
_ Sillita Pliko Switch: barra frontal, capota, cubrepiés y
protector de lluvia.
_ Sillita Pliko Switch On Track Deportivo: barra frontal,
capota y protector de lluvia.
INSTRUCCIONES DE USO
1 PROTECCIONES EMBALAJE: antes de abrir el chasis
deben desmontarse las protecciones (fig. a), sino el
chasis no se abrirá correctamente (fig. b).
2 APERTURA: Levantar a la vez las palancas de las
dos asas (fig_a) y tirar hacia arriba hasta abrir el
chasis (fig_b). Comprobar que la apertura esté bien
hecha: los montantes laterales deben estar bien
enganchados entre sí (fig_c).
3 MONTAJE DE LAS RUEDAS DELANTERAS: Comprobar
primero que esté la arandela, como en la imagen.
Bajar la palanca de las dos ruedas delanteras (fig_a) e
introducir la rueda hasta oír el clic (fig_b).
4 MONTAJE DE LAS RUEDAS TRASERAS: Introducir las
ruedas hasta oír el clic (fig_a) y comprobar que estén
enganchadas correctamente (fig_b).
5 Por último, enganchar el elemento central de la
barra de freno al chasis (fig_a), comprobando que el
enganche se haya realizado correctamente (fig_b).
6 MONTAJE DE LA CESTA: Introducir los ojales en los
ganchos delanteros (fig_a) y en los ganchos traseros
(fig_b).
7 MONTAJE PORTABEBIDAS: encajarlo en el perno hasta
oir un “click” (fig. a). Puede ir colocado a ambos lados
del chasis.
8 MANILLAR REGULABLES: Pliko Switch compact: Para
subir o bajar las asas, pulsar el botón (fig_a) y regular
al mismo tiempo las asas (fig_b).
9 RUEDAS DELANTERAS FIJAS O PIVOTANTES: Para
que las ruedas se queden fijas, levantar las palancas
(fig_a). Para que las ruedas sean pivotantes, bajar las
palancas (fig_b). Se recomienda utilizar las ruedas
fijas sobre terrenos difíciles.
10 FRENO: Pulsar una palanca de freno para bloquear
el chasis (fig_a). Subir la palanca para desbloquearlo
(fig_b).
11 ENGANCHE DE LA SILLA DE PASEO AL CHASIS: la
silla reversible puede engancharse al chasis mirando
Page 25

- 25 -
hacia la mamá (fig. a) o mirando hacia la calle (fig. b).
Colocarla sobre el chasis respetando los símbolos y
presionar hacia abajo con ambas manos hasta oir un
doble “click” de enganche. Asegurarse de que la silla
se haya acoplado correctamente tirando de ella hacia
arriba cogiéndola por la barra frontal.
12 DESENGANCHAR LA SILLA DE PASEO DEL CHASIS:
Pulsar los dos botones redondos laterales de la silla
de paseo (fig_a) y, al mismo tiempo, las dos palancas
situadas bajo los reposabrazos (fig_b) tirando de la
silla hacia arriba (fig_c) hasta desengancharla.
13 BARRA FRONTAL: Para enganchar la barra
frontal, introducir los extremos de la barra en los
reposabrazos y empujar hacia la silla hasta oír el clic
de enganche (fig_a).
Para sacar la barra frontal, pulsar los dos botones y
extraerla (fig_b). Abrir la farra frontal sólo por un lado
para facilitar la entrada y la salida del niño.
14 RESPALDO: para regularlo, alzar el asa (fig. a) y colocarlo
como desee en una de las 4 posiciones (fig. b).
15 REPOSAPIÉS: para bajarlo, empujar hacia abajo las dos
palancas (fig. a). Para alzarlo, empujar el reposapiés
hacia arriba (fig. b).
16 CINTURÓN DE SEGURIDAD DE 5 PUNTOS: Para
engancharlo, introducir las dos hebillas del cinturón
ventral (con los tirantes enganchados como muestra
la flecha_a) en la tira entrepiernas hasta oír el clic
(flecha_b). Para desengancharlo, pulsar el botón
redondo colocado en el centro de la hebilla (flecha_c)
y tirar hacia afuera del cinturón ventral (flecha_d).
17 Para apretar la correa de la cintura tire, desde los dos
lados, en el sentido de la flecha (flecha_a), para aflojarla
actúe en sentido contrario. La correa de la cintura puede
apretarse hasta el tope de seguridad (fig_b).
18 Para regular la altura de los cinturones de seguridad
es necesario desenganchar en la parte posterior del
respaldo de las dos hebillas.
Tire hacia sí los tirantes (flecha_a) hasta desenganchar
las hebillas y pasarlas por las ranuras del respaldo
(flecha_b). Saque los tirantes del saco (flecha_c)
y páselos por la ranura más adecuada (flecha_d),
finalmente vuelva a enganchar las dos hebillas detrás
del respaldo (flecha_e). Un clic determina que se han
enganchado correctamente las hebillas (fig_f).
19 CAPOTA: para engancharla, encajar lateralmente los
acoples en la silla de paseo (fig. a) y abotonarla al verso
del respaldo (fig. b). Para quitarla, quitar los acoples
y desbotonar. Para alzarla, tirar hacia sí mismo. Para
cerrarla, empujarla hacia atrás. Para transformar la
capota en parasol, abrir la cremallera con doble cursor
(fig. c) y desbotonarla desde el verso del respaldo. La
capota está dotada de un ojal para colgar su juguete
favorito (fig_d).
20 CUBREPIÉS: Colocar el cubrepiés y abotonarlo por
debajo y en el lateral del reposapiés (fig_a). En el modo
cochecito, levantar el reposapiés y colocar el cubrepiés
por encima de la barra frontal (fig_b), fijándolo a los
botones de la capota (fig_c).
21 Para la versión de silla de paseo baje el apoyapiernas,
pase la cubierta debajo del frontal (fig_a) y fíjela
según el modelo comprado A, B.
25• CUBREPIÉS Pliko Switch On Track:
Se usa y se engancha tanto a Navetta XL como a la
silla de paseo Pliko Switch On Track. Para montarlo en
Navetta XL, consultar el manual de uso.
Para montarlo en la silla de paseo, extender el
cubrepiés por dentro a fin de incluir las piernas del
bebé (Fig. a).
Ajustarlo bien incluyendo la barra frontal y abotonar
los botones delanteros (Fig. b). Meter el reposapiés en
el cubrepiés por abajo (Fig. c).
23 PARA-LLUVIA: coloque el para-lluvia en la silla de
paseo (fig_a) y pase las dos ranuras laterales del
mismo por los botones de la capota (fig_b).
24 Fije el para-lluvia enganchando el elástico a los
montantes posteriores (fig_a) o a los anteriores
(fig_b) dependiendo de la posición del asiento.
25 PATÍN POSTERIOR: facilita a la madre a superar pequeños
desniveles (fig. a) y para transportar el segundo niño
(fig. b). Para utilizar la silla de paseo con dos pequeños,
frenar la silla, colocar el niño más pequeño en el asiento
y ponerle el cinturón de seguridad (1). Empuñar las
manillas (2) y subir al segundo niño sobre el patín (3).
26 CIERRE: Puede realizarse sin la silla de paseo o con la
silla en dirección a la madre o a la calle. Si la silla de
paseo se encuentra en dirección a la madre: Antes
de cerrarla, bajar completamente el respaldo. Si la
silla se encuentra en dirección a la calle: Antes de
cerrarla, levantar el respaldo y, una vez cerrada, volver
a bajarlo. Para cerrar la silla de paseo, fijar las ruedas
delanteras y cerrar la capota si se encuentra abierta.
Levantar una por una las dos palancas de las
asas hasta oír el clic y empujar hacia abajo para
desbloquear los montantes laterales (fig_a-b). Tirar
hacia arriba del manillar centralizado (fig_c) hasta
cerrar los ganchos de seguridad (fig_d).
27 TRANSPORTE: se puede transportar por el manillar
central llevando las ruedas anteriores fijas (fig. a) o
por el manillar lateral (fig. b).
28 DESENFUNDAR: Quitar el forro del patinete
(fig_a), desenganchar los ganchos del forro de los
reposabrazos (fig_b) y desabotonar de los lados del
respaldo los dos botones (fig_c).
Por último, tirar hacia arriba (empujando la silla hacia
abajo) de la correa para la entrepierna (fig_d).
GANCIOMATIC SYSTEM
29 El sistema Ganciomatic es un sistema práctico y veloz
que permite enganchar con un solo gesto el capazo
Navetta o PrimoNido, la silla de auto Primo Viaggio
y la silla Pliko Switch al chasis: colocarlos y presionar
sobre el producto con ambas manos hasta oír el clic.
Accionar siempre el freno del chasis o del carrito
antes de enganchar y desenganchar los productos
(consultar los respectivos manuales de instrucciones).
Comprobar que el elemento de transporte del bebé
esté correctamente enganchado.
ACCESORIOS
30 BORSA (Bolso cambiador). Bolso con colchoncito para
cambiar al bebé se engancha a la silla de paseo.
NÚMEROS DE SERIE
31 Pliko Switch incluye información relativa a la fecha de
producción del mismo.
_ Nombre del producto, fecha de producción y numeración
de serie del asiento (fig_a) y del cochecito (fig_b).
Estas informaciones son indispensables en caso de
reclamación.
LIMPIEZA Y MANTENIMIENTO
MANTENIMIENTO DEL PRODUCTO: proteger contra
agentes atmosféricos (agua, lluvia o nieve). Una
exposición contínua y prolongada al sol podría causar
cambios de color de muchos materiales. Conservar
este producto en un lugar seco.
LIMPIEZA DEL CHASIS: Limpiar periódicamente las
partes de plástico con un paño húmedo sin usar
solventes u otros productos similares. Mantener secas
todas las partes de metal para prevenir la oxidación.
Mantener limpias todas las partes móviles (dispositivo
de regulación, de enganche, ruedas...) quitando el
polvo o la arena y, en caso necessario, engrasarlas con
aceites ligeros.
LIMPIEZA DEL PROTECTOR DE LLUVIA: lavar con una
esponja con agua y jabón, sin usar detergentes.
LIMPIEZA DE LAS PARTES DE TEJIDO: cepillar las
partes de tejido quitando el polvo y lavar a mano a
Page 26

- 26 -
una temperatura máxima de 30º. No torcer, no usar
lejía, no planchar, no lavar en seco, no usar solventes y
no secar utilizando secadoras de tambor rotativo.
PEG-PÉREGO S.p.A
Peg-Pérego S.p.A posee la certificación
de la Norma ISO 9001. La certificación
ofrece a los clientes y a los consumidores
la garantía de transparencia y de
confianza en cuanto a los procedimientos
de trabajo de la empresa.
Peg-Pérego podrá aportar en cualquier momento
modificaciones a los modelos que se describen en el
presente manual por razones técnicas o comerciales.
Peg-Pérego está a disposición de sus consumidores
para responder satisfactoriamente a sus exigencias.
De ahí que sea fundamental y extremamente
importante conocer la opinión de nuestros Clientes.
Les agradeceríamos por tanto que tras utilizar uno de
nuestros productos rellenase, indicando eventuales
observaciones o sugerencias, el CUESTIONARIO DE
SATISFACCIÓN DEL CONSUMIDOR que se halla en
nuestra página Web www.pegperego.com
SERVICIO DE ASISTENCIA PEG-PÉREGO
En caso de que se pierdan o se dañen partes del
producto, utilizar sólo repuestos originales Peg-
Pérego. Para eventuales reparaciones, sustituciones,
informaciones sobre los productos, venta de recambios
originales y accesorios, póngase en contacto con el
Servicio de Asistencia Peg Perego indicando, si está
presente, el número de serie del producto.
tel. 0039/039/60.88.213 fax 0039/039/33.09.992
e-mail assistenza@pegperego.it sito internet www.
pegperego.com
PT_Português
Obrigado por ter escolhido um produto Peg-Pérego.
ADVERTÊNCIA
_ IMPORTANTE: leia atentamente estas instruções e
conserve-as para uma futura utilização. A segurança
da criança pode vir a ser colocada em risco se estas
instruções não forem efectuadas.
_ Este artigo foi projectado para o transporte de 1
criança no assento e 1 criança em pé no repousa pés
posterior.
_ Não utilizar este artigo para um número de ocupantes
superior àquele previsto pelo fabricante.
_ Chassis-Pliko Switch + cadeirinha-Pliko Switch é
aprovada para crianças desde seu nascimento até 15 kg
de peso sentadas. O tapetinho traseiro é aprovado para
o transporte de outra criança de até 20 kg de peso.
_ O chassis-Pliko Switch foi concebido para ser usado
em combinação com os produtos Peg-Pérego
Ganciomatic: chassis-Pliko Switch + cadeira para
automóvel “Primo Viaggio” (grupo 0+) é homologado
para crianças desde o nascimento, até 13 kg de peso;
chassis-Pliko Switch + alcofa “Navetta” ou “Primonido”
é homologado para crianças desde o nascimento,
até 10 kg de peso. Durante o uso com “Navetta” e
“Primonido”, não utilize o patim traseiro.
_ Antes do uso assegurar-se que os produtos Peg-
Pérego Ganciomatic estejam correctamente
enganchados aos artigos.
_ Deixar a vossa criança sem vigilância pode ser perigoso.
_ Utilize sempre o cinto de segurança de cinco pontos,
enganche sempre o cinto na cintura àquele divisor de
pernas.
_ Prestar atenção à presença da criança quando forem
efectuadas operações de regulação dos mecanismos
(manípulo, encosto).
_ Accione sempre o travão quando parado e durante as
operações de carga e descarga da criança.
_ As operações de montagem, preparação do artigo,
de limpeza e manutenção devem ser efectuadas
somente por adultos.
_ Não utilizar este artigo caso apresente partes que
faltem ou rupturas.
_ Antes do uso assegurar-se que todos os mecanismos
de enganche estejam enganchados correctamente.
_ Evitar introduzir os dedos nos mecanismos.
_ Cada carga colocada sob a pega ou nas pegas
poderá tornar o artigo instável; siga as indicações do
fabricante em relação às recomendações máximas de
cargas a utilizar.
_ Não coloque no cesto de carga um peso superior a 5
kg. Não coloque no suporte, pesos superiores ao que
foi especificado no próprio suporte e mais bebidas
quentes. Não com coloque nos bolsos da cobertura
(se existirem) pesos superiores a 0.2 kg.
_ A parte frontal não foi projectada para suportar o
peso da criança; a parte frontal não foi desenhada
para manter a criança no assento e não substitui o
cinto de segurança.
_ Não utilizar o artigo perto de escadas ou degraus; não
utilizá-lo perto de fontes de calor, chamas livres ou
objectos perigosos ao alcance dos braços da criança.
_ Pode ser perigoso utilizar acessórios não aprovados
pelo fabricante.
_ Este artigo não é idóneo para o jogging ou para a
corrida em patins.
_ Não utilize o protector de chuvas (se presente) em
ambientes fechados, e controle sempre que a criança
não esteja quente demais, não coloque jamais perto de
fontes de calor e preste atenção a cigarros. Certifique-
se que o protector de chuva não interfira com os
Page 27

- 27 -
mecanismos em movimento do carrinho ou cadeirinha
de passeio; retire sempre o protector de chuva antes de
fechar o carrinho ou cadeirinha de passeio.
_ Quando usar a cadeirinha de passeio com duas
crianças, não as deixe jamais sozinhas e não permita à
segunda criança que suba no tapetinho traseiro com
a cadeirinha de passeio vazia.
_ Não utilize as manilhas de desenganche para transportar
ou levantar a cadeirinha de passeio com a criança dentro.
_ ATENÇÃO! Não coloque qualquer tipo de colchão.
Pliko Switch compact, o carrinho de bebé compacto
com cadeira reversível!
Versão com capota, cobre-pés e protector de chuva.
Versão desportiva com capota e protector de chuva
(Pliko Switch compact On Track Sportivo).
CARACTERÍSTICAS DO ARTIGO
_ Este artigo è numerado progressivamente
_ Pliko Switch è um carrinho com cadeira de passeio
reversível, frente para a mãe ou frente para o mundo.
_ Pliko Switch é composto por dois elementos: CHASSIS
– Pliko Swirch e CADEIRA DE PASSEIO-Pliko Switch.
COMPONENTES DO ARTIGO
Verifique o conteúdo presente na embalagem e em
caso de reclamação, contacte o Serviço de Assistência,
por favor.
_ Chassis Pliko Switch: cesta porta-objectos; 2 rodas
dianteiras giratórias ou fixas; 2 rodas traseiras com travão
centralizado de barra e porta-bebidas.
_ Cadeira Pliko Switch: parte frontal, capota, cobre-pés,
protector de chuva.
_ Cadeira Pliko Switch On Track Sportivo: parte frontal,
capota, protector de chuva.
INSTRUÇÕES DE USO
1 PROTECÇÕES DA EMBALAGEM: Antes de abrir o chassis,
é preciso remover as protecções (fig_a), contrariamente
o chassis não se abrirá correctamente (fig_b).
2 ABERTURA: puxe as alavancas dos dois manípulos
(fig_a) para cima até abrir o chassis (fig_b). Verifique
a correcta abertura: os tubos laterais têm de ficar
encaixados entre si (fig_c).
3 MONTAGEM DAS RODAS DIANTEIRAS: Verifique
inicialmente se está presente a anilha, como ilustrado
na figura, baixe a alavanca das duas rodas dianteiras
(fig_a) e introduza a roda até ouvir um clique (fig_b).
4 MONTAGEM DAS RODAS TRASEIRAS: insira as rodas
até ouvir um clique (fig_a) e verifique o correcto
encaixe (fig_b).
5 Depois encaixe o elemento central da barra do travão
no chassis (fig_a), verificando se o encaixe foi feito
correctamente (fig_b).
6 MONTAGEM DA CESTA PORTA-OBJECTOS: prenda as
alças nos ganchos dianteiros (fig_a) e nos ganchos
traseiros (fig_b).
7 MONTAGEM DO PORTA-BEBIDAS: Introduza no pino
até sentir o clique (fig_a). O porta-bebidas pode ser
colocada em ambos os lados do chassis.
8 PEGA REGULÁVEIS.
Pliko Switch compact: para alongar ou encolher os
manípulos, prima o botão (fig_a) e, simultaneamente,
regule a posição dos manípulos (fig_b).
9 RODAS DIANTEIRAS FIXAS OU GIRATÓRIAS: levante as
alavancas para tornar as rodas fixas (fig_a), baixe as
alavancas para tornar as rodas giratórias (fig_b). Em
superfícies difíceis aconselha-se a utilização das rodas
fixas.
10 TRAVÃO: carregue numa das alavancas do travão para
travar o chassis (fig_a) e levante-a para o destravar
(fig_b).
11 ENCAIXE DA CADEIRINHA NO CHASSIS: A cadeirinha
reversível pode ser encaixada no chassis virada para
a mãe (fig_a) ou para a via (fig_b), coloque o chassis
em correspondência aos símbolos e prema para
baixo com as duas mãos até sentir o clique duplo
do encaixe. Certifique-se do encaixe correcto da
cadeirinha, puxando-a para cima e agarrando-a pela
parte frontal.
12 DESACOPLAR O ASSENTO DO CHASSIS: prima os dois
botões redondos dos lados da cadeira de passeio
(fig_a) e, simultaneamente, as duas alavancas situadas
por baixo dos apoios de braços (fig_b), puxando o
assento para cima (fig_c) até o desacoplar.
13 PARTE FRONTAL: para montar a parte frontal,
introduza os encaixes nos apoios de braços e empurre
na direcção da cadeira de passeio até ouvir o clique
de encaixe (fig_a).
Para desmontar a parte frontal prima os dois botões
e extraia-a (fig_b). Abra a parte frontal apenas de um
lado para facilitar a entrada e a saída da criança.
14 ENCOSTO: Para regular, levante a manilha (fig_a) e
coloque como queira numa das 4 posições (fig_b).
15 APOIO DE PERNAS: Para abaixar, empurre para baixo
as duas alavancas e abaixe (fig_a); para levantar,
empurre o apoio de pernas para cima (fi_b).
16 CINTO DE SEGURANÇA DE 5 PONTOS: para apertar,
insira as duas fivelas do cinto abdominal (com os
cintos peitorais encaixados seta_a) no cinto entrepernas até ouvir um clique (seta_b). Para desapertar,
prima o botão redondo situado no centro do arnês
(seta_c) e puxe o cinto abdominal para fora (seta_d).
17 Para apertar o cinto da cintura puxar, por ambos
lados, no sentido da seta (seta_a), para desapertar
agir no sentido contrário. O cinto da cintura pode ser
apertado até ao fecho de segurança (fig_b).
18 Para regular a altura dos cintos de segurança é preciso
desapertar, na parte do encosto, as duas fivelas. Puxar
para si os suspensórios (seta_a) até desapertar as
fivelas e enfiá-las nas ranhuras do encosto (seta_b).
Remover os suspensórios da bolsa (seta_c) e infiá-los
na ranhura mais idónea (seta_d), por fim, apertar
novamente as duas fivelas atrás do encosto (seta_e). O
clique indica um correcto aperto das fivelas (fig_f).
19 CAPOTA: Para enganchar, introduza os encaixes na
cadeira lateralmente (fig_a) e abotoe na parte de
trás do encosto (fig_b). Para retirar a capota: Puxe os
encaixes e desabotoe. Para levantar a capota: Puxe
para si; para fechar a capota: Empurre-a para trás.
Para transformas a capota em protector do sol, abra
a dobradiça com duplo cursor (fig_c) e desabotoe-a
por trás do encosto. A capota está equipada com uma
alça para pendurar o brinquedo preferido do bebé
(fig_d).
20 COBRE-PÉS: prenda-o e aperte as molas por baixo do
repousa-pés (fig_a) e dos lados do repousa-pés. Na
versão com alcofa, levante o repousa-pés e coloque o
cobre-pés por cima da parte frontal (fig_b) fixando-o
nas molas da capota (fig_c).
21 Para a versão cadeira de passeio, baixar o apoio de
pernas, enfiar a coberta sob o pousa mãos (fig_a) e
fixá-la de acordo com o modelo adquirido A, B.
22 COBERTURA Pliko Switch On Track:
utiliza-se e prende-se tanto na Navetta XL como no
carrinho Pliko Switch On Track. Para montá-la na
Navetta XL, consultar o manual de instruções.
Para montá-la no carrinho, alargar a cobertura no
interior para que caibam as pernas do bebé (Fig. a).
Dobrá-la sobre o painel frontal e unir os botões
à frente (Fig. b) inserir o apoio para as pernas na
cobertura por baixo (Fig. c).
23 PROTECTOR DE CHUVA: colocar o protector de chuva
sob o carrinho de bebé (fig_a) e enfiar as duas ranhuras
laterais, do mesmo, nos botões da capota (fig_b).
24 Fixar o protector de chuva prendendo o elástico aos
suportes traseiros (fig_a) ou aos que se incontram na
Page 28

- 28 -
parte da frente (fig_b) de acordo com a posição do
assento.
25 TAPETINHO TRASPIRO: Ajuda a mãe para ultrapassar
pequenos desníveis (fig_a) e para transportar outra
criança (fig_b). Para utilizar a cadeirinha com duas
crianças, bloqueie a cadeira de passeio, posicione a
criança menor no assento e prenda com o cinto de
segurança (1). Segure as pegas (2) e faça com que a
outra criança suba no tapetinho (3).
26 FECHO: pode ser fechada sem o assento, com o assento
virado para si ou para a estrada. Se o assento estiver
virado para si: antes de fechar, baixe completamente
o encosto; se o assento estiver virado para a estrada:
antes de fechar levante o encosto e quando fechada,
baixe-o. Para fechar torne as rodas dianteiras fixas e
feche a capota, se montada.
Puxe para cima, uma de cada vez, as duas alavancas dos
manípulos até ouvir um clique e empurre para baixo
para desbloquear os tubos laterais (fig_a-b), puxe para
cima a pega central (fig_c) até fechar os ganchos de
segurança (fig_d).
27 TRANSPORTE: Pode ser transportada pela manilha
central, mantendo as rodas dianteiras fixas (fig_a) ou
pela manilha lateral (fig_b).
28 RETIRAR A VESTIDURA: desenfie a vestidura do repousa-
pés (fig_a), solte os encaixes da vestidura dos apoios de
braços (fig_b), desaperte as duas molas dos lados do
encosto (fig_c) e remova por cima (empurrando por baixo
da cadeira de passeio) o cinto entre-pernas (fig_d).
GANCIOMATIC SYSTEM
29 Ganciomatic System é o sistema prático e rápido que
lhe permite encaixar a alcofa Navetta ou PrimoNido, a
cadeira para automóvel Primo Viaggio e a cadeira Pliko
Switch no chassis com um só gesto: posicione o produto
e prema com ambas as mãos até ouvir um clique.
Accione sempre o travão do chassis ou do carrinho
antes de montar e desmontar os produtos (consulte
os respectivos manuais de instruções).
Verifique se o elemento de transporte da criança está
correctamente encaixado.
ACESSÓRIOS
30 BORSA (Bolsa de trocas). Bolsa com colchão para trocar o
bébe que se encaixa na cadeira de passeio.
NÚMEROS DE SÉRIE
31 Pliko Switch, remete informações relativas à data de
produção do mesmo.
_ Nome do produto, data de produção e numeração de
série do assento (fig_a) e do carrinho (fig_b).
Estas informações são indispensáveis em caso de
reclamação
LIMPEZA E MANUTENÇÃO
MANUTENÇÃO DO ARTICO: Protesa dos agentes
atmosféricos: Água, chuva ou neve; a exposição contínua
e prolongada ao sol pode causar alterações de cor em
muitos materiais, conserve este artigo num sítio seco.
LIMPEZA DO CHASSIS: Limpe periodicamente as
partes em plástico com um pano húmido sem usar
solventes ou outros produtos similares; mantenha
todas as partes em metal bem secas para prevenir
ferrugem; mantenha todas as parte em movimento
(mecanismos de regulação, mecanismos de encaixe,
rodas ...) limpas de poeiras ou areia e se necessário,
lubrifique com um óleo leve.
LIMPEZA DO PROTECTOR DE CHUVA: Lave com uma
esponja molhada com água e sabão, sem utilizar
detergentes.
LIMPEZA DAS PARTES EM TECIDO: escove as partes
em tecido para retirar poeiras e lave à mão a uma
temperatura máxima de 30°, não torça, não use
alvejante ou cloro, não passe a ferro, não lave a seco,
não use tira-manchas com solventes e não seque por
meio de máquinas de secar com tambor giratório.
PEG-PÉREGO S.p.A.
Peg-Pérego S.p.A é certificada ISO 9001.
A certificação oferece aos clientes e aos
consumidores a garantia de
transparência e confiança no que se
refere ao modo com que a empresa
trabalha.
Peg Pérego poderá realizar em qualquer momento
alterações nos modelos descritos nesta publicação,
por motivos técnicos ou comerciais.
Peg Perego está à disposição dos seus Consumadores
para satisfazer ao máximo suas exigências. Portanto,
conhecer a opinião de nossos Clientes, é para nós
extremamente importante e precioso. Ficaremos
muito agradecidos se depois de ter utilizado um
nosso produto, quiser preencher o QUESTIONÁRIO DE
SATISFAÇÃO DO CONSUMADOR, a indicar eventuais
observações ou sugestões, que encontrará em nosso
site Internet: www.pegperego.com
SERVIÇO DE ASSISTÊNCIA PEG-PÉREGO
Se casualmente partes do modelo forem perdidas
ou danificadas, use somente peças sobressalentes
originais Peg-Pérego. Para eventuais consertos,
substituições, informações sobre produtos, venda de
peças sobresselentes originais e acessórios, contactar
o Serviço de Assistência Peg Perego indicando, caso
se encontre presente, o número de série do produto.
tel. 0039/039/60.88.213 fax 0039/039/33.09.992
e-mail assistenza@pegperego.it sito internet www.
pegperego.com
Page 29

- 29 -
NL_Nederlands
Wij danken u voor de keuze van een Peg-Pérego
product.
WAARSCHUWING
_ BELANGRIJK: lees deze instructies aandachtig en
bewaar ze voor toekomstig gebruik. Het kind kan
gevaar lopen als u deze instructies niet opvolgt.
_ Dit artikel is ontworpen om 1 kind te vervoeren in het
zitje en 1 kind op de voetensteun achteraan.
_ Gebruik dit artikel niet voor meer dan het het door de
fabrikant voorziene aantal kineren.
_ Frame-Pliko Switch + stoeltje-Pliko Switch is bedoeld
voor kinderen vanaf de geboorte tot een gewicht
van 15 kg in het stoeltje. De voetsteun achteraan is
goedgekeurd voor het vervoer van een tweede kind
met een gewicht tot 20 kg.
_ Het frame-Pliko Switch is bedoeld om te worden
gecombineerd met de producten Peg-Pérego
Ganciomatic: het frame-Pliko Switch + autostoeltje
“Primo Viaggio” (categorie 0+) het is goedgekeurd
voor kinderen vanaf de geboorte tot 13 kg; het framePliko Switch + reiswieg “Navetta” of “Primonido” is
goedgekeurd voor kinderen vanaf de geboorte tot 10
kg. Als u het met “Navetta” en “Primonido” gebruikt,
mag u de voetsteun achterop niet gebruiken.
_ Controleer vóór het gebruik of de Peg-Pérego
Ganciomatic producten goed aan het artikel zijn
bevestigd.
_ Het kan gevaarlijk zijn uw kind zonder toezicht alleen
te laten.
_ Zet het kind altijd vast in de
vijfpuntsveiligheidsgordel en maak altijd het
buikgordeltje vast aan het beenstuk.
_ Pas op voor het kind als u mechanismen afstelt (stuur,
rugleuning).
_ Zet de rem altijd op als u stilstaat en als u het kind
erin zet of het eruit haalt.
_ Alleen volwassenen mogen dit artikel in elkaar zetten,
het klaarmaken, reinigen en onderhouden.
_ Gebruik dit artikel niet als er onderdelen ontbreken of
stuk zijn.
_ Controleer vóór het gebruik of alle bevestigingen
goed zijn gemonteerd.
_ Steek uw vingers niet in mechanismen.
_ Elke last die u aan de handgrepen of aan de duwstang
hangt, kan het artikel onstabiel maken; leef de
voorgeschreven gewichten van de fabrikant na.
_ Steek niets in het mandje dat meer dan 5 kg weegt.
Steek niets in de flessenhouder dat meer weegt dan
wat is voorgeschreven voor de flessenhouder en
steek er nooit warme dranken in. Steek niets in de
kappen (indien aanwezig) dat meer weegt dan 0,2 Kg.
_ De frontbescherming is niet bedoeld om het gewicht
van het kind te ondersteunen; de frontbescherming
is niet bedoeld om het kind in het zitje te houden en
vervangt de veiligheidsgordel niet.
_ Gebruik het artikel niet op trappen of treden; gebruik
het niet in de buurt van warmtebronnen, vlammen
of gevaarlijke voorwerpen binnen armbereik van het
kind.
_ Niet door de fabrikant goedgekeurde accessoires
kunnen gevaarlijk zijn.
_ Dit artikel is niet geschikt om te joggen of te
schaatsen.
_ Gebruik de regenkap (indien aanwezig) niet in
gesloten ruimten en controleer altijd of het kind
het niet te warm heeft; zet het niet in de buurt van
warmtebronnen en pas op voor sigaretten. Controleer
of de regenkap nergens in de weg zit van bewegende
mechanismen van de kinder- of wandelwagen;
haal de regenkap er altijd af voordat u de kinder- of
wandelwagen dichtklapt.
_ Als u twee kinderen op de wandelwagen vervoert,
laat deze dan nooit onbewaakt achter zodat het
tweede kind niet op de voetsteun gaat staan terwijl
het wagentje leeg is.
_ Gebruik de handgrepen met het loskoppelsysteem
niet om het wagentje te vervoeren of op te tillen
terwijl er een kind in zit.
_ LET OP plaats geen extra matrasje in de wagen.
Pliko Switch compact, de compacte wandelwagen
met omkeerbaar stoeltje!
Versie compleet met kap, dekentje en regenscherm.
Sportieve versie met kap en regenscherm (Pliko
Switch compact On Track Sportivo).
KENMERKEN VAN HET ARTIKEL
_ Dit artikel heeft een volgnummer.
_ Piko Switch is een wandelwagen met een stoeltje dat
in twee richtingen kan worden gezet: in de rijrichting
en andersom.
_ Piko Switch bestaat uit twee elementen. Piko Switch
Frame en Piko Switch Stoeltje.
COMPONENTEN
Controleer de inhoud van de verpakking. Neem
contact op met de technische service in geval van
klachten.
_ Frame Pliko Switch: mandje; 2 blokkeerbare
zwenkende voorwielen; 2 achterwielen met centrale
remstang en flessenhouder.
_ Stoeltje Pliko Switch: beschermstang, kap, dekentje,
regenscherm.
_ Stoeltje Pliko Switch On Track Sportivo:
beschermstang, kap, regenscherm.
GEBRUIKSAANWIJZINGEN
1 BEVEILIGINGEN VERWIJDEREN: voordat u het frame
openklapt, dient u de beveiligingen te verwijderen
(afb_a), omdat het frame anders verkeerd opengaat
(afb_b).
2 OPENEN: doe de hendeltjes op de twee handgrepen
samen omhoog (afb_a) en trek ze naar boven om
het frame open te klappen (afb_b). Controleer of
het frame goed is opengeklapt: de buizen aan de
zijkanten moeten in elkaar haken (afb_c).
3 DE VOORSTE WIELEN MONTEREN: Controleer eerst
of de sluitring er zit, zoals in de afbeelding, duw de
hendel op de twee voorste wielen omlaag (afb_a) en
steek het wiel erop tot u het hoort klikken (afb_b).
4 DE ACHTERSTE WIELEN MONTEREN: steek de wielen
erop tot u ze hoort klikken (afb_a) en controleer of ze
goed vastzitten (afb_b).
5 Bevestig ten slotte het centrale element op de
remstang aan het frame (afb_a), en controleer of het
goed bevestigd is (afb_b).
6 HET MANDJE MONTEREN: bevestig de lusjes aan de
haken vooraan (afb_a) en aan de haken achteraan
(afb_b).
7 DE FLESSENHOUDER MONTEREN: steek de
flessenhouder op de haak totdat u deze hoort klikken
(afb_a). U kunt de flessenhouder aan beide kanten
van het frame vastmaken.
8 VERSTELBARE HANDGREPEN: Pliko Switch compact:
om de handgrepen omhoog of omlaag te doen, drukt
u op de knop (afb_a) en verstelt u ze tegelijkertijd
(afb_b).
9 DE VOORWIELEN VASTZETTEN OF LATEN ZWENKEN:
doe de hendels omhoog om de wielen vast te zetten
(afb_a), en omlaag om ze te laten zwenken (afb_b).
Wij raden aan om op onregelmatige ondergronden
de wielen vast te zetten.
Page 30

- 30 -
10 REM: druk op een remhendel om het frame te
blokkeren (afb_a), en doe hem omhoog om het te
deblokkeren (afb_b).
11 HET ZITJE VASTMAKEN IN HET FRAME: het
omkeerbare zitje kan in de richting van de moeder
in het frame worden geplaatst (afb_a) of naar in de
rijrichting (afb_b). Zet het op de symbolen op het
frame en druk het met beide handen naar onder
zodat u een dubbele sluitklik hoort. Trek de voorkant
van het stoeltje naar boven om te controleren of het
goed vast zit.
12 HET ZITJE VAN HET FRAME AFHALEN: druk op de
twee ronde knoppen aan de zijkant van het zitje
(afb_a) en tegelijkertijd op de twee hendels onder de
armsteunen (afb_b), en trek het zitje omhoog (afb_c)
tot het loskomt.
13 VOORSTUK: om het voorstuk te bevestigen, steekt
u de bevestigingen in de armsteunen en duwt u
richting het zitje tot u het hoort vastklikken (afb_a).
Om het voorstuk te verwijderen drukt u op de twee
knoppen en haalt u het eruit (afb_b). Open het
voorstuk slechts aan één kant om het erinzetten en
eruithalen van het kind te vergemakkelijken.
14 RUGSTEUN: om de rugsteun te verplaatsen, tilt u de
handgreep (afb_a) op en zet u de rugsteun in één van
de 4 mogelijke standen (afb_b).
15 BENENSTEUN: om de benensteun naar onder te
zetten, duwt u de twee hendeltjes naar onder (afb_a);
naar boven duwt u de benensteun gewoon naar
boven (afb_b).
16 VIJFPUNTSVEILIGHEIDSGORDEL: om deze te sluiten
steekt u de twee gespen van het buikriempje (met
bevestigde schouderriemen pijl_a) in het riempje
tussen de benen, tot u het hoort klikken (pijl_b).
Om hem los te maken drukt u op de ronde knop
in het midden van de gesp (pijl_c) en trekt u het
buikriempje eruit (pijl_d).
17 Om het tailleriempje aan te trekken, trek aan
weerszijden in de richting van de pijl (pijl_a), om
losser te maken, te werk gaan in de andere richting.
Het tailleriempje kan strak gemaakt worden tot aan
de veiligheidsgrendel (fig_b).
18 Om de hoogte van de veiligheidsgordels te regelen,
moeten beide gespen achter aan de rug losgehaakt
worden.
Trek de schouderriemen naar u toe (pijl_a) tot de
gespen loskomen en steek ze in de gaten van de
rugsteun (pijl_b). Maak de schouderriemen vrij (pijl_c)
en steek ze in het gepaste gat (pijl_d); haak beide
riemen tot slot weer vast achter de rug (pijl_e). De
gespen zijn correct vastgehaakt wanneer men een
klik hoort (fig_f).
19 KAP: steek om de kap vast te maken de sluitingen
op de zijkanten op het stoeltje (afb_a) en knoop de
kap dan vast op de rugsteun (afb_b). De kap eraf
halen: trek de sluitingen eruit en maak de knopen
los. De kap naar boven zetten: trek de kap naar u toe;
de kap sluiten: duw de kap naar achter. Om de kap
als zonnescherm te gebruiken, opent u de dubbele
ritssluiting (afb_c) en maakt u de knopen op de
rugsteun los. De kap is voorzien van een opening
waaraan u een speeltje kunt hangen (afb_d).
20 DEKENTJE: leg het dekentje erop en knoop het
onderaan aan de benensteun (afb_a) en aan de
zijkanten ervan vast. Bij de uitvoering met de
draagmand doet u de benensteun omhoog en plaatst
u het dekentje over het voorstuk (afb_b), en maakt u
het vast aan de knoopjes van de kap (afb_c).
21 Voor de versie buggy wordt de voetensteun omlaag
gebracht; steek de afdekking onder het voorste deel
(fig_a) en maak hem vast volgens het aangekochte
model A, B.
22 DEKJE Pliko Switch On Track:
dit wordt gebruikt en bevestigd op zowel de Navetta
XL als op de wandelwagen Pliko Switch On Track. Om
het op de Navetta XL te bevestigen, raadpleeg de
gebruiksaanwijzing van de Navetta XL.
Om het op de wandelwagen te bevestigen, maakt u
het dekje van binnen groter zodat de benen van het
kind erin passen (Fig. a). Sla het over het voorstuk,
knoop het aan de voorkant vast (Fig. b), en steek
eronder de benensteun in het dekje (Fig. c).
23 REGENKAP: positioneer het regenscherm op de
buggy (fig_a) en haal de beide aan de zijkanten over
de knopen van de zonnewering (fig_b).
24 Bevestig het regenscherm door de elastiek vast te
maken aan de achterste opstaande elementen (fig_a)
of de voorste (fig_b) volgens de positie van het zitje
25 VOETSTEUN ACHTERAAN: handig als u over kleine
verhogingen in de weg moet rijden (afb_a) en om een
tweede kind te vervoeren (afb_b). Om twee kinderen
te vervoeren, zet u de rem op, zet u het kleinste kind
in het stoeltje en maakt u de veiligheidsgordel vast
(1). Houd de handgrepen (2) vast en laat het tweede
kind op de voetsteun (3) stappen.
26 INKLAPPEN: u kunt de wandelwagen inklappen
zonder het stoeltje, met het stoeltje in de richting van
de ouder of andersom. Als het stoeltje in de richting
van de ouder staat dient u, alvorens de wagen in
te klappen, de rugsteun helemaal naar beneden te
doen. Als het stoeltje andersom zit dient u, alvorens
de wagen in te klappen, de rugsteun omhoog te doen
en pas weer naar beneden te doen nadat de wagen is
ingeklapt. U zet tevens de voorwielen vast en sluit de
kap als deze erop zit.
Doe één voor één de twee hendels van de
handgrepen omhoog tot u het hoort klikken en duw
naar onder om de framebuizen aan de zijkant te
deblokkeren (afb_a-b), Trek de centrale handgreep
omhoog (afb_c) tot de veiligheidssluitingen dicht zijn
(afb_d).
27 VERVOER: u kunt de ingeklapte wagen dragen
met de gecentraliseerde handgreep of duwstang
als de voorste wielen vastzitten (afb_a) of met de
zijhandgreep (afb_b).
28 VERWIJDEREN BEKLEDING: trek de zak van de
voetensteun (afb_a), maak de bevestigingen van
de zak aan de armsteunen los (afb_b), maak aan de
zijkanten van de rugsteun de twee knopen los (afb_c)
en trek van bovenaf (duw van onder het zitje) het
riempje tussen de benen eruit (afb_d).
GANCIOMATIC SYSTEM
29 Ganciomatic System is het praktische en snelle
systeem waarmee u de reiswiegen
Navetta of PrimoNido, het autostoeltje Primo Viaggio
en het stoeltje Pliko Switch in één beweging op het
frame vastmaakt: zet ze op het frame en druk het
product er met beide handen op totdat u het hoort
klikken.
Zet altijd de rem van het frame of de wandelwagen
op voordat u er één van de producten op vastmaakt
of ervan losmaakt (raadpleeg de bijbehorende
instructies).
Controleer of het element waarmee u het kind in het
product vervoert goed is vastgemaakt.
ACCESSOIRES
30 BORSA, een tas met luiermatras die u aan de
wandelwagen vast kunt maken.
SERIENUMMERS
31 Pliko Switch geeft informatie over de productiedatum.
_ Naam van het product, productiedatum en
serienummer van het zitje (fig_a) en het frame (fig_b).
Deze gegevens zijn noodzakelijk in geval van een
klacht.
Page 31

- 31 -
ONDERHOUD EN REINIGEN
HET ARTIKEL ONDERHOUDEN: bescherm het tegen
weer en wind: water, regen of sneeuw; een langdurige
en continue blootstelling aan zonnestralen kan vele
materialen doen verkleuren; bewaar het op een droge
en beschutte plaats.
HET FRAME REINIGEN: reinig regelmatig de plastic
delen met een vochtige doek, zonder verdunners
of andere dergelijke producten; houd de metalen
delen droog zodat ze niet kunnen roesten; houd
alle bewegende delen schoon (stelmechanismen,
sluitmechanismen, wielen...), zorg dat er geen stof
of zand op blijft zitten en smeer ze indien nodig met
een lichte olie.
DE REGENKAP REINIGEN: was de kap met een spons
en sop zonder reinigingsproducten.
DE DELEN IN STOF REINIGEN: borstel de delen in stof
zodat er geen stof meer op zit en was ze met de hand
in water dat niet warmer is dan 30°. Wring ze niet
uit, bleek ze niet en strijk ze niet; laat ze niet stomen;
ontvlek ze niet met verdunners en laat ze niet drogen
in een droogtrommel.
PEG-PÉREGO S.p.A.
Peg-Pérego S.p.A. is houder van het
ISO-certificaat 9001. Dit certificaat biedt
aan onze klanten en gebruikers van
onze producten een waarborg voor een
transparante werkwijze en dus
vertrouwen.
Peg Pérego kan op elk ogenblik de in deze
documenten beschreven modellen wijzigen om
technische of commerciële redenen.
Peg Pérego wenst zo veel en zo goed mogelijk
tegemoet te komen aan de wensen van onze
klanten. De mening van onze klanten kennen, is dus
heel belangrijk voor ons. Wij verzoeken u daarom
vriendelijk een ogenblikje tijd te nemen om onze
VRAGENLIJST TEVREDEN KLANTEN in te vullen als
u één van onze producten gebruikt en ons uw
eventuele opmerkingen of suggesties stuurt. U vindt
de vragenlijst op het adres: www.pegperego.com
TECHNISCHE SERVICE PEG-PÉREGO
Als delen van het model in uw bezit toevallig
beschadigd of verloren raken, vervang deze dan
alleen door originele onderdelen van Peg Pérego.
Voor eventuele reparaties, vervangingen, informatie
over het product, de verkoop van originele
wisselonderdelen en accessoires, contacteer de
Assistentiedienst Peg Perego en vermeld het
serienummer van het product, indien dit aanwezig is.
tel. 0039/039/60.88.213 fax 0039/039/33.09.992
e-mail assistenza@pegperego.it site internet www.
pegperego.com
DK_Dansk
Tak for dit valg af et produkt fra Peg-Pérego.
PAS PÅ!
_ VIGTIGT: Læs denne brugsanvisning grundigt og
gem den til fremtidig brug. Barnets sikkerhed kan
blive udsat for risiko, hvis denne brugsanvisning
ikke følges.
_ Denne artikel er udformet til transport af 1 barn i
sædet og 1 stående barn på bageste ståbræt.
_ Anvend ikke denne artikel til et større antal børn, end
det, der er fastsat af producenten.
_ Pliko Switch stellet + Pliko Switch stolen er
typegodkendt til børn fra fødslen og indtil en
vægt på 15 kg på sædet. Den bageste fodstøtte er
typegodkendt til transport af endnu et barn på op til
20 kg.
_ Pliko Switch stellet er projekteret til at kunne bruges
i kombination med Peg Péregos Ganciomatic: Pliko
Switch stellet + autostolen “Primo Viaggio” (gruppe
0+) er typegodkendt til børn fra fødslen indtil en
vægt på 13 kg; Pliko Switch stellet + liften “Navetta”
eller “Primonido” er typegodkendt til børn fra fødslen
indtil en vægt på 10 kg. Ved brug med “Navetta” og
“Primonido” må den bageste fodstøtte ikke bruges.
_ Sørg for, at Peg-Pérego Ganciomatic-produkterne er
fastgjort korrekt til artiklen, før brugen.
_ Det kan være farligt at efterlade barnet uden opsyn.
_ Brug altid 5-punkts sikkerhedsselen og hægt altid den
lille rem om livet sammen med benremmen.
_ Når barnet er til stede, skal der udvises stor
opmærksomhed ved justering af mekanismerne (styr,
ryglæn).
_ Slå altid bremsen til under ophold eller når barnet
sættes i eller tages op af vognen.
_ Montering og forberedelse af produktet samt
rengøring og vedligeholdelse må kun udføres af
voksne.
_ Brug ikke denne artikel i tilfælde af manglende eller
defekte dele.
_ Sørg for, at alle fasthægtningsmekanismerne er sat
rigtigt i, før vognen anvendes.
_ Undgå at sætte fingrene ind i mekanismerne.
_ Eventuelle genstande, der hænges på håndgrebet
eller andre greb, kan gøre produktet ustabilt; følg
altid producentens anvisninger vedrørende den
maksimalt tilladte last.
_ Læg ikke ting i kurven med en samlet vægt på over
5 kg. Sæt ikke tungere ting i flaskebeholderen end
angivet på flaskebeholderen og aldrig varme drikke.
Stik ikke ting i lommerne på kalecherne (hvis disse er
monterede), der vejer mere end 0,2 kg.
_ Forstykket er ikke beregnet til at understøtte barnets
vægt. Forstykket er ikke udformet til at holde barnet i
sædet, og det erstatter ikke sikkerhedsselen.
_ Brug ikke artiklen i nærheden af trapper eller
trappetrin. Brug den ikke i nærheden af varmekilder,
åben ild eller farlige genstande, som er inden for
barnets rækkevidde.
_ Det kan være farligt at benytte udstyr, der ikke er
godkendt af producenten.
_ Denne artikel er ikke beregnet til at løbe med eller til
at løbe på skøjter med.
_ Anvend ikke regnslaget i lukkede miljøer, og
kontroller regelmæssigt at barnet ikke har det
for varmt; Anbring ikke regnslaget i nærheden af
varmekilder og pas på med cigaretter. Sørg for at
kontrollere at regnslaget ikke kommer i vejen for
nogen af stellets eller klapvognens bevægelige dele;
Tag altid regnslaget af før stellet eller klapvognen
lukkes sammen.
Page 32

- 32 -
_ Når klapvognen bruges til to børn, må de aldrig
efterlades alene; lad ikke barn nr. to træde op på den
bageste fodstøtte, når klapvognen er tom.
_ Brug ikke påhægtningsgrebene til at transportere
eller løfte klapvognen med, hvis barnet sidder i
vognen.
_ PAS PÅ: Læg ikke en yderligere skumgummiplade i
vognen.
Pliko Switch compact, den kompakte klapvogn med
vendbart sæde!
Den komplette version har kaleche, overstykke og
regnslag.
Sportsversionen har kaleche og regnslag (Pliko Switch
compact on Track Sportivo).
PRODUKTETS EGENSKABER
_ Dette produkt er progressivt nummereret.
_ Pliko Switch er en klapvogn med vendbart sæde: Ind
mod mor eller ud mod verden.
_ Pliko Switch består af to elementer: Pliko Switch STEL
og Pliko Switch STOL
PRODUKTETS KOMPONENTER
Kontroller indholdet i emballagen og kontakt
Servicecenteret i tilfælde af reklamationer.
_ Pliko Switch stellet: kurv; 2 roterende eller blokerbare
forhjul; 2 baghjul med central bremsestang og
flaskeholder.
_ Stol til Pliko Switch: forstykke, kaleche, overstykke,
regnslag.
_ Stol Pliko Switch on Track Sportivo: forstykke, kaleche,
regnslag.
BRUGSANVISNING
1 BESKYTTELSESINDPAKNING: Før stellet kan åbnes, er
det nødvendigt at fjerne beskyttelsesanordningerne
(fig. a), ellers kan det ikke åbnes korrekt (fig. b).
2 ÅBNING: Løft samtidigt i grebene på de 2 håndtag
(fig_a) og træk opad, indtil stellet åbner sig (fig_b).
Kontroller om åbningen er korrekt: Sidestængerne
skal være hægtet sammen (fig_c).
3 MONTERING AF FORHJULENE: kontroller om
spændeskiven findes, som vist på tegningen. Sænk
grebet på de to forhjul (fig_a), sæt hjulet på indtil der
høres et klik (fig_ b).
4 MONTERING AF BAGHJULENE: Sæt hjulene på indtil
der høres et klik (fig_a) og kontroller, om de er hægtet
ordentligt på (fig_b).
5 Til slut hægtes bremsestangens centrale del fast på
stellet (fig_a), kontroller om den er hægtet ordentligt
på (fig_b).
6 MONTERING AF KURVEN: Sæt øjerne fast på de
forreste kroge (fig_a) og på de bageste kroge (fig_b).
8 JUSTERBARE HÅNDTAG: Pliko Switch compact: For
at løfte eller sænke håndtagene trykkes på knappen
(fig_a), samtidig med at håndtagene justeres (fig_b).
9 FASTSPÆNDTE ELLER ROTERENDE FORHJUL: Træk
op i grebene for at spænde hjulene fast (fig_a), skub
grebene nedad for at gøre hjulene roterende (fig_b).
Det anbefales at køre med fastspændte hjul på
vanskeligt terræn.
10 BREMSE: Tryk på et bremsegreb for at blokere stellet
(fig_a), løft det opad for at frigøre det igen (fig_b).
11 SÅDAN HÆGTES STOLEN PÅ STELLET: Stolen kan
vendes i begge retninger og kan hægtes på stellet
vendt mod mor (fig. a) eller vendt ud mod vejen (fig.
b); anbring stolen på stellet ud for de tilsvarende
symboler og tryk det nedad med begge hænder,
indtil der høres et dobbelt klik. Kontroller, om stolen
er hægtet korrekt på, ved at holde i forstykket og
trække opad.
12 SÅDAN FRIGØRES STOLEN FRA STELLET: Tryk på
stolens to runde sideknapper (fig_a) samtidigt med
de to greb under armlænene (fig_b) og træk stolen
opad (fig_c), indtil den har løsnet sig.
13 FORSTYKKE: Forstykket hægtes på ved at føre de to
sidetapper ind i armlænene og skubbe det ind mod
stolen, indtil forstykket klikker fast (fig_a).
Forstykket fjernes ved at trykke på de to knapper og
trække det udad (fig_b). Forstykket kan åbnes kun
i den ene side, så det er nemmere at sætte barnet i
vognen eller tage det op igen.
14 RYGLÆN: Ryglænet kan justeres ved at løfte i
håndgrebet (fig. a) og indstille det efter ønske i en af
de 4 indstillinger (fig. b).
15 BENSTØTTE: Benstøtten sænkes ved at skubbe de to
greb nedad og trykke den nedad (fig. a); den løftes
ved at skubbe benstøtten opad (fig. b).
16 5-PUNKTS SIKKERHEDSSELE: Hægt sikkerhedsselen på
ved at indsætte de 2 spænder på bækkenselen (med
påhægtede skulderseler, pil_a) ind i skridtremmen,
indtil de klikker fast (pil_b). De løsnes ved at skubbe
opad på den runde knap midt på spændet (pil_c) og
trække bækkenselen udad (pil_d).
17 For at stramme remmen om livet skal man trække
fra begge sider i pilens retning (pil_a), for at løsne
remmen, skal man gøre det modsatte. Remmen om
livet kan strammes indtil sikkerhedsstoppet (fig_b).
18 For at regulere sikkerhedsselerne i højden skal man
hægte de to spænder på bagsiden af ryglænet af.
Man skal trække selerne mod sig selv (pil_a), indtil
spænderne hægtes af og herefter føre dem ind i
åbningerne på ryglænet (pil_b). Træk selerne ud
af betrækket (pil_c) og før dem ind i den ønskede
åbning (pil_d), hægt tilsidst spænderne fast igen fast
bag på ryglænet (pil_e). Når spænderne er korrekt
fastgjort høres et klik (fig_f).
19 KALECHE: Kalechen hægtes på ved at spænde
beslagene fast på stolens sider (fig. a), hvorefter
den knappes fast til ryglænet (fig. b). Sådan tages
kalechen af: Træk beslagene af og løsn knapperne.
Sådan åbnes kalechen: Træk den ind mod sig selv;
den lukkes ved at skubbe den bagud. Kalechen kan
laves om til en solskærm ved at åbne lynlåsen (fig.
c) og knappe kalechen af fra ryglænets bagside.
Kalechen er udstyret med et øje, hvor du kan hænge
barnets foretrukne legetøj (fig_d).
20 OVERSTYKKE: Anbring overstykket og knap det fast
under fodstøtten (fig_a) og på fodstøttens sider. Når
vognen fungerer som klapvogn, løftes fodstøtten, og
overstykket anbringes over forstykket (fig_b), hvor
det fastgøres på kalechens knapper (fig_c).
21 Til klapvognsmodellen skal man sænke benstøtten,
trække overstykket på under forstykket (fig_a) og
fastgøre det afhængigt af den købte model A, B.
22 OVERSTYKKE Pliko Switch On Track:
kan anvendes sammen med og hægtes på både
Navetta XL og på klapvognen Pliko Switch On Track.
Læs brugsanvisningen for Navetta XL for at se,
hvordan det hægtes på denne.
For at montere det på klapvognen udvides
overstykket indvendigt, så barnets ben kan stikkes i
det (Fig. a).
Hægt det rundt om klapvognens forstykke og luk
knapperne til foran (Fig. b) og rundt om benstøtten
(Fig. c).
23 REGNSLAG: placer regnslaget på klapvognen (fig_a)
og sæt de to åbninger i siden på knapperne på
kalechen (fig_b).
24 Fastgør regnslaget ved at hægte elastikken på de to
bagstøtter (fig_a) eller forstøtterne (fig_b) afhængigt
af stolens placering.
25 BAGESTE FODSTØTTE: Denne gør det nemmere at
køre over små højdeforskelle (fig. a) og kan anvendes
til at transportere endnu et barn (fig. b). For at bruge
klapvognen med to børn er det nødvendigt først at
Page 33

- 33 -
bremse vognen; anbring herefter det mindste barn
på sædet og spænd sikkerhedsselen (1). Hold fast i
håndtagene (2) mens det andet barn stiller sig på
fodstøtten (3).
26 LUKNING: Dette kan gøres både uden stolen på
vognen og med stolen vendt mod mor eller mod
vejen. Hvis stolen er vendt mod mor: Før vognen
klappes sammen, skal ryglænet sænkes helt. Hvis
stolen er vendt mod vejen: Før vognen klappes
sammen, skal ryglænet løftes helt, og når vognen er
lukket, skal det sænkes. Før sammenklapningen skal
forhjulene indstilles til fast position og hvis kalechen
er monteret, skal den lukkes sammen.
Løft et ad gangen i de to greb på håndtagene,
indtil der høres et klik, og skub nedad, således at
sidestængerne løsnes (fig_a-b), træk midterhåndtaget
opad (fig_c), indtil sikkerhedsbeslagene lukker sig
(fig_d).
27 TRANSPORT: Vognen kan transporteres ved hjælp af
det midterste håndtag, når forhjulene er indstillet til
fast position (fig. a) eller ved hjælp af sidehåndtaget
(fig. b).
28 AFTAGELIG BEKLÆDNING: Træk beklædningen ud
fra fodstøtten (fig_a), løsn beklædningens hægter
fra armlænene (fig_b), åbn de to knapper på siden af
ryglænen (fig_c) og træk skridtremmen ud oppefra
(ved at skubbe under sædet) (fig_d).
GANCIOMATIC SYSTEMET
29 Ganciomatic Systemet er et praktisk og hurtigt
system, der gør det muligt at hægte liftene Navetta
eller PrimoNido, autostolen Primo Viaggio og stolen
Pliko Switch påstellet med blot en enkel bevægelse:
Du skal blot anbringe produktet og trykke ned med
begge hænder, indtil det klikker fast.
Aktiver altid bremsen på stellet eller klapvognen,
før disse produkter hægtes på eller tages af (se de
pågældende brugsanvisninger).
Kontroller at barnets transportelement er hægtet
korrekt på.
TILBEHØR
30 BORSA (Skiftetaske). Taske med underlag til bleskift,
kan hægtes på klapvognen.
SERIENUMMER
31 Pliko Switch, med informationer vedrørende
produktionsdato af samme.
_ Produktnavn, produktionsdato og serienummer på
sædet (fig_a) og stellet (fig_b).
Disse informationer er nødvendige i ved
reklamationer.
RENGØRING OG VEDLIGEHOLDELSE
VEDLIGEHOLDELSE AF PRODUKTET: Beskyt produktet
mod vejrforholdene: vand, regn eller sne; mange
materialer vil skifte farve, såfremt de udsættes for
sollys i længere tid; opbevar produktet på et tørt sted.
RENGØRING AF STELLET: Rengør delene i plastik
regelmæssigt med en fugtig klud og brug ikke
opløsningsmidler eller lignende produkter; hold
alle metaldele tørre for at forhindre rustdannelser;
hold de bevægelige dele (justeringsmekanismer,
påhægtningsmekanismer, hjul...) rene og fri for støv
eller sand; smør med en let olie efter behov.
RENGØRING AF REGNSLAGET: Kan vaskes med
en svamp og sæbevand men uden brug af
rengøringsmidler.
RENGØRING AF DELE I STOF: børst stofdelene for
at fjerne støv og vask dem i hånden ved en højeste
temperatur på 30º; må ikke vrides; må ikke klorbleges;
må ikke stryges; må ikke kemisk renses; fjern ikke
pletter med opløsningsmidler og tør ikke stofdelene i
en tromletørremaskine.
PEG-PÉREGO S.p.A.
Peg Pérego S.p.A. er ISO 9001
certificeret. Certificeringen yder kunder
og forbrugere garanti for
gennemskuelighed og tillid til måden
firmaet arbejder på.
Peg-Pérego forbeholder sig retten til på ethvert
tidspunkt at foretage ændringer af de heri beskrevne
modeller af tekniske eller forretningsmæssige grunde.
Peg-Pérego er til forbrugernes disposition med
henblik på at opfylde deres behov på bedste måde.
Det er derfor yderst vigtigt og værdifuldt for os at
høre, hvad vores kunder mener. Vi vil derfor være
dig taknemmelige, hvis du efter anvendelsen af
et af vores produkter udfylder SPØRGESKEMAET
VEDR. KUNDETILFREDSHED, som du finder på vores
internetside, hvor du kan anføre bemærkninger eller
forslag: www.pegperego.com
SERVICEAFDELINGEN PEG-PÉREGO
Skulle det ske, at dele af modellen mistes eller
beskadiges, må der kun anvendes originale Peg-
Pérego reservedele. Ved eventuelle reparationer,
udskiftninger, informationer om produkterne, salg af
originale reservedele og tilbehør bedes De kontakte
Peg Peregos kundeservice og angive produktets
serienummer, hvis det forefindes.
Tlf.: 0039/039/60.88.213 fax 0039/039/33.09.992
e-mail assistenza@pegperego.it Internetside www.
pegperego.com
Page 34

- 34 -
FI_Suomi
Kiitos, kun olet valinnut Peg-Pérego-tuotteen.
HUOMAA
_ TÄRKEÄÄ: lue ohjeet huolellisesti läpi ja säilytä ne
myöhempää tarvetta varten. Lapsen turvallisuus
saattaa vaarantua, jos näitä käyttöohjeita ei
noudateta.
_ Tämä tuote on suunniteltu yhden lapsen
kuljettamiseen istuinosassa ja toisen takaosassa
olevalla seisomatelineellä seisoma-asennossa.
_ Älä käytä tuotetta lasten kuljettamiseen, jos niiden
lukumäärä ylittää valmistajan antamat ohjeet.
_ Pliko Swith -runko + Pliko Switch -istuin on hyväksytty
käytettäväksi enintään 15 kg:n painoisten vauvojen ja
pikkulasten kuljettamiseen istuinosassa. Takataso on
hyväksytty toisen, enintään 20 kg:n painoisen lapsen
kuljettamiseen.
_ Pliko Switch -runko on suunniteltu käytettäväksi
yhdessä Peg-Pérego Ganciomatic -tuotteiden kanssa:
Pliko Switch -runko + Primo Viaggio -turvaistuin (0+ryhmä) on hyväksytty enintään 13 kg:n painoisille
vauvoille ja pikkulapsille; Pliko Switch -runko +
Navetta- tai Primonido-turvakaukalo on hyväksytty
enintään 10 kg:n painoisille vauvoille. Kun Navetta- tai
Primonido-turvakaukalo on kiinnitettynä runkoon,
astinlautaa ei saa käyttää.
_ Ennen käyttöönottoa varmista, että Peg-Pérego
Ganciomatic tuotteet on kiinnitetty oikein
tuotteeseen.
_ Lapsen jättäminen yksin ilman valvontaa saattaa olla
vaarallista.
_ Käytä aina viisipisteturvavyötä. Kiinnitä vyötärön
ympäri kulkeva vyö jalkojen välistä kulkevaan vyöhön.
_ Pidä lasta tarkasti silmällä kun säädät mekanismeja
(työntöaisa, selkänoja).
_ Käytä aina jarrua paikalla oltaessa ja nostaessasi lasta
vaunuihin tai niistä pois.
_ Tuotteen saa koota, valmistella käyttöä varten,
puhdistaa ja huoltaa vain aikuinen.
_ Älä käytä tuotetta, jos siitä puuttuu osia tai jokin osa
on rikki.
_ Ennen käyttöönottoa varmista, että kaikki
kiinnitysmekanismit on kytketty oikein.
_ Varo sormien laittamista mekanismien väliin.
_ Tavaroiden ripustaminen työntöaisaan tai kahvoihin
voi tehdä tuotteesta epävakaan. Noudata valmistajan
enimmäiskuormituksesta antamia ohjeita.
_ Älä laita koriin kuormia, joiden paino ylittää 5 kg.
Älä laita juomanpidikkeeseen esineitä, joiden paino
ylittää pidikkeeseen merkityn painorajan, äläkä
koskaan kuumia juomia. Älä laita kuomujen taskuihin
(jos sellaisia on) esineitä, joiden paino ylittää 0,2 kg.
_ Suojakaarta ei ole suunniteltu kestämään lapsen
painoa. Suojakaarta ei ole suunniteltu pitämään lasta
istuimessa eikä se korvaa turvavöitä.
_ Älä käytä tuotetta portaiden tai askelmien
läheisyydessä. Älä käytä paikoissa, joissa lapsen käsien
ulottuvilla on lämmönlähteitä, avotulta tai vaarallisia
esineitä.
_ Muiden kuin valmistajan hyväksymien lisävarusteiden
käyttö saattaa olla vaarallista.
_ Tämä tuote ei sovellu käytettäväksi hölkätessä tai
rullaluistellessa.
_ Älä käytä sadesuojaa (jos sellainen kuuluu
tuotteeseen) sisätiloissa. Tarkasta aina, ettei
lapsella ole liian kuuma. Älä vie sadesuojaa lähelle
lämmönlähteitä - varo myös savukkeita. Varmista,
ettei sadesuoja tartu mihinkään vaunujen tai
rattaiden liikkuvaan mekanismiin. Irrota aina
sadesuoja, ennen kuin suljet vaunut tai rattaat.
_ Kun rattaissa on kaksi lasta, älä koskaan jätä lapsia
kahdestaan. Takatasolle ei saa nousta, jos rattaat ovat
tyhjät.
_ Älä käytä vapautuskahvoja rattaiden liikuttamiseen
tai nostamiseen, kun lapsi on kyydissä.
_ HUOMIO Älä lisää makuualustaa.
Pliko Switch compact, kompaktit rattaat
käännettävällä istuinosalla!
Täysin varustettu versio, johon kuuluu kuomu, peite ja
sadesuoja.
Sporttiversio, johon kuuluu kuomu ja sadesuoja (Pliko
Switch compact On Track Sportivo).
TUOTTEEN OMINAISUUDET
_ Tuotteeseen on merkitty järjestysnumero.
_ Pliko Switch -rattaissa on käännettävä istuinosa: lapsi
voi istua joko äitiin tai menosuuntaan päin.
_ Pliko Switch koostuu kahdesta osasta: Pliko Switch
-rungosta ja Pliko Switch -istuimesta.
TUOTTEEN OSAT
Tarkasta pakkauksen sisältö. Jos sinulla on
huomautettavaa, ota yhteyttä asiakaspalveluumme.
_ Pliko Switch -runko: kori, 2 kääntyvää tai lukittavaa
etupyörää, 2 jarruvaijerilla varustettua takapyörää ja
juomanpidin.
_ Pliko Switch -istuinosa: suojakaari, kuomu, peite,
sadesuoja.
_ Pliko Switch On Track Sportivo -istuinosa: suojakaari;
kuomu, sadesuoja.
KÄYTTÖOHJEET
1 PAKKAUSSUOJUKSET: ennen rungon avaamista poista
suojukset (kuva_a), muuten runko ei aukea oikein
(kuva_b).
2 AVAAMINEN: nosta molempien kahvojen vipuja
samanaikaisesti (kuva_a) ja vedä ylöspäin, kunnes runko
avautuu (kuva_b). Varmista, että runko on kunnolla auki:
sivuputkien on oltava kiinni toisissaan (kuva_c).
3 ETUPYÖRIEN ASENNUS: varmista, että aluslaatta
on paikallaan kuten kuvassa, laske etupyörien vipu
(kuva_a) alas ja työnnä pyörää paikalleen kunnes se
naksahtaa kiinni (kuva_b).
4 TAKAPYÖRIEN ASENNUS: työnnä pyöriä paikoilleen
kunnes ne naksahtavat kiinni (kuva_a). Varmista, että
ne ovat kunnolla kiinni (kuva_b).
5 Kiinnitä lopuksi jarrutangon keskiosa runkoon
(kuva_a). Varmista, että se tulee kunnolla kiinni
(kuva_b).
6 KORIN KIINNITTÄMINEN: pujota kiinnitysrenkaat
etukoukkuihin (kuva_a) ja takakoukkuihin (kuva_b).
7 JUOMANPIDIKKEEN KIINNITYS: pujota pidike
tappiin niin, että kuulet naksahduksen (kuva_a).
Juomanpidike voidaan kiinnittää kummalle puolelle
runkoa tahansa.
8 SÄÄDETTÄVÄT KAHVAT: Pliko Switch compact:
kahvoja nostetaan tai lasketaan painamalla painiketta
(kuva_a) ja säätämällä samalla kahvoja (kuva_b).
9 KIINTEÄT TAI KÄÄNTYVÄT ETUPYÖRÄT: nosta vivut ylös
kun haluat kiinteät pyörät (kuva_a), laske vivut alas
kun haluat, että pyörät kääntyvät (kuva_b). Vaikeassa
maastossa on suositeltavaa käyttää kiinteitä pyöriä.
10 JARRU: paina yhtä jarruvipua rungon lukitsemiseksi
(kuva_a), vapauta nostamalla se ylös (kuva_b).
11 ISTUIMEN KIINNITTÄMINEN RUNKOON: käännettävä
istuin voidaan kiinnittää runkoon lapsen kasvot
joko äitiin (kuva_a) tai kulkusuuntaan (kuva_b) päin.
Aseta istuin rungon päälle symbolien kohdalle ja
paina sitä molemmin käsin alaspäin, kunnes kuulet
naksahduksen. Varmista että istuin on kiinnittynyt
oikein vetämällä sitä turvakaaresta ylöspäin.
12 ISTUINOSAN IRROTTAMINEN RUNGOSTA: paina kahta
Page 35

- 35 -
pyöreää rattaiden sivuilla olevaa painiketta (kuva_a)
ja samalla käsinojien alla olevia vipuja (kuva_b), vedä
istuinosaa ylös (kuva_c) kunnes se irtoaa.
13 TURVAKAARI: turvakaari kiinnitetään työntämällä
kiinnitysosat käsinojiin, työnnä istuinosaan päin
kunnes se naksahtaa paikalleen (kuva_a).
Turvakaaren irrottamiseksi paina molempia
painikkeita ja vedä irti (kuva_b). Avaa turvakaari vain
yhdeltä puolelta lapsen sisäänpääsyn ja ulostulon
helpottamiseksi.
14 SELKÄNOJA: säädä selkänojaa nostamalla kahvaa
(kuva_a) ja ohjaamalla selkänoja johonkin neljästä
mahdollisesta asennosta (kuva_b).
15 REISITUKI: laske reisituki alas painamalla molempia
vipuja alaspäin ja laskemalla reisituki alas (kuva_a);
nosta työntämällä reisitukea ylöspäin (kuva_b).
16 5-PISTETURVAVYÖ: kiinnitä turvavyö työntämällä
keskivyön kaksi solkea (olkavyöt kiinni nuoli_a)
jalkojen väliseen vyöhön. Paina kunnes ne
naksahtavat kiinni (nuoli_b). Irrota vyö painamalla
soljen keskellä olevaa pyöreää painiketta (nuoli_c) ja
vetämällä keskivyötä ulospäin (nuoli_d).
17 Kiristä vyötärön ympäri kulkeva vyö vetämällä
molemmilta puolilta nuolen (nuoli_a) suuntaan. Voit
löysentää vyötä toimimalla päinvastoin. Vyötärön ympäri
kulkeva vyö voidaan kiristää turvalukkoon (kuva_b) asti.
18 Jos haluat säätää turvavyön korkeutta, vapauta
molemmat soljet selkänojan takana.
Vedä olkahihnoja itseäsi kohti (nuoli_a), kunnes soljet
vapautuvat ja työnnä ne selkänojan silmukoihin
(nuoli_b). Poista olkahihnat verhoilusta (nuoli_c) ja
työnnä ne sopivimpaan silmukkaan (nuoli_d) ja kiinnitä
sitten soljet uudelleen selkänojan taakse (nuoli_e). Soljet
ovat lujasti kiinni, kun on kuulunut naksahdus (kuva_f).
19 KUOMU: kiinnitä kuomu pujottamalla kiinnittimet
istuimen sivuille (kuva_a) ja napita kuomu kiinni
selkänojan takaosaan (kuva_b). Kun haluat irrottaa
kuomun: vedä kiinnittimet irti ja avaa napit. Kun haluat
nostaa kuomun ylös: vedä kuomua itseesi päin. Kun
haluat laskea kuomun alas: työnnä kuomua taaksepäin.
Kun haluat muuttaa kuomun aurinkolipaksi, avaa
vetoketju (kuva_c) ja avaa napit, joilla kuomu on
kiinnitetty selkänojaan. Kuomussa on lenkki, johon
voidaan kiinnittää lapsen lempilelu (kuva_d).
20 PEITE: levitä peite ja napita se jalkatuen alle (kuva_a)
ja sen sivuille. Vaunumallissa nosta jalkatuki ylös ja
sijoita peite suojakaaren päälle (kuva_b), kiinnitä se
kuomun nappeihin (kuva_c).
21 Ratasversion kanssa laske reisituki, sijoita peite
suojakaaren alapuolelle (kuva_a) ja kiinnitä se mallin
(A, B) mukaan.
22 SUOJA Pliko Switch On Track:
voidaan kiinnittää sekä Navetta XL -tuotteeseen että
Pliko Switch On Track -lastenrattaisiin. Katso suojan
asennusohjeet Navetta XL -tuotteeseen vastaavasta
käyttöoppaasta.
Asenna suoja lastenrattaisiin laajentamalla suojaa
sen sisäpuolelta niin, että se kattaa myös lapsen jalat
(kuva a).
Aseta suoja paikoilleen etuosa mukaan lukien ja
kiinnitä etuosan napit (kuva b), aseta jalkatuki suojaan
(kuva c).
23 SADESUOJA: aseta sadesuoja rattaiden päälle (kuva_a) ja
vedä kaksi silmukkaa kuomun nappien päälle (kuva_b).
24 Kiinnitä sadesuoja kiinnittämällä kuminauha takaosan
(kuva_a) tai etuosan tappeihin (kuva_b) istuimen
asennon mukaan.
25 TAKATASO helpottaa pienten kynnysten tms. esteiden
ylittämistä (kuva_a). Sillä voidaan myös kuljettaa toista
lasta (kuva_b). Kun haluat käyttää rattaita kahden
lapsen kuljettamiseen, kytke rattaiden jarru päälle.
Sen jälkeen voit asettaa pienemmän lapsen istumaan
ja kiinnittää turvavyön (1). Tartu sitten kädensijoihin (2)
ja anna isomman lapsen nousta takatasolle (3).
26 SULKEMINEN: voidaan sulkea ilman istuinosaa,
istuinosa äitiin päin tai eteenpäin. Istuinosa äitiin päin:
laske selkänoja kokonaan alas ennen sulkemista. Jos
istuinosa on eteenpäin: nosta selkänoja ylös ennen
sulkemista ja laske se alas sulkemisen jälkeen.
Sulkemista varten etupyörät täytyy lukita kiinteiksi. Jos
rattaissa on kuomu, sulje se. Nosta kahvojen vipuja yksi
kerrallaan, kunnes ne naksahtavat ja työnnä alas, jotta
sivuputket vapautuvat (kuva_a-b), nosta keskikahvaa
ylös (kuva_c), jotta turvakoukut sulkeutuvat (kuva_d).
27 KULJETTAMINEN: tuotetta voi kuljettaa keskikahvasta,
kun etupyörät on lukittu (kuva_a), tai sivukahvasta
(kuva_b).
28 VERHOILUN IRROTTAMINEN': irrota kangas seisomatelineestä
(kuva_a), irrota se käsinojista (kuva_b), avaa kaksi nappia
selkänojan sivuilta (kuva_c) ja vedä pois ylhäältä (työnnä
istuinosan alta) jalkojen välinen vyö (kuva_d).
GANCIOMATIC SYSTEM
29 Ganciomatic System on käytännöllinen ja kätevä
järjestelmä, jonka ansiosta voit kiinnittää Navettatai PrimoNido-turvakaukalon, Primo Viaggio
-turvaistuimen tai Pliko Switch -istuinosan runkoon
yhdellä helpolla liikkeellä: aseta istuin paikalleen
ja paina sitä molemmin käsin, kunnes kuulet
naksahduksen. Kytke aina rungon tai rattaiden jarru
päälle, ennen kuin irrotat tai kiinnität tuotteita (tutustu
tuotteiden käyttöohjeisiin). Varmista, että väline, jossa
lasta kuljetetaan, on kiinnitetty paikalleen oikein
LISÄVARUSTEET
30 BORSA (Hoitolaukku): Makuualusta ja laukku vauvan
vaipoille ja vaihtovaatteille; laukku voidaan kiinnittää
rattaisiin.
SARJANUMEROT
31 Pliko Switch ilmoittaa tiedot, jotka ovat voimassa
tuotteen valmistumispäivänä.
_ Tuotteen nimi, istuimen (kuva_a) ja vaunun (kuva_b)
valmistuspäivä ja sarjanumero.
Tämä tiedot vaaditaan kaikkiin valituksiin.
PUHDISTUS JA HUOLTO
TUOTTEEN HUOLTO: Suojaa tuote sateelta, lumelta ja
vedeltä. Jatkuva altistuminen auringonvalolle saattaa
muuttaa monien materiaalien väriä. Säilytä tuote
kuivassa paikassa.
RUNGON PUHDISTUS: Puhdista muoviosat
säännöllisesti kostealla kankaalla. Älä käytä
liuotteita tai muita vastaavia tuotteita. Pidä tuotteen
metalliosat kuivina, jotta ne eivät ruostu. Pidä kaikki
liikkuvat osat (säätömekanismit, kiinnitysmekanismit,
pyörät jne.) puhtaina ja poista niistä sora ja hiekka.
Voitele tarvittaessa kevytöljyllä.
SADESUOJAN PUHDISTUS: Pese saippuavedellä ja
sienellä. Älä käytä pesuaineita.
KANGASOSIEN PUHDISTUS: pöly harjataan
kangasosista ja kangas pestään käsin enintään
30-asteisessa vedessä. Ei saa vääntää kuivaksi.
Ei kloorivalkaisua, ei silitystä, ei kuivapesua, ei
tahranpoistoa liuotteilla, ei rumpukuivausta.
PEG-PÉREGO S.p.A.
Peg Pérego S.p.A. on ISO 9001 -sertifioitu
yhtiö. Sertifiointi on asiakkaille ja
kuluttajille tae siitä, että yritys toimii
läpinäkyvästi ja luotettavasti.
Peg Pérego voi koska tahansa tehdä
tässä julkaisussa kuvattuihin malleihin
teknisistä tai kaupallisista syistä muutoksia.
Peg Pérego haluaa palvella asiakkaitaan ja vastata
Page 36

- 36 -
CZ_Čeština
Děkujeme, že jste si vybrali ýrobek Peg-Pérego.
UPOZORNĚNÍ
_ DŮLEŽITÉ: přečtěte si tento návod a uchovejte jej
pro pozdější použití. Pokud se jím nebudete řídit,
můžete ohrozit bezpečí dítěte.
_ Tento výrobek byl navržen pro přepravu 1 dítěte
v sedačce a 1 dítěte stojícího na zadním stupátku.
_ Nepoužívejte výrobek pro přepravu více lidí, než jak
bylo zamýšleno výrobcem.
_ Podvozek Pliko Switch + sedačka Pliko Switch jsou
určené pro děti od narození s maximální hmotností
15 kg. Zadní nášlapná plošina je určená pro přepravu
druhého dítěte s maximální hmotností 20 kg.
_ Rám Pliko Switch je navržený tak, aby mohl být
používaný v kombinaci s následujícími výrobky PegPérego Ganciomatic: rám Pliko Switch + autosedačka
“Primo Viaggio” (skupina 0+), kombinace schválená
pro děti věkové kategorie od 0 do 13 kg; rám
Pliko Switch + korba “Navetta” nebo “Primonido”,
kombinace schválená pro děti od 0 do 10 kg. Při
použití rámu s korbou “Navetta” nebo “Primonido”
nepoužívejte zadní nášlapnou plošinu.
_ Před použitím zkontrolujte, zda jsou výrovky Peg-
Pérego Ganciomatic správně k výrobku připevněny.
_ Může být nebezpečné ponechat dítě bez dozoru.
_ Vždy používejte pětibodový bezpečnostní pás, břišní
pás a pás na nohy.
_ Při upravování mechanismu (řidítek, opěradla pro
záda) buďte opatrní, abyste nezranili dítě.
_ Jestliže je kočárek v klidu, vždy ho zabrzděte. Kočárek
zabrzděte i při usazování a vysazování dítěte.
_ Veškeré operace spojené s montáží, přípravou, čištěním
a údržbou mohou provádět pouze dospělé osoby.
_ Nepoužívejte výrobek, pokud z něj chybí nějaké
součásti nebo pokud vykazuje známky poškození.
_ Před použitím zkontrolujte, zda jsou všechny
spojovací prvky řádně upevněny.
_ Nestrkejte do mechanismu prsty.
_ Každý náklad zavěšený na madlech a rukojetích může
způsobit nestabilitu výrobku; sledujte pokyny výrobce
pokud jde o max. povolené zatížení těchto prvků.
_ Do košíka nevkládejte náklad těžší než 5 kg. Do
držáku na pití nevkládejte předměty s hmotností větší
než hodnota předepsaná na samotném držáku, a také
do něj nikdy nevkládejte horké nápoje. Nevkládejte
do kapes stříšky (pokud se na Vašem výrobku
nacházejí) předměty těžší než 0.2 kg.
_ Přední madlo neslouží k podpírání váhy dítěte. Nebylo
navrženo k tomu, aby udrželo dítě v sedačce, a
rozhodně nenahrazuje bederní pás.
_ Nepoužívejte výrobek v blízkosti schodů nebo
stupátek, zdrojů tepla, otevřeného ohně nebo
nebezpečných předmětů v dosahu dítěte.
_ Použití příslušenství, které není schváleno výrobcem,
může být nebezpečné.
_ Tento výrobek není vhodný pro jogging nebo jízdu na
bruslích.
_ Nepoužívejte pláštěnku (je-li součástí výbavy) v
zavřených prostorech a pravidelně kontrolujte, jestli
není vaše dítě přehřáté; nepokládejte pláštěnku do
blízkosti zdrojů tepla a dávejte pozor na to, abyste
ji nepropálili cigaretou. Ujistěte se, že pláštěnka
nezasahuje do žádných pohybujících se mechanismů
podvozku nebo kočárku; před složením podvozku
nebo kočárku pláštěnku vždy sejměte.
_ Jestliže používáte kočárek pro dvě děti, nikdy je
nenechávejte bez dozoru a nedovolte druhému dítěti,
aby si stouplo na nášlapnou plošinu, je-li kočárek
prázdný.
parhaansa mukaan kaikkiin heidän tarpeisiinsa.
Siksi asiakkaidemme mielipiteet ovat meille
erittäin tärkeitä ja arvokkaita. Olisimmekin hyvin
kiitollisia, jos haluaisit tuotettamme käytettyäsi
täyttää KULUTTAJAN TYYTYVÄISYYSKYSELYN ja
kertoa siinä mahdollisista huomautuksistasi ja
parannusehdotuksistasi. Kyselyn löydät Internetsivuiltamme: www.pegperego.com
PEG-PÉREGO-ASIAKASPALVELU
Jos osia tuotteesta katoaa tai vaurioituu, vaihda
niiden tilalle ainoastaan alkuperäisiä Peg Pérego
-varaosia. Ota yhteys Peg Perego -asiakaspalveluun
korjauksiin, vaihtoihin, tuotetietoihin ja alkuperäisten
varaosien ja lisäosien tilaamiseen liittyvissä asioissa ja
ilmoita mahdollinen tuotteen sarjanumero.
puh. +39 039 60 88 213 fax +39 039 33 09 992
s-posti assistenza@pegperego.it Internet-sivu www.
pegperego.com
Page 37

- 37 -
_ Nikdy nepoužívejte odepínací páčky pro přepravu
nebo zvedání kočárku, je-li v něm usazené dítě.
_ UPOZORNĚNÍ Nepřidávejte žádnou matraci.
Pliko Switch compact, kompaktní kočárek s
oboustranným nasazením sedačky!
K modelu patří stříška, nánožník a pláštěnka.
Spotovní verze se stříškou a pláštěnkou (Pliko Switch
compact On Track Sportivo).
CHARAKTERISTIKA VÝROBKU
_ Tento výrobek je číslovaný vzestupně.
_ Pliko Switch je kočárek se sedačkou, kterou můžete
připnout v obou směrech: směrem k mamince a ve
směru jízdy.
_ Pliko Switch je složený ze dvou častí: PODVOZEK-Pliko
Switch a SEDAČKA-Pliko Switch.
ČÁSTI VÝROBKU
Zkontrolujte, jestli obal obsahuje veškeré součásti
výrobku a v případě reklamace se prosím obraťte na
servisní službu.
_ Kostra-Pliko Switch: košík; 2 přední otočná nebo
blokovatelná kolečka; 2 zadní kolečka s centrální
tyčovou brzdou a držák na lahvičku.
_ Sedačka Pliko Switch: přední madlo; stříška; nánožník;
pláštěnka.
_ Sedačka Pliko Switch On Track Sportivo přední madlo;
stříška; pláštěnka.
NÁVOD NA POUŽITÍ
1 OCHRANNÉ ZÁTKY A OBAL: Před rozložením podvozku
je nutné odstranit ochranné zátky (obr._a); v opačném
případě se podvozek neotevře správně (obr_b).
2 ROZLOŽENÍ: zdvihněte najednou páčky obou držadel
(obr_a) a zatáhněte směrem nahoru, až se kostra
rozevře (obr_b). Zkontrolujte správné rozložení: boční
trubky musí být připojené k sobě (obr_c).
3 MONTÁŽ PŘEDNÍCH KOLEČEK: nejprve zkontrolujte,
zda je nasazená kulatá podložka jako na obrázku,
při montáži předních koleček přesuňte páčku dolů
(obr_a) a nasuňte kolečka, až zaklapnou (obr_b).
4 MONTÁŽ ZADNÍCH KOLEČEK: nasaďte kolečka, až
zaklapnou (obr_a), a zkontrolujte správné připevnění
(obr_b).
5 Nakonec připevněte na tyčovou brzdu kostry (obr_a)
prostřední díl a zkontrolujte správné připevnění
(obr_b).
6 PŘIPEVNĚNÍ KOŠÍKU: nasaďte očka na přední úchyty
(obr_a) a zadní úchyty (obr_b).
7 MONTÁŽ DRŽÁKU NA LÁHEV: Nasuňte držák na čep
tak, abyste uslyšeli cvaknutí (obr._a). Držák na láhev je
možné nasadit na obou stranách kočárku.
8 NASTAVITELNÁ: Pliko Switch compact: chcete-li
držadla zvýšit nebo snížit, stiskněte tlačítko (obr_a) a
současně upravte výšku držadel (obr_b).
9 PŘEDNÍ PEVNÁ NEBO OTOČNÁ KOLEČKA: zdvihnutím
páček kolečka zablokujete (obr_a), sklopením páček
se kolečka uvolní a mohou se otáčet (obr_b). Na
nerovném povrchu doporučujeme pevná kolečka.
10 BRZDA: stisknutím páčky kočárek zabrzdíte (obr_a),
zdvihnutím páčky ho odbrzdíte (obr_b).
11 PŘIPNUTÍ SEDAČKY K PODVOZKU: Sedačka může být
připnutá buď směrem k mamince (obr._a) nebo ve
směru jízdy (obr._b). Umístěte sedačku podle symbolů
a zatlačte na ni oběma rukama, dokud neuslyšíte dvojí
cvaknutí, které značí správné připnutí. Zkontrolujte
správné přicvaknutí sedačky tak, že uchopíte přední
madlo a budete na něho tlačit směrem nahoru.
12 ODPOJENÍ SEDAČKY OD KOSTRY: stiskněte současně
dvě boční kulatá tlačítka na sedačce (obr_a) a dvě
páčky umístěné pod opěrkami (obr_b) a sedačku
přitom vytahujte směrem nahoru (obr_c), až se
odpojí.
13 PŘEDNÍ MADLO: chcete-li připevnit přední madlo,
zasuňte úchyty do opěrek rukou a zatlačte je do
sedačky, až zaklapnou (obr_a).
Chcete-li přední madlo odstranit, stiskněte obě
tlačítka a madlo vytáhněte (obr_b). Přední madlo
můžete z jedné strany otevřít, větší dítě pak bude
snadněji nasedat a vysedat.
14 ZÁDOVÁ OPĚRKA: Pro nastavení zádové opěrky
nadzvedněte rukojeť (obr._a) a přesuňte opěrku do
jedné ze čtyř možných poloh (obr._b).
15 OPĚRKA NOHOU: Pro snížení opěrky zatlačte směrem
dolů na obě páčky (obr._a); pro její zvýšení postupujte
opačně (obr._b).
16 PĚTIBODOVÝ BEZPEČNOSTNÍ PÁS: pás se zapíná
zasunutím dvou spon břišního pásu (se zapnutými
ramenními pásy, (šipka_a) do spony pásu nožiček,
až zacvaknou (šipka_b). Pás se odepne stisknutím
kulatého tlačítka uprostřed spony (šipka_c) a
vytažením břišního pásu směrem ven (šipka_d).
17 Chcete-li břišní pás utáhnout, zatáhněte za obě
strany ve směru šipek (šipka a). Pokud jej chcete
povolit, udělejte opak. Břišní pás lze utáhnout až po
bezpečnostní zámek (obr. b).
18 Výšku bezpečnostního pásu nastavíte uvolněním
dvou přezek na zadní straně zádové opěrky.
Vytahujte ramenní popruhy směrem k sobě (šipka
a), dokud se přezka neuvolní a zasuňte je do oček na
zádové opěrce (šipka b). Vyvlečte ramenní popruhy
z potahu (šipka c) a provlečte je nejvhodnějším
očkem (šipka d). Poté opět upevněte dvě přezky na
zadní straně zádové opěrky (šipka e). Přezky budou
bezpečně upevněny, jakmile uslyšíte cvaknutí (obr. f).
19 STŘÍŠKA: Pro připnutí stříšky ji nasuňte tak, aby byly
úchyty po bocích kočárku (obr._a), a připněte ji k
zadní části zádové opěrky (obr._b) pomocí knoflíků.
Pro sejmutí stříšky: Uvolněte úchytky a odepněte ji.
Pro otevření stříšky: Táhněte za ni směrem k sobě; pro
zavření stříšky: Přesuňte ji směrem dozadu. Jestliže
chcete stříšku přeměnit na sluneční stříšku, rozepněte
zip s dvojím jezdcem (obr._c) a odepněte ji v zadní
části zádové opěrky.Ve stříšce je očko, ke kterému
můžete připevnit oblíbenou hračku dítěte (obr_d).
20 NÁNOŽNÍK: natáhněte nánožník a zapněte ho
pod opěrkou nohou (obr_a) a po jejích stranách.
U hlubokého kočárku zdvihněte opěrku nohou,
navlékněte nánožník přes přední madlo (obr_b) a
připevněte ho knoflíky ke stříšce (obr_c).
21 U golfové verze sklopte opěrku pro nohy, zasuňte
nánožník pod přední tyčku (obr. a) a v závislosti na
zakoupeném modelu (A, B) jej zajistěte.
22 NÁNOŽNÍK Pliko Switch On Track:
používá se jak na korbu Navetta XL, tak i na sportovní
kočárek Pliko Switch On Track: Pokyny k použití u
korby Navetta XL najdete v příslušném návodu k
použití. Při nasazení na kočárek vytáhněte vnitřek
nánožníku tak, aby zakrýval i nožičky dítěte (Obr. a).
Přetáhněte ho přes přední madlo, zapněte přední
knoflíky (Obr. b) a zasuňte pod opěrku nohou (Obr. c).
23 PLÁŠTĚNKA: Nasaďte pláštěnku na kočárek (obr. a) a
připněte dvě postranní poutka ke knoflíkům na stříšce
(obr. b).
24 S ohledem na pozici sedačky zajistěte pláštěnku
pomocí elastických poutek kolmo k zadní části (obr. a)
nebo kolmo k přední části (obr. b).
25 ZADNÍ NÁŠLAPNÁ PLOŠINA: Usnadňuje mamince
překonat malé nerovnosti terénu (obr._a) a umožňuje
přepravovat druhé dítě (obr._b). Jestliže chcete na
kočárku vozit dvě děti, nejdříve ho zabrzděte, posaďte
menší dítě do kočárku a zajistěte ho bezpečnostním
pásem (1). Uchopte obě rukojeti (2) kočárku a poté
nechte nastoupit druhé dítě na nášlapnou plošinu (3).
26 SLOŽENÍ: kočárek můžete složit bez sedačky, se
Page 38

- 38 -
sedačkou obrácenou směrem k matce nebo ven.
Jestliže je sedačka obrácená směrem k matce: před
složením úplně sklopte zádovou opěrku; Jestliže
je sedačka obrácená směrem ven od matky: před
složením zdvihněte zádovou opěrku a po složení
ji sklopte. Při skládání musí být přední kolečka
zablokovaná, sklopte i stříšku.
Zdvihněte postupně jednu po druhé obě páčky
obou držadel, až uslyšíte cvaknutí, zatlačte dolů, aby
se uvolnily boční trubky (obr_a-b), a jedno spojené
držadlo vytáhněte nahoru (obr_c), až se bezpečnostní
úchyty zavřou (obr_d).
27 PŘEPRAVA: Kočárek můžete přepravovat za středovou
rukojeť přední kola se nesmí otáčet (obr._a) nebo
boční rukojeť (obr._b).
28 SEJMUTÍ POTAHŮ: Stáhněte potah opěrky nohou
(obr_a), uvolněte úchyty potahu opěrek (obr_b),
rozepněte dva knoflíky po stranách zádové opěrky
(obr_c).
Nyní vytáhněte shora (vysunutím zespodu sedačky)
pásek nožiček (obr_d).
GANCIOMATIC SYSTEM
29 Ganciomatic System je rychlý a praktický systém,
který umožňuje k rámu připnout pomocí jednoho
jednoduchého gesta korbu Navetta nebo PrimoNido,
autosedačku Primo Viaggio a sedačku Pliko Switch:
položte příslušný komponent na rám a zatlačte na
něho oběma rukama tak, abyste uslyšeli cvaknutí.
Před připnutím nebo odepnutím výše zmíněných
komponentů vždy rám nebo kočárek zabrzděte (viz
příslušné návody k použití).
Zkontrolujte, je-li komponent pro přepravu dítěte
správně připnutý.
DOPLŇKY
30 BORSA (Taška pro přebalení dítěte): Taška s matračkou
pro přebalení dítěte, kterou můžete připnout ke
kočárku.
SÉRIOVÁ ČÍSLA
31 Pliko Switch obsahuje informace jako datum výroby
daného produktu,
_ název produktu, datum výroby a sériové číslo sedačky
(obr. a) a podvozku (obr. b).
Tyto informace jsou nezbytné při řešení jakýchkoliv
stížností.
ČIŠTĚNÍ A ÚDRŽBA
ÚDRŽBA: Chraňte výrobek před atmosférickými vlivy
(voda, déšť nebo sníh); nepřetržité a dlouhodobé
vystavení slunečnímu záření může způsobit změnu
barvy mnoha materiálů; uchovávejte výrobek na
suchém místě.
ČIŠTĚNÍ PODVOZKU: Pravidelně čistěte umělohmotné
části vlhkým hadrem bez použití rozpouštědel nebo
jiných podobných prostředků; kovové části vždy
dobře vysušte, aby nedošlo k jejich zrezivění; udržujte
veškeré pohyblivé části výrobku čisté (regulační
mechanismy, úchytné mechanismy, kola...) a
pravidelně z nich odstraňujte prach a písek; v případě
potřeby je promažte lehkým olejem.
ČIŠTĚNÍ PLÁŠTĚNKY: Umývejte houbou a mýdlovou
vodou bez použití čistících prostředků.
ČIŠTĚNÍ TEXTILNÍCH ČÁSTÍ: Textilní části pravidelně
kartáčujte, aby se na nich neusazoval prach, a
perte je v ruce při max. teplotě 30°; neždímejte;
nebělte chlórem; nežehlete; nečistěte chemicky;
neodstraňujte skvrny pomocí rozpouštědel a nesušte
v sušičce s otočným bubnem.
PEG-PÉREGO S.p.A.
Společnost Peg-Pérego S.p.A. je
certifikovaná podle ISO 9001. Tato
certifikace zaručuje klientům a
spotřebitelům transparentnost a
spolehlivost ohledně pracovních
postupů společnosti.
Společnost Peg Pérego si vyhrazuje právo provést
jakékoliv změny a úpravy na modelech popsaných v
této publikaci, jestliže si to vyžádají technické nebo
obchodní důvody.
Společnost Peg Pérego je k dispozici svým zákazníkům,
aby co nejlépe uspokojila veškeré jejich potřeby a
požadavky. Z tohoto důvodu je pro společnost velmi
užitečné a cenné se seznámit s názory svých zákazníků.
Budeme vám proto velmi vděční, když po použití
našeho výrobku vyplníte DOTAZNÍK O SPOKOJENOSTI
ZÁKAZNÍKŮ, který naleznete na našich internetových
stránkách www.pegperego.com, a seznámíte nás s
vašimi případnými připomínkami a podněty.
SERVISNÍ SLUŽBA PEG-PÉREGO
V případě ztráty anebo poškození některých částí
výrobku použijte pouze originální díly Peg Pérego.
V případě, že potřebujete informace o jakýchkoliv
opravách, náhradních dílech či výrobku nebo chcete
objednat originální náhradní díly a příslušenství,
kontaktujte Peg Perego After Sales Service a sdělte
sériové číslo daného výrobku (pokud je na výrobku
uvedeno). tel. 0039/039/60.88.213
fax 0039/039/33.09.992
e-mail assistenza@pegperego.it internetové stránky
www.pegperego.com
Page 39

- 39 -
SK_Slovenčina
Ďakujeme, že ste si vybrali výrobok Peg-Pérego.
OPOZORILO
_ DÔLEŽITÉ: prečítajte si dôkladne tieto inštrukcie
a uschovajte si je pre použitie v budúcnosti.
Bezpečnosť dieťaťa by mohla byť ohrozená
v prípade, že tieto inštrukcie nie sú dodržané.
_ Tento výrobok je určený pre prepravu 1 dieťaťa na
sedačke a 1 dieťaťa, ktoré stojí na zadnej stúpačke.
_ Nepoužívajte tento výrobok pre väčší počet
užívateľov ako je určené výrobcom.
_ Podvozok Pliko Switch + sedačka Pliko Switch
sú určené pre deti od narodenia s maximálnou
hmotnosťou do 15 kg. Zadná nášlapná plošina je
určená na prepravu druhého dieťaťa s maximálnou
hmotnosťou 20 kg.
_ Podvozok Pliko Switch bol navrhnutý tak, aby
mohol byť používaný v kombinácii s nasledujúcimi
výrobkami Peg-Pérego Ganciomatic: podvozok Pliko
Switch + autosedačka “Primo Viaggio” (skupina 0+) sú
určené pre deti od narodenia po deti s maximálnou
hmotnosťou 13 kg; podvozok Pliko Switch + športová
korba “Navetta” alebo “Primonido” sú určené pre deti
od narodenia po deti s maximálnou hmotnosťou 10
kg. Pri použití s elementami “Navetta” a “Primonido”
nikdy nepoužívajte zadnú nášlapnú plošinu.
_ Pred použitím skontrolujte, že výrobky Peg-Pérego
Ganciomatic sú správne upevnené k výrobku.
_ Nenechávajte dieťa bez dozoru. Môže to byť
nebezpečné.
_ Vždy použite päťbodový bezpečnostný pás, brušný
pás a pás na nohy.
_ Dávajte pozor, aby ste nezranili dieťa počas
nastavovania mechanizmov (držadlo, opierka).
_ Keď je kočík v kľude vždy ho zabrzdite. Kočík
zabrzdite aj pri nakladí a vykladaní dieťaťa.
_ Operácie spojené s montážou, prípravou výrobku,
čistením a údržbou musia vykonávať len dospelé
osoby.
_ Výrobok nepoužívajte, ak niektoré súčasti chýbajú
alebo sú zrejmé známky poškodenia.
_ Pred použitím skontrolujte, či sú všetky spojovacie
mechanizmy správne upevnené.
_ Do mechanizmov nedávajte prsty.
_ Každý náklad zavesený na držadlá a rukoväte môže
spôsobiť nestabilitu výrobku; sledujte pokyny
výrobcu pokiaľ ide o max. povolené zaťaženie týchto
prvkov.
_ Do košíka nedávajte náklad ťažší ako 5 kg. Do držiaka
nápojov nevkladajte predmety o hmotnosti väčšej
než je predpísaná na samotnom držiaku, a tiež doň
nikdy nevkladajte horúce nápoje. Nevkladajte do
vrecák striešky (ak sú na Vašom výrobku) predmety
ťažšie ako 0.2 kg.
_ Predný priečinok nie je navrhnutý tak, aby niesol váhu
dieťaťa. Nie je navrhnutý tak, aby držal dieťa v sedadle
a nenahradzuje popruh okolo pasu.
_ Nepoužívajte výrobok v blízkosti schodov alebo
stupníkov, tepelných zdrojov, otvoreného ohňa alebo
iných nebezpečných predmetov, ktoré sú v dosahu
dieťaťa.
_ Použitie doplnkov, ktoré nie sú schválené výrobcom,
môže byť nebezpečné.
_ Tento výrobok nie je vhodný pre behanie alebo pre
kolieskové korčuľovanie.
_ Nepoužívajte plášť (ak je súčasťou výbavy) v
uzavretých priestoroch a pravidelne kontrolujte, či
nie je vaše dieťa prehriate; plášť nikdy neumiestňujte
v blízkosti zdrojov tepla a dávajte pozor na to, aby ste
ho neprepálili cigaretou. Uistite sa, či plášť nebráni
v pohybe žiadnemu mechanizmu podvozku alebo
kočíku; pred zložením podvozku alebo kočíka plášť
vždy odoberte.
_ V prípade, že kočík používate pre dve deti, nikdy
ich nenechávajte bez dozoru a nedovoľte staršiemu
dieťaťu vystúpiť na zadnú nášlapnú plošinu v prípade,
keď je kočík prázdny.
_ Nepoužívajte odopínacie páčky na prepravu alebo
nadvihnutie kočíka ak je v ňom usadené dieťa.
_ POZOR Nepridávajte žiadnu vložku.
Pliko Switch compact, kompaktný športový kočík s
možnosťou zmeny smeru sedačky!
Kompletná verzia so strieškou, nánožníkom a
pršiplášťom.
Športová verzia so strieškou a pršiplášťom (Pliko
Switch compact On Track Sportivo).
VLASTNOSTI VÝROBKU
_ Tento výrobok je číslovaný vzostupne.
_ Pliko Switch predstavuje kočík so sedačkou, ktorú
môžete pripnúť v oboch smeroch: smerom k matke a
v smere jazdy.
_ Pliko Switch pozostáva z dvoch častí: PODVOZKU-
Pliko Switch a SEDAČKY-Pliko Switch.
ČASTI VÝROBKU
Skontrolujte, či obal obsahuje všetky súčasti výrobku
a v prípade reklamácie kontaktujte prosím asistenčnú
službu.
_ Rám-Pliko Switch: kôš; 2 predné kolieska – otočné
alebo blokovacie; 2 zadné kolieska s centralizovanou
tyčovou brzdou a nosič nápojov.
_ Sedačka Pliko Switch: predná opierka, strieška,
nánožník, pršiplášť.
_ Sedačka Pliko Switch On Track Sportivo: predná
opierka, strieška, pršiplášť.
NÁVOD NA POUŽITIE
1 OCHRANNÉ ZÁTKY A OBAL: pred rozložením
podvozku je potrebné najskôr odstrániť ochranné
zátky (obr_a), v opačnom prípade nebude možné
kočík správne rozložiť (obr_b).
2 OTVORENIE: nadvihnite súčasne páčky dvoch rukovätí
(obr_a) a potiahnite smerom hore, až kým sa neotvorí
rám (obr_b). Overenie správneho otvorenia: bočné
rúrky musia vzájomne zapadnúť (obr_c).
3 MONTÁŽ PREDNÝCH KOLIESOK: ešte predtým
skontrolujte, či je namontovaná podložka, ako na
obrázku, spusťte páčku dvoch predných koliesok
(obr_a), vsuňte koliesko, aby ste začuli kliknutie
(obr_b).
4 MONTÁŽ ZADNÝCH KOLIESOK: vsuňte kolieska,
až kým nezačujete kliknutie (obr_a) a uistite sa, že
správne zapadli (obr_b).
5 Nakoniec namontujte stredový prvok na centrálnej
tyčovej brzde na ráme (obr_a), pričom skontrolujte, či
sa správne upevnil (obr_b).
6 MONTÁŽ KOŠA: vsuňte očká na predné háčiky (obr_a)
a na zadné háčiky (obr_b).
7 MONTÁŽ DRŽIAKA NA FĽAŠU: nasuňte držiak na čap
pokiaľ nebudete počuť cvaknutie (obr_a). Držiak na
fľašu môžete pripevniť na obidve rukoväte kočíka.
8 NASTAVITEĽNÉ RUKOVÄTE: Pliko Switch compact:
aby ste zdvihli alebo znížili rukoväte, stlačte tlačidlo
(obr_a) a súčasne rukoväte nastavte do želanej polohy
(obr_b).
9 NEOTÁČAVÉ ALEBO OTÁČAVÉ KOLIESKA: nadvihnutím
páčok sa kolieska zablokujú a nebudú sa dať otáčať
(obr_a), spustením páčok sa kolieska odblokujú
a budú sa otáčať (obr_b). Na nerovnom teréne sa
odporúča používať kolieska bez otáčania.
10 BRZDA: stlačte jednu páčku brzdy, aby ste zablokovali
Page 40

- 40 -
rám (obr_a), nadvihnutím sa zase odblokuje (obr_b).
11 PRIPNUTIE SEDAČKY K PODVOZKU: sedačka môže
byť ku kočíku pripevnená smerom k matke (obr_a)
alebo v smere jazdy (obr_b), sedačku umiestnite na
kočík v súlade so symbolmi a oboma rubami na ňu
zatlačte smerom nadol pokiaľ nebudete počuť dvojité
cvaknutie. Skontrolujte správne pripevnenie sedačky
ku kočíku tak, že ju chytíte za prednú rukoväť a
budete ju ťahať smerom nahor.
12 UVOĽNENIE SEDAČKY Z RÁMU: stlačte dve okrúhle
tlačidlá na sedačke (obr_a) a súčasne aj dve páčky
nachádzajúce sa pod opierkami rúk (obr_b), pričom
ťahajte sedačku smerom hore (obr_c), kým sa
neuvoľní.
13 PREDNÁ OPIERKA: pri montáži prednej opierky
pridržte prípojky na opierkach rúk, zatlačte smerom k
sedačke, až kým nezačujete kliknutie (obr_a).
Aby ste prednú opierku odstránili, stlačte dve tlačidlá
a vyberte ju (obr_b). Otvorením opierky iba na jednej
strane uľahčíte vstup alebo výstup dieťaťa.
14 CHRBTOVÁ OPIERKA: pre nastavenie chrbtovej opierky
nadvihnite rukoväť (obr_a) a presuňte opierku do
jednej zo 4 možných polôh (obr_b).
15 OPIERKA NÔH: pre zníženie opierky nôh zatlačte
smerom nadol dve páčky (obr_a); pre nadvihnutie
vysuňte opierku nôh smerom nahor (obr_b).
16 5-BODOVÝ BEZPEČNOSTNÝ PÁS: aby ste ho zapli,
vsuňte dve pracky driekového pásu (so zapnutými
ramennými pásmi - šípka_a) do medzinožného
pásu, kým nezačujete kliknutie (šípka_b). Aby ste
ho uvoľnili, stlačte okrúhle tlačidlo nachádzajúce
sa v strede pracky (šípka_c) a potiahnite smerom k
vonkajšej strane driekového pásu (šípka_d).
17 Aby ste pásový popruh pritiahli, zatiahnite na oboch
stranách v smere šípky (Šípka a). Aby ste ho uvoľnili,
postupujte naopak. Pásový popruh je možné
zatiahnuť len potiaľ, pokiaľ to umožní bezpečnostná
poistka (Obr. b).
18 Aby ste upravili výšku bezpečnostného pásu, uvoľnite
dve spony na zadnej strane chrbtovej opierky.
Potiahnite ramenné popruhy smerom k sebe (Šípka a),
až kým sa spony neuvoľnia, presuňte ich cez otvory
na chrbtovej opierke (Šípka b). Vytiahnite ramenné
popruhy z vaku (Šípka c) a presuňte ich cez najlepšie
vyhovujúce otvory (Šípka d), potom opäť zapnite dve
spony na zadnej strane chrbtovej opierky (Šípka e).
Spony sa na pevno zapli, keď bolo počuť ich cvaknutie
(Obr. f).
19 STRIEŠKA: pre pripnutie zasuňte úchytky striešky do
sedačky na bočných stranách (obr_a) a pomocou
gombíkov ju pripnite na zadnej strane chrbtovej
opierky (obr_b). Pre odstránenie striešky vysuňte
úchytky a odopnite gombíky. Pre nadvihnutie striešky
ju zatiahnite smerom k sebe; pre sklopenie striešky ju
zatlačte smerom dozadu. Striešku môžete prementi
na slnečnú striešku tak, že otvoríte zips s dvojitým
kurzorom (obr_c) a odopnete gombíky na zadnej
strane chrbtovej opierky. Strieška je vybavená očkom,
na ktoré sa dá zavesiť obľúbená hračka (obr_d).
20 NÁNOŽNÍK: nánožník navlečte a zapnite gombíky
pod opierkou na nohy (obr_a) a na bokoch opierky
na nohy. U verzie kočíka nadvihnite opierku na nohy
a nasuňte nánožník nad prednú opierku (obr_b) a
potom zapnite ku gombíkom striešky (obr_c).
21 Pri verzii kočíka s chráničom na nohy, znížte opierku
nôh, vložte poťah pod prednú opierku (Obr. a) a
zabezpečte ho podľa toho, ktorý z modelov A, B ste si
kúpili.
22 NÁNOŽNÍK Pliko Switch On Track:
možno ho použiť na vaničke Navetta XL, ako aj na
športovom kočíku Pliko Switch On Track. Pri montáži
na Navetta XL si pozrite návod na používanie.
Pri montáži na športový kočík otvorte vnútro
nánožníka, aby ste zakryli nohy dieťaťa (Obr. a).
Nadvihnite ho tak, aby zakryl prednú lištu a spojte
predné gombíky (Obr. b) vsuňte opierku na nohy do
nánožníka (Obr. c).
23 KRYT PROTI DAŽĎU Umiestnite kryt proti dažďu na
kočík (Obr. a) a zopnite patentné gombíky s gombíkmi
na strieške (Obr. b).
24 Zabezpečte kryt proti dažďu pripevnením elastickej
slučky k zvislej zadnej strane (Obr. a) alebo zvislej
prednej strane (Obr. b), podľa polohy sedadla.
25 ZADNÁ NÁŠLAPNÁ PLOŠINA: uľahčuje matke
prekonať malé nerovnosti terénu (obr_a) a je na nej
možné prepravovať druhé dieťa (obr_b). V prípade,
že chcete na kočíku voziť dve deti, kočík najskôr
zabrzdite, posaďte doň mladšie dieťa a zaistite ho
bezpečnostným pásom (1). Uchopte obidve rukoväte
kočíka (2) a nechajte nastúpiť druhé dieťa na nášlapnú
plošinu (3).
26 ZATVORENIE: dá sa uskutočniť bez sedačky, so
sedačkou obrátenou smerom k mame alebo smerom
k chodníku. Ak je sedačka obrátená smerom k
mame: pred zatvorením úplne sklopte operadlo;
ak je sedačka obrátená smerom k chodníku: pred
zatvorením nadvihnite operadlo a po zatvorení ho
spusťte. Aby ste mohli zatvoriť rám, zablokujte predné
kolieska a, ak je namontovaná, zatvorte striešku.
Nadvihnite naraz dve páčky rukovätí, až kým nekliknú
a zatlačte ich smerom dolu, aby sa odblokovali bočné
rúrky (obr_a-b), potiahnite smerom hore strednú
rukoväť (obr_c), až kým sa nezatvoria poistné západky
(obr_d).
27 PREPRAVA: kočík môžete prepravovať tak, že uchytíte
stredovú úchytku, predné kolesá sa nesmú otáčať
(obr_a) alebo pomocou bočnej rukoväte (obr_b).
28 STIAHNUTIE POŤAHU: stiahnite poťah nánožníka
(obr_a), uvoľnite úchytky vaku z opierok rúk (obr_b) a
odpojte na bočných stranách operadla dva gombíky
(obr_c) a vytiahnite zhora (zatlačením pod sedačku)
medzinožný pás (obr_d).
GANCIOMATIC SYSTEM
29 Ganciomatic System je veľmi praktický a rýchly
systém, ktorý umožňuje vďaka jednoduchému gestu
pripnúť športovú korbu Navetta alebo PrimoNido,
autosedačku Primo Viaggio a sedačku Pliko Switch k
podvozku: položte príslušný prepravný element na
podvozok a zatlačte naň oboma rukami tak, aby ste
počuli cvaknutie.
Pred pripnutím alebo odopnutím jednotlivých
elementov podvozok alebo kočík vždy zabrzdite
(preštudujte si návody na použitie príslušných
elementov).
Skontrolujte, či je príslušný prepravný element
správne pripnutý.
DOPLNKY
30 BORSA (Taška pre prebalenie dieťaťa). Taška s
matracom pre prebalenie dieťaťa, ktorú môžete
pripnúť ku kočíku.
SÉRIOVÉ ČÍSLA
31 Pliko Switch udáva informácie, ktoré vyplývajú z
dátumu výroby výrobku.
_ Názov výrobku, dátum výroby a sériové číslo sedadla
(Obr. a) a konštrukcie kočíka (Obr. b).
Tieto informácie sú potrebné pri akýchkoľvek
reklamáciách.
ČISTENIE A ÚDRŽBA
ÚDRŽBA VÝROBKU: chráňte výrobok pred
atmosférickými vplyvmi: voda, dážď alebo sneh;
nepretržité a dlhodobé vystavenie slnečnému
žiareniu môže spôsobiť zmenu farby mnohých
materiálov; uchovávajte výrobok na suchom mieste.
Page 41

- 41 -
ČISTENIE PODVOZKU: pravidelne čistite umelohmotné
časti vlhkou handričkou; nepoužívajte rozpúšťadlá
alebo podobné prostriedky; kovové časti výrobku
vysušte, aby nedošlo k ich zhrdzaveniu; udržiavajte v
čistom stave všetky mobilné časti výrobku (regulačné
mechanizmy, úchytné mechanizmy, kolesá...),
odstraňujte z nich prach a piesok a v prípade potreby
ich namažte ľahkým olejom.
ČISTENIE PLÁŠŤA: umývajte pomocou špongie a
mydlovej vody, nepoužívajte pracie prostriedky.
ČISTENIE TEXTILNÝCH ČASTÍ: textilné časti výrobku
pravidelne vykefujte, čím odstránite prach a perte
v rukách pri maximálnej teplote 30°; nežmýkajte;
nepoužívajte prostriedky obsahujúce chlór;
nežehlite; nečistite chemicky; na odstraňovanie
škvŕn nepoužívajte rozpúšťadlá a nesušte v sušičke s
otáčajúcim sa bubnom.
PEG-PÉREGO S.p.A.
Spoločnosť Peg-Pérego S.p.A. je
certifikovaná podľa ISO 9001. Tento
certifikát zaručuje zákazníkom a
spotrebiteľom transparentnosť a
spoľahlivosť vzhľadom na pracovné
postupy spoločnosti.
Spoločnosť Peg Pérego môže kedykoľvek vykonať
zmeny a úpravy na modeloch, ktoré sú popísané v
tejto publikácii, ak si to budú vyžadovať technické
alebo obchodné podmienky.
Spoločnosť Peg Pérego je vždy k dispozícii svojim
spotrebiteľom, aby čo najlepšie uspokojila všetky
ich potreby a požiadavky. Z tohto dôvodu je pre
spoločnosť veľmi dôležité a cenné oboznámiť sa
s názormi našich zákazníkov. Preto vám budeme
veľmi vďační, keď po použití nášho výrobku vyplníte
DOTAZNÍK PRE ZISTENIE SPOKOJNOSTI ZÁKAZNÍKOV,
ktorý nájdete na nasledujúcej internetovej adrese:
www.pegperego.com. Prosíme vás o uvedenie
prípadných postrehov a doporučení.
ASISTENČNÁ SLUŽBA SPOLOČNOSTI
PEG-PÉREGO
Ak dôjde k náhodnej strate alebo poškodeniu
niektorých častí výrobku, použite len originálne
náhradné diely Peg Pérego. Pre prípad akejkoľvek
opravy, výmeny informácií o výrobku a objednávok
originálnych náhradných dielov alebo príslušenstva
kontaktujte prosím popredajný servis spoločnosti
Peg Perego s uvedením sériového čísla výrobku, ak je
uvedené.
tel. 0039/039/60.88.213 fax 0039/039/33.09.992
e-mail assistenza@pegperego.it internetová stránka
www.pegperego.com
HU_Magyar
Köszönjük, hogy a Peg-Pérego termékét választották.
FIGYELMEZTETÉS
_ FONTOS: figyelmesen olvassák el az alábbi
utasításokat és azokat őrizzék meg a későbbi
alkalmazás céljából. A gyermek biztonságát
veszélyeztethetik azzal, ha nem tartják be ezeket az
utasításokat.
_ Ezt a terméket 1 gyermek ülésben és 1 gyermek
álló helyzetben, a hátsó testvérfellépőn történő
szállítására tervezték.
_ Ne használják ezt a terméket a gyártó által előírtnál
több gyermek számára.
_ A Pliko Switch-vázat + Pliko Switch-gyerekülést
újszülött és maximum 15 kg súlyú gyermekek
ülésben történő szállítására hitelesítették. A hátsó
testvérfellépőt egy maximum 20 kg súlyú, második
gyermek szállítására hitelesítették.
_ A Pliko Switch kocsivázat arra tervezték, hogy a
Peg-Pérego Ganciomatic termékekkel kombinálva
használják: Pliko Switch kocsiváz + “Primo Viaggio”
autós gyerekülés (0+ csoport) újszülöttek és annál
nagyobb, maximum 13 kg-os súlyú gyermekek
számára lett hitelesítve; Pliko Switch kocsiváz +
“Navetta” vagy “Primonido” mózeskosár újszülöttek és
annál nagyobb, maximum 10 kg-os súlyú gyermekek
számára lett hitelesítve. A “Navetta” és “Primonido”
mózeskosárral való használata során ne alkalmazzák a
hátsó testvérfellépőt.
_ A használat előtt győződjenek meg arról, hogy a Peg-
Pérego Ganciomatic részek helyesen a termékhez
vannak kapcsolva.
_ A gyermekük felügyelet nélkül hagyása veszélyes
lehet.
_ Mindig használják az ötpontos biztonsági övet,
mindig csatolják be a csípőövet a lábelválasztó övbe.
_ Figyeljenek oda a jelenlévő gyermekre akkor, amikor a
szerkezeteket beállító műveleteket (tolókar, háttámla)
végzik.
_ Álló helyzetben és a gyermek behelyezése és kivétele
folyamán mindig működtessék a fékeket.
_ A termék összeszerelési, előkészítési, tisztítási és
karbantartási műveleteit csak felnőttek végezhetik.
_ Ne használják a terméket, ha egyes részei hiányoznak
vagy azon törést észlelnek.
_ A használat előtt győződjenek meg arról, hogy
minden rögzítő szerkezet helyesen be van kapcsolva.
_ Ne tegyék az ujjukat a szerkezetekbe.
_ A tolókarra vagy a fogantyúkra felakasztott bármilyen
teher instabillá teheti a terméket; tartsák be a
gyártó utasításait a maximális terhek alkalmazására
vonatkozóan.
_ Ne rakjanak a kosárba 5 kg-nál nagyobb súlyú
terheket. Ne tegyenek az italtartókba az italtartón
feltüntetett súlynál nehezebb terhet és meleg italt
soha. A kocsitető zsebekbe (ha vannak) 0,2 kg-ot meg
nem haladó súlyokat helyezzenek.
_ A kapaszkodót nem úgy tervezték, hogy az a gyermek
súlyát elbírja; a kapaszkodó nem arra szolgál, hogy az
ülőkében visszatartsa a gyermeket és nem helyettesíti
a biztonsági övet.
_ Ne alkalmazzák a terméket lépcső vagy lépcsőfokok
mellett; ne használják hőforrások, nyílt láng vagy
a gyermek kezeügyébe eső, veszélyes tárgyak
közelében.
_ A gyártó által jóvá nem hagyott tartozékok használata
veszélyes lehet.
_ Ez a termék nem alkalmas arra, hogy jogging vagy
görkorcsolyázás közben használják.
_ Ne használják az esővédőt (ha van) zárt környezetben
Page 42

- 42 -
és mindig ellenőrizzék, hogy a gyermek nincs-e
kimelegedve; soha ne helyezzék hőforrásokhoz közel
és dohányzás közben vigyázzanak. Győződjenek meg
arról, hogy az esővédő nem ütközik a kocsiváz vagy a
sportkocsi semmilyen mozgásban lévő szerkezetébe;
mindig vegyék le az esővédőt, mielőtt összecsukják a
kocsivázat vagy a sportkocsit.
_ Amikor két gyermekkel használják a sportkocsit,
soha ne hagyják őket egyedül és ne engedjék meg
a második gyermeknek azt, hogy felálljon a hátsó
testvérfellépőre, amikor a sportkocsi üres.
_ Ne használják a lekapcsoló fogantyúkat szállításhoz
vagy a sportkocsi felemeléséhez úgy, hogy a gyermek
benne ül.
_ FIGYELEM: Ne tegyen be semmilyen matracot.
Pliko Switch compact, a kompakt sportkocsi
megfordítható gyereküléssel!
Kocsitetővel, takaróval és esővédővel felszerelt
változat.
Sportos változat kocsitetővel és esővédővel (Pliko
Switch compact On Track Sportivo).
A TERMÉK JELLEMZŐI
_ Ez a termék növekvő számozással van ellátva.
_ Pliko Switch egy megfordítható gyereküléssel
felszerelt sportkocsi: a mamával vagy a külvilággal
szemben.
_ Pliko Switch két elemből tevődik össze: Pliko Switch-
VÁZ és Pliko Switch-GYEREKÜLÉS.
A TERMÉK ALKOTÓRÉSZEI
Vizsgálják meg a csomag tartalmát és reklamáció
esetén kérjük, vegyék fel a kapcsolatot a
Vevőszolgálattal.
_ Pliko Switch-váz: kosár; 2 elülső, bolygósítható vagy
rögzíthető kerék; 2 hátsó kerék központi rúdfékkel és
cumisüvegtartó.
_ Pliko Switch gyerekülés: kapaszkodó, kocsitető,
takaró, esővédő.
_ Pliko Switch On Track Sportivo gyerekülés:
kapaszkodó, kocsitető, esővédő.
HASZNÁLATI UTASÍTÁS
1 CSOMAGOLÓ VÉDŐDUGÓK: a váz szétnyitása előtt el
kell távolítani a védődugókat (a_ábra), máskülönben a
váz nem megfelelően nyílik szét (b_ábra).
2 SZÉTNYITÁS: tolják fel egyszerre a két fogantyú
emeltyűkarjait (a_ábra) és húzzák felfelé addig,
amíg a váz szét nem nyílik (b_ábra). Vizsgálják meg
a helyes szétnyitást: az oldalsó csöveknek össze kell
kapcsolódniuk (c_ábra).
3 ELSŐ KEREKEK FELSZERELÉSE: El"oször vizsgálják meg,
hogy jelen van-e az alátétgy"ur"u az ábra alapján,
engedjék le az első két kerék karját (a_ábra), illesszék
be a kereket kattanásig (b_ábra).
4 HÁTSÓ KEREKEK FELSZERELÉSE: illesszék be a
kerekeket kattanásig (a_ábra) és vizsgálják meg a
helyes beakadást (b_ábra).
5 Végül akasszák be a fékrúdon lévő, központi elemet
a vázba(a_ábra), ellenőrizve azt, hogy a beakadás
helyesen megtörtént-e (b_ábra).
6 KOSÁR FELSZERELÉSE: illesszék rá a karikákat az első
akasztókra (a_ábra) és a hátsó akasztókra (b_ábra).
7 ITALTARTÓ FELSZERELÉSE: illesszék rá a pecekre
kattanásig (a_ábra). Az italtartó a váz mindkét oldalán
alkalmazható.
8 ÁLLÍTHATÓ FOGANTYÚK: Pliko Switch compact: a
fogantyúk felhúzásához vagy leengedéséhez nyomják
be a gombot (a_ábra) és ezzel egyidejűleg állítsák be
a fogantyúkat (b_ábra).
9 RÖGZÍTETT VAGY BOLYGÓSÍTOTT ELSŐ KEREKEK:
húzzák fel a karokat a kerekek rögzítéséhez (a_ábra),
engedjék le a karokat a kerekek bolygósításához (b_
ábra). Rossz talajokon a rögzített kerekek használata
javasolt.
10 FÉK: nyomjanak le egy fékkart a váz blokkolásához
(a_ábra), húzzák fel a kioldásához (b_ábra).
11 A GYEREKÜLÉS RÁKAPCSOLÁSA A VÁZRA: a
megfordítható gyerekülés a vázra kapcsolható vagy
a mama felé (a_ábra) vagy az út irányába (b_ábra)
fordítva, helyezzék a vázra a jelekkel egybeesően
és mindkét kézzel nyomják lefelé a beakadást jelző,
dupla kattanásig. Győződjenek meg a gyerekülés
helyes rákapcsolásáról úgy, hogy a kapaszkodónál
megfogva húzzák felfelé.
12 A GYEREKÜLÉS LEKAPCSOLÁSA A VÁZRÓL: nyomják
be a gyerekülés oldalain lévő, két kerek gombot
(a_ábra) és ezzel egyidejűleg a kartámlák alatt
elhelyezett, két kart (b_ábra), felfelé húzva a
gyerekülést (c_ábra) a lekapcsolásáig.
13 KAPASZKODÓ: a kapaszkodó felerősítéséhez vezessék
be a csatlakozókat a kartámlákba, nyomják a
gyerekülés felé a beakadást jelző kattanásig (a_ábra).
A kapaszkodó eltávolításához nyomják be a két
gombot és húzzák ki a kapaszkodót (b_ábra). Csak
az egyik oldalról nyissák ki a kapaszkodót a gyermek
beszállásának és kiszállásának elősegítéséhez.
14 HÁTTÁMLA: a beállításához húzzák fel a fogantyút (a_
ábra) és állítsák be tetszés szerint a 4 pozíció egyikébe
(b_ábra).
15 LÁBTARTÓ: a leengedéséhez nyomják lefelé a két kis
kart és engedjék le (a_ábra); a felemeléséhez nyomják
a lábtartót felfelé (b_ábra).
16 5 PONTOS BIZTONSÁGI ÖV: a becsatolásához
vezessék be a deréköv szíjának két csatját (rácsatolt
vállpántokkal a_nyíl) a lábelválasztó szíjba kattanásig
(b_nyíl). A kicsatoláshoz nyomják be a csat közepén
elhelyezett, kerek gombot (c_nyíl) és húzzák a kültér
felé a deréköv szíját (d_nyíl).
17 A csípőöv megfeszítéséhez azt húzzák mindkét
oldalon a nyíl irányába (nyíl_a). A meglazításához az
ellenkező irányban járjanak el. A csípőöv a biztonsági
pecekig feszíthető (b_ábra).
18 A biztonsági öv magasságának a beállításához
csatolják ki a háttámla hátsó részén található két
csatot.
Húzzák maguk felé a vállpántokat (nyíl_a), egészen
addig, míg a csatok kioldódnak, majd vezessék be
őket a háttámlán található övbújtatókba (nyíl_b).
Vegyék ki a vállpántokat a zsákból (nyíl_c) és vezessék
be őket a legmegfelelőbb övbújtatóba (nyíl_d),
majd ezt követően ismét csatolják be a két csatot a
háttámla hátsó részén (nyíl_e). A csatok akkor vannak
biztonságosan rögzítve, ha bekattannak (f_ábra).
19 KOCSITETŐ: a rákapcsoláshoz illesszék be a
csatlakozókat a gyerekülés oldalán (a_ábra) és
gombolják be a kocsitetőt a háttámla hátulján
(b_ábra). A kocsitető levételéhez: húzzák ki a
csatlakozókat és gombolják le a kocsitetőt. A
kocsitető kifeszítéséhez: húzzák maguk felé; a
kocsitető összecsukásához: tolják hátra. A kocsitető
napellenzővé való átalakításához húzzák szét a két
húzós villámzárt (c_ábra) és gombolják le a háttámla
hátuljáról. A kocsitetőn található egy karika, amelyre a
gyermek kedvenc játékát fel lehet akasztani (d_ábra).
20 TAKARÓ: húzzák fel a takarót és gombolják be
a lábtartó alatt (a_ábra) és a lábtartó oldalán. A
babakocsis változatnál emeljék fel a lábtartót és
helyezzék el a takarót a kapaszkodó fölött (b_ábra)
majd rögzítsék a kocsitető gombjaihoz (c_ábra).
21 A sportkocsis változat esetében, engedjék le a
lábtartót, a takarót vezessék át a kapaszkodó alatt
(a_ábra) majd a vásárolt A, B modellnek megfelelően
rögzítsék.
22 Pliko Switch On Track TAKARÓ:
felhasználható és rákapcsolható akár a Navetta
Page 43

- 43 -
XL-re, akár a Pliko Switch On Track sportkocsira. A
Navetta XL-re történő felerősítéséhez olvassák el a
hozzátartozó használati utasítást.
A sportkocsira való felerősítéséhez terítsék szét a
takaró belső részét azért, hogy helyet alakítsanak ki a
gyermek lábai számára (Fig. a).
Húzzák fel a takarót, ráhajtva a kapaszkodóra is és
gombolják be elől a gombokat (Fig. b) fűzzék be a
lábtartó alatt a takaróba (Fig. c).
23 ESŐVÉDŐ: helyezzék fel az esővédőt a sportkocsira
(a_ábra) és illesszék a két oldalsó gomblyukat a
kocsitető gombjaira (b_ábra).
24 Az esővédő kifeszítéséhez a gumiszalagot rögzítsék
a hátsó vázakhoz (a_ábra) vagy az első vázakhoz
(b_ábra), az ülés helyzetének megfelelően.
25 HÁTSÓ TESTVÉRFELLÉPŐ: segítséget nyújt a mamának
a kisebb szintkülönbségek leküzdésében (a_ábra) és a
második gyermek szállításában (b_ábra). A sportkocsi
két gyermekkel történő használatához fékezzék le
a sportkocsit, helyezzék el a kisebb gyermeket az
ülésben és csatolják be a biztonsági övet (1). Fogják
meg a markolatokat (2) és léptessék fel a második
gyermeket a testvérfellépőre (3).
26 ÖSSZECSUKÁS: végrehajtható a gyerekülés nélkül,
illetve a mama felé vagy a menetirányba fordított
gyereküléssel. Ha a gyerekülés a mama felé van
fordítva: az összecsukás előtt teljesen engedjék
le a háttámlát; ha a gyerekülés a menetirányba
van fordítva: az összecsukás előtt emeljék fel a
háttámlát és az összecsukás után engedjék le. Az
összecsukáshoz állítsák az első kerekeket rögzített
pozícióba, csukják össze a kocsitetőt, ha rá van
erősítve. Külön-külön húzzák fel a fogantyúk két
emeltyűkarját kattanásig és nyomják lefelé az oldalsó
csövek kioldásáig (a-b_ábra), húzzák fel a központi
fogantyút (c_ábra) addig, amíg a biztonsági kapcsok
nem zárnak (d_ábra).
27 SZÁLLÍTÁS: az első kerekek rögzített állapotba
helyezésével a középső fogantyúnál megfogva (a_
ábra) vagy az oldalsó fogantyú segítségével (b_ábra)
szállítható.
28 A HUZAT LEVÉTELE: húzzák le a zsákot a lábtartóról
(a_ábra), kapcsolják le a zsák kapcsait a kartámlákról
(b_ábra), gombolják le a háttámla oldalairól a két
gombot (c_ábra) és felülről húzzák ki (a gyerekülés
alól felfelé nyomva) a lábelválasztó szíjat (d_ábra).
GANCIOMATIC SYSTEM
29 A Ganciomatic System az a praktikus és gyors
rendszer, amely lehetővé teszi azt, hogy egy egyetlen
mozdulattal rákapcsolják a kocsivázra a Navetta vagy
PrimoNido mózeskosarat, a Primo Viaggio autós
gyerekülést és a Pliko Switch gyerekülést: helyezzék rá
azokat és mindkét kézzel nyomják rá kattanásig.
Mindig működtessék a kocsiváz vagy a sportkocsi
fékjét a termékek rákapcsolása és lekapcsolása előtt
(olvassák el a vonatkozó használati utasítást).
Ellenőrizzék, hogy a gyermekszállító elem helyesen rá
van-e kapcsolva.
KIEGÉSZÍTŐK
30 BORSA (Pelenkázó Táska). Táska védőhuzattal
együtt a baba pelenkázásához, amely a sportkocsira
akasztható.
SOROZATSZÁMOK
31 A Pliko Switch a terméket a gyártásakor a rá
vonatkozó információval látja el.
_ Ez az információ a termék nevét, a gyártási idejét
és a gyermekülés (a_ábra) valamint a kocsiváz
sorozatszámát (b_ábra) tartalmazza.
Az esetleges reklamáció esetén ezeket az adatokat
kérjük megadni.
TISZTÍTÁS ÉS KARBANTARTÁS
A TERMÉK KARBANTARTÁSA: védjék meg az időjárási
viszontagságoktól: víztől, esőtől vagy hótól; a
napsütésnek való folytonos és hosszadalmas kitétel
sok alapanyagban színváltozást okozhat; száraz
helyen tárolják a terméket.
A VÁZ TISZTÍTÁSA: egy nedves törlőruhával,
oldószerek vagy egyéb hasonló termékek alkalmazása
nélkül, rendszeresen tisztítsák meg a műanyagból
készült részeket; tartsanak szárazon minden fémből
készült részt a rozsdásodás megelőzése céljából;
tisztítsák le a port vagy a homokot minden mozgó
részről (szabályozó mechanizmusok, összekapcsoló
mechanizmusok, kerekek…) és szükség esetén
könnyű olajjal kenjék be.
AZ ESŐVÉDŐ TISZTÍTÁSA: egy szivaccsal és szappanos
vízzel, mosószerek használata nélkül mossák le.
A SZÖVETRÉSZEK TISZTÍTÁSA: keféljék le a
szövetrészeket a por eltávolításához és legfeljebb 30°-
os hőmérsékleten, kézzel mossák ki; ne facsarják; ne
fehérítsék klórral; ne vasalják; ne végezzenek száraz
tisztítást; ne távolítsák el a foltokat oldószerekkel és
ne szárítsák forgódobos ruhaszárítógépben.
PEG-PÉREGO S.p.A.
A Peg-Pérego Rt. ISO 9001 tanúsítánnyal
rendelkezik. A tanúsítvány a vállalati
munkamódszer rendszerezettségének
és az abban való bizalomnak a
garanciáját kínálja az ügyfeleknek és a
fogyasztóknak.
A Peg Pérego az ebben a kiadványban ismertetett
modelleknél műszaki vagy kereskedelmi jellegű
okokból kifolyólag bármikor végrehajthat
módosításokat.
A Peg Pérego a Fogyasztói rendelkezésére áll minden
igényük legjobb kielégítése céljából. Ehhez az
Ügyfeleink véleményének megismerése számunkra
rendkívül fontos és értékes. Ezért nagyon hálásak
lennénk, ha a termékünk használatbavétele után
kitöltenék a FOGYASZTÓI ÉRTÉKELÉSI KÉRDŐÍVET
és abban feltüntetnék az esetleges észrevételeiket
vagy ötleteiket; a kérdőívet az alábbi internetes
weboldalunkon találják meg: www.pegperego.com
PEG-PÉREGO VEVŐSZOLGÁLAT
Ha a modell részei véletlenül elvesznek vagy
megsérülnek, akkor csak eredeti Peg Pérego
cserealkatrészeket használjanak! Az esetleges
javítások, cserék, a termékekkel kapcsolatos
információk valamint az eredeti alkatrészek és
tartozékok értékesítése ügyében vegyék fel a
kapcsolatot a Peg Perego Vevőszolgálatával, a termék
sorozatszámának a megadásával.
tel. 0039/039/60.88.213 fax 0039/039/33.09.992
e-mail assistenza@pegperego.it internetes
weboldal www.pegperego.com
Page 44

- 44 -
SL_Slovenščina
Hvala, ker ste izbrali izdelek Peg-Pérego.
OPOZORILO
_ POMEMBNO: natančno preberite ta navodila in jih
shranite za prihodnjo uporabo. Neupoštevanje teh
navodil lahko ogrozi varnost otroka.
_ Ta izdelek je namenjen prevažanju 1 otroka v sedežu
in 1 otroka stoje na zadnji stopnici.
_ Ne prevažajte večjega števila otrok, kot to navaja
proizvajalec.
_ Ogrodje Pliko Switch + športni voziček Pliko Switch
je homologirano za dojenčke od rojstva do 15 kg.
Zadnja ploščad je homologirana za prevažanje
drugega otroka, težkega do 20 kg.
_ Ogrodje Pliko Switch je bilo načrtovano za uporabo
v kombinaciji z izdelki Peg-Pérego Ganciomatic:
ogrodje Pliko Switch + avtosedež “Primo Viaggio”
(skupina 0+), homologirano za dojenčke od rojstva
do 13 kg; ogrodje Pliko Switch + košara “Navetta” ali
“Primonido”, homologirano za dojenčke od rojstva
do 10 kg. Pri uporabi z “Navetta” ali “Primonido” ne
uporabljajte zadnje ploščadi.
_ Pred uporabo preverite, ali so priključki Peg-Pérego
Ganciomatic ustrezno pritrjeni na izdelek.
_ Otroka nikoli ne puščajte samega.
_ Vedno uporabljajte pettočkovni varnostni pas. Jermen
za okoli pasu vedno pripnite na mednožni jermenček.
_ Pazite, da ne poškodujete otroka, ko nastavljate
mehanizme (ročaj, hrbtni naslon).
_ Vedno uporabljajte zavore, ko ste zaustavljeni, ter
medtem ko otroka polagate v voziček ali ga jemljete iz
njega.
_ Sestavljanje in pripravo izdelka, čiščenje in
vzdrževanje morajo izvajati odrasle osebe.
_ Izdelka ne uporabljajte, če manjkajo deli ali so vidne
poškodbe.
_ Pred uporabo se prepričajte, ali so vsi mehanizmi
sistema za pripenjanje pravilno speti.
_ V mehanizme nikoli ne vstavljajte prstov.
_ Vsako breme na ročaju ali ročicah lahko izdelek naredi
nestabilen; upoštevajte priporočila proizvajalca za
maksimalno obremenitev izdelka.
_ V nakupovalno košaro ne dajajte tovorov, ki bi
presegali težo 5 kg. V držalo za pijačo ne vstavljajte
predmetov, ki so težji od navedbe na samem držalu za
pijačo. Vanj nikoli ne odlagajte toplih pijač. V žepe na
strehici (če so prisotni) ne odlagajte predmetov, težjih
od 0,2 kg.
_ Sprednja zapora - pladenj ni oblikovana tako, da bi
prenesla težo otroka. Ni namenjena zadrževanju
otroka v sedežu in ni nadomestilo za varnostni pas.
_ Izdelka ne uporabljajte v bližini stopnic, virov toplote,
odprtega ognja ali nevarnih predmetov, ki so v
dosegu otrokovih rok.
_ Uporaba dodatkov, ki jih ne odobri proizvajalec, je
lahko nevarna.
_ Izdelek ni primeren za uporabo med tekanjem ali
rolanjem.
_ Dežne prevleke (če je v uporabi) ne smete uporabljati
v zaprtih prostorih. Vedno preverite, da otrok ni
pregret; Dežne prevleke nikoli ne puščajte ob virih
toplote in pazite na prižgane cigarete. Prepričajte
se, da dežna prevleka ne ovira premikajočih se
mehanizmov ogrodja ali vozička; preden ogrodje ali
voziček zaprete, jo vedno odstranite.
_ Ko uporabljate voziček za dva otroka, ju nikoli ne
puščajte sama in ne dovolite drugemu otroku, da se
vzpenja na zadnjo ploščad, ko je voziček prazen.
_ Ne uporabljajte ročajev za odpenjanje za prenašanje
ali dviganje vozička, ko je v njem otrok.
_ POZOR Ne dodajajte oblazinjenih vložkov.
Pliko Switch Compact, kompakten športni voziček z
obrnljivim sedežem!
Različica s strehico, odejico in dežno prevleko.
Športna različica s strehico in dežno prevleko (Pliko
Switch compact On Track Sportivo).
LASTNOSTI IZDELKA
_ Ta izdelek ima svojo zaporedno številko.
_ Pliko Switch je športni voziček s sedežem, ki ga je
mogoče obrniti: proti staršu ali v svet.
_ Pliko Switch je sestavljen iz dveh elementov:
OGRODJA Pliko Switch in SEDEŽA Pliko Switch.
SESTAVNI DELI IZDELKA
Preverite, ali je v embalaži vse navedeno in v primeru
reklamacije pokličite center za pomoč uporabnikom.
_ Ogrodje Pliko Switch: nakupovalna košara; 2 sprednji
kolesi, ki ju je mogoče sprostiti, da se vrtita, ali
blokirati; 2 zadnji kolesi s centralizirano prečno zavoro
in nosilec za pijačo.
_ Športni voziček Pliko Switch: sprednja zapora;
strehica; naslovnica; dežna prevleka.
_ Športni voziček Pliko Switch On Track Sportivo:
sprednja zapora; strehica; dežna prevleka.
NAVODILA ZA UPORABO
1 ZAŠČITNA EMBALAŽA: preden odprete ogrodje,
morate odstraniti zaščite (slika a), sicer se ogrodje ne
bo pravilno odprlo (slika b).
2 ODPIRANJE: sočasno dvignite vzvoda dveh ročajev
(risba_a) in povlecite navzgor, dokler ne odprete ogrodja
(risba_b). Preverite, ali se je ogrodje pravilno odprlo:
bočne cevi morajo biti med seboj spete (risba_c).
3 NAMEŠČANJE SPREDNJIH KOLES: spustite vzvod
sprednjih koles (risba_a) in nataknite kolo, Prej še
preverite, ali je nameščena podložka, kot je prikazano
na risbi, tako da klikne (risba_b).
4 NAMEŠČANJE ZADNJIH KOLES: nataknite kolesi, tako
da klikneta (risba_a) in preverite, da sta pravilno
pripeti (risba_b).
5 Na koncu pripnite centralni element na zavorni prečki
na ogrodje (risba_a) in preverite, ali je pripet pravilno
(risba_b).
6 NAMEŠČANJE NAKUPOVALNE KOŠARE: skozi reže napeljite
sprednja (risba_a) in zadnja trakca za pripenjanje (risba_b).
7 NAMEŠČANJE DRŽALA ZA PIJAČO: namestite na zatič,
dokler ne klikne (slika a). Držalo za pijačo je mogoče
namestiti na obe strani ogrodja.
8 NASTAVLJIVI ROČAJI: Pliko Switch Compact: da bi
dvignili ali spustili ročaje, pritisnite gumb (risba_a) in
sočasno nastavite ročaj (risba_b).
9 FIKSNA ALI VRTLJIVA SPREDNJA KOLESA: dvignite vzvoda,
da bi vrtljiva kolesa blokirali (risba_a), in ju spustite, da bi
se sprednji kolesi vrteli (risba_b). Svetujemo vam, da na
težavnem terenu uporabljate fiksirana kolesa.
10 ZAVORA: pritisnite zavoro, da bi zablokirali ogrodje
(risba_a), spustite, da bi ga odblokirali (risba_b).
11 PRIPENJANJE ŠPORTNEGA VOZIČKA NA OGRODJE:
športni sedež je mogoče obrniti v obe smeri in ga lahko
pritrdite na ogrodje tako, da je obrnjen proti staršu (slika
a) ali v svet (slika b). Postavite ga na ogrodje, tako da
ustreza simbolom in pritisnite navzdol z obema rokama,
dokler mehanizem za pripenjanje ne klikne dvakrat.
Prepričajte se, da je sedež pravilno pripet, tako da ga
povlečete navzgor za sprednjo zaporo.
12 ODPENJANJE ŠPORTNEGA SEDEŽA Z OGRODJA:
pritisnite okrogla bočna gumba na sedežu (risba_a)
in vzvoda pod naslonoma za roke (risba_b). Sočasno
sedež povlecite navzgor (risba_c), tako da ga odpnete.
13 SPREDNJA ZAPORA: da bi pripeli sprednjo zaporo,
vstavite priključke v naslona za roke in potisnite proti
Page 45

- 45 -
vozičku, dokler ne zaslišite klika, ki pomeni, da je
zapora pripeta (risba_a).
Da bi sprednjo zaporo odstranili, pritisnite oba gumba
in izvlecite (risba_b). Odprite sprednjo zaporo samo
na eni strani, da olajšate otroku sestopanje s sedeža in
sedanje nanj.
14 HRBTNI NASLON: da bi ga nastavili, dvignite ročaj
(slika a) in naslon premaknite v enega od štirih želenih
položajev (slika b).
15 NASLON ZA NOGE: da bi ga spustili, potisnite navzdol
oba vzvoda in ga potisnite navzdol (slika a); da bi ga
dvignili, ga potisnite navzgor (slika b).
16 5-TOČKOVNI VARNOSTNI PAS: da bi ga pripeli,
vstavite obe sponki jermena za okoli pasu (ko sta
naramnici pripeti, puščica_a) v mednožni jermenček,
dokler sponka ne klikne (puščica_b). Da bi ga odpeli,
pritisnite okrogli gumb na sponki navzgor (puščica_c)
in povlecite jermen za okoli pasu navzven (puščica_d).
17 Če želite zatisniti pas okoli pasu, povlecite pas v
smer puščice (puščica_a). Če ga želite zrahljati,
storite nasprotno. Pas okoli pasu lahko zatisnete do
varnostne zaponke (sl_b).
18 Če želite nastaviti višino varnostnega pasu, sprostite
sponki na zadnji strani opore.
Naramnici povlecite proti sebi (puščica_a), dokler
se sponki ne sprostita in ju lahko vstavite v zanki
okvira (puščica_b). Naramnici odstranite iz naslonjala
(puščica_c) in ju vstavite v najprimernejšo zanko
(puščica_d), nato sponki znova priključite na zadnjo
stran opore (puščica_e). Sponki sta varno pripeti, ko
zaslišite zvok (sl_f).
19 STREHICA: da bi pripeli, vstavite priključke na sedežu
bočno (slika a) in jo pripnite na zadnji strani hrbtnega
naslona (slika b). Da bi odstranili strehico: izvlecite
priključke in odpnite. Da bi dvignili strehico: povlecite jo
proti sebi; da bi zložili strehico: potisnite jo nazaj. Da bi
strehico spremenili v senčnik, odpnite zadrgo z dvojnim
vodilom (slika c) in jo odpnite na zadnji strani hrbtnega
naslona. Strehica je opremljena z zanko, na katero lahko
obesite otrokovo najljubšo igračo (risba_d).
20 ODEJICA: namestite odejico in jo pripnite z gumbi
pod podnožnikom (risba_a) in ob strani. Če jo
uporabljate kot košaro, dvignite podnožnik in odejico
postavite pod sprednjo zaporo (risba_b), nato pa jo
spnite z gumbi strehice (risba_c).
21 Če voziček uporabljate s spuščenim naslonom za
noge, spustite naslon za noge in vstavite pokrov
pod sprednjo zaporo (sl_a) in ga zavarujte glede na
možnosti kupljenega modela A, B.
22 ODEJICA Pliko Switch On Track:
se uporablja in se pripne tako na Navetto XL kot
na športni voziček Pliko Switch On Track. Da bi jo
namestili na Navetto XL, glejte priročnik za uporabo
košare.
Da bi jo namestili na športni voziček, jo z notranje
strani razširite, da boste vanjo lahko vtaknili otrokove
noge (risba a).
Nataknite jo na voziček tako, da boste pokrili sprednjo
zaporo in spnite sprednje gumbe (risba b); na spodnji
strani odejico nataknite na naslon za noge (risba c).
23 DEŽNA PREVLEKA: dežno prevleko namestite na
voziček (sl_a) in vstavite bočni reži čez gumbe strehice
(sl_b).
24 Dežno prevleko zavarujte, tako da elastične zanke
napnete okoli zadnjega (sl_a) ali sprednjega (sl_b)
pokončnega dela okvirja, glede na položaj sedeža.
25 ZADNJA PLOŠČAD: staršu omogoča premagovanje
manjših višinskih preprek (slika a) in za prevažanje
drugega otroka (slika b). Da bi lahko uporabili voziček
za dva otroka, morate voziček zavreti, manjšega
otroka posaditi na sedež in mu pripeti varnostni pas
(1). Prijeti morate oba ročaja (2) in dovoliti starejšemu
otroku, da se povzpne na ploščad (3).
26 ZAPIRANJE: lahko ga izvedete brez sedeža, s sedežem,
obrnjenim proti staršu ali v svet. Če je sedež obrnjen
proti staršu: preden ga zaprete, popolnoma spustite
hrbtni naslon; če je sedež obrnjen v svet: preden ga
zaprete, dvignite hrbtni naslon, ko je zaprt, hrbtni
naslon spustite. Da bi ga zaprli, fiksirajte sprednja
kolesa in zaprite strehico, če je pripeta.
Enega za drugim dvignite vzvoda ročajev, dokler ne
klikneta, nato pa potisnite navzdol, da bi odblokirali
bočne cevi (risbi_a-b). Povlecite ročaj navzgor (risba_c),
tako da se zapneta varnostna spenjalna člena (risba_d).
27 TRANSPORT: nosite ga lahko za srednji ročaj, pri
čemer morajo biti sprednja kolesa fiksirana (slika a) ali
za bočni ročaj (slika b).
28 SNEMLJIVA PREVLEKA: ko je naslonjalo v navpičnem
položaju odstranite elastični zanki zadaj (sl_a),
izvlecite štiri zatiče (sl_b) in snemite prevleko Velcro z
naslonjala za roke (sl_c).
SISTEM GANCIOMATIC
29 Sistem Ganciomatic je praktičen in hiter sistem,
ki vam omogoča pripenjanje košare Navetta ali
PrimoNido, avtosedeža Primo Viaggo in športnega
sedeža Pliko Switch na podstavek vozička z eno
samo kretnjo: položite jih na podstavek in pritisnite z
obema rokama, dokler ne zaslišite klika.
Vedno najprej zavrite ogrodje ali voziček, preden
pripenjate in odpenjate izdelke s podstavka
(upoštevajte posamična navodila za uporabo).
Preverite, da je izdelek, v katerem želite prevažati
otroka, pravilno pripet.
DODATKI
30 BORSA - Torba s podlogo za previjanje otroka, ki jo je
mogoče pripeti na voziček.
SERIJSKE ŠTEVILKE
31 Na izdelku Pliko Switch so navedene informacije, ki so
na razpolago v času izdelave izdelka.
_ Ime izdelka, datum proizvodnje in serijska številka
sedeža (sl_a) in ogrodja (sl_b).
Ti podatki so potrebni za vsakršne pritožbe.
ČIŠČENJE IN VZDRŽEVANJE
VZDRŽEVANJE IZDELKA: zaščitite pred atmosferskimi
vplivi: vodo, dežjem ali snegom; daljše izpostavljanje
soncu lahko povzroči spremembo barve veliko
materialov; izdelek vedno spravljajte na suhem mestu.
ČIŠČENJE OGRODJA: plastične dele redno brišite z vlažno
krpo. Ne uporabljajte topil ali drugih podobnih izdelkov;
pazite, da bodo vsi kovinski deli suhi, da bi preprečili
rjo; pazite, da premični deli (mehanizmi za uravnavanje,
mehanizmi za pripenjanje, kolesa ...) ne bodo prašni in,
če je to potrebno, jih podmažite z lahkim oljem.
ČIŠČENJE DEŽNE PREVLEKE: Operite z gobo in milnico,
ne uporabljajte detergentov.
ČIŠČENJE DELOV IZ BLAGA: blago skrtačite, da z njega
odstranite prah in ga operite na roke pri največ 30°; ne
ožemajte; ne uporabljajte klorovega belila; ne likajte;
ne uporabljajte kemičnega čiščenja; ne čistite s topili
in ne uporabljajte sušilca za perilo z vrtljivim bobnom.
PEG-PÉREGO S.p.A.
Peg Pérego S.p.A. ima certifikat ISO
9001. Certifikat za stranke in uporabnike
pomeni garancijo transparentnosti in
zaupanja v delo podjetja.
Peg Perego se lahko kadarkoli odloči,
da bo spremenil modele, objavljene v
katalogu, najsi bo to zaradi tehničnih ali podjetniških
razlogov.
Peg Pérego je vedno na voljo svojim strankam, da
Page 46

- 46 -
RU_Pусский
Благодарим вас за то, что вы выбрали продукцию
компании Peg-Pеrego.
ПРЕДУПРЕЖДЕНИЕ
_ ВАЖНО: внимательно прочитайте данные
инструкции и храните, чтобы в дальнейшем их
можно было использовать для консультации.
Ребёнок может подвергаться опасности, если Вы
не будете следовать данным инструкциям.
_ Данное изделие было создано для перемещения
одного ребёнка в сидячем положении и одного
ребёнка стоя на задней подставке для ног.
_ Запрещается использование данного изделия для
перемещения большего количества детей, чем то,
которое было предусмотрено производителем.
_ Шасси-Pliko Switch + сиденье-Pliko Switch
утверждены для детей с момента рождения и
до достижения веса 15 кг. на сидении. Задняя
подножка утверждена для перевозки второго
ребенка весом до 20 кг.
_ Шасси-Pliko Switch было разработано для
использования вместе со следующими изделиями
Peg-Pеrego Ganciomatic: шасси-Pliko Switch +
автомобильное кресло “Primo Viaggio” (группа
0+) утверждены для детей с момента рождения и
до достижения веса в 13 кг; шасси-Pliko Switch +
люлька “Navetta” или “Primonido” утверждены для
детей с момента рождения и до достижения веса
10 кг. При использовании с люлькой “Navetta” и
“Primonido” не используйте заднюю подножку.
_ Перед использованием убедитесь, что изделия
Peg-Pérego Ganciomatic были правильно
прикреплены к коляске.
_ Не оставляйте Вашего ребёнка без присмотра,
поскольку это может представлять собой
опасность.
_ Всегда используйте ремень безопасности с пятью
точками крепления, всегда соединяйте поясной
ремень с центральным ремешком.
_ Когда идёт выполнение операций по регулировке
механизмов (ручка, спинка), будьте очень
внимательны, если в изделии сидит ребёнок.
_ Всегда ставьте коляску на тормоз, когда она стоит и
во время посадки и высадки ребенка.
_ Операции сборки, подготовки изделия, чистки и
ухода должны всегда выполнять только взрослые.
_ Запрещается использование данного изделия
при обнаружении в нём недостающих частей или
поломок.
_ Перед использованием убедитесь, что все
механизмы крепления были правильно зацеплены.
_ Избегайте попадания пальцев в механизмы.
_ Любая нагрузка, подвешенная к ручке или
к ручкам, может нарушить устойчивость
изделия; соблюдайте указания изготовителя о
максимальных прилагаемых нагрузках.
_ Не кладите в корзину нагрузки, превышающие 5 кг.
Не кладите в подставки для напитков предметы,
вес которых выше указанного на подставке. Ни в
коем случае не ставьте в них горячие напитки. Не
кладите в карманы капотов (при их наличии) грузы,
превышающие 0,2 кг.
_ Передник не предназначен для выдерживания
веса ребёнка; передник не был создан для
удерживания ребёнка на сидении и не может
заменить ремень безопасности.
_ Запрещается использование изделия вблизи
лестниц или ступенек; не используйте его рядом
с источниками тепла, открытым огнём или
когда опасные предметы находятся в пределах
v kar največji meri izpolni njihove potrebe. Zato je
za nas zelo pomembno, da poznamo mnenje svojih
strank. Hvaležni vam bomo, če si boste, ko boste
uporabili naš izdelek, vzeli čas in izpolnili VPRAŠALNIK
O ZADOVOLJSTVU STRANK, ki ga boste našli na naših
spletnih straneh, na naslovu: www.pegperego.com.
CENTER ZA POMOČ UPORABNIKOM
Če izgubite ali poškodujete sestavni del izdelka,
uporabite izključno originalne rezervne dele Peg
Pérego. V primeru popravil, zamenjav, podatkov
o izdelku in naročila originalnih nadomestnih
delov in dodatkov, se obrnite na službo za pomoč
uporabnikom Peg Perego, pri tem pa navedite serijsko
številko izdelka, če je le ta navedena.
tel. 0039/039/6088213 faks 0039/039/3309992
e-pošta assistenza@pegperego.it spletna stran
www.pegperego.com
Page 47

- 47 -
досягаемости ребёнка.
_ Использование вспомогательных
принадлежностей, которые не получили
одобрения производителя, может представлять
собой опасность.
_ Данное изделие не предназначено для
использования при занятии бегом или катания на
коньках.
_ Не используйте дождевик (если имеется) в
закрытых помещениях, и всегда проверяйте, чтобы
ребенку не было жарко. Не держите дождевик
рядом с источниками тепла, будьте осторожными с
сигаретами. Убедитесь, что дождевик не цепляется
за движущиеся части шасси или прогулочной
коляски. Всегда снимайте дождевик перед тем, как
сложить шасси или прогулочную коляску.
_ Когда прогулочная коляска используется с двумя
детьми, не оставляйте их без присмотра и не
позволяйте второму ребенку подниматься на
заднюю подножку, если коляска пуста.
_ Не используйте ручки отсоединения для
перевозки или подъема прогулочной коляски, в
которой сидит ребенок.
_ ВНИМАНИЕ: не пользуйтесь матрацами.
Pliko Switch compact, компактная коляска с
разворачивающимся сиденьем!
Серия, оснащенная тентом, покрывалом и
дождевиком.
Спортивная серия с тентом и дождевиком (Pliko
Switch compact On Track Sportivo).
ХАРАКТЕРИСТИКИ ИЗДЕЛИЯ
_ Данное изделие отмечено порядковым номером.
_ Pliko Switch - это прогулочная коляска с
двусторонним сиденьем: его можно поворачивать
в сторону мамы или в сторону дороги.
_ Pliko Switch состоит из двух элементов: ШАССИ-
Pliko Switch и СИДЕНЬЕ-Pliko Switch.
КОМПОНЕНТЫ ИЗДЕЛИЯ
Проверьте содержание упаковки и в случае
рекламации обратитесь в Сервисную службу.
_ Шасси-Pliko Switch: корзина; 2 передних плавающих
колеса с возможностью блокировки, 2 задних
колеса, оснащенных центральным тормозом и
подставки для напитков.
_ Сиденье Pliko Switch: защитная панель, тент,
покрывало, дождевик.
_ Сиденье Pliko Switch On Track Sportivo: защитная
панель, тент, дождевик.
ИНСТРУКЦИЯ ПО ЭКСПЛУАТАЦИИ
1 ЗАЩИТНЫЕ ДЕТАЛИ УПАКОВКИ: перед
раскладыванием шасси необходимо удалить
защитные детали (рис_a), в противном случае оно
не может правильно раскладываться (рис_b).
2 ОТКРЫВАНИЕ: потяните вверх рычаги двух
ручек (рис_a) и поверните их вверх, чтобы рама
раскрылась (рис_b). Убедитесь в правильном
открывании: боковые трубки должны соединиться
между собой (рис_c).
3 УСТАНОВКА ПЕРЕДНИХ КОЛЕС: предварительно
убедившись, что шайба расположена как указано
на рисунке, а затем поднимите рычаг, опустите
рычаг передних колес (рис_a) и до щелчка
наденьте колесо (рис_b).
4 УСТАНОВКА ЗАДНИХ КОЛЕС: вставьте колеса до
щелчка (рис_a) и убедитесь, что они закреплены
правильно (рис_b).
5 Установите центральный элемент на штангу
тормоза, расположенную на раме (рис_a) и
убедитесь, что он закреплен правильно (рис_b).
6 УСТАНОВКА КОРЗИНЫ: наденьте петли на передние
(рис_a) и задние крепления (рис_b).
7 МОНТАЖ ПОДСТАВКИ ДЛЯ НАПИТКОВ: наденьте
ее на штифт до щелчка (рис_а). Подставку для
напитков можно установить с обеих сторон шасси.
8 РЕГУЛИРОВКА РУЧЕК: Pliko Switch compact: чтобы
поднять или опустить ручки, нажмите кнопку
(рис_a), одновременно устанавливая ручки в
нужное положение (рис_b).
9 ПЛАВАЮЩИЕ ПЕРЕДНИЕ КОЛЕСА: поднимите
рычаги, чтобы заблокировать колеса (рис_a) и
опустите их для разблокировки колес (рис_b). На
неровной поверхности советуем блокировать
плавающие колеса.
10 ТОРМОЗ: нажмите на рычаг тормоза, чтобы
заблокировать шасси (рис_a), поднимите рычаг,
чтобы снять блокировку (рис_b).
11 УСТАНОВКА СИДЕНЬЯ НА ШАССИ: двустороннее
сиденье можно установить на шасси в сторону
мамы (рис_а) или в сторону дороги (рис_b),
установите его на шасси в соответствии с
символами и нажмите вниз обеими руками
до тех пор, пока вы не услышите двойной
щелчок соединения. Убедитесь в правильности
соединения сидения, держа его за передник и
потянув вверх.
12 ОТСОЕДИНЕНИЕ СИДЕНЬЯ ОТ ШАССИ:
одновременно нажмите на две круглые кнопки
по бокам от сиденья (рис_a) и на два рычага,
находящиеся под подлокотниками (рис_b),
потянув сиденье вверх (рис_c), чтобы отсоединить
его.
13 ЗАЩИТНАЯ ПАНЕЛЬ: чтобы установить защитную
панель, вставьте крепления в подлокотники и
нажмите по направлению к сиденью до щелчка
(рис_a). Для удаления защитной панели нажмите
на две кнопки и снимите её (рис_b). Панель можно
открывать только с одной стороны - это облегчит
ребенку вход и выход.
14 СПИНКА: для регулировки наклона поднимите
ручку (рис_a) и установите спинку в одну из 4
положений на выбор (рис_b).
15 ПОДНОЖКА: для опускания сместите два рычага
вниз и опустите (рис_а); для поднятия сместите
подножку вверх (рис_b).
16 ПЯТИТОЧЕЧНЫЙ РЕМЕНЬ БЕЗОПАСНОСТИ: чтобы
застегнуть ремень безопасности, вставьте
до щелчка две защелки поясного ремня (с
прикреплёнными к ним лямками, см. стрелка_a) в
пряжку на вставке для разделения ног (стрелка_b).
Чтобы расстегнуть ремень, нажмите на круглую
кнопку, расположенную в центре пряжки
(стрелка_c) и потяните поясной ремень наружу
(стрелка_d).
17 Если поясной ремешок надо подтянуть, потяните
его с обеих сторон в направлении стрелок
(стрелка_a). Если его надо ослабить – поступите
наоборот. Поясной ремешок можно затянуть
только до предохранительного стопора (рис_b).
18 Для регулировки ремня безопасности по высоте,
отстегните обе пряжки на обратной стороне
спинки.
Вытягивайте плечевые лямки на себя (стрелка_a),
пока пряжки не освободятся, после чего вставьте
их в отверстия спинки (стрелка_b) Выньте
плечевые лямки из обивки (стрелка_c) и проденьте
их в подходящие по высоте отверстия (стрелка_d),
затем заново закрепите пряжки на обратной
стороне спинки (стрелка_e). Пряжки надежно
застегиваются со щелчком (рис_f).
19 КАПОТ: для установки закрепите крепления
сбоку сиденья (рис_а) и пристегните его к задней
стороне спинки (рис_b). Для снятия капота:
отведите крепления и отстегните. Для поднятия
Page 48

- 48 -
капота: потяните к себе. Для опускания капота:
сместите его назад. Для превращения капота
в солнцезащитную крышу откройте застежку-
молнию с двойным замком (рис_с) и отсоедините
его от задней стороны спинки. Тент оснащен
креплением, куда можно повесить любимую
игрушку (рис_d).
20 ПОКРЫВАЛО: расправьте покрывало и пристегните
его под подножкой (рис_a) и сбоку от нее. Для
коляски с люлькой поднимите подножку и
расположите покрывало над защитной панелью
(рис_b) прикрепив его кнопками тента (рис_с).
21 Когда ребенок сидит в коляске, опустите подножку,
проденьте покрывало под поручнем для ручек
ребенка (рис_a) и закрепите его одним из
способов (в зависимости от конкретной модели),
показанных на рисунках A, B и C.
22 ПОКРЫВАЛО Pliko Switch On Track:
используется и с Navetta XL, и с коляской
Pliko Switch On Track. Для крепления к Navetta
XL проконсультируйтесь с ее руководством
пользователя.
Для установки на коляску удлините покрывало,
чтобы покрыть ноги ребенка (Рис. a).
Наденьте его на переднюю часть, застегните
передние кнопки (Рис. b) и заправьте вниз, под
подножку (Рис. c).
23 ДОЖДЕВИК: накиньте дождевик на коляску (рис_а)
и накиньте его боковыми петлями на пуговицы
складного верха коляски (рис_b).
24 В зависимости от положения сиденья закрепите
дождевик резинками либо к задним (рис_a), либо к
передним стойкам (рис_b).
25 ЗАДНЯЯ ПОДНОЖКА: помогает маме преодолевать
небольшие неровности (рис_а), кроме того, на
ней можно перевозить второго ребенка (рис_b).
Чтобы перевозить на прогулочной коляске двух
детей, необходимо поставить ее на тормоз, после
чего посадить младшего ребенка на сиденье и
застегнуть ремень безопасности (1). Держите
ручки (2) и позвольте второму ребенку встать на
подножку (3).
26 СКЛАДЫВАНИЕ: можно производить складывание
без сиденья, а также с сиденьем обращенным
вперед или назад. Если сиденье обращено к
вам: перед закрыванием полностью опустите
спинку; если сиденье обращено вперед: перед
закрыванием поднимите спинку, а закрыв коляску,
опустите спинку. При закрывании заблокируйте
передние колеса, а также закройте тент, если он
надет.
По очереди, до щелчка, поднимите два рычага
на ручках, а затем опустите вниз, чтобы
заблокировать боковые трубки (рис_a-b), потяните
вверх центральную рукоятку (рис_c) чтобы
защелкнуть замки безопасности (рис_d).
27 ПЕРЕНОС: коляску можно переносить при помощи
централизованной ручки, держа передние колеса
в фиксированном положении (рис_а) или при
помощи боковой ручки (рис_b).
28 РАЗБОРКА: снимите покрытие с подножки
(рис_a), отсоедините крепления покрытия на
подлокотниках (рис_b) отстегните две кнопки по
бокам от спинки (рис_c), а затем снимите сверху
ремень вставки для разделения ног (потянув его от
нижней части спинки) (рис_d).
GANCIOMATIC SYSTEM
29 Ganciomatic System - это практичная и быстрая
система, позволяющая вам одним движением
прикрепить люльку Navetta или PrimoNido,
автомобильное кресло Primo Viaggio или сиденье
Pliko Switch к шасси: установите их и нажмите на
изделие двумя руками до защелкивания.
Всегда ставьте шасси или прогулочную коляску
на тормоз перед креплением и отсоединением
изделий (смотрите соответствующие инструкции
по эксплуатации).
Убедитесь, что элемент для перевозки ребенка
правильно зацеплен.
ПРИНАДЛЕЖНОСТИ
30 BORSA (Сумка для пеленания). Cумка с матрасиком
для пеленания ребенка, которую можно
прикрепить к прогулочной коляске.
СЕРИЙНЫЕ НОМЕРА
31 Серийные номера на коляске Pliko Switch несут
необходимую информацию, касающуюся даты ее
изготовления.
_ Название изделия, дата изготовления, серийный
номер сиденья (рис_a) и шасси (рис_b).
Эти данные необходимо указывать в любых
претензиях.
ЧИСТКА И УХОД
УХОД ЗА ИЗДЕЛИЕМ: защитите изделие от
атмосферных осадков - снега или дождя.
Постоянная и продолжительная подверженность
солнечным лучам может вызвать цветовые
изменения многих материалов. Храните это
изделие в сухом месте.
ЧИСТКА ШАССИ: периодически очищайте
пластмассовые детали влажной тряпкой, без
использования растворителей и сходных веществ.
Держите металлические части изделия сухими,
чтобы предотвратить образование ржавчины.
Поддерживайте чистоту всех движущихся деталей
(регулировочные и соединительные детали, колеса
и т.д.), удаляя пыль и песок. При необходимости,
смажьте их легким маслом.
ЧИСТКА ДОЖДЕВИКА: Промывайте его губкой
и мыльной водой, не пользуйтесь моющими
средствами.
ЧИСТКА ТКАНЫХ ЧАСТЕЙ: чистите щеткой тканые
части, чтобы удалить пыль. Стирайте вручную
при макс. температуре 30°, не выкручивать; не
отбеливать хлором; не гладить; не чистить в
химчистке; не обрабатывать растворителями и
не сушить при помощи барабанных сушильных
машин.
PEG-PEREGO S.p.A.
Peg-Perego S.p.A. сертифицирована
по ISO 9001. Сертификация
гарантирует заказчикам и
потребителям, что компания
работает, соблюдая принципы
гласности и доверия.
Компания Peg-Perego имеет право вносить в
любой момент изменения в модели, описанные в
настоящем издании, по причинам технического
или коммерческого характера.
Peg-Perego находится к услугам своих клиентов
для полного удовлетворения всех их требований.
Поэтому, для нас очень важно знать мнение наших
клиентов. Поэтому, мы будем вам признательны,
если после использования нашего изделия вы
заполните АНКЕТУ ОБ УДОВЛЕТВОРЕННОСТИ
ПОТРЕБИТЕЛЯ, которую можно найти на нашем
сайте в Интернете, высказывая свои замечания или
рекомендации. www.pegperego.com
Page 49

- 49 -
TR_Türkçe
Bir Peg-Pérego ürününü tercih ettiğiniz için size
teşekkür ederiz.
UYARI
_ ÖNEMLİ: bu talimatları dikkatlice okuyunuz ve
ileride de istifade edebilmek amacıyla muhafaza
ediniz. Bu talimatlara uyulmaması halinde çocuğun
güvenliği tehlikeye girebilir.
_ Bu ürün, oturma grubunda 1 ve arka zeminde de 1
çocuk taşınması için tasarlanmıştır.
_ Ürünü, üretici tarafından öngörülenden fazla sayıda
kullanıcı için kullanmayınız.
_ Şase-Pliko Switch + bebe sandalyesi-Pliko Switch
doğumdan itibaren 15 kg.ye kadar olan bebekler için
tescil olunmuştur. Arka kısımda yer alan dayanak 20
kg.ye kadar olan ikinci bir bebeğin taşınması için tescil
olunmuştur.
_ Şase-Pliko Switch, “Peg-Pérego Ganciomatic” ürünler
ile birlikte kullanılmak üzere tasarlanmıştır : Şase-Pliko
Switch + Primo Viaggio araba koltuğu (0+ yaş grubu)
doğumdan itibaren 13 kg. ye kadar olan bebekler
için tasarlanarak tescil edilmiştir; Şase-Pliko Switch
+ port-bebe “Navetta” doğumdan itibaren 10 kg. ye
kadar olan bebekler için tescil olunmuştur. “Navetta”
ve “Primonido” ile birlikte kullanım halinde arka
basamağı kullanmayınız.
_ Kullanım öncesinde “Peg-Pérego Ganciomatic”
ürünlerinin mamule tam olarak tespit edilmiş
olduğundan emin olunuz.
_ Çocuğunuzu tek başına bırakmanız tehlikeli olabilir.
_ Beş kademeli emniyet kemerini daima kullanınız; kemerin
bacak arası bandını bel kayışıyla birlikte kullanınız.
_ Mekanizmaların ayar işlemleri (tutacak, sırtlık)
yapılırken çocuğun konumuna dikkat ediniz.
_ Bebeğin bindirilmesi ve indirilmesi aşamasında fren
sistemini devreye almayı unutmayınız.
_ Ürünün montaj ve hazırlanma işlemlerinin yanı sıra
temizlik ve bakım müdahalelerinin de yetişkin bir kişi
tarafından yapılması gerekmektedir.
_ Bu ürünü kırık ya da eksik parçalı olması halinde
kullanmayınız.
_ Ürünü kullanmadan evvel tüm bağlantı aksamlarının
tam olarak takıldığından emin olunuz.
_ Parmaklarınızı mekanizmalar arasına sokmayınız.
_ Tutma ve sair yerlere asılan tüm yükler ürünün
dengesinin bozulmasına yol açabilir; taşınabilir azami
ağırlıklar konusunda üretici tarafından belirtilen
hususlara bakınız.
_ Sepete 5 kg.dan fazla ağırlık koymayınız. İçecek
sepetine kesinlikle sepet üzerinde belirtilenden fazla
ağırlık ve sıcak içecek koymayınız. Tente üzerinde yer
alan ceplere (var ise) 0,2 Kg.dan fazla ağırlık koymayınız.
_ Ön kısım çocuğun ağırlığını taşımak üzere
tasarlanmamıştır; ayrıca çocuğu oturma konumunda
tutmak amacıyla emniyet kemeri yerine de kullanılamaz.
_ Ürünü merdiven ve basak yakınlarında kullanmayınız;
ısı kaynaklarına, ateşe ve çocuğun erişebileceği
tehlikeli cisimlere yakın yerlerde kullanmayınız.
_ Üretici tarafından onaylanmamış aksesuarların
kullanılması tehlikeli olabilir.
_ Bu ürün jogging veya patenle koşmak için uygun değildir.
_ Yağmurluğu (eğer var ise) kapalı mekanlarda
kullanmayınız ve bebeğin aşırı ısıya maruz kalmamasını
sürekli olarak kontrol ediniz; ısı kaynaklarına yakın yerlerde
konumlandırmayınız ve sigara konusunda dikkatli olunuz.
Yağmurluğun puset veyahut bebek arabasının müteharrik
mekanizmaları ile temas etmemesine dikkat ediniz;
puset veyahut da bebek arabasını kapatmadan evvel
yağmurluğu çıkartmayı unutmayınız.
_ Bebek arabasının iki bebekle kullanılması halinde,
СЛУЖБА ОБСЛУЖИВАНИЯ PEG-
PEREGO
В случае утери или повреждения частей изделия,
используйте только фирменные запасные части
Peg-Perego. Для выполнения ремонта, замены
деталей, получения справок об изделии, продажи
фирменных запчастей и принадлежностей вы
можете обращаться в службу обслуживания PegPerego, с обязательным указанием серийного
номера коляски, если он имеется.
тел.: 0039/039/60.88.213 факс 0039/039/33.09.992
e-mail assistenza@pegperego.it сайт в интернете:
www.pegperego.com
Page 50

- 50 -
bebekleri hiçbir zaman için yalnız bırakmayınız ve
bebek arabası boş vaziyetteyken bebeklerin arka
zemin üzerine çıkmalarına müsaade etmeyiniz.
_ Bebek ürünün üzerindeyken açma kollarını kullanmak
suretiyle taşıma işlemi yapmayınız.
_ DİKKAT Minder eklemeyiniz.
Pliko Switch compact, ters çevrilebilir bebe koltuklu
kompakt puset!
Tente, örtü ve yağmurluk ile birlikte komple version.
Tente ve yağmurlukla birlikte spor versiyon (Pliko
Switch compact On Track Spor).
ÜRÜN ÖZELLİKLERİ
_ Söz konusu ürün seri olarak numaralandırılmıştır.
_ Pliko Switch, çok amaçlı oturma grubuna haiz bir
pusettir : anneye veyahut da yola dönük.
_ Pliko Switch, iki elementten oluşmaktadır : ŞASE-Pliko
Switch ve PUSET-Pliko Switch.
ÜRÜNÜN AKSAMLARI
Ambalaj muhteviyatını kontrol ediniz ve herhangi
bir şikayet durumunda Bakım Hizmet merkezine
müracaat ediniz.
_ Gövde-Pliko Switch: sepet; dönebilen veya
kilitlenebilir 2 ön tekerlek; merkezi çubuk frenli 2 arka
tekerlek ve içecek taşıyıcısı.
_ Pliko Switch Bebe Koltuğu: ön panel, tente, örtü,
yağmurluk.
_ Pliko Switch On Track Spor Bebe Koltuğu: ön panel,
tente, yağmurluk.
KULLANIM KILAVUZU
1 AMBALAJ VE MUHAFAZALAR: şaseyi açmadan evvel
muhafazalarını çıkartmak gerekmektedir (şekil a), aksi
takdirde şasenin sağlıklı bir şekilde açılması mümkün
olamayacaktır (şekil b).
2 AÇMA: İki kulpun kollarını birlikte kaldırınız (şekil a) ve
gövde açılıncaya kadar yukarıya doğru çekiniz (şekil b)
Düzgün açılıp açılmadığını kontrol ediniz: Yan borular
birbirlerine takılmış olmalıdır (şekil c).
3 ÖN TEKERLEKLERİN MONTAJI: önce rondelanın
şekilde gösterilen konumda olduğunu kontrol ediniz,
İki ön tekerleğin kolunu indiriniz (şekil a), ve tekerleği
tık sesi duyuluncaya kadar geçiriniz (şekil b).
4 ARKA TEKERLEKLERİN MONTAJI: Tekerleği tık sesi
duyuluncaya kadar geçiriniz (şekil a) ve düzgün takılıp
takılmadığını kontrol ediniz (şekil b).
5 Son olarak, fren çubuğunun üzerindeki merkezi
elemanı gövdeye takınız (şekil a), takma işleminin
düzgün yapılıp yapılmadığını kontrol ediniz (şekil b).
6 SEPETİN MONTAJI: Kılavuz delikleri ön kancalara (şekil
a) ve arka kancalara (şekil b) geçiriniz.
7 MEŞRUBAT TAŞIYICISININ MONTAJI: “klik” sesini
duyana kadar bastırarak yerleştiriniz (şekil a).
Meşrubat taşıyıcı şasesinin her iki tarafına da
takılabilir.
8 AYARLANABİLİR KULPLAR: Pliko Switch compact:
Kulpları kaldırmak veya indirmek için, düğmeye
basınız (şekil a) ve aynı anda kulpları ayarlayınız (şekil
b).
9 SABİT VEYA DÖNER ÖN TEKERLEKLER: Tekerlekleri
sabit hale getirmek için, kolları yukarıya kaldırınız
(şekil a), tekerlekleri döner hale getirmek için ise
kolları aşağıya indiriniz (şekil b). Düzgün olmayan
zeminlerde sabit tekerleklerin kullanılması
önerilmektedir.
10 FREN: Gövdeyi kilitlemek için bir fren koluna basınız
(şekil a), kilidi açmak için yukarıya kaldırınız (şekil b).
11 OTURMA GRUBUNUN ŞASE ÜZERİNE BAĞLANMASI:
çok kullanımlı oturma grubu şase üzerine annye
dönük olarak yerleştirilir (şekil a) veyahut da yol
istikametine doğru da konumlandırılması mümkündür
(şekil b), oturma grubunu şase üzerinde yer alan
yuvalara denk gelecek şekilde yerleştiriniz ve “klik”
sesini duyana kadar oturmasını sağlayacak şekilde
iterek yerleştiriniz. Oturma grubunu yukarı istikamette
çekmek suretiyle sağlıklı bir şekilde takıldığından
emin olunuz.
12 BEBE KOLTUĞUNUN GÖVDEDEN ÇIKARILMASI: Bebe
koltuğunun yan tarafında bulunan iki yuvarlak
düğmeye (şekil a) ve kol dayama yerlerinin altında
bulunan iki kola (şekil b) aynı anda basınız, bebe
koltuğunu yerinden çıkıncaya kadar yukarıya doğru
çekiniz (şekil c).
13 ÖN PANEL: Ön paneli takmak için, bağlantı yerlerini
kol dayama yerlerine getiriniz, tık şeklinde bir takılma
sesi duyuluncaya kadar bebe koltuğuna doğru itiniz
(şekil a).
Ön paneli çıkarmak için iki düğmeye basınız ve
çıkarınız (şekil b). Çocuğun girmesini ve çıkmasını
kolaylaştırmak için, ön paneli sadece bir taraftan
açınız.
14 SIRTLIK: ayarlamak için kolu yukarı kaldırınız (şekil
a) ve 4 seçeneği bulunan arzuladığınız konumda
ayarlayınız (şekil b).
15 AYAK DAYAMA: aşağı doğru konumlandırmak için
iki kolu aşağı istikamette itiniz (şekil a); yukarı doğru
konumlandırmak için de ayak dayanağını yukarı
istikamette indiriniz (şekil b).
16 5 NOKTALI EMNİYET KEMERİ: Takmak için, bel kayışının
iki kancasını (iki askısı kancalanmış- ok a) bacak ayırıcı
kemere geçiriniz ve tık sesini duyana kadar bastırınız
(ok b). Sökmek için, kancanın ortasında bulunan
yuvarlak düğmeye basınız (ok c) ve bel kayışını
dışarıya doğru çekiniz (ok d).
17 Bel kayışını sıkmak için, ok yönünde her iki taraftan
çekin (ok_a). Gevşetmek tam tersini yapın. Bel kayışı
emniyet kilidine kadar sıkılabilir (şekil_b).
18 Emniyet kemerinin yüksekliğini ayarlamak için, koltuk
arkalığının sırtındaki her iki tokayı da serbest bırakın.
Omuz kayışlarını tokalar serbest kalana kadar
kendinize doğru çekin (ok_a) ve koltuk arkalığı
halkalarına takın (ok_b). Omuz kayışlarını bezden
çıkarın (ok_c) ve en uygun halkaya (ok_d) takın, daha
sonra koltuk arkalığının sırtındaki iki tokayı da yeniden
takın (ok_e) Tokalar bir klik sesi duyulduğunda güvenli
bir şekilde takılmış olur (şek_f).
19 TENTE: takabilmek için kancaları oturma grubuna
yandan yerleştiriniz (şekil a) ve sırtlık arkasında yer
alan ilikler vasıtasıyla sabitleyiniz (şekil b). Tentenin
çıkartılması için: kancaları açınız ve ilikleri çözünüz.
Tentenin yukarı kaldırılması için: kendinize doğru
çekiniz; tenteyi kapatmak için: geriye doğru itiniz.
Tenteyi güneşlik şekline dönüştürebilmek için çift
başlı fermuarı açınız (şekil c) ve sırtlığın arkasındaki
ilikleri çözünüz. Tentede bebeğin en sevdiği
oyuncağın asılabileceği bir delik mevcuttur (şekil d).
20 ÖRTÜ: Örtüyü geçiriniz ve bacak dayama yerinin
altından (şekil a) ve bacak dayama yerinin yanlarından
ilikleyiniz. Bebek arabası versiyonu için, bacak dayama
yerini yukarıya kaldırınız ve örtüyü ön panelin üzerine
yerleştirerek (şekil b) tentenin düğmelerine ilikleyiniz
(şekil c).
21 Puset kullanımı için, ayak koyma yerini indirin, örtüyü
ön tutunma yerinin (şek_a) altına takın ve satın
aldığınız modele uygun olarak A, B yerine bağlayın.
22 ÖRTÜ Pliko Switch On Track On Track Modüler:
gerek Navetta XL gerekse Pliko Switch On Track
üzerinde kullanılabilir ve bunlara takılabilir. Navetta
XL’e takmak için kullanım kılavuzuna bakınız.
Pusete takmak için, bebeğin bacaklarını örtmesi için
örtüyü iç kısmına yayınız (Fig. a).
Ön paneli dahil ederek geçiriniz ve düğmeleri önden
ilikleyiniz (Fig. b) örtünün içerisine, ayak dayama
yerinin altına takınız (Fig. c).
23 YAĞMUR TENTESİ: yağmur tentesini pusetin
üzerine yerleştirin (şek_a) ve yan iki halkayı da askı
Page 51

- 51 -
düğmelerinin üzerine geçirin (şek_b).
24 Lastik halkayı arka (şek_a) veya ön (şek_b) dik
parçalara takarak koltuk konumuna göre bağlayın.
25 ARKA ZEMİN: annenin ufak seviye farklılıklarını
aşmasını kolaylaştırır (şekil a) ve ayrıca ikinci bebeğin
taşınmasına yardımcı olur (şekil b). bebek arabasını iki
bebekle kullanabilmek için, arabayı fren konumuna
getiriniz, daha küçük olan çocuğu oturma grubuna
yerleştiriniz ve emniyet kemerini takınız (1). Tutacakları
kavrayınız (2) ve ikinci çocuğu basamağa çıkartınız (3).
26 KAPATMA: Bebe koltuğu olmaksızın, bebe koltuğu
anneye doğru veya dışarıya doğru çevrilmiş
konumdayken gerçekleştirilebilir. Bebe koltuğunun
anneye doğru çevrilmiş olması halinde: kapatmadan
önce sırt dayanağını tamamen aşağıya indiriniz; bebe
koltuğunun yola doğru çevrilmiş olması halinde:
kapatmadan önce sırt dayanağını yukarıya kaldırınız
ve kapandığında aşağıya indiriniz. Kapatmak için
tekerlekleri sabit hale getiriniz, takılı olması halinde
tenteyi kapatınız.
Kulpların iki kolunu birer birer kaldırınız ve aşağıya
doğru iterek yan boruların kilidini açınız (şekil a-b),
ortadaki kulpu emniyet kancaları kapanıncaya kadar
(şekil d) yukarıya doğru çekiniz (şekil c).
27 TAŞINMASI: merkezi tutacak vasıtasıyla taşınabilir,
bunu yaparken ön tekerleklerinin sabit konumda
olması gerekir (şekil a) veyahut da yan tutacak
vasıtasıyla taşınması mümkündür (şekil b).
28 KILIFTAN ÇIKARILMASI: Kılıfı ayaklıktan çıkarınız (şekil
a) kol dayama yerlerindeki kılıf bağlantılarının tümünü
çıkarınız (şekil b), sırt dayanağının yan taraflarında
bulunan iki düğmeyi çıkarınız (şekil c) ve bacak ayırıcı
kemeri üst kısımdan (bebe koltuğunun altından
iterek) çıkarınız (şekil d).
GANCIOMATIC SYSTEM
29 Ganciomatik System, “Navetta veyahut da Primo
Nido” port-bebenin, “Primo Viaggio” araba koltuğu ile
“Pliko Switch” taşıma koltuğunun bebek arabasında
yer alan “Ganciomatic” zemine hızlı ve kolay bir
şekilde takılabilmesine olanak sağlayan bir sistemdir
: Bunları yerleştirilirler ve iki elle birden bu ürünler
üzerine, “klik” sesini duyana kadar, bastırmak suretiyle
takılırlar.
Muhtelif ürünleri ilave ederken takmadan veyahut da
bunları çıkartmadan, her zaman için, freni devreye
alınız (ilgili kılavuz kitapçıklara bakınız).
Bebeği taşıyıcı aksamın sağlıklı şekilde takılmış
olduğundan emin olunuz.
AKSESUARLAR
30 BORSA. Bebek arabasına takılabilir bebeğin alt
değişimi için gerekli döşekli “Alt Değiştirme Çantası”.
SERİ NUMARALARI
31 Pliko Switch ürün üretim tarihindeki bilgileri
vermektedir.
_ Ürün adı, üretim tarihi, koltuğun (şek_a) ve arabanın
(şek_b) seri numarası.
Bu bilgiler herhangi bir şikâyet için gereklidir.
TEMİZLİK VE BAKIM
ÜRÜNÜN BAKIMI ; atmosferik etkenlerden koruyunuz
: bu ürünün, su, yağmur, kar gibi atmosferik
etkenlerden muhafaza edilmesi gerekir; uzun süreli
güneşe maruz kalınması halinde bazı aksamda renk
değişimleri görülebilir; söz konusu ürünü kuru bir
mekanda muhafaza ediniz.
ŞASE TEMİZLİĞİ : plastik aksamları periyodik olarak
nemli biz bezle, herhangi b,ir solvent veyahut
da benzeri mamul kullanmaksızın temizleyiniz;
metal kısımların paslanmaya karşı korunabilmesi
için kuru muhafaza edilmesi gerekmektedir; tüm
müteharrik aksamın (ayar mekanizmaları, kancalama
mekanizmaları, vs.) temiz olmasını sağlayınız, toz ve
kum gibi maddelerle kaplanmasına mahal vermeyiniz,
gerektiği takdirle ince yağ ile yağlayınız.
YĞMURLUĞUN TEMİZLİĞİ : yağmurluğu, bir sünger ve
sabunlu su ile deterjan kullanmaksızın temizleyiniz.
KUMAŞ KISIMLARIN TEMİZLİĞİ : kumaş zeminlerin
tozdan arındırılması amacıyla fırça kullanınız ve
azami 30° derece ısıdaki suda yıkayınız; sıkmayınız;
klorlu maddeler ile kaynatmayınız; ütülemeyiniz;
kuru temizleme yapmayınız, leke çıkartıcı solventler
kullanmayınız, döner santrifüjlü tambur kurutucularda
kurutmayınız.
PEG-PÉREGO S.p.A.
Peg-Pérego S.p.A. ISO 9001 sertifikasına
haizdir. Söz konusu sertifikalandırma,
Kullanıcılara, Şirketin şeffaf ve güvenilir
çalışmaları konusunda garanti sunmaktadır.
Peg Prego, bu belgede belirtilen ürün
özellikleri üzerinde, teknik ve ticari
gereksinimlere istinaden, arzuladığı zaman değişiklik
yapabilme hakkını saklı tutar.
Peg Prego, gereksinimlerine en iyi şekilde verebilmek
için tüm Müşterilerinin emrine amadedir. Bu nedenle
de Müşterilerimizin fikir ve görüşlerini almak bizler
için gayet önemlidir. Ürünümüzü kullandıktan sonra,
aşağıda belirtilen internet sitemizde bulabileceğiniz
“Müşteri Memnuniyet Formunu” doldurmak suretiyle
muhtemel görüş ve önerilerinizi bizlere bildirebilirseniz
Sizlere müteşekkir oluruz : www.pegperego.com
PEG-PÉREGO TEKNİK BAKIM SERVİSİ
Ürünün herhangi bir aksam veyahut da parçasının
kaybolması veyahut da hasarlanması halinde,
kesinlikle ve yalnızca orijinal Peg Perego yedek
parçalarını kullanınız. Her türlü onarım, değiştirme,
ürün bilgisi ve orijinal yedek parça ve aksesuar siparişi
için, Lütfen varsa ürün seri numarasını bildirerek Peg
Perego Satış Sonrası Servis ile iletişim kurun.
Tel. 0039/039/60.88.213 Fax 0039/039/33.09.992
e-mail assistenza@pegperego.it İnternet sitesi
www.pegperego.com
Page 52

- 52 -
ΕL_Eλληνικά
Σας ευχαριστούμε που επιλέξατε ένα προϊόν Peg-
Pérego.
ΠΡΟΕΙΔΟΠΟΙΗΣΗ
_ ΣΗΜΑΝΤΙΚΟ: διαβάστε προσεκτικά τις οδηγίες
αυτές και διατηρήστε τις για μελλοντική χρήση.
Η ασφάλεια του παιδιού θα μπορούσε να τεθεί σε
κίνδυνο, εάν δεν ακολουθήσετε τις οδηγίες αυτές.
_ Το προϊόν αυτό έχει σχεδιαστεί για τη µεταφορά 1
παιδιού στο κάθισµα και 1 παιδιού σε όρθια θέση
στην πίσω πλατφόρµα.
_ Μην χρησιμοποιείτε το προϊόν αυτό για έναν αριθμό
καθήμενων μεγαλύτερο από αυτόν που προβλέπεται
από τον κατασκευαστή.
_ Το Πλαίσιο-Pliko Switch + κάθισµα-Pliko Switch
εγκεκριµένο για παιδιά από τη γέννηση, έως 15
kg βάρος στο κάθισµα. Η πίσω πλατφόρµα είναι
εγκεκριµένη για τη µεταφορά ενός δεύτερου παιδιού
µε βάρος έως 20 kg.
_ Ο σκελετός-Pliko Switch έχει σχεδιαστεί για να
χρησιμοποιηθεί σε συνδυασμό με τα προϊόντα
Peg-Pérego Ganciomatic: σκελετός-Pliko Switch
+ κάθισμα αυτοκινήτου “Primo Viaggio” (ομάδα
0+) έχει εγκριθεί για παιδιά από τη γέννηση, έως
13 Kg βάρος∙σκελετός-Pliko Switch + πορτ-μπεμπέ
“Navetta” ή “Primonido” έχει εγκριθεί για παιδιά από
τη γέννηση, έως 10 kg βάρος. Όταν χρησιμοποιείται
με “Navetta” και “Primonido”, μην χρησιμοποιείτε την
πίσω πλατφόρμα.
_ Πριν από τη χρήση βεβαιωθείτε ότι τα προϊόντα
Peg-Pérego Ganciomatic είναι σωστά συνδεμένα στο
προϊόν.
_ Μπορεί να είναι επικίνδυνο, εάν αφήσετε το παιδί σας
χωρίς επίβλεψη.
_ Χρησιμοποιείτε πάντα τη ζώνη ασφαλείας πέντε
σημείων, συνδέετε πάντα τη ζωνίτσα που περιβάλλει
τη μέση στη ζωνίτσα του διαχωριστικού για τα πόδια.
_ Προσέχετε ιδιαίτερα όταν εκτελείτε εργασίες
ρύθμισης των μηχανισμών (χειρολαβή, πλάτη)
παρουσία του παιδιού.
_ Ενεργοποιείτε πάντα το φρένο όταν είστε
σταματημένοι και κατά τους χειρισμούς τοποθέτησης
και εξόδου του παιδιού.
_ Οι εργασίες συναρμολόγησης, προετοιμασίας του
προϊόντος, καθαρισμού και συντήρησης πρέπει να
εκτελούνται μόνον από ενήλικες.
_ Μην χρησιμοποιείτε το προϊόν αυτό εάν παρουσιάζει
μέρη που λείπουν ή είναι σπασμένα.
_ Πριν από τη χρήση βεβαιωθείτε ότι όλοι οι μηχανισμοί
σύνδεσης είναι συνδεμένοι σωστά.
_ Μην εισάγετε τα δάχτυλα μέσα στους μηχανισμούς.
_ Κάθε φορτίο που κρεμάτε στη χειρολαβή ή στις λαβές
μπορεί να προκαλέσει την αστάθεια του προϊόντος·
ακολουθήστε τις υποδείξεις του κατασκευαστή
όσον αφορά το ανώτατο φορτίο που μπορεί να
χρησιμοποιηθεί.
_ Μην εισάγετε στο καλάθι φορτία με βάρος
μεγαλύτερο από 5 kg. Μην εισάγετε στην υποδοχή
αναψυκτικών βάρη μεγαλύτερα από αυτά που
προσδιορίζονται στην υποδοχή αναψυκτικών και
ποτέ ζεστά ροφήματα. Μην εισάγετε στις τσέπες
των κουκούλων (εάν υπάρχουν) βάρη που είναι
μεγαλύτερα από 0.2 kg.
_ Η προστατευτική μπάρα δεν έχει κατασκευαστεί για
να στηρίζει το βάρος του παιδιού· η προστατευτική
μπάρα δεν έχει σχεδιαστεί για να κρατά το παιδί στη
θέση του και δεν αντικαθιστά τη ζώνη ασφαλείας.
_ Μην χρησιμοποιείτε το προϊόν κοντά σε σκάλες ή
σκαλάκια· μην το χρησιμοποιείτε κοντά σε πηγές
θερμότητας, ελεύθερες φλόγες ή επικίνδυνα
αντικείμενα που μπορεί να φτάσει το παιδί.
_ Μπορεί να είναι επικίνδυνη η χρήση εξαρτημάτων
που δεν έχουν την έγκριση του κατασκευαστή.
_ Το προϊόν αυτό δεν είναι κατάλληλο για το jogging ή
το πατινάζ.
_ Μην χρησιμοποιείτε το προστατευτικό κάλυμμα για
τη βροχή (εάν υπάρχει) σε κλειστούς χώρους και
ελέγχετε πάντα ότι το παιδί δεν ζεσταίνεται· μην
το τοποθετείτε ποτέ κοντά σε πηγές θερμότητας
και προσέξτε τα τσιγάρα. Βεβαιωθείτε ότι το
προστατευτικό κάλυμμα για τη βροχή δεν
παρεμβάλλει με κανέναν κινούμενο μηχανισμό
που υπάρχει στο καρότσι ή στο καροτσάκι
περιπάτου·βγάζετε πάντα το προστατευτικό κάλυμμα
για τη βροχή πριν να κλείσετε το καρότσι ή το
καροτσάκι περιπάτου σας.
_ Όταν χρησιμοποιείτε το καροτσάκι περιπάτου με
δύο παιδιά, μην τα αφήνετε ποτέ μόνα τους και μην
επιτρέπετε στο δεύτερο παιδί να ανέβει επάνω στην
πίσω πλατφόρμα όταν το καροτσάκι περιπάτου είναι
άδειο.
_ Μην χρησιμοποιείτε τις λαβές αποσύνδεσης για να
μεταφέρετε ή να σηκώσετε το καροτσάκι περιπάτου
με το παιδί μέσα σ’ αυτό.
_ ΠΡΟΣΟΧΗ Μην προσθέτετε κανένα στρωματάκι.
Pliko Switch compact, το συμπαγές καροτσάκι
περιπάτου με αναστρεφόμενο κάθισμα!
Τύπος εξοπλισμένος με κουκούλα, ποδόσακο και
προστατευτικό κάλυμμα για τη βροχή.
Τύπος σπορ με κουκούλα και προστατευτικό κάλυμμα
για τη βροχή (Pliko Switch compact On Track Σπορ)
ΧΑΡΑΚΤΗΡΙΣΤΙΚΑ ΤΟΥ ΠΡΟΪΟΝΤΟΣ
_ Το προϊόν αυτό έχει προοδευτική αρίθμηση.
_ Το Pliko Switch είναι ένα καροτσάκι περιπάτου με
αντιστρεπτό κάθισμα: στραμμένο προς τη μαμά ή
προς τον δρόμο.
_ Το Pliko Switch αποτελείται από δύο στοιχεία:
ΠΛΑΙΣΙΟ-Pliko Switch και ΚΑΘΙΣΜΑ-Pliko Switch.
ΕΞΑΡΤΗΜΑΤΑ ΤΟΥ ΠΡΟΪΟΝΤΟΣ
Ελέγξτε το περιεχόμενο που υπάρχει εντός της
συσκευασίας και σε περίπτωση διαμαρτυρίας
παρακαλώ επικοινωνήστε με την Υπηρεσία
Υποστήριξης.
_ Σκελετός-Pliko Switch: καλάθι, 2 μπροστινοί
περιστρεφόμενοι ή μπλοκαρισμένοι τροχοί, 2 πίσω
τροχοί με κεντρικό φρένο με μπάρα και υποδοχή
αναψυκτικών.
_ Κάθισμα Pliko Switch: προστατευτική μπάρα,
κουκούλα, ποδόσακος, προστατευτικό κάλυμμα για τη
βροχή.
_ Κάθισμα Pliko Switch On Track Σπορ: προστατευτική
μπάρα, κουκούλα, προστατευτικό κάλυμμα για τη
βροχή.
ΟΔΗΓΙΕΣ ΧΡΗΣΗΣ
1 ΠΡΟΣΤΑΣΙΑ ΣΥΣΚΕΥΑΣΙΑΣ: πριν να ανοίξετε
το πλαίσιο χρειάζ εται να αφαιρέσετε τις τάπες
προστασίας (εικ_a), διαφορετικά το πλαίσιο δεν θα
ανοίξει σωστά (εικ._b).
2 ΑΝΟΙΓΜΑ: σηκώστε μαζί τους μοχλούς των δύο λαβών
(εικ_a) και τραβήξτε προς τα πάνω μέχρι να ανοίξει
ο σκελετός (εικ_b). Ελέγξτε το σωστό άνοιγμα: οι
πλαϊνοί σωλήνες πρέπει να είναι συνδεμένοι μεταξύ
τους (εικ_c).
3 ΣΥΝΑΡΜΟΛΟΓΗΣΗ ΜΠΡΟΣΤΙΝΩΝ ΤΡΟΧΩΝ: ελέγξτε
αρχικά ότι υπάρχει η ροδέλα, όπως στην εικόνα,
κατεβάστε το μοχλό των δύο μπροστινών τροχών
(εικ_a), περάστε τον τροχό μέχρι να ακουστεί το κλικ
(εικ_b).
4 ΣΥΝΑΡΜΟΛΟΓΗΣΗ ΠΙΣΩ Τ ΡΟΧΩΝ: περάστε τους
Page 53

- 53 -
τροχούς μέχρι να ακουστεί το κλικ (εικ_a) και ελέγξτε
τη σωστή σύνδεση (εικ_b).
5 Τέλος συνδέστε το κεντρικό στοιχείο επάνω στη
μπάρα φρένο με το σκελετό (εικ_a), ελέγχοντας ότι η
σύνδεση έχει γίνει σωστά (εικ_b).
6 ΣΥΝΑΡΜΟΛΟΓΗΣΗ ΚΑΛΑΘΙΟΥ: περάστε τις σχισμές
στα μπροστινά άγκιστρα (εικ_a) και στα πίσω
άγκιστρα (εικ_b).
7 ΣΥΝΑΡΜΟΛΟΓΗΣΗ ΥΠΟΔΟΧΗΣ ΑΝ ΑΨΥΚΤΙΚΩΝ:
περάστε στο άγκιστρο µέχρι να ακουστεί το
κλικ (εικ_a). Η υποδοχή αναψυκτικών µπορεί να
εφαρµοστεί και στις δύο πλευρές του πλαισίου χάρη
στο άγκιστρο που υπάρχει και στις δύο πλευρές του
πλαισίου.
8 ΡΥΘΜΙΖΟΜΕΝΕΣ ΛΑΒΕΣ: Pliko Switch compact: για να
σηκώσετε ή κατεβάσετε τις λαβές, πατήστε το κουμπί
(εικ_a) και ταυτόχρονα ρυθμίστε τις λαβές (εικ_b).
9 ΜΠΡΟΣΤΙΝΟΙ ΣΤΑΘΕΡΟΙ Ή ΠΕΡΙΣΤΡΕΦΟΜΕΝΟΙ
ΤΡΟΧΟΙ: σηκώστε τους μοχλούς για να κάνετε
σταθερούς τους τροχούς (εικ_a), κατεβάστε
τους μοχλούς να να κάνετε τους τροχούς
περιστρεφόμενους (εικ_b). Σε δύσκολα εδάφη
συνιστάται η χρήση σταθερών τροχών.
10 ΦΡΕΝΟ: πατήστε ένα μοχλό φρένο για να μπλοκάρετε
το σκελετό (εικ_a), σηκώστε για να ξεμπλοκάρετε
(εικ_b).
11 ΣΥΝΔΕΣΗ ΤΟΥ ΚΑΘΙΣΜΑΤΟΣ ΣΤΟ ΠΛΑΙΣΙΟ: το
αντιστρεπτό κάθισµα µπορεί να συνδεθεί στο πλαίσιο
στραµµένο προς τη µαµά (εικ_a) ή προς το δρόµο
(εικ_b), τοποθετήστε το στο πλαίσιο σε αντιστοιχία
µε τα σύµβολα και πατήστε προς τα κάτω και µε τα
δύο χέρια µέχρι να ακουστεί το διπλό κλικ σύνδεσης.
Βεβαιωθείτε για τη σωστή σύνδεση του καθίσµατος,
τραβώντας το προς τα πάνω πιάνοντάς το από την
προστατευτική µπάρα.
12 ΑΠΟΣΥΝΔΕΣΗ ΤΟΥ ΚΑΘΙΣΜΑΤΟΣ ΑΠΟ ΤΟ ΣΚΕΛΕΤΟ:
πατήστε τα δύο στρογγυλά κουμπιά που είναι στο
πλάι του καθίσματος (εικ_a) και ταυτόχρονα τους δύο
μοχλούς που βρίσκονται κάτω από τα μπράτσα (εικ_b)
τραβώντας προς τα πάνω το κάθισμα (εικ_c) μέχρι να
το αποσυνδέσετε.
13 ΠΡΟΣΤΑΤΕΥΤΙΚΗ ΜΠΑΡΑ: για να συνδέσετε την
προστατευτική μπάρα, συνοδεύστε τους συνδέσμους
στα μπράτσα, σπρώξτε προς το κάθισμα μέχρι να
ακουστεί το κλικ της σύνδεσης (εικ_a).
Για να αφαιρέσετε την προστατευτική μπάρα πατήστε
τα δύο κουμπιά και βγάλτε την (εικ_b). Ανοίξτε την
προστατευτική μπάρα μόνο από τη μία πλευρά για να
διευκολύνετε την είσοδο και την έξοδο του παιδιού.
14 ΠΛΑΤΗ: για να ρυθµίσετε σηκώστε τη λαβή της
πλάτης (εικ_a) και τοποθετήστε κατά την προτίµησή
σας σε µία από τις 4 θέσεις (εικ_b).
15 ΒΑΣΗ ΣΤΗΡΙΞΗΣ ΤΩΝ ΠΟΔΙΩΝ: για να την κατεβάσετε
σπρώξτε προς τα κάτω τους δύο µοχλούς και
κατεβάστε (εικ_a)·για να την σηκώσετε σπρώξτε τη
βάση στήριξης των ποδιών προς τα πάνω (εικ_b).
16 ΖΩΝΗ ΑΣΦΑΛΕΙΑΣ 5 ΣΗΜΕΙΩΝ: για να τη συνδέσετε,
περάστε τις δύο αγκράφες της ζωνούλας που
περιβάλλει τη μέση (με τιράντες συνδεμένες τόξο_a)
στη ζωνίτσα του διαχωριστικού για τα πόδια μέχρι
να ακουστεί το κλικ (τόξο_b). Για να αποσυνδέσετε,
πατήστε το στρογγυλό κουμπί που βρίσκεται κεντρικά
στην αγκράφα (τόξο_c) και τραβήξτε προς τα έξω τη
ζωνούλα που περιβάλλει τη μέση (τόξο_d).
17 Για να σφίξετε τη ζωνίτσα που περιβάλλει τη μέση
τραβήξτε, και από τις δύο πλευρές, προς τη φορά
του τόξου (βέλος_a), ενώ για να τη χαλαρώσετε
ενεργήστε προς την αντίθετη κατεύθυνση. Η ζωνίτσα
που περιβάλλει τη μέση μπορεί να σφιχτεί μέχρι το
στοπ ασφαλείας (εικ._b).
18 Για να ρυθμίσετε το ύψος των ζωνών ασφαλείας
είναι αναγκαίο να αποσυνδέσετε στο πίσω μέρος της
πλάτης τις δύο αγκράφες.
Τραβήξτε προς το μέρος σας τις τιράντες (βέλος_a)
έως ότου αποσυνδεθού ν οι αγκράφες και περάστε
τες στις κουμπότρυπες της πλάτης (βέλος_b). Βγάλτε
τις τιράντες του σάκου (βέλος_c) και βάλτε τες
στην πιο κατάλληλη κουμπότρυπα (βέλος_d). Τέλος
ξανακουμπώστε τις δύο αγκράφες πίσω από την
πλάτη (βέλος_e). Το σωστό κούμπωμα των αγκραφών
επισημαίνεται από ένα κλικ (εικ._f).
19 ΚΟΥΚΟΥΛΑ: για να τη συνδέσετε περάστε τις
υποδοχές στο κάθισµα πλευρικά (εικ_a) και
κουµπώστε την στο πίσω µέρος της πλάτης (εικ_b).
Για να αφαιρέσετε την κουκούλα: βγάλτε τις υποδοχές
και ξεκουµπώστε. Για να σηκώσετε την κουκούλα:
τραβήξτε την προς την πλευρά σας· για να κλείσετε
την κουκούλα: σπρώξτε την πίσω. Για να µετατρέψετε
την κουκούλα σε τέντα ήλιου, ανοίξτε το φερµουάρ
µε διπλό δροµέα (εικ_c) και ξεκουµπώστε την από
το πίσω µέρος της πλάτης. Η κουκούλα διαθέτει μία
σχισμή στην οποία θα κρεμάσετε το αγαπημένο του
παιχνίδι (εικ_d).
20 ΠΟΔΟΣΑΚΟΣ: φορέστε τον ποδόσακο και κουμπώστε
τον κάτω από τη βάση στήριξης των ποδιών (εικ_a)
και στο πλάι της βάσης στήριξης των ποδιών. Για τον
τύπο πολυκαρότσι σηκώστε τη βάση στήριξης των
ποδιών και τοποθετήστε τον ποδόσακο επάνω στην
προστατευτική μπάρα (εικ_b) στερεώνοντάς την με
τα κουμπιά της κουκούλας (εικ_c).
21 Για την έκδοση καροτσάκι περιπάτου χαμηλώστε το
στήριγμα ποδιών, περάστε τον ποδόσακο κάτω από
την προστατευτική μπάρα (εικ._a) και στερεώστε τον
στη βάση του μοντέλου που αγοράσατε A, B.
22 ΠΟΔΟΣΑΚΟΣ Pliko Switch On Track:
χρησιμοποιείται και συνδέεται και στο πορτ-μπεμπέ
Navetta XL και στο καροτσάκι περιπάτου Pliko
Switch On Track. Για να τον συναρμολογήσετε επάνω
στο πορτ-μπεμπέ Navetta XL, συμβουλευτείτε το
εγχειρίδιο χρήσης του.
Για να τον συναρμολογήσετε επάνω στο καροτσάκι
περιπάτου, επεκτείνετε τον ποδόσακο στο εσωτερικό
του για να περιλάβετε τα πόδια του παιδιού (Εικ. a).
Φορέστε τον περιλαμβάνοντας την προστατευτική
μπάρα ενώστε τα κουμπιά μπροστά (Εικ. b) περάστε
κάτω από τη βάση στήριξης των ποδιών στον
ποδόσακο (Εικ. c).
23 ΠΡΟΣΤΑΤΕΥΤΙΚΟ ΚΑΛΥΜΜΑ ΓΙΑ ΤΗ ΒΡΟΧΗ:
τοποθετήστε το προστατευτικό κάλυμμα για τη
βροχή στο καροτσάκι περιπάτου (εικ._a) και περάστε
τις δύο πλάγιες κουμπότρυπές του στα κουμπιά της
κουκούλας (εικ._b).
24 Στερεώστε το προστατευτικό κάλυμμα για τη βροχή
δεσμεύοντας το λάστιχο στα πίσω στηρίγματα (εικ._a)
ή στα πρόσθια (εικ._b) ανάλογα με τη θέση του
καθίσματος.
25 ΠΙΣΩ ΠΛΑΤΦΟΡΜΑ: διευκολύνει τη μαμά να υπερβεί
μικρές διαφορές επιπέδων (εικ_a) και να μεταφέρει
το δεύτερο παιδί (εικ_b). Για να χρησιμοποιήσετε το
καροτσάκι περιπάτου με τα δύο παιδιά, φρενάρετε το
καροτσάκι περιπάτου, τοποθετήστε το πιο μικρό παιδί
στο κάθισμα και συνδέστε τη ζώνη ασφαλείας (1).
Πιάστε τα χερούλια (2) και ανεβάστε το δεύτερο παιδί
στην πλατφόρμα (3).
26 ΚΛΕΙΣΙΜΟ: μπορεί να γίνει χωρίς το κάθισμα, με το
κάθισμα στραμμένο προς τη μαμά ή προς το δρόμο.
Εάν το κάθισμα είναι στραμμένο προς τη μαμά: πριν
να το κλείσετε, κατεβάστε τελείως την πλάτη·εάν το
κάθισμα είναι γυρισμένο προς το δρόμο: πριν να το
κλείσετε σηκώστε την πλάτη και αφού το κλείσετε,
κατεβάστε την. Για να το κλείσετε σταθεροποιήστε
τους μπροστινούς τροχούς, κλείστε την κουκούλα εάν
είναι τοποθετημένη.
Σηκώστε έναν έναν τους δύο μοχλούς των λαβών
μέχρι να ακουστεί το κλικ και σπρώξτε προς τα
κάτω για να ξεμπλοκάρετε τους πλευρικούς σωλήνες
(εικ_a-b), τραβήξτε προς τα πάνω την κεντρική λαβή
(εικ_c) μέχρι να κλείσετε τους γάντζους ασφαλείας
Page 54

- 54 -
(εικ_d).
27 ΜΕΤΑΦΟΡΑ: μπορείτε να το μεταφέρετε από την
κεντρική λαβή, έχοντας τους μπροστινούς τροχούς
σταθεροποιημένους (εικ_a) ή από την πλευρική λαβή
(εικ_b).
28 ΔΥΝΑΤΟΤΗΤΑ ΑΦΑΙΡΕΣΗΣ ΤΗΣ ΕΠΕΝΔΥΣΗΣ: βγάλτε
το σάκο από την πλατφόρμα (εικ_a), αποσυνδέστε
τους συνδέσμους του σάκου από τα μπράτσα (εικ_b)
ξεκουμπώστε από τα πλαϊνά της πλάτης τα δύο
κουμπιά (εικ_c) και τραβήξτε από ψηλά (σπρώχνοντας
κάτω από το κάθισμα) τη ζωνούλα διαχωριστικού των
ποδιών (εικ_d).
GANCIOMATIC SYSTEM
29 Ganciomatic System είναι το πρακτικό και γρήγορο
σύστημα που σας επιτρέπει να συνδέσετε το πορτ-
μπεμπέ Navetta ή PrimoNido, το κάθισμα αυτοκινήτου
Primo Viaggio και το κάθισμα Pliko Switch στo
σκελετό με μία μόνο κίνηση: τοποθετήστε τα και
πατήστε επάνω στο προϊόν και με τα δύο χέρια μέχρι
να ακουστεί το κλικ.
Ενεργοποιείτε πάντα το φρένο του σκελετού ή
του καροτσιού περιπάτου πριν να συνδέσετε και
αποσυνδέσετε τα προϊόντα (συμβουλευτείτε τα
σχετικά εγχειρίδια οδηγιών).
Ελέγξτε ότι το εξάρτημα μεταφοράς του παιδιού έχει
συνδεθεί σωστά.
ΕΞΑΡΤΗΜΑΤΑ
30 BORSA (Τσάντα Αλλαξιέρα ). Τσάντα με στρωματάκι
για την άλλαγμα της πάνας του μωρού, συνδεόμενη
στο καροτσάκι περιπάτου.
SERIAL NUMBER
31 Το Pliko Switch αναγράφει πληροφορίες σχετικά με
την ημερομηνία παραγωγής του.
_ Όνομα του προϊόντος, ημερομηνία παραγωγής
και αριθμός σειράς του καθίσματος , serial number
(εικ._a) και του καλαθιού (εικ._b).
Αυτές οι πληροφορίες είναι απαραίτητες σε
περίπτωση παραπόνων.
ΚΑΘΑΡΙΣΜΟΣ ΚΑΙ ΣΥΝΤΗΡΗΣΗ
ΣΥΝΤΗΡΗΣΗ ΤΟΥ ΠΡΟΪΟΝΤΟΣ: προστατέψτε το από
τους ατμοσφαιρικούς παράγοντες: νερό, βροχή ή
χιόνι· η συνεχής και παρατεταμένη έκθεση στον ήλιο
θα μπορούσε να προκαλέσει αλλαγές στο χρώμα
πολλών υλικών· φυλάξτε το προϊόν αυτό σε ξηρό
χώρο.
ΚΑΘΑΡΙΣΜΟΣ ΤΟΥ ΣΚΕΛΕΤΟΥ: Περιοδικά καθαρίζετε
τα πλαστικά μέρη με ένα υγρό πανί χωρίς να
χρησιμοποιείτε διαλυτικά ή άλλα παρόμοια προϊόντα·
κρατήστε στεγνά όλα τα μεταλλικά μέρη για να μη
σκουριάσουν· κρατήστε καθαρά όλα τα κινούμενα
μέρη (μηχανισμοί ρύθμισης, μηχανισμοί σύνδεσης,
τροχοί…) από σκόνη ή άμμο και εάν χρειαστεί,
λιπάνετέ τα με ελαφρύ λάδι.
ΚΑΘΑΡΙΣΜΟΣ ΤΟΥ ΠΡΟΣΤΑΤΕΥΤΙΚΟΥ ΚΑΛΥΜΜΑΤΟΣ
ΓΙΑ ΤΗ ΒΡΟΧΗ: πλύνετε με ένα σφουγγάρι
και σαπουνισμένο νερό, χωρίς τη χρήση
απορρυπαντικών.
ΚΑΘΑΡΙΣΜΟΣ ΤΩΝ ΥΦΑΣΜΑΤΙΝΩΝ ΜΕΡΩΝ:
βουρτσίστε τα μέρη από ύφασμα για να
απομακρύνετε τη σκόνη και πλύνετε στο χέρι σε
θερμοκρασία 30° το ανώτερο· μην τα στύβετε· μην
λευκαίνετε με χλώριο· μην τα σιδερώνετε· μην κάνετε
στεγνό καθάρισμα· μην αφαιρείτε τους λεκέδες με
διαλυτικά και μην στεγνώνετε σε στεγνωτήριο με
περιστροφικό κύλινδρο.
PEG-PÉREGO S.p.A.
Η Peg-Pérego S.p.A. διαθέτει
πιστοποίηση ΙSO 9001. Η πιστοποίηση
παρέχει στους πελάτες και τους
καταναλωτές την εγγύηση διαφάνειας
και εµπιστοσύνης στον τρόπο µε τον
οποίο εργάζεται η εταιρία.
Η Peg-Pérego θα μπορεί να επιφέρει ανά πάσα στιγμή
τροποποιήσεις στα μοντέλα που περιγράφονται
στην παρούσα δημοσίευση, για λόγους τεχνικής ή
εμπορικής φύσης.
Η Peg-Pérego είναι στη διάθεση των Καταναλωτών
της για να ικανοποιήσει όσο το δυνατόν καλύτερα
όλες τις απαιτήσεις τους. Για το λόγο αυτό, για
μας είναι εξαιρετικά σημαντικό και πολύτιμο
να γνωρίζουμε τη γνώμη των Πελατών μας.
Θα σας είμαστε λοιπόν ευγνώμονες εάν, αφού
χρησιμοποιήσετε ένα προϊόν μας, συμπληρώσετε το
ΕΡΩΤΗΜΑΤΟΛΟΓΙΟ ΙΚΑΝΟΠΟΙΗΣΗΣ ΚΑΤΑΝΑΛΩΤΗ,
επισημαίνοντας ενδεχόμενες παρατηρήσεις ή
υποδείξεις, που θα βρείτε στην ιστοσελίδα μας στο
διαδίκτυο. www.pegperego.com
ΥΠΗΡΕΣΙΑ ΥΠΟΣΤΗΡΙΞΗΣ PEG-
PÉREGO
Εάν τυχόν χαθούν ή καταστραφούν μέρη του
μοντέλου, χρησιμοποιήστε μόνον γνήσια
ανταλλακτικά Peg-Pérego. Για τυχόν επισκευές,
αντικαταστάσεις, πληροφορίες σχετικά με τα
προϊόντα, την πώληση γνήσιων ανταλλακτικών
και εξαρτημάτων, επικοινωνήστε με την Υπηρεσία
Υποστήριξης Peg Perego υποδεικνύοντας, αν υπάρχει,
τον αριθμό σειράς του ( serial number ) .
τηλ. 0039/039/60.88.213 fax 0039/039/33.09.992
e-mail assistenza@pegperego.it ιστοσελίδα internet
www.pegperego.com
Page 55

- 55 -
PEG PEREGO SpA
Via De Gasperi, 50
20043 Arcore (MI) Italy
www.pegperego.com
ΠΑΙΔΙΚΑ ΕΙΔΗ ΒΡΕΦΑΝΑΠΤΥΞΗΣ ΚΑΙ ΠΑΙΧΝΙΔΙΑ ΕΓΓΥΗΣΗ
Η PEG – PEREGO εγγυάται για τυχόν εργοστασιακά ελαττώματα των προιόντων της για διάστημα έξι
μηνών από την ημερομηνία αγοράς. Η προσκόμιση της ανάλογης ταμειακής απόδειξης αγοράς είναι
απαραίτητη. Εξαιρούνται της εγγύγησης οι επαναφορτιζόμενες μπαταρίες και οι μετασχη-ματιστές
παιχνιδιών. (βλ. αναλυτικές οδηγίες χρήσεως παιχνιδιών).
Η παρούσα εγγύηση ισχύει μόνον εφ’ όσον το προιόν χρησιμοποιείται σωστά και βάσει των οδηγιών
χρήσεως. Ο κατασκευαστής και οι εντεταλμένοι συνεργάτες του διατηρούν το δικαίωμα τεχνικού
ελέγχου.
Ο κατασκευαστής δεν μπορεί να θεωρηθεί υπεύθυνος εφ’ όσον:
• Δεν τηρηθούν οι ανάλογες οδηγίες χρήσεως του κάθε προιόντος.
• Καταστραφεί τυχαία το προιόν ή προκληθούν βλάβες από κακή χρήση αυτού.
• Υπάρξει τεχνική παρέμβαση ξένου προς την εταιρεία μας τεχνικού, πράγμα το οποίο απαγορεύεται
και αποτελεί κίνδυνο για την ασφάλεια του παιδιού.
• Φυσιολογική φθορά του προιόντος.
Διατηρείτε την εγγύηση και τις οδηγίες χρήσεως και για μελλοντική χρήση.
ΕΓΓΥΗΣΗ
ΟΝΟΜΑΤΕΠΩΝΥΜΟ ΑΓΟΡΑΣΤΟΥ : ........................................................................................
ΔΙΕΥΘΥΝΣΗ : ............................................................................................................................
ΤΗΛΕΦΩΝΟ : ............................................................................................................................
ΕΙΔΟΣ ΠΡΟΙΟΝΤΟΣ : ................................................................................................................
ΚΩΔΙΚΟΣ ΠΡΟΙΟΝΤΟΣ : ..........................................................................................................
ΗΜΕΡΟΜΗΝΙΑ ΑΓΟΡΑΣ
ΣΦΡΑΓΙΔΑ ΚΑΤΑΣΤΗΜΑΤΟ
Προσοχή: Η εγγύηση ισχύει μονο εφ’ όσον εχει συμπληρωθεί και σφραγισθεί από τον πωλητή η
ημερομηνία αγοράς. Ζητείστε το από το κατάστημα τη στιγμή της αγοράς. Αν χαθεί ή καταστραφεί
το απόκομμα της εγγύησης δεν μπορεί να αντικατασταθεί.
&
Page 56

PEG PEREGO S.p.A.
VIA DE GASPERI 50 20043 ARCORE MI ITALIA
tel. 0039 039 60881 fax 0039 039 615869/616454
Servizio Post Vendita - After Sale:
tel. 0039 039 6088213 fax: 0039 039 3309992
PEG PEREGO U.S.A. Inc.
3625 INDEPENDENCE DRIVE FORT WAYNE INDIANA 46808
phone 260 482 8191 fax 260 484 2940
Call us toll free: 1 800 671 1701
PEG PEREGO CANADA Inc.
585 GRANITE COURT PICKERING ONTARIO CANADA L1W3K1
phone 905 839 3371 fax 905 839 9542
Call us toll free: 1 800 661 5050
www.pegperego.com
FI001002I139
1/12/2010
pliko switch compact
 Loading...