

Page 1

IT Istruzioni d’uso
EN Instructions for use
FR Notice d’emploi
DE Gebrauchsanleitung
ES Instrucciones de uso
PT Instruções para uso
NL Gebruiksaanwijzing
DK Brugsanvisning
FI Käyttöohjeet
CZ Návod na použití
SK Návod na použitie
HU Használati útmutató
SL Navodila za uporab
RU Инструкции по пользованию
TR Kullanim klavuzu
EL Οδηγιεσ χρησεωσ
Pliko P3 Modular System
On Track
Page 2

OK
A
click
B
3
21
4
5
sx
D
X
SX
sx
DX
D
x
6
Page 3
B
A
A
B
C
B
C
A
A
B
9
8
11
10
12
NO
OK
click
7
Page 4
1
2
3
15 16
17 18
13 14
Page 5
2
1
1
2
3
23 24
19
21
20
22
Page 6
29 30
27 28
25
26
Page 7
1
2
B
A
31 32
33 34
35 36
Page 8
B
A
CLICK
1
2
3
1
2
3
1
2
3
A
B
A
39
40
41 42
37
38
Page 9
B
A
B
A
2
1
CLICK
44
4645
43
47 48
Page 10
B
A
49
51
5453
52
50
Page 11
Ganciomatic
System
GM
A
B
C
1
2
3
A
B
1
2
57
55 56
59
60
58
Page 12
B
A
click
61
63
62
66
64
65
Page 13
B
A
A
A
B
A
B
69
6867
70
71 72
Page 14
GM
Ganciomatic
System
B
A
GM
Ganciomatic
System
A
A
B
75
73 74
76
77
GM
Ganciomatic
System
78 Pliko P3+Navetta
Page 15
A
A
B
80
GM
Ganciomatic
System
79 Pliko P3+Primo Viaggio
82
3683
81
84
Page 16
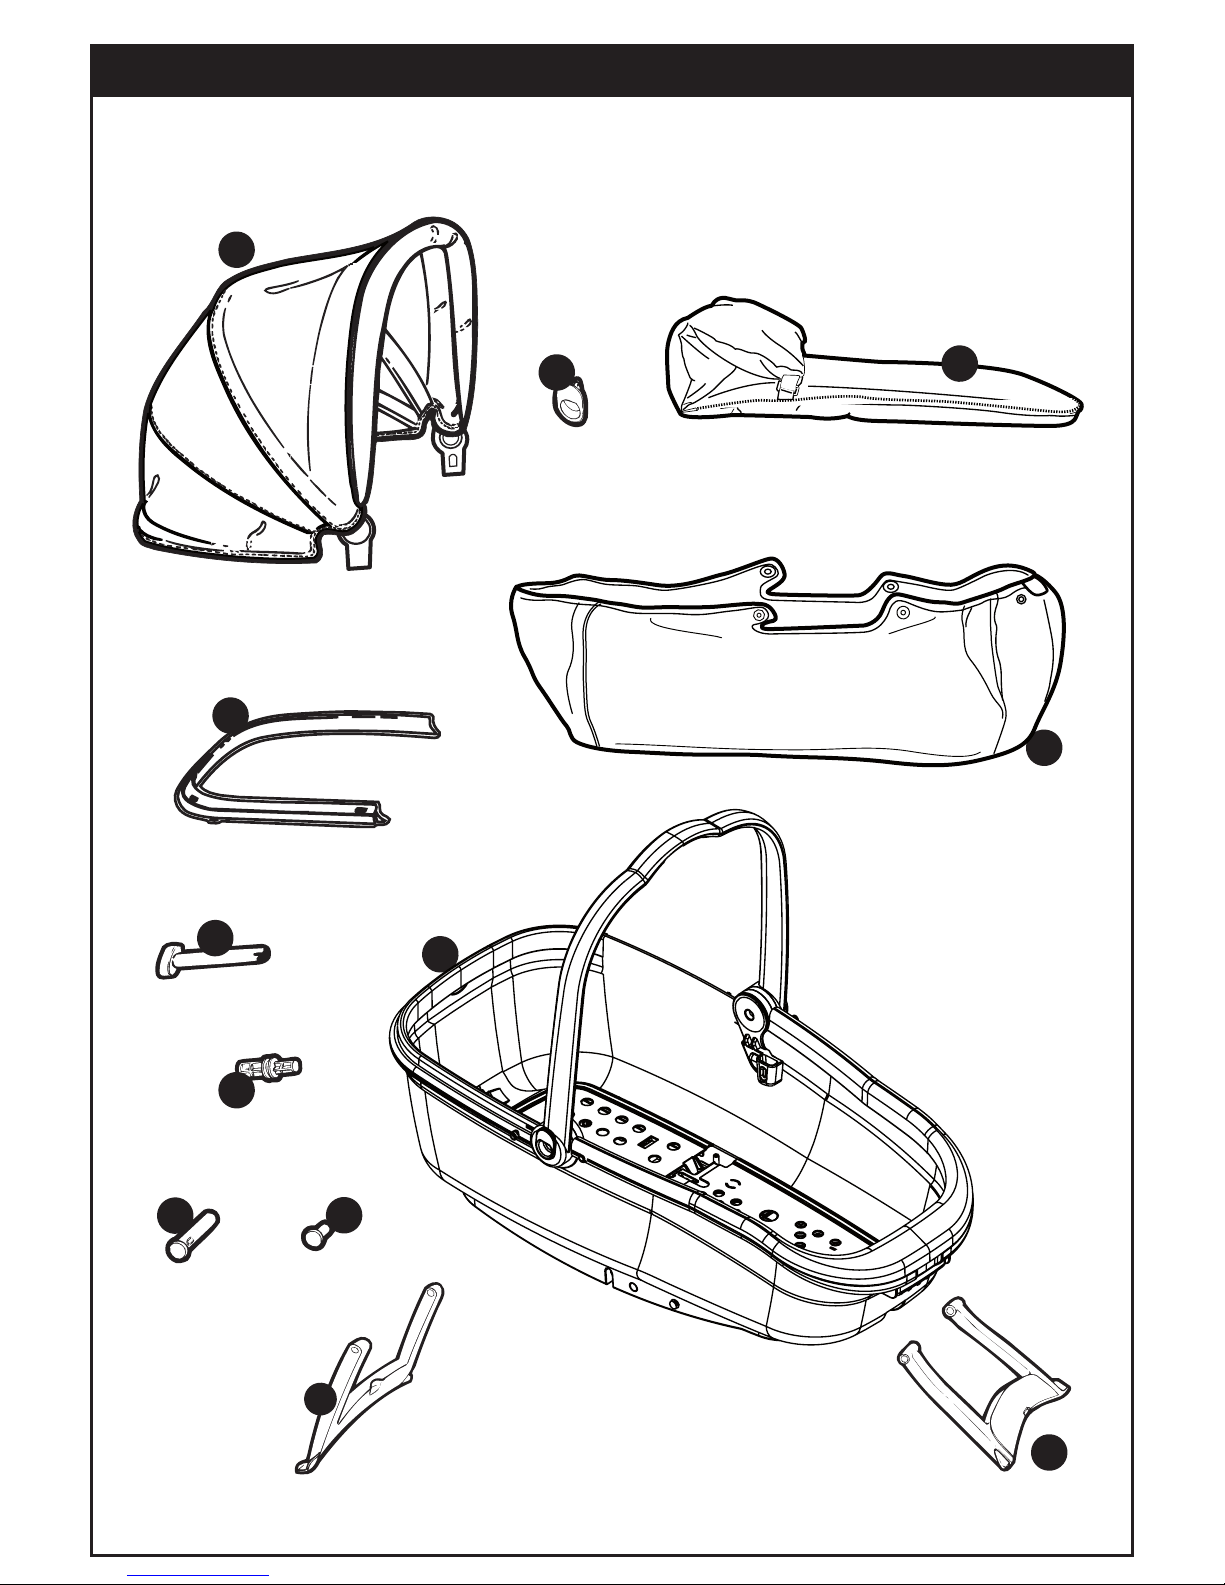
85
86 Accessory Pliko P3
87 Accessory
Kit auto
88 Accessory
89 Accessory
Page 17
Pliko P3
1
2
3
5
4
6
7
8
9
10
11
12
13
14
15
16
17
20
18
19
Pliko P3 Modular System On Track
Page 18
22
21
23
24
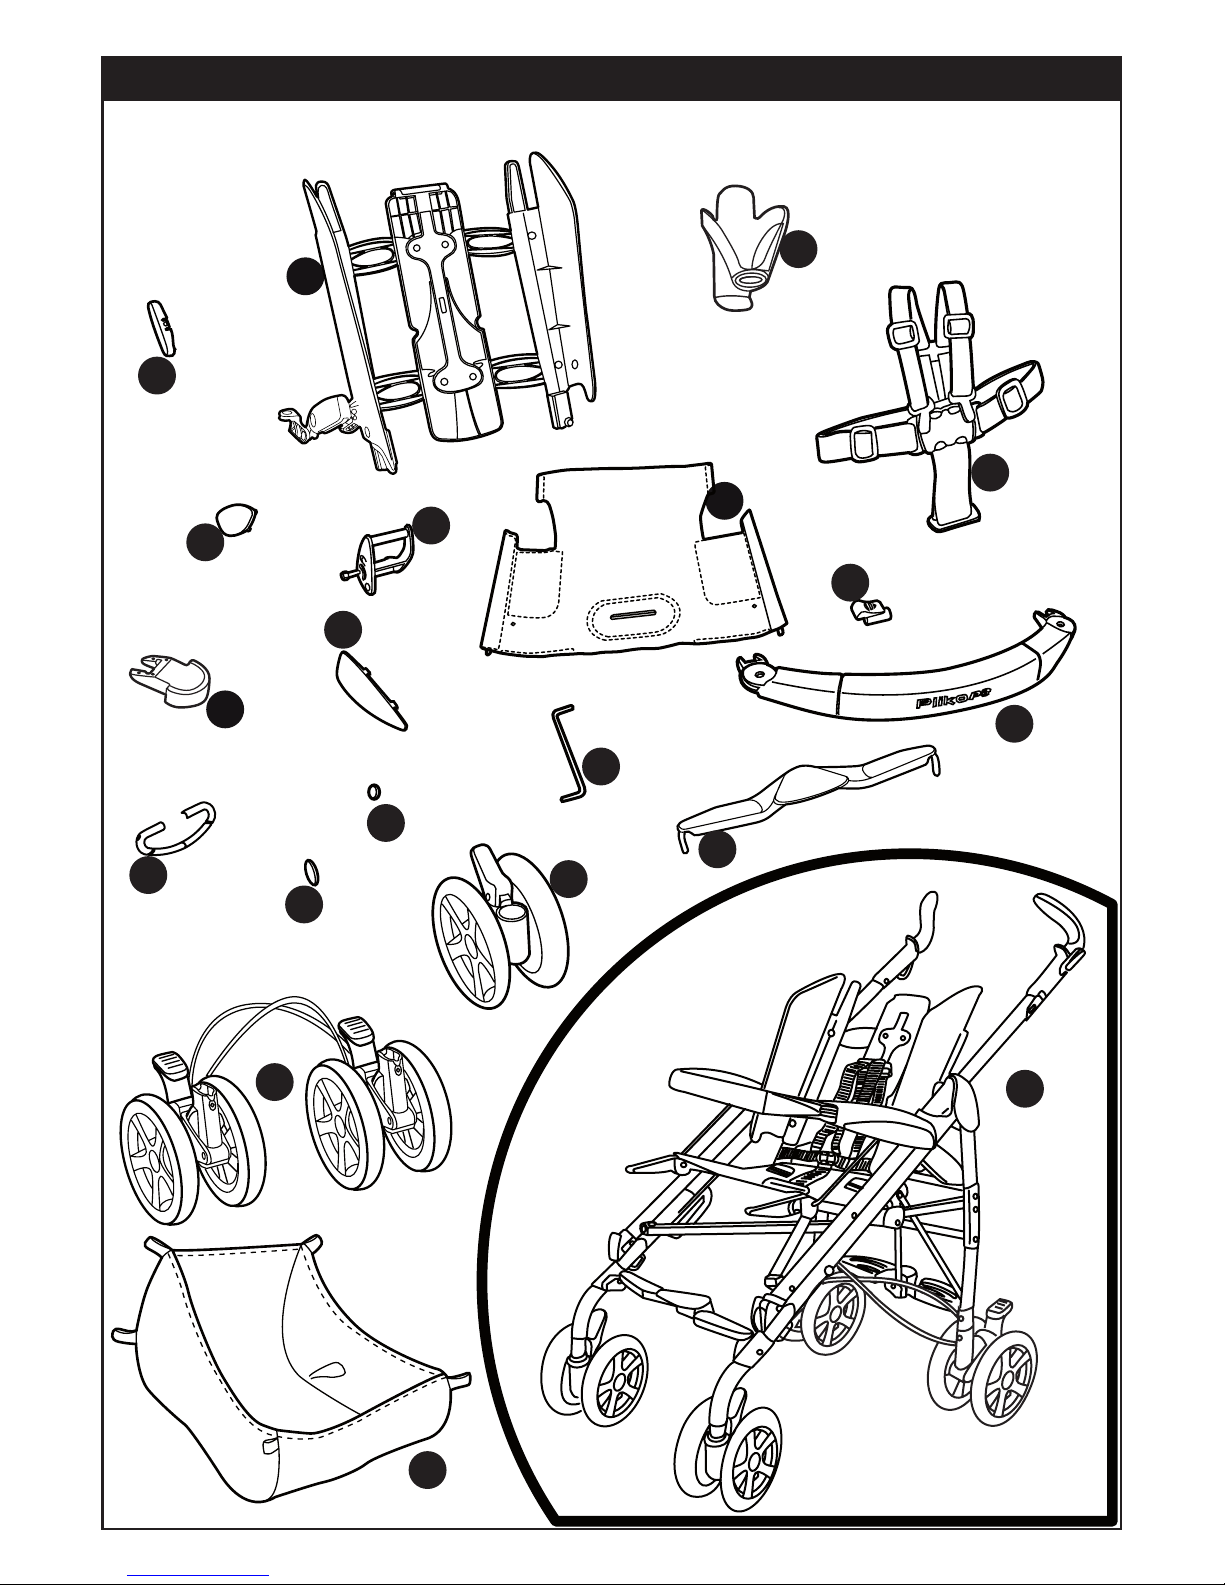
Pliko P3 On Track
1 SPST5332GP
2 ARPI0378GP
3 SAPI6430GPGR
4 dx) SPST5846DGP
4sx) SPST5846SGP
5 RSEPSN---NL63
6 dx) SPST5339DGPPEG
6 sx) SPST5339SGPPEG
7 MUCI5P14GD
8
IRSHP300-NY63RE53M
9 SPST5497GP
10 SOFF0186Z
11 SPST6378GP
12 SAPI5365GPGP
13 SAPI6097GP
14 SAPI6049GP
15 SPST6049GP
16 SPST6093GP
17 IRTR0016GP
18dx)ASPI0043DGP
18sx)ASPI0043SGP
19 SPST5352GP
20 ITP3OT00GL67
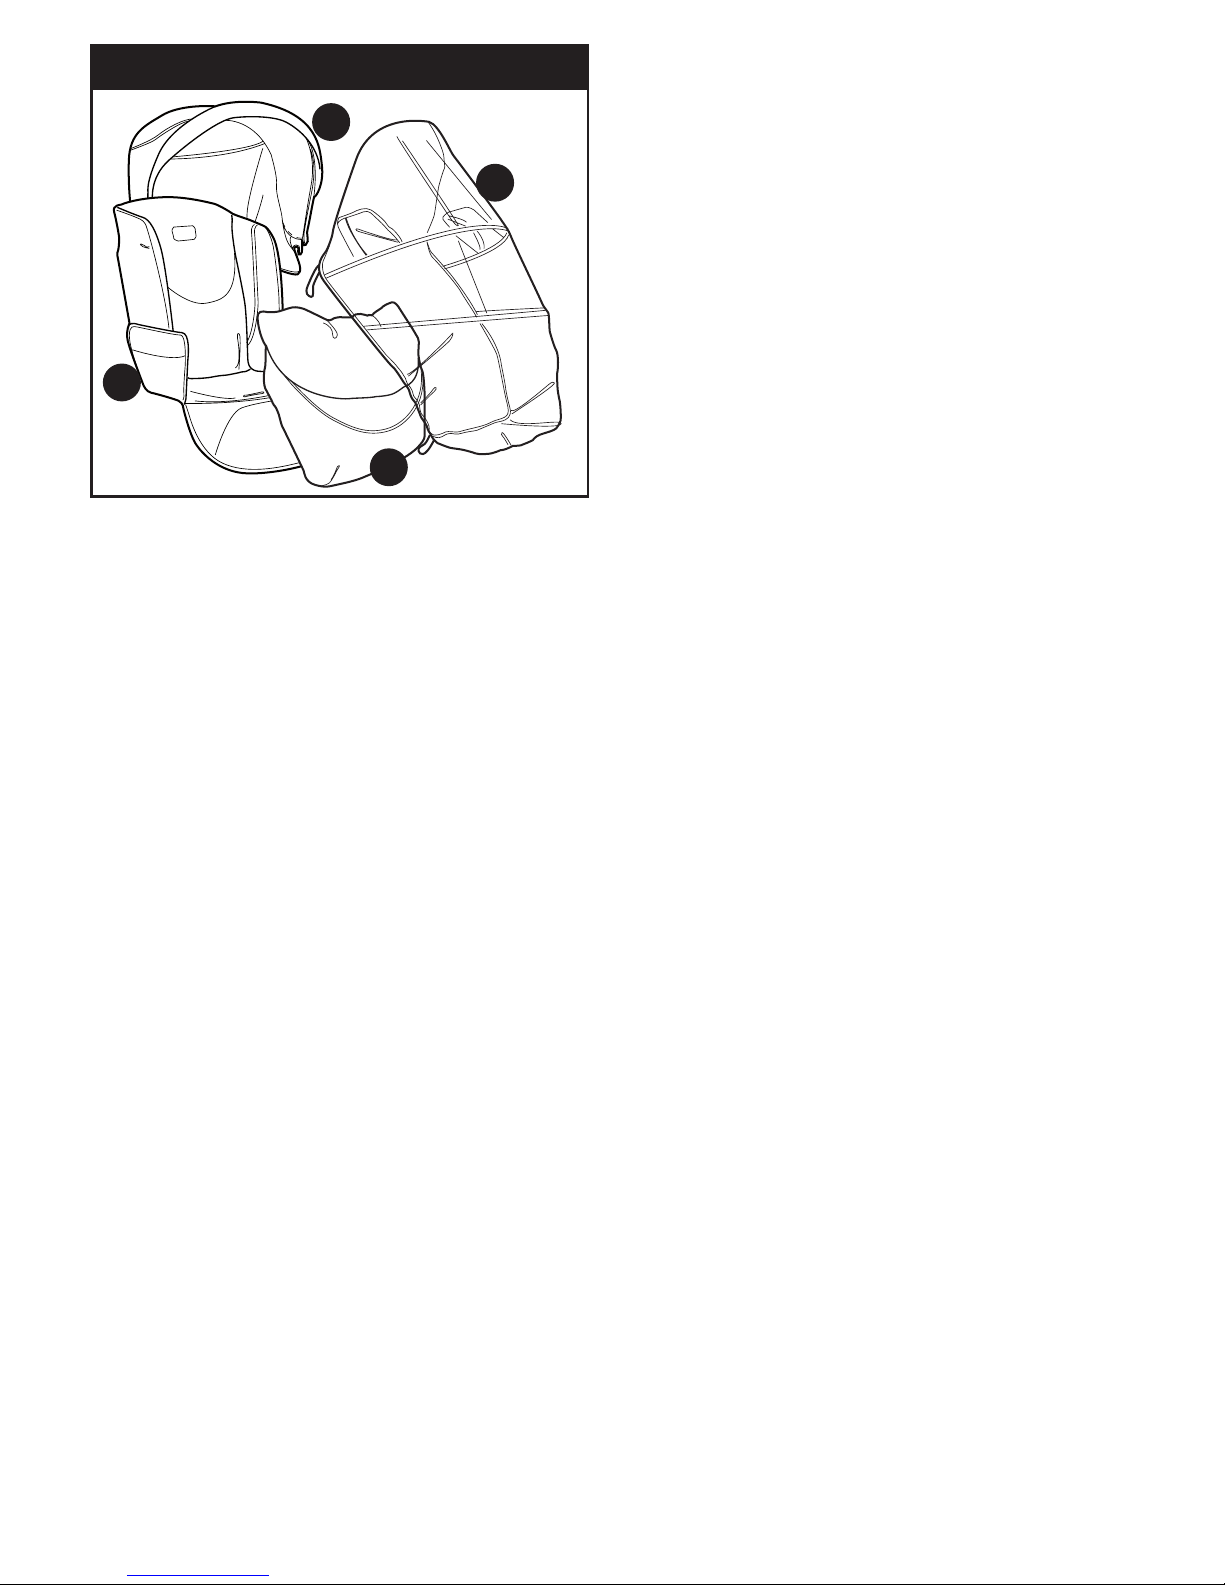
21 BSAPCO•
22 BCAPOT•
23 BCOPOT•
24 IRBELV0005N
IT• Ricambi disponibili in piú colori da specificare nella richiesta.
EN• Spare parts available in different colours to be specified
when ordering.
FR• Pièces de rechange disponibles en plusieurs couleurs à
spécifier dans la demande.
DE• Ersatzteile in mehr Farben vorhanden, die in der Anfrage
spezifiziert werden müssen.
ES• Repuestos disponibles en otros colores que se especificarán
en el pedido.
PT• Peças de reposição disponíveis em cores alternativas a serem
especificadas no pedido.
NL• Reserveonderdelen verkrijgbaar in meerdere kleuren, bij
bestelling te specificeren.
DK• Reservedele kan leveres i flere farver som bør specificeres
ved bestillingen.
FI• Varaosia saatavana eri värisinä: ilmoita väri tilauksessa.
CZ• U náhradních dílů, které jsou k dispozici ve více barvách, je
nutné na objednávce specifikovat příslušnou barvu.
SK• Pri náhradných dieloch, ktoré sú k dispozícii vo viacerých
farbách, je potrebné pri objednávke špecifikovať želanú
farbu.
HU• A tartalék alkatrészek különböző színekben elérhetők,
melyeket rendeléskor kell kiválasztani.
SL• Rezervni deli so na voljo v več barvah, ki jih je treba navesti
pri naročilu.
RU• Запчасти имеются различных цветов, необходимый
указать в запросе.
TR• Siparişte belirtilen değişik renklerdeki yedek parçalari
mevcuttur.
EL• Ανταλλακτικά διαθέσιμα σε διάψορα χρώματα. Προσδιορίστε
όταν παραγγείλετε.
Page 19
1
2
3
4
7
6
5
8
9
10
11
12
Navetta On Track
Page 20
• IMPORTANTE: leggere attentamente queste istruzioni e
conservarle per un futuro utilizzo.
La sicurezza del bambino potrebbe essere messa a rischio
se non si seguono queste istruzioni.
• Peg Perego potrà apportare in qualunque momento modifiche
ai modelli descritti in questa pubblicazione, per ragioni di natura
tecnica o commerciale.
Peg Perego S.p.A. è certificata ISO 9001.
La certificazione offre ai clienti e ai consumatori la
garanzia di una trasparenza e fiducia nel modo di
lavorare dell'impresa.
SERVIZIO ASSISTENZA
Se fortuitamente parti del modello vengono perse o danneggiate,
usare solo pezzi di ricambio originali Peg Perego. Per eventuali
riparazioni, sostituzioni, informazioni sui prodotti, la vendita di
ricambi originali e accessori, contatta il Servizio Assistenza PegPerego:
tel.:0039-039-60.88.213,
fax: 0039-039-33.09.992,
e-mail: assistenza@pegperego.it,
www.pegperego.com
La Peg Perego è a disposizione dei suoi Consumatori per soddisfare
al meglio ogni loro esigenza. Per questo, conoscere il parere dei ns.
Clienti, è per noi estremamente importante e prezioso. Le saremo
quindi molto grati se, dopo aver utilizzato un ns. prodotto, vorrà
compilare il QUESTIONARIO SODDISFAZIONE CONSUMATORE che
troverà in internet al seguente indirizzo: www.pegperego.com
segnalando eventuali osservazioni o suggerimenti.
PLIKO P3
• Pliko P3, grazie allo schienale removibile, può essere usato sia
in versione carrello che passeggino.
ISTRUZIONI D’USO
APERTURA
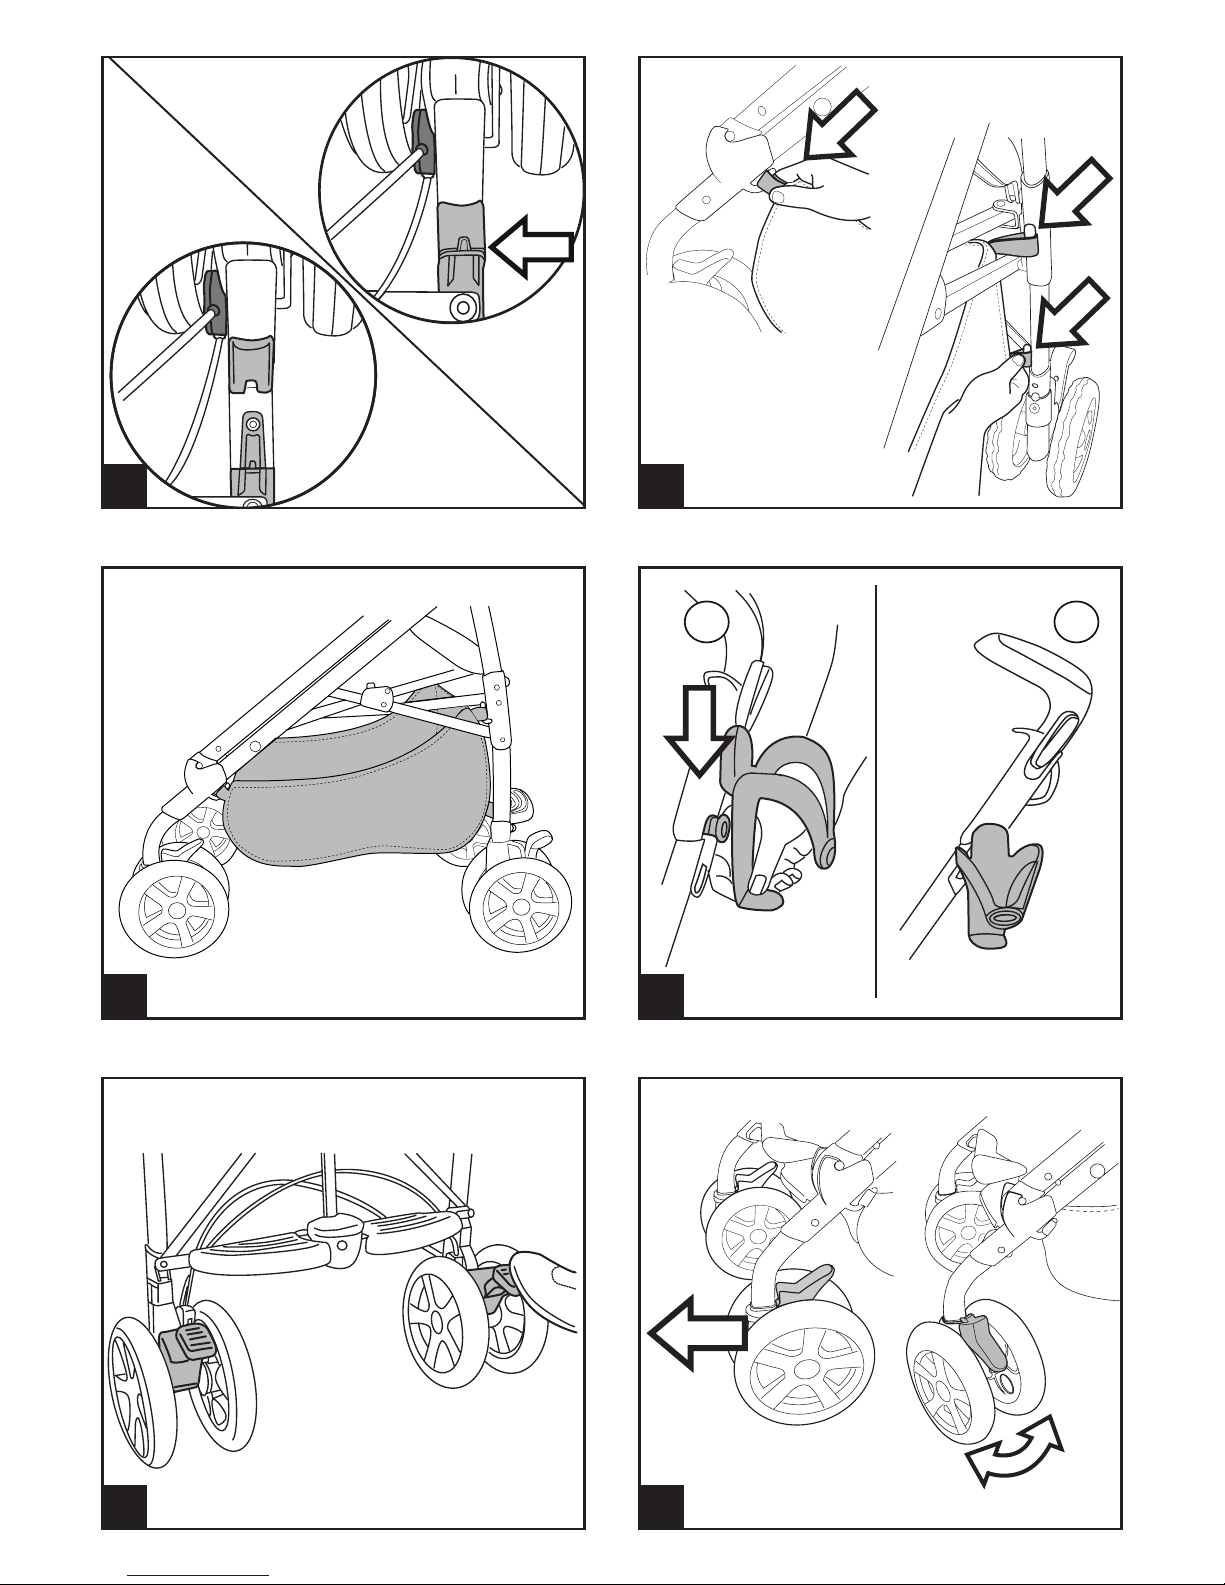
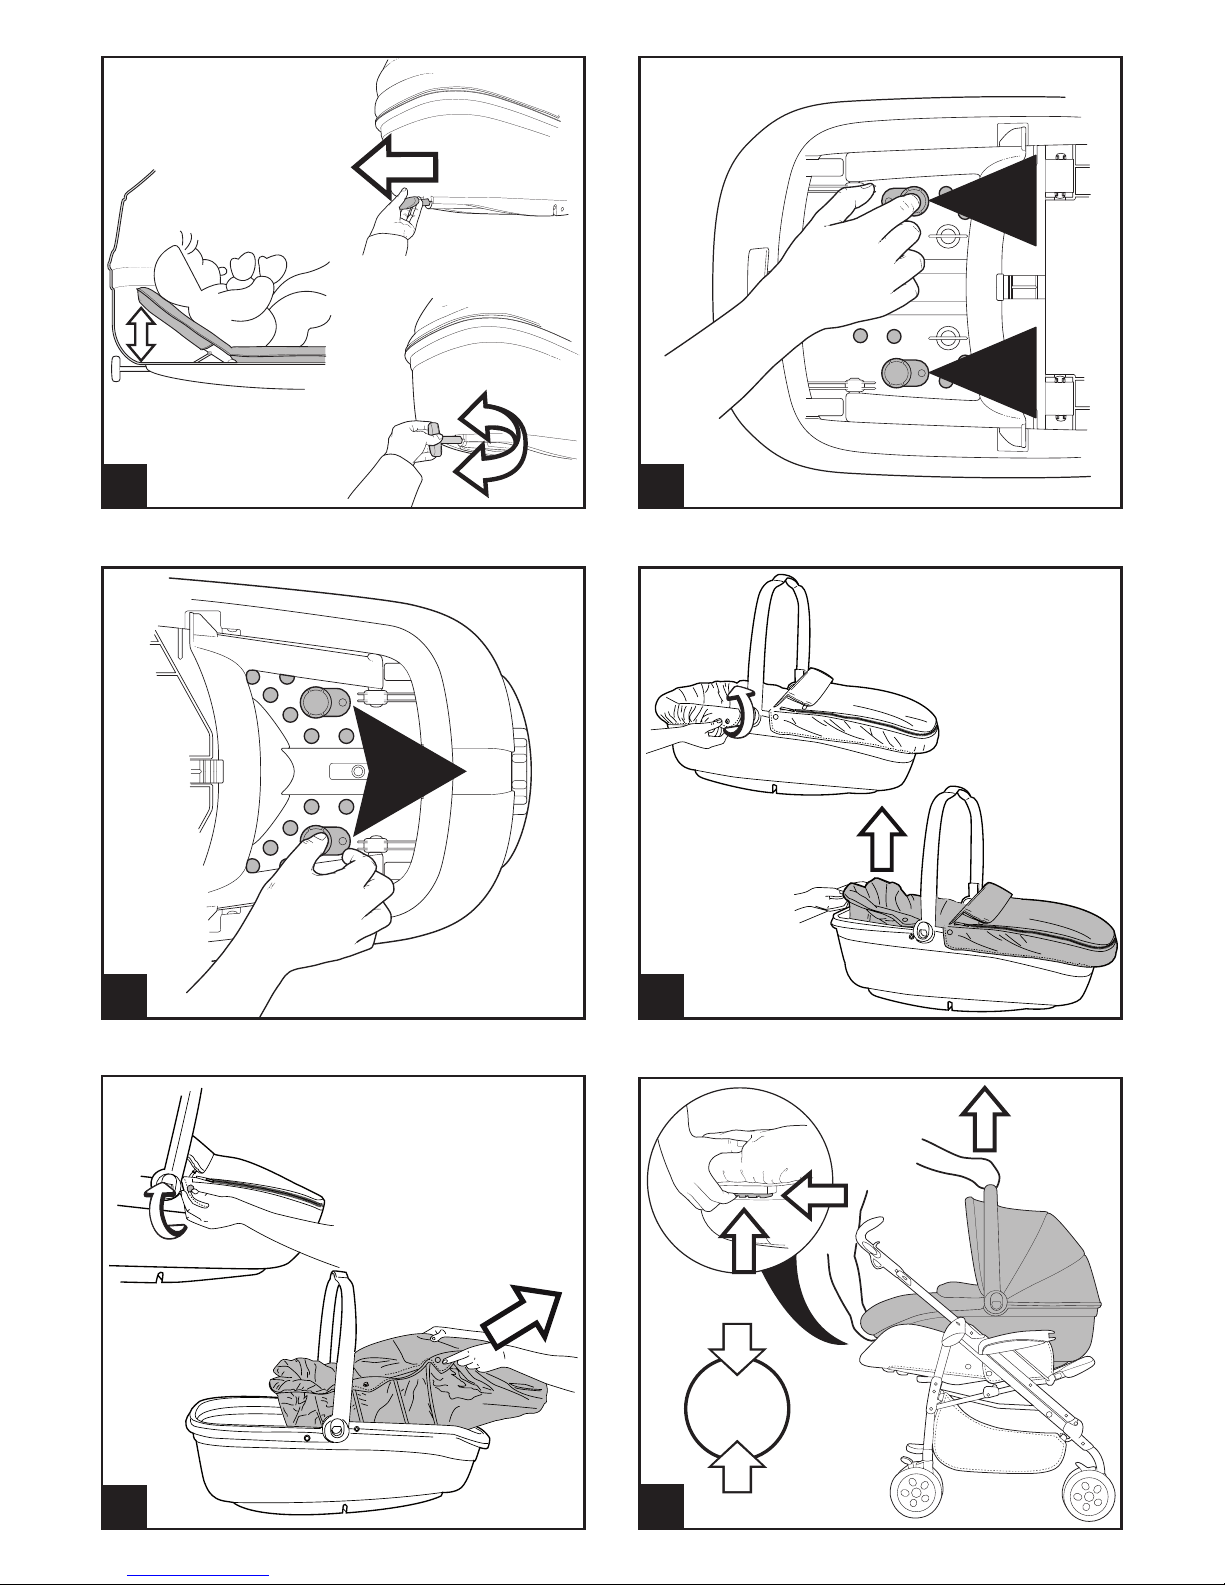
1• Prima di aprire il carrello occorre togliere i due tappi di
protezione dei ganci, come in figura, altrimenti non verrà
correttamente aperto.
2• Per aprire il carrello, occorre tirare verso l’alto le due leve sui
manici come in figura.
3• Contemporaneamente sollevare il carrello che si aprirà
automaticamente.
Per verificare che il passeggino sia correttamente aperto,
controllare i due ganci laterali (vedi figura).
ASSEMBLAGGIO
4• Per montare le ruote anteriori, abbassare la leva A e infilare la
ruota come in figura B fino al click.
5• Per montare le ruote posteriori, agganciare le ruote, unite dal
filo freno, come in figura.
6• Differenziare attentamente la ruota di SX con la ruota di DX
per agganciare correttamente le 2 ruote posteriori. La ruota di
SX presenta una nervatura sul tubo della ruota e una sul telaio
per garantire il giusto aggancio (vedi figura).
7• Verificare il giusto aggancio come in figura, fino al click.
8• Per montare il cestello, infilare le asole ai ganci anteriori A e ai
ganci posteriori B e C.
9• La figura mostra il cestello agganciato.
10•
Il portabibite é applicabile sul lato sinistro o destro del
passeggino, grazie al gancio già presente su ambedue i
lati del passeggino.
Per applicare il portabibite, agganciarlo fino al click, come in
figura A. Porta bibite agganciato, figura B.
Si consiglia di non inserire nel portabibite bevande calde
e con un peso superiore a 0,5 Kg (1 lbs).
IT•ITALIANO
1 BCAPOT•
2 BCOPOT•
3 SPST5264GR
4 SPST5284GR
5 BSANAS•
6 ITNAVM00GGGR
7 SAPI5276GR
8 SPST5403R
9 SPST5282GR
10 SPST5404GG
11 SPST5280GR
12 SPST5281GR
Navetta On Track
IT• Ricambi disponibili in piú colori da specificare nella richiesta.
EN• Spare parts available in different colours to be specified
when ordering.
FR• Pièces de rechange disponibles en plusieurs couleurs à
spécifier dans la demande.
DE• Ersatzteile in mehr Farben vorhanden, die in der Anfrage
spezifiziert werden müssen.
ES• Repuestos disponibles en otros colores que se especificarán
en el pedido.
PT• Peças de reposição disponíveis em cores alternativas a serem
especificadas no pedido.
NL• Reserveonderdelen verkrijgbaar in meerdere kleuren, bij
bestelling te specificeren.
DK• Reservedele kan leveres i flere farver som bør specificeres
ved bestillingen.
FI• Varaosia saatavana eri värisinä: ilmoita väri tilauksessa.
CZ• U náhradních dílů, které jsou k dispozici ve více barvách, je
nutné na objednávce specifikovat příslušnou barvu.
SK• Pri náhradných dieloch, ktoré sú k dispozícii vo viacerých
farbách, je potrebné pri objednávke špecifikovať želanú
farbu.
HU• A tartalék alkatrészek különböző színekben elérhetők,
melyeket rendeléskor kell kiválasztani.
SL• Rezervni deli so na voljo v več barvah, ki jih je treba navesti
pri naročilu.
RU• Запчасти имеются различных цветов, необходимый
указать в запросе.
TR• Siparişte belirtilen değişik renklerdeki yedek parçalari
mevcuttur.
EL• Ανταλλακτικά διαθέσιμα σε διάψορα χρώματα. Προσδιορίστε
όταν παραγγείλετε.
Page 21
FRENO
11• Per frenare il Pliko P3, abbassare col piede le leve posizionate
sulle ruote posteriori come in figura.
• Per sbloccare i freni, agire in senso contrario.
• Da fermi, azionare sempre i freni.
RUOTE PIROETTANTI
12• Per rendere le ruote anteriori piroettanti, occorre abbassare
la leva come in figura A. Per renderle fisse, agire sulla leva in
senso contrario, come in figura B.
REGOLAZIONE MANICI
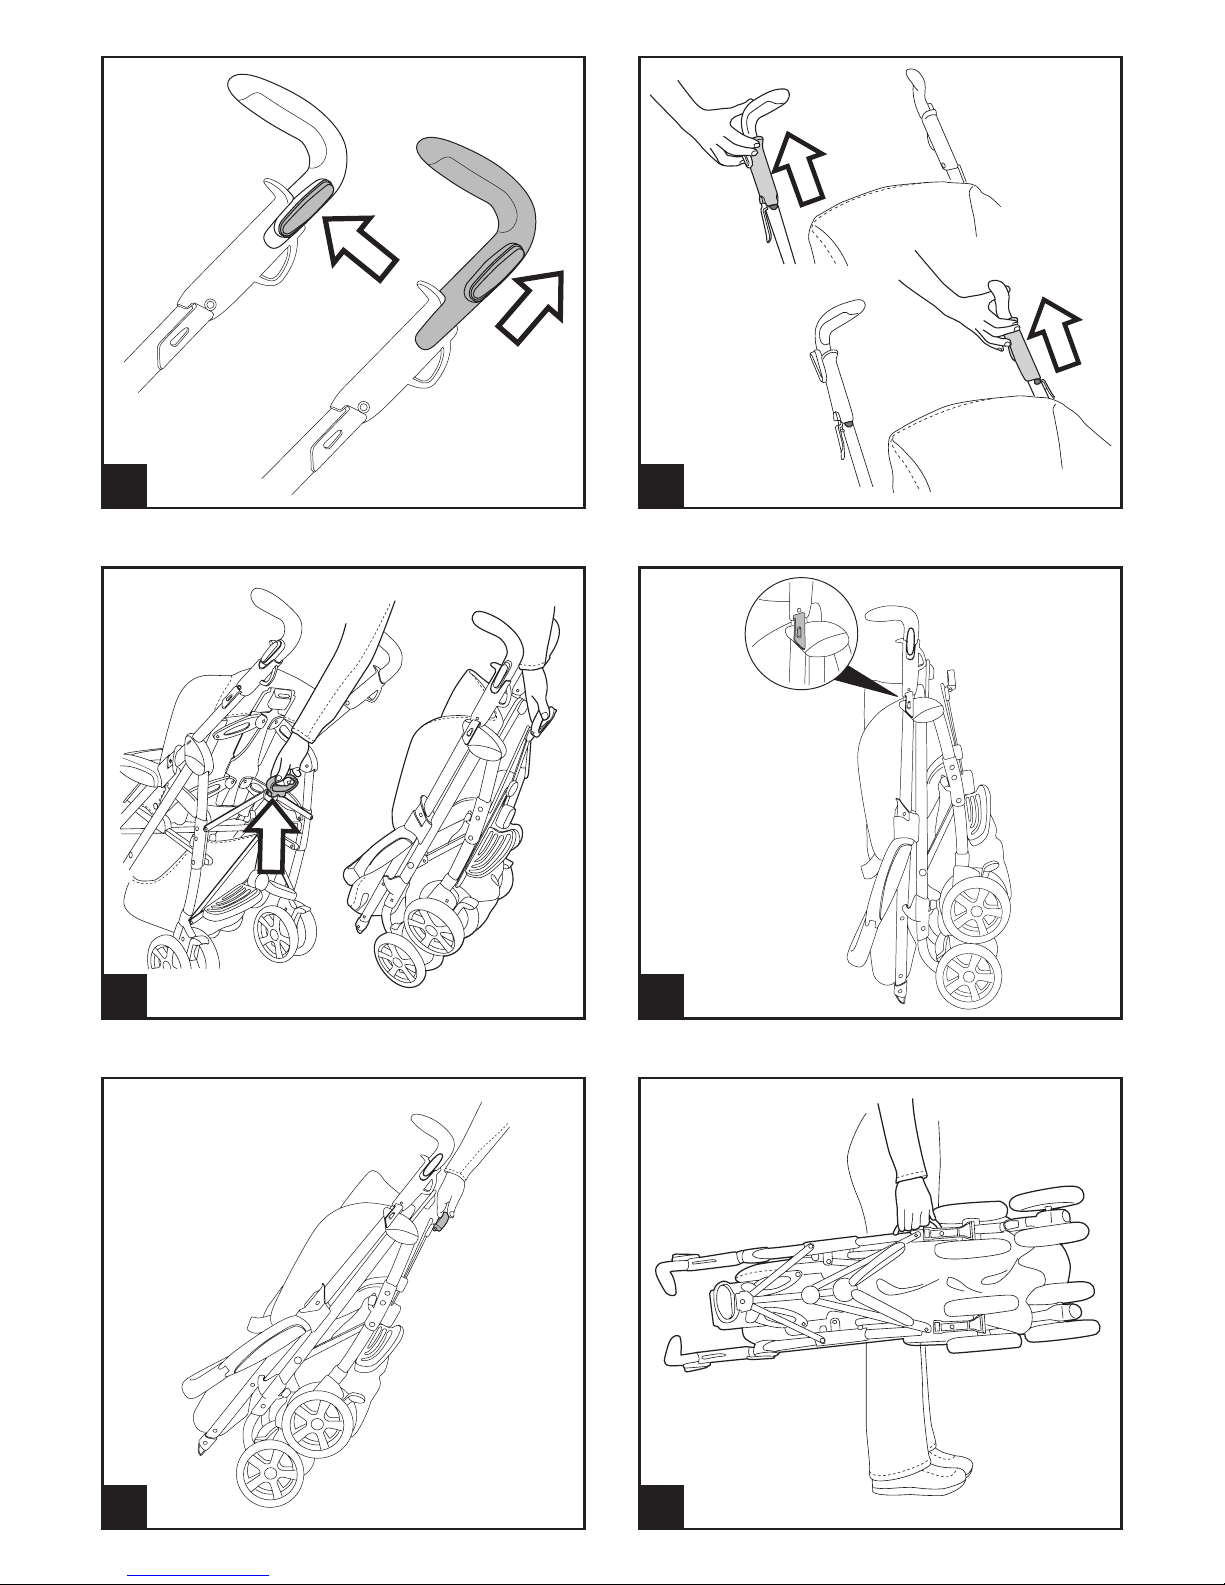
13• I manici sono regolabili in altezza in due posizioni. Per la
posizione alta, premere il pulsante e contemporaneamente
alzare il manico verso l’alto. Per abbassarla agire in senso
contrario.
CHIUSURA
• Prima di chiudere Pliko P3, è necessario sganciare la
Navetta o il seggiolino auto Primo Viaggio.
14• É possibile chiudere il passeggino con una sola mano: tirare
verso l’alto prima una leva e poi l’altra fino allo scatto.
15• Impugnare la maniglia centrale (figura 3) e tirarla verso l’alto
fino alla chiusura come in figura.
16• Verificare la corretta chiusura del carrello dal gancio di
sicurezza. Il carrello chiuso rimane in piedi da solo.
TRASPORTO
17• Il Pliko P3 si può trasportare comodamente (tenendo le ruote
anteriori non piroettate) impugnando la maniglia centrale
come in figura.
18• Si può trasportare anche grazie alla maniglia laterale, come in
figura.
GANCIOMATIC SYSTEM con
PLIKO P3 VERSIONE CARRELLO
Il Ganciomatic System è il sistema pratico e veloce che permette
di agganciare al Pliko P3 versione carrello, grazie agli attacchi
Ganciomatic, la Navetta e il Primo Viaggio, dotati anch’essi di
sistema Ganciomatic.
ATTACCHI GANCIOMATIC DEL CARRELLO
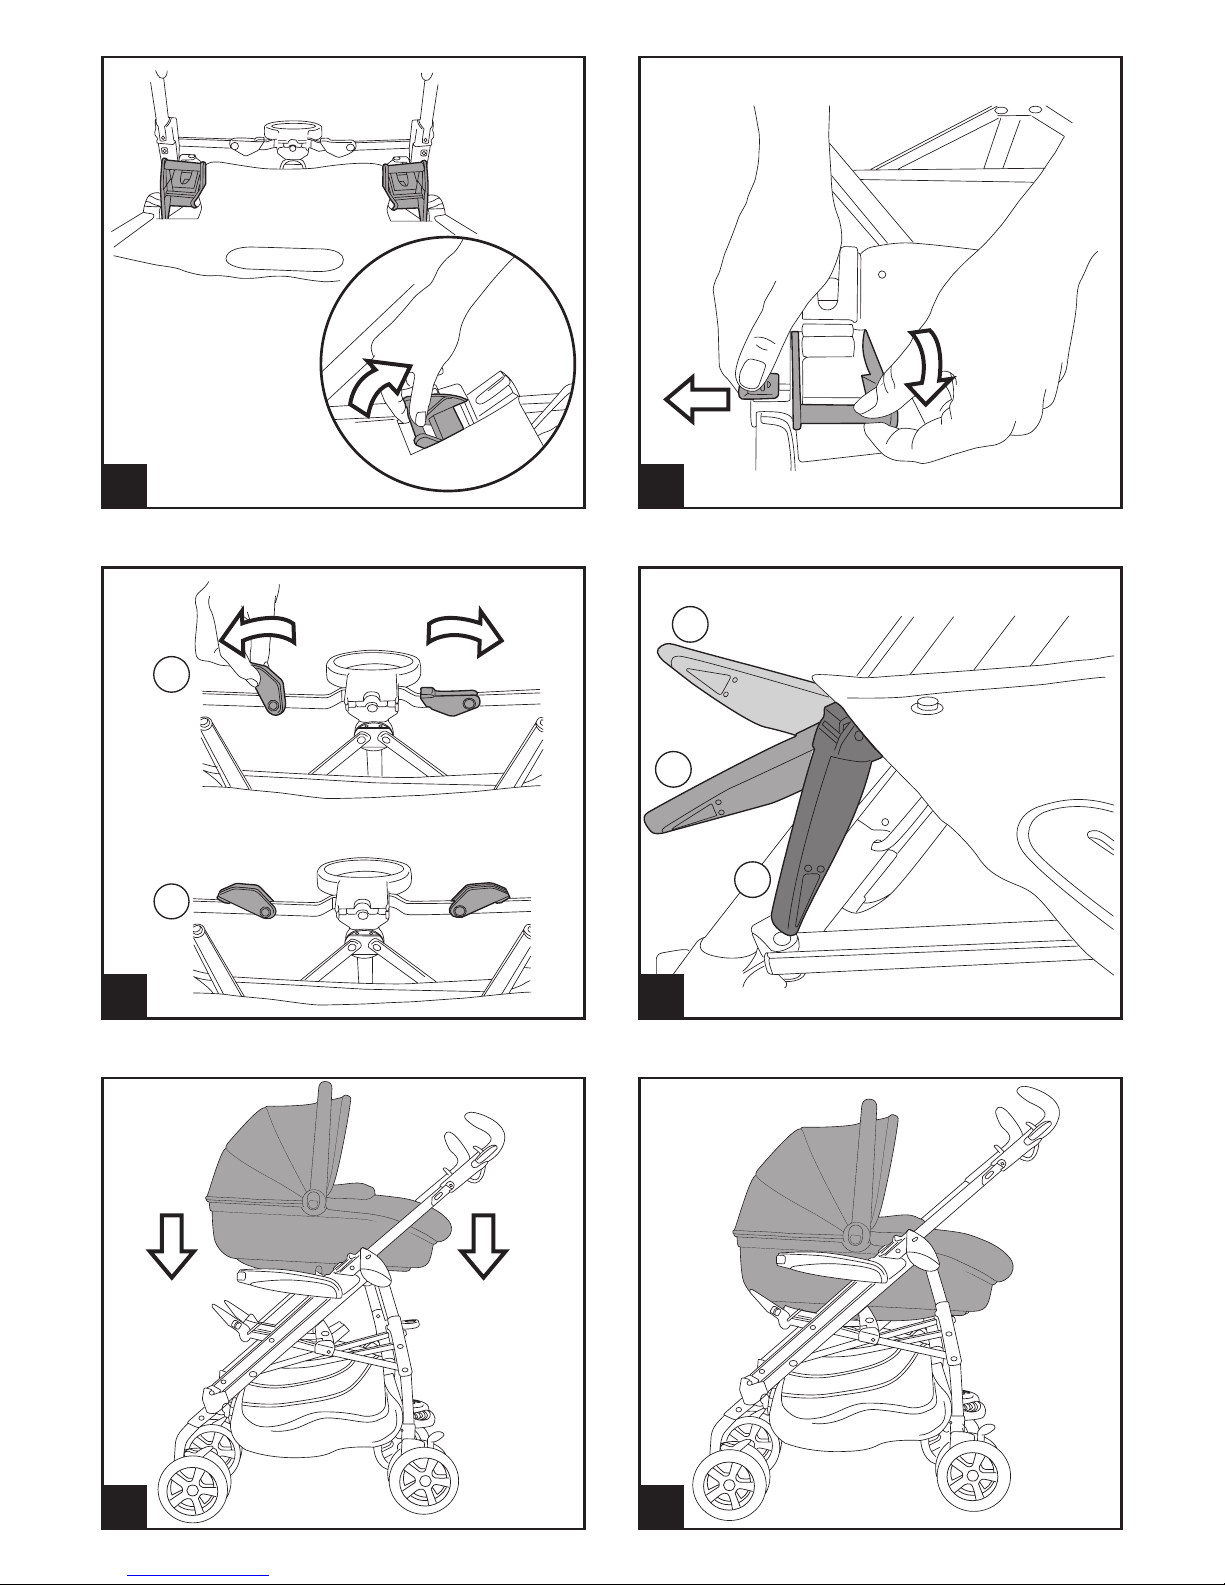
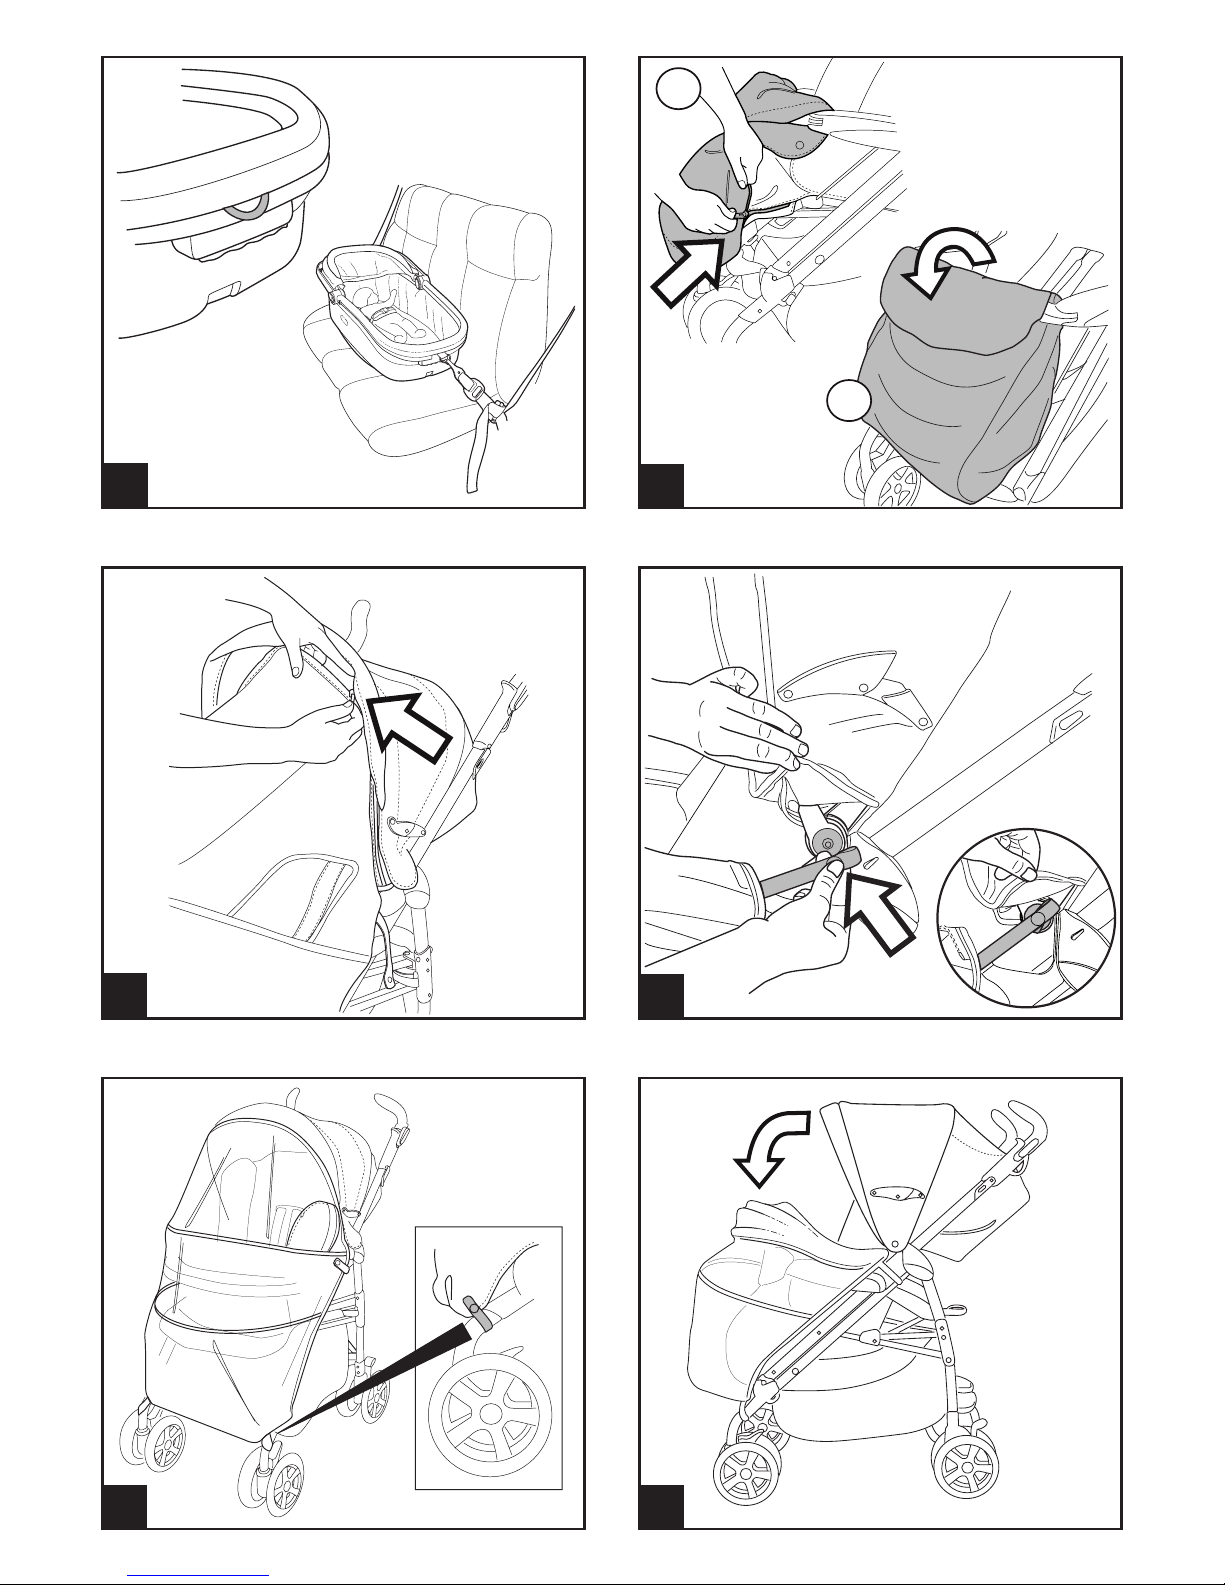
19• Per alzare gli attacchi Ganciomatic del carrello, ruotare verso
l’alto i due attacchi fino al click, come in figura.
20• Per abbassare gli attacchi Ganciomatic del carrello, tirare verso
l’esterno la levetta e contemporaneamente, ruotare verso il
basso gli attacchi come in figura.
PLIKO P3 + NAVETTA
Per agganciare la navicella Navetta al Pliko P3 versione carrello
occorre:
- Frenare Pliko P3;
- Sollevare gli attacchi Ganciomatic;
21•
Ruotare le due leve posizionate nella parte posteriore del carrello,
verso l'esterno come in figura;
22• Alzare il poggiagambe del carrello nella posizione più alta
(figura 1);
23• Pliko P3 versione carrello ora è pronto per poter agganciare la
Navetta;
24• Impugnare il maniglione della Navetta e posizionarla sugli
attacchi Ganciomatic del carrello, tenendo il lato della testa
della Navicella dalla parte opposta ai manici del carrello;
- Premere con entrambe le mani sui lati di Navetta fino al click;
- Per sganciare la navicella Navetta dal carrello consultare il suo
manuale istruzioni.
PLIKO P3 + PRIMO VIAGGIO
Per agganciare il seggiolino auto al carrello occorre:
- Frenare Pliko P3;
- Agganciare il frontalino (vedi sezione frontalino sotto);
25• Pliko P3 versione carrello è pronto per agganciare il
seggiolino Primo Viaggio;
26•
Impugnare il maniglione del seggiolino e posizionarlo sugli
attacchi Ganciomatic del carrello, tenendo il lato della testa del
seggiolino dalla parte opposta ai manici del carrello. Premere
con entrambe le mani sui lati del seggiolino fino al click;
- Per sganciare il seggiolino auto dal carrello consultare il suo
manuale istruzioni.
FRONTALINO
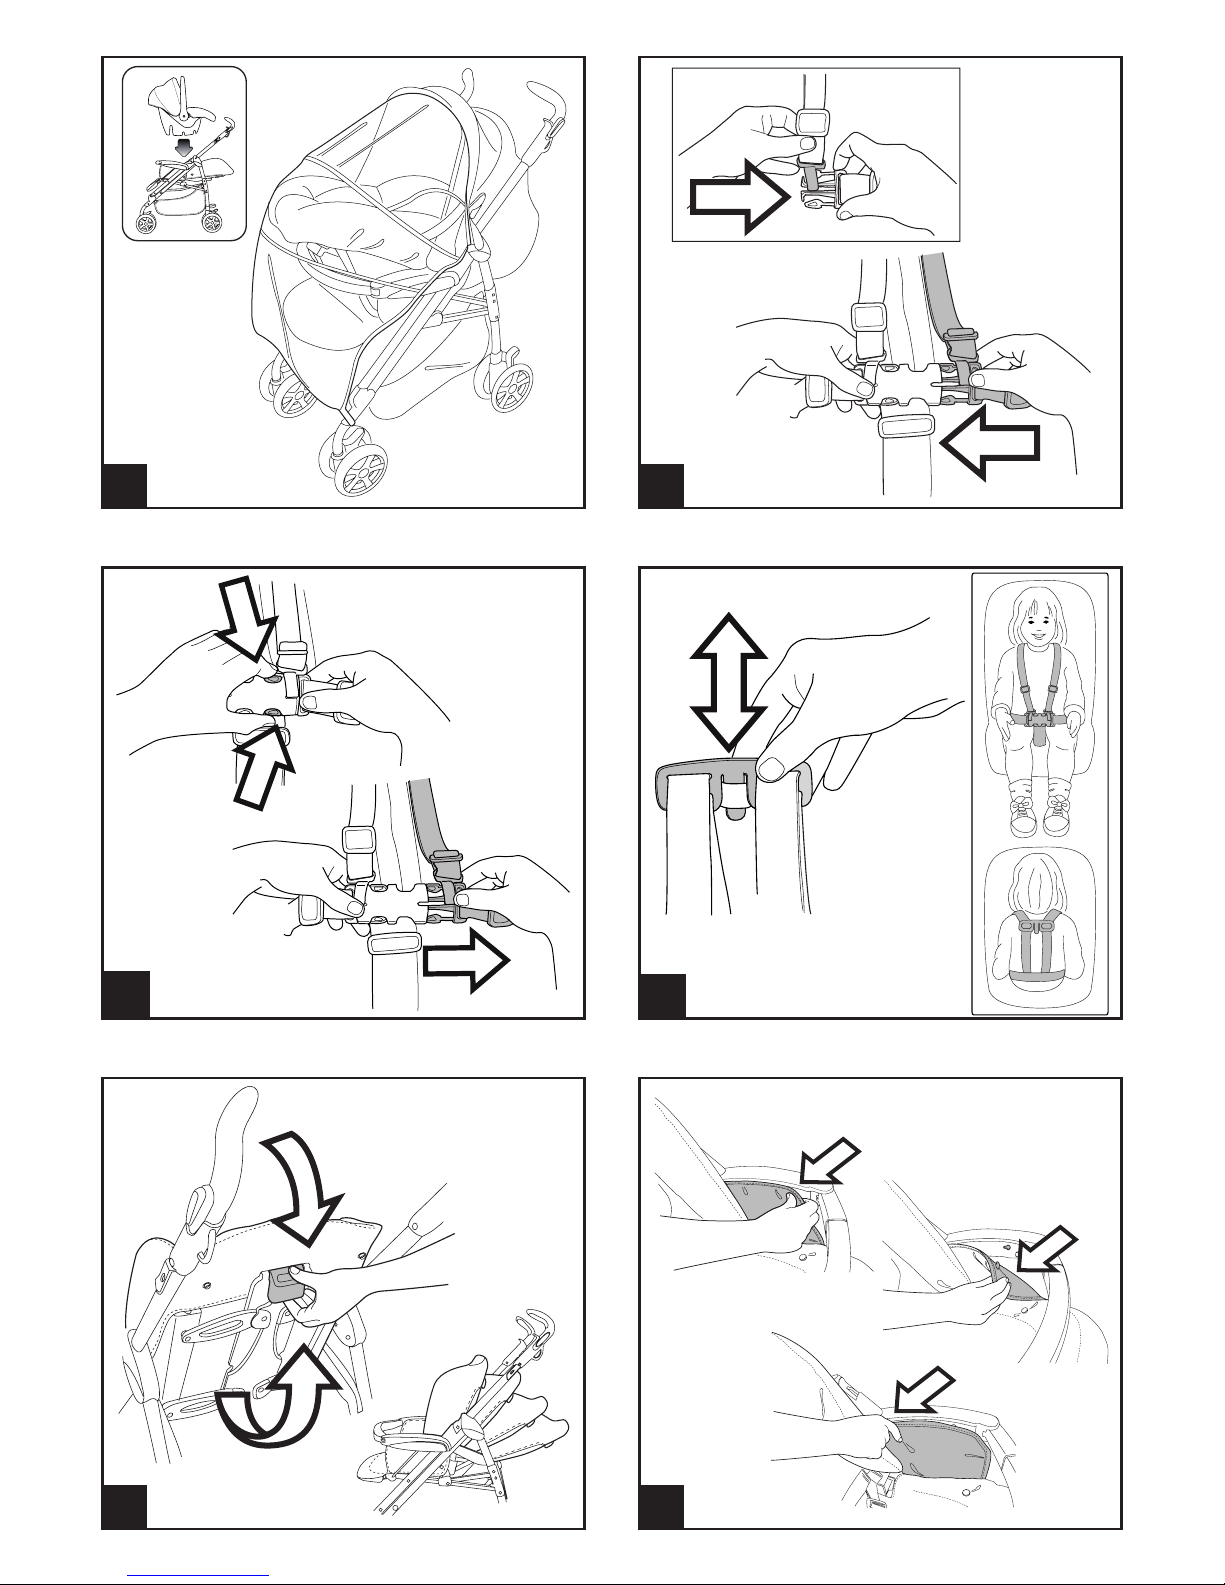
27• ll carrello si presenta con tappi di chiusura dei braccioli
applicati; per agganciare il frontalino occorre prima rimuoverli
(conservare i tappi, nel caso si volesse utilizzare il passeggino
senza frontalino). Per togliere i tappi, premere il pulsante
sotto il bracciolo e contemporaneamente estrarre il tappo
(procedere da ambo i braccioli).
28• Per agganciare il frontalino, inserire le due estremità del
frontalino nei braccioli come in figura, fino al click.
29• É possibile aprire il frontalino solo da un lato per facilitare
l’entrata e l’uscita del bambino quando é più grande.
Per aprire, premere il pulsante posto sotto il bracciolo e
contemporaneamente tirare il frontalino verso l’esterno.
30• Per togliere il frontalino premere i due pulsanti posti sotto
i braccioli e contemporaneamente tirare il frontalino verso
l’esterno.
PER CONVERTIRE IL CARRELLO IN PASSEGGINO
ASSEMBLAGGIO
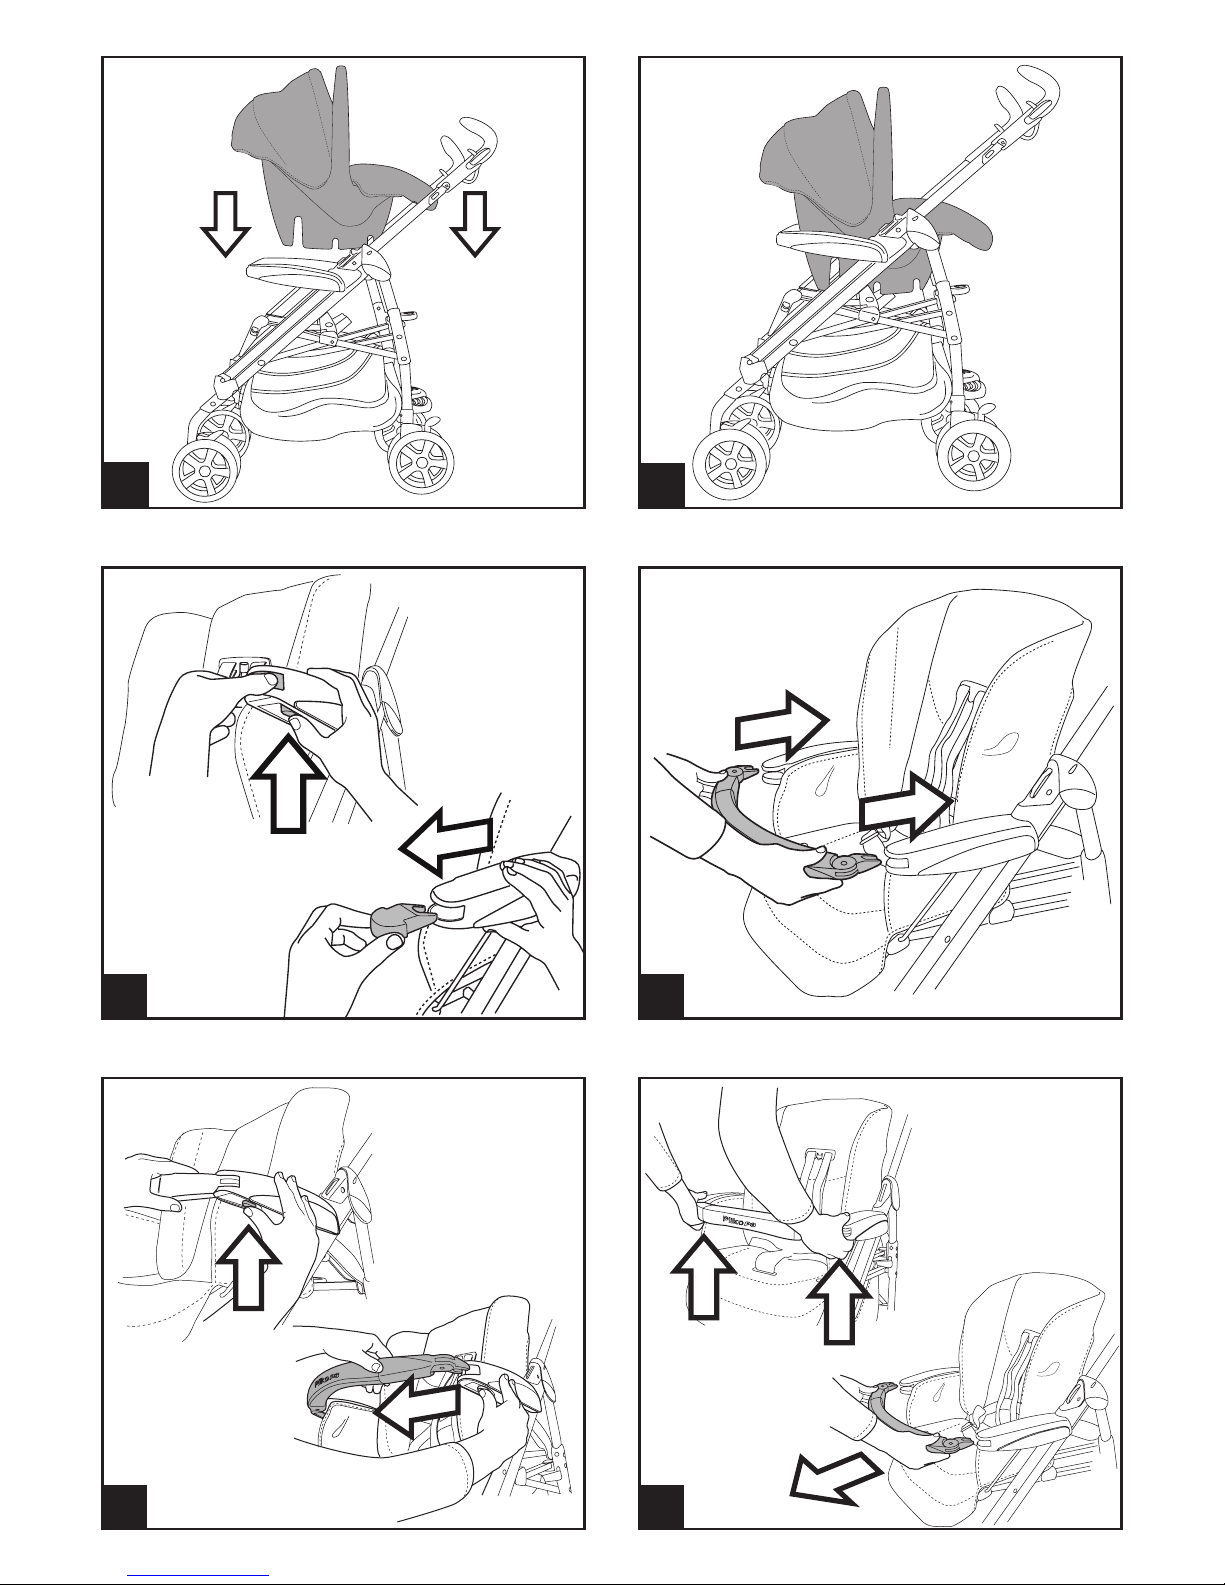
31• Per convertire il Pliko P3 versione carrello in passeggino
bisogna assicurarsi che le due leve siano abbassate come in
figura.
32• Posizionare lo schienale con la sacca sulla seduta del carrello,
come in figura.
33• Per agganciare lo schienale al carrello occorre inserire le due
estremità, premendo i due pulsanti, nella seduta del carrello,
come in figura 1, fino al click, come in figura 2.
34• Per agganciare la cresta regola schienale al carrello, occorre
ruotare verso l'alto l'attacco (figura B, in direzione della freccia)
e posizionarlo dietro al montante posteriore.
35• Spingere i due attacchi verso il basso, fino al click, nelle sedi
dei montanti posteriori.
36• Per foderare il passeggino, agganciare gli attacchi della sacca
ai braccioli, come indicano le frecce in figura.
37• Inserire le levette poggiagambe nella sacca dello schienale,
come in figura.
38• Per concludere l'aggancio della sacca al carrello, agganciare
i bottoni della sacca alla base, come in figura A. Far passare
il cinturino spartigambe più basso, sotto la seduta, come in
figura B, lasciando sopra alla sacca lo spartigambe più alto.
APERTURA E CHIUSURA
• Per aprire Pliko P3 versione passeggino, ripetere le operazioni
in figura 2 e 3.
• Per chiudere Pliko P3 versione passeggino allentare i
compassi capotta, sollevare lo schienale e ripetere le
operazioni in figura 14, 15 e 16.
REGOLAZIONE POGGIAGAMBE
39• Il poggiagambe é regolabile in tre posizioni.
Per abbassare il poggiagambe, tirare le due levette laterali
verso il basso e contemporaneamente abbassarlo. Per alzare il
poggiagambe, spingerlo verso l’alto fino al click.
PEDANETTA POSTERIORE
40• La pedanetta posteriore agevola la mamma nel superare
piccoli dislivelli e in più può trasportare il secondo bambino.
SEQUENZA DI CARICO
41• Per utilizzare il Pliko P3 con due bambini, occorre inizialmente
frenare il Pliko, successivamente posizionare il bambino più
piccolo nella seduta e agganciare la cintura di sicurezza (1).
Impugnare i manici (2) e fare salire il secondo bambino sulla
pedanetta (3).
• Non lasciate mai soli i vostri bambini.
• Non permettete al bambino di salire sulla pedanetta
posteriore con il passeggino vuoto.
CAPOTTINA
• La capottina si utilizza e si aggancia sia sulla Navicella Navetta
che sul passeggino. E' dotata di cerniera per applicare il
parapioggia.
42• Per montare la capottina sulla Navicella Navetta sbottonare i
bottoni A e B (figura 1). Agganciare la capottina come indica
Page 22
la figura 2 e verificare il corretto aggancio, figura 3.
43• Per montare la capottina sul passeggino agganciarla come in
figura e verificare il corretto aggancio (vedi figura).
44• Abbottonare la capottina come in figura all’interno del
bracciolo e allo schienale del passeggino.
45• Per tendere la capottina, spingere verso il basso il compasso
posizionato internamente, come in figura.
46• Allungare la capottina completamente, slacciando la cerniera,
figura B.
La capottina segue l’inclinazione dello schienale.
47• La capottina può facilmente trasformarsi in parasole, vedi
figura. Chiudere la cerniera e legare la capottina col suo
pratico gancetto.
48• Per togliere la capottina dalla Navicella Navetta, sganciarla
lateralmente dal rivestimento.
Sganciare le asole A e B dal rivestimento come in figura,
premere la linguetta da ambedue i lati e sganciare la capottina.
49• Per togliere la capottina dal passeggino, premere la linguetta
come in figura A, da ambedue i lati della capotta.
Sganciarla e tirarla verso l'alto come figura B.
NAVICELLA NAVETTA
MANIGLIONE
50• Per alzare il maniglione, tirarlo verso l’alto fino al click. Il
maniglione è bloccato solo quando è nella posizione verticale
e i due blocchi sono rientrati nella propria sede.
51• Per abbassare il maniglione, sbloccarlo, spingendo in sú i
due blocchi e successivamente spingere verso il basso il
maniglione.
52• Il maniglione facilita il trasporto e l’aggancio della navicella sui
carrelli e passeggini.
POSIZIONE DONDOLO E LETTINO
53• La base della Navetta ha una speciale forma che appoggiata
su un piano é dondolabile.
54• La Navetta diventa un piccolo nido, non dondolabile,
estraendo i cavalletti incorporati come in figura.
REGOLAZIONE SCHIENALE
55• Lo schienalino è regolabile in altezza, estraendo e ruotando la
maniglia come in figura.
REGOLAZIONE CIRCOLAZIONE ARIA
56• La base della Navetta è dotata di fori apribili che permettono
l’entrata dell’aria dal sotto.
Per aprire i fori nella parte anteriore della navetta (lato dove si
trova la capottina), spingere i due ganci verso l’esterno.
57• Per aprire i fori dalla parte posteriore (lato opposto alla
capottina) ,spingere uno dei due ganci verso l’esterno.
SFODERABILITÀ
58• Per togliere il rivestimento sganciare le asole lateralmente e
sfilarlo anteriormente.
59•
Togliere le 2 linguette dalla scocca posteriormente e rimuoverlo.
AGGANCIO E SGANCIO DELLA NAVICELLA SUL PASSEGGINO
La Navicella Navetta è dotata di Sistema Ganciomatic,
agganciabile agli attacchi Ganciomatic del passeggino Pliko P3.
60• Per sganciare la navicella dai passeggini, spingere prima la
maniglia (posta nel lato opposto alla capottina) lateralmente
poi spingerla verso l’alto e contemporaneamente alzare la
carrozzina dal maniglione verso l’alto.
NAVETTA IN AUTO
61• Navetta è predisposta a diventare Navetta AUTO grazie ai due
gancini (come in figura) e acquistando a parte il Kit Auto.
DETTAGLI SISTEMA MODULARE ON TRACK
COPERTINA
62•
Per agganciare la copertina unire la cerniera di questa con
quella del poggiagambe come in figura.
Agganciare i due bottoni, come in figura B, per fissare la
copertina.
PARAPIOGGIA
63• Per montare il parapioggia, occorre unire la cerniera di questo
con quella della capottina.
64• Agganciare il bottone dell’elastico al bottone del passeggino,
come in figura, fino al click.
65• Fissare l’elastico più basso del parapioggia alla ruota.
66• Il pratico parapioggia consente di essere abbassato aprendo
la cerniera e rimanendo fissato al passeggino grazie agli
elastici.
67• Questo parapioggia è stato studiato anche nel caso in cui sul
passeggino sia agganciato il seggiolino auto Primo Viaggio,
garantendo la totale protezione.
• Non utilizzare il parapioggia in ambienti chiusi e controllare
sempre che il bambino non sia accaldato.
• Non collocare il parapioggia in PVC vicino a fonti di calore e
fare attenzione alle sigarette.
• Assicurarsi che il parapioggia non interferisca con nessun
meccanismo in movimento del carrello o del passeggino.
• Togliere sempre il parapioggia prima di chiudere il vostro
carrello o passeggino.
• Lavare con una spugna e acqua saponata, senza utilizzare
detersivi.
CINTURA DI SICUREZZA
68•
Assicurarsi che la bretella sia correttamente inserita spingendo
come in figura A. Agganciare la cintura agendo come in figura B.
69• Per sganciare la cintura, premere ai lati della fibbia (figura
A) e contemporaneamente tirare verso l’esterno il cinturino
girovita (figura B).
70• La nuova cintura di sicurezza da oggi, é più facile da indossare
grazie al sistema “attacca e stacca”. Infatti prima di agganciare
la cintura, attacca la fibbietta allo schienale inserendo la
linguetta nell’apposito passante come in figura; poi quando
hai agganciato la cintura al tuo bambino staccala
dallo schienale per lasciare il tuo bambino più libero
di muoversi. La fibbietta deve rimanere sotto le spalle del
bambino.
REGOLAZIONE SCHIENALE
71•
Lo schienale é reclinabile in quattro posizioni. Per
abbassare lo schienale, sollevare la maniglia (figura A) e
contemporaneamente abbassare lo schienale (figura B),
bloccandolo nella posizione desiderata.
Per alzarlo, spingere lo schienale verso l’alto.
SFODERABILITÀ
72• Per sfoderare il passeggino, sganciare gli attacchi della sacca
dai braccioli come indicano le frecce.
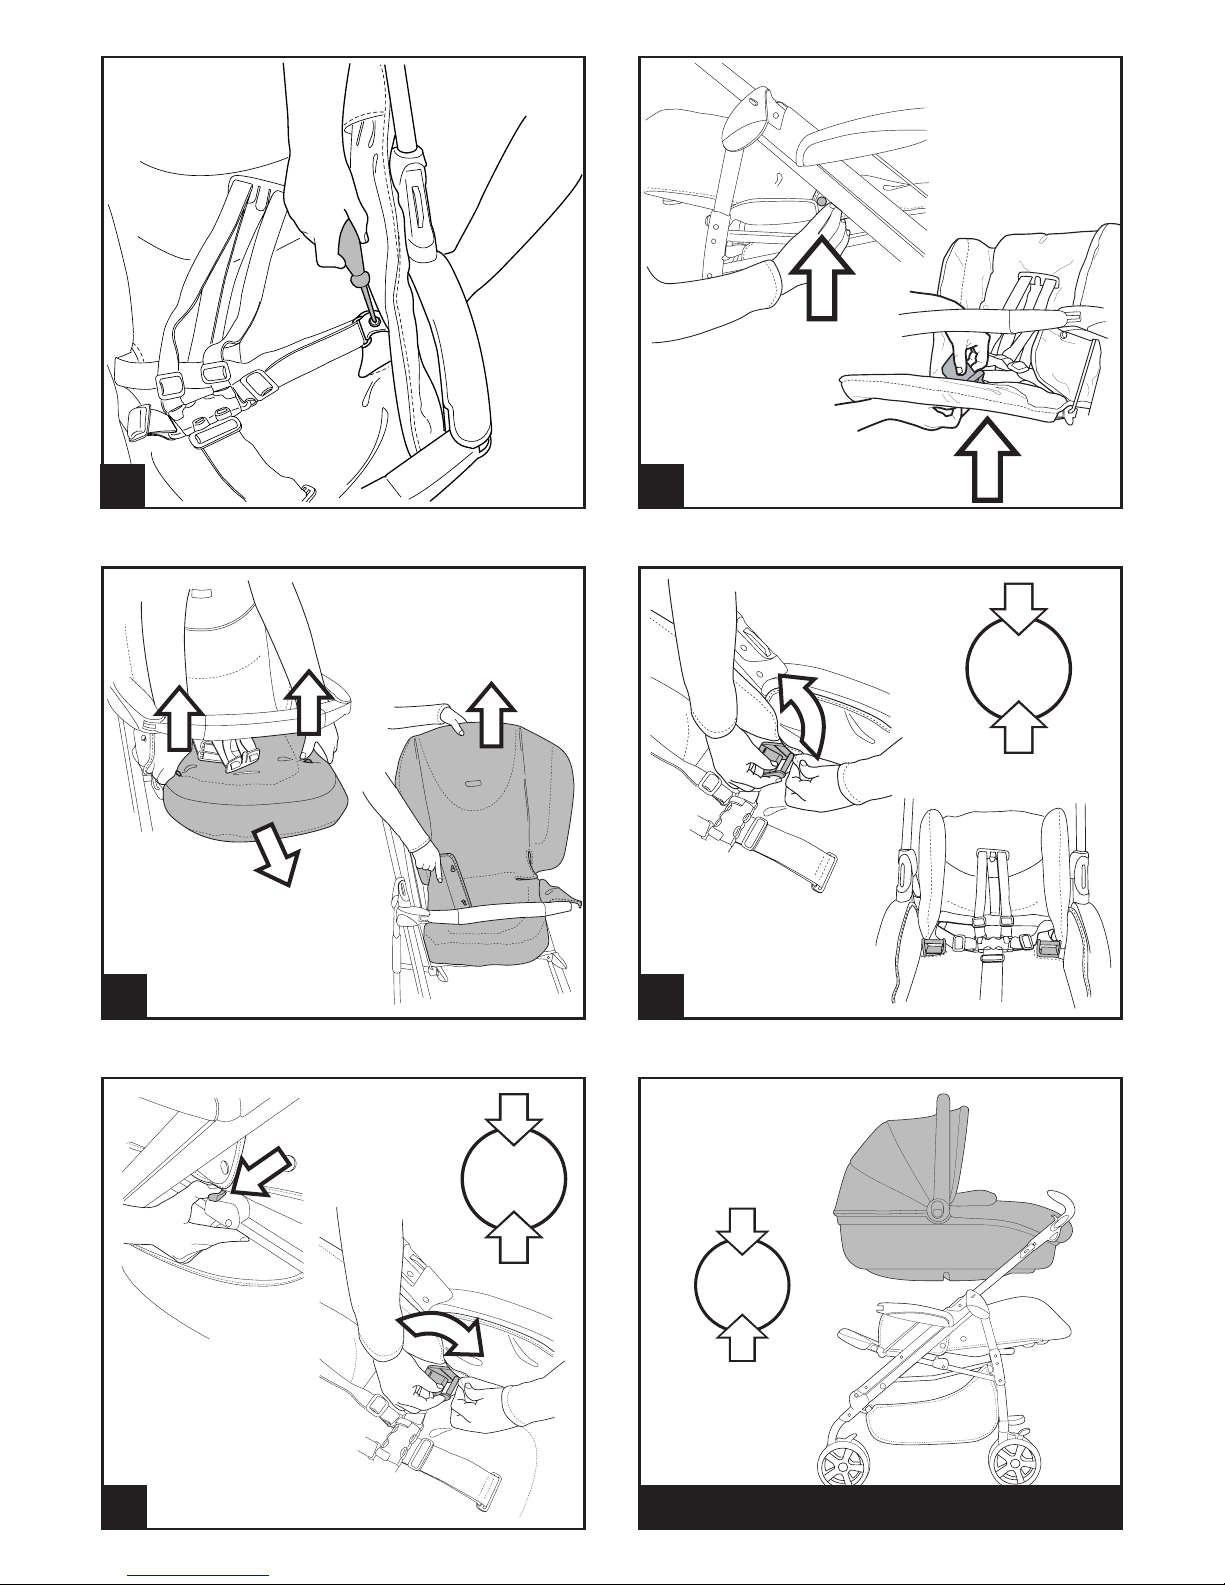
73• Svitare il cinturino (solo da un lato) come in figura tenendo il
dito sotto al dado.
74• Sganciare il bottone della sacca lateralmente come in figura.
Sfilare lo spartigambe del cinturino da sotto la seduta.
75•
Sganciare i bottoni della sacca dalla seduta e sfilarla per estrarre
la sacca dai ganci del poggiagambe. Sfilare la sacca dall’alto.
GANCIOMATIC SYSTEM con
PLIKO P3 VERSIONE PASSEGGINO
Il Ganciomatic System è il sistema pratico e veloce che permette
di agganciare al Pliko P3 versione passeggino, grazie agli attacchi
Ganciomatic, la Navetta e il Primo Viaggio, dotati anch’essi di
sistema Ganciomatic.
ATTACCHI GANCIOMATIC DEL PASSEGGINO
76• Per alzare gli attacchi Ganciomatic del passeggino, sollevare
la sacca negli angoli della seduta e ruotare verso l’alto i due
attacchi fino al click.
77• Per abbassare gli attacchi Ganciomatic del passeggino, tirare
verso l’esterno la levetta e contemporaneamente, ruotare
verso il basso gli attacchi, come in figura.
PLIKO P3 + NAVETTA
78• Per agganciare la navicella Navetta al passeggino, occorre:
- frenare il passeggino;
- abbassare completamente lo schienale del passeggino;
- alzare gli attacchi Ganciomatic del passeggino;
- togliere il frontalino ed inserire i tappi in dotazione per
Page 23

ATTENZIONE
PLIKO P3
• QUESTO VEICOLO È STATO PROGETTATO PER IL TRASPORTO
DI 1 BAMBINO NELLA SEDUTA ED 1 BAMBINO IN PIEDI SULLA
PEDANETTA POSTERIORE.
• NON UTILIZZARE IL PRODOTTO PER UN NUMERO DI OCCUPANTI
SUPERIORI A QUANTO PREVISTO DAL COSTRUTTORE.
• QUESTO VEICOLO È OMOLOGATO PER BAMBINI DALLA
NASCITA, FINO A 15 KG DI PESO NELLA SEDUTA. LA PEDANETTA
POSTERIORE È OMOLOGATA PER IL TRASPORTO DI UN SECONDO
BAMBINO FINO A 20 KG DI PESO.
• USARE UN SISTEMA DI RITENUTA APPENA IL BAMBINO E' IN
GRADO DI STARE SEDUTO AUTONOMAMENTE.
• QUESTO VEICOLO E' STATO PROGETTATO PER ESSERE USATO IN
COMBINAZIONE CON I PRODOTTI PEG PEREGO GANCIOMATIC:
NAVETTA, PORTE ENFANT SOFT, SEGGIOLINO AUTO PRIMO
VIAGGIO.
• LE OPERAZIONI DI ASSEMBLAGGIO E PREPARAZIONE DELL’
ARTICOLO DEVONO ESSERE EFFETTUATE DA ADULTI.
• NON UTILIZZATE IL PRODOTTO SE PRESENTA PARTI MANCANTI O
ROTTURE.
• UTILIZZATE SEMPRE LE CINTURE A CINQUE PUNTI; UTILIZZATE
SEMPRE LO SPARTIGAMBE DELLA CINTURA IN COMBINAZIONE
CON IL GIROVITA.
• POTREBBE ESSERE PERICOLOSO LASCIARE IL VOSTRO BAMBINO
INCUSTODITO.
• DA FERMI UTILIZZARE SEMPRE I FRENI.
• PRIMA DELL’ USO ASSICURARSI CHE TUTTI I MECCANISMI DI
AGGANCIO SIANO INGAGGIATI CORRETTAMENTE.
• PRIMA DELL’ USO ASSICURARSI CHE IL SEGGIOLINO AUTO O LA
SEDUTA RIPORTATA SIANO CORRETTAMENTE AGGANCIATI.
• EVITARE DI INTRODURRE LE DITA NEI MECCANISMI.
• PRESTARE ATTENZIONE ALLA PRESENZA DEL BAMBINO QUANDO
SI EFFETTUANO OPERAZIONI DI REGOLAZIONE DEI MECCANISMI
(MANIGLIONE, SCHIENALE).
• OGNI CARICO APPESO AL MANIGLIONE O ALLE MANIGLIE PUÒ
RENDERE INSTABILE IL PRODOTTO; SEGUIRE LE INDICAZIONI DEL
COSTRUTTORE RIGUARDO AI MASSIMI CARICHI UTILIZZABILI.
• IL FRONTALINO NON È PROGETTATO PER REGGERE IL PESO DEL
BAMBINO; IL FRONTALINO NON È DISEGNATO PER MANTENERE
IL BAMBINO NELLA SEDUTA E NON SOSTITUISCE IL CINTURINO
DI SICUREZZA.
• NON INTRODURRE NEL CESTELLO CARICHI PER UN PESO
SUPERIORE A 5 KG. NON INSERIRE NEI PORTABIBITE PESI
SUPERIORI A QUANTO SPECIFICATO NEL PORTABIBITE STESSO
E MAI BEVANDE CALDE. NON INSERIRE NELLE TASCHE DELLE
CAPOTTE (SE PRESENTI) PESI SUPERIORI A 0.2 KG.
• NON UTILIZZARE IL PRODOTTO IN VICINANZA DI SCALE O
GRADINI; NON UTILIZZARE VICINO A FONTI DI CALORE, FIAMME
LIBERE OD OGGETTI PERICOLOSI A PORTATA DELLE BRACCIA DEL
BAMBINO.
• POTREBBE ESSERE PERICOLOSO UTILIZZARE ACCESSORI NON
APPROVATI DAL COSTRUTTORE.
• QUESTO PRODOTTO NON E' ADATTO PER IL JOGGING O LA
CORSA COI PATTINI.
• UTILIZZARE I FRENI DURANTE LE OPERAZIONI DI CARICO E
SCARICO DEGLI OCCUPANTI.
ATTENZIONE
NAVICELLA NAVETTA
• QUESTO VEICOLO È ADATTO SOLO A BAMBINI CHE NON SI
POSSONO METTERE DA SOLI IN POSIZIONE SEDUTA.
• QUESTO VEICOLO E' INTESO PER BAMBINI DALLA NASCITA FINO
A 9 KG DI PESO.
• UTILIZZARE SOLO SU SUPERFICI DURE, ORIZZONTALI ED
ASCIUTTE.
• POTREBBE ESSERE PERICOLOSO LASCIARE IL VOSTRO BAMBINO
INCUSTODITO.
• NON LASCIARE ALTRI BAMBINI A GIOCARE INCUSTODITI VICINO
ALLA CARROZZINA.
• LE OPERAZIONI DI ASSEMBLAGGIO E PREPARAZIONE
chiudere i braccioli del passeggino;
- alzare il poggiagambe del passeggino nella posizione più alta;
- impugnare il maniglione della Navetta;
- posizionare la Navetta sugli attacchi Ganciomatic del
passeggino, tenendo il lato della testa della navicella dalla
parte opposta ai manici del passeggino;
- premere con entrambe le mani sui lati di Navetta fino al click;
- Per sganciare la navicella Navetta dal passeggino consultare il
suo manuale istruzioni.
PLIKO P3 + PRIMO VIAGGIO
79• Per agganciare il seggiolino auto al passeggino, occorre:
- frenare il passeggino;
- abbassare completamente lo schienale del passeggino;
- alzare gli attacchi Ganciomatic del passeggino;
- posizionare il seggiolino auto verso la mamma e spingerlo
verso il basso fino al click;
-
Si raccomanda di non rimuovere il frontalino dal passeggino,
quando si aggancia il seggiolino auto;
- Per sganciare il seggiolino auto dal passeggino consultare il
suo manuale istruzioni.
PER CONVERTIRE IL PASSEGGINO IN CARRELLO
Per trasformare il passeggino in carrello occorre inizialmente
sfoderarlo.
80• Sfoderare il passeggino, sganciando gli attacchi della sacca
dai braccioli come indicano le frecce.
81• Sganciare il bottone della sacca lateralmente come in figura.
Sfilare lo spartigambe del cinturino da sotto la seduta.
82•
Sganciare i bottoni della sacca dalla seduta e sfilarla per estrarre
la sacca dai ganci del poggiagambe. Sfilare la sacca dall’alto.
83• Sganciare la base schiacciando il punsante posizionato nella
parte posteriore del carrello, come in figura; sia nella barra di
destra che di sinistra. Sollevare verso l'alto lo schienale della
base con entrambe le mani.
84• Premere i due pulsanti nella seduta del carrello con entrambe
le mani e sollevare l'intera base verso l'alto, come in figura.
ACCESSORI
85• Borsa Cambio (inclusa): Borsa con materassino per il cambio
del bebè, agganciabile al passeggino.
86•
Zanzariera:
Zanzariera con zip, applicabile alla capottina con zip.
87• Borsa Viaggio: Pratica borsa per il trasporto aereo del
passeggino.
88• Kit Auto Navetta: É possibile richiedere il Kit auto
(omologato ECE R44/04), contiene il necessario per montare
la navicella sulla macchina.
89• Parapioggia Cover All: Parapioggia in PVC trasparente,
garantisce la totale protezione della navicella agganciata sul
passeggino.
PULIZIA E MANUTENZIONE
Il vostro prodotto necessita un minimo di manutenzione. Le
operazioni di pulizia e manutenzione devono essere effettuate solo
da adulti.
• Si raccomanda di tenere pulite tutte le parti in movimento e se
occorre, lubrificarle con olio leggero.
• Asciugare le parti in metallo del prodotto per prevenire la ruggine.
• Periodicamente pulire le parti in plastica con un panno umido,
non usare solventi o altri prodotti simili.
• Spazzolare le parti in tessuto per allontanare la polvere.
• Tenere pulite le ruote da polvere e sabbia.
• Proteggere il prodotto da agenti atmosferici, acqua, pioggia
o neve; l’esposizione continua e prolungata al sole potrebbe
causare cambiamenti di colore in molti materiali.
• Conservare il prodotto in un posto asciutto.
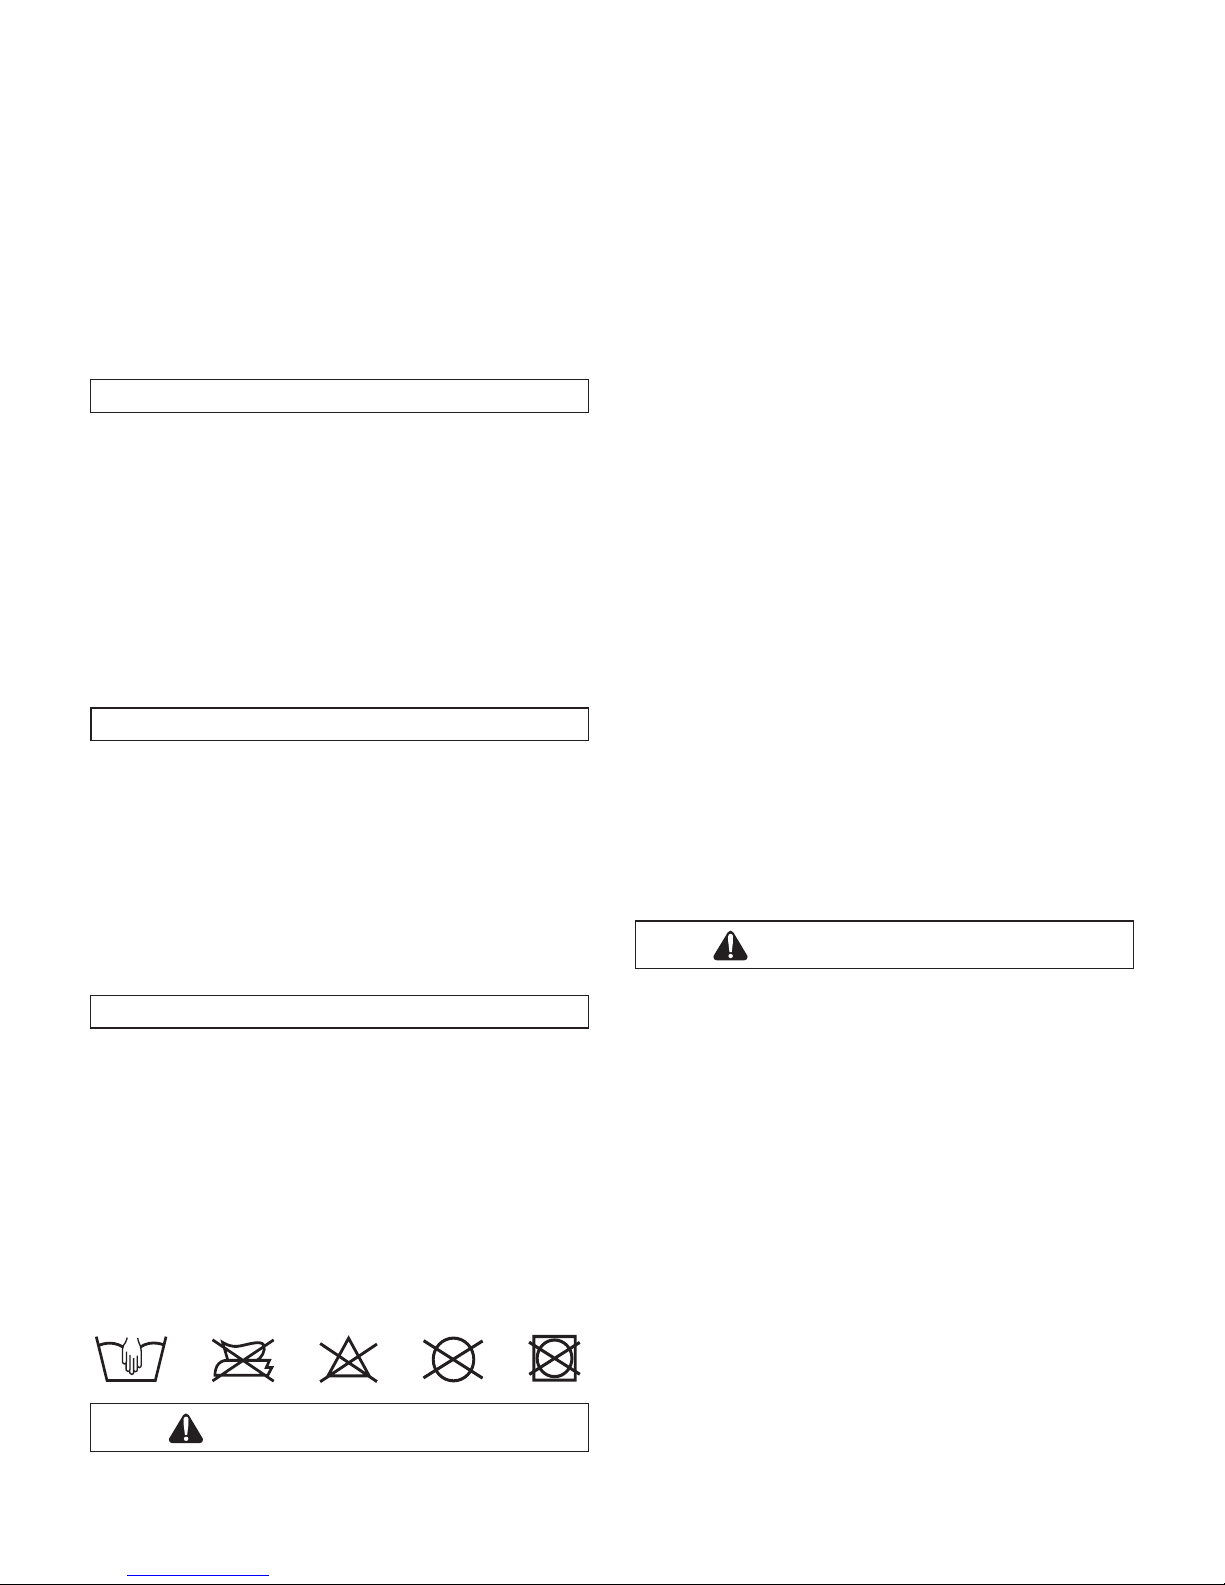
• Per il lavaggio della sacca, seguire le seguenti indicazioni.
Page 24

• IMPORTANT: Carefully read instructions and keep for
future use.
The child’s safety could be put at risk if the instructions are
not followed.
• PEG PEREGO reserves the right to make any necessary changes
or improvements to the products shown at any time without
notice.
Peg Perego S.p.A. is an ISO 9001 certified company.
The fact that we are certified provides a guarantee
of our honesty for our customers, and fosters trust
in the company’s way of working.
CUSTOMER SERVICE
If parts of the model are accidentally lost or damaged, use only
original Peg Perego spare parts. Contact the Peg Perego Customer
Service for all repair work, replacements, information about
products, and sale of original spare parts and accessories, at the
following:
tel.: 0039-039-60.88.213
fax: 0039-039-33.09.992
e-mail: assistenza@pegperego.it,
www.pegperego.com
Peg Perego is at the consumer's service, meeting every need in
the best way possible. This is why our customers' opinions are so
important and valuable to us. We would be very grateful if you
would kindly fill in the CUSTOMER SATISFACTION QUESTIONNAIRE
after using one of our products. You will find the questionnaire on
the Internet at www.pegperego.com
Please note any observations or suggestions you may have on the
questionnaire.
PLIKO P3
• With its removable backrest, Pliko P3 can be used as a chassis
or a stroller.
INSTRUCTIONS FOR USE
OPENING THE CHASSIS
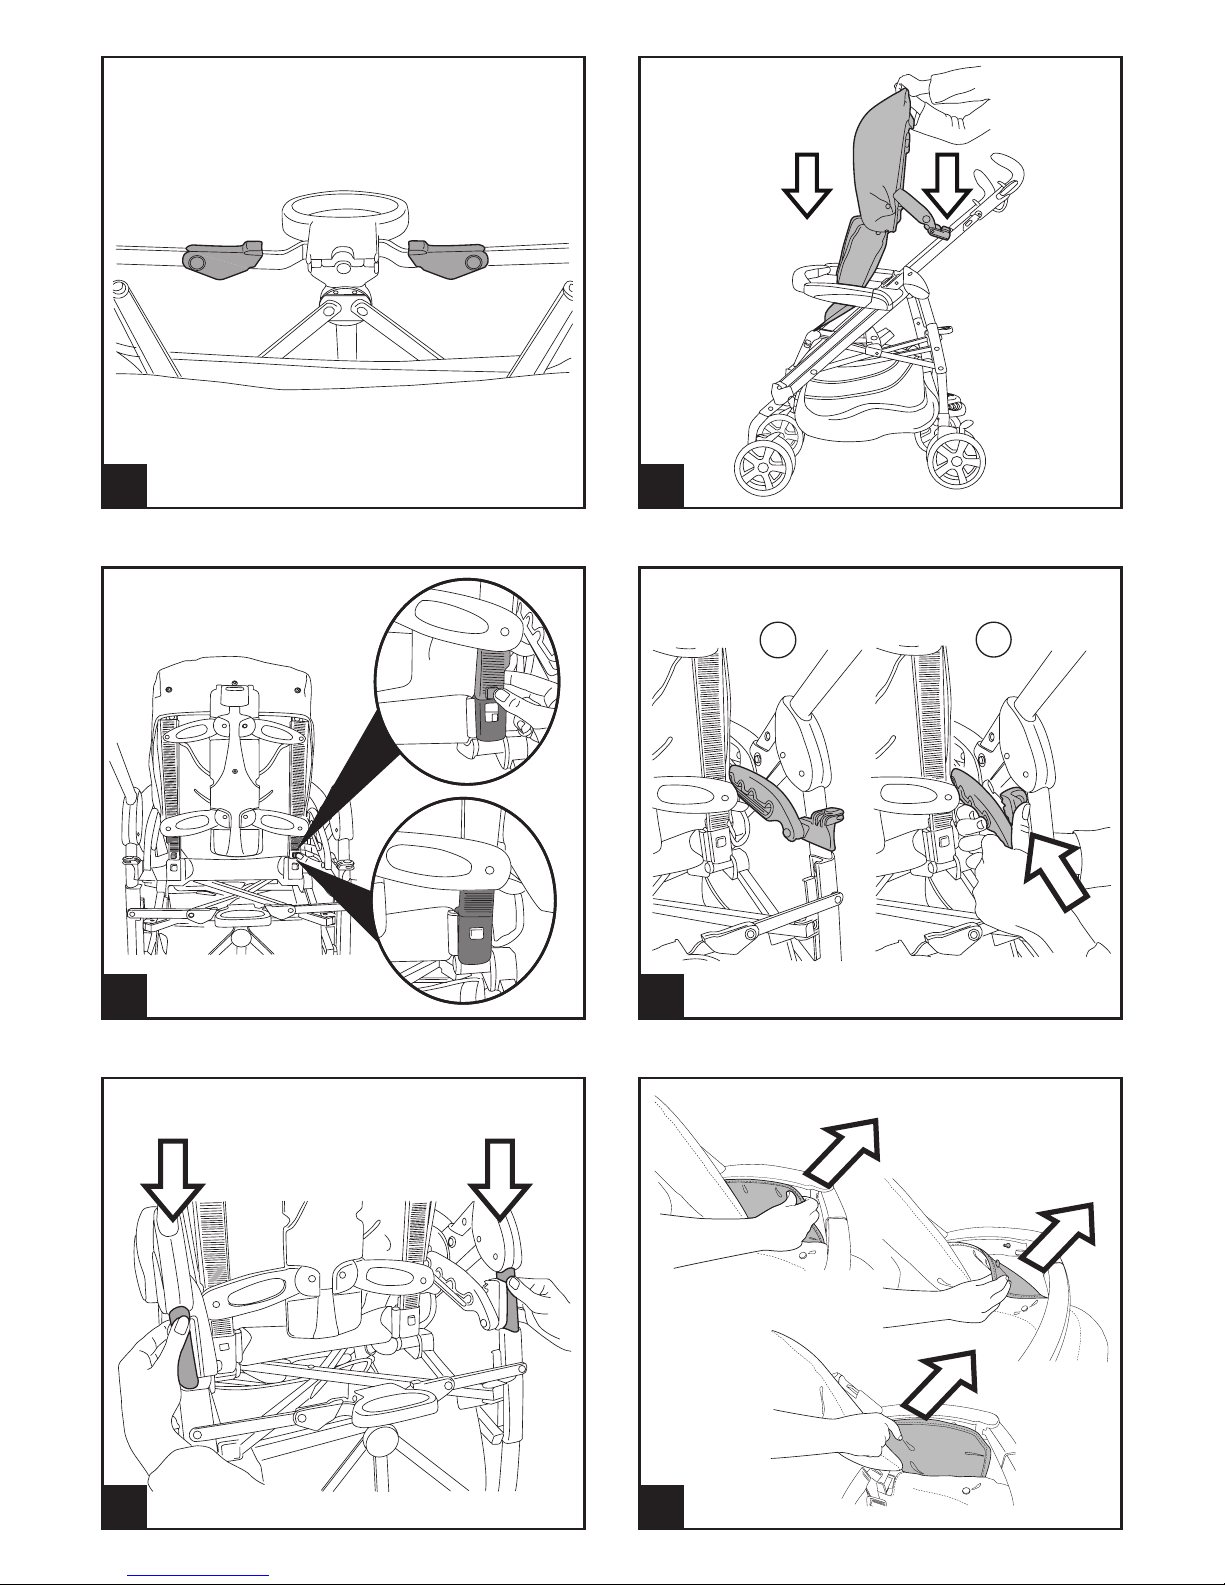
1• Before opening the chassis, remove the two safety caps
from the hooks as shown in the figure, otherwise it will be
impossible to open it correctly.
2• To open the chassis, pull the two levers on the handlebars
upwards, as shown in the figure.
3• While pulling upward on the levers, lift the chassis and it will
automatically open.
Check the two side hooks (see figure) to make sure the stroller
has completely opened.
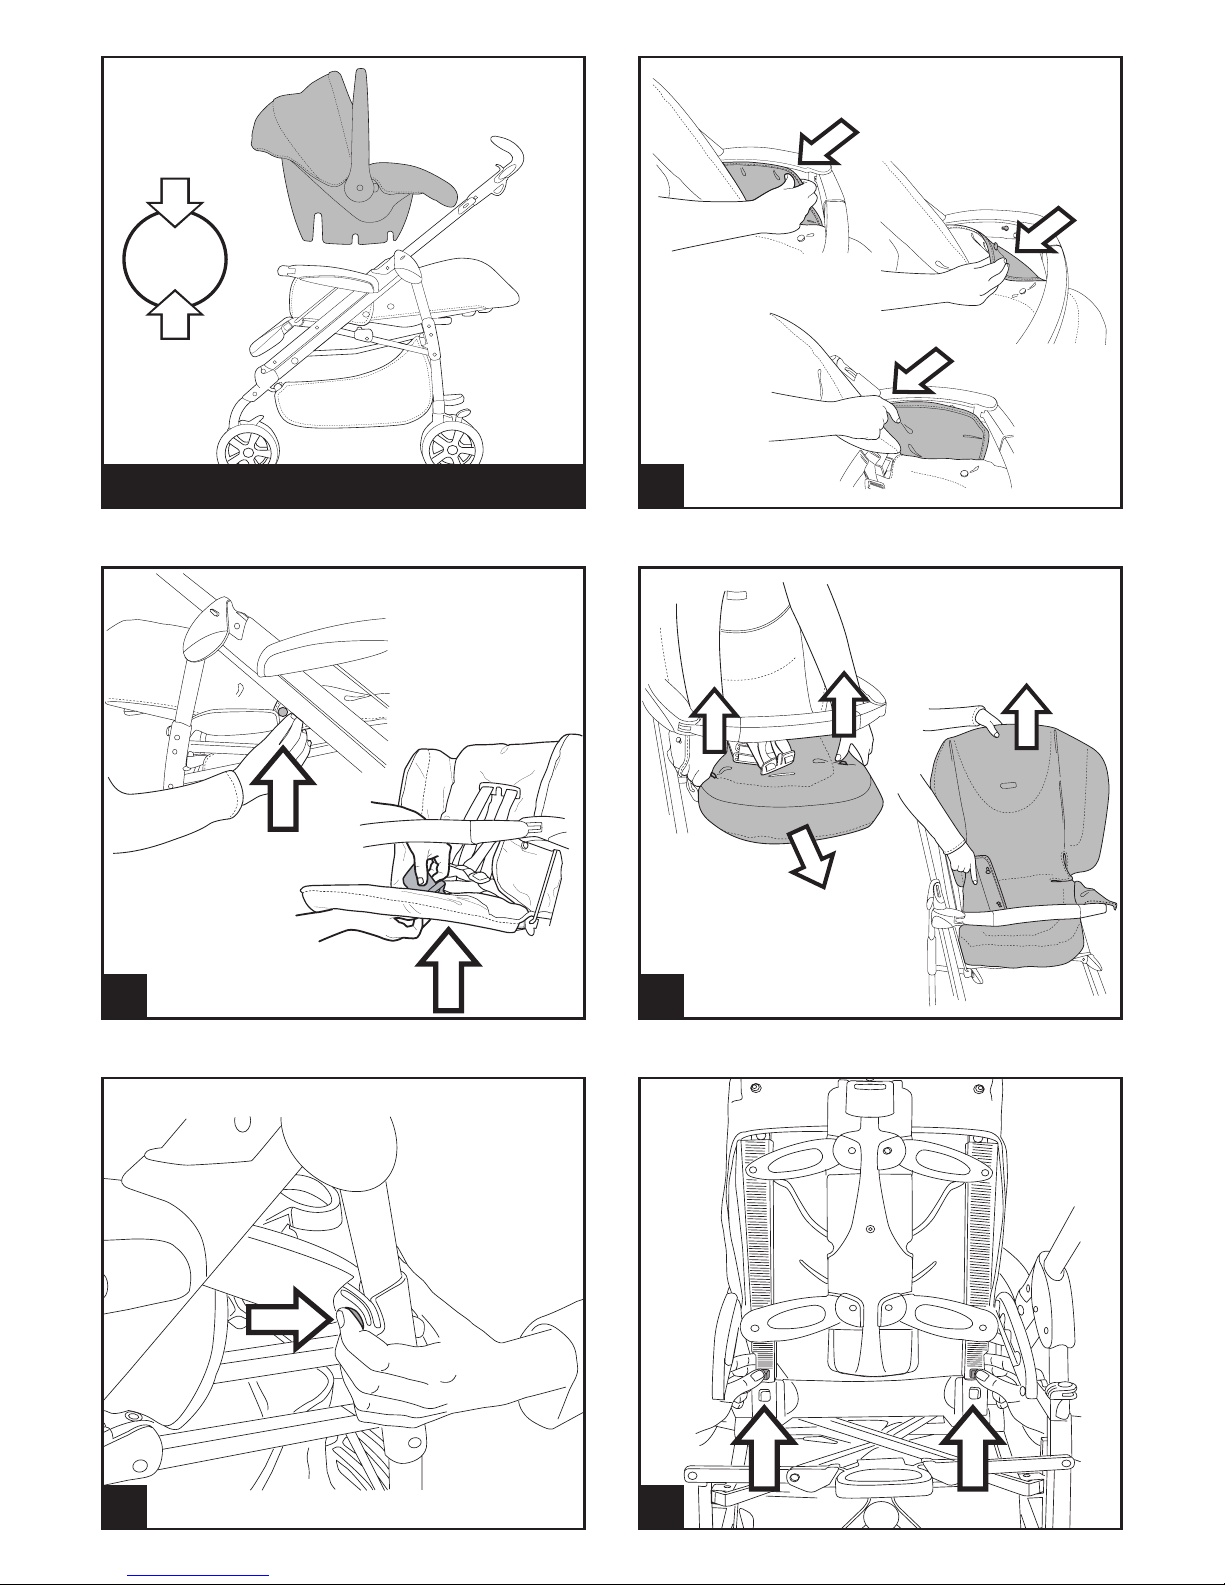
ASSEMBLING THE STROLLER
4• To mount the front wheels, lower lever A and slip the wheel
on as shown in figure B, pressing until it clicks into place.
5• To assemble the rear wheels fasten the wheels connected by
the break wire, as indicated in the figure.
6• Carefully distinguish the left wheel from the right, to fasten
the two rear wheels properly. The left wheel has a rib on
the wheel tube and one on the chassis to guarantee proper
fastening (see figure).
7• Make sure that it is fastened properly, as indicated in the
figure (click).
8• To mount the basket, slip the openings over the hooks in the
front (A) and the rear (B and C).
9• The figure shows the basket fastened to the stroller.
10•
The drink holder can be placed on the left or right hand
side of the stroller, thanks to the attachment which is
already fitted on both sides. To fit the drink holder, click it
on, as in Figure A. See Figure B for a fitted drink holder.
Do not put hot drinks in the drink-holder, nor items
EN•ENGLISH
DELL'ARTICOLO DEVONO ESSERE EFFETTUATE DA ADULTI.
• NON UTILIZZATE IL PRODOTTO SE PRESENTA PARTI MANCANTI O
ROTTURE.
• NON AGGIUNGERE MATERASSINI.
• PRIMA DELL’ USO ASSICURARSI CHE TUTTI I MECCANISMI DI
AGGANCIO SIANO AGGANCIATI CORRETTAMENTE.
• PRIMA DELL’ USO ASSICURARSI CHE IL SEGGIOLINO AUTO, LA
CARROZZINA O LA SEDUTA RIPORTATA SIANO CORRETTAMENTE
AGGANCIATI.
• EVITARE DI INTRODURRE LE DITA NEI MECCANISMI.
• PRESTARE ATTENZIONE ALLA PRESENZA DEL BAMBINO QUANDO
SI EFFETTUANO OPERAZIONI DI REGOLAZIONE DEI MECCANISMI
(MANIGLIONE, SCHIENALE).
• NON UTILIZZARE VICINO A FONTI DI CALORE, FIAMME LIBERE OD
OGGETTI PERICOLOSI A PORTATA DELLE BRACCIA DEL BAMBINO.
• POTREBBE ESSERE PERICOLOSO UTILIZZARE ACCESSORI NON
APPROVATI DAL COSTRUTTORE.
• CONTROLLARE REGOLARMENTE IL MANIGLIONE (O LE MANIGLIE)
ED IL FONDO DELLA CARROZZINA E VERIFICARE L'ASSENZA DI
SEGNI DI ROTTURA O DANNEGGIAMENTO.
• NELL'UTILIZZARE LA CARROZZINA CON UNO STAND, VERIFICATE
LA MASSIMA LUNGHEZZA DELLA CARROZZINA SPECIFICATA
SULLO STAND.
Page 25
weighing more than 0,5 Kg (1 lbs).
BRAKES
11• To set the brakes on Pliko P3, lower the lever on the rear
wheels with your foot, as shown in the figure.
• To release the brakes, lift the lever.
• Always set the brakes when the stroller is not moving.
SWIVEL WHEELS
12• To swivel the front wheels, lower the lever as shown in figure
A. To set the wheels on stationary, lift the lever as shown in
figure B.
ADJUSTING THE HANDLEBARS
13• The height of the handlebars can be adjusted to two
positions. For the higher position, press the button while
pulling the handlebar upward. To lower the handlebar, press
the button and push the handlebar downward.
FOLDING UP PLIKO P3
• Before folding up Pliko P3, remove the Navetta bassinet
unit or Primo Viaggio car seat.
14• The stroller can be folded up using one hand only. Pull first
one lever upwards and then the other, until they click.
15• Grab the central handlebar (Figure 3) and pull upward until
the stroller folds up, as shown in the figure.
16• Check to make sure that the safety hook is fastened. The
folded stroller will stand upright.
CARRYING
17• Pliko P3 can be conveniently carried (with the front wheels set
on stationary) when held by the central handle, as shown in
the figure.
18• The side handle can also be used to carry the stroller, as
shown in the figure.
THE GANCIOMATIC SYSTEM with
THE PLIKO P3 CHASSIS
The Ganciomatic system is a practical, fast way to fasten the
Navetta bassinet unit and the Primo Viaggio car seat – which are
both equipped with the Ganciomatic system - to the Pliko P3
chassis, using the Ganciomatic hooks.
GANCIOMATIC HOOKS ON THE CHASSIS
19• To raise the Ganciomatic hooks on the chassis, turn them
upwards until they click into place, as shown in the figure.
20• To lower the Ganciomatic hooks on the chassis, pull the lever
outwards while turning the hooks downwards, as shown in
the figure.
PLIKO P3 + NAVETTA
To fasten the Navetta bassinet unit to the Pliko P3 chassis, first:
- Set the brakes on the Pliko P3;
- Raise the Ganciomatic hooks;
21• Turn the two levers on the rear of the chassis outwards, as
shown in the figure;
22• Lift the chassis footboard to its highest position (Figure 1);
23• The Pliko P3 chassis is now ready for attaching the Navetta
bassinet unit;
24• Hold the Navetta bassinet unit by its handle, and place it on
the Ganciomatic hooks on the chassis, keeping the head
of the bassinet unit on the opposite side from the chassis
handlebars.
- Press down with both hands on the sides of the Navetta
bassinet unit, until it clicks into place.
- To remove the Navetta bassinet unit from the chassis, consult
the instruction manual.
PLIKO P3 + PRIMO VIAGGIO
To fasten the Primo Viaggio car seat to the Pliko P3 chassis, first:
- Set the brakes on the Pliko P3;
- Attach the front bar (see the “Front Bar” section below).
25• The Pliko P3 chassis is now ready for attaching the Primo
Viaggio car seat.
26•
Hold the car seat by its handle, and place it on the Ganciomatic
hooks on the chassis, keeping the head of the car seat on the
opposite side from the chassis handlebars. Press down with
both hands on the sides of the car seat, until it clicks into place.
- To remove the car seat from the chassis, consult the
instruction manual.
FRONT BAR
27• The chassis comes with caps closing the ends of the armrests.
To fasten the front bar to the chassis, remove the caps (keep
them for when you want to use the chassis without the
front bar). To remove the caps, press the buttons under the
armrests while pulling the caps off.
28• To fasten the front bar to the chassis, slip the two ends of the
front bar into the armrests as shown in the figure, pressing
until the bar clicks into place.
29• The front bar can be opened on one side only to allow the
child to get in and out of the stroller easier when he or she
is older. To open the front bar, press the button under the
armrest while pulling the front bar outwards.
30• To remove the front bar, press the two buttons under the
armrests while pulling the bar off the chassis.
HOW TO TURN THE CHASSIS INTO A STROLLER
ASSEMBLY
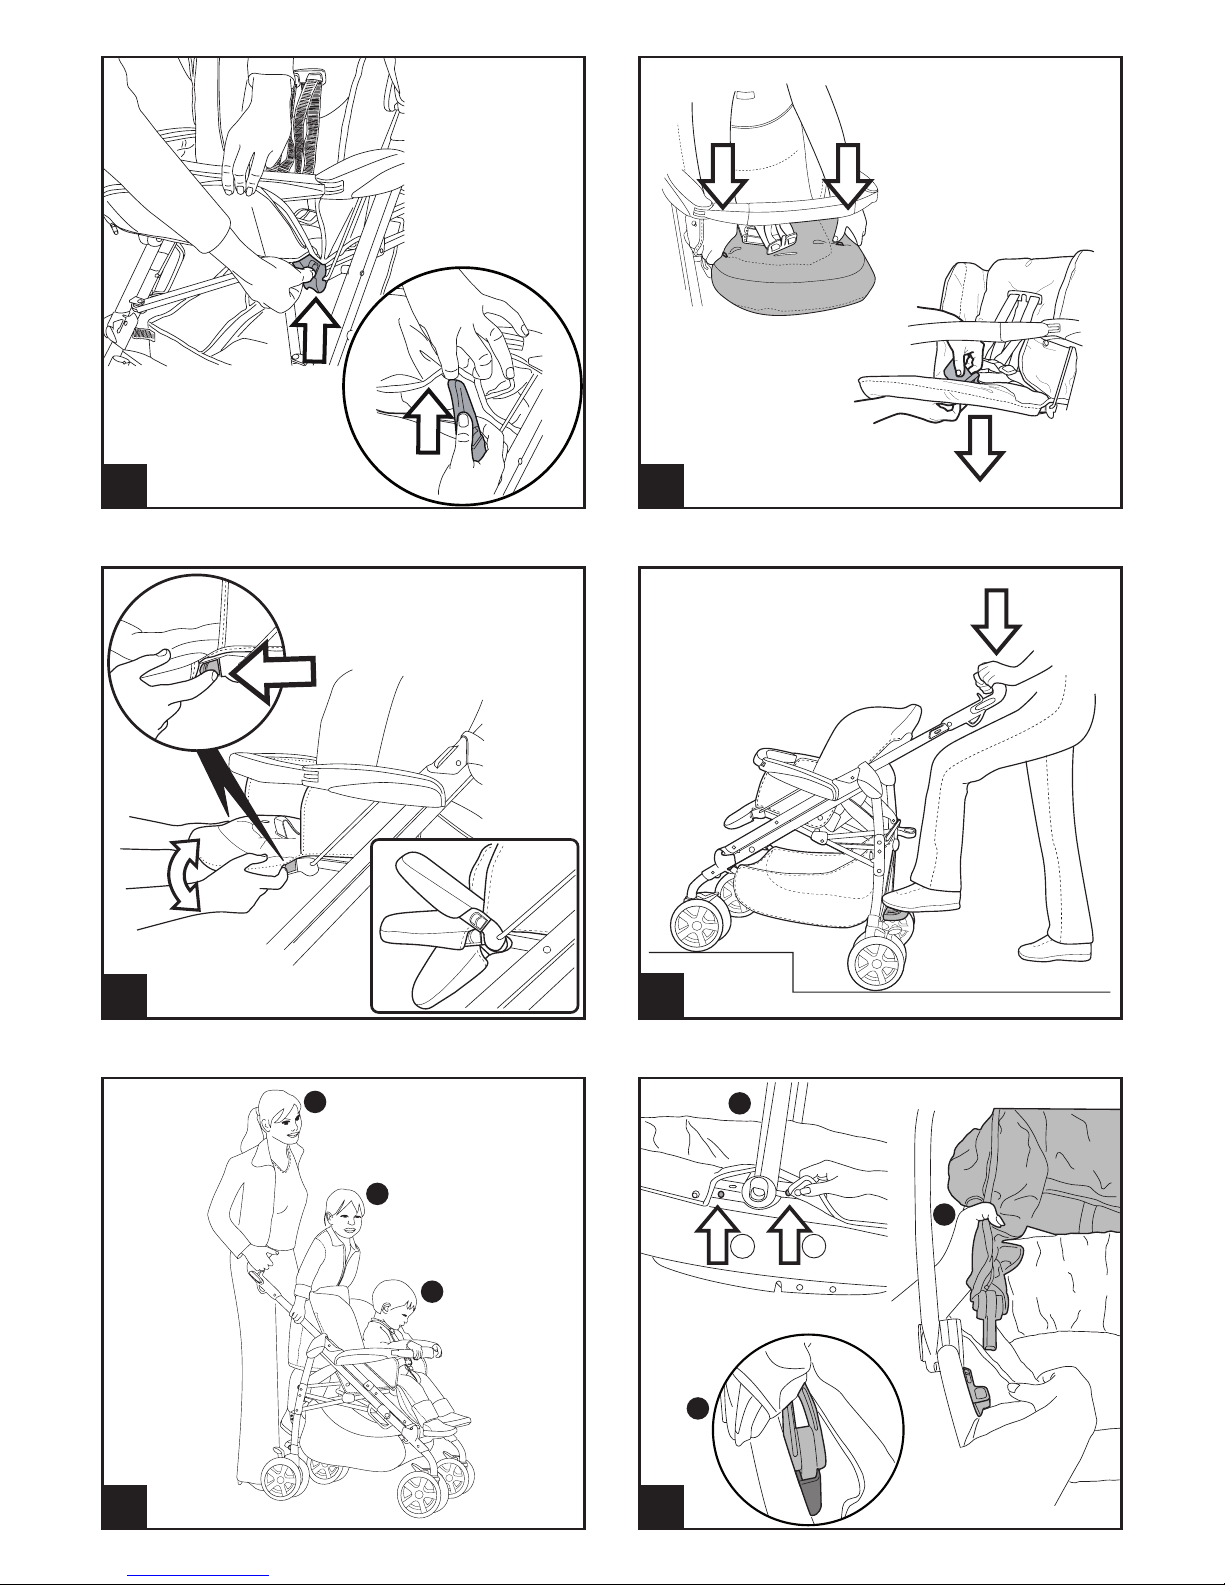
31• To turn the Pliko P3 chassis into a stroller, make sure the two
levers are lowered as shown in the figure.
32• Place the backrest with the sack on the seat of the chassis, as
shown in the figure.
33• To fasten the backrest to the chassis, insert the two ends of
the backrest into the seat of the chassis while pressing the
two buttons, as shown in Figure 1. Press on the backrest until
it clicks into place, as shown in Figure 2.
34• To attach the backrest adjustor to the chassis, turn the
fastener upward (Figure B – turn in the direction shown by
the arrow), placing it behind the rear brace.
35• Push the two fasteners downward until they click into place
on the braces.
36• To line the stroller, fasten the sack to the armrests as shown by
the arrows in the figure.
37• Insert the footboard levers into the sack on the backrest, as
shown in the figure.
38• Finally, fasten the buttons on the sack at the bottom, as
shown in Figure A. Pass the lower leg divider belt under the
seat, as shown in Figure B, and leave the upper leg divider
over the sack.
OPENING AND FOLDING UP
• To open the Pliko P3 stroller, repeat the steps shown in
Figures 2 and 3.
•
To fold up the Pliko P3 stroller, loosen the hood braces, lift the
backrest, and repeat the steps shown in Figures 14, 15, and 16.
ADJUSTING THE FOOTBOARD
39• The footboard can be adjusted to three positions. To lower
the footboard, pull the two side levers downwards. To lift the
footboard, pull it upwards until it clicks into place.
REAR FOOTBOARD
40• The rear footboard helps the mother to push the stroller over
small bumps, and can be used to carry a second child.
LOADING
41• To use the Pliko P3 with two children, first set the brakes on
the stroller. Next place the smaller child in the seat and fasten
the safety belt (1). Hold the handlebars (2) and have the
second child stand on the rear footboard (3).
• Never leave your children alone in the stroller.
• Do not allow a child to stand on the rear footboard when
the stroller is empty.
H O O D
• The hood can be used with the Navetta bassinet unit and can
be fastened to both the Navetta bassinet unit and the stroller.
It is equipped with a zipper to attach the rain canopy.
42• To assemble the hood onto the Navetta bassinet unit
unbutton buttons A and B (figure 1). Fasten the hood as
indicated in figure 2 and make sure it is fastened properly,
figure 3.
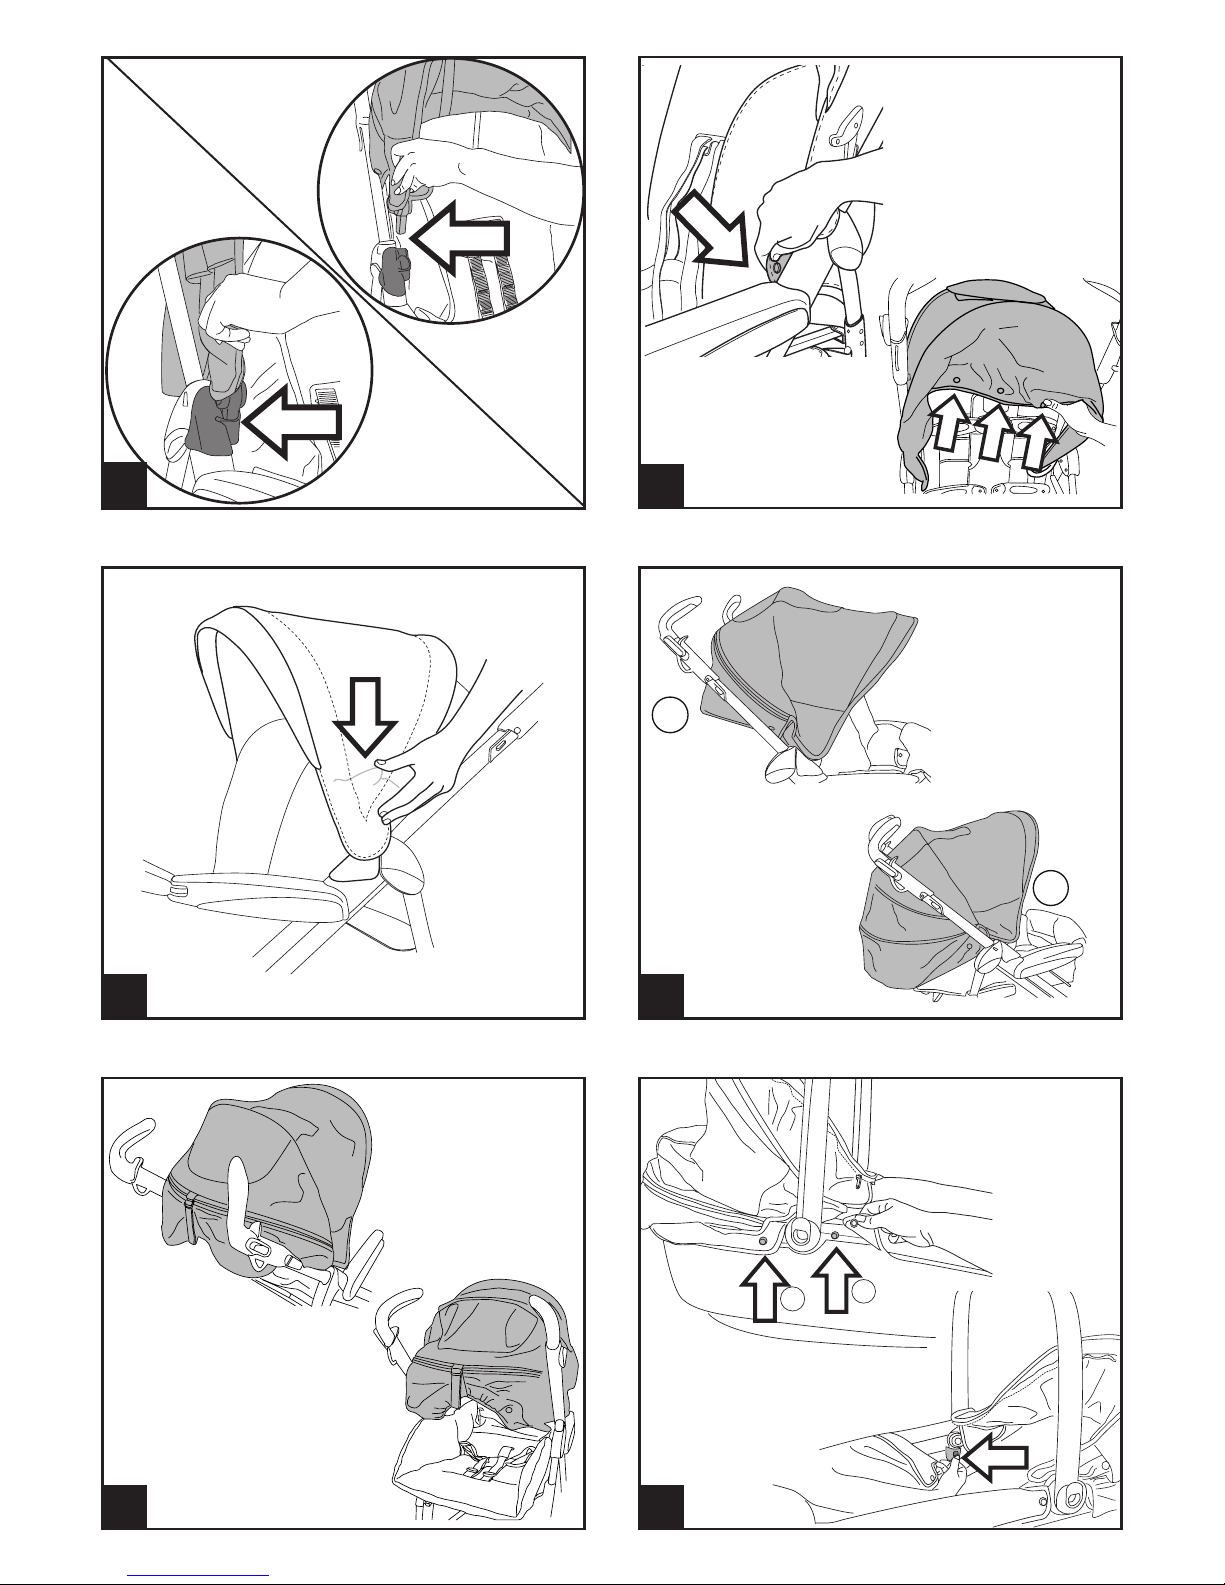
43• To assemble the hood onto the stroller fasten it as indicated
Page 26
wheel.
66• The practical rain canopy can be lowered by opening the
zipper; it will remain fastened to the stroller by the elastic.
67• This rain canopy has been designed for use with the Primo
Viaggio car seat fastened on the stroller as well, to guarantee
your child total protection.
• Do not use the rain canopy in closed places. Always check
from time to time to make sure the child is not too hot.
• Do not place the PVC rain canopy near sources of heat. Keep
cigarettes away from the rain canopy.
• Make sure the rain canopy does not get caught in any
moving mechanism on the chassis or stroller.
• Always remove the rain canopy before folding up the chassis
or stroller.
• Clean the rain canopy with a sponge and soapy water. Do not
use harsh detergents.
SAFETY BELT
68• Make sure that the strap has been correctly inserted as shown
in Figure A. Fasten the safety belt as shown in Figure B.
69• To unfasten the safety belt, press the sides of the buckle
(Figure A) and pull the waist belt outwards (Figure B).
70• The new safety belt is easier to wear, thanks to the “snap
open and shut” system. Before attaching the safety belt,
attach the small buckle to the backrest by inserting the tab
into the special holder, as shown in the figure. Next, fasten
the safety belt on your child, and then detach the belt
from the backrest to allow the child more freedom of
movement. The small buckle should be placed below the
child’s shoulders.
ADJUSTING THE BACKREST
71• The backrest reclines in four different positions. To recline the
backrest, lift the handle (Figure A) while lowering the backrest
(Figure B), stopping at the desired position. To raise the
backrest, pull it upwards.
REMOVABLE LINING
72• To remove the lining from the stroller, unhook the sack
fasteners from the armrests, as shown by the arrows.
73• Unbutton the sack from the seat, and slip it off the hooks on
the footboard.
74• Unbutton the side buttons on the sack, as shown in the
figure. Slip the safety belt leg divider out from under the seat.
75• Unbutton the buttons on the sack from the seat, and slip
the sack off the hooks on the footboard. Slip the sack off the
bottom of the stroller.
PLIKO P3 STROLLER with the
GANCIOMATIC SYSTEM
The Ganciomatic system is a practical, fast way to fasten the
Navetta bassinet unit and the Primo Viaggio car seat – which are
both equipped with the Ganciomatic system - to the Pliko P3
stroller, using the Ganciomatic hooks.
GANCIOMATIC HOOKS ON THE STROLLER
76• To raise the Ganciomatic hooks on the stroller, lift the sack in
the corners of the seat and turn the two hooks upwards until
they click into place.
77• To lower the Ganciomatic hooks on the stroller, pull the lever
outwards while turning the hooks downwards, as shown in
the figure.
PLIKO P3 + NAVETTA
78• To fasten the Navetta bassinet unit to the stroller, it is
necessary to first:
- Set the brakes on the stroller;
- Completely lower the backrest on the stroller;
- Raise the Ganciomatic hooks on the stroller;
- Remove the front bar and insert the caps to close the stroller
armrests;
- Lift the stroller footboard to its highest position;
- Hold the Navetta bassinet unit by its handle;
- Place the bassinet unit on the Ganciomatic hooks on the
stroller, keeping the head of the bassinet unit on the opposite
side from the stroller handlebars;
- Press down with both hands on the sides of the Navetta
in the figure and make sure it is fastened properly (see figure).
44• To open the hood, push the braces downwards. The hood can
be lowered along with the reclining backrest.
45• To tighten to hood, lower the hinge on the inside as indicated
in the figure.
46• Extend the hood completely, unzipping the zipper, figure B.
The hood follows the backrest’s incline.
47• The hood can easily be transformed into a sun canopy, see
figure. Zip the zipper up and block the hook with its practical
hook.
48• To remove the hood from the Navetta bassinet unit,
disconnect it from the cover at the sides. Disconnect eyelets A
and B from the lining as shown in the figure, press the tongue
on both sides and disconnect the hood.
49• To remove the hood from the stroller, press the tab as
indicated in figure A, from both sides of the hood.
Unhook and pull up as indicated in figure B.
NAVETTA BASSINET UNIT
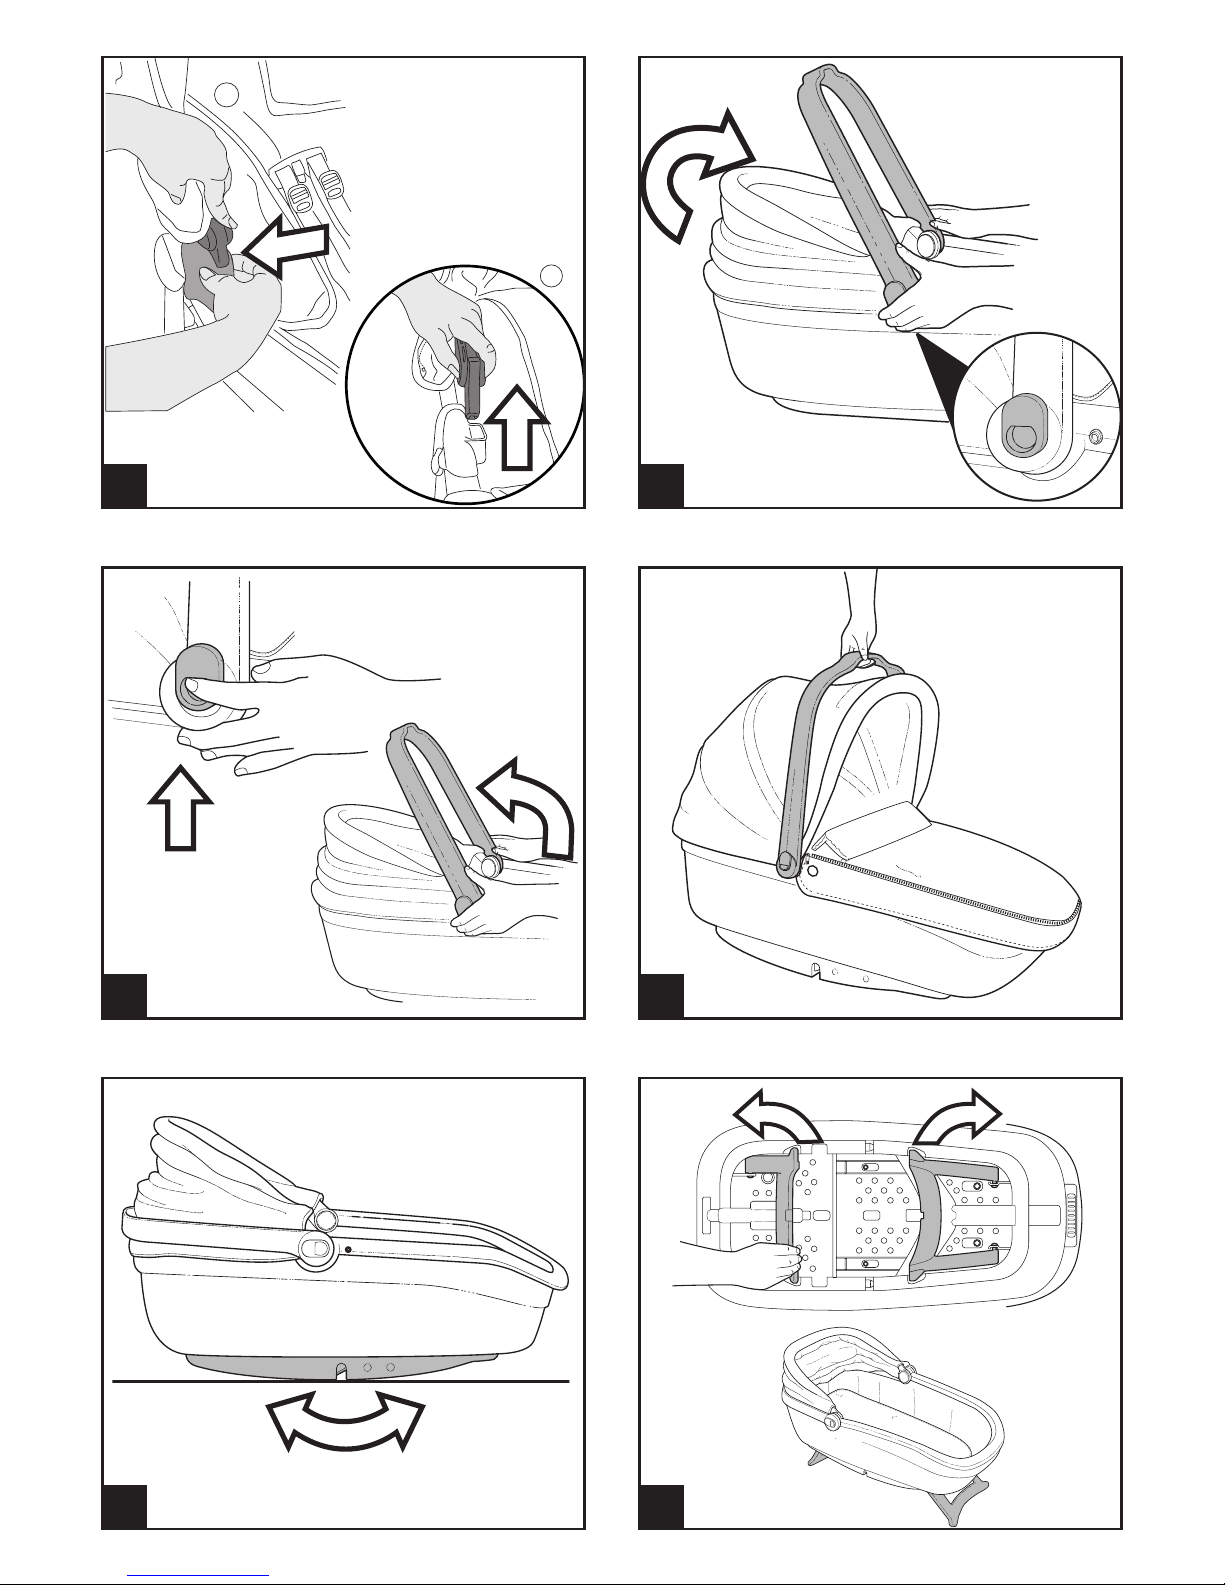
HANDLEBAR
50• To raise the handlebar, pull it up until it clicks into place. The
handlebar is locked only when it is in the vertical position and
the two blocks have been inserted in their housings.
51• To lower the handlebar, release it by pushing up the two
blocks and then push the handlebar downward.
52• The handlebar makes it easier to carry and hook the bassinet
unit onto the chassis and strollers.
POSITION OF ROCKER AND CRIB
53• The Navetta base is specially shaped so it will rock when set
on a flat surface.
54• The Navetta can be turned into a small, non-swinging cradle
by folding down the built-in legs, as shown in the figure.
ADJUSTING THE BACKREST
55• The height of the backrest can be adjusted by pulling it up
and turning the handle, as shown in the figure.
ADJUSTING THE AIR CIRCULATION
56• The Navetta base features holes that can be opened to allow
air to flow into it from below.
To open the holes in the front of Navetta (the side where the
hood is located), push the two hooks toward the outside.
57• To open the holes from the rear (the side opposite the hood),
push one of the two hooks toward the outside.
REMOVABLE LINING
58• To remove the lining, disconnect the eyelets on the sides and
undo it from the front.
59• Remove the 2 tongues from the bodywork and take it off.
ATTACHING AND REMOVING THE BASSINET UNIT ON THE
STROLLER
The Navetta bassinet unit is equipped with the Ganciomatic
System, which can fasten to the Pilko P3 stroller’s Ganciomatic
fastenings.
60• To detach the bassinet unit from the stroller, push the handle
(on the opposite side from the hood) sideways then upwards,
while lifting the bassinet unit by the handle.
USING NAVETTA IN THE CAR
61• Navetta is designed to turn into Navetta AUTO when you use
the two hooks (shown in the figure) together with the special
Auto Kit that is available for purchase separately.
ON TRACK MODULAR SYSTEM DETAILS
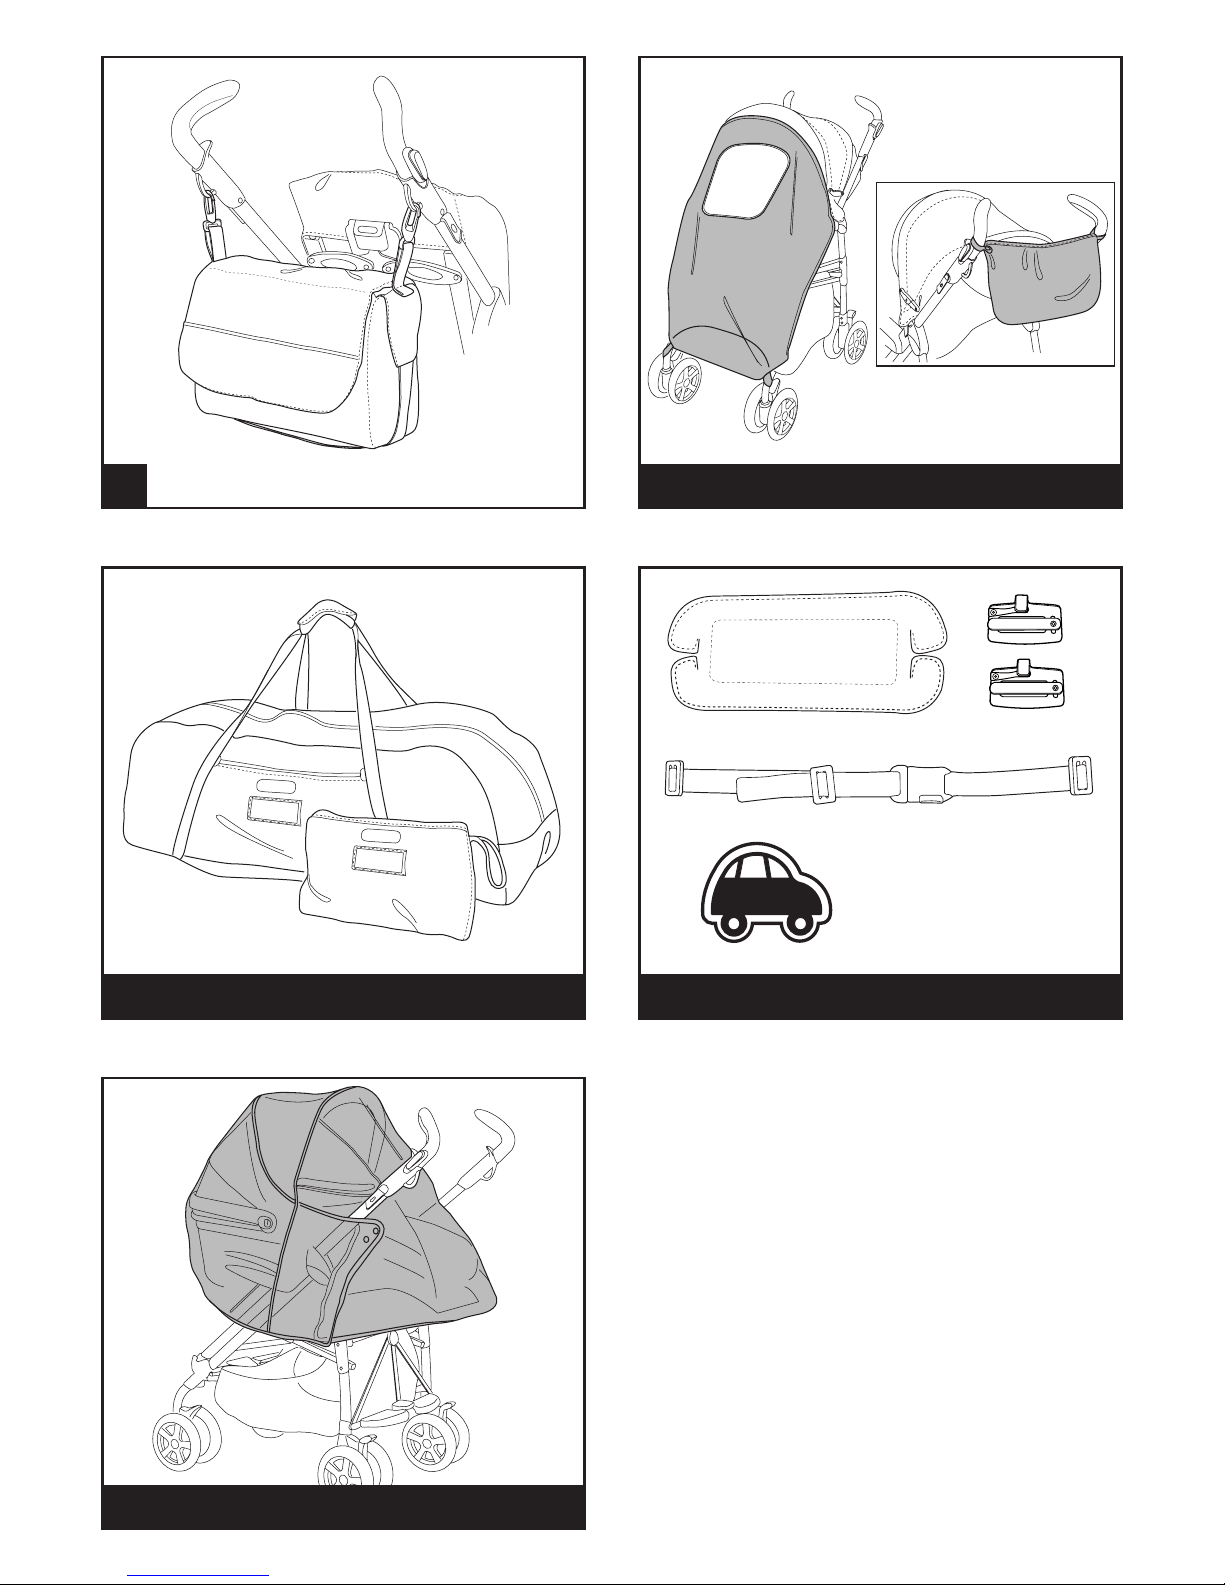
COVER
62• To fasten the cover to the stroller, zip it onto the footboard as
shown in the figure.
Do up the two buttons, as in figure B, to fasten the cover.
RAIN CANOPY
63• To attach the rain canopy, zip it to the hood.
64• Fasten the button found on the elastic to the stroller button
until you hear a click, as indicated in the figure.
65• Fasten the elastic on the bottom of the rain canopy to the
Page 27
bassinet unit, until it clicks into place;
- To remove the Navetta bassinet unit from the stroller, consult
the instruction manual.
PLIKO P3 + PRIMO VIAGGIO
79• To fasten the Primo Viaggio car seat to the stroller, it is necessary
to first:
- Set the brakes on the stroller;
- Completely lower the backrest on the stroller;
- Raise the Ganciomatic hooks on the stroller;
-
Place the car seat turned facing the mother, and press down
with both hands until it clicks into place;
- Do not remove the front bar when the car seat is attached to
the stroller;
- To remove the car seat from the stroller, consult the
instruction manual.
HOW TO TURN THE STROLLER INTO A CHASSIS
To turn the stroller into a chassis, remove the lining first of all.
80• Remove the lining from the stroller by loosening the fasteners
on the sack from the armrests as shown by the arrows.
81• Unbutton the side buttons on the sack, as shown in the
figure. Slip the safety belt leg divider out from under the seat.
82• Unbutton the buttons on the sack from the seat, and slip
the sack off the hooks on the footboard. Slip the sack off the
bottom of the stroller.
83• Unfasten the base by pressing the buttons on the right and
left sides at the rear of the chassis, as shown in the figure. Lift
the backrest upwards with both hands.
84•
Press the two buttons on the seat of the chassis using both
hands, and lift the whole base upwards, as shown in the figure.
ACCESSORIES
85• Diaper Bag (included): Satchel with pad for changing baby’s
diaper. Attaches to the stroller.
86• Mosquito netting: Mosquito netting zips onto the hood.
87• Travel Bag: Practical duffle bag for transporting the stroller by
plane.
88• Navetta Auto Kit: Request the auto kit (ECE R44/04 certified),
which contains everything you need for mounting the
bassinet unit in your car.
89• Cover All Rain Canopy: Rain canopy made of clear PVC,
guarantees complete protection when the bassinet unit is
attached to the stroller.
CLEANING & MAINTENANCE
Your product requires only minimal maintenance. Cleaning and
maintenance operations must be performed only by adults.
• Be sure to keep all moving parts clean, lubricating them with
light oil if necessary.
• Dry off metal parts to prevent rusting.
• Regularly clean the plastic parts with a damp cloth. Do not use
solvents or similar products.
• Brush the fabric parts to remove dust.
• Remove any dust and sand from the wheels.
• Protect the product against smog, water, rain and snow.
Continued and extended exposure to sunlight can change the
colours of many materials.
• Store the product in a dry area.
• To wash the sack, follow the instructions below.
WARNING
PLIKO P3
• THIS VEHICLE HAS BEEN DESIGNED TO CARRY 1 CHILD IN THE
SEAT AND 1 CHILD STANDING ON THE REAR FOOTBOARD.
• DO NOT USE THE PRODUCT FOR A GREATER NUMBER OF
OCCUPANTS THAN THAT INTENDED BY THE MANUFACTURER.
• THIS VEHICLE IS INTENDED FOR CHILDREN FROM BIRTH TO 15
KG IN WEIGHT. THE REAR FOOTBOARD HAS BEEN APPROVED
FOR CARRYING A SECOND CHILD UP TO 20 KG IN WEIGHT.
• USE A HARNESS AS SOON AS YOUR CHILD CAN SIT UNAIDED.
• THIS STROLLER HAS BEEN DESIGNED TO BE USED IN
CONJUNCTION WITH THE FOLLOWING PEG PEREGO
GANCIOMATIC PRODUCTS:
NAVETTA, PORTE ENFANT SOFT AND PRIMO VIAGGIO CAR
SEAT.
• PRODUCT ASSEMBLY AND PREPARATION MUST BE CARRIED
OUT BY AN ADULT.
• DO NOT USE THE PRODUCT IF PARTS ARE MISSING OR
BROKEN.
• USE THE FIVE POINT SEATBELTS AT ALL TIMES; USE THE STRAP
BETWEEN THE LEGS WITH THE STRAP THAT GOES AROUND
THE WAIST AT ALL TIMES.
• LEAVING YOUR CHILD UNATTENDED CAN BE DANGEROUS.
• USE THE BREAKS WHEN NOT IN MOTION AT ALL TIMES.
• MAKE SURE THAT ALL FASTENING DEVICES ARE FASTENED
PROPERLY BEFORE USE.
• MAKE SURE THAT THE CAR SEAT AND THE CARRYING CHAIR
ARE PROPERLY FASTENED BEFORE USE.
• BE CAREFUL NOT TO PUT FINGERS IN DEVICES.
• WATCH YOUR CHILD CAREFULLY WHEN ADJUSTING DEVICES
(HANDLEBAR, BACKREST).
• ANY WEIGHT ADDED TO THE HANDLEBAR OR HANDLES CAN
MAKE THE PRODUCT UNSTABLE; FOLLOW MANUFACTURER
DIRECTIONS REGARDING MAXIMUM WEIGHT LOAD.
• THE FRONT BAR IS NOT DESIGNED TO SUPPORT THE CHILD’S
WEIGHT; THE FRONT BAR IS NOT DESIGNED TO KEEP THE
CHILD IN THE SEAT AND IN NO WAY REPLACES THE SEATBELT.
• DO NOT PUT WEIGHT LOADS EXCEEDING 5 KG IN THE BASKET.
DO NOT PLACE ITEMS IN THE DRINK-HOLDER WHICH EXCEED
THE WEIGHT LIMIT ON THE DRINK-HOLDER ITSELF AND NEVER
HOT DRINKS. DO NOT PLACE ITEMS OVER 0.2 KG IN THE HOOD
POCKETS (IF PRESENT).
• DO NOT USE THE PRODUCT NEAR STAIRS OR STEPS; DO NOT
USE NEAR HEAT SOURCES, OPEN FLAMES OR DANGEROUS
OBJECTS WHICH ARE WITHIN THE CHILD’S REACH.
• THE USE OF ACCESSORIES WHICH HAVE NOT BEEN APPROVED
BY THE MANUFACTURER CAN BE DANGEROUS.
• DO NOT USE THIS PRODUCT WHILE JOGGING OR SKATING.
• PARKING DEVICES MUST BE ENGAGED DURING THE LOADING
AND UNLOADING OF CHILDREN.
WARNING
NAVETTA BASSINET UNIT
• THIS VEHICLE IS ONLY SUITABLE FOR BABIES WHO CANNOT SIT
UP YET.
•
THIS VEHICLE IS DESIGNED FOR BABIES FROM BIRTH UP TO 9 KG.
• USE ONLY ON HARD, FLAT AND DRY SURFACES.
• LEAVING YOUR CHILD UNATTENDED CAN BE DANGEROUS.
• DO NOT LET OTHER UNATTENDED CHILDREN PLAY NEAR THE
CARRIAGE.
• PRODUCT ASSEMBLY AND PREPARATION PROCEDURES MUST
BE CARRIED OUT BY ADULTS ONLY.
•
DO NOT USE THIS PRODUCT IF PARTS ARE BROKEN OR MISSING.
• DO NOT ADD A MATTRESS.
• MAKE SURE THAT ALL HOOKING DEVICES ARE PROPERLY
FASTENED BEFORE USE.
• CHECK THAT THE CAR SEAT, CARRIAGE OR CARRYING CHAIR
ARE PROPERLY FASTENED BEFORE USE.
• DO NOT PUT FINGERS INTO THE DEVICES.
• BE AWARE OF THE CHILD’S WHEREABOUTS WHEN ADJUSTING
THE DEVICES (HANDLEBAR, BACKREST).
• DO NOT USE NEAR HEAT SOURCES, OPEN FLAMES OR ANY
DANGEROUS OBJECTS WITHIN THE CHILD’S REACH.
• USING ACCESSORIES THAT ARE NOT APPROVED BY THE
MANUFACTURER CAN BE DANGEROUS.
• REGULARLY CHECK THE HANDLEBAR (OR HANDLES) AND THE
BOTTOM OF THE CARRIAGE AND MAKE SURE THERE ARE NO
SIGNS OF BROKEN OR DAMAGED PARTS.
• WHEN USING THE CARRIAGE WITH A STAND, CHECK THE
CARRIAGE MAXIMUM LENGTH SPECIFIED ON THE STAND.
Page 28

• IMPORTANT: Lire ces instructions avec attention et les
conserver pour toute référence future.
La sécurité de votre enfant pourrait être menacée si ces
instructions ne sont pas respectées.
• Pour des raisons techniques et commerciales, PEG PEREGO
pourra apporter à tout moment des modifications aux modèles
décrits dans ce manuel.
Peg Perego S.p.A. bénéficie de la certification ISO
9001.
La certification assure aux clients et aux
consommateurs une garantie de transparence
et de confiance dans la façon dont travaille
l’entreprise.
SERVICE D’ASSISTANCE
En cas de perte ou dommage fortuit de pièces du modèle, utilisez
exclusivement les pièces de rechange originales Peg Perego. Pour
les éventuelles réparations, substitutions, informations sur les
produits, la vente de pièces de rechange originales et d’accessoires,
contactez le Service d’assistance Peg-Perego:
tél.: 0039-039-60.88.213
fax: 0039-039-33.09.992
e-mail: assistenza@pegperego.it
www.pegperego.com
Peg Perego est à la disposition de ses consommateurs pour
satisfaire au mieux toutes leurs exigences. À cette fin, connaître
l’avis de nos clients est pour nous extrêmement important et
précieux. Nous vous saurions donc gré, après avoir utilisé l’un
de nos produits, de bien vouloir remplir le QUESTIONNAIRE
SATISFACTION DU CONSOMMATEUR que vous trouverez sur
Internet à l’adresse suivante: www.pegperego.com
et de nous faire vos éventuelles observations ou suggestions.
PLIKO P3
• Grâce à son dossier amovible, Pliko P3 peut être utilisée en
version poussette ou en version châssis seul.
INSTRUCTIONS D’UTILISATION
OUVERTURE
1• Avant d’ouvrir le châssis, il faut retirer les deux embouts
de protection en plastique comme indiqué sur la figure
correspondante. Si ces crochets ne sont pas retirés, le châssis
ne pourra pas s’ouvrir correctement.
2• Pour ouvrir le châssis, soulevez les deux manettes situées sous
les poignées.
3• Et simultanément, soulevez le châssis d’un coup sec pour
que le châssis s’ouvre automatiquement. Pour vous assurer
que le châssis est convenablement ouvert, contrôlez les
deux crochets en bas du châssis comme indiqué sur la figure
correspondante.
ASSEMBLAGE DES PIECES
4• Pour fixer les blocs roues avant, abaissez le levier A et insérez
la roue jusqu’au clic, comme indiqué sur l’image 4B.
5• Pour monter les roues arrière, accrocher les roues l’une à
l’autre en les reliant à l’aide du câble de frein, comme indiqué
sur la figure.
6• Faire bien attention à différencier la roue de gauche de celle
de droite avant de monter les 2 roues arrière. Le montant de
la roue de gauche présente une nervure de manière à garantir
un montage correct (voir figure).
7• Le clic lors du montage des roues permet de s’assurer qu’elles
sont montées correctement (voir figure).
8• Pour installer le panier, fixez les embouts du panier sur les
crochets avant A et sur les crochets arrières B et C.
9• La figure montre le panier correctement accroché.
FR•FRANÇAIS
10• Le porte-boisson se fixe indifféremment du côté droit comme
du côté gauche de la poussette grâce au crochet déjà
présent.
Pour fixer le porte-boisson, l'accrocher jusqu'à entendre le clic
(voir figure A). Porte-boisson accroché (voir figure B).
Il est déconseillé de mettre un biberon ou une bouteille
contenant une boisson chaude et pesant plus d' 0,5 kg
dans le porte-biberon.
FREIN
11• Pour actionner les freins, abaissez du pied les leviers situés sur
les roues arrière comme sur la figure correspondante.
Pour débloquer les freins, relever les leviers.
• A l’arrêt, toujours enclencher les freins.
ROUES PIVOTANTES
12• Pour mettre les roues avant en position pivotante, abaissez
le levier comme sur la figure 11A. Pour les mettre en position
fixe, relevez le levier.
REGLAGE DES POIGNEES
13• Les poignées sont réglables en hauteur. Pour mettre les
poignées en position haute, appuyez sur le bouton situé sur
le côté de la poignée et simultanément, tirez la poignée vers
le haut. Pour la rabaisser, procédez à l’inverse.
FERMETURE DU CHASSIS
• Avant de fermer Pliko P3, retirez la nacelle Navetta ou le
siège auto Primo Viaggio s’ils sont installés dessus.
14• La poussette peut se plier d’une seule main. Tirez une poignée
vers le haut puis l’autre jusqu’ au clic.
15• Tirez la poignée centrale (figure 14/3) vers le haut jusqu’à
complète fermeture, comme sur la figure.
16• Assurez-vous que le châssis est correctement fermé en
contrôlant le crochet de sécurité. Une fois fermé, le châssis
tient debout tout seul.
TRANSPORT
17• Une fois pliée, la poussette Pliko P3 peut être transportée
facilement en la tirant par la poignée centrale comme indiqué
sur la figure. La poussette roule alors sur les roues avant qui
doivent être en position fixe.
18• La poussette peut également être portée à l’aide de la
poignée latérale comme sur la figure.
SYSTEME GANCIOMATIC avec
PLIKO P3 VERSION CHASSIS NU
Grâce au système Ganciomatic, la nacelle Navetta et le siège auto
Primo viaggio peuvent se fixer très simplement directement sur le
châssis Pliko P3.
FIXATIONS GANCIOMATIC DU CHASSIS
19• Pour relever les fixations Ganciomatic du châssis, orientez les
deux crochets Ganciomatic vers le haut jusqu’au clic comme
indiqué sur la figure correspondante.
20• Pour abaisser les fixations Ganciomatic du châssis, tirez vers
l’extérieur la languette située à côté du crochet et rabattez le
crochet vers le bas comme indiqué sur la figure.
PLIKO P3 + NAVETTA
Pour accrocher la nacelle Navetta au châssis Pliko P3 il faut:
- enclencher les freins du châssis;
- relever les fixations Ganciomatic;
(si la main courante est fixée, il est nécessaire de la retirer
avant d’installer la Navetta - voir les paragraphes main
courante 27-28-29 et 30 ci-après).
21• Faites pivoter les deux leviers situés à l’arrière du châssis en
les orientant vers l’extérieur comme indiqué sur la figure
correspondante;
22• Mettre le repose-pied du châssis dans sa position la plus
haute (figure 1);
23• Pliko P3 version châssis nu est désormais prêt à recevoir la
nacelle Navetta;
24• Saisissez la nacelle Navetta par sa poignée et positionnez-la
sur les fixations Ganciomatic du châssis, la tête de la Navetta
étant du côté opposé aux poignées du châssis (face à la
Page 29

personne qui pousse);
- Appuyez des deux mains sur les côtés de la nacelle jusqu’au clic;
- Pour décrocher la nacelle du châssis, consultez le mode
d’emploi de la nacelle.
PLIKO P3 + PRIMO VIAGGIO
Pour accrocher le siège auto au châssis, il faut:
- Enclencher les freins du châssis;
- Fixer la main courante (voir la section MAIN COURANTE ci-
dessous);
25• Pliko P3 est désormais prêt à recevoir le siège auto primo
viaggio;
26• Saisissez le siège auto Primo Viaggio par sa poignée et
positionnez-le sur les fixations Ganciomatic, la tête du siège
auto étant du côté opposé aux poignées du châssis (face à la
personne qui pousse). Appuyez des deux mains sur les côtés
du siège auto jusqu’à entendre le clic;
- Pour décrocher le siège auto du châssis, consulter le mode
d’emploi du siège auto.
MAIN COURANTE
27• Dans les accoudoirs de la poussette, deux embouts sont
insérés. Ceux-ci servent à boucher l’embout des accoudoirs
lorsque la poussette est utilisée dans la main courante et
ce, afin d’éviter que l’enfant se coince les doigts dans les
accoudoirs.
- Pour retirer les embouts, enfoncer le bouton situé sous
l’accoudoir et en même temps, extraire l’embout. (répéter
l’opération de l’autre côté).
28• Pour fixer la main courante, introduisez les deux extrémités
de la main courante dans les accoudoirs jusqu’au clic comme
indiqué sur la figure correspondante.
29• La main courante peut s’ouvrir d’un côté pour facilité
l’installation et la sortie de l’enfant dans la poussette. Pour
ouvrir la main courante, appuyez sur le bouton situé sous
l’accoudoir et faites pivoter la main courante.
30• Pour retirer la main courante, appuyez sur les deux boutons
situés sous les accoudoirs et tirez la main courante.
POUR TRANSFORMER LE CHASSIS EN POUSSETTE
ASSEMBLAGE
31• Pour transformer Pliko P3 version châssis en poussette,
assurez-vous que les deux leviers soient abaissés comme sur
la figure correspondante.
32• Positionnez le dossier avec sa housse sur l’assise du châssis
comme indiqué sur la figure correspondante.
33• Pour accrocher le dossier au châssis, insérez ses deux
extrémités dans l’assise du châssis en appuyant sur les deux
boutons (figure 1) jusqu’ à ce qu’il soit enclenché (figure 2).
34•
Pour accrocher l’élément de réglage du dossier sur le châssis,
faites pivoter la fixation vers le haut (figure B dans le sens de la
flèche) et positionnez-le derrière le montant arrière.
35
• Enclenchez les deux fixations dans leurs logements sur les
montants arrières.
36• Pour installer la housse de la poussette, accrochez ses
fixations aux accoudoirs, comme l’indiquent les flèches sur la
figure correspondante).
37• Insérez les pédales repose-pied dans la housse du dossier,
comme sur la figure.
38• Pour achever l’installation de la housse du dossier sur le
châssis, boutonnez-la à la base du châssis comme sur la figure
A. Faites passer la partie basse de la sangle entre-jambes sous
l’assise, comme sur la figure B et laissez dépasser la partie
haute de la sangle entre-jambes.
OUVERTURE ET FERMETURE
• Pour ouvrir Pliko P3 version poussette, répétez les opérations
décrites sur les paragraphes 2 et 3.
• Pour refermer Pliko P3 version poussette, repliez les compas
de la capote, relevez le dossier et répétez les opérations
décrites dans les paragraphes 14, 15 et 16.
REGLAGE REPOSE-PIED
39• Le repose-pied est réglable en 3 positions. Pour rabattre le
repose-pied, actionner les deux petites manettes latérales et
baisser le repose-pied. Pour le mettre en position haute, relever
le repose-pied jusqu’au clic.
PLATE-FORME ARRIERE
40• La plate-forme arrière facilite le franchissement des petits
obstacles et permet de transporter un second enfant.
SEQUENCE DE CHARGE
41• Pour utiliser Pliko P3 avec deux enfants, enclenchez tout
d’abord les freins du châssis. Installez le plus jeune enfant sur
le siège et accrochez sa ceinture de sécurité (1). Saisissez les
poignées (2) et faites monter le second enfant sur la plateforme arrière (3).
•
Ne jamais laisser les enfants seuls dans la poussette.
• Ne pas laisser l’enfant monter sur la plate-forme arrière
lorsque la poussette est inoccupée.
CAPOTE
• La capote s’utilise et s’installe aussi bien sur la poussette que
sur la nacelle Navetta. Elle est équipée d’une fermeture éclair
qui permet d’y fixer l’habillage pluie.
42• Pour installer la capote sur la nacelle Navetta, ouvrir les
pressions A et B (figure 1), fixer la capote comme indiqué sur
la figure 2 et vérifier qu’elle est correctement fixée (figure 3).
43• Pour installer la capote sur la poussette, procéder comme
indiqué sur la figure et vérifier qu’elle est correctement fixée.
44• Pressionnez la capote à l’arrière de la housse et sur les bords.
45• Pour tendre la capote, pousser vers le bas le compas
positionné vers l’intérieur, comme sur la figure.
46• Allonger complètement la capote en ouvrant la fermeture-
Éclair (figure B).
La capote s’incline en suivant le dossier.
47• La capote peut être facilement transformée en pare-soleil
grâce à la fermeture éclair (voir la figure). Ouvrir la fermeture
éclair et attacher la capote grâce à son crochet de maintien.
48• Pour enlever la capote de la nacelle Navetta, la décrocher
des côtés de la housse. Défaire les boutonnières A et B de la
housse comme indiqué sur la figure, appuyer sur la languette
des deux côtés et décrocher la capote.
49• Pour enlever la capote de la poussette, appuyer sur la
languette des deux côtés de la capote (figure A).
La décrocher et la tirer vers le haut comme indiqué sur la
figure B.
NACELLE NAVETTA
POIGNÉE
50• Pour relever la poignée, la tirer vers le haut jusqu’au déclic. La
poignée n’est bloquée que lorsqu’elle se trouve à la verticale
et que les deux verrous sont rentrés dans leur logement.
51• Pour abaisser la poignée, la débloquer en tirant sur les deux
verrous et en poussant la poignée vers le bas.
52• La poignée facilite le transport et l'installation de la nacelle sur
les châssis et poussettes.
POSITION FIXE OU BASCULE
53• La forme incurvée de la base de la nacelle Navetta lui permet
d'avoir une fonction bascule lorsqu’elle est posée sur une
surface plane.
54• Navetta se transforme en un petit nid non basculant après
avoir déplié les pieds incorporés à la nacelle, comme indiqué
sur la figure.
RÉGLAGE DU DOSSIER
55• Le dossier est réglable en hauteur en tirant et en faisant
tourner la poignée comme indiqué sur la figure.
RÉGLAGE DE LA CIRCULATION DE L’AIR
56• La base de la nacelle est équipée de prises d’air permettant
une aération optimale.
Pour ouvrir les prises d’air avant de la nacelle (côté capote),
tirer les deux loquets vers l’extérieur.
57• Pour ouvrir les prises d’air arrière de la Navetta pousser l’un
des deux loquets vers l’extérieur.
POUR ENLEVER LA HOUSSE
58• Pour enlever la housse, décrocher les boutonnières situées sur
les côtés et défaire l’avant de la housse.
59• Décrocher de la coque les 2 languettes et retirer la housse.
Page 30

ACCROCHAGE / DÉCROCHAGE DE LA NACELLE DE LA POUSSETTE
La nacelle Navetta est équipée du système Ganciomatic et
peut ainsi être accrochée aux fixations Ganciomatic de la
poussette Pliko P3.
60•
Pour décrocher la nacelle de la poussette, actionner et
enfoncer la poignée (située sous l'entourage de la nacelle côté
pieds) et simultanément, la soulever par l'anse pour la retirer.
NAVETTA EN VOITURE
61• Navetta est pré-équipée sécurité auto grâce à deux crochets
(voir figure correspondante) et au kit Auto vendu séparément.
Pour la fixer dans la voiture, se référer à la notice du kit auto.
DETAILS DU SYSTEME MODULABLE ON TRACK
TABLIER
62• Pour fixer le tablier, unissez sa fermeture éclair à celle
située sur le bas de la housse comme indiqué sur la figure
correspondante.
Pour fixer le tablier, accrocher les deux boutons comme
indiqué sur la figure B.
HABILLAGE PLUIE
63• Pour fixer l’habillage pluie, unissez sa fermeture éclair à celle
de la capote.
64• Accrochez la pression du cordon élastique sur la pression de
la poussette comme indiqué sur la figure correspondante
jusqu’à entendre le clic.
65• Fixez l’élastique du bas de l’habillage pluie au-dessus du bloc
roues.
66• l’habillage pluie très pratique peut s’abaisser en ouvrant la
fermeture éclair et en le rabattant sur la poussette. Celui-ci
restera fixé à la poussette grâce aux élastiques.
67• Cet habillage pluie a été étudié pour permettre de couvrir
également le siège auto Primo Viaggio lorsqu’il est fixé sur la
poussette.
• Ne pas utiliser l’habillage pluie dans les milieux fermés,
contrôler régulièrement que l’enfant n’a pas trop chaud.
•
Ne pas approcher l’habillage pluie de sources de chaleur et
prêter attention à ce que des cigarettes ne l’endommagent pas.
• S’assurer que l’habillage pluie n’entrave pas le bon
fonctionnement de la poussette et ne bloque pas les parties
articulées.
• Toujours retirer l’habillage pluie avant de plier la poussette.
• Nettoyer avec une éponge et de l’eau savonneuse. Ne pas
utiliser de détergents.
CEINTURE DE SECURITE
68•
Assurez-vous que la bretelle est correctement enclenchée en
poussant comme indiqué sur la figure A et bouclez la ceinture
comme indiqué sur la figure B.
69•
Pour décrocher la ceinture, appuyez sur les côtés de la boucle
(figure A) et dans le même temps tirez vers l’extérieur (figure B).
70• Pour plus de facilité, avant d’installer l’enfant dans la
poussette, accrochez la petite boucle au dossier en insérant
la languette dans le passant prévu à cet effet à mi-hauteur
du dossier. Une fois la ceinture bouclée sur l’enfant ,
détachez-la du dossier pour laisser l’enfant libre de ses
mouvements. La petite boucle doit rester sous les épaules de
l’enfant.
REGLAGE DU DOSSIER
71• Le dossier est inclinable en quatre positions. Pour baisser le
dossier, actionnez la poignée (figure A) et en même temps
baissez le dossier jusqu’en position souhaitée.
Pour le relever, poussez-le vers le haut.
POUR RETIRER LA HOUSSE
72• Pour retirer la housse de la poussette, déboutonnez ses
fixations situées sur les accoudoirs, comme les flèches
l’indiquent.
73• Retirez la sangle (d’un seul côté) comme indiqué sur la figure
en tenant l’écrou avec le doigt.
74• Ouvrir les pressions sur les côtés de la housse comme indiqué
sur la figure. Enlevez la sangle entre-jambes par le dessous de
l’assise.
75• Défaire toutes les pressions tout autour de la housse et tirez la
housse par le haut.
SYSTEME GANCIOMATIC avec
PLIKO P3 VERSION POUSSETTE
Grâce aux fixations Ganciomatic, le système Ganciomatic permet
de fixer tout simplement la nacelle Navetta et le siège auto Primo
viaggio à Pliko version poussette.
FIXATIONS GANCIOMATIC DE LA POUSSETTE
76• Pour soulever les fixations Ganciomatic de la poussette,
relevez la housse dans les coins de l’assise et orienter les deux
fixations vers le haut jusqu’au clic.
77• Pour abaisser les fixations Ganciomatic de la poussette,
tirez les petits leviers vers l’extérieur et rabattez les fixations
Ganciomatic; comme indiqué sur la figure.
PLIKO P3 + NAVETTA
78• Pour installer la nacelle Navetta sur la poussette, il faut:
- enclencher les freins de la poussette;
- mettre le dossier de la poussette en position horizontale;
- relever les fixations Ganciomatic de la poussette;
- retirer la main courante et insérer les bouchons fournis dans
les trous des accoudoirs;
- soulever le repose-pied dans la position la plus haute;
- saisir la nacelle par la poignée;
- positionner la nacelle sur les fixations Ganciomatic de la
poussette, la tête de la Navetta devant être du côté opposé
aux poignées de la poussette (face à la personne qui pousse);
-
appuyer des deux mains sur les côtés de la Navetta jusqu’au clic;
- Pour décrocher la Navetta, consultez son mode d’emploi.
PLIKO P3 + PRIMO VIAGGIO
79•
Pour fixer le siège auto Primo viaggio sur la poussette, il faut:
- enclencher les freins de la poussette;
- mettre le dossier de la poussette en position horizontale;
- relever les fixations Ganciomatic de la poussette;
- positionner le siège auto sur les fixations Ganciomatic de la
poussette. La tête du siège auto devant être du côté opposé
aux poignées (face à la personne qui pousse);
-
appuyer des deux mains sur les côtés du siège auto jusqu’au clic;
- il est recommandé de ne pas retirer la main courante de la
poussette lorsque le siège auto Primo viaggio est installé;
- pour décrocher le siège auto de la poussette, consultez son
mode d’emploi.
POUR TRANSFORMER LA POUSSETTE EN CHASSIS
Pour transformer la poussette en châssis, il faut préalablement
retirer la housse.
80• Pour retirer la housse de la poussette, détachez ses fixations
situées sur les accoudoirs comme l’indiquent les flèches.
81• Défaire les pressions sur les côtés de la housse comme
indiqué sur la figure correspondante. Enlevez la sangle entrejambes de la ceinture par le dessous de l’assise.
82• Défaire les pressions de la housse situés tout autour de l’assise
et la décrocher du repose-pied. Enlever la housse par le haut.
83• Retirer l’assise en appuyant sur le bouton situé à l’arrière du
châssis comme indiqué sur la figure correspondante sur les
barres de droite et de gauche. Soulever le dossier des deux
mains en le séparant du châssis.
84• Appuyer des deux mains sur les deux boutons de l’assise du
châssis et soulever tout le bloc poussette comme indiqué sur
la figure correspondante.
ACCESSOIRES en option:
85• Sac à langer (inclus): sac avec matelas pour changer bébé. Il
peut s’accrocher sur la poussette.
86•
Moustiquaire: moustiquaire équipée d’une fermeture éclair
permettant de la zipper sur la capote.
87• Sac de voyage: sac pratique pour le transport de la poussette
en avion ou en voiture.
88• Kit Auto Navetta: le Kit auto (homologué ECE R44/04) est
disponible sur demande. Il contient tout le nécessaire pour
monter la nacelle dans la voiture.
89• Cover All:
Bulle en PVC transparent qui garantit une
protection optimale contre la puie de la nacelle sur la
Page 31

poussette.
NETTOYAGE ET ENTRETIEN
Votre poussette nécessite un minimum d’entretien. Les opérations
de nettoyage et d’entretien doivent être effectuées uniquement
par des adultes.
• Il est recommandé de maintenir toutes les parties articulées
propres et au besoin de les lubrifier avec une huile légère.
• Essuyer les parties métalliques du produit pour prévenir la
formation de rouille.
• Nettoyer régulièrement les parties en plastique avec un
chiffon humide, ne pas utiliser de solvants ou produits abrasifs
ou corrosifs.
• Brosser les parties tissus pour les dépoussiérer.
• Eliminer les dépôts de poussière et de sable des roues.
• Protéger les articles contre les agents atmosphériques, l’eau, la
pluie, la neige, l’exposition prolongée au soleil pourrait altérer
les couleurs de nombreux matériaux.
• Conserver le produit dans un endroit sec.
• Pour le lavage des parties tissus, suivre les indications ci-après.
AVERTISSEMENT
PLIKO P3
• LIRE ATTENTIVEMENT CETTE NOTICE AVANT TOUTE
UTILISATION ET LA CONSERVER POUR TOUTE CONSULTATION
ULTÉRIEURE. VOTRE ENFANT RISQUE DE SE BLESSER SI VOUS NE
SUIVEZ PAS CES INSTRUCTIONS.
• NE PAS UTILISER DANS LE CAS D’UN NOMBRE D’OCCUPANTS
PLUS ÉLEVÉ.
• CETTE POUSSETTE NE DOIT ÊTRE UTILISÉE QU'AVEC LE
NOMBRE D'ENFANTS POUR LEQUEL ELLE A ÉTÉ CONÇUE.
• L’ASSISE DE CETTE POUSSETTE EST HOMOLOGUÉE POUR
DES ENFANTS DE LA NAISSANCE À 15 KG. LA PLATE FORME
ARRIÈRE EST HOMOLOGUÉE POUR TRANSPORTER UN SECOND
ENFANT DONT LE POIDS N’EXCÈDE PAS 20 KG.
• UTILISER LE HARNAIS DORSAL DÈS QUE L’ENFANT PEUT TENIR
ASSIS TOUT SEUL.
• CETTE POUSSETTE EST ÉQUIPÉE DE BOUCLES
SUPPLÉMENTAIRES PERMETTANT L’UTILISATION DU HARNAIS
AMOVIBLE ET RÉGLABLE SELON LA TAILLE DE L’ENFANT.
• VEILLER À CE QUE LES ENFANTS SOIENT TOUJOURS ATTACHÉS
LORSQU’ILS SONT INSTALLÉS SUR LA POUSSETTE ET À CE QUE
LES SANGLES SOIENT AJUSTÉES À LEUR TAILLE.
• TOUJOURS UTILISER LA SANGLE ENTRE-JAMBES AVEC LA
SANGLE VENTRALE.
• CETTE POUSSETTE A ÉTÉ CONÇUE POUR ÊTRE UTILISÉE
EN COMBINAISON AVEC LES PRODUITS PEG PEREGO
GANCIOMATIC NAVETTA, PORTE-ENFANT ET SIÈGE AUTO
PRIMO VIAGGIO.
• LES OPÉRATIONS D’ASSEMBLAGE ET DE DÉMONTAGE DOIVENT
TOUJOURS ÊTRE EFFECTUÉES PAR DES ADULTES.
• NE PAS UTILISER LE PRODUIT SI DES PIÈCES SONT
MANQUANTES OU ENDOMMAGÉS.
• NE JAMAIS LAISSER LES ENFANTS SEULS SANS SURVEILLANCE
SUR LA POUSSETTE.
• A L’ARRÊT, TOUJOURS ACTIONNER LES FREINS.
• LE DISPOSITIF DE BLOCAGE À L’ARRÊT DOIT TOUJOURS ÊTRE
ENCLENCHÉ LORS DE L’INSTALLATION ET DU RETRAIT DES
ENFANTS HORS DE LA POUSSETTE.
• S’ASSURER QUE TOUS LES DISPOSITIFS DE VERROUILLAGE
SONT CORRECTEMENT ENCLENCHÉS AVANT UTILISATION.
• AVANT UTILISATION, S’ASSURER QUE TOUS LES MÉCANISMES
DE FIXATION SONT CORRECTEMENT ENCLENCHÉS.
• AVANT UTILISATION, TOUJOURS S’ASSURER QUE LE SIÈGE AUTO
PRIMO VIAGGIO, PRIMO VIAGGIO SIP, NACELLE NAVETTA OU
PORTE-ENFANT SONT CORRECTEMENT FIXÉS.
• NE PAS METTRE LES DOIGTS DANS LES MÉCANISMES.
• SURVEILLER LA POSITION DE L’ENFANT PENDANT LES
OPÉRATIONS DE RÉGLAGE DES PARTIES MOBILES (POIGNÉE,
DOSSIER…).
• TOUTE CHARGE SUR LES POIGNÉES INFLUE SUR LA STABILITÉ
DE LA POUSSETTE: SE CONFORMER AUX INDICATIONS DU
FABRICANT RELATIVES AUX CHARGES MAXIMALES ADMISES.
• LA MAIN COURANTE N’EST PAS CONÇUE POUR RECEVOIR UNE
CHARGE, NI POUR MAINTENIR L’ENFANT EN POSITION ASSISE
ET NE REMPLACE PAS LA CEINTURE DE SÉCURITÉ.
• LA CHARGE DU PANIER NE DOIT PAS DÉPASSER 5 KG. NE PAS
METTRE DANS LE PORTE-BOISSON UNE CHARGE SUPÉRIEURE
À CELLE INDIQUÉE SUR LE PORTE-BOISSON ET NE PAS Y
INTRODUIRE DE BIBERON OU BOUTEILLE CHAUDE. NE PAS
INTRODUIRE DANS LA POCHE DE LA CAPOTE (PRÉSENTE SUR
CERTAINS MODÈLES) UNE CHARGE SUPÉRIEURE À 0.2 KG.
• NE PAS UTILISER À PROXIMITÉ D’ESCALIERS OU DE MARCHES.
• NE PAS UTILISER À PROXIMITÉ DE SOURCES DE CHALEUR, DE
FLAMMES DIRECTES OU D’OBJETS DANGEREUX À PORTÉE DE
L’ENFANT.
• L’UTILISATION D’ACCESSOIRES NON APPROUVÉS PAR LE
FOURNISSEUR PEUT ÊTRE DANGEREUSE.
• NE PAS UTILISER DE MATELAS SUPPLÉMENTAIRE.
• NE PAS UTILISER CE PRODUIT PENDANT UN JOGGING OU AVEC
DES PATINS À ROULETTES.
• ACTIONNER LES FREINS PENDANT LES OPÉRATIONS
D'INSTALLATION OU DE RETRAIT DE L'ENFANT DANS LA
POUSSETTE.
AVERTISSEMENT
NACELLE NAVETTA
• CETTE NACELLE N'EST PAS RECOMMANDÉE POUR LES
ENFANTS QUI PEUVENT S'ASSEOIR TOUT SEULS (ÂGÉS
D'ENVIRON 9 MOIS, JUSQU'À 9KG)
• CETTE NACELLE A ÉTÉ CONÇUE POUR ACCUEILLIR DES
ENFANTS DE LA NAISSANCE JUSQU’À UN POIDS DE 9 KG.
• UTILISER UNIQUEMENT SUR DES SURFACES DURES, PLANES ET
SÈCHES.
• NE PAS LAISSER L'ENFANT SANS SURVEILLANCE.
• NE PAS LAISSER D’AUTRES ENFANTS JOUER SANS
SURVEILLANCE À PROXIMITÉ DU LANDAU.
• LES OPÉRATIONS D’ASSEMBLAGE ET DE PRÉPARATION DE
L’ARTICLE DOIVENT ÊTRE EFFECTUÉES PAR DES ADULTES.
• NE PAS UTILISER LE PRODUIT SI DES PIÈCES SONT
MANQUANTES OU CASSÉES.
• NE PAS AJOUTER DE MATELAS SUPPLÉMENTAIRE.
• AVANT L’UTILISATION, S’ASSURER QUE TOUS LES MÉCANISMES
DE FIXATION SONT CORRECTEMENT ENCLENCHÉS.
• AVANT L’UTILISATION, S’ASSURER QUE LE SIÈGE AUTO, LA
NACELLE OU LE BLOC POUSSETTE SONT CORRECTEMENT
FIXÉS.
• ÉVITER DE METTRE LES DOIGTS DANS LES MÉCANISMES.
• PRÊTER ATTENTION À LA POSITION DE L’ENFANT LORS DES
OPÉRATIONS DE RÉGLAGE DES ÉLÉMENTS MOBILES (POIGNÉE,
DOSSIER).
• NE PAS UTILISER À PROXIMITÉ DE SOURCES DE CHALEUR ET
DE FLAMMES DIRECTES OU DE TOUT OBJET DANGEREUX À
PORTÉE DE L’ENFANT.
• L’UTILISATION D’ACCESSOIRES N’AYANT PAS ÉTÉ APPROUVÉS
PAR LE FABRICANT PEUT ÊTRE DANGEREUSE.
• CONTRÔLER RÉGULIÈREMENT LES POIGNÉES ET LA PARTIE
INFÉRIEURE DU LANDAU ET S’ASSURER QU’AUCUNE PIÈCE
N’EST CASSÉE OU ENDOMMAGÉE.
• IL EST DANGEREUX DE POSER CETTE NACELLE EN HAUTEUR.
Page 32

• WICHTIG: Lesen Sie diese Hinweise sorgfältig vor der
Benutzung und bewahren Sie die Gebrauchsanleitung
für den späteren Gebrauch auf.
Wenn Sie diese Hinweise nicht beachten, kann die
Sicherheit Ihres Kindes beeinträchtigt werden.
• Farbliche und technische Änderungen vorbehalten.
Peg Perego S.p.A. ist gemäß ISO 9001 zertifiziert.
Die Zertifizierung garantiert den Kunden und
Verbrauchern Transparenz und ermöglicht
das Vertrauen in die Arbeitsweise unseres
Unternehmens.
KUNDENDIENST
Bei Verlust oder Beschädigung ausschließlich Originalersatzteile
von Peg Perego verwenden. Für eventuelle Reparaturen,
Produktinformationen, den Austausch diverser Teile bzw. den Kauf
von Originalersatzteilen oder Zubehörteilen wenden Sie sich bitte
an den Kundendienst Peg-Perego:
Tel.: 0039-039-60.88.213,
Fax: 0039-039-33.09.992,
E-Mail: assistenza@pegperego.it,
www.pegperego.com
Als Peg Perego stehen wir unseren Kunden für jeden Bedarf immer
gerne zur Seite. Deshalb ist es auch extrem wichtig, über die
Meinung unserer Kunden Bescheid zu wissen. Wir bitten Sie, das
FORMULAR ÜBER DIE KONSUMENTENZUFRIEDENHEIT nachdem Sie
unsere Produkte ausprobiert haben, auszufüllen. Das Formular ist
unter folgender Internetadresse abrufbar: www.pegperego.com
Wir würden uns über Anmerkungen und Ratschläge freuen.
PLIKO P3
• Pliko P3 kann als Sportwagen und dank seiner abnehmbaren
Rückenlehne mit Sitzbezug auch als Kinderwagengestell
verwendet werden.
GEBRAUCHSANLEITUNG
ÖFFNEN
1• Vor dem Öffnen des Gestells die beiden Schutzkappen von
den Ovalrohrenden abziehen Andernfalls kann das Gestell
nicht einwandfrei geöffnet werden.
2• Zum Öffnen des Gestells die beiden Hebel an den Griffen
nach oben ziehen (siehe Abbildung).
3• Gleichzeitig das Gestell anheben – es öffnet sich automatisch.
Um festzustellen, ob das Gestell korrekt geöffnet wurde, die
beiden seitlichen Haken kontrollieren (siehe Abbildung).
MONTAGE
4• Zum Montieren der Vorderräder den Hebel A
hinunterdrücken und das Rad nach Abbildung B einführen,
bis es einrastet.
5• Zur Montage der Hinterräder, die mit dem Bremskabel
verbundenen Hinterräder wie in der Abbildung dargestellt
befestigen.
6• Die beiden Räder unterscheiden sich durch unterschiedliche
Steckverbindungen. Das linke Rad besitzt eine Führungsrippe
auf der Radachse und kann nur auf der linken Seite des
Gestells vollständig aufgesteckt werden, wodurch die
korrekte Positionierung der Räder gewährleistet wird (siehe
Abbildung).
7• Überprüfen, dass die Räder eingerastet sind (siehe
Abbildung).
8• Zum Anbringen des Ablagekorbs die Schlaufen über die
Haken vorn (A) und hinten (B und C) hängen.
9• Auf der Abbildung ist der montierte Ablagekorb dargestellt.
10• Den Getränkehalter kann man auf der rechten oder der
linken Seite des Sportwagens befestigen, dazu ist auf beiden
Seiten des Sportwagens bereits ein Haken vorhanden. Den
DE•DEUTSCH
Getränkehalter nach Abbildung A auf den Haken stecken,
bis es klickt. Abbildung B zeigt den korrekt befestigten
Getränkehalter.
Keine heißen Getränke bzw. Gefäße über 0,5 Kg (1 lbs) im
Flaschenhalter abstellen.
FESTSTELLBREMSE
11• Zum Einlegen der Feststellbremse einen Bremshebel mit dem
Fuß niederdrücken. Beide Hinterräder müssen arretiert sein.
• Zum Lösen der Bremsen umgekehrt vorgehen.
• Wenn der Wagen still steht, die Räder immer mit den
Bremsen blockieren.
SCHWENKBARE RÄDER
12•
Die Vorderräder werden frei schwenkbar, nachdem man nach
Abbildung A den Hebel hinunter gedrückt hat. Um die Räder
zu blockieren, den Hebel wieder nach oben drücken (siehe
Abbildung B).
EINSTELLUNG DER GRIFFE
13• Die Griffe können auf zwei Höhen eingestellt werden. Für die
hohe Position auf den Knopf drücken und gleichzeitig den
Lenker nach oben ziehen. Zum Absenken wieder den Knopf
betätigen und den Lenker nach unten drücken.
SCHLIESSEN
• Vor dem Schließen des Pliko P3 müssen die Wiege
Navetta oder der Autokindersitz Primo Viaggio
abgenommen werden.
14• Der Wagen kann mit einer Hand geschlossen werden. Dazu
zuerst den einen und dann den anderen Hebel nach oben
ziehen, bis die Hebel einrasten.
15• Den Griff in der Mitte (Abbildung 3) fassen und nach oben
ziehen, bis der Wagen geschlossen ist (siehe Abbildung).
16• Sicherstellen, dass der Wagen korrekt mit dem
Sicherheitshaken geschlossen ist. Der geschlossene Wagen
bleibt von selbst stehen.
TRANSPORT
17• Der Pliko P3 kann bequem anhand des mittleren Griffes, wie
abgebildet, gezogen werden. Die Vorderräder müssen dabei
arretiert sein.
18• Der Wagen kann auch ,wie abgebildet, mit Hilfe des seitlichen
Griffs getragen werden.
GANCIOMATIC-SYSTEM mit
PLIKO P3 VERSION GESTELL
Dank dem praktischen Ganciomatic-System wird in
Sekundenschnelle aus dem Pliko P3 Gestell durch Einklinken der
Wiege Navetta oder des Autokindersitzes Primo Viaggio in die
Ganciomatic-Verbindungsstücke ein komfortabler Kinderwagen.
GANCIOMATIC-VERBINDUNGSSTÜCKE DES GESTELLS
19•
Die Ganciomatic-Verbindungsstücke des Gestells bis zum
Einrasten nach oben drehen (siehe Abbildung).
20• Um die Ganciomatic-Verbindungsstücke des Untergestells
hinunterzuklappen, den Hebel nach außen ziehen und
gleichzeitig die Verbindungsstücke nach unten drehen (siehe
Abbildung).
PLIKO P3 + NAVETTA
Einhängen der Wiege im Pliko P3 Gestell.
- Am Pliko P3 Gestell die Feststellbremsen einlegen.
- Die Ganciomatic-Verbindungsstücke nach oben drehen.
21• Die beiden Hebel neben dem Griff zum Schließen des
Gestells, wie abgebildet, nach außen drehen.
22• Die Fußstütze des Gestells in die oberste Position (1) stellen
(siehe Abbildung).
23• Jetzt kann die Wiege Navetta auf das Pliko P3 Gestell gesetzt
werden.
24• Die Navetta am Tragebügel so halten, dass sich das Kopfteil
auf der gegenüberliegenden Seite von den Schiebergriffen
befindet, und über den Ganciomatic-Verbindungsstücken
positionieren.
- Bis zum Einrasten mit beiden Händen auf die Seitenwände
der Navetta drücken.
Page 33
- Zum Abnehmen die Gebrauchsanleitung der Navetta zu Hilfe
nehmen.
PLIKO P3 + PRIMO VIAGGIO
Einhängen der Autokindersitzes im Pliko P3 Gestell:
- Am Pliko P3 Gestell die Feststellbremsen einlegen;
- Die Ganciomatic-Verbindungsstücke nach oben drehen;
25• Jetzt kann die Autokindersitzes Primo Viaggio auf das Pliko P3
Naked Gestell gesetzt werden.
26• Den Primo Viaggio am Tragebügel so halten, dass sich
das Kopfteil auf der gegenüberliegenden Seite von den
Schiebergriffen befindet.
- Bis zum Einrasten mit beiden Händen auf die Seitenwände
des Autokindersitzes drücken;
- Zum Abnehmen die Gebrauchsanleitung des
Autokindersitzes zu Hilfe nehmen.
SCHUTZBÜGEL
27• Das Untergestell besitzt an den Armlehnen Verschlusskappen,
die man entfernt, bevor man den Schutzbügel einsetzt
(bewahren Sie die Schutzkappen auf, falls Sie den Sportwagen
ohne Schutzbügel verwenden möchten). Zum Entfernen der
Schutzkappen auf den Knopf unter der Armlehne drücken
und gleichzeitig die Schutzkappe herausziehen (bei beiden
Armlehnen gleich verfahren).
28• Fügen Sie den Schutzbügel ein, indem Sie die beiden
Enden in die Armlehnen schieben (siehe Abbildung), bis sie
einrasten.
29• Man kann den Schutzbügel auch nur auf einer Seite öffnen,
damit das Kind bequemer ein- und aussteigen kann, wenn
es größer geworden ist. Zum Öffnen auf den Knopf unter der
Armlehne drücken und gleichzeitig den Schutzbügel nach
außen ziehen.
30• Zum Entfernen des Schutzbügels auf die beiden Knöpfe unter
den Armlehnen drücken und gleichzeitig den Schutzbügel
nach außen ziehen.
UMBAU DES UNTERGESTELLS ZUM SPORTWAGEN
MONTAGE
31• Für den Umbau des Pliko P3 Gestells zum Sportwagen
müssen die beiden Hebel neben dem Griff zum Schließen des
Gestells, wie abgebildet, nach innen umgelegt werden.
32• Die Rückenlehne mit dem Sitzbezug auf die Sitzfläche des
Gestells setzen (siehe Abbildung).
33• Zum Befestigen der Rückenlehne beidseitig die Druckknöpfe
auf der Rückseite der Rückenlehne betätigen (siehe
Bildausschnitt 1) und in die Einsteckhalterungen des Gestells
so weit eindrücken bis sie einrasten (
siehe Bildausschnitt 2).
34• Zum Einhängen der Steckverbindungsteile für die
Rückenlehnenverstellung (A) müssen diese zuerst in
Pfeilrichtung nach oben gedreht (B) und auf die hinteren
Gestellrohre gesetzt werden.
35• Die beiden Steckverbindungsteile soweit in die Gestellrohre
drücken bis sie einrasten.
36• Befestigen des Sitzbezugs am Sportwagen:
Die Kunststoffhaken auf der Innenseite der Armlehnen in der
Reihenfolge der abgebildeten Pfeile einhängen.
37• Die kleinen Hebel der Fußstützen in den Bezug der
Rückenlehne einfügen (siehe Abbildung).
38•
Den Bezug an der Sitzauflagefläche des Gestells anknöpfen (A).
Das Ende des Schrittgurtes mit der Kunststoffplatte durch die
Schlitze des Bezugs und der Gestellauflagefläche ziehen (B).
ÖFFNEN UND SCHLIESSEN
• Zum Öffnen des Pliko P3 Version Sportwagen die Hinweise zu
den Abbildungen 2 und 3 befolgen.
•
Zum Schließen des Pliko P3 Version Sportwagen die
Spannvorrichtungen des Verdecks lockern, die Rückenlehne
anheben und die Hinweise zu den Abbildungen 14, 15 und 16
befolgen.
EINSTELLEN DER FUSSSTÜTZEN
39• Die Fußstütze kann auf drei verschiedene Positionen
eingestellt werden. Zum Herunterklappen der Fußstütze die
beiden seitlichen Hebel nach unten ziehen und gleichzeitig
die Fußstütze hinunterklappen. Zum Hochklappen die
Fußstütze nach oben drücken, bis sie einrastet.
HINTERES TRITTBRETT
40• Das hintere Trittbrettchen erleichtert das Überwinden
von kleinen Höhenunterschieden. Es ermöglicht auch das
Mitfahren eines größeren Geschwisterchen.
FAHREN MIT ZWEI KINDERN
41• Um zwei Kinder mit dem Pliko P3 zu befördern, zuerst
die Feststellbremsen einlegen, danach das kleinere Kind
hineinsetzen und den Sicherheitsgurt anlegen (1). Die Griffe
festhalten (2) und das zweite Kind auf die Trittbrettchen (3)
stellen lassen.
• Lassen sie Ihre Kinder nie unbeaufsichtigt.
• Lassen Sie es nicht zu, dass ihr Kind auf die Trittbrettchen
steigt, wenn Sie den Sportwagen nicht halten oder dieser
leer ist.
VERDECK
• Das Verdeck kann sowohl an der Wiege Navetta als auch am
Sportwagen angebracht werden. Es ist an der Vorderkante
mit einem Reißverschluss zum Anbringen des Regenschutzes
ausgestattet.
42•
Zum Befestigen des Verdecks an der Wiege Navetta zuerst
die Druckknöpfe A und B öffnen (Abb. 1). Das Verdeck wie in
Abb. 2 in die Verdeckhalter stecken und auf festen Halt prüfen
(Abb.3).
43• Zum Befestigen am Sportwagen, das Verdeck wie abgebildet
beidseitig in die Verdeckhalter stecken und auf festen Halt
prüfen.
44• Das Verdeck, wie abgebildet, an der Innenseite der
Armlehnen und an der Rückseite der Rückenlehne
festknöpfen.
45• Zum Spannen des Verdecks die auf der Innenseite
befindlichen Verdeckspanner nach unten drücken.
46• Das Verdeck kann mit geöffnetem wie mit geschlossenem
Reißverschluss zusammen mit der Rückenlehne verstellt
werden.
47• Das Verdeck kann schnell und einfach in ein Sonnendach
verwandelt werden. Dazu das Verdeck wie abgebildet mit
dem praktischen Spanngurt hochbinden.
48• Um das Verdeck der Babyschale Navetta abzunehmen, lösen
Sie es seitlich von dem Bezug. Lösen Sie die Ösen A und B
vom Bezug wie auf der Abbildung, drücken Sie von beiden
Seiten gegen das Verbindungsstück und nehmen Sie das
Verdeck ab.
49• Zum Abnehmen des Verdecks vom Sportwagen auf beiden
Seiten die Verschlusszungen der Verdeckhalterung nach
Innen drücken und gleichzeitig das Verdeck nach oben
herausziehen.
WIEGE NAVETTA
TRAGEBÜGEL
50• Zum Tragen der Wiege muss der Bügel eingerastet sein. Der
Tragegriff ist nur dann gesichert, wenn er vertikal steht und
beidseitig die Arretierungen eingerastet sind.
51• Zum Herunterklappen zuerst beidseitig die
Entriegelungsgriffe nach oben schieben und dann den
Tragebügel selbst nach unten drehen.
52• Der Tragebügel erleichtert den Transport und das Einklinken
der Wiege auf einem Gestell oder Sportwagen.
WIEGE- UND BETTSTELLUNG
53• Durch den gewölbten Unterboden kann die Wiege auf
flachem Untergrund schaukeln.
54• Wenn man die integrierten Ständer herauszieht, wird Navetta
wie abgebildet zu einem kleinen feststehenden Babynest.
EINSTELLUNG DER RÜCKENLEHNE
55• Zum Einstellen der Rückenlehnenneigung den Griff laut
Abbildung herausziehen und drehen.
EINSTELLUNG DER LUFTZIRKULATION
56• Der Boden der Wiege Navetta ist mit Lüftungsöffnungen
ausgestattet, die eine Luftzufuhr von unten gewährleisten.
Zum Öffnen der Luftlöcher auf der Verdeckseite, die Schieber
(1 und 2) nach außen drücken.
57• Zum Öffnen der Luftlöcher auf der hinteren Seite, die
Schieber (3) ebenfalls nach außen drücken.
Page 34
ABNEHMEN DES BEZUGS
58• Um den Bezug abzunehmen, lösen Sie zuerst die Ösen an
den Seiten und ziehen Sie an ihm.
59• Nehmen Sie darauf die beiden Verbindungsstücke von dem
Gestell ab und entfernen Sie den Bezug.
BEFESTIGUNG DER WIEGE NAVETTA IM SPORTWAGEN
Das automatische Befestigungssystem Ganciomatic, mit dem
die Wiege und der Sportwagen Pliko P3 ausgestattet sind,
ermöglicht ein sicheres und schnelles Einklinken der Wiege in
den Sportwagen.
60• Zum Abnehmen der Multifunktionswiege von einem
Sportwagen zuerst den Entriegelungsgriff am Fußende der
Wiege in Pfeilrichtung A schieben und dann nach oben
drücken (B). Gleichzeitig die Wiege am Bügelgriff (C) nach
oben heben.
NAVETTA IM AUTO
61• Navetta lässt sich dank der D-Ringe an den Stirnseiten der
Wiege und dem separat erhältlichen Auto-Set in Navetta
AUTO umrüsten (siehe Abbildung).
DETAILS FÜR MODULSYSTEM ON TRACK
DECKE
62• Zum Besfestigen der Decke den Reißverschluss, wie
abgebildet, mit dem Reißverschluss an der Fußstütze
verbinden.
Zum Fixieren der Decke die zwei Knöpfe, wie in Abbildung B
gezeigt, zumachen.
REGENSCHUTZ
63• Der Regenschutz wird mittels Reißverschluss an der
Vorderkante des Verdecks befestigt.
64• Beidseitig den Druckknopf des Gummibandes auf das
Verdeckgelenk aufdrücken, wie in der Abbildung dargestellt.
65• Die unteren Gummibänder befestigen den Regenschutz bei
den Vorderrädern.
66• Der Regenschutz kann durch Öffnen des Reißverschlusses
geöffnet werden und bleibt trotzdem durch die praktischen
Gummibänder am Sportwagen befestigt.
67• Der Regenschutz garantiert auch dann besten Schutz, wenn
sich das Kind mit dem Autokindersitz Primo Viaggio im
Sportwagen befindet.
• Den Regenschutz nicht in geschlossenen Räumen verwenden
und immer kontrollieren, ob dem Kind darunter etwa zu
warm wird.
•
Den Regenschutz aus PVC nicht in die Nähe von Hitzequellen
bringen und mit Zigaretten Acht geben.
• Sicherstellen, dass der Regenschutz nicht an bewegten Teilen
des Wagens schleift.
• Vor Schließen des Wagens Regenschutz immer abnehmen.
• Mit einem Schwamm und Seifenwasser reinigen, keine
Reinigungsmittel verwenden.
SICHERHEITSGURT
68• Vergewissern Sie sich, dass die Gurte richtig am Gestell
befestigt sind.
A: Beide Schultergurthalter auf die Verschlusszungen, wie
abgebildet, aufstecken.
B: Die Gurte miteinander durch Einstecken der
Verschlusszungen in das Gurtschloss verbinden.
69• Zum Abschnallen die Verschlusszungen zusammendrücken
und gleichzeitig den Beckengurt nach außen ziehen.
70• Die neuen Sicherheitsgurte mit dem „Stecksystem“ erleichtern
das Anlegen. Vor dem Anschnallen die Steckverbindung in
die Rückenlehne laut Abbildung stecken; danach das Kind
angurten und für mehr Bewegungsfreiheit des Kindes
die Steckverbindung wieder aus der Rückenlehne ziehen.
Die Steckeinrichtung muss hinter den Schultern des Kindes
bleiben.
EINSTELLEN DER RÜCKENLEHNE
71•
Die Rückenlehne kann in vier verschiedene Stellungen
gebracht werden. Zum Senken der Rückenlehne den Griff
heben (Abbildung A) und gleichzeitig die Rückenlehne in die
gewünschte Stellung bringen (Abbildung B) und einrasten
lassen.
Zum Anheben die Rückenlehne nach oben drücken.
ABZIEHEN DES BEZUGS
72• Um den Bezug vom Sportwagen abzuziehen, die
Verbindungsstücke des Bezugs in Pfeilrichtung von den
Armlehnen lösen.
73• Den Beckengurt nur auf einer Seite, wie abgebildet, vom
Gestell abschrauben.
74• Die Druckknöpfe von den Seitenteilen lösen (siehe
Abbildung).
Den Schrittgurt durch die Sitzfläche nach oben herausziehen.
75• Die Druckknöpfe des Bezugs vom Sitz lösen, den Bezug
hochheben und nach vorne von den Verstellhebeln der
Fußstütze abziehen.
GANCIOMATIC-SYSTEM mit
PLIKO P3 VERSION SPORTWAGEN
Dank dem praktischen Ganciomatic-System kann in
Sekundenschnelle der Sportwagens Pliko P3 mit der Wiege
Navetta oder dem Autokindersitz Primo Viaggio, durch Einklinken
in die Ganciomatic-Verbindungsstücke, ausgestattet werden.
GANCIOMATIC-VERBINDUNGSSTÜCKE DES
SPORTWAGENS
76• Um die Ganciomatic-Verbindungsstücke des Sportwagens
hochzuklappen, den Bezug an den Ecken des Sitzes
hochheben und die beiden Verbindungsstücke nach oben
drehen, bis sie einrasten.
77•
Um die Ganciomatic-Verbindungsstücke des Sportwagens
herunterzuklappen, den Hebel nach außen ziehen und
gleichzeitig die Verbindungsstücke nach unten drehen (siehe
Abbildung).
PLIKO P3 + NAVETTA
78• Einhängen der Wiege Navetta am Sportwagen:
- Den Sportwagen bremsen;
- Die Rückenlehne des Sportwagens vollständig
herunterklappen;
- Die Ganciomatic-Verbindungsstücke des Sportwagens
hochstellen;
- Den Sicherheitsbügel entfernen und die beiliegenden
Verschlusskappen einsetzen, um die Armlehnen des
Sportwagens zu verschließen;
- Die Fußstütze des Sportwagens in die höchste Position
heben;
- Den Griff der Navetta fassen;
-
Die Navetta auf die Ganciomatic-Verbindungsstücke des
Sportwagens aufsetzen. Dabei muss sich das Kopfteil der
Babyschale entgegengesetzt zu den Lenkern des Sportwagens
befinden;
- Mit beiden Händen bis zum Einrasten auf die Seiten der
Navetta drücken;
- Zum Lösen der Babyschale Navetta vom Sportwagen die
zugehörige Bedienungsanleitung zu Hilfe nehmen.
PLIKO P3 + PRIMO VIAGGIO
79• Einhängen des Autokindersitzes am Sportwagen:
- Den Sportwagen bremsen;
- Die Rückenlehne des Sportwagens vollständig
herunterklappen;
- Die Ganciomatic-Verbindungsstücke des Sportwagens
hochstellen;
- Den Autokindersitz in Richtung der Mutter positionieren und
nach unten drücken, bis er einrastet;
- Den Schutzbügel nicht vom Sportwagen entfernen, wenn der
Autokindersitz angebracht wird;
- Zum Lösen des Autokindersitzes die zugehörige
Bedienungsanleitung zu Hilfe nehmen.
UMBAU DES SPORTWAGENS ZUM GESTELL
Um den Sportwagen zum Gestell umzubauen, muss zuerst der
Bezug abgenommen werden.
80• Um den Bezug vom Sportwagen abzunehmen, die
Verbindungsstücke des Bezugs in Pfeilrichtung von den
Armlehnen lösen.
Page 35
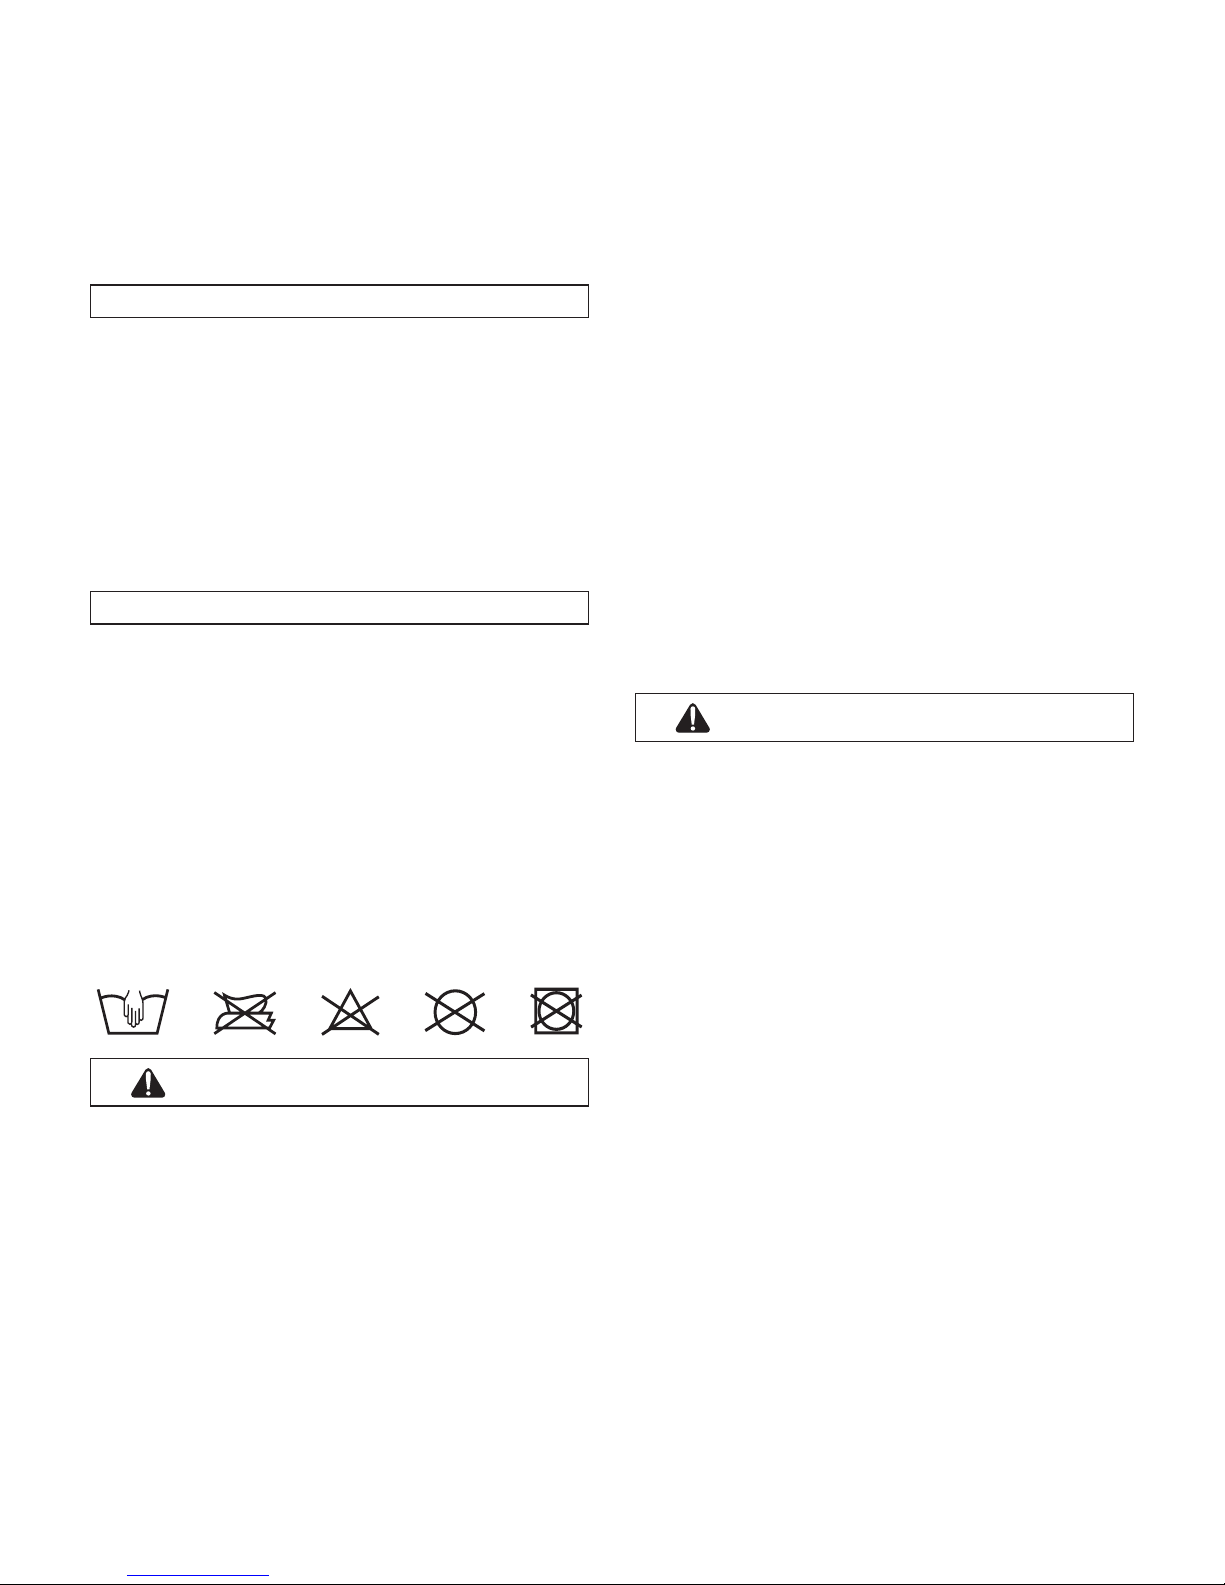
•
BEIM ABSTELLEN DES KINDERWAGENS STETS DIE BREMSEN BETÄTIGEN.
• VOR GEBRAUCH PRÜFEN, DASS ALLE VERBINDUNGELEMENTE
KORREKT MITEINANDER VERBUNDEN SIND.
• VOR GEBRAUCH SICHERSTELLEN, DASS DER
SEPARAT ERHÄLTLICHE AUTOKINDERSITZ BZW. DIE
KINDERWAGENAUFSÄTZE RICHTIG BEFESTIGT SIND.
•
NICHT MIT DEN FINGERN IN DIE VERBINDUNGSELEMENTE GREIFEN.
• BEI DER EINSTELLUNG DER BEWEGLICHEN ELEMENTE DES
KINDERWAGENS (GRIFF, RÜCKENLEHNE) AUF DAS KIND ACHT
GEBEN.
• AN DEN SCHIEBERGRIFFEN BEFESTIGTE LASTEN
BEEINTRÄCHTIGEN DIE STANDFESTIGKEIT DES
SPORTWAGENS. FÜR DAS MAXIMALGEWICHT DER LASTEN
HERSTELLERANWEISUNGEN BEACHTEN.
• DER VORDERE SCHUTZBÜGEL IST NICHT DAZU KONZIPIERT,
DAS GEWICHT DES KINDES ZU HALTEN UND ERSETZT NICHT
DEN SICHERHEITSGURT.
•
KEINE LASTEN VON ÜBER 5 KG GEWICHT IN DEN EINKAUFSKORB
LEGEN. IN DEN GETRÄNKEHALTER KEINE HÖHEREN LASTEN
EINSETZEN, ALS IM GETRÄNKEHALTER SELBST ANGEGEBEN. NIE
HEISSGETRÄNKE EINSETZEN. IN DIE VERDECKTASCHEN (FALLS
VORHANDEN) KEINE LASTEN VON MEHR ALS 0,2 KG EINSETZEN.
• DAS PRODUKT NICHT IN DER NÄHE VON TREPPEN ODER
STUFEN ABSTELLEN; NICHT IN DER NÄHE VON HITZEQUELLEN,
OFFENEN FLAMMEN ODER GEFÄHRLICHEN GEGENSTÄNDEN,
DIE SICH IN REICHWEITE DES KINDES BEFINDEN, ABSTELLEN.
•
DAS BENUTZEN ANDERER ALS DURCH DEN HERSTELLER
ZUGELASSENER ZUBEHÖRTEILE KÖNNTE ZU GEFAHREN FÜHREN.
• DIESES PRODUKT IST NICHT ZUM JOGGEN ODER
ROLLSCHUHLAUFEN GEEIGNET.
• WÄHREND MAN DAS KIND IN DEN WAGEN SETZT ODER AUS
DEM WAGEN NIMMT DIE BREMSEN BENUTZEN.
WARNUNG
WIEGE NAVETTA
• DIESES FAHRZEUG IST NUR FÜR KINDER GEEIGNET, DIE SICH
NICHT VON ALLEINE AUFSETZEN KÖNNEN.
• DIESES FAHRZEUG IST FÜR KINDER VON GEBURT AN BIS ZU
EINEM GEWICHT VON 9 KG GEEIGNET.
• NUR AUF HARTEN, WAAGRECHTEN UND TROCKENEN
OBERFLÄCHEN VERWENDEN.
• ES KÖNNTE GEFÄHRLICH SEIN, IHR KIND UNBEAUFSICHTIGT ZU
LASSEN.
• ANDERE KINDER NICHT UNBEAUFSICHTIGT IN DER NÄHE DES
KINDERWAGENS SPIELEN LASSEN.
• DER ARTIKEL DARF NUR VON ERWACHSENEN
ZUSAMMENGEBAUT UND VORBEREITET WERDEN.
• DAS PRODUKT NICHT VERWENDEN, FALLS TEILE FEHLEN ODER
BESCHÄDIGT SIND.
• KEINE ZUSÄTZLICHEN MATRATZEN VERWENDEN.
• VOR GEBRAUCH SICHERSTELLEN, DASS ALLE
BEFESTIGUNGSMECHANISMEN KORREKT EINGERASTET SIND.
• VOR GEBRAUCH SICHERSTELLEN, DASS DIE TEILE
DES AUTOKINDERSITZES, KINDERWAGENS BZW.
KINDERWAGENAUFSATZES KORREKT EINGERASTET SIND.
• NICHT MIT DEN FINGERN IN DIE BEFESTIGUNGSMECHANISMEN
GREIFEN.
• BEI DER EINSTELLUNG DER BEWEGLICHEN ELEMENTE DES
KINDERWAGENS (GRIFF, RÜCKENLEHNE) AUF DAS KIND ACHT
GEBEN.
• NICHT IN DER NÄHE VON HITZEQUELLEN, OFFENEN
FLAMMEN ODER GEFÄHRLICHEN GEGENSTÄNDEN, DIE SICH IN
REICHWEITE DES KINDES BEFINDEN, ABSTELLEN.
• DAS BENUTZEN ANDERER, ALS DURCH DEN HERSTELLER
ZUGELASSENER ZUBEHÖRTEILE, KÖNNTE ZU GEFAHREN
FÜHREN.
• REGELMÄSSIG DEN GRIFF (ODER DIE GRIFFE) SOWIE
DEN BODEN DES KINDERWAGES ÜBERPRÜFEN UND
SICHERSTELLEN, DASS KEINE ANZEICHEN VON BESCHÄDIGUNG
BESTEHEN.
• FALLS DER KINDERWAGEN IN VERBINDUNG MIT EINEM
GESTELL VERWENDET WIRD, DIE AUF DEM GESTELL FÜR DEN
KINDERWAGEN ANGEGEBENE HÖCHSTLÄNGE ÜBERPRÜFEN.
81•
Die Druckknöpfe von den Seitenteilen lösen (siehe Abbildung).
Den Schrittgurt durch die Sitzfläche nach oben herausziehen.
82• Die Druckknöpfe des Bezugs vom Sitz lösen, den Bezug
hochheben und nach vorne von den Verstellhebeln der
Fußstütze abziehen.
83• Die Steckverbindung zwischen Rückenlehne und Gestell
durch Betätigen der Drucktasten und gleichzeitigem nach
oben Ziehen der Rückenlehne lösen.
84• Mit beiden Händen die Rückenlehne aus der
Steckverbindung und den Sitzbezug aus den Verstellhebeln
der Fußstütze ziehen.
ZUBEHÖR
85• Wickeltasche (incl): Tasche mit Wickelunterlage, läßt sich am
Sportwagen befestigen.
86• Mückennetz: Mückennetz mit Reißverschluss, läßt sich mit
dem Reißverschluss des Verdecks verbinden.
87• Reisetasche: Praktische Tasche für den Transport des
Sportwagens im Flugzeug.
88• Kit Auto Navetta:
Das Kit Auto (zugelassen gemäß ECE
R44/04) kann zusätzlich geliefert werden und beinhaltet alles
Notwendige für die Montage der Multifunktionswanne im Auto.
89• Regenschutz Cover All: Transparenter Regenschutz aus
PVC. Garantiert einen umfassenden Schutz der auf dem
Sportwagen befestigten Wanne.
REINIGUNG UND PFLEGE
Ihr Produkt ist nur gering wartungsbedürftig. Die Reinigung und
Instandhaltung darf ausschließlich von Erwachsenen durchgeführt
werden.
• Alle beweglichen Teile unbedingt sauber halten und wenn nötig,
mit Leichtöl schmieren.
• Die Metallteile gut trocknen, um die Rostbildung zu vermeiden.
•
Die Kunststoffteile regelmäßig mit einem feuchten Lappen
reinigen - keine Lösungsmittel oder ähnliche Produkte verwenden.
• Die Stoffteile abbürsten, um den Staub zu entfernen.
• Die Räder staub- und sandfrei halten.
•
Den Produkt vor Witterungseinflüssen, wie Wasser, Regen oder
Schnee geschützt aufbewahren; eine längere Bestrahlung durch
die Sonne kann zu Farbänderungen der verschiedenen Materialien
führen.
• Den Produkt an einem trockenen Ort aufbewahren.
• Für die Reinigung des Bezugs sind die folgenden Hinweise zu
beachten.
WARNUNG
PLIKO P3
•
DIESES FAHRZEUG WURDE FÜR DEN TRANSPORT VON EINEM KIND
IM SITZEN UND EINEM KIND IM STEHEN AUF DEN TRITTBRETTCHEN
AN DER RÜCKSEITE DES SPORTWAGENS KONZIPIERT.
• BENUTZEN SIE DEN ARTIKEL KEINESFALLS FÜR EINE GRÖSSERE
ANZAHL MITFAHRER ALS VOM HERSTELLER VORGESEHEN.
•
DIESES FAHRZEUG IST FÜR KINDER VON GEBURT AN BIS ZU
EINEM GEWICHT VON 15 KG IN DER SITZFUNKTION VORGESEHEN.
DIE TRITTBRETTCHEN AN DER RÜCKSEITE SIND ZUM BEFÖRDERN
EINES ZWEITEN KINDES BIS ZU 20 KG VORGESEHEN.
• SOBALD DAS KIND IN DER LAGE IST VON ALLEIN AUFRECHT
ZU SITZEN, DAS GURTSYSTEM BENUTZEN.
•
DIESES TRANSPORTMITTEL WURDE ENTWICKELT FÜR DEN GEBRAUCH
IN KOMBINATION MIT DEN ARTIKELN PEG PEREGO GANCIOMATIC:
NAVETTA, PORTE ENFANT SOFT, AUTOSITZ PRIMO VIAGGIO.
• DER ZUSAMMENBAU SOWIE VORBEREITUNG DES PRODUKTS
MUSS DURCH ERWACHSENE PERSONEN ERFOLGEN.
• DEN KINDERWAGEN NICHT BENUTZEN, WENN TEILE FEHLEN
ODER SCHÄDEN FESTGESTELLT WURDEN.
•
IMMER DIE 5-PUNKT-GURTE BENUTZEN; IMMER DEN SCHRITTGURT
IN VERBINDUNG MIT DEM BECKENGURT VERWENDEN.
• DAS KIND NICHT UNBEAUFSICHTIGT LASSEN.
Page 36
• IMPORTANTE: Leer atentamente estas instrucciones y
conservarlas para futuras consultas.
La seguridad del niño puede ponerse en peligro si no se
siguen estas instrucciones.
• PEG PEREGO podrá modificar los modelos descritos en este
prospecto, por razones técnicas o comerciales.
Peg Perego S.p.A. cuenta con la certificación ISO
9001.
Dicha certificación ofrece tanto a los clientes como
a los consumidores la garantía de una transparencia
y confianza por lo que concierne al modo de
trabajar de la empresa.
SERVICIO DE ASISTENCIA
Si por casualidad alguna parte del modelo se pierde o se rompe,
usar sólo piezas de repuesto originales Peg Perego. Para todo lo
que concierne las reparaciones, cambios, informaciones sobre los
productos y la venta de repuestos originales y accesorios, contacte
con el Servicio de Asistencia Peg-Perego:
Tel.: 0039-039-60.88.213
Fax: 0039-039-33.09.992
e-mail: assistenza@pegperego.it
www.pegperego.com
Peg Perego está a disposición de sus Consumidores para satisfacer
lo mejor posible todas sus exigencias. Por eso, conocer lo que
piensan nuestros Clientes, es para nosotros muy importante y
fundamental. Le agradeceremos mucho si, después de haber
utilizado uno de nuestros productos rellena el FORMULARIO DE
SATISFACCIÓN DEL CONSUMIDOR que encontrará en internet en la
siguiente dirección:
www.pegperego.com
indicando las posibles observaciones o sugerencias.
PLIKO P3
• Pliko P3, gracias a su respaldo de quita y pon puede usarse
tanto en la versión cochecito como silla de paseo.
INSTRUCCIONES DE USO
APERTURA
1• Antes de abrir el cochecito hay que quitar los dos tapones de
protección de los ganchos como indica la figura pues de no
ser así no se abrirá correctamente.
2• Para abrir el carrito hay que tirar hacia arriba las dos
palanquitas que hay en el asa como indica la figura.
3• Al mismo tiempo levantar el cochecito que se abrirá
automáticamente.
Para comprobar que la silla de paseo está abierta correctamente
controlar los dos ganchos laterales (véase la figura).
MONTAJE
4• Para montar las ruedas delanteras bajar la palanca A y meter
la rueda como indica la figura B hasta oír clic.
5• Para montar las ruedas traseras enganche las ruedas, unidas
por el cable del freno, como indica la figura.
6• Diferencie atentamente la rueda izquierda de la derecha para
acoplar correctamente las 2 ruedas traseras. La rueda de la
izquierda tiene una nervadura en el tubo de la rueda y una en
la estructura para garantizar que se acoplen correctamente
(véase la figura).
7• Compruebe que se hayan acoplado bien hasta que oiga el
clic, como indica la figura.
8•
Para montar la cestilla, meter las ranuras en los gachos
delanteros A y en los ganchos traseros B y C.
9• La figura muestra la cestilla enganchada.
10•
El portabebidas puede colocarse a la derecha o a la
izquierda de la silla de paseo gracias a la instalación de
ES•ESPAÑOL
puntos de fijación a ambos lados de ésta. Para colocar
el portabebidas, presionar sobre él hasta oír un “click”
tal y como muestra la imagen A. En la imagen B, un
portabebidas colocado.
Se aconseja no poner en el portabebidas bebidas
calientes y que pesen más de 0,5 Kg (1 lbs).
FRENO
11• Para frenar Pliko P3, bajar con el pie las palancas que hay en
las ruedas traseras como indica la figura.
• Para desbloquear los frenos hacer la operación anterior al
contrario.
• Cuando están parados pongan siempre los frenos.
RUEDAS GIRATORIAS
12• Para que giren las ruedas delanteras hay que bajar la palanca
como indica la figura A. Para que no giren, mover la palanca
en el sentido contrario como indica la figura B.
REGULACIÓN DE LAS ASAS
13• Las asas se pueden regular en altura en dos posiciones. Para
la posición alta, presionar el botón y al mismo tiempo subir
el asa hacia arriba. Para bajarla hacer lo mismo en sentido
contrario.
CIERRE
•
Antes de cerrar Pliko P3 hay que desenganchar el capazo o la
silla de auto Primo Viaggio.
14• Se puede cerrar la silla de paseo con una sola mano: primero
tirar hacia arriba una palanca y luego la otra.
15•
Coger la empuñadura central (figura 3) y tirar hacia arriba
hasta que se cierre, como indica la figura.
16• Comprobar que el cochecito se ha cerrado bien con el
gancho de seguridad. El cochecito cerrado se sostiene en pie
solo.
TRANSPORTE
17•
Pliko P3 se puede transportar cómodamente (teniendo las
ruedas delanteras fijas) cogiendo la empuñadura central como
indica la figura.
18• Se puede transportar también gracias a su asa lateral, como
indica la figura.
GANCIOMATIC SYSTEM con
PLIKO P3 VERSIÓN COCHECITO
Ganciomatic System es el sistema práctico y rápido que gracias
a sus acoples Ganciomatic permite enganchar a Pliko P3 versión
cochecito, el capazo y la silla Primo Viaggio, dotados a su vez con el
sistema Ganciomatic.
ACOPLES GANCIOMATIC DEL COCHECITO
19• Para subir los acoples Ganciomatic del cochecito, girar hacia
arriba los dos acoples hasta oír clic, como indica la figura.
20• Para bajar los acoples Ganciomatic del cochecito, tirar hacia
fuera la palanquita y al mismo tiempo girar hacia abajo los
acoples como indica la figura.
PLIKO P3 + NAVETTA
Para enganchar el capazo Navetta al Pliko P3 versión cochecito
hay que:
- Frenar Pliko P3;
- Subir los acoples Ganciomatic;
21• Girar las dos palanquitas que hay en la parte de detrás del
cochecito hacia fuera, como indica la figura;
22• Subir el reposapiés del cochecito en la posición más alta
(figura 1);
23• Pliko P3 versión cochecito ahora ya está listo para poderlo
enganchar a Navetta;
24• Coger la empuñadura de Navetta y ponerla sobre los acoples
Ganciomatic del cochecito, manteniendo el lado de la
parte superior del capazo por la parte opuesta a las asas del
cochecito;
-
Presionar con ambas manos en los lados de Navetta hasta oír clic;
- Para desenganchar el capazo Navetta del cochecito consultar
su manual de instrucciones.
Page 37

PLIKO P3 + PRIMO VIAGGIO
Para enganchar la silla de auto al cochecito hay que:
- Frenar Pliko P3;
- Enganchar la barra frontal (véase más abajo el apartado
correspondiente a la barra frontal);
25• Pliko P3 versión cochecito está listo para enganchar a la silla
Primo Viaggio;
26• Coger la empuñadura de la silla y meterla en los acoples
Ganciomatic del cochecito, manteniendo el lado del cabezal
de la silla por la parte opuesta a las asas del cochecito.
Presionar con ambas manos en los lados de la silla hasta oír clic;
- Para desenganchar la silla de auto del cochecito consultar su
manual de instrucciones.
BARRA FRONTAL
27• El cochecito lleva los tapones de cierre de los reposabrazos
aplicados; para desenganchar la barra frontal primero hay que
quitarlos (conservar los tapones por si hubiera que utilizar
la silla de paseo sin barra frontal). Para quitar los tapones
presionar el botón que hay debajo del reposabrazos y al
mismo tiempo sacar el tapón (hacerlo en ambos lados).
28• Para enganchar la barra frontal, meter los dos extremos de la
barra frontal en los reposabrazos como indica la figura, hasta
oír clic.
29• Se puede abrir la barra frontal solo por un lado para facilitar
que entre o salga el niño cuando es más mayor. Para abrir,
presionar el botón que hay debajo del reposabrazos y al
mismo tiempo tirar de la barra frontal hacia fuera.
30• Para quitar la barra frontal presionar los dos botones que hay
debajo de los reposabrazos y al mismo tiempo tirar de la barra
frontal hacia fuera.
PARA CONVERTIR EL COCHECITO
EN SILLA DE PASEO
MONTAJE
31• Para convertir Pliko P3 versión cochecito en silla de paseo hay
que asegurarse de que las dos palancas estén bajadas como
indica la figura.
32• Poner el respaldo con la colchoneta en el asiento del
cochecito, como indica la figura.
33• Para enganchar el respaldo al cochecito hay que meter los
dos extremos, presionando los dos botones, en el asiento del
cochecito, como indica la figura 1, hasta oír clic, como indica
la figura 2.
34• Para enganchar el saliente que regula el respaldo al cochecito,
hay que girar hacia arriba el acople (figura B, en la dirección
que indica la flecha) y ponerlo detrás del montante trasero.
35• Empujar los dos acoples hacia abajo, hasta oír clic, en los
alojamientos de los montantes traseros.
36• Para enfundar la silla de paseo, enganchar los acoples de la
colchoneta en los reposabrazos, como indican las flechas de
la figura.
37• Meter las palanquitas del reposapiés en la colchoneta del
respaldo, como indica la figura.
38• Para concluir el enganche de la colchoneta en el cochecito,
enganchar los botones de la colchoneta en la base, como
indica la figura A. Pasar la tira entrepiernas más baja por
debajo del asiento, como indica la figura B, dejando encima
de la colchoneta la tira entrepiernas más alta.
APERTURA Y CIERRE
• Para abrir Pliko P3 versión silla de paseo, repetir las
operaciones de la figura 2 y 3.
•
Para cerrar Pliko P3 versión silla de paseo aflojar los compases de
la capota, levantar el respaldo y repetir las operaciones de la figura
14, 15 y 16.
REGULACIÓN DEL REPOSAPIÉS
39• El reposapiés se puede regular en tres posiciones. Para bajar el
reposapiés, tirar de las dos palanquitas laterales hacia abajo y
al mismo tiempo bajarlo. Para subir el reposapiés, empujarlo
hacia arriba hasta oír clic.
PELDAÑO TRASERO
40• El peldaño trasero facilita el esfuerzo de la madre al superar
los pequeños desniveles y además puede servir para
transportar otro niño.
SECUENCIA DE CARGA
41• Para utilizar Pliko P3 con dos niños primero hay que frenar
Pliko y luego poner al niño más pequeño en el asiento con el
cinturón de seguridad (1). Coger las asas (2) y hacer que suba
el otro niño sobre el peldaño (3).
• No dejar nunca solos a los niños.
• No permitir al niño que suba al peldaño trasero con la
silla de paseo vacía.
CAPOTA
• La capota se utiliza y se engancha tanto en el capazo Navetta
como en la silla de paseo. Lleva una cremallera para aplicar el
plástico de lluvia.
42• Para montar la capota en el capazo Navetta hay que
desabrochar los botones A y B (figura 1). Enganchar la capota
como indica la figura 2 y controlar que esté bien enganchada,
figura 3.
43• Para montar la capota en la silla de paseo hay que
engancharla como indica la figura y controlar que esté bien
enganchada (véase la figura).
44• Para tensar la capota, empujar hacia abajo el compás. La
capota puede reclinarse siguiendo la inclinación del respaldo.
45• Para tensar la capota, empujar hacia abajo el compás que
lleva dentro, como indica la figura.
46• Extender la capota completamente, abriendo la cremallera,
figura B.
La capota acompaña la inclinación del respaldo.
47• La capota puede transformarse fácilmente en parasol, véase
la figura. Cerrar la cremallera y atar la capota con su práctico
gancho.
48• Para quitar la capota del capazo “Navetta”, desengancharla
lateralmente del revestimiento. Desengachar las ranuras A
y B del revestimiento como muestra la figura, presionar la
lengüeta por ambos lados y desenganchar la capota.
49• Para quitar la capota de la silla de paseo, presionar la lengüeta
como indica la figura A, en ambos lados de la capota.
Desengancharla y tirar hacia arriba como indica la figura B.
CAPAZO NAVETTA
ASA
50• Para subir el asa, tirar hacia arriba hasta oír clic. El asa está
bloqueada sólo cuando está en posición vertical y las dos
piezas han entrado en su alojamiento.
51• Para bajar el asa, desbloquearla, empujando hacia arriba las
dos piezas y luego empujar hacia abajo el asa.
52• El asa facilita el transporte y el enganche del capazo sobre los
cochecitos y las sillas de paseo.
POSICIÓN BALANCÍN Y CUNA
53• La base del Capazo tiene una forma especial que al apoyarlo
sobre una superficie plana hace de balancín.
54•
El capazo se transforma en un pequeño nido, impidiendo el
balanceo al extraer los soportes incorporados como muestra la
figura.
REGULACIÓN DEL RESPALDO
55• La altura del respaldo se regula sacando y girando el asa
como indica la figura.
REGULACIÓN DE LA CIRCULACIÓN DEL AIRE
56• La base del Capazo lleva unos orificios que se pueden abrir los
cuales permiten la entrada del aire por debajo.
Para abrir los orificios en la parte delantera del capazo navetta
(lado donde está la capota), hay que empujar los dos ganchos
hacia fuera.
57• Para abrir los orificios por la parte trasera (lado opuesto a la
capota) hay que empujar uno de los dos ganchos hacia fuera.
DESENFUNDABLE
58• Para quitar el revestimiento, desenganchar las ranuras y
levantarlo de la parte delantera.
59• Quitar las dos lengüetas del chasis y retirarlo por la parte
trasera.
ENGANCHE Y DESENGANCHE DEL CAPAZO EN LA SILLA DE
PA S EO
El capazo Navetta está provisto del Sistema Ganciomatic, que
Page 38

se puede enganchar a los acoples Ganciomatic de la silla de
paseo Pliko P3.
60• Para desenganchar el capazo de las sillas de paseo, empujar
primero el asa (que está al lado opuesto de la capota)
lateralmente, luego empujarla hacia arriba y al mismo tiempo
levantar el capazo por el asa hacia arriba.
NAVETTA EN EL AUTOMÓVIL
61• Navetta se puede convertir en Navetta AUTO gracias a los dos
ganchos (como indica la figura) y comprando a parte el Kit
Auto.
DETALLES DEL SISTEMA MODULAR ON TRACK
CUBREPIES
62• Per enganchar el cubrepies unir la cremallera de éste con la
del reposapiés como indica la figura.
Para fijar el cubrepiés, abrochar los dos botones tal y como
muestra la imagen B.
PROTECTOR DE LLUVIA
63• Para montar el protector de lluvia hay que unir la cremallera
de éste con la de la capota.
64• Enganche el botón de la goma al botón de la silla de paseo
como indica la figura hasta oír clic.
65• Fijar la goma más baja del protector de lluvia a la rueda.
66• El práctico protector de lluvia puede bajarse abriendo la
cremallera y se queda fijado a la silla de paseo gracias a las
gomas.
67• Este protector de lluvia ha sido diseñado también para
cuando en la silla de paseo esté enganchada la silla de auto
Primo Viaggio, garantizando así una protección total.
• No utilizar el protector en sitios cerrados y controlar siempre
que el niño no esté sudado.
• No colocar el protector de lluvia de PVC cerca de fuentes de
calor y cuidado con los cigarros.
• Asegurarse de que el protector de lluvia no interfiera con
ningún mecanismo en movimiento del cochecito o de la silla
de paseo.
• Quitar siempre el protector de lluvia antes de cerrar el
cochecito o la silla de paseo.
• Lavar con una esponja y agua con jabón, sin utilizar
detergentes.
CINTURÓN DE SEGURIDAD
68• Asegurarse de que el tirante esté bien metido empujando
como indica la figura A. Enganchar el cinturón como indica la
figura B.
69• Para desenganchar el cinturón, presionar a los lados de la
hebilla (figura A) y al mismo tiempo tirar hacia fuera la correa
de la cintura (figura B).
70• El nuevo cinturón de seguridad desde ahora es más fácil de
poner gracias al sistema “quita y pon”. De hecho, antes de
enganchar el cinturón hay que poner la hebilla en el respaldo
metiendo la lengüeta en su presilla como indica la figura;
luego cuando se ha enganchado el cinturón al niño hay
que quitarlo del respaldo para dejar al niño más libre en
sus movimientos. La hebilla tiene que quedar por debajo de
los hombros del niño.
REGULACIÓN DEL RESPALDO
71• El respaldo se puede reclinar en cuatro posiciones. Para
bajarlo, levantar el asa (figura A) y al mismo tiempo bajar el
respaldo (figura B), bloqueándolo en la posición deseada.
Para subirlo, empujar el respaldo hacia arriba.
DESENFUNDABLE
72• Para desenfundar la silla de paseo, desenganchar los acoples
de la colchoneta de los reposabrazos como indican las
flechas.
73• Desabrochar los botones de la funda del asiento y extraerla
para sacar la funda de los ganchos del reposapiés.
74• Desenganchar los botones de la colchoneta lateralmente
como indica la figura. Sacar la tira entrepiernas del cinturón
por debajo del asiento.
75• Desenganchar los botones de la colchoneta del asiento
y sacarla para extraer la colchoneta de los ganchos del
reposapiés. Sacar la colchoneta por arriba.
GANCIOMATIC SYSTEM con
PLIKO P3 VERSIÓN SILLA DE PASEO
El Ganciomatic System es el sistema práctico y rápido que gracias a
los acoples Ganciomatic permite enganchar a Pliko P3 versión silla
de paseo, Navetta y Primo Viaggio, dotados a su vez con el sistema
Ganciomatic.
ACOPLES GANCIOMATIC DE LA SILLA DE PASEO
76• Para subir los acoples Ganciomatic de la silla de paseo,
levantar la colchoneta en las esquinas del asiento y girar hacia
arriba los dos acoples hasta oír clic.
77• Para bajar los acoples Ganciomatic de la silla de paseo, tirar
hacia fuera la palanquita y al mismo tiempo girar hacia abajo
los acoples, como indica la figura.
PLIKO P3 + NAVETTA
78• Para enganchar el capazo Navetta a la silla de paseo hay que:
- Frenar la silla de paseo;
-
Bajar completamente el respaldo de la silla de paseo;
- Subir los acoples Ganciomatic de la silla de paseo;
- Quitar la barra frontal y meter los tapones que se entregan en
dotación para cerrar los reposabrazos de la silla de paseo;
- Subir el reposapiés de la silla de paseo en la posición más alta;
- Coger la empuñadura de Navetta;
- Poner Navetta en los acoples Ganciomatic de la silla de paseo,
teniendo el lado del cabezal del capazo por la parte opuesta a
las asas de la silla de paseo;
- Presionar con ambas manos sobre los lados de Navetta hasta
oír clic;
- Para desenganchar el capazo Navetta de la silla de paseo
consultar su manual de instrucciones.
PLIKO P3 + PRIMO VIAGGIO
79• Para enganchar la silla de auto a la silla de paseo hay que:
- Frenar la silla de paseo;
- Bajar completamente el respaldo de la silla de paseo;
- Subir los acoples Ganciomatic de la silla de paseo;
- Poner la silla de auto hacia la madre y empujarla hacia abajo
hasta oír clic;
- Se aconseja no quitar la barra frontal de la silla de paseo
cuando se engancha la silla de auto;
- Para desenganchar la silla de auto de la silla de paseo
consultar su manual de instrucciones.
PARA CONVERTIR LA SILLA DE PASEO
EN COCHECITO
Para transformar la silla de paseo en cochecito lo primero que hay
que hacer es desenfundarla.
80• Desenfundar la silla de paseo, desenganchando los acoples
de la colchoneta de los reposabrazos como indican las
flechas.
81• Desenganchar los botones de la colchoneta lateralmente
como indica la figura. Sacar la tira entrepiernas del cinturón
por debajo del asiento.
82• Desenganchar los botones de la colchoneta del asiento
y sacarla para extraer la colchoneta de los ganchos del
reposapiés. Sacar la colchoneta por arriba.
83• Desenganchar la base apretando el botón que hay en la parte
trasera del cochecito, como indica la figura; tanto en la barra
de la derecha como de la izquierda. Levantar hacia arriba el
respaldo de la base con ambas manos.
84• Presionar los dos botones en el asiento del cochecito con
ambas manos y levantar toda la base hacia arriba, como
indica la figura.
ACCESORIOS
85• Bolso con Cambiador (incluída): bolso con colchoneta para
cambiar al bebé que se puede enganchar a la silla de paseo.
86• Mosquitero: mosquitero con cremallera que se puede aplicar
a la capota con cremallera.
87• Bolso de viaje: práctico bolso para transportar en avión la
silla de paseo.
88• Kit Auto Navetta: se puede pedir el Kit auto (homologado
Page 39
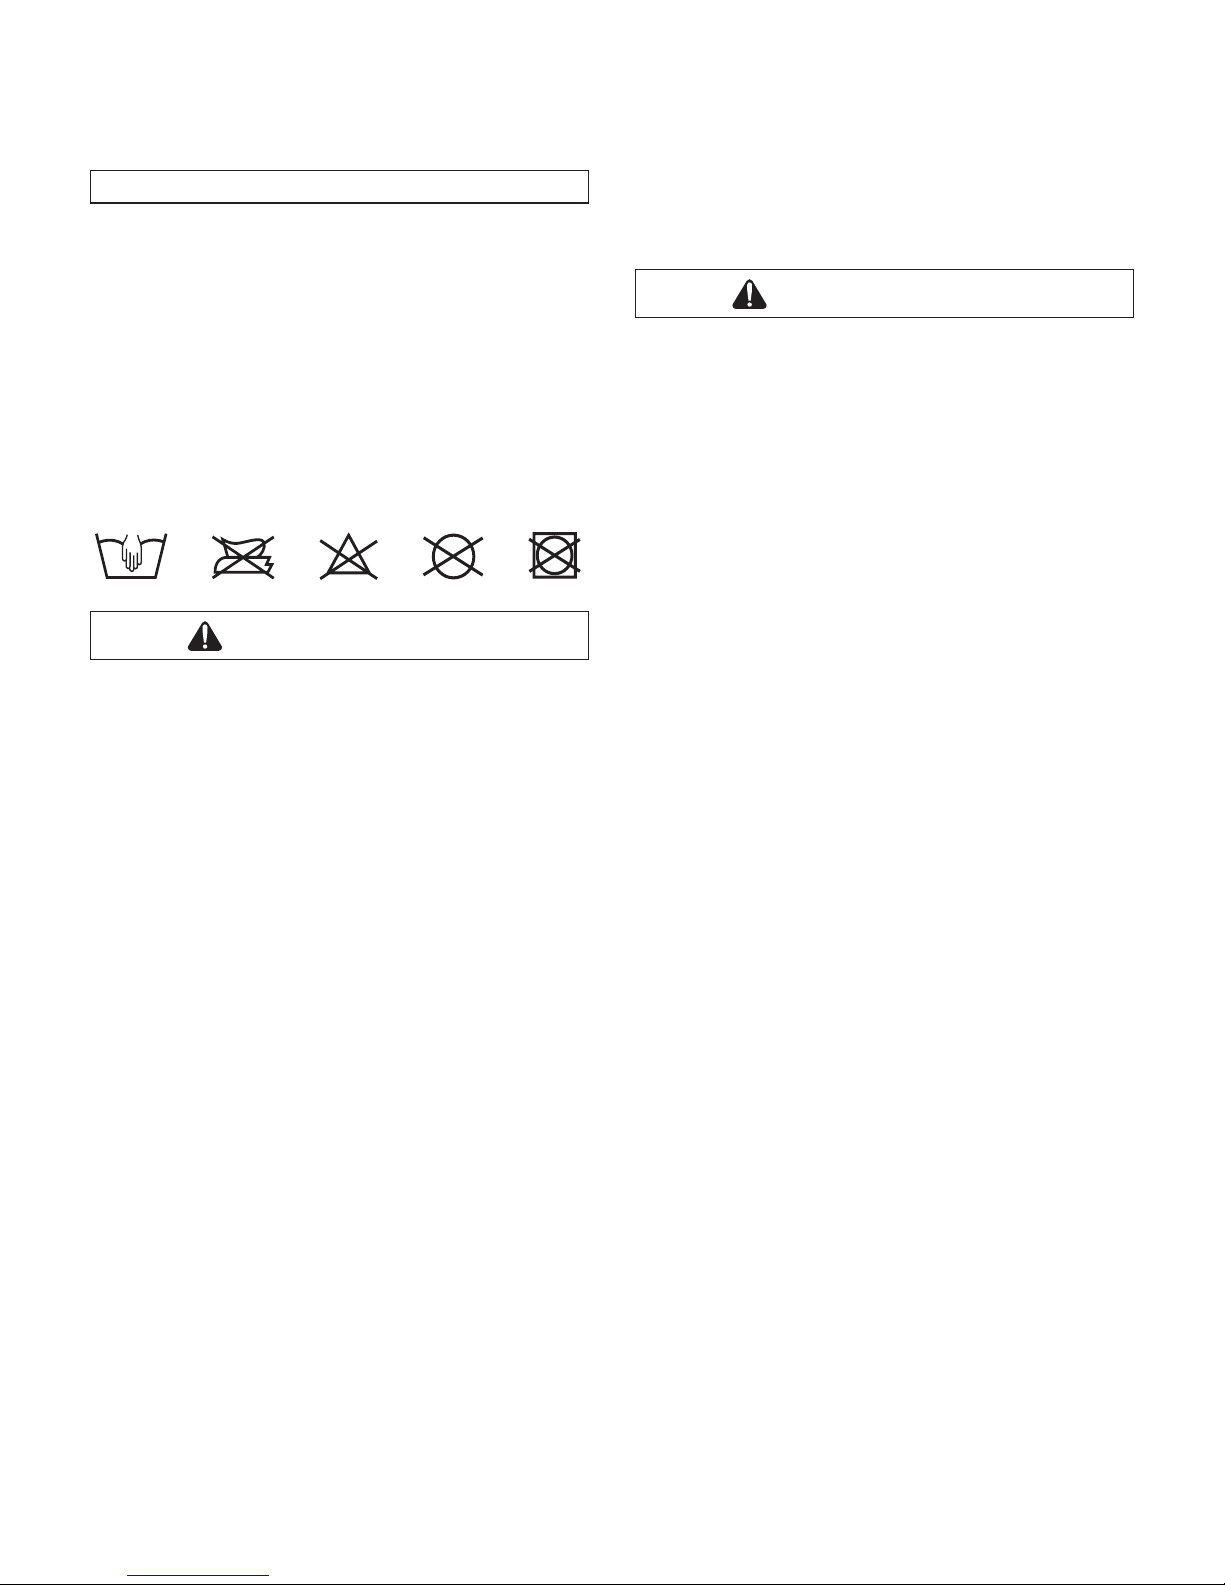
PESO SUPERIOR A 0.2 KG.
• NO UTILICE EL PRODUCTO CERCA DE ESCALERAS O
ESCALONES; NO LO UTILICE CERCA DE FUENTES DE CALOR,
LLAMAS LIBRES U OBJETOS PELIGROSOS QUE ESTÉN AL
ALCANCE DE LOS BRAZOS DEL NIÑO.
• PUEDE SER PELIGROSO UTILIZAR ACCESORIOS NO
HOMOLOGADOS POR EL FABRICANTE.
• ESTE PRODUCTO NO ESTÁ CONCEBIDO PARA CORRER NI PARA
LAS CARRERAS CON PATINES.
• UTILIZAR LOS FRENOS AL PONER O QUITAR EL NIÑO.
CUIDADO
CAPAZO NAVETTA
• ESTE VEHÍCULO ESTÁ CONCEBIDO SOLO PARA NIÑOS QUE NO
SE PUEDEN SENTAR POR SÍ SOLOS.
• ESTE VEHÍCULO ESTÁ CONCEBIDO PARA NIÑOS DESDE QUE
NACEN HASTA 9 KG DE PESO.
• UTILÍCELO SOLO SOBRE SUPERFICIES DURAS, HORIZONTALES Y
SECAS.
• PUEDE SER PELIGROSO DEJAR AL NIÑO SIN VIGILANCIA.
• NO DEJE QUE OTROS NIÑOS JUEGUEN SIN VIGILANCIA CERCA
DEL COCHECITO.
• LAS OPERACIONES DE ENSAMBLAJE Y REPARACIÓN DEL
ARTÍCULO TIENEN QUE REALIZARLAS LOS ADULTOS.
• NO UTILICE EL PRODUCTO SI TIENE ALGUNA PARTE ROTA O SI
FALTAN PARTES.
• NO AÑADA UN COLCHONCITO.
• ANTES DE USARLO, ASEGÚRESE DE QUE TODOS LOS
MECANISMOS DE ENGANCHE ESTÉN ACOPLADOS
CORRECTAMENTE.
• ANTES DE USARLO, ASEGÚRESE DE QUE LA SILLA DE AUTO,
EL COCHECITO O EL ASIENTO ESTÉN ENGANCHADOS
CORRECTAMENTE.
• EVITE INTRODUCIR LOS DEDOS EN LOS MECANISMOS.
• CONTROLE AL NIÑO CUANDO USTED HAGA OPERACIONES DE
REGULACIÓN DE LOS MECANISMOS (ASA, RESPALDO, ETC.).
• NO LO UTILICE CERCA DE FUENTES DE CALOR, LLAMAS LIBRES
U OBJETOS PELIGROSOS QUE ESTÉN CERCA DE LOS BRAZOS
DEL NIÑO.
• PUEDE SER PELIGROSO UTILIZAR ACCESORIOS QUE NO ESTÉN
HOMOLOGADOS POR EL FABRICANTE.
• CONTROLE CON REGULARIDAD EL ASA (O LAS ASAS), EL
FONDO DEL COCHECITO Y QUE NO PRESENTE ROTURAS NI
DAÑOS.
• CUANDO UTILICE EL COCHECITO CON UN CHASIS, VERIFIQUE
LA LONGITUD MÁXIMA DEL COCHE
CITO ESPECIFICADA EN
EL CHASIS.
ECE R44/04), que contiene todo lo necesario para montar el
capazo en el coche.
89•
Plástico de lluvia Cover All: Plástico de lluvia de PVC
transparente que garantiza una total protección del capazo
enganchado en la silla de paseo.
LIMPIEZA & MANTENIMIENTO
Su producto necesita un mínimo mantenimiento. Las operaciones
delimpieza y mantenimiento tiene que ser efectuadas sólo por
adultos.
• Se aconseja mantener limpias las partes en movimiento y si
hiciera falta, lubricarlas con aceite ligero.
• Secar las partes de metal del producto para evitar que se oxiden.
• Limpiar periódicamente las partes de plástico con un paño
húmedo, no usar disolventes ni otros productos parecidos.
• Cepillar las partes de tejido para quitar el polvo.
• Mantener limpias las ruedas quitando polvo y arena.
• Proteger el producto contra los agentes atmosféricos, agua, lluvia
o nieve; la exposición continua y prolongada al sol puede causar
cambios de color en muchos materiales.
• Conservar el producto en un sitio seco.
• Para lavar el saco, seguir las instrucciones siguientes.
CUIDADO
PLIKO P3
• ÉSTE VEHÍCULO HA SIDO PROYECTADO PARA TRANSPORTAR
UN NIÑO EN SU ASIENTO Y UNO PARADO SOBRE EL
REPOSAPIÉS POSTERIOR.
• NO UTILIZAR EL PRODUCTO PARA UN NÚMERO DE
OCUPANTES SUPERIOR AL PREVISTO POR EL FABRICANTE.
• ESTE VEHÍCULO ESTÁ HOMOLOGADO PARA NIÑOS DESDE QUE
NACEN HASTA 15 KG DE PESO EN EL ASIENTO. EL REPOSAPIES
POSTERIOR ESTÁ HOMOLOGADO PARA LLEVAR A OTRO NIÑO
DE HASTA 20 KG DE PESO.
• UTILIZAR UN SISTEMA DE RETENCIÓN SOLO CUANDO EL NIÑO
SEA CAPAZ DE ESTAR SENTADO SOLO.
• SE HA DISEÑADO ESTE PRODUCTO PARA USARSE JUNTO CON
LOS DEMÁS ARTÍCULOS PEG PÉREGO GANCIOMATIC: NAVETTA,
PORTE ENFANT SOFT, SILLA DE COCHE PRIMO VIAGGIO.
• LAS OPERACIONES DE MONTAJE Y DE PREPARACIÓN DEL
ARTÍCULO TIENEN QUE REALIZARLAS SOLO LOS ADULTOS.
• NO UTILICE EL PRODUCTO SI FALTA ALGUNA PARTE O SI
PRESENTA ROTURAS.
• UTILICE SIEMPRE LOS CINTURONES CON CINCO PUNTOS;
UTILICE SIEMPRE LA TIRA ENTREPIERNAS DEL CINTURÓN CON
LA CORREA DE LA CINTURA.
• PUEDE SER PELIGROSO DEJAR AL NIÑO SIN VIGILANCIA.
• CUANDO ESTÁN PARADOS, UTILICE SIEMPRE LOS FRENOS.
• ANTES DE USAR LA SILLA DE PASEO ASEGÚRESE DE QUE
TODOS LOS MECANISMOS DE ENGANCHE ESTÉN ACOPLADOS
CORRECTAMENTE.
• ANTES DE USAR LA SILLA DE PASEO ASEGÚRESE DE
QUE LA SILLA DE AUTO O LA SILLITA EXTRAÍBLE ESTÉN
CORRECTAMENTE ENGANCHADAS.
• EVITE INTRODUCIR LOS DEDOS EN LOS MECANISMOS.
• PRESTE ATENCIÓN AL NIÑO CUANDO SE REGULAN LOS
MECANISMOS (ASA, RESPALDO).
• TODA CARGA COLGADA DEL ASA O DE LAS MANILLAS PUEDE
HACER QUE LA SILLA DE PASEO SEA INESTABLE; SIGA LAS
INDICACIONES DEL FABRICANTE CONCERNIENTES AL PESO
MÁXIMO QUE SE PUEDE COLGAR.
• LA BARRA FRONTAL NO ESTÁ CONCEBIDA PARA SOPORTAR EL
PESO DEL NIÑO; NO ESTÁ CONCEBIDA PARA SUJETAR AL NIÑO
EN EL ASIENTO Y NO SUSTITUYE EL CINTURÓN DE SEGURIDAD.
• NO INTRODUZCA EN LA CESTA PORTAOBJETOS UNA CARGA
QUE PESE MÁS DE 5 KG. NO META EN EL PORTABEBIDAS UN
PESO SUPERIOR A LO QUE ESPECIFICA EL PORTABEBIDAS EN
CUESTIÓN Y NO META NUNCA BEBIDAS CALIENTES. NO META
EN LOS BOLSILLOS DE LAS CAPOTAS (SI LAS HUBIERA) UN
Page 40
• IMPORTANTE: Leia atentamente estas instruções,
conserve-as para sua futura utilização.
A segurança da criança pode ser colocada em risco, caso
tais instruções não sejam respeitadas
• A Peg Perego poderá efectuar em qualquer momento
modificações aos modelos descritos nesta publicação, por
motivos de natureza técnica ou comercial.
A Peg Perego S.p.A. é certificada ISO 9001.
A certificação oferece aos clientes e aos
consumidores a garantia de uma trasparência e
confiança no modo de trabalhar da empresa.
SERVIÇO DE ASSISTÊNCIA
No caso de perda ou dano de partes do modelo, use somente
peças originais Peg Perego. Caso necessite de reparar, substituir,
informar-se sobre os produtos Perego, ou também, adquirir peças
originais e acessórios, procure o Serviço de Assistência Peg-Perego:
tel.:0039-039-60.88.213,
fax: 0039-039-33.09.992,
e-mail: assistenza@pegperego.it,
www.pegperego.com
A Peg Perego é a disposição de seus Consumidores para satisfazêlos no melhor modo possível. Por isto, conhecer a opinião dos
nossos Clientes, para nos é muito importante e precioso. Portanto
agradecemos muito se logo após ter utilizado um nosso produto
V.Sa. queira preencher, enviando-nos suas observações ou
sujestões, o QUESTIONÁRIO SATISFAÇÃO DO CONSUMIDOR que
encontrarás em internet ao seguinte endereço:
www.pegperego.com
PLIKO P3
• Pliko P3, graças a parte traseira removível, pode ser usado seja
na versão carrinho que carrocinha.
INSTRUÇÕES PARA O USO
ABERTURA
1• Antes de abrir o carrinho é necessário remover as duas
tampas de protecção dos ganchos, como resulta na figura, de
outra maneira não será correctamente aberto.
2• Para abrir o carrinho, é necessário puxar para o alto as duas
alavancas sobre os guidões como na figura.
3• Contemporaneamente levantar o carrinho que abrir-se-á
automaticamente.
Para verificar que a carrocinha seja correctamente aberta,
controlar os dois ganchos laterais (ver a figura).
MONTAGEM
4• Para montar as rodas anteriores, abaixar a alavanca A e enfiar a
roda como na figura B até sentir o click.
5• Para montar as rodas traseiras, encaixe as rodas, junto ao fio
do travão, como na figura.
6• Diferencie atentamente a roda esquerda da roda direita, para
encaixar correctamente as 2 rodas traseiras. A roda esquerda
apresenta uma nervura no tubo da roda e uma no chassis, de
modo a garantir o correcto encaixe (vide figura).
7•
Verifique o correcto encaixe como na figura, até sentir o clique.
8• Para montar o cestinho, enfiar as argolas aos ganchos
anteriores A e aos ganchos posteriores B e C.
9• A figura mostra o cestinho enganchado.
10•
O porta bebidas pode ser colocado do lado esquerdo ou
direito da cadeira de passeio, graças ao gancho existente
em ambos os lados da cadeira de passeio. Para colocar o
porta bebidas, encaixe-o até sentir clique, como na figura
A. Porta bebidas encaixado, figura B.
Aconselhamos a não colocar bebidas muito quentes
ou com peso superior a 0,5 Kg (1 lbs) no porta biberão.
PT•PORTUGUÊS
FREIO
11• Para travar o Pliko P3 abaixar com o pé as alavancas
posicionadas sobre as rodas posteriores como na figura.
•
Para desbloquear os freios, agir no sentido contrário.
• Quando estacionar, accionar sempre os freios.
RODAS PIRUETANTES
12• Para tornar as rodas anteriores piruetantes, é necessário
abaixar a alavanca como na figura A. Para tornar-las fixas, agir
sobre a alavanca no sentido contrário, como na figura B.
REGULAÇÃO DOS GUIDÕES
13• Os guidões são reguláveis nas alturas em duas posições. Para
a posição alta, pressionar o botão e contemporaneamente
levantar o guidão para o alto. Para abaixar-la agir no sentido
contrário.
FECHO
• Antes de fechar Pliko P3, é necessário desenganchar a
Navetta ou a cadeirinha de carro Primo Viaggio.
14• É possível fechar a carrocinha com uma só mão: puxar para
o alto antes uma alavanca e logo apóa a outra até sentir o
impulso.
15• Empunhar a manilha central (figura 3) e puxar-la para o alto
até sentir o fecho como na figura.
16• Verificar o correcto fecho do gancho de segurança do
carrinho. O carrinho fechado fica em pé sózinho.
TRANSPORTE
17• O Pliko P3 pode-se transportar comodamente (tendo as rodas
anteriores não piruetadas) empunhando a manilha central
como na figura.
18• Pode-se transportar também graças à manilha lateral, como
na figura.
GANCIOMATIC SYSTEM com
PLIKO P3 VERSÃO CARRINHO
O Ganciomatic System é o sistema prático e rápido que permite
de enganchar ao Pliko P3 versão carrinho, graças às ligações
Ganciomatic, a Navetta e o Primo Viaggio, dotados estes também
de sistema Ganciomatic.
LIGAÇÕES GANCIOMATIC DO CARRINHO
19• Para levantar as ligações Ganciomatic do carrinho, rodar para
o alto as duas ligações até sentir o click, como resulta na
figura.
20• Para abaixar as ligações Ganciomatic do carrinho, puxar para
fora a pequena alavanca e contemporaneamente, rodar para
baixo as ligações como na figura.
PLIKO P3 + NAVETTA
Para enganchar a barquinha Navetta ao Pliko P3 versão carrinho é
necessário:
- Travar o Pliko P3;
- Levantar as ligações Ganciomatic;
21• Rodar as duas alavancas posicionadas na parte posterior do
carrinho, para fora como na figura;
22• Levantar o apoio das pernas do carrinho na posição mais alta
(figura 1);
23• Pliko P3 versão carrinho agora está pronto para poder
enganchar à Navetta;
24• Empunhar o manilháo da Navetta e posicionar-la sobre
as ligações Ganciomatic do carrinho, mantendo o lado da
cabeça da Navetta da parte oposta aos guidões do carrinho;
- Pressionar com ambas às mãos sobre os lados da Navetta até
sentir o click;
- Para desenganchar a barquinha Navetta do carrinho consultar
o seu manual de instruções.
PLIKO P3 + PRIMO VIAGGIO
Para enganchar a cadeirinha de carro ao carrinho é necessário:
- Travar o Pliko P3;
- Enganchar a parte frontal (ver a secção parte frontal de baixo);
25• Pliko P3 versão carrinho é pronto para enganchar a cadeirinha
Primo Viaggio;
26• Empunhar o manilhão da cadeirinha e posicionar-o sobre
as ligações Ganciomatic do carrinho, mantendo o lado
Page 41
da cabeça da cadeirinha da parte oposta aos guidões do
carrinho. Pressionar com ambas as mãos sobre os lados da
cadeirinha até sentir o click;
- Para desenganchar a cadeirinha de carro do carrinho
consultare o seu manual de instruções.
PARTE FRONTAL
27•
O carrinho se apresenta com tampas de fecho dos braços
aplicados; para enganchar a parte frontal é necessário antes
removê-las (conservar as tampas, no caso em que se queira
utilizar a carrocinha sem a parte frontal). Para remover as tampas,
pressionar o botão embaixo do braço e contemporaneamente
extrair a tampa (prosseguir de ambos os braços).
28• Para enganchar a parte frontal, inserir as duas extremidades
da parte frontal nos braços como na figura, até sentir o click.
29•
É possível abrir a parte frontal somente de um lado para
facilitar a entrada e a saída da criança quando for maior.
Para abrir, pressionar o botão colocado embaixo do braço e
contemporaneamente puxar a parte frontal para fora.
30•
Para remover a parte frontal pressionar os dois botões colocados
embaixo dos braços e contemporaneamente puxar a parte
frontal para fora.
PARA CONVERTIR O CARRINHO EM CARROCINHA
MONTAGEM
31•
Para convertir o Pliko P3 versão carrinho em carrocinha necessita
assegurar-se que as duas alavancas estejam abaixadas como
resulta na figura.
32• Posicionar a parte traseira com o saco sobre o assento do
carrinho, como na figura.
33• Para enganchar a parte traseira ao carrinho é necessário
inserir as duas extremidades, pressionando os dois botões, no
assento do carrinho, como na figura 1, até sentir o click, como
na figura 2.
34• Para enganchar a cresta de regulação da parte traseira ao
carrinho, é necessário rodar para o alto a ligação (figura B,
na direcção da seta) e posicionar-la por de trás do montante
posterior.
35• Empurrar as duas ligações para baixo, até sentir o click, nas
sedes dos montantes posteriores.
36• Para forrar a carrocinha, enganchar as ligações do saco aos
braços, como indicam as setas na figura.
37• Inserir as alavancas de apoio das pernas no saco da parte
traseira, como na figura.
38• Para concluir o enganche do saco ao carrinho, enganchar os
botões do saco à base, como na figura A. Fazer passar o cinto
que divide as pernas mais em baixo, por de baixo do assento,
como na figura B, deixando em cima o saco e o cinto que
divide as pernas mais pro alto.
ABERTURA E FECHO
• Para abrir Pliko P3 versão carrocinha, repetir as operações na
figura 2 e 3.
• Para fechar Pliko P3 versão carrocinha afrouxar os compassos
da capota, levantar a parte traseira e repetir as operações
descritas nas figuras 14, 15 e 16.
REGULAÇÃO DO APOIO DAS PERNAS
39•
O apoio das pernas é regulável em três posições. Para abaixar
o apoio das pernas, puxar as duas alavancas laterais para baixo
e contemporaneamente abaixar-o. Para levantar o apoio das
pernas, empurrar-o para o alto até sentir o click.
ESTRIBO POSTERIOR
40• O estribo posterior facilita a mamão ao superar os pequenos
desnivelamentos do pavimento e no mais pode transportar a
segunda criança.
SEQUÊNCIA DE CARGA
41• Para utilizar o Pliko P3 com duas crianças, é necessário
inicialmente travar o Pliko, sucessivamente posicionar
a criança menor no assento e enganchar a cintura de
segurança (1). Empunhar os guidões (2) e fazer subir a
segunda criança sobre o estribo (3).
• Não deixe jamais sós as suas crianças.
• Não permita a criança de subir sobre o estribo posterior
com a carrocinha vazia.
CAPOTINHA
• A capota è utilizada e encaixa-se seja sobre a alcofa Navetta
que na cadeira de passeio. Possui um zíper para aplicar o
protector de chuva.
42• Para montar a capota na alcofa Navetta, solte os botões A e B
(figura 1). Prenda a capota assim como indicado na figura 2 e
controle que o encaixe seja correcto, figura 3.
43• Para montar a capota na cadeira de passeio, prenda-a como
indicado na figura e controle que o encaixe seja correcto (vide
figura).
44• Para esticar a capotinha, empurrar para baixo o compasso. A
capotinha pode ser reclinada seguindo a inclinação da parte
traseira.
45• Para esticar a capota, empurre para baixo o compasso situado
na parte interna, assim como na figura.
46•
Estique a capota totalmente, usando zíper, figura B.
A capota segue a inclinação do encosto.
47• A capota pode transformar-se facilmente em guarda-sol,
vide figura. Feche o zíper e prenda a capota com seu prático
gancho.
48• Para retirar a capota da Alcofa Navetta, solte-a lateralmente do
revestimento. Solte então as aberturas A e B do revestimento
como na figura, prema a lingueta de ambos os lados e
desenganche a capota.
49• Para retirar a capota da cadeira de passeio, prema a lingueta
como na figura A, de ambos os lados da capota.
Desenganche-a e puxe-a para cima, como na figura B.
ALCOFA NAVETTA
MANILHA
50• Para levantar a manilha, puxe-a para cima até sentir um “click”.
A manilha, apenas é bloqueada quando está na posição
vertical e os dois fechos se encontram dentro dos próprios
orifícios.
51• Para baixar a manilha, deverá desbloqueá-la empurrando para
cima os dois fechos e, simultaneamente, deverá descê-la para
baixo.
52• A manilha facilita o transporte e o enganche da alcofa sobre
os chassis e as cadeiras de passeio.
POSIÇÃO BALANÇO E BERÇO
53• A base da alcofa, tem uma forma especial; uma vez apoiada
numa superfície plana, pode ser balançada.
54• A Navetta torna-se um pequeno berço, que não se balança,
ao retirarem-se os cavaletes incorporados, assim como na
fugura.
REGULAÇÃO DO ESPALDAR
55• O espaldar é regulável em altura, extraindo e rodando a
manilha como ilustrado na figura.
REGULAÇÃO DA CIRCULAÇÃO DO AR
56• A base da alcofa é dotada de orifícios que se podem abrir,
permitindo a entrada de ar pela parte inferor. Para abrir os
da parte dianteira da alcofa, empurre os dois ganchos para o
exterior.
57• Para abrir os orifícios da parte posterior, empurre um dos dois
ganchos para fora.
RETIRADA DA VESTIDURA EM TECIDO
58• Para retirar o revestimento, solte as aberturas lateralmente e
puxe-o pela frente.
59• Retire as 2 linguetas da estrutura na parte de trás e remova-o.
ENCAIXE E DESENCAIXE DA ALCOFA NA CADEIRA DE PASSEIO
A alcofa Navetta possui o Sistema Ganciomatic, que
engancha-se aos encaixes Ganciomatic da cadeira de passeio
Pliko P3.
60• Para desencaixar a alcofinha dos carrinhos, empurrar primeiro
a mola (colocada no lado oposto da capota) lateralmente, em
seguida, empurrá-la para cima e, ao mesmo tempo, levantar a
alcofinha do puxador.
A NAVETTA NO AUTOMÓVEL
61• A Navetta está preparada para converter-se em Navetta AUTO
graças aos dois ganchos (como na figura) e comprando à
parte o Kit Auto.
Page 42

DETALHES DO SISTEMA MODULAR ON TRACK
COBERTURA
62• Para enganchar a cobertura unir o fecho desta com aquelo do
apoio das pernas como na figura.
Enganche os dois botões, como na figura B, para fixar a coberta.
PLÁSTICO DE CHUVA
63• Para montar o plástico de chuva, é necessário unir o fecho
deste com aquelo da capotinha.
64• Encaixe o botão do elástico ao botão da cadeira de passeio,
como na figura, até sentir o clique.
65• Fixar o elástico mais embaixo do plástico de chuva à roda.
66• O prático plástico de chuva consente de ser abaixado abrindo
o fecho e deixando fixado à carrocinha graças aos elásticos.
67• Este plástico de chuva foi estudado também para o caso em
que sobre a carrocinha seja enganchada a cadeirinha de carro
Primo Viaggio, garantindo a total protecção.
• Não utilizar o plástico de chuva em ambientes fechados e
controlar sempre que a criança não seja esquentada.
• Não colocar o plástico de chuva de PVC perto de fontes de
calor e prestar atenção aos cigarros.
• Assegurar-se que o plástico de chuva não interfira com
nenhum mecanismo em movimento do carrinho ou da
carrocinha.
• Remover sempre o plástico de chuva antes de fechar o seu
carrinho ou carrocinha.
• Lavar com uma esponja e água com sabão, sem ter que
utilizar detergentes.
CINTURA DE SEGURANÇA
68• Assegurar-se que a tira de suspensão seja correctamente
inserida empurrando como na figura A. Enganchar a cintura
agindo como na figura B.
69• Para desenganchar a cintura, pressionar aos lados da
fivela (figura A) e contemporaneamente puxar para fora a
cinturinha de segurança (figura B).
70•
A nova cintura de segurança agora, é mais fácil de usar graças
ao sistema “engancha e desengancha”. De facto, antes de
enganchar a cintura, se engancha a fivela à parte traseira
inserindo a lingueta no próprio passante como resulta na figura;
logo depois quando enganchaste a cintura à tua criança
destacar-la da parte traseira para deixar a criança mais livre
de movimento. A fivela deve ficar por debaixo das costas da
criança.
REGULAÇÃO DA PARTE TRASEIRA
71• A parte traseira é reclinável em quatro posições. Para
abaixar a parte traseira, levantar a manilha (figura A) e
contemporaneamente abaixar a parte traseira (figura B),
bloqueando-lo na posição desejada.
Para levantar-lo, empurrar a parte traseira para o alto.
REMOÇÃO DO FORRO
72• Para retirar o forro da carrocinha, desenganchar as ligações do
saco dos braços como indicam as setas.
73• Desapertar os botões da vestidura do assento e desenfiá-la
para retirar a vestidura dos ganchos do repousa pés.
74• Desenganchar os botões do saco lateralmente como na
figura. Desfiar o divisor das pernas da cinturinha por debaixo
do assento.
75• Desenganchar os botões do saco do assento e desfilar-la para
extrair a saco dos ganchos do apoio das pernas. Desfiar a saco
do alto.
GANCIOMATIC SYSTEM com
PLIKO P3 VERSÃO CARROCINHA
O Ganciomatic System é o sistema prático e rápido que permite
de enganchar ao Pliko P3 versão carrocinha, graças às ligações
Ganciomatic, a Navetta e o Primo Viaggio, dotados esses também
de sistema Ganciomatic.
LIGAÇÕES GANCIOMATIC DA CARROCINHA
76• Para levantar as ligações Ganciomatic da carrocinha, levantar
a saco nos ângulos do assento e rodar para o alto as duas
ligações até sentir o click.
77• Para abaixar as ligações Ganciomatic da carrocinha, puxar
para fora a pequena alavanca e contemporaneamente, rodar
para baixo as ligações, como na figura.
PLIKO P3 + NAVETTA
78• Para enganchar a barquinha Navetta à carrocinha, é
necessário:
- Travar a carrocinha;
- Abaixar completamente a parte traseira da carrocinha;
- Levantar as ligações Ganciomatic da carrocinha;
- Remover a parte frontal e inserir as tampas em dotação para
fechar os braços da carrocinha;
- Levantar o apoio das pernas da carrocinha na posição mais
alta;
- Empunhar o manilhão de Navetta;
- Posicionar a Navetta sobre as ligações Ganciomatic da
carrocinha, mantendo o lado da cabeça da barquinha dalla
parte oposta aos guidões da carrocinha;
- Pressionar com ambas as mãos sobre os lados de Navetta até
sentir o click;
- Para desenganchar a barquinha Navetta da carrocinha
consultar o seu manual de instruções.
PLIKO P3 + PRIMO VIAGGIO
79• Para enganchar a cadeirinha de carro na carrocinha, é
necessário:
- Travar a carrocinha;
- Abaixar completamente a parte traseira da carrocinha;
- Levantar as ligações Ganciomatic da carrocinha;
- Posicionar a cadeirinha de carro na direcção da mamãe e
empurrar-la para baixo até sentir o click;
- Se recomenda de não remover a parte frontal da carrocinha,
quando se engancha a cadeirinha de carro;
- Para desenganchar a cadeirinha de carro da carrocinha
consultar o seu manual de instruções.
PARA CONVERTIR A CARROCINHA EM CARRINHO
Para transformar a carrocinha em carrinho é necessário
inicialmente desforrar-la.
80•
Desforrar a carrocinha, desenganchando as ligações do saco
dos braços como indicam as setas.
81• Desenganchar os botões do saco lateralmente como na
figura. Desfiar o divisor das pernas do cinto de baixo do
assento.
82• Desenganchar os botões do saco do assento e desfilar-la para
extrair a saco dos ganchos do apoio das pernas. Desfiar o saco
do alto.
83• Desenganchar a base esmagando o botão posicionado na
parte posterior do carrinho, como na figura; seja na barra de
direita que de esquerda. Levantar para o alto a parte traseira
da base com ambas as mãos.
84• Pressionar os dois botões no assento do carrinho com ambas
as mãos e levantar a inteira base para o alto, como na figura.
ACESSÓRIOS
85• Bolsa de Troca (incluída): Bolsa com almofada para a troca
do bebê, enganchável à carrocinha.
86• Mosquiteira: Mosquiteira com zip, aplicável à capotinha com
zip.
87• Bolsa de Viagem: Prática bolsa para o transporte aéreo da
carrocinha.
88• Kit Auto Navetta: É possível requerer o Kit auto
(homologação ECE R44/03), contém o necessário para montar
a alcofinha na viatura.
89• Cobertura para a chuva Cover All: Cobertura para a chuva
em PVC transparente que garante a total protecção da
alcofinha encaixada no carrinho.
LIMPEZA E MANUTENÇÃO
O seu produto necessita de um mínimo de manutenção. As
operações de limpeza e de manutenção devem ser feitas somente
por pessoas adultas.
• Aconselha-se de manter limpas todas as partes em movimento e
Page 43
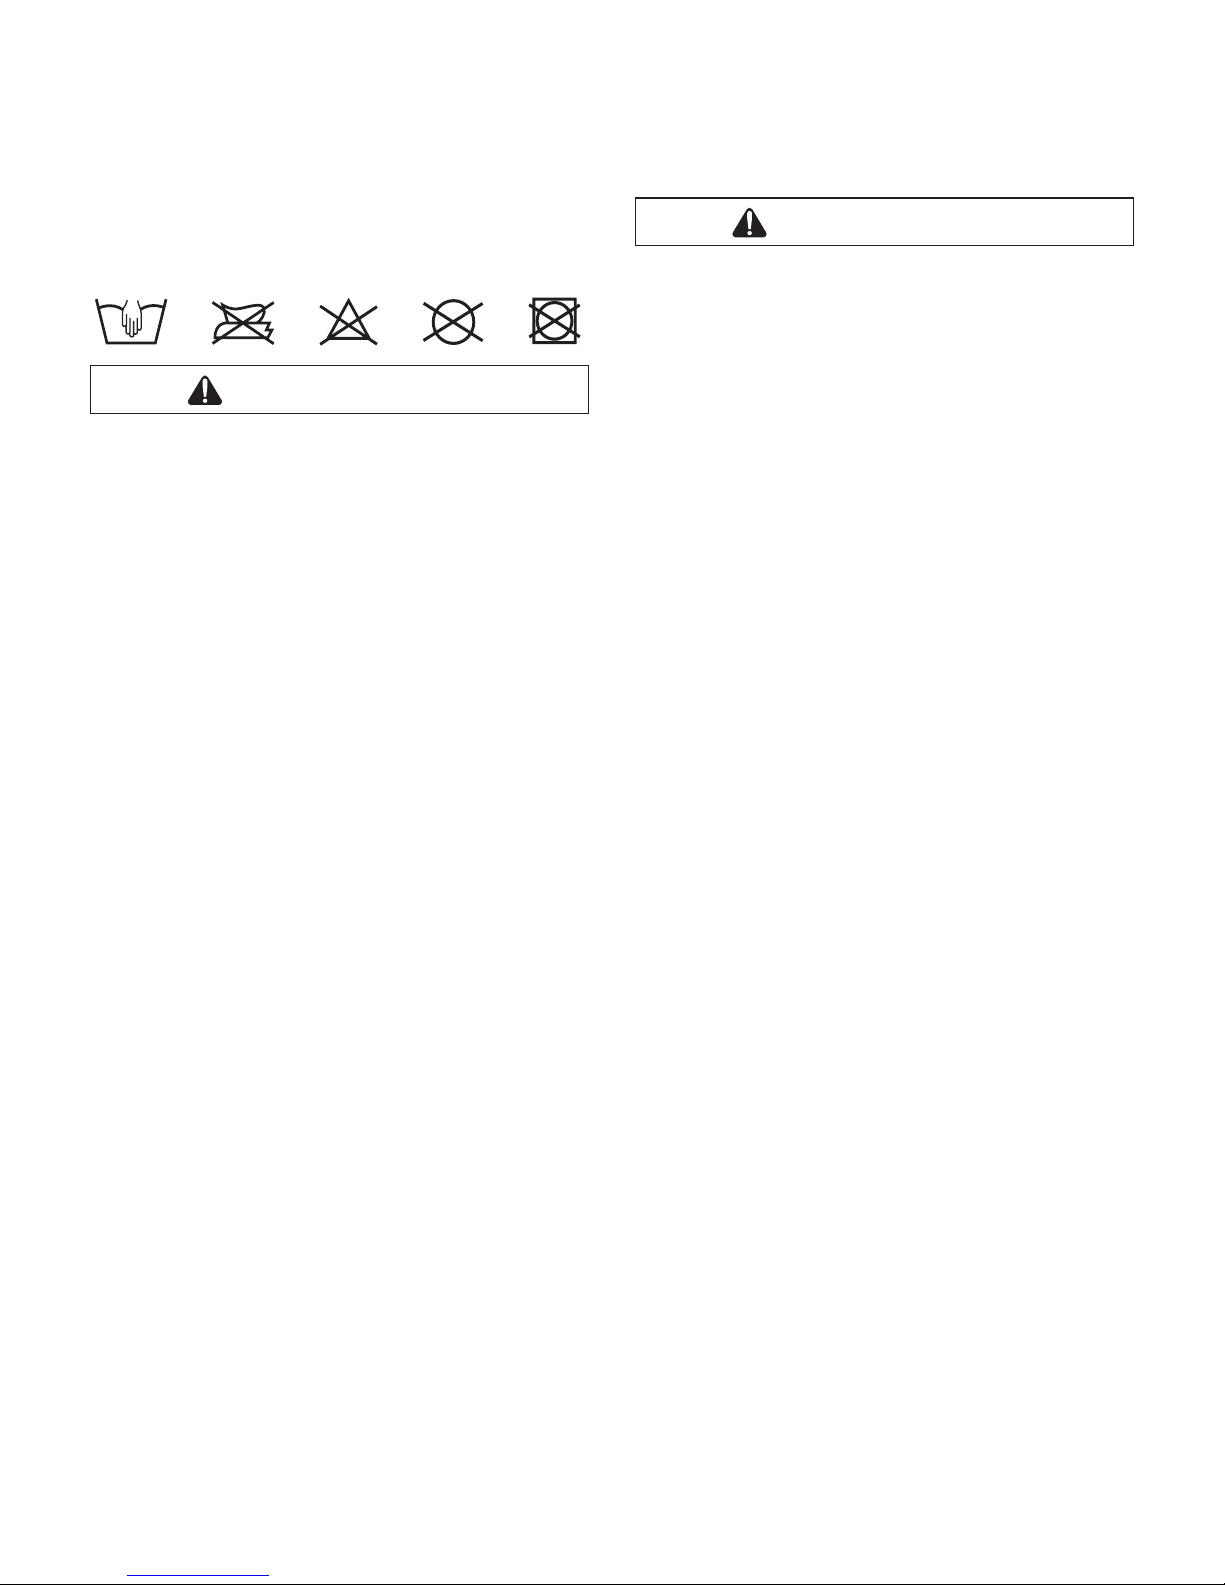
se for necessário, lubrificá-las com óleo leve.
• Enxugar as partes de metal do produto para prevenir contra a
ferrugem.
• Periodicamente limpar as partes de plástica com um pano
húmido, não usar solventes ou outros produtos semelhantes.
• Passar uma escova nas partes de tecido para eliminar a poeira.
• Manter as rodas limpas sem poeira e areia.
• Proteger o produto contra os agentes atmosféricos, água, chuva
ou neve; a exposição continua e prolongada ao sol pode causar
mudanças de cor em muitos materiais.
• Conservar o produto em um lugar seco.
• Para a lavagem da vestidura, siga as seguintes indicações.
ATENÇÃO
PLIKO P3
• ESTE VEÍCULO FOI PROJECTADO PARA TRANSPORTAR UMA
CRIANÇA SENTADA E UMA CRIANÇA EM PÉ NO SUPORTE
TRASEIRO.
• NÃO UTILIZE O PRODUTO PARA UM NÚMERO DE
OCUPANTES MAIOR DO QUE O PREVISTO PELO
FABRICANTE.
• ESTE VEÍCULO É HOMOLOGADO PARA CRIANÇAS DESDE
SEU NASCIMENTO, ATÉ COMPLETAR 15 KG, A SENTAR. O
APOIO TRASEIRO É HOMOLOGADO PARA TRANSPORTAR
UMA SEGUNDA CRIANÇA DE ATÉ 20 KG DE PESO.
• USE UM SISTEMA DE RETENÇÃO LOGO QUE A CRIANÇA
SEJA CAPAZ DE FICAR SENTADA AUTONOMAMENTE.
• ESTE VEÍCULO FOI PROJECTADO PARA SER USADO
CONJUNTAMENTE COM OS PRODUTOS PEG PEREGO
GANCIOMATIC: NAVETTA, PORTE ENFANT SOFT, CADEIRA
PARA CRIANÇA PRIMO VIAGGIO.
• AS OPERAÇÕES DE MONTAGEM E PREPARAÇÃO DO
PRODUTO DEVEM SER EFECTUADAS SOMENTE POR
ADULTOS.
• NÃO UTILIZE O PRODUTO SE APRESENTAR DEFEITOS OU
SE FALTEM PEÇAS.
• UTILIZE SEMPRE CINTOS COM CINCO PONTOS; UTILIZE
SEMPRE O DIVISOR DE PERNAS DO CINTO COMBINADO
COM CINTINHO DA CINTURA.
• PODERIA SER PERIGOSO DEIXAR SUA CRIANÇA SOZINHA.
• QUANDO PARADO, ACCIONE SEMPRE OS TRAVÕES.
• ANTES DE USAR, CERTIFIQUE-SE QUE TODOS OS
MECANISMOS DE ENCAIXE ESTEJAM PRESOS
CORRECTAMENTE.
• ANTES DE USAR, CERTIFIQUE-SE QUE A CADEIRA
PARA AUTOMÓVEL OU O ASSENTO ESTEJAM PRESOS
CORRECTAMENTE.
• EVITE INTRODUZIR OS DEDOS NOS MECANISMOS.
• PRESTE ATENÇÃO À PRESENÇA DA CRIANÇA QUANDO
EFECTUAR OPERAÇÕES DE REGULAGEM DOS
MECANISMOS (MANILHA E ENCOSTO).
• TODA E QUALQUER CARGA PENDURADA NAS MANILHAS
PODE FAZER COM QUE O PRODUTO TORNE-SE INSTÁVEL;
SIGA AS INDICAÇÕES DO FABRICANTE, COM RELAÇÃO ÀS
CARGAS MÁXIMAS QUE PODEM SER USADAS.
• O POUSA-MÃOS NÃO FOI PROJECTADO PARA SUPORTAR
O PESO DE UMA CRIANÇA; O POUSA-MÃOS NÃO FOI
DESENHADO PARA SEGURAR A CRIANÇA NO ASSENTO E
NÃO SUBSTITUI O CINTO DE SEGURANÇA.
• NÃO COLOQUE NO CESTINHO DE PACOTES UM PESO
SUPERIOR A 5 KG. NÃO INTRODUZA NOS PORTA-BEBIDAS
PESOS MAIORES DE QUANTO ESPECIFICADO NO PRÓPRIO
PORTA-BEBIDAS E JAMAIS BEBIDAS QUENTES. NÃO
INTRODUZA NOS BOLSOS DA CAPOTA (SE PRESENTES)
PESOS SUPERIORES A 0,2 KG.
• NÃO UTILIZE O PRODUTO PRÓXIMO À ESCADAS OU
DEGRAUS, NÃO UTILIZE-O PRÓXIMO A FONTES DE CALOR,
CHAMAS LIVRES E OBJECTOS PERIGOSOS AO ALCANCE DA
CRIANÇA.
• PODERIA SER PERIGOSO UTILIZAR ACESSÓRIOS NÃO
APROVADOS PELO FABRICANTE.
• ESTE PRODUTO NÃO É INDICADO PARA O JOGGING OU
CORRIDA COM PATINS.
• UTILIZE OS TRAVÕES DURANTE AS OPERAÇÕES DE CARGA
E DESCARGA DOS OCUPANTES.
AT EN Ç ÃO
ALCOFA NAVETTA
• ESTE VEÍCULO É ADEQUADO SOMENTE PARA CRIANÇAS
QUE NÃO PODEM SER COLADAS SOZINHAS NA POSIÇÃO
SENTADA.
• ESTE VEÍCULO DEVE SER USADO POR CRIANÇAS DESDE
SEU NASCIMENTO, ATÉ COMPLETAR 9 KG DE PESO.
• UTILIZE SOMENTE SOBRE SUPERFÍCIES DURAS,
HORIZONTAIS E SECAS.
• PODERIA SER PERIGOSO DEIXAR SUA CRIANÇA SOZINHA.
• NÃO DEIXE OUTRAS CRIANÇAS BRINCAREM SOZINHAS
PERTO DO CARRINHO.
• AS OPERAÇÕES DE MONTAGEM E PREPARAÇÃO DO
PRODUTO DEVEM SER EFECTUADAS POR ADULTOS.
• NÃO UTILIZE O PRODUTO SE APRESENTAR DEFEITOS OU
SE FALTEM PEÇAS.
• NÃO COLOQUE COLCHÃOZINHOS.
• ANTES DE USAR, CERTIFIQUE-SE QUE TODOS OS
MECANISMOS DE ENCAIXE ESTEJAM PRESOS
CORRECTAMENTE.
• ANTES DE USAR, CERTIFIQUE-SE QUE A CADEIRA PARA
AUTOMÓVEL, O CARRINHO OU O ASSENTO ESTEJAM
PRESOS CORRECTAMENTE.
• EVITE INTRODUZIR OS DEDOS NOS MECANISMOS.
• PRESTE ATENÇÃO À PRESENÇA DA CRIANÇA QUANDO
EFECTUAR OPERAÇÕES DE REGULAGEM DOS
MECANISMOS (MANILHA E ENCOSTO).
• NÃO UTILIZE-O PRÓXIMO A FONTES DE CALOR, CHAMAS
LIVRES E OBJECTOS PERIGOSOS AO ALCANCE DA
CRIANÇA.
• PODERIA SER PERIGOSO UTILIZAR ACESSÓRIOS NÃO
APROVADOS PELO FABRICANTE.
• CONTROLE REGULARMENTE A MANILHA (OU AS
MANILHAS) E O FUNDO DO CARRINHO E VERIFIQUE SE
EXISTEM SINAIS DE QUEBRA OU DANOS.
• AO UTILIZAR O CARRINHO COM UM STAND, VERIFIQUE O
COMPRIMENTO MÁXIMO DO CARRINHO ESPECIFICADO
NO STAND.
Page 44

• IMPORTANTE: Lees aandachtig deze instructies en
bewaar ze ook voor toekomstig gebruik.
De veiligheid van uw kind zou in gevaar kunnen komen
als u deze instructies niet naleeft.
• Peg Perego kan op ieder gewenst moment wijzigingen
aanbrengen op de modellen die in deze publicatie beschreven
worden, om reden van technische of commerciële aard.
Peg Perego S.p.A. heeft een ISO 9001-certificaat.
De certificiëring biedt klanten en consumenten de
garantie van doorzichtigheid en vertrouwen in de
manier van werken van het bedrijf.
ASSISTENTIEDIENST
Indien delen van het model per ongeluk verloren gaan of
beschadigd raken dan dient u alleen originele reserveonderdelen
van Peg Perego te gebruiken. Voor eventuele reparaties of
vervanging van de producten, alsmede voor informatie over
de producten, de verkoop van originele reserveonderdelen en
accessoires, neemt u contact op met de Assistentiedienst van
Peg-Perego:
tel.: 0039-039-60.88.213,
fax: 0039-039-33.09.992,
e-mail: assistenza@pegperego.it,
www.pegperego.com
Peg Perego staat ter beschikking van de Consument om zo goed
mogelijk aan diens wensen tegemoet te komen. Daarom is het
voor ons uiterst belangrijk om de mening van onze klanten te
kennen. Wij zullen u daarom dankbaar zijn indien u, na het gebruik
van één van ozne producten, de VRAGENLIJST TEVREDEN KLANTEN
wilt invullen die u in het internet vindt, op het volgende adres:
www.pegperego.com waarbij u opmerkingen kunt plaatsen of
suggesties kunt doen.
PLIKO P3
• Pliko P3 kan, dankzij de verwijderbare rugleuning, zowel in
de versie onderstel als in de versie wandelwagen worden
gebruikt.
INSTRUCTIES VOOR HET GEBRUIK
OPENEN
1• Alvorens de wagen te openen, moeten de beschermdoppen
van de haken verwijderd worden, zoals de afbeelding toont,
anders vindt de opening niet correct plaats.
2• Om de wagen te openen, moeten de twee hendels op de
handgrepen omhoog getrokken worden, zoals de afbeelding
toont.
3•
Op hetzelfde moment moet de wagen omhoog getild worden,
waarna hij automatisch zal opengaan.
Om te controleren of de wandelwagen correct geopend is,
controleert u de twee zijhaken (zie afbeelding).
ASSEMBLAGE
4•
Om de voorwielen te monteren hendel A omlaag plaatsen en
het wiel naar binnen steken, zoals afbeelding B toont, tot de klik.
5• Maak de wielen vast die samengehouden worden door de
remdraad zoals op de afbeelding.
6• Maak precies uit welk wiel het rechter is en welk wiel het
linker om de achterwielen op de goede manier vast te maken.
Op het linker wiel zit een gleuf op de wielbuis en een gleuf op
het frame die samen moeten vallen (zie de afbeelding).
7• Controleer of het wiel goed is vastgemaakt zoals op de
afbeelding. U moet het horen klikken.
8• Om de mand te monteren, de sleuven aan de voorhaken A en
aan de achterhaken B en C bevestigen.
9• De afbeelding toont de bevestigde mand.
10•
De flesjeshouder kan op de linker- of rechterkant van de
NL•NEDERLANDS
wandelwagen bevestigd worden, dankzij de haak die
reeds op beide zijden van de wandelwagen aanwezig is.
Om de flesjeshouder te bevestigen, deze vasthaken tot de
klik, zoals afbeelding A toont. Bevestigde flesjeshouder,
afbeelding B.
Plaats geen warme dranken in de flesjeshouder, en met
een gewicht van meer dan 0,5 Kg (1 lbs).
REM
11• Om de Pliko P3 te remmen, met de voet de hendels op de
achterwielen omlaag duwen, zoals de afbeelding toont.
• Om de remmen te deblokkeren op omgekeerde wijze te werk
gaan.
• Wanneer u stilstaat altijd de remmen activeren.
ZWENKWIELEN
12• Om zwenkwielen van de voorwielen te maken, moet de
hendel omlaag geplaatst worden, zoals afbeelding A toont.
Om er weer vaste wielen van te maken moet de hendel weer
omhoog geplaatst worden, zoals afbeelding B toont.
INSTELLING HANDGREPEN
13• De handgrepen kunnen in twee posities in hoogte ingesteld
worden. Voor de hoge positie drukt u op de knop en tilt
u de handgreep op hetzelfde moment omhoog. Om de
handgreep omlaag te plaatsen gaat u op omgekeerde wijze
te werk.
SLUITEN
• Voordat u de Pliko P3 sluit, moet de Navetta of het
autozitje Primo Viaggio losgekoppeld worden.
14•
Het is mogelijk om de wandelwagen met één hand te sluiten:
trek eerst één hendel en daarna de andere omhoog, tot de klik.
15• Neem de middelste handgreep vast (afbeelding 3) en trek
deze omhoog tot de sluiting plaats vindt zoals getoond wordt
in de afbeelding.
16•
Controleer of de wagen correct gesloten is aan de hand van de
veiligheidshaak. De gesloten wagen blijft los overeind staan.
TRANSPORT
17• De Pliko P3 kan moeiteloos meegenomen worden (waarbij
de voorwielen niet mogen zwenken), door de middelste
handgreep te gebruiken, zoals de afbeelding toont.
18• De wagen kan ook aan de zijdelingse handgreep
meegenomen worden, zie de afbeelding.
GANCIOMATIC SYSTEM met
PLIKO P3 VERSIE ONDERSTEL
Het Ganciomatic System is het praktische en snelle systeem
waarmee het mogelijk is om, dankzij de Ganciomatic
bevestigingspunten, de Navetta en de Primo Viaggio, die ook
over een Ganciomatic Systeem beschikken, op de Pliko P3 te
bevestigen.
GANCIOMATIC BEVESTIGINGSPUNTEN VAN HET
ONDERSTEL
19• Om de Ganciomatic bevestigingspunten van het onderstel
omhoog te plaatsen, moeten de twee bevestigingspunten
omhoog gedraaid worden tot de klik, zoals de afbeelding
toont.
20• Om de Ganciomatic bevestigingspunten van het onderstel
omlaag te plaatsen, trekt u het hendeltje naar buiten en draait
u de bevestigingspunten op hetzelfde moment omlaag, zoals
de afbeelding toont.
PLIKO P3 + NAVETTA
Om de reiswieg Navetta op de Pliko P3 versie onderstel te
bevestigen, handelt u als volgt:
- Rem de Pliko P3;
- Til de Ganciomatic bevestigingspunten omhoog;
21• Draai de twee hendels, die zich op de achterzijde van het
onderstel bevinden, naar buiten, zoals de afbeelding toont;
22• Til de benensteun van het onderstel op in de hoogste positie
(afbeelding 1);
23• De Pliko P3 versie onderstel is nu gereed voor de bevestiging
van de Navetta;
Page 45

24• Neem de handgreep van de Navetta beet en breng de
Navetta in positie op de Ganciomatic bevestigingspunten van
het onderstel. Het hoofdeinde van de Navetta moet zich aan
de zijde bevinden die tegengesteld is aan de handgrepen van
het onderstel;
- Druk met beide handen op de zijden van de Navetta, tot een
klik gehoord wordt;
- Om de reiswieg Navetta van het onderstel los te maken,
raadpleegt u de betreffende handleiding met instructies.
PLIKO P3 + PRIMO VIAGGIO
Om het autozitje op het onderstel te bevestigen, handelt u als
volgt:
- Rem de Pliko P3;
- Bevestig het voorzetstuk (zie het deel over het voorzetstuk
hierna);
25• De Pliko P3 versie onderstel is gereed voor de bevestiging van
het zitje Primo Viaggio;
26• Neem de handgreep van het zitje beet en breng het in positie
op de Ganciomatic bevestigingspunten van het onderstel.
Het hoofdeinde van het zitje moet zich aan de zijde bevinden
die tegengesteld is aan de handgrepen van het onderstel.
Druk met beide handen op de zijden van het zitje, tot een klik
gehoord wordt;
- Om het autozitje van het onderstel los te maken, raadpleegt u
de betreffende handleiding met instructies.
VOORZETSTUK
27• De armleuningen van de wagen hebben afsluitdoppen;
om het voorzetstuk te bevestigen moeten de doppen
weggenomen worden (bewaar de doppen voor wanneer u
de wandelwagen zonder voorzetstuk wilt gebruiken). Om
de doppen weg te nemen, drukt u op de knop onder de
armleuning en trekt u de dop op hetzelfde moment los (doe
dit voor beide armleuningen).
28•
Om het voorzetstuk te bevestigen, steekt u de beide uiteinden
van het voorzetstuk in de armleuningen, zoals de afbeelding
toont, tot de klik.
29• Het is mogelijk om het voorzetstuk aan slechts één zijde te
openen, om het naar binnen en naar buiten gaan van het iets
grotere kind te vergemakkelijken. Om het te openen, drukt u
op de knop onder de armleuning en trekt u het voorzetstuk
op hetzelfde moment naar buiten.
30• Om het voorzetstuk te verwijderen, drukt u op de twee
knoppen onder de armleuningen en trekt u het voorzetstuk
op hetzelfde moment naar buiten.
OM HET ONDERSTEL OM TE BOUWEN TOT WANDELWAGEN
ASSEMBLAGE
31• Om de Pliko P3 versie onderstel tot wandelwagen om te
bouwen, controleert u eerst of de twee hendels omlaag
geplaatst zijn, zoals de afbeelding toont.
32• Plaats de rugleuning met de zak op de zitting van het
onderstel, zoals de afbeelding toont.
33•
Om de rugleuning aan het onderstel te bevestigen, moeten
de twee uiteinden in de zitting van het onderstel ingebracht
worden, door op de twee knoppen te drukken, zoals
afbeelding 1 toont, tot de klik gehoord wordt, zie afbeelding 2.
34• Om de beugel voor de instelling van de rugleuning aan het
onderstel te bevestigen, moet het bevestigingspunt omhoog
gedraaid worden (afbeelding B, in de richting van de pijl) en
in positie gebracht worden achter de achterste staander.
35• Duw de twee bevestigingspunten omlaag, tot de klik, in de
zittingen van de achterste staanders.
36• Voor het bekleden van de wandelwagen, haakt u de
bevestigingspunten van de zak vast aan de armleuningen,
zoals de pijlen in de afbeelding tonen.
37• Steek de hendeltjes van de benensteun in de zak van de
rugleuning, zoals de afbeelding toont.
38• Om de bevestiging van de zak aan het onderstel te voltooien,
maakt u de knopen van de zak vast aan de basis, zie
afbeelding A. Voer het lagere riempje dat tussen de benen
loopt onder de zitting door, zoals afbeelding B toont, en laat
het hogere riempje dat tussen de benen loopt boven de zak.
OPENEN EN SLUITEN
• Om de Pliko P3 versie wandelwagen te openen, herhaalt u de
handelingen van de afbeeldingen 2 en 3.
• Om de Pliko P3 versie wandelwagen te sluiten, maakt u de
passers van de kap losser, tilt u de rugleuning op en herhaalt
u de handelingen van de afbeeldingen 14, 15 en 16.
INSTELLING BENENSTEUN
39• De benensteun kan in drie posities gezet worden. Om de
benensteun omlaag te plaatsen, trekt u de twee zijhendeltjes
omlaag en plaatst u de benensteun op hetzelfde moment
ook omlaag. Om de benensteun omhoog te plaatsen, duwt u
hem omhoog tot de klik.
VOETENPLANKJE ACHTERZIJDE
40• Het voetenplankje aan de achterzijde helpt de moeder bij het
nemen van kleine hoogteverschillen en kan bovendien een
tweede kind vervoeren.
LAADVOLGORDE
41• Om de Pliko P3 met twee kinderen te gebruiken, moet de
Pliko allereerst op de rem gezet worden, waarna het kleinste
kind in de zitting gezet wordt en de veiligheidsgordel (1)
omgedaan wordt. Neem de handgrepen (2) vast en laat het
tweede kind op het voetenplankje (3) klimmen.
• Laat uw kinderen nooit alleen.
• Sta het uw kind niet toe op het voetenplankje aan de
achterzijde te klimmen terwijl de wandelwagen leeg is.
K A P
• De kap kan zowel op de Reiswieg Navetta als op de
wandelwagen gebruikt en bevestigd worden. Het beschikt
over een rits met behulp waarvan het regenscherm
aangebracht kan worden.
42• Om de kap op de Reiswieg Navetta te monteren, moeten
knopen A en B (afbeelding 1) losgeknoopt worden. Haak de
kap vast zoals afbeelding 2 toont en controleer de correcte
bevestiging aan de hand van afbeelding 3.
43• Om de kap op de wandelwagen te monteren, de kap
vasthaken zoals de afbeelding toont en de correcte
bevestiging controleren (zie de afbeelding).
44• Om de kap te spannen, duwt u de passer omlaag. De kap
naar achteren geplaatst worden door de rugleuning te
verplaatsen.
45• Om de kap te spannen, moet de aan de binnenkant
geplaatste passer omlaag geduwd worden, zoals de
afbeelding toont.
46• Verleng de kap volledig door de rits los te maken, zie
afbeelding B.
De kap volgt de schuine stand van de rugleuning.
47• De kap kan gemakkelijk in een zonnenscherm veranderd
worden. Sluit de rits en zet de kap vast met het praktische
haakje.
48• Om de kap van de Navetta Reiswieg af te halen, moet deze
aan de zijkanten van de bekleding losgemaakt worden. Haak
sleuven A en B los van de bekleding, zoals de afbeelding
toont, druk aan beide zijden op het lipje en koppel de kap los.
49• Om de kap van de wandelwagen te verwijderen, aan beide
zijden van de kap op het lipje drukken, zoals afbeelding A
toont.
De kap loshaken en omhoog trekken, zoals afbeelding B toont.
REISWIEG NAVETTA
HANDGREEP
50• Om de handgreep op te tillen, trekt u hem omhoog tot
aan de klik. De handgreep is alleen in de verticale positie
geblokkeerd wanneer de twee blokjes zijn teruggekeerd in de
zitting.
51• Om de handgreep omlaag te zetten, deblokkeert u hem
door de twee blokjes omhoog te duwen en vervolgens de
handgreep omlaag te duwen.
52• De handgreep vereenvoudigt het transport en de bevestiging
van het reiswiegje Navetta op kinder- en wandelwagens.
POSITIE SCHOMMEL EN KINDERBEDJE
53•
De basis van het reiswiegje Navetta heeft een speciale vorm.
Plaatst u de basis op een ondergrond, dan kan het wiegje
geschommeld worden.
54• De reiswieg wordt een klein nestje, dat niet schommelt, door
Page 46

de ingebouwde staanders naar buiten te trekken, zoals de
afbeelding toont.
INSTELLING RUGLEUNING
55• De hoogte van de rugleuning kan ingesteld worden, door
de handgreep naar buiten te trekken en te draaien, zoals de
afbeelding toont.
INSTELLING LUCHTCIRCULATIE
56• De basis van het reiswiegje Navetta beschikt over gaten die
open gemaakt kunnen worden, zodat er van onderaf lucht
naar binnenkant.
Om de gaten aan de voorkant van het reiswiegje Navetta
te openen (zijde waar zich de kap bevindt), duwt u de twee
haken in buitenwaartse richting.
57• Om de gaten aan de achterkant te openen (zijde die
tegengesteld is aan de kap), duwt u één van de twee haken in
buitenwaartse richting.
IVERWIJDEREN VAN DE BEKLEDING
58• Om de bekleding weg te nemen, moeten de sleuven aan de
zijkanten los gemaakt worden en kan de bekleding aan de
voorkant weggenomen worden.
59• Verwijder de 2 lipjes aan de achterkant van het frame en
neem de bekleding weg.
LOS EN VASTKOPPELEN VAN DE REISWIEG OP DE
WANDELWAGEN
De reiswieg Navetta is uitgerust met het Ganciomatic
Systeem dat op de Ganciomatic bevestigingspunten van de
wandelwagen Pliko P3 vastgekoppeld kan worden.
60• Om het reiswiegje los te maken van de wandelwagen, duwt
u eerst de handgreep (aan de zijde die tegengesteld is aan
de kap) in zijwaartse richting en duwt u hem vervolgens
omhoog. Op hetzelfde moment tilt u het reiswiegje Navetta
bij de handgreep omhoog.
REISWIEGJE NAVETTA IN DE AUTO
61• Het reiswiegje Navetta kan een reiswiegje Navetta AUTO
worden, dankzij de twee haken(zie de afbeelding) en door de
Autokit apart aan te schaffen.
DETAILS MODULAIR SYSTEEM ON TRACK
DEKEN
62• Om de deken te bevestigen, verenigt u de rits van de deken
met die van de benensteun, zoals de afbeelding toont.
Haak de twee knopen vast, zoals afbeelding B toont, om de
deken vast te maken
REGENSCHERM
63• Om het regenscherm te monteren, verenigt u de rits van het
regenscherm met die van de kap.
64•
Maak de knop op de elastiek vast aan de knop op het wagentje
zoals op de afbeelding. U moet de knop horen klikken.
65•
Bevestig het onderste elastiek van het regenscherm aan het wiel.
66• Het praktische regenscherm kan omlaag geplaatst worden
door de rits te openen en blijft aan de wandelwagen
bevestigd dankzij de elastieken.
67• Dit regenscherm is bestudeerd om ook gebruikt te worden
wanneer het autozitje Primo Viaggio op de wandelwagen
bevestigd is en garandeert een volledige bescherming.
• Gebruik het regenscherm niet in gesloten ruimtes en
controleer altijd of het kind het niet te warm heeft.
• Plaats het PVC regenscherm niet nabij warmtebronnen en pas
op voor sigaretten.
• Controleer of het regenscherm geen belemmering vormt
voor de bewegende mechanismen van het onderstel of van
de wandelwagen.
• Neem het regenscherm altijd weg, voordat u het onderstel of
de wandelwagen sluit.
• Reinigen met een spons en zeepsop, zonder
reinigingsmiddelen te gebruiken.
VEILIGHEIDSGORDEL
68• Controleer of het riempje correct vastzit, door te handelen
zoals afbeelding A toont. Bevestig de gordel, door te
handelen zoals afbeelding B toont.
69• Om de gordel los te maken, drukt u op de zijkanten van de
gesp (afbeelding A) en trekt u de tailleriem (afbeelding B) op
hetzelfde moment naar buiten.
70• De nieuwe veiligheidsgordel van vandaag, is makkelijker
te dragen dankzij het “los-vast” systeem. Voordat de gordel
inderdaad vastgemaakt wordt, bevestigt u het gespje aan de
rugleuning, door de lip in de doorlopende opening te steken,
zoals de afbeelding toont; wanneer de riem eenmaal
aan uw kind bevestigd is, maakt u de riem los van de
rugleuning, zodat uw kind meer bewegingsvrijheid heeft.
Het gespje moet onder de schouders van het kind blijven.
INSTELLING RUGLEUNING
71• De rugleuning kan vier standen aannemen. Om de
rugleuning omlaag te plaatsen, tilt u de handgreep
(afbeelding A) op en plaatst u de rugleuning op hetzelfde
moment omlaag (afbeelding B) waarbij u hem vastzet in de
gewenste positie.
Om hem omhoog te plaatsen, duwt u de rugleuning omhoog.
VERWIJDEREN VAN DE BEKLEDING
72•
Om de bekleding van de wandelwagen te verwijderen, haakt
u de bevestigingspunten van de zak los van de armleuningen,
zoals de pijlen tonen.
73• Knoop de knopen van de zak los van de zitting en trek de zak
los van de haken van de benensteun.
74• Maak de knopen van de zak aan de zijkanten los, zie de
afbeelding. Trek de riem die tussen de benen loopt los van
onder de zitting.
75• Maak de knopen van de zak los van de zitting en trek de zak
naar buiten, los van de haken van de benensteun. Trek de zak
in bovenwaartse richting los.
GANCIOMATIC SYSTEM met
PLIKO P3 VERSIE WANDELWAGEN
Het Ganciomatic System is het praktische en snelle systeem
waarmee het mogelijk is om, dankzij de Ganciomatic
bevestigingspunten, de Navetta en de Primo Viaggio, die ook
over het Ganciomatic systeem beschikken, op de Pliko P3 versie
wandelwagen te bevestigen.
GANCIOMATIC BEVESTIGINGSPUNTEN VAN DE
WANDELWAGEN
76• Om de Ganciomatic bevestigingspunten van de
wandelwagen omhoog te plaatsen, tilt u de zak op
aan de hoeken van de zitting en draait u de twee
bevestigingspunten omhoog tot de klik.
77• Om de Ganciomatic bevestigingspunten van de
wandelwagen omlaag te plaatsen, trekt u het hendeltje in
buitenwaartse richting en draait u op hetzelfde moment de
bevestigingspunten omlaag, zoals de afbeelding toont.
PLIKO P3 + NAVETTA
78• Om de reiswieg Navetta op de wandelwagen te bevestigen,
handelt u als volgt:
- Rem de wandelwagen;
- Plaats de rugleuning van de wandelwagen volledig omlaag;
- Plaats de Ganciomatic bevestigingspunten van de
wandelwagen omhoog;
- Verwijder het voorzetstuk en breng de bijgeleverde doppen
aan om de armleuningen van de wandelwagen te sluiten;
- Plaats de benensteun van de wandelwagen in de hoogste
positie;
- Neem de handgreep van de Navetta vast;
- Zet de Navetta op de Ganciomatic bevestigingspunten van
de wandelwagen. Het hoofdeinde van de reiswieg moet zich
aan de zijde bevinden die tegengesteld is aan de handgrepen
van de wandelwagen;
- Druk met beide handen op de zijkanten van de Navetta, tot
de klik;
- Om de reiswieg Navetta los te maken van de wandelwagen
raadpleegt u de handleiding met instructies van de reiswieg.
PLIKO P3 + PRIMO VIAGGIO
79• Om het autozitje op de wandelwagen te bevestigen, handelt
u als volgt:
- Rem de wandelwagen;
Page 47

- Plaats de rugleuning van de wandelwagen volledig omlaag;
- Plaats de Ganciomatic bevestigingspunten van de
wandelwagen omhoog;
- Breng het autozitje in positie naar de moeder toe gekeerd en
duw het omlaag tot de klik;
- Het wordt aanbevolen het voorzetstuk niet van de
wandelwagen weg te nemen wanneer het autozitje
bevestigd wordt;
- Om het autozitje los te maken van de wandelwagen
raadpleegt u de handleiding met instructies van het autozitje.
OMBOUWEN VAN WANDELWAGEN IN ONDERSTEL
Om de wandelwagen in onderstel om te bouwen dient u allereerst
de bekleding weg te nemen.
80• Verwijder de bekleding van de wandelwagen door de
bevestigingspunten van de zak los te maken van de
armleuningen, zoals de pijlen aangeven.
81• Maak de knopen van de zak aan de zijkanten los, zie de
afbeelding. Trek de riem die tussen de benen loop los van
onder de zitting.
82• Maak de knopen van de zak los van de zitting en trek de zak
naar buiten, los van de haken van de benensteun. Trek de zal
in bovenwaartse richting los.
83• Maak de basis los door op de knop te drukken die zich op
de achterzijde van het onderstel bevindt, zie de afbeelding,
zowel in de rechter- als in de linkerstang. Til met beide
handen de rugleuning van de basis omhoog.
84• Druk met beide handen op de knoppen in de zitting van
het onderstel en til de volledige basis omhoog, zoals de
afbeelding toont.
ACCESSOIRES
85• Verschoningstas (inbegrepen): Tas met matrasje voor de
verschoning van de baby, kan aan de wandelwagen gehaakt
worden.
86• Muggenscherm: Muggenscherm met rits, kan met de rits
aan de kap bevestigd worden.
87• Reistas: Praktische tas voor het vervoer in het vliegtuig van
de wandelwagen.
88• Autokit reiswiegje Navetta:
Het is mogelijk om de Autokit
aan te vragen (gehomologeerd ECE R44/04),die het benodigde
bevat voor het monteren van het reiswiegje in de auto.
89• Regenscherm Cover All: Regenscherm van transparant PVC
dat de volledige bescherming van het reiswiegje garandeert,
wanneer het op de wandelwagen bevestigd is.
REINIGING EN ONDERHOUD
Uw product behoeft een minimum aan onderhoud. Reiniging en
onderhoud mogen alleen uitgevoerd worden door volwassenen.
• Het wordt geadviseerd alle bewegende delen schoon te
houden en zonodig te smeren met lichte olie.
• Droog de metalen delen van het product, om roestvorming te
voorkomen.
• Reinig regelmatig de plastic delen met een vochtige doek,
gebruik geen oplosmiddelen of gelijkaardige producten.
• Reinig het doek met een borstel om vuil te verwijderen.
• Houd de wielen schoon van stof en zand.
•
Bescherm het product tegen de weersomstandigheden, water,
regen of sneeuw; de continue en langdurige blootstelling aan
zonlicht kan een kleurverandering van vele materialen veroorzaken.
• Bewaar het product op een droge plek.
• Om de zak te wassen, volgt u onderstaande aanwijzingen op.
LET OP
PLIKO P3
• DIT VOERTUIG IS BEDOELD OM ÉÉN KIND IN HET STOELTJE
EN ÉÉN KIND RECHTSTAAND OP DE TREEPLANK TE
TRANSPORTEREN.
• GEBRUIK HET PRODUCT NIET VOOR EEN GROTER AANTAL
KINDEREN DAN DOOR DE FABRIKANT VASTGESTELD IS.
• DIT VOERTUIG IS GOEDGEKEURD VOOR KINDEREN VANAF
DE GEBOORTE TOT 15 KG. OP DE TREEPLANK ACHTERAAN
MAG EEN TWEEDE KIND WORDEN VERVOERD TOT EEN
GEWICHT VAN 20 KG.
• GEBRUIK VEILIGHEIDSGORDELS ZODRA HET KIND ALLEEN
RECHTOP KAN ZITTEN.
• DIT VOERTUIG IS ONTWORPEN OM GEBRUIKT TE WORDEN
IN COMBINATIE MET DE PRODUCTEN PEG PEREGO
GANCIOMATIC:NAVETTA, PORTE ENFANT SOFT, AUTOZITJE
PRIMO VIAGGIO.
• ALLEEN VOLWASSENEN MOGEN DIT ARTIKEL MONTEREN
EN OPBOUWEN.
• GEBRUIK HET PRODUCT NIET ALS ER DELEN AAN
ONTBREKEN OF STUK ZIJN.
• GEBRUIK ALTIJD DE VIJFPUNTSGORDELS; GEBRUIK ALTIJD
DE GORDEL TUSSEN DE BEENTJES IN COMBINATIE MET DE
BUIKGORDEL.
• LAAT UW KIND NIET ONBEWAAKT ALLEEN, DIT KAN
GEVAARLIJK ZIJN.
• ZET ALTIJD DE REMMEN OP ALS U NIET RIJDT.
• CONTROLEER VOORDAT U HET PRODUCT GEBRUIKT
OF ALLE BEVESTIGINGEN EN BEVEILIGINGEN VAST ZIJN
GEMAAKT.
• CONTROLEER VOORDAT U HET PRODUCT GEBRUIKT OF
HET AUTOSTOELTJE OF DE VERHOOGDE ZITTING GOED
VAST ZIJN GEMAAKT.
• STEEK UW VINGERS NIET IN DE MECHANISMEN.
• LET GOED OP HET KIND ALS U IETS AFSTELT AAN DE
MECHANISMEN (HANDGREPEN, RUGLEUNING ENZ).
• IETS WAT AAN DE HANDGREEP OF HANDGREPEN
HANGT, KANT HET PRODUCT ONSTABIEL MAKEN; LEEF
DE VOORSCHRIFTEN VAN DE FABRIKANT INZAKE DE
VERVOERBARE GEWICHTEN NA.
• DE STEUN VOORAAN IS NIET GESCHIKT OM HET GEWICHT
VAN EEN KIND TE DRAGEN. HET IS NIET BEDOELD OM HET
KIND TEGEN TE HOUDEN IN HET STOELTJE EN VERVANGT
DE VEILIGHEIDSGORDEL NIET.
• STEEK NIET MEER GEWICHT DAN 5 KG IN DE BERGRUIMTE.
STEEK IN DE KLERENBERGRUIMTE NIET MEER GEWICHT
DAN VOORGESCHREVEN OP DE KLERENBERGRUIMTE ZELF
EN DOE ER NOOIT WARME DRANKEN IN. STEEK IN DE
ZAKKEN OP DE KAP (INDIEN AANWEZIG) NIETS DAT MEER
DAN 0,2 KG WEEGT.
• GEBRUIK HET PRODUCT NIET OP TRAPPEN OF TREDEN;
GEBRUIK HET NIET IN DE BUURT VAN WARMTEBRONNEN,
VRIJE VLAMMEN OF GEVAARLIJKE VOORWERPEN BINNEN
HET GRIJPBEREIK VAN HET KIND.
• ACCESSOIRES GEBRUIKEN DIE NIET ZIJN GOEDGEKEURD
DOOR DE FABRIKANT, KAN GEVAARLIJK ZIJN.
• DIT PRODUCT IS NIET GESCHIKT OM MEE TE JOGGEN OF
TE ROLSCHAATSEN.
• GEBRUIK DE REMMEN WANNEER DE KINDEREN ERIN
GEZET EN ERUIT GEHAALD WORDEN.
LET OP
REISWIEG NAVETTA
• DIT VOERTUIG IS ALLEEN GESCHIKT VOOR KINDEREN DIE
NIET ALLEEN OVEREIND KUNNEN GAAN ZITTEN.
• DIT VOERTUIG IS BEDOELD VOOR KINDEREN VANAF DE
GEBOORTE TOT EEN GEWCIHT VAN 9 KG.
• ALLEEN OP HARDE, HORIZONTALE EN DROGE
OPPERVLAKKEN GEBRUIKEN.
• HET ZOU GEVAARLIJK KUNNEN ZIJN UW KIND ZONDER
TOEZICHT TE LATEN.
• LAAT ANDERE KINDEREN NIET ZONDER TOEZICHT VLAKBIJ
DE KINDERWAGEN SPELEN.
• DE ASSEMBLAGE EN GEREEDMAKING VAN HET ARTIKEL
MOET DOOR VOLWASSENEN UITGEVOERD WORDEN.
Page 48
• GEBRUIK HET PRODUCT NIET INDIEN DELEN ONTBREKEN
OF STUK ZIJN.
• GEEN MATRASJES TOEVOEGEN.
• CONTROLEER VÓÓR HET GEBRUIK OF ALLE
KOPPELMECHANISMEN CORRECT INGESCHAKELD ZIJN.
• CONTROLEER VÓÓR HET GEBRUIK OF HET AUTOZITJE,
DE KINDERWAGEN OF HET MEENEEMZITJE CORRECT
VASTGEZET ZIJN.
•
VERMIJD HET DE VINGERS IN DE MECHANISMEN TE STEKEN.
• LET OP DE AANWEZIGHEID VAN HET KIND WANNEER DE
MECHANISMEN INGESTELD WORDEN (HANDGREPEN,
RUGLEUNING).
• NIET GEBRUIKEN IN DE NABIJHEID VAN WARMTEBRONNEN,
OPEN VUUR OF GEVAARLIJKE OBJECTEN DIE ZICH BINNEN
ARMBEREIK VAN HET KIND BEVINDEN.
• HET ZOU GEVAARLIJK KUNNEN ZIJN ACCESSOIRES TE
GEBRUIKEN DIE NIET DOOR DE FABRIKANT GOEDGEKEURD
ZIJN.
• CONTROLEER REGELMATIG DE HANDGREEP (OF DE
HANDGREPEN) EN DE BODEM VAN DE KINDERWAGEN EN
CONTROLEER DE AFWEZIGHEID VAN TEKENS DIE OP STUK
GAAN OF BESCHADIGING WIJZEN.
• INDIEN DE KINDERWAGEN MET EEN STAND GEBRUIKT
WORDT, MOET DE MAXIMUMLENGTE VAN DE
KINDERWAGEN GECONTROLEERD WORDEN, DIE OP DE
STAND VERMELD WORDT.
• VIGTIGT: Læs brugsanvisningen omhyggeligt og
opbevar den til senere brug.
Barnets sikkerhed vil være i fare, såfremt disse
anvisninger ikke følges.
• Peg Perego kan til enhver tid foretage ændringer på modellerne,
som er beskrevet heri, af tekniske eller kommercielle årsager.
Peg Perego S.p.A. er ISO 9001 certificeret.
Certificeringen giver kunder og orbrugere
garanti for gennemskuelighed og tillid til
måden firmaet arbejder på.
SERVICEAFDELING
Skulle det ske, at dele af modellen mistes eller beskadiges, må der
kun anvendes originale Peg Perego reservedele. For eventuelle
reparationer, udskiftninger, produktoplysninger, salg af originale
reservedele og tilbehør bedes du kontakte Serviceafdelingen hos
Peg-Perego:
tel.:0039-039-60.88.213,
fax: 0039-039-33.09.992,
e-mail: assistenza@pegperego.it,
www.pegperego.com
Peg Perego står til forbrugernes rådighed for at imødekomme
ethvert ønske på bedste måde. Det er derfor yderst vigtigt og
værdifuldt for os at høre, hvad vores kunder mener. Vi vil derfor
være taknemmelige for, hvis du - efter at have brugt et af vores
produkter - venligst vil udfylde vort spørgeskema vedrørende
kundetilfredshed, som du finder på vores internetside på følgende
adresse: www.pegperego.com
hvor du kan informere os om din mening eller forslag.
PLIKO P3
• Pliko P3, kan takket være ryglænet, der kan tages af, anvendes
både som kørevogn og som klapvogn.
BRUGSANVISNING
ÅBNING
1• Før kørevognen åbnes, skal de to beskyttelsespropper tages
ud af klapvognens spænder, som på tegningen, ellers åbnes
den ikke rigtigt.
2• For at åbne kørevognen skal du trække de to greb på
håndtagene opad, som vist på tegningen.
3• Samtidigt løfter du vognen opad, så den åbner sig
automatisk.
For at være sikker på at klapvognen har åbnet sig rigtigt,
kontrollerer du de to sidespænder (se tegningen).
SAMLING
4• Montering af de forreste hjul sker ved at sænke grebet A og
påsætte hjulet som vist på tegningens B, indtil det klikker fast.
5• Klapvognen bremses ved at trykke ned med foden på
pedalerne, der findes på de bageste hjul, som vist på
tegningen.
6• Sørg for at anbringe det venstre og det højre hjul, så der ikke
byttes om på dem, og sæt de 2 baghjul korrekt på plads.
Venstre hjul har ribbe på hjulrøret og på stellet, så der sikres
korrekt fasthægtning (se venligst illustrationen).
7• Kontrollér at fasthægtningen er udført korrekt, som vist på
illustrationen, således at man hører et klik.
8• Kurven monteres ved at hægte løkkerne på de forreste kroge
A og på de bageste kroge B og C.
9• Tegningen viser kurven, når den er hægtet på.
10•
Flaskeholderen kan monteres både på håndtagets
højre side og på den venstre side ved hjælp af det lille
beslag, der befinder sig på begge sider af klapvognen.
For at sætte flaskeholderen på, hægtes den på beslaget,
indtil den klikker fast, som vist på figur A. Sådan er
DK•DANSK
Page 49
flaskeholderen hægtet på, figur B.
Der bør ikke sættes varme drikke i flaskeholderen og ikke
med en vægt større end 0,5 Kg.
BREMSE
11• Pliko P3 bremses ved at trykke ned med foden på pedalerne,
der findes på de bageste hjul, som vist på tegningen.
• For at løsne bremserne, løftes de i modsat retning.
• Under ophold skal bremserne altid slås til.
DREJELIGE HJUL
12• For at forhjulene kan dreje om sig selv, er det nødvendigt at
trykke grebet nedad som på tegningen A. For at spænde dem
fast, trækkes grebet i modsat retning, som på tegningen B.
REGULERING AF HÅNDTAG
13• Håndtagene kan højdereguleres til to indstillinger. For den
højeste indstilling trykker du på trykknappen, samtidig med
at håndtagene trækkes opad. For at sænke dem, skubbes de i
modsat retning.
SAMMENKLAPNING
• Før Pliko P3 lukkes, er det nødvendigt at spænde Navetta
eller autostolen Primo Viaggio af.
14• Det er muligt at klappe vognen sammen med den ene hånd:
Træk først det ene greb opad og herefter det andet, indtil de
klikker.
15• Hold i det midterste håndtag (figur 3) og træk det opad, indtil
vognen klappes sammen, som på tegningen.
16• Kontroller at klapvognen er lukket rigtigt sammen på
sikkerhedsspændet. Den lukkede klapvogn kan den stå
oprejst alene.
TRANSPORT
17• Pliko P3 transporteres nemt (med de drejelige forhjul i
blokeret stilling) ved at holde i det midterste håndtag, som
vist på tegningen.
18• Den kan også transporteres ved at holde i sidehåndtaget som
på tegningen.
GANCIOMATIC SYSTEM med
PLIKO P3 KØREVOGNSVERSION
Systemet ‘Ganciomatic’ er et praktisk og nemt system, der takket
være Ganciomatic spænderne gør det muligt at fastspænde til din
Pliko P3 i kørevognsversion en Navetta eller Primo Viaggio, som alle
også er udstyret med Ganciomatic systemet.
KØREVOGNENS GANCIOMATIC SPÆNDER
19• Kørevognens Ganciomatic spænder løftes opad, ved at dreje
de to spænder opad, indtil de klikker, som vist på tegningen.
20• For at lukke klapvognens Ganciomatic spænder nedad
trækkes grebet udad, samtidig med at spænderne drejes
nedad, som tegningen viser.
PLIKO P3 + NAVETTA
For at fastspænde boksen Navetta på Pliko P3 kørevognsversion
gør du sådan:
- Slå bremsen på Pliko P3 til;
- Løft Ganciomatic spænderne;
21• Drej de to spænder på kørevognens bageste ende udad, som
vist på tegningen;
22• Løft kørevognens benstøtte til den højeste indstilling (figur 1);
23• Nu er Pliko P3 kørevognen klar til at få Navetta spændt på;
24• Hold fast i håndtaget på Navetta og anbring den på
kørevognens Ganciomatic spænder, hvor Navetta-liftens
hovedstykke anbringes i den modsatte side af kørevognens
håndtag;
- Tryk nedad med begge hænder på Navetta-liftens sider, indtil
du hører et klik.
- For at løsne Navetta-liften fra kørevognen henvises til
brugsanvisningen for liften.
PLIKO P3 + PRIMO VIAGGIO
For at montere autostolen på kørevognen gør du sådan:
- Slå bremsen på Pliko P3 til;
- Hægt forstykket på (se udsnittet med forstykket nedenfor);
25• Nu er Pliko P3 kørevognsversionen klar til at få autostolen
Primo Viaggio spændt på;
26• Hold fast i håndtaget på autostolen og anbring den på
kørevognens Ganciomatic spænder, hvor autostolens
hovedstykke anbringes i den modsatte side af kørevognens
håndtag; Tryk nedad med begge hænder på autostolens sider,
indtil du hører et klik.
- For at løsne autostolen fra kørevognen henvises til stolens
brugsanvisning.
FORSTYKKE
27• Klapvognen er udstyret med lukkepropper på armlænene; for
at montere forstykket skal disse først fjernes (gem propperne,
så du har dem, hvis du senere vil bruge klapvognen uden
forstykke). For at fjerne propperne trykker du på knappen
under armlænet, samtidig med at du trækker proppen udad
(foretages på begge armlæn).
28• Forstykket hægtes på ved at indsætte forstykkets yderpunkter
i armlænene som vist på tegningen, indtil de klikker fast.
29• Det er muligt at åbne forstykket i den ene side, så det er
nemmere at få barnet op af og ned i klapvognen, når det
er blevet større. For at åbne det trykkes på knappen, der
befinder sig under armlænet, samtidig med at forstykket
trækkes udad.
30• For at fjerne frontstykket helt trykkes på begge knapperne
under armlænene, samtidig med at forstykket trækkes udad.
FOR AT OMDANNE KØREVOGNEN TIL KLAPVOGN
SAMLING
31• For at omdanne Pliko P3 kørevognsversionen til klapvogn skal
du først kontrollere, om de du greb er ført nedad, som vist på
tegningen.
32• Anbring ryglænet med køreposen på kørevognens sæde, som
vist på tegningen.
33• For at spænde ryglænet på kørevognen skal de to
yderpunkter føres ind, samtidig med at de to knapper trykkes
ind, i kørevognens sæde, som vist på figur 1, indtil de klikker,
som på figur 2.
34• For at spænde ryglænets justeringsstykke på kørevognen
er det nødvendigt at dreje spændet opad (figur B, drejes i
samme retning som pilen) og anbringe det bag det bageste
bærestykke.
35• Tryk de to greb nedad i de bageste lejer i de bageste
bærestykker, indtil de klikker.
36• Klapvognen fores ved at spænde køreposens to spænder fast
på armlænene, som pilene på tegningen viser.
37• Sæt de to greb på benstøtten i ryglænets pose, som vist på
tegningen.
38• For til slut at spænde posen på vognen tilsluttes posens
knapper til bundstykket, som på figur A. Før den nederste lille
rem mellem benene under sædet, som på figur B, og lad den
øverste benrem være ovenpå posen.
ÅBNING OG LUKNING
• For at åbne Pliko P3 kørevognsversionen gentages
fremgangsmåden vist på figur 2 og 3.
• For at lukke Pliko P3 kørevognsversionen løsnes kalechens
sidestænger, ryglænet løftes op, og fremgangsmåden i figur
14, 15, og 16 gentages.
REGULERING AF BENSTØTTEN
39• Benstøtten kan reguleres til tre forskellige indstillinger.
For at sænke benstøtten trækker du nedad i de to små
sidegreb, mens benstøtten samtidigt sænkes. For at løfte den
skubbes den opad, indtil du hører et klik.
BAGKLAPPEN
40• Bagklappen er en hjælp, når mor skal føre vognen over små
højdeforskelle, og den kan ydermere bruges til at transportere
endnu et barn.
RÆKKEFØLGE FOR ANBRINGELSE
41• For at bruge Pliko P3 med to børn skal du først slå bremsen
på Pliko til, herefter anbringes det mndste barn i sædet og
sikkerhedsselen (1) spændes. Hold fast i håndtagene (2), mens
det andet barn stiller sig på bagklappen (3).
• Efterlad aldrig barnet alene uden opsyn.
Page 50
• Lad ikke barnet stille sig på bagklappen, hvis klapvognen
er tom.
KALECHE
• Kalechen kan anvendes sammen med og hægtes på både
liften Navetta og på klapvognen. Den er udstyret med lynlås
for påsætning af regnslag.
42• For at montere kalechen på liften Navetta knappes knapperne
A og B op (figur 1). Hægt kalechen på som vist på figur 2 og
kontroller at den er hægtet rigtigt på, figur 3.
43• For montering af kalechen på klapvognen hægtes den på
som på tegningen; kontroller at den er hægtet rigtigt på (se
tegningen).
44• Kalechen strækkes ud ved at trykke sidestængerne nedad.
Kalechen kan bøjes bagud, så den passer med ryglænets
hældning.
45• For at trække kalechen ud, skubbes sidestængerne indvendigt
i kalechen nedad, som det ses på tegningen.
46• Træk kalechen helt ud ved at lyne lynlåsen op, figur B.
Kalechen følger ryglænets hældning.
47• Kalechen kan nemt omdannes til solskærm, som det ses på
tegningen. Luk lynlåsen og spænd kalechen fast med den
praktiske hægte.
48•
For at tage kalechen af liften Navetta hægtes den af på siden
af beklædningen. Hægt knaphullerne A og B af beklædningen
som på tegningen, tryk på spændestykket på begge sider og
hægt kalechen af.
49• For at tage kalechen af klapvognen trykkes spændestykket
ind som på figur A på begge sider af kalechen.
Hægt kalechen af og træk den opad som på figur B.
LIFTEN NAVETTA
HÅNDTAG
50• For at løfte håndtaget trækkes det opad, indtil du hører
et klik. Håndtaget er kun blokeret, når det befinder sig i
vertikal position og de to blokeringsspænder er ført ind i de
tilhørende lejer.
51• For at sænke håndtaget skal det først frigøres ved at trække
spænderne opad, og herefter skubbes håndtaget nedad.
52• Håndtaget gør transporten nemmere og ligeledes
påhægtningen af liften på understel og klapvogne.
INDSTILLING SOM VUGGE ELLER BABYSENG
53• Navetta’s bund er udstyret med en speciel form, der virker
som vugge, når den placeres på en jævn overflade.
54•
Liften Navetta bliver til en lille babyseng, som ikke vugger, ved
at trække de indbyggede støtteben ud som vist på tegningen.
REGULERING AF RYGLÆN
55• Ryglænet kan reguleres i højden ved at trække håndtaget ud
og dreje det som på tegningen.
REGULERING AF LUFTCIRKULATIONEN
56• Navetta’s bund er udstyret med huller, der kan åbnes, og som
hermed lader luften trænge ind nedefra.
For at åbne hullerne på Navetta’s forreste del (på samme side
som kalechen), skubbes de to spænder udad.
57• For at åbne hullerne på den bageste del (på modsatte side af
kalechen),skubbes en af de to spænder udad.
AFTAGELIGT BETRÆK
58• Betrækkes tages af ved at hægte knaphullerne af på siderne
og trække det opad fra forsiden.
59• Knap de to remme af bagest på liftkassen og fjern betrækket.
SÅDAN HÆGTES BARNEVOGNSKASSEN AF OG PÅ KLAPVOGNEN.
Liften Navetta er udstyret med systemet Ganciomatic, så den
kan hægtes på Ganciomatic spænderne på klapvognen Pliko P3.
60• Liften hægtes af klapvognen ved først at skubbe håndtaget
(anbragt på modsatte side af kalechen) på siderne og herefter
skubbe det opad, samtidig med at barnevognskassen løftes
fra håndtaget og opad.
NAVETTA I BILEN
61• Navetta er forberedt til at kunne blive Navetta AUTO ved
hjælp af de to spænder (som på tegningen) og et Kit Auto,
som købes separat.
DETALJER OM MODULSYSTEM ON TRACK
OVERLÆDER
62• Overlæderet hægtes fast ved at samle dets lynlås med
lynlåsen på benstøtten, som vist på tegningen.
Hægt de to knapper på, som på figur B, for at sætte
overstykket fast.
REGNSLAG
63• For at montere regnslaget skal lynlåsen herpå samles med
den, der findes på kalechen.
64• Hægt elastikkens knap på klapvognens knap, som vist på
illustrationen, så der høres et klik.
65•
Sæt regnslagets nederste elastik fast på hjulstangen.
66• Det praktiske regnslag kan foldes ned ved at åbne lynlåsen,
mens det vedbliver at være hægtet fast til klapvognen med
elastikkerne.
67• Dette regnslag er udformet på en sådan måde, at det sikrer
total beskyttelse, også hvis autostolen “Primo Viaggio” er
monteret på klapvognen.
• Anvend ikke regnslaget i lukkede miljøer, og kontroller
regelmæssigt at barnet ikke har det for varmt.
• Anbring ikke PVC-regnslaget i nærheden af varmekilder og
pas på med cigaretter.
• Sørg for at kontrollere at regnslaget ikke kommer i vejen for
nogen af klapvognens bevægelige dele.
•
Tag altid regnslaget af før klapvognen lukkes sammen.
• Kan vaskes med en svamp og sæbevand, men brug ikke
stærkere rengøringsmidler.
SIKKERHEDSSELE
68• Vær sikker på at selen er forbundet korrekt ved at trykke som
vist på figur A. Hægt remmen på, som det er vist på figur B.
69• For at løsne sikkerhedsselen trykkes på begge sider af
spændet (figur A) mens den lille rem om livet samtidigt
trækkes udad (figur B).
70• Med den nye type sikkerhedssele er det idag blevet
nemmere at få selen på, takket være ”hægt-på og hægtaf” systemet. Før sikkerhedsselen spændes, sættes det lille
spænde fast på ryglænet, mens tappen stikkes ind som vist
på tegningen; efter at have spændt selen på barnet kan
du hægte den af ryglænet, så dit barn hermed får mere
bevægelsesfrihed. Det lille spænde skal forblive under
barnets skuldre.
REGULERING AF RYGLÆN
71• Ryglænet kan bøjes bagud i fire indstillinger. For at sænke
ryglænet løftes håndtaget (figur A) samtidig med at ryglænet
sænkes (figur B), til det blokeres i den ønskede stilling.
For at hæve det, skubbes ryglænet opad.
AFTAGELIGT BETRÆK
72• For at tage betrækket af løsnes køreposens hængsler fra
armlænene, som angivet af pilene.
73• Skru remmen fri (kun i den ene side) som på tegningen, mens
du holder en finger under møtrikken.
74• Løsn køreposens knapper på siden, som vist på tegningen.
Træk herefter selens skridtrem ud fra undersiden af sædet.
75• Knap køreposens knapper af fra sædet og træk den udad, for
at løsne posen fra hægterne på benstøtten. Træk køreposen af
ovenfra.
GANCIOMATIC SYSTEM med PLIKO P3
KLAPVOGNSVERSION
Systemet ‘Ganciomatic’ er et praktisk og nemt system, der takket
være Ganciomatic spænderne gør det muligt at fastspænde til din
Pliko P3 i klapvognsversion en Navetta eller Primo Viaggio, som
også er udstyret med Ganciomatic systemet.
KLAPVOGNENS GANCIOMATIC SPÆNDER
76• For at åbne klapvognens Ganciomatic spænder løftes
køreposen fra sædets hjørner, hvorefter de to spænder drejes
opad, indtil de klikker.
77• For at lukke klapvognens Ganciomatic spænder trækkes
grebet udad, samtidig med at spænderne drejes nedad, som
tegningen viser.
Page 51
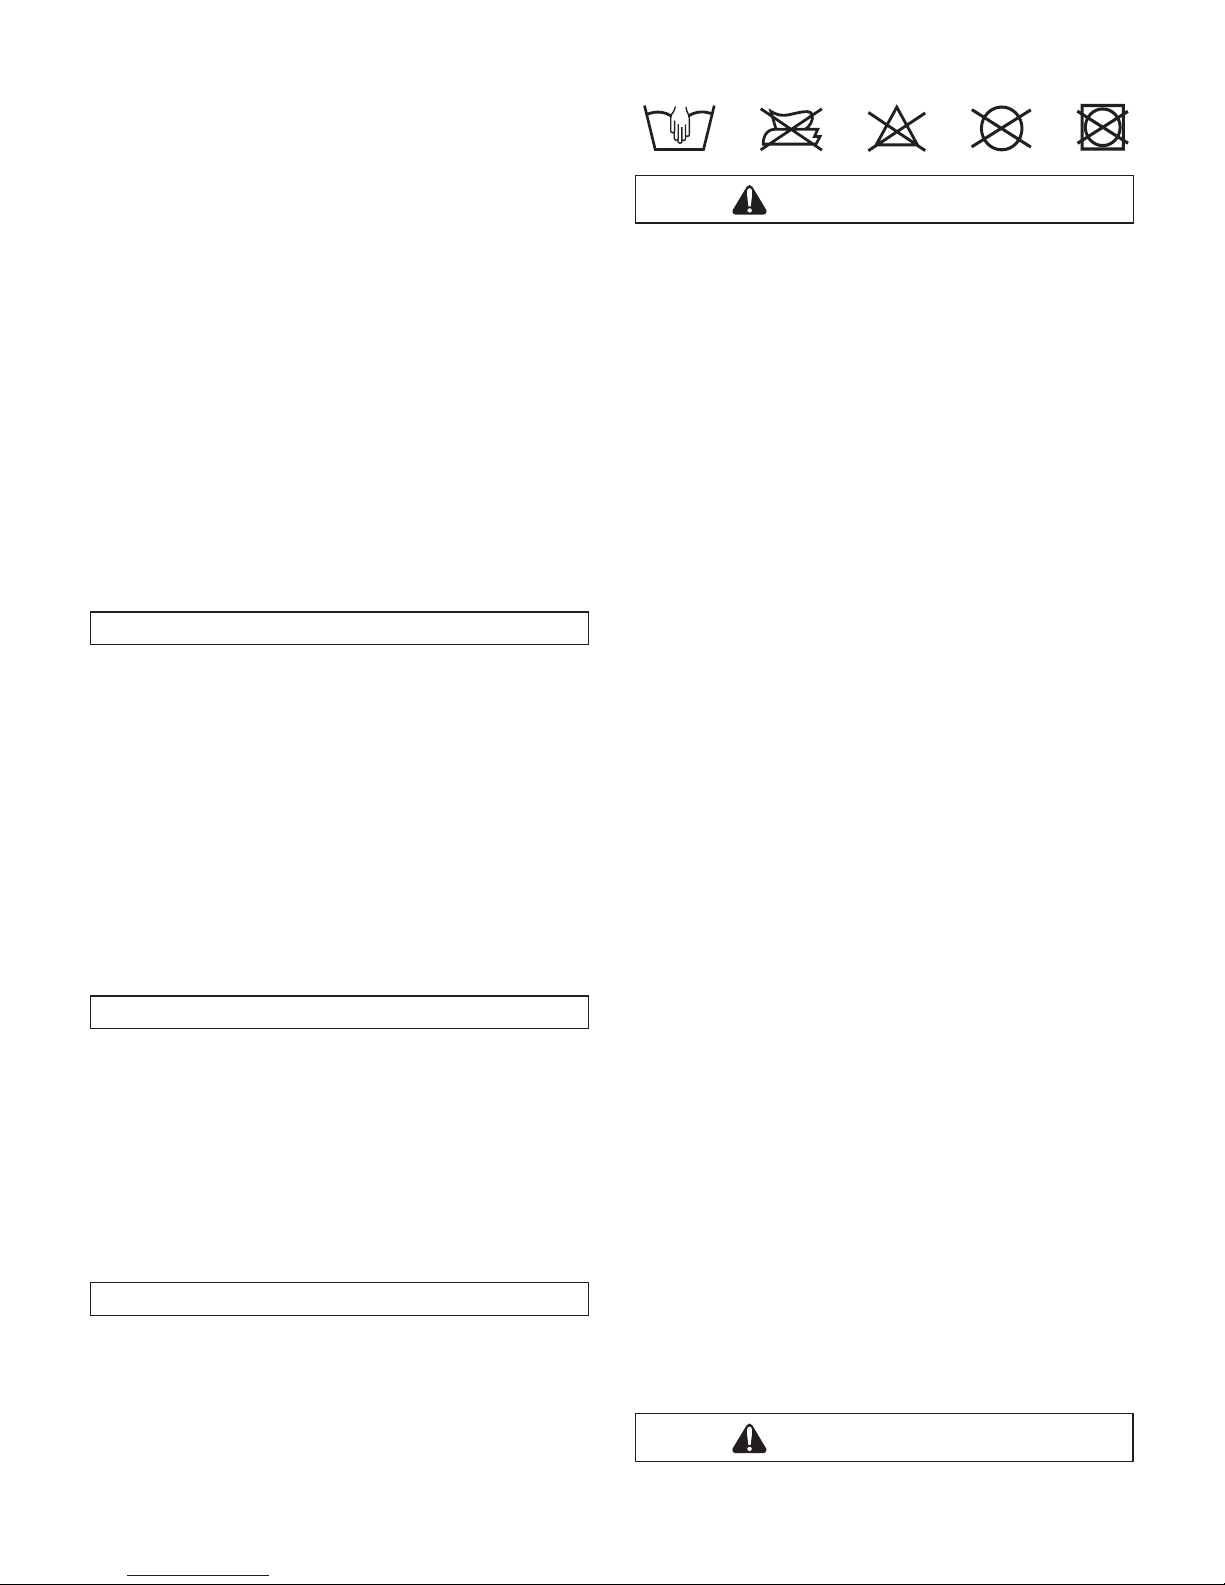
PLIKO P3 + NAVETTA
78• For at montere liften Navetta på klapvognen gør du sådan:
- slå klapvognens bremser til;
- sænk klapvognens ryglæn helt ned;
- drej klapvognens Ganciomatic spænder opad;
- fjern forstykket og sæt de tilhørende propper i klapvognens
armlæn for at lukke af;
- løft klapvognens benstøtte til den højeste indstilling;
- grib fat i bærehåndtaget på Navetta-liften;
- anbring Navetta-liften på klapvognens Ganciomatic spænder,
hvor liftens hovedstykke anbringes modsat klapvognens
håndtag;
- tryk nedad med begge hænder på Navetta-liftens sider, indtil
du hører et klik;
- For at løsne Navetta-liften fra klapvognen henvises til
brugsanvisningen for liften.
PLIKO P3 + PRIMO VIAGGIO
79• For at montere autostolen på klapvognen gør du sådan:
- slå klapvognens bremser til;
- sænk klapvognens ryglæn helt ned;
- drej klapvognens Ganciomatic spænder opad;
- anbring autosædet med retning mod mor og skub det nedad,
indtil det klikker;
- Det er vigtigt ikke at fjerne klapvognens forstykke, når
autosædet monteres på vognen;
- For at løsne autosædet fra klapvognen henvises til
brugsanvisningen for sædet.
FOR AT OMDANNE KLAPVOGNEN TIL KØREVOGN
For at omdanne klapvognen til kørevogn skal du først og fremmest
tage betrækket af.
80• For at tage betrækket af løsnes køreposens hængsler fra
armlænene, som angivet af pilene.
81• Løsn køreposens knapper på siden, som vist på tegningen.
Træk herefter selens skridtrem ud fra undersiden af sædet.
82• Knap køreposens knapper af fra sædet og træk den udad, for
at løsne posen fra hægterne på benstøtten. Træk køreposen af
ovenfra.
83•
Løsn bundstykket ved at trykke på knappen bagest på
kørevognen, som vist på tegningen, både på den højre og
den venstre stang. Løft ryglænet opad fra bundstykket med
begge hænder.
84• Tryk på de to knapper på kørevognens sæde med begge
hænder og løft hele bundstykket opad, som vist på
tegningen.
EKSTRAUDSTYR
85• Taske til bleskift (medfølger): Taske med indbygget
underlag for bleskift; kan hægtes på klapvognen.
86• Insektnet: Insektnet med lynlås; kan tilsluttes kalechen med
lynlås.
87• Rejsetaske: Praktisk rejsetaske til flytransport af klapvognen.
88• Kit Auto Navetta: Det er muligt at bestille et Kit Auto
(typegodkendt ECE R44/04), som inderholder det nødvendige
for at montere liften i bilen.
89• Regnslag Cover All: Regnslag i gennemsigtigt PVC, som
garanterer total beskyttelse af liften, når den er hægtet på
klapvognen.
RENGØRING OG VEDLIGEHOLDELSE
Produktet har kun brug for et minimum af vedligeholdelse.
Rengøring og vedligeholdelse må kun udføres af voksne.
• Det anbefales at holde alle bevægelige dele rene og om
nødvendigt smøre dem med en let olie.
• Tør produktets metaldele af for at undgå rust.
• Produktets plastikdele bør regelmæssigt rengøres med en fugtig
klud; brug ikke opløsningsmidler eller lignende produkter.
• Stofdelene skal børstes for at fjerne støv.
• Hold hjulene rene for støv og sand.
• Beskyt produktet mod vejrforholdene, vand, regn eller sne;
mange materialer vil skifte farve, såfremt de udsættes for sollys i
længere tid.
• Opbevar produktet på et tørt sted.
• For vask af posen følges de følgende anvisninger.
VIGTIGT
PLIKO P3
• DETTE PRODUKT ER UDVIKLET TIL TRANSPORT AF 1
BARN PÅ SÆDET OG 1 BARN STÅENDE PÅ DET BAGERSTE
TRINBRÆT.
• ANVEND IKKE PRODUKTET TIL AT KØRE MED FLERE BØRN
END BEREGNET FRA PRODUCENTENS SIDE.
• DETTE PRODUKT ER TYPEGODKENDT TIL BØRN FRA
FØDSLEN INDTIL 15 KG VÆGT PÅ SÆDET. DET BAGERSTE
TRINBRÆT ER TYPEGODKENDT TIL TRANSPORT AF ET
YDERLIGERE BARN MED VÆGT PÅ OP TIL 20 KG.
• BENYT EN FASTHOLDELSESANORDNING, NÅR BARNET ER I
STAND TIL AT SIDDE SELVSTÆNDIGT.
• DENNE VOGN ER BEREGNET TIL AT KUNNE ANVENDES
SAMMEN MED DE ANDRE PEG PEREGO PRODUKTER
MED GANCIOMATIC: NAVETTA, PORTE ENFANT SOFT,
AUTOSTOLEN PRIMO VIAGGIO.
• SAMLING OG FORBEREDELSE AF PRODUKTET MÅ
UDELUKKENDE UDFØRES AF VOKSNE.
• PRODUKTET MÅ IKKE ANVENDES, HVIS DER ER
BESKADIGEDE ELLER MANGLENDE DELE.
• BENYT ALTID SELERNE MED FEMPUNKTSFÆSTE; ANVEND
ALTID SELEN MELLEM BENENE PÅ SIKKERHEDSSELEN
SAMMEN MED MAVESELEN.
• DET KAN VÆRE FARLIGT AT EFTERLADE BARNET UDEN
OPSYN.
• I STILLESTÅENDE POSITION SKAL BREMSERNE ALTID
INDSÆTTES.
• FØR BRUG SKAL MAN SØRGE FOR, AT ALLE
FASTHÆGTNINGS-MEKANISMER ER KORREKT INDSAT.
• FØR BRUG SKAL MAN SØRGE FOR, AT AUTOSTOLEN ELLER
SÆDET ER KORREKT FASTHÆGTET.
• UNDGÅ AT FØRE FINGRENE IND I MEKANISMERNE.
• VÆR OPMÆRKSOM PÅ BARNET, NÅR MEKANISMERNE
(HÅNDTAG, RYGLÆN) INDSTILLES.
• ENHVER VÆGT HÆNGT PÅ DET STORE HÅNDTAG ELLER
DE SMÅ HÅNDTAG KAN GØRE PRODUKTET USTABILT;
OVERHOLD FABRIKANTENS ANGIVELSER FOR DEN
MAKSIMALE VÆGT.
• FORSTYKKET ER IKKE UDVIKLET TIL AT BÆRE BARNETS
VÆGT; FORSTYKKET ER IKKE BEREGNET TIL AT HOLDE
BARNET I SÆDET, OG ERSTATTER IKKE EN SIKKERHEDSSELE.
• LÆG ALDRIG MERE END 5 KG. I KURVEN. LÆG ALDRIG
EN VÆGT I FLASKEHOLDEREN, DER OVERSKRIDER
ANGIVELSERNE FOR SELVE FLASKEHOLDEREN, OG ALDRIG
VARME DRIKKE. LÆG ALDRIG OVER 0,2 KG. I KALECHENS
LOMMER (HVIS KALECHEN ER UDSTYRET MED LOMMER).
• ANVEND ALDRIG PRODUKTET I NÆRHEDEN AF
TRAPPER ELLER TRIN. ANVEND ALDRIG I NÆRHEDEN AF
VARMEKILDER, ÅBEN ILD ELLER FARLIGE GENSTANDE, SOM
BARNET KAN NÅ.
• DET KAN VÆRE FARLIGT AT ANVENDE TILBEHØR, DER IKKE
ER GODKENDT AF FABRIKANTEN.
• DETTE PRODUKT ER IKKE EGNET TIL BRUG UNDER
JOGGING ELLER RULLESKØJTELØB.
• SLÅ BREMSERNE TIL MENS BØRNENE BLIVER SAT I ELLER
TAGET OP.
VIGTIGT
LIFTEN NAVETTA
• DENNE VOGN ER KUN EGNET TIL BØRN, DER IKKE SELV
KAN SÆTTE SIG OP.
Page 52
• DENNE VOGN ER BEREGNET TIL BRUG FRA FØDSLEN OG
INDTIL EN VÆGT PÅ 9 KG.
• ANBRING KUN PRODUKTET PÅ FASTE, TØRRE
HORISONTALE OVERFLADER.
• DET KAN VÆRE FARLIGT AT EFTERLADE DIT BARN UDEN
OPSYN.
• LAD IKKE ANDRE BØRN LEGE ALENE I NÆRHEDEN AF
BARNEVOGNEN.
• MONTERING OG KLARGØRING AF PRODUKTET MÅ KUN
FORETAGES AF VOKSNE.
• BRUG IKKE PRODUKTET, HVIS DER ER TEGN PÅ
MANGLENDE DELE ELLER BRUD.
• TILFØJ IKKE FLERE MADRASSER.
• FØR BRUGEN SKAL DET SIKRES, AT ALLE
TILKOBLINGSMEKANISMER ER KORREKT TILKOBLEDE.
• FØR BRUGEN SKAL DET SIKRES, AT AUTOSÆDET,
BARNEVOGNSKASSEN ELLER DET FLYTBARE SÆDE ER
KORREKT TILKOBLEDE.
• UNDGÅ AT STIKKE FINGRENE IND I BEVÆGELIGE DELE.
• PAS PÅ BARNET NÅR DER UDFØRES REGULERINGER AF
MEKANISMERNE (DET STORE HÅNDGREB, RYGLÆNET).
• BRUG DEN IKKE I NÆRHEDEN AF VARMEKILDER, ÅBEN ILD
ELLER FARLIGE GENSTANDE, SOM BARNET KAN NÅ MED
HÅNDEN.
• DET KAN INDEBÆRE EN FARE AT ANVENDE TILBEHØR, SOM
IKKE ER GODKENDT AF PRODUCENTEN.
• KONTROLLER JÆVNLIGT DET STORE HÅNDGREB (ELLER
HÅNDTAG) SAMT BARNEVOGNSKASSENS BUND FOR
AT TILSIKRE, AT DER IKKE ER TEGN PÅ BRUD ELLER
BESKADIGELSER.
• NÅR BARNEVOGNSKASSEN BRUGES MED ET UNDERSTEL,
SKAL DET KONTROLLERES AT LIFTENS MAKSIMALE
LÆNGDE PASSER TIL DET ANFØRTE PÅ STELLET.
• TÄRKEÄÄ: Lue nämä ohjeet huolellisesti ja säilytä ne
tulevaa käyttöä varten.
Lapsen turvallisuus saattaa vaarantua, ellei ohjeita
noudateta.
• Peg Perego voi koska tahansa tehdä tässä julkaisussa kuvattuihin
malleihin teknisistä tai kaupallisista syistä muutoksia.
Peg Perego S.p.A. on ISO 9001 -sertifioitu yhtiö.
Sertifiointi on asiakkaille ja kuluttajille tae siitä, että
yritys toimii läpinäkyvästi ja luotettavasti.
ASIAKASPALVELU
Jos osia tuotteesta katoaa tai vaurioituu, vaihda niiden tilalle
ainoastaan alkuperäisiä Peg Perego -varaosia. Ota yhteys
asiakaspalveluun korjauksiin, vaihtoihin, tuotetietoihin ja
alkuperäisten varaosien ja lisävarusteiden tilaamiseen liittyvissä
asioissa.
Peg-Perego-asiakaspalvelu:
puh. +39 039 60 88 213
faksi: +39 039 33 09 992
s-posti: assistenza@pegperego.it
www.pegperego.com
Peg Perego haluaa palvella asiakkaitaan ja vastata parhaansa
mukaan kaikkiin heidän tarpeisiinsa. Siksi asiakkaidemme
mielipiteet ovat meille erittäin tärkeitä ja arvokkaita. Olisimmekin
hyvin kiitollisia, jos haluaisit tuotettamme käytettyäsi täyttää
KULUTTAJAN TYYTYVÄISYYSKYSELYN, jonka löydät Internetistä
osoitteesta: www.pegperego.com
ja kertoa meille sen välityksellä mahdollisista huomioistasi ja
ehdotuksistasi.
PLIKO P3
• Pliko P3:iä voidaan käyttää sekä vaunuina että rattaina
liikkuvan selkänojansa ansiosta.
KÄYTTÖOHJEET
AVAAMINEN
1• Ennen kuin avaat vaunut, poista koukkujen suojakorkit
kuvassa esitetyllä tavalla, muuten vaunut eivät aukea oikein.
2• Avaa vaunut vetämällä kädensijoissa olevia vipuja ylöspäin
kuten kuvassa.
3• Nosta samanaikaisesti vaunuja, jotka avautuvat
automaattisesti.
Tarkastamalla kahden sivukoukun asennon (ks. kuva) voit
varmistaa, että vaunut ovat auenneet oikein.
KOKOAMINEN
4• Kiinnitä etupyörät painamalla vipua A alas ja pujottamalla
pyörä paikalleen kuvassa B osoitetulla tavalla niin pitkälle, että
se naksahtaa.
5• Asenna takapyörät kiinnittämällä jarrukaapelin yhdistämät
pyörät paikoilleen kuvassa esitetyllä tavalla.
6• Tarkasta huolellisesti, kumpi pyöristä on oikea ja kumpi
vasen, jotta takapyörien kiinnitys tapahtuu varmasti oikein.
Oikeanpuoleisessa pyörässä on sekä pyörän putkessa että
rungossa merkintä, joka takaa oikean kiinnityksen (ks. kuva:
SX=vasen, DX=oikea).
7• Varmista, että kiinnitys tapahtuu oikein (ks. kuva): työnnä
pyörä niin pitkälle, että kuulet naksahduksen.
8• Kiinnitä kori pujottamalla sen kiinnityssilmukat etukoukkuihin
A ja takakoukkuihin B ja C.
9• Kuvassa näkyy, miltä valmiiksi ripustettu kori näyttää.
10•
Rattaissa on kiinnike juomanpidikettä varten sekä oikealla
että vasemmalla: juomanpidikkeen voi siis kiinnittää
kummalle puolelle tahansa. Kiinnitä juomanpidike
FI•SUOMI
Page 53

napsauttamalla se paikalleen kuvassa A esitetyllä tavalla.
Oikein kiinnitetty juomanpidike on esitetty kuvassa B.
Pidikkeeseen ei tulisi asettaa kuumia juomia eikä juomia,
joiden paino on yli 0,5 Kg (1 lbs).
JARRU
11• Pliko P3:in jarru toimii painamalla takapyörissä olevia vipuja
jalalla kuvassa esitetyllä tavalla.
• Vapauta jarrut toimimalla päinvastaisella tavalla.
• Kun vaunuilla ei liikuta, lukitse aina niiden jarrut.
SIVUSUUNNASSA KÄÄNTYVÄT PYÖRÄT
12• Saat etupyörät pyörimään sivusuunnassa, kun lasket vivun
alas kuvassa A esitetyllä tavalla. Jos haluat lukita ne tämän
estämiseksi, nosta vipua vastakkaiseen suuntaan kuten
kuvassa B.
KÄDENSIJOJEN SÄÄTÄMINEN
13• Kädensijoja voidaan säätää korkeussuunnassa kahteen eri
asentoon. Kun haluat nostaa kädensijan korkeaan asentoon,
paina painiketta ja nosta kädensijaa samanaikaisesti ylöspäin.
Kun haluat laskea kädensijan, toimi päinvastoin.
SULKEMINEN
• Ennen Pliko P3:in sulkemista tulee irrottaa Navetta-kori
ja Primo Viaggio -turvaistuin.
14• Rattaat voidaan sulkea yhdellä kädellä: vedä ensin toista ja
sitten toista vipua ylöspäin, kunnes ne naksahtavat.
15• Tartu keskikahvaan (kuva 3) ja vedä sitä ylöspäin, kunnes
rattaat sulkeutuvat, kuten kuvassa.
16• Varmista turvakoukusta, että vaunut ovat sulkeutuneet oikein.
Kun vaunut ovat kiinni, ne pysyvät pystyasennossa itsestään.
KULJETTAMINEN
17• Pliko P3: Iä voi kuljettaa mukavasti (kun etupyörät on lukittu
asentoon, jossa ne eivät pyöri sivusuunnassa) tarttumalla
keskikahvaan, kuten kuvassa.
18• Niitä voidaan kuljettaa myös sivukahvasta, kuten kuvassa.
GANCIOMATIC SYSTEM - PLIKO P3 VAUNUMALLISSA
Ganciomatic System on kätevä ja nopea järjestelmä, jonka ansiosta
Pliko P3:in vaunumalli voidaan Ganciomatic-kiinnittimien ansiosta
kiinnittää Navetta-kori ja Primo Viaggio -turvaistuin, joissa myös on
Ganciomatic-järjestelmä.
VAUNUJEN GANCIOMATIC-KIINNITTIMET
19• Nosta vaunujen Ganciomatic-kiinnittimet kääntämällä
molempia kiinnittimiä ylöspäin, kunnes ne naksahtavat.
20• Laske vaunujen Ganciomatic-kiinnittimet alas vetämällä vipua
ulospäin ja kääntämällä kiinnittimiä samanaikaisesti alaspäin
kuten kuvassa.
PLIKO P3 + NAVETTA
Kiinnitä Navetta-kori Pliko P3:in vaunumalliin seuraavasti:
- lukitse Pliko P3:n jarru;
- nosta Ganciomatic-kiinnittimet ylös;
21• Käännä kaksi vaunujen takaosassa sijaitsevaa vipua ulospäin
kuten kuvassa;
22• Nosta reisituki ylimpään asentoonsa (kuva 1);
23• Pliko P3:in vaunumalli on nyt valmis Navetta-korin
kiinnittämiseksi;
24• Tartu Navetta-korin kahvaan ja aseta se vaunujen
Ganciomatic-kiinnittimiin siten, että korin pääpuoli on
vastakkaisessa suunnassa kuin vaunujen kädensijat;
- paina molemmin käsin korin reunoja, kunnes kuulet
naksahduksen;
- katso ohjeet Navetta-korin vaunuista irrottamiseksi korin
käyttöohjeista.
PLIKO P3 + PRIMO VIAGGIO
Kiinnitä auton turvaistuin vaunuihin seuraavasti:
- lukitse Pliko P3:n jarru;
- irrota suojakaari (katso alla olevaa kappaletta Suojakaari);
25• Pliko P3:in vaunumalli on nyt valmis Primo Viaggio-
turvaistuimen kiinnittämiseksi;
26• Tartu turvaistuimen kahvaan ja aseta se vaunujen
Ganciomatic-kiinnittimiin siten, että turvaistuimen pääpuoli
on vastakkaisessa suunnassa kuin vaunujen kädensijat;
paina molemmin käsin korin reunoja, kunnes kuulet
naksahduksen;
- Katso ohjeet auton turvaistuimen vaunuista irrottamiseksi
turvaistuimen käyttöohjeista.
SUOJAKAARI
27• Vaunuissa on kädensijojen sulkutulpat paikoillaan;
suojakaaren kiinnittämiseksi tulpat on ensin irrotettava
(säilytä tulpat siltä varalta, että haluat myöhemmin käyttää
rattaita ilman suojakaarta). Irrota tulpat painamalla käsinojan
alla olevaa painiketta ja vetämällä tulppaa samanaikaisesti
ulospäin (sama toimenpide molemmille käsinojille).
28• Kiinnitä suojakaari työntämällä sen päitä käsinojissa
oleviin aukkoihin kuvassa esitetyllä tavalla, kunnes kuulet
naksahduksen.
29• Suojakaari on mahdollista avata vain toiselta sivulta niin, että
lapsi pääsee suuremmaksi kasvettuaan helpommin rattaisiin
ja niistä pois. Avaa kaari painamalla käsinojan alla olevaa
painiketta ja vetämällä suojakaarta samanaikaisesti ulospäin.
30• Kun haluat irrottaa suojakaaren, paina molempien käsinojien
alla olevia painikkeita ja vedä suojakaarta samanaikaisesti
ulospäin.
VAUNUJEN MUUTTAMINEN RATTAIKSI
31• Kun Pliko P3:in vaunumalli muutetaan rattaiksi, tulee
varmistaa, että molemmat vivut on laskettu alas kuten
kuvassa.
32• Laita selkänoja ja vaunujen verhoilu kuten kuvassa.
33•
Selkänojan kiinnittämiseksi vaunuihin työnnä sen päitä
painamalla molempia vaunujen istuimessa olevaa painiketta
kuten kuvassa 1, kunnes kuulet naksahduksen kuten kuvassa 2.
34• Päädyn kiinnittämiseksi säädä vaunujen selkänojaa, käännä
kiinnitin ylöspäin (kuva B, nuolen suuntaan) ja aseta se
takapalkin taakse.
35• Työnnä kahta kiinnitintä alaspäin takapalkin sijoihin, kunnes
kuulet naksahduksen.
36• Verhoilun laittamiseksi rattaisiin kiinnitä verhoilun kiinnittimet
käsinojiin kuten esitetään kuvan nuolilla.
37• Kiinnitä reisituen vivut selkänojan verhoiluun kuten kuvassa.
38• Vaunujen verhoilun kiinnittämisen saattamiseksi loppuun
kiinnitä verhoilun napit alustaan kuten kuvassa A. Pujota vyön
alempi jalkojen välistä kulkeva osa istuimen alta käsin, kuten
kuvassa B, jättämällä verhoilun päälle ylempi jalkojen välistä
kulkeva osa.
AVAAMINEN JA SULKEMINEN
• Avaa Pliko P3 ratasmalli toistamalla kuvien 2 ja 3 toimenpiteet.
• Sulje Pliko P3 ratasmalli löysäämällä kuomun salpoja,
nostamalla selkänojaa ja toistamalla kuvien 14, 15 ja 16
toimenpiteet.
REISITUEN SÄÄTÄMINEN
39• Reisituki voidaan säätää kolmeen eri asentoon.Kun haluat
laskea reisitukea alaspäin, vedä sivuilla olevia vipuja alaspäin
ja laske samanaikaisesti tukea. Kun haluat nostaa reisitukea
ylöspäin, työnnä sitä ylös, kunnes se naksahtaa.
TAKATASO
40• Takataso helpottaa rattaiden työntäjää pienten kynnysten
tms. ylittämisessä. Sillä voidaan myös kuljettaa toista lasta.
“LASTAUSJÄRJESTYS”
41• Kun haluat käyttää Pliko P3:ia kahden lapsen kuljettamiseen,
Plikon jarru on kytkettävä päälle. Sen jälkeen pienempi lapsi
on asetettava istumaan ja kiinnitettävä turvavyö (1). Tartu
sitten kädensijoihin (2) ja anna isomman lapsen nousta
takatasolle (3).
• Älä koskaan jätä lapsiasi yksin.
•
Älä anna lapsen nousta takatasolle, kun rattaat ovat tyhjät.
KUOMU
• Kuomua voidaan käyttää sekä Navetta-korissa että rattaissa
ja se voidaan kiinnittää molempiin. Siinä on vetoketju
sadesuojan kiinnittämistä varten.
42• Kuomun laittamiseksi Navetta-koriin avaa napit A ja B (kuva
Page 54
1). Kiinnitä kuomu kuten kuvassa 2 ja tarkista, että kiinnitys on
oikeanlainen, kuva 3.
43• Kuomun laittamiseksi rattaisiin kiinnitä se kuten kuvassa ja
tarkista, että kiinnitys on oikeanlainen (katso kuvaa).
44• Kiristä kuomu painamalla salpaa alaspäin. Kuomua voidaan
kallistaa selkänojan kallistusta seuraten.
45• Kuomun kiristämiseksi paina sisäpuolella sijaitsevaa salpaa
alaspäin kuten kuvassa.
46• Vedä kuomu paikoilleen kokonaan avaamalla vetokeju, kuva B.
Kuomu seuraa selkänojan asentoa.
47• Kuomu voidaan muuttaa helposti aurinkosuojaksi, katso kuva.
Sulje vetoketju ja kiinnitä kuomu sen kätevällä koukulla.
48• Kuomun irrottamiseksi Navetta-korista, irrota se verhoilusta
sivuilta. Irrota reiät A ja B verhoilusta, kuten kuvassa, paina
kielekettä molemmilta puolilta ja irrota kuomu.
49• Kuomun poistamiseksi rattaista paina kielekettä, kuten
kuvassa A, kuomun molemmilta puolilta.
Irrota se ja vedä sitä ylöspäin kuten kuvassa B.
NAVETTA-KORI
K A H VA
50• Kun haluat nostaa kahvan, vedä se ylös, kunnes se naksahtaa.
Kahva on lukittuna vain silloin, kun se on pystyasennossa ja
molemmat lukot ovat omissa sijoissaan.
51• Kahvan laskemiseksi, avaa sen lukitus, työnnä ylös kaksi lukkoa
ja työnnä sitten kahvaa alaspäin.
52• Kahvasta on apua kuljetuksessa ja korin kiinnittämisessä
vaunuihin ja rattaisiin.
KEINU- JA SÄNKYASENTO
53• Navetta-korin jalustan muoto on suunniteltu siten, että sitä
voi halutessaan keinuttaa tasaisella pinnalla.
54• Navetta-korista saadaan ei-keinuva vuode poistamalla tukijalat
paikoiltaan kuten kuvassa.
SELKÄNOJAN SÄÄTÄMINEN
55• Selkänojan korkeus on säädettävissä vetämällä kahvaa
ulospäin ja kääntämällä sitä kuten kuvassa.
ILMANVAIHDON SÄÄTÄMINEN
56• Navetan jalustassa on avattavia reikiä, joiden ansiosta ilma
kiertää alakautta.
Navetan etuosassa (kuomun puolella) olevien reikien
avaamiseksi työnnä kahta koukkua ulospäin.
57• Navetta-korin takaosassa (kuomusta nähden vastakkaisella
puolella) olevien reikien avaamiseksi työnnä yhtä kahdesta
koukusta ulospäin.
VERHOILUN IRROTTAMINEN
58• Kun haluat poistaa verhoilun, irrota reiät sivuilta ja pujota se
irti etukautta.
59• Poista 2 kielekettä rungon etuosasta ja irrota se.
KORIN KIINNITTÄMINEN RATTAISIIN JA NIISTÄ IRROTTAMINEN
Navetta-kori on varustettu Ganciomatic-järjestelmällä, joka on
kiinnitettävissä Pliko P3 rattaiden Ganciomatic-kiinnittimiin.
60• Korin irrottamiseksi rattaista työnnä kahvaa (joka
sijaitsee kuomusta nähden vastakkaisella puolella) ensin
sivusuunnassa, sitten ylöspäin ja nosta samanaikaisesti
vaunuja kahvasta ylöspäin.
NAVETTA-KORI AUTOSSA
61• Navetta-kori voidaan muuttaa Navetta AUTOKSI kahden
pienen koukun ansiosta (kuten kuvassa) ja hankkimalla
erikseen Auton Kit-pakkaus.
ON TRACK -YHDISTELMÄJÄRJESTELMÄN YKSITYISKOHDAT
PEITTO
62• Kiinnitä peitto yhdistämällä sen vetoketju reisituen
vetoketjuun kuvassa esitetyllä tavalla.
Kiinnitä peite kiinnittämällä molemmat napit kuvassa B
esitetyllä tavalla
SADESUOJA
63• Kiinnitä sadesuoja yhdistämällä sen vetoketju kuomun
vetoketjuun.
64• Kiinnitä kuminauhan nappi rattaiden nappiin kuvassa
esitetyllä tavalla niin, että kuulet naksahduksen.
65• Kiinnitä sadesuojan alimmainen kuminauha pyörään.
66• Käytännöllinen sadesuoja voidaan laskea alas avaamalla
vetoketju, mutta kuminauhojen ansiosta se pysyy kuitenkin
kiinni rattaissa.
67• Sadesuoja on suunniteltu sillä tavalla, että se takaa täydellisen
suojan silloinkin, kun rattaisiin on kiinnitetty Primo Viaggio
-turvaistuin.
• Älä käytä sadesuojaa sisätiloissa. Tarkasta aina, ettei lapsella
ole liian kuuma.
• Älä vie PVC-muovista valmistettua sadesuojaa
lämmönlähteiden lähelle - varo myös savukkeita.
• Varmista, ettei sadesuoja tartu mihinkään vaunujen tai
rattaiden liikkuvaan mekanismiin.
• Irrota aina sadesuoja ennen kuin suljet vaunut tai rattaat.
• Pese saippuavedellä ja sienellä: älä käytä pesuaineita.
T U R VA V Y Ö
68• Varmista että hihna on oikein paikoillaan työntämällä sitä
kuten kuvassa A. Lukitse vyö kuvassa B esitetyllä tavalla.
69• Kun haluat avata vyön, paina solkea reunoilta (kuva A) ja vedä
samanaikaisesti vyötärön ympäri kulkevaa vyötä ulospäin
(kuva B).
70• Uusi turvavyö on entistä helppokäyttöisempi “kiinnitä ja
irrota”-järjestelmän ansiosta. Tee näin: Ennen kuin lukitset
vyön, kiinnitä solki selkänojaan viemällä kieleke sille varattuun
aukkoon kuvassa esitetyllä tavalla: kun olet lukinnut vyön
lapsen ympärille, irrota se selkänojasta niin, että lapsi voi
liikkua vapaammin. Soljen täytyy jäädä lapsen hartioiden
alapuolelle.
SELKÄNOJAN SÄÄTÄMINEN
71• Selkänoja voidaan kallistaa neljään eri asentoon. Kun haluat
laskea selkänojaa alaspäin, nosta kahvasta (kuva A) ja laske
samanaikaisesti selkänojaa alaspäin (kuva B). Lukitse haluttuun
asentoon. Nosta selkänojaa työntämällä sitä ylöspäin.
VERHOILUN IRROTTAMINEN
72• Jos haluat irrottaa rattaiden verhoilun, irrota kiinnittimet
käsinojista nuolten osoittamalla tavalla.
73• Ruuvaa turvavyö irti (vain toiselta puolelta) kuten kuvassa
pitäen sormea mutterin alla.
74• Irrota verhoilun napit sivusuunnassa kuten kuvassa. Pujota
turvavyön jalkojen välistä kulkeva osa istuimen alta käsin.
75• Irrota verhoilun napit istuimesta ja vedä istuinta irrottaaksesi
verhoilun reisituen koukuista. Vedä verhoilukangas irti
yläkautta.
GANCIOMATIC SYSTEM - PLIKO P3 RATASMALLISSA
Ganciomatic System on kätevä ja nopea järjestelmä, jonka ansiosta
Pliko P3 ratasmalli voidaan Ganciomatic-kiinnittimien ansiosta
kiinnittää Navetta-kori ja Primo Viaggio -turvaistuin, joissa myös on
Ganciomatic-järjestelmä.
RATTAIDEN GANCIOMATIC-KIINNITTIMET
76• Nosta rattaiden Ganciomatic-kiinnittimet nostamalla pussia
istuimen kulmista ja kääntämällä molempia kiinnittimiä
ylöspäin, kunnes ne naksahtavat.
77• Laske Ganciomatic-kiinnittimet alas vetämällä vipua ulospäin
ja kääntämällä kiinnittimiä samanaikaisesti alaspäin, kuten
kuvassa.
PLIKO P3 + NAVETTA
78• Kiinnitä Navetta-kori rattaisiin seuraavasti:
- lukitse rattaiden jarru;
- laske rattaiden selkänoja kokonaan alas;
- nosta rattaiden Ganciomatic-kiinnittimet ylös;
- irrota suojakaari ja työnnä mukana toimitetut tulpat
paikoilleen rattaiden käsinojiin;
- nosta rattaiden reisituki ylimpään asentoonsa;
- tartu Navetta-korin kahvaan;
-
aseta Navetta-kori rattaiden Ganciomatic-kiinnittimiin siten,
että korin pääpuoli on vastakkaisessa suunnassa kuin rattaiden
kädensijat;
- paina molemmin käsin korin reunoja, kunnes kuulet
Page 55

LAPSEN KULJETTAMISEKSI ISTUINOSASSA JA TOISEN
ASTINTASOLLA SEISTEN TAKANA.
• ÄLÄ KÄYTÄ TUOTETTA ISOMMALLE KÄYTTÄJÄMÄÄRÄLLE
KUIN MITÄ VALMISTAJA SUOSITTELEE.
• TÄMÄ AJONEUVO ON HYVÄKSYTTY LAPSILLE
VASTASYNTYNEESTÄ ENINTÄÄN 15 KG:N PAINOISIKSI ASTI.
TAKATASO ON HYVÄKSYTTY TOISEN, ENINTÄÄN 20 KG:N
PAINOISEN LAPSEN KULJETTAMISEEN.
• ALA KÄYTÄ KIINNITYSJÄRJESTELMÄÄ HETI, KUN LAPSI
OSAA ISTUA OMIN AVUIN.
• TÄMÄ AJONEUVO ON SUUNNITELTU KÄYTETTÄVÄKSI
YHDESSÄ SEURAAVIEN PEG PEREGO GANCIOMATIC TUOTTEIDEN KANSSA:
NAVETTA, PORTE ENFANT SOFT, SEGGIOLINO AUTO PRIMO
VIAGGIO.
• TUOTTEEN SAA KOOTA JA VALMISTELLA KÄYTTÖÄ VARTEN
VAIN AIKUINEN.
• ÄLÄ KÄYTÄ TUOTETTA, JOS SIITÄ PUUTTUU OSIA TAI JOKIN
OSA ON RIKKI.
• KÄYTÄ AINA VIISIPISTEVALJAITA. KÄYTÄ TURVAVYÖN
KANSSA AINA VYÖN JALKOJEN VÄLISTÄ KULKEVAA OSAA.
• ÄLÄ JÄTÄ LASTA ILMAN VALVONTAA, SE VOI OLLA
VAARALLISTA.
• PAIKALLAAN OLTAESSA KÄYTÄ AINA JARRUJA.
• VARMISTA ENNEN KÄYTTÖÄ, ETTÄ KAIKKI
KIINNITYSMEKANISMIT ON LUKITTU OIKEIN.
• VARMISTA ENNEN KÄYTTÖÄ, ETTÄ TURVAISTUIN TAI
IRROTETTAVA ISTUINOSA ON KIINNITETTY OIKEIN.
• VARO TYÖNTÄMÄSTÄ SORMIASI MEKANISMEIHIN.
• PIDÄ LASTA TARKASTI SILMÄLLÄ, JOS SÄÄDÄT
MEKANISMEJA (TYÖNTÖAISA, SELKÄNOJA) HÄNEN LÄSNÄ
OLLESSAAN.
• TAVAROIDEN RIPUSTAMINEN TYÖNTÖAISAAN TAI
KAHVOIHIN VOI TEHDÄ TUOTTEESTA EPÄVAKAAN.
NOUDATA VALMISTAJAN ENIMMÄISKUORMITUKSESTA
ANTAMIA OHJEITA.
• SUOJAKAARTA EI OLE SUUNNITELTU KESTÄMÄÄN LAPSEN
PAINOA. SUOJAKAARTA EI OLE SUUNNITELTU PITÄMÄÄN
LASTA ISTUIMESSA, EIKÄ SE KORVAA TURVAVALJAITA.
• ÄLÄ PANE KORIIN KUORMIA, JOIDEN PAINO YLITTÄÄ 5
KG. ÄLÄ PANE JUOMANPIDIKKEESEEN ESINEITÄ, JOIDEN
PAINO YLITTÄÄ PIDIKKEESEEN MERKITYN PAINORAJAN,
ÄLÄKÄ KOSKAAN KUUMIA JUOMIA. ÄLÄ LAITA KUOMUJEN
TASKUIHIN (JOS SELLAISIA ON) ESINEITÄ, JOIDEN PAINO
YLITTÄÄ 0,2 KG.
• ÄLÄ KÄYTÄ TUOTETTA PORTAIDEN TAI ASKELMIEN
LÄHEISYYDESSÄ. ÄLÄ KÄYTÄ PAIKASSA, JOSSA LAPSEN
KÄDEN ULOTTUVILLA ON LÄMMÖNLÄHTEITÄ, AVOTULTA
TAI VAARALLISIA ESINEITÄ.
• MUIDEN KUIN VALMISTAJAN HYVÄKSYMIEN
LISÄVARUSTEIDEN KÄYTTÖ SAATTAA OLLA VAARALLISTA.
• TÄMÄ TUOTE EI SOVELLU KÄYTETTÄVÄKSI HÖLKÄTESSÄ TAI
RULLALUISTELLESSA.
• KÄYTÄ JARRUJA, KUN KYYTIIN NOUSEE TAI SIITÄ POISTUU
MATKUSTAJIA.
HUOMIO
NAVETTA-KORI
• TÄMÄ KULKUNEUVO SOVELTUU AINOASTAA LAPSILLE,
JOTKA EIVÄT VOI ISTUA ILMAN APUA.
• TÄMÄ KULKUNEUVO ON TARKOITETTU LAPSILLE
SYNTYMÄSTÄ 9 KG:N PAINOON ASTI.
• KÄYTÄ VAIN KOVILLA, VAAKATASOISILLA JA KUIVILLA
PINNOILLA.
• LAPSEN JÄTTÄMINEN ILMAN VALVONTAA VOI OLLA
VAARALLISTA.
• ÄLÄ SALLI MUIDEN LASTEN LEIKKIÄ ILMAN VALVONTAA
RATTAIDEN LÄHELLÄ.
• VAIN AIKUISET VOIVAT TEHDÄ TUOTTEEN KOKOAMIS- JA
VALMISTELUTOIMENPITEITÄ.
• ÄLÄ KÄYTÄ TUOTETTA, JOS SIITÄ PUUTTUU OSIA TAI SIINÄ
naksahduksen;
- Katso ohjeet Navetta-korin rattaista irrottamiseksi korin
käyttöohjeista.
PLIKO P3 + PRIMO VIAGGIO
79• Kiinnitä auton turvaistuin rattaisiin seuraavasti:
- lukitse rattaiden jarru;
- laske rattaiden selkänoja kokonaan alas;
- nosta rattaiden Ganciomatic-kiinnittimet ylös;
- aseta auton turvaistuin äitiä kohti ja työnnä sitä alaspäin,
kunnes se naksahtaa;
- älä irrota rattaiden suojakaarta, kun kiinnität auton
turvaistuimen;
- Katso ohjeet auton turvaistuimen rattaista irrottamiseksi
turvaistuimen käyttöohjeista.
RATTAIDEN MUUTTAMINEN VAUNUIKSI
Rattaiden muuttaminen vaunuiksi edellyttää verhoilun poistamista
ensin.
80• Poista rattaiden verhoilu irrottamalla verhoilun kiinnittimet
käsinojista nuolten osoittamalla tavalla.
81• Irrota verhoilun napit sivusuunnassa kuten kuvassa. Pujota
turvavyön jalkojen välistä kulkeva osa istuimen alta käsin.
82• Irrota verhoilun napit istuimesta ja vedä istuinta irrottaaksesi
verhoilu reisituen koukuista. Vedä verhoilukangas irti
yläkautta.
83• Kiinnitä alusta painamalla vaunujen takaosassa olevaa
painiketta kuten kuvassa; niin oikeanpuoleisessa kuin
vasemmanpuoleisessa tangossa. Nosta alustan selkänoja
ylöspäin kaksin käsin.
84• Paina molempia vaunujen istuimessa olevia painikkeita kaksin
käsin ja nosta koko alusta ylöspäin kuten kuvassa.
LISÄVARUSTEVALIKOIMA
85• Vaihtovaatelaukku (sisältyy): Makuualusta ja laukku vauvan
vaipoille ja vaihtovaatteille; laukku voidaan kiinnittää rattaisiin.
86• Hyttysverkko: Vetoketjullinen hyttysverkko, joka voidaan
kiinnittää vetoketjulliseen kuomuun.
87• Matkalaukku: Kätevä laukku rattaiden kuljettamiseksi
lentokoneessa.
88• Auton Kit Navetta: Voitte kysyä auton Kit-pakkausta
(hyväksytty ECE R44/04), jota tarvitaan korin kiinnittämiseksi
autoon.
89• Sateensuoja Cover All: Läpinäkyvästä PVC:stä valmistettu
sateensuoja takaa rattaisiin kiinnitetylle korille täyden suojan.
PUHDISTUS JA HUOLTO
Tuote vaatii hyvin vähän huoltoa. Vain aikuinen saa puhdistaa ja
huoltaa tuotetta.
• On tärkeää pitää kaikki liikkuvat osat puhtaina ja voidella ne
tarvittaessa kevyellä öljyllä.
• Kuivaa tuotteen metalliosat, jotta ne eivät pääse ruostumaan.
• Puhdista muoviosat säännöllisin väliajoin kostealla kankaalla: älä
käytä liuotteita tai muita vastaavia tuotteita.
• Harjaa tekstiiliosat pölyn poistamiseksi.
• Pidä pyörät puhtaina pölystä ja hiekasta.
• Suojaa tuote sateelta, vedeltä ja lumelta. Jatkuva altistuminen
auringonvalolle voi aiheuttaa monissa materiaaleissa värien
haalistumista.
• Säilytä tuotetta kuivassa paikassa.
•
Voit pestä verhoilupussin seuraavien ohjeiden mukaan.
HUOMIO
PLIKO P3
• TÄMÄ AJONEUVO ON SUUNNITELTU YHDEN
Page 56

ON RIKKOUMIA.
• ÄLÄ LISÄÄ PATJOJA.
• ENNEN KÄYTTÖÄ VARMISTA, ETTÄ KAIKKI
KIINNITYSMEKANISMIT OVAT OIKEIN KIINNITETTYJÄ.
• ENNEN KÄYTTÖÄ VARMISTA, ETTÄ AUTON TURVAISTUIN,
RATTAAT TAI ISTUIN OVAT OIKEALLA TAVALLA
KIINNITETTYINÄ.
• VÄLTÄ SORMIEN LAITTAMISTA MEKANISMEIHIN.
• VARO VAHINGOITTAMASTA LASTA, KUN TEET
SÄÄTÖTOIMENPITEITÄ MEKANISMEIHIN (KAHVA,
SELKÄNOJA).
• ÄLÄ KÄYTÄ LÄHELLÄ LÄMMÖNLÄHTEITÄ, AVOTULIA TAI
VAARALLISIA ESINEITÄ LAPSEN ULOTTUVILLA.
• LISÄVARUSTEIDEN, JOTKA EIVÄT OLE VALMISTAJAN
HYVÄKSYMIÄ, KÄYTTÖ SAATTAA OLLA VAARALLISTA.
• TARKISTA SÄÄNNÖLLISESTI KAHVA (TAI KAHVAT) JA
RATTAIDEN POHJA JA TARKISTA, ONKO NIISSÄ RIKKOUMIA
TAI JÄLKIÄ KOLHIINTUMISISTA.
• KUN RATTAITA KÄYTETÄÄN STANDILLÄ, TARKISTA
RATTAIDEN MAKSIMIPITUUS, JOKA ON MAINITTU
STANDILLÄ.
• DŮLEŽITÉ: Pozorně si přečtěte tyto pokyny a uschovejte
je pro budoucí použití.
Bezpečnost dítěte může být ohrožena, pokud tyto
pokyny nebudou dodrženy.
• Společnost Peg Perego může kdykoliv provést změny a úpravy
na modelech, které jsou popsány v této publikaci, jestliže si to
vyžádají technické nebo obchodní okolnosti.
Společnost Peg Perego S.p.A. je certi kovaná podle
ISO 9001.
Tato certi kace zaručuje klientům a spotřebitelům
transparentnost a spolehlivost ohledně pracovních
postupů společnosti.
ASISTENČNÍ SLUŽBA
Jestliže dojde k náhodné ztrátě nebo poškození některých částí
výrobku, použijte výhradně originální náhradní díly Peg Perego.
Pro případné opravy, výměny, informace o výrobcích, prodej
náhradních dílů a doplňků kontaktujte Asistenční službu
Peg-Perego:
tel.:0039-039-60.88.213,
fax: 0039-039-33.09.992,
e-mail: assistenza@pegperego.it,
www.pegperego.com
Společnost Peg Perego je vždy k dispozici svým klientům, aby co
nejlépe uspokojila veškeré jejich potřeby a přání. Z tohoto důvodu
je pro nás nesmírně důležité a cenné, abychom se seznámili s
názory našich klientů. Proto Vám budeme velmi vděčni, když
po použití našeho výrobku vyplníte DOTAZNÍK PRO ZJIŠTĚNÍ
SPOKOJENOSTI KLIENTŮ, který naleznete na následující internetové
adrese: www.pegperego.com
Prosíme Vás o uvedení případných postřehů a doporučení.
PLIKO P3
• Pliko P3 může být díky snímatelné opěrce zad použitý
nejenom jako kočárek, ale také jako podvozek.
NÁVOD K POUŽITÍ
ROZLOŽENÍ KOČÁRKU
1• Před rozložením podvozku je nutné nejdříve odstranit dvě
ochranné zátky, jak je to znázorněné na obrázku, neboť v
opačném případě není možné podvozek správně rozložit.
2• Pro rozložení podvozku je nutné zatáhnout směrem nahoru
za dvě páčky na rukojetích, jak je to znázorněné na obrázku.
3• Současně je nutné nadzvednout podvozek, který se
automaticky rozloží.
Pro ověření správného rozložení podvozku zkontrolujte obě
boční úchytky (viz obrázek).
MONTÁŽ
4• Pro montáž předních kol snižte páčku A a nasuňte kolo podle
obrázku B, dokud neuslyšíte cvaknutí.
5• Pro namontování zadních kol, připnout kola spojené brzdným
lankem podle obrázku.
6• Pozorně rozlišit kolo SX (levé) od kola DX (pravé) pro správní
připnuti 2 zadních kol. Levé kolo SX má jedno ryhováni na
trubce kola a jedno na ráme, aby se tak zabezpečilo správní
připnuti (vis obrázek).
7• Ověřit si správné připnuti podle obrázku, až po click.
8• Pro montáž košíku nasuňte poutka na přední úchytky A a na
zadní úchytky B a C.
9• Na tomto obrázku je znázorněný správně připnutý košík.
10•
Držák na láhev je možné připnout jak na levou, tak na
pravou stranu kočárku pomocí úchytky umístěné na obou
stranách kočárku. Pro připevnění držáku ho přicvakněte,
jak je to uvedené na obrázku A.
Nedoporučujeme používat držák na láhev pro teplé
CZ• ČEŠTINA
Page 57
nápoje a nápoje o hmotnosti vyšší než 0,5 Kg (1 lbs).
BRZDY
11• Pro zabrzdění kočárku Pliko P3 snižte nohou páčky, které jsou
umístěné na zadních kolech, jak je to znázorněné na obrázku.
• Pro uvolnění brzd postupujte opačně.
• Jestliže je kočárek v klidu, vždy ho zabrzděte.
OTOČNÁ KOLA
12• Jestliže chcete, aby se kola automaticky otáčela, stačí snížit
páčku, jak je to znázorněno na obrázku A. Jestliže chcete, aby
byla kola pevná a neotáčela se, přesuňte páčku opačným
směrem, jak je to znázorněné na obrázku B.
NASTAVENÍ RUKOJETÍ
13• Výšku rukojetí kočárku je možné regulovat do dvou poloh. Pro
nastavení horní polohy stiskněte tlačítko a současně přesuňte
rukojeť směrem nahoru. Pro nastavení spodní polohy
postupujte opačně.
SLOŽENÍ
• Před složením podvozku Pliko P3 je nutné odpojit
sportovní korbu Navetta a autosedačku Primo Viaggio.
14• Kočárek můžete složit i jednou rukou: přesuňte nejdříve první
a poté druhou páčku směrem nahoru tak, abyste uslyšeli
cvaknutí.
15• Uchopte středovou rukojeť a táhněte za ni směrem nahoru
(obrázek 3) dokud nedojde ke složení kočárku, jak je to
vyznačené na obrázku.
16•
Zkontrolujte správné složení podvozku pomocí bezpečnostní
úchytky. Jestliže je podvozek správně složený, zůstane sám stát.
PŘEPRAVA
17• Pliko P3 můžete velmi pohodlně přepravovat tak (nastavte
kola do polohy, která neumožňuje otáčení), že uchopíte
středovou rukojeť podle instrukcí na obrázku.
18• Kočárek můžete také přepravovat pomocí boční rukojeti, jak
je to vyznačené na obrázku.
GANCIOMATIC SYSTEM s PLIKO P3 VE VERZI PODVOZKU
Ganciomatic System je velmi praktický a rychlý systém, který Vám
umožní k podvozku Pliko P3 připnout, díky úchytkám Ganciomatic,
sportovní korbu Navetta a autosedačku Primo Viaggio, které jsou
také vybavené systémem Ganciomatic System.
ÚCHYTKY GANCIOMATIC PODVOZKU
19•
Pro zvýšení úchytek Ganciomatic podvozku je nutné otáčet
oběma úchytkami směrem nahoru, jak je to znázorněné na
obrázku, dokud neuslyšíte cvaknutí.
20• Pro snížení úchytek Ganciomatic podvozku zatáhněte za
páčku směrem ven a současně otáčejte oběma úchytkami
směrem dolů, jak je to znázorněné na obrázku.
PLIKO P3 + NAVETTA
Pro připnutí sportovní korby Navetta k podvozku Pliko P3
postupujte následujícím způsobem:
- zabrzděte podvozek Pliko P3;
- přesuňte úchyty Ganciomatic směrem nahoru;
21• Otáčejte oběma páčkami umístěnými v zadní části podvozku
směrem ven, jak je to znázorněné na obrázku.
22•
Přesuňte opěrku nohou podvozku do horní polohy (obrázek 1).
23• Podvozek Pliko P3 je připravený na připnutí sportovní korby
Navetta.
24• Uchopte rukojeť korby Navetta a položte korbu na úchyty
Ganciomatic podvozku s tím, že přední část korby musí být
protilehlá vůči rukojetím podvozku.
- zatlačte oběma rukama na boční části korby Navetta, dokud
neuslyšíte cvaknutí;
- Pro vyjmutí korby Navetta z podvozku odkazujeme na návod
k použití korby.
PLIKO P3 + PRIMO VIAGGIO
Pro připnutí autosedačky k podvozku postupujte následujícím
způsobem:
- zabrzděte podvozek Pliko P3;
- připněte přední madlo (viz část popisující přední madlo);
25• Podvozek Pliko P3 je připravený na připnutí autosedačky
Primo Viaggio;
26• Uchopte rukojeť autosedačky Primo Viaggio a umístěte
autosedačku na úchyty Ganciomatic podvozku s tím,
že přední část autosedačky musí být protilehlá vůči
rukojetím podvozku. Zatlačte oběma rukama na boční části
autosedačky, dokud neuslyšíte cvaknutí;
- Pro vyjmutí autosedačky z podvozku odkazujeme na návod
použití autosedačky.
PŘEDNÍ MADLO
27•
Podvozek je dodaný se zátkami, které jsou nasunuté na
loketních opěrkách; pro montáž bezpečnostního předního
madla je nutné tyto zátky nejdříve odstranit (zátky pečlivě
uschovejte, kdybyste chtěli kočárek použít bez předního madla).
Pro odstranění zátek stiskněte tlačítko umístěné pod loketní
opěrkou a současně zátku vytáhněte (takto postupujte u obou
loketních opěrek).
28• Pro nasazení předního madla vsuňte oba konce madla do
otvorů loketních opěrek, jak je to vyznačeno na obrázku,
dokud neuslyšíte cvaknutí.
29• Přední madlo můžete otevřít pouze z jedné strany, díky čemuž
si Vaše dítě, až bude větší, bude moci snadněji sednout do
kočárku anebo z něho vysednout. Pro otevření předního
madla stiskněte tlačítko umístěné pod loketní opěrkou a
současně přesuňte madlo směrem ven.
30•
Pro sejmutí předního madla stiskněte obě tlačítka umístěná pod
loketními opěrkami a současně přesuňte madlo směrem ven.
PŘESTAVĚNÍ PODVOZKU NA KOČÁREK
MONTÁŽ
31• Jestliže chcete přestavět podvozek Pliko P3 na kočárek,
ujistěte se, že jsou obě páčky ve spodní poloze, jak je to
znázorněné na obrázku.
32• Umístěte opěrku zad s potahem na podvozek, jak je to
znázorněné na obrázku.
33• Pro připnutí zádové opěrky k podvozku je nutné zasunout
oba konce opěrky, a stisknout přitom obě tlačítka, do sedačky
podvozku, jak je to vyznačené na obrázku 1, dokud neuslyšíte
cvaknutí, jak je to znázorněné na obrázku 2.
34• Pro připnutí horní části opěrky zad k podvozku je nutné
otáčet úchytkou směrem nahoru (obrázek B, ve směru šipky) a
umístit ji za zadní držák.
35• Zatlačte na obě úchytky směrem dolů, dokud neuslyšíte
cvaknutí, tak, aby dosedly do otvorů zadních držáků.
36• Pro nasunutí potahu na kočárek připněte úchytky potahu k
loketním opěrkám, jak je to vyznačené na obrázku pomocí
šipek.
37• Vsuňte páčky opěrky nohou do potahu opěrky zad, jak je to
znázorněné na obrázku.
38• Pro dokončení této operace připněte knoflíky potahu k
základně, jak je to znázorněné na obrázku A. Protáhněte
spodní pás na nohy pod sedačkou, jak je to vyznačené na
obrázku B, a nechte nad potahem horní pás na nohy.
ROZLOŽENÍ A SLOŽENÍ KOČÁRKU
• Pro otevření kočárku Pliko P3 zopakujte operace podle
obrázků 2 a 3.
•
Pro složení kočárku Pliko P3 uvolněte boční páčky na
polohování stříšky, nadzvedněte opěrku zad a zopakujte
operace podle obrázků 14, 15 a 16.
NASTAVENÍ OPĚRKY NOHOU
39•
Opěrku nohou můžete nastavit do tří poloh. Jestliže chcete
opěrku nohou snížit, přesuňte boční páčky směrem dolů a
současně snižte opěrku nohou. Jestliže chcete opěrku nohou
zvýšit, zatlačte ji směrem nahoru, dokud neuslyšíte cvaknutí.
ZADNÍ NÁŠLAPNÁ PLOŠINA
40• Zadní nášlapná plošina usnadňuje mamince překonat malé
nerovnosti terénu a kromě toho je na ní možné přepravovat i
druhé dítě.
POSTUP PRO NALOŽENÍ DĚTÍ DO KOČÁRKU
41•
Jestliže chcete na kočárku Pliko P3 vozit dvě děti, nejdříve
ho zabrzděte, posaďte menší dítě do kočárku a zajistěte ho
bezpečnostním pásem (1). Uchopte obě rukojeti (2) kočárku a
Page 58

poté nechte nastoupit druhé dítě na nášlapnou plošinu (3).
• Nikdy nenechte děti v kočárku samotné.
• Nedovolte Vašemu dítěti, aby si stouplo na nášlapnou
plošinu, jestliže je kočárek prázdný.
STŘÍŠKA
• Stříšku můžete připnout jak ke sportovní korbě Navetta, tak ke
kočárku. Stříška je vybavená zipem pro připnutí pláštěnky.
42• Pro montáž pláštěnky ke korbě Navetta odepněte knoflíky A a
B (obrázek 1), připněte stříšku podle obrázku 2 a zkontrolujte,
jestli je správně připnutá (obrázek 3).
43• Pro připnutí stříšky ke kočárku postupujte podle obrázku a
zkontrolujte, jestli je správně připnutá (viz obrázek).
44• Pro napnutí stříšky přesuňte páčku znázorněnou na obrázku
směrem dolů. Stříšku můžete sklopit podle sklonu opěrky zad.
45•
Pro napnutí stříšky přesuňte vnitřní polohovací páčku směrem
dolů, jak je to vyznačené na obrázku.
46•
Zcela roztáhněte stříšku tak, že odepnete zip (obrázek B). Stříška se
sklopí podle sklonu opěrky zad.
47• Stříšku můžete velmi rychle přeměnit na slunečník (viz
obrázek). Zapněte zip a připněte stříšku pomocí praktické
úchytky.
48• Jestliže chcete stříšku sejmout ze sportovní korby Navicella
Navetta, musíte ji nejdříve odepnout po bocích od potahu.
Odepněte poutka A a B od potahu, jak je to uvedené na
obrázku, stiskněte z obou stran jazýček a stříšku odepněte.
49• Pro sejmutí stříšky z kočárku stiskněte z obou stran jazýček
znázorněný na obrázku A.
Stříšku uvolněte a vytáhněte směrem nahoru, jak je to
vyznačené na obrázku B.
SPORTOVNÍ KORBA NAVETTA
RUKOJEŤ
50• Pro přesunutí rukojeti do horní pozice na ni zatlačte směrem
nahoru, dokud neuslyšíte cvaknutí. Rukojeť je zablokovaná
pouze v případě, že je ve vertikální poloze a dvě pojistky jsou
příslušně zacvaknuty.
51• Pro snížení rukojeti ji odblokujte tak, že zatlačíte směrem
nahoru na dvě pojistky a současně zatlačíte na rukojeť
směrem dolů.
52• Rukojeť usnadňuje přepravu a připnutí sportovní korby k
podvozku a kočárku.
HOUPAČKA A POSTÝLKA
53• Spodní část sportovní korby Navetta má zvláštní formu, díky
které je možné korbu houpat, jestliže ji položíte na rovnou
plochu.
54• Z korby Navetta můžete snadno udělat malé hnízdečko, které
se nedá houpat, jestliže vytáhnete boční podstavce, jak je to
uvedené na obrázku.
SEŘÍZENÍ OPĚRKY ZAD
55•
Výška opěrky zad se dá nastavit podle potřeby tak, že vytáhnete
a budete otáčet rukojetí, jak je to vyznačené na obrázku.
NASTAVENÍ CIRKULACE VZDUCHU
56• Ve spodní části sportovní korby Navetta jsou zabudovány
zavíratelné otvory, které umožňují přívod vzduchu zespodu.
Jestliže chcete otevřít otvory v přední části sportovní korby
(strana, na které je stříška), zatlačte na obě úchytky směrem
ven.
57• Jestliže chcete otevřít otvory v zadní části (strana protilehlá
vzhledem ke stříšce), zatlačte na jednu ze dvou úchytek
směrem ven.
SNÍMATELNOST POTAHŮ
58• Jestliže chcete sejmout potah, odepněte boční poutka a
stáhněte ho směrem dopředu.
59• Sejměte 2 jazýčky z konstrukce vzadu a stáhněte potah.
PŘIPNUTÍ A ODEPNUTÍ SPORTOVNÍ KORBY KE/OD KOČÁRKU
Sportovní korba Navetta je vybavená systémem Ganciomatic,
který umožňuje připnout korbu ke kočárku Pliko P3 pomocí
úchytek Ganciomatic.
60• Pro sejmutí sportovní korby z kočárku nejdříve z boku zatlačte
na rukojeť (umístěná na straně protilehlé vzhledem ke stříšce)
a poté ji přesuňte směrem nahoru a současně zvedněte
kočárek pomocí přední rukojeti směrem nahoru.
SPORTOVNÍ KORBA V AUTĚ
61• Sportovní korba Navetta je navržená tak, aby mohla být
přeměněna pomocí dvou úchytek (viz obrázek) a sady Auto
(nutné zakoupit zvlášť) na Navetta AUTO.
DETAILY MODULÁRNÍHO SYSTÉMU ON TRACK
NÁNOŽNÍK
62• Pro připnutí nánožníku ho musíte zapnout na zip k opěrce
nohou, jak je to vyznačeno na obrázku.
Připněte nánožník pomocí dvou knoflíků, jak je to uvedené na
obrázku B.
PLÁŠTĚNKA
63• Pro montáž pláštěnky ji musíte zapnout na zip ke stříšce.
64• Spojte knoflíky na gumě a na kočárku dokud nezacvaknou, viz
obrázek.
65• Připněte spodní gumový pásek pláštěnky ke kolu kočárku.
66• Praktickou pláštěnku můžete stáhnout tak, že ji odepnete od
stříšky kočárku. Pláštěnka zůstane ke kočárku připevněná díky
gumovým páskům.
67• Tato pláštěnka je vyrobená tak, abyste ji mohli použít v
případě, že k sedačce připevníte dětskou autosedačku Primo
Viaggio. I v tomto případě zaručujeme stoprocentní ochranu.
• Nepoužívejte pláštěnku v zavřených prostorech a pravidelně
kontrolujte, jestli není Vaše dítě přehřáté.
• Nenechávejte pláštěnku z PVC v blízkosti zdrojů tepla a
dávejte pozor na to, abyste ji nepropálili cigaretou.
• Ujistěte se, že pláštěnka nebrání v pohybu žádnému
mechanismu podvozku a kočárku.
•
Před složením podvozku nebo kočárku pláštěnku vždy sejměte.
• Čistěte pláštěnku houbou a mýdlovou vodou. Nepoužívejte
čistící prostředky.
BEZPEČNOSTNÍ PÁS
68• Ujistěte se, že je popruh správně zasunutý tak, že na něho
zatlačíte, jak je to znázorněné na obrázku A. Připněte popruh
podle obrázku B.
69• Pro odepnutí pásu zatlačte na přezku (obrázek A) z obou stran
a současně vytáhněte směrem ven břišní pás (obrázek B).
70• Nový bezpečnostní pás je snadněji použitelný, neboť je
vybavený systémem “připnout a odepnout”. Před zapnutím
pásu připněte přezku k opěrce zad tak, že zasunete jazýček do
příslušné průchodky podle obrázku; poté, jakmile zajistíte
Vaše dítě bezpečnostním pásem, odepněte pás od
opěrky zad, aby se Vaše dítě mohlo volněji pohybovat.
Přezka musí zůstat pod rameny dítěte.
NASTAVENÍ OPĚRKY ZAD
71• Opěrku zad můžete nastavit do čtyř poloh. Jestliže chcete
opěrku zad snížit, nadzvedněte páčku znázorněnou (obrázek
A) a současně snižte opěrku zad (obrázek B); v žádoucí poloze
opěrku zablokujte. Jestliže chcete opěrku zad naopak zvýšit,
zatlačte ji směrem nahoru.
SNÍMATELNOST POTAHŮ
72• Jestliže chcete sejmout potah kočárku, uvolněte úchytky
potahu z loketních opěrek podle znázorněných šipek.
73•
Odšroubujte pásek (pouze z jedné strany), jak je to znázorněné
na obrázku, s tím, že je nutné přidržovat matici prstem.
74• Odepněte knoflíky potahu po bocích, jak je to znázorněné na
obrázku. Stáhněte pás na nohy zespodu sedačky.
75• Jestliže chcete sejmout potah kočárku, odepněte knoflíky
potahu sedačky a stáhněte potah z úchytek opěrky nohou.
Stáhněte potah shora.
GANCIOMATIC SYSTEM s PLIKO P3 VE VERZI KOČÁRKU
Ganciomatic System je velmi praktický a rychlý systém, který Vám
umožní ke kočárku Pliko P3 připnout, díky úchytkám Ganciomatic,
sportovní korbu Navetta a autosedačku Primo Viaggio, které jsou
také vybavené systémem Ganciomatic System.
ÚCHYTY GANCIOMATIC KOČÁRKU
76• Pro zvednutí úchytů Ganciomatic kočárku nadzvedněte potah
Page 59

v rozích sedátka a otáčejte oba úchyty směrem nahoru, dokud
neuslyšíte cvaknutí.
77• Pro snížení úchytů Ganciomatic kočárku zatáhnete za páčku
směrem ven a současně otáčejte úchyty směrem dolů, jak je
to znázorněné na obrázku.
PLIKO P3 + NAVETTA
78• Pro připnutí sportovní korby k autosedačce postupujte
následujícím způsobem:
- zabrzděte kočárek;
- zcela snižte opěrku zad kočárku (přesuňte do mezní spodní
polohy);
- přesuňte úchyty Ganciomatic kočárku směrem nahoru;
- odstraňte přední madlo a vsuňte do příslušných otvorů
ochranné zátky, které jsou součástí dodávky, čímž zajistíte
loketní opěrky kočárku;
- přesuňte opěrku nohou kočárku do horní polohy;
- uchopte rukojeť korby Navetta;
- umístěte korbu Navetta na úchyty Ganciomatic kočárku s
tím, že přední část korby musí být protilehlá vůči rukojetím
kočárku;
- zatlačte oběma rukama na boční části korby Navetta, dokud
neuslyšíte cvaknutí;
- Pro vyjmutí korby Navetta z kočárku odkazujeme na návod k
použití korby.
PLIKO P3 + PRIMO VIAGGIO
79• Pro připnutí autosedačky ke kočárku postupujte následujícím
způsobem:
- zabrzděte kočárek;
- zcela snižte opěrku zad kočárku (přesuňte do mezní spodní
polohy);
- přesuňte úchyty Ganciomatic kočárku směrem nahoru;
- umístěte autosedačku směrem k mamince a zatlačte na ni
směrem dolů, dokud neuslyšíte cvaknutí;
- při připevňování autosedačky doporučujeme nechat v
kočárku přední madlo;
- Pro vyjmutí autosedačky z kočárku odkazujeme na návod k
použití autosedačky.
PŘESTAVĚNÍ KOČÁRKU NA PODVOZEK
Pro přestavění kočárku na podvozek z něho musíte nejdříve
sejmout potah.
80• Sejměte z kočárku potah tak, že uvolníte úchytky potahu z
loketních opěrek, jak to vyznačují šipky.
81• Odepněte knoflíky potahu po bocích, jak je to znázorněné na
obrázku. Stáhněte pás na nohy zespodu sedačky.
82•
Odepněte knoflíky potahu sedátka a stáhněte potah z úchytek
opěrky nohou. Stáhněte potah shora.
83• Uvolněte základnu stisknutím tlačítka, které je umístěné v
zadní části podvozku (viz obrázek); jak na pravé, tak na levé
straně. Oběma rukama nadzvedněte opěrku zad.
84• Oběma rukama stiskněte obě tlačítka na sedátku vozíku a
nadzvedněte celou základnu, jak je to vyznačené na obrázku.
DOPLŇKY
85• Taška pro přebalení dítěte (včetně): taška s matračkou pro
přebalení dítěte, kterou můžete připnout ke kočárku.
86• Síťka proti hmyzu: síťka proti hmyzu se zipem, kterou
můžete připnout ke stříšce kočárku se zipem.
87• Cestovní taška:
praktická taška pro leteckou přepravu kočárku.
88• Kit Auto Navetta: Můžete si vyžádat sadu Kit auto (schválená
v souladu s normou ECE R44/04), která obsahuje veškeré
nezbytné prvky pro montáž sportovní korby v autě.
89• Pláštěnka Cover All: Pláštěnka z průhledného PVC zajišťuje
kompletní ochranu sportovní korby připevněné ke kočárku.
ČIŠTĚNÍ A ÚDRŽBA
Váš výrobek si vyžaduje minimální údržbu. Veškeré operace
spojené s čištěním a údržbou výrobku mohou provést pouze
dospělé osoby.
• Doporučujeme udržovat v čistém stavu veškeré mobilní části
výrobku a v případě potřeby je namazat lehkým olejem.
• Kovové části výrobku vysušte, aby nedošlo k jejich zrezivění.
• Pravidelně čistěte umělohmotné části vlhkým hadrem;
nepoužívejte rozpouštědla anebo podobné prostředky.
• Textilní části vykartáčujte, čímž odstraníte prach.
• Odstraňte z kol prach a písek.
• Chraňte výrobek před atmosférickými vlivy, vodou, deštěm a
sněhem; nepřetržité a dlouhodobé vystavení slunečnímu záření
může způsobit změnu barvy mnohých materiálů.
• Uchovávejte výrobek na suchém místě.
• Pro praní potahu postupujte podle následujících instrukcí.
POZOR
PLIKO P3
• TENTO VÝROBEK BYL NAVRHNUTÝ PRO PŘEPRAVU
JEDNOHO DÍTĚTE V SEDĚ E JEDNOHO DÍTĚTE V STOJI NA
ZADNÍ PLOŠINĚ.
• NEPOUŽÍVEJTE VÝROBEK PRO VĚTŠÍ POČET OSOB, NEŽ JE
TEN UVEDENÝ VÝROBCEM.
• TOTO VOZÍTKO JE SCHVÁLENO PRO DĚTI OD NAROZENÍ
DO 15 KG HMOTNOSTI DÍTĚTE. ZADNÍ STUPÁTKO JE
SCHVÁLENO PRO PŘEPRAVU DRUHÉHO DÍTĚTE DO
HMOTNOSTI 20 KG.
• POUŽÍVEJTE ZADRŽOVACÍ SYSTÉM DOKUD DÍTĚ NEBUDE
SCHOPNÉ SEDĚT SAMOSTATNĚ.
• TENTO VÝROBEK JE NAVRŽENÝ TAK, ABY MOHL BÝT
POUŽÍVANÝ V KOMBINACI S NÁSLEDUJÍCÍMI VÝROBKY PEG
PEREGO GANCIOMATIC: KORBA NAVETTA, PORTE ENFANT
SOFT, AUTOASEDAČKA PRIMO VIAGGIO.
• MONTÁŽ A PŘÍPRAVA VÝROBKU MUSÍ BÝT PROVEDENY
DOSPĚLOU OSOBOU.
• NEPOUŽÍVEJTE VÝROBEK POKUD VYKAZUJE CHYBĚJÍCÍ
SOUČÁSTKY NEBO POŠKOZENÍ.
• VŽDY POUŽÍVEJTE PĚTIBODOVÉ PÁSY; VŽDY POUŽÍVEJTE
PÁSY MEZI NOHY V KOMBINACI S PÁSEM OKOLO PASU.
• NECHAT DÍTĚ BEZ DOZORU MŮŽE BÝT NEBEZPEČNÉ.
• PŘI STÁNÍ VŽDY POUŽÍVEJTE BRZDY.
• PŘED POUŽITÍM SE UJISTĚTE, ZDA JSOU VŠECHNY
UCHYCOVACÍ MECHANISMY SPRÁVNĚ ZAJIŠTĚNY.
• PŘED POUŽITÍM SE UJISTĚTE, ZDA JSOU AUTOSEDAČKA
NEBO PŘENOSNÁ SEDAČKA SPRÁVNĚ ZAJIŠTĚNY.
• VYVARUJTE SE ZASOUVÁNÍ PRSTŮ DO ZAŘÍZENÍ.
• PŘI SEŘIZOVÁNÍ MECHANISMŮ (ŘÍDÍTKA, ZÁDOVÁ OPĚRKA)
VĚNUJTE POZORNOST PŘÍTOMNOSTI DÍTĚTE.
• JAKÁKOLIV ZÁTĚŽ ZAVĚŠENÁ NA ŘÍDÍTKÁCH NEBO
RUKOJETÍCH MŮŽE ZPŮSOBIT NESTABILITU VÝROBKU;
OHLEDNĚ MAXIMÁLNÍCH PŘIJATELNÝCH ZÁTĚŽÍ
POSTUPUJTE PODLE NÁVODU OD VÝROBCE.
• PŘEDNÍ MADLO NENÍ NAVRŽENO NA UDRŽENÍ VÁHY
DÍTĚTE; PŘEDNÍ MADLO NENÍ NAVRŽENO PRO ZAJIŠTĚNÍ
DÍTĚTE V SEDU A NENAHRAZUJE BEZPEČNOSTNÍ PÁS.
• NÁKLAD KOŠE NESMÍ PŘESAHOVAT 5 KG. DRŽÁK NÁPOJŮ
NEPOUŽÍVEJTE NA PŘEDMĚTY O HMOTNOSTI VYŠŠÍ NEŽ
UVEDENO A NIKDY HO NEPOUŽÍVEJTE NA HORKÉ NÁPOJE.
DO KAPES NA BOUDĚ (POKUD PŘÍTOMNÉ) NEVKLÁDEJTE
PŘEDMĚTY O HMOTNOSTI VYŠŠÍ NEŽ 0,2 KG.
• NEPOUŽÍVEJTE VÝROBEK V BLÍZKOSTI SCHODŮ NEBO
STUPÁTEK; NEPOUŽÍVEJTE VÝROBEK V BLÍZKOSTI
TEPELNÝCH ZDROJŮ, VOLNÝCH PLAMENŮ NEBO
NEBEZPEČNÝCH PŘEDMĚTŮ V DOSAHU DÍTĚTE.
• POUŽITÍ PŘÍSLUŠENSTVÍ, KTERÉ NENÍ SCHVÁLENO
VÝROBCEM, MŮŽE BÝT RIZIKOVÉ.
• TENTO VÝROBEK NENÍ VHODNÝ PRO JOGGING ANEBO
JÍZDU NA BRUSLÍCH.
• BĚHEM OPERACÍ SPOJENÝCH S NAKLÁDÁNÍM A
VYKLÁDÁNÍM DĚTÍ KOČÁREK ZABRZDĚTE.
Page 60

• DÔLEŽITÉ: Pozorne si prečítajte tento návod a uchovajte
ho pre ďalšie použitie.
Pri nedodržaní tohto návodu, môže byť ohrozená
bezpečnosť dieťaťa.
• Spoločnost Peg Perego môže kedykoľvek vykonať zmeny a
úpravy na modeloch, ktoré sú popísané v tejto publikácii, ak si to
budú vyžadovať technické alebo obchodné podmienky.
Spoločnost Peg Perego S.p.A. je certi kovaná podľa
ISO 9001.
Tento certi kát zaručuje klientom a spotrebiteľom
transparentnosť a spoľahlivosť vzťahujúcich sa na
pracovné postupy spoločnosti.
ASISTENČNÁ SLUŽBA
Ak dôjde k náhodnej strate alebo poškodeniu niektorých častí
výrobku, použite výlučne originálne náhradné diely Peg Perego.
Pre prípadné opravy, výmeny, informácie o výrobkoch, predaj
náhradných dielov a doplnkov kontaktujte Asistenčnú službu
Peg-Perego:
tel.:0039-039-60.88.213,
fax: 0039-039-33.09.992,
e-mail: assistenza@pegperego.it,
www.pegperego.com
Spoločnost Peg Perego je svojim klientom vždy k dispozícii,
aby čo najlepšie uspokojila všetky ich potreby a priania. Z tohto
dôvodu je pre nás nesmierne dôležité a cenné, aby sme sa
oboznámili s názormi našich klientov. Preto Vám budeme veľmi
vďační, keď po použití nášho výrobku vyplníte DOTAZNÍK PRE
ZISTENIE SPOKOJNOSTI KLIENTOV, ktorý nájdete na nasledujúcej
internetovej adrese: www.pegperego.com Prosíme Vás o uvedenie
prípadných postrehov a doporučení.
PLIKO P3
• Pliko P3 môže byť vďaka odnímateľnej opierke chrbta použitý
nielen ako kočík, ale tiež ako podvozok.
NÁVOD NA POUŽITIE
ROZLOŽENIE KOČÍKA
1• Pred rozložením podvozku je potrebné najskôr odstrániť dve
ochranné zátky tak ako je to znázornené na obrázku, pretože v
opačnom prípade nie je možné podvozok správne rozložiť.
2• Pre rozloženie podvozku je potrebné zatiahnuť smerom hore
za dve páčky na rukovätiach tak ako je to znázornené na
obrázku.
3• Súčasne je potrebné nadvihnúť podvozok, ktorý sa
automaticky rozloží.
Pre overenie toho, či došlo k správnemu rozloženiu podvozku
skontrolujte obidve bočné úchytky (viď obrázok).
MONTÁŽ
4• Pre montáž predných kolies znížte páčku A a nasuňte koleso
podľa obrázku B, pokiaľ nebudete počuť cvaknutie.
5• Pre namontovanie zadných koliesok, pripnúť kolieska spojené
brzdným lankom podľa obrázku.
6• Pozorne rozlíšiť koleso SX (ľavé) od kolesa DX (pravé) pre
správne pripnutie 2 zadných kolies. Ľavé koleso SX má
jedno ryhovanie na rúrke kolesa a jedno na ráme, aby sa tak
zabezpečilo správne pripnutie (pozri obrázok).
7• Overiť si správne pripnutie podľa obrázku, až po click.
8• Pre montáž košíka nasuňte putá na predné háčiky A a na
zadné háčiky B a C.
9• Na tomto obrázku je znázornený správne pripnutý košík.
10•
Držiak na fľašu je možné pripnúť na ľavú alebo pravú
stranu kočíka vďaka už existujúcej úchytke, ktorá sa
nachádza na obidvoch stranách kočíka. Pre pripevnenie
držiaka na fľašu ho nasuňte tak, ako je to vyznačené na
POZOR
SPORTOVNÍ KORBA NAVETTA
• TENTO VÝROBEK JE URČENÝ POUZE PRO DĚTI, KTERÉ JSOU
SCHOPNÉ SAMY SEDĚT.
• TENTO VÝROBEK JE URČENÝ PRO DĚTI S HMOTNOSTÍ DO 9
KG.
• POUŽÍVEJTE VÝROBEK POUZE NA TVRDÝCH,
VODOROVNÝCH A SUCHÝCH POVRŠÍCH.
• JE NEBEZPEČNÉ NECHÁVAT DÍTĚ BEZ DOZORU.
• NEDOVOLTE, ABY SI JINÉ DĚTI HRÁLY V BLÍZKOSTI
KOČÁRKU.
• VEŠKERÉ OPERACE SPOJENÉ S MONTÁŽÍ A SEŘÍZENÍM
VÝROBKU MUSÍ PROVÉST DOSPĚLÁ OSOBA.
• NEPOUŽÍVEJTE VÝROBEK V PŘÍPADĚ, ŽE JE POŠKOZENÝ
ANEBO ŽE CHYBÍ NĚKTERÉ JEHO ČÁSTI.
• NEPOUŽÍVEJTE PŘÍDAVNÉ MATRAČKY.
• PŘED POUŽITÍM VÝROBKU SE UJISTĚTE, ŽE JSOU VEŠKERÉ
PŘIPÍNACÍ MECHANISMY SPRÁVNĚ PŘIPOJENÉ.
• PŘED POUŽITÍM VÝROBKU SE UJISTĚTE, ŽE JSOU
AUTOSEDAČKA, KOČÁREK ANEBO SEDÁTKO SPRÁVNĚ
PŘIPNUTÉ.
• NEVSUNUJTE PRSTY DO MECHANISMŮ VÝROBKU.
• PŘI SEŘIZOVÁNÍ JEDNOTLIVÝCH MECHANISMŮ (RUKOJEŤ,
OPĚRKA ZAD) DÁVEJTE POZOR NA DÍTĚ USAZENÉ V
KOČÁRKU.
• NEPOUŽÍVEJTE VÝROBEK V BLÍZKOSTI ZDROJŮ TEPLA,
OHNĚ NEBO NEBEZPEČNÝCH PŘEDMĚTŮ, NA KTERÉ MŮŽE
DÍTĚ DOSÁHNOUT.
• POUŽITÍ DOPLŇKŮ, KTERÉ NEJSOU SCHVÁLENÉ
VÝROBCEM, MŮŽE BÝT NEBEZPEČNÉ.
• PRAVIDELNĚ KONTROLUJTE RUKOJEŤ (RUKOJETI) A DNO
VÝROBKU: NESMÍ VYKAZOVAT ZNAKY OPOTŘEBENÍ NEBO
POŠKOZENÍ.
• PŘI POUŽITÍ KOČÁRKU S PODVOZKEM ZKONTROLUJTE
MAXIMÁLNÍ DÉLKU KOČÁRKU, KTERÁ JE UVEDENÁ NA
PODVOZKU.
SK• SLOVENČINA
Page 61

obrázku A, pokiaľ nebudete počuť cvaknutie. Na obrázku
B je uvedený správne pripevnený držiak na fľašu.
Nedoporučujeme používať držiak na fľašu pre teplé
nápoje a nápoje s hmotnosťou vyššou ako 0,5 Kg (1 lbs).
BRZDY
11• Pre zabrzdenie kočíka Pliko P3 nohou znížte páčky, ktoré
sú umiestnené na zadných kolesách kočíka tak ako je to
znázornené na obrázku.
• Pre uvoľnenie bŕzd postupujte opačne.
• Ak je kočík v kľude, vždy ho zabrzdite.
OTÁČAVÉ KOLESÁ
12• Ak chcete, aby sa kolesá automaticky otáčali, stačí znížiť
páčku tak ako je to znázornené na obrázku A. Ak chcete, aby
boli kolesá pevné a neotáčali sa, presuňte páčku opačným
smerom tak ako je to znázornené na obrázku B.
NASTAVENIE RUKOVÄTE
13• Výšku rukoväte kočíka je možné regulovať v dvoch polohách.
Pre nastavenie hornej polohy stlačte tlačidlo a súčasne
presuňte rukoväť smerom nahor. Pre nastavenie spodnej
polohy postupujte opačne.
ZLOŽENIE
• Pred zložením Pliko P3 je potrebné odpojiť športovú
korbu Navetta a autosedačku Primo Viaggio.
14• Kočík môžete zložiť aj jednou rukou: presuňte najskôr prvú
a potom druhú páčku smerom nahor tak, aby ste počuli
cvaknutie.
15• Uchopte strednú rukoväť (obrázok 3) a potiahnite ňou
smerom nahor, pokým nedôjde k zloženiu kočíka, ako je to
znázornené na obrázku.
16• Skontrolujte správne zloženie podvozku pomocou
bezpečnostnej úchytky. Ak je podvozok správne zložený,
zostane sám stáť.
PREPRAVA
17• Pliko P3 môžete veľmi pohodlne prepravovať tak (nastavte
kolesá do polohy, ktorá neumožňuje otáčanie), že uchopíte
strednú rukoväť podľa inštrukcií na obrázku.
18• Kočík môžete tiež prepravovať pomocou bočnej rukoväte, ako
je to znázornené na obrázku.
GANCIOMATIC SYSTEM s PLIKO P3 VO VERZII PODVOZKU
Ganciomatic System je veľmi praktický a rýchly systém, ktorý Vám
umožní k podvozku Pliko P3 pripnúť, vďaka úchytkám Ganciomatic,
športovú korbu Navetta a autosedačku Primo Viaggio, ktoré sú tiež
vybavené systémom Ganciomatic System.
ÚCHYTKY GANCIOMATIC PODVOZKU
19• Pre zvýšenie úchytiek Ganciomatic podvozku je potrebné
otáčať dvoma úchytkami smerom hore tak ako je to
znázornené na obrázku, pokiaľ nebudete počuť cvaknutie.
20• Pre zníženie úchytiek Ganciomatic podvozku zatiahnite za
páčku smerom von a súčasne otáčajte dvoma úchytkami
smerom nadol tak ako je to znázornené na obrázku.
PLIKO P3 + NAVETTA
Pre pripnutie športovej korby Navetta k podvozku Pliko P3
postupujte nasledujúcim spôsobom:
- zabrzdite podvozok Pliko P3;
- presuňte úchyty Ganciomatic smerom hore;
21• Otáčajte dvoma páčkami umiestnenými v zadnej časti
podvozku smerom von tak ako je to znázornené na obrázku.
22•
Presuňte podperu nôh podvozku do hornej polohy (obrázok 1).
23• Podvozok Pliko P3 je pripravený na pripnutie športovej korby
Navetta.
24• Uchopte rukoväť korby Navetta a položte korbu na úchyty
Ganciomatic podvozku s tým, že predná časť korby musí byť
protiľahlá voči rukovätiam podvozku;
- zatlačte oboma rukami na bočnú časť korby Navetta, pokiaľ
nebudete počuť cvaknutie;
- Pre odobratie korby Navetta z podvozku odkazujeme na
návod na použitie korby.
PLIKO P3 + PRIMO VIAGGIO
Pre pripnutie autosedačky k podvozku postupujte nasledujúcim
spôsobom:
- zabrzdite podvozok Pliko P3;
- pripnite prednú rukoväť (viď časť, ktorá opisuje prednú
rukoväť);
25• Podvozok Pliko P3 je pripravený na pripnutie autosedačky
Primo Viaggio;
26• Uchopte rukoväť autosedačky Primo Viaggio a umiestnite
autosedačku na úchyty Ganciomatic podvozku s tým,
že predná časť autosedačky musí byť protiľahlá voči
rukovätiam podvozku. Zatlačte oboma rukami na bočné časti
autosedačky, pokiaľ nebudete počuť cvaknutie;
- Pre odobratie autosedačky z podvozku odkazujeme na návod
na použitie autosedačky.
PREDNÁ RUKOVÄŤ
27• Podvozok je dodaný so zátkami, ktoré sú nasunuté na lakťové
operadlá; pre montáž bezpečnostnej prednej rukoväti je
potrebné tieto zátky najskôr odstrániť (zátky starostlivo
uschovajte, ak by ste chceli kočík použiť bez prednej
rukoväti). Pre odstránenie zátok stlačte tlačidlo umiestnené
pod lakťovým operadlom a súčasne zátku vytiahnite (takto
postupujte pri oboch lakťových operadlách).
28• Pre nasadenie prednej rukoväti vsuňte obidva konce rukoväti
do otvorov lakťových operadiel tak ako je to znázornené na
obrázku, pokiaľ nebudete počuť cvaknutie.
29• Prednú rukoväť môžete otvoriť len z jednej strany, vďaka
čomu si Vaše dieťa, až bude staršie, bude môcť ľahšie
sadnúť do kočíka alebo z neho vysadnúť. Pre otvorenie
prednej rukoväte stlačte tlačidlo umiestnené pod lakťovým
operadlom a súčasne presuňte rukoväť smerom von.
30• Pre odobratie prednej rukoväte stlačte obe tlačidlá
umiestnené pod lakťovými operadlami a súčasne presuňte
rukoväť smerom von.
PREMENA PODVOZKU NA KOČÍK
MONTÁŽ
31• Ak chcete premeniť podvozok Pliko P3 na kočík, uistite sa či
sú obe páčky v spodnej polohe tak ako je to znázornené na
obrázku.
32• Umiestnite opierku chrbta s poťahom na vozík tak ako je to
znázornené na obrázku.
33•
Pre pripnutie opierky chrbta k vozíku je potrebné zasunúť
obidva konce opierky, a stlačiť pritom obidve tlačidlá, do
sedačky vozíku tak, ako je to znázornené na obrázku 1, pokiaľ
nebudete počuť cvaknutie, ako je to znázornené na obrázku 2.
34• Pre pripnutie hornej časti opierky chrbta k vozíku je potrebné
otáčať úchytkou smerom hore (obrázok B, v smere šípky) a
umiestniť ju za zadný držiak.
35• Zatlačte na obidve úchytky smerom nadol, pokiaľ nebudete
počuť cvaknutie tak, aby dosadli do otvorov zadných držiakov.
36• Pre navlečenie poťahu na kočík pripnite úchytky poťahu k
lakťovým operadlám tak ako je to znázornené na obrázku
pomocou šípiek.
37• Vsuňte páčky podpery nôh do poťahu opierky chrbta tak ako
je to znázornené na obrázku.
38• Pre dokončenie tejto operácie pripnite gombíky poťahu k
základni tak ako je to znázornené na obrázku A. Pretiahnite
spodný pás na nohy pod sedačku tak ako je to znázornené na
obrázku B, a nechajte nad poťahom horný pás na nohy.
ROZLOŽENIE A ZLOŽENIE KOČÍKA
• Pre otvorenie kočíka Pliko P3 zopakujte operáciu podľa
obrázkov 2 a 3.
• Pre zloženie kočíka Pliko P3 uvoľnite bočné páčky na
polohovanie striešky, nadvihnite opierku chrbta a zopakujte
operáciu podľa obrázkov 14, 15 a 16.
NASTAVENIE PODPERY NÔH
39• Podperu nôh môžete nastaviť v troch polohách. Ak si želáte
podperu nôh znížiť, presuňte bočné páčky smerom nadol a
súčasne znížte podperu nôh. Ak si želáte podperu nôh zvýšiť,
zatlačte ho smerom nahor, pokým nebudete počuť cvaknutie.
ZADNÝ NÁŠLAPNÝ STUPIENOK
40• Zadný nášlapný stupienok uľahčuje mamičke prekonávať
Page 62

malé nerovnosti terénu a okrem toho je na nej možné
prepravovať aj ďaľšie dieťa.
POSTUP PRI UKLADANÍ DETÍ DO KOČÍKU
41• Ak chcete v kočíku Pliko P3 voziť dve deti, najskôr ho
zabrzdite, posaďte menšie dieťa do kočíka a zaistite ho
bezpečnostným pásom (1). Uchopte obidve rukoväte (2)
kočíka a potom nechajte nastúpiť druhé dieťa na nášlapnú
plošinu (3).
• Nikdy nenechávajte deti v kočíku samotné.
• Nedovoľte Vášmu dieťaťu, aby si stúplo na nášlapný
stupienok, ak je kočík prázdny.
STRIEŠKA
• Striešku môžete pripnúť aj ku športovej korbe Navetta aj ku
kočíku. Strieška je vybavená zipsom pre pripnutie plášťa.
42• Pre montáž plášťa ku korbe Navetta odopnite gombíky A a B
(obrázok 1), pripnite striešku podľa obrázku 2 a skontrolujte, či
je správne pripnutá (obrázok 3).
43• Pre pripnutie striešky ku kočíku postupujte podľa obrázku a
skontrolujte, či je správne pripnutá (viď obrázok).
44• Pre napnutie striešky presuňte páčku znázornenú na obrázku
smerom nadol. Striešku môžete sklopiť podľa sklonu opierky
chrbta.
45• Pre napnutie striešky presuňte vnútornú polohovaciu páčku
smerom nadol tak ako je to vyznačené na obrázku.
46• Celkom roztiahnite striešku tak, že odopnete zips (obrázok B).
Strieška sa sklopí podľa sklonu opierky chrbta.
47• Striešku môžete veľmi rýchlo premeniť na slnečník (viď
obrázok). Zapnite zips a pripnite striešku pomocou praktickej
úchytky.
48• Ak chcete odobrať striešku zo športovej korby Navetta, musíte
ju odopnúť z poťahu na bočných stranách tak, že odopnete
putká A a B z poťahu (viď obrázok). Z oboch strán stlačte
jazýček a striešku odopnite.
49• Pre odobratie striešky z kočíka stlačte z oboch strán jazýček
znázornený na obrázku A.
Striešku uvoľnite a vytiahnite smerom nahor tak ako je to
vyznačené na obrázku B.
ŠPORTOVÁ KORBA NAVETTA
RUKOVÄŤ
50• Pre presunutie rukoväte do hornej polohy na ňu zatlačte
smerom nahor pokiaľ nebudete počuť cvaknutie. Rukoväť je
zablokovaná len v prípade, že je vo vertikálnej polohe a dve
poistky sú príslušne zacvaknuté.
51• Pre zníženie rukoväte ju odblokujte tak, že zatlačíte smerom
nahor na dve poistky a súčasne zatlačíte na rukoväť smerom
nadol.
52• Rukoväť uľahčuje prepravu a pripnutie športovej korby k
podvozku a kočíku.
HÚPAČKA A POSTIEĽKA
53• Spodná časť športovej korby Navetta má zvláštnu formu,
vďaka ktorej je možné korbu húpať, ak ju položíte na rovnú
plochu.
54• Ak vytiahnete zasunuté podstavce tak, ako je to uvedené
na obrázku, športová korba Navetta sa premení na malé
hniezdočko, ktoré však nie je možné húpať.
NASTAVENIE OPIERKY CHRBTA
55• Výška opierky chrbta sa dá nastaviť podľa potreby tak, že
vytiahnete a budete otáčať rukoväťou tak ako je to vyznačené
na obrázku.
NASTAVENIE CIRKULÁCIE VZDUCHU
56• V spodnej časti športovej korby Navetta sú zabudované
zatvárateľné otvory, ktoré umožňujú prívod vzduchu zospodu.
Ak chcete otvoriť otvory v prednej časti športovej korby
(strana, na ktorej je strieška), zatlačte na obidve úchytky
smerom von.
57• Ak chcete otvoriť otvory v zadnej časti (strana protiľahlá
vzhľadom k strieške), zatlačte na jednu z dvoch úchytiek
smerom von.
ZVLIEKNUTIE POŤAHOV
58• Ak chcete stiahnuť poťah, odopnite putká z bočných strán a
poťah vytiahnite smerom dopredu.
59• Odoberte dva jazýčky z podvozku vzadu a poťah odstráňte.
PRIPNUTIE A ODOPNUTIE ŠPORTOVEJ KORBY KU/OD KOČĺKU
Športová korba Navetta je vybavená systémom Ganciomatic,
ktorý umožňuje pripnúť korbu ku kočíku Pliko P3 pomocou
úchytiek Ganciomatic.
60• Pre odobratie športovej korby z kočíka najskôr z boku zatlačte
na rukoväť (umiestnená na strane protiľahlej vzhľadom k
strieške) a potom ju presuňte smerom nahor a súčasne
zdvihnite kočík pomocou prednej rukoväte smerom nahor.
ŠPORTOVÁ KORBA V AUTE
61• Športová korba Navetta je navrhnutá tak, aby mohla byť
premenená pomocou dvoch úchytiek (viď obrázok) a sady
Auto (potrebné zakúpiť zvlášť) na Navetta AUTO.
DETAILY MODULÁRNEHO SYSTÉMU ON TRACK
NÁNOŽNÍK
62• Na pripnutie nánožníka ho musíte zapnúť na zips k podpere
nôh, ako je to vyznačené na obrázku.
Pripnite nánožník pomocou dvoch gombíkov tak, ako je to
uvedené na obrázku B.
PLÁŠŤ
63• Pre montáž plášťa ho musíte zapnúť na zips k strieške.
64• Pripevnite gombík na gume ku gombíku na kočíku, ako je
znázornené na obrázku, pokiaľ nezačujete kliknutie.
65• Pripnite spodný gumový pásik plášťa ku kolesu kočíka.
66• Praktický plášť môžete stiahnuť tak, že ho odopnete od
striešky kočíka. Plášť zostane ku kočíku pripevnený vďaka
gumovým pásikom.
67• Tento plášť je vyrobený tak, aby ste ho mohli použiť v prípade,
že k sedačke pripevníte detskú autosedačku Primo Viaggio. Aj
v tomto prípade zaručujeme stopercentnú ochranu.
• Nepoužívajte plášť v uzatvorených priestoroch a pravidelne
kontrolujte, či nie je Vaše dieťa pod plášťom prehriate.
• Nenechávajte plášť z PVC v blízkosti zdrojov tepla a dávajte
pozor na to, aby ste ho neprepálili cigaretou.
• Uistite sa, či plášť nebráni v pohybe žiadnemu mechanizmu
podvozku a kočíku.
• Pred zložením podvozku alebo kočíku plášť vždy odopnite.
• Plášť čistite handrou a mydlovou vodou. Nepoužívajte čistiace
prostriedky.
BEZPEČNOSTNÝ PÁS
68• Uistite sa, či je popruh správne zasunutý, a to tak, že naň
zatlačíte, ako je to znázornené na obrázku A. Pripnite popruh
podľa obrázku B.
69• Pre odopnutie pásu zatlačte na spony z oboch strán (obrázok
A) a súčasne vytiahnite smerom von brušný pás (obrázok B).
70• Nový bezpečnostný pás je ľahšie použiteľný, pretože je
vybavený systémom “pripnúť a odopnúť”. Pred zapnutím pásu
pripnite sponu k opierke chrbta tak, že zasuniete jazýček do
príslušného priechodu podľa obrázku; potom, akonáhle
zaistíte Vaše dieťa bezpečnostným pásom, odopnite
pás od opierky chrbta, aby sa Vaše dieťa mohlo voľne
pohybovať. Spona musí zostať pod ramenami dieťaťa.
NASTAVENIE OPIERKY CHRBTA
71• Opierku chrbta môžete nastaviť v štyroch polohách. Ak si
želáte opierku chrbta znížiť, nadvihnite páčku znázornenú
(obrázok A) a súčasne znížte opierku chrbta (obrázok B); v
želanej polohe opierku zablokujte.
Naopak ak si želáte opierku chrbta zvýšiť, zatlačte ju smerom
nahor.
ZVLIEKANIE POŤAHOV
72• Ak si želáte zvliecť poťah kočíka, uvoľnite úchytky poťahov z
lakťových operadiel podľa znázornených šípok.
73• Odskrutkujte pásik (iba z jednej strany) tak ako je to
znázornené na obrázku, s tým, že pritom pridržíte jeden prst
pod maticou.
74• Odopnite gombíky poťahu na bokoch tak ako je to
znázornené na obrázku. Stiahnite pás na nohy zospodu
sedačky.
75• Ak chcete zvlieknuť poťah kočíka, odopnite gombíky poťahu
Page 63

sedačky a stiahnite poťah z úchytiek podpery nôh. Stiahnite
poťah zhora.
GANCIOMATIC SYSTEM s PLIKO P3 VO VERZII KOČÍKA
Ganciomatic System je veľmi praktický a rýchly systém, ktorý Vám
umožní ku kočíku Pliko P3 pripnúť, vďaka úchytkám Ganciomatic,
športovú korbu Navetta a autosedačku Primo Viaggio, ktoré sú tiež
vybavené systémom Ganciomatic System.
ÚCHYTKY GANCIOMATIC KOČÍKA
76• Pre zdvihnutie úchytiek Ganciomatic kočíka nadvidnite poťah
v rohoch sedadla a otáčajte obidve úchytky smerom nahor,
pokým nebudete počuť cvaknutie.
77• Pre zníženie úchytiek Ganciomatic kočíka zatiahnite za páčku
smerom von a súčasne otáčajte úchytky smerom nadol, ako je
to znázornené na obrázku.
PLIKO P3 + NAVETTA
78• Pre pripnutie športovej korby k autosedačke postupujte
nasledujúcim spôsobom:
- zabrzdite kočík;
- úplne znížte opierku chrbta kočíka (presuňte ju do hraničnej
spodnej polohy);
- presuňte úchytky Ganciomatic kočíka smerom nahor;
- odstráňte prednú rukoväť a vsuňte do príslušných otvorov
ochranné zátky, ktoré sú súčasťou vybavenia, čím zaistíte
lakťové operadlá kočíka;
- presuňte podperu nôh kočíka do hornej polohy;
- uchopte rukoväť korby Navetta;
- umiestnite korbu Navetta na úchytky Ganciomatic kočíka s
tým, že predná časť korby musí byť protiľahlá voči rukovätiam
kočíka;
- zatlačte oboma rukami na bočné časti korby Navetta, pokým
nebudete počuť cvaknutie;
- Pre vybratie korby Navetta z kočíka sa odvolávame na návod
na použitie korby.
PLIKO P3 + PRIMO VIAGGIO
79• Pre pripnutie autosedačky ku kočíku postupujte nasledujúcim
spôsobom:
- zabrzdite kočík;
- úplne znížte opierku chrbta kočíka (presuňte ju do hraničnej
spodnej polohy);
- presuňte úchytky Ganciomatic kočíka smerom nahor;
- umiestnite autosedačku smerom k mamičke a zatlačte na ňu
smerom nadol, pokým nebudete počuť cvaknutie;
- Pri pripevňovaní autosedačky doporučujeme nechať v kočíku
prednú rukoväť;
• Pre vybratie autosedačky z kočíku sa odvolávame na návod na
použitie autosedačky.
PREMENA KOČÍKA NA PODVOZOK
Pre premenu kočíka na podvozok z neho musíte najskôr zvlieknuť
poťah.
80• Zvlieknite z kočíka poťah tak, že uvoľníte úchytky poťahu z
lakťových operadiel tak ako to vyznačujú šípky.
81• Odopnite gombíky poťahu na bokoch tak ako je to
znázornené na obrázku. Stiahnite pás na nohy zospodu
sedačky.
82• Odopnite gombíky poťahu sedadla a stiahnite poťah z
úchytiek podpery nôh. Stiahnite poťah zhora.
83• Uvoľnite základňu stlačením tlačidla, ktoré je umiestnené v
zadnej časti podvozku (viď obrázok); ako na pravej, tak aj na
ľavej strane. Oboma rukami nadvihnitete opierku chrbta.
84• Oboma rukami stlačte obidve tlačidá na sedadle vozíka a
nadvihnite celú základňu tak ako je to vyznačené na obrázku.
DOPLNKY
85• Taška pre prebaľovanie dieťaťa (vrátane): taška s
matracom pre prebalenie dieťaťa, ktorú môžete pripnúť ku
kočíku.
86• Sieť proti hmyzu: sieť proti hmyzu so zipsom, ktorú môžete
pripnúť ku strieške kočíka so zipsom.
87• Cestovná taška: praktická taška pre leteckú prepravu kočíka.
88• Kit Auto Navetta: Môžete si vyžiadať sadu Kit auto (schválená
v súlade s normou ECE R44/04), ktorá obsahuje všetky
nevyhnutné prvky pre montáž športovej korby v aute.
89• Plášť Cover All: Plášť z priehľadného PVC zaisťuje kompletnú
ochranu športovej korby pripevnenej ku kočíku.
PUHDISTUS JA HUOLTO
Tuote vaatii hyvin vähän huoltoa. Vain aikuinen saa puhdistaa ja
huoltaa tuotetta.
• On tärkeää pitää kaikki liikkuvat osat puhtaina ja voidella ne
tarvittaessa kevyellä öljyllä.
• Kuivaa tuotteen metalliosat, jotta ne eivät pääse ruostumaan.
• Puhdista muoviosat säännöllisin väliajoin kostealla kankaalla: älä
käytä liuotteita tai muita vastaavia tuotteita.
• Harjaa tekstiiliosat pölyn poistamiseksi.
• Pidä pyörät puhtaina pölystä ja hiekasta.
• Suojaa tuote sateelta, vedeltä ja lumelta. Jatkuva altistuminen
auringonvalolle voi aiheuttaa monissa materiaaleissa värien
haalistumista.
• Säilytä tuotetta kuivassa paikassa.
• Voit pestä verhoilupussin seuraavien ohjeiden mukaan.
POZOR
PLIKO P3
• TENTO VÝROBOK BOL NAVRHNUTÝ NA PREPRAVU
JEDNÉHO DIEŤAŤA V SEDE E JEDNÉHO DIEŤAŤA
POSTOJAČKY NA ZADNEJ PLOŠINE.
• NEPOUŽÍVAJTE VÝROBOK PRE VÄČŠÍ POČET OSOB NEŽ TEN
UVEDENÝ VÝROBCOM.
• TENTO KOČÍK BOL SCHVÁLENÝ NA POUŽITIE PRE DETI
OD NARODENIA DO MAXIMÁLNEJ HMOTNOSTI 15
KG. ZÁVESNÉ STÚPADLO ZA KOČÍK BOLO SCHVÁLENÉ
NA PREVOZ DRUHÉHO DIEŤAŤA S MAXIMÁLNOU
HMOTNOSŤOU 20 KG.
• AKONÁHLE JE DIEŤA SCHOPNÉ SAMOSTATNE SEDIEŤ,
POUŽÍVAJTE SYSTÉM BEZPEČNOSTNÝCH PÁSOV.
• TENTO VÝROBOK JE URČENÝ PRE POUŽITIE V KOMBINÁCII
S VÝROBKAMI PEG PEREGO GANCIOMATIC: NAVETTA,
PORTE ENFANT SOFT, AUTOSEDAČKA PRIMO VIAGGIO.
• MONTÁŽ A PRÍPRAVU VÝROBKU MUSÍ PREVÁDZAŤ
DOSPELÁ OSOBA.
• VÝROBOK NEPOUŽÍVAJTE, AK NIEKTORÉ SÚČIASTKY
CHÝBAJÚ, ALEBO AK SÚ ZLOMENÉ A POŠKODENÉ.
• VŽDY POUŽÍVAJTE PÄŤBODOVÉ BEZPEČNOSTNÉ PÁSY;
VŽDY POUŽÍVAJTE MEDZINOŽNÝ PÁS V SPOJENÍ S PÁSOM,
KTORÝ PRECHÁDZA OKOLO PÁSA DIEŤAŤA.
• PONECHANIE DIEŤAŤA BEZ DOZORU MÔŽE BYŤ
NEBEZPEČNÉ.
• AK KOČÍK NIE JE V POHYBE, VŽDY POUŽÍVAJTE BRZDY.
• PRED POUŽITÍM SKONTROLUJTE, ČI SÚ VŠETKY UPÍNACIE
MECHANIZMY SPRÁVNE UPEVNENÉ.
• PRED POUŽITÍM SKONTROLUJTE, ČI SÚ AUTOSEDAČKA A
PRENOSNÁ VANIČKA SPRÁVNE UPEVNENÉ.
• DÁVAJTE POZOR, ABY STE NEVLOŽILI PRSTY DO
MECHANIZMOV.
• PRI ÚPRAVE MECHANIZMOV (RUKOVÄTE, OPIERKY
CHRBTA), DÁVAJTE POZOR NA VAŠE DIEŤA.
• NAVÝŠENIE HMOTNOSTI NA RUKOVÄŤ ALEBO NA RÚČKY
MÔŽE SPÔSOBIŤ NESTABILNOSŤ VÝROBKU; DODRŽIAVAJTE
POKYNY VÝROBCU V SÚVISLOSTI S MAXIMÁLNOU
HMOSTNOSŤOU NÁKLADU.
• PREDNÁ HRAZDIČKA NIE JE KONŠTRUOVANÁ TAK, ABY
UNIESLA CELÚ VÁHU DIEŤAŤA; PREDNÁ HRAZDIČKA NIE JE
KONŠTRUOVANÁ TAK, ABY UDRŽALA DIEŤA V SEDAČKE A V
ŽIADNOM PRÍPADE NENAHRÁDZA BEZPEČNOSTNÝ PÁS.
• DO KOŠÍKA NEVKLADAJTE NÁKLAD VYŠŠÍ AKO 5 KG. DO
DRŽIAKA NA NÁPOJE NEVKLADAJTE PREDMETY, KTORÉ
Page 64

• FONTOS: Figyelmesen olvassák el ezeket az utasításokat
és őrizzék meg a jövőbeni felhasználás céljából.
A gyermek biztonságát veszélyeztethetik azzal, ha nem
tartják be ezeket az utasításokat.
• A Peg Perego az ebben a kiadásban ismertetett modelleknél
műszaki vagy kereskedelmi jellegű okokból kifolyólag bármikor
végrehajthat módosításokat.
Peg Perego R.t. ISO 9001 tanúsítvánnyal rendelkezik.
A tanúsítvány a vállalati munkamódszer
rendszerezettségének és az abban való bizalomnak
a garanciáját kínálja az ügyfeleknek és a
fogyasztóknak.
VEVŐSZOLGÁLAT
Ha véletlenül a modell részei elvesznek vagy károsodnak, akkor
csak eredeti Peg Perego alkatrészeket használjon! Az esetleges
javítások, cserék, a termékekkel kapcsolatos információk valamint
az eredeti alkatrészek és tartozékok értékesítése ügyében vegye fel
a kapcsolatot a Peg Perego Vevőszolgálatával:
tel.:0039-039-60.88.213,
fax: 0039-039-33.09.992, a
e-mail: assistenza@pegperego.it,
www.pegperego.com
A Peg Perego a fogyasztóinak rendelkezésére áll minden igényük
legjobb kielégítése céljából. Ehhez az ügyfeleink véleményének
megismerése számunkra rendkívül fontos és értékes. Ezért nagyon
hálásak lennénk, ha a termékünk használatbavétele után kitöltené
a FOGYASZTÓ ÉRTÉKELÉSE KÉRDŐÍVET, amelyet az alábbi internet
címen talál meg: www.pegperego.com
Ott feltüntetheti az esetleges észrevételeit vagy ötleteit.
PLIKO P3
• A Pliko P3 az eltávolítható háttámlának köszönhetően akár
kocsiváz, akár sportkocsi változatban felhasználható.
HASZNÁLATI UTASÍTÁS
SZÉTNYITÁS
1• A kocsiváz szétnyitása előtt le kell venni a horgokat védő két
dugót az ábra szerint, máskülönben nem nyílik szét helyesen.
2• A kocsiváz szétnyitásához felfelé kell húzni a fogantyúkon lévő
két kart az ábra szerint.
3• Ezzel egyidejűleg emeljék fel a kocsivázat, amely ekkor
automatikusan szétnyílik.
Annak vizsgálatához, hogy a sportkocsi helyesen ki van-e
nyitva, ellenőrizzék a két oldalsó horgot (lásd ábra).
ÖSSZEÁLLÍTÁS
4• Az első kerekek felszereléséhez engedjék le az A kart és
illesszék be a kereket kattanásig a B ábra szerint.
5• A hátsó kerekek felszereléséhez akasszák be a fékhuzal által
összetartozó kerekeket az ábra szerint.
6• A két hátsó kerék helyes beakasztása érdekében tegyenek
különbséget a BAL és a JOBB kerék között. Egy bordázat
látható a BAL kerék csövén és egy a vázon a helyes beakasztás
biztosításához (lásd ábra).
7• Ellenőrizzék a kattanással jelzett helyes beakasztást az ábra
szerint.
8• A kosár felerősítéséhez helyezzék az akasztókat az elülső A
kampókra és a hátsó B és C kampókra.
9• Az ábra a beakasztott kosarat mutatja.
10•
A sportkocsi mindkét oldalán található fogantyúnak
köszönhetően, az italtartó a sportkocsi bal vagy
jobb oldalára szerelhető. Az italtartó felszereléséhez
akasszák be azt kattanásig, ahogy azt az A ábra mutatja.
Beakasztott italtartó, B ábra.
0,5 kg-nál (1 lbs) nagyobb súlyú és meleg italoknak az
PREVYŠUJÚ HMOTNOSTNÝ LIMIT SAMOTNÉHO DRŽIAKA
NA NÁPOJE, A NIKDY DOŇ NEVKLADAJTE HORÚCE
NÁPOJE. DO VRECKA NA STRIEŠKE (AK JE SÚČASŤOU
VÝBAVY) NEVKLADAJTE PREDMETY PREVYŠUJÚCE
HMOTNOSŤ 0,2 KG.
• NEPOUŽÍVAJTE VÝROBOK V BLÍZKOSTI SCHODOV ALEBO
SCHODISKA; NEPOUŽÍVAJTE V BLÍZKOSTI ZDROJA
TEPLA, OTVORENÉHO OHŇA ALEBO NEBEZPEČNÝCH
PREDMETOV, KTORÉ SÚ V DOSAHU DIEŤAŤA.
• POUŽITIE PRÍSLUŠENSTVA, KTORÉ NEBOLO SCHVÁLENÉ
VÝROBCOM, MÔŽE BYŤ NEBEZPEČNÉ.
• TENTO VÝROBOK NIE JE VHODNÝ PRE JOGGING ALEBO
KORČUĽOVANIE.
• POČAS OPERÁCIÍ SPOJENÝCH S NAKLADANÍM A
VYKLADANÍM DETÍ ZABRZDITE BRZDY KOČÍKA.
POZOR
ŠPORTOVÁ KORBA NAVETTA
• TENTO VÝROBOK JE URČENÝ LEN PRE DETI, KTORÉ SÚ
SCHOPNÉ SAMI SEDIEŤ.
• TENTO VÝROBOK JE URČENÝ PRE DETI S HMOTNOSŤOU
DO 9 KG.
• POUŽÍVAJTE VÝROBOK LEN NA TVRDÝCH, VODOROVNÝCH
A SUCHÝCH POVRCHOCH.
• JE NEBEZPEČNÉ NECHÁVAŤ DIEŤA BEZ DOZORU.
• NEDOVOĽTE, ABY SA INÉ DETI HRALI V BLÍZKOSTI KOČÍKA.
• VŠETKY OPERÁCIE SPOJENÉ S MONTÁŽOU A NASTAVENÍM
VÝROBKU MUSIA BYŤ VYKONÁVANÉ DOSPELOU OSOBOU.
• NEPOUŽÍVAJTE VÝROBOK V PRÍPADE, ŽE JE POŠKODENÝ
ALEBO ŽE CHÝBA NIEKTORÁ JEHO ČASŤ.
• NEPOUŽÍVAJTE PRÍDAVNÉ MATRACE.
• PRED POUŽITÍM VÝROBKU SA UISTITE, ČI SÚ VŠETKY
PRIPÍNACIE MECHANIZMY SPRÁVNE PRIPOJENÉ.
• PRED POUŽITÍM VÝROBKU SA UISTITE, ČI SÚ
AUTOSEDAČKA, KOČÍK ALEBO SEDADLO SPRÁVNE
PRIPNUTÉ.
• NEVSÚVAJTE PRSTY DO MECHANIZMOV VÝROBKU.
• PRI NASTAVOVANÍ JEDNOTLIVÝCH MECHANIZMOV
(RUKOVÄŤ, OPIERKA CHRBTA) DÁVAJTE POZOR NA DIEŤA
USADENÉ V KOČÍKU.
• NEPOUŽÍVAJTE VÝROBOK V BLÍZKOSTI ZDROJOV TEPLA,
OHŇA ALEBO INÝCH NEBEZPEČNÝCH PREDMETOV, NA
KTORÉ MÔŽE DIEŤA DOČIAHNUŤ.
• POUŽITIE DOPLNKOV, KTORÉ NIE SÚ SCHVÁLENÉ
VÝROBCOM, MÔŽE BYŤ NEBEZPEČNÉ.
• PRAVIDELNE KONTROLUJTE RUKOVÄŤ (RUKOVÄTE)
A SPODOK VÝROBKU: NESMIE VYKAZOVAŤ ZNAKY
OPOTREBOVANIA ALEBO POŠKODENIA.
• PRI POUŽITÍ KOČÍKU S PODVOZKOM SKONTROLUJTE
MAXIMÁLNU DĹŽKU KOČÍKA, KTORÁ JE UVEDENÁ NA
PODVOZKU.
HU•MAGYAR
Page 65
italtartóba történ[ő betöltése nem javasolt.
FÉK
11• A Pliko P3 fékezéséhez lábbal engedjék le a hátsó kerekekre
szerelt karokat az ábra szerint.
• A fékek kiengedéséhez az ellentétes irányban járjanak el.
• Álló helyzetben mindig állítsák be a fékeket.
BOLYGÓKEREKEK
12• Az elülső kerekek bolygókerekekké alakításához a kar
leengedése szükséges az A ábra szerint. A rögzítésükhöz az
ellentétes irányban mozdítsák el a kart a B ábra szerint.
A MARKOLATOK BEÁLLÍTÁSA
13• A markolatok magassága két pozícióba beállítható. A felső
pozícióhoz nyomják be a gombot és egyidejűleg emeljék
felfelé a markolatot. A leengedéséhez az ellentétes irányban
járjanak el.
ÖSSZECSUKÁS
• A Pliko P3 összecsukása előtt a Navetta vagy a Primo
Viaggio autós gyerekülés lekapcsolása szükséges.
14• A sportkocsi összecsukható akár csak egy kézzel is: először az
egyik majd a másik kart húzzák felfelé kattanásig.
15•
Fogják meg a középső fogantyút (3. ábra) és húzzák felfelé
egészen az összecsukásig az ábra szerint.
16• Ellenőrizzék a kocsiváz helyes összecsukását a biztonsági
kapocsnál. Az összecsukott kocsiváz egymagában megáll.
SZÁLLÍTÁS
17• A Pliko P3 a középső fogantyúnál megfogva kényelmesen
szállítható az ábra szerint (az első kerekeket ne
bolygókerekekként állítsák be).
18• Az oldalsó fogantyú segítségével is szállítható az ábra szerint.
GANCIOMATIC SYSTEM a
PLIKO P3 KOCSIVÁZ VÁLTOZATÁNÁL
A Ganciomatic System egy olyan praktikus és gyors rendszer,
amely a Ganciomatic kapcsoknak köszönhetően lehetővé teszi
az ugyancsak Ganciomatic rendszerrel felszerelt Navetta és Primo
Viaggio rákapcsolását a Pliko P3 kocsiváz változatára.
GANCIOMATIC KAPCSOK A KOCSIVÁZON
19• A kocsiváz Ganciomatic kapcsainak felállításához forgassák
felfelé a két kapcsot kattanásig az ábra szerint.
20• A kocsiváz Ganciomatic kapcsainak leengedéséhez húzzák a
kültér irányába a kart és ezzel egyidejűleg forgassák lefelé a
kapcsokat az ábra szerint.
PLIKO P3 + NAVETTA
A Navetta mózeskosárnak a Pliko P3 kocsiváz változatára történő
rákapcsolásához szükséges:
- A Pliko P3 lefékezése;
- A Ganciomatic kapcsok felállítása;
21• Forgassák el a kocsiváz hátsó részén elhelyezett két kart a
kültér felé az ábra szerint;
22• Emeljék fel a kocsiváz lábtartóját a legmagasabb pozícióba (1.
ábra);
23• A Pliko P3 Naked kocsiváz változat ekkor készen áll arra, hogy
a Navettát rákapcsolják;
24• Fogják meg a Navettát a fogantyújánál és helyezzék a kocsiváz
Ganciomatic kapcsaira úgy, hogy a Navicella fejrésze a
kocsiváz markolataival ellentétes oldalra kerüljön;
- A Navettát az oldalainál mindkét kézzel megfogva nyomják rá
kattanásig;
- A Navetta mózeskosár kocsivázról történő lekapcsolásához
tanulmányozzák az ahhoz tartozó használati utasítást.
PLIKO P3 + PRIMO VIAGGIO
Az autós gyerekülésnek a kocsivázra történő kapcsolásához
szükséges:
- A Pliko P3 lefékezése;
- A biztosítópánt beakasztása (lásd a biztosítópánt bekezdést
alul);
25• A Pliko P3 kocsiváz változat készen áll arra, hogy a Primo
Viaggio gyerekülést rákapcsolják;
26• Fogják meg a gyerekülést a fogantyújánál és helyezzék a
kocsiváz Ganciomatic kapcsaira úgy, hogy a gyerekülés
fejrésze a kocsiváz markolataival ellentétes oldalra kerüljön. A
gyerekülést az oldalainál mindkét kézzel megfogva nyomják
rá kattanásig;
- Az autós gyerekülés kocsivázról történő lekapcsolásához
tanulmányozzák az ahhoz tartozó használati utasítást.
BIZTOSÍTÓPÁNT
27• A kocsiváz a kartámláira illesztett záródugókkal rendelkezik; a
biztosítópánt beakasztásához azokat először el kell távolítani
(őrizzék meg a dugókat arra az esetre, ha a sportkocsit
biztosítópánt nélkül kívánják használni). A dugók levételéhez
nyomják be a kartámla alatti gombot és ezzel egyidejűleg
húzzák ki a dugót (ezt mindkét kartámlánál hajtsák végre).
28• A biztosítópánt beakasztásához illesszék be kattanásig a
biztosítópánt két végét a kartámlákba az ábra szerint.
29• A biztosítópánt kinyitható csak az egyik oldalról a már
nagyobb gyermek be- és kiszállásának megkönnyítéséhez.
A kinyitásához nyomják meg a kartámla alatt elhelyezett
gombot és ezzel egyidejűleg húzzák a biztosítópántot a kültér
irányába.
30• A biztosítópánt levételéhez nyomják meg a kartámlák
alatt elhelyezett két gombot és ezzel egyidejűleg húzzák a
biztosítópántot a kültér irányába.
A KOCSIVÁZ SPORTKOCSIVÁ TÖRTÉNŐ ÁTALAKÍTÁSA
ÖSSZEÁLLÍTÁS
31• A Pliko P3 kocsiváz változat sportkocsivá történő
átalakításához meg kell bizonyosodni arról, hogy a két kart
leengedték az ábra szerint.
32• Helyezzék a háttámlát a zsákkal a kocsiváz ülőrészére az ábra
szerint.
33• A háttámla kocsivázba történő beakasztásához illesszék be a
két végét az 1. ábra szerint úgy, hogy nyomják be a kocsiváz
ülőrészén lévő két gombot kattanásig a 2. ábra szerint.
34• A háttámla szabályozó szelvénynek a kocsivázhoz történő
beakasztásához felfelé kell forgatni a kapcsot (B. ábra, a nyíl
irányában) és beállítani a hátsó merevítőrúd mögé.
35• Nyomják lefelé kattanásig a két kapcsot a hátsó
merevítőrudak foglalataiba.
36• A sportkocsi huzatának rögzítéséhez akasszák be a zsák
kapcsait a kartámlákhoz, ahogy azt a nyilak az ábrán jelölik.
37• Vezessék be a lábtartón lévő karokat a háttámla zsákjába az
ábra szerint.
38•
A zsák kocsivázra erősítésének befejező műveleteként
gombolják a zsák gombjait az alapzathoz az A ábra szerint.
Vezessék be az alsó lábválasztó szíjat az ülés alá a B ábra szerint,
miközben hagyják a felső lábválasztót a zsák fölött.
SZÉTNYITÁS ÉS ÖSSZECSUKÁS
• A Pliko P3 sportkocsi változat szétnyitásához ismételjék meg a
2. és 3. ábrán látható műveleteket.
• A Pliko P3 sportkocsi változat összecsukásához engedjék ki a
kocsitető támaszkarokat, emeljék fel a háttámlát és ismételjék
meg a 14., 15 és 16. ábrán látható műveleteket.
LÁBTARTÓ BEÁLLÍTÁSA
39• A lábtartó három pozícióba állítható. A lábtartó
leengedéséhez húzzák lefelé a két odalsó kart és egyidejűleg
engedjék le a lábtartót. A lábtartó felemeléséhez azt tolják
felfelé kattanásig.
HÁTSÓ KOCSILÉPCSŐ
40• A hátsó kocsilépcső segítséget nyújt a mamának a kisebb
szintkülönbségek leküzdésében és ezenkívül a másik
gyermekét is szállíthatja rajta.
TERHELÉSI SORREND
41• A Pliko P3 két gyermekkel történő használata esetén először
le kell fékezni a Pliko-t, ezután elhelyezni a kisebb gyermeket
az ülésen és bekapcsolni a biztonság övet (1). Fogják meg
a markolatokat (2) és szállítsák fel a másik gyermeket a
kocsilépcsőre (3).
• Soha ne hagyják egyedül a gyermekeiket.
• Ne engedjék meg a gyermeknek a hátsó kocsilépcsőre
történő felszállást akkor, amikor a sportkocsi üres.
Page 66
ON TRACK MODULÁRIS RENDSZER RÉSZLETEI
TA KA RÓ
62• A takaró felerősítéséhez húzzák össze a takaró és a lábtartó
czipzárját az ábra szerint.
A takaró rögzítéséhez gombolják be a két gombot, ahogy azt
a B ábra mutatja.
ESŐVÉDŐ
63• Az esővédő felerősítéséhez az esővédő és a kocsitető
czipzárjának összehúzása szükséges.
64• Kapcsolják be kattanásig a gumiszalag gombját a sportkocsi
gombjához az ábra szerint.
65• Rögzítsék az esővédő legalsó gumiszalagját a kerékhez.
66• A praktikus esővédő alkalmas arra, hogy a czipzár lehúzásával
lenyissák úgy, hogy a gumiszalagok segítségével rögzítve
maradjon a sportkocsihoz.
67• Ezt az esővédőt a teljes védelem biztosítása érdekében arra az
esetre is tervezték, amikor a Primo Viaggio autós gyerekülést
kapcsolják a sportkocsira.
• Ne használják az esővédőt zárt helyiségekben és mindig
ellenőrizzék, hogy a gyermek ne melegedjen ki.
• Ne helyezzék a PVC-ből készült esővédőt hőforrások közelébe
és dohányzás esetén vigyázzanak.
• Győződjenek meg arról, hogy az esővédő nem ütközik
a kocsiváz vagy a sportkocsi egyik mozgásban lévő
szerkezetével sem.
• Mindig vegyék le az esővédőt, mielőtt összecsukják a
kocsivázat vagy a sportkocsit.
• Szivaccsal és szappanos vízzel, mosószer alkalmazása nélkül
mossák le.
BIZTONSÁGI ÖV
68• Győződjenek meg arról, hogy a vállpánt helyesen be van-e
vezetve oly módon, hogy nyomják azt be az A ábra szerint.
Kapcsolják be az övet a B ábra szerint.
69• Az öv kikapcsolásához nyomják be a csat oldalait (A ábra) és
egyidejűleg húzzák a kültér irányába a derékövet (B ábra).
70• Mától kezdve egyszerűbb az új biztonsági öv viselete a
“kattintsd be és kattintsd ki” rendszernek köszönhetően.
Valóban, az öv bekapcsolása előtt kattintsák be a kis csatot
a háttámlához oly módon, hogy vezessék be a nyelvecskét
a megfelelő nyílásba az ábra szerint; majd miután
bekapcsolták az övet a gyermekükön, kattintsák le azt
a háttámláról a gyermek szabad mozgásának lehetővé
tételéhez. A kis csatnak a gyermek vállai alatt kell maradnia.
HÁTTÁMLA BEÁLLÍTÁSA
71• A háttámla négy pozícióba dönthető. A háttámla
leengedéséhez húzzák fel a fogantyút (A ábra) és egyidejűleg
engedjék le a háttámlát (B ábra) majd a kívánt pozícióban
rögzítsék. A háttámla felemeléséhez azt tolják felfelé.
HUZAT LEVÉTELE
72• A sportkocsi huzatának levételéhez akasszák le a zsák
illesztőkapcsait a kartámlákról, mint ahogy azt a nyilak jelzik.
73• Gombolják le a zsák gombjait az ülésről és húzzák le ahhoz,
hogy a zsák levehető legyen a lábtartó akasztóiról.
74•
Gombolják le oldalt a zsák gombjait az ábra szerint. Húzzák ki az
öv lábválasztó részét az ülés alól.
75•
Gombolják le a zsák gombjait az ülésről és emeljék meg a
zsákot ahhoz, hogy az lehúzható legyen a lábtartó kapcsairól.
Felülről húzzák le a zsákot.
GANCIOMATIC SYSTEM a
PLIKO P3 SPORTKOCSI VÁLTOZATÁNÁL
A Ganciomatic System egy olyan praktikus és gyors rendszer,
amely a Ganciomatic kapcsoknak köszönhetően lehetővé teszi
az ugyancsak Ganciomatic rendszerrel felszerelt Navetta és Primo
Viaggio rákapcsolását a Pliko P3 sportkocsi változatára.
GANCIOMATIC KAPCSOK A SPORTKOCSIN
76• A sportkocsi Ganciomatic kapcsainak felállításához húzzák
fel a zsákot az ülés sarkainál és forgassák felfelé a két kapcsot
kattanásig.
77• A sportkocsi Ganciomatic kapcsainak leengedéséhez húzzák
KOCSITETŐ
• A kocsitető a Navicella Navettára és a sportkocsira egyaránt
felhasználható és felkapcsolható. Villámzárral van ellátva az
esővédő felerősítése céljából.
42• A kocsitető Navicella Navettára történő felszereléséhez
gombolják ki az A és a B gombokat (1. ábra). Kapcsolják rá a
kocsitetőt, ahogyan azt a 2. ábra jelzi és ellenőrizzék a helyes
rákapcsolást, 3. ábra.
43•
A kocsitető sportkocsira történő felszereléséhez azt kapcsolják rá
az ábra szerint és ellenőrizzék a helyes rákapcsolást (lásd ábra).
44• A kocsitető kifeszítéséhez nyomják lefelé a támaszkart. A
kocsitető a háttámla dőlésének megfelelően lehajtható.
45• A kocsitető kifeszítéséhez nyomják lefelé a belső felén
elhelyezett támasztókart, az ábra szerint.
46• Teljesen nyújtsák ki a kocsitetőt a villámzár lehúzásával, B ábra.
A kocsitető a háttámla dőlését követi.
47• A kocsitető könnyen átalakítható napellenzővé, az ábra
alapján. Húzzák össze a villámzárat és a praktikus akasztóval
rögzítsék a kocsitetőt.
48• A naptetőnek a Navetta babahordozóról történő levételéhez,
kapcsolják le azt oldalról a huzatról. Kapcsolják le az A és B
nyílást a huzatról az ábra szerint, nyomják be a kocsi mindkét
oldalán található nyelvecskét és kapcsolják le a naptetőt.
49• A kocsitető sportkocsiról való levételéhez nyomják be a
nyelvet a kocsitető mindkét oldalán az A ábra szerint.
NAVETTA MÓZESKOSÁR
FOGANTYÚ
50• A fogantyú felemeléséhez azt húzzák felfelé kattanásig.
A fogantyú csak akkor van rögzítve, amikor a függőleges
pozíciót eléri és a két retesz visszatért a saját mélyedésébe.
51• A fogantyú leengedéséhez azt oldják ki úgy, hogy nyomják
felfelé a két reteszt és ezt követően tolják lefelé a fogantyút.
52• A fogantyú megkönnyíti a mélykocsi szállítását valamint a
kocsivázakra és sportkocsikra történő rákapcsolását.
HINTAÁGY ÉS KISÁGY POZÍCIÓ
53• A Navetta olyan speciális formájú alapzattal rendelkezik, amely
egy sík felületre helyezve hintáztatható.
54• A beépített állvány ábra szerinti kihúzásával a Navetta
babahordozó egy kis mózeskosárrá alakítható át, amely nem
ringatható.
HÁTTÁMLA BEÁLLÍTÁSA
55•
A háttámla magassága beállítható úgy, hogy húzzák ki és
forgassák el a kézikart az ábra szerint.
LÉGKERINGÉS SZABÁLYOZÁSA
56• A Navetta alapzata megnyitható nyílásokkal van ellátva,
amelyek lehetővé teszik alulról a levegő beáramlását.
A mózeskosár elülső részén lévő nyílások megnyitásához(azon
az oldalon, ahol a kocsitető található), nyomják a kültér felé a
két kapcsot.
57• A hátsó részén lévő nyílások megnyitásához (a kocsitetővel
ellentétes oldalon), nyomják a kültér felé a két kapocs egyikét.
A HUZAT LEVÉTELE
58• A huzat eltávolításához oldják ki az oldalsó nyílásokat és
szedjék ki a huzatot a babahordozó elején.
59• Húzzák ki a két nyelvecskét az alvázból és távolítsák el a
huzatot a babahordozó hátuljától fogva.
A NAVICELLA SPORTKOCSIRA KAPCSOLÁSA ÉS ARRÓL VALÓ
LEKAPCSOLÁSA
A Navicella Navetta Ganciomatic Rendszerrel van felszerelve,
amely a Pliko P3 sportkocsi Ganciomatic kapcsaihoz
erősíthető.
60• A mélykocsinak a sportkocsiról történő lekapcsolására
vonatkozóan nyomják a (kocsitetővel ellentétes oldalon
elhelyezett) kart először oldalsó irányban majd nyomják felfelé
és ezzel egyidejűleg emeljék felfelé a fogantyúnál fogva a
mélykocsit.
NAVETTA AZ AUTÓBAN
61•
Navetta alkalmas arra, hogy a két kapocsnak köszönhetően(az
ábra szerint) és az Autós Kit külön megvásárlásával AUTÓS
Navettává alakuljon át.
Page 67
a kültér irányába a kart és ezzel egyidejűleg forgassák lefelé a
kapcsokat az ábra szerint.
PLIKO P3 + NAVETTA
78• A Navetta mózeskosárnak a sportkocsira történő
kapcsolásához szükséges:
- A sportkocsi lefékezése;
- A sportkocsi háttámlájának teljes lehajtása;
- A sportkocsi Ganciomatic kapcsainak felállítása;
- A biztosítópánt eltávolítása és a tartozékként átadott dugók
beillesztése a sportkocsi kartámláinak összecsukásához;
- A sportkocsi lábtartójának a legmagasabb pozícióba történő
felemelése;
- Fogják meg a Navettát a fogantyújánál;
-
Helyezzék a Navettát a sportkocsi Ganciomatic kapcsaira
úgy, hogy a mózeskosár fejrésze a sportkocsi markolataival
ellentétes oldalra kerüljön;
- A Navettát az oldalainál mindkét kézzel megfogva nyomják rá
kattanásig;
- A Navetta mózeskosár sportkocsiról történő lekapcsolásához
tanulmányozzák az ahhoz tartozó használati utasítást.
PLIKO P3 + PRIMO VIAGGIO
79• Az autós gyerekülésnek a sportkocsira történő kapcsolásához
szükséges:
- A sportkocsi lefékezése;
- A sportkocsi háttámlájának teljes lehajtása;
- A sportkocsi Ganciomatic kapcsainak felállítása;
- Az autós gyerekülésnek a mama irányába történő beállítása és
lefelé nyomása kattanásig;
- Nem ajánlatos a biztosítópánt levétele a sportkocsiról akkor,
amikor az autós gyerekülést bekapcsolják;
- Az autós gyerekülés sportkocsiról történő lekapcsolásához
tanulmányozzák az ahhoz tartozó használati utasítást.
A SPORTKOCSI KOCSIVÁZZÁ TÖRTÉNŐ ÁTALAKÍTÁSA
A sportkocsi kocsivázzá történő átalakításához először a huzat
levétele szükséges.
80• A sportkocsi huzatának levételéhez akasszák le a zsák
illesztőkapcsait a kartámlákról, mint ahogy azt a nyilak jelzik.
81• Gombolják le oldalt a zsák gombjait az ábra szerint. Húzzák ki
az öv lábválasztó részét az ülés alól.
82• Gombolják le a zsák gombjait az ülésről és emeljék meg a
zsákot ahhoz, hogy az lehúzható legyen a lábtartó kapcsairól.
Felülről húzzák le a zsákot.
83• Kapcsolják le az alapzatot úgy, hogy nyomják be a kocsiváz
hátsó részén elhelyezett gombot az ábra szerint; úgy a jobb,
mint a bal oldali rúdon. Emeljék felfelé mindkét kézzel a
háttámlát az alapzatról.
84• Nyomják be mindkét kézzel a kocsiváz ülőrészén lévő két
gombot és emeljék felfelé az egész alapzatot az ábra szerint.
KIEGÉSZÍTŐK
85• Pelenkázó Táska (hozzáadva): Táska védőhuzattal együtt a
baba pelenkázásához, amely a sportkocsira akasztható.
86• Szúnyogháló: Czipzáras szúnyogháló, amely a czipzáras
kocsitetőre illeszthető.
87• Utazótáska: Praktikus táska a sportkocsi légi szállításához.
88• Navetta Autós Kit: megrendelhető az autós Kit (ECE R44/04
szerint jóváhagyott), amely a mélykocsi autóba szereléséhez
szükséges tartozékokat tartalmazza.
89• Cover All esővédő: Esővédő átlátszó PVC-ből, amely a
sportkocsira kapcsolt mélykocsi teljes védelmét biztosítja.
TISZTÍTÁS ÉS KARBANTARTÁS
A termék minimális karbantartást igényel. A tisztító és karbantartó
műveleteket csak felnőttek végezhetik.
• Valamennyi mozgó rész tisztántartása javasolt, és amennyiben az
szükséges, olajjal vékonyan kenjék be azokat.
• Szárítsák meg a termék fémből készült részeit a rozsdásodás
megelőzése céljából.
• Egy nedves törlőruhával rendszeresen tisztítsák meg a
műanyagból készült részeket, ne használjanak oldószereket vagy
egyéb hasonló termékeket.
• A szövetrészeket keféljék le a por eltávolításához.
• Portól és homoktól tartsák tisztán a kerekeket.
• Óvják a terméket a légköri hatóerőktől, víztől, esőtől vagy
hótól; a folytonos és hosszadalmas napsütésnek való kitétel sok
alapanyagban színváltozást okozhat.
• Száraz helyen tárolják a terméket.
• A zsák mosásánál tartsák be az alábbi útmutatást.
VIGYÁZAT
PLIKO P3
• EZT A SZÁLLÍTÓESZKÖZT 1 ÜLÉSBEN LÉVŐ GYERMEK ÉS 1
HÁTSÓ KOCSILÉPCSŐN ÁLLÓ GYERMEK SZÁLLÍTÁSÁHOZ
TERVEZTÉK.
• NE HASZNÁLJÁK A TERMÉKET A GYÁRTÓ ÁLTAL ELŐÍRTNÁL
TÖBB GYERMEKKEL.
• E SZÁLLÍTÓESZKÖZ AZ ÜLÉSEN ÚJSZÜLÖTT KORÚ
ÉS ANNÁL NAGYOBB, MAXIMUM 15 KG-OS SÚLYÚ
GYERMEKEK SZÁMÁRA LETT HONOSÍTVA. A HÁTSÓ
KOCSILÉPCSŐ EGY MAXIMUM 20 KG SÚLYÚ MÁSODIK
GYERMEK SZÁLLÍTÁSÁRA HONOSÍTOTT.
• EGY VISSZATARTÓ RENDSZERT ALKALMAZZANAK
AKKOR, AMIKOR A GYERMEK MÁR ÖNÁLLÓAN ÜLVE TUD
MARADNI.
• EZT A SZÁLLÍTÓESZKÖZT ÚGY TERVEZTÉK, HOGY AZ
ALÁBBI PEG PÉREGO GANCIOMATIC TERMÉKEKKEL
KOMBINÁLVA FEL LEHESSEN HASZNÁLNI: NAVETTA, PORTE
ENFANT SOFT, PRIMO VIAGGIO GYERMEK AUTÓSÜLÉS.
• A TERMÉK ÖSSZESZERELÉSI ÉS ELŐKÉSZÍTÉSI MŰVELETEIT
FELNŐTTEK VÉGEZHETIK.
• NE HASZNÁLJÁK A TERMÉKET, HA EGYES RÉSZEI
HIÁNYOZNAK VAGY AZON TÖRÉST ÉSZLELNEK.
• MINDIG ÖTPONTOS BIZTONSÁGI ÖVET HASZNÁLJANAK;
MINDIG ALKALMAZZÁK AZ ÖV CSÍPŐÖVVEL
ÖSSZEKAPCSOLT LÁBELVÁLASZTÓ RÉSZÉT.
• A GYERMEKÜK FELÜGYELET NÉLKÜL HAGYÁSA VESZÉLYES
LEHET.
• ÁLLÓ HELYZETBEN MINDIG HASZNÁLJÁK A FÉKEKET.
• HASZNÁLAT ELŐTT GYŐZŐDJENEK MEG ARRÓL, HOGY
MINDEN RÖGZÍTŐ SZERKEZET HELYESEN BE VAN-E
KAPCSOLVA.
• HASZNÁLAT ELŐTT BIZONYOSODJANAK MEG ARRÓL,
HOGY MEGFELELŐEN RÖGZÍTVE VAN-E AZ AUTÓS
GYEREKÜLÉS VAGY A SPORT GYEREKÜLÉS.
• NE TEGYÉK AZ UJJUKAT A SZERKEZETEKBE.
• FIGYELJENEK ODA A JELENLÉVŐ GYERMEKRE AKKOR,
AMIKOR A SZERKEZETEKET BEÁLLÍTÓ MŰVELETEKET
(TOLÓKAR, HÁTTÁMLA) VÉGZIK.
• A TOLÓKARRA VAGY A FOGANTYÚKRA FELAKASZTOTT
BÁRMILYEN TEHER INSTABILLÁ TEHETI A TERMÉKET;
TARTSÁK BE A GYÁRTÓ UTASÍTÁSAIT A MAXIMÁLISAN
ALKALMAZHATÓ TERHEKRE VONATKOZÓAN.
• A KAPASZKODÓT NEM ÚGY TERVEZTÉK, HOGY AZ
A GYERMEK SÚLYÁT ELBÍRJA; A KAPASZKODÓ NEM
ARRA SZOLGÁL, HOGY AZ ÜLŐKÉBEN VISSZATARTSA A
GYERMEKET ÉS NEM HELYETTESÍTI A BIZTONSÁGI ÖVET.
• NE RAKJANAK A KOSÁRBA 5 KG-NÁL NAGYOBB SÚLYÚ
TERHET. NE TEGYENEK AZ ITALTARTÓBA AZ ITALTARTÓN
FELTÜNTETETT SÚLYNÁL NEHEZEBB TERHET ÉS MELEG
ITALT SOHA. NE HELYEZZENEK A KOCSITETŐ ZSEBEKBE (HA
VANNAK) 0.2 KG-NÁL NAGYOBB SÚLYOKAT.
• NE ALKALMAZZÁK A TERMÉKET LÉPCSŐ VAGY
LÉPCSŐFOKOK MELLETT; NE HASZNÁLJÁK HŐFORRÁSOK,
NYÍLT LÁNG VAGY A GYERMEK KEZEÜGYÉBE ESŐ,
VESZÉLYES TÁRGYAK KÖZELÉBEN.
• A GYÁRTÓ ÁLTAL JÓVÁ NEM HAGYOTT TARTOZÉKOK
HASZNÁLATA VESZÉLYES LEHET.
• EZ A TERMÉK JOGGING VAGY GÖRKORCSOLYÁZÁS
KÖZBEN NEM HASZNÁLHATÓ.
Page 68
• HASZNÁLJÁK A FÉKEKET A GYERMEKEK BEHELYEZÉSE ÉS
KIVÉTELE FOLYAMÁN.
VIGYÁZAT
NAVETTA MÓZESKOSÁR
• E SZÁLLÍTÓESZKÖZ CSAK OLYAN GYERMEKEK SZÁMÁRA
ALKALMAS, AKIK SEGÍTSÉG NÉLKÜL NEM TUDNAK ÜLŐ
HELYZETBEN MARADNI.
• E SZÁLLÍTÓESZKÖZ ÚJSZÜLÖTT ÉS MAXIMUM 9 KG-OS
SÚLYÚ GYERMEKEK SZÁMÁRA KÉSZÜLT.
• CSAK KEMÉNY, VÍZSZINTES ÉS SZÁRAZ FELÜLETEKEN
HASZNÁLJÁK.
• A GYERMEKÜK FELÜGYELET NÉLKÜL HAGYÁSA VESZÉLYES
LEHET.
• NE HAGYJÁK, HOGY MÁS GYERMEKEK FELÜGYELET
NÉLKÜL A BABAKOCSI KÖZELÉBEN JÁTSSZANAK.
• A TERMÉK ÖSSZESZERELÉSI ÉS ELŐKÉSZÍTÉSI MŰVELETEIT
FELNŐTTEK VÉGEZHETIK.
• NE HASZNÁLJÁK A TERMÉKET, HA EGYES RÉSZEI
HIÁNYOZNAK VAGY AZON TÖRÉST ÉSZLELNEK.
• NE TEGYENEK BELE MATRACOKAT.
• HASZNÁLAT ELŐTT GYŐZŐDJENEK MEG ARRÓL, HOGY
MINDEN RÖGZÍTŐ SZERKEZET HELYESEN BE VAN
KAPCSOLVA.
• HASZNÁLAT ELŐTT BIZONYOSODJANAK MEG ARRÓL,
HOGY MEGFELELŐEN RÖGZÍTVE VAN AZ AUTÓS
GYEREKÜLÉS, A BABAKOCSI VAGY A SPORT GYEREKÜLÉS.
• NE TEGYÉK AZ UJJUKAT A SZERKEZETEKBE.
• FIGYELJENEK ODA A JELENLÉVŐ GYERMEKRE AKKOR,
AMIKOR A SZERKEZETEKET BEÁLLÍTÓ MŰVELETEKET
(TOLÓKAR, HÁTTÁMLA) VÉGZIK.
• NE HASZNÁLJÁK HŐFORRÁSOK, NYÍLT LÁNG VAGY
A GYERMEK KEZEÜGYÉBE ESŐ, VESZÉLYES TÁRGYAK
KÖZELÉBEN.
• A GYÁRTÓ ÁLTAL JÓVÁ NEM HAGYOTT TARTOZÉKOK
HASZNÁLATA VESZÉLYES LEHET.
• RENDSZERESEN ELLENŐRIZZÉK A TOLÓKART (VAGY A
FOGANTYÚKAT) ÉS A BABAKOCSI ALJÁT ÉS GYŐZŐDJENEK
MEG ARRÓL, HOGY AZON TÖRÉS VAGY SÉRÜLÉS JELEI NEM
MUTATKOZNAK.
• HA TARTÓÁLLVÁNNYAL ALKALMAZZÁK A BABAKOCSIT,
AKKOR VIZSGÁLJÁK MEG A TARTÓÁLLVÁNYON
MEGHATÁROZOTT MAXIMÁLIS BABAKOCSI HOSSZÚSÁGOT.
• POMEMBNO: Pozorno preberite ta navodila in jih
shranite za nadaljnjo uporabo.
Če teh navodil ne boste upoštevali, lahko ogrozite
varnost otroka.
• Peg Perego se lahko kadarkoli odloči, da bo spremenil modele,
objavljene v katalogu, najsi bo to zaradi tehničnih ali tržnih
razlogov.
Peg Perego S.p.A. ima certifikat ISO 9001.
Certifikat za stranke in porabnike pomeni garancijo
transparentnosti in zaupanja v delo podjetja.
POMOČ UPORABNIKOM
Če izgubite ali poškodujete sestavni del izdelka, uporabite izključno
originalne rezervne dele Peg Perego. Za morebitna popravila,
zamenjave, podatke o izdelkih, prodajo originalnih rezervnih delov
in dodatkov, stopite v stik s centrom za pomoč uporabnikom Peg
Perego:
tel.:0039 (039) 60-88-213,
faks: 0039 (039) 33-09-992,
e-pošta: assistenza@pegperego.it,
www.pegperego.com
Peg Perego je vedno na voljo svojim strankam, da v kar največji
meri izpolni njihove potrebe. Zato je za nas zelo pomembno, da
poznamo mnenje svojih strank.
Hvaležni vam bomo, če si boste, ko boste uporabili naš izdelek,
vzeli čas in izpolnili VPRAŠALNIK O ZADOVOLJSTVU STRANK, ki ga
boste našli na naših spletnih straneh, na naslovu
www.pegperego.com
in nam sporočite vaše pripombe in predloge.
PLIKO P3
• Zahvaljujoč odstranljivemu hrbtnemu naslonu lahko Pliko P3
uporabljate v različici s košaro ali kot športni voziček.
NAVODILA ZA UPORABO
ODPIRANJE
1• Preden odprete ogrodje, morate odstraniti dva zaščitna čepa
zank, kot je prikazano na risbi, sicer se ogrodje ne bo pravilno
odprlo.
2• Da bi odprli ogrodje, morate povleči navzgor dva vzvoda, kot
prikazuje risba.
3•
Sočasno dvignite ogrodje, ki se bo samodejno odprlo.
Da bi preverili, ali je voziček pravilno odprt, preverit bočni
plastični zanki (glej risbo).
SESTAVLJANJE
4•
Da bi namestili sprednja kolesa, spustite vzvod A in nato vstavite
kolo, kot kaže risba B, dokler ne klikne.
5• Da bi namestili zadnja kolesa, pripnite kolesi, ki ju povezuje
zavorna zajla, kot je prikazano na risbi.
6• Pozorno si oglejte kolesi, da boste vedeli, katero je levo in
katero desno, da bi pravilno pripeli zadnji kolesi. Levo kolo
ima utor na cevi kolesa in na okvirju, da bi lahko zagotovili
pravilno pripenjanje (glejte risbo).
7• Preverite pravilno pripenjanje, kot je prikazano na risbi, dokler
ne klikne.
8• Da bi namestili košaro, v reže vstavite sprednje zanke A ter
zadnje zanke B in C.
9• Na risbi je prikazana pripeta košara.
10•
Nosilec za pijačo je mogoče namestiti na desno ali levo
stran vozička z zaponko, ki je že nameščena na obeh
straneh vozička. Da bi namestili nosilec za pijačo, ga
pripnite, dokler ne klikne, kot prikazuje risba A. Pripet
nosilec za pijačo, risba B.
Svetujemo vam, da v držalo ne postavljate toplih pijač ali
pijač, težjih od 0,5 kg (1 funta).
SL•SLOVENŠČINA
Page 69
ZAVORA
11•
Da bi zavrli Pliko P3, z nogo spustite vzvode, nameščene na
zadnjih kolesih, kot prikazuje risba.
• Da bi zavore odpustili, naredite nasprotno.
• Ko stojite na mestu, vedno zavrite.
VRTLJIVA KOLESA
12• Da bi se sprednja kolesa vrtela, je treba spustiti vzvod, kot
je prikazano na risbi A. Da bi jih fiksirali, vzvod premaknite v
drugo smer, kot prikazuje risba B.
NASTAVLJANJE ROČAJEV
13• Ročaje lahko nastavite v dva položaja. Za višji položaj pritisnite
gumb in sočasno dvignite ročaj navzgor. Da bi ga spustili,
postopek obrnite.
ZAPIRANJE
• Preden zaprete Pliko P3, morate odpeti Navetto ali
avtosedež Primo Viaggio.
14• Voziček lahko zaprete samo z eno roko: navzgor povlecite
najprej en vzvod in nato še drugega, dokler ne klikne.
15• Primite srednji ročaj (risba 3) in ga povlecite navzgor, dokler se
voziček ne zapre.
16• Z varnostno zanko preverite, ali je ogrodje pravilno zaprto.
Zaprt ogrodje bo stalo samo.
PREVOZ
17• Pliko P3 lahko udobno prevažate (sprednja kolesa ne smejo
biti vrtljiva v vse smeri) in držite srednji ročaj, kot je prikazano
na risbi.
18• Prenašanje še dodatno olajša bočni ročaj.
SISTEM GANCIOMATIC s
PLIKO P3 V RAZLIČICI OGRODJE
Sistem Ganciomatic je praktičen in hiter sistem, ki omogoča
pripenjanje košare Navetta in avtosedeža Primo Viaggio, na P3 v
različici ogrodje s priključki Ganciomatic, saj sta tudi ta opremljena
s sistemom Ganciomatic.
PRIKLJUČKI GANCIOMATIC NA OGRODJU
19• Da bi dvignili priključke Ganciomatic na ogrodju, zavrtite
navzgor priključka, dokler ne klikneta, kot prikazuje risba.
20• Da bi spustili priključke Ganciomatic na ogrodju, vzvod
povlecite navzven in priključke sočasno zavrtite navzdol, kot
prikazuje risba.
PLIKO P3 + NAVETTA
Da bi pripeli košaro Navetta na Pliko P3 v različici ogrodje, morate:
- Zavreti Pliko P3;
- Dvigniti priključke Ganciomatic;
21• Zavrteti oba vzvoda na zadnjem delu ogrodja navzven, kot
prikazuje risba;
22• Dvigniti naslon za noge na ogrodju v najvišji položaj (risba 1);
23• Pliko P3 v različici ogrodje je zdaj pripravljen za pripenjanje
Navette;
24• Primite ročaj košare Navetta in jo postavite na priključke
Ganciomatic ogrodja, tako da držite stranico z vzglavjem
Navetta na nasprotni strani od ročajev ogrodja;
- Z obema rokama pritisnite ob straneh Navetta, dokler
priključki ne kliknejo;
- Da bi košaro Navetta sneli z ogrodja, glejte njena navodila za
uporabo.
PLIKO P3 + PRIMO VIAGGIO
Da bi avtosedež pripeli na ogrodje, je treba:
- Zavreti Pliko P3;
- Pripeti sprednjo zaporo (glejte poglavje o zapori v
nadaljevanju);
25•
Pliko P3 v različici ogrodje je zdaj pripravljen na pripenjanje
avtosedeža Primo Viaggio;
26•
Primite ročaj avtosedeža in ga postavite na priključke
Ganciomatic na ogrodju, tako da stran z vzglavjem avtosedeža
držite na nasprotni strani od ročajev ogrodja. Z obema rokama
pritisnite ob straneh avtosedeža, dokler priključki ne kliknejo;
- Da bi avtosedež sneli z ogrodja, preberite navodila za uporabo
avtosedeža.
SPREDNJA ZAPORA
27• Ogrodje ima nataknjene pokrovčke za zaključevanje ročajev;
da bi pripeli sprednjo zaporo, jih je treba najprej odstraniti
(pokrovčke shranite, za primer, da bi hoteli spet uporabljati
voziček brez sprednje zapore). Da bi pokrovčke odstranili,
pritisnite gumb pod ročajem in sočasno izvlecite pokrovček
(na obeh ročajih).
28• Da bi pripeli sprednjo zaporo, vstavite njena konca v ročaje,
kot je prikazano na risbi, dokler ne zaslišite klika.
29• Zaporo je mogoče odpreti tudi samo na eni strani, tako da
lahko otrok laže spleza iz vozička in spet vanj, ko je večji. Da
bi jo odprli, pritisnite gumb pod naslonom za roke in sočasno
potegnite zaporo navzven.
30• Da bi odstranili zaporo, pritisnite oba gumba pod naslonoma
za roke in jo hkrati potegnite navzven.
DA BI OGRODJE UPORABLJALI ZA ŠPORTNI VOZIČEK
SESTAVLJANJE
31• Da bi spremenili Pliko P3 različica ogrodje v športni voziček,
je treba zagotoviti, da sta oba vzvoda spuščena, kot prikazuje
risba.
32• Naslon za hrbet z vrečo na sedalo ogrodja postavite tako, kot
prikazuje risba.
33• Da bi pripeli naslon na ogrodje, je treba vstaviti dva skrajna
konca, tako da pritisnete dva gumba, v sedalo ogrodja, kot
prikazuje risba 1, dokler ne klikne, kot prikazuje risba 2.
34• Da bi pripeli greben za uravnavanje hrbtnega naslona na
ogrodje, morate zavrteti navzgor priključek (risba B v smeri
puščice) in ga postaviti pod zadnji nosilec.
35• Potisnite oba priključka navzdol, dokler ne klikneta, v ležišči
zadnjih nosilcev.
36•
Da bi podložili voziček, pripnite priključke vreče na naslona za
roke, kot prikazujejo puščice na risbi
.
37• Vstavite vzvode za naslon za noge v vrečo hrbtnega naslona,
kot prikazuje risba.
38• Da bi končali pripenjanje vreče na ogrodje, pripnite gumbe
vreče na osnovo, kot prikazuje risba A. Spodnji mednožni
jermenček pod sedalom povlecite, kot prikazuje risba B, tako
da pustite zgornji mednožni jermenček nad vrečo.
ODPIRANJE IN ZAPIRANJE
• Da bi odprli Pliko P3 v izvedbi športni voziček, ponovite
postopke z risb 2 in 3.
•
Da bi zaprli Pliko P3 v izvedbi športni voziček, popustite
napenjalo za strehico, dvignite hrbtni naslon in ponovite
postopke z risb 14, 15 in 16.
NASTAVLJANJE NASLONA ZA NOGE
39• Naslon za noge je mogoče nastaviti v tri položaje. Da bi
ga spustili, povlecite bočna vzvoda navzdol in ga sočasno
potisnite navzdol. Da bi ga dvignili, ga potisnite navzgor,
dokler ne klikne.
ZADNJA PLOŠČAD
40• Zadnja ploščad staršem omogoča premagovanje manjših
razlik v višini terena, po katerem vozijo voziček, ter prevažanje
starejšega otroka.
VRSTNI RED OBREMENJEVANJA
41• Da bi uporabljali Pliko P3 z dvema otrokoma, morate Pliko
najprej zavreti, nato manjšega otroka posesti v sedež in
pripeti njegov varnostni pas (1). Prijeti morate oba ročaja (2) in
dovoliti starejšemu otroku, da se povzpne na ploščad (3).
• Otrok nikoli ne puščajte samih.
• Otroku ne dovolite, da se povzpne na zadnjo ploščad, če
je voziček prazen.
STREHICA
• Strehico je mogoče uporabljati in pripeti na košaro Navetta
in na športni voziček. Opremljena je z zadrgo, tako da lahko
nanjo pripnemo dežno prevleko.
42• Da bi namestili strehico na košaro Navetta, odpnite gumba
A in B (slka 1). Pripnite strehico, kot je prikazano na sliki 2 in
preverite, ali ste jo pravilno pripeli, kot je prikazano na sliki 3.
43• Da bi nmestili strehico na športni voziček, jo pripnite, kot
prikazuje slika, in preverite, ali ste jo pravilno pripeli (glejte
sliko).
Page 70
• Dežne prevleke ne smete uporabljati v zaprtih prostorih.
Vedno preverite, da otrok ni pregret.
• Dežne prevleke iz polivinila nikoli ne puščajte ob virih toplote
in pazite na prižgane cigarete.
• Prepričajte se, da dežna prevleka ne ovira premikajočih se
mehanizmov ogrodja ali vozička.
• Preden ogrodje ali voziček zaprete, jo vedno odstranite.
• Operite z gobo in milnico, ne uporabljajte detergentov.
VARNOSTNI PAS
68• Prepričajte se, da je naramnica pravilno vstavljena, kot je
prikazano na risbi A. Zapnite pas, kot je prikazano na risbi B.
69• Da bi odpeli pas, pritisnite ob straneh sponke (risba A) in
sočasno jermenček okoli pasu potegnite navzven (risba B).
70• Novi varnostni pas je zaradi sistema “pripni in odpni” še
laže uporabljati. Preden pas zapnete, pripnite sponko na
hrbtni naslon, tako da vstavite jeziček v ustrezno režo, kot je
prikazano na risbi; ko zapnete pas otroku, ga odpnite z
naslona, da se otrok laže premika. Sponka mora ostati pod
otrokovimi rameni.
URAVNAVANJE HRBTNEGA NASLONA
71• Naslon lahko nastavite v štiri položaje: Da bi spustili hrbtni
naslon, dvignite ročaj (risba A) in sočasno spustite hrbtni
naslon (risba B), tako da ga blokirate v želenem položaju.
Da bi ga dvignili, ga potisnite navzgor.
SNEMLJIVOST PREVLEK
72• Da bi oprali prevleko iz blaga, jo odpnite z naslonov za roke,
kot prikazujejo puščice.
73• Odpnite gumbe prevleke s sedeža in jo izvlecite, da bi sneli
prevleko z zank naslona za noge.
74• Odpnite bočne gumbe prevleke, kot prikazuje risba. Izvlecite
mednožni pas izpod sedeža.
75•
Odpnite gumbe prevleke s sedeža in jo izvlecite, da bi sneli
prevleko z zank naslona za noge. Prevleko snemite z zgornje strani.
SISTEM GANCIOMATIC s
PLIKO P3 V RAZLIČICI ŠPORTNI VOZIČEK
Sistem Ganciomatic je praktičen in hiter sistem, ki omogoča
pripenjanje košare Navetta in avtosedeža Primo Viaggio, na P3
v različici športni voziček s priključki Ganciomatic, saj sta tudi ta
opremljena s sistemom Ganciomatic.
PRIKLJUČKI GANCIOMATIC ZA VOZIČEK
76• Da bi dvignili priključke Ganciomatic na vozičku, na vogalih
sedeža dvignite prevleko in priključka obrnite navzgor, dokler
ne klikneta.
77• Da bi spustili priključke Ganciomatic na vozičku, vzvod
povlecite navzven in priključke sočasno zavrtite navzdol, kot
prikazuje risba.
PLIKO P3 + NAVETTA
78• Da bi pripeli košaro Navetta na športni voziček, je treba:
- Zavreti voziček;
- Naslon vozička spustiti v vodoravni položaj;
- Dvigniti priključke Ganciomatic na vozičku;
- Odstraniti sprednjo zaporo in v nastale odprtine vstaviti
priložene pokrovčke, da bi zaprli ročaje vozička;
- Dvigniti naslon za noge na vozičku v najvišji položaj;
- Prijeti ročaj Navette;
- Postaviti Navetto na priključke Ganciomatic vozička, tako da je
vzglavje košare nasproti ročajev vozička;
- Pritisniti z obema rokama ob straneh Navette, dokler priključki
ne kliknejo;
- Da bi košaro Navetta sneli s športnega vozička, glejte njena
navodila za uporabo.
PLIKO P3 + PRIMO VIAGGIO
79•
Da bi avtosedež pripeli na športni voziček, je treba:
- Zavreti voziček;
- Naslon vozička spustiti v vodoravni položaj;
- Dvigniti priključke Ganciomatic na vozičku;
- Avtosedež postaviti tako, da je obrnjen proti staršu in ga
potisniti navzdol, dokler ne klikne;
- Svetujemo vam, da sprednje zapore vozička ne odstranjujete,
ko pripenjate avtosedež;
44• Da bi napeli strehico, potisnite napenjalo navzdol. Strehico je
mogoče nagibati v skladu z naklonom naslona.
45• Da bi napeli strehico, potisnite notranje napenjalo navzdol,
kot prikazuje risba.
46• Strehico popolnoma podaljšajte in odpnite zadrgo, slika B.
Strehica sledi naklonu hrbtnega naslona.
47• Strehico lahko preprosto spremenite v senčnik, kot je
prikazano na risbi. Zapnite zadgo in privežite strehico s
praktično zanko.
48• Da bi sneli strehico s košare Navetta, jo ob strani odpnite s
prevleke. Nato odpnite reži A in B s prevleke, kot prikazuje
risba, na obeh straneh pritisnite jezička in odpnite strehico.
49• Da bi sneli strehico s športnega vozička, pritisnite jeziček, kot
prikazuje risba A, na obeh straneh strehice.
Odpnite jo in jo povlecite navzgor, kot prikazuje risba B.
KOŠARA NAVETTA
R O Č A J
50• Da bi dvignili ročaj, ga povlecite navzgor, dokler ne klikne.
Ročaj je blokiran šele, ko je v navpičnem položaju in sta
blokadi sedli v svoje ležišče.
51• Da bi ročaj spustili, ga odblokirajte, tako da potisnete obe
blokadi, in nato ročaj potisnite navzdol.
52• Ročaj olajša prenašanje in pripenjanje košare na ogrodja in
vozičke.
POLOŽAJ GUGALNICA IN POSTELJICA
53• Osnova Navette je oblikovana tako, da jo lahko zibljemo, če jo
postavimo na ravno površino.
54• Iz Navette nastane majhno gnezdece, ki ga ne morete zibati,
če dvignete vdelane podstavke, kot prikazuje risba.
URAVNAVANJE HRBTNEGA NASLONA
55• Višino hrbtnega naslona uravnavamo z vrtenjem ročaja.
URAVNAVANJE ZRAČNEGA PRETOKA
56• Na osnovi Navette so odprtine, ki jih je mogoče odpreti ali
zapreti, tako da zrak kroži s spodnje strani košare.
Da bi odprli zračne odprtine na sprednjem delu košare (na
strani, kjer je strehica), zanki potisnite navzven.
57• Da bi odprli odprtine na zadnjem delu (na strani nasproti
strehice), potisnite ven eno od zank.
SNEMLJIVOST PREVLEK
58• Da bi sneli prevleko, bočno odpnite reže in jo snemite s
sprednje strani.
59• Snemite 2 jezička z zadnje strani ogrodja in jo odstranite.
PRIPENJANJE IN ODPENJANJE KOŠARE Z VOZIČKA
Košara Navetta je opremljena s sistemom Ganciomatic, tako da
jo lahko pripnemo s priključki Ganciomatic vozička Pliko P3.
60• Da bi košaro odpeli z ogrodja ali vozička, najprej potisnite
najprej ročico (na drugi strani strehice) bočno navzgor in
sočasno dvignite voziček za ročaj navzgor.
NAVETTA V AVTOMOBILU
61•
Navetta se lahko spremeni v Navetto AUTO, z dvema sponkama
(glejte risbo) in dodatkom Kit Auto, ki ga morate dokupiti.
PODROBNOSTI MODULARNEGA SISTEMA ON TRACK
ODEJICA
62• Da bi pripeli pokrivalo, ga z zadrgo zapnite na naslon za noge,
kot je prikazano na risbi.
Da bi pritrdili odejico, pripnite oba gumba, kot prikazuje risba B.
DEŽNA PREVLEKA
63• Če želite namestiti dežno prevleko, jo morate zapeti z zadrgo
na strehico.
64• Pripnite gumb elastike na gumb vozička, kot prikazuje risba,
dokler ne klikne.
65• Spodnjo elastiko dežne prevleke pritrdite na kolo.
66•
Zaradi elastik ostane lahko praktična dežna prevleka na vozičku,
ko jo spustite, tako da odpnete zadrgo.
67• Izdelana je tako, da omogoča popolno zaščito tudi za
avtosedež Primo Viaggio, ki bi bil pripet na voziček.
Page 71
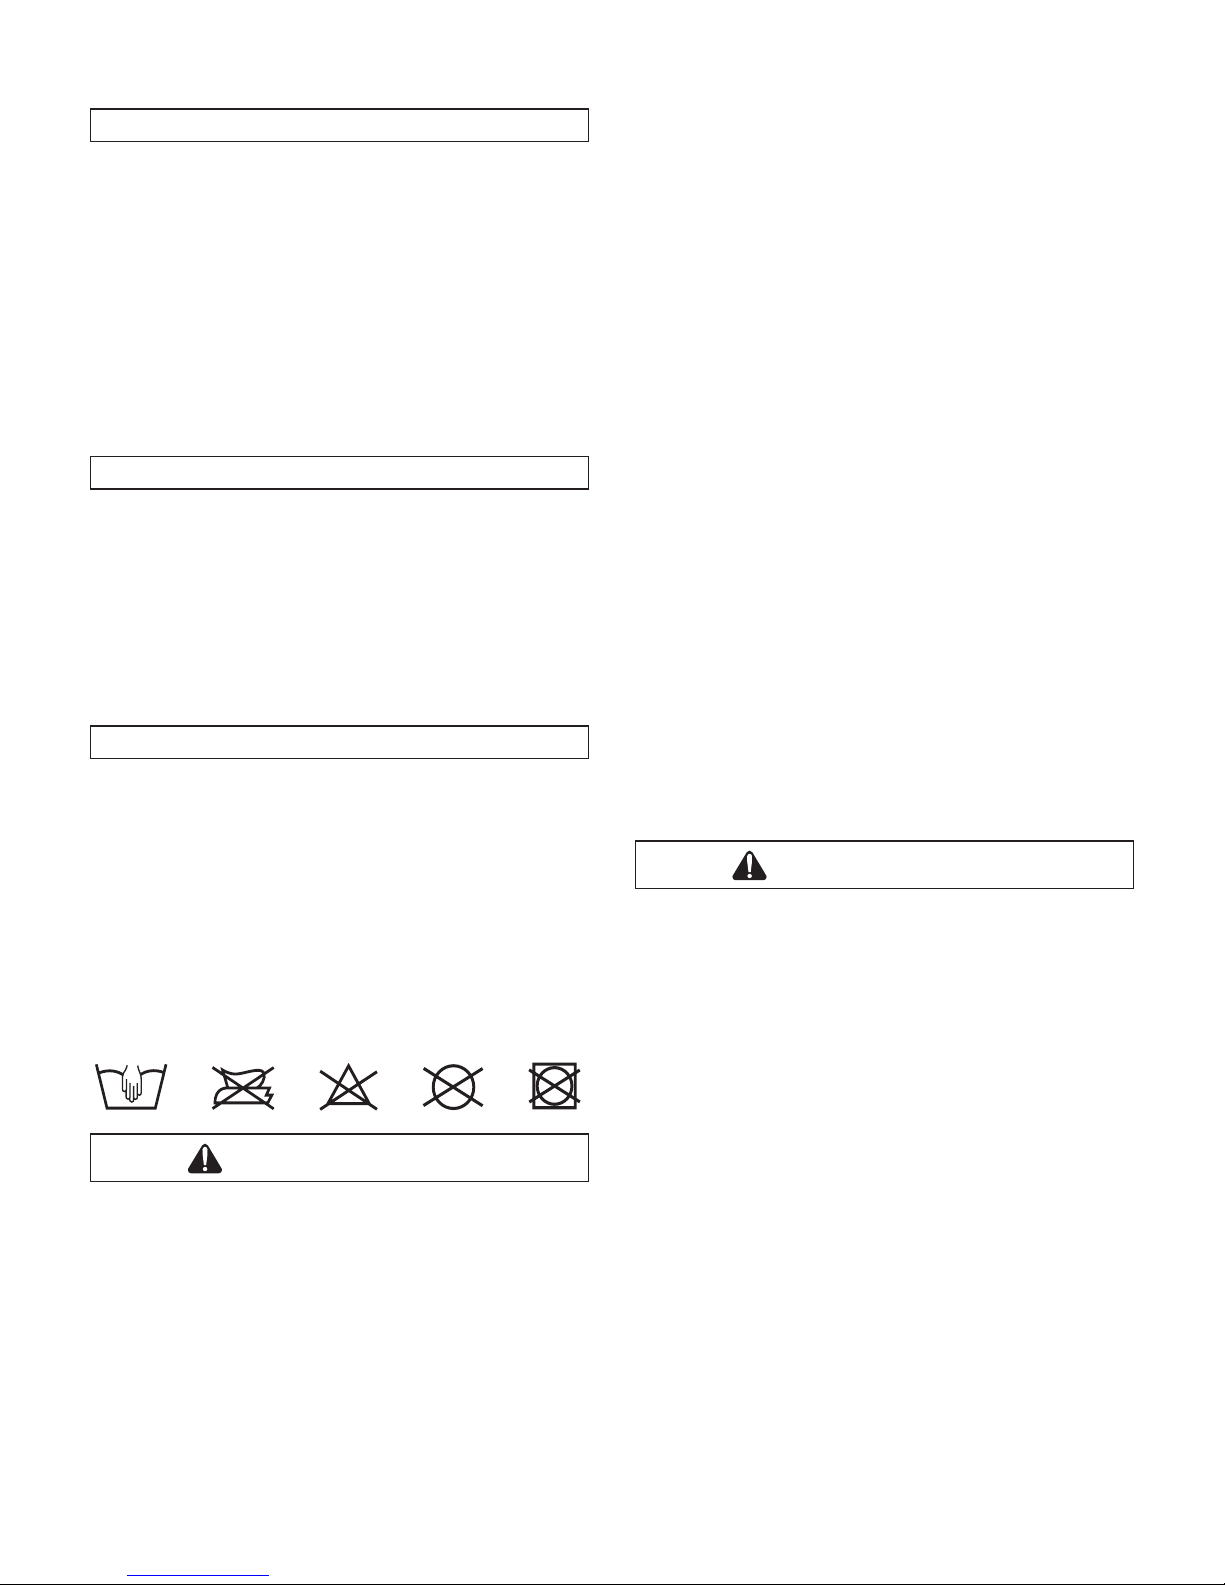
ALI SO TI POLOMLJENI.
• VEDNO UPORABLJAJTE PETTOČKOVNI VARNOSTNI PAS;
VEDNO UPORABLJAJTE MEDNOŽNI JERMEN PASU V
KOMBINACIJI S PASOM OKOLI TREBUHA.
• OTROKA NIKOLI NE PUŠČAJTE SAMEGA.
• KO IZDELEK STOJI NA MESTU, VEDNO UPORABLJAJTE
ZAVORE.
• PRED UPORABO SE PREPRIČAJTE, DA SO VSI MEHANIZMI
SISTEMA ZA PRIPENJANJE PRAVILNO SPETI.
• PRED UPORABO SE PREPRIČAJTE, DA STA AVTOSEDEŽ ALI
ŠPORTNI SEDEŽ PRAVILNO PRIPETA.
• IZOGIBAJTE SE TEMU, DA BI V MEHANIZEM VTAKNILI
PRSTE.
• PAZITE NA OTROKA, KO NASTAVLJATE MEHANIZME
(ROČAJ, HRBTNI NASLON).
• VSAK TOVOR, KI GA OBESITE NA ROČAJ ALI ROČAJE,
LAHKO NAREDI IZDELEK NESTABILEN; UPOŠTEVAJTE
NAVODILA PROIZVAJALCA PRI MAKSIMALNIH DOVOLJENIH
OBREMENITVAH.
• SPREDNJA ZAPORA NI NAMENJENA ZADRŽEVANJU
TEŽE OTROKA; SPREDNJA ZAPORA NI NAMENJENA
ZADRŽEVANJU OTROKA V SEDEŽU IN NI VARNOSTNI PAS.
• V KOŠARO ZA TOVOR NE ODLAGAJTE PREDMETOV,
TEŽJIH OD 5 KG. V NOSILEC ZA PIJAČO NE ODLAGAJTE
PREDMETOV, TEŽJIH OD NAVEDENEGA NA NOSILCU
ZA PIJAČO. VANJ NIKOLI NE POSTAVLJAJTE VROČE
PIJAČE. V ŽEPE STREHICE (ČE SO NAŠITI), NE ODLAGAJTE
PREDMETOV, TEŽJIH OD 0,2 KG.
•
NE UPORABLJAJTE IZDELKA V BLIŽINI STOPNIC; NE
UPORABLJAJTE GA OB VIRIH TOPLOTE, ODPRTEM OGNJU ALI
NEVARNIH PREDMETIH, KI SO V DOSEGU OTROKOVIH ROK.
• UPORABA DODATKOV, KI JIH NE ODOBRI PROIZVAJALEC,
JE LAHKO NEVARNA.
• IZDELEK NI PRIMEREN ZA UPORABO MED TEKANJEM ALI
ROLANJEM.
• MEDTEM KO V VOZIČEK POLAGATE OTROKA ALI JU
JEMLJETE IZ VOZIČKA, VEDNO POSKRBITE ZA TO, DA BO
VOZIČEK ZAVRT.
POZOR
KOŠARA NAVETTA
• TO PREVOZNO SREDSTVO JE PRIMERNO SAMO ZA
OTROKE, KI ŠE NE ZNAJO SAMOSTOJNO SEDETI.
• TO PREVOZNO SREDSTVO JE NAMENJENO OTROKOM OD
ROJSTVA DO 9 KG TEŽE.
• UPORABLJAJTE LE NA TRDIH, VODORAVNIH IN SUHIH
POVRŠINAH.
•
OTROKA NE PUŠČAJTE SAMEGA, SAJ JE TO LAHKO NEVARNO.
• NE DOVOLITE, DA SE DRUGI OTROCI IGRAJO OKOLI ALI
BLIZU VOZIČKA.
• SESTAVLJANJE IN PRIPRAVO PRIPOMOČKA MORAJO
IZVESTI ODRASLE OSEBE.
• NE UPORABLJAJTE IZDELKA, ČE NEKATERI NJEGOVI DELI
MANJKAJO ALI SO POŠKODOVANI.
• NE DODAJAJTE OBLAZINJENIH VLOŽKOV.
• PRED UPORABO SE PREPRIČAJTE, DA SO VSI MEHANIZMI
ZA PRIPENJANJE PRAVILNO PRIPETI.
• PRED UPORABO SE PREPRIČAJTE, DA SO AVTOSEDEŽ,
KOŠARA VOZIČKA ALI SEDEŽ ŠPORTNEGA VOZIČKA
PRAVILNO PRITRJENI.
• V MEHANIZME NE VTIKAJTE PRSTOV.
• PAZITE NA OTROKA, KO PRILAGAJATE MEHANIZME
(ROČAJI, HRBTNI NASLON).
•
NE UPORABLJAJTE OB VIRIH TOPLOTE, ODPRTEM OGNJU ALI
NEVARNIH PREDMETIH, KI SO NA DOSEGU OTROKOVIH ROK.
• UPORABLJANJE DODATNE OPREME, KI JE NI ODOBRIL
PROIZVAJALEC, BI LAHKO BILO NEVARNO.
• REDNO PREVERJAJTE ROČAJ (ALI ROČAJE) IN DNO
IZDELKA, DA NISO OBRABLJENI ALI POLOMLJENI.
• PRI UPORABLJANJU KOŠARE NA STOJALU PREVERITE
MAKSIMALNO DOLŽINO KOŠARE, KI JE NAVEDENA NA
STOJALU.
- Da bi avtosedež sneli z vozička, preberite navodila za uporabo
avtosedeža.
DA BI SPREMENILI ŠPORTNI VOZIČEK V OGRODJE
Da bi spremenili športni voziček v ogrodje, morate najprej sneti
prevleko.
80• Snemite prevleko s športnega vozička, tako da odpnete
priključke vreče z naslonov za roke, kot prikazujejo puščice.
81• Odpnite bočne gumbe prevleke, kot prikazuje risba. Izvlecite
mednožni pas izpod sedeža.
82• Odpnite gumbe prevleke s sedeža in jo izvlecite, da bi sneli
prevleko z zank naslona za noge. Prevleko snemite z zgornje
strani.
83• Odpnite osnovo, tako da pritisnete gumb, postavljen na zadnji
strani ogrodja, kot prikazuje risba; to storite na desni in na levi
prečki. Naslon osnove dvignite navzgor z obema rokama.
84•
Pritisnite oba gumba sedala ogrodja z obema rokama in celotno
osnovo dvignite, kot prikazuje risba.
DODATKI
85• Torba za previjanje (priložena): Torba s podlogo za
previjanje otroka, ki jo je mogoče pripeti na voziček.
86• Mrežica proti komarjem: Mrežica proti komarjem z zadrgo,
ki jo pripnemo na strehico z zadrgo.
87• Potovalna torba: Praktična torba za letalski transport vozička.
88• Komplet za avtomobil za košaro: Zahtevate lahko komplet
za avtomobil (Kit auto) (homologacija ECE R44/04), v katerem
je vse potrebno za namestitev košare v avto.
89• Dežna prevleka Cover All: Dežna prevleka iz prozornega
PVC-ja zagotavlja popolno zaščito košare, pripete na voziček.
ČIŠČENJE IN VZDRŽEVANJE
Izdelek ne potrebuje veliko vzdrževanja. Čistijo in vzdržujejo ga
lahko samo odrasli.
• Svetujemo vam, da redno čistite vse premikajoče se dele in jih,
če je to potrebno, podmažete z lahkim oljem.
• Kovinske dele obrišite do suhega, da ne bi zarjaveli.
• Plastične dele redno brišite z vlažno krpo. Ne uporabljajte topil
ali drugih podobnih izdelkov.
• Blago skrtačite, da z njega odstranite prah.
• Na koleščkih ne sme biti prahu ali peska.
• Izdelek zaščitite pred atmosferskimi vplivi, vodo, dežjem ali
snegom; daljše izpostavljanje soncu lahko povzroči spremembo
barve veliko materialov.
• Izdelek hranite v suhem prostoru.
• Za čiščenje vreče upoštevajte naslednja navodila.
POZOR
PLIKO P3
• TA VOZIČEK JE BIL IZDELAN ZA PREVOZ ENEGA
OTROKA NA SEDEŽU IN ENEGA, KI STOJI NA ZADNJEM
PODNOŽNIKU.
• NE UPORABLJAJTE IZDELKA ZA VEČ OSEB, KAKOR JIH JE
PREDVIDEL PROIZVAJALEC.
•
TA IZDELEK JE HOMOLOGIRAN ZA OTROKE OD ROJSTVA DO 15
KG TEŽE V SEDEŽU. ZADNJA STOPNIČKA JE HOMOLOGIRANA
ZA PREVOZ DRUGEGA OTROKA DO TEŽE 20 KG.
• TAKOJ KO ZNA OTROK SAMOSTOJNO SEDETI,
UPORABLJAJTE SISTEM ZA PRIPENJANJE.
• TO PREVOZNO SREDSTVO JE NAMENJENO UPORABI Z
DRUGIMI IZDELKI PEG PEREGO GANCIOMATIC: NAVETTA,
PORTE ENFANT SOFT, AVTOSEDEŽ PRIMO VIAGGIO.
• SESTAVLJANJE IN PRIPRAVO IZDELKA SMEJO IZVESTI LE
ODRASLE OSEBE.
• NE UPORABLJAJTE IZDELKA, ČE NA NJEM MANJKAJO DELI
Page 72

• ВАЖНО: Внимательно прочитайте эти инструкции и
сохраните их для использования в будущем.
При невыполнении этих инструкций безопасность
ребенка может быть поставлена под угрозу.
• Пег Перего имеет право внести в любой момент изменения
в модели, описанные в данном руководстве, по техническим
или коммерческим причинам.
Peg Perego S.p.A. сертифицирована по норме ISO
9001.
Сертификация гарантирует заказчикам и
потребителям, что компания работает, соблюдая
принципы гласности и доверия.
ОБСЛУЖИВАНИЕ
Если вы случайно потеряли или повредили какие-нибудь
детали изделия, заменяйте их только фирменными запасными
частями Пег Перего. Для ремонта, замены, получения сведений
о продукции, приобретения фирменных запасных частей и
принадлежностей обращайтесь в Сервисную службу ПегПерего:
тел.: 0039-039-60.88.213,
факс: 0039-039-33.09.992,
e-mail: assistenza@pegperego.it,
www.pegperego.com
Фирма Пег Перего находится в распоряжении своих
потребителей для того, чтобы наилучшим образом
удовлетворить все их требования. Поэтому, для нас очень
важно и ценно знать мнение наших заказчиков. Мы будем
вам очень признательны, если, после использования
нашего изделия, вы пожелаете заполнить АНКЕТУ
УДОВЛЕТВОРЕННОСТИ ПОТРЕБИТЕЛЯ, которую вы найдете в
интернете на сайте: www.pegperego.com
выразив там свои пожелания или советы.
PLIKO P3
• Благодаря съемной спинке модель Pliko P3 можно
использовать как в качестве шасси, так и в качестве
прогулочной коляски.
ИНСТРУКЦИЯ ПО ЭКСПЛУАТАЦИИ
РАСКЛАДЫВАНИЕ
1• Перед раскладыванием шасси необходимо снять с
креплений две защитные пробки, как показано на
рисунке, в противном случае шасси не будет правильно
раскладываться.
2• Для раскладывания шасси необходимо сместить вверх
два рычага, установленных на ручках, так, как показано на
рисунке.
3• Вместе с этим поднимите шасси, которое автоматически
раскладывается.
Чтобы убедиться в том, что прогулочная коляска
правильно разложена, проверьте два боковых крепления
(смотри рисунок).
СБОРКА
4• Для установки передних колес опустите рычаг А и
наденьте колесо так, как показано на рисунке В, пока не
послышится щелчок.
5• Для установки задних колес зацепите колеса, соединенные
тросиком тормоза, как показано на рисунке.
6• Для правильного зацепления 2 задних колес внимательно
определите левое колесо и правое. Левое колесо имеет
оребрение на трубе колеса и на раме для обеспечения
правильного зацепления (смотри рисунок).
7• Убедитесь в правильности зацепления, как показано на
рисунке, до щелчка.
8• Для установки корзины, зацепите прорези за передние
RU•PУССКИЙ
крючки A и за задние крючки B и C.
9• На рисунке показана зацепленная корзина.
10• Подставку для напитков можно установить с правой
или с левой стороны прогулочной коляски, используя
имеющиеся с двух сторон крепления. Для установки
подставки для напитков защелкните ее по месту, как
показано на рисунке А. Закрепленная подставка для
напитков, рисунок В.
Рекомендуется не ставить в подставку горячие
напитки и напитки весом больше 0,5 кг (1 фунтов).
Т О Р М О З
11• Для торможения Pliko P3 нажмите ногой рычаги тормоза,
расположенные на задних колесах, как показано на
рисунке.
• Чтобы снять тормоз, верните рычаги в исходное
положение.
• Когда изделие стоит, всегда ставьте его на тормоз.
ПОВОРОТНЫЕ КОЛЕСА
12• Чтобы сделать передние колеса поворотными,
необходимо опустить рычаг, как показано на рисунке
А. Чтобы колеса не поворачивались, верните рычаг в
исходное положение, как показано на рисунке В.
РЕГУЛИРОВКА РУЧЕК
13•
Ручки регулируются по высоте в двух положениях. Для
их установки в верхнее положение нажмите кнопку и
одновременно потяните ручку вверх. Для установки ручек в
нижнее положение выполните противоположные действия.
СКЛАДЫВАНИЕ
•
Перед складыванием Pliko P3 необходимо
отсоединить от него люльку Navetta или
автомобильное кресло Primo Viaggio.
14• Прогулочную коляску можно сложить одной рукой: для
этого сместите вверх сначала один рычаг, потом другой, до
щелчка.
15• Возьмите центральную ручку (рисунок 3) и потяните ее
вверх до складывания, как показано на рисунке.
16• Проверьте правильное складывание шасси при помощи
предохранительного крючка. После складывания шасси
будет стоять самостоятельно.
ПЕРЕНОС
17• Pliko P3 можно удобно переносить (с передними колесами
не в поворотном положении), держа его за центральную
ручку, смотри рисунок.
18• Его можно переносить также и за боковую ручку, смотри
рисунок.
GANCIOMATIC SYSTEM с PLIKO P3, ИСПОЛЬЗУЕМЫМ В
КАЧЕСТВЕ ШАССИ
Gаnciomаtic System - это практичная и быстрая система,
позволяющая вам установить на Pliko P3, используемое в
качестве шасси, при помощи креплений Gаnciomаtic, люльку
Navetta и автомобильное кресло Primo Viаggio, которые также
оборудованы Gаnciomаtic System.
КРЕПЛЕНИЯ GANCIOMATIC ШАССИ
19• Для поднятия креплений Ganciomatic шасси поверните
вверх два крепления до щелчка, как показано на рисунке.
20• Для опускания креплений Ganciomatic шасси сместите
рычажок наружу и одновременно поверните крепления
вниз, как показано на рисунке.
PLIKO P3 + ЛЮЛЬКА NAVETTA
Для крепления люльки Navetta к Pliko P3, используемому в
качестве шасси, выполните следующее:
- поставьте Pliko P3 на тормоз;
- поднимите крепления Ganciomatic;
21• Сместите наружу, как показано на рисунке, два рычага,
расположенных в задней части шасси;
22• Поднимите подножку шасси в самое верхнее положение
(рисунок 1);
23• Теперь Pliko P3, используемое в качестве шасси, готово для
Page 73

крепления люльки Navetta;
24• Возьмитесь за ручку люльки Navetta и установите ее на
крепления Ganciomatic шасси, оставляя изголовье люльки
с противоположной стороны относительно ручек шасси;
-
Нажмите обеими руками на бока люльки Nаvettа до щелчка;
- Для отсоединения люльки Navetta от шасси смотрите
соответствующее руководство по пользованию.
PLIKO P3 + КРЕСЛО PRIMO VIAGGIO
Чтобы прикрепить автомобильное кресло к шасси необходимо:
- поставить Pliko P3 на тормоз;
- Прикрепить передник (смотри раздел передника ниже);
25• Теперь Pliko P3, используемое в качестве шасси, готово для
крепления кресла Primo Viaggio;
26• Возьмитесь за ручку автомобильного кресла и установите
его на крепления Ganciomatic шасси, оставляя изголовье
кресла с противоположной стороны относительно ручек
шасси. Нажмите обеими руками на бока кресла до щелчка;
- Для отсоединения автомобильного кресла от шасси
смотрите его руководство по пользованию.
ПЕРЕДНИК
27• Шасси поставляется с установленными заглушками
подлокотников. Для установки передника необходимо
сначала удалить заглушки (сохраните их на случай, если
вы захотите использовать прогулочную коляску без
передника). Для удаления заглушек нажмите кнопку,
расположенную под подлокотником, и одновременно с
этим выньте заглушку (выполните данные операции на
обоих подлокотниках).
28• Для крепления передника вставьте два конца передника в
подлокотники, как показано на рисунке, до щелчка.
29• Передник можно открывать только с одной стороны,
для облегчения посадки и высадки ребенка, когда он
подрастет. Для открытия передника нажмите кнопку,
расположенную под подлокотником, и одновременно с
этим сместите передник наружу.
30• Для снятия передника нажмите обе его кнопки,
расположенные под подлокотниками, и одновременно с
этим сместите передник наружу.
ДЛЯ ПРЕОБРАЗОВАНИЯ ШАССИ В ПРОГУЛОЧНУЮ
КОЛЯСКУ
СБОРКА
31• Для преобразования Pliko P3, используемого в качестве
шасси, в прогулочную коляску необходимо убедиться, что
два рычага опущены, как показано на рисунке.
32• Установите спинку с обивкой на сиденье шасси, как
показано на рисунке.
33• Для крепления спинки к шасси необходимо ввести два
конца, нажав две кнопки, в сиденье шасси, как показано на
рисунке 1, до щелчка, как показано на рисунке 2.
34• Для крепления регулировочной детали спинки к шасси
необходимо сместить вверх крепление (рисунок B, в
сторону стрелки) и установить его за задней стойкой.
35• Сместите два крепления вниз, до щелчка, в гнезда задних
стоек.
36• Для установки обивки на прогулочную коляску соедините
крепления обивки с подлокотниками, как показывают
стрелки на рисунке.
37• Вставьте рычаги подножки в обивку спинки, как показано
на рисунке.
38• Для завершения установки обивки на шасси прикрепите
кнопки обивки к основанию, как показано на рисунке
А. Пропустите нижний центральный ремешок под
сиденьем, как показано на рисунке В, и оставьте верхний
центральный ремешок над обивкой.
РАСКЛАДЫВАНИЕ И СКЛАДЫВАНИЕ
• Для раскладывания Pliko P3 используемого в качестве
прогулочной коляски, повторите операции рисунков 2 и 3.
• Для складывания Pliko P3, используемого в качестве
прогулочной коляски, ослабьте каркас капота, поднимите
спинку и повторите операции рисунков 14, 15 и 16.
РЕГУЛИРОВКА ПОДНОЖКИ
39• Подножка регулируется в трех положениях. Чтобы
перевести подножку в нижнее положение, сместите два
боковых рычага вниз и одновременно с этим опустите
подножку. Чтобы перевести подножку в верхнее
положение, поднимите ее вверх до щелчка.
ЗАДНЯЯ ПОДНОЖКА
40• Задняя подножка помогает маме преодолевать небольшие
неровности, кроме того, на ней можно перевозить второго
ребенка.
ПОСЛЕДОВАТЕЛЬНОСТЬ ПОСАДКИ
41• Чтобы перевозить на Pliko P3 двух детей необходимо
поставить его на тормоз, после чего посадить младшего
ребенка на сиденье и застегнуть ремень безопасности (1).
Держите ручки (2) и позвольте второму ребенку встать на
подножку (3).
• Никогда не оставляйте ваших детей без присмотра.
• Не разрешайте ребенку залезать на заднюю
подножку, если прогулочная коляска пуста.
КАПОТ
• Капот можно использовать и прикрепить как к люльке
Navetta, так и к прогулочной коляске. Он оснащен
молнией, при помощи которой можно установить
дождевик.
42• Для монтажа капота на люльку Navetta расстегните кнопки
A и B (рисунок 1). Закрепите капот так, как показано на
рисунке 2, и проверьте, правильно ли он установлен,
рисунок 3.
43• Для монтажа капота на прогулочную коляску закрепите
его так, как показано на рисунке, и проверьте, правильно
ли он установлен (смотри рисунок).
44• Чтобы натянуть капот, опустите каркас. Капот можно
опустить по наклону спинки.
45• Расстегнув застежку-молнию, можно Чтобы натянуть капот,
опустите расположенный внутри каркас, как показано на
рисунке.
46•
Полностью расправьте капот, расстегнув молнию, рисунок B.
Наклон капота соответствует наклону спинки.
47• Капот можно легко превратить в солнцезащитную крышу,
смотри рисунок. Застегните молнию и привяжите капот
его удобным креплением.
48• Для снятия капюшона с Navicella Navetta, отсоединить
его по бокам от обшивки. Отсоединить петли A и B от
обшивки, как показано на рисунке, нажать на язычок с
обеих сторон, и отсоединить капюшон.
49• Для снятия капота с прогулочной коляски нажмите язычок
так, как показано на рисунке А с обеих сторон капота.
Расстегните его и сместите его вверх, как показано на
рисунке В.
ЛЮЛЬКА NAVETTA
РУЧКА
50• Чтобы поднять ручку, потяните ее вверх до тех пор, пока
не послышится щелчок. Ручка заблокирована только тогда,
когда она находится в вертикальном положении и два
стопора вошли в свои гнезда.
51• Чтобы опустить ручку разблокируйте ее, сместив стопоры
вверх, после чего опустите ручку вниз.
52• Ручка облегчает перевозку и крепление люльки на шасси
и прогулочные коляски.
ПОЛОЖЕНИЕ КАЧАЛКИ И КРОВАТКИ
53• Благодаря специальной форме основания люльки Navetta,
если ее поставить на ровную поверхность, то она будет
качаться.
54• Вынув вмонтированные опоры, как показано на рисунке,
Navetta превратится в нераскачивающееся, маленькое
гнездышко.
РЕГУЛИРОВКА СПИНКИ
55• Спинку можно отрегулировать по высоте, для этого
необходимо выдвинуть и повернуть ручку, как показано на
рисунке.
РЕГУЛИРОВКА ЦИРКУЛЯЦИИ ВОЗДУХА
56• В основании люльки Navetta имеются открывающиеся
Page 74

спинку, поднимите ручку (рисунок А) и одновременно
опустите спинку (рисунок В), блокируя ее в необходимом
положении.
Чтобы поднять спинку, сместите ее вверх.
СНЯТИЕ ОБИВКИ
72• Для снятия тканой обивки прогулочной коляски
отсоедините крепления обивки от подлокотников, как
показано стрелками.
73• Отстегните кнопки обивки от сиденья и снимите ее, чтобы
отсоединить обивку от крепления подножки.
74• Отстегните кнопки обивки сбоку, как показано на рисунке.
Снимите центральный ремень снизу сиденья.
75• Отстегните кнопки обивки от сиденья и сдвиньте ее, чтобы
отсоединить от крепления подножки. Снимите обивку
сверху.
GANCIOMATIC SYSTEM с PLIKO P3, ИСПОЛЬЗУЕМЫМ В
КАЧЕСТВЕ ПРОГУЛОЧНОЙ КОЛЯСКИ
Gаnciomаtic System - это практичная и быстрая система,
позволяющая вам установить на Pliko P3, используемое в
качестве прогулочной коляски, при помощи креплений
Gаnciomаtic, люльку Nаvettа и автомобильное кресло Primo
Viаggio, которые также оборудованы Gаnciomаtic System.
КРЕПЛЕНИЯ GANCIOMATIC ПРОГУЛОЧНОЙ
КОЛЯСКИ
76•
Для поднятия креплений Ganciomatic прогулочной коляски
поднимите обивку у углов сиденья, и поверните вверх два
крепления до щелчка.
77• Для опускания креплений Ganciomatic прогулочной
коляски сместите рычажок наружу и одновременно
поверните крепления вниз, как показано на рисунке.
PLIKO P3 + ЛЮЛЬКА NAVETTA
78• Для крепления люльки Navetta к прогулочной коляске
выполните следующее:
- поставьте прогулочную коляску на тормоз;
-
полностью опустите спинку прогулочной коляски;
- поднимите крепления Ganciomatic прогулочной коляски;
- снимите передник и установите входящие в комплект
заглушки для закрытия подлокотников прогулочной
коляски;
- поднимите подножку прогулочной коляски в самое
верхнее положение;
- возьмитесь за ручку люльки Navetta;
- установите люльку Navetta на крепления Ganciomatic
прогулочной коляски, оставляя изголовье люльки
с противоположной стороны относительно ручек
прогулочной коляски;
- Нажмите обеими руками на бока люльки Nаvettа до
щелчка;
- Для отсоединения люльки Navetta от прогулочной коляски
смотрите соответствующее руководство по пользованию.
PLIKO P3 + КРЕСЛО PRIMO VIAGGIO
79• Чтобы прикрепить автомобильное кресло к прогулочной
коляске необходимо:
- поставить прогулочную коляску на тормоз;
- полностью опустить спинку прогулочной коляски;
- поднять крепления Ganciomatic прогулочной коляски;
- Установите автомобильное кресло в сторону мамы, и
сместите его вниз до щелчка;
- Рекомендуется не удалять передник с прогулочной
коляски в случае установки автомобильного кресла;
- Для отсоединения автомобильного кресла от прогулочной
коляски смотрите его руководство по пользованию.
ДЛЯ ПРЕОБРАЗОВАНИЯ ПРОГУЛОЧНОЙ
КОЛЯСКИ В ШАССИ
Для преобразования прогулочной коляски в шасси следует,
прежде всего, снять с нее обивку.
80• Для снятия тканой обивки с прогулочной коляски
отсоедините крепления обивки от подлокотников, как
показано стрелками.
отверстия, пропускающие воздух снизу.
Чтобы открыть отверстия в передней части люльки (со
стороны капота), сместите две ручки наружу.
57• Чтобы открыть отверстия в задней части (со стороны,
противоположной капоту), сместите одну из ручек наружу.
СНЯТИЕ ОБИВКИ
58• Для снятия обшивки, отсоединить петли по бокам и снять
обшивку, начиная с передней части.
59• Снять два язычка с кузова и удалить обшивку в ее задней
части.
УСТАНОВКА И ОТСОЕДИНЕНИЕ ЛЮЛЬКИ ОТ ПРОГУЛОЧНОЙ
КОЛЯСКИ
Люлька Navetta оборудована системой Ganciomatic
и может прикрепляться к креплениям Ganciomatic
прогулочной коляски Pliko P3.
60•
Для отсоединения люльки от прогулочной коляски сначала
сместите ручку (расположенную с противоположной
стороны капота) вбок, потом вверх, одновременно с этим
возьмите люльку за ручку и поднимите ее.
ЛЮЛЬКА NAVETTA В МАШИНЕ
61• Navetta приспособлена для преобразования в люльку
Navetta AUTO при помощи двух (показанных на рисунке)
креплений, при этом необходимо отдельно купить набор
принадлежностей Kit Auto.
ДЕТАЛИ МОДУЛЬНОЙ СИСТЕМЫ ON TRACK
ПОКРЫВАЛО
62• Для крепления покрывала соедините его молнию с
молнией подножки, как показано на рисунке.
Для крепления покрывала закрепите две кнопки так, как
показано на рисунке В.
ДОЖДЕВИК
63• Для установки дождевика необходимо соединить его
молнию с молнией капота.
64• Соедините кнопку резинки с кнопкой прогулочной
коляски, как показано на рисунке, до щелчка.
65• Прикрепите самую нижнюю резинку дождевика к колесу.
66• Удобный дождевик можно опустить, расстегнув молнию,
при этом он все еще прикреплен к коляске при помощи
резинок.
67• Этот дождевик был разработан для применения также
в случае, если на прогулочной коляске установлено
автомобильное сиденье Primo Viaggio, и он обеспечивает
полную защиту от дождя. дождя.
• Не используйте дождевик в закрытых помещениях, и
всегда проверяйте, чтобы ребенку не было жарко.
• Не держите дождевик из ПВХ рядом с источниками тепла,
будьте осторожными с сигаретами.
• Убедитесь, что дождевик не цепляется за движущиеся
части шасси или прогулочной коляски.
• Всегда снимайте дождевик перед тем, как сложить шасси
или прогулочную коляску.
• Промывайте его губкой и мыльной водой, не пользуйтесь
моющими средствами.
РЕМЕНЬ БЕЗОПАСНОСТИ
68• Убедиться в том, что бретель вставлена правильно,
нажимая, как показано на рисунке А. Соедините ремень,
действуя по рисунку В.
69• Для отсоединения ремня нажмите с боков пряжки
(рисунок А) и одновременно потяните наружу поясной
ремешок (рисунок В).
70• Благодаря пристегивающейся системе, теперь новый
ремень безопасности можно будет надевать проще. Перед
тем, как прикрепить ремень, прикрепите пряжку к спинке,
пропустив язычок через специальную петлю, как показано
на рисунке. Затем, когда ремень был застегнут на
ребенке, открепите его от спинки, чтобы ваш ребенок
мог свободно двигаться. Пряжка должна оставаться под
плечами ребенка.
РЕГУЛИРОВКА СПИНКИ
71• Спинка опускается в четырех положениях. Чтобы опустить
Page 75
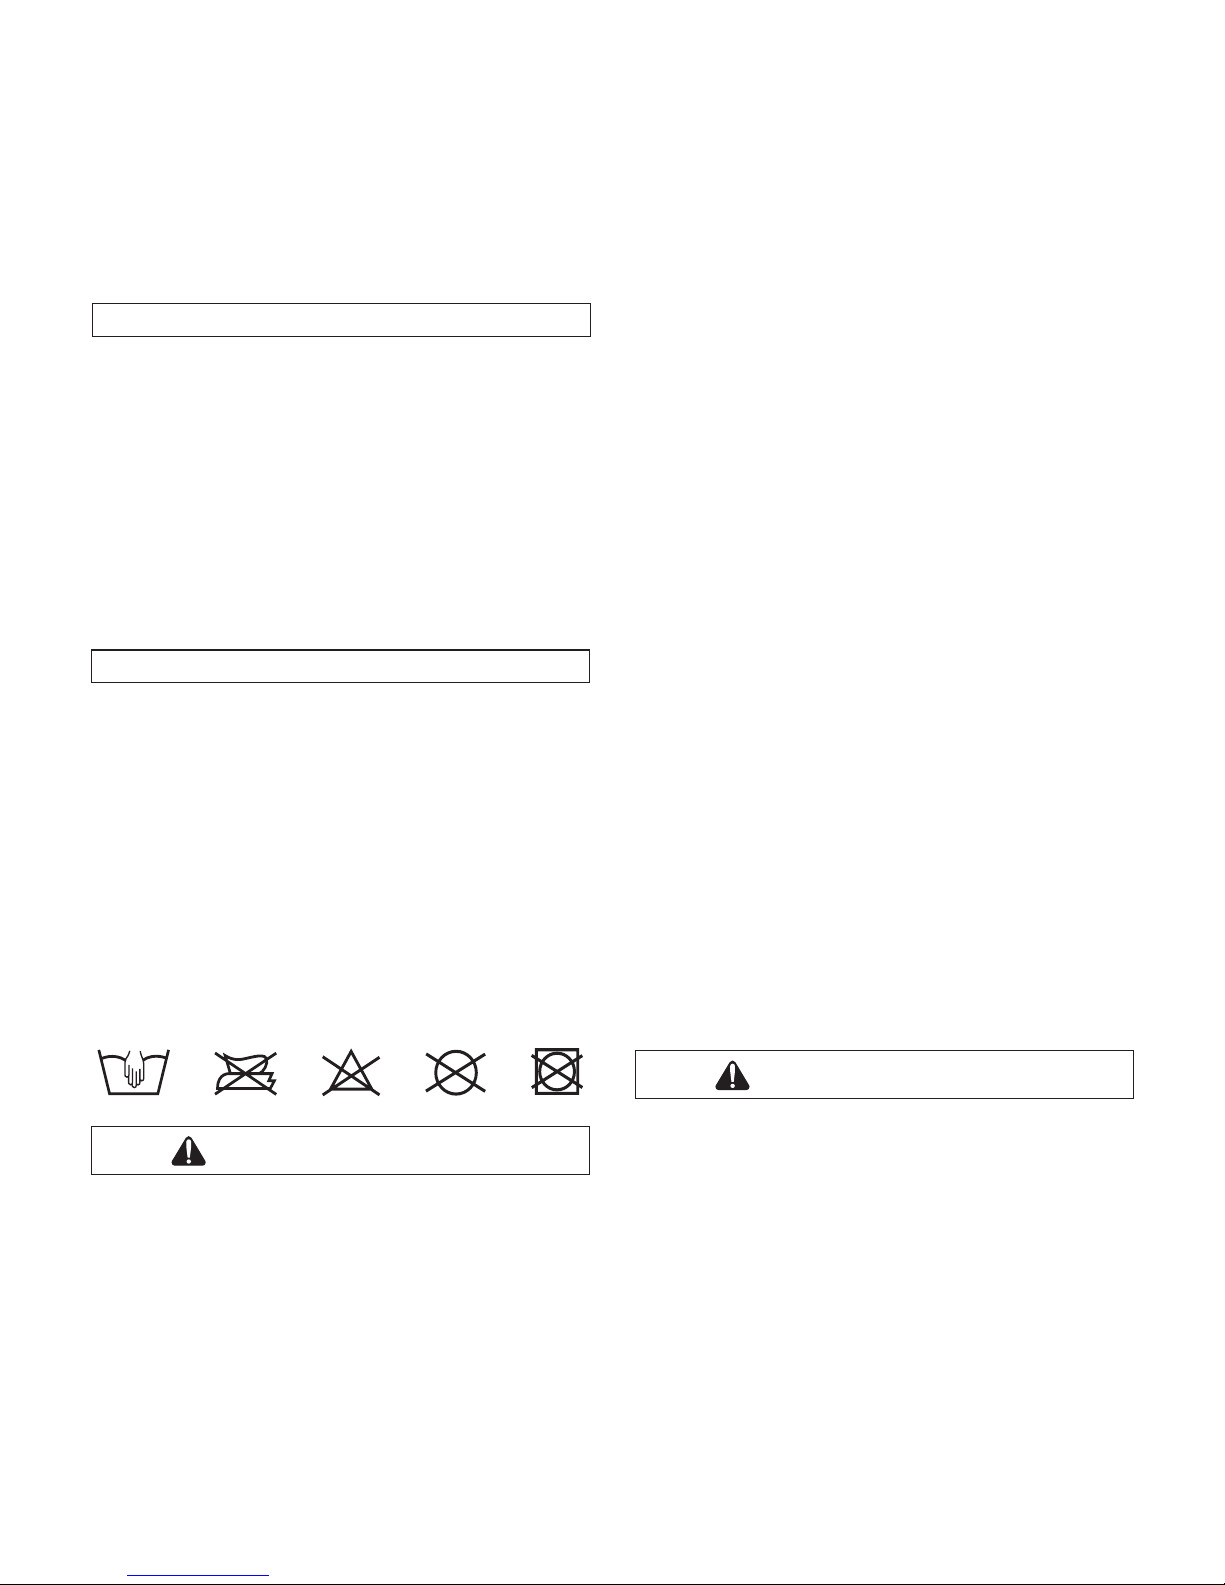
81• Отстегните кнопки обивки сбоку, как показано на рисунке.
Снимите центральный ремень снизу сиденья.
82• Отстегните кнопки обивки от сиденья и сдвиньте ее, чтобы
отсоединить от крепления подножки. Снимите обивку
сверху.
83• Отсоедините основание, нажав кнопку, расположенную в
задней части шасси, как показано на рисунке; Выполните
операцию на правой и левой штанге. Сместите вверх
спинку основания двумя руками.
84• Нажмите две кнопки сиденья шасси двумя руками и
поднимите целое основание вверх, как показано на
рисунке.
ПРИНАДЛЕЖНОСТИ
85• Сумка для пеленания (входит в комплект): Сумка с
матрасиком для пеленания ребенка, ее можно прикрепить
к прогулочной коляске.
86• Сетка от комаров: Сетка от комаров с молнией, может
устанавливаться на капот с молнией.
87• Дорожная сумка: Удобная сумка для перевозки
прогулочной коляски в самолете.
88• Автомобильный комплект Kit Auto Navetta: можно
приобрести автомобильный комплект (с утверждением
типа ECE R44/04), в котором содержатся все необходимые
детали для установки люльки на машину.
89• Дождевик Cover All: Дождевик из прозрачного ПВХ,
накрывающий всю люльку, прикрепленную к прогулочной
коляске.
ЧИСТКА И УХОД
Ваше изделие нуждается в несложном уходе. Операции по
чистке и уходу должны выполнять только взрослые.
• Рекомендуется содержать в чистоте все движущиеся части,
при необходимости смажьте их легким маслом.
• Вытрите насухо металлические части, чтобы предотвратить
образование ржавчины.
• Периодически очищайте пластмассовые части влажной
тканью, не пользуйтесь растворителями или сходными с
ними веществами.
• Чистите щеткой тканые части, чтобы удалить ею пыль.
• Очищайте от пыли и песка колеса.
• Защитите изделие от атмосферных осадков - воды, снега или
дождя. Постоянная и продолжительная подверженность
солнечным лучам может вызвать цветовые изменения многих
материалов.
• Храните изделие в сухом месте.
• Для стирки тканой обивки выполните следующие указания.
BHИMAHИE
PLIKO P3
• НЕ ИСПОЛЬЗОВАТЬ ИЗДЕЛИЕ ДЛЯ ПЕРЕВОЗКИ
БОЛЬШЕГО КОЛИЧЕСТВА ДЕТЕЙ, ЧЕМ БЫЛО
ПРЕДУСМОТРЕНО ЕГО ИЗГОТОВИТЕЛЕМ.
• ЭТА КОЛЯСКА БЫЛА РАЗРАБОТАНА ДЛЯ ПЕРЕВОЗКИ 1
РЕБЕНКА В СИДЯЧЕМ ПОЛОЖЕНИИ И ОДНОГО СТОЯ НА
ЗАДНЕЙ ПОДСТАВКЕ.
• ДАННАЯ КОЛЯСКА ОДОБРЕНА ДЛЯ ДЕТЕЙ, СИДЯЩИХ НА
СИДЕНЬЕ, С МОМЕНТА РОЖДЕНИЯ И ДО ДОСТИЖЕНИЯ
ВЕСА В 15 КГ. ЗАДНЯЯ ПОДНОЖКА ОДОБРЕНА ДЛЯ
ПЕРЕВОЗКИ ВТОРОГО РЕБЕНКА ВЕСОМ ДО 20 КГ.
• ИСПОЛЬЗУЙТЕ СИСТЕМУ ПРИСТЕГИВАНИЯ РЕБЕНКА,
КАК ТОЛЬКО ОН БУДЕТ В СОСТОЯНИИ СИДЕТЬ
САМОСТОЯТЕЛЬНО.
• ДАННОЕ ИЗДЕЛИЕ БЫЛО РАЗРАБОТАНО ДЛЯ
ИСПОЛЬЗОВАНИЯ ВМЕСТЕ СО СЛЕДУЮЩИМИ
МОДЕЛЯМИ PEG PEREGO GANCIOMATIC: NAVETTA,
PORTE ENFANT SOFT, АВТОМОБИЛЬНОЕ КРЕСЛО PRIMO
VIAGGIO.
• СБОРКУ И ПОДГОТОВКУ ИЗДЕЛИЯ ДОЛЖНЫ
ВЫПОЛНЯТЬ ТОЛЬКО ВЗРОСЛЫЕ.
• НЕ ПОЛЬЗУЙТЕСЬ ИЗДЕЛИЕМ ПРИ ОБНАРУЖЕНИИ В
НЕМ НЕДОСТАЮЩИХ ЧАСТЕЙ ИЛИ ПОЛОМОК.
• ВСЕГДА ИСПОЛЬЗУЙТЕ РЕМНИ С ПЯТЬЮ ТОЧКАМИ
КРЕПЛЕНИЯ; ВСЕГДА ИСПОЛЬЗУЙТЕ ЦЕНТРАЛЬНЫЙ
РЕМЕШОК ВМЕСТЕ С ПОЯСНЫМ РЕМЕШКОМ.
• ОСТАВЛЯТЬ ВАШЕГО РЕБЕНКА БЕЗ ПРИСМОТРА МОЖЕТ
БЫТЬ ОПАСНЫМ.
• КОГДА ИЗДЕЛИЕ НЕ ДВИГАЕТСЯ, ВСЕГДА СТАВЬТЕ ЕГО НА
ТОРМОЗ.
• ПЕРЕД ИСПОЛЬЗОВАНИЕМ УБЕДИТЕСЬ, ЧТО ВСЕ
МЕХАНИЗМЫ КРЕПЛЕНИЯ ПРАВИЛЬНО ЗАЦЕПЛЕНЫ.
• ПЕРЕД ИСПОЛЬЗОВАНИЕМ УБЕДИТЕСЬ, ЧТО
АВТОМОБИЛЬНОЕ КРЕСЛО ИЛИ СИДЕНЬЕ ПРАВИЛЬНО
УСТАНОВЛЕНЫ.
• НЕ ВВОДИТЕ ПАЛЬЦЫ В МЕХАНИЗМЫ.
• ПРИ ВЫПОЛНЕНИИ РЕГУЛИРОВКИ МЕХАНИЗМОВ
(РУЧКА, СПИНКА) БУДЬТЕ ОЧЕНЬ ВНИМАТЕЛЬНЫ, ЕСЛИ
В ИЗДЕЛИИ СИДИТ РЕБЕНОК.
• ЛЮБАЯ НАГРУЗКА, ПОДВЕШЕННАЯ К РУЧКЕ ИЛИ
К РУЧКАМ МОЖЕТ НАРУШИТЬ УСТОЙЧИВОСТЬ
ИЗДЕЛИЯ; СОБЛЮДАЙТЕ УКАЗАНИЯ ИЗГОТОВИТЕЛЯ О
МАКСИМАЛЬНЫХ ПРИЛАГАЕМЫХ НАГРУЗКАХ.
• ПЕРЕДНИК НЕ ПРЕДНАЗНАЧЕН ДЛЯ ВЫДЕРЖИВАНИЯ
ВЕСА РЕБЕНКА; ПЕРЕДНИК НЕ ПРЕДНАЗНАЧЕН ДЛЯ
УДЕРЖИВАНИЯ РЕБЕНКА НА СИДЕНИИ, И ОН НЕ
ЗАМЕНЯЕТ РЕМЕНЬ БЕЗОПАСНОСТИ.
• НЕ КЛАДИТЕ В КОРЗИНУ ПРЕДМЕТЫ, ВЕС КОТОРЫХ
ПРЕВЫШАЕТ 5 КГ. НЕ КЛАДИТЕ В ПОДСТАВКИ
ДЛЯ НАПИТКОВ ПРЕДМЕТЫ, ВЕС КОТОРЫХ ВЫШЕ
УКАЗАННОГО НА ПОДСТАВКЕ. НИ В КОЕМ СЛУЧАЕ
НЕ СТАВЬТЕ В НИХ ГОРЯЧИЕ НАПИТКИ. В КАРМАНЫ
КАПОТА (ЕСЛИ ИМЕЮТСЯ) НЕЛЬЗЯ КЛАСТЬ ПРЕДМЕТЫ
ВЕСОМ БОЛЕЕ 0,2 КГ.
• НЕ ПОЛЬЗУЙТЕСЬ ИЗДЕЛИЕМ ВБЛИЗИ ЛЕСТНИЦ ИЛИ
СТУПЕНЕК. НЕ ИСПОЛЬЗУЙТЕ ЕГО ВБЛИЗИ ОГНЯ,
ОТКРЫТОГО ПЛАМЕНИ ИЛИ ОПАСНЫХ ПРЕДМЕТОВ,
НАХОДЯЩИХСЯ В ПОЛЕ ДОСЯГАЕМОСТИ РЕБЕНКА.
• ИСПОЛЬЗОВАНИЕ ПРИНАДЛЕЖНОСТЕЙ, НЕ
ОДОБРЕННЫХ ИЗГОТОВИТЕЛЕМ, МОЖЕТ БЫТЬ
ОПАСНЫМ.
• ДАННОЕ ИЗДЕЛИЕ НЕ ПРИГОДНО ДЛЯ БЕГА ТРУСЦОЙ
ИЛИ КАТАНИЯ НА КОНЬКАХ.
• ВО ВРЕМЯ ПОСАДКИ И ВЫСАДКИ ДЕТЕЙ ПОСТАВЬТЕ
ИЗДЕЛИЕ НА ТОРМОЗ.
BHИMAHИE
ЛЮЛЬКА NAVETTA
• ЭТА КОЛЯСКА ПРИГОДНА ТОЛЬКО ДЛЯ ДЕТЕЙ, КОТОРЫЕ
НЕ МОГУТ САМОСТОЯТЕЛЬНО ЗАНИМАТЬ СИДЯЧЕЕ
ПОЛОЖЕНИЕ.
• ЭТА КОЛЯСКА ПРЕДНАЗНАЧЕНА ДЛЯ ДЕТЕЙ С МОМЕНТА
РОЖДЕНИЯ И ДО ДОСТИЖЕНИЯ ВЕСА В 9 КГ.
• ИСПОЛЬЗОВАТЬ ТОЛЬКО НА ТВЕРДЫХ,
ГОРИЗОНТАЛЬНЫХ И СУХИХ ПОВЕРХНОСТЯХ.
• ОСТАВЛЯТЬ ВАШЕГО РЕБЕНКА БЕЗ ПРИСМОТРА МОЖЕТ
БЫТЬ ОПАСНЫМ.
• НЕ ДОПУСКАЙТЕ, ЧТОБЫ ДРУГИЕ ДЕТИ ИГРАЛИ БЕЗ
ПРИСМОТРА РЯДОМ С ДЕТСКОЙ КОЛЯСКОЙ.
• ОПЕРАЦИИ ПО СБОРКЕ И ПОДГОТОВКЕ ИЗДЕЛИЯ
ДОЛЖНЫ ВЫПОЛНЯТЬ ТОЛЬКО ВЗРОСЛЫЕ.
• НЕ ПОЛЬЗУЙТЕСЬ ИЗДЕЛИЕМ ПРИ НАЛИЧИИ В НЕМ
НЕДОСТАЮЩИХ ИЛИ СЛОМАННЫХ ЧАСТЕЙ.
• НЕ СТЕЛИТЕ МАТРАСИКИ.
• ПЕРЕД ИСПОЛЬЗОВАНИЕМ УБЕДИТЕСЬ, ЧТО ВСЕ
КРЕПЕЖНЫЕ УСТРОЙСТВА НАДЕЖНО ЗАЦЕПЛЕНЫ.
• ПЕРЕД ИСПОЛЬЗОВАНИЕМ УБЕДИТЕСЬ, ЧТО
АВТОМОБИЛЬНОЕ КРЕСЛО, ДЕТСКАЯ КОЛЯСКА ИЛИ
Page 76

СИДЕНЬЕ ПРАВИЛЬНО УСТАНОВЛЕНЫ.
• НЕ СУЙТЕ ПАЛЬЦЫ В МЕХАНИЗМЫ.
• ПРИ ВЫПОЛНЕНИИ РЕГУЛИРОВОЧНЫХ ОПЕРАЦИЙ
МЕХАНИЗМОВ (РУЧКИ, СПИНКИ) БУДЬТЕ
ОСТОРОЖНЫМИ, ЕСЛИ В ИЗДЕЛИИ НАХОДИТСЯ
РЕБЕНОК.
• НЕ ИСПОЛЬЗОВАТЬ РЯДОМ С ИСТОЧНИКАМИ ТЕПЛА,
ОТКРЫТЫМ ОГНЕМ ИЛИ ОПАСНЫМИ ПРЕДМЕТАМИ,
НАХОДЯЩИМИСЯ В РАДИУСЕ ДОСЯГАЕМОСТИ РЕБЕНКА.
• ИСПОЛЬЗОВАНИЕ ПРИНАДЛЕЖНОСТЕЙ, НЕ
ОДОБРЕННЫХ ИЗГОТОВИТЕЛЕМ, МОЖЕТ БЫТЬ
ОПАСНЫМ.
• РЕГУЛЯРНО ПРОВЕРЯЙТЕ РУЧКУ (ИЛИ РУЧКИ) И ДНИЩЕ
ДЕТСКОЙ КОЛЯСКИ, И УБЕДИТЕСЬ В ОТСУТСТВИИ
СЛЕДОВ ПОЛОМКИ ИЛИ ПОВРЕЖДЕНИЯ.
• В СЛУЧАЕ ИСПОЛЬЗОВАНИЯ ДЕТСКОЙ КОЛЯСКИ С
ПОДСТАВКОЙ, ПРОВЕРЬТЕ НА ПОДСТАВКЕ, КАКОВА
МАКСИМАЛЬНАЯ ДОПУСКАЕМАЯ ДЛИНА КОЛЯСКИ.
• ÖNEMLİ: Bu talimatları dikkatlice okuyunuz ve ileride de
istifade edebilmek amacıyla muhafaza ediniz.
Bu talimatlara uyulmaması halinde çocuğun güvenliği
tehlikeye girebilir.
• Pegperego ihbarsiz olarak herhangi bir zamanda üründe
değişiklik yapmak ve islah etmek haklarini sakli tutar.
Peg Perego S.p.A. ISO 9001 sertifikalıdır.
Bu sertifika ile müşterilere ve tüketicilere kurumun
şeffaf işleyişinin ve tam bir güven ortamının
garantisi verilmektedir.
MÜŞTERİ SERVİSİ
Şayet kazara ürünün birtakım parçaları kaybolacak ya da zarar
görecek olursa, yedek parça olarak yalnızca orijinal PegPerego
parçalarını kullanın. Muhtemel tamir, değiştirme, ürün hakkında
bilgi alma, orijinal yedek parça ve aksesuar satışı işlemleri için
PegPerego Satış Destek hattına başvurun:
tel.: 0039-039-60.88.213,
fax: 0039-039-33.09.992,
e-mail: assistenza@pegperego.it,
www.pegperego.com
Peg Perego olarak tüketicilerin her türlü gereksinimini en iyi şekilde
karşılamak üzere daima onlara hizmet etmeye hazırız. Dolayısıyla,
müşterilerimizin görüş ve önerileri bizim için son derece önemli
ve değerlidir. Bu nedenle, bir ürünümüzü satın alıp kullandıktan
sonra, görüş ve önerilerinizi bildirmek üzere Internet üzerinde
www.pegperego.com adresinde yer alan MÜŞTERİ MEMNUNİYETİ
FORMUNU dolduracak olursanız size gerçekten minnettar
kalacağız.
PLIKO P3
• Pliko P3 çıkartılabilir sırtlığı sayesinde gerek araba ve gerekse
puset olarak kullanılabilir.
KULLANIM KILAVUZU
A Ç M A
1• Arabanın Açılmasından önce iki adet kanca koruma tıpalarının,
şekilde gösterildiği gibi, çıkartılması gerekmektedir, aksi
takdirde sağlıklı bir açılma olmayacaktır.
2• Arabayı açmak için tutma yerlerinde yer alan iki kolu, şekilde
gösterildiği gibi, yukarı çekmek gerekir.
3• Eş zamanlı olarak arabayı kaldırdığınız takdirde araba otomatik
olarak açılacaktır.
Bebek arabasının tam ve sağlıklı bir şekilde açılmış
olduğundan emin olmak için yanlarda yer alan iki kancayı
kontrol ediniz (şekle bakınız).
AKSAMIN TAKILMASI
4• Ön tekerleklerin yerine takılabilmesi için “A” kolunu aşağı
indiriniz ve “B” şeklinde gösterildiği gibi “klik” sesinin duyana
kadar tekerleği itiniz.
5• Arka tekerlekleri monte etmek için, tekerlekleri, fren teli ile
birlikte şekilde gösterildiği gibi takınız.
6• 2 arka tekerleği doğru bir şekilde takabilmek için SAĞ ve SOL
tekerlekleri dikkatlice belirleyip, ayırınız. SOL tekerleğin doğru
takılmasını sağlayabilmek için tanımlanabilmesi amacıyla
gövde üzerinde ve tekerlek borusu üzerinde bir çentik yer alır.
7• Şekilde gösterildiği gibi, “klik” sesini duyana kadar doğru bir
şekilde takılmış olduğunu kontrol ediniz.
8• Sepetin takılması için ilikleri önde yer alan “A” ve arkada yer
alan “B” ve “C” kancalarına geçiriniz.
9• Şekil takılmış sepeti göstermektedir.
10•
İçecek taşıyıcısı, bebek arabasının her iki tarafında da
bulunan kancalar sayesinde, bebek arabasına gerek sağ
ve gerekse sol tarafına takılabilecek özelliktedir. İçecek
taşıyıcısını takabilmek için, “A” şeklinde de gösterilmekte
TR•TÜRKÇE
Page 77

olduğu gibi, “klik” sesini duyana kadar iterek takınız. “B”
şeklinde takılı içecek taşıyıcı gösterilmektedir.
Bardaklığa 0,5 kilogramın üzerinde bir ağırlığın ve sıcak
içeceklerin konulmaması tavsiye olunur.
FREN
11• “Pliko P3”in fren yapması için arka tekerleklerde yer alan kolları,
şekilde de gösterildiği gibi, ayağınızla aşağı doğru itiniz.
• Fren konumundan çıkmak için daha önce frenlemek için
yapmış olduğunuz hareketin tersini yapınız.
•
Durma halinde her zaman fren konumunda olunuz.
DÖNER TEKERLEKLER
12• Ön tekerleklerin döner hale getirilmesi için kolun şekil “A” da
gösterildiği gibi aşağı konumlandırılması gerekir. Tekerleklerin
sabit hale getirilmesi için ise “B” şeklinde de gösterildiği gibi
kolu aksi istikamette konumlandırınız.
TUTMA YERLERİNİN AYARLANMASI
13• Tutma yerleri iki konumlu yükseklikte ayarlanabilirler. Yüksek
konumda ayarlayabilmek için düğmeye basınız ve ayni
zamanda da tutacağı yukarı doğru çekiniz. Aşağı çekmek için
tersini uygulayınız.
KAPATILMASI
• “Pliko P3”i kapatmadan önce “Navetta” beşik veya Primo
Viaggio (İlk Yolculuk) Araba Koltuğu”nun çıkartılması
gerekmektedir.
14• Bebek arabasını tek elle kapatmak mümkündür: önce bir
kolu ve sonra da diğerini tespit olana kadar yukarı istikamette
çekiniz.
15• Ortada yer alan tutma yerini (şekil 3) tutunuz ve şekilde
gösterildiği gibi kapanana kadar yukarı doğru çekiniz.
16• Bebek arabasının tam ve sağlıklı bir şekilde kapanmış
olduğundan emin olmak için emniyet kancasını kontrol ediniz.
Kapatılan bebek arabası tek başına ayakta kalacaktır.
TAŞINMASI
17• “Pliko P3”, ortada yer alan tutma yerinden kavramak suretiyle
(ön tekerlekler döner konumdan çıkartılarak) şekilde
görüldüğü gibi rahat bir şekilde taşınabilir.
18• Yan tutma yeri vasıtasıyla, şekilde gösterildiği gibi de
taşınabilir.
“PLIKO P3” BEBEK ARABASI VERSİYONU ile GANCIOMATIC
SYSTEM
“Ganciomatic Sistem”, “Ganciomatic” kancalar sayesinde
“Ganciomatik Sistem” ile donatılmış olan “Navetta” beşik ve
Primo Viaggio (İlk Yolculuk) koltuklarının “Pliko P3” bebek arabası
versiyonuna kolay ve hızlı takılmasını sağlar.
BEBEK ARABASININ GANCİOMATİK KANCALARI
19• Bebek arabasının Ganciomatik kancalarını kaldırmak için iki
kancayı da şekilde görüldüğü gibi, “klik” sesini duyana kadar
yukarı doğru çeviriniz.
20• Bebek arabasının Ganciomatik kancalarını aşağı konuma
getirmek için kolu dışarıya doğru çekiniz ve eş zamanlı
olarak da kancaları, şekilde gösterildiği gibi, aşağı istikamette
çeviriniz.
PLIKO P3 + NAVETTA
“Navetta”nın “Pliko P3” bebek arabası versiyonuna takılabilmesi için
aşağıdaki işlemlerin yapılması gerekmektedir:
- “Pliko P3”ün fren konumuna getirilmesi;
- Ganciomatic kancaların yukarı kaldırılması;
21• Bebek arabasının arka kısmında yer alan iki kolu, şekilde de
gösterildiği gibi, dışa doğru çeviriniz;
22• Bebek arabasının ayaklık dayanak mekanizmasını en yüksek
konuma getiriniz (şekil 1);
23• “Pliko P3” bebek arabası versiyonu “Navetta”nın takılabilmesi
için hazır konumdadır;
24• “Navetta”nın sapını tutunuz ve bebek arabasının Ganciomatik
kancaları üzerine yerleştiriniz, bu işlemi yaparken “Navicella”nın
baş kısmını bebek arabasının tutma yerlerinin karşı tarafına
denk getiriniz;
- Her iki elinizle, “klik” sesini duyana kadar “Navetta”nın yan
kısımlarından bastırınız;
- “Navetta” beşiğin bebek arabasından çıkartılması hususu ile
ilgili olarak kendi kullanma kılavuzuna bakınız.
PLIKO P3 + İLK YOLCULUK
Araba koltuğunun bebek arabasına tespit edilmesi için aşağıdaki
işlemlerin yapılması gerekmektedir:
- “Pliko P3”ün fren konumuna getirilmesi;
- Ön kısmı takınız (ön kısımla ilgili aşağıdaki başlığa bakınız);
25• “Pliko P3” bebek arabası versiyonu Primo Viaggio (İlk Yolculuk)
un takılabilmesi için hazır konumdadır;
26• Koltuğun sapını tutunuz ve bebek arabasının Ganciomatik
kancaları üzerine yerleştiriniz, bu işlemi yaparken koltuğun baş
kısmını bebek arabasının tutma yerlerinin karşı tarafına denk
getiriniz. Her iki elinizle, “klik” sesini duyana kadar koltuğun yan
kısımlarından bastırınız;
- Araba koltuğunun bebek arabasından çıkartılması için koltuk
kullanma kılavuzuna bakınız.
ÖN KISIM
27• Bebek arabası kol koyma yerlerinin kapama tıpaları ile birlikte
sunulur; ön kısmın takılabilmesi için öncelikle bu tıpaların
çıkartılması gerekir (daha sonradan bebek arabasının ön
kısımsız kullanılması istendiğinde kullanabilmek için bu
tıpaların muhafazası tavsiye olunur). Tıpaların çıkartılması için
kol koyma yeri altındaki düğmeye basınız ve eş zamanlı olarak
da tıpayı çıkartınız (bu işlemi her iki kol koyma yeri için de
tekrarlayınız).
28• Ön kısmı takmak için iki ucunu, şekilde de gösterildiği gibi, kol
koyma yerlerine “klik” sesini duyana kadar takınız.
29• Bebek büyüdüğü zaman daha rahat yerleştirilebilmesi ve
çıkartılabilmesi için ön kısmın tek bir taraftan açılabilmesi
mümkündür. Açmak için kol koyma yerinin altında bulunan
düğmeye basınız ve eş zamanlı olarak ön kısmı dışarıya doğru
çekiniz.
30• Ön kısmın tamamen çıkartılması için kol koyma yerleri altında
yer alan her iki düğmeye de basınız ve eş zamanlı olarak ön
kısmı dışarıya doğru çekiniz.
ARABANIN PUSETE DÖNÜŞTÜRÜLMESİ İÇİN
AKSAMIN TAKILMASI
31• “Pliko P3” bebek arabası versiyonunun pusete
dönüştürülebilmesi için iki kolun, şekilde de gösterildiği gibi,
aşağı konumda olmasının kontrol edilmesi gerekmektedir.
32• Torbalı sırtlığı, şekilde gösterildiği gibi, arabanın oturma yerine
konumlandırınız.
33• Sırtlığın arabaya tespit edilmesi için iki ucunun, şekil 1 de
gösterildiği gibi, iki düğmeye de basmak suretiyle, arabanın
oturma yerine, şekil 2 de gösterildiği gibi, “klik” sesi duyulana
kadar yerleştirilmesi gerekmektedir.
34• Sırtlık ayar mekanizmasının arabaya takılabilmesi için kancanın
yukarı istikamette döndürülmesi (şekil B, ok istikametinde) ve
arka taşıyıcının arkasına konumlandırılması gerekmektedir.
35• İki kancayı, “klik” sesini duyana kadar taşıyıcı üzerinde bulunan
yuvaların içine doğru aşağı istikamette itiniz.
36• Pusetin kaplanması için torba kancalarını kol dayama yerlerine,
şekilde gösterilen oklar istikametinde tespit ediniz.
37• Ayaklık dayanaklarının kollarını sırtlık torbasına, şekilde
gösterildiği gibi, geçiriniz.
38• Torbanın arabaya tespit edilme işlemini bitirmek için torba
düğmelerini, şekil “A”da gösterildiği gibi, zemine ilikleyiniz. Kısa
olan bacak arası bandını şekil “B”de gösterildiği gibi oturma
mahallinin altından geçiriniz ve ve uzun bacak arası bandını
da torbanın üstünde bırakınız.
AÇMA VE KAPAMA
• “Pliko P3” puset versiyonunu açmak için 2 ve 3 numaralı
şekillerde gösterilen işlemleri tekrarlayınız.
• “Pliko P3” puset versiyonunu kapamak için tente tespit
mekanizmalarını gevşetiniz, sırtlığı kaldırınız ve 14, 15 ve 16
numaralı şekillerdeki işlemleri tekrarlayınız.
AYAK DAYANAKLARININ AYARLANMASI
39• Ayak dayanağı üç konumda ayarlanabilir. Ayak dayanağının
aşağı konuma getirilmesi için yanlarda yer alan iki kolu birden
aşağı doğru çekiniz ve dayanağı aşağı konumlandırınız. Ayak
dayanağının yukarı konumlandırılması için, “klik” sesini duyana
Page 78

“NAVİCELLA”NIN BEBEK ARABASINA TAKILMASI VE ÇIKARTILMASI
“Navicella Navetta”da “Pliko P3” bebek arabasının “Ganciomatik”
kancalarına kolayca takılabilmesi için “Ganciomatik Sistem” ile
donatılmıştır.
60• Oturma grubunu pusetten çıkartmak için,kolu (tentenin aksi
istikametinde yer alan) önce yana doğru ve daha sonra yukarı
doğru itiniz ve eş zamanlı olarak da oturma gurubunu taşıyıcı
kolundan tutmak suretiyle yukarı kaldırınız.
NAVETTA ARABA BEŞİĞİ
61• Navetta beşik, çift taraflı bağlantı birimleri sayesinde (şekildeki
gibi) araba beşiği olarak kullanılmaya da imkân tanır ve Oto
Kit’ten ayrı olarak satın alınabilir.
“ON TRACK” MODÜLER SİSTEM DETAYLARI
Ö R T Ü
62• Örtünün takılması için fermuarının şekilde de gösterildiği gibi
ayak örtüsü fermuarı ile birleştirilmesi gerekmektedir.
Her iki pimi "B" şeklinde gösterilmekte olduğu gibi takınız ve
tenteyi sabitleyiniz.
Y A ĞMURLUK
63• Yağmurluğun takılabilmesi için fermuarının tente fermuarı ile
birleştirilmesi gerekmektedir.
64• Lastiğin düğmesini, şekilde gösterilmekte olduğu gibi, “klik”
sesini duyana kadar pusetin düğmesine takınız.
65• Yağmurluğun kısa elastik kısmını tekerleğe tespit ediniz.
66• Pratik kullanımlı yağmurluk fermuarın açılması suretiyle
alçaltılabilir ve elastiki kısımlar sayesinde pusete tespit
edilebilir.
67• Bu yağmurluk, pusete Primo Viaggio (İlk Yolculuk) araba
koltuğu takılması halinde de tam koruma sağlayacak şekilde
tasarlanmıştır.
• Yağmurluğu kapalı mekanlarda kullanmayınız ve bebeğin
fazla ısıya maruz kalmamasını kontrol ediniz.
• PVC malzemeden mamul yağmurluğu ısı kaynaklarına yakın
bırakmayınız ve sigaradan uzak tutunuz.
• Yağmurluğun bebek arabası veya pusetinin herhangi bir
hareket mekanizması ile temasa girmemesine dikkat ediniz.
• Bebek arabası veya puseti kapatmadan önce yağmurluğu
kesinlikle çıkartınız.
• Deterjan kullanmaksızın sabunlu su ve süngerle yıkayınız.
EMNİYET KEMERİ
68• Kemerin şekil “A”da gösterildiği üzere doğru bir şekilde takılmış
olduğundan emin olunuz. Kemeri şekil “B”de gösterildiği gibi
takınız.
69•
Kemeri açmak için kemer tokasının yanlarından bastırınız (şekil
A) ve ayni zamanda da bel kemerini dışa doğru çekiniz (şekil B).
70• “Tak ve Çıkart” sistemi sayesinde günümüzde yeni emniyet
kemerlerinin kullanımı çok daha kolay. Kemeri takmadan önce,
şekilde gösterildiği gibi sırtlıkta yer alan yuvaya kancalamak
suretiyle tokayı takınız; daha sonra kemeri bebeğe taktıktan
sonra sırtlıktan sökülerek bebeğin daha rahat hareket
etmesi sağlanır. Tokanın bebeğin omuzlarının altında kalması
gerekmektedir.
SIRTLIĞIN AYARLANMASI
71• Sıtlık dört farklı eğim konumunda ayarlanabilir. Sırtlığın aşağı
konuma getirilmesi için tutma kolunu yukarı kaldırınız (şekil
A) ve ayni zamanda da sırtlığı aşağı doğru bastırarak (şekil B)
istediğiniz konumda ayarlayınız.
Kaldırmak için ise sırtlığı yukarı doğru itiniz.
DÖŞEMENİN ÇIKARTILABİLMESİ
72• Puset döşemesinin sökülebilmesi için torbanın kancalarını
oklarla gösterilen istikamette kol koyma yerlerinden çıkartınız.
73• Kumaş kaplamanın düğmelerini oturma yerinden çözün ve
kaplamayı ayak dayanağının kancalarından çekmek için bu
kısmı çıkarın.
74• Torbanın yan düğmelerini şekilde gösterildiği gibi çıkartınız.
Bacak ayırma bandını oturma gurubunun alt kısmından
çıkartınız.
75• Torbanın düğmelerini oturma gurubundan sökünüz ve ayak
dayanak kancalarından çıkartınız. Torbayı yukardan çıkartınız.
kadar yukarı doğru itiniz.
KÜÇÜK ARKA DAYANAK
40• Küçük arka dayanak annenin ufak seviye farklılıklarını kolayca
aşabilmesinin yanı sıra ikinci bebeği de taşıma olanağı sunar.
BİNDİRME SIRASI
41• “Pliko P3”in iki bebek ile kullanılması için öncelikle “Pliko”nun
fren konumuna getirilmesi gerekir, bunu müteakiben daha
küçük olan bebeği oturma gurubuna yerleştirmek ve emniyet
kemerini bağlamak lazımdır (1). Tutma kollarını kavrayarak (2)
ikinci bebeği arka dayanağa yerleştiriniz (3).
• Çocuklarınızı kesinlikle yalnız bırakmayınız.
• Bebeğin puset boşken arka dayanağa binmesine engel
olunuz
.
TENTE
• Tente gerek “Navicella Navetta”da ve gerekse bebek
arabasında kullanılabilir ve bunlara takılabilir. Yağmurluğun
takılabilmesi için fermuar bulunmaktadır.
42• Tentenin “Navicella Navetta”ya monte edilebilmesi için “A” ve
“B” düğmelerini açınız (şekil 1). Tenteyi şekil 2de gösterildiği
gibi taktıktan sonra şekil 3teki gibi doğru takılmış olmasını
kontrol ediniz.
43• Tenteyi şekilde gösterildiği gibi bebek arabasına taktıktan
sonra doğru takılmış olmasını kontrol ediniz (şekle bakınız).
44• Tentenin gergin hale gelmesi için ayar mekanizmasını aşağı
doğru itiniz. Tente, sırtlığın eğimine göre konumlandırılabilir.
45• Tenteyi gergin hale getirebilmek için iç tarata yer alan gergi
kumpasını, şekilde gösterildiği gibi, aşağı doğru itiniz.
46• Fermuarı açmak suretiyle tenteyi tamamen uzatınız, şekil “B”.
Tente sırtlığın eğimini takip eder.
47• Tente kolaylıkla güneşliğe dönüşebilir, şekle bakınız.
Fermuarını kapatınız ve pratik kancası vasıtasıyla tenteyi
kapatınız.
48• Tenteyi “Navicella Navetta”dan çıkartmak için yan taraflardan
döşeme düğmelerini sökünüz. Bilahare “A” ve “B” iliklerini,
şekilde gösterildiği gibi, döşemeden sökünüz, dilciklere iki
taraftan bastırmak suretiyle tenteyi çıkartınız.
49• Tenteyi bebek arabasından çıkartmak için, “A” şeklinde
gösterildiği gibi, tentede yer alan dilciklere iki taraftan
bastırınız.
Sökünüz ve “B” şekilinde gösterildiği gibi yukarı doğru çekiniz.
NAVETTA BEŞIĞI
SAP
50• Sapı kaldırmak için, klik sesi duyana dek yukarı doğru çekin.
Sap sadece dikey pozisyonda, iki blok da yerine oturduğunda
kitlenir.
51• Sapı indirmek için kiliti çözün, blokları yukarı doğru çekip
devamında sapı da aşağıya doğru bastırın.
52• Sap taşıma işlemini kolaylaştırdığı gibi, araba ve pusetlerin
üzerine bağlantıyı da sağlar.
SALLANIR KOLTUK VE YATAK KONUMU
53• Beşik, tabanındaki özel şeklinden dolayı, herhangi bir yüzeye
konduğunda sallanabilir durumdadır.
54• Şekildegöterildiği gibi ayaklarn açılası ile Navetta, sallanmaz,
sabit bir yuva halini alır.
SIRTLIK AYARI
55• Sırtlığın yükseklik ayarı şekildeki gibi kolu çıkarıp çevirerek
yapılır.
HAVA DOLAŞIM AYARI
56• Beşiğin tabanı alttan hava dolaşımını sağlamak için açılabilir
deliklere sahiptir. Beşiğin ön tarafındaki (başlığın bulunduğu
kısım) delikleri açmak için iki kancayı dışa doğru itin.
57• Arka taraftaki (başlığın karşısında bulunan kısım) delikleri
açmak için kancalardan birini dışa doğru itin.
KILIFINDAN ÇIKARABİLME
58• Döşemeyi çıkartmak için ilikleri yan taraflarından açınız ve
öntaraftan çekerek çıkartnız.
59• 2 dilciği gövdenin arka tarafından sökünüz ve çıkartınız.
Page 79

“PLIKO P3” PUSET VERSİYONU ile GANCIOMATIC SYSTEM
“Ganciomatic System” Ganciomatik kancalar sayesinde “Pliko P3”
puset versiyonunun Ganciomatik sistem ile donatılmış bulunan
“Navetta” ve Primo Viaggio (İlk Yolculuk) araba koltuğuna kolay ve
hızlı takılabilmesini sağlayan bir sistemdir.
PUSETİN GANCİOMATİK KANCALARI
76• Pusetin Ganciomatik kancalarını kaldırmak için oturma gurubu
üzerinde yer alan torbanın köşelerini kaldırınız ve iki kancayı
“klik” sesini duyana kadar yukarı doğru çeviriniz.
77• Pusetin Ganciomatik kancalarını indirmek için kolu dışarıya
doğru çekiniz ve ayni zamanda da kancaları, şekilde
gösterildiği gibi, aşağı doğru çeviriniz.
PLIKO P3 + NAVETTA
78• “Navetta”nın pusete takılabilmesi için aşağıdaki işlemlerin
yapılması gerekmektedir:
- Puseti fren konumuna getiriniz;
- Pusetin sırtlığını tamamen yatırınız;
- Pusetin Ganciomatik kancalarını kaldırınız;
- Ön kısmı çıkartınız ve ambalajda sunulan tıpaları takarak
pusetin kol koyma yerlerini kapatınız;
- Pusetin ayaklık dayanak mekanizmasını en yüksek konuma
getiriniz;
- “Navetta”nın sapından tutunuz;
- “Navetta”yı pusetin Ganciomatik kancaları üzerine yerleştiriniz,
bu işlemi yaparken “Navicella”nın baş kısmını pusetin tutma
yerlerinin karşı tarafına denk getiriniz;
- Her iki elinizle, “klik” sesini duyana kadar “Navetta”nın yan
kısımlarından bastırınız;
- “Navetta” beşiğin pusetten çıkartılması hususu ile ilgili olarak
kendi kullanma kılavuzuna bakınız.
PLIKO P3 + İLK YOLCULUK
79• Araba koltuğunun pusete takılması için aşağıdaki işlemlerin
yapılması gerekmektedir:
- Puseti fren konumuna getiriniz;
- Pusetin sırtlığını tamamen yatırınız;
- Pusetin Ganciomatik kancalarını kaldırınız;
- Araba koltuğunu anneye doğru konumlandırınız ve “klik” sesini
duyana kadar aşağı doğru itiniz;
- Araba koltuğu takıldığı zaman pusetin ön kısmının
çıkartılmaması tavsiye olunur;
- Araba koltuğunun pusetten çıkartılması hususu ile ilgili olarak
kendi kullanma kılavuzuna bakınız.
PUSETİN ARABAYA DÖNÜŞTÜRÜLMESİ İÇİN
Pusetin arabaya dönüştürülmesi için öncelikle döşeme kılıfının
çıkartılması gerekmektedir.
80• Puset torbasının kancalarını oklarla işaret edilen şekilde kol
koyma yerlerinden çıkartılır.
81• Torbanın yan düğmelerini şekilde gösterildiği gibi çıkartınız.
Bacak ayırma bandını oturma gurubu altından çekiniz.
82• Torbanın düğmelerini oturma gurubundan sökünüz ve ayak
dayanak kancalarından çıkartmak için çekiniz. Torbayı üstten
çıkartınız.
83• Zemini arabanın arka tarafında yer alan düğmeye basmak
suretiyle, şekilde gösterildiği gibi, gerek sağ ve gerekse sol
millerden çıkartınız. Her iki elinizle zemin sırtlığını yukarı doğru
kaldırınız.
84• Arabanın oturma gurubunda yer alan iki düğmeye her iki
elinizle basınız ve tüm zemini, şekilde gösterildiği gibi yukarı
doğru kaldırınız.
AKSESUARLAR
85• Alt Değiştirme Çantası (dahil): Bebeğin altını
değiştirebilmek için pusete takılabilir şilte.
86• Sineklik: Tenteye fermuarla tespit edilebilen fermuarlı sineklik.
87• Seyahat Çantası: Pusetin uçakta taşınabilmesi için pratik bir
çanta.
88• Oturma grubu araç seti: Oturma grubunun araca monte
edilebilmesi için gerekli donanımı ihtiva eden Araç Setini (ECE
R44/04 tescilli) talep etmek mümkündür.
89• “Cover All” yağmur koruyucu: Şeffaf PVC’den mamul bu
yağmur koruyucu tente, pusete yerleştirilen oturma gurubu
için tam koruma sağlar.
TEMİZLEME VE BAKIM
Pusetiniz çok az bir bakım gerektirir. Temizlik ve bakım işlemleri
sadece yetişkinler tarafından yapılmalıdır.
• Bütün hareketli kısımların temiz tutulması ve gerekirse ince yağla
yağlanması önerilir.
• Demir kısımlarını, paslanmayı önlemek için iyicene kurulayın.
• Düzenli olarak plastik kısımları nemli bir bezle silin, çözücü veya
benzeri maddeler kullanmayın.
• Tozdan arındırmak için kumaş kısımlarını fırçalayın.
• Tekerlekleri tozdan ve kumdan temiz tutun.
• Ürünü su, yağmur ve kar gibi dış etkenlerden koruyun, güneşte
devamlı ve uzun kalış birçok malzemede renk değişimine sebep
olabilir.
• Ürünü kuru bir ortamda muhafaza edin.
• Torbanın yıkanması için, aşağıdaki talimatlara riayet ediniz.
UYARI
PLIKO P3
• BU ARAÇ, OTURMA GRUBUNDA 1 VE ARKA ZEMINDE
DE AYAKTA OLARAK 1 ÇOCUK TAŞINMASI IÇIN
TASARLANMIŞTIR.
• ÜRÜNÜ, ÜRETICI TARAFINDAN ÖNGÖRÜLENDEN FAZLA
SAYIDA KULLANICI IÇIN KULLANMAYINIZ.
• BU ARAÇ, ÇOCUĞUN DOĞUMUNDAN ITIBAREN VE AZAMI
15 KG. AĞIRLIK IÇIN TESCIL OLUNMUŞTUR. ARKA KISIMDA
YER ALAN DAYANAK 20 KG.YE KADAR OLAN IKINCI BIR
BEBEĞIN TAŞINMASI IÇIN TESCIL OLUNMUŞTUR.
• ÇOCUK TEK BAŞINA OTURABILECEK DURUMA GELDIĞINDE
KORUYUCU BIR SISTEM KULLANINIZ.
• BU ARAÇ, "PEG PEREGO GANCIOMATIC" ÜRÜNLER
ILE BIRLIKTE KULLANILMAK ÜZERE TASARLANMIŞTIR :
NAVETTA, PORTE ENFANT SOFT, PRIMO VIAGGIO ARABA
KOLTUĞU.
• ÜRÜNÜN MONTAJ VE HAZIRLANMA IŞLEMLERININ
YETIŞKIN BIR KIŞI TARAFINDAN YAPILMASI GEREKMEKTEDIR.
• KIRIK YA DA EKSIK PARÇALI ÜRÜNLERIKULLANMAYIN.
• DAIMA BEŞ KADEMELI EMNIYET KEMERINI KULLANINIZ;
KEMERIN BACAK ARASI BANTINI BEL KAYIŞIYLA BIRLIKTE
KULLANINIZ.
• ÇOCUĞUNUZU TEK BAŞINA BIRAKMANIZ TEHLIKELI
OLABILIR.
• DURMA HALINDE HER ZAMAN FREN TERTIBATINI DEVREYE
SOKUNUZ.
• ÜRÜNÜ KULLANMADAN EVVEL TÜM BAĞLANTI
AKSAMLARININ TAM OLARAK TAKILDIĞINDAN EMIN
OLUNUZ.
• KULLANIM ÖNCESINDE ARABA KOLTUĞU VEYA
ÇIKARTILABILIR OTURMA GRUBUNUN TAM OLARAK TESPIT
EDILMIŞ OLDUĞUNDAN EMIN OLUNUZ.
• PARMAKLARINIZI MEKANIZMALAR ARASINA SOKMAYINIZ.
• MEKANIZMALARIN AYAR IŞLEMLERI (TUTACAK, SIRTLIK)
YAPILIRKEN ÇOCUĞUN KONUMUNA DIKKAT EDINIZ.
• TUTMA VE SAIR YERLERE ASILAN TÜM YÜKLER ÜRÜNÜN
DENGESININ BOZULMASINA YOL AÇABILIR; TAŞINABILIR
AZAMI AĞIRLIKLAR KONUSUNDA ÜRETICI TARAFINDAN
BELIRTILEN HUSUSLARA BAKINIZ.
• ÖN KISIM ÇOCUĞUN AĞIRLIĞINI TAŞIMAK ÜZERE
TASARLANMAMIŞTIR; AYRICA ÇOCUĞU OTURMA
KONUMUNDA TUTMAK AMACIYLA EMNIYET KEMERI
YERINE DE KULLANILAMAZ.
• SEPETE 5 KG.DAN FAZLA AĞIRLIK KOYMAYINIZ. IÇECEK
SEPETINE KESINLIKLE SEPET ÜZERINDE BELIRTILENDEN
FAZLA AĞIRLIK VE SICAK IÇECEK KOYMAYINIZ. TENTE
Page 80
ÜZERINDE YER ALAN CELERE (VAR ISE) 0,2 KG.DAN FAZLA
AĞIRLIK KOYMAYINIZ.
• ÜRÜNÜ MERDIVEN VE BASAK YAKINLARINDA
KULLANMAYINIZ; ISI KAYNAKLARINA, ATEŞE VE ÇOCUĞUN
ERIŞEBILECEĞI TEHLIKELI CISIMLERE YAKIN YERLERDE
KULLANMAYINIZ.
• ÜRETICI TARAFINDAN ONAYLANMAMIŞ OLAN
AKSESUARLARIN KULLANIMI TEHLIKELI OLABILIR.
• BU ÜRÜN JOGGING VEYA PATENLE KOŞMAK IÇIN UYGUN
DEĞILDIR.
• KULLANICILARIN INIP BINMESI ESNASINDA FRENLERI
KULLANINIZ.
UYARI
NAVETTA BEŞIĞI
• BU ARAÇ YALNIZCA KENDİ BAŞINA OTURAMAYAN
BEBEKLER İÇİN UYGUNDUR.
• BU ARAÇ, ÇOCUĞUN DOĞUMUNDAN İTİBAREN VE AZAMİ
9 KG. YA KADAR ÇOCUKLAR İÇİN TASARLANMIŞTIR.
• YALNIZCA SERT, YATAY VE KURU ZEMİNLERDE KULLANINIZ.
• ÇOCUĞUNUZU TEK BAŞINA BIRAKMANIZ TEHLİKELİ
OLABİLİR.
• DİĞER ÇOCUKLARIN TEK BAŞLARINA ARABANIN
CİVARINDA OYNAMALARINA MÜSAADE ETMEYİNİZ.
• ÜRÜNÜN MONTAJ VE HAZIRLANMA İŞLEMLERİNİN
YETİŞKİN BİR KİŞİ TARAFINDAN YAPILMASI GEREKMEKTEDİR.
• KIRIK YA DA EKSİK PARÇALI ÜRÜNLERİKULLANMAYIN.
• LAVE DÖŞEK EKLEMEYİNİZ.
• ÜRÜNÜ KULLANMADAN EVVEL TÜM BAĞLANTI
AKSAMLARININ TAM OLARAK TAKILDIĞINDAN EMİN
OLUNUZ.
• KULLANIM ÖNCESİNDE ARABA KOLTUĞU, ARABA VEYA
ÇIKARTILABİLİR OTURMA GRUBUNUN TAM OLARAK TESPİT
EDİLMİŞ OLDUĞUNDAN EMİN OLUNUZ.
• PARMAKLARINIZI MEKANİZMALAR ARASINA SOKMAYINIZ.
• MEKANİZMALARIN AYAR İŞLEMLERİ (TUTACAK, SIRTLIK)
YAPILIRKEN ÇOCUĞUN KONUMUNA DİKKAT EDİNİZ.
• ISI KAYNAKLARINA, ATEŞE VE ÇOCUĞUN ERİŞEBİLECEĞİ
TEHLİKELİ CİSİMLERE YAKIN YERLERDE KULLANMAYINIZ.
• ÜRETİCİ TARAFINDAN ONAYLANMAMIŞ OLAN
AKSESUARLARIN KULLANIMI TEHLİKELİ OLABİLİR.
• BEBEK ARABASININ TUTACAK YERİ (VEYA YERLERİ) İLE
ZEMİNİNİ DÜZENLİ OLARAK KONTROL EDİNİZ VE HASAR
YAHUT DA KIRIKLAR OLMAMASINA ÖZEN GÖSTERİNİZ.
• BEBEK ARABASININ BİR STAND İLE BİRLİKTE KULLANILMASI
HALİNDE, STAND ÜZERİNDE BELİRTİLEN AZAMİ BEBEK
ARABASI BOYUNU KONTROL EDİNİZ.
• ΣΗΜΑΝΤΙΚΟ: ιαβάστε µε προσοχή τι οδηγίε αυτέ και
διατηρήστε τι για µελλοντική χρήση.
Η ασφάλεια του παιδιού θα µπορούσε να τεθεί σε
κίνδυνο εάν δεν ακολουθήσετε τι οδηγίε αυτέ.
• Η PEG PEREGO διατηρεί το δικαίωμα να κάνει ότι αλλαγές είναι
αναγκαίες ή βελτιώσεις σε αυτά τα προιόντα οποτεδήποτε χωρίς
ειδοποίηση.
Η Peg Perego S.p.Α. διαθέτει πιστοποίηση ΙSΟ 9001.
Η πιστοποίηση παρέχει στους πελάτες και στους
καταναλωτές την εγγύηση της διαφάνειας και της
εμπιστοσύνης στον τρόπο με τον οποίο εργάζεται η
εταιρία.
ΕΞΥΠΗΡΕΤΗΣΗ ΠΕΛΑΤΝ
Εάν τυχόν χαθούν μέρη του μοντέλου ή υποστούν κάποια βλάβη,
χρησιμοποιείτε μόνο γνήσια ανταλλακτικά Peg Perego. Για τυχόν
επισκευές, αντικαταστάσεις, πληροφορίες σχετικά με τα προ
ϊόντα,
την πώληση γνήσιων ανταλλακτικών και αξεσουάρ, επικοινωνήστε
με την Υπηρεσία Εξυπηρέτησης Peg Perego:
τηλ: 0039-039-60.88.213,
fax: 0039-039-33.09.992,
e-mail: assistenza@pegperegο.it,
www.pegperegο.cοm
Η Peg Perego είναι στη διάθεση των Καταναλωτών της για την
καλύτερη εξυπηρέτηση των αναγκών τους. Για το λόγο αυτό είναι
για μας εξαιρετικά σημαντικό και πολύτιμο να γνωρίζουμε τη
γνώμη των Πελατών μας. Θα σας είμαστε λοιπόν πολύ ευγνώμονες
εάν, αφού χρησιμοποιήσετε ένα προιόν μας, συμπληρώσετε το
ΕΡΩΤΗΜΑΤΟΛΟΓΙΟ ΙΚΑΝΟΠΟΙΗΣΗΣ ΚΑΤΑΝΑΛΩΤΗ που θα βρείτε
στο internet στην ακόλουθη διεύ
θυνση:
www.pegperegο.cοm
επισημαίνοντας ενδεχόμενες παρατηρήσεις ή υποδείξεις.
PLIKO P3
• Το Pliko P3, χάρη στη μετακινήσιμη πλάτη, μπορεί να
χρησιμοποιηθεί είτε στον τύπο πολυκαρότσι είτε στον τύπο
καροτσάκι περιπάτου.
ΟΗΓΙΕΣ ΧΡΗΣΗΣ
ΑΝΟΙΓΜΑ
1• Πριν ανοίξετε το καρότσι πρέπει να αφαιρέσετε τα δύο
προστατευτικά πώματα των γάντζων, όπως φαίνεται στην
εικόνα, διαφορετικά δεν θα ανοίξει σωστά.
2• Για να ανοίξετε το καρότσι, χρειάζεται να τραβήξετε προς τα
πάνω τους δύο μοχλούς των χειρολαβών όπως φαίνεται στην
εικόνα.
3• Ταυτόχρονα σηκώστε το καρότσι που θα ανοίξει αυτόματα.
Για να βεβαιωθείτε ότι το καροτσάκι περιπάτου έχει ανοίξει
σωστά, ελέγξτε τους δύο πλευρικούς γάντζους (βλέπε εικόνα).
ΣΥΝΑΡΜΟΛΟΓΗΣΗ
4• Για να συναρμολογήσετε τους μπροστινούς τροχούς,
κατεβάστε το μοχλό Α και περάστε τον τροχό όπως φαίνεται
στην εικόνα Β μέχρι να ακουστεί το κλικ.
5• Για να τοποθετήσετε τους πίσω τροχούς, συνδέστε τους
τροχούς, οι οποίοι ενώνονται με το καλώδιο του φρένου,
όπως φαίνεται στην εικόνα.
6• Ξεχωρίστε με προσοχή τον ΑΡ τροχό από τον ΔΞ τροχό για
να συνδέσετε σωστά τους 2 πίσω τροχο
ύς. Ο ΑΡ τροχός
παρουσιάζει μία νεύρωση στο σωλήνα του τροχού και μία
επάνω στο σκελετό για να εξασφαλιστεί η σωστή σύνδεση
(βλέπε εικόνα).
7• Ελέγξτε τη σωστή σύνδεση όπως φαίνεται στην εικόνα, μέχρι
να ακουστεί το κλικ.
8• Για να συναρμολογήσετε το καλάθι, περάστε τις σχισμές στους
μπροστινούς γάντζους Α και στους πίσω γάντζους Β και C.
9• Η εικόνα δείχνει τo καλάθι συνδεμένο.
ΕL•EΛΛΗΝΙΚΑ
Page 81

10• Η υποδοχή αναψυκτικών μπορεί να εφαρμοστεί στην
αριστερή ή δεξιά πλευρά του καροτσιού περιπάτου, χάρη
στο άγκιστρο που υπάρχει ήδη και στα δύο πλαϊνά του
καροτσιού περιπάτου. Για να εφαρμόσετε την υποδοχή
αναψυκτικών, συνδέστε την μέχρι να ακουστεί το κλικ,
όπως φαίνεται στην εικόνα Α. Υποδοχή αναψυκτικών
συνδεμένη εικόνα Β.
Συνιστάται να μην τοποθετείτε στην υποδοχή
τοποθέτησης αναψυκτικών ζεστά ροφήματα και με
βάρος μεγαλύτερο του 0,5 Kg (1 lbs).
ΦΡΕΝΟ
11• Για να φρενάρετε το Pliko P3, κατεβάστε με το πόδι τους
μοχλούς που είναι τοποθετημένοι στους πίσω τροχούς όπως
φαίνεται στην εικόνα.
• Για να ελευθερώσετε τα φρένα, ενεργήστε αντίθετα.
• Όταν είστε σταματημένοι, να ενεργοποιείτε πάντα τα
φρένα.
Π ΕΡΙΣΤΡΕΦΟΜΕΝΟΙ ΤΡΟΧΟΙ
12• Για να κάνετε περιστρεφόμενους τους μπροστινούς τροχούς,
χρειάζεται να κατεβάσετε το μοχλό όπως φαίνεται στην
εικόνα A. Για να τους κάνετε σταθερούς, ενεργήστε στο μοχλό
αντίθετα, όπως φαίνεται στην εικόνα Β.
ΡΥΘΜΙΣΗ ΧΕΙΡΟΛΑΒΩΝ
13• Οι χειρολαβέ
ς έχουν ρυθμιζόμενο ύψος σε δύο θέσεις. Για τη
θέση ψηλά, πατήστε το κουμπί και ταυτόχρονα σηκώστε τη
χειρολαβή προς τα πάνω. Για να την κατεβάσετε ενεργήστε
αντίθετα.
ΚΛΕΙΣΙΜΟ
• Πριν κλείσετε το Pliko P3, είναι απαραίτητο να
αποσυνδέσετε το Navetta ή το κάθισμα αυτοκινήτου
Primo Viaggio.
14• Είναι δυνατόν να κλείσετε το καροτσάκι περιπάτου με το ένα
μόνο χέρι: τραβήξτε προς τα πάνω πρώτα τον ένα μοχλό
και στη συνέχεια τον άλλο μέχρι την απελευθέρωση του
μηχανισμού.
15• Πιάστε την κεντρική χειρολαβή (εικόνα 3) και τραβήξτε την
προς τα πάνω μέχρι να κλείσει όπως φαίνεται στην εικόνα.
16• Ελέγξτε το σωστό κλείσιμο του καροτσιού από το γάντζο
ασφαλείας. Το καρότσι κλειστό παραμένει όρθιο μόνο του.
ΜΕΤΑΦΟΡΑ
17• Το Pliko P3 μπορεί να μεταφερθεί άνετα (διατηρώντας τους
μπροστινούς τροχούς μη περιστρεφόμενους) πιάνοντας την
κεντρική χειρολαβή, όπως φαίνεται στην εικόνα.
18• Μπορεί να μεταφερθεί και χάρη στην πλευρική χειρολαβή,
όπως φαίνεται στην εικόνα.
GANCIOMATIC SYSTEM ε
PLIKO P3 ΤΥΠΟΥ ΠΟΛΥΚΑΡΟΤΣΙ
Το Ganciomatic System είναι το πρακτικό και γρήγορο σύστημα
που σας επιτρέπει να συνδέσετε στο Pliko P3 τύπου πολυκαρότσι,
χάρη στους συνδέσμους Ganciomatic, το Navetta και το Primo
Viaggio, καθώς διαθέτουν και αυτά σύστημα Ganciomatic.
ΣΥΝΕΣΜΟΙ GANCIOMATIC ΤΟΥ ΠΟΛΥΚΑΡΟΤΣΙΟΥ
19• Για να σηκώσετε τους συνδέσμους Ganciomatic του
πολυκαροτσιού, στρέψτε προς τα πάνω τους δύο συνδέσμους
μέχρι να ακουστεί το κλικ, όπως φαίνεται στην εικόνα.
20• Για να κατεβάσετε τους συνδέσμους Ganciomatic του
πολυκαροτσιού, τραβήξτε προς τα έξω το μοχλό και
ταυτόχρονα, γυρίστε προς τα κάτω τους συνδέσμους όπως
φαίνεται στην εικόνα.
PLIKO P3 + NAVETTA
Για να συνδέσετε το πορτ-μπεμπέ Navetta στο Pliko P3 τύπου
πολυκαρότσι χρειάζεται να ενεργήσετε ως εξής:
- Φρενάρετε το Pliko P3;
- Σηκώστε το
υς συνδέσμους Ganciomatic;
21• Γυρίστε τους δύο μοχλούς που είναι τοποθετημένοι στο πίσω
μέρος του καροτσιού, προς τα έξω όπως φαίνεται στην εικόνα;
22• Σηκώστε το στήριγμα των ποδιών του καροτσιού στην πιο
ψηλή θέση (εικόνα 1);
23• Το Pliko P3 Naked τύπου πολυκαρότσι είναι τώρα έτοιμο να
συνδέσει το Navetta;
24• Πιάστε τη χειρολαβή του Navetta και τοποθετήστε την στους
συνδέσμους Ganciomatic του πολυκαροτσιού, κρατώντας το
πλάι της κεφαλής του Πορτ-μπεμπέ από την αντίθετη πλευρά
των χερουλιών του καροτσιού;
- Πατήστε και με τα δύο χέρια επάνω στα πλαϊνά του Navetta
μέχρι να ακουστεί το κλικ;
- Για να αποσυνδέσετε το πορτ-μπεμπέ Navetta από το
πολυκαρότσι συμβουλευτείτε το εγχειρίδιο οδηγιών του.
PLIKO P3 + PRIMO VIAGGIO
Για να συνδέσετε το κάθισμα αυτοκινήτου στο καρότσι χρειάζεται
να ενεργήσετε ως ε
ξής:
- Φρενάρετε το Pliko P3;
- Συνδέστε την προστατευτική μπάρα (βλέπε τμήμα
προστατευτικής μπάρας κάτω);
25• Το Pliko P3 τύπου πολυκαρότσι είναι έτοιμο να συνδέσει το
κάθισμα Primo Viaggio;
26• Πιάστε τη χειρολαβή του καθίσματος και τοποθετήστε
την στους συνδέσμους Ganciomatic του πολυκαροτσιού,
κρατώντας το πλάι της κεφαλής του καθίσματος από την
αντίθετη πλευρά των χερουλιών του καροτσιού. - Πατήστε και
με τα δύο χέρια επάνω στα πλαϊνά του καθίσματος μέχρι να
ακουστεί το κλικ;
- Για να αποσυνδέσετε το κάθισμα αυτοκινή
του από το
πολυκαρότσι συμβουλευτείτε το εγχειρίδιο οδηγιών του.
Π ΡΟΣΤΑΤΕΥΤΙΚΗ ΜΠΑΡΑ
27• Το πολυκαρότσι παρουσιάζεται με τοποθετημένα
πώματα κλεισίματος των μπράτσων· για να συνδέσετε
την προστατευτική μπάρα χρειάζεται πρώτα να τα
αφαιρέσετε (φυλάξτε τα πώματα, σε περίπτωση που
θελήσετε να χρησιμοποιήσετε το καροτσάκι περιπάτου
χωρίς προστατευτική μπάρα). Για να αφαιρέσετε τα πώματα,
πατήστε το κουμπί κάτω από το μπράτσο και ταυτόχρονα
βγάλτε το πώμα (ενεργήστε και στα δύο μπράτσα).
28• Για να συνδέσετε την προστατευτική μπάρα, περάστε τα
δύ
ο άκρα της προστατευτικής μπάρας στα μπράτσα όπως
φαίνεται στην εικόνα, μέχρι να ακουστεί το κλικ.
29• Είναι δυνατόν να ανοίξετε την προστατευτική μπάρα μόνο
από τη μία πλευρά για να διευκολύνετε την είσοδο και
την έξοδο του μωρού όταν μεγαλώσει. Για να ανοίξετε,
πατήστε το κουμπί που βρίσκεται κάτω από το μπράτσο και
ταυτόχρονα τραβήξτε την προστατευτική μπάρα προς τα έξω.
30• Για να αφαιρέσετε την προστατευτική μπάρα πατήστε τα
δύο κουμπιά που βρίσκονται κάτω από τα μπράτσα και
ταυτόχρονα τραβήξτε την προστατευτική μπάρα προς τα έξω.
ΓΙΑ ΝΑ ΜΕΤΑΤΡΕΨΕΤΕ ΤΟ ΠΟΛΥΚΑΡΟΤΣΙ ΣΕ ΚΑΡΟΤΣΑΚΙ
ΠΕΡΙΠΑΤΟΥ
ΣΥΝΑΡΜΟΛΟΓΗΣΗ
31• Για να μετατρέψετε το Pliko P3 τύπου πολυκαρότσι σε
καροτσάκι περιπάτου χρειάζεται να βεβαιωθείτε ότι οι δύο
μοχλοί είναι κατεβασμένοι όπως φαίνεται στην εικόνα.
32• Τοποθετήστε την πλάτη με τον ποδόσακο στο κάθισμα του
καροτσιού, όπως φαίνεται στην εικόνα.
33• Για να συνδέσετε την πλάτη στο καρότσι, χρειάζεται να
περάσετε τα δύο άκρα, πατώντας τα δύο κουμπιά, στο
κάθισμα του καροτσιού, όπως φαίνεται στην εικόνα 1, μέχρι
να ακουστεί το κλικ, όπως φαίνεται στην εικόνα 2.
34• Για να συνδέσετε την κορωνίδα ρύθμισης της πλάτης στο
καρότσι, χρειάζεται να στρέψετε προς τα πάνω το σύνδεσμο
(εικόνα B προς την κατεύθυνση του τόξου) και να τον
τοποθετήσετε πίσω από τον πίσω ιστό.
35• Ωθήστε τους δύο συνδέσμους προς τα κάτω, μέχρι να
ακουστεί το κλικ, στις έδρες των πίσω ιστών.
36• Για τοποθετήσετε την επένδυση στο καροτσάκι περιπάτου,
συνδέστε τους συνδέσμους του ποδόσακου στα μπράτσα,
όπως δείχνουν τα τόξα στην εικόνα.
37•
Περάστε τους μοχλούς στήριξης των ποδιών στο σάκο της
πλάτης, όπως φαίνεται στην εικόνα.
38• Για να ολοκληρώσετε τη σύνδεση του ποδόσακου στο
καρότσι, συνδέστε τα κουμπιά του σάκου στη βάση, όπως
φαίνεται στην εικόνα A. Περάστε την πιο κάτω ζωνίτσα
που χωρίζει τα πόδια, κάτω από το κάθισμα, όπως φαίνεται
στην εικόνα Β, αφήνοντας επάνω από το σάκο το πιο πάνω
Page 82

διαχωριστικό των ποδιών.
Α ΝΟΙΓΜΑ ΚΑΙ ΚΛΕΙΣΙΜΟ
• Για να ανοίξετε το Pliko P3 τύπου καροτσάκι περιπάτου,
επαναλάβατε τις ενέργειες που φαίνονται στην εικόνα 2 και 3.
• Για να κλείσετε το Pliko P3 τύπου καροτσάκι περιπάτου
χαλαρώστε τους στροφείς της κουκούλας, σηκώστε την πλάτη
και επαναλάβατε τις ενέργειες που φαίνονται στις εικόνες 14,
15 και 16.
ΡΥΘΜΙΣΗ ΒΑΣΗΣ ΣΤΗΡΙΞΗΣ ΤΩΝ ΠΟΔΙΩΝ
39•
Η βάση στήριξης των ποδιών είναι ρυθμιζόμενη σε τρεις θέσεις.
Για να χαμηλώσετε τη βάση στήριξης των ποδιών, τραβήξτε
τους δύο πλευρικούς μοχλούς προς τα κάτω και ταυτόχρονα
κατεβάστε την. Για να σηκώστε τη βάση στήριξης των ποδιών,
ωθήστε την προς τα πάνω μέχρι να ακουστεί το κλικ.
Π ΙΣΩ ΠΛΑΤΦΟΡΜΑ
40• Η πίσω πλατφόρμα διευκολύνει τη μαμά να υπερβεί μικρές
διαφορές επιπέδων και επί πλέον μπορεί να μεταφέρει το
δεύτερο παιδί.
ΣΕΙΡΑ ΤΟΠΟΘΕΤΗΣΗΣ
41• Για να χρησιμοποιήσετε το Pliko P3 με δύο παιδιά, χρειάζεται
αρχικά να φρενάρετε το Pliko, στη συνέχεια τοποθετήστε
το πιο μικρό παιδί στο κάθισμα και προσδέστε τη ζώνη
ασφαλείας (1). Πιάστε τα χερούλια (2) και ανεβάστε το
δεύτερο παιδί στην πλατφόρμα (3).
• Μην αφήνετε ποτέ μόνα τα παιδιά σας.
•
Μην επιτρέπετε στο παιδί να ανεβαίνει στην πίσω
πλατφόρμα με το καροτσάκι περιπάτου άδειο.
ΚΟΥΚΟΥΛΑ
• Η κουκούλα χρησιμοποιείται και συνδέεται και στο Πορτ-
μπεμπέ Navetta και στο καροτσάκι περιπάτου. Διαθέτει
φερμουάρ για να εφαρμοστεί το προστατευτικό κάλυμμα για
τη βροχή.
42• Για να τοποθετήσετε την κουκούλα στο Πορτ-μπεμπέ Navetta
ξεκουμπώστε τα κουμπιά Α και Β (εικόνα 1). Συνδέστε την
κουκούλα όπως φαίνεται στην εικόνα 2 και ελέγξτε τη σωστή
σύνδεση, εικόνα 3.
43• Για να τοποθετήσετε την κουκούλα στο καροτσάκι περιπάτου
συνδέστε την όπως φαίνεται στην εικόνα και ελέγξτε τη
σωστή σύνδεση (βλέπε εικόνα).
44• Για να τεντώσετε την κο
υκούλα, σπρώξτε προς τα κάτω το
στροφέα. Η κουκούλα είναι ανακλινόμενη ακολουθώντας την
κλίση της πλάτης.
45• Για να τεντώσετε την κουκούλα, σπρώξτε προς τα κάτω το
στροφέα που είναι τοποθετημένος στο εσωτερικό, όπως
φαίνεται στην εικόνα.
46• Προεκτείνετε την κουκούλα τελείως, ανοίγοντας το φερμουάρ,
εικόνα B.
Η κουκούλα ακολουθεί την κλίση της πλάτης.
47• Η κουκούλα μπορεί εύκολα να μετατραπεί σε τέντα ήλιου,
βλέπε εικόνα. Κλείστε το φερμουάρ και δέστε την κουκούλα
με το πρακτικό τη
ς άγκιστρο.
48• Για να αφαιρέσετε την κουκούλα από το Πορτ-μπεμπέ
Navetta, αποσυνδέστε την στο πλάι από την επένδυση.
Αποσυνδέστε στη συνέχεια τα ανοίγματα A και B από την
επένδυση όπως φαίνεται στην εικόνα, πατήστε τη γλωσσίτσα
και από τις δύο πλευρές και αποσυνδέστε την κουκούλα.
49• Για να αφαιρέσετε την κουκούλα από το καροτσάκι περιπάτου,
πατήστε τη γλωσσίτσα όπως φαίνεται στην εικόνα Α, και από
τις δύο πλευρές της κουκούλας.
Αποσυνδέστε την και τραβήξτε την προς τα πάνω όπως
φαίνεται στην εικόνα Β.
ΠΟΡΤ-ΜΠΕΜΠΕ NAVETTA
ΧΕΙΡΟΛΑΒΗ
50•
Για να σηκώσετε τη χειρολαβή, τραβήξτε την προς τα πάνω μέχρι
το κλικ. Η χειρολαβή μπλοκάρεται μόνον όταν είναι σε κάθετη
θέση και τα δύο στοιχεία μπλοκαρίσματος μπουν στην έδρα
τους.
51• Για να χαμηλώσετε τη χειρολαβή, απελευθερώστε την,
τραβώντας επάνω τα δύο στοιχεία μπλοκαρίσματος και κατόπιν
τραβήξτε προς τα κάτω τη χειρολαβή.
52• Η χειρολαβή διευκολύνει τη μεταφορά και τη σύνδεση του
πορτ-μπεμπέ επάνω στα πολυκαρότσια και στα καροτσάκια
περιπάτου.
ΘΕΣΗ ΚΟΥΝΙΑΣ ΚΑΙ ΚΡΕΒΑΤΑΚΙ
53• Η βάση του πορτ-μπεμπέ Navetta έχει ένα ειδικό σχήμα που
όταν ακουμπήσει σε μία επίπεδη επιφάνεια μπορεί να κουνιέται.
54• To Navetta γίνεται μία μικρή φωλιά, η οποία δεν κουνιέται,
βγάζοντας τα καβαλέτα που είναι ενσωματωμένα όπως φαίνεται
στην εικόνα.
ΡΥΘΜΙΣΗ ΤΗΣ ΠΛΑΤΗΣ ΤΟΥ ΚΑΘΙΣΜΑΤΟΣ
55• Η πλατούλα του καθίσματος μπορεί να ρυθμισθεί βγάζοντα
ς
έξω και περιστρέφοντας τη λαβή όπως φαίνεται στην εικόνα.
ΡΥΘΜΙΣΗ ΚΥΚΛΟΦΟΡΙΑΣ ΑΕΡΑ
56• Η βάση του πορτ-μπεμπέ Navetta είναι εφοδιασμένη με
ανοιγόμενες οπές που επιτρέπουν την είσοδο του αέρα από
κάτω.
Για να ανοίξετε τις οπές από το μπροστινό μέρος του καλαθιού
Navetta (πλευρά στην οποία βρίσκεται η κουκούλα), σπρώξτε τα
δύο άγκιστρα προς τα έξω.
57• Για να ανοίξετε τις οπές από το πίσω μέρος (πλευρά αντίθετη
από την κουκούλα), σπρώξ
τε ένα από τα δύο άγκιστρα προς τα
έξω.
ΔΥΝΑΤΟΤΗΤΑ ΑΦΑΙΡΕΣΗΣ ΤΗΣ ΕΠΕΝΔΥΣΗΣ
58• Για να αφαιρέσετε την επένδυση αποσυνδέστε τα ανοίγματα
στο πλάι και βγάλτε την από μπροστά.
59• Αφαιρέστε τις 2 γλωσσίτες από το σκελετό στο πίσω μέρος και
αφαιρέστε την.
ΣΥΝΔΕΣΗ ΚΑΙ ΑΠΟΣΥΝΔΕΣΗ ΤΟΥ ΠΟΡΤ-ΜΠΕΜΠΕ ΣΤΟ
ΚΑΡΟΤΣΑΚΙ ΠΕΡΙΠΑΤΟΥ
Το Πορτ-μπεμπέ Navetta διαθέτει Σύστημα Ganciomatic,
το οποίο συνδέεται στους συνδέσμους Ganciomatic του
καροτσιο
ύ περιπάτου Pliko P3.
60• Για να αποσυνδέσετε το πορτ-μπεμπέ από τα καροτσάκια
περιπάτου, σπρώξτε πρώτα το χερούλι (βρίσκεται στην αντίθετη
πλευρά της κουκούλας) στο πλάι και στη συνέχεια σπρώξτε το
προς τα πάνω και συγχρόνως σηκώστε το πορτ-μπεμπέ από τη
χειρολαβή προς τα πάνω.
Η NAVETTA ΣΤΟ ΑΥΤΟΚΙΝΗΤΟ
61• Η Navetta μπορεί να γίνει Navetta AUTO χάρη στα δύο
γαντζάκια (όπως φαίνεται στην εικόνα) και αγοράζοντας
ξεχωριστά το Kit Auto.
ΛΕΠΤΟΜΕΡΕΙΕΣ ΑΡΘΡΤΟΥ ΣΥΣΤΗΜΑΤΟΣ ON TRACK
Π Ο ΔΟΣΑΚΟΣ
62•
Για να συνδέσετε τον ποδόσακο ενώστε το φερμουάρ του με το
φερμουάρ της βάσης στήριξης των ποδιών όπως φαίνεται στην
εικόνα.
Συνδέστε τα δύο κουμπιά, όπως φαίνεται στην εικόνα B, για να
στερεώσετε τον ποδόσακο
Π ΡΟΣΤΑΤΕΥΤΙΚΟ ΚΑΛΥΜΜΑ ΓΙΑ ΤΗ ΒΡΟΧΗ
63• Για να τοποθετήσετε το προστατευτικό κάλυμμα για τη βροχή,
χρειάζεται να ενώσετε το φερμουάρ του με το φερμουάρ της
κουκούλας.
64• Συνδέστε το κουμπί του λάστιχου στο κουμπί του καροτσιού
περιπάτου, όπως φαίνεται στην εικόνα, μέχρι να ακουστεί το
κλικ.
65•
Στερεώστε το πιο κάτω λάστιχο του προστατευτικού καλύμματος
για τη βροχή στον τροχό.
66• Το πρακτικό προστατευτικό κάλυμμα για τη βροχή σας δίνει
τη δυνατότητα να το κατεβάσετε ανοίγοντας το φερμουάρ και
παραμένοντας στερεωμένο στο καροτσάκι περιπάτου χάρη
στα λάστιχα.
67• Το προστατευτικό αυτό κάλυμμα για τη βροχή έχει σχεδιαστεί
και για την περίπτωση που επάνω στο καροτσάκι περιπάτου
είναι συνδεδεμένο το κάθισμα αυτοκινήτου Primo Viaggio,
εξασφαλίζοντας πλήρη προστασία.
• Μην χρησιμοποιείτε το προστατευτικό κάλυμμα για τη βροχή
σε κλειστούς χώρους και να ελέγχετε πάντα εάν το παιδί έχει
ζεσταθεί.
• Μην τοποθετείτε το προστατευτικό κάλυμμα για τη βροχή
από PVC κοντά σε πηγές θερμότητας
και προσέξτε τα τσιγάρα.
Page 83
• Βεβαιωθείτε ότι το προστατευτικό κάλυμμα για τη βροχή
δεν εμποδίζει κανέναν κινούμενο μηχανισμό που φέρει το
πολυκαρότσι ή το καροτσάκι περιπάτου σας.
• Αφαιρείτε πάντα το προστατευτικό κάλυμμα για τη βροχή
πριν να κλείσετε το πολυκαρότσι ή το καροτσάκι περιπάτου
σας.
• Πλύνετε με ένα σφουγγάρι και σαπουνισμένο νερό, χωρίς τη
χρήση απορρυπαντικών.
ΖΩΝΗ ΑΣΦΑΛΕΙΑΣ
68• Βεβαιωθείτε ότι η τιράντα έχει τοποθετηθεί σωστά ωθώντας
όπως φαίνεται στην εικόνα A. Συνδέστε τη ζώνη ενεργώντας
όπως δείχνει η εικόνα B.
69• Για να απελευ
θερώσετε τη ζώνη, πατήστε στα πλαϊνά της
αγκράφας (εικόνα A) και ταυτόχρονα τραβήξτε προς τα έξω τη
ζωνίτσα που περιβάλλει τη μέση (εικόνα B).
70• Η νέα ζώνη ασφαλείας από σήμερα, είναι πιο εύκολο να
φορεθεί χάρη στο σύστημα “βάλε και βγάλε”. Πράγματι πριν
να γαντζώσετε τη ζώνη, συνδέστε το λουράκι στην πλάτη
βάζοντας τη γλωσσίτσα στο ειδικό θηλυκάκι όπως φαίνεται
στην εικόνα; στη συνέχεια αφού προσδέσετε τη ζώνη στο
παιδί βγάλτε την από την πλάτη για να μπορεί το παιδί
να κινείται πιο ελεύθερα. Το λουράκι πρέπει να παραμείνει
κάτω από τους ώμους του παιδιού.
ΡΥΘΜΙΣΗ ΠΛΑΤΗΣ
71• Η πλάτη είναι ανακλινόμενη σε τέσσερις θέσεις. Γ
ια να
χαμηλώσετε την πλάτη, σηκώστε τη λαβή (εικόνα Α) και
ταυτόχρονα κατεβάστε την πλάτη (εικόνα Β), μπλοκάροντάς
την στην επιθυμητή θέση.
Για να τη σηκώσετε, ωθήστε την πλάτη προς τα πάνω.
ΔΥΝΑΤΟΤΗΤΑ ΑΦΑΙΡΕΣΗΣ ΤΗΣ ΕΠΕΝΔΥΣΗΣ
72• Για να αφαιρέσετε την επένδυση από το καροτσάκι περιπάτου,
ξεκουμπώστε τους συνδέσμους του ποδόσακου από τα
μπράτσα, όπως δείχνουν τα τόξα.
73• Ξεβιδώστε το λουράκι (μόνο από τη μία πλευρά) όπως
φαίνεται στην εικόνα κρατώντας το δάχτυλο κάτω από το
περικόχλιο.
74• Ξεκουμπώστε τα κουμπιά του ποδόσακου
από τα πλαϊνά
όπως φαίνεται στην εικόνα. Βγάλτε το διαχωριστικό για τα
πόδια της ζωνίτσας από κάτω από το κάθισμα.
75•
Ξεκουμπώστε τα κουμπιά του ποδόσακου από το κάθισμα και
βγάλτε τον για να αφαιρέσετε τον ποδόσακο από τους γάντζους
της βάσης στήριξης των ποδιών. Βγάλτε τον ποδόσακο από
πάνω.
GANCIOMATIC SYSTEM ε
PLIKO P3 ΤΥΠΟΥ ΠΟΛΥΚΑΡΟΤΣΙ
Το Ganciomatic System είναι το πρακτικό και γρήγορο σύστημα
που σας επιτρέπει να συνδέσετε στο Pliko P3 τύπου πολυκαρότσι,
χάρη στους συνδέσμους Ganciomatic, το Navetta και το Primo
Viaggio, καθώς διαθέτουν και αυτά σύστημα Ganciomatic.
ΣΥΝΕΣΜΟΙ GANCIOMATIC ΤΟΥ ΚΑΡΟΤΣΙΟΥ
ΠΕΡΙΠΑΤΟΥ
76• Για να σηκώσετε τους συνδέσμους Ganciomatic του
καροτσιού περιπάτου, σηκώστε τον ποδόσακο στις γωνίες του
καθίσματος και στρέψτε προς τα πάνω τους δύο συνδέσμους
μέχρι να ακουστεί το κλικ.
77•
Για να κατεβάσετε τους συνδέσμους Ganciomatic του
καροτσιού περιπάτου, τραβήξτε προς τα έξω το μοχλό και
ταυτόχρονα, γυρίστε προς τα κάτω τους συνδέσμους όπως
φαίνεται στην εικόνα.
PLIKO P3 + NAVETTA
78• Για να συνδέσετε το πορτ-μπεμπέ Navetta στο καροτσάκι
περιπάτου, χρειάζεται να ενεργήσετε ως εξής:
- φρενάρετε το καροτσάκι περιπάτου;
- κατεβάστε τελείως την πλάτη του καροτσιού περιπάτου;
- σηκώστε τους συνδέσμους Ganciomatic του καροτσιού
περιπάτου;
- αφαιρέστε την προστατευτική μπάρα και τοποθετήστε
τα παρεχόμενα πώματα για να κλείσετε τα μπράτσα του
καροτσιού περιπάτου;
- σηκώστε τη βάση για τη στήριξη των ποδιών του καροτσιού
περιπάτου στην πιο ψηλή θέση;
- πιάστε τη χειρολαβή του Navetta;
- τοποθετήστε το Navetta στους συνδέσμους Ganciomatic
του καροτσιού περιπάτου, κρατώντας το πλάι της κεφαλής
του πορτ-μπεμπέ από το αντίθετο μέρος των χερουλιών του
καροτσιού περιπάτου;
- πατήστε και με τα δύο χέρια επάνω στα πλαϊνά του Navetta
μέχρι να ακουστεί το κλικ;
- Για να αποσυνδέσετε το πορτ-μπεμπέ Navetta από το
καροτσάκι περιπάτου συμβουλευτείτε το εγχειρίδιο οδηγιών
του.
PLIKO P3 + PRIMO VIAGGIO
79• Για να συνδέσετε το κάθισμα αυτοκινήτου στο καροτσάκι
περιπάτου χρειάζεται να ενεργήσετε ως εξής:
- φρενάρετε το καροτσάκι περιπάτο
υ;
- κατεβάστε τελείως την πλάτη του καροτσιού περιπάτου;
- σηκώστε τους συνδέσμους Ganciomatic του καροτσιού
περιπάτου;
- τοποθετήστε το κάθισμα αυτοκινήτου προς τη μαμά και
ωθήστε το προς τα κάτω μέχρι να ακουστεί το κλικ;
- Σας συμβουλεύουμε να μην αφαιρείτε την προστατευτική
μπάρα από το καροτσάκι περιπάτου, όταν συνδέετε το
κάθισμα αυτοκινήτου;
-
Για να αποσυνδέσετε το κάθισμα αυτοκινήτου από το καροτσάκι
περιπάτου συμβουλευτείτε το εγχειρίδιο οδηγιών του.
ΓΙΑ ΝΑ ΜΕΤΑΤΡΕΨΕΤΕ ΤΟ ΚΑΡΟΤΣΑΚΙ ΠΕΡΙΠΑΤΟΥ ΣΕ
ΠΟΛΥΚΑΡΟΤΣΙ
Για να μετατρέψετε το καροτσάκι περιπάτου σε πολυκαρότσι
χρειάζεται αρχικά να αφαιρέσετε την επένδυσή του.
80• Αφαιρέστε την επένδυση από το καροτσάκι περιπάτου,
ξεκουμπώνοντας τους συνδέσμους του ποδόσακου από τα
μπράτσα, όπως δείχνουν τα τόξα.
81• Ξεκουμπώστε τα κουμπιά του ποδόσακου από τα πλαϊνά
όπως φαίνεται στην εικόνα. Βγάλτε το διαχωριστικό για τα
πόδια της ζωνίτσας από κάτω από το κάθισμα.
82• Ξεκουμπώστε τα κουμπιά του ποδόσακου από το κάθισμα
και βγάλτε τον για να αφαιρέσετε τον ποδόσακο από τους
γάντζους της
βάσης στήριξης των ποδιών. Βγάλτε τον
ποδόσακο από πάνω.
83•
Ξεκουμπώστε τη βάση πατώντας το κουμπί που βρίσκεται στο
πίσω μέρος του πολυκαροτσιού, όπως φαίνεται στην εικόνα·
τόσο στη δεξιά όσο και στην αριστερή μπάρα. Σηκώστε προς τα
πάνω την πλάτη της βάσης και με τα δύο τα χέρια.
84• Πατήστε τα δύο κουμπιά στο κάθισμα του πολυκαροτσιού
και με τα δύο χέρια και σηκώστε όλη τη βάση προς τα πάνω,
όπως φαίνεται στην εικόνα.
ΕΞΑΡΤΗΜΑΤΑ
85• Τσάντα Αλλαξιέρα (περιλαμβάνεται): Τσάντα με
στρωματάκι για το άλλαγμα της πάνας του μωρού,
συνδεόμενη στο καροτσάκι περιπάτου.
86• Κουνουπιέρα: Κουνουπιέρα με φερμουάρ, που μπορεί να
εφαρμοστεί στην κουκούλα με φερμουάρ.
87• Τσάντα Ταξιδιού: Πρακτική τσάντα για την εναέρια
μεταφορά του καροτσιού περιπάτου.
88• Kit Αυτοκινήτου Navetta: Μπορείτε να ζητή
σετε το Kit
αυτοκινήτου(με έγκριση ECE R44/04), περιέχει τα απαραίτητα για
τη συναρμολόγηση του πορτ-μπεμπέ στο αυτοκίνητο.
89• Προστατευτικό κάλυμμα για τη βροχή Cover All:
Προστατευτικό κάλυμμα για τη βροχή από διαφανές PVC,
εξασφαλίζει την πλήρη προστασία του πορτ-μπεμπέ που είναι
συνδεμένο στο καροτσάκι περιπάτου.
ΚΑΘΑΡΙΣΜΑ ΚΑΙ ΣΥΝΤΗΡΗΣΗ
Το προϊόν σας χρειάζεται ελάχιστη συντήρηση. Οι εργασίες
καθαρισμού και συντήρησης πρέπει να εκτελούνται μόνον από
ενήλικες.
• Συμβουλεύουμε να διατηρείτε καθαρά όλα τα μέρη που
κινούνται και εάν χρειάζεται, να τα λιπαίνετε με ελαφρύ
λάδι.
• Στεγνώνετε τα μεταλλικά μέρη του προϊόντος για να αποφύγετε
τη σκουριά.
Page 84

• Περιοδικά καθαρίζετε τα πλαστικά μέρη με ένα υγρό πανί, μη
χρησιμοποιείτε διαλυτικά ή άλλα παρόμοια προϊόντα.
• Βουρτσίζετε τα μέρη από ύφασμα για να απομακρυνθεί η σκόνη.
• Διατηρείτε καθαρούς τους τροχούς από σκόνη και άμμο.
• Προστατεύετε το προϊόν από ατμοσφαιρικούς παράγοντες, νερό,
βροχή ή χιόνι, η συνεχής έκθεση στον ήλιο για πολύ καιρό θα
μπορούσε να προκαλέσει αλλαγές στο χρώμα πολλών υλικών.
• Φυλάξτε το προϊόν σε ξηρό χώρο.
• Για το πλύσιμο των επενδύσεων, ακολουθήστε τις παρακάτω
υποδείξεις.
ΠΡΟΣΟΧΗ
PLIKO P3
• TO ΠΡΟΪΟΝ ΑΥΤΟ ΕΧΕΙ ΣΧΕΔΙΑΣΤΕΙ ΓΙΑ ΤΗ ΜΕΤΑΦΟΡΑ 1
ΠΑΙΔΙΟΥ ΣΤΟ ΚΑΘΙΣΜΑ ΚΑΙ 1 ΠΑΙΔΙΟΥ ΟΡΘΙΟ ΣΤΗΝ ΠΙΣΩ
ΠΛΑΤΦΟΡΜΑ.
• ΜΗΝ ΧΡΗΣΙΜΟΠΟΙΕΙΤΕ ΤΟ ΠΡΟΪΟΝ ΓΙΑ ΕΝΑΝ ΑΡΙΘΜΟ
ΚΑΘΗΜΕΝΩΝ ΜΕΓΑΛΥΤΕΡΟ ΑΠΟ ΑΥΤΟΝ ΠΟΥ
ΠΡΟΒΛΕΠΕΤΑΙ ΑΠΟ ΤΟΝ ΚΑΤΑΣΚΕΥΑΣΤΗ.
• ΤΟ ΠΡΟΪΟΝ ΑΥΤΟ ΕΙΝΑΙ ΕΓΚΕΚΡΙΜΕΝΟ ΓΙΑ ΠΑΙΔΙΑ ΑΠΟ
ΤΗ ΓΕΝΝΗΣΗ, ΕΩΣ 15 KG ΒΑΡΟΣ ΣΤΟ ΚΑΘΙΣΜΑ. Η ΠΙΣΩ
ΠΛΑΤΦΟΡΜΑ ΕΙΝΑΙ ΕΓΚΕΚΡΙΜΕΝΗ ΓΙΑ ΤΗ ΜΕΤΑΦΟΡΑ
ΕΝΟΣ ΔΕΥΤΕΡΟΥ ΠΑΙΔΙΟΥ ΜΕ ΒΑΡΟΣ ΜΕΧΡΙ 20 KG.
• ΧΡΗΣΙΜΟΠΟΙΕΙΣΤΕ ΕΝΑ ΣΥΣΤΗΜΑ ΣΥΓΚΡΑΤΗΣΗΣ ΜΟΛΙΣ
ΤΟ ΠΑΙΔΙ ΕΙΝΑΙ ΣΕ ΘΕΣΗ ΝΑ ΚΑΘΕΤΑΙ ΜΟΝΟ ΤΟΥ.
• ΤΟ ΠΡΟΪΟΝ ΑΥΤΟ ΕΧΕΙ ΣΧΕΔΙΑΣΤΕΙ ΓΙΑ ΝΑ
ΧΡΗΣΙΜΟΠΟΙΗΘΕΙ ΣΕ ΣΥΝΔΥΑΣΜΟ ΜΕ ΤΑ ΠΡΟΪΟΝΤΑ
PEREGO GANCIOMATIC: NAVETTA, PORTE ENFANT SOFT,
ΚΑΘΙΣΜΑ ΑΥΤΟΚΙΝΗΤΟΥ PRIMO VIAGGIO.
• ΟΙ ΕΡΓΑΣΙΕΣ ΣΥΝΑΡΜΟΛΟΓΗΣΗΣ ΚΑΙ ΠΡΟΕΤΟΙΜΑΣΙΑΣ
ΤΟΥ ΠΡΟΪΟΝΤΟΣ ΠΡΕΠΕΙ ΝΑ ΕΚΤΕΛΟΥΝΤΑΙ ΑΠΟ
ΕΝΗΛΙΚΕΣ.
• ΜΗΝ ΧΡΗΣΙΜΟΠΟΙΕΙΤΕ ΤΟ ΠΡΟΪΟΝ ΕΑΝ ΠΑΡΟΥΣΙΑΖΕΙ
ΡΩΓΜΕΣ Ή ΤΜΗΜΑΤΑ ΠΟΥ ΛΕΙΠΟΥΝ.
• ΝΑ ΧΡΗΣΙΜΟΠΟΙΕΙΤΕ ΠΑΝΤΑ ΤΙΣ ΖΩΝΕΣ ΠΕΝΤΕ ΣΗΜΕΙΩΝ.
ΝΑ ΧΡΗΣΙΜΟΠΟΙΕΙΤΕ ΠΑΝΤΑ ΤΟ ΔΙΑΧΩΡΙΣΤΙΚΟ ΓΙΑ ΤΑ
ΠΟΔΙΑ ΤΗΣ ΖΩΝΗΣ ΣΕ ΣΥΝΔΥΑΣΜΟ ΜΕ ΤΗ ΖΩΝΗ ΠΟΥ
ΠΕΡΙΒΑΛΛΕΙ ΤΗ ΜΕΣΗ.
• ΜΠΟΡΕΙ ΝΑ ΕΙΝΑΙ ΕΠΙΚΙΝΔΥΝΟ ΕΑΝ ΑΦΗΣΕΤΕ ΤΟ ΠΑΙΔΙ
ΣΑΣ ΧΩΡΙΣ ΕΠΙΒΛΕΨΗ.
• ΟΤΑΝ ΕΙΣΤΕ ΣΤΑΜΑΤΗΜΕΝΟΙ ΧΡΗΣΙΜΟΠΟΙΕΙΤΕ ΠΑΝΤΑ ΤΑ
ΦΡΕΝΑ.
• ΠΡΙΝ ΑΠΟ ΤΗ ΧΡΗΣΗ ΒΕΒΑΙΩΘΕΙΤΕ ΟΤΙ ΟΛΟΙ ΟΙ
ΜΗΧΑΝΙΣΜΟΙ ΣΥΝΔΕΣΗΣ ΕΙΝΑΙ ΣΥΝΔΕΜΕΝΟΙ ΣΩΣΤΑ.
• ΠΡΙΝ ΑΠΟ ΤΗ ΧΡΗΣΗ ΒΕΒΑΙΩΘΕΙΤΕ ΟΤΙ ΤΟ ΚΑΘΙΣΜΑ
ΑΥΤΟΚΙΝΗΤΟΥ Ή Η ΘΕΣΗ ΕΙΝΑΙ ΣΩΣΤΑ ΣΥΝΔΕΜΕΝΑ.
• ΜΗΝ ΕΙΣΑΓΕΤΕ ΤΑ ΔΑΧΤΥΛΑ ΜΕΣΑ ΣΤΟΥΣ
ΜΗΧΑΝΙΣΜΟΥΣ.
• ΠΡΟΣΕΧΕΤΕ ΙΔΙΑΙΤΕΡΑ ΟΤΑΝ ΕΚΤΕΛΕΙΤΕ ΕΡΓΑΣΙΕΣ
ΡΥΘΜΙΣΗΣ ΤΩΝ ΜΗΧΑΝΙΣΜΩΝ (ΧΕΙΡΟΛΑΒΗ, ΠΛΑΤΗ)
ΠΑΡΟΥΣΙΑ ΤΟΥ ΠΑΙΔΙΟΥ.
• ΚΑΘΕ ΦΟΡΤΙΟ ΠΟΥ ΚΡΕΜΑΤΕ ΣΤΗ ΧΕΙΡΟΛΑΒΗ Ή ΣΤΙΣ
ΛΑΒΕΣ ΜΠΟΡΕΙ ΝΑ ΠΡΟΚΑΛΕΣΕΙ ΤΗΝ ΑΣΤΑΘΕΙΑ ΤΟΥ
ΠΡΟΪΟΝΤΟΣ. ΑΚΟΛΟΥΘΗΣΤΕ ΤΙΣ ΥΠΟΔΕΙΞΕΙΣ ΤΟΥ
ΚΑΤΑΣΚΕΥΑΣΤΗ ΟΣΟΝ ΑΦΟΡΑ ΤΟ ΑΝΩΤΑΤΟ ΦΟΡΤΙΟ ΠΟΥ
ΜΠΟΡΕΙ ΝΑ ΧΡΗΣΙΜΟΠΟΙΗΘΕΙ.
• Η ΠΡΟΣΤΑΤΕΥΤΙΚΗ ΜΠΑΡΑ ΔΕΝ ΕΧΕΙ ΚΑΤΑΣΚΕΥΑΣΤΕΙ ΓΙΑ
ΝΑ ΣΤΗΡΙΖΕΙ ΤΟ ΒΑΡΟΣ ΤΟΥ ΠΑΙΔΙΟΥ. Η ΠΡΟΣΤΑΤΕΥΤΙΚΗ
ΜΠΑΡΑ ΔΕΝ ΕΧΕΙ ΣΧΕΔΙΑΣΤΕΙ ΓΙΑ ΝΑ ΚΡΑΤΑ ΤΟ ΠΑΙΔΙ ΣΤΗ
ΘΕΣΗ ΤΟΥ ΚΑΙ ΔΕΝ ΑΝΤΙΚΑΘΙΣΤΑ ΤΗ ΖΩΝΗ ΑΣΦΑΛΕΙΑΣ.
• ΜΗΝ ΕΙΣΑΓΕΤΕ ΣΤΟ ΚΑΛΑΘΙ ΦΟΡΤΙΑ ΜΕ ΒΑΡΟΣ
ΜΕΓΑΛΥΤΕΡΟ ΑΠΟ 5 KG. ΜΗΝ ΕΙΣΑΓΕΤΕ ΣΤΗΝ ΥΠΟΔΟΧΗ
ΑΝΑΨΥΚΤΙΚΩΝ ΒΑΡΗ ΜΕΓΑΛΥΤΕΡΑ ΑΠΟ ΑΥΤΑ ΠΟΥ
ΠΡΟΣΔΙΟΡΙΖΟΝΤΑΙ ΣΤΗΝ ΥΠΟΔΟΧΗ ΑΝΑΨΥΚΤΙΚΩΝ ΚΑΙ
ΠΟΤΕ ΖΕΣΤΑ ΡΟΦΗΜΑΤΑ. ΜΗΝ ΕΙΣΑΓΕΤΕ ΣΤΙΣ ΤΣΕΠΕΣ
ΤΩΝ ΚΟΥΚΟΥΛΩΝ (ΕΑΝ ΥΠΑΡΧΟΥΝ) ΒΑΡΗ ΠΟΥ ΕΙΝΑΙ
ΜΕΓΑΛΥΤΕΡΑ ΑΠΟ 0.2 KG.
• ΜΗΝ ΧΡΗΣΙΜΟΠΟΙΕΙΤΕ ΤΟ ΠΡΟΪΟΝ ΚΟΝΤΑ ΣΕ ΣΚΑΛΕΣ Η
ΣΚΑΛΑΚΙΑ. ΜΗΝ ΤΟ ΧΡΗΣΙΜΟΠΟΙΕΙΤΕ ΚΟΝΤΑ ΣΕ ΠΗΓΕΣ
ΘΕΡΜΟΤΗΤΑΣ, ΕΛΕΥΘΕΡΕΣ ΦΛΟΓΕΣ Ή ΕΠΙΚΙΝΔΥΝΑ
ΑΝΤΙΚΕΙΜΕΝΑ ΠΟΥ ΜΠΟΡΕΙ ΝΑ ΦΤΑΣΕΙ ΤΟ ΠΑΙΔΙ.
• ΜΠΟΡΕΙ ΝΑ ΕΙΝΑΙ ΕΠΙΚΙΝΔΥΝΗ Η ΧΡΗΣΗ ΕΞΑΡΤΗΜΑΤΩΝ
ΠΟΥ ΔΕΝ ΕΧΟΥΝ ΤΗΝ ΕΓΚΡΙΣΗ ΤΟΥ ΚΑΤΑΣΚΕΥΑΣΤΗ.
• ΤΟ ΠΡΟΪΌΝ ΑΥΤΌ ΔΕΝ ΕΊΝΑΙ
ΚΑΤΆΛΛΗΛΟ ΓΙΑ ΤΟ
JOGGING Ή ΤO ΠΑΤΙΝΆΖ.
• ΧΡΗΣΙΜΟΠΟΙΗΣΤΕ ΤΑ ΦΡΕΝΑ ΟΤΑΝ ΑΝΕΒΑΖΕΤΕ ΚΑΙ
ΚΑΤΕΒΑΖΕΤΕ ΤΟΥΣ ΕΠΙΒΑΙΝΟΝΤΕΣ.
ΠΡΟΣΟΧΗ
ΠΟΡΤ-ΜΠΕΜΠΕ NAVETTA
• ΤΟ ΠΡΟΪΟΝ ΑΥΤΟ ΕΙΝΑΙ ΚΑΤΑΛΛΗΛΟ ΜΟΝΟ ΓΙΑ ΠΑΙΔΙΑ
ΠΟΥ ΔΕΝ ΜΠΟΡΟΥΝ ΝΑ ΣΤΑΘΟΥΝ ΜΟΝΑ ΤΟΥΣ ΣΕ
ΚΑΘΙΣΤΗ ΘΕΣΗ.
• ΤΟ ΠΡΟΪΟΝ ΑΥΤΟ ΠΡΟΟΡΙΖΕΤΑΙ ΓΙΑ ΠΑΙΔΙΑ ΑΠΟ ΤΗ
ΓΕΝΝΗΣΗ ΕΩΣ 9 KG ΒΑΡΟΣ.
• ΧΡΗΣΙΜΟΠΟΙΗΣΤΕ ΤΟ ΜΟΝΟ ΕΠΑΝΩ ΣΕ ΣΚΛΗΡΕΣ,
ΟΡΙΖΟΝΤΙΕΣ ΚΑΙ ΣΤΕΓΝΕΣ ΕΠΙΦΑΝΕΙΕΣ.
• ΜΠΟΡΕΙ ΝΑ ΕΙΝΑΙ ΕΠΙΚΙΝΔΥΝΟ ΕΑΝ ΑΦΗΣΕΤΕ ΤΟ ΠΑΙΔΙ
ΣΑΣ ΧΩΡΙΣ ΕΠΙΒΛΕΨΗ.
• ΜΗΝ ΑΦΗΝΕΤΕ ΑΛΛΑ ΠΑΙΔΙΑ ΝΑ ΠΑΙΖΟΥΝ ΧΩΡΙΣ
ΕΠΙΒΛΕΨΗ ΚΟΝΤΑ ΣΤΟ ΚΑΡΟΤΣΑΚΙ.
• ΟΙ ΕΡΓΑΣΙΕΣ ΣΥΝΑΡΜΟΛΟΓΗΣΗΣ ΚΑΙ ΠΡΟΕΤΟΙΜΑΣΙΑΣ
ΤΟΥ ΠΡΟΪΟΝΤΟΣ ΠΡΕΠΕΙ ΝΑ ΕΚΤΕΛΟΥΝΤΑΙ ΑΠΟ
ΕΝΗΛΙΚΕΣ.
• ΜΗΝ ΧΡΗΣΙΜΟΠΟΙΕΙΤΕ ΤΟ ΠΡΟΪΟΝ ΕΑΝ ΠΑΡΟΥΣΙΑΖΕΙ
ΕΞΑΡΤΗΜΑΤΑ ΠΟΥ ΛΕΙΠΟΥΝ Ή ΕΙΝΑΙ ΣΠΑΣΜΕΝΑ.
• ΜΗΝ ΠΡΟΣΘΕΤΕΤΕ ΣΤΡΩΜΑΤΑΚΙΑ.
• ΠΡΙΝ ΝΑ ΤΟ ΧΡΗΣΙΜΟΠΟΙΗΣΕΤΕ ΒΕΒΑΙΩΘΕΙΤΕ ΟΤΙ ΟΛΟΙ ΟΙ
ΜΗΧΑΝΙΣΜΟΙ ΣΥΝΔΕΣΗΣ ΕΧΟΥΝ ΣΥΝΔΕΘΕΙ ΣΩΣΤΑ.
• ΠΡΙΝ ΑΠΟ ΤΗ ΧΡΗΣΗ ΒΕΒΑΙΩΘΕΙΤΕ ΟΤΙ ΤΟ ΚΑΘΙΣΜΑ
ΑΥΤΟΚΙΝΗΤΟΥ, ΤΟ ΚΑΡΟΤΣΑΚΙ Ή ΤΟ ΜΕΤΑΦΕΡΟΜΕΝΟ
ΚΑΘΙΣΜΑ ΕΧΟΥΝ ΣΥΝΔΕΘΕΙ ΣΩΣΤΑ.
• ΜΗΝ ΕΙΣΑΓΕΤΕ ΤΑ ΔΑΧΤΥΛΑ ΜΕΣΑ ΣΤΟΥΣ
ΜΗΧΑΝΙΣΜΟΥΣ.
• ΠΡΟΣΕΞΤΕ ΤΗΝ ΠΑΡΟΥΣΙΑ ΤΟΥ ΠΑΙΔΙΟΥ ΟΤΑΝ ΚΑΝΕΤΕ
ΕΠΕΜΒΑΣΕΙΣ ΡΥΘΜΙΣΗΣ ΤΩΝ ΜΗΧΑΝΙΣΜΩΝ (ΧΕΙΡΟΛΑΒΗ,
ΠΛΑΤΗ).
• ΜΗΝ ΤΟ ΧΡΗΣΙΜΟΠΟΙΕΙΤΕ ΚΟΝΤΑ ΣΕ ΠΗΓΕΣ
ΘΕΡΜΟΤΗΤΑΣ, ΕΛΕΥΘΕΡΕΣ ΦΛΟΓΕΣ Ή ΕΠΙΚΙΝΔΥΝΑ
ΑΝΤΙΚΕΙΜΕΝΑ ΠΟΥ ΜΠΟΡΕΙ ΝΑ ΦΤΑΣΕΙ ΤΟ ΠΑΙΔΙ.
• ΜΠΟΡΕΙ ΝΑ ΕΙΝΑΙ ΕΠΙΚΙΝΔΥΝΗ Η ΧΡΗΣΗ ΕΞΑΡΤΗΜΑΤΩΝ
ΠΟΥ ΔΕΝ ΕΧΟΥΝ ΤΗΝ ΕΓΚΡΙΣΗ ΤΟΥ ΚΑΤΑΣΚΕΥΑΣΤΗ.
• ΕΛΕΓΧΕΤΕ ΤΑΚΤΙΚΑ ΤΗ ΧΕΙΡΟΛΑΒΗ (Ή ΤΙΣ ΛΑΒΕΣ) ΚΑΙ ΤΗ
ΒΑΣΗ ΤΟΥ ΚΑΡΟΤΣΙΟΥ ΚΑΙ ΝΑ ΒΕΒΑΙΩΝΕΣΤΕ ΟΤΙ ΔΕΝ
ΥΠΑΡΧΟΥΝ ΕΝΔΕΙΞΕΙΣ ΣΠΑΣΙΜΑΤΟΣ Ή ΦΘΟΡΑΣ.
• ΟΤΑΝ ΧΡΗΣΙΜΟΠΟΙΕΙΤΕ ΤΟ ΠΟΛΥΚΑΡΟΤΣΙ ΜΕ ΕΝΑ STAND,
ΝΑ ΕΛΕΓΧΕΤΕ ΤΟ ΜΕΓΙΣΤΟ ΜΗΚΟΣ ΚΑΡΟΤΣΙΟΥ ΠΟΥ
ΠΡΟΣΔΙΟΡΙΖΕΤΑΙ ΕΠΑΝΩ ΣΤΟ STAND.
Page 85

Page 86

Page 87
PEG PEREGO SpA
Via De Gasperi, 50
20043 Arcore (MI) Italy
www.pegperego.com
ΠΑΙΙΚΑ ΕΙΗ ΒΡΕΦΑΝΑΠΤΥΞΗΣ ΚΑΙ ΠΑΙΧΝΙΙΑ ΕΓΓΥΗΣΗ
Η PEG – PEREGO εγγυάται για τυχόν εργοστασιακά ελαττώματα των προιόντων της για διάστημα έξι
μηνών από την ημερομηνία αγοράς. Η προσκόμιση της ανάλογης ταμειακής απόδειξης αγοράς είναι
απαραίτητη. Εξαιρούνται της εγγύγησης οι επαναφορτιζόμενες μπαταρίες και οι μετασχη-ματιστές
παιχνιδιών. (βλ. αναλυτικές οδηγίες χρήσεως παιχνιδιών).
Η παρούσα εγγύηση ισχύει μόνον εφ’ όσον το προιόν χρησιμοποιείται σωστά και βάσει των οδηγιών
χρήσεως. Ο κατασκευαστής και οι εντεταλμένοι συνεργάτες του διατηρούν το δικαίωμα τεχνικού
ελέγχου.
Ο κατασκευαστ
ής δεν μπορεί να θεωρηθεί υπεύθυνος εφ’ όσον:
• Δεν τηρηθούν οι ανάλογες οδηγίες χρήσεως του κάθε προιόντος.
• Καταστραφεί τυχαία το προιόν ή προκληθούν βλάβες από κακή χρήση αυτού.
• Υπάρξει τεχνική παρέμβαση ξένου προς την εταιρεία μας τεχνικού, πράγμα το οποίο απαγορεύεται και
αποτελεί κίνδυνο για την ασφάλεια του παιδιού.
• Φυσιολογική φθορά του προιόντος.
ιατηρείτε την εγγύηση και τι οδηγίε χρήσεω και για ελλοντική χρήση.
ΕΓΓΥΗΣΗ
ΟΝΟΜΑΤΕΠΝΥΜΟ ΑΓΟΡΑΣΤΟΥ : ...........................................................................................
ΙΕΥΘΥΝΣΗ : ............................................................................................................................
ΤΗΛΕΦΝΟ : ....................................................................................................................
........
ΕΙΟΣ ΠΡΟΙΟΝΤΟΣ : .................................................................................................................
ΚΙΚΟΣ ΠΡΟΙΟΝΤΟΣ : ....................................................................................................
ΗΜΕΡΟΜΗΝΙΑ ΑΓΟΡΑΣ
ΣΦΡΑΓΙΑ ΚΑΤΑΣΤΗΜΑΤΟ
Προσοχή: Η εγγύηση ισχύει μονο εφ’ όσον εχει συμπληρωθεί και σφραγισθεί από τον πωλητή η
ημερομηνία αγοράς. Ζητείστε το από το κατάστημα τη στιγμή της αγοράς. Αν χαθεί ή καταστραφεί το
απόκομμα της εγγύησης δεν μπορεί να αντικατασταθεί.
&
Page 88

Pliko P3 Modular System
On Track
PEG PEREGO S.p.A.
VIA DE GASPERI 50 20043 ARCORE MI ITALIA
tel. 0039 039 60881 fax 0039 039 615869/616454
Servizio Post Vendita - After Sale:
tel. 0039 039 6088213 fax: 0039 039 3309992
PEG PEREGO U.S.A. Inc.
3625 INDEPENDENCE DRIVE FORT WAYNE INDIANA 46808
phone 260 482 8191 fax 260 484 2940
Call us toll free: 1 800 671 1701
PEG PEREGO CANADA Inc.
585 GRANITE COURT PICKERING ONTARIO CANADA L1W3K1
phone 905 839 3371 fax 905 839 9542
Call us toll free: 1 800 661 5050
www.pegperego.com
FI000701I75
20/07/07
MARTINELLI
is produced by
PEG PEREGO
 Loading...