

Page 1
JUVENILE
PRODUCTS
MANUFACTURERS
ASSOCIATION
U.S.A./CANADA/AUSTRALIA
Instructions for use EN
Instrucciones de uso ES
Notice dʼemploi FR
Pliko P3
AN INDEPENDENT TESTING
LABORATORY VALIDATES
THE MANUFACTURER'S
CERTIFICATION OF THIS
CARRIAGE/STROLLER TO ASTM F-833
FINA0602I43
WARNING:
AVOID SERIOUS INJURY FROM FALLING OR SLIDING
OUT. ALWAYS USE COMPLETE 5 POINT SEAT BELT.
Page 2
OK
21
A
click
3
click
4
5 6
Page 3
7 8
A
B
C
9
A
B
C
10
11
12 Pliko P3 “CLASSICO”
Page 4
13
15 16
14
1817
Page 5
A
B
2019
3
2
1
2221
B
A
23
24
Page 6
2625
2827
2
3
1
1
2
3029
Page 7
3
31
32
33 34
35 36
Page 8

A
A
B
37 38
GM
A
Ganciomatic
System
GM
Ganciomatic
System
39
GM
Ganciomatic
System
B
40 Pliko P3+Primo Viaggio
41 Accessory
45 Accessory
42 Accessory
Page 9

43 Accessory
45 Accessory
44 Accessory
Page 10

Pliko P3
2
11
4
10
1
12
6
5
7
3
9
8
18
17
22
41
38a
ONLY USA
SOLO USA
38b
15
14
29
27
16
13
30
24
25
39
26
19
20
28
21
23
40
36
35
34
32
33
31
37
Page 11

Pliko P3 “CLASSICO”
44
43
42
1 SPST5331D•
SPST5331S•
2 SPST5332GR
3 SPST5333DGRS
SPST5333SGRS
4 SPST5492D•
SPST5492S•
5 ARPI0282•
6 IRTR0007GR
7 ARPI0332•
8 SPST5338D•
SPST5338S•
9 RSEP3N---NL•
10 SPST5334D•
SPST5334S•
11 SPST5745DGRS
SPST5745DGRS
12 SPST5638DGR
SPST5638SGR
13 ARPI0331D•
ARPI0331S•
14 ARPI0272D•
ARPI0272S•
15 SPST5374D•
SPST5374D•
16 ARPI0333D•
ARPI0333S•
17 SPST5339D•
SPST5339S•
18 ASPI0045D•
ASPI0045S•
19 ASPI0043D•
ASPI0043S•
20 ARPI0334D•
ARPI0334S•
21 ARPI0274•
22 MUCI5P14•
23 IRSHP300-RE•
24 SPST5352GR
25 SPST5497•
26 SOFF0186Z
27 SAPI5363GR
28 SAPI5365•
29 SAPI5375•
30 ARPI0277•
31 SAPI5368•
32 SPST4023•
33 MMRP0718
34 SAPI5469GRN
35 SPST5468•
36 ARPI0339•
37 ARPI0275•
38a SPST5348D•
SPST5348S•
38b SPST5521GR
39 SPST5362•
40 ASPI0047D•
ASPI0047S•
41 SPST5758•
42 IRTR0008•
43 BSP3CL•
BSPCFR• (Free Style)
44 BCAP3N•
BCAPFN• (Free Style)
EN• Spare parts available in different colours to be specified when
ordering.
Repuestos disponibles en otros colores que se especificarán en el
ES•
pedido.
FR• Pièces de rechange disponibles en plusieurs couleurs à spécifier
dans la demande.
Page 12

EN•ENGLISH
• IMPORTANT: read the instructions
carefully before using the stroller. Save the
instructions for future reference.
• PEG PEREGO reserves the right to make any
necessary changes or improvements to the
products shown at any time without notice.
CUSTOMER SERVICE
If parts of the model are accidentally lost or
damaged, use only original Peg Perego spare
parts. Contact the Peg Perego Customer
Service for all repair work, replacements,
information about products, and sale of
original spare parts and accessories, at the
following:
USA:
tel.: 800.671.1701
fax: 260.471.6332
Call us toll free: 1.800.671.1701
CANADA:
tel.: 905.839.3371
fax: 905.839.9542
Call us toll free: 1.800.661.5050
www.pegperego.com
INSTRUCTIONS FOR USE
OPENING
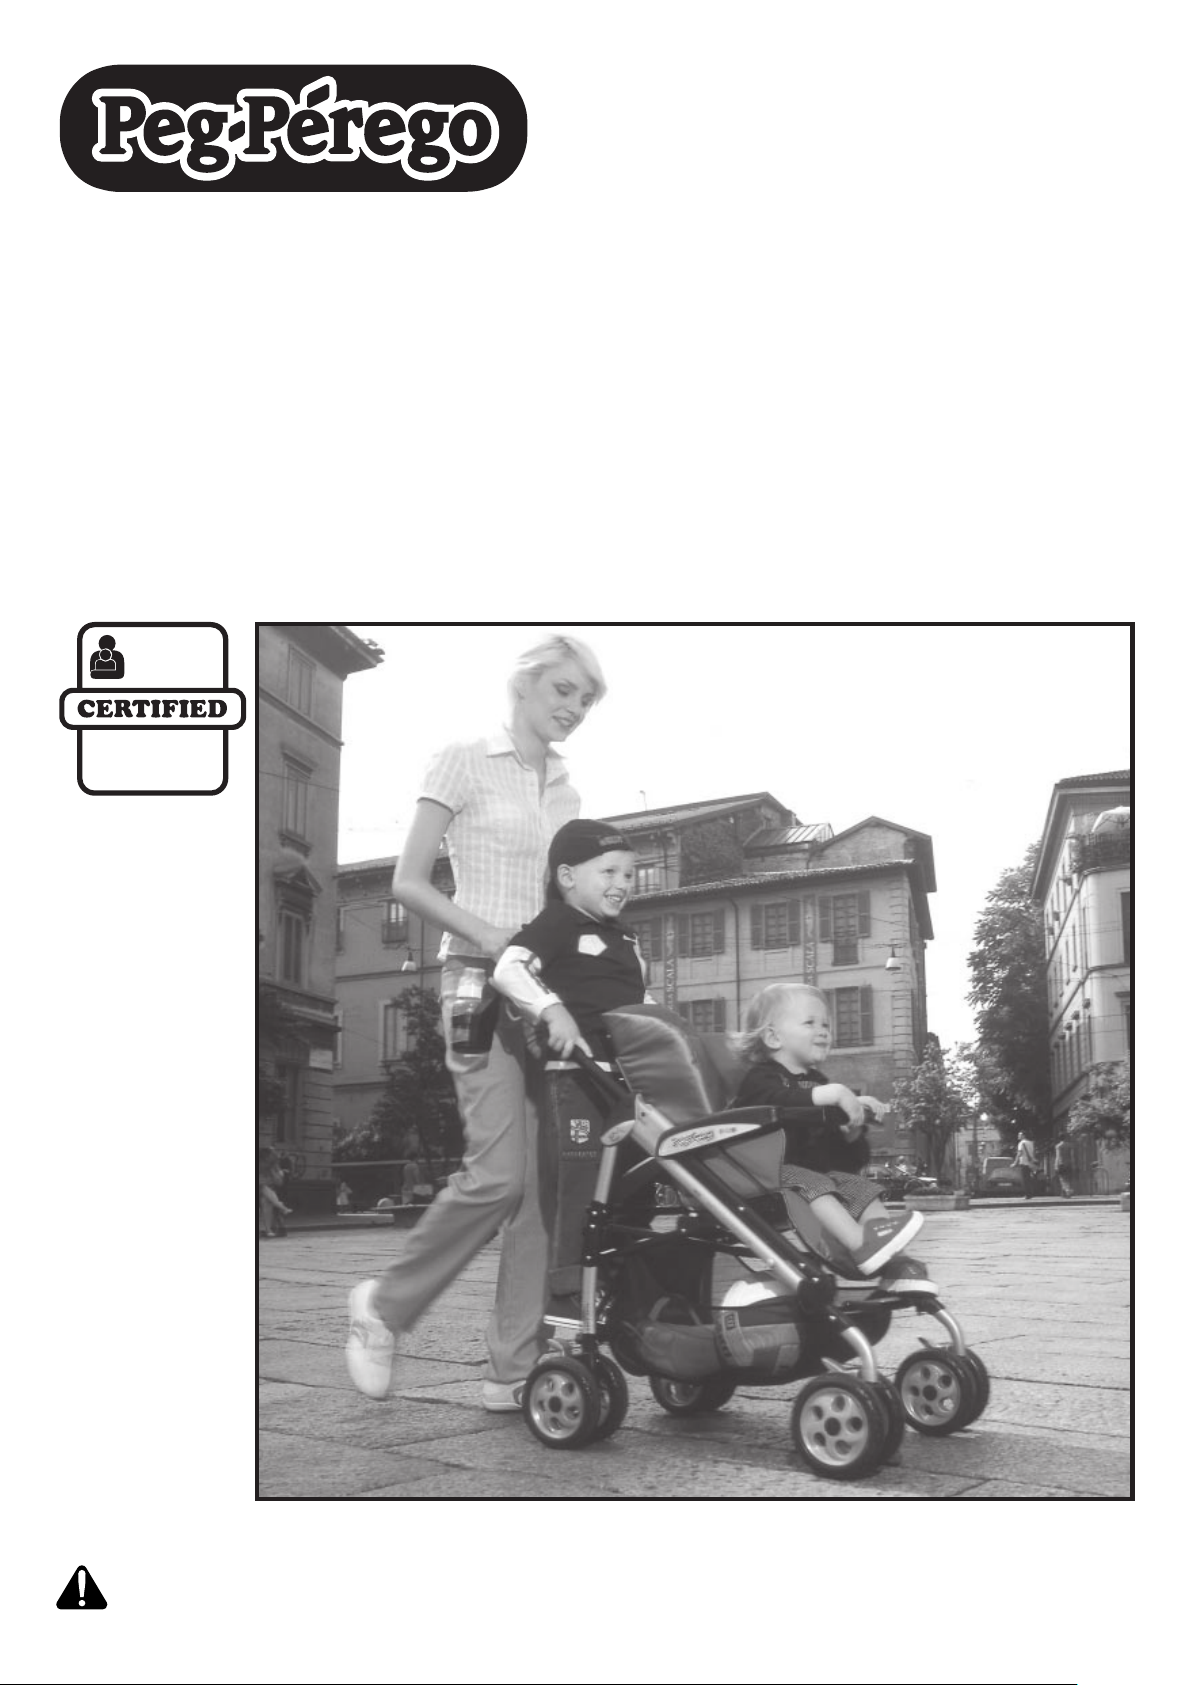
1• Before opening the stroller remove the
two protective caps from the hooks
as shown in the figure. Otherwise, the
stroller will not open correctly.
2• To open the stroller, pull up the two
levers on the handles and
3• at the same time, lift the stroller, which
will open automatically. To make sure
that the stroller has been set up correctly,
check the two side hooks (see figure).
ASSEMBLYING THE STROLLER
4• To mount the front wheels, lower Lever
A and slip the wheels onto the axle,
as shown in the figure. Press until the
wheels click into place.
5• To mount the rear wheels, slip the wheels
onto the axle, as shown in the figure.
Press until the wheels click into place.
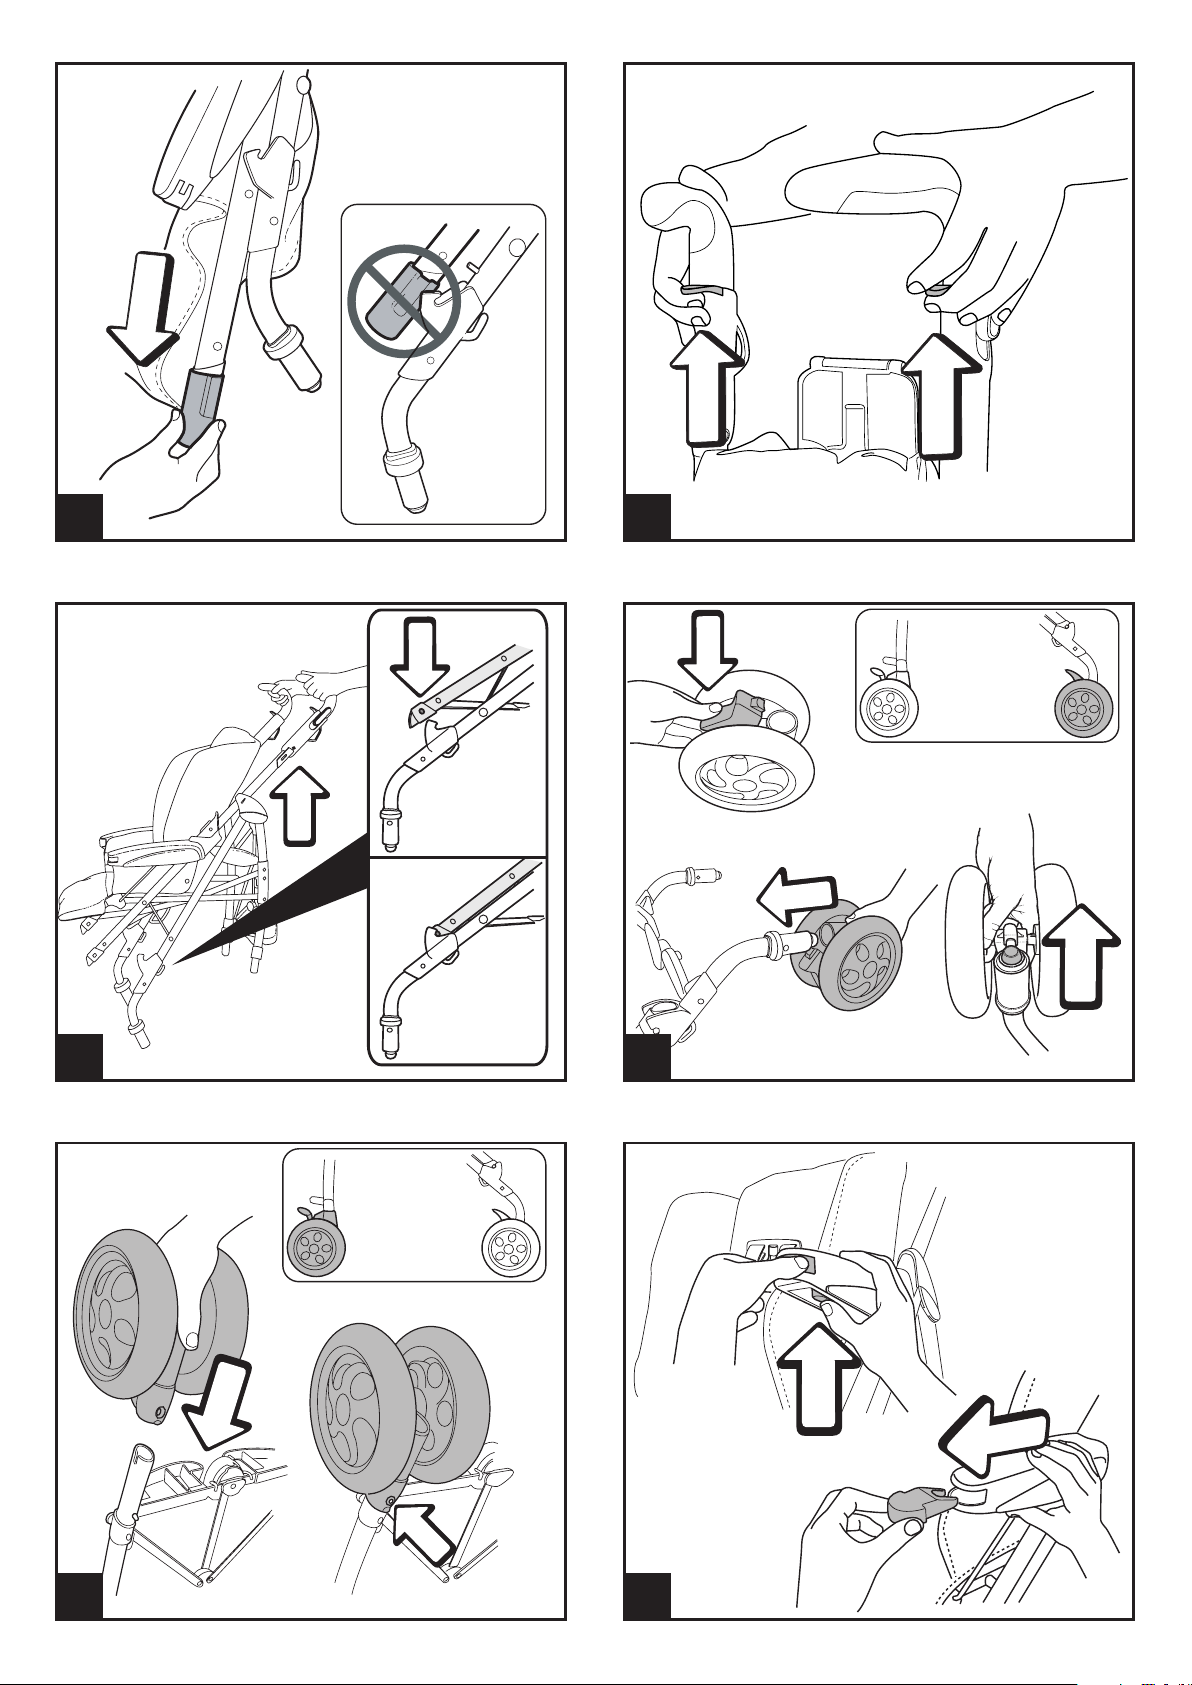
6• The stroller comes with caps on the
armrests. To attach the front bar, remove
the caps first. (Keep the caps, in case
you want to use the stroller without the
front bar). To remove the caps, press the
buttons under the armrests while pulling
the caps off.
7• To attach the front bar, insert the two
ends of the bar into the armrests and
press until the bar clicks into place, as
shown in the figure.
8• To mount the basket, slide the slots onto
the front hooks A and the rear hooks B
and C.
9• The figure shows the mounted basket.
10• The drink-holder can be attached to the
left or the right handle of the stroller,
using the two bands.
• To mount the drink-holder to the handle,
widen the clamp and fasten as shown in
the figure.
11• Slide the clamp in the drink-holder until
it clicks.
Do not put hot drinks in the drink-holder,
nor items weighing more than 1 kg (2.2
lbs).
PLIKO P3 VERSION
12• “Classico” Model: comes with a hood and
front bar-child tray. (WARNING: Never
place boiling-hot drinks on the front bar-
child tray.)
HOOD
• The hood comes with a zipper, for
attaching the zip-on rain canopy or
mosquito netting (see Accessories Line).
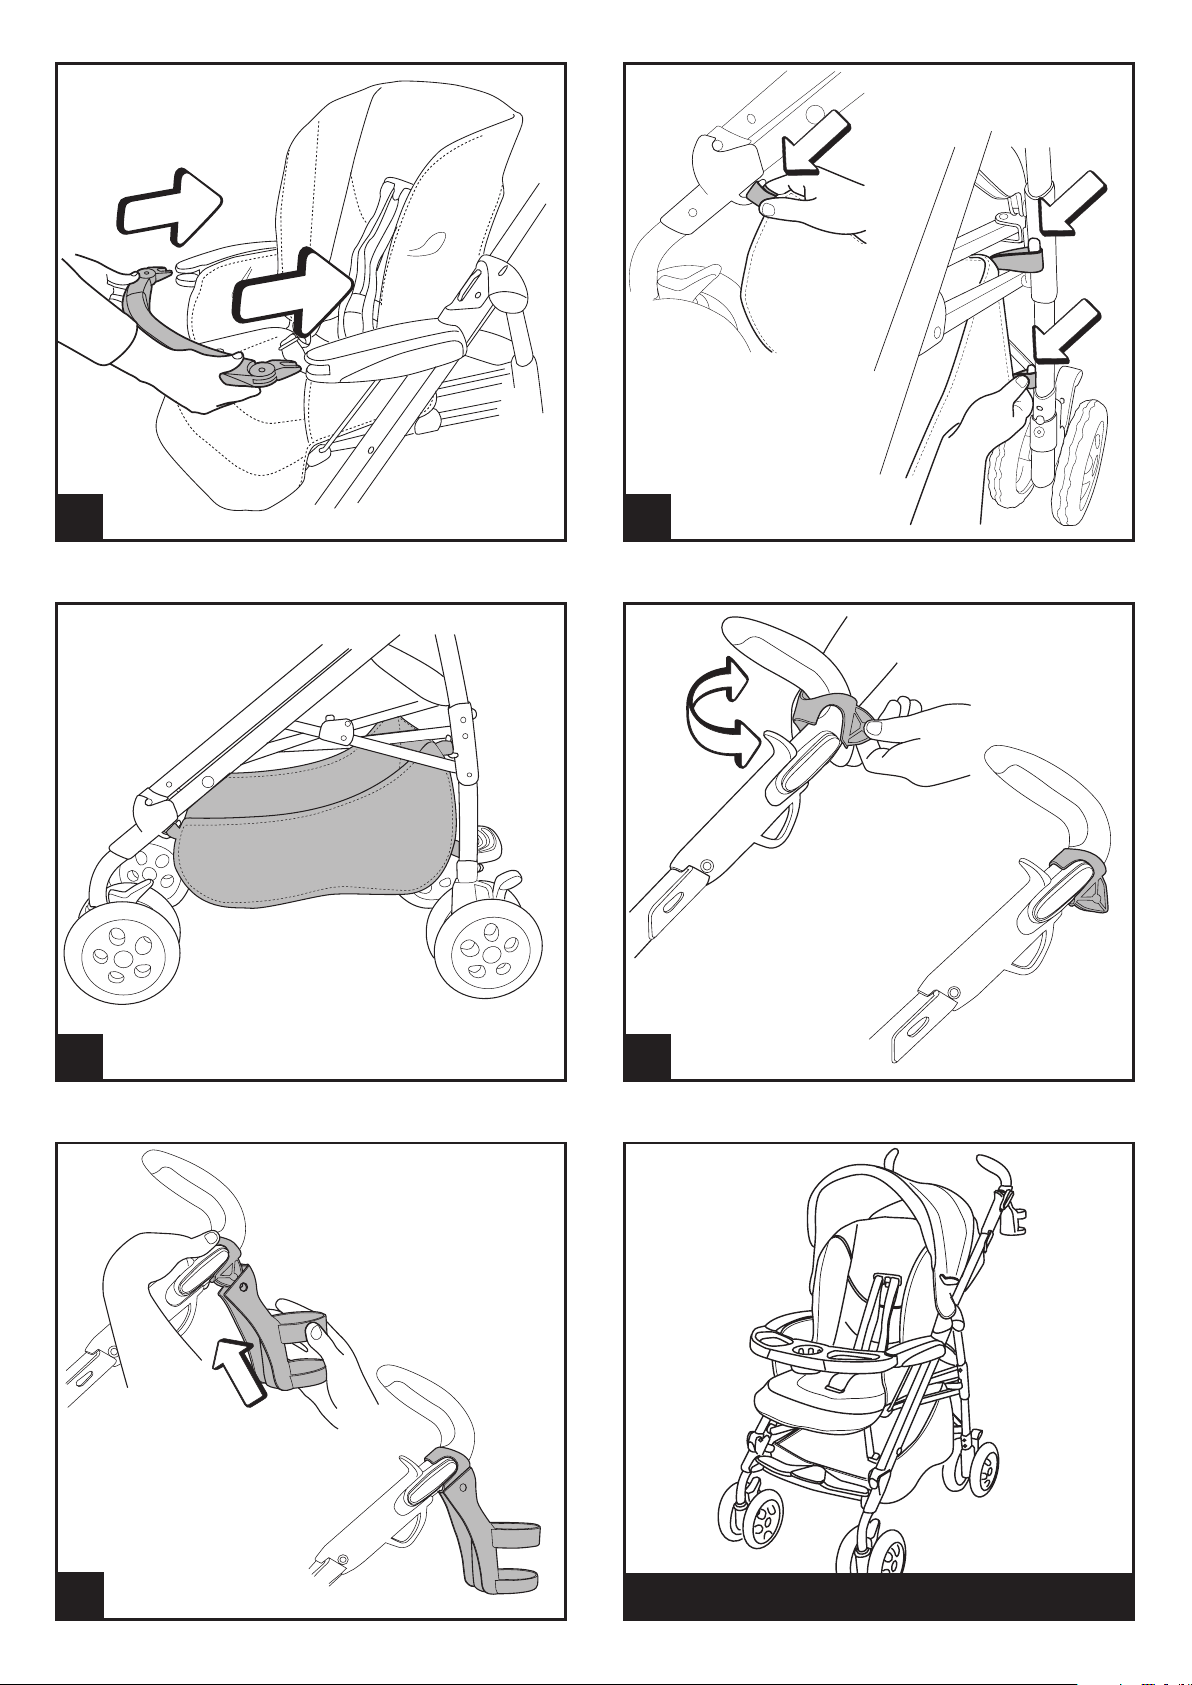
13• To mount the hood, push the fittings
down until they click, as shown in the
figure.
14• As shown in the figure, button the hood
inside the armrest and the backrest of the
stroller.
15• To stretch out the hood, push the
compass downward. The hood can be
reclined by following the inclination of
the backrest.
16• The hood has a zipper on the back. With
the zipper open, the hood can be used as
a sun canopy.
17• To remove the hood, you must unbutton
it from the stroller, loosen the couplings
and raise the tabs of the fasteners,
pushing towards the inside of the stroller.
BRAKE
18• To apply the brakes, push down with
one foot the bars on the rear wheels,
as shown in the figure. To release the
brakes, draw the bar up. Always set the
brakes on the stroller when it is not in
motion.
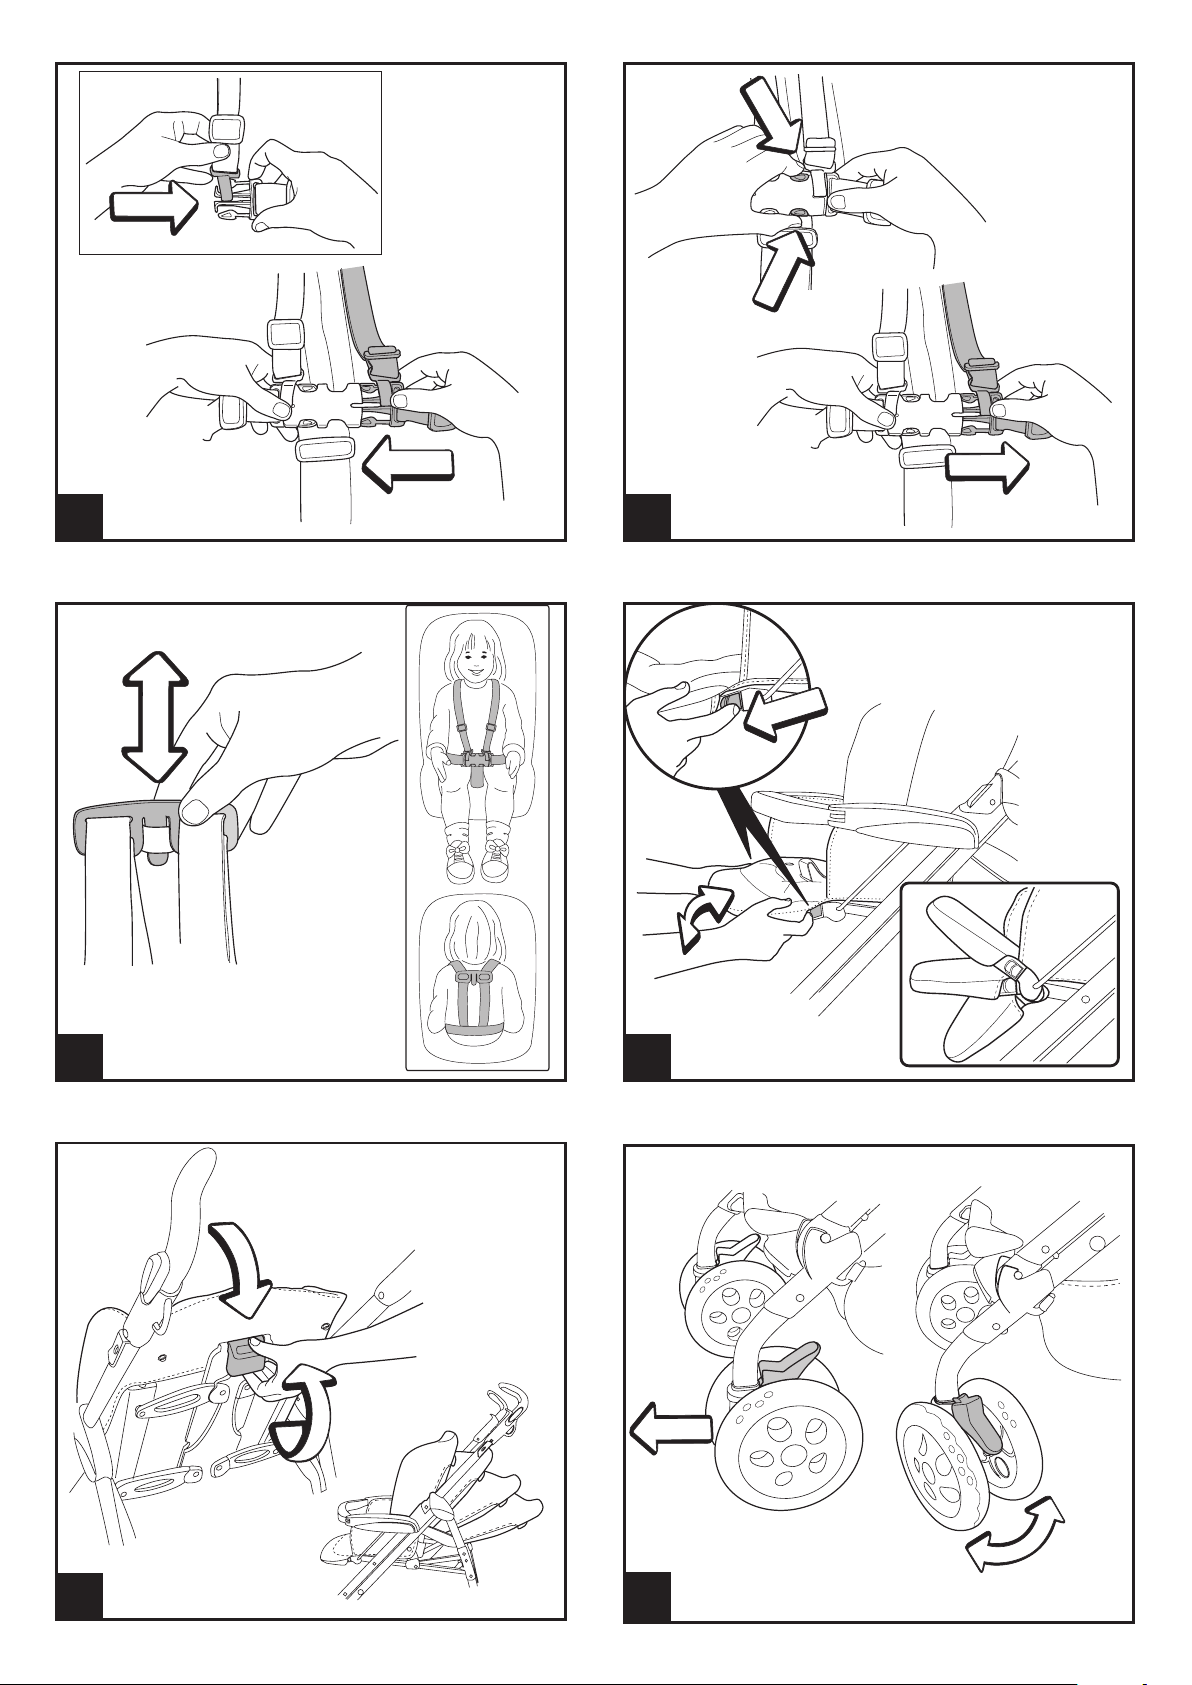
SAFETY BELT
19• A: Make sure that the brace is properly
inserted by pushing as shown in the
figure. B: Fasten the belt as shown in the
figure.
20• To unfasten the belt, press on the buckle
sides and pull out the waist strap.
21• The new safety belt is now easier to
fasten thanks to the "snap-open-and-
shut" device. Before fastening the safety
belt, attach the buckle to the backrest
by inserting the tab through the special
Page 13

holder, as shown in the figure. After
fastening the safety belt on your child,
detach it from the backrest to allow the
child more freedom of movement. The
buckle must remain below the child's
shoulders.
ADJUSTING THE FOOTBOARD
22• The footboard can be adjusted to
three different positions. To lower the
footboard, pull the two small levers
downward while lowering. To lift the
footboard, pull it up until it clicks into
place.
ADJUSTING THE BACKREST
23• The backrest can be reclined in four
positions. To lower the backrest, raise
the handle as you lower the backrest,
blocking it in the desired position. To
raise it, push the backrest upward.
SWIVELLING WHEELS
24• To make the front wheels swivel, push
down as shown in the figure. To fix the
wheels, pull up the lever.
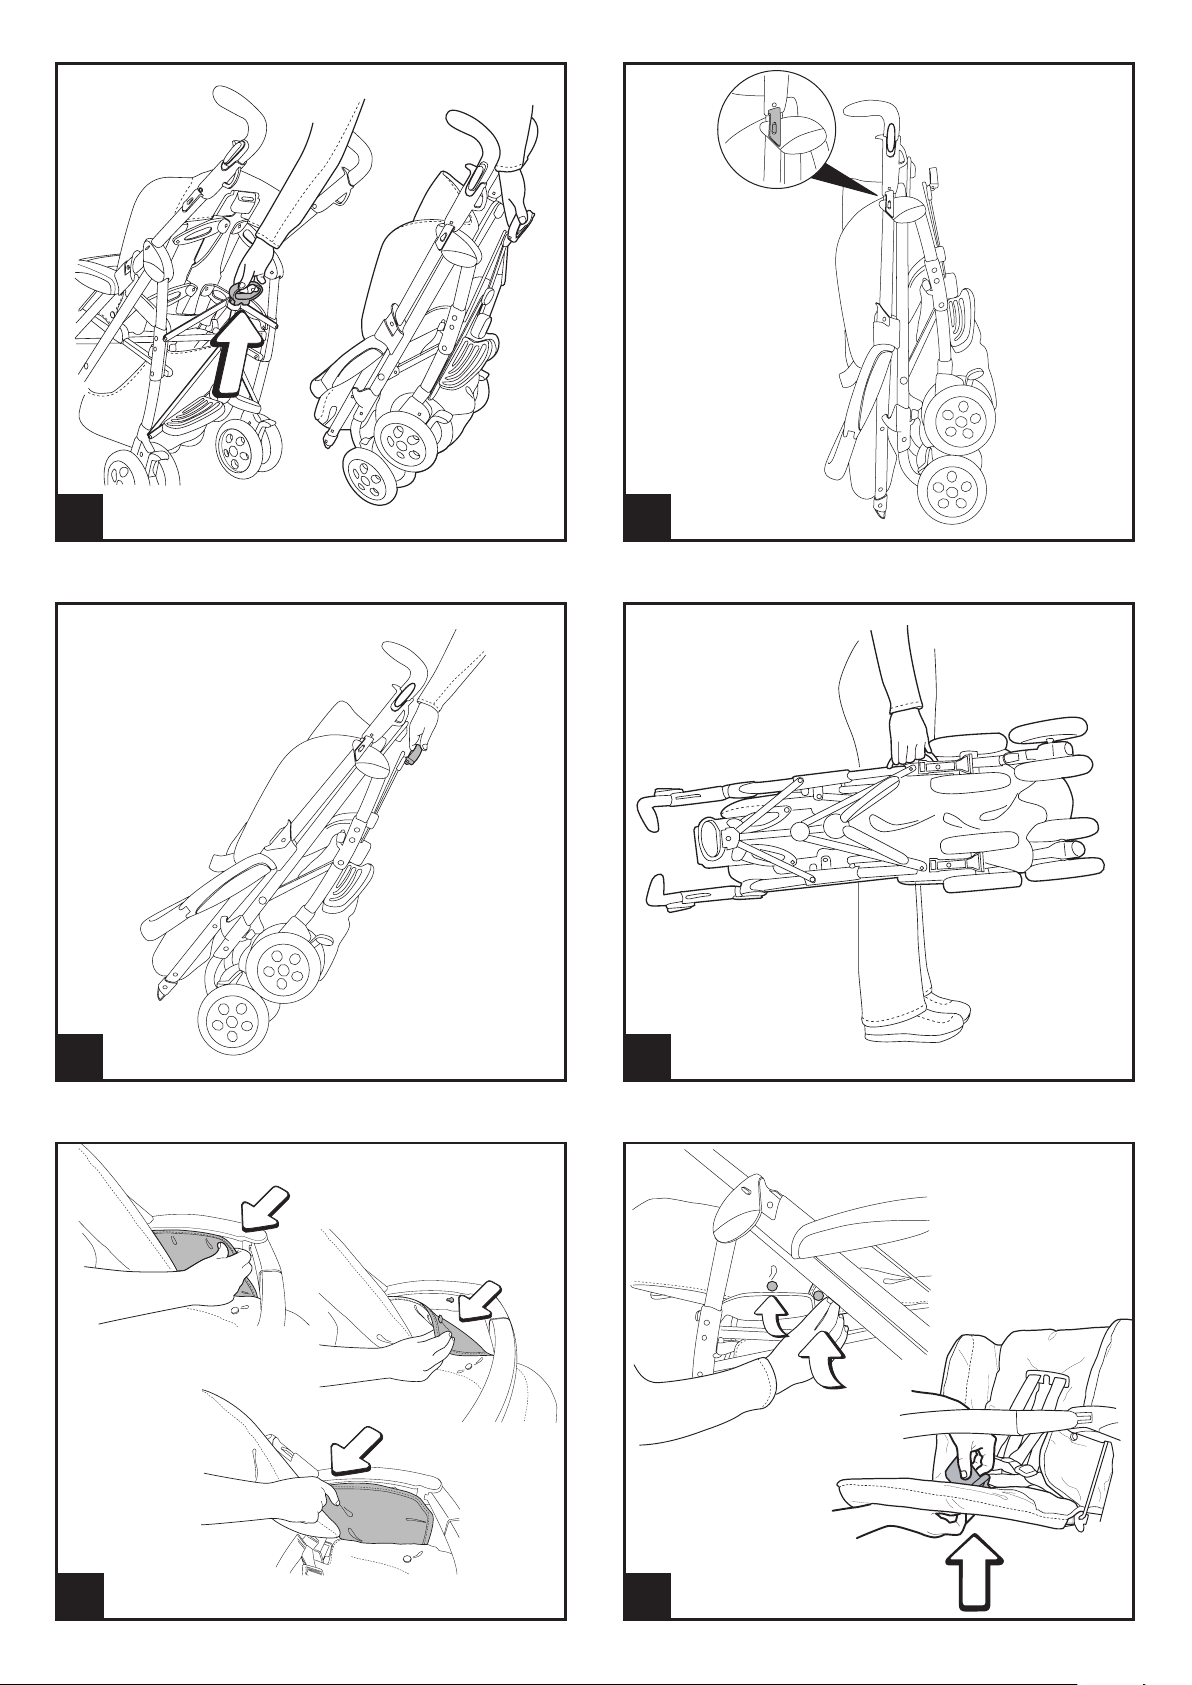
31• Grip the central handle and pull it upward
until it closes, as shown in the figure.
32• Verify the correct closing of the stroller
from the safety hook. The folded stroller
can stand upright.
TRANSPORT
33• The stroller can easily be carried (lock the
swivelling front wheels) by gripping the
central handle, as shown in the figure.
34• You can also use the side handle to carry
it, as shown in the figure.
REMOVABLE LINING
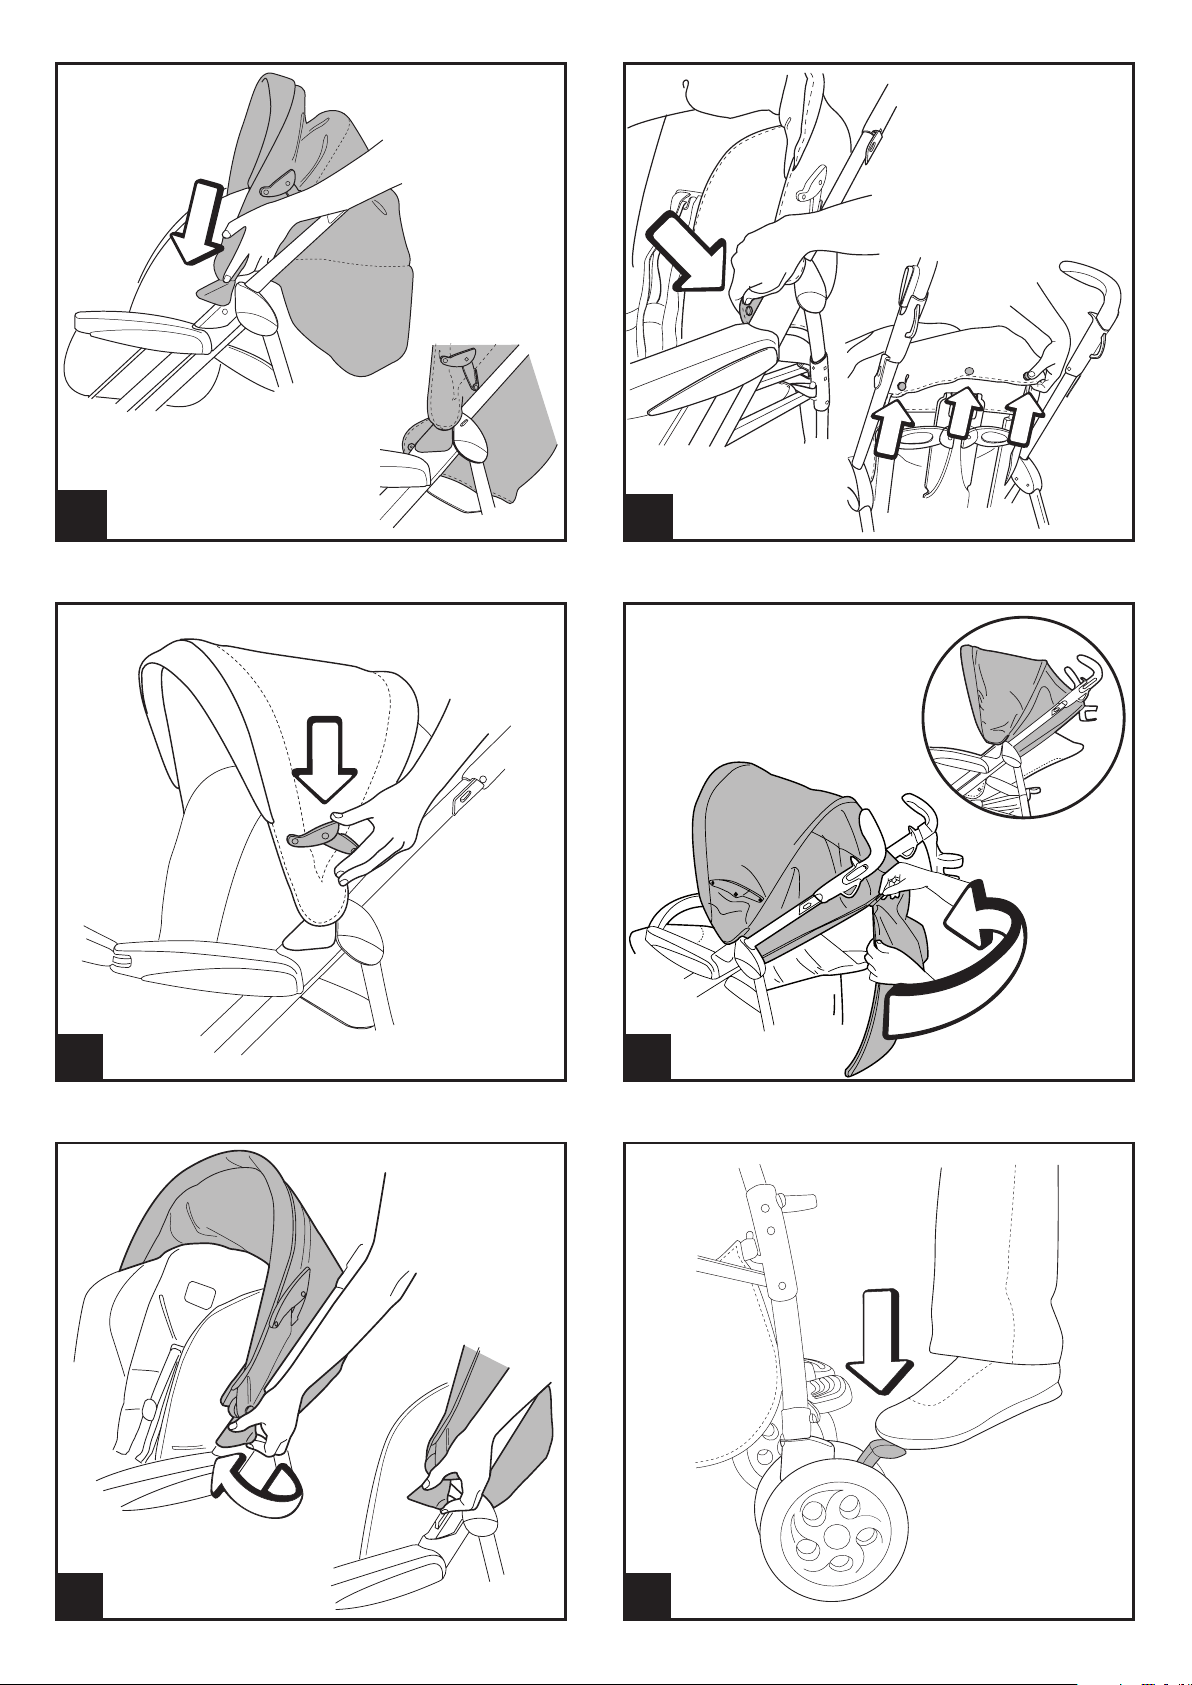
35• To remove the strollerʼs lining, loosen the
fasteners on the armrests as shown by
the arrows.
36• Unbutton the sack at the side, as shown
in the figure. Slip the leg divider on the
safety belt out from under the seat.
37• Unbutton the sack from the seat and slip
it off the footboard hooks. Slip the sack
off the top of the stroller.
GANCIOMATIC SYSTEM
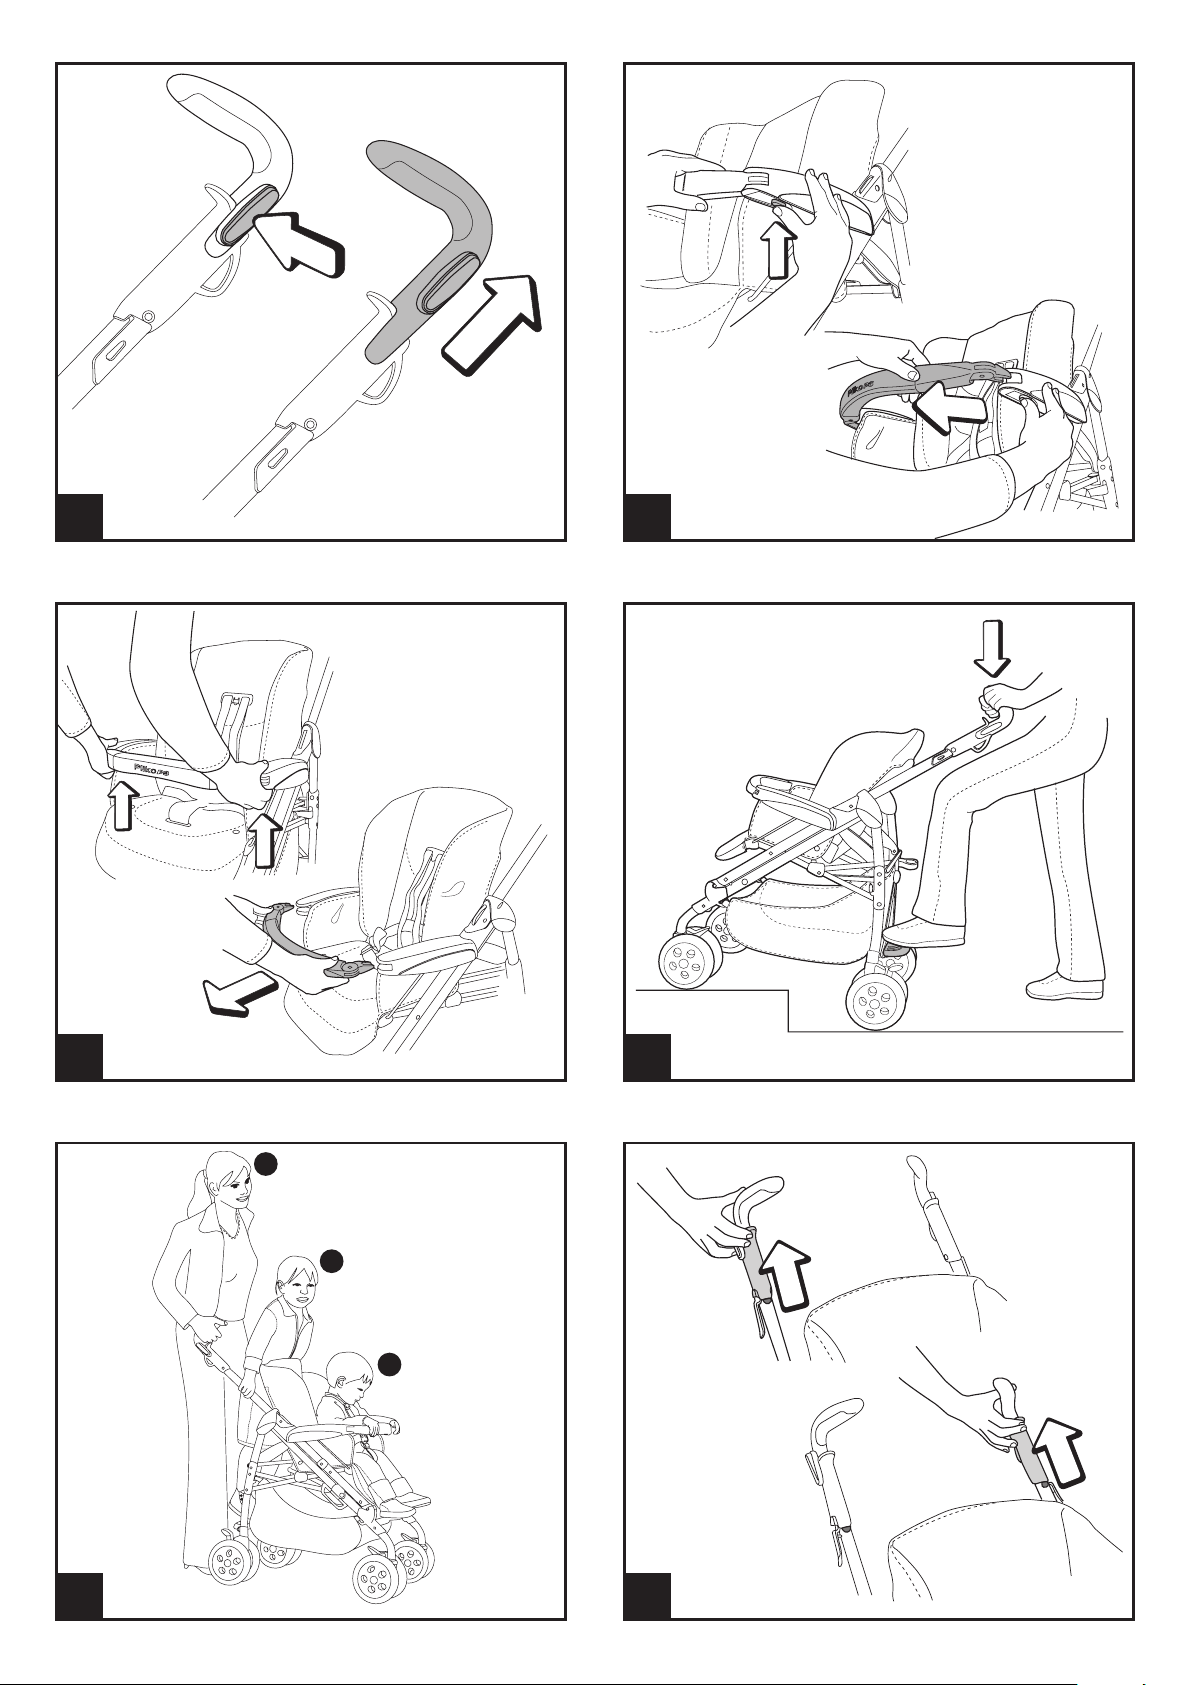
ADJUSTING THE HANDLES
25• The height of the handles can be adjusted
in two positions. For the upper position,
press the button as you raise the handle.
To lower it, press the button as you lower
the handle.
FRONT BAR
26• The front bar can be opened on one side
only to make it easier for the child to
get into the stroller when he is older. To
open the bar, press the button under the
armrest while pulling the bar outwards.
27• To remove the front bar, press the two
buttons under the armrests while pulling
the bar outwards.
REAR LEDGE
28• The rear ledge helps overcome small rises
and can also be used to carry a second
child.
LOADING SEQUENCE
29• To use the stroller with two children,
brake the stroller, place the smaller child
in the seat and fasten the safety belt (1).
Grip the handles (2) and help the second
child climb onto the footrest (3). Never
leave your children unattended. Do not
allow the child to climb onto the rear
footrest when the stroller is empty.
CLOSING
Before closing the stroller, loosen the
braces if the hood is attached, and raise
the backrest if it is lowered.
30• The stroller can be closed with one hand:
pull first one lever up and then the other
until it releases.
The Ganciomatic System is the swift,
practical system that allows one to fasten
to the stroller, with Ganciomatic fasteners,
the car seat Primo Viaggio, which can be
bought separately and is also equipped with
Ganciomatic System. Primo Viaggio can be
detached from its base (which stays in the car)
and attached to the Ganciomatic fasteners of
the stroller to transport your child without
disturbing him/her.
STROLLER GANCIOMATIC HOOKS
38• To raise the Ganciomatic hooks on the
stroller, pull the sack up at the corners of
the seat and turn the two hooks upwards
until they click into place.
39• To lower the Ganciomatic hooks on the
stroller, pull the little lever outwards and
turn the hooks upwards at the same time,
as shown in the figure.
PLIKO P3 + PRIMO VIAGGIO CAR SEAT
40• To fasten the car seat to the stroller:
- set the brake on the stroller,
- remove the hood from the stroller,
- completely lower the backrest on the
stroller,
- raise the Ganciomatic hooks on the
stroller.
- Place the car seat, turned towards the
adult, on the stroller and push downward
until it clicks into place.
- Do not remove the front bar from the
stroller when attaching the car seat.
• See the userʼs manual for instructions
on how to detach the car seat from the
stroller.
Page 14

ACCESSORY LINE
41• Diaper-Changing Bag: Satchel with pad
for changing babyʼs diaper. Attaches to
the stroller.
42• Sun Canopy: Sun canopy attaches to the
stroller.
43• Rain Canopy: Rain canopy zips onto the
hood.
44• Mosquito Netting: Mosquito netting zips
onto the hood.
45• Travel Bag: Practical duffle bag for
transporting the stroller by plane.
CLEANING & MAINTENANCE
Your product requires only minimal
maintenance. Cleaning and maintenance
operations must be performed only by adults.
• Be sure to keep all moving parts clean,
lubricating them with light oil if necessary.
• Dry off metal parts to prevent rusting.
• Regularly clean the plastic parts with a
damp cloth. Do not use solvents or similar
products.
• Brush the fabric parts to remove dust.
• Remove any dust and sand from the wheels.
• Protect the product against smog, water,
rain and snow. Continued and extended
exposure to sunlight can change the colours
of many materials.
• Store the product in a dry area.
• To wash the sack, follow the instructions
below.
WARNING
• THIS PRODUCT IS DESIGNED FOR
CHILDREN WHOSE MAXIMUM
WEIGHT IS 44 POUNDS (20 KG)
AND WHOSE MAXIMUM HEIGHT
IS 43 INCHES (110 CM). THIS
SHOPPER BASKET IS DESIGNED TO
CARRY A MAXIMUM WEIGHT OF 11
POUNDS (5 KG). ANY CUPHOLDER
EVENTUALLY PROVIDED WITH
THIS UNIT IS DESIGNED TO CARRY
A MAXIMUM WEIGHT SPECIFIED
ON THE CUPHOLDER ITSELF. ANY
POACH OR POCKET PROVIDED
WITH THIS UNIT IS DESIGNED TO
CARRY A MAXIMUM WEIGHT OF
0.44 POUNDS (0.2 KG).
• FAILURE TO FOLLOW
MANUFACTURERʼS SPECIFICATIONS
OR USE OF ACCESSORIES OTHER
THAN THOSE APPROVED BY THE
MANUFACTURER MAY CAUSE THE
UNIT TO BECOME UNSTABLE.
• AVOID SERIOUS INJURY FROM
FALLING OR SLIDING OUT. ALWAYS
USE COMPLETE 5 POINT SEAT BELT.
• NEVER LEAVE YOUR CHILD
UNATTENDED.
• ALWAYS USE ALL THE BRAKES
WHENEVER PARKED.
• TO AVOID SERIOUS INJURY, WHEN
MAKING ADJUSTMENTS ENSURE
THE CHILDʼS BODY IS CLEAR OF
ALL MOVING PARTS.
• ALL OPERATING AND ASSEMBLY
PROCEDURES SHOULD BE
PERFORMED BY AN ADULT.
• DO NOT LIFT THE STROLLER BY
GRIPPING THE FRONT BAR. THE
FRONT BAR IS NOT DESIGNED TO
WITHSTAND LOADS.
• ENSURE THAT THE STROLLER IS
OPENED CORRECTLY AND LOCKED
IN POSITION OF USE.
• CHECK TO MAKE SURE THAT THE
CAR SEAT OR THE BABY CARRIAGE
IS CORRECTLY FASTENED TO THE
STROLLER (WHERE APPLICABLE).
• DO NOT DRIVE THIS PRODUCT
AROUND STAIRS OR STEPS; CARE
MUST BE TAKEN IF UNIT IS USED
ON STAIRS OR ESCALATORS.
• DO NOT USE THE PRODUCT IF IT
HAS BROKEN OR MISSING PARTS.
• DO NOT USE NEAR FIRE OR
EXPOSED FLAME.
Page 15

ES•ESPAÑOL
• IMPORTANTE: leer detenidamente las
instrucciones antes del uso y conservarlas
para poder utilizarlas en el futuro.
• PEG PEREGO podrá modificar los modelos
decritos en este prospecto, por razones
técnicas o commerciales.
SERVICIO DE ASISTENCIA
Si por casualidad alguna parte del modelo
se pierde o se rompe, usar sólo piezas de
repuesto originales Peg Perego. Para todo
lo que concierne las reparaciones, cambios,
informaciones sobre los productos y la venta
de repuestos originales y accesorios, contacte
con el Servicio de Asistencia Peg-Perego:
USA:
tel.: 800.671.1701
fax: 260.471.6332
Call us toll free: 1.800.671.1701
www.pegperego.com
INSTRUCCIONES DE USO
APERTURA
1• Antes de abrir la silla de paseo hay que
quitar los dos tapones de protección de
los ganchos como indica la figura pues,
si no se quitan, el carro no se abrirá
correctamente.
2• Para abrir la silla de paseo hay que tirar
hacia arriba las dos palancas de los
mangos y
3• al mismo tiempo levantar la silla de paseo
que se abrirá automáticamente. Para
verificar que la silla de paseo esté abierta
correctamente, controlar los dos ganchos
laterales (véase la figura).
ENSAMBLAJE DE LA SILLA DE PASEO
4• Para montar las ruedas anteriores, bajar
la palanca A e introducir las ruedas como
indica la figura hasta oír un clic.
5• Para montar las ruedas posteriores,
introducirlas como indica la figura hasta
oír un clic.
6• La silla de paseo se presenta con los
tapones de cierre de los brazos ya
puestos; para enganchar la barra frontal
primero hay que quitarlos (conservarlos
por si hubiera que utilizar la silla de
paseo sin barra frontal). Para quitar los
tapones, presionar el botón que hay
debajo del brazo y al mismo tiempo
sacar el tapón (hacer lo mismo en ambos
brazos).
7• Para enganchar la barra frontal, meter los
dos extremos de la barra frontal en los
brazos como indica la figura, hasta oír
clic.
8• Para montar la cesta hay que meter las
ranuras en los ganchos delanteros A y en
los ganchos posteriores B y C.
9• La figura muestra la cesta enganchada.
10• El portabebidas, gracias a sus dos
abrazaderas, se puede poner en el asa
derecha o izquierda de la silla de paseo.
• Para aplicar el portabebidas al asa,
ensanchar la abrazadera y fijarla como
indica la figura.
11• Meter la abrazadera en el portabebidas
hasta oír clic.
Se aconseja no poner en el portabebidas
bebidas calientes y que pesen más de 1
Kg (2,2 lbs).
VERSIONE PLIKO P3
12• Modelo Classico: dotado de capota y
frontal bandeja (no apoyar bebidas
calientes sobre el frontal bandeja, ya que
puede resultar peligroso).
CAPOTA
• La capota está dotada de cremallera
para aplicar el plástico de lluvia o el
mosquitero con cremallera (véase la Línea
de Accesorios).
13• Para montar la capota, empujar hacia
abajo los acoples hasta oír clic como
indica la figura.
14• Abrochar la capota como indica la figura
dentro del brazo y en el respaldo de la
silla de paseo.
15• Para tensar la capota, empujar hacia
abajo el compás. La capota puede
reclinarse siguiendo la inclinación del
respaldo.
16• La capota por detrás lleva una cremallera
que, una vez abierta, puede usarse como
parasol.
17• Para quitar la capota hay que
desabotonarla de la silla de paseo, aflojar
los compases y levantar las aletas de los
acoples empujando hacia el interior de la
silla de paseo.
FRENO
18• Para frenar la silla de paseo, bajar con el
pie las palancas colocadas en las ruedas
posteriores como muestra la figura. Para
desbloquear los frenos, actuar en sentido
contrario. Cuando la silla de paseo
está detenida, siempre hay que dejar
accionados los frenos.
CINTURÓN DE SEGURIDAD
19• A: Asegurarse que los tirantes estén
correctamente introducidos, empujando
tal y como muestra la figura. B:
Enganchar el cinturón actuando como
muestra la figura.
20• Para desenganchar el cinturón, pulsar en
los lados de la hebilla y al mismo tiempo
tirar hacia fuera, el cinturón.
Page 16

21• El nuevo cinturón de seguridad desde
hoy es más fácil de poner gracias al
sistema “quita y pon”. De hecho, antes
de enganchar el cinturón, fije la hebilla
pequeña al respaldo introduciendo la
lengüeta en la presilla como indica la
figura; luego, cuando haya enganchado
el cinturón al niño tiene que soltarla del
respaldo para dejar que el niño tenga
más movilidad. La hebilla pequeña tiene
que quedar debajo de los hombros del
niño.
REGULACIÓN DEL REPOSAPIÉS
22• El reposapiés se puede regular en tres
posiciones. Para bajar el reposapiés, tirar
de las dos palanquitas laterales hacia
abajo y al mismo tiempo bajarlo. Para
subir el reposapiés, subirlo hacia arriba
hasta oír clic.
Empuñar las asas (2) y hacer que suba el
segundo niño en el peldaño (3). Nunca
deje solos a los niños. No permita que el
niño suba sobre el peldaño de atrás con
la silla de paseo vacía.
CIERRE
Antes de cerrar la silla de paseo, si está
montada la capota, aflojar los compases y
si el respaldo está bajado, levantarlo.
30• La silla de paseo se puede cerrar con una
sola mano: tirar hacia arriba primero una
palanca y luego la otra hasta oír clic.
31• Empuñar el mango central y tirar de él
hacia arriba hasta que cierre como indica
la figura.
32• Comprobar que la silla de paseo esté
bien cerrada por medio del gancho de
seguridad. La silla de paseo cerrada se
sostiene sola en pie.
REGULACIÓN DEL RESPALDO
23• El respaldo se puede reclinar en cuatro
posiciones. Para bajarlo hay que levantar
el mango al mismo tiempo que se baja
el respaldo, bloqueándolo en la posición
deseada. Para levantarlo empujar el
respaldo hacia arriba.
RUEDAS GIRATORIAS
24• Para hacer que las ruedas anteriores sean
giratorias, es necesario bajar la palanca
como muestra la figura. Para hacerlas
fijas, actuar en la palanca en sentido
contrario.
REGULACIÓN DE LOS MANGOS
25• En los mangos se puede regular la altura
y las dos posiciones. Para la posición
alta, presionar el botón y al mismo
tiempo subir el mango hacia arriba. Para
la posición baja, hacer la operación en
sentido contrario.
BARRA FRONTAL
26• Se puede abrir la barra frontal sólo por
una parte para facilitar la entrada y la
salida del niño cuando es más mayor.
Para abrir, presionar el botón que hay
debajo del brazo y al mismo tiempo tirar
la barra frontal hacia fuera.
27• Para quitar la barra frontal presionar
los dos botones que hay debajo de los
brazos y al mismo tiempo tirar la barra
frontal hacia fuera.
TRANSPORTE
33• La silla de paseo se puede transportar
cómodamente (manteniendo las ruedas
delanteras en posición no giratoria)
cogiendo el asa central como indica la
figura.
34• También se puede transportar gracias al
asa lateral como indica la figura.
DESENFUNDABLE
35• Para quitar la funda de la silla de paseo,
desenganchar los acoples del saco por los
reposabrazos como indican las flechas.
36• Desenganchar los botones del saco
lateralmente como indica la figura. Sacar
la correa para la entrepierna por debajo
del asiento.
37• Desenganchar los botones del saco del
asiento y sacarla para extraer el saco de
los ganchos del reposapiés. Sacar el saco
por arriba.
GANCIOMATIC SYSTEM
Ganciomatic System es el sistema práctico
y rápido que permite enganchar en la silla
de paseo la silla de auto Primo Viaggio, que
también está dotada de sistema Ganciomatic
y se puede comprar por separado. Primo
Viaggio se desengancha de la base (que
queda en el automóvil) y se engancha en la
silla de paseo para transportar al niño sin
molestarlo.
APOYAPIÉS POSTERIOR
28• El apoyapiés posterior ayuda a la madre
a superar los pequeños desniveles y
además puede transportar otro niño.
SECUENCIA DE CARGA
29• Para utilizar la silla de paseo con dos
niños primero hay que frenarla, colocar
al niño más pequeño en el asiento y
enganchar el cinturón de seguridad (1).
ACOPLES GANCIOMATIC DE LA SILLA
DE PASEO
38• Para subir los acoples Ganciomatic de
la silla de paseo, levantar el saco en los
ángulos del asiento y girar hacia arriba
los dos acoples hasta oír clic.
39• Para bajar los acoples Ganciomatic de
la silla de paseo, tirar hacia fuera la
palanquita y al mismo tiempo girar hacia
abajo los acoples como indica la figura.
Page 17

PLIKO P3 + PRIMO VIAGGIO CAR SEAT
40• Para enganchar la silla de auto a la silla
de paseo hay que:
- frenar la silla de paseo,
- quitar la capota de la silla de paseo,
- bajar completamente el respaldo de la
silla de paseo,
- levantar los acoples Ganciomatic de la
silla de paseo.
- Poner la silla de auto hacia la madre y
empujarla hacia abajo hasta oír clic.
- Se aconseja no quitar el frontal de la silla
de paseo cuando se engancha la silla de
auto.
• Para desenganchar la silla de auto de
la silla de paseo consultar el manual de
instrucciones.
LÍNEA DE ACCESORIOS
41• Bolso con cambiador: bolso con
colchoneta para cambiar al bebé, que se
puede enganchar a la silla de paseo.
42• Parasol: parasol que se puede aplicar a la
silla de paseo.
43• Plástico de lluvia: plástico de lluvia con
cremallera que se puede aplicar a la
capota mediante la cremallera
44• Mosquitero: mosquitero con cremallera,
que se puede aplicar a la capota mediante
la cremallera
45• Bolso de viaje: práctico bolso para llevar
la silla de paseo en el avión.
LIMPIEZA & MANTENIMENTO
Su producto necesita un mínimo
mantenimiento. Las operaciones delimpieza y
mantenimiento tiene que ser efectuadas sólo
por adultos.
• Se aconseja mantener limpias las partes en
movimiento y si hiciera falta, lubricarlas con
aceite ligero.
• Secar las partes de metal del producto para
evitar que se oxiden.
• Limpiar periódicamente las partes de
plástico con un paño húmedo, no usar
disolventes ni otros productos parecidos.
• Cepillar las partes de tejido para quitar el
polvo.
• Mantener limpias las ruedas quitando polvo
y arena.
• Proteger el producto contra los agentes
atmosféricos, agua, lluvia o nieve; la
exposición continua y prolongada al sol
puede causar cambios de color en muchos
materiales.
• Conservar el producto en un sitio seco.
• Para lavar el saco, seguir las instrucciones
siguientes.
CUIDADO
• ESTE PRODUCTO HA SIDO
DISEÑADO PARA NIÑOS CON
UN PESO MÁXIMO DE 20 KG
Y UNA ALTURA MÁXIMA DE
110 CM. LA CESTILLA HA SIDO
REALIZADA PARA SOPORTAR
UN PESO MÁXIMO DE 5 KG. LOS
POSIBLES PORTABEBIDAS QUE
VAN CON ESTE PRODUCTO ESTÁN
CONCEBIDOS PARA SOPORTAR EL
PESO MÁXIMO ESPECIFICADO EN
EL PORTABEBIDAS EN CUESTIÓN.
CUALQUIER BOLSA ENTREGADA
JUNTO AL PRODUCTO ESTÁ
REALIZADA PARA SOPORTAR UN
PESO MÁXIMO DE 0,2 KG.
• SI NO SE RESPETAN LAS
INDICACIONES ESPECIFICADAS O SI
SE USAN ACCESORIOS DIFERENTES
DE LOS HOMOLOGADOS POR EL
FABRICANTE, EL PRODUCTO PUEDE
SER INESTABLE.
• PARA EVITAR LESIONES GRAVES
POR CAÍDAS O SI ESCAPA EL
NIÑO DE LA SILLA DE PASEO,
USAR SIEMPRE UN CINTURÓN
DE SEGURIDAD DE 5 PUNTOS
COMPLETO.
• NO DEJAR NUNCA AL NIÑO SIN
VIGILANCIA.
• USAR SIEMPRE TODOS LOS
DISPOSITIVOS DE BLOQUEO CADA
VEZ QUE LA SILLA DE PASEO NO
ESTÉ EN MOVIMIENTO.
• PARA EVITAR LESIONES GRAVES,
ASEGURARSE DE QUE EL NIÑO NO
PUEDA MOVERSE PELIGROSAMENTE
MIENTRAS SE REGULA EL
PRODUCTO.
• TODAS LAS OPERACIONES DE
ENSAMBLAJE DEBE REALIZARLAS
SOLO UN ADULTO.
• NO LEVANTAR LA SILLA DE PASEO
COGIÉNDOLA POR LA BARRA
FRONTAL. LA BARRA FRONTAL
NO HA SIDO CONCEBIDA PARA
SOPORTAR PESOS.
• ASEGURARSE DE QUE LA
SILLA DE PASEO ESTÉ ABIERTA
CORRECTAMENTE Y BLOQUEADA
Page 18

EN LA POSICIÓN CORRECTA PARA
SU UTILIZACIÓN.
• ASEGURARSE DE QUE LA SILLA DE
AUTO O EL COCHECITO ESTÉN
ENGANCHADOS CORRECTAMENTE
A LA SILLA DE PASEO.
• NO USAR LA SILLA DE PASEO
CERCA DE ESCALERAS O
ESCALONES; PRESTAR ATENCIÓN
CUANDO SE UTILIZA EN ESCALERAS
O ESCALERAS MECÁNICAS.
• NO UTILIZAR EL PRODUCTO SI
PRESENTA PARTES DAÑADAS O SI
FALTA ALGUNA PARTE.
• NO USAR EN PRESENCIA DE
LLAMAS O FUENTES DE CALOR.
FR•FRANÇAIS
• AVERTISSEMENT: lire attentivement les
instructions avant dʼutiliser le produit et les
conserver pour toute référence ultérieure.
• Pour des raisons techniques et
commerciales, PEG PEREGO pourra apporter
à tout moment des modifications aux
modèles décrits dans ce manuel.
SERVICE DʼASSISTANCE
En cas de perte ou dommage fortuit de
pièces du modèle, utilisez exclusivement
les pièces de rechange originales Peg
Perego. Pour les éventuelles réparations,
substitutions, informations sur les produits,
la vente de pièces de rechange originales
et dʼaccessoires, contactez le Service
dʼassistance Peg-Perego:
CANADA:
tel.: 905.839.3371
fax: 905.839.9542
Call us toll free: 1.800.661.5050
www.pegperego.com
NOTICE DʼEMPLOI
OUVERTURE
1• Avant dʼouvrir la poussette, retirer
les deux bouchons de protection des
crochets, comme indiqué sur la figure,
ou la poussette ne pourra être ouverte
correctement.
2• Pour ouvrir la poussette, tirez
simultanément les deux crochets des
poignées vers le haut et,
3• en même temps, soulevez la poussette
et elle s'ouvrira automatiquement.
Appuyez avec une main au fond de la
poussette afin de vérifier que l'ouverture
soit correcte. Pour vous assurer que la
poussette est ouverte correctement,
contrôlez les deux crochets latéraux (voir
figure).
ASSEMBLAGE DE LA POUSSETTE
4• Pour monter les roues avant, abaissez le
levier A et insérez la roue jusquʼau déclic,
comme sur la figure.
5• Pour monter les roues arrière, insérez la
roue jusquʼau déclic, comme sur la figure.
6• La poussette est munie de bouchons
de protection appliqués au niveau
des accoudoirs ; pour monter la barre
frontale, enlever dʼabord les bouchons
de protection (les conserver au cas où
la poussette serait utilisée sans la barre
frontale). Pour retirer les bouchons,
presser le bouton situé sous lʼaccoudoir
Page 19

et, en même temps, enlever le bouchon
(procéder de même sur lʼautre accoudoir).
7• Pour monter la barre frontale, insérer
jusquʼau déclic les deux extrémités de la
barre frontale dans les accoudoirs.
8• Pour fixer le panier, enfilez les crochets
avant A et les crochets arrières B et C sur
les ergots prévus à cet effet.
9• Panier installé.
10• Le porte-biberon est applicable à la
poignée gauche ou droite de la poussette,
grâce aux deux attaches.
• Pour le fixer sur la poignée, élargissez le
collier et fixez-le comme indiqué sur la
figure.
11• Enfilez le porte-biberon sur le collier
jusqu'au CLIC. Il est déconseillé de mettre
un biberon ou une bouteille contenant
une boisson chaude et pesant plus d'1 kg
dans le porte-biberon.
VERSION PLIKO P3
12• Modèle Classico: équipé dʼune capote
et dʼune barre frontale/plateau (ne pas
poser de boissons chaudes sur la barre
frontale/plateau; cela pourrait être
dangereux).
CAPOTE
• La capote est munie dʼune fermeture
éclair pour monter la bâche ou la
moustiquaire avec fermeture éclair (voir
Ligne Accessoires).
13• Pour fixer la capote, enfoncez les
attaches sur les tubes de la poussette
jusqu'à entendre le CLIC comme indiqué
sur le schéma correspondant.
14• Pressionnez l'arrière de la capote au
dossier de la poussette et sur la partie
intérieure des accoudoirs.
15• Pour tendre la capote, poussez les petits
leviers vers le bas. La capote peut être
réglée en fonction de l'inclinaison du
dossier.
16• La capote est équipée à lʼarrière dʼune
fermeture Eclair qui, une fois détachée,
permet son utilisation également comme
pare-soleil.
17• Pour retirer la capote, la déboutonner de
la poussette, détendre les petit leviers
et relever les ailettes des fixations en
poussant vers lʼintérieur de la poussette.
FREINS
18• Pour actionner le frein de la poussette,
abaissez avec le pied la barre située sur
les roues arrières comme indiqué sur
le schéma. Pour débloquer les freins,
relevez la barre. A lʼarrêt, toujours
actionner les freins de la poussette.
CEINTURES DE SECURITE
19• A: Assurez-vous que la bretelle soit
correctement insérée en vérifiant comme
indiqué sur le schéma correspondant. B:
Accrochez la ceinture comme indiqué sur
le schéma.
20• Pour détacher la ceinture, appuyez de
chaque côté de la boucle et tirez pour
que les deux parties se désolidarisent.
21• Grâce à son système de fixation
particulier, la nouvelle ceinture de
sécurité est désormais plus pratique à
attacher. En effet, avant dʼattacher la
ceinture, fixer la boucle au dossier en
insérant la languette dans le passant
prévu à cet effet, comme indiqué sur la
figure. Après avoir attaché la ceinture,
la détacher du dossier pour permettre
au bébé de bouger en toute liberté. La
boucle doit rester sous les épaules du
bébé.
REGLAGE DU REPOSE-PIEDS
Le repose-pieds est réglable en trois
22•
positions. Pour la position la plus basse,
actionnez les deux petites manettes
situées de chaque côté du repose-pieds
et celui-ci s'abaissera. Pour le mettre en
position haute, soulevez le repose-pieds
jusqu'au déclic.
REGLAGE DU DOSSIER
23• Le dossier est inclinable en quatre
positions. Pour le baisser, tirez la poignée
et bloquez le dossier dans la position
désirée. Pour le relever, remontez le
dossier.
ROUES PIVOTANTES
24• Pour mettre les roues avant en position
pivotante, baissez le levier comme
indiqué sur le dessin correspondant. Pour
les mettre en position fixe, relevez le
levier.
REGLAGE DES POIGNEES
25• La hauteur des poignées est réglable en
deux positions. Pour la position haute,
appuyez sur le bouton sur le côté tout
en tirant la poignée vers le haut. Pour la
position basse, inversez la manœuvre.
BARRE FRONTALE
26• Il est possible dʼouvrir la barre frontale
dʼun seul côté pour faciliter lʼentrée et
la sortie de lʼenfant une fois plus grand.
Pour lʼouvrir, presser le bouton situé sous
lʼaccoudoir et, en même temps, tirer la
barre frontale vers lʼextérieur.
27• Pour enlever la barre frontale, presser les
deux boutons situés sous les accoudoirs
et, en même temps, tirer la barre frontale
vers lʼextérieur.
MARCHEPIED ARRIERE
28• Le marchepied situé à l'arrière est une
aide pour franchir les petites différences
de niveau. Il peut également servir de
plateforme pour un second enfant.
Page 20

ORDRE D'INSTALLATION DES ENFANTS
29• Si vous utilisez la poussette pour
transporter deux enfants, enclenchez les
freins, asseyez le plus petit enfant dans la
poussette et attachez-le avec la ceinture
de sécurité (1). Saisissez les poignées (2)
et faites monter le second enfant sur le
marchepied arrière (3). Ne laissez jamais
les enfants seuls et sans surveillance
dans la poussette. Empêchez l'enfant de
monter sur le marchepied arrière si la
poussette est vide.
FERMETURE
Avant de fermer la poussette, si la capote
est montée, desserrer les petits leviers, et
relever le dossier sʼil est abaissé.
30• Vous pouvez fermer la poussette dʼune
seule main: tirez dʼabord vers le haut
lʼune des deux poignées puis lʼautre,
jusquʼà entendre le déclic.
31• Saisissez la poignée centrale et
tirez énergiquement pour fermer
complètement la poussette.
32• Vérifiez que la poussette soit bien fermée
et que le crochet de sécurité soit bien
enclenché. La poussette fermée tient
debout toute seule.
les deux fixations vers le haut jusquʼau
déclic.
39• Pour abaisser les fixations Ganciomatic
de la poussette, tirer le petit levier vers
lʼextérieur et, dans le même temps, faire
pivoter les fixations vers le bas comme
sur la figure.
PLIKO P3 + PRIMO VIAGGIO CAR SEAT
40• Pour monter le siège auto sur la
poussette, il faut-:
- bloquer la poussette,
- retirer la capote de la poussette,
- abaisser complètement le dossier de la
poussette,
- soulever les fixations Ganciomatic de la
poussette.
- Positionner le siège auto vers maman et
le pousser vers le bas jusquʼau déclic.
- Il est recommandé de ne pas retirer la
barre frontale de la poussette lorsque lʼon
monte le siège auto.
• Pour démonter le siège auto de la
poussette, se reporter au manuel
dʼinstructions correspondant.
LIGNE ACCESSOIRES
TRANSPORT
33• Il est très facile de transporter la Pliko
grâce à la poignée centrale.
34• La poignée latérale, très pratique pour
les petits parcours, vous permettra de
transporter la poussette aisément.
POUR RETIRER LE SAC
35• Pour retirer le sac de la poussette,
détacher des accoudoirs les fixations du
sac, comme indiqué par les flèches.
36• Détacher les boutons du sac situés sur
le côté, comme sur la figure. Enlever
la sangle dʼentre-jambes par la partie
inférieure de lʼassise.
37• Détacher de lʼassise les boutons du sac,
retirer lʼassise puis enlever le sac des
crochets du repose-pieds. Retirer le sac
par le haut.
SYSTEME GANCIOMATIC
Grâce à ses fixations spéciales, le Système
Ganciomatic, pratique et rapide, permet de
monter sur la poussette le siège auto Primo
Viaggio (vendu séparément), lui aussi muni du
Système Ganciomatic. Primo Viaggio peut être
détaché de sa base (qui reste dans la voiture)
et accroché à la poussette pour transporter le
bébé sans le déranger.
FIXATIONS GANCIOMATIC DE LA
POUSSETTE
38• Pour soulever les fixations Ganciomatic
de la poussette, relever le sac au niveau
des angles de lʼassise et faire pivoter
41• Sac à langer: Sac muni dʼun petit matelas
pour changer bébé, qui peut être monté
sur la poussette.
42• Pare-soleil: Pare-soleil adaptable à la
poussette.
43• Bâche: Bâche avec fermeture-Eclair
adaptable à la capote munie de
fermeture-Eclair
44• Moustiquaire: Moustiquaire avec
fermeture-Eclair adaptable à la capote
munie de fermeture-Eclair.
45• Sac de voyage : Sac pratique pour le
transport en avion de la poussette.
NETTOYAGE ET ENTRETIEN
Votre produit nécessite un minimum
dʼentretien. Les opérations de nettoyage
et dʼentretien doivent être effectuées
uniquement par des adultes.
• Il est recommandé de maintenir toutes les
parties mobiles propres et, au besoin, de
les lubrifier avec une huile légère.
• Essuyer les parties métalliques du produit
pour prévenir la formation de rouille.
• Nettoyer régulièrement les parties en
plastique avec un chiffon humide, ne pas
utiliser de solvants ou dʼautres produits du
même type.
• Brosser les parties en tissu pour les
dépoussiérer.
• Éliminer les dépôts de poussière et de sable
des roues.
• Protéger le produit contre les agents
atmosphériques, lʼeau, la pluie ou la neige ;
lʼexposition continue et prolongée au soleil
Page 21

pourrait altérer les couleurs de nombreux
matériaux.
• Conserver le produit dans un endroit sec.
• Pour le lavage du sac, suivre les instructions
ci-après.
AVERTISSEMENT
• CE PRODUIT A ETE CONÇU POUR
DES ENFANTS DONT LE POIDS
NʼEXCEDE PAS 20 KG (44 LIVRES)
ET LA TAILLE NE DEPASSE PAS
110 CM (43 POUCES). LE PANIER
A ETE CONÇU POUR SUPPORTER
DES CHARGES MAXIMALES DE
5 KG (11 LIVRES). LE PORTEBOISSONS EVENTUELLEMENT
FOURNI AVEC LE PRODUIT A ETE
CONÇU POUR SUPPORTER DES
CHARGES INDIQUEES SUR LE
PORTE-BOISSONS LUI-MEME. LES
POCHETTES OU SACS FOURNIS
AVEC CE PRODUIT ONT ETE
CONÇUS POUR SUPPORTER DES
CHARGES MAXIMALES DE 0,2 KG
(0,44 LIVRES).
• LE DEFAUT DʼOBSERVATION DES
SPECIFICATIONS DU FABRICANT
OU LʼEMPLOI DʼACCESSOIRES NON
APPROUVES PAR LE FABRICANT
PEUT AFFECTER LA STABILITE DU
PRODUIT.
• POUR ÉVITER DE GRAVES
BLESSURES SUITE À LA CHUTE OU
AU GLISSEMENT DE LʼENFANT DU
PRODUIT, TOUJOURS UTILISER UNE
CEINTURE DE SÉCURITÉ À 5 POINTS
COMPLÈTE.
• NE JAMAIS LAISSER LʼENFANT SANS
SURVEILLANCE.
• TOUJOURS ACTIONNER LES FREINS
LORSQUE LE PRODUIT EST A
LʼARRET.
• POUR ÉVITER DE GRAVES
BLESSURES LORS DU RÉGLAGE
DU PRODUIT, SʼASSURER QUE LES
MEMBRES DE LʼENFANT NE SONT
PAS EN CONTACT AVEC DES PIÈCES
EN MOUVEMENT.
• LʼENSEMBLE DES PROCÉDURES DE
MONTAGE ET DʼUTILISATION DOIT
ÊTRE EFFECTUÉ PAR UN ADULTE
• NE PAS SOULEVER LA POUSSETTE
PAR LA BARRE FRONTALE. ELLE NʼA
PAS ÉTÉ CONÇUE POUR SUPPORTER
DES CHARGES.
• SʼASSURER QUE LA POUSSETTE
EST CORRECTEMENT OUVERTE
EST BLOQUÉE DANS LA POSITION
CONVENANT À SON UTILISATION.
• CONTRÔLER QUE LE SIÈGE
ENFANT OU LE LANDAU EST
CORRECTEMENT ACCROCHÉ À LA
POUSSETTE.
• NE PAS UTILISER CE PRODUIT
À PROXIMITÉ DE MARCHES OU
DʼESCALIERS; PRÊTER ATTENTION
À LA MANIPULATION DU PRODUIT
DANS DES ESCALIERS OU DES
ESCALATORS.
• NE PAS UTILISER LE PRODUIT SI DES
PIÈCES SONT MANQUANTES OU
CASSÉES.
• NE PAS UTILISER PRÈS DU FEU OU
DʼUNE FLAMME DIRECTE.
Page 22

Page 23

Page 24

Pliko P3
PEG PEREGO S.p.A.
VIA DE GASPERI 50 20043 ARCORE MI ITALIA
tel. 0039•039•60881 fax 0039•039•615869-616454
Servizio Post Vendita - After Sale:
tel. 0039•039•6088213 fax: 0039•039•3309992
PEG PEREGO U.S.A. Inc.
3625 INDEPENDENCE DRIVE FORT WAYNE INDIANA 46808
phone 260•482•8191 fax 260•484•2940
Call us toll free 1•800•671•1701
PEG PEREGO CANADA Inc.
585 GRANITE COURT PICKERING ONTARIO CANADA L1W3K1
phone 905•839•3371 fax 905•839•9542
Call us toll free 1•800•661•5050
www.pegperego.com
28-02-06
 Loading...