

Page 1

U.S.A.
EN Instructions for use
ES Instrucciones de uso
pliko mini
Page 2

1
A
B
OKNO
2
D
E
3
NO
A
OK
B
Page 3
4
A
5
A
1
3
B
C
B
2
6
A
1
2
B
Page 4

A
B B
C
D D
7
A
B
8
9
A
B
Page 5
10
2
1
11
3
2
1
12
A
C
A
B
D
F
E
B
Page 6

13
C
B
A
14
A
B
15
1
2
3
Page 7

16
4
5
6
17
18
7
8
Page 8

19
20
A
B
C
A
B
Page 9

Pliko Mini
1
2
3
4
5
6
7
8
10
9
12
11
14
13
- 9 -
Page 10

Pliko Mini
16
15
17
18
1) SAPI6957NP
2) MUCI5P22N
3) SAPI6430NP
4dx) SPST6669KDGOS
4sx) SPST6669KSGOS
5) SPST6501GO
6) SPST6502DNP
7) SPST6502SNP
8) SPST6500NP
9) ERSHMI00-RE01
EN• Spare parts available in different colours to
be specified when ordering.
ES• Repuestos disponibles en otros colores que
se especificarán en el pedido.
10) SAPI5367KNPGO
11) SAPI5377NPGO
12) SPST6951NP
13) SPST6942...
14) ITPKMRUSNPL76
15) BCAMIN...
16) IRBELV0007
17) IRCOMI00--NL53
18) BSAMIN...
EN_English
Thank you for choosing a Peg-Pérego
product.
WARNING
_ CAREFULLY READ INSTRUCTIONS
AND KEEP FOR FUTURE USE.
THE CHILD’S SAFETY COULD BE PUT
AT RISK IF THE INSTRUCTIONS ARE
NOT FOLLOWED.
_ THIS PRODUCT IS DESIGNED FOR A
CHILD WHOSE MAXIMUM WEIGHT
IS 45 POUNDS (20 KG) AND WHOSE
MAXIMUM HEIGHT IS 43 INCHES
(110 CM). THIS SHOPPER BASKET IS
DESIGNED TO CARRY A MAXIMUM
WEIGHT OF 11 POUNDS (5 KG). ANY
CUPHOLDER EVENTUALLY PROVIDED
WITH THIS UNIT IS DESIGNED
TO CARRY A MAXIMUM WEIGHT
SPECIFIED ON THE CUPHOLDER
ITSELF. ANY POACH OR POCKET
PROVIDED WITH THIS UNIT IS
DESIGNED TO CARRY A MAXIMUM
WEIGHT OF 0.44 POUNDS (0.2 KG).
_ FAILURE TO FOLLOW
MANUFACTURER’S SPECIFICATIONS
OR USE OF ACCESSORIES OTHER
THAN THOSE APPROVED BY THE
MANUFACTURER MAY CAUSE THE
UNIT TO BECOME UNSTABLE.
_ AVOID SERIOUS INJURY FROM
FALLING OR SLIDING OUT. ALWAYS
USE COMPLETE 5 POINT SEAT BELT.
_ NEVER LEAVE YOUR CHILD
UNATTENDED.
_ ALWAYS USE ALL THE BRAKES
WHENEVER PARKED.
_ TO AVOID SERIOUS INJURY, WHEN
MAKING ADJUSTMENTS ENSURE
THE CHILD’S BODY IS CLEAR OF ALL
MOVING PARTS.
_ ALL OPERATING AND ASSEMBLY
PROCEDURES SHOULD BE PERFORMED
BY AN ADULT.
_ ENSURE THAT THE STROLLER IS OPENED
- 10 -
Page 11

CORRECTLY AND LOCKED IN POSITION
OF USE.
_ DO NOT DRIVE THIS PRODUCT
AROUND STAIRS OR STEPS; CARE
MUST BE TAKEN IF UNIT IS USED ON
STAIRS OR ESCALATORS.
_ DO NOT USE THE PRODUCT IF IT HAS
BROKEN OR MISSING PARTS.
_ DO NOT USE NEAR FIRE OR EXPOSED
FLAME.
NOTICE
THIS ARTICLE MEETS OR EXCEEDS
ALL REQUIREMENTS COVERED IN
ASTM F833 STANDARD AND LATEST
REVISIONS.
PRODUCT PARTS
Check the package contents and contact our
Customer Service for any claim.
_ The PLIKO MINI stroller is composed of:
2 swivel or locking front wheel sets, 2 rear
wheel sets, basket, cup holder, hood.
INSTRUCTIONS
1• OPENING: to open the stroller, unhook the left
hand side lever (fig_a), hold the handles and
at the same time lift the stroller.
Check that the stroller has opened properly by
ensuring that the side hooks are well secured
(fig_b).
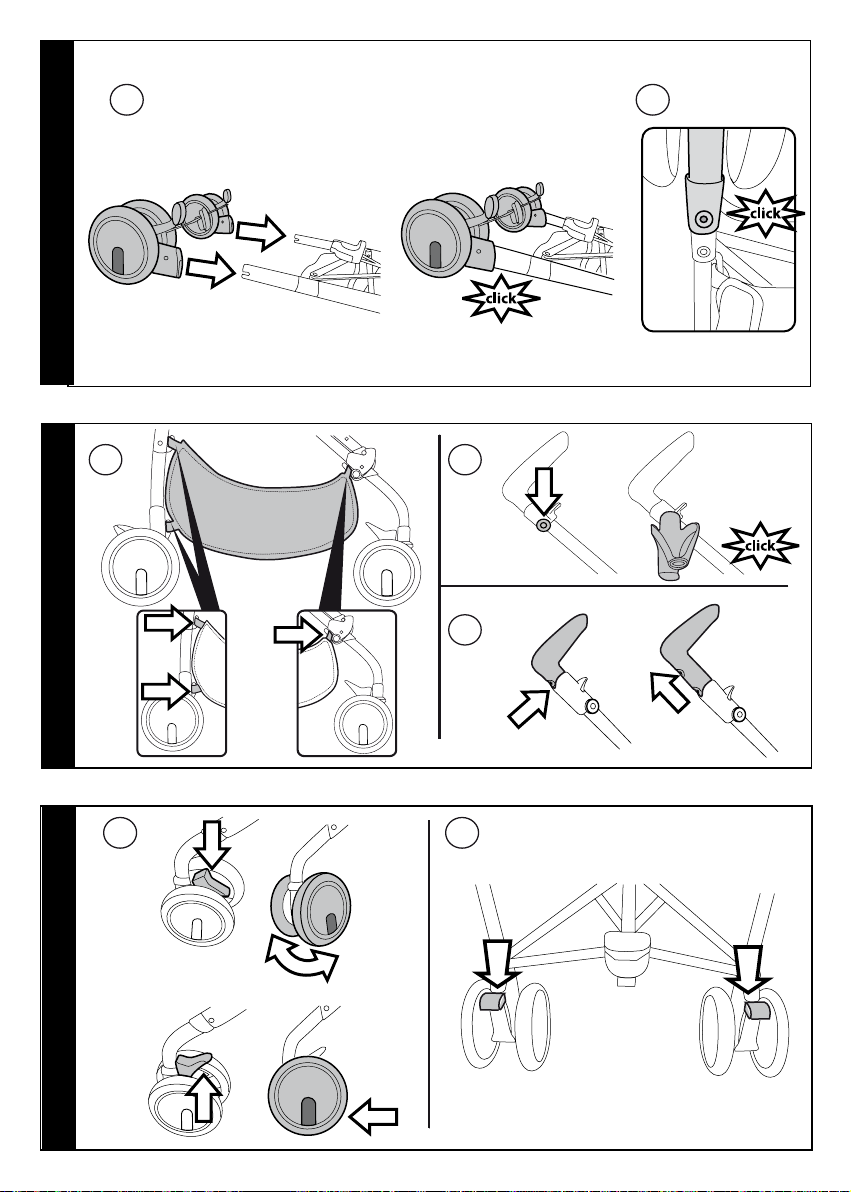
2• If the hooks are not secured properly, press
the seat downwards (fig_d) until they click
into place. Finally, press downwards on PUSH
with your foot (fig_e).
3• ASSEMBLING: to mount the front wheels,
firstly check that the washer is present, as
shown in the figure, then lower lever A and
slip wheel B on until it clicks into place.
4• To mount the rear wheels connected by the
brake cable, place them with the brake facing
externally (fig_a).
WARNING: ensure the hooks have clicked into
place, as in figure b.
5• BASKET: to mount the basket, slip the loops
over the rear hooks 1 and 2 and the front hook
3 (fig_a).
CUP HOLDER: It can only be fitted to the right
hand side of the stroller, using the clip which
is already present on the chassis. To fit the cup
holder, push until it clicks into place (fig_b).
ADJUSTING THE HANDLES: the height of
the handles can be adjusted. Press the little
button behind the handles and pull upwards.
To lower the handles, do the opposite (Fig. c).
6• SWIVEL WHEELS: In order to make the wheels
swivel, the lever (arrow 1) must be lowered.
To secure the wheels, move the lever to the
opposite direction (arrow 2). The rear wheels
are fixed.
BRAKE: To set the brake on the stroller, lower
the lever on the rear wheel unit with your
foot. To release the brake, lift the lever (fig_b).
When stationary, always apply the brake.
7• HOOD: To fit the hood, click the fasteners
onto the appropriate points and button down
the hood on the rear of the stroller’s backrest
(fig_a).
The hood can be set to 2 positions (fig_b),
simply by pulling it backwards or forwards.
8• 5-POINT SAFETY HARNESS: to fasten, insert
the two buckles of the waist strap (with
attached shoulder straps, arrow a) into the leg
divider strap until they click into place (arrow
b). To unfasten, push the round button placed
in center of the buckle upwards (arrow_c) and
pull the waist strap outwards (arrow d).
9• To tighten the waist strap, pull on both sides
in the direction of the arrow (Fig. a). To loosen
it do the opposite. The waist strap can be
tightened as far as the safety lock (Fig. b).
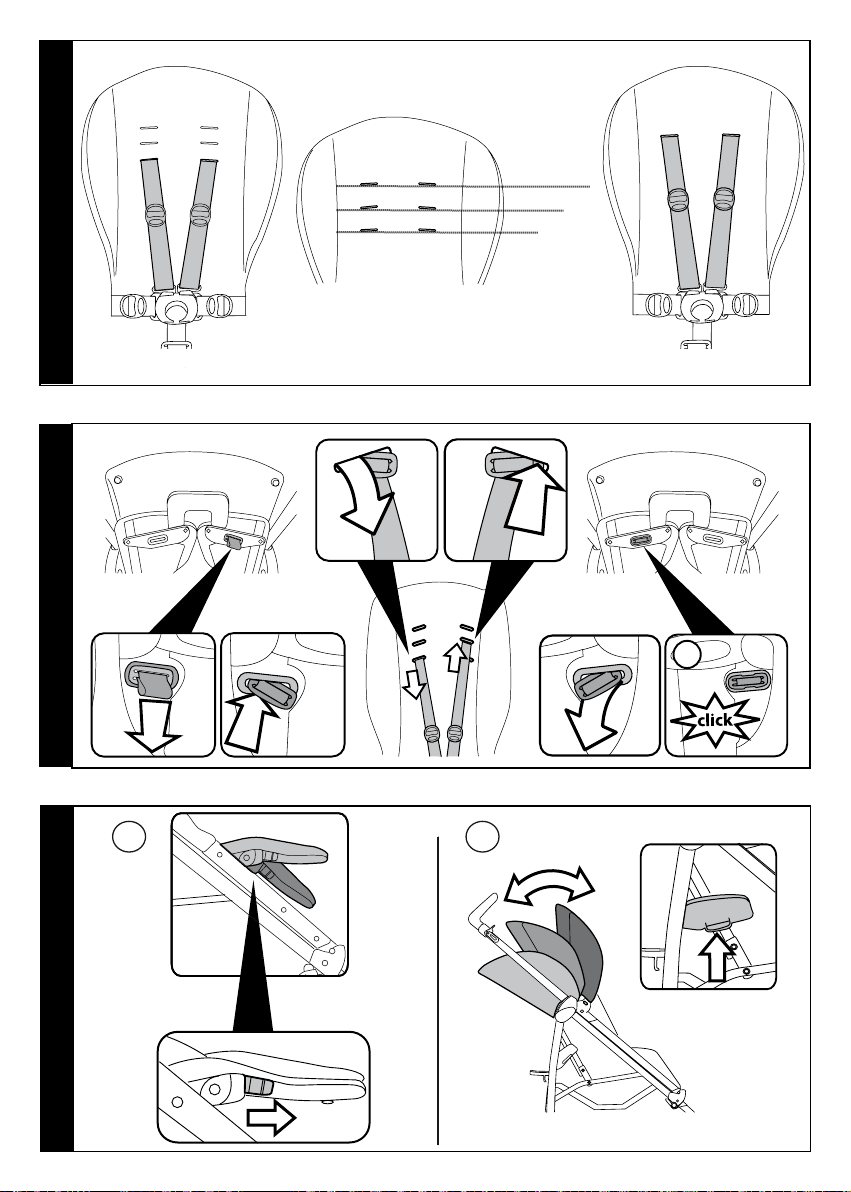
10• It is possible to set the safety harness at 3
different heights, depending on how tall the
child is. As the child gets bigger, the harness
must be moved to a higher position.
11• To adjust the height of the safety harnesses,
release the two buckles on the rear of the
backrest.
Pull the shoulder straps towards you (arrow a)
until the buckles are released and insert them
in the backrest loops (arrow b). Remove the
shoulder straps from the sack (arrow c) and
insert them in the most appropriate buckle
(arrow d), then reattach the two buckles
behind the backrest (arrow e). The buckles are
securely attached when a click is heard (fig f).
12• LEG REST ADJUSTMENT: The leg rest can be
set in 2 different positions. To lower the leg
rest, pull the two side levers downwards and
at the same time lower the leg rest. To raise
the leg rest, push it upwards until it clicks into
position.
BACKREST ADJUSTMENT: The backrest can be
set in 3 positions: To lower the backrest, lift
the levers on both sides at the same time and
lower it, locking it in the position required. To
lift the backrest, push it upwards.
- 11 -
Page 12

13• FOLDING UP: pull one lever followed by the
second lever upwards until you hear them
click (fig_a); then, hold the central handle
(fig_b) and pull it upwards until the stroller
folds up. When folded, the stroller will stand
upright (fig_c).
14• CARRYING: The stroller can be conveniently
carried (with the front wheels set on
stationary) by the central handle (fig_a). It can
also be carried by the side handle (fig_b).
15• REMOVABLE LINING: to remove the lining
from the stroller, unhook the fasteners on the
rear of the backrest (fig_1), slip the fastener of
the leg divider out from under the seat (fig_2),
loosen the two screws (on both sides) using a
screwdriver to keep the nut fastened (fig_3),
16• unhook the elastic from the chassis (fig_4),
unhook the chassis (fig_5, see OPENING
paragraph, point 1), slide the sack off the
chassis (fig_6),
17• slide the sack off the footboard (fig_7).
and pull the sack upwards (fig_8).
SERIAL NUMBERS
18• The Stroller PLIKO MINI has all the following
relevant information behind the backrest:
product name, date of manufacture and serial
number.
This information is required for any
complaints.
ACCESSORIES
19• COVER: practical cover.
RAIN CANOPY: can be applied to the hood.
MOSQUITO NETTING: can be fastened to the
hood.
20• TRAVEL BAG: practical duffle bag for
transporting the stroller by plane (fig_a).
UMBRELLA: practical umbrella to match
(fig_b).
locking mechanisms, wheels, ...) and free of
dust and sand and, if necessary, lubricate
with light machine oil.
CLEANING THE RAIN CANOPY: wash with
a sponge and soapy water; do not use
detergents.
CLEANING FABRIC PARTS: brush fabric parts to
remove dust and wash by hand at a maximum
temperature of 30°C; do not wring; do not use
chlorine bleach, do not iron; do not dry clean;
do not apply solvent-based stain removers
and do not dry in a tumble dryer.
PEG-PÉREGO AFTER-SALES
SERVICE
If any parts of the item get lost or damaged,
only use genuine Peg Pérego spare parts.
For any repairs, replacements, information
on the products and sales of genuine spare
parts and accessories, contact the Peg
Pérego Assistance Service and state the serial
number of the product, if present.
USA:
tel. 800.671.1701
fax: 260.471.6332
call us toll free: 1.800.671.1701
web site: www.pegperego.com
Peg-Perego reserves the right to make any
necessary changes or improvements to the
products shown at any time without notice.
CLEANING AND
MAINTENANCE
PRODUCT MAINTENANCE: protect from the
weather: water, rain, or snow; prolonged and
continuous exposure to bright sunlight may
give rise to colour changes of various different
materials; store this product in a dry place.
CLEANING THE CHASSIS: periodically clean all
plastic parts with a damp cloth. Do not use
solvent or similar cleaning products; keep
all metal parts dry to prevent rusting; keep
moving parts clean (adjustment mechanisms,
- 12 -
Page 13

ES_Español
Le agradecemos haber elegido un producto
Peg-Pérego.
ADVERTENCIA
_ LEER ATENTAMENTE ESTAS
INSTRUCCIONES Y CONSERVARLAS
PARA FUTURAS CONSULTAS.
LA SEGURIDAD DEL NIÑO PUEDE
PONERSE EN PELIGRO SI NO SE
SIGUEN ESTAS INSTRUCCIONES.
_ ESTE PRODUCTO HA SIDO DISEÑADO
PARA UN NIÑO CON UN PESO
MÁXIMO DE 20 KG Y UNA ALTURA
MÁXIMA DE 110 CM. LA CESTILLA HA
SIDO REALIZADA PARA SOPORTAR
UN PESO MÁXIMO DE 5 KG. LOS
POSIBLES PORTABEBIDAS QUE
VAN CON ESTE PRODUCTO ESTÁN
CONCEBIDOS PARA SOPORTAR EL
PESO MÁXIMO ESPECIFICADO EN
EL PORTABEBIDAS EN CUESTIÓN.
CUALQUIER BOLSA ENTREGADA
JUNTO AL PRODUCTO ESTÁ
REALIZADA PARA SOPORTAR UN
PESO MÁXIMO DE 0,2 KG.
_ SI NO SE RESPETAN LAS
INDICACIONES ESPECIFICADAS O SI
SE USAN ACCESORIOS DIFERENTES
DE LOS HOMOLOGADOS POR EL
FABRICANTE, EL PRODUCTO PUEDE
SER INESTABLE.
_ PARA EVITAR LESIONES GRAVES POR
CAÍDAS O SI ESCAPA EL NIÑO DE
LA SILLA DE PASEO, USAR SIEMPRE
UN CINTURÓN DE SEGURIDAD DE 5
PUNTOS COMPLETO.
_ NO DEJAR NUNCA AL NIÑO SIN
VIGILANCIA.
_ USAR SIEMPRE TODOS LOS
DISPOSITIVOS DE BLOQUEO CADA
VEZ QUE LA SILLA DE PASEO NO ESTÉ
EN MOVIMIENTO.
_ PARA EVITAR LESIONES GRAVES,
ASEGURARSE DE QUE EL NIÑO NO
PUEDA MOVERSE PELIGROSAMENTE
MIENTRAS SE REGULA EL PRODUCTO.
_ TODAS LAS OPERACIONES DE
ENSAMBLAJE DEBE REALIZARLAS
SOLO UN ADULTO.
_ ASEGURARSE DE QUE LA
SILLA DE PASEO ESTÉ ABIERTA
CORRECTAMENTE Y BLOQUEADA EN
LA POSICIÓN CORRECTA PARA SU
UTILIZACIÓN.
_ NO USAR LA SILLA DE PASEO CERCA
DE ESCALERAS O ESCALONES;
PRESTAR ATENCIÓN CUANDO SE
UTILIZA EN ESCALERAS O ESCALERAS
MECÁNICAS.
_ NO UTILIZAR EL PRODUCTO SI
PRESENTA PARTES DAÑADAS O SI
FALTA ALGUNA PARTE.
_ NO USAR EN PRESENCIA DE LLAMAS
O FUENTES DE CALOR.
AVISO
ESTE PRODUCTO CUMPLE
SUFICIENTEMENTE CON TODOS LOS
REQUISITOS ESTABLECIDOS POR LA
NORMA ASTM F833 Y ULTERIORES
REVISIONES.
COMPONENTES DEL
ARTÍCULO
Compruebe el contenido presente en el
embalaje y, en caso de reclamación, póngase
en contacto con el Servicio de Asistencia.
_ La silla de paseo PLIKO MINI está compuesta
por:
2 juegos de ruedas delanteras pivotantes o
bloqueables, 2 juegos de ruedas traseras,
cesta, portabebidas, capota.
INSTRUCCIONES DE USO
1• APERTURA: para abrir la silla de paseo,
desenganchar la palanca lateral (fig_a)
del lado izquierdo, aferrar los mangos y
simultáneamente levantar la silla.
Verificar la correcta apertura, comprobando
que los ganchos laterales estén bien
enganchados (fig_b).
2• Si los ganchos no están bien enganchados,
ejercer presión sobre el asiento (fig_d) hasta
- 13 -
Page 14

oír el clic de enganche.
Ejercer presión hacia abajo con el pie sobre
PUSH (fig_e).
3• ENSAMBLAJE: para montar las ruedas
delanteras, comprobar que esté puesta la
arandela, como en la figura, bajar la palanca A
y colocar la rueda B, hasta el clic.
4• Para montar las ruedas traseras unidas por
la barra de freno, colocarlas sosteniendo el
freno externo (fig_a).
ATENCIÓN: comprobar que el enganche sea
correcto, como indica la figura (Fig.b); se
debe oír un clic.
5• CESTA: para montar la cesta, hacer pasar por
las ranuras los ganchos traseros 1 y 2 y el
gancho delantero 3, (fig_a).
PORTABEBIDAS: Sólo puede colocarse en el
lado derecho de la silla de paseo gracias al
enganche ya existente en el chasis.
Para aplicar el portabebidas, engancharlo
hasta oír el clic (fig_b).
REGULACIÓN DE LOS MANGOS: es posible
regular la altura de los mangos. Presionar el
botón situado detrás del mango y levantarlo.
Para bajarlo actuar en sentido contrario
(Fig.c).
6• RUEDAS PIRUETANTES: Para hacer que
las ruedas anteriores sean piruetantes,
es necesario bajar la palanca (flecha 2).
Para hacer que sean fijas, gire la palanca
en sentido contrario (lecha 2). Las ruedas
posteriores son fijas.
FRENO: Para frenar la silla de paseo, bajar
con el pie la palanca freno colocada sobre el
grupo de ruedas traseras. Para desbloquear
el freno, realizar la misma operación pero en
sentido contrario (fig_b). Accionar siempre el
freno estando parados.
7• CAPOTA: Para aplicar la capota, introducir
los enganches en los correspondientes
alojamientos hasta oír el clic y abrochar la
capota por detrás del respaldo de la silla de
paseo (fig_a).
La capota se puede regular en 2 posiciones
(fig_b), simplemente tirando hacia delante o
hacia atrás.
8• CINTURÓN DE SEGURIDAD DE 5 PUNTOS: para
engancharlo, introduzca las dos hebillas de la
correa de la cintura (con tirantes enganchados,
(flecha a) en la correa de separación de
las piernas hasta oír un clic (flecha b). Para
desenganchar, empuje hacia arriba el pulsador
redondo colocado en la parte central de la
hebilla (flecha c) y tire hacia el exterior la
correa de la cintura (flecha d).
9•Para apretar la correa de la cintura tire, desde
los dos lados, en el sentido de la flecha (flecha
a), para aflojarla actúe en sentido contrario.
La correa de la cintura puede apretarse hasta
el tope de seguridad (Fig b).
10•Se pueden reglar los cinturones de seguridad
en 3 alturas según la altura del bebé. Se
deberá usar la posición más alta cuando el
bebé sea más grande.
11•Para regular la altura de los cinturones de
seguridad es necesario desenganchar en
la parte posterior del respaldo de las dos
hebillas.
Tire hacia sí los tirantes (flecha a) hasta
desenganchar las hebillas y pasarlas por las
ranuras del respaldo (flecha b). Saque los
tirantes del saco (flecha c) y páselos por la
ranura más adecuada (flecha d), finalmente
vuelva a enganchar las dos hebillas detrás del
respaldo (flecha e). Un clic determina que se
han enganchado correctamente las hebillas
(Fig. f).
12•REGULACIÓN DEL REPOSAPIÉS: El reposapiés
puede regularse en 2 posiciones. Para bajar
el reposapiés, empujar hacia abajo las dos
palancas laterales y simultáneamente bajarlo.
Para levantar el reposapiés, empujarlo hacia
arriba hasta oír el clic.
REGULACIÓN DEL RESPALDO: El respaldo
puede reclinarse en 3 posiciones. Para
bajar el respaldo, levantar la palanca lateral
simultáneamente de ambos lados y bajar
el respaldo, bloqueándolo en la posición
deseada. Para levantarlo, presionar sobre el
respaldo hacia arriba.
13•CIERRE: tirar hacia arriba primero con una
palanca y luego con la otra hasta el enganche
(fig_a); aferrar el asa central (fig_b) y tirar
hacia arriba hasta el cierre.
La silla cerrada se mantiene en pie por sí sola
(fig_c).
14• TRANSPORTE: La silla de paseo se puede
transportar cómodamente (manteniendo fijas
las ruedas delanteras) aferrando el asa central
(fig_a). Es posible transportarla también con
el asa lateral (fig_b).
15• DESENFUNDADO: para desenfundar la silla
de paseo: desenganchar las dos hebillas (fig_
1) de la parte posterior del respaldo,
quitar por abajo la hebilla de la correa
de separación de las piernas (fig_2) y
desenroscar (a ambos lados) los dos tornillos,
utilizando un destornillador para dejar fija la
tuerca (fig_3),
16• desenganchar el elástico del chasis (fig_4) y
desenganchar el chasis (fig_5);
ver el apartado Apertura, punto1; quitar el
saco alrededor del chasis (fig_6),
17• retirar el saco del estribo (fig_7).
Tirar del saco hacia arriba (fig_8).
- 14 -
Page 15

NÚMEROS DE SERIE
18• Silla de paseo PLIKO MINI, indica detrás
del respaldo, informaciones relativas a:
nombre del producto, fecha de producción
y numeración de serie del mismo. Estas
informaciones son indispensables en caso de
reclamación.
ACCESORIOS:
19• CUBIERTA: práctica cubierta.
PARALLUVIA: aplicable a la capota.
MOSQUITERA: aplicable a la capota.
20• BOLSA DE VIAJE: Práctica bolsa para el
transporte aéreo de la silla de paseo (fig_a).
SOMBRILLA: práctica sombrilla coordinada
(fig_b).
LIMPIEZA Y MANTENIMIENTO
MANTENIMIENTO DEL PRODUCTO: proteger
contra agentes atmosféricos (agua, lluvia o
nieve). Una exposición contínua y prolongada
al sol podría causar cambios de color de
muchos materiales. Conservar este producto
en un lugar seco.
LIMPIEZA DEL CHASIS: Limpiar periódicamente
las partes de plástico con un paño húmedo
sin usar solventes u otros productos similares.
Mantener secas todas las partes de metal para
prevenir la oxidación. Mantener limpias todas
las partes móviles (dispositivo de regulación,
de enganche, ruedas...) quitando el polvo o la
arena y, en caso necessario, engrasarlas con
aceites ligeros.
LIMPIEZA DEL PROTECTOR DE LLUVIA: lavar
con una esponja con agua y jabón, sin usar
detergentes.
LIMPIEZA DE LAS PARTES DE TEJIDO: cepillar
las partes de tejido quitando el polvo y lavar a
mano a una temperatura máxima de 30º. No
torcer, no usar lejía, no planchar, no lavar en
seco, no usar solventes y no secar utilizando
secadoras de tambor rotativo.
los productos, venta de repuestos originales y
accesorios, contactar al Servicio al Cliente Peg
Pérego indicando, en caso fuere presente, el
número de serie del producto.
USA:
tel.: 800.225.1558 (Español)
fax: 260.471.6332
Número de teléfono gratis: 1.800.225.1558
(Español)
sito internet: www.pegperego.com
Peg-Perego se reserva el derecho para hacer
cambios necesarios o mejorar los productos
al cualquier tiempo sin notificación.
SERVICIO DE ASISTENCIA
PEG-PÉREGO
Si se pierden o dañan algunas partes del
modelo, utilizar únicamente repuestos
originales Peg Pérego. Para cualquier
reparación, sustitución, información acerca de
- 15 -
Page 16

PEG PEREGO S.p.A.
VIA DE GASPERI 50 20043 ARCORE MI ITALIA
tel. 0039 039 60881 fax 0039 039 615869/616454
Servizio Post Vendita - After Sale:
tel. 0039 039 6088213 fax: 0039 039 3309992
PEG PEREGO U.S.A. Inc.
3625 INDEPENDENCE DRIVE FORT WAYNE INDIANA 46808
phone 260 482 8191 fax 260 484 2940
Call us toll free: 1 800 671 1701
PEG PEREGO CANADA Inc.
585 GRANITE COURT PICKERING ONTARIO CANADA L1W3K1
phone 905 839 3371 fax 905 839 9542
Call us toll free: 1 800 661 5050
www.pegperego.com
Conforms to
ASTM F833
Safety Standards
WARNING
AVOID SERIOUS INJURY FROM FALLING OR SLIDING OUT.
ALWAYS USE COMPLETE 5 POINT SEAT BELT.
ADVERTENCIA
EVITE LESIÓNES DE CAIDAS O DESLIZAMIENTOS HACIA FUERA.
SIEMPRE UTILIZE EL CINTURON COMPLETO DE 5 PUNTOS.
pliko mini
FIUS1101I123
22/11/2010
 Loading...