

Page 1

Page 2
NO
OK
3
2
1
Page 3
6
5
4
Page 4
8
7
9
Page 5
12
11
10
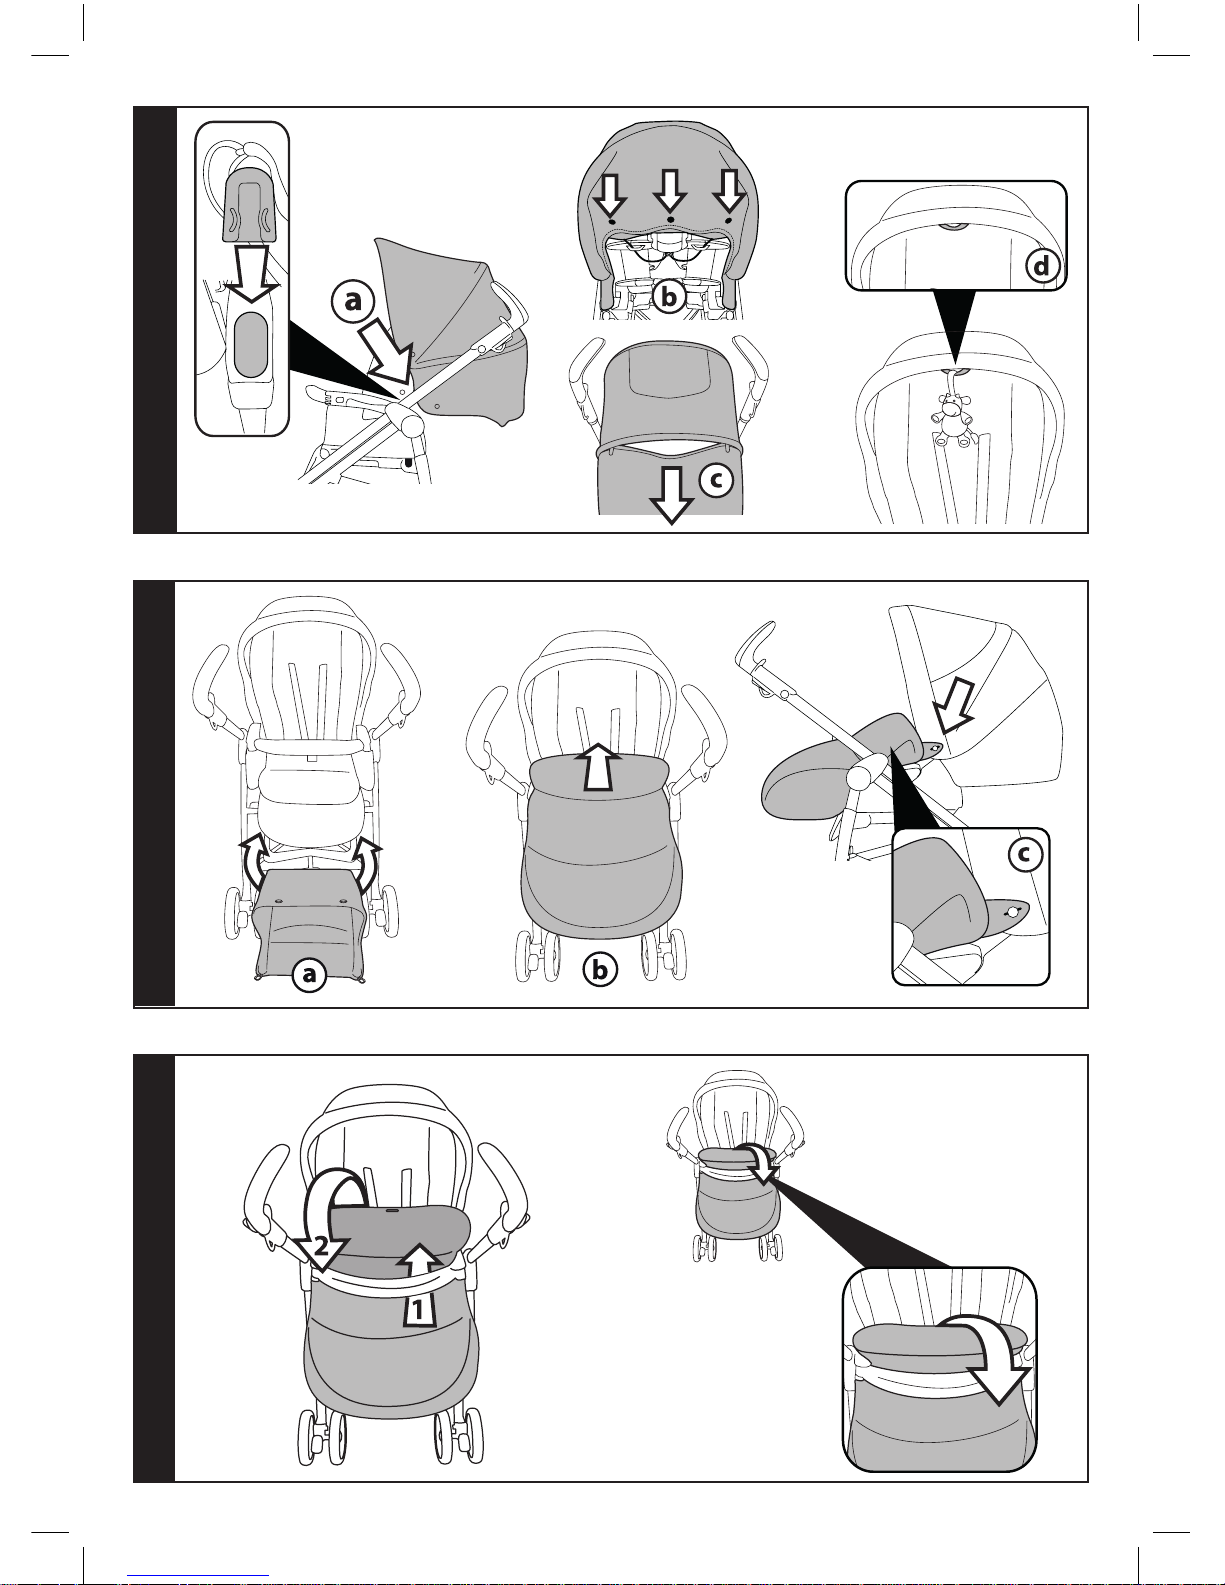
Page 6

14
15
13
Page 7

16
17
18
Page 8
20
21
19
Page 9

22
23
24
Only Pliko Switch On Track
Page 10

25
26
27
Page 11

28
Page 12

- 12 -
EN_English
Thank you for choosing a Mamas & Papas
product.
WARNING
_ IMPORTANT: read the instructions carefully
before use and keep them for future reference.
The child may be hurt if you do not follow these
instructions.
_ SWITCH: This item is designed to carry 1 child in
the seat.
_ Do not use this item for a number of occupants
greater than that intended by the manufacturer.
_ The Switch Chassis + Switch car seat is approved
for infants from birth up to 15 kg
in weight.
_ The Switch chassis is designed for use with
Mamas & Papas Surefix products: the Switch
chassis + Primo Viaggio car seat (0+ group) is
approved for children from birth up to 13 kg
of weight. The Switch chassis + “Navetta” or
“Primonido” bassinet unit is approved for children
from birth up to 10 kg of weight. If using with the
“Navetta” or the “Primonido”, refrain from using
the rear ledge.
_ Before use check that the Mamas & Papas
Surefix products are correctly fixed to the item.
_ It may be dangerous to leave your child
unattended.
_ Always use the 5-point harness and attach the
waist strap to the leg divider strap.
_ Be careful not to hurt the child when adjusting the
mechanisms (handlebar, backrest).
_ Always apply the brake when stopped and when
positioning the child in the seat or when removing
the child from the seat.
_ Assembly and preparation of the product, plus
cleaning and maintenance operations, must be
carried out exclusively by adults.
_ Do not use this item if there are parts missing or
signs of breakage.
_ Before use check that all the attachment
mechanisms are correctly engaged.
_ Do not insert fingers into the mechanisms.
_ Any load hanging on the handlebar or the handles
can make the stroller/carriage unstable; follow the
manufacturer’s instructions for max load capacity.
_ Do not place loads over 3 kilos in the basket. Do
not place in the bottle holder weights heavier than
stated or hot drinks. Do not place in the hood
pockets (if applicable) weights over 0.2 Kg.
_ The front bar is not designed to support the
child’s weight. It is not designed to keep the child
in the seat and does not substitute for the waist
belt.
_ Do not use the item near to stairs or steps, heat
sources, naked flames or dangerous objects
within reach of the child.
_ The use of accessories not approved by the
manufacturer could be dangerous.
_ This item is not suitable for jogging or roller
skating.
_ Do not use the rain canopy (if present) indoors
and regularly check to ensure the child is not
too warm; do not park the stroller close to
heat sources and keep well away from lighted
cigarettes. Ensure the rain canopy is not
interfering with any moving parts of the carriage
or stroller; always remove the rain canopy before
folding your carriage or stroller.
_ Do not use the release levers to move or lift the
stroller when the child is in it.
_ WARNING: Do not add a mattress pad.
Switch, the compact stroller with reversible
baby seat!
Full version with hood, cover and rain canopy.
Sports version with hood and rain canopy (Switch
compact On Track Sportivo).
FEATURES OF THE ITEM
_ The item is numbered progressively.
_ Switch is a stroller with a reversible seat: facing
the person pushing or facing forwards.
_ Switch is made up of two elements: Switch
CHASSIS and Switch SEAT.
COMPONENTS OF THE ITEM
Check the contents of the packaging and if you
have any complaints please contact Mamas &
Papas Customer Care.
_ Switch Chassis: a basket, 2 swiveling or locking
front wheels, 2 rear wheels with a central brake
bar and a drink holder.
_ Switch baby seat: front bumper bar; hood; cover;
rain canopy.
_ Switch On Track Sportivo baby seat: front bar;
hood; rain canopy.
INSTRUCTIONS
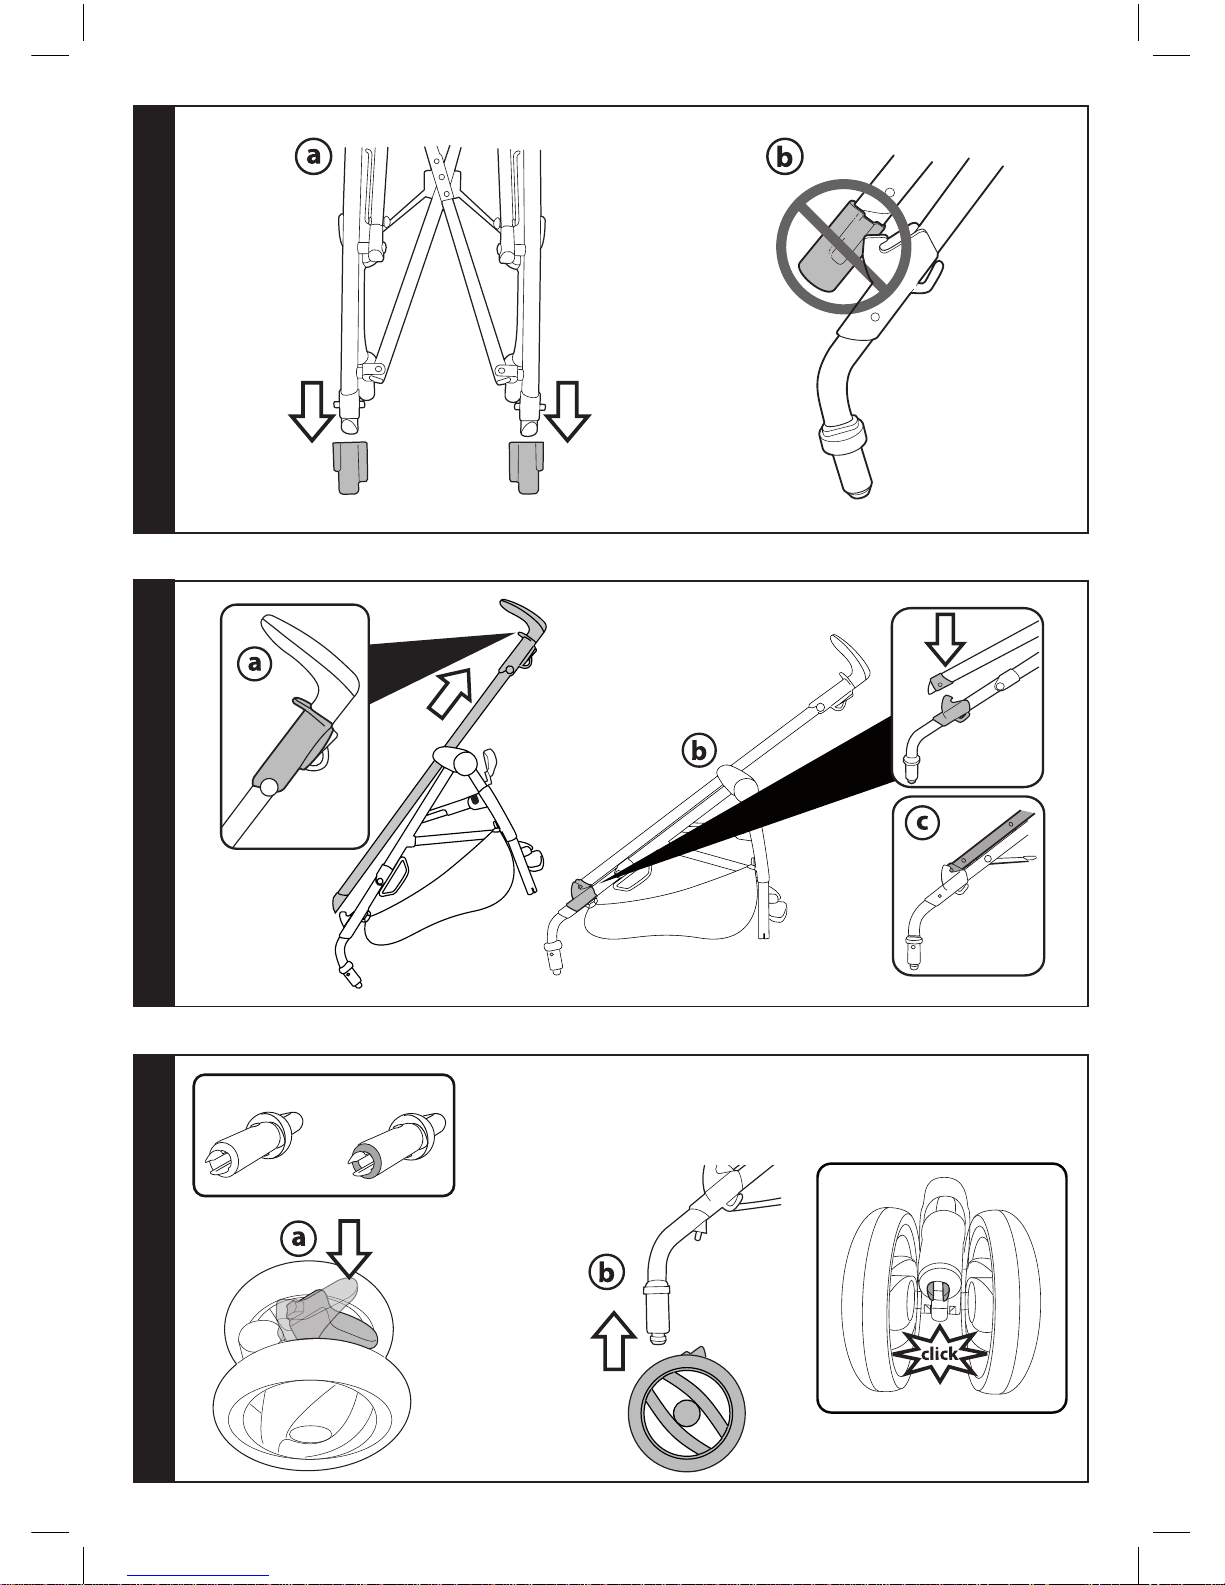
1 PACKING PROTECTION: before opening the
chassis remove the protection (fig_a), otherwise it
will not open correctly (fig_b).
2 OPENING: Raise the levers on the two handles
together (fig_a) and pull upwards until the chassis
is completely open (fig_b). Check that the chassis
is correctly opened: the side tubes must be
locked together (fig_c).
If the front clips do not fasten properly, push
down on the seat until they click into place.
3 FITTING THE FRONT WHEELS: First check that
the washer is in place, as shown in the figure,
lower the levers on the two front wheels (fig_a)
and push them until they click into place (fig_b).
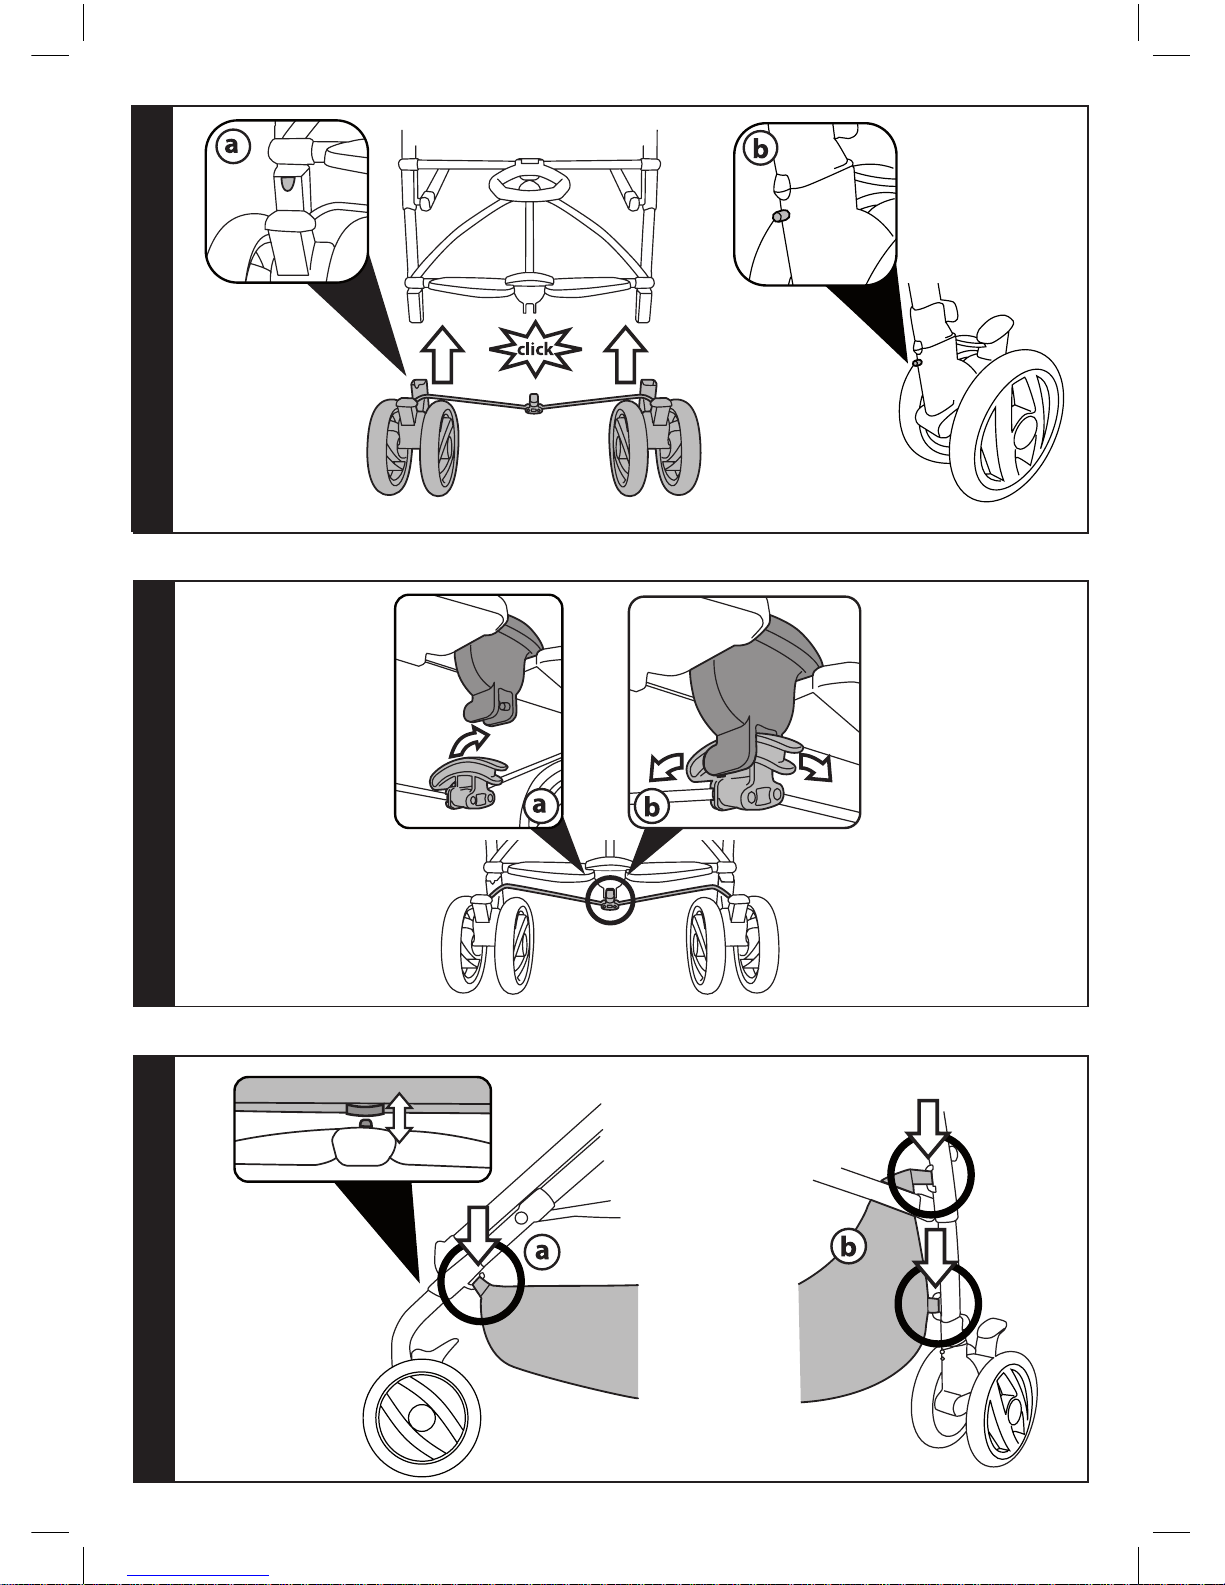
4 FITTING THE REAR WHEELS: Push the wheels
until they click into place (fig_a) and check that
they are properly attached (fig_b).
5 Finally, attach the element in the centre of the
brake bar to the chassis (fig_a) and check that it
has slotted into place properly (fig_b).
6 FITTING THE BASKET: Slip the loops onto the
hooks at the front (fig_a) and the rear (fig_b).
7 FITTING THE CUP HOLDER: insert the cup holder
on the corresponding peg and press down until it
clicks into place. The cup holder can be attached
to either side of the chassis.
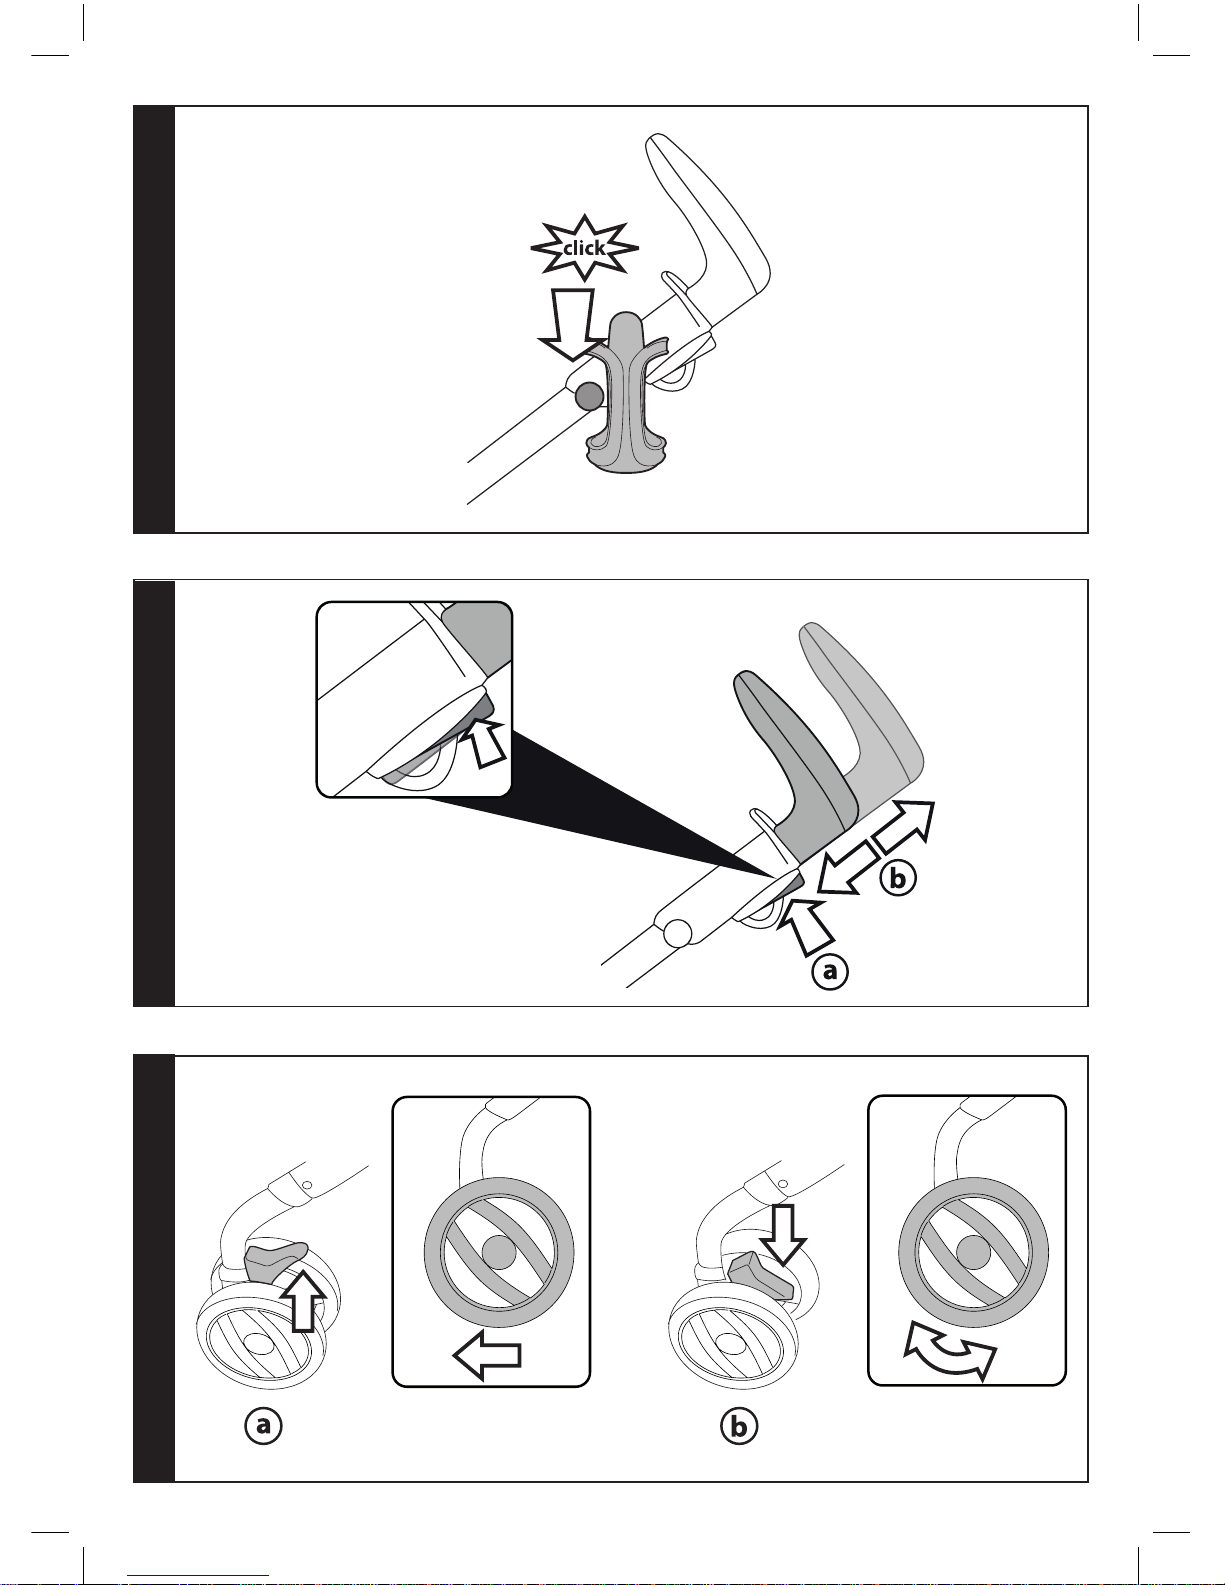
8 ADJUSTABLE HANDLES: Switch compact: To
raise or lower the handles, hold the button down
(fig_a) and adjust them (fig_b).
9 FIXED OR SWIVELLING FRONT WHEELS: Lift the
levers to prevent the wheels from swiveling (fig_a)
and lower them to allow the wheels to swivel
(fig_b). On uneven surfaces, the wheels should be
set to their fixed position.
10 BRAKES: Press a brake lever to immobilize the
chassis (fig_a) and lift the lever to release it
(fig_b).
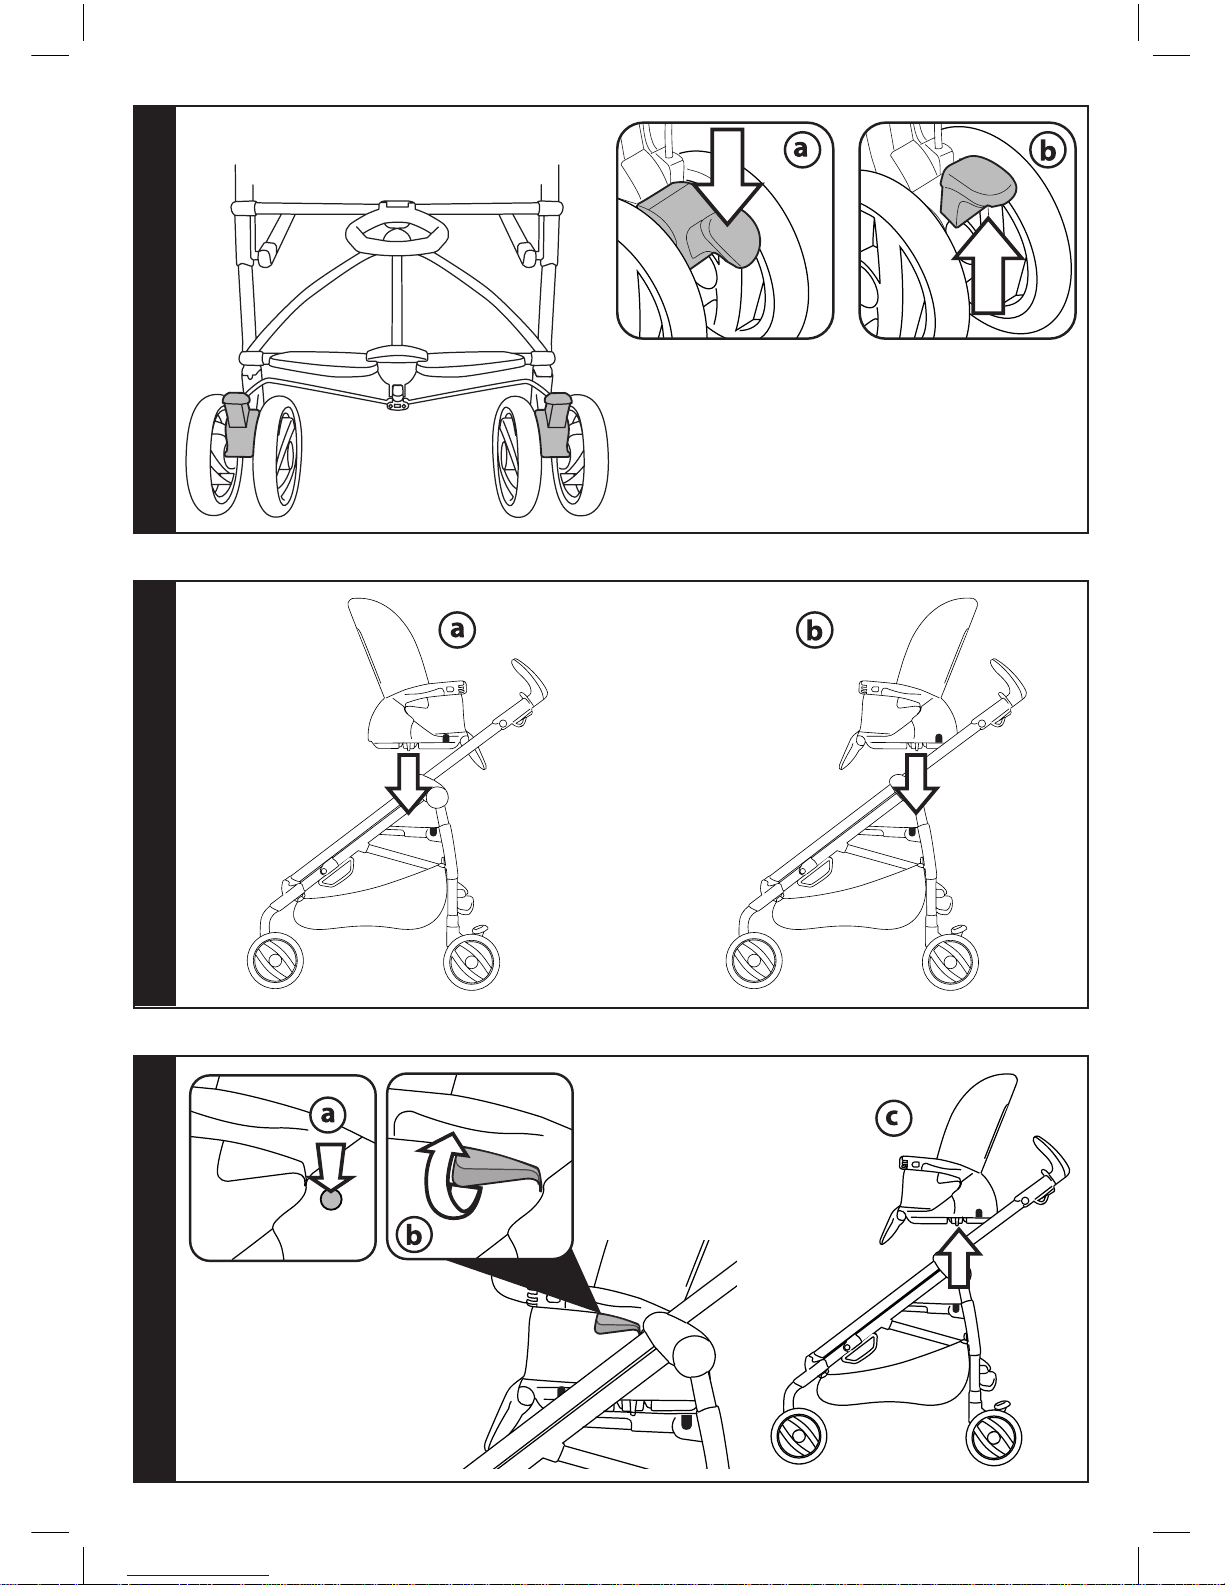
11 MOUNTING THE SEAT TO THE CHASSIS: the
reversible seat can be attached to the chassis
either facing the person pushing the stroller
(fig_a), or facing forwards (fig_b), place the
seat on the chassis so that it is aligned with the
relative symbols and press downwards with both
Page 13

- 13 -
hands until you hear two clicks confirming that
it has locked into position. Ensure the seat is
correctly secured by attempting to pull it upwards
by gripping the front bar.
12 REMOVING THE SEAT FROM THE CHASSIS:
Hold down the two round buttons on the sides
of the seat (fig_a), press the two levers under the
armrests (fig_b) and pull up the seat (fig_c) until it
is released.
13 FRONT BAR: Before attaching the front bar, press
the buttons on the sides of the armrests and
remove the caps (fig_a). To attach the front bar,
guide the connections into the armrests and push
towards the seat until they click into place (fig_b).
To remove the front bar, press the two buttons
and pull it out (fig_c). To make it easier for the
child to get in and out, it is possible to open the
front bar on one side only. If you wish to use the
stroller without the front bar, put the caps back in
the armrests.
14 BACKREST: to recline the backrest lift the lever
(fig_a) and choose one of the 4 positions (fig_b).
15 FOOTREST: to lower the footrest push the two
levers downwards and then push the footrest
downwards (fig_a); to raise the footrest lift it
upwards (fig_b).
16 FIVE POINT SAFETY HARNESS: To fasten
it, push the two waist strap buckles (with the
shoulder straps attached – arrow_a) into the leg
divider until they click into place (arrow_b). To
unfasten it, press the round button in the centre
of the buckle (arrow_c) and pull the waist straps
out (arrow_d).
17 To tighten the waist strap, pull on both sides in
the direction of the arrow (arrow_a). To loosen it
do the opposite. The waist strap can be tightened
as far as the safety lock (fig_b).
18 To adjust the height of the safety harnesses,
release the two buckles on the rear of the
backrest.
Pull the shoulder straps towards you (arrow_a)
until the buckles are released and insert them
in the backrest loops (arrow_b). Remove the
shoulder straps from the sack (arrow_c) and
insert them in the most appropriate loop
(arrow_d), then re-attach the two buckles on the
rear of the backrest (arrow_e) The buckles are
securely attached when a click is heard (fig_f).
19 HOOD: to attach the hood insert the connections
into the sides of the seat (fig_a) and then fasten
the buttons on the rear of the backrest (fig_b).
To remove the hood: disengage the connections
and unbutton from the backrest. To raise the
hood: pull it towards you; to close the hood: push
it back. To convert the hood into a sun canopy,
open the double zipper (fig_c) and unfasten the
buttons on the rear of the backrest. The child’s
favorite toy can be hung from the loop on the
hood (fig_d).
20 COVER: Fit the cover on and fasten the buttons
under the leg rest (fig_a) and on the sides of it.
For the baby carriage version, raise the leg rest,
put the cover over the front bar (fig_b) and fasten
it with the buttons on the hood (fig_c).
21 For the stroller version, lower the footrest, insert
the cover underneath the front bar (fig_a) and
secure it according to the model purchased A, B.
22 Switch On Track COVER:: this can be used with
and attached to both the Navetta XL and the
Switch On Track stroller. To fit it on the Navetta
XL, consult its user manual. To fit it on the stroller,
open up the cover inside to make room for the
child’s legs (Fig. a). Put it into position. Cover the
front bar, fasten the buttons on the front (Fig. b)
and insert it under the leg rest (Fig. c).
23 RAIN CANOPY:Before the rain cover can be fitted you
will need to attach the hood as shown on page 12.
Zip the rain cover onto the hood (A).
Pull the front of the cover down over the leg rest of
the seat. Fasten the press studs on the sides of the
rain cover to the studs on the sides of the hood (B).
When entering a building or between rain showers
the front of the rain cover can be lowered by
unzipping it from the hood (C).
Regularly check that the child is not becoming over
heated in warm weather when using the rain cover.
24 FOLDING UP: The stroller can be folded without
the seat, with the seat facing the person pushing,
or with the seat facing forwards. If the seat is
facing the person pushing: before folding it, lower
the backrest completely. If the seat is facing
forwards: before folding the stroller raise the
backrest, then lower it once the stroller is folded.
To fold the stroller, set the front wheels to their
fixed position and close the hood (if fitted).
Lift the two levers on the handles one at a time
until they click, push downwards to release the
side tubes (fig_a-b) and pull the central handle
upwards (fig_c) until the safety catches engage
(fig_d).
25 TRANSPORT: the stroller can be carried by the
central handle, keeping the front wheels fixed
(fig_a) or by the side handle (fig_b).
26 REMOVABLE COVERS: Pull the fabric covering
off the ledge (fig_a), release the attachments
of the fabric covering from the armrests (fig_b),
unfasten the buttons on the sides of the backrest
(fig_c) and remove the leg divider strap from
above by pushing it from under the seat (fig_d).
SUREFIX SYSTEM
27 Surefix is a fast and practical system that allows
you to attach the Navetta or PrimoNido bassinet
unit, the Primo Viaggio car seat or the Switch seat
to the Surefix Base of the chassis in one quick
step.
Place the item on the Surefix Base and press
down with both hands until it clicks into place.
Always apply the chassis or stroller brake before
attaching and removing products (refer to the
respective instruction manuals).
Check that the child transport unit is properly
attached.
SERIAL NUMBERS
28 Switch reports information as at the date of
manufacture of the product.
_ Product name, date of manufacture and serial
number of the seat (fig_a) and of the carriage
(fig_b).
This information is required for any complaints.
CLEANING AND MAINTENANCE
PRODUCT MAINTENANCE: protect from the
weather: water, rain, or snow; prolonged and
continuous exposure to bright sunlight may
give rise to colour changes of various different
materials; store this product in a dry place.
CLEANING THE CHASSIS: periodically clean
all plastic parts with a damp cloth. Do not use
solvent or similar cleaning products; keep all
Page 14

- 14 -
metal parts dry to prevent rusting; keep moving
parts clean (adjustment mechanisms, locking
mechanisms, wheels, ...) and free of dust and
sand and, if necessary, lubricate with light
machine oil.
CLEANING THE RAIN CANOPY: wash with a
sponge and soapy water; do not use detergents.
CLEANING FABRIC PARTS: brush fabric parts
to remove dust and wash by hand at a maximum
temperature of 30°C; do not wring; do not use
chlorine bleach, do not iron; do not dry clean; do
not apply solvent-based stain removers and do
not dry in a tumble dryer.
Page 15

Page 16

+44 (0)845 268 2000
1-800-490-0331
1300 663 034
1-800-667-4111
Mamas & Papas Ltd, HD5 0RH, UK
customer.care@mamasandpapas.com
mamasandpapas.com
 Loading...