

Page 1

IT Istruzioni d’uso
EN Instructions for use
FR Notice d’emploi
DE Gebrauchsanleitung
ES Instrucciones de uso
pliko switch
on track modular
Page 2

3
2
1
Page 3
6
5
4
Page 4
8
7
9
Page 5
12
11
10
Page 6
14
15
13
Page 7
16
17
18
Page 8
20
21
19
Page 9
22
23
24
Page 10
25
26
27
Page 11
28
29
30
Page 12

31
32
33
Page 13

34
35
36
Page 14

Kit Auto
39
38
37
Page 15

40
41
42
Page 16

2
5
6
13
14
34
15
1
3
4
7
12
11
8
10
9
37
33
40
41
42
43
17
26
25
24
23
22
21
20
19
18
16
27
30
29
28
32
31
35
38
39
36
44
45
Pliko Switch
1 MUCI5P22N
2 IRBELV0007
3 BCONXW•
4 BSASWI•
5 BCAPSW•
6 ITPDSW00NL65
7 SAPI6402L31N
8 ERSHPS00-NY01RE53M
9 SAPI6049XNGR
10 SPST6368N
11 SAPI6 0 97XNG R
12 SO FF018 6Z
13 IT SPS400NZ
14 SAPI6404NGR
15 SAPI6 430NG R
16 SPST5846DGR
SPST5846SGR
17 SP S T5332GR
18 MMVI0438
19 SPST6396GR
20 SPST5492DGR
SPST5492SGR
21 SAPI6103DN
SAPI6103SN
22 SPST5333KDGR
SPST5333KSGR
23 ARPI0470NGL
24 SAPI6441N
Page 17

2
5
6
13
14
15
1
3
4
7
12
11
8
10
9
Navetta XL
IT• Ricambi disponibili in piú colori da specificare nella richiesta.
EN• Spare parts available in different colours to be specified when ordering.
FR• Pièces de rechange disponibles en plusieurs couleurs à spécifier dans la demande.
DE• Ersatzteile in mehr Farben vorhanden, die in der Anfrage spezifiziert werden müssen.
ES• Repuestos disponibles en otros colores que se especificarán en el pedido.
1 SPST5403R
2 SAPI6656GR
3 ITNAVX00NFGR
4 SPST6643GR
5 SPST5274GL
6 SPST6658GL
7 BCONXW•
8 BCANXL•
9 SPST6703GL
10 CIENXO•
11 SPST66 47G L
12 MM SP0038
MMSP0039
13 SPST6 6 42G R
Page 18

- 18 -
IT_Italiano
Grazie per aver acquistato un prodotto Peg-Pérego.
PLIKO SWITCH
AVVERTENZA
_ IMPORTANTE: leggere attentamente queste
istruzioni e conservarle per un futuro utilizzo. La
sicurezza del bambino potrebbe essere messa a
rischio se non si eseguono queste istruzioni.
_ Questo articolo è stato progettato per il trasporto di
1 bambino nella seduta ed 1 bambino in piedi sulla
pedanetta posteriore.
_ Non utilizzare questo articolo per un numero di
occupanti superiori a quanto previsto dal costruttore.
_ Telaio-Pliko Switch + seggiolino-Pliko Switch è omologato
per bambini dalla nascita, fino a 15 kg di peso nella
seduta. La pedanetta posteriore è omologata per il
trasporto di un secondo bambino fino a 20kg di peso.
_ Il telaio-Pliko Switch e' stato progettato per essere
usato in combinazione con i prodotti Peg-Pérego
Ganciomatic: telaio-Pliko Switch + seggiolino auto
"Primo Viaggio" (gruppo 0+) è omologato per
bambini dalla nascita, fino a 13 kg di peso; telaioPliko Switch + navicella "Navetta" è omologato per
bambini dalla nascita, fino a 10 kg di peso. Nell'uso
con "Navetta", non utilizzare la pedanetta posteriore.
_ Prima dell’ uso assicurarsi che i prodotti Peg-Pérego
Ganciomatic siano correttamente agganciati all'articolo.
_ Potrebbe essere pericoloso lasciare il vostro bambino
incustodito.
_ Utilizzare sempre la cintura di sicurezza a cinque
punti, agganciare sempre il cinturino girovita al
cinturino spartigambe.
_ Prestare attenzione alla presenza del bambino
quando si effettuano operazioni di regolazione dei
meccanismi (maniglione, schienale).
_ Azionare sempre il freno quando si è fermi e durante
le operazioni di carico e scarico del bambino.
_ Le operazioni di assemblaggio, preparazione
dell’articolo, di pulizia e manutenzione devono essere
effettuate solo da adulti.
_ Non utilizzate questo articolo se presenta parti
mancanti o rotture.
_ Prima dell’ uso assicurarsi che tutti i meccanismi di
aggancio siano ingaggiati correttamente.
_ Evitare di introdurre le dita nei meccanismi.
_ Ogni carico appeso al maniglione o alle maniglie può
rendere instabile l'articolo; seguire le indicazioni del
costruttore riguardo ai massimi carichi utilizzabili.
_ Non introdurre nel cestello carichi per un peso
superiore a 5 kg. Non inserire nei portabibite pesi
superiori a quanto specificato nel portabibite stesso
e mai bevande calde. Non inserire nelle tasche delle
capotte (se presenti) pesi superiori a 0.2 Kg.
_ Il frontalino non è progettato per reggere il peso del
bambino; il frontalino non è disegnato per mantenere
il bambino nella seduta e non sostituisce il cinturino
di sicurezza.
_ Non utilizzare l'articolo in vicinanza di scale o gradini;
non utilizzare vicino a fonti di calore, fiamme libere o
oggetti pericolosi a portata delle braccia del bambino.
_ Potrebbe essere pericoloso utilizzare accessori non
approvati dal costruttore.
_ Questo articolo non e' adatto per il jogging o la corsa
coi pattini.
_ Non utilizzare il parapioggia (se presente) in ambienti
chiusi e controllare sempre che il bambino non sia
accaldato; non collocare mai vicino a fonti di calore
e fare attenzione alle sigarette. Assicurarsi che il
parapioggia non interferisca con nessun meccanismo
in movimento del carrello o passeggino; togliere
sempre il parapioggia prima di chiudere il vostro
carrello o passeggino.
_ Quando si utilizza il passeggino con due bambini,
non lasciarli mai da soli e non permettere al secondo
bambino di salire sulla pedanetta posteriore con il
passeggino vuoto.
_ Non utilizzare le maniglie di sgancio per trasportare o
alzare il passeggino con dentro il bambino.
NAVETTA XL
caratteristiche prodotto
Navetta XL-auto, Gruppo 0, categoria
“Universale”
_ Navetta XL è omologata secondo il regolamento UN/
ECE R44/04 per bambini di peso da 0-10 kg. Adatto
alla maggior parte dei sedili delle autovetture, ma
non a tutti.
_ Navetta XL può essere correttamente installata se nel
manuale d’uso e manutenzione del veicolo è indicata
la compatibilità con sistemi di ritenuta “Universali” di
Gruppo 0.
_ Navetta XL è classificata “Universale” secondo criteri
di omologazione più severi rispetto ai modelli
precedenti che non dispongono di questa scritta.
_ Il dispositivo può essere utilizzato solo su veicoli dotati
di sedile posteriore a 2 o 3 posti dotati di cinture di
sicurezza a 2 o 3 punti, omologate in conformità al
regolamento UN/ECE R16 o a normative equivalenti.
_ In caso di dubbi, o per ulteriori informazioni sul
fissaggio di Navetta XL su vetture specifiche,
rivolgersi al costruttore o al rivenditore.
IMPORTANTE
_ “Navetta XL”, gruppo 0, deve essere installata
perpendicolare al senso di marcia.
_ Non installare Navetta XL su sedili rivolti in direzione
opposta al senso di marcia o trasversalmente al senso
comune di marcia del veicolo.
_ Questo articolo è numerato progressivamente.
AVVERTENZA
IMPORTANTE: leggere attentamente queste
istruzioni e conservarle nell'apposita sede per
tutta la vita del prodotto. La sicurezza del bambino
potrebbe essere messa a rischio se non si eseguono
queste istruzioni.
_ Potrebbe essere pericoloso lasciare il vostro bambino
incustodito.
_ Le operazioni di assemblaggio e preparazione
dell'articolo devono essere effettuate da adulti.
_ Non utilizzate il prodotto se presenta parti mancanti o
rotture.
_ Prima dell’ uso assicurarsi che tutti i meccanismi di
aggancio siano fissati correttamente.
_ Evitare di introdurre le dita nei meccanismi.
_ Non utilizzare vicino a fonti di calore, fiamme libere
od oggetti pericolosi a portata delle braccia del
bambino.
_ Potrebbe essere pericoloso utilizzare accessori non
approvati dal costruttore.
_ Assicurarsi che le cinghie per fissare la Navetta XL
al veicolo siano sempre tese e regolare quelle che
bloccano il bambino.
_ Non attorcigliare mai le cinghie.
_ Si raccomanda di sostituire il dispositivo nel caso sia
stato sottoposto a sollecitazioni eccessive durante
un incidente o abbia evidenti segni di rottura o
deformazione.
_ Il dispositivo di sicurezza non deve essere modificato
in nessun caso dall’utilizzatore.
_ Seguire scrupolosamente le istruzioni fornite dal
fabbricante del sistema di tenuta del bambino.
Page 19

- 19 -
_ Non lasciare il bambino nella Navetta XL in auto,
senza sorveglianza.
_ Navetta XL deve essere sempre fissata con le cinture
di sicurezza del veicolo, anche quando non è
occupata dal bambino. In caso di frenata improvvisa,
potrebbe provocare lesioni agli occupanti del
veicolo.
_ Durante i viaggi in auto non tenere mai in braccio il
bambino e non sistemarlo mai al di fuori di Navetta XL.
In caso di frenata improvvisa, anche a bassa andatura, il
bambino verrebbe facilmente catapultato in avanti.
_ Prestare particolare attenzione a bagagli o oggetti
che possono causare lesioni al bambino in Navetta
XL, in caso di incidente.
_ Non lasciare Navetta XL nella vettura sotto
l’esposizione del sole, alcune parti potrebbero
essersi surriscaldate e nuocere alla pelle delicata del
bambino, controllare prima di collocare il bambino.
_ Prestare attenzione che Navetta XL non rimanga
bloccata da una parte mobile del sedile o da una
portiera.
_ Non utilizzare Navetta XL senza il rivestimento di
tessuto, tale rivestimento non puó essere sostituito da
uno non approvato dal costruttore in quanto costituisce
parte integrante di Navetta XL e della sicurezza. In caso
di sostituzione utilizzare un ricambio originale.
_ Navetta XL é stata progettata con dispositivo
di assorbimento d’urto in polistirolo, integrato
direttamente nella scocca, sotto l’imbottitura: non
rimuovere.
_ Questo prodotto è adatto solo a bambini che non si
possono mettere da soli in posizione seduta.
_ Questo prodotto e' inteso per bambini dalla nascita
fino a 9 kg di peso. Usato in auto inteso fino ai 10 kg
di peso.
_ Durante l'impiego in auto utilizzare sempre il
cinturino di sicurezza. Per l'impiego a carrozzina
rimuovere il cinturino e riporlo nell'apposita tasca.
_ Utilizzare solo su superfici dure, orizzontali ed
asciutte.
_ Non lasciare altri bambini a giocare incustoditi vicino
alla carrozzina.
_ Prestare attenzione alla presenza del bambino
quando si effettuano operazioni di regolazione dei
meccanismi (maniglione, schienale).
_ Controllare regolarmente il maniglione (o le maniglie)
ed il fondo della carrozzina e verificare l'assenza di
segni di rottura o danneggiamento.
_ Nell'utilizzare la carrozzina con uno stand, verificate la
massima lunghezza della carrozzina specificata sullo
stand.
CARATTERISTICHE DELL'ARTICOLO
_ Questi articoli sono numerati progressivamente.
_ Pliko Switch On Track Modular è un sistema
modulare caratterizzato da un'unica copertina
che è possibile applicare sia su Navetta XL che sul
passeggino Pliko Switch.
_ Pliko Switch On Track Modular è composto da: telaio
Pliko Switch, seggiolino Pliko Switch, Navetta XL,
seggiolino auto Primo Viaggio Tri Fix, Borsa Cambio.
_ Pliko Switch è un passeggino con seggiolino
reversibile: fronte mamma o fronte mondo.
COMPONENTI DELL'ARTICOLO
Verificare il contenuto presente nell'imballo e in caso
di reclamo prego contattare il Servizio Assistenza.
_ Telaio Pliko Switch è composto da: cestello, 2 ruote
anteriori piroettanti o bloccabili, 2 ruote posteriori
con filofreno, portabibite.
_ Seggiolino Pliko Switch è composto da: capottina,
frontalino,
parapioggia, borsa cambio e copertina
utilizzabile anche da Navetta XL
.
_ Navetta XL è composta da: capottina.
_ Seggiolino auto Primo Viaggio Tri Fix è composto
da: capottina, riduttore, cinture di sicurezza.
ISTRUZIONI D'USO
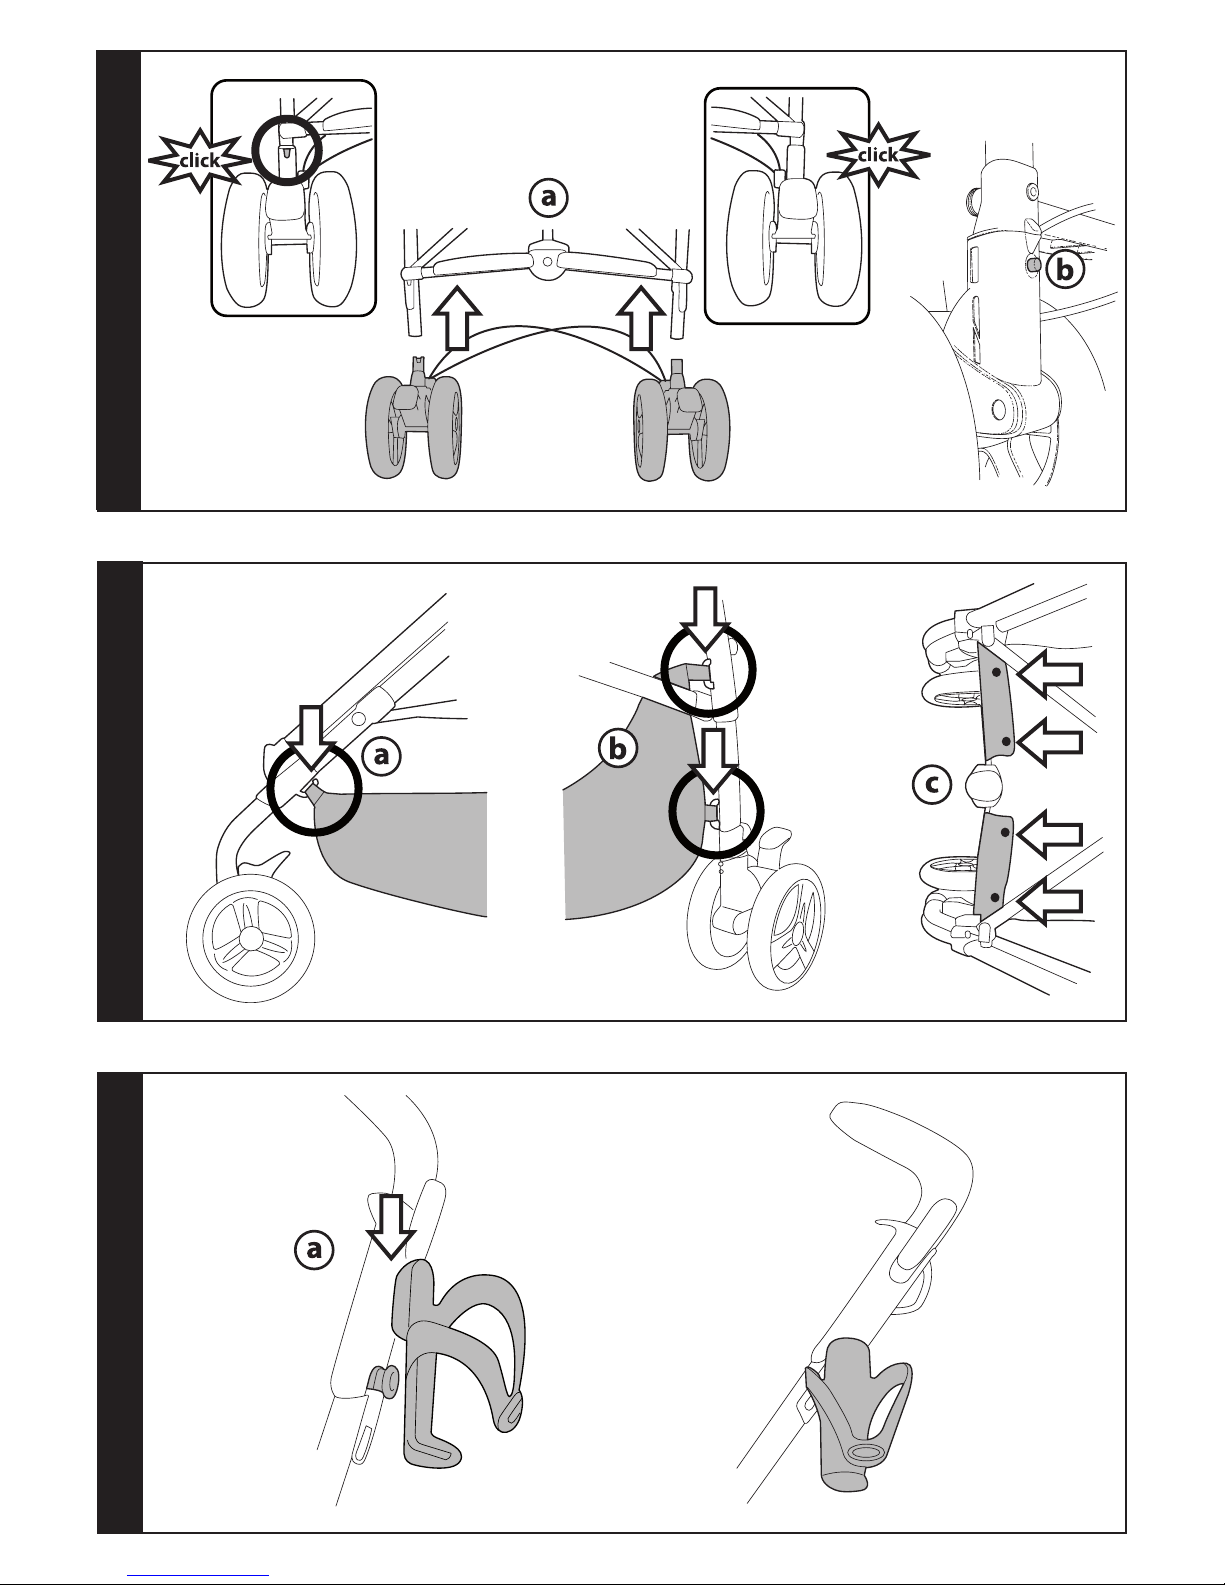
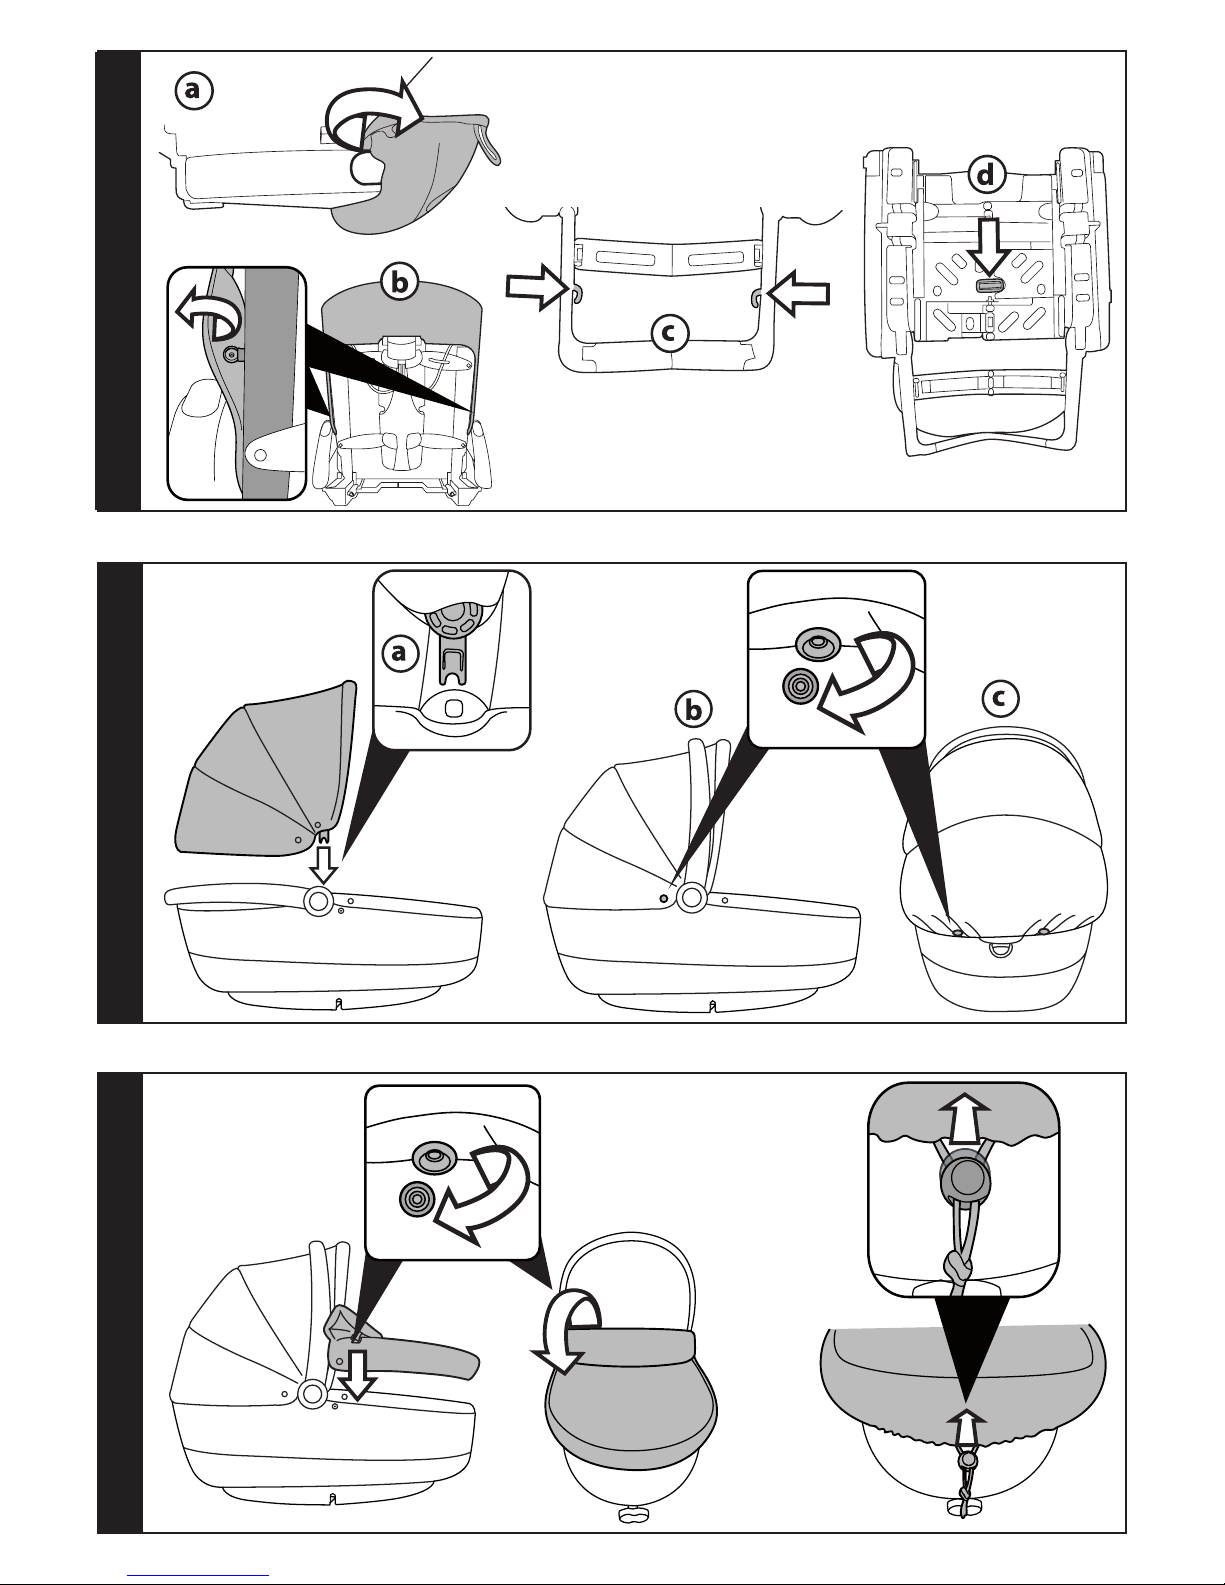
1 PROTEZIONI IMBALLO: prima di aprire il telaio occorre
rimuovere le protezioni (fig_a), altrimenti il telaio non
si aprirà correttamente (fig_b).
2 APERTURA: alzare insieme le leve delle due maniglie
(fig_a) e tirare verso l'alto fino ad aprire il telaio (fig_
b). Verificare la corretta apertura: i tubi laterali devono
risultare agganciati tra di loro (fig_c).
3 MONTAGGIO RUOTE ANTERIORI: abbassare la leva
delle due ruote anteriori (fig_a), infilare la ruota fino
al click (fig_b) e verificare il corretto aggancio (fig_c).
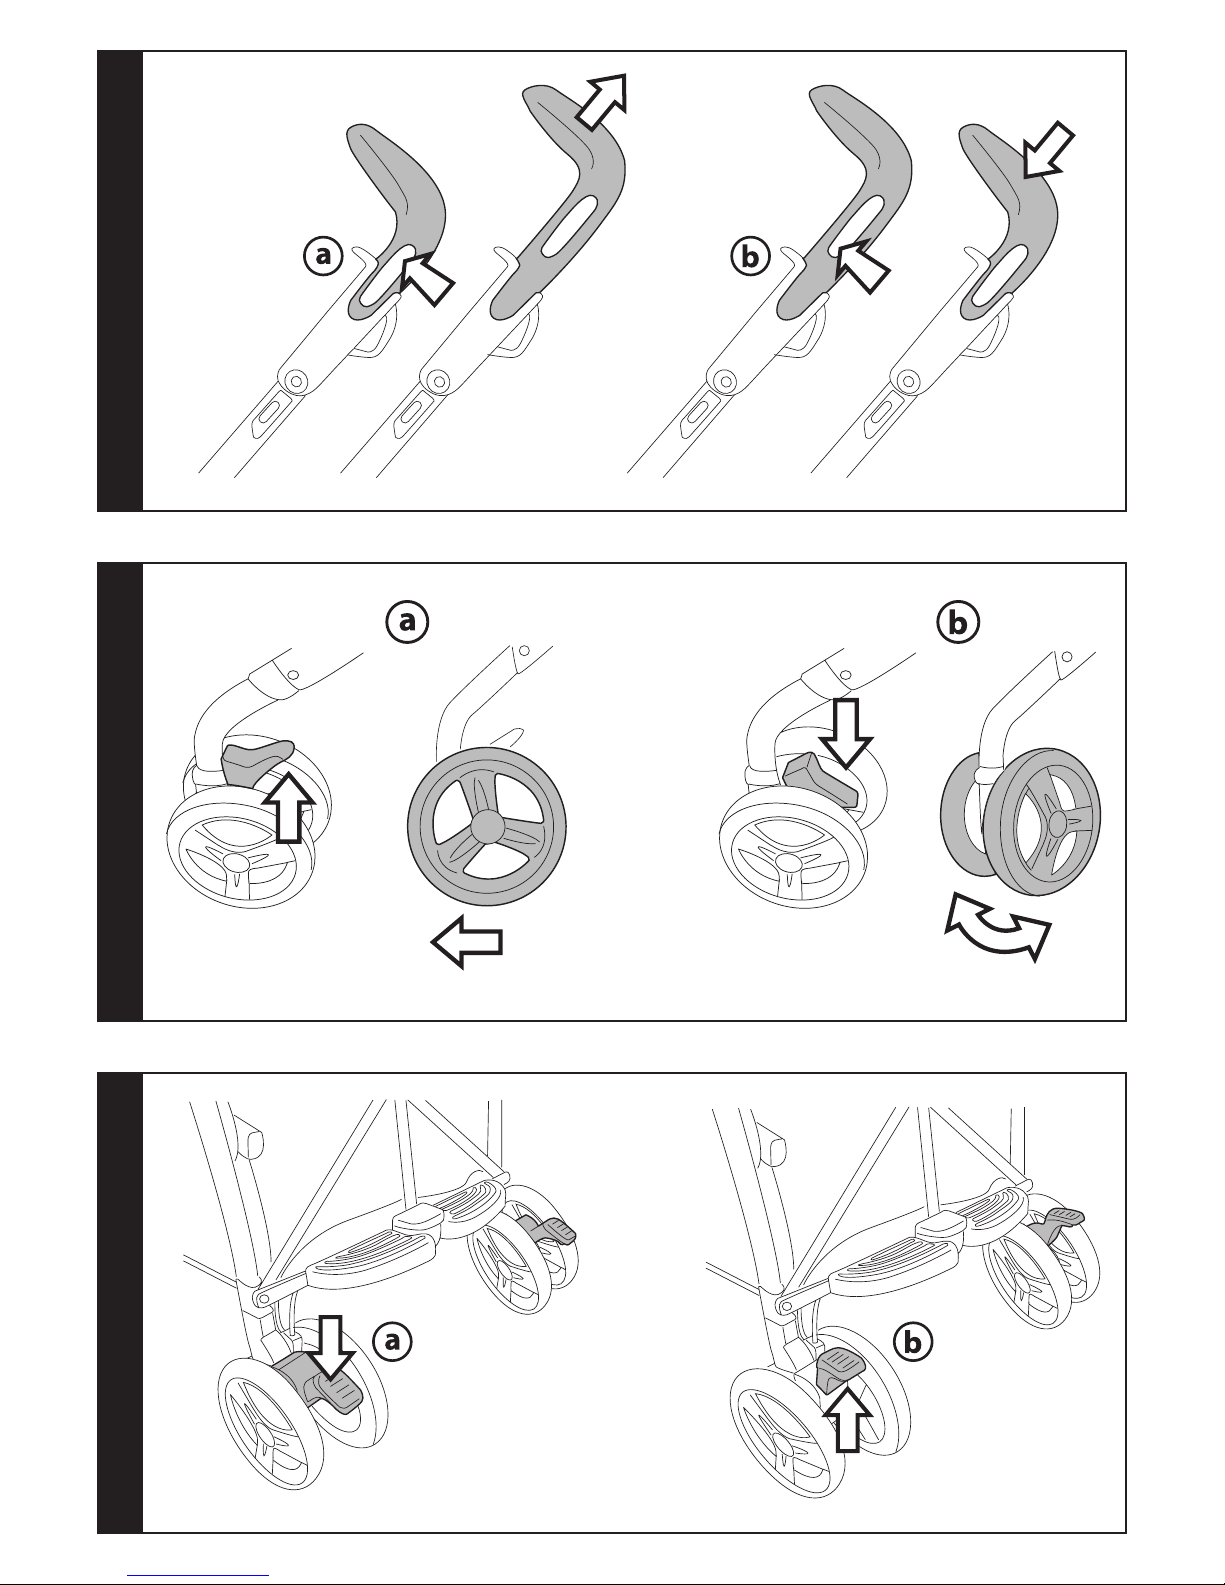
4 MONTAGGIO RUOTE POSTERIORI: differenziare le
due ruote unite dal
filofreno, la ruota di sinistra
presenta una scalanatura da far coincidere con la
scalanatura del tubo posteriore di sinistra. Infilare
le ruote fino al click (fig_a) e verificare il corretto
aggancio (fig_b).
5 MONTAGGIO CESTELLO: infilare le asole ai ganci
anteriori (fig_a) ai ganci posteriori (fig_b) e
abbottonare le due alette al tubo anteriore (fig_c).
6 MONTAGGIO PORTA-BIBITE: infilare sul perno fino al
click (fig_a). Il porta-bibite é applicabile su entrami i
lati del telaio.
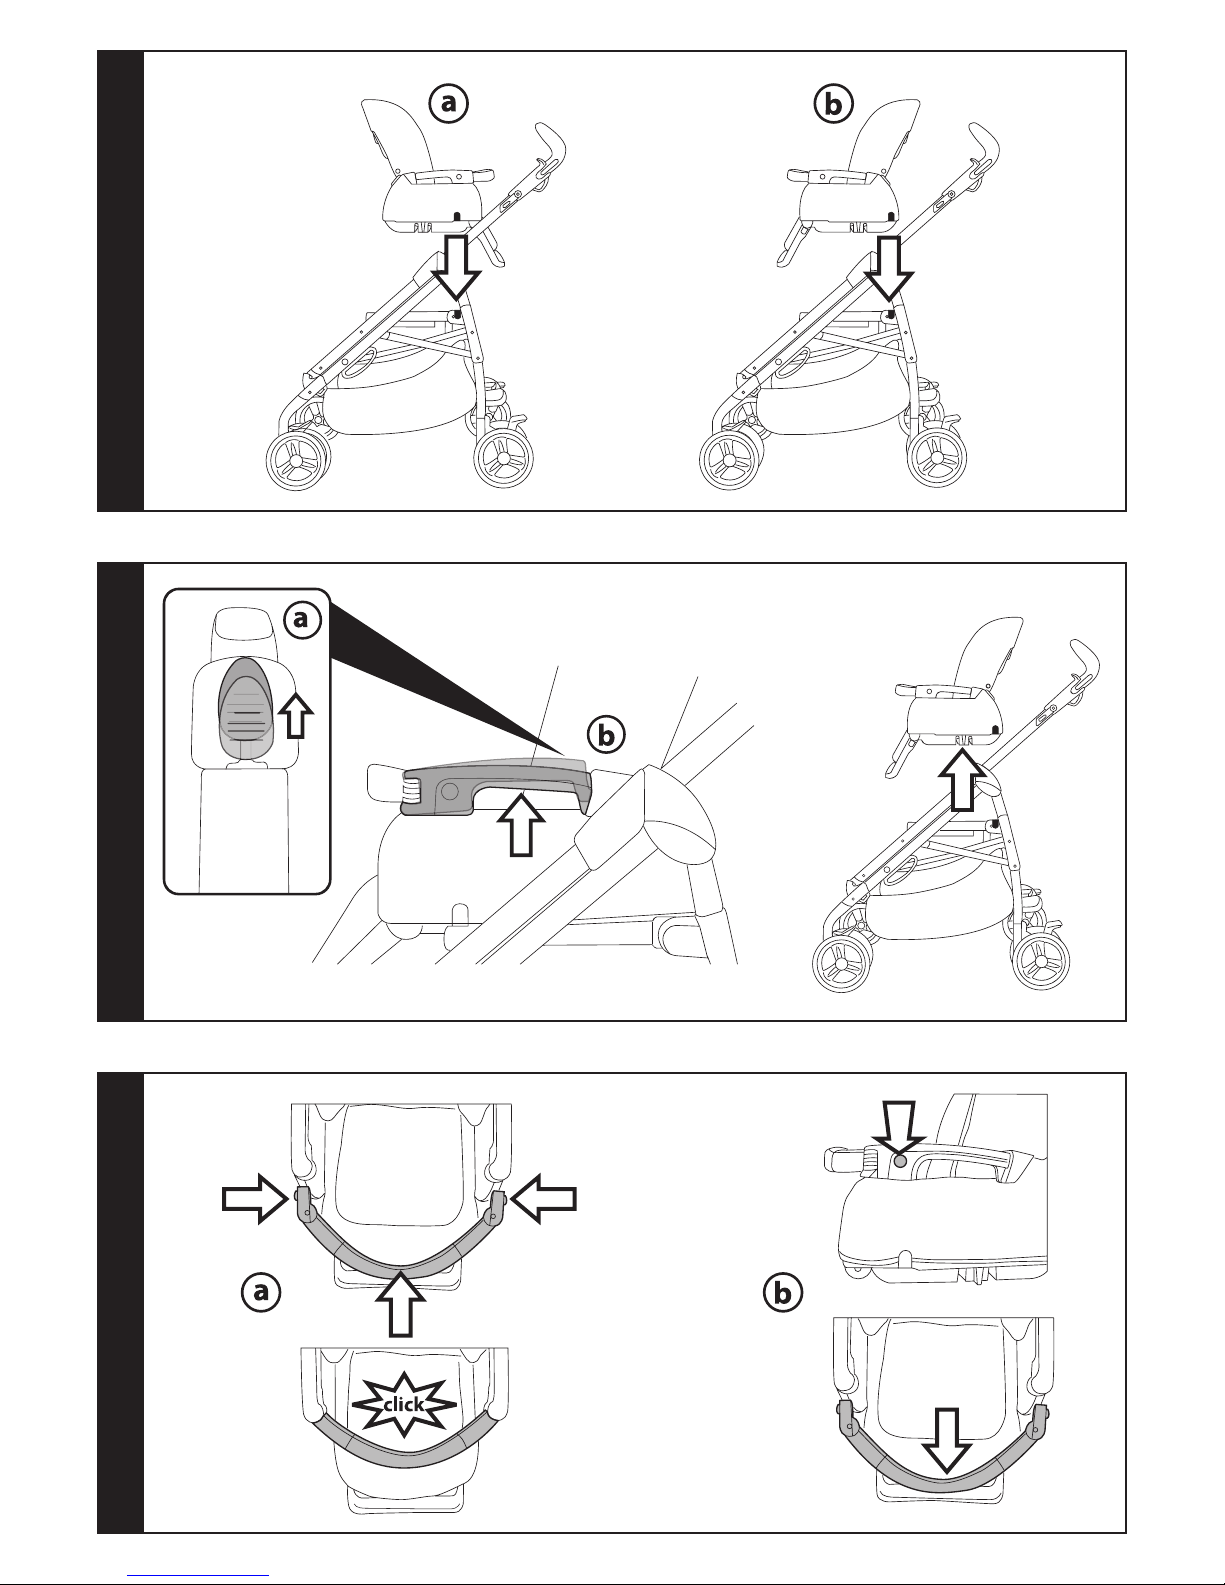
7 MANIGLIE ALLUNGABILI: per alzare le maniglie, premere
il pulsante in alto e contemporaneamente alzare (fig_a)
e per abbassare le maniglie, premere il pulsante in basso
e contemporaneamente abbassare (fig_b).
8 RUOTE ANTERIORI FISSE O PIROETTANTI: alzare le leve
per rendere le ruote fisse (fig_a), abbassare le leve per
rendere le ruote piroettanti (fig_b). Su terreni difficili
si consiglia l'uso di ruote fisse.
9 RUOTE POSTERIORI CON FILOFRENO CENTRALIZZATO:
premere una leva freno per bloccare il telaio (fig_a),
alzare per sbloccare (fig_b).
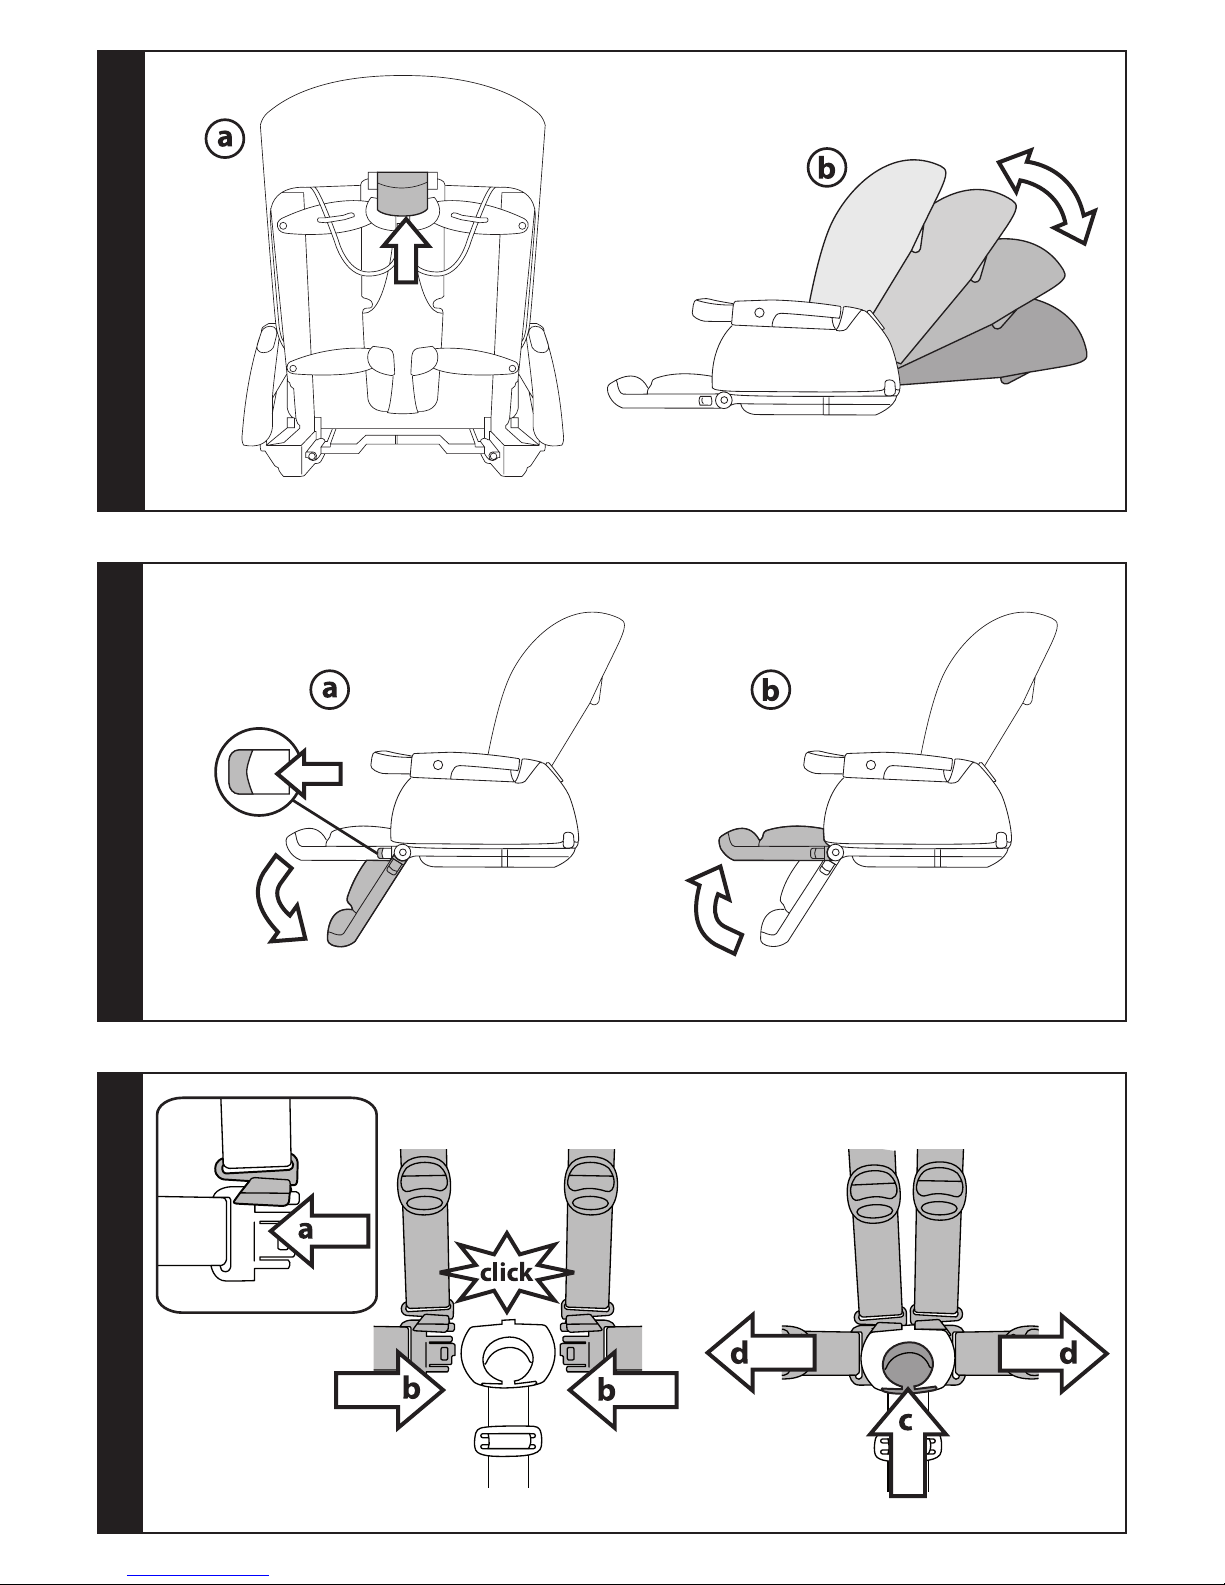
10 AGGANCIO DEL SEGGIOLINO AL TELAIO: il seggiolino
reversibile può essere agganciato al telaio rivolto
verso la mamma (fig_a) o verso la strada (fig_b),
posizionare sul telaio in corrispondenza dei simboli
e premere verso il basso con entrambe le mani fino
al doppio click di aggancio. Assicurarsi il corretto
aggancio del seggiolino, tirandolo verso l'alto
afferrandolo dal frontalino.
11 SGANCIO DEL SEGGIOLINO DAL TELAIO: spostare
le due levette nel senso della freccia (fig_a) e tirare
verso l'alto le due maniglie (fig_b) fino a sganciare. É
possibile effettuare lo sgancio e il riposizionamento
del seggiolino sul telaio, con dentro il bambino.
12 FRONTALINO: per agganciare il frontalino,
accompagnare gli attacchi nei braccioli, premere i
due pulsanti laterali e spingere verso il seggiolino fino
al click di aggancio (fig_a). Per rimuovere il frontalino
premere i due pulsanti ed estrarre (fig_b). Aprire il
frontalino solo da un lato per agevolare l'entrata e
l'uscita del bambino.
13 SCHIENALE: per regolare alzare la maniglia (fig_a) e
posizionare a piacere in una delle 4 posizioni (fig_b).
14 POGGIAGAMBE: per abbassare spingere verso il basso
le due levette e abbassare (fig_a); per alzare spingere
il poggiagambe verso l'alto (fig_b).
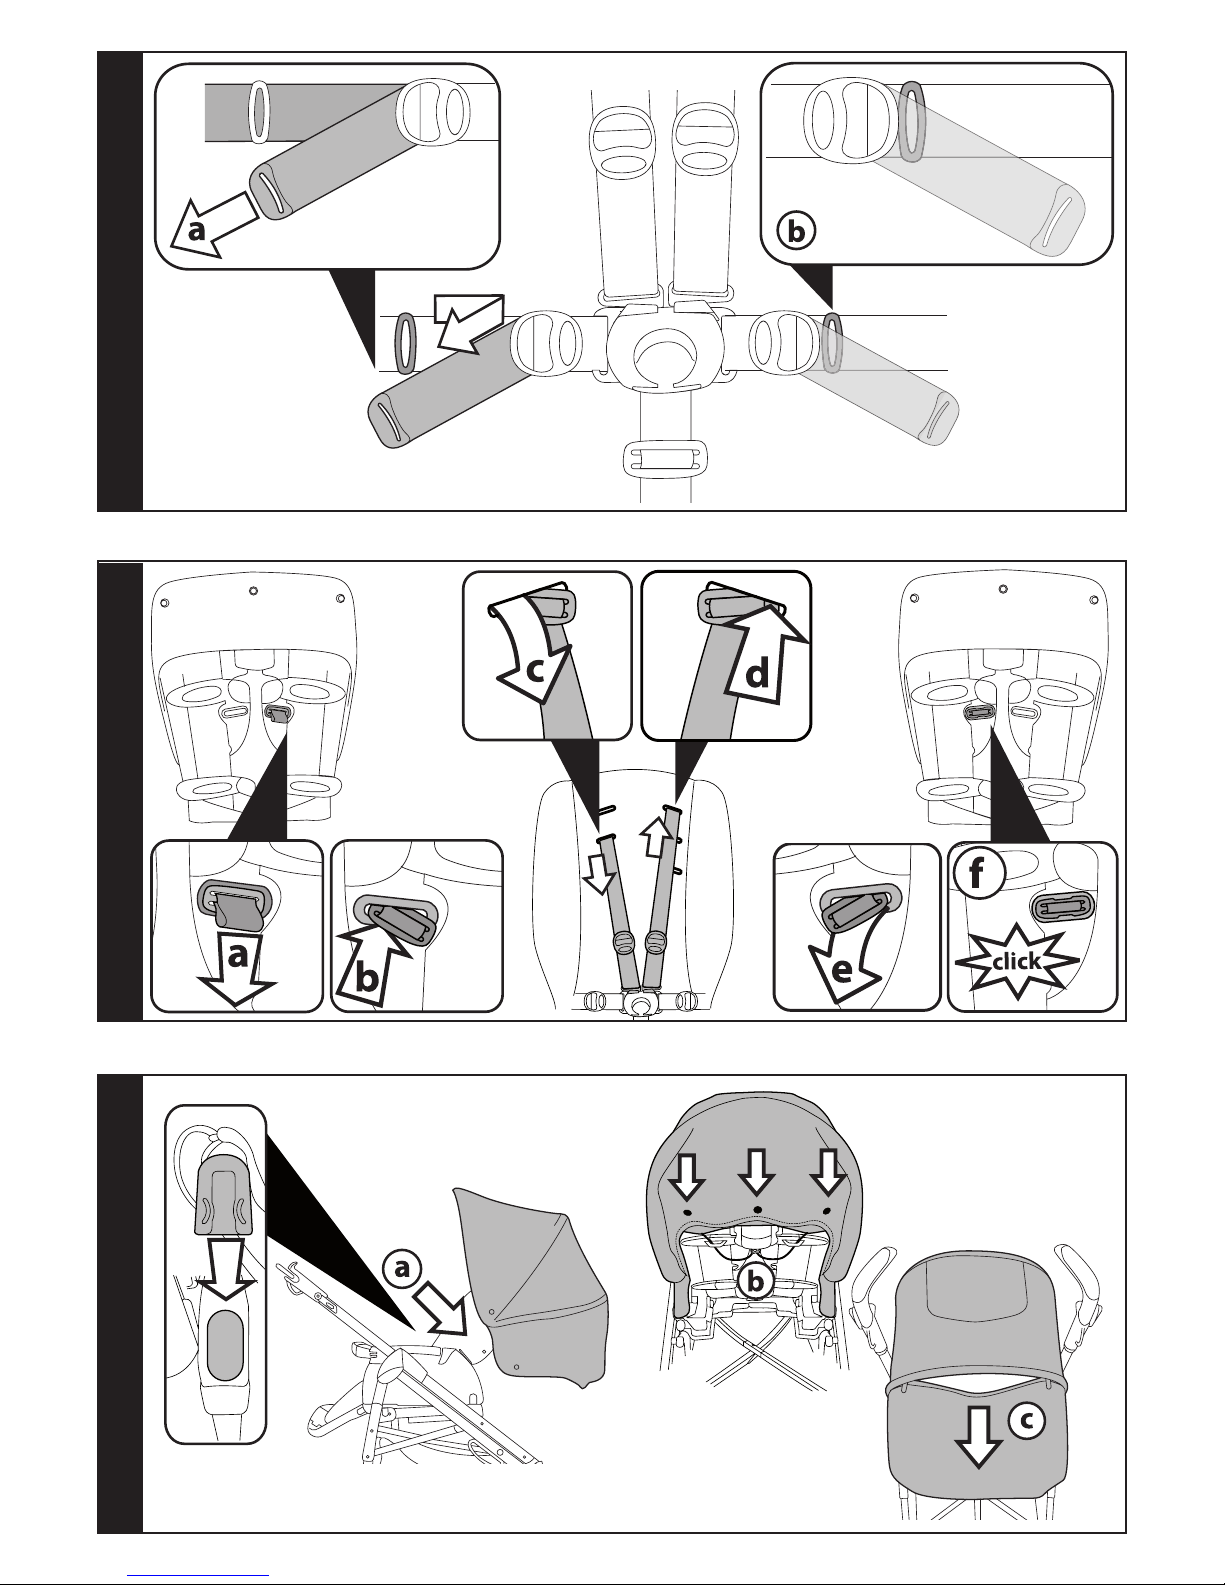
15 CINTURA DI SICUREZZA 5 PUNTI: per agganciare,
inserire le due fibbie del cinturino girovita (con
bretelle agganciate freccia_a) nel cinturino
spartigambe fino al click (freccia_b). Per sganciare,
spingere verso l'alto il pulsante tondo posto
centralmente alla fibbia (freccia_c) e tirare verso
l’esterno il cinturino girovita (freccia_d).
16 Per stringere il cinturino girovita tirare, da entrambi
i lati, nel senso della freccia (freccia_a), per allentarlo
Page 20

- 20 -
agire in senso contrario. Il cinturino girovita può
essere stretto fino al fermo di sicurezza (fig_b).
17 Per regolare l'altezza delle cinture di sicurezza è
necessario sganciare sul retro dello schienale le due
fibbie;
Tirare verso di se le bretelle (freccia_a) fino a sganciare
la fibbie e infilarle nelle asole dello schienale (freccia_
b). Sfilare le bretelle dalla sacca (freccia_c) e infilarle
nell'asola più idonea (freccia_d), infine riagganciare
le due fibbie dietro lo schienale (freccia_e). Il corretto
aggancio delle fibbie è determinato dal click (fig_f).
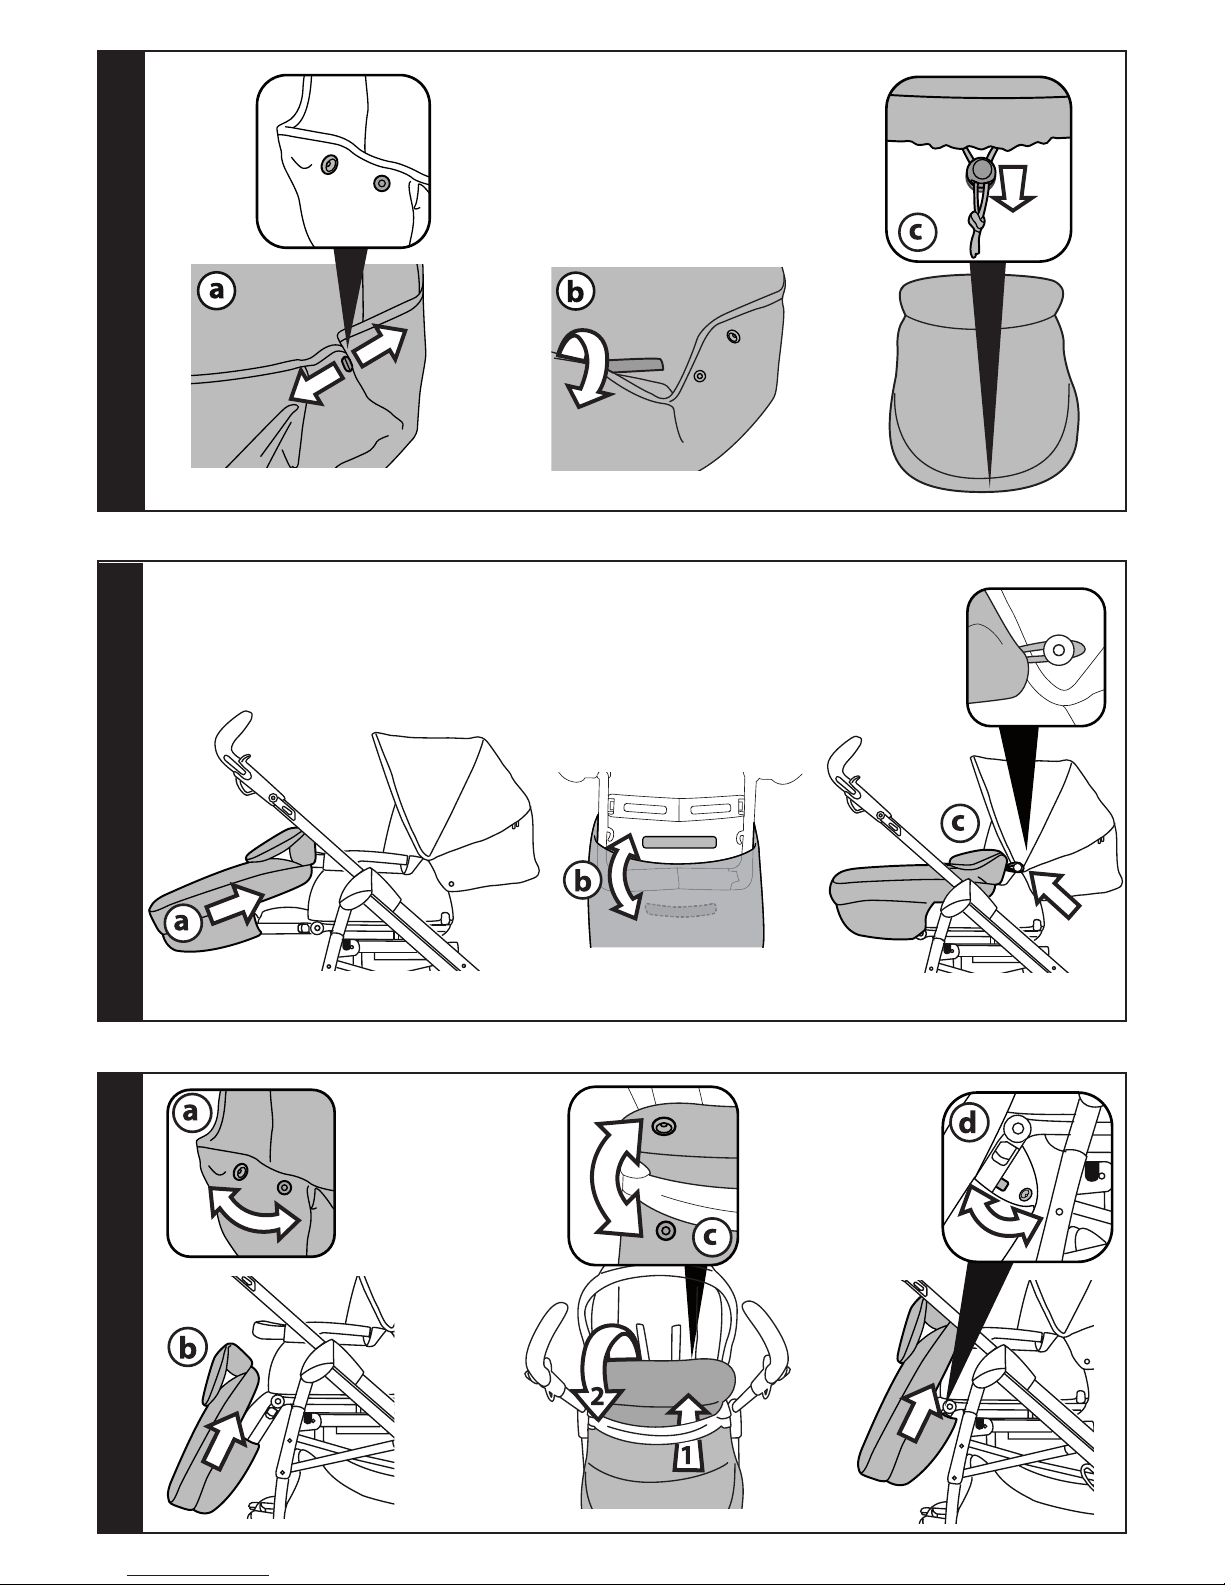
18 CAPOTTINA: per agganciare infilare gli attacchi al
seggiolino lateralmente (fig_a) e abbottonarla al retro
dello schienale (fig_b). Per togliere la capottina: sfilare
gli attacchi e sbottonare. Per alzare la capottina:
tirarla verso di sè; per chiudere la capottina: spingerla
indietro. Per trasformare la capottina in parasole,
aprire la cerniera con doppio cursore (fig_c) e
sbottonarla dal retro dello schienale.
19 COPERTINA: la stessa copertina si aggancia e si utilizza
sia su Navetta XL che sul passeggino Pliko Switch.
sbottonare la parte sotto della copertina (fig_a),
staccare il velcro (fig_b) e allargarla (fig_c).
20 Per la versione a carrozzina alzare il poggiagambe,
calzare la copertina sopra al frontalino (fig_a) fissarla
dietro al poggiagambe con il velcro (fig_b) e agganciarla
con gli elastici ai bottoni della capottina (fig_c).
21 Per la versione a passeggino, abbottonare la
parte sotto della copertina (fig_a), abbassare il
poggiagambe e calzarla (fig_b) infilandola sotto al
frontalino (fig_c), infine fissarla con i bottoni (fig_d).
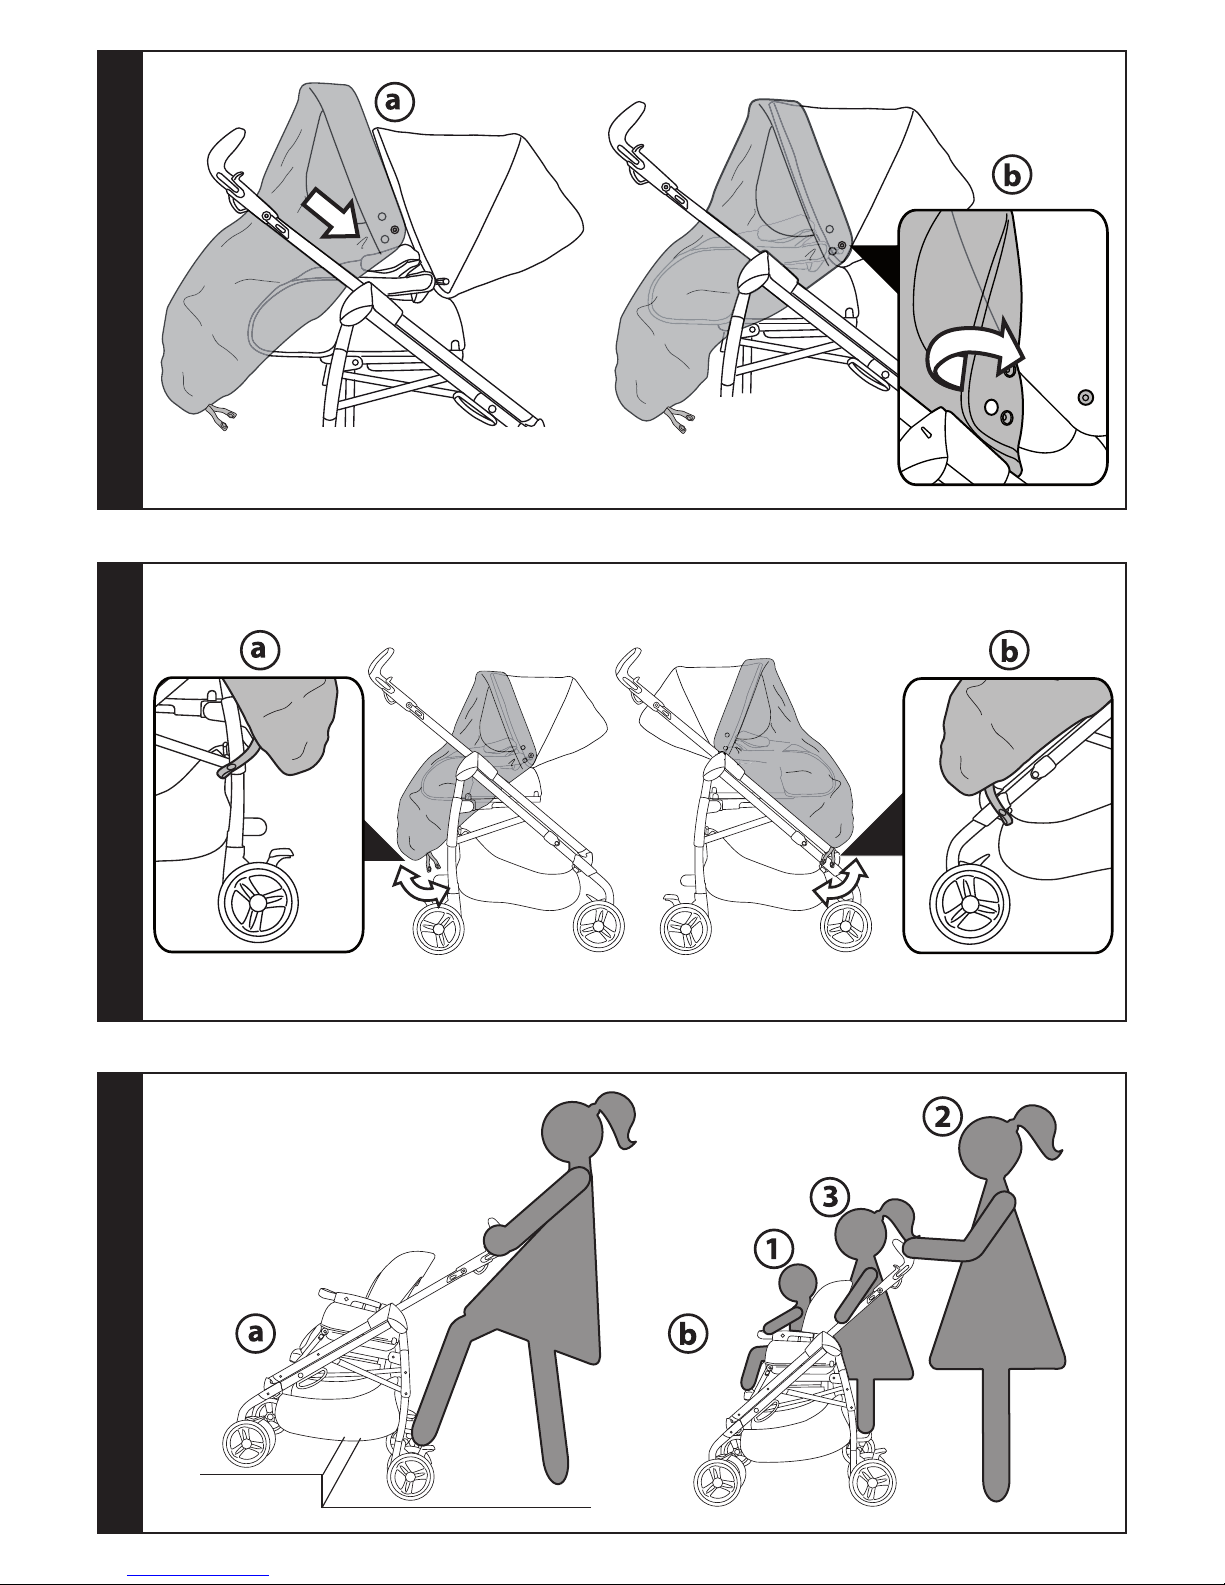
22 PARAPIOGGIA: posizionare il parapioggia sul
passeggino (fig_a) e infilare le due asole laterali dello
stesso ai bottoni della capottina (fig_b).
23 fissare il parapioggia agganciando l'elastico ai
montanti posteriori (fig_a) o a quelli anteriori (fig_b) a
seconda della posizione del seggiolino.
24 PEDANETTA POSTERIORE: agevola la mamma nel
superare piccoli dislivelli (fig_a) e per trasportare il
secondo bambino (fig_b). Per utilizzare il passeggino
con due bambini, frenare il passeggino, posizionare
il bambino più piccolo nella seduta e agganciare la
cintura di sicurezza (1). Impugnare i manici (2) e fare
salire il secondo bambino sulla pedanetta (3).
25 CHIUSURA: può essere effettuata senza il seggiolino,
con seggiolino rivolto verso la mamma o verso la
strada. Se il seggiolino è rivolto verso la mamma: prima
di chiudere, abbassare completamente lo schienale; se
il seggiolino è rivolto verso la strada: prima di chiudere
alzare lo schienale e una volta chiuso, abbassare. Per
chiudere rendere le ruote anteriori fisse, chiudere la
capottina se applicata. Alzare insieme le due leve delle
maniglie e spingere verso il basso per sbloccare i tubi
laterali (fig_a-b), tirare in alto la maniglia centralizzata
(fig_c) fino a chiudere i ganci di sicurezza (fig_d). Il
passeggino chiuso rimane in piedi da solo.
26 TRASPORTO: si può trasportare dala maniglia
centralizzata, tenendo le ruote anteriori fisse (fig_a) o
dalla maniglia laterale (fig_b).
27 SFODERABILITA': con lo schienale alzato sganciare, sul
retro dello stesso, i due elastici posti internamente
(fig_a), sfilare lateralmente le quattro alette (fig_b) e
staccare il velcro dal rivestimento dei braccioli (fig_c).
28 sfilare il rivestimento laterale dagli attacchi della
capottina (fig_a), staccare dai lati dello schienale i
due bottoni (fig_b), staccare i due elastici della sacca
dal poggiagambe (fig_c), sfilare dall'alto (spingendo
da sotto il seggiolino) il cinturino spartigambe (fig_d).
NAVETTA XL
ISTRUZIONI D’USO
29 CAPOTTINA: per agganciare la capottina infilare
gli attacchi nelle proprie sedi (fig_a), abbottonare
lateralmente (fig_b) e, a bottoni presenti,
abbottonare sul retro (fig_c).
30 COPERTINA: la stessa copertina si aggancia e si
utilizza sia su Navetta XL che sul passeggino Pliko
Switch. Posizionare la copertina, abbottonarla da
entrambi i lati (fig_a), fissare il risvolto della copertina
abbottandolo alla stessa (fig_b) e, tramite il cursore,
stringerla (fig_c).
31 MANIGLIONE: alzare il maniglione ruotandolo verso
l'alto fino al click (freccia_a). Il maniglione è bloccato
solo quando è nella posizione verticale. Per abbassare
il maniglione premere contemporaneamente i due
pulsanti tondi (freccia_b) e ruotarlo verso il basso
(freccia_c). Il maniglione facilita il trasporto (fig_d) e
l'aggancio di Navetta XL sul passeggino.
32 POSIZIONE DONDOLINO: la base di Navetta XL ha una
speciale forma che, appoggiata su una superficie piana,
permette di dondolare il bambino (fig_a). POSIZIONE
LETTINO: Navetta XL diventa una culla non dondolabile
estraendo i due cavalletii posti sotto la base (fig_b).
33 REGOLAZIONE SCHIENALE e POGGIAGAMBE:
grazie al sistema COMFORT SYSTEM schienalino e
poggiagambe si regolano simultaneamente. Tirare la
manopola verso l'esterno (fig_a) e ruotarla (fig_b) per
alzare o abbassare schienalino e poggiagambe.
34 SISTEMA QUATTRO STAGIONI: Navetta XL é dotata
di fori disposti sotto la base, dai quali è possibile
regolare la circolazione dell’aria interna con la
chiusura o l'apertura degli stessi.
Per aprire i fori, spostare le 4 levette verso l'esterno.
35 SFODERARE NAVETTA XL: sbottonare la capottina
lateralmente e sul retro (fig_a), premere sugli attacchi
della stessa per sganciarla (fig_b) e sfilarla verso l'alto;
36 sbottonare la copertina e rimuoverla (fig_a), alzare
lo schienale, staccare il rivestimento interno (fig_b) e
sfilarlo dall'alto (fig_c).
GANCIOMATIC SYSTEM
37 Ganciomatic System é il sistema pratico e veloce
che ti permette di agganciare la navicella Navetta, il
seggiolino auto Primo Viaggio e il seggiolino Pliko
Switch alla Base Ganciomatic del telaio con un solo
gesto.
Appoggiarli alla Base Ganciomatic e premere sul
prodotto con entrambi le mani fino al click.
Azionare sempre il freno del telaio o passeggino
prima di agganciare e sganciare i prodotti (consultare
i rispettivi manuali istruzioni).
Verificare che l'elemento di trasporto del bambino sia
correttamente agganciato.
38 AGGANCIARE NAVETTA XL: per agganciare Navetta
XL, posizionarla sul passeggino e premere con
entrambi le mani fino al click.
Azionare sempre il freno del passeggino o del carrello
prima di agganciare e sganciare Navetta XL.
Verificare che la navicella sia correttamente
agganciata.
_ Per sganciarla, alzare la leva della maniglia Ganciomatic
(freccia_a) e alzare Navetta XL (freccia_b).
ACCESSORI
39
KIT AUTO: è possibile richiedere il Kit auto (omologato
ECE R44/04), contiene il necessario per montare la
navicella sulla macchina (fig_a).
PARAPIOGGIA COVER ALL: Parapioggia copri-tutto
trasparente per Navetta XL (fig_b).
40 BASSINET STAND: base d'appoggio pratica e compatta
(fig_a).
BORSA CAMBIO: Borsa con materassino per il cambio
del bebè, agganciabile al passeggino (fig_b).
Page 21

- 21 -
NUMERI DI SERIE
41 Pliko Switch, riporta informazioni relative alla data di
produzione dello stesso.
_ Nome del prodotto, data di produzione e
numerazione seriale della seduta (fig_a) e del carrello
(fig_b).
42 Navetta XL riporta sotto la base, informazioni relative
alla data di produzione della stessa.
_ Nome del prodotto, data di produzione e numerazione
seriale dello stesso.
Queste informazioni sono indispensabili in caso di
reclamo.
PULIZIA E MANUTENZIONE
MANUTENZIONE DELL'ARTICOLO: proteggere
da agenti atmosferici: acqua, pioggia o neve;
l’esposizione continua e prolungata al sole potrebbe
causare cambiamenti di colore in molti materiali;
conservare questo articolo in un posto asciutto.
PULIZIA DEL TELAIO: periodicamente pulire le parti in
plastica con un panno umido senza utilizzare solventi
o altri prodotti simili; mantenere asciutte tutte le
parti in metallo per prevenire la ruggine; mantenere
pulite tutte le parti in movimento (meccanismi di
regolazione, meccanismi di aggancio, ruote...) da
polvere o sabbia e se occorre, lubrificarle con olio
leggero.
PULIZIA DEL PARAPIOGGIA: lavare con una spugna e
dell'acqua saponata, senza utilizzare detersivi.
PULIZIA DELLE PARTI IN TESSUTO: spazzolare le parti
in tessuto per allontanare la polvere e lavare a mano
a una temperatura massima di 30° non torcere; non
candeggiare al cloro; non stirare; non lavare a secco;
non smacchiare con solventi e non asciugare a mezzo
di asciugabiancheria a tamburo rotativo.
PEG-PÉREGO S.p.A.
Peg-Pérego S.p.A. è certificata ISO 9001.
La certificazione offre ai clienti e ai
consumatori la garanzia di una
trasparenza e fiducia nel modo di
lavorare dell'impresa.
Peg Pérego potrà apportare in qualunque
momento modifiche ai modelli descritti in questa
pubblicazione, per ragioni di natura tecnica o
commerciale.
Peg Pérego è a disposizione dei suoi Consumatori
per soddisfare al meglio ogni loro esigenza. Per
questo, conoscere il parere dei ns. Clienti, è per noi
estremamente importante e prezioso. Le saremo
quindi molto grati se, dopo aver utilizzato un
ns. prodotto, vorrà compilare il QUESTIONARIO
SODDISFAZIONE CONSUMATORE, segnalando
eventuali osservazioni o suggerimenti, che troverà nel
nostro sito internet: www.pegperego.com
SERVIZIO ASSISTENZA PEG-PÉREGO
Se fortuitamente parti del modello vengono perse
o danneggiate, usare solo pezzi di ricambio originali
Peg Pérego. Per eventuali riparazioni, sostituzioni,
informazioni sui prodotti, vendita di ricambi originali
e accessori, contatta il Servizio Assistenza Peg Pérego
indicando, qualora fosse presente, il numero seriale
del prodotto.
tel. 0039/039/60.88.213 numero verde: 800/147.414
(contattabile da rete fissa)
fax 0039/039/33.09.992
e-mail assistenza@pegperego.it sito internet www.
pegperego.com
EN_English
Thank you for choosing a Peg-Pérego product.
PLIKO SWITCH
WARNING
_ IMPORTANT: read the instructions carefully before
use and keep them for future reference. The child
may be hurt if you do not follow these instructions.
_ This item was designed for the transport of 1 child
in the seat and 1 one child standing on the rear
footboard.
_ Do not use this item for a number of occupants
greater than that intended by the manufacturer.
_ The Pliko Switch Chassis + Pliko Switch car seat is
approved for infants from birth up to 15 kg in weight.
The rear ledge is approved for transporting a second
child of up to 20 kg in weight.
_ The Pliko Switch chassis is designed for use with Peg-
Pérego Ganciomatic products: the Pliko Switch chassis
+ Primo Viaggio car seat (0+ group) is approved for
children from birth up to 13 kg of weight. The Pliko
Switch chassis + “Navetta” or “Primonido” bassinet
unit is approved for children from birth up to 10 kg of
weight. If using with the “Navetta” or the “Primonido”,
refrain from using the rear ledge.
_ Before use check that the Peg-Pérego Ganciomatic
products are correctly fixed to the item.
_ It may be dangerous to leave your child unattended.
_ Always use the 5-point harness and attach the waist
strap to the leg divider strap.
_ Be careful not to hurt the child when adjusting the
mechanisms (handlebar, backrest).
_ Always apply the brake when stopped and when
positioning the child in the seat or when removing
the child from the seat.
_ Assembly and preparation of the product, plus
cleaning and maintenance operations, must be
carried out exclusively by adults.
_ Do not use this item if there are parts missing or signs
of breakage.
_ Before use check that all the attachment mechanisms
are correctly engaged.
_ Do not insert fingers into the mechanisms.
_ Any load hanging on the handlebar or the handles
can make the stroller/carriage unstable; follow the
manufacturer’s instructions for max load capacity.
_ Do not place loads over 5 kilos in the basket. Do not
place in the bottle holder weights heavier than stated
or hot drinks. Do not place in the hood pockets (if
applicable) weights over 0.2 Kg.
_ The front bar is not designed to support the child’s
weight. It is not designed to keep the child in the seat
and does not substitute for the waist belt.
_ Do not use the item near to stairs or steps, heat
sources, naked flames or dangerous objects within
reach of the child.
_ The use of accessories not approved by the
manufacturer could be dangerous.
_ This item is not suitable for jogging or roller skating.
_ Do not use the rain canopy (if present) indoors and
regularly check to ensure the child is not too warm;
do not park the stroller close to heat sources and
keep well away from lighted cigarettes. Ensure the
rain canopy is not interfering with any moving parts
of the carriage or stroller; always remove the rain
canopy before folding your carriage or stroller.
_ When using the stroller with two children, never leave
them unattended and do not allow the second child
to climb onto the rear ledge with the stroller empty.
_ Do not use the release levers to move or lift the
Page 22

- 22 -
stroller when the child is in it.
NAVETTA XL
product characteristics
Navetta XL-auto, Group 0, “Universal”
category
_ The Navetta XL is approved under regulation UN
ECE R44/04 for children weighing from 0-10 kg. It is
suitable for installation on the majority of vehicle
seats, but not all.
_ The Navetta XL can be properly installed if the
vehicle's use and maintenance manual states that
it is compatible with “Universal” Group 0 restraint
systems.
_ The Navetta XL is classified as “Universal” in
compliance with stricter approval criteria than
previous models that do not have this label.
_ The device can only be used on vehicles with
2 or 3 rear seats fitted with 2- or 3-point safety
belts, approved in compliance with UN ECE R16 or
equivalent regulations.
_ For any questions or further information on installing
the Navetta XL in specific vehicles, contact the
manufacturer or the retailer.
IMPORTANT
_ “Navetta XL” (Group 0) must be fitted perpendicular
to the vehicle’s normal direction of travel.
_ Do not fit Navetta XL on vehicle seats that face away
or sideways with respect to the normal direction of
travel of the vehicle.
_ The item is given a serial number.
WARNING
IMPORTANT: Read these instructions carefully and
store them in the holder provided throughout the
lifecycle of the product. The child’s safety could be
put at risk if these instructions are not followed.
_ It could be dangerous to leave your child unattended.
_ Assembly and preparation of the item must be carried
out by adults.
_ Do not use the product if there are missing or broken
parts.
_ Before use make sure that all of the attachment
mechanisms are connected properly.
_ Do not insert fingers into the mechanisms.
_ Do not use near heat sources, open flames or
dangerous objects that are within reach of the child.
_ It could be dangerous to use accessories which are
not approved by the manufacturer.
_ Make sure the belts fastening the Navetta XL to the
vehicle are always taut and adjust the straps securing
the child.
_ Never twist the belts.
_ Replace the item if it undergoes significant strain
in an accident or shows clear signs of breakage or
deformation.
_ The safety device should not be modified by users in
any circumstances.
_ Carefully follow the instructions supplied by the
manufacturer of the child restraint system.
_ Never leave the child unattended in the Navetta XL in
a vehicle.
_ The Navetta XL must always be secured with the
vehicle’s safety belts, even when the child is not
present. In the event of sudden braking, it could
injure the occupants of the vehicle.
_ When travelling in vehicles, never hold the child in
your arms and never put him/her anywhere but in the
Navetta XL. In the event of sudden braking, even at
low speeds, the child would be flung forward.
_ Take particular care to make sure that luggage or
other objects are not located where they may injure
the child in the Navetta XL in the event of an accident.
_ Do not leave the Navetta XL in vehicles exposed to the
sun. Some parts might heat up and be harmful to the
delicate skin of the child – check before placing the
child in the seat.
_ Make sure that the Navetta XL is not obstructed by
any moving parts of the vehicle’s seat or by one of the
doors.
_ Do not use the Navetta XL without its fabric covering,
which cannot be replaced with one not approved by
the manufacturer since it is an integral part of the
Navetta XL and the safety system. If replacing it, use
an official spare part.
_ The design of the Navetta XL features a polystyrene
shock absorption device built directly into the shell,
below the padding: do not remove it.
_ This product is only suitable for children who are
unable to sit up by themselves.
_ This product is designed for children from birth up to
a weight of 9 kg. When used in vehicles it is designed
for weights of up to 10 kg.
_ During use in vehicles, always fasten the safety
harness. When using the product as a carriage,
remove the harness and place it in the special pocket.
_ Only use the product on surfaces that are hard,
horizontal and dry.
_ Do not leave other children playing unattended near
the carriage.
_ Take care when adjusting the mechanisms (handle,
backrest) with the child present.
_ Regularly check the handle (or the handles) and the
bottom of the carriage to make sure that there are no
signs of breakage or damage.
_ When using the carriage with a stand, check the
maximum length of the carriage specified on the
stand.
PRODUCT FEATURES
_ These items are numbered progressively.
_ Pliko Switch On Track Modular is a modular system
characterized by a single cover that can be fitted on
both the Navetta XL and on the Pliko Switch stroller.
_ Pliko Switch On Track Modular consists of: Pliko
Switch chassis, Pliko Switch seat, Navetta XL, Primo
Viaggio Tri Fix car seat, diaper-changing bag.
_ The Pliko Switch stroller has reversible seat: facing the
mother or facing the world.
COMPONENTS OF THE ITEM
Check the contents of the packaging and for any
complaints please contact the After-Sales Service.
_ The Pliko Switch chassis consists of: basket, 2
swiveling or locking front wheels, 2 rear wheels with
brake cable, cup holder.
_ The Pliko Switch seat consists of: hood, front bar, rain
canopy, diaper-changing bag and a cover that can
also be used for the Navetta XL.
_ Navetta XL consists of: hood.
_ Primo Viaggio Tri Fix car seat consists of: hood,
booster cushion, safety harnesses.
INSTRUCTIONS
1 PACKING PROTECTION: before opening the chassis
remove the protection (fig_a), otherwise it will not
open correctly (fig_b).
2 OPENING: raise the two levers together (fig_a) and
pull upwards until the chassis is completely open
(fig_b). Check that the chassis is correctly opened: the
side tubes must be locked together (fig_c).
3 FITTING THE FRONT WHEELS: press the lever of the
two front wheels (fig_a), insert the wheel until it
clicks into place (fig_b) and check that it is securely
Page 23

- 23 -
attached (fig_c).
4 FITTING THE REAR WHEELS: carefully distinguish
between the two rear wheels connected by the brake
cable: the rear left wheel features a slot that matches
a corresponding rib on the rear left chassis tube. Press
in the wheels until they click into place (fig_a) and
check that they are firmly attached (fig_b).
5 FITTING THE BASKET: insert the loops over the front
hooks (fig_a) and rear hooks (fig_b) and button down
the two flaps around the front tube (fig_c).
6 FITTING THE CUP HOLDER: insert the cup holder on
the corresponding peg and press down until it clicks
into place (fig_a). The cup holder can be attached to
either side of the chassis.
7 EXTENDABLE HANDLES: to extend the handles press
the top of the button and lift upwards the same time
(fig_a); to retract the handles press the bottom of the
button and push the handle downwards at the same
time (fig_b).
8 FIXED OR SWIVELLING FRONT WHEELS: lift the levers
to prevent the front wheels from swivelling (fig_a),
lower the levers to allow the front wheels to swivel
(fig_b). On uneven surfaces the wheels should be set
to their fixed position.
9 REAR WHEELS WITH CENTRAL BRAKE CABLE: press a
brake lever to immobilise the stroller (fig_a), lift the
lever to release it (fig_b).
10 MOUNTING THE SEAT TO THE CHASSIS: the reversible
seat can be attached to the chassis either facing
the person pushing the stroller (fig_a), or facing
forwards (fig_b), place the seat on the chassis so
that it is aligned with the relative symbols and press
downwards with both hands until you hear two clicks
confirming that it has locked into position. Ensure
the seat is correctly secured by attempting to pull it
upwards by gripping the front bar.
11 REMOVING THE SEAT FROM THE CHASSIS: move the
two levers in the direction of the arrow (fig_a) and lift
the two handles up (fig_b) until release. Pull the two
handles upwards until the seat is released. The seat
can be removed from and re-attached to the chassis
also when it is occupied by a child.
12 FRONT BAR: to attach the front bar, slide the
connections into the end of the armrests, press the
two side buttons and push the bar towards the seat
until it clicks into place (fig_a). To remove the front
bar press the two buttons and pull it outwards (fig_b).
Open the front bar at one side only so that the child
can be positioned in or removed from the seat more
easily.
13 BACKREST: to recline the backrest lift the lever (fig_a)
and choose one of the 4 positions (fig_b).
14 FOOTREST: to lower the footrest push the two levers
downwards and then push the footrest downwards
(fig_a); to raise the footrest lift it upwards (fig_b).
15 5-POINT SAFETY HARNESS: to attach the safety
harness, insert the two buckles of the waist strap
(with shoulder straps attached – arrow_a) into the
leg divider strap until it clicks into place (arrow_b). To
release, push the round button placed in center of the
buckle upwards (arrow_c) and pull the waist strap to
the sides (arrow_d).
16 To tighten the waist strap, pull on both sides in the
direction of the arrow (arrow_a). To loosen it do the
opposite. The waist strap can be tightened as far as
the safety lock (fig_b).
17 To adjust the height of the safety harnesses, release
the two buckles on the rear of the backrest.
Pull the shoulder straps towards you (arrow_a) until
the buckles are released and insert them in the
backrest loops (arrow_b). Remove the shoulder straps
from the sack (arrow_c) and insert them in the most
appropriate loop (arrow_d), then re-attach the two
buckles on the rear of the backrest (arrow_e) The
buckles are securely attached when a click is heard
(fig_f ).
18 HOOD: to attach the hood insert the connections
into the sides of the seat (fig_a) and then fasten the
buttons on the rear of the backrest (fig_b). To remove
the hood: disengage the connections and unbutton
from the backrest. To raise the hood: pull it towards
you; to close the hood: push it back. To convert the
hood into a sun canopy, open the double zipper
(fig_c) and unfasten the buttons on the rear of the
backrest.
19 COVER: The same cover can be attached and used
with both the Navetta XL and the Pliko Switch stroller.
Unbutton the part under the cover (fig_a), detach the
Velcro (fig_b) and extend it (fig_c).
20 For the carriage version, lift the leg rest and fit the
cover over the front bar (fig_a), then fasten it behind
the leg rest with the Velcro (fig_b) and attach it to the
buttons on the hood with the elastic loops (fig_c).
21 For the stroller version, fasten the buttons on the
underside of the cover (fig_a), lower the leg rest and
fit the cover on (fig_b). Next, pass the cover under the
front bar (fig_c) and attach it with the buttons (fig_d).
22 RAIN CANOPY: position the rain canopy on the stroller
(fig_a) and insert the two lateral loops over the hood
buttons (fig_b).
23 Secure the rain canopy by attaching the elastic loop
to the rear uprights (fig_a) or to the front uprights
(fig_b), according to the seat position.
24 REAR LEDGE: the rear ledge makes it easier to
negotiate kerbs or level differences with the stroller
(fig_a) and can also be used to transport a second
child (fig_b). To use the stroller with two children,
apply the brakes, position the smaller child in the seat
and attach the safety harness (1). Grip the handles (2)
and help the second child to climb onto the ledge (3).
25 FOLDING: the stroller can be folded without the
seat, with the seat facing the person pushing the
stroller, or with the seat facing forwards. If the seat
is facing the person pushing the stroller: before
folding it, lower the backrest completely; if the seat is
facing forwards: before folding the stroller raise the
backrest, and once it is folded, lower it. To fold the
stroller set the front wheels to their fixed position
and close the hood, if fitted. Lift the two levers of the
handles together and push downwards to release the
side tubes (fig_a-b), pull the central handle upwards
(fig_c) until the safety catches engage (fig_d). When
folded the stroller will stand upright without support.
26 TRANSPORT: the stroller can be carried by the central
handle, keeping the front wheels fixed (fig_a) or by
the side handle (fig_b).
27 REMOVABLE LINING: with the backrest in its raised
position, detach the two elastic loops on the back
(fig_a), extract the four tabs to the sides (fig_b) and
detach the Velcro from the armrests (fig_c).
28 Slip the side lining off the hood tabs (fig_a), undo
the two buttons at the sides of the backrest (fig_b),
detach the two elastic loops of the sack from the
footrest (fig_c), remove the leg divider strap from the
top (by pushing it up from under the seat) (fig_d).
NAVETTA XL
INSTRUCTIONS FOR USE
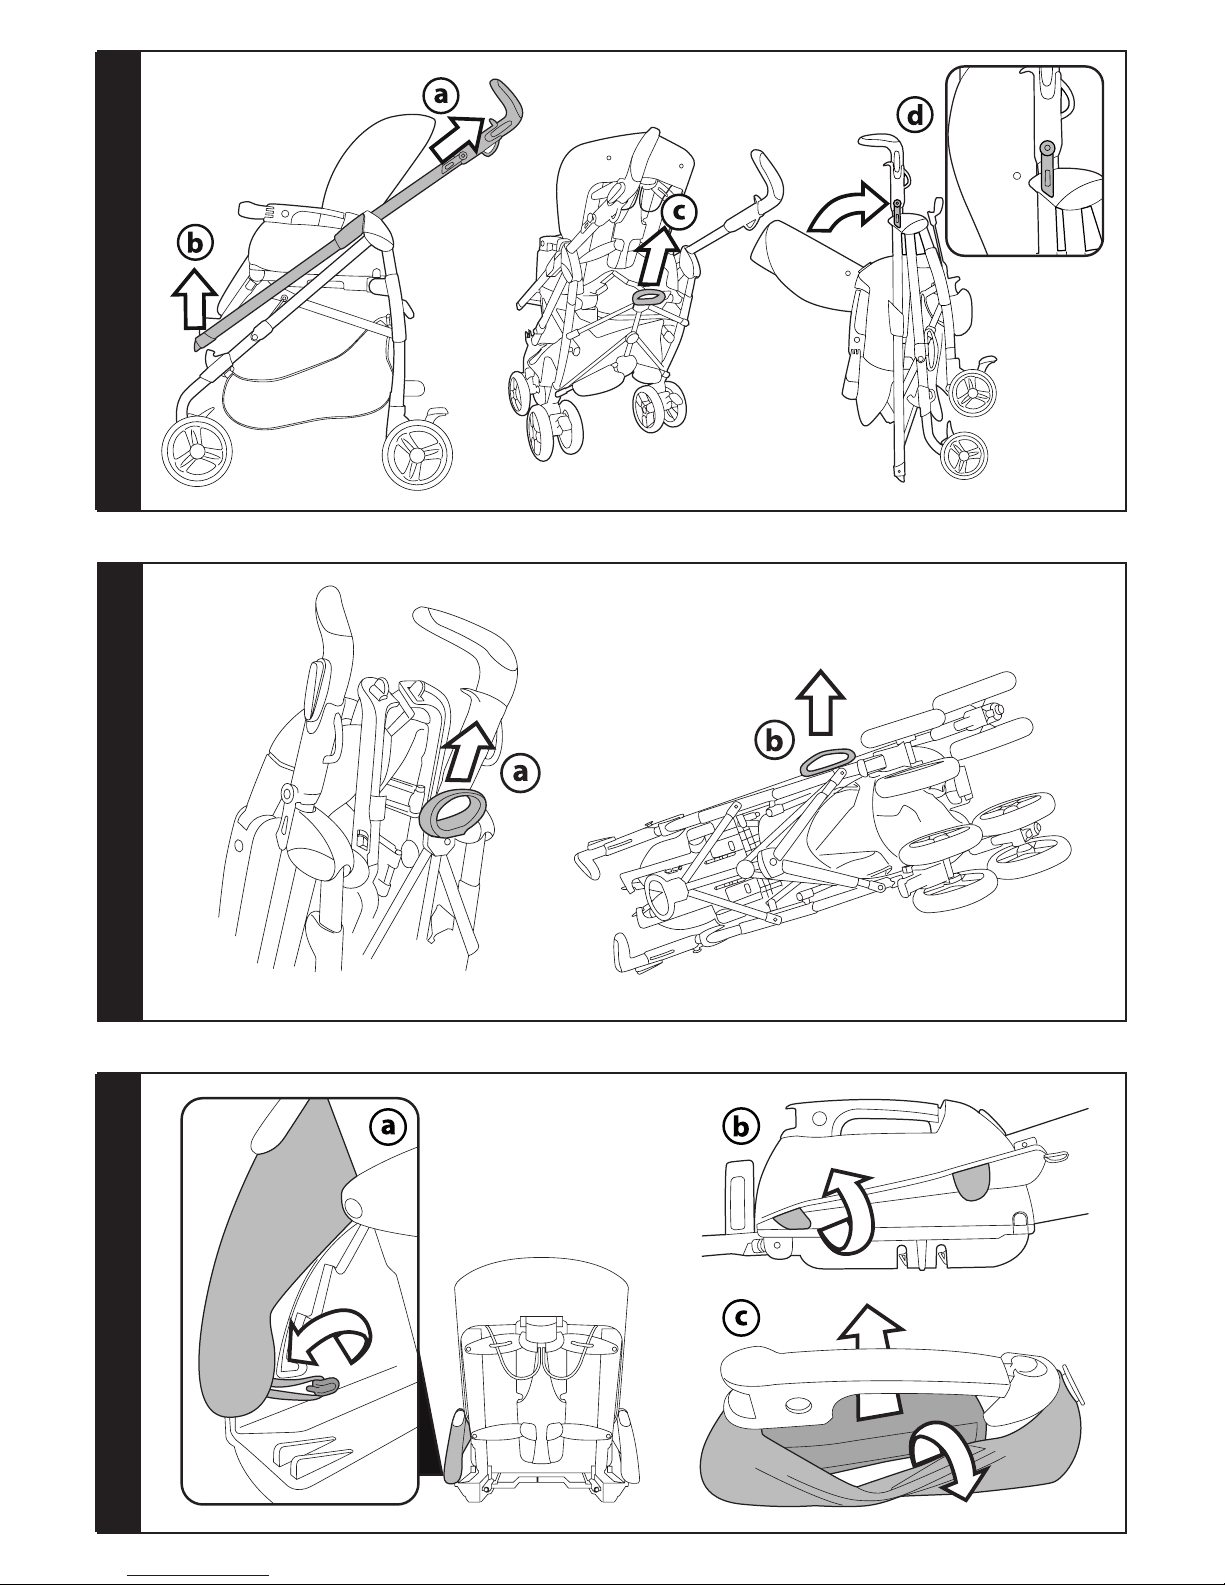
29 HOOD: To attach the hood, fasten the clips (fig_a) and
then the buttons on the sides (fig_b) and, if present,
the back (fig_c).
30 COVER: The same cover can be attached and used
with both the Navetta XL and the Pliko Switch stroller.
Position the cover, button it on both sides (fig_a),
attach the cover flap by buttoning it to the cover
Page 24

- 24 -
(fig_b) and tighten it with the two-way slider (fig_c).
31 HANDLE: Rotate the handle upwards until it clicks
into place (arrow_a). The handle is only locked in
place when it is in the vertical position. To lower the
handle, press the two round buttons at the same time
(arrow_b) and rotate it downwards (arrow_c). The
handle is useful for carrying the Navetta XL (fig_d)
and for fitting it to stroller.
32 ROCKING CRADLE POSITION: The Navetta XL base has
a special shape which, when laid on a flat surface,
enables to rock the baby (fig_a). BED POSITION: The
Navetta XL turns into a non-rocking cradle by pulling
out the two stands placed under the base (fig_b).
33 ADJUSTING THE BACKREST and THE FOOTREST: with
the COMFORT SYSTEM, backrest and footrest can
be adjusted simultaneously. Pull the knob outwards
(fig_a) while turning it (fig_b) to raise or lower the
backrest and the footrest.
34 FOUR SEASONS SYSTEM: There are holes under the
base of the Navetta XL which can be opened or
closed to adjust the air circulation inside it.
To open the holes, move the 4 levers outwards.
35 REMOVING THE LINING OF THE NAVETTA XL:
Unbutton the hood on the sides and the back (fig_a),
press down on the clips to release them (fig_b) and
pull the hood upwards to remove it.
36 Unbutton the cover and remove it (fig_a), raise the
backrest, detach the inner lining (fig_b) and pull it
upwards to remove it (fig_c).
GANCIOMATIC SYSTEM
37 Ganciomatic System is a quick and practical way to
attach the Navetta bassinet, the PrimoViaggio car seat
and the Pliko Switch seat to the Ganciomatic Base of
the chassis in a single movement.
Place the item on the Ganciomatic Base and press
down with both hands until it clicks into place.
Always apply the chassis or stroller brake before
attaching and removing products (refer to the
respective instruction manuals).
Check that the child transport unit is properly
attached.
38 FASTENING NAVETTA XL: To fasten the Navetta XL,
rest it on the stroller and press with both hands until
it clicks into place.
Always apply the brakes on the stroller or chassis
before attaching and removing the Navetta XL.
Check that the bassinet unit is properly attached.
_ To release it, raise the lever of the Ganciomatic clip
(arrow_a) and lift up the Navetta XL (arrow_b).
ACCESSORIES
39 CAR KIT: The ECE R44/04-approved car kit is available
on request. It contains all the necessary items to fit
the bassinet in the car (fig_a).
COVER ALL RAIN CANOPY: Transparent cover-all rain
canopy for Navetta XL (fig_b).
40 BASSINET STAND: Practical and compact support base
(fig_a).
DIAPER-CHANGING BAG: Diaper-changing bag with
pad for changing baby's diaper. It can be attached to
the stroller (fig_b).
SERIAL NUMBERS
41 Pliko Switch reports information as at the date of
manufacture of the product.
_ Product name, date of manufacture and serial
number of the seat (fig_a) and of the carriage (fig_b).
42 Information about the production date of Navetta XL
can be found under the base.
_ Product name, production date and serial number.
This information is required for any complaints.
CLEANING AND MAINTENANCE
PRODUCT MAINTENANCE: protect from the weather:
water, rain, or snow; prolonged and continuous
exposure to bright sunlight may give rise to colour
changes of various different materials; store this
product in a dry place.
CLEANING THE CHASSIS: periodically clean all plastic
parts with a damp cloth. Do not use solvent or
similar cleaning products; keep all metal parts dry to
prevent rusting; keep moving parts clean (adjustment
mechanisms, locking mechanisms, wheels, ...) and
free of dust and sand and, if necessary, lubricate with
light machine oil.
CLEANING THE RAIN CANOPY: wash with a sponge
and soapy water; do not use detergents.
CLEANING FABRIC PARTS: brush fabric parts to
remove dust and wash by hand at a maximum
temperature of 30°C; do not wring; do not use
chlorine bleach, do not iron; do not dry clean; do not
apply solvent-based stain removers and do not dry in
a tumble dryer.
PEG-PÉREGO S.p.A.
Peg-Pérego S.p.A. is an ISO 9001
certified company. This certification is a
guarantee for customers and consumers
of the transparency and trustworthiness
of the company's procedures and
working methods.
Peg Pérego can make changes at any time to the
models described in this publication for technical or
commercial reasons.
Peg Pérego is at the disposal of its customers and
consumers to ensure that all their demands and
queries are fully satisfied. It is a key part of our policy
to ensure we are always aware of our customers'
views and requirements. We would therefore be very
grateful if, after using a Peg Pérego product, you
take the time to fill in our CUSTOMER SATISFACTION
QUESTIONNAIRE, making a note of any comments
or suggestions you might have. You can find the
questionnaire on the Peg Pérego website: www.
pegperego.com
PEG-PÉREGO AFTER-SALES SERVICE
If any parts of your Peg Pérego product should be
accidentally mislaid or damaged, use exclusively
genuine original Peg Pérego replacements. For any
repairs, replacements, product information, and
orders for genuine original replacement parts and
accessories, please contact Peg Perego After Sales
Service indicating the product serial number, if any.
tel. 0039/039/60.88.213 fax 0039/039/33.09.992
e-mail assistenza@pegperego.it
website www.pegperego.com
Page 25

- 25 -
FR_Français
Merci d’avoir choisi un produit Peg-Pérego.
PLIKO SWITCH
AVERTISSEMENT
_ IMPORTANT : lire ces instructions avec attention
et les conserver pour toute référence future. La
sécurité de l’enfant pourrait être menacée si ces
instructions ne sont pas suivies.
_ Cet article a été conçu pour transporter 1 enfant dans
le siège et 1 enfant debout sur le marchepied arrière.
_ Ne pas utiliser lorsque le nombre d’occupants est
supérieur aux prescriptions du fabricant.
_ Châssis-Pliko Switch + siège-Pliko Switch est
homologué pour des enfants de la naissance jusqu’à
un poids de 15 kg dans le siège. Le marchepied arrière
est homologué pour le transport d’un second enfant
d’un poids maximal de 20kg.
_ Le châssis-Pliko Switch a été conçu pour être utilisé
en combinaison avec les produits Peg-Pérego
Ganciomatic : châssis-Pliko Switch + siège-auto « Primo
Viaggio » (groupe 0+) est homologué pour les enfants
de la naissance jusqu’à un poids de 13 kg ; châssis Pliko
Switch + nacelle « Navetta » est homologué pour les
enfants de la naissance jusqu’à un poids de 10 kg. Ne
pas utiliser le marche-pied arrière lorsque le produit
est employé en combinaison avec « Navetta ».
_ Avant chaque utilisation, s’assurer que les articles
Peg-Pérego Ganciomatic sont correctement
accrochés sur le châssis.
_ Il peut être dangereux de laisser l’enfant sans surveillance.
_ Toujours utiliser la ceinture de sécurité à cinq points;
toujours accrocher la sangle ventrale à la sangle
d’entrejambes.
_ Prêter attention à la position de l’enfant lors des
opérations de réglage des éléments mobiles
(poignée, dossier).
_ Toujours actionner le frein lorsque l’article est à l’arrêt
et pendant l’installation ou la sortie de l’enfant.
_ Les opérations d’assemblage, de préparation de
l’article, de nettoyage et d’entretien doivent être
réalisées uniquement par des adultes.
_ Ne pas utiliser cet article si des pièces sont
manquantes ou cassées.
_ Avant l’utilisation, s’assurer que tous les mécanismes
de fixation sont correctement enclenchés.
_ Éviter de mettre les doigts dans les mécanismes.
_ Toute charge suspendue aux poignées peut
déstabiliser le produit, suivre les recommandations
du fabrication sur les charges maximales admises.
_ Ne pas utiliser le panier pour transporter des charges
dont le poids dépasse 5 kg. Ne pas introduire dans
le porte-boisson des charges supérieures à celles
indiquées sur le porte-boisson lui-même et ne jamais
introduire de boissons chaudes. Ne pas introduire
dans les poches de la capote (lorsqu'elles sont
présentes) des objets dont le poids dépasse 0.2 kg.
_ La main courante n’a pas été conçue pour supporter
le poids de l’enfant; elle n’a pas non plus été conçue
pour maintenir l’enfant en position assise et ne
remplace pas la sangle de sécurité.
_ Ne pas utiliser l’article à proximité d’escaliers ou de
marches; ne pas l’utiliser à proximité de sources de
chaleur, de flammes directes ou d’objets dangereux
se trouvant à la portée de l’enfant.
_ L’utilisation d’accessoires n’ayant pas été approuvés
par le fabricant peut se révéler dangereuse.
_ Ne pas utiliser ce produit lors d’un jogging ou avec
des patins à roulettes.
_ Ne pas utiliser l’habillage pluie (lorsqu’il est présent
sur l’article) dans des milieux clos et toujours
contrôler que l’enfant n’ait pas trop chaud; ne jamais
placer à proximité de sources de chaleur et prendre
garde aux cigarettes. S’assurer que l’habillage pluie
n’interfère avec aucun mécanisme en mouvement du
châssis ou de la poussette; toujours retirer l’habillage
pluie avant de refermer le châssis ou la poussette.
_ Lorsque la poussette est utilisée avec deux enfants,
ne jamais les laisser seuls et ne pas laisser le second
enfant monter sur le marchepied arrière tandis que la
poussette est vide.
_ Ne pas se servir des poignées de décrochage pour
transporter ou soulever la poussette alors que l’enfant
est installé à bord.
_ Conforme aux exigences de sécurité.
NAVETTA XL
caractéristiques du produit
Navetta XL-auto, Groupe 0, catégorie
d’homologation « Universelle »
_ Navetta XL est homologuée conformément au
Règlement UN/ECE R44/04 pour le transport d’enfants
d'un poids de 0 à 10 kg. Il s’adapte à la plupart des
sièges d’automobiles mais pas à tous.
_ Pour installer correctement Navetta XL vérifier dans le
manuel d'utilisation et d'entretien de votre véhicule
si ce dernier peut recevoir des systèmes de fixation «
Universels » du Groupe 0.
_ Navetta XL a été classée dans la catégorie
d'homologation « Universelle » selon des critères
d’homologation plus sévères que ceux des modèles
antérieurs qui ne bénéficient pas de cette catégorie.
_ Navetta XL peut être utilisée uniquement sur des
véhicules munis de siège arrière à 2 ou 3 places dotés
de ceintures di sécurité 2 ou 3 points, homologués
conformément au règlement UN/ECE R16 ou normes
équivalentes.
_ En cas de doute ou pour plus de renseignements sur
l’installation de Navetta XL sur un véhicule particulier,
contacter le fabricant ou le revendeur.
IMPORTANT
_ «Navetta XL», groupe 0, doit être installée
perpendiculairement au sens de marche.
_ Ne pas installer Navetta XL sur un siège orienté
dans la direction opposée au sens de la marche ou
transversalement au sens de marche normale du véhicule.
_ Cet article porte un numéro séquentiel de fabrication.
AVERTISSEMENT
IMPORTANT : lire attentivement ces instructions
et les conserver dans la poche prévue à cet effet
pendant toute la durée de vie utile du produit.
Le non-respect de ces instructions pourrait
compromettre la sécurité de l’enfant.
_ Ne pas laisser l’enfant seul et sans surveillance.
_ Les opérations d’assemblage et de préparation de
l’article doivent être effectuées par des adultes.
_ Ne pas utiliser Navetta XL s’il manque des pièces ou
s'il est endommagé.
_ Avant d’utiliser Navetta XL, vérifier si tous les
mécanismes de fixation sont correctement enclenchés.
_ Ne pas mettre les doigts dans les mécanismes.
_ Ne pas utiliser Navetta XL près de sources de chaleur,
de flammes nues ou près d’objets dangereux et à la
portée des bras de l’enfant.
_ L’emploi d’accessoires non approuvés par le fabricant
peut s’avérer dangereux.
_ Vérifier si les sangles de fixation au véhicule de
Navetta XL sont bien tendues et régler celles qui
retiennent l’enfant.
_ Ne jamais entortiller les sangles.
Page 26

- 26 -
_ Il est recommandé de remplacer Navetta XL s’il a
été soumis à des sollicitations excessives suite à un
accident ou s’il présente des signes de cassure ou de
déformation évidents.
_ En aucun cas l’utilisateur ne doit modifier le dispositif
de sécurité.
_ Suivre scrupuleusement les instructions fournies par
le fabricant de Navetta XL.
_ Ne jamais laisser l’enfant seul et sans surveillance
dans Navetta XL en voiture.
_ Navetta XL doit toujours être fixée avec les ceintures de
sécurité du véhicule, même lorsqu'elle est vide car elle
pourrait blesser les occupants de la voiture en cas de
coup de frein brusque.
_ Pendant les voyages en voiture, ne tenez jamais
l’enfant dans vos bras et installez-le toujours dans
Navetta XL car même à petite vitesse, en cas de coup
de frein brusque l’enfant serait catapulté en avant.
_ Prêter une attention particulière aux bagages ou
autres objets se trouvant dans l’habitacle car ils
pourraient blesser l’enfant en cas d’accident.
_ Ne pas laisser Navetta XL dans le véhicule exposé au
soleil ; certaines parties pourraient chauffer et brûler
la peau délicate de l'enfant. Vérifier la température de
Navetta XL avant d'y installer l'enfant.
_ Veiller à ce que Navetta XL ne reste pas coincée dans une
partie mobile du siège de la voiture ou dans une portière.
_ Ne pas utiliser Navetta XL sans sa housse en tissu. Cette
housse ne peut être remplacée que par une autre housse
approuvée par le fabricant car elle fait partie intégrante
de Navetta XL et est une garantie de sa sûreté. En cas de
remplacement, utiliser uniquement une housse originale
du fabricant.
_ Navetta XL a été conçue avec un dispositif en polystyrène
pour l’absorption des chocs, qui est incorporé
directement dans la coque, sous la housse : ne pas l‘ôter.
_ Cet article ne convient qu’aux enfants qui ne savent
pas encore s’asseoir tout seul.
_ Cet article a été conçu pour le transport des enfants à partir
de la naissance et jusqu’à un poids de 9 kg. Il a été conçu
pour utilisation en voiture jusqu’à un poids de 10 kg.
_ Utiliser uniquement sur des surfaces dures, planes et
sèches.
_ Ne pas laisser d’autres enfants jouer sans surveillance
près du landau.
_ En cas d’emploi dans une automobile, utiliser
toujours la ceinture de sécurité. En cas d’utilisation
comme landau, enlever la ceinture et la ranger dans la
pochette spéciale.
_ Tenir compte de la position de l’enfant pendant les
opérations de réglage des mécanismes (poignée,
dossier).
_ Contrôler régulièrement la poignée centrale (ou les
poignées de transport) et le fond du landau. Vérifier s’il
présente des signes de cassure ou d’endommagement.
_ Si le landau est utilisé avec un stand, vérifier la
longueur maximale du landau indiquée sur le stand.
_ “Conforme aux exigences de securite”.
_ Norme NF S 54-001.
CARACTÉRISTIQUES DE L'ARTICLE
_ Ces articles sont numérotés progressivement.
_ Pliko Switch On Track Modular est un système modulaire,
caractérisé par un seul tablier, qu’il est possible d’appliquer
aussi bien sur Navetta XL que sur la poussette Pliko Switch.
_ Pliko Switch On Track Modular est composé de :
châssis Pliko Switch, siège Pliko Switch, Navetta XL,
siège auto Primo Viaggio Tri Fix, sac à langer.
_ Pliko Switch est une poussette avec siège réversible :
face à maman ou tourné vers le monde extérieur.
COMPOSANTS DE L'ARTICLE
Vérifier le contenu de l’emballage et en cas de
réclamation, contacter le Service Assistance.
_ Le châssis Pliko Switch est composé de : panier, 2
roues avant pivotantes ou fixes, 2 roues arrière avec
câble de frein, porte-boissons.
_ Le siège Pliko Switch est composé de : capote, main
courante, habillage pluie, sac à langer et tablier
utilisable aussi par Navetta XL.
_ Navetta XL est composée de : capote.
_ Le siège auto Primo Viaggio Tri Fix est composé de :
capote, réducteur, ceintures de sécurité.
INSTRUCTIONS D’UTILISATION
1 PROTECTIONS EMBALLAGE: avant d’ouvrir le châssis,
retirer les protections (fig. a). Dans le cas contraire le
châssis ne s’ouvrira pas correctement (fig. b).
2 OUVERTURE: relever le levier des deux poignées
en même temps (fig. a) et tirer vers le haut jusqu’à
ouverture du châssis (fig. b). S’assurer de sa bonne
ouverture en vérifiant que les montants latéraux sont
fixés l’un à l’autre (fig. c).
3 MONTAGE DES ROUES AVANT: baisser le levier des
deux roues avant (fig. a), insérer la roue jusqu’au déclic
(fig. b) et s’assurer de l’accrochage correct (fig. c).
4 MONTAGE DES ROUES ARRIÈRE: distinguer les deux
roues reliées par le câble de frein: la roue de gauche
présente une rainure qu’il faut faire coïncider avec celle
du montant arrière gauche. Insérer les roues jusqu’au
déclic (fig. a) et s’assurer de l’accrochage correct (fig. b).
5 MONTAGE DU PANIER: faire passer les boutonnières
dans les crochets avant (fig. a) et arrière (fig. b) et
boutonner les deux ailettes au montant avant (fig. c).
6 MONTAGE DU PORTE-BOISSONS: enfiler le porte-
boissons sur son support jusqu’au déclic (fig. a). Il peut
se fixer indifféremment des deux côtés du châssis.
7 POIGNÉES REGLABLES: pour allonger les poignées,
appuyer sur le haut du bouton tout en tirant les
poignées vers le haut (fig. a); pour les raccourcir, appuyer
sur le bas du bouton tout en les abaissant (fig. b).
8 ROUES AVANT FIXES OU PIVOTANTES: relever les leviers
pour rendre les roues fixes (fig. a), abaisser les leviers
pour les rendre pivotantes (fig. b). En terrains difficiles,
l’utilisation des roues fixes est recommandée.
9 ROUES ARRIÈRE AVEC CÂBLE DE FREIN CENTRALISÉ:
appuyer sur l’une des pédales de frein pour immobiliser le
châssis (fig. a), la relever pour débloquer le châssis (fig. b).
10 MONTAGE DU BLOC POUSSETTE SUR LE CHÂSSIS: il est
possible d’accrocher le bloc poussette réversible au
châssis en le tournant vers maman (fig. a) ou vers le
monde (fig. b). Le positionner sur le châssis en s’aidant
des symboles et appuyer vers le bas des deux mains
jusqu’à entendre un double clic d’enclenchement.
S’assurer du bon accrochage du siège en le tirant vers
le haut par la main courante. Si le bloc poussette se
décroche, répéter l’opération ci-dessus décrite..
11 DÉMONTAGE DU BLOC POUSSETTE DU CHÂSSIS:
pousser les deux boutons dans le sens indiqué par la
flèche (fig_a) et tirer les deux poignées vers le haut (fig_
b) jusqu’à ce que le bloc poussette se décroche.. Tirer
vers le haut les deux poignées jusqu’à ce que le siège se
décroche. Il est possible de décrocher le siège et de le
repositionner sur le châssis quand l’enfant y est installé.
12 MAIN COURANTE: pour accrocher la main courante,
insérer les fixations dans les accoudoirs, appuyer sur les
deux boutons latéraux et pousser vers le siège jusqu’à
entendre un déclic (fig. a). Pour enlever la main courante,
appuyer sur les deux boutons latéraux et la retirer (fig. b).
Afin de faciliter l’installation de l’enfant dans la poussette,
la main courante peut ne s’ouvrir que d’un côté.
13 DOSSIER: pour régler l’inclinaison, relever la poignée
(fig. a) et placer le dossier dans l’une des 4 positions
au choix (fig. b).
14 REPOSE-PIEDS: pour abaisser le repose-pieds,
déplacer vers le bas les deux petits leviers et baisser
le repose-pieds. vers le bas (fig. a); pour le relever, le
Page 27

- 27 -
pousser vers le haut (fig. b).
15 CEINTURE DE SÉCURITÉ À 5 POINTS : pour l’accrocher,
insérer les deux clips de la sangle ventrale (avec
les bretelles accrochées, flèche_a) dans la sangle
d’entrejambes jusqu’au déclic (flèche_b). Pour la
décrocher, pousser vers le haut le bouton rond placé
au centre du clip (flèche_c) et tirer vers l’extérieur la
sangle ventrale (flèche_d).
16 Pour serrer la sangle ventrale, tirer, des deux côtés,
dans le sens de la flèche (flèche_a), pour la desserrer
procéder dans le sens inverse. La sangle ventrale peut
être serrée jusqu’à la butée de sécurité (fig_b).
17 Pour régler la hauteur des ceintures de sécurité, il faut
décrocher les deux clips à l’arrière du dossier.
Tirer vers soi les bretelles (flèche_a) jusqu’à décrocher
les clips et les enfiler dans les boutonnières du dossier
(flèche_b). Enlever les bretelles de la housse (flèche_
c) et les enfiler dans la boutonnière la plus adaptée
(flèche_d), enfin accrocher de nouveau les deux clips
derrière le dossier (flèche_e). L’accrochage correct des
clips est déterminé par le déclic (fig_f).
18 CAPOTE: pour installer la capote, accrocher ses fixations
sur les côtés du siège (fig. a) et la boutonner à l’arrière du
dossier (fig. b). Pour enlever la capote, défaire ses fixations
et la déboutonner. Pour la relever, la tirer vers l’avant.
Pour la replier, la pousser en arrière. Pour la transformer
en pare-soleil, ouvrir la fermeture éclair à double curseur
(fig. c) et la déboutonner de l’arrière du dossier.
19 TABLIER : Le même tablier s’accroche et s’utilise à la
fois sur Navetta XL et sur la poussette Pliko Switch.
déboutonner la partie inférieure du tablier (fig_a),
détacher le (fig_b) et l’élargir (fig_c).
20 Dans la version landau, relever le repose-pieds, mettre le
tablier en place sur la barre frontale (fig_a), le fixer derrière
le repose-pieds avec le velcro (fig_b) et l’accrocher avec
les élastiques aux boutons de la capote (fig_c).
21 Dans la version poussette, boutonner la partie
inférieure du tablier (fig_a), abaisser le repose-pieds
et mettre le tablier en place (fig_b) en le faisant passer
sous la barre frontale (fig_c), puis le fixer avec les
boutons (fig_d).
22 HABILLAGE PLUIE : Placer l’habillage pluie sur la
poussette (fig_a) et enfiler ses deux boutonnières
latérales aux boutons de la capote (fig_b).
23 Fixer l’habillage pluie en fixant l’élastique aux
montants arrière (fig_a) ou aux montants avant
(fig_b) selon la position du siège.
24 MARCHEPIED ARRIÈRE: il permet d’aider à franchir de
petits obstacles (fig. a) et de transporter un second enfant
(fig. b). Pour transporter deux enfants sur la poussette,
actionner le frein de la poussette, placer le plus petit
enfant dans le siège et l’attacher à l’aide de la ceinture de
sécurité (1). Saisir la poussette par ses poignées (2) et faire
monter le second enfant sur le marchepied (3).
25 FERMETURE: La poussette se plie avec le bloc poussette,
qu’il soit tourné vers la maman ou vers le monde,
ou seul sans le bloc poussette Si le bloc poussette
est tourné vers la maman, avant de plier, abaisser
complètement le dossier. Si le bloc poussette est tourné
vers le monde, relever le dossier et le rabaisser une fois
la poussette pliée. Avant de plier, mettre les roues avant
en position fixe et rabattre la capote si elle est installée.
Relever les deux leviers des poignées simultanément
et pousser vers le bas pour débloquer les montants de
chaque côté à l’avant (fig a-b). Tirer énergiquement la
poignée centrale vers le haut (fig c) jusqu’à ce que les
crochets de sécurité se referment (fig d). Une fois pliée,
elle tient debout toute seule.
26 TRANSPORT: Pliée, elle se transporte par sa poignée
centrale, en ayant pris soin de mettre les roues avant en
position fixe (fig. a), ou par sa poignée latérale (fig. b).
27 RETIRER LA HOUSSE : Avec le dossier soulevé,
décrocher, à l’arrière de celui-ci, les deux élastiques
placés à l’intérieur (fig_a), défaire latéralement les
quatre ailettes (fig_b) et détacher le velcro de la
housse des accoudoirs (fig_c).
28 Défaire la housse latérale des fixations de la capote
(fig_a), détacher les deux boutons des côtés du dossier
(fig_b), défaire les deux élastiques de la housse du
repose-pieds (fig_c), enlever par le haut (en la poussant
de sous le siège) la sangle d’entrejambes (fig_d).
NAVETTA XL
MODE D’EMPLOI
29 CAPOTE : pour accrocher la capote, enfiler les fixations
dans leurs logements (fig_a), boutonner les côtés (fig_
b) et l’arrière (si des boutons y sont présents) (fig_c).
30 TABLIER : Le même tablier s’accroche et s’utilise à la
fois sur Navetta XL et sur la poussette Pliko Switch.
positionner le tablier, le boutonner des deux côtés
(fig_a), fixer le revers du tablier en le boutonnant à
celui-ci (fig_b) et, à l’aide du curseur, serrer (fig_c).
31 POIGNÉE : relever la poignée en la faisant pivoter vers
le haut jusqu’au déclic (flèche_a). La poignée n’est
bloquée que lorsqu’elle est en position verticale.
Pour abaisser la poignée, appuyer simultanément sur
les deux boutons ronds (flèche_b) et la faire pivoter
vers le bas (flèche_c). La poignée facilite le transport
(fig_d) et l’installation de Navetta XL sur le poussette.
32 POSITION BERCEMENT : la base de Navetta XL a une
forme spéciale qui, quand elle est posée sur une surface
plane, permet de bercer l'enfant (fig_a). POSITION LIT:
Navetta XL devient un berceau qui n'oscille pas en
retirant les deux chevalets placés sous la base (fig_b).
33 RÉGLAGE DU DOSSIER et DU REPOSE-PIEDS : grâce au
système COMFORT SYSTEM, on peut régler en même
temps le dossier et le repose-pieds. Tirer la poignée
vers l'extérieur (fig_a) et la tourner (fig_b) pour
soulever ou abaisser le dossier et le repose-pieds.
34 SYSTÈME QUATRE SAISONS : Navetta XL est munie de
trous sous la base, qui permettent, en les ouvrant ou
en les fermant, de réguler la circulation interne de l’air.
Pour ouvrir les trous, pousser les 4 petits leviers vers
l’extérieur.
35 ENLEVER LA HOUSSE DE NAVETTA XL : déboutonner
les côtés et l’arrière de la capote (fig_a), appuyer sur ses
fixations pour la décrocher (fig_b) et l’enlever par le haut.
36 Déboutonner le tablier et l’enlever (fig_a), relever
le dossier, déboutonner la housse interne (fig_b) et
l’enlever (fig_c).
SYSTÈME GANCIOMATIC
37 Ganciomatic System est le système pratique et rapide
qui vous permet de fixer la nacelle Navetta, le siège
auto Primo Viaggio et le siège Pliko Switch, à la Base
Ganciomatic du châssis d’un seul geste.
Toujours actionner le frein du châssis ou de la poussette
avant d’accrocher ou de décrocher les produits
(consulter le manuel d’instructions de chaque produit).
Vérifier que le produit est bien positionné sur le châssis.
38 FIXER NAVETTA XL : pour fixer Navetta XL, la placer
sur la poussette et appuyer des deux mains jusqu’au
déclic.
Toujours actionner le frein de la poussette ou du
châssis avant d’accrocher et de décrocher Navetta XL.
Vérifier que la nacelle est correctement accrochée.
_ Pour la décrocher, relever le levier de la poignée
Ganciomatic (flèche_a) et soulever Navetta XL (flèche_b).
ACCESSOIRES
39 KIT AUTO : il est possible de demander le Kit auto
(homologué ECE R44/04), il contient le nécessaire
pour monter la nacelle sur la voiture (fig_a).
HABILLAGE PLUIE COVER ALL : Habillage pluie
transparent, qui couvre tout, pour Navetta XL (fig_b).
40 BASSINET STAND : base d'appui pratique et
Page 28

- 28 -
compacte (fig_a).
SAC A LANGER : sac avec un petit matelas pour
langer bébé, applicable à la poussette (fig_b).
NUMÉROS DE SÉRIE
41 Pliko Switch reporte les informations relatives à sa
date de production.
_ Nom du produit, date de production et numéro de
série du siège (fig_a) et du châssis (fig_b).
42 Des informations telles que la date de production
sont reportées sous la base de Navetta XL.
_ Nom du produit, date de production et numéro de série.
Ces informations sont indispensables en cas de
réclamation.
NETTOYAGE ET ENTRETIEN
ENTRETIEN DE L’ARTICLE: protéger l’article des agents
atmosphériques (eau, pluie ou neige); une exposition
continue et prolongée au soleil pourrait entraîner
un changement de couleur de nombreux matériaux;
ranger cet article dans un lieu sec.
NETTOYAGE DU CHÂSSIS: nettoyer régulièrement
les pièces en plastique à l’aide d’un linge humide; ne
pas utiliser de solvants ou autres produits similaires.
Veiller à ce que toutes les pièces métalliques
restent sèches pour prévenir la formation de rouille.
Maintenir le bon état de propreté de toutes les pièces
mobiles (mécanismes de réglage, mécanismes de
fixation, roues, etc.) en enlevant poussière ou sable;
graisser avec une huile légère si nécessaire.
NETTOYAGE DE L’HABILLAGE PLUIE: utiliser une éponge
et de l’eau savonneuse; ne pas utiliser de détergents.
NETTOYAGE DES ÉLÉMENTS EN TISSU: brosser les
éléments en tissu pour enlever la poussière et laver à
la main à une température maximale de 30° ; ne pas
tordre ; ne pas utiliser d’eau de javel ; ne pas repasser ;
ne pas laver à sec ; ne pas détacher à l’aide de solvants ;
ne pas sécher dans un sèche-linge à tambour rotatif.
PEG-PÉREGO S.p.A.
Peg-Pérego S.p.A. est certifiée ISO 9001.
La certification offre à la clientèle une
garantie de transparence et représente
un gage de confiance dans la façon de
travailler de l’entreprise.
Peg-Pérego se réserve le droit de
procéder à tout moment à des modifications sur les
modèles décrits dans cet ouvrage, pour des raisons
de nature technique ou commerciale.
Peg-Pérego est à la disposition de sa clientèle pour
satisfaire au mieux chacune de ses exigences. En cela, il
est très important et précieux pour nous de connaître
l’opinion de notre clientèle. Nous vous saurions donc
gré, après avoir utilisé un de nos produits, de remplir
le QUESTIONNAIRE DE SATISFACTION CLIENT, en
nous faisant part de toute observation ou suggestion
éventuelle. Vous trouverez ce questionnaire sur notre
site Internet, à l'adresse www.pegperego.com
SERVICE D’ASSISTANCE PEG-PÉREGO
En cas de perte de pièces ou de rupture de l'une
d'elles, utiliser exclusivement des pièces de rechange
originales Peg-Pérego. Pour d’éventuelles réparations,
substitutions, informations sur les produits, vente de
pièces de rechange d’origine et d’accessoires, contactez
le Service Assistance Peg Perego en indiquant, s’il est
présent, le numéro de série du produit.
tél. 0039/039/60.88.213 fax 0039/039/33.09.992
e-mail assistenza@pegperego.it site Internet www.
pegperego.com
DE_Deutsch
Vielen Dank, dass Sie sich für ein Peg-Pérego Produkt
entschieden haben.
PLIKO SWITCH
WARNUNG
_ WICHTIG: Diese Anweisungen sorgfältig lesen und
danach aufbewahren. Die Sicherheit des Kindes
könnte bei Nichtbeachtung der Anweisungen
gefährdet werden.
_ Dieser Artikel ist für die Beförderung eines Kindes im
Sitz und eines auf dem hinteren Trittbrett stehenden
Kindes vorgesehen.
_ Den Artikel nicht für mehr Insassen verwenden, als
vom Hersteller vorgesehen.
_ Die Kombination Gestell-Pliko Switch + Autositz-Pliko
Switch ist für Kinder mit einem Gewicht von 0-15 Kg
zugelassen. Das hintere Trittbrett eignet sich für den
Transport von einem zweiten Kind mit einem Gewicht
von 0-20Kg.
_ Das Untergestell Pliko Switch ist für den Gebrauch
in Verbindung mit den Ganciomatic-Produkten von
Peg-Pérego vorgesehen: Das Untergestell Pliko Switch
+ der Autositz “Primo Viaggio” (Gruppe 0+) sind für
Kinder ab der Geburt bis zu einem Körpergewicht
von 13 kg zugelassen; das Untergestell Pliko Switch +
die Wiege “Navetta” oder “Primonido” sind für Kinder
ab der Geburt bis zu einem Körpergewicht von 10 kg
zugelassen. Bei der Verwendung mit “Navetta“ oder
“Primonido“ das hintere Trittbrett nicht verwenden.
_ Vor Gebrauch sicherstellen, dass die Peg-Pérego
Ganciomatic Produkte korrekt am Artikel angebracht
wurden.
_ Es könnte gefährlich sein, das Kind ohne Aufsicht zu
lassen.
_ Den Fünf-Punkt-Sicherheitsgurt immer benutzen.
_ Bei Verstellen von beweglichen Teilen (Griff,
Rückenteil) auf das Kind acht geben.
_ Beim Halten und während des Herein- und
Herausnehmens des Kindes immer die
Feststellbremse einlegen.
_ Die Montage, die Zusammensetzung des Artikels,
die Reinigung und die Instandhaltung dürfen
ausschließlich von Erwachsenen durchgeführt
werden.
_ Artikel nicht mit fehlenden oder defekten Bauteilen
verwenden.
_ Vor dem Gebrauch sicherstellen, dass alle
Verbindungsmechanismen korrekt befestigt sind.
_ Nicht die Finger in die Mechanismen halten.
_ Gewichte, die am Tragebügel oder am Schieber
angebracht sind, können die Stabilität des Artikels
beeinträchtigen; die Anweisungen des Herstellers in
Bezug auf das vorgesehene Höchstgewicht beachten.
_ Keine Gegenstände mit einem Gewicht von mehr als 5
kg in den Korb legen. Niemals warme Getränke sowie
keine Gegenstände mit einem höheren Gewicht, als
das auf dem Getränkehalter angegebene in diesen
stellen. Keine Gegenstände von mehr als 0,2 kg in die
Taschen des Verdecks (sofern vorhanden) füllen.
_ Der vordere Sicherheitsbügel ist nicht zum Tragen
des Kindes geeignet; der vordere Sicherheitsbügel ist
nicht dazu gedacht, das Kind im Sitzen zu halten oder
den Sicherheitsgurt zu ersetzen.
_ Den Artikel nicht in der Nähe von Treppen oder
Stufen abstellen und nicht in Reichweite des Kindes
von Wärmequellen, offenem Feuer oder gefährlichen
Gegenständen abstellen.
_ Es könnte gefährlich sein, vom Hersteller nicht
genehmigtes Zubehör zu verwenden.
Page 29

- 29 -
_ Dieser Artikel ist nicht zum Joggen oder
Rollschuhlaufen geeignet.
_ Den Regenschutz (sofern vorhanden) nicht in
geschlossenen Räumen benutzen und immer
überprüfen, dass das Kind nicht schwitzt; den
Regenschutz nicht in die Nähe von Wärmequellen
bringen und beim Rauchen besondere Vorsicht
walten lassen. Überprüfen, dass sich der Regenschutz
nicht in bewegten Teilen des Sportwagens verfangen
kann; den Regenschutz vor dem Zusammenklappen
des Wagens abnehmen.
_ Beim Benutzen des Sportwagens mit zwei Kindern,
dürfen diese nie unbeaufsichtigt sein und die
Schiebergriffe nie ausgelassen werden. Das zweite
Kind darf bei leerem Sportwagen das Trittbrett nicht
betreten.
_ Den Befestigungsbügel zum Transport oder zum
Hochstellen des Sportwagens nicht benutzen, wenn
ein Kind darin sitzt.
NAVETTA XL
produkteigenschaften
Navetta XL-auto, Gruppe 0, „Universal“
_ Navetta XL ist gemäß europäischer Prüfnorm UN/ECE
R44/04 für Kinder mit einem Gewicht von 0 bis 10
kg zugelassen. Geeignet für die meisten Autositze,
jedoch nicht für alle.
_ Navetta XL kann in allen Fahrzeugen korrekt
befestigt werden, in deren Beschreibungs- bzw.
Wartungshandbuch die Kompatibilität mit
Rückhaltesystemen der Kategorie „Universal“ der
Gruppe 0 angegeben wird.
_ Navetta XL ist als „Universal“ eingestuft. Die
Prüfkriterien hierfür sind strenger als bei den
Vorgängermodellen ohne diese Zulassung.
_ Die abnehmbare Babyschale darf nur in
Fahrzeugen mit einem Rücksitz für 2 oder 3
Personen verwendet werden, der mit Zwei- oder
Drei-Punkt-Sicherheitsgurten ausgestattet ist, die
gemäß europäischer Prüfnorm UN/ECE R16 oder
gleichbedeutender Vorschriften zugelassen sind.
_ Bei Fragen oder für nähere Informationen zur
Befestigung der Navetta XL in den einzelnen
Fahrzeugtypen wenden Sie sich bitte an den
Hersteller oder Händler.
_ Navetta XL, Gruppe 0, muss quer zur Fahrtrichtung
befestigt werden.
_ Navetta XL darf nicht auf Autositzen befestigt
werden, die entgegengesetzt oder längs zur
Fahrtrichtung ausgerichtet sind.
_ Dieser Artikel ist mit einer laufenden Seriennummer
gekennzeichnet.
WARNUNG
WICHTIG: Lesen Sie diese Anweisungen
aufmerksam durch und bewahren Sie sie für die
gesamte Verwendungsdauer des Produktes am
dafür vorgesehenen Platz auf. Wenn Sie diese
Anweisungen nicht beachten, könnte die Sicherheit
Ihres Kindes gefährdet sein.
_ Es kann gefährlich sein, Ihr Kind unbeaufsichtigt zu
lassen.
_ Montage und Voreinstellung des Produktes müssen
von Erwachsenen durchgeführt werden.
_ Verwenden Sie das Produkt nicht, wenn es
unvollständig ist oder Schäden aufweist.
_ Vergewissern Sie sich vor Gebrauch, dass alle
Haltevorrichtungen korrekt befestigt sind.
_ Achten Sie darauf, die Finger nicht zwischen den
Bauteilen einzuklemmen.
_ Nicht in der Nähe von Wärmequellen, offenem Feuer
oder gefährlichen Gegenständen verwenden, die in
Reichweite des Kindes sind.
_ Es kann gefährlich sein, Zubehörteile zu verwenden,
die nicht vom Hersteller zugelassen sind.
_ Vergewissern Sie sich, dass die Gurte, mit denen
die Babyschale Navetta XL im Fahrzeug befestigt
wird, immer straff gespannt sind, und stellen Sie die
Sicherheitsgurte für das Kind immer genau ein.
_ Die Gurte dürfen keinesfalls verdreht sein.
_ Bitte tauschen Sie die Babyschale nach übermäßiger
Beanspruchung durch einen Unfall oder wenn sie
sichtbar beschädigt oder verformt ist, aus.
_ Das Sicherheitssystem darf unter keinen Umständen
vom Benutzer verändert werden.
_ Folgen Sie genauestens den vom Hersteller des
Kinderrückhaltesystems mitgelieferten Anweisungen.
_ Lassen Sie das Kind im Auto nicht unbeaufsichtigt in
der Babyschale Navetta XL.
_ Auch wenn kein Kind darin sitzt, muss die Babyschale
Navetta XL mit den Sicherheitsgurten des Fahrzeugs
befestigt sein. Andernfalls könnten mitfahrende
Personen bei plötzlichem, scharfen Bremsen verletzt
werden.
_ Das Kind nie auf den Arm nehmen oder außerhalb
der Babyschale setzen, wenn das Fahrzeug in
Bewegung ist. Andernfalls könnte das Kind bei
plötzlichem Bremsen, dies gilt auch für sehr geringe
Fahrgeschwindigkeiten, nach vorn geschleudert
werden.
_ Achten Sie besonders darauf, dass das Kind in der
Navetta XL bei einem Unfall nicht von Gepäckstücken
oder anderen Gegenständen verletzt werden kann.
_ Lassen Sie die Babyschale nicht unter direkter
Sonneneinstrahlung im Fahrzeug, da einige Teile
überhitzen und die empfindliche Kinderhaut
verletzen könnten. Überprüfen Sie dies, bevor Sie das
Kind in die Babyschale legen.
_ Achten Sie darauf, dass die Babyschale nicht durch
bewegliche Teile des Autositzes oder einer Autotür
blockiert ist.
_ Die Babyschale nicht ohne Bezug verwenden.
Der Bezug kann nur gegen ein vom Hersteller
zugelassenes Produkt ausgetauscht werden,
da er fester Bestandteil der Babyschale und der
entsprechenden Sicherheitseinrichtungen ist.
Beim Austausch von Teilen nur original Ersatzteile
verwenden.
_ Navetta XL ist zur Dämpfung von Stößen mit einem
Aufprallschutz aus Polystyrol ausgestattet, der
unter der Polsterung direkt in die Kunststoffschale
integriert ist. Er darf nicht entfernt werden.
_ Das Produkt ist nur für Kinder geeignet, die sich noch
nicht allein aufrichten können.
_ Das Produkt ist für Kleinkinder von der Geburt bis zu
einem Gewicht von 9 kg vorgesehen. Im Auto kann es
für Kinder von bis zu 10 kg genutzt werden.
_ Nur auf stabilen, horizontalen und trockenen
Oberflächen verwenden.
_ Andere Kinder dürfen nicht unbeaufsichtigt in der
Nähe des Kinderwagens spielen.
_ Montage und Voreinstellung des Navetta XL müssen
von Erwachsenen durchgeführt werden.
_ Verwenden Sie das Produkt nicht, wenn es
unvollständig ist oder Schäden aufweist.
_ Im Auto grundsätzlich den Sicherheitsgurt
verwenden. Bei Verwendung als Kinderwagen
den Sicherheitsgurt abnehmen und in die dafür
vorgesehene Tasche stecken.
_ Verwenden Sie nur vom Hersteller zugelassene
Kinderwageneinlagen. Achtung, verwenden Sie die
Kinderwageneinlagen nicht im Auto.
_ Versichern Sie sich vor Gebrauch, dass alle
Haltevorrichtungen korrekt befestigt sind.
_ Achten Sie immer auf das Kind, wenn Sie Teile des
Page 30

- 30 -
Kinderwagens (Griff, Rückenlehne) verstellen.
_ Überprüfen Sie regelmäßig den Griff (oder die
Griffe) und die Unterseite des Kinderwagens und
vergewissern Sie sich, dass keine Anzeichen für Risse
oder sonstige Schäden vorliegen.
_ Wenn Sie die Babyschale auf einem Ständer
verwenden, beachten Sie die Maximallänge der
Babyschale, die auf dem Ständer angegeben ist.
EIGENSCHAFTEN DES ARTIKELS
_ Diese Artikel sind fortlaufend nummeriert.
_ Pliko Switch On Track Modular ist ein modulares
System, das durch einen Fußsack gekennzeichnet
ist, der sowohl an der Navetta XL wie auch am
Sportwagen Pliko Switch angebracht werden kann.
_ Pliko Switch On Track Modular besteht aus: Gestell
Pliko Switch, Kindersitz Pliko Switch, Navetta XL,
Autositz Primo Viaggio Tri Fix, Wickeltasche.
_ Pliko Switch ist ein Sportwagen mit umkehrbarem
Sitz: In Richtung der Mutter oder in Richtung der
Umgebung.
PRODUKTKOMPONENTEN
Bitte überprüfen Sie den Packungsinhalt und wenden
Sie sich bei Reklamationen an den Kundendienst.
_ Das Gestell Pliko Switch besteht aus: Korb, 2 dreh-
oder feststellbare Vorderräder, 2 Hinterräder mit
Handbremse, Flaschenhalter.
_ Der Kindersitz Pliko Switch besteht aus: Verdeck,
Vorderbügel, Regenschutz, Wickeltasche und
Fußsack, der auch für Navetta XL verwendet werden
kann.
_ Navetta XL besteht aus: Fußsack.
_ Autositz Primo Viaggio Tri Fix besteht aus: Fußsack,
Adapter, Sicherheitsgurte.
GERAUCHSANWEISUNG
1 SCHUTZVORRICHTUNGEN: vor dem Öffnen des
Gestells müssen die Schutzvorrichtungen (Abb_a)
entfernt werden, da sich das Gestell ansonsten nicht
korrekt öffnen lässt (Abb_b).
2 ÖFFNEN: die Entriegelungen an beiden Griffen
(Abb_a) hochziehen und gleichzeitig mit den
Schiebergriffen nach oben ziehen, bis das Gestell
geöffnet ist (Abb_b). Das korrekte Öffnen überprüfen:
die Schieberrohre müssen unten am Gestellrohr
vollständig einrasten (Abb_c).
3 MONTAGE VORDERRÄDER: den Hebel der zwei
Vorderräder herunterdrücken (Abb_a), das Rad bis
zum Einrasten einschieben (Abb_b) und die korrekte
Befestigung überprüfen (Abb_c).
4 MONTAGE HINTERRÄDER: die zwei durch eine
Bremsleitung verbundenen Räder differenzieren;
das linke Rad weist eine Kerbe auf, die mit der Kerbe
der hinteren linken Rohrstange übereinstimmt. Die
Räder bis zum Einrasten einschieben (Abb_a) und die
korrekte Befestigung überprüfen (Abb_b).
5 MONTAGE KORB: die Ösen über die vorderen Haken
(Abb_a) und die hinteren Haken (Abb_b) ziehen
und die zwei Zungen an der vorderen Rohrstange
befestigen (Abb_c).
6 MONTAGE GETRÄNKEHALTER: bis zum Einrasten auf
den Zapfen schieben (Abb_a). Der Getränkehalter
kann auf beiden Seiten des Gestells angebracht
werden.
7 AUSZIEHBARE GRIFFE: zum Höherstellen der Griffe,
den oberen Knopf drücken und den Griff gleichzeitig
hochziehen (Abb_a) und zum Niedrigerstellen der
Griffe, den unteren Knopf drücken und die Griffe
gleichzeitig hinunterdrücken (Abb_b).
8 FESTSTEHENDE ODER DREHENDE VORDERRÄDER:
die Hebel hochziehen, um die Räder fest zu stellen
(Abb_a), die Hebel herunterdrücken, um die Räder
in Drehstellung zu bringen (Abb_b). Auf unebenem
Boden wird empfohlen, die Räder in die feste Stellung
zu bringen.
9 HINTERRÄDER MIT ZENTRALER BREMSLEITUNG: einen
Bremshebel drücken, um das Gestell zu blockieren
(Abb_a), ihn hochziehen, um die Bremse zu lösen
(Abb_b).
10 BEFESTIGUNG DES SITZES AM GESTELL: der
umsetzbare Sitz kann sowohl in Blickrichtung
zur Mama (Abb_a) als auch in Fahrtrichtung
(Abb_b) auf dem Gestell befestigt werden. Den
Sitz in Übereinstimmung mit den Markierungen
positionieren und mit beiden Händen bis zum
Einrasten nach unten drücken. Die korrekte
Befestigung des Sitzes durch Hochziehen am
vorderen Schutzbügels überprüfen.
11 ABNEHMEN DES SITZES VOM GESTELL: die zwei Hebel
in Pfeilrichtung verstellen (abb_a) und die zwei Griffe
(abb_b) bis zum Loslösen nach oben ziehen. Die zwei
Griffe so weit hochziehen, bis der Sitz losgelöst ist.
Der Sitz kann ohne Gefahr mit darin sitzendem Kind
vom Gestell losgelöst und umpositioniert werden.
12 VORDERER SCHUTZBÜGEL: zur Befestigung des
Schutzbügels, die Enden des Bügels in die Armlehnen
stecken und zugleich die seitlichen Knöpfe drücken.
Den Bügel bis zum Einrasten zum Sitz hin schieben
(Abb_a). Um den vorderen Schutzbügel abzunehmen,
die zwei seitlichen Knöpfe drücken und den Bügel
herausziehen (Abb_b). Den vorderen Schutzbügel nur
auf einer Seite öffnen, um ein leichteres Hineinsetzen
und Herausnehmen des Kindes zu ermöglichen.
13 RÜCKENLEHNE: um die Rückenlehne einzustellen,
den Griff hochziehen (Abb_a) und in eine der 4
vorgegebenen Positionen bringen (Abb_b).
14 FUSSSTÜTZE: zum Verstellen der Fußstütze beidseitig
die Einrastschieber nach vorne (in Pfeilrichtung
ziehen Abb_a)und die Fußstütze in die gewünschte
Position schwenken (Abb_b).
15 FÜNFPUNKT-SICHERHEITSGURT: Zum Anlegen der
Sicherheitsgurte die beiden Schnallen des Bauchgurts
mit befestigten Schultergurten (Pfeil a) bis zum
Einrasten in den Beingurt stecken (Pfeil b). Zum
Abnehmen der Sicherheitsgurte den mittig auf der
Schnalle (Pfeil c) gelegenen runden Knopf nach oben
drücken und den Bauchgurt nach außen ziehen (Pfeil
d).
16 Den Bauchgurt beidseitig in Pfeilrichtung (Pfeil
a) festziehen. Zum Lockern des Gurts in die
entgegengesetzte Richtung ziehen. Der Bauchgurt
kann bis zum Sicherheitsverschluss festgezogen
werden (Abb. b).
17 Zur Höhenregulierung der Sicherheitsgurte die
beiden Schnallen auf der Rückseite der Lehne
herausziehen.
Ziehen Sie die Schultergurte zu sich heran (Pfeil a )
bis die Schallen ausrasten. Dann die Schnallen in die
Ösen an der Lehne stecken (Pfeil b). Die Schultergurte
aus der Schutztasche ziehen (Pfeil c) und in die
geeignete Öse einführen (Pfeil d); dann die beiden
Schnallen wieder hinter der Rückenlehne einrasten
(Pfeil e). Die Schnallen müssen hörbar einrasten,
damit sie fest sitzen (Abb. f).
19 FUSSSACK: Die Decke kann sowohl an der Babyschale
Navetta XL als auch am Sportwagen Pliko Switch
befestigt werden. Den Teil unter dem Fußsack
(Abb_a) abknöpfen, das Klettband (Abb_b) lösen und
erweitern (Abb_c).
20 Für die Verwendung am Kinderwagen heben Sie die
Fußstütze an und ziehen die Fußdecke von oben über
den Sicherheitsbügel (Abb_a). Befestigen Sie sie mit
dem Klettverschluss unter der Fußstütze (Abb_b) und
hängen Sie die Gummibandschlaufen der Fußdecke
an beiden Seiten des Verdecks ein (Abb_c).
21 Für die Verwendung am Sportwagen knöpfen Sie den
Page 31

- 31 -
unteren Teil der Fußdecke fest (Abb_a), heben die
Fußstütze an und ziehen die Fußdecke darüber (Abb_
b). Ziehen Sie sie unterhalb des Sicherheitsbügels
hindurch (Abb_c) und befestigen Sie sie mit den
Knöpfen (Abb_d).
22 REGENSCHUTZ: Den Regenschutz über dem
Kinderwagen anbringen (Abb. a) und die beiden
seitlichen Schlitze an den Knöpfen des Verdecks
einhaken (Abb. b).
23 Dann den Regenschutz mit den Gummilaschen je
nach Sitzposition an den vorderen (Abb. a) oder
hinteren (Abb. b) Stangen befestigen.
24 HINTERES TRITTBRETT: hilft der Mama kleine
Höhenunterschiede zu überwinden (Abb_a) und
ermöglicht ihr, ein zweites Kind zu transportieren
(Abb_b). Um den Sportwagen mit zwei Kindern
zu benutzen, muss der Wagen in die feststehende
Stellung gebracht, das kleinere Kind in den
Sitz gesetzt und mit Hilfe der Sicherheitsgurte
angeschnallt werden (1). Die Griffe festhalten (2) und
das zweite Kind auf die Fußstütze steigen lassen (3).
25 SCHLIESSEN: kann ohne Sitz, mit Sitz in Blickrichtung
Mama oder mit Sitz in Fahrtrichtung ausgeführt
werden. Wenn der Sitz in Blickrichtung Mama
aufgesetzt ist: vor dem Schließen, die Rückenlehne
komplett herunter stellen; wenn der Sitz in
Fahrtrichtung aufgesetzt ist: vor dem Schließen die
Rückenlehne hoch stellen und nach dem Schließen
wieder herunter stellen. Um den Sportwagen zu
schließen, die Vorderräder in die feststehende
Stellung bringen, das Verdeck, sofern vorhanden,
schließen. Die Entriegelungen an beiden Griffen
hochziehen und nach unten drücken, um die Sperre
der Schieberrohre zu lösen (Abb_a-b), den zentralen
Griff hinter der Rückenlehne nach oben ziehen
(Abb_c) bis die Sicherheitshaken einrasten (Abb_d).
Der zusammengeklappte Sportwagen kann senkrecht
frei stehen.
26 TRANSPORT: er kann an dem zentralen Griff gezogen
werden, wobei die Vorderräder in die feststehende
Stellung gebracht werden müssen (Abb_a) oder an
dem seitlichen Griff getragen werden (Abb_b).
27 ABNEHMBARER BEZUG: Bei aufgestellter Rückenlehne
die beiden innen auf der Rückseite der Lehne
gelegenen Gummilaschen aushaken (Abb. a), die vier
seitlichen Laschen herausziehen (Abb. b) und den
Klettbelag von der Polsterung der Armstützen lösen
(Abb. c).
28 Den seitlichen Bezug von der Verdeckbefestigung
lösen (Abb. a), die Knöpfe auf den beiden Seiten
der Rückenlehne öffnen (Abb. b), die beiden
Gummilaschen des Bezugs von der Beinauflage
abhaken (Abb. c) und den Beingurt von oben
herausziehen (dazu von unten gegen den Sitz
drücken) (Abb. d).
NAVETTA XL
GEBRAUCHSANWEISUNG
29 VERDECK: Zum Befestigen des Verdecks haken Sie die
Verbindungsteile in die Halterungen ein (Abb_a) und
knöpfen das Verdeck an beiden Seiten (Abb_b) und
an der Rückseite (Abb_c) fest.
30 FUSSSACK: Die Decke kann sowohl an der Babyschale
Navetta XL als auch am Sportwagen Pliko Switch
befestigt werden. Den Fußsack anbringen, auf beiden
Seiten festknöpfen (Abb_a), den Umschlag des
Fußsacks durch Anknöpfen daran anbringen (fig_b)
und mit dem Cursor festziehen (Abb_c).
31 TRAGEBÜGEL: Den Bügel anheben und bis zum
hörbaren „Klick“ nach oben klappen (Pfeil_a). Der
Bügel ist nur in senkrechter Position sicher fixiert.
Um den Bügel flach zu legen, gleichzeitig die runden
Tasten (Pfeil_b) drücken und den Bügel nach unten
klappen (Pfeil_c). Der Bügel erleichtert den Transport
(Pfeil_d) und die Befestigung der Navetta XL auf
Kinderwägen.
32 WIEGEPOSITION: Das Unterteil von Navetta XL
besitzt eine besondere Form, die es auf einer ebenen
Fläche aufliegend ermöglicht, das Kind zu wiegen
(Abb_a). BETTPOSITION: Navetta XL wird zu einem
feststehenden Bett, wenn die beiden Füße unter dem
Unterteil herausgezogen werden (Abb_b).
33 RÜCKENLEHNE UND BEINAUFLAGE EINSTELLEN:
Mit dem System COMFORT SYSTEM können die
Rückenlehne und die Beinauflage gleichzeitig
reguliert werden. Den Griff nach außen ziehen (Abb.
a) und drehen (Abb. b), um die Rückenlehme und die
Beinlehne aufzurichten oder zu senken.
34 VIER JAHRESZEITEN-SYSTEM: An der Unterseite der
Navetta XL befinden sich Öffnungen, durch die sich
die Luftzirkulation in der Babyschale regulieren lässt.
Zum Öffnen die vier kleinen Hebel nach außen
schieben.
35 DEN BEZUG DER NAVETTA XL ABNEHMEN: Das
Verdeck seitlich und rückwärts abknöpfen (Abb_a),
auf die Verbindungsteile drücken (Abb_b) und das
Verdeck nach
36 Knöpfen Sie die Fußdecke ab und nehmen Sie sie ab
(Abb_a). Heben Sie die Rückenlehne an, lösen Sie
den Bezug (Abb_b) und ziehen Sie ihn nach oben ab
(Abb_c).
GANCIOMATIC SYSTEM
37 Ganciomatic System ist das praktische und schnelle
System, dass es Ihnen ermöglicht, den Kindersitz
Navetta, den Autositz Primo Viaggio und den
Kindersitz Pliko Switch am Unterteil Ganciomatic des
Gestells mit nur einem Handgriff anzubringen.
Die Bremse des Gestells oder des Sitzwagens vor
dem Befestigen und Abnehmen der Produkte stets
betätigen (die entsprechenden Anweisungen der
Gebrauchshandbücher befolgen).
Überprüfen Sie, ob das Transportelement für das Kind
richtig befestigt wurde.
38 EINHÄNGEN VON NAVETTA XL: Navetta XL zum
Einhängen auf dem Sportwagen oder Wagen
positionieren und mit beiden Händen darauf drücken,
bis er mit einem Klicken einrastet.
Ziehen Sie immer die Bremse des Sportwagens oder
des Kinderwagengestells an, bevor Sie die Navetta XL
befestigen oder abnehmen.
Vergewissern Sie sich, dass die Babyschale korrekt
befestigt ist.
_ Zum Abnehmen den Ganciomatic-Hebel am Griff
(Pfeil_a) nach oben drücken und die Navetta XL nach
oben abnehmen (Pfeil_b).
ZUBEHÖR
39 KIT AUTO: Es ist möglich, das Kit Auto (Zulassung
nach ECE R44/04) zu bestellen, das alles Notwendige
enthält, um den Kindersitz im Auto zu montieren
(Abb_a).
REGENSCHUTZ COVER ALL: Alles abdeckender,
transparenter Regenschutz für Navetta XL (Abb_b).
40 BASSINET STAND: Praktische und kompakte
Ablagefläche (Abb_a).
WICKELTASCHE: Tasche mit Matte zum Wickeln des
Kindes zur Befestigung am Kinderwagen (Abb_b)
SERIENNNUMMER
41 Am Piko Switch sind Informationen zum
Produktionsdatum des Kinderwagens angebracht.
Produktname, Produktionsdatum un Seriennummer
des Sitzes (Abb. a) und des Wagens (Abb. b).
42 Auf der Unterseite der Babyschale Navetta XL finden
Page 32

- 32 -
Sie die Herstellungsdaten.
_ Produktname, Herstellungsdatum und Seriennummer
der Babyschale.
Diese Informationen sind unerlässlich im Falle von
Reklamationen.
REINIGUNG UND PFLEGE
REINIGUNG DES ARTIKELS: vor Witterungseinflüssen
schützen: Wasser, Regen oder Schnee; eine
längere Bestrahlung durch die Sonne kann zu
Farbänderungen der verschiedenen Materialien
führen; diesen Artikel an einem trockenen Ort
aufbewahren.
REINIGUNG DES GESTELLS: die Kunststoffteile
regelmäßig mit einem feuchten Lappen reinigen
– keine Lösungsmittel oder ähnliche Produkte
verwenden; sämtliche Metallteile trocken halten,
um einem eventuellen Rosten vorzubeugen; alle
beweglichen Teile (Einstellungsmechanismen,
Befestigungsmechanismen, Räder,…) von Staub oder
Sand unbedingt sauber halten und, wenn nötig, mit
Leichtöl schmieren.
REINIGUNG DES REGENSCHUTZES: mit einem
Schwamm und Seifenwasser waschen, ohne
Reinigungsmittel zu verwenden.
REINIGUNG DER STOFFTEILE: die Stoffteile abbürsten,
um den Staub zu entfernen und per Hand bei
einer Höchsttemperatur von 30° waschen; nicht
auswringen; nicht mit Bleichmittel behandeln; nicht
bügeln; nicht chemisch Reinigen; die Flecken nicht
mit Hilfe von Lösungsmitteln entfernen und nicht in
einem Trockner mit Drehtrommel trocknen.
PEG-PÉREGO S.p.A.
Peg-Pérego S.p.A. ist gemäß ISO 9001
zertifiziert. Die Zertifizierung garantiert
den Kunden und Verbrauchern
Transparenz und ermöglicht das
Vertrauen in die Arbeitsweise des
Unternehmens.
Peg Pérego kann zu jedem beliebigen Zeitpunkt
Änderungen an den in dieser Veröffentlichung
beschriebenen Modellen sowohl aus technischen, als
auch aus kommerziellen Gründen vornehmen.
Peg Pérego steht den Verbrauchern zur
Verfügung, um deren Anforderungen auf das
Bestmöglichste gerecht zu werden. Demnach ist es
ausgesprochen wichtig und wertvoll für uns, über
die Meinung unserer Kunden Bescheid zu wissen.
Wir bitten Sie daher, das FORMULAR ÜBER DIE
KONSUMENTENZUFRIEDENHEIT auszufüllen, nachdem
Sie unsere Produkte ausprobiert haben. Das Formular
ist unter folgender Internetadresse abrufbar: www.
pegperego.com
KUNDENDIENST PEG-PÉREGO
Bei Verlust oder Beschädigung ausschließlich
Originalersatzteile von Peg Pérego verwenden.
Für eventuelle Reparaturen, Ersatzforderungen,
Informationen zum Produkt, den Verkauf von
Originalersatzteilen und Zubehör setzen Sie sich bitte
mit dem Peg Perego Kundendienst in Verbindung.
Halten Sie dazu, falls vorhanden, die Seriennummer
des Produkts bereit.
Tel. 0039/039/60.88.213 Fax 0039/039/33.09.992
E-Mail assistenza@pegperego.it Webseite www.
pegperego.com
ES_Español
Le agradecemos haber elegido un producto Peg-
Pérego.
PLIKO SWITCH
ADVERTENCIA
_ IMPORTANTE: léase atentamente estas
instrucciones y consérvelas para futuras consultas.
La seguridad del niño podría estar en peligro si no
se leen dichas instrucciones.
_ Este artículo se ha diseñado para el transporte de 1 niño
en el asiento y un niño de pie en el patinete posterior.
_ No utilice este artículo para un número de ocupantes
superior al previsto por el fabricante.
_ El chasis-Pliko Switch + la silla de auto-Pliko Switch
está homologado para bebés desde el nacimiento
hasta los 15 kg de peso en el asiento. El patín
posterior está homologado para transportar a un
segundo bebé hasta los 20kg de peso.
_ El chasis Pliko Switch se ha diseñado para usarse junto
con los productos Peg-Pérego Ganciomatic: chasisPliko Switch + silla de auto “Primo Viaggio” (grupo
0+) está homologado para bebés desde el nacimiento
hasta los 13 kg de peso; chasis-Pliko Switch + capazo
“Navetta” o “Primonido” está homologado para bebés
desde el nacimiento hasta los 10 kg de peso. Cuando
se use con “Navetta” y “Primo Nido”, no utilizar el
patín posterior.
_ Antes de usar los productos Peg-Pérego Ganciomatic
asegúrese de que estén correctamente enganchados
al artículo.
_ Podría ser peligroso dejar a su hijo sin vigilancia.
_ Utilizar siempre el cinturón de seguridad de cinco
puntos y enganchar siempre la correa ventral a la tira
entrepiernas.
_ Preste atención a la presencia del niño cuando
efectúe operaciones de regulación de los dispositivos
(asa, respaldo).
_ Tener pulsado siempre el freno cuando el automóvil
esté parado y durante la carga y descarga del niño.
_ Las operaciones de montaje, preparación del
producto, limpieza y manutención deben realizarlas
sólo los adultos.
_ No utilice este artículo si le faltan partes o presenta
rupturas.
_ Antes de usarse, asegúrese de que todos los mecanismos
de enganche estén perfectamente enganchados.
_ No introduzca los dedos en los dispositivos.
_ Las cargas colgadas del manillar o asas pueden
desestabilizar el artículo; siga las indicaciones del
fabricante relativas a las cargas máximas que pueden
utilizarse.
_ No introduzca en la cesta cargas con un peso superior
a 5 kg. No coloque en los portabebidas pesos
superiores a los que figuran en el propio portabebidas
ni bebidas calientes. No meta en los bolsillos de la
capota (si los hay) pesos superiores a 0.2 Kg.
_ La barra frontal no se ha diseñado para soportar
el peso del niño; la barra frontal no se ha diseñado
para mantener al niño en el asiento y no sustituye el
cinturón de seguridad.
_ No utilice el artículo cerca de escaleras o peldaños;
no utilizar cerca de fuentes de calor, llamas directas u
objetos peligrosos que se hallen al alcance de los niños.
_ Podría ser peligroso usar accesorios no aprobados por
el fabbricante.
_ Este artículo no está adaptado para el footing o
carreras en patines.
_ No utilizar el protector de lluvia (si presenta) en
lugares cerrados y controlar siempre que el niño no
Page 33

- 33 -
esté acalorado. Nunca colocarlo cerca de fuentes de
calor y prestar atención a los cigarillos. Asegurarse
de que el protector de lluvia no interfiera en ningún
dispositivo en movimiento del carrito o silla de paseo.
Quitar siempre el protector de lluvia antes de cerrar
vuestro carrito o silla de paseo.
_ Cuando se usa la silla de paseo con dos niños, no
dejarlos nunca solos y evitar que el segundo niño se
suba sobre el patín posterior estando el carrito vacío.
_ No utilizar las asas de desenganche para transportar o
alzar la silla de paseo estando el bebé dentro.
NAVETTA XL
características del producto
Navetta XL-auto, Grupo 0, categoría
“Universal”
_ Navetta XL está homologado de acuerdo con el
reglamento UN/ECE R44/04 para bebés de un peso
comprendido entre 0-10 kg. Apto para la mayoría de
los asientos de los vehículos, pero no todos.
_ Navetta XL puede instalarse correctamente si en el
manual de uso y mantenimiento del vehículo figura la
compatibilidad con sistemas de retención “Universales”
de Grupo 0.
_ Navetta XL se ha clasificado “Universal” en virtud de
criterios de homologación más severos respecto de los
modelos precedentes, los cuales no disponen de esta
inscripción.
_ El dispositivo debe utilizarse únicamente en vehículos
con asientos traseros de 2 o 3 plazas que dispongan de
cinturones de seguridad de 2 o 3 puntos, homologados
conformemente al reglamento UN/ECE R16 o a normas
equivalentes.
_ En caso de dudas, o para una mayor información
acerca del acoplamiento de Navetta XL en vehículos
específicos, contactar con el fabricante o el vendedor.
IMPORTANTE:
_ “Navetta XL”, grupo 0, debe instalarse
perpendicularmente al sentido de marcha.
_ No instalar Navetta XL en asientos colocados
en dirección opuesta al sentido de la marcha o
transversalmente al sentido normal de la marcha del
vehículo.
_ Este artículo está enumerado en orden consecutivo.
ADVERTENCIA
IMPORTANTE: Leer atentamente estas instrucciones
y conservarlas en su respectivo alojamiento durante
toda la vida útil del producto. La seguridad del
bebé podría comprometerse si se incumplen dichas
instrucciones.
_ Podría ser peligroso dejar a su bebé sin vigilancia.
_ Las operaciones de montaje y de preparación del
artículo deben efectuarse por adultos.
_ No utilizar el producto si existen rupturas o le faltan
piezas.
_ Antes del uso, cerciorarse de que todos los
mecanismos de enganche estén enganchados
correctamente.
_ Evitar introducir los dedos dentro de los mecanismos.
_ No utilizar cerca de fuentes de calor, llamas libres u
objetos peligrosos que estén al alcance de los brazos
del bebé.
_ Podría ser peligroso utilizar accesorios no aprobados
por el fabricante.
_ Asegurarse de que las correas para fijar Navetta XL al
vehículo estén siempre tensas y ajustar aquellas que
bloqueen el bebé.
_ No doblar nunca las correas.
_ Se aconseja reemplazar el dispositivo si ha estado
sometido a fuertes golpes debido a un accidente o si
existen signos evidentes de ruptura o deformación.
_ El usuario no debe modificar el dispositivo de
seguridad bajo ningún concepto.
_ Seguir atentamente las instrucciones del sistema de
retención del bebé que proporciona el fabricante.
_ No dejar el bebé sin vigilancia dentro de Navetta XL
en el automóvil.
_ Navetta XL debe estar siempre fijado con los
cinturones de seguridad del vehículo, incluso cuando
el bebé no esté en su interior. En caso de frenado
repentino, podría ocasionar lesiones a los ocupantes
del vehículo.
_ Durante los viajes en automóvil, no tener nunca al
bebé en brazos y no ponerlo nunca fuera de Navetta
XL. En caso de frenado repentino, incluso a baja
velocidad, el bebé se proyectaría fácilmente hacia
adelante.
_ Prestar especial atención a maletas u otros objetos
que puedan ocasionarle lesiones al bebé estando
dentro de Navetta XL en caso de accidente.
_ No dejar Navetta XL en el vehículo expuesto al sol, pues
algunas partes podrían recalentarse y dañar la piel del
bebé, por lo que debe controlarlo antes de colocar al bebé.
_ Prestar especial atención a que Navetta XL no quede
bloqueado ni por una parte móvil del asiento ni por la
puerta.
_ No utilizar Navetta XL sin su forro de tejido, el cual
no puede reemplazarse por otro no aprobado por el
fabricante puesto que es parte integrante del capazo
y de la seguridad. En caso de sustitución, utilizar un
repuesto original.
_ Navetta XL se ha diseñado con dispositivo de
absorción de impacto en poliestireno, incorporado
directamente en el chasis debajo del acolchado. No
quitarse.
_ Este producto es únicamente apto para bebés que no
puedan sentarse por sí solos.
_ Este producto se ha concebido para bebés desde
el nacimiento hasta los 9 kg de peso. Si se usa en el
automóvil, se permite hasta los 10 kg de peso.
_
Utilizar siempre el cinturón de seguridad durante el uso
en el automóvil. Para el uso como cochecito, quitar el
cinturón y guardarlo en su correspondiente bolsillo.
_ Utilizar únicamente en superficies duras, horizontales y
secas.
_ No dejar que otros niños jueguen sin vigilancia cerca
del cochecito.
_ Prestar especial atención a la presencia del bebé
cuando se realicen operaciones de ajuste de los
mecanismos (manillar, respaldo).
_ Controlar con frecuencia el manillar (o las asas) y el
fondo del cochecito y comprobar la inexistencia de
rupturas o desperfectos.
_ Cuando utilice el cochecito con un soporte,
comprobar la máxima longitud del cochecito que se
especifique en dicho soporte.
CARACTERÍSTICAS DEL ARTÍCULO
_ Estos artículos se numeran progresivamente.
_ Pliko Switch On Track Modular es un sistema modular
caracterizado por una única cubierta que se puede
aplicar tanto en el moisés Navetta XL como en la silla
de paseo Pliko Switch.
_ Pliko Switch On Track Modular se compone de:
armazón Pliko Switch, sillita Pliko Switch, moisés
Navetta XL, silla para coche Primo Viaggio Tri Fix,
bolsa de cambio.
_ Pliko Switch es una silla de paseo con sillita reversible:
hacia la madre o hacia el mundo.
COMPONENTES DEL ARTÍCULO
Compruebe el contenido de este embalaje y en caso
Page 34

- 34 -
de reclamación póngase en contacto con el Servicio
de Asistencia.
_ Armazón Pliko Switch se compone de: cesta, 2 ruedas
anteriores piruetantes o bloqueables, 2 ruedas
posteriores con freno de hilo, portabebidas.
_ Sillita Pliko Switch se compone de: capota, frontal,
paralluvia, bolsa de cambio y cubierta que se puede
utilizar también en la Navetta XL.
_ Moisés Navetta XL se compone de: capota.
_ Silla de coche Primo Viaggio Tri Fix se compone de:
capota, reductor, cinturones de seguridad.
INSTRUCCIONES DE USO
1 PROTECCIONES EMBALAJE: antes de abrir el chasis
deben desmontarse las protecciones (fig. a), sino el
chasis no se abrirá correctamente (fig. b).
2 APERTURA: alzar al mismo tiempo las palancas de las
dos asas (fig. a) y tirar hacia arriba hasta abrir el chasis
(fig. b). Comprobar su correcta apertura. Los tubos
laterales deben estar bien acoplados entre sí (fig. c).
3 MONTAJE RUEDAS DELANTERAS: bajar la palanca
de las dos ruedas anteriores (fig. a), meter la rueda
hasta oir un “click” (fig. b) y comprobar el correcto
enganche (fig. c).
4 MONTAJE RUEDAS TRASERAS: diferenciar las dos
ruedas unidas por el cable de freno. La rueda
izquierda presenta un engache que debe coincidir
con el enganche del tubo posterior izquierdo. Meter
las ruedas hasta oir un “click” (fig. a) y comprobar el
correcto acoplamiento (fig. b).
5 MONTAJE CESTA: encajar los ojales a los ganchos
delanteros (fig. a) y a los ganchos posteriores (fig.
b) y abotonar a continuación las dos aletas al tubo
anterior (fig. c).
6 MONTAJE PORTABEBIDAS: encajarlo en el perno hasta
oir un “click” (fig. a). Puede ir colocado a ambos lados
del chasis.
7 ASAS QUE SE EXTIENDEN: para alzar las asas, pulsar
sobre el botón superior y simultáneamente alzarlas
(fig. a). Para bajarlas, pulsar el botón inferior y
simultáneamente bajarlas (fig. b).
8 RUEDAS ANTERIORES FIJAS O PIVOTANTES: alzar las
palancas para conseguir ruedas fijas (fig. a). Bajar las
palancas para conseguir ruedas pivotantes (fig. b). Se
aconseja usar ruedas fijas en terrenos difíciles.
9 RUEDAS POSTERIORES CON CABLE DE FRENO
CENTRALIZADO: presionar una palanca de freno para
bloquear el chasis (fig. a) y alzarla para desbloquearlo
(fig. b).
10 ENGANCHE DE LA SILLA DE PASEO AL CHASIS: la silla
reversible puede engancharse al chasis mirando
hacia la mamá (fig. a) o mirando hacia la calle (fig. b).
Colocarla sobre el chasis respetando los símbolos y
presionar hacia abajo con ambas manos hasta oir un
doble “click” de enganche. Asegurarse de que la silla
se haya acoplado correctamente tirando de ella hacia
arriba cogiéndola por la barra frontal.
11 DESENGANCHE DE LA SILLA DE PASEO DEL CHASIS:
cambiar la posición de las dos palanquitas siguiendo el
sentido de la flecha (fig_a) y tirar hacia arriba de las dos
asas (fig_b) hasta el desenganche. Tirar hacia arriba las dos
asas hasta desengancharlas. Es posible desenganchar y
volver a enganchar la silla permaneciendo el niño dentro.
12 BARRA FRONTAL: para enganchar la barra frontal,
encajar los acoples en los brazos, pulsar los dos botones
laterales y empujar hacia la silla de paseo hasta oir un
“click” de enganche (fig. a). Para quitarla, pulsar sobre los
dos botones y extraerla (fig. b). Abrir la barra frontal por
un sólo lado para facilitar la entrada y la salida del niño.
13 RESPALDO: para regularlo, alzar el asa (fig. a) y colocarlo
como desee en una de las 4 posiciones (fig. b).
14 REPOSAPIÉS: para bajarlo, empujar hacia abajo las dos
palancas (fig. a). Para alzarlo, empujar el reposapiés
hacia arriba (fig. b).
15 CINTURÓN DE SEGURIDAD DE 5 PUNTOS: para
engancharlo, introduzca las dos hebillas de la correa
de la cintura (con tirantes enganchados, flecha_a) en
la correa de separación de las piernas hasta oír un clic
(flecha_b). Para desenganchar, empuje hacia arriba el
pulsador redondo colocado en la parte central de la
hebilla (flecha_c) y tire hacia el exterior la correa de la
cintura (flecha_d).
16 Para apretar la correa de la cintura tire, desde los dos
lados, en el sentido de la flecha (flecha_a), para aflojarla
actúe en sentido contrario. La correa de la cintura puede
apretarse hasta el tope de seguridad (fig_b).
17 Para regular la altura de los cinturones de seguridad
es necesario desenganchar en la parte posterior del
respaldo de las dos hebillas.
Tire hacia sí los tirantes (flecha_a) hasta desenganchar
las hebillas y pasarlas por las ranuras del respaldo
(flecha_b). Saque los tirantes del saco (flecha_c)
y páselos por la ranura más adecuada (flecha_d),
finalmente vuelva a enganchar las dos hebillas detrás
del respaldo (flecha_e). Un clic determina que se han
enganchado correctamente las hebillas (fig_f).
18 CAPOTA: para engancharla, encajar lateralmente los
acoples en la silla de paseo (fig. a) y abotonarla al verso
del respaldo (fig. b). Para quitarla, quitar los acoples
y desbotonar. Para alzarla, tirar hacia sí mismo. Para
cerrarla, empujarla hacia atrás. Para transformar la
capota en parasol, abrir la cremallera con doble cursor
(fig. c) y desbotonarla desde el verso del respaldo.
19 CUBIERTA: El mismo cubrepiés se engancha y se usa
con Navetta XL y con la silla de paseo Pliko Switch.
Desabotone la parte situada debajo de la cubierta
(fig_a), separe el velcro (fig_b) y ensánchela (fig_c).
20 Para la versión cochecito, levantar el reposapiés, colocar
el cubrepiés por encima de la bandeja frontal (fig_a),
fijarlo por detrás del reposapiés con el velcro (fig_b) y
enganchar los elásticos a los botones de la capota (fig_c).
21 Para la versión silla de paseo, abotonar la parte inferior
del cubrepiés (fig_a), bajar el reposapiés y ajustarlo
(fig_b) metiéndolo por debajo de la bandeja frontal
(fig_c). Por último, abrochar los botones (fig_d).
22 PARA-LLUVIA: coloque el para-lluvia en la silla de
paseo (fig_a) y pase las dos ranuras laterales del
mismo por los botones de la capota (fig_b).
23 Fije el para-lluvia enganchando el elástico a los
montantes posteriores (fig_a) o a los anteriores (fig_
b) dependiendo de la posición del asiento.
24 PATÍN POSTERIOR: facilita a la madre a superar pequeños
desniveles (fig. a) y para transportar el segundo niño
(fig. b). Para utilizar la silla de paseo con dos pequeños,
frenar la silla, colocar el niño más pequeño en el asiento
y ponerle el cinturón de seguridad (1). Empuñar las
manillas (2) y subir al segundo niño sobre el patín (3).
25 CIERRE: puede realizarse sin la silla de paseo, con
la silla mirando hacia la mamá o hacia la calle. Si la
silla está mirando hacia la madre: antes de cerrarla,
bajar completamente el respaldo. Si la silla está
mirando hacia la calle: antes de cerrarla, alzar el
respaldo y una vez cerrado bajarlo. Para cerrar, hay
que poner las ruedas delanteras fijas, cerrar la capota
en caso fuere colocada. Tirar hacia arriba de las dos
palancas de las manillas y empujar hacia abajo para
desbloquear los tubos laterales (fig. a-b), tirar del
manillar centralizado hacia arriba (fig_c) hasta cerrar
los ganchos de seguridad (fig. d). La silla de paseo
cerrada permanece en pié por sí sola.
26 TRANSPORTE: se puede transportar por el manillar
central llevando las ruedas anteriores fijas (fig. a) o
por el manillar lateral (fig. b).
27 DESENFUNDABILIDAD: con el respaldo subido
desenganche, en la parte posterior del mismo, los dos
elásticos colocados en la parte interior (fig_a), saque
por el lado las cuatro aletas (fig_b) y separe el velcro
del revestimiento de los brazos (fig_c).
Page 35

- 35 -
28 Saque el revestimiento lateral de los enganches de
la capota (fig_a), separe de los lados del respaldo
los dos botones (fig_b), separe los dos elásticos del
saco del apoyapiernas (fig_c), sacar desde arriba
(empujando desde abajo el asiento) el cinturón de
separación de piernas (fig_d).
NAVETTA XL
INSTRUCCIONES DE USO
29 CAPOTA: Para enganchar la capota, introducir los
enganches en sus correspondientes alojamientos (fig_
a), abrochar los laterales (fig_b) y también los botones
traseros (fig_c).
30 CUBIERTA: El mismo cubrepiés se engancha y se usa
con Navetta XL y con la silla de paseo Pliko Switch.
Coloque la cubierta. Abotónela por los dos lados (fig_
a), fije la parte anterior de la cubierta abotonándola a
la misma (fig_b) y, con el tope, apriétela (fig_c).
31 MANILLAR: Levantar el manillar girándolo hacia arriba
hasta oír el clic (flecha_a). El manillar sólo se bloquea
en posición vertical. Para bajar el manillar, pulsar
simultáneamente sobre los dos botones redondos
(flecha_b) y girarlo hacia abajo (flecha_c). El manillar
facilita el transporte (flecha_d) y el acoplamiento de
Navetta XL sillas de paseo.
32 POSICIÓN MECEDORA: la base del moisés Navetta
XL tiene una forma especial que si se apoya en
una superficie plata, permite mecer al niño (fig_a).
POSICIÓN CAMA: Navetta XL se convierte en una cuna
que no se puede mecer sacando los dos caballetes
colocados debajo de la base (fig_b).
33 REGULACIÓN DEL RESPALDO y EL APOYAPIERNAS:
gracias al sistema COMFORT SYSTEM el respaldo y el
apoyapiernas se regulan simultáneamente. Tire el asa
hacia fuera (fig_a) y gírela (fig_b) para subir o bajar el
respaldo y el apoyapiernas.
34 SISTEMA CUATRO ESTACIONES: Navetta XL dispone de
orificios debajo de su base que al cerrarlos o abrirlos
regulan la circulación del aire interior.
Para abrir los orificios, mover las 4 palancas hacia fuera.
35 DESENFUNDAR NAVETTA XL: Desabrochar la capota
lateralmente y por detrás (fig_a), presionar sobre sus
enganches para desengancharla (fig_b) y quitarla por
arriba;
36 Desabrochar el cubrepiés y quitarlo (fig_a), levantar el
respaldo, extraer el acolchado (fig_b) y sacarlo por arriba
(fig_c).
GANCIOMATIC SYSTEM
37 Ganciomatic System es el sistema práctico y rápido
que permite enganchar el moisés Navetta, la silla de
coche Primo Viaggio y la sillita Pliko Switch a la Base
Ganciomatic del armazón con un solo gesto.
Accionar siempre el freno del chasis o del carrito
antes de enganchar y desenganchar los productos
(consultar los respectivos manuales de instrucciones).
Comprobar que el elemento de transporte del bebé
esté correctamente enganchado.
38 ENGANCHAR NAVETTA XL: para enganchar el moisés
Navetta XL, colocarlo en la silla de paseo y apretar con
las dos manos hasta oír un clic.
Accionar siempre el freno de la silla de paseo o del
carrito antes de enganchar y desenganchar Navetta XL.
Comprobar que el capazo esté correctamente enganchado.
_ Para desengancharlo, levantar la palanca del asa
Ganciomatic (flecha_a) y levantar Navetta XL (flecha_b).
ACCESORIOS
39 KIT AUTO: se puede solicitar el Kit auto (homologado
ECE R44/04), contiene lo necesario para montar el
moisés en el coche (fig_a).
PARALLUVIA COVER ALL: Paralluvia cubretodo
transparente para moisés Navetta XL (fig_b).
40 BASSINET STAND: base de apoyo práctica y compacta
(fig_a).
BOLSA DE CAMBIO: Bolsa con colchón para el cambio
del bebé, se puede enganchar a la silla de paseo
(fig_b).
NÚMEROS DE SERIE
41 Pliko Switch incluye información relativa a la fecha de
producción del mismo.
_ Nombre del producto, fecha de producción y numeración
de serie del asiento (fig_a) y del cochecito (fig_b).
42 Bajo la base de Navetta XL figuran las informaciones
relativas a su fecha de fabricación.
_ Nombre del producto, fecha de fabricación y
numeración de serie del mismo.
Estas informaciones son indispensables en caso de
reclamación.
LIMPIEZA Y MANTENIMIENTO
MANTENIMIENTO DEL PRODUCTO: proteger contra
agentes atmosféricos (agua, lluvia o nieve). Una
exposición contínua y prolongada al sol podría causar
cambios de color de muchos materiales. Conservar
este producto en un lugar seco.
LIMPIEZA DEL CHASIS: Limpiar periódicamente las partes
de plástico con un paño húmedo sin usar solventes u
otros productos similares. Mantener secas todas las partes
de metal para prevenir la oxidación. Mantener limpias
todas las partes móviles (dispositivo de regulación, de
enganche, ruedas...) quitando el polvo o la arena y, en
caso necessario, engrasarlas con aceites ligeros.
LIMPIEZA DEL PROTECTOR DE LLUVIA: lavar con una
esponja con agua y jabón, sin usar detergentes.
LIMPIEZA DE LAS PARTES DE TEJIDO: cepillar las
partes de tejido quitando el polvo y lavar a mano a
una temperatura máxima de 30º. No torcer, no usar
lejía, no planchar, no lavar en seco, no usar solventes
y no secar utilizando secadoras de tambor rotativo.
PEG-PÉREGO S.p.A
Peg-Pérego S.p.A posee la certificación de
la Norma ISO 9001. La certificación ofrece
a los clientes y a los consumidores la
garantía de transparencia y de confianza
en cuanto a los procedimientos de trabajo
de la empresa.
Peg-Pérego podrá aportar en cualquier momento
modificaciones a los modelos que se describen en el
presente manual por razones técnicas o comerciales.
Peg-Pérego está a disposición de sus consumidores
para responder satisfactoriamente a sus exigencias.
De ahí que sea fundamental y extremamente
importante conocer la opinión de nuestros Clientes.
Les agradeceríamos por tanto que tras utilizar uno de
nuestros productos rellenase, indicando eventuales
observaciones o sugerencias, el CUESTIONARIO DE
SATISFACCIÓN DEL CONSUMIDOR que se halla en
nuestra página Web www.pegperego.com
SERVICIO DE ASISTENCIA PEG-PÉREGO
En caso de que se pierdan o se dañen partes del
producto, utilizar sólo repuestos originales PegPérego. Para eventuales reparaciones, sustituciones,
informaciones sobre los productos, venta de recambios
originales y accesorios, póngase en contacto con el
Servicio de Asistencia Peg Perego indicando, si está
presente, el número de serie del producto.
tel. 0039/039/60.88.213 fax 0039/039/33.09.992
e-mail assistenza@pegperego.it sito internet www.
pegperego.com
Page 36

pliko switch
on track modular
PEG PEREGO S.p.A.
VIA DE GASPERI 50 20043 ARCORE MI ITALIA
tel. 0039 039 60881 fax 0039 039 615869/616454
Servizio Post Vendita - After Sale:
tel. 0039 039 6088213 fax: 0039 039 3309992
PEG PEREGO U.S.A. Inc.
3625 INDEPENDENCE DRIVE FORT WAYNE INDIANA 46808
phone 260 482 8191 fax 260 484 2940
Call us toll free: 1 800 671 1701
PEG PEREGO CANADA Inc.
585 GRANITE COURT PICKERING ONTARIO CANADA L1W3K1
phone 905 839 3371 fax 905 839 9542
Call us toll free: 1 800 661 5050
www.pegperego.com
FI000901I122
07/01/2010
 Loading...