

Page 1
Istruzioni d!uso IT
Instructions for use EN
Notice d!emploi FR
Gebrauchsanleitung DE
Instrucciones de uso ES
Instruções para uso PT
Gebruiksaanwijzing NL
Használati útmutató HU
Navodila za uporab SL
"#$%&'()** +, +,-./,01#*2 RU
Kullanim klavuzu TR
3456789 :;598<9 EL
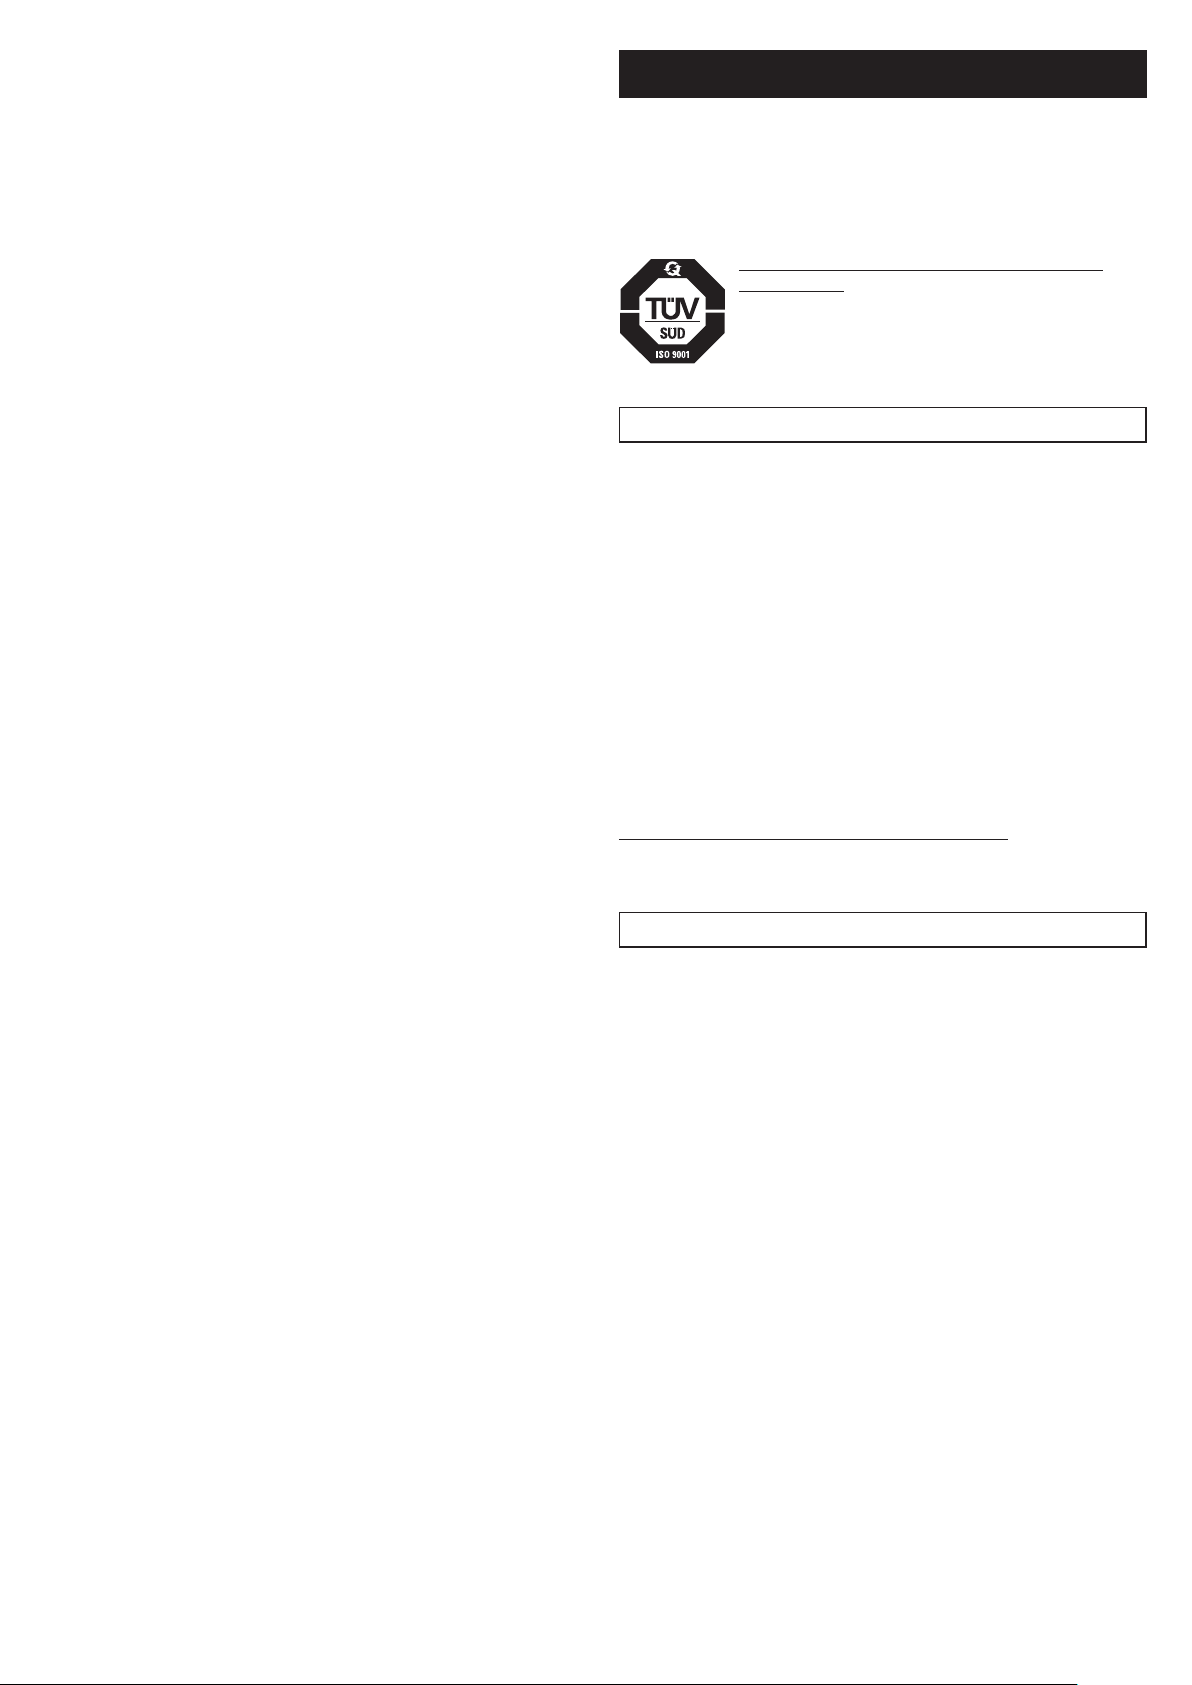
Navetta
S
FI000602I38
Page 2
1 2
3
4
65
Page 3
7
8
9
11
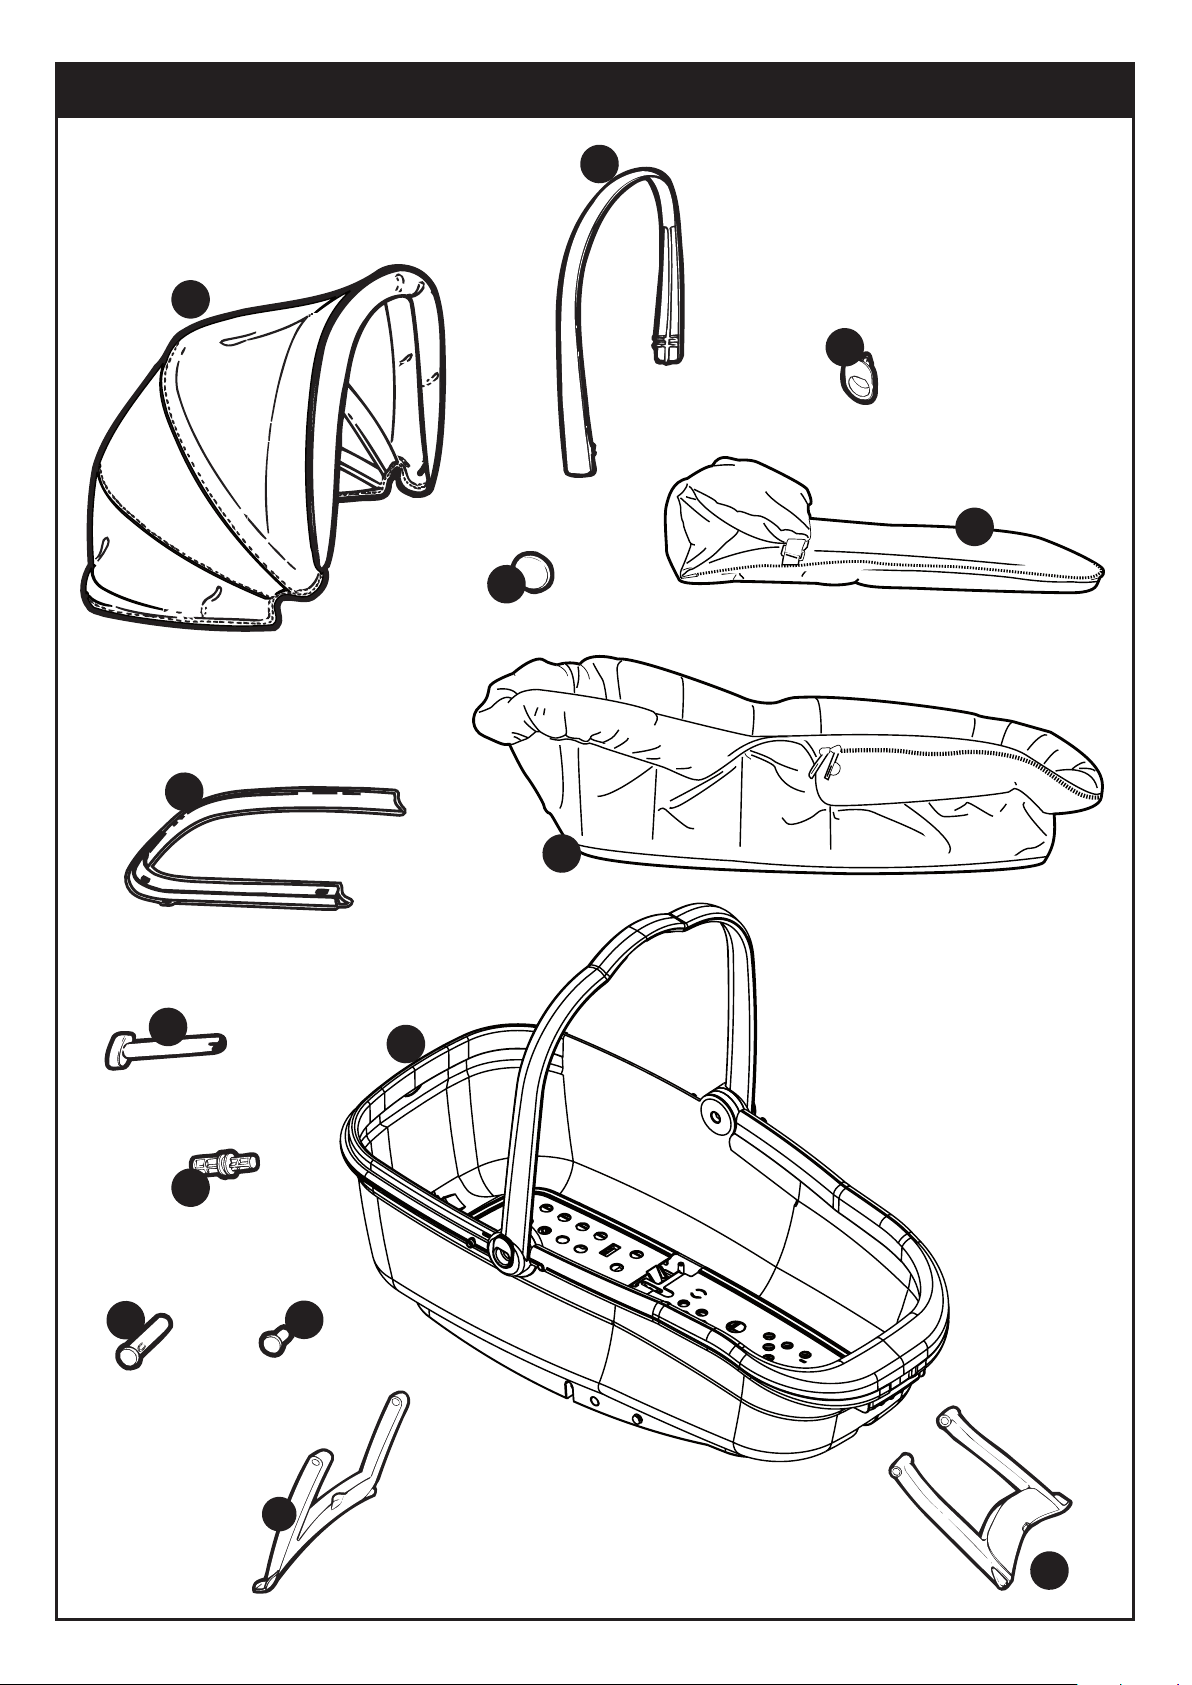
A
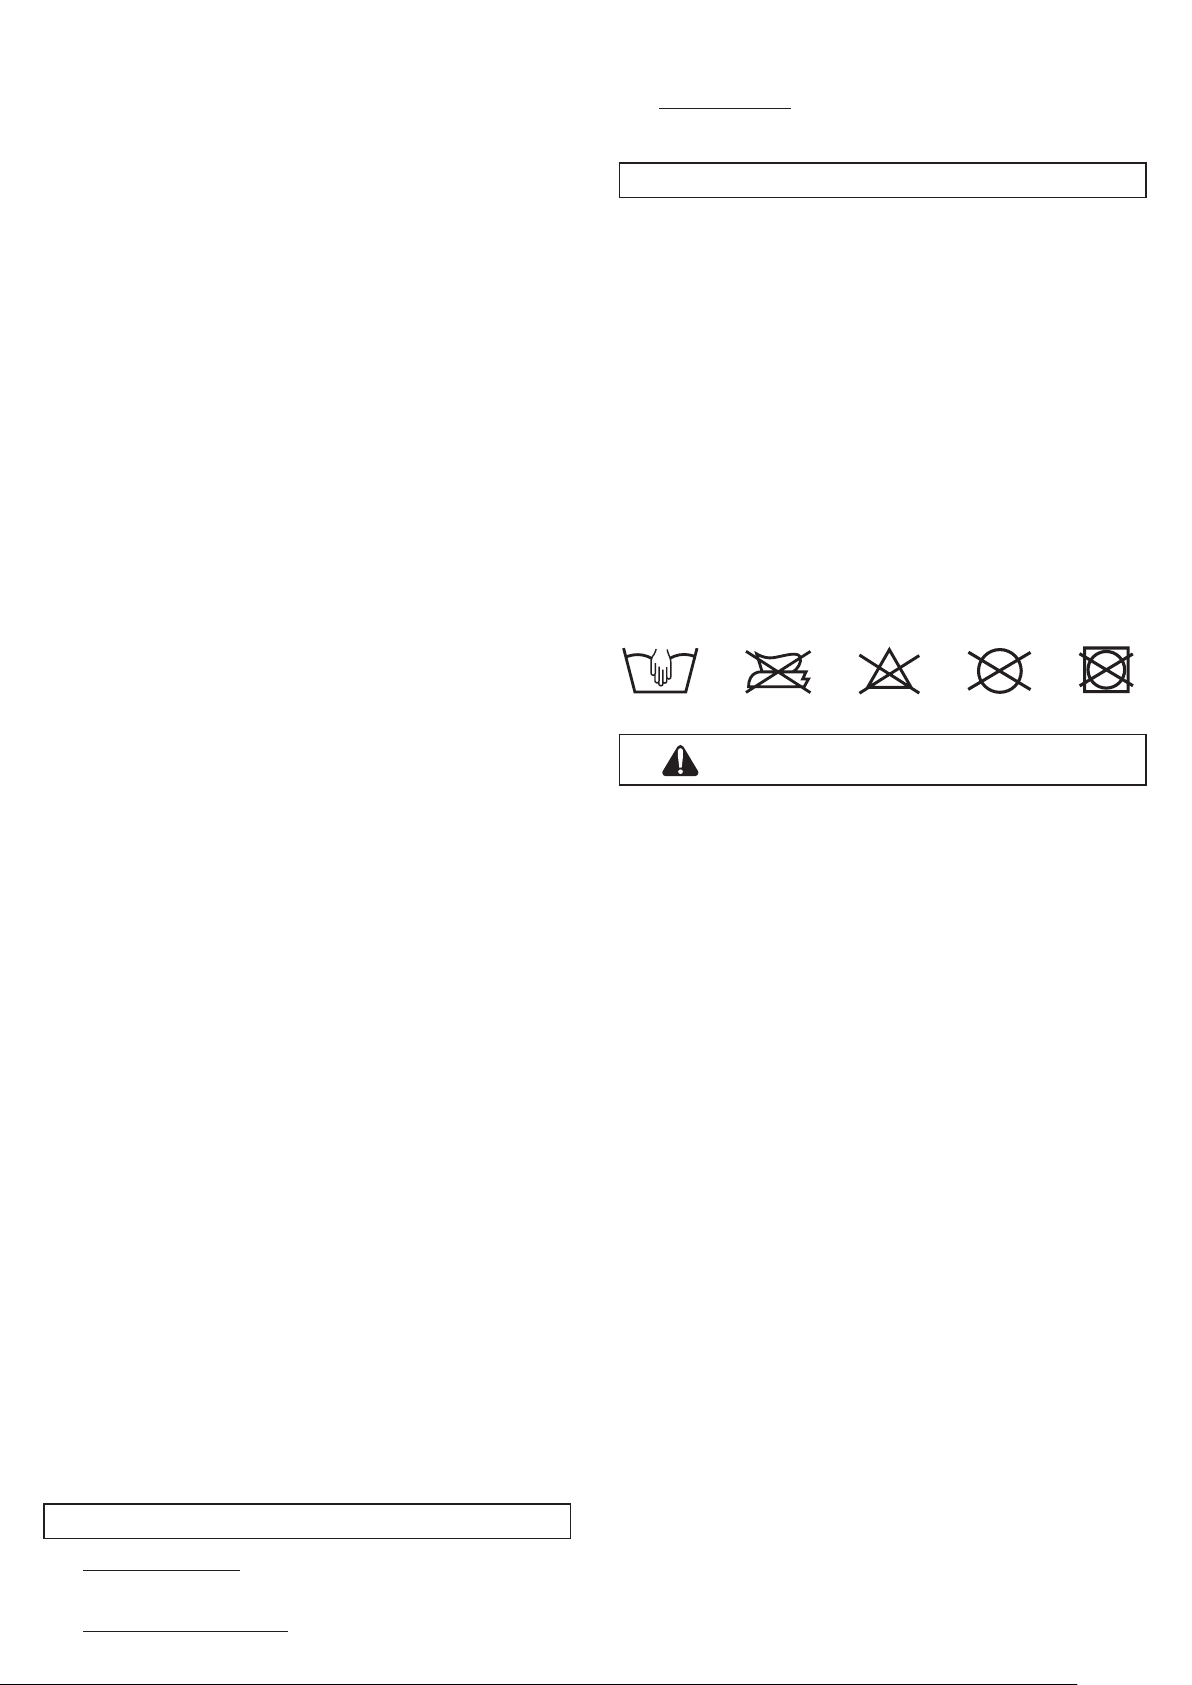
A
10
2
1
B
12
Page 4
3
2
1
13
15
14
16
GM
Ganciomatic
System
17 18
B
GM
Ganciomatic
System
C
A
Page 5

19
2020
2121
23
22
24
Page 6
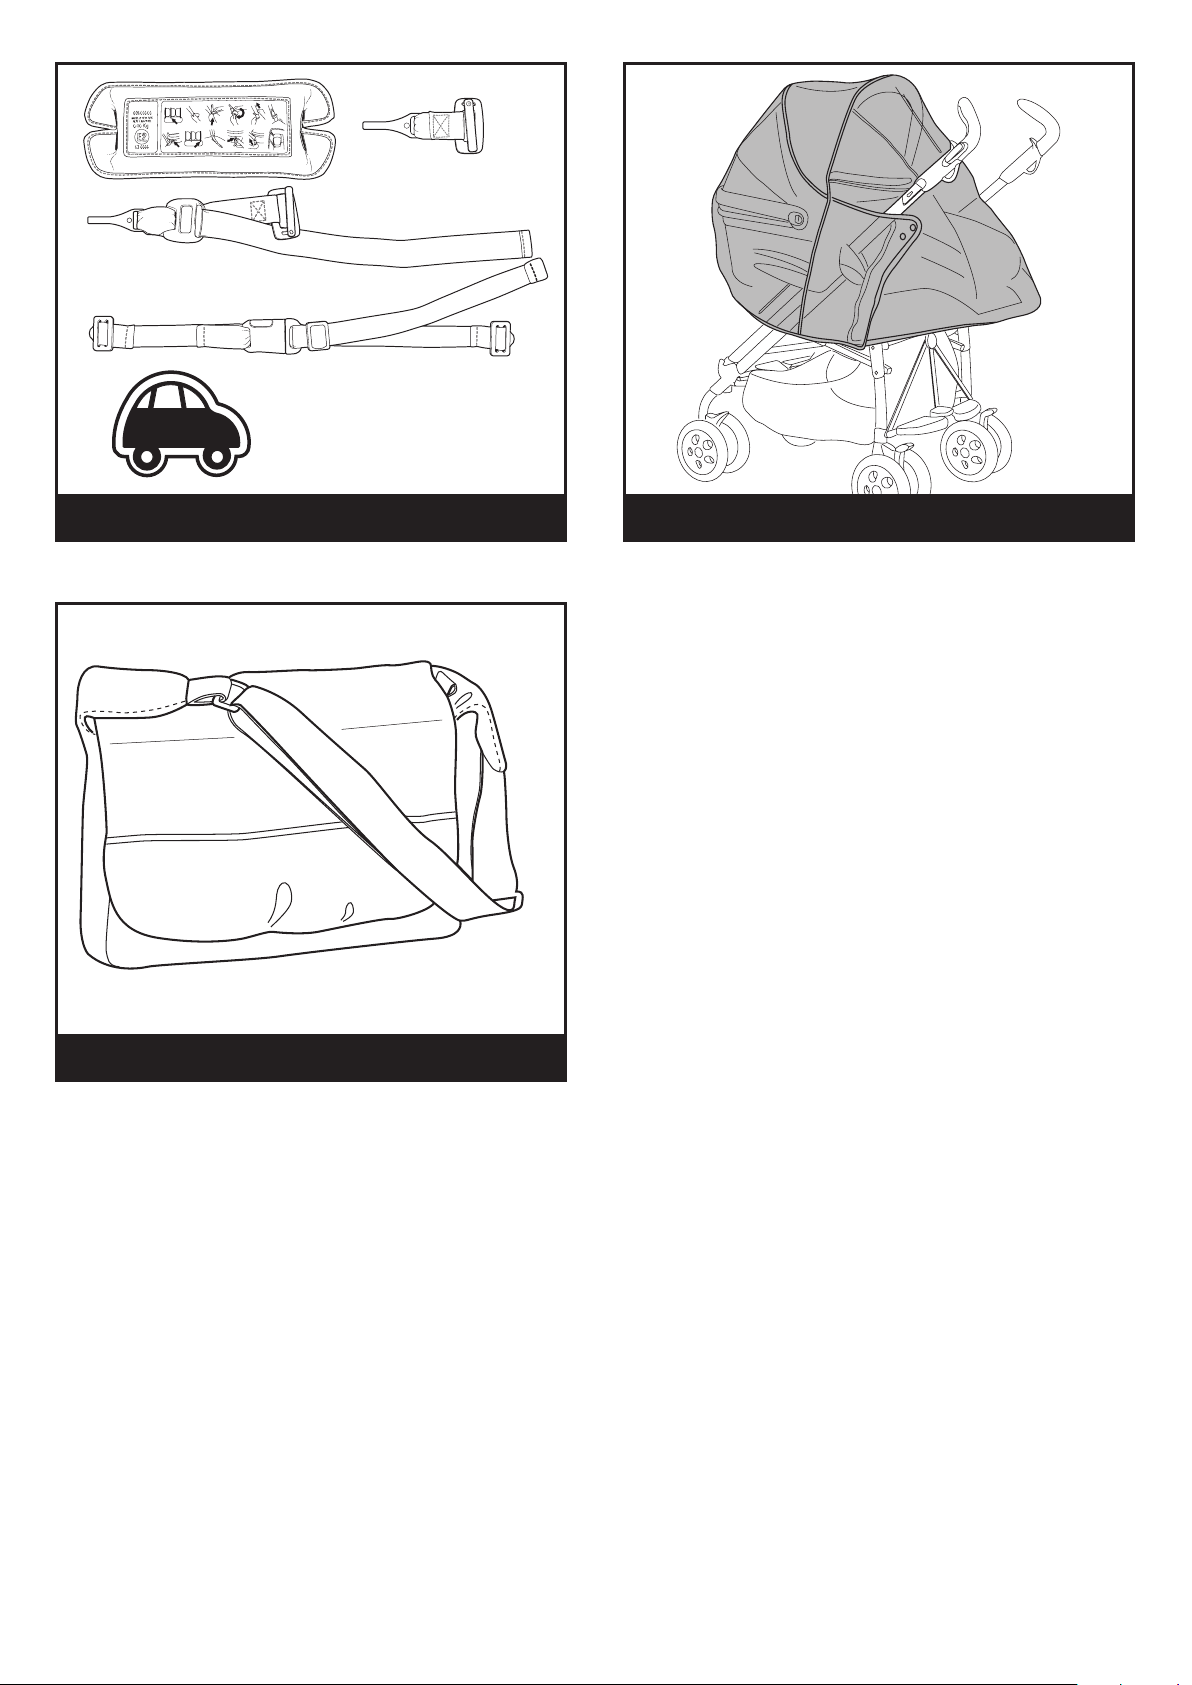
Kit auto
26 Accessory25 Accessory
27 Accessory
Page 7
Navetta S
2
1
6
4
3
11
5
7
9
8
10
12
13
14
Page 8

1 BCANAS•
2 SPST5289GL
3 SPST5290•
4 BCONAS•
5 SPST5264•
6 SPST5284•
7 BSANAS•
8 ITNAVE00•
9 SAPI5276•
10 SPST5403R
11 SPST5282•
12 SPST5404•
13 SPST5280•
14 SPST5281•
IT•ITALIANO
• IMPORTANTE: leggere attentamente queste
istruzioni e conservarle per un futuro utilizzo.
La sicurezza del bambino potrebbe essere messa
a rischio se non si seguono queste istruzioni.
• Peg Perego potrà apportare in qualunque
momento modifiche ai modelli descritti in questa
pubblicazione, per ragioni di natura tecnica o
commerciale.
Peg Perego S.p.A. è certificata ISO 9001.
La certificazione offre ai clienti e
ai consumatori la garanzia di una
trasparenza e fiducia nel modo di lavorare
dell'impresa.
SERVIZIO ASSISTENZA
Se fortuitamente parti del modello vengono perse o
danneggiate, usare solo pezzi di ricambio originali
Peg Perego. Per eventuali riparazioni, sostituzioni,
informazioni sui prodotti, la vendita di ricambi
originali e accessori, contatta il Servizio Assistenza
Peg-Perego:
tel.:0039-039-60.88.213,
fax: 0039-039-33.09.992,
e-mail: assistenza@pegperego.it,
www.pegperego.com
IT• Ricambi disponibili in piú colori da
specificare nella richiesta.
EN• Spare parts available in different colours
to be specified when ordering.
FR• Pièces de rechange disponibles en
plusieurs couleurs à spécifier dans la
demande.
DE• Ersatzteile in mehr Farben vorhanden,
die in der Anfrage spezifiziert werden
müssen.
ES• Repuestos disponibles en otros colores
que se especificarán en el pedido.
PT• Peças de reposição disponíveis em cores
alternativas a serem especificadas no
pedido.
NL• Reserveonderdelen verkrijgbaar in
meerdere kleuren, bij bestelling te
specificeren.
HU• A tartalék alkatrészek különböz=
színekben elérhet=k, melyeket
rendeléskor kell kiválasztani.
SL• Rezervni deli so na voljo v ve> barvah, ki
jih je treba navesti pri naro>ilu.
RU• ?1+@1$%* *AB2%$C &1/-*@#DE )0B%,0,
#B,FE,G*ADH '(1/1%. 0 /1+&,$B.
TR• SipariIte belirtilen deJiIik renklerdeki
yedek parçalari mevcuttur.
EL• KLMNOONPMQPR SQNTUVQWN VX SQRYZ[N
\[]WNMN. ^[ZVSQZ[_VMX `MNL
aN[NbbX_OXMX.
La Peg Perego è a disposizione dei suoi Consumatori
per soddisfare al meglio ogni loro esigenza. Per
questo, conoscere il parere dei ns. Clienti, è per noi
estremamente importante e prezioso. Le saremo
quindi molto grati se, dopo aver utilizzato un
ns. prodotto, vorrà compilare il QUESTIONARIO
SODDISFAZIONE CONSUMATORE che troverà in
internet al seguente indirizzo: www.pegperego.com/
SSCo.html.it,
segnalando eventuali osservazioni o suggerimenti.
ISTRUZIONI DʼUSO
IMBALLO
1• Prima di utilizzare la Navetta occorre eliminare i
gancini di sicurezza posti lateralmente.
CAPOTTINA
2• Per alzare la capottina, tirarla verso l!alto fino al
click da entrambi i lati.
3• Per abbassare la capottina, premere i due pulsanti
posti sugli attacchi e successivamente spingerla
verso il basso come in figura.
4• Aprendo la zip, la capottina ha un inserto in rete
che garantisce al bebé una maggiore areazione e
ti permette di vederlo da ogni posizione.
COPERTINA
5• La copertina é facilmente applicabile o removibile
grazie alla zip.
MANIGLIONE
6• Per alzare il maniglione, tirarlo verso l!alto fino al
click. Il maniglione è bloccato solo quando è nella
posizione verticale e i due blocchi sono rientrati
nella propria sede.
7• Per abbassare il maniglione, sbloccarlo, spingendo
in sú i due blocchi e successivamente spingere
verso il basso il maniglione.
8• Il maniglione facilita il trasporto e l!aggancio della
navicella sui carrelli e passeggini.
POSIZIONE DONDOLO E LETTINO
9• La base della Navetta ha una speciale forma che
Page 9
appoggiata su un piano é dondolabile.
10• La Navetta diventa lettino non dondolabile,
estraendo i cavalletti incorporati come in figura.
REGOLAZIONE SCHIENALE
11• Lo schienalino è regolabile in altezza, estraendo e
ruotando la maniglia come in figura.
trasparente, garantisce la totale protezione della
navicella agganciata sul passeggino.
27• Borsa Cambio: Borsa con materassino per il
cambio del bebè, agganciabile al passeggino.
PULIZIA E MANUTENZIONE
REGOLAZIONE CIRCOLAZIONE ARIA
12• La base della Navetta è dotata di fori apribili che
permettono l!entrata dell!aria dal sotto.
Per aprire i fori nella parte anteriore della navetta
(lato dove si trova la capottina), spingere i due
ganci verso l!esterno.
13• Per aprire i fori dalla parte posteriore (lato
opposto alla capottina) ,spingere uno dei due
ganci verso l!esterno.
SFODERABILITÀ
14• Per togliere la capottina sbottonarla lateralmente e
sfilarla dagli attacchi.
15• Per togliere il rivestimento sbottonarlo
lateralmente e sfilarlo anteriormente.
16• Sbottonare posteriormente il rivestimento e
rimuoverlo.
AGGANCIO E SGANCIO DELLA NAVICELLA SUI
PASSEGGINI
La Navicella Navetta è dotata di Sistema
Ganciomatic, agganciabile agli attacchi
Ganciomatic dei passeggini Pliko P3, GT3 e Centro.
17• Per agganciare la navicella al passeggino,
consultare il manuale di istruzione per alzare gli
attacchi Ganciomatic del passeggino, posizionare
la navicella verso la mamma e spingerla verso il
basso fino al click.
18• Per sganciare la navicella dai passeggini, spingere
prima la maniglia (posta nel lato opposto alla
capottina) lateralmente poi spingerla verso l!alto
e contemporaneamente alzare la carrozzina dal
maniglione verso l!alto.
NAVETTA IN AUTO
19• Navetta è predisposta a diventare Navetta
AUTO grazie ai due gancini (come in figura) e
acquistando a parte il Kit Auto.
NAVETTA/PASSEGGINO
• Per quando il bebè è più grande, la Navetta si
sfodera e il rivestimento si trasforma in una
seconda sacca con copertina da montare sul
passeggino.
• Sfoderare il rivestimento dalla Navetta.
20• Infilare il rivestimento della Navetta sulla seduta
del passeggino come mostrato in figura.
21• Infilare la cintura di sicurezza del passeggino,
precedentemente sganciata, nelle asole del
rivestimento della Navetta.
• I cinturini girovita di sicurezza devono passare per
le due asole laterali più esterne.
22• Rimboccare il rivestimento della Navetta alla
pedanetta del passeggino come mostrato in
figuta. Procedere poi a risvoltare la testata del
rivestimento sullo schienale del passeggino come
in figura.
23• Abbottonare lateralmente il rivestimento come
mostrato in figura.
24• Risvoltare la copertina del rivestimento sul
frontalino, fissandola ai lati con il velcro ai cursori
delle cerniere.
LINEA ACCESSORI
25• Kit Auto Navetta: É possibile richiedere il Kit auto
(omologato ECE R44/04), contiene il necessario
per montare la navicella sulla macchina.
26• Parapioggia Cover All: Parapioggia in PVC
Il vostro prodotto necessita un minimo di
manutenzione. Le operazioni di pulizia e
manutenzione devono essere effettuate solo da adulti.
• Si raccomanda di tenere pulite tutte le parti in
movimento e se occorre, lubrificarle con olio
leggero.
• Periodicamente pulire le parti in plastica con un
panno umido, non usare solventi o altri prodotti
simili.
• Spazzolare le parti in tessuto per allontanare la
polvere.
• Proteggere il prodotto da agenti atmosferici, acqua,
pioggia o neve; l!esposizione continua e prolungata
al sole potrebbe causare cambiamenti di colore in
molti materiali.
• Conservare il prodotto in un posto asciutto.
• La navicella é realizzata in polipropilene, resistente
agli urti e all!umidità da pulire con un panno umido.
• Per il lavaggio dei rivestimenti, seguire le suguenti
indicazioni.
ATTENZIONE
• QUESTO VEICOLO È INTESO PER BAMBINI DALLA
NASCITA FINO A 9 KG DI PESO.
• LE OPERAZIONI DI ASSEMBLAGGIO E PREPARAZIONE
DELL! ARTICOLO DEVONO ESSERE EFFETTUATE DA
ADULTI.
• NON UTILIZZATE IL PRODOTTO SE PRESENTA PARTI
MANCANTI O ROTTURE.
• POTREBBE ESSERE PERICOLOSO LASCIARE IL VOSTRO
BAMBINO INCUSTODITO. NON AGGIUNGERE UN
MATERASSINI.
• DA FERMI UTILIZZARE SEMPRE I FRENI; ASSICURARSI
CHE I FRENI SIANO AZIONATI DURANTE LE
OPERAZIONI DI CARICO E SCARICO DEI BAMBINI.
• PRIMA DELL! USO ASSICURARSI CHE TUTTI I
MECCANISMI DI AGGANCIO SIANO INGAGGIATI
CORRETTAMENTE.
• PRIMA DELL! USO ASSICURARSI CHE IL SEGGIOLINO
AUTO, LA CARROZZINA O LA SEDUTA RIPORTATA
SIANO CORRETTAMENTE AGGANCIATI.
• EVITARE DI INTRODURRE LE DITA NEI MECCANISMI.
• PRESTARE ATTENZIONE ALLA PRESENZA DEL
BAMBINO QUANDO SI EFFETTUANO OPERAZIONI
DI REGOLAZIONE DEI MECCANISMI (MANIGLIONE,
SCHIENALE).
• OGNI CARICO APPESO AL MANIGLIONE O ALLE
MANIGLIE PUÒ RENDERE INSTABILE IL PRODOTTO;
SEGUIRE LE INDICAZIONI DEL COSTRUTTORE
RIGUARDO AI MASSIMI CARICHI UTILIZZABILI.
• NON INTRODURRE NEL CESTELLO CARICHI PER
UN PESO SUPERIORE A 5 KG. NON INSERIRE NEI
PORTABIBITE PESI SUPERIORI A QUANTO SPECIFICATO
NEL PORTABIBITE STESSO E MAI BEVANDE CALDE.
NON INSERIRE NELLE TASCHE DELLE CAPOTTE (SE
PRESENTI) PESI SUPERIORI A 0.2 KG.
• NON UTILIZZARE IL PRODOTTO IN VICINANZA DI
SCALE O GRADINI; NON UTILIZZARE VICINO A FONTI
DI CALORE, FIAMME LIBERE OD OGGETTI PERICOLOSI
A PORTATA DELLA BRACCIA DEL BAMBINO.
• POTREBBE ESSERE PERICOLOSO UTILIZZARE
ACCESSORI NON APPROVATI DAL COSTRUTTORE.
Page 10

EN•ENGLISH
• IMPORTANT: carefully read instructions and keep
for future use.
The childʼs safety could be put at risk if the
instructions are not followed.
• PEG PEREGO reserves the right to make any
necessary changes or improvements to the products
shown at any time without notice.
Peg Perego S.p.A. is an ISO 9001 certified
company.
The fact that we are certified provides
a guarantee of our honesty for our
customers, and fosters trust in the
company!s way of working.
when set on a flat surface.
10• Navetta also becomes a regular crib that doesn!t
rock: simply pull out the incorporated stands as
shown in the figure.
ADJUSTING THE BACKREST
11• The height of the backrest can be adjusted by
pulling it up and turning the handle, as shown in
the figure.
ADJUSTING THE AIR CIRCULATION
12• The Navetta base features holes that can be
opened to allow air to flow into it from below.
To open the holes in the front of Navetta (the side
where the hood is located), push the two hooks
toward the outside.
13• To open the holes from the rear (the side opposite
the hood), push one of the two hooks toward the
outside.
CUSTOMER SERVICE
If parts of the model are accidentally lost or damaged,
use only original Peg Perego spare parts. Contact
the Peg Perego Customer Service for all repair work,
replacements, information about products, and sale of
original spare parts and accessories, at the following:
tel.: 0039-039-60.88.213
fax: 0039-039-33.09.992
e-mail: assistenza@pegperego.it,
www.pegperego.com
Peg Perego is at the consumer's service, meeting
every need in the best way possible. This is why our
customers' opinions are so important and valuable
to us. We would be very grateful if you would kindly
fill in the CUSTOMER SATISFACTION QUESTIONNAIRE
after using one of our products. You will find the
questionnaire on the Internet at "www.pegperego.
com/SSCo.html.en-UK".
Please note any observations or suggestions you may
have on the questionnaire.
INSTRUCTIONS FOR USE
PACKAGING
1• Before using the bassinet unit, remove the safety
hooks from the sides.
HOOD
2• To raise the hood, pull it up until both sides click
into place.
3• To lower the hood, press the two buttons on the
mounts and then push it downward as shown in
the figure.
4• When you open the zipper, the hood has a net
insert that guarantees better ventilation for your
baby and that allows you to see the baby from all
angles.
COVER
5• The cover can easily be attached or removed using
the zipper.
HANDLEBAR
6• To raise the handlebar, pull it up until it clicks into
place. The handlebar is locked only when it is in
the vertical position and the two blocks have been
inserted in their housings.
7• To lower the handlebar, release it by pushing
up the two blocks and then push the handlebar
downward.
8• The handlebar makes it easier to carry and hook
the bassinet unit onto the chassis and strollers.
POSITION OF ROCKER AND CRIB
9• The Navetta base is specially shaped so it will rock
REMOVABLE LINING
14• To remove the hood, unbutton it from the sides
and slip it out of the hooks.
15• To remove the lining, unbutton it from the sides
and slip it off the front.
16• Unbutton the lining from the back and remove it.
ATTACHING AND DETACHING THE BASSINET UNIT
ON STROLLERS
The Navetta Bassinet Unit is equipped with
the Ganciomatic System, to attach it to the
Ganciomatic hooks on the Pliko P3, GT3 and
Centro.
17• To attach the bassinet unit to the stroller,
consult the user!s manual to see how to raise
the Ganciomatic hooks on the stroller. Place
the bassinet unit turned towards you, and push
downwards until it clicks.
18• To detach the bassinet unit from the stroller, push
the handle (on the opposite side from the hood)
sideways then upwards, while lifting the bassinet
unit by the handle.
USING NAVETTA IN THE CAR
19• Navetta is designed to turn into Navetta AUTO
when you use the two hooks (shown in the figure)
together with the special Auto Kit that is available
for purchase separately.
BASSINET UNIT/STROLLER
• When the baby is bigger, the lining can be
removed from the bassinet unit and used as a
spare sack with a cover for the stroller.
• Remove the lining from the bassinet unit.
20• Slip the bassinet unit lining over the stroller seat,
as shown in the figure.
21• Unfasten the stroller safety belt and slip it through
the openings in the bassinet unit lining.
• The safety lap belts go through the two outer side
openings.
22• Tuck the bassinet unit lining around the stroller
footboard, as shown in the figure. Fold the top
part of the lining over the back of the stroller, as
shown in the figure.
23• Button the lining at the sides, as shown in the
figure.
24• Turn the lining cover down over the front bar,
fastening it to the zipper tabs at the sides with the
Velcro fasteners.
ACCESSORY LINE
Navetta Auto Kit: Request the auto kit (ECE
25•
R44/04 certified), which contains everything you
need for mounting the bassinet unit in your car.
26• Cover All Rain Canopy: Rain canopy made of clear
PVC, guarantees complete protection when the
Page 11

bassinet unit is attached to the stroller.
27• Diaper-Changing Bag: Satchel with pad for
changing baby!s diaper; attaches to the stroller.
CLEANING & MAINTENANCE
Your product requires only minimal maintenance.
Cleaning and maintenance operations must be
performed only by adults.
• Be sure to keep all moving parts clean, lubricating
them with light oil if necessary.
• Regularly clean the plastic parts with a damp cloth.
Do not use solvents or similar products.
• Brush the fabric parts to remove dust.
• Protect the product against smog, water, rain and
snow. Continued and extended exposure to sunlight
can change the colours of many materials.
• Store the product in a dry area.
• The bassinet unit is made of polypropylene. It is
resistant to bumps, damp-proof, and can be cleaned
with a damp cloth.
• To wash the lining, carry out the following
instructions.
WARNING
• THIS VEHICLE IS INTENDED FOR CHILDREN FROM
BIRTH UP TO A WEIGHT OF 9 KG.
• THE ASSEMBLY PROCEDURES AND PREPARATION OF
THE PRODUCT MUST BE CARRIED OUT BY AN ADULT.
• DO NOT USE THE PRODUCT IF THERE ARE BROKEN
OR MISSING PARTS.
• IT MAY BE DANGEROUS TO LEAVE YOUR CHILD
UNATTENDED. DO NOT ADD A MATTRESS.
• WHEN STATIONARY, ALWAYS APPLY THE BRAKE.
ENSURE THAT THE BRAKE IS ON WHILE LOADING AND
UNLOADING THE CHILD.
• BEFORE USE, CHECK THAT ALL THE LOCKING
MECHANISMS ARE CORRECTLY ENGAGED.
• BEFORE USE, ENSURE THAT THE CAR SEAT, BABY
CARRIAGE, OR CARRYING CHAIR ARE CORRECTLY
LOCKED INTO POSITION.
• DO NOT INSERT FINGERS INTO THE MECHANISMS.
• TAKE CARE IF CHILDREN ARE PRESENT WHILE
ADJUSTING THE MECHANISMS (HANDLE, BACKREST).
• ANY LOADS HANGING ON THE HANDLE OR HANDLES
MIGHT MAKE THE PRODUCT UNSTABLE. FOLLOW THE
MANUFACTURER!S INSTRUCTIONS AS REGARDS THE
MAXIMUM PERMITTED WEIGHTS.
• DO NOT PUT LOADS OF OVER 5 KG IN THE BASKET.
DO NOT PUT WEIGHTS IN THE DRINK-HOLDERS
HIGHER THAN THOSE SPECIFIED IN THE SAME,
AND NEVER INSERT HOT DRINKS. DO NOT INSERT
WEIGHTS OF OVER 0.2 KG INTO THE HOOD POCKETS
(IF PRESENT).
• DO NOT USE THE PRODUCT CLOSE TO STAIRS OR
STEPS. DO NOT USE CLOSE TO HEAT SOURCES,
NAKED FLAMES, OR DANGEROUS OBJECTS WITHIN
REACH OF THE CHILD.
• THE USE OF ACCESSORIES NOT APPROVED BY THE
MANUFACTURER COULD BE DANGEROUS.
FR•FRANÇAIS
• IMPORTANT: lire ces instructions avec attention
et les conserver pour toute référence future.
La sécurité de votre enfant pourrait être menacée
si ces instructions ne sont pas respectées.
• Pour des raisons techniques et commerciales,
PEG PEREGO pourra apporter à tout moment des
modifications aux modèles décrits dans ce manuel.
Peg Perego S.p.A. bénéficie de la
certification ISO 9001.
La certification assure aux clients et
aux consommateurs une garantie de
transparence et de confiance dans la
façon dont travaille l!entreprise.
SERVICE DʼASSISTANCE
En cas de perte ou dommage fortuit de pièces
du modèle, utilisez exclusivement les pièces de
rechange originales Peg Perego. Pour les éventuelles
réparations, substitutions, informations sur les
produits, la vente de pièces de rechange originales et
d!accessoires, contactez le Service d!assistance PegPerego:
tél.: 0039-039-60.88.213
fax: 0039-039-33.09.992
e-mail: assistenza@pegperego.it
www.pegperego.com
Peg Perego est à la disposition de ses consommateurs
pour satisfaire au mieux toutes leurs exigences.
À cette fin, connaître l!avis de nos clients est pour
nous extrêmement important et précieux. Nous vous
saurions donc gré, après avoir utilisé l!un de nos
produits, de bien vouloir remplir le QUESTIONNAIRE
SATISFACTION DU CONSOMMATEUR que vous
trouverez sur Internet à l!adresse suivante:
“www.pegperego.com/SSCo.html.en-UK”,
et de nous faire vos éventuelles observations ou
suggestions.
NOTICE DʼEMPLOI
EMBALLAGE
1• Avant d!utiliser la nacelle Navetta, il convient de
retirer les petits crochets de sécurité situés sur les
côtés.
CAPOTE
2• Pour relever la capote, la tirer de chaque côté vers
le haut jusqu!au déclic.
3• Pour abaisser la capote, appuyer sur les deux
boutons situés sur les fixations, puis la pousser
vers le bas comme indiqué sur la figure.
4• Une fois la fermeture éclair ouverte, la capote
est munie d!une toile qui garantit à l!enfant une
aération optimale et vous permet de le voir à tout
moment.
TABLIER
5• Le tablier peut se fixer et se retirer facilement
grâce à sa fermeture eclair.
POIGNÉE
6• Pour relever la poignée, la tirer vers le haut
jusqu!au déclic. La poignée n!est bloquée que
lorsqu!elle se trouve à la verticale et que les deux
verrous sont rentrés dans leur logement.
7• Pour abaisser la poignée, la débloquer en tirant
sur les deux verrous et en poussant la poignée
vers le bas.
8• La poignée facilite le transport et l'installation de
Page 12

la nacelle sur les châssis et poussettes.
POSITION FIXE OU BASCULE
9• La forme incurvée de la base de la nacelle Navetta
lui permet d'avoir une fonction bascule lorsqu!elle
est posée sur une surface plane.
10• Les pieds se deplient, permettant de stabiliser la
nacelle Navetta au sol.
RÉGLAGE DU DOSSIER
11• Le dossier est réglable en hauteur en tirant et en
faisant tourner la poignée comme indiqué sur la
figure.
RÉGLAGE DE LA CIRCULATION DE L!AIR
12• La base de la nacelle est équipée prises d!air
permettant une aération optimale.
Pour ouvrir les prises d!air avant de la nacelle
(côté capote), tirer les deux loquets vers
l!extérieur.
13• Pour ouvrir les prises d!air arrière de la Navetta
pousser l!un des deux loquets vers l!extérieur.
POUR ENLEVER LA HOUSSE
14• Pour enlever la capote, en déboutonner les côtés
et la décrocher de ses fixations.
15• Pour enlever la housse, en déboutonner les côtés
et la retirer par l!avant.
16• Déboutonner la housse à l!arrière et l!enlever.
UTILISATION DE LA NACELLE SUR LA POUSSETTE
La nacelle Navetta est équipée du système
Ganciomatic qui lui permete de s'accrocher aux
fixations Ganciomatic des poussettes Pliko P3,
GT3 et Centro.
17• Pour fixer la nacelle sur la poussette, se reporter
au manuel d!instructions de la pousette où il
est indiqué comment soulever les fixations
Ganciomatic de la poussette, positionner la nacelle
face à la maman et appuyer jusqu!a entendre le
clic d'enclenchement. Pour plus de sécurité, nous
vous recommandons vivement de vérifier que la
nacelle est correctement fixée sur la poussette en
la soulevant par l'anse.
18• Pour décrocher la nacelle de la poussette,
actionner et enfoncer la poignée (située
sous l'entourage de la nacelle côté pieds) et
simultanément, la soulever par l'anse pour la
retirer.
NAVETTA EN VOITURE
19• Navetta est pré-équipée sécurité auto grâce à
deux crochets (voir figure correspondante) et au
kit Auto vendu séparément. Pour la fixer dans la
voiture, se référer à la notice du kit auto.
NACELLE NAVETTA/POUSSETTE
• Lorsque l!enfant grandit, la housse de Navetta se
retire et se transforme en nid d'ange pouvant se
positionner sur la poussette.
• Retirer la housse de la Navetta.
Installer la housse de Navetta sur l!assise de la
20•
poussette, comme indiqué sur la figure.
21• Introduire la ceinture de sécurité de la poussette,
détachée au préalable, dans les passants de la
housse de Navetta.
• Les sangles ventrales de sécurité doivent passer
par les deux fentes latérales situées les plus à
l!extérieur.
22• Repositionner la housse nid d'ange de la Navetta
sur le repose-pied comme indiqué sur la figure
correspondente. Remonter ensuite la partie
supérieure de la housse nid d'ange sur le dossier
de la poussette.
23• Pressioner la housse nid d'ange comme indiqué
sur la figure.
24• Retourner le tablier de la housse nid d'ange
sur la main courante et la maintenir en fixant
les embouts de la fermeture éclair à l'aide des
attaches en velcro.
LIGNE ACCESSOIRES
25• Kit Auto Navetta: le Kit auto (homologué ECE
R44/04) est disponible sur demande. Il contient
tout le nécessaire pour monter la nacelle dans la
voiture.
26• Cover All: Bulle en PVC transparent qui garantit
une protection optimale contre la puie de la
nacelle sur la poussette.
27• Sac à langer: Sac contenant un petit matelas
pour changer le bébé, qui peut être accroché à la
poussette.
NETTOYAGE ET ENTRETIEN
Votre produit nécessite un minimum d!entretien. Les
opérations de nettoyage et d!entretien doivent être
effectuées uniquement par des adultes.
• Il est recommandé de maintenir toutes les parties
mobiles propres et, au besoin, de les lubrifier avec
une huile légère.
• Nettoyer régulièrement les parties en plastique avec
un chiffon humide, ne pas utiliser de solvants ou
d!autres produits du même type.
• Brosser les parties en tissu pour les dépoussiérer.
• Protéger le produit contre les agents
atmosphériques, l!eau, la pluie ou la neige ;
l!exposition continue et prolongée au soleil pourrait
altérer les couleurs de nombreux matériaux.
• Conserver le produit dans un endroit sec.
• La nacelle est fabriquée en polypropylène, résistant
aux chocs et à l!humidité. Nettoyer avec un linge
humide.
• Pour le lavage de la housse, suivre les instructions
ci-après.
AVERTISSEMENT
• CE VÉHICULE A ÉTÉ CONÇU POUR ACCUEILLIR DES
ENFANTS DE LA NAISSANCE À UN POIDS DE 9 KG.
• LES OPÉRATIONS D!ASSEMBLAGE ET DE PRÉPARATION
DE CET ARTICLE DOIVENT ÊTRE EFFECTUÉES PAR DES
ADULTES.
• NE PAS UTILISER CET ARTICLE SI DES PIÈCES SONT
MANQUANTES OU CASSÉES.
• IL PEUT ÊTRE DANGEREUX DE LAISSER VOTRE ENFANT
SANS SURVEILLANCE. NE PAS AJOUTER DE MATELAS.
• À L!ARRÊT, TOUJOURS ACTIONNER LES FREINS.
VEILLER À CE QUE LES FREINS SOIENT ACTIONNÉS
LORS DE L!INSTALLATION DES ENFANTS DANS LES
LANDAUS OU DE LEUR SORTIE.
• AVANT L!UTILISATION, S!ASSURER QUE TOUS LES
MÉCANISMES DE FIXATION SONT CORRECTEMENT
ENCLENCHÉS.
• AVANT L!UTILISATION, S!ASSURER QUE LE SIÈGE
AUTO, LE LANDAU OU LE SIÈGE AMOVIBLE SONT
CORRECTEMENT MONTÉS.
• ÉVITER DE METTRE LES DOIGTS DANS LES
MÉCANISMES.
• PRÊTER ATTENTION À LA POSITION DE L!ENFANT
LORS DES OPÉRATIONS DE RÉGLAGE DES ÉLÉMENTS
MOBILES (POIGNÉE, DOSSIER).
• LES CHARGES ACCROCHÉES AU GUIDON OU AUX
POIGNÉES LATÉRALES PEUVENT RENDRE LE PRODUIT
INSTABLE ; SE CONFORMER AUX INDICATIONS DU
FABRICANT RELATIVES AUX CHARGES MAXIMALES
ADMISES.
• NE PAS UTILISER LE PANIER POUR TRANSPORTER DES
CHARGES SUPÉRIEURES À 5 KG. NE PAS INTRODUIRE
Page 13
DANS LE PORTE-BOISSONS DES CHARGES
SUPÉRIEURES À CELLES INDIQUÉES SUR LE PORTEBOISSONS LUI-MÊME ; NE JAMAIS Y INTRODUIRE
DE BOISSONS CHAUDES. NE PAS INTRODUIRE DANS
LES POCHES DE LA CAPOTE (LORSQU!ELLES SONT
PRÉSENTES) DES OBJETS DONT LE POIDS EXCÈDE 0,2
KG.
• NE PAS UTILISER LE PRODUIT À PROXIMITÉ
D!ESCALIERS OU DE MARCHES ; NE PAS UTILISER À
PROXIMITÉ DE SOURCES DE CHALEUR, DE FLAMMES
DIRECTES OU D!OBJETS DANGEREUX SE TROUVANT À
LA PORTÉE DE L!ENFANT.
• L!UTILISATION D!ACCESSOIRES N!AYANT PAS ÉTÉ
APPROUVÉS PAR LE FABRICANT PEUT SE RÉVÉLER
DANGEREUSE.
• EN VOITURE, NE PAS UTILISER DE MATELAS
SUPPLÉMENTAIRE.
DE•DEUTSCH
• WICHTIG: Lesen Sie diese Hinweise sorgfältig
vor der Benutzung und bewahren Sie sie auf.
Wenn Sie diese Hinweise nicht beachten, kann die
Sicherheit Ihres Kindes beeinträchtigt werden.
• Farbliche und technische Änderungen vorbehalten.
Peg Perego S.p.A. ist gemäß ISO 9001
zertifiziert.
Die Zertifizierung garantiert den
Kunden und Verbrauchern Transparenz
und ermöglicht das Vertrauen in die
Arbeitsweise unseres Unternehmens.
KUNDENDIENST
Bei Verlust oder Beschädigung ausschließlich
Originalersatzteile von Peg Perego verwenden. Für
eventuelle Reparaturen, Produktinformationen,
den Austausch diverser Teile bzw. den Kauf von
Originalersatzteilen oder Zubehörteilen wenden Sie
sich bitte an den Kundendienst Peg-Perego:
Tel.: 0039-039-60.88.213,
Fax: 0039-039-33.09.992,
E-Mail: assistenza@pegperego.it,
www.pegperego.com
Als Peg Perego stehen wir unseren Kunden für jeden
Bedarf immer gerne zur Seite. Deshalb ist es auch
extrem wichtig, über die Meinung unserer Kunden
Bescheid zu wissen. Wir bitten Sie, das FORMULAR
ÜBER DIE KONSUMENTENZUFRIEDENHEIT nachdem Sie
unsere Produkte ausprobiert haben, auszufüllen. Das
Formular ist unter folgender Internetadresse abrufbar:
“www.pegperego.com/SSCo.html.en-UK”
Wir würden uns über Anmerkungen und Ratschläge
freuen.
GEBRAUCHSANLEITUNG
VERPACKUNG
1• Bevor Sie die Wiege Navetta benutzen, müssen Sie
die seitlich angebrachten Transportsicherungen
entfernen.
VERDECK
2• Zum Hochklappen das Verdeck so weit nach oben
ziehen, bis es auf beiden Seiten einschnappt.
3• Zum Herunterklappen die beiden Knöpfe
eindrücken und das Verdeck laut Abbildung nach
unten drücken.
4• Beim Öffnen des Reißverschlusses wird der
Netzeinsatz des Verdecks sichtbar, der eine
optimale Lüftung im Kinderwagen gewährleistet.
Außerdem können Sie so Ihr Kind von allen Seiten
sehen.
DECKE
5• Die Decke kann dank des Reißverschlusses leicht
angesetzt und wieder abgenommen werden.
TRAGEGRIFF
6• Zum Anheben den Tragegriff bis zum Einrasten
nach oben ziehen. Der Tragegriff ist nur dann
gesichert, wenn er vertikal steht und beidseitig die
Arretierungen eingerastet sind.
7• Zum Herunterklappen zuerst beidseitig die
Entriegelungsgriffe nach oben schieben und dann
den Tragebügel selbst nach unten drehen.
8• Der Tragebügel erleichtert den Transport und
das Einklinken der Wiege auf einem Gestell oder
Sportwagen.
Page 14

WIEGE- UND BETTSTELLUNG
9• Durch den gewölbten Unterboden kann die Wiege
auf flachem Untergrund schaukeln.
10• Durch Ausklappen der beiden eingebauten Stützen
(siehe Abbildung) steht die Wiege fest und dient
als Kinderbett.
EINSTELLUNG DER RÜCKENLEHNE
11• Zum Einstellen der Rückenlehnenneigung den Griff
laut Abbildung herausziehen und drehen.
EINSTELLUNG DER LUFTZIRKULATION
12• Der Boden des Oberteils Navetta ist mit
Lüftungsöffnungen ausgestattet, die eine
Luftzufuhr von unten gewährleisten.
Zum Öffnen der Luftlöcher auf der Verdeckseite,
die Schieber (1 und 2) nach außen drücken.
13• Zum Öffnen der Luftlöcher auf der hinteren Seite,
die Schieber (3) ebenfalls nach außen drücken.
ABNEHMEN DES BEZUGS
14• Zum Abnehmen des Verdecks die seitlich
angebrachten Knöpfe öffnen und das Verdeck aus
den Verbindungsstücken ziehen.
15• Zum Abnehmen des Bezugs die seitlich
angebrachten Knöpfe öffnen und den Bezug vorne
herausziehen.
16• Den Bezug hinten aufknöpfen und herausnehmen.
BEFESTIGEN UND ABNEHMEN DER
MULTIFUNKTIONSWIEGE AM BZW. VOM
SPORTWAGEN
Die Multifunktionswiege Navetta ist mit dem
Ganciomatic-System ausgestattet, das sich
problemlos an den Ganciomatic-Anschlüssen der
Sportwagen Pliko P3, GT3 und Centro einklinken
lässt.
17• Zum Einsetzen der Wiege in einen Sportwagen
unbedingt die Gebrauchsanleitung des jeweiligen
Sportwagen beachten. Die GanciomaticAnschlüsse des Sportwagens hochstellen, die
Wiege wie abgebildet positionieren und bis zum
Einrasten nach unten drücken.
18• Zum Abnehmen der Multifunktionswiege von
einem Sportwagen zuerst den Entriegelungsgriff
am Fußende der Wiege in Pfeilrichtung A schieben
und dann nach oben drücken (B). Gleichzeitig die
Wiege am Bügelgriff (C) nach oben heben.
NAVETTA IM AUTO
19• Navetta lässt sich dank der D-Ringe an
den Stirnseiten der Wiege und dem separat
erhältlichen Auto-Set in Navetta AUTO umrüsten
(siehe Abbildung).
WIEGE NAVETTA/SPORTWAGEN
• Wenn das Baby größer geworden ist, ziehen Sie
den Bezug der Wiege ab. Der Bezug kann jetzt als
zusätzlicher Sitzbezug oder als Fußsack in einem
Sportwagen eingesetzt werden.
20• Den Bezug der Wiege in den Sitz des Sportwagens
einschieben (siehe Abbildung).
21• Die Sicherheitsgurte des Sportwagens lösen und
die Schultergurte sowie den Schrittgurt durch die
Schlitze des Bezuges in der Mitte der Sitzfäche
ziehen.
• Die Sicherheitsgurte des Beckengurtes durch die
seitlichen Schlitze stecken.
22• Den Bezug des Oberteils über das Trittbrett des
Sportwagens stülpen (siehe Abbildung). Dann
das Kopfteil des Bezugs über die Fußstütze des
Sportwagens ziehen (siehe Abbildung).
23• Den Bezug auf den Seiten des Sportwagens
anknöpfen (siehe Abbildung).
24• Wickeln Sie den Fußsack des Bezugs um den
Schutzbügel und befestigen Sie ihn auf beiden
Seiten mit den Klettverschlüssen an den
Reißverschlussschiebern.
ZUBEHÖR
25• Kit Auto Navetta: Das Kit Auto (zugelassen gemäß
ECE R44/04) kann zusätzlich geliefert werden und
beinhaltet alles Notwendige für die Montage der
Multifunktionswanne im Auto.
26• Regenschutz Cover All: Transparenter
Regenschutz aus PVC. Garantiert einen
umfassenden Schutz der auf dem Sportwagen
befestigten Wanne.
27• Wickeltasche: Tasche mit Wickelunterlage. Lässt
sich am Sportwagen befestigen.
REINIGUNG UND PFLEGE
Ihr Produkt ist nur gering wartungsbedürftig. Die
Reinigung und Instandhaltung darf ausschließlich von
Erwachsenen durchgeführt werden.
• Alle beweglichen Teile unbedingt sauber halten und
wenn nötig, mit Leichtöl schmieren.
• Die Kunststoffteile regelmäßig mit einem feuchten
Lappen reinigen - keine Lösungsmittel oder ähnliche
Produkte verwenden.
• Die Stoffteile abbürsten, um den Staub zu entfernen.
• Den Produkt vor Witterungseinflüssen, wie Wasser,
Regen oder Schnee geschützt aufbewahren; eine
längere Bestrahlung durch die Sonne kann zu
Farbänderungen der verschiedenen Materialien
führen.
• Den Produkt an einem trockenen Ort aufbewahren.
• Die Multifunktionswanne wurde aus Polypropylen
hergestellt, ist stoßfest und feuchtigkeitsbeständig.
Mit einem feuchten Tuch reinigen.
• Für die Reinigung des Bezugs sind die folgenden
Hinweise zu beachten.
WARNUNG
• DIESES FAHRZEUG IST FÜR KINDER AB GEBURT BIS ZU
EINEM GEWICHT VON 9 KG VORGESEHEN.
• DER ZUSAMMENBAU SOWIE VORBEREITUNG DES
PRODUKTS MUSS DURCH ERWACHSENE PERSONEN
ERFOLGEN.
• PRODUKT NICHT VERWENDEN, FALLS EINZELTEILE
FEHLEN BZW. DAS PRODUKT SCHÄDEN AUFWEIST.
• LASSEN SIE IHR KIND NICHT UNBEAUFSICHTIGT.
• VERWENDEN SIE EINEN SICHERHEITSGURT SOBALD
IHR KIND SITZEN KANN. KEINE SITZPOLSTER
HINZUFÜGEN.
• BEI STEHEN BLEIBEN STETS DIE BREMSEN BETÄTIGEN.
PRÜFEN, DASS DIE BREMSEN ANGEZOGEN SIND,
WENN DAS KIND HINEIN GESETZT ODER HERAUS
GEHOBEN WIRD.
• VOR GEBRAUCH PRÜFEN, DASS ALLE
VERBINDUNGSELEMENTE KORREKT MITEINANDER
VERBUNDEN SIND.
• VOR GEBRAUCH PRÜFEN, DASS DIE TEILE DES
AUTOKINDERSITZES, KINDERWAGENS ODER
KINDERWAGENAUFSATZES KORREKT EINGERASTET
SIND.
• NICHT MIT DEN FINGERN IN DIE BEWEGLICHEN
VERBINDUNGSELEMENTE GREIFEN.
• BEI DER EINSTELLUNG DER BEWEGLICHEN ELEMENTE
DES KINDERWAGENS (GRIFF, RÜCKENLEHNE) AUF DAS
KIND ACHT GEBEN.
• AM SCHIEBEGRIFF ODER DEN SCHIEBEGRIFFEN
HÄNGENDE LASTEN KÖNNEN DIE STABILITÄT
DES KINDERWAGENS GEFÄHRDEN. FÜR
DAS MAXIMALGEWICHT DER LASTEN
HERSTELLERANWEISUNGEN BEACHTEN.
Page 15

• KEINE LASTEN VON ÜBER 5 KG GEWICHT IN DEN
EINKAUFSKORB LEGEN. IN DEN GETRÄNKEHALTER
KEINE HÖHEREN LASTEN EINSETZEN, ALS
IM GETRÄNKEHALTER SELBST ANGEGEBEN.
NIE HEISSGETRÄNKE EINSETZEN. IN DIE
VERDECKTASCHEN (FALLS VORHANDEN) KEINE
LASTEN VON MEHR ALS 0,2 KG EINSETZEN.
• DEN KINDERWAGEN NICHT IN DER NÄHE VON
TREPPEN ODER STUFEN ABSTELLEN. NICHT IN DER
NÄHE VON HITZEQUELLEN, OFFENEN FLAMMEN
ODER GEFÄHRLICHEN GEGENSTÄNDEN, DIE SICH IN
REICHWEITE DES KINDES BEFINDEN, ABSTELLEN.
• DAS BENUTZEN ANDERER ALS DURCH DEN
HERSTELLER ZUGELASSENER ZUBEHÖRTEILE KÖNNTE
ZU GEFAHREN FÜHREN.
ES•ESPAÑOL
• IMPORTANTE: lea detenidamente estas
instrucciones y consérvelas para utilizarlas
eventualmente en otra ocasión.
La seguridad del niño puede ponerse en peligro si
no se siguen estas instrucciones.
• PEG PEREGO podrá modificar los modelos descritos
en este prospecto, por razones técnicas o
comerciales.
Peg Perego S.p.A. cuenta con la
certificación ISO 9001.
Dicha certificación ofrece tanto a los
clientes como a los consumidores la
garantía de una transparencia y confianza
por lo que concierne al modo de trabajar
de la empresa.
SERVICIO DE ASISTENCIA
Si por casualidad alguna parte del modelo se pierde o
se rompe, usar sólo piezas de repuesto originales Peg
Perego. Para todo lo que concierne las reparaciones,
cambios, informaciones sobre los productos y la venta
de repuestos originales y accesorios, contacte con el
Servicio de Asistencia Peg-Perego:
Tel.: 0039-039-60.88.213
Fax: 0039-039-33.09.992
e-mail: assistenza@pegperego.it
www.pegperego.com
Peg Perego está a disposición de sus Consumidores
para satisfacer lo mejor posible todas sus exigencias.
Por eso, conocer lo que piensan nuestros Clientes,
es para nosotros muy importante y fundamental. Le
agradeceremos mucho si, después de haber utilizado
uno de nuestros productos rellena el FORMULARIO DE
SATISFACCIÓN DEL CONSUMIDOR que encontrará en
internet en la siguiente dirección: “www.pegperego.
com/SSCo.html.en-UK”,
indicando las posibles observaciones o sugerencias.
INSTRUCCIONES DE USO
EMBALAJE
1• Antes de utilizar el capazo Navetta hay que quitar
los ganchitos de seguridad que hay lateralmente.
CAPOTA
2• Para levantar la capota, tirar hacia arriba de ambos
lados hasta oír clic.
3• Para bajar la capota, presionar los dos botones
colocados a los lados en los acoples y luego
empujarla hacia abajo como indica la figura.
4• Abriendo la cremallera, la capota tiene una parte
de red que garantiza al bebé una mayor aireación
y a ti te permite verlo desde cualquier posición.
CUBREPIES
5• El cubrepies se puede quitar o poner fácilmente
gracias a la cremallera.
ASA
6• Para subir el asa, tirar hacia arriba hasta oír clic. El
asa está bloqueada sólo cuando está en posición
vertical y las dos piezas han entrado en su
alojamiento.
7• Para bajar el asa, desbloquearla, empujando hacia
arriba las dos piezas y luego empujar hacia abajo
el asa.
8• El asa facilita el transporte y el enganche del
capazo sobre los cochecitos y las sillas de paseo.
Page 16

POSICIÓN BALANCÍN Y CUNA
9• La base del Capazo tiene una forma especial que
al apoyarlo sobre una superficie plana hace de
balancín.
El capazo se convierte en cuna sin balancear sacando
10•
los caballetes que lleva como indica la figura.
REGULACIÓN DEL RESPALDO
11• La altura del respaldo se regula sacando y girando
el asa como indica la figura.
(homologado ECE R44/04), que contiene todo lo
necesario para montar el capazo en el coche.
26• Plástico de lluvia Cover All: Plástico de lluvia
de PVC transparente que garantiza una total
protección del capazo enganchado en la silla de
paseo.
27• Bolso con cambiador: Bolso con colchoneta para
cambiar al bebé, que se puede enganchar a la silla
de paseo.
REGULACIÓN DE LA CIRCULACIÓN DEL AIRE
12• La base del Capazo lleva unos orificios que se
pueden abrir los cuales permiten la entrada del
aire por debajo.
Para abrir los orificios en la parte delantera del
capazo navetta (lado donde está la capota), hay
que empujar los dos ganchos hacia fuera.
13• Para abrir los orificios por la parte trasera (lado
opuesto a la capota) hay que empujar uno de los
dos ganchos hacia fuera.
DESENFUNDABLE
14• Para quitar la capota desabrocharla lateralmente y
sacarla de los acoples.
15• Para quitar la funda desabrocharla lateralmente y
sacarla por delante.
16• Desabrochar por detrás la funda y quitarla.
ENGANCHE Y DESENGANCHE DEL CAPAZO EN LAS
SILLAS DE PASEO
El capazo Navetta lleva el Sistema Ganciomatic,
que se puede enganchar a los acoples Ganciomatic
de las sillas de paseo Pliko P3, GT3 y Centro.
17• Para enganchar el capazo a la silla de paseo,
consultar el manual de instrucciones para levantar
los acoples Ganciomatic de la silla de paseo,
poner el capazo hacia la madre y empujarlo hacia
abajo hasta oír clic.
18• Para desenganchar el capazo de las sillas de
paseo, empujar primero el asa (que está al
lado opuesto de la capota) lateralmente, luego
empujarla hacia arriba y al mismo tiempo levantar
el capazo por el asa hacia arriba.
NAVETTA EN EL AUTOMÓVIL
19• Navetta se puede convertir en Navetta AUTO
gracias a los dos ganchos (como indica la figura) y
comprando a parte el Kit Auto.
CAPAZO NAVETTA/SILLA DE PASEO
• Para cuando el bebé ya es más mayor, Navetta
se desenfunda y la funda se transforma en un
segundo saco con cubrepies, para montar en la
silla de paseo.
• Desenfundar la funda del capazo Navetta.
20• Meter la funda del capazo Navetta en el asiento de
la silla de paseo como muestra la figura.
21• Poner el cinturón de seguridad de la silla de
paseo, que se ha desenganchado antes, en las
ranuras de la funda del capazo Navetta.
• Las correas de seguridad de la cintura tienen que
pasar por las dos ranuras laterales más externas.
22• Meter la funda del capazo Navetta en el peldaño
reposapiés de la silla de paseo como muestra la
figura. Luego doblar la parte superior de la funda
en el respaldo de la silla de paseo como indica la
figura.
23• Abrochar lateralmente la funda como muestra la
figura.
24• Doblar el cubrepies de la funda en la barra frontal,
sujetándolo a los lados con el velcro en las
correderas de las cremalleras.
LÍNEA DE ACCESORIOS
25• Kit Auto Navetta: se puede pedir el Kit auto
LIMPIEZA & MANTENIMIENTO
Su producto necesita un mínimo mantenimiento. Las
operaciones delimpieza y mantenimiento tiene que ser
efectuadas sólo por adultos.
• Se aconseja mantener limpias las partes en
movimiento y si hiciera falta, lubricarlas con aceite
ligero.
Limpiar periódicamente las partes de plástico con
•
un paño húmedo, no usar disolventes ni otros
productos parecidos.
• Cepillar las partes de tejido para quitar el polvo.
• Proteger el producto contra los agentes
atmosféricos, agua, lluvia o nieve; la exposición
continua y prolongada al sol puede causar cambios
de color en muchos materiales.
• Conservar el producto en un sitio seco.
• El capazo está realizado con polipropileno, resistente
a los golpes y a la humedad y se limpia con una
bayeta húmeda.
• Para lavar los revestimientos, seguir las indicaciones
siguientes.
CUIDADO
• ESTE VEHÍCULO ESTÁ PREPARADO PARA PORTAR
NIÑOS A PARTIR DE SU NACIMIENTO HASTA 9 KG DE
PESO.
• LAS OPERACIONES DE MONTAJE Y PREPARACIÓN DEL
ARTÍCULO DEBEN SER EFECTUADAS POR UN ADULTO.
• NO UTILIZAR EL PRODUCTO SI FALTAN PARTES O
PRESENTA ROTURAS.
• PODRÍA SER PELIGROSO DEJAR SU NIÑO
DESCUIDADO. NO AÑADA UN COLCHÓNETAS.
• UTILIZAR SIEMPRE LOS FRENOS CUANDO EL
COCHECITO ESTÁ PARADO; ASEGURARSE DE QUE LOS
FRENOS SEAN USADOS DURANTE LAS OPERACIONES
DE CARGA Y DESCARGA DE LOS NIÑOS.
• ANTES DEL USO, ASEGURARSE DE QUE TODOS LOS
MECANISMOS DE ALISTADO ESTÉN CORRECTAMENTE
ENGANCHADOS.
• ANTES DEL USO ASEGURARSE DE QUE LA SILLA
DE AUTO, EL COCHECITO O LA SILLITA ESTÉN
CORRECTAMENTE ENGANCHADOS.
• EVITAR INTRODUCIR LOS DEDOS EN LOS
MECANISMOS.
• EN PRESENCIA DEL NIÑO, PRESTAR ATENCIÓN AL
REGULAR LOS MECANISMOS (MANILLAR, RESPALDO,
ETC.).
• LAS CARGAS COLGADAS AL MANILLAR O A LAS
MANIJAS PUEDEN INESTABILIZAR EL PRODUCTO;
SEGUIR LAS INDICACIONES DEL CONSTRUCTOR
RESPECTO A CARGAS MÁXIMAS UTILIZABLES.
• NO INTRODUCIR EN EL BOLSO PORTAOBJETOS
UN PESO SUPERIOR A 5 KG. NO INSERIR EN EL
PORTABEBIDAS PESOS SUPERIORES A AQUELLOS
ESPECIFICADOS EN EL PORTABEBIDAS MISMO Y
NUNCA BEBIDAS CALIENTES. NO INSERIR EN LOS
BOLSILLOS DE LA CAPOTA ( SI LOS TIENE) PESOS QUE
SUPEREN LOS 0,2 KG.
• NO UTILIZAR EL PRODUCTO CERCA DE ESCALONES
O ESCALERAS; NO UTILIZAR CERCA DE FUENTES DE
Page 17

CALOR, LLAMAS LIBRES U OBJETOS PELIGROSOS AL
ALCANCE DE LOS NIÑOS.
• PODRÍA SER PELIGROSO UTILIZAR ACCESORIOS QUE
NO ESTÉN APROBADOS POR EL CONSTRUCTOR.
PT•PORTUGUÊS
• IMPORTANTE: leia atentamente estas instruções e
conserve-as para um futuro uso.
A segurança da criança poderia ser colocada em
risco, caso não sejam seguidas estas instruções.
• A Peg Perego poderá efectuar em qualquer
momento modificações aos modelos descritos nesta
publicação, por motivos de natureza técnica ou
comercial.
A Peg Perego S.p.A. é certificada ISO
9001.
A certificação oferece aos clientes e
aos consumidores a garantia de uma
trasparência e confiança no modo de
trabalhar da empresa.
SERVIÇO DE ASSISTÊNCIA
No caso de perda ou dano de partes do modelo, use
somente peças originais Peg Perego. Caso necessite
de reparar, substituir, informar-se sobre os produtos
Perego, ou também, adquirir peças originais e
acessórios, procure o Serviço de Assistência PegPerego:
tel.:0039-039-60.88.213,
fax: 0039-039-33.09.992,
e-mail: assistenza@pegperego.it,
www.pegperego.com
A Peg Perego é a disposição de seus Consumidores
para satisfazê-los no melhor modo possível. Por
isto, conhecer a opinião dos nossos Clientes,
para nos é muito importante e precioso. Portanto
agradecemos muito se logo após ter utilizado um
nosso produto V.Sa. queira preencher, enviando-nos
suas observações ou sujestões, o QUESTIONÁRIO
SATISFAÇÃO DO CONSUMIDOR que encontrarás em
internet ao seguinte endereço: “www.pegperego.com/
SSCo.html.it”.
INSTRUÇÕES DE USO
EMBALAGEM
1• Antes de utilizar a Navetta é preciso eliminar os
ganchinhos de segurança situados lateralmente.
CAPOTA
2• Para levantar a capota, puxe-a para cima, até
sentir um “click” em ambos os lados.
3• Para baixá-la, pressione os dois botões situados
no sistema de acoplamento e, logo depois,
empurre-a para baixo, como mostra a figura.
4• Uma vez aberto o fecho encontre uma rede
protectiva que garante ao bebe uma maior
circulação de ar e permite de observa-lo de todas
as posições.
COBERTA
5• A coberta é facilmente aplicada ou removida,
graças ao zíper.
MANILHA
6• Para levantar a manilha, puxe-a para cima até
sentir um “click”. A manilha, apenas é bloqueada
quando está na posição vertical e os dois fechos
se encontram dentro dos próprios orifícios.
7• Para baixar a manilha, deverá desbloqueá-
la empurrando para cima os dois fechos e,
simultaneamente, deverá descê-la para baixo.
8• A manilha facilita o transporte e o enganche da
alcofa sobre os chassis e as cadeiras de passeio.
Page 18

POSIÇÃO BALANÇO E BERÇO
9• A base da alcofa, tem uma forma especial; uma
vez apoiada numa superfície plana, pode ser
balançada.
10• A alcofa torna-se num berço não balanceável,
extraindo os cavaletes que leva incorporados; por
favor, veja a figura.
REGULAÇÃO DO ESPALDAR
11• O espaldar é regulável em altura, extraindo e
rodando a manilha como ilustrado na figura.
REGULAÇÃO DA CIRCULAÇÃO DO AR
12• A base da alcofa é dotada de orifícios que se
podem abrir, permitindo a entrada de ar pela
parte inferor. Para abrir os da parte dianteira da
alcofa, empurre os dois ganchos para o exterior.
13• Para abrir os orifícios da parte posterior, empurre
um dos dois ganchos para fora.
RETIRADA DA VESTIDURA EM TECIDO
14• Para retirar a capota, desabotoe-a lateralmente e
puxe-a dos encaixes.
15• Para retirar o revestimento, desabotoe-o
lateralmente e puxe-o pela frente.
Desabotoe na parte de trás o revestimento e retire-o.
16•
ENCAIXE E DESENCAIXE DA ALCOFINHA NOS
CARRINHOS
A Alcofinha Navetta dispõe de Sistema
Ganciomatic, encaixável nos ganchos Ganciomatic
dos carrinhos Pliko P3, GT3 e Centro.
17• Para encaixar a alcofinha ao carrinho, consultar
o manual de instruções para levantar os ganchos
Ganciomatic do carrinho, colocar a alcofinha
voltada para a mamã e empurrá-la para baixo até
fazer um estalido.
18• Para desencaixar a alcofinha dos carrinhos,
empurrar primeiro a mola (colocada no lado
oposto da capota) lateralmente, em seguida,
empurrá-la para cima e, ao mesmo tempo,
levantar a alcofinha do puxador.
A NAVETTA NO AUTOMÓVEL
19• A Navetta está preparada para converter-se em
Navetta AUTO graças aos dois ganchos (como na
figura) e comprando à parte o Kit Auto.
NAVETTA/CADEIRA DE PASSEIO
• Quando a criança é maior, a vestidura pode ser
retirada e o revestimento da Navetta se transforma
numa segunda vestidura acolchoada com coberta
para montar na cadeira de passeio.
• Retire o revestimento da Navetta.
20• Introduza o revestimento da Navetta no assento
da cadeira de passeio, como mostra a figura.
21• Introduza o cinto de segurança da cadeira de
passeio, anteriormente desenganchada, nas
aberturas do revestimento da Navetta.
• As cintinhos de segurança do corpo devem passar
pelas duas aberturas laterais mais externas.
22• Recoloque o revestimento da Navetta no tapete
repousa-pés da cadeira de passeio, como mostra
a figura. Continue então a virar a parte da frente
do revestimento no encosto da cadeira de passeio,
como na figura.
23• Abotoe o revestimento lateralemente, como
mostra a figura.
24• Vire a coberta do revestimento no pousa-mãos,
fixando-a nos lados com o velcro nos linhas dos
fecho éclair.
LINHA DE ACESSÓRIOS
25• Kit Auto Navetta: É possível requerer o Kit auto
(homologação ECE R44/03), contém o necessário
para montar a alcofinha na viatura.
26• Cobertura para a chuva Cover All: Cobertura para
a chuva em PVC transparente que garante a total
protecção da alcofinha encaixada no carrinho.
27• Bolsa para Muda: Bolsa com colchãozinho para a
muda do bebé, encaixável no carrinho.
LIMPEZA E MANUTENÇÃO
O seu produto necessita de um mínimo de
manutenção. As operações de limpeza e de
manutenção devem ser feitas somente por pessoas
adultas.
• Aconselha-se de manter limpas todas as partes em
movimento e se for necessário, lubrificá-las com
óleo leve.
• Periodicamente limpar as partes de plástica com um
pano húmido, não usar solventes ou outros produtos
semelhantes.
• Passar uma escova nas partes de tecido para eliminar
a poeira.
• Proteger o produto contra os agentes atmosféricos,
água, chuva ou neve; a exposição continua e
prolongada ao sol pode causar mudanças de cor em
muitos materiais.
• Conservar o produto em um lugar seco.
• A alcofinha é feita de polipropileno, resistente a
encontrões e à humidade que pode ser limpa com
um pano húmido.
• Para a lavagem dos revestimentos, seguir as
indicações seguintes.
ATENÇÃO
• ESTE VEÍCULO É DESTINADO À CRIANÇAS RECÉMNASCIDAS OU ATÉ 9 KG DE PESO.
• AS OPERAÇÕES DE MONTAGEM E PREPARAÇÃO DO
PRODUTO DEVEM SER EFECTUADAS SOMENTE POR
ADULTOS.
• NÃO UTILIZE O PRODUTO CASO APRESENTE PARTES
DANIFICADAS OU QUE FALTEM.
• PODERIA SER PERIGOS DEIXAR SUA CRIANÇA
SOZINHA. NÃO ACRESCENTE COLCHONETES.
• QUANDO PARADO, USE SEMPRE OS TRAVÕES;
CERTIFIQUE-SE QUE OS TRAVÕES ESTEJAM
ACCIONADOS DURANTE AS OPERAÇÕES DE
COLOCAÇÃO E RETIRADA DE CRIANÇAS.
• ANTES DE USAR, CERTIFIQUE-SE QUE TODOS
OS MECANISMOS DE ENCAIXE ESTEJAM PRESOS
CORRECTAMENTE.
• ANTES DE USAR, CERTIFIQUE-SE QUE A CADEIRA
PARA AUTOMÓVEL, O CARRINHO OU O ASSENTO
ESTEJAM PRESOS CORRECTAMENTE.
• EVITE INTRODUZIR OS DEDOS NOS MECANISMOS.
• PRESTE ATENÇÃO À PRESENÇA DA CRIANÇA
QUANDO EFECTUAR OPERAÇÕES DE REGULAGEM
DOS MECANISMOS (MANILHA E ENCOSTO).
• TODA E QUALQUER CARGA PENDURADA NAS
MANILHAS PODE FAZER COM QUE O PRODUTO
TORNE-SE INSTÁVEL; SIGA AS INDICAÇÕES DO
FABRICANTE, COM RELAÇÃO ÀS CARGAS MÁXIMAS
QUE PODEM SER USADAS.
• NÃO COLOQUE NO CESTINHO DE PACOTES UM PESO
SUPERIOR A 5 KG. NÃO INTRODUZA NOS PORTABEBIDAS PESOS MAIORES DE QUANTO ESPECIFICADO
NO PRÓPRIO PORTA-BEBIDAS E JAMAIS BEBIDAS
QUENTES. NÃO INTRODUZA NOS BOLSOS DA CAPOTA
(SE PRESENTES) PESOS SUPERIORES A 0,2 KG.
• NÃO UTILIZE O PRODUTO PRÓXIMOS À ESCADAS OU
DEGRAUS; NÃO UTILIZE-O PRÓXIMO A FONTES DE
CALOR, CHAMAS LIVRES E OBJECTOS PERIGOSOS AO
ALCANCE DOS BRAÇOS DA CRIANÇA.
• PODERIA SER PERIGOSO UTILIZAR ACESSÓRIOS NÃO
APROVADOS PELO FABRICANTE.
Page 19

NL•NEDERLANDS
• IMPORTANTE: leia atentamente estas instruções e
conserve-as para um futuro uso.
A segurança da criança poderia ser colocada em
risco, caso não sejam seguidas estas instruções.
• Peg Perego kan op ieder gewenst moment
wijzigingen aanbrengen op de modellen die in
deze publicatie beschreven worden, om reden van
technische of commerciële aard.
Peg Perego S.p.A. heeft een ISO 9001-
certificaat.
De certificiëring biedt klanten
en consumenten de garantie van
doorzichtigheid en vertrouwen in de
manier van werken van het bedrijf.
ASSISTENTIEDIENST
Indien delen van het model per ongeluk verloren
gaan of beschadigd raken dan dient u alleen originele
reserveonderdelen van Peg Perego te gebruiken. Voor
eventuele reparaties of vervanging van de producten,
alsmede voor informatie over de producten,
de verkoop van originele reserveonderdelen
en accessoires, neemt u contact op met de
Assistentiedienst van Peg-Perego:
tel.: 0039-039-60.88.213,
fax: 0039-039-33.09.992,
e-mail: assistenza@pegperego.it,
www.pegperego.com
Peg Perego staat ter beschikking van de Consument
om zo goed mogelijk aan diens wensen tegemoet te
komen. Daarom is het voor ons uiterst belangrijk om
de mening van onze klanten te kennen. Wij zullen u
daarom dankbaar zijn indien u, na het gebruik van
één van ozne producten, de VRAGENLIJST TEVREDEN
KLANTEN wilt invullen die u in het internet vindt, op
het volgende adres: “www.pegperego.com/SSCo.html.
it”, waarbij u opmerkingen kunt plaatsen of suggesties
kunt doen.
INSTRUCTIES VOOR HET GEBRUIK
VERPAKKING
1• Voordat u de Reiswieg in gebruik neemt,
moeten de veiligheidhaakjes aan de zijkanten
weggenomen worden.
KAP
2• Om de kap omhoog te zetten, trekt u hem aan
beide zijden omhoog, tot de klik.
3• Om de kap omlaag te zetten, drukt u op de twee
knoppen op de bevestigingspunten, en duwt u de
kap vervolgens omlaag, zoals de afbeelding toont.
4• Wanneer u de rits opent, ziet u dat de kap een
net heeft, waardoor de baby een betere ventilatie
gegarandeerd wordt en u de baby vanuit elke
positie zien kunt.
DEKEN
5• Het dekentje kan dankzij de rits gemakkelijk
bevestigd of verwijderd worden.
HANDGREEP
6• Om de handgreep op te tillen, trekt u hem
omhoog tot aan de klik. De handgreep is alleen in
de verticale positie geblokkeerd wanneer de twee
blokjes zijn teruggekeerd in de zitting.
7• Om de handgreep omlaag te zetten, deblokkeert
u hem door de twee blokjes omhoog te duwen en
vervolgens de handgreep omlaag te duwen.
8• De handgreep vereenvoudigt het transport en de
bevestiging van het reiswiegje Navetta op kinderen wandelwagens.
POSITIE SCHOMMEL EN KINDERBEDJE
9• De basis van het reiswiegje Navetta heeft
een speciale vorm. Plaatst u de basis op een
ondergrond, dan kan het wiegje geschommeld
worden.
10• Het reiswiegje Navetta wordt een niet
schommelend kinderbedje door de ingebouwde
staanders naar buiten te trekken, zoals de
afbeelding toont.
INSTELLING RUGLEUNING
11• De hoogte van de rugleuning kan ingesteld
worden, door de handgreep naar buiten te trekken
en te draaien, zoals de afbeelding toont.
INSTELLING LUCHTCIRCULATIE
12• De basis van het reiswiegje Navetta beschikt over
gaten die open gemaakt kunnen worden, zodat er
van onderaf lucht naar binnenkant.
Om de gaten aan de voorkant van het reiswiegje
Navetta te openen (zijde waar zich de kap
bevindt), duwt u de twee haken in buitenwaartse
richting.
13• Om de gaten aan de achterkant te openen (zijde
die tegengesteld is aan de kap), duwt u één van de
twee haken in buitenwaartse richting.
IVERWIJDEREN VAN DE BEKLEDING
14• Om de kap te verwijderen moet deze aan
de zijkanten losgeknoopt worden en van de
bevestigingspunten getrokken worden.
15• Om de bekleding te verwijderen moet deze aan
de zijkanten losgeknoopt worden en aan de
voorzijde losgetrokken worden.
16• Knoop de bekleding aan de achterzijde los en
verwijder hem.
LOS EN VASTMAKEN VAN HET REISWIEGJE
NAVETTA OP DE WANDELWAGENS
Het reiswiegje Navetta is uitgerust met een
Ganciomatic systeem dat aan de Ganciomatic
bevestigingspunten van de wandelwagens Pliko
P3, GT3 en Centro.
17• Om het reiswiegje Navetta op de wandelwagen
te bevestigen, raadpleegt u de handleiding
met instructies. Om de Ganciomatic
bevestigingspunten van de wandelwagen omhoog
te plaatsen, brengt u het reiswiegje Navetta in
positie in de richting van de moeder, en duwt u
het omlaag tot de klik.
18• Om het reiswiegje los te maken van de
wandelwagen, duwt u eerst de handgreep (aan de
zijde die tegengesteld is aan de kap) in zijwaartse
richting en duwt u hem vervolgens omhoog. Op
hetzelfde moment tilt u het reiswiegje Navetta bij
de handgreep omhoog.
REISWIEGJE NAVETTA IN DE AUTO
19• Het reiswiegje Navetta kan een reiswiegje Navetta
AUTO worden, dankzij de twee haken(zie de
afbeelding) en door de Autokit apart aan te
schaffen.
REISWIEG/WANDELWAGEN
• Wanneer de baby groter is, kan de bekleding van
de Reiswieg verwijderd worden en in een tweede
zak met deken veranderd worden die op de
wandelwagen kan worden gemonteerd.
• Maak de bekleding van de Reiswieg los.
20• Plaats de bekleding van de Reiswieg op de zitting
van de wandelwagen, zoals de afbeelding toont.
21• Steek de veiligheidsgordel van de wandelwagen,
die u eerder losgemaakt had, in de sleuven van de
bekleding van de Reiswieg.
Page 20

• De veiligheidsriempjes voor rond de taille moeten
door de buitenste sleuven aan de zijkanten
gevoerd worden.
22• Sla de bekleding van de Reiswieg om de
voetenplank van de wandelwagen, zoals de
afbeelding toont. Sla vervolgens het hoofdeinde
van de bekleding om de rugleuning van de
wandelwagen, zoals de afbeelding toont.
23• Knoop de bekleding aan de zijkant vast, zoals de
afbeelding toont.
24• Sla de deken van de bekleding om het
voorzetstuk, en bevestig de zijkanten met het
klittenband aan de schuiven van de scharnieren.
ACCESSOIRES
25• Autokit reiswiegje Navetta: Het is mogelijk om de
Autokit aan te vragen (gehomologeerd ECE R44/
04),die het benodigde bevat voor het monteren
van het reiswiegje in de auto.
26• Regenscherm Cover All: Regenscherm van
transparant PVC dat de volledige bescherming
van het reiswiegje garandeert, wanneer het op de
wandelwagen bevestigd is.
27• Tas voor verschonen: Tas met matrasje voor het
verschonen van de baby, kan aan de wandelwagen
gehaakt worden.
•
CONTROLEER VÓÓR HET GEBRUIK OF HET AUTOZITJE,
DE KINDERWAGEN OF HET MEENEEMZITJE CORRECT
VASTGEZET ZIJN.
• VERMIJD HET UW VINGERS IN DE MECHANISMEN TE
STEKEN.
• BESTEED BIJZONDERE AANDACHT AAN DE
AANWEZIGHEID VAN HET KIND TIJDENS HET
INSTELLEN VAN DE MECHANISMEN (HANDGREEP,
RUGLEUNING).
• ELKE LADING DIE AAN DE HANDGREEP OF
HANDGREPEN HANGT, KAN HET PRODUCT INSTABIEL
MAKEN. NEEM DE AANWIJZINGEN VAN DE FABRIKANT
IN ACHT MET BETREKKING TOT DE MAXIMAAL
BRUIKBARE LADING.
• PLAATS GEEN LADING IN DE MAND MET EEN
GEWICHT VAN MEER DAN 5 KG. PLAATS GEEN
GEWICHT IN DE FLESJESHOUDER DAT ZWAARDER IS
DAN HET GEWICHT DAT OP DE FLESJESHOUDER ZELF
AANGEGEVEN WORDT EN NOOIT HETE DRANKEN.
PLAATS GEEN GEWICHTEN IN DE ZAKKEN VAN DE KAP
(INDIEN AANWEZIG) VAN MEER DAN 0,2 KG.
• GEBRUIK HET PRODUCT NIET IN DE NABIJHEID VAN
TRAPPEN OF TREDEN. GEBRUIK HET NIET IN DE
NABIJHEID VAN WARMTEBRONNEN, OPEN VUUR OF
GEVAARLIJKE OBJECTEN BINNEN ARMBEREIK VAN HET
KIND.
• HET ZOU GEVAARLIJK KUNNEN ZIJN ACCESSOIRES
TE GEBRUIKEN DIE NIET DOOR DE FABRIKANT ZIJN
GOEDGEKEURD.
REINIGING EN ONDERHOUD
Uw product behoeft een minimum aan onderhoud.
Reiniging en onderhoud mogen alleen uitgevoerd
worden door volwassenen.
• Het wordt geadviseerd alle bewegende delen schoon
te houden en zonodig te smeren met lichte olie.
• Reinig regelmatig de plastic delen met een vochtige
doek, gebruik geen oplosmiddelen of gelijkaardige
producten.
• Reinig het doek met een borstel om vuil te
verwijderen.
• Bescherm het product tegen de
weersomstandigheden, water, regen of sneeuw; de
continue en langdurige blootstelling aan zonlicht
kan een kleurverandering van vele materialen
veroorzaken.
• Bewaar het product op een droge plek.
• Het reiswiegje is van polypropyleen gemaakt, is
schokbestendig en vochtwerend en moet met een
vochtige doek gereinigd worden.
• Om de zak te wassen, volgt u onderstaande
aanwijzingen op.
LET OP
• DIT VOERTUIG IS BEDOELD VOOR KINDEREN VANAF
DE GEBOORTE TOT EEN GEWICHT VAN 9 KG.
• DE ASSEMBLAGE EN DE VOORBEREIDING VAN HET
ARTIKEL MOETEN UITGEVOERD WORDEN DOOR
VOLWASSENEN.
• GEBRUIK HET PRODUCT NIET INDIEN DELEN
ONTBREKEN OF STUK ZIJN.
• HET ZOU GEVAARLIJK KUNNEN ZIJN UW KIND
ZONDER TOEZICHT TE LATEN. GEEN MATRASJES
TOEVOEGEN.
• GEBRUIK ALTIJD DE REMMEN BIJ HET STILSTAAN.
CONTROLEER OF DE REMMEN GEACTIVEERD ZIJN
WANNEER U HET KIND IN DE KINDERWAGEN LEGT OF
ERUIT HAALT.
• CONTROLEER VÓÓR HET GEBRUIK OF ALLE
MECHANISMEN VOOR DE BEVESTIGING OP CORRECTE
WIJZE BENUT WORDEN.
Page 21

HU•MAGYAR
valamint a kocsivázakra és sportkocsikra történ=
rákapcsolását.
• FONTOS: figyelmesen olvassák el ezeket
az utasításokat és őrizzék meg a jövőbeni
felhasználás céljából.
A gyermek biztonságát veszélyeztethetik azzal,
ha nem tartják be ezeket az utasításokat.
• A Peg Perego az ebben a kiadásban ismertetett
modelleknél mcszaki vagy kereskedelmi jellegc
okokból kifolyólag bármikor végrehajthat
módosításokat.
Peg Perego R.t. ISO 9001 tanúsítvánnyal
rendelkezik.
A tanúsítvány a vállalati munkamódszer
rendszerezettségének és az abban való
bizalomnak a garanciáját kínálja az
ügyfeleknek és a fogyasztóknak.
VEVŐSZOLGÁLAT
Ha véletlenül a modell részei elvesznek vagy
károsodnak, akkor csak eredeti Peg Perego
alkatrészeket használjon! Az esetleges javítások,
cserék, a termékekkel kapcsolatos információk
valamint az eredeti alkatrészek és tartozékok
értékesítése ügyében vegye fel a kapcsolatot a Peg
Perego Vev=szolgálatával:
tel.:0039-039-60.88.213,
fax: 0039-039-33.09.992, a
e-mail: assistenza@pegperego.it,
www.pegperego.com
A Peg Perego a fogyasztóinak rendelkezésére áll
minden igényük legjobb kielégítése céljából. Ehhez
az ügyfeleink véleményének megismerése számunkra
rendkívül fontos és értékes. Ezért nagyon hálásak
lennénk, ha a termékünk használatbavétele után
kitöltené a FOGYASZTÓ ÉRTÉKELÉSE KÉRDdÍVET,
amelyet az alábbi internet címen talál meg: www.
pegperego.com/SSCo.html.it.
Ott feltüntetheti az esetleges észrevételeit vagy
ötleteit.
HASZNÁLATI UTASÍTÁS
CSOMAGOLÁS
1• A Navetta használata el=tt az oldalt ráhelyezett
biztosító kapcsok eltávolítása szükséges.
KOCSITETd
2• A kocsitet= felnyitásához azt mindkét oldalon
húzzák felfelé kattanásig.
3• A kocsitet= leengedéséhez nyomják be a
kapcsokon elhelyezett két gombot és ezt követ=en
tolják lefelé a kocsitet=t az ábra szerint.
4• A czipzár kinyitásával a kocsitet=n egy hálóbetét
jelenik meg, amely jobb szell=zést biztosít a baba
számára és lehet=vé teszi minden pozícióból a
rálátást.
TAKARÓ
5• A takaró a czipzár segítségével könnyen
ráer=síthet= és eltávolítható.
FOGANTYÚ
6• A fogantyú felemeléséhez azt húzzák felfelé
kattanásig. A fogantyú csak akkor van rögzítve,
amikor a függ=leges pozíciót eléri és a két retesz
visszatért a saját mélyedésébe.
7• A fogantyú leengedéséhez azt oldják ki úgy, hogy
nyomják felfelé a két reteszt és ezt követ=en
tolják lefelé a fogantyút.
8• A fogantyú megkönnyíti a mélykocsi szállítását
HINTAÁGY ÉS KISÁGY POZÍCIÓ
9• A Navetta olyan speciális formájú alapzattal
rendelkezik, amely egy sík felületre helyezve
hintáztatható.
10• A Navetta nem hintáztatható kisággyá alakul át
akkor, ha kihúzzák a beillesztett lábakat az ábra
szerint.
HÁTTÁMLA BEÁLLÍTÁSA
11• A háttámla magassága beállítható úgy, hogy
húzzák ki és forgassák el a kézikart az ábra
szerint.
LÉGKERINGÉS SZABÁLYOZÁSA
12• A Navetta alapzata megnyitható nyílásokkal van
ellátva, amelyek lehet=vé teszik alulról a leveg=
beáramlását.
A mózeskosár elüls= részén lév= nyílások
megnyitásához(azon az oldalon, ahol a kocsitet=
található), nyomják a kültér felé a két kapcsot.
13• A hátsó részén lév= nyílások megnyitásához (a
kocsitet=vel ellentétes oldalon), nyomják a kültér
felé a két kapocs egyikét.
A HUZAT LEVÉTELE
14• A kocsitet=t a levételhez oldalt gombolják le és
húzzák le a kapcsokról.
15• A bélést a levételhez oldalt gombolják le és elölr=l
húzzák le.
16• Gombolják le hátul a bélést és távolítsák el.
A NAVICELLA SPORTKOCSIKRA VALÓ
RÁKAPCSOLÁSA ÉS LEKAPCSOLÁSA
A Navicella Navetta Ganciomatic Rendszerrel van
felszerelve, amely rákapcsolható a Pliko P3, GT3
és Centro.
17• A mélykocsinak a sportkocsira történ=
kapcsolására vonatkozóan olvassák el a használati
utasítást a sportkocsi Ganciomatic kapcsainak
felemeléséhez, helyezzék el a mélykocsit a mama
felé fordítva és azt nyomják lefelé kattanásig.
18• A mélykocsinak a sportkocsiról történ=
lekapcsolására vonatkozóan nyomják a
(kocsitet=vel ellentétes oldalon elhelyezett) kart
el=ször oldalsó irányban majd nyomják felfelé és
ezzel egyidejcleg emeljék felfelé a fogantyúnál
fogva a mélykocsit.
NAVETTA AZ AUTÓBAN
Navetta alkalmas arra, hogy a két kapocsnak
19•
köszönhet=en(az ábra szerint) és az Autós Kit külön
megvásárlásával AUTÓS Navettává alakuljon át.
NAVETTA/SPORTKOCSI
• Amikor a baba nagyobb lesz, akkor a Navetta
huzatának levételével a bélés egy második,
takaróval ellátott zsákká alakítható, amely a
sportkocsira feler=síthet=.
• Vegyék le a bélést a Navettáról.
20• Húzzák fel a Navetta bélését a sportkocsi
ül=részére úgy, ahogy azt az ábra mutatja.
21• Fczzék be a sportkocsi korábban kiakasztott
biztonsági övjét a Navetta bélésének nyílásaiba.
• A biztonsági derékszíjaknak a két legszéls=bb,
oldalsó nyíláson kell áthaladniuk.
22• Hajtsák le a Navetta bélését a sportkocsi
lábtartójára úgy, ahogy azt az ábra mutatja.
Ezután hajtsák fel a bélés fejrészét a sportkocsi
háttámlájára az ábra szerint.
23• Gombolják be oldalt a bélést úgy, ahogy azt az
ábra mutatja.
24• Hajtsák vissza a bélés takarórészét a
biztosítópántra, majd kétoldalt a czipzárak
tolattyúinál tép=zárral rögzítsék.
Page 22

TARTOZÉKOK TERMÉKSKÁLÁJA
25• Navetta Autós Kit: megrendelhet= az autós
Kit (ECE R44/04 szerint jóváhagyott), amely
a mélykocsi autóba szereléséhez szükséges
tartozékokat tartalmazza.
26• Cover All es=véd=: Es=véd= átlátszó PVC-b=l,
amely a sportkocsira kapcsolt mélykocsi teljes
védelmét biztosítja.
27• Pelenkázó Táska: Táska matraccal a baba
pelenkázásához, amely a sportkocsira akasztható.
TISZTÍTÁS ÉS KARBANTARTÁS
A termék minimális karbantartást igényel. A tisztító és
karbantartó mcveleteket csak feln=ttek végezhetik.
• Valamennyi mozgó rész tisztántartása javasolt, és
amennyiben az szükséges, olajjal vékonyan kenjék
be azokat.
• Egy nedves törl=ruhával rendszeresen tisztítsák meg
a mcanyagból készült részeket, ne használjanak
oldószereket vagy egyéb hasonló termékeket.
• A szövetrészeket keféljék le a por eltávolításához.
• Óvják a terméket a légköri hatóer=kt=l, vízt=l,
es=t=l vagy hótól; a folytonos és hosszadalmas
napsütésnek való kitétel sok alapanyagban
színváltozást okozhat.
• Száraz helyen tárolják a terméket.
• A mélykocsi ütés- és nedvességálló polipropilénb=l
készült, amely egy nedves törl=ruhával tisztítható.
• A zsák mosásánál tartsák be az alábbi útmutatást.
LÉPCSdFOKOK MELLETT; NE HASZNÁLJÁK
HdFORRÁSOK, NYÍLT LÁNG VAGY A GYERMEK
KEZEÜGYÉBE ESd, VESZÉLYES TÁRGYAK KÖZELÉBEN.
• A GYÁRTÓ ÁLTAL JÓVÁ NEM HAGYOTT TARTOZÉKOK
HASZNÁLATA VESZÉLYES LEHET.
VIGYÁZAT
• E SZÁLLÍTÓESZKÖZ ÚJSZÜLÖTT KORTÓL KEZDVE,
MAXIMUM 9 KG-OS SÚLYÚ GYERMEKEK SZÁMÁRA
ALKALMAS.
• A TERMÉK ÖSSZESZERELÉSI ÉS ELdKÉSZÍTÉSI
MeVELETEIT KIZÁRÓLAG FELNdTTEK VÉGEZHETIK.
• NE HASZNÁLJÁK A TERMÉKET, HA EGYES RÉSZEI
HIÁNYOZNAK VAGY AZON TÖRÉST ÉSZLELNEK.
• A GYERMEKÜK FELÜGYELET NÉLKÜL HAGYÁSA
VESZÉLYES LEHET. NE TEGYENEK BE MATRACOKAT.
• ÁLLÓ HELYZETBEN MINDIG HASZNÁLJÁK A FÉKEKET;
GYdZdDJENEK MEG ARRÓL, HOGY A GYERMEKEK
BEHELYEZÉSE ÉS KIVÉTELE SORÁN A FÉKEK
MeKÖDTETVE VANNAK.
• HASZNÁLAT ELdTT GYdZdDJENEK MEG ARRÓL,
HOGY MINDEN RÖGZÍTd SZERKEZET HELYESEN BE
VAN-E KAPCSOLVA.
• HASZNÁLAT ELdTT BIZONYOSODJANAK MEG
ARRÓL, HOGY MEGFELELdEN RÖGZÍTVE VAN-E AZ
AUTÓS GYEREKÜLÉS, A BABAKOCSI VAGY A SPORT
GYEREKÜLÉS.
• NE NYÚLJANAK UJJAL A SZERKEZETEKBE.
• FIGYELJENEK ODA A JELENLÉVd GYERMEKRE AKKOR,
AMIKOR A SZERKEZETEKET BEÁLLÍTÓ MeVELETEKET
(TOLÓKAR, HÁTTÁMLA) VÉGZIK.
• A TOLÓKARRA VAGY A FOGANTYÚKRA
FELAKASZTOTT BÁRMILYEN TEHER INSTABILLÁ
TEHETI A TERMÉKET; TARTSÁK BE A GYÁRTÓ
UTASÍTÁSAIT A MAXIMÁLIS TERHEK ALKALMAZÁSÁRA
VONATKOZÓAN.
• NE RAKJANAK A KOSÁRBA 5 KG-NÁL NAGYOBB
SÚLYÚ TERHET. NE TEGYENEK AZ ITALTARTÓBA AZ
ITALTARTÓN FELTÜNTETETT SÚLYNÁL NEHEZEBB
TERHET ÉS MELEG ITALT SOHA. A KOCSITETd
ZSEBEKBE (HA VANNAK) 0,2 KG-OT MEG NEM
HALADÓ SÚLYOKAT HELYEZZENEK.
• NE ALKALMAZZÁK A TERMÉKET LÉPCSd VAGY
Page 23

SL•SLOVENŠČINA
10• fe izvle>emo vdelane podstavke, se Navetta
spremeni v mirujo>o posteljico.
• POMEMBNO: pozorno preberite ta navodila in jih
shranite za prihodnjo uporabo.
Če teh navodil ne boste upoštevali, lahko ogrozite
varnost otroka.
• Peg Perego se lahko kadarkoli odlo>i, da bo
spremenil modele, objavljene v katalogu, najsi bo to
zaradi tehni>nih ali tržnih razlogov.
Peg Perego S.p.A. ima certifikat ISO 9001.
Certifikat za stranke in porabnike pomeni
garancijo transparentnosti in zaupanja v
delo podjetja.
POMOČ UPORABNIKOM
fe izgubite ali poškodujete sestavni del izdelka,
uporabite izklju>no originalne rezervne dele Peg
Perego. Za morebitna popravila, zamenjave, podatke
o izdelkih, prodajo originalnih rezervnih delov
in dodatkov, stopite v stik s centrom za pomo>
uporabnikom Peg Perego:
tel.:0039 (039) 60-88-213,
faks: 0039 (039) 33-09-992,
e-pošta: assistenza@pegperego.it,
www.pegperego.com
Peg Perego je vedno na voljo svojim strankam, da
v kar najve>ji meri izpolni njihove potrebe. Zato je
za nas zelo pomembno, da poznamo mnenje svojih
strank.
Hvaležni vam bomo, >e si boste, ko boste uporabili
naš izdelek, vzeli >as in izpolnili VPRAŠALNIK O
ZADOVOLJSTVU STRANK, ki ga boste našli na naših
spletnih straneh, na naslovu “www.pegperego.com/
SSCo.html.en-UK”, in nam sporo>ite vaše pripombe in
predloge.
NAVODILA ZA UPORABO
EMBALAŽA
1• Preden uporabite Navetto, je treba odstraniti
varnostne jermen>ke ob straneh.
STREHICA
2• Da bi dvignili strehico, jo povlecite navzgor,
dokler ne klikne na obeh straneh.
3• Da bi strehico spustili, pritisnite gumba na
priklju>kih in jo potisnite navzdol, kot je
prikazano na risbi.
4• fe odpnete zadrgo na strehici, se bo razprl
mrežast vložek, ki otroku zagotavlja ve>jo
zra>nost in vam omogo>a, da ga vidite od vseh
strani.
ODEJICA
5• Odejico je mogo>e preprosto namestiti ali
odstraniti z zadrgo.
URAVNAVANJE HRBTNEGA NASLONA
11• Višino hrbtnega naslona uravnavamo z vrtenjem
ro>aja.
URAVNAVANJE ZRAfNEGA PRETOKA
12• Na osnovi Navette so odprtine, ki jih je mogo>e
odpreti ali zapreti, tako da zrak kroži s spodnje
strani košare.
Da bi odprli zra>ne odprtine na sprednjem delu
košare (na strani, kjer je strehica), zanki potisnite
navzven.
13• Da bi odprli odprtine na zadnjem delu (na strani
nasproti strehice), potisnite ven eno od zank.
SNEMLJIVOST PREVLEK
14• Da bi odstranili strehico, jo odpnite ob straneh in
jo snemite s priklji>kov.
15• Da bi odstranili prevleko, jo ob straneh odpnite in
jo snemite od zadaj.
16• Na zadnji strani odpnite prevleko in jo odstranite.
PRIPENJANJE IN ODPENJANJE KOŠARE NA VOZIfKE
Košara Navetta je opremljena s sistemom
Ganciomatic, tako da jo lahko pripnemo na
priklju>ke Ganciomatic na vozi>kih Pliko P3, GT3
in Centro.
17• Da bi košaro pripeli na vozi>ek, v priro>niku
z navodili preberite, kako dvigniti priklju>ke
Ganciomatik na vozi>ku. Košaro obrnite v smeri
proti staršem in jo potisnite navzdol, dokler ne
klikne.
18• Da bi košaro odpeli z ogrodja ali vozi>ka, najprej
potisnite najprej ro>ico (na drugi strani strehice)
bo>no navzgor in so>asno dvignite vozi>ek za
ro>aj navzgor.
NAVETTA V AVTOMOBILU
19• Navetta se lahko spremeni v Navetto AUTO, z
dvema sponkama (glejte risbo) in dodatkom Kit
Auto, ki ga morate dokupiti.
NAVETTA/ŠPORTNI VOZIfEK
• Ko je otrok ve>ji, lahko z Navette snamete
prevleko in jo spremenite v dodatno vre>o z
odejico, ki jo namestite na športni vozi>ek.
• Snemite prevleko Navette.
20• Nataknite prevleko Navette na sedež športnega
vozi>ka, kot prikazuje risba.
21• Vstavite varnosti pas vozi>ka, ki ste ga prej
odpeli, v reže na prevleki Navette.
• Varnostni jermen>ki okoli trebuha morajo iti skozi
najbolj zunanje bo>ne reže.
22• Zavihajte prevleko Navette okoli podnožnika
športnega sedeža, kot prikazuje risba. Nato
obrnite >elno stran prevleke na hrbtno stran
športnega vozi>ka, kot prikazuje risba.
23• Prevleko pripnite ob straneh, kot prikazuje risba.
24• Obrnite odejico prevleke na sprednji zapori in jo
ob straneh pritrdite s pritrdilnimi ježki na vodilo
zadrge.
ROfAJ
6• Da bi dvignili ro>aj, ga povlecite navzgor,
dokler ne klikne. Ro>aj je blokiran šele, ko je v
navpi>nem položaju in sta blokadi sedli v svoje
ležiš>e.
Da bi ro>aj spustili, ga odblokirajte, tako da
7•
potisnete obe blokadi, in nato ro>aj potisnite
navzdol.
8• Ro>aj olajša prenašanje in pripenjanje košare na
ogrodja in vozi>ke.
POLOŽAJ GUGALNICA IN POSTELJICA
9• Osnova Navette je oblikovana tako, da jo lahko
zibljemo, >e jo postavimo na ravno površino.
DODATKI
25• Komplet za avtomobil za košaro: Zahtevate lahko
komplet za avtomobil (Kit auto) (homologacija ECE
R44/04), v katerem je vse potrebno za namestitev
košare v avto.
26• Dežna prevleka Cover All: Dežna prevleka iz
prozornega PVC-ja zagotavlja popolno zaš>ito
košare, pripete na vozi>ek.
27• Torba za previjanje: Torba s podlogo za previjanje
otroka, ki jo je mogo>e pripeti na vozi>ek.
Page 24

ČIŠČENJE IN VZDRŽEVANJE
RU•PУССКИЙ
Izdelek ne potrebuje veliko vzdrževanja. fistijo in
vzdržujejo ga lahko samo odrasli.
• Svetujemo vam, da redno >istite vse premikajo>e se
dele in jih, >e je to potrebno, podmažete z lahkim
oljem.
• Plasti>ne dele redno brišite z vlažno krpo. Ne
uporabljajte topil ali drugih podobnih izdelkov.
• Blago skrta>ite, da z njega odstranite prah.
• Izdelek zaš>itite pred atmosferskimi vplivi, vodo,
dežjem ali snegom; daljše izpostavljanje soncu
lahko povzro>i spremembo barve veliko materialov.
• Izdelek hranite v suhem prostoru.
• Košara je izdelana iz polipropilena, ki je odporen
proti udarcem in vlagi ter ga o>istimo tako, da ga
obrišemo z vlažno krpo.
• Za >iš>enje vre>e upoštevajte naslednja navodila.
POZOR
• TA VOZIfEK JE NAMENJEN OTROKOM OD ROJSTVA
DO TEŽE 9 KG.
• SESTAVLJANJE IN PRIPRAVO PRIPOMOfKA MORAJO
IZVESTI ODRASLE OSEBE.
• NE UPORABLJAJTE IZDELKA, fE NEKATERI NJEGOVI
DELI MANJKAJO ALI SO POŠKODOVANI.
• OTROKA NE PUŠfAJTE SAMEGA, SAJ JE TO LAHKO
NEVARNO. NE DODAJAJTE BLAZIN ZA LEŽANJE.
• KO STOJITE NA MESTU, VEDNO UPORABLJAJTE
ZAVORE; PREPRIfAJTE SE, DA SO ZAVORE VEDNO
UPORABLJENE, KO OTROKA POLAGATE V VOZIfEK IN
GA JEMLJETE IZ NJEGA.
• PRED UPORABO SE PREPRIfAJTE, DA SO VSI
MEHANIZMI ZA PRIPENJANJE PRAVILNO PRIPETI.
• PRED UPORABO SE PREPRIfAJTE, DA SO AVTOSEDEŽ,
KOŠARA VOZIfKA ALI SEDEŽ ŠPORTNEGA VOZIfKA
PRAVILNO PRITRJENI.
• V MEHANIZME NE VTIKAJTE PRSTOV.
• PAZITE NA OTROKA, KO PRILAGAJATE MEHANIZME
(ROfAJI, HRBTNI NASLON).
• VSAK TOVOR, OBEŠEN NA KRMILO ALI NA ROfAJE,
LAHKO POVZROfI NESTABILNOST IZDELKA;
UPOŠTEVAJTE PRIPOROfILA PROIZVAJALCA ZA
MAKSIMALNO OBREMENITEV IZDELKA.
• V NAKUPOVALNO KOŠARO NE DAJAJTE TOVOROV,
KI BI PRESEGALI TEŽO 5 KG. V DRŽALO ZA PIJAfO NE
VSTAVLJAJTE PREDMETOV, KI SO TEŽJI OD NAVEDENE
NA SAMEM DRŽALU ZA PIJAfO. VANJ NIKOLI NE
ODLAGAJTE TOPLIH PIJAf. V ŽEPE NA STREHICI (fE
SO PRISOTNI) NE ODLAGAJTE PREDMETOV, TEŽJIH OD
0,2 KG.
• NE UPORABLJAJTE IZDELKA OB STOPNIŠfIH IN
STOPNICAH; NE UPORABLJAJTE OB VIRIH TOPLOTE,
ODPRTEM OGNJU ALI NEVARNIH PREDMETIH, KI SO
NA DOSEGU OTROKOVIH ROK.
• UPORABLJANJE DODATNE OPREME, KI JE NI ODOBRIL
PROIZVAJALEC, BI LAHKO BILO NEVARNO.
• ВАЖНО: внимательно прочтите инструкцию и
сохраните ее для использования в будущем.
В случае невыполнения этой инструкции
безопасность ребенка может быть под угрозой.
• gBh gB&Bh, *ABB% +&10, 0#B$%* 0 -2F,H A,AB#%
*/AB#B#*C 0 A,GB-*, ,+*$1##DB 0 G1##,A
&'(,0,G$%0B, +, %BE#*@B$(*A *-* (,AAB&@B$(*A
+&*@*#1A.
Peg Perego S.p.A. $B&%*i*)*&,01#1 +,
#,&AB ISO 9001.
jB&%*i*(1)*C h1&1#%*&'B% /1(1/@*(1A
* +,%&BF*%B-CA, @%, (,A+1#*C &1F,%1B%,
$,F-2G1C +&*#)*+D h-1$#,$%* *
G,0B&*C.
ОБСЛУЖИВАНИЕ
k$-* 0D $-'@1H#, +,%B&C-* *-* +,0&BG*-* (1(*B#*F'G. GB%1-* */GB-*C, /1AB#CH%B *E %,-.(,
i*&AB##DA* /1+1$#DA* @1$%CA* gBh gB&Bh,. l-C
&BA,#%1, /1AB#D, +,-'@B#*C $0BGB#*H , +&,G'()**,
+&*,F&B%B#*C i*&AB##DE /1+1$#DE @1$%BH *
+&*#1G-Bm#,$%BH ,F&1n1H%B$. 0 jB&0*$#'2 $-'mF'
gBh-gB&Bh,:
%B-.: 0039-039-60.88.213,
i1($: 0039-039-33.09.992,
e-mail: assistenza@pegperego.it,
www.pegperego.com
o*&A1
$0,*E +,%&BF*%B-BH G-C %,h,, @%,FD #1*-'@p*A
,F&1/,A 'G,0-B%0,&*%. 0$B *E %&BF,01#*C. g,q%,A',
G-C #1$ ,@B#. 01m#, * )B##, /#1%. A#B#*B #1p*E
/1(1/@*(,0. rD F'GBA 01A ,@B#. +&*/#1%B-.#D,
B$-*, +,$-B *$+,-./,01#*C #1pBh, */GB-*C, 0D
+,mB-1B%B /1+,-#*%. stukvw wlxyzkvyx{kttxjv"
gxv{k|"vkz}, (,%,&'2 0D #1HGB%B 0 *#%B&#B%B #1
$1H%B:
“www.pegperego.com/SSCo.html.en-UK”,
0D&1/*0 %1A $0,* +,mB-1#*C *-* $,0B%D.
wgsuxyus
1• gB&BG *$+,-./,01#*BA -2-.(* Navetta
usgxv
2• ~%,FD +,G#C%. (1+,%, +,%C#*%B Bh, 00B&E G, %BE
3• ~%,FD ,+'$%*%. (1+,%, #1mA*%B G0B (#,+(*,
4• {1$$%Bh#'0 A,-#*2, ,%(&D01B%$C $B%@1%1C
gBh gB&Bh, #1E,G*%$C 0 &1$+,&CmB#**
ИНСТРУКЦИИ ПО ПОЛЬЗОВАНИЮ
#B,FE,G*A, 'G1-*%. &1$+,-,mB##DB $F,('
+&BG,E&1#*%B-.#DB (&B+-B#*C.
+,&, +,(1 #B '$-Dp*%B nB-@,( $ ,FB*E $%,&,#.
&1$+,-,mB##DB #1 (&B+-B#*CE, +,$-B @Bh,
,+'$%*%B Bh,
0$%10(1 (1+,%1, (,%,&1C ,FB$+B@*01B% &BFB#('
+,$%'+-B#*B 0,/G'E1 * +,/0,-CB% 01A 0*GB%.
Bh, */ -2F,h, +,-,mB#*C.
%1(, (1( +,(1/1#, #1 &*$'#(B.
gxu{•yszx
5• g,(&D01-, A,m#, -Bh(, +&*$%Bh#'%. *-*
'G1-*%. +&* +,A,n* A,-#**-/1$%Bm(*.
{w~us
6• ~%,FD +,G#C%. &'@(', +,%C#*%B BB 00B&E G,
%BE +,&, +,(1 #B +,$-Dp*%$C nB-@,(.
/1F-,(*&,01#1 %,-.(, %,hG1, (,hG1 ,#1
#1E,G*%$C 0 0B&%*(1-.#,A +,-,mB#** * G01
$%,+,&1 0,p-* 0 $0,* h#B/G1.
7• ~%,FD ,+'$%*%. &'@(' &1/F-,(*&'H%B BB, $AB$%*0
$%,+,&D 00B&E, +,$-B @Bh, ,+'$%*%B &'@(' 0#*/.
{'@(1
Page 25
8• {'@(1 ,F-Bh@1B% +B&B0,/(' * (&B+-B#*B -2-.(*
#1 p1$$* * +&,h'-,@#DB (,-C$(*.
gxzx€kt"k us~szu" " u{xysvu"
9• |-1h,G1&C $+B)*1-.#,H i,&AB ,$#,01#*C
-2-.(* Navetta, B$-* BB +,$%10*%. #1 &,0#'2
+,0B&E#,$%., %, ,#1 F'GB% (1@1%.$C.
10• yD#'0 0$%&,B##DB #,m(* ($A,%&* &*$'#,(),
-2-.(1 Navetta $%1#,0*%$C #B(1@12nBH$C
(&,01%(,H.
{k•wz"{xyus jg"tu"
11• j+*#(' A,m#, ,%&Bh'-*&,01%. +, 0D$,%B, G-C
#B,FE,G*A, 0DG0*#'%. * +,0B&#'%. &'@(',
q%,h,
(1( +,(1/1#, #1 &*$'#(B.
{k•wz"{xyus ‚"{uwz}‚"" yx?lwƒs
12• y ,$#,01#** -2-.(* Navetta *AB2%$C
,%(&D012n*B$C ,%0B&$%*C, +&,+'$(12n*B
0,/G'E $#*/'.
~%,FD ,%(&D%. ,%0B&$%*C 0 +B&BG#BH @1$%*
-2-.(* ($, $%,&,#D (1+,%1), $AB$%*%B G0B &'@(*
#1&'m'.
13• ~%,FD ,%(&D%. ,%0B&$%*C 0 /1G#BH @1$%* ($,
$%,&,#D, +&,%*0,+,-,m#,H (1+,%'), $AB$%*%B
,G#' */
jt}v"k x|"yu"
14• ~%,FD $#C%. (1+,%, &1$$%Bh#*%B Bh, $F,(' *
$#*A*%B $ (&B+-B#*H.
15• ~%,FD $#C%. ,F*0(', &1$$%Bh#*%B BB $F,(' *
$#*A*%B $ +B&BG#BH @1$%*.
16• {1$$%Bh#*%B ,F*0(' $/1G*, +,$-B @Bh, $#*A*%B
BB.
u{kgzkt"k z„z…u" u g{x•wzx~tx† uxz}juk
" xvjxkl"tkt"k xv tkk
z2-.(1 Navetta ,F,&'G,01#1 $*$%BA,H
Ganciomatic, (,%,&'2 A,m#,
(&B+-B#*CA* Ganciomatic +&,h'-,@#DE (,-C$,(
Pliko P3, GT3 * Centro.
17• l-C (&B+-B#*C -2-.(* ( +&,h'-,@#,H (,-C$(B
$A,%&*%B &'(,0,G$%0, +, q($+-'1%1)**, 0
(,%,&,A ,+*$D01B%$C, (1( +,G#C%. (&B+-B#*C
Ganciomatic +&,h'-,@#,H (,-C$(*, $AB$%*%B
-2-.(' 0 $%,&,#' A1AD * #1mA*%B #1 #BB, @%,FD
+,$-Dp1-$C nB-@,(.
18• l-C ,%$,BG*#B#*C -2-.(* ,% +&,h'-,@#,H
(,-C$(* $#1@1-1 $AB$%*%B &'@(' (&1$+,-,mB##'2
+&,%*0,+,-,m#,H $%,&,#D (1+,%1) 0F,(,
$
+,%,A 00B&E, ,G#,0&BAB##, $ q%*A 0,/.A*%B
-2-.(' /1 &'@(' * +,G#*A*%B BB.
&'@B( #1&'m'.
$,BG*#*%. $
+,(1/1#, #1 &*$'#(B.
23• ?1$%Bh#*%B ,F*0(' +, F,(1A %1(, (1( +,(1/1#,
#1 &*$'#(B.
24• ?10B&#*%B +,(&D01-, ,F*0(* #1 +B&BG#*( *
/1(&B+*%B Bh, $F,('
A,-#*H.
ЛИНИЯ ПРИНАДЛЕЖНОСТЕЙ
25• s0%,A,F*-.#DH (,A+-B(% Kit Auto Navetta:
A,m#, +&*,F&B$%* 10%,A,F*-.#DH (,A+-B(%
($ '%0B&mGB#*BA %*+1 ECE R44/04), 0 (,%,&,A
$,GB&m1%$C 0$B #B,FE,G*ADB GB%1-* G-C
'$%1#,0(* -2-.(* #1 A1p*#'.
26• l,mGB0*( Cover All: l,mGB0*( */ +&,/&1@#,h,
gyƒ, #1(&D012n*H 0$2 -2-.(', +&*(&B+-B##'2
( +&,h'-,@#,H (,-C$(B.
27• j'A(1 G-C +B-B#1#*C: $'A(1 $ A1%&1$*(,A G-C
+B-B#1#*C &BFB#(1, (,%,&'2
( +&,h'-,@#,H (,-C$(B.
ЧИСТКА И УХОД
y1pB */GB-*B #'mG1B%$C 0 #B$-,m#,A 'E,GB.
x+B&1)** +, @*$%(B * 'E,G' G,-m#D 0D+,-#C%.
%,-.(, 0/&,$-DB.
• {B(,AB#G'B%$C $,GB&m1%. 0 @*$%,%B 0$B
G0*m'n*B$C @1$%*, +&* #B,FE,G*A,$%* $A1m.%B
*E -Bh(*A A1$-,A.
• gB&*,G*@B$(* ,@*n1H%B +-1$%A1$$,0DB @1$%*
0-1m#,H %(1#.2, #B +,-./'H%B$. &1$%0,&*%B-CA*
*-* $E,G#DA* $ #*A* 0BnB$%01A*
• ~*$%*%B nB%(,H %(1#DB @1$%*, @%,FD 'G1-*%. B2
+D-..
• ?1n*%*%B */GB-*B ,% 1%A,$iB&#DE ,$1G(,0
- 0,GD, $#Bh1 *-* G,mGC. g,$%,C##1C *
+&,G,-m*%B-.#1C +,G0B&mB##,$%. $,-#B@#DA
-'@1A A,mB% 0D/01%. )0B%,0DB */AB#B#*C A#,h*E
A1%B&*1-,0.
• ƒ&1#*%B */GB-*B 0 $'E,A AB$%B.
• z2-.(1 0D+,-#B#1 */ 'G1&,+&,@#,h, *
0-1h,$%,H(,h, +,-*+&,+*-B#1, (,%,&DH
,@*n1B%$C 0-1m#,H %&C+(,H.
• l-C $%*&(* %(1#,H ,F*0(* 0D+,-#*%B $-BG'2n*B
'(1/1#*C.
-*+'@(1A* /1 /1$%Bm(*
A,m#, +&*(&B+*%.
.
z„z…us NAVETTA y rs‡"tk
19• Navetta +&*$+,$,F-B#1 G-C +&B,F&1/,01#*C
0 -2-.(' Navetta AUTO +&* +,A,n* G0'E
(+,(1/1##DE #1 &*$'#(B) (&B+-B#*H, +&*
q%,A #B,FE,G*A, ,%GB-.#, ('+*%. #1F,&
+&*#1G-Bm#,$%BH Kit Auto.
NAVETTA/g{x•wzx~ts} uxz}jus
• u,hG1 &BFB#,( +,G&1$%B%, $ -2-.(* Navetta
A,m#, $#C%. ,F*0('
G,+,-#*%B-.#'2 ,F*0(' $ +,(&D01-,A, (,%,&'2
A,m#, *$+,-./,01%. #1 +&,h'-,@#,H (,-C$(B.
• j#*A*%B ,F*0(' $ -2-.(* Navetta.
20• t1GB#.%B ,F*0(' -2-.(* Navetta #1 $*GB#.B
+&,h'-,@#,H (,-C$(*, (1( +,(1/1#, #1 &*$'#(B.
21• g&,+'$%*%B &BAB#. FB/,+1$#,$%* +&,h'-,@#,H
(,-C$(*, (,%,&DH 0D &1#.pB $#C-*, @B&B/ +B%-*
,F*0(* Navetta.
• g&BG,E&1#*%B-.#DB &BABp(* 0,(&'h %1-**
#B,FE,G*A, 0$%10*%. 0
+B%-*.
22• ?1+&10.%B ,F*0(' -2-.(* Navetta /1 +,G#,m('
+&,h'-,@#,H (,-C$(* %1(, (1( +,(1/1#, #1
&*$'#(B. ?1%BA /10B&#*%B 0B&E#22 @1$%.
,F*0(* #1 $+*#(' +&,h'-,@#,H (,-C$(* %1(, (1(
. x#1 +&B0&1%*%$C 0
G0B (&1H#*B F,(,0DB
BHИMAHИE
•
lstts} uxz}jus g{"•xlts lz} lkvk† j rxrktvs
{x€lkt"} " lx lxjv"€kt"} ykjs y 9 u•.
• j|x{uw " gxl•xvxyuw "?lkz"} lxz€t•
y•gxzt}v… vxz…ux y?{xjz•k.
• tk gxz…?w†vkj… "?lkz"kr g{" x|ts{w€kt"" y
tkr tklxjvs„ˆ"ƒ ~sjvk† "z" gxzxrxu.
• xjvsyz}v… ys‡k•x {k|ktus |k? g{"jrxv{s
rx€kv |•v… xgsjt•r. tk jvkz"vk
lxgxzt"vkz…t•k rsv{sj"u".
• ux•ls uxz}jus tk ly"•skvj}, yjk•ls jvsy…vk
kk ts vx{rx?. w|kl"vkj…, ~vx uxz}jus
gxjvsyzkts ts vx{rx? yx y{kr} gxjslu"
y•jslu" lkvk†.
• gk{kl "jgxz…?xyst"kr w|kl"vkj…, ~vx yjk
rkƒst"?r• u{kgzkt"} g{sy"z…tx ?s‚kgzkt•.
• gk{kl "jgxz…?xyst"kr w|kl"vkj…, ~vx
syvxrx|"z…txk u{kjzx, lkvjus} uxz}jus
"z" j"lkt…k g{sy"z…tx wjvstxyzkt•.
• tk yyxl"vk gsz…‚• y rkƒst"?r•.
• g{" y•gxztkt"" {k•wz"{xyu" rkƒst"?rxy
({w~us, jg"tus) |wl…vk x~kt… yt"rsvkz…t•,
kjz" y uxz}juk j"l"v {k|ktxu.
• z„|s} ts•{w?us, gxlyk‡ktts} u
{w~uk "z"
"
Page 26

u {w~usr rx€kv ts{w‡"v… jvs|"z…txjv…
"?lkz"}; jx|z„ls†vk wus?st"}
"?•xvxy"vkz} x rsuj"rsz…t•ƒ g{"zs•skr•ƒ
ts•{w?usƒ.
• tk uzsl"vk y ux{?"tw g{klrkv•, ykj uxvx{•ƒ
g{ky•‡skv 5 u•. tk uzsl"vk y gxljvsyu"
lz} tsg"vuxy g{klrkv•, ykj uxvx{•ƒ y•‡k
wus?sttx•x ts gxljvsyuk. t" y uxkr jzw~sk
tk jvsy…vk y t"ƒ •x{}~"k tsg"vu". y us{rst•
usgxvs (kjz" "rk„vj})
g{klrkv• ykjxr |xzkk 0,2 u•.
• tk gxz…?w†vkj… "?lkz"kr y|z"?" zkjvt"‚
"z" jvwgktk†. tk "jgxz…?xysv… y|z"?" x•t},
xvu{•vx•x gzsrkt" "z" xgsjt•ƒ g{klrkvxy,
tsƒxl}ˆ"ƒj} y gxzk lxj}•skrxjv" {k|ktus.
• "jgxz…?xyst"k g{"tslzk€txjvk†, tk
xlx|{ktt•ƒ "?•xvxy"vkzkr, rx€kv |•v…
xgsjt•r.
tkz…?} uzsjv…
TR•TÜRKÇE
• ÖNEMLİ: bu talimatlarõ dikkatlice okuyunuz ve
ileride de istifade edebilmek amacõyla muhafaza
ediniz.
Bu talimatlara uyulmamasõ halinde çocuğun
güvenliği tehlikeye girebilir.
• Pegperego ihbarsiz olarak herhangi bir zamanda
üründe deJiIiklik yapmak ve islah etmek haklarini
sakli tutar.
Peg Perego S.p.A. ISO 9001 sertifikalõdõr.
Bu sertifika ile müIterilere ve tüketicilere
kurumun Ieffaf iIleyiIinin ve tam bir
güven ortamõnõn garantisi verilmektedir.
MÜŞTERİ SERVİSİ
‰ayet kazara ürünün birtakõm parçalarõ kaybolacak ya
da zarar görecek olursa, yedek parça olarak yalnõzca
orijinal PegPerego parçalarõnõ kullanõn. Muhtemel
tamir, deJiItirme, ürün hakkõnda bilgi alma, orijinal
yedek parça ve aksesuar satõIõ iIlemleri için PegPerego
SatõI Destek hattõna baIvurun:
tel.: 0039-039-60.88.213,
fax: 0039-039-33.09.992,
e-mail: assistenza@pegperego.it,
www.pegperego.com
Peg Perego olarak tüketicilerin her türlü gereksinimini
en iyi Iekilde karI
etmeye hazõrõz. Dolayõsõyla, müIterilerimizin görüI ve
önerileri bizim için son derece önemli ve deJerlidir.
Bu nedenle, bir ürünümüzü satõn alõp kullandõktan
sonra, görüI ve önerilerinizi bildirmek üzere Internet
üzerinde “www.pegperego.com/SSCo.html.en-UK”
adresinde yer alan M܉TERŠ MEMNUNŠYETŠ FORMUNU
dolduracak olursanõz size gerçekten minnettar
kalacaJõz.
AMBALAJ
1• Puseti kullanmadan önce kenar güvenlik
kancalarõnõ kaldõrmak gerekmektedir.
GÜNE‰LŠK
2• GüneIliJi kaldõrmak için, her iki taraftan da klik
sesi duyana dek, yukarõ doJru çekin.
3• GüneIliJi indirmek için, baJlantõlardaki iki
düJmeye bastõrõp daha sonra Iekildeki gibi
aIaJõya doJ
4• Fermuar açõldõJõnda baIlõJõn fileden bir ilavesi
vardõr; bu, hem bebeJe mümkün olan en geniI
alanõ saJlayacak hem de sizin bebeJinizi her
konumda görebilmenizi saJlayacaktõr.
õlamak üzere daima onlara hizmet
KULLANIM KILAVUZU
ru ittirin.
ÖRTÜ
5• Örtü fermuar sayesinde kolaylõkla takõlabilir veya
deJiItirilebilir.
SAP
6• Sapõ kaldõrmak için, klik sesi duyana dek yukarõ
doJru çekin. Sap sadece dikey pozisyonda, iki
blok da yerine oturduJunda kitlenir.
7• Sapõ indirmek için kiliti çözün, bloklarõ yukarõ
doJru çekip devamõnda sapõ da aIaJõya doJru
bastõrõn.
8• Sap taIõma iIlemini kolaylaItõrd
pusetlerin üzerine baJlantõyõ da saJlar.
SALLANIR KOLTUK VE YATAK KONUMU
9• BeIik, tabanõndaki özel Ieklinden dolayõ, herhangi
bir yüzeye konduJunda sallanabilir durumdadõr.
õJõ gibi, araba ve
Page 27

10• BeIik, Iekildeki gibi dayanaklarõ çõkartõldõJõnda,
sallanmaz yatak Iekline dönüIür.
TEMİZLEME VE BAKIM
SIRTLIK AYARI
11• SõrtlõJõn yükseklik ayarõ Iekildeki gibi kolu çõkarõp
çevirerek yapõlõr.
HAVA DOLA‰IM AYARI
12• BeIiJin tabanõ alttan hava dolaIõmõnõ saJlamak için
açõlabilir deliklere sahiptir. BeIiJin ön tarafõndaki
(baIlõJõn bulunduJu kõsõm) delikleri açmak için iki
kancayõ dõIa doJru itin.
Arka taraftaki (baIlõJõn karIõsõnda bulunan kõsõm)
13•
delikleri açmak için kancalardan birini dõIa doJru
itin.
KILIFINDAN ÇIKARABŠLME
14• BaIlõJõ çõkarmak için kenardan düJmelerini sökün
ve pergellerden çõkarõn.
15• KumaIõ çõkarmak için kenardan düJmelerini sökün
ve önden çõkarõn.
16• Arkadan kumaIõn düJmelerini sökün ve çõkarõn.
OTURMA GRUBUNUN PUSETLERE TAKILMASI VE
ÇIKARTILMASI
Oturma grubu, Pliko P3, GT3 ve Centro serisi
pusetlerin “Ganciomatic” kancalarõna talõkalbilmesi
için “Ganciomatic Sistem” kancalarla donatõlmõItõr.
17• Oturma grubunu pusete yerleItirmek için
talimatlar kitapçõJõna bakõ
kancalarõnõ kaldõrmak için, oturma grubunu
anneye doJru konumlandõrõnõz ve “klik” sesini
dayana kadar aIaJõya doJru itiniz.
18• Oturma grubunu pusetten çõkartmak için,kolu
(tentenin aksi istikametinde yer alan) önce yana
doJru ve daha sonra yukarõ doJru itiniz ve eI
zamanlõ olarak da oturma gurubunu taIõyõcõ
kolundan tutmak suretiyle yukarõ kaldõrõnõz.
NAVETTA ARABA BE‰Š‹Š
19• Navetta beIik, çift taraflõ baJlantõ birimleri
sayesinde (Iekildeki gibi) araba beIiJi olarak
kullanõlmaya da imkân tanõr ve Oto Kit!ten ayrõ
olarak satõn alõnabilir.
PUSET/ ÇOÇUK ARABASI
• Bebek büyüdüJünde, puset astar
kumaI ile örtü çocuk arabasõna monte edilecek
ikinci bir torbaya dönüIür.
• Pusetten kumaIõ çõkarõn.
20• ‰ekilde gösterildiJi gibi, pusetin kumaIõnõ çoçuk
arabasõnõn koltuJuna geçirin.
21• Daha önceden sökülmüI olan çocuk arabasõ
emniyet kemerini puset kumaIõnõn kanatçõklarõna
geçirin.
• Bel emniyet kemercikleri en dõI kenar
kanatçõklarõndan geçmelidir.
22• ‰ekilde gösterildiJi gibi pusetin kumaIõnõ çoçuk
arabasõnõn basamakçõJõnõn içine sokun. ‰ekilde
gösterildiJi gibi örtünün baI kõ
arabasõnõn sõrtlõJõna tekrar çevirin.
23• ‰ekilde gösterildiJi gibi kenar örtüyü düJmeleyin.
Örtünün kumaIõnõ alõnlõJa tekrar çevirin, ve
24•
kenarlardaki yapõIkanlõ alana ve fermuara sabitleyin.
AKSESUAR SERİSİ
nõz; pusetin Ganciomatic
õ çõkarõlõr ve
smõnõ çoçuk
Pusetiniz çok az bir bakõm gerektirir. Temizlik
ve bakõm iIlemleri sadece yetiIkinler tarafõndan
yapõlmalõdõr.
• Bütün hareketli kõsõmlarõn temiz tutulmasõ ve
gerekirse ince yaJla yaJlanmasõ önerilir.
• Düzenli olarak plastik kõsõmlarõ nemli bir bezle silin,
çözücü veya benzeri maddeler kullanmayõn.
• Tozdan arõndõrmak için kumaI kõsõmlarõnõ fõrçalayõn.
• Ürünü su, yaJmur ve kar gibi dõI etkenlerden
koruyun, güneIte devamlõ ve uzun kalõI birçok
malzemede renk deJiIimine sebep olabilir.
• Ürünü kuru bir ortamda muhafaza edin.
• Oturma gurubu, darbelere ve rutubete dayanõklõ ve
de õslak bir bezle kolayca temizlenebilir polipropilen
malzemenden mamuldür.
• Torbanõn yõkanmasõ için, aIaJõdaki talimatlara riayet
ediniz.
UYARI
• BU ARAÇ DO‹UMDAN ITIBAREN 9 KG. YE KADAR
OLAN BEBEKLER IÇIN TASARLANMI‰TIR.
• ÜRÜNÜN MONTAJ VE HAZIRLANMA I‰LEMLERININ
YETI‰KIN BIR KI‰I TARAFINDAN YAPILMASI
GEREKMEKTEDIR.
• KIRIK YA DA EKSIK PARÇALI ÜRÜNLERIKULLANMAYIN.
• ÇOCU‹UNUZU TEK BA‰INA BIRAKMANIZ TEHLIKELI
OLABILIR. ŠLAVE ‰ILTE KULLANMAYINIZ.
• DURURKEN ER ZAMAN FREN KULLANINIZ; BEBEK
INDIRILIR VE BINDIRILIRKEN FRENLERIN DEVREDE
OLDU‹UNDAN EMIN OLUNUZ.
• ÜRÜNÜ KULLANMADAN EVVEL TÜM BA‹LANTI
AKSAMLARININ TAM OLARAK TAKILDI‹INDAN EMIN
OLUNUZ.
• KULLANIM ÖNCESINDE ARABA KOLTU‹U, BEBEK
ARABASI VEYA ÇIKARTILABILIR OTURMA GRUBUNUN
TAM OLARAK TESPIT EDILDI‹INDEN EMIN OLUNUZ.
• PARMAKLARINIZI MEKANIZMALAR ARASINA
SOKMAYINIZ.
• MEKANIZMALARIN AYAR I‰LEMLERI (TUTACAK,
SIRTLIK) YAPILIRKEN ÇOCU‹UN KONUMUNA DIKKAT
EDINIZ.
• TUTMA VE SAIR YERLERE ASILAN TÜM YÜKLER
ÜRÜNÜN DENGESININ BOZULMASINA YOL AÇABILIR;
TA‰INABILIR AZAMI A‹IRLIKLAR KONUSUNDA
ÜRETICI TARAFINDAN BELIRTILEN HUSUSLARA
BAKINIZ.
• SEPETE 5 KG.DAN FAZLA A‹IRLIK KOYMAYINIZ.
ŠÇECEK SEPETINE KESINLIKLE SEPET ÜZERINDE
BELIRTILENDEN FAZLA A‹IRLIK VE SICAK IÇECEK
KOYMAYINIZ. TENTE ÜZERINDE YER ALAN CEPLERE
(VAR ISE) 0,2 KG.DAN FAZLA A‹IRLIK KOYMAYINIZ.
• ÜRÜNÜ MERDIVEN VE BASAMAK YAKINLARINDA
KULLANMAYINIZ; ISI KAYNAKLARINA, ATE‰E VE
ÇOCU‹UN ERI‰EBILECE‹I TEHLIKELI CISIMLERE YAKIN
YERLERDE KULLANMAYINIZ.
• ÜRETICI TARAFINDAN ONAYLANMAMI‰ OLAN
AKSESUARLARIN KULLANIMI TEHLIKELI OLABILIR.
25• Oturma grubu araç seti: Oturma grubunun araca
monte edilebilmesi için gerekli donanõmõ ihtiva
eden Araç Setini (ECE R44/04 tescilli) talep etmek
mümkündür.
“Cover All” yaJmur koruyucu: ‰effaf PVC!den
26•
mamul bu yaJmur koruyucu tente, pusete
yerleItirilen oturma gurubu için tam koruma saJlar.
27• Alt deJiItirme çantasõ: bebeJin altõnõn
deJiItirilebilmesi için döIekli çanta pusete
takõlabilir.
Page 28

ΕL•EΛΛΗΝΙΚΑ
• ΣΗΜΑΝΤΙΚΟ: διαβάστε με προσοχή τις οδηγίες
αυτές και διατηρήστε τις για μελλοντική χρήση.
Η ασφάλεια του παιδιού θα μπορούσε να τεθεί
σε κίνδυνο εάν δεν ακολουθήσετε τις οδηγίες
αυτές.
• 5 PEG PEREGO SQNMŒ[X_ MZ SQPN_•WN LN PRLXQ `MQ
NOONbUŽ X_LNQ NLNbPN_XŽ • •XOMQ]VXQŽ VX N‘MR MN
a[ZQ`LMN ZaZMXS•aZMX \•[_Ž XQSZaZ_ŒVŒ.
5 aQVMZaZ_ŒVŒ aN[U\XQ VMZ‘Ž aXORMXŽ
5 Peg Perego S.p.K. SQNTUMXQ
aQVMZaZ_ŒVŒ 7S3 9001.
PNQ VMZ‘Ž PNMNLNO•MUŽ MŒL Xbb’ŒVŒ
MŒŽ SQN“RLXQNŽ PNQ MŒŽ XWaQVMZV’LŒŽ
VMZL M[`aZ WX MZL ZaZ_Z X[bR”XMNQ Œ
XMNQ[_N.
ΕΞΥΠΗΡΕΤΗΣΗ ΠΕΛΑΤΩΝ
PNQ MN S’Z VMZQ\X_N WaOZPN[_VWNMZŽ WaZ‘L VMŒL
US[N MZ‘Ž.
7• 6QN LN \NWŒO]VXMX MŒ \XQ[ZON••, NaXOX‘TX[]VMX
MŒL, M[N•]LMNŽ XaRL• MN S’Z VMZQ\X_N
WaOZPN[_VWNMZŽ PNQ PNM`aQL M[N••–MX a[ZŽ MN
PRM• MŒ \XQ[ZON••.
8• 5 \XQ[ZON•• SQX‘PZO’LXQ MŒ WXMN“Z[R PNQ
MŒ V’LSXVŒ MZ‘ aZ[M-WaXWaU XaRL• VMN
aZO‘PN[`MVQN PNQ VMN PN[ZMVRPQN aX[QaRMZ‘.
™895
9• 5 •RVŒ MZ‘ aZ[M-WaXWaU Navetta U\XQ ULN XQSQP`
10• šZ aZ[M-WaXWaU Navetta b_LXMNQ P[X•NMRPQ
;—™›795 š59 ^œKš59 š3— ˜K™79›Kš39
11• 5 aONMZ’ON MZ‘ PNT_VWNMZŽ
˜3—•7K9 ˜K7 ˜;8žKšK˜7
V\•WN aZ‘ `MNL NPZ‘Wa•VXQ VX W_N Xa_aXSŒ
XaQ“RLXQN WaZ[X_ LN PZ‘LQUMNQ.
aZ‘ SXL PZ‘LQUMNQ, •bR”ZLMNŽ U–• MQŽ
XLV•WNM•WULXŽ •RVXQŽ-PN•NOUMN `a•Ž
“N_LXMNQ VMŒL XQP`LN.
WaZ[X_ LN
[‘TWQVTX_ •bR”ZLMNŽ U–• PNQ aX[QVM[U“ZLMNŽ MŒ
ON•• `a•Ž “N_LXMNQ VMŒL XQP`LN.
8RL M‘\`L \NTZ’L WU[Œ MZ‘ WZLMUOZ‘ • ‘aZVMZ’L
PRaZQN •OR•Œ, \[ŒVQWZaZQX_MX W`LZ bL•VQN
NLMNOONPMQPR Peg Perego. 6QN M‘\`L XaQVPX‘UŽ,
NLMQPNMNVMRVXQŽ, aOŒ[Z“Z[_XŽ V\XMQPR
a[Z•`LMN, MŒL a]OŒVŒ bL•VQ•L NLMNOONPMQP]L
PNQ N–XVZ‘R[, XaQPZQL•L•VMX WX MŒL —aŒ[XV_N
8–‘aŒ[UMŒVŒŽ Peg Perego:
MŒO: 0039-039-60.88.213,
fax: 0039-039-33.09.992,
e-mail: assistenza@pegperegZ.it,
www.pegperegZ.cZm
5 Peg Perego X_LNQ VMŒ SQRTXVŒ M•L ˜NMNLNO•M]L
MŒŽ bQN MŒL PNO’MX[Œ X–‘aŒ[UMŒVŒ M•L NLNbP]L
MZ‘Ž. 6QN MZ O`bZ N‘M` X_LNQ bQN WNŽ X–NQ[XMQPR
VŒWNLMQP` PNQ aZO’MQWZ LN bL•[_”Z‘WX MŒ bL]WŒ
M•L ^XONM]L
X‘bL]WZLXŽ XRL, N“Z’ \[ŒVQWZaZQ•VXMX ULN
a[ZQ`L WNŽ, V‘WaOŒ[]VXMX MZ 8;<š5›Kš3œ3673
7˜K•3^375959 ˜KšK•Kœ<š5 aZ‘ TN •[X_MX VMZ
Q–ter–et VMŒL NP`OZ‘TŒ SQX’T‘LVŒ: “www.pegperegZ.
cZm/SSCZ.html.en-UK”,
XaQVŒWN_LZLMNŽ XLSX\`WXLXŽ aN[NMŒ[•VXQŽ •
‘aZSX_–XQŽ.
9—9˜8—K97K
1• ^[QL LN \[ŒVQWZaZQ•VXMX MZ Navetta a[UaXQ LN
N“NQ[UVXMX MN WQP[R RbPQVM[N NV“NOX_NŽ aZ‘
•[_VPZLMNQ VMN aON•LR.
K3—˜3—œK
2• 6QN LN VŒP]VXMX MŒL PZ‘PZ’ON, M[N••–MX MŒL
a[ZŽ MN aRL• WU\[Q LN NPZ‘VTX_ MZ POQP PNQ Na`
MQŽ S’Z aOX‘[UŽ.
3• 6QN LN PNMX•RVXMX MŒL PZ‘PZ’ON, aQUVMX MN
S’Z PZ‘WaQR aZ‘ •[_VPZLMNQ VMQŽ V‘LSUVXQŽ
PNQ PNM`aQL M[N••–MX MŒL a[ZŽ MN PRM• `a•Ž
“N_LXMNQ VMŒL XQP`LN.
4• KLZ_bZLMNŽ
ULTXMZ S_\M‘ aZ‘ XaQM[UaXQ VMZ W•[` LN U\XQ
WXbNO’MX[Z NX[QVW` PNQ VNŽ S_LXQ MŒ S‘LNM`MŒMN
LN MZ •OUaXMX Na` PRTX TUVŒ.
˜3—ž8;š3—œK
5• 5 PZ‘•X[MZ’ON X“N[W`”XMNQ PNQ N“NQ[X_MNQ WX
X’PZOZ M[`aZ \R[Œ VMZ “X[WZ‘R[.
:87;3œKž5
6• 6QN LN VŒP]VXMX MŒ \XQ[ZON••, M[N••–MX MŒL
a[ZŽ MN aRL•
WaOZPR[XMNQ W`LZL `MNL X_LNQ VX PRTXMŒ TUVŒ
WNŽ. ™N VNŽ X_WNVMX OZQa`L aZO’
ΟΔΗΓΙΕΣ ΧΡΗΣΕΩΣ
MZ “X[WZ‘R[, Œ PZ‘PZ’ON U\XQ ULN
WU\[Q MZ POQP. 5 \XQ[ZON••
WX MN
;—™›795 ˜—˜œ3Ÿ3;7K9 K8;K
12• 5 •RVŒ MZ‘ aZ[M-WaXWaU Navetta X_LNQ
X“ZSQNVWULŒ WX NLZQb`WXLXŽ ZaUŽ aZ‘
XaQM[UaZ‘L MŒL X_VZSZ MZ‘ NU[N Na` PRM•.
6QN LN NLZ_–XMX MQŽ ZaUŽ Na` MZ Wa[ZVMQL`
WU[ZŽ MZ‘ PNONTQZ’ Navetta (aOX‘[R VMŒL ZaZ_N
•[_VPXMNQ
a[ZŽ MN U–•.
13• 6QN LN NLZ_–XMX MQŽ ZaUŽ Na` MZ a_V• WU[ZŽ
(aOX‘[R NLM_TXMŒ Na` MŒL PZ‘PZ’ON), Va[]–MX
ULN Na` MN S’Z RbPQVM[N a[ZŽ MN U–•.
4—•Kš3š5šK KŸK7;8959 š59 8^8•4—959
14• 6QN LN N“NQ[UVXMX MŒL PZ‘•X[MZ’ON
–XPZ‘Wa]VMX MŒL VMZ aORQ PNQ •bROMX MŒL
MZ‘Ž V‘LSUVWZ‘Ž.
15• 6QN LN N“NQ[UVXMX MŒL XaULS‘VŒ –XPZ‘Wa]VMX
MŒL VMZ aORQ PNQ •bROMX MŒL Na` Wa[ZVMR.
16• XPZ‘Wa]VMX Na` a_V• MŒL XaULS‘VŒ PNQ
N“NQ[UVMX MŒL.
9—•4895 ˜K7 K^39—•4895 š3— ^3;š-›^8›^8
9šK ˜K;3š9K˜7K ^8;7^Kš3—
šZ ^Z[M-WaXWaU Navetta SQNTUMXQ 9’VMŒWN
Ganciomatic, PNQ WaZ[X_ LN V‘LSXTX_ VMZ‘Ž
V‘LSUVWZ‘Ž Ganciomatic M•L PN[ZMVQ]L
aX[QaRMZ‘ Pliko P3, GT3 PNQ Centro.
17• 6QN LN V‘LSUVXMX MZ aZ[M-WaXWaU VMZ PN[ZMVRPQ
aX[QaRMZ‘, V‘W•Z‘OX‘MX_MX MZ Xb\XQ[_SQZ \[•VŒŽ
bQN LN VŒP]VXMX MZ‘Ž V‘LSUVWZ‘Ž Ganciomatic
MZ‘ PN[ZMVQZ’ aX[QaRMZ‘, MZaZTXM•VMX MZ aZ[MWaXWaU a[ZŽ MŒ WNWR PNQ Va[]–MX MZ a[ZŽ MN
PRM• WU\[Q LN NPZ‘VMX_ MZ POQP.
18• 6QN LN NaZV‘LSUVXMX MZ aZ[M-WaXWaU Na` MN
PN[ZMVRPQN aX[QaRMZ‘, Va[]–MX a[]MN MZ
\X[Z’OQ (•[_VPXMNQ VMŒL NLM_TXMŒ aOX‘[R MŒŽ
PZ‘PZ’ONŽ) VMZ aORQ PNQ VMŒ V‘LU\XQN Va[]–MX
MZ a[ZŽ MN aRL• PNQ V‘b\[`L•Ž VŒP]VMX MZ
aZ[M-WaXWaU Na` MŒ \XQ[ZON•• a[ZŽ MN aRL•.
5 NAVETTA 9š3 K—š3˜7•5š3
19• 5 Navetta WaZ[X_ LN b_LXQ Navetta AUTO \R[Œ VMN
S’Z bNLM”RPQN (`a•Ž “N_LXMNQ VMŒL XQP`LN)
NbZ[R”ZLMNŽ –X\•[QVMR MZ Kit Auto.
NAVETTA/˜K;3š9K˜7 ^8;7^Kš3—
• ¡MNL MZ ¢•[` WXbNO]VXQ , ¢aZ[X_ LN N“NQ[XTX_
Œ XaULS‘VŒ MZ‘ Navetta PNQ LN ¢XMNM[NaX_ Œ
XaULS‘VŒ VX ULN SX’MX[Z VRPZ ¢X PZ‘•X[MZ’ON
aZ‘ V‘LN[¢ZOZbX_MNQ XaRL• VMZ PN[ZMVRPQ
aX[QaRMZ‘.
• K“NQ[UVMX MŒL XaULS‘VŒ Na` MZ Navetta.
20• ^X[RVMX MŒL XaULS‘VŒ MZ‘ Navetta XaRL• VMZ
PRTQVWN MZ‘ PN[ZMVQZ’ `a•Ž
Œ PZ‘PZ’ON), Va[]–MX MN S’Z RbPQVM[N
Na`
PNQ
“N_LXMNQ VMŒL
Page 29

XQP`LN.
21• ^X[RVMX MŒ ”]LŒ NV“NOX_NŽ MZ‘ PN[ZMVQZ’, aZ‘
U\XMX a[ZŒbZ‘WUL•Ž NaZV‘LSUVXQ, VMQŽ V\QVWUŽ
MŒŽ XaULS‘VŒŽ MZ‘ Navetta.
• šN OZ‘[RPQN NV“NOX_NŽ b’[• Na` MŒ WUVŒ
a[UaXQ LN aX[RVZ‘L WUVN Na` MQŽ S’Z aQZ
X–•MX[QPUŽ aOX‘[QPUŽ V\QVWUŽ.
22• 4QaO]VMX MZ PRM• WU[ZŽ MŒŽ XaULS‘VŒŽ MZ‘
Navetta VMŒL •RVŒ M•L aZSQ]L MZ‘ PN[ZMVQZ’
aX[QaRMZ‘
^[Z\•[•VMX VMŒ V‘LU\XQN b‘[_”ZLMNŽ MZ XaRL•
WU[ZŽ MŒŽ XaULS‘VŒŽ XaRL• VMŒL aORMŒ MZ‘
PN[ZMVQZ’ `a•Ž “N_LXMNQ VMŒL XQP`LN.
23• ˜Z‘Wa]VMX VMZ aORQ MŒL XaULS‘VŒ `a•Ž
“N_LXMNQ VMŒL XQP`LN.
24• 6‘[_VMX MŒL PZ‘•X[MZ’ON MŒŽ XaULS‘VŒŽ VMŒL
a[ZVMNMX‘MQP• WaR[N, VMX[X]LZLMRŽ MŒL VMN
aON•LR WX MZ N‘MZP`OOŒMZ velcro VMZ‘Ž S[ZWX_Ž
M•L “X[WZ‘R[.
25• Kit K‘MZPQL•MZ‘ Navetta: ›aZ[X_MX LN ”ŒM•VXMX MZ
Kit N‘MZPQL•MZ‘(WX UbP[QVŒ ECE R44/04), aX[QU\XQ
MN NaN[N_MŒMN bQN MŒ V‘LN[WZO`bŒVŒ MZ‘ aZ[MWaXWaU VMZ N‘MZP_LŒMZ.
26• ^[ZVMNMX‘MQP` PRO‘WWN bQN MŒ •[Z\• Cover
All: ^[ZVMNMX‘MQP` PRO‘WWN bQN MŒ •[Z\•
Na` SQN“NLUŽ PVC, X–NV“NO_”XQ MŒL aO•[Œ
a[ZVMNV_N MZ‘ aZ[M-WaXWaU aZ‘ X_LNQ
V‘LSXWULZ VMZ PN[ZMVRPQ aX[QaRMZ‘
27• šVRLMN KOON–QU[N: šVRLMN WX VM[•WNMRPQ bQN
LN NOOR”XMX MZ W•[`, V‘LSX`WXLŒ VMZ PN[ZMVRPQ
aX[QaRMZ‘.
`a•Ž “N_LXMNQ VMŒL XQP`LN.
ΣΕΙΡΑ ΑΞΕΣΟΥΑΡ
.
• ¡šK• 8¤9š8 9šK›Kš5›§•37 •K :;597›3^378¤š8
^¦•šK šK Ÿ;§•K· ž8žK7<™8¤š8 ¡š7 šK Ÿ;§•K
8¤•K7 8•8;63^375›§•K ˜Kš¦ š3—9 :87;79›3¨9
š3^3™§š5959 ˜K7 8 ¡43— š<• ^K747«•.
• ^;7• K^¡ š5 :;©95 ž8žK7<™8¤š8 ¡š7 ¡œ37 37
›5:K•79›3¤ 9¨•48959 8¤•K7 9—•48›§•37 9<9š¦.
• ^;7• K^¡ š5 :;©95 ž8žK7<™8¤š8 ¡š7 š3 ˜¦™79›K
K—š3˜7•©š3—, š3 ^3œ—˜K;¡š97 © 5 ™§95
9<9š¦ 9—•48›§•K.
• ›5• 879¦68š8 šK 4¦:š—œK ›§9K 9š3—9
›5:K•79›3¨9.
• ^;39§:8š8 747K¤š8;K ¡šK• 8˜š8œ8¤š8 8;6K9¤89
;¨™›7959 š<• ›5:K•79›«• (:87;3œKž©, ^œ¦š5)
^K;3—9¤K š3— ^K7473¨.
• ˜¦™8 Ÿ3;š¤3 ^3— ˜;8›¦š8 9š5 :87;3œKž© ©
9š79 œKž§9 ›^3;8¤ •K ^;3˜Kœ§987 š5• K9š¦™87K
š3— ^;3£¡•š39· K˜3œ3—™©9š8 š79 —^348¤ 879
š3— ˜KšK9˜8—K9š© ¡93• KŸ3;¦ š3 K•«šKš3
Ÿ3;š¤3
• ›5• 879¦68š8 9š3 ˜Kœ¦™7 Ÿ3;š¤K ›8 ž¦;39
›86Kœ¨š8;3 K^¡ 5 KG. ›5• 879¦68š8 9š5•
—^343:© K•Kª—˜š7˜«• ž¦;5 ›86Kœ¨š8;K K^¡
K—š¦ ^3— ^;39473;¤¥3•šK7 9š5• —^343:©
K•Kª—˜š7˜«• ˜K7 ^3š§ ¥89š¦ ;3Ÿ©›KšK. ›5•
879¦68š8 9š79 š9§^89 š<• ˜3—˜3¨œ<• (8¦•
—^¦;:3—•) ž¦;5 ^3— 8¤•K7 ›86Kœ¨š8;K K^¡ 0,2
KG.
• ›5• :;597›3^378¤š8 š3 ^;3£¡• ˜3•š¦
9˜¦œ89 © 9˜Kœ¦˜7K· ›5• š3 :;597›3^378¤š8
˜3•š¦ 98 ^56§9 ™8;›¡š5šK9, 8œ8¨™8;89
Ÿœ¡689 © 8^7˜¤•4—•K K•š7˜8¤›8•K ^3— ›^3;8¤
•K Ÿš¦987 š3 ^K74¤.
• ›^3;8¤ •K 8¤•K7 8^7˜¤•4—•5 5 :;©95
8 K;š5›¦š<• ^3— 48• §:3—• š5• §6˜;795 š3—
˜KšK9˜8—K9š©.
^3— ›^3;8¤ •K :;597›3^375™8¤.
8¤•K7
98
ΚΑΘΑΡΙΣΜΑ ΚΑΙ ΣΥΝΤΗΡΗΣΗ
šZ a[Z•`L VNŽ \[XQR”XMNQ W_N XOR\QVMŒ V‘LM•[ŒVŒ.
3Q X[bNV_XŽ PNTN[QVWZ’ PNQ V‘LM•[ŒVŒŽ a[UaXQ LN
XPMXOZ’LMNQ W`LZL Na` XL•OQPXŽ.
• 9‘W•Z‘OX’Z‘WX LN SQNMŒ[X_MX PNTN[R `ON MN WU[Œ
aZ‘ PQLZ’LMNQ PNQ XRL \[XQR”XMNQ, LN MN
WX XON“[’ ORSQ.
• ^X[QZSQPR PNTN[_”XMX MN aONVMQPR WU[Œ WX ULN
‘b[` aNL_, WŒ \[ŒVQWZaZQX_MX SQNO‘MQPR • ROON
aN[`WZQN a[Z•`LMN.
• žZ‘[MV_”XMX MN WU[Œ Na` ’“NVWN bQN LN
NaZWNP[‘LTX_ Œ VP`LŒ.
• ^[ZVMNMX’XMX MZ a[Z•`L Na` NMWZV“NQ[QPZ’Ž
aN[RbZLMXŽ, LX[`, •[Z\• • \Q`LQ, Œ V‘LX\•Ž
UPTXVŒ VMZL •OQZ bQN aZO’ PNQ[` TN WaZ[Z’VX LN
a[ZPNOUVXQ NOONbUŽ VMZ \[]WN aZOO]L ‘OQP]L.
• Ÿ‘OR–MX MZ a[Z•`L VX –Œ[` \][Z.
• šZ aZ[M-WaXWaU X_LNQ PNMNVPX‘NVWULZ Na`
aZO‘a[Za‘OULQZ, NLTXPMQP` VMN \M‘a•WNMN PNQ
VMŒL ‘b[NV_N PNQ PNTN[_”XMNQ WX
• 6QN MZ aO’VQWZ M•L XaXLS’VX•L, NPZOZ‘T•VMX MQŽ
aN[NPRM• ‘aZSX_–XQŽ.
ULN ‘b[` aNL_.
OQaN_LXMX
ΠΡΟΣΟΧΗ
• š3 ^;3£¡• K—š¡ ^;33;¤¥8šK7 67K ^K747¦ K^¡ š5
6§••595 §<9 9 KG ž¦;39.
• 37 8;6K9¤89 9—•K;›3œ¡65959 ˜K7
^;38š37›K9¤K9 š3— ^;3£¡•š39 ^;§^87 •K
8˜š8œ3¨•šK7 K^¡ 8•©œ7˜89.
• ›5• :;597›3^378¤š8 š3 ^;3£¡• 8¦• ^K;3—97¦¥87
›§;5 ^3— œ8¤^3—• © 8¤•K7 9^K9›§•K.
• ›^3;8¤ •K 8¤•K7 8^7˜¤•4—•3 8¦• KŸ©98š8 š3
^K74¤ 9K9 :<;¤9 8^¤žœ8ª5. ›5• ^;39™§š8š8
9š;<›Kš¦˜7K
.
Page 30

Page 31
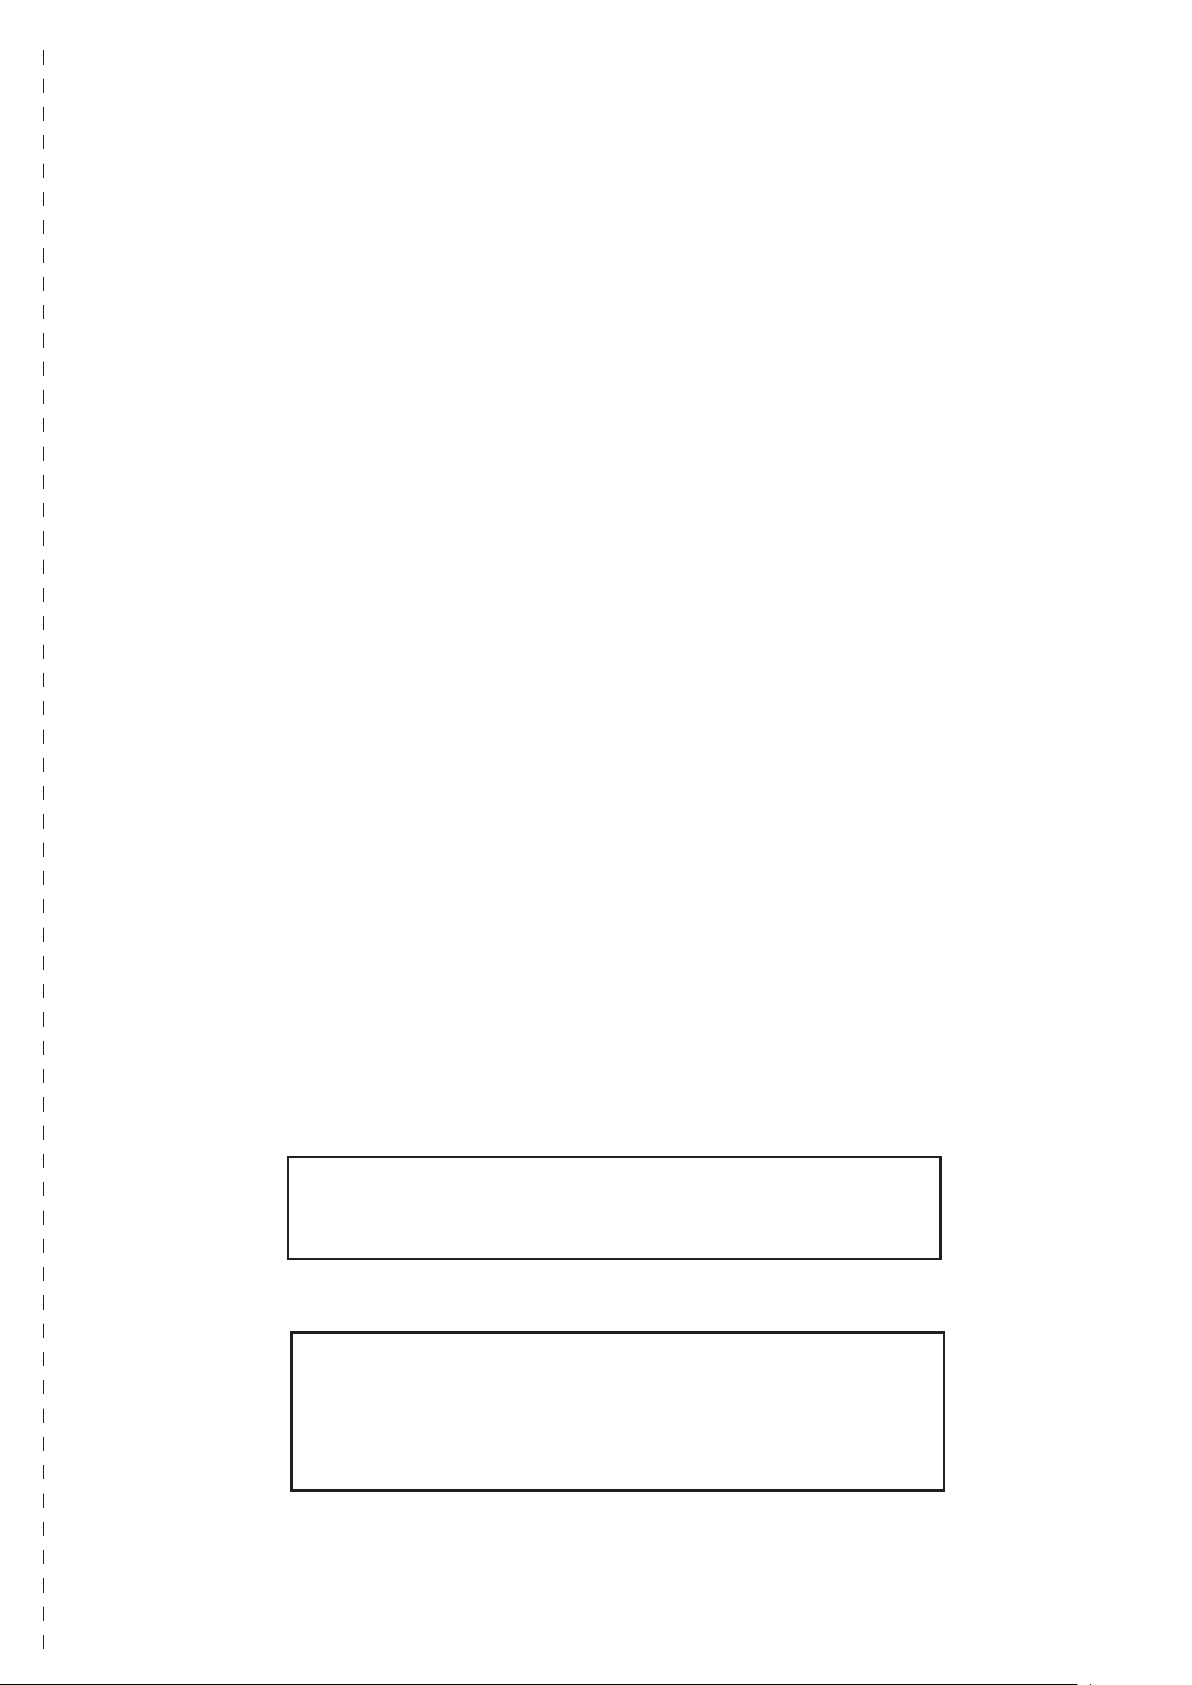
&
PEG PEREGO SpA
Via De Gasperi, 50
20043 Arcore (MI) Italy
www.pegperego.com
ΠΑΙΔΙΚΑ ΕΙΔΗ ΒΡΕΦΑΝΑΠΤΥΞΗΣ ΚΑΙ ΠΑΙΧΝΙΔΙΑ ΕΓΓΥΗΣΗ
5 PEG – PEREGO Xbb‘RMNQ bQN M‘\`L X[bZVMNVQNPR XONMM]WNMN M•L a[ZQ`LM•L
MŒŽ bQN SQRVMŒWN U–Q WŒL]L Na` MŒL ŒWX[ZWŒL_N NbZ[RŽ. 5 a[ZVP`WQVŒ
MŒŽ NLROZbŒŽ MNWXQNP•Ž Na`SXQ–ŒŽ NbZ[RŽ X_LNQ NaN[N_MŒMŒ. 8–NQ[Z’LMNQ
MŒŽ Xbb’bŒVŒŽ ZQ XaNLN“Z[MQ”`WXLXŽ WaNMN[_XŽ PNQ ZQ WXMNV\Œ-WNMQVMUŽ
aNQ\LQSQ]L. (•O. NLNO‘MQPUŽ ZSŒb_XŽ \[•VX•Ž aNQ\LQSQ]L).
5 aN[Z’VN
•RVXQ M•L ZSŒbQ]L \[•VX•Ž. 3 PNMNVPX‘NVM•Ž PNQ ZQ XLMXMNOWULZQ V‘LX[bRMXŽ
MZ‘ SQNMŒ[Z’L MZ SQPN_•WN MX\LQPZ’ XOUb\Z‘.
3 PNMNVPX‘NVM•Ž SXL WaZ[X_ LN TX•[ŒTX_ ‘aX’T‘LZŽ X“! `VZL:
• 4XL MŒ[ŒTZ’L ZQ NLROZbXŽ ZSŒb_XŽ \[•VX•Ž MZ‘ PRTX a[ZQ`LMZŽ.
• ˜NMNVM[N“X_ M‘\N_N MZ a[ZQ`L • a[ZPOŒTZ’L
• —aR[–XQ MX\LQP• aN[UW•NVŒ –ULZ‘ a[ZŽ MŒL XMNQ[X_N WNŽ MX\LQPZ’, a[RbWN MZ
ZaZ_Z NaNbZ[X’XMNQ PNQ NaZMXOX_ P_LS‘LZ bQN MŒL NV“ROXQN MZ‘ aNQSQZ’.
• Ÿ‘VQZOZbQP• “TZ[R MZ‘ a[ZQ`LMZŽ.
Διατηρείτε την εγγύηση και τις οδηγίες χρήσεως και για μελλοντική χρήση.
ΟΝΟΜΑΤΕΠΩΝΥΜΟ ΑΓΟΡΑΣΤΟΥ : .................................................................................................
ΔΙΕΥΘΥΝΣΗ : .............................................................................................................................................
ΤΗΛΕΦΩΝΟ : .............................................................................................................................................
ΕΙΔΟΣ ΠΡΟΙΟΝΤΟΣ : ..............................................................................................................................
Xbb’ŒVŒ QV\’XQ W`LZL X“! `VZL MZ a[ZQ`L \[ŒVQWZaZQX_MNQ V•VMR PNQ
•OR•XŽ Na` PNP• \[•VŒ N‘MZ’.
ΕΓΓΥΗΣΗ
ΚΩΔΙΚΟΣ ΠΡΟΙΟΝΤΟΣ : .......................................................................................................................
ΗΜΕΡΟΜΗΝΙΑ ΑΓΟΡΑΣ
ΣΦΡΑΓΙΔΑ ΚΑΤΑΣΤΗΜΑΤΟ
Προσοχή: 5 Xbb’ŒVŒ QV\’XQ WZLZ X“! `VZL X\XQ V‘WaOŒ[•TX_ PNQ V“[NbQVTX_
Na` MZL a•OŒM• Œ ŒWX[ZWŒL_N NbZ[RŽ. ¥ŒMX_VMX MZ Na` MZ PNMRVMŒWN MŒ VMQbW•
MŒŽ NbZ[RŽ. KL \NTX_ • PNMNVM[N“X_ MZ Na`PZWWN MŒŽ Xbb’ŒVŒŽ SXL WaZ[X_ LN
NLMQPNMNVMNTX_.
Page 32

Navetta
PEG PEREGO S.p.A.
VIA DE GASPERI 50 20043 ARCORE MI ITALIA
tel. 0039•039•60881 fax 0039•039•615869-616454
Servizio Post Vendita - After Sale:
tel. 0039•039•6088213 fax: 0039•039•3309992
PEG PEREGO U.S.A. Inc.
3625 INDEPENDENCE DRIVE FORT WAYNE INDIANA 46808
phone 260•482•8191 fax 260•484•2940
Call us toll free 1•800•671•1701
PEG PEREGO CANADA Inc.
585 GRANITE COURT PICKERING ONTARIO CANADA L1W3K1
phone 905•839•3371 fax 905•839•9542
Call us toll free 1•800•661•5050
S
www.pegperego.com
MARTINELLI è prodotta da Peg Perego.
MARTINELLI is produced by Peg Perego.
MARTINELLI est un produit Peg Perego.
MARTINELLI wird von Peg Perego hergestellt.
MARTINELLI es un producto Peg Perego.
MARTINELLI é um produto Peg Perego
MARTINELLI is een productie van Peg Perego.
MARTINELLI egy Peg Perego termék.
MARTINELLI je izdelek Peg Perego.
rsRTINELLI +&,*/0BGB#1 Peg Perego.
MARTŠNELLŠ PegPerego tarafindan Üretilmektedir.
TN a[ZQ`LMN MARTINELLI aN[RbZLMNQ Na` MŒL Peg – Perego.
07-09-2006
 Loading...