

Page 1
FIUS0501G65
Model Number IGCD0524
MINI
LOADER
USE AND CARE
UTILISATION ET ENTRETIEN
EN
FR
ES
EMPLEO Y MANUTENCION
Page 2
10
9
11
1
12
13
NNOO OOKK
14 15
2 3
1
1
2
2
4 5
6
7
A
8
Page 3
A
16
17
18
19 20
R
L
L
21
B
A
22 23
A
24
25
26
Page 4

11
1100
1111
2244
1144
2277
2299
1188
2200
2211
1199
1155
1122
1133
22
88
99
55
66
44
ddxx
77
ddxx
1166
77
ssxx
2288
3355
3366
3300
3344
3311
3322
3333
1177
ddxx
2222
ddxx
2233
2255
2266
33
1 SAGI8340YFGP
2 SOGI0036SC
3 SPST8354N
4
dx SARP8326DNGR
4
sx SARP8326DNGR
5 SPST8349
6 SPST8352N
7
dx SPST8339KDGR
7
sx SPST8339KSGR
8 SPST8332KNP
9 SPST8332JNP
10 SPST8342RF
11
dx SPST8341DGP
11
sx SPST8341SGP
12 SPST8344GR
13 SPST8345YF
14 SPST8450N
15 SPST3813N
SPST3814YF
16 SOGI0035
17
dx SARP8325DNGR
17
sx SARP8325DNGR
18 SAGI8348N
19 SMCT0001
20 SPST8448GR
21 ASGI0153GP
22
dx SPST8335D
22
sx SPST8335S
23 SPST8334WN
24 SPST8330WKN
25 SPST8338N
26 SPST8333WYF
27 ASGI0145NYF
28 SPST8347N
29 SPST8249N
30 SAGI8343GR
31 SPST8207R
32 SPST8550N
33 SPST8331WN
34 ASGI0154NGP
35 SPST8457N
36 MMEV0149
Page 5

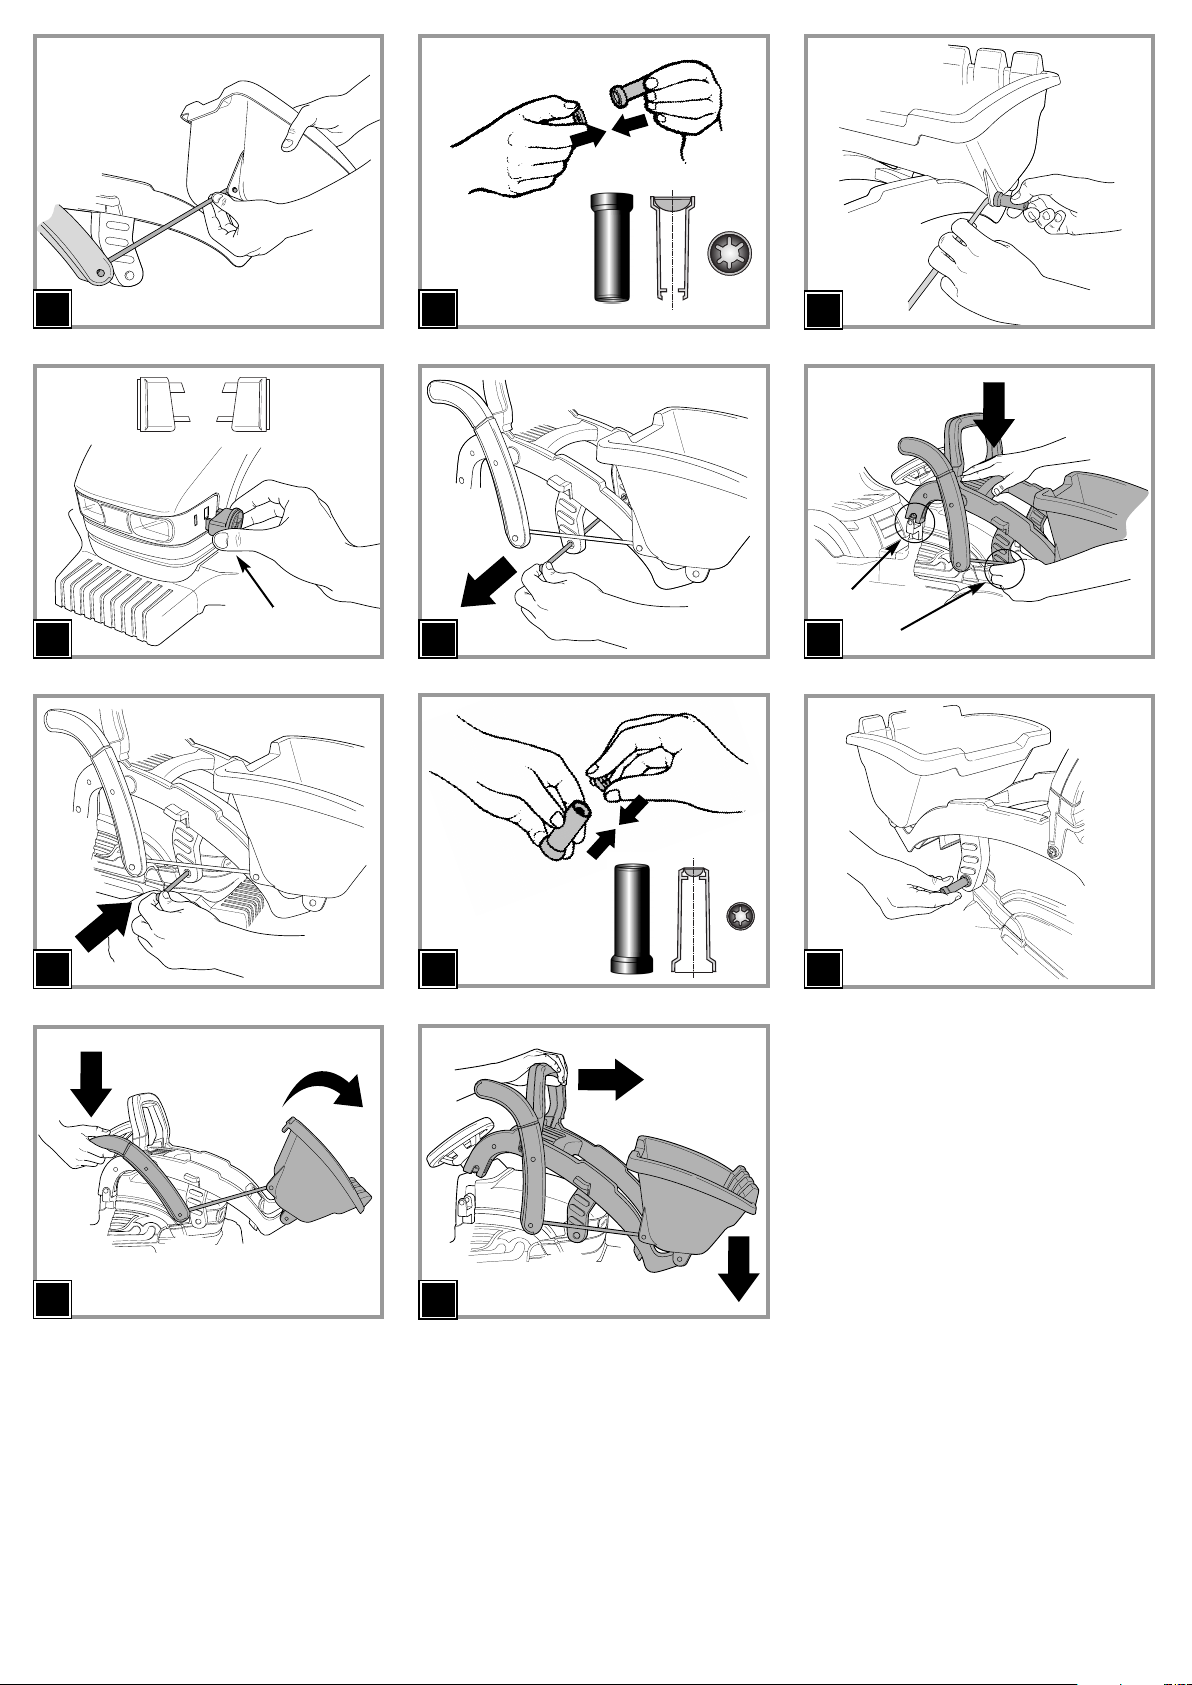
15 • Finish fastening the handlebar by holding the
nuts in place while tightening the screws.
16 • Insert the rod for the shovel command lever
into the hole in the shovel.
17 • Place a large stud in the special tool (see detail
A).
18 • Fasten the rod by pushing the stud all the way
in. (If this is difficult to do, use a hammer).
19 • Press the two loader-arm rests into place on the
sides of the grill, as shown in the figure.The two
pieces are shaped to fit the grill, so make sure
to position them carefully,inserting the pin
marked “L”on the left and the pin marked “R”
on the right.
20 • Remove the pin that fastens the loader to the
tractor from the loader arms, as shown in the
figure.
21 • Place the loader on the tractor,lining up point
A on both sides with the previously attached
rests. Press on the back of the loader arms on
both sides to fasten them at point B.
22 • Push the pin that fastens the loader to the
tractor through its hole and out the opposite
side of the tractor.
23 • Place a small stud in the special tool (see detail
A).
24 • Fasten the pin by pushing the stud all the way
in. (If this is difficult to do, use a hammer).
25 • To dump the slovel, lower the lever.
26 • To lower the entire loader,push the handlebar
forward.
This product conforms to EN 71 the
safety standard for toys.
This vehicle is not intended for use
on streets, around traffic or parked
cars.
This product meets and/or exceeds
all ASTM TOY SAFETY STANDARDS,
including F 963, Consumer Toy
Safety Specifications.
MAINTENANCE AND CARE
• Regularly check the conditions of
the vehicle. In case of fault, do not
try to use the vehicle. For repair
use only original PEG PEREGO’s
spare parts.
• PEG PEREGO assumes no liability if
the product as been tampered
with.
• Do not leave vehicle near sources
of heat such as radiators, stoves,
fireplaces, etc.
• Protect vehicle from water,rain,
snow,etc.
• Periodically lubricate (with a light
weight oil) moving parts, such as
wheel bearings, steering linkages,
and chains at points of rotation or
where they come in contact.
• The vehicle’s surface can be
cleaned with a dampcloth. Do not
use abrasive cleaners.The cleaning
must be carried out by adults only.
• Never disassemble the vehicles
mechanisms unless authorized by
PEG PEREGO.
SAFETY
WARNING!
THE CAR MUST BE USED UNDER
ADULT SUPERVISION.
• Not suitable for children under the
age of 2 years.The small pieces
could be swallowed or inhaled.
• PEG PEREGO® thanks you for choosing this
product. For over 50 years,PEG PEREGO has been
taking children for an outing: first with its famous
baby carriages and strollers, later with its pedal and
battery operated toy vehicles.
• Read this instruction manual carefully to learn the
use of the vehicle and to teach your child safe and
enjoyable driving.Please keep this manual for use
as a reference in the future.
• Our toys conform with the safety requirements
provided by the Council of the EEC,of the T.Ü.V.;of
the I.I.S.G. Istituto Italiano Sicurezza Giocattoli,and
the U.S. Consumer Toy Safety Specification F963.
Peg Perego S.p.A. is an ISO 9001
certified company.
The fact that we are certified provides
a guarantee of our honesty for our
customers, and fosters trust in the
company’s way of working.
• Peg Perego reserves the right to modify or change
its product. Price, literature, manufacturing
processes or locations or any combination of the
above mentioned entities may change at any time
for any reason without notice with impunity.
Years 2-4
Weight capacity
50 lbs
PEG PEREGO offers after-sales services, directly or
through a network of authorized service centers for
repairs or replacement parts. See the back cover of
this instruction manual for contact information.
CAUTION:
ADULT ASSEMBLY REQUIRED.
USE CARE WHEN UNPACKING AS
COMPONENTS TO BE ASSEMBLED
MAY POSE A SMALL PARTS/SHARP
EDGE HAZARD.
ASSEMBLY
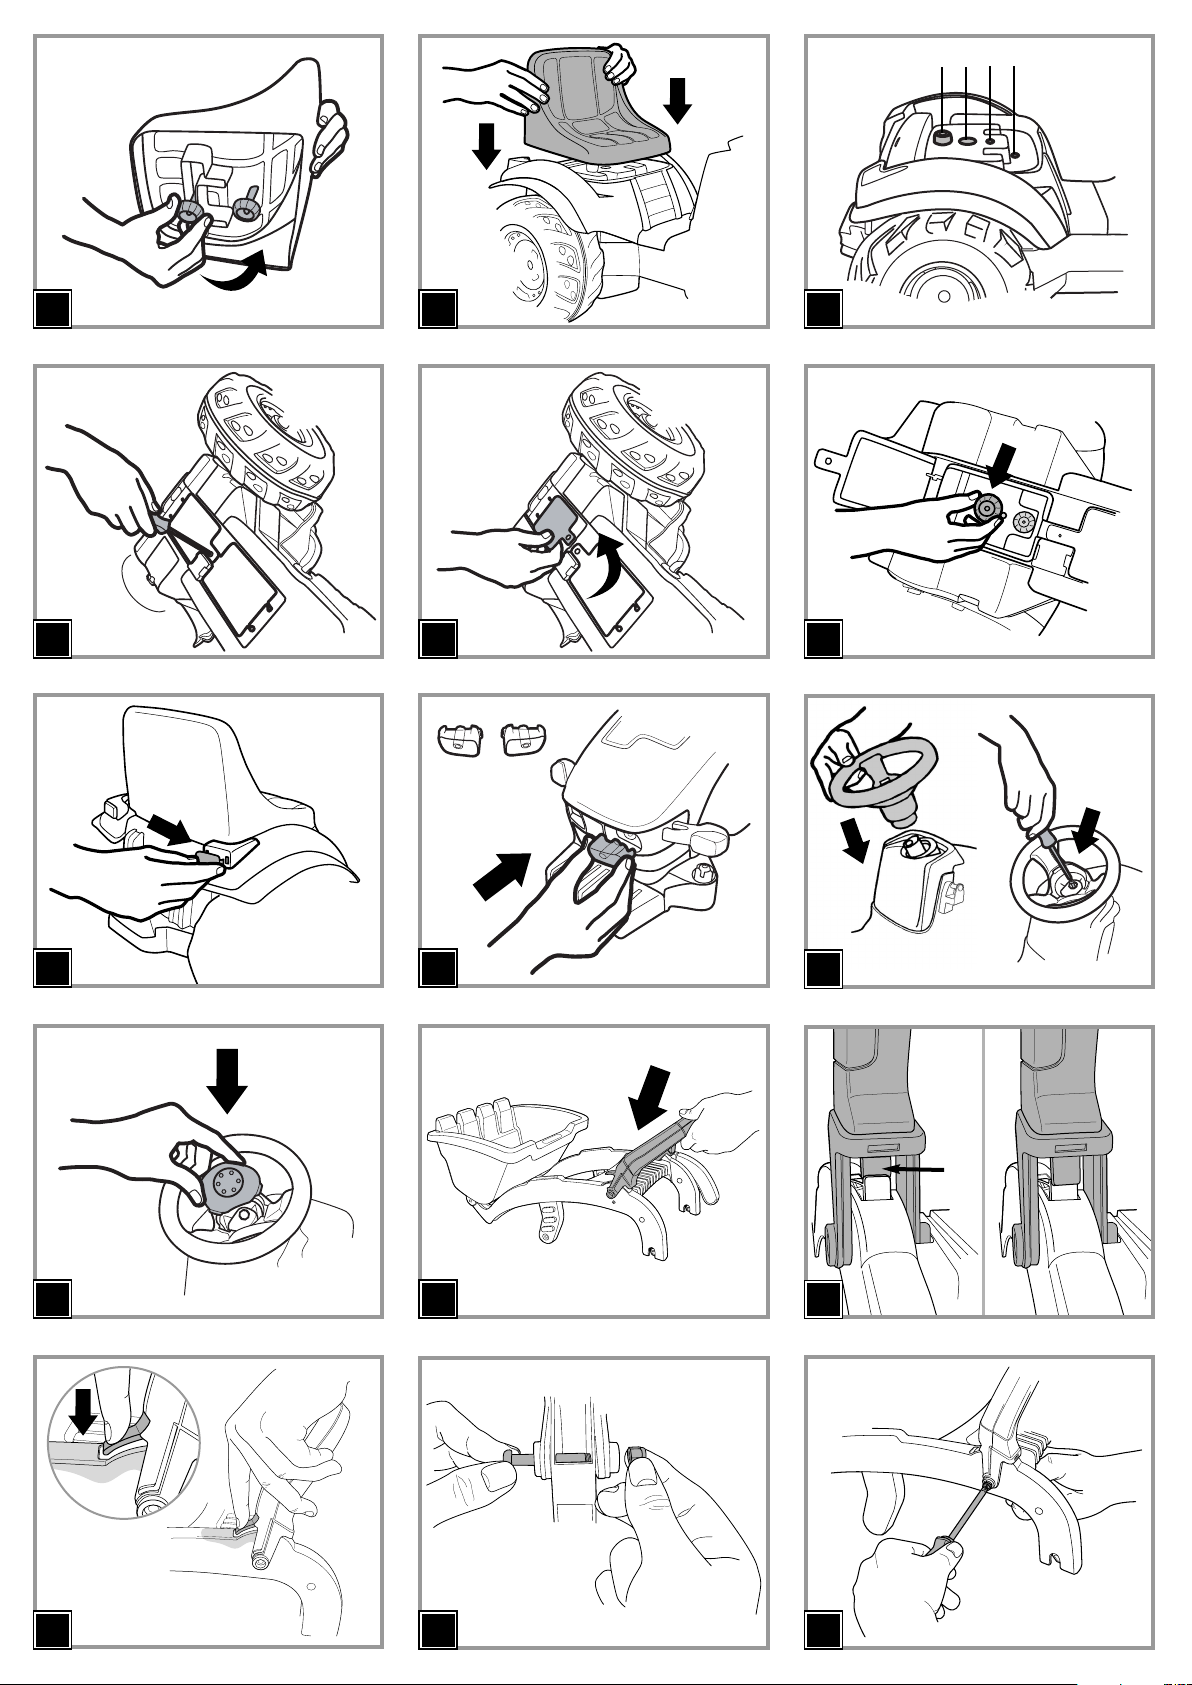
1 • Unscrew the 2 knobs under the seat.
2 • Position the seat as shown in the figure.
3 • IMPORTANT: the seat can be adjusted to 2
positions depending on the height of the child
(see figure). Position 1: the seat is higher and
further back. Position 2:the seat is lower and
further forward.
4 • Turn the vehicle on its side, keeping the seat in
position. Unscrew the chain cover under the
vehicle.
5 • Open the cover to access the seat fixing screws.
6 • Screw on the two seat fixing knobs as shown in
the figure. Close and screw on the cover.
7 • Snap on the 2 rear lights.
8 • Press on the 2 headlights as shown in detail A.
9 • Position the steering wheel. Fix the steering
wheel with the screw and washer provided.
10 • Push on the steering wheel cap as shown in the
figure.
11 • Place the handlebar on the loader arms,
slanting it downward slightly in order to
correctly position the two pins on the
handlebar (see detail in the next figure).
12 • The two pins on the handle must be kept on
the outside of the hooks that protrude from the
loader arms.The figure shows one of the two
pins in both the wrong position (NO) and the
right position (OK).
13 • Insert the tabs on the front part of the
handlebar into the openings in the loader arms.
14 • Fasten the handlebar using the screws and
nuts, inserting the nuts into the hexagonal
housings inside the loader arms, and the screws
through the circular holes from the outside.
(The figure shows the bottom of the loader
arms).
ENGLISH
CUSTOMER SERVICE
ASSEMBLY INSTRUCTIONS
VEHICLE MAINTENANCE
AND SAFETY
• Never use the vehicle on steep
slopes, near steps or stairs, in the
middle of traffic or between
parked cars.
• Children should always wear shoes
when riding in or driving a ridein/ride-on vehicle.
• Do not allow children to place
their hands, feet or any part of
their body,clothing or other
articles near the moving parts
while vehicle is in operation.
• Never use gasoline or other
flammable substances near the
vehicle.
• The vehicle is constructed just for
one child.
Page 6

ligeramente inclinado hacia abajo para colocar
correctamente los dos pivotes en su interior
(véase el detalle en la figura siguiente).
12 • Los dos pivotes del mango tienen que quedar
fuera del gancho que sobresale del cucharón.
La figura ilustra uno de los dos pivotes en la
posición incorrecta (NO) y en la posición
correcta (OK).
13 • Meter las lenguetas de la parte delantera del
mango en los agujeros del cucharón.
14 • Fijar el mango con el tornillo y la tuerca
metiendo la tuerca en el alojamiento
hexagonal dentro del cucharón y el tornillo por
el exterior en el agujero circular (la figura
muestra el cucharón por debajo)
15 • Completar la sujeción teniendo sujeta con un
dedo la tuerca mientras se atornilla el tornillo.
16 • Meter en el agujero de la pala la varilla de la
palanca de mando de la pala.
17 • Meter un bullón grande en la herramienta
correspondiente (véase el detalle A).
18 • Fijar la varilla empujando a fondo el bullón (si la
operación resulta dificultosa utilizar un
martillo).
19 • Meter a presión los dos casquillos de sujeción
del cucharón a los lados de la calandra como
indica la figura. Cuidado, las piezas están
perfiladas para seguir la línea de la calandra;
meter el pivote L a la izquierda y el perno R a la
derecha.
20 • Extraer el pivote de sujeción del cucharón
como indica la figura.
21 • Colocar el cucharón en el tractor haciendo que
coincida el punto A (por ambos lados) con los
casquillos aplicados antes. Presionar sobre la
parte de atrás del cucharón para engancharlo
en el punto B (por ambos lados).
22 • Meter el pivote de sujeción del cucharón hasta
que salga por la parte opuesta del tractor.
23 • Meter un bullón pequeño en la herramienta
correspondiente (véase el detalle A).
24 • Fijar el pivote empujando a fondo el bullón (si
la operación resulta dificultosa utilizar un
martillo).
25 • Para volcar la pala,bajar la palanca de mando.
26 • Para bajar todo el brazo del cucharón,empujar
hacia adelante el mango.
Este producto ha sido fabricado
conforme a las Normas de
Seguridad EN 71 para los juguetes;
pero no con las disposiciones del
Reglamento del Tránsito en la calle
y por lo tanto no puede circular en
vías públicas.
Este producto cumple con y/o
sobrepasa los ESTÁNDARES DE
SEGURIDAD ASTM TOY, incluido el F
963, Especificaciones de seguridad
en juguetes para consumidores.
MANTENIMIENTO Y CUIDADOS
• Controle periódicamente el estado
del vehículo.En caso de defectos
comprobados, el vehículo no
deben utilizarse. Para las
reparaciones utilizar sólo piezas de
recambio originales PEG PEREGO.
• PEG PEREGO no asume ninguna
responsabilidad en caso de uso
indebido.
• No deje el vehículo cerca de
fuentes de calor como caloríferos,
chimeneas, etc.
• Proteja el vehículo contra el agua,
lluvia, nieve, etc.
• Lubricar periódicamente (con
aceite liviano) las partes móviles
como cojinetes,dirección,
cadena,etc.
• Las superficies del coche deben
limpiarse con un paño húmedo y,
• PEG PEREGO® le agradece que haya elegido este
producto.
Hace más de 50 años que PEG PEREGO lleva a
pasear a los niños: al nacer, con sus famosos cochescuna y coches de paseo,después con los fantásticos
vehículos de juguete a pedal y con batería.
• Lea atentamente este manual de instrucciones
para familiarizarse con el uso del modelo y enseñar
a su niño un modo de conducir correcto,seguro y
divertido. Conserve después el manual para
cualquier consulta futura.
• Nuestros juguetes respetan los requisitos de
seguridad previstos por el Consejo de la EEC, por el
“U.S. Consumer Toy Safety Specification F963”y
están aprobados por el T.Ü.V. y por el I.I.S.G.Istituto
Italiano Sicurezza Giocattoli.
Peg Perego S.p.A. cuenta con la
certificación ISO 9001.
Dicha certificación ofrece tanto a los
clientes como a los consumidores la
garantía de una transparencia y
confianza por lo que concierne al
modo de trabajar de la empresa.
• Peg Perego se reserva el derecho de aportar
modificaciones a sur productos. El precio, el manual
adjunto,los procesos o lugares de fabricación o una
combinación de estos factores pueden provocar
cambios sin previo aviso y sin que ello suponga
ninguna obligación para Peg Perego.
Años 2-4
Peso trasportable
50 lbs / 22,7 kg
PEG PEREGO ofrece un servicio de asistencia postventa, directamente o a través de una red de
centros de asistencia técnica autorizados,para
eventuales reparaciones o substituciones y venta
de recambios originales. Para contactar con los
centros de asistencia véase la parte de atrás de la
cubierta de este manual de instrucciones.
PRECAUTION:
REQUIERE MONTAJE DE UN
ADULTO.
ALGUNOS COMPONENTES AL SER
ENSAMBLADOS PODRÍAN TENER
PARTES PEQUEÑAS/RIESGO POR
BORDES CONTANTES.
MONTAJE
1 • Desenroscar los 2 pomos que hay debajo del
asiento.
2 • Poner el asiento como indica la figura.
3 • ATENCIÓN: el asiento se puede regular en 2
posiciones según la altura del niño (véase la
figura). Posición 1: el asiento está más alto y
retrasado; posición 2:el asiento está más bajo y
adelantado.
4 • Poner el vehículo de lado manteniendo en
posición el asiento.Destornillar la tapa del
alojamiento-cadena que está debajo del
vehículo.
5 • Abrir la tapa para acceder a los pivotes de
fijación del asiento.
6 • Enroscar los 2 pomos de fijación del asiento
como indica la figura. Cerrar y volver a atornillar
la tapa.
7 • Montar a presión los 2 cristales de los faros
posteriores.
8 • Montar a presión los dos faros delanteros de
manera correcta como indica la figura A.
9 • Colocar el volante. Fijar el volante con la
arandela y el tornillo que se entrega.
10 • Poner a presión el tapón del volante como
indica la figura.
11 • Poner el mango en el cucharón manteniéndolo
ESPAÑOL
SERVICIO DE ASISTENCIA
INSTRUCCIONES DE MONTAJE
si es necesario,con productos
adecuados de uso doméstico.
Las operaciones de limpieza
deben ser realizadas únicamente
por adultos.
• No desmonte nunca los
mecanismos del vehículo,sin
autorización de la PEG PEREGO.
SEGURIDAD
¡ATENCIÓN!
LA SUPERVISIÓN DE UN ADULTO ES
SIEMPRE NECESARIA.
• No adecuado para niños de edad
inferior a 24 meses: contiene
piezas pequeñas que podrían ser
tragadas o inhaladas.
• No usar el vehículo en vías
públicas, donde hay tránsito y
coches estacionados, en
pendientes fuertes, cerca de
escaleras, canales y piscinas.
• Los niños deben usar siempre
zapatos durante el uso del
vehículo.
• Cuando el vehículo está
funcionando, preste atención para
que los niños no metan manos,
pies u otras partes del cuerpo,
indumentarias u otras cosas, cerca
de las partes en movimiento.
• No usar gasolina u otras
substancias inflamables cerca del
vehículo.
• El vehículo está construido para un
solo niño.
MANTENIMIENTO Y
SEGURIDAD DEL VEHÍCULO
Page 7

doivent être effectuées
exclusivement par des adultes.
• Ne jamais démonter les
mécanismes du véhicule, sauf
autorisation de PEG PEREGO.
SÉCURITÉ
ATTENTION!
LA SURVEILLANCE D’UN ADULTE
EST TOUJOURS NECESSAIRE.
• Ce produit n'est pas destiné aux
enfants de moins de 24 mois. La
présence de petites pièces est
dangereuse parce qu'elles
pourraient être avalées ou
inhalées.
• Ne pas utiliser le véhicule sur la
voie publique,là où il y a de la
circulation et des voitures en
stationnement, sur les pentes
raides, près de gradins, d’escaliers,
de cours d’eau et de piscines.
• Les enfant doivent toujours porter
des chaussures quand ils utilisent
le véhicule.
• Quand le véhicule fonctionne,faire
attention à ce que les enfants ne
mettent pas les mains, les pieds ou
d’autres parties du corps, des
vêtements ou d’autres choses près
des parties en mouvement.
• Ne jamais utiliser d’essence ou
d’autres substances inflammables
près du véhicule.
• Le véhicule est assembler
seulement pour un enfant.
FRANÇAIS
• PEG PEREGO® vous remercie de votre confiance et
vous félicite d'avoir choisi ce produit.Depuis plus
de 50 ans, PEG PEREGO emmène en promenade les
enfants: à peine nés,avec ses fameux landaus et
poussettes et plus tard,avec ses fantastiques
véhicules à pédales et à batterie.
• Lire attentivement ce manuel d'instructions pour
se familiariser avec l'utilisation du modèle et
enseigner a l'enfant a conduire prudemment tout
en s'amusant. Garder ce manuel pour toute
nécessité future.
• Nos jouets répondent aux conditions de sécurité
prévues par le Conseil de la EEC, et le “U.S.
Consumer Toy Safety Specification”, en outre, ils sont
approuvés par le T.Ü.V. et par le I.I.S.G.Istituto
Italiano Sicurezza Giocattoli.
Peg Perego S.p.A. bénéficie de la
certification ISO 9001.
La certification assure aux clients et
aux consommateurs une garantie de
transparence et de confiance dans la
façon dont travaille l’entreprise.
• Peg Perego pourra apporter à tout moment des
modifications aux modèles décrits dans cette
publication, pour des raisons de nature technique
ou commerciale.
Ans 2-4
Poids transportable
50 lbs / 22,7 kg
PEG PEREGO offre un service d’assistance aprèsvente,directement ou à travers un réseau de
centres d’assistance autorisés pour les éventuelles
réparations ou pour le remplacement et la vente de
pièces de recharge d’origine.La liste des centres
d’assistance est fournie sur la dernière page de ce
manuel d’instructions.
ATTENTION:
ASSEMBLAGE PAR UN ADULTE
REQUIS. PRENDRE GARDE AU
MOMENT DE DEBALLER CAR LES
COMPOSANTES À ASSEMBLER
PEUVENT COMPORTER UN DANGER
DE PETITES PIÈCES OU DE BORDS
TRANCHANTS.
MONTAGE
1 • Dévisser les 2 poignées situées sous le siège.
2 • Placer le siège comme indiqué sur la figure.
3 • ATTENTION : le siège est réglable en 2 positions
en fonction de la hauteur de l’enfant (voir la
figure). Position 1 : le siège est plus haut et en
arrière. Position 2 : le siège est plus bas et en
avant.
4 • Coucher le véhicule sur un flanc en maintenant
le siège en position. Dévisser le couvercle du
compartiment de la chaîne situé sous le
véhicule.
5 • Ouvrir le couvercle pour accéder aux poignées
de fixation du siège.
6 • Visser les 2 poignées de fixation du siège
comme indiqué sur la figure. Fermer et revisser
le couvercle.
7 • Enclencher les 2 verres des phares arrière.
8 • Monter correctement par pression les 2 phares
avant comme indiqué sur la figure A.
9 • Mettre le volant en place.Fixer le volant avec la
rondelle et la vis fournies.
10 • Monter par pression le bouchon du volant
comme indiqué sur la figure.
11 • Placer la poignée sur la benne en l’inclinant
légèrement vers le bas pour y insérer
correctement les deux tiges (voir détail de la
figure suivante).
12 • Les deux tiges de la poignée doivent rester à
SERVICE D’ASSISTANCE
INSTRUCTIONS DE MONTAGE
l’extérieur du crochet qui dépasse de la benne.
La figure représente une tige en position
incorrecte (NO) et en position correcte (OK).
13 • Insérer les languettes situées à l’avant de la
poignée dans les trous de la benne.
14 • Fixer la poignée avec la vis et l’écrou en
insérant l'écrou dans le logement hexagonal
situé à l’intérieur de la benne et la vis dans le
trou rond,de l’extérieur (sur la figure, la benne
est vue de dessous).
15 • Finir de fixer la poignée en bloquant l’écrou
d’un doigt tout en serrant la vis.
16 • Insérer la tringle du levier de commande de la
pelle dans le trou de cette dernière.
17 • Insérer un grand clou dans l’outil prévu à cet
effet (voir détail A).
18 • Fixer la tringle en enfonçant le clou à fond (en
cas de résistance, utiliser un marteau).
19 • De chaque côté du cache, insérer par pression
les deux douilles de support de la benne,
comme indiqué sur la figure. Attention ! Les
pièces sont profilées pour suivre la ligne du
cache ; insérer la douille L à gauche et la douille
R à droite.
20 • Extraire la tige de fixation de la benne comme
indiqué sur la figure.
21 • Placer la benne sur le tracteur en faisant
coïncider le point A (de chaque côté) avec les
douilles précédemment appliquées. Appuyer
sur l’arrière de la benne pour l’accrocher au
point B (de chaque côté).
22 • Insérer la tige de fixation de la benne jusqu'à ce
qu’elle sorte de l’autre côté du tracteur.
23 • Insérer un petit clou dans l’outil prévu à cet
effet (voir détail A).
24 • Fixer la tige en enfonçant le clou à fond (en cas
de résistance, utiliser un marteau).
25 • Pour faire basculer la pelle,abaisser le levier de
commande.
26 • Pour abaisser tout le bras de la benne,pousser
la poignée vers l’avant.
Ce produit est conforme aux
Normes de Sûreté
EN 71pour les jouets; il n’est pas
conforme aux dispositions des
normes de circulation routière et ne
peut par conséquent pas circuler
sur la voie publique.
Ce produit réponde et/ou dépasse
tous les CONDITIONS DE SECURITE
ASTM TOY et il est conforme à la
NORME DE SURETE F 963 pour les
utilisateurs des jouets.
SÉCURITÉ MAINTENANCE ET
ENTRETIEN
• Contrôler régulièrement l’état du
véhicule. Si l’on trouve des défauts,
le véhicule ne douvra par étre
utilisé. Pour les réparations,
n’utiliser que des pièces de
rechange d’origine PEG PEREGO.
• PEG PEREGO décline toute
responsabilité en cas de mauvaise.
• Ne pas laisser le véhicule à
proximité de sources de chaleur
comme des radiateurs,des
cheminées, etc.
• Protéger le véhicule de l’eau, de la
pluie, de la neige, etc.
• Lubrifier périodiquement (avec
une huile légère) les parties
mobiles comme roulements à
billes, direction, chain,etc.
• Les surfaces du véhicule peuvent
être nettoyées avec un chiffon
humide et, s'il est necessaire, avec
des produits d'emploi domestique.
Les opérations de nettoyage
ENTRETIEN ET SÉCURITÉ
DU VÉHICULE
Page 8

PEG PEREGO S.p.A.
via DE GASPERI 50 20043 ARCORE (MI) ITALIA
tel. 039·60881 fax 039·615869-616454
assistenza: tel.039·6088213 fax 039·3309992
PEG PEREGO U.S.A Inc.
3625 INDEPENDENCE Dr. FORT WAYNE IN 46808
phone 260·4828191 fax 260·4842940
call us toll free 1·800·728·2108
llame USA gratis 1·800·225·1558
llame Mexico gratis 1·800·710·1369
PEG PEREGO CANADA Inc.
585 GRANITE COURT PICKERING ONT. CANADA L1W3K1
phone 905·8393371 fax 905·8399542
call us toll free 1·800·661·5050
PEG Kinderwagenvertriebs- und Service GmbH
Rudolf-Diesel-Straße 6 D - 85221 Dachau (Germany)
Tel. 0049 / 08131 / 5185-12 Fax 0049/ 08131 / 5185-40
e-mail: info@peg.de
AND DISTRIBUTED IN UNITED KINGDOM AND EIRE BY:
MAMA'S AND PAPA'S LTD
HUDDERSFIELD HD5 0RH ENGLAND
toy helpline: (01484) 438222
BURIGOTTO S/A INDÚSTRIA E COMÉRCIO
RUA CEARÁ,406 - VILA SÃO CRISTOVAN - LIMEIRA SP
CEP 13480-565 - TEL (19) 451 0420 - FAX (19) 451 6994
WWW.BURIGOTTO.COM.BR e-mail: info@burigotto.com.br
www.pegperego.com
MINI LOADER
model number IGCD0524
 Loading...