

Page 1

Istruzioni dʼuso IT
Instructions for use EN
Notice dʼemploi FR
Gebrauchsanleitung DE
Instrucciones de uso ES
Instruções para uso PT
Gebruiksaanwijzing NL
Brugsanvisning DK
Käyttöohjeet FI
Návod na použití CZ
Návod na použitie SK
Használati útmutató HU
Navodila za uporab SL
Инструкции по пользованию RU
Kullanim klavuzu TR
ΟΔΗΓΙΕΣ ΧΡΗΣΕΩΣ EL
Classico
FI000701I77
Page 2

1 2
3
5
4
6
Page 3

87
9 10
A
B
11 12
Page 4

13
14
15
16
Page 5

PrimoNido
Seat Unit
Navetta
Primo Viaggio
Primo Viaggio SIP
17 Ganciomatic
System
Page 6

Classico
5
4
6
7
8
2
10
11
3
1
9
Page 7

Classico Classico "
CHROME"
1 ICCLAI•
2 SMCE0004•
3 SAPI5627•
4 ARPI0417•
5 SPST5603DGR
SPST5603SGR
6 SPST4848GR
7 SPST5667•
8 SPST5607D•
SPST5607S•
9 SPST5616K•
10 SPST5616JD•
SPST5616JS•
11 ARPI0418•
1 ICCLAI00LC
2 SMCE0004C
3 SAPI5627LV
4 ARPI0417LVGRPEG
5 SPST5603DGR
SPST5603SGR
6 SPST4848GR
7 SPST5667LV
8 SPST5607DLV
SPST5607SLV
9 SPST5616KLV
10 SPST5616JDLV
SPST5616JSLV
11 ARPI0418CLV
IT• Ricambi disponibili in piú colori da specificare nella richiesta.
EN• Spare parts available in different colours to be specified when ordering.
FR• Pièces de rechange disponibles en plusieurs couleurs à spécifier dans la demande.
DE• Ersatzteile in mehr Farben vorhanden, die in der Anfrage spezifiziert werden müssen.
ES• Repuestos disponibles en otros colores que se especificarán en el pedido.
PT• Peças de reposição disponíveis em cores alternativas a serem especificadas no pedido.
NL• Reserveonderdelen verkrijgbaar in meerdere kleuren, bij bestelling te specificeren.
DK• Reservedele kan leveres i flere farver som bør specificeres ved bestillingen.
FI• Varaosia saatavana eri värisinä: ilmoita väri tilauksessa.
CZ• U náhradních dílů, které jsou k dispozici ve více barvách, je nutné na objednávce specifikovat
příslušnou barvu.
SK• Pri náhradných dieloch, ktoré sú k dispozícii vo viacerých farbách, je potrebné pri objednávke
špecifikovať želanú farbu.
HU• A tartalék alkatrészek különböző színekben elérhetők, melyeket rendeléskor kell kiválasztani.
SL• Rezervni deli so na voljo v več barvah, ki jih je treba navesti pri naročilu.
RU• Запчасти имеются различных цветов, необходимый указать в запросе.
TR• Siparişte belirtilen değişik renklerdeki yedek parçalari mevcuttur.
EL• Ανταλλακτικά διαθέσιμα σε διάψορα χρώματα. Προσδιορίστε όταν παραγγείλετε.
Page 8

IT•ITALIANO
• IMPORTANTE: leggere attentamente queste
istruzioni e conservarle per un futuro utilizzo.
La sicurezza del bambino potrebbe essere messa
a rischio se non si eseguono queste istruzioni.
• Peg Perego potrà apportare in qualunque
momento modifiche ai modelli descritti in questa
pubblicazione, per ragioni di natura tecnica o
commerciale.
Peg Perego S.p.A. è certificata ISO 9001.
La certificazione offre ai clienti e
ai consumatori la garanzia di una
trasparenza e fiducia nel modo di lavorare
dell'impresa.
SERVIZIO ASSISTENZA
per facilitarne lʼapertura.
8• Per aprire il carrello, sganciare i fermi di chiusura,
spingendoli verso lʼinterno come in figura.
9• Sollevare il maniglione e ruotarlo fino a fine corsa
spingendolo fino allo scatto.
10• Carrello aperto. La corretta apertura del carrello
é verificabile dal gancio di sicurezza A; se si
dovesse presentare come in figura B, spingere
ulteriormente il maniglione verso il basso fino allo
scatto.
MANIGLIONE REGOLABILE
11• Per regolare lʼaltezza del maniglione, premere
simultaneamente i pulsanti laterali e bloccare il
maniglione nella posizione desiderata.
PER TOGLIERE LE RUOTE
12• Per togliere le ruote, occorre abbassare la levetta
posizionata al centro della ruota come in figura
e contemporaneamente spingere la ruota verso
lʼesterno.
Se fortuitamente parti del modello vengono perse o
danneggiate, usare solo pezzi di ricambio originali
Peg Perego. Per eventuali riparazioni, sostituzioni,
informazioni sui prodotti, la vendita di ricambi
originali e accessori, contatta il Servizio Assistenza
Peg-Perego:
tel.:0039-039-60.88.213,
fax: 0039-039-33.09.992,
e-mail: assistenza@pegperego.it,
www.pegperego.com
La Peg Perego è a disposizione dei suoi Consumatori
per soddisfare al meglio ogni loro esigenza. Per
questo, conoscere il parere dei ns. Clienti, è per noi
estremamente importante e prezioso. Le saremo
quindi molto grati se, dopo aver utilizzato un
ns. prodotto, vorrà compilare il QUESTIONARIO
SODDISFAZIONE CONSUMATORE che troverà in
internet al seguente indirizzo: www.pegperego.com
segnalando eventuali osservazioni o suggerimenti.
ISTRUZIONI DʼUSO
MONTAGGIO MANIGLIONE
1• Con lʼaiuto di un cacciavite, svitare le due viti e i
due tappini dal maniglione.
2• Infilare il maniglione sui tubi del carrello ancora
chiuso (tolto dallʼimballo) come in figura.
3• Posizionare il tappino e la vite come in figura,
quindi avvitare con il cacciavite fino in fondo ma
senza forzare, da entrambi i lati del maniglione.
MONTAGGIO RUOTE
4• Togliere i quattro tappi di protezione dellʼimballo
(due rotondi e due quadrati) dal carrello ancora
chiuso, come in figura.
5• Inserire due ruote sui perni come in figura dalla
parte del maniglione del carrello ancora chiuso.
Per agganciarla al carrello, fare pressione sulla
ruota con la mano fino al click e verificare il
corretto aggancio.
6• Inserire le altre due ruote sui perni come in figura
dalla parte opposta del maniglione del carrello
ancora chiuso. Per agganciarla, inserire i raggi
della ruota nelle fessure del perno, fare pressione
sulla ruota con la mano fino al click e verificare il
corretto aggancio.
FRENO
7• Per frenare il carrello abbassare la barra freno
posizionata sulle ruote posteriori come in figura.
Per sbloccare il carrello, alzare la barra.
APERTURA
• Si consiglia, prima di aprire il carrello, di frenarlo
CHIUSURA
13• Per chiudere il carrello, tirare verso lʼalto le due
leve posizionate sul maniglione come in figura.
14• Sollevare il gancio di sicurezza,
15• portare il maniglione verso il basso fino al click.
16• Carrello chiuso.
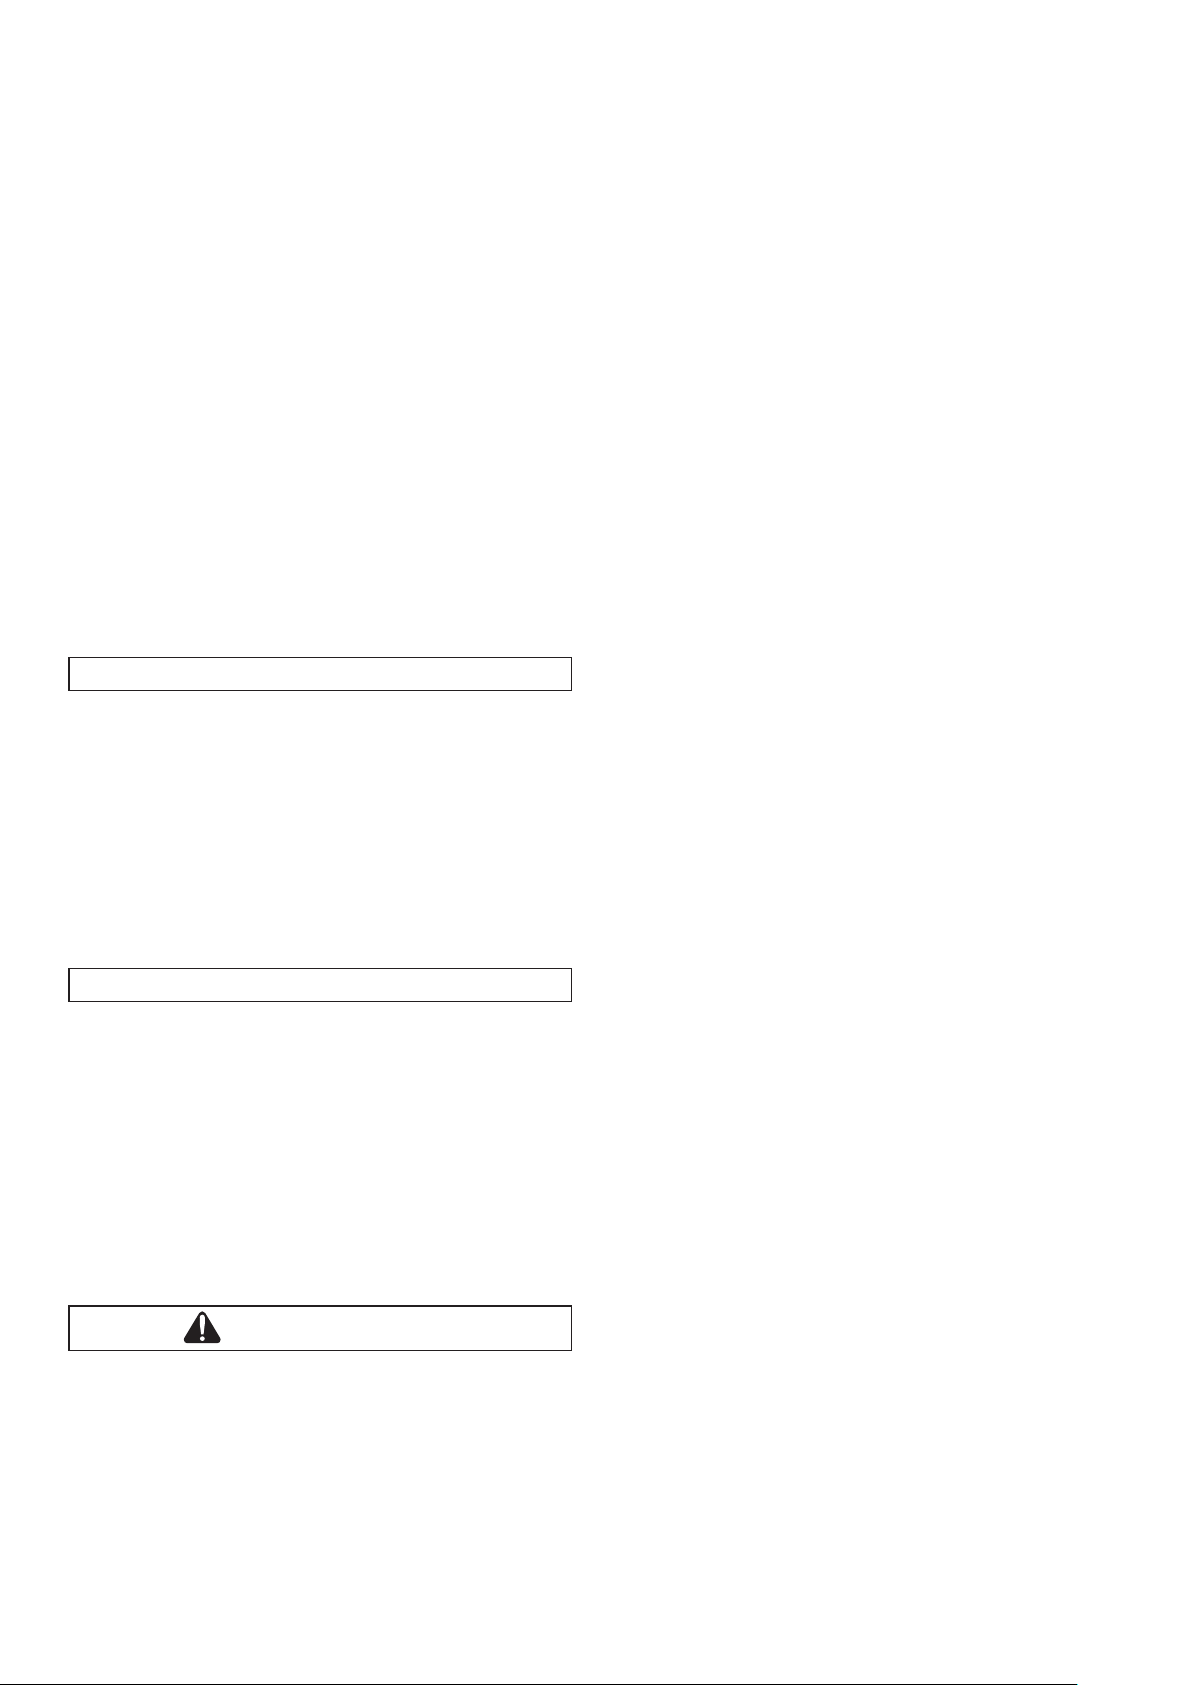
GANCIOMATIC SYSTEM
17• “Ganciomatic System” é il sistema pratico e
veloce che ti permette di agganciare la navicella
PrimoNido o Navetta, il seggiolino auto Primo
Viaggio e il seggiolino di riporto Seat Unit alla
Base Ganciomatic del carrello con un solo gesto:
basta appoggiarli alla Base Ganciomatic e premere
sul prodotto con entrambi le mani fino al click.
Prima di procedere alle fasi di aggancio e sgancio,
azionare sempre il freno del carrello.
• Per sganciare i prodotti dal carrello consultare i
rispettivi manuali istruzioni.
PULIZIA E MANUTENZIONE
Il vostro prodotto necessita un minimo di
manutenzione. Le operazioni di pulizia e
manutenzione devono essere effettuate solo da adulti.
• Si raccomanda di tenere pulite tutte le parti in
movimento e se occorre, lubrificarle con olio
leggero.
• Asciugare le parti in metallo del prodotto per
prevenire la ruggine.
• Periodicamente pulire le parti in plastica con un
panno umido, non usare solventi o altri prodotti
simili.
• Tenere pulite le ruote da polvere e sabbia.
• Proteggere il prodotto da agenti atmosferici, acqua,
pioggia o neve; lʼesposizione continua e prolungata
al sole potrebbe causare cambiamenti di colore in
molti materiali.
• Conservare il prodotto in un posto asciutto.
ATTENZIONE
• QUESTO VEICOLO È STATO PROGETTATO PER IL
TRASPORTO DI UN BAMBINO.
• NON UTILIZZARE IL PRODOTTO PER UN NUMERO DI
OCCUPANTI SUPERIORI A QUANTO PREVISTO DAL
COSTRUTTORE.
• LE OPERAZIONI DI ASSEMBLAGGIO E PREPARAZIONE
DELLʼ ARTICOLO DEVONO ESSERE EFFETTUATE DA
ADULTI.
Page 9

• NON UTILIZZATE IL PRODOTTO SE PRESENTA PARTI
MANCANTI O ROTTURE.
• POTREBBE ESSERE PERICOLOSO LASCIARE IL VOSTRO
BAMBINO INCUSTODITO.
• DA FERMI UTILIZZARE SEMPRE I FRENI.
• PRIMA DELLʼ USO ASSICURARSI CHE TUTTI I
MECCANISMI DI AGGANCIO SIANO INGAGGIATI
CORRETTAMENTE.
• PRIMA DELLʼ USO ASSICURARSI CHE IL SEGGIOLINO
AUTO O LA SEDUTA RIPORTATA SIANO
CORRETTAMENTE AGGANCIATI.
• EVITARE DI INTRODURRE LE DITA NEI MECCANISMI.
• PRESTARE ATTENZIONE ALLA PRESENZA DEL
BAMBINO QUANDO SI EFFETTUANO OPERAZIONI
DI REGOLAZIONE DEI MECCANISMI (MANIGLIONE,
SCHIENALE).
• OGNI CARICO APPESO AL MANIGLIONE O ALLE
MANIGLIE PUÒ RENDERE INSTABILE IL PRODOTTO;
SEGUIRE LE INDICAZIONI DEL COSTRUTTORE
RIGUARDO AI MASSIMI CARICHI UTILIZZABILI.
• NON INTRODURRE NEL CESTELLO CARICHI PER
UN PESO SUPERIORE A 5 KG. NON INSERIRE NEI
PORTABIBITE PESI SUPERIORI A QUANTO SPECIFICATO
NEL PORTABIBITE STESSO E MAI BEVANDE CALDE.
NON INSERIRE NELLE TASCHE DELLE CAPOTTE (SE
PRESENTI) PESI SUPERIORI A 0.2 KG.
• NON UTILIZZARE IL PRODOTTO IN VICINANZA DI
SCALE O GRADINI; NON UTILIZZARE VICINO A FONTI
DI CALORE, FIAMME LIBERE OD OGGETTI PERICOLOSI
A PORTATA DELLE BRACCIA DEL BAMBINO.
• POTREBBE ESSERE PERICOLOSO UTILIZZARE
ACCESSORI NON APPROVATI DAL COSTRUTTORE.
• QUESTO PRODOTTO NON Eʼ ADATTO PER IL JOGGING
O LA CORSA COI PATTINI.
EN•ENGLISH
• IMPORTANT: read these instructions carefully
and keep them for future reference.
Failure to follow these instructions could put the
childʼs safety at risk.
• PEG PEREGO reserves the right to make any
necessary changes or improvements to the products
shown at any time without notice.
Peg Perego S.p.A. is an ISO 9001 certified
company.
The fact that we are certified provides
a guarantee of our honesty for our
customers, and fosters trust in the
companyʼs way of working.
CUSTOMER SERVICE
If parts of the model are accidentally lost or damaged,
use only original Peg Perego spare parts. Contact
the Peg Perego Customer Service for all repair work,
replacements, information about products, and sale of
original spare parts and accessories, at the following:
tel.: 0039-039-60.88.213
fax: 0039-039-33.09.992
e-mail: assistenza@pegperego.it,
www.pegperego.com
Peg Perego is at the consumer's service, meeting
every need in the best way possible. This is why our
customers' opinions are so important and valuable
to us. We would be very grateful if you would kindly
fill in the CUSTOMER SATISFACTION QUESTIONNAIRE
after using one of our products. You will find the
questionnaire on the Internet at www.pegperego.com
Please note any observations or suggestions you may
have on the questionnaire.
INSTRUCTIONS FOR USE
MOUNTING THE HANDLE
1• Using a screwdriver, loosen the two screws and
the two caps on the handle.
2• Slip the handle onto the tubes of the chassis, with
the chassis removed from the packing but still
closed, as shown in the figure.
3• Place the cap and the screw as shown in the
figure. Use the screwdriver to tighten the screw
completely but without forcing it, on both sides of
the handle.
MOUNTING THE WHEELS
4• Remove the four protective packing caps (two
round ones and two square ones) from the chassis
while it is still closed, as shown in the figure.
5• Insert two wheels on the rods from the handle
side of the chassis while it is still closed, as shown
in the figure. To attach to the chassis, press on
the wheel with your hand until it clicks into place,
and check to make sure it is properly fastened.
6• Insert the other two wheels on the rods on the
opposite side of the chassis from the handle as
shown in the figure, with the chassis still closed.
To attach, insert the wheel spokes into the slits in
the rod. Press on the wheel with your hand until
it clicks into place, and check to make sure it is
fastened properly.
BRAKE
7• To brake the chassis, lower the brake bar on the
rear wheels as shown in the figure. To unlock the
brake on the chassis, lift the bar.
Page 10
OPENING THE CHASSIS
• We recommend setting the brake on the chassis
before opening it, to make the operation easier.
8• To open the chassis, unhook the clasps and push
them inwards, as shown in the figure.
9• Lift the handle and pull it all the way up until it
clicks into place.
10• Open chassis. The correct open position for the
chassis can be verified by checking safety hook A.
If it is in the position shown in figure B, push the
handle further down, until it clicks into place.
ADJUSTABLE HANDLE
11• To adjust the height of the handle, press
simultaneously on the side buttons and lock the
handle into the desired position.
REMOVING THE WHEELS
12• To remove the wheels, lower the little lever on the
center of the wheel, as shown in the figure. At the
same time, push the wheel outwards.
CLOSING THE CHASSIS
13• To close the chassis, pull the two levers on the
handle upwards, as shown in the figure.
14• Lift the safety hook.
15• Lower the handle until it clicks into place.
16• Closed chassis.
• BEFORE USE MAKE SURE THAT ALL OF THE
ATTACHMENT MECHANISMS ARE CONNECTED
CORRECTLY.
• BEFORE USE MAKE SURE THAT THE CAR SEAT OR THE
CARRYING SEAT ARE CORRECTLY ATTACHED.
• DO NOT PUT YOUR FINGERS IN THE MECHANISMS.
• TAKE CARE WHEN ADJUSTING THE MECHANISMS
(HANDLEBAR, BACKREST) WITH THE CHILD PRESENT.
• ANY LOAD HANGING FROM THE HANDLEBAR OR
THE HANDLES CAN MAKE THE PRODUCT UNSTABLE;
FOLLOW THE MANUFACTURERʼS INDICATIONS
REGARDING THE MAXIMUM LOADS.
• DO NOT PLACE LOADS WEIGHING OVER 5 KG IN THE
BASKET. DO NOT PLACE WEIGHTS IN THE DRINKHOLDERS GREATER THAN THOSE SPECIFIED ON THE
DRINK-HOLDERS THEMSELVES AND NEVER PUT HOTDRINKS IN THEM. DO NOT INSERT WEIGHTS GREATER
THAN 0.2 KG IN THE POCKETS OF THE HOODS (IF
PRESENT).
• DO NOT USE THE PRODUCT NEAR STAIRS OR STEPS;
DO NOT USE NEAR HEAT SOURCES, OPEN FLAMES OR
DANGEROUS OBJECTS THAT ARE WITHIN REACH OF
THE CHILD.
• IT COULD BE DANGEROUS TO USE ACCESSORIES
WHICH ARE NOT APPROVED BY THE MANUFACTURER.
• THIS PRODUCT IS NOT SUITABLE FOR JOGGING OR
ROLLER SKATING.
GANCIOMATIC SYSTEM
17• ”Ganciomatic System” is the practical, fast system
that allows you to attach the Primo Viaggio or
Navetta bassinet unit, the Primo Viaggio child
car seat, and the Seat Unit carrier seat to the
Ganciomatic Base of the chassis with a single flick
of the hand. All you need to do is set the unit on
the Ganciomatic Base and press on it with both
hands until it clicks into place. Before attaching or
detaching the other units to the Ganciomatic Base,
always set the chassis brake.
• To disconnect the products from the chassis
consult the respective instruction manuals.
CLEANING & MAINTENANCE
Your product requires only minimal maintenance.
Cleaning and maintenance operations must be
performed only by adults.
• Be sure to keep all moving parts clean, lubricating
them with light oil if necessary.
• Dry off metal parts to prevent rusting.
• Regularly clean the plastic parts with a damp cloth.
Do not use solvents or similar products.
• Remove any dust and sand from the wheels.
• Protect the product against smog, water, rain and
snow. Continued and extended exposure to sunlight
can change the colours of many materials.
• Store the product in a dry area.
WARNING
• THIS VEHICLE HAS BEEN DESIGNED FOR THE
TRANSPORT OF ONE CHILD.
• DO NOT USE THE PRODUCT FOR A GREATER NUMBER
OF OCCUPANTS THAN THAT INTENDED BY THE
MANUFACTURER.
• ASSEMBLY AND PREPARATION OF THE ARTICLE MUST
BE CARRIED OUT BY ADULTS.
• DO NOT USE THE PRODUCT IF THERE ARE MISSING
OR BROKEN PARTS.
• IT COULD BE DANGEROUS TO LEAVE YOUR CHILD
UNATTENDED.
• WHEN STATIONARY ALWAYS USE THE BRAKES.
Page 11

FR•FRANÇAIS
• IMPORTANT : lire ces instructions avec attention
et les conserver pour toute référence future.
ILa sécurité de votre enfant pourrait être menacée
si ces instructions ne sont pas respectées.
• Pour des raisons techniques et commerciales,
PEG PEREGO pourra apporter à tout moment des
modifications aux modèles décrits dans ce manuel.
Peg Perego S.p.A. bénéficie de la
certification ISO 9001.
La certification assure aux clients et
aux consommateurs une garantie de
transparence et de confiance dans la
façon dont travaille lʼentreprise.
SERVICE DʼASSISTANCE
En cas de perte ou dommage fortuit de pièces
du modèle, utilisez exclusivement les pièces de
rechange originales Peg Perego. Pour les éventuelles
réparations, substitutions, informations sur les
produits, la vente de pièces de rechange originales et
dʼaccessoires, contactez le Service dʼassistance PegPerego:
tél.: 0039-039-60.88.213
fax: 0039-039-33.09.992
e-mail: assistenza@pegperego.it
www.pegperego.com
OUVERTURE
• Il est conseillé de bloquer le châssis pour en
faciliter lʼouverture.
8• Pour ouvrir le châssis, décrocher les fermetures en
les poussant vers lʼintérieur, comme indiqué sur la
figure.
9• Soulever le guidon et le faire pivoter jusquʼen fin
de course en le poussant jusquʼau déclic.
10• Châssis ouvert. Le crochet de sécurité A permet
de vérifier si le châssis est correctement ouvert;
si le guidon se présente comme sur la figure B, le
pousser encore vers le bas jusquʼau déclic.
RÉGLAGE DU GUIDON
11• Pour régler la hauteur du guidon, appuyer
simultanément sur les boutons latéraux et bloquer
le guidon dans la position désirée.
DÉMONTAGE DES ROUES
12• Pour démonter les roues, abaisser le doigt situé
au centre de la roue, comme indiqué sur la figure,
tout en poussant la roue vers lʼextérieur.
FERMETURE
13• Pour fermer le châssis, tirer vers le haut les deux
leviers situés sur le guidon, comme indiqué sur la
figure.
14• Soulever le crochet de sécurité,
15• abaisser le guidon jusquʼau déclic.
16• Châssis fermé.
GANCIOMATIC SYSTEM
Peg Perego est à la disposition de ses consommateurs
pour satisfaire au mieux toutes leurs exigences.
À cette fin, connaître lʼavis de nos clients est pour
nous extrêmement important et précieux. Nous vous
saurions donc gré, après avoir utilisé lʼun de nos
produits, de bien vouloir remplir le QUESTIONNAIRE
SATISFACTION DU CONSOMMATEUR que vous
trouverez sur Internet à lʼadresse suivante:
www.pegperego.com et de nous faire vos éventuelles
observations ou suggestions.
NOTICE DʼEMPLOI
MONTAGE DU GUIDON
1• À lʼaide dʼun tournevis, desserrer du guidon les
deux vis et les deux capuchons.
2• Enfiler le guidon sur les tubes du châssis fermé
(déballé), comme indiqué sur la figure.
3• Placer le capuchon et la vis comme indiqué sur la
figure puis, à lʼaide du tournevis, les visser à fond
mais sans forcer, de chaque côté du guidon.
MONTAGE DES ROUES
4• Retirer les quatre bouchons de protection (deux
ronds et deux carrés) du châssis fermé, comme
indiqué sur la figure.
5• Insérer deux roues sur lʼessieu, comme indiqué
sur la figure, du côté du guidon, châssis fermé.
Pour monter la roue sur le châssis, lʼenfoncer de
la main jusquʼau déclic et vérifier quʼelle est bien
fixée.
6• Insérer les deux autres roues sur lʼessieu, comme
indiqué sur la figure, de lʼautre côté du guidon,
châssis fermé. Pour monter la roue, insérer ses
rayons dans les fissures de lʼessieu, lʼenfoncer de
la main jusquʼau déclic et vérifier quʼelle est bien
fixée.
FREIN
7• Pour bloquer le châssis, abaisser la barre de frein
située sur les roues arrière, comme indiqué sur la
figure. Pour débloquer le châssis, relever la barre.
17• «Ganciomatic System» est un système pratique
et rapide qui permet de monter dʼun seul geste
la nacelle PrimoNido ou Navetta, le siège auto
Primo Viaggio et le siège amovible Seat Unit sur la
Base Ganciomatic du châssis: il suffit de poser le
produit sur la Base Ganciomatic et dʼappuyer des
deux mains jusquʼau déclic. Avant de procéder au
montage ou au démontage, toujours enclencher le
frein du châssis.
• Pour décrocher les articles du châssis, consulter
leur manuel dʼinstructions respectif.
NETTOYAGE ET ENTRETIEN
Votre produit nécessite un minimum dʼentretien. Les
opérations de nettoyage et dʼentretien doivent être
effectuées uniquement par des adultes.
• Il est recommandé de maintenir toutes les parties
mobiles propres et, au besoin, de les lubrifier avec
une huile légère.
• Essuyer les parties métalliques du produit pour
prévenir la formation de rouille.
• Nettoyer régulièrement les parties en plastique avec
un chiffon humide, ne pas utiliser de solvants ou
dʼautres produits du même type.
• Éliminer les dépôts de poussière et de sable des
roues.
• Protéger le produit contre les agents
atmosphériques, lʼ
lʼexposition continue et prolongée au soleil pourrait
altérer les couleurs de nombreux matériaux.
• Conserver le produit dans un endroit sec.
eau, la pluie ou la neige ;
AVERTISSEMENT
• CET ARTICLE A ÉTÉ CONÇU POUR TRANSPORTER UN
SEUL ENFANT.
• NE PAS UTILISER LORSQUE LE NOMBRE
DʼOCCUPANTS EST SUPÉRIEUR AUX PRESCRIPTIONS
DU FABRICANT.
• LES OPÉRATIONS DʼASSEMBLAGE ET DE
Page 12

PRÉPARATION DE LʼARTICLE DOIVENT ÊTRE
EFFECTUÉES PAR DES ADULTES.
• NE PAS UTILISER LE PRODUIT SI DES PIÈCES SONT
MANQUANTES OU CASSÉES.
• IL PEUT ÊTRE DANGEREUX DE LAISSER LʼENFANT
SANS SURVEILLANCE.
• À LʼARRÊT, TOUJOURS ACTIONNER LES FREINS.
• AVANT LʼUTILISATION, SʼASSURER QUE TOUS LES
MÉCANISMES DE FIXATION SONT CORRECTEMENT
ENCLENCHÉS.
• AVANT LʼUTILISATION, SʼASSURER QUE LE SIÈGE
AUTO OU LE SIÈGE AMOVIBLE EST CORRECTEMENT
MONTÉ.
• ÉVITER DE METTRE LES DOIGTS DANS LES
MÉCANISMES.
• PRÊTER ATTENTION À LA POSITION DE LʼENFANT
LORS DES OPÉRATIONS DE RÉGLAGE DES ÉLÉMENTS
MOBILES (POIGNÉE, DOSSIER).
• TOUTE CHARGE PENDUE AUX POIGNÉES PEUT
RENDRE LE PRODUIT INSTABLE ; SE CONFORMER
AUX INDICATIONS DU FABRICANT RELATIVES AUX
CHARGES MAXIMALES ADMISES.
• NE PAS UTILISER LE PANIER POUR TRANSPORTER
DES CHARGES DONT LE POIDS DÉPASSE 5 KG.
NE PAS INTRODUIRE DANS LE PORTE-BOISSONS
DES CHARGES SUPÉRIEURES À CELLES INDIQUÉES
SUR LE PORTE-BOISSONS LUI-MÊME ; NE JAMAIS
Y INTRODUIRE DE BOISSONS CHAUDES. NE PAS
INTRODUIRE DANS LES POCHES DE LA CAPOTE
(LORSQUʼELLES SONT PRÉSENTES) DES OBJETS DONT
LE POIDS EXCÈDE 0,2 KG.
• NE PAS UTILISER LʼARTICLE À PROXIMITÉ
DʼESCALIERS OU DE MARCHES ; NE PAS UTILISER À
PROXIMITÉ DE SOURCES DE CHALEUR, DE FLAMMES
DIRECTES OU DʼOBJETS DANGEREUX SE TROUVANT À
LA PORTÉE DE LʼENFANT.
• LʼUTILISATION DʼACCESSOIRES NʼAYANT PAS
ÉTÉ APPROUVÉS PAR LE FABRICANT PEUT ÊTRE
DANGEREUSE.
• NE PAS UTILISER CE PRODUIT LORS DʼUN JOGGING
OU AVEC DES PATINS À ROULETTES.
DE•DEUTSCH
• WICHTIG: diese gebrauchsanleitung aufmerksam
durchlesen und für späteren gebrauch
aufbewahren.
Die missachtung dieser gebrauchsanleitung
könnte die sicherheit ihres kindes gefährden.
• Farbliche und technische Änderungen vorbehalten.
Peg Perego S.p.A. ist gemäß ISO 9001
zertifiziert.
Die Zertifizierung garantiert den
Kunden und Verbrauchern Transparenz
und ermöglicht das Vertrauen in die
Arbeitsweise unseres Unternehmens.
KUNDENDIENST
Bei Verlust oder Beschädigung ausschließlich
Originalersatzteile von Peg Perego verwenden. Für
eventuelle Reparaturen, Produktinformationen,
den Austausch diverser Teile bzw. den Kauf von
Originalersatzteilen oder Zubehörteilen wenden Sie
sich bitte an den Kundendienst Peg-Perego:
Tel.: 0039-039-60.88.213,
Fax: 0039-039-33.09.992,
E-Mail: assistenza@pegperego.it,
www.pegperego.com
Als Peg Perego stehen wir unseren Kunden für jeden
Bedarf immer gerne zur Seite. Deshalb ist es auch
extrem wichtig, über die Meinung unserer Kunden
Bescheid zu wissen. Wir bitten Sie, das FORMULAR
ÜBER DIE KONSUMENTENZUFRIEDENHEIT nachdem Sie
unsere Produkte ausprobiert haben, auszufüllen. Das
Formular ist unter folgender Internetadresse abrufbar:
www.pegperego.com
Wir würden uns über Anmerkungen und Ratschläge
freuen.
GEBRAUCHSANLEITUNG
MONTAGE DES LENKERS
1• Die beiden Schrauben und die beiden
Abdeckungen mithilfe eines Schraubendrehers
vom Lenker ausschrauben.
2• Den Lenker laut Abbildung auf die Rohre des
geschlossenen Untergestells (ausgepackt) stecken.
3• Die Abdeckung und die Schraube laut Abbildung
anordnen und mit einem Schraubendreher von
beiden Lenkerseiten aus ganz eindrehen, ohne die
Schrauben zu fest zu ziehen.
MONTAGE DER RÄDER
4• Die vier Verpackungs-Schutzabdeckungen (zwei
runde und zwei quadratische Abdeckungen) vom
geschlossenen Untergestell entfernen (siehe
Abbildung).
5• Die Räder laut Abbildung an der Seite des Lenkers
am geschlossenen Untergestell aufstecken. Das
Rad mit einer Hand festdrücken, bis es durch ein
Klickgeräusch am Untergestell einrastet und den
einwandfreien Halt prüfen.
6• Die anderen beiden Räder laut Abbildung an
der gegenüber liegenden Seite des Lenkers am
geschlossenen Untergestell aufstecken. Das Rad
mit den Speichen in die Einkerbungen des Stifts
stecken und mit einer Hand festdrücken, bis
es durch ein Klickgeräusch einrastet; nun den
einwandfreien Halt prüfen.
BREMSE
7• Zum Bremsen des Untergestells die Bremsstange
an den Hinterrädern laut Abbildung runter
Page 13

drücken. Zum Lösen der Bremse die Stange wieder
anheben.
ÖFFNEN
• Vor dem Öffnen des Untergestells ist es
empfehlenswert, die Bremse zu fixieren.
8• Zum Öffnen des Untergestells die Sperren lösen
und dazu laut Abbildung nach innen drücken.
9• Den Lenker bis zum Anschlag, d.h. bis zum
Einrasten anheben.
10• Offenes Untergestell. Ob das Untergestell
korrekt geöffnet wurde, kann an der Sicherung
A festgestellt werden; entspricht die Sicherung
der Abbildung B, ist der Lenker bis zum Einrasten
noch weiter nach unten zu drücken.
VERSTELLBARER LENKER
11• Zur Höheneinstellung des Lenkers gleichzeitig die
beiden seitlichen Druckknöpfe drücken und den
Lenker in der gewünschten Höhe fixieren.
ZUM ABNEHMEN DER RÄDER
12• Zur Abnahme der Räder den Hebel in der Radmitte
laut Abbildung verstellen und das Rad gleichzeitig
nach außen drücken.
SCHLIESSEN
13• Zum Schließen des Untergestells die beiden Hebel
des Lenkers laut Abbildung nach oben ziehen.
14• Die Sicherung anheben,
15• den Lenker bis zum Einrasten nach unten
verstellen.
16• Geschlossenes Untergestell.
GANCIOMATIC SYSTEM
17• „Ganciomatic System“ ist ein praktisches und
schnelles System, das die Montage des zum
Untergestell passenden Oberteils PrimoNido oder
Navetta, des Autositzes Primo Viaggio und des
Sportwagenaufsatzes Seat Unit am Ganciomatic
Unterteil mit einem einzigen Handgriff ermöglicht:
Die Teile einfach auf dem Ganciomatic Unterteil
aufsetzen und mit beiden Händen bis zum
Einrasten nach unten drücken. Vor dem Befestigen
bzw. Abnehmen das Untergestell immer mit der
Bremse fixieren.
• Um die Produkte vom Untergestell zu
lösen, nehmen Sie die entsprechenden
Gebrauchsanleitungen zu Hilfe.
KINDES ENTWICKELT WORDEN.
• BENUTZEN SIE DEN ARTIKEL KEINESFALLS FÜR EINE
GRÖSSERE ANZAHL MITFAHRER ALS VOM HERSTELLER
VORGESEHEN.
• MONTAGE UND VORBEREITUNG DES ARTIKELS
MÜSSEN DURCH ERWACHSENE ERFOLGEN.
• BENUTZEN SIE DEN ARTIKEL KEINESFALLS, WENN
DIESER BESCHÄDIGUNGEN AUFWEIST ODER TEILE
FEHLEN.
• ES KÖNNTE GEFÄHRLICH SEIN, IHR KIND
UNBEAUFSICHTIGT ZU LASSEN
• ZIEHEN SIE IM STAND IMMER DIE BREMSEN AN.
• VERGEWISSERN SIE SICH VOR DEM GEBRAUCH,
DASS ALLE SCHNAPPVORRICHTUNGEN RICHTIG
EINGERASTET SIND.
• VERGEWISSERN SIE SICH VOR DEM GEBRAUCH, DASS
DER AUTOKINDERSITZ ODER DER AUFGESETZTE SITZ
KORREKT EINGERASTET SIND.
• STECKEN SIE NIEMALS DIE FINGER IN DIE MECHANIK.
• PASSEN SIE AUF, WO SICH DAS KIND AUFHÄLT, WENN
SIE EINSTELLUNGEN AN DER MECHANIK VORNEHMEN
(GRIFF, RÜCKENLEHNE).
• JEDER SCHWERE GEGENSTAND, DEN SIE AN DEN
GRIFF ODER DIE GRIFFE HÄNGEN, KANN DAS
PRODUKT DESTABILISIEREN; BEFOLGEN SIE DIE
HERSTELLERHINWEISE IM HINBLICK AUF DIE
MAXIMALE NUTZLAST.
• BELADEN SIE DEN ABLAGEKORB NICHT MIT
GEGENSTÄNDEN, DIE SCHWERER ALS 5 KG SIND.
STELLEN SIE NIEMALS HEISSE GETRÄNKE UND KEINE
GEGENSTÄNDE IN DIE GETRÄNKEHALTER, DIE
SCHWERER SIND ALS IN DEM GETRÄNKEHALTER
SELBST ANGEGEBEN. BELADEN SIE DIE TASCHEN
DER VERDECKE (FALLS VORHANDEN) NICHT MIT
GEGENSTÄNDEN, DIE SCHWERER ALS 0,2 KG SIND.
• BENUTZEN SIE DEN ARTIKEL NICHT IN DER NÄHE VON
TREPPEN ODER STUFEN; BRINGEN SIE IHN NICHT IN
DIE NÄHE VON WÄRMEQUELLEN, OFFENEM FEUER
ODER GEFÄHRLICHEN GEGENSTÄNDEN, DIE SICH IN
REICHWEITE DES KINDES BEFINDEN.
• DIE BENUTZUNG VON VOM HERSTELLER NICHT
GENEHMIGTEM ZUBEHÖR IST GEFÄHRLICH.
• DIESER ARTIKEL IST NICHT ZUR VERWENDUNG BEIM
JOGGEN ODER ROLLSCHUHLAUFEN GEEIGNET.
REINIGUNG UND PFLEGE
Ihr Produkt ist nur gering wartungsbedürftig. Die
Reinigung und Instandhaltung darf ausschließlich von
Erwachsenen durchgeführt werden.
• Alle beweglichen Teile unbedingt sauber halten und
wenn nötig, mit Leichtöl schmieren.
• Die Metallteile gut trocknen, um die Rostbildung zu
vermeiden.
• Die Kunststoffteile regelmäßig mit einem feuchten
Lappen reinigen - keine Lösungsmittel oder ähnliche
Produkte verwenden.
• Die Räder staub- und sandfrei halten.
• Den Produkt vor Witterungseinflüssen, wie Wasser,
Regen oder Schnee geschützt aufbewahren; eine
längere Bestrahlung durch die Sonne kann zu
Farbänderungen der verschiedenen Materialien
führen.
• Den Produkt an einem trockenen Ort aufbewahren.
WARNUNG
• DIESES FAHRZEUG IST FÜR DEN TRANSPORT EINES
Page 14

ES•ESPAÑOL
• IMPORTANTE: leer atentamente estas instrucciones y conservarlas para una futura utilización.
Si no se siguen estas instrucciones, se podría
arriesgar la seguridad del niño.
• PEG PEREGO podrá modificar los modelos descritos en
este prospecto, por razones técnicas o comerciales.
Peg Perego S.p.A. cuenta con la
certificación ISO 9001.
Dicha certificación ofrece tanto a los
clientes como a los consumidores la
garantía de una transparencia y confianza
por lo que concierne al modo de trabajar
de la empresa.
SERVICIO DE ASISTENCIA
Si por casualidad alguna parte del modelo se pierde o
se rompe, usar sólo piezas de repuesto originales Peg
Perego. Para todo lo que concierne las reparaciones,
cambios, informaciones sobre los productos y la venta
de repuestos originales y accesorios, contacte con el
Servicio de Asistencia Peg-Perego:
Tel.: 0039-039-60.88.213
Fax: 0039-039-33.09.992
e-mail: assistenza@pegperego.it
www.pegperego.com
Peg Perego está a disposición de sus Consumidores
para satisfacer lo mejor posible todas sus exigencias.
Por eso, conocer lo que piensan nuestros Clientes,
es para nosotros muy importante y fundamental. Le
agradeceremos mucho si, después de haber utilizado
uno de nuestros productos rellena el FORMULARIO DE
SATISFACCIÓN DEL CONSUMIDOR que encontrará en
internet en la siguiente dirección: “www.pegperego.com
indicando las posibles observaciones o sugerencias.
INSTRUCCIONES DE USO
MONTAJE DEL ASA
1• Con un destornillador quitar los dos tornillos y las
dos tapitas del asa.
2• Introducir el asa en los tubos del carrito cuando
aún está cerrado (fuera del embalaje) como indica
la figura.
3• Poner la tapita y el tornillo como indica la figura,
y luego atornillar con el destornillador hasta el
fondo, pero sin forzar, en ambos lados del asa.
MONTAJE DE LAS RUEDAS
4• Quitar las cuatro tapitas de protección del embalaje
(dos redondas y dos cuadradas) del carrito cuando
aún está cerrado, como indica la figura.
5• Meter dos ruedas en los pivotes como indica la
figura por la parte del asa del carrito cuando aún
está cerrado. Para engancharla al carrito, hacer
presión sobre la rueda con la mano hasta oír clic y
comprobar que se ha enganchado bien.
6• Meter las otras dos ruedas en los pivotes como
indica la figura por la parte opuesta del asa del
carrito cuando aún está cerrado. Para engancharla,
meter los radios de la rueda en las ranuras del
pivote, hacer presión sobre la rueda con la mano
hasta oír clic y comprobar que se ha enganchado
bien.
FRENO
7• Para frenar el carrito bajar la barra del freno
colocada en las ruedas traseras, como indica la
figura. Para desbloquear el carrito, subir la barra.
APERTURA
• Se aconseja frenar el carrito antes de abrirlo, para
facilitar su apertura.
8• Para abrir el carrito, desenganchar los retenes de
cierre, empujándolos hacia el interior como indica
la figura.
9• Levantar el asa y girarla hasta el tope empujándola
hasta oír clic.
10• Carrito abierto. La correcta apertura del carrito
se comprueba con el gancho de seguridad A;
si se queda como se ve en la figura B, empujar
ulteriormente el asa hacia abajo hasta oír clic.
ASA REGULABLE
11• Para regular la altura del asa, presionar a la vez los
botones laterales y bloquear el asa en la posición
deseada.
PARA QUITAR LAS RUEDAS
12• Para quitar las ruedas, hay que bajar la palanquita
que está en el centro de la rueda como indica la
figura y al mismo tiempo empujar la rueda hacia
fuera.
CIERRE
13• Para cerrar el carrito, tirar hacia arriba las dos
palancas que hay en el asa como indica la figura.
14• Levantar el gancho de seguridad,
15• poner el asa hacia abajo hasta oír clic.
16• Carrito cerrado.
GANCIOMATIC SYSTEM
17• “Ganciomatic System” es el sistema práctico y
rápido que permite enganchar el capazo PrimoNido
o Navetta, la silla de automóvil Primo Viaggio y el
asiento
con un solo movimiento: es suficiente apoyarlos a
la Base Ganciomatic y presionar sobre el producto
con ambas manos hasta oír clic. Antes de pasar
a las fases de enganche y desenganche, accionar
siempre el freno del carrito.
•
Para desenganchar los productos que se pueden
acoplar al carrito hay que consultar los respectivos
manuales de instrucciones.
Su producto necesita un mínimo mantenimiento. Las
operaciones delimpieza y mantenimiento tiene que ser
efectuadas sólo por adultos.
• Se aconseja mantener limpias las partes en
movimiento y si hiciera falta, lubricarlas con aceite
ligero.
• Secar las partes de metal del producto para evitar
que se oxiden.
• Limpiar periódicamente las partes de plástico con
un paño húmedo, no usar disolventes ni otros
productos parecidos.
• Mantener limpias las ruedas quitando polvo y arena.
• Proteger el producto contra los agentes
atmosféricos, agua, lluvia o nieve; la exposición
continua y prolongada al sol puede causar cambios
de color en muchos materiales.
• Conservar el producto en un sitio seco.
Seat Unit
LIMPIEZA & MANTENIMIENTO
a la Base Ganciomatic del carrito
CUIDADO
• ESTE VEHÍCULO HA SIDO DISEÑADO PARA
TRANSPORTAR SOLO UN NIÑO.
• NO UTILIZAR EL PRODUCTO PARA UN NÚMERO
DE OCUPANTES SUPERIOR AL PREVISTO POR EL
FABRICANTE.
• LAS OPERACIONES DE MONTAJE Y PREPARACIÓN
Page 15

DEL ARTÍCULO TIENEN QUE REALIZARLAS SOLO LOS
ADULTOS.
• NO UTILIZAR EL PRODUCTO SI TIENE PARTES ROTAS
O SI FALTA ALGUNA.
• PUEDE SER PELIGROSO DEJAR AL NIÑO SIN
VIGILANCIA.
• CUANDO ESTÁN PARADOS UTILICEN SIEMPRE LOS
FRENOS.
• ANTES DE USAR EL PRODUCTO HAY QUE
ASEGURARSE QUE TODOS LOS MECANISMOS DE
ACOPLE ESTÉN ENGANCHADOS CORRECTAMENTE.
• ANTES DE USAR EL PRODUCTO HAY QUE
ASEGURARSE QUE LA SILLA DE AUTO O LA SILLA
EXTRAÍBLE ESTÉN ENGANCHADAS CORRECTAMENTE.
• EVITAR INTRODUCIR LOS DEDOS EN LOS
MECANISMOS.
• PRESTAR ATENCIÓN AL NIÑO CUANDO SE HAGAN
OPERACIONES DE REGULACIÓN DE LOS MECANISMOS
(MANILLAR, RESPALDO).
• CUALQUIER CARGA COLGADA DEL MANILLAR O
DE LAS ASAS PUEDE HACER QUE EL PRODUCTO
SEA INESTABLE; SEGUIR LAS INDICACIONES DEL
FABRICANTE RESPECTO AL PESO MÁXIMO QUE SE
PUEDE COLGAR.
• NO INTRODUCIR EN LA CESTILLA OBJETOS CON
UN PESO SUPERIOR A 5 KG. NO METER EN EL
PORTABEBIDAS UN PESO SUPERIOR AL INDICADO EN
EL PORTABEBIDAS Y JAMÁS BEBIDAS CALIENTES. NO
METER EN LOS BOLSILLOS DE LAS CAPOTAS (SI LAS
HUBIERA) UN PESO SUPERIOR A 0,2 KG.
• NO UTILIZAR EL PRODUCTO CERCA DE ESCALERAS O
ESCALONES. NO UTILIZARLO CERCA DE FUENTES DE
CALOR, LLAMAS LIBRES U OBJETOS PELIGROSOS QUE
ESTÉN AL ALCANCE DE LOS BRAZOS DEL NIÑO.
• PUEDE SER PELIGROSO UTILIZAR ACCESORIOS NO
HOMOLOGADOS POR EL FABRICANTE.
• ESTE PRODUCTO NO ES APTO PARA HACER JOGGING
NI CARRERA CON PATINES.
PT•PORTUGUÊS
• IMPORTANTE: leia atentamente estas instruções,
conserve-as para sua futura utilização.
A segurança da criança pode ser colocada em
risco, caso tais instruções não sejam respeitadas.
• A Peg Perego poderá efectuar em qualquer momento
modificações aos modelos descritos nesta publicação,
por motivos de natureza técnica ou comercial.
A Peg Perego S.p.A. é certificada ISO 9001.
A certificação oferece aos clientes e
aos consumidores a garantia de uma
trasparência e confiança no modo de
trabalhar da empresa.
SERVIÇO DE ASSISTÊNCIA
No caso de perda ou dano de partes do modelo, use
somente peças originais Peg Perego. Caso necessite
de reparar, substituir, informar-se sobre os produtos
Perego, ou também, adquirir peças originais e
acessórios, procure o Serviço de Assistência PegPerego:
tel.:0039-039-60.88.213,
fax: 0039-039-33.09.992,
e-mail: assistenza@pegperego.it,
www.pegperego.com
A Peg Perego é a disposição de seus Consumidores
para satisfazê-los no melhor modo possível. Por isto,
conhecer a opinião dos nossos Clientes, para nos é
muito importante e precioso. Portanto agradecemos
muito se logo após ter utilizado um nosso produto
V.Sa. queira preencher, enviando-nos suas observações
ou sujestões, o QUESTIONÁRIO SATISFAÇÃO DO
CONSUMIDOR que encontrarás em internet ao seguinte
endereço: “www.pegperego.com.
INSTRUÇÕES DE UTILIZAÇÃO
MONTAGEM DO PUXADOR
1• Com a ajuda de uma chave de fendas, desapertar
os dois parafusos e as tampinhas do puxador.
2• Enfiar o puxador nos tubos do carrinho ainda
fechado (fora da embalagem), como representado
na figura.
3• Colocar a tampinha e o parafuso como
representado na figura e, em seguida, apertar com
a chave de fendas até ao fundo mas sem forçar, em
ambos os lados do puxador.
MONTAGEM DAS RODAS
4• Retirar as quatro tampas de protecção da
embalagem (duas redondas e duas quadradas) do
carrinho ainda fechado, como representado na
figura.
5• Inserir duas das rodas nos pernos, como
representado na figura, do lado do puxador
do carrinho ainda fechado. Para encaixá-la no
carrinho, pressionar a roda com a mão até fazer
um estalido e verificar se ficou bem encaixada.
6• Inserir as outras duas rodas nos pernos, como
representado na figura, do lado oposto ao puxador
do carrinho ainda fechado. Para encaixar cada
roda, introduzir os raios da roda nas fissuras do
perno, pressionar a roda com a mão até fazer um
estalido e verificar se ficou se ficou bem encaixada.
TRAVÃO
7• Para travar o carrinho, baixar a barra do
travão posicionada nas rodas traseiras, como
representado na figura. Para desbloquear o
carrinho, levantar a barra.
Page 16

ABERTURA
• Antes de abrir o carinho, aconselha-se a travagem
para facilitar a abertura.
8• Para abrir o carrinho, desengatar as presilhas de
fecho empurrando para dentro, como representado
na figura.
9• Levantar o puxador e invertendo a sua posição e
empurrando até que faça um estalido.
10• Carrinho aberto. A correcta abertura do carrinho
pode ser verificada pelo gancho de segurança A; se
estiver como na figura B, empurrar o puxador para
baixo até fazer o estalido.
PUXADOR REGULÁVEL
11• Para regular a altura do puxador, apertar os botões
laterais ao mesmo tempo e bloquear o puxador na
posição desejada.
PARA RETIRAR AS RODAS
12• Para retirar as rodas, deve baixar a alavanca
colocada no centro da roda, como representado
na figura, e empurrar a roda para fora ao mesmo
tempo.
FECHO
13• Para fechar o carrinho, puxar para cima as
duas alavancas colocadas no puxador, como
representado na figura.
14• Levantar o gancho de segurança,
15• empurrar o puxador para baixo até fazer um
estalido.
16• Carrinho fechado.
GANCIOMATIC SYSTEM
17• O “Ganciomatic System” é o sistema prático e
rápido que permite encaixar a alcofinha PrimoNido
ou a Navetta, a cadeira para automóvel Primo
Viaggio e a cadeirinha de transporte
na Base Ganciomatic do carrinho com um único
gesto: basta apoiá-las na Base Ganciomatic e fazer
pressão sobre o artigo com as ambas as mãos, até
fazer um estalido. Antes de proceder às fases de
encaixe e desencaixe, accionar sempre o travão do
carrinho.
•
Para desenganchar os produtos do carrinho,
consulte os respectivos manuais de instruções.
Seat Unit
FABRICANTE.
•
AS OPERAÇÕES DE MONTAGEM E PREPARAÇÃO DO
PRODUTO DEVEM SER EFECTUADAS POR ADULTOS.
•
NÃO UTILIZE O PRODUTO SE APRESENTAR DEFEITOS
OU SE FALTEM PEÇAS.
•
PODERIA SER PERIGOSO DEIXAR SUA CRIANÇA
SOZINHA..
•
QUANDO PARADO, ACCIONE SEMPRE OS TRAVÕES.
•
ANTES DE USAR, CERTIFIQUE-SE QUE TODOS
OS MECANISMOS DE ENCAIXE ESTEJAM PRESOS
CORRECTAMENTE.
•
ANTES DE USAR, CERTIFIQUE-SE QUE A CADEIRA
PARA AUTOMÓVEL OU O ASSENTO ESTEJAM PRESOS
CORRECTAMENTE.
•
EVITE INTRODUZIR OS DEDOS NOS MECANISMOS.
•
PRESTE ATENÇÃO À PRESENÇA DA CRIANÇA
QUANDO EFECTUAR OPERAÇÕES DE REGULAGEM DOS
MECANISMOS (MANILHA E ENCOSTO).
•
TODA E QUALQUER CARGA PENDURADA NAS
MANILHAS PODE FAZER COM QUE O PRODUTO
TORNE-SE INSTÁVEL; SIGA AS INDICAÇÕES DO
FABRICANTE, COM RELAÇÃO ÀS CARGAS MÁXIMAS
QUE PODEM SER USADAS.
•
NÃO COLOQUE NO CESTINHO DE PACOTES UM PESO
SUPERIOR A 5 KG. NÃO INTRODUZA NOS PORTABIBERÃO PESOS MAIORES DE QUANTO ESPECIFICADO
NO PRÓPRIO PORTA-BIBERÃO E JAMAIS BEBIDAS
QUENTES. NÃO INTRODUZA NOS BOLSOS DA CAPOTA
(SE PRESENTES) PESOS SUPERIORES A 0,2 KG.
•
NÃO UTILIZE O PRODUTO PRÓXIMO À ESCADAS OU
DEGRAUS, NÃO UTILIZE-O PRÓXIMO A FONTES DE
CALOR, CHAMAS LIVRES E OBJECTOS PERIGOSOS AO
ALCANCE DA CRIANÇA.
•
PODERIA SER PERIGOSO UTILIZAR ACESSÓRIOS NÃO
APROVADOS PELO FABRICANTE.
•
ESTE PRODUTO NÃO È INDICADO PARA JOGGING OU
CORRIDA COM PATINS.
LIMPEZA E MANUTENÇÃO
O seu produto necessita de um mínimo de manutenção.
As operações de limpeza e de manutenção devem ser
feitas somente por pessoas adultas.
• Aconselha-se de manter limpas todas as partes em
movimento e se for necessário, lubrificá-las com óleo
leve.
• Enxugar as partes de metal do produto para prevenir
contra a ferrugem.
• Periodicamente limpar as partes de plástica com um
pano húmido, não usar solventes ou outros produtos
semelhantes.
• Manter as rodas limpas sem poeira e areia.
• Proteger o produto contra os agentes atmosféricos,
água, chuva ou neve; a exposição continua e
prolongada ao sol pode causar mudanças de cor em
muitos materiais.
• Conservar o produto em um lugar seco.
ATENÇÃO
•
ESTE VEÍCULO FOI PROJECTADO PARA O TRANSPORTE
DE UMA CRIANÇA.
•
NÃO UTILIZE O PRODUTO PARA UM NÚMERO DE
OCUPANTES MAIOR DO QUE O PREVISTO PELO
Page 17

NL•NEDERLANDS
• BELANGRIJK: lees aandachtig deze instructies en
bewaar ze ook voor later.
U brengt uw kind in gevaar als u deze instructies
niet naleeft.
controleert u de correcte bevestiging.
REM
7• Om de wagen te remmen, plaatst u de remstang
omlaag die op de achterwielen van de wagen
geplaatst is, zoals de afbeelding toont. Om de
wagen te deblokkeren, plaatst u de stang omhoog.
• Peg Perego kan op ieder gewenst moment
wijzigingen aanbrengen op de modellen die in
deze publicatie beschreven worden, om reden van
technische of commerciële aard.
Peg Perego S.p.A. heeft een ISO 9001-
certificaat.
De certificiëring biedt klanten
en consumenten de garantie van
doorzichtigheid en vertrouwen in de
manier van werken van het bedrijf.
ASSISTENTIEDIENST
Indien delen van het model per ongeluk verloren
gaan of beschadigd raken dan dient u alleen originele
reserveonderdelen van Peg Perego te gebruiken. Voor
eventuele reparaties of vervanging van de producten,
alsmede voor informatie over de producten,
de verkoop van originele reserveonderdelen
en accessoires, neemt u contact op met de
Assistentiedienst van Peg-Perego:
tel.: 0039-039-60.88.213,
fax: 0039-039-33.09.992,
e-mail: assistenza@pegperego.it,
www.pegperego.com
Peg Perego staat ter beschikking van de Consument
om zo goed mogelijk aan diens wensen tegemoet te
komen. Daarom is het voor ons uiterst belangrijk om
de mening van onze klanten te kennen. Wij zullen u
daarom dankbaar zijn indien u, na het gebruik van
één van ozne producten, de VRAGENLIJST TEVREDEN
KLANTEN wilt invullen die u in het internet vindt, op
het volgende adres: www.pegperego.com
waarbij u opmerkingen kunt plaatsen of suggesties
kunt doen.
INSTRUCTIES VOOR HET GEBRUIK
MONTAGE HANDGREEP
1• Schroef met behulp van een schroevendraaier
de twee schroeven en de twee dopjes van de
handgreep los.
2• Plaats de handgreep op de buizen van de nog
gesloten (uit de verpakking gehaalde) wagen,
zoals de afbeelding toont.
3• Breng het dopje en de schroef in positie, zoals de
afbeelding toont, en draai ze aan beide zijden
van de handgreep tot het einde vast met de
schroevendraaier, maar zonder te forceren.
MONTAGE WIELEN
4• Verwijder de vier beschermdoppen van de
verpakking (twee ronde en twee vierkante) van de
nog gesloten wagen, zoals de afbeelding toont.
5• Plaats de twee wielen op de spillen, zoals de
afbeelding toont, aan de zijde van de handgreep
van de nog gesloten wagen. Om het wiel aan de
wagen vast te zetten, oefent u met uw hand druk
uit op het wiel tot u de klik hoort, en controleert u
de correcte bevestiging.
6• Plaats de andere twee wielen op de spillen, zoals
de afbeelding toont, aan de zijde die tegengesteld
aan de handgreep van de nog gesloten wagen is.
Om het wiel vast te zetten, steekt u de spaken
van het wiel in de openingen van de spil, oefent
u druk uit met uw hand tot u de klik hoort en
OPENEN
• Het wordt aangeraden om de wagen te remmen,
voordat u hem opent, om het openen te
vergemakkelijken.
8• Om de wagen te openen, koppelt u de sluithaken
los, door ze naar binnen te duwen, zoals de
afbeelding toont.
9• Til de handgreep op en draai hem tot het einde,
tot u niet verder kunt en de klik hoort.
10• Geopende wagen. De correcte opening van de
wagen is herkenbaar aan veiligheidshaak A.
Staat deze in de stand die aangeduid wordt door
afbeelding B, dan duwt u de handgreep verder
omlaag tot de klik.
INSTELBARE HANDGREEP
11• Om de hoogte van de handgreep in te stellen,
drukt u gelijktijdig op de zijknoppen en blokkeert
u de handgreep in de gewenste positie.
VERWIJDEREN VAN DE WIELEN
12• O de wielen te verwijderen, dient u het hendeltje
omlaag te plaatsen, dat zich in het midden van het
wiel bevindt, zoals de afbeelding toont, en duwt
u het wiel op hetzelfde moment in buitenwaartse
richting.
SLUITEN
13• Om de wagen te sluiten, trekt u de twee hendels
omhoog, die zich op de handgreep bevinden,
zoals de afbeelding toont.
14• Til de veiligheidshaak omhoog.
15• Plaats de handgreep omlaag, tot u de klik hoort.
16• Gesloten wagen.
GANCIOMATIC SYSTEM
17• “Ganciomatic System” is het praktische en snelle
systeem waarmee u met één gebaar het reiswiegje
PrimoNido of Navetta, het autozitje Primo Viaggio
of het zitje Seat Unit op de Ganciomatic Basis van
de wagen kunt bevestigen: het volstaat ze op
de Ganciomatic Basis te plaatsen en met beide
handen op het product te drukken, tot u de klik
hoort . Voordat u deze componenten los- of
vastkoppelt, moet u altijd eerst de rem van de
wagen activeren.
• Raadpleeg de betreffende handleidingen met
instructies om de producten van het onderstel los
te koppelen.
REINIGING EN ONDERHOUD
Uw product behoeft een minimum aan onderhoud.
Reiniging en onderhoud mogen alleen uitgevoerd
worden door volwassenen.
• Het wordt geadviseerd alle bewegende delen schoon
te houden en zonodig te smeren met lichte olie.
• Droog de metalen delen van het product, om
roestvorming te voorkomen.
• Reinig regelmatig de plastic delen met een vochtige
doek, gebruik geen oplosmiddelen of gelijkaardige
producten.
• Houd de wielen schoon van stof en zand.
• Bescherm het product tegen de
weersomstandigheden, water, regen of sneeuw; de
continue en langdurige blootstelling aan zonlicht
kan een kleurverandering van vele materialen
Page 18

veroorzaken.
• Bewaar het product op een droge plek.
LET OP
• DIT VOERTUIG IS ONTWORPEN OM EEN KIND TE
VERVOEREN.
• GEBRUIK HET PRODUCT NIET VOOR EEN GROTER
AANTAL KINDEREN DAN DOOR DE FABRIKANT
VASTGESTELD IS.
• DE ASSEMBLAGE EN DE VOORBEREIDING VAN HET
ARTIKEL MOETEN DOOR VOLWASSENEN UITGEVOERD
WORDEN.
• GEBRUIK HET PRODUCT NIET INDIEN ER DELEN
ONTBREKEN OF STUK ZIJN.
• HET ZOU GEVAARLIJK KUNNEN ZIJN UW KIND
ZONDER TOEZICHT TE LATEN.
• GEBRUIK ALTIJD DE REMMEN WANNEER U STILSTAAT.
• CONTROLEER VÓÓR HET GEBRUIK OF ALLE
KOPPELMECHANISMEN CORRECT OP ELKAAR
AANGESLOTEN ZIJN.
• CONTROLEER VÓÓR HET GEBRUIK OF HET AUTOZITJE
OF HET MEENEEMZITJE CORRECT VASTGEKOPPELD
ZIJN.
• VERMIJD HET DE VINGERS IN DE MECHANISMEN TE
STEKEN.
• LET BIJZONDER GOED OP DE AANWEZIGHEID VAN
HET KIND WANNEER DE MECHANISMEN INGESTELD
WORDEN (STUUR, RUGLEUNING).
• ELKE LAST DIE AAN HET STUUR OF AAN
DE HANDGREPEN GEHANGEN WORDT, KAN
HET PRODUCT INSTABIEL MAKEN. VOLG DE
AANWIJZINGEN VAN DE FABRIKANT M.B.T. HET
TOELAATBARE MAXIMUMGEWICHT.
• PLAATS GEEN GEWICHTEN VAN MEER DAN 5 KG.
IN DE MAND. PLAATS GEEN GEWICHTEN IN DE
FLESJESHOUDER DIE ZWAARDER ZIJN DAN HET
GEWICHT DAT OP DE FLESJESHOUDER AANGEGEVEN
WORDT, EN NOOIT HETE DRANKEN. PLAATS GEEN
GEWICHTEN VAN MEER DAN 0,2 KG IN DE ZAKKEN
VAN DE KAP.
• GEBRUIK HET PRODUCT NIET IN DE NABIJHEID VAN
TRAPPEN OF TREDEN. GEBRUIK HET NIET IN DE
NABIJHEID VAN WARMTEBRONNEN, OPEN VUUR OF
GEVAARLIJKE OBJECTEN DIE ZICH BINNEN ARMBEREIK
VAN HET KIND BEVINDEN.
• HET ZOU GEVAARLIJK KUNNEN ZIJN ACCESSOIRES
TE GEBRUIKEN DIE NIET DOOR DE FABRIKANT
GOEDGEKEURD ZIJN.
• DIT PRODUCT IS NIET GESCHIKT OM MEE TE JOGGEN
OF TE ROLSCHAATSEN.
DK•DANSK
• VIGTIGT: Læs brugsanvisningen omhyggeligt og
opbevar den til senere brug.
Barnets sikkerhed vil være i fare, såfremt disse
anvisninger ikke følges.
• Peg Perego kan til enhver tid foretage ændringer på
modellerne, som er beskrevet heri, af tekniske eller
kommercielle årsager.
Peg Perego S.p.A. er ISO 9001 certificeret.
Certificeringen giver kunder og forbrugere
garanti for gennemskuelighed og tillid til
måden firmaet arbejder på.
SERVICEAFDELING
Skulle det ske, at dele af modellen mistes eller
beskadiges, må der kun anvendes originale Peg Perego
reservedele. For eventuelle reparationer, udskiftninger,
produktoplysninger, salg af originale reservedele og
tilbehør bedes du kontakte Serviceafdelingen hos PegPerego:
tel.:0039-039-60.88.213,
fax: 0039-039-33.09.992,
e-mail: assistenza@pegperego.it,
www.pegperego.com
Peg Perego står til forbrugernes rådighed for at
imødekomme ethvert ønske på bedste måde. Det er
derfor yderst vigtigt og værdifuldt for os at høre, hvad
vores kunder mener. Vi vil derfor være taknemmelige
for, hvis du - efter at have brugt et af vores produkter
- venligst vil udfylde vort spørgeskema vedrørende
kundetilfredshed, som du finder på vores internetside
på følgende adresse: www.pegperego.com
hvor du kan informere os om din mening eller forslag.
BRUGSANVISNING
MONTERING AF HÅNDTAG
1• Brug en skruetrækker til at løsne de to skruer på
håndtaget og tag de to propper ud.
2• Stik det store håndtag ned på den
sammenklappede vogns stænger (som taget ud af
emballagen) som vist på tegningen.
3• Anbring den lille prop og skruen som på
tegningen, og skru den herefter helt i bund med
skruetrækkeren uden dog at presse for hårdt,
dette gøres på begge sider af håndtaget.
MONTERING AF HJULENE
4• Fjern de fire beskyttelsespropper (to runde og to
firkantede) på den endnu sammenklappede vogn,
som vist på tegningen.
5• Sæt de to hjul på drejetapperne som på tegningen
i den samme ende som den sammenklappede
vogns håndtag. For at hægte hjulet fast på
vognen, trykker du ind på hjulet med hånden,
indtil det klikker, hvorefter du kontrollerer, at det
er sat rigtigt på.
6• Sæt de andre to hjul på drejetapperne som
på tegningen i den modsatte ende af den
sammenklappede vogns håndtag. For at hægte
hjulet fast på vognen, tilpasses hjulets riller med
furene på drejetappen, herefter trykker du ind på
hjulet med hånden, indtil det klikker, hvorefter du
kontrollerer, at det er sat rigtigt på.
BREMSER
7• Vognen bremses ved at trykke bremsestangen på
de bageste hjul ned, som vist på tegningen. For at
løsne vognens bremser, løftes stangen op.
Page 19

ÅBNING
• Det anbefales at slå bremsen til, før vognen åbnes,
hvilket gør åbningen nemmere.
8• For at åbne vognen skal sikkerhedskrogene løsnes
ved at skubbe dem indad, som vist på tegningen.
9• Løft det store håndtag op og drej det rundt indtil
stoppunktet, hvorefter det skubbes ned til det
klikker.
10• Åben vogn. Du kan kontrollere, at vognen er åbnet
korrekt, på sikkerhedsspændet A; hvis det ser
ud som på tegningen B, skal du skubbe det store
håndtag længere nedad, indtil det klikker fast.
REGULERBART HÅNDTAG
11• For at regulere håndtagets højde trykkes samtidigt
på begge sideknapperne, hvorefter håndtaget
blokkeres i den ønskede stilling.
SÅDAN TAGES HJULENE AF
12• For at tage hjulene af, er det nødvendigt at
trykke grebet midt på hjulet nedad, som vist på
tegningen, og samtidigt skubbe hjulet udad.
SAMMENKLAPNING
13• For at klappe vognen sammen skal du trække de
to greb på håndtaget opad, som vist på tegningen.
14• Løft sikkerhedsspændet,
15• Træk håndtaget nedad, indtil det klikker.
16• Lukket vogn.
• FØR BRUGEN SKAL DET SIKRES, AT ALLE
TILKOBLINGSMEKANISMER ER KORREKT TILKOBLEDE.
• FØR BRUGEN SKAL DET SIKRES, AT AUTOSTOLEN
ELLER DET GENMONTEREDE SÆDE ER KORREKT
TILKOBLET.
UNDGÅ AT STIKKE FINGRENE IND I BEVÆGELIGE DELE.
•
• PAS PÅ BARNET NÅR DER UDFØRES REGULERINGER AF
MEKANISMERNE (DET STORE HÅNDGREB, RYGLÆNET).
• EVENTUELLE GENSTANDE, DER HÆNGES PÅ
HÅNDTAGET ELLER ANDRE GREB, KAN GØRE
PRODUKTET USTABILT; FØLG PRODUCENTENS
ANVISNINGER VEDRØRENDE DEN MAKSIMALE
LASTEKAPACITET.
• LÆG IKKE TING I KURVEN MED EN SAMLET
VÆGT OVER 5 KG. SÆT IKKE TUNGERE TING
I FLASKEBEHOLDEREN END ANGIVET PÅ
FLASKEBEHOLDEREN OG ALDRIG VARME DRIKKE. STIK
IKKE TING I LOMMERNE PÅ KALECHERNE (HVIS DISSE
ER MONTEREDE), DER VEJER MERE END 0,2 KG.
• ANVEND IKKE PRODUKTET I NÆRHEDEN AF TRAPPER
ELLER TRIN; ANVEND DET IKKE I NÆRHEDEN AF
VARMEKILDER, ÅBEN ILD ELLER FARLIGE GENSTANDE,
SOM BARNET VIL KUNNE NÅ MED ARMENE.
• DET KAN INDEBÆRE EN FARE AT ANVENDE TILBEHØR,
SOM IKKE ER GODKENDT AF PRODUCENTEN.
• DETTE PRODUKT ER IKKE VELEGNET TIL BRUG UNDER
JOGGING ELLER KØRSEL PÅ RULLESKØJTER.
GANCIOMATIC SYSTEMET
17• “Ganciomatic System” er et praktisk og nemt
system, der gør det muligt at hægte liftene Primo
Nido eller Navetta, autostolen Primo Viaggio og
ekstrasædet Seat Unit på vognens Ganciomatic
understel med en enkel bevægelse: Du anbringer
produktet på Ganciomatic understellet og trykker
ned på det med begge hænder, indtil det klikker
fast. Før du går igang med at hægte noget på eller
tage det af, skal du altid slå vognens bremse til.
• For at løsne produktet fra vognen henvises du til
de pågældende produkters brugsanvisninger.
RENGØRING OG VEDLIGEHOLDELSE
Produktet har kun brug for et minimum af
vedligeholdelse. Rengøring og vedligeholdelse må kun
udføres af voksne.
• Det anbefales at holde alle bevægelige dele rene og
om nødvendigt smøre dem med en let olie.
• Tør produktets metaldele af for at undgå rust.
• Rengør delene i plastik regelmæssigt med en fugtig
klud; brug ikke opløsningsmidler eller lignende
produkter.
• Hold hjulene rene for støv og sand.
• Beskyt produktet mod vejrforholdene, vand, regn
eller sne; mange materialer vil skifte farve, såfremt
de udsættes for sollys i længere tid.
• Opbevar produktet på et tørt sted.
VIGTIGT
• DENNE VOGN ER FREMSTILLET MED HENBLIK PÅ
TRANSPORT AF 1 BARN.
• ANVEND IKKE PRODUKTET TIL AT KØRE MED FLERE
BØRN END BEREGNET FRA PRODUCENTENS SIDE.
• MONTERING OG KLARGØRING AF PRODUKTET MÅ
KUN FORETAGES AF VOKSNE.
• BRUG IKKE PRODUKTET, HVIS DER ER TEGN PÅ
MANGLENDE DELE ELLER BRUD.
• DET KAN VÆRE FARLIGT AT EFTERLADE DIT BARN
UDEN OPSYN.
• UNDER OPHOLD SKAL BREMSERNE ALTID SLÅS TIL.
Page 20

FI•SUOMI
• TÄRKEÄÄ: lue nämä ohjeet huolellisesti ja säilytä
ne tulevaa käyttöä varten.
Lapsen turvallisuus saattaa vaarantua, ellei ohjei-
ta noudateta.
• Peg Perego voi koska tahansa tehdä tässä julkaisussa
kuvattuihin malleihin teknisistä tai kaupallisista
syistä muutoksia.
AVAAMINEN
• Ennen vaunujen avaamista on suositeltavaa laittaa
jarrut päälle, jotta avaaminen olisi helpompaa.
8• Vaunujen avaamiseksi irrota sulut työntämällä
niitä ulospäin kuten kuvassa.
9• Nosta kahvaa ja käännä se ylimpään asentoonsa
työntämällä sitä pykälään asti.
10• Vaunut ovat avoinna. Vaunujen oikeanlainen
avaaminen voidaan varmistaa turvakoukusta A;
jos se on kuten kuvassa B, työnnä kahvaa vielä
alaspäin kunnes kuulet naksahduksen.
Peg Perego S.p.A. on ISO 9001 -sertifioitu
yhtiö.
Sertifiointi on asiakkaille ja kuluttajille
tae siitä, että yritys toimii läpinäkyvästi ja
luotettavasti.
ASIAKASPALVELU
Jos osia tuotteesta katoaa tai vaurioituu, vaihda
niiden tilalle ainoastaan alkuperäisiä Peg Perego varaosia. Ota yhteys asiakaspalveluun korjauksiin,
vaihtoihin, tuotetietoihin ja alkuperäisten varaosien ja
lisävarusteiden tilaamiseen liittyvissä asioissa.
Peg-Perego-asiakaspalvelu:
puh. +39 039 60 88 213
faksi: +39 039 33 09 992
s-posti: assistenza@pegperego.it
www.pegperego.com
Peg Perego haluaa palvella asiakkaitaan ja vastata
parhaansa mukaan kaikkiin heidän tarpeisiinsa.
Siksi asiakkaidemme mielipiteet ovat meille erittäin
tärkeitä ja arvokkaita. Olisimmekin hyvin kiitollisia, jos
haluaisit tuotettamme käytettyäsi täyttää KULUTTAJAN
TYYTYVÄISYYSKYSELYN, jonka löydät Internetistä
osoitteesta: www.pegperego.com
ja kertoa meille sen välityksellä mahdollisista
huomioistasi ja ehdotuksistasi.
KÄYTTÖOHJEET
SÄÄDETTÄVÄ KAHVA
11• Kahvan korkeuden säätämiseksi paina
samanaikaisesti sivuilla olevia painikkeita ja
lukitse kahva haluttuun asentoon.
RENKAIDEN POISTAMINEN
12• Renkaiden poistamiseksi tulee laskea renkaan
keskustassa olevaa vipua, kuten kuvassa, ja
työntää samanaikaisesti rengasta ulospäin.
SULKEMINEN
13• Vaunujen sulkemiseksi vedä ylöspäin kaksi vipua,
jotka sijaitsevat kahvalla, kuten kuvassa.
14• Nosta turvakoukkua,
15• vie kahvaa alaspäin kunnes kuulet naksahduksen.
16• Vaunut ovat suljettuina.
GANCIOMATIC SYSTEM
17• “Ganciomatic System“ on kätevä ja nopea
järjestelmä, jonka ansiosta vaunuihin voidaan
kiinnittää Primo Nido tai Navetta-kori, Primo
Viaggio –turvaistuin ja Seat Unit –istuin
vaunujen Base Ganciomaticiin hyvin helposti:
on riittävää, että asetat ne Base Ganciomaticille
ja painat tuotetta kaksin käsin, kunnes kuulet
naksahduksen. Ennen kuin aloitat kiinnitys- ja
irrottamistoimenpiteitä, aktivoi aina vaunujen
jarrut.
• Tuotteiden irrottamiseksi vaunuista tutustu
asianomaisiin käyttöohjeisiin.
KAHVAN KIINNITTÄMINEN
1• Avaa kaksi ruuvia ja kahvan kaksi tulppaa
ruuvimeisselin avulla.
2• Laita kahva vaunujen, jotka ovat vielä suljettuna
(pakkauksesta poistettuina), putkille kuten
kuvassa.
3• Laita paikoilleen tulppa ja ruuvi, kuten kuvassa,
ruuvaa sitten kahvan molemmat puolet
ruuvimeisselillä loppuun saakka silti kiristämättä
lujaan.
RENKAIDEN KIINNITTÄMINEN
4• Poista pakkauksen neljä (kaksi pyöreää ja kaksi
neliskulmaista) suojatulppaa vaunuista, jotka ovat
vielä suljettuna, kuten kuvassa.
5• Pujota kaksi rengasta tappeihin, kuten kuvassa,
edelleen suljettuna olevien vaunujen kahvan
puolelta. Kiinnitä se vaunuihin ja paina sen päältä
kädellä kunnes kuulet naksahduksen ja tarkista,
että kiinnitys on oikeanlainen.
6• Pujota kaksi muuta rengasta tappeihin, kuten
kuvassa, edelleen suljettuina olevien vaunujen
kahvan vastakkaiselta puolelta. Kiinnitä se
laittamalla renkaan pinnat tapissa oleviin sijoihin,
paina vaunujen päältä kädellä kunnes kuulet
naksahduksen ja tarkista, että kiinnitys on
oikeanlainen.
JARRUT
7• Vaunujen jarruttamiseksi laske takarenkaiden
päällä sijaitsevaa jarruvipua kuten kuvassa.
Vaunujen lukituksen avaamiseksi nosta vipua.
PUHDISTUS JA HUOLTO
Tuotteenne edellyttää pienen määrän huoltoa.
Vain aikuiset voivat tehdä puhdistus- ja
huoltotoimenpiteitä.
• Pidä puhtaana kaikki liikkuvat osat ja, jos tarpeen,
voitele kevyellä öljyllä.
• Kuivaa tuotteen metalliosat, jotta ne eivät ruostu.
• Puhdista säännöllisesti muoviosat kostealla
pyyhkeellä. Älä käytä liuottimia tai muita
samankaltaisia tuotteita.
• Pidä renkaat puhtaina pölystä ja hiekasta.
• Suojaa tuote ulkoisilta tekijöiltä, vedeltä, sateelta tai
lumelta; jatkuva ja pitkäaikainen auringon paisteessa
pitäminen voi aiheuttaa värimuutoksia useisiin
materiaaleihin.
• Säilytä tuotetta kuivassa paikassa.
HUOMIO
• TÄMÄ KULKUNEUVO ON SUUNNITELTU YHDEN
LAPSEN KULJETTAMISEEN.
• ÄLÄ KÄYTÄ TUOTETTA ISOMMALLE
KÄYTTÄJÄMÄÄRÄLLE KUIN MITÄ VALMISTAJA
SUOSITTELEE.
• VAIN AIKUISET VOIVAT TEHDÄ TUOTTEEN
KOKOAMIS- JA VALMISTELUTOIMENPITEITÄ.
• ÄLÄ KÄYTÄ TUOTETTA, JOS SIITÄ PUUTTUU OSIA TAI
SIINÄ ON RIKKOUMIA.
• LAPSEN JÄTTÄMINEN ILMAN VALVONTAA VOI OLLA
Page 21

VAARALLISTA.
• PAIKOILLAAN OLLESSA, PIDÄ JARRUT AINA
LUKITTUINA.
• ENNEN KÄYTTÖÄ VARMISTA, ETTÄ KAIKKI
KIINNITYSMEKANISMIT OVAT OIKEIN KIINNITETTYJÄ.
• ENNEN KÄYTTÖÄ VARMISTA, ETTÄ AUTON
TURVAISTUIN TAI ISTUIN OVAT OIKEALLA TAVALLA
KIINNITETTYINÄ.
• VÄLTÄ SORMIEN LAITTAMISTA MEKANISMEIHIN.
• VARO VAHINGOITTAMASTA LASTA, KUN TEET
SÄÄTÖTOIMENPITEITÄ MEKANISMEIHIN (KAHVA,
SELKÄNOJA).
• JOKAINEN PAINO, JOKA ROIKKUU KANTOKAHVASSA
TAI MUISSA KAHVOISSA VOI SAATTAA TUOTTEEN
EPÄTASAPAINOON; NOUDATA VALMISTAJAN OHJEITA
MITÄ TULEE MAKSIMIPAINORAJOITUKSIIN.
• ÄLÄ LAITA KORIIN MITÄÄN, JOKA PAINAA ENEMMÄN
KUIN 5 KG. ÄLÄ LAITA JUOMANPIDIKKEESEEN
MITÄÄN, JOKA PAINAA ENEMMÄN KUIN ON
TARKENNETTU ITSE JUOMANPIDIKKEESSÄ JA ÄLÄ
LAITA SIIHEN KOSKAAN KUUMIA JUOMIA. ÄLÄ LAITA
KUOMUN TASKUIHIN (JOS SELLAISIA ON) ENEMPÄÄ
PAINOA KUIN 0,2 KG.
• ÄLÄ KÄYTÄ LÄHELLÄ PORTAITA TAI RAPPUJA; ÄLÄ
KÄYTÄ LÄHELLÄ LÄMMÖNLÄHTEITÄ, AVOTULIA TAI
VAARALLISIA ESINEITÄ LAPSEN ULOTTUVILLA.
• LISÄVARUSTEIDEN, JOTKA EIVÄT OLE VALMISTAJAN
HYVÄKSYMIÄ, KÄYTTÖ SAATTAA OLLA VAARALLISTA.
• TÄMÄ TUOTE EI OLE SOPIVA KÄYTETTÄVÄKSI
JUOSTESSA TAI RULLALUISTELLESSA.
CZ•ČEŠTINA
• DŮLEŽITÉ: pozorně si přečtěte tyto pokyny a
uchovejte je pro budoucí použití.
Bezpečnost dítěte může být ohrožena pokud tyto
pokyny nebudou dodrženy.
• Společnost Peg Perego může kdykoliv provést změny
a úpravy na modelech, které jsou popsány v této
publikaci, jestliže si to vyžádají technické nebo
obchodní okolnosti.
Společnost Peg Perego S.p.A. je
certifi kovaná podle ISO 9001.
Tato certifi kace zaručuje klientům
a spotřebitelům transparentnost a
spolehlivost ohledně pracovních postupů
společnosti.
ASISTENČNÍ SLUŽBA
Jestliže dojde k náhodné ztrátě nebo poškození
některých částí výrobku, použijte výhradně originální
náhradní díly Peg Perego. Pro případné opravy,
výměny, informace o výrobcích, prodej náhradních dílů
a doplňků kontaktujte Asistenční službu
Peg-Perego:
tel.:0039-039-60.88.213,
fax: 0039-039-33.09.992,
e-mail: assistenza@pegperego.it,
www.pegperego.com
Společnost Peg Perego je vždy k dispozici svým
klientům, aby co nejlépe uspokojila veškeré jejich
potřeby a přání. Z tohoto dů
důležité a cenné, abychom se seznámili s názory
našich klientů. Proto Vám budeme velmi vděčni, když
po použití našeho výrobku vyplníte DOTAZNÍK PRO
ZJIŠTĚNÍ SPOKOJENOSTI KLIENTŮ, který naleznete na
následující internetové adrese:
www.pegperego.com.
Prosíme Vás o uvedení případných postřehů a doporučení.
NÁVOD K POUŽITÍ
MONTÁŽ RUKOJETI
1• Pomocí šroubováku odšroubujte oba šrouby a oba
uzávěry rukojeti.
2• Nasuňte rukojeť na trubky struktury ještě
složeného kočárku (vytaženého z obalu), jak je to
vyznačené na obrázku.
3• Umístěte uzávěr a šroub, jak je to vyznačené na
obrázku, a zašroubujte je pomocí šroubováku na
doraz bez vynaložení přílišné síly.
MONTÁŽ KOL
4• Sejměte z podvozku kočárku čtyři ochranné zátky
(dvě kulaté a dvě hranaté), jak je to vyznačené na
obrázku.
5• Nasuňte obě kola na čep ze strany rukojeti
ještě složeného podvozku, jak je to vyznačené
na obrázku. Pro správné nasazení kola na
něho zatlačte, dokud neuslyšíte cvaknutí, a
zkontrolujte, jestli je kolo řádně nasazené.
6• Nasuňte zbylá dvě kola na čepy z opačné strany
rukojeti ještě složeného podvozku (viz obrázek).
Pro správné nasazení kola vsuňte dráty kola
štěrbin čepu, zatlačte na kolo rukou, dokud
neuslyšíte cvaknutí, a zkontrolujte, jestli je kolo
řádně nasazené.
vodu je pro nás nesmírně
BRZDA
7• Pro zabrzdění podvozku snižte páčku brzdy na
zadních kolech, jak je to znázorněné na obrázku.
Pro odblokování podvozku páčku přesuňte do
Page 22

horní polohy.
ROZLOŽENÍ PODVOZKU
• Před rozložením podvozku ho doporučujeme
zabrzdit.
8• Před rozložením podvozku uvolněte pojistky
tak, že na ně zatlačíte směrem dovnitř, jak je to
vyznačené na obrázku.
9• Přesuňte rukojeť směrem nahoru a otáčejte ho,
dokud se nezablokuje v poslední možné pozici.
10• Rozložený podvozek. Správné rozložení podvozku
můžete zkontrolovat pomocí bezpečnostní
pojistky A; jestliže je bezpečnostní pojistka v
pozici, která je znázorněná na obrázku B, znovu
zatlačte na rukojeť směrem dolů, aby se přesunula
do mezní spodní pozice.
NASTAVITELNÁ RUKOJEŤ
11• Pro seřízení výšky rukojeti stiskněte současně
obě boční tlačítka a zablokujte rukojeť ve zvolené
pozici.
SEJMUTÍ KOL
12• Pro sejmutí kol stačí snížit páčku umístěnou ve
středu kola tak, jak je to vyznačené na obrázku, a
současně zatlačit na kolo směrem ven.
SLOŽENÍ PODVOZKU
13• Pro složení podvozku přesuňte směrem na
horu obě páčky umístěné na rukojeti, jak je to
vyznačené na obrázku.
14• Přesuňte směrem nahoru bezpečnostní pojistku.
15• Přesuňte rukojeť směrem dolů, dokud neuslyšíte
cvaknutí.
16• Nyní je podvozek složený.
• VEŠKERÉ OPERACE SPOJENÉ S MONTÁŽÍ A SEŘÍZENÍM
VÝROBKU MOHOU PROVÁDĚT POUZE DOSPĚLÉ
OSOBY.
• NEPOUŽÍVEJTE VÝROBEK V PŘÍPADĚ, ŽE JE
POŠKOZENÝ ANEBO ŽE CHYBÍ NĚKTERÉ JEHO ČÁSTI.
• NIKDY DÍTE NENECHÁVEJTE BEZ DOZORU.
• JESTLIŽE JE KOČÁREK V KLIDU, VŽDY HO ZABRZDĚTE.
PŘED POUŽITÍM VÝROBKU SE UJISTĚTE, ŽE JSOU
•
VEŠKERÉ PŘIPÍNACÍ MECHANISMY SPRÁVNĚ PŘIPOJENÉ.
• PŘED POUŽITÍM VÝROBKU SE UJISTĚTE, JESTLI JSOU
AUTOSEDAČKA A SEDÁTKO SPRÁVNĚ PŘIPNUTÉ.
• NEVSUNUJTE PRSTY DO MECHANISMŮ VÝROBKU.
• PŘI SEŘIZOVÁNÍ JEDNOTLIVÝCH MECHANISMŮ
(RUKOJEŤ, OPĚRKA ZAD) DÁVEJTE POZOR NA DÍTĚ
USAZENÉ V KOČÁRKU.
• JAKÉKOLIV BŘEMENO ZAVĚŠENÉ NA PŘEDNÍ RUKOJETI
ANEBO NA BOČNÍCH RUKOJETÍCH MŮŽE KOČÁREK
DESTABILIZOVAT; PRO MAXIMÁLNÍ POVOLENÉ
ZATÍŽENÍ KOČÁRKU ODKAZUJEME NA INSTRUKCE
VÝROBCE.
• NEVKLÁDEJTE DO KOŠÍKU BŘEMENA S VÁHOU
VYŠŠÍ NEŽ 5 KG. NEVKLÁDEJTE DO DRŽÁKU
NA LÁHEV PŘEDMĚTY S VÁHOU VYŠŠÍ NEŽ JE
HODNOTA UVEDENÁ NA DRŽÁKU A NIKDY DO NEHO
NEVKLÁDEJTE TEPLÉ NÁPJE. NEVKLÁDEJTE DO KAPES
STŘÍŠEK (JSOU-LI PŘÍTOMNÉ), BŘEMENA S VÁHOU
VYŠŠÍ NEŽ 0,2 KG.
• NEPOUŽÍVEJTE KOČÁREK V BLÍZKOSTI SCHODŮ;
NEPOUŽÍVEJTE KOČÁREK V BLÍZKOSTI ZDROJŮ TEPLA,
OHNĚ NEBO NEBEZPEČNÝCH PŘEDMĚTŮ, NA KTERÉ
MŮŽE DÍTĚ DOSÁHNOUT.
• POUŽITÍ DOPLŇ
VÝROBCEM, MŮŽE BÝT NEBEZPEČNÉ.
• TENTO VÝROBEK NENÍ VHODNÝ PRO JOGGING A
JÍZDU NA BRUSLÍCH.
KŮ, KTERÉ NEJSOU SCHVÁLENÉ
GANCIOMATIC SYSTEM
17• Ganciomatic System je velmi praktický a rychlý
systém, který umožňuje pomocí jednoho
jednoduchého gesta k bázi Ganciomatic podvozku
připnout sportovní korbu Primo Nido nebo
Navetta, dětskou autosedačku Primo Viaggio a
sedačku Seat Unit alla Base Ganciomatic. Před
připnutím nebo odepnutím jednotlivých elementů
vždy podvozek zabrzděte.
• Pro odpojení jednotlivých elementů odkazujeme
na příslušné návody k použití.
ČIŠTĚNÍ A ÚDRŽBA
Tento výrobek si vyžaduje minimální údržbu. Veškeré
operace spojené s čištěním a údržbou mohou provádět
pouze dospě
• Doporučujeme udržovat v čistém stavu veškeré
pohyblivé části kočárku a v případě potřeby je
namazat lehkým olejem.
• Kovové části výrobku vysušte, aby nedošlo k jejich
zrezivění.
• Pravidelně čistěte umělohmotné části kočárku
vlhkým hadrem; nepoužívejte rozpouštědla anebo
jiné podobné prostředky.
• Odstraňte z kol prach a písek.
• Chraňte výrobek před atmosférickými vlivy, vodou,
deštěm a sněhem; nepřetržité a dlouhodobé
vystavení slunečnímu záření může způsobit změnu
barvy mnohých materiálů.
• Uchovávejte výrobek na suchém místě.
lé osoby.
POZOR
• TENTO VÝROBEK JE URČENÝ PRO PŘEPRAVU
JEDNOHO DÍTĚTE.
• NEPOUŽÍVEJTE VÝROBEK PRO VĚTŠÍ POČET DĚTÍ.
Page 23

SK•SLOVENČINA
• DÔLEŽITÉ: pozorne si prečítajte tento návod a
uchovajte ho pre ďalšie použitie.
Pri nedodržaní tohto návodu, môže byť ohrozená
bezpečnosť dieťaťa.
• Spoločnost Peg Perego môže kedykoľvek vykonať
zmeny a úpravy na modeloch, ktoré sú popísané v
tejto publikácii, ak si to budú vyžadovať technické
alebo obchodné podmienky.
Spoločnost Peg Perego S.p.A. je
certifi kovaná podľa ISO 9001.
Tento certifi kát zaručuje klientom
a spotrebiteľom transparentnosť a
spoľahlivosť vzťahujúcich sa na pracovné
postupy spoločnosti.
vytiahnite smerom nahor.
ROZLOŽENIE KOČÍKA
• Kočík pred jeho rozložením zabrzdite.
8• Ak si želáte kočík rozložiť, odopnite
zabezpečovacie poistky a zatlačte ich smerom
dovnútra tak ako je to uvedené na obrázku.
9• Nadvihnite rukoväť a otáčajte ju až do konečného
cvaknutia.
10• Kočík je teraz rozložený. Správne rozloženie
kočíka môžete skontrolovať pomocou
bezpečnostnej poistky A; ak by bol kočík
rozložený tak, ako je uvedené na obrázku B znovu
zatlačte rukoväť smerom nadol pokiaľ nebudete
počuť cvaknutie.
NASTAVITEĽNÁ RUKOVÄŤ
11• Pre nastavenie výšky rukoväti stlačte súčasne
obidve bočné páčky a zablokujte rukoväť v želanej
polohe.
ASISTENČNÁ SLUŽBA
Ak dôjde k náhodnej strate alebo poškodeniu
niektorých častí výrobku, použite výlučne originálne
náhradné diely Peg Perego. Pre prípadné opravy,
výmeny, informácie o výrobkoch, predaj náhradných
dielov a doplnkov kontaktujte Asistenčnú službu
Peg-Perego:
tel.:0039-039-60.88.213,
fax: 0039-039-33.09.992,
e-mail: assistenza@pegperego.it,
www.pegperego.com
Spoločnost Peg Perego je svojim klientom vždy
k dispozícii, aby čo najlepšie uspokojila všetky
ich potreby a priania. Z tohto dôvodu je pre nás
nesmierne dôležité a cenné, aby sme sa oboznámili
s názormi našich klientov. Preto Vám budeme veľmi
vďační, keď po použití nášho výrobku vyplníte
DOTAZNÍK PRE ZISTENIE SPOKOJNOSTI KLIENTOV,
ktorý nájdete na nasledujúcej internetovej adrese:
www.pegperego.com. Prosíme Vás o uvedenie
prípadných postrehov a doporučení.
NÁVOD NA POUŽITIE
MONTÁŽ RUKOVÄTE
1• Skrutkovačom odskrutkujte dve skrutky a dva
uzávery rukoväte.
2• Zasuňte rukoväť do trubíc ešte zloženého kočíka
(vybaleného z obalu) tak, ako je to uvedené na
obrázku.
3• Umiestnite uzáver a skrutky tak, ako je to
uvedené na obrázku, a zaskrutkujte ich pomocou
skrutkovača na doraz z oboch strán rukoväte.
MONTÁŽ KOLIES
4• Odstráňte štyri ochranné uzávery obalu (dva
gulaté a dva štvorcové) z ešte zloženého kočíka,
ako je to uvedené na obrázku.
5• Vložte dve kolesá do čapu na strane rukoväti
ešte zloženého kočíka tak, ako je to uvedené
na obrázku. Zatlačte rukou na koleso pokiaľ
nebudete počuť cvaknutie, čím ho pripevníte na
kočík a skontrolujte jeho správne nasadenie.
6• Vložte ďaľšie dve kolesá do čapov na opačnej
strane rukoväti ešte zloženého kočíka tak, ako
je to uvedené na obrázku. Vložte dráty kolesa
do otvorov čapu, zatlačte rukou na koleso pokiaľ
nebudete počuť cvaknutie a skontrolujte jeho
správne nasadenie.
VYTIAHNUTIE KOLIES
Pre vytiahnutie kolies musíte znížiť páčku
12•
umiestnenú v strede kolesa tak, ako je to uvedené
na obrázku a súčasne vytiahnuť koleso smerom von.
ZLOŽENIE KOČÍKA
13• Pre zloženie kočíka vytiahnite smerom nahor
dve páčky umiestnené na rukoväti tak, ako je to
uvedené na obrázku.
14• Vytiahnite bezpečnostnú poistku smerom nahor,
15• znížte rukoväť smerom nadol, pokiaľ nebudete
počuť cvaknutie.
16• Kočík je teraz zložený.
GANCIOMATIC SYSTEM
17• “Ganciomatic System” je veľmi praktický a rýchly
systém, ktorý Vám umožní pripnúť športovú korbu
Primo Nido alebo Navetta, detskú autosedačku
Primo Viaggio a sedačku Seat Unit k základni Base
Ganciomatic kočíka, a to jediným pohybom: stačí
ak ich položíte na základňu Base Ganciomatic a
zatlačíte na nich oboma rubami, pokiaľ nebudete
počuť cvaknutie. Predtým ako pripevníte alebo
odoberiete uvedené časti zo základne vždy
zabrzdite kočík.
• Pre odobratie športovej korby, autosedačky a
sedačky z kočíka odkazujeme na ich návod na
použitie.
ČISTENIE A ÚDRŽBA
Váš výrobok si vyžaduje minimálnu údržbu. Všetky
operácie spojené s čistením a údržbou výrobku musia
vykonávať len dospelé osoby.
• Doporučujeme udržovať v čistom stave všetky
mobilné časti výrobku a v prípade potreby ich
namazať
• Kovové časti výrobku vysušte, aby sa zabránilo ich
zhrdzaveniu.
• Pravidelne čistite umelohmotné časti kočíka vlhkou
handričkou, nepoužívajte riedidlá alebo podobné
prostriedky.
• Kolesá čistite od prachu a piesku.
• Chráňte výrobok pred atmosferickými vplyvmi,
vodou, dažďom alebo snehom; nepretržité a
dlhodobé vystavenie slnečnému žiareniu môže
spôsobiť zmenu farby viacerých materiálov.
• Uchovávajte výrobok na suchom mieste.
ľahkým olejom.
BRZDA
7• Pre zabrzdenie kočíka znížte nohou páčku brzdy
umiestnenú na zadných kolesách tak, ako je to
uvedené na obrázku. Pre odbrzdenie kočíka páčku
POZOR
• TENTO VÝROBOK JE URČENÝ NA PREPRAVU JEDNÉHO
Page 24

DIEŤAŤA.
• NEPOUŽÍVAJTE VÝROBOK NA PREPRAVU VYŠŠIEHO
POČTU DETÍ AKO PREDPISUJE VÝROBCA.
• VŠETKY OPERÁCIE SPOJENÉ S MONTÁŽOU A
NASTAVENÍM VÝROBKU MUSIA BYŤ VYKONÁVANÉ
LEN DOSPELÝMI OSOBAMI.
• VÝROBOK NEPOUŽÍVAJTE V PRÍPADE, ŽE NA ŇOM
CHÝBA NIEKTORÁ JEHO ČASŤ ALEBO JE POŠKODENÝ.
• NIKDY NENECHÁVAJTE VAŠE DIEŤA BEZ DOZORU.
• PO ODSTAVENÍ KOČÍK VŽDY ZABRZDITE.
• PRED POUŽITÍM VÝROBKU SA UISTITE, ČI SÚ VŠETKY
PRIPÍNACIE MECHANIZMY SPRÁVNE PRIPOJENÉ.
• PRED POUŽITÍM VÝROBKU SA UISTITE, ČI SÚ
AUTOSEDAČKA ALEBO UVEDENÁ SEDAČKA SPRÁVNE
PRIPOJENÉ.
• NEVKLADAJTE PRSTY DO MECHANIZMOV.
• PRI VYKONÁVANÍ OPERÁCIÍ SPOJENÝCH S
REGULÁCIOU MECHANIZMOV (RUKOVÄŤ, OPIERKA
CHRBTA) DÁVAJTE POZOR NA PRÍTOMNOSŤ DIEŤAŤA.
• AKÝKOĽVEK NÁKLAD ZAVESENÝ NA PREDNÚ
RUKOVÄŤ ALEBO NA POSTRANNÉ RUKOVÄTE MÔŽE
ZNAMENAŤ PORUŠENIE STABILITY VÝROBKU; PRE
MAXIMÁLNU POVOLENÚ HMOTNOSŤ NÁKLADU SI
PREČÍTAJTE POKYNY VÝROBCU.
• DO NÁKLADNÉHO KOŠÍKA NEVKLADAJTE NÁKLAD
S HMOTNOSŤOU VYŠŠOU AKO 5 KG. DO DRŽIAKA
NA FĽAŠU NEVKLADAJTE NÁKLAD S HMOTNOSŤOU
VYŠŠOU AKO JE UVEDENÉ NA SAMOTNOM
DRŽIAKU A NIKDY DOŇ NEVKLADAJTE HORÚCE
NÁPOJE. DO VRECIEK NA STRIEŠKE KOČÍKA (AK
SA TU NACHÁDZAJÚ) NEVKLADAJTE NÁKLAD S
HMOTNOSŤOU VYŠŠOU AKO 0,2 KG.
• VÝROBOK NEPOUŽÍVAJTE V BLÍZKOSTI SCHODOV
ALEBO SCHODÍKOV; VÝROBOK NEPOUŽÍVAJTE V
BLÍZKOSTI ZDROJOV TEPLA, VOĽ
ALEBO NEBEZPEČNÝCH PREDMETOV, KTORÉ SÚ V
DOSAHU RUKY DIEŤAŤA.
• POUŽITIE DOPLNKOV, KTORÉ NIE SÚ SCHVÁLENÉ
VÝROBCOM, MÔŽE BYŤ NEBEZPEČNÉ.
• TENTO VÝROBOK NIE JE VHODNÝ PRE JOGGING
ALEBO KORČUĽOVANIE.
NÝCH PLAMEŇOV
HU•MAGYAR
• FONTOS: fi gyelmesen olvassák el ezeket
az utasításokat és őrizzék meg a jövőbeni
felhasználás céljából.
A gyermek biztonságát veszélyeztethetik azzal,
ha nem tartják be ezeket az utasításokat.
• A Peg Perego az ebben a kiadásban ismertetett
modelleknél műszaki vagy kereskedelmi jellegű
okokból kifolyólag bármikor végrehajthat
módosításokat.
Peg Perego R.t. ISO 9001 tanúsítvánnyal
rendelkezik.
A tanúsítvány a vállalati munkamódszer
rendszerezettségének és az abban való
bizalomnak a garanciáját kínálja az
ügyfeleknek és a fogyasztóknak.
VEVŐSZOLGÁLAT
Ha véletlenül a modell részei elvesznek vagy
károsodnak, akkor csak eredeti Peg Perego
alkatrészeket használjon! Az esetleges javítások,
cserék, a termékekkel kapcsolatos információk valamint
az eredeti alkatrészek és tartozékok értékesítése
ügyében vegye fel a kapcsolatot a Peg Perego
Vevőszolgálatával:
tel.:0039-039-60.88.213,
fax: 0039-039-33.09.992, a
e-mail: assistenza@pegperego.it,
www.pegperego.com
A Peg Perego a fogyasztóinak rendelkezésére áll
minden igényük legjobb kielégítése céljából. Ehhez
az ügyfeleink véleményének megismerése számunkra
rendkívül fontos és értékes. Ezért nagyon hálásak
lennénk, ha a termékünk használatbavétele után
kitöltené a FOGYASZTÓ ÉRTÉKELÉSE KÉRDŐÍVET,
amelyet az alábbi internet címen talál meg:
www.pegperego.com
Ott feltüntetheti az esetleges észrevételeit vagy ötleteit.
HASZNÁLATI UTASÍTÁS
FOGANTYÚ FELSZERELÉSE
1• Egy csavarhúzó segítségével csavarozzák le a két
csavart és a két dugót a fogantyúról.
2• Húzzák rá a fogantyút a még összecsukott (a
csomagolásból kibontott) kocsi csővázaira az ábra
szerint.
3• Helyezzék rá a dugót és a csavart az ábra szerint,
majd teljesen de túlfeszítés nélkül csavarozzák rá a
csavarhúzóval a fogantyú mindkét oldalánál.
KEREKEK FELSZERELÉSE
4• Vegyék le a négy csomagoló védődugót (két kerek
és két négyszögletes) a még összecsukott kocsiról
az ábra szerint.
5• Illesszenek két kereket a tengelycsapokra a még
összecsukott kocsi fogantyú felőli részén az ábra
szerint. A kocsira való beakasztásához kézzel
nyomják rá a kereket kattanásig és ellenőrizzék a
helyes beakasztást.
6• Illesszék a másik két kereket a tengelycsapokra a
még összecsukott kocsi fogantyújával ellentétes
oldalon az ábra szerint. A beakasztásához illesszék
a kocsi küllőit a tengelycsap nyílásaiba, kézzel
nyomják rá a kereket kattanásig és ellenőrizzék a
helyes beakasztást.
FÉK
7• A kocsi fékezéséhez engedjék le a hátsó kerekeken
elhelyezett fékrudat az ábra szerint. A kocsi
Page 25

fékjeinek kiengedéséhez emeljék fel a rudat.
KINYITÁS
• A kocsi kinyitása előtt ajánlatos a lefékezése a
kinyitás megkönnyítése céljából.
8• A kocsi kinyitásához akasszák ki a zárópeckeket
úgy, hogy nyomják azokat befelé az ábra szerint.
9• Emeljék fel a fogantyút és kattanásig nyomva
fordítsák el végállásig.
10• Kinyitott kocsi. A kocsi helyes kinyitása az A
biztonsági kapocsnál ellenőrizhető; ha úgy
mutatkozna, ahogy az a B ábrán látható, akkor
nyomják tovább lefelé a fogantyút kattanásig.
BEÁLLÍTHATÓ FOGANTYÚ
11• A fogantyú magasságának beállításához
egyidejűleg nyomják be az oldalsó
nyomógombokat és a kívánt pozícióban rögzítsék a
fogantyút.
A KEREKEK LEVÉTELÉHEZ
12• A kerekek levételéhez a kerék közepén elhelyezett
kart engedjék le az ábra szerint és egyidejűleg
nyomják a kereket a kültér irányába.
ÖSSZECSUKÁS
13• A kocsi összecsukásához húzzák felfelé a
fogantyún elhelyezett két kart az ábra szerint.
14• Emeljék fel a biztonsági kapcsot,
15• tolják lefelé a fogantyút kattanásig.
16• Összecsukott kocsi.
GANCIOMATIC SYSTEM
•
NE HASZNÁLJÁK A TERMÉKET, HA EGYES RÉSZEI
HIÁNYOZNAK VAGY AZON TÖRÉST ÉSZLELNEK.
•
A GYERMEKÜK FELÜGYELET NÉLKÜL HAGYÁSA
VESZÉLYES LEHET.
•
ÁLLÓ HELYZETBEN MINDIG HASZNÁLJÁK A FÉKEKET.
•
HASZNÁLAT ELŐTT GYŐZŐDJENEK MEG ARRÓL, HOGY
MINDEN RÖGZÍTŐ SZERKEZET HELYESEN BE VAN
KAPCSOLVA.
•
HASZNÁLAT ELŐTT BIZONYOSODJANAK MEG ARRÓL,
HOGY MEGFELELŐEN RÖGZÍTVE VAN AZ AUTÓS
GYEREKÜLÉS VAGY A SPORT GYEREKÜLÉS.
•
NE TEGYÉK AZ UJJUKAT A SZERKEZETEKBE.
•
FIGYELJENEK ODA A JELENLÉVŐ GYERMEKRE AKKOR,
AMIKOR A SZERKEZETEKET BEÁLLÍTÓ MŰVELETEKET
(TOLÓKAR, HÁTTÁMLA) VÉGZIK.
•
A TOLÓKARRA VAGY A FOGANTYÚKRA FELAKASZTOTT
BÁRMILYEN TEHER INSTABILLÁ TEHETI A TERMÉKET;
TARTSÁK BE A GYÁRTÓ UTASÍTÁSAIT A MAXIMÁLIS
TERHEK ALKALMAZÁSÁRA VONATKOZÓAN.
•
NE RAKJANAK A KOSÁRBA 5 KG-NÁL NAGYOBB
SÚLYÚ TERHET. NE TEGYENEK AZ ITALTARTÓBA AZ
ITALTARTÓN FELTÜNTETETT SÚLYNÁL NEHEZEBB
TERHET ÉS MELEG ITALT SOHA. A KOCSITETŐ
ZSEBEKBE (HA VANNAK) 0,2 KG-OT MEGHALADÓ
SÚLYOKAT NE HELYEZZENEK.
•
NE HASZNÁLJÁK A TERMÉKET LÉPCSŐK VAGY
LÉPCSŐFOKOK KÖZELÉBEN; NE HASZNÁLJÁK
HŐFORRÁSOK, NYÍLT LÁNG VAGY A GYERMEK
KEZEÜGYÉBE ESŐ, VESZÉLYES TÁRGYAK KÖZELÉBEN.
•
A GYÁRTÓ ÁLTAL JÓVÁ NEM HAGYOTT TARTOZÉKOK
HASZNÁLATA VESZÉLYES LEHET.
•
EZ A TERMÉK NEM ALKALMAS ARRA, HOGY JOGGING
VAGY GÖRKORCSOLYÁZÁS KÖZBEN HASZNÁLJÁK.
17• “Ganciomatic System” az a praktikus és gyors
rendszer, amely lehetővé teszi a PrimoNido
vagy a Navetta mélykocsi, a Primo Viaggio autós
gyerekülés és a
egyetlen mozdulattal történő rákapcsolását a kocsi
Ganciomatic Alapvázára: elegendő, ha azokat a
Ganciomatic Alapvázra helyezik és rányomják
mindkét kézzel kattanásig. A rákapcsolási és
lekapcsolási fázisok végrehajtása előtt mindig
működtessék a kocsi fékjeit.
•
A termékek kocsivázról történő lekapcsolásához
olvassák el a vonatkozó használati utasítást.
TISZTÍTÁS ÉS KARBANTARTÁS
A termék minimális karbantartást igényel. A tisztító és
karbantartó műveleteket csak felnőttek végezhetik.
• Valamennyi mozgó rész tisztántartása javasolt, és
amennyiben az szükséges, olajjal vékonyan kenjék
be azokat.
• Szárítsák meg a termék fémből készült részeit a
rozsdásodás megelőzése céljából.
• Egy nedves törlőruhával rendszeresen tisztítsák meg
a műanyagból készült részeket, ne használjanak
oldószereket vagy egyéb hasonló termékeket.
• Portól és homoktól tartsák tisztán a kerekeket.
• Óvják a terméket a légköri hatóerőktől, víztől,
esőtől vagy hótól; a folytonos és hosszadalmas
napsütésnek való kitétel sok alapanyagban
színváltozást okozhat.
• Száraz helyen tárolják a terméket.
Seat Unit
hordozó gyerekülés egy
VIGYÁZAT
•
E SZÁLLÍTÓESZKÖZT EGY GYERMEK SZÁLLÍTÁSÁRA
TERVEZTÉK.
•
NE HASZNÁLJÁK A TERMÉKET A GYÁRTÓ ÁLTAL
ELŐÍRTNÁL TÖBB GYERMEKKEL.
•
A TERMÉK ÖSSZESZERELÉSI ÉS ELŐKÉSZÍTÉSI
MŰVELETEIT FELNŐTTEK VÉGEZHETIK.
Page 26

SL•SLOVENŠČINA
• POMEMBNO: pozorno preberite ta navodila in jih
shranite za nadaljnjo uporabo.
Če ne upoštevate teh navodil, lahko zmanjšate
stopnjo varnosti otroka.
• Peg Perego se lahko kadarkoli odloči, da bo
spremenil modele, objavljene v katalogu, najsi bo to
zaradi tehničnih ali tržnih razlogov.
Peg Perego S.p.A. ima certifikat ISO 9001.
Certifikat za stranke in porabnike pomeni
Če izgubite ali poškodujete sestavni del izdelka,
uporabite izključno originalne rezervne dele Peg
Perego. Za morebitna popravila, zamenjave, podatke
o izdelkih, prodajo originalnih rezervnih delov
in dodatkov, stopite v stik s centrom za pomoč
uporabnikom Peg Perego:
tel.:0039 (039) 60-88-213,
faks: 0039 (039) 33-09-992,
e-pošta: assistenza@pegperego.it,
www.pegperego.com
Peg Perego je vedno na voljo svojim strankam, da
v kar največji meri izpolni njihove potrebe. Zato je
za nas zelo pomembno, da poznamo mnenje svojih
strank.
Hvaležni vam bomo, če si boste, ko boste uporabili
naš izdelek, vzeli čas in izpolnili VPRAŠALNIK O
ZADOVOLJSTVU STRANK, ki ga boste našli na naših
spletnih straneh, na naslovu www.pegperego.com
in nam sporočite vaše pripombe in predloge.
NAMEŠČANJE ROČAJA
1• Z izvijačem odvijte oba vijaka in pokrovčka z
ročaja.
2• Nataknite ročaj na cevi še zaprtega vozička (ki ste
ga vzeli iz embalaže), kot prikazuje risba.
3• Pokrovček in vijak postavite, kot prikazuje risba,
nato pa ju z izvijačem privijte, ne da bi preveč
zategnili, na obeh straneh ročaja.
NAMESTITEV KOLES
4• Odstranite štiri zaščitne embalažne pokrovčke
(dva okrogla in dva kvadratna) s še zaprtega
vozička, kot prikazuje risba.
5• Nataknite kolesi na zatiča, kot je prikazano na
risbi, na strani ročaja še zaprtega vozička. Da bi
ga pripeli na kolo, z roko pritisnite na kolo, dokler
ne klikne, in preverite, ali je pravilno sedlo.
Nataknite kolesi na zatiča, kot je prikazano na
6•
risbi, na drugi strani ročaja še zaprtega vozička.
Da bi ga pripeli na kolo, vstavite napere kolesa v
reže zatiča, z roko pritisnite na kolo, dokler ne
klikne, in preverite, ali je pravilno sedlo.
ZAVORA
7• Da bi zavrli voziček, spustite zavorno prečko na
zadnja kolesa, kot prikazuje risba. Da bi voziček
sprostili, prečko dvignite.
ODPIRANJE
• Preden voziček odprete, vam svetujemo, da ga
zavrete. Tako ga boste laže odprli.
8• Da bi voziček odprli, odpnite zaporne zatiče in jih
potisnite navznoter, kot prikazuje risba.
9• Dvignite ročaj in ga do konca zavrtite, dokler ne
garancijo transparentnosti in zaupanja v
delo podjetja.
POMOČ UPORABNIKOM
NAVODILA ZA UPORABO
klikne.
10• Voziček odprt. Pravilno odpiranje vozička lahko
preverite z varnostno zanko A; če je postavljena,
kot prikazuje risba B, ročaj potisnite še bolj
navzdol, dokler ne klikne.
URAVNAVANJE ROČAJA
11• Da bi uravnali višino ročaja, sočasno pritisnite
bočna gumba, kot je prikazano na risbi, in ročaj
postavite v želeni položaj.
DA BI ODSTRANILI KOLESA
12• Da bi odstranili kolesa, morate vzvod na sredini
koles postaviti, kot prikazuje risba in kolo sočasno
potisniti navzven.
ZAPIRANJE
13• Da bi voziček zaprli, povlecite navzgor vzvoda na
ročaju, kot prikazuje risba.
14• Dvignite varnostno zanko,
15• potisnite ročaj navzdol, dokler ne klikne.
16• Zaprt voziček.
SISTEM GANCIOMATIC
17• Sistem Ganciomatic je praktičen in hiter sistem,
ki vam omogoča pripenjanje košare PrimoNido ali
Navetta, avtosedeža Primo Viaggo in športnega
sedeža Seat Unit na podstavek Ganciomatic
vozička z eno samo kretnjo: zadošča, da jih
položite na podstavek Ganciomatic in pritisnete z
obema rokama, dokler ne zaslišite klika. Preden
kaj pripnete ali odpnete, voziček vedno zavrite.
• Da bi odpeli izdelke z vozička, poglejte v njihova
navodila za uporabo.
ČIŠČENJE IN VZDRŽEVANJE
Izdelek ne potrebuje veliko vzdrževanja. Čistijo in
vzdržujejo ga lahko samo odrasli.
• Svetujemo vam, da redno čistite vse premikajoče se
dele in jih, č
oljem.
• Kovinske dele obrišite do suhega, da ne bi zarjaveli.
• Plastične dele redno brišite z vlažno krpo. Ne
uporabljajte topil ali drugih podobnih izdelkov.
• Na koleščkih ne sme biti prahu ali peska.
• Izdelek zaščitite pred atmosferskimi vplivi, vodo,
dežjem ali snegom; daljše izpostavljanje soncu
lahko povzroči spremembo barve veliko materialov.
• Izdelek hranite v suhem prostoru.
e je to potrebno, podmažete z lahkim
POZOR
• TO VOZILO JE NAMENJENO ZA PREVOZ ENEGA
OTROKA.
• NE UPORABLJAJTE IZDELKA ZA VEČ OSEB, KAKOR JIH
JE PREDVIDEL PROIZVAJALEC.
• SESTAVLJANJE IN PRIPRAVO PRIPOMOČKA MORAJO
IZVESTI ODRASLE OSEBE.
• NE UPORABLJAJTE IZDELKA, ČE NEKATERI NJEGOVI
DELI MANJKAJO ALI SO POŠKODOVANI.
• OTROKA NE PUŠČAJTE SAMEGA, SAJ JE TO LAHKO
NEVARNO.
• KO STOJITE NA MESTU, VEDNO UPORABLJAJTE
ZAVORE .
• PRED UPORABO SE PREPRIČAJTE, DA SO VSI
MEHANIZMI ZA PRIPENJANJE PRAVILNO PRIPETI.
• PRED UPORABO SE PREPRIČAJTE, DA STA AVTOSEDEŽ
ALI SEDEŽ ŠPORTNEGA VOZIČKA PRAVILNO
PRITRJENA.
• V MEHANIZME NE VTIKAJTE PRSTOV.
• PAZITE NA OTROKA, KO PRILAGAJATE MEHANIZME
(ROČAJI, HRBTNI NASLON).
Page 27

• TOVOR, OBEŠEN NA KRMILO ALI NA ROČAJE, LAHKO
POVZROČI NESTABILNOST IZDELKA; UPOŠTEVAJTE
PRIPOROČILA PROIZVAJALCA ZA MAKSIMALNO
OBREMENITEV IZDELKA.
• V NAKUPOVALNO KOŠARO NE DAJAJTE TOVOROV,
KI BI PRESEGALI TEŽO 5 KG. V DRŽALO ZA PIJAČO
NE VSTAVLJAJTE PREDMETOV, KI SO TEŽJI OD TEŽE,
NAVEDENE NA DRŽALU ZA PIJAČO. VANJ NIKOLI NE
ODLAGAJTE TOPLIH PIJAČ. V ŽEPE NA STREHICI (ČE
SO PRISOTNI) NE ODLAGAJTE PREDMETOV, TEŽJIH OD
0,2 KG.
• NE UPORABLJAJTE IZDELKA OB LESTVAH ALI
STOPNICAH; NE UPORABLJAJTE OB VIRIH TOPLOTE,
ODPRTEM OGNJU ALI NEVARNIH PREDMETIH, KI SO
NA DOSEGU OTROKOVIH ROK.
• UPORABLJANJE DODATNE OPREME, KI JE NI ODOBRIL
PROIZVAJALEC, BI LAHKO BILO NEVARNO.
• IZDELEK NI PRIMEREN ZA UPORABO MED TEKANJEM
ALI ROLANJEM.
RU•PУССКИЙ
• ВАЖНО: внимательно прочитайте эти
инструкции и сохраните их для использования
в будущем.
При невыполнении этих инструкций
безопасность ребенка может быть поставлена
под угрозу.
• Пег Перего имеет право внести в любой момент
изменения в модели, описанные в данном
руководстве, по техническим или коммерческим
причинам.
Peg Perego S.p.A. сертифицирована по
Сертификация гарантирует
Если вы случайно потеряли или повредили какиенибудь детали изделия, заменяйте их только
фирменными запасными частями Пег Перего. Для
ремонта, замены, получения сведений о продукции,
приобретения фирменных запасных частей и
принадлежностей обращайтесь в Сервисную службу
Пег-Перего:
тел.: 0039-039-60.88.213,
: 0039-039-33.09.992,
факс
e-mail: assistenza@pegperego.it,
www.pegperego.com
норме ISO 9001.
заказчикам
и потребителям, что компания работает,
соблюдая принципы гласности и
доверия.
ОБСЛУЖИВАНИЕ
Фирма Пег Перего находится в распоряжении
своих потребителей для того, чтобы наилучшим
образом удовлетворить все их требования. Поэтому,
для нас очень важно и ценно знать мнение наших
заказчиков. Мы будем вам очень признательны,
если, после использования нашего изделия, вы
пожелаете заполнить АНКЕТУ УДОВЛЕТВОРЕННОСТИ
ПОТРЕБИТЕЛЯ, которую вы найдете в интернете на
сайте: www.pegperego.com
выразив там свои пожелания или советы.
ИНСТРУКЦИИ ПО ПОЛЬЗОВАНИЮ
УСТАНОВКА РУЧКИ
1• При помощи отвертки отвинтите два винта и
две заглушки ручки.
2• Наденьте ручки на трубы еще сложенного
(распакованного) шасси, как показано на
рисунке.
3• Установите заглушку и винт так, как показано
на рисунке, после чего затяните их отверткой
упора, но не прикладывая чрезмерного
до
усилия, с обеих сторон ручки.
УСТАНОВКА КОЛЕС
4• Удалите четыре защитные упаковочные
заглушки (две из них круглые, а две квадратные) с еще сложенного шасси, как
показано на рисунке.
5• Установите два колеса на оси со стороны
ручки еще сложенного шасси, как показано на
рисунке. Для крепления
на колесо рукой до щелчка и проверьте,
правильно ли оно установлено.
6• Наденьте оставшиеся два колеса на оси,
как показано на рисунке, со стороны,
противоположной ручке еще сложенного шасси.
Для крепления колеса вставьте его спицы в
прорези оси и нажмите на колесо рукой до
щелчка, после чего
колеса к шасси нажмите
проверьте, правильно ли
Page 28

оно установлено.
ТОРМОЗ
7• Для торможения шасси опустите штангу-
тормоз, расположенную на задних колесах, как
показано на рисунке. Для разблокировки шасси,
поднимите штангу.
РАСКЛАДЫВАНИЕ
• Перед раскладыванием шасси рекомендуется
поставить его на тормоз для облегчения
операции.
8• Для раскладывания шасси откройте
закрывающие крепления, смещая их наружу, как
показано на рисунке.
9• Поднимите ручку
хода, смещая его вплоть до защелкивания.
10• Разложенное шасси. Правильное
раскладывание шасси можно проверить по
предохранительному креплению А; если оно
выглядит, как на рисунке В, то необходимо еще
сместить ручку вниз до щелчка.
РЕГУЛИРОВКА РУЧКИ
11• Для регулировки высоты ручки нажмите
одновременно боковые кнопки и
ручку в необходимом вам положении.
ДЛЯ СНЯТИЯ КОЛЕС
12• Для снятия колес необходимо опустить
рычажок, расположенный в середине колеса,
как показано на рисунке, и одновременно с
этим сместить колесо наружу.
СКЛАДЫВАНИЕ
13• Для складывания шасси сместите вверх два
рычага, расположенных на ручке, как показано
на рисунке.
14• Поднимите предохранительное крепление
15• и сместите ручку вниз до щелчка.
16• Сложенное шасси.
GANCIOMATIC SYSTEM
17• “Ganciomatic System” - это удобная и быстрая
система, позволяющая вам крепить люльку
PrimoNido или Navetta, автомобильное кресло
Primo Viaggio и сиденье Seat Unit к Основанию
Ganciomatic шасси одним движением:
достаточно приложить их к Основанию
Ganciomatic и нажать на них двумя руками
до щелчка. Перед тем, как приступить
присоединению или отсоединению, не забудьте
поставить шасси на тормоз.
• Для отсоединения изделий от шасси
обращайтесь к соответствующим инструкциям
по эксплуатации.
и поверните его до конца
заблокируйте
,
к
• Храните изделие в сухом месте.
BHИMAHИE
• ЭТО ИЗДЕЛИЕ ПРЕДНАЗНАЧЕНО ДЛЯ ПЕРЕВОЗКИ
ОДНОГО РЕБЕНКА.
• НЕ ИСПОЛЬЗОВАТЬ ИЗДЕЛИЕ ДЛЯ ПЕРЕВОЗКИ
БОЛЬШЕГО КОЛИЧЕСТВА ДЕТЕЙ, ЧЕМ БЫЛО
ПРЕДУСМОТРЕНО ЕГО ИЗГОТОВИТЕЛЕМ.
• ОПЕРАЦИИ ПО СБОРКЕ И ПОДГОТОВКЕ ИЗДЕЛИЯ
ДОЛЖНЫ ВЫПОЛНЯТЬ ТОЛЬКО ВЗРОСЛЫЕ.
• НЕ ПОЛЬЗУЙТЕСЬ ИЗДЕЛИЕМ ПРИ НАЛИЧИИ В НЕМ
НЕДОСТАЮЩИХ ИЛИ СЛОМАННЫХ ЧАСТЕЙ.
• ОСТАВЛЯТЬ ВАШЕГО РЕБЕНКА БЕЗ ПРИСМОТРА
МОЖЕТ БЫТЬ
• КОГДА ИЗДЕЛИЕ СТОИТ, ВСЕГДА СТАВЬТЕ ЕГО НА
ТОРМОЗ.
• ПЕРЕД ИСПОЛЬЗОВАНИЕМ УБЕДИТЕСЬ, ЧТО ВСЕ
КРЕПЕЖНЫЕ УСТРОЙСТВА НАДЕЖНО ЗАЦЕПЛЕНЫ.
• ПЕРЕД ИСПОЛЬЗОВАНИЕМ УБЕДИТЕСЬ, ЧТО
АВТОМОБИЛЬНОЕ КРЕСЛО ИЛИ СИДЕНЬЕ
ПРАВИЛЬНО УСТАНОВЛЕНЫ.
• НЕ СУЙТЕ ПАЛЬЦЫ В МЕХАНИЗМЫ.
• ПРИ ВЫПОЛНЕНИИ РЕГУЛИРОВОЧНЫХ ОПЕРАЦИЙ
МЕХАНИЗМОВ (РУЧКИ, СПИНКИ) БУДЬТЕ
ОСТОРОЖНЫМИ, ЕСЛИ В ИЗДЕЛИИ НАХОДИТСЯ
РЕБЕНОК.
ЛЮБАЯ НАГРУЗКА, ПОДВЕШЕННАЯ К РУЧКЕ ИЛИ
•
РУЧКАМ, МОЖЕТ НАРУШИТЬ СТАБИЛЬНОСТЬ
ИЗДЕЛИЯ. ПРИДЕРЖИВАЙТЕСЬ УКАЗАНИЙ
ИЗГОТОВИТЕЛЯ О МАКСИМАЛЬНЫХ ДОПУСТИМЫХ
НАГРУЗКАХ.
• НЕ КЛАДИТЕ В КОРЗИНУ НАГРУЗКИ,
ПРЕВЫШАЮЩИЕ 5 КГ. НЕ СТАВЬТЕ В ПОДСТАВКУ
ДЛЯ НАПИТКОВ ГРУЗЫ, ПРЕВЫШАЮЩИЕ
УКАЗАННЫЕ НА ПОДСТАВКЕ ЗНАЧЕНИЯ, И НЕ
В КОЕМ СЛУЧАЕ НЕ КЛАДИТЕ В НЕЕ ГОРЯЧИЕ
НАПИТКИ НЕ КЛАДИТЕ
ИХ НАЛИЧИИ) НАГРУЗКИ, ПРЕВЫШАЮЩИЕ 0,2 КГ.
• НЕ ИСПОЛЬЗОВАТЬ ИЗДЕЛИЕ ВБЛИЗИ СТУПЕНЕК
И ЛЕСТНИЦ. НЕ ИСПОЛЬЗОВАТЬ РЯДОМ С
ИСТОЧНИКАМИ ТЕПЛА, ОТКРЫТЫМ ОГНЕМ ИЛИ
ОПАСНЫМИ ПРЕДМЕТАМИ, НАХОДЯЩИМИСЯ В
РАДИУСЕ ДОСЯГАЕМОСТИ РЕБЕНКА.
• ИСПОЛЬЗОВАНИЕ ПРИНАДЛЕЖНОСТЕЙ, НЕ
ОДОБРЕННЫХ ИЗГОТОВИТЕЛЕМ, МОЖЕТ БЫТЬ
ОПАСНЫМ.
• ДАННОЕ ИЗДЕЛИЕ НЕПРИГОДНО ДЛЯ БЕГА
ТРУСЦОЙ ИЛИ НА КОНЬКАХ.
ОПАСНЫМ.
В КАРМАНЫ КАПОТОВ (ПРИ
ЧИСТКА И УХОД
Ваше изделие нуждается в несложном уходе.
Операции по чистке и уходу должны выполнять
только взрослые.
• Рекомендуется содержать в чистоте все
движущиеся части, при необходимости смажьте
легким маслом.
их
• Вытрите насухо металлические части, чтобы
предотвратить образование ржавчины.
• Периодически очищайте пластмассовые части
влажной тканью, не пользуйтесь растворителями
или сходными с ними веществами.
• Очищайте от пыли и песка колеса.
• Защитите изделие от атмосферных осадков
- воды, снега или дождя. Постоянная и
продолжительная подверженность солнечным
лучам может вызвать цветовые
материалов.
изменения многих
Page 29

TR•TÜRKÇE
• ÖNEMLI: bu talimatlari dikkatlice okuyunuz ve
ileride de istifade edebilmek amaciyla muhafaza
ediniz.
Bu talimatlara uyulmamasi halinde çocuğun
güvenliği tehlikeye girebilir.
• Pegperego ihbarsiz olarak herhangi bir zamanda
üründe değişiklik yapmak ve islah etmek haklarini
sakli tutar.
Peg Perego S.p.A. ISO 9001 sertifikalıdır.
Bu sertifika ile müşterilere ve tüketicilere
kurumun şeffaf işleyişinin ve tam bir
güven ortamının garantisi verilmektedir.
gibi aşağı doğru itin. Çocuk arabasını yeniden
hareket ettirmek istediğinizde fren çubuğunu
yukarı kaldırın.
AÇMA
• Çocuk arabasını açmadan önce, açma işlemini
kolaylaştırmak için frenin devreye sokulması
tavsiye edilir.
8• Çocuk arabasını açmak için kapama
sabitleyicilerini şekildeki gibi içeri doğru iterek
çıkarın.
9• Tutma kolunu yukarı doğru kaldırın ve son atım
noktasına gelene dek çekerek çevirin.
10• Çocuk arabasının açık hali. Çocuk arabasının
doğru açılıp açılmadığını kontrol etmek için
güvenlik kancasına bakın A; şayet şekil B'deki
gibi duruyorsa tutma kolunu son atım noktasına
gelene dek iyice aşağı doğru itin.
MÜŞTERİ SERVİSİ
Şayet kazara ürünün birtakım parçaları kaybolacak ya
da zarar görecek olursa, yedek parça olarak yalnızca
orijinal PegPerego parçalarını kullanın. Muhtemel
tamir, değiştirme, ürün hakkında bilgi alma, orijinal
yedek parça ve aksesuar satışı işlemleri için PegPerego
Satış Destek hattına başvurun:
tel.: 0039-039-60.88.213,
fax: 0039-039-33.09.992,
e-mail: assistenza@pegperego.it,
www.pegperego.com
Peg Perego olarak tüketicilerin her türlü gereksinimini
en iyi şekilde karşılamak üzere daima onlara hizmet
etmeye hazırız. Dolayıs
önerileri bizim için son derece önemli ve değerlidir.
Bu nedenle, bir ürünümüzü satın alıp kullandıktan
sonra, görüş ve önerilerinizi bildirmek üzere Internet
üzerinde www.pegperego.com
adresinde yer alan MÜŞTERİ MEMNUNİYETİ FORMUNU
dolduracak olursanız size gerçekten minnettar
kalacağız.
KULLANIM KILAVUZU
TUTMA KOLUNUN TAKILMASI
1• Bir tornavida yardımıyla tutma kolundaki iki vida
ile iki tıpayı sökün.
2• Tutma kolunu henüz kapalı halde duran
(ambalajından çıktığı biçimde) çocuk arabasının
borularına şekildeki gibi geçirin.
3• Tıpa ve vidaları şekildeki gibi yerlerine yerleştirin;
iyice sıkışıncaya kadar tutma kolunun her iki
yanından tornavidayla sıkıştırın ancak fazla
zorlamamaya özen gösterin.
ıyla, müşterilerimizin görüş ve
AYARLANABİLİR TUTMA KOLU
11• Tutma kolunun yüksekliğini ayarlamak için yan
taraflardaki düğmelere aynı anda basın ve tutma
kolunu istediğiniz konuma getirip sabitleyin.
TEKERLEKLERİ ÇIKARMAK İÇİN
12• Tekerlekleri çıkarmak için tekerleğin ortasına
yerleştirilmiş olan olan kolu şekildeki gibi aşağı
doğru itin ve aynı anda tekerleği dışarı doğru
çekin.
KAPAMA
13• Çocuk arabasını kapamak için tutma kolunun
üzerinde bulunan iki manivelayı şekildeki gibi
yukarı doğru çekin.
14• Güvenlik kancasını yukarı kaldırın,
15• tık sesini duyana dek tutma kolunu aşağı doğru
götürün.
16• Çocuk arabasının kapalı hali.
KANCAMATİK SİSTEM
17• "Kancamatik Sistem" İlk Yuva beşiğini (PrimoNido)
ya da Navetta beşiği; İlk Yolculuk (Primo Viaggio)
araba koltuğunu ve İlk Gezinti (Seat Unit) taşıma
koltuğunu tek bir hamlede çocuk arabasının
Kancamatik Kaide'sine kolayca takabileceğiniz son
derece kullanışlı ve hızlı bir sistemdir: Bu sistemi
kullanmak için yapmanız gereken tek şey satın
aldığın
ve tık sesini duyana dek ürüne iki elinizle birden
bastırmaktır. Takma ve çıkarma işlemlerini
gerçekleştirmeden önce daima çocuk arabasının
frenini devreye sokun.
• Ürünlerin arabadan çıkartılması için kendi kullanım
kılavuzlarına bakınız.
ız ürünü Kancamatik Kaide'ye yaslamak
TEKERLEKLERİN TAKILMASI
4• Ambalaj için kullanılan dört koruma tıpasını (iki
yuvarlak ve iki dörtgen tıpa) henüz kapalı halde
duran çocuk arabasından şekildeki gibi çıkarın.
5• Henüz kapalı halde duran çocuk arabasının tutma
kolunun bulunduğu taraftan şekildeki gibi iki
tekerleği tekerlek millerine yerleştirin. Tekerleği
çocuk arabasına takmak için tık sesini duyana
kadar tekerleğin üzerine bastırın ve iyice yerine
oturduğundan emin olun.
6• Henüz kapalı halde duran çocuk arabasının tutma
kolunun karşı tarafından şekildeki gibi iki tekerleği
tekerlek millerine yerleştirin. Tekerleği takmak
için tekerlek parmaklarını mil üzerindeki yuvalara
geçirin, tık sesini duyana kadar elinizle tekerleğin
üzerine bastırın ve iyice yerine oturdu
emin olun.
FREN
7• Çocuk arabasını durdurmak için arka tekerlek
üzerine yerleştirilmiş olan fren çubuğunu şekildeki
ğundan
TEMİZLEME VE BAKIM
Pusetiniz çok az bir bakım gerektirir. Temizlik
ve bakım işlemleri sadece yetişkinler tarafından
yapılmalıdır.
• Bütün hareketli kısımların temiz tutulması ve
gerekirse ince yağla yağlanması önerilir.
• Demir kısımlarını, paslanmayı önlemek için iyicene
kurulayın.
• Düzenli olarak plastik kısımlar
çözücü veya benzeri maddeler kullanmayın.
• Tekerlekleri tozdan ve kumdan temiz tutun.
• Ürünü su, yağmur ve kar gibi dış etkenlerden
koruyun, güneşte devamlı ve uzun kalış birçok
malzemede renk değişimine sebep olabilir.
• Ürünü kuru bir ortamda muhafaza edin.
ı nemli bir bezle silin,
Page 30

UYARI
• BU ARAÇ, BİR ADET ÇOCUK TAŞINMASI İÇİN
TASARLANMIŞTIR.
• ÜRÜNÜ, ÜRETİCİ TARAFINDAN ÖNGÖRÜLENDEN
FAZLA SAYIDA KULLANICI İÇİN KULLANMAYINIZ.
• ÜRÜNÜN MONTAJ VE HAZIRLANMA İŞLEMLERİNİN
YETİŞKİN BİR KİŞİ TARAFINDAN YAPILMASI
GEREKMEKTEDİR.
• KIRIK YA DA EKSİK PARÇALI ÜRÜNLERİKULLANMAYIN.
• ÇOCUĞUNUZU TEK BAŞINA BIRAKMANIZ TEHLİKELİ
OLABİLİR.
• DURMA HALİNDE HER ZAMAN FREN TERTİBATINI
DEVREYE SOKUNUZ.
• ÜRÜNÜ KULLANMADAN EVVEL TÜM BAĞLANTI
AKSAMLARININ TAM OLARAK TAKILDIĞINDAN EMİN
OLUNUZ.
• KULLANIM ÖNCESİNDE ARABA KOLTUĞU VEYA
ÇIKARTILABİLİR OTURMA GRUBUNUN TAM OLARAK
TESPİT EDİLMİŞ OLDUĞ
• PARMAKLARINIZI MEKANİZMALAR ARASINA
SOKMAYINIZ.
• MEKANİZMALARIN AYAR İŞLEMLERİ (TUTACAK,
SIRTLIK) YAPILIRKEN ÇOCUĞUN KONUMUNA DİKKAT
EDİNİZ.
• TUTMA VE SAİR YERLERE ASILAN TÜM YÜKLER
ÜRÜNÜN DENGESİNİN BOZULMASINA YOL AÇABİLİR;
TAŞINABİLİR AZAMİ AĞIRLIKLAR KONUSUNDA
ÜRETİCİ TARAFINDAN BELİRTİLEN HUSUSLARA
BAKINIZ.
• SEPETE 5 KG.DAN FAZLA AĞIRLIK KOYMAYINIZ.
İÇECEK SEPETİNE KESİNLİKLE SEPET ÜZERİNDE
BELİRTİLENDEN FAZLA AĞIRLIK VE SICAK İÇECEK
KOYMAYINIZ. TENTE ÜZERİNDE YER ALAN CEPLERE
(VAR İSE) 0,2 KG.DAN FAZLA AĞIRLIK KOYMAYINIZ.
• ÜRÜNÜ MERDİVEN VE BASAK YAKINLARINDA
KULLANMAYINIZ; ISI KAYNAKLARINA, ATEŞE VE
ÇOCUĞUN ER
YERLERDE KULLANMAYINIZ.
• ÜRETİCİ TARAFINDAN ONAYLANMAMIŞ OLAN
AKSESUARLARIN KULLANIMI TEHLİKELİ OLABİLİR.
• BU ÜRÜN JOGGİNG VEYA PATENLE KOŞMAK İÇİN
UYGUN DEĞİLDİR.
İŞEBİLECEĞİ TEHLİKELİ CİSİMLERE YAKIN
UNDAN EMİN OLUNUZ.
ΕL•EΛΛΗΝΙΚΑ
• ΣΗΜΑΝΤΙΚΟ: διαβάστε με προσοχή τισ οδηγίεσ
αυτέσ και διατηρήστε τισ για μελλοντική χρήση.
Η ασφάλεια του παιδιού θα μπορούσε να τεθεί
σε κίνδυνο εάν δεν ακολουθήσετε τισ οδηγίεσ
αυτέσ.
• Η PEG – PEREGO διατηρεί το δικαίωμα να κάνει ότι
αλλαγές είναι αναγκαίες ή βελτιώσεις σε αυτά τα
προιόντα οποτεδήποτε χωρίς ειδοποίηση.
Η πιστοποίηση παρέχει στους πελάτες
Εάν τυχόν χαθούν μέρη του μοντέλου ή υποστούν
κάποια βλάβη, χρησιμοποιείτε μόνο γνήσια
ανταλλακτικά Peg Perego. Για τυχόν επισκευές,
αντικαταστάσεις, πληροφορίες σχετικά με τα
προϊόντα, την πώληση γνήσιων ανταλλακτικών
και αξεσουάρ, επικοινωνήστε με την Υπηρεσία
Εξυπηρέτησης Peg-Perego:
τηλ: 0039-039-60.88.213,
fax: 0039-039-33.09.992,
e-mail: assistenza@pegperego.it,
www.pegperego.com
Η Peg Perego είναι στη διάθεση των Καταναλωτών
της για την καλύτερη εξυπηρέτηση των αναγκών
τους. Για το λόγο αυτό είναι για μας εξαιρετικά
σημαντικό και πολύτιμο να γνωρίζουμε τη γνώμη
των Πελατών μας. Θα σας είμαστε λοιπόν πολύ
ευγνώμονες εάν, αφού χρησιμοποιήσετε ένα
προΪφόν μας, συμπληρώσετε το ΕΡΩΤΗΜΑΤΟΛΟΓΙΟ
ΙΚΑΝΟΠΟΙΗΣΗΣ ΚΑΤΑΝΑΛΩΤΗ που θα βρείτε στο
internet στην ακόλουθη διεύθυνση:
www.pegperego.com
επισημαίνοντας ενδεχόμενες παρατηρήσεις ή
υποδείξεις.
Η Peg Perego S.p.A. διαθέτει
πιστοποίηση ISO 9001.
και στους καταναλωτές την εγγύηση
της διαφάνειας και της εμπιστοσύνης
στον τρόπο με τον οποίο εργάζεται η
εταιρία.
ΕΞΥΠΗΡΕΤΗΣΗ ΠΕΛΑΤΩΝ
ΟΔΗΓΙΕΣ ΧΡΗΣΕΩΣ
ΣΥΝΑΡΜΟΛΟΓΗΣΗ ΧΕΙΡΟΛΑΒΗΣ
1• Με τη βοήθεια ενός κατσαβιδιού, ξεβιδώστε τις
δύο βίδες και τα δύο ταπάκια από τη χειρολαβή.
2• Περάστε τη χειρολαβή στους σωλήνες του
καροτσιού όντας ακόμη κλειστό (αφού το
βγάλετε από τη συσκευασία) όπως φαίνεται
στην εικόνα.
3• Τοποθετήστε το ταπάκι και τη βίδα όπως
φαίνεται στην εικόνα, στη συνέχεια βιδώστε
με το κατσαβίδι μέχρι το τέλος αλλά χωρίς
να πιέζετε, και από τις δύο πλευρές της
χειρολαβής.
ΣΥΝΑΡΜΟΛΟΓΗΣΗ ΤΡΟΧΩΝ
4• Βγάλτε τις τέσσερις
της συσκευασίας (δύο στρογγυλές και δύο
τετράγωνες) από το κλειστό καρότσι, όπως
φαίνεται στην εικόνα.
5• Περάστε δύο τροχούς στους πείρους όπως
φαίνεται στην εικόνα από την πλευρά της
χειρολαβής του κλειστού καροτσιού. Για να τον
συνδέσετε στο καρότσι, πιέστε επάνω στον
τροχό με το χέρι μέχρι το κλικ
ότι έχει συνδεθεί σωστά.
6• Περάστε τους άλλους δύο τροχούς στους
πείρους όπως φαίνεται στην εικόνα από την
τάπες προστασίας
και βεβαιωθείτε
Page 31

αντίθετη πλευρά της χειρολαβής του κλειστού
ακόμη καροτσιού. Για να τον συνδέσετε,
περάστε τις ακτίνες του τροχού στις σχισμές
του πείρου, πιέστε επάνω στον τροχό με το χέρι
μέχρι το κλικ και βεβαιωθείτε ότι έχει συνδεθεί
σωστά.
ΦΡΕΝΟ
7• Για να φρενάρετε το καρότσι κατεβάστε τη
μπάρα φρένου που βρίσκεται επάνω
πίσω τροχούς όπως φαίνεται στην εικόνα.
Για να ελευθερώσετε το καρότσι, σηκώστε τη
μπάρα.
ΑΝΟΙΓΜΑ
• Συνιστάται, προτού ανοίξετε το καρότσι, να το
φρενάρετε για να διευκολύνετε το άνοιγμά του.
8• Για να ανοίξετε το καρότσι, αποσυνδέστε τα
στοπ για το κλείσιμο, ωθώντας τα προς τα
μέσα όπως φαίνεται στην εικόνα
9• Σηκώστε τη χειρολαβή και στρέψτε τη
μέχρι τέλος ωθώντας τη μέχρι το σημείο
συγκράτησης.
10• Καρότσι ανοιχτό. Το σωστό άνοιγμα του
καροτσιού μπορεί να ελεγχθεί από το άγκιστρο
ασφαλείας Α. Εάν εμφανίζεται όπως στην
εικόνα Β, ωθήστε κι άλλο τη χειρολαβή προς τα
κάτω μέχρι το σημείο συγκράτησης.
ΡΥΘΜΙΖΟΜΕΝΗ
11• Για να ρυθμίσετε το ύψος της χειρολαβής,
πατήστε συγχρόνως τα πλευρικά κουμπιά
και μπλοκάρετε τη χειρολαβή στη θέση που
επιθυμείτε.
ΓΙΑ ΝΑ ΒΓΑΛΕΤΕ ΤΟΥΣ ΤΡΟΧΟΥΣ
12• Για να βγάλετε τους τροχούς, χρειάζεται να
κατεβάσετε το μοχλό που βρίσκεται στο κέντρο
του τροχού όπως φαίνεται στην εικόνα και
συγχρόνως να
έξω.
ΚΛΕΙΣΙΜΟ
13• Για να κλείσετε το καρότσι, τραβήξτε προς τα
πάνω τους δύο μοχλούς που βρίσκονται επάνω
στη χειρολαβή όπως φαίνεται στην εικόνα.
14• Σηκώστε το άγκιστρο ασφαλείας,
15• θέστε τη χειρολαβή προς τα κάτω μέχρι το κλικ.
16• Κλειστό καρότσι.
17• “Ganciomatic System” είναι το
γρήγορο σύστημα που σας επιτρέπει να
συνδέσετε το πορτ-μπεμπέ PrimoNido ή Navetta,
το κάθισμα αυτοκινήτου Primo Viaggio και το
κάθισμα μεταφοράς Seat Unit στη βάση Base
Ganciomatic του καροτσιού με μία μόνο κίνηση:
αρκεί να τα τοποθετήσετε επάνω στη βάση Base
Ganciomatic και να πιέσετε επάνω στο προϊόν
και με τα δύο χέρια μέχρι να ακουσθεί
Πριν να προχωρήσετε στις φάσεις σύνδεσης και
αποσύνδεσης, ενεργοποιείτε πάντα το φρένο
του καροτσιού.
• Για να αποσυνδέσετε τα προϊόντα από
το καρότσι συμβουλευτείτε τα αντίστοιχα
εγχειρίδια οδηγιών.
ΧΕΙΡΟΛΑΒΗ
σπρώξετε τον τροχό προς τα
GANCIOMATIC SYSTEM
πρακτικό και
στους
.
το κλικ.
• Στεγνώνετε τα μεταλλικά μέρη του προϊόντος για
να αποφύγετε τη σκουριά.
• Περιοδικά καθαρίζετε τα πλαστικά μέρη με ένα
υγρό πανί, μη χρησιμοποιείτε διαλυτικά ή άλλα
παρόμοια προϊόντα.
• Διατηρείτε καθαρούς τους τροχούς από σκόνη και
άμμο.
• Προστατεύετε το προϊόν από ατμοσφαιρικούς
παράγοντες, νερό, βροχή ή χιόνι, η συνεχής
έκθεση στον
προκαλέσει αλλαγές στο χρώμα πολλών υλικών.
• Φυλάξτε το προϊόν σε ξηρό χώρο.
ήλιο για πολύ καιρό θα μπορούσε να
ΠΡΟΣΟΧΗ
• ΤΟ ΠΡΟΪΟΝ ΑΥΤΟ ΕΧΕΙ ΣΧΕΔΙΑΣΤΕΙ ΓΙΑ ΤΗ
ΜΕΤΑΦΟΡΑ ΕΝΟΣ ΠΑΙΔΙΟΥ.
• ΜΗΝ ΧΡΗΣΙΜΟΠΟΙΕΙΤΕ ΤΟ ΠΡΟΪΟΝ ΓΙΑ ΕΝΑΝ ΑΡΙΘΜΟ
ΚΑΘΗΜΕΝΩΝ ΜΕΓΑΛΥΤΕΡΟ ΑΠΟ ΑΥΤΟΝ ΠΟΥ
ΠΡΟΒΛΕΠΕΤΑΙ ΑΠΟ ΤΟΝ ΚΑΤΑΣΚΕΥΑΣΤΗ.
• ΟΙ ΕΡΓΑΣΙΕΣ ΣΥΝΑΡΜΟΛΟΓΗΣΗΣ ΚΑΙ ΠΡΟΕΤΟΙΜΑΣΙΑΣ
ΤΟΥ ΠΡΟΪΟΝΤΟΣ ΠΡΕΠΕΙ ΝΑ ΕΚΤΕΛΟΥΝΤΑΙ ΑΠΟ
ΕΝΗΛΙΚΕΣ.
• ΜΗΝ ΧΡΗΣΙΜΟΠΟΙΕΙΤΕ ΤΟ ΠΡΟΪΟΝ ΕΑΝ ΠΑΡΟΥΣΙΑΖΕΙ
ΡΩΓΜΕΣ Ή ΤΜΗΜΑΤΑ ΠΟΥ ΛΕΙΠΟΥΝ
• ΜΠΟΡΕΙ ΝΑ ΕΙΝΑΙ ΕΠΙΚΙΝΔΥΝΟ ΕΑΝ ΑΦΗΣΕΤΕ ΤΟ
ΠΑΙΔΙ ΣΑΣ ΧΩΡΙΣ ΕΠΙΒΛΕΨΗ.
• ΟΤΑΝ ΕΙΣΤΕ ΣΤΑΜΑΤΗΜΕΝΟΙ ΧΡΗΣΙΜΟΠΟΙΕΙΤΕ
ΠΑΝΤΑ ΤΑ ΦΡΕΝΑ.
• ΠΡΙΝ ΑΠΟ ΤΗ ΧΡΗΣΗ ΒΕΒΑΙΩΘΕΙΤΕ ΟΤΙ ΟΛΟΙ ΟΙ
ΜΗΧΑΝΙΣΜΟΙ ΣΥΝΔΕΣΗΣ ΕΙΝΑΙ ΣΥΝΔΕΜΕΝΟΙ ΣΩΣΤΑ.
• ΠΡΙΝ ΑΠΟ ΤΗ ΧΡΗΣΗ ΒΕΒΑΙΩΘΕΙΤΕ ΟΤΙ ΤΟ ΚΑΘΙΣΜΑ
ΑΥΤΟΚΙΝΗΤΟΥ Ή ΤΟ ΚΑΘΙΣΜΑ ΜΕΤΑΦΟΡΑΣ ΕΙΝΑΙ
ΣΩΣΤΑ ΣΥΝΔΕΜΕΝΑ.
ΜΗΝ ΕΙΣΑΓΕΤΕ ΤΑ ΔΑΧΤΥΛΑ ΣΤΟΥΣ ΜΗΧΑΝΙΣΜΟΥΣ.
•
• ΠΡΟΣΕΧΕΤΕ ΙΔΙΑΙΤΕΡΑ ΟΤΑΝ ΕΚΤΕΛΕΙΤΕ ΕΡΓΑΣΙΕΣ
ΡΥΘΜΙΣΗΣ ΤΩΝ ΜΗΧΑΝΙΣΜΩΝ (ΧΕΙΡΟΛΑΒΗ, ΠΛΑΤΗ)
ΠΑΡΟΥΣΙΑ ΤΟΥ ΠΑΙΔΙΟΥ.
• ΚΑΘΕ ΦΟΡΤΙΟ ΠΟΥ ΚΡΕΜΕΤΑΙ ΑΠΟ ΤΗ ΧΕΙΡΟΛΑΒΗ
Ή ΑΠΟ ΤΙΣ ΛΑΒΕΣ ΜΠΟΡΕΙ ΝΑ ΠΡΟΚΑΛΕΣΕΙ ΤΗΝ
ΑΣΤΑΘΕΙΑ ΤΟΥ ΠΡΟΪΟΝΤΟΣ. ΑΚΟΛΟΥΘΗΣΤΕ
ΤΙΣ ΥΠΟΔΕΙΞΕΙΣ ΤΟΥ ΚΑΤΑΣΚΕΥΑΣΤΗ ΟΣΟΝ
ΑΦΟΡΑ ΤΟ ΑΝΩΤΑΤΟ ΦΟΡΤΙΟ ΠΟΥ ΜΠΟΡΕΙ ΝΑ
ΧΡΗΣΙΜΟΠΟΙΗΘΕΙ.
• ΜΗΝ ΕΙΣΑΓΕΤΕ ΣΤΟ ΚΑΛΑΘΙ ΦΟΡΤΙΑ ΜΕ ΒΑΡΟΣ
ΜΕΓΑΛΥΤΕΡΟ ΑΠΟ 5 KG. ΜΗΝ ΕΙΣΑΓΕΤΕ ΣΤΙΣ
ΥΠΟΔΟΧΕΣ ΑΝΑΨΥΚΤΙΚΩΝ ΒΑΡΗ ΜΕΓΑΛΥΤΕΡΑ ΑΠΟ
ΑΥΤΑ ΠΟΥ ΠΡΟΣΔΙΟΡΙΖΟΝΤΑΙ ΣΤΗΝ ΥΠΟΔΟΧΗ
ΑΝΑΨΥΚΤΙΚΩΝ ΚΑΙ ΠΟΤΕ ΖΕΣΤΑ ΡΟΦΗΜΑΤΑ. ΜΗΝ
ΕΙΣΑΓΕΤΕ ΣΤΙΣ ΤΣΕΠΕΣ ΤΩΝ ΚΟΥΚΟΥΛΩΝ (ΕΑΝ
ΥΠΑΡΧΟΥΝ) ΒΑΡΗ ΜΕΓΑΛΥΤΕΡΑ ΑΠΟ 0,2 KG.
• ΜΗΝ ΧΡΗΣΙΜΟΠΟΙΕΙΤΕ ΤΟ ΠΡΟΪΟΝ ΚΟΝΤΑ ΣΕ
ΣΚΑΛΕΣ Ή ΣΚΑΛΑΚΙΑ. ΜΗΝ
ΚΟΝΤΑ ΣΕ ΠΗΓΕΣ ΘΕΡΜΟΤΗΤΑΣ, ΕΛΕΥΘΕΡΕΣ ΦΛΟΓΕΣ
Ή ΕΠΙΚΙΝΔΥΝΑ ΑΝΤΙΚΕΙΜΕΝΑ ΠΟΥ ΜΠΟΡΕΙ ΝΑ
ΦΤΑΣΕΙ ΤΟ ΠΑΙΔΙ.
• ΜΠΟΡΕΙ ΝΑ ΕΙΝΑΙ ΕΠΙΚΙΝΔΥΝΗ Η ΧΡΗΣΗ
ΕΞΑΡΤΗΜΑΤΩΝ ΠΟΥ ΔΕΝ ΕΧΟΥΝ ΤΗΝ ΕΓΚΡΙΣΗ ΤΟΥ
ΚΑΤΑΣΚΕΥΑΣΤΗ.
• ΤΟ ΠΡΟΪΟΝ ΑΥΤΟ ΔΕΝ ΕΙΝΑΙ ΚΑΤΑΛΛΗΛΟ ΓΙΑ ΤΟ
JOGGING Ή ΤΟ ΠΑΤΙΝΑΖ.
ΤΟ ΧΡΗΣΙΜΟΠΟΙΕΙΤΕ
.
ΚΑΘΑΡΙΣΜΑ ΚΑΙ ΣΥΝΤΗΡΗΣΗ
Το προϊόν σας χρειάζεται μία ελάχιστη συντήρηση.
Οι εργασίες καθαρισμού και συντήρησης πρέπει να
εκτελούνται μόνον από ενήλικες.
Συμβουλεύουμε να διατηρείτε καθαρά όλα τα μέρη
•
που κινούνται και εάν χρειάζεται, να τα λιπαίνετε
με ελαφρύ λάδι.
Page 32

Page 33

Page 34

Page 35

&
PEG PEREGO SpA
Via De Gasperi, 50
20043 Arcore (MI) Italy
www.pegperego.com
ΠΑΙΔΙΚΑ ΕΙΔΗ ΒΡΕΦΑΝΑΠΤΥΞΗΣ ΚΑΙ ΠΑΙΧΝΙΔΙΑ ΕΓΓΥΗΣΗ
Η PEG – PEREGO εγγυάται για τυχόν εργοστασιακά ελαττώματα των προιόντων
της για διάστημα έξι μηνών από την ημερομηνία αγοράς. Η προσκόμιση
της ανάλογης ταμειακής απόδειξης αγοράς είναι απαραίτητη. Εξαιρούνται
της εγγύγησης οι επαναφορτιζόμενες μπαταρίες και οι μετασχη-ματιστές
παιχνιδιών. (βλ. αναλυτικές οδηγίες χρήσεως παιχνιδιών).
Η παρούσα
βάσει των οδηγιών χρήσεως. Ο κατασκευαστής και οι εντεταλμένοι συνεργάτες
του διατηρούν το δικαίωμα τεχνικού ελέγχου.
Ο κατασκευαστής δεν μπορεί να θεωρηθεί υπεύθυνος εφʼ όσον:
• Δεν τηρηθούν οι ανάλογες οδηγίες χρήσεως του κάθε προιόντος.
• Καταστραφεί τυχαία το προιόν ή προκληθούν
• Υπάρξει τεχνική παρέμβαση ξένου προς την εταιρεία μας τεχνικού, πράγμα το
οποίο απαγορεύεται και αποτελεί κίνδυνο για την ασφάλεια του παιδιού.
• Φυσιολογική φθορά του προιόντος.
Διατηρείτε την εγγύηση και τις οδηγίες χρήσεως και για μελλοντική χρήση.
ΟΝΟΜΑΤΕΠΩΝΥΜΟ ΑΓΟΡΑΣΤΟΥ : .................................................................................................
ΔΙΕΥΘΥΝΣΗ : .............................................................................................................................................
ΤΗΛΕΦΩΝΟ : .............................................................................................................................................
ΕΙΔΟΣ ΠΡΟΙΟΝΤΟΣ : ..............................................................................................................................
εγγύηση ισχύει μόνον εφʼ όσον το προιόν χρησιμοποιείται σωστά και
βλάβες από κακή χρήση αυτού.
ΕΓΓΥΗΣΗ
ΚΩΔΙΚΟΣ ΠΡΟΙΟΝΤΟΣ : .......................................................................................................................
ΗΜΕΡΟΜΗΝΙΑ ΑΓΟΡΑΣ
ΣΦΡΑΓΙΔΑ ΚΑΤΑΣΤΗΜΑΤΟ
Προσοχή: Η εγγύηση ισχύει μονο εφʼ όσον εχει συμπληρωθεί και σφραγισθεί
από τον πωλητή η ημερομηνία αγοράς. Ζητείστε το από το κατάστημα τη στιγμή
της αγοράς. Αν χαθεί ή καταστραφεί το απόκομμα της εγγύησης δεν μπορεί να
αντικατασταθεί.
Page 36

Classico
PEG PEREGO S.p.A.
VIA DE GASPERI 50 20043 ARCORE MI ITALIA
tel. 0039•039•60881 fax 0039•039•615869-616454
Servizio Post Vendita - After Sale:
tel. 0039•039•6088213 fax: 0039•039•3309992
PEG PEREGO U.S.A. Inc.
3625 INDEPENDENCE DRIVE FORT WAYNE INDIANA 46808
phone 260•482•8191 fax 260•484•2940
Call us toll free 1•800•671•1701
PEG PEREGO CANADA Inc.
585 GRANITE COURT PICKERING ONTARIO CANADA L1W3K1
phone 905•839•3371 fax 905•839•9542
Call us toll free 1•800•661•5050
www.pegperego.com
14-03-2007
 Loading...