

Page 1

6
VOLT
FIUS0901G131
made in USA
CHOO CHOO
express train
USE AND CARE
UTILISATION ET ENTRETIEN
EN
FR
ES
EMPLEO Y MANUTENCION
See separate insert
sheet for more
information
Vea la hoja separada del
separador de millares
para másinformación
Voir ls feuille séparée
d’insertion pour plus
d’information
Model Number IGED1116
Page 2
FEATURES AND
INSTRUCTIONS FOR USE
CARACTERÍSTICAS Y USO
CARACTERÍSTIQUES ET
UTILISATION
1
9
1
2
A
B
2
1
2
3 4
5
6 7
8
10
LOC KED
OPEN
A
SEE VERBAL INSTRUCTIONS
AFTER THE PICTURES
VER LAS INSTRUCCIONES
DESPUÉS DE LOS DISEÑOS
VOIR LES INSTRUCTIONS
APRÈS LES DESSINS
INITIAL BATTERY CHARGE
PRIMERA CARGA DE LA
BATERÍA
PREMIÈRE CHARGE DE
BATTERIE
ASSEMBLY
MONTAJE
MONTAGE
Page 3
a
b
A
B
b
x6
x4
x4
11 12
13 14 15
16 17 18
19
23
A
C
A
C
1
2
3
20
21
22
OPTION
OPCIONAL
OPTION
BATTERY REPLACEMENT
CAMBIO DE LA BATERÍA
REPLACEMENT DE LA BATTERIE
Page 4
A
A
B
B
B
C
C
B
2
1
24
25
26 27
28
29
BATTERY RECHARGE
CARGA DE LA BATERÍA
CHARGE DE LA BATTERIE
Page 5
8
23
11
12
19 sx
10
14
15
15
16
18
20
22
17
9
1
2
4
5
6
7
25
24
13
21
21
3 sx
3 dx
26
27
28
29
30
31
32
33
34
35
36
37
38
39
SAGI9992
MEIE0041
20 AMP.2 AMP.
b
MEDI0005
LAMP
b
MEPU0036
MEPU0033
LOUDSPEAKER
b
y
y
r
r
bk
bk
wbk
b
r
MEVA0061
SOUND
BOARD
40
42
41
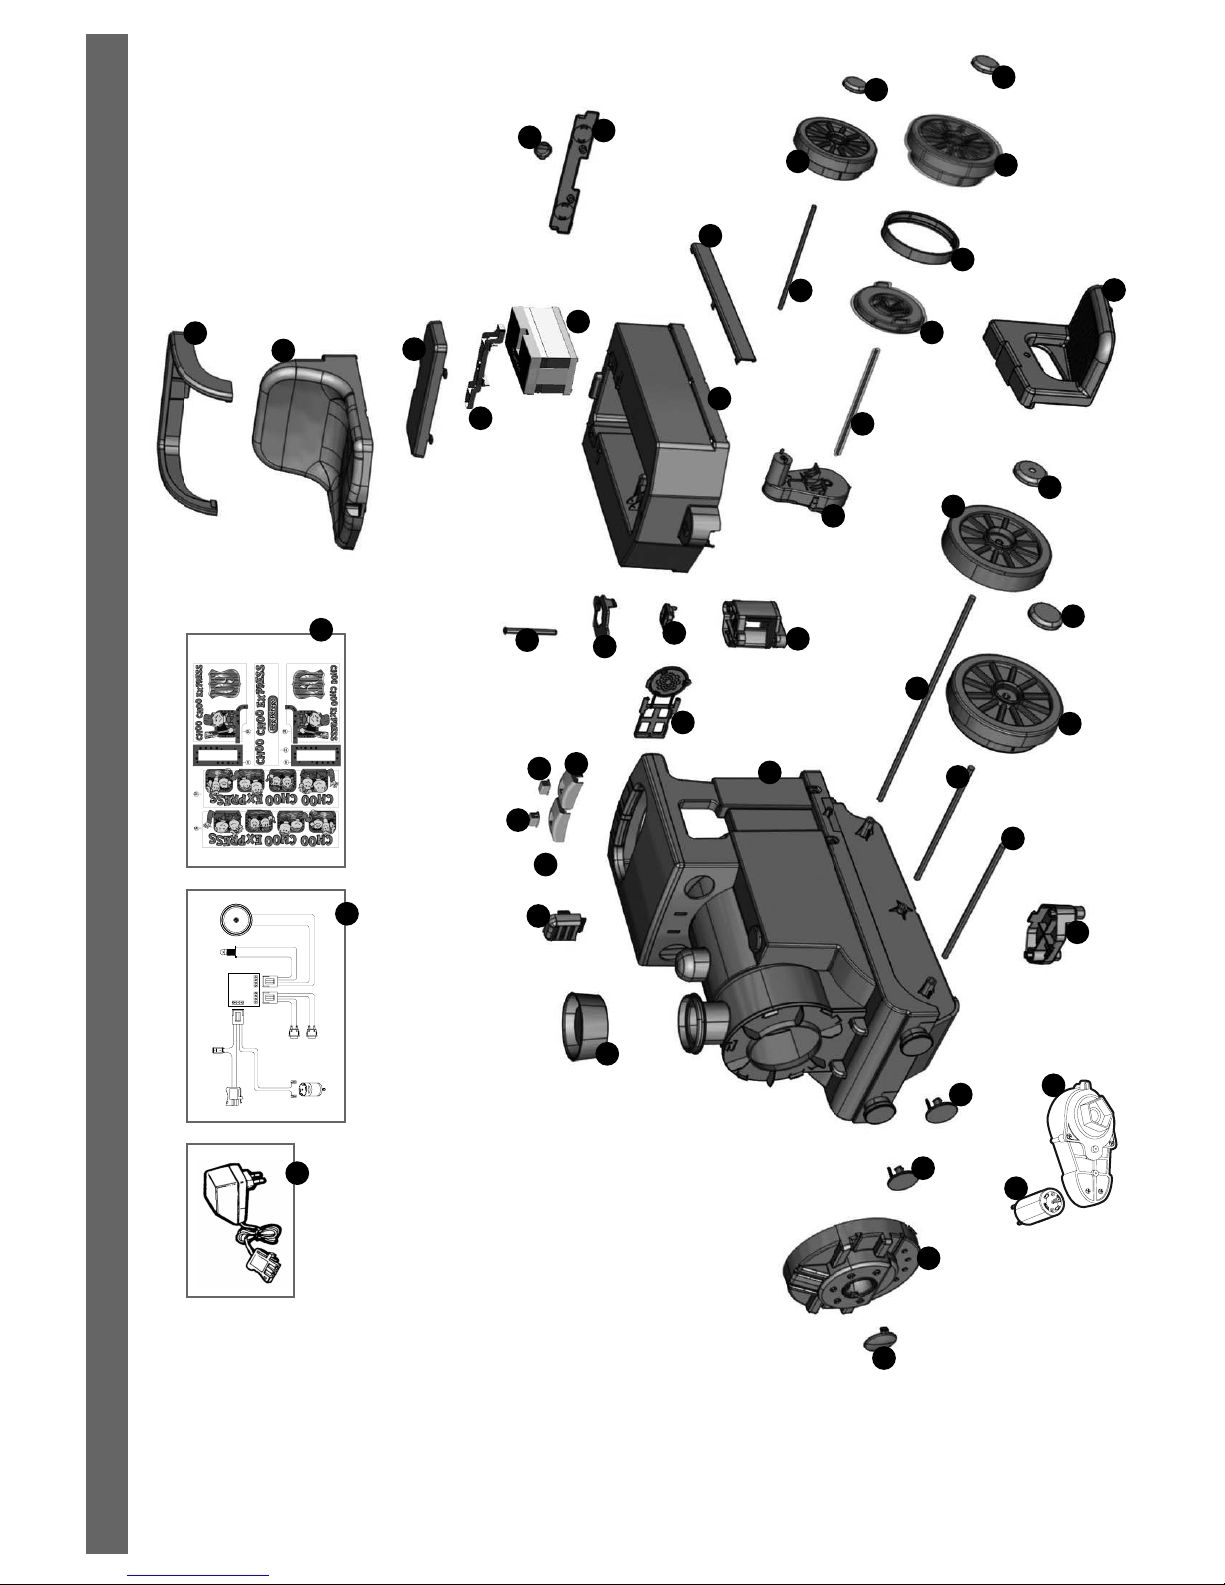
1 SPST9168YY
2 SPST9111GR
3dx SPST8532KDYY
3sx SPST8532KSYY
4 MMRP0990
5 SPST8588JGP
6 SPST9071R
7 SPST8512GR
8 SPST8513R
9 SPST8514GP
10 SPST9128GL
11 SPST8517YY
12 IAKB0022
13 SPST8516GR
14 SPST8515GR
15 SPST8521GP
16 SPST8541N
17 SAGI9963JKTBN
18 SPST8511JR
19dx SPST8518DGR
19sx SPST8518SGR
20 SPST8644GP
21 SPST8538YY
22 SPST8521GP
23 ASGI0169GP
24 SPST9072GR
25 SPST8535J
26 MMEV0622
27 IKCB...
28 SOFF0214Z
29 SOFF0214Z
30 SOFF0215Z
31 SPST8537JGP
32 SPST8519YY
33 SPST8536YY
34 SPST8589N
35 SOFF0214Z
36 SOFF0214Z
37 SPST8520YY
38 SPST8519YY
39 SPST8519YY
40 MEVA0061 + MEIE0041 electrical diagram
41 SAGI9992
42 SAGI3635WJKB
43 ASGI0170GPR
44dx SPST9196N
44sx SPST9196R
43
CHOO CHOO express train IGED1116
REPLACEMENT PARTS PIEZAS DE RECAMBIO PIÈCES DE RECHANGE
44 sx
44 dx
Page 6

ENGLISH
PEG PEREGO
®
baby carriages and strollers, later with its pedal and battery operated toy vehicles.
Discover our complete range of products, news and other information about the Peg Perego world on our web site www.pegperego.com
IMPORTANT INFORMATION
•Read this instruction manual carefully to learn the use of the toy and to teach your child safe and enjoyable
driving. Please keep this manual (with your original sales receipt) for use as a reference in the future.
•DO NOT RETURN YOUR TOY TO THE STORE. This product cannot be returned for a refund after
it has been used. If you have ANY questions, need replacement parts or need assistance, call us
toll-free; U.S.A. , call 1-800-728-2108 / CANADA, call 1-800-661-5050
•This product meets and/or exceeds all ASTM (American Society for Testing and Materials) TOY SAFETY
STANDARDS, including F 963, Consumer Toy Safety Specifications as well as C.R.C, c.931, the Canadian
Hazardous Products (Toys)Regulations.
•Tools needed for assembly: small and medium phillips screwdrivers and a hammer.
assembly.
result in permanent battery damage.
•Use only with the included Peg Perego 6 Volt lead-acid, rechargeable battery and a Peg Perego 6 Volt Charger
(both included).
•Year 1-3
•Weight capacity 40 lbs
•Do not exceed the maximum total weight capacity of 40 lbs (18,1Kg).
Contents:
•1 Choo Choo Express Train riding toy -- partially assembled
•1 Rechargeable 6V 3,3Ah sealed lead-acid battery
•1 Charger 6V
•one 60 W motor -- pre installed
•assembly hardware
•parts to be assembled
•decals
•Speed: 1,5 mph
•Peg Perego reserves the right to modify or change its products. Price, literature, manufacturing processes or
locations or any combination of the above mentioned entities may change at any time for any reason without
notice with impunity.
CAUTION:
ELECTRIC TOY NOT RECOMMENDED FOR CHILDREN UNDER 1 YEAR OF AGE. AS WITH ALL ELECTRIC
PRODUCTS, PRECAUTIONS SHOULD BE OBSERVED DURING HANDLING AND USE TO PREVENT ELECTRIC
SHOCK. RECHARGER INCLUDED. 120 VOLTS, 60Hz, 15W INPUT, 6 VOLTS (DC) OUTPUT.
thanks you for choosing this product. For almost 60 years, PEG PEREGO has been taking children for outings: first with its famous
•Your new toy is partially pre-assembled. It will require adult assembly. Please set aside 15-20 minutes for
•Before the toy is used for the first time, charge the battery for 18 hours to initiate it. Failure to do this can
Page 7

CAUTION:
Only adults should recharge batteries never children.
Never allow children to handle batteries.
Only use the batteries specified by the manufacturer. Only use the charger specified by the manufacturer.
Do not mix old and new batteries.
Do not mix alkaline, standard (carbon-zinc), or rechargeable (nickel-cadmium) batteries.
CHARGING THE BATTERY
•Charge the batteries no longer than 24 hours, following the instructions enclosed with the battery charger.
•Charge the battery, as the toy shows low power, in this way you will avoid damage to the battery.
•If you don’t use your toy for a long period of time unplug the battery from the main wire harness of the toy.
Remember to charge the battery at least every three months.
•Never charge the battery upside down.
•Do not forget batteries during charging! Check them periodically.
•Never use a replacement recharger or batteries unless they are approved by PEG PEREGO.
•Batteries are sealed and maintenance free.
•Battery polarity must be observed when connecting battery to wiring.
WARNING:
• BATTERIES CONTAIN TOXIC AND CORROSIVE SUBSTANCES. DO NOT TAMPER WITH THEM.
•Batteries contain an acid-based electrolyte.
•Do not make direct contact between battery terminals, as this can cause an explosion or fire.
•Charging produces explosive gases. Charge batteries in a well ventilated area away from sources of heat and
flammable materials.
•Exhausted batteries are to be removed from the toy.
•Do not place the batteries near clothing to avoid damage.
IF A LEAK DEVELOPS
Shield your eyes. Avoid direct contact with the electrolyte, protect your hands.
Place battery in a plastic bag and follow directions listed below.
IF ELECTROLYTE COMES IN CONTACT WITH SKIN OR CLOTHING
Flush with cool water for at least 15 minutes.
See a physician at once.
IF ELECTROLYTE IS INJESTED
Give tap water, milk of magnesia or egg whites at once.
Do not induce vomiting.
See a physician at once.
DISPOSAL OF BATTERIES
Help protect the environment!
Do not throw used batteries in your regular, household trash.
Dispose of the old batteries in an approved dumping station; contact your local environmental protection agency
office for further information.
BATTERY MAINTENANCE AND SAFETY
Page 8

WARNING:
ADULT ASSEMBLY REQUIRED. USE CARE WHEN UNPACKING AS COMPONENTS TO BE ASSEMBLED MAY
POSE A SMALL PARTS/SHARP EDGE HAZARD.
BATTERY ALREADY INSTALLED IN VEHICLE.
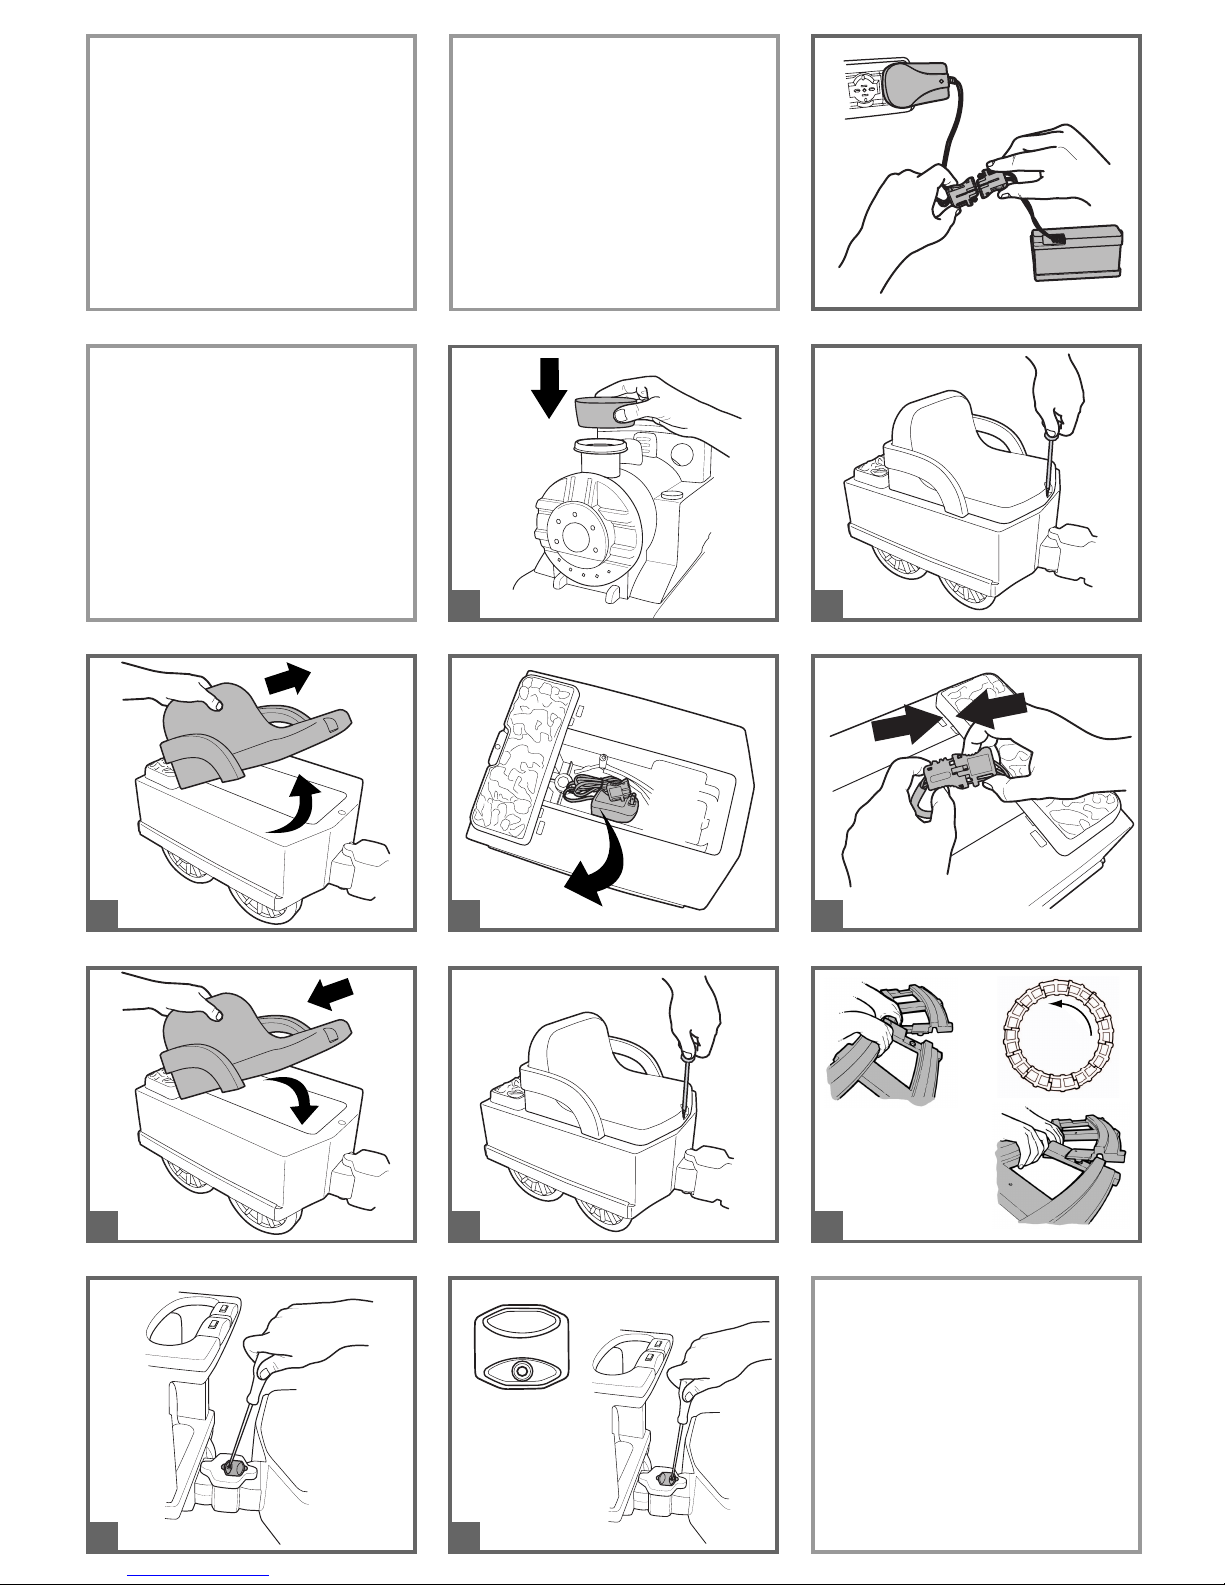
1 • Snap-fit the end of the funnel, which is included in the packaging.
2 • Loosen the screw on the front of the seat.
3 • Remove the seat by lifting the front part (1) and pulling out the back part (2).
4 • Remove the battery charger from the compartment under the seat.
5 • Connect the battery plug (A) to the system plug (B).
6 • Put the seat back into place, inserting the back part first (1) and then the front part (2).
7 • Fasten the seat with the screw. The vehicle is ready for use.
8 • The product can operate both with and without the track. Assemble the track as shown in the figure. For best results, position the train on the track so that it
travels anticlockwise.
9 • To use the train off the track, remove the screw on the coupling lock as shown in the figure.
10 •Turn the lock around and put it back, as shown in detail A of the figure. Secure the lock with the screw. To use the product on the track again, it is necessary to
return it to its original state.
FEATURES AND INSTRUCTIONS FOR USE
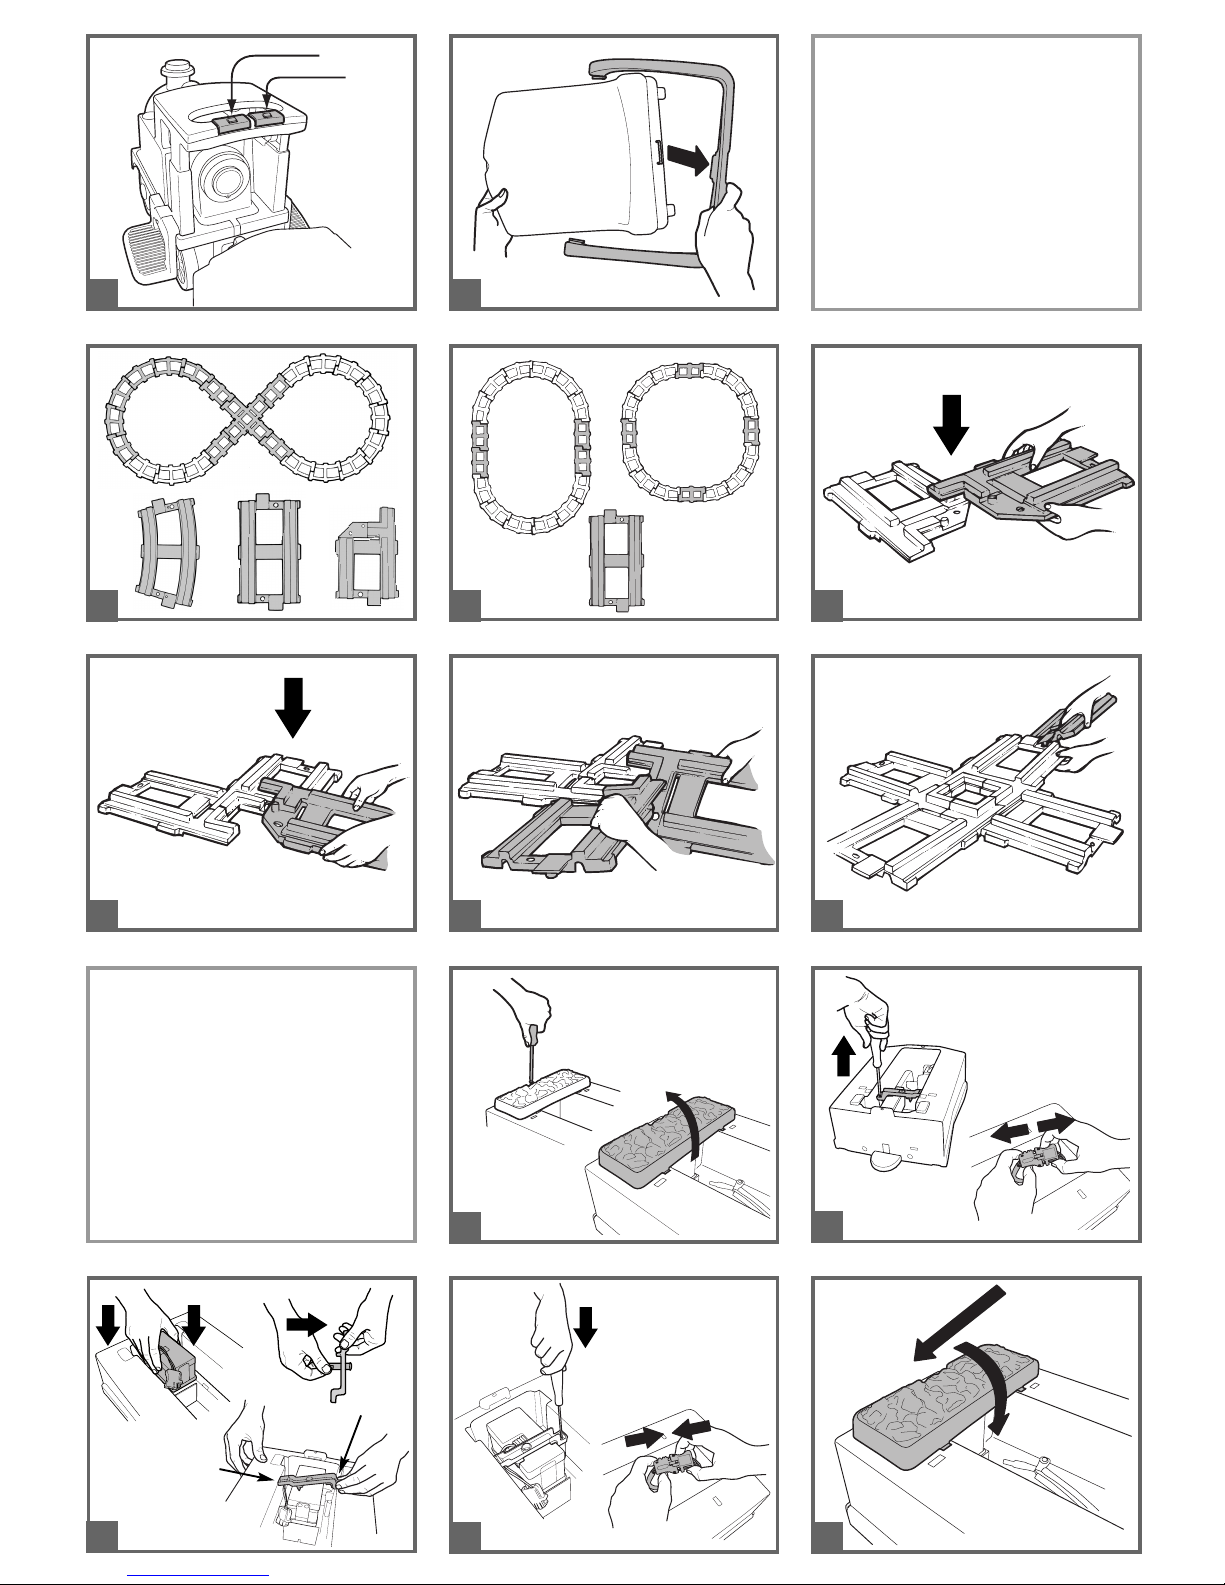
11 •OPERATION BUTTONS: Press button A to play the tunes. Press the button again to change the tune. To start the train, press button B: the headlight and the
sound effects will also automatically come on.
12 •ARMRESTS: Pull the seat out as shown above. Unhook and remove the armrests (see figure). Put the seat back into place and fasten it with the screw.
OPTION
13 •FIGURE 8 CONVERSION TRACK SET OPTION: The kit for the Figure 8 Track includes 6 bends, 4 straight pieces of track, and 4 intersections. By adding the
12 bends that come with the train, the track will make a figure eight.
14 •When you purchase an OPTIONAL FIGURE 8 CONVERSION TRACK SET, you can also make the OVAL FIGURE using the 4 pieces of straight track.
15 •To assemble the FIGURE 8 TRACK, place a piece of intersection over another piece, as shown in the figure.
16 •Add a second piece of track.
17 •To fasten the last piece of the intersection, turn the first and last piece slightly, as shown in the figure.
18 •Complete the track by adding the remaining pieces.
BATTERY REPLACEMENT
WARNING:
WARNING: BATTERY CHARGING AND ANY OTHER OPERATION ON THE ELECTRICAL SYSTEM MUST BE
CARRIED OUT BY ADULTS ONLY.
THE BATTERY CAN ALSO BE CHARGED WITHOUT REMOVING IT FROM THE TOY.
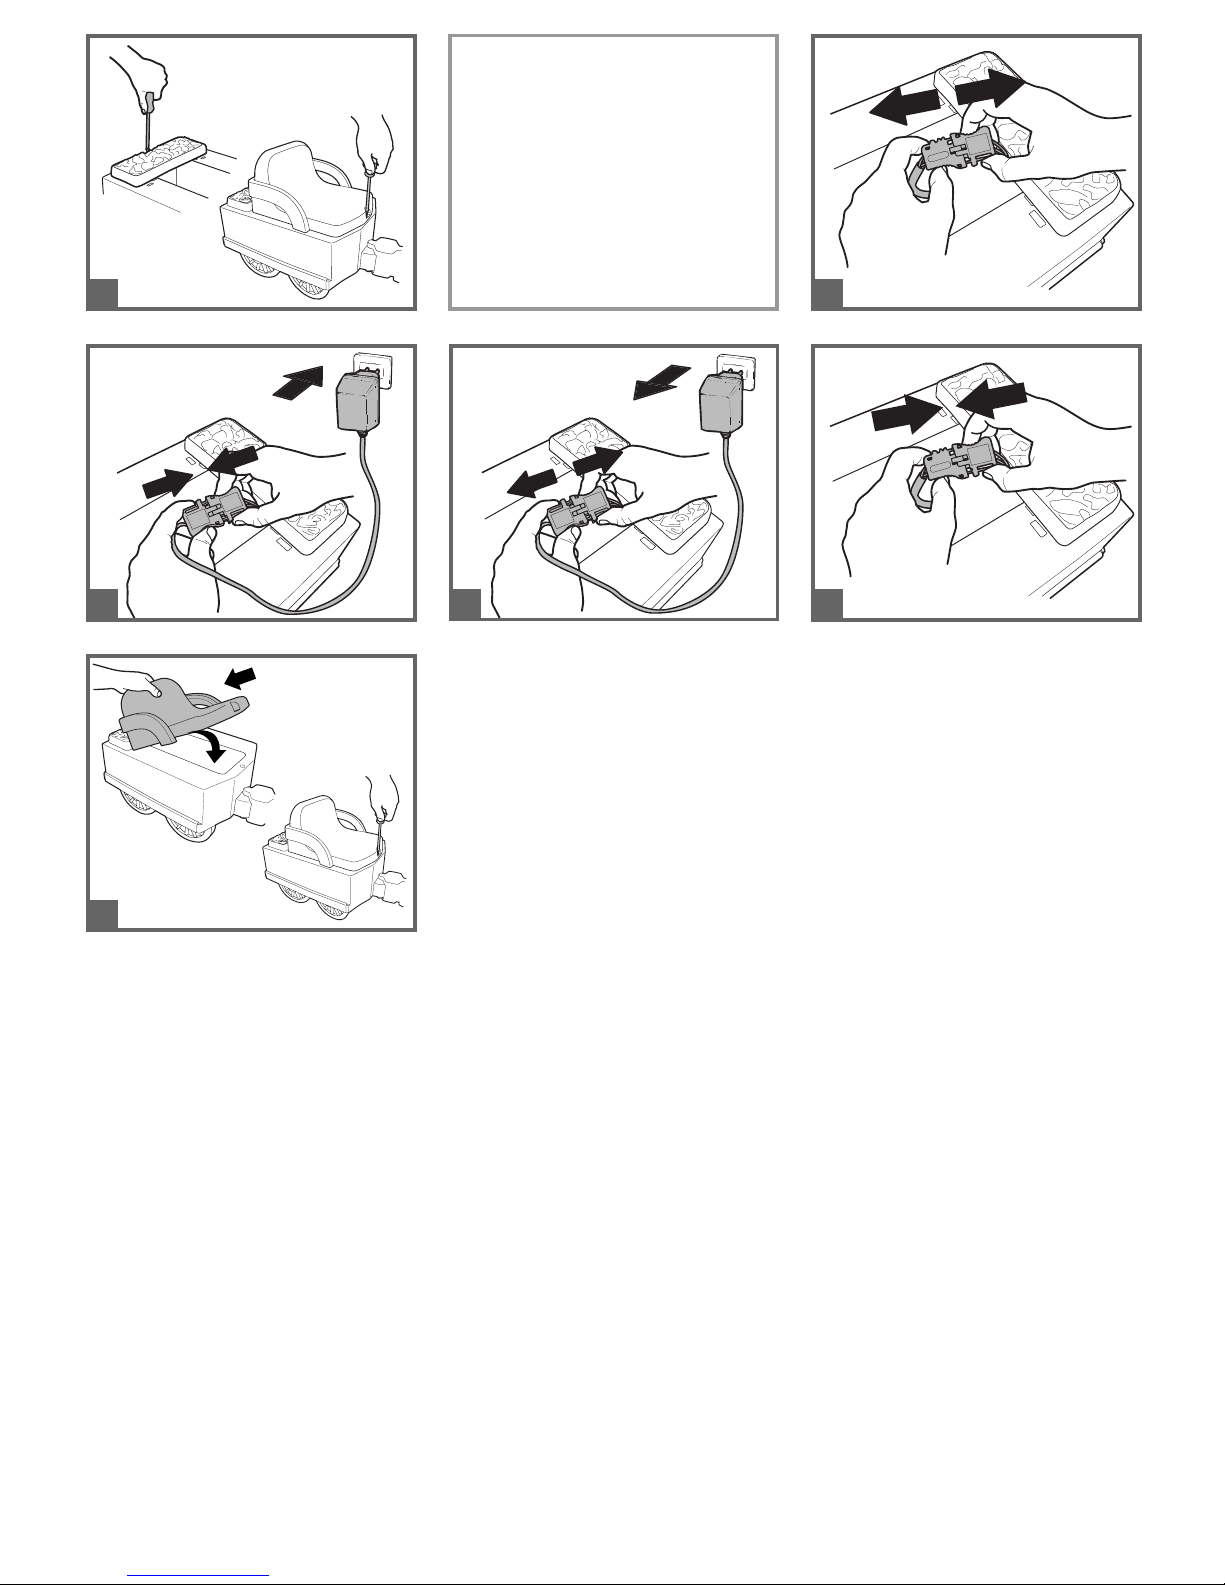
19 •Remove the seat. Loosen the screw and remove the fake coal from the back of the seat.
20 •Unfasten the screw fixing the battery holder and take it out. Unfasten the connectors (system-battery).
21 •Replace the battery (1). Remove the central peg from the battery holder, pressing the tabs at the end of the peg to do so (2). Replace the battery holder,
inserting it first into one opening and then into the other (3), as shown in the figure.
22 •Screw the battery holder back into place. Join the two connectors.
23 •Put the fake coal back into place.
24 •Fasten the fake coal with the screw and put the seat back into place, as shown above. Fasten the seat with the screw.
BATTERY RECHARGER
25 •Disconnect plug A (the electrical system plug) from plug B (the battery plug) by pressing on the sides of the plugs.
26 •Connect plug B to plug C (the battery charger plug). Connect the battery charger to a household electrical outlet, following the instructions supplied with the
battery charger.
27 •When the battery is completely charged, disconnect the battery charger from the outlet and disconnect plug C from plug B.
28 •Connect plug B to plug A, pressing until it clicks into place.
29 •Always remember to put the seat back into place and to fasten it with a screw.
ASSEMBLY INSTRUCTIONS
INITIAL BATTERY CHARGE
!• Remove battery and charger from packaging. Connect battery charger to a 120vac wall recepticle. Connect battery
charger to battery.
Page 9

DON'T STOP THE FUN: always have freshly charged, back-up batteries on hand.
For your child’s safety: please read and follow all instructions below before operating.
•ATTENTION:
Check the fastening retainers to be sure they are tight.
Teach your child the proper use of this toy for a safe and fun play time.
CAUTION:
•If the toy is overloaded, the overload switch will immediately disconnect the power. The power
supply will be restored after a few seconds.
RULES FOR SAFETY DRIVING
This product meets and/or exceeds all ASTM (American Society for Testing and Materials) TOY SAFETY
STANDARDS, including F 963, Consumer Toy Safety Specification.
This toy is not intended for use on streets, around traffic or parked cars.
MAINTENANCE AND CARE
•Regularly check the conditions of the toy, particularly the electrical system, the plug connections, the covering
caps and the charger. In case of fault, do not try to use the toy and the charger. For repair use only original PEG
PEREGO’s spare parts.
•PEG PEREGO assumes no liability if the electrical system is tampered with.
•Do not leave toy or batteries near sources of heat such as radiators, stoves, fireplaces, etc.
•Protect toy from water, rain, snow, etc.
•When operating in overload conditions, the overload circuit breaker will automatically disconnect the power.
After 10 or more seconds,the circuit breaker will automatically reset, however you must eliminate overload
conditions to resume normal driving.
•Periodically lubricate (with a light weight oil) moving parts, such as wheel bearings, steering linkages, where they
rotate or touch one another.
•The toy’s surface can be cleaned with a dampcloth. Do not use abrasive cleaners. The cleaning must be carried
out by adults only.
•Never disassemble the toy mechanisms or motor unless authorized by PEG PEREGO.
SAFETY
WARNING:
•To reduce the risk of injury, adult supervision is required. Never use in roadways, near motor vehicles, on or near
steep inclines or steps, swimming pools or other bodies of water; always wear shoes, and never allow more than
one rider.
•A child must be 1 year of age or older for the necessary coordination and maturation to operate this motorized
toy safely.
•Never use the toy on steep slopes or near steps or stairs. This toy is not suitable for use on public roadways.
•Children should always wear shoes when riding in or driving a riding toy.
•Do not allow children to place their hands, feet or any part of their body, clothing or other articles near the
moving parts while toy is in operation.
•Do not allow the electrical components, motors, wiring, switches of your motorized toy to become wet and
never wash it with a hose.
•Never use gasoline or other flammable substances near the toy.
•The toy is designed just for one child: never allow more than one rider.
MAINTENANCE AND SAFETY
•Surface appropriate for use: asphalt, cement, tiles and smooth surfaces.
Page 10

For your convience, PEG PEREGO offers after-sales service, directly or through a network of authorized service
centers for repairs or replacement parts.
If you have any questions about your Peg Perego vehicle, please call our toll-free service lines at;
U.S.A , call 1-800-728-2108
CANADA, call 1-800-661-5050
Trained customer service representatives are available to take your call in English or Spanish.
CUSTOMER SERVICE
IF THE TOY DOES NOT OPERATE?
•When operating in overload conditions, the circuit breaker will automatically disconnect the
power. After 10 or more seconds, the circuit breaker will automatically reset, however-you must
eliminate overload conditions to resume normal operating.
•Check that all plugs are properly connected.
•Check electrical switches. Replace if necessary.
•Check that the battery is connected to the electrical system.
IF THERE IS NO POWER?
•Fully recharge the battery. If the problem persist, check with an Authorised PEG PEREGO Service Center.
PROBLEMS?
Page 11

ESPAÑOL
PEG PEREGO®le agradece que haya elegido esto producto. Hace más de 60 ańos que PEG PEREGO lleva a pasear a los nińos: al nacer, con sus
famosos coches-cuna y coches de paseo, después con los fantásticos vehículos de juguete a pedal y con la batería.
Descubre la gama completa de los productos, las novedades y otras informaciones acerca del mundo Peg Perego en nuestra página Web
www.pegperego.com
INFORMACIÓN IMPORTANTE
•Lea este manual de instrucción cuidadosamente para aprender el uso del juguete y para enseñar su conducir
seguro y agradable del niño. Guarde por favor este manual (con su recibo original de las ventas) para el uso
como referencia en el futuro.
•NO VUELA SU JUGUETE AL ALMACÉN. Este producto no se puede volver para un reembolso
después de que se haya utilizado. Si usted tenga los preguntas, necesita piezas de recambio o
necesita ayuda, llámenos gratis.
USA: 1-800-225-1558, MEXICO: 1-800-710-1369.
•Este producto cumple con y/o sobrepasa los ESTÁNDARES DE SEGURIDAD ASTM TOY, incluido el F 963,
Especificaciones de seguridad en juguetes para consumidores y C.R.C, c.931, el Regulaciones Peligrosas
Canadienses De los Productos (Juguetes).
•Herramientas necesitadas para el ensamblaje: destornilladores de la phillips medio y pequeño, martillo.
•Su juguete nuevo se premonta parcialmente. Requiere a ensamblaje de un adulto. Puesto a un lado por favor por
lo menos 15-20 minutos para el ensamblaje.
•Antes de utilizar el juguete por primera vez, cargar las baterías durante 18 horas. No respectar este
procedimiento podría causar daños irreversibles a la batería, anulando su garantía.
•Utilice solamente con la clavija incluida Peg Perego 6 voltio baterías lead-acid, rechargables y una clavija Peg
Perego de 6 voltio cargadores (ambos incluidos).
•Años 1-3
•Peso trasportable 40 lbs/18,1 Kg
•No exceda la capacidad total máxima del peso de 40 libras (18,1 kg).
Contenido:
•1 Choo choo Express Train vehículo de los niños -- ensemblado parcialmente
•1 batería sellada recarable de plomo ácido de 6V 3,3Ah
•1 cargador de 6V
•1 motore de 60 W -- instalado previamente
•dotacíon física del montaje
•piezas que se montaje
•calcomanias
•Velocidad: 1,5 mph
•Peg Perego se reserva el derecho de aportar modificaciones a sur productos. El precio, el manual adjunto, los
procesos o lugares de fabricación o una combinación de estos factores pueden provocar cambios sin previo aviso
y sin que ello suponga ninguna obligación para Peg Perego.
ATENCÍON:
LOS JUGUETES ELECTRICOS NO SON RECOMENDABLE PARA NIÑOS MENORES DE 1 AÑO. COMO TODOS
LOS PRODUCTOS ELECTRICOS, CUANDOO SE ESTA MANEJANDO OBSERVE LAS MEDIDAS DE PRECAUCION
PARA PREVENIR UN CHOQUE ELECTRICO. EL CARGADOR ESTA INCLUIDO. 1220 VOLTS, 60 HZ, 15W DE
ENTRADA, 6 VOLTS (DC) DE SALIDA.
Page 12

ADVERTENCIAS:
Las baterías deben ser cargadas sólo por personas adultas.
No deje que los niños jueguen con las baterías.
Use sólo las baterías especificadas por el fabricante. Use solamente el cargador especificado por el fabricante.
No mezcle baterías viejas y nuevas.
No mezcle baterías alcalinas, estándar (carbono-zinc) o recargables (níquel - cadmio).
CARGA DE LAS BATERÍAS
•Cargar la batería siguiendo las instrucciones incluidas en el cargador y no superar en ningún caso las 24 horas.
No respetar estostiempos puede acortar la vida de las baterías.
•Cargue las baterías a tiempo, apenas el juguete pierda velocidad. De este modo se evitarán otros daños.
•Si el juguete se queda sin usarlo por largo tiempo, recuérdese de cargar la batería y de mantenerla desconectada
de la instalación; repita la operación de carga al menos cada tres mees.
•La batería no debe recargarse en posición invertida.
•¡No se olvide de las baterías que se están cargando! Contrólelas periódicamente.
•Use sólo el cargador en dotación y las baterías originales PEG PEREGO.
•Las baterías están selladas y no necesitan de mantenimiento.
•Inserte las baterías con la correcta polaridad.
ATENCIÓN:
•LAS BATERÍAS CONTIENEN SUBSTANCIAS TÓXICAS CORROSIVAS.
NO SE DEBEN MANIPULAR ABUSIVAMENTE.
•Las baterías contiene electrolita de base ácida.
•No provoque el contacto directo entre los terminales de la batería, riesgo de explosión o incendio.
•Mientras se están cargando, las baterías producen gas explosivos. Cárguelas en un lugar bien ventilado, lejos de
fuentes de calor y materiales inflamables.
•Las baterías agotadas se deben sacar del juguete.
•No coloque las baterías sobre prendas porque se podrían dañar.
SI HAY UNA PÉRDIDA
Protéjase los ojos. Evite el contacto directo con el electrolito: proteja sus manos.
Ponga la batería en una bolsa de plástico y siga las instrucciones para la eliminación de baterías.
SI PIEL Y OJOS ENTRAN EN CONTACTO CON EL ELECTROLITO
Lave abundantemente con agua corriente durante al menos 15 minutos.
Consultar un médico inmediatamente.
SI SE INGIERE ELECTROLITO
Tome pequeños sorbos de agua, leche de magnesia o clara de huevo.
No provocar el vómito.
Consultar un médico inmediatamente.
ELIMINACIÓN DE BATERÍAS
Ayude a proteger el medio ambiente.
Las baterías usadas no se deben tirar junto con la basura doméstica.
Se pueden entregar a un centro de recogida de baterías usadas o de eliminación de residuos especiales; infórmese
en su Ayuntamiento.
MANTENIMIENTO Y SEGURIDAD DE LA BATERÍA
Page 13

ATENCIÓN:
LAS OPERACIONES DE MONTAJE DEBEN SER REALIZADAS ÚNICAMENTE POR PERSONAS ADULTAS.
PRESTAR ATENCIÓN AL SACARSE EL JUGUETE DEL EMBALAJE.
TODOS LOS TORNILLOS Y LAS PIEZAS PEQUEÑAS SE ENCUENTRAN EN UNA BOLSA DENTRO DEL
EMBALAJE.
LA BATERÍA PODRÍA ESTAR INTRODUCIDA EN EL ARTÍCULO.
1 • Encajar la extremidad de la chimenea presente en la confección.
2 • Quitar el tornillo que hay delante del asiento.
3 • Quitar el asiento levantando la parte de delante (1) y sacando la de detrás (2).
4 • Extraer el cargador de baterías que está en el vagón, debajo del asiento.
5 • Conectar la clavija de la batería (A) a la clavija de la instalación (B).
6 • Volver a poner el asiento metiendo primero la parte de detrás (1) y apoyando luego la parte delantera (2).
7 • Fijar el asiento con el tornillo. El vehículo ya está listo para usar.
8 • El artículo puede funcionar con o sin los carriles. Unir los carriles tal y como se muestra en la figura. Para optimizar el uso, colocar el tren sobre las ruedas de
modo que el sentido de la marcha sea contrario al de las agujas del reloj.
9 • Para el funcionamiento sin los carriles, destornillar el gancho del pivote tal y como se muestra en la figura.
10 •Volver a colocar el gancho invirtiéndolo tal y como se muestra en el punto A de la figura. Volver a atornillar el gancho con el tornillo. Para utilizar nuevamente el
artículo sobre los carriles, colocarlo en su posición inicial.
CARACTERÍSTICAS Y USO
11 •BOTONES de FUNCIONAMIENTO: La melodía se activará pulsándose el botón A. Para cambiar de melodía, pulsar de nuevo el botón. Pulsar el botón B para
accionar el tren. En modo automático, las luces frontales también se encenderán y los sonidos se activarán.
12 •APOYABRAZOS: Extrayendo el asiento como se ha mostrado antes, quitar el reposabrazos desenganchándolo (véase la figura). Volver a poner el asiento y
fijarlo con el tornillo.
OPCIONAL
13 •CIRCUITO OCHO. El kit Circuito Ocho está formado por: 6 curvas, 4 raíles rectos y 4 cruces. Añadiendo las 12 curvas, que ya van con el tren, se consigue
formar la Figura Ocho.
14 •Si se compra el CIRCUITO OCHO se puede componer también la FIGURA OVALADA utilizando los 4 raíles rectos.
15 •Para montar el CIRCUITO OCHO, poner encima una pieza de la cruceta sobre otra pieza como muestra la figura.
16 •Poner la segunda pieza.
17 •Para enganchar la última pieza de la cruceta hacer como muestra la figura, girando ligeramente la primera y la última pieza.
18 •Completar el circuito enganchando las piezas restantes.
SUSTITUCIÓN DE LA BATERÍA
ATENCIÓN:
LA OPERACIÓN DE RECARGA DE LA BATERÍA ASÍ COMO CUALQUIER INTERVENCIÓN ELÉCTRICA, DEBEN
SER REALIZADAS ÚNICAMENTE POR PERSONAS ADULTAS.
LA BATERÍA TAMBIÉN SE PUEDE RECARGAR SIN QUITARLA DEL JUGUETE.
SÓLO PARA EL BRASIL: TENSIÓN DEL CARGADOR: 127V - 60 HZ. OBSERVACIÓN: NO UTILIZAR EL
CARGADOR DE LA BATERÍA CON UNA TENSIÓN DE 220V.
19 •Quitar el asiento. Quitar el tornillo y quitar el carbón simulado que está detrás del asiento.
20 •Destornillar el tornillo del dispositivo de retención de la batería y sacarlo. Desconectar las clavijas conectadas (instalación-batería).
21 •Sustituir la batería (1). Sacar el perno central del dispositivo de retención de la batería, manteniendo presionadas las lengüetas situadas en el extremo del perno
(2). Volver a colocar el dispositivo de retención introduciéndolo primero en una cavidad y, después, en la segunda (3) tal y como se muestra en la figura.
22 •Volver a atornillar el dispositivo de retención de la batería. Volver a conectar las dos clavijas.
23 •Una vez concluidas las operaciones volver a poner el carbón simulado.
24 •Fijar con el tornillo el carbón simulado y volver a poner el asiento como se ha indicado anteriormente. Fijar el asiento con el tornillo.
RECARGA DE LA BATERÍA
25 •Desconectar la clavija A de la instalación eléctrica de la clavija B de la batería pulsando lateralmente.
26 •Conectar la clavija B con la clavija C del cargador de baterías. Meter la clavija del cargador de baterías en un enchufe doméstico siguiendo las instrucciones
adjuntas.
27 •Cuando se ha terminado de cargar la batería quitar el cargador de baterías del enchufe doméstico y luego desconectar la clavija C de la clavija B.
28 •Meter a fondo, hasta el tope, la clavija B en la clavija A.
29 •Cuando se han terminado todas las operaciones no olvide nunca volver a poner el asiento y fijarlo con el tornillo.
INSTRUCCIONES DE MONTAJE
PRIMERA CARGA DE LA BATERÍA
!• Quite la batería y el cargador del empaquetado. Conecte el cargador de la batería con un socket doméstico.
Conecte el cargador de batería con la batería.
Page 14

DIVERTIMIENTO SIN INTERRUPCIÓN: Hay un set de baterías recargadas de repuesto puesto a disposición y listo
para su uso.
Para la seguridad del niño: antes de accionar el vehículo, leer y seguir atentamente las siguientes instrucciones.
¡ATENCIÓN!
•Controlar que todos los remaches/las tuercas de fijación de las ruedas estén firmes.
•Enseñar a su niño el uso correcto del juguete para una conducción segura y divertida.
¡ATENCIÓN!
•Si el juguete funciona en condiciones de sobrecarga, el interruptor de sobrecarga desconectará
inmediatamente la potencia. Después de algunos segundos, se reanudará el suministro de
corriente.
REGLAS PARA CONDUCIR EN CONDICIONES DE SEGURIDAD
MANTENIMIENTO Y CUIDADOS DEL JUGUETE
Este producto cumple con y/o sobrepasa los ESTÁNDARES DE SEGURIDAD ASTM TOY, incluido el F 963,
Especificaciones de seguridad en juguetes para consumidores.
Este juguete no ha sido fabricado para ser usado en la vía pública, con vehículos en movimiento o aparcados.
MANTENIMIENTO Y CUIDADOS
•Controlare periódicamente el estado del juguete, en especial la instalación eléctrica, las conexiones de los
enchufes, las caperuzas de protección y el cargador. En caso de defectos comprobados, el juguete eléctrico y el
cargador no deben utilizarse. Para las reparaciones utilizar sólo piezas de recambio originales PEG PEREGO.
•PEG PEREGO no se asume ninguna responsabilidad en caso de uso indebido de la instalación eléctrica.
•No dejare las baterías o el juguete cerca de fuentes de calor como radiadores, caloríferos, chimeneas, etc.
•Proteger el juguete contra el agua, lluvia, nieve, etc.;
•Si el juguete funciona en condiciones de sobrecarga, el interruptor de la sobrecarga desconectará inmediatamente
la potencia. El suministro de corriente se reanudará una vez eliminadas las condiciones de sobrecarga.
•Lubricar periódicamente (con aceite ligero) las partes móviles como cojinetes, dirección, etc., donde girar o están
en contacto entre ellas.
•Las superficies del juguete deben limpiarse con un paño húmedo y, si es necesario, con productos adecuados de
uso doméstico.
Las operaciones de limpieza deben ser realizadas únicamente por adultos.
•No desmontar nunca los mecanismos del juguete o los motores, sin la autorización de PEG PEREGO.
SEGURIDAD
¡ATENCIÓN!
•Para reducir el riesgo de heridas, la supervisión de un adulto es siempre necesaria. No usar nunca en carreteras,
cerca de vehículos a motor, o en pendientes pronunciadas o cerca de escaleras, piscinas u otras superficies de
agua; los niños deben usar siempre zapatos durante el uso del juguete.
•Se puede usar sobra superficies lisas: asfalto, cemento,baldosas.
•No apto para niños menores de 12 meses por sus características funcionales y dimenciones.
•No usar el juguete en vías públicas, donde hay tránsito y coches estacionados, en pendientes pronunciadas, cerca
de escaleras, cursos de agua y piscinas.
•Los niños deben usar siempre zapatos durante el uso del juguete.
•Cuando el juguete está funcionando, preste atención para que los niños no metan las manos, los pies u otras
partes del cuerpo, cerca de las partes en movimiento.
•No mojar nunca los componentes eléctricos del juguete como motores, cableado, botones, etc.
•No usar gasolina u otras sustancias inflamables cerca del juguete.
•El juguete está construido para un solo niño: no deje que lo use más de un solo niño.
Page 15

Para su convience, PEG PEREGO ofrece un servicio de asistencia post-venta, directamente o a través de una red de
centros de asistencia técnica autorizados, para eventuales reparaciones o substituciones y venta de recambios
originales.
Si usted tiene cualesquiera preguntas sebre su vehículo de Peg Perego, llame por favor nuestras líneas de servicio gratis.
U.S.A , 1-800-225-1558
MEXICO, 1-800-710-1369
Los representantes técnico de cliente entrenados están disponibles para tomar su llamada en español o inglés.
SERVICIO DE ASISTENCIA
¿EL JUGUETE NO FUNCIONA?
•Si el juguete funciona en condiciones de sobrecarga, el interruptor de la sobrecarga desconectará
inmediatamente la potencia. Después de unos 10 segundos se reanudará el suministro de
corriente, pero deben eliminarse las condiciones de sobrecarga.
•Controlar que todos los enchufes están correctamente conectados.
• Controlar los interruptores eléctricos y si fuera necesario sustituirlos.
•Controlar que la batería esté conectada a la instalación eléctrica.
¿EL JUGUETE NO TIENE POTENCIA?
• Cargar la baterías. Si después de cargarlas el problema persiste hacer controlar las baterías y el cargador de
baterías en un centro de asistencia autorizado Peg Perego.
¿PROBLEMAS?
Page 16

FRANÇAIS
PEG PEREGO®vous remercie de votre confiance et vous félicite d'avoir choisi ce produit. Depuis plus de 50 ans, PEG PEREGO emmène en
promenade les enfants: à peine nés, avec ses fameux landaus et poussettes et plus tard, avec ses fantastiques véhicules à pédales et à batterie.
Découvrez sur notre site la gamme complète des produits, les nouveautés et d’autres renseignements sur le monde Peg Perego. www.pegperego.com
L’INFORMATION IMPORTANTE
•Lisez ce manuel d’instruction soigneusement pour apprendre l’utilisation du jouet et pour enseigner votre piloter
sûr et agréable d’enfant. Veuillez garder ce manuel (avec votre réception initiale de ventes) pour l’usage comme
référence à l’avenir.
•NE RENYOYEZ PAS VOTRE JOUET À LA MÉMOIRE. Ce produit ne peut pas être retourné pour
un remboursement après qu’il ait été utilisé. Si vous avez des questions, avez besoin des pièces de
recharge ou avez besoin d’aide, appelez-nous en service libre appel à 1-800-661-5050.
•Ce produit réponde et/ou dépasse tous les CONDITIONS DE SECURITE ASTM TOY et il est conforme à la
NORME DE SURETE F 963 pour les utilisateur des jouets électriques et C.R.C, c.931, le Règlements Dangereux
Canadiens de Produits (Jouets).
•Outils requis pour l’assemblage: tournevis de Phillips moyen et petit, marteau.
•Votre nouveau jouet est partiellement prémonté. Il exige l’assemblage par un adulte. S’il vous plaît mis de côte au
moins 15-20 minutes pour l’assemblage.
•Avant d’utiliser le jouet pour la première fois, recharger les batteries pendant 18 heures. La non-observation des
instructions dans cette brochure peut entraîner le risque des dommages irréversibles à la batterie.
•Utiliser seulement avec la batterie rechargeable Peg Perego de 6 volts aux plombo sigillé et chargeurs Peg Perego
de 6 volts (tous les deux inclus).
•Âge 1-3
•Poids transportable 40 lbs / 18,1 kg
•N’excédez pas toute la capacité maximum de poids de 40 livres (18,1Kg).
Table des matières:
•1 Choo Choo Express Train véhicule des enfant -- partiellement réuni.
•1 batterie rechargeable sigillée au plomb de 6V 3,3Ah -- dans l’empaquetage
•1 chargeur de 6V
•1 motore de 60W -- préinstallé
•matériel de montage
•pièces à montage
•decalcomanies
•Vitesse: 1,5 mph/2,4 km/h
•Peg Perego pourra apporter à tout moment des modifications aux modèles décrits dans cette publication, pour
des raisons de nature technique ou commerciale.
ATTENTION:
JOUET ÉLECTRIQUE NON RECOMMANDÉ POUR LES ENFANTS DE MOINS DE 12 MOIS. COMME POUR TOUS
LES PRODUITS ÉLECTRIQUES, DES PRÉCAUTIONS DOIVENT ÊTRE PRISES PENDANT LE MANIEMENT ET
L’UTILISATION POUR PRÉVENIR LES CHOCS ÉLECTRIQUES. CHARGEUR DE BATTERIE INCLU. 120 VOLT, 60HZ,
15W, 6 VOLT (c.a.) EN SORTIE.
Page 17

PRECAUTION:
Les batteries ne doivent être rechargées que par ou sous la surveillance d’adultes.
Ne pas laisser les enfants jouer avec les batteries.
Utiliser uniquement le chargeur de batterie fourni et les batteries originales PEG PEREGO.
Ne pas utiliser simultanément des batteries neuves et usagées.
Ne pas utiliser simultanément des batteries alcalines standard (zinc-carbone) ou rechargeables (nickel-cadmium).
RECHARGEMENT DES BATTERIES
•Charger les batteries sans dépasser les 24 heures et en suivant les instructions jointes au chargeur de batterie.
•Recharger les batteries à temps, dès que le jouet perd de la vitesse, pour éviter de les endommager.
•Si on laisse le jouet arrêté pendant un long intervalle, se rappeler de recharger la batterie et de la laisser
débranchée de l’installation; répéter l’opération de rechargement tous les trois mois au moins.
•La batterie ne doit pas être rechargée retournée.
•Ne pas oublier la batterie en rechargement! Contrôler périodiquement.
•Utiliser exclusivement le type de batteries et de chargeur spécifié par PEG PEREGO.
•Les batteries doivent être mises en place avec la polarité correcte.
•Les batteries sont scellées et n’exigent pas de maintenance.
ATTENTION:
•LES BATTERIES CONTIENNNENT DES SUBSTANCES TOXIQUES ET CORROSIVES. NE PAS LES OUVRIR.
•Les batteries contiennent des électrolytes à base d’acide.
•Ne pas provoquer de contact direct entre les plots de la batterie: risque d’explosion et d’incendie.
•Pendant le rechargement, la batterie produit des gaz. Recharger la batterie dans un lieu bien aéré, loin de toute
source de chaleur et de matériaux inflammables.
•Les batteries déchargées doivent être enlevées du jouet.
•Eviter que les batteries entrent en contact avec les vêtements: ceux-ci pourraient s'abîmer.
EN CAS DE FUITE
Se protéger les yeux. Eviter tout contact direct avec le électrolyte et se protéger les mains. Mettre la batterie dans
un sac en plastique et suivre les instructions sur l’élimination des batteries.
SI LA PEAU OU LES YEUX ENTRENT EN CONTACT AVEC L’ELECTROLYTE
Laver abondamment les parties concernées à l’eau courante (pendant 15 minutes au moins).
Consulter immédiatement un médecin.
EN CAS D’INGESTION DE ELECTROLYTE
Boire à petites gorgées de l’eau, du lait de magnésie ou de l’albumen d’œuf.
Ne pas provoquer de vomissement.
Consulter immédiatement un médecin.
ELIMINATION DES BATTERIES
Contribuons à la sauvegarde de l’environnement.
Les batteries usées ne doivent pas être jetées dans les ordures ménagères.
On peut les déposer dans un centre de récupération de batteries usées ou d’élimination de déchets spéciaux;
s’informer à la mairie.
MAINTENANCE ET SECURITE DE LA BATTERIE
Page 18

ATTENTION!
ASSEMBLAGE PAR UN ADULTE REQUIS. PRENDRE GARDE AU MOMENT DE DEBALLER CAR LES
COMPOSANTES À ASSEMBLER PEUVENT COMPORTER UN DANGER DE PETITES PIÈCES OU DE BORDS
TRANCHANTS.
IL SE POURRAIT QUE LA BATTERIE SOIT DEJA MONTEE SUR LE JOUET.
1 • Monter en appuyant la sommité de la cheminée présente dans l’emballage.
2 • Dévisser la vis située à l’avant du siège.
3 • Enlever le siège en soulevant la partie avant (1) et en retirant la partie arrière (2).
4 • Retirer la chargeur de batterie placé dans le compartiment sous l’assise.
5 • Brancher la fiche de la batterie (A) à celle de l’installation électrique (B).
6 • Remettre le siège en place; pour ce faire, insérer d’abord la partie arrière (1) puis faire reposer la partie avant (2).
7 • Fixer le siège au moyen de la vis. Le véhicule est prêt à l’emploi.
8 • L’article peut fonctionner sur les rails ou sans eux. Assembler les rails en procédant comme indiqué sur la figure. Pour une utilisation optimale, positionner le
petit train sur les rails de façon à ce que son sens de marche soit contraire aux aiguilles d’une montre.
9 • Pour une utilisation sans rails, dévisser le dispositif de fixation de l’articulation comme indiqué sur la figure.
10 •Remettre en place le dispositif de fixation en l’inversant, comme le montre le détail A de la figure. Revisser le dispositif de fixation. Pour utiliser l'article sur les
rails, le remettre dans son état initial.
CARACTERISTIQUES ET UTILISATION
11 •BOUTONS de FONCTIONNEMENT : pour activer la mélodie, appuyer sur le bouton A. Pour changer de mélodie, appuyer à nouveau sur ce bouton. Pour
actionner le train, appuyer sur le bouton B : la lumière frontale s’allume et les effets sonores s’activent alors automatiquement.
12 •REPOSE-BRAS: Après avoir retiré le siège comme indiqué précédemment, détacher le repose-bras et l’enlever (voir figure). Remettre le siège en place et le
fixer avec la vis.
EN OPTION
13 •CIRCUIT EN HUIT. Le kit Circuit en Huit est composé de : 6 virages, 4 sections rectilignes et 4 croisements. En ajoutant les 12 virages fournis avec le train on
obtient la figure en huit.
14 •En achetant le circuit en huit et en utilisant les 4 sections rectilignes, il est également possible de constituer la figure ovale.
15 •Pour monter le circuit en huit, superposer un morceau du croisement sur une autre pièce, comme indiqué sur la figure.
16 •Mettre en place une deuxième pièce.
17 •Pour monter le dernier morceau du croisement, procéder comme sur la figure en courbant légèrement la première et la dernière pièce.
18 •Achever de monter le circuit en assemblant les pièces restantes.
REMPLACEMENT DE LA BATTERIE
ATTENTION:
ATTENTION : LA MISE EN CHARGE DE LA BATTERIE ET TOUTE AUTRE INTERVENTION SUR
L'INSTALLATION ELECTRIQUE DOIVENT ETRE EFFECTUEES PAR DES ADULTES.
LA BATTERIE PEUT ETRE RECHARGEE SANS ETRE RETIREE DU JOUET.
19 •Enlever le siège. Dévisser la vis et retirer l’imitation de carbone située à l’arrière du siège.
20 •Dévisser la vis de la barrette de fermeture de la batterie et enlever cette dernière. Débrancher les fiches de l’installation électrique et de la batterie.
21 •Remplacer la batterie (1). Retirer la tige centrale de la barrette de fermeture de la batterie en gardant les languettes situées à l’extrémité de la tige (2)
enfoncées. Remettre en place la barrette de fermeture de la batterie en l’insérant d’abord dans un logement puis dans l’autre (3), comme le montre la figure.
22 •Revisser la barrette de fermeture de la batterie. Rebrancher les deux fiches.
23 •Une fois ces opérations terminées, remettre en place l’imitation de carbone.
24 •Fixer avec la vis l’imitation de carbone et remettre en place le siège, comme indiqué au préalable sur la figure. Fixer ce dernier avec la vis.
MISE EN CHARGE DE LA BATTERIE
25 •Débrancher la fiche A (installation électrique) de la fiche B (batterie) en appuyant sur les côtés.
26 •Brancher la fiche B à la fiche C du chargeur de batterie. Brancher la fiche du chargeur de batterie à une prise de courant en suivant les instructions ci-jointes.
27 •Une fois la batterie chargée, débrancher le chargeur de la prise de courant puis débrancher les fiches C et B.
28 •Insérer la fiche B dans la fiche A jusqu’au déclic.
29 •Une fois ces opérations terminées, toujours remettre en place le siège et le revisser.
MONTAGE
PREMIÈRE CHARGE DE BATTERIE
! • Retirez la batterie et le chargeur de l'empaquetage. Reliez le chargeur de batterie à un plot domestique. Reliez le
chargeur de batterie à la batterie.
Page 19

DIVERTISSEMENT SANS INTERRUPTION: prévoir une batterie de rechange chargée et prête à l’emploi.
Pour la sécurité de l’enfant: avant de mettre en marche le jouet, lire et suivre attentivement les instructions suivantes:
•ATTENTION!
Contrôler que toutes les plaques/écrous de fixation des roues sont bien serrés.
Enseigner à l’enfant à utiliser le véhicule correctement pour conduire en sécurité tout en s’amusant.
ATTENTION:
•Si le jouet est utilisé dans des conditions entraînant une surcharge, l’interrupteur de surcharge
réduira automatiquement la puissance. La puissance sera rétablie quelques secondes plus tard.
REGLES POUR UNE CONDUITE EN TOUTE SECURITE
Ce produit réponde et/ou dépasse tous les CONDITIONS DE SECURITE ASTM TOY et il est conforme à la
NORME DE SURETE F 963 pour les utilisateurs des jouets électriques.
Ce jouet n’est pas conforme aux dispositions des normes de circulation routière et ne peut par conséquent pas
circuler sur la voie publique.
SECURITE, MAINTENANCE ET ENTRETIEN
•Contrôler régulièrement l’état du jouet, en particulier l'installation électrique, le branchement des fiches, les
capots de protection et le chargeur de batterie. Si l’on trouve des défauts, le jouet électrique et le chargeur de
batterie ne doivent par être utilisés. Pour les réparations, n’utiliser que des pièces de rechange d’origine PEG
PEREGO.
•PEG PEREGO décline toute responsabilité en cas de mauvaise utilisation de l'installation électrique.
•Ne pas laisser les batteries ou le jouet à proximité de sources de chaleur comme des radiateurs, des cheminées,
etc.
•Protéger le jouet de l’eau, de la pluie, de la neige, etc.
•Si le véhicule fonctionne en conditions de surcharge, l’interrupteur de surcharge coupe immédiatement le
courant. La distribution de courant reprend de 10 secondes environ, mais il faut éliminer les conditions de
surcharge pour assurer la conduite normale.
•Lubrifier périodiquement (avec une huile légère) les parties mobiles comme roulements à billes, direction, etc.,
surtout là où ils tournent ou entrent en contact.
•Les surfaces du jouet peuvent être nettoyées avec un chiffon humide. Ne jamais utiliser des détergents abrasifs.
Les opérations de nettoyage doivent être effectuées exclusivement par des adultes.
•Ne jamais démonter les mécanismes du jouet ou les moteurs, sauf autorisation de PEG PEREGO.
SECURITE
ATTENTION:
•Pour éviter tout risque d’accident, la supervision d’un adulte est toujours requise. Ne pas utiliser le jouet sur les
voies publiques, là où il y a des voitures, sur les pentes raides, près de gradins, d’escaliers, de cours d’eau et de
piscines; les enfant doivent toujours porter des chaussures quand ils utilisent le vehicule. Le vehicle est assemble
seulement pour 1 enfant.
•Pour utiliser sur surfaces lisses : goudron, ciment, carreaux.
•De par ses caractéristiques fonctionnelles, ne convient pas aux enfants de moins de 12 mois.
•Ne pas utiliser le jouet sur les pentes raides ou près de gradins et d’escaliers. Le véhicule n’est pas conçu pour
l’utilisation sur les voies publiques.
•Les enfant doivent toujours porter des chaussures quand ils utilisent le jouet.
•Quand le jouet fonctionne, faire attention à ce que les enfants ne mettent pas les mains, es pieds ou d’autres
parties du corps, des vêtements ou d’autres choses près des parties en mouvement.
•Ne jamais mouiller les composants du jouet comme les moteurs, les installations, les touches, etc.
•Ne jamais utiliser d’essence ou d’autres substances inflammables près du jouet.
•Le jouet devra impérativement n’être utilisé que par un seul enfant.
ENTRETIEN ET SECURITE DU JOUET
Page 20

Pour votre convience, PEG PEREGO offre un service d’assistance après-vente, directement ou à travers un réseau de
centres d’assistance autorisés pour les éventuelles réparations ou pour le remplacement et la vente de pièces de
recharge d’origine.
Si vous avez n'importe quelles questions au sujet de votre véhicule de Peg Perego, veuillez appeler nos tuyaux de
service en service libre appel à
U.S.A , 1-800-728-2108
CANADA, 1-800-661-5050
Les représentants qualifiés de service à la clientèle sont disponibles pour prendre votre appel.
SERVICE D’ASSISTANCE
LE JOUET NE FONCTIONNE PAS?
•Si le jouet fonctionne en conditions de surcharge, l’interrupteur de surcharge coupe
immédiatement le courant. La distribution de courant reprend au bout de 10 secondes environ,
mais il faut éliminer les conditions de surcharge pour assurer la conduite normale.
• Vérifier qu'il n'y a pas de câbles débranchés sous le bouton de mise en route.
• Contrôler le fonctionnement de le bouton de mise in route et le remplacer éventuellement.
• Contrôler si la batterie est branchée à l'installation électrique.
LE JOUET MANQUE DE PUISSANCE?
•Recharger la batterie. Si après l'avoir rechargée le problème persiste, faire contrôler la batterie et le chargeur de
batterie par un centre d'assistance autorisé PEG PEREGO.
DES PROBLEMES?
Page 21

Page 22

Page 23

Page 24

www.pegperego.com
CHOO CHOO express train
PEG PEREGO S.p.A.
via DE GASPERI 50 20043 ARCORE (MI) ITALIA
tel. 039·60881 fax 039·615869-616454
assistenza: tel. 039·6088213 fax 039·3309992
numero verde (solo da telefono fisso):
PEG PEREGO U.S.A Inc.
3625 INDEPENDENCE Dr. FORT WAYNE IN 46808
phone 260·4828191 fax 260·4842940
call us toll free 1·800·728·2108
llame USA gratis 1·800·225·1558
llame Mexico gratis 1·800·710·1369
PEG PEREGO CANADA Inc.
585 GRANITE COURT PICKERING ONT. CANADA L1W3K1
phone 905·8393371 fax 905·8399542
call us toll free 1·800·661·5050
model number IGED1116
 Loading...