

Page 1
USE AND CARE
UTILISATION ET ENTRETIEN
EN
FR
ES
EMPLEO Y MANUTENCION
See separate insert
sheet for more
information
Voir la feuille séparée
d’insertion pour plus
d’information
Vea la hoja separada del
separador de millares
para másinformación
VOLT
6
LIL TRACTOR
& Trailer
Model Number IGED1112
Made in USA
In our Fort Wayne, Indiana Factory using domestic
and global components.
Fabriqué aux États-Unis
à notre usine de Fort Wayne, Indiana à l’aide de pieces
locales et importees.
Hecho en E.A.U.
En nuestra fabrica de Fort Wayne, Indiana usando
componentes domesticos e importados.
FIUS1901G179
• Y
• W
2 +
ear
eight Capacity 55 lbs
• Année 2+
• Capacité de poids 55 lbs
• Año 2+
• Capacidad de peso 55 lbs
Page 2
STOP! VERY IMPORTANT
Do NOT ride vehicle before charging battery for 18 hours. Failure to do this
will permanently damage the battery and void your warranty.
ALSO;
Charge the battery immediately after each use, regardless of how long the vehicle was used.
Storing the battery in a discharged state will permanently damage the battery.
When storing, the battery must be recharged every 30 days.
NEED HELP: Call 1-800-728-2108
ONLY USE THE PEG PEREGO BATTERY & CHARGER
WITH THIS TOY.
As Peg Perego USA, INC. grows, counterfeits and unauthorized distributors and retailers
are making non-Peg Perego products and low quality knockoffs that are mistaken for an
authentic one. Please avoid use of outside brand - third party accessories and/or products
with the Peg Perego brand, which have resulted in damage to
the product.
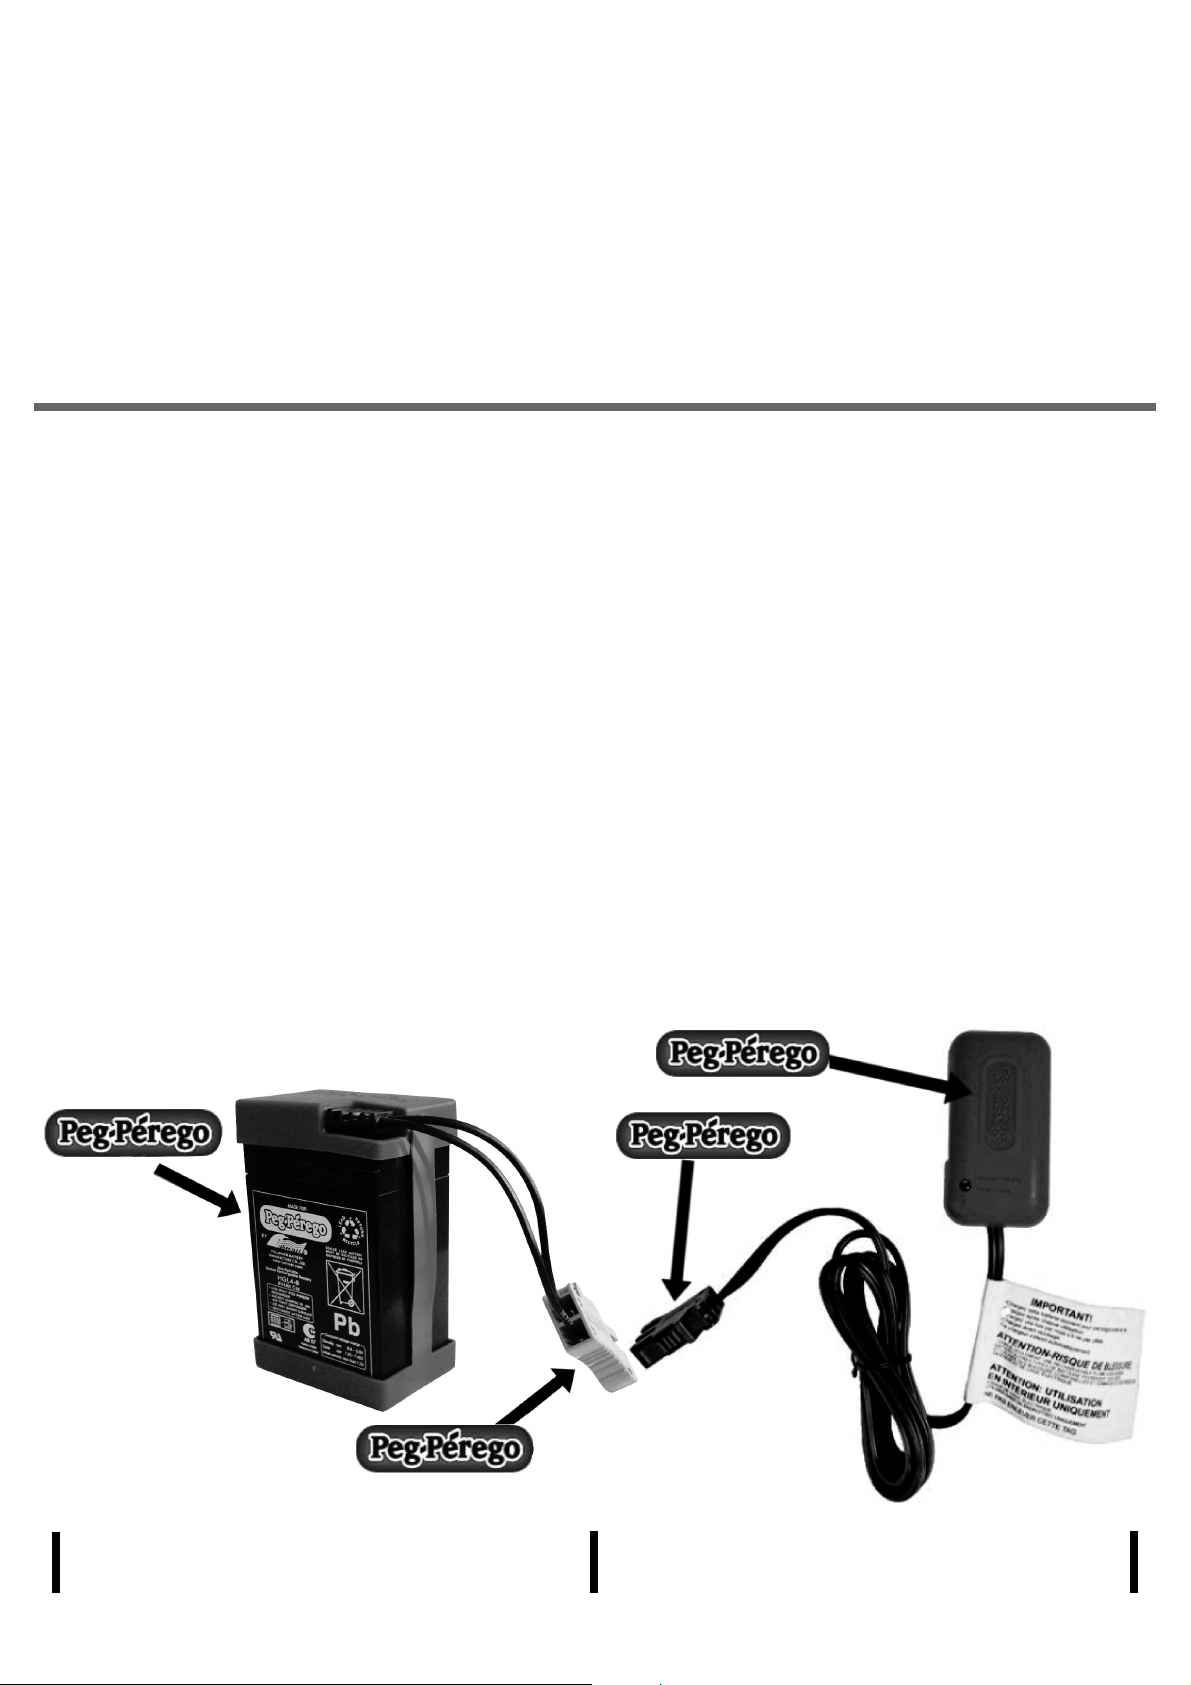
Ways to determine a true Peg Perego battery and/or
charger:
1) The Peg Perego logo along the front of the battery itself.
2) The Peg Perego logo along the front of the charger.
3) The Peg Perego logo along the battery and charger connectors.
Peg Perego 6 volt baolt battery
1
Peg Perego 6 volt charger
Page 3

CHARGER LED INDICATOR INFORMATION
ENGLISH FRANÇAIS ESPAÑOL
A) Plug the battery charger into a power
outlet in compliance with the specifications
on the label. This power unit is intended to
be correctly oriented in a vertical or floor
mount position.
B) Connect the charger the battery for 18
hours.
C) If your battery charger is provided with a
LED indicator, it means that:
i) When plugging in the charger, as described
in A, and no battery is connected, the
green LED light will appear, indicating that
the device is working correctly.
ii) Connect the battery as described in B.
If all connections have been made properly
and the battery is sufficiently discharged,
the start of charging will be confirmed by
the orange LED lighting up.
iii) When the battery is almost fully charged,
the LED will turn from orange to green.
iv) The green LED does not necessarily
mean that the battery is charged.
v) If the battery is already charged, the green
LED is already on or turns green soon
after B is carried out. If the battery life is
reduced the next time you use the battery,
please contact Customer Service for
assistance in checking the battery and
battery charger operation.
D)Once the charge is completed and the LED
is on, unplug the battery charger from the
main outlet first, then the battery terminal.
Connect the battery to the electrical
system of your toy, which is now ready to
use.
The battery charger is fitted with a safety
device. In the event of short circuit or
overheating, a protection system prevents
current peaks, which could damage
your battery charger.
In this case, unplug the battery charger from
the power outlet, find and remove the cause of
short circuit, and re-connect everything to the
power outlet.
WARNING:
1 •Insert only lead batteries.
2 •Do not use with non-rechargeable
batteries. Risk of explosion.
3 •For adult use only. It is not a toy.
4 •Do not use with damaged sheathing, cable
or connector.
5 •During recharging operations, make sure
the battery charger is in a well-ventilated
area.
6 •Should the battery charger be damaged in
any way, do not use it until it is fully
repaired.
A) Brancher le chargeur de batteries dans une
prise de courant conforme aux
caractéristiques indiquées sur l’étiquette.
Cette unité d’alimentation est conçue
pour être installée correctement dans une
position verticale ou de montage au sol.
B) Raccorder la prise du chargeur de
batteries à celle de la batterie et laisser tel
quel pendant 18 h.
C) Si le chargeur de batteries est muni d’un
témoin lumineux (LED), les conditions
suivantes peuvent se produire:
i) Lorsque vous branchez le chargeur comme
indiqué en A), et qu’aucune batterie n’y est
reliée, le voyant vert à DEL s’allume pour
indiquer que l’appareil fonctionne
correctement.
ii) Connecter la batterie tel qu’indiqué en B).
Si toutes les connexions ont été effectuées
correctement et que la batterie est
suffisamment déchargée, le début du
chargement sera confirmé lorsqu’une DEL
orange s’allumera.
iii) Lorsque la batterie est presque à charge
complète, la DEL indique celleci est
suffisamment chargée en passant de
l’orange au vert.
iv) La DEL verte ne signifie pas forcément que
la batterie est chargée.
v) Si la batterie est déjà chargée, la DEL verte
sera déjà allumée ou passera au vert juste
après l’exécution de l’étape B). Si la
batterie se décharge plus rapidemente
lorsque vous la remettez en service,
veuillez vous adresser au Service à la
clientèle qui vous aidera à vérifier le
fonctionnement de la batterie et du
chargeur de batterie.
D)Une fois la charge terminée et le témoin
lumineux allumé, débrancher avant tout le
chargeur de la batterie de sa prise de
courant, et après seulement la batterie. Puis
connecter la batterie au système électrique
de votre jouet, qui est maintenant prêt à
fonctionner.
Le chargeur est muni d’un dispositif de
sécurité contre les court-circuites et les
surcharges internes de la batterie, une
protection qui empêche le courant de se
propager et de compromettre le bon
fonctionnement du chargeur. Dans ce cas, il
faut débrancher le chargeur de batteries de sa
prise de courant, déceler et résoudre la cause
du court-circuit et rebrancher le tout à la
prise d’alimentation.
ATTENTION:
1 •Insérer seulement des batteries au plomb.
2 •Ne pas utiliser avec des batteries non
rechargeables. Risque d’explosion.
3 •Utilisation réservée aux adultes. Ce n’est
pas un jouet.
4 •Ne pas utiliser avec enveloppe, câble ou
connecteur en mauvais état.
5 •Pendant la recharge, s’assurer que le
chargeur soit placée dans un lieu bien aéré.
6 •Si le chargeur de la batterie est abîmé, ne
pas l’utiliser tant qu’il n’est pas réparé.
A) Conecte el cargador de baterías a una
toma doméstica con características
similares a las especificadas en la plaquita
del aparato. Esta unidad de energía solo se
puede usar correctamente en la posición
vertical o en un monte piso.
B) Conecte la clavija del cargador y la clavija
de la batería, y déjela conectada durante 18
h.
C) Si su cargador de baterías está provisto de
un LED luminoso, su funcionamiento es el
siguiente:
i) Cuando conecte el cargador como se
indicia en A), y no esté conectada ninguna
pila, la luz indicadora verde se encenderá
para indicar que el aparato está
funcionando correctamente.
ii) Conecte la pila como se indica en B). Si
todas las conexiones están bien hechas y la
pila está bien descargada, la luz indicadora
de color naranja se encenderá para
confirmar que se comenzó a cargar la pila.
iii) Cuando la pila esté casi complemente
cargarda, la luz pasará de naranja a verde
para indicar que la pila tiene suficiente
carga.
iv) La luz indicadora verde no necesariamente
significa que la pila está completamente
cargada.
v) Si la pila ya estaba cargada, la luz indicadora
verde se encenderá o pasará al color verde
poco después de completar el paso B). Si la
carga de la pila dura mucho menos la
próxima vez que usted la use, comuníquese
con el Departamento de atención al cliente
para que lo ayuden a verificar la condición
de la pila y del cargador.
D)Con la carga finalizada y el indicador
encendido, desenchufe primero el cargador
de la toma doméstica y luego la batería; a
continuación, conecte la clavija de la
instalación eléctrica en la toma de la
batería. Su juguete está listo para ser
utilizado.
El cargador está provisto de un dispositivo de
seguridad. En caso de una elevada temperatura
interna, o si se produce un cortocircuito en la
batería, un dispositivo de protección
intervendrá para impedir el suministro de una
corriente fuerte, que podría romper el
cargador. En este caso es necesario
desconectar el cargador de baterías de la toma
doméstica, resolver la causa del cortocircuito y
volver a conectar el conjunto en la toma de
alimentación.
ATENCIÓN:
1 •Cargue exclusivamente pilas con plomo.
2 •No lo utilice con baterías o pilas no
recargables. Riesgo de explosión.
3 •Utilizable sólo por adultos. No es un
juguete.
4 •No lo utilice con revestimientos, cables o
conectores defectuosos.
5 •Durante la carga, compruebe que haya una
buena ventilación alrededor del cargador
de baterías.
6 •Si el cargador de baterías se hubiera
dañado, no se debe utilizar hasta que no
haya sido reparado.
2
Page 4
INITIAL BATTERY CHARGE
BATTERY REPLACEMENT
PREMIÈRE CHARGE DE
BATTERIE
PRIMERA CARGA DE LA
BATERÍA
REPLACEMENT DE LA
BATTERIE
SUSTITUCIÓN DE LA BATERÍA
BATTERY RECHARGE
RECHARGE DE LA BATTERIE
RECARGA DE LA BATERÍA
C
B
A
C
B
B
A
B
3
A
Page 5

ENGLISH FRANÇAIS ESPAÑOL
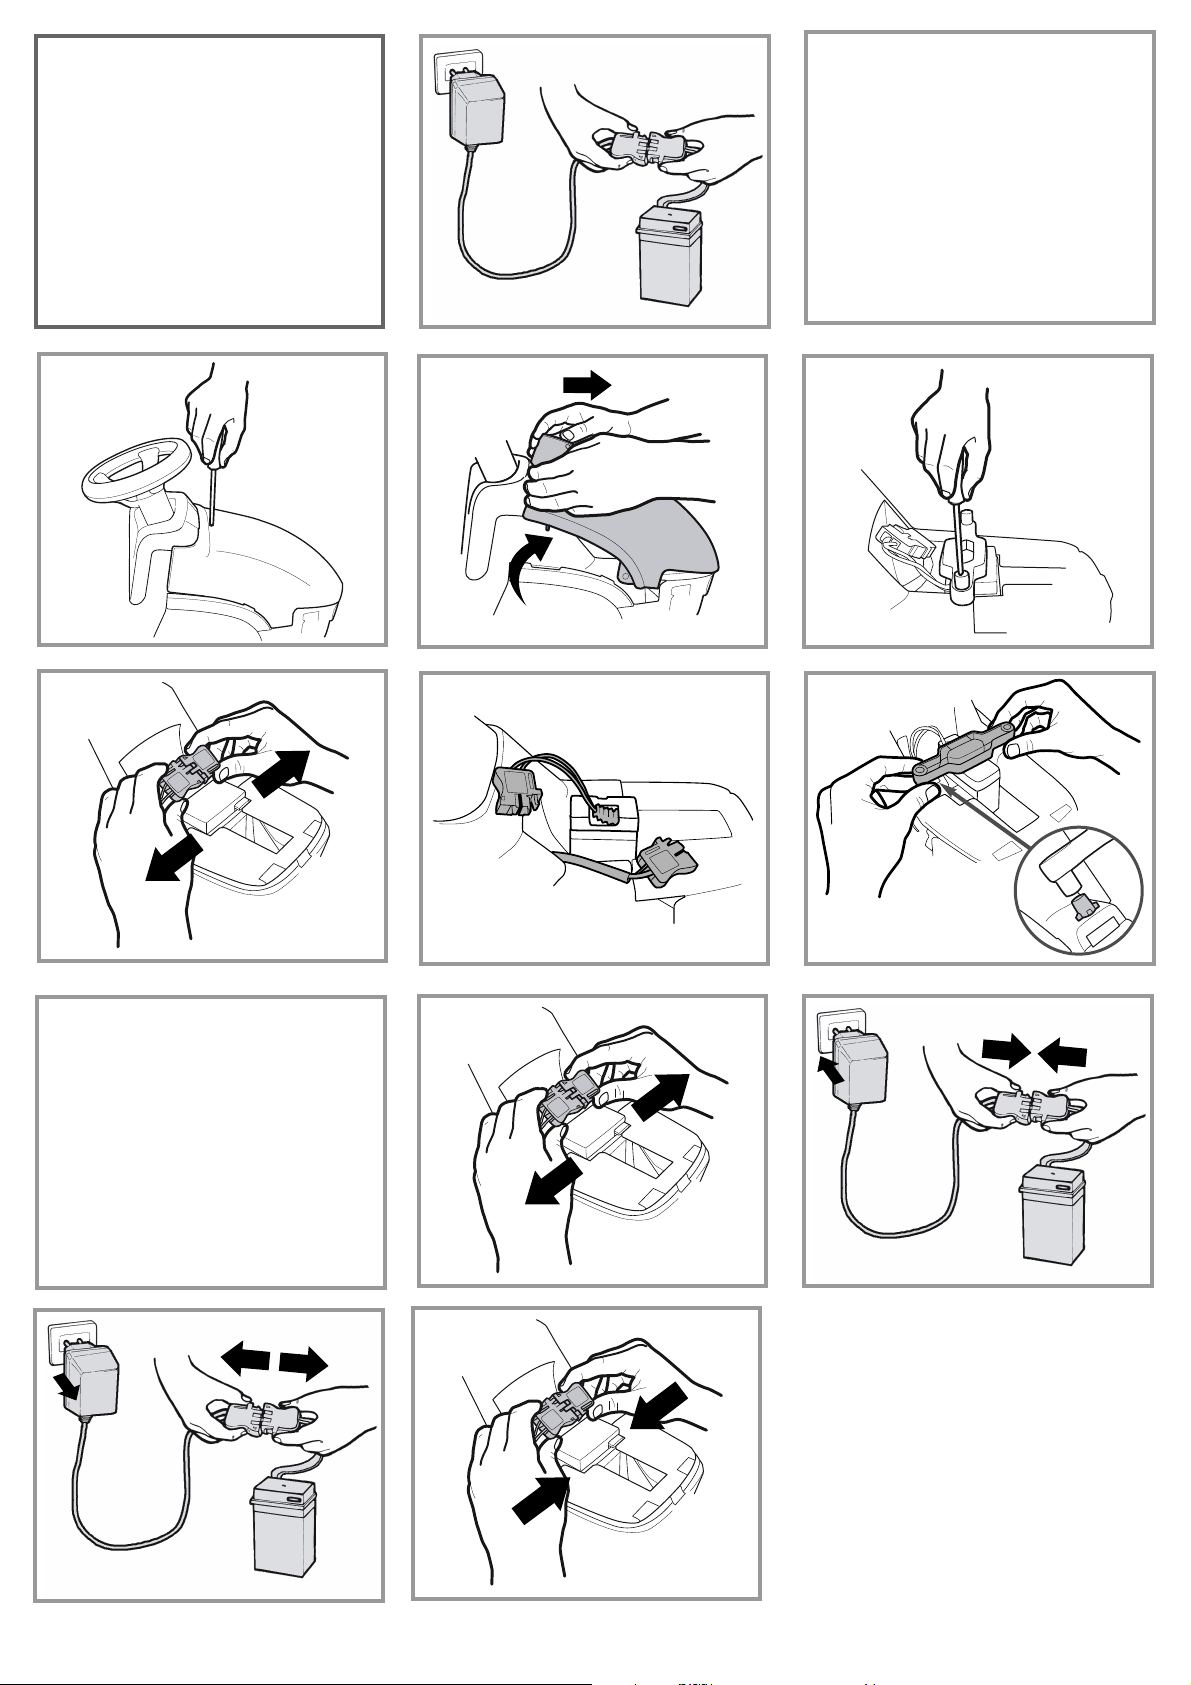
INITIAL BATTERY CHARGE
!• Connect battery charger to a 120vac wall
recepticle. Connect battery charger to
battery.
BATTERY REPLACEMENT
WARNING:
W
ARNING: BA
ANY
AND
ON THE ELECTRICAL SYSTEM
MUST BE CARRIED OUT BY
ADULTS ONLY. THE BATTERY
CAN ALSO BE CHARGED
WITHOUT REMOVING IT FROM
THE VEHICLE.
•Unscrew the hood.
•Pull the hood towards you while lifting
and turning it to remove (see figure).
•Loosen the 2 screws that hold the
battery in place.
•Disconnect the 2 plugs and remove the
battery supplied with the vehicle.
•Insert a new battery and connect the
two plugs.
•Screw the battery clamp into place again,
turning it upside down as shown in the
figure. Close the hood as described
above (fig. 26) and fasten with the
screw.
TTER
Y CHARGING
OTHER OPERATION
PREMIERE CHARGE DE BATTERIE
!• Reliez le chargeur de batterie à une prise
domestique. Reliez le chargeur de batterie
à la batterie.
REMPLACEMENT DE LA BATTERIE
ATTENTION:
LE CHARGEMENT DE LA
BATTERIE ET TOUTE
INTERVENTION SUR LE CIRCUIT
ELECTRIQUE DOIVENT ETRE
EFFECTUES EXCLUSIVEMENT P
UN ADULTE. LA BATTERIE PEUT
ETRE RECHARGEE SANS DEVOIR
LA RETIRER DU JOUET.
•Dévisser le capot.
•Tirer le capot vers soi, en le soulevant
par un mouvement de rotation (voir la
figure), puis l’enlever.
•Dévisser les 2 vis du cache batterie.
•Débrancher les deux fiches et enlever la
batterie.
•Insérer la batterie de rechange et
connecter les 2 fiches.
•Revisser le cache batterie en le
retournant, comme sur la figure.
Refermer le capot en suivant les
instructions données plus haut (fig. 26)
et le fixer avec la vis.
AR
PRIMERA CARGA DE LA BATERÍA
!• Conecte el cargador de la batería con un
socket doméstico. Conecte el cargador de
batería con la batería.
SUSTITUCIÓN DE LA BATERÍA
ATENCIÓN:
LA OPERACIÓN DE RECARGA DE
LA BATERÍA ASÍ COMO
CUALQUIER INTERVENCIÓN
ELÉCTRICA, DEBEN SER
REALIZADAS ÚNICAMENTE POR
PERSONAS ADULTAS. LA BATERÍA
TAMBIÉN SE PUEDE RECARGAR
SIN QUITARLA DEL JUGUETE.
SÓLO PARA EL BRASIL: TENSIÓN DEL
CARGADOR: 127V - 60 HZ.
OBSERVACIÓN: NO UTILIZAR EL
CARGADOR DE LA BATERÍA CON
UNA TENSIÓN DE 220V.
•Destornillar el capó.
•Tirar hacia sí el capó, levantándolo al
mismo tiempo con un movimiento
rotatorio (véase la figura) y sacarlo.
•Quitar los 2 tornillos del sujeta-batería.
•Desconectar las 2 clavijas y sacar la
batería que se entrega con el vehículo.
•Meter la batería sustitutiva conectando
las 2 clavijas.
•Volver a atornillar el sujeta-batería dando
la vuelta como indica la figura. Cerrar el
capó como se ha descrito con
anterioridad (fig. 26) y sujetar con el
tornillo.
BATTERY RECHARGE
PLEASE NOTE: THE PICTURES OF
THE BATTERIES
ARE FOR
ILLUSTRATIVE PURPOSES ONLY.
YOUR BATTERY MAY BE
DIFFERENT FROM THE MODEL
SHOWN. THIS DOES NOT
AFFECT THE REPLACEMENT AND
CHARGING PROCEDURES
DESCRIBED.
•Unplug vehicle wiring terminal A from
battery terminal B, by pressing terminals
on side and pulling apart.
•Plug the battery charger terminal to a
wall outlet following the instructions
enclosed. Connect the plug B to the
battery charger plug C.
•Once the charge is completed unplug
recharger from wall outlet. Unplug
recharger cord terminal C from battery
terminal B.
•Plug battery terminal A into vehicle
wiring terminal B. Close hood.
RECHARGE DE LA BATTERIE
ATTENTION: LES DESSINS DES
BATTERIES SONT DONNÉS À
TITRE PUREMENT INDICATIF. LA
BATTERIE EN VOTRE POSSESSION
POURRAIT DIFFÉRER DU
MODÈLE REPRÉSENTÉ. LES
SÉQUENCES DE
REMPLACEMENT
ET DE CHARGE REPRÉSENTÉES
RESTENT NÉANMOINS
VALABLES.
•Débrancher la fiche A de la fiche B en
appuyant sur les côtés.
•Insérer la fiche du chargeur de la
batterie dans une prise de courant en
suivant les instructions jointes. Brancher
la fiche B et la fiche C du chargeur de la
batterie.
•Uen fois la charge terminée, débrancher
le chargeur de batterie C de la prise
domestique en premier lieu et ensuite
de la fiche de la batterie B.
•Insérer à fond jusqu'au déclic la fiche A
dans la fiche B. Une fois toutes les
opérations terminées, veiller à bien
refermer le capot.
RECARGA DE LA BATERÍA
ATENCIÓN: LAS BATERÍAS DE
LOS DIBUJOS SON MODELOS
APROXIMADOS. ES POSIBLE QUE
SU BATERÍA SEA DISTINTA DE LA
REPRESENTADA EN LOS DIBUJOS.
ESTO NO AFECTA A LAS
SECUENCIAS DE SUSTITUCIÓN Y
DE CARGA QUE SE ILUSTRAN.
•Desconectar la clavija-instalación A de la
clavija-bateria B, pulsando de lado.
•Introducir la clavija del cargador de
baterías en una toma doméstica
siguiendo las instrucciones incluidas.
Conectar el enchufe B con el enchufe del
cargador de baterías C.
•Una vez finalizada la carga desconectar el
cargador C de la toma de corriente y
después desconectar la clavija C de la
clavija B.
•Introducir a fondo hasta el “clic” la clavija
A e la clavija B. Finalizada la operación
recuerde siempre cerrar el capó.
4
Page 6

ASSEMBLY
MONTAGE
MONTAJE
1 2
1
2
2
1
3
4 5
1
2
6
7
8
A
12
5
9
10 11
A
13 14
Page 7

ENGLISH
FRANÇAIS ESPAÑOL
ASSEMBLY INSTRUCTIONS
CAUTION:
ADULT ASSEMBLY REQUIRED.
USE CARE WHEN UNPACKING AS
COMPONENTS TO BE ASSEMBLED
MAY POSE A SMALL PARTS/SHARP
EDGE HAZARD.
IF THE PRODUCT IS DAMAGED
WHEN YOU OPEN THE
PACKAGING, CONTACT THE
SERVICE CENTER AND DO NOT
USE THE PRODUCT.
BATTERY IS INCLUDED AND
MUST BE CONNECTED
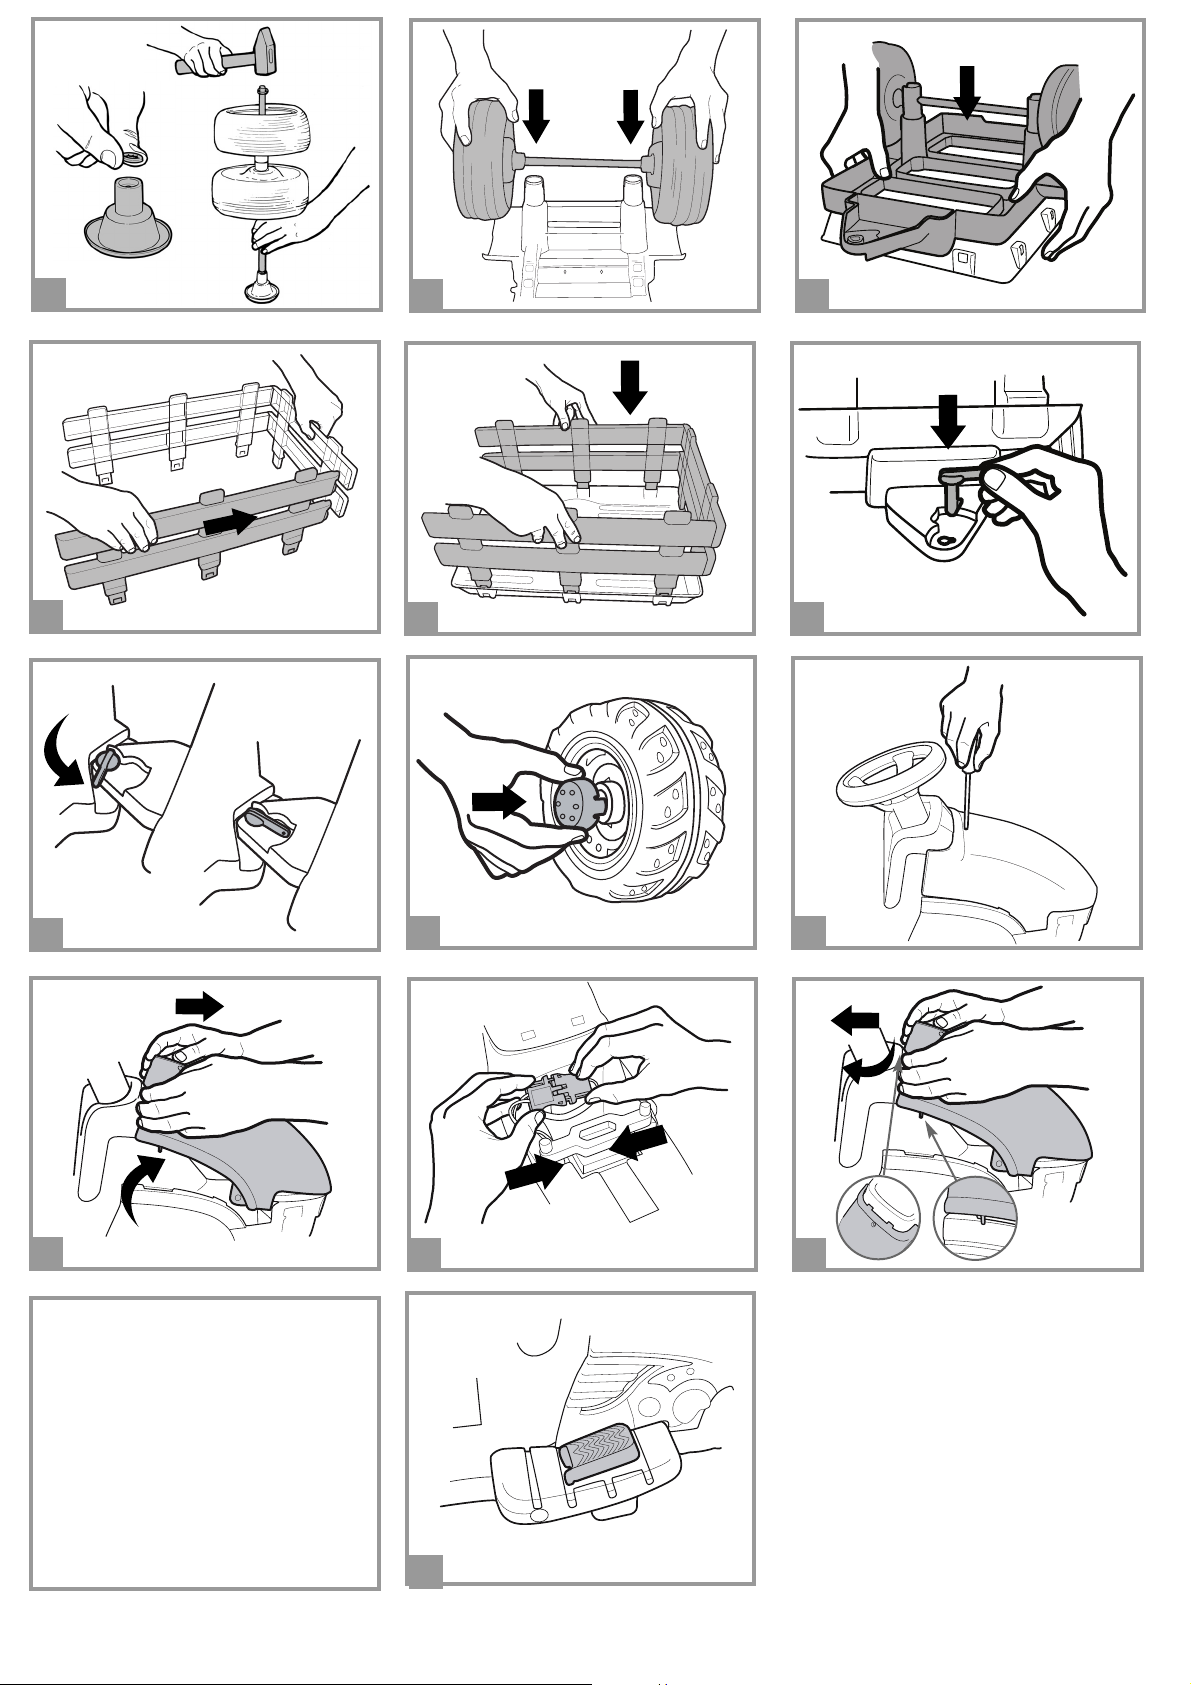
1 •Position the seat as shown in the
figure.
2 •IMPORTANT: the seat can
be adjusted to 2 positions depending
on the height of the child (see figure).
Position 1: the seat is higher and
further back. Position 2: the seat is
lower and further forward.
3 •Turn the vehicle on its side, keeping
the seat in position. Remove the
screw from the access door, under
the vehicle.
4 •Open the cover to access the seat
attachment screws.
5 •Fasten the two seat screws as shown
in the figure. Close and screw on the
cover.
6 •Snap on the 2 rear light lenses.
7 •Assemble the indicators as shown in
the figure.
8 •Attach the 2 indicators at the front of
the vehicle, as shown in figures 1-2,
taking care that the hollow part of
the indicator is facing down.
9 •Press on the 2 headlight lenses as
shown in detail A.
10 •Position the steering wheel. Attach
the steering wheel with the screw
(10P x 11/4 inch) and washer (5 x 11
x 1 mm) provided.
11 •Push on the steering wheel cap as
shown in the figure.
12 •Insert one of the 4 self-locking
washers (the tractor comes with 2
spare washers) into the special tool
provided with the tractor.
ATTENTION: the tabs on the self locking washer must be turned
towards the interior of the tool (see
detail A).
13 •Remove the axle from the packing.
Remove the protective caps from the
axle. Insert the axle by pounding the
special tool all the way in using a
hammer. Remove the tool.
14 •Slide the 2 wheels onto the axle.
IMPORTANT: check that the wheels
are correctly inserted, with the hub
caps facing out.
INSTRUCTIONS D'ASSEMBLAGE
ATTENTION:
ASSEMBLAGE PAR UN ADULTE
REQUIS.
OUVRIR LES EMBALLAGES AVEC
PRÉCAUTION CAR LES PIÈCES À
ASSEMBLER PEUVENT
COMPORTER DES RISQUES DE
COUPURES OU DE BLESSURES.
SI LE PRODUIT EST ENDOMMAGÉ
LORSQUE VOUS OUVREZ
L’EMBALLAGE, CONTACTEZ LE
SERVICE APRÈS-VENTE ET
N’UTILISEZ PAS LE PRODUIT.
LA BATTERIE EST INCLUSE
ET DOIT ETRE CONNECTÉE
1 •Placer le siège comme indiqué sur la
figure.
2 •ATTENTION : le siège est réglable en 2
positions en fonction de la hauteur de
l’enfant (voir la figure). Position 1 : le
siège est plus haut et en arrière.
Position 2 : le siège est plus bas et en
avant.
3 •Coucher le véhicule sur un flanc en
maintenant le siège en position.
Dévisser le couvercle du
compartiment-châssis situé sous le
véhicule.
4 •Ouvrir le couvercle pour accéder aux
visses de fixation du siège.
5 •Visser les visses de fixation du siège
comme indiqué sur la figure. Fermer
et revisser le couvercle.
6 •Enclencher les 2 verres des phares
arrière. 7 •Assembler les clignotants
comme indiqué sur la figure.
8 •Monter les 2 clignotants à l’avant du
véhicule comme indiqué sur les
figures 1-2 et en veillant à ce que la
partie creuse du clignotant soit
tournée vers le bas.
9 •Monter correctement par pression les
2 phares avant comme indiqué sur la
figure A.
10 •Mettre le volant en place. Fixer le
volant avec la rondelle (5 x 11 x 1
mm) et la vis fournies (10P x 11/4
inch).
11 •Monter par pression le bouchon du
volant comme indiqué sur la figure.
12 •Insérer une des 4 rondelles à blocage
automatique (2 de réserve) dans
l’outil spécial fourni. ATTENTION :
les languettes de la rondelle à blocage
automatique doivent être tournées
vers l’intérieur de l’outil (voir détail
A).
13 •Sortir l’essieu de l’emballage. Retirer
les bouchons de protection de
l’essieu. Marteler l’essieu pour
l’insérer complètement dans l’outil
spécial, puis retirer l’outil.
14 •Enfiler les 2 roues sur l’essieu.
ATTENTION : s’assurer que les roues
sont enfilées correctement, à savoir
les enjoliveurs tournés vers
l’extérieur.
INSTRUCCIONES DE MONTAJE
PRECAUTION:
REQUIERE MONTAJE DE UN
ADULTO. ALGUNOS
COMPONENTES AL SER
ENSAMBLADOS PODRÍAN TENER
PARTES PEQUEÑAS/RIESGO POR
BORDES CONTANTES.
SI AL ABRIR EL PAQUETE SE
NOTASEN DAÑOS EN EL
PRODUCTO, CONTACTE CON EL
CENTRO DE ASISTENCIA. NO
UTILICE EL PRODUCTO.
LA BATERÍA VIENE
INCLUIDA Y DEBE ESTAR
CONECTADO
1 •Poner el asiento como indica la figura.
2 •ATENCIÓN: el asiento se puede
regular en 2 posiciones según la
altura del niño (véase la figura).
Posición 1: el asiento está más alto y
retrasado; posición 2: el asiento está
más bajo y adelantado. v posición el
asiento. Destornillar la tapa del
alojamiento-chasis que está debajo
del vehículo.
3 •Poner el vehículo de lado manteniendo
en posición el asiento. Destornillar la
tapa del alojamiento-chasis que está
debajo del vehículo
4 •Abrir la tapa para acceder a los 2
tornillos de fijación del asiento.
5 •Enroscar los tornillos de fijación del
asiento como indica la figura. Cerrar
y volver a atornillar la tapa.
6 •Montar a presión los 2 cristales de los
faros posteriores.
7 •Ensamblar los intermitentes como
indica la figura.
8 •Montar las 2 flechas en la parte
delantera del vehículo, tal y como se
indica en las figuras 1-2 y prestando
atención a que la parte hueca de la
flecha quede hacia abajo.
9 •Montar a presión los dos faros
delanteros de manera correcta como
indica la figura A.
10 •Colocar el volante. Fijar el volante
con la arandela (5 x 11 x 1 mm) y el
tornillo (10P x 11/4 inch) que se
entrega.
11 •Poner a presión el tapón del volante
como indica la figura.
12 •Meter una de las 4 arandelas
autobloqueantes (2 son de repuesto)
en la herramienta que se entrega.
ATENCIÓN: las lengüetas de la
arandela autobloqueante tienen que
estar hacia el interior de la
herramienta (véase el detalle A).
13 •Quitar el eje del embalaje. Quitar los
tapones de protección del eje. Meter
el eje golpeando con un martillo en la
herramienta hasta el fondo; quitar
luego la herramienta.
14 •Meter en el eje las 2 ruedas.
ATENCIÓN: comprobar que las
ruedas estén metidas correctamente,
es decir, con los tapacubos hacia
fuera.
6
Page 8
15
16 17
18
21
1
2
19
22 23
20
24
VEHICLE FEATURES AND
INSTRUCTIONS FOR USE
CARACTERISTIQUES ET
EMPLOI DU VEHICULE
CARACTERÍSTICAS Y USO
DEL VEHÍCULO
7
25 26
A
27
Page 9

ENGLISH
FRANÇAIS ESPAÑOL
15 •Place a self-locking washer in the
special tool, and insert the prepared
axle, pounding it all the way in.
16 •Attach the wheel unit to the base of
the trailer by pressing on it.
17 •Attach the bottom of the trailer
(prepared beforehand) to the bed by
pressing, as shown in the figure.
18 •Assemble the 3 sides of the trailer,
ensuring that the parts with the
wooden effect are facing outwards.
19 •Fit the assembled parts into the slots
in the base of the trailer.
20 •Insert the red coupling into the hole
on the trailer (see figure).
21 •Couple the trailer onto the back of
the tractor, rotating the red lever.
Figure 1: the trailer can be
uncoupled; figure 2: the trailer
coupled. WARNING: The trailer will
hold a load weighing up to 11 lbs (5
kg).
22 •Attach the 2 hubcaps to the wheels
on the trailer (Attention, in the
packaging you will find 6 hubcaps; the
remaining 4 are to be attached to the
wheels of the tractor).
23 •Unscrew the hood.
24 •Pull the hood towards you while
lifting and turning it to remove (see
figure).
25 •Connect the battery plug to the
electric system plug.
26 •Close the hood, taking care to
correctly insert the tabs into the
openings in the chassis.
ATTENTION: Detail A shows the
hood incorrectly attached. The
vehicle is ready for use.
15 •Placer une rondelle à blocage
automatique dans l’outil spécial,
insérer l’essieu préparé et le marteler
jusqu’à insertion complète.
16 •Enfiler par pression le groupe des
roues sur la base de la remorque.
17 •Accrocher le fond de la remorque
(préparée auparavant) sur la benne
en appuyant comme indiqué sur la
figure.
18 •Assembler les 3 flancs de la
remorque en plaçant vers l’extérieur
les côtés où l’effet bois est
représenté.
19 •Positionner les pièces assemblées sur
la partie inférieure de la remorque en
les enclenchant dans les trous prévus
à cet effet.
20 •Insérer le crochet rouge dans le trou
adéquat de la remorque (voir la
figure). 21 •Accrocher la remorque à
l’arrière du tracteur en faisant
pivoter la cheville rouge. Figure 1 : la
remorque peut être décrochée ;
figure 2 : la remorque est bloquée.
ATTENTION: La remorque peut
contenir des objets pour un poids
maximum de 11 lbs (5 kg).
22 •Appliquer les 2 enjoliveurs aux roues
de la remorque (Attention ! Vous
trouverez 6 enjoliveurs dans
l’emballage; les 4 autres doivent être
appliqués aux roues du tracteur).
23 •Dévisser le capot.
24 •Tirer le capot vers soi, en le
soulevant par un mouvement de
rotation (voir la figure), puis l’enlever.
25 •Connecter la fiche de la batterie à
celle de l’installation.
26 •Refermer le capot en prenant soin
d’insérer correctement les languettes
dans les encoches de la coque.
ATTENTION: le détail A illustre un
mauvais montage du coffre. Le
véhicule est prêt à l’emploi.
15 •Colocar una arandela autobloqueante
en la herramienta, meter el eje
preparado y golpear hasta el fondo.
16 •Presionando, meter el grupo de
ruedas en la base del remolque.
17 •Enganchar el fondo del remolque
(preparado con anterioridad) sobre el
cajón presionando como indica la
figura.
18 •Montar los 3 lados del remolque
colocando las partes que reproducen
el efecto madera hacia el exterior.
19 •Colocar las partes montadas en el
fondo del remolque encajándolas en
los orificios correspondientes.
20 •Meter el gancho rojo en el orificio
correspondiente del remolque (véase
la figura).
21 •Enganchar el remolque en la parte
trasera del tractor, girando el pivote
rojo. Figura 1: el remolque puede
desengancharse; figura 2: el remolque
está bloqueado. ATENCIÓN: El
remolque puede contener objetos
por un máximo de 11 lbs (5 kg).
22 •Aplicar los 2 cubre-pernos a las
ruedas del remolque (Atención, en el
embalaje hay 6 cubre-pernos; los
otros 4 son para aplicar a las ruedas
del tractor).
23 •Destornillar el capó.
24 •Tirar hacia sí el capó, levantándolo al
mismo tiempo con un movimiento
rotatorio (véase la figura) y sacarlo.
25 •Conectar la clavija de la batería a la
de la instalación.
26 •Volver a cerrar el capó metiendo bien
las lengüetas en los huecos de la
carrocería. ATENCIÓN: en el detalle
A se ve el enganche incorrecto del
capó. El vehículo ya está listo para
ser usado.
VEHICLE FEATURES AND
INSTRUCTIONS FOR USE
27 •ACCELERATOR PEDAL/ELECTRIC
BRAKE: when the foot is lifted from
the accelerator pedal, the electric
automatically stops the
brake
tractor.
CARACTERISTIQUES ET MODE
D’EMPLOI DU VEHICULE
27 •PEDALE D’ACCELERATEUR/FREIN
ELECTRIQUE: en soulevant le pied de
la pédale, le
automatiquement en fonction.
frein entre
CARACTERÍSTICAS Y USO DEL
VEHÍCULO
27 •PEDAL ACELERADOR/FRENO
ELÉCTRICO: al levantar el pie del
pedal, el freno entra en
funcionamiento automáticamente.
8
Page 10

ELECTRICAL DIAGRAM DIAGRAMME ÉLECTRIQUE DIAGRAMA ELÉCTRICO
9
Page 11

46
USA
Llame gratis:
Call toll free:
1-800-728-2108
1-800-225-1558
www.pegperego.com
8
libre:
CANADA
Call toll free:
Appelez le péage
1-800-661-5050
7
9
6
10
PIEZAS DE RECAMBIOREPLACEMENT PARTS PIÈCES DE RECHANGE
5
4
13
11
12
14
25
15
16
18
22
19
17
21
20
23
45
DECAL
CALCOMANIAS
DECALCOMANIES
ELECTRIC SYSTEM
CIRCUIT ÉLECTRIQUE
44
INSTALACIÓN ELÉCTRICA
3
24
1
33
32
34
38
36
37
39
40
35
26
27
28
31
2
29
30
41
42
43
SPST8343GR
SPST8787N
SAGI8340RYN
SPST8347N
ASGI0145NRY
1
2
3
4
5
SPST8552SGP
SPST8338N
SPST8553SN
SPST8333WRY
SPST8249N
6
7
8
9
10
SPST8551N
SPST8334WN
IAKB0509
SPST8335
11
12
13
14
SPST8337A
ASGI0144DNA
ASGI0144SNA
SAGI8348N
15
17
16L
16R
SPST8330WN
SPST8553DN
SARP8325DNGR
SARP8325SNGR
SPST8331WN
18
19
21
20L
20R
SOFF0197Z
SPST8332JNP
SPST8332KNP
ASGI0160GPN
22
23
24
25
SPST8354JGP
SOTF0512Z
SARP8326XDNGR
SARP8326XSNGR
SPST8344JGR
26
27
29
28L
28R
SPST8345RY
SAGI9963XXKR
SPST8341DN
SPST8341SN
30
31
32L
32R
SPST8342RF
SPST0397R
SPST8356N
SPST9073RY
33
34
35
36
SPST9074SGR
SPST9075GR
SPST9074DGR
SOFF0174L30
SARP8358NGR
37
38
39
40
41
SPST8344GR
SPST8345RY
MECB0085U
MMEV1104
MEIE0057
42
43
44
45
46
10
Page 12

ENGLISH
PEG PEREGO®thanks you for choosing this product. For more than 60 years, PEG PEREGO has been taking children
for an outing: first with its famous baby carriages and strollers, later with its pedal and battery operated children's
vehicles.
Discover our complete range of products, news and other information about the Peg Perego world on our web site
www.pegperego.com
IMPORTANT INFORMATION
•Read this instruction manual carefully to learn the use of the vehicle and to teach your child safe and enjoyable
driving. Please keep this manual (with your original sales receipt) for use as a reference in the future.
•DO NOT RETURN YOUR VEHICLE TO THE STORE. This product cannot be returned for a
refund after it has been used. If you have ANY questions, need replacement parts or need
assistance, call us toll-free; U.S.A. , call 1-800-728-2108 / CANADA, call 1-800-661-5050
•This product meets and/or exceeds all ASTM (American Society for Testing and Materials) TOY SAFETY
STANDARDS, including F 963, Consumer Toy Safety Specifications as well as C.R.C, c.931, the Canadian Hazardous
Products (Toys) Regulations.
•If you give away the product to third parties, make sure that it is accompanied by the instruction manual.
•Tools needed for assembly: medium Phillips screwdriver and a hammer (not included)
•Your new vehicle is partially pre-assembled. It will require adult assembly. Please set aside at least 45 minutes for
assembly.
•Before the vehicle is used for the first time, charge the battery for 18 hours to initiate it. Failure to do this can result
in permanent battery damage.
•Use only with the included Peg Perego 6 Volt lead-acid, rechargeable battery and a Peg Perego 6 Volt Charger (both
included).
•Year 2+
•Weight capacity 55 lbs + 11 lbs
•Do not exceed the maximum total weight capacity of 55 lbs (25 kg) + 11 lbs (5 kg)
Contents:
• 1 CASE IH Lil Tractor & Trailer children’s riding vehicle -- partially assembled
• 1 Rechargeable 6 V 4,5 Ah sealed lead-acid battery
• 1 Charger 6 V
• 1 heavy duty 50 W motor -- pre installed
• assembly hardware
• parts to be assembled
• decals
•Speed: 2,5 mph
•To prevent damaging the motor and gears, teach your child to stop the vehicle before switching directions.
•Use this vehicle ONLY outdoors. Most interior flooring can be damaged by riding this vehicle indoors. Peg Perego will
not be respnsible for damage to the floor if the vehicle is used indoors.
•Peg Perego reserves the right to modify or change its products. Price, literature, manufacturing processes or locations
or any combination of the above mentioned entities may change at any time for any reason without notice with
impunity.
CAUTION:
ELECTRIC VEHICLE NOT RECOMMENDED FOR CHILDREN UNDER 2 YEARS OF AGE. AS WITH ALL ELECTRIC
PRODUCTS, PRECAUTIONS SHOULD BE OBSERVED DURING HANDLING AND USE TO PREVENT ELECTRIC
SHOCK. RECHARGER INCLUDED. 120 VOLTS, 60Hz, 8W INPUT, 6 VOLTS (DC) OUTPUT.
11
Page 13

BATTERY MAINTENANCE AND SAFETY
CAUTION:
Only adults should recharge batteries never children.
Never allow children to handle batteries.
Only use the batteries specified by the manufacturer. Only use the charger specified by the manufacturer.
Do not mix old and new batteries.
Do not mix alkaline, standard (carbon-zinc), or rechargeable (nickel-cadmium) batteries.
CHARGING THE BATTERY
•Charge the battery no longer than 24 hours, following the instructions enclosed with the battery charger.
•Charge the battery, as the vehicle shows low power, in this way you will avoid damage to the battery.
•If you don’t use your vehicle for a long period of time unplug the battery from the main wire harness of the
vehicle. Remember to charge the battery at least every three months.
•Never charge the battery upside down.
•Do not forget batteries during charging! Check them periodically.
•Never use a replacement recharger or batteries unless they are approved by PEG PEREGO.
•Batteries are sealed and maintenance free.
•Battery polarity must be observed when connecting battery to wiring.
WARNING:
•BATTERIES CONTAIN TOXIC AND CORROSIVE SUBSTANCES. DO NOT TAMPER WITH THEM.
•Batteries contain an acid-based electrolyte.
•Do not make direct contact between battery terminals, as this can cause an explosion or fire.
•Charging produces explosive gases. Charge batteries in a well ventilated area away from sources of heat and
flammable materials.
•Exhausted batteries are to be removed from the vehicle.
•Do not place the batteries near clothing to avoid damage.
IF A LEAK DEVELOPS
Shield your eyes. Avoid direct contact with the electrolyte, protect your hands.
Place battery in a plastic bag and follow directions listed below.
IF ELECTROLYTE COMES IN CONTACT WITH SKIN OR CLOTHING
Flush with cool water for at least 15 minutes.
See a physician at once.
IF ELECTROLYTE IS INJESTED
Give tap water, milk of magnesia or egg whites at once.
Do not induce vomiting.
See a physician at once.
DISPOSAL OF BATTERIES; CONTAINS SEALED LEAD ACID BATTERY. BATTERY MUST BE RECYCLED.
Help protect the environment!
Do not throw used batteries in your regular, household trash.
Dispose old batteries at an approved battery dumping station; contact your local Environmental Protection Agency
office or call Peg Perego Customer Service for additional information.
12
Page 14

RULES FOR SAFE DRIVING
DON'T STOP THE FUN: Purchase a spare battery to have a freshly charged back-up available or purchase a Quick
Charge recharger to recharge your battery in 2 hours.
For your child’s safety: please read and follow all instructions below before operating.
•1st SPEED:
With both hands on the steering wheel, press down on the accelerator pedal; the vehicle goes forward at
•BRAKE: The electric braking system stops the vehicle automatically when your child lifts his foot off the pedal.
ATTENTION!
•Check that all studs/nuts of the wheels are secure.
•When operating in overload conditions, the overload circuit breaker will automatically disconnect the power. After 10
or more seconds,the circuit breaker will automatically reset, however you must eliminate overload conditions to
resume normal driving.
•If the circuit breaker opens, the toy becomes free-wheeling. You must remove foot from gas pedal to apply the breaks.
Teach your child the proper use of this vehicle for a safe and fun play time.
•Before starting be sure that the way is free from people and objects.
•Drive with both hands on the steering wheel and keep your eyes on the road at all times.
•Stop in time to avoid accidents and immediately release pedal when stuck.
2,5 mph.
CAUTION:
•If the toy is overloaded, the overload switch will immediately disconnect the power. The
power supply will be restored after a few seconds.
VEHICLE MAINTENANCE AND SAFETY
This product meets and/or exceeds all ASTM (American Society for Testing and Materials) TOY SAFETY
STANDARDS, including F 963, Consumer Toy Safety Specification.
This vehicle is not intended for use on streets, around traffic or parked cars.
MAINTENANCE AND CARE
•Do not try to repair the vehicle by yourself.
•Regularly check the conditions of the vehicle, particularly the electrical system, the plug connections, the
covering caps and the charger. In case of fault, do not try to use the vehicle and the charger. For repair use only
original PEG PEREGO’s spare parts.
•PEG PEREGO assumes no liability if the electrical system is tampered with.
•Take care with the battery charger cable. For example, do not pull it to remove the plug, do not pull the vehicle
along on its wheels using the cable, do not cover the cable because it may overheat, do not leave it on hot
surfaces and be careful about where and how you roll it up.
•Do not leave vehicle or batteries near sources of heat such as radiators, stoves, fireplaces, etc.
•Protect vehicle from water, rain, snow, etc.
•When operating in overload conditions, the overload circuit breaker will automatically disconnect the power.
After 10 or more seconds,the circuit breaker will automatically reset, however you must eliminate overload
conditions to resume normal driving.
•Periodically lubricate (with a light weight oil) moving parts, such as wheel bearings, steering linkages, where they
rotate or touch one another.
•The vehicle’s surfaces can be cleaned with a dampcloth. Do not use abrasive cleaners. The cleaning must be
carried out by adults only.
•Never disassemble the vehicle mechanisms or motor unless authorized by PEG PEREGO.
SAFETY
WARNING:
•To reduce the risk of injury, adult supervision is required. Never use in roadways, near motor vehicles, on or
near steep inclines or steps, swimming pools or other bodies of water; always wear shoes, and never allow more
than one rider.
•Surface that are appropriate for use: asphalt, cement, tiles and smooth surfeces.
•Not suitable for children under the age of 2 years.
•Never use the vehicle on steep slopes or near steps or stairs. This vehicle is not suitable for use on public
highways.
13
Page 15

•Children should always wear shoes when riding in or driving a ride-in/ride-on vehicle.
•Do not allow children to place their hands, feet or any part of their body, clothing or other articles near the
moving parts while vehicle is in operation.
•Do not allow the electrical components, motors, wiring, switches of your motorized vehicle to become wet and
never wash it with a hose.
•Never use gasoline or other flammable substances near the vehicle. Keep all gasoline away from children.
PROBLEMS?
IF THE VEHICLE DOES NOT OPERATE?
•When operating in overload conditions, the circuit breaker will automatically disconnect
the power. After 10 or more seconds, the circuit breaker will automatically reset,
however-you must eliminate overload conditions to resume normal operating.
•Check that all plugs are properly connected.
•Check electrical switches. Replace if necessary.
•Check that the battery is connected to the electrical system.
IF THERE IS NO POWER?
•Fully recharge the battery. If the problem persist, check with an Authorized PEG PEREGO Service Center.
CUSTOMER SERVICE
For your convience, PEG PEREGO offers after-sales service, directly or through a network of authorized service
centers for repairs or replacement parts.
If you have any questions about your Peg Perego vehicle, please call our toll-free service lines at;
U.S.A , call 1-800-728-2108
CANADA, call 1-800-661-5050
Trained customer service representatives are available to take your call in English or Spanish.
14
Page 16

FRANÇAIS
®
PEG PEREGO
les promenades des enfants. Dès leur naissance, avec les landaus puis avec les poussettes et plus tard, avec les jouets à
pédales et à batterie.
Découvrez la gamme complète des produits, les nouveautés et d’autres renseignements sur le monde Peg Perego sur
notre site www.pegperego.com
vous remercie d’avoir choisi ce produit. Cela fait déjà plus de 60 ans que PEG PEREGO accompagne
L’INFORMATION IMPORTANTE
•Lisez attentivement ce manuel d’instructions pour apprendre à utiliser le véhicule, et apprendre à votre enfant à le
conduire, en s’amusant et en toute sécurité. Veuillez conserver ce manuel (ainsi que votre ticket de caisse original)
pour pouvoir vous y référer à l’avenir.
•NE RETOURNEZ PAS VOTRE VÉHICULE AU MAGASIN. Ce produit ne peut pas être rendu
pour remboursement après avoir été utilisé. Si vous avez la MOINDRE question, ou besoin de
pièces de rechange ou d’assistance, appelez notre numéro vert: pour les ÉTATS-UNIS,
appelez le 1-800-728-2108 / pour le CANADA, appelez le 1-800-661-5050.
•Ce produit est conforme et/ou supérieur aux NORMES DE SÉCURITÉ SUR LES JOUETS de l’ASTM (American
Society for Testing and Materials), y compris celles des «Consumer Toy Safety Specifications» F 963, et des Lois
Canadiennes sur les Produits Dangereux (Jouets), C.R.C, c.931.
•Si vous donnez le produit à des tiers, assurez-vous qu’il soit accompagné du manuel d’instructions.
•Outils nécessaires pour l’assemblage : tournevis de Phillips moyen et marteau (non inclus).
•Votre nouveau véhicule est partiellement assemblé. Il doit être assemblé par un adulte. Veuillez compter au moins 45
minutes pour l’assemblage.
•Avant d’utiliser le véhicule pour la première fois, mettez en charge la batterie pendant 18 heures pour la déclencher.
Le manquement à cette règle pourrait être à l’origine de dommages irréversibles à la batterie.
•À n’utiliser qu’avec la batterie rechargeable de 6 Volt Peg Perego et un chargeur 6 Volt Peg Perego (tous deux inclus).
•Âge: 2+
•Capacité 25 kg + 5 kg
•Ne pas dépasser la capacité maximale de 25 kg + 5 kg.
Contient :
• 1 véhicule de conduite pour enfants CASE IH Lil Tractor & Trailer – partiellement assemblé
• 1 Batterie rechargeable de 6 V 4,5 Ah scellée au plomb
• 1 Chargeur 6 V
• 1 moteur poids lourds 50 W – préinstallés
• matériel d’assemblage
• parties à assembler
•decalcomanies
•Vitesse: 4 km/h
•Pour éviter d’endommager le moteur et les vitesses, apprenez à votre enfant à arrêter le véhicule avant de changer de
direction.
•Utilisez ce véhicule à l’extérieur UNIQUEMENT. La plupart des sols d’intérieur peut être endommagée par la
conduite du véhicule à l’intérieur. Peg Perego n’est pas responsable des dommages causés au sol si le véhicule est
utilisé à l’intérieur.
•Peg Perego se réserve le droit de modifier ou changer ses produits. Le prix, la documentation, les processus ou lieux
de fabrication ou toute combinaison des entités ci-dessus mentionnées peuvent changer à tout moment, pour quelque
raison que ce soit, et ce sans préavis et en toute impunité.
15
Page 17

ATTENTION:
VÉHICULE ÉLECTRIQUE DÉCONSEILLÉ AUX ENFANTS DE MOINS DE 2 ANS. COMME POUR TOUS LES
PRODUITS ÉLECTRIQUES, UNE ATTENTION PARTICULIÈRE DOIT ÊTRE PRÊTÉE PENDANT LA MANIPULATION
ET L’USAGE, AFIN D’ÉVITER TOUT CHOC ÉLECTRIQUE. CHARGEUR INCLUS. 120 VOLTS, 60 Hz, ALIMENTATION
8 W, PUISSANCE DE SORTIE 6 VOLTS (CC).
ENTRETIEN DE LA BATTERIE ET SÉCURITÉ
ATTENTION :
La recharge des piles doit être effectuée exclusivement par un adulte, et en aucun cas un enfant.
Ne jamais laisser les enfants jouer avec les piles.
Utiliser uniquement les piles indiquées par le fabricant. Utiliser uniquement le chargeur indiqué par le fabricant.
Ne pas mélanger des piles neuves avec de vieilles piles.
Ne pas mélanger les piles alcalines, classiques (carbone-zinc) ou rechargeables (nickel-cadmium).
MISE EN CHARGE DE LA BATTERIE
•Ne pas dépasser 24 heures de mise en charge, en suivant les instructions jointes au chargeur de batterie.
•Mettre la batterie en charge dès que le véhicule perd de la puissance, vous éviterez ainsi de lui causer tout
dommage.
•Si le véhicule n’est pas utilisé pendant longtemps, débranchez la batterie du faisceau de câbles principal du
véhicule. N’oubliez pas de charger la batterie tous les trois mois minimum.
•La batterie ne doit pas être chargée à l’envers.
•Ne pas oublier la batterie en charge ! Contrôlez-la de temps en temps.
•Ne jamais utiliser de chargeur ou de batterie de rechange qui ne soient pas approuvés par PEG PEREGO.
•La batterie est scellée et ne nécessite pas d’entretien.
•La polarité de la batterie doit être respectée lors de son branchement.
ATTENTION :
•LA BATTERIE CONTIENT DES SUBSTANCES TOXIQUES CORROSIVES. NE PAS LA MANIPULER.
•La batterie contient des électrolytes à base acide.
•Evitez tout contact direct entre les cosses de la batterie, sous peine de causer une explosion ou un incendie.
•Le chargement produit des gaz explosifs. Mettre la batterie en charge dans un endroit bien aéré, loin de toute
source de chaleur et des matières inflammables.
•Retirer la batterie déchargée du véhicule.
•Ne pas placer la batterie près de vêtements afin d’éviter tout dommage.
EN CAS DE FUITE
Protégez vos yeux. Évitez tout contact direct avec l'électrolyte : protégez vos mains.
Mettez la batterie dans un sac en plastique et suivez les instructions concernant l’élimination de la batterie.
EN CAS DE CONTACT DE LA PEAU OU DES VÈTEMENTS AVEC L’ÉLECTROLYTE
Rincer abondamment la partie touchée sous l’eau courante pendant 15 minutes. Consulter immédiatement un
médecin.
EN CAS D’INGESTION D’ÉLECTROLYTE
Donner immédiatement de l’eau courante, du lait de magnésie ou des blancs d’œuf. Ne pas faire vomir. Consulter
immédiatement un médecin.
ÉLIMINATION DE LA BATTERIE; CONTIENT BATTERIE SCELLEE AU PLOMB. LA BATTERIE DOIT ETRE
RECYCLÉE.
Contribuez à la protection de l’environnement!
Ne pas jeter la batterie usagée parmi les ordures ménagères.
Vous pouvez la confier à un centre de collecte agréé pour batteries usagées; contactez votre Agence de
protection de l’environnement locale ou appelez le Service Client de Peg Perego pour plus d’informations.
16
Page 18

RÈGLES POUR UNE CONDUITE EN TOUTE SÉCURITÉ
DIVERTISSEMENT SANS INTERRUPTION : Prévoyez une batterie de rechange chargée et prête à l’emploi ou achetez
un chargeur Quick Charge pour charger votre batterie en 2 heures.
Pour la sécurité de vos enfants: veuillez lire et suivre les instructions ci-dessous avant de mettre en marche le véhicule.
• 1ere VITESSE :
Les deux mains sur le volant, appuyez sur la pédale d’accélérateur; le véhicule avance à 4 km/h.
•FREIN: le système de freinage électrique arrête le véhicule automatiquement dès que votre enfant enlève son pied de
la pédale.
ATTENTION !
•Vérifier que si toutes les plaques/écrous de fixation des roues sont bien serrés.
•Si le véhicule fonctionne en conditions de surcharge, l’interrupteur de surcharge coupe immédiatement le courant. La
distribution de courant reprend de 10 secondes environ, mais il faut éliminer les conditions de surcharge pour assurer
la conduite normale.
•Si le disjoncteur se déclenche, le jouet devient autonome. Vous devez enlever le pied de la pédale d’accélérateur pour
freiner.
Apprenez à votre enfant à utiliser correctement le véhicule pour garantir une conduite amusante en toute sécurité.
•Avant de partir, s’assurer que le parcours est libre de personnes ou de choses.
•Conduire avec les mains sur le volant et toujours regarder la route.
•Freiner à temps pour éviter les accrochages.
ATTENTION:
•Si le jouet est utilisé dans des conditions entraînant une surcharge, l’interrupteur de
surcharge réduira automatiquement la puissance. La puissance sera rétablie quelques
secondes plus tard.
ENTRETIEN ET SOIN DU VÉHICULE
Ce produit est conforme et/ou supérieur aux NORMES DE SÉCURITÉ SUR LES JOUETS de l’ASTM (American
Society for Testing and Materials), y compris celles des «Consumer Toy Safety Specifications» F 963.
Ce véhicule n’est pas destiné à l’utilisation sur la route, près de la circulation ou de voitures en stationnement.
ENTRETIEN ET SOIN
•Ne tentez pas de réparer le véhicule vous-même.
•Contrôlez régulièrement l’état du véhicule, en particulier le circuit électrique, le branchement des fiches, les
cosses de protection et le chargeur de batterie. Au cas où vous relèveriez des anomalies, n’utilisez ni le véhicule
électrique, ni le chargeur de batterie. Pour les réparations, n’utilisez que des pièces de rechange originales PEG
PEREGO.
•PEG PEREGO décline toute responsabilité en cas de manipulation du circuit électrique.
•Prenez soin du câble du chargeur de batterie. Par exemple, ne pas tirer pour retirer la fiche, ne pas traîner le
véhicule sur ses roues en utilisant le câble, ne pas couvrir le câble car il pourrait surchauffer, ne pas le laisser sur
des surfaces chaudes et soyez attentifs à la façon et le lieu où vous l’enroulez.
•Ne pas laisser les batteries ou le véhicule à proximité de sources de chaleur telles que des radiateurs, des fours,
des cheminées, etc.
•Protéger le véhicule contre l’eau, la pluie, la neige, etc.
•Si le véhicule fonctionne en conditions de surcharge, l’interrupteur de surcharge coupe immédiatement le
courant. La distribution de courant reprend de 10 secondes environ, mais il faut éliminer les conditions de
surcharge pour assurer la conduite normale.
•Graisser périodiquement (avec une huile légère) les pièces mobiles telles que les coussinets, le volant, là où elles
tournent ou se touchent entre elles.
•Les surfaces du véhicule peuvent être nettoyées avec un chiffon humide. N’utilisez pas de produits d’entretien
abrasifs. Le nettoyage doit être effectué uniquement par un adulte.
•Ne jamais démonter les mécanismes ou le moteur du véhicule sans l’autorisation de PEG PEREGO.
SÉCURITÉ
ATTENTION:
•Pour éviter tout risque d’accident, la supervision d’un adulte est toujours requise. Ne pas utiliser le jouet sur les
voies publiques, là où il y a des voitures, sur les pentes raides, près de gradins, d’escaliers, de cours d’eau et de
piscines; les enfant doivent toujours porter des chaussures quand ils utilisent le vehicule. Le vehicle est assemble
seulement pour 1 enfant.
17
Page 19

•Pour utiliser sur surfaces lisses : goudron, ciment, carreaux.
•Non adapté aux enfants de moins de 2 ans.
•Ne jamais utiliser sur des pentes raides ou près de marches ou d’escaliers. Ce véhicule n’est pas destiné aux
routes publiques.
•Les enfants doivent toujours porter des chaussures lors de la montée ou de la conduite dans les véhicules
couverts et non couverts.
•Quand le véhicule est en marche, veillez à ce que les enfants ne mettent pas les mains, les pieds ou autres
parties du corps, ni des vêtements ou autres objets près des pièces mobiles.
•Ne jamais mouiller les composants électriques du véhicule tels que moteurs, câblages, boutons, etc., et ne jamais
le nettoyer avec un tuyau d’arrosage.
•Ne jamais utiliser d’essence ou autres substances inflammables à proximité du véhicule. Tenir l’essence hors de la
portée des enfants.
PROBLÈMES?
LE VÉHICULE NE FONCTIONNE PAS?
•Si le jouet fonctionne en conditions de surcharge, l’interrupteur de surcharge coupe
immédiatement le courant. La distribution de courant reprend au bout de 10 secondes
environ, mais il faut éliminer les conditions de surcharge pour assurer la conduite normale.
•Vérifiez que les câbles sont bien connectés.
•Vérifiez les interrupteurs électriques. Remplacez-les si nécessaire.
•Vérifiez que la batterie est branchée au système électrique.
LE VÉHICULE MANQUE DE PUISSANCE ?
•Chargez complètement la batterie. Si le problème persiste, vérifiez auprès d'un centre d’assistance agréé PEG
PEREGO.
SERVICE CLIENT
PEG PEREGO vous offre un service après-vente, directement ou par l’intermédiaire de centres d’assistance agréés,
pour toute réparation ou pièces de rechange.
Pour toute question au sujet de votre véhicule Peg Perego, veuillez appeler notre Service à la Clientèle sans frais au
1-800-661-5050 entre 8 AM et 6:30 PM, du lundi au vendredi. Les représentants qualifiés du service à la clientèle sont
disponibles pour prendre votre appel en français ou en anglais.
18
Page 20

ESPAÑOL
PEG PEREGO®le da las gracias por elegir este producto. PEG PEREGO lleva más de 60 años llevando de paseo a los
más pequeños: primero con sus famosos cochecitos y sillas de paseo, y después con sus vehículos de pedales y batería.
Descubra nuestra gama completa de productos, noticias y más información acerca del mundo Peg Perego en nuestro
sitio web www.pegperego.com
INFORMACIÓN IMPORTANTE
•Lea atentamente este manual de instrucciones para aprender a usar el vehículo y enseñar a su hijo a conducir en
modo seguro y divertido. Conserve este manual (con el ticket de compra original) para su uso como futura
referencia.
•NO DEVUELVA EL VEHÍCULO A LA TIENDA.
Una vez usado el vehículo, no se admiten devoluciones ni se reembolsa el importe pagado. Si
tiene ALGUNA pregunta, necesita recambios o asistencia, llame gratuitamente a nuestros
teléfonos de asistencia; en U.S.A. llame al 1-800-728-2108 / en CANADÁ, llame al 1-800-6615050
•Este producto cumple y/o supera todos los ESTÁNDARES DE SEGURIDAD PARA JUGUETES de la ASTM (Sociedad
Americana para Pruebas y Materiales), entre ellos las Especificaciones de Seguridad del Consumidor de Juguetes, F
963, así como los Reglamentos Canadienses para Productos (Juguetes) Peligrosos, C.R.C, c.931.
•Si cede el producto a terceras partes, asegúrese de que vaya acompañado por el manual de instrucciones.
•Herramientas necesarias para el montaje: destornilladores de la Phillips medio y martillo (no incluidos).
•Su nuevo vehículo se entrega parcialmente pre-montado. El montaje debe ser realizado por un adulto.
Considere un mínimo de 45 minutos para el montaje.
•Antes de utilizar el vehículo por vez primera, cargue la batería durante 18 horas para ponerlo en marcha. No hacerlo
puede causar daños permanentes a la batería.
•Utilícelo solamente con la batería recargable Peg Perego incluida (batería de plomo y ácido de 6 Volt) y un cargador
Peg Perego de 6 Volt (también incluido).
•Años 2+
•Peso máximo 55 lbs + 11 lbs
•No supere el peso máximo admitido, de 55 lbs (25 kg) + 11 lbs (5 kg). Este peso incluye la carga y el conductor.
Contenido:
• 1 vehículo para niños CASE IH Lil Tractor & Trailer -- parcialmente montado
• 1batería recargable de plomo y ácido de 6 V 4,5 Ah sellada
• 1cargador de 6 V
• 1 resistentes motore de 50 W -- preinstalados
• herramientas de montaje
• piezas para el montaje
• adhesivos
•Marcha: 2,5 mph
•Para prevenir daños al motor y los engranajes, enseñe a su hijo a detener el vehículo antes de cambiar de dirección.
•Utilice este vehículo SOLAMENTE en exteriores. Si se conduce en interiores, este vehículo puede causar daños a la
mayor parte de los suelos. Peg Perego no se hace responsable de los daños que puedan sufrir los suelos en caso de
usar el vehículo en interiores.
•Peg Perego se reserva el derecho de modificar o cambiar sus productos. El precio, los textos asociados, los procesos
o lugares de fabricación, así como cualquier combinación de los factores indicados pueden cambiar en cualquier
momento y por cualquier razón, sin necesidad de previo aviso y sin que ello comporte responsabilidad legal alguna.
19
Page 21

PRECAUCIÓN:
VEHÍCULO ELÉCTRICO, NO RECOMENDADO PARA NIÑOS DE MENOS DE 2 AÑOS DE EDAD. DURANTE SU
MANEJO Y SU USO, SE DEBEN OBSERVAR LAS PRECAUCIONES QUE HABITUALMENTE SE APLICAN A LOS
PRODUCTOS ELÉCTRICOS PARA EVITAR DESCARGAS ELÉCTRICAS. CARGADOR DE BATERÍA INCLUIDO. 120
VOLTS, 60Hz, 8W EN ENTRADA, Y 6 VOLTS (CC) EN SALIDA.
MANTENIMIENTO Y SEGURIDAD DE LA BATERÍA
PRECAUCIÓN:
Las baterías deben ser recargadas únicamente por adultos, y bajo ningún concepto por niños.
Nunca permita a los niños manejar las baterías.
Utilice únicamente las baterías especificadas por el fabricante. Utilice únicamente el cargador especificado por el
fabricante.
No mezcle baterías viejas y nuevas.
No mezcle baterías alcalinas con baterías estándar (carbón-zinc) o recargables (níquel-cadmio).
CARGA DE LA BATERÍA
•No cargue la batería por un período superior a 24 horas; siga las instrucciones que vienen con el cargador de
baterías.
•Cargue la batería cuando el vehículo muestre poca potencia, de ese modo evitará dañar la batería.
•Si no utiliza el vehículo durante un período de tiempo prolongado, desenchufe la batería del arnés de cables
principal del vehículo. Recuerde que debe cargar la batería al menos una vez cada tres meses.
•Nunca cargue la batería puesta boca arriba.
•¡No olvide las baterías que ha puesto a cargar! Revíselas de vez en cuando.
•Nunca use baterías o cargadores sustitutorios que no hayan sido aprobados por PEG PEREGO.
•Las baterías están selladas y no necesitan mantenimiento.
•Se debe respetar la polaridad de la batería al conectarla al cableado.
PRECAUCIÓN:
SI SE PRODUCEN FUGAS
Protéjase los ojos. Evite el contacto directo con el electrolito, proteja sus manos. Ponga la batería en una bolsa
plástica y siga las indicaciones que se dan a continuación.
SI EL ELECTROLITO ENTRA EN CONTACTO CON LA PIEL O CON LA ROPA
Aplique agua fría durante un mínimo de 15 minutos.
Acuda a un médico inmediatamente.
EN CASO DE INGESTIÓN DEL ELECTROLITO
Suministre agua corriente, leche de magnesia o claras de huevo inmediatamente. No provoque el vómito. Acuda a
un médico inmediatamente.
ELIMINACIÓN DE BATERÍAS; CONTIENE BATERÍAS DE PLOMO Y ÁCIDO SELLADAS. LA BATERÍA DEBE
RECICLARSE.
¡Ayude a proteger el medio ambiente! No tire las baterías con su basura doméstica. Entregue las baterías viejas
en un punto aprobado de recogida de baterías; para más información, contacte a la oficina local de la Agencia de
Protección del Medio Ambiente o llame al Servicio de Asistencia de Peg Perego.
20
Page 22

REGLAS PARA UNA CONDUCCIÓN SEGURA
QUE NO PARE LA DIVERSIÓN: Compre una batería de repuesto para tener un batería disponible siempre cargada, o
compre un cargador de recarga rápida (Quick Charge), para cargar su batería en 2 horas.
Para la seguridad de su hijo, lea y siga todas las instrucciones que se dan seguidamente antes de poner en marcha el
vehículo.
• 1ª VELOCIDAD :
Con las dos manos en el volante, pise el acelerador; el vehículo avanza a 2,5 mph
•FRENO: El sistema eléctrico de freno detiene el vehículo automáticamente cuando el niño levanta el pie del pedal.
¡ATENCIÓN!
•Compruebe que todos los pernos/tuercas de las ruedas están seguros.
•Si el juguete funciona en condiciones de sobrecarga, el interruptor de la sobrecarga desconectará inmediatamente la
potencia. Después de unos 10 segundos se reanudará el suministro de corriente, pero deben eliminarse las
condiciones de sobrecarga.
•Si el disyuntor se abre, las ruedas del juguete giran libremente. Para aplicar el freno, hay que levantar el pie del
acelerador.
Enseñe a su hijo el uso adecuado de este vehículo para que se divierta jugando con seguridad.
•Antes de ponerse en marcha, asegúrese de que el camino está libre de personas y cosas.
•Se conduce con las dos manos en el volante, y sin apartar la vista de la carretera en ningún momento.
•Hay que detenerse a tiempo para evitar accidentes, y en caso de atascarse, hay que levantar inmediatamente el pie del
pedal.
PRECAUCIÓN:
•Si el juguete funciona en condiciones de sobrecarga, el interruptor de sobrecarga desconectará
inmediatamente la potencia. Después de algunos segundos, se reanudará el suministro de
corriente.
MANTENIMIENTO Y CUIDADOS DEL VEHICULO
Este producto cumple y/o supera todos los ESTÁNDARES DE SEGURIDAD PARA JUGUETES de la ASTM (Sociedad
Americana para Pruebas y Materiales), incluida la Especificación de Seguridad para Consumidores de Juguetes, F 963.
Este vehículo no ha sido concebido para su uso en calles, con tráfico o vehículos aparcado
CUIDADO Y MANTENIMIENTO
• No intente reparar el vehículo usted mismo.
• Revise regularmente el estado del vehículo, en especial el sistema eléctrico, los enchufes de conexión, la tapas de
cubierta y el cargador. En caso de avería, no trate de usar el vehículo y el cargador. Para efectuar reparaciones, utilice
únicamente piezas de repuesto PEG PEREGO.
• PEG PEREGO no asume responsabilidad alguna en caso de que se haya intentado alterar de algún modo el sistema
eléctrico.
• Preste atención cuando use el cable de recarga de la batería. Por ejemplo, no tire del cable para desenchufar la clavija,
no use el cable para arrastrar el vehículo sobre sus ruedas, no tape el cable, pues puede recalentarse, no lo deje
sobre superficies calientes y proceda con cuidado en lo que se refiere a cómo y dónde lo enrolla.
• No deje el vehículo o las baterías cerca de fuentes de calor como radiadores, hornos, chimeneas, etc.
• Proteja el vehículo del agua, la lluvia, la nieve, etc.
• Si el juguete funciona en condiciones de sobrecarga, el interruptor de la sobrecarga desconectará
inmediatamente la potencia. Después de unos 10 segundos se reanudará el suministro de corriente, pero deben
eliminarse las condiciones de sobrecarga.
• Las piezas móviles, como los cojinetes de las ruedas y las articulaciones de la dirección, deben lubricarse
periódicamente con un aceite ligero, en los puntos en que giran o se tocan unas con otras.
• Las superficies del vehículo pueden limpiarse con un paño húmedo. No utilice limpiadores abrasivos. La limpieza debe
ser realizada exclusivamente por adultos.
• Nunca desmonte los mecanismos del vehículo o del motor a no ser que haya recibido autorización de PEG PEREGO.
21
Page 23

SEGURIDAD
ADVERTENCIA
• Para reducir el riesgo de heridas, la supervisión de un adulto es siempre necesaria. No usar nunca en carreteras,
cerca de vehículos a motor, o en pendientes pronunciadas o cerca de escaleras, piscinas u otras superficies de
agua; los niños deben usar siempre zapatos durante el uso del vehículo. El vehículo está construido para un solo
niño: no deje que lo use más de un solo niño.
• Se puede usar sobra superficies lisas: asfalto, cemento,baldosas.
• No es adecuado para niños de menos de 2 años.
• El vehículo nunca debe usarse en pendientes pronunciadas o cerca de escalones o escaleras. Este vehículo no es apto
para su uso en calzadas públicas.
• Los niños siempre deben estar calzados cuando conducen o van montados en un vehículo abierto de usos
recreativos.
• No permita que los niños pongan las manos, los pies o cualquier parte de su cuerpo, ropas u otros artículos cerca de
las partes móviles del vehículo en marcha.
• No permita que los componentes eléctricos, motores, cableados o conmutadores de su vehículo de motor se mojen,
y nunca lo lave con una manguera de agua.
• Nunca use gasolina u otras sustancias inflamables cerca del vehículo. La gasolina siempre debe mantenerse fuera del
alcance de los niños.
¿PROBLEMAS?
¿EL VEHÍCULO NO FUNCIONA?
•Si el juguete funciona en condiciones de sobrecarga, el interruptor de la sobrecarga
desconectará inmediatamente la potencia. Después de unos 10 segundos se reanudará el
suministro de corriente, pero deben eliminarse las condiciones de sobrecarga.
• Compruebe que todos los enchufes estén debidamente conectados.
• Revise los interruptores eléctricos. Cámbielos si fuera necesario.
• Compruebe que la batería esté conectada al sistema eléctrico.
¿EL VEHÍCULO NO TIENE POTENCIA?
• Recargue completamente la batería. Si el problema persiste, revíselo en un Centro de Servicio autorizado de PEG
PEREGO.
SERVICIO DE ASISTENCIA
Para su comodidad, PEG PEREGO ofrece servicio de posventa, directamente o a través de una red de centros de
servicio autorizados para reparaciones o distribución de piezas de repuesto.
Si tiene alguna pregunta acerca de su vehículo Peg Perego, llame a nuestras líneas gratuitas de atención al cliente a:.
U.S.A , 1-800-225-1558
Nuestros representantes de asistencia al cliente, debidamente preparados, están a su disposición para atender a su
llamada en inglés o en español.
22
Page 24

Page 25

Page 26

STOP!
Do not return your vehicle to the store!
We’re a toll-free phone call away and we can help.
If you are missing parts or need assistance, please see the contact information below.
ARRÊTEZ!
Ne retournez pas votre véhicule au magasin !
Nous offrons un service d'appel téléphonique sans frais et nous pouvons aider. Si vous avez des pièces
manquantes ou avez besoin d'aide, voir s'il vous plaît l'information de contact ci-dessous.
¡ALTO!
¡No vuelva su vehículo al almacén!
Somos una llamada telefónica gratis lejos y podemos ayudar.
Si usted es piezas que falta o necesita ayuda, vea por favor la información del contacto abajo.
Model Number IGED1112
PEG PEREGO U.S.A Inc.
3625 INDEPENDENCE Dr. FORT WAYNE IN 46808
fax 260·484·2940
call us toll free 1·800·728·2108
llame USA gratis 1·800·225·1558
PEG PEREGO CANADA Inc.
585 GRANITE COURT PICKERING ONT. CANADA L1W3K1
fax 905·839·9542
call us toll free 1·800·661·5050
PEG PEREGO S.p.A.
via A. De Gasperi, 50 20862 ARCORE (MB) ITALIA
www.pegperego.com
 Loading...