

Page 1

book plus
U.S.A./CANADA
EN Instructions for use
ES Instrucciones de uso
FR Notice d’emploi
Page 2
3
2
1
1
2
Page 3
6
5
4
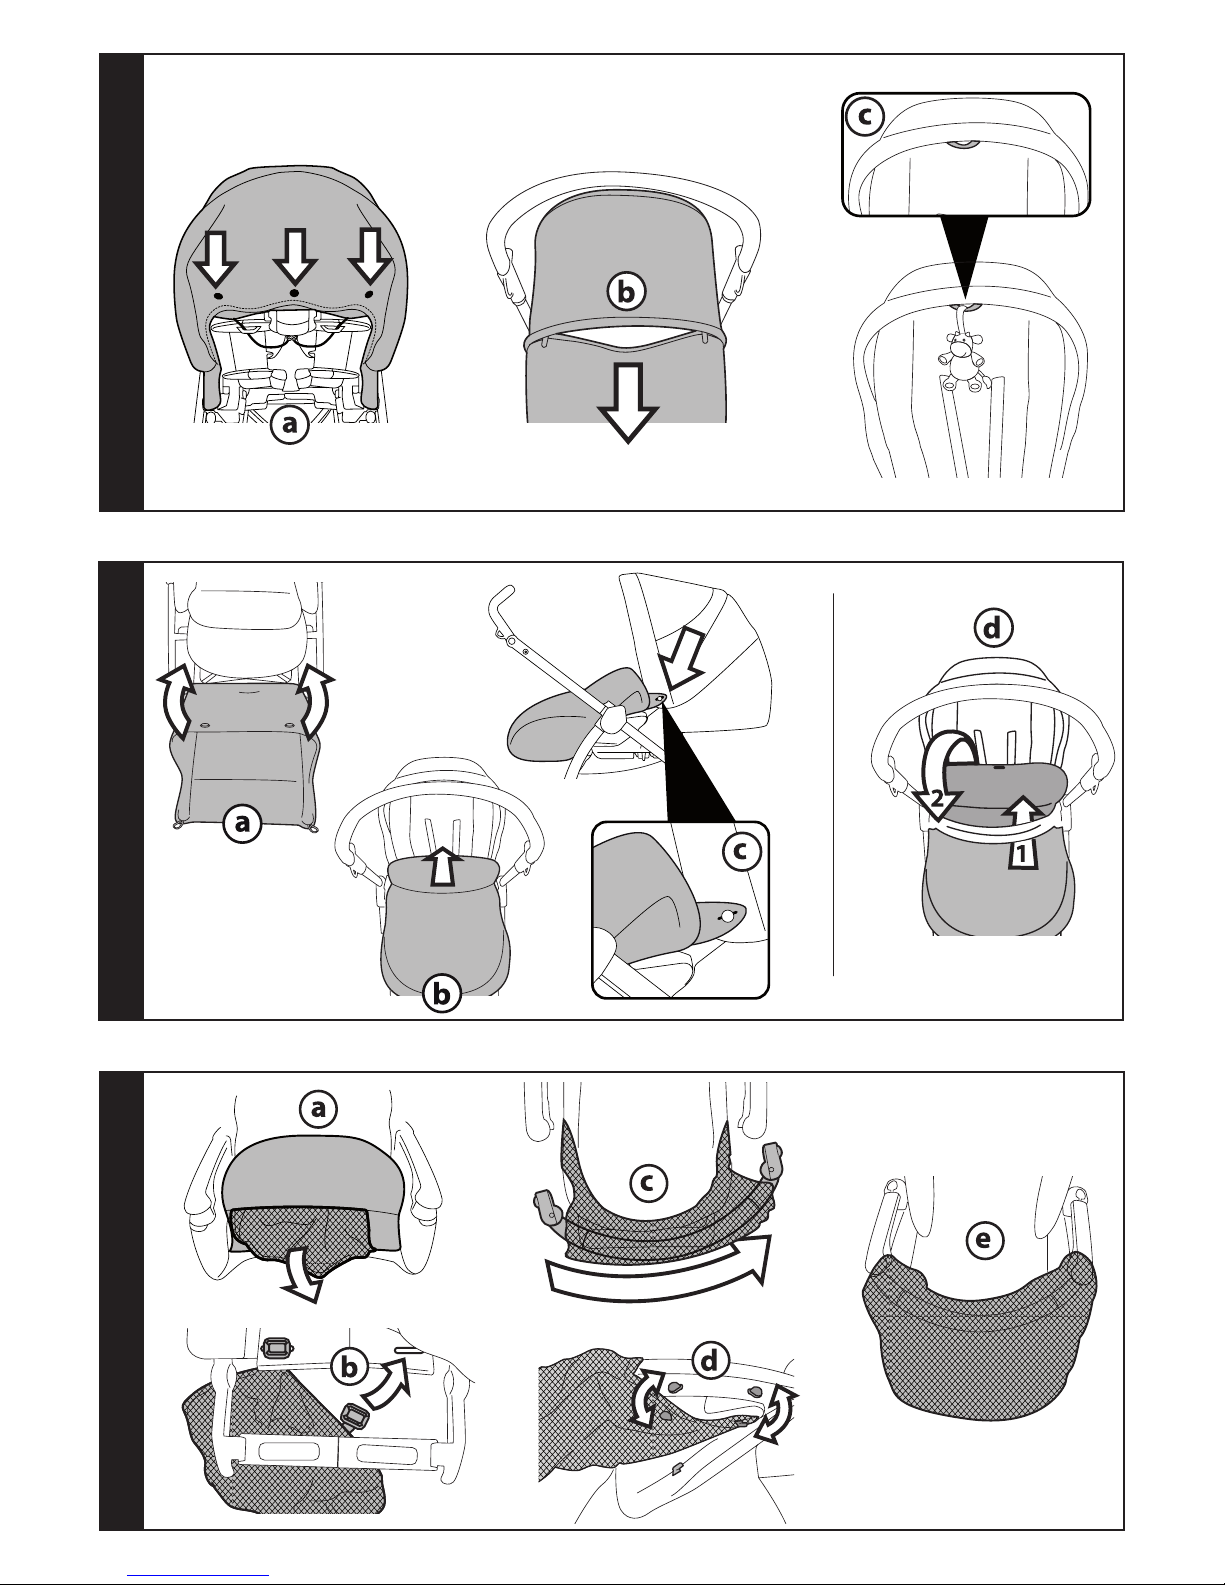
Page 4

8
7
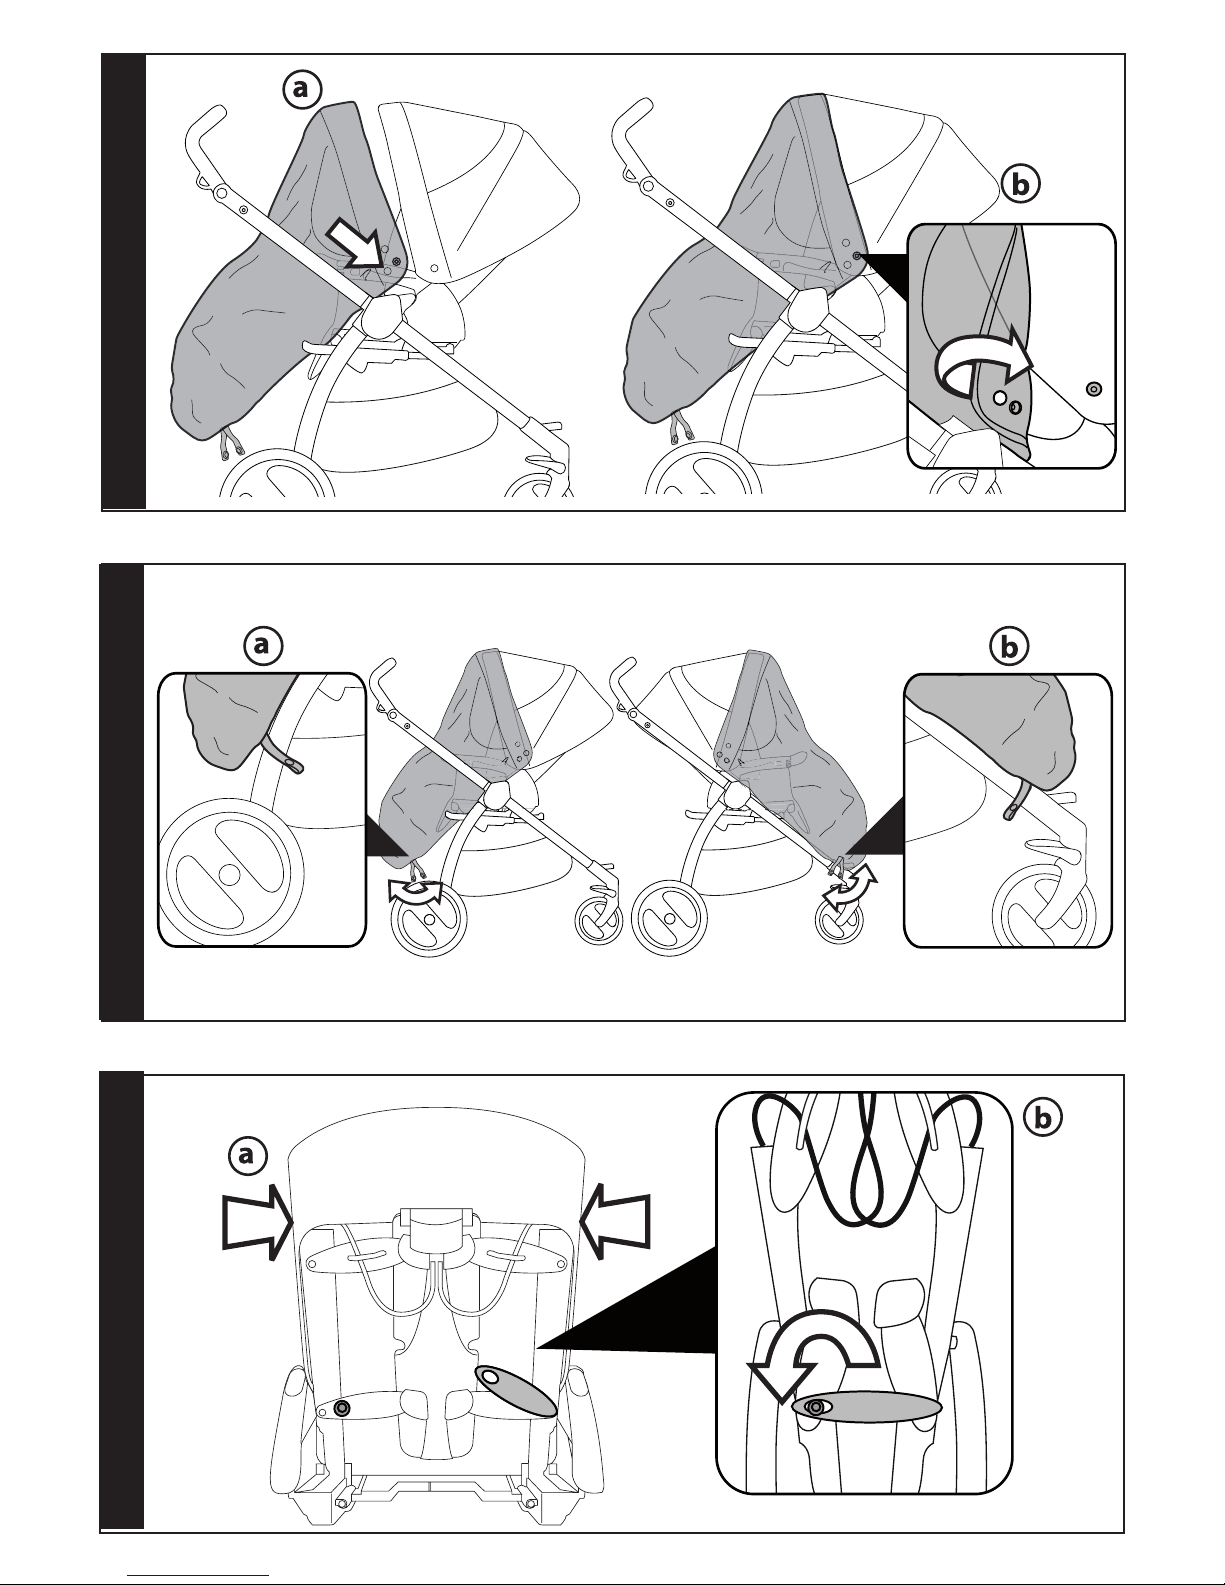
9
Page 5
12
11
10
Page 6
14
15
13
Page 7
16
17
18
Page 8
20
21
19
Page 9

22
23
24
Page 10

25
26
27
Page 11

28
29
Page 12

- 12 -
Book Plus chassis
12
2
5
6
1
3
4
7
11
8
10
9
Reversible seat
1 ITSWCONANF
2 ASPI0145NF
3 ASPI0136NFGL
4 BCAPSS•
5 IRBELV0007
6 SPST6975DB
SPST6975SB
7 SAPI7205NFGRPEG
8 SPST7071DNF
SPST7071SNF
9 BSAPSS•
10 BCOPSS•
11 MUCI5P22N
12 ERSBSW00-RE01M
EN Spare parts available in different colours to be specified when ordering.
ES Repuestos disponibles en otros colores que se especificarán en el pedido.
FR Pièces de rechange disponibles en plusieurs couleurs à spécifier dans la demande.
2
5
6
24
24
13
14
15
1
3
4
7
12
11
8
10
9
17
22
21
20
19
18
16
23
1 SPST7372DGR
SPST7372SGR
2 SPST7302N
SPST7302KN
3 SPST7357NPEG
4 SPST6232KN
5 SAPI7255N
6 SPST7255N
7 ARPI0693L32NGR
8 SPST7309N
9 SPST7328N
10 SOTF0377C
11 MUCI0027N
12 SPST7263N
13 SPST7286WDNPEG
SPST7286WSNPEG
14 SAPI7303JN
15 SAPI7251NN
16 MMST0087N
SPST7303N
MMRA0007
MMCA0007L30
17 SPST7323N
MMVI0526
18 SPST7351N
MMVA0260N
19 ARPI0675NGR
20 ICCABONA•
21 SPST7301•
22 ASPI0152L31
23 ERSHBK00-NY01RT01
24 MMMO0025D
Page 13

- 13 -
EN_English
Thank you for choosing a Peg-Pérego product.
WARNING
_
READ THE INSTRUCTIONS CAREFULLY
BEFORE USE AND KEEP THEM FOR
FUTURE REFERENCE.
FAILURE TO FOLLOW THESE WARNINGS
AND INSTRUCTIONS COULD RESULT IN
SERIOUS INJURY OR DEATH.
_ THIS PRODUCT IS DESIGNED FOR
CHILDREN WHOSE MAXIMUM WEIGHT
IS 50 POUNDS (22.7 KG) AND WHOSE
MAXIMUM HEIGHT IS 43 INCHES (110
CM). THIS SHOPPER BASKET IS DESIGNED
TO CARRY A MAXIMUM WEIGHT OF 11
POUNDS (5 KG). ANY POACH OR POCKET
PROVIDED WITH THIS UNIT IS DESIGNED
TO CARRY A MAXIMUM WEIGHT OF 0.44
POUNDS (0.2 KG).
_ THIS ITEM WAS DESIGNED FOR
USE IN COMBINATION WITH 1 PEGPÉREGO GANCIOMATIC “PRIMO
VIAGGIO” CAR SEAT (GROUP 0+),
"NAVETTA XL" BASSINET, "REVERSIBLE
SEAT" OR "PRATICO" SEAT.
_ BEFORE USE CHECK THAT THE “PRIMO
VIAGGIO” CAR SEAT (GROUP 0+),
"NAVETTA XL" BASSINET, "REVERSIBLE
SEAT" OR "PRATICO" SEAT ARE
CORRECTLY FIXED TO THE ITEM.
_ IF PRESENT DO NOT PUT HOT DRINKS
IN THE DRINK-HOLDER, NOR ITEMS
WEIGHING MORE THAN 0,5 KG (1 LBS).
_ FAILURE TO FOLLOW MANUFACTURER’S
SPECIFICATIONS OR USE OF
ACCESSORIES OTHER THAN THOSE
APPROVED BY THE MANUFACTURER MAY
CAUSE THE UNIT TO BECOME UNSTABLE.
_ WARNING: AVOID
SERIOUS INJURY FROM FALLING
OR SLIDING OUT. ALWAYS USE
COMPLETE 5 POINT SEAT BELT.
_ WARNING: NEVER
LEAVE YOUR CHILD UNATTENDED.
_ ALWAYS USE ALL THE BRAKES
WHENEVER PARKED.
_ TO AVOID SERIOUS INJURY, WHEN MAKING
ADJUSTMENTS ENSURE THE CHILD’S BODY
IS CLEAR OF ALL MOVING PARTS.
_ ALL OPERATING AND ASSEMBLY
PROCEDURES SHOULD BE
PERFORMED BY AN ADULT.
_ DO NOT LIFT THE STROLLER BY
GRIPPING THE FRONT BAR. THE
FRONT BAR IS NOT DESIGNED TO
WITH STAND LOADS.
_ ENSURE THAT THE STROLLER IS
OPENED CORRECTLY AND LOCKED IN
POSITION OF USE.
_ CHECK TO MAKE SURE THAT THE
CAR SEAT OR THE BABY CARRIAGE
IS CORRECTLY FASTENED TO THE
STROLLER (WHERE APPLICABLE).
_ DO NOT DRIVE THIS PRODUCT
AROUND STAIRS OR STEPS; CARE
MUST BE TAKEN IF UNIT IS USED ON
STAIRS OR ESCALATORS.
_ DO NOT USE THE PRODUCT IF IT HAS
BROKEN OR MISSING PARTS.
_ DO NOT USE NEAR FIRE OR EXPOSED
FLAME.
_ WHEN USED IN COMBINATION WITH
BASSINET.
_ WARNING: DO NOT
ADD A MATTRESS PAD.
NOTICE
THIS ARTICLE MEETS OR EXCEEDS ALL
REQUIREMENTS COVERED IN ASTM F833
STANDARD AND LATEST REVISIONS.
COMPONENTS OF THE ITEM
Check the contents of the packaging and if
you have any complaints please contact the
Assistance Service.
_ Book Plus chassis: Basket, 2 rear wheels with
brake mechanism, rear wheel crosspiece and
drink holder.
_ Reversible seat: hood, cover, rain canopy.
INSTRUCTIONS
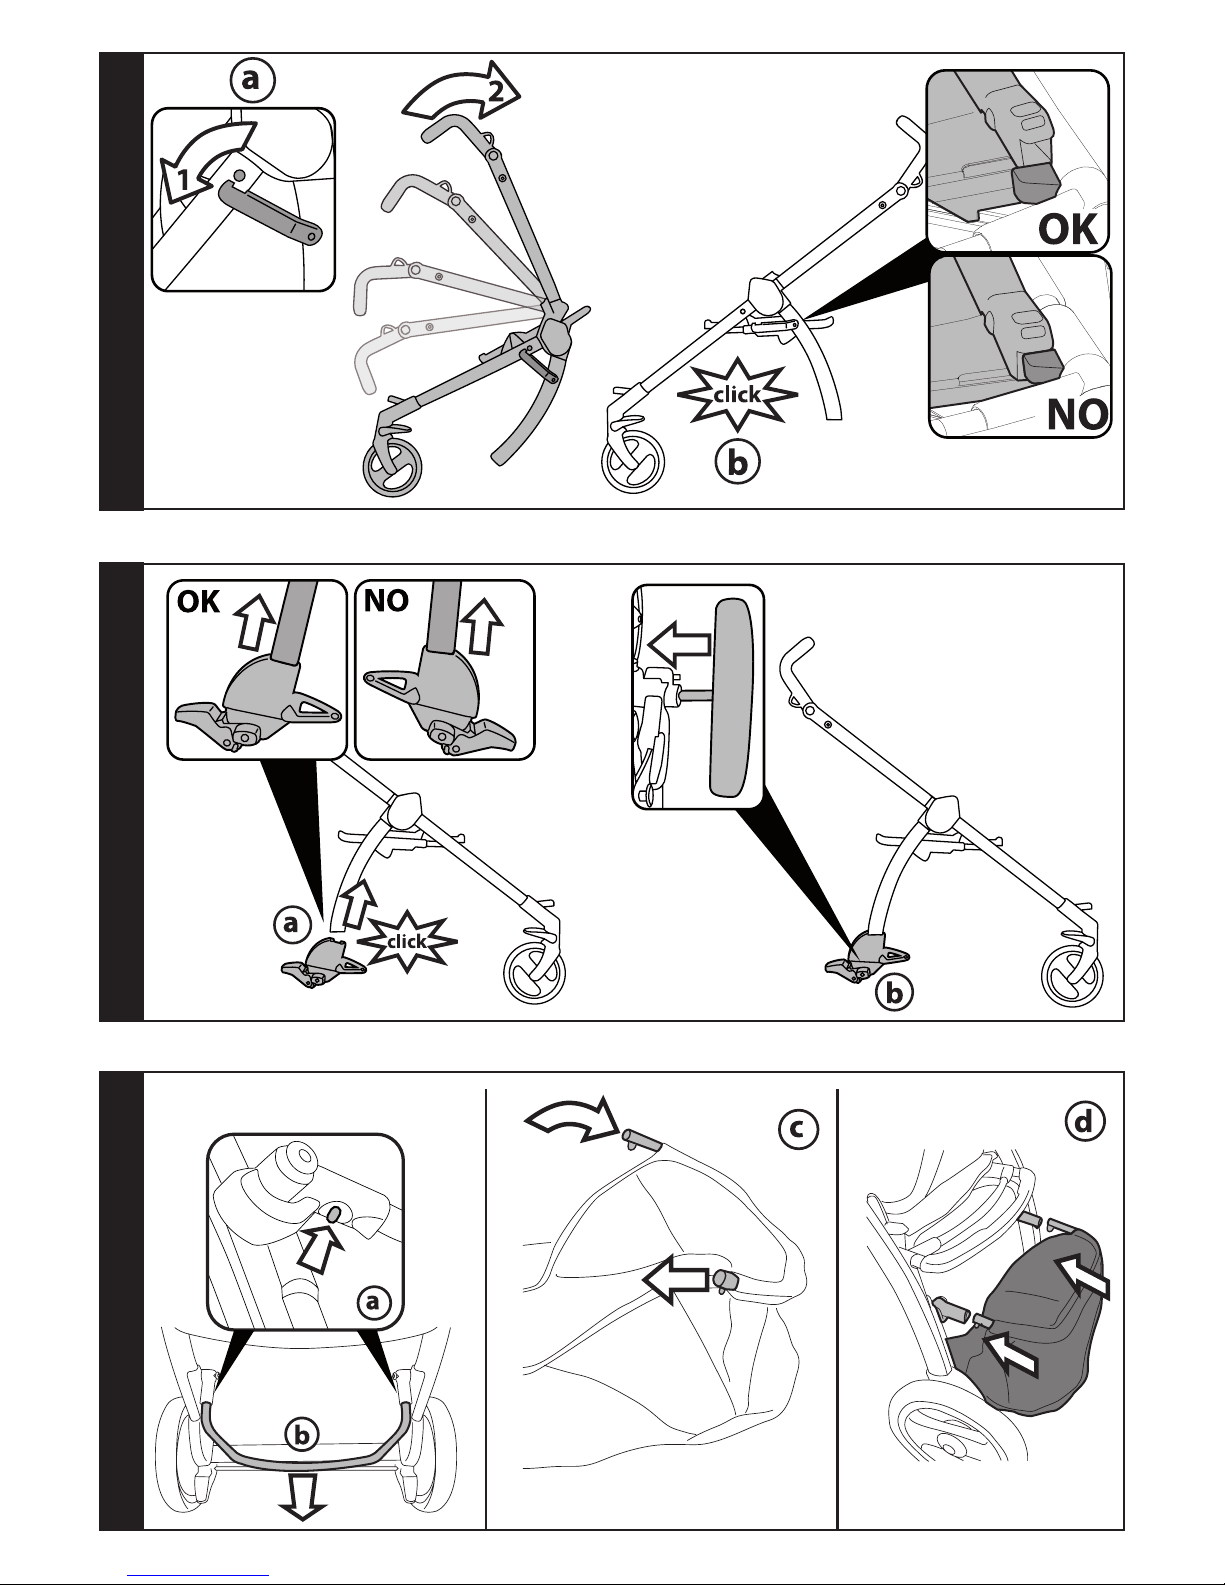
1 OPENING: Before opening the frame, remove
(without using blades) any die-cut cardboard.
WARNING:
_ DO NOT PULL OR FORCE THE FASTENER BEYOND ITS
LIMIT.
_ DO NOT USE THE FASTENER AS A CARRY HANDLE OR
TO CARRY WEIGHTS.
DO NOT HANG BAGS OR OTHER ACCESSORIES TO THIS
FEATURE.
Press down the side fastener, hold
the upper section of the handle and rotate it
towards you until the frame is fully opened
(fig_a). Open frame (fig_b).
The frame is properly opened when the
attachment on the base clicks into place,
as shown. CAUTION: When placing the seat
on the frame, press the seat downwards to
Page 14

- 14 -
ensure it engages securely onto the base.
2 FITTING THE WHEELS: Slot the uprights into the
rear wheel crosspiece (fig_a), ensuring that it is
facing the right way, then push the rear wheels on
and make sure that they click into place (fig_b).
3 FITTING THE BASKET: if lowered, lift the basket
tube to the horizontal position. Press the silver
buttons under the metal basket tube located at
the back of the stroller (fig_a) and remove the
metal tube (fig_b). Thread the tube through the
fabric loop on the back of the basket, making sure
that the two silver buttons are facing downward
(fig_c). Re-attach the tube to the housings (fig_d).
4 Secure the two upper basket vinyl eyelets to
the two grey buttons on either side of the metal
tube housing. Please note that the eyelets open
(fig_e). Remove the cardboard from the lower
rear bar. IMPORTANT! Secure the two lower
basket vinyl eyelets to the two grey buttons
on the top of the lower rear bar. Please note
that the eyelets open (fig_f). WARNING! If this
operation is not performed correctly, the basket
will not properly hold the weight.
Attach the basket tabs to the grey buttons on
the front of the frame (figure).
REFER TO OUR INSTALLATION INSTRUCTIONS
VIDEO AT: WWW.PEGPEREGO.COM
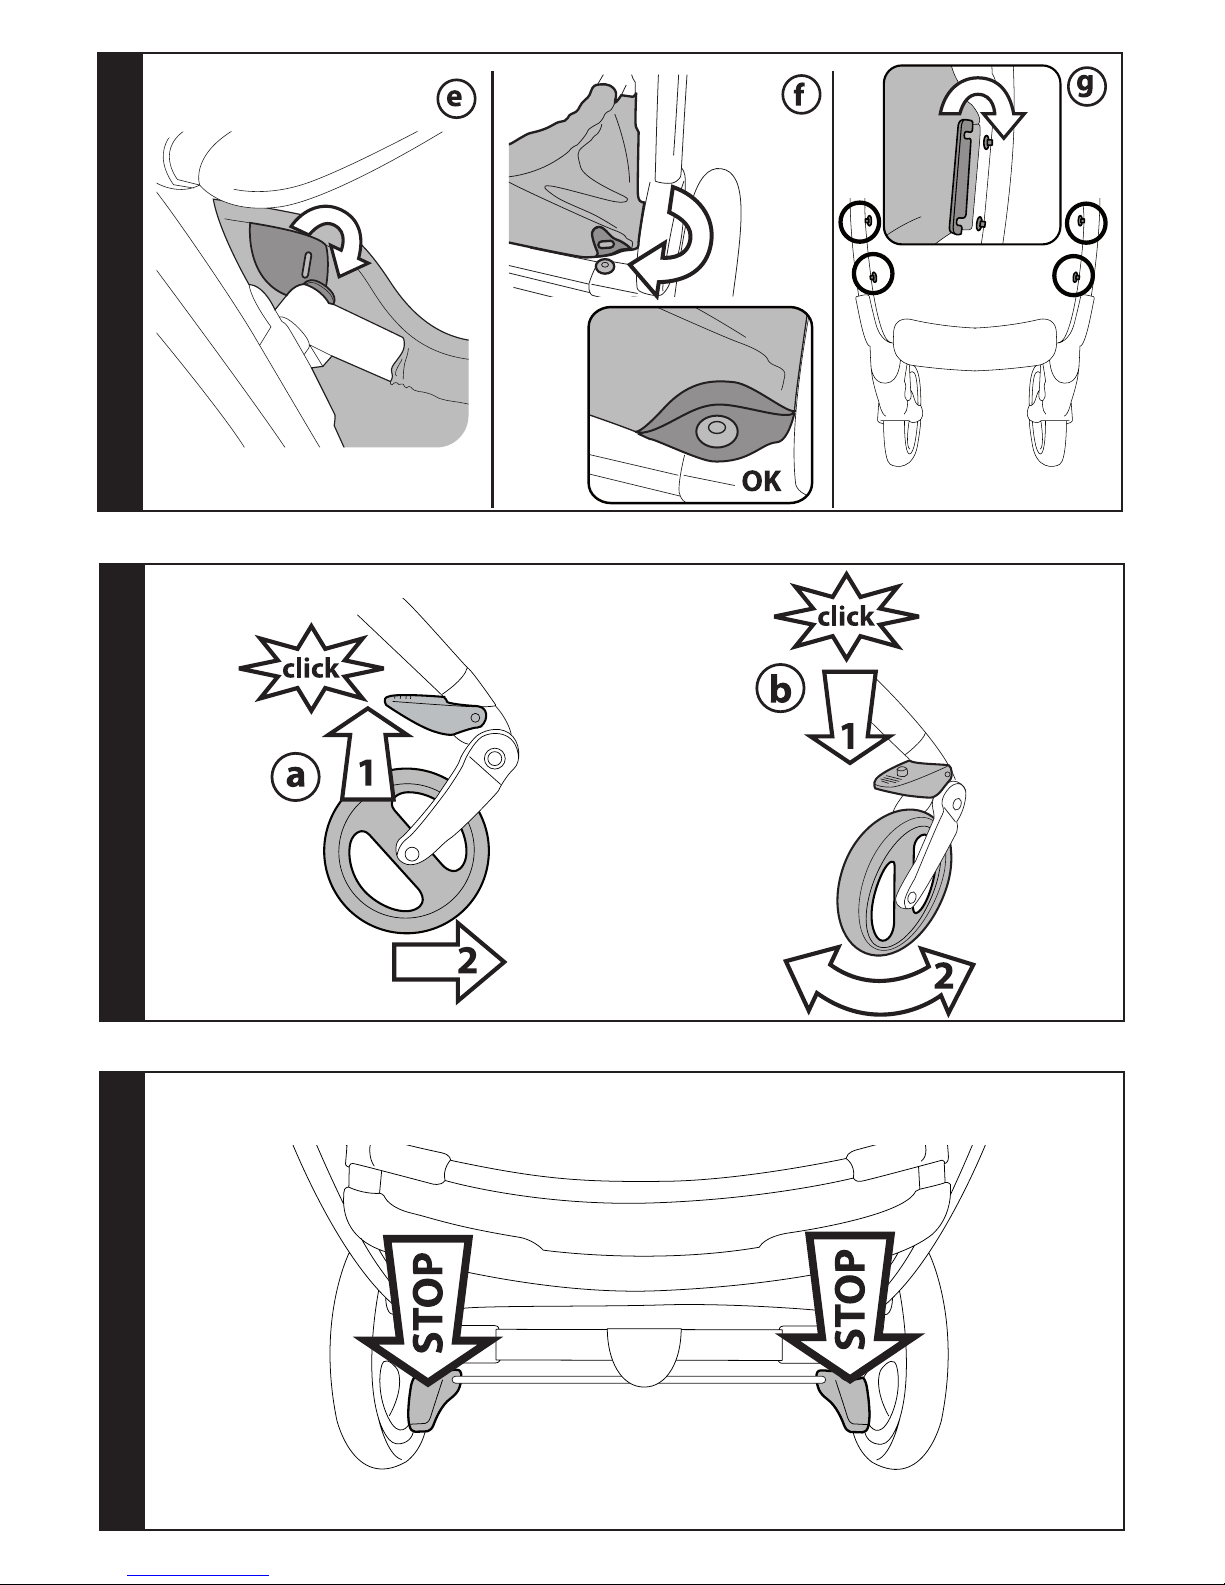
5 FIXED OR SWIVELING FRONT WHEELS: Lift the
levers to prevent the wheels from swiveling
(fig_a) and lower them to allow the wheels to
swivel (fig_b). On uneven surfaces, the wheels
should be set to their fixed position.
6 BRAKE: Press the lever down to apply the brake
on the chassis and lift it to release the brake.
7 ADJUSTABLE HANDLEBAR: To adjust the height
of the handlebar, press both of the side buttons
at the same time (fig_a) and swing it into the
desired position (fig_b), then release the buttons.
8 ATTACHING THE SEAT ONTO THE CHASSIS:
the reversible seat can be attached onto the
chassis to face mum or to face outwards (fig_a).
Position centrally on the chassis and press down
with both hands until it double clicks into place.
To make sure that it is properly attached, take
hold of the seat via the front bar and pull it up.
9 REMOVING THE SEAT FROM THE CHASSIS: Hold
down the two round buttons on the sides of
the seat (fig_a), press the two levers under the
armrests (fig_b) and pull up the seat (fig_c) until
it is released. The seat can be removed from and
re-attached to the chassis when there is a child in it.
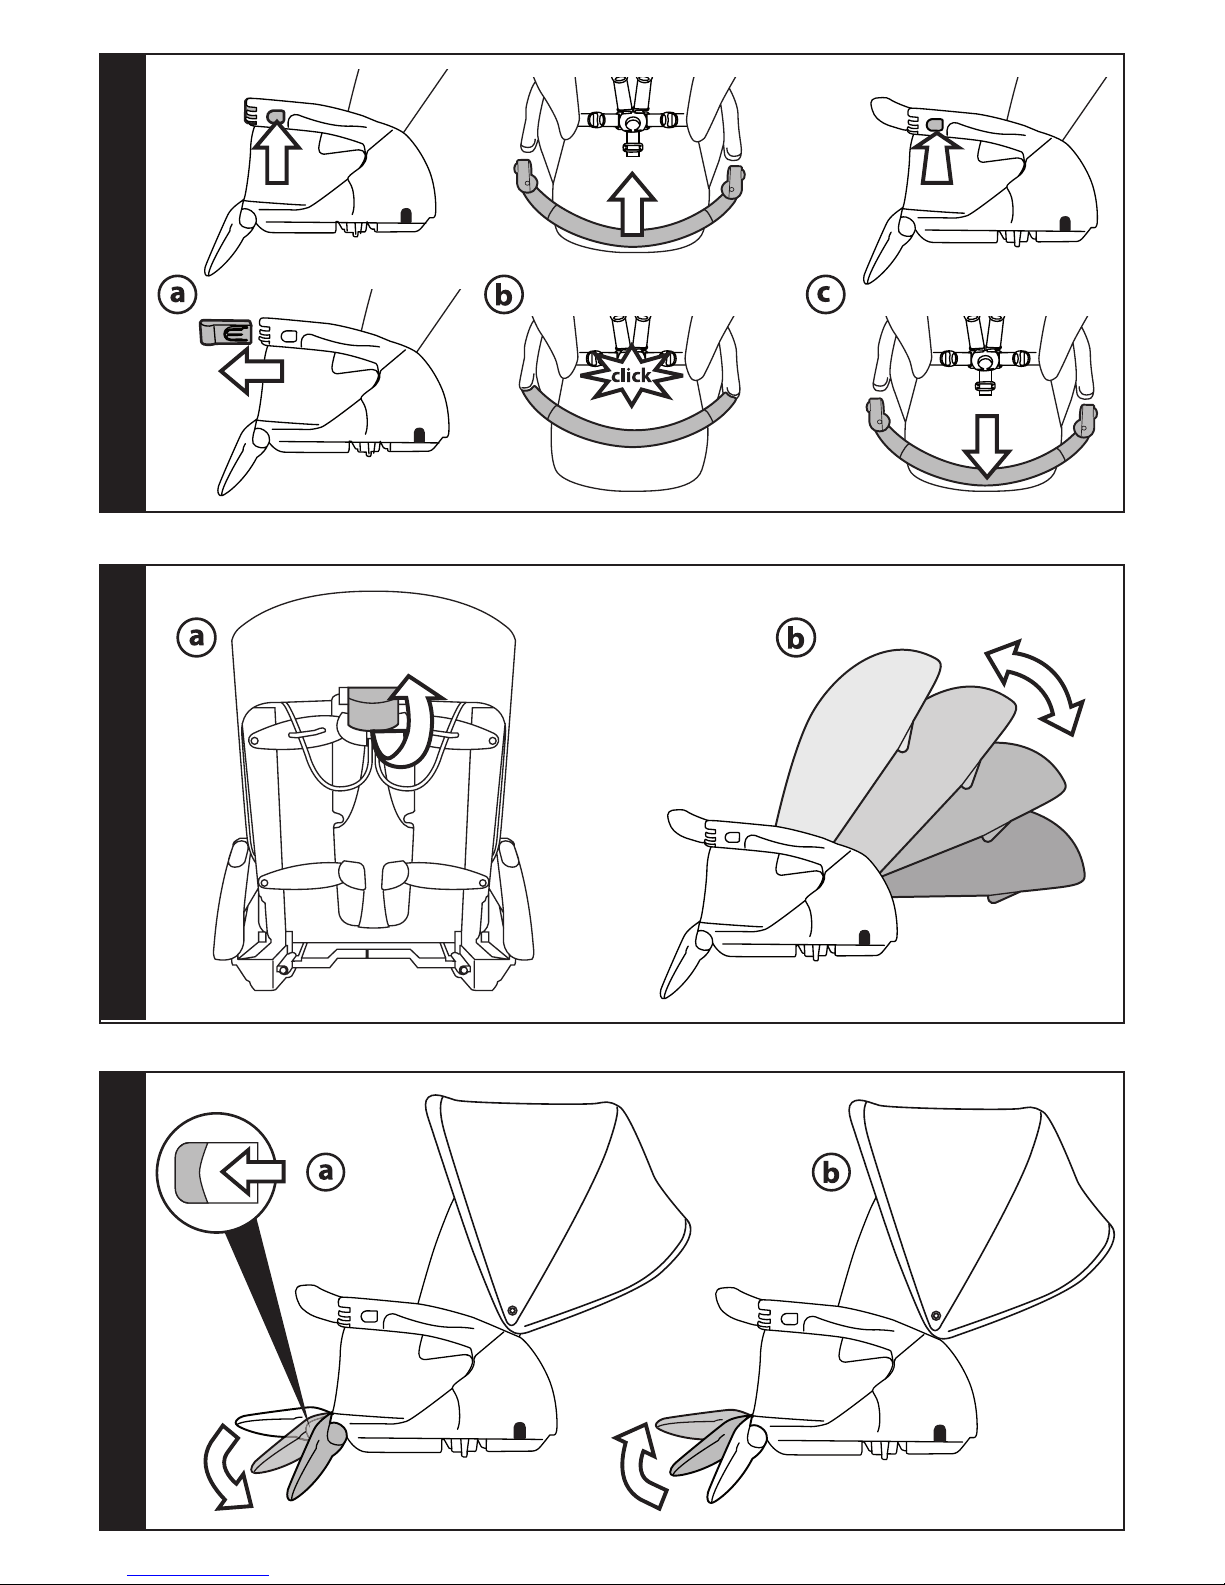
10 FRONT BAR: Before attaching the front bar,
press the buttons on the sides of the armrests
and remove the caps (fig_a). To attach the front
bar, guide the connections into the armrests
and push towards the seat until they click into
place (fig_b). To remove the front bar, press
the two buttons and pull it out (fig_c). To make
it easier for the child to get in and out, it is
possible to open the front bar on one side only.
If you wish to use the stroller without the front
bar, put the caps back in the armrests.
11 BACKREST: to recline the backrest lift the lever
(fig_a) and choose one of the 4 positions (fig_b).
12 FOOTREST: to lower the footrest push the two
levers downwards and then push the footrest
downwards (fig_a); to raise the footrest lift it
upwards (fig_b).
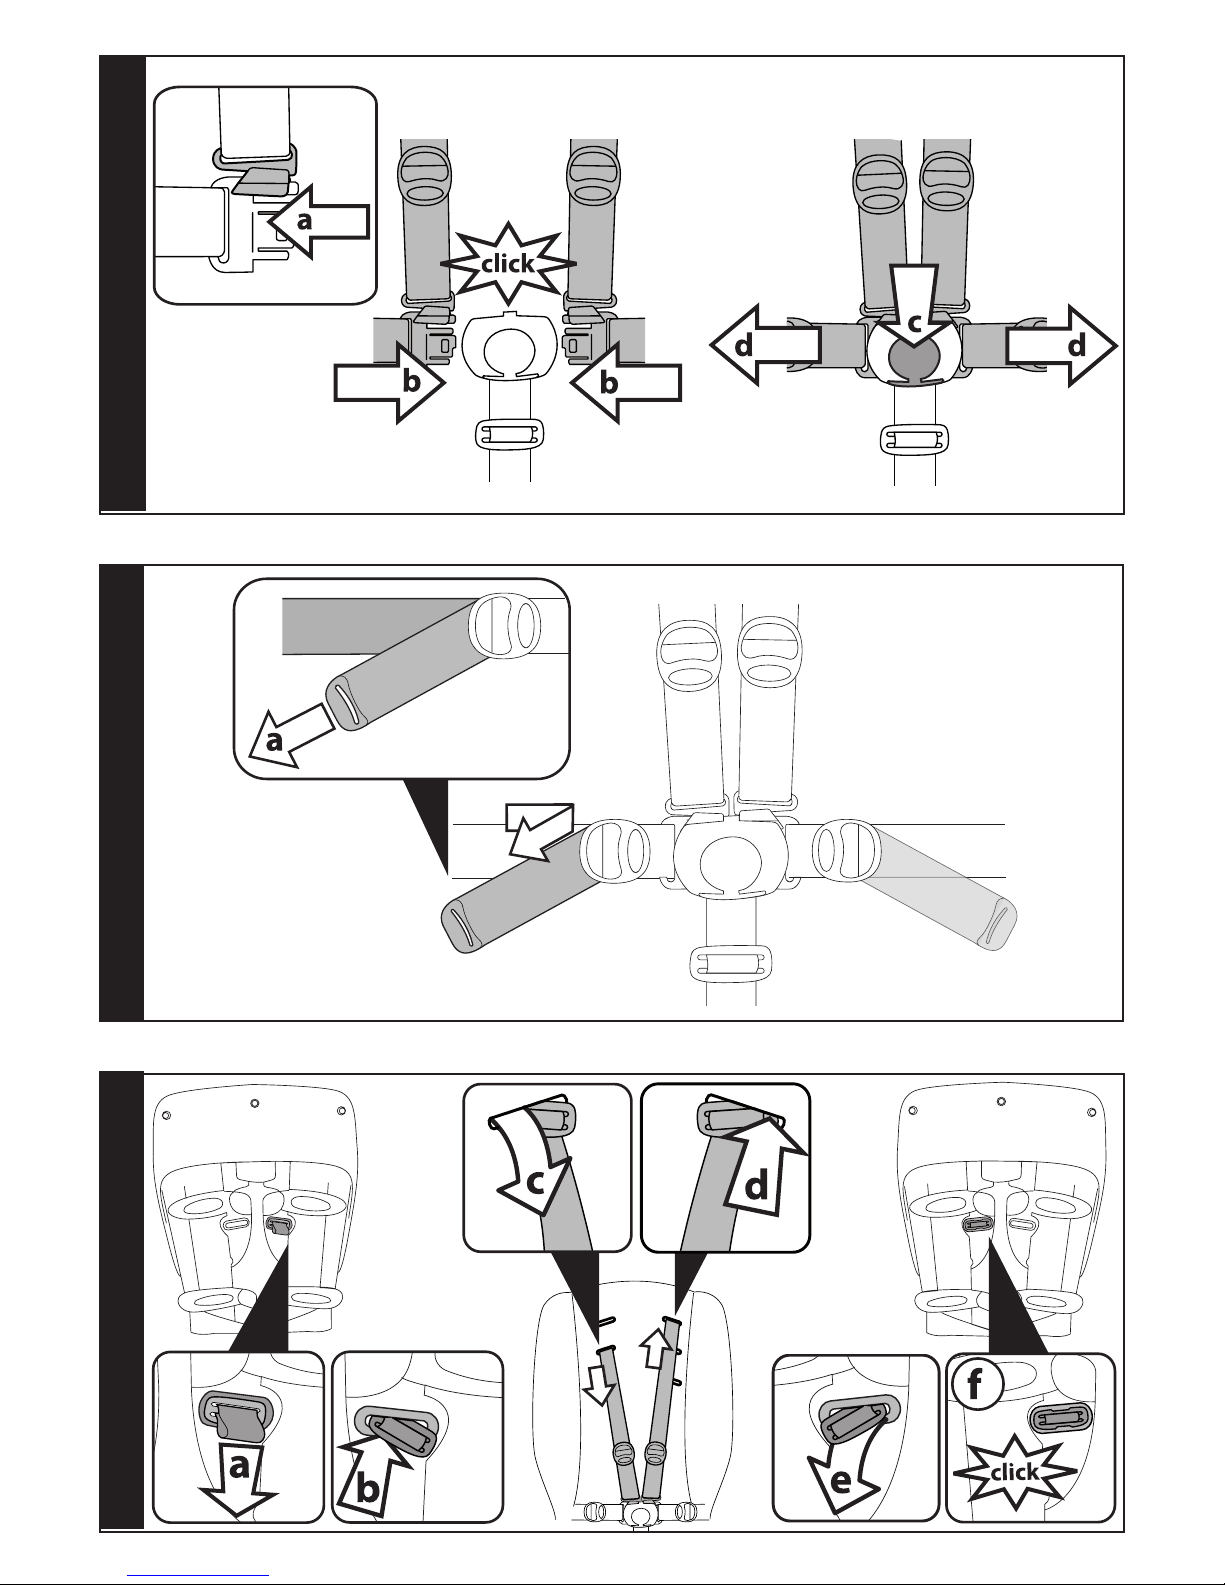
13 FIVE POINT SAFETY HARNESS: To fasten it,
push the two waist strap buckles (with the
shoulder straps attached – arrow_a) into
the leg divider until they click into place
(arrow_b). To unfasten it, press the round
button in the centre of the buckle (arrow_c)
and pull the waist straps out (arrow_d).
14 To tighten the waist strap, pull on both sides
in the direction of the arrow (arrow_a). To
loosen it, move it in the opposite direction.
15 To adjust the height of the safety harnesses,
release the two buckles on the rear of the
backrest.
Pull the shoulder straps towards you (arrow_a)
until the buckles are released and insert them
in the backrest loops (arrow_b). Remove the
shoulder straps from the sack (arrow_c) and
insert them in the most appropriate loop
(arrow_d), then re-attach the two buckles on the
rear of the backrest (arrow_e) The buckles are
securely attached when a click is heard (fig_f).
16 HOOD: WARNING. Ensure the buttons are
fastened on the rear of the backrest. If this
is not the case, fasten them now (fig_a). To
open the hood, pull it towards you; to close
the hood, push it backwards. The hood may
only be used as a parasol if the backrest
is not fully reclined. In this case, open the
double slider zipper (fig_b) and unfasten the
hood buttons on the rear of the backrest.
The hood comes with a loop from which to
dangle baby’s favorite toy (fig_c).
17 COVER: put on the cover, and fasten it
underneath (fig_a) and on the sides of the
footboard. For the baby carriage version, move
the footboard up and place the cover over the
front bar (fig_b), fastening it to the buttons of
the hood (fig_c). For the stroller version, move
the footboard down, insert the cover underneath
the front bar (fig_d) and fix it in place.
18 BABY SAFE: pull the Baby Safe system out from
under the leg rest (fig_a), attach it to the seat
(fig_b), fit the front bar (fig_c), unbutton the fabric
covering at the side and then attach the Baby Safe
system to the sides of the armrests (fig_d). A fitted
Baby Safe system is shown in Figure E.
19 RAIN CANOPY: position the rain canopy on
the stroller (fig_a) and insert the two lateral
loops over the hood buttons (fig_b).
20 Secure the rain canopy by attaching the
elastic loop to the rear uprights (fig_a) or to
the front uprights (fig_b), according to the
seat position.
21 FOLDING UP: to fold up the seat press the
Page 15

- 15 -
outer sides towards the inside (fig_a) and fix
in place with the fastener (fig_b).
22 FOLDING UP: The chassis can be folded up
without the seat, with the seat facing the person
pushing (recline the backrest before folding
it) or with the seat facing forward. To fold the
stroller, it is best to set the front wheels to their
fixed position and close the hood (if fitted).
Position the handlebar as shown in fig_a. Pull
the inner handle on the base (fig_b), keep
hold of it, lift it (fig_c) and swing the handlebar
forward until the chassis is folded.
23 To ensure the frame is closed properly, check
that the side fastener is enabled (fig_d). When
closed, the frame remains in the upright
position (fig_e). If necessary, it can be made
even more compact by removing the rear
wheels. Pull the pin out and remove the wheel,
as in fig_f. To remove the front wheels: press the
tab as shown, and remove the wheel (fig_g).
24 REMOVING THE HOOD: with a screwdriver,
remove the screw placed inside the hood
(fig_a), unfasten the hood buttons on the rear
of the backrest (fig_b), and remove the hood
from the seat as shown in the figure (fig_c).
25 REMOVABLE COVERS: remove the cover from the
ledge (fig_a). Unfasten the cover attachments from
the armrests (fig_b). Unfasten the two buttons on
the sides of the backrest (fig_c). Unscrew the belt
on both sides (fig_d) and remove the straps. Lastly,
remove the strap between the legs from above by
pushing it from under the seat (fig_e).
GANCIOMATIC SYSTEM
26 Ganciomatic is a fast and practical system
that allows you to attach the Navetta bassinet
unit, the Primo Viaggio car seat or the
Reversible seat seat to the Ganciomatic Base
of the chassis in one quick step.
Place the item on the Ganciomatic Base and
press down with both hands until it clicks
into place.
Always apply the chassis or stroller brake
before attaching and removing products
(refer to the respective instruction manuals).
Check that the child transport unit is properly
attached.
ACCESSORY
27 A_BORSA. Diaper-Changing Bag with pad for
changing the baby. Attaches to the stroller.
B_MOSQUITO NETTING: can be fastened to
the hood.
C_PRATICO: Transform your Book Plus to a
lighter strollerwith our compact Pratico seat
that comes with its very owntravel bag.
D_CHILD TRAY for Book Plus.
SERIAL NUMBERS
28 Information about the production date can
be found on the Book Plus chassis.
_ The product name, production date and serial
number of the chassis.
29 Reversible seat reports information as at the
date of manufacture of the product.
_ Product name, date of manufacture and serial
number of the seat (fig_a) and of the carriage
(fig_b).
This information is required for any complaints.
CLEANING AND MAINTENANCE
PRODUCT MAINTENANCE: protect from the
weather: water, rain, or snow; prolonged and
continuous exposure to bright sunlight may
give rise to colour changes of various different
materials; store this product in a dry place.
CLEANING THE CHASSIS: periodically clean all
plastic parts with a damp cloth. Do not use
solvent or similar cleaning products; keep all
metal parts dry to prevent rusting; keep moving
parts clean (adjustment mechanisms, locking
mechanisms, wheels, ...) and free of dust and sand
and, if necessary, lubricate with light machine oil.
CLEANING THE RAIN CANOPY: wash with a
sponge and soapy water; do not use detergents.
CLEANING FABRIC PARTS: brush fabric parts to
remove dust and wash by hand at a maximum
temperature of 30°C; do not wring; do not use
chlorine bleach, do not iron; do not dry clean;
do not apply solvent-based stain removers and
do not dry in a tumble dryer.
PEG-PÉREGO S.p.A.
Peg Pérego can make changes at any time to
the models described in this publication for
technical or commercial reasons.
PEG-PÉREGO
AFTER-SALES SERVICE
If any parts of the item get lost or damaged,
only use genuine Peg Pérego spare parts.
For any repairs, replacements, information
on the products and sales of genuine spare
parts and accessories, contact the Peg
Pérego Assistance Service and state the serial
number of the product, if present.
USA
tel. 800.671.1701 fax 260.471.6332
call us toll free 1.800.671.1701
website www.pegperego.com
CANADA
tel. 905.839.3371 fax 905.839.9542
call us toll free 1.800.661.5050
website www.pegperego.com
Page 16

- 16 -
ES_Español
Le agradecemos haber elegido un producto
Peg-Pérego.
ADVERTENCIA
_ LEER ESTAS INSTRUCCIONES
DETENIDAMENTE Y CONSERVARLAS
EN SU LUGAR DURANTE TODA
LA VIDA ÚTIL DEL PRODUCTO.
EL INCUMPLIMIENTO DE ESTAS
ADVERTENCIAS E INSTRUCCIONES
PODRÍA OCASIONAR LESIONES
GRAVES O LA MUERTE.
_ DISEÑADO PARA UN NIÑO CON UN
PESO MÁXIMO DE 22.7 KG Y UNA
ALTURA MÁXIMA DE 110 CM. LA
CESTILLA HA SIDO REALIZADA PARA
SOPORTAR UN PESO MÁXIMO DE 5
KG. LOS POSIBLES PORTABEBIDAS
QUE VAN CON ESTE PRODUCTO
ESTÁN CONCEBIDOS PARA SOPORTAR
EL PESO MÁXIMO ESPECIFICADO EN
EL PORTABEBIDAS EN CUESTIÓN.
CUALQUIER BOLSA ENTREGADA
JUNTO AL PRODUCTO ESTÁ
REALIZADA PARA SOPORTAR UN
PESO MÁXIMO DE 0,2 KG.
_ ESTE ARTÍCULO SE HA DISEÑADO
PARA USARSE JUNTO CON UNA SILLA
DE AUTO "PRIMO VIAGGIO" (GRUPO
0+) "NAVETTA XL", ""REVERSIBLE
SEAT" " Y "PRATICO" ASIENTO PEGPÉREGO GANCIOMATIC.
_ ANTES DE USAR LA SILLA DE AUTO
"PRIMO VIAGGIO" (GRUPO 0+),
"NAVETTA XL", ""REVERSIBLE SEAT"
" Y "PRATICO" ASIENTO ASEGÚRESE
DE QUE ESTÉ CORRECTAMENTE
ENGANCHADA AL ARTÍCULO.
_ NO PONGA BEBIDAS CALIENTES EN
EL PORTA BEBIDAS, NI OBJETOS QUE
PESEN MÁS DE MEDIO KILO.
_ SI NO SE RESPETAN LAS
INDICACIONES ESPECIFICADAS O SI
SE USAN ACCESORIOS DIFERENTES
DE LOS HOMOLOGADOS POR EL
FABRICANTE, EL PRODUCTO PUEDE
SER INESTABLE.
_
ADVERTENCIA:
PARA EVITAR LESIONES GRAVES POR
CAÍDAS O SI ESCAPA EL NIÑO DE
LA SILLA DE PASEO, USAR SIEMPRE
UN CINTURÓN DE SEGURIDAD DE 5
PUNTOS COMPLETO.
_
ADVERTENCIA:
NO DEJAR NUNCA AL NIÑO SIN
VIGILANCIA.
_ USAR SIEMPRE TODOS LOS
DISPOSITIVOS DE BLOQUEO CADA
VEZ QUE LA SILLA DE PASEO NO ESTÉ
EN MOVIMIENTO.
_ PARA EVITAR LESIONES GRAVES,
ASEGURARSE DE QUE EL NIÑO NO
PUEDA MOVERSE PELIGROSAMENTE
MIENTRAS SE REGULA EL PRODUCTO.
_ TODAS LAS OPERACIONES DE
ENSAMBLAJE DEBE REALIZARLAS
SOLO UN ADULTO.
_ NO LEVANTAR LA SILLA DE PASEO
COGIÉNDOLA POR LA BARRA FRONTAL.
LA BARRA FRONTAL NO HA SIDO
CONCEBIDA PARA SOPORTAR PESOS.
_ ASEGURARSE DE QUE LA SILLA DE
PASEO ESTÉ ABIERTA CORRECTAMENTE
Y BLOQUEADA EN LA POSICIÓN
CORRECTA PARA SU UTILIZACIÓN.
_ ASEGURARSE DE QUE LA SILLA
DE AUTO O EL COCHECITO ESTÉN
ENGANCHADOS CORRECTAMENTE A
LA SILLA DE PASEO.
_ NO USAR LA SILLA DE PASEO CERCA
DE ESCALERAS O ESCALONES; PRESTAR
ATENCIÓN CUANDO SE UTILIZA EN
ESCALERAS O ESCALERAS MECÁNICAS.
_ NO UTILIZAR EL PRODUCTO SI
PRESENTA PARTES DAÑADAS O SI
FALTA ALGUNA PARTE.
_ NO USAR EN PRESENCIA DE LLAMAS
O FUENTES DE CALOR.
_ CUANDO SE UTILIZA COMBINADO
CON BASSINET.
_
ADVERTENCIA:
NO AÑADA NINGÚN COLCHÓN.
AVISO
ESTE PRODUCTO CUMPLE O NEBASA
CON TODOS LOS REQUISITOS
ESTABLECIDOS POR LA NORMA ASTM
F833 Y ULTERIORES REVISIONES.
COMPONENTES DEL
ARTÍCULO
Comprobar el contenido presente en el
embalaje y contactar al Servicio de Asistencia
en caso de reclamación.
Page 17

- 17 -
para bloquear el chasis y alzarlarla para
desbloquearlo.
7 MANILLAR REGULABLE: para regular la altura
del manillar, presionar simultáneamente los
botones laterales (fig_a) y girar el manillar
en la posición deseada (fig_b). Soltar los
botones.
8 ENGANCHE DEL ASIENTO AL CARRITO: el
asiento reversible puede engancharse al
carrito mirando hacia atrás o hacia delante
(fig_a); colocarlo centrado sobre el carrito y
empujar hacia abajo con ambas manos hasta
escuchar el doble clic de enganche. Para
comprobar el enganche correcto, sujetar el
asiento por la barra frontal y tirar hacia arriba.
9 DESENGANCHAR LA SILLA DE PASEO DEL
CHASIS: Pulsar los dos botones redondos
laterales de la silla de paseo (fig_a) y, al
mismo tiempo, las dos palancas situadas bajo
los reposabrazos (fig_b) tirando de la silla
hacia arriba (fig_c) hasta desengancharla. Es
posible enganchar y desenganchar la silla de
paseo del chasis con el niño dentro.
10 BARRA FRONTAL: antes de introducirla,
presionar sobre los botones laterales de
los brazos y quitar los tapones (fig_a). Para
enganchar la barra frontal, introducir los
enganches en los brazos y empujar hacia la
silla hasta oír el clic de enganche (fig_b). Para
quitar la barra frontal, presionar sobre los
dos botones y quitarla (fig_c). Abrir la barra
frontal sólo por un lado para facilitarle al
bebé la entrada y la salida. Cuando se desee
utilizar la silla de paseo sin barra frontal,
volver a poner los tapones en los brazos.
11 RESPALDO: para regularlo, alzar el asa (fig.
a) y colocarlo como desee en una de las 4
posiciones (fig. b).
12 REPOSAPIÉS: para bajarlo, empujar hacia
abajo las dos palancas (fig. a). Para alzarlo,
empujar el reposapiés hacia arriba (fig. b).
13 CINTURÓN DE SEGURIDAD DE 5 PUNTOS:
Para engancharlo, introducir las dos hebillas
del cinturón ventral (con los tirantes
enganchados como muestra la flecha_a) en
la tira entrepiernas hasta oír el clic (flecha_b).
Para desengancharlo, pulsar el botón
redondo colocado en el centro de la hebilla
(flecha_c) y tirar hacia afuera del cinturón
ventral (flecha_d).
14 Para ajustar la correa de la cintura, tirar
de ambos lados en el sentido de la flecha
(flecha_a); para aflojarla, deslizarla en sentido
contrario.
15 Para regular la altura de los cinturones de
seguridad es necesario desenganchar en
la parte posterior del respaldo de las dos
hebillas.
Tire hacia sí los tirantes (flecha_a) hasta
desenganchar las hebillas y pasarlas por las
ranuras del respaldo (flecha_b). Saque los
_ Book Plus carrito: cestita; 2 ruedas traseras
con engranaje freno, barra ruedas traseras y
portabebidas.
_ Asiento reversible: capota, cubrepiés y
protector de lluvia.
INSTRUCCIONES DE USO
1 APERTURA: Antes de abrir el bastidor, quitar
todos los cartones troquelados, si los hay, sin
utilizar cuchillas.
ATENCIÓN:
_ NO TIRE NI FUERCE EL GANCHO DE CIERRE MÁS
ALLÁ DE SU FINAL DE CARRERA.
_ NO UTILICE EL GANCHO DE CIERRE COMO
ASIDERO DE TRANSPORTE NI PARA ENGANCHAR
PESOS.
NO CUELGUE BOLSOS NI OTROS ACCESORIOS EN
ESTA PIEZA.
Presione hacia abajo el gancho de
cierre lateral, sujetar los extremos superiores
del tirador y girarlos hasta abrir el carrito por
completo (fig_a). Carrito abierto (fig_b).
La apertura correcta se produce cuando
se percibe el encastre, correspondiente al
enganche de la base; ver la figura. ATENCIÓN:
una vez aplicada la silla, presionar sobre ella
para asegurar el enganche correcto de la base.
2 MONTAJE DE LAS RUEDAS: introducir la
ruedas traseras en los montantes (fig_a),
prestando atención a hacerlo en la dirección
correcta. Por último, enganchar las ruedas
traseras (fig_b) hasta oír el clic.
3 MONTAJE DE LA CESTA: Pulse los botones
plateados que están debajo del tubo metálico
de la cesta, situado en la parte trasera de la
silla de paseo (fig_a) y retire el tubo metálico
(fig_b). Haga pasar el tubo por el dobladillo
de tejido de la parte trasera de la cesta, con
los dos botones plateados dirigidos hacia
abajo (fig_c).
Coloque nuevamente el tubo en su soporte
(fig_d).
4 Fije los dos ojales superiores de la cesta en
los dos botones grises que se encuentran a
ambos lados de los soportes del tubo de la
cesta. Nótese que los ojales se abren (fig_e).
Retire el cartón de la barra trasera.
IMPORTANTE! Fije los dos ojales inferiores de
la cesta en los dos botones grises presentes
sobre la barra trasera. Nótese que los ojales se
abren (fig_f).
¡ATENCIÓN! si esta operación no se realiza
correctamente, la cesta no puede sostener
el contenido. Fije las aletas delanteras de la
cesta en los botones grises del chasis (fig_g).
PARA LA INSTALACIÓN CONSULTE NUESTRO
VÍDEO DE INSTRUCCIONES EN LA PÁGINA:
WWW.PEGPEREGO.COM
5 RUEDAS DELANTERAS FIJAS O PIVOTANTES:
levantar las palancas para que las ruedas
queden fijas (fig_a), bajar las palancas para
que las ruedas giren (fig_b). En terrenos
difíciles, se aconseja el uso de las ruedas fijas.
6 FRENO: presionar la palanca de freno
Page 18

- 18 -
tirantes del saco (flecha_c) y páselos por la
ranura más adecuada (flecha_d), finalmente
vuelva a enganchar las dos hebillas detrás del
respaldo (flecha_e). Un clic determina que se
han enganchado correctamente las hebillas
(fig_f).
16 CAPOTA: ATENCIÓN: Asegurarse de que los
botones estén cerrados en la parte posterior
del respaldo; en caso contrario, abotonar
(fig_a). Para levantar la capota: tirar de la
capota; para cerrar la capota: empujarla
hacia atrás. Será posible transformar la
capota en parasol sólo cuando el respaldo
no esté totalmente reclinado; para ello,
abrir la cremallera con doble cursor (fig_b)
y desabotonarla de la parte posterior del
respaldo. La capota está dotada de un ojal
para colgar el juguete preferido (fig_c).
17 CUBREPIÉS: colocar el cubrepiés y abotonarlo
en la parte inferior (fig_a) y en los laterales
al reposapiés. En la versión con cochecito,
levantar el reposapiés y colocar el cubrepiés
sobre la barra frontal (fig_b) fijándolo a los
botones de la capota (fig_c). En la versión con
silla de paseo, bajar el reposapiés, colocar el
cubrepiés bajo la barra frontal (fig_d) y fijarlo.
18 Sacar el dispositivo de protección de debajo
del reposapiés (fig_a), engancharlo a la silla
de auto (fig_b), introducir la barra frontal
(fig_c) y enganchar el dispositivo al lateral
de los reposabrazos desabotonando primero
el lateral del forro (fig_d). Dispositivo de
protección montado (fig_e).
19 PARA-LLUVIA: coloque el para-lluvia en la
silla de paseo (fig_a) y pase las dos ranuras
laterales del mismo por los botones de la
capota (fig_b).
20 Fije el para-lluvia enganchando el elástico
a los montantes posteriores (fig_a) o a los
anteriores (fig_b) dependiendo de la posición
del asiento.
21 CIERRE: para cerrar el asiento, comprimir los
lados exteriores hacia adentro (fig_a) y fijarlo
con el enganche provisto (fig_b).
22 CIERRE: el cierre puede ser efectuado sin
asiento, con el asiento mirando hacia la
madre (reclinando, antes de cerrarlo, el
respaldo) o hacia la calle. Para cerrar el carrito
es preferible fijar las ruedas traseras y cerrar la
capota, si está abierta.
Poner el tirador como
en la figura (fig_a).
Tirar del tirador interno de la base (fig_b) y,
sin variar la empuñadura, levantarlo (fig_c)
y dejar caer el tirador hacia delante hasta el
cierre.
23 Para un correcto cierre, compruebe que el
gancho lateral esté acoplado (fig_d). El chasis
cerrado se mantiene de pie solo (fig_e).
Si fuera necesario, será posible extraer las
ruedas traseras para que sea más compacto.
Tirar hacia el exterior de la perno y extraer la
rueda como en la figura (fig_f). Para extraer
las ruedas delanteras: presionar la lengüeta
como en la figura y extraer la rueda (Fig_g).
24 CÓMO QUITAR LA CAPOTA: desenroscar
con un destornillador el tornillo interno
de la capota (fig_a), desabotonarla de
la parte posterior del respaldo (fig_b) y
desengancharla de la silla como en la figura
(fig_c).
25 DESMONTAJE: quitar el forro del estribo
(fig_a), desenganchar de los brazos los
acoples del forro (fig_b), soltar los dos
botones de los laterales del respaldo (fig_c),
desatornillar la correa de ambos lados
(fig_d), quitar las correas y, por último, quitar
la correa para la entrepierna hacia arriba
empujando desde debajo del asiento (fig_e).
GANCIOMATIC SYSTEM
26 El sistema Ganciomatic es un sistema práctico
y veloz que permite enganchar con un solo
gesto el capazo Navetta, la silla de auto Primo
Viaggio y la silla Asiento reversible al chasis:
colocarlos y presionar sobre el producto con
ambas manos hasta oír el clic.
Accionar siempre el freno del chasis o del
carrito antes de enganchar y desenganchar
los productos (consultar los respectivos
manuales de instrucciones).
Comprobar que el elemento de transporte
del bebé esté correctamente enganchado.
ACCESORIOS
27 A_BORSA (Bolso cambiador). Bolso con
colchoncito para cambiar al bebé se
engancha a la silla de paseo.
B_MOSQUITERA: aplicable a la capota.
C_BANDEJA para Book Plus.
D_PRATICO: a medida que el niño crece, puede
transformar su cochecito Book Plus en una silla
de paseo ligera y compacta. Incluye el bolso de
paseo.
NÚMEROS DE SERIE
28 Book Plus, incluye información relativa a la
fecha de producción del mismo.
_ Nombre del producto, fecha de producción y
numeración del carrito.
29 Asiento reversible incluye información
relativa a la fecha de producción del mismo.
_ Nombre del producto, fecha de producción y
numeración de serie del asiento (fig_a) y del
cochecito (fig_b).
Estas informaciones son indispensables en
caso de reclamación.
LIMPIEZA Y MANTENIMIENTO
MANTENIMIENTO DEL PRODUCTO: proteger contra
agentes atmosféricos (agua, lluvia o nieve). Una
exposición contínua y prolongada al sol podría
Page 19

- 19 -
FR_Français
Merci d’avoir choisi un produit Peg-Pérego.
AVERTISSEMENT
LIRE ATTENTIVEMENT CES
INSTRUCTIONS ET LES CONSERVER
DANS LE LOGEMENT PRÉVU À
CET EFFET PENDANT TOUTE LA
DURÉE DE VIE DU PRODUIT LE NON
RESPECT DE CES AVERTISSEMENTS
ET INSTRUCTIONS PEUT ENTRAÎNER
DES BLESSURES GRAVES OU MÊME LA
MORT.
_ CE PRODUIT A ETE CONÇU POUR DES
ENFANTS DONT LE POIDS N’EXCEDE
PAS 22.7 KG (50 LIVRES) ET LA
TAILLE NE DEPASSE PAS 110 CM (43
POUCES). LE PANIER A ETE CONÇU
POUR SUPPORTER DES CHARGES
MAXIMALES DE 5 KG (11 LIVRES).
LES POCHETTES OU SACS FOURNIS
AVEC CE PRODUIT ONT ETE CONÇUS
POUR SUPPORTER DES CHARGES
MAXIMALES DE 0,2 KG (0,44 LIVRES).
_ CET ARTICLE A ÉTÉ CONÇU POUR
ÊTRE UTILISÉ AVEC UN SIÈGE-AUTO
“PRIMO VIAGGIO” GANCIOMATIC DE
PEG-PÉREGO (GROUPE 0+) LANDAU
"NAVETTA XL", "REVERSIBLE SEAT" ET
"PRATICO" SIÈGE.
_ AVANT TOUTE UTILISATION, VEUILLEZ
CONTRÔLER QUE LE SIÈGE-AUTO
“PRIMO VIAGGIO” (GROUPE 0+)
LANDAU "NAVETTA XL", "REVERSIBLE
SEAT" " ET "PRATICO" SIÈGE.SONT
FIXÉ CORRECTEMENT À L’ARTICLE.
_ IL EST DÉCONSEILLÉ DE METTRE
UN BIBERON OU UNE BOUTEILLE
CONTENANT UNE BOISSON CHAUDE
ET PESANT PLUS D' 0,5 KG DANS LE
PORTE-BIBERON.
_ LE DEFAUT D’OBSERVATION DES
SPECIFICATIONS DU FABRICANT
OU L’EMPLOI D’ACCESSOIRES NON
APPROUVES PAR LE FABRICANT PEUT
AFFECTER LA STABILITE DU PRODUIT.
_
AVERTISSEMENT:
POUR ÉVITER DE GRAVES
BLESSURES SUITE À LA CHUTE OU
AU GLISSEMENT DE L’ENFANT DU
PRODUIT, TOUJOURS UTILISER UNE
CEINTURE DE SÉCURITÉ À 5 POINTS
causar cambios de color de muchos materiales.
Conservar este producto en un lugar seco.
LIMPIEZA DEL CHASIS: Limpiar periódicamente las
partes de plástico con un paño húmedo sin usar
solventes u otros productos similares. Mantener
secas todas las partes de metal para prevenir
la oxidación. Mantener limpias todas las partes
móviles (dispositivo de regulación, de enganche,
ruedas...) quitando el polvo o la arena y, en caso
necessario, engrasarlas con aceites ligeros.
LIMPIEZA DEL PROTECTOR DE LLUVIA: lavar
con una esponja con agua y jabón, sin usar
detergentes.
LIMPIEZA DE LAS PARTES DE TEJIDO: cepillar
las partes de tejido quitando el polvo y lavar a
mano a una temperatura máxima de 30º. No
torcer, no usar lejía, no planchar, no lavar en
seco, no usar solventes y no secar utilizando
secadoras de tambor rotativo.
PEG-PÉREGO S.p.A
Peg-Pérego podrá aportar en cualquier
momento modificaciones a los modelos
que se describen en el presente manual por
razones técnicas o comerciales.
SERVICIO DE ASISTENCIA
PEG-PÉREGO
En caso de que se pierdan o se dañen partes
del producto, utilizar sólo repuestos originales
Peg-Pérego. Para eventuales reparaciones,
sustituciones, informaciones sobre los
productos, venta de recambios originales y
accesorios, póngase en contacto con el Servicio
de Asistencia Peg Perego indicando, si está
presente, el número de serie del producto.
USA
tel. 800.671.1701 fax 260.471.6332
call us toll free 1.800.671.1701
website www.pegperego.com
Page 20

- 20 -
COMPLÈTE.
_
AVERTISSEMENT:
NE JAMAIS LAISSER L’ENFANT SANS
SURVEILLANCE.
_ TOUJOURS ACTIONNER LES FREINS
LORSQUE LE PRODUIT EST A L’ARRET.
_ POUR ÉVITER DE GRAVES BLESSURES
LORS DU RÉGLAGE DU PRODUIT,
S’ASSURER QUE LES MEMBRES DE
L’ENFANT NE SONT PAS EN CONTACT
AVEC DES PIÈCES EN MOUVEMENT.
_ L’ENSEMBLE DES PROCÉDURES DE
MONTAGE ET D’UTILISATION DOIT
ÊTRE EFFECTUÉ PAR UN ADULTE
_ NE PAS SOULEVER LA POUSSETTE
PAR LA BARRE FRONTALE. ELLE N’A
PAS ÉTÉ CONÇUE POUR SUPPORTER
DES CHARGES.
_ S’ASSURER QUE LA POUSSETTE
EST CORRECTEMENT OUVERTE
EST BLOQUÉE DANS LA POSITION
CONVENANT À SON UTILISATION.
_ CONTRÔLER QUE LE SIÈGE ENFANT
OU LE LANDAU EST CORRECTEMENT
ACCROCHÉ À LA POUSSETTE.
_ NE PAS UTILISER CE PRODUIT
À PROXIMITÉ DE MARCHES OU
D’ESCALIERS; PRÊTER ATTENTION
À LA MANIPULATION DU PRODUIT
DANS DES ESCALIERS OU DES
ESCALATORS.
_ NE PAS UTILISER LE PRODUIT SI DES
PIÈCES SONT MANQUANTES OU
CASSÉES.
_ NE PAS UTILISER PRÈS DU FEU OU
D’UNE FLAMME DIRECTE.
_ LORSQU'UTILISÉ EN COMBINAISON
AVEC BASSINET
_
AVERTISSEMENT:
NE PAS RAJOUTER DE MATELAS.
REMARQUE
CET ARTICLE REMPLIT LES
CONDITIONS REQUISES PAR LA
NORME ASTM F833 ET RÉVISIONS
RÉCENTES OU SATISFAIT À DES
CONDITIONS PLUS SÉVÈRES.
COMPOSANTS DE L’ARTICLE
Vérifier le contenu de l’emballage. Pour toute
réclamation, veuillez contacter le Service
d’assistance.
_ Book Plus châssis : panier ; 2 roues arrière
avec engrenage frein, barre roues arrière et
porte-boisson.
_ Siège réversible: capote, tablier, habillage
pluie.
INSTRUCTIONS D’UTILISATION
1 OUVERTURE : Avant d'ouvrir le châssis, le cas
échéant, retirer (sans utiliser de lames) tous
les éléments en carton.
ATTENTION :
_ NE PAS TIRER OU FORCER LE CROCHET DE FERMETURE
AU-DELÀ DE LA FIN DE COURSE.
_ NE PAS UTILISER LE CROCHET DE FERMETURE COMME
POIGNÉE DE TRANSPORT OU POUR Y SUSPENDRE DES
POIDS.
NE PAS SUSPENDRE SACS OU AUTRES ACCESSOIRES À
CETTE PIÈCE.
Appuyer vers le bas sur le crochet
de fermeture latéral, saisir les extrémités
supérieures de l'anse et les tourner vers soi
jusqu'à ce que le chariot soit complètement
ouvert (fig_a). Chariot ouvert (fig_b).
L’ouverture correcte est confirmée par le
déclic, qui correspond à l’accrochage de la
base, voir figure. ATTENTION : lorsque le siège
est monté, appuyer dessus pour être sûr qu'il
soit bien accroché à la base.
2 MONTAGE ROUES : insérer la barre des roues
arrière dans les montants (fig_a) en veillant
au sens d’introduction correct, puis accrocher
les roues arrière (fig_b) jusqu’au déclic.
3 MONTAGE PANIER : si abaissé, soulever le
tube du panier en position horizontale.
Appuyez sur les boutons argentés sous le
montant en métal du panier situé au dos de
la poussette (fig_a) et enlevez le montant
(fig_b) Introduisez le montant dans la boucle
en tissu au dos du panier, avec les deux
boutons argentés tournés vers le bas (fig_c).
Remettez le montant dans ses logements
(fig_d).
4 Fixez les deux œillets supérieurs du panier
aux deux boutons gris fixés de chaque côté
des supports du montant du panier À noter
que les œillets s’ouvrent (fig_e).Enlevez le
carton de la barre arrière. IMPORTANT ! Fixez
les deux œillets inférieurs du panier aux deux
boutons gris situés au-dessus de la barre
arrière. À noter que les œillets s’ouvrent
(fig_f).
ATTENTION ! Si cette opération n’est pas
effectuée correctement, le panier ne peut
pas soutenir le contenu.Fixez les languettes
antérieures du panier aux boutons gris du
châssis (fig_g).
CONSULTEZ NOTRE VIDÉO D’INSTRUCTIONS
POUR L’INSTALLATION À L’ADRESSE :
WWW.PEGPEREGO.COM
5 ROUES AVANT PIVOTANTES OU FIXES : relever
les leviers pour bloquer les roues (fig_a), les
baisser pour les rendre pivotantes (fig_b). Sur
terrains difficiles, il est conseillé d’utiliser les
roues fixes.
6 FREIN : appuyer sur le levier de frein pour
Page 21

- 21 -
bloquer le châssis. Pour débloquer le châssis,
procéder à l’opération inverse.
7 POIGNÉE RÉGLABLE : pour régler la hauteur
de la poignée, appuyer simultanément sur les
boutons latéraux (fig_a) et tourner la poignée
dans la position souhaitée (fig_b), puis
relâcher les boutons.
8 MONTAGE DU SIÈGE SUR LE CHÂSSIS : le siège
réversible peut être accroché au châssis en
étant tourné vers maman ou vers la route
(fig_a) ; le positionner au centre du châssis et
appuyer vers le bas des deux mains jusqu’au
déclic d’enclenchement. Pour s’assurer que le
siège est correctement accroché, tirer le siège
vers le haut en le tenant par la barre frontale.
9 DÉCROCHAGE DU SIÈGE DU CHÂSSIS :
appuyer sur les deux boutons ronds situés
sur les côtés du siège (fig_a) et, dans le même
temps, sur les deux leviers placés sous les
accoudoirs (fig_b), puis tirer le siège vers le
haut (fig_c) jusqu’à ce qu’il se décroche. Le
siège peut être décroché du châssis et remis
en place avec l’enfant installé à l’intérieur.
10 BARRE FRONTALE : avant d’introduire la
barre frontale, appuyer sur les boutons
latéraux des accoudoirs et extraire les
bouchons (fig_a). Pour accrocher la barre
frontale, accompagner les attaches dans les
accoudoirs et pousser vers le siège jusqu’au
click d’accrochage (fig_b). Pour ôter la barre
frontale, appuyer sur les deux boutons et
enlevez-la (fig_c). Ouvrir la barre frontale
d’un coté seulement pour faciliter l’entrée
et la sortie de l’enfant. Si vous voulez utiliser
la poussette sans barre frontale, mettre à
nouveau les bouchons dans les accoudoirs.
11 DOSSIER: pour régler l’inclinaison, relever la
poignée (fig. a) et placer le dossier dans l’une
des 4 positions au choix (fig. b).
12 REPOSE-PIEDS: pour abaisser le repose-pieds,
déplacer vers le bas les deux petits leviers
et baisser le repose-pieds. vers le bas (fig. a);
pour le relever, le pousser vers le haut (fig. b).
13 CEINTURE DE SÉCURITÉ À 5 POINTS : pour
l’accrocher, enclencher les deux boucles
de la ceinture ventrale (bretelles attachées,
flèche_a) dans la sangle d’entrejambes
jusqu’au déclic (flèche_b). Pour la décrocher,
appuyer sur le bouton rond situé au centre
de la boucle (flèche_c) et tirer la ceinture
ventrale vers l’extérieur (flèche_d).
14 Pour serrer la ceinture ventrale, tirer des
deux côtés dans le sens indiqué par la flèche
(flèche_a) ; pour la desserrer, procéder à
l’opération contraire.
15 Pour régler la hauteur des ceintures de
sécurité, il faut décrocher les deux clips à
l’arrière du dossier.
Tirer vers soi les bretelles (flèche_a) jusqu’à
décrocher les clips et les enfiler dans les
boutonnières du dossier (flèche_b). Enlever
les bretelles de la housse (flèche_c) et les
enfiler dans la boutonnière la plus adaptée
(flèche_d), enfin accrocher de nouveau les
deux clips derrière le dossier (flèche_e).
L’accrochage correct des clips est déterminé
par le déclic (fig_f).
16 CAPOTE : ATTENTION Vérifier si les boutons
sont bien boutonnés derrière le dossier, si ce
n’est pas le cas, les boutonner (fig_a). Pour
soulever la capote : la tirer vers soi ; pour
fermer la capote : la pousser vers l'arrière. La
capote peut être transformée en ombrelle
uniquement lorsque le dossier n’est
pas complètement incliné, en ouvrant la
fermeture éclair avec double curseur (fig_b)
et en la déboutonnant à l'arrière du dossier.
La capote est dotée d'un œillet auquel
suspendre son jouet préféré (fig_c).
17 TABLIER : mettre le tablier en place et le
boutonner sous le repose-pieds (fig_a) et sur
les côtés. Pour la version landau, relever le
repose-pieds et mettre le tablier en place sur
la barre frontale (fig_b) en l’accrochant aux
boutons de la capote (fig_c). Pour la version
poussette, abaisser le repose-pieds, enfiler le
tablier sous la barre frontale et le fixer (fig_d).
18 Défaire le dispositif de protection par le
dessous du repose-pieds (fig_a), l’accrocher
au siège (fig_b), insérer la barre frontale
(fig_c) et accrocher le dispositif de protection
aux côtés de l’accoudoir en déboutonnant
d’abord la partie latérale de la housse (fig_d).
Dispositif de protection installé (fig_e).
19 HABILLAGE PLUIE : Placer l’habillage pluie
sur la poussette (fig_a) et enfiler ses deux
boutonnières latérales aux boutons de la
capote (fig_b).
20 Fixer l’habillage pluie en fixant l’élastique
aux montants arrière (fig_a) ou aux montants
avant (fig_b) selon la position du siège.
21 FERMETURE : pour fermer le siège, comprimer
l’extérieur des côtés vers l’intérieur (fig_a) et
le bloquer avec le crochet prévu à cet effet
(fig_b).
22 FERMETURE : il est possible de procéder à
la fermeture sans siège, avec siège tourné
vers maman (en inclinant le dossier avant
la fermeture) ou tourné vers la route. Pour
fermer le châssis, il est préfér able de rendre
les roues avant fixes et de fermer la capote
si elle est installée. Placer l'anse comme le
montre la figure (fig. a).
Tirer sur la poignée intérieure située sur la
base (fig_b) et, en continuant de la tenir, la
soulever (fig_c) et laisser retomber l'anse vers
l'avant jusqu'à la fermeture.
23 Pour une bonne fermeture, vérifier que le
crochet latéral soit correctement enclenché
(fig_c). Le chariot fermé tient debout tout
seul (fig_d). Pour un encombrement réduit,
il est possible d’extraire les roues arrière.
Page 22

- 22 -
Tirer la languette vers l’extérieur et extraire
la roue, comme indiqué sur la figure (fig_f).
Pour extraire les roues avant : appuyez sur
la languette comme le montre la figure, et
extraire la roue (fig_g).
24 ENLEVER LA CAPOTE : dévisser à l'aide
d'un tournevis la vis située à l'intérieur de
la capote (fig_a), la déboutonner derrière
le dossier (fig_b) et la décrocher du siège
comme le montre la figure (fig_c).
25 ENLEVER LA HOUSSE : retirer la housse du
repose-pieds (fig_a), défaire les fixations de
la housse des accoudoirs (fig_b) et les deux
boutons des côtés du dossier (fig_c) ; dévisser
ensuite la ceinture de part et d’autre (fig_d) et
enlever les sangles, puis retirer par le haut (en
poussant par le dessous du siège) la sangle
d’entrejambes (fig_e).
SYSTÈME GANCIOMATIC
26 Le Système Ganciomatic, pratique et rapide,
permet d’accrocher en un seul geste la
nacelle Navetta, le siège-auto Primo Viaggio
et le siège Siège réversible au châssis: les
positionner sur le châssis et appuyer des deux
mains jusqu’au déclic. Châssis non utilisable
avec la nacelle Primo Nido en France
Toujours actionner le frein du châssis ou
de la poussette avant d’accrocher ou de
décrocher les produits (consulter le manuel
d’instructions de chaque produit).
Vérifier que le produit est bien positionné sur
le châssis.
ACCESSOIRES EN OPTION
27 A_BORSA (Sac à langer). Ce sac muni d’un
petit matelas pour changer bébé peut se fixer
sur la poussette.
B_MOUSTIQUAIRE : applicable à la capote.
C_PRATICO: Transformez votre Book Plus
en une poussette plus légère grâce à notre
siège Pratico qui comprend son propre sac de
transport.
D_PLATEAU pour Book Plus.
NUMÉROS DE SÉRIE
28 Des informations relatives à la date de
production figurent sur Book Plus châssis :
_ Nom du produit, date de production et
numéro de châssis.
29 Siège réversible reporte les informations
relatives à sa date de production.
_ Nom du produit, date de production et
numéro de série du siège (fig_a) et du châssis
(fig_b).
Ces informations sont indispensables en cas
de réclamation.
NETTOYAGE ET ENTRETIEN
ENTRETIEN DE L’ARTICLE: protéger l’article des
agents atmosphériques (eau, pluie ou neige);
une exposition continue et prolongée au
soleil pourrait entraîner un changement de
couleur de nombreux matériaux; ranger cet
article dans un lieu sec.
NETTOYAGE DU CHÂSSIS: nettoyer
régulièrement les pièces en plastique à
l’aide d’un linge humide; ne pas utiliser de
solvants ou autres produits similaires. Veiller
à ce que toutes les pièces métalliques restent
sèches pour prévenir la formation de rouille.
Maintenir le bon état de propreté de toutes
les pièces mobiles (mécanismes de réglage,
mécanismes de fixation, roues, etc.) en
enlevant poussière ou sable; graisser avec
une huile légère si nécessaire.
NETTOYAGE DE L’HABILLAGE PLUIE: utiliser
une éponge et de l’eau savonneuse; ne pas
utiliser de détergents.
NETTOYAGE DES ÉLÉMENTS EN TISSU:
brosser les éléments en tissu pour enlever
la poussière et laver à la main à une
température maximale de 30° ; ne pas tordre ;
ne pas utiliser d’eau de javel ; ne pas repasser
; ne pas laver à sec ; ne pas détacher à l’aide
de solvants ; ne pas sécher dans un sèchelinge à tambour rotatif.
PEG-PÉREGO S.p.A.
Peg-Pérego se réserve le droit de procéder
à tout moment à des modifications sur les
modèles décrits dans cet ouvrage, pour des
raisons de nature technique ou commerciale.
SERVICE D’ASSISTANCE
PEG-PÉREGO
En cas de perte de pièces ou de rupture de
l'une d'elles, utiliser exclusivement des pièces
de rechange originales Peg-Pérego. Pour
toute réparation, remplacement, informations
sur les produits, vente de pièces détachées
d’origine et accessoires, contactez le service
après-vente Peg Pérego en indiquant, si
présent, le numéro de série du produit.
CANADA
tél. 905.839.3371 fax 905.839.9542
call us toll free 1.800.661.5050 site Internet
www.pegperego.com
Page 23

- 23 -
Dichiarazione di
conformità
Denominazione del prodotto
BOOK PLUS
Codice identicativo del
prodotto
IPBR*
Normative di riferimento (origine)
EN 1888:2012
EN 71-3
European Directive 2005/84/CE
(Phtalates Directive)
European Directive 2002/61/CE
(Azocolourants)
16 CFR 1303 lead
16 CFR 1501 small parts
CPSIA 2008
ASTM F833-11
Dichiarazione di conformità
La PegPerego S.p.A. dichiara sotto
la propria responsabilità che
l’ articolo in oggetto è stato
sottoposto a test di collaudo
interni e omologato secondo le
normative vigenti presso laboratori
esterni ed indipendenti.
Data e luogo di rilascio
Arcore, Aprile 2012
PegPerego S.p.A.
via De Gasperi, 50
20862 Arcore (MB), ITALY
Declaration of
conformity
Product name
BOOK PLUS
Product reference number
IPBR*
Reference Standards (origin)
EN 1888:2012
EN 71-3
European Directive 2005/84/CE
(Phtalates Directive)
European Directive 2002/61/CE
(Azocolourants)
16 CFR 1303 lead
16 CFR 1501 small parts
CPSIA 2008
ASTM F833-11
Declaration of conformity
PegPerego S.p.A. declares under
its sole responsibility that the
article to which this declaration
relates has undergone internal
testing and has been approved,
in accordance with regulations
in force, by external, indepen-
dent testing laboratories.
Date and place of issue
Arcore, April 2012
PegPerego S.p.A.
via De Gasperi, 50
20862 Arcore (MB), ITALY
IT_Italiano
EN_English FR_Français DE_Deutsch ES_Español
Declaration du
conformitè
Denomination du produit
BOOK PLUS
Identication du produit
IPBR*
Standard du referiment (origin)
EN 1888:2012
EN 71-3
European Directive 2005/84/CE
(Phtalates Directive)
European Directive 2002/61/CE
(Azocolourants)
16 CFR 1303 lead
16 CFR 1501 small parts
CPSIA 2008
ASTM F833-11
Declaration du conformitè
PegPerego S.p.A. déclare, sous
sa propre responsabilité, que
l’article en question a été
soumis à des tests d’essais
internes et homologué selon
les normes en vigueur par des
laboratoires extérieurs et
indépendants.
Date et lieu du publication
Arcore, Avril 2012
PegPerego S.p.A.
Via De Gasperi, 50
20862 Arcore (MB), ITALY
Konformität-
serklärung
Bezeichnung des Produktes
BOOK PLUS
Kennzeichnungscode des
Produktes
IPBR*
Bezugsbestimmungen
(Ursprung)
EN 1888:2012
EN 71-3
European Directive 2005/84/CE
(Phtalates Directive)
European Directive 2002/61/CE
(Azocolourants)
16 CFR 1303 lead
16 CFR 1501 small parts
CPSIA 2008
ASTM F833-11
Konformitätserklärung
Die Firma PegPerego S.p.A.
erklärt auf ihre Verantwortung,
dass der betreende Artikel
internen Abnahmetests
unterzogen sowie gemäß den
gültigen Bestimmungen von
externen und unabhängigen
Labors zugelassen wurde.
Datum und Ort der Ausstellung
Arcore, April 2012
PegPerego S.p.A.
Via De Gasperi, 50
20862 Arcore (MB), ITALY
declaración de
conformidad
Denominación del producto
BOOK PLUS
Código de identicación del
producto
IPBR*
Normativas de referencia
(origen)
EN 1888:2012
EN 71-3
European Directive 2005/84/CE
(Phtalates Directive)
European Directive 2002/61/CE
(Azocolourants)
16 CFR 1303 lead
16 CFR 1501 small parts
CPSIA 2008
ASTM F833-11
Declaración de conformidad
PegPerego S.p.A. declara bajo
su responsabilidad que el
artículo en objeto ha sido
sometido a pruebas de ensayo
internas y ha sido homologado
según las normativas vigentes
en laboratorios exteriores e
independientes.
Fecha y lugar de expedición
Arcore, Abril
de
2012
PegPerego S.p.A.
Via De Gasperi, 50
20862 Arcore (MB), ITALY
Page 24

PEG PEREGO S.p.A.
VIA DE GASPERI 50 20862 ARCORE MB ITALIA
tel. 0039 039 60881 fax 0039 039 615869/616454
Servizio Post Vendita - After Sale:
tel. 0039 039 6088213 fax: 0039 039 3309992
PEG PEREGO U.S.A. Inc.
3625 INDEPENDENCE DRIVE FORT WAYNE INDIANA 46808
phone 260 482 8191 fax 260 484 2940
Call us toll free: 1 800 671 1701
PEG PEREGO CANADA Inc.
585 GRANITE COURT PICKERING ONTARIO CANADA L1W3K1
phone 905 839 3371 fax 905 839 9542
Call us toll free: 1 800 661 5050
www.pegperego.com
WARNING
AVOID SERIOUS INJURY FROM FALLING OR SLIDING OUT.
ALWAYS USE COMPLETE 5 POINT SEAT BELT.
ADVERTENCIA
EVITE LESIÓNES DE CAIDAS O DESLIZAMIENTOS HACIA FUERA.
SIEMPRE UTILIZE EL CINTURON COMPLETO DE 5 PUNTOS.
AVERTISSEMENT
EVITER UNE BLESSURE SÉRIEUSE DUE À UNE CHUTE OU À UN GLISSEMENT.
TOUJOURS UTILISER LA CEINTURE DE SÉCURITÉ À 5 POINTS COMPLÈTE.
book plus
BOOK PLUS
FINA1402I163
20/03/2014
Conforms to
ASTM F833
Safety Standards
Tutti i diritti di proprietà intellettuale relativi ai contenuti di questo manuale d’istruzione appartengono a
PEG PEREGO S.p.A. e sono tutelati dalle leggi vigenti.
All of the intellectual property rights for the contents of this instruction manual belong to PEG PEREGO
S.p.A. and are protected by the laws in force.
 Loading...