

Page 1
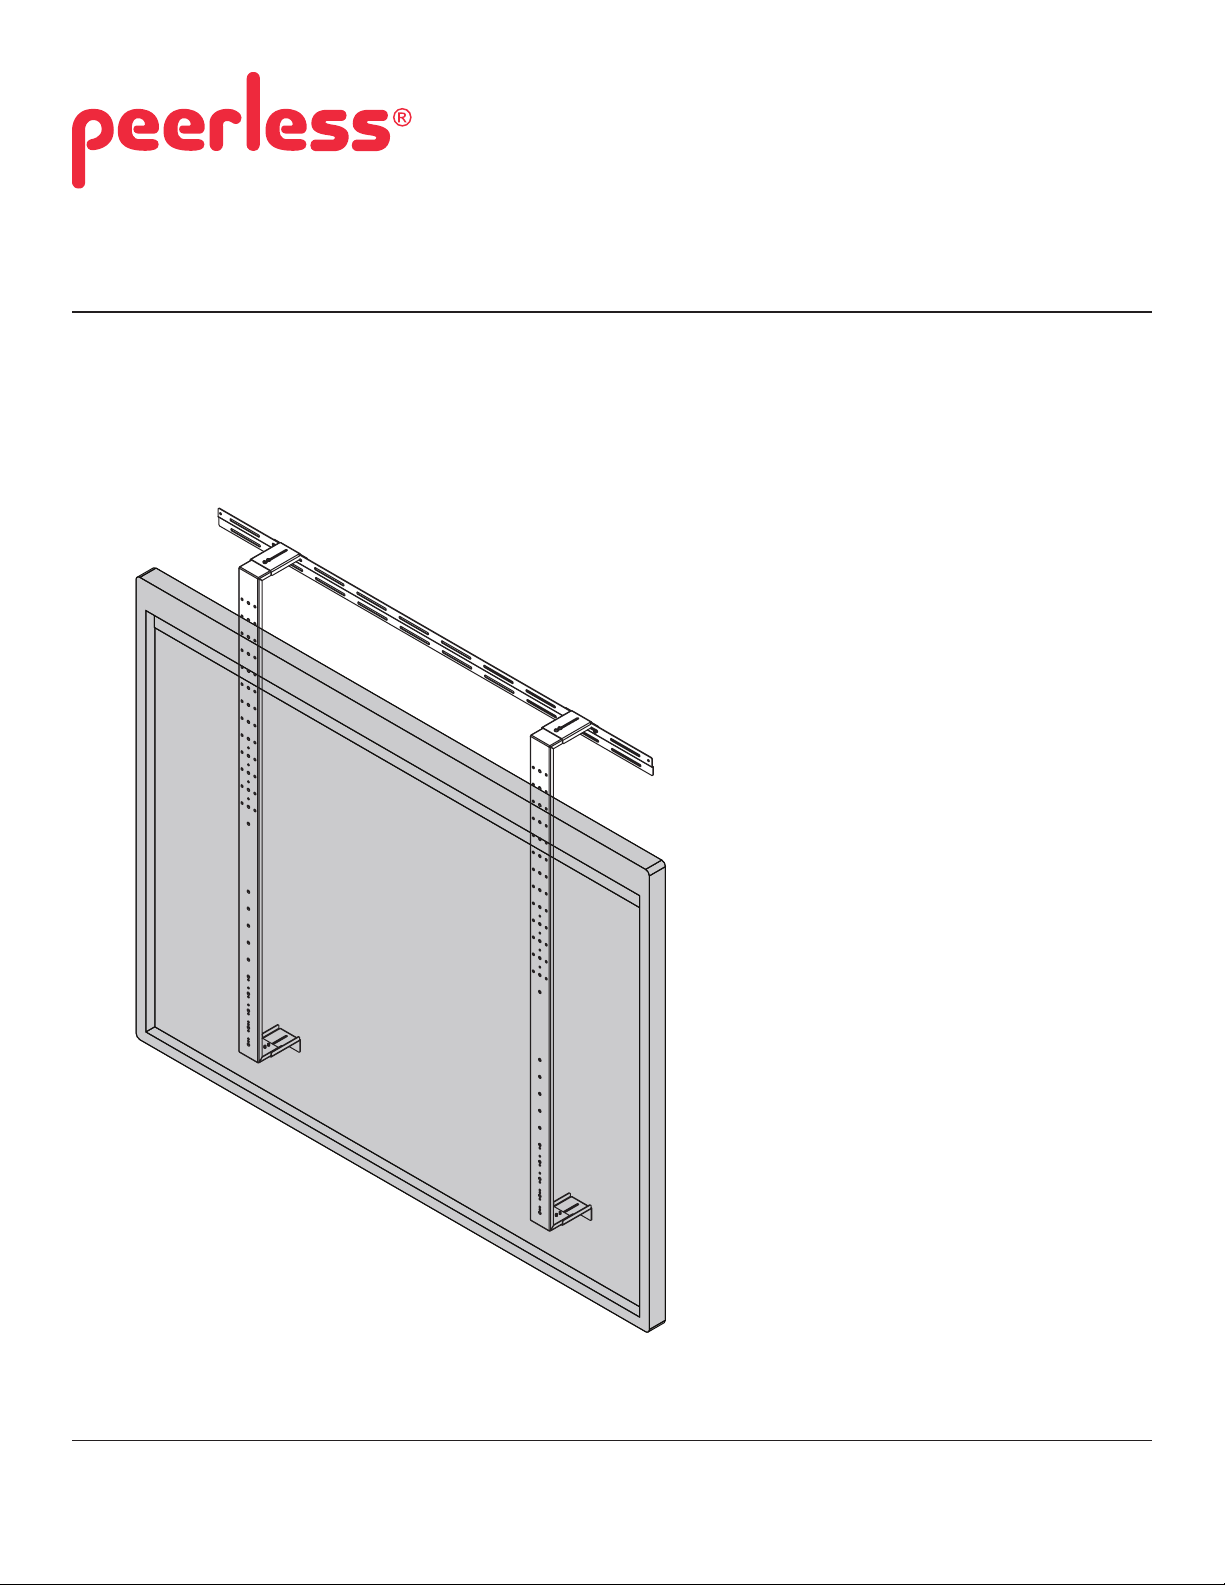
Installation and Assembly:
Wall Mount for White Boards
Model: IWB600-2SB
COMPATIBLE WITH:
ActivBoard
• 64" ActivBoard 164
• 78" ActivBoard 178
• 78" ActivBoard 378 PRO
• 87" ActivBoard 387 PRO
• 95" ActivBoard 395 PRO
Interwrite
• 77" Dual Board
Hitachi
• 63" Starboard DUO
• 77" Starboard DUO
• 77" Starboard TRIO
• 88" Starboard DUO
Marsh
• 77" Marsh Board PR4050000
SMART
• 64" SMART Board SB660
• 77" SMART Board SB680
Max Load Capacity: 70 lb (31.7 kg)
3215 W. North Ave. • Melrose Park, IL 60160 • (800) 729-0307 or (708) 865-8870 • Fax: (708) 865-2941 • www.peerlessmounts.com
ISSUED: 11-09-10 SHEET #: 125-9154-4 12-21-10
Page 2
A
NOTE: Read instruction sheet before you start installation and assembly.
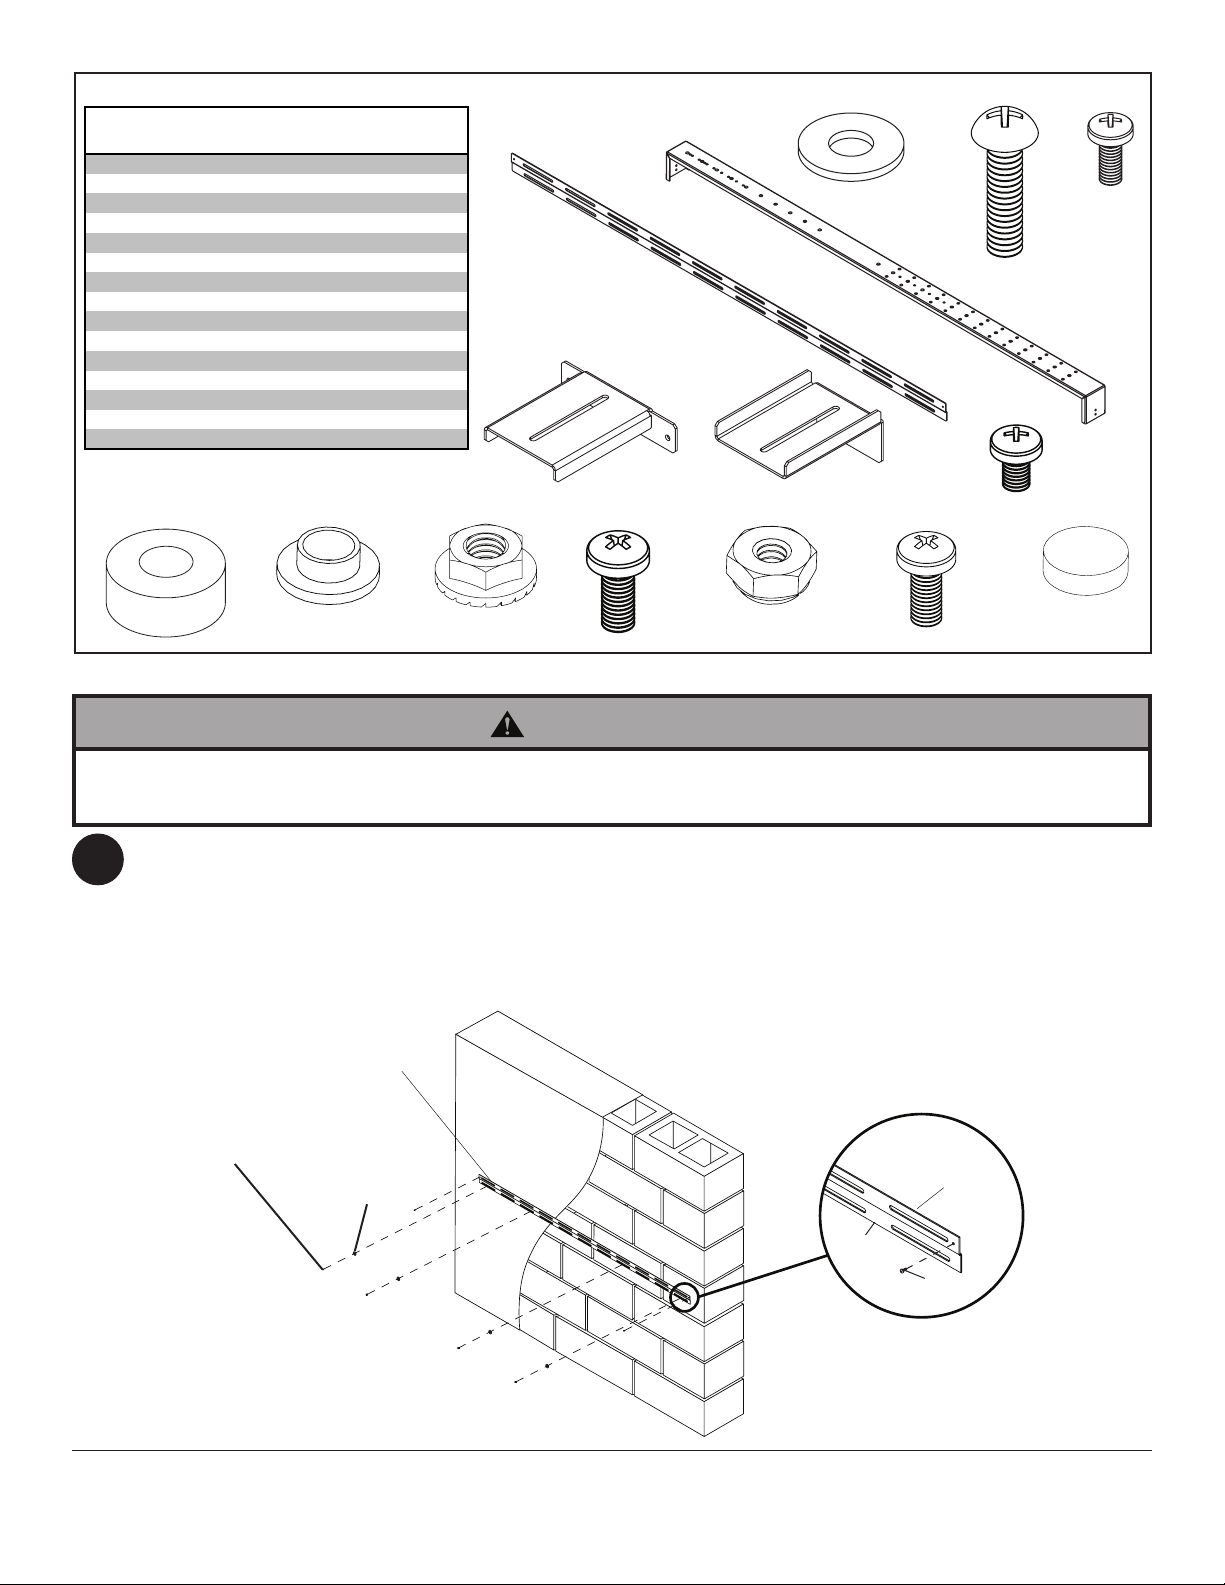
PARTS LIST
Description Qty. Part #
wall bracket 1 095-4652
B vertical bracket 2 095-4683
C 1/4" flat washer 6 540-9444
D 1/4-20 x 1" phillips screw 4 510-9110
E M4 x 6 mm pphillips screw 2 520-2032
F top depth adjusting bracket 2 095-4685
G .320 ID x 1 OD x .375 spacer 4 540-2084
H bottom depth adjusting bracket 2 095-4684
I plastic bushing 4 540-0087
J M5 serrated flanged lock nut 4 530-2042
K M5 x 12 mm phillips screw 4 520-2039
L M6 nylock nut 4 530-9334
M M6 x 12 mm phillips screw 4 520-2039
N rubber pad 4 590-1124
O M5 x 8 mm phillips screw 10 520-2167
NOTE: Some parts may appear slightly
different than illustrated
G
I K L
Installation to Wall
A
F
B C D E
H
O
J
M
N
WARNING
• Installer must verify that the supporting surface will safely support the combined load of the equipment and all
attached hardware and components.
NOTE: Make sure ange of wall bracket is located on top as shown in detail 1
1
Be sure wall bracket (A) is level and in desired position. Then use wall bracket (A) as a template to mark center
of four mounting holes. Drill four mounting holes. Attach wall bracket (A) to mounting surface using four screws
provided by installer and four 1/4 washers (C) if required. Once secure, wall bracket (A) will be ush with the top of
the vertical bracket (B). Fasten two M4 x 6 mm phillips screws (E) into wall bracket (A).
NOTE: Vertical brackets (B) may be used to determine location of wall bracket (A).
A
Fasteners Supplied by Installer
C
A
Flange
E
DETAIL 1
2 of 13
ISSUED: 11-09-10 SHEET #: 125-9154-4 12-21-10
Page 3
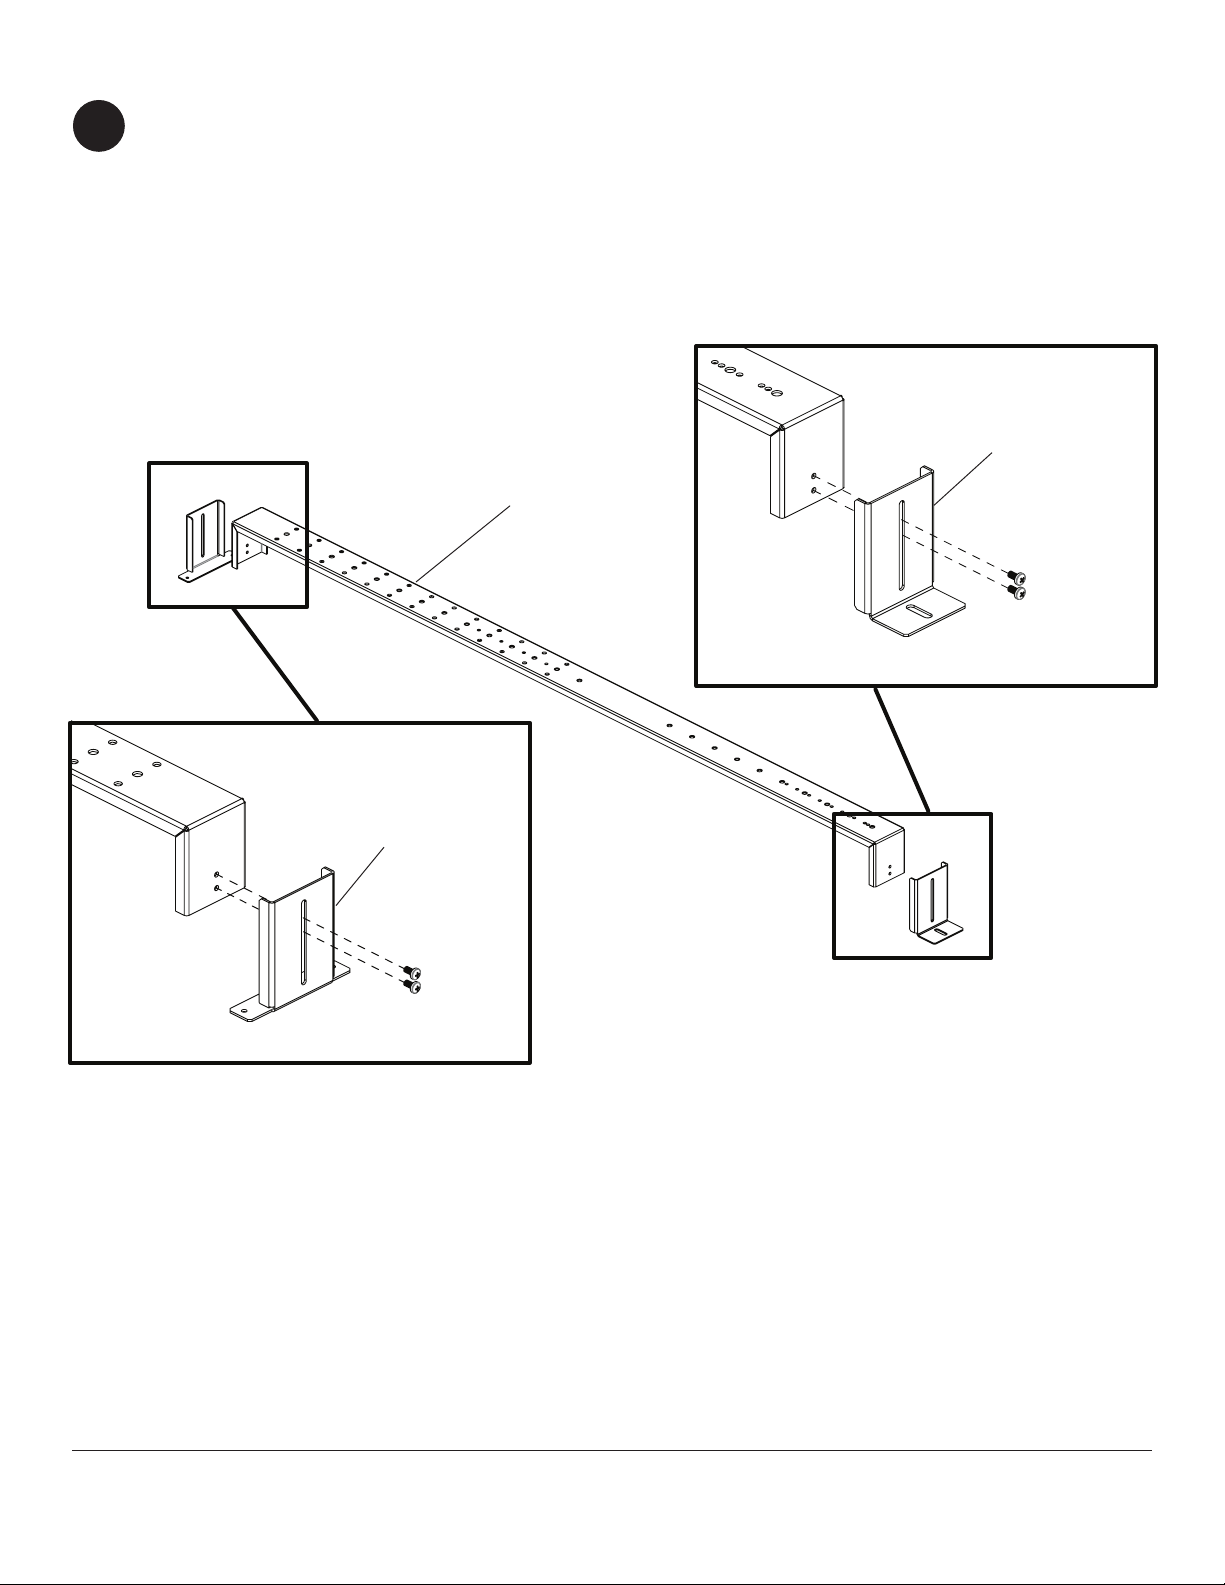
Attaching Top and Bottom Depth Adjusting Brackets
Attach top and bottom depth adjusting brackets (F and H) onto vertical bracket (B) using four
2
M5 x 8 mm phillips screws (O) as shown below.
NOTE: Fully extend and tighten depth adjusting brackets (F and H). Depth can be adjusted after whiteboard is
attached to mount.
Repeat using second vertical bracket (B) and top and bottom depth adjusting brackets (F and H).
B
H
O
BOTTOM
F
O
TOP
Installation to SMARTboards.........................................................Skip to Page 4
Installation to Hitachi Starboard..................................................Skip to Page 5
Installation to Marsh Board............................................................Skip to Page 7
Installation to Interwrite Board...................................................Skip to Page 10
Installation to ActivBoard.............................................................Skip to Page 11
.
3 of 13
ISSUED: 11-09-10 SHEET #: 125-9154-4 12-21-10
Page 4
SMARTboards
3
Rest Smart Board face down on a non abrasive surface to prevent scratching.
Attach vertical brackets (B) to board using four 1/4 - 20 phillips head screws (D) through plastic bushings (I), and
.320 ID x 1 x .375 spacers (G) as shown in detail 2.
NOTE: Vertical brackets (B) can be adjusted vertically in 2" increments to change Smartboard position.
D
I
B
D
I
G
G
SMARTboard
DETAIL 2
Hook vertical brackets (B) to wall bracket (A) and secure using two M5 x 8 mm phillips screws (O)
4
as shown in detail 3.
SKIP TO PAGE 13
B
O
SMARTboard
4 of 13
A
O
DETAIL 3
ISSUED: 11-09-10 SHEET #: 125-9154-4 12-21-10
Page 5

Hitachi Starboard
Fasten Hitachi bracket (supplied with Hitachi Starboard) to vertical support (B) using two M6 x 12 mm phillips
3
screws (M) and two M6 nylock nuts (L) as shown below.
Repeat using second vertical support (B).
M
(supplied with Hitachi Starboard)
L
B
Hook vertical brackets (B) to wall bracket (A) and secure using two M5 x 8 mm phillips screws (O)
4
as shown in detail 4.
O
A
B
DETAIL 4
O
5 of 13
ISSUED: 11-09-10 SHEET #: 125-9154-4 12-21-10
Page 6

Press four rubber pads (N) into center holes on top and bottom of vertical supports (B) to stabilize
5
board as shown below. Make sure rubber pads (N) line up with existing Hitachi brackets on back of
board.
Hook Hitachi rail cutouts onto Hitachi bracket at desired height as shown below.
SKIP TO PAGE 13
Hitachi bracket
(supplied with
Hitachi Starboard)
Cutouts
TOP
N
Hitachi Starboard
N
BOTTOM
6 of 13
ISSUED: 11-09-10 SHEET #: 125-9154-4 12-21-10
Page 7

Marsh Board
Hook vertical brackets (B) to wall bracket (A) and secure using two M5 x 8 mm phillips screws (O)
3
as shown in detail 5.
A
DETAIL 5
O
B
Fasten two support brackets (supplied with Marsh Board) to bottom of vertical supports (B) using four M5 x 12 mm
phillips screws (K) and M5 serrated anged lock nuts (J) as shown below.
4
NOTE: Make sure that the distance between the top of the support bracket and bottom of hole is 1/8".
NOTE: Use only the large bottom four mounting holes on vertical support (B).
USE LARGE
BOTTOM HOLES
O
support brackets
(supplied with
Marsh Board)
K
B
1/8"
support brackets
(supplied with
J
Marsh Board)
B
7 of 13
ISSUED: 11-09-10 SHEET #: 125-9154-4 12-21-10
Page 8

Position Marsh Board onto support brackets (supplied with Marsh Board) and mark top of board as shown below.
5
Remove Marsh Board.
B
support brackets
(supplied with
Marsh Board)
Fasten two support brackets (supplied with Marsh Board) to vertical supports (B) using four M5 x 12 mm phillips
6
screws (K) and M5 serrated anged lock nuts (J) as shown below.
support brackets
support brackets
(supplied with
Marsh Board)
(supplied with Marsh Board)
Mark top of board
J
B
8 of 13
K
ISSUED: 11-09-10 SHEET #: 125-9154-4 12-21-10
Page 9

Position Marsh Board onto support brackets (supplied with Marsh Board) and align top of board with marked line on
7
vertical support as shown below.
Fasten two support brackets (supplied with Marsh Board) to Marsh Board using four support fasteners
(supplied with Marsh Board) on top and bottom as shown below.
SKIP TO PAGE 13
support fastener
(supplied with Marsh Board)
TOP
support bracket
(supplied with Marsh Board)
support bracket
(supplied with Marsh Board)
BOTTOM
support fastener
(supplied with Marsh Board)
9 of 13
ISSUED: 11-09-10 SHEET #: 125-9154-4 12-21-10
Page 10

Interwrite Board
Attach vertical brackets (B) to Interwrite board using four 1/4 - 20 phillips head screws (D) as shown.
3
USE TOP TWO
MOUNTING HOLES
D
B
USE BOTTOM TWO
Interwrite Board
Hook vertical brackets (B) to wall bracket (A) and secure using two M5 x 8 mm phillips screws (O)
4
as shown in detail 6.
SKIP TO PAGE 13
MOUNTING HOLES
O
10 of 13
A
DETAIL 6
ISSUED: 11-09-10 SHEET #: 125-9154-4 12-21-10
O
Page 11

ActivBoard
Fasten top and bottom support bracket (supplied with ActivBoard) to vertical bracket (B) using two
3
M6 x 12 mm phillips screws (M), and M6 nylock nuts (L) as shown below. Repeat using second vertical bracket (B).
NOTE: Be sure to mount brackets 27.9" apart.
M
Top Support Bracket
(supplied with ActivBoard)
27.9"
(708 mm)
Bottom Support Bracket
(supplied with ActivBoard)
L
B
Hook vertical brackets (B) to wall bracket (A) and secure using two M5 x 8 mm phillips screws (O)
4
as shown in detail 7.
O
A
B
DETAIL 7
O
11 of 13
ISSUED: 11-09-10 SHEET #: 125-9154-4 12-21-10
Page 12

Hook ActivBoard onto top and bottom support bracket (supplied with ActivBoard) as shown in detail 8.
5
SKIP TO PAGE 13
Top Support Bracket
(supplied with ActivBoard)
ActivBoard
Bottom Support Bracket
(supplied with ActivBoard)
DETAIL 8
12 of 13
ISSUED: 11-09-10 SHEET #: 125-9154-4 12-21-10
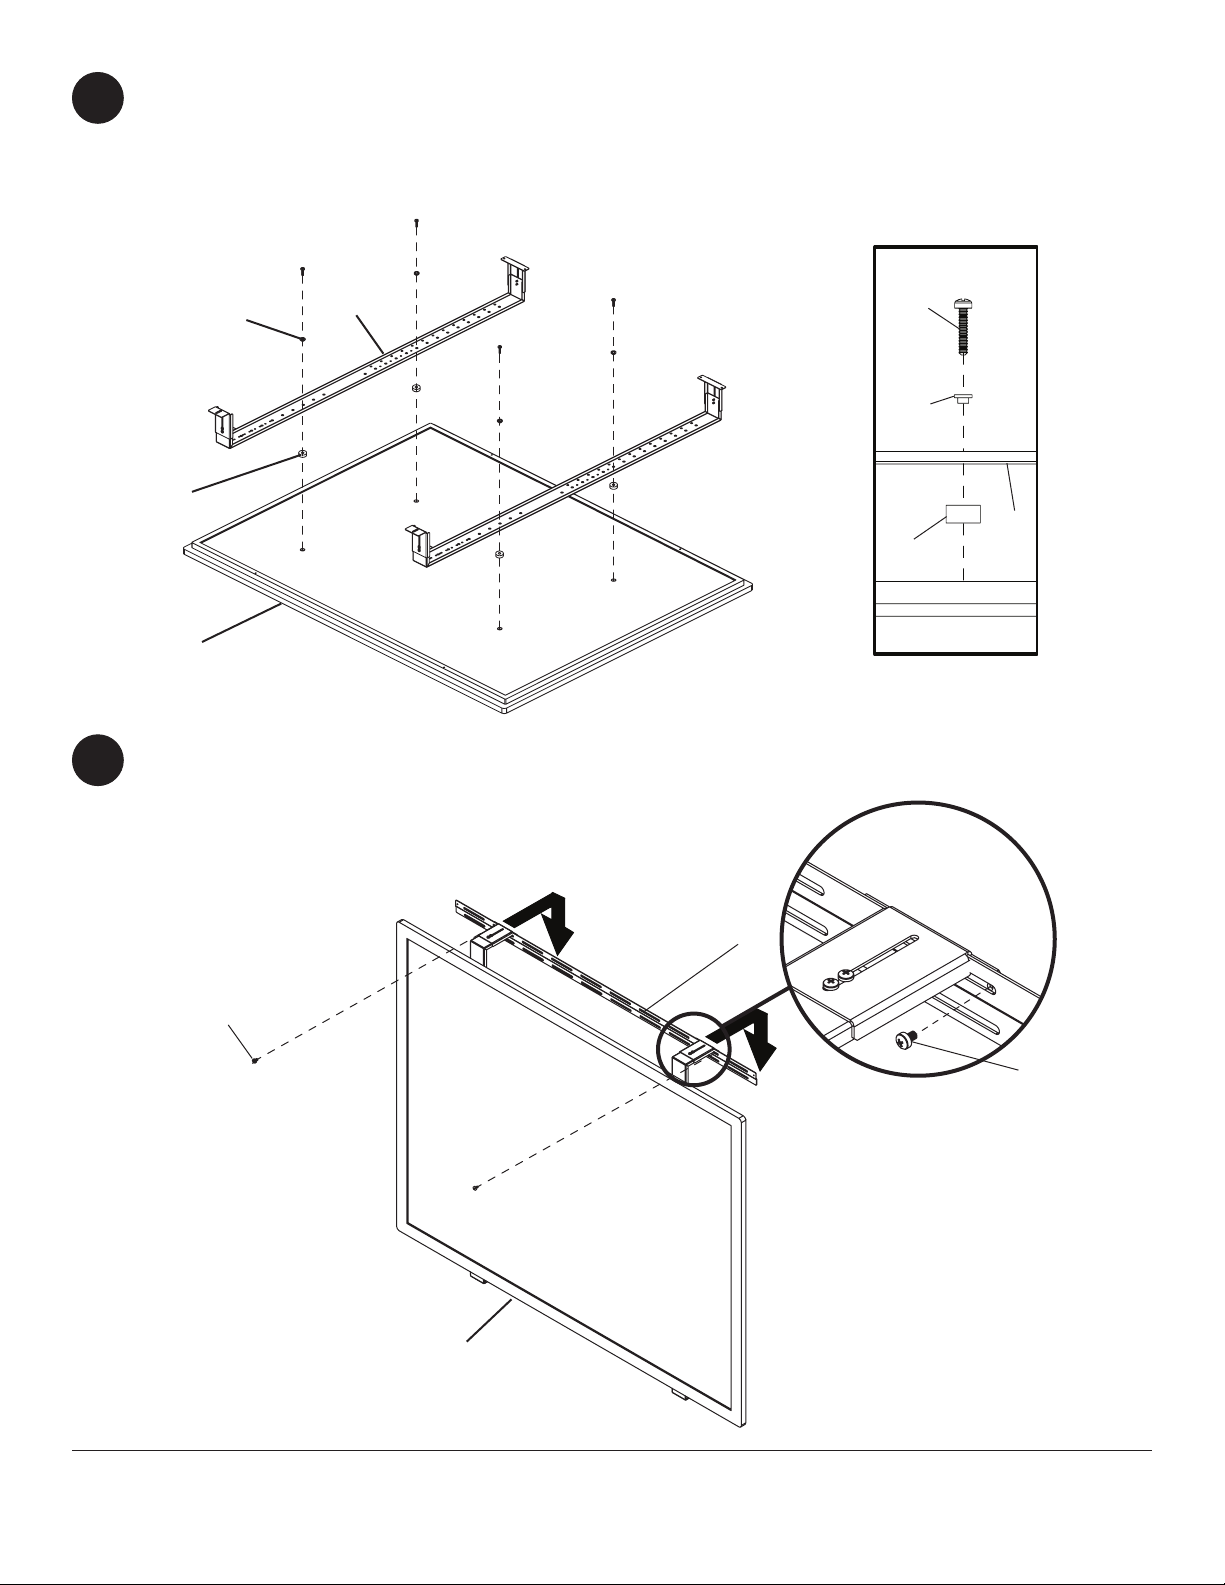
Page 13

Secure bottom depth adjusting bracket (H) to mounting surface using screws provided by installer, and
1/4 washers (C) if required as shown below.
8
C
Fasteners Supplied by Installer
C
H
Loosen eight M5 x 8 mm phillips screws (O) installed in step 2 and adjust to desired depth. Retighten all fasteners.
9
O
WHITEBOARD
13 of 13
All other brand and product names are trademarks or registered trademarks of their respective owners.
ISSUED: 11-09-10 SHEET #: 125-9154-4 12-21-10
© 2010, Peerless Industries, Inc. All rights reserved.
 Loading...