

IRTO49-200, IRTO55-200
ENG
1
2018-11-28 #:180-9122-1
WARNING
ENG - Before installing make sure the supporting surface will support the combined load of the equipment and
hardware. Screws must be tightly secured. Do not overtighten screws or damage can occur and product may fail.
Never exceed the Maximum Load Capacity. Always use an assistant or mechanical lifting equipment to safely
lift and position equipment. Be careful not to pinch ngers when operating the mount. For support please call
customer care at 1-800-865-2112.
ADVERTENCIA
ESP - Antes de instalarlo, asegúrese de que la supercie de apoyo sostendrá la carga combinada del equipo y
los jadores. Los tornillos se tienen que jar rmemente. No apriete los tornillos en exceso, ya que se pueden
dañar y el producto podría fallar. Nunca exceda la Capacidad Máxima de Carga. Siempre cuente con la ayuda
de un asistente o utilice un equipo mecánico de izar para levantar y colocar el equipo con más seguridad. Tenga
cuidado de no pincharse los dedos cuando extienda y recoja el soporte contra la pared. Si necesita ayuda, por
favor, llame a Servicio al Cliente de Peerless al 1-800-865-2112.
ADVERTISSEMENT
FRN - Avant de procéder à l’installation, assurez-vous que la surface de support peut soutenir la charge totale de
l’équipement ainsi que des pièces de xation. Les vis doivent être serrées au maximum. Ne serrez pas trop les
vis pour éviter tout risque d’endommager le produit et de causer sa défaillance. Ne dépassez jamais la capacité
de charge maximale. Pour lever et positionner l’équipement en toute sécurité, faites-vous toujours aider par une
autre personne ou utilisez un dispositif de levage mécanique. Prenez garde à ne pas vous pincer les doigts en
dépliant le support et en le repliant contre le mur. Pour toute assistance, veuillez contacter le service à la clientèle
au 1-800-865-2112.
ENG
Symbols
ESP
FRN
ENG
ESP
FRN
Símbolos
Symboles
R
Back
Parte trasera
Arrière
ENG
WARNING
ESP
ADVERTENCIA
FRN
ADVERTISSEMENT
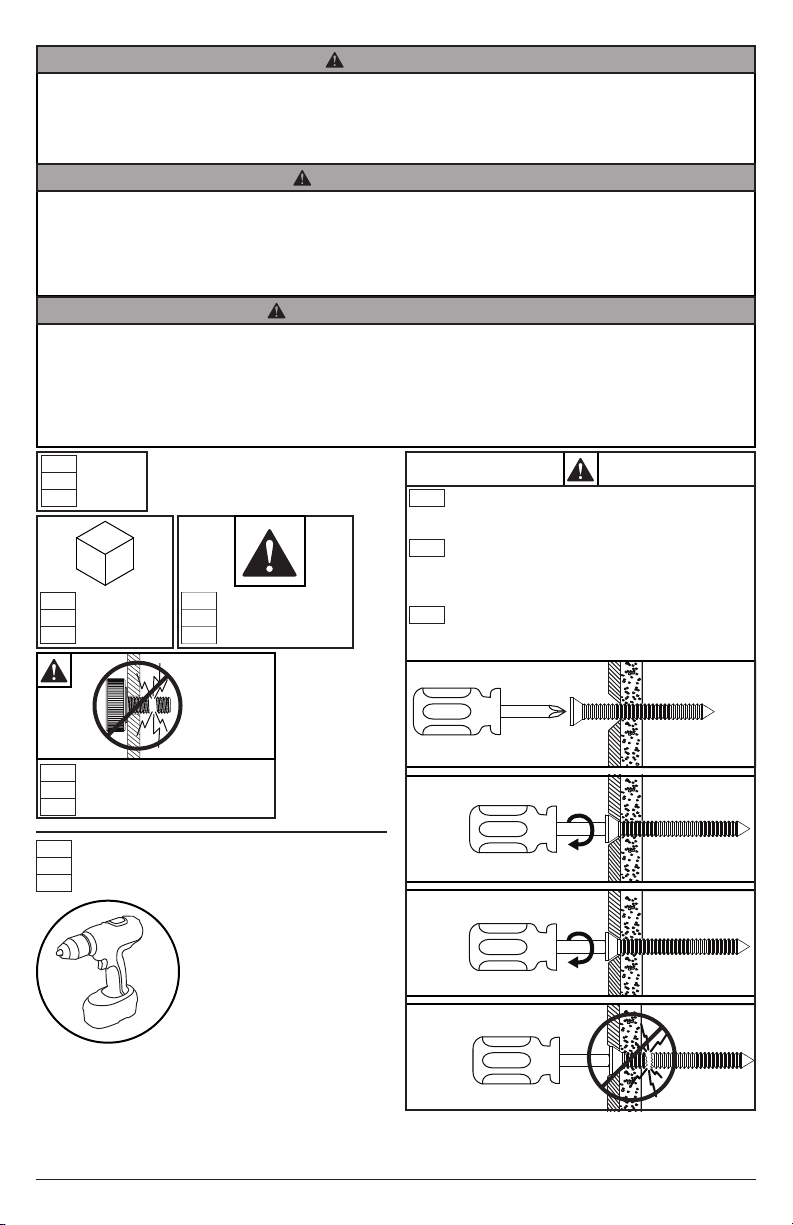
To properly tighten screws: Tighten until screw
ENG
head makes contact, then tighten another 1/2
turn. Do not overtighten screws.
ESP
Apriete adecuado de los tornillos: Apriete hasta
que la cabeza del tornillo haga contacto y luego
apriete otra 1/2 vuelta. No apriete de más los
tornillos.
Pour bien serrer les vis : Serrez jusqu’à ce que
FRN
la tête de la vis entre en contact, puis serrez
encore d’un 1/2 tour. Ne serrez pas trop les vis.
1
ENG
Do not overtighten screws.
ESP
No apriete de más los tornillos.
FRN
Ne pas trop serrer les vis.
ENG
Tools Needed for Assembly.
ESP
Herramientas necesarias para el ensamblaje.
FRN
Outils nécessaires au montage.
2
3
+1/2
4
2
2018-11-28 #:180-9122-1
ENG
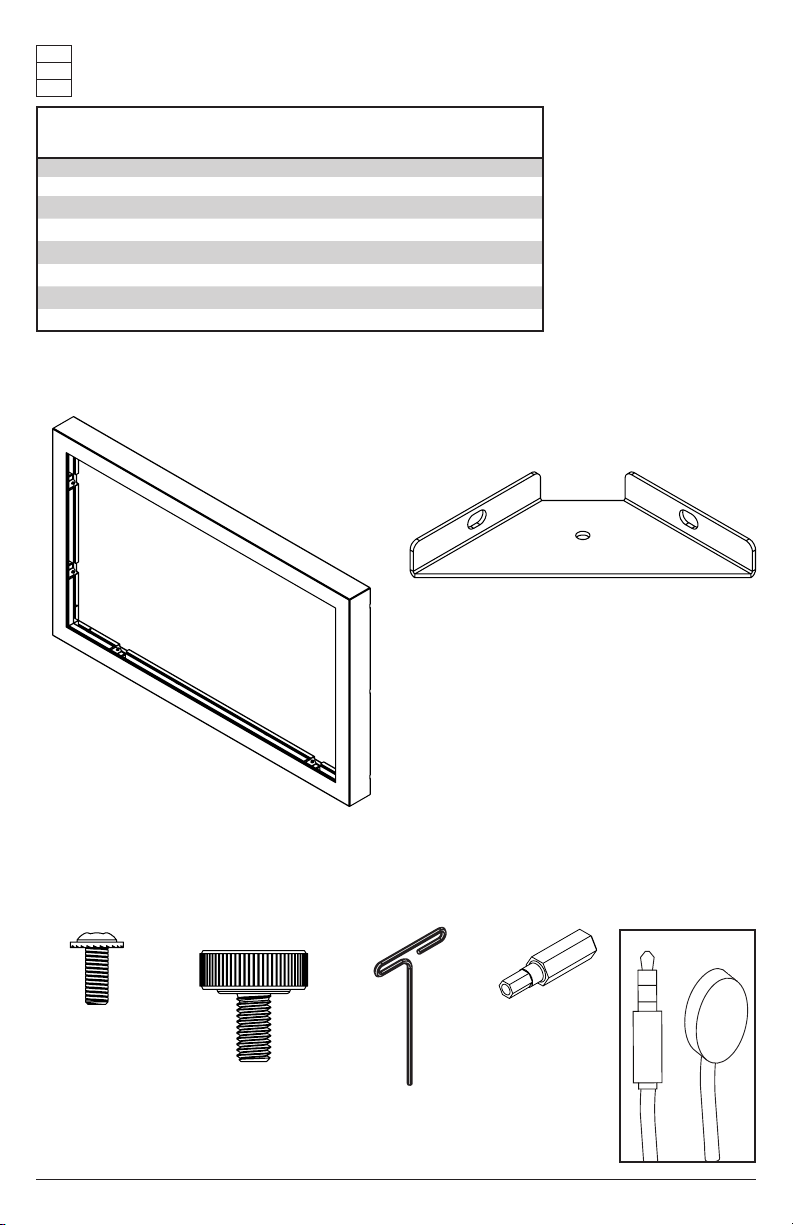
Parts (Before beginning, make sure you have all parts shown below).
ESP
Piezas (antes de iniciar, asegúrese de tener todas las piezas siguientes).
FRN
Pièces (avant de commencer, assurez-vous d’avoir toutes les pièces illustrées ci-dessous).
Parts List
A overlay 1 180-T1692 180-T1710
B corner bracket 4 180-T1428 180-T1428
C M4 x 10mm socket pin screws 8 510-D1060 510-D1060
D M6 x 16mm thumb screws 4 560-1397 560-1397
E 4mm T-wrench 1 560-1718 560-1718
F 4mm driver bit 1 560-1133 560-1133
G IR extender 1 600-0711 600-0711
H USB extension cable (not shown) 1 600-0435 600-0435
IRTO49-200
Part #
IRTO55-200
Part #Description Qty
B (4)A (1)
corner bracketoverlay
C (8)
M4 x 10mm
D (4) E (1)
M6 x 16mm
thumb screw
4mm T-wrench
F (1)
4mm driver bit
3
2018-11-28 #:180-9122-1
(1)
G
IR extender
IR
IN
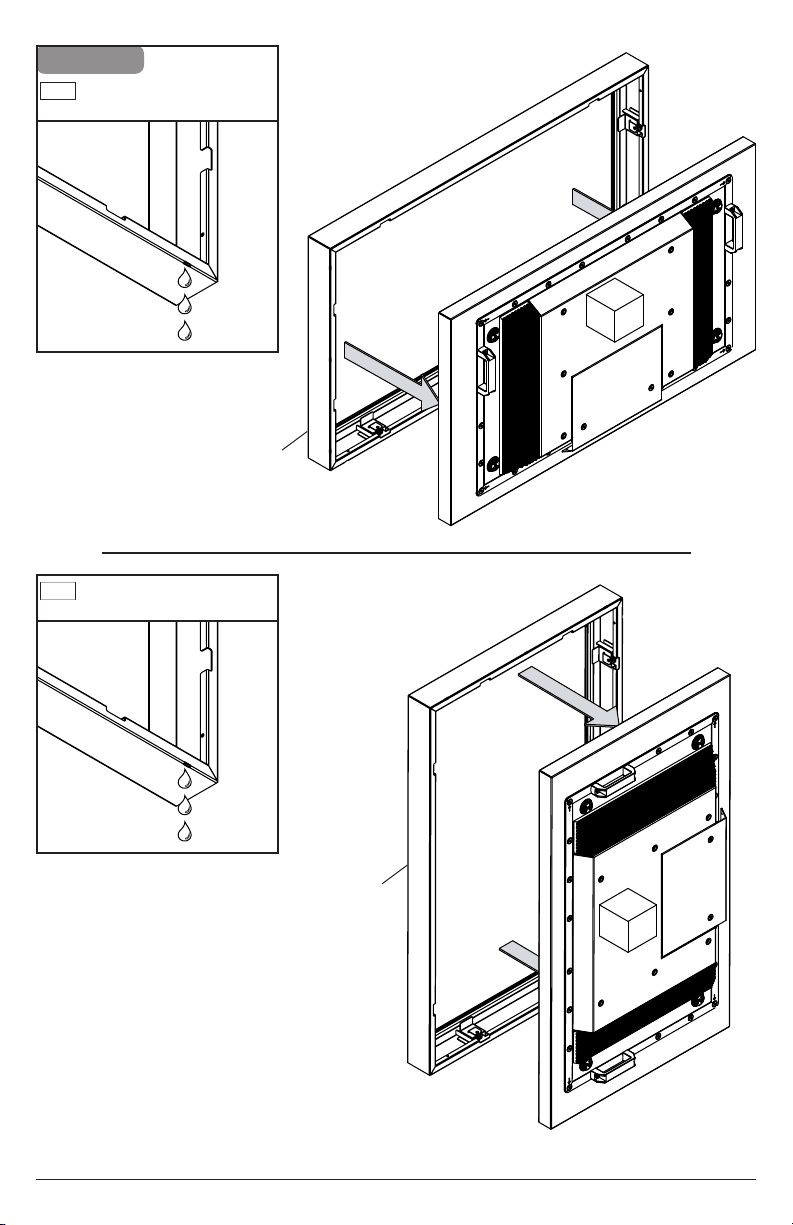
1-1
ENG
Drainage holes indicate bottom
of overlay.
R
ENG
Drainage holes indicate bottom
of overlay.
A
A
XHB492, XHB552
sold separately
R
XHB492, XHB552
sold separately
4
2018-11-28 #:180-9122-1
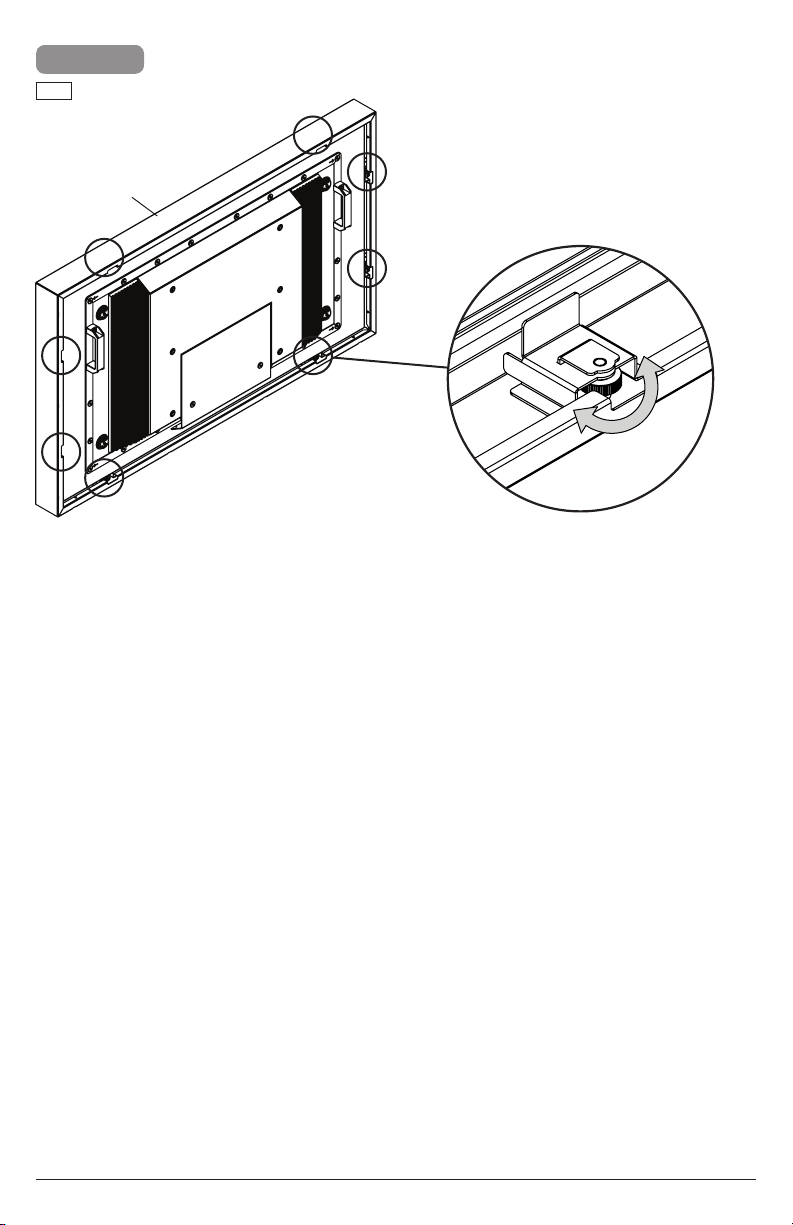
1-2
ENG
Center display by adjusting knobs.
A
5
2018-11-28 #:180-9122-1

2
3
F
E
C (8)
A
B (4)
D (4)
ENG
Tighten.
ESP
Apretar.
FRN
Serrer.
6
2018-11-28 #:180-9122-1

ENG
This page intentionally left blank.
ESP
Página en blanco.
FRN
Cette page a été laissée en blanc intentionnellement.
7
2018-11-28 #:180-9122-1

4
ENG
Connect source device, and waterproof USB extensions with electrical tape or heat-shrinking tube.
A
5-1
ENG
Optional: If use of IR sensor is required, insert the 3.5mm end of the IR Extender into the IR Extender port on
the input panel of the display (sold seperately). Connecting the IR Extender will disable the factory installed
IR sensor.
IR
Extender
G
8
2018-11-28 #:180-9122-1

5-2
G
5-3
ENG
If use of IR sensor is required, install IR extender in a location within line of sight of remote signal.
POWER
TV
DVD
MUTE
1
VCR
4
CBL
SOURCE
7
SAT
2
.
AUX
5
8
3
0
6
9
LAST
VOL
OK
+
INFO
REW
EXIT
REC STOP PAUSEGUIDE
PLAY
CH
FF
MENU
9
2018-11-28 #:180-9122-1

6-1
ENG
Optional: If use of ALS sensor is required, insert the 3.5mm end of the ALS Extender (ACCD-ALS sold
separately) into the ALS Extender port on the input panel of the display (sold seperately). Connecting the
ALS Extender will disable the factory installed ALS sensor.
ALS
Extender
ENG
Sold separately.
10
2018-11-28 #:180-9122-1

6-2
ENG
Sold separately.
6-3
ENG
If use of ambient light sensor is required, install ALS extender in a location representative of
actual ambient light.
11
2018-11-28 #:180-9122-1

7a
ENG
Windows Calibration Instructions
For most operating systems and display orientations calibration is not required. If the touch points are not being
registered accurately please follow the instructions below for calibrating your IR Touch Overlay. You will need
to connect a mouse until your IR Touch Overlay is calibrated properly.
1. Please go to the following website https://www.imanageshare.com/pd/3p8nBT6IerQ and download
the calibration software for the operating system that you are using.
2. Plug the USB from the IR Touch Overlay into the computer or media player that is being used.
3. Install the software on the computer or media player being used with the IR Touch Overlay.
4. Open the Zaagtech Multi-Touch software.
5. Select the language of your choice.
6. Select “Agree” on the License Agreement Page.
7. A prompt will appear to install the Universal Serial Bus Controllers. Check the box that says “Always
trust software from Multi-Touch Surface Inc.” and then click “Install”. After the installation is complete
it will automatically launch the software. Restart the connected pc or windows based media player.
8. Using your connected mouse open the ZinFrame Panel Software by either selecting the shortcut
placed on the desktop or by going to the Start Menu, applications, ZaagTech and then clicking on
the ZinFrame Panel icon.
9. Click on the “Calibration” button.
10. Spinning targets will appear on the screen. Touch and hold the spinning targets until they stop
spinning and display the next target. After all targets have registered it will take you back to the
main screen in the software.
11. If your connected pc or Windows based media player supports multi-touch, leave the HID Windows
Icon at the top menu selected and then click “Ok” at the bottom of your conguration panel. If your
pc or Windows based media player only supports single touch, click the mouse button in the top
menu of the ZinFrame Panel software and then click “Ok” at the bottom of the calibration panel.
Touch on your desktop to make sure that the touches are registering accurately. If the touches are
registering accurately the calibration process is completed. If they are not registering accurately
restart the connected pc or Windows based media player. Once fully booted verify that the touches
are registering accurately. If they are still not registering accurately please contact Peerless-AV
Customer Care at 800-865-2112 and ask to speak with one of our "PeerTech Pros" for further
assistance.
12
2018-11-28 #:180-9122-1

7b
ENG
Mac Calibration Instructions
For most operating systems and display orientations calibration is not required. If the touch points are not being
registered accurately please follow the instructions below for calibrating your IR Touch Overlay. You will need
to connect a mouse until your IR Touch Overlay is calibrated properly.
1. Please go to the following website https://www.imanageshare.com/pd/AicFN9Jx2hM and download
the calibration software for the operating system that you are using.
2. Plug the USB from the IR Touch Overlay into the computer or media player that is being used.
3. Install the software on the computer or media player being used with the IR Touch Overlay.
4. Open the Zaagtech Multi-Touch software.
5. If the Zaagtech Multi-Touch software is not detecting the IR Touch Overlay, please restart your
computer or media player.
6. Once the computer or media player is rebooted all touches should be registering accurately. If this
is not the case please open the Zaagtech Multi-Touch Software and click on calibration.
7. Spinning targets will appear on the screen. Touch and hold the spinning targets until they stop
spinning and display the next target. After all targets have registered it will take you back to the
main screen in the software.
8. If the connected Mac or Mac OS based media player support multi-touch, Click “Ok” at the bottom
of the calibration panel. If the connected Mac or Mac OS based media player only supports single
touch, click the mouse button in the top menu of the Zaagtech Multi-Touch software and then click
“Ok” at the bottom of the calibration panel. Touch on the desktop to make sure that the touches are
registering accurately. If the touches are registering accurately the calibration process is complete.
If the touches are not registering accurately restart the connected restart the connected Mac or Mac
OS based media player. Once fully booted verify that the touches are registering accurately. If the
touches are still not registering accurately please contact Peerless-AV Customer Care at 800-865-
2112 and ask to speak with one of our “PeerTech Pros” for further assistance.
13
2018-11-28 #:180-9122-1

LIMITED TWO-YEAR WARRANTY
TWO-YEAR PARTS & LABOR LIMITED WARRANTY
Terms of Peerless-AV®
The Peerless-AV IR touch overlay is warrantied to be free of defects
in material and workmanship from the time of purchase by the
original owner. If this product is found and proved to be defective
under the terms and conditions of this warranty, Peerless-AV will
repair or replace defective parts with new and/or reconditioned
parts at no charge for the parts and labor to the original owner,
subject to the terms and conditions of this Limited Warranty. This
Limited Warranty covers failures due to defects in material and
workmanship that occur during normal residential or commercial
use as follows:
• Parts – the warranty period for parts is: two (2) years from
the date of original purchase. During the applicable Limited
Warranty period for parts, defective parts will be replaced at
no charge. Parts used for the replacement will be warranted
for the remainder of the original warranty period for those
parts.
• Labor – the warranty period for labor is: two (2) years from
the date of original purchase. During the applicable Limited
Warranty period for labor, Peerless-AV will provide the labor
for warranty repair at no charge for a period of two (2) years
from the date of original purchase.
• Original owner must provide verication of the date of
purchase when requesting Limited Warranty Services.
A copy of the original Dated Sales Receipt is required
together with the product to obtain service under this Limited
Warranty.
• All repairs must be performed by a Peerless-AV Authorized
Service Provider.
• Customer is responsible for returning (including any
freight and shipping costs) defective unit to a Peerless-AV
Authorized Service Provider. If the product is found to have
no defects, the customer will be responsible for return
shipping costs as well.
THIS LIMITED WARRANTY DOES NOT COVER:
• Labor to uninstall and reinstall the IR touch overlay
• Shipping damage.
• Damage caused during customer unpacking, and/or removal
of packing materials.
• Damage due to power surges or lightning strikes.
• Damages which results from re, ood, lightning, tornado,
hurricane, large hail, extremely gusty winds, sand storms,
vandalism, terrorism or other acts of nature.
• Any unit which has been modied or damaged due to
improper installation or failure to obey the operating
instructions in the User Manual.
• Any failure, loss, damage or personal injury due to accident,
neglect, misuse, abuse, improper orientation, improper
maintenance, improper storage, alteration to the unit, or
failure by the consumer to follow operating instructions
provided by the user manual.
• Any owner other than the original owner.
• Any unit purchased from an unauthorized seller.
• If the original product serial number has been removed,
defaced or tampered with in any way.
• Any packaging or transportation charges incurred in
connection with warranty services.
• Indirect, consequential, or special damages except as
required by federal or state laws.
• Any unit tampered with, modied, adjusted or repaired by
any party other than the Peerless-AV Authorized Service
Provider.
• Any cosmetic damages to the surface or exterior that has
been defaced or faded, or caused by normal wear and tear
or exposure to chemicals, acid rain, large hail or adverse
weather conditions.
• Return shipping when no defect is found.
Peerless-AV and its representatives or agents shall in no event be
liable for any general, indirect or consequential damages arising out
of/or caused by the use of /or the inability to use this product.
This warranty is made in lieu of all other warranties, expressed or
implied, and all other liabilities on the part of Peerless-AV. Any other
warranties, including the warranties of merchantability and tness
for a particular purpose are hereby disclaimed by Peerless-AV and
its representatives and/or agents.
All warranty inspections and repairs must be performed by Peerless-
AV or its authorized service representations.
Customer Care: 800.865.2112 or 630.375.5100
Website: www.peerless-av.com
© 2018 Peerless Industries, Inc. All rights reserved.
14
2018-11-28 #:180-9122-1

15
2018-11-28 #:180-9122-1

Peerless-AV
2300 White Oak Circle
Aurora, IL 60502
Email: tech@peerlessmounts.com
Ph: (800) 865-2112
Fax: (800) 359-6500
www.peerless-av.com
© 2018, Peerless Industries, Inc.
Peerless-AV Europe
Unit 3 Watford Interchange,
Colonial Way, Watford, Herts,
WD24 4WP, United Kingdom
Customer Care
44 (0) 1923 200 100
www.peerless-av.com
© 2018, Peerless Industries, Inc.
Peerless-AV de Mexico
Ave de las Industrias 413
Parque Industrial Escobedo
Escobedo N.L Mexico 66050
Servicio al Cliente
01-800-849-65-77
www.peerless-av.com
© 2018, Peerless Industries, Inc.
 Loading...