

Page 1

WK4
PS2500 - GPS2500
SK76 - SK88
WK6 - WK6SE
SK760 - SK880
EQUINOX
Hard Disk
Kit
GENERALMUSIC
Installation Instructions
Istruzioni per l’installazione
ENGLISH/ITALIANO code: 271062
Page 2
CAUTION
Read these notes before proceeding
These servicing instructions are for use by qualified personnel only. To reduce the risk of electric
shock and device malfunction, do not perform any user-servicing but refer all servicing to the
nearest Service Center Authorized by GENERALMUSIC. Any servicing performed by unqualified
service personnel will forfeit all GUARANTEE rights and will exonerate GENERALMUSIC from
all liabilities for damage to property or persons resulting from device malfunction.
ATTENZIONE
Leggi queste note prima di procedere
Le seguenti istruzioni di servizio sono ad esclusivo uso di personale qualificato. Per evitare il
rischio di scosse elettriche e malfunzionamenti dell’ apparecchio, non tentate di effettuare
personalmente queste operazioni, rivolgetevi al più vicino Centro di Assistenza Autorizzato
GENERALMUSIC. Ogni intervento effettuato da personale non qualificato farà decadere i diritti
di GARANZIA ed esonererà GENERALMUSIC da ogni responsabilità su eventuali danni a
persone o cose conseguenti dal suo malfunzionamento.
ATTENTION
Observe precautions when handling electrostatic sensitive devices.
ATTENZIONE
Maneggiare con cura i dispositivi elettronici sensibili alle cariche elettrostatiche.
Device serial number.
Numero di serie apparecchio.
Optional accessory installed.
Accessorio opzionale installato.
Stamp of Service Center
Authorized by Generalmusic
Timbro Centro Assistenza
Autorizzato da Generalmusic
Installation Date.
Data di installazione.
Page 3
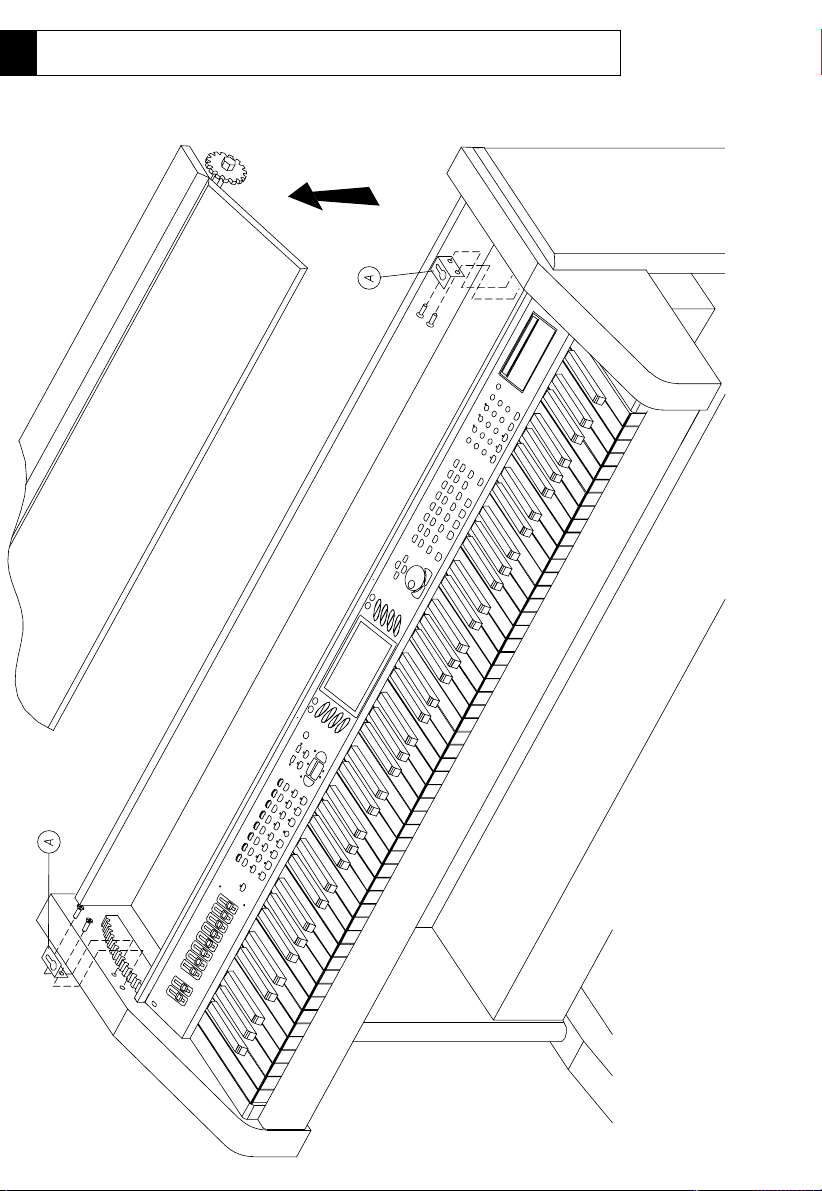
WK4 - WK6/6PS/6SE
Model - Modello Instructions / Istruzioni
ENGLISH
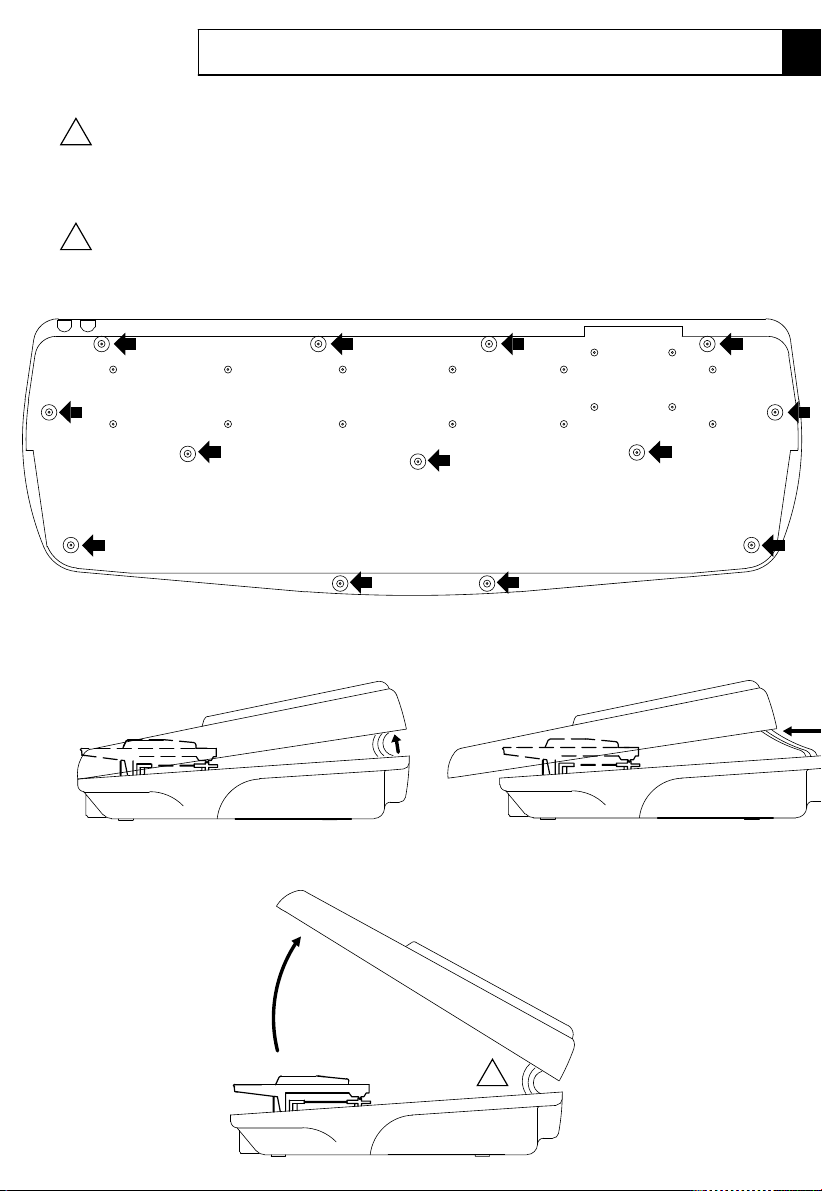
Disconnect the instrument from the mains.
!
Carefully turn the instrument over and unscrew the screws marked by the arrows.
Hold the chassis (top and bottom) tightly and turn the instrument the right way up. Grasp the extreme top
ends of the lid and lift it off by following the sequence of illustrations A, B and C.
ITALIANO
Sconnetti lo strumento dalla presa di corrente.
Rovesciare con attenzione lo strumento e rimuovere le viti indicate dalle frecce.
!
Trattenendo saldamente le parte superiore e inferiore dello strumento raddrizzarlo, afferrare le estremità del
coperchio e sollevarlo seguendo le istruzioni A, B e C.
Front / Davanti
Rear / Dietro
Opening / Apertura
(A) Lift up
Sollevare
(B) Pull towards you to clear the keyboard.
Tiralo verso te per liberarlo dalla tastiera.
(C) Raise the lid, taking care not to disconnect the cables.
Sollevare il coperchio, facendo attenzione a non scollegare i cavi.
!
Mounting Instructions M-3
Page 4
Opening / Apertura SK76-88 and SK760-880
Instructions / Istruzioni
ENGLISH
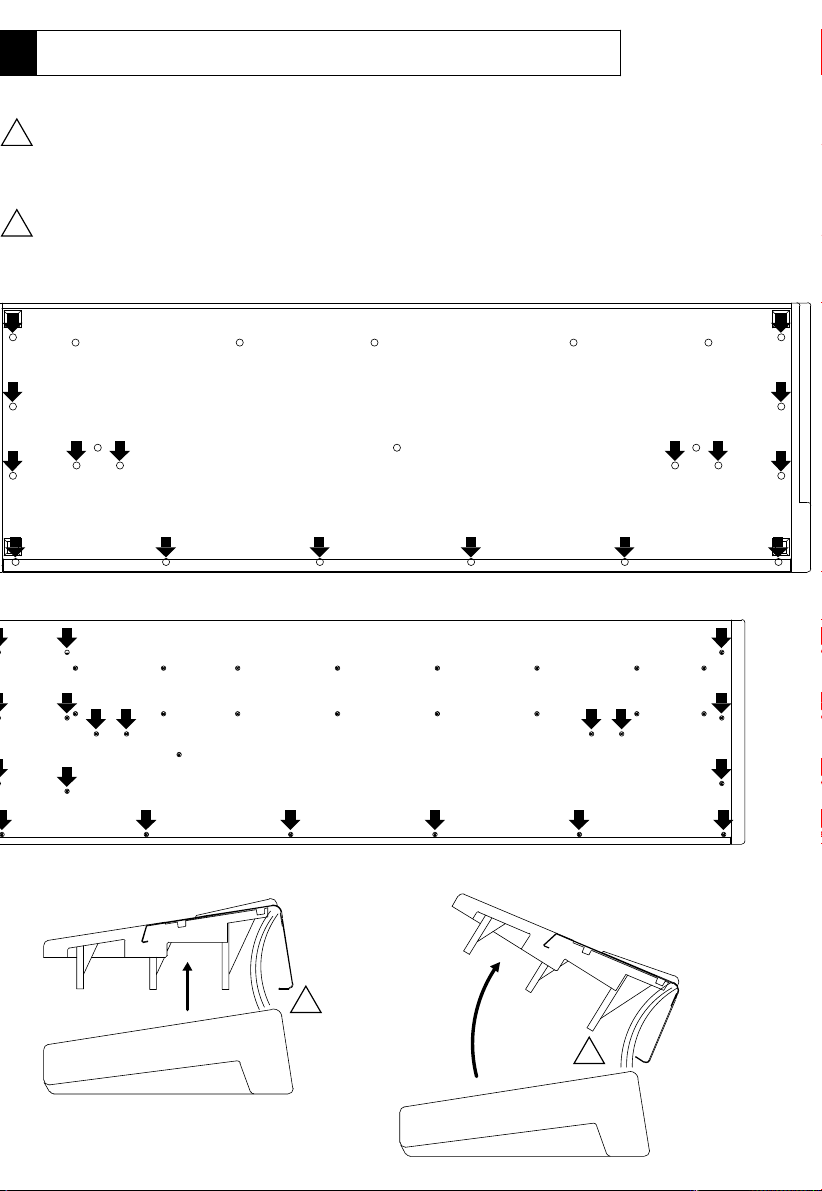
Disconnect the instrument from the mains.
!
Carefully turn the instrument over and unscrew the screws marked by the arrows.
Hold the chassis (top & Bottom) tightly and turn the instrument the right way up,
lift off the top chassis as shown in the figure with care without forcing or disconnecting the cables.
ITALIANO
Sconnettere lo strumento dalla presa di corrente.
!
Rovesciare con attenzione lo strumento e rimuovere le viti indicate dalle frecce.
Trattenendo saldamente le parti superiore e inferiore raddrizzare lo strumento,
rimuovere la parte superiore come indicato in figura, attenzione a non forzare o scollegare i cavi.
Front / Davanti
Rear / Dietro
Model - Modello
a) Lift up.
Sollevare.
Rear / Dietro
!
b) Be careful do not disconnect the cables.
Attenzione a non sconnettere i cavi.
!
Page 5
PS2500
Model - Modello
Opening/Apertura (1/2) ->
Instructions / Istruzioni
ENGLISH
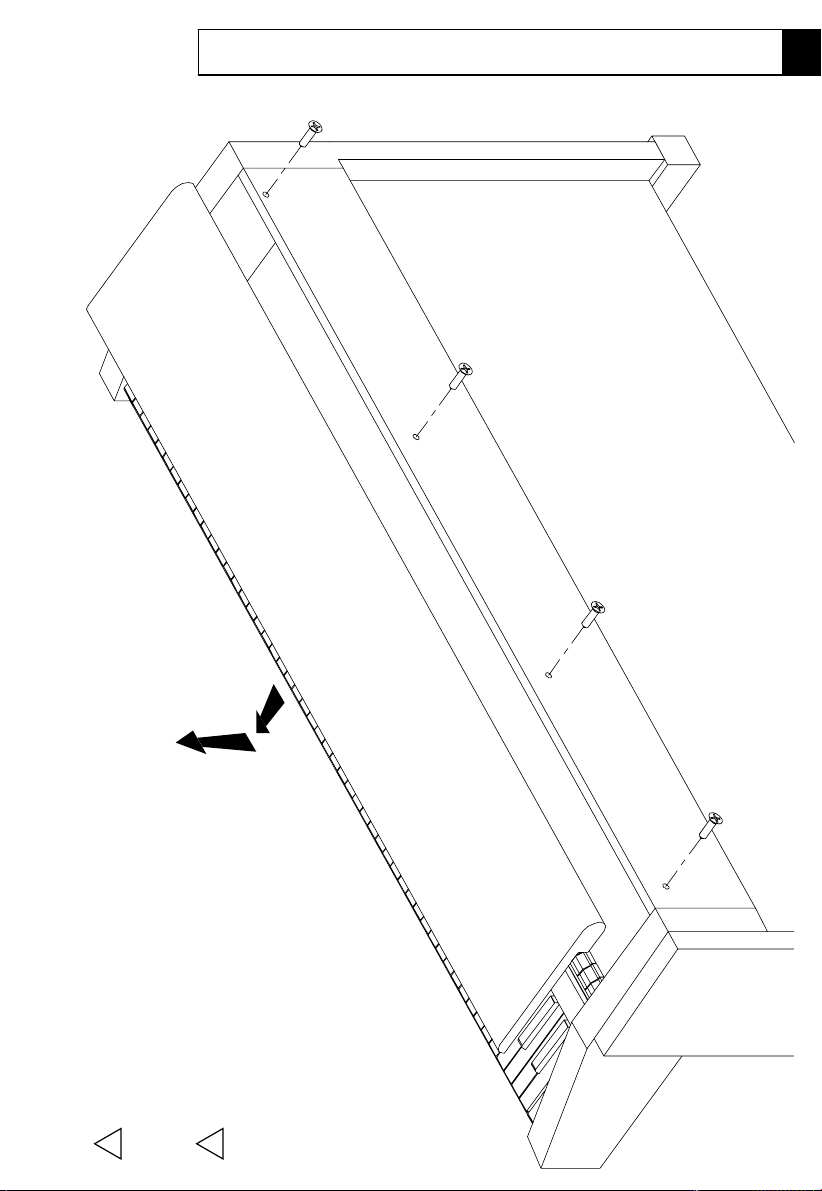
Disconnect the instrument from the mains.
Unscrew the four screws at the rear of instrument.
!
ITALIANO
Sconnettere lo strumento dalla presa di corrente.
Rimuovere le quattro viti sul retro dello strumento.
Remove the top panel in the direction as shown.
For PS2500 only, see the instructions on the next page also.
Rimuovere il pannello superiore nella direzione indicata.
Solo per il PS2500 vedi anche le istruzioni nella pagina
seguente.
!
Mounting Instructions M-5
Page 6
PS2500-> Opening/Apertura (2/2)
Instructions / Istruzioni Model - Modello
Remove the keyboard cover (slide it through the lateral guides).
Rimuovere i due bloccaggi (A) dai laterali.
Remove the two locking plates (A) from the sides.
ENGLISH
Rimuovere il copri tastiera (farlo scorrere attraverso le guide laterali).
ITALIANO
Page 7

Model - Modello
Opening/Apertura (1/2) ->GPS2500
Instructions / Istruzioni
Rimuovere il pannello di protezione sollevandolo dal retro (B). Svitare le due viti laterali (C).
Sconnettere lo strumento dalla presa di corrente. Sollevare il coperchio e svitare le tre viti (A).
Sollevare la specchiera col copritastiera sollevato.
Per operare facilmente sono necessarie due persone.
To operate without difficulty two people are required.
Disconnect the instrument from the mains. Lift the cover and unscrew the three screws (A).
ENGLISH
!
ITALIANO
Remove the protection panel by lifting it from the rear (B). Unscrew the two lateral screws (C).
Lift up the front panel with the keyboard cover raised.
!
Mounting Instructions M-7
Page 8

-> Opening/Apertura (2/2)
Instructions / Istruzioni
fianchi per evitare la loro rigatura.
toncino fra il pannello e i
Nota: Mettere due fogli di car-
their scoring.
controls panel and the flanks to avoid
Note: Place two sheets of paper between
GPS2500
Model - Modello
To re-assemble the piano follow the instructions in reverse order.
Unscrew the three screws (A), disconnect the three grounding jumpers (B), pull the controls panel
to disconnect other jumpers of the controls panel, rest the panel temporarily on the keyboard.
To easy access to the internal circuitry, you must remove the controls panel.
toward you and raise it. To install the optional accessories it is not necessary
ENGLISH
Per far ciò svitare le tre viti (A), scollegare i tre rilanci di massa (B), muovere il pannello dei controlli
scollegare gli altri rilanci dal pannello di controllo, appoggiarlo temporaneamente sopra la tastiera.
Per facilitare l’accesso alle parti interne devi rimuovere il pannello dei controlli.
leggermente avanti e in su. Per installare gli accessori opzionali non è necessario
ITALIANO
Per riassemblare il piano seguire all’indietro le istruzioni.
Page 9

EQUINOX 61 and 76
Model - Modello
ENGLISH
Disconnect the instrument from the mains.
!
Carefully turn the instrument over and unscrew the screws marked by the arrows.
Hold the chassis (top & Bottom) tightly and turn the instrument the right way up,
lift off the top chassis as shown in the figure with care without forcing or disconnecting the cables.
ITALIANO
Sconnettere lo strumento dalla presa di corrente.
!
Rovesciare con attenzione lo strumento e rimuovere le viti indicate dalle frecce.
Trattenendo saldamente le parti superiore e inferiore raddrizzare lo strumento,
rimuovere la parte superiore come indicato in figura, attenzione a non forzare o scollegare i cavi.
61 notes
76 notes
Front / Davanti
Rear / Dietro
Front / Davanti
Opening / Apertura
Instructions / Istruzioni
a) Lift up.
Sollevare.
Rear / Dietro
b) Be careful do not disconnect the cables.
Attenzione a non sconnettere i cavi.
!
!
Mounting Instructions M-9
Page 10

This page is intentionally left blank
Page 11

WK4 and WK6/6SE
Model Instructions
Hard disk rear connector.
Mounting
Dimensions: 2.5" Interface: IDE, or EIDE, or Fast ATA
Must be formatted using the procedure specified in the owner’s manual.
Brands generally accepted: SEAGATE, QUANTUM, HITACHI, IBM.
Hard disk specifications:
(Code 120521)5) 8 washers 3mm
(Code 120029)
(Code 171250)
(Code 840824)
(Code 761094)
starting from the extreme left end in order that 4 free pins remain
to the CPU’s CN8 connector [D].
ENGLISH
KIT 970207 - Hard disk installation kit
screws [7].
- Locate the CPU board [A] and remove the support [B] by unscrewing the locking
screw [4] and the four washers [5], fix the assembly to the threaded
- Insert the DRAM module [1] into the CPU’s CN9 connector [C].
- Fix the mounting brakets [3] to the Hard Disk [6] by means of the four
- Replace the support [B].
to the right of the connector, and the other end
locations [E] by means of the four screws [4] and the four washers [5].
- Connect one end of the jumper [2] to the Hard Disk connector,
Part List:
2) 44 contacts x 7.5 cm flat cable
3) 2 mounting brackets
4) 8 screws (M3x4)
1) 16Mbit DRAM module
special outlets with the same technical characteristics
NOTE: The optional Generalmusic Hard Disk is not
supplied with this kit. Hard Disks are avalaible from
as the optional Generalmusic hard disk.
If you mount the optional Generalmusic hard disk
DO NOT FORMAT THE DEVICE, because it is
samples and songs.
filled with various styles,
supplied already formatted and
Mounting Instructions M-11
Page 12

KIT 970207 - Kit installazione Hard disk
Connettore posteriore Hard disk.
Caratteristiche dell’Hard disk:
Dimensioni: 2.5 pollici Interfaccia: IDE, o EIDE, o Fast ATA
Deve essere formattato usando la procedura specificata nel manuale d’uso.
Marche generalmente accettate: SEAGATE, QUANTUM, HITACHI, IBM.
- Inserire il modulo DRAM [1] nel connettore CN9 [C] sulla scheda CPU.
- Trovare la scheda CPU [A] e rimuovere il supporto [B] svitando le viti di fissaggio [7].
viti [4] e le quattro rondelle [5], fissare l’assieme agli inserti
4) 8 rondelle 3mm
filettati [E] tramite le altre quattro viti [4] e le quattro rondelle [5].
Lista parti:
3) 2 ancoraggi
CN8 [D] sulla scheda CPU.
1) Modulo 16Mbit DRAM
2) Cavo piatto 44 contatti 7.5cm
- Riposizionare e fissare il supporto [B].
- Collegare un capo del cavo [2] al connettore dell’Hard Disk,
che dell’Hard Disk opzionale Generalmusic.
presso i negozi di computer aventi le stesse caratteristi-
NOTE: L’Hard Disk opzionale Generalmusic non è for-
Montando l’hard disk opzionale Generalmusic NON FORMAT-
TARLO, perchè viene fornito già formattato e riempito
con vari stili, campioni e canzoni.
4) 8 viti (M3x4)
- Fissare i due ancoraggi [3] all’Hard Disk [6] usando quattro
partendo dall’estrema sinistra in modo da lasciare liberi gli ultimi
4 pin alla destra del connettore, e l’altro capo al connettore
nito con questo kit. Vari tipi di Hard Disk sono disponibili
(Code 761094)
(Code 840824)
(Code 171250)
(Code 120029)
(Code 120521)
Istruzioni
Montaggio
ITALIANO
Modello
WK4 e WK6/6SE
Page 13

GPS-PS2500, SK76-88
Model
Hard disk rear connector.
Mounting
Instructions
Dimensions: 2.5" Interface: IDE, or EIDE, or Fast ATA
Must be formatted using the procedure specified in the owner’s manual.
Brands generally accepted: SEAGATE, QUANTUM, HITACHI, IBM.
Hard disk specifications:
(Code 840824)
(Code 171250)
(Code 120029)
(Code 761094)
screw [4] and the four washers [5], fix the assembly to the threaded
starting from the extreme left end in order that 4 free pins remain
KIT 970207 - Hard disk installation kit
- Locate the CPU board [A] and remove the support [B] by unscrewing the locking
- Insert the DRAM module [2] into the CPU’s CN9 connector [C].
ENGLISH
screws [7].
locations [E] by means of the four screws [4] and the four washers [5].
- Fix the mounting brakets [3] to the Hard Disk [6] by means of the four
- Replace the support [B].
to the CPU’s CN8 connector [D].
to the right of the connector, and the other end
- Connect one end of the jumper [2] to the Hard Disk connector,
Part List:
4) 8 screws (M3x6)
3) 2 mounting brackets
2) 44 contacts x 7.5 cm flat cable
1) 16Mbit DRAM module
5) 8 washers 3mm (Code 120521)
NOTE: The optional Generalmusic Hard Disk is not
as the optional Generalmusic hard disk.
supplied with this kit. Hard Disks are avalaible from
special outlets with the same technical characteristics
If you mount the optional Generalmusic hard disk
DO NOT FORMAT THE DEVICE, because it is
styles, samples and songs.
supplied already formatted and filled with various
Mounting Instructions M-13
Page 14

nito con questo kit. Vari tipi di Hard Disk sono disponibili
4 pin alla destra del connettore, e l’altro capo al connettore
partendo dall’estrema sinistra in modo da lasciare liberi gli ultimi
viti [4] e le quattro rondelle [5], fissare l’assieme agli inserti
- Fissare i due ancoraggi [3] all’Hard Disk [6] usando quattro
KIT 970207 - Kit installazione Hard disk
- Trovare la scheda CPU [A] e rimuovere il supporto [B] svitando le viti di fissaggio [7].
- Inserire il modulo DRAM [1] nel connettore CN9 [C] sulla scheda CPU.
4) 8 viti (M3x4)
già formattato e riempito con vari stili, campioni
NON FORMATTARLO, perchè viene fornito
Montando l’hard disk opzionale Generalmusic
NOTE: L’Hard Disk opzionale Generalmusic non è for-
presso i negozi di computer aventi le stesse caratteristi-
che dell’Hard Disk opzionale Generalmusic.
e canzoni.
- Collegare un capo del cavo [2] al connettore dell’Hard Disk,
- Riposizionare e fissare il supporto [B].
2) Cavo piatto 44 contatti 7.5cm
1) Modulo 16Mbit DRAM
CN8 [D] sulla scheda CPU.
3) 2 ancoraggi
Lista parti:
Marche generalmente accettate: SEAGATE, QUANTUM, HITACHI, IBM.
Deve essere formattato usando la procedura specificata nel manuale d’uso.
Dimensioni: 2.5 pollici Interfaccia: IDE, o EIDE, o Fast ATA
Caratteristiche dell’Hard disk:
Connettore posteriore Hard disk.
(Code 120521)
(Code 120029)
(Code 171250)
(Code 840824)
(Code 761094)
filettati [E] tramite le altre quattro viti [4] e le quattro rondelle [5].
4) 8 rondelle 3mm
ITALIANO
GPS-PS2500, SK76-88
Istruzioni
Montaggio
Modello
Page 15

SK760-880
Model Instructions
Hard disk rear connector.
(manufactured before april 2000)
Mounting
Hard disk specifications:
Must be formatted using the procedure specified in the owner’s manual.
Dimensions: 2.5" Interface: IDE, or EIDE, or Fast ATA
(Code 761094)
locations [B] by means of the four screws [4] and the four washers [5].
to the right of the connector, and the other end
starting from the extreme left end in order that 4 free pins remain
KIT 970207 - Hard disk installation kit
ENGLISH
screw [4] and the four washers [5], fix the assembly to the threaded
- Fix the mounting brakets [3] to the Hard Disk [6] by means of the four
- Locate the CPU board [A] and insert the DRAM module [2] into the
CPU’s CN9 connector [C].
to the CPU’s CN8 connector [D].
Part List:
- Connect one end of the jumper [2] to the Hard Disk connector,
1) 16Mbit DRAM module
(Code 120521)
(Code 120029)
(Code 171250)
(Code 840824)
5) 8 washers 3mm
2) 44 contacts x 7.5 cm flat cable
3) 2 mounting brackets
4) 8 screws (M3x6)
special outlets with the same technical characteristics
supplied with this kit. Hard Disks are avalaible from
NOTE: The optional Generalmusic Hard Disk is not
If you mount the optional Generalmusic hard disk
supplied already formatted and filled with various
DO NOT FORMAT THE DEVICE, because it is
as the optional Generalmusic hard disk.
styles, samples and songs.
Mounting Instructions M-15
Page 16

Caratteristiche dell’Hard disk:
Dimensioni: 2.5 pollici Interfaccia: IDE, o EIDE, o Fast ATA
Deve essere formattato usando la procedura specificata nel manuale d’uso.
Marche generalmente accettate: SEAGATE, QUANTUM, HITACHI, IBM.
CN8 [D] sulla scheda CPU.
filettati [B] tramite le altre quattro viti [4] e le quattro rondelle [5].
- Collegare un capo del cavo [2] al connettore dell’Hard Disk,
CN9 [C] sulla scheda CPU.
- Trovare la scheda CPU [A] e Inserire il modulo DRAM [1] nel connettore
KIT 970207 - Kit installazione Hard disk
- Fissare i due ancoraggi [3] all’Hard Disk [6] usando quattro
viti [4] e le quattro rondelle [5], fissare l’assieme agli inserti
partendo dall’estrema sinistra in modo da lasciare liberi gli ultimi
4 pin alla destra del connettore, e l’altro capo al connettore
ITALIANO
(Code 761094)
(Code 840824)
(Code 171250)
(Code 120029)
(Code 120521)
presso i negozi di computer aventi le stesse caratteristi-
NOTE: L’Hard Disk opzionale Generalmusic non è for-
Montando l’hard disk opzionale Generalmusic
NON FORMATTARLO, perchè viene fornito
già formattato e riempito con vari stili, campioni
nito con questo kit. Vari tipi di Hard Disk sono disponibili
e canzoni.
che dell’Hard Disk opzionale Generalmusic.
5) 8 rondelle 3mm
1) Modulo 16Mbit DRAM
2) Cavo piatto 44 contatti 7.5cm
Lista parti:
3) 2 ancoraggi
4) 8 viti (M3x4)
Connettore posteriore Hard disk.
Montaggio
Istruzioni
SK760-880
Modello
(costruiti prima dell’ aprile 2000)
Page 17

EQUINOX
ENGLISH
Model/Modello
Part List:
A) 16Mbit DRAM module
B) 1 hard disk (see specifications)
C) 2 mounting brackets
D) 8 screws (M3x6)
E) 8 grower washers 3mm
F) 4 washers 7/3mm
G) 4 rubber suspension
H) 44 contacts x 7.5 cm flat cable
- Assemble the brackets (C) to the hard disk (B) using
the screws (D) and their washers (E).
- Insert the rubber suspensions (G) into slots
of the brackets (C).
D
(761094)
(not supplied)
(171471)
(120029)
(120521)
(120451)
(340905)
(840824)
Mounting/Montaggio
ITALIANO
Instructions/Istruzioni
Lista parti:
A) Modulo 16Mbit DRAM
B) 1 hard disk (vedi caratteristiche)
C) 2 supporti
D) 8 viti (M3x6)
E) 8 rondelle grower 3mm
F) 4 rondelle 7/3mm
G) 4 rubber suspension
H) Cavo piatto 44 contatti 7.5cm
- Assemblare i supporti (C) all’ hard disk (B) usando
le viti (D) e le loro rondelle (E).
- Inserire le sospensioni in gomma (G) nelle asole
dei supporti (C).
(761094)
(non fornito)
(171471)
(120029)
(120521)
(120451)
(340905)
(840824)
F
D
E
C
I
E
G
B
Hard Disk Specifications:
Dimensions: 2.5" Interface: IDE, EIDE, FAST ATA
Brands: SEAGATE, QUANTUM, HITACHI, IBM, MAXTOR.
Caratteristiche Hard Disk:
Dimensioni: 2.5" Interfacce: IDE, EIDE, FAST ATA
Marche: SEAGATE, QUANTUM, HITACHI, IBM, MAXTOR.
Mounting Instructions M-17
Page 18

Mounting/Montaggio
Instructions/Istruzioni
CPU (I) which mark the hard disk (B) location.
(E) and (F).
by means cable (H) as show in figure.
NOTE: leave the last 4 pins free.
Hard disk rear connector.
Connettore posteriore Hard disk.
I
EQUINOX
Model/Modello
- Localizzare le 4 colonnine filettate al lato destro della
scheda CPU (I) dove montare l’hard disk (B).
- Fissarlo usando le viti (D) e le loro rondelle (E) e(F).
- Connettere il disco (B) al connettore CN8 sulla
scheda CPU (I) con il cavo (H) come mostrato in figura.
NOTA: lasciare liberi gli ultimi 4 pin.
B
H
- Inserire il modulo DRAM (A) al connettore CN9 (L)
connector (L) of the CPU.
operations as described in the owner’s manual.
IMPORTANT: if the hard disk is not supplied by
Generalmisic, you may FORMAT it following
the instructions enclosed in the owner’s manual. manuale d’uso.
A
sulla scheda CPU.
- Chiudere lo strumento e controllare il funzionamento
dell’Hard Disk come descritto nel manuale fornito.
IMPORTANTE: se il disco non è fornito dalla Generalmusic,
devi FORMATTARLO seguendo le istruzioni incluse nel
I
L
Page 19

SK760-880
Model/Modello
ENGLISH
(manufactured after april 2000)
Part List:
A) 16Mbit DRAM module
B) 1 hard disk (see specifications)
C) 2 mounting brackets
D) 8 screws (M3x6)
E) 8 grower washers 3mm
F) 4 washers 7/3mm
G) 4 rubber suspension
H) 44 contacts x 7.5 cm flat cable
connector (L) of the CPU.
- Assemble the brackets (C) to the hard disk (B) using
the screws (D) and their washers (E).
- Insert the rubber suspensions (G) into slots
of the brackets (C).
(761094)
(not supplied)
(171471)
(120029)
(120521)
(120451)
(340905)
(840824)
Mounting/Montaggio (1/2)
ITALIANO
Instructions/Istruzioni
Lista parti:
A) Modulo 16Mbit DRAM
B) 1 hard disk (vedi caratteristiche)
C) 2 supporti
D) 8 viti (M3x6)
E) 8 rondelle grower 3mm
F) 4 rondelle 7/3mm
G) 4 rubber suspension
H) Cavo piatto 44 contatti 7.5cm
- Inserire il modulo DRAM (A) al connettore CN9 (L)- Insert the DRAM module (A) into the CN9
sulla scheda CPU.
- Assemblare i supporti (C) all’ hard disk (B) usando
le viti (D) e le loro rondelle (E).
- Inserire le sospensioni in gomma (G) nelle asole
dei supporti (C).
D
E
F
(761094)
(non fornito)
(171471)
(120029)
(120521)
(120451)
(340905)
(840824)
G
C
B
A
L
Hard Disk Specifications:
Dimensions: 2.5" Interface: IDE, EIDE, FAST ATA
Brands: SEAGATE, QUANTUM, HITACHI, IBM, Marche: SEAGATE, QUANTUM, HITACHI, IBM,
MAXTOR. MAXTOR.
Caratteristiche Hard Disk:
Dimensioni: 2.5" Interfacce: IDE, EIDE, FAST ATA
D
E
Mounting Instructions M-19
Page 20

Mounting/Montaggio (2/2)
Instructions/Istruzioni
CPU (I) which mark the hard disk (B) location.
(E) and (F).
by means cable (H) as show in figure.
NOTE: leave the last 4 pins free.
operations as described in the owner’s manual.
IMPORTANT: if the hard disk is not supplied by
Generalmisic, you may FORMAT it following
the instructions enclosed in the owner’s manual.
(manufactured after april 2000)
- Localizzare le 4 colonnine filettate al lato destro della
scheda CPU (I) dove montare l’hard disk (B).
- Fissarlo usando le viti (D) e le loro rondelle (E) e(F).
- Connettere il disco (B) al connettore CN8 sulla
scheda CPU (I) con il cavo (H) come mostrato in figura.
NOTA: lasciare liberi gli ultimi 4 pin.
- Chiudere lo strumento e controllare il funzionamento
dell’Hard Disk come descritto nel manuale d’uso.
IMPORTANTE: se il disco non è fornito dalla Generalmusic,
devi FORMATTARLO seguendo le istruzioni incluse nel
manuale d’uso.
SK760-880
Model/Modello
Hard disk rear connector.
Connettore posteriore Hard disk.
B
H
I
 Loading...