

Page 1

WK6 - WK8
SK760 - SK880
EQUINOX
SCSI Interface
Kit
GENERALMUSIC
Installation Instructions
Istruzioni per l’installazione
ENGLISH/ITALIANO code: 271238
Page 2
CAUTION
Read these notes before proceeding
These servicing instructions are for use by qualified personnel only. To reduce the risk of electric
shock and device malfunction, do not perform any user-servicing but refer all servicing to the
nearest Service Center Authorized by GENERALMUSIC. Any servicing performed by unqualified
service personnel will forfeit all GUARANTEE rights and will exonerate GENERALMUSIC from all
all liabilities for damage to property or persons resulting from device malfunction.
ATTENZIONE
Leggi queste note prima di procedere
Le seguenti istruzioni di servizio sono ad esclusivo uso di personale qualificato. Per evitare il
rischio di scosse elettriche e malfunzionamenti dell’ apparecchio, non tentate di effettuare
personalmente queste operazioni, rivolgetevi al più vicino Centro di Assistenza Autorizzato
GENERALMUSIC. Ogni intervento effettuato da personale non qualificato farà decadere i diritti
di GARANZIA ed esonererà GENERALMUSIC da ogni responsabilità su eventuali danni a
persone o cose conseguenti dal suo malfunzionamento.
ATTENTION
Observe precautions when handling electrostatic sensitive devices.
ATTENZIONE
Maneggiare con cura i dispositivi elettronici sensibili alle cariche elettrostatiche.
IMPORTANT: Part below to be filled in by the service center.
IMPORTANTE: Fate compilare al servizio di assistenza la parte sottostante.
Stamp of Service Center
Authorized by Generalmusic
Timbro Centro Assistenza
Autorizzato da Generalmusic
Device serial number.
Numero di serie apparecchio.
Optional accessory installed.
Accessorio opzionale installato.
Installation Date.
Data di installazione.
Page 3
WK6 and WK8
Model - Modello Instructions / Istruzioni
ENGLISH
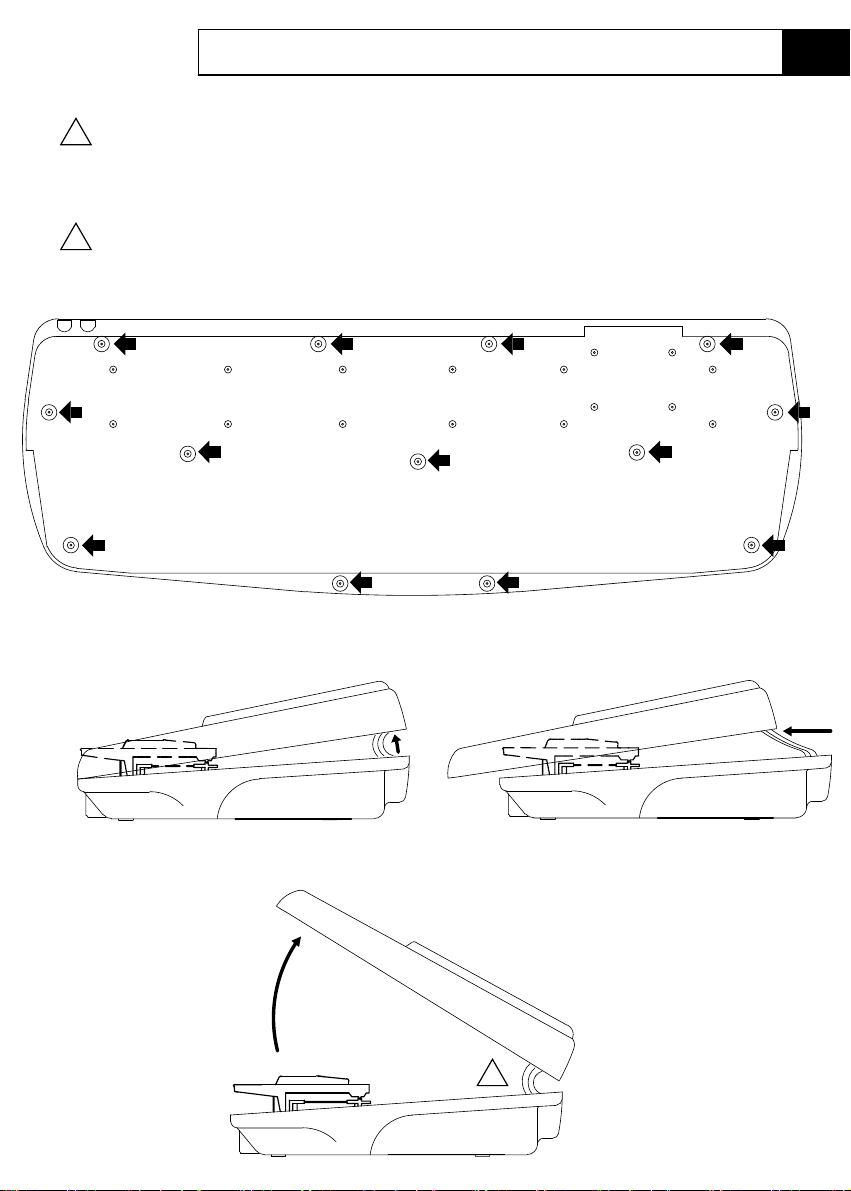
Disconnect the instrument from the mains.
!
Carefully turn the instrument over and unscrew the screww marked by the arrows.
Hold the chassis (top and bottom) tightly and turn the instrument the right way up. Grasp the extreme top
ends of the lid and lift it off by following the sequence of illustrations A, B and C.
ITALIANO
Sconnetti lo strumento dalla presa di corrente.
Rovesciare con attenzione lo strument e rimuovere le viti indicate dalle frecce.
!
Trattenendo saldamente le parte superiore e inferiore dello strumento raddrizzarlo, afferrare le estremitˇ del
coperchio e sollevarlo seguendo le istruzioni A, B e C.
Front / Davanti
Rear / Dietro
Opening / Apertura
(A) Lift up
Sollevare
(B) Pull towards you to clear the keyboard.
Tiralo verso te per liberarlo dalla tastiera.
(C) Raise the lid, taking care not to disconnect the cables.
Sollevare il coperchio, facendo attenzione a non scollegare i cavi.
!
Mounting Instructions M-3
Page 4

Opening / Apertura SK760 and SK880
Instructions / Istruzioni
ENGLISH
Disconnect the instrument from the mains.
!
Carefully turn the instrument over and unscrew the screws marked by the arrows.
Hold the chassis (top & Bottom) tightly and turn the instrument the right way up,
lift off the top chassis as shown in the figure with care without forcing or disconnecting the cables.
ITALIANO
Sconnettere lo strumento dalla presa di corrente.
!
Rovesciare con attenzione lo strumento e rimuovere le viti indicate dalle frecce.
Trattenendo saldamente le parti superiore e inferiore raddrizzare lo strumento,
rimuovere la parte superiore come indicato in figura, attenzione a non forzare o scollegare i cavi.
SK88/880
SK76/760 Front / Davanti
Model - Modello
Front / Davanti
Rear / Dietro
a) Lift up.
Sollevare.
M-4 Mounting Instructions
Rear / Dietro
!
a) Be careful do not disconnect the cables.
Attenzione a non sconnettere i cavi.
!
Page 5

EQUINOX
Model - Modello
ENGLISH
Disconnect the instrument from the mains.
!
Carefully turn the instrument over and unscrew the screws marked by the arrows.
Hold the chassis (top & Bottom) tightly and turn the instrument the right way up,
lift off the top chassis as shown in the figure with care without forcing or disconnecting the cables.
ITALIANO
Sconnettere lo strumento dalla presa di corrente.
!
Rovesciare con attenzione lo strumento e rimuovere le viti indicate dalle frecce.
Trattenendo saldamente le parti superiore e inferiore raddrizzare lo strumento,
rimuovere la parte superiore come indicato in figura, attenzione a non forzare o scollegare i cavi.
61 notes
76 notes
Front / Davanti
Rear / Dietro
Front / Davanti
Opening / Apertura
Instructions / Istruzioni
a) Lift up.
Sollevare.
Rear / Dietro
a) Be careful do not disconnect the cables.
Attenzione a non sconnettere i cavi.
!
!
Mounting Instructions M-5
Page 6

Mounting/Montaggio EQUINOX - WK6/8 - SK760/880
Instructions / Istruzioni
Model - Modello
970330 - SCSI interface kit 970330 - Kit interfaccia SCSI
ENGLISH ITALIANO
Part List (supplied):
A) SCSI interface board
C) Support for SK and Equinox keyb.
D) 4 screws (M3x6)
F) 1 screw 2.9x6.5mm (120255) F) 1 vite 2.9x6.5mm
G) 34 contacts x 25cm flat cable (841183) G) Cavo piatto 34 contatti 25cm
H) 34 contacts x 5 cm flat cable (841152) H) Cavo piatto 34 contatti 5cm (841152)
I ) 22 cm plaited cable (841186) I ) Cavo intrecciato 22cm
L) 7.5 cm plaited cable (841185) L) Cavo intrecciato 7.5cm (841185)
(761177)
(171466)
(171453)
(120029)
(120521)E) 4 grower washers 3mm E) 4 rondelle grower 3mm
Lista parti (fornite):
A) Scheda interfaccia SCSI
C) Supporto per tast. SK e Equinox
D) 4 viti (M3x6)
(761177)
(171466)B) Support for WK keyboard B) Supporto per tastiera WK
(171453)
(120029)
(120521)
(120255)
(841183)
(841186)
Tools (not supplied): Utensili (non forniti):
N) Phillips screwdriver N) Cacciavite a croce
O) 5.5mm vertical nut wrench O) Chiave inglese verticale 5.5mm
Instructions:
- To install the kit into EQUINOX, SK760 or SK880
keyboards, follow the instructions on page 9-10. o SK880 segui le istruzioni a pagina 9-10.
- To install the kit into WK6 or WK8 keyboards follow - Per montare il kit sulla tastiera WK6 e WK8 segui
see FIG.1
vedi FIG.1
Istruzioni:
- Per montare il kit sulla tastiera EQUINOX o SK760
le istruzioni a pagina 7-8.the instructions on page 7-8.
Fig.1
M
N O A
HLGIBFDEC
Mounting Instructions M-6
Page 7

WK6 - WK8
Model/Modello Instructions/Istruzioni
ENGLISH ITALIANO
- Anchor the SCSI board (A) to the support (B) using
the screws (D) and washers (E) as show on fig.2. usando le viti (D) e le loro rondelle (E) come da fig.2.
- Assemblare la scheda SCSI (A) al supporto (B)
Mounting/Montaggio
Fig.2
D
E
- Locate the SCSI slot cover and remove it by
unscrewing the 3 screws that fix it to the chassis.
- Connect the flat cable (H) and the plaited cable (L) to
CN16 connector and S1 faston on CPU board (fig.3).
Fig.3
- Localizzare il coperchio del vano SCSI e rimuoverlo
svitando le 3 viti che lo fissano al fondo.
- Connettere il cavo piatto (H) e il cavo intrecciato (L)
al connettore CN16 e al faston S1 sulla scheda CPU
vedi figura 3.
L
H
Mounting Instructions M-7
Page 8

Mounting/Montaggio WK6 - WK8
Instructions / Istruzioni
ENGLISH ITALIANO
- Connect the other ends of the cables (H) and (L) to
the SCSI board and to the support as show in figure 4. scheda SCSI e al supporto come da figura 4.
- Connettere l'altro capo dei cavi (H) e (L) alla
Model - Modello
Fig.4
B
A
+
L
H
- Fix the SCSI kit to its location using the 3 previously Fissare il kit SCSI nella suo posto tramite le 3 viti
Fig.5
F
- Close the instrument and check for correct SCSI - Chiudere lo strumento e controllare il corretto
operation as described in the owner’s manual. funziomento della SCSI come descritto nel
rimosse precedentemente e con la vite (F) come daremoved screws and the screw (F) as shown in fig.5.
figura 5.
manuale d’uso in dotazione con lo strmuento.
Mounting Instructions M-8
Page 9

EQUINOX - SK760 - SK880
Model/Modello Instructions/Istruzioni
ENGLISH ITALIANO
- Anchor the SCSI board (A) to the support (C) using
the screws (D) and washers (E) as show on fig.2. usando le viti (D) e le loro rondelle (E) come da fig.2.
- Assemblare la scheda SCSI (A) al supporto (C)
Mounting/Montaggio
Fig.2
D
E
- Locate the SCSI slot cover on the cover right side and- Localizzare il coperchio del vano SCSI sulla destra
remove it unscrewing the 2 nuts as show in fig.3.
Note: the photos show the EQUINOX model, the SK
models are similar for the parts concerned.
Fig.3
del coperchio e rimuoverlo svitando i 2 dadi come
da figura 3.
Nota: le foto rappresentano il modello EQUINOX,
i modelli SK sono simili per le parti in oggetto.
Mounting Instructions M-9
Page 10

Mounting/Montaggio EQUINOX - SK760 - SK880
Instructions / Istruzioni
ENGLISH ITALIANO
- Fix the SCSI kit on its location using the two previously
removed nuts. rimossi precedentemente.
- Connect the plaited cable (I) to S1 faston on CPU board and the other end to S1 faston on SCSI board.
as show in figure 4.
- Fissare il kit SCSI al suo posto usando i due dadi
- Connettere il cavo intrecciato (I) al faston S1 sulla
scheda CPU e l'altro capo al faston S1 sulla scheda
SCSI come da figura 4.
Model - Modello
Fig.4
C
A
+
I
- Connect the flat cable (G) to CN16 connector on CPU - Collegare il cavo piatto (G) al connettore CN16
show in figure 5.
sulla scheda CPU e l'altro capo al connettore board and the other end to CN1 on SCSI board as
CN1 sulla scheda SCSI come da figura 5.
Fig.5
G
- Close the instrument and check the SCSI correct - Chiudere lo strumento e controllare il corretto
funzionamento della SCSI come descritto sull'operations as described on the supplied manual.
accluso manuale.
Mounting Instructions M-10
 Loading...