

Page 1
Vypyr® X Series
Operating
Manual
www.peavey.com
Page 2

FCC Compliancy Statement
This device complies with Part 15 of the FCC rules. Operation is subject to the following two
conditions: (1) this device may not cause harmful interference, and (2) this device must accept any
interference received, that may cause undesired operation.
Warning: Changes or modications to the equipment not approved by Peavey Electronics Corp. can
void the user’s authority to use the equipment.
Note - This equipment has been tested and found to comply with the limits for a Class B digital device,
pursuant to Part 15 of the FCC Rules. These limits are designed to provide reasonable protection
against harmful interference in a residential installation. This equipment generates, uses and can radiate
radio frequency energy and, if not installed and used in accordance with the instructions, may cause
harmful interference to radio communications. However, there is no guarantee that interference will not
occur in a particular installation. If this equipment does cause harmful interference to radio or television
reception, which can be determined by turning the equipment off and on, the user is encouraged to try
and correct the interference by one or more of the following measures.
• Reorient or relocate the receiving antenna.
• Increase the separation between the equipment and receiver.
• Connect the equipment into an outlet on a circuit different from that to which the receiver is
connected.
• Consult the dealer or an experienced radio/TV technician for help.
Caution
e equipment complies with FCC radiation exposure limits set forth for an uncontrolled environment.
Peavey Electronics Corporation • 5022 Hartley Peavey Drive • Meridian, MS • 39305
(601) 483-5365 • FAX (601) 486-1278 • www.peavey.com • 80305796 • ©2011
CAN ICES-3 B/NMB/3B
Page 3

ENGLISH
Electric • Acoustic • Bass
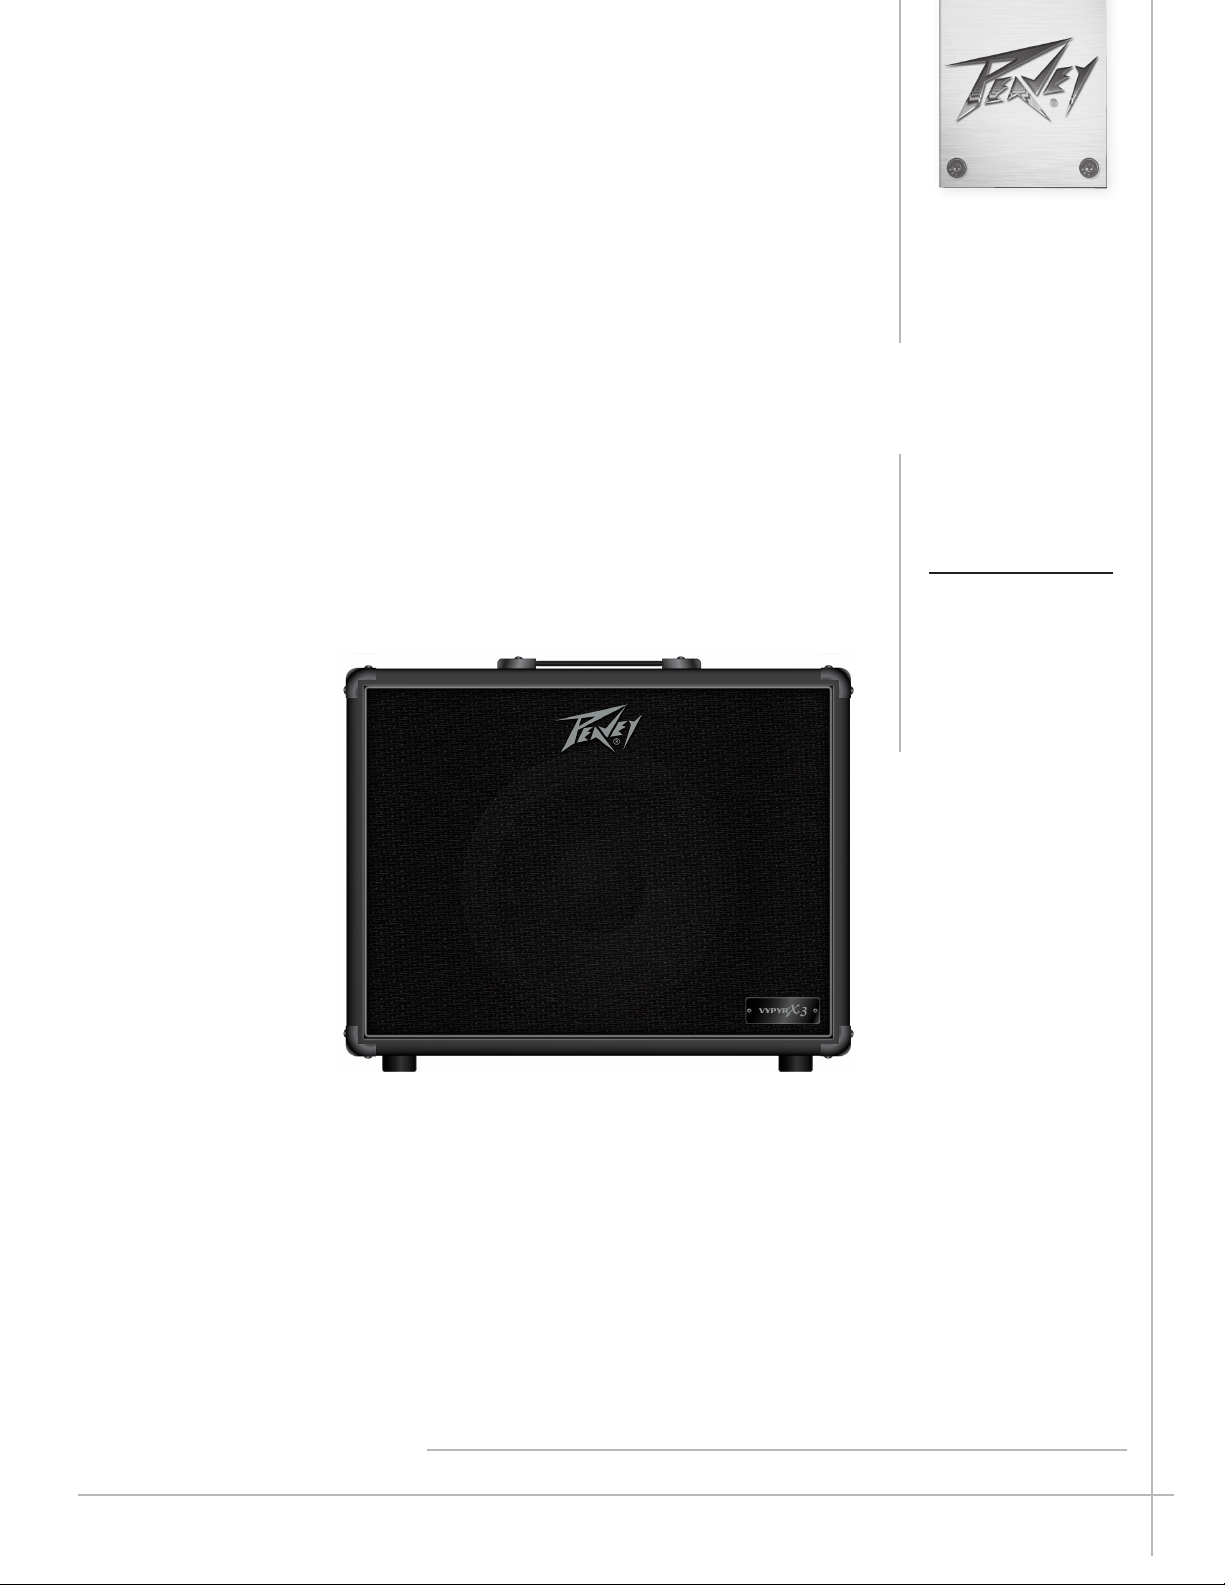
Morphing from a bass amp, to an electric amp, to an acoustic amp, the VYPYR® X is
Peavey's latest Variable Instrument Performance™ amplifier.
Peavey Electronics revolutionized the modeling amp industry with the
introduction of the VYPYR® VIP Series — the world’s first amp that
contained Bass guitar, Acoustic guitar and Electric guitar amplifier
models. We are excited to introduce the latest evolution of that series,
VYPYR® X. Using its Variable Instrument Input, a single VYPYR® X
amp can provide amplification for a variety of instrument types.
Not only does the amplifier morph from a bass amp to an acoustic
amp, to an electric amp, it also, allows the electric guitar player access
to instrument models as well.
Peavey uses a combination of a powerful 32-bit, floating point SHARC
processor and patented TransTube® analog circuitry to create the best
sounding modeling amplifiers available. Nothing sounds as good as a
VYPYR.
All VYPYR effects, amp models and parameter controls can be
accessed via the amp itself, with no need to hook the amplifier to a
VYPYR® X1
• Variable Instrument Performance Amplier
• 30 Watts RMS
• Acoustic Guitar Simulation
• Bass Guitar Simulation
• Acoustically Optimized Semi-Closed Back
• Patented TRANSTUBE® Technology
• 22 Amp Accessible Eects
• 36 On Board Amp Models (Includes 6 Bass Amp
and 6 Acoustic Amp Models)
• Enhanced Chromatic Tuner
• On Board Looper*
• WYSIWYG LED Indicator Controls
• Amp Accessible Real-Time Dual Parameter
Controls
• Amp Accessible Global Reverb and Delay
• Bi-Directional USB (Data-MIDI-Audio Record Out)
• AUX/MP3/CD Input
• Studio Quality Headphone Out
• Up to 4 Eects Simultaneously*
• Tap Tempo
• Variable Instrument Performance Amplier
• 60 Watts RMS
• 12" Custom Voiced Heavy Duty Speaker
• Patented TRANSTUBE® Technology
• Acoustically Optimized Semi-Closed Back
• 10 Instrument Models
• Enhanced Chromatic Tuner
• 12 Amp Accessible Stompbox Models
• 36 On Board Amp Models
• 6 Bass Amp Models
• 6 Acoustic Amp Models
• 25 Total On Board Amp Accessible Eects
• On Board Looper*
• WYSIWYG LED Indicator Controls
• Amp Accessible Real-Time Parameter Controls
• Amp Accessible Global Reverb and Delay
• Tap Tempo
• Bi-Directional USB (Data-MIDI-Audio Record Out)
• Studio Quality Headphone Out
• AUX/MP3/CD Input
• Up to 5 Eects Simultaneously*
•Bluetooth Connectivity
VYPYR® X2
computer. Peavey’s WYSIWYG (What You See Is What You Get)
control surface quickly allows the user the ability to see and adjust the
control position — no guessing where the control is supposed to be or
having to manually move it to where it should be from preset to preset.
VYPYR’s USB bi-directional data and audio port provides an easy way
to record, and/or connect to our VYPYR software and store presets.
All of the revolutionary features from the original VYPYR series, now
even better. More power, more effects, more amp models, Variable
Instrument Input, instrument models, and more make this the
ultimate amplifier.
VYPYR® X3
• Variable Instrument Performance Amplier
• 100 Watts RMS
• 12" Custom Voiced Heavy Duty Speaker
• Patented TRANSTUBE® Technology
• Power Sponge® 100 Watts to 1 Watt
• Acoustically Optimized Semi-Closed Back
• Over 400 Amp Accessible Presets
• LCD Display for Quick Preset, Model, and Eect
Selection
• 10 Instrument Models
• Enhanced Chromatic Tuner
• 12 Amp Accessible Stompbox Models
• 36 On Board Amp Models
• 6 Bass Amp Models
• 6 Acoustic Amp Models
• 25 Total On Board Amp Accessible Eects
• On Board Looper*
• WYSIWYG LED Indicator Controls
• Amp Accessible Real-Time Parameter Controls
• Amp Accessible Global Reverb and Delay
• Tap Tempo
• Bi-Directional USB (Data-MIDI-Audio Record Out)
• Studio Quality Headphone Out
• AUX/MP3/CD Input
• Up to 5 Eects Simultaneously*
•Bluetooth Connectivity
*With optional Sanpera® 1 (Peavey part number 03017540) or Sanpera® II (Peavey part number 03017550) footcontroller.
3
Page 4
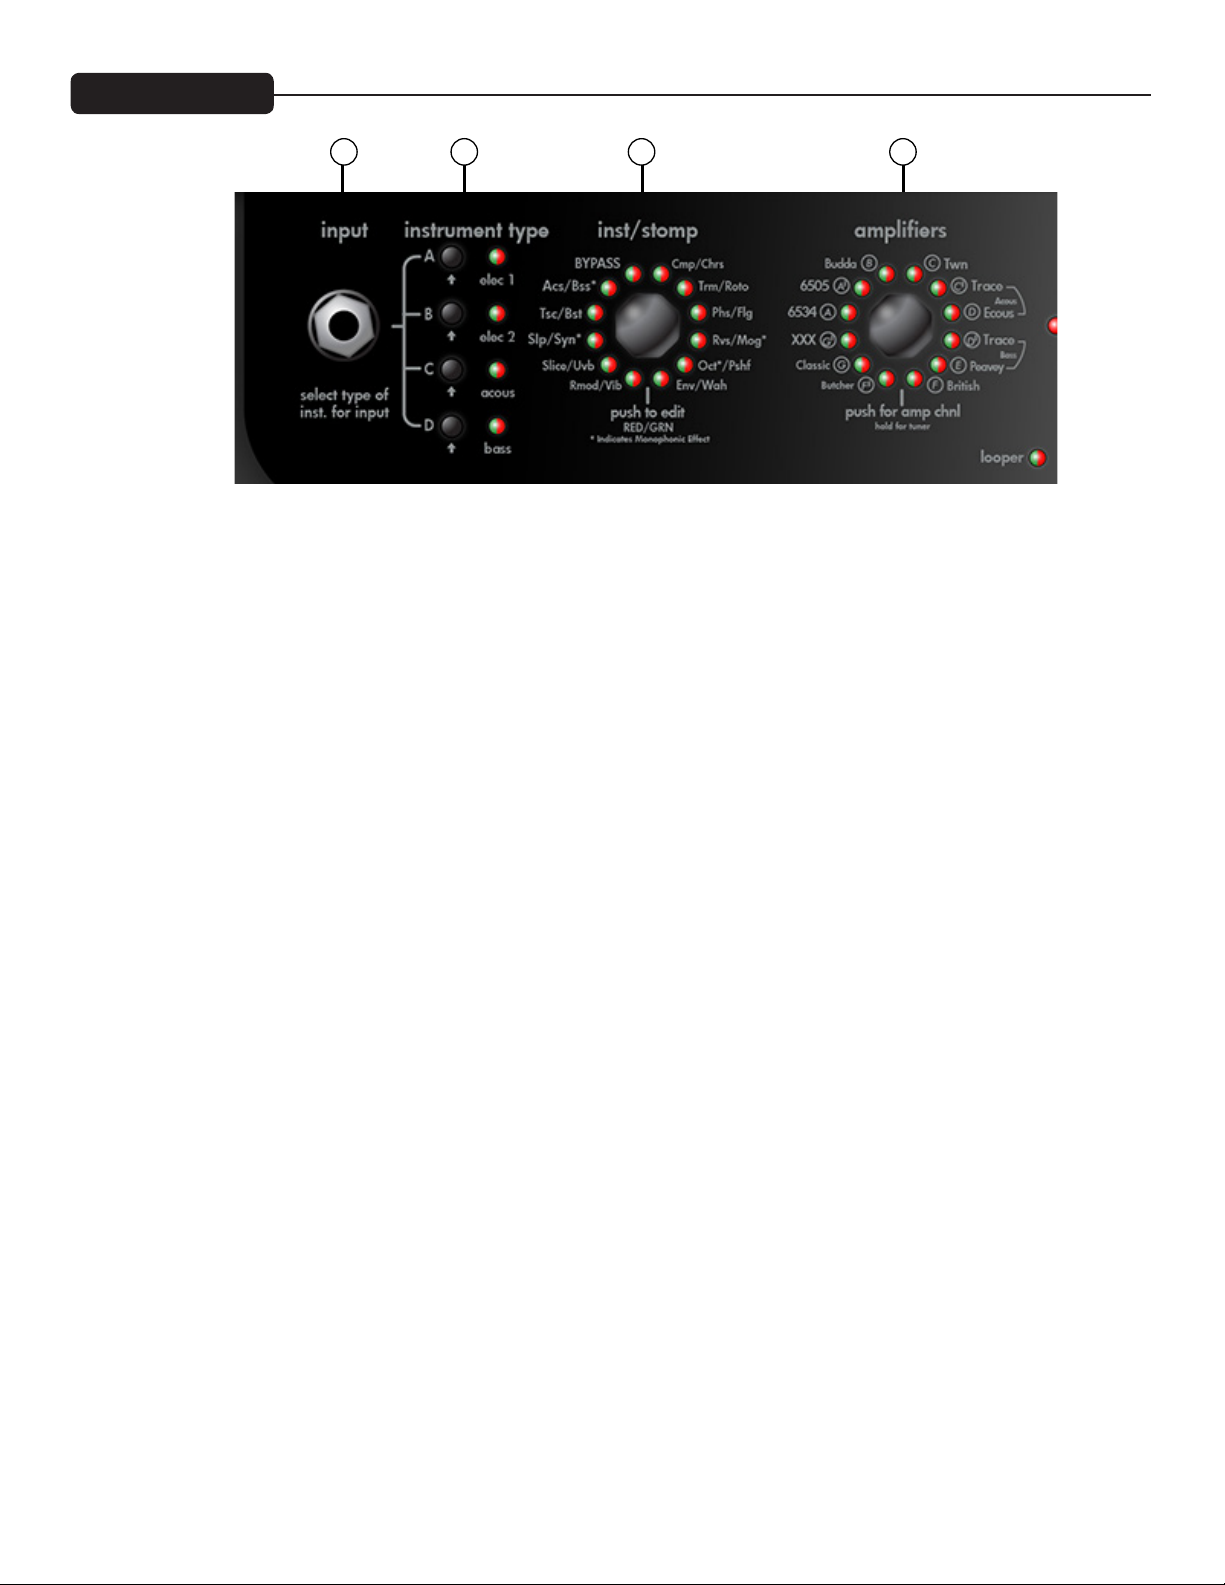
VYPYR X1 Front Panel
1 2 30
(0) VARIABLE INSTRUMENT INPUT
On the VYPYR X1, you can input an electric, an acoustic, or a bass guitar. There are amp models for all 3 instrument types. Once
you plug into the amp, you select the instrument type to the right (item 1). The amp then changes its input sensitivity and gain
structure to match your selection.
NOTE: VYPYR X Amplifers are designed to be used with instruments with passive electronics. When using instruments with active
electronics, the volume of the instrument may need to be reduced to prevent clipping (unwanted distortion).
(1) INSTRUMENT TYPE/PRESETS
With these buttons you select which type of instrument you are using with the amp. There are 4 banks with 4 presets each, for a
total of 16 presets. The names of the preset banks are associated with the type of instrument being used. To access the different
presets within the current bank, simply continue pressing the button and the LED will change color to indicate which preset you
have selected. Any changes you make to the settings (except for master volume level) can be saved back to the preset if desired. To
save settings over the loaded preset, just press and hold its bank button until its LED begins to blink and then continue to hold the
button until the LED stops blinking. Pressing the Tap Tempo button cancels the save. To save changes to the current preset over a
different preset, press and hold its bank button until its LED begins to blink. The LEDs for any other banks in which the preset can
be saved will also blink. Select the bank to save in by tapping the desired bank button - it will continue to blink but the other bank
LEDs will turn off. If the bank LED is not the color of the desired preset to overwrite, tap the bank LED again until the color matches
the desired preset number (red, orange, yellow, and green). To complete the save, press and hold the bank button until the LED stops
blinking. Pressing the Tap Tempo button cancels the save.
NOTE: When selecting bass or acoustic presets (Banks C & D) the VYPYR X1 and VYPYR X2 will limit access to only those amp
models associated with the selected instrument bank. Pressing and holding buttons B & D during power on will open up all amp
models to any preset (e.g. you may use all 16 presets for electric guitar).
(2) INSTRUMENT/STOMPBOX ENCODER
Turn this knob to select your desired pre-amplifier effect (if any). Just think, 20 pedals you’ll never have to buy! In addition, there
are 2 instrument models to choose from, an acoustic simulation and a bass simulation! Press the encoder momentarily to enter Edit
mode (Item 11). You’ll also notice a small ‘m’ on a few effects and the bass simulation. This is because these are monophonic effects
and as such, you’ll need to be careful to play one note at a time for them to work properly. The LEDs on this encoder are bi-color.
At the bottom of the encoder is a guide to show which color represents which effect.
(3) AMPS ENCODER
Turn this knob to select your amp model. Each amp has 3 channels: if the LED is red, you are on the high gain channel, yellow for
medium gain and green for low gain. When you are using an acoustic preset (Item 1, Bank C) only the acoustic amplifiers will be
4
Page 5

VYPYR X1 Front Panel
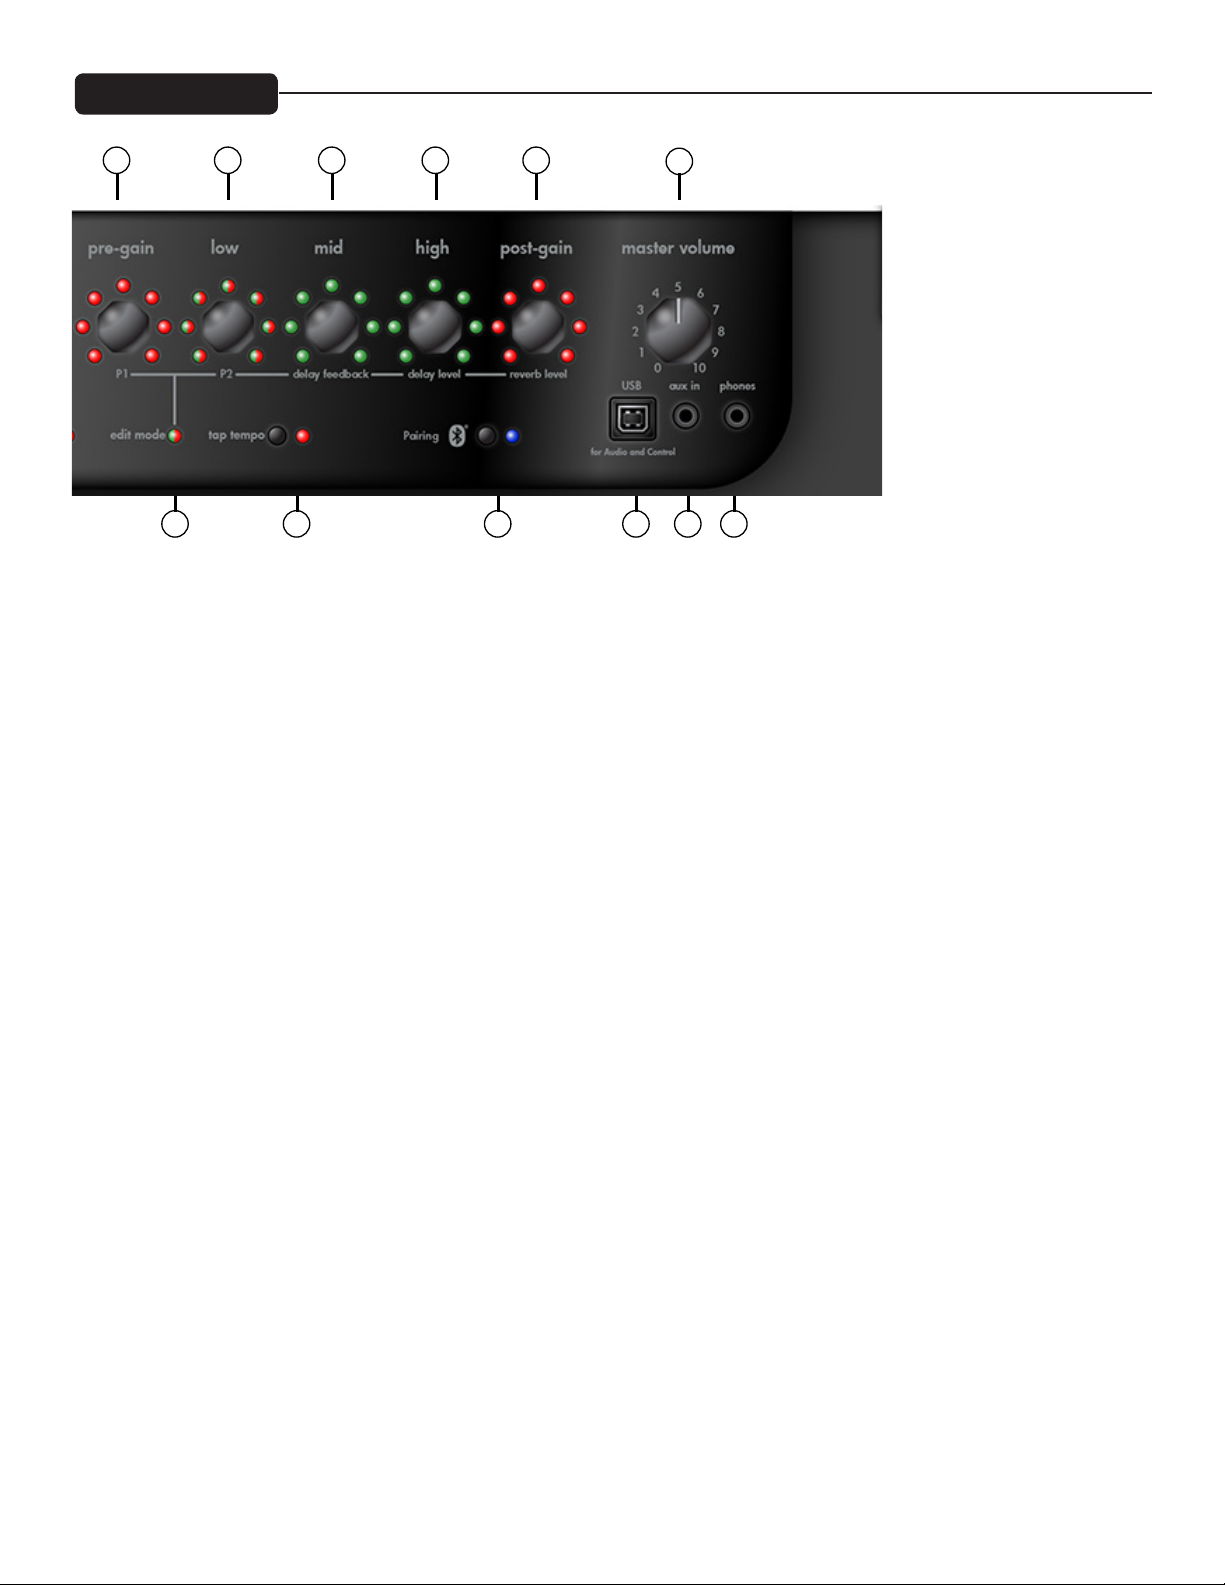
4 5 76 8 9
10
11
12 13 14 15
available. If you are using a bass preset (Item 1, Bank D) only the bass amplifiers will be available.
TUNER MODE: Press and hold Amp Encoder (3) for 2 seconds to enter tuner mode. The LEDs around the Amp encoder will tell you
what note you are tuning. At the same time, the LEDs around the Stompbox encoder (Item 2) will indicate whether the note is sharp
or flat. If the LED is to the right of the 12:00 position you are sharp (Tune down). If the LED is to the left of the 12:00 position you
are flat (tune up). When all of the LEDs around the Effects encoder come on, you are in tune.
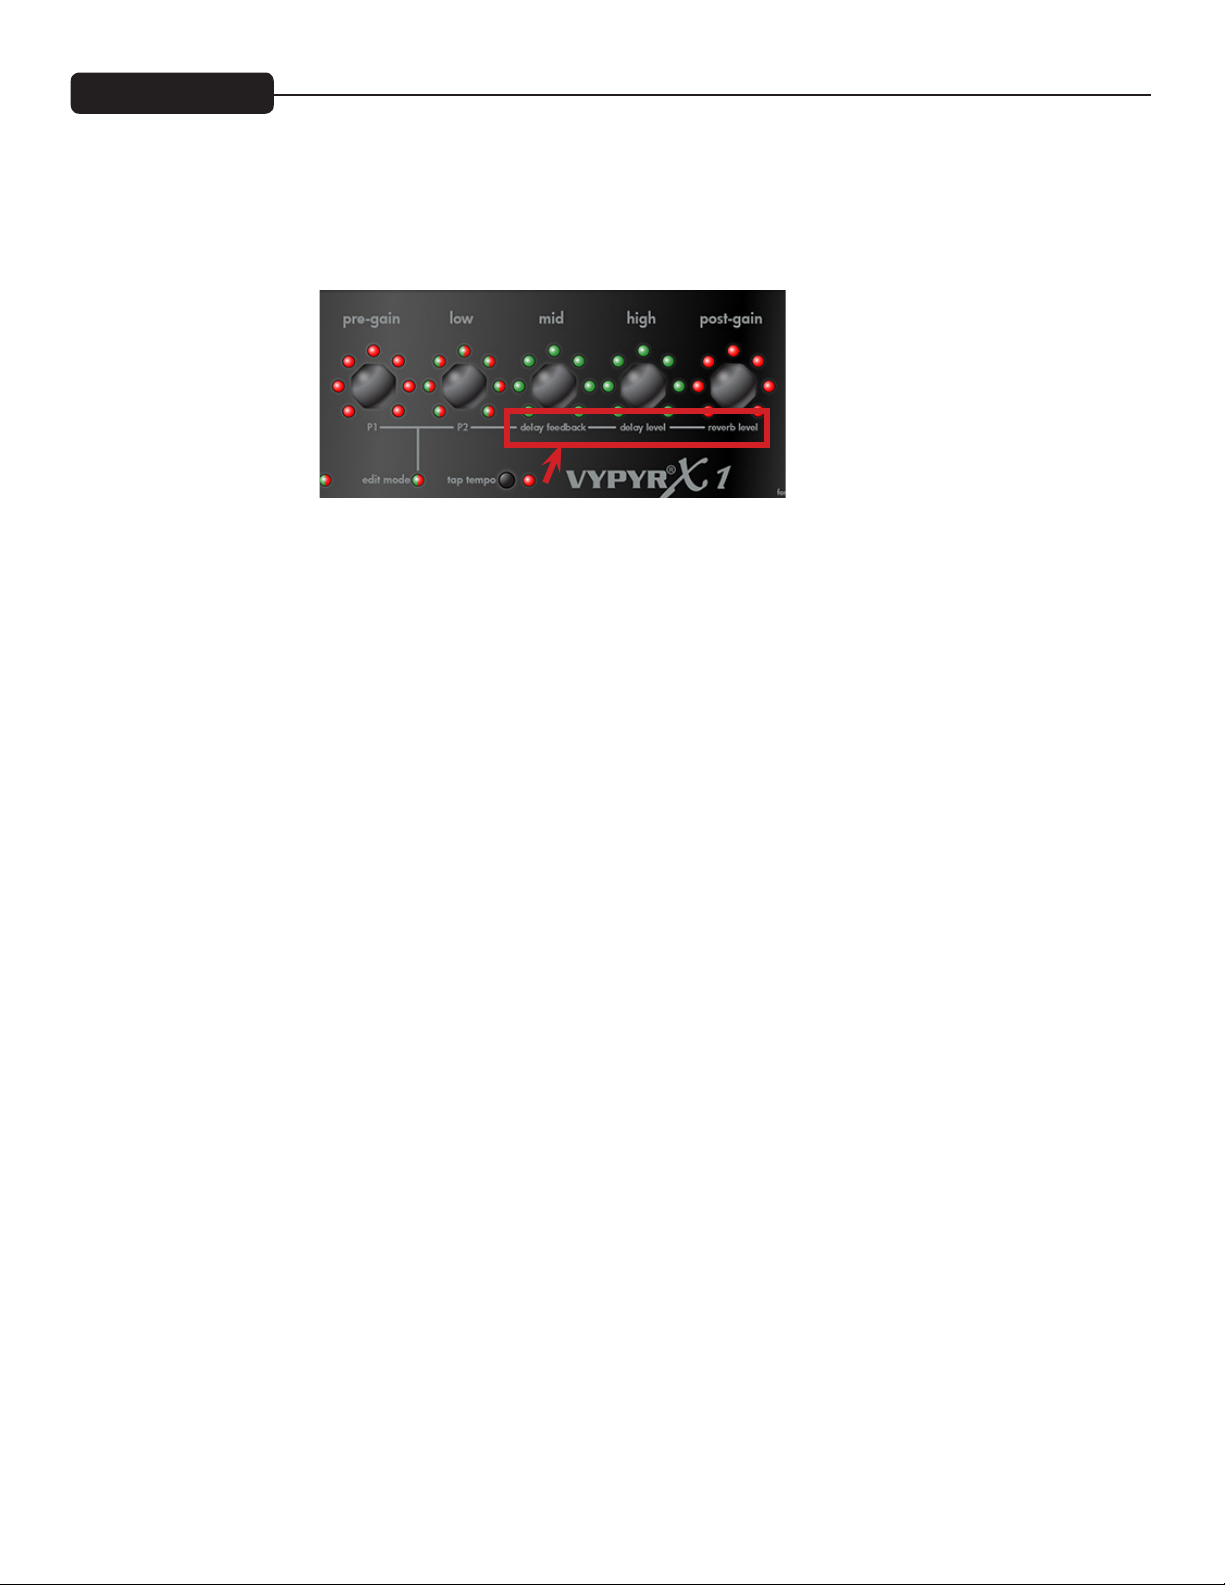
(4) PRE GAIN
Turn this knob to crank up the gain —think of it as how much distortion you want out of the amplifier. In Edit mode this knob
controls parameter 1 of either the selected Stompbox or Effect.
(5) LOW ENCODER
Low EQ adjustment. In edit mode this knob controls parameter 2 of either the selected Stompbox or Effect.
(6) MID ENCODER
Mid EQ adjustment. In edit mode this knob controls the Feedback of the Delay effect. Feedback is the number of times the delay
repeats.
(7) HIGH ENCODER
High EQ adjustment. In edit mode this knob controls the Level or amount of Delay effect. All the way to the left is zero and all the
way to the right is max.
(8) POST GAIN
This is the individual preset volume. In edit mode this knob controls the amount of Reverb.
9) MASTER VOLUME
Controls overall amp volume.
NOTE: Due to the low pregain settings for acoustic and bass amp models, the master volume may need to be set higher when using
bass or acoustic guitars than when using electric guitars. Experiment with various levels of pregain, postgain, and master volume to
achieve desired results.
5
Page 6
VYPYR X1 Front Panel
(10) LOOPER INDICATOR
This function requires a Sanpera® I or Sanpera II foot controller. Waste no time in making that purchase— the looper will allow
you hours and hours of fun. You can record any 30 plus seconds of anything, switch your tone (preset), and play over top of your
recording. For example, try recording a bass track, then change your tone to a lead tone and play over the top! Note the LED that
corresponds to the looper on the encoder will turn on when recording or playing back the loop.
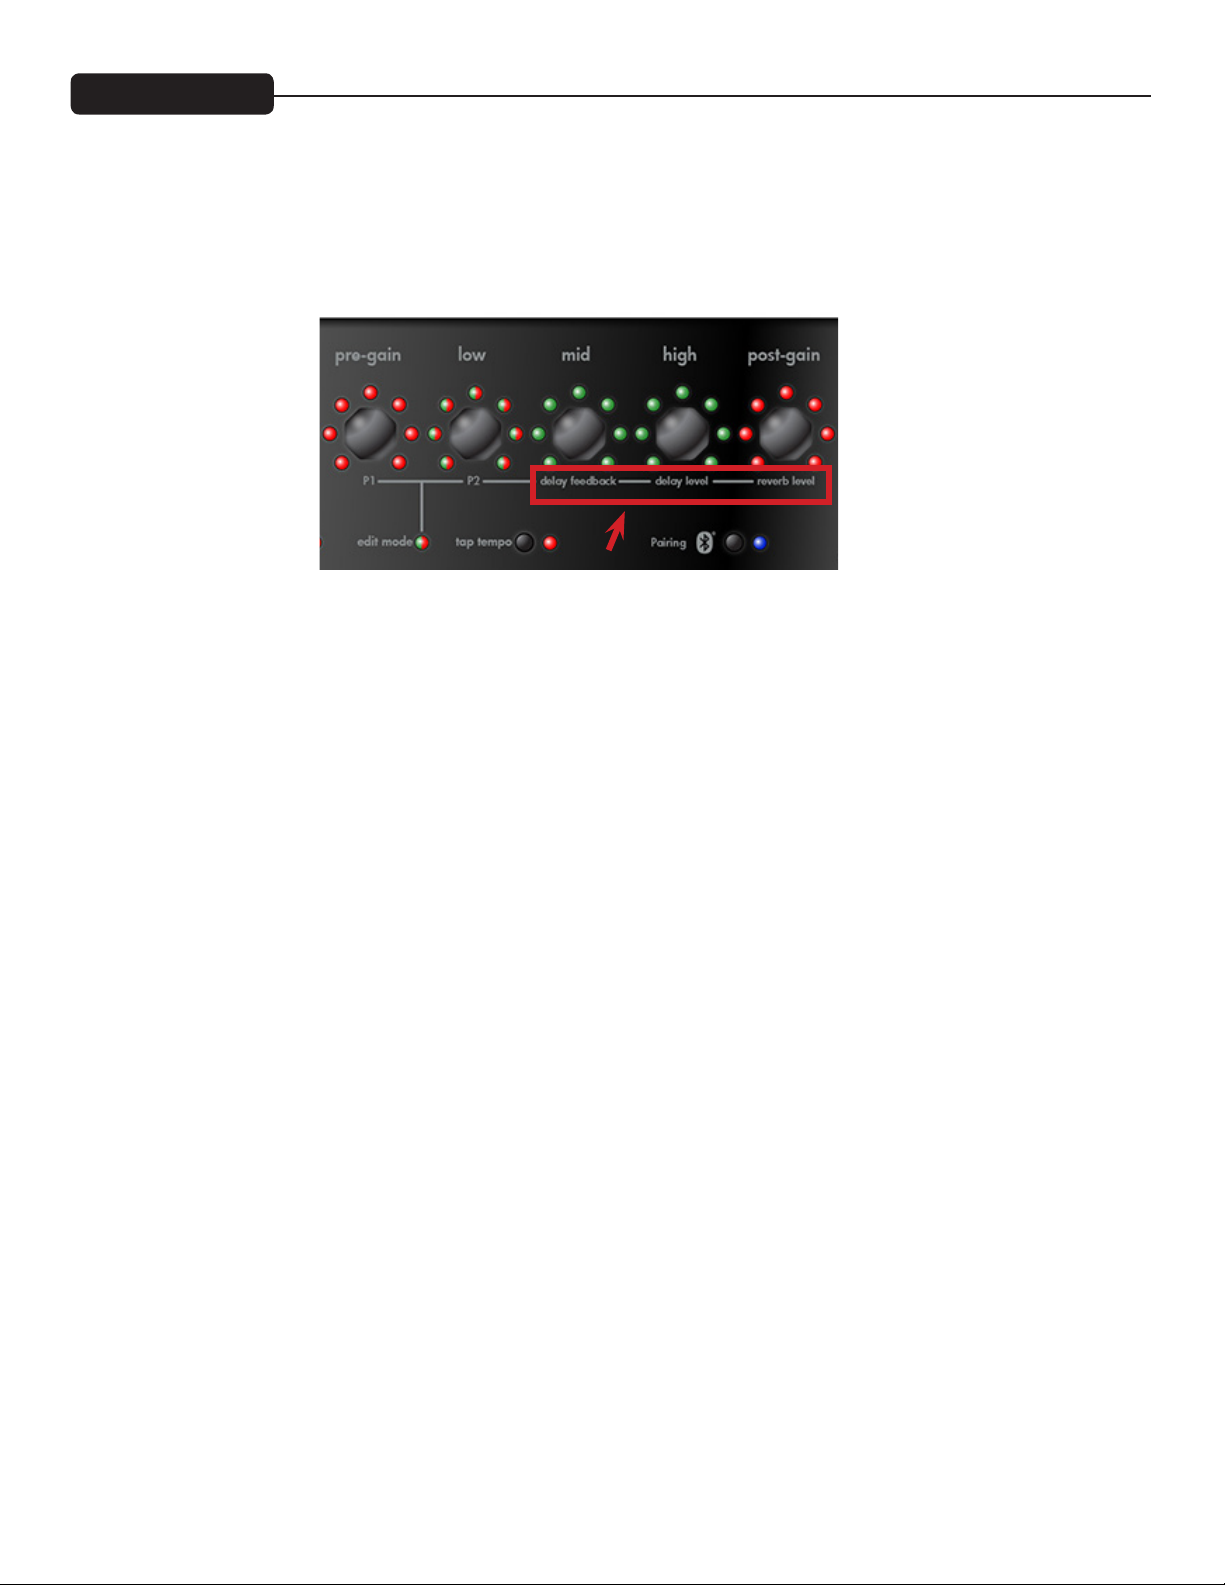
(11) INST/STOMPBOX EDIT MODE
Edit mode simply changes the 5 amp controls to their alternate function as listed on the bottom of the encoder (The red box above).
On VYPYR X1, the edit mode LED color tells whether the effect is before the amp (red) or after the amp (green). To enter Edit mode
simply press the Stompbox encoder (Item 2). To exit Edit mode simply press the same encoder again.
NOTE: Anytime you want access to the Delay or Reverb you will need to enter Edit mode.
(12) TAP TEMPO
Tap on this button to set the tempo of the Delay effect. If you aren’t hearing any delay enter Edit mode (Item 11) to turn the level up.
(13) USB RECORD OUT
The VYPYR USB Record out requires no additional drivers—just plug a standard USB 2.0 cable into your computer and it will detect
it as an audio device. Open your favorite recording program and start recording. Don’t worry, the output is microphone/cabinet
simulated and will sound great right in your computer.
NOTE: The speaker is intentionally muted when USB output is in use although the headphone output is active for real time
monitoring. The USB port can also be used to download firmware updates and to connect to a computer to use the Vypyr Edit
Graphic User Interface. MIDI works over the USB as well.
(14) AUX INPUT
Plug in your favorite mp3 player, drum machine, or CD player and play along.
NOTE: Goes to amplifier and headphones but is not added to USB output.
(15) HEADPHONE/RECORD OUT
We really spent a lot of time making sure the headphone jack was studio quality. Because of that, and with the proper adapters (not
supplied), you can use this output for recording as well as the USB port.
NOTE: When headphones are in use the speaker is muted and Master Volume (Item 9) controls headphone level. 16Ω or 32Ω headphones are
best, but a lower impedance is okay.
NOTE: Headphones have a higher frequency response than guitar speakers.
6
Page 7
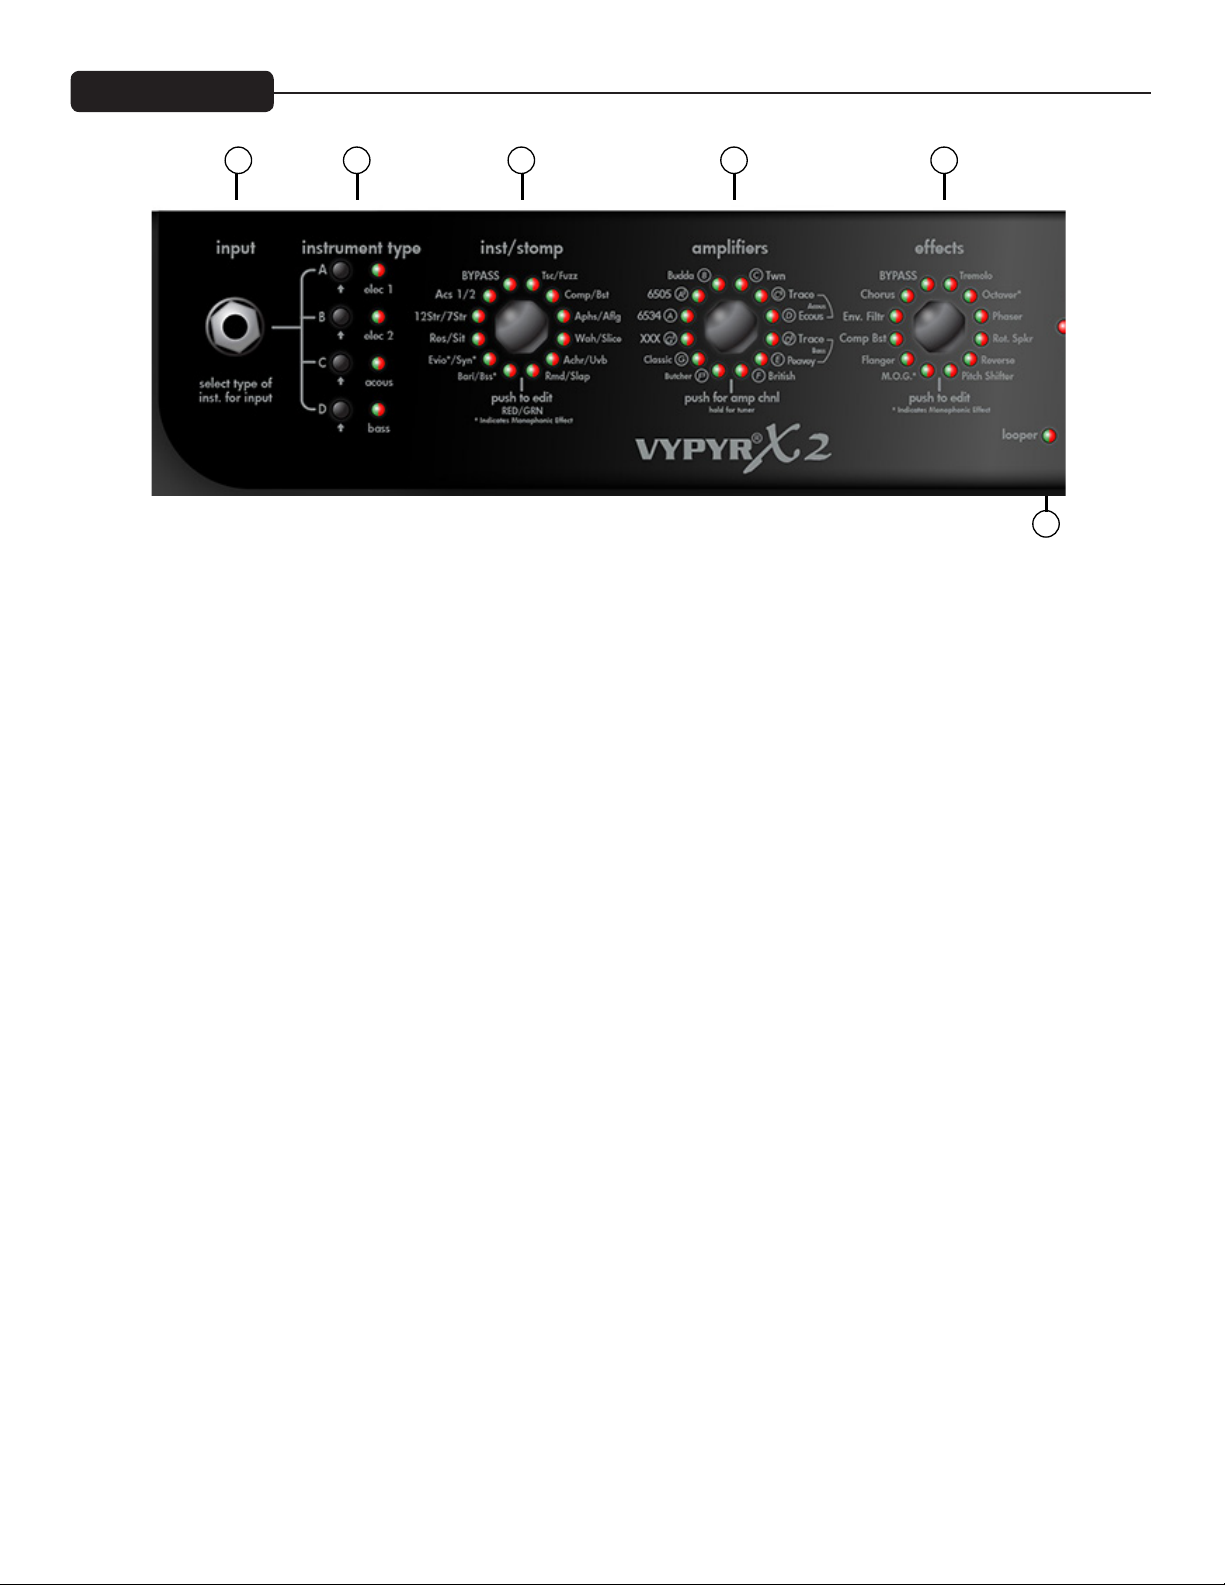
VYPYR X2 Front Panel
0 4
1 2 3
11
(0) VARIABLE INSTRUMENT INPUT
On the VYPYR X2, you can input an electric, an acoustic, or a bass guitar. There are amp models for all 3 instrument types. Once
you plug into the amp, you select the instrument type to the right (item 1). The amp then changes its input sensitivity and gain
structure to match your selection.
NOTE: Vypyr X Amplifers are designed to be used with instruments with passive electronics. When using instruments with active
electronics, the volume of the instrument may need to be reduced to prevent clipping (unwanted distortion).
(1) INSTRUMENT TYPE/PRESETS
The Vypyr® X series was designed for use with electric guitars, acoustic guitars and bass guitars! With these buttons you select which
type of instrument you are using with the amp. There are 4 banks with 4 presets each, for a total of 16 presets. The names of the
preset banks are associated with the type of instrument being used . To access the different presets within the current bank, simply
continue tapping the button and the LED will change color to indicate which preset you have selected. Any changes you make to the
settings (except for master volume level) can be saved back to the preset if desired. To save settings over the loaded preset, just press
and hold its bank button until its LED begins to blink and then continue to hold the button until the LED stops blinking. Pressing
the Tap Tempo button cancels the save. To save changes to the current preset over a different preset, press and hold its bank button
until its LED begins to blink. The LEDs for any other banks in which the preset can be saved will also blink. Select the bank to save
in by tapping the desired bank button - it will continue to blink but the other bank LEDs will turn off. If the bank LED is not the
color of the desired preset to overwrite, tap the bank LED again until the color matches the desired preset number. To complete the
save, press and hold the bank button until the LED stops blinking. Pressing the Tap Tempo button cancels the save.
(2) INSTRUMENT/STOMP ENCODER
For the first time ever in a modeling amp, you have access to instrument models! Using your electric guitar, you can access 10
different instrument models, from acoustic guitars to baritone guitars and even a synth! The other side of the encoder is dedicated to
stompboxes, so you have access to a full complement of stompbox effects! Turn this knob to select your desired pre-amplifier effect
(if any). Press the encoder momentarily to enter Edit mode (Item 12). You’ll also notice a small ‘m’ on a few effects and the bass
simulation. This is because these are monophonic effects and as such, you’ll need to be careful to play one note at a time for them
to work properly. The LEDs on this encoder are bi-color. At the bottom of the encoder is a guide to show which color represents
which effect.
(3) AMPS ENCODER
Turn this knob to select your amp model. Each amp has 3 channels: if the LED is red, you are on the high gain channel, yellow for
medium gain and green for low gain. When you are using an acoustic preset (Item 1, Bank C) only the acoustic amplifiers will be
available. If you are using a bass preset (Item 1, Bank D) only the bass amplifiers will be available. Press and hold for 2 seconds to
enter tuner mode.
7
Page 8
VYPYR X2 Front Panel
5 76 8 9
12 13 14 15 16
10
17
The LEDs around the Amp encoder will tell you what note you are tuning. At the same time the LEDs around Effects encoder (Item
4) will indicate whether the note is sharp or flat. If the LED is to the right of the 12:00 position you are sharp (tune down). If the
LED is to the left of the 12:00 position you are flat (tune up). When all of the LEDs around the Effects encoder come on, you are in
tune.
(4) EFFECTS ENCODER
Turn this knob to select any “Rack” effect. These are effects you might find attached to the effects loop of an amplifier. Press the
encoder momentarily to enter Edit mode.
(5) PRE GAIN
Turn this knob to crank up the gain—think of it as how much distortion you want out of the amplifier. In Edit mode this knob
controls parameter 1 of either the selected Stompbox or Effect.
(6) LOW ENCODER
Low EQ adjustment. In edit mode this knob controls parameter 2 of either the selected Stompbox or Effect.
(7) MID ENCODER
Mid EQ adjustment. In edit mode this knob controls the Feedback of the Delay effect. Feedback is the number of times the delay
repeats.
(8) HIGH ENCODER
High EQ adjustment. In edit mode this knob controls the Level or amount of Delay effect. All the way to the left is zero and all the
way to the right is max.
(9) POST GAIN
This is the individual preset volume. In edit mode this knob controls the amount of reverb.
(10) MASTER VOLUME
Controls overall system volume.
8
Page 9
VYPYR X2 Front Panel
(11) LOOPER INDICATOR
This function requires a Sanpera® I or Sanpera II foot controller. Waste no time in making that purchase— the looper will allow
you hours and hours of fun. You can record any 30 plus seconds of anything, switch your tone (preset), and play over top of your
recording. For example, try recording a bass track, then change your tone to a lead tone and play over the top! Note the LED that
corresponds to the looper on the encoder will turn on when recording or playing back the loop.
(12) EDIT MODE
Edit mode simply changes the 5 amp controls to their alternate function as listed on the bottom of the encoder (The red box above).
When in Edit mode the Edit mode LED will either be green if you are editing Effects, or red if you are editing Stompboxes. In
addition, the corresponding LED for the feature you are editing will flash while in Edit Mode. To enter Edit mode simply press either
the Stompbox encoder (Item 2) or the Effects encoder (Item 4). To exit Edit mode simply press the same encoder again.
Anytime you want access to the Delay or Reverb you will need to enter Edit mode!
(13) TAP TEMPO
Tap on this button to set the tempo of the Delay effect. If you aren’t hearing any delay enter Edit mode to turn the level up.
NOTE: Not accessible by Sanpera.
(14) BLUETOOTH PAIRING
The audio connection allows you to play music from your phone to the amp, and practice along with it (into speaker or using
headphones). The master volume will set the overall level. You can balance the level of the music and your guitar using the phone
volume and the Volume encoder on the amp.
The data connection allows you to use Peavey's Bluetooth Vypyr-X editor to change settings on the amp remotely.
BLUETOOTH LED:
- OFF: module off
- ON: module on and connected
- Blinking: pairing mode (looking for a connection)
BLUETOOTH SWITCH:
- Press switch to turn Bluetooth on (if the LED is off)
- If the LED is on (or blinking) press and hold switch for 2 seconds to turn it off
- If on, press and hold switch for 10 seconds to clear the device list in the module. (The LED will go off after 2
seconds, then back on 8 seconds later. It will stay on after the clearing function.)
9
Page 10

When powering up, the Vypyr X will remember whether the Bluetooth functions were on or off.
To Connect via Bluetooth: Place your phone or music device in Bluetooth search mode. The phone or music device will
begin searching for the Vypyr X. Select “Vypyr_X” (data/editor id: LE_Vypyr_X) from the search results on your phone or music
device.
You will be prompted to enter a pin number. Enter the pin#, it is 7878.
If the pairing is successful, the Bluetooth Active LED will stop blinking and stay lit.
You are now ready to begin streaming through Bluetooth through the amp.
(15) USB RECORD OUT
The VYPYR USB Record out requires no additional drivers—just plug a standard USB 2.0 cable into your computer and it will detect
it as an audio device. Open your favorite recording program and start recording. Don’t worry, the output is microphone/cabinet
simulated and will sound great right in your computer.
NOTE: The speaker is intentionally muted when USB output is in use although the headphone output is active for real time
monitoring. The USB port can also be used to download firmware updates and to connect to a computer to use the Vypyr Edit
Graphic User Interface. MIDI works over the USB as well.
(16) AUX INPUT
Plug in your favorite mp3 player, drum machine, or CD player and play along.
(17) HEADPHONE/RECORD OUT
We really spent a lot of time making sure the headphone jack was studio quality. Because of that, and with the proper adapters (not
supplied), you can use this output for recording as well as the USB port.
NOTE: When headphones are in use the speaker is muted and Master Volume (Item 9) controls headphone level. 16Ω or 32Ω headphones are
best but a lower impedance is okay.
NOTE: Headphones have a higher frequency response than guitar speakers.
10
Page 11

VYPYR X3 Front Panel
0
1
12
2 3 4
(0) VARIABLE INSTRUMENT INPUT
On the VYPYR X3, you can input an electric, an acoustic, or a bass guitar. There are amp models for all 3 instrument types. Once
you plug into the amp, you select the instrument bank. The amp then changes its input sensitivity and gain structure to match your
selection.
NOTE: Vypyr X Amplifers are designed to be used with instruments with passive electronics. When using instruments with active
electronics, the volume of the instrument may need to be reduced to prevent clipping (unwanted distortion).
(1) PRESETS ENCODER
The VYPYR X3 includes over 400 user definable preset locations! Use this encoder to scroll though them and when you find the
preset you are looking for, press the encoder to call up that preset. Presets in bank C are designated for use with acoustic guitar and
presets in bank D are designed for Bass.
(2) INSTRUMENT/STOMP ENCODER
Turning the Instrument/Stompbox Encoder allows the user to select the desired instrument or effect by highling the effect and
pressing the encoder. After you’ve made your selection, press the encoder momentarily to enter Edit mode (Item 13). Pressing and
holding the encoder will toggle the effect or instrument on and off. When the effect or instrument is on, the name will be in UPPER
CASE. When the effect or instrument is bypassed, the name will be displayed in lower case.
NOTE: This encoder also serves other functions, see Preset Section for more information.
(3) AMPS ENCODER
Turn this knob to select your amp model then press the encoder to make the selection. Each amp has 3 channels, no icon (6505)
represents the clean channel, a square (6505n) represents the medium gain channel, and a star (6505*) represents the high gain
channel. Momentarily pressing the amps encoder will change channels on the amp.
Press and hold for 2 seconds to enter Tuner mode, keep pressing to enter the System Menu mode.
NOTE: This encoder also serves other functions, see Preset Section for more information.
TUNER MODE: The tuner is shown on the screen, and an icon will indicate whether the note is sharp or flat. If the icon is to the
right of the middle you are sharp (Tune down). If the icon is to the left of the middle, you are flat (Tune up). The guitar is in tune
when the icon is directly in the middle.
(4) EFFECTS ENCODER
Turn this knob to select any “Rack” effect. These are effects you might find attached to the effects loop of an amplifier. Press the
11
Page 12

VYPYR X3 Front PanelVYPYR X3 Front Panel
5 6 87 9
13
14
15 16 17 18
10
11
encoder momentarily to enter Edit mode.
NOTE: This encoder also serves other functions, see Preset Section for more information.
(5) PRE GAIN
Turn this knob to crank up the gain, think of it as how much distortion you want out of the amplifier. In Edit mode this knob controls
parameter 1 of either the selected Stompbox or Effect.
(6) LOW ENCODER
Low EQ adjustment. In edit mode this knob controls parameter 2 of either the selected Stompbox or Effect.
(7) MID ENCODER
Mid EQ adjustment. In edit mode this knob controls the Feedback of the Delay effect. Feedback is the number of times the delay
repeats.
(8) HIGH ENCODER
High EQ adjustment. In edit mode this knob controls the Level or amount of Delay effect. All the way to the left is zero and all the
way to the right is max.
(9) POST GAIN
This is the individual preset volume. In Edit mode this knob controls the amount of Reverb.
(10) MASTER VOLUME
Controls overall system volume.
(11) POWER SPONGE
This knob allows you to reduce the power output of the amplifier. Don’t confuse this with the Master Volume control. Power Sponge
adjusts the amount of power the amp is capable of producing. This circuit allows you to get that full on cranked sound at bedroom
levels. The Power Sponge can adjust the maximum output of the power amp from 100 Watts all the way down to 1 Watt.
12
Page 13

VYPYR X3 Front Panel
(12) LOOPER INDICATOR
This function requires a Sanpera® I or Sanpera II foot controller. Waste no time in making that purchase— the looper will allow
you hours and hours of fun. You can record any 30 plus seconds of anything, switch your tone (preset), and play over top of your
recording. For example, try recording a bass track, then change your tone to a lead tone and play over the top! Note the LED that
corresponds to the looper on the encoder will turn on when recording or playing back the loop.
(13) EDIT MODE
Edit mode simply changes the 5 amp controls to their alternate function as listed on the bottom of the encoder. When in Edit mode
the Edit mode LED will either be green if you are editing Effects, or red if you are editing Stompboxes. To enter Edit mode simply
press either the Stompbox encoder (Item 2) or the Effects encoder (Item 4). To exit Edit mode simply press the same encoder again.
Anytime you want access to the Delay or Reverb you will need to enter Edit mode!
(14) TAP TEMPO
Tap on this button to set the tempo of the Delay effect. If you aren’t hearing any delay enter Edit mode to turn the level up.
(15) BLUETOOTH CONNECTIVITY
The audio connection allows you to play music from your phone to the amp, and practice along with it (into speaker or using
headphones). The master volume will set the overall level. You can balance the level of the music and your guitar using the phone
volume and the Volume encoder on the amp.
The data connection allows you to use Peavey's Bluetooth Vypyr-X editor to change settings on the amp remotely.
BLUETOOTH LED:
- OFF: module off
- ON: module on and connected
- Blinking: pairing mode (looking for a connection)
BLUETOOTH SWITCH:
- Press switch to turn Bluetooth on (if the LED is off)
- If the LED is on (or blinking) press and hold switch for 2 seconds to turn it off
- If on, press and hold switch for 10 seconds to clear the device list in the module. (The LED will go off after 2
seconds, then back on 8 seconds later. It will stay on after the clearing function.)
To Connect via Bluetooth: Place your phone or music device in Bluetooth search mode. The phone or music device will
begin searching for the Vypyr X. Select “Vypyr_X” (data/editor id: LE_Vypyr_X) from the search results on your phone or music
device.
You will be prompted to enter a pin number. Enter the pin#, it is 7878. If the pairing is successful, the Bluetooth Active LED will stop
blinking and stay lit. You are now ready to begin streaming through Bluetooth through the amp. When powering up, the Vypyr X
will remember whether the Bluetooth functions were on or off.
13
Page 14

VYPYR X3 Front Panel
(16) USB RECORD OUT
The VYPYR USB Record out requires no additional drivers—just plug a standard USB 2.0 cable into your computer and it will detect
it as an audio device. Open your favorite recording program and start recording. Don’t worry, the output is microphone/cabinet
simulated and will sound great right in your computer.
NOTE: The speaker is intentionally muted when USB output is in use although the headphone output is active for real time
monitoring. The USB port can also be used to download firmware updates and to connect to a computer to use the Vypyr Edit
Graphic User Interface. MIDI works over the USB as well.
(17) AUX INPUT
Plug in your favorite mp3 player, drum machine, or CD player and play along.
(18) HEADPHONE/RECORD OUT
We really spent a lot of time making sure the headphone jack was studio quality. Because of that, and with the proper adapters (not
supplied), you can use this output for recording as well as the USB port.
NOTE: When headphones are in use the speaker is muted and Master Volume (Item 9) controls headphone level.
14
Page 15

VYPYR X Rear Panel
0
8 PIN MIDI
0
2
1
Connect your Sanpera® I or Sanpera II here. This particular style of MIDI jack provides power to the Sanpera
foot controllers and is required for their operation via the 8-pin cable. Other MIDI devices can send program and
control changes to the amp via a standard MIDI 5-pin cable.
1
POWER SWITCH
This two-way rocker switch applies power to the unit when placed in the ON position.
CAUTION: The on/off switch in this unit does not break both sides of the primary mains. Hazardous engery can
be present inside the chassis when the on/off switch in in the OFF position.
2
AC POWER INLET:
This is the receptacle for an IEC line cord, which provides AC power to the unit. Connect the line cord to this
connector to provide power to the unit. Damage to the equipment may result if improper line voltage is used.
(See line voltage marking on unit).
Never break off the ground pin on any equipment. It is provided for your safety. If the outlet used does not have a
ground pin, a suitable grounding adapter should be used and the third wire should be grounded properly.
To prevent the risk of shock or fire hazard, always make sure that the amplifier and all associated equipment is
properly grounded.
NOTE: FOR U.K. ONLY
As the colors of the wires in the mains lead of this apparatus may not correspond with the colored markings
identifying the terminals in your plug, proceed as follows:
(1) The wire which is colored green and yellow must be connected to the terminal which is marked by the letter
E, or by the Earth symbol, or colored green or green and yellow. (2) The wire which is colored blue must be
connected to the terminal
which is marked with the letter N, or the color black. (3) The wire which is colored brown must be connected to
the terminal which is marked with the letter L, or the color red.
15
Page 16

VYPYR X3 Presets
0
7
8
1
2
3
4
5
6
10
11
9
12
13
1%
50%
100%
inst/stomp amplifiers effects
aux inUSB phones
preset name
turn to search
press to select
push to select channel/
hold for tuner/menu
push to edit/hold to bypass push to edit/hold to bypass
pre-gainmodel presetspresets low mid high post-gain master
power
sponge
Fig 1
Fig 2
Fig 3
Fig 4
SAVING AND RENAMING PRESETS
1. To save a preset you have edited, first press and hold the Preset Encoder for 2 seconds, then release. The
screen will now look like Fig 1. You can now rename and save your preset.
2. In this mode, the bottom row on the display scrolls through different commands. In this example, the display
reads “Turn Stomp=NEXT BANK” meaning that the inst/stomp encoder is used to quickly scroll through the
banks allowing you to choose the desired bank in which to save the current preset (See Fig. 2).
3. The amplifiers and effects encoders are used to rename the preset. Use the amplifiers encoder to move the
cursor and use the effect encoder to change the chosen character (See Fig 3 and Fig 4).
To save the preset, simply press the PRESET ENCODER.
NOTE: At any time during save mode press the TAP TEMPO button to cancel out of save mode
and return to normal play.
16
Page 17

Fig 5
Fig 7
Fig 6
SYSTEM MENU COMMANDS
1. To access the System Menu, press and hold the Amplifier/Tuner button (Fig 5). The screen will display 3
choices in this menu: ADJUST CONTRAST (for changing the contrast of the display), DISABLE DEMO MODE
(turns off the “light show”) and FACTORY RESET (erases all user defined presets and returns the amp to
original factory presets. To disable DEMO MODE, use the inst/stomp encoder to scroll until the display reads
DISABLE DEMO MODE and press the amplifiers encoder to select.
IMPORTANT, ALTHOUGH THE SYSTEM MENU WILL PROMPT YOU TO SELECT YES OR NO WHEN
PERFORMING A FACTORY RESET, DO NOT CLICK "YES" UNTIL YOU ARE CERTAIN, BECAUSE THE
FACTORY RESET IS IRREVERSIBLE
2. To adjust the contrast, press the amplifier encoder, then use the inst/stomp encoder (Fig 6) to adjust the
contrast. Then, press the amplifiers encoder to save your changes or the effects encoder to exit without saving
changes (Fig 7).
17
Page 18

Stompbox Encoder
VYPYR X1
The first encoder to the right of the input jack is the Instrument/Stompbox encoder. This control selects the
Instrument model or Stompbox (Traditional floor effects unit) which is exactly like connecting your guitar to
your favorite pedal and then into your amplifier. With the Instrument/Stompbox encoder you can select several
unique instrument models, as well as distortion and boost pedals. Combine these with the various amp channel
settings and you can get some pretty amazing tones. Simply turn the Instrument/Stompbox encoder to select
the effect you desire. If you want to adjust the parameters, simply press the encoder to enter Edit mode. Refer to
the Vypyr X Matrix to see what stompboxes, instruments and effects are on each model.
OPTIONS ON THE INSTRUMENT/STOMPBOX ENCODER:
12 STRING*: Simulation of an electric 12 string guitar with a small body. P1: Body (fullness) P2: String
(brightness)
7 STRING*: Lowers the pitch by 5 half-steps to simulate a 7 string guitar. P1: Body, P2: String
ACOUSTIC 1: Bright acoustic guitar with a small body. P1: Body, P2: String
ACOUSTIC 2*: Jumbo dreadnought acoustic guitar with a deep body. P1: Body, P2: String
BARITONE* Tunes the instrument down to low A, simulating a Baritone guitar. P1: Body, P2: String
BASS: Monophonic model that tunes the instrument down an entire octave, simulating a Bass guitar. P1: Body,
P2: String
EVIO*: Monophonic Electric Violin simulation. P1: Color, P2: Glide (higher settings will glide between notes).
RESONATOR*: Simulation of a Resonator guitar, commonly used in Blues and Country music. Try different
settings on your guitar with the pickup selection and tone control to achieve the most realism with your
instrument. P1: Body, P2: String.
SITAR*: Simulation of the traditional instrument used in Indian music. P1: Body, P2: String.
* Not available on VIP1
NOTE: MONOPHONIC MODELS ARE MEANT TO BE PLAYED ONE NOTE AT A TIME FOR BEST
RESULTS.
VYPYR X2
TSC: Classic overdrive distortion with just a touch of mid boost. Great in front of almost any amp model. Try
it in front of a clean TWN for starters. Parameter Adjustment: P1 Drive, P2 Level
ANALOG BOOST: One of the most useful effects, the boost offers a clean level boost which you will find handy
when you want to do a solo with a clean sound or if you need a boost when playing a heavy solo. This will be
useful when you have the optional Sanpera® I or II pedal, where using this effect will give you a solo boost in
“manual mode”. Refer to the Sanpera manual for more information. P1 Drive, P2 Level
SLAP: A very quick, short repetition of the original note, sounds like the note "slaps" back at you. This effect is
great for playing country music. Parameter Adjustments: P1 Time, P2 Mix
SYNTH: The synth is a Monophonic (one note at a time) effect that creates a square wave at the frequency of
18
Page 19

Instruments
V
IP 1
V
IP 2
V
IP 3
XXX
X
X
X
X
X
X
X
X
rXX
X
X
X
X
X
X
XXX
Instruments
V
IP 1
V
IP 2
V
IP 3
Acoustic 1
XXX
Acoustic 2
X
X
12 string
X
X
7 string
X
X
Resonator
X
X
Sita
rXX
EVIO
X
X
Synth
X
X
Bari
X
X
Bass
XXX
Stompboxes
V
IP 1
V
IP 2
V
IP 3
TSC
XXX
X
X
XXX
X
XXX
r
XXX
XXX
XXX
XXX
X
X
XXX
X
X
X
X
X
XXX
XXX
V
X
XXX
Stompboxes X1 X2 X3
Fuzz
Comp
Slap
Wah
Phase
Flanger
Synth
Slice
Env Filter
Pitch shifter
Chorus
Octaver
Rotary
MOG
Tremolo
Reverse
Uvb
Ring Mod
ibrato
Boost
Instruments X1 X2 X3
Acoustic 1
Acoustic 2
12 string
7 string
Resonator
Sita
EVIO
Synth
Bari
Bass
the input string and runs it through a built-in envelope filter and pitch glide controller. The attack parameter
controls the amount of filter modulation - higher values result in more wah-like filtering. The glide parameter
controls the amount of time it takes to glide from one note to another. Higher values result in more audible
sliding between notes. P1 Attack, P2 Glide
SLICER: The Slicer turns the signal on and off very fast or very slow. You can create hythmic effects with the
Slicer, you just have to experiment. P1 Speed, P2 Width
NOTE: The optional Sanpera I and Sanpera® II pedals will change the speed of this effect.
UVB: Originally designed to be a rotary speaker simulator, Uvb quickly took on a life of it’s own. It’s been one of
the most popular effects since Hendrix pulled it out for the National Anthem at Woodstock: P1 Speed, P2 Depth
RING MODULATOR: The Ring Modulator combines two waveforms, and outputs the sum and difference of
the frequencies present in each waveform. As you will see this effect is certainly a little different but can be a
lot of fun. Listen to the guitar solo in “Paranoid” and you will hear a Ring Modulator combined with a Fuzz
distortion. Parameter adjustments: P1 Carrier Frequency, P2 Mix
VIBRATO: Unlike Tremolo, which changes the volume of the signal to create the effect, Vibrato changes the
pitch slightly to create the effect. P1 Speed, P2 Depth
COMP: This compressor allows you to set an output level and the sensitivity at which it kicks in (Edit mode).
Compressors can produce percussive, clicky sounds on clean guitar - or mellow sustain for lead work. Try this
stompbox effect on a clean channel and strike the strings softly at first and than harder to hear and feel the effect.
Parameter Adjustments: P1 Sensitivity, P2 Level
CHORUS: This unmistakable classic warm analog chorus model will no doubt be a staple in your preset arsenal.
P1 Speed, P2 Depth
ANALOG PHASE: Analog Phase is an effect commonly confused with Flanging. Phasing uses changes in the
frequency spectrum to create peaks and valleys in the audio signal. Check out “Ain’t Talking ‘Bout Love.” P1
Speed, P2 Depth
ANALOG FLANGE: Flanging is a time-based audio effect that occurs when two identical signals are mixed
together with one signal slightly delayed. This delay produces a swept comb filter effect. - Check out the intro to
“Cowboys from Hell” or “Barracuda”. P1 Speed, P2 Depth
WAH: The auto wah uses frequency filter sweeps in the range typically associated with vocals to give the guitar a
“Wah” sound. Think “Voodoo Child” on autopilot. P1 Speed, P2 Sweep Depth
19
Page 20

Amp Encoder
One of the most unique features of the VYPYR® amplifier is the channel select encoder. Each of the amp modes
contain three channel models, low gain, medium gain, and high gain. Turn the encoder to select the amplifier
model you desire. To change the channel model, simply press the Amp encoder.
WORD ABOUT EQ:
When modeling the amplifiers for the VYPYR we also painstakingly modeled the EQ and how the EQ controls
functioned on the various amplifiers. For instance the XXX, has active EQ on the lead channel. You will notice
when you are on the Red channel model of the XXX the EQ will act very differently from that of a Green
channel Twn. Some EQs will have drastic effects and some, like the British amplifier we modeled, will have little
effect at all.
BRITISH: The classic sound of Queen and so many British bands from the 60’s through today. The tone stack
on Brian May’s amplifier was shorted, so on this model the tone controls have limited response.
BUTCHER™: Modern take on a classic British stack. This very versatile amplifier can go from nice ‘n clean to
modern hot rodded tones.
CLASSIC®: The Peavey Classic 50 is one of the most successful amps of all time. With its responsive gain
structure and warm/punchy tone. Classic Series guitar amps are revered by gritty blues benders, chicken pickin’
country cats and nouveau-Stones rockers alike.
XXX: The Peavey XXX is an extremely versatile amplifier. With an ultra-clean clean channel, a modified British
rhythm channel and lead channel with over-the-top gain for screamin’ leads, the XXX may become your favorite
amp.
6534+: The legendary sound of the 6505+ head, but with an EL34 power section for a bit of British flair. The
EL34’s add a “bark” to the midrange that has become a favorite for many of Peavey’s artists.
20
Page 21

Amp Encoder
6505® +: Named in celebration of Peavey’s first 40 years, the 6505 Series is also the relaunch of the 5150 Series, the
immensely popular amplifiers Peavey designed with Edward Van Halen. While known as the 5150, these amps
became the undisputed go-to guitar amps for scores of rock, hardcore and metal bands due to their raw tone,
relentless power and road-proven reliability. The 6505 is still the unquestionable choice for an ever-expanding list of
endorsers and over the years has become the sound of metal the world over.
BUDDA®: Budda Amplification specializes in hand-wired amplifiers and cabinets that balance warm tube gain
stages with defined, responsive attack. Budda sparked the low-wattage revolution in guitar amps more than a
decade ago with the hand-wired Budda Twinmaster™, and the innovation continues today with the Superdrive™II
Series. The proprietary Budda Dual Class Hot Bias Circuit combines the best characteristics of class A and
class AB to produce lively tones defined by massive dynamics and complex overtones in second and third order
harmonics, with plenty of separation to let your guitar sing.
TWN: Classic California clean. To achieve overdriven tones, we’ve added stompbox distortion in front of the
amp on the Orange and Red Channels.
TRACE ACOUSTIC: Over two decades ago, Trace Elliot revolutionized the world of acoustic instrumentation
™
with its original TA
Series. Trace Elliot brought studio-quality acoustic reproduction to the stage through
designs that incorporated very high-impedance (piezo pickup) inputs, notch filters, phantom power, DSP effects
and Dynamic Correction™, unique circuitry that reproduces the sparkling top end of an acoustic instrument
without relying on high-frequency horns (which can produce harsh, unwanted overtones).
PEAVEY ECOUSTIC®: Peavey Ecoustic Series amplifiers are highly versatile amplification systems designed
for acoustic instruments, vocals and line-level devices such as samplers and audio players in performance and
rehearsal applications.
TRACE BASS: Trace Elliot revolutionized bass amplification in the 1980’s with a line of full-range amps and
enclosures. Give the Trace Elliot signature tone a try and you’ll see why over the years countless artists have
relied on Trace Elliot.
PEAVEY BASS: For over 40 years, Peavey bass amps have been a mainstay in the music industry. Round, huge,
loud, deep; there are many ways to describe the Peavey bass amp sound.
21
Page 22

Effects Encoder
The third encoder from the right is the Effects encoder. This encoder selects any desired “Rack” effect. The
term “Rack effect” is used to identify effect components that would typically be found connected to an effects
loop on an amplifier. These effects are usually post input, post EQ and sound distinctly different than pre
amplifier effects (Stompboxes). To select your effect, simply turn the encoder so the LED is next to the effect
you desire.
TREMOLO: This effect is achieved through amplitude modulation. The note gets slightly louder and softer in
rapid succession. Note this effect is different from Rotary. With Tremolo there is no pitch fluctuation. This effect
is on the inst/stomp encoder on the VYPYR X1. P1 Speed, P2 Depth
OCTAVER: Just as the name implies this Monophonic effect will produce a tone one octave below the note
you are playing. This effect is on the inst/stomp encoder on the VYPYR X1. P1 Mix (Amount of effect VS dry
signal), P2 Octave level
PHASER: Unlike the Analog Phaser model on the Stompbox encoder, this phaser utilizes an 8 stage process.
Resulting in much more of a phasing sound than you would find in a stompbox. P1 Speed, P2 Depth
ROTA RY: This effect simulates the sound of a rotating speaker. Listen carefully to this effect and you will notice
as the simulated speaker rotates, you will hear a pitch shift due to the Doppler effect. This effect is on the inst/
stomp encoder on the VYPYR X1. NOTE: The optional Sanpera I and Sanpera II pedals will change the speed
of this effect. P1 Speed, P2 Depth
REVERSE: As the name implies, strum or play a note - and it will play back in reverse. This effect is on the inst/
stomp encoder on the VYPYR X1. P1 Time, P2 Mix
PITCH SHIFT: Changes the pitch of the note you are playing. With the Sanpera® I or II optional footswitch
you can assign this effect to the foot controller and sweep from the original note to the note selected in the
parameter adjustment. This effect is on the inst/stomp encoder on the VYPYR X1. P1 Interval, P2 Mix
NOTE: The optional Sanpera I and Sanpera II pedals will change the parameter of this effect.
MOG: An effect of our own creation. MOG stands for Monophonic Octave Generator. Basically we generate a
22
Page 23

VVV
XXX
X
X
X
X
X
X
Resonator
X
X
Sita
r
X
X
EVIO
X
X
Synth
X
X
Bari
X
X
Bass
XXX
Stompboxes
V
IP 1
V
IP 2
V
IP 3
TSC
XXX
Fuzz
X
X
Comp
XXX
Slap
X
Wah
XXX
Phase
r
XXX
Flanger
XXX
Synth
XXX
Slice
XXX
Env Filter
X
Pitch shifter
X
Chorus
XXX
Octaver
X
Rotary
X
MOG
X
Tremolo
X
Reverse
X
Uvb
XXX
Ring Mod
XXX
V
ibrato
X
Boost
XXX
Effects
V
IP 1
V
IP 2
V
IP 3
Tremolo
X
X
X
X
r
X
X
X
X
X
X
X
X
X
X
X
X
X
X
X
X
X
X
Effects Encoder
Eects VYPYR X1 VYPYR X2 VYPYR X3
Octaver
Phase
Rot. Spkr
Reverse
Pitch Shft
mog
Flanger
Comp bst
Env. Filter
Chorus
signal one octave above the signal you are playing and another one octave below. This effect is not intended for
use with chords, so try it with single notes at first. This effect is on the inst/stomp encoder on the VYPYR X1.
P1 Octave up level, P2 Octave down level
FLANGER: Unlike the Analog Flanger model on the Stompbox encoder, this flanger uses a longer delay line.
Essentially this causes the flanger to emphasise lower frequencies. Parameter Adjustments: P1 Speed, P2 Depth
COMP BST: Works in a similar fashion as Comp. However, the Comp BST compresses the dynamic range after
the amp model but before the tone controls. P1: Sensitivity, P2: Level
ENV FILTER: Short for Envelope Filter, this effect is similar to Auto-Wah. The main difference is in the
parameter adjustment. With the Env Filter we allow you access to the “Q” (Width of the frequency band
filtered) which allows you to stray far from the sound of an Auto-Wah. This effect is on the inst/stomp encoder
on the VYPYR X1. P1 Sensitivity (Threshold), P2 Intensity (Q)
CHORUS: Similar to the Analog Chorus on the Stompbox encoder but with a longer delay line. What does that
mean? Well it means this effect will allow you to create a “Wetter” signal than you would normally find on a
stompbox chorus pedal. In fact at it’s most intense setting you can clearly hear a doubling effect on the signal.
P1 Speed, P2 Depth
LOOPER: (not on an encoder wheel, this function will require a Sanpera I or Sanpera II foot controller). Waste
no time in making that purchase, the looper will allow you hours and hours of fun. You can record any 30 plus
seconds of anything, switch your tone (Preset) and play over top of that.
NOTE: The LED that corresponds to the looper on the encoder will turn on when recording or playing back the
loop.
23
Page 24

Effects
STOMP P1 P2 Notes
TSC Drive Level Tone knob at 12:00, 12dB more gain than pedal at max
Fuzz Drive Level Russian model, tone at 11:00, 10dB more gain potential
Comp Sensitivity Level
Slap Time Mix Max Mix = 50/50 Dry/Wet, 50ms<T<167ms
Auto Wah Speed Depth At min Depth, Param1 serves as xed
Analog Phase Speed Depth Depth adds regeneration for more intensity
Analog Flange Speed Depth Depth combines Width and Regen of original pedal
Synth Attack Glide
Slice Speed Width
Chorus Speed Depth Filters set to 12:00, at
UVB Speed Depth
Ring Modulator Freq Mix Modulation frequency from 80 Hz to 2Khz
Vibrato Speed Depth
Boost Drive Level
EFFECT P1 P2 Notes
Tremolo Speed Depth
Octave Mix Level
Phaser Speed Depth 8 stage phaser
Rotary Spkr Speed Depth
Reverse Time Mix Max Mix = 0/100 Dry/Wet, 250ms<1T<11s
Pitch Shifter Interval Mix At Minimum Mix, Param1 controls Detune
MOG Octave Up Octave Down Level controls
Flanger Speed Depth DelayLine=7ms
Comp bst Sensitivity Level
Env Filter Sensitivity Intensity (Q)
Chorus Speed Depth DelayLine=15ms
24
Page 25

Effects/Amps Matrix
V
V
V
XXX
X
X
X
X
X
X
X
X
r
X
X
X
X
X
X
X
X
XXX
V
V
V
XXX
X
X
XXX
X
XXX
r
XXX
XXX
XXX
XXX
X
X
XXX
X
X
X
X
X
XXX
XXX
V
X
XXX
V
V
V
X
X
X
X
r
X
X
X
X
X
X
X
X
X
X
X
X
X
X
X
X
X
X
VYPYR X1 VYPYR X2 VYPYR X3
Instruments
Acoustic 1
Acoustic 2
12 string
7 string
Resonator
Sita
EVIO
Synth
Bari
Bass
Stompboxes
TSC
Fuzz
Comp
Slap
Wah
Phase
Flanger
Synth
Slice
Env Filter
Pitch shifter
Chorus
Octaver
Rotary
MOG
Tremolo
Reverse
Uvb
Ring Mod
ibrato
Boost
IP 1
IP 1
IP 2
IP 2
IP 3
IP 3
Effects
IP 1
IP 2
IP 3
Tremolo
Octaver
Phase
Rot. Spkr
Reverse
Pitch Shft
mog
Flanger
Comp bst
Env. Filter
Chorus
25
Page 26

Engineering Notes
VYPYR X1 POWER SPECIFICATIONS
Rated Power & Load:
(5% THD, 1kHz, 120V AC line)
30W RMS into 8 Ohms
Power Consumption (1/8th Power Output):
20W @ 50/60Hz, 100-120V AC
20W @ 50/60Hz, 220-240V AC
Dimensions & Weight
15" H x 16.584" W x 8.5" D
17.5 lbs.
VYPYR X2 POWER SPECIFICATIONS
Rated Power & Load:
(5% THD, 1kHz, 120V AC line)
60W RMS into 8 Ohms
Power Consumption (1/8th Power Output):
20W @ 50/60Hz, 100-120V AC
20W @ 50/60Hz, 220-240V AC
Dimensions & Weight
17.7" H x 19.59" W x 10" D
26 lbs.
VYPYR X3 POWER SPECIFICATIONS
Rated Power & Load:
(5% THD, 1kHz, 120V AC line)
100W RMS into 8 Ohms
Power Consumption (1/8th Power Output):
42W @ 50/60Hz, 100-120V AC
42W @ 50/60Hz, 220-240V AC
Dimensions & Weight
19" H x 19.566" W x 10" D
31 lbs.
26
Page 27

Logo referenced in Directive 2002/96/EC Annex IV
The bar is the symbol for marking of new waste and
13 August 2005
Warranty registration and information for U.S. customers available online at
Peavey Electronics Corporation 5022 Hartley Peavey Drive Meridian, MS 39305 (601) 483-5365 FAX (601) 486-1278
www.peavey.com
www.peavey.com/warranty
or use the QR tag below
Features and specications subject to change without notice.
(OJ(L)37/38,13.02.03 and defined in EN 50419: 2005
is applied only to equipment manufactured after
 Loading...