

Page 1
VYPYR® SANPERA® PRO
Footcontroller for VYPYR PRO
Operating
Manual
www.peavey.com
Page 2

ENGLISH
Vypyr® Sanpera® Pro
Footcontroller for Vypyr Pro Series Amplifier
Featuring direct access to all 4 model locations, plus delay and reverb, the Sanpera Pro unlocks all the power of
your Vypyr Pro. e dual expression pedals can be assigned to either the default setting (volume on le, wah on
right) or assigned to an alternate eect, for instance pitch control, or rotary speaker speed. ere are also looper
controls that will allow you to create multi-track loops. e Sanpera Pro also includes a boost switch, tap tempo
and access to the chromatic tuner.
KEY FEATURES:
• 2 fully programmable expression pedals
• Direct access to Volume and Wah pedals
• Direct access to all 4 models, plus delay and reverb
• Boost switch
• Tap Tempo
• Chromatic tuner
• Full looper controls
• Presets arranged in banks of 4, up to 500 presets!
• Self powered via Vypyr amplier
• MIDI output for connecting to AT200-B Breakout box (for controlling the AT-200 guitar)
Page 3

FOOTSWITCH
MIDI OUT
(See Owner’s Manual)
from Amplifier
(Control to Amplifier)
MADE IN CHINA
DESIGNED AND ENGINEERED IN U.S.A.
A PRODUCT OF PEAVEY
ELECTRONICS CORPORATION
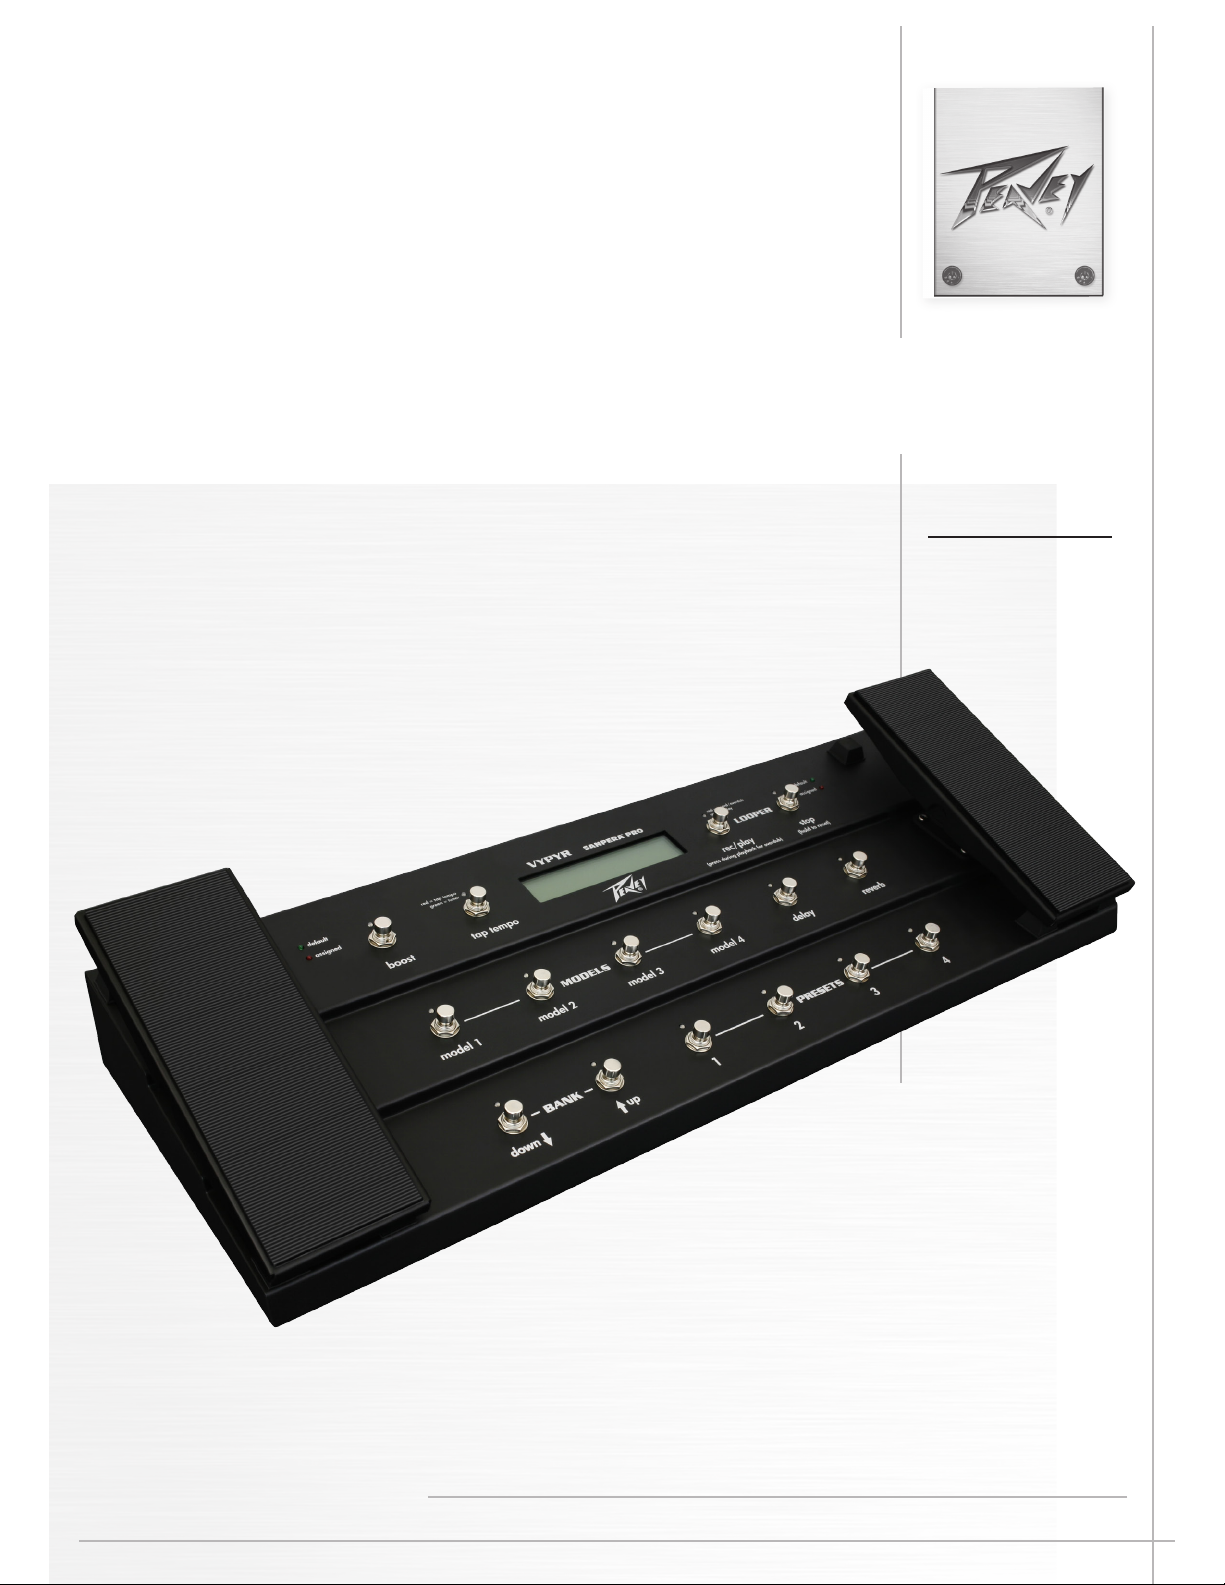
Top Panel
1
1
Le Expression Pedal
2
default
assigned
boost tap tempo rec/play stop
BANK
down up
6 7 8 9
3 4 5 6
red = tap tempo
green = tuner
VYPYR
MODELS
model 2 model 3 model 4 delay reverbmodel 1
®
SANPERA PRO
2 3 41
PRESETS
red = record
green = play/ovrdub
LOOPER
default
assigned
(hold to reset)(press during playback for overdub)(hold for tuner)
e default setting for this pedal is for a volume control, but it can be programmed to control any parameter.
2
Boost Switch
Provides a clean boost to the instrument signal path.
3
Tap Tempo
Tapping this switch will allow you to set the tempo of the delay eect. Holding the switch down will activate the
onboard tuner.
4
LCD Display
Displays information about the presets and other parameters.
Looper Controls
5
ese two switches allow for recording, playback and overdubbing through the onboard looper. A complete
description of the Looper feature can be found on page 24.
6
Right Expression Pedal
e default setting for this pedal is for Wah, but it can be programmed to control multiple parameters.
7
Model Selectors
ese four switches allow you to select one of four models within the Preset.
Bank Selectors
8
ese two switches allow you to scroll through the Vypyr Pro’s Preset Banks.
Preset Selectors
9
ese selectors allow easy access to your favorite presets.
Page 4

Top Panel continued
10
Delay and Reverb Engage Switches
ese switches turn the delay and reverb eects of the VYPYR PRO on and o.
Rear Panel
MIDI OUT
from Amplifier
(See Owner’s Manual)
11
DESIGNED AND ENGINEERED IN U.S.A.
11
Footswitch MIDI Connectors
A PRODUCT OF PEAVEY
ELECTRONICS CORPORATION
MADE IN CHINA
FOOTSWITCH
(Control to Amplifier)
*Footswitch (Control to Amplier)– connects the Sanpera to the VYPYR Amplier
*MIDI OUT– connects to any device that accepts program change messages.
Page 5

Looper Function
e Sanpera Pro unlocks the Vypyr Pro’s looper, which features unlimited overdubs! ere’s so much you can do
with the looper, so give it a try and have fun.
To start a loop, press down on the REC/PLAY button and hold it. e recording starts and stops when you li
your foot o the button. is is far more accurate than starting the recording when you press down. e looper
lasts 30 seconds which is usually enough time for a phrase. When you are ready to end the loop recording, press
down on the switch. Again, the recording will stop and playback will immediately begin when you li UP on
the switch.
Now, you have choices! Either you can play along with your recorded phrase, stop the playback, or begin adding to it. Pressing STOP will end the playback, pressing REC/PLAY will start it again. If you want to add to the
phrase, you can just press REC/PLAY again to begin recording an overdub. NOTE: You are only recording to
the looper with the LED above the REC/PLAY button is lit RED. When that LED is lit green, then you in PLAYBACK mode and not recording anything. e LED above the STOP button indicates if there is a loop in memory. Holding down the STOP button will erase the loop so that you can start over.
With the Vypyr Pro’s looper, you can erase the last loop you created if you are unhappy with it. However, because of how the looper works, you must erase the last loop BEFORE it goes through an entire playback cycle.
In other words, if you record an overdub, then press the REC/PLAY button to end the recording and continue
playback, you have until the loop plays all the way through to erase the last loop. To do this, you must press the
REC/PLAY and STOP buttons at the same time. If the loop starts over, then it commits the last loop to memory
and it cannot be erased.
ere is no limit to the number of overdubs that you can add!
A key feature to use with the looper is the LOOPER VOLUME (page 19, OUTPUT MENU, P2). Each time you
record a loop, it will record it at the level specied in that preset. is is so you can plan ahead for a performance
situation and commit to the looper each part at the level you desire.
HAVE FUN!!
Page 6

Logo referenced in Directive 2002/96/EC Annex IV
The bar is the symbol for marking of new waste and
13 August 2005
Warranty registration and information for U.S. customers available online at
Peavey Electronics Corporation 5022 Hartley Peavey Drive Meridian, MS 39305 (601) 483-5365 FAX (601) 486-1278
www.peavey.com
www.peavey.com/warranty
or use the QR tag below
Features and specications subject to change without notice.
(OJ(L)37/38,13.02.03 and defined in EN 50419: 2005
is applied only to equipment manufactured after
 Loading...