

Peaq PPA120BT-B, PPA120BT-W User Manual
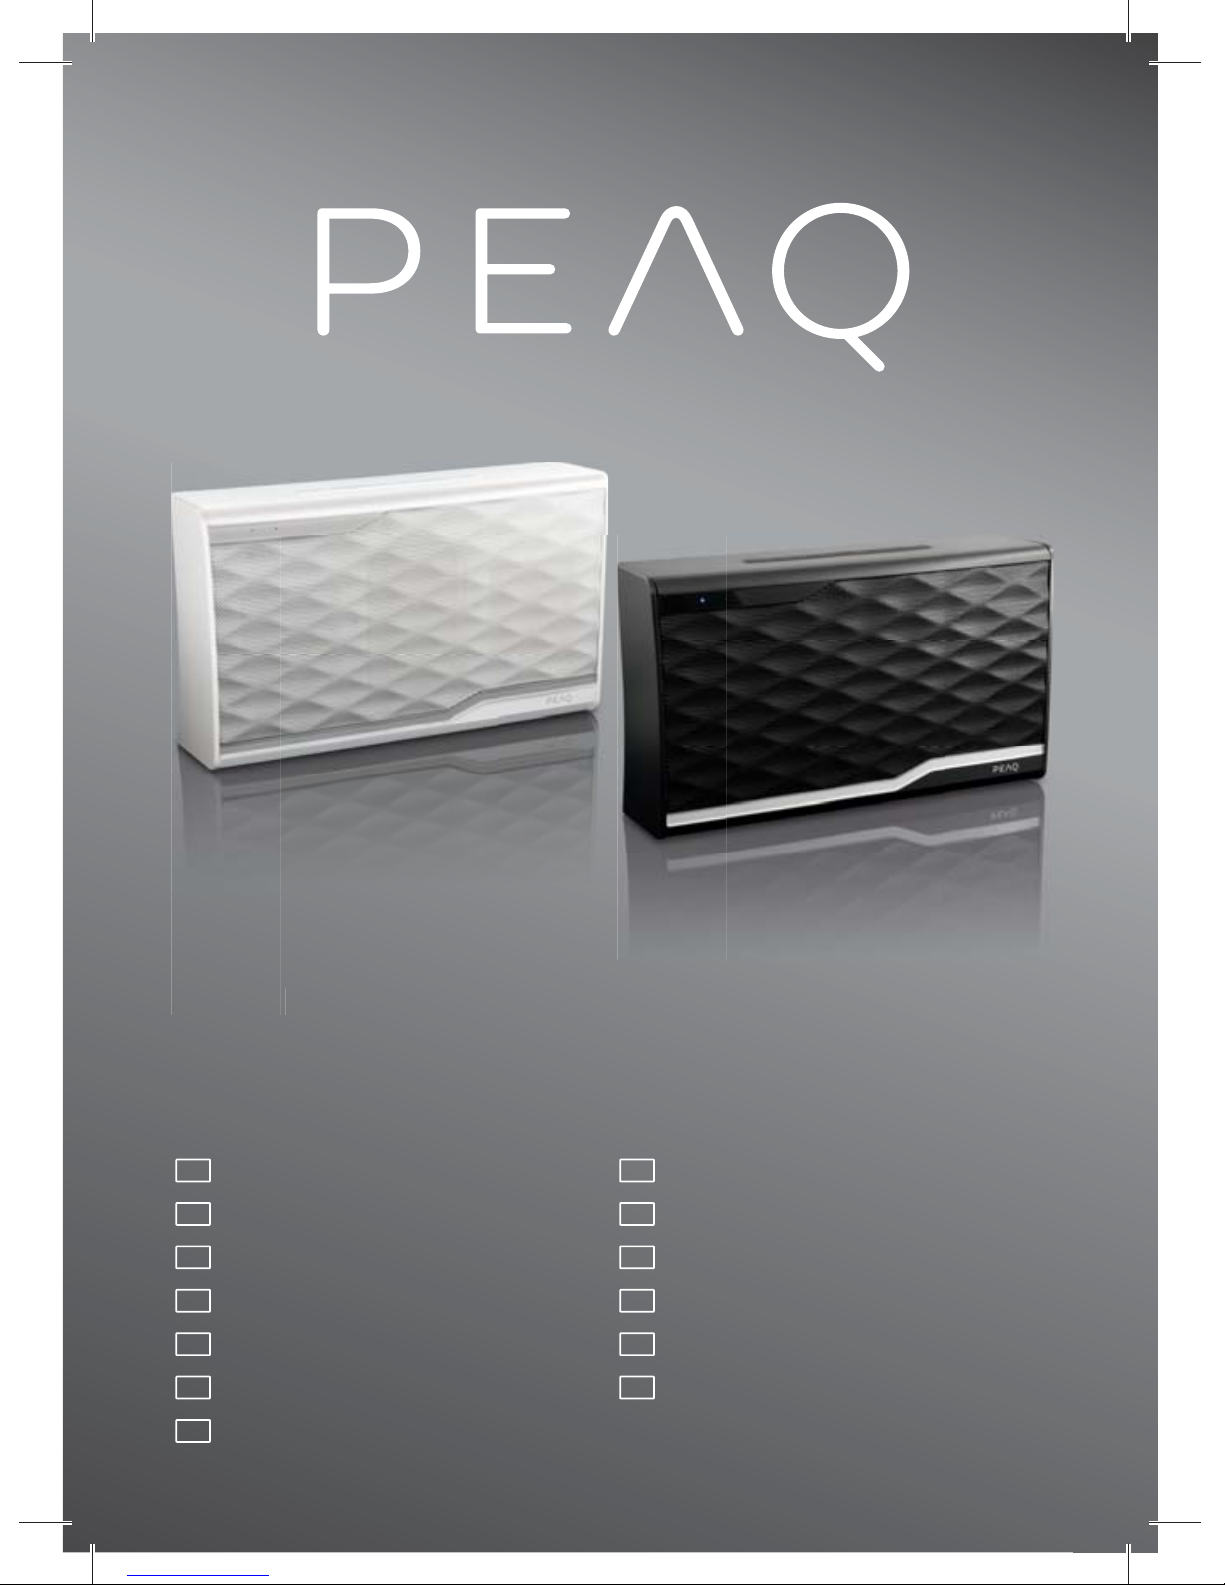
Portable Bluetooth Speaker
PPA120BT-B/W
DE
Bedienungsanleitung
EL
Οδηγίες χρήσης
EN
User manual
ES
Manual de instrucciones
FR
Mode d’emploi
HU
Kezelési leírás
IT
Manuale dell’utente
NL
Gebruiksaanwijzing
PL
Instrukcja obsługi
PT
Instruções de utilização
RU
Руководство пользователя
SV
Bruksanvisning
TR
Kullanım kılavuzu

Deutsch - 4
Ελληνικά - 13
English - 22
Español - 31
Français - 40
Magyar - 49
Italiano - 58
Nederlands - 67
Polski - 76
Português - 85
Русский язык - 94
Svenska - 103
Türkçe - 112

Deutsch 4 5
Wichtige Sicherheitshinweise
1. Beachten Sie alle Sicherheitshinweise, um Schäden durch
nicht sachgemäßen Gebrauch zu vermeiden!
2. Bewahren Sie die Gebrauchsanweisung für den weiteren
Gebrauch auf. Sollte dieses Gerät an Dritte weitergegeben
werden, muss diese Gebrauchsanweisung mit ausgehändigt
werden.
3. Verwenden Sie keine Geräte, die beschädigt sind!
Trennen Sie bei Beschädigungen die USB-Verbindung und
kontaktieren Sie Ihren Händler.
4. Versuchen Sie nie, das Gerät selbst zu reparieren. Lassen
Sie das Gerät im Falle von Störungen nur von qualifi zierten
Fachleuten reparieren.
5. Ö nen Sie unter keinen Umständen das Gehäuse. Führen
Sie keine Gegenstände in das Innere des Gehäuses ein.
11. Halt
12. Stelle
13. Ziehe
14. Vor j
15. Wich
6. Warnung! Tauchen Sie elektrische Teile des Geräts während
des Reinigens oder des Betriebs nie in Wasser oder andere
Flüssigkeiten. Halten Sie das Gerät nie unter fl ießendes
Wasser.
7. Nehmen Sie das Gerät nicht mit feuchten Händen, oder auf
nassem Boden stehend in Betrieb.
8. Nicht in direkter Nähe von Wasser – z.B. Badewanne,
Waschbecken, Spüle, Waschkübel – in einem feuchten
Keller, oder in der Nähe eines Schwimmbeckens benutzen.
9. Die Benutzung von Zubehörteilen (Netzteile, USB-Kabel,
usw.), die nicht zusammen mit diesem Produkt verkauft
werden, kann Verletzungen und Beschädigungen
verursachen. Verwenden Sie deshalb nur Originalzubehör.
10. Das Gerät nur in gemäßigten Breitengraden verwenden,
Tropen und besonders feuchtes Klima vermeiden.
16. Im Fa
Bestimm
• Das
• Verw

11. Halten Sie das Gerät von allen heißen Flächen und o enen
Flammen fern. Betreiben Sie das Gerät immer auf einer
ebenen, stabilen, sauberen und trockenen Fläche. Schützen
Sie das Gerät vor extremer Hitze und Kälte, Staub, direkter
Sonneneinstrahlung, Feuchtigkeit, Tropf- und Spritzwasser.
12. Stellen Sie keine schweren Gegenstände auf das Gerät.
Stellen Sie keine Gegenstände mit o enen Flammen, wie
z.B. Kerzen, auf oder neben das Gerät. Stellen Sie keine mit
Flüssigkeit gefüllten Gegenstände, wie z.B. Vasen, auf das
Gerät.
13. Ziehen Sie das Gerät nicht am Kabel aus dem USBAnschluss und wickeln Sie das Kabel nicht um das Gerät.
14. Vor jeder Reinigung den USB-Stecker aus dem USBAnschluss ziehen.
15. Wichtig! Der USB-Anschluss ist nur für Geräte bestimmt,
die mit einer USB-Verbindung ausgestattet sind. Andere
Geräte können nicht mit dieser USB-Verbindung genutzt
werden. Benutzen Sie ausschließlich das mitgelieferte USBKabel.
16. Im Falle einer Fehlfunktion aufgrund elektrostatischer
Entladung und elektrischer kurzzeitiger Spitzen, setzen
Sie das Gerät zurück, indem Sie es vom USB-Anschluss
trennen, einige Sekunden warten und dann die USBVerbindung wieder herstellen.
Bestimmungsgemäße Verwendung
• Das Produkt eignet sich zur drahtlosen und kabel gebundenen Ausgabe von Audio-Signalen.
• Verwenden Sie das Gerät nur für den vorgesehenen Zweck.
Das Gerät ist nicht für den kommerziellen Gebrauch ge eignet. Dieses Gerät ist für den ausschließlichen Gebrauch im
Haushalt konzipiert. Verwenden Sie das Gerät nicht im Freien
oder im Badezimmer.

Deutsch 6 7
• Im Falle von unsachgemäßem Gebrauch oder falscher
Handhabung kann keine Haftung für eventuell auftretende
Schäden übernommen werden.
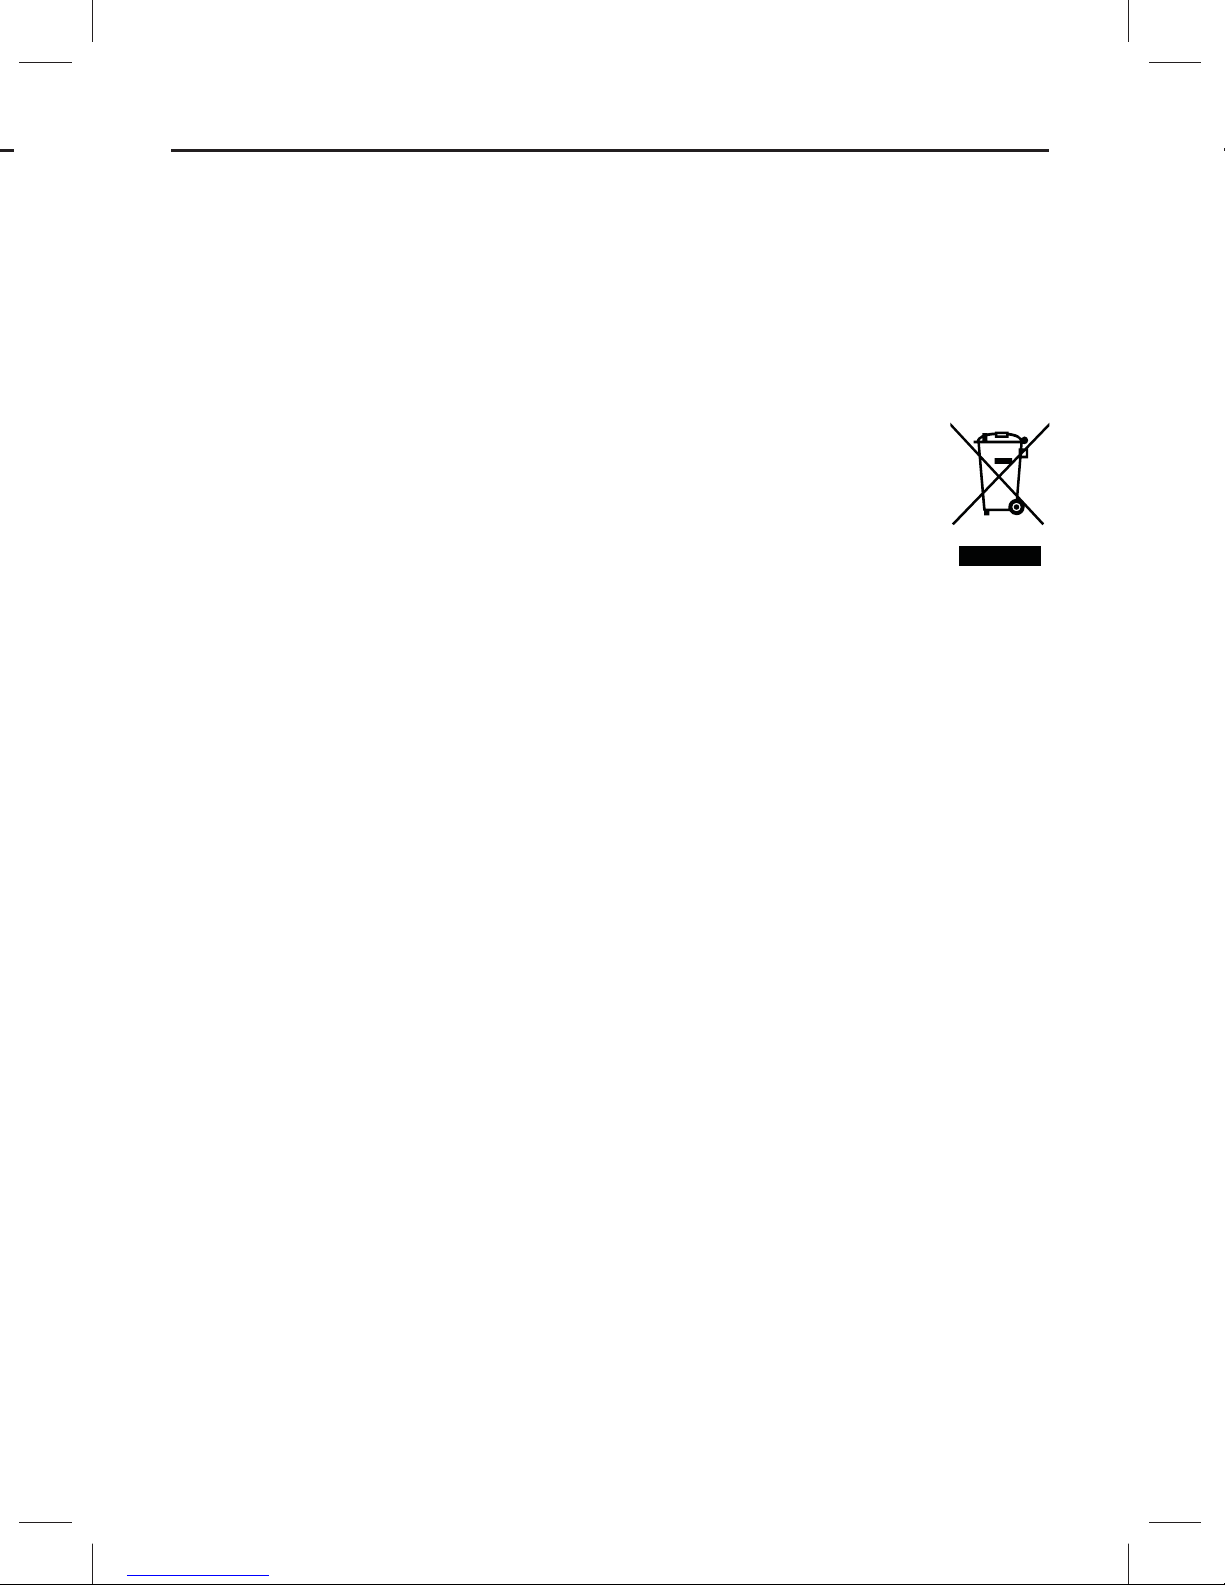
Entsorgung
Das Symbol „durchgestrichene Mülltonne“ erfordert
die separate Entsorgung von Elektro- und ElektronikAltgeräten (WEEE). Elek trische und elektronische Geräte
können gefährliche und um welt gefährdende Sto e
enthalten. Dieses Gerät nicht im unsortierten Haus müll
entsorgen. An einer ausgewiesenen Sammel stelle für
Elektro- und Elektronik-Altgeräte entsorgen.
Dadurch tragen Sie zum Schutz der Ressourcen und
der Umwelt bei. Für weitere In formation wenden Sie sich
bitte an Ihren Händler oder die örtlichen Behörden.
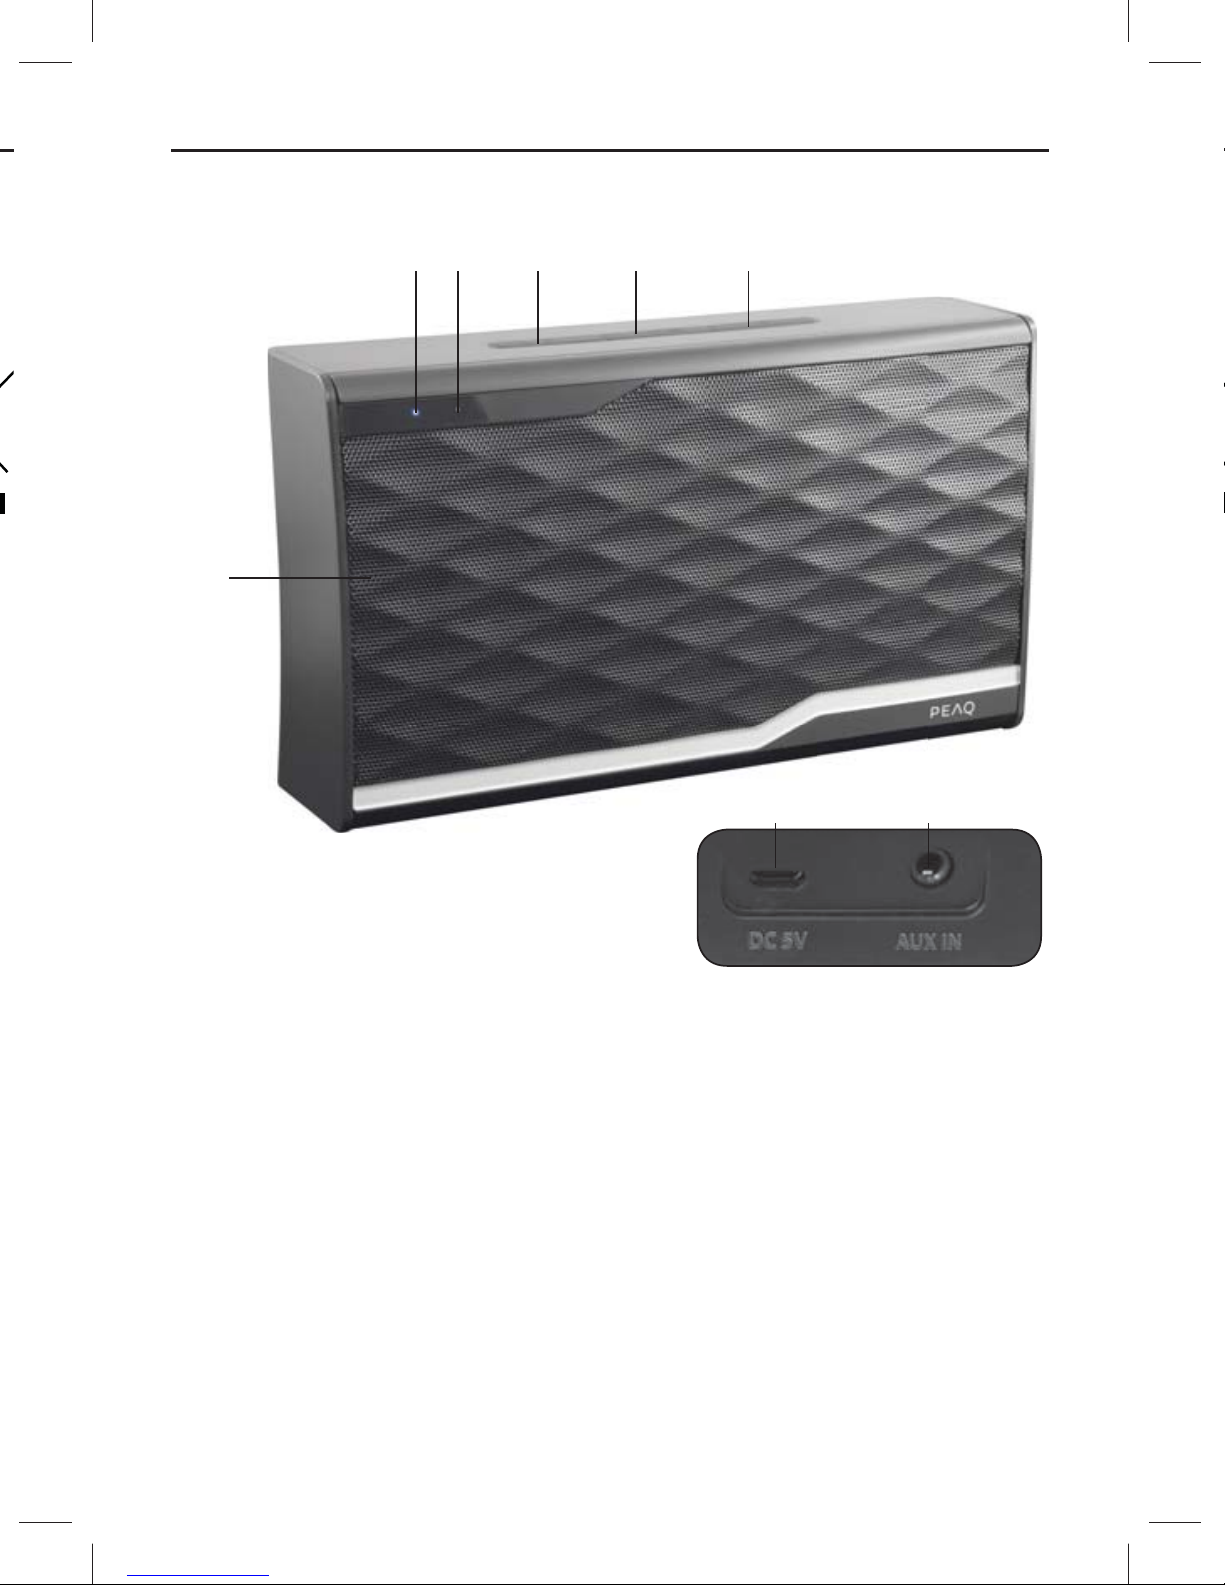
Bauteile
Werfen Sie das Gerät nicht in den Hausmüll, da das
Gerät einen eingebauten Akku enthält.
1. Blau
2. Wei
3. Taste
4. Taste
Zubehör:
1 x Auf
1 x Netz
1 x USB

Bauteile
6
13452
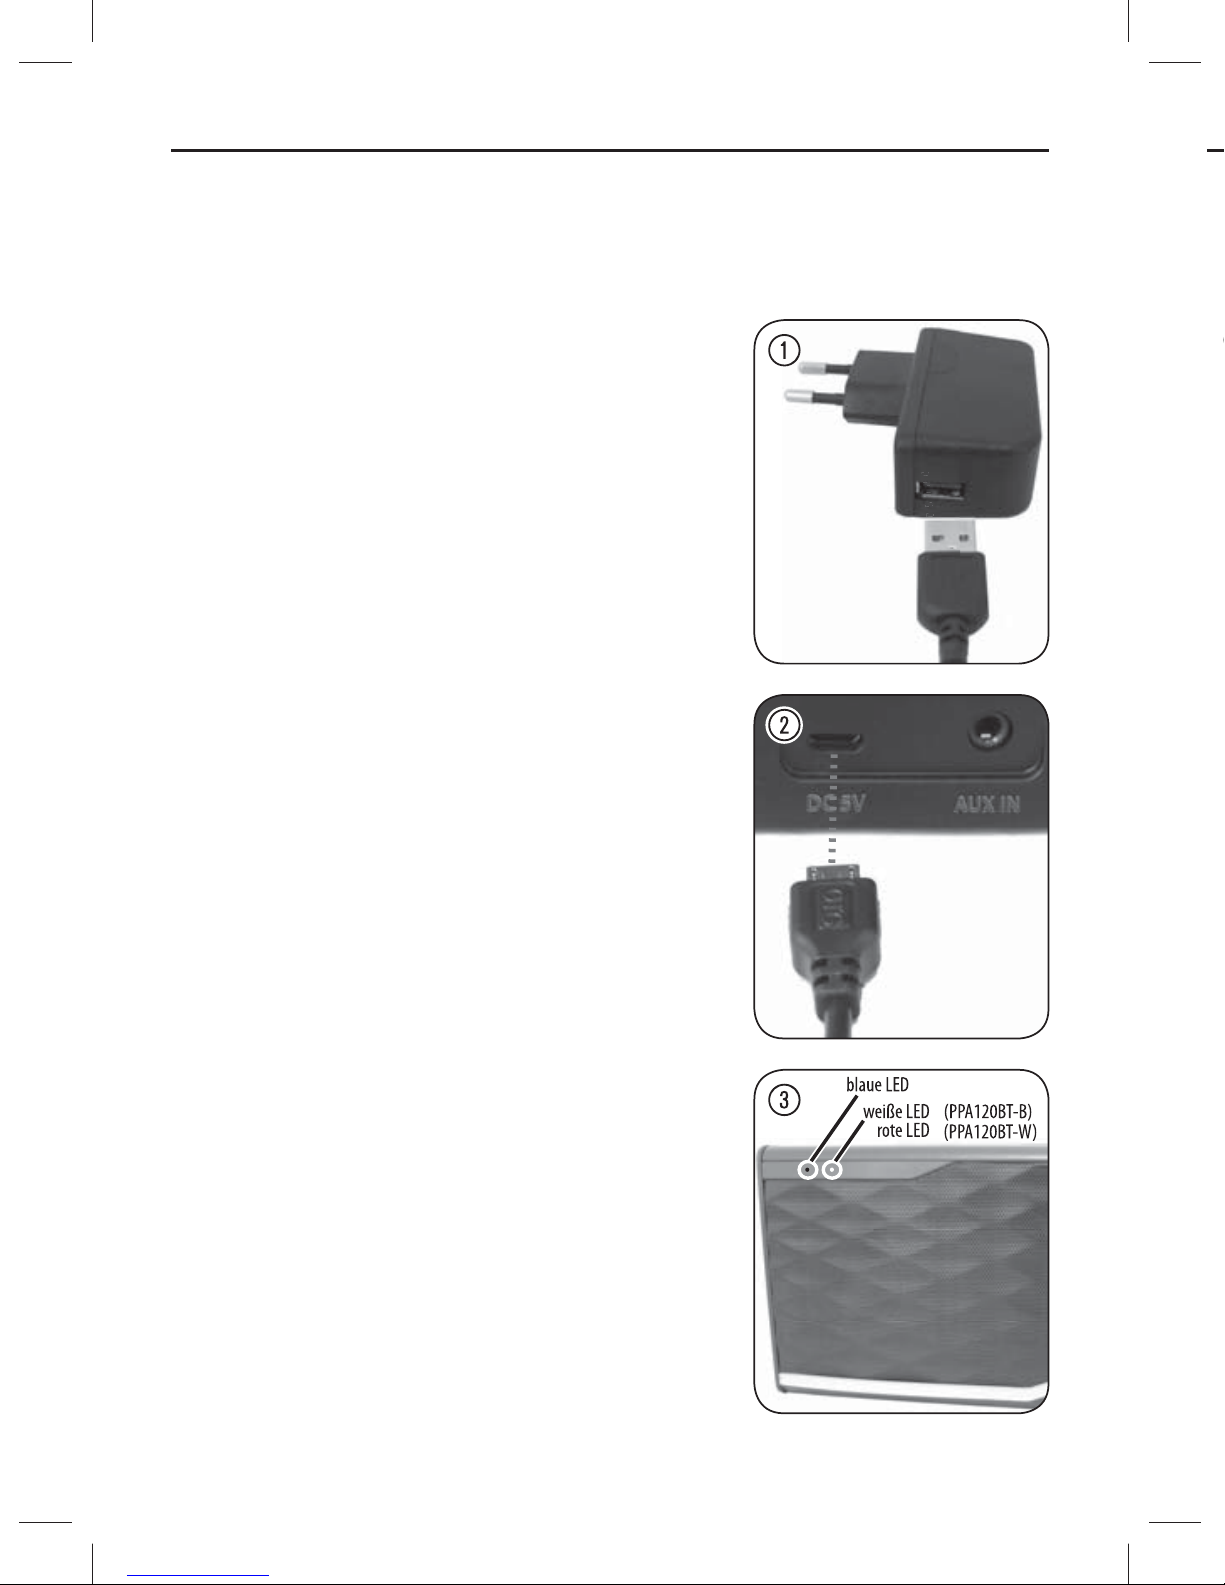
1. Blaue LED
2. Weiße LED
(Modell: PPA120BT-B) /
Rote LED
(Modell: PPA120BT-W)
3. Taste –
4. Taste PAIR
Zubehör:
1 x Aufbewahrungsbeutel
87
5. Taste +
6. Lautsprecher
Geräterückseite:
7. USB-Port
8. Audiobuchse
1 x Audiokabel
1 x Netzteil
1 x USB-Kabel
1 x Bedienungsanleitung
Deutsch 8 9
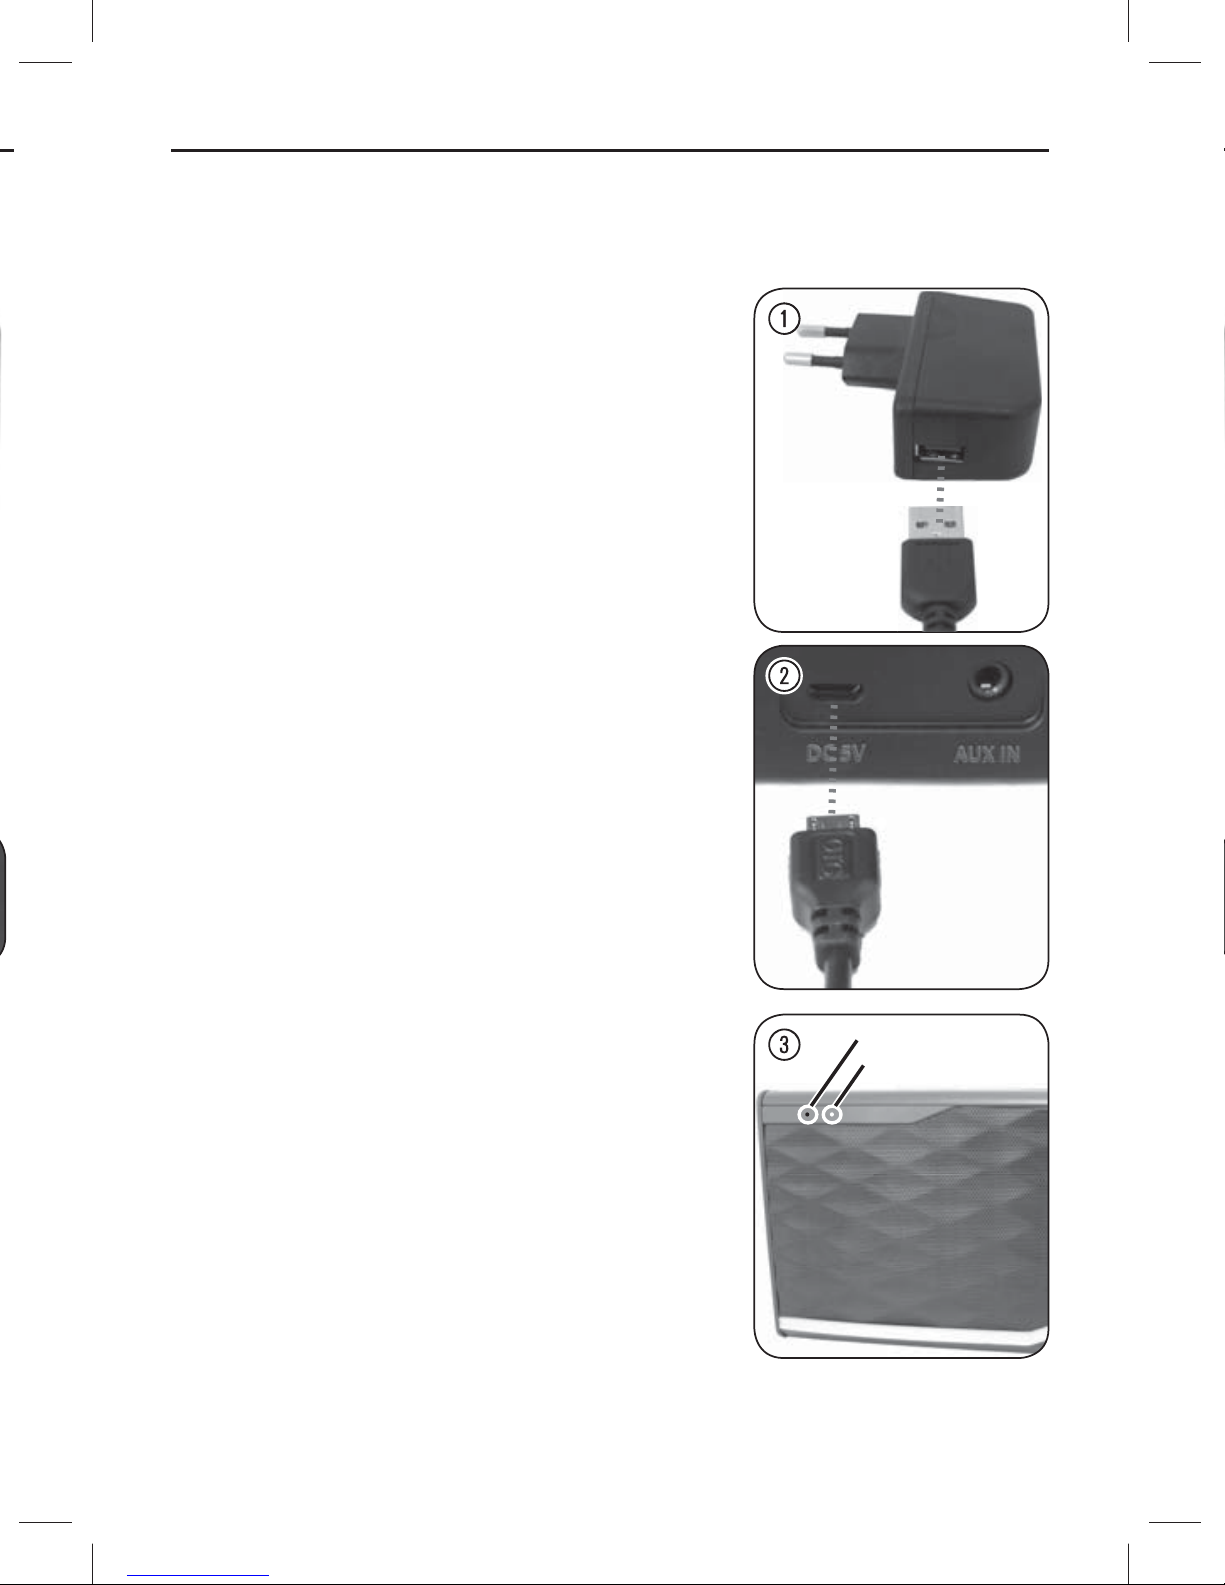
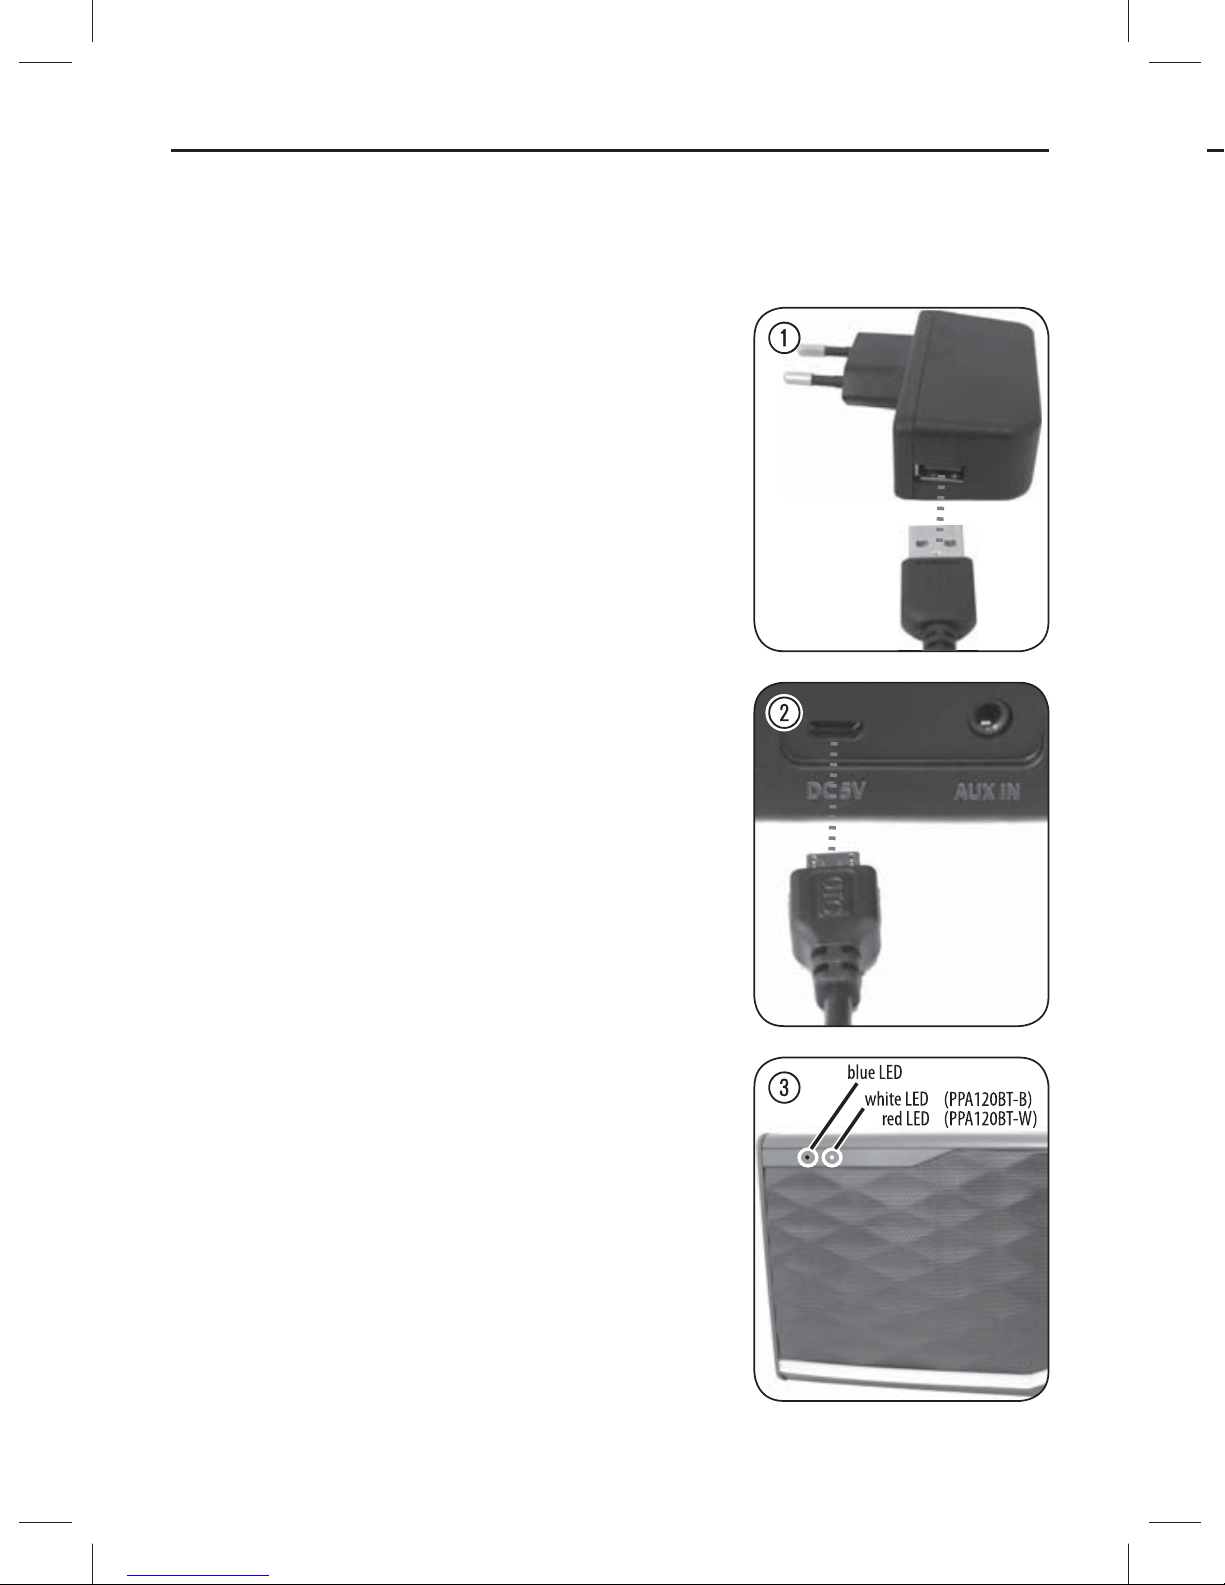
Akku aufl aden
Achtung! Laden Sie den internen Akku vor der ersten
Verwendung komplett auf.
1. Verbinden Sie den USB-Stecker mit
dem Netzteil (Abb. 1). Verbinden Sie
den Micro-USB-Stecker Buchse an
der Rückseite des Lautsprechers
(Abb. 2).
2. Verbinden Sie das Netzteil mit einer
Steckdose.
3. Die weiße LED (PPA120BT-B) / rote
LED (PPA120BT-W) (Abb. 3) auf
der Vorderseite des Lautsprechers
blinkt und signalisiert, dass der
Akku geladen wird. Sobald der Akku
• Aufl
Bluetoot
Achtung
kein Stec
Lautspre
1. Drü
2. Die b
komplett aufgeladen ist, erlischt die
LED.
4. Trennen Sie nach dem Ladevorgang
das Netzteil vom Lautsprecher und
von der Steckdose.
Hinweise:
• Laden Sie den Akku auf, wenn beide
LEDs (Abb. 3) auf der Vorder seite
abwechselnd blinken.
• Sie können den Akku auch über den
USB-Anschluss eines Computers
aufl aden. Verbinden Sie dazu den
Lautsprecher über das USB-Kabel mit
dem Computer.
• Teilweises Aufl aden beeinträchtigt
Hinweis:
Falls inn
tooth-Ge
matisch a
1. Aktiv
2. Sob
3. Rege
Akku-Lebensdauer nicht.

• Aufl aden und Audio-Wiedergabe zur gleichen Zeit möglich.
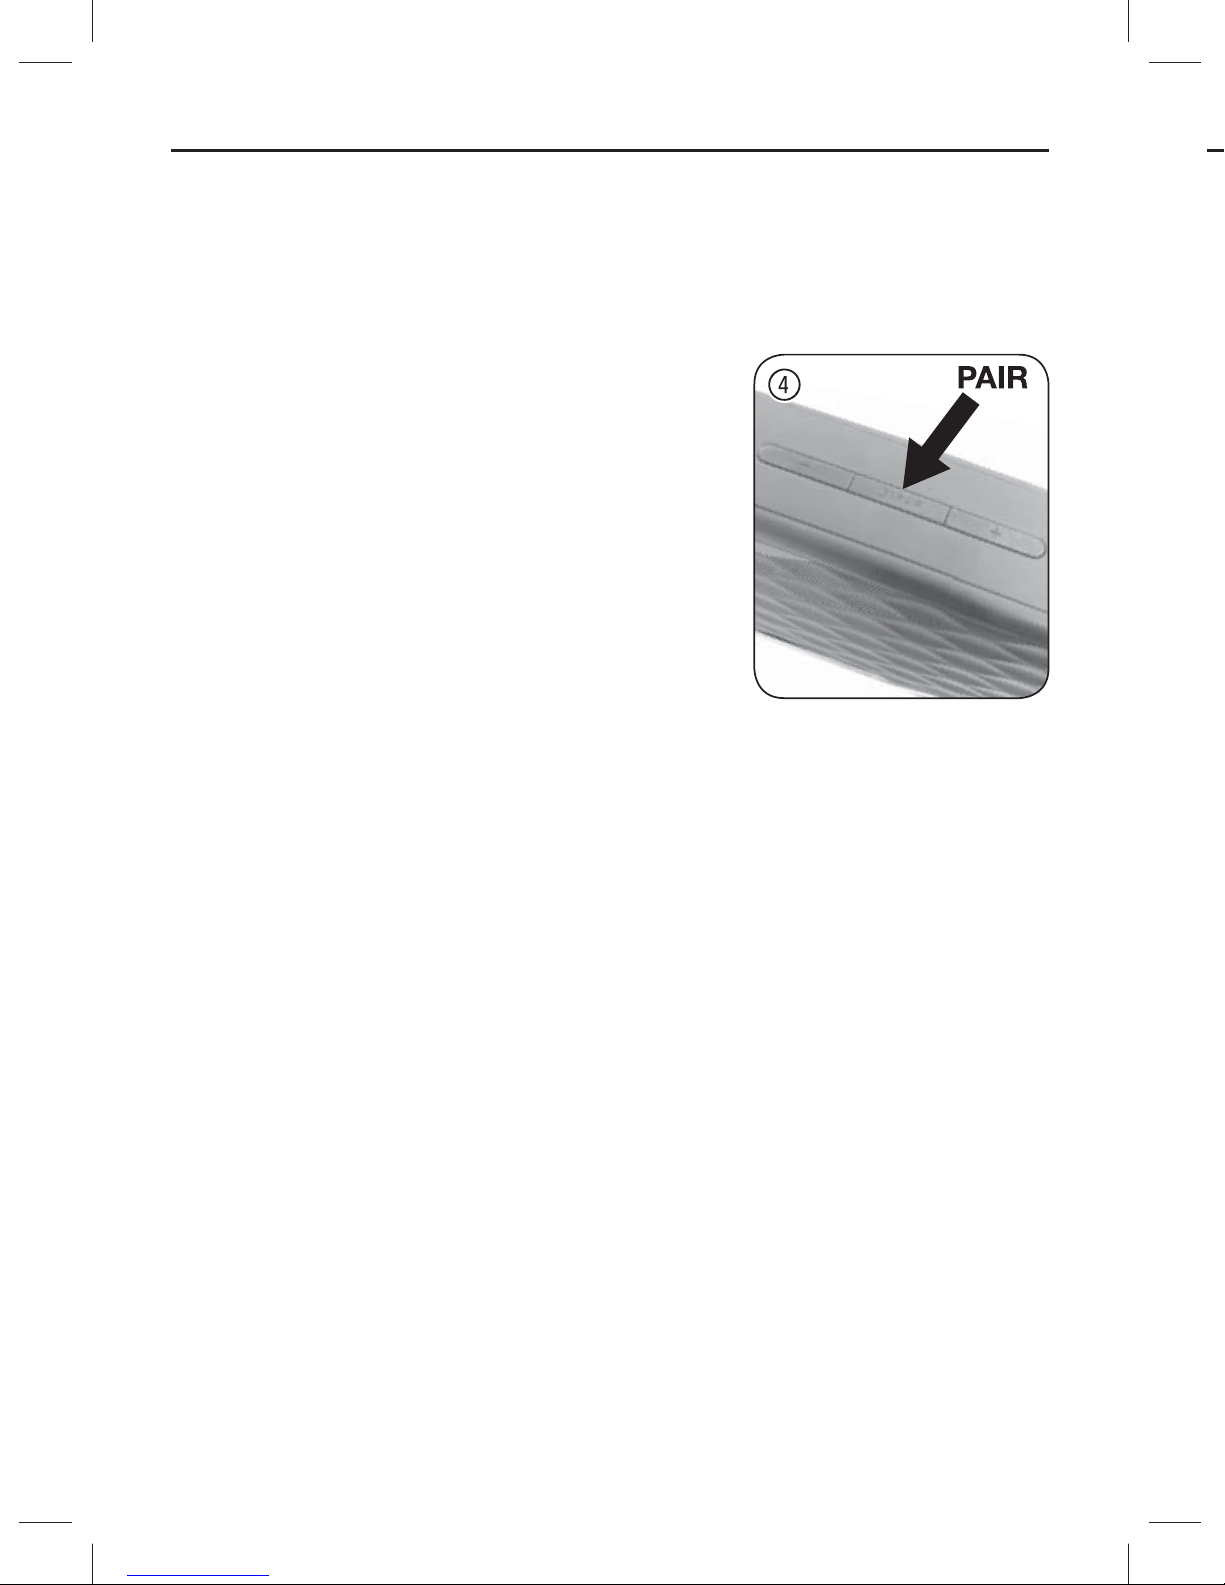
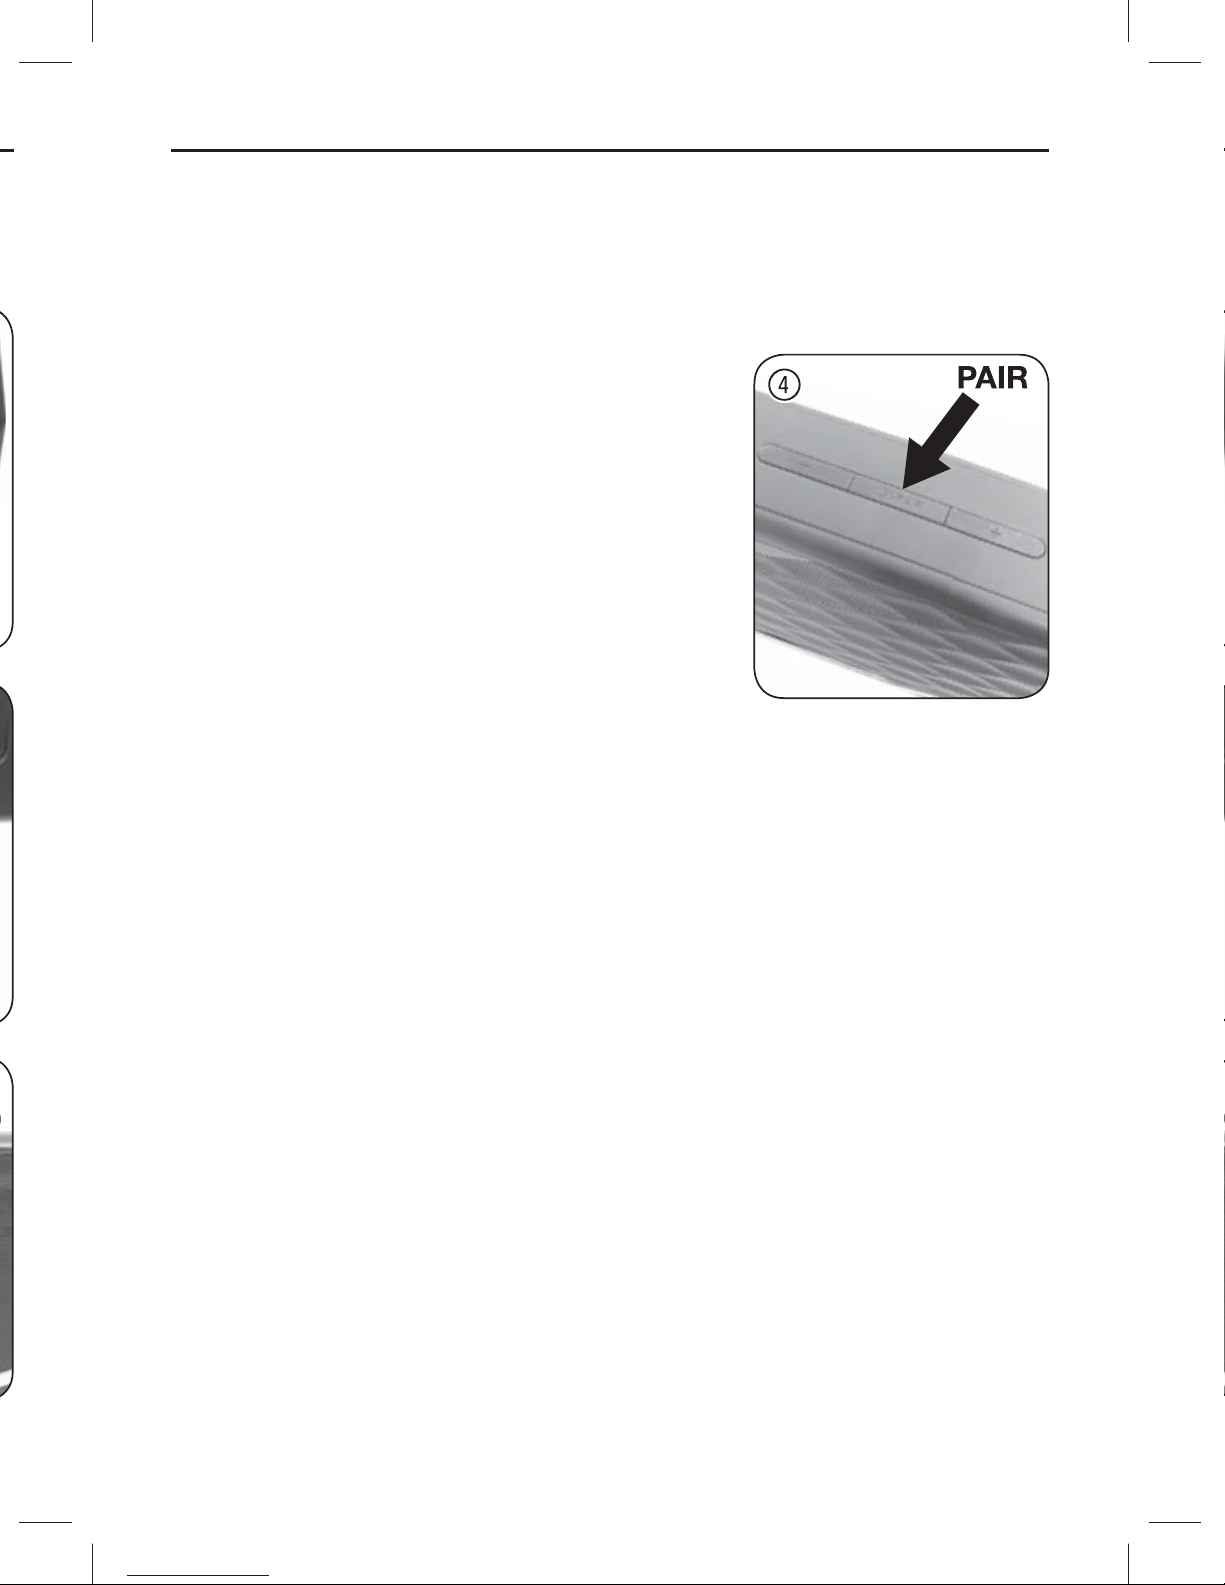
Bluetooth-Verbindung herstellen
Achtung! Vor und während der Bluetooth-Übertragung darf
kein Stecker mit der Buchse AUX IN auf der Rückseite des
Lautsprechers verbunden sein.
1. Drücken Sie die Taste PAIR auf der
Oberseite, um den Lautsprecher
einzuschalten (Abb. 4). Ein akus tisches Signal ertönt.
2. Die blaue LED (Abb. 3) auf der Vorder seite blinkt und signalisiert, dass
der Laut sprecher zur Verbindung mit
einem anderen Bluetooth-Gerät bereit
ist.
Hinweis:
Falls innerhalb von 5 Minuten keine Verbindung zu einem Bluetooth-Gerät hergestellt wird, schaltet sich der Lautsprecher automatisch aus.
1. Aktivieren Sie die Bluetooth-Funktion der Audio-Quelle (z.B.
Smartphone, MP3-Player, Notebook, etc.). Wählen Sie bei
der Gerätesuche „PPA120BT“ aus. Legen Sie, falls nötig,
den Lautsprecher als Audio-Ausgabegerät fest. Beziehen Sie
sich auf die Anleitung der Audio-Quelle.
2. Sobald die Verbindung hergestellt ist, leuchtet die blaue LED
stetig (Abb. 3). Gleichzeitig ertönt ein akustisches Signal.
3. Regeln Sie die Lautstärke der Audio-Quelle zunächst auf
eine niedrige Stufe und starten Sie erst danach die AudioWiedergabe. Nach nur wenigen Sekunden beginnt der Lautsprecher mit der Audio-Ausgabe.
Deutsch 10 11
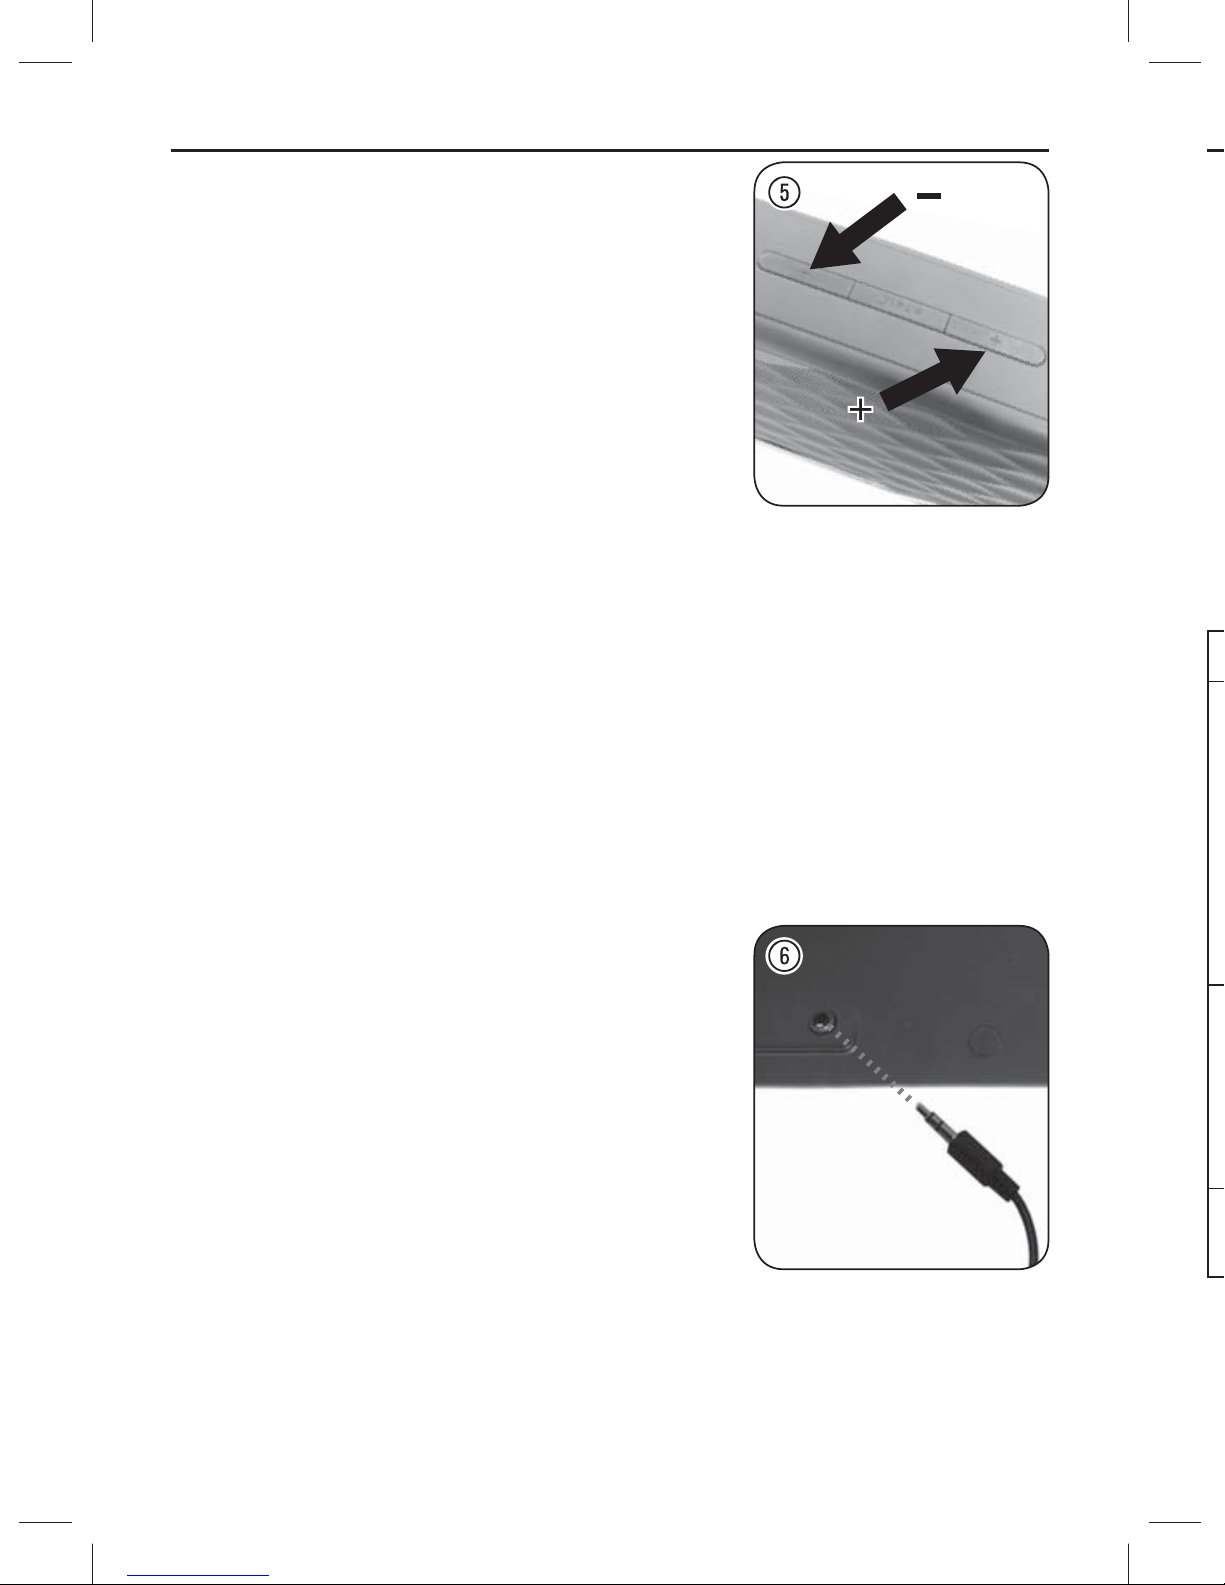
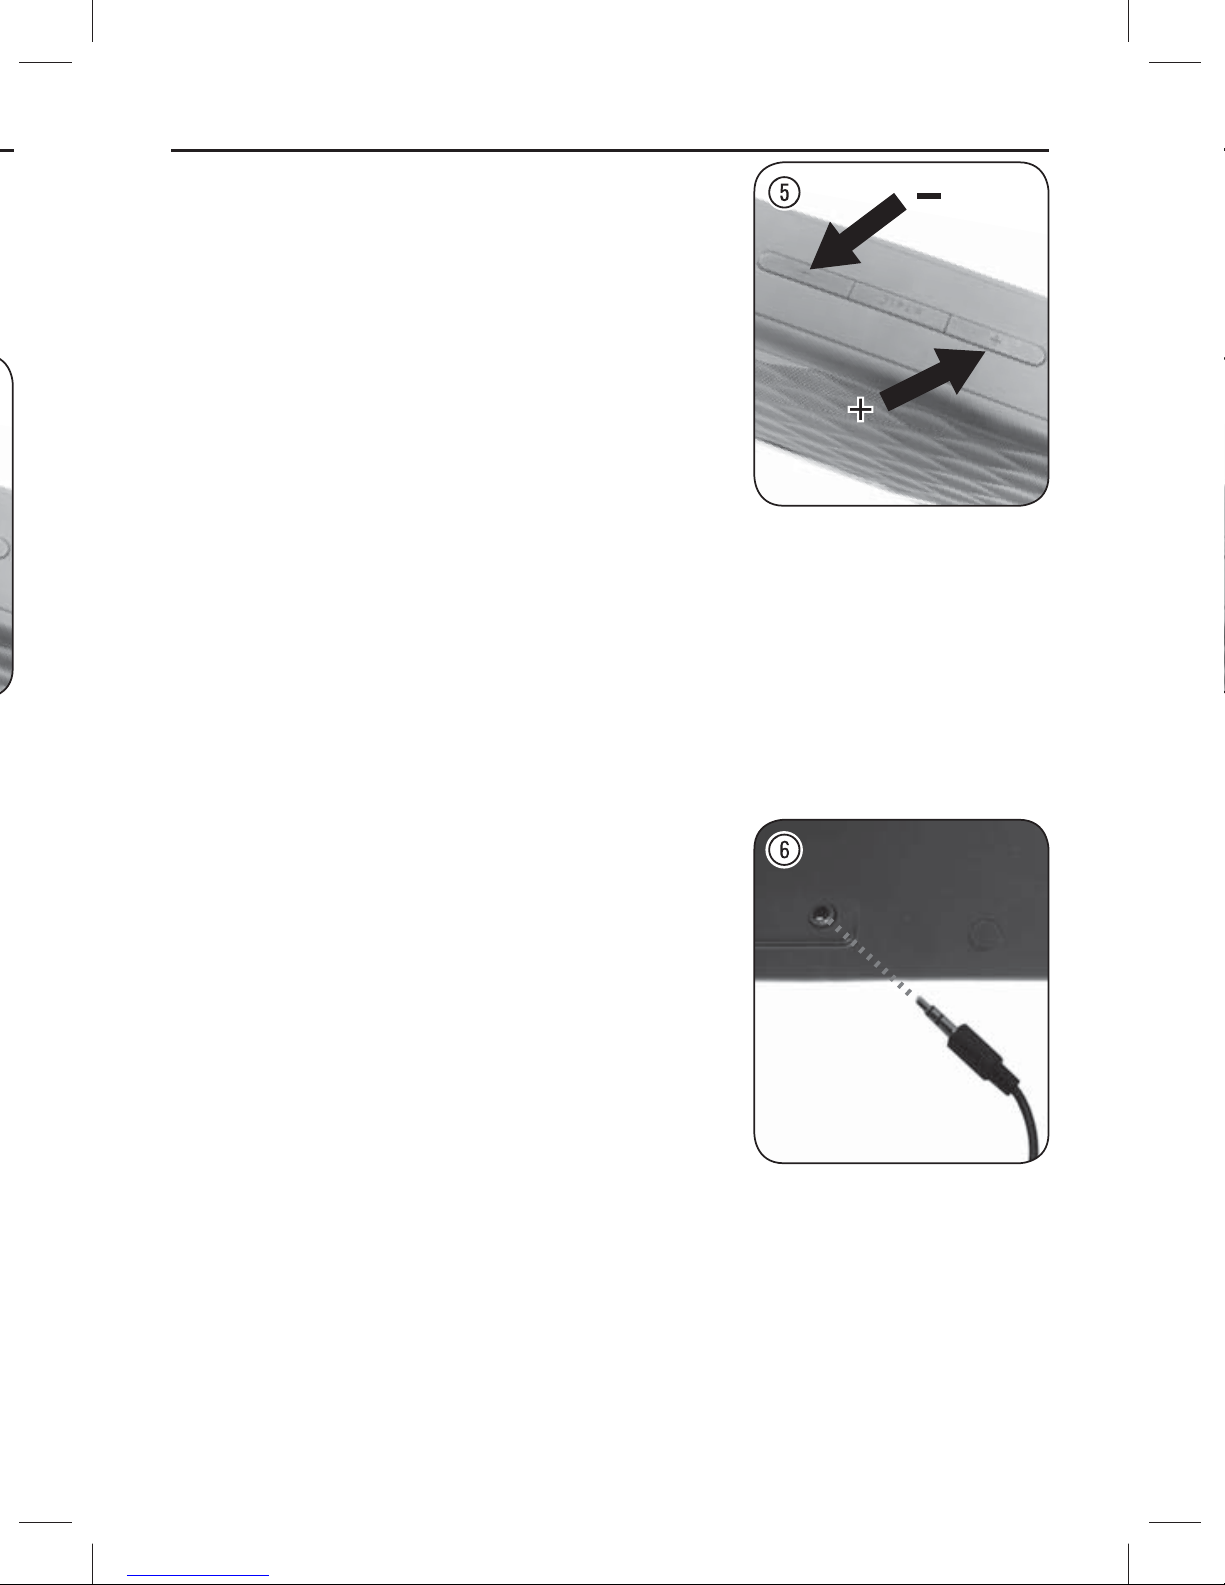
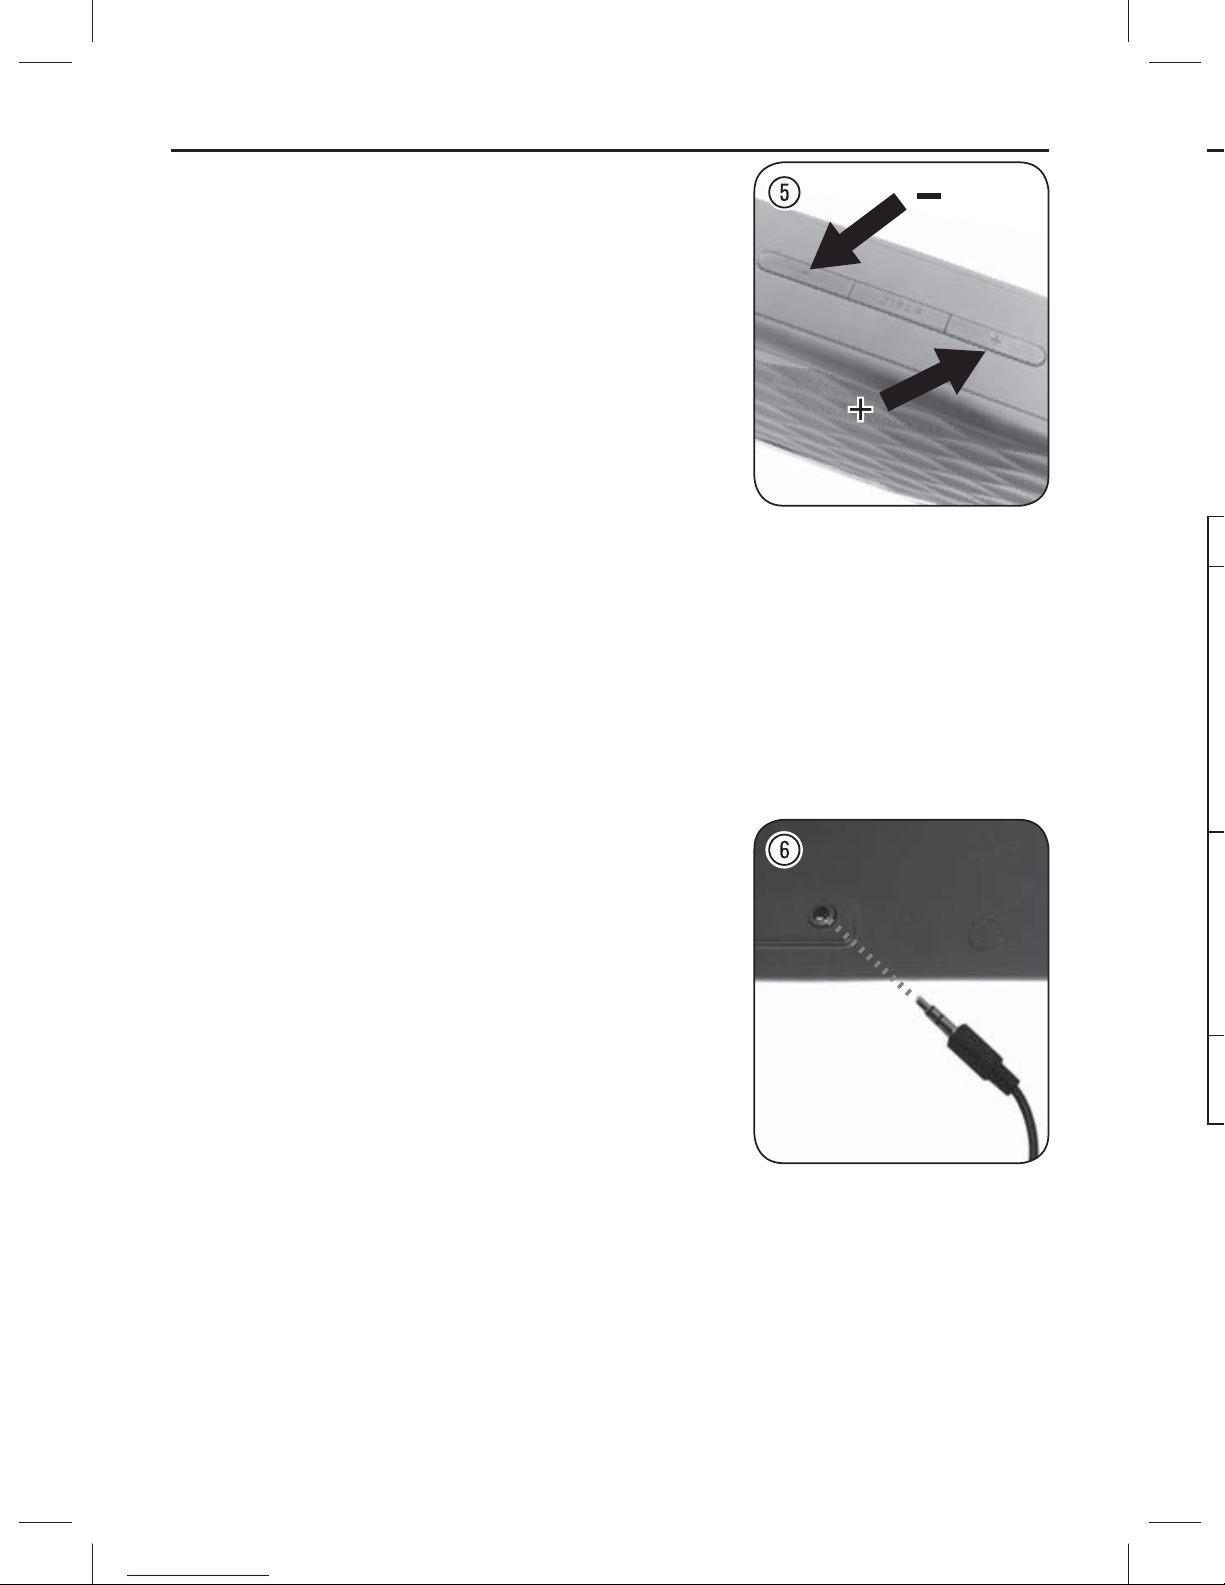
4. Regeln Sie nun die Lautstärke mit
den Tasten + und – auf der Oberseite
des Lautsprechers (+ = lauter, – =
leiser) (Abb.5). Bei Bedarf können Sie
zusätzlich die Lautstärke der AudioQuelle erhöhen.
5. Um den Lautsprecher auszuschalten,
drücken Sie die Taste PAIR (Abb.4).
Die LED erlischt und es ertönt ein
akustisches Signal.
Hinweise:
• Die maximale Reichweite des Lautsprechers beträgt
ca.10Meter. Die Reichweite ist abhängig von verschiedenen
Faktoren (z.B. Raumaufteilung, Wandmaterial, Reichweite
der Audio-Quelle).
• Stellen Sie sicher, dass die Audio-Quelle den A2DP-
4. Rege
5. Rege
6. Um
LED-Sig
LED-Fa
Linke Se
Blau
Standard unterstützt.
Verbindung per Kabel
1. Verbinden Sie einen der beiden
Klinkenstecker des beiliegenden
Audio-Kabels mit dem Eingang
AUX IN auf der Rückseite des
Lautsprechers (Abb.6)
2. Verbinden Sie das andere Ende des
Audio-Kabels mit der Kopf hörerbuchse der Audio-Quelle.
3. Drücken Sie die Taste PAIR auf der
Oberseite, um den Laut sprecher einzu schalten (Abb.4). Die LED auf der rechten Seite ( weiße bzw.
rote Farbe)
(Abb.3) auf der Vorder sei te des Lautsprechers
Rechte
• Weiß
• Rote
Beide L
leuchtet stetig und es ertönt ein akustisches Signal.
4. Regeln Sie die Lautstärke der Audio-Quelle zunächst auf
eine niedrige Stufe und starten Sie erst danach die AudioWiedergabe.
5. Regeln Sie nun die Lautstärke mit den Tasten + und – auf
der Oberseite des Lautsprechers (+ = lauter, – = leiser)
(Abb.5). Bei Bedarf können Sie zusätzlich die Lautstärke der
Audio-Quelle erhöhen.
6. Um den Lautsprecher auszuschalten, drücken Sie die Taste
PAIR (Abb. 4). Die LED erlischt und es ertönt ein akustisches
Signal.
LED-Signale
LED-Farbe LED-Status Bedeutung
Linke Seite:
Blinkt Bereitschaft zur Bluetooth-
Blau
Leuchtet Bluetooth-Verbindung
Rechte Seite:
• Weiße LED
Blinkt Akku wird aufgeladen
Leuchtet Verbindung per Kabel
(PPA120BT-B)
• Rote LED
(PPA120BT-W)
Beide LEDs Blinken
abwechselnd
Verbindung
Suche nach dem letz ten
über Bluetooth ver bun denen Gerät
hergestellt
hergestellt
Akku schwach

Deutsch 12
Reinigung
• Schalten Sie den Lautsprecher vor der Reinigung aus und
trennen Sie alle Kabelverbindungen.
• Verwenden Sie ein trockenes, weiches Tuch.
• Vermeiden Sie den Kontakt mit Wasser.
• Verwenden Sie keine aggressiven Reinigungsmittel.
Technische Daten
Netzteil
Eingang: 100 – 240 V~, 50/60 Hz, 0,5 A
Ausgang: 5 V
, 1,2 A
Lautsprecher
Ladespannung (via USB oder
mitgeliefertes Netzteil): 5 V
Lautsprecher-Ausgangsleistung: 2 x 3 Watt RMS
Akkuspannung: 3,7 V
Akkukapazität: 2000 mAh
Akkulaufzeit: ca. 6 Stunden
Impedanz: 4 Ω
Frequenzgang: 60 Hz – 20 kHz
Signal-Rausch-Verhältnis: >50 dB
Lautsprecher-Ø:
Abmessungen (B x H x T):
50 mm
200 x 150 x 60 mm
ist eine registrierte Handelsmarke der Bluetooth SIG, Inc.

13 Ελληνικά
Σημαντική υπόδειξη ασφαλείας
1. Ακολουθήστε όλες τις οδηγίες ασφαλείας για την αποφυγή
πρόκλησης βλάβης λόγω λανθασμένης χρήσης!
2. Φυλάξτε το εγχειρίδιο χρήστη για περαιτέρω χρήση. Σε
περίπτωση που μεταβιβάσετε τη συσκευή σε τρίτα μέρη, θα
πρέπει να μεταβιβάζετε μαζί και το παρόν εγχειρίδιο χρήστη.
3. Μην χρησιμοποιείτε ποτέ συσκευές που έχουν υποστεί
ζημιά! Αποσυνδέστε το USB και επικοινωνήστε με τον
προμηθευτή σας, εάν η συσκευή έχει υποστεί ζημιά.
4. Μην επιχειρείτε ποτέ να επιδιορθώσετε τη συσκευή μόνοι
σας. Σε περίπτωση δυσλειτουργίας, οι επισκευές πρέπει να
διεξάγονται μόνο από ειδικευμένο προσωπικό.
5. Μην ανοίγετε το περίβλημα της συσκευής σε καμία
περίπτωση. Μην τοποθετείτε ξένα αντικείμενα στο
εσωτερικό του περιβλήματος.
6. Προειδοποίηση! Κατά τη διάρκεια του καθαρισμού ή
της λειτουργίας μην βυθίζετε τα ηλεκτρικά τμήματα της
συσκευής σε νερό ή άλλα υγρά. Μην τοποθετείτε ποτέ τη
συσκευή κάτω από τρεχούμενο νερό.
7. Μην λειτουργείτε τη συσκευή με βρεγμένα χέρια ή όταν
στέκεστε πάνω σε υγρό πάτωμα.
8. Μην χρησιμοποιείτε τη συσκευή κοντά σε νερό - για
παράδειγμα, κοντά σε μπανιέρες, λεκάνες, νεροχύτες, υγρά
υπόγεια ή πισίνες.
9. Μην χρησιμοποιείτε ποτέ αξεσουάρ (αντάπτορες, καλώδια
USB κτλ.) τα οποία δεν διατίθενται σε συνδυασμό με
αυτό το προϊόν από τον κατασκευαστή. Μπορούν να
βάλουν σε κίνδυνο την ασφάλεια του χρήστη και μπορεί
να προκαλέσουν ζημιά στη συσκευή. Για το λόγο αυτόν θα
πρέπει να χρησιμοποιείτε μόνο αυθεντικά αξεσουάρ.
10. Η συσκευή προορίζεται αποκλειστικά για χρήση σε μεσαία
γεωγραφικά πλάτη. Μην χρησιμοποιείτε σε τροπικά ή πολύ
υγρά κλίματα.

Ελληνικά 14 15
11. Φυλάξτε τη συσκευή μακριά από θερμές επιφάνειες και
γυμνή φλόγα. Λειτουργείτε πάντα τη συσκευή σε επίπεδη,
σταθερή, καθαρή και στεγνή επιφάνεια. Προστατέψετε τη
συσκευή από τη ζέστη και το κρύο, τη σκόνη, το άμεσο
ηλιακό φως, την υγρασία, τις σταγόνες και το πιτσίλισμα
νερού.
12. Μην τοποθετείτε βαριά αντικείμενα πάνω στη συσκευή. Μην
τοποθετείτε αντικείμενα με γυμνή φλόγα, π.χ. κεριά, πάνω ή
δίπλα στη συσκευή. Μην τοποθετείτε αντικείμενα γεμάτα με
νερό, π.χ. βάζα, πάνω ή κοντά στην συσκευή.
13. Μην τραβάτε ποτέ το καλώδιο για να αποσυνδέσετε
τη συσκευή από τη θύρα USB και μην τυλίγετε ποτέ το
καλώδιο γύρω από τη συσκευή.
14. Πριν από κάθε καθαρισμό, αποσυνδέστε το βύσμα USB από
τη θύρα USB.
15. Σημαντικό! Η θύρα USB προορίζεται αποκλειστικά για
συσκευές με σύνδεση USB. Η χρήση άλλων συσκευών με
αυτή τη σύνδεση USB δεν είναι εφικτή. Χρησιμοποιήστε
μόνο το συνοδευτικό καλώδιο USB.
Απόρριψ
Ο διαγρα
απαιτείτα
ηλεκτρικο
Ο ηλεκτρ
να περιέχ
συσκευή
Επιστρέ
ανακύκλω
ηλεκτρικο
τρόπο, β
προστασ
προμηθε
πληροφ
Μην απο
καθώς η
16. Σε περίπτωση δυσλειτουργίας, λόγω ηλεκτροστατικής
εκκένωσης ή ηλεκτρικών διακυμάνσεων, επαναφέρετε
τη συσκευή αποσυνδέοντας την από την θύρα USB,
περιμένετε μερικά δευτερόλεπτα και στη συνέχεια
επανασυνδέστε τη συσκευή στη θύρα USB.
Προοριζόμενη χρήση
• Το προϊόν αυτό εξυπηρετεί ως συσκευή εξόδου ήχου και
μπορεί να συνδεθεί ασύρματα ή ενσύρματα.
• Η εταιρία δεν αναλαμβάνει καμία ευθύνη για τυχόν βλάβες
που μπορεί να οφείλονται σε ακατάλληλη χρήση ή
λανθασμένο χειρισμό.
• Χρησιμοποιήστε τη συσκευή μόνο για την προοριζόμενη
χρήση. Η συσκευή δεν είναι κατάλληλη για εμπορική χρήση.
Η συσκευή αυτή έχει σχεδιαστεί αποκλειστικά για οικιακή
χρήση. Μην χρησιμοποιείτε τη συσκευή στο ύπαιθρο ή στο
μπάνιο.
Απόρριψη
Ο διαγραμμένος κάδος απορριμάτων σημαίνει ότι
απαιτείται η χωριστή συλλογή των αποβλήτων
ηλεκτρικού και ηλεκτρονικού εξοπλισμού (οδηγία WEEE).
Ο ηλεκτρικός και ο ηλεκτρονικός εξοπλισμός μπορεί
να περιέχει επικίνδυνες ουσίες. Μην απορρίπτετε τη
συσκευή μαζί με τα οικιακά απορρίμματα.
Επιστρέψτε το σε ένα καθορισμένο σημείο συλλογής για
ανακύκλωση σύμφωνα με την οδηγία περί Απόρριψης
ηλεκτρικού και ηλεκτρονικού εξοπλισμού. Με αυτόν τον
τρόπο, βοηθάτε στην διατήρηση των πόρων και την
προστασία του περιβάλλοντος. Επικοινωνήστε με τον
προμηθευτή σας ή τις τοπικές αρχές για περισσότερες
πληροφορίες.
Μην απορρίπτετε μαζί με τα οικιακά απορρίμματα,
καθώς η συσκευή διαθέτει ενσωματωμένη μπαταρία.

Ελληνικά 16 17
Εξαρτήματα
6
13452
Φόρτιση
Προσοχή
την πρώτ
1. Συνδ
2. Συν
3. Η λε
1. Μπλε LED
2. Λευκό LED
(Μοντέλο: PPA120BT-B) /
Κόκκινο LED
(Μοντέλο: PPA120BT-W)
3. Κουμπί –
4. Κουμπί PAIR
Αξεσουάρ:
1 x Θήκη
1 x Προσαρμογέας
5. Κουμπί +
6. Ηχείο
Πίσω μέρος συσκευής:
7. Θύρα USB
8. Υποδοχή ήχου
1 x Καλώδιο ήχου
1 x Εγχειρίδιο χρήσης
87
4. Αφο
Σημειώσε
• Επαν
• Εναλ
• Η ημ
• Κατ
1 x Καλώδιο USB
Φόρτιση της μπαταρίας
Προσοχή! Φορτίστε πλήρως την ενσωματωμένη μπαταρία πριν
την πρώτη χρήση.
1. Συνδέστε το βύσμα USB στην
υποδοχή USB του προσαρμογέα
(εικ. 1) και το βύσμα micro-USB στην
υποδοχή στο πίσω μέρος του ηχείου
(εικ. 2).
2. Συνδέστε τον προσαρμογέα ισχύος σε
κατάλληλη πρίζα.
3. Η λευκή λυχνία LED (PPA120BT-B) /
κόκκινο LED (PPA120BT-W) (εικ. 3)
στην πρόσοψη του ηχείου αρχίζει να
αναβοσβήνει, υποδεικνύοντας ότι η
μπαταρία φορτίζεται. Η λυχνία LED
σβήνει μετά την ολοκλήρωση της
φόρτισης.
4. Αφού ολοκληρωθεί η φόρτιση,
αποσυνδέστε τον προσαρμογέα
ισχύος από το ηχείο και από την
πρίζα.
Σημειώσεις:
• Επαναφορτίστε τη μπαταρία όταν
αρχίσουν να αναβοσβήνουν εναλλάξ
και οι δύο λυχνίες LED (εικ. 3) στην
πρόσοψη.
• Εναλλακτικά, μπορείτε να φορτίσετε
τη μπαταρία συνδέοντας το ηχείο σε
μια θύρα USB υπολογιστή μέσω του
συνοδευτικού καλωδίου USB.
• Η ημιτελής φόρτιση δεν επηρεάζει τη
διάρκεια ζωής της μπαταρίας.
Μπλε LED
Λευκό LED
Κόκκινο LED
PPA120BT-B
PPA120BT-W
• Κατά τη διάρκεια της φόρτισης
επιτρέπεται και η αναπαραγωγή ήχου.
Ελληνικά 18 19
Ρύθμιση σύνδεσης Bluetooth
Προσοχή! Βεβαιωθείτε ότι πριν ή κατά τη διάρκεια της
μετάδοσης μέσω Bluetooth δεν συνδέεται κανένα βύσμα στην
υποδοχή AUX IN στην πίσω πλευρά του ηχείου.
1. Πιέστε το κουμπί PAIR στο
πάνω μέρος του ηχείου για
να το ενεργοποιήσετε (εικ. 4).
Αναπαράγεται ένα ακουστικό σήμα.
2. Η μπλε λυχνία LED (εικ. 3) στην
πρόσοψη αρχίζει να αναβοσβήνει,
υποδεικνύοντας ότι το ηχείο είναι
έτοιμο για σύνδεση με κάποια άλλη
συσκευή Bluetooth.
4. Τώρ
5. Απεν
Σημειώσε
• Η μέ
• Βεβα
Σημείωση:
Αν δεν πραγματοποιηθεί σύνδεση με καμία συσκευή Bluetooth
μέσα σε 5 λεπτά, το ηχείο απενεργοποιείται αυτόματα.
1. Ενεργοποιήστε τη λειτουργία Bluetooth της πηγής ήχου
(π.χ. smartphone, MP3 player, φορητός υπολογιστής κτλ.).
Κάντε αναζήτηση για συσκευές και επιλέξτε “PPA120BT”. Αν
είναι απαραίτητο, επιλέξτε το ηχείο ως πηγή εξόδου ήχου.
Ανατρέξτε στις οδηγίες της πηγής ήχου.
2. Μετά την ολοκλήρωση της σύνδεσης, η μπλε λυχνία LED
(εικ. 3) ανάβει σταθερά. Ταυτόχρονα αναπαράγεται ένα
ακουστικό σήμα.
3. Αρχικά ρυθμίστε την ένταση της πηγής ήχου σε χαμηλό
επίπεδο και έπειτα ξεκινήστε την αναπαραγωγή. Το ηχείο
αρχίζει να εκπέμπει το σήμα ήχου λίγα δευτερόλεπτα
αργότερα.
Ενσύρμα
1. Συνδ
2. Συνδ
3. Πιέσ
4. Τώρα ρυθμίστε την ένταση από τα
κουμπιά + και – στο πάνω μέρος του
ηχείου (+ = αύξηση, – = μείωση) (εικ.
5). Επίσης, μπορείτε να αυξήσετε την
ένταση από την πηγή ήχου.
5. Απενεργοποιήστε το ηχείο πιέζοντας
το κουμπί PAIR (εικ. 4). Η λυχνία
LED σβήνει και αναπαράγεται ένα
ακουστικό σήμα.
Σημειώσεις:
• Η μέγιστη ακτίνα μετάδοσης του ηχείου είναι περίπου
10 μέτρα.
Η ακτίνα εξαρτάται από ποικίλους παράγοντες
(π.χ. από τη διάταξη του χώρου, το υλικό του τοίχου και την
ακτίνα μετάδοσης της πηγής ήχου).
• Βεβαιωθείτε ότι η πηγή ήχου υποστηρίζει το πρότυπο A2DP.
Ενσύρματη σύνδεση
1. Συνδέστε ένα από τα βύσματα του
συνοδευτικού καλωδίου ήχου στην
υποδοχή AUX IN στην πίσω πλευρά
του ηχείου (εικ. 6).
2. Συνδέστε το άλλο άκρο του καλωδίου
ήχου στην υποδοχή ακουστικών της
πηγής ήχου.
3. Πιέστε το κουμπί PAIR στο
πάνω μέρος του ηχείου για να το
ενεργοποιήσετε (εικ. 4). Η λυχνία LED
στη δεξιά πλευρά ( λευκή ή κόκκινη)
(εικ. 3) της πρόσοψης του ηχείου ανάβει σταθερά και
αναπαράγεται ένα ακουστικό σήμα.

Ελληνικά 20 21
4. Αρχικά ρυθμίστε την ένταση της πηγής ήχου σε χαμηλό
επίπεδο και έπειτα ξεκινήστε την αναπαραγωγή.
5. Τώρα ρυθμίστε την ένταση από τα κουμπιά + και – στο
πάνω μέρος του ηχείου (+ = αύξηση, – = μείωση) (εικ. 5).
Επίσης, μπορείτε να αυξήσετε την ένταση από την πηγή
ήχου.
6. Απενεργοποιήστε το ηχείο πιέζοντας το κουμπί PAIR (εικ.
4). Η λυχνία LED σβήνει και αναπαράγεται ένα ακουστικό
σήμα.
Σήματα LED
Χρώμα LED Κατάσταση
LED
Αριστερή
Αναβοσβήνει Έτοιμο για σύνδεση
πλευρά:
Μπλε
Έννοια
Bluetooth
Αναζήτηση για
Καθαρισ
• Απεν
• Χρη
• Αποφ
• Μην
Τεχνικά σ
Προσαρ
Είσοδος:
Έξοδος:
Ηχείο
Τάση φό
του συν
Ισχύς εξό
Ανάβει
σταθερά
Δεξιά πλευρά:
Αναβοσβήνει Φόρτιση μπαταρίας σε
• Λευκό LED
(PPA120BT-B)
• Κόκκινο LED
Ανάβει
σταθερά
(PPA120BT-W)
Και τα δύο LED Αναβοσβήνουν
εναλλάξ
συσκευές Bluetooth
που συνδέθηκαν στο
παρελθόν
Έγινε σύνδεση Bluetooth
εξέλιξη
Έγινε ενσύρματη
σύνδεση
Χαμηλή μπαταρία
Τάση μπα
Χωρητικό
Διάρκεια
Αντίστα
Απόκριση
Λόγος σή
Ø Ηχείου
Διαστάσε
Το
SIG, Inc.

Καθαρισμός
• Απενεργοποιήστε το ηχείο και αποσυνδέστε όλα τα καλώδια
πριν τον καθαρισμό.
• Χρησιμοποιήστε ένα στεγνό, απαλό πανί.
• Αποφύγετε την επαφή με νερό.
• Μην χρησιμοποιείτε σκληρά καθαριστικά.
Τεχνικά στοιχεία
Προσαρμογέας
Είσοδος: 100 – 240 V~, 50/60 Hz, 0,5 A
Έξοδος: 5 V
, 1,2 A
Ηχείο
Τάση φόρτισης (μέσω USB ή
του συνοδευτικού προσαρμογέα): 5 V
Ισχύς εξόδου ηχείου: 2
x 3 Watt RMS
Τάση μπαταρίας: 3,7 V
Χωρητικότητα μπαταρίας: 2000 mAh
Διάρκεια μπαταρίας: περ. 6 ώρες
Αντίσταση: 4 Ω
Απόκριση συχνότητας: 60 Hz – 20 kHz
Λόγος σήματος προς θόρυβο: >50 dB
Ø Ηχείου: 50 mm
Διαστάσεις (Π x Υ x Β): 200 x 150 x 60 mm
Το
αποτελεί κατοχυρωμένο εμπορικό σήμα της Bluetooth
SIG, Inc.

English 22 23
Important safety advice
1. Follow all safety instructions in order to prevent damage
being caused by incorrect use!
2. Keep the user manual for further use. If you pass this
appliance on to third parties, you must also deliver this user
manual with it.
3. Never use an appliance that is damaged! Disconnect the
USB connection and contact your supplier if the appliance is
damaged.
4. Never try to repair the appliance yourself. In the event of
any malfunction, repairs are to be conducted by qualifi ed
personnel only.
5. Do not open the appliance casing under any circumstances.
Do not insert any foreign objects into the inside of the
casing.
11. Kee
12. Do n
13. Nev
14. Prior
15. Impo
6. Warning! During cleaning or operation do not immerse the
electrical parts of the appliance in water or other liquids.
Never hold the appliance under running water.
7. Do not operate the appliance with wet hands or while
standing on a wet fl oor.
8. The appliance should not be used near water – for example,
near a bathtub, wash bowl, kitchen sink, in a wet basement,
or near a swimming pool.
9. Never use accessories (adaptor, USB cable, etc.) which are
not sold together with this product by the manufacturer.
They could pose a safety risk to the user and might damage
the appliance. You must therefore use original accessories
only.
10. The appliance is only suitable for use at moderate degrees
of latitude. Do not use in the tropics or in particularly humid
climates.
16. In ca
Intended
• The
• No li
• Use

11. Keep the appliance away from any hot surfaces and open
fl ames. Always operate the appliance on a level, stable,
clean and dry surface. Protect the appliance against heat
and cold, dust, direct sunlight, moisture, dripping and
splashing water.
12. Do not place heavy objects on top of the appliance. Do
not place objects with open fl ames, e.g. candles, on top or
beside the appliance. Do not place objects fi lled with water,
e.g. vases, on or near the appliance.
13. Never pull on the cord to disconnect the appliance from the
USB port and never wind the cord around the appliance.
14. Prior to each cleaning, disconnect the USB plug from the
USB port.
15. Important! The USB port is intended only for appliances
equipped with an USB connection. Other devices cannot
be used with this USB connection. Only use provided USB
cable.
16. In case of malfunction based on electrostatic discharge and
electrical fl uctuations, reset the appliance by disconnecting it
from the USB port, wait a few seconds and then reconnect
the appliance to the USB port.
Intended use
• The product serves as an audio output device and features
wireless or wired connection.
• No liability for any damage that occurs can be accepted in
the event of improper use or incorrect handling.
• Use the appliance for the intended use only. The appliance
is not suitable for commercial use. This appliance has been
designed exclusively for household use. Do not use the
appliance outdoors or in a bathroom.

English 24 25
Disposal
The crossed-out wheeled bin logo requires the separate
collection of waste electric and electronic equipment
(WEEE). Electric and electronic equipment may contain
dangerous and hazardous substances. Do not dispose
of this appliance as unsorted municipal waste.
Return it to a designated collection point for the recycling
of WEEE. By doing so, you will help to conserve
resources and protect the environment. Contact your
retailer or local authorities for more information.
Do not dispose of in the household waste, as the
appliance contains a built-in battery.
Compon
1. Blue
2. Whi
3. – bu
4. PAI
Accessor
1 x Pouc
1 x Adap
1 x USB
Components
6
13452
1. Blue LED
2. White LED
(Model: PPA120BT-B) /
Red LED
(Model: PPA120BT-W)
3. – button
4. PAIR button
Accessories:
1 x Pouch
87
5. + button
6. Speaker
Back of the appliance:
7. USB port
8. Audio jack
1 x Audio cable
1 x Adaptor
1 x USB cable
1 x User manual
English 26 27
Charging battery
Attention! Charge the internal battery completely before fi rst
use.
1. Connect USB plug to the USB socket
at the adapter (fi g. 1) and connect the
micro-USB plug to the socket on back
side of the speaker (fi g. 2).
2. Connect the power adapter to a
power outlet.
3. The white LED (PPA120BT-B) / red
LED (PPA120BT-W) (fi g. 3) on the
speaker’s front fl ashes to indicate
battery is being charged. The LED will
go out when the battery is completely
charged.
4. After charging is fi nished, disconnect
the power adapter from the speaker
Setting u
Attentio
Bluetoot
speaker’s
1. Pres
2. The
Note:
If no con
5 minute
and from the power outlet.
Notes:
• Recharge the battery, when both
LEDs (fi g. 3) on the front fl ash
alternately.
• Alternatively, you may charge the
battery by connecting the speaker
to a computer USB port using the
provided USB cable.
• Partial charging does not impair
battery’s lifetime.
• Charging and audio playback possible
at the same time.
1. Activ
2. After
3. Firstl
Setting up Bluetooth connection
Attention! Make sure that before or during transmission via
Bluetooth no plug is connected to the AUX IN socket on the
speaker’s rear side.
1. Press the PAIR button on the top
to turn on the speaker (fi g. 4). An
acoustic signal sounds.
2. The blue LED (fi g. 3) on the front
fl ashes and thus signalizes, that the
speaker is ready to be connected with
another Bluetooth device.
Note:
If no connection to another Bluetooth device is established within
5 minutes, the speaker will be turned o automatically.
1. Activate the Bluetooth function of the audio source (e.g.
smartphone, MP3 player, notebook, etc.). Browse for
devices and select “PPA120BT”. If necessary, select the
speaker as audio output device. Refer to the audio source’s
instructions.
2. After the connection is established, the blue LED (fi g. 3)
lights up steadily. An acoustic signal sounds simultaneously.
3. Firstly, set the audio source’s volume to a low level and only
then start the audio playback. After only a few seconds the
speaker starts to emit the audio signal.
English 28 29
4. Now set the volume using the + and
– buttons on the speaker’s top (+ =
up, – = down) (fi g. 5). In addition, you
may increase the volume on the audio
source.
5. Turn o the speaker using the PAIR
button (fi g. 4). The LED goes o and
an acoustic signal sounds.
Notes:
• The speaker’s maximum transmission range is about
10metres.
This range depends on di erent factors (e.g. room
layout, wall material, audio source’s transmission range).
• Make sure that the audio source supports the A2DP
standard.
4. Firstl
5. No
6. Turn
LED sign
LED co
Left side
Blue
Wired connection
1. Connect one of the included audio
cable’s jack plugs to the AUX IN input
on the speaker’s rear side (fi g. 6).
2. Connect the other end of the
audio cable to the audio source’s
headphone socket.
3. Press the PAIR button on the top to
turn on the speaker (fi g. 4). The LED
on the right side ( white or red colour)
(fi g. 3) of the speaker’s front lights up
steadily and an acoustic signal sounds.
Right si
• White
• Red L
Both LE

4. Firstly, set the audio source’s volume to a low level and only
then start the audio playback.
5. Now set the volume using the + and – button on the
speaker’s top (+ = up, – = down) (fi g. 5). In addition, you
may increase the volume on the audio source.
6. Turn o the speaker using the PAIR button (fi g. 4). The LED
goes o and an acoustic signal sounds.
LED signals
LED colour LED status Meaning
Left side:
Flashes Ready for Bluetooth
Blue
Lights up
steadily
Right side:
• White LED
(PPA120BT-B)
Flashes Battery is being charged
Lights up
steadily
• Red LED
(PPA120BT-W)
Both LEDs Flash
alternately
connection
Searching for previously
connected Bluetooth device
Bluetooth connection
established
Wired connection
established
Low battery

English 30
Cleaning
• Turn o the speaker before cleaning and disconnect all
cables.
• Use a dry, soft cloth.
• Avoid contact with water.
• Do not use aggressive cleaning agents.
Technical data
Adaptor
Input: 100 – 240 V~, 50/60 Hz, 0.5 A
Output: 5 V
, 1.2 A
Speaker
Charging voltage (via USB or
provided adaptor): 5 V
Speaker output power: 2 x 3 Watts RMS
Battery voltage: 3.7 V
Battery capacity: 2000 mAh
Battery run-time: approx. 6 hours
Impedance: 4 Ω
Frequency response: 60 Hz – 20 kHz
Signal-to-noise ratio: >50 dB
Speaker Ø: 50 mm
Dimensions (W x H x D):
200 x 150 x 60 mm
is a registered trademark of Bluetooth SIG, Inc.

31 Español
Instrucciones de seguridad importantes
1. Siga todas las instrucciones de seguridad para evitar daños
producidos por un uso inadecuado.
2. Guarde este manual de instrucciones para su posterior uso.
Si entrega el dispositivo a un tercero, deberá entregarle
también este manual de instrucciones.
3. Jamás utilice un dispositivo que se encuentre dañado.
En caso de que el dispositivo esté dañado, quítelo de la
conexión USB y póngase en contacto con su proveedor.
4. Nunca intente reparar la unidad usted mismo. En caso
de mal funcionamiento, solo personal califi cado debe
encargarse de las reparaciones.
5. En ningún caso abra la cubierta del aparato. No inserte
ningún objeto extraño en el interior de la cubierta.
6. ¡Advertencia! Durante la limpieza o uso, no sumerja las
piezas eléctricas del dispositivo en agua u otros líquidos.
Nunca sostenga el aparato bajo el agua corriente.
7. No utilice el aparato con las manos mojadas o cuando se
encuentre sobre un suelo mojado.
8. El producto no debe usarse cerca del agua; por ejemplo,
cerca de una tina, lavaplatos, lavatorio, en un sótano mojado
o cerca de una piscina.
9. Jamás utilice accesorios (adaptador, cable USB, etc.)
que el fabricante no venta en conjunto con este producto.
Éstos podrían presentar un riesgo de seguridad para el
usuario y podrían dañar el aparato. Por lo tanto, debe utilizar
solamente accesorios originales.
10. El producto es apto solo para un uso a grados de latitud
moderados. No utilizar en los trópicos ni en climas
particularmente húmedos.
 Loading...