


Users Manual
610 / 611 / 612 Printers
PAXAR Systems Group
Manual Edition 2.1
16 March 2001
Manual Part Number 441397
This page left blank intentionally.

Contents
Getting Started |
1 |
Audience.............................................................................................................................. |
2 |
Unpacking the Printer........................................................................................................... |
2 |
Connecting the Power Cable................................................................................................. |
2 |
Establishing Communications............................................................................................... |
3 |
Connecting the Communication Cable .................................................................... |
3 |
Default Serial Port Communication Values ............................................................. |
3 |
Default Printer Settings ........................................................................................................ |
4 |
Using the Control Panel........................................................................................................ |
4 |
Printer Status Lights ............................................................................................... |
4 |
Button Functions .................................................................................................... |
5 |
Status Code Box ..................................................................................................... |
5 |
Setting Dip Switches ............................................................................................................ |
6 |
DIP Switches.......................................................................................................... |
7 |
Loading Supplies |
9 |
Loading Labels – 610 / 611 ................................................................................................ |
10 |
Loading Labels – 612 ......................................................................................................... |
15 |
Loading Ribbon ................................................................................................................. |
20 |
Adjusting the Wide/Narrow Knobs ..................................................................................... |
24 |
Printing |
26 |
Printing .............................................................................................................................. |
26 |
Printer Alignment - Top and Bottom Copy – 612 ................................................................ |
27 |
Printing an Error Label ......................................................................................... |
27 |
Non-Printing Zone ............................................................................................................. |
28 |
Preventing Jams.................................................................................................... |
28 |
Printing Serial Bar Codes ................................................................................................... |
29 |
Adjusting Print Positions .................................................................................................... |
29 |
Adjusting the Cut Angle ..................................................................................................... |
30 |
Using the Knife .................................................................................................................. |
31 |
Adjusting the Drop Tray ..................................................................................................... |
31 |
Care Symbol Font Samples................................................................................................. |
32 |
Ginetex Font......................................................................................................... |
32 |
Nafta Font ............................................................................................................ |
32 |
Care and Maintenance |
33 |
Clearing Supply Jams ......................................................................................................... |
34 |
Clearing a Knife Jam.......................................................................................................... |
34 |
Cleaning ............................................................................................................................ |
35 |
Replacing the Printhead...................................................................................................... |
37 |
Adjusting the Print Contrast ............................................................................................... |
41 |
Replacing the Fuse ............................................................................................................. |
42 |
Users Manual - 610/611/612 Printers |
Contents ∙ i |

Lubricating the Knife ......................................................................................................... |
43 |
Troubleshooting |
44 |
Printing a Test Label .......................................................................................................... |
45 |
Troubleshooting ................................................................................................................. |
46 |
Error Messages .................................................................................................................. |
47 |
Data Errors........................................................................................................... |
47 |
Communication Failures....................................................................................... |
52 |
Data Formatting Errors ......................................................................................... |
53 |
Machine Faults..................................................................................................... |
54 |
Appendix A - Specifications & Accessories |
56 |
Printer Specifications ......................................................................................................... |
56 |
Supply Specifications......................................................................................................... |
57 |
Ribbon Specifications ........................................................................................................ |
58 |
Accessories ........................................................................................................................ |
59 |
Contacting Paxar |
59 |
ii ∙ Contents |
Users Manual - 610/611/612 Printers |

Getting Started
The Paxar 610 / 611 / 612 Care Label printers let you print text, graphics, and bar codes on thermal transfer (ribbon) fabric labels.
This chapter includes information about
♦Unpacking the printer.
♦Connecting the power cord.
♦Connecting the communications cable.
♦Using the printer's control panel.
Users Manual - 610/611/612 Printers |
Getting Started ∙ 1 |
Audience
The Operator's Handbook is for the person who prints and applies labels.
Unpacking the Printer
After you unpack the printer, you should have: a 610 / 611 / 612 printer, power cord, communication cable and a ribbon take-up core (may already be on take-up reel).
Keep the box and packaging material in case the printer ever needs repair.
Power cords are not supplied with 230-volt printers. You need to purchase a power cord separately. The power cord requires IEC 320 STD C13 end finish for the printer interface and it must meet requirements for 1.6 Amps at 115VAC and 1 Amp at 230VAC.
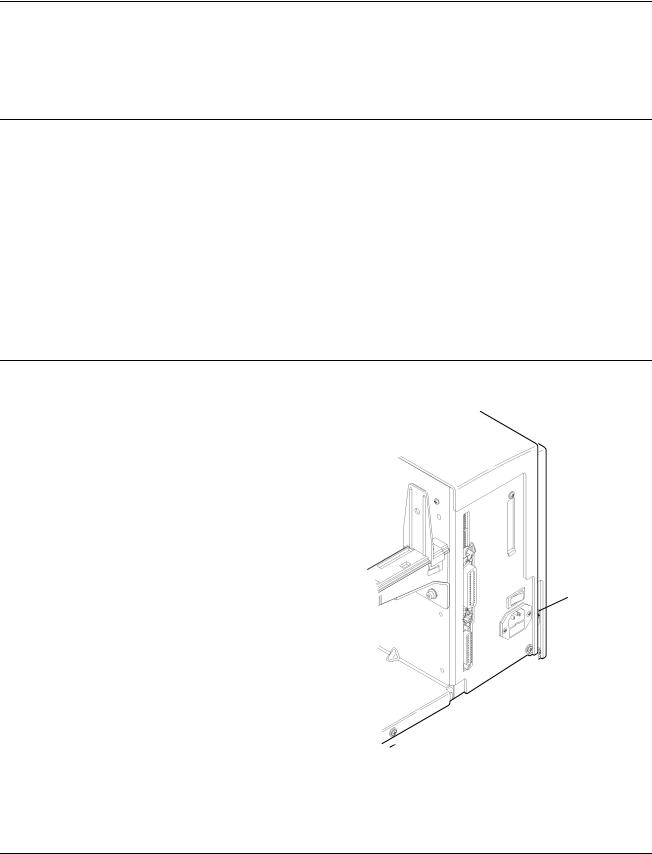
Connecting the Power Cable
To connect the power cable:
1.Plug the power cable into the socket.
Plug the other end of the cable into a grounded electrical outlet.
2.Turn on the printer. Press ( I ) to turn on and ( O ) to turn off the printer.
Power Cable goes here
For information about replacing the fuse, see Chapter 4, "Care and Maintenance."
2 ∙ Getting Started |
Users Manual - 610/611/612 Printers |
Establishing Communications
Before the printer can accept print jobs from the host, you must:
♦Connect the communication cable to the printer and to the host.
♦Set the communication values on the printer to match those at the host. (Only required if you are using the serial port.)
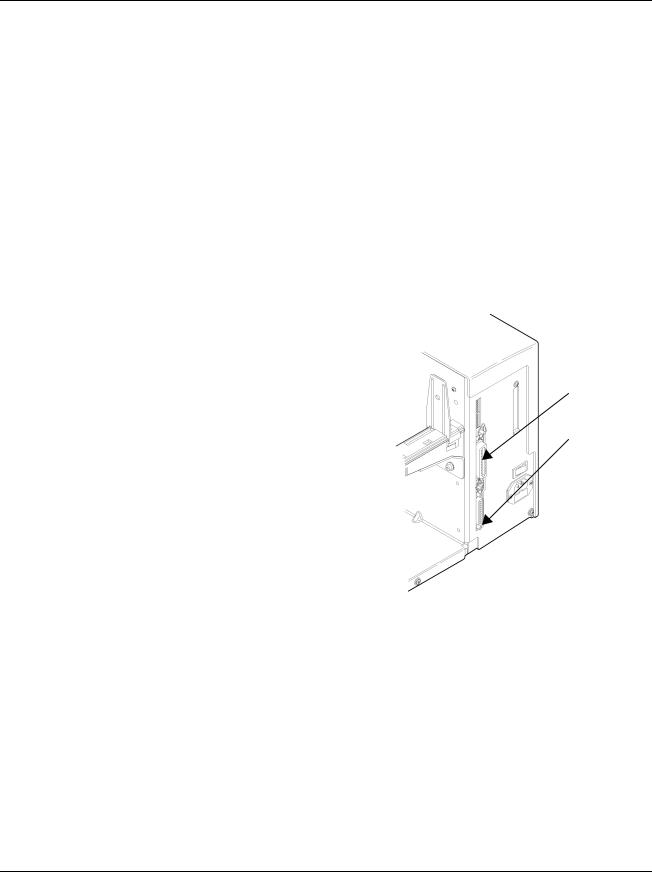
Connecting the Communication Cable
Make sure the printer is off before connecting the cable to the communication port. Your printer is supplied with a parallel printer cable. You may optionally connect your printer to a serial port. To do this, you must purchase a serial interface cable compatible with your computer.
♦Serial Communication
9 to 25 pin cable
25 to 25 pin cable
Parallel Port
♦Parallel Communication
IEEE-1284 or Centronics mode cable
Serial Port
See "Setting DIP Switches," for more information.
Connect the communications cable to the appropriate port on your computer. If you are unsure where to connect the cable, consult your computer documentation.
Note: It is highly recommended that you use the cable supplied with your printer. Paxar cannot be
responsible for communications problems when a non-Paxar cable is used.
Connect the other end of the communication cable into the appropriate port on the printer.
Secure the cable with the connecting screws (serial) or spring clips (parallel).
Default Serial Port Communication Values
If you are communicating with the host through the serial port, make sure the printer's communication values match those at the host. The factory default values are: 9600-Baud,
8 bit data frame Word Length, 1 Stop Bit, no Parity, and XON/XOFF Flow Control.
To change the printer's communication values, ask your System Administrator or see "Setting DIP Switches" to change the DIP switch settings.
Users Manual - 610/611/612 Printers |
Getting Started ∙ 3 |
Default Printer Settings
These defaults can be changed using Paxar's PCMate software. Print Speed - 4.0 ips (inches per second), Ribbon - High Energy, Supply Type - Black Mark, Contrast - 255,
Backfeed - Enabled, Dispense Position - 120 dots, Backfeed Distance - 110 dots.
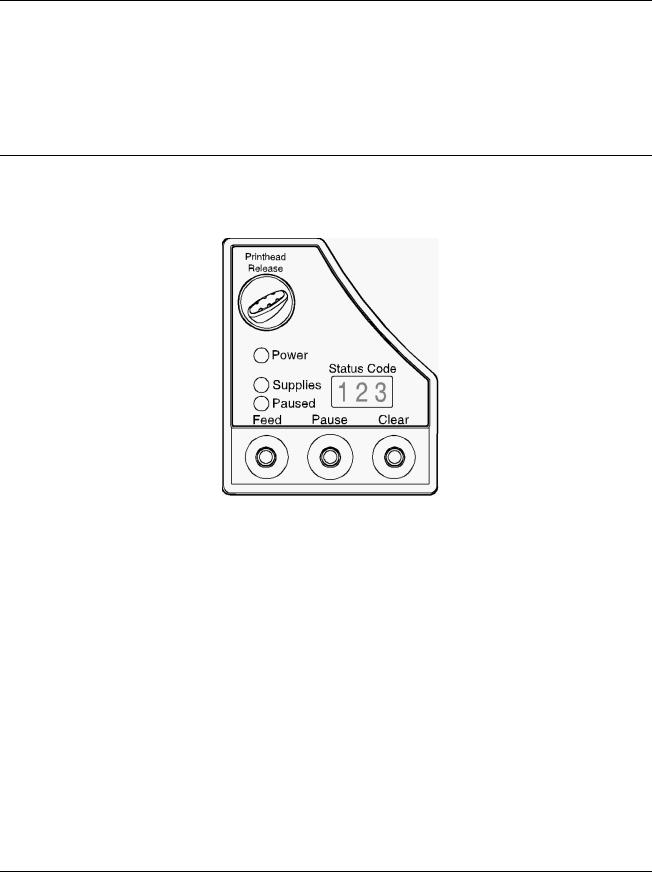
Using the Control Panel
The control panel helps you check printer status, displays error codes, and allows you to perform some basic printer functions.
Printer Status Lights
Power: |
The printer shows a steady green light when it is on. |
Supplies: |
The printer shows a blinking amber light when it is out of |
|
labels or ribbon, or when you have a supply jam. |
Paused: |
The printer shows a steady amber light when paused. |
|
The printer shows a blinking amber light when there is a |
|
data, communication, or data formatting error. See the |
|
status code box for the error code. The printer also |
|
shows a blinking amber light when it's ready to print a |
|
label in the On-Demand mode. See Chapter 3, "Printing" |
|
for more information. |
4 ∙ Getting Started |
Users Manual - 610/611/612 Printers |

Button Functions
Feed: |
Prints a label in the On-Demand mode. Feeds a blank |
|
label if there is no print job. |
|
Prints a label with error information that is useful to your |
|
System Administrator if an error is displayed. |
Pause: |
Pauses the current print job or resumes a paused print |
|
job. When the Paused light is on, the job is paused. |
Feed and Pause: |
Prints a test label when you press the buttons at the |
|
same time. |
Feed and Clear: |
Allows you to adjust print positions from paused mode. |
|
See Chapter 3, "Printing" for more information. |
Clear: |
Clears an error. |
|
Cancels the current print job. |
|
Cancels all queued print jobs if pressed for two seconds. |
|
Also clears the communication queue and cancels any |
|
packet being received. |
To cancel a single or all queued print jobs, the printer must be in paused mode before Clear is pressed.
Status Code Box
The status code box displays a three-digit error code to identify any problem the printer may have. For a description of the problem, look up the error code in Chapter 5,
“Troubleshooting.”
_________
If there is no error, the display will be blank.
_________
Users Manual - 610/611/612 Printers |
Getting Started ∙ 5 |
Setting Dip Switches
To change the DIP switch settings, move the switches to the desired position and then turn on the printer. If you select Software Controlled, the parameters in Packet F will override the communication settings. Software Controlled uses the last sent Packet F settings or the defaults. Turning on the printer activates the DIP switch settings. Make sure the DIP switch settings match the printer's setup for ribbon or supply type.
Upper DIP Switches
Lower DIP Switches
6 ∙ Getting Started |
Users Manual - 610/611/612 Printers |
DIP Switches
Upper DIP Switches |
|
|
|
|
|
|
|
|
|
|
|
1 |
2 |
3 |
4 |
5 |
6 |
7 |
8 |
|
Baud Rate |
|
|
|
|
|
|
|
|
|
38400 |
ON |
ON |
OFF |
|
|
|
|
|
|
19200 |
ON |
OFF |
ON |
|
|
|
|
|
|
9600 |
ON |
OFF |
OFF |
|
|
|
|
|
|
4800 |
OFF |
ON |
ON |
|
|
|
|
|
|
2400 |
OFF |
ON |
OFF |
|
|
|
|
|
|
1200 |
OFF |
OFF |
ON |
|
|
|
|
|
|
Software Control |
OFF |
OFF |
OFF |
|
|
|
|
|
|
Data Bits |
|
|
|
|
|
|
|
|
|
7 Data Bits |
|
|
|
ON |
|
|
|
|
|
8 Data Bits |
|
|
|
OFF |
|
|
|
|
|
Stop Bits |
|
|
|
|
|
|
|
|
|
2 Stop Bits |
|
|
|
|
ON |
|
|
|
|
1 Stop Bit |
|
|
|
|
OFF |
|
|
|
|
Parity |
|
|
|
|
|
|
|
|
|
Even |
|
|
|
|
|
ON |
OFF |
|
|
Odd |
|
|
|
|
|
OFF ON |
|
|
|
None |
|
|
|
|
|
OFF OFF |
|
|
|
Parallel Port |
|
|
|
|
|
|
|
OFF |
|
Centronics Mode |
|
|
|
|
|
|
|
|
|
IEEE-1284 |
|
|
|
|
|
|
|
ON |
Values in bold indicate the default setting (9600 Baud; 8 Data Bits; 1 Stop Bit; No Parity; and Centronics Mode).
Communication settings at the printer must match those at the host. Make sure your host is capable of communicating at the speed you select for the printer.
Users Manual - 610/611/612 Printers |
Getting Started ∙ 7 |

Lower DIP Switches |
|
|
|
|
|
|
|
|
|
1 |
2 |
3 |
4 |
5 |
6 |
7 |
8 |
Flow Control |
|
|
|
|
|
|
|
|
XON/XOFF |
ON |
OFF |
|
|
|
|
|
|
RTS/CTS |
OFF |
ON |
|
|
|
|
|
|
DTR |
OFF |
OFF |
|
|
|
|
|
|
Diagnostics |
|
|
OFF |
|
|
|
|
|
Normal |
|
|
|
|
|
|
|
|
Diagnostics Mode |
|
|
ON |
|
|
|
|
|
Verifier |
|
|
|
OFF |
|
|
|
|
No Verifier |
|
|
|
ON |
|
|
|
|
Verifier Installed |
|
|
|
|
|
|
|
|
Supply Type |
|
|
|
|
|
|
|
|
Die Cut or Edge Aperture |
|
|
|
|
OFF |
OFF |
|
|
Black Mark |
|
|
|
|
OFF |
ON |
|
|
Continuous |
|
|
|
|
ON |
OFF |
|
|
Center Aperture |
|
|
|
|
ON |
ON |
|
|
Ribbon |
|
|
|
|
|
|
|
|
Transfer |
|
|
|
|
|
|
OFF |
|
Direct, |
|
|
|
|
|
|
ON |
|
Feed Mode |
|
|
|
|
|
|
|
|
Disable On-Demand |
|
|
|
|
|
|
|
OFF |
Enable On-Demand |
|
|
|
|
|
|
|
ON |
Values in bold indicate the default setting (RTS/CTS Flow Control; Normal Mode; No
Verifier; Continuous Supply; Transfer; and Continuous Mode).
Shaded DIP switches are not enabled (verifier and feed mode).
8 ∙ Getting Started |
Users Manual - 610/611/612 Printers |

Loading Supplies
This chapter describes how to load a roll of supply and a ribbon roll.
You can use Paxar's fabric label kits containing fabric labels and ribbon. If you switch from black mark to continuous supplies make sure the DIP switches are set correctly.
Make sure you use only approved Paxar supplies. See Appendix A, "Specifications and Accessories" for a list of Paxar supplies or contact your Paxar Representative for more information.
If you experience label jamming with narrow supplies in humid environments, store supplies separately from the printer in a dry, less humid environment.
CAUTION
The width of the ribbon must be greater than the supply width. Since some supplies are more abrasive to printheads than others, using a ribbon wider than your supply helps protect the printhead. Failure to do this may void your printhead warranty. Replacement printheads are expensive.
Users Manual - 610/611/612 Printers |
Loading Supplies ∙ 9 |

Loading Labels – 610 / 611
For instructions for loading labels for the 612, see page 15.
Make sure the printer is configured for the correct supply type.
To load a roll of labels: 1. Open the cover.
2. Unlock the printhead by turning the retaining latch.
10 ∙ Loading Supplies |
Users Manual - 610/611/612 Printers |

3. Lift printhead assembly using the printhead tab until the assembly locks into place.
CAUTION
Make sure you use only approved Paxar supplies. See Appendix A, "Specifications and Accessories" for a list of Paxar supplies or contact your Paxar Representative for more information.
4.Place the roll of supply on the supply holder. Make sure the supply unrolls from the top as shown.
Supply Guides
Do not pick up the printer by the supply holder.
5.Adjust the supply holder guides so the sides barely touch the roll. Make sure the supply roll turns freely.
Users Manual - 610/611/612 Printers |
Loading Supplies ∙ 11 |
6.Push down on the supply lever to unlock the supply guides.
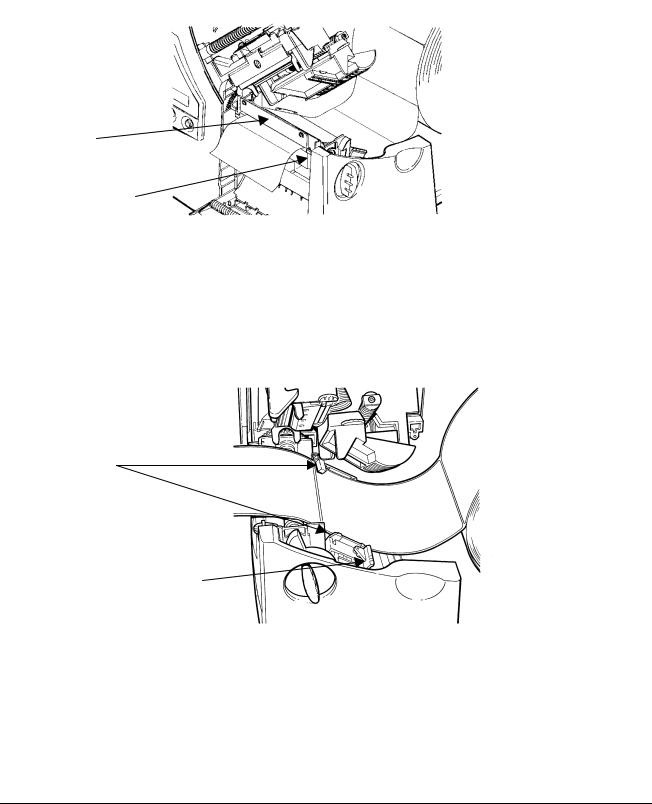
7.Lay the label strip across the supply guide. Lift the auxiliary rollers slightly and thread the supply under the rollers until it appears in the knife opening.
Peel Bar
Ribbon Bar
CAUTION
Make sure the supply is straight in the supply path and aligned with the printhead.
8. Tuck the supply under the nibs.
Nibs
Supply Lever
__________
Make sure a few inches of supply are past the front end of the printer.
__________
12 ∙ Loading Supplies |
Users Manual - 610/611/612 Printers |
9.Adjust the supply guides so they touch the supply. Push up on the supply lever to lock the supply guides into place.
10.Hold the printhead assembly by the printhead tab while pressing down on the printhead release.
11.Close the printhead by pressing down on the thumb well until you hear it click into place.
Users Manual - 610/611/612 Printers |
Loading Supplies ∙ 13 |

12.Close the cover.
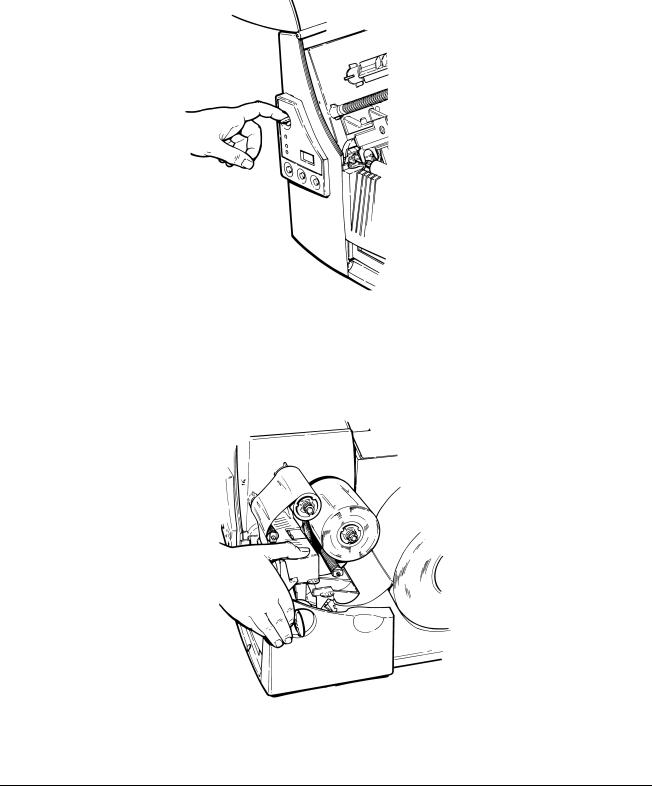
13.Press Feed to position the supply under the printhead.
You may need to adjust the wide/narrow knobs depending on the width of your supply. See Chapter 4, "Care and Maintenance" for more information.
If the printer will be unused for extended periods of time, leave the printhead unlatched.
14 ∙ Loading Supplies |
Users Manual - 610/611/612 Printers |

Loading Labels – 612
Make sure the printer is configured for the correct supply type. To load a roll of labels:
1. Open the cover.
2. Unlock the printhead by turning the retaining latch.
Users Manual - 610/611/612 Printers |
Loading Supplies ∙ 15 |
 Loading...