


PARROT CK3000
EVOLUTION
Quick start guide
Käyttöopas


www.parrot.com
Parrot CK3000 EVOLUTION
Installation diagrams........................
English..............................................
Suomi...............................................
General Information..........................
p.04
p.05
p.09
p.14
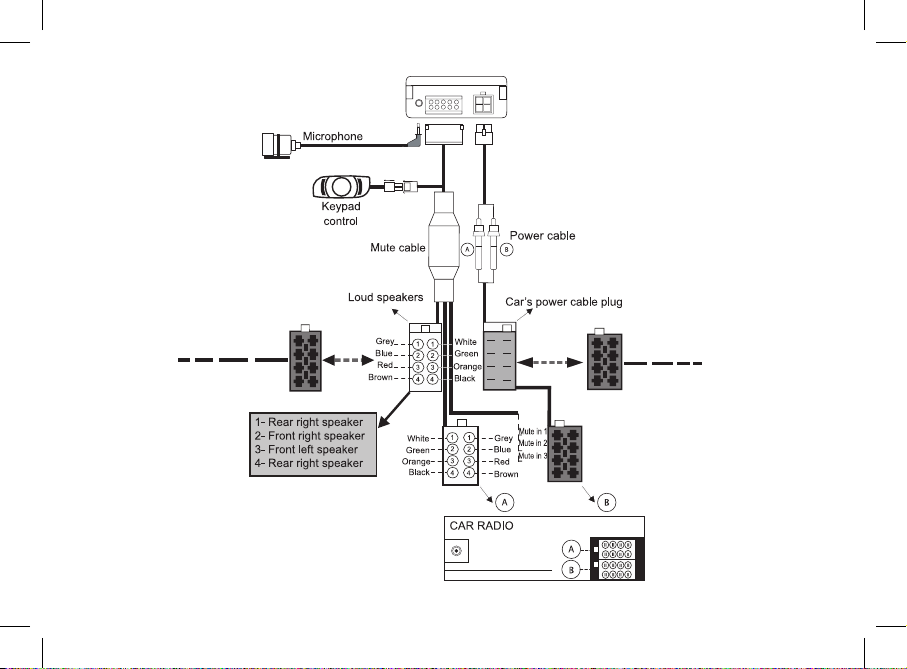
mute yellow wire
Connection car
Audio cable
Connection car
Power cable
4

This simplified guide of the Parrot CK3000 EVOLUTION
gives you the main instructions to easily use this product.
For further information, refer to the user guide available on
our website www.parrot.com.
Contents
The Parrot CK3000 EVOLUTION comprises an electronic
control unit, a microphone, a 2-key remote control and two
ISO connector plugs for the car stereo.
Installing the electronic box
Avoid installing the electronic box:
- near heating or air-conditioning system;
- on a spot directly exposed to sunlight;
- behind metal walls.
Connecting the mute cable and power supply cable
• The mute cable is tted with black ISO connectors. The
power supply cable is fitted with grey ISO connectors.
• Consult the electric wiring of your car radio. For some
vehicles, it is necessary to inverse the positions of the red
and orange wires. Indeed, the red wire of the power cable
must be connected to the permanent 12V, the orange wire
to the 12V ignition and the black wire to the ground. This
can be done simply by reversing both fuse holders located
on the Parrot wiring.
English
English
The availability of some functionality only depends
on your mobile phone.
► Refer to our website www.parrot.com, in the
Compatibility section, for further information.
Installing the kit...................................................................
Installing the electronic box.........................................
Connecting the mute cable and power supply cable..
Installing the audio connectors....................................
Installing the microphone.............................................
Installing the remote control........................................
Using the telephony function..............................................
Connecting a phone via Bluetooth...............................
Receiving contacts......................................................
Commands...................................................................
Using the keywords and the magic words...................
Making a call via voice recognition..............................
05
05
05
06
06
06
07
07
07
07
08
08
Installing the kit
5

Installing the audio connectors
► Refer to the installation diagram p.4 for more information.
• Car radio with ISO connectors:
1. Disconnect the ISO connectors of the car radio.
2. Wire the male connectors of the mute and power
cables to the car radio.
3. Wire the audio and power connectors of the car
to the female connectors of the Parrot CK3000
EVOLUTION wiring.
If the car radio is equipped with a Mute input, connect the
yellow wire of the audio cable to one of the “Mute in 1”,
“Mute in 2” or “Mute in 3” inputs.
• Car radio without ISO connectors:
- You have to obtain an ISO cable to adapt your car
radio to the ISO connectors of the Parrot
CK3000 EVOLUTION.
- If you do not have an adapter, connect each wire in
turn if your vehicle does not have ISO connector
plugs. If the car stereo has a mute jack, connect using
the yellow wire of the mute cable.
Installing the microphone
Parrots microphones are directional and need to be pointed
towards the user to pick up clear speech. The microphone
should be installed near the front roof light cluster, in the
centre of the vehicle with a clear path to the user.
Installing the remote control
► Refer to the installation diagram p.4 for more information.
Connect the mute cable to the connector provided on the
remote control. Ensure that the red and green LEDs light up
and switch off according to the position of the ignition key.
We advise you to fit the remote control where it
can easily be reached, preferably on a flat surface
that has first been cleaned.
Do not connect the orange wire to the permanent
12V, otherwise you can cause the vehicle battery
to go flat.
6

Connecting a phone via Bluetooth ®
Prior to using your Parrot CK3000 EVOLUTION with your
phone for the very first time, you must initially pair both
devices.
1. From your phone, search for Bluetooth peripherals. Refer
to your phone user guide for more information.
> The Bluetooth peripherals list is displayed.
2. When the search is complete, select « Parrot EVOL ».
3. Enter « 1234 » when the PIN Code is required.
> You can now connect both devices.
Receiving contacts
To use the Parrot CK3000 EVOLUTION’s voice recognition
feature, you must send the contacts from your phone to the
kit via Bluetooth (if your phone supports this feature).
1. Go to the «Add voiceprints» menu.
2. Press the jog wheel or the green button.
> The Parrot CK3000 EVOLUTION and the phone
disconnect, the kit is now ready to receive contacts.
3. Select the contact on your phone, press Options and
« send by Bluetooth ».
4. Select « Parrot EVOL » from the list (enter 1234 as the
PIN code if prompted by your phone).
> Once received, the kit asks you to record the name
corresponding to the contact. The voiceprint is assigned
to the contact.
Commands
Using the telephony function
Button
Functions
- Navigate through the menus
- Adjust the communication volume
Short press:
- Enter the menu
- Confirm a selection
Short press during a call: use the DTMF
function (to manage interactive vocal servers)
- Pick up
- Use the voice recognition function
- Long press: call the last dialed number
- Short press during a call: transfer an
ongoing call on the phone (discreet mode)
- Refuse an incoming call
- Hang up
- Exit the menu
7

Using the keywords and the magic words
To offer you as many features as possible, the Parrot
CK3000 EVOLUTION lets you record the keywords:
«mobile», «work», «home», as well as the magic words:
«phone» and «hang up».
- The magic word «phone» allows you to accept an
incoming call, as well as to start the voice recognition
feature.
- The magic word «hang up» allows you to end a call.
- The keywords allow you to choose the number to call if a
contact has several phone numbers.
• To record the keywords:
1. From the main menu, select «Record Keywords».
> The kit says “Record all keywords”.
2. Press the jog wheel if you want to record all the
keywords or select the specific keyword
you want to record using the jog wheel.
3. Press the jog wheel or the green key to start
recording.
> When a keyword has been successfully recorded,
the kit automatically goes to the next keyword.
> When all the keywords have been recorded, the kit
automatically activates them.
• To use the magic words, you must activate them.
To do so:
1. Press the jog dial and select «Magic words».
2. Press the jog dial to activate/deactivate the
magic words.
Making a call via voice recognition function
1. Press the green key for 2 seconds or say “Phone” if this
keyword is recorded.
> A “beep” is emitted.
2. Say your contact’s name.
> If the contact has one phone number, the call is made.
> If the contact has several phone numbers and if the
keywords are recorded, pronounce the type of number
you want to call.
If the contact you want to call is not in the
phonebook of the Parrot CK3000 EVOLUTION,
stop your vehicle in a safe location then make the
call directly from your phone. The call is
automatically directed to the hands-free kit.
8

Parrot CK3000 EVOLUTION-laitteen asennus.....................
Handsfree-rasian asennus...........................................
Mute-kaapelin ja virtajohdon asennus ........................
Audioliitinten asennus..................................................
Mikrofonin asennus......................................................
Näppäimistön asennus................................................
Puhelintoiminnon käyttö.......................................................
Puhelimen kytkentä Bluetoothin® avulla.....................
Komennot.....................................................................
Yhteystietojen vastaanottaminen.................................
Avainsanojen ja taikasanojen käyttö............................
Puhelun soitto äänentunnistusta käyttäen...................
09
09
09
10
10
10
11
11
11
12
12
13
Tämä Parrot CK3000 EVOLUTION-pikaopas antaa sinulle
keskeisimmät laitteen käyttöä koskevat ohjeet. Tarkempaa
tietoa laitteen käytöstä on varsinaisessa käyttöoppaassa
sivustollamme www.parrot.com.
Huomio: Tiettyjen toimintojen käyttö riippuu
puhelimestasi.
Lisätietoja saat sivustoltamme www.parrot.com,
kohdasta Tuki.
Yhteenveto
Parrot CK3000 EVOLUTION koostuu handsfree-rasiasta,
mikrofonista, kahdella näppäimellä varustetusta kaukosäätimestä ja kahdesta autoradion ISO-liitäntäjohdosta.
Handsfree-rasian asennus
Vältä rasian asentamista:
- lähelle lämmitys-tai ilmastointilaitetta
- suoraan auringonvaloon
- metallisen sisäseinän taakse
Mute-kaapelin ja virtajohdon asennus
• Mute-kaapelissa on mustat ISO-liitännät.
• Virtajohdossa on harmaat ISO-liitännät.
Tutustu autoradiosi kytkentäkaavioon.
Joissakin autoissa punaisen ja oranssin johtimen paikat on
vaihdettava keskenään. Virtajohdon punaisen johtimen tulee
olla liitettynä jatkuvaan 12 V jännitteeseen, oranssin johtimen
12 V sytytysvirtaan ja mustan johtimen auton runkoon. Tämä
toimenpide suoritetaan vaihtamalla Parrotin kytkennässä
olevien kahden varokekannen paikkaa.
Suomi
Parrot CK3000 EVOLUTION-laitteen asennus
FI
9

Audioliitinten asennus
Katso lisätietoja sivun 4s. kaaviosta.
• ISO-liittimillä varustettu autoradio:
1. Kytke irti autoradion ISO-liittimet.
2. Kytke mute-kaapelin ja virtajohdon urosliittimet
autoradioon.
3. Liitä audioliittimet ja auton virtalähde Parrot CK3000
EVOLUTION-laitteen kytkennän naarasliittimiin.
Jos autoradiossa on mute-tulo, kytke audiokaapelin keltainen johdin yhteen mute-tuloista («mute in» 1, 2 tai 3).
Jos et ole varma, missä autoradion mute-tulo sijaitsee, tarkista
asia autoradion käyttöoppaasta.
• Autoradio, jossa ei ole ISO-liittimiä:
- Voit hankkia ISO-adapterijohdon ja muuntaa sen
avulla autoradion Parrot CK3000 EVOLUTION-laitteen
ISO-liitäntään soveltuvaksi.
- Jos käytössä ei ole adapteria, suorita asennus johti
mesta johtimeen, mikäli ajoneuvossa ei ole ISO-liitän
tämahdollisuutta. Jos autoradiossa on mute-tulo,
suorita kytkentä mute-kaapelin keltaisella johtimella.
Mikrofonin asennus
Mikrofonin tulee olla suunnattuna kuljettajaan päin, ja sen tulisi
mieluiten olla asennettuna häikäisysuojan ja taustapeilin väliin.
Näppäimistön asennus
Huomio: Suosittelemme asennusta paikkaan, jossa
näppäimistöä on helppo käyttää sekä mieluiten
tasaiselle, puhdistetulle pinnalle.
Kytke näppäimistö mute-kaapelissa olevaan näppäimistöä
varten olevaan liittimeen. Varmista, että punaiset ja vihreät
ilmaisimet syttyvät ja sammuvat virta-avaimen asennosta
riippuen.
Huomio: Älä kytke oranssia johdinta jatkuvaan 12 V
jännitteeseen. Tämä voi aiheuttaa ajoneuvon akun
tyhjenemisen.
10

Puhelimen kytkentä Bluetoothin® avulla
Ennen Parrot CK3000 EVOLUTION-laitteen käyttöä puhelimen kanssa laitteet on yhdistettävä toisiinsa. Jos käytät
puhelinta ensimmäistä kertaa Parrot CK3000 EVOLUTION
-laitteen kanssa, sinun tulee ensimmäiseksi parittaa laitteet
keskenään. Kun laitteet ovat tunnistaneet toisensa, tätä
toimenpidettä ei enää tarvitse suorittaa.
Jos käytät laitetta ensimmäistä kertaa Parrot CK3000
EVOLUTION-laitteen kanssa:
1. Käynnistä puhelimesta Bluetooth-oheislaitteiden etsintä.
Katso lisätietoja puhelimen käyttöohjeista.
> Bluetooth -oheislaitteiden luettelo ilmestyy laitteeseen.
2. Kun haku on päättynyt, valitse «Parrot EVOL».
3. Kun puhelin kysyy PIN-koodia, näppäile «1234» ja
vahvista.
> Parrot CK3000 EVOLUTION yhdistyy puhelimeen.
Komennot
Puhelintoiminnon käyttö
- hyväksyy tulevan puhelun
- aktivoi äänentunnistustoiminnon
- pitk ä paina llus: soittaa viimeksi valittuun
numeroon
- lyhy t pain allus puhelun aikana : siirtää
puhelun puhelimeen
- selaa valikkoja
- säätä ä äänenvoimakkuut ta puhelun
aikana - l yhyt p ainal lus:
- avaa valikon
- vahvistaa valinna n - lyhyt painallus
puhelun aikana: aktivoi DTMF-toiminnon
(interaktiivisten äänipalvelimien hallinta)
- kieltäytyy tulevasta puhelusta
- lopettaa puhelun
- poistuu valikosta
FI
11

Yhteystietojen vastaanottaminen
Jotta Parrot CK3000 EVOLUTION-laitteen äänentunnistustoimintoa voidaan käyttää, tulee yhteystiedot lähettää
laitteeseen Bluetoothin välityksellä puhelimesta (jos toiminto
on tuettu puhelimessa).
1. Valitse päävalikosta «Record Keywords».
2. Paina vierityspyörää tai vihreää näppäintä.
> Parrot CK3000 EVOLUTION ja puhelin muodostavat
yhteyden ja laite on valmis vastaanottamaan yhteystiedot.
3. Mene puhelimen hakemistoon, valitse lähetettävä yhteys
tieto, valitse Valinnat > Lähetä Bluetoothin avulla.
4. Valitse luettelosta « Parrot EVOL » (jos puhelin kysyy
PIN-koodia, näppäile 1234).
> Kun laite on vastaanottanut yhteystiedon, se pyytää tal
lentamaan yhteystietoon liitettävän nimen. Tämä äänital
lenne liitetään vastaanotettuun yhteystietoon.
Avainsanojen ja taikasanojen käyttö
Parhaan mahdollisen käytettävyyden varmistamiseksi Parrot
CK3000 EVOLUTION tarjoaa mahdollisuuden tallentaa
avainsanoja: «mobile», «work», «home», ja taikasanoja:
«phone», «hang up».
- Avainsanojen avulla käyttäjä voi valita numeron, johon
laite soittaa siinä tapauksessa, että yhteystiedolla on useita
puhelinnumeroita.
- Taikasanan « phone » avulla voi vastata tulevaan puhe
luun sekä käynnistää äänentunnistustoiminnon.
- Taikasanan « hang up » avulla voi päättää puhelun.
• Avainsanojen tallennus:
1. Valitse päävalikosta Record Keywords.
> Laite ilmoittaa “Record all keywords”.
2. Paina vierityspyörää, jos haluat tallentaa kaikki avain
sanat tai käännä sitä, jos haluat valita tallennettavaksi
tietyn avainsanan.
3. Aloita tallennus painamalla keskivierityspyörää.
> Kun avainsana on tallennettu onnistuneesti, laite
siirtyy automaattisesti seuraavaan sanaan.
> Kun kaikki avainsanat on tallennettu onnistuneesti,
laite aktivoi ne automaattisesti.
• Jotta taikasanoja voidaan käyttää, tulee ne ensin aktivoida.
Toimi näin:
1. Paina vierityspyörää ja valitse «Magic words».
2. Paina vierityspyörää, kun haluat aktivoida / poistaa
käytöstä taikasanoja.
12

Puhelun soitto äänentunnistusta käyttäen
1. Paina vihreää painiketta pitkään tai sano ”Phone” jos
taikasana ”Phone” on tallennettu laitteeseen.
> Laite piippaa.
2. Lausu yhteystiedon nimi.
> Jos yhteystietoon on liitetty vain yksi puhelinnumero,
puhelu alkaa.
> Jos yhteystietoon on liitetty useita puhelinnumeroita ja
laitteeseen on tallennettu avainsanoja, lausu sen numeron
taikasana, johon haluat soittaa.
Jos yhteyshenkilöä, jolle haluat soittaa ei löydy
Parrot CK3000 EVOLUTION-laitteeseen liitetyn
puhelimen hakemistosta, pysäytä auto sopivaan
paikkaan ja näppäile numero suoraan puhelimeen.
Puhelu siirtyy automaattisesti handsfree-tilaan. Jos
näin ei tapahdu, paina Parrot CK3000 EVOLUTION
-laitteen vihreää näppäintä.
FI
13

14
Warranty
Parrot products are warranted during
1 year from the date of purchase for
defects in materials and workmanship,
provided that no deterioration to the
product has been made, and upon
presentation of proof of purchase (date
of purchase, location of sale and product serial number) to the retailer.
Warranty does not cover: upgrading of
the software items of the Parrot products with Bluetooth® cell phones for
compatibility purpose, data recovery,
deterioration of the external aspect
due to normal use of the product,
any damage caused by accident,
misuse, misapplication, or non-Parrot
products. Parrot is not responsible
for storage, loss or damaged to data
during transit or repair.
Any product wrongfully declared to be
defective will be returned to sender
and inspection, process and carriage
costs will be invoiced to him.
Due to the technical nature of this
product, we advise you to ask your
garage mechanic to take care of the
installation. Parrot shall not be held
responsible of any dysfunction caused
by an installation which does not
follow the instructions provided in this
user guide or an incorrect installation.
Correct disposal of This Product
(Waste Electrical & Electronic Equipment)
(Applicable in the European Union
and other European countries with
separate collection systems).
This marking shown on the product
or its literature, indicates that
it should not be disposed with
other household wastes at the
end of its working life. To prevent possible harm to the environment
or human health from uncontrolled
waste disposal, please separate this
from other types of wastes and recycle
it responsibly to promote the sustainable reuse of material resources.
Household users should contact either
the retailer where they purchased this
product, or their local government office, for details of where and how they
can take this item for environmentally
safe recycling. Business users should
contract their supplier and the terms
and conditions of the purchase
contract. This product should not be
mixed with other commercial wastes
for disposal.
Modifications
The explanations and specifications
in this guide are given for information
purposes only and may be modified
without prior notice. They are deemed
to be correct at time of going to press.
The utmost care has been taken when
writing this guide,as part of the aim to
provide you with accurate information.
However, Parrot shall not be held
responsible for any consequences
arising from any errors or omissions
in the guide, nor for any damage
or accidental loss of data resulting
directly or indirectly from the use of the
information herein. Parrot reserves the
right to amend or improve the product
design or user guide without any
restrictions and without any obligation
to notify users. As part of our ongoing
concern to upgrade and improve our
products, the product that you have
General Information

Yleiset tiedot
15
purchased may differ slightly from the
model described in this guide.
FCC Compliance Statement
This device complies with part 15 of
the FCC rules. Operation is subject to
the following two conditions:
(1). this device may not cause harmful
interference, and
(2). this device must accept any interference received, including interference
that may cause unde sired operation.
Note: The manufacturer is not responsible for any radio or tv interference
caused by unauthorized modifications
to this equipment. Such modifications
could void the user’s authority to
operate the equipment.
Declaration of Conformity
We, Parrot S.A. 174 quai de Jemma-
pes, 75010 Paris, France,
declare under our sole
responsibility that our product, the Parrot CK3000 EVOLUTION
to which this declaration relates is in
conformity with appropriate standards
EN300328, EN301489-17, EN 60950
following the provision of Radio Equi-
pment and Telecommunication Equipment directive 1999/5/EC R&TTE.
Identification N. 394 149 496 R.C.S.
PARIS - Parrot S.A.
Copyrights
Copyright © 2007 Parrot. All rights
reserved.
Licences
The Bluetooth ® word mark and logos
are owned by the Bluetooth SIG, Inc.
and any use of such marks by Parrot
S.A. is under license.
Other trademarks and trade names are
those of their respective owners.
Compatibility problems
Some special edition cars can be
released with some differences from
the original model. This could cause
some compatibility problems with the
interfaces.
Our company is not responsible of
compatibility problems caused by new
equipment or devices updated by the
car manufacturer without advise.
Takuu
Haittaamatta laillista takuuta, Parrottuotteilla sekä niiden osilla ja huollolla on 1 vuoden takuu ostopäivästä
lähtien, lukuunottamatta tuotteen
kulumista. Takuun voi todistaa ostotositteella (ostopäivä ja -paikka sekä
tuotteen sarjanumero) jälleenmyyjän
luona tai suoraan Parrot-yrityksessä.
Takuu ei kata Bluetooth® kännyköiden
kanssa toimivien Parrot-tuotteiden
sisältävien ohjelmistojen päivitystä
seuraavissa tarkoituksissa: yhteensopivuus, tietojen talteenotto, tuotteen ulkoinen kuluminen joka johtuu tuotteen
normaalista käytöstä, mikä tahansa
onnettomuuden, tuotteen epänormaalin tai luvattoman käytön tai muun kuin
Parrot-tuotteen aiheuttama vahinko.
Parrot ei ole vastuussa kuljetuksen
tai korjauksen aikana tapahtuvasta
tuotteen säilytyksestä, katoamisesta tai
tietojen vahingoittamisesta.
Tuote, josta ei löydy minkäänlaista
vahinkoa tai vikaa palautetaan lähettäjälle. Lähettäjä maksaa käsittely-,

16
tarkastus- ja kuljetuskulut. Tuotteen
teknisten ominaisuuksien takia suosittelemme, että annat huoltomiehen
asentaa sen. Parrotia ei voi missään
tapauksessa pitää vastuussa tuotteen
toimintahäiriöstä, joka johtuu asennuksesta, jossa ei ole otettu huomioon
käyttöoppaan ohjeita ja/tai käyttäjän
itsensä suorittamasta vääränlaisesta
asennuksesta.
Tuotteen kierrätys
Sähköiset ja elektroniset
laitteistojätteet
Tuotteessa ja sen käyttöoppaassa
oleva tunnus merkitsee, että tuotetta
ei saa hävittää tavallisten kotitalousjätteiden kanssa tuotteen käyttöajan
loputtua. Jätteiden valvomaton
hävittäminen voi aiheuttaa vahinkoa
ympäristölle ja ihmisen terveydelle. Älä
sekoita tuotetta muiden tyyppisten jätteiden kanssa, vaan kierrätä se oikealla
ja vastuullisella tavalla. Näin edistät
materiaalisten aineiden kestävää
uudelleenkäyttöä.
Yksityiset kuluttajat voivat ottaa
yhteyttä siihen jälleenmyyjään, joka on
myynyt tuotteen heille tai oman kunnan
palveluihin saadakseen tietoja tuotteen
hävittämisestä ja sen ympäristöystävällisestä kierrätyksestä. Yritykset
voivat ottaa yhteyttä tavaratoimittajaansa ja hakea lisätietoja tuotteen
myyntisopimuksen ehdoista. Tuotetta
ei saa hävittää muiden kaupallisten
jätteiden kanssa.
Muutokset
Käyttöoppaan sisältämät ohjeet ja
tiedot ovat viitteellisiä ja niitä voidaan
muuttaa ilman ennakkoilmoitusta.
Käyttöoppaan tiedot ovat oikeita
oppaan tulostushetkellä. Tiedot on
kirjoitettu suurella huolella, jotta käyttäjä saisi käyttöönsä mahdollisimman
tarkat tiedot.
Parrot S.A. yritystä ei voida kuitenkaan
pitää vastuullisena suorasti tai
epäsuorasti mahdollisesta tahattomasta vahingosta tai tietojen katoamisesta,
joka johtuu kyseisestä käyttöoppaasta
puuttuvasta tai virheellisestä tiedosta.
Parrot S.A.
pidättää oikeuden korjata tai parantaa
tuotetta sekä sen käyttöopasta ilman
rajoituksia tai varoittamatta käyttäjää
siitä etukäteen.
Parrot S.A. kehittää jatkuvasti
tuotteitaan, joten ostamasi tuote
saattaa olla hieman erilainen kuin
käyttöoppaassa esitelty tuote. Siinä
tapauksessa voit yrittää hakea uuden
elektronisen version käyttöoppaasta
nettisivulla www.parrot.com.
Rekisteröity tavaramerkki
Bluetooth nimi ja logo ovat Bluetooth
®
SIG, Inc.in rekisteröimiä tavaramerkkejä.
Parrot S.A. käyttää edellä mainittuja
tavaramerkkejä luvanalaisesti.
Yhteensopivuusongelmat
Jotkut rajoitetusti valmistetut automallit
voivat sisältää hieman eroavaisuuksia
alkuperäiseen automalliin verrattuna.
Se voi aiheuttaa tiettyjä yhteensopivuusongelmia tämän tuotteen kanssa.
Parrot S.A. ei ole vastuussa mahdolli-

17
sista yhteensopivuusongelmista
jotka johtuvat lisätyistä laitteistoista,
joista valmistaja ei ole etukäteen
ilmoittanut.


Hotline
Our hotline is at your disposal from Monday to Friday between 9 am and 6 pm (GMT + 1) - Hot-line@parrot.com
Italy : [+39] 02 59 90 15 97
Spain : [+34] 902 404 202
UK : [+44] (0)844 472 2360
Germany : 0900 1727768
USA : [+1] (877) 9 Parrot (toll free)
China : [+86] 755 8203 3307
Hong Kong : [+852] 2736 1169
France : 01 48 03 60 69
Europe : [+33] 1 48 03 60 69 (Spoken languages : French, English and Spanish)

www.parro t.com
 Loading...