

Page 1
Notice 5100 Zone A 09.01.06.qxp 10/01/2006 16:49 Page 1
CD/MP3
Hands-free
Receiver
RHYTHM N’BLUE
User manual
For Bluetooth
Mobile Phone
ENG
FRA
ESP
ITA
P. 3
P.15
DUT
P.27
P.39
POR
P.51
P.63
Page 2

Warning
The manufacturer Parrot S.A. and its affiliates should not be held liable towards end users or third parties to prejudice caused by misusage of the product, nor for usage that would
be in violation of local traffic regulations and laws.
Disclaimer
The information in this document is subject to change without notice and does not represent a commitment on the part of vendor. No warranty or representation, either expressed
or implied, is made with respect of quality, accuracy or fitness for any particular purpose of this document. The associated with it at any time without obligation to notify any person or organisation of such changes. In no event will the manufacturer to liable for direct, indirect, special, incidental or consequential damages arising out of the use or inability
to use this product or documentation, even if advised of the possibility of such damages. This document contains material protected by copyright. All right are reserved. No part
of this manual may be reproduced or transmitted in any forme, by any means or for any purpose without express written consent. Product names appearing in this document are
mentioned for identification purposes only. All trademarks, product names appearing in this document are registred property of their respective owners.
FCC Compliance Statement
This device complies with part 15 of the FCC rules. Operation is subject to the following two conditions.
1. This device may not cause harmful interference.
2. This device must accept any interference received, including interference that may cause undesired operation.
Declaration of Conformity
We, Parrot S.A. of 174 quai de Jemmapes, 75010 Paris, France, declare under our sole responsibility that our product, the Parrot Rhythm n’ Blue, to which this declaration relates is in conformity with appropriate standards EN300328, EN301489-17, EN 60950 following the provision of Radio Equipment and Telecommunication
Equipment directive, with requirements covering EMC directive 89/336/EEC and Low Voltage directive 73/23/EEC.
Bluetooth®
The Bluetooth® word mark and logos are owned by the Bluetooth® SIG, Inc. and any use of such marks by Parrot S.A. is under license. Other trademarks and trade names are
those of their respective owners.
Correct Disposal of This Product ( Waste Electrical & Electronic Equipment )
(Applicable in the European Union and other European countries with separate collection systems). This marking shown on the product or its literature, indica
tes that it should not be disposed with other household wastes at the end of its working life.To prevent possible harm to the environment or human health from
uncontrolled waste disposal, please separate this from other types of wastes and recycle it responsibly to promote the sustainable reuse of material resources.
Household users should contact either the retailer where they purchased this product, or their local government office, for details of where and how they can take
this item for environ, mentally safe recycling. Business users should contract their supplier and the terms and conditions of the purchase contract. This product should
not be mixed with other commercial wastes for disposal.
2
Notice 5100 Zone A 09.01.06.qxp 10/01/2006 16:49 Page 2
Page 3
Français
EspañolItaliano
Deutsch
Português
3
Dutch
Rhythm n'Blue
Directions for use
English
Notice 5100 Zone A 09.01.06.qxp 10/01/2006 16:49 Page 3
Page 4

4
SAFETY INFORMATION
PRECAUTIONS
Only use on a 12 V electrical system with a negative earth.
When replacing the fuse, use one with the same amp rating. Using a fuse
with a higher amp rating could damage the system.
Do not dismantle the system. The laser beam of the CD player is dangerous for your eyes.
Ensure that foreign objects are not inserted into the system: they could
cause the system to malfunction or jeopardise your safety, such as electrocutions or exposure to the laser.
If your vehicle has been exposed to very high or very low temperatures
for a prolonged period, wait until the inside of the car has returned to a
normal temperature before using the device.
The sound volume of the car stereo should not be too loud: you should be
able to hear outside warning signals or sirens.
NOTES ON CDs
Playing a damaged or dusty CD could result in the disc jumping during playback.
Hold CDs as shown in the illustration opposite.
Do not touch the unprinted side.
Avoid getting any types of marks on the readable side of the CD.
Do not expose a CD to direct sunlight or excessive temperatures.
Wipe dirty CDs from the centre outwards with an appropriate cloth. Never use
solvents, such as benzene or alcohol.
This car stereo cannot read 3" CDs (8 cm).
Never use 3" CDs or discs with an irregular shape. They could get stuck and
cause the unit to malfunction.
BEFORE SWITCHING ON
Do not set the volume too high - doing so might prevent you from hearing
sounds outside the car.
The car must be stationary before working on the system.
CAUTION
Do not remove the unit's cover. Do not repair the system yourself. Please
contact your retailer or a specialist technician.
PRESENTATION
Thank you for choosing a Parrot car stereo.
You can now take full advantage of a Bluetooth®CD/MP3 car stereo with a
built-in hands-free kit. All the features sported by a top-of-the-range hands-free kit
are available: phonebook synchronisation, caller ID display, exceptional audio
quality inside the car, dual call management, compatibility with all Bluetooth
®
phones, and much more.
YOUR CAR STEREO'S BLUETOOTH® FEATURES
This system is equipped with the Bluetooth®technology, which enables the
wireless exchange of data between electronic systems. In the present case, your
Bluetooth® phone is connected to the car stereo. Depending on your phone
(*), this synchronises the phone's phonebook in the car stereo's memory, which
will subsequently allow you to call people directly from the phonebook, see the
caller's name displayed, and so on. You can also answer calls, hang up and
control the call volume with the car stereo's green and red buttons and the
scroll wheel. The built-in voice recognition feature allows you to use several
functions without taking your hands off the wheel.
(*): Applies to certain phones.
For further information, visit our website:
"www.parrot.biz, at the section entitled Technical Support, User Guides"
Notice 5100 Zone A 09.01.06.qxp 10/01/2006 16:49 Page 4
Page 5
5
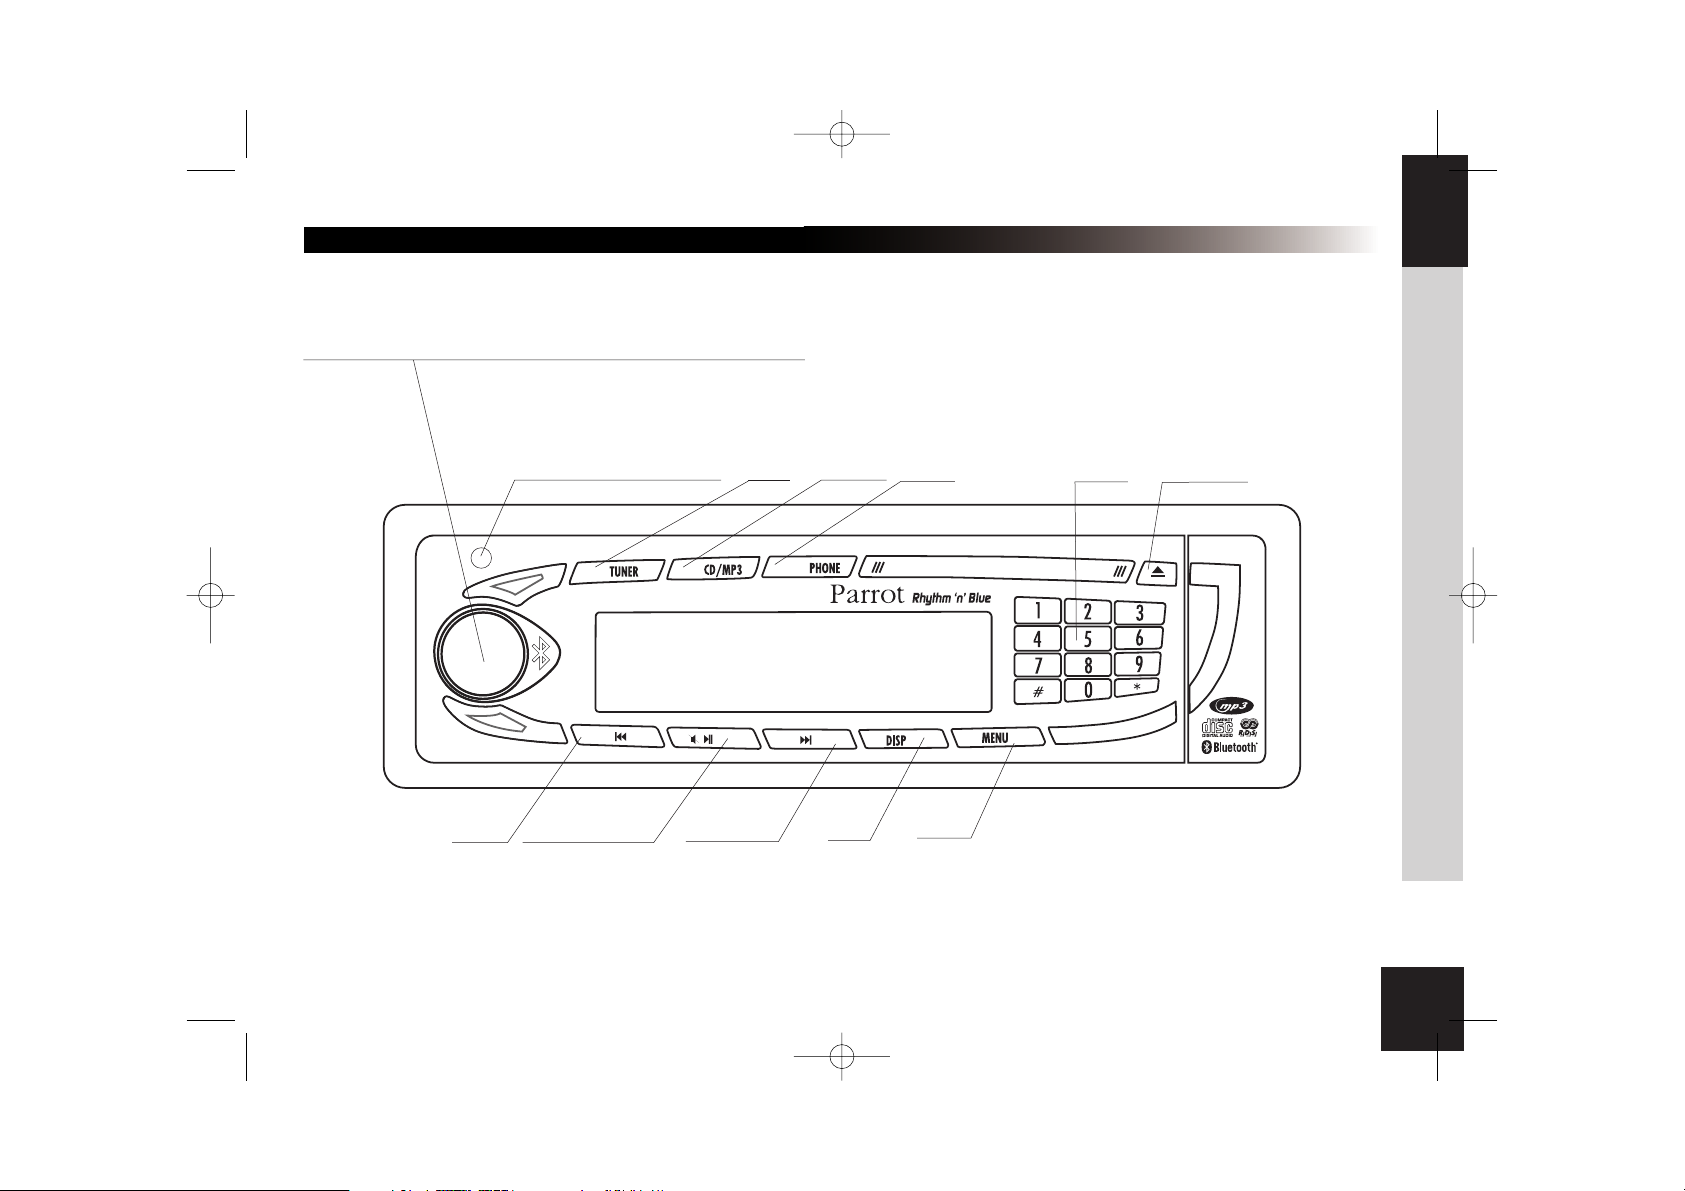
FRONT PANEL
To turn the car stereo on, press the rotary button. To turn the car stereo off,
hold down the same button for two seconds.
Infrared sensor for the remote
Tuner
CD/MP3
Phone
Fast-forward
Rewind
Pause/Play/Mute
DISP
Menu
Eject button
Keypad
Français
EspañolItaliano
Deutsch
Português
Dutch
English
Notice 5100 Zone A 09.01.06.qxp 10/01/2006 16:49 Page 5
Page 6

6
ANTI-THEFT SYSTEM
Without the detachable front panel, the system cannot be used.
Removing the front panel
Press the eject button (in the top right) to tip the front panel.
Move the panel sideways to the left.
Pull the right side of the panel away from the car stereo and then the left side.
Store the panel in the carry case and take it with you.
Replacing the front panel
Insert the left side of the front panel into the car stereo.
Then insert the right side of the panel into the car stereo.
Push the panel up until you hear a click.
Removing the entire stereo
Remove the car stereo's front panel and casing.
Insert the keys into the appropriate holes until they remain stuck.
Pull the stereo towards you.
Notice 5100 Zone A 09.01.06.qxp 10/01/2006 16:49 Page 6
Page 7

7
INSTALLATION GUIDE
Note: to ensure that your settings are memorised, check that the ignition 12 V and the constant 12 V supply are not reversed.
Otherwise, you will have to enter all your settings again.
Français
Español
Italiano
Deutsch
Português
Dutch
English
Notice 5100 Zone A 09.01.06.qxp 10/01/2006 16:49 Page 7
B
A
Purple/
Black
Purple Gray White Green
Stripe
(+) (-) (+) (-)(+) (-)
Gray/
Black
Stripe
White/
Black
Stripe
(+) (-)
1357
B
2468
A
24 8
ISO Connector
Red
Black
Blue
Yellow
Green/
Black
Stripe
57
To car battety (+)
Continuous + 12V DC
Ground Lead
Motor/Electric Antenna relay control Lead
Amplifier relay control Lead
Ignition key
+ 12 V DC When ON/ACC
External microphone
Fuse 15A
Connector
Rear Line-out (Gray)
R (Red)
L (White)
Amplifier
Right Speaker
(Rear)
Right Speaker
(Front)
Left Speaker
(Front)
Left Speaker
(Rear)
Page 8

8
REMOTE CONTROL
Using the remote control
- The on/off button is used to turn the car stereo on and off.
- Source is used to change from one mode to another: Tuner, CD/MP3 and then Phone.
- In CD/MP3 mode, the fast-forward and rewind arrows let you skip from one track to
another by means of a quick press. They are also used to simply go for wards/back
wards in a track. In Tuner mode, they allow you to skip from one radio station to ano
ther.
- The play/pause button is used for playing CDs.
- When you receive an incoming call, press the green button to answer and the red but
ton to hang up.
- You can also dial a phone number on the remote control. To do so, change to Phone
mode (via the Source button or by pressing the Phone button
directly on the car stereo's front panel) and then dial the num
ber on the keypad. Once the number has been dialled, press
the green button to call.
Note:
the "+" prefix can be obtained by pressing the zero button for two
seconds.
Replacing the battery in the remote control
When the remote control no longer works properly or you
experience problems controlling the car stereo with the remote
control, replace the remote control's battery. Ensure that the
battery is facing the correct polarity when fitting the replacement.
1. Remove the battery cover by pressing the button.
2. Insert the new battery with the (+) side facing you. Replace the cover.
CAUTION :
The battery must be stored out of the reach of children. If a child accidentally swallows the battery, seek medical advice immediately. Do not recharge, open, heat or
throw onto a heat source. Any of these actions could cause sparks and start a fire.
Do not store the battery with other metallic materials. This could cause sparks and
start a fire. Do not handle the battery with tweezers. This could cause sparks and
start a fire.
DIFFERENT FEATURES MODE
First of all, turn the car stereo on. To do so, press the rotary button.
To turn the car stereo off, hold down the same button for two seconds.
There are three major features, which can be accessed directly via the car stereo's front panel:
Tuner, CD/MP3 and Phone mode
EACH MODE ENABLES THE CAR STEREO TO BE USED IN A DIFFERENT WAY:
TUNER (OR RADIO
) MODE
Press the Tuner button to listen to the radio. The fast-forward and rewind
arrows let you search for stations on a step-by-step basis. If you hold down
either arrow, the system will automatically search for the next station.
When you are tuned into a station, hold down a number on the
front panel's keypad (long press) to assign a shortcut number.
Subsequently, to go straight to a memorised station, simply press
the corresponding number. When the station is memorised, the assigned
shortcut number is displayed at the same time as the station's frequency.
CD/MP3 (
OR DISC PLAYBACK) MODE
Press CD/MP3 to listen to a CD.
You can move from one track on the CD to another by pressing
fast-forward or rewind. To move quickly forwards or backwards in a track,
hold down the fast-forward or rewind button for more than half a second.
When playing an MP3 disc, the LCD screen successively
displays the following information: title of the song, album and artist,
and always the time elapsed.
You can also select the track directly on the CD via the keypad.
P
HONE MODE
Press Phone to change the system to phone mode.
Once connected with your Bluetooth® phone, you will be given
information on your mobile phone's battery and signal levels.
Your operator is also displayed (*).
You can access your phonebook simply by turning the scroll wheel.
You can then browse through the alphabet.
Select the corresponding letter for the required contacts.
If your contacts have more than one phone number, press the
scroll wheel again to access the numbers and then the green button to call.
To view your call records, press the rotary button.
All the calls made, missed and received are displayed.
(*) These features depend on your phone.
Notice 5100 Zone A 09.01.06.qxp 10/01/2006 16:49 Page 8
Page 9

MENUS
Pressing the Menu button opens the Settings menu.
You can fully use all the car stereo's features and define the audio settings, backlight
and all the Bluetooth® features.
You can browse through the menus using the scroll wheel.
Pressing the scroll wheel opens the selected menu, allowing you to make any required
adjustments to the selected feature.
TUNER :
Some information about RDS:
- The RDS (RDS Scan) option displays the radio station's name and searches for alternative frequencies if the reception signal fades.
This feature is also called "RDS Alternative Frequencies (AF)".
- Once enabled, the "RDS Region" feature keeps the settings of the current station
when searching for alternative frequencies.
For example, a radio station broadcasting local programmes to a specific region
will not be replaced by the same station broadcasting national programmes when
searching for alternative frequencies.
- The "Traffic Program" indicator (RDS TP) determines whether the radio station can
broadcast traffic information.
- If the "Traffic Alert" feature (RDS TA) is enabled and the current station can broadcast traffic information ("Traffic Program" indicator enabled), the car stereo automatically switches to Tuner mode when traffic information is broadcast.
- If the "Traffic Alert" feature is enabled and the current station does not broadcast
traffic information ("Traffic Program" indicator disabled), the following screen is displayed on the car stereo:
Français
EspañolItaliano
Deutsch
Português
Dutch
English
9
Menu description and structure
- CD/MP3 :
Used to define the way in which you wish to listen to your CDs:
search, play back options, etc.
- CD/MP3
o MP3 search
Intelligent
A B C…
o Browser
o Repeat mode
Disabled
Repeat one
o Mode aléatoire
Disabled
Enabled
Notice 5100 Zone A 09.01.06.qxp 10/01/2006 16:50 Page 9
Page 10

10
TUNER
o Search
all (automatic memory store)
By type
All Program Types
Pop Music
Rock Music
...
Documentary
o Band
FM1
FM2
FM3
MW1
LW
o Tuner sensivity
Local
Distant
o Stereo / Mono
Stereo
Mono
o RDS options (Radio Data System)
RDS Scan (AF function)
Disabled
Enabled
Traffic Alert (TA feature)
Disabled
Enabled
RDS Region
Disabled
Enabled
Notice 5100 Zone A 09.01.06.qxp 10/01/2006 16:50 Page 10
Page 11

11
BLUETOOTH :
This menu lets you manage all the Bluetooth features on your car stereo: phonebook management, assigning of voiceprints, display, language.
- Phonebook: access to the phonebook memorised in the car stereo.
- Call records: list of calls missed, made and received.
- In the Settings subdirectory:
The paired devices option displays the name of the Bluetooth phone with which your car stereo is connected in hands-free mode.
Once enabled, the automatic answer feature immediately answers any incoming call.
With some phones, a specific mode must be enabled before pairing (Pair a phone), so that as many features as possible can be supported.
Once again on specific phones, the Object Push feature is used to receive contacts when automatic synchronisation is not available.
Note : some functions depend on your phone and might therefore be disabled.
Bluetooth
o Phonebook
A, B, C…
o Call records
Missed calls
calls made
call received
o Voice commands
Phonebook
keywords
Select voice recognition
o Settings
Volume
Ringtone
Phone
Microphone
Automatic answer
Information
Hotline
Advanced settings
Pair a phone
Sort Order
Delete Contacts
Object Push
Français
Español
Italiano
Deutsch
Português
Dutch
English
Notice 5100 Zone A 09.01.06.qxp 10/01/2006 16:50 Page 11
Page 12

12
FEATURES IN PHONE MODE: hands-free (Bluetooth)
Press Phone to change the system to Phone mode.
Phones compatible with the Bluetooth® technology use either the Hands-free or the
Headset profile for transferring the call to the car stereo. The Hands-free profile offers the
most features.
When using your car stereo in Tuner or CD/MP3 mode, the unit automatically switches to
Phone mode if someone calls you. After the call, the car stereo returns to Tuner or
CD/MP3 mode. The driver does not need to take any action. The same applies when you
make a call via the car stereo.
Pairing:
Pairing is the first connection between your Bluetooth® phone and the car
stereo. This procedure is initiated via your phone. Search for any Bluetooth® peripherals.
Once "Parrot Car Stereo" is found, select it and your phone prompts you to enter a fourdigit code. Enter 1234 and confirm. After the necessary data has been exchanged, you
are now Bluetooth® connected with the car stereo.
With some phones, a special mode needs to be enabled prior to pairing for access to
more features. Refer to Bluetooth > Settings > Pair a phone.
Synchronising the phone's phonebook:
With some Bluetooth phones, the phonebook is automatically synchronised in the kit's
memory. If your phone does not support automatic synchronisation, you can also use the
Object Push feature on your phone to send contacts from your phone to the car stereo by
Bluetooth®. When synchronising the phonebook, the Bluetooth® icon scrolls over the
screen. Refer to your phone's user guide or our website for details on how to proceed:
"www.parrot.biz, at the section entitled Technical Support, User Guides"
Answering / Hanging up :
To answer a call, press the green button above the scroll wheel. Once you have finished
your conversation, press the red button to hang up.
Discreet mode:
During a call, press the green button to switch the conversation over to the phone. Press the
green button again to return the call to hands-free mode. This feature is only available on
phones with a Hands-free profile.
Caller ID :
When an incoming call is received, the caller's name or number is displayed. This feature
is only available on certain phones.
Making a call via the car stereo's interface :
Two options are available:
Change to Phone mode. Dial the phone number directly via the keypad and then press the
green button. To dial a number with "+" as the prefix, quickly press the zero key twice.
You can also use the voice recognition feature (see below).
Voice recognition :
You can make calls using the car stereo's voice recognition
feature. To do so, contacts
must be memorised in the kit's memory (automatic synchronisation of the phonebook or contacts
sent individually from the phone). You must have first recorded the keywords: home, work, office,
and so on, as well as the magic word "phone".
Once you have recorded the names, keywords and magic word, you
can call a contact as follows:
Say: Phone… (Beep)… Anna… (Beep)… Home… and the car stereo automatically
dials Anna's home number.
Similarly, if Anna calls you, you will hear "Anna". Press the green button to answer the
call. Press the red button to end the call. The car stereo automatically returns to Tuner,
CD/MP3 or Phone mode.
You can also use the following sequence for using the voice recognition feature, but
without keywords:
Press the green button and the radio or CD is muted. You will hear a beep.
Say the required person's name after the beep and if necessary, specify house, work
or office (if available).
Note: When recording the keywords and magic word, park your vehicle in a
quiet place with the windows closed and the heater/air conditioner off.
This is necessary to obtain a higher recognition rate.
Notice 5100 Zone A 09.01.06.qxp 10/01/2006 16:50 Page 12
Page 13

PREFERENCES :
This menu allows you to select your language, the display colour and all the audio features to fine-tune the hearing levels inside the vehicle.
13
Français
EspañolItaliano
Deutsch
Português
Dutch
English
o Audio o Display o Language
Contrast Automatic
Bass Brightness English
Treble Backlight colour (sky blue by default) ...
Fader balance White
Right/left balance Blue
Equaliser Yellow
Disabled Red
Rock sky blue
Classique Violet
Pop Amber
Loudness
Disabled
Enabled
Spoken menus
Beep
Disabled
Enabled
Notice 5100 Zone A 09.01.06.qxp 10/01/2006 16:50 Page 13
Page 14
14
UPDATING YOUR CAR STEREO
To take advantage of the latest improvements (new compatible phones, new features,
etc.), you can update your car stereo by Bluetooth.
To do so, enable the option in Bluetooth > Settings > Advanced settings > Software
update, and then use a computer fitted with Bluetooth to download the latest version
to your car stereo (available from our website).
For further information, visit our website: www.parrot.biz
TROUBLESHOOTING
In the event of a malfunction, immediately disconnect the car stereo.
This unit must not be used in abnormal conditions, such as if there is no sound or
unpleasant smells are detected from the unit, to avoid any risk of electrocution.
On no account should you try to repair the unit yourself.
General:
The car stereo does not come on.
The car's ignition is switched off. Turn the key in the ignition to the ACC
position (on). Check the wiring. The fuse has blown. Replace the fuse.
No sound:
Check that the car stereo's volume is not at the lowest setting.
Also ensure that the Mute function has not been enabled (sound cut off).
Radio :
Excessive noise with a station:
The station that you are listening to is too far away for an optimal signal.
Choose another station with a better signal.
Preset stations lost:
The car stereo's power supply is not set up correctly.
Check that the battery wire is correctly fitted (ignition 12 V and constant 12 V).
Disc :
The disc is inserted, but it does not play.
The disc is upside-down.
The disc must be inserted with the name of the artist/CD facing upwards.
The disc is dirty or damaged. Clean the disc or change the CD.
The CD jumps or the sound quality is poor.
The disc is dirty or damaged. Clean the disc or change the CD.
Vibrations when driving the car cause the CD to jump.
The angle for fitting the car stereo must be less than 30°.
Check that the car stereo has been securely fitted in the appropriate place.
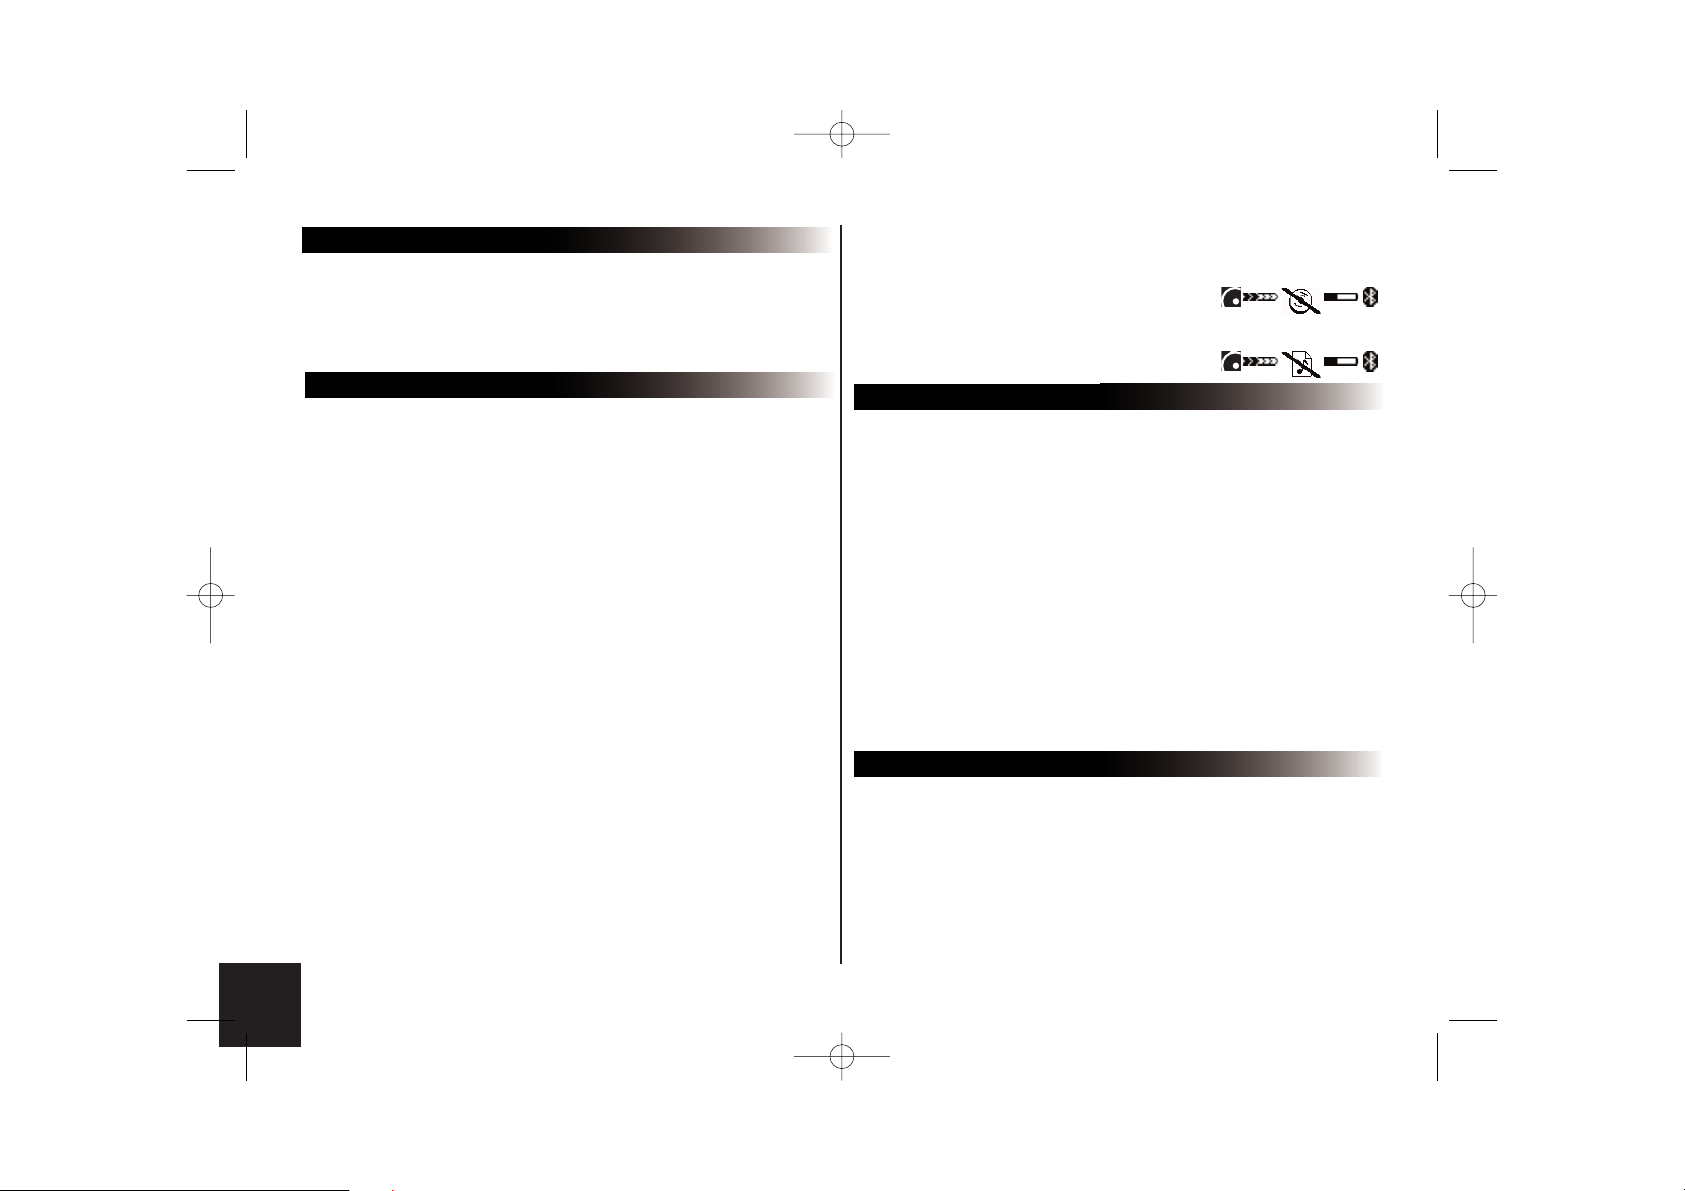
CD/MP3 : error messages.
The icon below is displayed: this means that there is no CD in the player.
The icon below is displayed: this means that your CD does not contain any files in MP3 format.
TECHNICAL SPECIFICATIONS
CD / CD-R / CD-RW / MP3, ID3 Tag.
Manual flip-down front panel.
Output power: 4x45W.
Line out: 4 channel x 4V/4ch x 2V
DSP: Classic, rock, pop, flat.
Power / Speaker wire: ISO.
Colour screen.
Bluetooth flash updates for the latest version.
External microphone.
Uses your car's speakers for greater listening comfort.
Bluetooth®.
Bluetooth® profiles supported:
- Hands-free 0.96 and 1.0.
- Headset 1.0.
- Object Push 1.0.
- Synch ML 1.0.
HOTLINE
- Our hotline is at your disposal.
You can contact the hotline by email or telephone
(open from Monday to Friday between 9 am and 6 pm - GMT+1).
- For further information, visit our website at www.parrot.biz.
Notice 5100 Zone A 09.01.06.qxp 10/01/2006 16:50 Page 14
Page 15

English
EspañolItaliano
Deutsch
Português
15
Dutch
Rhythm n'Blue
Notice d'utilisation
Français
Notice 5100 Zone A 09.01.06.qxp 10/01/2006 16:50 Page 15
Page 16

16
INFORMATIONS DE SECURITE
PRECAUTIONS
S'utilise uniquement sur un système électrique 12V avec mise à la terre négative.Lors du remplacement d'un fusible, utiliser un ampérage de même valeur
que le fusible à changer.
Utiliser un fusible avec un ampérage supérieur peut endommager le système.
Ne pas démonter le système. Le faisceau laser du lecteur est dangereux pour
les yeux. Assurez-vous que des objets extérieurs ne s'insèrent pas dans le système :
ils peuvent causer un dysfonctionnement du système, ou engendrer des problèmes de sécurité tels que desélectrocutions ou une exposition au laser.
Si vous avez exposé votre véhicule pour une longue période à de très haute ou
de très basses températures, veuillez attendre que le rétablissement de la température de l'habitacle avant d'utiliser l'appareil.
Le volume sonore de l'autoradio ne doit pas être trop fort : vous devez entendre les avertissements extérieurs.
NOTES SUR LES CD
Ecouter un CD abîmé ou poussiéreux peut causer des coupures pendant
l'écoute.
Tenir les CD comme illustré ci-contre.
Ne pas toucher la partie non imprimée.
Ne pas faire de marques de toutes natures sur la partie lisible du CD.
Ne pas exposer un CD à la lumière directe du soleil ou à un environnement
trop chaud.
Essuyer les CD sales du centre vers l'extérieur avec un tissu adapté. Ne jamais
utilisé des solvants tels que le benzène ou de l'alcool.
Cet autoradio ne peut pas lire les CD de 3'' (8cm).
Ne jamais utiliser un CD de 3'', ou des disques ayant une forme irrégulière. Ils
pourraient rester bloqués et provoquer des dysfonctionnements.
AVANT LA MISE EN MARCHE
Ne pas mettre le volume trop fort, cela pourrait rendre les bruits extérieurs
inaudibles.
La voiture doit être arrêtée avant toute intervention sur le système.
ATTENTION
Ne retirez pas le couvercle de l'appareil. Ne pas réparer vous-même le
système. Veuillez consulter votre revendeur ou un technicien spécialisé.
PRESENTATION
Merci d'avoir sélectionné un autoradio de marque Parrot.
Vous allez bénéficier d'un autoradio Bluetooth® CD/MP3 avec ensemble mains-
libres intégré.
Toutes les fonctions d'un kit mains-libres haut de gamme sont présentes : synchronisation du répertoire, affichage du nom de l'interlocuteur, qualité audio
exceptionnelle dans l'habitacle de la voiture, gestion du double appel, compatibilité avec tous les téléphones Bluetooth…
LES FONCTIONNALITES BLUETOOTH® DE VOTRE AUTORADIO
Ce système est équipé de la technologie Bluetooth®, qui permet d'établir des
échanges de données sans fils entre systèmes électroniques. Dans le cas présent, votre téléphone Bluetooth® est connecté avec l'autoradio. Ceci permet,
selon votre téléphone (*), de synchroniser le répertoire de votre téléphone dans
la mémoire de l'autoradio. Cela vous permettra par la suite d'appeler les personnes directement depuis ce répertoire, de voir le nom de l'appelant s'afficher...
Vous pouvez aussi décrocher, raccrocher, contrôler le volume de vos communications avec les boutons vert, rouge et la molette de l'autoradio. La reconnaissance vocale intégrée permet d'utiliser de nombreuses fonctions sans lâcher le
volant des mains.
(*) : Valable pour certains téléphones.
Pour plus d'informations, rendez-vous sur notre site :
" www.parrot.biz, rubrique Support Technique, Guides Utilisateurs "
Notice 5100 Zone A 09.01.06.qxp 10/01/2006 16:50 Page 16
Page 17

17
FACADE
La mise sous tension de l'autoradio se fait en appuyant sur le bouton rotateur.
Pour arrêter l'autoradio, appuyer 2 secondes sur ce même bouton.
Capteur infrarouge pour télécommande.
Tuner
CD/MP3
Phone
Avant
Arrière
Pause/Lecture/Mute
DISP
Menu
Touche d’éjection
Clavier
English
EspañolItaliano
Deutsch
Português
Dutch
Français
Notice 5100 Zone A 09.01.06.qxp 10/01/2006 16:50 Page 17
Page 18

18
SYSTÈME ANTIVOL
Sans la façade détachable, le système est non fonctionnel.
Retrait de la façade:
Appuyez sur le bouton d'éjection (en haut à droite) pour faire basculer la façade.
Déplacez latéralement la façade vers la gauche.
Tirez le côté droit de la façade hors de l'autoradio puis le côté gauche.
Rangez la façade dans l'étui et emportez-là avec vous.
Mise en place de la façade:
Insérez le côté gauche de la façade dans l'autoradio.
Insérez ensuite le côté droit de la façade dans l'autoradio.
Relevez la façade jusqu'à entendre le clic de fixation
Retrait de l'appareil complet:
Retirez la façade et le contour de l'autoradio.
Introduisez les clés dans les emplacements adéquats jusqu'à ce qu'elles restent bloquées.
Tirez sur l'appareil.
Notice 5100 Zone A 09.01.06.qxp 10/01/2006 16:50 Page 18
Page 19

19
English
EspañolItaliano
Deutsch
Português
Dutch
Français
GUIDE D'INSTALLATION
Note : Afin de garder en mémoire vos paramètres, veillez à ce que le 12V clé et le 12V permanent ne soient pas inversés.
Vous auriez à refaire tous vos réglages.
Notice 5100 Zone A 09.01.06.qxp 10/01/2006 16:50 Page 19
Purple/
Black
Purple Gray White Green
Stripe
(+) (-) (+) (-)(+) (-)
Gray/
Black
Stripe
External microphone
Fuse 15A
Amplifier
Connector
Rear Line-out (Gray)
1357
B
2468
A
B
A
White/
Black
Stripe
(+) (-)
Red
Black
Blue
Yellow
Green/
Black
Stripe
57
24 8
ISO Connector
To car battety (+)
Continuous + 12V DC
Ground Lead
Motor/Electric Antenna relay control Lead
Amplifier relay control Lead
Ignition key
+ 12 V DC When ON/ACC
R (Red)
L (White)
Right Speaker
(Rear)
Right Speaker
(Front)
Left Speaker
(Front)
Left Speaker
(Rear)
Page 20

20
TELECOMMANDE
Utilisation de la télécommande :
- Le bouton marche/arrêt permet de contrôler l'alimentation de l'autoradio.
- Source permet de passer d'un mode à l'autre : mode Tuner, CD/MP3 puis Phone.
- En mode CD/MP3, les flèches avant et arrière permettent de passer d'une chanson à
une autre avec un appui bref. Elles sont aussi utilisées pour simplement avancer/reculer
dans une chanson. En mode Tuner, elles vous permettent d'avancer ou de revenir sur le
choix de vos stations.
- Le bouton lecture/pause contrôle la lecture d'un CD.
- Lors d'un appel entrant, le bouton vert décroche, et le bouton rouge raccroche.
Vous pouvez aussi composer un numéro de téléphone depuis la télécommande.
Pour cela, passez en mode Phone (à l'aide du bouton source ou en appuyant directement
sur Phone sur la façade de l'autoradio), puis composez votre numéro en utilisant le clavier.
Une fois votre numéro composé, appuyez sur vert pour lancer l'appel.
Remarque :
le " + " s'obtient en appuyant 2 secondes sur le zéro.
Remplacement de la batterie de la télécommande :
Lorsque la télécommande ne fonctionne plus correctement ou que
vous avez des difficultés pour contrôler l'autoradio avec la télécommande, remplacez la batterie de la télécommande avec une nouvelle. Assurez-vous de la bonne polarité lors du remplacement.
1. Retirer le support de la batterie en appuyant sur le bouton.
2. Insérer la nouvelle batterie avec la face (+) vers vous. Remettre
le support en position.
ATTENTION :
La batterie doit être entreposée dans un endroit hors d'atteinte des enfants.
Si un enfant avale la batterie accidentellement, consulter immédiatement un docteur.
Ne pas recharger, ouvrir, chauffer ou jeter sur une source incandescente. Une de ces
actions peut entraîner des étincelles ou un début de feu.
Ne pas entreposer la batterie avec d'autres matériaux métallique.
Ceci peut entraîner des étincelles ou un début de feu.
Ne pas manipuler la batterie avec une pince à épiler. Ceci peut entraîner des étincelles ou
début de feu.
LES DIFFERENTS MODES DE FONCTIONNEMENT
Tout d'abord, vous devez mettre l'autoradio sous tension.
Pour cela, appuyez sur le bouton rotateur pour le mettre en marche.
Pour l'éteindre, appuyer 2 secondes sur ce même bouton.
Il existe 3 fonctionnalités majeures, accessibles directement depuis l'interface de l'autoradio:
mode Tuner, mode CD/mp3 et mode Phone.
Chaque mode permet une utilisation différente de l'autoradio :
MODE TUNER (OU
RADIO
)
Appuyez sur la touche Tuner pour écouter la radio.
Les flèches arrière et avant vous permettent de vous déplacer en pas
à pas pour la recherche de stations. Si vous restez appuyé sur une des deux
touches en continu, le système va se caler automatiquement sur la prochaine station.
Quand vous êtes sur une station, appuyez sur un chiffre du clavier de la façade
(appui long) pour lui assigner un raccourci. Ensuite, pour vous placer sur une
station mémorisée, appuyez simplement dessus pour la rappeler.
Lorsque la station est mémorisée, le chiffre raccourci attribué est affiché en
même temps que la fréquence de la station.
M
ODE CD/
MP3 (OU LECTURE DES DISQUES) :
Appuyez sur CD/mp3 pour basculer sur l'écoute d'un CD.
Vous pouvez vous déplacer de chanson en chanson sur le CD en appuyant sur
arrière ou avant. Pour un retour ou une avance rapide, maintenez arrière ou
avant appuyé pendant plus de 0,5 secondes.
Lors de la lecture d'un disque MP3, l'écran LCD affiche successivement les
informations suivantes : titre de la chanson, album et artiste,
et en permanence le temps écoulé.
Vous pouvez également sélectionner directement la chanson sur votre CD
depuis le clavier.
M
ODE PHONE (OU TÉLÉPHONIE) :
Appuyez sur Phone pour passer le système en mode téléphonie.
Une fois connecté avec votre téléphone Bluetooth®, vous retrouvez
les informations relatives au niveau de batterie et de réseau de votre portable.
Votre opérateur est aussi affiché (*).
L'accès à votre répertoire se fait simplement en
faisant tourner la molette.
Vous naviguez alors sur l'alphabet. Sélectionnez
votre lettre pour accéder aux contacts. Si vos contacts ont plus d'un numéro de
téléphone, appuyez encore sur la molette pour accéder à ces numéros,
puis bouton vert pour l'appeler. Pour consulter votre journal d'appels,
pressez le bouton rotateur. Les appels émis, manqués et reçus s'affichent.
(*) Ces fonctions dépendent de votre téléphone portable.
Notice 5100 Zone A 09.01.06.qxp 10/01/2006 16:50 Page 20
Page 21

21
MENUS
Un appui sur la touche Menu permet d'entrer dans le menu Paramètres.
Vous pouvez utiliser pleinement toutes les fonctionnalités de l'autoradio, paramétrer
l'écoute, l'éclairage et toutes les fonctionnalités Bluetooth®.
La navigation dans les menus se fait à l'aide de la molette.
Un appui sur cette molette permet l'accès au menu sélectionné, et vous permet de gérer
complètement la fonctionnalité sélectionnée.
TUNER :
Quelques informations à propos du RDS :
L'option RDS (RDS Scan) permet l'affichage du nom de la station radio, ainsi que la recherche de fréquences alternatives si le signal de réception s'affaiblit.
Cette fonctionnalité s'appelle aussi " RDS Alternative Frequencies (AF) ".
Une fois activée, la fonction " RDS Region " permet de conserver les paramètres de la station
courante lors de la recherche de fréquences alternatives.
Par exemple, une station de radio émettant des programmes locaux à une région ne sera pas
remplacée par la même station qui émet des programmes nationaux dans le cas d'une recherche de fréquences alternatives.
L'indicateur "Traffic Program" (RDS TP) permet de connaître si la station radio courante peut
diffuser des informations de traffic ou non.
Si la fonction "Traffic Alert" (RDS TA) est activée, et que la station courante peut fournir des
informations de traffic (indicateur "Traffic Program" activé),l'autoradio bascule automatiquement
en mode Tuner lorsque les informations de traffic sont diffusées.
Si la fonction "Traffic Alert" est activée et que la station courante ne fournit pas des informations de traffic (indicateur "Traffic Program" désactivé), 'écran suivant apparaît sur l'autoradio :
Description et Arborescence des menus
- CD/MP3 :
Permet de gérer l'écoute de vos CD : recherche, gestion de la lecture…
- CD/MP3
o Recherche MP3
Intelligente
A B C…
o Navigateur
o Mode répétition
Désactivé
Répéter une
o Mode aléatoire
Désactivé
Activé
English
Español
Italiano
Deutsch
Português
Dutch
Français
Notice 5100 Zone A 09.01.06.qxp 10/01/2006 16:50 Page 21
Page 22

22
TUNER
o Recherche
Tous (Mémorisation automatique)
Par type de programme (fonction PTY du RDS)
All Program Types
Pop Music
Rock Music
...
Documentaire
o Band
FM1
FM2
FM3
MW1
LW
o Sensibilité du tuner
Local
Distant
o Stereo / Mono
Stereo
Mono
o Options RDS (Radio Data System)
RDS Scan (function AF)
Désactivé
Activé
Traffic Alert (function TA)
Désactivé
Activé
RDS Region
Désactivé
Activé
Notice 5100 Zone A 09.01.06.qxp 10/01/2006 16:50 Page 22
Page 23
23
BLUETOOTH :
L'accès à ce Menu permet de gérer l'ensemble des fonctionnalités Bluetooth de votre autoradio :
gestion de votre répertoire, attribution des empreintes vocales, affichage, langue, sélection locuteur.
Répertoire : Accès au répertoire téléphonique mémorisé dans l'autoradio.
Journal d'appel : Liste vos appels manqué, émis, reçus.
Dans le sous-répertoire Paramètres : Les appareils jumelés, affiche le nom du téléphone Bluetooth avec lequel votre autoradio est connecté en mode mains-libres.
Une fois activée, la réponse automatique décroche immédiatement sur un appel entrant.
Certains téléphones demandent d'activer un certain mode avant le jumelage avec le téléphone Bluetooth (Appairer un téléphone), ceci afin de supporter un maximum de fonctionnalités.
L'Object Push permet, toujours pour certains téléphones, de recevoir des contacts lorsque la synchronisation automatique n'est pas disponible.
Note : Certaines fonctions dépendent de votre téléphone, et peuvent donc être désactivées.
Bluetooth
o Répertoire
A, B, C…
o Journal d'appels
Appels manqués
Appels émis
Appels reçus
o Commandes vocales
Répertoire
Mots clés
Sélectionner la reconnaissance vocale
o Préférences
Volume
Sonnerie
Téléphone
Microphone
Réponse automatique
Information
Hotline
Préférences avancés
Jumeler un téléphone
Ordre de tri
Effacer Contacts
Object Push
English
Español
Italiano
Deutsch
Português
Dutch
Français
Notice 5100 Zone A 09.01.06.qxp 10/01/2006 16:50 Page 23
Page 24

PRÉFÉRENCES :
Ce menu vous permet de sélectionner votre langue, la couleur de l'affichage, ainsi que toutes les fonctions audio afin d'optimiser l'écoute dans votre véhicule.
o Audio o Affichage o Langue
Contraste Automatique
Basses Luminosité English
Aiguës Couleur de rétro éclairage (bleu ciel par défaut) ...
Balance Avant-Arrière Blanc
Balance Gauche-Droite Bleu
Egaliseur Jaune
Désactivé Rouge
Rock Bleu ciel
Classique Violet
Pop Ambre
Loudness
Désactivé
Activé
Menus parlés
Bip
Désactivé
Activé
24
Notice 5100 Zone A 09.01.06.qxp 10/01/2006 16:50 Page 24
Page 25

25
FONCTIONS EN MODE TELEPHONIE : Mains-libres (Bluetooth)
Appuyer sur Phone pour vous mettre en mode téléphonie.
Les téléphones supportant Bluetooth® utilisent soit le profil Handsfree, soit le profil Headset pour
transférer la communication sur l'autoradio. Le profil Handsfree est le profil offrant le plus de fonctionnalités.
Lorsque vous utilisez votre autoradio en mode Tuner ou en mode CD/mp3, si quelqu'un vous
appelle, l'autoradio bascule automatiquement en mode téléphonie. A la fin de la communication,
l'autoradio repasse en mode Tuner ou en mode CD/mp3. Aucune action de l'utilisateur n'est
nécessaire. De même lorsque vous effectuez un appel depuis l'autoradio
Appairage :
L'appairage est la première connexion entre votre téléphone Bluetooth® et l'autoradio. Cette opération est initiée depuis votre téléphone. Lancez une recherche des périphériques Bluetooth®. Une
fois " Parrot Autoradio " trouvé, sélectionnez-le, et votre téléphone vous demande alors d'entrer
un code de 4 chiffres. Entrez 1234 et validez... Après quelques échanges de données, vous êtes
maintenant connecté Bluetooth® avec l'autoradio. Pour obtenir plus de fonctionnalités, certains
téléphones nécessitent d'activer un mode spécial avant le jumelage. Référez-vous au menu
Bluetooth, paramètres, paramètres avancés et appairer un téléphone.
Synchronisation du répertoire du téléphone :
Avec certains téléphones Bluetooth, le répertoire du téléphone est automatiquement synchronisé
dans la mémoire du kit. Si votre téléphone ne supporte pas la synchronisation automatique, vous
pouvez aussi utiliser la fonctionnalité Object Push de votre téléphone afin d'envoyer des contacts
de votre téléphone vers l'autoradio par Bluetooth®. Lors de la synchronisation du répertoire,
l'icône Bluetooth® défile sur l'écran. Référez-vous à la notice de votre téléphone ou notre site internet pour savoir comment procéder : " www.parrot.biz rubrique support technique, guides utilisateurs "
Décrocher / Raccrocher :
Pour décrocher, appuyez sur le bouton vert situé au-dessus de la molette. Une fois votre conversation terminée, appuyez sur le bouton rouge pour raccrocher.
Mode discret : Pendant une communication, appuyez sur le bouton vert pour basculer la communication sur le téléphone. Appuyez une nouvelle fois sur le bouton vert pour repasser en mode
mains-libres. Fonctionnalité disponible uniquement sur les téléphones ayant le profile Handsfree.
Affichage de l'appelant :
Lors d'un appel entrant, le nom ou le numéro de votre correspondant s'affiche. Fonctionnalité disponible sur certains téléphones.
Passer un appel depuis l'interface de l'autoradio :
Deux possibilités s'offrent à vous :
Passez en mode Phone. Appeler en composant directement le numéro de téléphone à partir du
clavier, puis appuyez sur le bouton vert. Pour composer un numéro avec un " + " comme préfixe,
appuyez deux fois rapidement sur le zéro.
Vous pouvez également utiliser la reconnaissance vocale (voir ci-dessous).
Reconnaissance vocale :
Vous pouvez passer des appels en utilisant la reconnaissance vocale de l'autoradio. Pour cela,
vous devez avoir des contacts mémorisés dans la mémoire du kit (synchronisation automatique
du répertoire ou envoi de contact un par un depuis le téléphone). Vous devez aussi au préalable
avoir enregistré les mots clés : maison, travail, portable… ainsi que le mot magique : téléphone.
Une fois les noms enregistrés, les mots clés et le mot magique, vous pouvez
appeler un correspondant de la façon suivante :
Dites : Téléphone… Bip… Anna… Bip… Maison… et vous appelez automatiquement le numéro
correspondant à Maison pour le contact Anna.
De même, si Anna vous appelle, vous entendrez " Anna ". Appuyer alors sur le bouton vert pour
décrocher. Raccrochez l'appel en appuyant sur le bouton rouge. Vous retournez automatiquement
en mode Tuner, CD/mp3 ou Téléphone.
Vous pouvez aussi utiliser la séquence suivante pour utiliser la reconnaissance vocale,
mais sans mots clés :
Appuyez sur le bouton vert, la radio ou le CD se coupe. Vous allez entendre un bip. Dites le nom
de votre correspondant à appeler après ce bip, et spécifiez éventuellement maison, travail ou
bureau (si disponible).
Remarque :
Lors de l'enregistrement des mots clés et du mot magique, vous devez vous mettre votre véhicule
dans un endroit sans bruit, fenêtres fermées et pas de ventilation. Ceci est nécessaire pour un
meilleur taux de reconnaissance.
English
Español
Italiano
Deutsch
Português
Dutch
Français
Notice 5100 Zone A 09.01.06.qxp 10/01/2006 16:50 Page 25
Page 26

26
MISE A JOUR DE VOTRE AUTORADIO
Afin de profiter des dernières améliorations (nouveaux téléphones compatibles, nouvelles
fonctionnalités…), vous pouvez mettre à jour votre autoradio par Bluetooth.
Pour cela, activez l'option dans : Bluetooth, Paramètres, Paramètres avancés, Software
update, puis utilisez un ordinateur équipé de Bluetooth afin de charger la dernière version
sur votre autoradio (disponible sur notre site web).
Rendez-vous sur notre site web pour plus d'informations : www.parrot.biz.
DEPANNAGE
En cas de dysfonctionnement, déconnectez immédiatement l'autoradio. Cet appareil
ne doit pas être utilisé dans des conditions anormales, comme par exemple, en
absence de son ou en présence de mauvaise odeurs, afin d'éviter tout risque d'électrocution. N'essayez en aucun cas de réparer vous-même l'appareil.
Général :
L'autoradio ne se met pas en route.
Le contact du véhicule est coupé. Mettez la clé de contact dans la position
ACC (en marche). Vérifiez la connectique. Le fusible est fondu.
Remplacez le fusible.
Pas de son:
Vérifiez que le son de l'autoradio n'est pas au minimum.
Vérifiez également que la fonction Mute n'est pas activée (coupure du son).
Radio :
Trop de bruit sur une station.
La station que vous écoutez est trop éloignée de son signal optimal.
Choisissez une autre station avec un meilleur signal.
Perte des stations présélectionnées.
L'alimentation de l'autoradio n'est pas correcte. Vérifiez que le câble de la
batterie est correctement installé (12V clé et 12V permanent).
Disque :
Le disque est inséré mais n'est pas joué.
Le disque est à l'envers.
Le disque doit être inséré avec le nom de l'artiste/CD vers le haut.
Le disque est sale ou endommagé.
Nettoyez le disque ou changez de CD.
Le CD saute ou la qualité du son est mauvaise.
Le disque est sale ou endommagé.
Nettoyez le disque ou changez de CD.
Les vibrations du véhicule engendrent des sauts de son.
L'angle d'installation de l'autoradio doit être inférieur à 30°.
Vérifiez que l'installation de l'appareil est stable dans l'emplacement
prévu à cet effet.
CD/MP3 : message d'erreurs.
L'icône ci-dessous s'affiche : Cela signifie qu'il n'y a pas de CD dans le lecteur.
L'icône ci-dessous s'affiche : Cela signifie que votre CD ne contient pas des fichiers
au format MP3.
SPECIFICATIONS TECHNIQUES
CD / CD-R / CD-RW / MP3, ID3 Tag.
Manual flip-down front panel.
Output power : 4x45W.
Line out : 4 channel x4V/4ch x2V
DSP : Classic, rock, pop, flat.
Power / Speaker wire : ISO.
Ecran couleur.
Flashage par Bluetooth pour mise à jour à la dernière version.
Micro externe.
Utilise les haut-parleurs de votre voiture pour une meilleure écoute. Bluetooth®.
Profils Bluetooth® supportés:
- Handsfree 0.96 et 1.0.
- Headset 1.0.
- Object Push 1.0.
- Synch ML 1.0.
HOTLINE
- Notre hot-line se tient à votre disposition.
Vous pouvez la contacter par mail ou par téléphone
(permanence du lundi au vendredi de 9h à 18h, heures française).
- Rendez-vous sur notre site web www.parrot.biz pour pls d’information.
Notice 5100 Zone A 09.01.06.qxp 10/01/2006 16:51 Page 26
Page 27

Français English
Italiano
Deutsch
Português
27
Rhythm n'Blue
Manual de empleo
Español
Dutch
Notice 5100 Zone A 09.01.06.qxp 10/01/2006 16:51 Page 27
Page 28

28
INFORMACIÓN DE SEGURIDAD
PRECAUCIONES
Se utiliza únicamente con un sistema eléctrico de 12V y puesta a tierra negativa.
Al cambiar un fusible, utilice otro del mismo amperaje. Si emplea un fusible con un amperaje superior, puede averiar el sistema.
No desmonte el sistema. El haz láser del lector es peligroso para la vista.
Cerciórese de que no entran en el sistema objetos extraños: podrían averiarlo o engendrar
problemas de seguridad como electrocuciones o exposición al láser.
Si ha expuesto su vehículo durante un largo período de tiempo a temperaturas muy altas o
muy bajas, espere a que se recupere la temperatura en el habitáculo antes de utilizar
el aparato.
El volumen sonoro de la autorradio no debe ser muy fuerte: debe poder oír las advertencias
del exterior.
NOTAS SOBRE LOS CD
Escuchar un CD estropeado o con polvo puede provocar cortes durante la escucha.
Sujete los CD como indica la ilustración de al lado.
No toque la parte no impresa.
No haga marcas de ninguna naturaleza en la parte legible del CD.
No exponga el CD ni a la luz directa del sol ni a un entorno demasiado caliente.
Limpie los CD sucios desde el centro hacia el exterior, con un trapo adecuado. No utilice
nunca disolventes como benceno o alcohol.
Este autorradio no puede leer CD de 3'' (8 cm).
No utilice nunca un CD de 3'', ni discos de forma irregular. Podrían bloquearse y provocar averías.
ANTES DE LA PUESTA EN MARCHA
No ponga el volumen demasiado alto, podría no oír los avisos procedentes del exterior.
Antes de hacer nada en el sistema, debe parar el coche.
ATENCIÓN
No retire la tapa del aparato. No trate de reparar el sistema usted mismo. Consulte al
comercio en el que compró el aparato o a un técnico especializado.
PRESENTACIÓN
Gracias por haber seleccionado una autorradio de la marca Parrot.
Va a disfrutar de una autorradio Bluetooth® CD/MP3 con kit de manos libres integrado.
Dispone de todas las funciones de un kit de manos libres de gama alta: sincronización de
la agenda, presentación del nombre del interlocutor, calidad de audio excepcional en el
habitáculo del coche, gestión de llamadas, compatibilidad con todos los teléfonos
Bluetooth…
FUNCIONES BLUETOOTH® DE LA AUTORRADIO
Este sistema va equipado con la tecnología Bluetooth®, que permite intercambiar datos,
de modo inalámbrico, entre sistemas electrónicos. En el caso actual, su teléfono
Bluetooth® está conectado con la autorradio. Ello permite, en función del teléfono (*), sincronizar la agenda del teléfono con la memoria de la autorradio, lo que le permitirá
hacer llamadas directamente desde la agenda, ver el nombre del interlocutor... La comunicación se realizará de forma natural por medio de micrófono, y por los altavoces del vehículo. Puede también descolgar, colgar, controlar el volumen de la comunicación con los
botones verde, rojo y la rueda de la autorradio. El reconocimiento de voz integrado le
permite utilizar numerosas funciones sin soltar las manos del volante.
(*) : Válido para ciertos teléfonos.
Si desea más información, visite nuestro sitio:
"www.parrot.biz, apartado Asistencia técnica, Guías de los usuarios"
Notice 5100 Zone A 09.01.06.qxp 10/01/2006 16:51 Page 28
Page 29

29
FRONTAL
Para dar corriente a la autorradio se pulsa el botón giratorio.
Para parar la autorradio, pulse ese mismo botón durante 2 segundos.
Detector infrarrojo para el telemand
Tuner
CD/MP3
Teléfono
Avance
Retroceso
Pausa/Lectura/Silencio
DISP
Menú
Tecla de expulsión
Teclado
Français English
Italiano
Deutsch
Português
Español
Dutch
Notice 5100 Zone A 09.01.06.qxp 10/01/2006 16:51 Page 29
Page 30

30
SISTEMA ANTIRROBO
Sin el frontal desmontable, el sistema no funciona.
Extracción del frontal
Pulse el botón de expulsión (en la parte superior derecha) para hacer bascular el frontal.
Desplace lateralmente el frontal hacia la izquierda.
Extraiga el lado derecho del frontal de la autorradio y luego el lado izquierdo.
Coloque el frontal en el estuche y lléveselo.
Colocación del frontal
Inserte el lado izquierdo del frontal en la autorradio.
Inserte el lado derecho del frontal en la autorradio.
Suba el frontal hasta oír el clic de enganche.
Extracción de todo el aparato
Retire el frontal y el contorno de la autorradio.
Introduzca las llaves en los emplazamientos adecuados hasta que estén bloqueados.
Saque el aparato.
Notice 5100 Zone A 09.01.06.qxp 10/01/2006 16:51 Page 30
Page 31

31
Français English
Italiano
Deutsch
Português
Español
Dutch
GUÍA DE INSTALACIÓN
Nota: Para mantener en la memoria los parámetros, procure que los 12V de la llave y los 12V permanentes no estén invertidos.
Tendría que rehacer todas las regulaciones.
Notice 5100 Zone A 09.01.06.qxp 10/01/2006 16:51 Page 31
1357
B
2468
A
B
57
24 8
ISO Connector
External microphone
Fuse 15A
Connector
Rear Line-out (Gray)
R (Red)
L (White)
Amplifier
A
Purple/
Black
Purple Gray White Green
Stripe
(+) (-) (+) (-)(+) (-)
Right Speaker
(Rear)
Gray/
Black
Stripe
Right Speaker
(Front)
White/
Black
Stripe
(+) (-)
Left Speaker
(Front)
Red
Black
Blue
Yellow
Green/
Black
Stripe
Left Speaker
(Rear)
To car battety (+)
Continuous + 12V DC
Ground Lead
Motor/Electric Antenna relay control Lead
Amplifier relay control Lead
Ignition key
+ 12 V DC When ON/ACC
Page 32

32
TELEMANDO
Empleo del telemando:
- El botón de marcha/parada permite controlar la alimentación de la autorradio.
- Fuente permite pasar de un modo a otro: modo Radio, CD/MP3 o Teléfono.
- En modo CD/MP3, las flechas de avance y retroceso permiten pasar de una canción a
otra con una breve pulsación. Se emplean también para avanzar o retroceder por una
canción. En modo Radio, le permiten avanzar o volver sobre las emisoras elegidas.
- El botón lectura/pausa controla la lectura de un CD.
- Al entrar una llamada, el botón verde descuelga, y el botón rojo cuelga.
- También puede marcar un número de teléfono desde el telemando. Para ello, pase al
modo Teléfono (mediante el botón origen o pulsando directamente sobre Teléfono en la
parte frontal de la autorradio), marque luego el número con el teclado.
Una vez marcado el número, pulse el botón verde para llamar.
Observación:
el "+" se obtiene pulsando el cero durante 2 segundos.
Cambio de la pila del telemando:
Cuando el telemando ya no funcione correctamente o tenga
problemas para controlar la autorradio con el telemando,
cambie la pila del mismo. Cerciórese de que la coloca con
los polos en la posición correcta.
1. Retire el soporte de la pila pulsando el botón.
2. Inserte la nueva pila con la cara (+) mirando hacia usted.
Vuelva a colocar el soporte en su sitio.
ATENCIÓN:
La pila debe guardarse en un lugar fuera del alcance de los niños. Si un niño se
traga la pila sin querer, acuda inmediatamente a un médico.
No recargue, abra, ni caliente la pila, ni la eche en una fuente incandescente.
Cualquiera de estas acciones podría provocar chispas o el inicio de un incendio.
No guarde la pila con otros materiales metálicos, ya que ello puede provocar chispas o
un incendio.
No manipule la pila con una pinza de depilar. Puede hacer saltar chispas o provocar un incendio.
DISTINTOS MODOS DE FUNCIONAMIENTO
En primer lugar, debe encender la autorradio. Para ello, pulse el botón giratorio.
Para apagarlo, pulse ese mismo botón durante un segundo.
Existen 3 funciones principales, a las que se puede acceder directamente desde la autorradio:
modo Radio, modo CD/mp3 y modo Teléfono.
Cada modo permite un empleo distinto de la autorradio:
MODO TUNER (O RADIO)
Pulse la tecla Radio (Tuner) para escuchar la radio. Las flechas de retroceso y
avance le permitirán desplazarse paso a paso para buscar emisoras.
Si mantiene pulsada una de estas teclas, el sistema pasará
automáticamente a la emisora siguiente. Cuando haya sintonizado una
emisora, pulse un dígito del teclado del frontal (pulsación larga) para
asignarle un atajo. A continuación, para sintonizar una emisora ya
memorizada, pulse simplemente encima para sintonizarla. Si ha
memorizado una emisora, al mismo tiempo que aparece la frecuencia de
la emisora, lo hace también el dígito atribuido a la misma.
M
ODO CD/MP3 (O LECTURA DE DISCOS):
Pulse en CD/mp3 para pasar a escuchar un CD. Puede desplazarse de canción
en canción por el CD mediante la tecla de avance o retroceso.
Para retroceder o avanzar rápidamente, mantenga pulsada la tecla de
retroceso o avance durante más de 0,5 segundos.
Durante la lectura de un disco MP3, la pantalla LCD muestra sucesivamente
la información siguiente: título de la canción, álbum y artista, y el tiempo
transcurrido, ermanentemente. También puede seleccionar directamente la
canción del CD desde el teclado.
M
ODO PHONE (O TELÉFONO):
Pulse en Teléfono (Phone) para poner el sistema en modo teléfono. Una vez
conec tado con el teléfono Bluetooth®, encontrará información referente al
nivel de carga de la pila y de red del móvil. También aparece el operador (*).
El acceso a la agenda se realiza sencillamente girando la rueda. Entonces, nave
gará por el alfabeto.
Seleccione la letra con la que acceder a los contactos. Si el contacto dispone de
más de un número de teléfono, pulse la rueda para acceder a esos números, y
luego el botón verde para llamar.
Para consultar el diario de llamadas, pulse el botón giratorio.
Aparecen las llamadas emitidas, perdidas y recibidas.
(*) Estas funciones dependen de su teléfono móvil.
Notice 5100 Zone A 09.01.06.qxp 10/01/2006 16:51 Page 32
Page 33

33
MENÚS
Al pulsar la tecla Menú se entra en el menú de Parámetros.
Puede utilizar plenamente todas las funciones de la autorradio, parametrizar la escucha, la
iluminación y todas las funciones Bluetooth®.
La navegación por los menús se realiza mediante la rueda.
Al pulsar sobre ella se accede al menú seleccionado, lo que permite gestionar totalmente la
función seleccionada.
RADIO (TUNER):
Alguna información acerca de RDS:
- La opción RDS (RDS Scan) permite ver el nombre de la emisora de radio, así como
buscar las frecuencias alternativas si se debilita la señal de recepción.
Esta función se llama también "RDS Frecuencias alternativas (AF)".
- Una vez activada, la función "Región RDS" permite conservar los parámetros de la emisora sintonizada durante la búsqueda de frecuencias alternativas.
Por ejemplo, en el caso de una búsqueda de frecuencias alternativas, una emisora de
radio que emite programas locales en una región no se cambiará por la misma emisora
que emite programas nacionales.
- El indicador "Programa de tráfico" (RDS TP) permite saber si la emisora de radio sintonizada puede difundir información sobre el tráfico o no.
-
Si se activa la función "Alerta de tráfico" (RDS TA), y la emisora sintonizada puede suminis-
trar información sobre el tráfico
(está activado el indicador "Programa de tráfico"), la autorradio conmuta automáticamente
al modo radio (tuner) cuando se emite la información sobre el tráfico.
- Si se activa la función "Alerta de tráfico" y la emisora sintonizada no proporciona información del tráfico (está desactivado el indicador "Programa de tráfico"), en la autorradio
aparece la pantalla siguiente:
Menu description and structure
- CD/MP3 :
Permite gestionar la escucha de los CD: búsqueda, gestión de la lectura…
- CD/MP3
o Búsqueda MP3
Inteligente
A B C…
o Navegador
o Modo repetición
Desactivado
Repetir una
o Modo aleatorio
Desactivado
Activado
Français
English
Italiano
Deutsch
Português
Español
Dutch
Notice 5100 Zone A 09.01.06.qxp 10/01/2006 16:51 Page 33
Page 34

34
TUNER
o Búsqueda
Todas (Memorización automática)
Por tipo de programa (función PTY del RDS
)
Todos los tipos de programas
Música Pop
Música Rock
...
Documentales
o Emisoras
FM1
FM2
FM3
MW1
LW
o Sensibilidad de la radio
Local
Distancia
o Estéreo / Mono
Estéreo
Mono
o Opciones RDS (Radio Data System)
RDS Scan (función AF)
Desactivada
Activada
Alerta de tráfico (función TA)
Desactivada
Activada
Región RDS
Desactivada
Activada
Notice 5100 Zone A 09.01.06.qxp 10/01/2006 16:51 Page 34
Page 35

35
BLUETOOTH :
El acceso a este menú permite gestionar todas funciones Bluetooth de la autorradio:
gestión de la agenda, atribución de voces, presentación, idioma.
- Agenda: Acceso a la agenda telefónica memorizada en la autorradio.
- Diario de llamadas: Presenta en una lista las llamadas perdidas, emitidas y recibidas.
- En la subcarpeta Parámetros:
Aparatos acoplados presenta el nombre del teléfono Bluetooth al que está conectada la autorradio en modo manos libres.
Una vez activada, la respuesta automática descuelga inmediatamente las llamadas que entran.
Algunos teléfonos piden que se active un determinado modo antes de acoplarse al teléfono Bluetooth (Emparejar un teléfono), para disponer de un máximo de funciones.
Objeto Push permite, sólo en algunos teléfonos, recibir contactos cuando no se dispone de la sincronización automática.
Bluetooth
o Agenda
A, B, C…
o Diario de llamadas
Llamadas perdidas
Llamadas emitidas
Llamadas recibidas
o Mandos de voz
Agenda
Palabras clave
Seleccionar el reconocimiento de voz
o Parámetros
Volumen
Sonidos
Teléfono
Micrófono
Respuesta automática
Información
Línea directa
Parámetros avanzados
Aparatos acoplados
Orden de clasificación (apellido - nombre, nombre - apellido)
Borrar Contactos
Objeto Push
Français
English
Italiano
Deutsch
Português
Español
Dutch
Notice 5100 Zone A 09.01.06.qxp 10/01/2006 16:51 Page 35
Page 36

36
PREFERENCES :
Este menú le permite seleccionar el idioma, el color de la pantalla, así como todas aquéllas funciones de audio que le permitirán optimizar la escucha dentro del vehículo.
o Audio o Pantalla o Idioma
Contraste Automático
Graves Luminosidad Inglés
Agudos Color de la retroiluminación (azul celeste por defecto) ...
Balance Delante-Detrás Blanco
Balance Izquierda-Derecha Azul
Ecualizador Amarillo
Desactivado Rojo
Rock Azul celeste
Clásico Violeta
Pop Ámbar
Resonancia
Desactivada
Activada
Menús hablados
Pitido
Desactivado
Activado
Notice 5100 Zone A 09.01.06.qxp 10/01/2006 16:51 Page 36
Page 37

37
FUNCIONES EN MODO TELEFONÍA: Manos libres (Bluetooth)
Pulsar en Teléfono (Phone) para pasar al modo de telefonía.
Los teléfonos que incorporan Bluetooth® utilizan el perfil Handsfree o el perfil Headset
para transferir la comunicación a la autorradio. El perfil Handsfree es el perfil que
ofrece más funciones.
Cuando utilice la autorradio en modo Radio (Tuner) o en modo CD/mp3, si alguien
le llama, la autorradio pasa automáticamente al modo de telefonía. Acabada la comunicación, la autorradio regresa al modo Radio o al modo CD/mp3. No hace falta que
el usuario haga nada. Lo mismo sucede cuando se realiza una llamada desde la
autorradio.
Emparejamiento:
El emparejamiento es la primera conexión que se realiza entre el teléfono Bluetooth®
y la autorradio. Esta operación se realiza desde el teléfono. Realice una búsqueda de
periféricos Bluetooth®. Cuando encuentre "Autorradio Parrot", selecciónelo; el telé-
fono le pedirá un código de 4 dígitos. Teclee 1234 y confirme. Una vez realizado el
intercambio de datos, ya habrá conectado Bluetooth® con la autorradio. Para obtener más funciones, algunos teléfonos necesitan activar un modo especial antes de realizar el acoplamiento. Consulte el menú Bluetooth, parámetros, parámetros avanzados
y emparejar un teléfono.
Sincronización de la agenda del teléfono:
Con algunos teléfonos Bluetooth, se puede sincronizar automáticamente la agenda del
teléfono en la memoria del equipo. Si el teléfono no soporta la sincronización automática, también puede usar la función Object Push del teléfono para enviar contactos
del teléfono hacia la autorradio mediante Bluetooth®. Durante la sincronización de la
agenda, aparece el icono Bluetooth® en pantalla.
Para saber cómo actuar, consulte el manual del teléfono o nuestro sitio de internet:
"www.parrot.biz dentro del apartado de asistencia técnica, guías de los usuarios"
Descolgar / Colgar:
Para descolgar, pulse el botón verde situado debajo de la rueda. Acabada la conversación, pulse el botón rojo para colgar.
Modo discreto:
Durante una comunicación, pulse el botón verde para pasar la comunicación al teléfono.
Pulse de nuevo el botón verde para volver al modo de manos libres. Esta función sólo está
disponible en aquellos teléfonos que dispongan del perfil Handsfree.
Mostrar el interlocutor:
Al entrar una llamada, aparece el nombre o el número del interlocutor. Esta función sólo está
disponible en algunos teléfonos.
Pasar una llamada desde la autorradio:
Hay dos posibilidades: Pase al modo Teléfono (Phone). Llame marcando directamente
el número de teléfono a través del teclado y después pulse el botón verde. Para marcar un número con un "+" como prefijo, pulse el cero dos veces seguidas y rápidamente. También puede utilizar el reconocimiento de voz (ver a continuación).
Reconocimiento de voz:
Puede pasar llamadas mediante el reconocimiento de voz de la autorradio. Para ello,
debe haber memorizado los contactos en la memoria del kit (sincronización automática de la agenda o envío de contacto desde un teléfono). También debe haber grabado previamente las palabras clave: domicilio, trabajo, despacho, etc. así como la
palabra mágica: teléfono.
Una vez grabados los nombres, las palabras clave y la palabra
mágica, ya puede llamar a quien desee del modo siguiente:
Diga: Teléfono… Bip… Ana… Bip… Ana… y llamará automáticamente al número del
domicilio del contacto Ana.
Asimismo, si es Ana quien llama, oirá "Ana". Para descolgar, pulse el botón verde.
Para colgar pulse el botón rojo. Volverá automáticamente al modo Radio, CD/mp3 o
Teléfono.
También puede emplear la secuencia siguiente para utilizar el reconocimiento de voz,
pero sin palabras clave:
Pulse el botón verde, se corta la radio o el CD. Oirá un pitido. Diga, después del
pitido, el nombre del interlocutor al que desea llamar e indique, de ser necesario,
domicilio, trabajo o despacho (si está disponible).
Observaciones:
Durante la grabación de las palabras clave y de la palabra mágica, debe situar el
coche en un lugar sin ruido, con las ventanas cerradas y sin ventilación. Ello es necesario para lograr una mejor tasa de reconocimiento de voz.
Français English
Italiano
Deutsch
Português
Español
Dutch
Notice 5100 Zone A 09.01.06.qxp 10/01/2006 16:51 Page 37
Page 38

38
ACTUALIZACIÓN DE LA AUTORRADIO
Para disfrutar de las últimas mejoras (nuevos teléfonos compatibles, nuevas funciones, etc.) puede hacer que Bluetooth actualice la autorradio. Para ello, active la
opción en: Bluetooth, Parámetros, Parámetros avanzados, Actualización de software
y luego utilice un ordenador equipado con Bluetooth con el que pueda cargar la última
versión en la autorradio (disponible en nuestro sitio web).
Si desea más información, visite nuestro sitio web: www.parrot.biz
REPARACIÓN DE AVERÍAS
En caso de anomalías, desconecte inmediatamente la autorradio. Este aparato no se
debe utilizar en condiciones anormales, como por ejemplo,
si no suena o huele mal, a fin de evitar cualquier riesgo de electrocución. Nunca
intente reparar el aparato usted mismo.
General:
La autorradio no se enciende.
No está activado el contacto del vehículo. Introduzca la llave de
contacto en la posición ACC (en marcha). Compruebe las conexiones.
El fusible puede haberse fundido. Cambie el fusible.
No suena.
Compruebe que el volumen de la autorradio no está puesto al mínimo.
Compruebe también que no está activada la función Mute (corte de sonido).
Radio:
Una emisora emite mucho ruido.
La señal de la emisora que escucha es débil; es decir, la emisora está
muy alejada. Elija otra emisora con mejor señal.
Pérdida de las emisoras preseleccionadas.
La alimentación de la autorradio no es correcta. Compruebe si el cable de la
batería está bien instalado (12V de la llave y 12V permanentes).
Disco:
Se introduce el disco, pero no suena.
El disco está colocado al revés. Debe insertarse con el nombre del artista/CD
mirando hacia arriba.
El disco está sucio o deteriorado. Limpie el disco o cambie de CD.
Salta la pista o la calidad del sonido no es buena.
El disco está sucio o deteriorado. Limpie el disco o cambie de CD.
Las vibraciones del vehículo producen saltos en el sonido.
El ángulo de instalación de la autorradio debe ser inferior a 30°.
Compruebe que la instalación del aparato es estable en el emplazamiento
previsto a tal efecto.
CD/MP3 : mensaje de errores.
Aparece el icono de más abajo: Significa que no hay ningún CD en el lector.
Aparece el icono de más abajo: Significa que el CD no contiene archivos con formato MP3.
ESPECIFICACIONES TÉCNICAS
CD / CD-R / CD-RW / MP3, ID3 Tag.
Frontal desmontable manualmente.
Potencia de salida: 4x45W.
Salida: 4 canales x4V/4canales x2V
DSP: Clásica, rock, pop, flat.
Cable del altavoz / alimentación: ISO.
Pantalla a color.
Actualización a la última versión mediante Bluetooth.
Micrófono externo.
Emplea los altavoces del coche para oír mejor.
Bluetooth®.
Perfiles Bluetooth® soportados:
- Handsfree 0.96 et 1.0.
- Headset 1.0.
- Object Push 1.0.
- Synch ML 1.0.
LÍNEA DIRECTA
- Nuestra línea directa está a su entera disposición. Puede ponerse en contacto con
nosotros por correo electrónico o por teléfono.
Estamos de lunes a viernes de 9:00 a 18:00 h (hora francesa).
- Si desea más información, también puede ponerse en
contacto con nuestro sitio Internet www.parrot.biz.
Notice 5100 Zone A 09.01.06.qxp 10/01/2006 16:51 Page 38
Page 39

Français English
Español
Deutsch
Português
39
Dutch
39
Rhythm n'Blue
Manuale d'istruzioni
Italiano
Notice 5100 Zone A 09.01.06.qxp 10/01/2006 16:51 Page 39
Page 40

40
INFORMAZIONI DI SICUREZZA
PRECAUZIONI
Da utilizzare esclusivamente con tensione a 12 V con messa a terra negativa.
Durante la sostituzione di un fusibile, utilizzare un amperaggio con lo stesso valore del fusibile da sostituire. L'utilizzo di un fusibile con un amperaggio superiore può danneggiare il
sistema.
Non smontare il sistema. Il raggio laser del lettore può danneggiare la vista.
Assicurarsi di non introdurre oggetti estranei nel sistema : l'introduzioni di oggetti esterni
può causare un malfunzionamento del sistema o provocare problemi di sicurezza quali folgorazione o esposizione al laser.
Se il veicolo è stato lasciato esposto per un periodo prolungato a temperature molto elevate o molto basse,
si consiglia di aspettare che la temperatura a bordo del veicolo si sia ristabilita prima di utilizzare l'apparecchio.
Il volume audio dell'autoradio non deve essere troppo elevato: il guidatore deve poter
udire i segnali provenienti dall'esterno.
NOT
A SUI CD
Ascoltare un CD rovinato o polveroso può provocare delle interruzioni durante l'ascolto.
Maneggiare i CD come illustrato di seguito.
Non toccare il lato non stampato.
Non graffiare o segnare in alcun modo il lato leggibile del CD.
Non esporre un CD alla luce diretta del sole o conservarlo in un ambiente troppo caldo.
Pulire i CD partendo dal centro verso l'esterno e utilizzare un tessuto adatto. Non utilizzare
mai solventi, come ad esempio benzene o alcol.
Questa autoradio non supporta i CD da 3" (8 cm).
Non utilizzare mai un CD da 3" o dischi con forma irregolare. Potrebbero rimanere bloccati e provocare dei malfunzionamenti nel sistema.
PRIMA DELL'UTILIZZO
Non regolare il volume a un livello troppo elevato poiché potrebbe essere impossibile udire i suoni provenienti dall'esterno.
È necessario arrestare la vettura prima di intervenire sul sistema.
A
TTENZIONE
Non aprire il coperchio dell'apparecchio. Non tentare di aggiustare il sistema da sé ma
rivolgersi al rivenditore autorizzato o a un tecnico specializzato.
PRESENTAZIONE
Grazie di aver scelto un'autoradio di marca Parrot:
un'autoradio Bluetooth® CD/MP3 con kit mani libere integrato. Sono disponibili tutte le
funzioni di un kit mani libere di alta qualità: sincronizzazione della rubrica, visualizzazione del nome dell'interlocutore, qualità audio eccezionale nell'abitacolo della vettura,
gestione dell'avviso di chiamata, compatibilità con tutti i telefoni Bluetooth..
LE FUNZIONALITÀ BLUETOOTH® DELL'AUTORADIO
Questo sistema è dotato di tecnologia Bluetooth® che consente uno scambio di dati senza
fili tra diversi dispositivi elettronici. In questo caso, è possibile collegare un telefono
Bluetooth® all'autoradio. Ciò consente all'utente, in base al telefono in uso (*), di sincronizzare la rubrica del telefono con la memoria dell'autoradio. Pertanto, sarà dunque possibile effettuare le chiamate direttamente dalla rubrica sull'autoradio e visualizzare il nome
del chiamante... La comunicazione avviene naturalmente tramite microfoni e tramite gli
altoparlanti della vettura. È inoltre possibile rispondere alle chiamate, riagganciare, regolare il volume delle comunicazioni tramite i pulsanti verdi, rosso e la manopola dell'autoradio. Il sistema di riconoscimento vocale integrato consente di utilizzare numerose funzioni
senza spostare le mani dal volante.
(*) : disponibile per alcuni modelli di telefono.
Per maggiori informazioni, consultare il sito Web :
" www.parrot.biz, alla voce Supporto tecnico, Manuali per l'utente "
Notice 5100 Zone A 09.01.06.qxp 10/01/2006 16:51 Page 40
Page 41

41
FRONTALINO
Per accendere l'autoradio, premere la manopola. Per spegnere l'autoradio,
premere la stessa manopola e tenere premuto per 2 secondi.
Ricezione infrarossi per telecomando
Sintonizzatore
CD/MP3
Telefono
Avanti
Indietro
Pausa/Riproduzione/Mute
DISP
Menu
Pulsante di espulsione
Telefono
Français
English
Español
Deutsch
Português
Dutch
Italiano
Notice 5100 Zone A 09.01.06.qxp 10/01/2006 16:52 Page 41
Page 42

42
SISTEMA ANTIFURTO
Il sistema non funziona senza il frontalino estraibile.
Estrazione del frontalino
Premere il pulsante di espulsione (in alto a destra) per far oscillare il frontalino.
Spostare lateralmente il frontalino verso sinistra.
Estrarre la parte destra del frontalino dall'autoradio, quindi estrarre la parte sinistra.
Riporre il frontalino nell'astuccio e portarlo con sé.
Posizionamento del frontalino
Inserire la parte sinistra del frontalino nell'autoradio.
Inserire quindi la parte destra del frontalino nell'autoradio.
ollevare il frontalino finché non scatta in posizione.
Rimozione dell'intero apparecchio
Rimuovere il frontalino e il bordo dell'autoradio.
Introdurre le chiavi nelle posizioni appropriate finché non si bloccano.
Tirare l'apparecchio.
Notice 5100 Zone A 09.01.06.qxp 10/01/2006 16:52 Page 42
Page 43

43
GUÍA DE INSTALACIÓN
Nota : per mantenere memorizzati i parametri selezionati, assicurarsi che il 12 V della chiave e il 12 V
con flusso continuo non siano invertiti. In caso contrario, sarà necessario immettere nuovamente tutte le impostazioni.
Français
English
Español
Deutsch
Português
Dutch
Italiano
Notice 5100 Zone A 09.01.06.qxp 10/01/2006 16:52 Page 43
Purple/
Black
Purple Gray White Green
Stripe
(+) (-) (+) (-)(+) (-)
Gray/
Black
Stripe
External microphone
Fuse 15A
Amplifier
Connector
Rear Line-out (Gray)
1357
B
2468
A
B
A
White/
Black
Stripe
(+) (-)
Red
Black
Blue
Yellow
Green/
Black
Stripe
57
24 8
ISO Connector
To car battety (+)
Continuous + 12V DC
Ground Lead
Motor/Electric Antenna relay control Lead
Amplifier relay control Lead
Ignition key
+ 12 V DC When ON/ACC
R (Red)
L (White)
Right Speaker
(Rear)
Right Speaker
(Front)
Left Speaker
(Front)
Left Speaker
(Rear)
Page 44

44
TELEMANDO
Utilizzo del telecomando :
- Il pulsante marche/arrêt (accensione/spegnimento) consente di controllare l'alimentazione dell'autoradio.
- Source (sorgente) consente di passare da una modalità all'altra : modalità Tuner
(Sintonizzatore), CD/MP3 e Phone (Telefono).
- In modalità CD/MP3, le frecce avanti e indietro consentono di passare da un brano
all'altro mediante una breve pressione. Le frecce vengono inoltre utilizzate
per andare avanti/indietro all'interno dello stesso brano. In modalità Tuner (Sintonizzatore)
invece, consentono di andare avanti o indietro per la selezione delle stazioni radio.
- Il pulsante lecture/pause (Riproduzione/pausa) controlla la lettura di un CD.
- In caso di chiamata in entrata, il pulsante verde consente di rispondere e quello rosso di
riagganciare.
- È inoltre possibile comporre un numero telefonico con il telecomando: è sufficiente passare alla modalità Phone (Telefono), mediante il pulsante Source (Origine) oppure premendo direttamente il pulsante Phone sul frontalino dell'autoradio, quindi comporre il
numero mediante la tastiera. Una volta composto il numero, premere il pulsante verde per
inoltrare la chiamata.
Nota :
il segno " + " si ottiene premendo il tasto zero per 2 secondi.
Sostituzione della batteria del telecomando :
Se il telecomando non funziona più correttamente o si verificano
delle difficoltà durante il controllo dell'autoradio con il telecomando, sostituire la batteria del telecomando con una batteria
nuova. Assicurarsi di posizionare la batteria con la polarità corretta.
1. Estrarre il supporto della batteria premendo sul pulsante.
2. Inserire la nuova batteria con il polo (+) rivolto verso l'utente. Riposizionare il supporto.
ATTENZIONE :
La batteria deve essere riposta in un luogo lontano dalla portata dei bambini.
Se un bambino ingerisce accidentalmente la batteria, consultare immediatamente un
medico. Non ricaricare, aprire, scaldare o gettare su fonti di calore. Tali azioni possono provocare scintille o un principio di incendio.Non posizionare la batteria
vicino ad altri materiali metallici. Ciò può provocare scintille o un principio di incendio.Non manipolare la batterie con le pinzette per sopracciglia. Ciò può provocare
scintille o un principio di incendio.
LE MODALITÀ DI FUNZIONAMENTO
Innanzitutto, accendere l'autoradio. Premere la manopola per accendere l'autoradio. Per
spegnerla, premere la manopola e tenere premuto per un secondo.
Sono disponibili 3 funzionalità principali, accessibili direttamente dall'interfaccia dell'autoradio :
modalità Tuner (Sintonizzatore), modalità CD/MP3 e modalità Phone (Telefono).
Ciascuna modalità consente un utilizzo differente dell'autoradio :
MODE TUNER (SINTONIZZATORE) (O RADIO)
Premere il tasto Tuner per ascoltare la radio. Le frecce indietro e avanti
consentono di spostarsi per la ricerca delle stazioni radio. Tenendo premuto uno
dei due tasti, il sistema si sintonizza automaticamente sulla stazione radio
successiva. Una volta trovata una stazione, premere un tasto della tastiera del
frontalino (pressione prolungata) per assegnare un tasto di scelta rapida.
Successivamente, per posizionarsi su una stazione radio memorizzata, premere
semplicemente sul medesimo tasto per richiamarla. Una volta memorizzata la
stazione, il numero breve assegnato viene
visualizzato contemporaneamente alla frequenza della stazione.
M
ODALITÀ CD/MP3 (LETTURA DEI DISCHI) :
Premere CD/mp3 per passare all'ascolto di un CD. È possibile spostarsi da un
brano all'altro sul CD premendo le frecce avanti e indietro.
Per un ritorno o un avanzamento rapido, mantenere la freccia avanti o indietro
premuta per più di 0,5 secondi.Durante la lettura di un disco MP3,
il display LCD visualizza in successione le informazioni seguenti : titolo del brano,
album e artista mentre il tempo di ascolto resta sempre visualizzato.
È inoltre possibile selezionare il brano da ascoltare dalla tastiera.
M
ODALITÀ PHONE (O TELEFONIA) :
P
remere Phone per passare alla modalità telefonia del sistema. Una volta
collegato il telefono Bluetooth®, verranno visualizzate le informazioni
relative al livello della batteria e della rete del telefono portatile.
È inoltre visualizzato l'operatore telefonico in uso (*). È possibile accedere alla
rubrica semplicemente ruotando la manopola che consente lo scorrimento delle
lettere dell'alfabeto. Selezionare la lettera per accedere ai contatti.
Se i contatti dispongono di più numeri telefonici, premere nuovamente la
manopola per accedere a tali numeri, quindi premere il pulsante verde per
inoltrare la chiamata. Per consultare il registro delle chiamate, premere la
manopola. Vengono visualizzate le chiamate effettuate, quelle perse e quelle ricevute.
(*) Estas funciones dependen de su teléfono móvil.
Notice 5100 Zone A 09.01.06.qxp 10/01/2006 16:52 Page 44
Page 45

45
MENU
Una pressione sul tasto Menu consente di accedere al menu delle Impostazioni.
È possibile utilizzare tutte le funzioni dell'autoradio, regolare il livello di ascolto, la
luminosità e tutte le funzionalità Bluetooth®.
La navigazione all'interno dei menu viene eseguita tramite la manopola.
Una pressione sulla manopola consente l'accesso al menu selezionato e consente di
gestire la funzionalità selezionata.
TUNER :
Alcune informazioni relative al sistema RDS :
- L'opzione RDS (RDS Scan) consente la visualizzazione del nome della stazione radio
nonché la ricerca di frequenze alternative se il segnale di ricezione è debole.
Questa funzionalità viene denominata anche " RDS Alternative Frequencies (AF) ".
- Una volta attivata, la funzione " RDS Region " consente di memorizzare i parametri della
stazione corrente durante la ricerca di frequenze alternative. Ad esempio, se una stazione
radio emette dei programmi locali in una regione,
non verrà sostituita dalla stessa stazione radio che emette dei programmi nazionali in caso
di ricerca di frequenze alternative.
- L'indicatore "Traffic Program" (RDS TP) consente di conoscere se la stazione radio cor-
rente può diffondere informazioni di traffico o meno.
- Se la funzione "Traffic Alert" (RDS TA) è attivata e la stazione radio corrente è in grado
di fornire le informazioni sul traffico (indicatore "Traffic Program" attivato), l'autoradio
passa automaticamente in modalità Tuner al momento in cui vengono diffuse le informazioni sul traffico.
- Se la funzione "Traffic Alert" è attivata ma la stazione radio corrente non fornisce infor-
mazioni sul traffico (indicatore "Traffic Program" disattivato), sull'autoradio viene visualizzata la schermata seguente:
Descrizione e struttura dei menu
- CD/MP3 :
consente di gestire l'ascolto dei CD : ricerca, lettura...
- CD/MP3
o Ricerca MP3
Intelligente
A B C…
o Navigatore
o Modalità ripetizione
Disattivata
Ripetere una volta
o Modalità aleatoria
Disattivata
Attivata
Français
English
Español
Deutsch
Português
Dutch
Italiano
Notice 5100 Zone A 09.01.06.qxp 10/01/2006 16:52 Page 45
Page 46

46
TUNER - SINTONIZZATOR
o Ricerca
Tutte (Memorizzazione automatica)
Per tipo di programma (funzione PTY dell'RDS)
All Program Types
Pop Music
· Rock Music
...
Documentary
o Banda
FM1
FM2
FM3
MW1
LW
o Sensibilità del sintonizzatore
Locale
Distante
o Stereo / Mono
Stereo
Mono
o Opzioni RDS (Radio Data System)
RDS Scan (function AF)
Disattivata
Attivata
Traffic Alert (function TA)
Disattivata
Attivata
RDS Region
Disattivata
Attivata
Notice 5100 Zone A 09.01.06.qxp 10/01/2006 16:52 Page 46
Page 47

47
BLUETOOTH :
L'accesso a questo menu consente di gestire l'insieme delle funzionalità Bluetooth dell'autoradio :
gestione della rubrica, attribuzione dei nomi vocali, visualizzazione, lingua.
- Rubrica : Accesso alla rubrica telefonica memorizzata nell'autoradio.
- Registro chiamate : elenca le chiamate perse, effettuate, ricevute.
- Nella sottocartella Impostazioni :
dispositivi gemellati, viene visualizzato il nome del telefono Bluetooth con cui è collegata l'autoradio in modalità mani libere.
Una volta attivata, la risposta automatica attiva immediatamente la comunicazione per una chiamata in entrata.
Alcuni telefoni richiedono di attivare una determinata modalità prima del gemellaggio con il telefono Bluetooth (Abbinamento di un telefono) per garantire il supporto del numero massimo
di funzionalità disponibili.
La funzione Object Push, disponibile solo per alcuni modelli di telefono, consente di ricevere dei contatti anche se la sincronizzazione automatica non è disponibile.
Nota : alcune funzioni dipendono dal telefono in uso, pertanto potrebbero risultare disattivate.
B
luetooth
o Rubrica
A B C…
o Registro chiamate
Chiamate perse
Chiamate effettuate
Chiamate ricevute
o Comandi vocali
Rubrica
Parole chiave
Selezionare il riconoscimento vocale
o Impostazioni
Volume
Suoneria
Telefono
Microfono
Risposta automatica
Informazioni
Hot-line
Impostazioni avanzate
Dispositivi gemellati
Ordinamento (cognome - nome, nome - cognome)
Cancellare Contatto
Object Push
Français English
Español
Deutsch
Português
Dutch
Italiano
Notice 5100 Zone A 09.01.06.qxp 10/01/2006 16:52 Page 47
Page 48

48
PREFERENCES :
Questo menu consente di selezionare la lingua,il colore della visualizzazione e tutte le funzioni audio per ottimizzare al massimo l'ascolto all'interno della vettura.
o Audio o Schermo o Lingua
Contrasto Automatica
Bassi Luminosità Inglese
Acuti Colore della retroilluminazione …
Bilanciamento avanti-indietro Bianco
Bilanciamento destra-sinistra Blu
Equalizzatore Giallo
Disattivato Rosso
Rock Blu chiaro
Classica Viola
Pop Ambra
Loudness
Disattivato
Attivato
Menu vocali
Bip
Disattivato
Attivato
Notice 5100 Zone A 09.01.06.qxp 10/01/2006 16:52 Page 48
Page 49

49
Français
English
Español
Deutsch
Português
Dutch
Italiano
FUNZIONI IN MODALITÀ TELEFONIA: Mani libere (Bluetooth)
Premere Phone per passare alla modalità telefonia.
I telefoni che supportano la tecnologia Bluetooth® utilizzano i profili Handsfree ed Headset per
trasferire le comunicazioni sull'autoradio. Il profilo Handsfree è il profilo che offre maggiori funzionalità. Quando si utilizza l'autoradio in modalità Tuner o in modalità CD/MP3 e si riceve una
chiamata, l'autoradio passa automaticamente in modalità telefonia. Al termine della comunicazione, l'autoradio passa nuovamente in modalità Tuner o CD/mp3. Non è necessario alcun intervento da parte dell'utente. Lo stesso avviene quando si effettua una chiamata dall'autoradio.
Abbinamento:
L'abbinamento è la prima connessione tra il telefono Bluetooth® e l'autoradio. Tale operazione
viene eseguita a partire dal telefono. Effettuare una ricerca delle periferiche Bluetooth®. Una volta
trovata la periferica " Parrot Autoradio ", selezionatela, quindi il telefono richiederà l'immissione
di un codice a 4 cifre. Digitare 1234 e convalidare... Al termine dello scambio di dati, viene stabilita una connessione Bluetooth® con l'autoradio. Per ottenere maggiori funzionalità, per alcuni
telefoni è necessario attivare una modalità particolare prima del gemellaggio. Fare riferimento al
menu Bluetooth, Impostazioni, Impostazioni avanzati e abbinare un telefono.
Sincronizzazione della rubrica del telefono:
Per alcuni tipi di telefoni Bluetooth, la rubrica del telefono viene sincronizzata automaticamente
nella memoria del kit. Se il telefono in uso non supporta la sincronizzazione automatica, è possibile utilizzare la funzionalità Object Push del telefono per inviare i contatti presenti nel telefono all'autoradio mediante connessione Bluetooth®. Al momento della sincronizzazione della
rubrica, l'icona Bluetooth® passa sullo schermo. Fare riferimento al manuale del telefono o visitare il nostro sito Internet per maggiori informazioni sulle procedure da eseguire:
"www.parrot.biz, alla voce Supporto tecnico, Manuali per l'utente"
Rispondere / riagganciare:
Per rispondere a una chiamata, premere il pulsante verde posizionato sopra la manopola. Una
volta terminata la conversazione, premere il pulsante rosso per riagganciare.
Modalità discreta:
Durante una comunicazione, premere il pulsante verde per passare la comunicazione sul telefono. Premere nuovamente il pulsante verde per passare nuovamente alla modalità mani libere.
Funzionalità disponibile esclusivamente sui telefoni che dispongono del profilo Handsfree.
Visualizzazione del chiamante:
Quando si riceve una chiamata, viene visualizzato il nome o il numero del corrispondente.
Funzionalità disponibile solo per alcuni modelli di telefono.
Rispondere / riagganciare:
Per rispondere a una chiamata, premere il pulsante verde posizionato sopra la manopola.
Una volta terminata la conversazione, premere il pulsante rosso per riagganciare.
Modalità discreta:
Durante una comunicazione, premere il pulsante verde per passare la comunicazione
sul telefono. Premere nuovamente il pulsante verde per passare nuovamente alla
modalità mani libere. Funzionalità disponibile esclusivamente sui telefoni che dispongono del profilo Handsfree.
Visualizzazione del chiamante:
Quando si riceve una chiamata, viene visualizzato il nome o il numero del corrispondente. Funzionalità disponibile solo per alcuni modelli di telefono.
Per effettuare una chiamata dall'interfaccia dell'autoradio:
sono disponibili due possibilità:
Passare alla modalità Phone. Effettuare la chiamata componendo direttamente il
numero di telefono dalla tastiera, quindi premere il pulsante verde. Per comporre un
numero con un " + " come prefisso, premere rapidamente due volte il tasto zero.
È inoltre possibile utilizzare il sistema di riconoscimento vocale (vedere sotto).
Riconoscimento vocale:
è possibile effettuare delle chiamate utilizzando il riconoscimento vocale dell'autoradio. Per questa operazione, è necessario che i contatti siano memorizzati nella memoria del kit (sincronizzazione automatica della rubrica oppure invio di contatti uno alla
volta tramite il telefono). Inoltre, le parole chiave devono essere già state registrate in
un momento precedente : casa, lavoro, ufficio... e anche la parola magica : telefono.
Una volta registrati i nomi, le parole chiave e la parola magica, è possibile
chiamare un corrispondente seguendo la procedura illustrata di seguito :
Pronunciare : Telefono… Bip… Anna… Bip… Casa… e verrà effettuata la chiamata automatica al numero corrispondente a Casa per il contatto Anna.
Analogamente, se Anna telefona, verrà emessa la parola " Anna ". Premere quindi il pulsante verde per rispondere alla chiamata. Terminare la comunicazione premendo il pulsante
rosso. L'autoradio ritornerà automaticamente in modalità Tuner, CD/mp3 o Telefono.
Per l'utilizzo del riconoscimento vocale è disponibile anche la sequenza seguente che non
prevede le parole chiave: premere il pulsante verde: la radio o il CD viene interrotto. Viene
emesso un bip. Pronunciare il nome del corrispondente da chiamare dopo il bip specificando eventualmente casa, lavoro o ufficio (se disponibile).
Notice 5100 Zone A 09.01.06.qxp 10/01/2006 16:52 Page 49
Page 50

50
AGGIORNAMENTO DELL'AUTORADIO
Per ottenere le ultime novità (nuovi telefoni compatibili, nuove funzionalità...) è possibile
aggiornare l'autoradio tramite Bluetooth.
Attivare l'opzione in: Bluetooth, Impostazioni, Impostazioni avanzate, Aggiornamento software, quindi utilizzare un computer dotato di tecnologia Bluetooth per caricare l'ultima versione sull'autoradio (disponibile sul nostro sito Web).
Visitare il nostro sito Web per maggiori informazioni: www.parrot.biz
RISOLUZIONE DEI PROBLEMI
In caso di malfunzionamento, scollegare immediatamente l'autoradio.
L'apparecchio non deve essere utilizzato in condizioni anomale, ad esempio in assenza di
suono o in presenza di cattivi odori per evitare eventuali rischi di folgorazione. Non tentare in alcun caso di riparare l'apparecchio.
General:
L'autoradio non si accende.
Il contatto del veicolo è interrotto. Posizionare la chiave di contatto in
posizione ACC
(in funzione). Verificare i collegamenti. Il fusibile è fuso. Sostituire il fusibile.
Assenza di suono.
Verificare che il suono dell'autoradio non sia regolato sul livello minimo.
Verificare anche che la funzione Mute sia disattivata (interruzione del suono).
Radio:
Rumore elevato su una stazione.
La stazione corrente è troppo lontana dal segnale ottimale.
Scegliere un'altra stazione con un segnale migliore.
Perdita della stazioni preselezionate.
L'alimentazione dell'autoradio non è corretta.
Verificare che il cavo della batteria sia installato correttamente
(12 V chiave e 12 V con flusso continuo).
Disco:
Il disco è inserito ma non viene riprodotto.
Il disco è al contrario. Il disco deve essere inserito con il nome
dell'artista/CD rivolto verso l'alto.
Il disco è sporco o danneggiato. Pulire il disco oppure cambiare il CD.
Il disco salta o la qualità del suono è cattiva.
Il disco è sporco o danneggiato. Pulire il disco oppure cambiare il CD.
Le vibrazioni del veicolo causano dei salti del suono.
L'angolo di installazione dell'autoradio deve essere inferiore a 30°.
Verificare che l'apparecchio sia installato in modo saldo e posizionato
nell'apposito vano.
CD/MP3 : mensaje de errores.
Aparece el icono de más abajo: Significa que no hay ningún CD en el lector.
Aparece el icono de más abajo: Significa que el CD no contiene archivos con formato MP3.
SPECIFICHE TECNICHE
CD / CD-R / CD-RW / MP3, ID3 Tag.
Pannello frontale a scomparsa manuale.
Potenza di uscita : 4x45 W.
Uscita linea: 4 canali x4 V/4 canali x2 V.
DSP: Classica, rock, pop, flat.
Cavo alimentazione / altoparlante: ISO.
Schermo a colori.
Trasmissione dati tramite Bluetooth per l'aggiornamento all'ultima versione.
Microfono esterno.
Utilizza gli altoparlanti della vettura per un ascolto ottimale.
Bluetooth®.
Profili Bluetooth® supportati:
- Handsfree 0.96 e 1.0.
- Headset 1.0.
- Object Push 1.0.
- Synch ML 1.0.
LÍNEA DIRECTA
- È disponibile una hot-line per gli utenti. Gli utenti possono contattare la hot-line
tramite e-mail o chiamata telefonica
(dal lunedì al venerdì dalle 9 alle 18, ora italiana).
- Visitare il nostro sito Web www.parrot.biz per maggiori informazioni :
Notice 5100 Zone A 09.01.06.qxp 10/01/2006 16:52 Page 50
Page 51

Français English
EspañolItaliano
Deutsch
Português
51
Rhythm n'Blue
Gebruiksaanwijzing
Dutch
Notice 5100 Zone A 09.01.06.qxp 10/01/2006 16:52 Page 51
Page 52

52
VEILIGHEIDSINFORMATIES
VOORZORGSMAATREGELEN
Uitsluitend te gebruiken op een elektrisch systeem van 12V en met negatieve beaarding.
Bij de vervanging van een zekering, dient een zekering van dezelfde waarde gebruikt te worden als de te vervangen zekering.
Het plaatsen van een zekering met een hogere amperage kan het systeem beschadigen.
Het systeem niet uit elkaar halen. De laserstraal in de lezer is gevaarlijk voor de ogen.
Zorg er voor dat objecten van buiten niet in het systeem terechtkomen: ze kunnen een disfuntioneren van het systeem of veiligheidsproblemen veroorzaken, zoals elektrische schokken of de
blootstelling aan laserstralen.
Als uw voertuig gedurende een lange periode aan zeer hoge of zeer lage temperaturen is
blootgesteld, wacht dan tot de temperatuur in de auto weer normaal is voordat u het apparaat
gebruikt.
Het geluidsvolume van de autoradio moet niet te hoog staan: u dient de waarschuwingen van
buiten te kunnen horen
OPMERKINGEN OVER DE CD
Het luisteren naar een beschadigde of stoffige CD kan gedurende het afspelen voor onderbrekingen zorgen.
Houd de CD's vast zoals dat hier onder staat aangegeven.
Het niet bedrukte gedeelte niet aanraken.
Geen merktekens opbrengen op het leesbare gedeelte van de CD.
Een CD niet blootstellen aan direct zonlicht of aan een te warme omgeving.
Veeg vieze CD's vanaf het midden naar de buitenkant schoon met een daarvoor geschikte
doek. Nooit oplosmiddelen gebruiken als benzeen of alcohol.
Deze autoradio kan geen CD van 3'' (8cm) lezen.
Nooit een CD 3'' gebruiken, of CD's die een onregelmatige vorm hebben. Deze kunnen in het
apparaat geblokkeerd raken of het slecht functioneren van het apparaat veroorzaken.
VOOR HET STARTEN
Het volume niet te hard zetten, dat kan de van buiten komende geluiden onhoorbaar maken.
De auto moet worden gestopt voor elke interventie in het systeem.
OPGELET
Haal de bovenkant van het apparaat niet los. Het systeem niet zelf repareren. Raadpleeg uw
verkoper of een gespecialiseerde technicus.
PRESENTATIE
Wij danken u voor de aankoop van een autoradio Parrot.
U gaat een autoradio Bluetooth® CD/MP3 gebruiken met een ingebouwde hands-free set. Alle
functies van een hands-free set zijn aanwezig: synchronisatie van het telefoonboek, weergave
naam van de gesprekspartner, uitzonderlijke geluidskwaliteit in de auto, beheer van dubbel
gesprek, compatibel met alle Bluetooth telefoons.
DE FUNCTIES BLUETOOTH® VAN UW AUTORADIO
Dit systeem is uitgerust met de technologie Bluetooth® die het mogelijk maakt draadloos
gegevens uit te wisselen tussen elektronische systemen. In het huidige geval is uw telefoon
Bluetooth® verbonden met de autoradio. Dit maakt het mogelijk, afhankelijk van uw telefoon (*) om het telefoonboek van uw telefoon in het geheugen van de autoradio te synchroniseren. Dit maakt het u vervolgens mogelijk om personen direct te bellen vanuit dit
telefoonboek, en de naam van personen die bellen worden zo op de radio weergegeven... U kunt gesprekken ook aannemen, ophangen, het geluidsvolume van uw communicaties beheersen met de groene en rode knoppen en het wieltje van de autoradio. De
ingebouwde stemherkenning maakt het mogelijk om vele functies te gebruiken zonder het
stuur los te laten.
(*) : Geldig voor bepaalde telefoons.
Voor meer informatie, kunt u onze Internetsite bezoeken:
" www.parrot.biz, Rubriek Technische ondersteuning, Gebruikershandleidingen
Notice 5100 Zone A 09.01.06.qxp 10/01/2006 16:52 Page 52
Page 53

53
VOORKANT
De autoradio wordt aangeschakeld door op de draaiknop te drukken.
Om de autoradio uit te schakelen, drukt u 2 seconden op dezelfde knop.
Infraroodontvanger voor afstandsbediening
CD/MP3
Telefoon
Vooruit
Achteruit
Pauze/Afspelen/Stil
DISP
Menu
Uitwerptoets
Toetsenbord
Tuner
Français
English
EspañolItaliano
Deutsch
Português
Dutch
Notice 5100 Zone A 09.01.06.qxp 10/01/2006 16:52 Page 53
Page 54

54
SYSTEEM ANTI-DIEFSTAL
Zonder de afneembare voorkant, kan het systeem niet functioneren.
Afnemen voorkant
Druk op de uitwerpknop (rechtsboven) om de voorkant los te koppelen.
Verplaats de voorkant naar links.
Trek de rechterkant van de voorkant los van de autoradio en vervolgens de linkerkant.
Berg de voorkant op in het etui en draag deze bij u..
Plaatsen van de voorkant
Plaats de linkerkant van de voorkant in de autoradio.
Plaats de rechterkant van de voorkant in de autoradio.
Druk op de voorkant tot u de 'klik' van de bevestiging hoort.
Het gehele apparaat loshalen
Haal de voorkant en de kast van de autoradio weg.
Plaats de sleutels in de juiste plaatsen totdat deze geblokkeerd blijven.
Trek aan het apparaat.
Notice 5100 Zone A 09.01.06.qxp 10/01/2006 16:52 Page 54
Page 55

55
Français
English
EspañolItaliano
Deutsch
Português
Dutch
INSTALLATIEHANDLEIDING
Opmerking: om uw parameters in het geheugen op te kunnen slaan, dient u er op te letten dat de 12V van de sleutel en
de 12V van de accu niet worden omgewisseld. Daardoor zou u alle instellingen opnieuw moeten uitvoeren.
Notice 5100 Zone A 09.01.06.qxp 10/01/2006 16:52 Page 55
Purple/
Black
Purple Gray White Green
Stripe
(+) (-) (+) (-)(+) (-)
Gray/
Black
Stripe
External microphone
Fuse 15A
Amplifier
Connector
Rear Line-out (Gray)
1357
B
2468
A
B
A
White/
Black
Stripe
Red
Black
Blue
Yellow
(+) (-)
57
24 8
ISO Connector
Green/
Black
Stripe
To car battety (+)
Continuous + 12V DC
Ground Lead
Motor/Electric Antenna relay control Lead
Amplifier relay control Lead
Ignition key
+ 12 V DC When ON/ACC
R (Red)
L (White)
Right Speaker
(Rear)
Right Speaker
(Front)
Left Speaker
(Front)
Left Speaker
(Rear)
Page 56

56
AFSTANDSBEDIENING
Gebruik van de afstandsbediening:
- De Aan/Uit-knop schakelt de stroomtoevoer naar de autoradio aan of uit.
- Bron maakt het mogelijk van de ene naar de andere modus te schakelen: modus Tuner,
CD/MP3 en vervolgens Phone.
- In de modus CD/MP3 kunt u met de pijlen vooruit en achteruit van het ene nummer naar het
volgende schakelen met een korte druk op de knop. Deze worden ook gebruikt om binnen een
nummer eenvoudig vooruit/achteruit te gaan. In de modus Tuner maken deze het mogelijk om
vooruit te gaan of terug te gaan bij het kiezen van uw radiostations.
- De knop afspelen/pauze bedient het lezen van een CD.
- Wanneer een oproep binnenkomt, drukt u op de groene knop om de oproep aan te nemen
en op de rode knop om op te hangen.
- U kunt ook een telefoonnummer op de afstandsbediening vormen. Daarvoor gaat u naar de
modus Phone (met behulp van de knop source of door direct op
Phone te drukken op de voorkant van de autoradio, en vervolgens
vormt u uw nummer door op het toetsenbord te drukken. Zodra het
nummer is gevormd, drukt u op de groene knop om de oproep te
starten.
Opmerking:
De '+' wordt verkregen door 2 secondes op de knop Nul te drukken.
Vervangen van de batterij van de afstandsbediening:
Als de afstandsbediening niet goed meer functioneert of als u moeilijkheden heeft om de autoradio te bedienen met de afstandsbediening,
vervang dan de batterij van de afstandsbediening. Controleer dat de
+ en de - kant van de nieuwe batterij goed worden gerespecteerd.
1. Haal het deksel van het batterijvakje door op de knop te drukken.
2. Plaats de nieuwe batterij met de + naar u gekeerd. Plaats het deksel op de juiste plaats.
OPGELET:
De batterij moet op een plaats worden opgeborgen die niet door kinderen kan worden bereikt.
Als een kind per ongeluk een batterij inslikt, raadpleeg dan onmiddellijk een arts.
Niet opnieuw opladen, openen, verwarmen of in het vuur werpen. Hierdoor kunnen vonken of
kan brand ontstaan. De batterij niet samen met andere metalen opslaan. Hierdoor kunnen vonken of brand ontstaan.De batterij niet met een epileerpincet hanteren. Hierdoor kunnen vonken
of brand ontstaan.
DE VERSCHILLENDE MANIEREN VAN FUNCTIONEREN
Schakel eerst de autoradio aan. De autoradio wordt aangeschakeld door op de draaiknop
te drukken. Om de autoradio uit te schakelen, drukt u 2 seconden op dezelfde knop.
Er zijn 3 hoofdfuncties, die direct vanaf de interface van de autoradio toegankelijk zijn:
De modi Tuner, CD/MP3 en Phone.
Iedere modus maakt een ander gebruik van de autoradio mogelijk:
MODUS TUNER (OF RADIO)
Druk op de knop Tuner om naar de radio te luisteren. Met de pijlen vooruit
en achteruit kunt u stap voor stap de radiostations zoeken.
Als u continu op één van de toetsen blijft drukken, zoekt het systeem
automatisch het volgende station. Als u een station heeft gevonden, drukt
op een cijfer van het toetsenbord op de voorkant (lang drukken) om dit met
een sneltoets te verbinden. Vervolgens kunt u eenvoudig op deze toets
drukken om naar een in het geheugen opgeslagen station te gaan.
Als het station in het geheugen is opgeslagen, wordt de toegekende
sneltoets tegelijk weergegeven met de frequentie van het station.
M
ODUS CD/MP3 (OF AFSPELEN VAN DE CD'S) :
Druk op CD/mp3 om naar de modus voor het spelen van een CD te gaan.
U kunt op de cd-rom van nummer naar nummer gaan door op de pijlen vooruit
en achteruit te drukken. Om snel vooruit of achteruit te gaan, houdt u de pijlen
vooruit of achteruit langer dan een 0,5 seconde ingedrukt.
Bij het lezen van een MP3-cd, geeft het LCD-scherm de volgende informaties
weer: titel van het nummer, album en artiest, en de verstreken tijd.
U kunt tevens direct het nummer op uw CD met het toetsenbord kiezen.
M
ODUS PHONE (TELEFOON) :
Druk op Phone om het systeem in de modus voor de telefoon te zetten.
Zodra u met uw telefoon Bluetooth® bent verbonden,
krijgt u de informatie wat betreft het niveau van de batterij en het netwerk
van uw mobiel te zien. Ook wordt uw operator weergegeven (*).
U krijgt eenvoudig toegang tot uw telefoonboek door aan de draaiknop te
draaien. U navigeert door het alfabet.
Kies uw letter om toegang te krijgen tot uw contacten. Als uw contacten
meer dan één telefoonnummer hebben, drukt u opnieuw op de draaiknop
om toegang te krijgen tot die nummers, en drukt u op de groene knop om te
bellen.
Om uw belhistorie te raadplegen, drukt u op de draaiknop. De appels uit
gegane, gemiste en binnengekomen oproepen worden weergegeven.
(*) Estas funções dependem do seu telemóvel.
Notice 5100 Zone A 09.01.06.qxp 10/01/2006 16:53 Page 56
Page 57

57
MENUS
Door op de toets Menu te drukken, kunt u het menu parameters binnengaan.
U kunt alle functies van de autoradio gebruiken, de parameters van het luisteren instellen, de verlichting en alle functies van de Bluetooth®.
De navigatie door de menu's wordt gedaan met behulp van de draaitoets.
Door op de draaitoets te drukken krijgt u toegang tot het gekozen menu, en kunt u
volledig de gekozen functie beheren.
TUNER :
Enkele informaties over RDS:
- De optie RDS (RDS-scan) maakt het mogelijk de naam van het radiostation weer te geven,
net als het zoeken naar alternatieve frequenties als het ontvangstsignaal te zwak wordt.
Deze functie heet ook 'RDS Alternatieve Frequenties (AF)'.
- Als de functie 'RDS Region' is geactiveerd kunt u de parameters van het huidige station
bewaren bij het zoeken naar alternatieve frequenties.
Bijvoorbeeld: een radiostation dat lokale programma's uitzendt in een regio, zal niet worden vervangen door hetzelfde station dat nationale programma's uitzendt in het geval dat
het zoekt naar alternatieve frequenties.
- De indicator 'Traffic Program' (RDS TP) maakt het mogelijk te zien of het beluisterde
radiostation wel of niet verkeersinformatie kan uitzenden.
- Als de functie 'Traffic Alert' (RDS TA) is geactiveerd en het beluisterde station de verkeer-
sinformatie kan bieden (indicator 'Traffic Program' geactiveerd) schakelt de autoradio automatisch naar de modus Tuner als er verkeersinformatie wordt uitgezonden.
- Als de functie 'Traffic Alert' is geactiveerd en het beluisterde station geen
verkeersinformatie kan bieden (indicator 'Traffic Program' gedeactiveerd) verschijnt het
volgende scherm op de autoradio:
Beschrijving en organisatie van de menu's
- CD/MP3:
Om het luisteren naar uw cd-rom te beheren: zoeken, beheer van het aflezen…
- CD/MP3
o Zoeken naar MP3
Intelligent
A B C…
o Browser
o Modus herhalen
Uitgeschakeld
één keer herhalen
o Toevallige modus
Uitgeschakeld
Aangeschakeld
Français
English
EspañolItaliano
Deutsch
Português
Dutch
Notice 5100 Zone A 09.01.06.qxp 10/01/2006 16:53 Page 57
Page 58

58
TUNER
o Zoeken
Alles (automatische geheugenopslag)
Per type programma (functie PTY van de RDS)
Alle programmatypes
Popmuziek
Rock
...
Documentaire
o Band
FM1
FM2
FM3
MW1
LW
o Gevoeligheid tuner
Lokaal
Afstand
o Stereo / Mono
Stereo
Mono
o Optie RDS (Radio Data System)
RDS Scan (functie AF)
Uitgeschakeld
Aangeschakeld
Verkeersinformatie (functie TA)
Uitgeschakeld
Aangeschakeld
RDS Regio
Uitgeschakeld
Aangeschakeld
Notice 5100 Zone A 09.01.06.qxp 10/01/2006 16:53 Page 58
Page 59

59
BLUETOOTH :
De toegang tot dit menu maakt het mogelijk om alle functies Bluetooth van uw autoradio te beheren:
- Beheer van uw telefoonboek, toekenning van stemlabels, weergave, taal.
- Telefoonboek: toegang tot telefoonboek dat in de autoradio staat opgeslagen.
- Historie oproepen: lijst van uitgegane, gemiste en binnengekomen oproepen.
- In het onder-repertoire parameters:
De gepaarde apparaten, geeft de naam van de Bluetooth-telefoon weer waarmee uw autoradio is aangesloten in de modus handsfree.
Zodra deze is geactiveerd, zal de functie automatisch beantwoorden bij een binnenkomende oproep automatisch de telefoon opnemen.
Sommige telefoons vragen het activeren van een bepaalde modus voor het koppelen, met de Bluetooth-telefoon
(een telefoon koppelen) dit om een maximaal aantal functies te ondersteunen.
Het Object Push maakt het in sommige telefoons mogelijk om contacten te ontvangen als de automatische synchronisatie niet beschikbaar is.
Opmerking: Bepaalde functies hangen af van uw telefoon, en kunnen dus zijn uitgeschakeld.
Bluetooth
o Telefoonboek
A, B, C…
o Historie oproepen:
Gemiste oproepen
Uitgegane Oproepen
Binnengekomen oproepen
o Spraakherkenning
Telefoonboek
Belangrijke woorden
Kies de spraakherkenning
o Parameters
Volume
Belgeluid Microfoon
Beeldscherm
Telefoon
automatisch beantwoorden
Informatie
Hotline
Gevorderde Instellingen
Geschakelde apparaten
Volgorde sorteren (naam - voornaam, voornaam- naam)
De Contactpersoon wissen
Object Push
Français
English
EspañolItaliano
Deutsch
Português
Dutch
Notice 5100 Zone A 09.01.06.qxp 10/01/2006 16:53 Page 59
Page 60

60
PREFERENTIES:
Dit menu maakt het mogelijk dat u uw taal kiest, de kleur van de weergave, net als alle geluidsfuncties om het luisteren in uw auto optimaal te maken.
o Audio o Scherm o Taal
Contrast Automatisch
Bas Helderheid Engels
Treble Kleur van de archergrondverlichting
...
Balance voor-achter Wit
Balance links-rechts Blauw
Equalizer Geel
Uitgeschakeld Rood
Rock Hemelsblauw
Klassiek Paars
Popmuziek Amberkleurig
Geluid
Uitgeschakeld
Aangeschakeld
Gesproken menu's
Pieptonen
Uitgeschakeld
Aangeschakeld
Notice 5100 Zone A 09.01.06.qxp 10/01/2006 16:53 Page 60
Page 61

61
FUNCTIES IN DE MODUS TELEFONIE : handsfree Bluetooth
Druk op Phone om het systeem in de modus telefoon te zetten.
De telefoons die Bluetooth® ondersteunen gebruiken ofwel het profiel Handsfree, of het profiel Headset om de communicatie op de autoradio over te brengen. Het profiel Handsfree
heeft de meeste functies.
Als u uw autoradio in de modus Tuner gebruikt of in de modus CD/mp3, en iemand belt u,
dan schakelt de autoradio automatisch naar de modus telefoon. Aan het eind van de
oproep, schakelt de autoradio terug naar de modus Tuner of naar de modus CD/mp3. Geen
enkele actie van de gebruiker is hierbij nodig. Hetzelfde geldt als u een oproep vanuit een
autoradio uitvoert
Koppelen
Het koppelen is de eerste verbinding tussen uw telefoon Bluetooth® en de autoradio. Deze
operatie wordt vanuit uw telefoon opgestart. Voer een zoekopdracht uit naar randapparatuur Bluetooth®. Zodra de 'Parrot Autoradio' is gevonden kiest u deze, waarna uw telefoon
u vraagt een code van 4 cijfers in te voeren. Voer 1234 in en bevestig... Na het uitwisselen
van een aantal gegevens, bent u aangesloten op de Bluetooth® met de autoradio. Om meer
functies te verkrijgen, hebben bepaalde telefoons het nodig om een speciale modus te activeren voor het koppelen. Raadpleeg het menu Bluetooth, parameters, gevorderde parameters en koppelen van een telefoon.
Synchronisatie van het telefoonboek van de telefoon:
Met bepaalde telefoons Bluetooth wordt het telefoonboek automatisch gesynchroniseerd in
het geheugen van de set. Als uw telefoon de automatische synchronisatie niet ondersteunt,
kunt u ook de functie Object Push van uw telefoon gebruiken om contacten van uw telefoon
naar de autoradio per Bluetooth® te sturen. Gedurende de synchronisatie van uw telefoonboek beweegt de icoon Bluetooth® over uw scherm.
Raadpleeg de handleiding van uw telefoon of bezoek de site Internet om te weten te komen
hoe u dat kunt uitvoeren:
' www.parrot.biz, Rubriek Technische ondersteuning, Gebruikershandleidingen'
Aannemen / Ophangen:
Om een oproep aan te nemen, drukt u op de groene knop die zich boven de draaiknop
bevindt. Zodra uw gesprek is beeindigd, drukt u op de rode knop om op te hangen.
Privé-modus:
Gedurende een communicatie drukt u op de groene knop om de communicatie op de telefoon over te schakelen. Door nogmaals op de groene knop te drukken schakelt u terug naar
de Handsfree-modus. Deze functie is alleen beschikbaar op de telefoons die het profiel
Handsfree hebben.
Weergave van de beller:
Bij een binnenkomende oproep, worden de naam en de het nummer van uw correspondent
weergegeven. Deze functie is uitsluitend beschikbaar op bepaalde telefoons.
Een oproep uitvoeren vanaf de interface van de autoradio:
Er zijn twee mogelijkheden:
Ga naar de modus Telefoon. Bel door direct het nummer van de telefoon op het toetsenbord te vormen, en druk vervolgensop de groene knop. Om een nummer met een
'+' als voorvoegsel, druk u snel twee keer op de nul.
U kunt tevens de spraakherkenning gebruiken (zie hieronder ).
Spraakherkenning:
U kunt oproepen uitvoeren met gebruik van de spraakherkenning van de autoradio.
Daarvoor moet u contacten hebben opgeslagen in het geheugen van de kit (automatische synchronisatie van het telefoonboek of één voor één sturen van het contact
vanuit het telefoonboek). U dient ook van te voren de sleuteltermen te hebben opgenomen: huis, werk, bureau… net als het magische woord: telefoon.
Zodra de namen, de sleuteltermen en het magische woord zijn opgenomen, kunt u op
de volgende wijze een correspondent bellen:
Zeg: Telefoon… Bip… Anna… Bip… Anna… en u belt automatische het nummer dat
overeenkomt met het huis van Anna.
Op dezelfde wijze: als Anna u belt hoort u 'Anna'. Druk dan op de groene knop om
de oproep aan te nemen. Neem het gesprek aan door op de rode knop te drukken.
U gaat automatisch terug naar de modus Tuner, CD/mp3 of Telefoon
U kunt ook de volgende reeks gebruiken om de spraakherkenning te
gebruiken, maar zonder de sleuteltermen:
Druk op de groene knop, de radio of de CD wordt onderbroken. U hoort nu een pieptoon. Zeg de naam van uw gesprekspartner die u wilt bellen na de pieptoon, en specificeer eventueel het huis, het werk of het bureau (indien dit beschikbaar is).
Opmerking:
Gedurende het opnemen van de sleuteltermen en het magische woord, dient u uw auto
op een geluidsloze plaats te parkeren, met de ramen gesloten en zonder de ventilatie. Dit is nodig om een beter percentage herkenning te behalen.
Français English
EspañolItaliano
Deutsch
Português
Dutch
Notice 5100 Zone A 09.01.06.qxp 10/01/2006 16:53 Page 61
Page 62

62
BIJWERKEN VAN UW AUTORADIO
Om te profiteren van de laatste verbeteringen (nieuwe telefoons die compatibel zijn,
de nieuwe functies…), kunt u uw autoradio per Bluetooth bijwerken.
Activeer daarvoor de optie in: Bluetooth, Parameters, Gevorderde Parameters,
Software bijwerken, en gebruik vervolgens een computer die is uitgerust met
Bluetooth om de laatste versie op uw autoradio te laden (beschikbaar op onze website).
Bezoek onze Internetsite voor meer informatie: www.parrot.biz.
REPARATIE
Als er sprake is van een disfunctioneren, schakel dan onmiddellijk de radio los. Dit
apparaat mag niet worden gebruikt in abnormale condities, zoals bij een aanwezigheid van geluid of als er vreemde geuren uit opstijgen, om ieder risico op elektrische schokken te vermijden.
Probeer in geen geval zelf het apparaat te repareren.
Algemeen:
de autoradio start niet.
De contactsleutel van de auto is uitgeschakeld. Draai de contactsleutel in
de positie ACC (in werking). Verifieer de aansluiting. De zekering is
gesmolten. Vervang de zekering.
Geen geluid
Verifieer dat het geluid van de autoradio niet op de laagst stand staat.
Verifieer tevens dat de functie Mute niet geactiveerd is
(uitschakelen geluid).
Rádio:
Te hoog volume bij één radiostation.
Het station waarnaar u luistert ligt te ver weg van het optimale signaal.
Kies een ander station met een beter signaal.
Verlies van voorgeselecteerde stations.
De stroomtoevoer naar de autoradio is niet correct. Verifieer dat het
snoer van de batterij op de juiste wijze is geïnstalleerd
(12V contactsleutel en 12V van de accu).
Cd-rom:
de cd is aangebracht maar wordt niet afgespeeld.
De cd is verkeerd omgedraaid. De cd dient te worden ingebracht met de
naam van de artiest/de CD naar boven.
De cd is vuil of beschadigd. Reinig de CD of verander de CD.
Het geluid hapert of de kwaliteit van het geluid is slecht.
De cd is vuil of beschadigd. Reinig de CD of verander de CD.
De vibraties van de auto leiden tot haperingen in het geluid.
De hoek van de installatie van de autoradio moet minder zijn dan 30°.
Verifieer dat de installatie van het apparaat stabiel is in de plaats die
daarvoor voorzien is.
CD/MP3 : foutmeldingen
De icoon hierboven geeft aan:
Dat betekent dat er geen CD in de speler zit.
De icoon hierboven geeft aan:
Dat betekent dat uw CD geen bestanden van het formaat MP3 bevat.
TECHNISCHE SPECIFICATIES
CD / CD-R / CD-RW / MP3, ID3 Tag.
Handmatig uitklapbare voorkant.
Uitgaande stroom: 4x45W.
Uitvoer: 4 kanalen x4V/4ch x2V
DSP: Klassiek, rock, pop, flat.
Stroom / Speakerdraden: ISO.
Kleurenscherm.
Flashage per Bluetooth voor bijwerken tot laatste versie.
Externe microfoon.
Gebruik de versterkers in uw auto om het gesprek beter te kunnen horen.
Bluetooth®.
Ondersteunde profielen Bluetooth®:
- Handsfree 0.96 en 1.0.
- Headset 1.0.
- Object Push 1.0.
- Synch ML 1.0.
HULPLIJN
- Onze hulplijn staat voor u klaar.
U kunt contact met ze opnemen per mail of per telefoon
(open van maandag tot vrijdag van 9h tot 18h, Franse tijd).
- Bezoek onze website www.parrot.biz voor meer informatie.
Notice 5100 Zone A 09.01.06.qxp 10/01/2006 16:53 Page 62
Page 63

Français English
EspañolItaliano
Deutsch
63
Dutch
Rhythm n'Blue
Manual de utilização
Português
Notice 5100 Zone A 09.01.06.qxp 10/01/2006 16:53 Page 63
Page 64

64
INFORMAÇÕES DE SEGURANÇA
PRECAUÇÕES
A utilizar unicamente com sistema eléctrico de 12V e com ligação à terra negativa.
Para substituir um fusível, utilize uma amperagem com o mesmo valor que o fusível que
está a substituir.
Usar um fusível com amperagem superior pode deteriorar o sistema.
Não desmontar o sistema. O feixe laser do leitor é perigoso para os olhos.
Certifique-se de que não foi inserido no sistema nenhum objecto externo: poderia causar
disfunções no sistema, ou provocar problemas de segurança tais como electrocussões ou
uma exposição ao laser.
Se expôs a sua viatura durante bastante tempo a temperaturas muito elevadas ou muito
baixas, espere que a temperatura do habitáculo volte ao normal antes de utilizar o aparelho.
O volume sonoro do autorádio não deve estar forte demais: deve poder ouvir os avisos
exteriores.
NOT
AS A PROPÓSITO DOS CDS
Ouvir um CD danificado ou com pó pode causar cortes durante a escuta.
Pegar nos CDs como ilustrado ao lado.
Não tocar na parte não imprimida.
Não fazer marcas de qualquer natureza na parte legíveis do CD.
Não expor os CDs à luz directa do sol ou a um ambiente quente demais.
Limpar os CDs sujos do centro para o exterior com um tecido adaptado. Não utilizar
nunca solventes como o benzeno ou o álcool.
Este autorádio não pode ler os CDs de 3'' (8cm).
Não utilizar nunca CDs de 3" ou discos com formas irregulares. Poderiam ficar bloqueados e provocar disfunções.
ANTES DE PÔR O AP
ARELHO EM FUNCIONAMENTO
O som não deve estar forte demais, visto que isso poderia impedir de ouvir os ruídos externos.
É preciso parar o carro antes de poder intervir no sistema.
CUIDADO
Não retire a tampa do aparelho. Não tente consertar o sistema por si próprio. Contacte o
revendedor ou um técnico especializado.
APRESENTAÇÃO
Obrigado por ter escolhido um autorádio da marca Parrot.
Vai beneficiar dum autorádio Bluetooth® CD/MP3 com kit mãos-livres integrado. Dispõe de
todas as funções de um kit mãos-livres de alto nível: sincronização da lista telefónica, visualização do nome do contacto, qualidade áudio excepcional no habitáculo do carro, gestão da
chamada tripartida,
compatibilidade com todos os telefones Bluetooth…
AS FUNCIONALIDADES BLUETOOTH® DO SEU AUTORÁDIO
Este sistema está equipado com a tecnologia Bluetooth® que permite realizar intercâmbios
de dados sem fios entre sistemas electrónicos. No caso presente, o seu telefone
Bluetooth® está conectado com o autorádio. O que permite, em função do seu telefone
(*), sincronizar a lista telefónica do seu telefone na memória do seu autorádio. Poderá
depois ligar para as pessoas directamente a partir da sua lista telefónica, ver o nome do
contacto no ecrã...
Também pode atender, desligar, ajustar o volume das suas comunicações com os botões
verde e vermelho e o selector do autorádio.
O reconhecimento de voz integrado permite utilizar numerosas funções sem tirar as mãos
do volante.
(*) : Unicamente para alguns telefones.
Para mais informações, visite o nosso sítio internet:
" www.parrot.biz, secção Assistência técnica, Guias Utilizadores "
Notice 5100 Zone A 09.01.06.qxp 10/01/2006 16:53 Page 64
Page 65

65
TAMPA FRONTAL
Para colocar o autorádio sob tensão, basta carregar no botão rotativo.
Para parar o autorádio, carregar 2 segundos no mesmo botão.
Sensor infravermelho para telecomando
Tuner
CD/MP3
Phone
Avançar
Retroceder
Pausa/Leitura/Mute
DISP
Menu
Tecla de ejecção
Teclado
Français
English
EspañolItaliano
Deutsch
Dutch
Português
Notice 5100 Zone A 09.01.06.qxp 10/01/2006 16:53 Page 65
Page 66

66
SISTEMA ANTI-ROUBO
Sem a tampa frontal destacável, o sistema não pode funcionar.
Extracção da tampa frontal
Para extrair a tampa frontal, carregue primeiro no botão de ejecção (na parte superior direita).
Desloque lateralmente a tampa frontal para a esquerda.
Extraia do autorádio o lado direito da tampa frontal, e em seguida o lado esquerdo.
Arrume a tampa frontal no estojo e leve-a consigo.
Instalação da tampa frontal
Insira o lado esquerdo da tampa frontal no autorádio.
Insira depois o lado direito da tampa frontal no autorádio.
Levante a tampa frontal até ouvir o clique de fixação.
Extracção do aparelho completo
Retire a tampa frontal e o contorno do autorádio.
Introduza as chaves nos lugares apropriados até que se encontrem bloqueadas.
Extraia o aparelho.
Notice 5100 Zone A 09.01.06.qxp 10/01/2006 16:53 Page 66
Page 67

67
GUIA DE INSTALAÇÃO
Nota : Se quiser conservar as suas definições na memória, verifique que a 12V chave e a 12V permanente não estão invertidas.
Seria nesse caso obrigado a realizar novamente todos os ajustes.
Français
English
EspañolItaliano
Deutsch
Dutch
Português
Notice 5100 Zone A 09.01.06.qxp 10/01/2006 16:53 Page 67
Purple/
Black
Purple Gray White Green
Stripe
(+) (-) (+) (-)(+) (-)
Gray/
Black
Stripe
External microphone
Fuse 15A
Amplifier
Connector
Rear Line-out (Gray)
1357
B
2468
A
B
A
White/
Black
Stripe
(+) (-)
Red
Black
Blue
Yell ow
Green/
Black
Stripe
57
24 8
ISO Connector
To car battety (+)
Continuous + 12V DC
Ground Lead
Motor/Electric Antenna relay control Lead
Amplifier relay control Lead
Ignition key
+ 12 V DC When ON/ACC
R (Red)
L (White)
Right Speaker
(Rear)
Right Speaker
(Front)
Left Speaker
(Front)
Left Speaker
(Rear)
Page 68

68
TELECOMANDO
Utilização do telecomando:
- O botão activar/desactivar permite controlar a alimentação do autorádio.
- Fonte permite passar de um modo para outro: modo Tuner, CD/MP3 e Phone.
- Em modo CD/MP3, as setas avançar e retroceder permitem passar de uma música para
outra com um apoio rápido. Também podem ser utilizadas para avançar/retroceder
durante uma música. Em modo Tuner, permitem-lhe avançar ou retroceder durante a
escolha das suas estações.
- O botão leitura/pausa controla a leitura de um CD.
- Quando uma chamada está a chegar, o botão verde permite atender e o botão vermelho desligar.
- Também pode marcar um número de telefone a partir do telecomando. Para isso, passe
para o modo Phone (com o botão fonte ou carregando directamente em Phone na tampa
frontal do autorádio), e marque depois o seu número utilizando o teclado. Depois de marcar o seu número, carregue no botão verde para iniciar a chamada.
Observação:
o " + " é obtido quando se apoia 2 segundos no zero.
Sostituzione della batteria del telecomando :
Se o telecomando já não funcionar correctamente ou se tiver
dificuldades em controlar o autorádio com o telecomando,
substitua a bateria do telecomando e instale uma nova. Verifique
que a polaridade é a correcta durante a substituição.
1.Retire o suporte da bateria carregando no botão.
2. Insira a nova bateria com o lado (+) virado para si. Colocar novamente o
suporte na posição.
CUIDADO:
A bateria deve ficar num lugar que as crianças não possam atingir. Se uma criança engolir acidentalmente a bateria, contacte imediatamente um médico.
Não recarregar, abrir, aquecer ou deitar fora numa fonte incandescente. Uma dessas acções poderia provocar faíscas ou um começo de fogo.
Não deixar a bateria com outros materiais metálicos. Poderia provocar faíscas ou
um começo de fogo.
Não manipular a bateria com uma pinça de depilar. Poderia provocar faíscas ou
um começo de fogo.
LOS DIVERSOS MODOS DE FUNCIONAMENTO
É preciso primeiro colocar o autorádio sob tensão. Carregue para isso no botão rotativo
para o pôr em funcionamento.
Para o desligar, carregue um segundo no mesmo botão.
Existem 3 funcionalidades principais, acessíveis directamente a partir da interface do autorádio: modo Tuner, modo CD/mp3 e modo Phone.
Cada modo permite uma utilização diferente do autorádio:
Modo Tuner (ou Rádio):
Carregue na tecla Tuner para ligar o rádio. Com as setas avançar e retroceder,
pode deslocar-se passo a passo para procurar estações de rádio.
Se carregar mais longamente numa das teclas, o sistema vai procurar a estação
mais próxima e parar na mesma. Quando está numa estação, carregue num
número do teclado da tampa frontal (apoio demorado) para lhe atribuir uma
tecla de atalho.Depois, para atingir uma estação memorizada, carregue
simplesmente nesse número para a chamar. Quando uma estação está
memorizada, o número de atalho atribuído aparece ao mesmo tempo
do que a frequência da estação.
Modo CD/mp3 (ou leitura de discos):
Carregue em CD/mp3 para poder ouvir um CD. Pode passar de uma música
para outra no CD carregando em retroceder ou avançar. Para retroceder ou
avançar rapidamente, mantenha a seta retroceder ou avançar carregada
durante mais de 0,5 segundos. Durante a leitura de um disco MP3, o ecrã LCD
apresenta sucessivamente as seguintes informações: título da música, álbum e
artista e, de maneira permanente, o tempo decorrido.
Também pode seleccionar directamente a música no seu CD a partir do teclado.
Modo Phone (ou telefonia):
Carregue em Phone para que o sistema passe em modo telefonia. Quando está
conectado com o seu telefone Bluetooth®, obtém as informações relativas ao
nível da bateria e à rede do seu telemóvel. O nome do seu operador também é
visualizado (*). Ao rodar o selector, pode aceder facilmente à sua lista
telefónica. Navega então no alfabeto. Seleccione uma letra para aceder aos
contactos. Se os seus contactos têm mais de um número de telefone, carregue
uma vez mais no selector para aceder a esses números, e depois no botão verde
para fazer a chamada.Para consultar a lista de chamadas, carregue no botão
rotativo. As chamadas efectuadas, perdidas e recebidas são visualizadas.
(*) Estas funções dependem do seu telemóvel.
Notice 5100 Zone A 09.01.06.qxp 10/01/2006 16:53 Page 68
Page 69

69
MENUS
Carregar na tecla Menu permite entrar no menu Definições. Pode utilizar plenamente todas as funcionalidades do autorádio, parametrizar a escuta, a luminosidade e todas as funcionalidades Bluetooth®.
A navegação nos menus faz-se com a ajuda do selector. Carregar no selector permite aceder ao menu seleccionado e permite-lhe gerir completamente a funcionalidade seleccionada.
TUNER :
Algumas informações a propósito do RDS:
- A opção RDS (RDS Scan) permite visualizar o nome da estação de rádio, assim como a
procura de frequências alternativas se o sinal de recepção diminui.
Esta funcionalidade também é chamada de " RDS Alternative Frequencies (AF) ".
- Depois de activada, a função " RDS Região " permite conservar as definições da esta-
ção corrente durante a procura de frequências alternativas.
Por exemplo, uma estação de rádio que emite programas locais numa dada região não
será substituída pela mesma estação que emite programas nacionais no caso da procura
de frequências alternativas.
- O indicador "Traffic Program" (RDS TP) permite saber se a estação corrente pode ou não
difundir informações de tráfego.
- Se a função "Traffic Alert" (RDS TA) está activada e que a estação corrente pode forne-
cer informações de tráfego (indicador "Traffic Program" activado), o autorádio passa automaticamente para o modo Tuner quando as informações de trafego devem ser difundidas.
- Se a função "Traffic Alert" está activada e que a estação corrente não fornece
informações de tráfego (indicador "Traffic Program" desactivado), aparece o seguinte
ecrã no autorádio:
Descrição e arborescência dos menus
- CD/MP3:
Permite gerir a escuta dos seus CDs: procura, gestão da leitura...
- CD/MP3
o Procura MP3
Inteligente
A B C…
o Navegador
o Modo repetição
Desactivado
Repetir uma
o Modo aleatório
Desactivado
Activado
Français English
EspañolItaliano
Deutsch
Dutch
Português
Notice 5100 Zone A 09.01.06.qxp 10/01/2006 16:53 Page 69
Page 70

70
TUNER
o Procura
Todos (Memorização automática)
Por tipo de programa (função PTY do RDS)
All Program Types
Pop Music
Rock Music
...
Documentary
o Banda
FM1
FM2
FM3
MW1
LW
o Sensibilidade do tuner
Local
Distante
o Stereo / Mono
Stereo
Mono
o Opções RDS (Radio Data System)
RDS Scan (function AF)
Desactivado
Activado
Traffic Alert (function TA)
Desactivado
Activado
RDS Region
Desactivado
Activado
Notice 5100 Zone A 09.01.06.qxp 10/01/2006 16:53 Page 70
Page 71

71
BLUETOOTH :
O acesso a este Menu permite gerir o conjunto das funcionalidades Bluetooth do seu autorádio:
gestão da sua lista telefónica, atribuição das vozes, visualização, língua.
- Lista telefónica: Acesso à lista telefónica guardada no autorádio.
- Lista de chamadas: Lista das suas chamadas perdidas, efectuadas, recebidas.
- No sub-directório Definições:
Os aparelhos acoplados permitem visualizar o nome do telefone Bluetooth com o qual o seu autorádio está conectado em modo mãos-livres.
Quando está activada, a resposta automática permite atender imediatamente uma chamada.
Alguns telefones requerem a activação dum certo modo antes do emparelhamento com o telefone Bluetooth (Emparelhar um telefone),
o que permite suportar um máximo de funcionalidades.
O Object Push permite, sempre para alguns telefones, receber contactos quando a sincronização automática não está disponível.
Nota: Algumas das funções dependem do seu telefone e podem portanto estar desactivadas.
Bluetooth
o Lista telefónica
A, B, C…
o Lista de chamadas
Chamadas perdidas
Chamadas efectuadas
Chamadas recebidas
o Comandos vocais
Lista telefónica
Palavras chave
Seleccionar o reconhecimento de voz
o Definições
Volume
Toque
Telefone
Microfone
Resposta automática
Informação
Hotline
Definições avançadas
Aparelhos acoplados
Sentido da ordenação (apelido - nome, nome - apelido)
Apagar o contacto
Object Push
Français English
Español
Italiano
Deutsch
Dutch
Português
Notice 5100 Zone A 09.01.06.qxp 10/01/2006 16:53 Page 71
Page 72

72
PREFERÊNCIAS:
Este menu permite-lhe seleccionar a língua, a cor da visualização, assim como todas as funções áudio para uma optimização da escuta na sua viatura.
o Áudio o Ecrã o Lingua
Contraste Automática
Graves Luminosidade English
Agudos Cor da retro-iluminação ...
Balanço Frente-Atrás Branco
Balanço Esquerda-Direita Azul
Equalizador Amarelo
Desactivado Vermelho
Rock Azul claro
Clássico Violeta
Pop Âmbar
Loudness
Desactivado
Activado
Menus voz
Bip
Desactivado
Activado
Notice 5100 Zone A 09.01.06.qxp 10/01/2006 16:53 Page 72
Page 73

73
FUNÇÕES EM MODO TELEFONIA: Mãos-livres (Bluetooth)
Carregue em Phone para voltar ao modo telefonia.
Os telefones que suportam o Bluetooth® utilizam quer o perfil Handsfree, quer o perfil
Headset, para transferir a comunicação para o autorádio.
O perfil Handsfree é o perfil que oferece mais funcionalidades.
Quando está a utilizar o seu autorádio em modo Tuner ou em modo CD/mp3, se alguém
tenta telefonar-lhe, o autorádio passa automaticamente em modo telefonia. No final da
comunicação, o autorádio volta ao modo Tuner ou CD/mp3. Não é requerida nenhuma
intervenção da parte do utilizador.
A mesma coisa acontece quando se realiza uma chamada a partir do autorádio.
Emparelhamento:
O emparelhamento é a primeira ligação entre o seu telefone Bluetooth® e o autorádio. A
operação é iniciada a partir do seu telefone. Lance uma procura de periféricos Bluetooth®.
Quando aparece o " Parrot Autoradio ", seleccione-o e o seu telefone pede-lhe então para
entrar um código de 4 dígitos. Entre 1234 e valide... Depois de alguns intercâmbios de
dados, o autorádio fica conectado com o Bluetooth®.
Para a obtenção de funcionalidades adicionais, alguns telefones requerem a activação de
um modo especial antes do emparelhamento. Veja o menu Bluetooth, as definições, definições avançadas e emparelhar um telefone.
Sincronização da lista telefónica do telefone:
Com alguns telefones Bluetooth, a lista telefónica do telefone é automaticamente sincronizada na memória do kit. Se o seu telefone não suporta a sincronização automática,
também pode utilizar a funcionalidade Object Push do seu telefone para enviar os
contactos do seu telefone par o autorádio através do Bluetooth®. Durante a sincronização da lista telefónica, o ícone Bluetooth® desfila no ecrã.
Veja o guia do seu telefone ou o nosso sítio internet para saber como proceder:
" www.parrot.biz secção Assistência técnica, guias utilizadores "
Atender / Desligar:
Para atender, carregue no botão verde situado acima do selector. Depois de acabar
a conversa, carregue no botão vermelho para desligar.
Modo discreto:
Durante uma comunicação, carregue no botão verde para fazer passar a comunicação para o telefone. Carregue novamente no botão verde para voltar ao modo Mãoslivres. Funcionalidade unicamente disponível nos telefones que possuem o perfil
Handsfree.
Indicação da pessoa que está a ligar:
Quando alguém está a ligar, o nome ou o número da pessoa aparecem.
Funcionalidade disponível em alguns telefones.
Fazer uma chamada a partir da interface do autorádio:
Existem duas possibilidades:
Passe para o modo Phone. Pode marcar directamente o número de telefone no
teclado e carregar depois no botão verde. Para marcar um número com um " + "
como prefixo, carregue duas vezes rapidamente no zero.
Também pode utilizar o reconhecimento de voz (ver mais abaixo).
Reconhecimento de voz:
Pode fazer telefonemas utilizando o reconhecimento de voz do autorádio. Deve
para isso ter guardado contactos na memória do kit (sincronização automática da
lista telefónica ou envio dos contactos um depois do outro a partir do telefone).
Também deve ter guardado anteriormente as palavras chave: casa, trabalho, escritório... assim com a palavra mágica: telefone.
Depois de ter guardado os nomes dos contactos, as palavras chave e a palavra
mágica, pode fazer uma chamada da seguinte maneira:
Diga: Telefone… Bip… Ana… Bip… Ana… e pode ligar automaticamente para o
número que corresponde a Casa para o contacto Ana.
Da mesma maneira, se a Ana ligar, ouvirá " Ana ". Carregue então no botão verde
para atender. Desligue carregando no botão vermelho. Volta assim automaticamente
ao modo Tuner, CD/mp3 ou Telefone.
Também pode utilizar a seguinte sequência para utilizar o reconhecimento de voz, mas sem palavras chave:
Carregue no botão verde, o que desliga o rádio ou o leitor de CD. Ouve-se um bip.
Depois do bip, diga o nome do contacto pretendido e especifique eventualmente
casa, trabalho ou escritório (quando disponíveis).
Nota:
Para guardar as palavras chave e a palavra mágica, é preciso estacionar a viatura
num lugar sem barulho, com as janelas fechadas e sem ventilação. Torna-se necessário para uma taxa de reconhecimento mais elevada.
Français
English
EspañolItaliano
Deutsch
Dutch
Português
Notice 5100 Zone A 09.01.06.qxp 10/01/2006 16:53 Page 73
Page 74

74
ACTUALIZAÇÃO DO SEU AUTORÁDIO
Para poder aproveitar os últimos aperfeiçoamentos (novos telefones compatíveis,
novas funcionalidades…), tem a possibilidade de actualizar o seu autorádio através
do Bluetooth.
Active para isso a opção: Bluetooth, Definições, Definições avançadas, Software
update, e utilize depois um computador equipado com o Bluetooth para transferir a
última versão para o seu autorádio (disponível no nosso sítio web).
Visite o nosso sítio web para obter mais informações. www.parrot.biz
RESOLUÇÃO DE PROBLEMAS
Em caso de disfunção, desligue imediatamente o autorádio. O aparelho não deve
ser utilizado em condições anormais como, por exemplo, a ausência de som ou a
presença de maus cheiros, para evitar qualquer risco de electrocussão.
Não tente nunca consertar o aparelho por si próprio.
Geral:
O autorádio não funciona.
O contacto do veículo está cortado. Coloque a chave de contacto na
posição ACC (funcionamento).
Verifique os cabos de ligação. O fusível fundiu. É preciso substituí-lo.
Não há nenhum som.
Verifique que o som do autorádio não está no mínimo.
Verifique também que a função Mute não está activada (corte do som).
Rádio:
Demasiado barulho numa estação.
A estação que está a escutar está longe demais do seu sinal óptimo.
Escolha outra estação com melhor sinal.
Perda das estações pré-seleccionadas.
Problema na alimentação do autorádio.
Verifique que o cabo da bateria está instalado de maneira correcta
(12V chave e 12V permanente).
Disco:
O disco foi inserido, mas não funciona.
O disco foi inserido no sentido contrário. É preciso inserir o disco com o
nome do artista/CD para cima.
O disco está sujo ou danificado. Limpe o disco ou use outro CD.
O som salta ou é de má qualidade.
O disco está sujo ou danificado. Limpe o disco ou use outro CD.
As vibrações da viatura provocam saltos de som.
O ângulo de instalação do autorádio deve ser inferior a 30°.
Verifique que a instalação do aparelho é estável no lugar previsto para
o efeito.
CD/MP3 : mensagem de erros.
Quando aparece o seguinte ícone: Significa que não há CD no leitor.
Quando aparece o seguinte ícone: Significa que o seu CD não contém ficheiros de formato MP3.
ESPECIFICAÇÕES TÉCNICAS
CD / CD-R / CD-RW / MP3, ID3 Tag.
Manual flip-down front panel.
Output power: 4x45W.
Line out: 4 channel x4V/4ch x2V
DSP: Classic, rock, pop, flat.
Power / Speaker wire: ISO.
Ecrã a cores.
Flashing com o Bluetooth para a transferência da última versão.
Micro externo.
Utiliza os altifalantes da sua viatura para uma escuta de melhor qualidade.
Bluetooth®.
Profili Bluetooth® supportati:
- Handsfree 0.96 e 1.0.
- Headset 1.0.
- Object Push 1.0.
- Synch ML 1.0.
HOTLINE
- A nossa hot-line está ao seu dispor. Pode contactá-la por mail ou por telefone
(permanência da segunda à sexta-feira, das 9h à 18h, hora francesa).
- Visite o nosso sítio web www.parrot.biz para obter mais informações.
Notice 5100 Zone A 09.01.06.qxp 10/01/2006 16:54 Page 74
Page 75

Notice 5100 Zone A 09.01.06.qxp 10/01/2006 16:54 Page 75
Page 76

ZONE A
Notice 5100 Zone A 09.01.06.qxp 10/01/2006 16:54 Page 76
 Loading...