

Page 1
LASER DISTANCE MEASURE PLEM 50 B2
LASER DISTANCE MEASURE
PLEM 50 B2
Operation and safety notes
LASER-AFSTANDSMETER
PLEM 50 B2
Bedienings- en veiligheidsinstructies
TÉLÉMÈTRE LASER PLEM 50 B2
Instructions d‘utilisation et consignes de sécurité
LASER-ENTFERNUNGS MESSER PLEM 50 B2
Bedienungs- und Sicherheitshinweise
IAN 315778_1904
Page 2

GB / IE / NI Operation and safety notes Page 5
FR / BE Instructions d‘utilisation et consignes de sécurité Page 32
NL / BE Bedienings- en veiligheidsinstructies Pagina 61
DE / AT / CH Bedienungs- und Sicherheitshinweise Seite 89
Page 3
A
1
6
2
3
4
5 a
5 b
Page 4
B
16
C
D
30
28
26
15
14
13
12
11
29
27
25
19 b
24
31
17
18
32
19 a
20
22
23
7
8
9
10
21
33
Page 5

List of pictograms used ..................................... Page 7
Introduction ................................................................ Page 7
Intended use ..................................................................... Page 8
Parts description ............................................................... Page 8
Scope of delivery ............................................................. Page 10
Technical data .................................................................. Page 10
General safety instructions ........................... Page 11
Safety instructions for batteries /
rechargeable batteries..................................................... Page 13
Before using ............................................................... Page 14
Inserting / replacing the batteries .................................... Page 14
Start-up .......................................................................... Page 15
Power ON / OFF .............................................................. Page 15
Handling and Operation ................................. Page 16
Selecting the unit of length .............................................. Page 16
Return / Clear ................................................................... Page 16
Selection of the reference point ...................................... Page 17
End piece reference point................................................ Page 17
Measuring lengths ................................................ Page 18
Single Measurement mode ............................................. Page 18
Continuous Measurement mode ..................................... Page 19
5 GB/IE/NI
Page 6

Measurement value functions .................... Page 20
Area .................................................................................. Page 20
Volumes ............................................................................ Page 21
Simple Pythagoras ........................................................... Page 21
Double Pythagoras .......................................................... Page 22
Addition (Plus) .................................................................. Page 23
Subtraction (Minus).......................................................... Page 24
Historical memory ................................................ Page 24
Calling up a stored memory ............................................ Page 24
Clearing / deleting memory record and
single memory record ...................................................... Page 25
Clearing / deleting all memory records .......................... Page 25
Leaving memory mode .................................................... Page 25
Belt pouch .................................................................... Page 26
Error, faults & troubleshooting .................. Page 26
Maintenance and cleaning ............................ Page 27
Storage .......................................................................... Page 27
Disposal ......................................................................... Page 28
Warranty ...................................................................... Page 29
Warranty claim procedure .............................................. Page 30
Service .............................................................................. Page 30
6 GB/IE/NI
Page 7
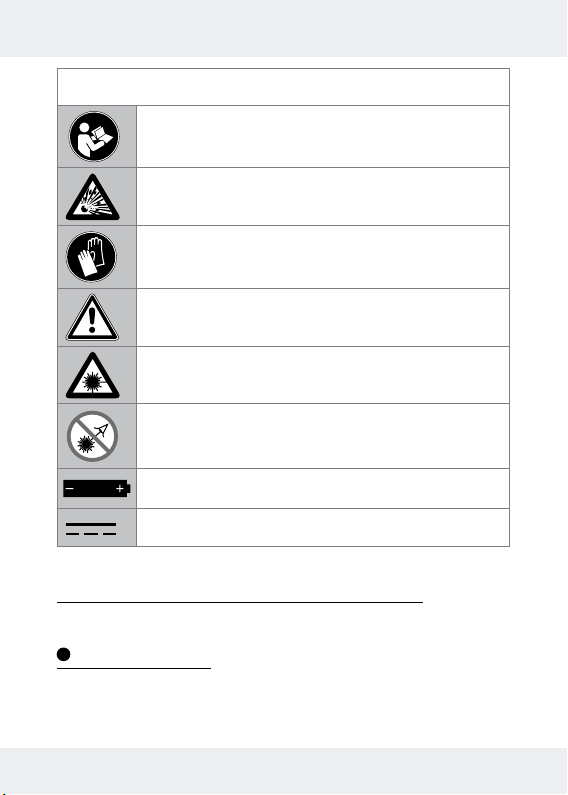
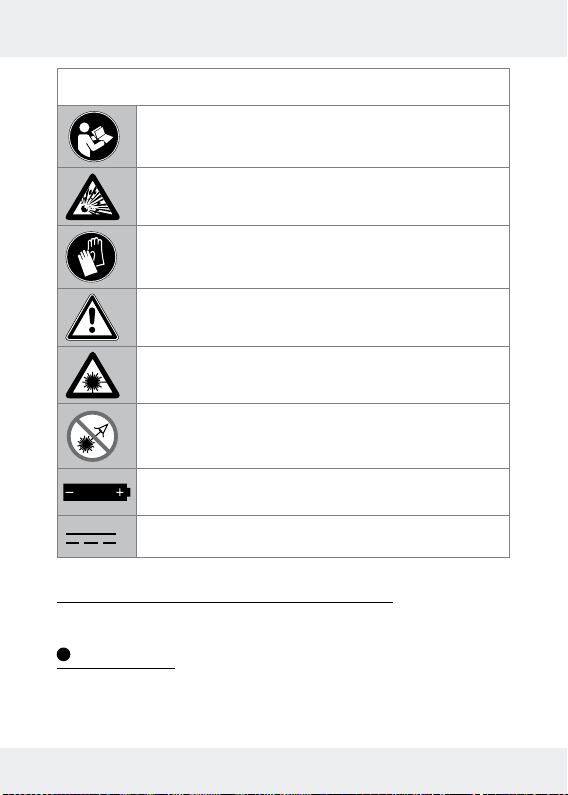
List of pictograms used
Read the instruction manual.
Danger of explosion!
Wear protective gloves!
Attention!
Protect yourself from laser radiation!
Do not stare into the laser beam!
Batteries included.
Direct current
Laser distance measure PLEM 50 B2
Introduction
We congratulate you on the purchase of your new product. You
have chosen a high quality product. The instructions for use are
7 GB/IE/NI
Page 8
part of the product. They contain important information concerning safety, use and disposal. Before using the product, please familiarise yourself with all of the safety information and instructions
for use. Only use the product as described and for the specified
applications. If you pass the product on to anyone else, please
ensure that you also pass on all the documentation with it.
Intended use
This laser distance measurer (hereinafter product) is suitable for
measuring distances, lengths, heights, gaps and for calculating
areas and volumes in indoor spaces. Any other use or product
modification shall be considered improper use and hold considerable safety hazards. The manufacturer assumes no liability for
damages due to improper use. Not intended for commercial use.
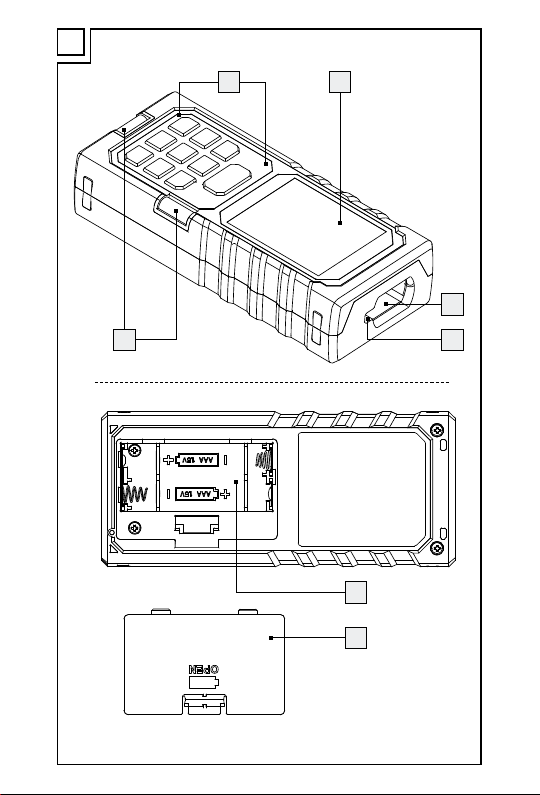
Parts description
1
Keypad
2
Display
3
Receiver lens
4
Laser beam output opening
5a
Battery compartment
5b
Battery compartment cover
6
Spirit level
8 GB/IE/NI
Page 9
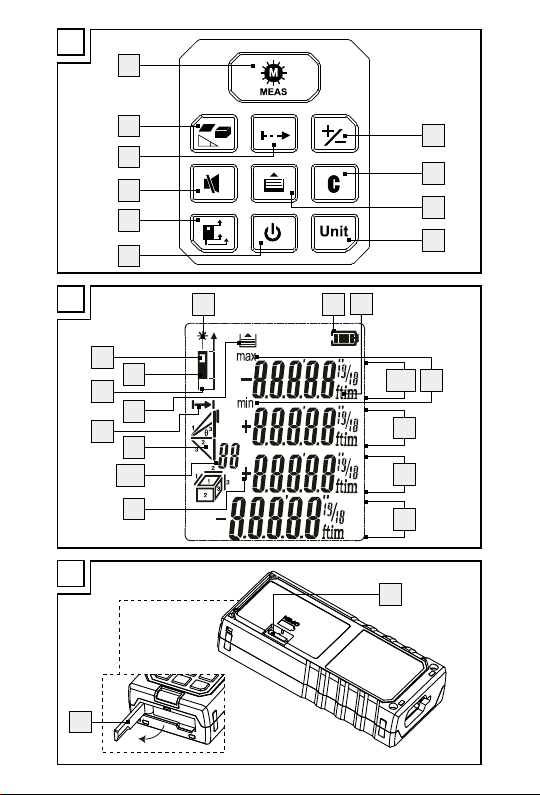
Keypad
7
Add / Subtract button
8
Return / Clear button
9
Memory button
10
Unit button
11
Power button
12
Reference button
13
Beep button
14
Continuous Measurement button
15
Function selection button
16
MEAS button
Display
17
Battery status icon
18
Measuring units
19 a
Value-1 row
19 b
Memory location number row
20
Value-2 row
21
Max / Min values
22
Value-3 row
23
Bottom row
24
Add / Subtract
25
Measuring mode indication symbol
26
Distance measurement mode icon
27
Memory icon
28
Reference point (end piece)
29
Reference point (rear)
30
Reference point (front)
31
Laser on icon
9 GB/IE/NI
Page 10
Battery compartment
32
Battery compartment cover latch
Trailing edge
33
End piece at the reference point (foldable)
Scope of delivery
1 Laser Distance Measurer
2 1.5 V batteries LR03 (AAA)
1 Belt pouch
1 Instruction manual
Technical data
Maximum measuring range: 0.05–50 meter*
(measure from top side);
0.17–50 meter*
(measure from bottom side)
Measuring accuracy: ±1.5 mm**
Measuring units: m / in / ft / ft+in
Laser class: Class 2
Laser type: 630–670 nm, 1 mW
Historical memory: 100 sets
Operating temperature: 0 °–40 °C
Storage temperature: -10 °–60 °C
Relative humidity: 90 % max
Batteries: 2 x 1.5 V LR03 (AAA)
10 GB/IE/NI
Page 11
Weight: 108 g (without batteries)
Dimensions: 114.4 x 50 x 26.8 mm
*) During daylight or if the target has poor reflection properties,
please use target plate.
**) In favourable conditions, a deviation influence of + / - 0.05
mm / m must be taken in to account. In unfavorable conditions, such
as intense sunshine, poorly reflecting target surface (black surface)
or high temperature variations, a higher deviation is expected.
General safety
instructions
Choking hazard! Packaging material (e. g. foils or polystyrol)
are not to be toyed with. Keep children away from packaging
material. The packaging material is not a toy.
Do not use the product in locations where there is a risk of fi
re or explosion, e.g. in the vicinity of infl ammable liquids or
gases.
This product can be used by children aged from 8 years and
above and persons with reduced physical, sensory or mental
capabilities or lack of experience and knowledge if they have
been given supervision or instruction concerning use of the
product in a safe way and understand the hazards involved.
Children shall not play with the product. Cleaning and user
maintenance shall not be made by children without supervision.
Do not leave the product unattended when switched on, and
switch off the product directly after use. Other people could
be blinded by the laser beam.
11 GB/IE/NI
Page 12
Protect the product from wetness or direct sunlight.
Do not expose the product to any extremes of temperature or
temperature fluctuations. For example, do not leave it in a car
for extended periods. After exposure to large temperature
fluctuations, allow the product to acclimatise before using it
again. The precision of the product can be adversely aff ected
by extreme temperatures or temperature fluctuations.
Avoid hefty knocks or dropping the measuring tool.
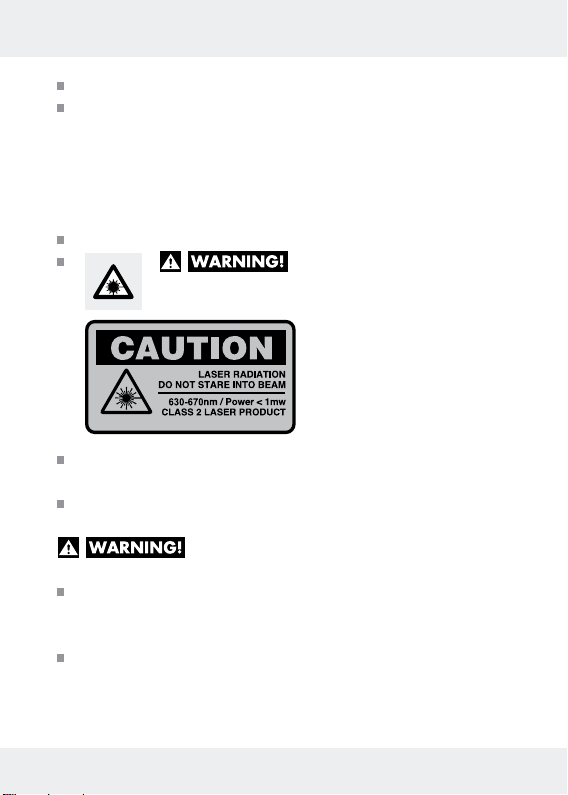
Protect yourself from laser radiation!
EN 60825-1:2014
CAUTION LASER RADIATION! DO NOT STARE INTO
BEAM! CLASS 2 LASER PRODUCT!
Never look directly into the laser beam or into the opening
from which it emerges.
Looking at a laser beam through optical instru-
ments (e.g. magnifying glasses etc.) can cause eye injuries.
ATTENTION! If operating and adjustment equipment is used
or procedures other than those specified here are carried out,
this may result in hazardous radiation exposure.
Never aim the laser beam at reflective surfaces, people or ani-
mals. Even brief visual contact with a laser beam can result in
eye injuries.
12 GB/IE/NI
Page 13
Safety instructions for batteries /
rechargeable batteries
DANGER TO LIFE! Keep batteries / rechargeable batteries
out of reach of children. If accidentally swallowed seek immediate medical attention.
DANGER OF EXPLOSION! Never recharge
non-rechargeable batteries. Do not short-circuit
batteries / rechargeable batteries and / or open
them. Overheating, fire or bursting can be the result.
Never throw batteries / rechargeable batteries into fire or water.
Do not exert mechanical loads to batteries / rechargeable
batteries.
Risk of leakage of batteries / rechargeable batteries
Avoid extreme environmental conditions and temperatures,
which could affect batteries / rechargeable batteries, e.g.
radiators / direct sunlight.
If batteries / rechargeable batteries have leaked, avoid contact
with skin, eyes and mucous membranes with the chemicals!
Flush immediately the affected areas with fresh water and
seek medical attention!
WEAR PROTECTIVE GLOVES! Leaked or dam-
aged batteries / rechargeable batteries can cause
burns on contact with the skin. Wear suitable pro-
tective gloves at all times if such an event occurs.
In the event of a leakage of batteries / rechargeable batteries,
immediately remove them from the product to prevent damage.
Only use the same type of batteries / rechargeable batteries.
Do not mix used and new batteries / rechargeable batteries.
13 GB/IE/NI
Page 14
Remove batteries / rechargeable batteries if the product will
not be used for a longer period.
Risk of damage of the product
Only use the specified type of battery / rechargeable battery!
Insert batteries / rechargeable batteries according to polarity
marks (+) and (-) on the battery / rechargeable battery and
the product.
Clean the contacts on the battery / rechargeable battery and
in the battery compartment before inserting!
Remove exhausted batteries / rechargeable batteries from the
product immediately.
Before using
Check the consignment for completeness and for signs of
visible damage.
Remove all packaging material from the product.
Inserting / r eplacing the batteries
When the low battery icon appears in the display 2, you can
still make measurements. As soon as the battery icon turns empty
, however, you must replace the batteries. Measurements are
no longer possible.
Open the battery compartment cover 5b by gently pushing
down the battery compartment cover latch
32
.
14 GB/IE/NI
Page 15
Remove the used batteries from the battery compartment 5a,
if necessary.
Insert the (new) batteries. Ensure the correct polarity as shown
on the diagram inside the battery compartment
5a
.
Replace the battery compartment cover 5b as shown (fig. A).
Start-up
Power ON / OFF
Press power button 11 to power on the product.
Press and hold the power button 11 until the LC display turns
off to power off the product.
Note: If no button is pressed for 3 minutes, the product will
automatically power off itself.
Acoustic signal:
- Each press of a button and every error-free function that is carried
out is confirmed by a short beep.
- A double beep will be heard in the event of any fault.
- Under continuous measurement mode, fast pace of short beeps will
be continuously heard and in the event of error, the fast pace
double beep will slow down.
- Briefly press the beep button
beep sound at any mode.
13
to activate or deactivate the
15 GB/IE/NI
Page 16
Home-screen mode:
Briefly press power button 11 at any mode to clear all data
shown on the display and to go to Home-screen mode. At
Home-screen mode, there won't be any data on the display
and user can press any particular button at this home-screen
mode to go to any specific mode.
Handling and Operation
Selecting the unit of length
Right after power on the product, the last-used length unit will be
shown on the display. Press Unit button
10
to select another unit.
You can set the following length units in this order:
Length Area Volumes
0.000 m 0.000 m
0.000 ft 0.000 ft
0’0” 1/16 in 0.00 ft
0’0” 1/16 0.00 ft
2
2
2
2
0.000 m
0.00 ft
0.00 ft
0.00 ft
3
3
3
3
Return / Clear
Press “Return / Clear“ button 8 at any mode to clear latest
measured value and go back to previous value (or) go back
to previous mode.
16 GB/IE/NI
Page 17
Press “Return / Clear“ button 8 multiple times to go back to
Home-screen (see chapter “Start-up“, section “Home-screen
mode“).
Note: Pressing “Return / Clear“ button
8
under continuous
measurement mode will stop the measurement.
Selection of the reference point
The rear reference point 29 (base) or the end piece 28 reference
point or the front reference
30
point of the product can be used
as the contact surface for any measurement. The reference point is
to be set before measurement. Otherwise, the measured result differs from actual value. The default reference point setting is from
the reference point (rear)
can be changed by pressing the reference button
29
of the product. The reference point
12
repeatedly
until the desired reference point shown on the top left side corner
of the display.
End piece reference point
The end piece 33 will be useful while a distance is measured from
a corner (diagonal room) or from the place, where it is difficult to
reach. The end piece
The end piece
sharp tool or finger nail. Once finished using, the end piece
has to be folded-back for future use.
33
is located on the rear side of the product.
33
can be unfolded as shown in the fig D using a
33
17 GB/IE/NI
Page 18
Measuring lengths
Single Measurement mode
1. Place or hold the reference plane of the product on or against
the desired base surface from which you want to determine a
distance.
2. Check the flatness of the product by use of both the bubble
6
levels
flatness and the other air bubble is for checking vertical flatness.
To, check the flatness of certain angle, make sure that bubble
is positioned at the middle of respective angle bubble level.
3. Briefly press the MEAS button
the laser is switched on, it is indicated by the laser icon
the display.
Note: Step 3 can be skipped if the laser beam is already
activated.
4. Now aim the laser at the target point and press the MEAS
button
urement is successful, the measured result will be shown on
the bottom row
pushed upwards.
Note:
- Repeat the step 1 to 4 if needed to measure another distance.
- Distance Measurement mode icon
- Maximum up to 4 measured values can be shown on the
. One of the bubble level is for checking horizontal
16
to activate the laser. Once
16
briefly again to take a measurement. If the meas-
23
of the display. The previous readings are
26
will stay on (not flashing)
under single measurement mode.
display at a same time.
31
on
18 GB/IE/NI
Page 19
- If no button is pressed for 30 seconds, the laser and display
back-light will turn off. If no button is pressed for 3 minutes,
the product will power off itself.
Continuous Measurement mode
Continuous measurement involves taking series of measurements
from which the maximum (MAX) and minimum (MIN) values are
displayed. To do this, move the product along a base surface or
an edge from which you wish to the measure a distances. You can,
for example, measure how parallel two opposite walls are or measure the maximum values while using a function.
1. Start the continuous measurement by briefly pressing the con-
tinuous measurement button
observed to get first measured value on the display. This is common. Now, each measured value will be shown on the display.
2. Stop the measurement by pressing the continuous measure-
ment button
8
. The display now shows the maximum (MAX) and mini-
14
or MEAS button 16 or return / Clear button
mum (MIN) values
and the last measured value.
Note:
- Repeat the step 1 to 2 if needed to do another measurement.
- Distance measurement mode icon
tinuous measurement mode while measurement is on process.
- Addition, subtraction, area measurement and volume measure-
ment cannot be done on on this mode. So, function selection
14
. A very short delay could be
21
of that particular measurement series
26
will be flashing under con-
19 GB/IE/NI
Page 20
button 15 and add / subtract button 7 will be inactive at this
mode.
- If no button is pressed for 3 minutes, the product will power off
itself.
Measurement value functions
To make it easier to process measurement results, the product offers
a number of integrated functions. By pressing the Function button
15
repeatedly, you can activate the following functions one after
the other: Area, Volume, Simple Pythagoras, Double Pythagoras.
Note: The desired function must be selected before the measurement.
Area
1. Press the Function selection button 15 once. The area icon of
measuring mode indication symbol
2. Now measure the length and width of the area to be measured
by pressing the MEAS button
the area icon flashes on the display for the individual measurement values. Right after the second measurement, the calculated area is shown on the bottom row
the corresponding line of the area icon stop flashing. Length,
width and perimeter will be shown on the top three rows of
the display orderly.
25
appears on the display.
16
. The corresponding line of
23
of the display and
20 GB/IE/NI
Page 21
Volumes
1. Press the Function button 15 twice. The volume icon of meas-
uring mode indication symbol
25
appears on the display.
2. Now measure the length, width and height of the volume to be
measured by pressing the MEAS button
16
. The corresponding line of the volume icon flashes on the display for the individual measurement values. Right after the third measurement,
the calculated volume will be shown on the bottom row
23
of
the display and the corresponding line of the volume icon
stops flashing on the display. Length, width and height will be
shown on the top three rows of the display orderly.
Simple Pythagoras
Pythagoras Theorem describes the dependence of the lengths of
the sides in a right-angled triangle as follows: a² + b² = c², where
a and b are the legs and c the hypotenuse of the triangle. Using
the “Simple Pythagoras“ function, it is possible to calculate the
length of one of the legs. This feature is particularly useful for
poorly accessible measurement points.
1. Press the Function selection button
15
three times. The “Simple
Pythagoras“ triangle icon of measuring mode indication sym-
25
bol
appears on the display.
2. Now measure the hypotenuse (largest distance) and one of the
legs (shortest distance to the measurement surface) by pressing
the MEAS button
16
. The corresponding line of the “Simple
Pythagoras“ icon flashes for the individual measurement values.
21 GB/IE/NI
Page 22
Right after the second measurement, the calculated length is
shown on the bottom row
23
of the display and the corresponding line of the “Simple Pythagoras“ icon stop flashing. The individual measured values will be shown on the top two rows
of the display.
Note: Please note that angular error (no right angles) will lead to
incorrect results. Ensure that the measured distances lie on a plane
(alignment).
Double Pythagoras
In this function, Pythagoras Theorem is applied to two right triangles that have a common leg. This makes it possible to calculate
the length of the base side of any triangle. This function calculates
the distance between two arbitrary points and is especially useful
for inaccessible measurement points.
1. Press the Function selection button
15
four times. The “Double
Pythagoras“ triangle icon of measuring mode indication
25
symbol
appears on the display.
2. Now measure the left hypotenuse (largest distance to the left)
and then one leg (shortest distance to the measurement surface)
and finally the right hypotenuse (largest distance to the right)
by pressing the MAES button
16
. The corresponding line of
the “Double Pythagoras“ triangle icon flashes for the individual
measurement values. Right after the third measurement, the
calculated length will be shown on the bottom row
23
of the
display and the corresponding line of the “Double Pythagoras“
22 GB/IE/NI
Page 23
triangle icon stop flashing. The individual measured values will
be shown on the top 3 rows of the display.
Note: Please note that angular error (no right angles) will lead to
incorrect results. Ensure that the measured distances lie on a plane
(alignment).
Addition (Plus)
1. To add two individual values, take a measurement (length or
area or volume) so that the display is showing a value.
2. Then press the add / subtract button
(Plus) function. Now, the plus symbol will be flashing on the
“value-3“ row
22
of the display.
3. Now take a second measurement (length or area or volume).
The second measured / calculated value will be shown on the
“value-3“ row
22
of the display. Right after the second measurement, the added result will be shown on the bottom row
of the display. The first measured/calculated value will be shown
on the “value-2“ row
20
of the display.
Note:
- The addition can be carried out with all units (length, area,
volume). You can also include the measurement results of
functions such as area and volume in the addition.
- Only values of the same units can be added. The first measured / calculated value sets the unit to be used.
- Addition cannot be used with Pythagoras theorem.
7
to start the Addition
23
23 GB/IE/NI
Page 24
- Result of an addition and the individual values of the addition
are automatically stored in the memory.
Subtraction (Minus)
The subtraction of measurements is carried out in the same way as
the addition. The only difference is that the add / subtract button
has to be pressed again while the plus symbol is flashing on the
display to get minus symbol on the display. Rest are same.
7
Historical memory
All measured and calculated values will be automatically stored in
the memory. The values are saved with their unit (length, area or
volume). Calculated values are stored together with the respective
individual values. There are a total of 100 memory locations available. As soon as all 100 memory locations are occupied, the oldest memory record will be over-written by newest record.
Calling up a stored memory
Briefly press the memory button 9 to display the latest stored
memory. Memory icon
the respective memory location number will be shown on the
“memory location number row“
uct has entered the historical memory mode.
Press the memory button 9 again to go to next memory.
27
will be displayed on the display and
19 b
to indicate that the prod-
24 GB/IE/NI
Page 25
Press and hold the memory button 9 for more than 1.5 sec-
onds will scroll down the memory record fast by jumping the
record from 10 to 20 to 30....100.
Clearing / deleting memory record and
single memory record
Under memory mode, press and hold memory button 9 and
Clear / return button
Clear currently viewing memory. “CLEAR“ will be shown on the
display for a second and a short beep will be heard as a confirmation.
8
together for less than 1.5 seconds to
Clearing / deleting all memory records
Under memory mode, press and hold memory button 9 and
Clear /return button
Clear all the recorded memories. “CLEAR ALL“ will be shown
on the display for a second and a long beep will be heard as
a confirmation.
8
together for more than 5 seconds to
Leaving memory mode
Briefly press Clear / return button 8 to leave the historical memory
mode and to enter Home-screen mode. Now, the memory icon
will be disappeared from the display. The memory location
25 GB/IE/NI
Page 26
number will also be disappeared from the “memory location
number row“
19 b
.
Belt pouch
Use the supplied belt pouch to protect the product when not in use.
Error, faults & troubleshooting
Faults
204 Calculation error Refer to user manual,
220 Low battery Replace batteries or charge
255 Received signal too
256 Received signal too
261 Out of measuring
26 GB/IE/NI
Cause Solution
repeat the procedures.
the batteries.
Improve the reflective surface.
weak or measurement time too long
strong
range
(Use target plate, white paper)
Improve the reflective surface.
(Use target plate, or don't aim
at strong light)
Measuring the distance within
measurement range.
Page 27
Faults
500 Hardware error Switch on / off the product, if
Cause Solution
the symbol still appears after
several times, please contact
with your dealer.
Maintenance and cleaning
The product is maintenance-free.
CAUTION! Never submerse the product in water or other
liquids. Do not allow any moisture to penetrate into the product during cleaning.
Clean the laser beam output opening 4 and the receiver
3
lens
with a gentle air stream. In the case of more serious
contamination, remove the dirt with a damp cotton swab. Do
not exert any strong pressure!
Never use petrol, solvents or cleaning agents that attack plastic.
The product should only be opened by a
qualified person for repairs.
To clean the casing, use a soft dry cloth.
Keep the product clean to ensure fault-free operation.
Storage
If you decide not to use the product for a long period, remove
the batteries and store it in a clean, dry place away from direct
sunlight.
27 GB/IE/NI
Page 28
Disposal
The packaging is made entirely of recyclable materials, which you
may dispose of at local recycling facilities.
Observe the marking of the packaging materials for waste
b
separation, which are marked with abbreviations (a) and
a
numbers (b) with following meaning: 1–7: plastics /
20–22: paper and fibreboard / 80–98: composite
materials.
The product and packaging materials are recyclable,
dispose of it separately for better waste treatment. The
Triman logo is valid in France only.
Contact your local refuse disposal authority for more
details of how to dispose of your worn-out product.
To help protect the environment, please dispose of the
product properly when it has reached the end of its useful life and not in the household waste. Information on
collection points and their opening hours can be obtained from your local authority.
Faulty or used batteries / rechargeable batteries must be recycled
in accordance with Directive 2006/66/EC and its amendments.
Please return the batteries / rechargeable batteries and / or the
product to the available collection points.
28 GB/IE/NI
Page 29
Environmental damage through
incorrect disposal of the batteries /
rechargeable batteries!
Batteries / rechargeable batteries may not be disposed of with the
usual domestic waste. They may contain toxic heavy metals and
are subject to hazardous waste treatment rules and regulations.
The chemical symbols for heavy metals are as follows: Cd = cadmium, Hg = mercury, Pb = lead. That is why you should dispose of
used batteries / rechargeable batteries at a local collection point.
Warranty
The product has been manufactured to strict quality guidelines and
meticulously examined before delivery. In the event of product defects you have legal rights against the retailer of this product. Your
legal rights are not limited in any way by our warranty detailed
below.
The warranty for this product is 3 years from the date of purchase.
Should this product show any fault in materials or manufacture
within 3 years from the date of purchase, we will repair or replace
it – at our choice – free of charge to you.
The warranty period begins on the date of purchase. Please keep
the original sales receipt in a safe location. This document is required as your proof of purchase. This warranty becomes void if
the product has been damaged, or used or maintained improperly.
29 GB/IE/NI
Page 30
The warranty applies to defects in material or manufacture. This
warranty does not cover product parts subject to normal wear, thus
possibly considered consumables (e.g. batteries) or for damage to
fragile parts, e.g. switches, rechargeable batteries or glass parts.
Warranty claim procedure
To ensure quick processing of your case, please observe the
following instructions:
Please have the till receipt and the item number (e.g.
IAN 123456_7890) available as proof of purchase.
You will find the item number on the type plate, an engraving on
the front page of the instructions (bottom left), or as a sticker on
the rear or bottom of the appliance.
If functional or other defects occur, please contact the service
department listed either by telephone or by e-mail.
You can return a defective product to us free of charge to the service address that will be provided to you. Ensure that you enclose
the proof of purchase (till receipt) and information about what the
defect is and when it occurred.
Service
Service Great Britain
30 GB/IE/NI
Page 31
Service Ireland
Service Northern Ireland
Tel.: 1890 930 034
(0,08 EUR / Min., (peak)) (0,06 EUR / Min.,
(off peak))
E-Mail: [email protected]
31 GB/IE/NI
Page 32

Légende des pictogrammes utilisés ....... Page 34
Introduction ................................................................ Page 35
Utilisation conforme ......................................................... Page 35
Descriptif des pièces ........................................................ Page 36
Contenu de la livraison .................................................... Page 37
Caractéristiques techniques ............................................. Page 38
Instructions générales de sécurité .......... Page 39
Consignes de sécurité relatives aux piles /
aux piles rechargeables .................................................. Page 41
Avant la mise en service .................................. Page 42
Insérer / remplacer les piles ............................................. Page 43
Mise en service ........................................................ Page 43
Mise en marche / arrêt .................................................... Page 43
Manipulation et utilisation ............................ Page 44
Choix de l'unité de longueur ........................................... Page 44
Retour / Supprimer ........................................................... Page 45
Sélectionner le point de référence .................................. Page 45
Point de référence de pièce finale .................................. Page 46
Mesure de longueurs ......................................... Page 46
Mode de mesure individuelle .......................................... Page 46
Mode de mesure en continu ........................................... Page 47
32 FR/BE
Page 33

Fonctions de valeur de mesure .................. Page 48
Surface .............................................................................. Page 49
Volume .............................................................................. Page 49
Pythagore simple .............................................................. Page 50
Pythagore double ............................................................. Page 51
Addition (Plus) .................................................................. Page 52
Soustraction (Moins) ........................................................ Page 53
Mémoire historique ............................................. Page 53
Accès à une série de données mémorisée ..................... Page 53
Éliminer / Supprimer des séries de données
mémorisées et mémorisées individuellement .................. Page 54
Éliminer / Supprimer toutes les séries de
données mémorisées ....................................................... Page 54
uitter le mode de mémoire ............................................... Page 55
Sac à ceinture ........................................................... Page 55
Erreur, dysfonctionnement
& dépannage ............................................................ Page 55
Entretien et nettoyage....................................... Page 56
Rangement.................................................................. Page 57
Mise au rebut ............................................................ Page 57
Garantie ........................................................................ Page 59
Faire valoir sa garantie .................................................... Page 59
Service après-vente .......................................................... Page 60
33 FR/BE
Page 34
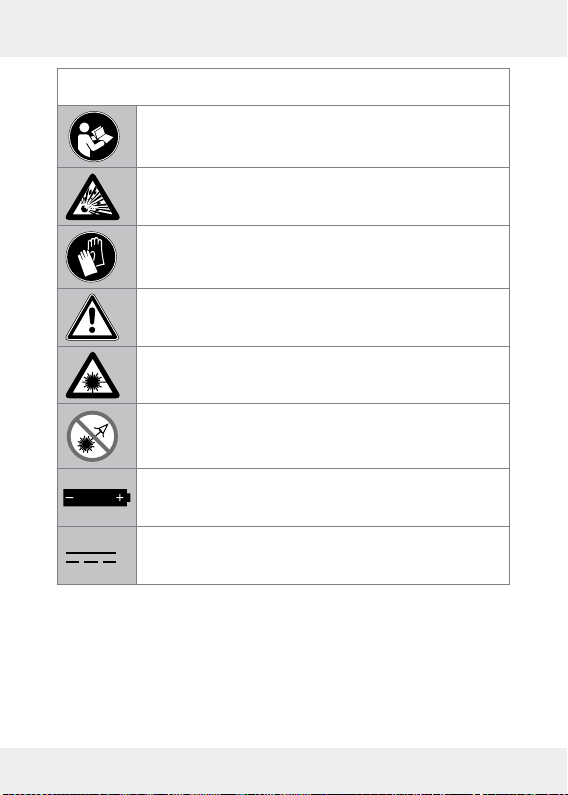
Légende des pictogrammes utilisés
Veuillez lire le mode d'emploi.
Risque d'explosion!
Porter des gants de protection!
Attention !
Protégez-vous contre les rayons laser!
Ne regardez pas le rayon laser!
Les piles sont fournies à la livraison.
Courant continu
34 FR/BE
Page 35

Télémètre laser PLEM 50 B2
Introduction
Ce télémètre à laser (désigné par appareil dans la suite) est approprié à la mesure d'éloignements, longueurs, hauteurs, distances
et au calcul de surfaces et volumes dans des espaces intérieurs.
Le mode d‘emploi fait partie intégrante de ce produit. Il contient
des indications importantes pour la sécurité, l’utilisation et la mise
au rebut. Veuillez lire consciencieusement toutes les indications
d‘utilisation et de sécurité du produit. Ce produit doit uniquement
être utilisé conformément aux instructions et dans les domaines
d‘application spécifiés. Lors d‘une cession à tiers, veuillez également
remettre tous les documents.
Utilisation conforme
Ce télémètre laser (désigné par «produit» ci-après) convient à la
mesure d'éloignements, de longueurs, hauteurs, distances et au
calcul de surfaces et volumes dans des espaces intérieurs. Toute
autre utilisation ou modification du produit est considérée comme
non conforme et peut être source de graves dangers. Le fabricant
décline toute responsabilité pour les dommages résultant d'une utilisation non conforme. Non destiné à une utilisation commerciale.
35 FR/BE
Page 36
Descriptif des pièces
1
Champ de touches
2
Écran
3
Lentille de réception
4
Orifice de sortie du rayon laser
5 a
Compartiment à piles
5b
Couvercle du compartiment à piles
6
Niveau à bulle
Champ de touches
7
Touche Addition /Soustraction
8
Toucher Retour /Supprimer
9
Touche de mémoire
10
Touche d'unités
11
Touche Marche / Arrêt
12
Touche de point de référence
13
Touche de sonorité
14
Touche de mesure en continu
15
Touche de sélection de fonction
16
Touche MEAS
Écran
17
Symbole d'état des piles
18
Unités de mesure
19 a
Ligne Valeur 1
19 b
Ligne Numéro d'emplacement de mémoire
20
Ligne Valeur 2
21
Valeurs Min./Max.
22
Ligne Valeur 3
36 FR/BE
Page 37
23
Ligne de résultat
24
Addition / Soustraction
25
Symbole d'affichage de mode de mesure
26
Symbole de mode de mesure de distance
27
Symbole de mémoire
28
Point de référence (pièce finale)
29
Point de référence (arrière)
30
Point de référence (avant)
31
Symbole Laser marche
Compartiment à piles
32
Languette du couvercle du compartiment à piles
Bord arrière
33
Pièce finale du point de référence (rabattable)
Contenu de la livraison
1 télémètre à laser
2 piles 1,5 V LR03 (AAA)
1 sac à ceinture
1 mode d'emploi
37 FR/BE
Page 38

Caractéristiques techniques
Étendue maximale de mesure : 0,05–50 m*
(mesure de côté supérieur)
0,17–50 m*
(mesure de côté inférieur)
Précision de mesure : ± 1,5 mm **
Unités de mesure : m / in / ft / ft + in
Classe de laser : Classe 2
Type de laser : 630–670 nm, 1 mW
Mémoire historique : 100 séries
Température de fonctionnement : 0 °–40 °C
Température de stockage : -10 °–60 °C
Humidité relative de l'air : 90 % max.
Piles: 2 piles 1,5 V LR03 (AAA)
Poids: 108 g (sans piles)
Dimensions : 114,4 x 50 x 26,8 mm
*) À la lumière du jour ou en cas de conditions de réflexion défavorables de l'objectif, utilisez la plaque de mire.
**) Dans des conditions favorables, il faut compter avec une influence de ± 0,05 mm / m. En cas de conditions défavorables,
par exemple fort ensoleillement, surface cible réfléchissant mal
(surface noire) ou fortes variations de température, on doit s'attendre à un écart plus important.
38 FR/BE
Page 39
Instructions générales de sécurité
Risque d'asphyxie ! Les matériaux d'emballages (par.ex. plas-
tiques ou en polystyrène) ne doivent pas être utilisés comme
jouet. Ne laissez jamais les matériaux d'emballages à portée
des enfants. Le matériel d'emballage n'est pas un jouet.
Ne pas utiliser le produit dans les lieux exposés à un risque
d'incendie ou d'explosion, par ex. à proximité de liquides ou
gaz inflammables.
Ce produit peut être utilisé par des enfants âgés de 8 ans et
plus ainsi que par des personnes ayant des capacités physiques, sensorielles ou mentales réduites ou manquant d'expérience ou de connaissances, s'ils sont surveillés ou s'ils ont été
informés de l'utilisation sûre du produit et s'ils comprennent les
risques liés à son utilisation. Les enfants ne doivent pas jouer
avec le produit. Le nettoyage et l'entretien du produit ne doivent
pas être effectués par des enfants laissés sans surveillance.
Ne jamais laisser le produit sans surveillance lorsqu'il est en
cours d'utilisation. D'autres personnes pourraient être aveu-
glées par le faisceau laser.
Protégez le produit contre l'humidité et les rayons solaires directs.
Ne pas exposer le produit à des variations de température ou
températures extrêmes. Par exemple, ne le laissez pas dans la
voiture en été pendant une longue durée. Avant d'utiliser le
produit, laissez-le d'abord se remettre à température ambiante
s'il a été exposé à de fortes variations de température. Lors de
températures ou variations de température extrêmes, la préci-
sion du produit peut être altérée.
Évitez les chocs violents ou la chute du produit.
39 FR/BE
Page 40
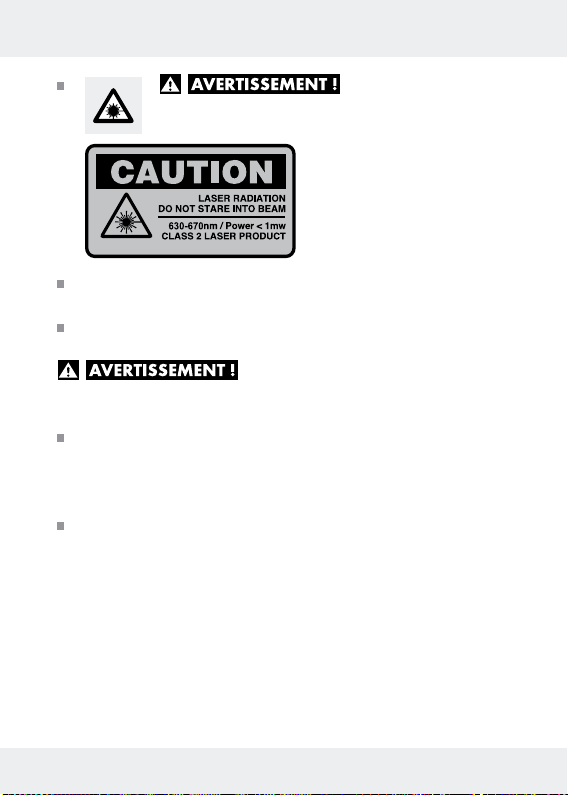
Protégez-vous contre les rayons laser!
EN 60825-1:2014
ATTENTION RAYON LASER! NE PAS REGARDER
DANS LE FAISCEAU LASER! CLASSE DE LASER 2!
Ne regardez pas directement dans le faisceau laser ou dans
l'ouverture du laser.
Regarder le faisceau laser à l'aide
d'instruments optiques (par ex. loupe, loupe grossissante, etc.)
peut représenter un risque pour les yeux.
ATTENTION! Si des commandes ou dispositifs de réglage
autres que ceux spécifiés ici sont utilisés ou que d'autres pro-
cédures sont effectuées, cela peut entraîner une exposition
dangereuse au rayonnement.
N'orientez jamais le laser sur des surfaces réfléchissants, des
personnes ou des animaux. Un seul contact visuel bref avec le
faisceau peut provoquer des lésions oculaires.
40 FR/BE
Page 41
Consignes de sécurité relatives aux
piles / aux piles rechargeables
DANGER DE MORT! Rangez les piles / piles rechargeables
hors de la portée des enfants. En cas d’ingestion, consultez
immédiatement un médecin !
RISQUE D‘EXPLOSION ! Ne rechargez jamais
des piles non rechargeables. Ne court-circuitez pas
les piles / piles rechargeables et / ou ne les ouvrez
pas ! Autrement, vous risquez de provoquer une surchauffe,
un incendie ou une explosion.
Ne jetez jamais des piles / piles rechargeables au feu ou dans
l’eau.
Ne pas soumettre les piles / piles rechargeables à une charge
mécanique.
Risque de fuite des piles / piles rechargeables
Évitez d’exposer les piles / piles rechargeables à des conditions
et températures extrêmes susceptibles de les endommager, par
ex. sur des radiateurs / exposition directe aux rayons du soleil.
Lorsque les piles / piles rechargeables fuient, évitez tout contact
du produit chimique avec la peau, les yeux ou les muqueuses!
Rincez les zones touchées à l‘eau claire et consultez immédiatement un médecin !
PORTER DES GANTS DE PROTECTION! Les
piles / piles rechargeables endommagées ou sujettes
à des fuites peuvent provoquer des brûlures au contact
de la peau. Vous devez donc porter des gants adéquats pour
les manipuler.
41 FR/BE
Page 42
En cas de fuite des piles / piles rechargeables, retirez-les aussi-
tôt du produit pour éviter tout endommagement.
Utilisez uniquement des piles / piles rechargeables du même
type. Ne mélangez pas des piles / piles rechargeables usées
et neuves !
Retirez les piles / piles rechargeables, si vous ne comptez pas
utiliser le produit pendant une période prolongée.
Risque d‘endommagement du produit
Exclusivement utiliser le type de pile / pile rechargeable spécifié.
Insérez les piles / piles rechargeables conformément à l‘indi-
cation de polarité (+) et (-) indiquée sur la pile / pile rechargeable et sur le produit.
Nettoyez les contacts de la pile / pile rechargeable et du
compartiment à pile avant d‘insérer la pile !
Retirez immédiatement les piles / piles rechargeables usées
du produit.
Avant la mise en service
Vérifiez que les éléments de la livraison sont au complet, et
constatez si des dommages sont visibles.
Veuillez retirer entièrement les matériaux composant l'embal-
lage du produit.
42 FR/BE
Page 43
Insérer / rem placer les piles
Lorsque le symbole de la pile apparaît pour la première fois
sur l'écran
Si le symbole de pile déchargée apparaît
cer les piles.
Aucune mesure n'est plus possible.
Ouvrez le couvercle du compartiment à piles 5b, en appuyant
Retirez les piles usagées du compartiment à piles 5a, si
Insérez les piles (neuves). Respectez la polarité comme
Fermez le couvercle du compartiment à piles 5b comme
2
, quelques mesures peuvent encore être effectuées.
, vous devez rempla-
prudemment sur la languette du couvercle du compartiment à
32
piles
.
nécessaire.
indiqué à l'intérieur du compartiment à piles
illustré (ill. A).
5a
.
Mise en service
Mise en marche / arrêt
Appuyez sur la touche Marche / Arrêt 11 pour allumer le produit.
Pour éteindre le produit, maintenez la touche Marche / Arrêt 11
enfoncée jusqu'à extinction de l'écran LCD.
Remarque : le produit s'éteint automatiquement si aucune touche
n'est actionnée pendant 3 minutes.
43 FR/BE
Page 44
Signal acoustique:
- Chaque pression de touche et chaque fonction effectuée sans
erreur est confirmée par un bip sonore bref.
- Un double bip se fait entendre en cas d'erreur.
- En mode de mesure en continu, une succession rapide de doubles
bips sonores brefs se fait entendre. En cas d'erreur, la succession
de doubles bips se fait plus lente.
- Maintenez la touche de sonorité
d'activer / de désactiver le bip sonore dans chaque mode.
Mode d'écran principal :
Maintenez la touche Marche / Arrêt 11 enfoncée dans
chaque mode afin de supprimer toutes les données affichées
sur l'écran et revenir au mode d'écran principal. Dans le mode
d'écran principal, aucune donnée n'est visible sur l'écran et
l'utilisateur peut ici presser n'importe quelle touche pour passer dans un mode quelconque.
13
brièvement enfoncée afin
Manipulation et utilisation
Choix de l'unité de longueur
Immédiatement après la mise en marche du produit, l'unité de longueur utilisée en dernier est affichée sur l'écran.
Pressez la touche d'unités 10 pour en sélectionner une autre.
Vous pouvez sélectionner les unités de longueur suivantes
dans cet ordre :
44 FR/BE
Page 45
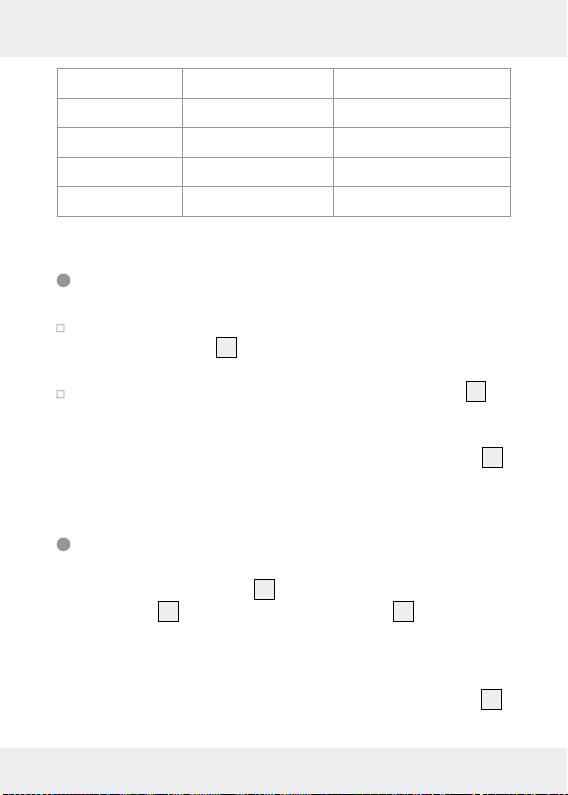
Longueur Surface Volume
0,000 m 0,000 m
0,000 ft 0,000 ft
0’0” 1/16 in 0,00 ft
0’0” 1/16 0,00 ft
2
2
2
2
0,000 m
0,00 ft
0,00 ft
0,00 ft
3
3
3
3
Retour / Supprimer
Appuyez dans un mode quelconque plusieurs fois la touche
Retour / Supprimer
8
pour effacer les valeurs mesurées en
dernier et revenir à la valeur précédente ou au mode précédent.
Appuyez plusieurs fois sur la touche Retour / Supprimer 8
pour revenir à l'écran principal (voir chapitre «Mise en service»,
section «Mode d'écran principal»).
Remarque : Une pression de la touche Retour / Supprimer
8
en mode de mesure en continu permet de stopper la mesure.
Sélectionner le point de référence
Le point de référence arrière 29 (base), le point de référence de
la pièce finale
peuvent être utilisés comme surface de contact pour toutes les mesures.
Le point de référence doit être défini avant la mesure. Dans le cas
contraire, le résultat divergera de la valeur réelle. Le réglage standard
de point de référence se trouve sur le point de référence arrière
du produit. Le point de référence peut être modifié en pressant
28
ou le point de référence avant 30 du produit
29
45 FR/BE
Page 46
plusieurs fois la touche de point de référence 12, et ce jusqu'à ce
que le point de référence souhaité soit affiché dans le coin supérieur
gauche de l'écran.
Point de référence de pièce finale
La pièce finale 33 est pratique lorsqu'une distance est mesurée à
partir d'un coin (pièce diagonale) ou d'un endroit difficile d'accès.
La pièce finale
sur la fig. D, la pièce finale
til aiguisé ou un ongle. Après utilisation, la pièce finale
33
est située à l'arrière du produit. Comme indiqué
33
peut être dépliée en utilisant un ou-
33
doit
être de nouveau rabattue.
Mesure de longueurs
Mode de mesure individuelle
1. Placez ou maintenez la surface de référence du produit sur ou
contre la surface de base souhaitée, à partir de laquelle vous
souhaitez mesurer une distance.
2. Vérifiez la planéité du produit à l'aide du niveau à bulle
Une bulle du niveau sert au contrôle du plan horizontal tandis
que l'autre permet de contrôler le plan vertical. Afin de vérifier
la planéité d'un certain angle, assurez-vous que la bulle se
trouve au centre du niveau à bulle d'angle correspondant.
3. Appuyez brièvement sur la touche MEAS
16
pour activer le
rayon laser. Lorsque le laser est activé, il est indiqué par le
symbole de laser
31
sur l'écran.
6
.
46 FR/BE
Page 47
Remarque: L'étape 3 peut être passée si le rayon laser est
déjà activé.
4. Dirigez à présent le laser sur le point cible et appuyez de nouveau brièvement sur la touche MEAS
16
pour effectuer une
mesure. En cas de mesure réussie, le résultat est affiché dans
la ligne inférieure
23
de l'écran. Les mesures précédentes sont
décalées vers le haut.
Remarque :
- Répétez le cas échéant les étapes 1 à 4 pour effectuer une
autre mesure de distance.
- Le symbole de mode de mesure de distance
26
reste allumé
sous le mode de mesure individuelle (ne clignote pas).
- 4 valeurs de mesure au maximum peuvent être affichées simultanément sur l'écran.
- Si aucune touche n'est pressée pendant plus de 30 secondes,
le laser et le rétroéclairage de l'écran s'éteignent. Le produit
s'éteint automatiquement si aucune touche n'est actionnée
pendant 3 minutes.
Mode de mesure en continu
Le mode de mesure en continu permet d'effectuer une série de
mesures dont les valeurs maximales (MAX) et minimales (MIN)
sont affichées. À cet effet, déplacez le produit le long d'une surface
de base ou d'un rebord, à partir duquel vous souhaitez effectuer
la mesure. Vous pouvez par exemple mesurer le parallélisme de
deux murs en vis-à-vis ou bien déterminer les valeurs maximales
au moyen d'une fonction.
47 FR/BE
Page 48
1. Commencez la mesure en continu en pressant brièvement la
touche de mesure en continu
14
. Lors de l'affichage de la première mesure sur l'écran, un léger retard peut survenir. C'est
normal. Chaque valeur de mesure est maintenant affichée sur
l'écran.
2. Arrêtez la mesure en pressant la touche de mesure en continu
la touche MEAS
16
ou la touche Retour / Supprimer 8. Sur
14
l'écran sont maintenant affichées les valeurs maximales (MAX)
et minimales (MIN)
21
de cette série de mesure ainsi que la
dernière valeur mesurée.
Remarque :
- Répétez le cas échéant les étapes 1 à 2 pour effectuer une autre
mesure.
- En mode de mesure en continu, le symbole de mode de mesure
de distance
26
clignote pendant que la mesure est effectuée.
- Les additions, soustractions ainsi que les mesures de surface et
de volume ne peuvent pas être effectuées dans ce mode. Pour
cette raison, la touche de sélection de fonction
Addition / Soustraction
7
sont inactives dans ce mode.
15
et la touche
- Le produit s'éteint automatiquement si aucune touche n'est action-
née pendant 3 minutes.
Fonctions de valeur de mesure
Afin de simplifier le traitement des résultats de mesure, le produit
offre toute une série de fonctions intégrées. Une pression répétée
de la touche de sélection de fonction
15
permet d'activer l'une
,
48 FR/BE
Page 49
après l'autre les fonctions suivantes : Surface, Volume, Pythagore
simple, Pythagore double.
Remarque : La fonction souhaitée doit être sélectionnée avant
la mesure.
Surface
1. Pressez une fois la touche de sélection de fonction 15. Le
symbole de surface du symbole d'affichage de mode de me-
25
sure
apparaît sur l'écran.
2. Mesurez à présent la longueur et la largeur de la surface à
mesurer en appuyant sur la touche MEAS
16
. La ligne correspondante du symbole de surface clignote sur l'écran pour les
différentes valeurs de mesure. Immédiatement après la seconde
mesure, la surface calculée est affichée dans la ligne de résul-
23
tat
de l'écran et la ligne correspondante du symbole de
surface arrête de clignoter. La longueur, la largeur et le périmètre sont affichés dans cet ordre dans les trois lignes supérieures de l'écran.
Volume
1. Pressez deux fois la touche de sélection de fonction 15.
Le symbole de volume du symbole d'affichage de mode
de mesure
2. Mesurez à présent la longueur, la largeur et la hauteur du
volume à mesurer en appuyant sur la touche MEAS
ligne correspondante du symbole de volume clignote sur
25
apparaît sur l'écran.
16
. La
49 FR/BE
Page 50
l'écran pour les différentes valeurs de mesure. Immédiatement
après la troisième mesure, le volume calculé est affiché dans
la ligne de résultat
23
de l'écran et la ligne correspondante
du symbole de volume arrête de clignoter. La longueur, la
largeur et la hauteur sont affichés dans cet ordre dans les
trois lignes supérieures de l'écran.
Pythagore simple
Le théorème de Pythagore met en lumière l'interdépendance des
longueurs des côtés d'un triangle rectangle, et ce de la manière
suivante : a² + b² = c², a et b étant les côtés et c l'hypoténuse du
triangle. La fonction «Pythagore simple» permet de calculer la
longueur de l'un des côtés. Cette fonction est particulièrement utile
dans le cas de points de mesure difficilement accessibles.
1. Pressez trois fois la touche de sélection de fonction
15
.
Le symbole de triangle «Pythagore simple» du symbole
d'affichage de mode de mesure
25
apparaît sur l'écran.
2. L'hypoténuse (plus grande distance) et l'un des côtés (distance
la plus courte par rapport à la surface de mesure) est alors
mesurée en pressant la touche MEAS
16
. La ligne correspondante du symbole «Pythagore simple» clignote pour les différentes valeurs de mesure. Immédiatement après la seconde
mesure, la longueur calculée est affichée dans la ligne de
23
résultat
de l'écran et la ligne correspondante du symbole
«Pythagore simple» arrête de clignoter. Les différentes valeurs
de mesure sont affichées dans les deux lignes supérieures de
l'écran.
50 FR/BE
Page 51
Remarque : Sachez que des erreurs d'angle (angles incorrects)
conduisent à des résultats erronés. Assurez-vous que les distances
mesurées sont dans un même plan (alignement).
Pythagore double
Cette fonction permet d'appliquer le théorème de Pythagore à deux
triangles rectangles présentant un côté commun. Il est ainsi possible
de calculer la longueur de la base de chaque triangle. Cette fonction
calcule la distance entre deux points quelconques et est particulièrement utile pour des points de mesure inaccessibles.
1. Pressez quatre fois la touche de sélection de fonction
15
.
Le symbole de triangle «Pythagore double» du symbole
d'affichage de mode de mesure
25
apparaît sur l'écran.
2. Mesurez à présent l'hypoténuse gauche (plus grande distance
vers la gauche), puis un côté (distance la plus courte vers la
surface de mesure), et enfin l'hypoténuse droite (plus grande
distance vers la droite) en pressant la touche MEAS
16
. La ligne
correspondante du symbole de triangle «Pythagore double»
clignote pour les différentes valeurs de mesure. Immédiatement
après la troisième mesure, la longueur calculée est affichée
dans la ligne de résultat
23
de l'écran et la ligne correspondante du symbole de triangle «Pythagore double» arrête de
clignoter. Les différentes valeurs de mesure sont affichées dans
les 3 lignes supérieures de l'écran.
51 FR/BE
Page 52
Remarque : Sachez que des erreurs d'angle (angles incorrects)
conduisent à des résultats erronés. Assurez-vous que les distances
mesurées sont dans un même plan (alignement).
Addition (Plus)
1. Afin d'additionner deux valeurs individuelles, servez-vous d'une
mesure (longueur, surface ou volume), afin que l'écran affiche
une valeur.
20
.
7
pour
2. Appuyez ensuite sur la touche Addition / Soustraction
lancer la fonction d'addition (Plus). Le symbole Plus clignote
maintenant dans la ligne «Valeur 3»
22
sur l'écran.
3. Effectuez à présent une seconde mesure (longueur, surface ou
volume). La seconde valeur mesurée / calculée est affichée dans
la ligne «Valeur 3»
22
sur l'écran. Immédiatement après la
seconde mesure, le résultat ajouté est indiqué sur l'écran dans
la ligne de résultat
23
. La première valeur mesurée / calculée
est affichée sur l'écran dans la ligne «Valeur 2»
Remarque:
- L'addition peut être effectuée avec toutes les unités (longueur,
surface, volume). Vous pouvez aussi inclure dans l'addition les
résultats de mesure de fonctions comme surface et volume.
- Uniquement des valeurs possédant la même unité peuvent être
additionnées. La première valeur mesurée/calculée définit l'unité
à utiliser.
- L'addition ne peut pas être utilisée avec le théorème de Pythagore.
- Le résultat d'une addition et les différentes valeurs de l'addition
sont automatiquement sauvegardées dans la mémoire.
52 FR/BE
Page 53
Soustraction (Moins)
La soustraction de mesures est effectuée de la même manière que
l'addition. La seule différence est que la touche Addition / Soustraction
Plus clignote sur l'écran, ceci afin d'obtenir le symbole Moins sur
l'écran. Le reste est identique.
7
doit être de nouveau pressée pendant que le symbole
Mémoire historique
Toutes les valeurs mesurées et calculées sont automatiquement
sauvegardées dans la mémoire. Les valeurs sont mémorisées avec
leur unité (longueur, surface ou volume). Les valeurs calculées sont
mémorisées avec leur valeurs individuelles correspondantes. 100
emplacements de mémoire sont disponibles en tout. Dès que les
100 emplacements sont occupés, l'enregistrement de mémoire le
plus ancien est remplacé par la série de données la plus récente.
Accès à une série de données mémorisée
Maintenez brièvement enfoncée la touche de mémoire 9 afin
d'afficher la série de données mémorisée en dernier. Le symbole
de mémoire
de mémoire correspondant est affiché dans la ligne Numéro
d'emplacement de mémoire
Appuyez de nouveau sur la touche de mémoire 9 pour passer
à la mémoire suivante.
27
apparaît sur l'écran et le numéro d'emplacement
19 b
.
53 FR/BE
Page 54
Maintenez enfoncée la touche de mémoire 9 pendant plus
de 1,5 secondes afin de naviguer rapidement vers le bas
dans les séries de données mémorisées, ceci de 10 à 20,
puis 30....100.
Éliminer / Supprimer des séries de
données mémorisées et mémorisées
individuellement
En mode de mémoire, maintenez la touche de mémoire 9 et
la touche Supprimer / Retour
moins de 1,5 secondes afin de supprimer la mémoire actuellement affichée. «CLEAR» apparaît sur l'écran pendant une seconde et un bref signal sonore de confirmation retentit.
8
pressées ensemble pendant
Éliminer / Supprimer toutes les séries de
données mémorisées
En mode de mémoire, maintenez la touche de mémoire 9 et
la touche Supprimer /Retour
plus de 5 secondes afin de supprimer toutes les séries de données. «CLEAR ALL» apparaît sur l'écran pendant une seconde
et un bref signal sonore de confirmation retentit.
8
pressées ensemble pendant
54 FR/BE
Page 55
Quitter le mode de mémoire
Pressez brièvement la touche Supprimer / Retour 8 pour quitter
le mode de mémoire historique et passer au mode d'écran
principal. Le symbole de mémoire a maintenant disparu de
l'écran. Le numéro d'emplacement de mémoire va également
disparaître de la ligne Numéro d'emplacement de mémoire
19 b
Sac à ceinture
Utilisez l'étui de ceinture fourni pour protéger le produit lors-
qu'il n'est pas utilisé.
Erreur, dysfonctionnement & dépannage
.
Problème
204 Erreur de calcul Voir mode d'emploi,
220 Pile faible Remplacez les piles ou
255 Le signal reçu est trop
Cause Solution
répétez les processus.
rechargez-les.
Améliorez la surface
faible ou la durée de
mesure est trop
longue.
réfléchissante (utilisez une
plaque de mire, du papier
blanc).
55 FR/BE
Page 56
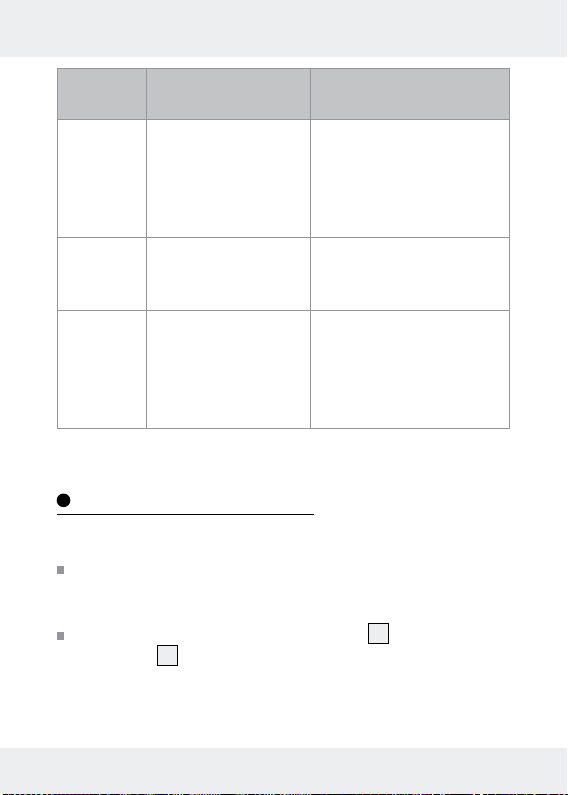
Pro-
Cause Solution
blème
256 Le signal reçu est trop
fort.
Améliorez la surface
réfléchissante (utilisez
une plaque de mire ou
ne visez pas vers une
lumière intense).
261 Hors de la zone de
mesure
Mesurez la distance à
l'intérieur de la zone de
mesure.
500 Erreur de matériel Allumez / éteignez le
produit. Si le symbole
n'apparaît pas après plu-
sieurs tentatives, contactez
votre revendeur.
Entretien et nettoyage
Le produit ne nécessite pas de maintenance.
ATTENTION! Ne plongez jamais le produit dans de l'eau,
ni dans d'autres liquides. L'humidité ne peut pas pénétrer à
l'intérieur du produit lors du nettoyage.
Nettoyez le port de sortie du rayon laser 4 et la lentille
réceptrice
plus tenaces, enlevez la saleté avec un coton-tige légèrement
humidifié. Ne pas exercer de fortes pressions lors de cette
manipulation!
3
à l'aide d'un jet d'air doux. Pour les impuretés
56 FR/BE
Page 57
N’utilisez en aucun cas de l’essence, des solvants ou des
nettoyants attaquant le plastique.
Le produit ne peut être ouvert que
par un spécialiste s'il a besoin d'être réparé.
Utilisez un chiffon sec pour le nettoyage du boîtier.
Nettoyez le produit régulièrement, de préférence après
chaque utilisation.
Rangement
Si vous n'utilisez plus le produit pendant une longue période,
enlevez les piles et stockez-le dans un endroit propre, sec et
protégé des rayons directs du soleil.
Mise au rebut
L’emballage se compose de matières recyclables pouvant être
mises au rebut dans les déchetteries locales.
Veuillez respecter l‘identification des matériaux d‘em-
b
ballage pour le tri sélectif, ils sont identifiés avec des
a
abbréviations (a) et des chiffres (b) ayant la signification
suivante : 1–7 : plastiques / 20–22 : papiers et cartons /
80–98 : matériaux composite.
Le produit et les matériaux d'emballage sont recyclables,
mettez-les au rebut séparément pour un meilleur traitement
des déchets. Le logo Triman n'est valable qu'en France.
57 FR/BE
Page 58
Votre mairie ou votre municipalité vous renseigneront
sur les possibilités de mise au rebut des produits usagés.
Afin de contribuer à la protection de l'environnement,
veuillez ne pas jeter votre produit usagé dans les ordures ménagères, mais éliminez-le de manière appropriée. Pour obtenir des renseignements concernant les
points de collecte et leurs horaires d’ouverture, vous
pouvez contacter votre municipalité.
Les piles / piles rechargeables défectueuses ou usagées doivent
être recyclées conformément à la directive 2006/66/CE et ses
modifications. Les piles et / ou piles rechargeables et / ou le produit
doivent être retournés dans les centres de collecte proposés.
Pollution de l’environnement par
la mise au rebut incorrecte des piles /
piles rechargeables !
Les piles / piles rechargeables ne doivent pas être mises au rebut
avec les ordures ménagères. Elles peuvent contenir des métaux
lourds toxiques et doivent être considérées comme des déchets
spéciaux. Les symboles chimiques des métaux lourds sont les suivants : Cd = cadmium, Hg = mercure, Pb = plomb. Pour cette raison,
veuillez toujours déposer les piles / piles rechargeables usagées
dans les conteneurs de recyclage communaux.
58 FR/BE
Page 59

Garantie
Le produit a été fabriqué selon des critères de qualité stricts et contrôlé
consciencieusement avant sa livraison. En cas de défaillance, vous
êtes en droit de retourner ce produit au vendeur. La présente garantie ne constitue pas une restriction de vos droits légaux.
Ce produit bénéficie d‘une garantie de 3 ans à compter de sa date
d’achat. La durée de garantie débute à la date d’achat. Veuillez
conserver le ticket de caisse original. Il fera office de preuve d’achat.
Si un problème matériel ou de fabrication devait survenir dans 3
ans suivant la date d‘achat de ce produit, nous assurons à notre
discrétion la réparation ou le remplacement du produit sans frais
supplémentaires. La garantie prend fin si le produit est endommagé
suite à une utilisation inappropriée ou à un entretien défaillant.
La garantie couvre les vices matériels et de fabrication. Cette
garantie ne s’étend ni aux pièces du produit soumises à une
usure normale (p. ex. des piles) et qui, par conséquent, peuvent
être considérées comme des pièces d’usure, ni aux dommages sur
des composants fragiles, comme des interrupteurs, des batteries
ou des éléments fabriqués en verre.
Faire valoir sa garantie
Pour garantir la rapidité d’exécution de la procédure de garantie,
veuillez respecter les indications suivantes :
59 FR/BE
Page 60
Veuillez conserver le ticket de caisse et la référence du produit
(par ex. IAN 123456_7890) à titre de preuve d’achat pour toute
demande.
Le numéro de référence de l’article est indiqué sur la plaque
d’identification, gravé sur la page de titre de votre manuel (en bas
à gauche) ou sur un autocollant apposé sur la face arrière ou inférieure du produit.
En cas de dysfonctionnement du produit, ou de tout autre défaut,
contactez en premier lieu le service après-vente par téléphone ou
par e-mail aux coordonnées indiquées ci-dessous.
Vous pouvez alors envoyer franco de port tout produit considéré
comme défectueux au service clientèle indiqué, accompagné de
la preuve d’achat (ticket de caisse) et d’une description écrite du
défaut avec mention de sa date d’apparition.
Service après-vente
Service après-vente France
Tél.: 0800 919270
E-Mail: [email protected]
Service après-vente Belgique
Tél. : 070 270 171 (0,15 EUR / Min.)
E-Mail : [email protected]
60 FR/BE
Page 61

Legenda van de gebruikte
pictogrammen .......................................................Pagina 63
Inleiding .....................................................................Pagina 63
Correct gebruik .............................................................Pagina 64
Beschrijving van de onderdelen ...................................Pagina 64
Omvang van de levering ..............................................Pagina 66
Technische gegevens ....................................................Pagina 66
Algemene veiligheidsinstructies ............Pagina 67
Veiligheidsinstructies voor batterijen / accu‘s ..............Pagina 69
Voor de ingebruikname ...............................Pagina 70
Batterijen plaatsen / vervangen ....................................Pagina 70
Ingebruikname ....................................................Pagina 71
In- / uitschakelen ............................................................Pagina 71
Gebruik en bediening ....................................Pagina 72
Lengte-eenheid kiezen ..................................................Pagina 72
Terug / Wissen...............................................................Pagina 73
Referentiepunt kiezen ....................................................Pagina 73
Eindstuk-referentiepunt ..................................................Pagina 74
Meten van lengtes .............................................Pagina 74
Enkele meting ................................................................Pagina 74
Continu meten ...............................................................Pagina 75
61 NL/BE
Page 62

Meetwaarde-functies ......................................Pagina 76
Oppervlak .....................................................................Pagina 77
Volume ...........................................................................Pagina 77
Pythagoras enkel ...........................................................Pagina 78
Pythagoras dubbel ........................................................Pagina 79
Optellen (Plus) ...............................................................Pagina 80
Aftrekken (Min) .............................................................Pagina 81
Opslag .........................................................................Pagina 81
Opvragen van opgeslagen gegevens .........................Pagina 81
Verwijderen / Wissen van (afzonderlijk)
opgeslagen gegevens ..................................................Pagina 82
Verwijderen / Wissen van alle
opgeslagen gegevens ..................................................Pagina 82
Opslagmodus verlaten .................................................Pagina 82
Riemtas .......................................................................Pagina 83
Fouten, storingen &
storing oplossen ..................................................Pagina 83
Onderhoud en reiniging ...............................Pagina 84
Opslag .........................................................................Pagina 85
Afvoer ..........................................................................Pagina 85
Garantie .....................................................................Pagina 86
Afwikkeling in geval van garantie ...............................Pagina 87
Service ...........................................................................Pagina 88
62 NL/BE
Page 63
Legenda van de gebruikte pictogrammen
Lees de gebruiksaanwijzing.
Explosiegevaar!
Veiligheidshandschoenen dragen!
Opgelet!
Bescherm u tegen laserstraling!
Niet in de laserstraal kijken!
Inclusief batterijen.
Gelijkstroom
Laser-afstandsmeter PLEM 50 B2
Inleiding
Hartelijk gefeliciteerd met de aankoop van uw nieuwe product. U
heeft voor een hoogwaardig product gekozen. De gebruiksaanwijzing
63 NL/BE
Page 64
is een deel van het product. Deze bevat belangrijke aanwijzingen
voor veiligheid, gebruik en verwijdering. Maakt U zich voor de ingebruikname van het product met alle bedienings- en veiligheidsvoorschriften vertrouwd. Gebruik het product alleen zoals beschreven
en voor de aangegeven toepassingsgebieden. Overhandig alle
documenten bij doorgifte van het product aan derden.
Correct gebruik
Deze laserafstandsmeter (hierna product) is geschikt voor het meten
van afstanden, lengtes, hoogtes, dieptes en voor het berekenen van
oppervlakken en volumes binnenshuis. Elke wijziging of elk ander
gebruik van het product is niet doelmatig en houdt een aanzienlijk
ongevalrisico in. De fabrikant is niet aansprakelijk voor schade als
gevolg van ondoelmatig gebruik. Niet bestemd voor commercieel
gebruik.
Beschrijving van de onderdelen
1
Toetsenveld
2
Display
3
Ontvangstlens
4
Uitgang laserstraal
5a
Batterijvak
5b
Batterijvak-deksel
6
Waterpas
64 NL/BE
Page 65
Toetsenveld
7
Toets Optellen / Aftrekken
8
Toets Terug / Wissen
9
Opslag-toets
10
Eenheden-toets
11
Aan- / Uit-toets
12
Referentiepunt-toets
13
Geluidstoets
14
Toets voor continu meten
15
Functiekeuze-toets
16
MEAS-toets
Display
17
Batterijstatus-symbool
18
Meeteenheden
19 a
Regel Waarde-1
19 b
Regel Opslaglocatienummer
20
Waarde-2
21
Max.- / Min.-waarden
22
Waarde-3
23
Resultaat
24
Optellen / Aftrekken
25
Symbool voor de meetmodus
26
Symbool afstandsmeting-modus
27
Opslag-symbool
28
Referentiepunt (eindstuk)
29
Referentiepunt (achterkant)
30
Referentiepunt (voorkant)
31
Symbool voor Laser aan
65 NL/BE
Page 66

Batterijvak
32
Lip batterijvak-deksel
Achterzijde
33
Eindstuk aan referentiepunt (uitklapbaar)
Omvang van de levering
1 laser-afstandsmeter
2 1,5 V-batterijen LR03 (AAA)
1 riemtas
1 gebruiksaanwijzing
Technische gegevens
Maximaal meetbereik: 0,05–50 m*
(meting vanaf de bovenkant)
0,17–50 m*
(meting vanaf de onderkant)
Meetnauwkeurigheid: ± 1,5 mm **
Meeteenheden: m / in / ft / ft + in
Laserklasse: klasse 2
Lasertype: 630–670 nm, 1 mW
Opslag: 100 metingen
Bedrijfstemperatuur: 0 °–40 °C
Opslagtemperatuur: -10–60 °C
Relatieve luchtvochtigheid: 90 % max.
Batterijen: 2 x 1,5 V LR03 (AAA)
66 NL/BE
Page 67
Gewicht: 108 g (zonder batterijen)
Afmetingen: 114,4 x 50 x 26,8 mm
*) Bij daglicht of bij slechte reflectie-eigenschappen van het doel
a.u.b. het doelbord gebruiken.
**) Bij gunstige omstandigheden moet rekening worden gehouden
met een afwijking van + / - 0,05 mm / m. Bij ongunstige omstandigheden, bijvoorbeeld veel zonlicht, slecht reflecterend doeloppervlak (zwarte oppervlakken) of grote temperatuurschommelingen
kan de verwachte afwijking hoger zijn.
Algemene veiligheidsinstructies
Verstikkingsgevaar! Verpakkingsmateriaal (bijv. folie of polys-
tyreen) mag niet worden gebruikt om ermee te spelen. Houd
kinderen uit de buurt van het verpakkingsmateriaal. Het verpakkingsmateriaal is geen speelgoed.
Gebruik het product niet op plekken waar brand- of explosie-
gevaar bestaat, bijv. in de buurt van brandbare vloeistoffen of
gassen.
Dit product kan door kinderen vanaf 8 jaar alsmede door
personen met verminderde fysieke, sensorische of mentale
vaardigheden of een gebrek aan ervaring en kennis worden
gebruikt, als zij onder toezicht staan of geïnstrueerd zijn met
betrekking tot het veilige gebruik van het product en zij de
hieruit voortvloeiende gevaren begrijpen. Kinderen mogen
niet met het product spelen. Reiniging en onderhoud mogen
niet door kinderen zonder toezicht worden uitgevoerd.
67 NL/BE
Page 68
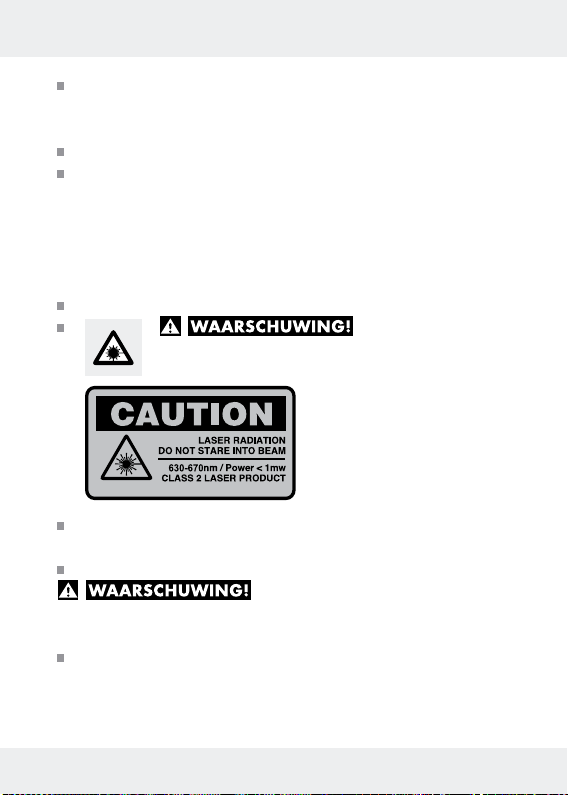
Laat het product niet onbeheerd achter als het wordt gebruikt.
Andere personen zouden door de laserstraal verblind kunnen
worden.
Bescherm het product tegen vocht en directe zonnestraling.
Stel het product niet bloot aan extreme temperaturen of tem-
peratuurschommelingen. Laat het bijvoorbeeld niet voor lange
tijd in de auto liggen. Laat het product bij grote temperatuur-
schommelingen eerst acclimatiseren alvorens het in bedrijf te
nemen. Bij extreme temperaturen of temperatuurschommelingen
kan de nauwkeurigheid van het product beïnvloed worden.
Vermijd heftige schokken of het laten vallen van het product.
Bescherm u tegen laserstraling!
EN 60825-1:2014
VOORZICHTIG LASERSTRALING! NIET IN DE
STRAAL KIJKEN! LASERKLASSE 2!
Kijk nooit direct in de laserstraal of in de opening.
Het observeren van de laserstraal
met optische instrumenten (bijv. loep, vergrootglas e. d.) is
schadelijk voor de ogen.
VOORZICHTIG! Als er andere dan de hier genoemde be-
dienings- of afstelfuncties worden gebruikt of andere handelin-
gen worden verricht, kan dit tot gevaarlijke blootstelling aan
straling leiden.
68 NL/BE
Page 69
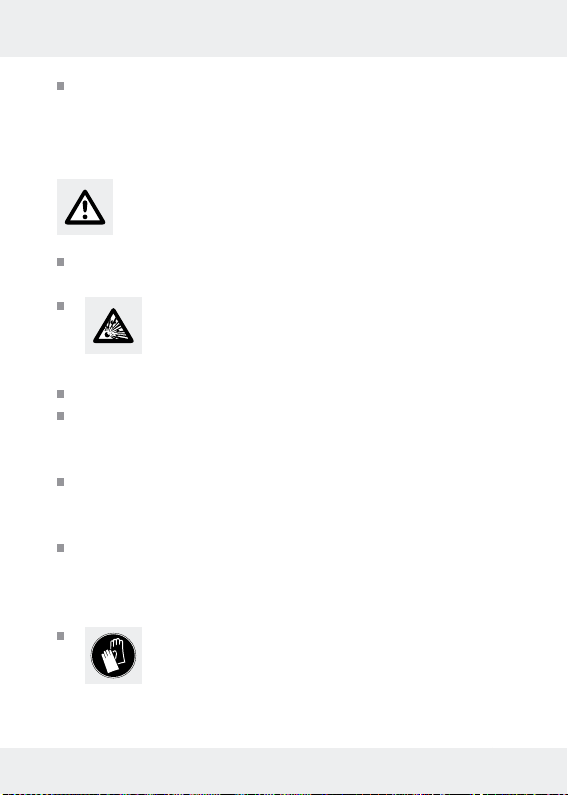
Richt de laserstraal nooit op reflecterende oppervlakken, per-
sonen of dieren. Slechts een kort zichtcontact met de laser-
straal kan leiden tot oogletsel.
Veiligheidsinstructies voor
batterijen / accu‘s
LEVENSGEVAAR! Houd batterijen / accu‘s buiten het bereik
van kinderen. Raadpleeg bij inslikken onmiddellijk een arts!
EXPLOSIEGEVAAR! Laad niet oplaadbare bat-
terijen nooit op. Sluit de batterijen / accu‘s niet kort
en / of open deze niet. Daardoor kan de batterij
oververhit raken, in brand vliegen of exploderen.
Gooi batterijen / accu‘s nooit in het vuur of water.
Stel batterijen / accu‘s nooit bloot aan mechanische belastingen.
Risico dat de batterijen / accu’s lekken
Vermijd extreme omstandigheden en temperaturen die invloed
op de batterijen / accu‘s zouden kunnen hebben bijv. radiato-
ren / direct zonlicht.
Bij lekkende batterijen / accu‘s het contact van de chemicaliën
met de huid, ogen en slijmvliezen vermijden! Spoel de desbe-
treffende plekken direct af met schoon water en raadpleeg
onmiddellijk een arts!
DRAAG VEILIGHEIDSHANDSCHOENEN!
Lekkende of beschadigde batterijen / accu‘s kunnen
in geval van huidcontact chemische brandwonden
veroorzaken. Draag daarom in dit geval geschikte veiligheidshandschoenen.
69 NL/BE
Page 70
Als de batterijen / accu‘s lekken, dient u deze direct uit het
product te halen om beschadigingen te vermijden.
Gebruik alleen batterijen / accu‘s van hetzelfde type. Gebruik
nooit nieuwe en oude batterijen / accu‘s door elkaar!
Verwijder de batterijen / accu‘s, als u het product gedurende
een langere periode niet gebruikt.
Risico op beschadiging van het product
Gebruik uitsluitend het aangegeven type batterij / accu!
Plaats de batterijen / accu‘s volgens de weergegeven polariteit
(+) en (-) op batterij / accu en op product.
Reinig de contacten van de batterij / accu en die in het batterijvak,
voordat u deze plaatst!
Verwijder verbruikte batterijen / accu‘s direct uit het product.
Voor de ingebruikname
Controleer de levering op volledigheid en op zichtbare
beschadigingen.
Verwijder al het verpakkingsmateriaal van het product.
Batterijen plaatsen / vervangen
Als het batterijsymbool voor de eerste keer in het display 2
verschijnt, zijn er nog enkele metingen mogelijk. Als het lege batterijsymbool
Metingen zijn niet meer mogelijk.
verschijnt, moeten de batterijen worden vervangen.
70 NL/BE
Page 71
Open het batterijvak-deksel 5b door de lip van het batterij-
vak-deksel
32
voorzichtig naar beneden te drukken.
Verwijder, indien nodig, de lege batterijen uit het batterijvak 5a.
Plaats de (nieuwe) batterijen. Let op de juiste polariteit overeen-
komstig de afbeelding aan de binnenkant van het batterijvak
5a
Sluit het deksel 5b van het batterijvak zoals aangegeven (afb. A).
Ingebruikname
In- / uitschakelen
Druk op de Aan- / Uit-toets 11 om het product in te schakelen.
Houd voor het uitschakelen van het product de Aan- / Uit-toets
11
ingedrukt totdat het display uit gaat.
Opmerking: als er 3 minuten lang geen toets wordt ingedrukt,
schakelt het product zichzelf automatisch uit.
Akoestisch signaal:
- Elke toetsdruk en elke foutloos uitgevoerde functie wordt bevestigd met een korte pieptoon.
- Bij een fout is een dubbele pieptoon te horen.
- In de modus voor continu meten is voortdurend een snelle reeks
korte pieptonen te horen en bij een fout wordt de snelle reeks
van dubbele pieptonen vertraagd.
- Houd de geluidstoets
modus te activeren of te deactiveren.
13
kort ingedrukt om de pieptoon in elke
.
71 NL/BE
Page 72
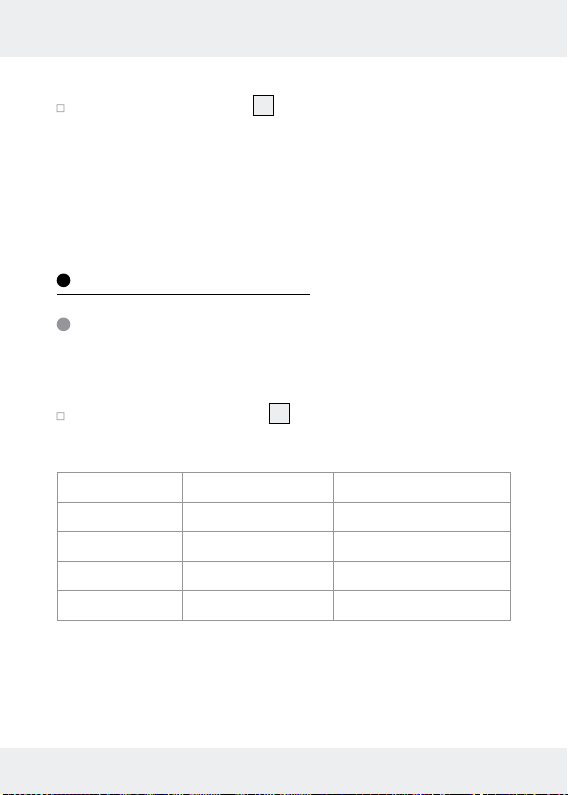
Hoofdoverzicht-modus:
Houd de Aan- / Uit-toets 11 in elke modus ingedrukt om alle
op het display weergegeven gegevens te wissen en terug te
keren naar de hoofdoverzicht-modus. In de hoofdoverzicht-modus zijn er geen gegevens op het display te zien en
de gebruiker kan hier op elke willekeurige toets drukken om
naar een bepaalde modus te gaan.
Gebruik en bediening
Lengte-eenheid kiezen
Gelijk na het inschakelen van het product wordt op het display de
laatst gebruikte lengte-eenheid weergegeven.
Druk op de eenheden-toets 10 om een andere eenheid te kie-
zen. U kunt de volgende lengte-eenheden in deze
volgorde selecteren:
Lengte Bereik Volume
0,000 m 0,000 m
0,000 ft 0,000 ft
0’0” 1/16 in 0,00 ft
0’0” 1/16 0,00 ft
2
2
2
2
0,000 m
0,00 ft
0,00 ft
0,00 ft
3
3
3
3
72 NL/BE
Page 73
Terug / Wissen
Druk in een willekeurige modus meermaals op de toets Terug /
Wissen
8
om de laatst gemeten waarde te wissen en terug
te keren naar de vorige waarde of de vorige modus.
Druk meermaals op de toets Terug / Wissen 8 om terug te
keren naar het hoofdoverzicht (zie hoofdstuk ”Ingebruikname”,
onderdeel ”Hoofdbeeldschermmodus“).
Opmerking: door het indrukken van de toets Terug /
Wissen
8
tijdens de modus voor continu meten, wordt de
meting gestopt.
Referentiepunt kiezen
Het achterste referentiepunt 29 (basis), het referentiepunt van het
eindstuk
nen als contactvlak voor alle metingen worden gebruikt. Het referentiepunt moet voor de meting worden vastgelegd. Anders wijkt
het resultaat af van de daadwerkelijke waarde. De standaardinstelling voor het referentiepunt is het achterste referentiepunt
van het product. Het referentiepunt kan door het herhaald indrukken van de referentiepunt-toets
gewenste referentiepunt in de linker bovenhoek van het display
wordt weergegeven.
28
of het voorste referentiepunt 30 van het product kun-
12
worden gewijzigd totdat het
29
73 NL/BE
Page 74
Eindstuk-referentiepunt
Het eindstuk 33 is handig als er een afstand vanaf een hoek (diagonaal) of vanaf een moeilijk te bereiken plek wordt gemeten. Het
eindstuk
eindstuk
33
bevindt zich aan de achterkant van het product. Het
33
kan zoals in afb. D getoond met een scherp voorwerp
of de vingernagel worden uitgeklapt. Na het gebruik moet het
eindstuk
33
weer worden ingeklapt.
Meten van lengtes
Enkele meting
1. Plaats of houd het referentievlak van het product op of tegen
het gewenste basisoppervlak van waaruit u een afstand wilt
meten.
2. Controleer de horizontale positie van het product met behulp
van de waterpas
het controleren van de horizontale positie en de andere voor
het controleren van de verticale positie. Zorg ervoor dat bij het
controleren van de positie van een bepaalde hoek de luchtbel
zich in het midden van de desbetreffende waterpas bevindt.
3. Druk kort op de MEAS-toets
de laser is ingeschakeld, wordt dit door het lasersymbool
op het display aangegeven.
Opmerking: stap 3 kan worden overgeslagen als de laser-
straal al geactiveerd is.
4. Richt de laser nu op het doel en druk opnieuw kort op de
MEAS-toets
6
. Een luchtbel in de waterpas dient voor
16
om de laser te activeren. Als
16
om een meting uit te voeren. Als de meting
31
74 NL/BE
Page 75
succesvol is, wordt het meetresultaat op de onderste regel 23
van het display weergegeven. De vorige metingen worden
naar boven geschoven.
Opmerking:
- Herhaal indien gewenst de stappen 1 t / m 4 om een andere
afstand te meten.
- Het symbool voor de afstandsmeting-modus
26
blijft tijdens
de modus voor enkele meting ingeschakeld (knippert niet).
- Op het display kunnen gelijktijdig maximaal 4 gemeten
waarden worden weergegeven.
- Als er langer dan 30 seconden geen toets wordt ingedrukt,
worden de laser en de achtergrondverlichting van het display uitgeschakeld. Als er 3 minuten lang geen toets wordt
ingedrukt, schakelt het product zichzelf uit.
Continu meten
Bij het continu meten wordt een serie metingen uitgevoerd waarvan de maximale (MAX) en de minimale (MIN) waarden worden
weergegeven. Beweeg het product langs een grondvlak of zijkant
van waaruit u een afstand wilt meten. U kunt bijvoorbeeld meten
hoe parallel twee tegenover elkaar liggende wanden zijn of met
een functie de maximale waarden meten.
1. Begin de continue meting door het kort indrukken van de toets
voor continu meten
op het display kan iets langer duren. Dat is normaal. Nu wordt
elke meetwaarde op het display weergegeven.
14
. Het weergeven van de eerste meting
75 NL/BE
Page 76
2. Stop de meting door de toets voor continu meten 14, de
MEAS-toets
16
of de toets Terug / Wissen 8 in te drukken.
Op het display worden nu de maximale (MAX) en minimale
(MIN) waarden
21
van deze serie metingen evenals de laatst
gemeten waarde weergegeven.
Opmerking:
- Herhaal indien gewenst de stappen 1 en 2 om nog een meting
uit te voeren.
- Tijdens het continu meten knippert het symbool voor de afstandsmeting-modus
26
zolang de meting wordt uitgevoerd.
- Optellen, aftrekken, oppervlakte- en volumemetingen kunnen in
deze modus niet worden uitgevoerd. Daarom zijn de functiekeu-
15
ze-toets
en de toets Optellen / Aftrekken 7 in deze modus
niet actief.
- Als er 3 minuten lang geen toets wordt ingedrukt, schakelt het
product zichzelf uit.
Meetwaarde-functies
Om het verwerken van de meetresultaten te vereenvoudigen, heeft
het product een aantal geïntegreerde functies. Door het herhaald
indrukken van de functiekeuze-toets
na elkaar activeren: oppervlak, volume, Pythagoras enkel, Pythagoras dubbel.
Opmerking: de gewenste functie moet voor de meting worden
geselecteerd.
15
kunt u de volgende functies
76 NL/BE
Page 77
Oppervlak
1. Druk eenmaal op de functiekeuze-toets 15. Het oppervlak-sym-
bool als symbool voor de meetmodus
25
verschijnt op het
display.
2. Meet nu de lengte en breedte van het te meten oppervlak door
op de MEAS-toets
16
te drukken. De desbetreffende regel voor
het oppervlak-symbool knippert voor de afzonderlijke meetwaarden op het display. Direct na de tweede meting wordt het
berekende oppervlak als resultaat
23
op het display weergegeven en de desbetreffende regel voor het oppervlak-symbool
stopt met knipperen. Lengte, breedte en omtrek worden in volgorde in de bovenste drie regels van het display weergegeven.
Volume
1. Druk tweemaal op de functiekeuze-toets 15. Het volume-symbool
als symbool voor de meetmodus
2. Meet nu de lengte, breedte en hoogte van het te meten volume
door op de MEAS-toets
16
gel voor het volume-symbool knippert voor de afzonderlijke
meetwaarden op het display. Direct na de derde meting wordt
het berekende volume als resultaat
geven en de desbetreffende regel voor het volume-symbool
op het display stopt met knipperen. Lengte, breedte en hoogte
worden in de bovenste drie regels in volgorde weergegeven.
25
verschijnt op het display.
te drukken. De desbetreffende re-
23
op het display weerge-
77 NL/BE
Page 78
Pythagoras enkel
De stelling van Pythagoras beschrijft de afhankelijkheid van de
lengtes van de zijden van een rechthoekige driehoek als volgt:
a² + b² = c², waarbij a en b de benen zijn en c de schuine zijde
van de driehoek is. Met de functie ”Pythagoras enkel” is het mogelijk de lengte van één van de benen te berekenen. Deze functie
is vooral bij moeilijk toegankelijke meetpunten handig.
1. Druk driemaal op de functiekeuze-toets
bool ”Pythagoras enkel” als symbool voor de meetmodus
15
. Het driehoek-sym-
25
verschijnt op het display.
2. Nu wordt de schuine zijde (grootste afstand) en één van de
benen (kortste afstand) door het indrukken van de MEAS-toets
16
gemeten. De desbetreffende regel voor het symbool ”Pythagoras enkel” knippert voor de afzonderlijke meetwaarden
op het display. Direct na de tweede meting wordt de berekende
lengte als resultaat
23
op het display weergegeven en de
desbetreffende regel voor het symbool ”Pythagoras enkel”
stopt met knipperen. De afzonderlijke gemeten waarden worden
in de bovenste twee regels van het display weergegeven.
Opmerking: let erop dat hoekfouten (onjuiste hoek) tot onjuiste
resultaten leiden. Zorg ervoor dat de gemeten afstanden op één
vlak liggen (uitlijning).
78 NL/BE
Page 79
Pythagoras dubbel
Bij deze functie wordt de stelling van Pythagoras toegepast op twee
rechthoekige driehoeken die een gemeenzaam been hebben.
Daardoor is het mogelijk de lengte van de basiszijde van elke
driehoek te berekenen. Deze functie berekent de afstand tussen
twee willekeurige punten en is vooral handig bij ontoegankelijke
meetpunten.
1. Druk viermaal op de functiekeuze-toets
15
. Op het display
verschijnt het driehoek-symbool ”Pythagoras dubbel” als
symbool voor de meetmodus
25
.
2. Meet nu de linker schuine zijde (grootste afstand naar links) en
vervolgens een been (kortste afstand tot het meetoppervlak)
en tot slot de rechter schuine zijde (grootste afstand naar rechts)
door op de MEAS-toets
16
te drukken. Voor de afzonderlijke
meetwaarden knippert de desbetreffende regel voor het driehoek-symbool ”Pythagoras dubbel”. Direct na de derde meting wordt de berekende lengte als resultaat
23
op het
display weergegeven en de desbetreffende regel voor het
driehoek-symbool ”Pythagoras dubbel” stopt met knipperen.
De afzonderlijke meetwaarden worden in de bovenste 3 regels van het display weergegeven.
Opmerking: let erop dat hoekfouten (onjuiste hoek) tot onjuiste
resultaten leiden. Zorg ervoor dat de gemeten afstanden op één
vlak liggen (uitlijning).
79 NL/BE
Page 80
Optellen (Plus)
1. Voer voor het optellen van twee afzonderlijke waarden een
meting uit (lengte, oppervlak of volume) zodat het display een
waarde aangeeft.
2. Druk vervolgens op de toets Optellen / Aftrekken
functie Optellen (Plus) te starten. Nu knippert het plus-symbool
in de regel voor ”Waarde-3”
22
op het display.
3. Voer nu een tweede meting uit (lengte, oppervlak of volume).
De tweede gemeten / berekende waarde wordt in de regel
voor ”Waarde-3”
22
op het display weergegeven. Gelijk na
de tweede meting wordt het opgetelde resultaat op het display weergegeven op de regel voor Resultaat
gemeten / berekende waarde wordt in de regel voor
”Waarde-2”
20
op het display weergegeven.
Opmerking:
- De optelling kan met alle eenheden (lengte, oppervlak, volume)
worden uitgevoerd. U kunt ook de meetresultaten van functies zoals oppervlak en volume bij de optelling betrekken.
- Alleen waarden met gelijke eenheden kunnen worden opgeteld.
De eerste gemeten / berekende waarde bepaalt de te gebruiken
eenheid.
- Bij de stelling van Pythagoras kan de optel-functie niet worden
gebruikt.
- Het resultaat van de optelling en de afzonderlijke waarden van
de optelling worden automatisch in het geheugen opgeslagen.
7
om de
23
. De eerste
80 NL/BE
Page 81
Aftrekken (Min)
Het van elkaar aftrekken van metingen gebeurt op dezelfde manier
als bij het optellen. Het enige verschil is dat de toets Optellen /
Aftrekken
symbool op het display knippert waardoor het min-symbool op
het display verschijnt. De rest is hetzelfde.
7
opnieuw ingedrukt moet worden terwijl het plus-
Opslag
Alle gemeten en berekende waarden worden automatisch in het
geheugen opgeslagen. De waarden worden samen met de eenheid
(lengte, oppervlak of volume) opgeslagen. Berekende waarden
worden samen met de desbetreffende afzonderlijke waarden opgeslagen. Er kunnen in totaal 100 metingen worden opgeslagen.
Zodra alle 100 plaatsen vol zijn, worden de oudste gegevens door
de nieuwste overschreven.
Opvragen van opgeslagen gegevens
Houd de opslag-toets 9 kort ingedrukt om de laatst opgeslagen
gegevens weer te geven. Op het display wordt het opslagsymbool
nummer wordt in de regel voor Opslaglocatienummer
weergegeven.
Druk opnieuw op de opslag-toets 9 om naar de volgende
opslagpositie te gaan.
27
weergegeven en het bijbehorende opslaglocatie-
19 b
81 NL/BE
Page 82
Houd de opslag-toets 9 langer dan 1,5 seconden ingedrukt
om snel door de opgeslagen gegevens van 10 naar 20 naar
30....100 naar onderen te springen.
Verwijderen / Wissen van (afzonderlijk)
opgeslagen gegevens
Houd in de opslagmodus de opslag-toets 9 en de toets
Wissen / Terug
om de actueel weergegeven opslag te wissen. Op het display
wordt een seconde lang ”CLEAR” weergegeven en als bevestiging klinkt er een korte pieptoon.
8
samen minder dan 1,5 seconden ingedrukt
Verwijderen / Wissen van alle
opgeslagen gegevens
Houd in de opslagmodus de opslag-toets 9 en de toets
Wissen / Terug
om alle opgeslagen gegevens te wissen. Op het display
wordt een seconde lang ”CLEAR ALL” weergegeven en als
bevestiging klinkt er een korte pieptoon.
8
samen langer dan 5 seconden ingedrukt
Opslagmodus verlaten
Druk kort op de toets Wissen / Terug 8 om de opslagmodus
te verlaten en terug te keren naar de hoofdoverzicht-modus.
Het opslag-symbool is nu van het display verdwenen. Het
82 NL/BE
Page 83
opslaglocatienummer zal eveneens uit de regel voor het
Opslaglocatienummer
19 b
verdwijnen.
Riemtas
Gebruik de meegeleverde riemtas om het product te beschermen
als het niet wordt gebruikt.
Fouten, storingen & storing oplossen
Probleem
204 Berekeningsfout Zie gebruiksaanwijzing,
220 Zwakke batterij Vervang de batterijen of
255 Het ontvangen sig-
256 Het ontvangen sig-
261 Buiten het meetbereik Meet de afstand binnen het
Oorzaak Oplossing
herhaal het proces.
laad deze op.
Verbeter het reflecterende
naal is te zwak of de
meetduur te lang.
naal is te sterk.
oppervlak (gebruik een
doelbord, wit papier).
Verbeter het reflecterende
oppervlak (gebruik een
doelbord of richt niet op te
helder licht).
meetbereik.
83 NL/BE
Page 84
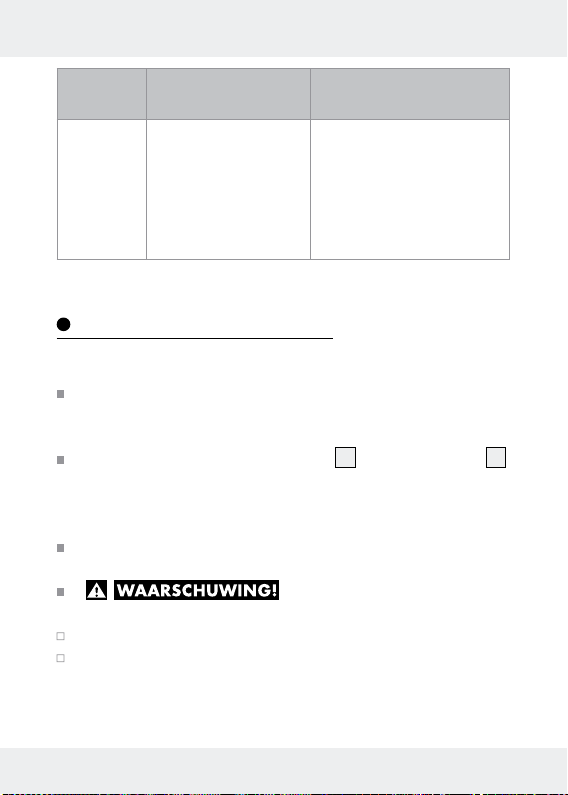
Probleem
500 Hardwarefout Schakel het product
Oorzaak Oplossing
in / uit. Als het symbool na
meerdere pogingen nog
steeds verschijnt, neem
dan contact op met uw
verkoper.
Onderhoud en reiniging
Het product is onderhoudsvrij.
LET OP! Dompel het product nooit onder in water of andere
vloeistoffen. Bij het reinigen mag er geen vocht in het product
binnendringen.
Reinig de uitgang van de laserstraal 4 en het sensor-oog 3
met een zachte luchtstroom. Bij sterkere verontreinigingen het
vuil verwijderen met een licht vochtig gemaakt wattenstaafje.
Oefen daarbij geen sterke druk uit!
Gebruik nooit benzine, oplosmiddelen of reinigingsmiddelen
die kunststof aantasten.
Het product mag voor repara-
tie-doeleinden alleen door een vakman worden geopend.
Gebruik voor het reinigen van de behuizing een droge doek.
Reinig het product regelmatig, zo mogelijk na elk gebruik.
84 NL/BE
Page 85
Opslag
Indien het product voor langere tijd niet wordt gebruikt, verwij-
der dan de batterijen en bewaar deze op een schone, droge
plek zonder direct zonlicht.
Afvoer
De verpakking bestaat uit milieuvriendelijke grondstoffen die u via
de plaatselijke recyclingcontainers kunt afvoeren.
Neem de aanduiding van de verpakkingsmaterialen
b
voor de afvalscheiding in acht. Deze zijn gemarkeerd
a
met de afkortingen (a) en een cijfers (b) met de volgende betekenis: 1–7: kunststoffen / 20–22: papier en
vezelplaten / 80–98: composietmaterialen.
Het product en de verpakkingsmaterialen zijn recyclebaar;
verwijder deze afzonderlijk voor een betere afvalbehandeling. Het Triman-logo geldt alleen voor Frankrijk.
Informatie over de mogelijkheden om het uitgediende
product na gebruik te verwijderen, verstrekt uw gemeentelijke overheid.
Gooi het afgedankte product omwille van het milieu
niet weg via het huisvuil, maar geef het af bij het daarvoor bestemde depot of het gemeentelijke milieupark.
85 NL/BE
Page 86
Over afgifteplaatsen en hun openingstijden kunt u zich
bij uw aangewezen instantie informeren.
Defecte of verbruikte batterijen / accu‘s moeten volgens de richtlijn
2006/66/EG en veranderingen daarop worden gerecycled. Geef
batterijen / accu‘s en / of het product af bij de daarvoor bestemde
verzamelstations.
Milieuschade door foutieve verwij
de batterijen / accu‘s!
Batterijen / accu‘s mogen niet via het huisvuil worden weggegooid.
Ze kunnen giftige zware metalen bevatten en vallen onder het
chemisch afval. De chemische symbolen van de zware metalen
zijn: Cd = cadmium, Hg = kwik, Pb = lood. Geef verbruikte batterijen / accu‘s daarom af bij een gemeentelijk inzamelpunt.
dering van
Garantie
Het product wordt volgens strenge kwaliteitsrichtlijnen zorgvuldig
geproduceerd en voor levering grondig getest. In geval van schade
aan het product kunt u rechtmatig beroep doen op de verkoper van
het product. Deze wettelijke rechten worden door onze hierna vermelde garantie niet beperkt.
Op dit product verlenen wij 3 jaar garantie vanaf aankoopdatum.
De garantieperiode start op de dag van aankoop. Bewaar de originele kassabon alstublieft. Dit document is nodig als bewijs voor
aankoop.
86 NL/BE
Page 87

Wanneer binnen 3 jaar na de aankoopdatum van dit product een
materiaal- of productiefout optreedt, dan wordt het product door
ons – naar onze keuze – gratis voor u gerepareerd of vervangen.
Deze garantie komt te vervallen als het product beschadigd
wordt, niet correct gebruikt of onderhouden wordt.
De garantie geldt voor materiaal- en productiefouten. Deze garantie is niet van toepassing op productonderdelen, die onderhevig
zijn aan normale slijtage en hierdoor als aan slijtage onderhevige
onderdelen gelden (bijv. batterijen) of voor beschadigingen aan
breekbare onderdelen, zoals bijv. schakelaars, accu’s of dergelijke
onderdelen, die gemaakt zijn van glas.
Afwikkeling in geval van garantie
Om een snelle afhandeling van uw reclamatie te waarborgen
dient u de volgende instructies in acht te nemen:
Houd bij alle vragen alstublieft de kassabon en het artikelnummer
(bijv. IAN 123456_7890) als bewijs van aankoop bij de hand.
Het artikelnummer vindt u op de typeplaat, ingegraveerd, op het
titelblad van uw handleiding (linksonder) of als sticker op de achterof onderzijde.
Wanneer er storingen in de werking of andere gebreken optreden,
dient u eerst telefonisch of per e-mail contact met de onderstaande
service-afdeling op te nemen.
Een als defect geregistreerd product kunt u dan samen met uw
aankoopbewijs (kassabon) en vermelding van de concrete schade
87 NL/BE
Page 88
alsmede het tijdstip van optreden voor u franco aan het u meegedeelde servicepunt verzenden.
Service
Service Nederland
Tel.: 0900 0400 223
(0,10 EUR/Min.)
E-Mail: [email protected]
Service Belgiё
Tel.: 070 270 171
(0,15 EUR/Min.)
E-Mail: [email protected]
88 NL/BE
Page 89

Legende der verwendeten
Piktogramme ........................................................... Seite 91
Einleitung ..................................................................... Seite 91
Bestimmungsgemäße Verwendung ................................ Seite 92
Teilebeschreibung ........................................................... Seite 92
Lieferumfang .................................................................... Seite 94
Technische Daten ............................................................ Seite 94
Allgemeine Sicherheitshinweise .............. Seite 95
Sicherheitshinweise für Batterien / Akkus ....................... Seite 97
Vor der Inbetriebnahme ................................Seite 98
Batterien einsetzen / austauschen .................................. Seite 99
Inbetriebnahme ..................................................... Seite 99
Ein- / Ausschalten.............................................................Seite 99
Handhabung und Bedienung ..................... Seite 100
Längeneinheit auswählen ............................................... Seite 100
Zurück / Löschen .............................................................. Seite 101
Bezugspunkt auswählen ................................................. Seite 101
Endstück-Bezugspunkt ..................................................... Seite 102
Messen von Längen ............................................Seite 102
Einzelmessmodus ............................................................Seite 102
Dauermessmodus ............................................................ Seite 103
89 DE/AT/CH
Page 90

Messwertfunktionen .........................................Seite 105
Fläche ..............................................................................Seite 105
Volumen ........................................................................... Seite 106
Pythagoras einfach .........................................................Seite 106
Pythagoras doppelt ......................................................... Seite 107
Addition (Plus) ................................................................. Seite 108
Subtraktion (Minus) ......................................................... Seite 109
Historienspeicher .................................................. Seite 109
Aufrufen eines gespeicherten Datensatzes .................... Seite 110
Entfernen / Löschen von gespeicherten und
von einzelnen gespeicherten Datensätzen .................... Seite 110
Entfernen / Löschen aller gespeicherten Datensätze ....Seite 111
Speichermodus verlassen ............................................... Seite 111
Gürteltasche..............................................................Seite 111
Fehler, Störungen & Fehlerbehebung ....Seite 112
Wartung und Reinigung ................................. Seite 113
Lagerung .....................................................................Seite 113
Entsorgung ................................................................. Seite 114
Garantie ....................................................................... Seite 115
Abwicklung im Garantiefall ............................................ Seite 116
Service .............................................................................Seite 117
90 DE/AT/CH
Page 91
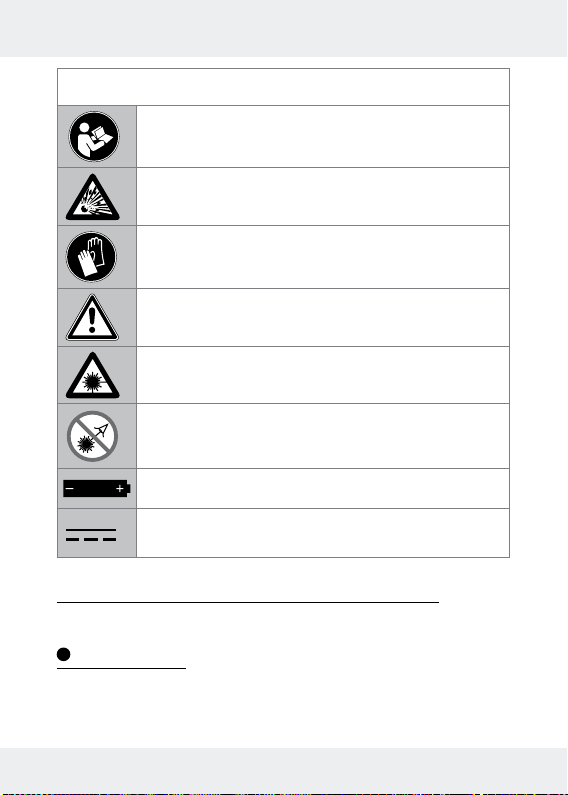
Legende der verwendeten Piktogramme
Lesen Sie die Bedienungsanleitung.
Explosionsgefahr!
Schutzhandschuhe tragen!
Achtung!
Schützen Sie sich vor Laserstrahlung!
Nicht in den Laserstrahl blicken!
Batterien im Lieferumfang enthalten.
Gleichstrom
Laser-Entfernungsmesser PLEM 50 B2
Einleitung
Wir beglückwünschen Sie zum Kauf Ihres neuen Produkts. Sie
haben sich damit für ein hochwertiges Produkt entschieden. Die
91 DE/AT/CH
Page 92
Bedienungsanleitung ist Teil dieses Produkts. Sie enthält wichtige
Hinweise für Sicherheit, Gebrauch und Entsorgung. Machen Sie
sich vor der Benutzung des Produkts mit allen Bedien- und Sicherheitshinweisen vertraut. Benutzen Sie das Produkt nur wie beschrieben und für die angegebenen Einsatzbereiche. Händigen Sie alle
Unterlagen bei Weitergabe des Produkts an Dritte mit aus.
Bestimmungsgemäße Verwendung
Dieser Laser-Entfernungsmesser (nachstehend Produkt) eignet sich
zum Messen von Entfernungen, Längen, Höhen, Abständen und
zum Berechnen von Flächen und Volumen in Innenräumen. Jede
andere Verwendung oder Veränderung des Produkts gilt als nicht
bestimmungsgemäß und birgt erhebliche Unfallgefahren. Für aus
bestimmungswidriger Verwendung entstandene Schäden übernimmt der Hersteller keine Haftung. Nicht für den gewerblichen
Einsatz bestimmt.
Teilebeschreibung
1
Tastenfeld
2
Display
3
Empfangslinse
4
Laserstrahlaustrittsöffnung
5a
Batteriefach
5b
Batteriefachabdeckung
6
Wasserwaage
92 DE/AT/CH
Page 93
Tastenfeld
7
Taste Addieren / Subtrahieren
8
Taste Zurück / Löschen
9
Speichertaste
10
Einheitentaste
11
Ein- / Aus-Taste
12
Bezugspunkttaste
13
Tontaste
14
Dauermesstaste
15
Funktionsauswahltaste
16
MEAS-Taste
Display
17
Batteriestatussymbol
18
Messeinheiten
19 a
Zeile Wert-1
19 b
Zeile Speicherortnummer
20
Zeile Wert-2
21
Max.- / Min.-Werte
22
Zeile Wert-3
23
Ergebniszeile
24
Addieren / Subtrahieren
25
Anzeigesymbol Messmodus
26
Symbol Entfernungsmessungsmodus
27
Speichersymbol
28
Bezugspunkt (Endstück)
29
Bezugspunkt (hinten)
30
Bezugspunkt (vorne)
31
Symbol Laser ein
93 DE/AT/CH
Page 94

Batteriefach
32
Lasche Batteriefachabdeckung
Hinterkante
33
Endstück am Bezugspunkt (aufklappbar)
Lieferumfang
1 Laser-Entfernungsmesser
2 1,5 V-Batterien LR03 (AAA)
1 Gürteltasche
1 Bedienungsanleitung
Technische Daten
Maximaler Messbereich: 0,05–50 m*
(Messung von Oberseite)
0,17–50 m*
(Messung von Unterseite)
Messgenauigkeit: ± 1,5 mm **
Messeinheiten: m / in / ft / ft + in
Laserklasse: Klasse 2
Lasertyp: 630–670 nm, 1 mW
Historienspeicher: 100 Sätze
Betriebstemperatur: 0 °–40 °C
Lagertemperatur: -10 °–60 °C
Relative Luftfeuchtigkeit: 90 % max.
Batterien: 2 x 1,5 V LR03 (AAA)
94 DE/AT/CH
Page 95
Gewicht: 108 g (ohne Batterien)
Abmessungen: 114,4 x 50 x 26,8 mm
*) Bei Tageslicht oder bei schlechten Reflektionseigenschaften des
Ziels verwenden Sie bitte die Zieltafel.
**) Bei günstigen Bedingungen ist mit einem Einfluss von + / 0,05 mm / m zu rechnen. Bei ungünstigen Bedingungen, zum
Beispiel intensiver Sonnenschein, schlecht reflektierende Zieloberfläche (schwarze Oberfläche) oder starken Temperaturschwankungen, wird eine höhere Abweichung erwartet.
Allgemeine
Sicherheitshinweise
Erstickungsgefahr! Verpackungsmaterialien (z. B. Folien oder
Polystyrol) dürfen nicht zum Spielen verwendet werden. Halten
Sie Kinder stets von Verpackungsmaterial fern. Das Verpackungsmaterial ist kein Spielzeug.
Benutzen Sie das Produkt nicht an Orten, an denen Feuerge-
fahr oder Explosionsgefahr besteht, z. B. in der Nähe von
brennbaren Flüssigkeiten oder Gasen.
Dieses Produkt kann von Kindern ab 8 Jahren und darüber sowie
von Personen mit verringerten physischen, sensorischen oder
mentalen Fähigkeiten oder Mangel an Erfahrung und Wissen
benutzt werden, wenn sie beaufsichtigt oder bezüglich des sicheren
Gebrauchs des Produkts unterwiesen wurden und die daraus
resultierenden Gefahren verstehen. Kinder dürfen nicht mit
dem Produkt spielen. Reinigung und Benutzerwartung dürfen
nicht von Kindern ohne Beaufsichtigung durchgeführt werden.
95 DE/AT/CH
Page 96
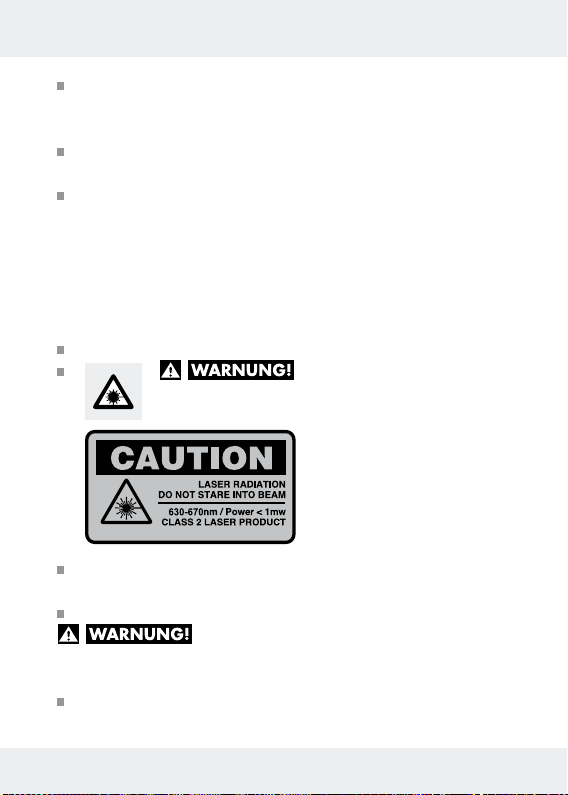
Lassen Sie das Produkt nicht unbeaufsichtigt, wenn dieses in
Gebrauch ist. Andere Personen könnten vom Laserstrahl geblendet werden.
Schützen Sie das Produkt vor Nässe und direkter Sonnenein-
strahlung.
Setzen Sie das Produkt keinen extremen Temperaturen oder
Temperaturschwankungen aus. Lassen Sie es z. B. nicht längere Zeit im Auto liegen. Lassen Sie das Produkt bei größeren
Temperaturschwankungen erst austemperieren, bevor Sie es in
Betrieb nehmen. Bei extremen Temperaturen oder Temperaturschwankungen kann die Präzision des Produkts beeinträchtigt
werden.
Vermeiden Sie heftige Stöße oder Stürze des Produkts.
Schützen Sie sich vor Laserstrahlung!
EN 60825-1:2014
VORSICHT LASERSTRAHLUNG! NICHT IN DEN
STRAHL BLICKEN! LASER KLASSE 2!
Schauen Sie nicht direkt in den Laserstrahl bzw. in die -öffnung.
Das Betrachten des Laserstrahls mit optischen
Instrumenten (z. B. Lupe, Vergrößerungsgläsern u. ä.) ist mit
einer Augengefährdung verbunden.
VORSICHT! Wenn andere als die hier angegebenen
Bedienungs- oder Justiereinrichtungen benutzt oder andere
96 DE/AT/CH
Page 97
Verfahrensweisen ausgeführt werden, kann dies zu gefährlicher
Strahlungsexposition führen.
Richten Sie den Laserstrahl niemals auf reflektierende Flächen,
Personen oder Tiere. Bereits ein kurzer Sichtkontakt mit dem
Laserstrahl kann zu Augenschäden führen.
Sicherheitshinweise für
Batterien / Akkus
LEBENSGEFAHR! Halten Sie Batterien / Akkus außer Reich-
weite von Kindern. Suchen Sie im Falle eines Verschluckens sofort einen Arzt auf!
EXPLOSIONSGEFAHR! Laden Sie nicht auflad-
bare Batterien niemals wieder auf. Schließen Sie
Batterien / Akkus nicht kurz und / oder öffnen Sie
diese nicht. Überhitzung, Brandgefahr oder Platzen können
die Folge sein.
Werfen Sie Batterien / Akkus niemals in Feuer oder Wasser.
Setzen Sie Batterien / Akkus keiner mechanischen Belastung
aus.
Risiko des Auslaufens von Batterien / Akkus
Vermeiden Sie extreme Bedingungen und Temperaturen, die
auf Batterien / Akkus einwirken können, z. B. auf Heizkörpern /
direkte Sonneneinstrahlung.
Wenn Batterien / Akkus ausgelaufen sind, vermeiden Sie den
Kontakt von Haut, Augen und Schleimhäuten mit den Chemikalien! Spülen Sie die betroffenen Stellen sofort mit klarem
Wasser und suchen Sie einen Arzt auf!
97 DE/AT/CH
Page 98
SCHUTZHANDSCHUHE TRAGEN! Ausge-
laufene oder beschädigte Batterien / Akkus können
bei Berührung mit der Haut Verätzungen verursachen.
Tragen Sie deshalb in diesem Fall geeignete Schutzhandschuhe.
Im Falle eines Auslaufens der Batterien / Akkus entfernen Sie
diese sofort aus dem Produkt, um Beschädigungen zu vermeiden.
Verwenden Sie nur Batterien / Akkus des gleichen Typs. Mischen
Sie nicht alte Batterien / Akkus mit neuen!
Entfernen Sie die Batterien / Akkus, wenn das Produkt längere
Zeit nicht verwendet wird.
Risiko der Beschädigung des Produkts
Verwenden Sie ausschließlich den angegebenen Batterietyp /
Akkutyp!
Setzen Sie Batterien / Akkus gemäß der Polaritätskennzeichnung
(+) und (-) an Batterie / Akku und des Produkts ein.
Reinigen Sie Kontakte an Batterie / Akku und im Batteriefach
vor dem Einlegen!
Entfernen Sie erschöpfte Batterien / Akkus umgehend aus dem
Produkt.
Vor der Inbetriebnahme
Prüfen Sie die Lieferung auf Vollständigkeit und auf sichtbare
Schäden.
Entfernen Sie das gesamte Verpackungsmaterial vom Produkt.
98 DE/AT/CH
Page 99
Batterien einsetzen / aust auschen
Wenn das Batteriesymbol erstmals im Display 2 erscheint,
sind noch einige Messungen möglich. Erscheint das leere Batteriesymbol
Messungen sind nicht mehr möglich.
Öffnen Sie die Batteriefachabdeckung 5b, indem Sie die Lasche
Entfernen Sie die verbrauchten Batterien aus dem Batteriefach
Legen Sie die (neuen) Batterien ein. Achten Sie auf die richtige
Schließen Sie die Batteriefachabdeckung 5b wie gezeigt
, müssen Sie die Batterien auswechseln.
der Batteriefachabdeckung
5a
, falls notwendig.
Polarität entsprechend der Darstellung auf der Innenseite des
Batteriefachs
(Abb. A).
5a
.
32
vorsichtig nach unten drücken.
Inbetriebnahme
Ein- / Ausschalt en
Drücken Sie die Ein- / Aus-Taste 11, um das Produkt einzuschalten.
Halten Sie zum Ausschalten des Produkts die Ein- / Aus-Taste 11
gedrückt, bis sich das LC-Display abschaltet.
Hinweis: Wenn 3 Minuten lang keine Taste gedrückt wird,
schaltet sich das Produkt automatisch selbst aus.
99 DE/AT/CH
Page 100
Akustisches Signal:
- Jeder Tastendruck und jede fehlerfrei durchgeführte Funktion wird
von einem kurzen Piepton bestätigt.
- Bei einem Fehler ist ein doppelter Piepton zu hören.
- Im Dauermessmodus ist fortlaufend eine schnelle Abfolge von
kurzen Pieptönen zu hören und bei einem Fehler verlangsamt
sich die schnelle Abfolge der doppelten Pieptöne.
- Halten Sie die Tontaste
jedem Modus zu aktivieren oder deaktivieren.
Hauptbildschirmmodus:
Halten Sie die Ein- / Aus-Taste 11 in jedem Modus gedrückt,
um alle auf dem Display angezeigten Daten zu löschen und
zum Hauptbildschirmmodus zurückzukehren. Im Hauptbildschirmmodus sind auf dem Display keine Daten zu sehen und
der Anwender kann hier auf jede beliebige Taste drücken, um
in einen bestimmten beliebigen Modus zu wechseln.
13
kurz gedrückt, um den Piepton in
Handhabung und Bedienung
Längeneinheit auswählen
Gleich nach dem Einschalten des Produkts wird auf dem Display
die zuletzt verwendete Längeneinheit angezeigt.
Drücken Sie die Einheitentaste 10, um eine andere Einheit
auszuwählen. Sie können die folgenden Längeneinheiten in
dieser Reihenfolge auswählen:
100 DE/AT/CH
 Loading...