

Page 1

Parallels® Plesk Expand
Page 2

Copyright Notice
ISBN: N/A
Parallels
660 SW 39th Street
Suite 205
Renton, Washington 98057
USA
Phone: +1 (425) 282 6400
Fax: +1 (425) 282 6444
© Copyright 1999-2008,
Parallels, Inc.
All rights reserved
Distribution of this work or derivative of this work in any form is prohibited unless prior written
permission is obtained from the copyright holder.
Patented technology protected by U.S.Patents 7,328,225; 7,325,017; 7,293,033; 7,099,948;
7,076,633.
Patents pending in the U.S.
Product and service names mentioned herein are the trademarks of their respective owners.
Page 3

Contents
Preface 5
About This Guide ........................................................................................................................... 5
Who Should Read This Guide ....................................................................................................... 5
Organization of This Guide ............................................................................................................ 6
Documentation Conventions ......................................................................................................... 6
Typographical Conventions ........................................................................................................... 6
Feedback ....................................................................................................................................... 7
Learning Plesk Expand Basics 8
About Plesk Expand ...................................................................................................................... 9
Introducing Plesk Expand Interface ............................................................................................. 12
Navigation Pane ................................................................................................................ 13
Plesk Expand Work Area .................................................................................................. 15
Action Bar .......................................................................................................................... 18
Getting Help ................................................................................................................................. 19
Finding Helpful Information ............................................................................................... 19
Requesting Help From Support Team .............................................................................. 19
Starting Plesk Expand 22
Preparing Plesk Expand for Work ............................................................................................... 23
Configuring Plesk Expand to Run Behind a Firewall ........................................................ 24
Logging In To Plesk Expand ....................................................................................................... 26
Accepting Parallels License Agreement ...................................................................................... 27
Changing Default Login Data ...................................................................................................... 27
Managing Plesk Expand License 28
Licensing Policy ........................................................................................................................... 28
Upgrading Limited License Key to Full-Functional License Key ................................................. 29
Registering Plesk Server in Plesk Expand 30
Registering New Plesk Server ..................................................................................................... 31
Resolving the IP Range Issue ..................................................................................................... 33
Creating Expand Client Account 35
Creating Client Template ............................................................................................................. 36
Registering New Expand Client ................................................................................................... 41
Adding IP Address to Expand Client’s IP Pool .................................................................. 42
Creating Domain for Expand Client 43
Creating Domain Template ......................................................................................................... 44
Creating a Domain for an Expand Client ..................................................................................... 51
Page 4

Preface 4
Providing for the Information Safety in Plesk Expand 53
Registering a Remote Backup Storage in Plesk Expand ............................................................ 54
Scheduling Backups in Plesk Expand ......................................................................................... 55
Page 5

Preface 5
In this section:
About This Guide ............................................................................................... 5
Who Should Read This Guide ........................................................................... 5
Organization of This Guide ................................................................................ 6
Documentation Conventions ............................................................................. 6
Typographical Conventions ............................................................................... 6
Feedback .......................................................................................................... 7
Preface
About This Guide
This guide is intended to provide a practical introduction to Plesk Expand by explaining how
to start your work with Plesk Expand immediately after its installation and how to perform
basic administrative tasks in it.
This document provides step-by-step instructions you should follow after logging in to Plesk
Expand. It does not cover all features of this control panel. For detailed information on the
entire Plesk Expand functionality, refer to the Plesk Expand Administrator’s Guide and the
Plesk Expand Client’s Guide at http://www.parallels.com/en/products/plesk/expand/docs/.
If you encounter any problems when installing the control panel, refer to the Plesk Expand
Installation Guide at http://www.parallels.com/en/products/plesk/expand/docs/.
For more information on how to integrate Plesk Expand with external systems, see the Plesk
Expand Integration Guide at http://www.parallels.com/en/products/plesk/expand/docs/.
Who Should Read This Guide
This guide is intended for anyone who has purchased Plesk Expand and is willing to start
working in it. Good knowledge of the operating system your Plesk servers operate on is
required. This can be Linux, FreeBSD or Windows.
Page 6

6 Preface
Organization of This Guide
Formatting convention
Type of Information
Example
Special Bold
Items you must select,
such as menu options,
command buttons, or
items in a list.
Go to the System tab.
Titles of chapters,
sections, and subsections.
Read the Basic Administration
chapter.
Chapter 2, Learning Plesk Expand Basics (see page 8), familiarizes you with Plesk Expand, its
basic concept of centralized management and its interface, and tells you how you can get
help in case you encounter any problems in the control panel.
Chapter 3, Starting Plesk Expand (see page 22), provides information on the preliminary steps
you should take before starting to work in Plesk Expand, on the possible problems you may
encounter at the start of Plesk Expand, and also teaches you how you can find your
password in case you have forgotten it.
Chapter 4, Managing Plesk Expand License (see page 28), tells you about the Plesk Expand
licensing policy and provides instructions on how you can install a new license in your Plesk
Expand.
Chapter 5, Registering Plesk Server in Plesk Expand (see page 30), teaches you how to register
your first server in Plesk Expand.
Chapter 6, Creating Expand Client Account (see page 35), provides step-by-step instructions on
how to create Expand client accounts on the basis of client templates.
Chapter 7, Creating Domain for Expand Client (see page 43), explains in detail how to create
domain templates and add new domains based on these templates.
Documentation Conventions
Before you start using this guide, it is important to understand the documentation
conventions used in it.
Typographical Conventions
Before you start using this guide, it is important to understand the documentation
conventions used in it.
The following kinds of formatting in the text identify special information.
Page 7

Preface 7
Italics
Used to emphasize the
importance of a point, to
introduce a term or to
designate a command line
placeholder, which is to be
replaced with a real name
or value.
The system supports the so
called wildcard character search.
Monospace
The names of commands,
files, and directories.
The license file is located in the
http://docs/common/licen
ses directory.
Preformatted
On-screen computer
output in your commandline sessions; source code
in XML, C++, or other
programming languages.
# ls –al /files
total 14470
Preformatted Bold
What you type, contrasted
with on-screen computer
output.
# cd /root/rpms/php
CAPITALS
Names of keys on the
keyboard.
SHIFT, CTRL, ALT
KEY+KEY
Key combinations for
which the user must press
and hold down one key
and then press another.
CTRL+P, ALT+F4
Feedback
If you have found a mistake in this guide, or if you have suggestions or ideas on how to
improve this guide, please send your feedback using the online form at
http://www.parallels.com/en/support/usersdoc/. Please include in your report the guide’s title,
chapter and section titles, and the fragment of text in which you have found an error.
Page 8

From this chapter you will learn the following information about Plesk Expand:
In this chapter:
About Plesk Expand .......................................................................................... 9
Introducing Plesk Expand Interface ................................................................... 12
Getting Help ...................................................................................................... 19
C H A P T E R 1
Learning Plesk Expand Basics
Basic Plesk Expand concept of centralized management (see page 9).
Introduction to the Plesk Expand interface (see page 12).
How to find help in case you encounter any problems in the Plesk Expand control
panel (see page 19).
Page 9

Learning Plesk Expand Basics 9
About Plesk Expand
The main thing about Plesk Expand is that it is intended to extend Plesk™ functionality
and is considered to be an add-on application for Plesk™. Plesk Expand cannot be
used separately, it requires at least two Plesk servers to operate.
Below, we provide short descriptions of Plesk™ and Plesk Expand.
Plesk™ is a control panel designed to automate all aspects of your hosting business
and deliver superior flexibility and stability to your customers. It enables users to create
and remotely manage hundreds of virtual hosts through an easy-to-use, intuitive
interface, without in-depth technical knowledge of web hosting technologies. The
extensive set of Plesk features allows you to completely automate product installation,
enrich self-administration capabilities for your clients, and minimize the number of
support calls.
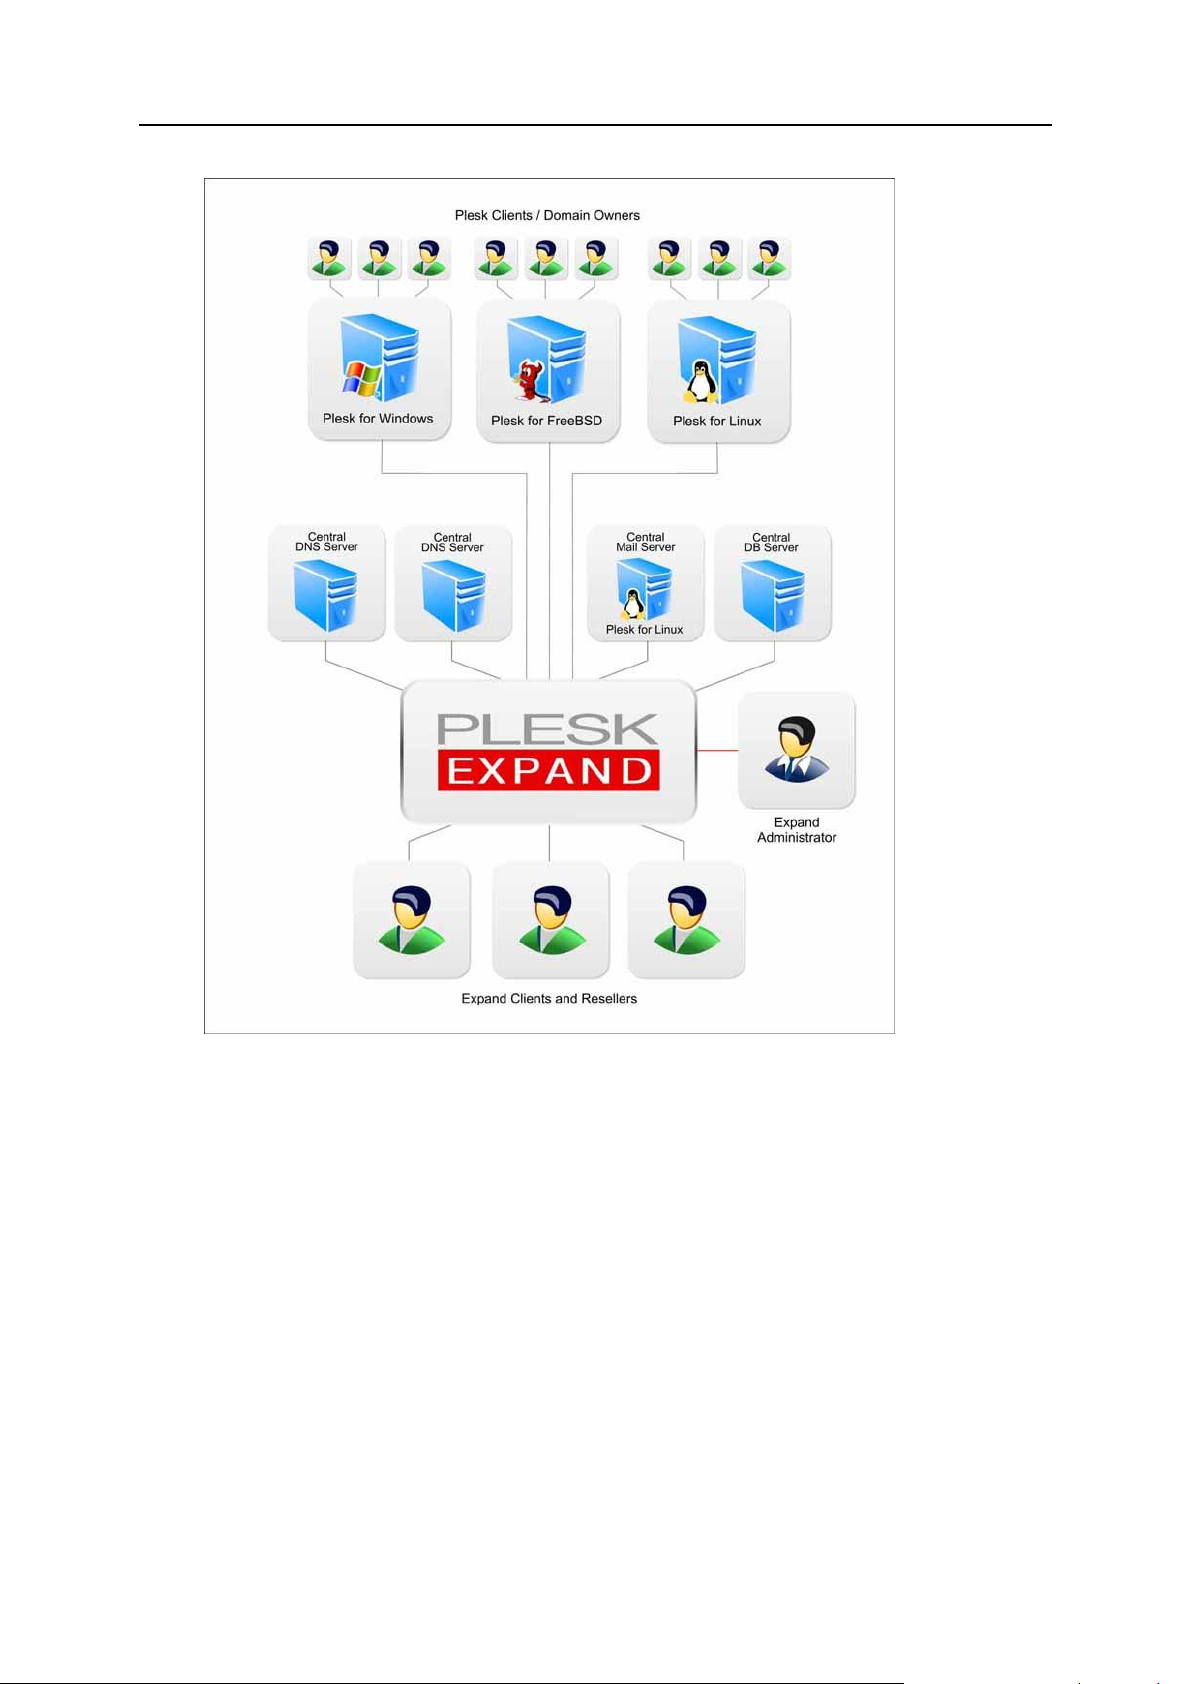
Plesk Expand is the hosting automation software that unites multiple Plesk servers on
a single hosting platform. It allows hosting service providers to administer several Plesk
servers from one centralized point: the Plesk Expand control panel. Using Plesk
Expand, the administrator can centrally manage all Plesk client accounts, domains and
other objects registered on different Plesk servers, without having to log in to these
servers. Plesk Expand offers centralized administration of major client services - such
as e-mail, DNS and database management - across all Plesk Expand servers, thus
allowing to effectively balance the workload. Specialized user roles - such as the Plesk
Expand reseller and Plesk Expand client - allow the administrator to configure and sell
a number of advanced web hosting reseller packages. Plesk Expand can be easily
integrated with the provider’s infrastructure through special APIs (Application
Programming Interfaces).
The principles of the Plesk Expand operation are presented in the following schema:
Page 10
10 Learning Plesk Expand Basics
Plesk Expand user roles and basic object types are described further in this section.
Plesk Expand objects
Plesk Expand objects are Plesk servers and accounts registered on Plesk servers,
which are managed by Plesk Expand users.
There are the following kinds of objects in Plesk Expand:
Plesk Server. A hosting server running Plesk
TM
control panel software (either Plesk
for Windows or Plesk for Linux/Unix) registered in Plesk Expand.
Plesk Server Group. Several Plesk servers to which common rules or features are
assigned by Administrator, or which are assigned to one Reseller.
Plesk client is a Plesk client account residing on one of Plesk servers registered in
Plesk Expand. You can grant Plesk clients access to Plesk control panel, where he
can manage his or her account and domains.
Page 11

Learning Plesk Expand Basics 11
Domain is a virtual host on the Internet owned by a Plesk client, Expand Reseller or
Expand client. For each domain, you can create a Domain Administrator account
allowing to manage the domain in the Plesk control panel.
Plesk Expand users
Plesk Expand Users have certain rights and privileges on certain Plesk objects they
own. Plesk Expand users have access to the Plesk Expand control panel, where they
can manage their objects and accounts, within the limits and capabilities provided by
their user role. There are the following user roles in Plesk Expand:
Administrator. A Plesk Expand user who has full rights to configure Plesk Expand
and manage all its objects and user accounts.
Expand Reseller is a Plesk Expand user who owns and manages Plesk servers,
groups of Plesk servers, Plesk client accounts and domains. Reseller has
Administrator rights on all objects registered on Plesk servers which he or she
owns.
Expand Client is a Plesk Expand user who owns and manages domains and Plesk
clients in Plesk Expand. These domains and Plesk clients may be registered on
several Plesk servers, including servers running different platforms (Plesk for
Windows or Plesk for Linux/Unix).
Plesk Expand Centralized servers
Plesk Expand offers a set of distributed (or centralized) services. A distributed service
is a service received by several Plesk servers remotely, from a single centralized
dedicated server. Such a server (called a Centralized server) is allocated for providing
this service to several or all objects registered on other Plesk servers. This allows to
reduce the workload on each Plesk server, optimize the overall system performance,
and helps to quickly and easily detect and resolve typical service issues. There are the
following types of centralized servers in Plesk Expand:
Mail server. A Plesk server registered in Plesk Expand which operates as a
centralized mail server for several Plesk servers.
DNS server. A Plesk or a non-Plesk server which operates as a centralized DNS
server for several Plesk servers.
Database Server. A Plesk or a non-Plesk server which operates as a centralized
database server for several Plesk servers.
Communication between Plesk Expand and Plesk servers
The communication between Plesk and Plesk Expand is provided by PSA API RPC,
the data and command communication software. PSA API RPC should be installed on
every Plesk/Linux server prior to registering it in Plesk Expand. On and Plesk/FreeBSD
and Plesk for Windows servers there is no need to install PSA API RPC; it is included
in the distribution package.
Page 12
12 Learning Plesk Expand Basics
Introducing Plesk Expand Interface
In this section:
Navigation Pane ................................................................................................ 13
Plesk Expand Work Area................................................................................... 15
Action Bar ......................................................................................................... 18
This section describes the basics of the Plesk Expand web-based interface. Here you
can find instructions on how to navigate through your Plesk Expand control panel.
A regular Plesk Expand page looks as follows:
Figure 1: Plesk Expand interface
Any Plesk Expand page consists of the following elements:
Navigation pane (see page 13) contains navigation items and the context help area.
Work area (see page 15) provides access to available operations (depending on
the current context), input forms, lists, and other interface elements.
Action bar (see page 18) displays the name and the status of the currently
executed action.
Page 13
Learning Plesk Expand Basics 13
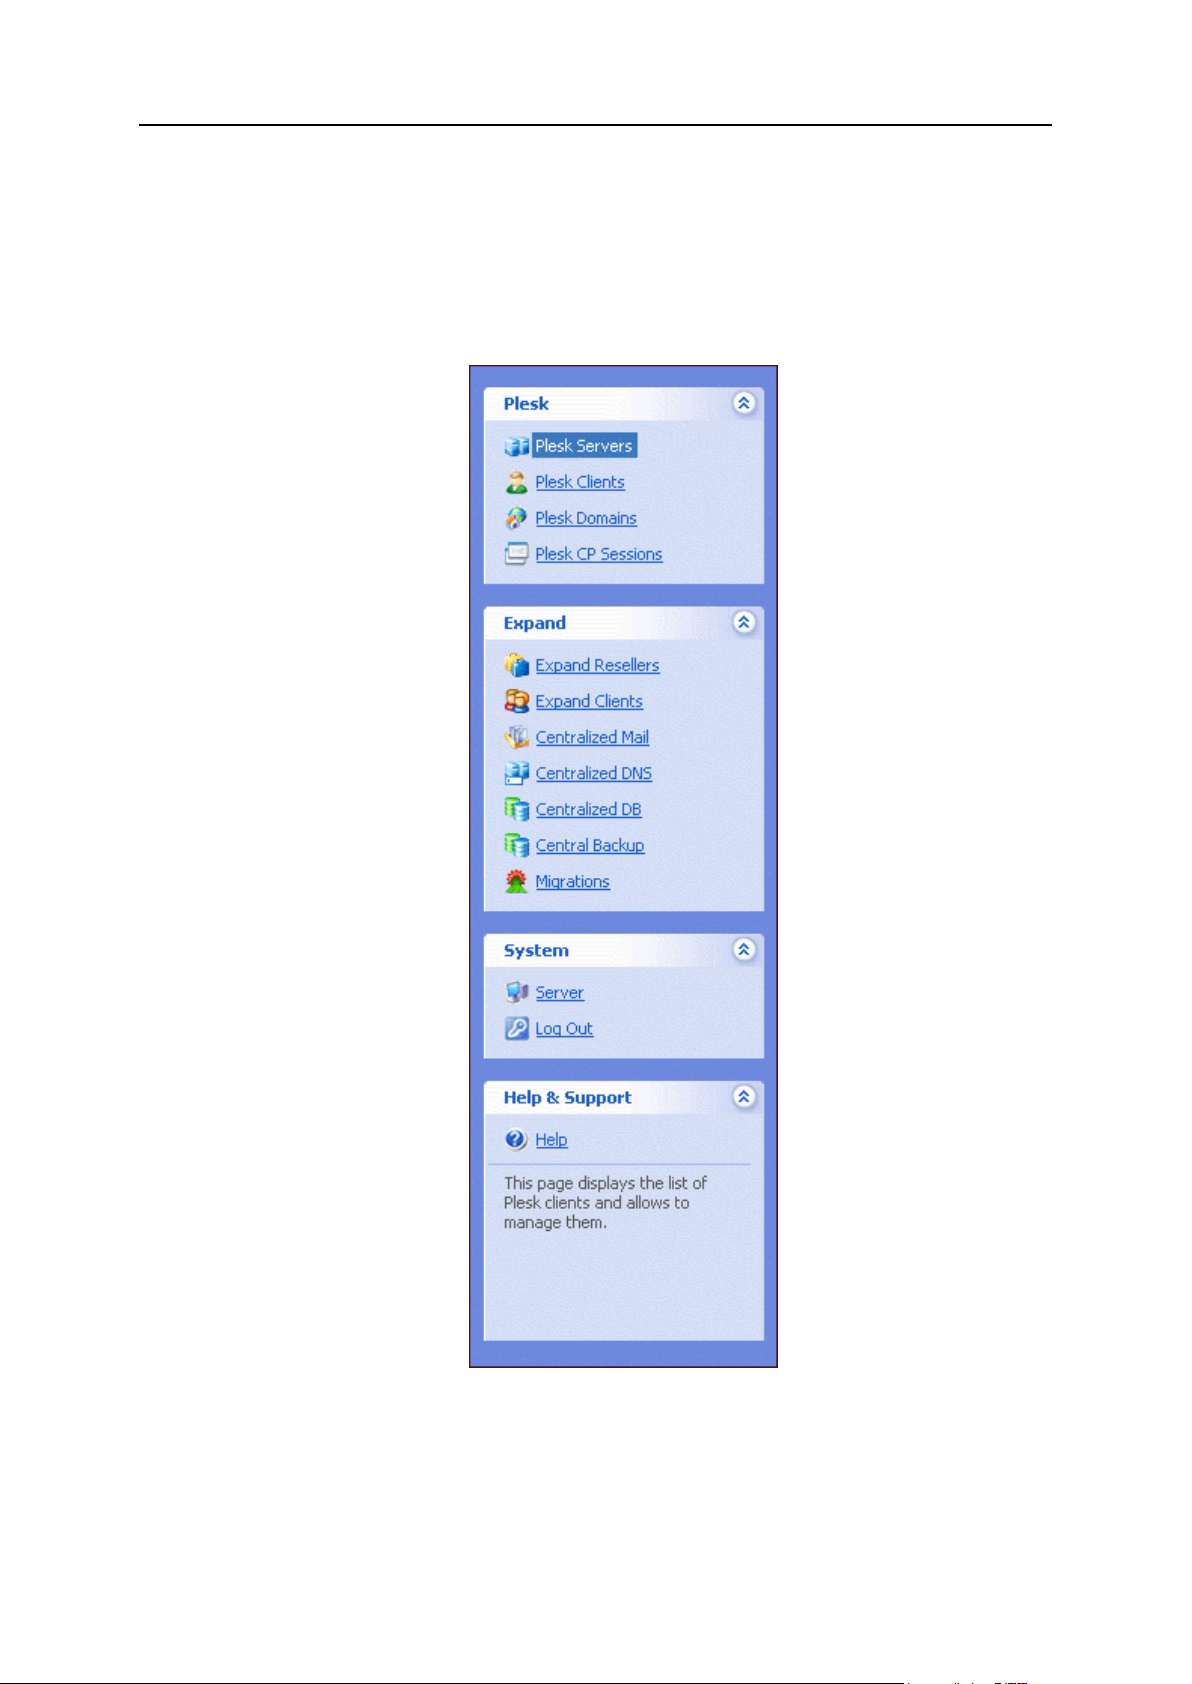
Navigation Pane
The navigation pane is located on the left side of the Plesk Expand page. In the right
part of the screen there is the work area where you can perform management
operations on a particular Plesk Expand component selected in the navigation pane.
Figure 2: Navigation pane
The navigation pane is divided into four sections: Plesk, Expand, System and Help &
Support. To expand or collapse the contents of each section, click the arrows in the
upper right corner of each section.
Page 14

14 Learning Plesk Expand Basics
The Plesk section contains the following shortcuts:
Plesk Servers. This shortcut takes you to the list of all Plesk servers registered in
Plesk Expand. There you can manage Plesk servers, register a new Plesk server,
reload selected servers or remove the servers you no longer need.
Plesk Clients. This shortcut takes you to the list of all Plesk client accounts from all
Plesk servers registered in Plesk Expand. There you can manage Plesk clients,
create a new Plesk client, create a new client template. You can also suspend,
unsuspend, remove Plesk clients or refresh the particular client’s data from the
corresponding Plesk server.
Plesk Domains. This shortcut takes you to the list of all domains from all Plesk
servers registered in Plesk Expand. There you can manage domains, create new
domains, create and edit domain templates, manage DNS zones configured for
domains. You can also suspend, unsuspend, remove domains from Plesk Expand
and refresh a particular domain data from the corresponding Plesk server.
Plesk CP Sessions. This shortcut takes you to the list of all sessions with Plesk
servers registered in Plesk Expand.
The Expand section contains the following shortcuts:
Expand Resellers. This shortcut takes you to the list of all resellers registered in Plesk
Expand. There you can manage reseller accounts, create or remove resellers.
Expand Clients. This shortcut takes you to the list of all Expand client accounts
registered in Plesk Expand. There you can create Expand clients (from scratch or
by transforming a regular Plesk client into an Expand client), remove Expand
clients, or proceed to the administration page of each Expand client.
Centralized Mail. This shortcut takes you to the list of all central mail servers
registered in Plesk Expand. There you can create or remove central mail servers,
proceed to the administration page of each central mail server by clicking its name
in the list. You can also view the overall centralized mail statistics and proceed to
the list of all mail accounts (Plesk clients and domains) registered on all the central
mail servers.
Centralized DNS. This shortcut takes you to the list of all central DNS servers
registered in Plesk Expand. There you can create or remove central DNS servers,
proceed to the administration page of each central DNS server by clicking its name
in the list.
Centralized DB. This shortcut takes you to the list of all central database servers
registered in Plesk Expand. There you can create or remove central database
servers, proceed to the administration page of each central database server by
clicking its name in the list.
Central Backups. This shortcut takes you to the list of all remote storages for backing
up Plesk servers, Plesk clients and domains. There you can schedule and manage
backup tasks for Plesk servers, Plesk clients and domains.
Migrations. This shortcut takes you to the list of all migrations of accounts between
Plesk servers, which were initiated in Plesk Expand. There you can start a new
migration, view and refresh statuses of migrations, remove migrations, proceed to
viewing information about each migration task by clicking its name in the list.
The System section contains the following shortcuts:
Page 15

Learning Plesk Expand Basics 15
Server. This shortcut takes you to the page, where the Plesk Expand administrator
In this section:
Path Bar ............................................................................................................ 15
Working with Lists of Objects ............................................................................ 16
can perform system management tasks, such as viewing system statistics and
action log, editing administrator profile and login information, managing Plesk
Expand license and so on.
Log out. This shortcut takes you to the confirmation page, where you can close the
current session with Plesk Expand.
The Help & Support section contains the following shortcut:
Help. This shortcut opens the Online Help topic providing information about the
page you are currently on.
Below the Help shortcut there is a context-sensitive help area that contains a short
description of the user interface item. When you point to an interface element, you can
see its brief description and available operations.
Plesk Expand Work Area
The Plesk Expand work area includes all interface elements located to the right of the
navigation pane. The work area displays the options available for the shortcut selected
in the navigation pane.
The sections below describe how to work with the following elements of the Plesk
Expand work area interface: a path bar (see page 15) and lists of objects (see page
16).
Path Bar
The path bar is a chain of links indicating your current location within the Plesk Expand
system. It is located at the top of the Plesk Expand work area. By clicking these links,
you can jump up one or more levels.
Figure 3: Path Bar
The Up Level button located in the upper right corner of the screen is used to jump up
one level.
On some screens, the Refresh Screen button appears in the upper right corner. It can be
used to renew the screen you are on.
Below the path bar, you can see the title of the Plesk Expand page you are currently
on.
Page 16
16 Learning Plesk Expand Basics
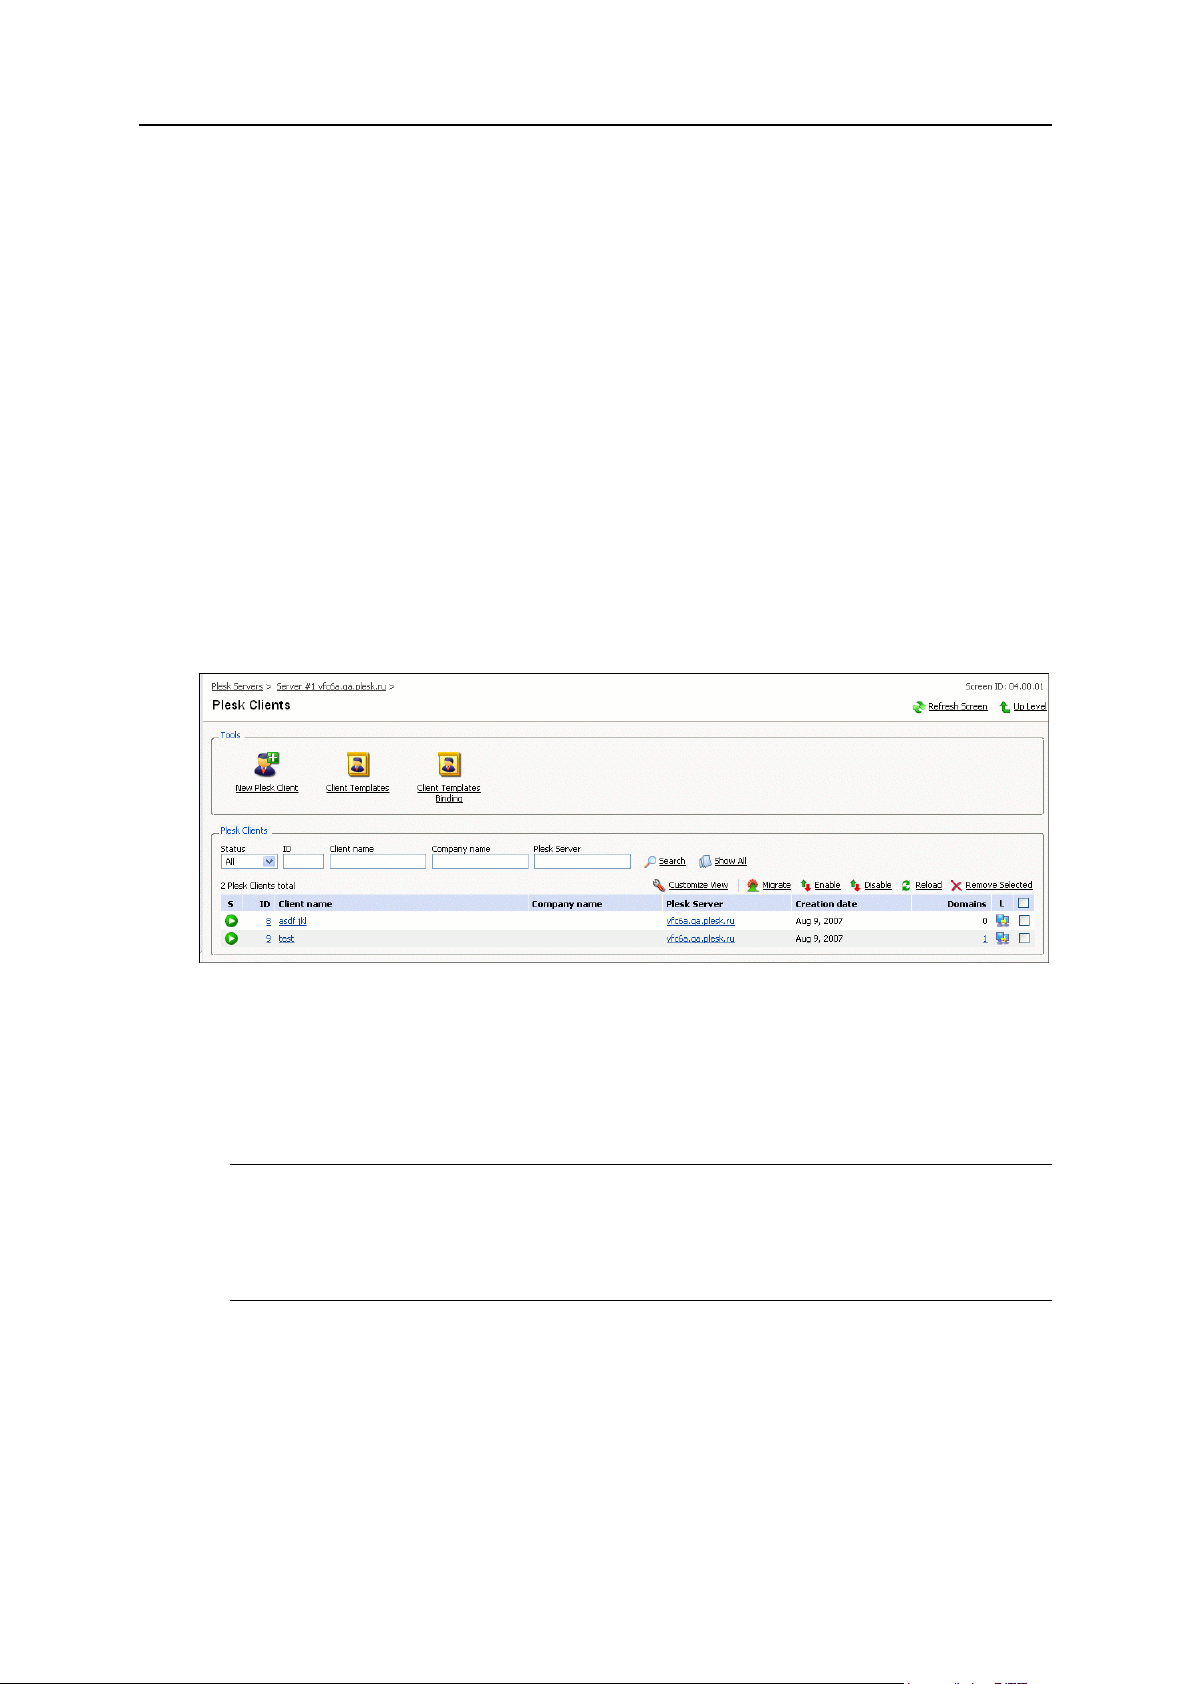
Working with Lists of Objects
On some pages, you may see a considerable number of items, such as Plesk servers,
Plesk clients, Plesk domains, shown in Plesk Expand work area. Such multiple
elements are always displayed as shortcuts organized in tables. The list shows the
items themselves (on the Plesk servers’ management page, it shows Plesk servers, on
the domains’ management page - domains, and so on), and critical parameters of
these objects in separate columns of the table. Each item in the list is clickable; by
clicking the item you get to its administration page. Values in some columns are also
shortcuts to pages where these parameters can be adjusted.
The list of items can be sorted by any parameter. To sort items by a parameter, for
example, Client name (see the figure below), click the corresponding column title. The
list will be sorted by the client name in ascending alphabet order. You can change the
sorting order, ascending to descending or vice versa, by clicking column title once
more.
The example of such page is shown below.
Figure 4: Working with lists
You can perform the following typical operations on the items listed on such pages:
Search. To search for a specific item in the list, enter the corresponding information
into one or several of the provided search fields, and click Search. All matching
items will be displayed in a reduced list.
Note: The search patterns slightly differ for different types of search fields. For the
ID field, only exact matches are shown. For example, if you enter “3”, only objects
with ID=3 are shown, objects with ID=33 are not shown. All the text fields use the
“any word” search pattern. For example, if you enter “John” in the Client Name field,
you will see all objects containing “John”, such as “Johnson”, “John Smith”, etc.
Show All. If you are viewing a reduced list, click Show All to revert to the complete list
of objects.
Customize View. Upon clicking this link, a pop-up window opens, where you can do
the following:
Specify the number of items of the list to be displayed per page.
Select the columns to be displayed:
Select the check boxes of columns you want to be displayed;
Page 17

Learning Plesk Expand Basics 17
Clear the check boxes of columns you want to be hidden.
By default, all columns are selected.
Migrate. To migrate one or several objects, select the objects in the list (select the
corresponding check boxes to the right of the table) and click Migrate. You will be
taken to the New Migration Wizard, where you should specify all other details for the
migration.
Enable. To activate (unsuspend) one or several objects, select the objects in the list
and click Enable.
Disable. To deactivate (suspend) one or several objects, select the objects in the list
and click Disable.
Assign Selected. Plesk Expand objects or users can be assigned to Expand clients or
resellers, and also to centralized servers. To assign items, select them in the list
and click Assign Selected. Confirm assigning on the confirmation page that appears.
Deassign Selected. To deassign items, select them in the list and click Deassign
Selected. Confirm deassigning on the confirmation page that appears.
Reload. To refresh data about certain items in the list, select them and click Reload.
On the next page, select which data should be refreshed. This option might be
useful if you have applied some changes to these particular Plesk Expand objects
or users, and wish to refresh these data immediately, without having to wait for
Plesk Expand to do this automatically.
Remove Selected. To remove items from the list, select them and click Remove or
Remove Selected. Confirm the deletion on the confirmation page that appears.
Log in. To log in to a particular Plesk object’s administration page in the Plesk
control panel, click the Login icon next to the corresponding object. It takes you
straight to this object on the Plesk server where it resides. The Plesk control panel
opens in a separate browser window. No login is required.
To proceed to the administration page of a certain item in the list, click its name in the
list.
Page 18

18 Learning Plesk Expand Basics
Action Bar
When a certain action is being executed in Plesk Expand, the state of its performance
is displayed in the action bar at the bottom of the page. If you don’t see the action bar,
click on the small triangle to the left of the Action Bar title in the bottom tray of the Plesk
Expand screen. The action bar shows actions recently performed in Plesk Expand and
their statuses:
Figure 5: Action Bar Screen
The status of an action can be indicated by one of the following icons:
The action was executed successfully;
The action failed;
The action is running;
The action is scheduled for execution.
Note: Actions are temporarily stored in the action bar. When the action bar is filled to
capacity, older actions are replaced by more recent ones. When you log out of the
control panel, the action bar is automatically cleared.
To view the detailed information on a certain action, click this action name.
To proceed to the action log, where you can view the list of all users’ and system’s
actions, click the Action Log shortcut.
To refresh the data on the actions, click Refresh.
To hide the action bar, click the small triangle to the left of the Action Bar title. To
show the action bar, click this triangle again.
Page 19

Learning Plesk Expand Basics 19
Getting Help
In this section:
Finding Helpful Information ................................................................................ 19
Requesting Help From Support Team ............................................................... 19
In this section:
Support Options ................................................................................................ 20
Sending Request to Support Team ................................................................... 21
If you encounter any problem in the system, you can find help in the following ways:
Learn more information about Plesk Expand (see page 19);
Request help from our support team (see page 19).
Finding Helpful Information
Plesk Expand help system has been created to assist you in finding answers to
questions you might have about the Plesk Expand control panel. You can find helpful
information in the following locations:
Context-sensitive help. This is the quickest way to get instant help with your
immediate tasks. Click the Help shortcut in the navigation pane (see page 13) to
open a help topic related to the Plesk Expand page you are currently on.
Printable Plesk Expand documentation. Refer to the extensive Plesk Expand
documentation package that answers most questions about using the product. The
files are available for download at
http://www.parallels.com/en/products/plesk/expand/docs/.
Online forum. Join our online forum (http://forum.swsoft.com/), where all users can
post questions, exchange ideas, and troubleshoot common problems.
Requesting Help From Support Team
If you have any issues with Plesk Expand, you can request help from our technical
support team. This section tells you about available support options (see page 20) and
provides detailed instructions on how you can contact the technical support (see page
21).
Page 20

20 Learning Plesk Expand Basics
Support Options
Before contacting Technical Support, read carefully the information below on the
support options for our customers.
Parallels (former SWsoft) support services
Parallels Technical Support offers you the 24-hour Technical Support via e-mail and
phone (voice support). Our technical consultants can also help you fix problems on
your server from a remote location.
An average response time for a single incident reported is 6 hours during business
hours (Monday to Friday 9am - 6pm, Eastern Standard Time) or 12 hours during other
times.
Parallels Technical Consultants are ready to train your personnel and administrators on
how to use basic and advanced capabilities of our programs. We are happy to offer you
the following training programs: Plesk training, HSPcomplete training, Virtuozzo
training, and Reseller training. Each training course takes one day and is performed
onsite. All travel and accommodation expenses are covered by the customer. To
arrange onsite training, please contact your sales representative.
Important: Parallels Technical Support provides assistance with problems directly
related to the use of company products. All issues related to the use of your operating
system or other technologies can be purchased as a part of Plesk Expand Engineering
Services (see below).
Who is entitled to get Technical Support:
If you purchased the product directly from the Sales Department of Parallels, a 30-
day after-purchase support program is included in your package. You will be able to
ask an unlimited number of questions via e-mail. However, if you are acting under
the 30-day support program, the Technical Support staff does not guarantee that
they will respond within the indicated time frame.
If you purchased Plesk Expand from a reseller-company, you should contact the
company where you purchased the product.
Support programs
Parallels offers flexible support programs addressed to meet the unique needs of our
customers.
Per incident support package covers assistance for specific problems you might
encounter while using Plesk Expand. Support is provided on an incident basis,
which means that there is a single support issue and some efforts have been
required to resolve it.
1 year unlimited E-mail Support package entitles you to receive support from our
consultants as many times as you have requested it via e-mail.
1 year Premium Support package provides comprehensive troubleshooting of your
issues via e-mail or phone. This package covers phone support for a maximum of
25 incidents from 9 am to 5 pm (EST) and unlimited e-mail support.
Page 21

Learning Plesk Expand Basics 21
Plesk Expand Engineering services include fixing Plesk Expand-related issues on
your server from a remote location.
Pricing
If you require a higher level of support, we suggest that you subscribe to the following
support programs:
Per incident support package - $75 USD
1 year unlimited E-mail Support package - $299 USD (per license key)
1 year Premium Support package - $599 USD (per license key)
Plesk Expand Engineering services are provided on an hourly basis at a rate of
$150 USD /hour.
The Support Purchase Request Form is available for downloading at:
http://www.parallels.com/r/upload/sw-plesk-support-purchase-request-form.pdf .
Please, fill in this form and fax it to +1-703-991-0550.
Other options
If you have any questions about the services, support plans or quotes, please, contact
sales@parallels.com or call (703) 815-5670.
Sending Request to Support Team
To submit a request to the Parallels Technical Support from the Parallels web site:
1 Go to the Parallels web site at
https://parallels.com/support/pleskexpand/form/. The Plesk Expand
Online Server Support Form opens.
2 Describe your problem in the form and fill in all required fields.
3 Click Submit Request to instantly send it to our technical experts.
To submit a request to the Parallels Technical Support from the Plesk Expand control
panel:
1 Click Server in the navigation pane.
2 Click Support. The Plesk Expand Online Server Support Form
opens in a new browser window.
3 Describe your problem in the form and fill in all required fields.
4 Click Submit Request to instantly send it to our technical experts.
Page 22

This chapter describes your first steps when starting to work in Plesk Expand.
In this chapter:
Preparing Plesk Expand for Work ...................................................................... 23
Logging In To Plesk Expand .............................................................................. 26
Accepting Parallels License Agreement ............................................................ 27
Changing Default Login Data ............................................................................ 27
C H A P T E R 2
Starting Plesk Expand
Page 23

Starting Plesk Expand 23
Preparing Plesk Expand for Work
Before you start working with Plesk Expand, perform the following steps:
1 Install the Plesk Expand software. The ways of installation and
installation instructions are described in the Plesk Expand Installation
Guide at http://www.parallels.com/en/products/plesk/expand/docs/.
2 When Plesk Expand is installed, make sure:
You have at least two Plesk servers of compatible versions that you wish to
manage.
For compatibility list, refer to Plesk Expand Installation Guide.
You have PSA API RPC installed on those Plesk servers to enable
communication between them and Plesk Expand.
For detailed information on PSA API RPC and its installation instructions, see
the Plesk Expand Installation Guide.
You have all the services necessary for the operation of Plesk Expand started
on the machine Plesk Expand is installed on.
The following services are necessary and the following problems may occur if
they are not started:
sw-cp-server
If the service is not started, the control panel does not open.
mysqld
If the service is not started, you cannot work in the Plesk Expand control
panel: neither log in, nor open any page in it.
expandtm
If the service is not started, you cannot change any data in Plesk Expand.
Plesk Expand opens in a sort of a read-only mode.
expandom
If the service is not started, you cannot change any data in Plesk Expand.
Plesk Expand opens in a sort of a read-only mode.
sendmail
If the service is not started, all e-mail notifications are disabled in Plesk
Expand. The password retrieval option on the login screen is unavailable.
Tip: You may check the status of these services in the console of the machine
Plesk Expand is installed on, by using the following command:
service <service_name> {status|stop|start}
-or/etc/init.d/<service_name> {status|stop|start}
You have properly configured the DNS zones for all your hosts, including Plesk
servers, Centralized Mail servers, Centralized DNS servers, and the Plesk
Expand host. Plesk Expand might use DNS lookup to resolve hostname to IP,
and reverse lookup to resolve IP to hostname.
Page 24

24 Starting Plesk Expand
Note: Special attention should be paid to the DNS zones configuration on the
In this section:
Configuring Plesk Expand to Run Behind a Firewall .......................................... 24
Ports
To/from, comments
Protocol
8442
from all hosts from which users will access
the Plesk Expand control panel
TCP
8443, 22 (SSH)
to every Plesk server in the system
TCP
8443, 22 (SSH)
to every central mail server
TCP
8441, 22 (SSH)
to every central DNS server
TCP
Ports
To/from, comments
Protocol
22 (SSH)
from Plesk Expand server
TCP
8443
from Plesk Expand server
TCP
8443
from the central mail server this Plesk server
is assigned to (if assigned to any)
TCP
53 (DNS)
from EVERY central DNS server this Plesk
server is assigned to (if assigned to any).
TCP
Centralized Mail server. If the PTR record for this server's IP points to the
wrong host name, you won't be able to manage the Centralized Mail server.
You have the firewall properly configured.
If the firewall is blocking port #8442, you cannot open the Plesk Expand control
panel. For detailed instructions on adjusting firewall settings, see Configuring
Plesk Expand servers to run behind a firewall further in this section.
After all the above preparations are made, you can log into the Plesk Expand control
panel (see page 26).
Configuring Plesk Expand to Run Behind a Firewall
The main idea of Plesk Expand is to unite multiple Plesk servers, including the ones
used for centralized services, into a single hosting platform. Therefore, server
communication issues must be observed very carefully, both for the main Plesk
Expand server and for other servers (Plesk and non-Plesk) operating in the system.
Below is the list of ports which must be open on various types of servers in the system,
in order to enable correct operation of Plesk Expand and its services. Please make
sure that the firewall is configured accordingly.
On each Plesk Expand server:
On each Plesk server:
Page 25

Starting Plesk Expand 25
For more details about configuring communication settings of Plesk servers, see Plesk
Ports
To/from, comments
Protocol
8443
from Plesk Expand server
TCP
8443
from every Plesk server assigned to this
central mail server (if there are any)
TCP
22 (SSH)
from Plesk Expand
TCP
Ports
To/from, comments
Protocol
8441
from Plesk Expand
TCP
22 (SSH)
from Plesk Expand
TCP
53 (DNS)
from all Internet hosts which are going to use
its services
53 (DNS)
to all external DNS servers which will be
communicating with the central DNS server
(depends on the DNS zones configuration),
including the root server
TCP
53 (DNS)
from all external DNS servers which will be
communicating with the central DNS server
(including, e.g., DNS registrars)
TCP
53 (DNS)
to all Plesk servers assigned to this DNS
servers (if there are any)
TCP
documentation.
On each server with Central Mail server installed:
On each server with the Central DNS server installed:
Important: Make sure that the DNS and the reverse DNS zones for all your hosts
including Plesk servers, central mail servers, central DNS servers, and Plesk Expand
host, are configured properly.
Page 26

26 Starting Plesk Expand
Logging In To Plesk Expand
To log in to Plesk Expand:
1 Open your browser and enter the URL of the following kind:
https://expandhost.domain:8442
where:
https://
A secure protocol used to connect to your server.
expandhost.domain
The domain name of the server your Plesk Expand is installed on.
8442
The port used to connect to your server.
2 Provide the following login details and interface settings:
Login
Use root@expandhost.domain as the login.
Password
Use setup as the password for your first logging in to Plesk Expand.
Interface Language
Select an interface language for your Plesk Expand control panel.
After logging in to Plesk Expand for the first time, perform the following steps:
View the Parallels License Agreement (see page 27).
Change the default login data (see page 27).
Page 27

Starting Plesk Expand 27
Accepting Parallels License Agreement
After your first logging in to Plesk Expand, the Parallels (formerly SWsoft) License
Agreement opens. Read the License Agreement attentively.
To accept the Parallels License Agreement:
1 Select the check box next to I agree to the terms of this license agreement.
2 Select the check box next to Do not show it again, if you do not want this
license agreement to appear each time you log in to Plesk Expand.
3 Click Accept. If you click Decline, you will be taken back to the login
screen.
Changing Default Login Data
For security purposes, we recommend that you change the default login name and
password.
After you accept the terms of the Parallels License Agreement, the Preferences screen
opens.
To change the default data:
1 Enter your new login name.
The login name must be from 5 to 20 characters long; the first character must be a
letter. Use Latin letters, hyphenations and underlines in the password. Do not use
quotes, spaces or national alphabet characters.
2 Enter your e-mail address.
Make sure this is a valid e-mail address, as it will be used for receiving e-mail
notifications from Plesk Expand events.
3 Enter your new password.
The password must be from 5 to 14 characters long. Use Latin letters,
hyphenations and underlines in the password. Do not use quotes, spaces or
national alphabet characters.
4 Retype your new password.
Note: If you leave the New password and Retype password fields blank, the password
will not be changed.
5 Click OK.
Now, you are logged in to the Plesk Expand control panel.
Page 28

To be able to use the full functionality of the Plesk Expand control panel, you should
In this chapter:
Licensing Policy ................................................................................................ 28
Upgrading Limited License Key to Full-Functional License Key ......................... 29
C H A P T E R 3
Managing Plesk Expand License
obtain a full-featured license for the product. This chapter tells you about Plesk Expand
licensing policy (see page 28) and the license key upgrade procedure (see page 29).
If you already have the Plesk Expand license and do not wish to review your licensing
options, you can skip this chapter and proceed to registering Plesk servers in Plesk
Expand (see page 31).
Licensing Policy
This section focuses on the licensing options for the Plesk Expand control panel and
the licensing procedure.
Plesk Expand is shipped with the license that has limited functionality. This license
allows you to register up to 10 servers and create the unlimited number of Plesk client
accounts and domains on these registered servers. However, all created Plesk client
accounts and domains should include the test prefix in their names (e.g. my-test-client
or my-test-domain.com). To be able to use the full functionality of Plesk Expand, you
should purchase the Plesk Expand license key (see page 29).
At present, Plesk Expand is only available on Retail. Plesk Expand is licensed based
on the number of Plesk servers being managed. General Plesk Expand license
includes capability to manage two Plesk servers together with one Centralized Mail
server. To control more Plesk servers with one Plesk Expand installation, the
purchased license should include the required number of additional managed Plesk
servers, which are purchased as additional features. You can also add to the Plesk
Expand license such additional features as the capability to manage Centralized Mail,
DNS and Database servers.
The Plesk Expand license includes one year of Software Update Service/Maintenance
(SUS) that entitles you to update the current Plesk Expand version to the latest version
released during the life of your SUS. You need to renew your Software Maintenance
annually to continue the service. Detailed information about SUS is available at
http://www.parallels.com/en/buyonline/support/ .
You can purchase Plesk Expand license keys from the Parallels online store at
http://www.parallels.com/en/buyonline/plesk/expand/ or from your local resellers.
Page 29

Managing Plesk Expand License 29
Upgrading Limited License Key to FullFunctional License Key
To upgrade a limited-functionality license to a full-functionality one:
1 Obtain the license key:
1. Go to the Parallels online store online store at
http://www.parallels.com/en/buyonline/plesk/expand/.
2. Select options you want to include in the license and click Submit.
3. Specify currency, number of license keys, provide contact details, billing
address, and payment method, and submit the form.
The new key will be sent to the specified e-mail address.
2 When you receive the license key, log in to Plesk Expand.
3 Click Server in the navigation pane.
4 Click License Management.
5 Click Upload License Key.
6 Specify a path to the license key file location.
7 Click OK.
The new license is uploaded to your Plesk Expand control panel.
Page 30

After installation of the Plesk Expand license key, you may start performing
In this chapter:
Registering New Plesk Server ........................................................................... 31
Resolving the IP Range Issue ........................................................................... 33
C H A P T E R 4
Registering Plesk Server in Plesk Expand
administrative tasks in the control panel. First you need to register two or more Plesk
servers in Plesk Expand (see page 31). Read this chapter for instructions.
Page 31

Registering Plesk Server in Plesk Expand 31
Registering New Plesk Server
To be able to use the functionality of Plesk Expand you should register at least two
Plesk servers in Plesk Expand.
To register a server in Plesk Expand:
1 Click Plesk Servers in the navigation pane.
2 Click New Server.
3 Fill in the following fields:
IP address/Hostname, the IP address of the Plesk server, which you want to make
its default IP address, or type in a hostname of the Plesk server. For example,
plesk2.example.com.
Important: Make sure that the IP addresses of the server you are registering
are not already included in the IP range of another server.
f they are, you should manually create an IP range for this server (on page 33)
prior to registering it in Plesk Expand. Otherwise, you will not be able to
register it in Plesk Expand. For details, refer to Adding IP Range (on page
33).
Port, enter the TCP/IP port of the Plesk server you are registering. Typically
Plesk servers use the TCP/IP port 8443.
Admin’s password, the administrator password to this Plesk server.
The administrator password is necessary for authorization during data
communication between Plesk Expand and this Plesk server, and for logging
into the Plesk server control panel. If later you forget your Plesk administrator
password, you can’t retrieve it through the Plesk interface. See Plesk
documentation for details about using password retrieval options available in the
corresponding version of Plesk control panel.
Group, select the group to assign this server to.
Groups are used for combining Plesk servers in order to assign common IP
allocation policy to several servers simultaneously or to assign them to one
reseller. Each server must necessarily be included in a group. If no group is
selected, the server is added to the Default group by default.
Allow to create clients, select the check box to allow creating new client accounts
on this server.
If you do not allow creating new clients on this server, you restrict client account
creation for all user types, including the Plesk Expand administrator.
Allow to create domains, select this check box to allow creating new domains on
this server.
If you do not allow creating new domains on this server, you restrict new
domains creation for Plesk clients registered on this server.
Maximum number of clients, the maximum number of clients to be created on the
server. Leave the Unlimited check box selected or clear the check box and enter
the number you want.
Page 32

32 Registering Plesk Server in Plesk Expand
Maximum number of domains, the maximum number of domains to be created on
the server. Leave the Unlimited check box selected or clear the check box and
enter the number you want.
Note: We recommend to leave the default settings for the first Plesk server
registered in Plesk Expand. It allows you to use full functionality of Plesk Expand.
You can modify the settings later. To do this, click Settings on the Plesk server
administration page. For details, refer to Plesk Expand Administrator’s Guide at
http://www.parallels.com/en/products/plesk/expand/docs/.
4 Click OK.
If you register a Plesk server, which has domains and Plesk clients already
registered on it, all these accounts are migrated to Plesk Expand. You can
manage these accounts by clicking Plesk Clients and Domains on the
administration page of this Plesk server.
Tip: If the server you are trying to register has not gone through the initial setup yet, the
error message appears at the top of the screen: Plesk server setup is not complete yet.
Click the Click to complete Plesk setup and register a new Plesk server link, and complete the
initial setup form for the Plesk server. Click OK. The Plesk server setup is now
completed, and the Plesk server is registered in Plesk Expand.
When a new server is registered in Plesk Expand, one or several IP ranges are
automatically created for this server. The number of the created IP ranges depends on
the IP addresses of the server.
Important: Before registering another Plesk server in Plesk Expand, make sure that its
IP addresses are not included in the IP range of any other servers already registered in
Plesk Expand.
To view the IP ranges of a particular Plesk server, click IP Ranges on the
administration page of this Plesk server.
If the new server’s IP addresses intersect with those listed in the IP ranges of the
existing Plesk server, you will be unable to register this new server. If you still wish to
register this Plesk server, you should create a new IP range (or several IP ranges) for it
manually and include there the necessary range of IP addresses.
Refer to Resolving the IP Range Issue (on page 33) for information on how to add an
IP range for a particular Plesk server.
At a later stage, you can edit the settings of a new Plesk server. To do this, click Plesk
Servers in the navigation pane, and then click this Plesk server name in the list.
For complete information on administering Plesk servers in Plesk Expand, see Plesk
Expand Administrator’s Guide at
http://www.parallels.com/en/products/plesk/expand/docs/.
Page 33

Registering Plesk Server in Plesk Expand 33
Resolving the IP Range Issue
When a new Plesk server is registered in Plesk Expand, one or several IP ranges are
automatically created for this server. The number of IP ranges depends on the IP
addresses of the server. Generally, IP addresses are automatically joined into an IP
range by a class C subnet. If all IP addresses of a server have an identical class C
subnet, one IP range is formed for the server. If some IP addresses of the server have
different class C subnets or different netmasks, several IP ranges are formed. Let us
consider the two examples below:
A server has the following three IP addresses: 10.1.209.1, 10.1.209.3 and
10.1.209.4. All these IP addresses can be joined in one IP range, because they
have an identical class C subnet. So we have the following IP range for the server:
10.1.209.1 - 10.1.209.4.
A server has the following three IP addresses: 10.1.208.1, 10.1.209.5 and
10.1.209.6. In this case, we receive two IP ranges for the server: one for the first IP
address and another one for the last two IP addresses. Such division occurs
because the last two IP addresses have an identical class C subnet, while the first
one has a different class C subnet.
Before registering a server in Plesk Expand, make sure that its IP addresses are not
already included in the IP range of another server currently registered in Plesk Expand.
Such situation could occur at the automatic creation of IP ranges for that server. You
can check the IP ranges of a particular server on the IP Ranges management page
which can be accessed by clicking IP Ranges on the administration page of this Plesk
server. If IP addresses of the server you want to register intersect in one or several IP
ranges with the IP addresses of some Plesk server already registered in Plesk Expand,
you will be unable to register the new server - these two servers cannot coexist in
Plesk Expand. To be able to register the server, you should create a new IP range (or
several IP ranges) for it manually and include there the necessary range of IP
addresses.
To add an IP range for a particular Plesk server in Plesk Expand:
1 Click Plesk Servers in the navigation pane.
2 Click IP Ranges.
3 Click New IP Range.
4 On the New IP Range page:
Specify the IP range name.
Specify the first IP address in the IP range.
Specify the last IP address in the IP range.
Specify the subnet mask.
To make shared IP addresses from this IP range available during new domain
creation, leave the box Use leased shared IP addresses for new domains creation
selected. Otherwise, clear the check box.
Page 34

34 Registering Plesk Server in Plesk Expand
To make shared IP addresses from this IP range available for automatic
allocation to newly created domains, leave the box Use range for auto allocation of
shared IP addresses selected. Otherwise, clear the box.
To make exclusive IP addresses from this IP range available for automatic
allocation to newly created domains, leave the box Use range for auto allocation of
exclusive IP addresses selected. Otherwise, clear the box.
Provide a description of the IP range in arbitrary format. This description is
meant for your usage and is not used by the system in any way.
Specify the Plesk Expand object to use this IP range exclusively:
For the IP range to be used exclusively by a Plesk server group, select the
Use exclusively by group option and choose a group from the list.
Tip: If you want to release IP addresses from the range, for further allocation to
various objects in the system, assign it to the Default group. Do the same if
you have no registered Plesk servers in the system.
For the IP Range to be used exclusively by a Plesk server, select the Use
exclusively by server option and choose a server from the list.
Note: If you assign an IP range to a server, it becomes a server locked IP and
is not available for allocation to any objects registered outside this Plesk
server.
5 Click OK.
For complete information on IP ranges management, refer to Plesk Expand
Administrator’s Guide at
http://www.parallels.com/en/products/plesk/expand/docs/.
Page 35

After you have registered at least two Plesk servers, you can proceed to creating your
In this chapter:
Creating Client Template ................................................................................... 36
Registering New Expand Client ......................................................................... 41
C H A P T E R 5
Creating Expand Client Account
first user account in Plesk Expand.
Besides the Plesk Expand administrator, there are two user account types:
Expand client, who owns and manages Plesk clients and domains on multiple Plesk
servers
Expand reseller, who owns Plesk servers and groups of Plesk servers, with all
objects registered on them.
For full information about user roles in Plesk Expand, refer to About Plesk Expand (on
page 9).
Depending on your objectives, you can start with creating an Expand client or Expand
reseller. We recommend that you create an Expand client first, since this user is more
flexible and can own objects on multiple Plesk servers, without having administrator
privileges on these servers.
Prior to creating the first Expand client in the system, we recommend creating one or
several client templates, in order to speed up the Expand client creation process in the
future.
This chapter explains how you can create client templates (on page 36) and Expand
clients (on page 41).
Page 36

36 Creating Expand Client Account
Creating Client Template
Client templates are used for quick creation of Expand clients. Each client template
contains a pre-defined set of permissions and limits. The client account created on the
basis of a template receives all these options automatically, thus freeing Plesk Expand
Administrator from having to set these options manually. This is especially useful if you
plan to create several Expand client accounts.
To create a client template:
1 Click Plesk Clients in the navigation pane.
2 Click Client Templates.
3 Click New Client Template.
4 Specify the client template name to identify the template during
clients creation.
5 Select the Create SiteBuilder user check box to create a SiteBuilder user
for the client created with this template.
6 Select the Allow to use for clients creation check box to make this client
template available for creation of new client. The new client template
will appear active the list of available client templates.
7 Click Next to save the settings and continue.
8 Specify the following parameters:
Maximum number of domains, the maximum number of domains the client can
create.
Maximum number of subdomains, the maximum number of subdomains the client
can create for their domains.
Maximum number of domain aliases, the maximum number of domain aliases the
client can create for his/her domains.
Disk space, the amount of disk space which can be occupied by domains of the
client.
Maximum amount of traffic, the maximum traffic per month for the client.
Maximum number of web users, the maximum number of web users for domains of
the client.
Maximum number of databases, the maximum number of databases used on
domains of the client.
Maximum number of mailboxes, the maximum number of mailboxes on all domains
of the client.
Mailbox quota, the maximum amount of space which can be occupied by a
mailbox of the client.
Maximum number of mail redirects, the maximum number of mail redirects allowed
for mailboxes of the client.
Page 37

Creating Expand Client Account 37
Maximum number of mail groups, the maximum number of mail groups for domains
of the client.
Maximum number of mail autoresponders, the maximum number of autoresponders
enabled for mailboxes of the client.
Maximum number of mailing lists, the maximum number of mailing lists supported
by mailboxes of the client.
Maximum number of Java applications, the maximum number of web applications
which can be installed on domains of the client.
Validity period, the period during which a Plesk client remains active. When this
period is over, the client status turns to deactivated, and domains of the client
become unavailable.
Maximum number of Microsoft FrontPage subaccounts, the maximum number of
Microsoft FrontPage subaccounts the client can have on their domains.
Maximum number of FTP subaccounts, the maximum number of FTP subaccounts
the client can have on their domains.
Total mailboxes quota, the maximum amount of space which can be occupied by
all mailboxes of the client.
Note: This limit works for Plesk for Windows servers only. If applied to clients
on Plesk for Linux/UNIX servers, it is ignored.
Maximum number of IIS application pools, the maximum number of dedicated IIS
application pools the client can allocate between their domains.
Note: This limit works for Plesk for Windows servers only. If applied to clients
on Plesk for Linux/UNIX servers, it is ignored.
Maximum number of Microsoft SQL Server databases, the maximum number of
Microsoft SQL Server databases the client can create on their domains.
Note: This limit works for Plesk for Windows servers only. If applied to clients
on Plesk for Linux/UNIX servers, it is ignored.
Maximum number of shared SSL links, the total number of shared SSL links the
client can use on their domains.
Note: This limit works for Plesk for Windows servers only. If applied to clients
on Plesk for Linux/UNIX servers, it is ignored.
Maximum number of ODBC connections, the maximum number of ODBC data
sources the client can use for their domains.
Microsoft SQL databases quota, the maximum amount of disk space which can be
occupied by Microsoft SQL Server databases on domains of the client.
Note: This limit works for Plesk for Windows servers only. If applied to clients
on Plesk for Linux/UNIX servers, it is ignored.
MySQL databases quota, the maximum amount of disk space which can be
occupied by Microsoft SQL Server databases on domains of the client.
Note: This limit works for Plesk for Windows servers only. If applied to clients
on Plesk for Linux/UNIX servers, it is ignored.
Maximum number of ColdFusion DNS connections, the maximum number of
ColdFusion DNS connections which can be set up for the client.
Page 38

38 Creating Expand Client Account
9 Click Next to save the settings and continue.
10 Configure the following settings:
Access to control panel. Specify whether the client can access the Plesk control
panel for managing their account and web sites.
User interface. Specify the type of user interface the client will be able to use -
standard, desktop, or both.
With the desktop interface, the client uses the desktop view with shortcuts to
main operations this client can perform in Plesk control panel. The regular
Plesk control panel interface is unavailable.
With the standard interface, the client can work in the regular Plesk interface.
The desktop view is unavailable.
With both interfaces, the client can switch between them.
Note: This permission works only for Plesk for Linux/UNIX servers and only if
you grant the Access to control panel permission to the client.
Desktop management. Specify whether the client can customize their desktop by
placing on the desktop shortcuts to Plesk operations.
Note: This permission works only for Plesk for Linux/UNIX servers and only if
you grant the Access to control panel permission to the client.
Domain creation. Specify whether the client can create domains (the number of
domains depends on the limits set by the administrator and the hosting plan).
Even if domain creation is not allowed, the client still can manage and remove
domains created for them by the administrator.
Physical hosting management. Specify whether the client can set up physical
hosting for domains and configure the hosting parameters.
PHP safe mode management. Specify whether the client can switch the PHP safe
mode off for their sites. By default, PHP is configured to operate in safe mode
with functional restrictions.
Management of shell access to server. Specify whether the client can allow shell
access for FTP users of a domain when setting up physical hosting for the
domain. The client can permit any type of shell access under FTP account
credentials if the non-chrooted shell management is allowed for the user.
Non-chrooted shell management. Specify whether the client can allow domain users
any type of shell access if management of shell access to a server is allowed for
the user. Without this permission, the client can allow only chrooted shell access
for domain users, if management of shell access to a server is allowed for the
user.
Hard disk quota assignment. Specify whether the client can assign hard disk quota
for a system (FTP) user when setting up physical hosting for a domain.
Note: This function may be ignored if hard disk quotation capability is not
configured in the domain administrator's operating system settings.
Subdomains management. Specify whether the client can create and edit
subdomains (the number of subdomains depends on the limits set by the
administrator and a hosting plan). Even if subdomains management is not
allowed, the client still can remove subdomains created for them by the
administrator.
Page 39

Creating Expand Client Account 39
Domain aliases management. Specify whether the client can set up additional
alternative domain names for their web sites and allow their users to do so.
Log rotation management. Specify whether the client can activate and configure
settings for log rotation.
Anonymous FTP management. Specify whether the client can enable and configure
settings for anonymous FTP.
Important: Use this option with care. If anonymous FTP is set up with
excessive limits, it could lead to excessive server resources and bandwidth
usage.
FTP subaccounts management. Specify whether the client can create and manage
additional FTP accounts.
Crontab/Scheduler management. Specify whether the client can schedule, edit, view
and remove tasks, and set the e-mail address for the crontab messages to be
sent to.
Important: Use this option with care, it might seriously affect the system.
Domain limits adjustment. Specify whether the client can limit usage of resources
and the validity period of each domain.
DNS zone management. Specify whether the client can activate a DNS zone,
switch the DNS server type from master to slave, restore a DNS zone by a
template, add, edit and remove DNS records. Without this permission, the client
can only view the list of DNS records.
Important: Use this option with care. Misconfigured DNS settings might cause
malfunction of web, mail and FTP services.
Java applications management. Specify whether the client can activate the Tomcat
service, upload and remove the Tomcat web application archive files (.WAR
files), access, start, stop and restart web applications. Without this permission,
the client can only view uploaded web applications.
Web statistics management
Mailing lists management. Specify whether the client can activate the Mailing List
service, add, administer and remove mailing lists. Without this permission, the
client can only view the list of mailing lists.
Antivirus management. Specify whether the client can use and configure settings
of the server-side antivirus protection for filtering incoming and outgoing mail.
Without this permission, the client can only use the server-side antivirus
protection.
Backup/Restore functions. Specify whether the client can create and remove
backup files the domain.
Allow backup/restore using local repository. Specify whether the client can store
backup files on the server.
Allow backup/restore using remote (FTP) repository. Specify whether the client can
use an arbitrary FTP server for storing backups.
IIS application pool management. Specify whether the client can manage their IIS
application pool.
Hosting performance management. Specify whether the client can change the
hosting performance preferences for the domain.
Page 40

40 Creating Expand Client Account
SiteBuilder. Specify whether the client can use SiteBuilder for creating and
editing their web sites.
Ability to use remote XML interface. Specify whether the client can remotely manage
his or her web sites through custom applications. The XML interface can be
used for developing custom applications integrated with web sites, which could
be used, for instance, for automating setup of hosting accounts and provisioning
of services for customers purchasing hosting services from your reseller’s site.
Spam filter management. Specify whether the client can use SpamAssassin spam
filter and customize filtering settings.
Additional write/modify permissions management. Specify whether the client’s web
applications can use of a file-based database (like Jet) located in the root of
httpdocs or httpsdocs folders.
Important: This option might compromise the web site security.
Shared SSL management. Specify whether the client can manage shared SSL for
their domains.
11 Click OK to save the settings.
Tip: You can also create a new client template:
- using a configured client as a prototype. Just save a Plesk client as a template.
- using a client template as a prototype. Just copy the client template and edit the
required parameters.
- using a client template of a Plesk server as a prototype. Just import a client template
from a Plesk server.
For details refer to the Plesk Expand Administrator’s Guide at
http://www.parallels.com/en/products/plesk/expand/docs/.
Page 41

Creating Expand Client Account 41
Registering New Expand Client
After at least one template is created, you can start adding Expand clients to your
control panel. You can also create Expand clients without templates, but this takes
more time as you have to manually define the limits and permissions each time you
create a new Expand client.
Registering an Expand client procedure is generally similar to registering a Plesk client
account in Plesk.
To register a new Expand client:
1 Click Expand Clients in the navigation pane.
2 Click New Expand Client.
3 Specify the general settings for the Expand client:
The contact information and login details.
To make the new Expand client account active upon creation, leave the Client
Enabled check box selected.
Select a template in the Select template list.
Note: When you choose a template to be applied, the page compresses. The Show
Additional Setup section where you can choose to set limits and permissions, is
hidden, since these settings are pre-defined by the template. You can adjust these
setting later by clicking Limits or Permissions on the administration page of the
desired Expand client.
4 Click OK to complete registration.
After the successful creation of an Expand client, you are taken back to the
Expand Clients management page, from which you can open the administration
page of the new Expand client. For detailed information about managing
Expand clients, see Plesk Expand Administrator’s Guide at
http://www.parallels.com/en/products/plesk/expand/docs/.
Note: The new Expand client is not fully functional after registration. It becomes active
(i.e., able to create domains and Plesk client accounts) as soon as it is linked to at least
one Plesk server. When Expand client is linked to a Plesk server, they can create and
manage domains and Plesk client accounts on this server.
We recommend that you link the first Expand client to all Plesk servers registered in
your Plesk Expand. In this case, the Expand client can use the full functionality of this
user role, including cross-platform management of Plesk clients and domains on
multiple Plesk servers.
You can link an Expand client to a Plesk server by adding one of the Plesk server’s IP
addresses to the Expand client’s IP Pool. For details, refer to Adding IP Addresses to
Expand Client’s IP Pool.
Page 42

42 Creating Expand Client Account
In this section:
Adding IP Address to Expand Client’s IP Pool ................................................... 42
Adding IP Address to Expand Client’s IP Pool
IP address allocation is necessary for linking an Expand client to all Plesk servers on
which you wish this client to be able to create domains and Plesk client accounts.
1 To add an IP address to an Expand client’s IP pool:
2 Click Expand Clients in the navigation pane.
3 Click the name of the Expand client, for whom you want to add an IP
address.
4 Click IP Pool.
5 Click Add IP Address.
6 Select the Plesk server to register an IP address on.
Note: All IP addresses are allocated to Plesk servers. By booking an IP address on
a Plesk server, you create a link between the Expand client and the server. After
this, the Expand client will be able to create domains on this Plesk server. If you
want the Expand client to be able to create objects on several Plesk servers, add IP
addresses from these servers to the Expand client’s IP pool.
7 Specify the type of IP address allocation:
Autoselect a shared IP address, to automatically allocate a shared IP address from
the IP pool of the selected Plesk server.
Autoselect an exclusive IP address, to automatically allocate an exclusive IP
address.
Select one of server IP addresses, to select the IP address from the list of available
IP addresses.
Specify a server IP address manually, to enter the IP address in the provided field.
Note: Make sure that there is at least one IP address of the specified type (for
autoselection) or the specified IP address (for manual selection) on the selected
Plesk server.
8 Click OK.
After the IP address is added to the Expand client’s IP pool, this client is able to
create and manage Plesk clients and domains on this server.
To link the Expand client to another Plesk server, repeat the IP Address allocation
procedure and select another Plesk server.
Page 43

Creating Domain for Expand Client 43
As soon as you create at least one Expand client, you can start adding domains to their
In this section:
Creating Domain Template ................................................................................ 44
Creating a Domain for an Expand Client ........................................................... 51
Creating Domain for Expand Client
account. We recommend creating one or several domain templates before you start
creating domains in Plesk Expand, as this saves time during the domain creation
process.
This section explains in detail how to create domain templates (see page 44) and add
new domains.
Page 44

44 Creating Domain for Expand Client
Creating Domain Template
Domain templates are used for quick creation of domains. Each domain template
contains a pre-defined set of limits and permissions available on the domain level.
When a domain is created, you can simply apply one of the templates to it, instead of
manually configuring limits and permissions for each new domain account. This is very
useful when it is necessary to quickly add many domains with basically the same
configuration.
To create a domain template:
1 Click Plesk Domains in the navigation pane.
2 Click Domain Templates.
3 Click New Domain Template.
4 Specify the domain template name to identify the template during
domains creation.
5 Select the Allow to use for domains creation check box to make this domain
template available for creation of new domains. The new domain
template will appear active the list of available domain templates.
6 Specify the type of an IP address to be used by a domain:
Shared IP address, an IP address shared among several users (i.e. one IP
address can be used for hosting by many users).
Exclusive IP address, an IP address granted to a particular user exclusively.
7 Select the hosting type for this domain template from the list:
None, no hosting is configured.
If you select this type of hosting, you proceed to setting domain level limits.
Frame forwarding. With this type of hosting, the pointed domain address is
retained in the browser address bar and the user does not know that the domain
is pointed to another URL. The drawback of this method is that some search
engines do not index the pointed domains and some browsers do not support
frames.
If you select this type of hosting, you proceed to setting domain level limits. The
frame forwarding hosting type is set for each domain individually.
Standard forwarding. With this type of hosting, all requests to your domain are
forwarded by the server to another URL. When the user of your site enters the
address of your domain in the browser address bar, they see that the domain is
routed to another URL. This method is mainly used to have multiple domain
names pointing to one web site.
If you select this type of hosting, you proceed to setting domain level limits. The
standard forwarding hosting type is set for each domain individually.
Physical hosting. The most common type of hosting services, which means
allocating a certain amount of disk space on the local server for your domain. It
enables you to place your files in the domain directory on the hard disk.
Page 45

Creating Domain for Expand Client 45
If you select this type of hosting, you proceed to configuring physical hosting
parameters. These settings are applied to all domains created on the basis of
this template.
8 Click Next to save the settings and continue.
9 If you selected physical hosting for domains created with this
template, configure physical hosting for domains created with the
template:
Note: This step is optional. It appears only if physical hosting was selected in
general settings.
Hard disk quota, the maximum amount of disk space to be used by a domain.
FrontPage support, support of the FrontPage Server extensions.
FrontPage over SSL support, support of the FrontPage Server extensions.
FrontPage authoring, enabling authorization of FrontPage extensions.
Important: For security reasons, it is recommended to enable authorization of
FrontPage extensions only when FrontPage extensions are used.
Shell enabled, allowing shell access to the system.
Important: Allowing shell access compromises the system security. It is
recommended to allow shell access to the system only to trusted users.
SSL support, support of Secure Socket Layer.
Microsoft ASP support, support of Active Server Pages.
Microsoft ASP.NET support, support of ASP.NET.
SSI support, support of Server Side Included scripting.
PHP support, support of HTML documents containing PHP scripts.
CGI support, support of Common Gateway Interface scripting, allows creating an
individual cgi-bin directory.
Perl support, support of Perl scripting.
Python support, support of Python scripting.
FastCGI support, support of Fast Common Gateway Interface scripting.
Miva support, support of Miva scripting.
ColdFusion support, support of ColdFusion scripting.
Web statistics, select the application to be used for retaining domain statistics.
Custom error documents, enabling the client to create their own error pages, which
will be displayed to notify about web server errors.
Publish site with SiteBuilder, allowing the domain administrator to access
SiteBuilder through their Plesk control panel.
Use dedicated IIS application pool, enabling the use of dedicated IIS application
pool for web applications on a domain.
Additional write/modify permissions, enabling in the client’s web applications the
use of a file-based database (like Jet) located in the root of httpdocs or
httpsdocs folders.
Page 46

46 Creating Domain for Expand Client
Important: This option might compromise the web site security.
10 Click Next to save the settings and continue.
11 Configure limits for domains created with the template:
Maximum number of subdomains, the maximum number of subdomains which can
be created for the domain.
Maximum number of domain aliases, the maximum number of domain aliases which
can be created for the domain.
Disk space, the amount of disk space which can be occupied by the domain.
Maximum amount of traffic, the maximum traffic for the domain per month.
Maximum number of web users, the maximum number of web users for the domain.
Maximum number of databases, the maximum number of databases which can be
used on the domain.
Maximum number of mailboxes, the maximum number of mailboxes which can be
used on the domain.
Mailbox quota, the maximum amount of disk space which can be occupied by a
mailbox.
Maximum number of mail redirects, the maximum number of mail redirects allowed
for a mailbox.
Maximum number of mail groups, the maximum number of mail groups which can
be used on the domain.
Note: This limit works for Plesk for Windows servers only. If applied to domains
on Plesk for Linux/UNIX servers, it is ignored.
Maximum number of mail autoresponders, the maximum number of autoresponders
which can be used for a mailbox.
Maximum number of mailing lists, the maximum number of mailing lists supported
by the mailboxes.,
Maximum number of Java applications, the maximum number of web applications
which can be installed on the domain.
Validity period, the period during which a Plesk domain remains active. When this
period is over, the domain status turns to deactivated.
Maximum number of Microsoft FrontPage subaccounts, the maximum number of
Microsoft FrontPage subaccounts which can be created for the domain.
Maximum number of FTP subaccounts, the maximum number of FTP subaccounts
which can be created for the domain.
Total mailboxes quota, the maximum amount of disk space which can be occupied
by all mailboxes on the domain.
Note: This limit works for Plesk for Windows servers only. If applied to domains
on Plesk for Linux/UNIX servers, it is ignored.
Maximum number of Microsoft SQL Server databases, the maximum number of
Microsoft SQL Server databases which can be used on the domain.
Note: This limit works for Plesk for Windows servers only. If applied to domains
on Plesk for Linux/UNIX servers, it is ignored.
Page 47

Creating Domain for Expand Client 47
Maximum number of shared SSL links, the maximum number of shared SSL links
which can be used on the domain.
Note: This limit works for Plesk for Windows servers only. If applied to domains
on Plesk for Linux/UNIX servers, it is ignored.
Maximum number of ODBC connections, the maximum number of ODBC
connections which can be set up on the domain.
Microsoft SQL databases quota, the maximum amount of disk space which can be
occupied by Microsoft SQL Server databases on the domain.
Note: This limit works for Plesk for Windows servers only. If applied to domains
on Plesk for Linux/UNIX servers, it is ignored.
MySQL databases quota, the maximum amount of disk space which can be
occupied by MySQL Server databases on the domain.
Note: This limit works for Plesk for Windows servers only. If applied to domains
on Plesk for Linux/UNIX servers, it is ignored.
Maximum number of ColdFusion DNS connections, the maximum number of
ColdFusion DNS connections which can be set up on the domain.
12 Click Next to save the settings and continue.
13 Configure preferences for domains created with the template:
Select the WWW-prefix for domain check box to make the domain accessible by
the same URL without the “www” prefix.
Select the Retain traffic statistics for check box to set the traffic statistic retention
period, and specify the period of time to retain statistics.
14 Click Next to save the settings and continue.
15 Configure permissions for domain administrators of domains created
with the template:
User interface. Specify the type of user interface the domain administrator will be
able to use - standard, desktop, or both.
With the desktop interface, the domain administrator uses the desktop view
with shortcuts to main operations the domain administrator can perform in
Plesk control panel. The regular Plesk control panel interface is unavailable.
With the standard interface, the domain administrator can work in the regular
Plesk interface. The desktop view is unavailable.
With both interfaces, the domain administrator can switch between them.
Desktop management. Specify whether the domain administrator can customize
their desktop interface.
Physical hosting management. Specify whether the domain administrator can set
up and configure physical hosting for the domain. Without this permission, the
domain administrator can set up only standard forwarding or frame forwarding
hosting. The domain administrator can only view hosting parameters of the
domain with physical hosting, but cannot configure them. Only the Plesk Expand
administrator can set up and configure physical hosting for the domain.
Page 48

48 Creating Domain for Expand Client
Management of shell access to server. Specify whether the domain administrator
can select a type of shell access for FTP users of the domain when setting up
physical hosting for the domain. The domain administrator can permit any type
of shell access under FTP account credentials, if non-chrooted shell
management is allowed for the domain administrator. Without this permission,
the domain administrator cannot allow FTP or shell access to users of the
domain.
Note: Allowing this option might compromise the system security.
Non-chrooted shell management. Specify whether the domain administrator can
allow any type of shell access to users of the domain, if management of shell
access to server is allowed for the domain. Without this permission, the domain
administrator can allow only chrooted shell access to users of the domain, if
management of shell access to server is allowed for the domain.
Hard disk quota assignment. Specify whether the domain administrator can assign
hard disk quota for FTP users when setting up physical hosting for the domain.
Without this permission, only the Plesk Expand administrator can assign hard
disk quota for the domain administrator.
Note: This function may be ignored if hard disk quotation capability is not
configured in the domain administrator's operating system settings.
Subdomains management. Specify whether the domain administrator can create,
edit and remove subdomains (the number of subdomains depends on the limits
set by the administrator and the hosting plan). Without this permission, the
domain administrator can only view the information of subdomains created by
the administrator, and remove them. Only the administrator can create and edit
subdomains of this domain.
Domain aliases management. Specify whether the domain administrator can set up
alternative domain names for the domain.
Log rotation management. Specify whether the domain administrator can use and
configure settings for log rotation.
Anonymous FTP management. Specify whether the domain administrator can
enable and configure anonymous FTP.
Important: Use this option with care. If anonymous FTP is set up with
excessive limits, it could lead to excessive server resources and bandwidth
usage.
FTP subaccount management. Specify whether the domain administrator can
manage FTP subaccounts.
FTP password management. Specify whether the domain administrator can change
their FTP account password. Without this permission, the domain administrator
cannot change their FTP account password, only use the FTP password
provided by the Plesk Expand administrator.
Crontab/Scheduler management. Specify whether the domain administrator can
schedule, edit and remove tasks; set the e-mail address for the crontab
messages to be sent to.
Important: Use this option with care, it might seriously affect the system.
Page 49

Creating Domain for Expand Client 49
DNS zone management. Specify whether the domain administrator can activate a
DNS zone, switch the DNS server type from master to slave, restore a DNS
zone by a template, add, edit and remove DNS records. Without this permission,
the domain administrator can only view the list of DNS records.
Important: Use this option with care. Misconfigured DNS settings might cause
malfunction of web, mail and FTP services.
Java applications management. Specify whether the domain administrator can
activate the Tomcat service, upload and remove the Tomcat web application
archive files (.WAR files), access, start, stop and restart web applications,
refresh data on the screen. Without this permission, the domain administrator
can only view uploaded web applications and refresh data on the screen.
Web statistics management. Specify whether the domain administrator can manage
web statistics for the domain
Mailing lists management. Specify whether the domain administrator can activate
the Mailing List service, add, administer and remove mailing lists. Without this
permission, the domain administrator can only view the list of mailing lists.
Antivirus management. Specify whether the domain administrator can use and
configure settings of the server-side antivirus protection for filtering incoming
and outgoing mail. Without this permission, the domain administrator can only
use the server-side antivirus protection.
Backup/Restore functions. Specify whether the domain administrator can create
and remove backup files the domain.
Allow backup/restore using local repository. Specify whether the domain
administrator can store backup files on the server.
Allow backup/restore using remote (FTP) repository. Specify whether the domain
administrator can use an arbitrary FTP server for storing backups.
IIS application pool management. Specify whether the domain administrator can
manage their IIS application pool.
Hosting performance management. Specify whether the domain administrator can
change the hosting performance preferences for the domain.
SiteBuilder. Specify whether the domain administrator can use SiteBuilder for
creating and editing their web site.
Spam filter management. Specify whether the domain administrator can use
SpamAssassin spam filter and customize filtering settings.
Additional write/modify permissions management. Specify whether the domain
administrator’s web applications can use of a file-based database (like Jet)
located in the root of httpdocs or httpsdocs folders.
Important: This option might compromise the web site security.
16 Click OK.
Page 50

50 Creating Domain for Expand Client
Tip: You can also create a new domain template:
- using a configured domain as a prototype. Just save a Plesk domain as a template.
- using a domain template as a prototype. Just copy the domain template and edit the
required parameters.
- using a domain template of a Plesk server as a prototype. Just import the domain
template from a Plesk server.
For details refer to the Plesk Expand Administrator’s Guide at
http://www.parallels.com/en/products/plesk/expand/docs/.
Page 51

Creating Domain for Expand Client 51
Creating a Domain for an Expand Client
Having configured at least one domain template, you can proceed to registering
domain accounts.
To create a new domain:
1 Click Plesk Domains in the navigation pane.
2 Click New Domain.
3 Select the Plesk client, who will own the domain.
4 Click Next.
5 Specify the general settings for the domain:
Specify the domain name as it was registered. Leave the www check box
selected to allow users to access the site by URL like www.your-domain.com.
Note: Having the www.- prefix preceding a domain name will not require
additional payment, but it will allow users to get to the site no matter what
they type in their browsers: www.your-domain.com or your-domain.com,
both URLs will point to the same site.
To make the new domain active upon creation, leave the Enabled check box
selected.
Select the template from the Select template list.
Select the Attach to Template check box to make the domain actively bound to the
template. All changes of the template will be applied to the domain.
Select the Allow domain administrator access check box to allow access to the
control panel for the domain administrator.
Provide and retype the domain administrator password.
Select the Allow multiple sessions check box to allow several people log in under
this domain administrator account.
6 Click OK.
You can also create a domain without a template, per customer requirements. In
this case additional steps may be required, such as:
Selecting and configuring a hosting type: frame forwarding, standard forwarding or
physical hosting.
Configuring domain level limits and preferences.
Creating the domain administrator’s account for this domain.
Selecting an IP address for the domain. When selecting IP addresses, we
recommend using the Autoselect IP Address from Client Pool option. To use this option,
you must have at least one IP address in the Expand client’s IP pool. Refer to
Adding IP Address to Expand Client’s IP Pool (on page 42) to learn how to add an
IP address to Expand client’s IP pool.
Page 52

52 Creating Domain for Expand Client
For detailed information about managing domains in Plesk Expand, see Plesk Expand
Administrator’s Guide at http://www.parallels.com/en/products/plesk/expand/docs/.
Page 53

Once you have several Plesk servers registered in Plesk Expand and if you care about
In this chapter:
Registering a Remote Backup Storage in Plesk Expand ................................... 54
Scheduling Backups in Plesk Expand................................................................ 55
C H A P T E R 6
Providing for the Information Safety in
Plesk Expand
information safety, you might want to back up the data often. It may be convenient to
have one or several dedicated backup servers with high reliability (RAID, UPS, etc.)
and have Plesk servers storing their backups to these servers. In Plesk Expand, you
can create, manage and schedule backups of Plesk clients and Plesk domains on all
Plesk servers from one point.
Plesk clients and domains may use remote storages for storing their backup files.
Only one remote backup storage may be assigned to each Plesk object. Only users
having write permissions on a Plesk object are allowed to assign backup storages to
this Plesk objects and deassign from it.
A remote backup storage may be assigned to a Plesk object in the following ways:
Explicitly, if the storage was assigned to this object by a user. This object is
shown in list of objects assigned to this remote backup storage.
Implicitly, if the object has no explicitly assigned storage and some of its
superior objects (a Plesk server for a Plesk client; a Plesk server or a Plesk
client for a Plesk domain) has an explicitly assigned storage. In other words, if
no storage was assigned to an object by the user, then the object inherits the
storage from its superior object.
The objects are backed up according to the following principles:
Each Plesk client is backed up to a separate backup file.
Each Plesk domain is backed up to separate backup file, if it has an explicitly
assigned backup storage. If a Plesk domain has no explicitly assigned storage,
its backup is included into the backup of a client it belongs to.
A backup of a Plesk client or a Plesk domain is stored:
To a remote storage, if a Plesk object has an assigned remote backup storage.
To a local storage, if a Plesk object does not have an assigned remote backup
storage.
For every Plesk object, you can view the list of its backups. This list includes all
backups ever made, not only the ones stored in the currently assigned backup storage.
Page 54

54 Providing for the Information Safety in Plesk Expand
Registering a Remote Backup Storage in
Plesk Expand
To add a new remote backup storage:
1 Click Central Backup in the navigation pane.
2 Click Add Backup Storage.
3 Specify the following information:
Name, the name of the backup storage.
Host, the host name or the IP address of the backup storage.
Port, the port number of the storage.
Directory, a directory within the storage for storing backups.
Login, the login name for FTP access.
Password, the password for FTP access.
4 Click OK.
After the successful registration of a remote backup storage, you are taken back
to the Central Backup management page, from where you can open the
administration page of the new backup storage. At the administration page of a
backup storage, you can edit the remote backup storage preferences and check
if the storage is in order. You can also assign Plesk servers, clients and
domains to the backup storage. The backups of assigned Plesk servers, clients
and domains will be stored in this remote backup storage.
For detailed information about managing remote backup storages, see Plesk
Expand Administrator’s Guide at
http://www.parallels.com/en/products/plesk/expand/docs/.
Page 55

Providing for the Information Safety in Plesk Expand 55
Scheduling Backups in Plesk Expand
To schedule a periodic backup task:
1 Click Central Backup in the navigation pane.
2 Click Scheduled Backups.
3 Click Add Backup Task.
4 Specify the following settings:
Task name, the friendly name of a scheduled backup task.
Time, the time for a backup process to start on a scheduled day.
Period, the periodicity of a scheduled backup task execution (daily, weekly,
monthly).
Backup file name, the name of the backup file which will be created.
Tip: You can use tags to insert the names of the domain and the client it
belongs to into the backup file name.
Description, the description of the backup for your convenience.
Volume size, the size of a volume, if you want the backup file to be split into
volumes.
5 Click Next.
Here you can view the list of objects - Plesk clients and Plesk domains - which can
be scheduled for backup.
To add one or several Plesk servers to the list of objects which can be
scheduled for backup:
1. Click Add Servers.
2. Select the check boxes of Plesk servers in the list.
3. Click OK.
To add one or several Plesk clients to the list of objects which can be scheduled
for backup:
1. Click Add Clients.
2. Select the check boxes of Plesk clients in the list.
3. Click OK.
To add one or several Plesk domains to the list of objects which can be
scheduled for backup:
1. Click Add Domains.
2. Select the check boxes of Plesk domains in the list.
3. Click OK.
6 Select the check boxes of the objects you want to back up.
7 Click Finish.
Page 56

56 Providing for the Information Safety in Plesk Expand
After the successful creation of a scheduled backup task, you are taken back to
the Scheduled Backups management page, from where you can open the
administration page of the new scheduled backup task. At the administration
page of a backup storage, you can edit the remote backup storage preferences.
You can also add Plesk servers, clients and domains to or remove them from
the scheduled backup task.
Tip: To start one or several scheduled backup tasks immediately, select the check
boxes of these tasks on the Scheduled Backups management page and click Start
Selected.
For detailed information about managing scheduled backup tasks, see Plesk Expand
Administrator’s Guide at http://www.parallels.com/en/products/plesk/expand/docs/.
 Loading...