

Page 1
Parallels® Plesk Expand
Page 2

Copyright Notice
ISBN: N/A
Parallels
660 SW 39th Street
Suite 205
Renton, Washington 98057
USA
Phone: +1 (425) 282 6400
Fax: +1 (425) 282 6444
© Copyright 1999-2008,
Parallels, Inc.
All rights reserved
Distribution of this work or derivative of this work in any form is prohibited unless prior written
permission is obtained from the copyright holder.
Patented technology protected by U.S.Patents 7,328,225; 7,325,017; 7,293,033; 7,099,948;
7,076,633.
Patents pending in the U.S.
Product and service names mentioned herein are the trademarks of their respective owners.
Page 3

Contents
Preface 4
About This Guide ........................................................................................................................... 4
Who Should Read This Guide ....................................................................................................... 4
Organization of This Guide ............................................................................................................ 5
Typographical Conventions ........................................................................................................... 5
Feedback ....................................................................................................................................... 6
Overview 7
About Plesk Expand ...................................................................................................................... 8
Preparing for Installation of Plesk Expand .................................................................................. 10
Plesk Expand Requirements ............................................................................................. 11
Installing Plesk ............................................................................................................................. 16
Installing PSA API RPC .................................................................................................... 17
Installing Plesk Expand 19
Automatic Installation .................................................................................................................. 19
Web-Based Installation ..................................................................................................... 20
Console-Based Installation ............................................................................................... 22
Manual Installation....................................................................................................................... 28
Preparing for Manual Installation ...................................................................................... 29
Installation Procedure ....................................................................................................... 30
Installing Additional Software ...................................................................................................... 31
Installing Centralized Mail Server...................................................................................... 32
Installing Centralized DNS Server..................................................................................... 33
Installing Centralized Database Server ............................................................................. 36
Configuring Plesk Expand to Run Behind a Firewall ........................................................ 37
Upgrading Plesk Expand 39
Automatic Upgrade ...................................................................................................................... 39
Web-Based Upgrade ......................................................................................................... 40
Console-Based Upgrade ................................................................................................... 42
Manual Upgrade .......................................................................................................................... 49
Preparing for Manual Upgrade .......................................................................................... 49
Upgrade Procedure ........................................................................................................... 50
Deinstalling Plesk Expand 51
Automatic Deinstallation .............................................................................................................. 51
Web-Based Deinstallation ................................................................................................. 52
Console-Based Deinstallation ........................................................................................... 53
Manual Deinstallation .................................................................................................................. 56
Preparing for Manual Deinstallation .................................................................................. 56
Deinstallation Procedure ................................................................................................... 56
Page 4

4 Preface
In this section:
About This Guide ............................................................................................... 4
Who Should Read This Guide ........................................................................... 4
Organization of This Guide ................................................................................ 5
Typographical Conventions ............................................................................... 5
Feedback .......................................................................................................... 6
Preface
About This Guide
The purpose of this guide is to provide full and comprehensive information on preliminary
steps you should take before you can start installing, upgrading Plesk Expand on your server
or deinstalling it, on two types of Plesk Expand installation, upgrade and deinstallation, and
on the process of the installation, upgrade and deinstallation itself.
Who Should Read This Guide
This guide is intended for hosting service providers or those who purchased Plesk Expand
and wishes to install this product on a server. Basic skills in usage of Linux operating
systems supported by Plesk Expand is required, these are shell usage, understanding of the
RPM system, etc.
Page 5

Preface 5
Organization of This Guide
Formatting convention
Type of Information
Example
Special Bold
Items you must select,
such as menu options,
command buttons, or
items in a list.
Go to the System tab.
Titles of chapters,
sections, and subsections.
Read the Basic Administration
chapter.
Italics
Used to emphasize the
importance of a point, to
introduce a term or to
designate a command line
placeholder, which is to be
replaced with a real name
or value.
The system supports the so
called wildcard character search.
Monospace
The names of commands,
files, and directories.
The license file is located in the
http://docs/common/licen
ses directory.
Chapter 2, Overview, familiarizes you with Plesk Expand. It outlines the basic Plesk Expand
concept of centralized management and provides information on preliminary steps you
should take before you can start installing Plesk Expand.
Chapter 3, Installing Plesk Expand, tells you about the two types of the installation - automatic
and manual - and provides detailed information on how to install Plesk Expand with the help
of each of these two types.
Chapter 4, Upgrading Plesk Expand, provides instructions on how to upgrade Plesk Expand using
either of the two possible ways - automatic upgrade or manual upgrade.
Chapter 5, Deinstalling Plesk Expand, teaches you how to deinstall Plesk Expand from your
server either automatically or manually.
Typographical Conventions
Before you start using this guide, it is important to understand the documentation
conventions used in it.
The following kinds of formatting in the text identify special information.
Page 6

6 Preface
Preformatted
On-screen computer
output in your commandline sessions; source code
in XML, C++, or other
programming languages.
# ls –al /files
total 14470
Preformatted Bold
What you type, contrasted
with on-screen computer
output.
# cd /root/rpms/php
CAPITALS
Names of keys on the
keyboard.
SHIFT, CTRL, ALT
KEY+KEY
Key combinations for
which the user must press
and hold down one key
and then press another.
CTRL+P, ALT+F4
Feedback
If you have found a mistake in this guide, or if you have suggestions or ideas on how to
improve this guide, please send your feedback using the online form at
http://www.parallels.com/en/support/usersdoc/. Please include in your report the guide‟s title,
chapter and section titles, and the fragment of text in which you have found an error.
Page 7

This chapter outlines the basic Plesk Expand functionality and provides information on
In this chapter:
About Plesk Expand .......................................................................................... 8
Preparing for Installation of Plesk Expand ................................ ......................... 10
Installing Plesk ................................................................ .................................. 16
C H A P T E R 1
Overview
preliminary steps you should take before you can start installing Plesk Expand.
Page 8

8 Overview
About Plesk Expand
The main thing about Plesk Expand is that it is intended to extend Plesk™ functionality
and is considered to be an add-on application for Plesk™. Plesk Expand cannot be
used separately, it requires at least two Plesk servers to operate.
Below, we provide short descriptions of Plesk™ and Plesk Expand.
Plesk™ is a control panel designed to automate all aspects of your hosting business
and deliver superior flexibility and stability to your customers. It enables users to create
and remotely manage hundreds of virtual hosts through an easy-to-use, intuitive
interface, without in-depth technical knowledge of web hosting technologies. The
extensive set of Plesk features allows you to completely automate product installation,
enrich self-administration capabilities for your clients, and minimize the number of
support calls.
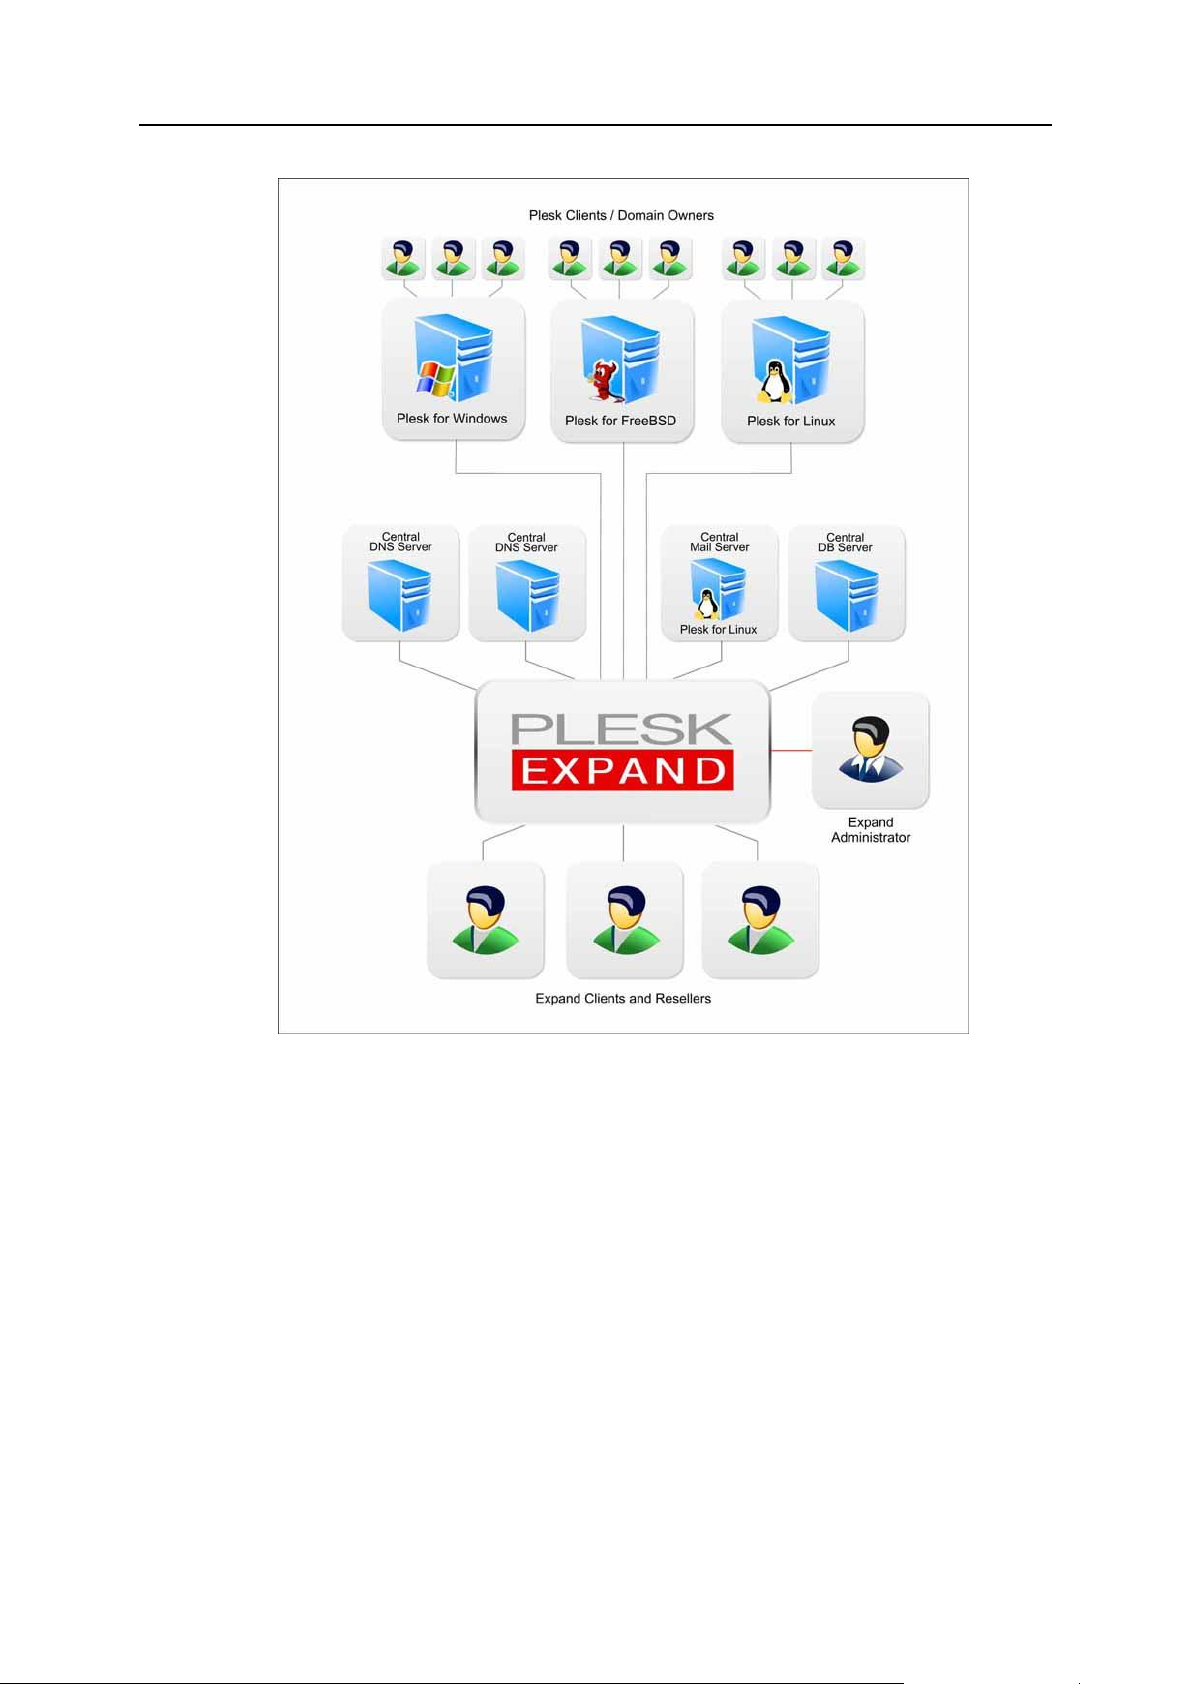
Plesk Expand is the hosting automation software that unites multiple Plesk servers on
a single hosting platform. It allows hosting service providers to administer several Plesk
servers from one centralized point: the Plesk Expand control panel. Using Plesk
Expand, the administrator can centrally manage all Plesk client accounts, domains and
other objects registered on different Plesk servers, without having to log in to these
servers. Plesk Expand offers centralized administration of major client services - such
as e-mail, DNS and database management - across all Plesk Expand servers, thus
allowing to effectively balance the workload. Specialized user roles - such as the Plesk
Expand reseller and Plesk Expand client - allow the administrator to configure and sell
a number of advanced web hosting reseller packages. Plesk Expand can be easily
integrated with the provider‟s infrastructure through special APIs (Application
Programming Interfaces).
The principle of the Plesk Expand operation is presented in the schema below:
Page 9
Overview 9
Plesk Expand User roles and basic object types are described further.
Plesk Expand objects
Plesk Expand objects are Plesk servers and accounts registered on Plesk servers,
which are managed by Plesk Expand users.
There are the following kinds of objects in Plesk Expand:
Plesk Server. A hosting server running Plesk
TM
control panel software (either Plesk
for Windows or Plesk for Linux/Unix) registered in Plesk Expand.
Plesk Server Group. Several Plesk servers to which common rules or features are
assigned by Administrator, or which are assigned to one Reseller.
Plesk client is a Plesk client account residing on one of Plesk servers registered in
Plesk Expand. You can grant Plesk clients access to Plesk control panel, where he
can manage his or her account and domains.
Page 10

10 Overview
Domain is a virtual host on the Internet owned by a Plesk client, Expand Reseller or
Expand client. For each domain, you can create a Domain Administrator account
allowing to manage the domain in the Plesk control panel.
Plesk Expand users
Plesk Expand Users have certain rights and privileges on certain Plesk objects they
own. Plesk Expand users have access to the Plesk Expand control panel, where they
can manage their objects and accounts, within the limits and capabilities provided by
their user role. There are the following user roles in Plesk Expand:
Administrator. A Plesk Expand user who has full rights to configure Plesk Expand
and manage all its objects and user accounts.
Expand Reseller is a Plesk Expand user who owns and manages Plesk servers,
groups of Plesk servers, Plesk client accounts and domains. Reseller has
Administrator rights on all objects registered on Plesk servers which he or she
owns.
Expand Client is a Plesk Expand user who owns and manages domains and Plesk
clients in Plesk Expand. These domains and Plesk clients may be registered on
several Plesk servers, including servers running different platforms (Plesk for
Windows or Plesk for Linux/Unix).
Plesk Expand Centralized servers
Plesk Expand offers a set of distributed (or centralized) services. A distributed service
is a service received by several Plesk servers remotely, from a single centralized
dedicated server. Such a server (called a Centralized server) is allocated for providing
this service to several or all objects registered on other Plesk servers. This allows to
reduce the workload on each Plesk server, optimize the overall system performance,
and helps to quickly and easily detect and resolve typical service issues. There are the
following types of centralized servers in Plesk Expand:
Mail server. A Plesk server registered in Plesk Expand which operates as a
centralized mail server for several Plesk servers.
DNS server. A Plesk or a non-Plesk server which operates as a centralized DNS
server for several Plesk servers.
Database Server. A Plesk or a non-Plesk server which operates as a centralized
database server for several Plesk servers.
Communication between Plesk Expand and Plesk servers
The communication between Plesk and Plesk Expand is provided by PSA API RPC,
the data and command communication software. PSA API RPC should be installed on
every Plesk/Linux server prior to registering it in Plesk Expand. On and Plesk/FreeBSD
and Plesk for Windows servers there is no need to install PSA API RPC; it is included
in the distribution package.
Preparing for Installation of Plesk Expand
Before starting the installation or upgrade process, it is strongly recommended that you
create a full system backup of the entire server.
Page 11

Overview 11
make sure that your server meets all Plesk Expand requirements (see page 11).
In this section:
Plesk Expand Requirements ............................................................................. 11
In this section:
Hardware Requirements ................................................................................... 12
Software Requirements ..................................................................................... 12
Manageable Plesk Server Platforms ................................................................. 13
Mail Client Requirements .................................................................................. 14
Browser Access Requirements ......................................................................... 14
Requirements For Installing on Virtuozzo .......................................................... 15
make sure you have at least 2 Plesk servers with all required software installed on
them. If you do not have servers with Plesk installed, refer to Installing Plesk (on
page 16) for installation instructions.
Note: Even if you already have Plesk servers installed, do NOT skip this step anyway.
Please pay special attention to the software that must be installed on the servers so
they could properly communicate with Plesk Expand.
Plesk Expand Requirements
The following Plesk Expand requirements should be taken into consideration:
Hardware Requirements (see page 12);
Software Requirements (see page 12);
Manageable Plesk Server Platforms (see page 13);
Mail Client Requirements (see page 14);
Browser Access Requirements (see page 14);
Requirements for Installing Plesk Expand on Virtuozzo (see page 15).
Note: Requirements differ for different versions of Plesk Expand. See the Release
Notes for a particular version of Plesk Expand for the most up-to-date list of
requirements for this version. Release notes can be found at the Parallels web site at
http://www.parallels.com/en/download/expand/.
Page 12

12 Overview
Hardware Requirements
In this section:
Plesk Expand Installation OS Requirements (With or Without Plesk) ................ 13
Supported Plesk Versions ................................................................................. 13
Plesk Expand installation requires an IBM PC-compatible computer with the following
hardware configuration:
i586-compatible CPU (Intel Celeron, Pentium II, Pentium III, Pentium 4, or AMD
Athlon);
At least 1 GB of RAM;
Hard drive(s) with at least 1 GB of free disk space;
A network card.
Software Requirements
The following software should be installed prior to Plesk Expand installation:
Page 13

Overview 13
Plesk Expand Installation OS Requirements (With or Without Plesk)
Plesk Expand can be installed on:
a clean server (standalone installation)
a Plesk 8.x for Linux/Unix server (over-Plesk installation)
In both cases, Plesk Expand can be installed on the following operation systems:
Server configuration of Red Hat Enterprise Linux 3;
Server configuration of Red Hat Enterprise Linux 4 (32 and 64 bit);
Server configuration of Red Hat Enterprise Linux 5 (32 and 64 bit);
Server configuration of Fedora Core 4;
Server configuration of Fedora Core 5 (32 and 64 bit);
Server configuration of Fedora Core 6 (32 and 64 bit);
Server configuration of Fedora 7 (32 and 64 bit);
Server configuration of Fedora 8 (32 and 64 bit);
Server configuration of CentOS 3.x;
Server configuration of CentOS 4.x (32 and 64 bit);
Server configuration of CentOS 5.x (32 and 64 bit);
Server configuration of Debian GNU Linux 3.1;
Server configuration of Debian GNU Linux 4.0 (32 and 64 bit);
SuSE Linux 9.3;
openSuSE 10.3 (32 and 64 bit);
SUSE Linux Enterprise 10 (32 and 64 bit).
Supported Plesk Versions
Plesk 8.1 - 8.6 for Linux/Unix;
Plesk 8.1 - 8.6 for Windows.
Manageable Plesk Server Platforms
Plesk Expand allows to manage Plesk servers running all platforms available for each
of the supported Plesk versions:
Plesk 8.1 - 8.6 for Linux/Unix;
Plesk 8.1 - 8.6 for Windows.
Page 14

14 Overview
Mail Client Requirements
The following Mail Clients can be used with Plesk Expand:
Eudora v5.1 for Windows;
Microsoft Outlook Express v6.0 for Windows;
Microsoft Outlook 2000+ for Windows;
Netscape 6.2 for Windows/Unix;
Mozilla 1.0 and above.
Browser Access Requirements
The following browser access requirements should be taken into consideration:
Internet Explorer 7.0;
Internet Explorer 6.0;
Mozilla 1.7+;
Firefox 2.0+;
Firefox 1.0+; .
Page 15

Overview 15
Requirements For Installing on Virtuozzo
The product works being installed into a Virtuozzo VE under management of
Virtuozzo for Linux 3.0
Virtuozzo for Linux 3.0 SP1
Virtuozzo for Linux 4.0
As the product is delivered only under Linux platforms, the corresponding platforms for
Virtuozzo should be concerned.
The product works with any terminal software (Plesk server , central DB server, central
mail server, central DNS server) running in a Virtuozzo VE.
When installing Plesk Expand on Virtuozzo, it‟s recommended to use the following VE
configuration:
EL3 - EL5/FC3 - FC8/CO3 - CO5-based VE
DISKSPACE=”1048576:1153434”
DISKINODES=”200000:220000”
PRIVVMPAGES = “250000:250000”
You can use the unlimited template for the VE creation. Be sure that the VE has no
MySQL template installed.
Tip: We recommend disabling the „offline management‟ option for Plesk servers
running on a Virtuozzo VE. Otherwise, you may have problems using features like
„Login to Plesk server‟, „Centralized Mail‟, etc.
Page 16

16 Overview
Installing Plesk
In this section:
Installing PSA API RPC ..................................................................................... 17
As it was mentioned above, you will need to install 1-3 Plesk boxes for using Plesk
Expand to your advantage.
Plesk Expand 2.3 supports the following Plesk versions:
Plesk 8.1 - 8.6 for Linux/Unix;
Plesk 8.1 - 8.6 for Windows.
For detailed instructions on how to install a Plesk server, refer to Plesk Installation
Guides for each of the supported versions: Plesk for Linux/Unix and Plesk for
Windows.
After the general Plesk server setup is complete and you see the Plesk congratulation
message, you will need to install the following software necessary for the
communication of this Plesk server with Plesk Expand:
PSA API RPC (see page 17);
Plesk License Key. Instructions for installation of the Plesk license key are provided
in Plesk Installation Guides for the corresponding Plesk versions.
Page 17

Overview 17
Installing PSA API RPC
In this section:
Installation/Upgrade Procedure ......................................................................... 18
Deinstallation Procedure ................................................................................... 18
PSA API RPC is a base tool of the data and command communication between Plesk
and Plesk Expand. Plesk Expand cannot work with Plesk until PSA API RPC is
installed on it. PSA API RPC must be installed on every Plesk server prior to
registering it in Plesk Expand.
If you skip this step now, Plesk Expand will warn you about the absence of PSA API
RPC and will suggest that you complete this step of the installation.
Note: Plesk Expand 2.3 does not provide the autoinstallation/update of PSA API RPC.
It is necessary to install PSA API RPC on every Plesk server running Linux, if you
wish to register this server in Plesk Expand.
PSA API RPC is included in the base distribution of Plesk for FreeBSD and of Plesk
for Windows. For Plesk servers running these operation systems, there is no need
to install PSA API RPC manually.
Page 18

18 Overview
Installation/Upgrade Procedure
Each version of Plesk goes with a certain version of PSA API RPC necessary for the
operation of this Plesk server with Plesk Expand. PSA API RPC can be found in the
opt/api directory of the Plesk distribution.
To install PSA API RPC, follow these steps:
1 Log in to your Plesk server via SSH.
2 Go to the directory you have uploaded the Plesk distribution to.
# cd rpm_FedoraCore_4/
3 Check that you have Plesk API RPC packages there:
# ls opt/api/
psa-agent-1.3.4-81061129.22.noarch.rpm
psa-api-rpc-8.1.0-fc4.build81061129.22.noarch.rpm
psa-api-rpc-doc-8.1.0-fc4.build81061129.22.noarch.rpm
psa-api-rpc-protocol-8.1.0-fc4.build81061129.22.noarch.rpm
Note: Plesk API RPC package versions may differ from those listed, as Parallels
constantly improves its products functionality.
4. Install Plesk API RPC (please note the line break in the line below):
# rpm -Uhv psa-agent-1.3.4-81061129.22.noarch.rpm
psa-api-rpc-8.1.0-fc4.build81061129.22.noarch.rpm
Note: All the commands above are samples and should be adopted to your situation
before being applied.
Deinstallation Procedure
To deinstall PSA API RPC, use the following command (within root account):
# rpm -e psa-api-rpc
Page 19

This chapter will provide a detailed description on how to install Plesk Expand.
In this chapter:
Automatic Installation ........................................................................................ 19
Manual Installation ............................................................................................ 28
Installing Additional Software ............................................................................ 31
In this section:
Web-Based Installation ..................................................................................... 20
Console-Based Installation ................................................................................ 22
C H A P T E R 2
Installing Plesk Expand
Plesk Expand can be installed automatically (see page 19) or manually (see page 28)
on
a clean server;
a Plesk server running a supported version of Plesk for Linux/Unix.
Note: Installation on a clean server and on a Plesk server differs in the RPM packages
used and in OS requirements.
Tip: We strongly recommend using autoinstallation (see page 19), for fast and clean
installations.
Automatic Installation
You can select one of the following methods for the automatic installation of Plesk
Expand:
Use web-based installer (see page 20). This Installer allows you to install Plesk
Expand remotely, through a web browser.
Use console-based interactive Auto Installer (see page 22). This Installer is
launched locally from the server you are going to install Plesk Expand on.
Page 20

20 Installing Plesk Expand
Web-Based Installation
The web-based installation is carried out with the help of Plesk Expand Web Installer.
Plesk Expand Web Installer is an installation wizard which guides you through the
installation process. To install Plesk Expand, follow the steps below:
1 Start Web Installer by running the URL https://expand-webinstall.parallels.com/wui/
in your web browser.
Figure 1: Start Installation Screen
2 On the Start Installation page, provide the following information:
Enter the address and the root password of the server where you want to install
Plesk Expand;
Select the default interface skin and language from the list.
3 Click Start to begin uploading Web Installer to the specified server.
4 On the Welcoming Page, click Next if you agree to the terms provided in the Welcoming
message.
After you click Next Web Installer checks if any versions of Plesk Expand are
already installed on the server you specified. If no Plesk Expand versions are
detected, you proceed to the next page of the wizard.
5 On the Selecting Software Source page, specify the source Plesk Expand should be
installed from:
Local Media. A data storage device (e.g. a compact disc) available locally on the
machine where Plesk Expand will be installed.
Plesk Expand Server. A network server where the Plesk Expand distribution is
stored.
Other Network Site. Some other website where the Plesk Expand distribution is
stored.
On the same screen the location of the selected source is specified. You can
specify any desired location here.
Page 21

Installing Plesk Expand 21
Important: For the Plesk Expand Server source, the location cannot be changed.
After you specified the source, click Next.
6 On the Indicating Distribution Directory page, specify the directory where temporary
files, including the Plesk Expand distribution, will be placed.
By default, the /tmp/expand.distribution directory is specified.
If the directory you specified does not exist, you are taken to the Creating Distribution
Directory page where you can create a new directory.
After you specified or created the directory, click Next. Web Installer will connect to
the specified source and download Plesk Expand information files. The
downloading progress is shown on the Downloading Files page by two progress bars.
7 On the Selecting Version page, you see a list of available versions of Plesk Expand
that can be installed on your server. Select the desired version in the list and click
Next to proceed.
8 The Viewing Lists of Operated RPM Packages page displays the RPM packages that will
be processed during the installation. Web Installer checks for the RPM packages
already installed on the server, analyzes the information and displays the RPM
packages in the following groups:
RPM packages to be installed (packages which are not installed on the server)
RPM packages to be upgraded (packages already installed on the server)
RPM packages to be removed (packages installed on the server but no longer
needed).
If Web Installer finds no RPM packages on the server, all packages are displayed in
the RPM packages to be installed list.
Click Next to start downloading RPM packages to the specified location. The
downloading progress is presented by two progress bars.
Note: If you selected the Local Media source on the Selecting Software Source step,
there is no need to download the files, as they are stored locally. You proceed
directly to the Confirming Installation step.
9 When download is complete, the Confirming Install page opens to inform you that
everything is ready for the installation of Plesk Expand. If you are ready to start the
installation, click Install.
Important: After you select Install here, you will not be able to cancel the
installation.
Web Installer processes the downloaded RPM packages, i.e. installing, upgrading
or removing them, and installs Plesk Expand itself. Progress is shown by two
progress bars.
10 Upon successful installation, you see the login details of your Plesk Expand server:
URL - https://expandhost.domain:8442
E-mail - root@expandhost.domain
Password - setup
To log in to the Plesk Expand server, click the Login button or use the provided
URL.
Page 22

22 Installing Plesk Expand
Click Finish to end the installation process.
In this section:
Obtaining Auto Installer ..................................................................................... 23
Using GUI-Based Interface ................................................................................ 24
Using Text-Based Interface ............................................................................... 26
Console-Based Installation
The console-based installation is realized with the help of Plesk Expand Auto Installer.
Plesk Expand Auto Installer is the installation wizard that has three modes of operation:
GUI-based interface (see page 24)
This interface allows users to work with windows (window interface) and manage
various elements, such as buttons, scroll bars, checkboxes, and others, with the help of
the standard number of keys used for GUI (Graphical User Interface) - TAB, arrows,
SPACE, ENTER, and hot keys, such as F1 (Help) and F12 (Next Screen). Besides
that, this interface is also good-looking and easy to use.
Text-based interface (see page 26)
This interface was created in accordance with Plesk Installer and can be used as an
alternative in cases when GUI-based interface cannot be used (in case a terminal is
too small/old/new or when a non-standard charset is used in the terminal).
Unattended mode
This mode allows to install/upgrade Plesk Expand without user attendance. At the end,
if installation/upgrade was successful, a message appears congratulating you on
successful completion of the process. In case an error occurs, the error message is
displayed and installation/upgrade is automatically aborted.
In this guide, the first two modes will be observed.
Page 23

Installing Plesk Expand 23
Obtaining Auto Installer
To obtain Plesk Expand Auto Installer, follow these steps:
1 Run your web browser and open the http://www.parallels.com/en/download/expand/
link. Download Plesk Expand Installer (console-based Autoinstaller) for the desired
version of Plesk Expand and save it on the server you wish to install Plesk Expand
on.
2 Open SSH terminal and log in to this server.
3 Go to the directory where the cd <directory_name> file is saved. For example,
cd ~ .
4 Launch Auto Installer:
to launch GUI-based installation mode, run the command of the following kind:
sh <installer_name>
For example:
sh expand_installer-*.sh
where * is the version of the Auto Installer.
to launch text-based installation mode, run the command of the following kind:
sh <installer_name> -T
For example:
sh expand_installer-*.sh -T
where * is the version of the Auto Installer.
to launch unattended mode, run the command of the following kind:
sh <installer_name> -C
For example:
sh expand_installer-*.sh -C
where * is the version of the Auto Installer.
Note: The installation process will be logged in the /tmp/product_installer.log
file on the server where you are installing Plesk Expand.
Page 24

24 Installing Plesk Expand
Using GUI-Based Interface
Plesk Expand Auto Installer is a wizard which will guide you through the installation
process. To install Plesk Expand, follow the steps below:
Note: If the GUI looks ugly, for example, has broken window or button frames, cancel
installation/upgrade/deinstallation, and before starting
installation/upgrade/deinstallation again, execute the following command:
export LANG=C
1 When Plesk Expand Auto Installer is launched, the Welcoming screen opens.
If you agree to the terms provided in the Welcoming message, select Next by using
[TAB] (or arrows) on your keyboard and press [SPACE] or [ENTER].
2 On the Selecting Software Source screen, select the source Plesk Expand will be
installed from:
Local Media. The data storage device (e.g. a compact disc) available locally on
the machine where Plesk Expand is being installed.
Plesk Expand Server. A network server where the Plesk Expand distribution is
stored.
Other Network Site. Some other website where the Plesk Expand distribution is
stored.
On the same screen the location of the selected source is specified. You can
specify any desired location here.
Important: For the Plesk Expand Server source, the location cannot be changed.
After you specified the source, select Next and press [SPACE] or [ENTER] to
continue the installation.
3 On the Indicating Distribution Directory page, specify the directory where temporary
files, including the Plesk Expand distribution, will be placed.
By default, the /tmp/expand.distribution directory is specified. You may
specify another location.
If the directory you specified does not exist, you are taken to the Creating Distribution
Directory page where you can create a new directory.
After you specified (or created) a directory, select Next. Auto Installer will connect to
the specified source and download Plesk Expand information files. The
downloading progress is presented on the Downloading Files page by two progress
bars.
4 On the Selecting Version page, you see a list of available versions of Plesk Expand
that can be installed on your server. Select the desired version in the list and select
Next to proceed.
5 The Operating Plugins screen displays the list of all additional plugins available for
the specified Plesk Expand version.
Select the plugins process by using [TAB] or arrows on your keyboard. Use
[SPACE] or [ENTER] on your keyboard to select what operation should be
performed on each plugin. Operations are indicated by the following symbols in
brackets:
Page 25

Installing Plesk Expand 25
[ I ] - install the plugin;
[U] - upgrade the plugin;
[R] - remove the plugin;
[*] - leave the plugin as is (already installed);
[ ] - do not install the plugin (not yet installed).
Only two modes are possible for each of these operations:
[U] <-> [*] - upgrade or leave as it is;
[U] <-> [R] - upgrade or remove (unless this plugin can be left with the same
version);
[I] <-> [ ] - install or do not install;
[R] <-> [*] - remove or leave.
Tip: You can view information on a certain plugin by selecting it and pressing F1 on
your keyboard.
When the required operations are selected for each plugin, select Next to continue
the installation.
6 The Viewing Lists of Operated RPM Packages page displays the RPM packages that will
be processed during the installation. Web Installer checks for the RPM packages
already installed on the server, analyzes the information and displays the RPM
packages in following groups:
RPM packages to be installed (packages which are not installed on the server).
RPM packages to be upgraded (packages already installed on the server).
RPM packages to be removed (packages installed on the server but no longer
needed).
If Web Installer finds no RPM packages on the server, all packages are displayed in
the RPM packages to be installed list.
Click Next to start processing RPM packages. Web Installer starts downloading all
necessary files to the specified location. The downloading progress is presented on
the Downloading Files screen by two progress bars.
Note: If you selected the Local Media source on the Selecting Software Source step,
there is no need to download the files, as they are stored locally. You proceed
directly to the Confirming Installation step.
7 When RPM packages download is complete, the Confirming Install page opens
informing you that everything is ready for the installation of Plesk Expand. If you are
ready to start the installation, click Install.
Important: After you select Install here, you will not be able to cancel the
installation.
Auto Installer starts preparing for the installation and then proceeds to installing
Plesk Expand. Progress is shown by the progress bars. When the installation
process is over, press [ENTER] to continue.
8 The results of Plesk Expand installation is displayed on a separate screen.
Select Finish to end the installation process.
Page 26

26 Installing Plesk Expand
Using Text-Based Interface
Plesk Expand Auto Installer is the wizard that will guide you through the installation
process. To install Plesk Expand, perform the following steps:
1 When Plesk Expand Auto Installer is launched, the Welcoming screen opens. If you
agree to the terms provided in the Welcoming message, press [1] and [ENTER] on
your keyboard. Press [0] and [ENTER] if you disagree with the terms described and
do not want to proceed further.
Tip: The value given in brackets is the action performed by default. If you wish to
select this action, press [ENTER].
2 On the Selecting Software Source page, specify the source Plesk Expand will be
installed from. Select one of the following sources:
Local Media. The data storage device (e.g. a compact disc) available locally on
the machine where Plesk Expand is being installed.
Plesk Expand Server. The network server where the Plesk Expand distribution is
stored.
Other Network Site. Some other website where the Plesk Expand distribution is
stored.
The selected source and its location will be displayed below.
To change the source, press [3] and [ENTER] on your keyboard. After that,
To change source to Local Media, press [0] and [ENTER].
To change source to Plesk Expand Server, press [1] and [ENTER].
To change source to Other Network Site, press [2] and [ENTER].
After you specified the source, press [1] and [ENTER] on your keyboard to continue
the installation.
3 On the Indicating Distribution Directory page, specify the directory where temporary
files, including the Plesk Expand distribution, will be placed.
Select the action to be performed next using your keyboard:
To select the offered default directory and proceed further, press [1] and
[ENTER].
Note: By default, the /tmp/expand.distribution directory is specified.
To return to the previous screen, press [2] and [ENTER].
To change the distribution directory, press [3] and [ENTER].
If the directory you selected does not exist, you are taken to the Creating
Distribution Directory page where you can create a new directory:
Press [Y] and [ENTER] to create the directory. Specify the desired path.
To cancel the installation, press [0] and [ENTER].
After you specified or created the directory, click Next.
Press [N] and [ENTER] to skip it and to get back to the previous screen.
Page 27

Installing Plesk Expand 27
4 Auto Installer connects to the specified source and displays a list of the available
versions of Plesk Expand which can be installed on your server.
Select the desired action using the keyboard:
To select a version, press [3] and [ENTER].
To proceed with the installation, press [1] and [ENTER].
To return to the previous screen, press [2] and [ENTER].
To cancel the installation, press [0] and [ENTER].
Tip: The value in brackets is the action by default. To select this action, press
[ENTER].
5 The Operating Plugins screen displays the list of all additional plugins available for
the specified Plesk Expand version.
Select the plugins to process by using [TAB] or arrows on the keyboard. Select the
operation to be performed on each plugin. Operations are indicated by the following
symbols in brackets:
[ I ] - install the plugin;
[U] - upgrade the plugin;
[R] - remove the plugin;
[*] - leave the plugin as is (already installed);
[ ] - do not install the plugin (not yet installed).
Only two modes are possible for each of these operations:
[U] <-> [*] - upgrade or leave as it is;
[U] <-> [R] - upgrade or remove (unless this plugin can be left with the same
version);
[I] <-> [ ] - install or do not install;
[R] <-> [*] - remove or leave as is.
Tip: You can view information on a certain plugin by selecting it and pressing F1
on your keyboard.
6 When the required operation is selected for each plugin, press
[1] and [ENTER] to continue;
[2] and [ENTER] to return to the previous screen;
[0] and [ENTER] to cancel the installation.
7 The Viewing Lists of Operated RPM Packages page displays the RPM packages that will
be processed during the installation. Web Installer checks for the RPM packages
already installed on the server, analyzes the information and displays the RPM
packages in following groups:
RPM packages to be installed (for packages which are not installed on the server).
RPM packages to be upgraded (for packages already installed on the server).
RPM packages to be removed (for packages installed on the server but no longer
needed).
Page 28

28 Installing Plesk Expand
If Web Installer finds no RPM packages on the server, all packages are displayed in
In this section:
Preparing for Manual Installation ....................................................................... 29
Installation Procedure ........................................................................................ 30
the RPM packages to be installed list.
Click Next to start downloading RPM packages. Web Installer starts downloading all
necessary files to the specified location. The downloading progress is presented on
the Downloading Files screen by two progress bars.
Note: If you selected the Local Media source on the Selecting Software Source step,
there is no need to download the files, as they are stored locally. You proceed
directly to the Confirming Installation step.
8 When RPM packages download is complete, the Confirming Install page opens
informing you that everything is ready for the installation of Plesk Expand. On this
page:
To start the installation, press [1] and [ENTER].
To return to the previous screen, press [2] and [ENTER].
To cancel the installation, press [0] and [ENTER].
Important: After you select Install here, you will not be able to cancel the
installation.
Auto Installer starts preparing for the installation and then proceeds to upgrading
Plesk Expand. Progress is shown by the progress bars. When the installation
process is over, press [1] and [ENTER] to continue.
9 The results of the Plesk Expand installation will be displayed.
Press [0] and [ENTER] to finish the installation process.
Manual Installation
Plesk Expand can also be installed manually. For manual installation, thorough
knowledge of RPMs system is required. If you are not completely familiar with the
RPMs system, we strongly recommend that you use automatic installation (see page
19).
Page 29

Installing Plesk Expand 29
Preparing for Manual Installation
To prepare for the Plesk Expand installation:
Install a number if RPM packages:
expand-xxx.i586.rpm (Plesk Expand itself);
expand-dist-repository-xxx.i586.rpm (Plesk Expand distribution
repository);
expand-locale-base-en_US.xxx.noarch.rpm (Plesk Expand base
locale; US English).
Note: In these packages‟ numbers:
xxx is a version of Plesk Expand;
i586 is a binary package architecture mark. It should be compatible with the target
platform architecture.
1 Install the following additional packages:
libssh
mysql++
Important: These packages cannot be substituted for the packages of other
vendors because they contain patched code to meet the requirements of Plesk
Expand.
additional packages necessary for the installation on a clean server (dedicated
Expand server). Please see the list of the packages in the Release Notes of the
corresponding version of Plesk Expand. Release Notes are available at the
Parallels web site at http://www.parallels.com/en/download/expand/.
2 Install special third-party software packages. The list of the third-party software
varies depending on the version of Plesk Expand. The most up-to-date list of this
software for a corresponding version of Plesk Expand is provided in the Release
Notes for this version.
Note: These additional software packages can be installed from a distribution CD
for an appropriate operating system. For your convenience, we provide them along
with Plesk Expand.
3 Download a necessary version of Plesk Expand (RPM version) from the Parallels
web site at http://www.parallels.com/en/download/expand/ and save it on the server
where you are going to install Plesk Expand.
Page 30

30 Installing Plesk Expand
Installation Procedure
Plesk Expand is shipped in the form of:
Tarballs (with RPM- or DEB-packages inside) for all of OS supported (but one
tarball might fit for several OSes).
Tarballs (with RPM- or DEB-packages inside) for installation on the top of Plesk
server on OSes supported by Plesk Expand.
STD VZ templates for all of OSes in intersection of OSes supported by Plesk
Expand and OSes supported by Virtuozzo. For each OS, 2 templates are provided:
for installation on clean OS and for installation over Plesk server.
EZ VZ templates for all of OSes in intersection of OSes supported by Plesk Expand
and OSes supported by Virtuozzo. For each OS, 2 templates are provided: for
installation on clean OS and for installation over Plesk server.
Set of RPMs available for online installation (web- and auto-installers) on RPM-
based Linux OSes
For example, to install Plesk Expand on a clean Red Hat Enterprise Linux 3 server
(with no Plesk installed), follow these steps:
1 Log in as root to the server you wish to install Plesk Expand on.
2 Decompress the appropriate Plesk Expand archive (tarball) by running the
command of the following kind:
$ tar xfv expand-xxx.el3.tar
where xxx - is the version of Plesk Expand.
3 Install the extracted RPM packages by issuing the command of the following kind:
$ rpm -Uhv *.rpm
After the Plesk Expand package is installed, you will be notified on how to log into the
Plesk Expand frontend (the frontend URL, login and password will be provided). The
message should look the following way:
Congratulations! You have just installed Plesk Expand v.2.3. You can access the
system at https://expandhost.domain:8442 Use root@expandhost.domain as an e-mail
and setup as a password to connect to the Plesk Expand frontend. You can change
this login data after logging into the frontend.
Page 31

Installing Additional Software
In this chapter:
Installing Centralized Mail Server ...................................................................... 32
Installing Centralized DNS Server ..................................................................... 33
Installing Centralized Database Server .............................................................. 36
Configuring Plesk Expand to Run Behind a Firewall .......................................... 37
C H A P T E R 3
Plesk Expand offers a set of distributed (or centralized) services.
A distributed service is a service received by several Plesk servers remotely, from a
single centralized dedicated server (Plesk or non-Plesk). This server (called a
Centralized Server) is allocated for providing the service to several or all users
registered on other Plesk servers. Three such services - Centralized Mail, Centralized
DNS and Centralized Databases - are available in Plesk Expand.
For Instructions on installing and configuring each of these centralized services, refer to
Installing Centralized Mail Server (on page 32), Installing Centralized DNS Server (on
page 33) and Installing Centralized Database Server (on page 36) further in this
section.
Note: To ensure correct operation of distributed services behind a firewall, please
make sure that all the necessary communication ports are open on each server in the
system. Refer to Configuring Plesk Expand to Run Behind a Firewall (on page 37) for
detailed information about the communication settings.
Make sure you have properly configured DNS zone for all you hosts including Plesk
servers, Central Mail servers, Central DNS servers, Plesk Expand host. Plesk Expand
might use DNS lookup to resolve hostname to IP, and reverse lookup to resolve IP to
hostname. For instance, if the PTR record for Centralized Mail server IP points to the
wrong name, you won‟t be able to manage the Centralized Mail server.
Page 32

32 Installing Plesk Expand
Installing Centralized Mail Server
You may skip this step if you are not going to provide the Centralized Mail service. But
if you choose to provide it later, you need to go back and complete this step prior to
registering the Centralized Mail server in Plesk Expand.
The Centralized Mail server is configured on the basis of a regular Plesk server. Just
like a regular Plesk server, it can be installed either standalone (on a separate host) or
on one host with Plesk Expand.
You can use the following Plesk versions as a mail server:
Plesk 8.1 - 8.6 for Unix/Linux
Plesk 8.1 - 8.6 for Windows To install the Centralized Mail server, follow the
instructions below:
1 Consult the Installing Plesk (on page 16) section to get instructions on how to install
the Plesk server (installation of PSA API RPC (on page 17) is a mandatory step).
Then return to follow the instructions below:
2 Complete the Plesk postinstallation process.
3 Make sure that you have added a SHARED default IP address to the Centralized
Mail server IP Pool in Plesk Expand.
Note: If you choose another IP address selection option, the „Remote Mail‟ buttons
in the control panels of all domain users will be disabled.
4 Make sure that you have removed all clients (including the one named „My
Domains‟) from the Centralized Mail server.
5 Install the proper Plesk license key on the Centralized Mail server. It should allow to
create as many domains as this server is going to serve.
6 It is highly recommended to switch the Centralized mail server to using full
POP3/IMAP mail accounts names. Login to the Centralized mail server, go to
“Server > Mail” page and enable the “Only use of full POP3/IMAP mail accounts
names is allowed” option. Unless this option is enabled, there might be a situation
when one mail user can read mail of another mail user (if they have the same
password).
When this feature is activated (a Plesk server is assigned to the Centralized Mail
Server), the „Remote Mail‟ button appears in the Plesk Control Panel of each domain
user residing on the assigned Plesk servers. By clicking this button in the Plesk control
panel, Plesk users can open a page where they can manage their remote mail settings.
If later you wish to re-configure certain parameters of the Centralized Mail server, login
to this Plesk server in the Plesk control panel and perform the necessary changes. For
details about configuring mail parameters of a Plesk server, refer to Plesk
Administrator’s Guides for Plesk for Windows and Plesk for Linux/Unix
correspondingly.
Page 33

Installing Plesk Expand 33
Installing Centralized DNS Server
You may skip this step if you are not going to provide the Centralized DNS service. But
if you choose to provide it later, you need to go back and complete this step.
The centralized DNS software can be installed on one machine with Plesk Expand, but
it is highly recommend to install services on separate dedicated or virtual servers.
Otherwise it may cause operation problems if server is overloaded. Also the centralized
DNS software cannot be installed on one machine with Plesk (or with a Centralized
Mail server).
Currently, the Centralized DNS server can run on the following OSes:
Server configuration of Red Hat Enterprise Linux 3;
Server configuration of Red Hat Enterprise Linux 4;
Server configuration of Red Hat Enterprise Linux 5;
Server configuration of Fedora Core 3;
Server configuration of Fedora Core 4;
Server configuration of Fedora Core 5;
Server configuration of Fedora Core 6;
Server configuration of Fedora Core 7;
Server configuration of Fedora Core 8;
Server configuration of CentOS 3.7 or higher;
Server configuration of CentOS 4.3 or higher;
Server configuration of CentOS 5.x;
Server configuration of Debian GNU Linux 3.1;
Server configuration of Debian GNU Linux 4.0;
SuSE Linux 9.3;
openSuSE Linux 10.3;
SUSE Linux Enterprise 10.
Before the installation, make sure that:
bind 9.2.1 or higher is installed on the host that you are going to make a dedicated
DNS server;
Note: For correct operation of the Centralized DNS server, manual installation of
bind is required.
bind is running properly (see instructions how to check this below).
Go to the Plesk Expand Control Panel and register a Centralized DNS server in Plesk
Expand.
The DNS controller software is required to manage your DNS server, it will be installed
on your server automatically (unless you decline this option).
The DNS controller software can also be installed manually. To install the DNS
controller manually, follow these steps:
Page 34

34 Installing Plesk Expand
1 Prepare a Unix server (see supported OSes above) with bind 9.2.1 or higher
installed.
2 Go to your Plesk Expand distribution and upload the following files to your server:
dnscontroller/dnscontroller-2.0.0-.i586.rpm
3 Now log in to your server and install the uploaded packages:
# rpm -Uhv dnscontroller/dnscontroller-2.0.0-*.i586.rpm
4 After installation is complete, ensure that the DNS controller is configured properly:
a Check that your bind installation works properly, try:
# /etc/init.d/named status
# /etc/init.d/named stop
# /etc/init.d/named start
# /etc/init.d/named restart
All these commands must succeed.
b Check if your bind installation is running in the chroot mode or not. Typically, it
is not, unless you (or some software) changed this option. If you do not know
how to check your bind configuration, follow these instructions:
1. Start the bind server (if it is not started yet).
# /etc/init.d/named start
2. Look at its options:
# ps -ax | grep named
31200 ? S 0:30 /usr/sbin/named -u named -n1 -c
/etc/named.conf
• u named -t /var/named/run-root
If you found the „-t‟ option, then the parameter following it is the chroot
directory and your bind server is running in the chroot mode.
c If you found that your bind server is running in the chroot mode, then you
need to open the dnscontroller.conf file:
# vim /usr/local/dnscontroller/conf/dnscontroller.conf
and change the line
#chroot_dir = /var/named/run-root
to
chroot_dir = /your/chroot/dir
d Open the /usr/local/dnscontroller/conf/hosts.allow file and add
IP of your Plesk Expand host to this file (each host should be on separate line,
line break is a delimiter).
Since dnscontroller-2.0.0, the hosts.allow file is used to restrict unauthorized
access to your DNS server. DNS controller software won‟t accept any
connections from hosts with IPs not included into the hosts.allow file.
e If you prefer UNIX Timestamp SOA serial to YYYYMMDDnn format, change the
serial_type parameter in
/usr/local/dnscontroller/dnscontroller.conf to
unix_timestamp value:
Page 35

Installing Plesk Expand 35
serial_type = unix_timestamp
Important: It is recommended to choose SOA serial type BEFORE the Central
DNS server keeps any DNS zones. If you change SOA serial format having
any DNZ zones already configured in the DNS controller, then you will have
problems with updating your DNS zone content by outer DNS servers
because new serial is lower than the previous one (being compared as
positive integer numbers).
Note: Exact package versions may differ from one release to another.
Page 36

36 Installing Plesk Expand
Installing Centralized Database Server
You may skip this step if you are not going to provide the Centralized Database
(Centralized DB) service. But if you choose to provide it later, you need to go back and
complete this step.
The Host server for DB server can be a Plesk server, or a non-Plesk server. There are
no platform or OS limitations for the Host DB server.
Install a DB server of the required type on the Host server (physical or virtual). Plesk
Expand supports the following database types: MySQL, MS SQL and PostgreSQL. For
installation instructions for each DB type, refer to the links below, refer to the websites
of Microsoft Corporation (http://www.microsoft.com/sql/default.mspx) (MS SQL),
MySQL (http://dev.mysql.com/doc/refman/5.0/en/installing.html) and PostgreSQL, Inc.
(http://techdocs.postgresql.org/), correspondingly.
Tip: After installing MySQL as a database server, there are certain steps you should
take in order to make the server fully functional.
By default MySQL accepts only local queries. In order to permit connection from
remote hosts, perform the following actions:
1. In MySQL configuration file /etc/my.cnf, delete or comment out the line
socket=/var/lib/mysql/mysql.sock and restart mysqld.
2. Login to MySQL via MySQL client. To do this, perform the following steps:
- on non-Plesk servers, issue a command mysql -uroot (MySQL username root,
empty password).
- on Plesk servers, issue a command mysql -uadmin -p„cat /etc/psa/.psa.shadow„.
(MySQL username is admin, password is the same as the one used to login to Plesk
Expand).
3. In order to grant access to user admin with a password setup from a remote host
10.58.35.11 (for example), issue the following command: grant all on . to
admin@10.58.35.11 identified by “setup” with grant option.
4. For changes to take effect, run flush privileges command.
After that, queries from remote hosts will be accepted and processed by the MySQL
server.
Page 37

Installing Plesk Expand 37
Tip: Configure SQL Server Area Configuration and enable the SQL Browser service for
Ports
To/from, comments
Protocol
8442
from all hosts from which users will access
the Plesk Expand control panel
TCP
8443, 22 (SSH)
to every Plesk server in the system
TCP
8443, 22 (SSH)
to every central mail server
TCP
8441, 22 (SSH)
to every central DNS server
TCP
Ports
To/from, comments
Protocol
22 (SSH)
from Plesk Expand server
TCP
remote connections. Please remember that enabling the SQL Browser service may
increase your security risk. It may also make your computer or your network more
vulnerable to attack by malicious users or by malicious software such as viruses.
To configure SQL Server Area Configuration and to enable the SQL Browser service
for remote connections, perform the following actions:
1. Click Start, select Programs > Microsoft SQL Server 2005 > Configuration Tools > SQL
Server Surface Area Configuration.
2. Click Surface Area Configuration for Services and Connections.
3. Expand Database Engine, click Remote Connections > Local and remote connections, select
the appropriate protocol to enable for your environment, and then click Apply.
4. Click OK when you receive the message: Changes to Connection Settings will not
take effect until you restart the Database Engine service.
5. On the same page, expand Database Engine, click Service > Stop, wait until the
MSSQLSERVER service stops, and then click Start to restart the MSSQLSERVER service.
6. On the same page, click SQL Server Browser > Automatic for Startup type > Apply.
When you select the Automatic option, the SQL Server Browser service starts
automatically every time that you start Microsoft Windows.
7. Click Start, and then click OK.
Configuring Plesk Expand to Run Behind a Firewall
The main idea of Plesk Expand is to unite multiple Plesk servers, including the ones
used for centralized services, into a single hosting platform. Therefore, server
communication issues must be observed very carefully, both for the main Plesk
Expand server and for other servers (Plesk and non-Plesk) operating in the system.
Below is the list of ports which must be open on various types of servers in the system,
in order to enable correct operation of Plesk Expand and its services. Please make
sure that the firewall is configured accordingly.
On each Plesk Expand server:
On each Plesk server:
Page 38

38 Installing Plesk Expand
8443
from Plesk Expand server
TCP
8443
from the central mail server this Plesk server
is assigned to (if assigned to any)
TCP
53 (DNS)
from EVERY central DNS server this Plesk
server is assigned to (if assigned to any).
TCP
For more details about configuring communication settings of Plesk servers, see Plesk
Ports
To/from, comments
Protocol
8443
from Plesk Expand server
TCP
8443
from every Plesk server assigned to this
central mail server (if there are any)
TCP
22 (SSH)
from Plesk Expand
TCP
Ports
To/from, comments
Protocol
8441
from Plesk Expand
TCP
22 (SSH)
from Plesk Expand
TCP
53 (DNS)
from all Internet hosts which are going to use
its services
53 (DNS)
to all external DNS servers which will be
communicating with the central DNS server
(depends on the DNS zones configuration),
including the root server
TCP
53 (DNS)
from all external DNS servers which will be
communicating with the central DNS server
(including, e.g., DNS registrars)
TCP
53 (DNS)
to all Plesk servers assigned to this DNS
servers (if there are any)
TCP
documentation.
On each server with Central Mail server installed:
On each server with the Central DNS server installed:
Important: Make sure that the DNS and the reverse DNS zones for all your hosts
including Plesk servers, central mail servers, central DNS servers, and Plesk Expand
host, are configured properly.
Page 39

This chapter will provide a detailed information on how to upgrade Plesk Expand, and
In this chapter:
Automatic Upgrade............................................................................................ 39
Manual Upgrade ................................................................................................ 49
In this section:
Web-Based Upgrade ......................................................................................... 40
Console-Based Upgrade ................................................................................... 42
C H A P T E R 4
Upgrading Plesk Expand
also on how to change the configuration of the current Plesk Expand version. The
procedures of both the upgrade and the change of the configuration are identical. Thus,
the configuration change will be referred to as the upgrade further in this manual.
Plesk Expand can be upgraded
automatically (see page 39);
manually (see page 49).
We recommend that you use automatic upgrade (see page 39) for fast and clean
upgrades.
Important: After Plesk Expand upgrade is complete, remember to upgrade the
DNSController software at your Central DNS servers.
Automatic Upgrade
You can select one of the following methods for the automatic upgrade of Plesk
Expand:
Use web-based installer (see page 40). This Installer allows you to upgrade Plesk
Expand remotely, through a web browser.
Use console-based interactive Auto Installer (see page 42). This Installer is
launched locally from the server you are going to upgrade Plesk Expand on.
Page 40

40 Upgrading Plesk Expand
Web-Based Upgrade
Plesk Expand Web Installer is the installation wizard that will guide you through the
upgrade process. To upgrade Plesk Expand, follow the steps below:
1 Start Web Installer by running the URL https://expand-webinstall.parallels.com/wui/
in your web browser.
Figure 2: Start Installation Screen
On the Start Installation page, provide the following information:
Enter the address and the root password of the server you wish to install Plesk
Expand on
Select from the list the default interface skin and language to be used.
Click Start to begin uploading Web Installer to the specified server.
2 On the Welcoming Page, click Next if you agree to the terms provided in the Welcoming
message.
3 After you click Next, Web Installer searches for any versions of the product already
installed on the server. If it finds a version of Plesk Expand, the Selecting Operation
page opens, on which you need to select an operation to be performed on this
version.
To upgrade the current version to a new one, click Upgrade.
4 On the Selecting Software Source page, specify the source Plesk Expand will be
upgraded from. Select one of the three available options:
Local Media. A data storage device (e.g. a compact disc) available locally on the
machine where Plesk Expand will be installed.
Plesk Expand Server. A network server where the Plesk Expand distribution is
stored.
Other Network Site. Some other website where the Plesk Expand distribution is
stored.
On the same screen the location of the selected source is specified. You can
specify any desired location here.
Page 41

Upgrading Plesk Expand 41
Important: For the Plesk Expand Server source, the location cannot be changed.
After you specified the source, click Next.
5 On the Indicating Distribution Directory page, specify the directory where temporary
files, including the Plesk Expand distribution, will be placed.
By default, the /tmp/expand.distribution directory is specified. You may
specify another location.
If the directory you specified does not exist, you are taken to the Creating Distribution
Directory page where you can create a new directory.
After you specified (or created) a directory, click Next. Web Installer will connect to
the specified source and download Plesk Expand information files. The
downloading progress is presented on the Downloading Files page by two progress
bars.
6 On the Selecting Version page that opens, you see a list of available versions of
Plesk Expand that can be installed on your server. Select the desired version in the
list and click Next to proceed.
7 The Viewing Lists of Operated RPM Packages page displays the RPM packages that will
be processed during the upgrade. Web Installer checks for the RPM packages
already installed on the server, analyzes the information and displays the RPM
packages in following groups:
RPM packages to be installed (for packages which are not installed on the server).
RPM packages to be upgraded (for packages already installed on the server).
RPM packages to be removed (for packages installed on the server but no longer
needed).
Click Next to start processing RPM packages. Web Installer starts downloading all
necessary files to the specified location. The downloading progress is presented on
the Downloading Files screen by two progress bars.
Note: If you selected the Local Media source in Selecting Software Source step, there is
no need to download the files, as they are stored locally. You proceed directly to the
Confirming Upgrade step.
8 When download is complete, the Confirming Upgrade page opens informing you that
everything is ready for the upgrade of Plesk Expand. If you are ready to start the
upgrade, click Upgrade.
Important: After you select Upgrade here, you will not be able to cancel the
upgrade.
Web Installer starts preparing for the upgrade and then proceeds to upgrading
Plesk Expand. Progress is shown by the progress bars. When the upgrade process
is over, press ENTER to continue.
9 The result of Plesk Expand upgrade is displayed on a separate screen.
Click Finish to end the upgrade process.
Note: After the upgrade, please, make sure the latest available version of PSA API
RPC is installed on all Plesk servers registered in Plesk Expand.
Page 42

42 Upgrading Plesk Expand
Console-Based Upgrade
In this section:
Using GUI-Based Interface ................................................................................ 43
Using Text-Based Interface ............................................................................... 46
The console-based upgrade is carried out with the help of Plesk Expand Auto Installer.
Plesk Expand Auto Installer is the installation/upgrade wizard that has three modes of
operation:
GUI-based interface (see page 43)
This interface allows users to work with windows (window interface) and manage
various elements, such as buttons, scroll bars, checkboxes, and others, with the help of
the standard number of keys used for GUI (Graphical User Interface) - TAB, arrows,
SPACE, ENTER, and hot keys, such as F1 (Help) and F12 (Next Screen). Besides
that, this interface is also good-looking and easy to use.
Text-based interface (see page 46)
This interface was created in accordance with Plesk Installer and can be used as an
alternative in cases when GUI-based interface cannot be used (in case a terminal is
too small/old/new or when a non-standard charset is used in the terminal).
Unattended mode
This mode allows to install/upgrade Plesk Expand without user attendance. At the end,
if installation/upgrade was successful, a message appears congratulating you on
successful completion of the process. In case an error occurs, the error message is
displayed and installation/upgrade is automatically aborted.
In this guide, the first two modes will be observed.
To find out how to obtain Plesk Expand Auto Installer, refer to Obtaining Auto Installer
(on page 23).
Page 43

Upgrading Plesk Expand 43
Using GUI-Based Interface
Plesk Expand Auto Installer is the wizard that will guide you through the upgrade
process. Follow the steps below to complete the upgrade:
Note: If the GUI looks ugly, for example, has broken window or button frames, cancel
installation/upgrade/deinstallation, and before starting
installation/upgrade/deinstallation again, execute the following command:
export LANG=C
1 When Plesk Expand Auto Installer is launched, the Welcoming screen opens.
If you agree to the terms provided in the Welcoming message, select Next by using
[TAB] or arrows on your keyboard to move to the desired item and then pressing
[SPACE] or [ENTER].
2 After you click Next, Auto Installer searches for any versions of the product already
installed on the server. If it finds a version of Plesk Expand, the Selecting Operation
page opens, where you need to select an operation to be performed on this version
using [TAB] or arrows on the keyboard:
To upgrade the current version to a new one, select Upgrade and press [SPACE]
or [ENTER].
To remove the current version from the server, select Remove and press
[SPACE] or [ENTER].
To return to the previous screen, select Back and press [SPACE] or [ENTER].
3 On the Selecting Software Source screen that opens, select the source Plesk Expand
will be upgraded from. Select one of the three options:
Local Media. The data storage device (e.g. a compact disc) available locally on
the machine where Plesk Expand is being installed.
Plesk Expand Server. A network server where the Plesk Expand distribution is
stored.
Other Network Site. Some other website where the Plesk Expand distribution is
stored.
On the same screen the location of the selected source is specified. You can
specify any desired location here.
Note: For the Plesk Expand Server source, the location cannot be changed.
After you specified the source, select Next to continue the upgrade.
4 On the Indicating Distribution Directory page, specify the directory where temporary
files, including the Plesk Expand distribution, will be placed.
By default, the /tmp/expand.distribution directory is specified. You may
specify another location.
If the directory you specified does not exist, you are taken to the Creating Distribution
Directory page where you can create a new directory. On this page:
Select Yes and press [SPACE] or [ENTER] to create a directory.
Select No to skip it and to get back to the previous screen.
Page 44

44 Upgrading Plesk Expand
After you specified or created a directory, click Next.
5 Auto Installer connects to the specified source and displays the Selecting Version
page. On the Selecting Version page, you see a list of available versions of Plesk
Expand that can be installed on your server. Select the desired version in the list
and click Next to proceed.
6 The Operating Plugins screen displays the list of all additional plugins available for
the specified Plesk Expand version.
Select which plugin(s) you wish to process and what operation should be performed
on this plugin using [TAB] or arrows on the keyboard . Operations are indicated by
the following symbols in brackets:
[ I ] - install the plugin;
[U] - upgrade the plugin;
[R] - remove the plugin;
[*] - leave the plugin as is (already installed);
[ ] - do not install the plugin (not yet installed).
Only two modes are possible for each of these operations:
[U] <-> [*] - upgrade or leave as it is;
[U] <-> [R] - upgrade or remove (unless this plugin can be left with the same
version);
[I] <-> [ ] - install or do not install;
[R] <-> [*] - remove or leave as is.
Tip: You can view information on a certain plugin by selecting it and pressing F1
on your keyboard.
When the required operations are selected for each plugin, select Next to continue
the upgrade.
7 The Viewing Lists of Operated RPM Packages page displays the RPM packages that will
be processed during the upgrade. Web Installer checks for the RPM packages
already installed on the server, analyzes the information and displays the RPM
packages in following groups:
RPM packages to be installed (for packages which are not installed on the server).
RPM packages to be upgraded (for packages already installed on the server).
RPM packages to be removed (for packages installed on the server but no longer
needed).
If Web Installer finds no RPM packages on the server, all packages are displayed in
the RPM packages to be installed list.
Click Next to start processing RPM packages. Web Installer starts downloading all
necessary files to the specified location. The downloading progress is presented on
the Downloading Files screen by two progress bars.
Note: If you selected the Local Media source on the Selecting Software Source stage,
there is no need to download the files, as they are stored locally. You proceed
directly to the Confirming upgrade step.
Page 45

Upgrading Plesk Expand 45
8 When RPM packages download is complete, the Confirming Upgrade page opens
informing you that everything is ready for the upgrade of Plesk Expand. If you are
ready to start the upgrade, click Install.
Important: After you select Upgrade here, you will not be able to cancel the
upgrade.
Auto Installer starts preparing for the upgrade and then proceeds to upgrading
Plesk Expand. Progress is shown by the progress bars. When the upgrade process
is over, press [ENTER] to continue.
9 The results of Plesk Expand upgrade are displayed on a separate screen.
Select Finish and press [SPACE] or [ENTER] to end the upgrade.
Note: After the upgrade, please, make sure the latest available version of PSA API
RPC is installed on all Plesk servers registered in Plesk Expand.
Page 46

46 Upgrading Plesk Expand
Using Text-Based Interface
Plesk Expand Auto Installer is the wizard that will guide you through the upgrade
process. To upgrade Plesk Expand, follow the steps below to complete the upgrade:
1 When Plesk Expand Auto Installer is launched, the Welcoming screen opens.
If you agree with the terms provided in the Welcoming message, press [1] and
[ENTER] on your keyboard.
Press [0] and [ENTER] if you disagree with the terms described and do not want
to proceed further.
Tip: The value given in brackets is the action performed by default. To select this
action, press [ENTER].
2 After you confirm the upgrade, Auto Installer searches for any versions of the
product already installed on the server. When the search is completed, the found
version is displayed on the Selecting Operation screen.
On this screen, select which operation should be performed on this product version:
To upgrade the current version to a new one, press [1] and [ENTER].
To remove the current version from the server, press [3] and [ENTER].
To return to the previous screen, press [2] and [ENTER].
3 On the Selecting Software Source page, specify the source Plesk Expand will be
installed from:
Local Media. The data storage device (e.g. a compact disc) available locally on
the machine where Plesk Expand is being installed.
Plesk Expand Server. The network server where the Plesk Expand distribution is
stored.
Other Network Site. Some other website the Plesk Expand distribution is stored.
The selected source and its location are displayed below. If you wish to change this
source, press [3] and [ENTER] on your keyboard. After that, perform one of the
following actions:
To change source to Local Media, press [0] and [ENTER].
To change source to Plesk Expand Server, press [1] and [ENTER].
To change source to Other Network Site, press [2] and [ENTER].
After you specified the source, press [1] and [ENTER] on your keyboard to continue
the installation.
4 On the Indicating Distribution Directory page, specify the directory where temporary
files, including the Plesk Expand distribution, will be placed.
Select the action to be performed using the keyboard:
To select the offered default directory and to proceed further, press [1] and
[ENTER].
To return to the previous screen, press [2] and [ENTER].
To change the distribution directory, press [3] and [ENTER].
To cancel the installation, press [0] and [ENTER].
Page 47

Upgrading Plesk Expand 47
By default, the /tmp/expand.distribution directory is offered.
If the directory you specified does not exist, you are taken to the Creating Distribution
Directory page where you can create a new directory. On this page:
Press [Y] and [ENTER] to create a new directory.
Press [N] and [ENTER] to skip it and to get back to the previous screen.
After you specified (or created) a directory, click Next.
5 Auto Installer connects to the specified source and displays a list of available
versions of Plesk Expand which can be installed on your server.
Select the desired action using your keyboard:
To select a version, press [3] and [ENTER].
To proceed with the installation, press [1] and [ENTER].
To return to the previous screen, press [2] and [ENTER].
To cancel the installation, press [0] and [ENTER].
6 The Operating Plugins screen displays the list of all additional plugins available for
the specified Plesk Expand version.
Select the plugins to process by using [TAB] or arrows on your keyboard. Use
[SPACE] or [ENTER] on your keyboard to select what operation should be
performed on this plugin. Operations are indicated by the following symbols in
brackets:
[ I ] - install the plugin;
[U] - upgrade the plugin;
[R] - remove the plugin;
[*] - leave the plugin as is (already installed);
[ ] - do not install the plugin (not yet installed).
Only two modes are possible for each of these operations:
[U] <-> [*] - upgrade or leave as it is;
[U] <-> [R] - upgrade or remove (unless this plugin can be left with the same
version);
[I] <-> [ ] - install or do not install;
[R] <-> [*] - remove or leave as is.
Tip: You can view information on a certain plugin by selecting it and pressing F1
on your keyboard.
When the required operations are selected for each plugin, select Next to continue
the installation. When the required operation is selected for each plugin, press
[1] and [ENTER] to continue;
[2] and [ENTER] to return to the previous screen;
[0] and [ENTER] to cancel the upgrade.
Page 48

48 Upgrading Plesk Expand
7 The Viewing Lists of Operated RPM Packages page displays the RPM packages that will
be processed during the upgrade. Web Installer checks for the RPM packages
already installed on the server, analyzes the information and displays the RPM
packages in the following groups:
RPM packages to be installed (packages which are not installed on the server).
RPM packages to be upgraded (packages already installed on the server).
RPM packages to be removed (packages installed on the server but no longer
needed).
If Web Installer finds no RPM packages on the server, all packages are displayed in
the RPM packages to be installed list.
Select the action you would like to perform further:
To upgrade/install/remove the presented RPMs, press [1] and [ENTER] to
proceed further.
To change the list of RPMs, press [3] and [ENTER]. This will return you to the
previous screen.
To cancel the upgrade, press [0] and [ENTER].
If you select to upgrade/install/remove the packages, Auto Installer starts
downloading all necessary files to the specified location. The downloading progress
is presented on the Downloading Files screen by two progress bars.
Note: If you selected the Local Media source on the Selecting Software Source step,
there is no need to download the files, as they are stored locally. You proceed
directly to the Confirming Upgrade step.
8 When RPM packages download is complete, the Confirming Upgrade page opens
informing you that everything is ready for the upgrade of Plesk Expand. Select one
of the following options:
If you are ready to start the upgrade, press [1] and [ENTER].
If you wish to return to the previous screen, press [2] and [ENTER].
If you wish to cancel the upgrade, press [0] and [ENTER].
Important: After you select Upgrade here, you will not be able to cancel the
upgrade.
Auto Installer starts preparing for the upgrade and then proceeds to upgrading
Plesk Expand. Progress is shown by the progress bars. When the upgrade process
is over, press [ENTER] to continue.
9 The results of the Plesk Expand upgrade are displayed in a separate page. Press
[0] and [ENTER] to finish the installation process.
Page 49

Upgrading Plesk Expand 49
Manual Upgrade
In this section:
Preparing for Manual Upgrade .......................................................................... 49
Upgrade Procedure ........................................................................................... 50
Plesk Expand can also be upgraded manually. For manual upgrade, thorough
knowledge of RPMs system is required. If you are not completely familiar with the
RPMs system, we strongly recommend using automatic upgrade (see page 39).
Preparing for Manual Upgrade
Upgrading Plesk Expand means upgrading a number of RPM packages.
expand-xxx.i586.rpm (Plesk Expand itself);
expand-dist-repository-xxx.i586.rpm (Plesk Expand distribution
repository);
expand-locale-base-en_US.xxx.noarch.rpm (Plesk Expand base
locale; US English).
Note: In these packages‟ numbers:
xxx is a version of Plesk Expand;
i586 is a binary package architecture mark. It should be compatible with the target
platform architecture.
Before starting the upgrade, download the desired version of Plesk Expand (RPM
version) from the Parallels web site at http://www.parallels.com/en/download/expand/
and save it on the server where you wish to upgrade Plesk Expand.
Page 50

50 Upgrading Plesk Expand
Upgrade Procedure
For example, the upgrade on Red Hat Enterprise Linux 3 server may look as follows:
1 Log in as root to your system.
2 Decompress the appropriate Plesk Expand archive (tarball) by running the
command of the following kind:
$ tar xfv expand-xxx.el3.tar
3 Upgrade Plesk Expand using the extracted RPM packages by executing the
command of the following kind:
$ rpm -Uhv expand-xxx.i586.rpm expand-dist-repository-xxx.i586.rpm
expand-locale-base-en_US-xxx.i586.rpm
where:
xxx - is the version of Plesk Expand;
i586 - is a binary package architecture mark. It should be compatible with the
target platform architecture.
After the Plesk Expand package is upgraded, a message of the following kind will
appear:
Congratulations! You have just upgraded your Plesk Expand to v.2.3!
Note: After the upgrade, make sure that the latest available version of PSA API RPC is
installed on all Plesk servers registered in Plesk Expand.
Page 51

This chapter will guide you through the deinstallation process.
In this chapter:
Automatic Deinstallation .................................................................................... 51
Manual Deinstallation ........................................................................................ 56
In this section:
Web-Based Deinstallation ................................................................................. 52
Console-Based Deinstallation ........................................................................... 53
C H A P T E R 5
Deinstalling Plesk Expand
Plesk Expand can be deinstalled:
automatically (see page 51);
manually (see page 56).
We recommend that you use automatic deinstallation (see page 51) for the fast and
clean deinstallation of Plesk Expand.
Automatic Deinstallation
You can select one of the following methods for the automatic deinstallation of Plesk
Expand:
Use web-based installer (see page 52). This Installer allows you to install Plesk
Expand remotely, through a web browser.
Use console-based interactive Auto Installer (see page 53). This Installer is
launched locally from the server you are going to install Plesk Expand on.
Page 52

52 Deinstalling Plesk Expand
Web-Based Deinstallation
The web-based deinstallation is carried out with the help of Plesk Expand Web
Installer. Plesk Expand Web Installer is a wizard that will guide you through the
upgrade process. To deinstall Plesk Expand, follow the steps below:
1 Start Web Installer by running the URL https://expand-webinstall.parallels.com/wui/
in your web browser.
Figure 3: Start Installation Screen
On the Start Installation page, provide the following information:
Enter the address and the root password of the server you wish to install Plesk
Expand on
Select from the list the default interface skin and language to be used.
Click Start to begin uploading Web Installer to the specified server.
2 On the Welcoming Page, click Next if you agree to the terms provided in the Welcoming
message.
3 After you click Next, Web Installer searches for any versions of the product already
installed on the server. When it finds a version of Plesk Expand, the Selecting
Operation page opens, on which you need to select an operation to be performed on
this version.
To remove the current version from the server, click Remove.
4 On the Confirming Removal screen that appears, you will see a list of RPM packages
that are going to be removed. If you confirm the removal the RPMs, click Remove.
Important: Right after you press Remove on this page, Web Installer will start
deinstalling Plesk Expand, and you will not be able to cancel it.
Web Installer will start removing the RPM packages. The progress is shown by the
two operation bars.
5 The result of Plesk Expand deinstallation is displayed on a separate screen. On this
screen, click Finish to end the deinstallation.
Page 53

Deinstalling Plesk Expand 53
In this section:
Using GUI-Based Interface ................................................................................ 54
Using Text-Based Interface ............................................................................... 55
Console-Based Deinstallation
The console-based deinstallation is carried out with the help of Plesk Expand Auto
Installer. Plesk Expand Auto Installer is a wizard that has three modes of operation:
GUI-based interface (see page 54)
This interface allows users to work with windows (window interface) and manage
various elements, such as buttons, scroll bars, checkboxes, and others, with the help of
the standard number of keys used for GUI (Graphical User Interface) - TAB, arrows,
SPACE, ENTER, and hot keys, such as F1 (Help) and F12 (Next Screen). Besides
that, this interface is also good-looking and easy to use.
Text-based interface (see page 55)
This interface was created in accordance with Plesk Installer and can be used as an
alternative in cases when GUI-based interface cannot be used (in case a terminal is
too small/old/new or when a non-standard charset is used in the terminal).
Unattended mode
This mode allows for installing/upgrading Plesk Expand without user attendance. At the
end, if installation/upgrade was successful, a message appears congratulating you on
successful completion of the process. In case an error occurs, the error message is
displayed and installation/upgrade is automatically aborted. You may start it again later.
In this guide, the first two modes will be observed.
To find out how to obtain Plesk Expand Auto Installer, refer to Obtaining Auto Installer
(on page 23).
Page 54

54 Deinstalling Plesk Expand
Using GUI-Based Interface
Plesk Expand Auto Installer is the wizard that will guide you through the deinstallation
process. Follow the steps below to complete the deinstallation:
Note: If the GUI looks ugly, for example, has broken window or button frames, cancel
installation/upgrade/deinstallation, and before starting
installation/upgrade/deinstallation again, execute the following command:
export LANG=C
1 When Plesk Expand Auto Installer is launched, the Welcoming screen opens.
If you agree to the terms provided in the Welcoming message, select Next by using
TAB (or arrows) on your keyboard to move to the desired item and then pressing
SPACE or ENTER.
2 After you click Next, Auto Installer searches for any versions of the product already
installed on the server. When it finds a version of Plesk Expand, the Selecting
Operation page opens.
To remove the current version from the server, select Remove using TAB (or arrows)
on your keyboard and press SPACE (or ENTER).
3 On the Confirming Removal screen you will see a list of the RPM packages that are
going to be removed. If you wish to remove the presented RPMs, select Remove and
press SPACE (or ENTER).
Important: Right after you press Remove on this page, Auto Installer will start
deinstalling Plesk Expand, and you will not be able to cancel it.
Auto Installer will start removing the specified RPM packages. The Operating RPM
Package(s) screen shows information about the task progress.
4 When the removal is over, the result of the Plesk Expand deinstallation is
displayed. Select Finish on this page and press [SPACE] or [ENTER] to finish the
deinstallation.
Page 55

Deinstalling Plesk Expand 55
Using Text-Based Interface
Plesk Expand Auto Installer is the wizard that will guide you through the deinstallation
process. To deinstall Plesk Expand, follow the steps below:
1 When Plesk Expand Auto Installer is launched, the Welcoming screen opens.
If you agree to the terms provided in the Welcoming message, press [1] and
[ENTER] on your keyboard.
Press [0] and [ENTER] if you disagree with the terms described and do not want
to proceed further.
Tip: The value given in brackets is the action performed by default. To select this
action, press [ENTER].
2 After you have confirmed that you agree to proceed with the upgrade, Auto Installer
will search for any versions of the product already installed on the server. When the
search is completed, the found version is displayed on the Selecting Operation
screen. Select the operation to be performed:
To remove the current version from the server, press [3] and [ENTER].
To upgrade the current version to a new one, press [1] and [ENTER].
To return to the previous screen, press [2] and [ENTER].
3 On the Confirming Removal screen you will see a list of the RPM packages that are
going to be removed. On this page:
To remove the presented RPMs, press [1] and [ENTER] to start the removal.
To return to the previous screen, press [3] and [ENTER]. You will be taken back
to the Selecting Operation screen.
To cancel the removal, press [0] and [ENTER].
Important: Right after you press [0] and [ENTER] on this screen, Auto Installer will
start deinstalling Plesk Expand, and you will not be able to cancel it.
If you select to remove specified RPM packages, Auto Installer will start removing
Plesk Expand. The progress is displayed by the progress bar. When the removal is
over, press [ENTER] to continue.
4 The result of the Plesk Expand deinstallation will be displayed. Press [0] and
[ENTER] to finish the deinstallation.
Page 56

56 Deinstalling Plesk Expand
Manual Deinstallation
In this section:
Preparing for Manual Deinstallation ................................................................... 56
Deinstallation Procedure ................................................................................... 56
Plesk Expand can also be deinstalled manually. For manual deinstallation, thorough
knowledge of RPMs system is required. If you are not completely familiar with the
RPMs system, we strongly recommend that you use automatic deinstallation (see page
51).
Preparing for Manual Deinstallation
Deinstalling Plesk Expand means removing a number of RPM package from the
system.
Important: Before starting the deinstallation, it is highly recommended that you
create a full backup of your system.
Deinstallation Procedure
For example, the deinstallation of Plesk Expand may look as follows:
1 Log in as root to your system.
2 Issue the command of the following kind:
$ rpm -e expand
If the expand-dist-repository and expand-locale packages are installed, the
command must look the following way:
$ rpm -e expand expand-dist-repositor expand-locale-base-en_US
This will erase Plesk Expand installation files from the /usr/local/expand directory
and drop „expand‟ MySQL database. Though, the /usr/local/expand directory will
not be erased and the following files will be left for post-mortem reviews:
License files;
Config files;
Log files.
Upon the installation, all configuration files being patched by Plesk Expand will be presaved as „<filename[.extension]>.exp_bak‟. Though these files will NOT be
reverted to their previous copies upon the deinstallation.
 Loading...